

Page 1

UC App for iPhone
Page 2

© 2018 by Cox Communications.
All rights reserved. No part of this document may be reproduced or transmitted in any form or by any means, electronic,
mechanical, photocopying, recording, or otherwise, without prior written permission of Cox Communications.
0418
Page 3

Table of Contents
Table of Contents
Table of Contents ............................................................................................................ i
About the UC App for iPhone.......................................................................................... 1
Get Started ...................................................................................................................... 2
Install the UC A............................................................................................................ 2
Activate Unified Communications for IP Centrex Professional Seats ................... 2
Sign In .......................................................................................................................... 6
Reset Your Password ................................................................................................. 7
Unify Tabs ....................................................................................................................... 8
Contacts Tab ............................................................................................................... 9
Add Contacts ........................................................................................................ 10
Add Conference .................................................................................................... 11
Add iPhone Contact ............................................................................................. 11
Edit Contacts ........................................................................................................ 11
Contact Card ......................................................................................................... 12
Filters ..................................................................................................................... 12
Sort and Display Order ........................................................................................ 13
iPhone Contacts ................................................................................................... 13
Search .................................................................................................................... 13
Call Tab ...................................................................................................................... 14
Conference Call ......................................................................................................... 15
Initiate Conference Call ........................................................................................ 15
Chat Tab ..................................................................................................................... 18
Start Group Chat ................................................................................................... 20
Call History Tab ......................................................................................................... 21
Main Menu .................................................................................................................... 22
My Status ................................................................................................................... 23
Set Avatar and Status .......................................................................................... 23
Status Message .................................................................................................... 25
Availability ............................................................................................................. 25
Instant Messaging ........................................................................................................ 26
Start a Chat ........................................................................................................... 27
Group Chat ............................................................................................................ 28
ii
Page 4

Table of Contents
Audio Calls ................................................................................................................... 29
VoIP Calling Mode ................................................................................................ 29
Mobile calls use the carrier’s circuit-switched network. Mobile calls leverage
Anywhere or Mobility to present the business identity of the user. For more
information, see section Message Waiting Indicator ............................................ 29
Checking Voice Mail ............................................................................................. 29
Make Calls ................................................................................................................. 31
Answer Call ............................................................................................................... 31
CallKit ......................................................................................................................... 32
Answer Incoming VoIP Call on Locked Screen ................................................. 32
Answer Incoming VoIP Call on Unlocked Screen .............................................. 33
Receive Second Incoming Call (Call Waiting) .................................................... 33
Integration with Native Contacts and Call History ............................................ 33
In Call Actions .............................................................................................................. 35
Missed Calls and New Messages ............................................................................ 35
Setting Up Voice Mail ........................................................................................... 36
Message Waiting Indicator ....................................................................................... 36
Checking Voice Mail ............................................................................................. 36
Business Line Call Through..................................................................................... 36
Mid-Call Controls for Circuit-switched Business Calls ......................................... 36
Contact Name Lookup for Incoming Calls and Call Logs ..................................... 37
Call Waiting ............................................................................................................... 37
New Call ..................................................................................................................... 37
Call Transfer .............................................................................................................. 38
Conference Call ......................................................................................................... 39
Initiate Conference Call ........................................................................................ 39
Call Pull ...................................................................................................................... 40
Call Park ..................................................................................................................... 41
Bluetooth Support .................................................................................................... 41
Call Settings and Preferences .................................................................................... 43
My Status ................................................................................................................... 44
Call Settings .............................................................................................................. 45
Block My Caller ID ................................................................................................ 46
Dialing Service ...................................................................................................... 47
iii
Page 5

Table of Contents
iPhone Number ..................................................................................................... 48
Call Forwarding .................................................................................................... 49
Do Not Disturb ...................................................................................................... 51
Simultaneous Ring ............................................................................................... 52
Anywhere .............................................................................................................. 54
Remote Office ....................................................................................................... 55
Preferences .................................................................................................................. 56
About .......................................................................................................................... 57
Help Page ................................................................................................................... 57
Sign Out ..................................................................................................................... 57
The UC App and iPhone Setting ................................................................................ 59
Push Notifications ....................................................................................................... 60
Push Notifications for Incoming Calls .................................................................... 60
Push Notifications for Chat Messages .................................................................... 60
Multi Device Support ................................................................................................... 61
Message History and Message Read Status Synchronization ............................. 61
iiii
Page 6

About the UC Apps for iPhone
The UC Apps for iPhone provides the following communication features:
• Voice Calling (Circuit Switched)
• Voice Calling through Data Connection (VoIP)
• Voice Calling (Call-Through) using the mobile phone line
• Instant Messaging and Presence (IM&P)
• Call Settings
Important: UC Apps operate with lines, seats, and other voice features
—which may vary among customers. In rare cases, customers may
gain access to features and interactions which are not fully
recommended for use with UC Apps.
About
UC App for Android Mobile User Guide 1
Page 7

Get Started
Get Started
This section covers the following topics:
• How to install the UC Apps
• How to sign in to the UC Apps
• How to reset your password for the UC Apps
Install the UC Apps
The iPhone UC client can be downloaded from the Apple App Store. Use the following
steps to download the UC Apps for iPhone Mobile app.
1. Open the Apple App Store on your iPhone.
2. In the Search field, enter Cox Business Unified Communications
3. Press the Install button.
4. Follow the prompts to download.
5. Press the Accept button and Agree and Continue button on the License Agreement
screens.
Activate Unified Communications for IP Centrex Professional
Seats
To use the Unified Communications (UC) features with your IP Centrex Professional Seat,
you must first activate UC through the MyAccount Portal.
Use the following steps to activate UC for your assigned IP Centrex seat:
1. Log in to the MyAccount Portal.
Result: The MyAccount Portal Home page opens.
UC App for iPhone Mobile User Guide 2
Page 8
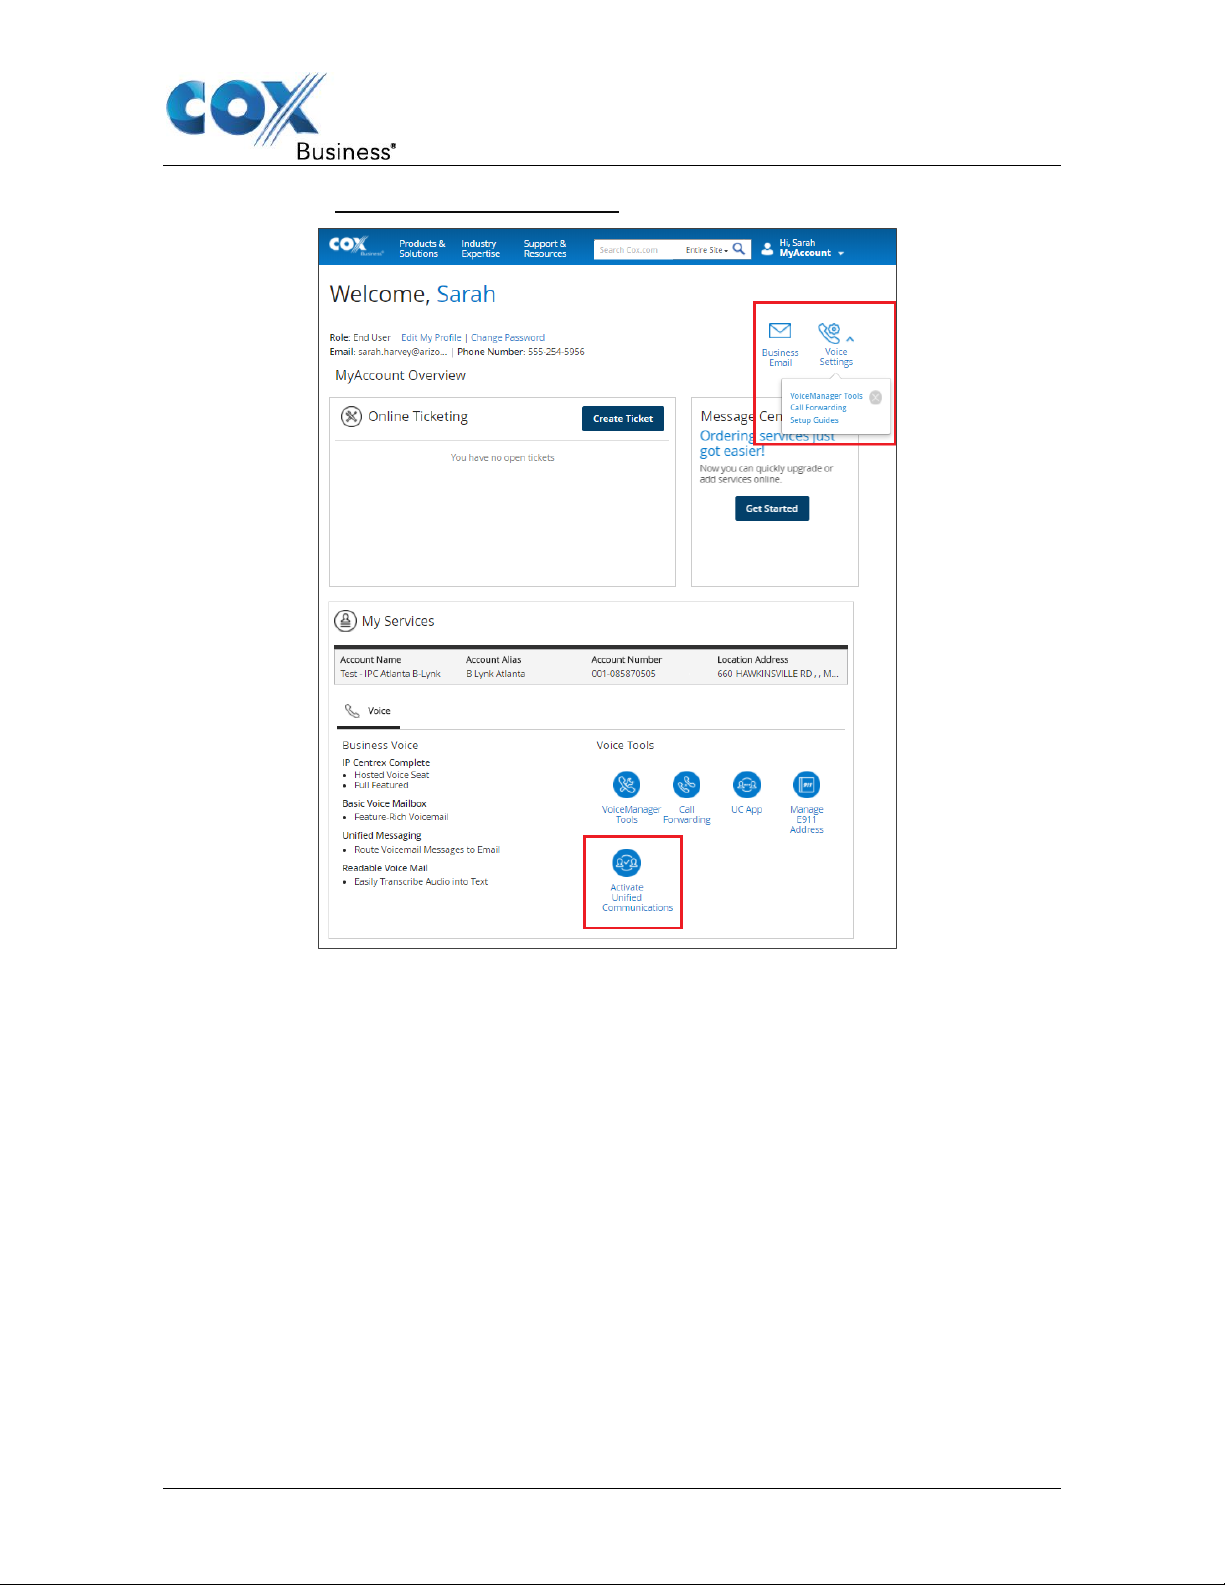
Figure 1. MyAccount Portal Home Page
Get Started
2. On the MyAccount Portal Home page, scroll down to the My Services section
and click the Activate Unified Communications icon. See Figure 1.
Result: The Activate Unified Communications window opens. See Figure 2.
Alternatively, you can access the Activate Unified Communications window by
performing the following steps:
a. Click the Voice Settings dropdown menu and select VoiceManager Tools. See
Error! Reference source not found..
b. On the VoiceManager Tools Home page, click the User & System
Management tab.
c. Click the Activate Unified Communications link in the User Management
section.
Result: The Activate Unified Communications window opens.
UC App for iPhone Mobile User Guide 3
Page 9
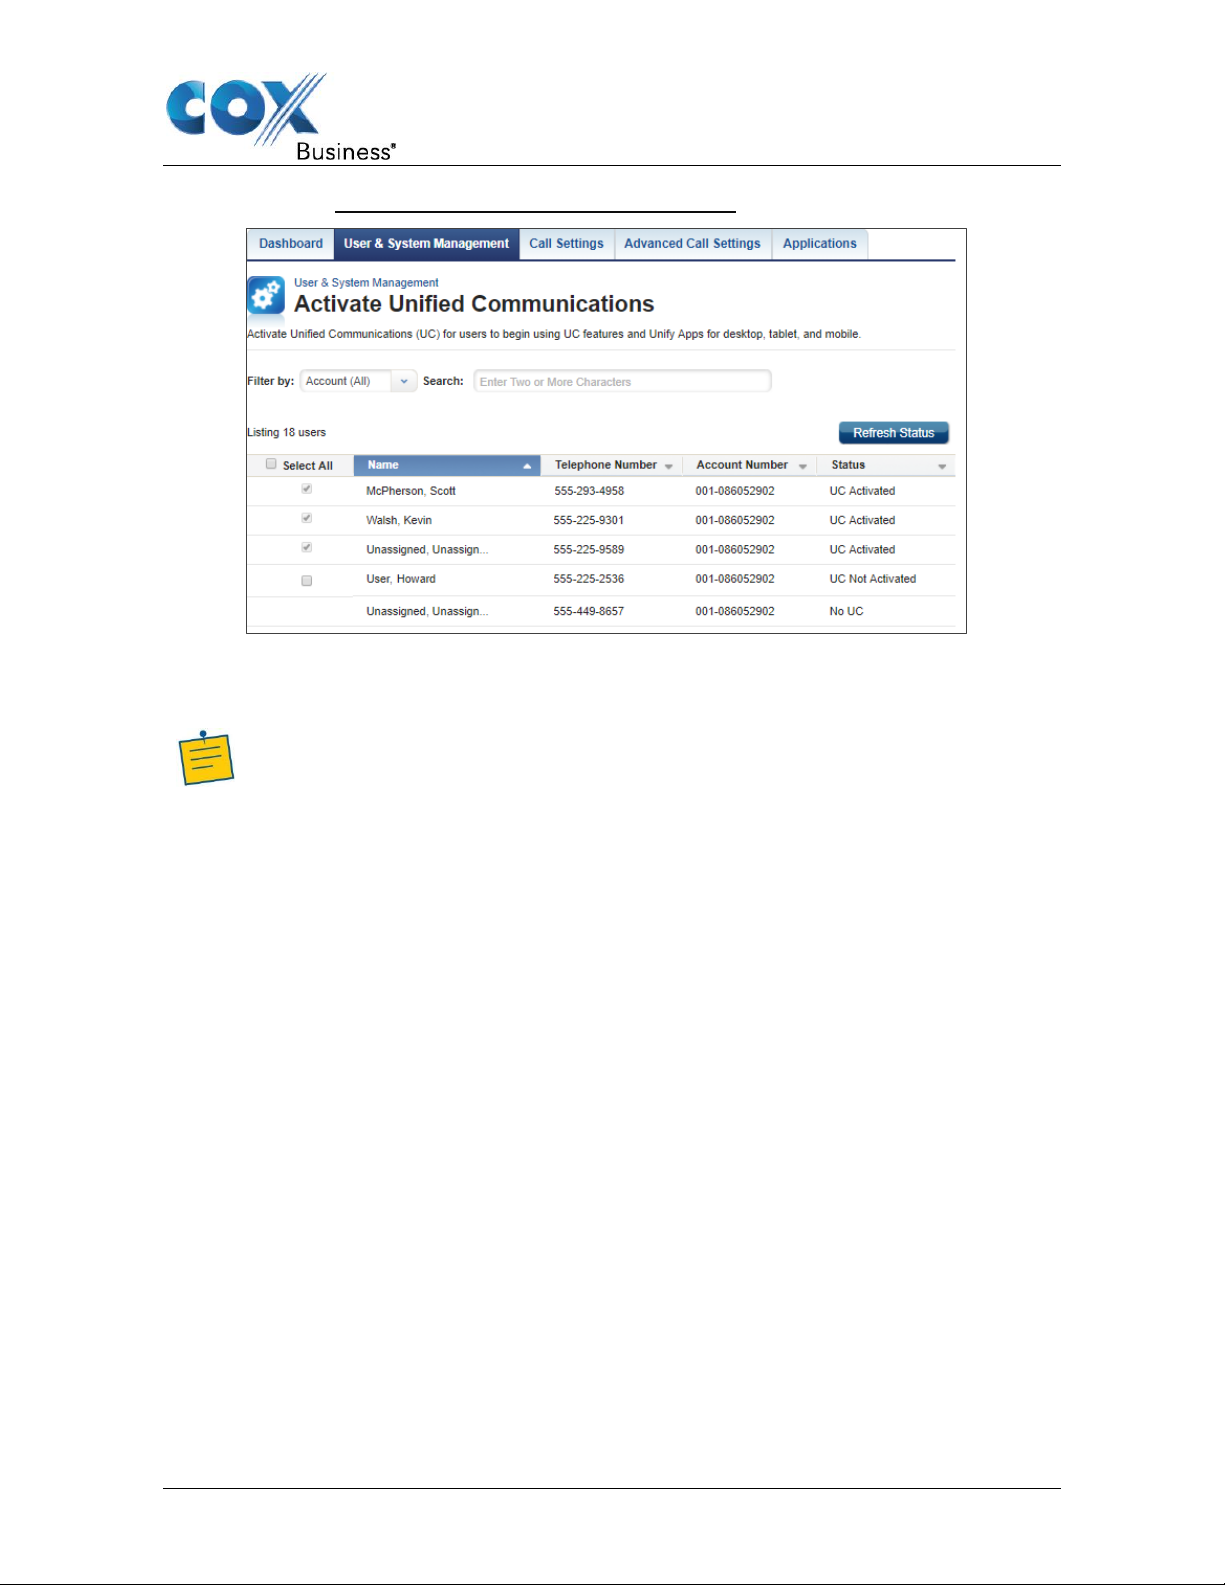
Figure 2. Activate Unified Communications Window
Note: Profile Owners and Profile Administrators can view and activate UC for
any IP Centrex Professional Seat on the account. End users can only activate
UC for the IP Centrex Professional Seat assigned to them.
3. Click the checkbox to the left of the name associated with the IP Centrex
Professional Seat you want to activate.
Get Started
4. Click the Save button to save your changes.
Result: The status changes from UC Not Activated to Pending. See Figure 3.
Refreshing the page after approximately 30 seconds updates to the status to UC
Activated.
UC App for iPhone Mobile User Guide 4
Page 10
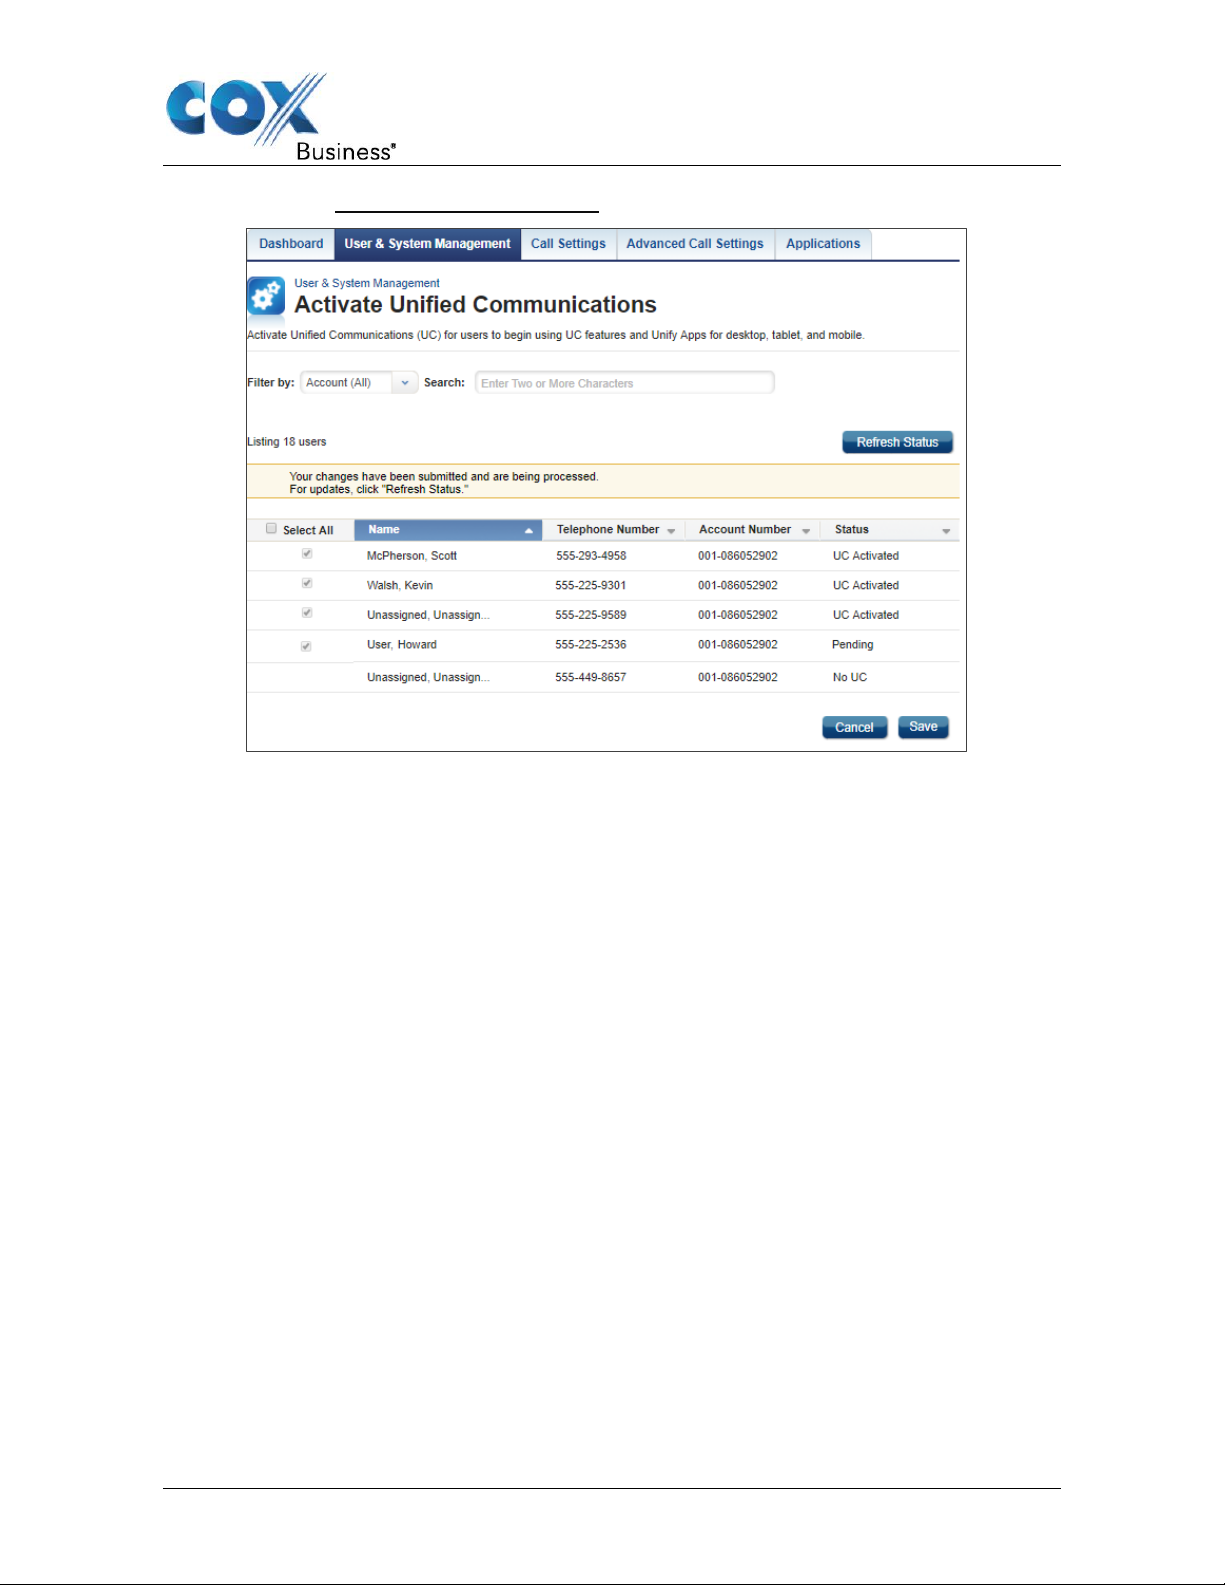
Figure 3. Activation Status – Pending
Get Started
UC App for iPhone Mobile User Guide 5
Page 11
Get Started
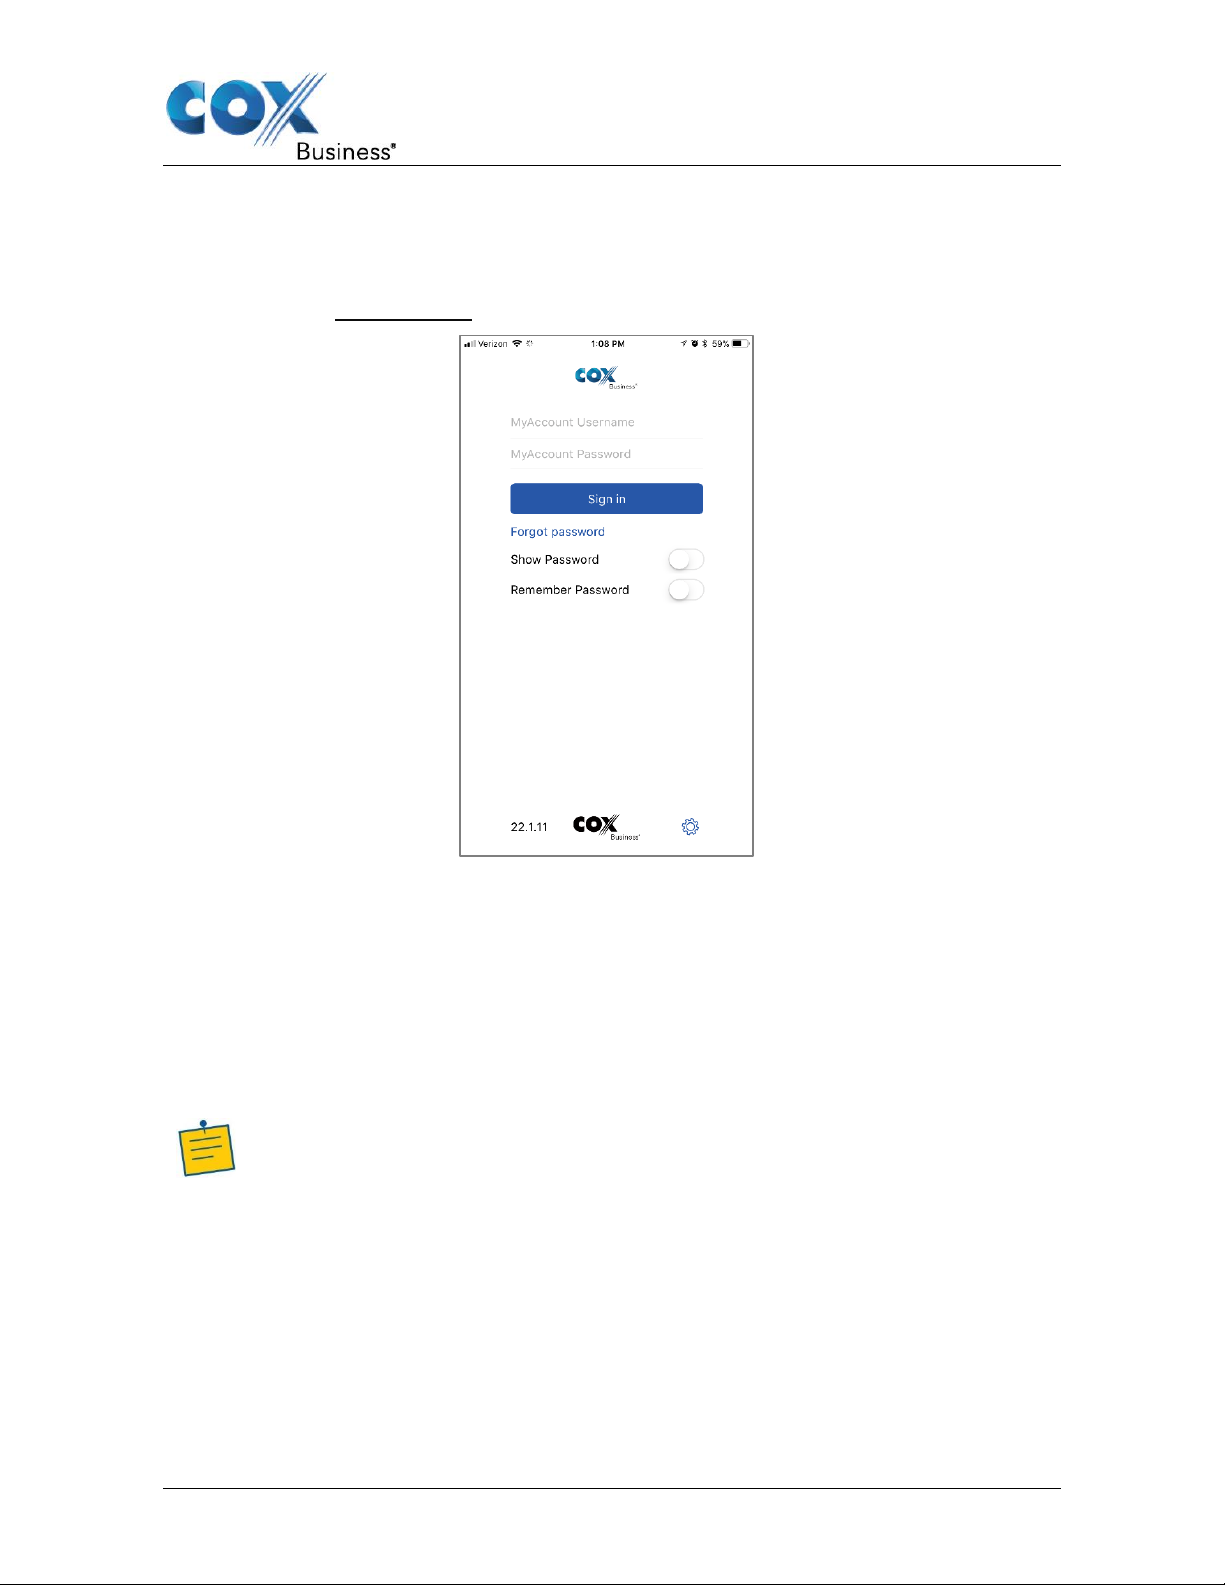
Sign In
When you first launch the application, you are prompted to sign in with your username and
password.
Figure 4. Sign in screen
1. Enter your MyAccount user name and password.
2. Tap the Forgot password link to reset your password.
3. Tap the Show Password box to see the password as you enter it in the field.
4. Tap the Remember Password box to avoid re-entering it upon subsequent
launches.
5. Tap the Sign In button.
Result: The Chat window appears.
Note: Once you are signed in, the UC App does not prompt you again for
the username and password until you sign out. The login is preserved
even if the UC App is terminated or the device is restarted.
UC App for iPhone Mobile User Guide 6
Page 12
Get Started
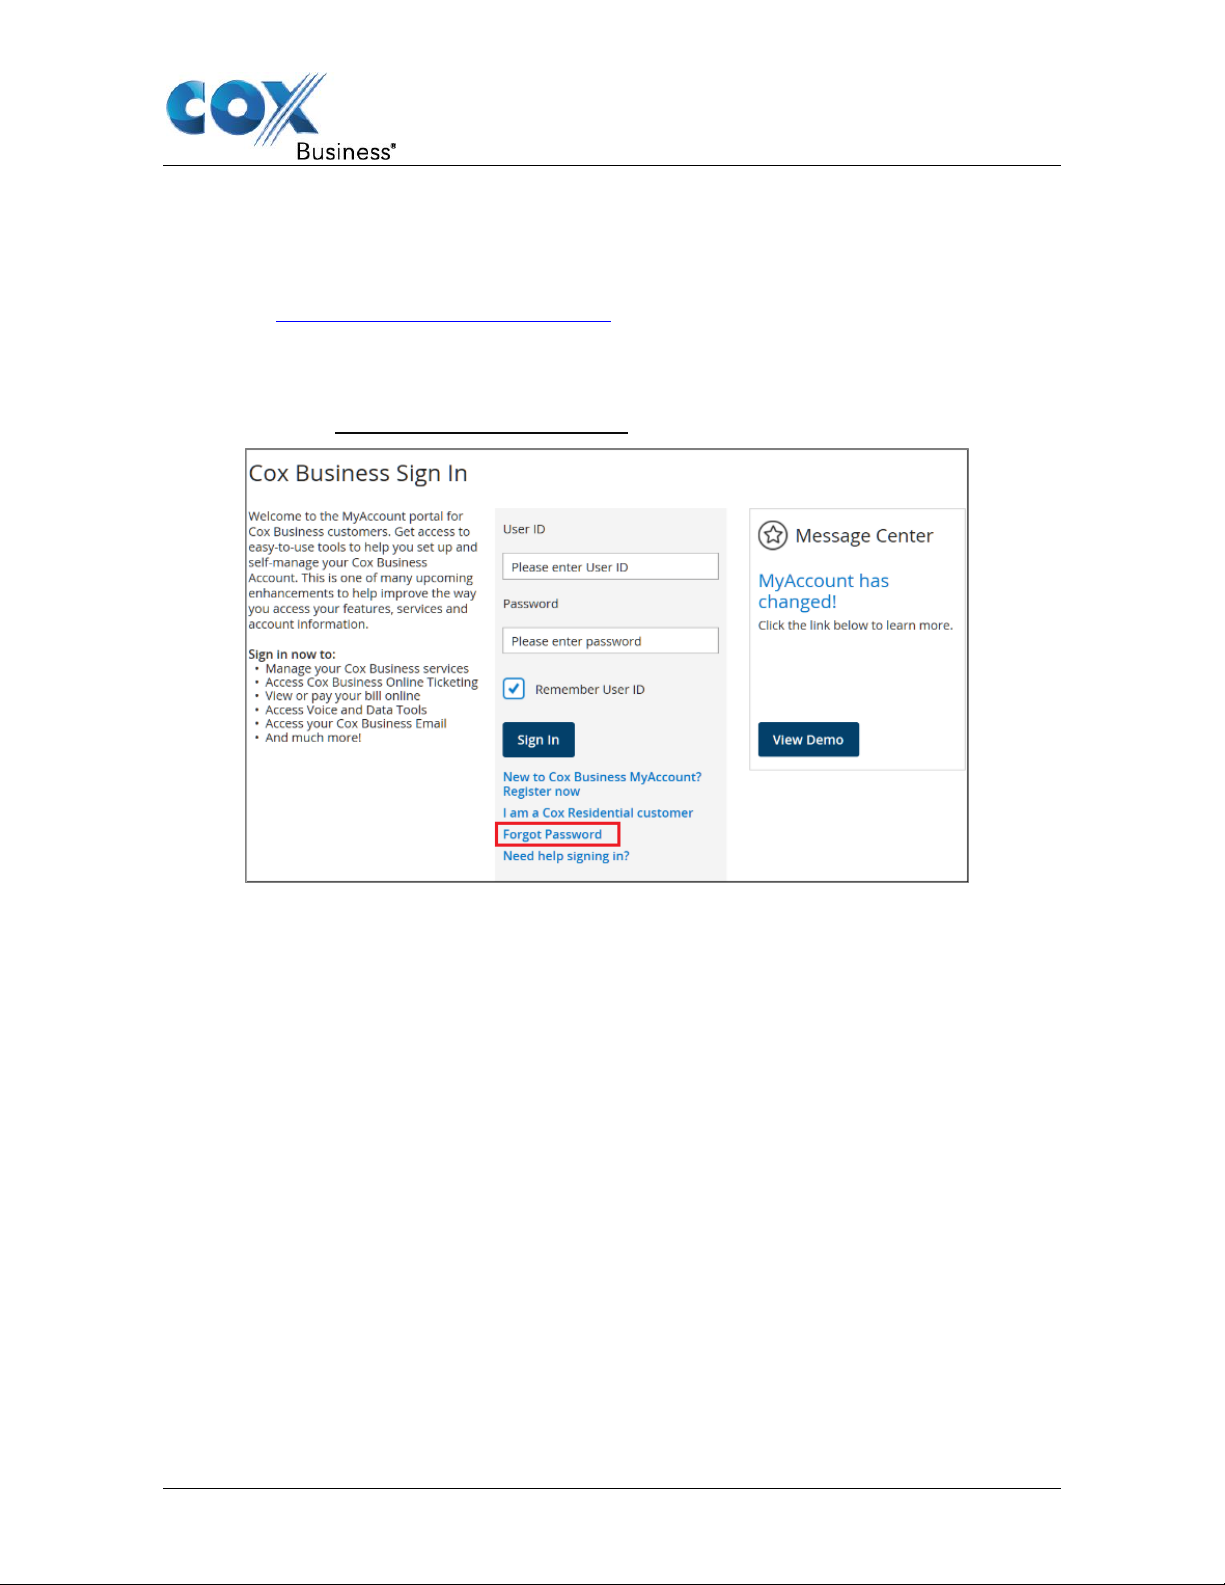
Reset Your Password
If you forget your password, follow the steps below to reset. If you forget your User ID,
contact Cox Technical Support.
1. Go to www.myaccount.coxbusiness.com.
2. Enter your User ID if the field is not pre-populated.
3. Click the Forgot Password link.
Figure 5. MyAccount – Forgot Password
4. Enter your email address.
5. Click the Reset Password button.
UC App for iPhone Mobile User Guide 7
Page 13
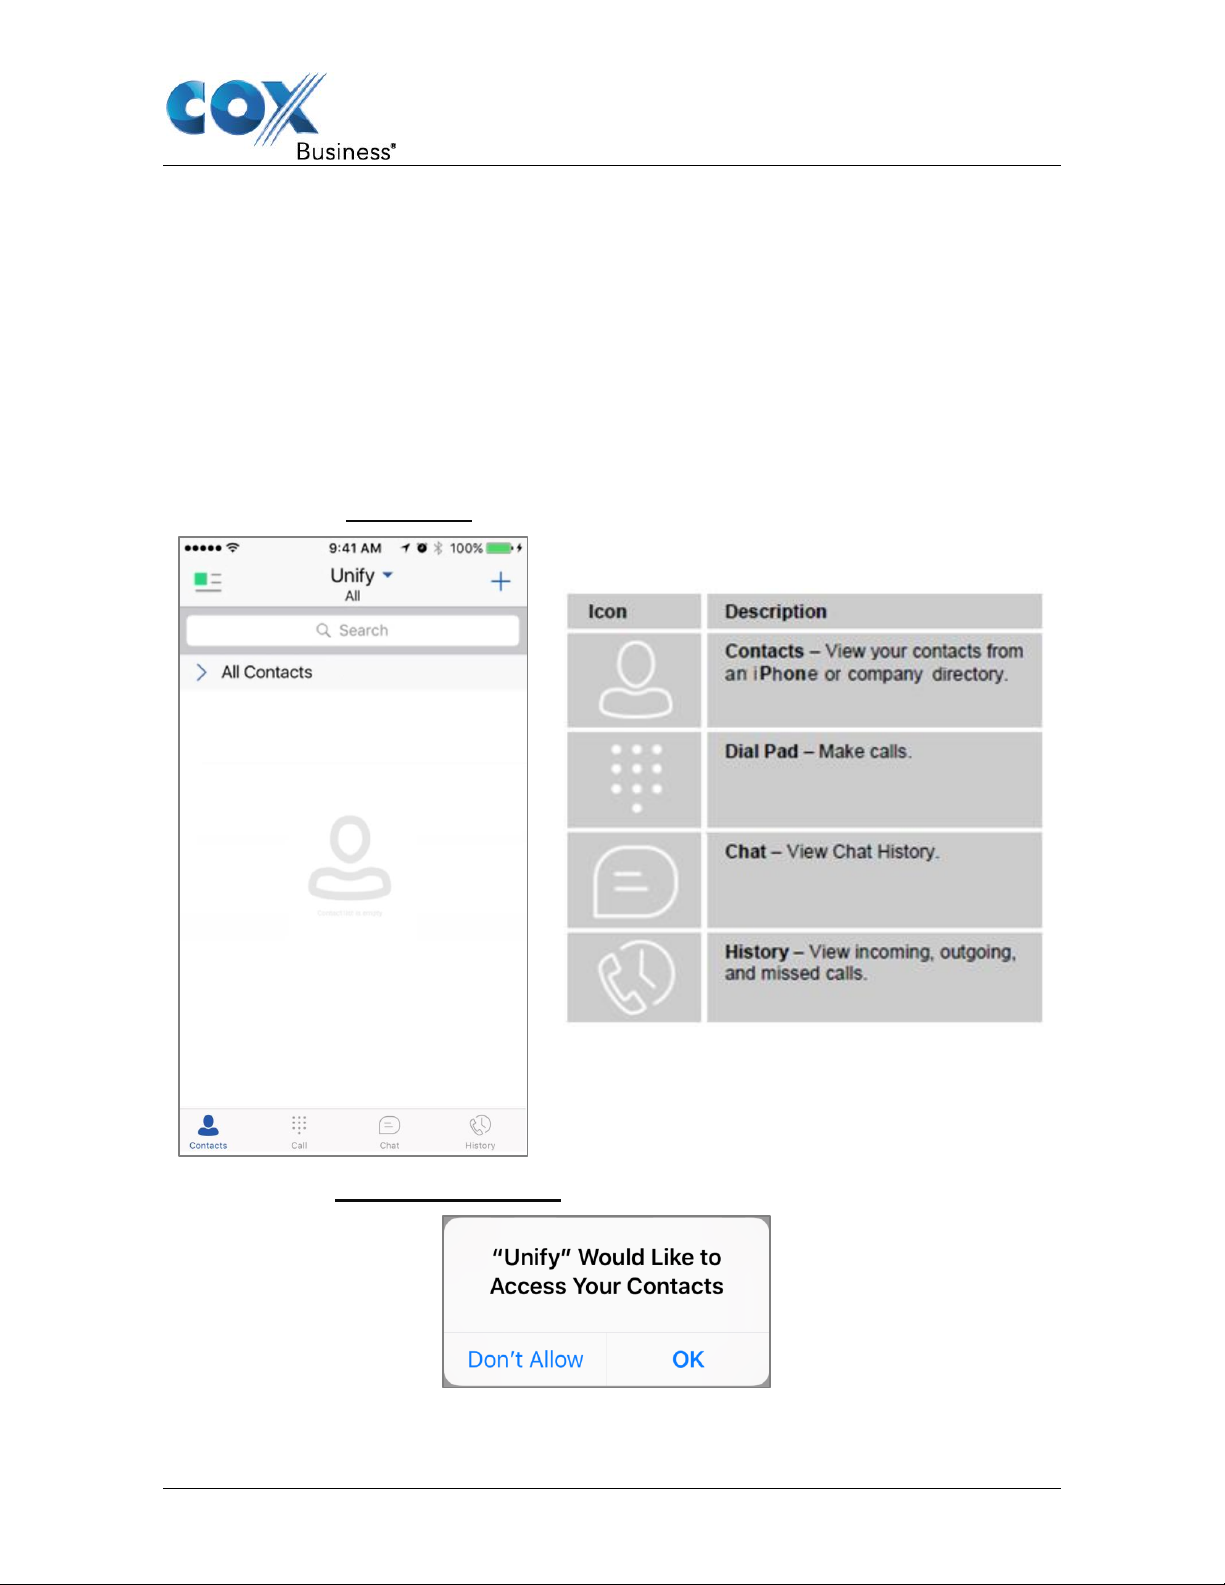
The UC App Tabs
Figure 6. Contacts Tab
The main view contains several tabs (located on the
lower bar) that present information about the contacts
and communications options.
The UC App Tabs
There are four “tabs” on the default page in the UC App (as are shown by the icons in the
bottom toolbar). They are: Contacts, Call, Chat, and History. This section provides an
overview of each tab and provides instructions on how to use functionalities, where
applicable.
When you start the UC App for the first time, an empty Contacts tab displays. You can
use the Search field to find people and add them to your Contacts list; or, if you have
contacts in Outlook, a message may appear asking if you want the UC App to access
your contacts (Figure 7). If you tap OK, the contacts will load automatically. If you tap Do
Not Allow, you will need to add contacts manually.
Figure 7. Access Contacts dialog
UC App for iPhone Mobile User Guide 8
Page 14

Contacts Tab
Figure 8. Contacts
Your list of Contacts can be categorized as
“presence-enabled” and “non-presence-enabled.”
Any contact can be marked as a favorite and it
appears at the top of the Contacts list in the Favorites
section.
Presence-enabled contacts are users with an
Extensible Messaging and Presence Protocol
from other systems such as Google Talk. Nonpresence-enabled contacts can be phone numbers or
conference numbers.
from the Desktop or Tablet devices. The contacts
groups cannot be created or edited from the iPhone
client.
The Contacts tab contains a list of all your associates. From this tab, you can:
• Add contacts
• Search for contacts
• Filter contacts displayed in the list
• Access contact information
(XMPP) address. These can be the UC App users or users
The UC App Tabs
The iPhone UC App shows contact groups created
UC App for iPhone Mobile User Guide 9
Page 15
The UC App Tabs
Note: If you receive a contact request invitation, you can ignore or accept it. If
you ignore the contact request, you can always share your presence
information later by selecting Subscribe from the contact card. Note that the
contact must accept your subscription request for you to establish the
presence relationship successfully.
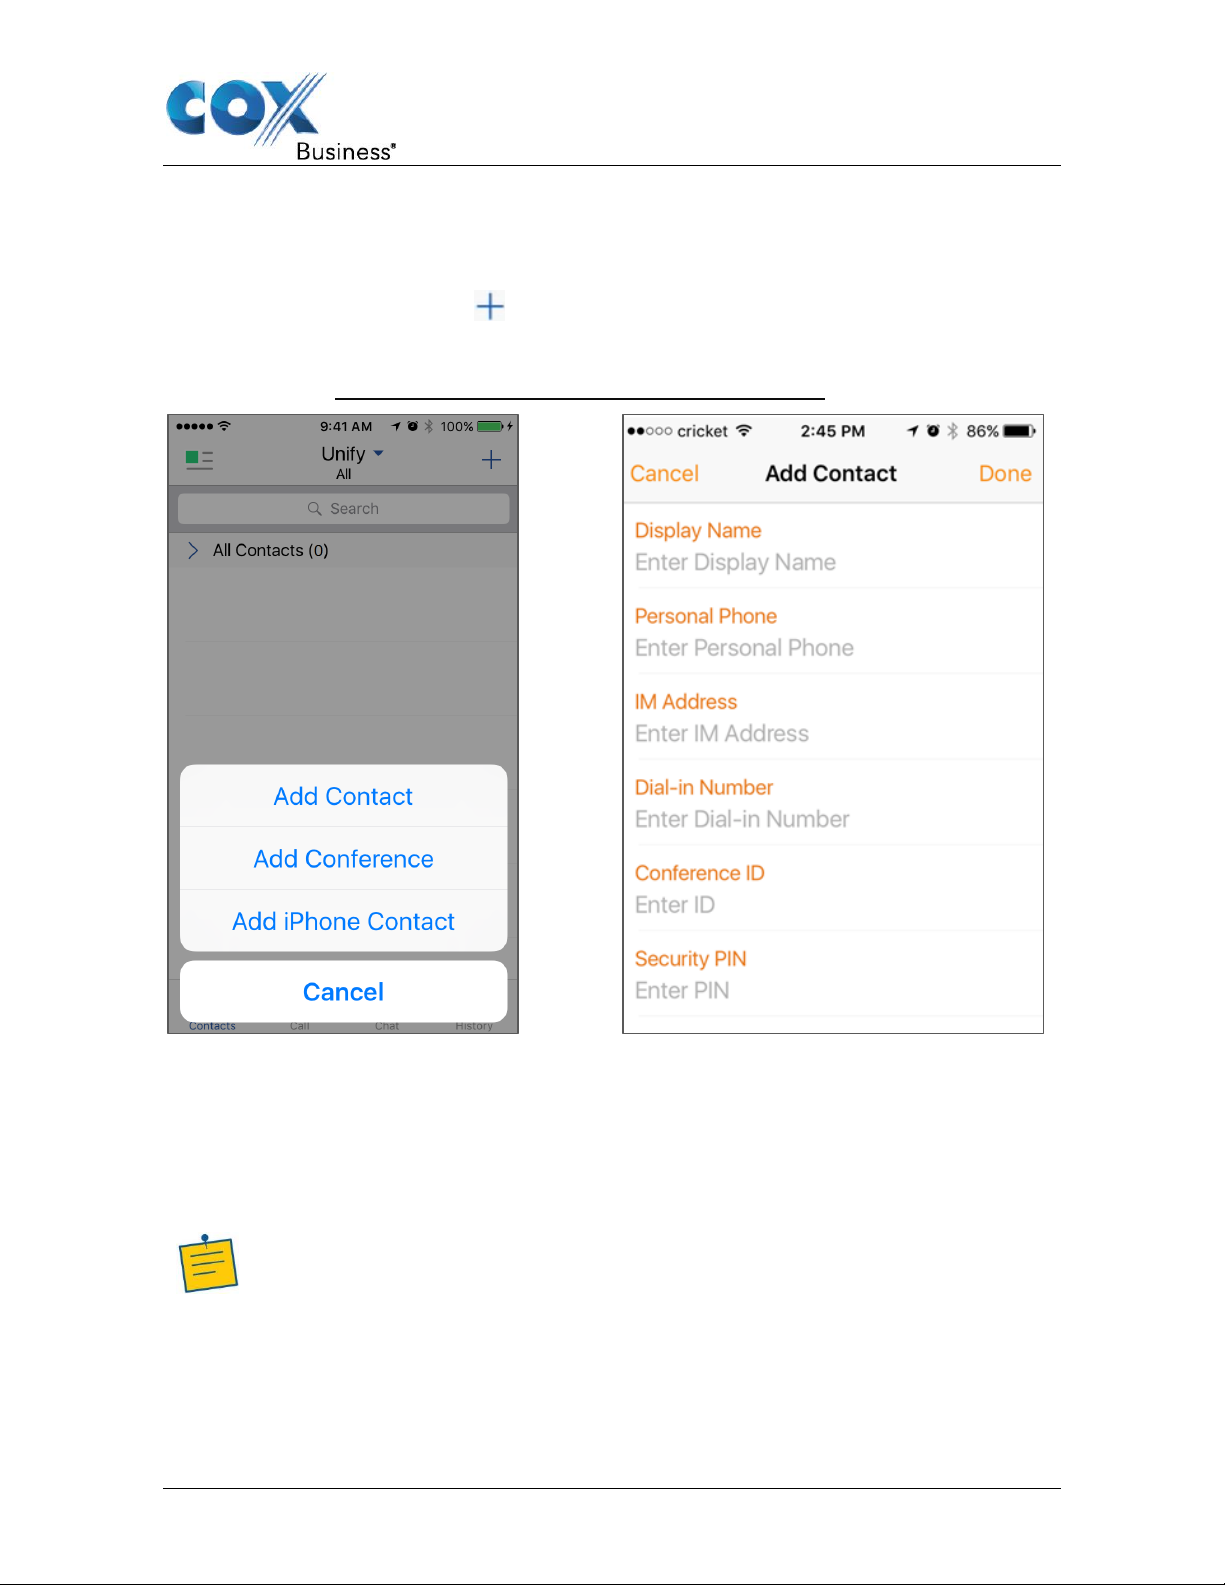
Add Contacts
As was stated in the previous section, when you sign in to the UC App for the first time,
there are no contacts in your Contacts list. There are two ways to add new contacts:
• Tap the Add Contact icon in the top navigation bar.
• Use the directory search option from the Contacts tab.
Figure 9. Add Contact option and Add Contact details screen
Use the following steps to add a new contact.
1. Use one of the two methods shown above to access the Add Contact dialog.
2. Tap the field names you wish to populate and enter values for each.
3. Tap the Done link. By default, your presence information is always shared with a new
contact if an XMPP address is provided.
UC App for iPhone Mobile User Guide 10
Page 16
The UC App Tabs
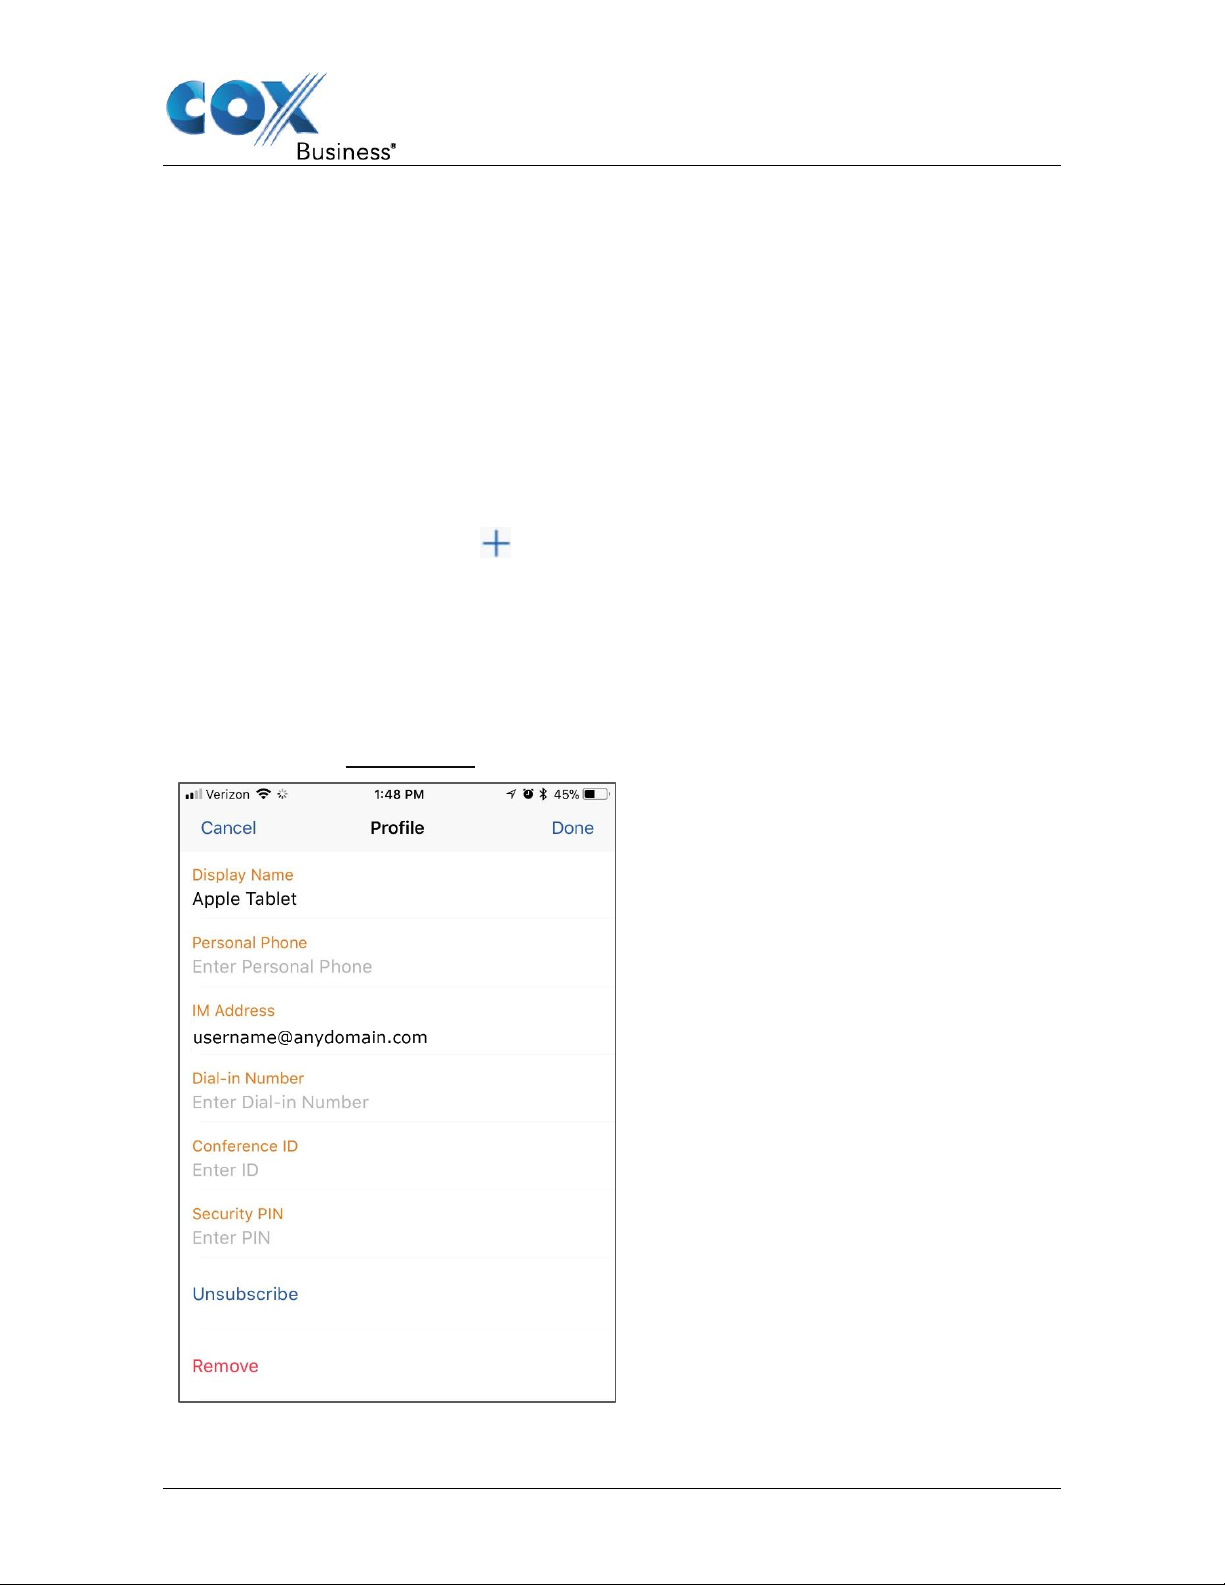
Figure 10. Edit Contacts
Edit opens the Contact Information dialog
box where you can add, edit, or remove
information.
1. Tap any of the fields and make the
necessary changes. When you have
finished, tap the Done link.
2. (Optional): Tap Unsubscribe to
remove the presence relationship
between you and that contact. This
means you do not see the contact’s
presence information and your contact
does not see yours. Select Subscribe
to re-establish the presence
relationship. An unsubscribed contact
remains on your Contacts list and is
always shown as “offline.”
3. (Optional): Tap Remove to delete the
contact from your Contacts list.
Add Conference
You may need to add a Conference to access recurring meetings quicker and easier.
Use the following steps to add a Conference.
1. Select Add Conference from the same plus icon in the navigation bar. See Figure 9.
2. Tap the fields you want to populate and enter the necessary values. (Note: You can
also add a conference number from directory search.)
3. Tap the Done link.
Add iPhone Contact
Use the following steps to add an iPhone contact.
1. Tap the Add Contact icon in the top navigation bar.
2. Tap the Add iPhone Contact.
Result: The native Address Book appears.
3. Follow the prompts to add a new contact from your local iPhone address book.
Edit Contacts
UC App for iPhone Mobile User Guide 11
Page 17
The UC App Tabs
Contact Card
The contact card displays information about a contact based on the type of the contact.
This includes UC contacts, Local address book contacts, and contacts from directory
search results.
You can initiate a call or chat session directly from the contact card. If the contact has an
associated email address, you can send an email to the person when you launch the
email client on your iPhone.
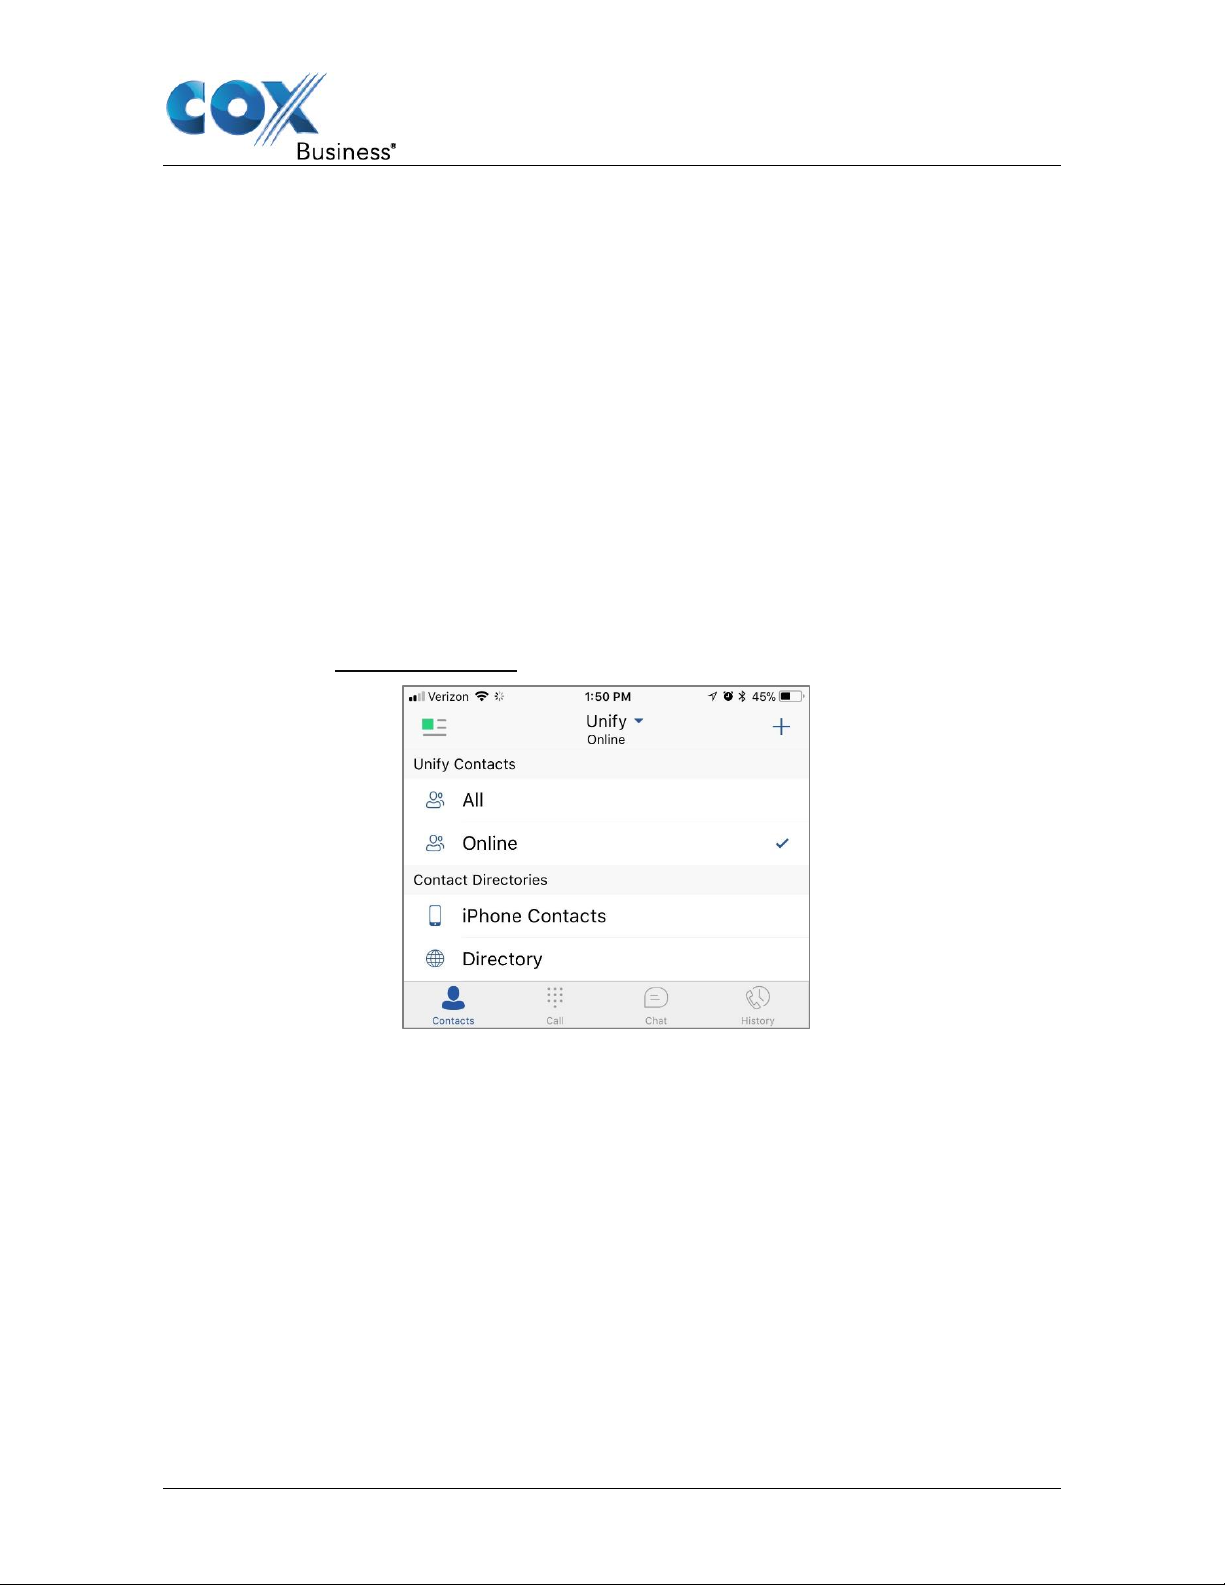
Filters
The following filters are available from the Contacts filter menu:
• All – Shows all presence-enabled and non-presence-enabled contacts.
• Online – Shows only the presence-enabled contacts that are currently online.
• iPhone Contacts – Shows the contacts from your local phone book.
• Directory – Shows the contacts from a company directory (which requires a search).
Figure 11. Contact filter menu
Follow the steps below to view contacts in a specific category.
1. From the Contacts tab, tap the down arrow to the right of the UC App label in the top
bar.
2. Tap the type of contact you want to view.
Result: A checkmark will appear at the right of the contact type and a list of contacts
for the selected category will appear.
UC App for iPhone Mobile User Guide 12
Page 18

Sort and Display Order
If you’re using…
Use this navigation path to sort contacts…
iOS 9 and lower
Settings > Mail, Contacts, Calendars > Contacts
iOS 10
Settings > Contacts
iOS 11
Settings > Mail
Display Order
Displays First name or Last name first
Sort Order
Sorts by First name or Last name
Short Name
Displays the format of the name that is used in chat lists
Note: Short names are not supported on iOS 8. On iOS 8, the application will
always use the full names for display in such lists.
The sort and display order for contacts is based on phone settings:
The table below describes three ways in which a contact can be sorted.
The UC App Tabs
iPhone Contacts
iPhone contacts are ordered in groups by the first letter of their display name. There is no further
ordering within the group.
Search
The UC App supports searches in the UC App Contacts and Contact Directories (in a separate
input field) in the Contacts tab. The results of the search are defined by the type of search filter
you select (All, Online, iPhone Contacts or Directory). See Filters for more information.
In addition to results from the company directory, the search is also performed in other search
sources, such as:
• User’s Personal Phone List
• Group’s Common Phone List
• Company’s Common Phone List
An enhanced search is applied to both the UC App Contacts and Contact Directories
when the search is initiated by a user or when an incoming call is received. (Note: The
application performs a search for the display name that corresponds to the caller’s
number.)
UC App for iPhone Mobile User Guide 13
Page 19

The UC App Tabs
Call Tab
The Call tab enables you to dial a number and place a call, pull a call and retrieve a call.
UC App for iPhone Mobile User Guide 14
Page 20
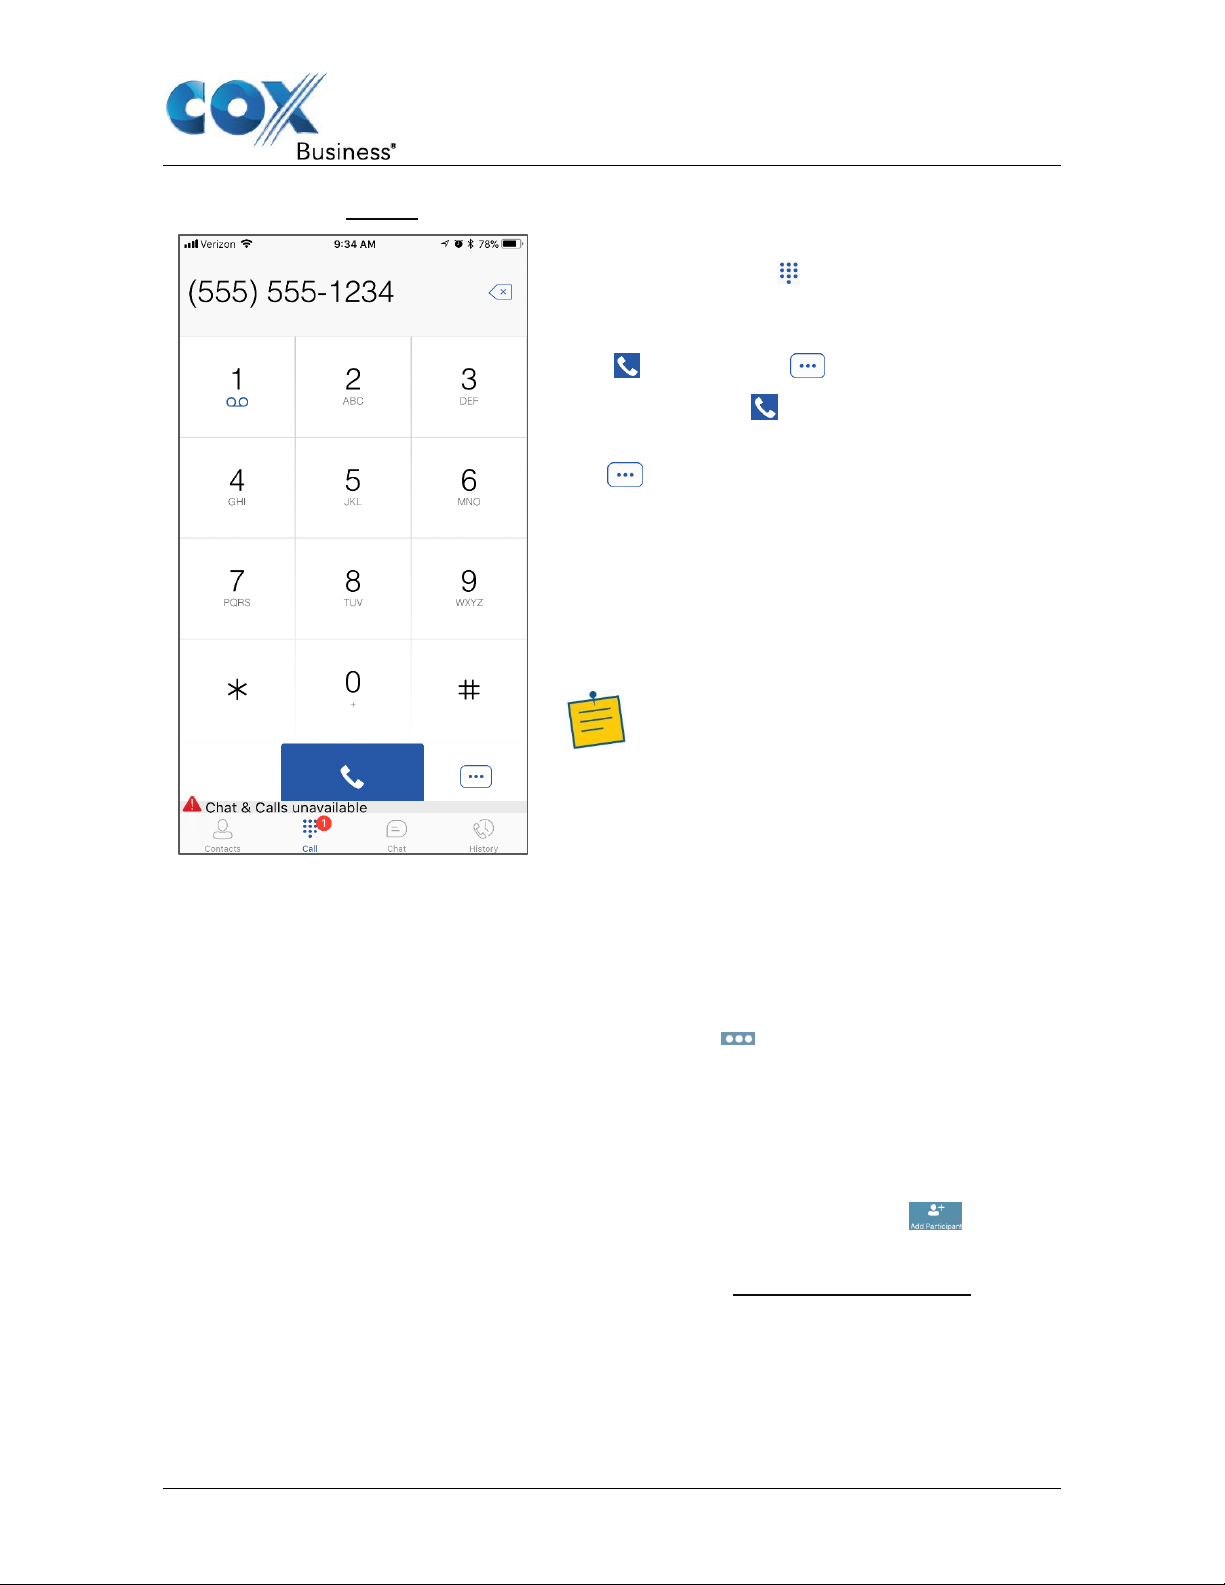
Figure 12. Call tab
Use the following steps to place a call from the
Call tab.
1. Tap the Call tab to open the dial pad
and enter your phone number.
2. There are two icons below the dial pad: call
and call menu .
1. Tap to place the call after you
enter the phone number.
Tap to “pull” a call or retrieve a call from
another telephone line. See
Conference Call
A Conference Call is a telephone call that
enables multiple people to speak to each other
at the same time.
Note: A conference call with more than
three people is known as “N-way
Calling.”
1. Initiate a call using one of the methods
described in the Make Calls section of this
user guide.
2. When the call becomes active, tap the
menu icon in the lower right corner of
the dial window.
Result: A sub-menu appears.
3. Tap the Conference option.
Result: A new screen appears on your
phone.
4. Tap the Add Participant icon . See
Figure 27.
Figure 13. Initiate a Conference Call
The UC App Tabs
Initiate Conference Call
Use the following steps to initiate—or add
members—to a conference call on the UC
App for iPhone.
UC App for iPhone Mobile User Guide 15
Page 21

The UC App Tabs
5. Locate the person to whom you wish to
join the conference from the Contacts list,
Call History list, or tap the dial pad icon to
dial the phone number directly.
6. When the call becomes conferenced, the
screen changes to display the names of
the participants on the call and presents
additional calling options (see Figure 29).
7. Tap the Add participant button again to
add another party and repeat steps 4-7 to
continue adding people.
Note: You may add up to 14 other
participants for a total of 15, including
yourself.
UC App for iPhone Mobile User Guide 16
Page 22

Figure 14. In Conference Calling Options
1. Call PullError! Reference
source not found. for more
information.)
• The top of the dial pad has a delete button
that you can use to remove one
character at a time.
• A badge notification appears on the
dial tab when there is a message(s) in the
voice mail box. Press and hold “1” on the
dial pad to access your voice mail box.
The UC App Tabs
UC App for iPhone Mobile User Guide 17
Page 23

The UC App Tabs
Chat Tab
Users can initiate a chat session using one of two methods:
• From the Contacts list, tap a contact to open the contact card. From the contact card,
choose the chat bubble icon to start a chat.
• In the Chat History list, tap an entry to start a chat.
Chatting with a contact is possible only when you are both online. If your contact initiates a
chat, you see a notification badge on the Chat tab and the entry appears at the bottom of
the Chat History list.
Figure 15. Chat Notification Badge
When the chat opens, the name of the person sending the chat appears, along with their
availability icon. The messages you receive are displayed in an orange background and
your messages appear on a white background.
You can add an emoticon to a message by selecting it from the “keyboard.” See (Add
contact) Chat tab.
When you clear the history, the chat history is removed from the view, but the chat view
remains open if you want to continue chatting. If you navigate back to the chat list, the
specific chat entry is removed from the list because there is no chat history associated
with it.
UC App for iPhone Mobile User Guide 18
Page 24

The UC App Tabs
Figure 16. Chat tab
See below for more information about the Chat
tab.
• If two people chat multiple times, their
discussions appear as one item in the
chat list.
• When you tap a name from the chat list,
the Chat view (IM view) opens and you
can enter new messages. Old messages
are also displayed.
• New incoming messages are indicated
with a notification badge to the right of the
name. The icon remains next to the name
until the message is read.
• Chats are displayed in a list of recent
chats since the last login. The newest one
is always at the top. Chats are not in
alphabetical order and are always listed
with the most recent first.
• When you tap the menu button ( ) in the
top right corner of the screen, you can
select from two options: Start Group Chat
and Mark All Read. The Mark All Read
option removes all notification badges
from the Chat History list. See the next
page for instructions on how to start a
group chat.)
UC App for iPhone Mobile User Guide 19
Page 25

The UC App Tabs
Figure 17. (Add contact) Chat
tab
See below for more information about the Chat
tab.
• When you initiate a group chat, the Chat
screen opens. You can add people to the
chat using the add participant icon .
Anyone in the group chat can add
participants; however, participants cannot
be removed.
• A group chat works similarly to a “single”
chat. All messages from anyone are sent
to everyone else; and all contacts need to
be online to participate in the chat.
• The group chat is saved in the Chat
History and is available to view later in the
Chat tab.
• You can leave a group chat when you tap
the Leave chat option. The chat is marked
as “offline,” and you will no longer receive
messages from the chat. When you tap
the “offline” chat, you re-join the room and
start receiving messages; however, you
will not see the messages that were sent
in the chat while you were away.
• The Clear History menu item works the
same way as the corresponding option in
a singular chat.
• The View Participants button opens a
dialog that shows the list of participants in
the group chat.
Start Group Chat
You can start a group chat using one of the following three methods:
• In a single chat session, tap the Add Participant icon and select the person you want
to include.
• Tap the menu button ( ) in the top right corner of the screen and select Start
Group Chat.
• From the Chat History list, tap a group communication entry.
Use the following steps to start a group chat in the Chat tab.
1. From the Chat tab, determine the contacts with whom you want to chat.
2. Enter your message.
Result: The message will be seen by everyone in the group.
UC App for iPhone Mobile User Guide 20
Page 26

The UC App Tabs
Figure 18. Chat History tab
• An arrow appears to the left of each call
which indicates the type of call—incoming,
outgoing, or missed.
• An arrow pointed to the number represents
an incoming call. An arrow pointed away
from the number represents an outgoing
call. If the call is in red, it indicates a
missed call.
• It also shows the name, number,
Unavailable status for the caller, and
below the name, it shows the number, if
available. To the right, is the date of the
call and the time the call was initiated.
Call History Tab
Call history makes it easy for you to redial/return a call when you miss one or when you
want to dial a contact with whom you have recently spoken.
Use the following step to view your calls.
1. Tap the History icon in the lower right corner of the Contacts tab.
Result: A list of All calls appears. (Note: Tap the Missed button to view that specific
type of call.)
UC App for iPhone Mobile User Guide 21
Page 27

Availability
The Main Menu contains the following
items:
• My Status (blue bar)
• Call Settings
• Error! Not a valid result for table.
• About
• Help Page
• Sign Out
Details for each topic will be reviewed
later in this manual. For quicker access
to each section, click the bulleted item
and you will be taken directly.
Figure 19. Main Menu
Main Menu
This section describes the options shown on the Main menu and instructs you on how to
configure UC App settings.
UC App for iPhone Mobile User Guide 22
Page 28

Availability
My Status
The top of the Main Menu is the My Status section. Here, you can insert a picture (or other
image) you want contacts to see, a message, and your Availability.
Figure 20. My Status Screen
Set Avatar and Status
Your avatar is an image or photo that represents you in your friends’ Contacts list and in
chat screens. If you do not currently have or want to use a photo or other image, the app
will display your initials. However, if you want to add an avatar, follow the steps below.
1. Tap the circle that contains your initials.
Result: The Change Profile Photo dialog box appears.
2. Choose which action you want to do. You can tap the link to take a new photo,
choose an existing photo, or clear your photo.
3. Follow the prompts based on the option you select.
4. Tap the Cancel link to exit the screen.
UC App for iPhone Mobile User Guide 23
Page 29

Figure 21. Change Profile Photo
Availability
UC App for iPhone Mobile User Guide 24
Page 30

Availability
Icon
Description
Available: The user is online and can chat.
Away: The user is online, but has been idle or away from their phone for
more than 10 minutes.
Busy: The user is busy and does not want to be disturbed.
Offline: The user is offline and may only be reached by a phone call or email.
Notes: All-day meetings do not trigger to a Busy – In Meeting status change.
Status Message
Use the Status Message line to inform your contacts about or enter another comment. It
will appear in the area below your avatar.
1. Tap the text that asks, “What’s on your mind?” and type a message.
Result: Your contacts will see your message, as shown in Figure 20.
Availability
The Availability feature enables Contacts to see the status of each other’s presence.
Note: If you see the error message, “Chat Unavailable” under any tab, it means
that the XMPP connectivity has been lost for chat and availability; however, you
can still make calls. If the UC App has been inactive for an extended period, try
logging out and then logging back in to reestablish XMPP connectivity. If chat is
still unavailable, contact your service provider.
The table below describes the colors you see next to a contact’s chat status.
The availability update is only triggered by appointments and meetings that you initiate or
accept.
• The client updates its own status based on the information it receives from the
server.
• Accepting a shared presence invitation in one client is also recognized by
another client and both clients start receiving presence updates.
• A status change in one device is recognized in another. If the contact blocks
the invitation, then there are presence notifications sent from the server to all
the user’s devices (that have the UC App) indicating that the subscription was
terminated. This information is shown to the user. If the client receives two
presence authorization requests from two or more devices for the same user,
it only shows one request to the user.
Use the following steps to set your availability.
1. Tap the menu icon in the top left corner of the screen to open the Main menu.
2. Tap anywhere in the top half of the Main menu to open the My status screen.
3. Tap the status checkbox to change your presence.
UC App for iPhone Mobile User Guide 25
Page 31

Instant Messaging
Instant Messaging
This section provides helpful information about the Instant Message feature in the UC
App for iPhone. See the bullets below for details.
• The UC App displays the list of recent chats since your last login. If you chat with
another contact multiple times, your discussions appear as one item in the list.
• When you tap the name, the chat view opens and new messages can be typed. Old
messages also appear.
• New incoming messages are indicated with a notification badge to the right of the
name. The icon remains next to the name until the message is read.
• Chats are listed so that the newest ones are always at the top. Chats are not in
alphabetical order. Instead, they are listed with the most recent first.
• Tap the menu button in the navigation bar to view the Start Group Chat options.
UC App for iPhone Mobile User Guide 26
Page 32

Start a Chat
Figure 22. Start a Chat
Start a chat using one of the following methods:
• From the Contacts list, tap a contact to open the contact card; and choose the chat
bubble icon to start a chat.
• In the Chat History list, tap a Chat History entry to start a chat.
When you initiate a chat, the Chat screen opens. You can chat with a contact only when
you are both online. If your contact initiates a chat, you see a notification badge on the
Chat tab and the entry appears on the top of Chat History list.
Instant Messaging
When the chat screen appears, the name
of the recipient is on the top bar and there
is an availability icon flag to the left of the
name. The recipient messages are
presented in an orange background and
the initiator’s messages are presented in a
white background.
An emoticon can be added to a message
by typing the corresponding character code
or by selecting a smiley icon. The image
displays with its character code in the input
text and graphically in the chat area and
when displayed to the remote party.
The text input field in Chat uses
autocorrect, auto-cap, and spell check
based on system settings. Use the system
settings to enable or disable these
features.
If you use the Clear History function, the
chat history is removed from the view, but
the chat view remains open if you want to
continue chatting. If you navigate back to
the chat list, the specific chat entry is
removed from the list because there is no
chat history associated with it.
Chat invitations are sent to all Coxsupported devices that a UC user may
have. Before the session is accepted,
messages are sent to the devices, and
once answered, the chat messages go to
the device that sent a reply message.
When you remove a contact from a contact
list in one device, the contact is removed in
another client, too.
UC App for iPhone Mobile User Guide 27
Page 33

Instant Messaging
Figure 23. Start a Group Chat
(option 2)
A group chat works the same way as a
one-on-one chat. Everyone can see
messages if they are not sent to a single
person.
When you initiate a group chat, the Chat
screen opens. Anyone in the group chat
can add participants. However, you may
not remove participants.
All contacts need to be online to be able to
participate in a group chat. You cannot
invite an offline contact.
A group Chat History is saved and is
available to view later in the Chat tab.
You can leave a group chat when you
select the Leave Chat option. The chat is
marked as “offline” and you can no longer
receive messages from the chat. Note:
When you tap “offline,” you re-join the room
and can receive messages. However, you
cannot see messages that were sent in the
chat while you were offline.
The Clear History menu item works the
same way as the one-on-one chat and
removes the local history.
The View Participants button opens a
dialog that shows the list of participants in
the group chat.
Group Chat
Start a group chat using one of the following methods:
• In single chat session, tap the add participant icon to escalate from a single to a
group chat.
• From the Chat tab, tap the menu icon to select the Start Group Chat. Tap the
radio button to the left of the contact’s name you want to include in the chat.
• In the Chat History list, tap a group communication entry to start a group chat.
UC App for iPhone Mobile User Guide 28
Page 34

Audio Calls
Audio Calls
The Call menu contains three options:
• Voice over Internet Protocol (VoIP) Mode
• Pull Call
• Retrieve Call
VoIP Calling Mode
The UC Mobile App supports an option that allows you to switch between VoIP and
Mobile calling modes.
• VoIP calls use WiFi or a carrier’s data network.
Mobile calls use the carrier’s circuit-switched network. Mobile
calls leverage Anywhere or Mobility to present the business
identity of the user. For more information, see section Message
Waiting Indicator
If you have pending voice mail messages, a badge displays on the Call tab icon that
indicates the number of messages.
Checking Voice Mail
To check voice mail on your iPhone, press and hold “1” on the key pad.
• Business Line Call Through on page 36.
You can switch between VoIP and Mobile through the Dial Pad menu. An indication of the
currently selected mode is displayed on the Dial pad.
• VoIP Mode On:
• Outgoing and incoming calls use VoIP over WiFi or data network.
• Anywhere or Mobility* location for the device is disabled.
• VoIP Mode Off:
• Outgoing and incoming calls use the mobile circuit-switched network.
• Anywhere or Mobility* location for the device is enabled. Outgoing calls are
performed with Call-Through. Incoming calls are delivered via the Anywhere or
Mobility location.
VoIP calls over the carrier data network are dependent on the quality of the network and
may incur additional charges. As such, there are options for an operator or end user to
disable VoIP calls over the carrier data network (3G, 4G, or LTE) if needed. You can
manage this behavior in Call Settings → VoIP Calls. There are two options:
• WiFi only: VoIP calls are only allowed through a WiFi connection.
Cox Business The UC App for iPhone User Guide 29
Page 35

• All Networks: VoIP calls are only allowed on any data network.
Audio Calls
Cox Business UC for iPhone User Guide 30
Page 36

Make Calls
Figure 24. Answer Call
Make a call using one of the following methods:
• Choose a contact from the contact list and tap on the headset icon .
• From search results, open a contact card and tap on the headset icon .
• Open the dial pad, enter a phone number, and tap the Call button.
• On the Call History list, tap a call entry.
• On the Chat screen, tap the headset icon .
Answer Call
An incoming call is indicated by a ringtone.
There are two options on the incoming call
screen: Accept and Decline. If you decline
the call, it causes the line to sound busy at
the caller’s end and they know that you
rejected the call.
Audio Calls
If you are in the middle of a VoIP call and
receive an incoming cellular call, the VoIP
call is put on hold.
If the iOS device (iPhone or iPad) is locked
and there is an incoming VoIP call, a
notification appears on the locked screen,
accompanied with an alert sound and
vibration.
If the device is in silent mode, the UC App
notification is accompanied by multiple
vibrations. Vibrations are played until the
call is answered locally, answered on
another location, or redirected to voice mail
or another number, or after a predefined
timeout.
The incoming call ring volume when the
application is in background is controlled by
the Ringer volume when the phone is
unlocked. The volume of the incoming call
ring when the application is in foreground is
controlled only during active alerting of an
incoming call.
Cox Business UC for iPhone User Guide 31
Page 37

Audio Calls
CallKit
Starting with iOS 10, the UC App supports integration with the iPhone UI using the
CallKit Framework. This integration enables the functionality described in the
following subsections.
Answer Incoming VoIP Call on Locked Screen
See the bullets below for information on what you can do to answer an incoming data
connection call on a locked screen.
• When you receive an incoming VoIP call and the device is locked, iOS shows the
native caller ID, avatar, and the “Unify Audio” label.
• Slide the device lock to establish the call with no additional interaction required. This
means you are not required to enter the device unlock code. See Figure 25.
Figure 25. The UC App Incoming Call Screen and Passcode screen
• You can perform basic mid-call control functions from the main screen. For
advanced mid-call control functionality, you must activate the application by tapping
the application button on the main screen. (Note: You will then be required to enter
the device lock code, if it is set.)
• Incoming calls are always accepted as audio.
• If you do not want to accept the call, tap the power button once to silence the call,
and twice to reject it.
Cox Business UC for iPhone User Guide 32
Page 38

Audio Calls
Answer Incoming VoIP Call on Unlocked Screen
When you receive an incoming VoIP call while the device is unlocked and the application
is either in the foreground or background, you are notified on the iOS screen. The call will
display the caller ID, avatar, and the “Unify Audio” label.
You can answer the call when you tap the Accept button, which opens the application in
call screen. See Figure 26.
Figure 26. Accept/Decline The UC App Call
Receive Second Incoming Call (Call Waiting)
When you receive an incoming circuit switched (CS) call during an active VoIP call, you
are notified on the iOS screen. You will see the caller ID and avatar of the new calling
party. You may hold the current call and answer, or end the current call and answer (or
decline the call, which will send it to voicemail.) When you accept the new call, the
previous call is put on hold. You then may swap between the calls or end one or both.
The same behavior applies when you receive an incoming VoIP call during a CS call, or
when you receive a second VoIP call.
Integration with Native Contacts and Call History
VoIP calls made using the UC App display in the call history screen as “Recent.” When
you tap the call entry in this screen, you will initiate the call.
Cox Business UC for iPhone User Guide 33
Page 39

Audio Calls
The UC App calls can also be dialed directly from the contact profile of an address book
entry. Press the call button in a contact profile to open a list of calling options (which
includes the UC App).
If the last call to a contact has been handled by the UC App, the call button in the profile
changes to “Unify”.
Cox Business UC for iPhone User Guide 34
Page 40

The UC App In Call Actions
• End a call
• Transfer a call – Unattended
• Mute the microphone
• Make a conference
• Enable / Disable Speaker
• Park a call
• Open the key pad
• Transfer a call to circuit-switched call
• Adjust the volume
• Add more participants (in conference call only)
• Place a call on hold
• Merge two separate calls
• Make a new call
• Swap two separate calls
• Transfer a call – Attended
• View participants (on a conference call)
Figure 27. In Call Screen(s)
The UC App In Call Actions
You can perform the following actions from the In Call screen:
Missed Calls and New Messages
Notifications of missed calls or new messages are flagged with “badges” on the tab icons.
Cox Business UC for iPhone User Guide 35
Page 41

The UC App In Call Actions
Note: The following functionality is only available for the iOS platform.
Setting Up Voice Mail
For your reference, use the following steps to set up your voice mail.
1. From your desk phone or UC App, dial your business number or *86.
2. Enter the temporary PIN, “269266” and press #.
3. Select your default language.
4. Set a new PIN (4-8 digits) for your account and press #.
5. Record your name.
6. Record a greeting or select the default system greeting.
Message Waiting Indicator
If you have pending voice mail messages, a badge displays on the Call tab icon that
indicates the number of messages.
Checking Voice Mail
To check voice mail on your iPhone, press and hold “1” on the key pad.
Business Line Call Through
See the Dialing Service section on page 47 for information about Business Line Call
Through.
Mid-Call Controls for Circuit-switched Business Calls
The UC App for mobile provides mid-call control services for business circuitswitched calls. This functionality is available for:
• Call Through calls that are initiated from the the UC App client through the native
phone dialer.
• Incoming circuit-switch calls that are delivered to the mobile phone via Anywhere,
Mobility, or Remote Office location.
Supported mid-call control services are:
• Hold / Resume: For more than one call, this functionality requires Call Control to be
turned on for the location.
• Transfer
• Swap: Requires Call Control to be turned on for the location.
• End call
Cox Business UC for iPhone User Guide 36
Page 42

The UC App In Call Actions
After initiating a Call Through call or after receiving a business circuit-switched call, you
can return to the main screen and launch the UC App to the foreground. By doing so, the
application will display a Mid-Call Control screen to manage the call.
The UC App for iPhone will display a notification for Call Through outgoing calls when the
remote party answers the call. Tap the notification to return to the the UC App screen and
control the call.
Contact Name Lookup for Incoming Calls and Call Logs
When you receive a call, The UC App searches for the name in the following sources and
in the following order:
1. XMPP contact name
2. company directories
3. iPhone Contact
4. P- Identifier header (SIP)
5. From header (SIP)
If the number matches one of the contacts, the name displays on the call screen.
Call Waiting
You can have one active call at a time if you receive and accept an incoming call. Your
active call will be placed on hold and you can toggle between the two calls through the
Hold and Unhold buttons.
New Call
From the UC App, you can start a new call while on an active call.
Use the steps below to start a new call while on an active call.
1. Establish a call with a remote party.
2. Tap the new call button to initiate the second call.
3. Select a contact and then choose a number.
Result: After the new call is established, the first call is put on hold. You can also
swap the two calls or to merge them to a conference call.
Cox Business UC for iPhone User Guide 37
Page 43

The UC App In Call Actions
Call Transfer
The UC App for iPhone allows you to transfer VoIP calls to another party through an
Attended Transfer, also known as a “warm transfer” or Unattended Transfer, also known
as a “blind transfer.”
Use the steps below to transfer a call through the attended or unattended mode.
Attended Transfer
1. Select a contact then choose a number.
2. Select the call first option. If the call is successfully established, you can talk with the
third party privately before completing the transfer by pressing the Complete button.
Unattended Transfer
1. Select a contact and then choose a number.
2. Select the Transfer option and the transfer is completed.
Cox Business UC for iPhone User Guide 38
Page 44

The UC App In Call Actions
Note: A conference call with more than three people is known as “N-way
Calling.”
Conference Call
A Conference Call is a telephone call that enables multiple people to speak to each other
at the same time.
Initiate Conference Call
Use the following steps to initiate—or add members—to a conference call on the UC
App for iPhone.
3. Initiate a call using one of the methods described in the Make Calls section of this
user guide.
4. When the call becomes active, tap the menu icon in the lower right corner of the
dial window.
Result: A sub-menu appears.
5. Tap the Conference option.
Result: A new screen appears on your phone.
6. Tap the Add Participant icon . See Figure 27.
Figure 28. Initiate a Conference Call
Cox Business UC for iPhone User Guide 39
Page 45

The UC App In Call Actions
Note: You may add up to 14 other participants for a total of 15, including
yourself.
Note: Call Pull is not possible when there is an active circuit-switched call on
the iPhone, regardless if the circuit-switched call is mobile (personal) or
business. Call Pull requires initiating a VoIP call and iPhone initiating a VoIP
call during a circuit-switched call.
7. Locate the person to whom you wish to join the conference from the Contacts list,
Call History list, or tap the dial pad icon to dial the phone number directly.
8. When the call becomes conferenced, the screen changes to display the names of the
participants on the call and presents additional calling options (see Figure 29).
9. Tap the Add participant button again to add another party and repeat steps 4-7 to
continue adding people.
Figure 29. In Conference Calling Options
Call Pull
Call Pull can be used when you have two “endpoints;” e.g., a VoIP desk phone and a
mobile phone with the UC App installed. If you have an active call on the desk phone,
you can transfer to your mobile phone seamlessly with the Call Pull button. Depending
on the application, dialing settings, and service configuration, the call can be pulled as a
VoIP or circuit-switched call to the mobile phone. There is no interruption to the voice
call.
Cox Business UC for iPhone User Guide 40
Page 46

Figure 30. Call Pull/Retrieve Call
The UC App In Call Actions
Use the following steps to Pull or Retrieve a Call.
1. From your iPhone key pad, tap the menu icon in the lower right of the screen
and tap Pull Call.
Call Park
The Call Park feature is especially beneficial for businesses with shared environments—
where one person can answer a phone call, park it (put it on hold), walk away from the
phone, and resume the call from another phone in a different location.
Call Retrieval works similarly to a parked call. It can be retrieved from your own extension
number or another number’s extension. This provides flexibility for the person who picks
up the parked call.
If the call is not retrieved in a pre-determined amount of time, then the call rings back to
the person who parked the call.
Bluetooth Support
You can make calls from a compatible Bluetooth headset. The list below displays
headsets that have been tested; however, other Bluetooth devices should also work.
Cox Business UC for iPhone User Guide 41
Page 47

The UC App In Call Actions
• Voyager Pro UC
• Savi 700 series
• Blackwire C3xx, C4xx, C5xx, and C7xx
• Calisto 620
• Audio 628USB
The UC App allows you to mute and control the volume from the Bluetooth headset;
however, you must answer and hang up the call through the application.
Cox Business UC for iPhone User Guide 42
Page 48

Call Settings and Preferences
The UC App main menu comprises the following menu options:
• My Status (in blue panel)
• Call Settings
• Preferences
• About
• Help
• Sign Out
Figure 31. Main Menu
Preferences
Cox Business UC for iPhone User Guide 43
Page 49

Preferences
Note: If you see the error message “Chat Unavailable” under any tab, it
means that XMPP connectivity has been lost for chat and availability;
however, you can still make calls. If this happens, contact your service
provider.
My Status
The top panel in the UC App main menu contains a blue bar, and it is here that you can
set your availability status, image/picture (avatar), and personal message.
Note: Availability can also be referred to as presence status, which was the
term used in previous versions of the UC App.
Use the following steps to configure your status panel.
1. Tap the UC App main menu icon and tap the blue bar.
Result: The Status panel appears.
2. Tap your initials in the circle.
Result: A dialog box appears where you can browse and select an image or picture,
known as an avatar. This image represents you in your and your Contacts’ lists and
in chat screens. If you want to use a picture of yourself, but don’t have an existing
one, take a photo from your phone and upload as prompted.
3. Tap the area next to the avatar and enter a status message. This status text is shown
in your friends’ Contacts lists.
Figure 32. Availability Status screen
Cox Business UC for iPhone User Guide 44
Page 50

Call Settings
Figure 33. Call Settings
Preferences
The UC App supports multiple calling
features that are shown in Figure 33.
You can configure each feature as your
business dictates.
See the following sub-sections for
instructions on how to set each one.
Cox Business UC for iPhone User Guide 45
Page 51

Preferences
Block My Caller ID
This feature allows you to prevent your name and number from being displayed on
outgoing.
Figure 34. Block My Caller ID
Use the following steps to activate the Block My Caller ID feature.
1. From the UC App main screen, tap the menu icon in the upper left corner.
Result: The UC App main menu appears.
2. Tap the Settings link.
3. Tap the Block My Caller ID feature.
4. Swipe the Active switch to the right.
Result: The switch turns to green.
5. Tap the Save link.
Result: The feature is active. To deactivate it, swipe the Active switch to the left.
Cox Business UC for iPhone User Guide 46
Page 52

Preferences
Figure 35. Dialing Service optioni
Data Connection Call dials anywhere you
have a data connection, WiFi or LTE (4G).
Scenario: You don’t have optimal
“call phone” coverage, but you do
have a strong data connection. Note:
Tablets must use this method
because they do not have cellular
voice service.
Call Through is also a cellular phone call
type whereby the switch dials the second
number immediately.
The person you call will see the Cox
Business caller ID, not the caller ID of your
cell phone.
Scenario: You want to avoid using
any data on your cellular plan.
Note: If you use the Call Through mode, you
must enter your mobile device’s phone
number in the iPhone Number field. It must
also match the number configured in Mobility
or Anywhere.
Dialing Service
The Dialing Service feature in the UC App offers two modes you may use to make a
phone call: Data Connection and Call Through. For your convenience, the table below
contains descriptions of each mode and provides scenarios to help you understand
when you would want to use one method over another.
Use the following steps to set your call type.
Figure 36. Dialing Service configuration
Cox Business UC for iPhone User Guide 47
Page 53

Use the following steps to set your outgoing calling mode.
Note: When you select the calling mode, the UC App will use it for all
outgoing calls. If you want to choose a mode before you place a call, select
Always Ask.
icon Result: The UC App main menu appears.
2. Tap the Settings link.
3. Tap the text to the right of the Dialing Service option.
Result: The Dialing Service configuration screen appears.
• Tap the Data Connection Call option to make phone calls if you don’t have
optimal “call phone” coverage, but you do have a strong data connection.
• Tap the Call Through mode if you want to avoid using any data on your
cellular plan. Call Through allows the switch to pass the call directly from your
phone to the recipient’s number without intervention.
• Tap Always Ask if you want the UC App to prompt you to select a mode
before you place a call.
Preferences
in the upper left corner. 1. From the UC App main screen, tap the menu
iPhone Number
The UC App needs the iPhone number* of your device to enable features such as Dialing
Service, Anywhere, and Remote Office. Without it, the Cox Business voice switch will be
unable to confirm a match between the number used with the Anywhere or Remote Office
features and your iPhone number. (Important: When you configure your iPhone number
in the UC App, enter the area code and phone number only. Do not put a “1” in front of
the area code. It will incur an error.)
Figure 37. iPhone Number
in the upper left corner. 1. From the UC App main screen, tap the menu
icon Result: The UC App main menu appears.
2. Tap the Settings link.
Cox Business UC for iPhone User Guide 48
Page 54

Preferences
Figure 39. Call Forward When Not
Reachable
Figure 40. Call Forward When Busy
3. Tap the iPhone Number field and enter the number of your device.
Call Forwarding
You can set your phone to forward incoming calls always, when busy, when you can’t
answer, and when you are not reachable.
Figure 38. Call Forwarding options
Use the following steps to configure each Call Forwarding type.
1. From the UC App main screen, tap the
menu icon in the upper left corner.
Result: The UC App main menu appears.
2. Tap the Settings link.
3. Tap the When Not Reachable link.
4. Swipe the Active switch to the right.
5. Enter the number to which you want
incoming calls to ring when you are not
able to answer the phone.
6. Tap the Save link.
1. From the UC App main screen, tap the
menu icon in the upper left corner.
Result: The UC App main menu appears.
2. Tap the Settings link.
3. Tap the When Busy link.
4. Swipe the Active switch to the right.
5. Enter the number to which you want
incoming calls to ring when you are
engaged in an activ
e call.
6. Tap the Save link.
Cox Business UC for iPhone User Guide 49
Page 55

Preferences
Figure 41. Call Forward Always
Figure 42. Call Forward When No
Answer
1. From the UC App main screen, tap
the menu icon in the upper left
corner.
Result: The UC App main menu
appears.
2. Tap the Settings link.
3. Tap the Always link.
4. Swipe the Active switch to the right.
5. In the Forward to # field, enter the
number to which you want all
incoming calls to ring.
6. Swipe the Ring Splash switch to the
right if you want your phone to alert
you when you receive an incoming
call.
7. Tap the Save link.
1. From the UC App main screen, tap
the menu icon in the upper left
corner.
Result: The UC App main menu
appears.
2. Tap the Settings link.
3. Tap the When No Answer link.
4. Swipe the Active switch to the right.
5. In the Forward to # field, enter the
number to which you want incoming
calls to ring if you are unable to
answer your phone.
6. Tap the Number of Rings link and
choose the number of rings you want
the caller to hear before the call is
sent to the forwarded number.
7. Tap the Save link.
Cox Business UC for iPhone User Guide 50
Page 56

Preferences
Figure 43. Do Not Disturb
Do Not Disturb
When you activate this service, all calls are typically blocked by the server and sent to
your voice mail.
1. From the UC App main screen, tap
the menu icon in the upper left
corner.
Result: The UC App main menu
appears.
2. Tap the Settings link.
3. Tap the Do Not Disturb link.
4. Swipe the Active switch to the
right.
5. Swipe the Ring Splash switch to
the right if you want your phone to
alert you when you receive an
incoming call.
6. Tap the Save link.
Cox Business UC for iPhone User Guide 51
Page 57

Preferences
Figure 44. Simultaneous Ring
Simultaneous Ring
The Simultaneous Ring feature allows the UC App to ring multiple phone numbers
when you receive an incoming call. This is especially beneficial for on-the-go users
who have multiple devices.
Use the following steps to configure the Simultaneous Ring feature.
1. From the UC App main screen, tap the menu icon in the upper left corner.
Result: The UC App main menu appears.
2. Tap the Settings link.
3. Tap the Simultaneous Ring link.
4. Swipe the Active switch to the right.
5. Swipe the Ring If On Call switch to the right if you want your phone to alert you to an
incoming call while you are engaged in an active call.
6. Tap the Add Location link.
Result: The Add Location screen appears.
7. Enter the phone number you want to ring and a description of the number; e.g.,
home office.
Cox Business UC for iPhone User Guide 52
Page 58

Preferences
8. Swipe the Active switch to the right if you want to enable the phone number to ring at
the next incoming call.
9. Switch the Call Control switch to the right if you want to enable the server platform
to provide mid-call services such as Call Transfer and Conferencing for that number
(location).
10. Switch the Prevent Diverting Calls switch to the right if you want to stop a call from
going to voice mail.
11. Switch the Answer Confirmation switch to the right to receive a separate audio
prompt when answering a call from that number (location). Note: This can be useful
in cases where mobile numbers are being used to prevent incoming calls from going
to mobile voice mail, since the call will be ended without going to voice mail if the
answer confirmation is not provided.
12. Tap the Save link.
Result: The number will appear on the Simultaneous Ring screen.
13. Repeat steps 6-12 to add more phone numbers.
Cox Business UC for iPhone User Guide 53
Page 59

Preferences
Figure 45. Anywhere
Anywhere
The Anywhere feature simplifies communications for on-the-go and remote users by
extending the features of a desk phone to other fixed or mobile devices, regardless of the
network or handset manufacturer. Anywhere affords voice call continuity because you can
move live calls from one device to another without hanging up.
Important: Anywhere and Mobility are offered as the UC App features;
however, Mobility will eventually be phased out and no longer available. It
is recommended that the Anywhere feature be used, as it offers the same
capabilities and enhanced functionality.
Use the following steps to configure the Simultaneous Ring feature.
1. From the UC App main screen, tap the menu icon in the upper left corner.
Result: The UC App main menu appears.
2. Tap the Settings link.
3. Tap the Cox Business Anywhere link.
4. Tap the Add Location link.
Result: The Add Location screen appears.
5. Enter the phone number you want to ring and a description of the number; e.g.,
home office.
6. Tap Active to enable the phone number to ring at the next incoming call.
7. Tap Call Control to enable the server platform to provide mid-call services such as
Call Transfer and Conferencing for that number (location).
8. Tap Prevent Diverting Calls to stop a call from going to voice mail.
Cox Business UC for iPhone User Guide 54
Page 60

Preferences
Figure 46. Remote Office
9. Tap Answer Confirmation to receive a separate audio prompt when answering a
call from that number (location). Note: This can be useful in cases where mobile
numbers are being used to prevent incoming calls from going to mobile voice mail,
since the call will be ended without going to voice mail if the answer confirmation is
not provided.
10. Tap the Save link.
Result: The number will appear on the Cox Business Anywhere screen.
11. Repeat steps 4-10 to add more phone numbers.
12. Tap Alert All Locations to activate parallel ringing of all added devices.
13. To remove a number from the Anywhere feature, tap the number on the Cox
Business Anywhere screen and tap the Delete Location link.
Remote Office
The Remote Office feature allows you to configure any phone as the office phone from a
charging and numbering perspective. For instance, a hotel room phone can be used as
the office phone.
1. From the UC App main screen, tap the
menu icon in the upper left
corner.
Result: The UC App main menu
appears.
2. Tap the Settings link.
3. Tap the Remote Office link.
4. Tap Active.
5. Enter the phone number you want to
use as your Remote Office number.
6. Tap the Save link.
Result: The number appears in the
Remote Office screen.
Cox Business UC for iPhone User Guide 55
Page 61

Preferences
Figure 47. Preferences menu from
Sign In screen
Figure 48. Preferences options
Preferences
The UC App has two menus for Preferences. You can access one on the Sign In
screen before you log in and the other when on the main screen after you log in. Each
menu has different options, as shown in Figure 47 and Figure 48.
Descriptions for each option are provided for your reference below.
Use the following steps to access the Preferences menu option in the app.
1. Tap the UC App on your iPhone.
Result: The Sign In screen appears.
2. Tap the Settings icon in the lower right corner.
Result: The Preferences menu appears.
3. Configure the settings*, as necessary.
• *Language: Tap to select the language you want the UC App to present.
Important: The UC App is only available in English.
• Help: Tap to open the UC App for iPhone User Guide online.
Cox Business UC for iPhone User Guide 56
Page 62

• About: Tap to view brief informational text about the UC App, version of the
app, copyright information, website URL, app ID, and build version. The
License sub-view contains the End User License Agreement. Finally, the Legal
Notices sub-view contains third parties used by the UC App.
• Troubleshooting: Tap the Troubleshooting option if you encounter issues with
the UC App. The app collects and sends diagnostic information to Cox
Business Technical Support so they can identify the issue. The information
sent includes diagnostic logs from the application and media engine.
Troubleshooting diagnostics:
• Console logging – Option for getting logs in a development environment. The
device should be connected to a PC/MAC and the logs to appear real-time in
the console.
• File Logging – Saves logs to the device memory for subsequent sending by e-
mail.
• XMPP logging – Includes IM&P related information (XMPP stanzas) in the
logs.
• Other logging – Includes additional logs different from XMPP.
Preferences
• PN logging – Includes push notification related information (only when push
notifications are enabled).
• Crash reporting – Sends crash logs to crash report.
• Display Diagnostic Info in Calls – Displays information about ongoing calls
like the codec type.
About
Tap the About link to access the following information:
• Info – The Info view contains short info text, version, copyright, website URL, app ID,
and build version.
• License – The License view contains the End User License Agreement.
• Legal Notices – The Legal Notices view contains third parties to which the UC App
engages.
Help Page
Tap the Help link to access the the UC App for iPhone User Guide online.
Sign Out
Tap the Sign Out link at the bottom Settings screen to exit the app.
Cox Business UC for iPhone User Guide 57
Page 63

Preferences
Figure 49. Preferences menu from
side navigation panel
Figure 50. Preferences options
Use the following steps to access the Preferences menu option in the app.
1. From the UC App main screen, tap the menu icon in the upper left corner.
Result: The UC App main menu appears.
2. Tap the Preferences link.
Result: The Preferences menu appears.
3. Configure the settings*, as necessary.
• *Language: The UC App is only available in English.
• Remember password: Swipe the switch to the right to avoid having to enter your
password on subsequent launches.
• Troubleshooting: Tap the Troubleshooting option to configure the logs you want to
capture if you encounter issues with the UC App. The app collects and sends
diagnostic information to Cox Business Technical Support so they can identify the
issue. The information sent comprises the application and media engine diagnostic
logs.
• Caller ID Lookup: Swipe the switch to the right if you want the UC App to search for
a match for an incoming call number. The UC App will reference your contact list,
local address book, and company directory. Note: You may need to adjust this
setting for “local address search” to improve the performance of the app
Cox Business UC for iPhone User Guide 58
Page 64

The UC App and iPhone Settings
Note: It is recommended that you enable the items listed above. In addition, it
is recommended to select “Alerts” in the Alert style when unlocked option.
The UC App and iPhone Settings
From your iPhone, go to Settings and configure the UC App to allow the following functions:
• Contacts
• Microphone
• Camera
• Notifications
• Cellular Data
Note: It is recommended that the UC App have access to all listed resources.
You can configure the type of notifications you want with the UC App, such as:
• Allow Notifications
• Show in Notification Center
• Sounds
• Badge App Icon
• Show on Lock Screen
Cox Business UC for iPhone User Guide 59
Page 65

Push Notifications
Note: The application icon badge for unread conversations is updated only if
the application is running in the background.
Push Notifications
Push Notifications for Incoming Calls
The UC App supports Push Notifications for Incoming Calls to alert you about incoming
calls and accepting Voice over Internet Protocol (VoIP) calls.
• During an incoming call, a push notification is sent to the app which appears as
either a platform-specific visual notification or in the app’s graphical user interface
(GUI).
• From a user experience perspective, accepting a call works in the same way for both
push-enabled apps and non-push-enabled apps.
• On iOS, when the app is in the background, the call appears with an iOS-specific
local notification (alert or banner). When the app is in the foreground, the call
appears with an iOS-specific Incoming Call screen with Answer and Decline buttons.
• Outgoing VoIP calls are performed with SIP registration on demand, which is
transparent to a user. The SIP registration is performed only when the user initiates
a VoIP call.
Push Notifications for Chat Messages
The UC App supports Push Notifications for Chat Messages, too, so you will receive
an alert about incoming messages and chat invitations.
• When a new message arrives, a push notification is sent to the app which appears
as either a platform-specific visual notification or in the app’s graphical user interface
(GUI).
Push Notifications display when:
• One-on-one messages are sent. Push notifications for incoming calls and one-onone messages are received even if the client application is not running if you have
signed in and registered for push notifications before the application is removed from
memory.
• You receive a request to approve guest invitations. Push notifications to approve
Guest Client invitations require the client application to be running either in the
background or foreground.
Push notifications can be sent when the application is not running. You can remove
the app from memory by swiping the app’s icon. This will prevent the app from running in
the background.
Cox Business UC for iPhone User Guide 60
Page 66

Multi Device Support
Note: Received messages are immediately available on all logged clients, while
sent messages are synchronized when the message history is retrieved from the
server.
Note: The application icon badge for unread messages is updated only if the
application is running in the background.
Multi Device Support
The UC App provides support for users with multiple devices. This includes several features:
• Chat invitations are sent to all devices. Before the session is accepted, messages are
sent to all devices; and once answered, the chat messages go to the device that sent a
reply message.
• Retrieving one’s own presence notification when another client updates the user’s
presence. The client updates its own status based on the information it receives from the
server.
• Accepting a shared presence invitation in one client is also recognized by another client
and both clients start receiving presence updates.
• A new presence subscription made in one client is recognized in another. If the contact
blocks the invitation, then there are presence notifications sent from the server to all
user’s clients indicating that the subscription was terminated. This information is shown to
the user. If the client receives two presence authorization requests from two or more
devices for the same user, it only shows one request to the user.
• Removing a contact from a contact list in one device is recognized in another client and
the contact list is updated (that is, the contact is removed) in the other client as well.
Message History and Message Read Status Synchronization
Message history is retrieved and synchronized on all devices. This includes all received and
sent messages, even if a specific user device is not online when a message is received or
sent.
Message history is retrieved when the mobile app is brought from the background to the
foreground, or during certain time periods when receiving messages in the background.
• Messages read status is also synchronized when a message is read on another device
and unread message counts are appropriately updated on badges.
End of Document
 Loading...