

Page 1
EnglishVer. 1.0(A)
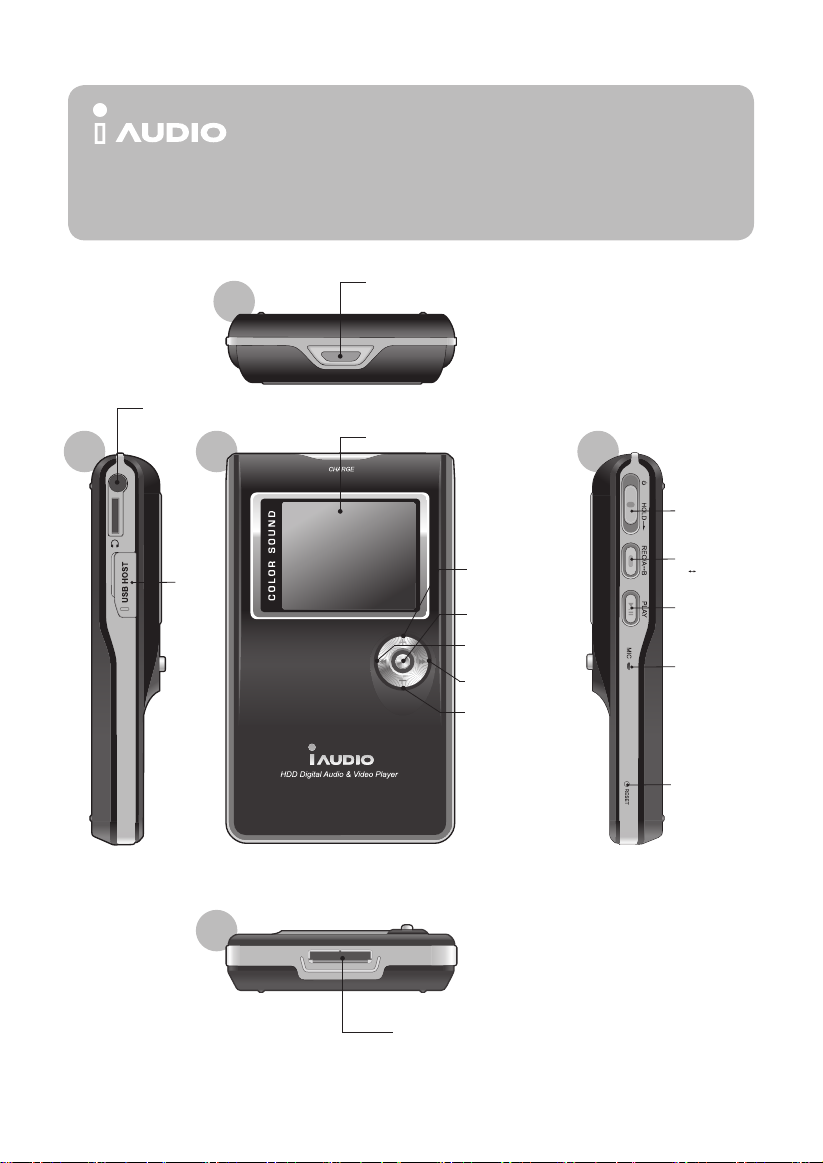
Earphone Jack
USB
Top
X5
Quick Install Guide
for Windows 98SE/ME/2000/XP
Mac OS 10.x
Charging Indicator
Display
+(VOL+)
Volume increase, move cursor
up, increase setup value
(MENU/Navigation)
Lever
Enter Menu/Navigation
◀◀ (REW)
Previous song, rewind
▶▶ (FF)
Next song, Fast forward
-(VOL-)
Volume decrease, move cursor
down, decrease setup value
RightFront Left
Power /
Hold Switch
REC
/A B Button
PLAY Button
MIC
Bottom
Reset
Connector
Page 2
X5
iAUDIO X5
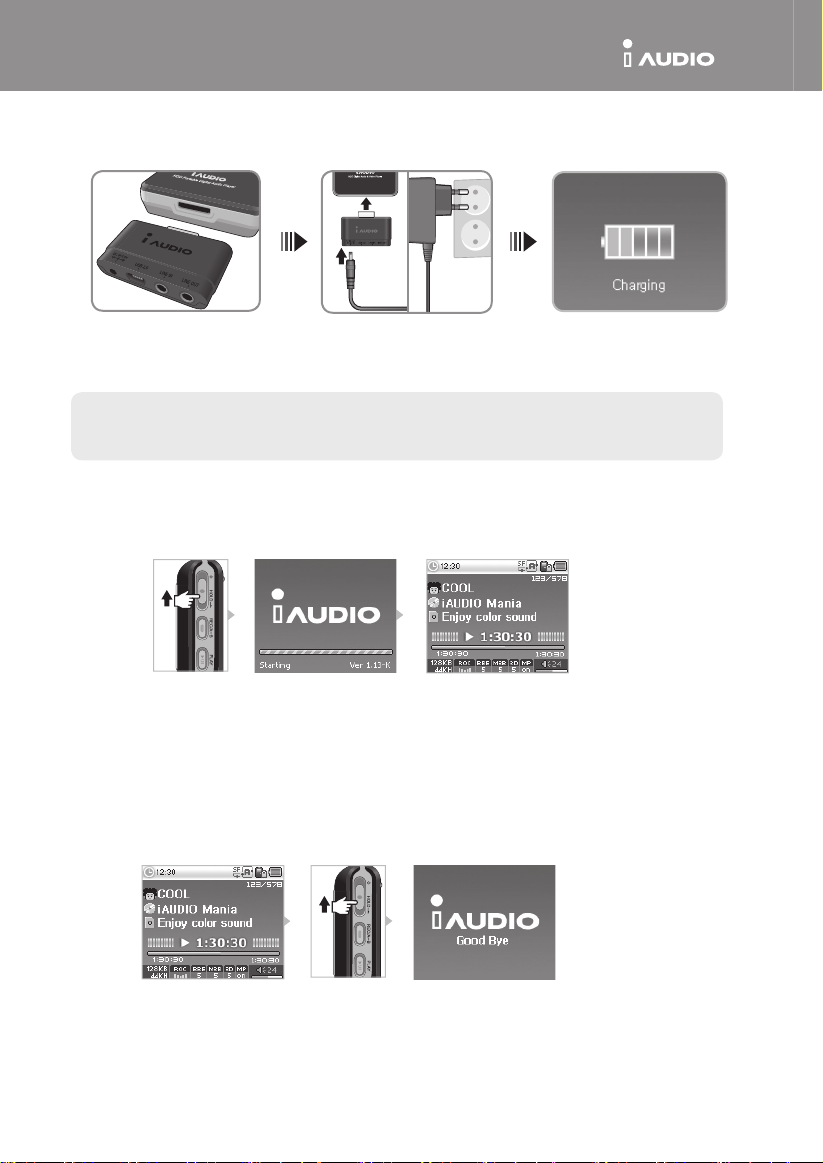
Connecting to a Power Source and Charging
1. Connect the subpack to
the bottom of the iAUDIO X5
main unit.
- You must sufficiently charge the device with the AC adaptor before you use it for the first time or after a long period
of storage.
- For the safety reasons, you must use only the supplied AC adaptor.
Turning the Power ON
The power will turn on when the power switch is pushed upward for 1~2 seconds.
2. Connect the AC adaptor to the
power outlet and the DC terminal
of the subpack.
3. The power automatically enters the
unit and charging begins as soon as the
connection is made.
Turning the Power OFF
•
The power will turn off when the power switch is pushed upward for 1-2 seconds.
•
The LCD will turn off when the power switch is slightly pushed upward, but the power remains on.
The CD will turn on when the power switch is slightly pushed upward again.
Page 3
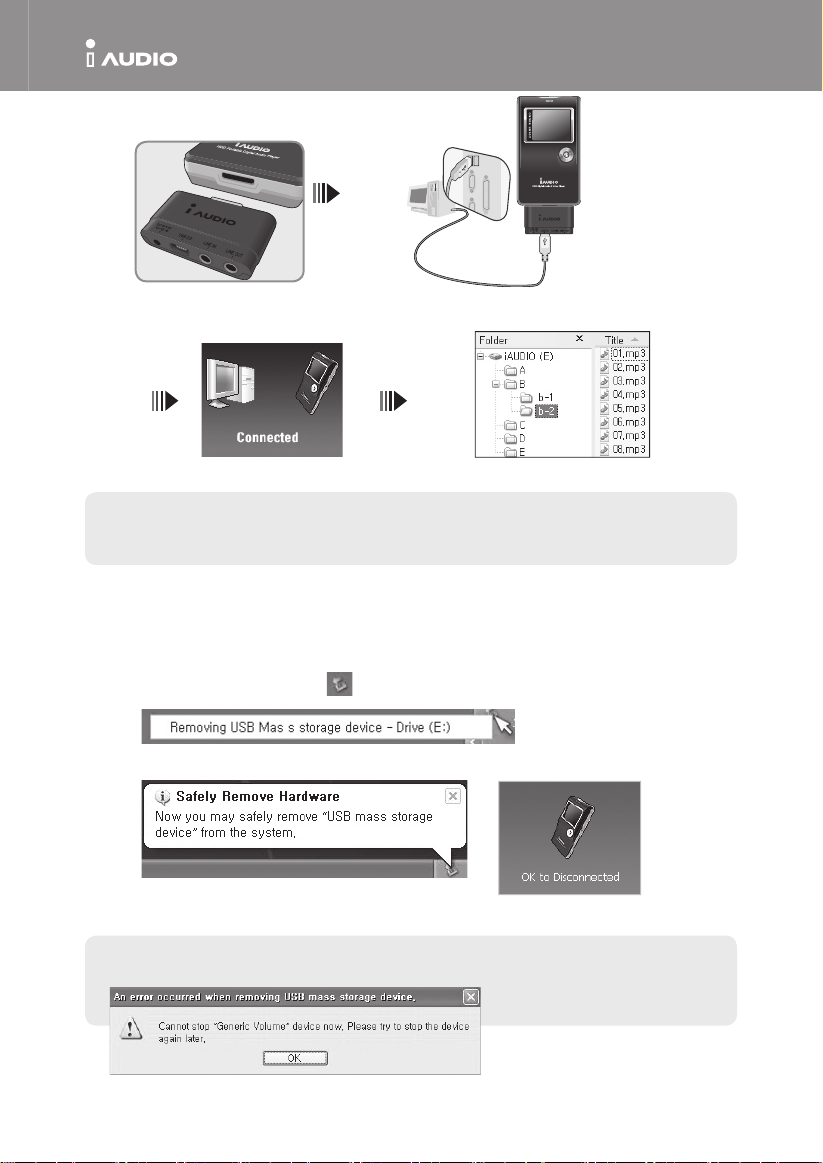
X5
iAUDIO X5
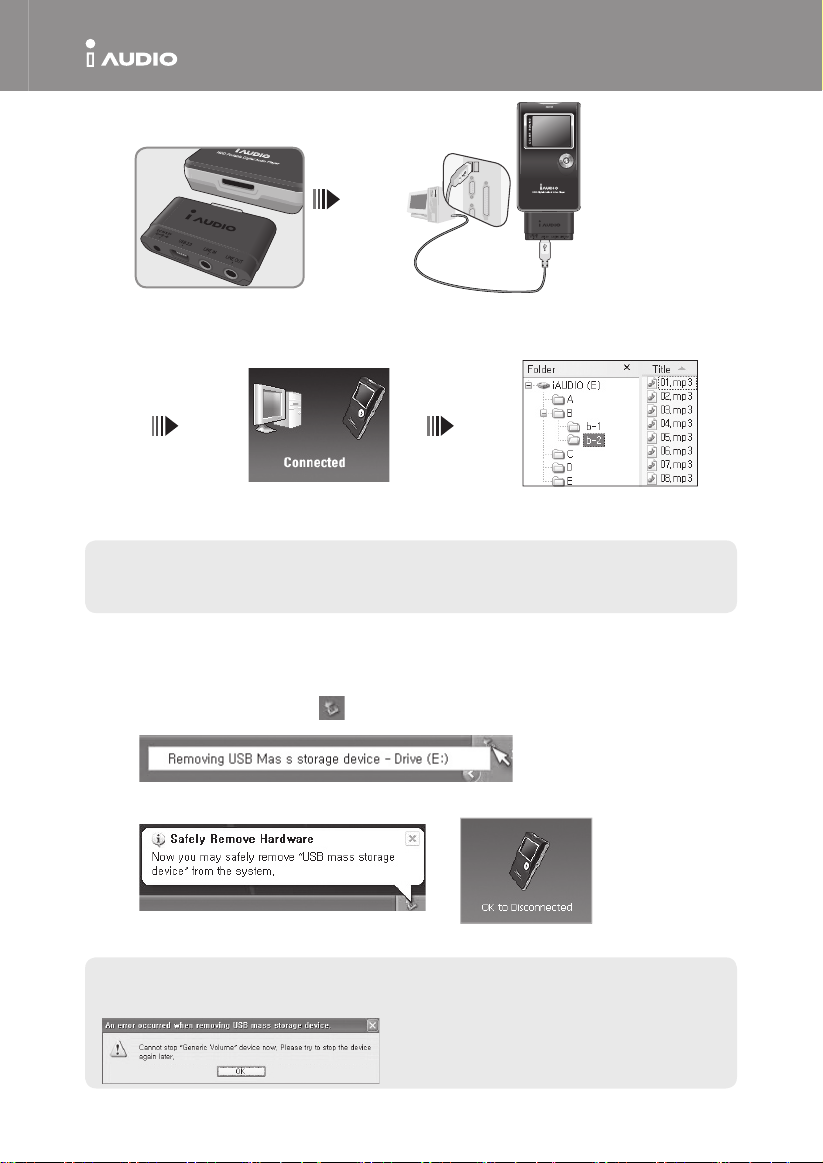
Connecting to a PC
1. Connect the subpack to the bottom
of the iAUDIO X5 main unit.
- A separate driver installation process is needed for Windows 98, and 98 SE.
- For driver installation process, please refer to 5. additional description on page 5.
- The maximum folder number and file number this product can recognize is 2,000 and 10,000 respectively.
2. Connect the USB 2.0 terminal of the
subpack to the PC using the USB cable
provided.
3. If the connection is correct, the
following figure appears on LCD.
4. You may confirm the newly
added drive with a Windows search.
Saving Files and Disconnecting
1. Open Windows search while the iAUDIO X5 is connected to your PC.
2. Save audio files, graphic files, encoded files and other files to be used in iAUDIO X5 to the drive.
3. After saving the files, click the icon in the PC tray.
4. Click the following popup message when it appears.
5. The“Safely remove hardware”window appears. At the same time, the following picture appears
on the iAUDIO X5 LCD.
6. Click the OK button and then disconnect the USB cable.
- This product uses a hard disk and must confirm the safe removal of hardware before disconnecting.
- If the following message appears, it does not mean product failure. You may execute safe hardware removal after
a few moments.
Page 4
Please refer to the manual shipped with the product for instructions on how to use iAUDIO X5 correctly.
- A CD with product number is included in the package.
- Please visit the iAUDIO home page (http://www.iaudio.c0m) to become a member. When you register
the product by entering the product number and the serial number from the back of the product,
you will be registered as a formal member and will receive benefits as a formal member.
- For more information please refer to the manual.
XXXX-XXXX-XXX
- The Product Number will not be reissued when lost. It is composed of 16 digits in English letters and numbers.
- The Product Number is different from the serial number on the back of the product.
Page 5
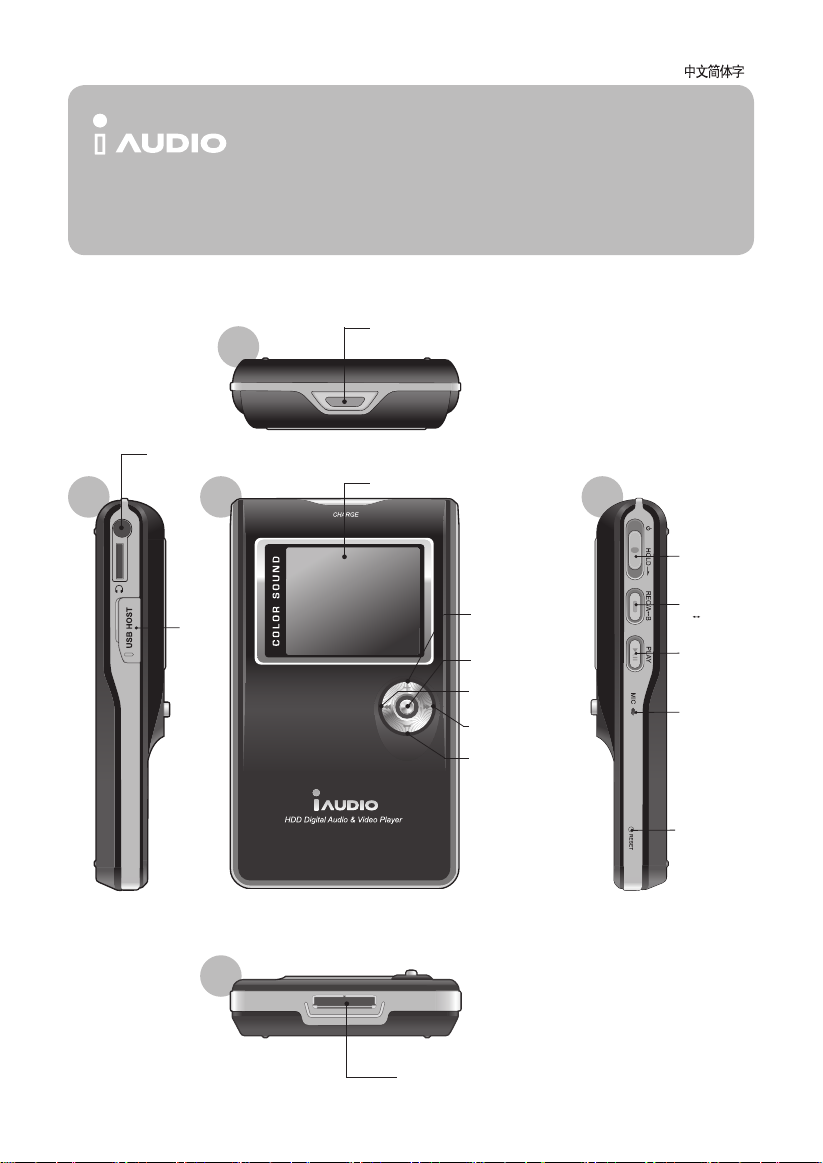
部件名称
X5
快速安装指南
用于 Windows 98SE/ME/2000/XP
Mac OS 10.x
耳机 插孔
USB
顶部
充电指示器
显示屏
+(VOL+)
提高音量、向上移动光标、
提高设置值
(菜单/导航)
操纵杆
进入菜单/导航
◀◀ (后退)
上一首歌曲,后退
▶▶ (快进)
下一首歌曲,快进
-(VOL-)
降低音量、向下移动光标、降
低设置值
右侧 正面左侧
电源 /
“保持”开关
录制
/A B 按钮
“播放”按钮
麦克风
重置
底部
连接器
Page 6
X5
iAUDIO X5
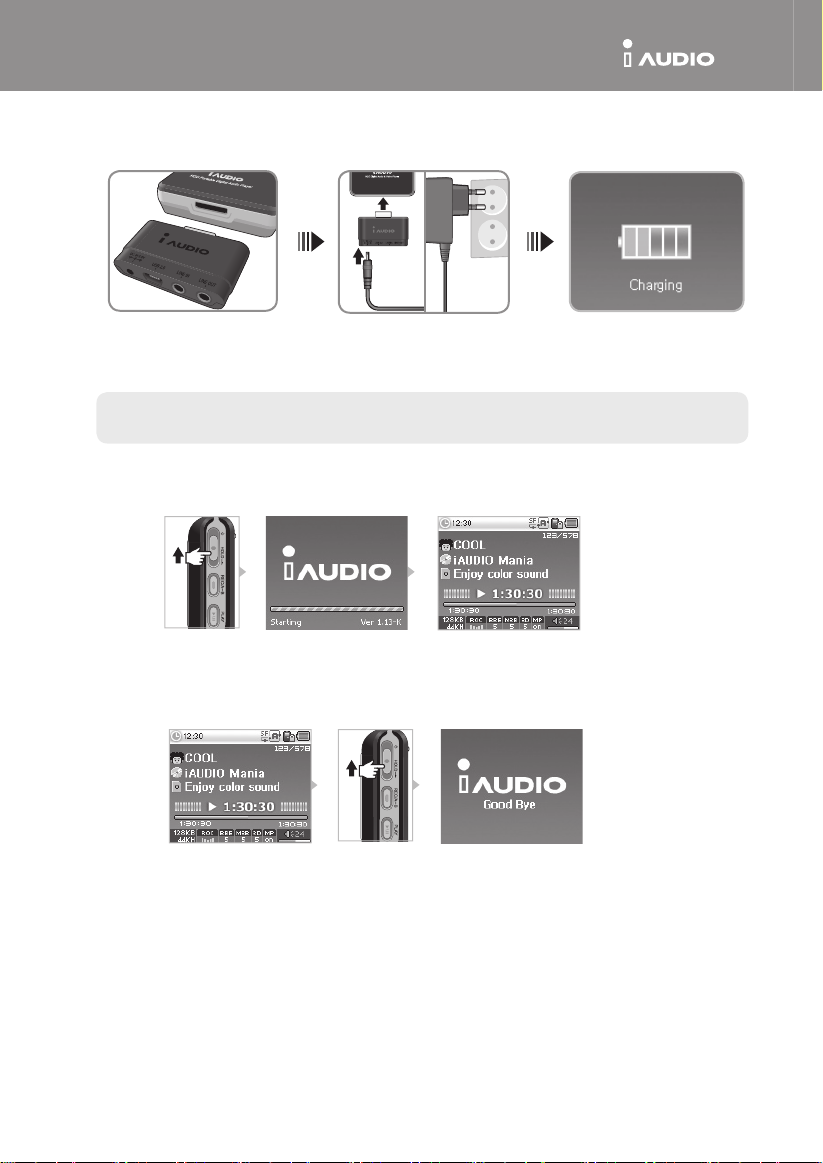
连接电源和充电
1. 将子套件连接到 iAUDIO X5 主
装置的底部。
- 第一次使用装置前或长期存储后,您必须使用 AC 适配器为设备充分充电。
-
基于安全理由,您必须仅使用所提供的 AC 适配器。
2. 将 AC 适配器连接到电源插座和子
套件的 DC 端子。
3. 连接一旦完成,电源将会自动输入
装置和开始充电。
打开电源 将电源开关向上推 1-2 秒后电源就会打开。
打开电源 • 将电源开关向下推 1-2 秒后电源就会关闭。
• 将电源开关稍微向上推时 LCD 将会关闭,但电源将保持打开。将电源开关稍微向上推时 CD 将会打开。
Page 7
X5
iAUDIO X5
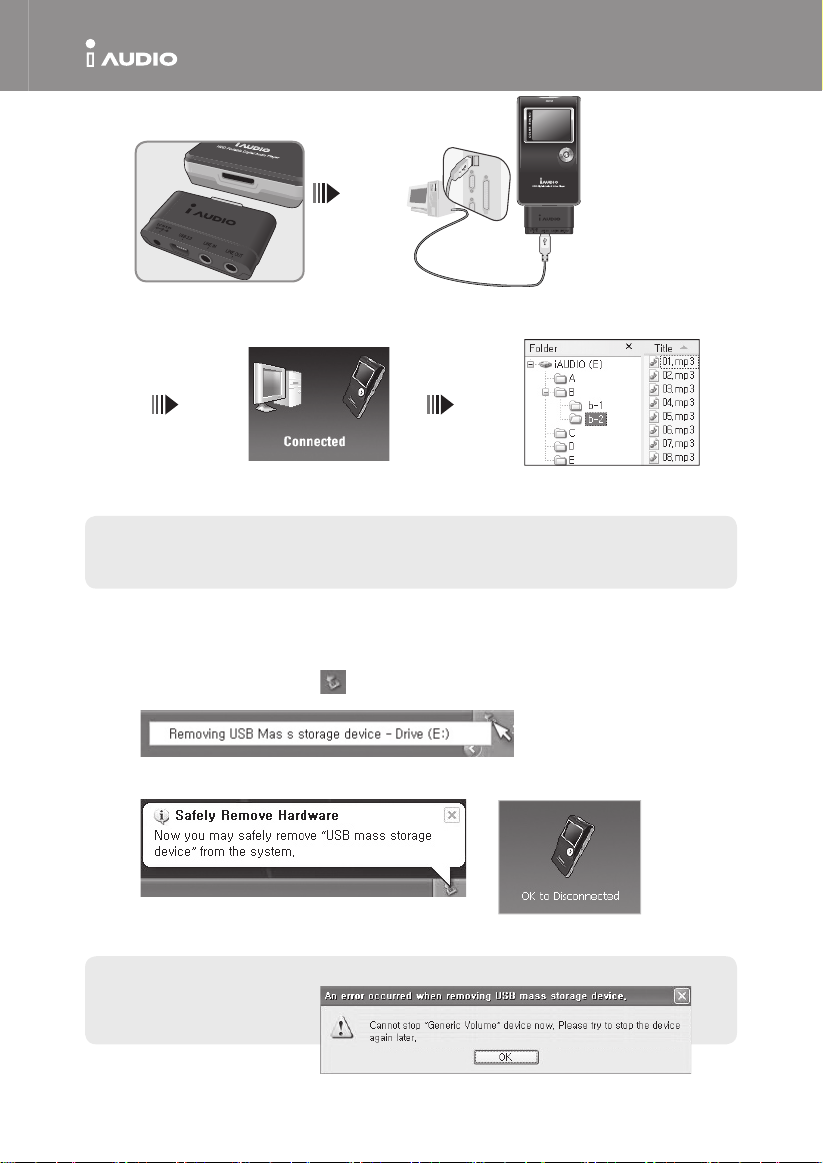
连接到计算机
1. 将子套件连接到 iAUDIO X5 主装置的底部。 2. 使用所提供的 USB 电缆将子套件的
USB 2.0 端子连接到计算机。
3. 如果连接正确,以上图片将会显
示在 LCD 上。
- Windows 98 和 98 SE 需要个别的驱动程序安装程序。
- 有关驱动程序的安装程序,请参阅第 5 页的 5. 附加说明。
- 本产品可识别的最多文件夹数目和文件数目分别为 2,000 个和 10,000 个。
您可以使用 Windows 搜索功能来
4.
确认新添加的驱动器。
保存文件和断开计算机连接
1. 将 iAUDIO X5 连接到计算机后,打开 Windows 搜索。
2. 将要在 iAUDIO X5 中使用的音频文件、图形文件、编码的文件和其他文件保存到驱动器上。
3. 保存文件后,单击计算机托盘中的 图标。
4. 当下列弹出式信息出现时,单击它。
5. “安全取下硬件”窗口将会显示。与此同时,以下图片也会显示在 iAUDIO X5 LCD 上。
6. 单击“OK”(确定)按钮然后拔下 USB 电缆。
- 本产品使用硬盘,因此必须在断开连接前遵循安全取下硬件的说明。
- 如果出现以下信息,并不表示产品有故障。
您可以在稍等片刻后执行安全取下硬件步骤。
Page 8

有关如何正确使用 iAUDIO X5 的说明,请参阅产品随附的手册。
- 包装箱内随附标有产品编号的 CD。
- 要成为会员,请拜访 iAUDIO 首页 (http://www.iAUDIO.com)。当您通过输入产品编号和产品背面
的序列号以注册产品时,您将会注册成为正式会员,并且将会获得身为正式会员的利益。
- 有关详细信息,请参阅手册。
序列号 XXXX-XXXX-XXX
- 产品编号若遗失将不会获得补发。它由包含英文字母和数字的 16 位数组成。
- 产品编号和产品背面的序列号不一样。
Page 9
部件名稱
快速安裝指南
用於 Windows 98SE/ME/2000/XP
Mac OS 10.x
耳機 插孔
USB
頂部
充電指示器
顯示螢幕
+(VOL+)
提高音量、向上移動游標、
提高設定值
(功能表/導航)
操作桿
進入功能表/導航器
◀◀ (後退)
上一首歌曲,後退
▶▶ (快進)
下一首歌曲,快進
-(VOL-)
降低音量、向下移動游標、降
低設定值
右側 正面左側
電源 /
「保持」切換器
錄製
/A B 按鈕
「播放」按鈕
麥克風
重設
底部
連接器
Page 10

X5
iAUDIO X5
連接電源和充電
1. 將子套件連接到 iAUDIO X5 主
裝置的底部。
- 第一次使用裝置前或長期儲存後,您必須使用 AC 配接器為裝置充分充電。
-
為了安全起見,您必須僅使用所提供的 AC 配接器。
開啟電源
將電源開關向上推 1-2 秒之後電源按便會開啟。
2. 將 AC 配接器連接到電源插座和子
套件的 DC 終端。
3. 連接完成之後,電源將會自動輸入
裝置和開始充電。
關閉電源
• 將電源開關向下推 1-2 秒後電源便會關閉。
• 將電源開關稍微向上推時 LCD 將會關閉,但電源將保持開啟。將電源開關稍微向上推時 CD 將會開啟。
Page 11
X5
iAUDIO X5
連接到電腦
1. 將子套件連接到 iAUDIO X5 主裝置的底部。 2. 使用所提供的 USB 連接線將子套件的 USB 2.0 終端連接到電腦。
- Windows 98 和 98 SE 需要個別的驅動程式安裝操作。
- 如需有關驅動程式的安裝操作,請參閱第 5 頁的 5. 附加指示。
- 本產品可識別的最多資料夾數量和檔案數量分別為 2,000 個和 10,000 個。
儲存檔案和中斷電腦連接
1. 將 iAUDIO X5 連接到電腦之後,開啟 Windows 搜尋。
2. 將要在 iAUDIO X5 中使用的聲訊檔案、圖形檔案、編碼的檔案和其他檔案儲存到磁碟機上。
3. 儲存檔案之後,按一下電腦託盤中的 圖示。
4. 出現下列快顯訊息時按一下該訊息。
3. 如果連接正確,以上圖片將會顯示在 LCD 上。 4. 您可以使用 Windows 搜尋功能來確認新增的磁碟機。
5. 「安全取下硬體」視窗將會顯示。與此同時,以下圖片也會顯示在 iAUDIO X5 LCD 上。
6. 按一下「OK」(確定)按鈕然後拔下 USB 連接線。
- 本產品使用硬碟,因此必須在中斷連接前遵循安全取下硬體的指示。
- 如果出現以下訊息,並不表示產品有故障。您可以在稍等片刻之後執行安全取下硬體步驟。
Page 12

如需有關如何正確使用 iAUDIO X5 的指示,請參閱產品隨附的手冊。
- 包裝箱內隨附標有產品編號的 CD。
- 要成為會員,請瀏覽 iAUDIO 主頁 (http://www.iAUDIO.com)。透過輸入產品編號和產品背面的
序號註冊產品時,您將會註冊成為正式會員,並且將會獲得身為正式會員的利益。
- 有關詳情,請參閱手冊。
序號 XXXX-XXXX-XXX
-
產品編號若遺失將不會獲得補發。它由包含英文字母和數字的 16 位數組成。
-
產品編號和產品背面的序號不一樣。
Page 13

Page 14

Page 15

Page 16

 Loading...