

Page 1

Bria Professional 2.3 for Windows
User Guide
www.counterpath.com
Page 2

CounterPath Corporation
CounterPath Corporation
Suite 300, One Bentall Centre
505 Burrard Street, Box 95
Vancouver, BC V7X 1M3
Tel: 604.320.3344
sales@counterpath.com www.counterpath.com
© June 2008 CounterPath Corporation. All rights reserved.
Windows is a registered trademark of Microsoft Corporation in the United States and other countries.
This document contains information proprietary to CounterPath Corporation, and shall not be used for
engineering, design, procurement, or manufacture, in whole or in part, without the consent of CounterPath
Corporation.
CounterPath and the logo are trademarks of CounterPath Corporation.
The content of this publication is intended to demonstrate typical uses and capabilities of the CounterPath Bria
Professional 2.3 softphone application from CounterPath Corporation. Users of this material must determine for
themselves whether the information contained herein applies to a particular IP-based networking system.
CounterPath makes no warranty regarding the content of this docu ment, including—but not limit ed to—implied
warranties of fitness for any particular purpose.
In no case will CounterPath or persons invo lved in th e pr oduct ion of th is do cumente d ma teria l be lia ble for any
incidental, indirect or otherwise consequential damage or loss that may result after the use of this publication.
This manual corresponds to Bria Professional version 2.3.
Page 3

Content s
Introduction...................................................................................................................................1
Installation and Setup....................................................................................................................3
Getting Ready .........................................................................................................................3
Starting Bria Professional.......................................................................................................4
Configuring Bria Professional ................................................................................................4
Setting up a Contact List.........................................................................................................5
Using Bria Professional ................................................................................................................7
Starting Bria Professional.......................................................................................................7
Shutting Down........................................................................................................................7
The Onscreen Softphone.........................................................................................................8
Placing a Call..........................................................................................................................11
Handling an Incoming Call.....................................................................................................15
Handling an Established Call..................................................................................................16
Transfering a Call ...................................................................................................................17
Video.......................................................................................................................................19
Voicemail................................................................................................................................20
Conference Calls.....................................................................................................................21
Instant Messaging ...................................................................................................................25
Sending and Receiving Files...................................................................................................28
Email.......................................................................................................................................30
The Deskbar............................................................................................................................30
The Address Book ........................................................................................................................31
Contacts Tab ...........................................................................................................................31
History Tab .............................................................................................................................37
Availability .............................................................................................................................38
Privacy ....................................................................................................................................43
LDAP Directory Tab ..............................................................................................................45
Configuring Bria Professional ......................................................................................................47
Configuring your Profile.........................................................................................................47
Configuring Preferences .........................................................................................................48
Configuring Accounts.............................................................................................................58
A Application Hot Keys ...............................................................................................................59
B Contact List Headings...............................................................................................................60
C Location of Files .......................................................................................................................61
D Other Ways to Run Bria Professional.......................................................................................62
E Glossary.....................................................................................................................................63
i
Page 4

CounterPath Corporation
ii
Page 5

Bria Professional 2.3 for Windows User Guide
1 Introduction
Bria Professional is CounterPath’s softphone designed specifically for business an d enterprise u sers. It includ es
the features that are standard to Bria—the ability to make VoIP phone calls, to send and receive instant
messages, to share presence (availability) information, and to exchange files. Bria Professional adds to those
features the ability to auto-answer incoming calls and support for LDAP.
A system administrator in an enterprise can provision the application remotely (with or without DHCP), and
automatically install the .msi package across an enterprise.
Standard Telephone Features
The CounterPath Bria Professional has all standard enterprise telephone features, including:
• Call display and Message Waiting Indicator (MWI).
• Speakerphone and Mute.
• Redial, Hold, Do Not Disturb.
• Call history – list of received, missed, and dialed calls.u
• Call transfer.
• Call record.
• Auto answer.
• Six-party audio conferencing.
• Three-party video conferencing.
Enhanced Features and Functions
The CounterPath Bria Professional also supports the following features and functions:
• Instant messaging and presence using the SIMPLE protocol or the XMPP protocol.
• Managed contact list – importing and exporting contacts between Bria Professional and other applications.
• File transfer via an XMPP account.
• File transfer via content indirection (by sending the files to a file transfer server for “pick up ” by the othe r
party).
• Support for LDAP.
• Automatic detection and configuration of audio and vid eo dev ices.
• Acoustic echo cancellation, automatic gain control, voice activity detection.
• Support for the following audio codecs:
AMR Wideband (G.722.2), Broadvoice-32, Broadvoice-32 FEC, DVI4, DVI4 Wideband, G.711aLaw,
G.711uLaw, G.723, G.726, G.729, GSM, iLBC, L16 PCM Wideband, Speex , Speex FEC, Speex Wideband,
Speex Wideband FEC.
• Support for the following video codecs:
H.263, H.263+ 1998, H.264.
1
Page 6

CounterPath Corporation
• Automatic selection of the best codec based on the other party ’s capability, the available bandwidth, and
network conditions. Bria Professional switches the codec within a call in response to changing network
conditions.
• SIP compliance to 3261 SIP standard.
• XMPP compliance as follows:
• RFC 3920
• RFC 3921
Supported extensions:
•XEP-0004
•XEP-0016
•XEP-0022
•XEP-0077
•XEP-0085
•XEP-0092
•XEP-0115
• STUN and ICE NAT traversal. XTunnels for firewall traversal.
• Support for DTMF (RFC 2833, inband DTMF or SIP INFO messages).
• Support for languages.
2
Page 7

Bria Professional 2.3 for Windows User Guide
2 Installation and Setup
2.1 Getting Ready
Multimedia Device Requirements
Bria Professional requires both speakers and a microphone to make calls. Any of the following configurations
are acceptable:
• External speakers and microphone
• Built-in speakers and microphone
• Dual-jack multimedia headset
• Bluetooth® multimedia headset
• USB multimedia headset
• USB phone.
Optimized Devices
Bria Professional is optimized to work with the following:
• Actiontec Internet Phone Wizard
• GN Netcom GN 8120 USB and GN Netcom 8110 USBXP
• Plantronics CS50-USB Wireless Office Headset System
• Polycom® Communicator C100S Wideband USB Speakerphone
• TigerJet RJ11 to USB Phone Adaptor (incorporating the Tiger560C)
• TigerJet USB Phone Set (incorporating the Tiger560C)
• Yealink USB-P1K USB hand phone
Video Cameras
Calls made with Bria Professional will work without a v ideo camera, but one is necessary to all ow other p arties
to see your image. Bria Professional will work with most USB video cameras.
3
Page 8
CounterPath Corporation
2.2 Starting Bria Professional
If Bria Professional is not already running, start it as you would any other program: Use the Windows
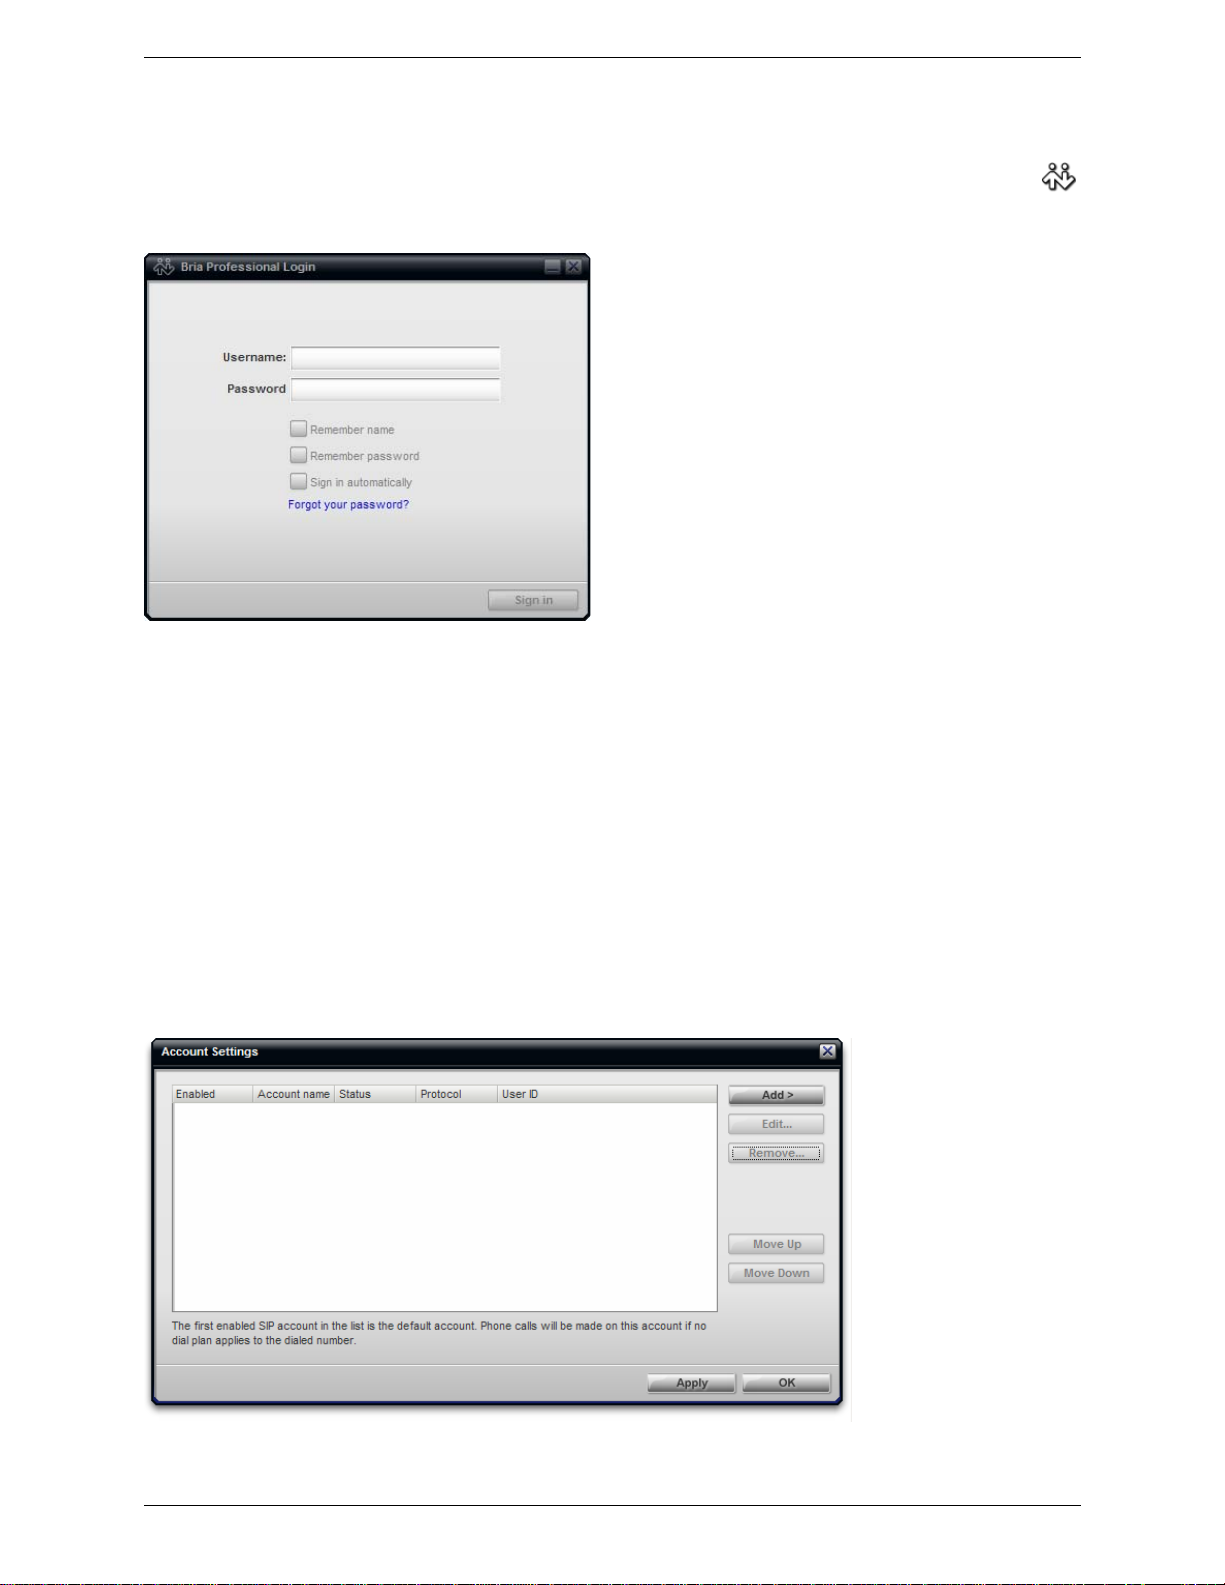
Start menu or d ouble-click the desktop icon. Either the Log in window or the softphone itself appears. If
the login window appears, enter the credentials provided by your system adminstrator.
2.3 Configuring Bria Professional
Read this section if your system administrator advises you that you must ei ther configure Bria Professional or
complete the configuration.
(If your administrator advises you that configuration is already done, go to “Setting up a Contact List” on
page 5.)
1. Choose File > Account Settings.
2. Create or modify accounts as instructed by your administrator. See the following pages for details. When
done, return to the Accoun t Settings wind ow and click Apply to register t he accounts . Click Close when the
Status column is “Ready”.
4
Page 9

Bria Professional 2.3 for Windows User Guide
2.4 Setting up a Contact List
Typically, you will want to create contacts in order to easily make phone calls, send IMs and transfer files. You
can set up contacts in several ways:
• During a call that you place or receive, you can add the other party to your contact list. See “Handling an
Established Call” on page 16.
• You can add addresses to the Contact list one by one. See “Adding a Contact” on page 32.
• You can import a contact list from a file or from another application. See “Importing Contacts” on page 34.
• You can create a contact from an entry in the LDAP directory; see “LDAP Directory Tab” on page 45.
For general information on contacts, see “Contacts Tab” on page 31.
5
Page 10

CounterPath Corporation
6
Page 11
Bria Professional 2.3 for Windows User Guide
3 Using Bria Professional
3.1 Starting Bria Professional
If Bria Professional is not already running, start it as you would any other program: Use the Windows
Start menu or double-click the desktop icon. Bria Professional appears.
Receiving a Presence Request
If availability is enabled, then at any time you may get a Presence Request dialog box. For information on this
request, see “Availability” on page 38.
3.2 Shutting Down
To shut down Bria Professional, choose File > Exit, or press Ctrl-Q. Note that clicking the X Close icon on the
softphone minimizes Bria Professional to the system tray; it does not exit.
7
Page 12

CounterPath Corporation
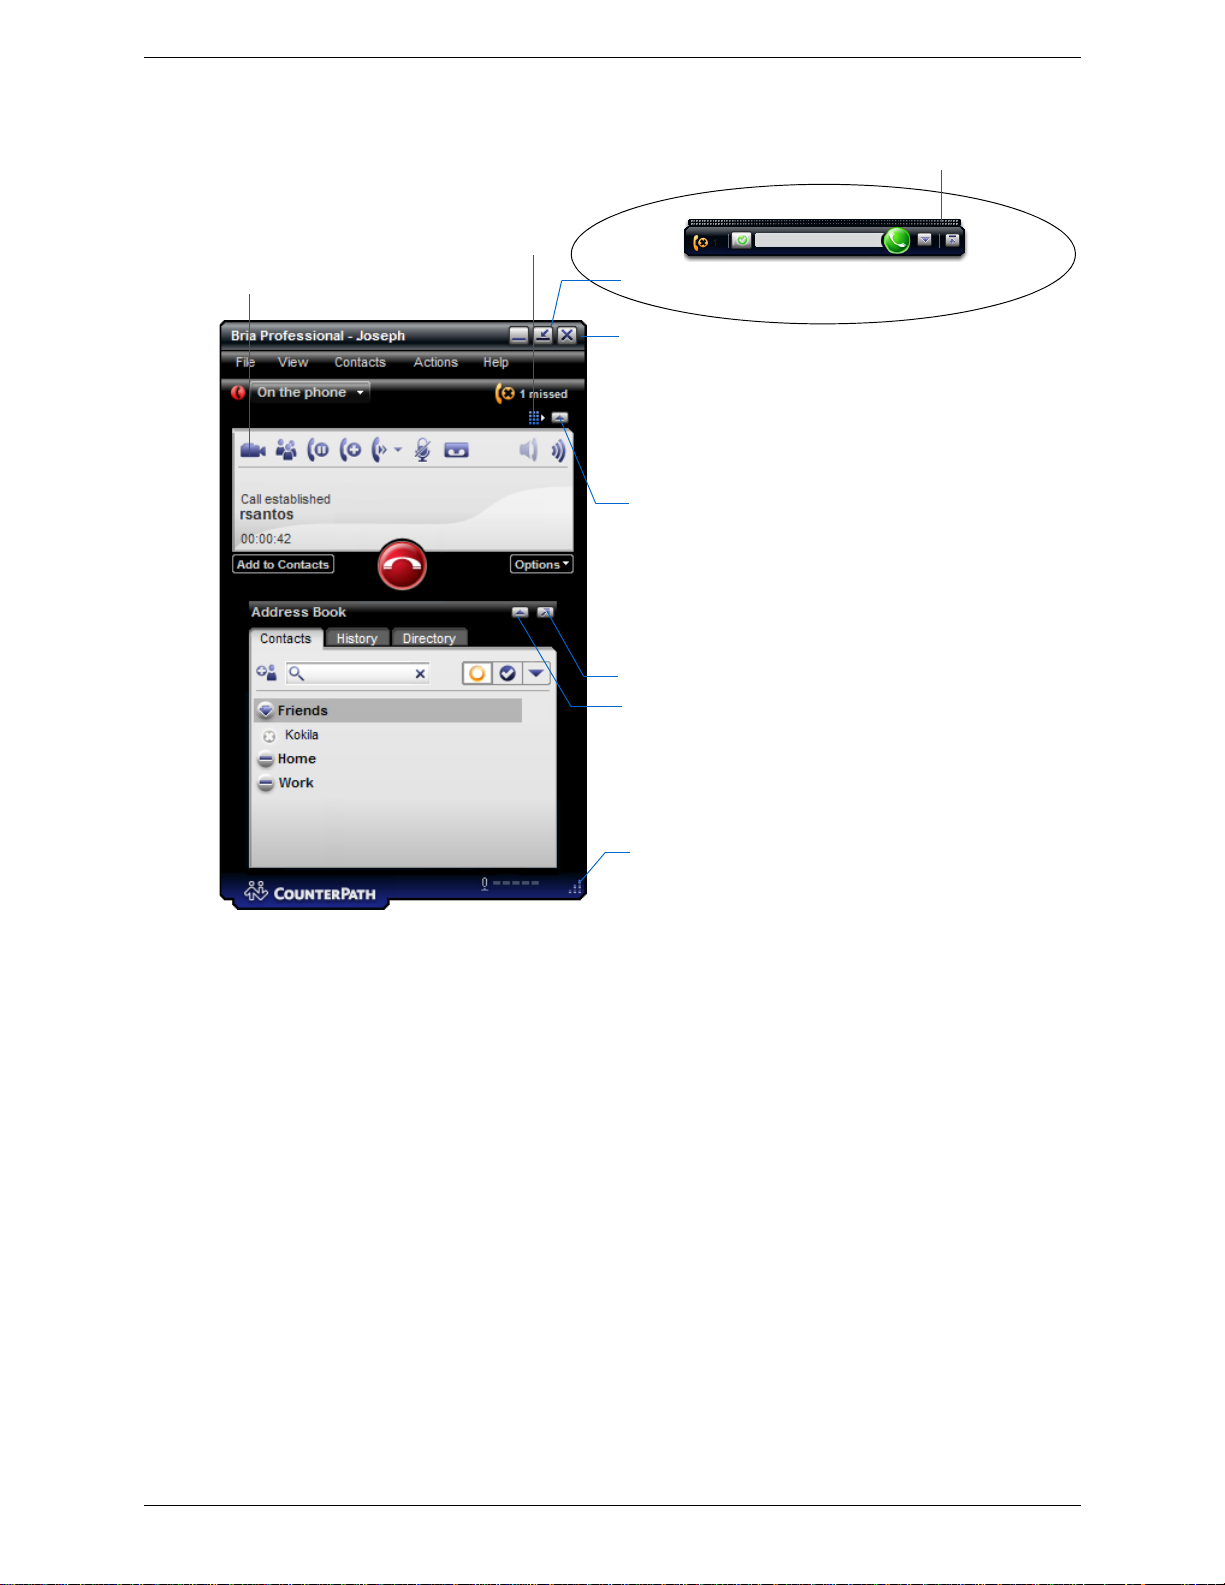
Call panel.
See page 11.
Bria Professional
menu. See below.
Address Book panel.
See page 31.
3.3 The Onscreen Softphone
The Bria Professional Menu
File
• My Profile. See page 47.
• Preferences. These settings control the way that you work with Bria Professional and apply to all accounts.
See page 48.
• Account Settings. You will work with these settings only if advised to do so by your system administrator.
See “Configuring Bria Professional” on page 4.
• Sign Out. To log off and minimize Bria Professional to the system tray. If you click the Bria Professional
icon in the status bar, the Login screen appears.This menu item does not appear if you have configured Bria
Professional for no login (page 57).
• Exit. To shut down Bria Professional. You can also exit by pressing Ctrl-Q.
View
• Change the GUI. See “Showing and Hiding Parts of the Softphone” on page 10.
8
Page 13

Bria Professional 2.3 for Windows User Guide
Contacts
Lets you work with contacts. Everything in this menu except for import and export can also be performed
directly in the Address Book panel.
For information on these actions, including import and export, see page 31.
For information on managing blocked contacts, see “Privacy” on page 43.
Actions
Lists the actions that you can perform, depending on the current “state” of Bria Professional. For example, if a
contact is selected, it lists all the actions that can be performed on that contact.
Help
Provides access to various service-related features.
9
Page 14
CounterPath Corporation
Show/hide Video panel
Show/hide Dial pad
Display as Deskbar. See page 30
Close Call panel (only Call entry field will
remain). Click again to open.
Show/hide Address Book
Move Address Book to a separate window
Drag to resize
Restore to large view
Close to System Tray
Showing and Hiding Parts of the Softphone
You can still receive calls when Bria Professional is hidden or minimized.
If you exit when Bria Professional is minimized or in Deskbar mode; Bria Professional will start next time as
minimized or in Deskbar mode.
10
Page 15
Bria Professional 2.3 for Windows User Guide
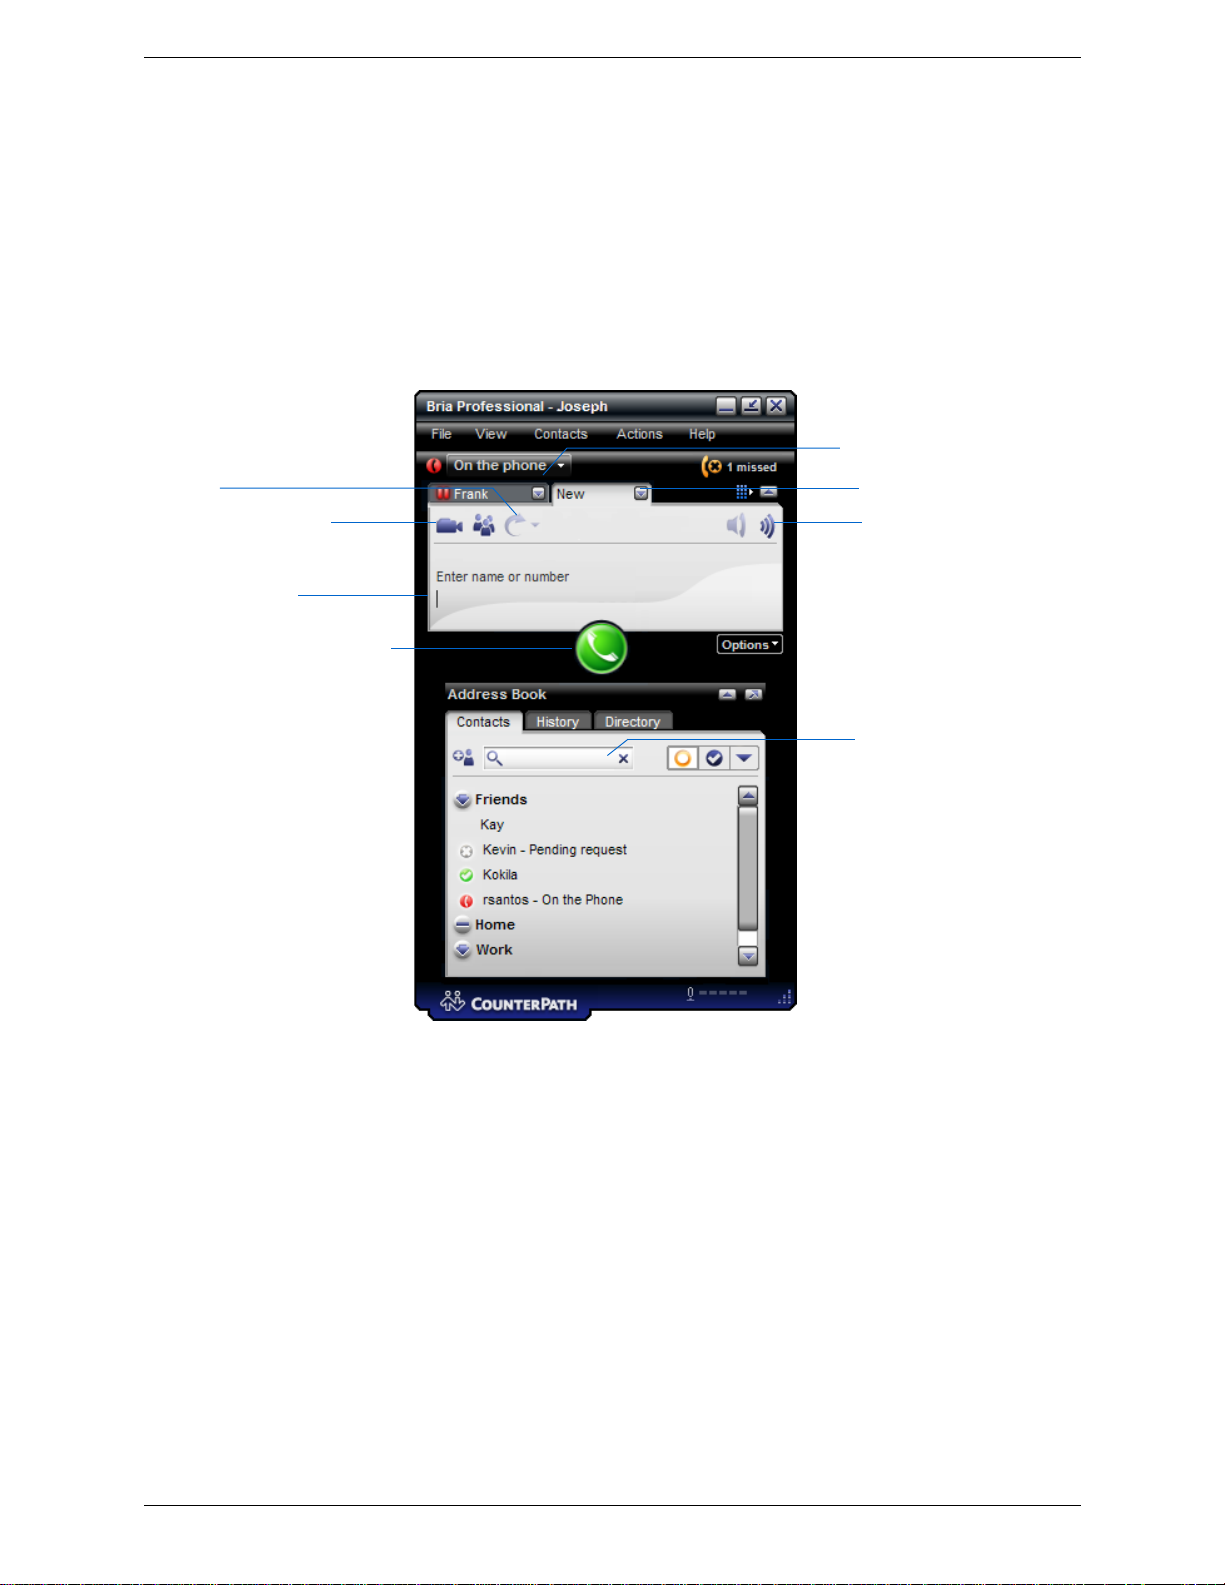
Redial
Call entry field
Click a button to place the call. If
the Video panel was open, a Video
Call button would also appear
here.
Current Calls bar
Call toolbar
Other calls are on hold
Filter
Open/close Video panel
3.4 Placing a Call
You can contact someone using:
• A softphone address (for example, kpereira@domainA.com)
• A traditional phone number.
You can place a call when another call is already in progress. There is no limit to the number of calls you can
make, although eventually the quality of audio and video will degrade because of limitations on the computer.
We recommend no more than six concurrent calls.
1. If you have a camera on your computer, decide how you want to handle video for this call:
• The Video panel must be open if you want to send your video immediately. When the Video panel is
2. Place the call. See the table below.
opened, the Video button appears on the Call panel.
(You always have the option of starting the call without video and then adding it later).
• The Video panel can be opened or closed if you do not want to send video.
The new call is added to the Current Calls bar. You will hear a ringing tone while Bria Professional attempts
to make a connection.
3. Once the new call is established, switch between different calls by clicking the tab in the Current Calls bar.
11
Page 16

CounterPath Corporation
How From the... Description
Keying Dialpad or computer
keyboard
Drag-and-drop contact or
previous call
Right-click a contact or
previous call
Contacts or History tab in the
Address Book panel
Contacts or History tab in the
Address Book panel
Double-click a contact Contacts in the Address Book
panel
1. If another call is currently in progress, click on the Call toolbar.
A new Call Entry area appears. The current call is put on hold.
2. Enter the softphone address or number in the Call entry field using
the dialpad or the computer keyboard.
For the name, you can enter the entire softphone address
(kpereira@domain.com) or just the name (kpereira).
As you type, a suggestion for completing the entry may appear.
Choose the suggestion or keep typing.
3. To make an audio call, click the green Call button or press Enter.
Even if the Video panel is open, an audio call will be placed.
4. Or to make a video call, open the Video panel and press Video Call.
Drag an entry from the Contacts or History tab. The call is placed
immediately . (I f the t ab contains lots of contacts, first use the field
to filter the list.)
• If the video panel is closed, an audio call is placed.
• If the video panel is open, a video call is placed and your video will
be sent as soon as the other party answers.
Right-click an entry from the Contacts or History tab and choose Call or
Video Call. The call is placed immediately.
(If the tab contains lots of entries, first use the field to filter the
list.)
Contacts have a “double-click” action that either makes a phone call or
starts an IM. Each contact can be configured separately for this action.
See Tab le1 on page 32.
Double-click a previous
call
History tab in the Address
Book panel
Double-click an entry. The call is placed.
Redial Redial button Click Options and choose Redial. Or click the Redial button.
The call is placed immediately (without video, even if the Video panel
is open).
Right-click an LDAP
entry
Directory tab in the Address
Book panel
If you have set up an LDAP directory (page 55), right-click an entry
from the Directory tab and choose Call or V ideo Call. The call is placed
immediately.
(If the tab contains lots of entries, first use the field to filter the
list.)
From Outlook If you have set up contacts in Microsoft® Outlook®, you can place a
call to a PSTN number (but not a softphone address).
1. Double-click the contact in the contact list in Outlook. The Contact
dialog box appears.
2. Click the in the top left corner and select the phone number to
dial. As soon as you release, Bria Professional will be brought to the
front (or will be started) and the call will be placed.
If you cannot make a call from Outlook, speak to your system
administrator; the account dial plans may need to be revised.
For information on how Bria Professional and Outlook contacts work
together, see “Exporting Contacts” on page 35.
12
Page 17
Bria Professional 2.3 for Windows User Guide
Start another Call
button
Placing another Call
To place a new call (without hanging up on the current call), click the Start another Call button. In the Current
Calls bar, a tab appears for each separate call.
Hiding your Identity
You can hide your identity on a call, so that the other person will not see your ID on their phone.
On the Call control bar , choo se Options > Hi de my Numb er for this Call. appears on the Call control bar for
this call. Place the call in the usual way.
You identity is hidden only for this call.
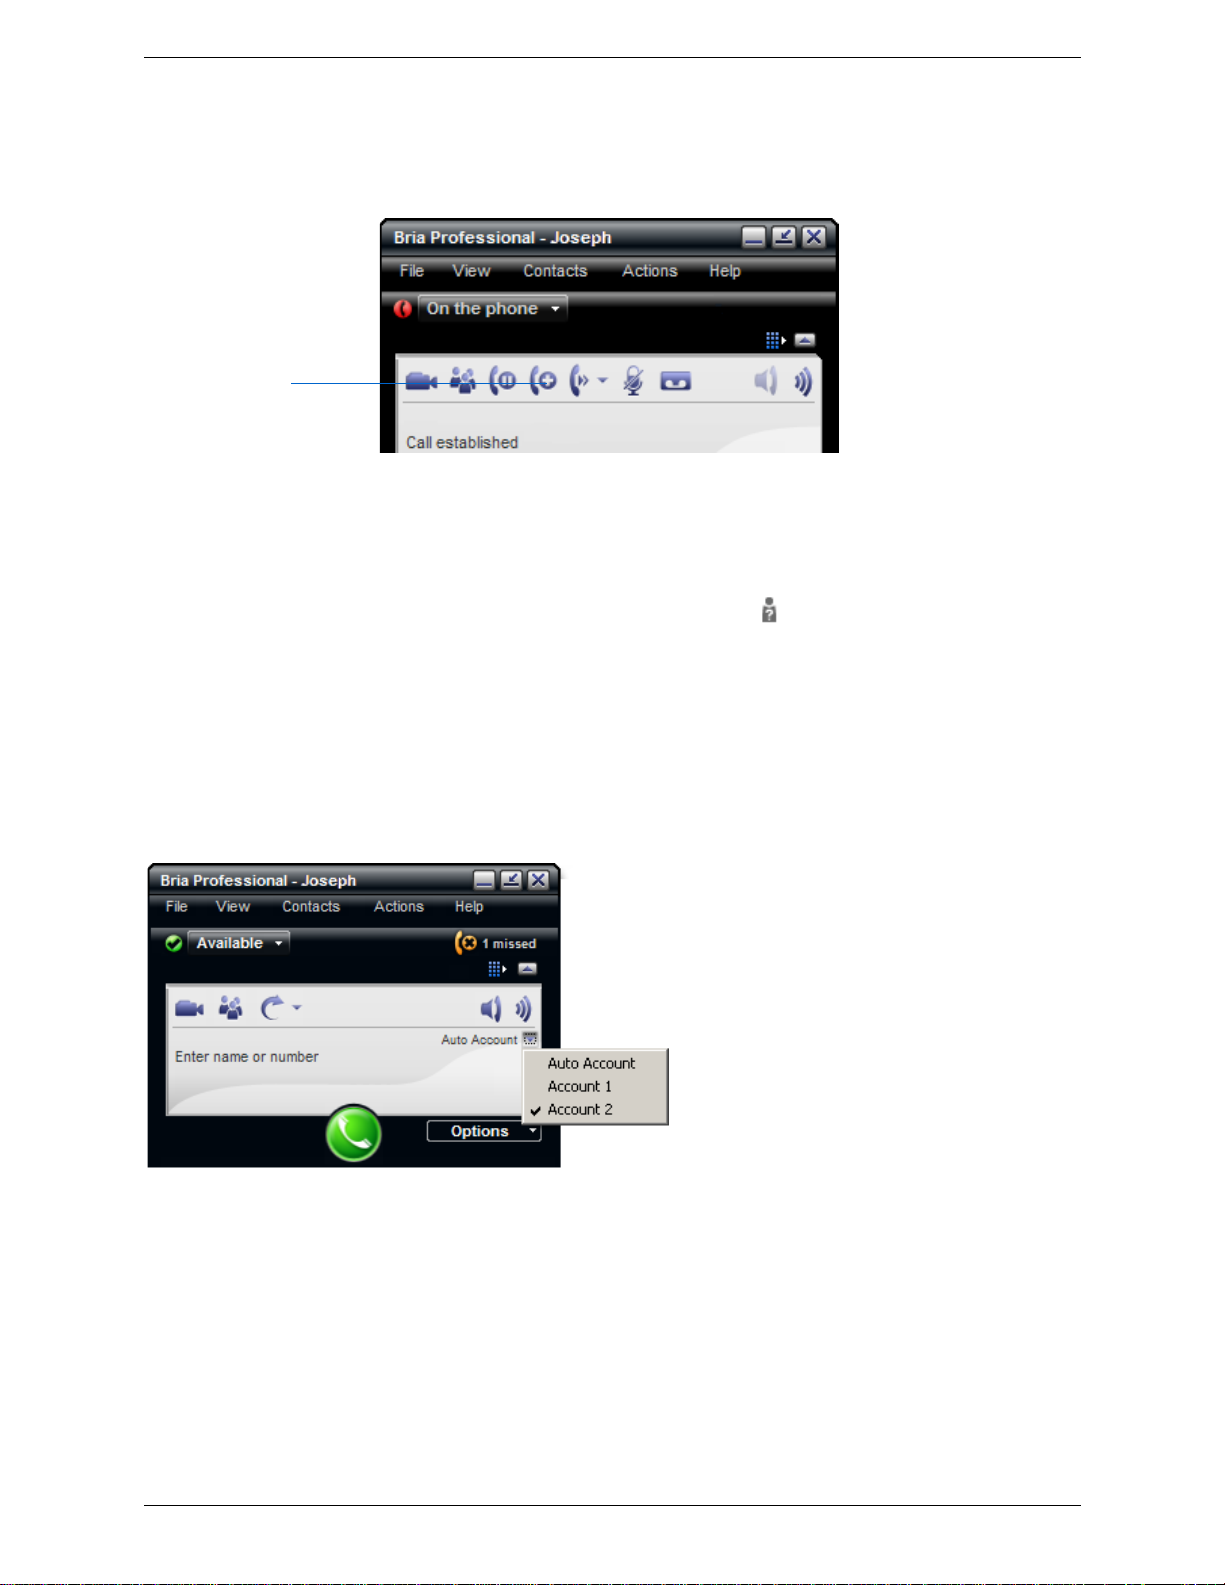
Which Account Is Used?
When placing an outgoing call, you can explicitly speci fy the acco unt to use for that call. Click the Account
Selection menu and select the desired account.
Once the call is placed, this menu always reverts back to “Auto”.
If You Do not Select an Account – Auto Account
If you have more than one account enabled and if you do not select the account, Bria Professional selects the
account to use to place the call as follows:
• If a dial plan exists for any account, Bria Professional runs through the di al pl ans to determine if the dialed
number matches any of these plans. If a match is found, the account that the dial plan belongs to is used.
Your system administrator will have already set up suitable dial plans.
13
Page 18

CounterPath Corporation
• If there is no match on any dial plans or if no dial plans are defined, then the default account is used. The
default account is the account listed first in the Account Settings window (page 58).
Ending a Call
Click End on the Call panel. Details of the call remain on the Call display. To clear the details of the call from
the display, click Clear.
14
Page 19
Bria Professional 2.3 for Windows User Guide
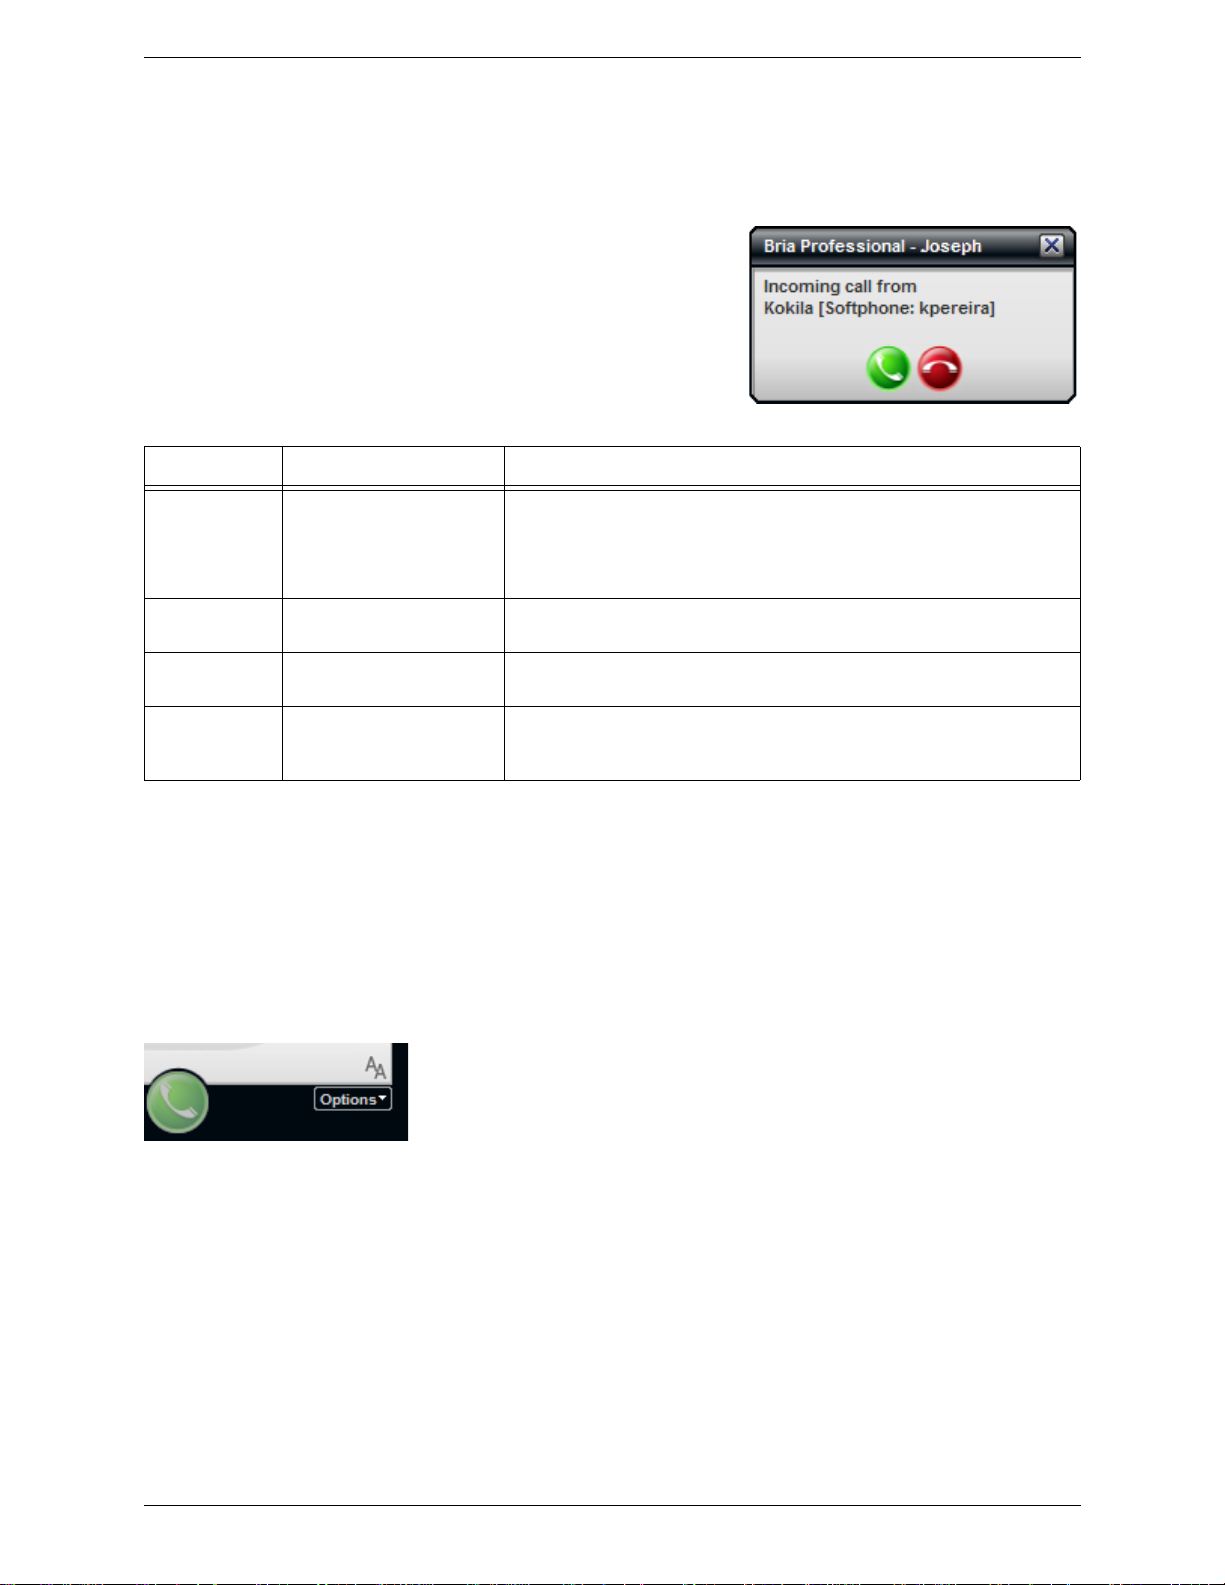
3.5 Handling an Incoming Call
Bria Professional must be running to answer incoming calls. (If Bria Professional is not running, incoming calls
may be directed to voicemail; check with your system administrator.)
Bria Professional rings and information about the incoming call
appears in the Call entry field. In addition, th e Call Ale rt bo x appears,
even if Bria Professional is minimized. For information on call alerts,
see “Preferences – Alerts & Sounds” on page 49.
The softphone address of the person calling you is displayed. The
display name may also appear.
Action From the... Description
Answer Call panel or Call Alert box Click Answer.
If you are on another call, that first call is automatically put on hold. You are
now talking to the new caller.
Or press Enter (on the keyboard), if Bria Professional is the active application.
Decline Call panel or Call Alert box Click Decline. There will be a busy signal. In some networks, the call will be
directed to voicemail (if you have this service).
Permanently
block the caller
Answer with IM Options menu Click Options and choose Answer with Instant Message. The phone call is
Options menu Click the Options button and choose Block this person.
declined, and instead an Instant Message window appears. Type the message
and click Send. (Or close the window if you change your mind.)
Ending a Call
Click End on the Call panel. Details of the call remain o n the Ca ll disp lay. To clear the Call display, click Clear.
Auto Answer
To turn auto answer off and on, in the Call panel choose Options > Auto Answer. The AA icon appears in the
LCD.
Auto answer is initially configured to auto-answer after one ring, and to send only your audio when the call is
established. You can change this configuration; see “Preferences – Advanced” on page 57.
Auto answer is automatically turned off when you shut down or log off.
15
Page 20
CounterPath Corporation
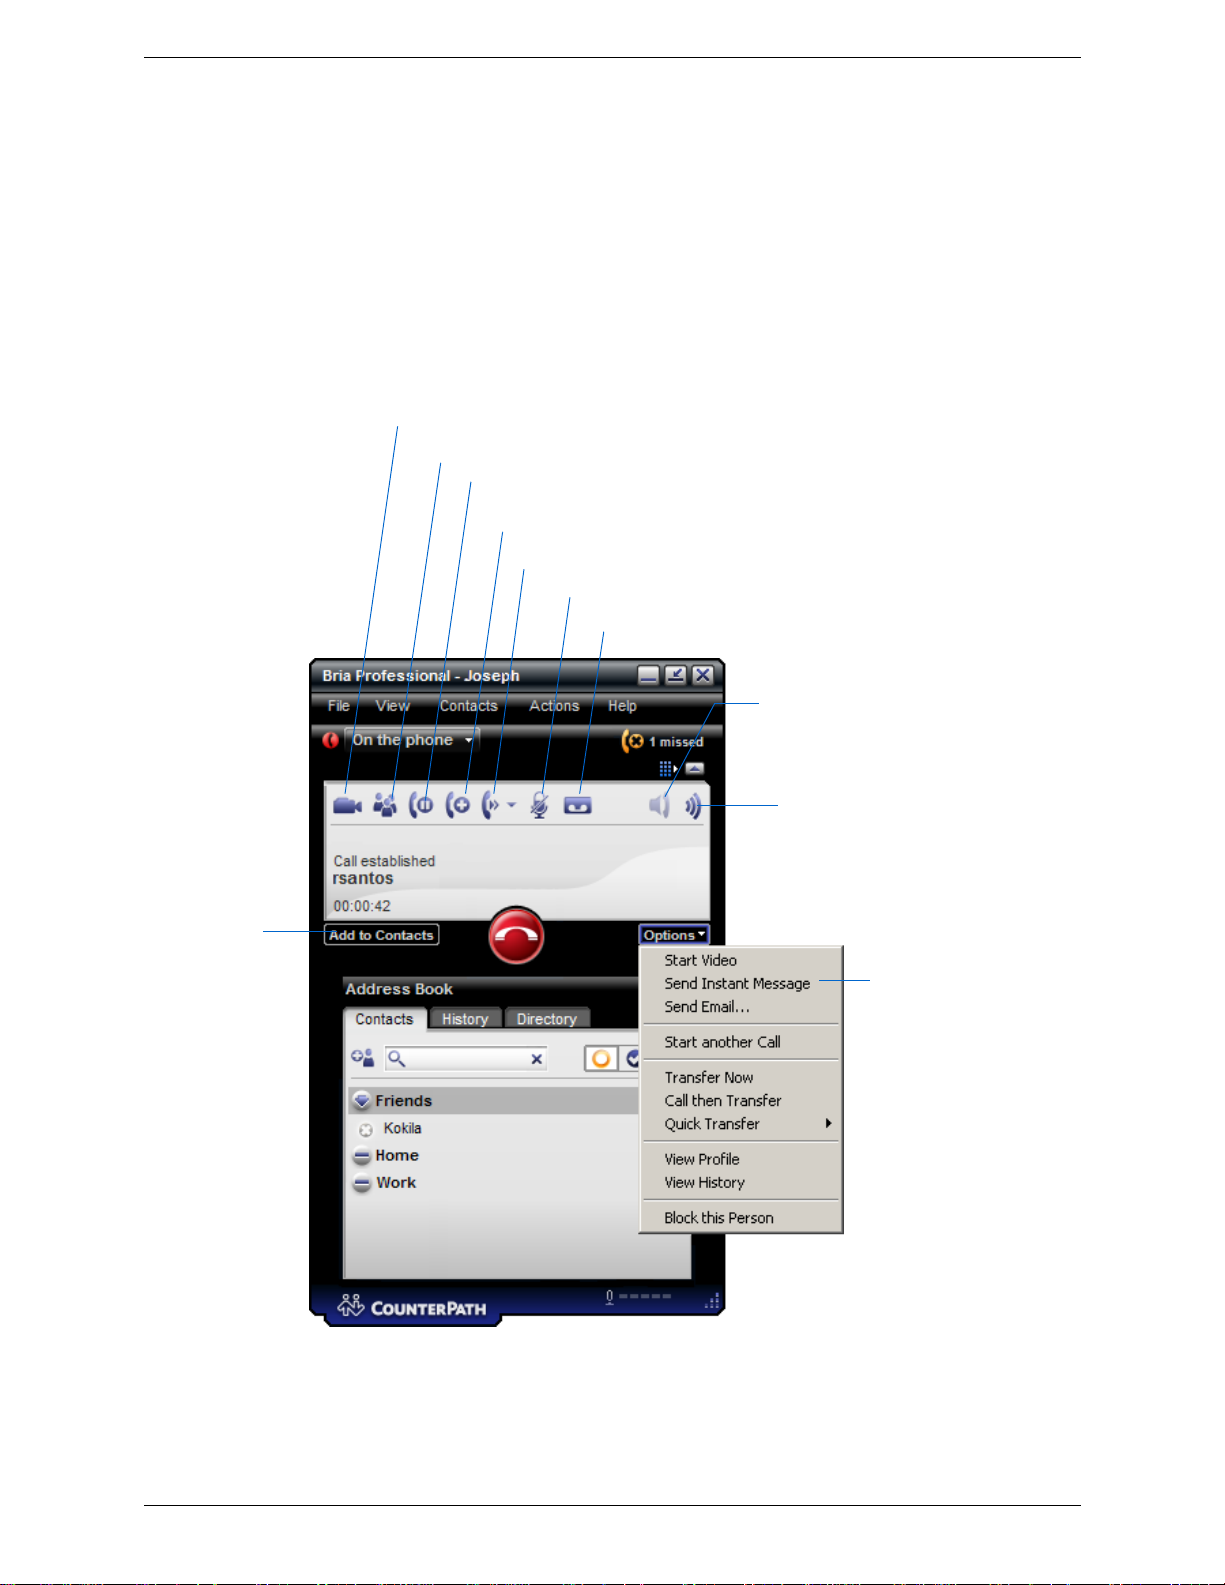
Show/hide video panel. See page 19
Speakerphone (this button only
appears if your computer has a
speakerphone)
Hold
Mute
Volume control
You can do any of these
even with the call in
progress. Many of these
actions are also buttons on
the Call toolbar.
Quick transfer. See page 17
Place another call (this one will automatically be
put on hold). See page 13
Conference call. See page 21
Record on/off
Add the current
caller as a contact.
See “Adding a
Contact using an
Existing Address” on
page 33.
3.6 Handling an Established Call
While the call is in progress you can:
• Control the audio: use the speakerphone, mute the call, control volume.
• Record the call.
• Put the call on hold.
• Add the caller as a contact.
• Transfer the call. See the next page.
• Add video. Pause and resume video when video is already present. See “Video” on page 19
16
Page 21
Bria Professional 2.3 for Windows User Guide
Quick Transfer
3.7 Transfering a Call
Quick Transfer
You can set up a list of phone numbers that calls can be transferred to. Then during a call, you can transfer to
any of these numbers by selecting from a list.
To set up the n umbers:
1. Choose File > Preferences from the menu. Display the Transfer panel.
2. Enter as many numbers as you want. To enter a new number, click in an empty line. To remove an entry,
click in the line and delete the number.
Set one of the numbers as the default and click OK.
To transfer a call, click the arrow on the Transfer button and click the number to transfer to. As soon as the
transfer is made (the other phone starts ringing), the call is disconnected at your end.
Basic (Unattended) Transfer – Transfer this Call
You can transfer a call to any number, then hang up as soon as you have entered the number.
1. Click Options > Transfer this Call. The LCD prompts for the number to transfer to.
2. Call the target (the person you are transfering the call to) by keying the number.
3. Click Transfer; the message Transfer Successful appears.
Or click Cancel to continue the current call.
17
Page 22

CounterPath Corporation
Attended Tr ansfer – Call then Transfer
You can first speak to the target (the person you are transfering the call to), then click Transfer to complete the
transfer.
1. Click Options > Call then Transfer. The first call is put on hold and a New call tab appears
2. Call the target in any of the normal ways.
3. When you are ready, click Transfer; the message Transfer Successful appears.
If the target does not want to take the call, simply end the call with that person. The first call is taken off hold.
18
Page 23

Bria Professional 2.3 for Windows User Guide
Show/hide video
panel
Control video from the Call panel
or the Video panel
This button only appears
when video panel is open
3.8 Video
Adding Video
Either you or the other party can add video at any time.
T o add video, open the V ideo panel and click Start My V ideo. When you add video, the other party may (or may
not) start sending their video to you.
You can add video, even if you do not have a camera, in order to start receiving the other party’s video.
Other Party Adds Video
If the other party starts their video, the Video panel automatically opens and the video is played. You can start
sending your own video, if desired (and assuming you have a camera) by clicking Start My Video.
Pausing and Resuming Video
If the Video panel is open and video exists in a call, the Start My Video and Stop My Video buttons appear, to
let you pause and resume video.
If you close the V ideo p anel, your video will stop being sent; you can reopen th e panel and click Start M y Video
again.
19
Page 24

CounterPath Corporation
Voicemail icon
3.9 Voicemail
If your service includes voicemail, then when you have voicemail messages, the word “new” appears beside the
voicemail icon at the top of the phone. Click the icon to automatically connect to voicemail and listen to your
messages.
20
Page 25

Bria Professional 2.3 for Windows User Guide
Conference icon Enter phone number for new participant
3.10 Conference Calls
Starting a Conference Call
You can create a conference call starting from one existing call:
1. Click the Conference icon. Bria Professional enters “conference mode” and “Call a conference participant”
appears on the LCD.
2. Place the second call in one of these ways:
• Right-click on a contact and choose Add to Conference Call.
• Type a name or number.
(Or to cancel the call, click the Cancel button.)
When the second callee answers, the call will automatically be added to the conference.
Or you can start a conference call using all the existing, separate calls:
1. Establish the calls. The calls can be incoming or outgoing, and one or more calls can include video.
2. Click Conference All.
21
Page 26

CounterPath Corporation
Conference is now established
Click for actions for this participant
Managing the Conference
Adding More Participants
You can add more participants to an existing conference in any of these ways:
• Right-click on a contact and choose Add to Conference Call.
• From the tab that contains the conference, click the Conference icon. Place a call by typing a name or
number. When the callee answers, the call will automatically be added to the conference.
• Place a separate outgoing call in the normal way (by clicking the New Call icon to display a new tab).
When the call is established, click Conference All. All existing separate calls will be brought into the
existing conference.
• Accept one or more incoming calls. A separate call will be established for each call. Click Conference All.
All existing separate calls will be brought into the existing conference.
Whenever you click Conference All, all current established calls are conferenced together; you cannot keep
any one call out of the conference.
Send an IM
Click the down arrow beside a participant name and choose Send Instant Message.
Removing a Participant
To remove one call from the conference, click the down arrow beside a participant name and choose Separate
Call from Conference. The call becomes a separate call.
Disbanding the Conference
To break the conference into separate calls, click Options > Disband Conference.
To hang up on everyone, click the End bu tton.
22
Page 27

Bria Professional 2.3 for Windows User Guide
Suspending the Conference
To suspend the conference, click the Hold button.
Audio Controls
Adjusting Volume. Use the speaker adjustment to adjust volume of the sound you are hearing.
Mute. Click on the dialpad to prevent the other parties from hearing you. The icon appears on the Call
display. When you mute, you may also want to stop video feed, if any.
Speakerphone. Click on the dial pad to put the callers on the speaker phone. The icon appears on the
Call display.
Video Conference Calls
Starting a Conference with Video
To start a conference with video, make sure that both the existing calls are video calls. Then click the
Conference button.
Adding Video to an Existing Conference Call
Choose Options > Start Group Video. Your video starts immediately.
Or open the Video panel and click Start my Video.
When you add video, the other party may (or may not) st art sending the ir video to you. You can add video, even
if you do not have a camera, in order to start receiving the other party’s video.
How Video Is Shared
When you conference two calls together, video continues as it was before the conference call. For example, if
you were sharing video with one party, and only sending your video to another party, then that is how the video
will be handled when the conference call is created.
23
Page 28

CounterPath Corporation
The conference host, serves as the “funnel” for other video. Whatever the conference host is receiving will
automatically be sent to the other parties.
Controlling Video
Once video has been added, it can be paused, resumed and stopped in the same way as on a regular conference
call, by the initiator of the individual “leg” of the conference call.
The conference host does not have special contro l over the vid eo, and can on ly add video o n legs for whic h they
were the initiator.
However, if the conference host pauses or stops video, other participants will no longer receive video, because
the host is the video “funnel” as described above.
24
Page 29

Bria Professional 2.3 for Windows User Guide
A separate tab for each IM conversation.
The active conversation appears in bold.
If a message comes in on a hidden tab, the tab flashes.
Click the button to close one conversation.
Click to perform one of these actions
for the active conversation.
Message input area
3.11 Instant Messaging
Instant messages are made using softphone address. Therefore, you can send or receive an instant message (IM)
to:
• Any contact who has a softphone address.
• Any party who phoned you from a softphone address.
• Any party whom you phoned using a softphone address.
You may also be able to use an instant message to send files to another party. See page 28.
Sending an IM
1. There are several ways to select the person to send an IM to.
From the Contacts tab in the
Address Book
An active phone call The person in the active phone call. Choose Options > Send Instant Message.
A person on hold In the Current Calls bar, click the arrow next to this call and choose Options >
From the History tab in the
Address Book
Right-click on the contact and choose Send Instant Message. The contact must
have a softphone address.
Send Instant Message.
Right-click on the entry and choose Send Instant Message.
The Instant Message window appears. Or if another Instant Message session exists , a new tab i s created for
this IM session.
2. Type the message. Include emoticons and formatting, as desired.
T o insert a return in the message, press Ctrl-Enter. (You can control the behavior of Enter and of Ctrl-Ente r;
see “Preferences – Application” on page 48.)
3. Press Send or Enter.
You can press Ctrl-F to search for text in the large message area.
25
Page 30

CounterPath Corporation
Receiving an IM
When an IM is received, either the IM window or a Call Alert pops up. (To control which window appears, see
see “Preferences – Application” on page 48.)
If the IM window is already displayed with an IM session with another person, the message from t he new
person appears in another tab in that window. (You can set up Bria Professional so that each person has their
own IM window; see “Preferences – Application” on page 48.)
Receiving a File as Part of an IM
The other person may be able to send you files within the IM. The file will appear as a hyperlink. Click on the
hyperlink to open a Browse for Folder that lets you specify where to save the file.
When the file has been successfully retrieved, a prompt will appear to let you open the file immediately.
Receiving a File outside an IM Session
Another person may send a file to you with out first startin g an IM session. In this case, the Call Ale rt shows the
name of the file being sent. Click on the link to open an IM window and download the file as described above.
26
Page 31

Bria Professional 2.3 for Windows User Guide
Shows the display names of all the selected contacts and
the individual display names of all the contacts in any
selected groups. Contacts that do not have a softphone
address are not included in the list.
Sending a Broadcast IM
You can send an IM to several people at one time. A broadcast IM is not a conference IM.
• With a broadcast IM, each recipient can reply to the IM, but only you will see these replies; the other
recipients will not see these replies.
• With a conference IM, all parties see everyone’s messages and the messages each party sends are seen by
everyone. Conference IM is currently not supported.
1. Select the parties from the Contacts tab in one or more of the following ways:
• Select one or more contacts in the usual ways (using Shift-click or Ctrl-click).
• Select one or more groups in the usual way.
2. Right-click and choose Send Broadcast Instant Message. The Send Instant Message to Group window
appears.
3. Type the message. Include emoticons and formatting, as desired.
T o insert a return in the message, press Ctrl-Enter. (You can control the behavior of Enter and of Ctrl-Ente r;
see “Preferences – Application” on page 48.)
4. Press Send or Enter. The IM is sent and the window closes.
A recipient may send you a response, which will b e displ ayed t o you in a regu lar Instant Messa ge windo w;
you will then be in a regular IM with that one party.
You can press Ctrl-F to search for text in the large message area.
27
Page 32

CounterPath Corporation
3.12 Sending and Receiving Files
Sending Files
If your system administrator has set up your service for fi le transfer, you can send files to any contact who has a
SIP address. If you are not set up for file transfer, the Send a file command is not available.
1. Choose one of these actions:
• Right-click a contact and choose Send Files.
• From the instant message window, choose Send a File.
2. A standard Select Files to Send dialog box opens. Select the files to send and press Open.
If you want, you can cancel the send before the other person retrieves them.
Receiving Files
Receiving a File as Part of an IM
You can receive files from another party. You do not have to set up to receive files. In other words, to receive
files, you do not need a file transfer server at your end. See “Receiving a File as Part of an IM” on page 26.
28
Page 33

Bria Professional 2.3 for Windows User Guide
Receiving a File Independently of an IM
Another person may send you files outside of an IM. The following dialog appear s, to allow you to save the file.
29
Page 34

CounterPath Corporation
Deskbar button
Your availability
Switches between Call
button and End button
Menu changes depending on whether
there is an entry in the entry field
Entry field
Restore to main window
Missed calls
3.13 Email
You can send an email to one or more contacts, or to all the contacts in a group.
Select the contact, contacts or group, right-click and choose Send Email. An email window opens in your
default email application, with the “to” lin e populated with al l those contacts who h ave email addresses (in their
Contact Profiles).
3.14 The Deskbar
To display the softphone as a deskbar, click the Deskbar button.
The Deskbar provides a compact GUI for performing many Bria Professional actions. It is assumed that you
will work in this mode after you are quite familiar with Bria Professional and its features.
30
Page 35

Bria Professional 2.3 for Windows User Guide
Add a Contact
The availability of others. See page 38.
Display all contacts
Display only contacts who are set up for
Availability and who are currently online
Search field
4 The Address Book
The Address Book panel, which is divided into tabs, provides access to the following:
• Contacts.
• Call history, see page 37.
• Contact availability (presence), see page 38.
• LDAP directory, see page 45.
4.1 Contacts Tab
The Contacts tab displays your contacts and lets you specify multiple contact methods for them, including:
• Softphone address
• Home phone number, business phone number, cellphone number
• Fax number (this is provided for convenience; Bria Professional does not have any fax capability).
•Email
You can identify one of these contacts as the primary contact method.
Contacts are typically organized into groups. Bria Professional inc ludes built-in groups: “Friends”, “Home” and
“Work”. You can add more groups, as desired.
31
Page 36

CounterPath Corporation
This button is always displayed for
a new contact. It also appears
once you enter a new address for
an existing contact.
Setting up Contacts
Adding a Contact
Click , or right-click a group and choose Add Contact to Group. The Cont act Profile dialog box appears.
See the table on page 35.
Table 1: Contact Profile Fields
Field Description
Contact name Only the display name is required. This is the name that will appear in the Call display and the
Call Alert when this person phones you.
Group Either:
• Choose one group.
• Click More and select several groups. The new contact will be added to each group.
Ring tone Choose a ring tone for this contact, or use the preferred sound (which is defined in Preferences >
Alerts). Click the arrow to play the currently selected ring tone.
Contact Methods Enter as many contact methods as you want. Email and softphone entries must have the format
<name>@<domain>
Advanced The Advanced dialog appears, showing all the addresses for the contact. See below.
Double-click action Choose the desired method. This method will be used when you double-click this contact.
For example, if you choose “IM:kpereira@domainA.com”, then double-clicking this contact will
open an IM window using this address (rather than any of the other addresses that exist for this
contact).
Other fields Complete as desired.
32
Page 37

Bria Professional 2.3 for Windows User Guide
Contact Profile — Advanced Dialog
This dialog lets you fine tune the p resence sharin g information for this con tact and chan ge the acco unt that ea ch
address is associated with.
Presence Sharing
You can configure which accounts will be used for presence sharing: none, some or all.
• If you disable all items, this contact will not have an availability icon beside its name in the Contact list.
• If you enable at least one item, the availability icon will be gray; later its color will change to indicate the
current availability.
Associated Account
You can change the account that an address is associated with.
The associated account will be used for sending IMs and for sharing presence information. This means that the
associated account must be enabled in order to use the address for IM and presence sharing.
The associated account will not be used for placing phone calls; phone calls select the account using a different
rule; see “Which Account Is Used?” on page 13.
The associated account must be an enabled account of the correct protocol (a SIP account for an address in a
softphone slot, an XMPP account for an address in a Jabber sl ot). Bria Professiona l makes the initial association
by trying to match the domains. If that fails, it will selec t the first enabled acco unt of the appropriat e protocol. If
no appropriate account is enabled, the association will not be made (the Account will show as “Unavailable”).
Adding a Contact using an Existing Address
You can add a contact by capturing existing information:
• If you are on a phone call with a person who is not a contact, click the Add to Contacts in the call panel.
• If you are in an instant message session with a person who is not a contact, click the Add button.
• On the History tab, select an entry that is not a contact. Right-click and choose Add as Contact.
The Add a Contact dialog appears.
If the user portion of the address matches the user portion of an existing address, the Update option is
automatically selected. For example, if the address is kpereira@domainB.com and there is an existing contact
an address of kpereira@domainA.com. Otherwise, the Create option is automatically selected.
Take the appropriate action:
33
Page 38

CounterPath Corporation
• Create a new contact: Click Create. Change the display name, contact method, and group if desired. Click
OK.
• Update an existing contact. Click Update. Choose a different contact, if necessary. Change the contact
method and group, if desired. Click OK.
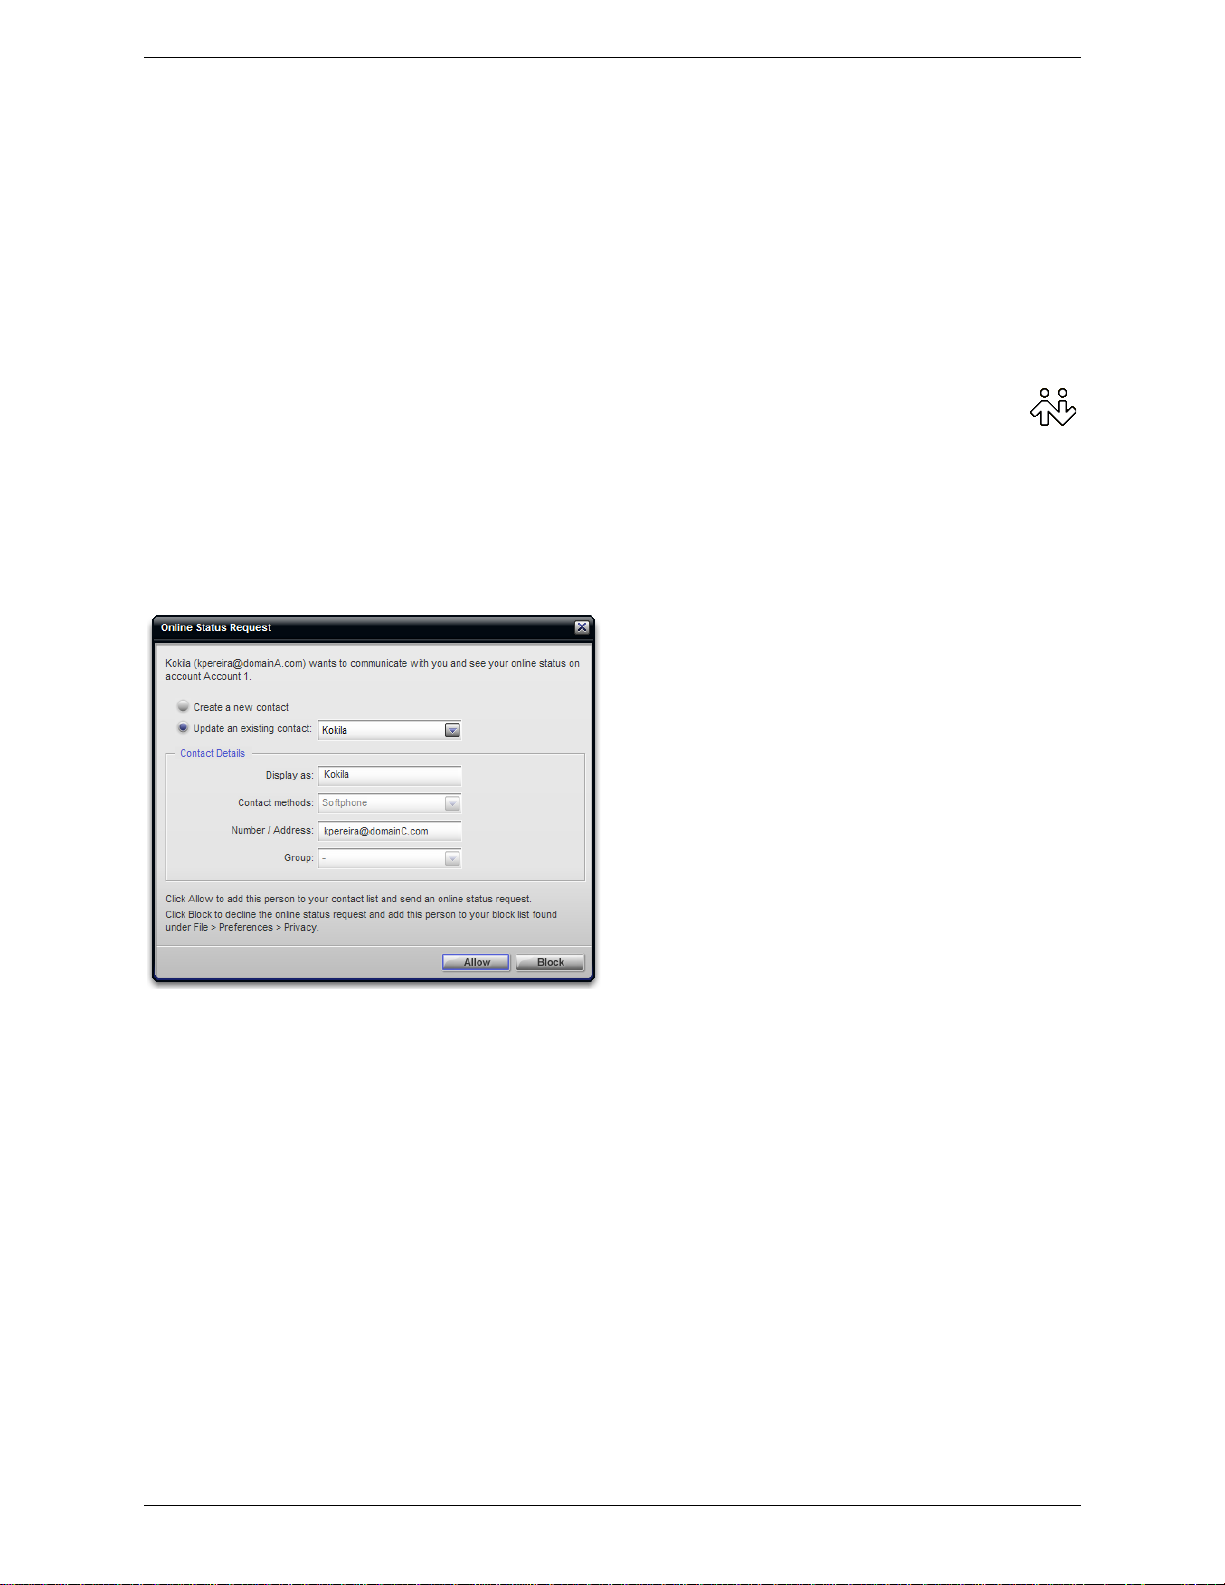
If the contact method is Softphone or Jabber, an online status request is sent to this person.
Importing Contacts
You can populate the Bria Professional contact list by importing from an external file or files. Your system
administrator may have placed a file on a server for you to impo rt. You can also import your own file or files, as
many as required. The new contacts will be added to the existing contacts.
You can import a contact list from:
• A comma-separated file. Use this method to import from a Microsoft® Excel® file. You will first have to
set up the file; see below.
• A Microsoft® Outlook® or Microsoft® Exchange contact list (a *. pst file).
• A vCard file (*.vcf file). A vCard is an electronic business card that is often attached to an email.
1. From the main menu, click the Contacts menu and choose Import Contacts. The Import Contacts wizard
starts.
2. As soon as you click Finish on the wizard, the Contacts tab in Bria Professional is updated to show the
imported entries. Note that none of the entries are set up with availability turned on; in order to view
availability of contacts, you must modify the appropriate entries by viewing the contact’s Profile and
clicking the Advance button. See “Contact Profile — Advanced Dialog” on page 33 for details.
Setting up an Excel File for Import
1. Remove any introductory text or headings from the top of the file. (You can keep text at the end of the file;
it will be ignored during the import.)
2. Insert a blank row as the first row, then insert the headings that Bria Pro f essional will use to interpret the
meaning of each column. The columns can be in any order. The most popular headings are:
• display-name
•entry_id
34
Page 39

Bria Professional 2.3 for Windows User Guide
•given_name
• surname
• postal_address.
For a complete list of headings, see “Contact List Headings” on page 60.
3. Save the file as *.csv.
External Storage of the Contact List
Each time Bria Professional is started, the contact list is retrieved from the external storage. Each time a contact
is added to the contact list, it is immediately copied to external storage.
The list is always stored on the local computer. In addition, if you have access to a remote storage server, you
can configure Bria Professional so that the contact list is also stored remotely using XCap or WebDAV.
To set up for remote storage, see “Preferences – Contact Storage” on page 55.
Exporting Contacts
You can export a contact list to a comma-separated file, a pst file or a vcf file.
1. From the main menu, click the Contacts menu and choose Export Contacts. The Export Contacts wizard
starts.
2. When you click Next, the export starts. The result is:
• For an Outlook export, the existing.pst file is updated to include the entries from the Bria Professional
contact list. If Outlook is open, the entries immediately appear in the contact list.
All information in the Bria Professional conta ct list is exported to Mic rosoft Outlook. On ly information
that can be displayed in Outlook actually appears in the Outlook Contacts window. Typically this
means that all softphone addresss are exported (and stored in custom fields) but not displayed in
Outlook.
• For other formats, a new file of the specified type is created.
Managing Contacts
Changing Contact Information
To change the information for a contact, right-click the contact and choose View Profile. The Contact Profile
dialog box appears, see page 32. Some of the changes you can make are:
• Change any contact details.
• Add, delete or change a contact method.
• Move a contact to another group by selecting a different group.
• Add an existing contact to more groups by selecting one or more extra groups.
• Display the Advanced dialog to enable or disable availability information for this contact; see “Contact
Profile — Advanced Dialog” on page 33.
Moving or Deleting a Contact
• To drag one or more contacts to a different group, select them and drag to the new group.
• T o de lete one or more con tacts, sel ect them, right-cli ck, and choose Delete. The contacts are removed from
this group.
35
Page 40

CounterPath Corporation
Click an icon to perform the action.
This contact is online on their
domainA account but offline on
their domainXMPP account
Adding, Deleting or Renaming Groups
Select any group, right-click, and choose the appropriate menu item.
You can only delete an empty group.
Using Contacts
Phone or IM the person • Double-click the contact to start a phone call or IM to the person
(depending on how double-clicking is configured in the contact’s
profile).
• Drag the contact to the Call display to start a phone call.
Phone the person Right-click and choose
Call, then click the desired number.
Send an IM Right-click and choose Instant Message.
Call a contact and include video Right-click the contact and choose Call with Video. The Video p anel o pens,
and the call is placed. As soon as the other party answers,
Bria Professional
starts sending your video.
Email a contact who has an
Right-click and choose Send Email.
email address
You can watch the contact’s
See Table 2 on page 41 for the meaning of the availability icons.
availability, if the contact has a
softphone address
See “Availability” on page 38 for information on obtaining availability
information.
Contact Flyout
Left-click on a contact to show the Contact flyout. This flyout shows all the contact methods set up for the
contact and has icons you can click to perform an action that is valid for that contact method.
Finding a Contact
If the contact list is long, use the field to filter th e c on tac ts t ha t are di splayed. To clear the filter and display
all contacts again, clear the field.
36
Page 41

4.2 History Tab
Display all calls
Dialed calls
Missed calls
Received calls
Missed or blocked
incoming
Answered call
(incoming or outgoing)
Canceled outgoing
Bria Professional 2.3 for Windows User Guide
Managing the Lists of Calls
You can right-click on an entry in a list to:
• Delete the call.
• Delete all entries in this list.
• Block this person to control whether they can send you phone calls or instant messages, or see your online
• Add to contacts. The Add a Contact dialog box appears. Complete the dialog box and press OK. For more
Phoning and Sending IM from a List
You can right-click on an entry in the Received or Dialed list to:
• Place a call to this person, using the c ontact method th at was used for th is call. You can also double-click to
• Place a call to this person and add them to a conference call that is in progress. For more information on
• Send an instant message, if the call was made with a softphone address. For details, see page 25.
availability. You can change these privacy settings at any time; see page 50.
information on the fields, see “Adding a Contact using an Existing Address” on page 33.
place a call.
conference calls, see “Conference Calls” on page 21.
37
Page 42

CounterPath Corporation
Your availability
Availability of other people
This person may be
logged out
This contact is currently online on their
domainA account. This account supports
phone and IM.
The contact is not online on their
domainXMPP account. This account
supports IM but not phone.
4.3 Availability
Availability refers to the ability to see whether a person is available or not: online, on phone, busy, and so on.
Your availability information is displayed below on th e main menu. The availabi lity of others is display ed in the
Contacts tab.
You can publish your availability to conta cts who ha ve softphone address, and you can set up Bria Professional
to view the availability of other contacts.
If the contact has several addresses, you can look at their profile for information on which addresses are
currently online:
38
Page 43

Bria Professional 2.3 for Windows User Guide
Sharing Availability
Watching Others’ Availability
When you create a contact by entering details in the Contact Profile, the contat is automatically set up so that
you share availability. If you created a contact by importing a contact list, it is not automatically set up to
shared. You must display the Contact Profile and click the Advanced button. See “Contact Profile — Advanced
Dialog” on page 33.
As soon as the person is set up in this way in your Contac ts, Bria Professional sends them a noti fication requ est.
The request asks that you be able to see that person’ s av ailability. If the person allows this request, then the icon
beside their name (in your Contacts) becomes color coded, so you can determine their availability.
Allowing Other Parties to See your Availability (Publishing your Availability)
Continuing from above, when the other person allows the notification request, your name is added to their
contact list. As soon as you are added to their list, a request is sent back to you requesting that they be able to
see you. You can reply to this request to complete the sharing loop.
The following chart illustrates how the sharing of availability occurs.
Receiving a Presence Request
Your Bria Professional receives a new contact request when you add a contact to your list or when another
person adds you as a contact at their end.
The request is handled in one of two ways:
• If you set up a privacy rule before this person has a chance to contact you, then you will never see this
request. Bria Professional will automatically reply to the request according to the rule. See “Preferences –
Privacy” on page 50.
39
Page 44

CounterPath Corporation
• If you do not yet have a privacy rule set up for this person or for th eir domain, this request a ppears to you as
a Presence Request. You must respond to the request:
• Block the request. This person will not be abl e to contact you from this address.
• Allow the request and create a new contact using this address.
• Allow the request and add this address to an existing contact (if Bria Professional has found an
appropriate match).
Button Next Action Result
Allow and Add to
Contacts
Allow The other person will:
Block The other person will:
Close the window The other person will not be able to see your availability. The
This button appears only if the other person is
not already on your contact list.
When you click this button, the Add a Contact
dialog box appears. Complete the dialog box
and press OK. For more information on the
fields, see “Managing Contacts” on page 35.
The other person will:
• Be able to see your availability.
• Be added to your Contacts.
In the future, you will not receive this request from this
person.
In addition, this same request will be sent to the other person,
so that you can see their availability.
• Be able to see your availability, but for this session only.
Because you have not set up the person as a contact, a
Presence Request will appear for this person each time you
start Bria Professional.
• Not be able to see your availability .
• Not be able to phone or IM you.
• Be added to your Blocked List. See “Preferences –
Privacy” on page 50.
other person will not be added to your privacy settings.
The Presence Request may appear again in this session or a
future session
For important information on how privacy affects availability, see “Privacy” on page 43.
40
Page 45

Bria Professional 2.3 for Windows User Guide
Setting your Availability
Changing your Availability
Click the down arrow beside the availability indicator on Bria Professional, and select the desired availability.
See Table 2, below.
When your availability changes, the new availability is sent to everyone who has permission to see your
availability, according to the Privacy Settings (see “Preferences – Privacy” on page 50).
Setting up Availability Indicators
You can create custom availability indicators, or edit or delete custom or built-in indicators: click the down
arrow beside the availability indicator, and choose Custom Message.
Indicator Meaning for your Availability Meaning for Others’ Availability
Available Either:
• You have set your availability to this status.
• Bria Professional has determined that you are logged on but not on the
phone or idle.
When you have this availability, Bria Professional will automatically
detect when you are idle or on the phone, and change the availability to
match.
Busy You have set your availability to this status. Bria Professional will never
automatically switch you out of this status; you must switch yourself.
On the phone Either:
• You have set your availability to this status. In this case, Bria
Professional will never automatically switch you out of this status;
you must switch yourself.
• Bria Professional has detected that you are on a call. When your call
finishes, your availability reverts to the last availability.
Table 2: Availability Indicators
You can contact this person.
You can contact this person.
You can contact this person.
Not A v ailable
for calls
You have set your availability to this status. Bria Professional will never
automatically switch you out of this status; you must switch yourself.
Incoming phone calls will be directed to voicemail.
Your phone calls to this person will
be directed to voicemail.
You can IM this person.
41
Page 46

CounterPath Corporation
Table 2: Availability Indicators
Indicator Meaning for your Availability Meaning for Others’ Availability
Do not disturb You have set your availability to this status. Bria Professional will never
automatically switch you out of this status; you must switch yourself.
You cannot make phone calls or IMs
to this person.
Both incoming phone calls and incoming IMs will be directed to
voicemail.
However, you can still make phone calls and IMs. When the other per son
responds, your availability will remain as Do not disturb.
Idle You have not moved or clicked the mouse or pressed a keyboard key for
You can contact this person.
the Idle period. To set the Idle period see “Preferences – Application” on
page 48.
As soon as you click the mouse or keyboard, your status changes to
Available.
Away You have set your availability to this status. Bria Professional will never
You can contact this person.
automatically switch you out of this status; you must switch yourself.
Offline Not applicable The contact is either not logged on or
else is not set up for availability.
42
Page 47

Bria Professional 2.3 for Windows User Guide
4.4 Privacy
You can control how contacts and other people can contact you by phone or IM, and you can control whether
your contacts can see your availability information (whether you are online, one the phone, and so on).
You can set up controls in advance or “on the fly” (as phone calls and presence requests come in).
Setting up Controls in Advance
To set up controls in advance, see “Preferences – Privacy” on page 50.
Setting up Controls “on the Fly”
On an Incoming Call
To block someone when they are phoning you, choose Options > Block this Person.
The call is declined, and this person is added to your Blocked List (see page 50). In add ition, if the person is a
contact, then “blocked” appears beside their name in the contact list.
You will no longer see incoming calls or instant messages from this person; they will au tomatically be de clined.
To later unblock this person, remove them from your Blocked List. Or, if the person is a contact, right-click
their name on the contact list and choose Unblock this Person.
43
Page 48

CounterPath Corporation
On an Incoming IM
T o bloc k who send s an IM, choose Opt ions > Block thi s Person on the Insta nt Message wind ow. Then close the
window.
The other person gets a message that their instant message has been declined.
This person is added to your Blocked List (see page 50). In addition, if the person is a contact, then “blocked”
appears beside their name in the contact list.
You will no longer see incoming calls or instant messages from this person; they will au tomatically be de clined.
To later unblock this person, remove them from your Blocked List. Or, if the person is a contact, right-click
their name on the contact list and choose Unblock this Person.
Via the Presence Request Dialog Box
Another party can send you a presence request, to request that they be able to see your availabi lity, as described
on page 38.
Your response has the following effect on privacy:
• If you add the person as a contact, then the ability of that person to phone or IM you is controlled by your
privacy settings; see “Preferences – Privacy” on page 50.
• If you allow the person without adding them as a contact, then the ability of that person to phone or IM you
is controlled by your privacy settings; see “Preferences – Privacy” on page 50.
• If you block the person, then that person is added to your Blocked List (see pa ge 50). The person will not be
able to phone or IM you, and will not see your availability information. You can change this blocking by
removing the person from the Blocked List, in which case they will then be controlle d by your pri va cy
settings.
From the Contact List or History List
Right-click on the name and choose Block this Person. The perso n will be added to your Blocked List (see
page 50). The person will not be able to phone or IM you, and wi ll not see your availability information.
To later unblock this person, right-click on the name and choose Unblock this Person.
44
Page 49

Bria Professional 2.3 for Windows User Guide
Only one number appears for each entry.
There may be other numbers that will show
if you try to call this person.
4.5 LDAP Directory Tab
The Directory tab appears only if you have set up to use LDAP, as described on page 55.
Phone a Person
Right-click an entry and choose Call or Video Call. The call is placed immediately.
Create a Contact
Right-click an entry and choose Add as Contact. The Contact Profile window appears, populated with all the
information from the directory (not only the information displayed in the tab).
Complete the window with any missing information that you wan t t o record and press OK.
45
Page 50

CounterPath Corporation
46
Page 51

Bria Professional 2.3 for Windows User Guide
5 Configuring Bria Professional
You can configure Bria Professional in several ways:
• Set up your personal profile. See below.
• Configure global behavior. See “Configuring Preferences” on page 48.
• Configure the behavior on a per-account basis. See “Configuring Accounts” on page 58.
5.1 Configuring your Profile
To set up information about yourself, choose File > My Profile. In later versions of Bria Professional, you will
be able to share this information with other users.
47
Page 52

CounterPath Corporation
5.2 Configuring Preferences
Choose File > Preferences. The Preferences wi ndow appears.
The Preferences panels let you control the way that you work with Bria Professional.
Preferences – Application
This panel lets you set your preferences for general GUI behavior.
48
Page 53

Preferences – Alerts & Sounds
Bria Professional 2.3 for Windows User Guide
This panel lets you control the Call Alerts box and lets you assign sounds.
Showing Call Alert Box
You can control whether the Call Alert box is displayed in different situations.
Assigning Sounds
You can assign specific sounds to a variety of actions or “events”.
1. Click Enable sounds on and click each event on or off, or click
Enable sounds off to disable all sounds.
2. If enabling sounds, you can change the sound for each event: select the individual event. The value in
Sound preference will change. Select the desired sound.
Keep in mind that you can also override any sound for an individual Cont act; see page 32.
You can import sounds; these will be added to the list of sounds you can choose from when assigning a sound to
an action.
49
Page 54

CounterPath Corporation
Choose one.
If you choose “Allow only”, then all
contacts will be able to contact you
unless they or their domain are in the
Blocked list (below).
This section is optional. It lets you
enter addresses and domains that will
be prevented contacting you.
You can add and remove entries from
the blocked lists.
In addition, entries are automatically
added to this list when you block
someone “on the fly” (page 43).
If you enter a domain in this list,
people in that domain will
automatically be allowed to see your
availability online.
You will no longer see Presence
Request dialogs from these people in
this domain.
Preferences – Privacy
You can control how contacts and other people can contact you by phone or IM, and you can control whether
your contacts can see your availability information (whether you are online, on the phone, and so on).
50
Page 55

Preferences – Quick Transfer
Bria Professional 2.3 for Windows User Guide
This panel lets you set up a list of phone numbers that calls can be transferred to. Then during a call, you can
transfer to any of these number s by selecting from a list.
Enter as many numbers as you want. To enter a new number , click in an empty line. To remove an entry, click in
the line and delete the number. Set one of the numbers as the default.
See “Quick Transfer” on page 17 for information on using this feature.
51
Page 56

CounterPath Corporation
Preferences – Devices
Bria Professional automatically detects devices at each st artup, and selects the most appropria te device for each
purpose. If you do not like this selection, you can override it on th is panel.
If you override a selection, it will apply the next time you start Bria Professional, unless the device is no longer
available, in which case Bria Professional will again select the device to use.
52
Page 57

Field Description
Headset Mode
Bria Professional 2.3 for Windows User Guide
Speaker
Microphone
Change these fields only if you want to override the devices that Bria Professional automatically
selected.
In both these fields, select the headset you are using.
The headset is the device that is usually used for audio out (the sound you hear) and audio in
(recording your voice). The only situation in which the headset is not used is when the Speaker
Phone button on the dialpad is pressed.
Therefore, unless you will always be using Bria Professional in speakerphone mode, you must make
a selection here.
Select the headset in both the Speaker device field and Microphone device field.
Speakerphone Mode
Speaker Change this field only if you want to override the devices that Bria Professional automatically
selected.
Make the appropriate choice:
• Select the device that you want to use for audio out (the sound you hear) when the Speaker
Phone button is pressed. Make sure you select a speaker device (not the headset).
• Select None if you do not have a speaker phone. The Speaker Phone button on the dialpad is
disabled.
Microphone Change this field only if you want to override the devices that Bria Professional automatically
selected.
Make the appropriate choice:
• Select the device that you want to use for audio in (recording your voice) when the Speaker
Phone button is pressed.
It can be any microphone: it does not have to be the microphone on the device you specified as
the speaker device. For example, it can be the microphone on your camera.
• Select None if you do not have a speaker phone. The Speaker Phone button on the dialpad is
disabled.
Reduce background noise Automatically attempts to remove background noise.
Typically on for the speakerphone.
Phone Ring Device
Ring Device Change this field only if you want to override the devices that Bria Professional automatically
selected.
The device where you want to hear the phone ringing: the headset, the speakerphone, or none.
Ring volume The volume of the ringer.
Also ring PC speaker Click on or off, to suit your preference.
Camera
Camera This field appears only on version of Bria Professional that include video functionality.
Change this field only if you want to override the devices that Bria Professional automatically
selected.
Select the camera model.
53
Page 58

CounterPath Corporation
Preferences – Network
Field Description
Network Connection Speed Select the type of network connection for your computer.
The sliders move to show the bitrate that will be used for sending and receiving. These rates are
typical rates for the selected configuration.
If you know that your computer and network can handle a faster sending speed, click Custom
and move the slider.
It is recommended that you not change the receiving speed.
You will know that you have set the sending speed too high if:
• The remote video shows black areas or is slow or jerky.
• The remote audio is garbled.
Y ou will know that you have set the sen ding speed too low if the audio is good but the video is of
poor quality (grainy).
Video Image Size Leave at standard, or change the size as follows:
• Set it to high if you have a good camera and a computer with a fast CPU. You will know that
you have set the size too large if:
Your computer slows down (the video is using too much CPU)
The video shows black areas or is slow or jerky.
• Typi cally set i t to low only in special situati ons, for example, when using wi-fi in a hotel. You
will know that you have set the size too small if the video is fuzzy.
Preserve bandwidth When this feature is on, Bria Professional stops sending audio when you are not talking.
When this feature is off, Bria Professional always sends audio, which uses more bandwidth but
may result in better call quality.
Typically off. However, if you are using a slow (dial-up or ISDN) connection, you may want to
turn it on.
54
Page 59

Bria Professional 2.3 for Windows User Guide
Preferences – Audio Codecs
Change the settings on this tab only if advised to do so by your system administrator.
Preferences – Video Codecs
Change the settings on this tab only if advised to do so by your system administrator.
Preferences – Quality of Service
Change the settings on this tab only if advised to do so by your system administrator.
Preferences – LDAP
Change the settings on this tab only if advised to do so by your system administrator.
Preferences – Contact Storage
Change the settings on this tab only if advised to do so by your system administrator.
55
Page 60

CounterPath Corporation
Preferences – Diagnostics
This panel lets you enable logging to files. Loggi ng uses computer resource s, so you should only e nable it when
instructed by a customer support representative.
To set up logg ing:
1. Click Enable diagnostic logging.
2. Set the logging level.
3. Specify the folder where logs will be saved.
4. Click OK.
Activity on Bria Professional will be logged to.csv files i n the specified folder. A new set of files is started each
time you log on. In order not to create large files when logging (which may create computer problems), you
must not remain logged on indefinitely when logging. You should occasionally exit and restart Bria
Professional.
If requested by a customer support representative, you can:
• Open the logging folder and then open a log file using a text editor.
• Email the logs in the specified folder to customer support: Click Send logs to customer support. A dialog
box appears showing all the logs. Select files and cli ck Open; the selected files are sent and the dialog box
closes.
You can delete log files from the specified folder as you would delete any file on your computer.
56
Page 61

Preferences – Advanced
Bria Professional 2.3 for Windows User Guide
Field Description
Reduce echoes Turning this feature on improves sound quality. This feature is typically on.
Use slower but more compatible video format Turning this field on may improve performance when running Bria Professional
Auto Answer Calls
Auto answer incoming calls From the first set of radio buttons, choose how quickly you want Bria
Auto answer with From the second set of radio buttons, choose how you want to handle your own
Login Server
Change the settings on this tab only if advised to do so by your system administrator.
on older hardware.
Professional to auto-answer an incoming call.
video (the video you send), if the other party has placed a video call:
• Auto answer with audio: Your video is not sent. However, if necessary, the
video panel opens so you can view the other person’s video.
• Auto answer with audio and video: Your video is sent. If necessary, the video
panel opens, showing both your video and the other person’s video.
57
Page 62

CounterPath Corporation
5.3 Configuring Accounts
Accounts Settings Window
In general, you will work with the Account Settings window only when advised to do so by your system
administrator; see “Configuring Bria Professional” on page 4.
58
Page 63

Bria Professional 2.3 for Windows User Guide
A Application Hot Keys
Function Keyboard Shortcut
Answer Enter
Exit Ctrl-Q
Hang up Esc
Hold Period
Mute Spacebar
59
Page 64

CounterPath Corporation
B Contact List Headings
Following is a list of all the headings that are used in the Bria Professional contact list. This list can be useful
when formatting a contact list in order to import it intoBria Professional. For details, see “Importing Contacts”
on page 34
uri business_number sms_addresss
display-name business_number2 ms_address2
entry_id business_number3 sms_address3
given_name business_number4 sms_address4
surname business_number5 sms_address5
email_address business_number6 sms_address6
email_address2 mobile_number custom_fields
email_address3 mobile_number2 custom_fields2
email_address4 mobile_number3 custom_fields3
email_address5 mobile_number4 custom_fields4
email_address6 mobile_number5 pres_subscription
sip_address mobile_number6
sip_address2 fax_number
sip_address3 fax_number2
sip_address4 fax_number3
sip_address5 fax_number4
sip_address6 fax_number5
home_number fax_number6
home_number2 groups
home_number3 comment
home_number4 postal_address
home_number5 default_address
home_number6 default_address_type
60
Page 65

Bria Professional 2.3 for Windows User Guide
C Location of Files
System files get copied to the installation directory specified when installing Bria Professional. The default
installation directory is:
C:\Program Files\CounterPath\Bria Professional
Data files are saved in the Counterpath folder in the standard location for application data, as defined in
Windows.This location is typically:
C:\Documents and Settings\<user name>\Application Data\CounterPath
Solutions Inc\Bria\
61
Page 66

CounterPath Corporation
D Other Ways to Run Bria Professional
D.1 From a Hyperlink
You can attach a hyperlink to a phone number or softphone address that, when clicked, starts Bria Professional
and dials the number. Attach a hyperlink with this format:
<a href="sip:<address or number>">dial <address or number></a>
For example:
<a href="sip:kpereira@domain.com">dial kpereira@domain.com</a>
D.2 From the Command Line
You can start Bria Professional from a DOS prompt. You may need to add Bria.exe to the PATH. Then type:
Bria.exe
To start Bria from a DOS prompt and immediately dial a number, type:
Bria.exe -dial=sip:<number>
62
Page 67

Bria Professional 2.3 for Windows User Guide
E Glossary
AEC Acoustic echo cancellation. Processing of the au dio or vid eo signal t o reduce th e echo
effect that can arise with a speakerphone or that can arise if the sound from the
speakerphone or headphone leaks into the microphone.
AGC Automatic gain control. Processing of the audio or video sign al to adjust the
microphone volume level so that the oth er party does not hear the distortion that
might be caused by too high a microphone input or too low volume (due to too low
input level).
AVI Audio Video Interleave. A multimedia container format. AVI files contain both audio
and video data in a standard container that allows simultaneous playback.
Broadband Broad or wi de ba ndwidt h. In d ata transmissi on, the wider the ban d, the mo re data it is
possible to transmit in a given time span. A cable, DSL and ADSL connection to the
network provide broadband for data transmission. A dialup or ISDN connection
typically provide a narrow bandwidth for data transmission.
Codec The format by which audio or video streams are compressed for tran smission over
networks.
Default account The SIP account that will be used when placing an outgoing cal l, if Bria Prof essio nal
does not determine that another account should be used. Bria Professional uses the
dial plan to determine the account to use. Your system administrator will have
identified which account is the default.
Dial plan The rules that Bria Professional follows in order to interpret the softphone address or
phone number that the user has entered and to modify the number or address, as
required, to ensure that the call will be placed successfully.
DTMF Dual-tone multi frequency. DTMF is the system that is used in interactive voice-
response menu systems such as the menu system for accessing voicemail messages.
The DTMF system allows the user to interact with the menu by pressing keys on a
dialpad or keyboard.
IM Instant Messaging. A technology that lets users send text message and files for near
instantaneous delivery and display on each others’ computers.
IP Internet Protocol. A data-oriented protocol used for communicating data across a
network. IP is the most common protocol used on the internet.
IP address A unique number that devices use in order to identify and communicate with each
other on a computer network using the IP standard.
Media In a VoIP phone call, the audio and video portion of the information in a call.
Compare to “Signaling”.
MWI Message Waiting Indicator. An indicator that there is a voicemail message for the
owner of an account.
Narrowband In data transmission, the wider the band, the more data it is possible to transmit in a
given time span. A cable, DSL and ADSL connection to the network provide
broadband for data transmission. A dialup or ISDN connection typically provide a
narrow bandwidth for data transmission.
Presence An instant messaging feature that allows users to share information about their
availability, mood, location and so on.
Proxy See SIP account.
PSTN Public Switch Telephone Network. The traditional land-line phone network.
63
Page 68

CounterPath Corporation
RFC Request for Comment. A document that describes an aspect of an internet te chnology.
An RFC may be a proposed, draft or full internet standard.
RTP Real-time Transport Protocol. A protocol for delivering the media portion of a data
transmission over an IP network. SRTP is another media protocol.
Signaling In a VoIP phone call, the information in a call that deals with establishing and
controlling the connection, and managing the network. The non-signaling portion of
the call is the Media.
SIMPLE protocol Session Initiation Protocol for Instant Messaging and Presence Leveraging
Extensions. The instant messaging (IM) protocol followed by Bria Professional. It
encapsulate the rules for exchanging instant messages.
SIP Session Initiation Protocol. The signaling protocol followed by Bria Professional for
handling phone calls.
SIP account An account that provides the user the ability to make VoIP phone calls. The account
encapsulates the rules and functions the user can access.
softphone address The address used to connect to a SIP endpoint. In other words, the “phone number”
used in a VoIP phone call. For example, sip:joseph@domainA.com.
SRTP Secure Real-time Transport Protocol. A protocol for delive ring the me dia porti on of a
data transmission over an IP network. SRTP is a secure protocol, which means that
the media is encrypted. RTP is another media protocol.
TCP Transmission Control Protocol. A transport protocol for delivering data over an IP
network. Other transport protocols are TLS and UDP.
TLS T ransport Layer Security. A transport protocol for delivering data over an IP network.
TLS is a secure transport protocol, which means that all the data being transmitted
(signaling and media) is encrypted. Other transport protocols are TCP and UDP.
UDP User Datagram Protocol. A transport protocol for delivering data over an IP network.
Other transport protocols are TCP and TLS.
URI Uniform Resource Identifier. A name or address that i dentifies a location on the world
wide web. A softphone address is a type of URI.
URL Uniform Resource Locator . A U RI that both identifies a name or address and indicate s
how to locate it.
USB device Universal Serial Bus device. A device that follows a specific communications
standard. A headset may be a “USB type” of headset.
VAD Voice Activity Detection. A technology that detects if audio is a human voice or
background noise. Bria Professional includes a feature (Preserve bandwidth o n the
Network panel of the Preferences window) that controls whether audio is transmitted
when VAD determines that none is actually speaking.
vCard An electronic business card that is often attached to an email. It often appears as a
“signature” block that identifies the person, their title, and their business.
VoIP Voice over Internet Protocol. A variation of IP used for sending voice data over the
internet, in other words, used for making phone calls over the internet.
WAV Or WAVE. A file format standard for storing audio on PCs.
64
 Loading...