


 Loading...
Bria 4 for Mac User Guide Retail Deployments

CounterPath Corporation
CounterPath Corporation Suite 300, One Bentall Centre 505 Burrard Street, Box 95 Vancouver, BC V7X 1M3 Tel: 604.320.3344
sales@counterpath.com www.counterpath.com
© April 2014 CounterPath Corporation. All rights reserved.
This document contains information proprietary to CounterPath Corporation, and shall not be used for engineering, design, procurement, or manufacture, in whole or in part, without the consent of CounterPath Corporation.
The content of this publication is intended to demonstrate typical uses and capabilities of the CounterPath Bria 4 for Mac softphone application from CounterPath Corporation. Users of this material must determine for themselves whether the information contained herein applies to a particular IP-based networking system. CounterPath makes no warranty regarding the content of this document, including—but not limited to—implied warranties of fitness for any particular purpose. In no case will CounterPath or persons involved in the production of this documented material be liable for any incidental, indirect or otherwise consequential damage or loss that may result after the use of this publication.
CounterPath and the  logo are trademarks of CounterPath Corporation.
Mac and Mac OS are registered trademarks of Apple Inc., registered in the U.S. and other countries
This manual corresponds to version 4.0 of Bria 4 for Mac.
Rev 1
ii

|
Contents |
Introduction................................................................................................................................ |
1 |
Installation and Setup................................................................................................................. |
3 |
Getting Ready ...................................................................................................................... |
3 |
Configuring Bria .................................................................................................................. |
4 |
Troubleshooting ................................................................................................................... |
7 |
Checking for Bria Updates .................................................................................................. |
7 |
Making Phone Calls................................................................................................................... |
9 |
The Onscreen Softphone...................................................................................................... |
9 |
Placing a Call ....................................................................................................................... |
11 |
Handling Incoming Calls ..................................................................................................... |
15 |
Handling an Established Call............................................................................................... |
16 |
Transfering a Call ................................................................................................................ |
17 |
Handling Video Calls.......................................................................................................... |
19 |
Conference Calls.................................................................................................................. |
20 |
Voicemail............................................................................................................................. |
24 |
Forwarding Calls.................................................................................................................. |
24 |
Other Bria Features.................................................................................................................... |
25 |
Instant Messaging ................................................................................................................ |
25 |
Sending a Broadcast IM....................................................................................................... |
26 |
Group Chat (Conference IM)............................................................................................... |
27 |
Chat Rooms.......................................................................................................................... |
29 |
Viewing Messages ............................................................................................................... |
29 |
Sending and Receiving Files................................................................................................ |
30 |
The Contacts Tab ....................................................................................................................... |
31 |
Populating the Contact List.................................................................................................. |
32 |
Managing Contacts and Groups........................................................................................... |
34 |
Using Contacts..................................................................................................................... |
38 |
Sharing Online Status .......................................................................................................... |
39 |
Privacy ................................................................................................................................. |
43 |
Using Other Resources .............................................................................................................. |
45 |
The History Tab ................................................................................................................... |
45 |
The Favorites Tab ................................................................................................................ |
47 |
Configuring Bria ........................................................................................................................ |
49 |
Configuring Accounts: the Accounts Tab ........................................................................... |
49 |
General Preferences ............................................................................................................. |
64 |
A Troubleshooting ..................................................................................................................... |
73 |
B Dial Plan................................................................................................................................. |
77 |
C Contact List Headings ............................................................................................................ |
83 |
D Other Ways to Run Bria......................................................................................................... |
84 |
E Glossary.................................................................................................................................. |
85 |
iii

CounterPath Corporation
iv

1 Introduction
Bria is a softphone from CounterPath that enables you to make VoIP voice and video calls, send and receive instant messages, share online status (presence) information, and exchange files. Bria implements SIP-based standards for phone calls, IM and presence, allowing you to work with different VoIP service providers. Bria also uses XMPP-based standards for IM and presence.
Standard Telephone Features
The CounterPath Bria 4 for Mac softphone has all standard telephone features, including:
•Call display and Message Waiting Indicator (MWI).
•Speakerphone and Mute.
•Redial, Hold, Do Not Disturb.
•Call history – list of received, missed, and dialed calls.
•Call forward.
•Call transfer.
•Call record.
•Auto answer.
•Five-party audio conferencing.
•Three-party video conferencing.
Enhanced Features and Functions
Bria also supports the following features and functions:
•Video
•IM and presence using the SIP SIMPLE protocol or the XMPP protocol.
•IM conferencing (group chat) via an XMPP account.
•Corporate chat rooms.
•Contact list containing the individual user’s contacts
•Directory containing names from a shared LDAP directory.
•File transfer via an XMPP account.
•Automatic detection and configuration of audio and video devices.
•Acoustic echo cancellation, automatic gain control, voice activity detection.
•Support for DTMF (RFC 2833 or inband DTMF).
•Support for the following audio codecs:
G.711aLaw, G.711uLaw, G.722, G.729, iLBC, OPUS, SILK Narrowband, SILK Wideband, SILK Superwideband, Speex, Speex Wideband.
•Support for the following video codecs: H.263, H.263+ 1998, H.264, VP8.
1

CounterPath Corporation
•Support for these firewall traversal solutions: STUN, TURN, or ICE.
2

2 Installation and Setup
2.1 Getting Ready
Account Information
After choosing a VoIP service provider, you will need the following information:
•User name and domain. For example, 1331@domainA.com
•Password
•Authorization Name (if applicable)
•Firewall traversal and other network information; see “Configuring Bria” on page 49.
XMPP Accounts
If you use an XMPP service for instant messaging or presence, you will need the following information:
•Jabber ID: user name and domain. For example, jsantos@domainXMPP.com.
•Password
•Connection information; see “XMPP Account” on page 51.
3
CounterPath Corporation
2.2 Configuring Bria
First-time Startup
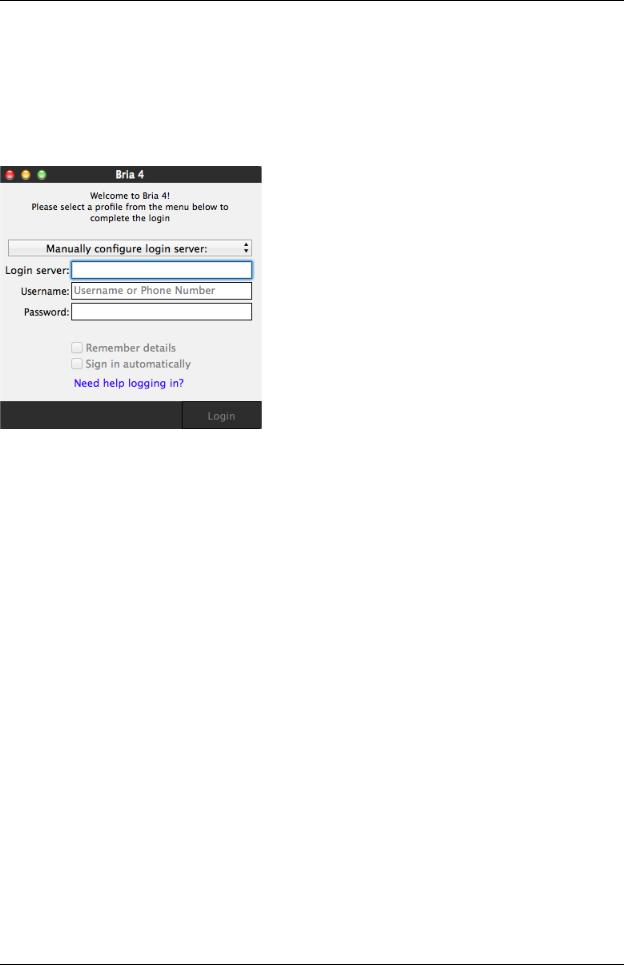
If Bria is not already running, start it as you would any other program. The Bria Login dialog appears with the Profile set to “Manually configure login server”.
Set the profile to “No login required” and click Continue. The softphone GUI appears. (Login is used only in enterprise deployments in which a system administrator has set up a provisioning server to automatically configure Bria for you.)
Subsequent Startups
After the first-time startup, the Bria Login dialog will not appear if you selected the No login required profile.
(If you started up the first time with “No login required” but in fact you do need to log in, go to the menu and choose Preferences. Click the Application tab and enable login. See page 64.)
Setting up Notifications
Bria uses OS notifications. Make sure that the notifications are set up for Bria in system preferences.
From the menu, click Apple logo > System Preferences > Notifications. In the notification center, choose Bria 4. Choose Banner or Alerts for the alert style. For details on incoming call notifications, see page 15.
Setting up Accounts
After obtaining SIP account information from your VoIP service provider, you can set up Bria accounts.
1.From the menu bar, choose Bria 4 > Preferences > Accounts. The Account list appears with one account (the Mac Address Book account) configured; see below.
Set up the SIP Account
2. Click the + button and choose New SIP Account. The SIP Account window opens.
4

Bria 4 for Mac User Guide – Retail Deployments
3.In the General tab, complete the User Details area with the information obtained from your VoIP service provider.
4.Complete the remaining tabs as specified by your service provider or to suit your setup. Settings that you may need to change immediately include:
•General tab, Domain Proxy area.
•Topology tab, if your computer is on a network and/or behind a firewall.
For more information, see page 53.
5.Click OK; the account is enabled and registered; check the account list to make sure the account registers successfully.
Set up the XMPP Account
If you already have an XMPP account independent of Bria (for example, a Gmail™ webmail service account), you can create an account in Bria and pull your contacts into the Bria contact list. You can then IM these contacts directly from Bria.
6.Click the + symbol at the bottom of the window and choose New XMPP Account. The XMPP Account window opens.
7.Complete the window with the information obtained from the XMPP service provider. Typically you only have to complete the User Details. For more information, see page 51.
8.Click OK. In a few seconds you will see all the existing contacts from your XMPP account appear in the Bria contact list, in a new group.
9.Make sure the Status is green for all accounts.
Enable your Mac Address Book Account
If you want to pull in the contacts from your Mac Address Book, enable the Mac Address Book account. See page 49 for more information.
5

CounterPath Corporation
Setting up for Voicemail
Your VoIP service provider may offer voicemail. If it does, then you can set up some voicemail features in Bria. See page 55.
Populating your Contact List
Typically, you will want to create contacts in order to easily make phone calls, send IMs and transfer files. You can bring in contacts from other sources:
•From a file such as a vCard or comma-separated-values (CSV) file. See page 33.
•From your Mac Address book, by enabling the Mac Address Book account. See page 49.
In addition:
•During a call that you place or receive, you can add the other party to your contact list. See “Handling an Established Call” on page 16.
•You can add addresses to the Contact list one by one. See page 34.
For general information on contacts, see page 31.
6
Bria 4 for Mac User Guide – Retail Deployments
2.3 Troubleshooting
Bria includes tools for helping you troubleshoot problems. From the menu, choose Help > Troubleshooting.
•Audio tab: While you are on a phone call, you can test the quality of the audio. Note that to perform a valid test, you should be on an established call (not a call attempt).
•Video tab: You can verify that your camera is working.
•Devices tab: You can verify that your microphone and speakers are working and can set the volume to a comfortable level without having to actually place a phone call.
•Diagnostics tab: If none of the other tabs help you solve your problem.
2.4 Checking for Bria Updates
To check for updates to Bria, from the menu bar, choose Help > Check for updates. The Auto Update window appears.
•If a new version of the software is available, you can download it from this window.
•If no newer version is available, this window informs you that your version is up to date.
7

CounterPath Corporation
8
3 Making Phone Calls
3.1 The Onscreen Softphone
Minimize to dock
Close window
Bria Toolbar.
See page 16
Call entry field.
See page 11.
 Voicemail indicator. See page 24
 Missed calls indicator. Opens the History tab.
Resources.
See page 45
 Resize softphone
9
CounterPath Corporation
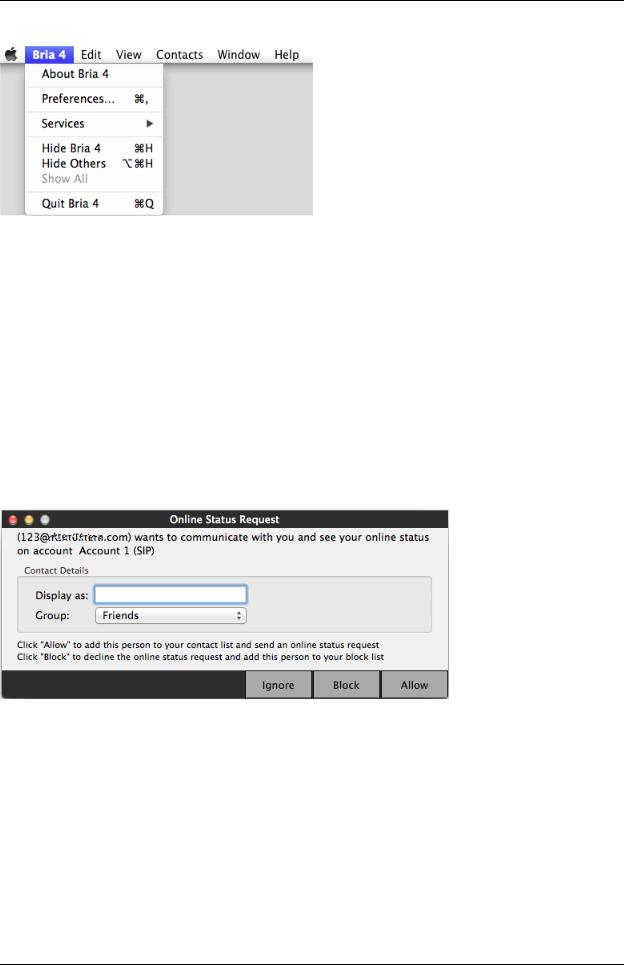
The Bria Menu
The menu contains the following items that are specific to Bria:
•Bria 4 > Preferences. See page 64.
•View. Changes how Bria looks. Also lets you view the messages and chat rooms (if you are a member of one; see page 29).
•Contacts. Lets you work with contacts.
•Help. Provides access to various service-related features.
Receiving an Online Status Request
When you start Bria, one of the first things you may see (if presence is enabled) is an Online Status Request dialog. See “Sharing Online Status” on page 39.
10

Bria 4 for Mac User Guide – Retail Deployments
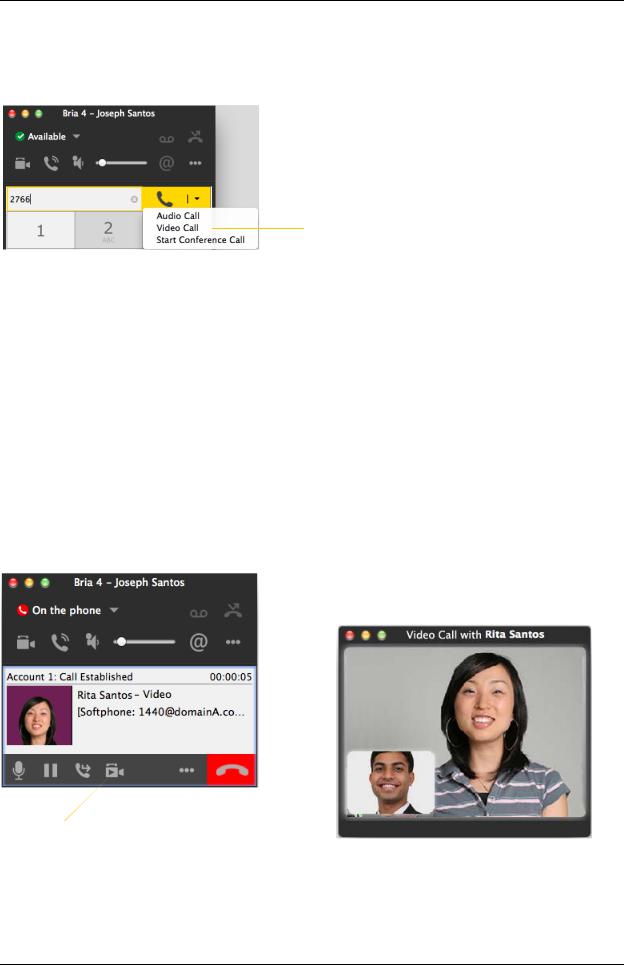
3.2 Placing a Call
Place the call as described in the table below. The outgoing call opens in its own call panel, below any other existing call panels. You will hear a ringing tone while Bria attempts to make a connection.
Option |
From the... |
|
Description |
|
|
|
|
|
|
|
|
Keying |
Dialpad or computer |
1. |
Enter the number or address in the call entry field using the dialpad |
|
keyboard |
|
or the computer keyboard. To turn letters to numbers, see page 13. |
|
|
|
If entering a softphone address, you can enter the entire address |
|
|
|
(6045551212@domainA.com) or just the number (6045551212). |
|
|
|
As you type, a suggestion for completing the entry may appear. |
|
|
|
Choose the suggestion or keep typing. |
|
|
2. |
Click the Call button or press Enter. |
|
|
|
|
Control-click a contact or |
Contacts or History tab |
Control-click an entry from the Contacts or History tab and choose Call |
|
previous call |
|
or Video Call. |
|
|
|
(If the tab contains lots of entries, first search or filter the list.) |
|
|
|
|
|
Double-click a contact |
Contacts tab |
Contacts have a “double-click” action (page 64) that either makes an |
|
|
|
audio phone call or starts an IM. |
|
|
|
|
|
Single-click a contact |
Contacts tab |
Hover over the right side of the contact to reveal the click-to-call |
|
|
|
button. Click to place a call using the primary phone number for this |
|
|
|
contact. |
|
|
|
|
|
Redial |
Redial button |
• When the call entry field is empty, click the Call button. |
|
|
|
• Or click the arrow in the call entry field and select a recent call. |
|
|
|
An audio call is placed. |
|
|
|
|
|
Dialing |
Dialpad |
1. |
If the dialpad is not visible, click the Phone tab at the bottom |
|
|
2. |
Click the numbers on the dialpad to enter the phone number. |
|
|
3. |
Click the Call button or press Enter. |
|
|
|
|
From an instant message |
Messages window |
Click the menu at the top of the IM window and choose Call. |
|
|
|
|
|
See the next page for an example.
11

CounterPath Corporation
Call entry field
Click to place the call
Auto complete suggestions
For information on working with the call, see “Handling an Established Call” on page 16.
Dealing with an Auto Attendant
If you know that your call will be answered by an auto attendant and you know what menu items you will choose, you can include those menu items (DTMF) in the phone number when you dial it:
•Before the first DTMF number, include at least one capital P.
•You can include other Ps. Each P causes Bria to wait one second before sending the next character.
•At the end of the input, you must include a ; character.
Example: To dial a number, add a 3-second delay and then press 44, enter this in the call entry field:
604551212PPP44;
Example: To dial a number, add a 6-second delay, then press 1 then 3 then 2, each with a two second delay:
604551212PPPPPP1PP3PP2;
A capital X or , (comma) can be used instead of P; the following will work in the same way as the first example above.
6045551212XXX44;
12
Bria 4 for Mac User Guide – Retail Deployments
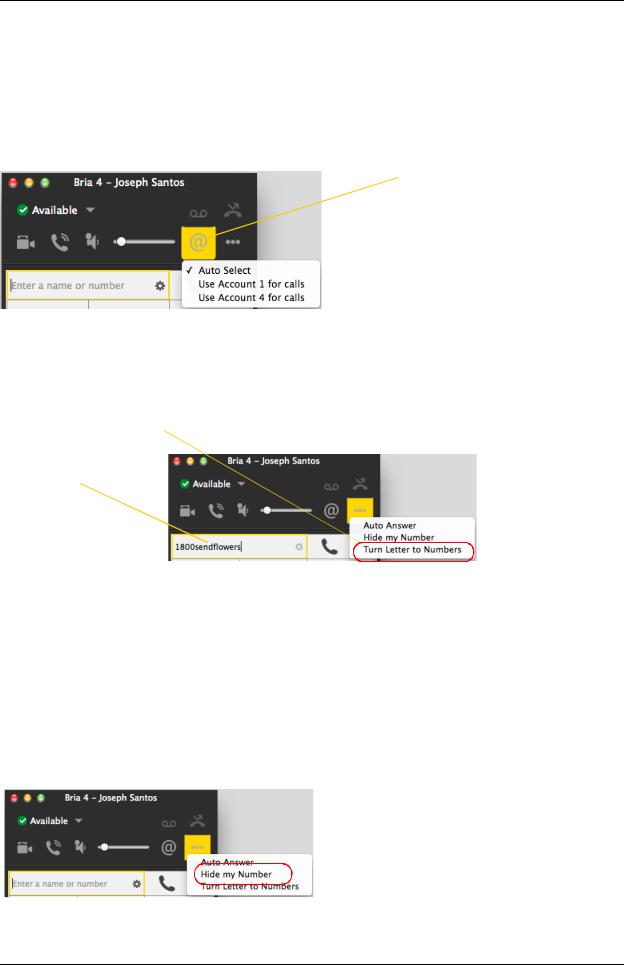
Selecting the Account to Use
This information applies only if you have more than one SIP account set up and enabled.
When you place a call, you can explicitly specify the account to use for that call.
The account selection options appear only if you have two or more SIP accounts that are enabled and being used for phone calls. To make an account “useable” for phone calls, from the menu bar, choose Bria > Preferences > Accounts, open the desired account and change the Use For fields on the General tab (page 49).
Choose the account to use.
you choose Auto Select, then the account to use depends on your dial plan rules (page 53). If there are no dial plan rules, then the “preferred” account
(page 49) is used.
Letters to Numbers
You can type letters and Bria will convert the letters to numbers when placing the call:
Turn letters-to-numbers on or off
Type the phone number using numbers and letters, as desired 
When you click Call, the call panel will open and the call will be placed. The call panel will show the phone number all in digits.
Hiding your Identity (Anonymous Calling)
You can hide your identity on a call, so that the other person will not see your name or number on their phone. Your ID will be hidden for all outgoing calls until you turn off Hide my number mode
Anonymous Calling is automatically turned off when you shut down.
Turn Hide my number on or off
13
CounterPath Corporation
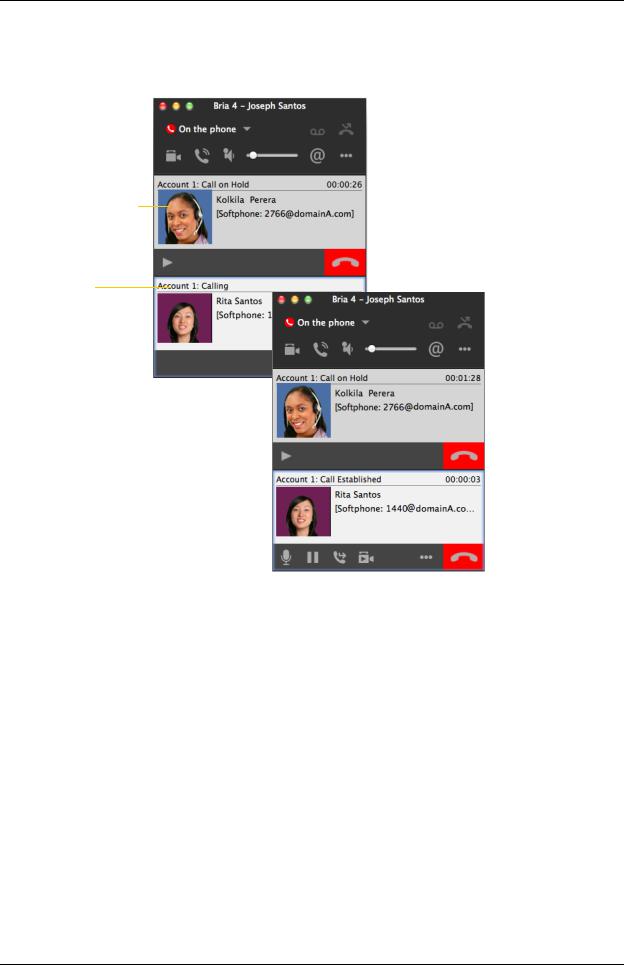
Placing another Call
You can place another call. There is no limit to the number of calls you can make, although eventually the quality of audio and video will degrade because of limitations on the computer.
Place the call in the usual way
Existing call is automatically put on hold
New outgoing call
Switch between the different calls by clicking Resume on the desired call panel. That call becomes the active call and all other calls are on hold.
14
Bria 4 for Mac User Guide – Retail Deployments
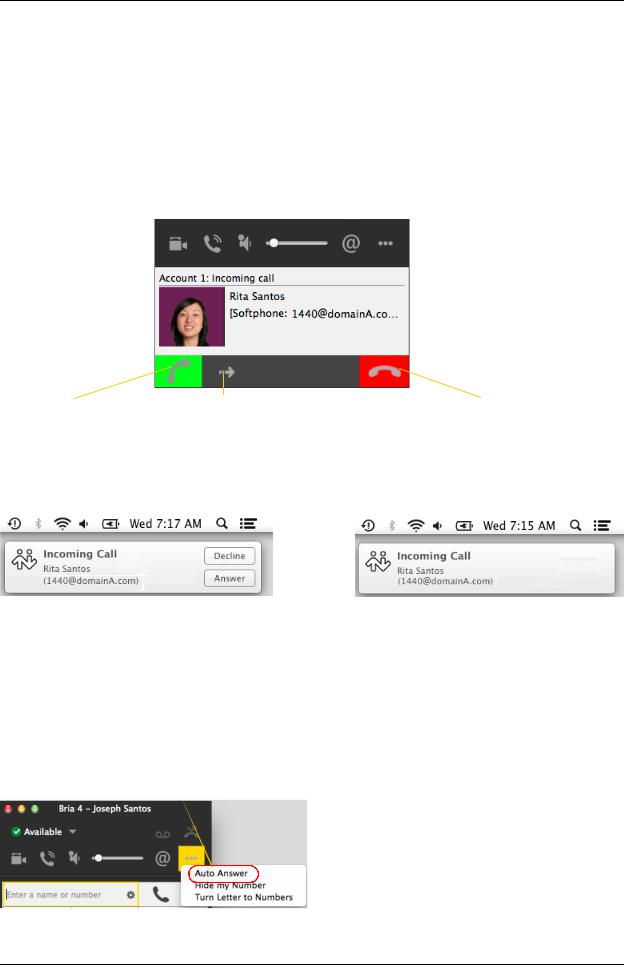
3.3 Handling Incoming Calls
Bria must be running to answer incoming calls. (If Bria is not running, incoming calls may be directed to voicemail; check with your VoIP service provider.)
When Bria is in the foreground, the new call appears in its own call panel. When Bria is in the background (the focus is on other application), the incoming call notification appears in the upper-right corner. To receive notifications, make sure that you configured both system preferences on Mac OS (page 4) as well as Bria’s alerts preferences (page 66).
When Bria is in Foreground
Click. If you are
call, that first call is automatically put on hold. You are now talking to the new
Or click Forward; a call entry field appears. Enter the name or number to forward to and click Forward Now.
There will be a busy signal. The call may be directed to voicemail (if you have this service).
When Bria is in Background
The Alert style shows buttons: Answer and Decline.
The Banners style goes away automatically.
 Clicking the banner answers the call.
The notifications do not indicate whether the incoming call is an audio or video call. If the incoming call is a video call, Bria will answer with video.
Auto Answer
You can set Bria to automatically answer all incoming calls.
Turn Auto Answer on or off
Auto answer is initially configured to auto-answer after one ring, and to send only your audio when the call is established. To change this configuration choose Preferences > Calls.
Auto answer is automatically turned off when you shut down.
15
CounterPath Corporation
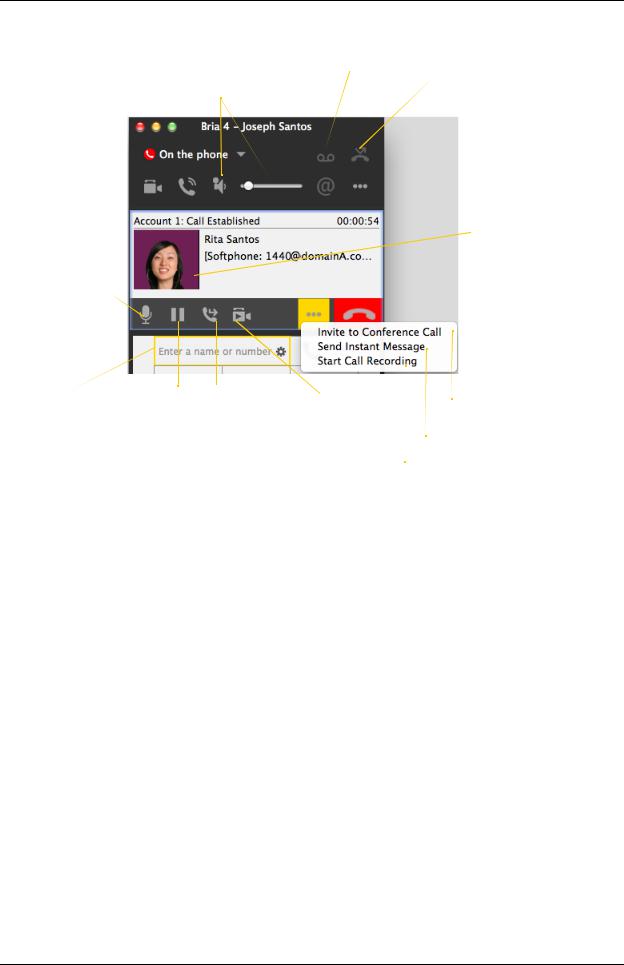
3.4 Handling an Established Call
Speakerphone |
Speaker and |
Voicemail |
Missed calls |
|
|
See page 45 |
|||
|
|
microphone control |
|
|
|
|
|
||
|
|
|
|
|
|
|
|
|
|
Mute your voice
Place another call
The current call is automatically put on hold). See page 14
Hold and |
Transfer |
resume |
See page 17 See page 19 |
Add as Contact
If a plus symbol appears here, you can add the current caller as a contact. See “Adding a Contact using an Existing Address” on page 37.
Conference Calls
See page 20
Instant Message
See page 25
Record the call
Ending a Call
Click the End call button on the Call panel (the call can be active or on hold). The call panel closes after a few seconds.
16
Bria 4 for Mac User Guide – Retail Deployments
3.5 Transfering a Call
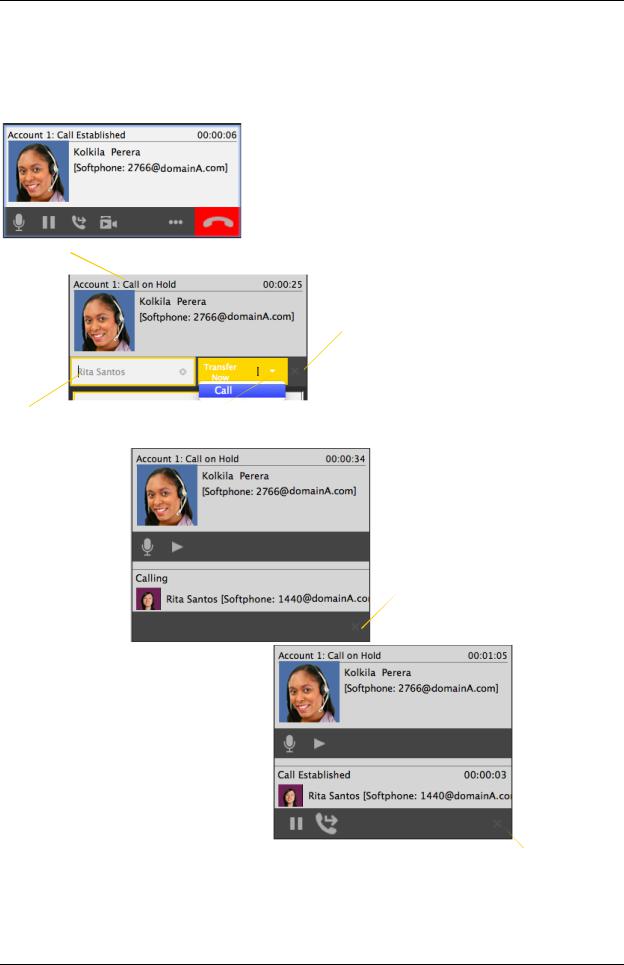
Basic (Unattended) Transfer – Transfer this Call
Click the Transfer button
The call is put on hold and a call entry field appears.
Type a name or number
Then click Transfer Now.
The call may end immediately.
Or it may show “calling”, In this case, do not hang up immediately: if the other person does not answer, the call will come back to you.
17
CounterPath Corporation
Attended Transfer – Call then Transfer
You can first speak to the target (the person you are transferring the call to), then click Transfer to complete the transfer.
Click the Transfer button
The call is put on hold and a call entry field appears
Type a name or number |
Then click the down arrow and |
|
choose Call |
Bria phones the  new person
Or you can click the X to cancel the transfer request and return to the first call
You can hang up the second call and return to the first call
When the other person answers, the
Transfer Now button is enabled
When you are ready, click  Transfer Now. The call panel
closes
Or if the other person does not want to take the call, click X and return to the first call
18
Bria 4 for Mac User Guide – Retail Deployments
3.6 Handling Video Calls
Placing a Video Call
Click the down arrow and choose Video call.
If you mostly make video calls, you can
Option-click this down arrow to reveal the “Set
Video Call as default action” menu item.
Adding Video
If you have a camera, you can click Start Video to add video to an established call. When you add video, the other party may (or may not) start sending their video to you.
Other Party Adds Video
If the other party starts their video, your video panel automatically opens and the video is played. You can start sending your own video, if desired (and assuming you have a camera) by clicking Start Video on the call panel.
Pausing and Resuming Video
Click Stop Video on the call panel or close the video window to pause sending your video.
Click Start Video to resume sending your video; the video window will open.
Show/hide video window
Start or stop video
19
CounterPath Corporation
3.7 Conference Calls
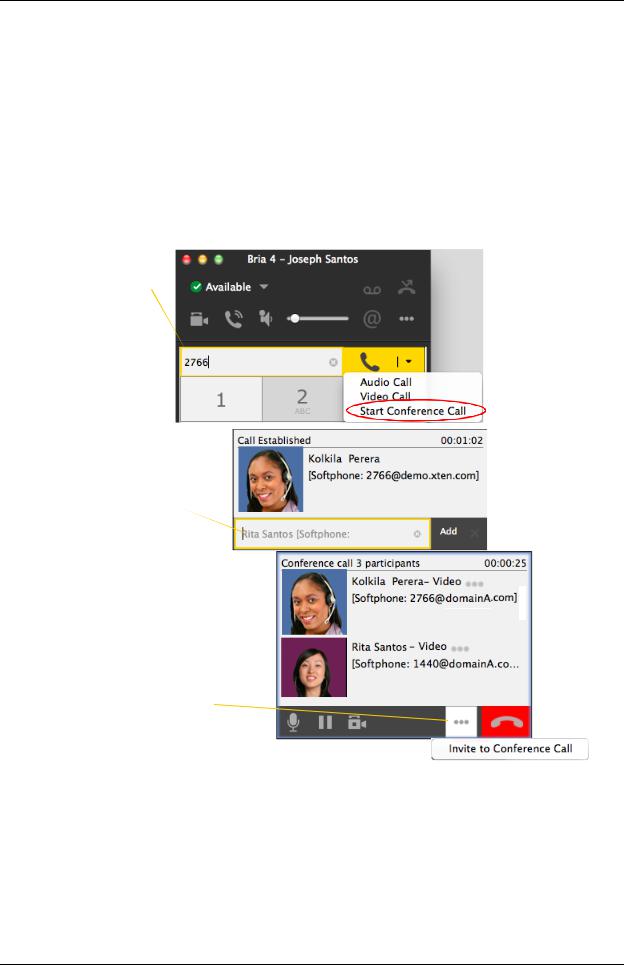
Starting a Conference Call
You can start a conference call by:
•making a conference call from the dashboard,
•adding participants to an existing established call, or
•having two established calls and merging them to a conference call.
From the Dashboard
•Enter the number or address by typing
•Or select from the redial list
Then choose Start
Conference Call
Type a name or number.
Click Add. 
You can add more participants from here
20
Bria 4 for Mac User Guide – Retail Deployments
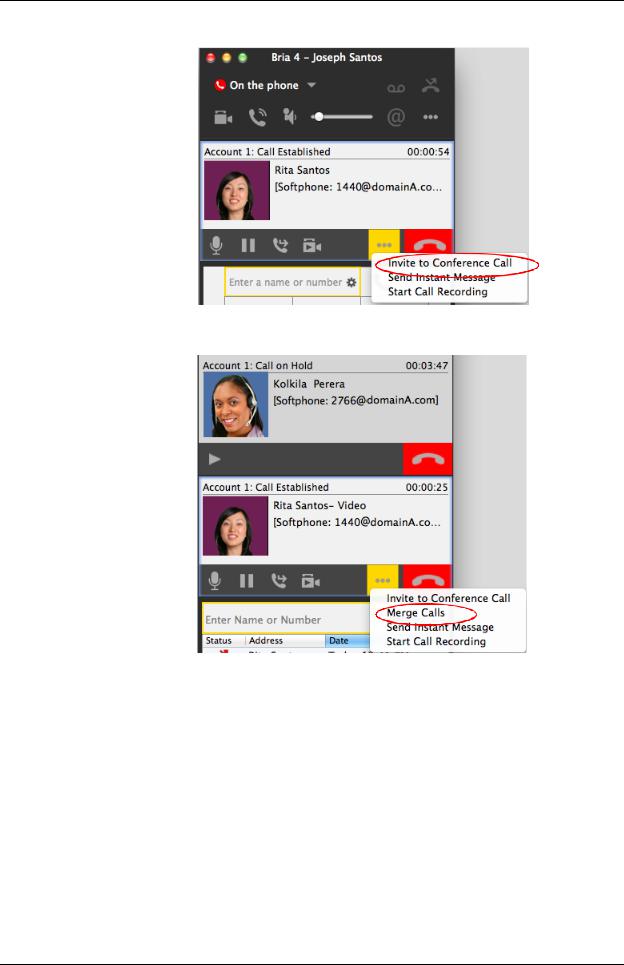
From an Existing Call
From One Established Call
From Two Established Call
21

CounterPath Corporation
Managing the Conference
Participant menu
Conference call menu
Mute. When you mute during a video call, you may also want to click Stop Video to stop the video feed.
Adding More Participants
You can add more participants to an existing conference in any of these ways:
•Control-click on a contact and choose Add to Conference Call.
•In the conference call panel, click Invite to Conference Call, enter a name and then click Add.
•Add in a separate call that is not part of the conference call: In the call panel for the individual call, click the down arrow and choose Merge Calls. This call is added to the conference call.
Send an Instant Message
Click the down arrow beside a participant name and choose Send Instant Message.
Removing a Participant
To remove one call from the conference, click the down arrow beside a participant name and choose Separate. The call becomes a separate call.
Ending the Conference
To hang up on everyone, click the End button.
Suspending the Conference
To suspend the conference, click the Hold button. All participants are put on hold.
If you need to speak to one participant separately, put the conference on hold, separate the one participant from the conference, take that person off hold. When done, merge the participant back into the call.
22
Bria 4 for Mac User Guide – Retail Deployments
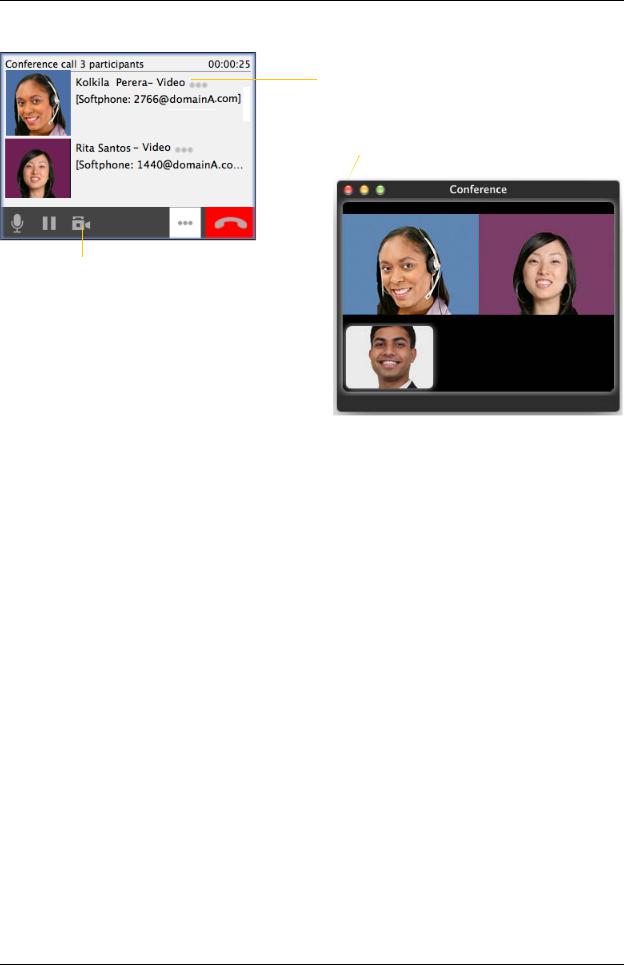
Video Conference Calls
“Video” appears beside each person
Closing the video window stops sending video.
Start and stop sending your video to all participants
Starting a Conference with Video
When you start a conference from established calls, video is included if at least one of the calls already includes video. Video is sent to all the participants.
When you start a conference from scratch, video is not included. You can open your video window and choose to add video at any time. Video is sent to all the participants.
How Video Is Shared
The conference host (the person who starts the conference) serves as the host for other video. Whatever the conference host is receiving will automatically be sent to the other parties.
If the conference host pauses or stops video, other participants will no longer receive video.
23
Loading...