

Page 1
Bria 3 for Linux Administrator Guide
Page 2

CounterPath Corporation
CounterPath Corporation
Suite 300, One Bentall Centre
505 Burrard Street, Box 95
Vancouver, BC V7X 1M3
Tel: 604.320.3344
sales@counterpath.com www.counterpath.com
© July 2010 CounterPath Corporation. All rights reserv ed.
This document contains information proprietary to CounterPath Corporation, and shall not be used for
engineering, design, procurement, or manufacture, in whole or in part, without the consent of CounterPath
Corporation.
The content of this publication is intended to demonstrate typical uses and capabilities of the CounterPath
Bria 3 softphone application from CounterPath Corporation. Users of this material must determine for
themselves whether the information contained herein applies to a particular IP-based networking system.
CounterPath makes no warranty regarding the content of this docu ment, including—but not limit ed to—implied
warranties of fitness for any particular purpose. In no case will CounterPath or persons involved in the
production of this documented material be liab le for any inciden tal, indire ct or otherwise co nsequential damage
or loss that may result after the use of this publication.
CounterPath and the logo are trademarks of CounterPath Corporation.
Ubuntu and Canonical are registered trademarks of Canonical Ltd.
This manual corresponds to version 3.1 of Bria 3 for Linux.
Rev 2
2
Page 3

Content s
Overview.......................................................................................................................................1
System Requirements .............................................................................................................1
Multimedia Device Requirements ..........................................................................................2
Deploying through Manual Configuration: Recommended Procedure..................................3
Deploying through Remote Provisioning: Recommended Procedure....................................4
Configuring Bria...........................................................................................................................6
Configuring Accounts.............................................................................................................6
Configuring Global Settings (Preferences).............................................................................7
Setting up Contacts.................................................................................................................7
Managing Licenses .................................................................................................................8
Account Configuration Reference ................................................................................................9
SIP Account Properties – Account .........................................................................................10
SIP Account Properties – Voicemail ......................................................................................11
SIP Account Properties – Topology .......................................................................................13
SIP Account Properties – Storage...........................................................................................14
SIP Account Properties – Security..........................................................................................15
SIP Account Properties – Advanced.......................................................................................17
Preferences Reference...................................................................................................................19
Preferences – Network............................................................................................................20
Preferences – Audio Codecs...................................................................................................21
Preferences – Quality of Service ............................................................................................23
Preferences – Directory ..........................................................................................................24
Preferences – Advanced..........................................................................................................25
A Dial Plan....................................................................................................................................27
B Contact List Headings...............................................................................................................35
C Glossary.....................................................................................................................................37
1
Page 4

CounterPath Corporation
2
Page 5

1 Overview
This manual is intended for:
• “Retail” users. You are a retail user if you are working in a non-office environment and you are your own
system administrator.
• System administrators who have purchased Bria 3 for Linux from the CounterPath website and are
deploying it for use by the staff in an enterprise. The staff are considered “enterprise users”. The
administrator should be familiar with PBX solutions, telephony and VoIP telephony.
You can deploy Bria by manually configuring via the softphone GUI, or using a provisioning server. If you are
planning to implement provisioning, you must also read:
• “Bria 3 Provisioning Guide - Retail Edition”
For more information on the documents you should read, go to http://www.counterpath.com/bria.html, click
Resources, and read the “Bria 3 for Linux Administrator Orientation”.
1.1 System Requirements
System Requirements
Hardware Requirements
• 1 Ghz processor or faster.
• 256 MB RAM.
• 20 MB free disk space on your hard drive.
• Internet connection - broadband is best (GPRS is not supported for voice calls).
• Microphone and speakers or headset. Headsets with built-in AEC are recommended.
Software Requirements
• Qt 4.4.0
• libasound2 1.0.18
•Gconf 2.2
• PulseAudio 0.9.16 (optional)
• Ubuntu 10.04.
1
Page 6

CounterPath Corporation
1.2 Multimedia Device Requirements
Bria requires both speakers and a microphone to make calls. Any of the following are acceptable:
• External speakers and microphone
• Built-in speakers and microphone
• Dual-jack multimedia headset
• USB multimedia headset
• USB phone.
2
Page 7
Bria 3 for Linux Administrator Guide
1.3 Deploying through Manual Configuration: Recommended Procedure
If you have chosen to manually configure Bria and will not implement remote provisioning, read this entire
manual.
If you are a service provider, you should be aware that if you deploy through manual configuration then users
do not log in, which exposes your service to abuse and may compromise the user’s privacy.
Configuring Bria: Administrator Steps
The general procedure is:
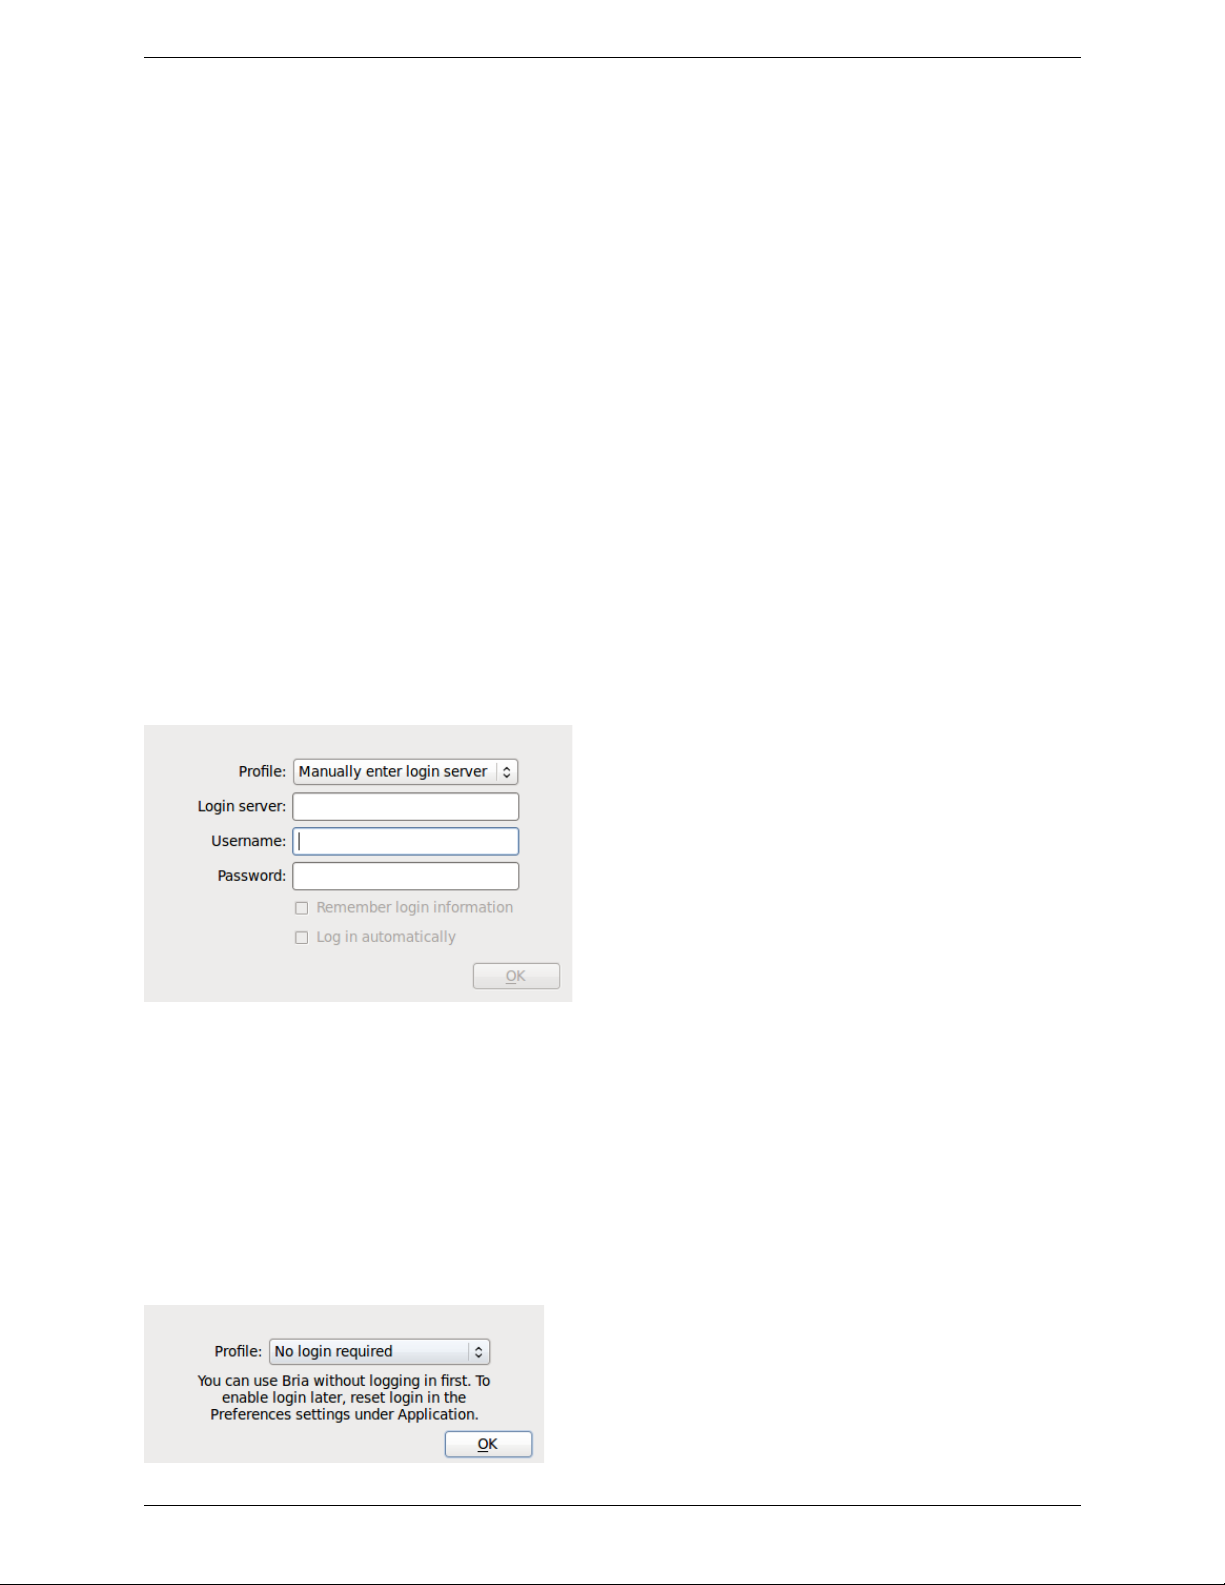
1. Install and start Bria. The Bria Login dialog appears with the Profile set to “Manually enter login server”.
Set the profile to “No login required” and click Continue. The softphone appears.
2. Configure Bria to work on your network and with your services. Use the Account Settings window
(Softphone > Accounts) and the Preferences window (Softphone > Preferences.
The rest of this manual describes this configuration.
3. When you are satisfied with the configuration, deploy to your employ ees or users.
4. Then either configure the application for each employee, or provide them with a list of settings so th at they
can configure it themselves.
Instructions for your Users
Because you are not provisioning Bria, your users do not need to log on. Instruct your users to start Bria as
follows:
• The first time the user starts Bria, the Login dialog appears.
• The user should set the profile to “No login required” and click Continue.
Bria will start and the user can configure the softphone. The next time the us er starts Bria, the Login dialog will
not appear: Bria will start immediately.
3
Page 8
CounterPath Corporation
1.4 Deploying through Remote Provisioning: Recommended Procedure
Configuring Bria: Administrator Steps
If you are deploying through remote provisioning you will need to start Bria without provisioning in order to
explore configuration options.
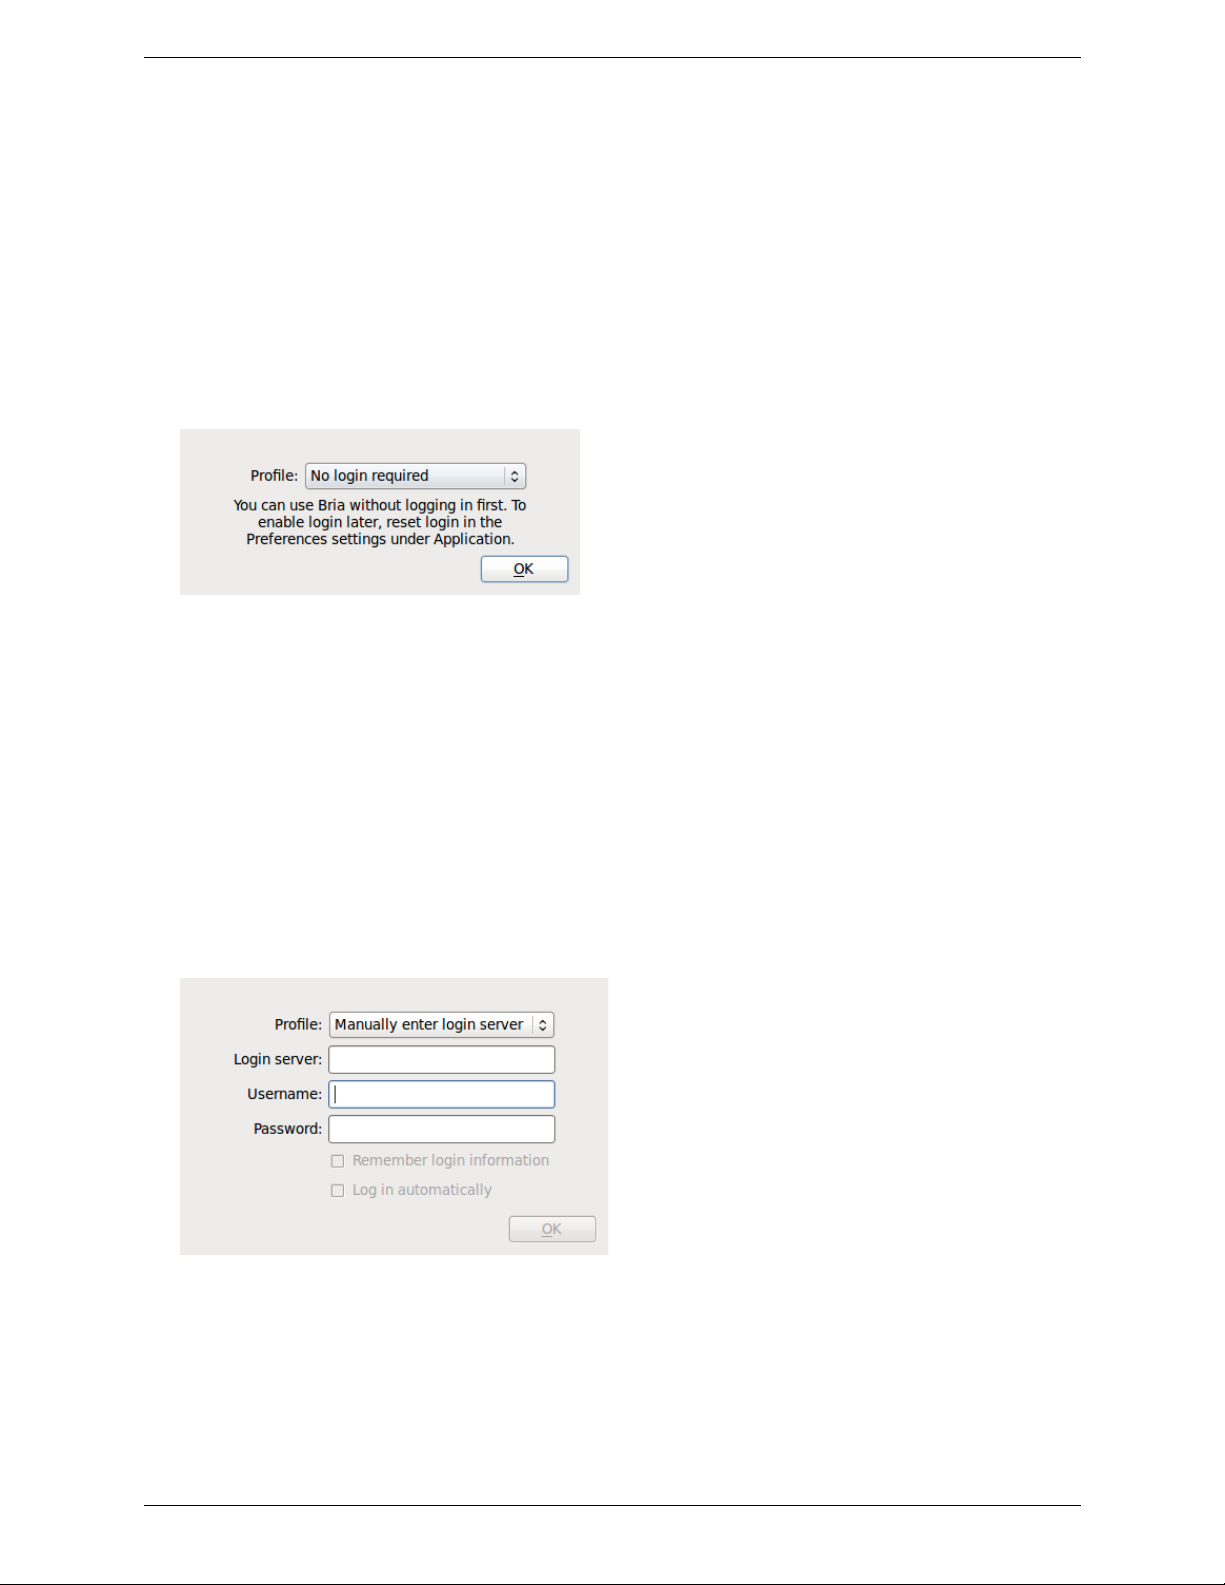
1. Install and start Bria. The Bria Login dialog appears with the Profile set to “Manually enter login server”.
Set the profile to “No login required” and click Co ntinue. The softph one GUI appe ars. From now on , when
Bria starts, the Login dialog will not appear.
2. Manually configure Bria to work on your network and with your services. Use the Account Settings
window (Softphone > Accounts) and the Preferences window (Softphone > Preferences.
The rest of this manual describes this configuration.
3. When you are satisfied with the configuration, see the “Bria 3 Provisioning Guide - Retail Edition” for
information on setting up your users for remote logi n and remote provisioning.
4. In addition, just before you deploy across your enterprise, change the setup for your own Bria to follow the
correct login procedure:
• Start Bria, go to the Preferences > Application page and check Enable login screen.
• Shut down Bria and restart. The Login dialog will appear.
• Choose “Manually enter login server” and complete the other fields. Click OK.
4
Page 9
Bria 3 for Linux Administrator Guide
Using the “No Login” Profile
If you ever need to start Bria without logging in:
1. Go to the Preferences > Application page and check Enable Login screen.
2. Restart Bria. The Login dialog will appear.
3. Choose “No login required” and click OK.
Bria will start, using the local version of the configuration data that is saved on your computer (from the
first time you used Bria without logging in).
Keep in mind that when you are supp orti ng remot e provisioning, starting Bria without logging in is intended to
allow you, the administrator , to experiment wi th login opti ons. It is not inten ded to allow u sers to skip login , for
example, by displaying the Login dialog and choosing the “No login required” option.
If a user first logs in and then later changes to “No login required”, Bria will start but none of the user’s account
credentials or account settings will be available, so Bria will not be usable.
Instructions for your Users
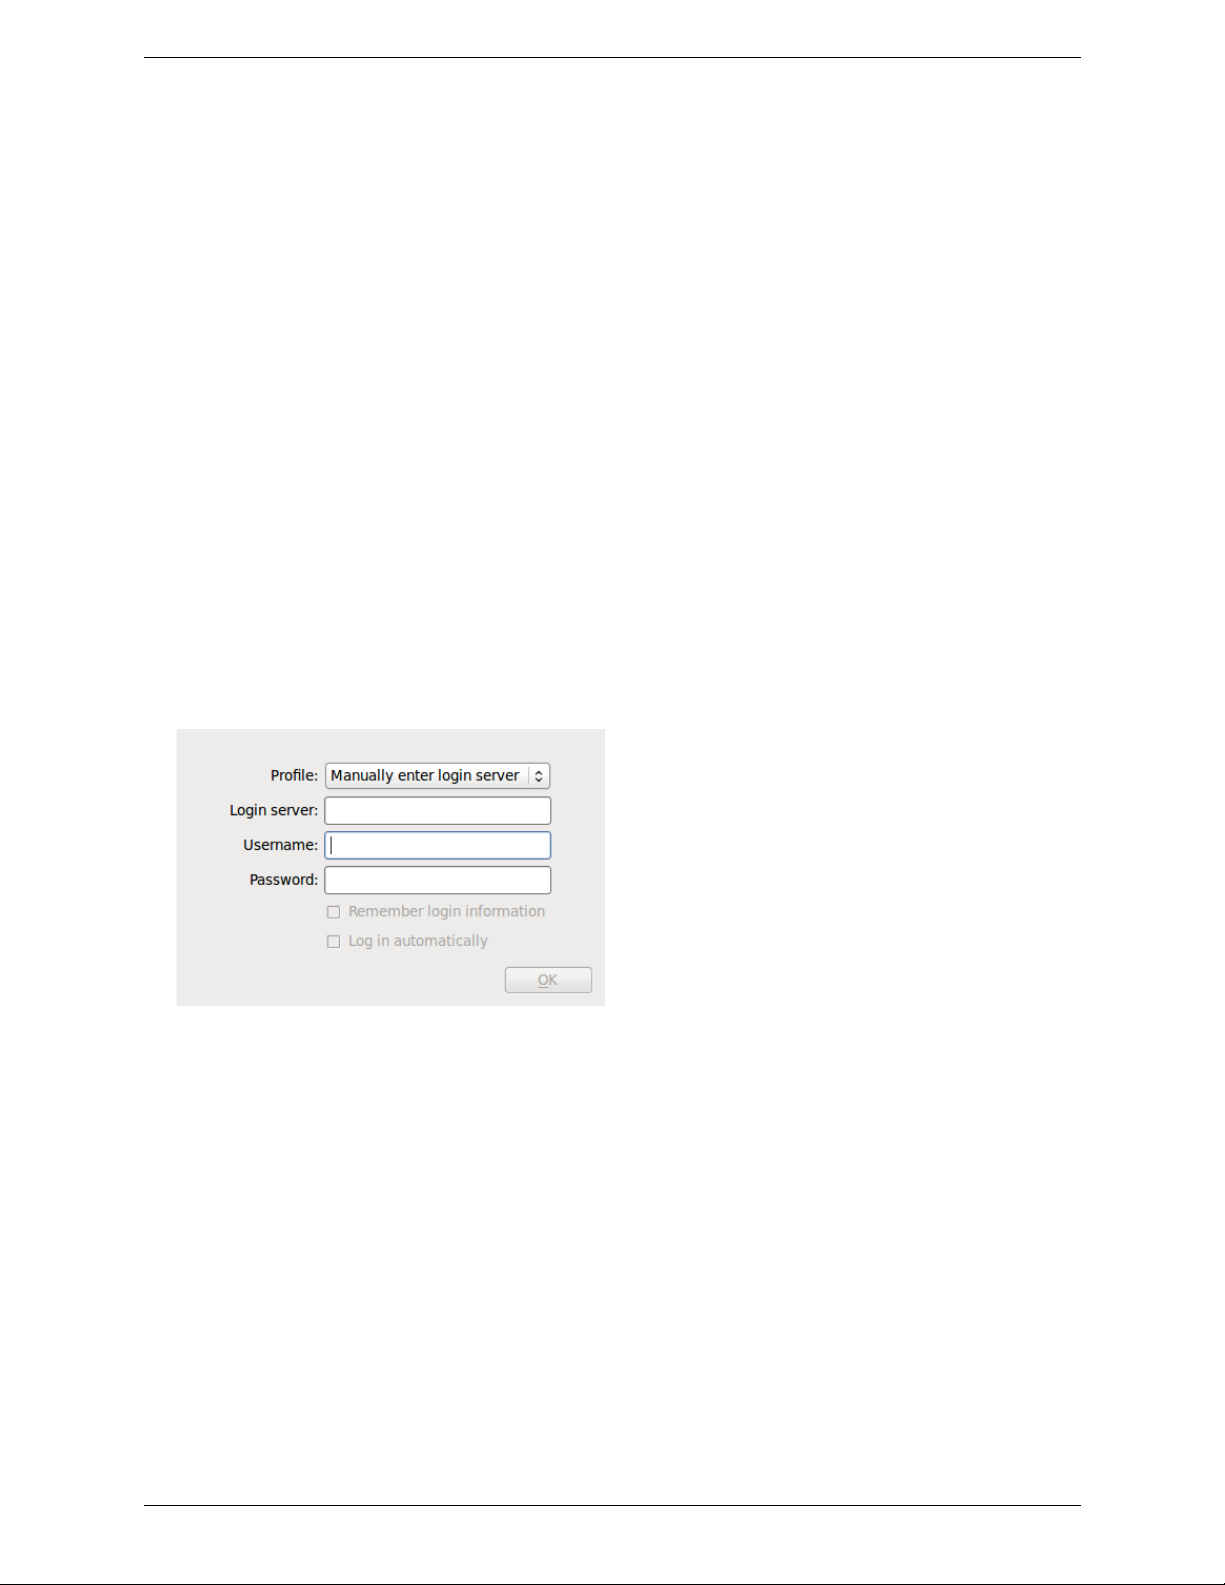
1. When the user starts Bria, the Login dialog appears.
2. The user should set the profile to “Manually enter login serv er”.
3. The user should complete the remaining fields (with information you have provided to each user, perhaps
through an e-mail) and click OK. Bria will start. From now on, the Login dialog will appear at each startup.
5
Page 10
CounterPath Corporation
2 Configuring Bria
2.1 Configuring Accounts
Each user will need at least one SIP account. Each account requires the following information:
•User name
• Password
• Authorization Name (if applicable; see page 10 for information)
•Domain
Procedure
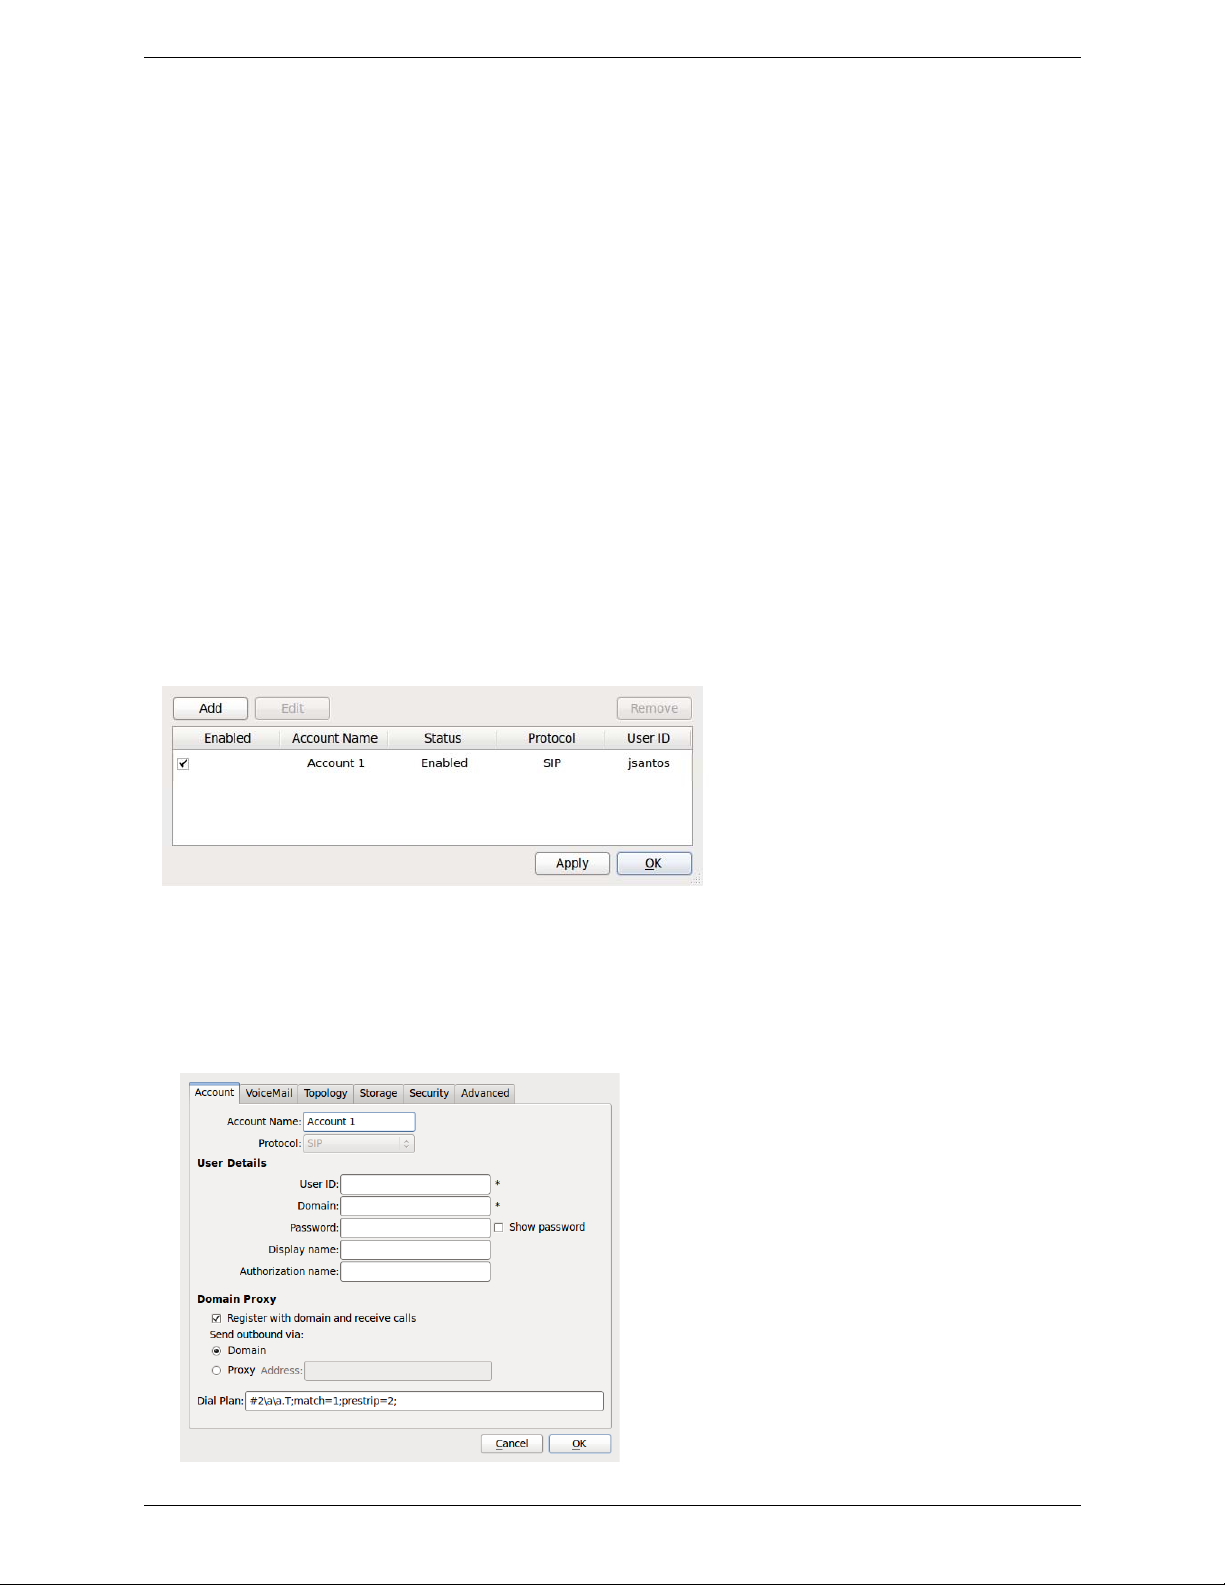
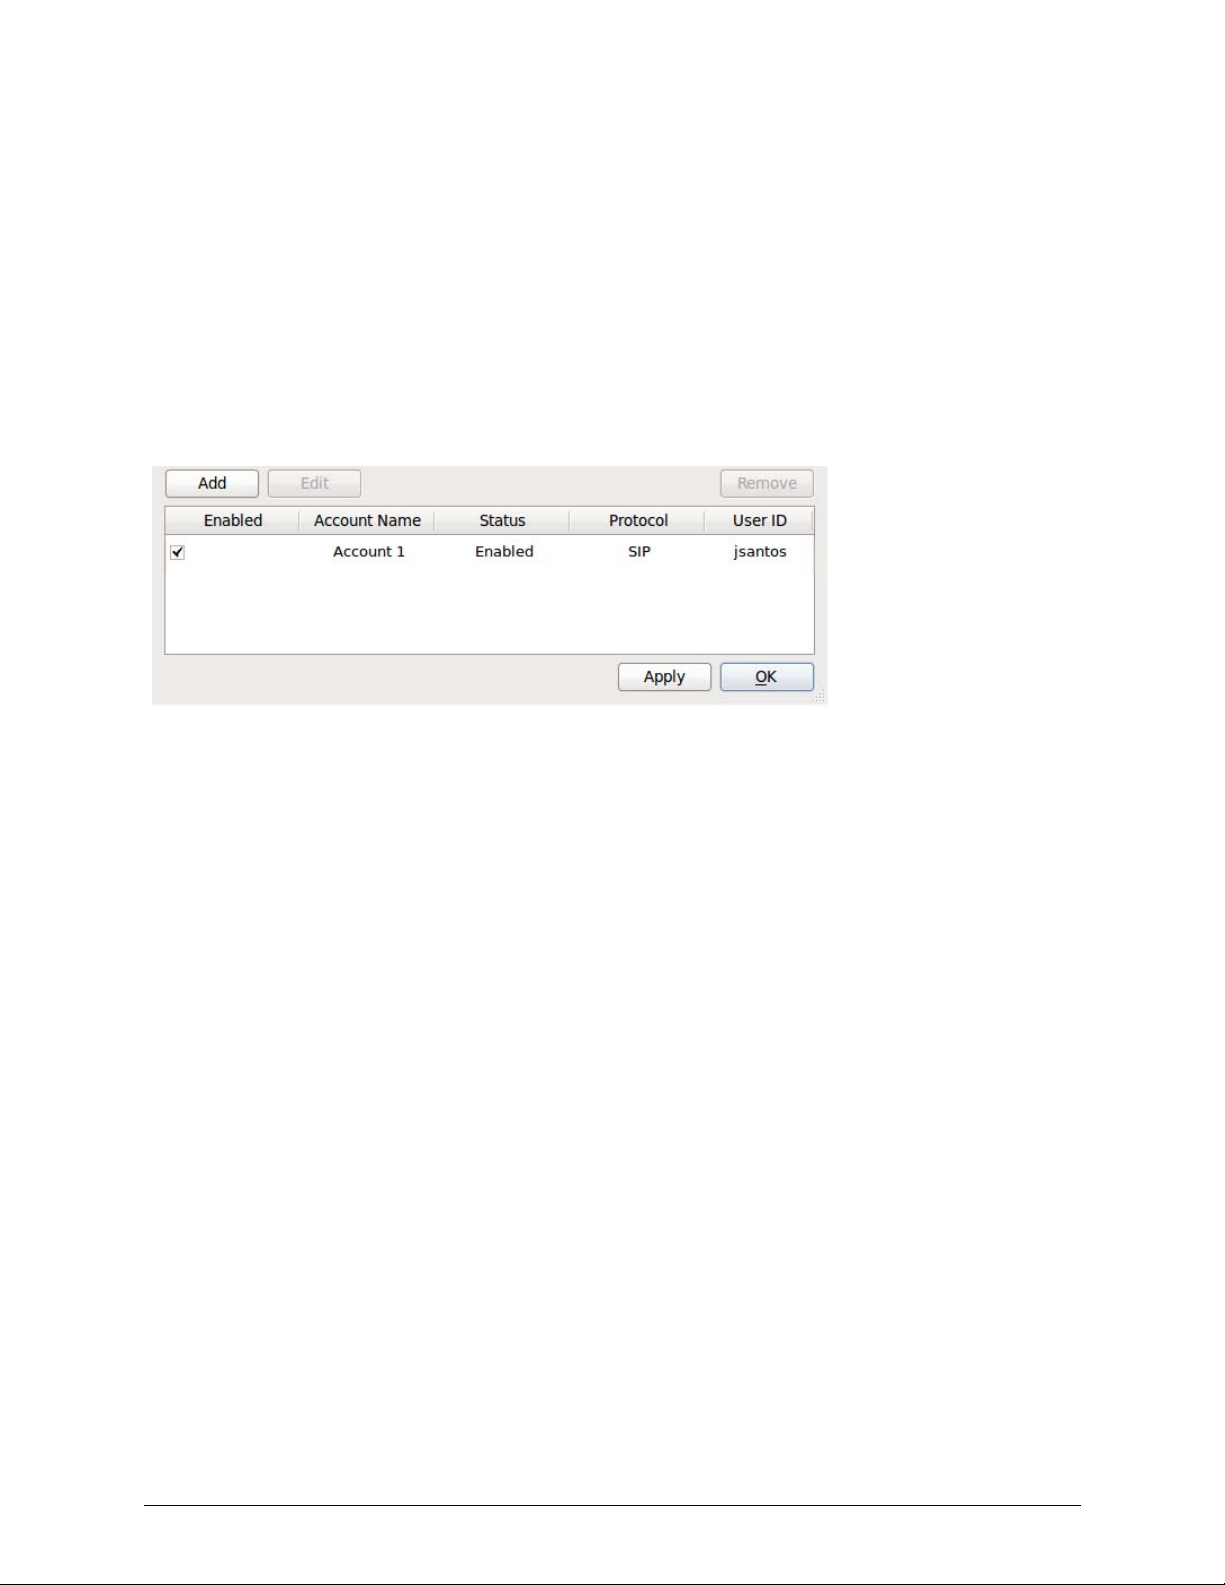
1. From the Bria menu, choose Softphone > Account Settings. The Account list appears.
2. Choose Add; the SIP Account window appears.
3. Enter the User Details and then change or complete all other fields. See “Account Configuration
Reference” on page 9 for details.
4. When done, click OK. The account is created and registered.
6
Page 11

Bria 3 for Linux Administrator Guide
2.2 Configuring Global Settings (Preferences)
Use the Preferences window (Softphone > Preferences) to configure features that apply globall y, rather than on
a per-account basis. The panels that you, as the system administrator, should set are:
• Network. You should complete these fields to suit your network.
• Audio Codecs. You should enable the codecs that are suitable to your environment.
• Quality of Service. If your VoIP service provider supports QoS, you can configure Br ia for it.
• Directory. You can set up a company directory on a server and connect Bria to it via the LDAP protocol.
The directory will appear in the Directory tab. Information in this tab will update automatically whenever
the information on the LDAP directory changes.
• Advanced.
See “Preferences Reference” on page 19. For information on the pa nel s tha t are no t di scusse d in this guide, see
“Bria 3 for Linux User Guide”.
2.3 Setting up Contacts
Typically, users will want to create contacts in order to easily make phone calls. In addition, in order to send
IMs, shared online information and transfer files, contacts are required.
Contact Storage
You can set up Bria so that contacts are only stored locally on each user’s computer, or both locally and
remotely on a WebDAV or XCAP server. See page 14.
Populating the Contact List
You may want to provide an initial contact list for users who are using Bria. You can:
• Provide a file that users can import. See below.
This option makes sense if users will be set up to store their contacts locally or on a WebDAV or XCAP
server. It cannot be used if users will be set up to use the Outlook address book for contacts.
• Create an LDAP directory and set up users to connect to this directory. Once Bria is connected to the
directory, the directory contents appear in the Directory tab (alongside the Contacts and History tabs) and
users can choose to create a contact from any entry. See page 24.
Importing Contacts
You can provide a file (for example, the company contact list) that each user can import as desired. The import
file can be:
• A comma-separated file. Use this method to import from a Microsoft® Excel® file. You will first have to
set up the file; see below.
• A vCard file (*.vcf file). A vCard is an electronic business card that is often attached to an email.
Setting up an Excel File for Import
1. Remove any introductory text or headings from the top of the file. (You can keep text at the end of the file;
it will be ignored during the import.)
7
Page 12

CounterPath Corporation
2. Insert a blank row as the first row. In this row, type the headings that Bria will use to interpret the meaning
of each column. The columns can be in any order. Key headings are:
• uri. Bria recognizes a value in this column as a soft phone address a nd considers t he address as one that
can be phoned.
• display-name, entry_id, given_name, surname
• business number
For a complete list of headings, see page 35.
3. Save the file as *.csv.
2.4 Managing Licenses
When you obtain Bria, you purchase a license with a specified number of seats. Each time a user enters the
license key, the license count is drawn down on the CounterPath license database. When the count is drawn
down to 0, then the next time the key is entered, an error message appears for that user.
You can either increase your license count or revoke unused seats. To revoke seats, go to ww.counterpath.com,
click the Store link, click the Your Account link, and log in.
Users on the same computer can use the same license but they all need to enter it first time they run the client
(the key is saved to own home folder so other users cannot read it).
Therefore, if you seem to have drawn down more license counts than expected, the problem may be that one or
more guests have used seats. You can request that CounterPath revoke these licenses in order to reinstate the
number of seats actually in use.
Setting up for the Licensing Server
Periodically, Bria connects to CounterPath’s license server in order to verify that a valid license is being used.
Therefore, at all times, Bria will need to have an internet connection.
Bria connects to https://secure.counterpath. com via port 443; make sure your firewall allows this HTTPS traf fic
to this URL.
8
Page 13
3 Account Configuration Reference
The Account Settings window lets you configure features that apply on a per-account basis. (The preferences
window lets you configure features that apply across all accounts.)
1. Choose Softphone > Account Settings from the menu. The Accounts list appears.
2. Edit an existing account or create a new one. The Account Settings window appears.
9
Page 14

CounterPath Corporation
Fields with an asterisk are
required
3.1 SIP Account Properties – Account
Table 1: SIP Account Properties – Account
Field Description
Account name If desired, change the account name to something that is meaningful to you.
Protocol Read-only. Always specifies SIP.
User Details
User ID The account number for the softphone account. For example, kpereira.
Domain For example, myVoipProvider.com.
Password The account password, which is not the same as the login password (if login is used).
Display name This name is displayed in the Bria display.
Other people will see you as this name.
Authorization name Typically not used in an enterprise environment. This name is useful if, for example, you
allow user IDs that are short and therefore easy to guess. The authorization name is used in
place of the user name to register the account with the SIP registrar.
Domain Proxy
Register with domain and receive
calls
Send outbound via • Domain: If your VoIP service provider requires that traffic be directed to proxies that are
Dial Plan The default plan is:
Typically, this field is checked.
A situation in which this field is unchecked is, for example, if your level of service does not
include the ability to receive incoming calls. In this case, turning this field on may cause
registration to fail (when you close the Account Properties window), meaning that your Bria
cannot register.
discovered via the domain.
• Proxy Address: If your VoIP service provider has an outbound proxy address and requires
that you provide the address to Bria. For the address enter a domain name (for example,
domain.com) or an IP address (for example, 123.456.789.012).
If you are using Bria in a test lab, it is possible that neither of these settings is suita ble; see
page 18 for a third way to direct traffic.
#1\a\a.T;match=1;prestrip=2;
See page 27.
10
Page 15
Bria 3 for Linux Administrator Guide
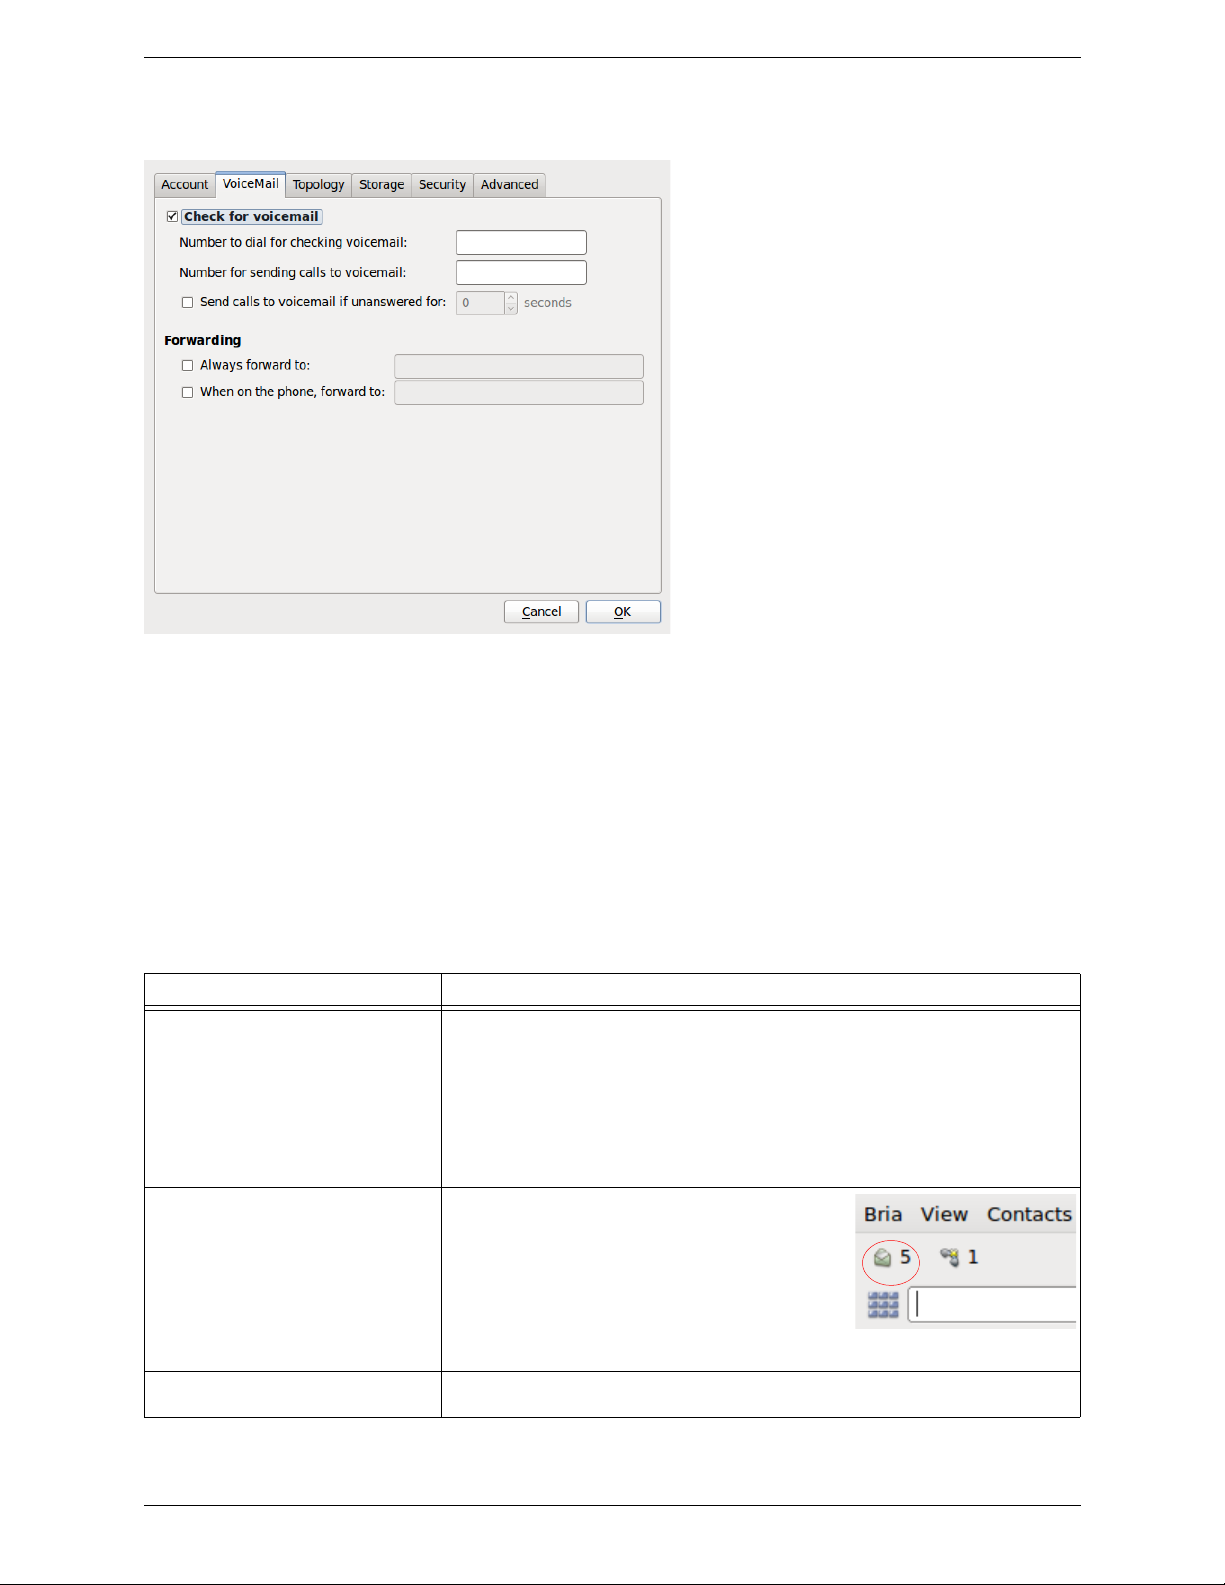
3.2 SIP Account Properties – Voicemail
These settings let you configure client-side voicemail features.
Your IP PBX or VoIP service provider may also provide the ability to configure voicemail (server-side
handling). An incoming phone call first goes through server-side handlers and then through the client-side
handlers. Keep in mind that the fields on this Voicemail tab are not written to the server; they are configuring a
second, separate handler.
You must decide how you want phone calls to be hand led: by the server on ly, by the Bria client only, or by both.
Instruct your users accordingly.
If you decide to allow both, you must make sure that your users understand how the server-side and client-side
voicemail configuration must be synchronized to work together. You must also check what the server-side
settings are and make sure you enter compatible information in Bria.
Field Description
Check for voicemail Set the checkbox in one of these ways:
Number to dial for checking voicemail This is the number that will be called when a user
Number for sending calls to voicemail This is the number that incoming calls will be forwarded to if they are unanswered after
Table 2: SIP Account Properties – Voicemail
• Check the box if Bria must subscribe to be notified when there is a voicemail for
you. In other words, to configure for “subscribe for message waiting”.
• Clear the checkbox if your voicemail server sends notifications without Bria
subscribing. In other words, to configure for “implicit subscription”.
• Clear the checkbox if you do not support voicemail.
Voicemail is controlled by your IP PBX, not by Bria.
clicks the Check for voicemail icon on the softphone,
in order to connect to voicemail and listen to
messages.
• Completing this field activates the voicemail icon
on the softphone.
• If you leave this field empty, then this icon will not
work; users will have to manually dial this number in order to connect to voicemail.
the specified interval (below).
11
Page 16

CounterPath Corporation
Table 2: SIP Account Properties – Voicemail
Field Description
Send calls to voicemail if unanswered To send to voicemail after the specified number of seconds.
Your IP PBX may also provide a similar feature that is set up outside of Bria. If so,
make sure you do not enter competing information in Bria and in the IP PBX’s user
interface. For example, if you turn off this field, make sur e the same feature at your
service provider is also turned off. Otherwise, all your calls will continue to be
forwarded.
Always forward to this address Typically, each user sets this field up individually, to suit their needs. This feature works
even if the VoIP service does not include voicemail.
To always forward phone calls received on this account.
Enter the address to forward to, but leave the checkbox cleared (the individual user will
click it when desired). Phone calls received on other accounts (if you have them) are not
affected by enabling this field for this particular account.
When on the phone, forward to T ypically, each user sets this field up individually, to suit their needs. This feature works
even if the VoIP service does not include voicemail.
To forward only when you are on another phone call.
Enter the address to forward to, but leave the checkbox cleared (the individual user will
click it when desired). Phone calls received on other accounts (if you have them) are not
affected by enabling this field for this particular account.
Your service provider may provide a similar feature that is set up outside of Bria. If so,
your users must make sure they do not enter competing information in Bria and in the
service provider’s user interface. For example, if they turn off this field, make sure the
same feature at your service provider is also turned off.
12
Page 17
Bria 3 for Linux Administrator Guide
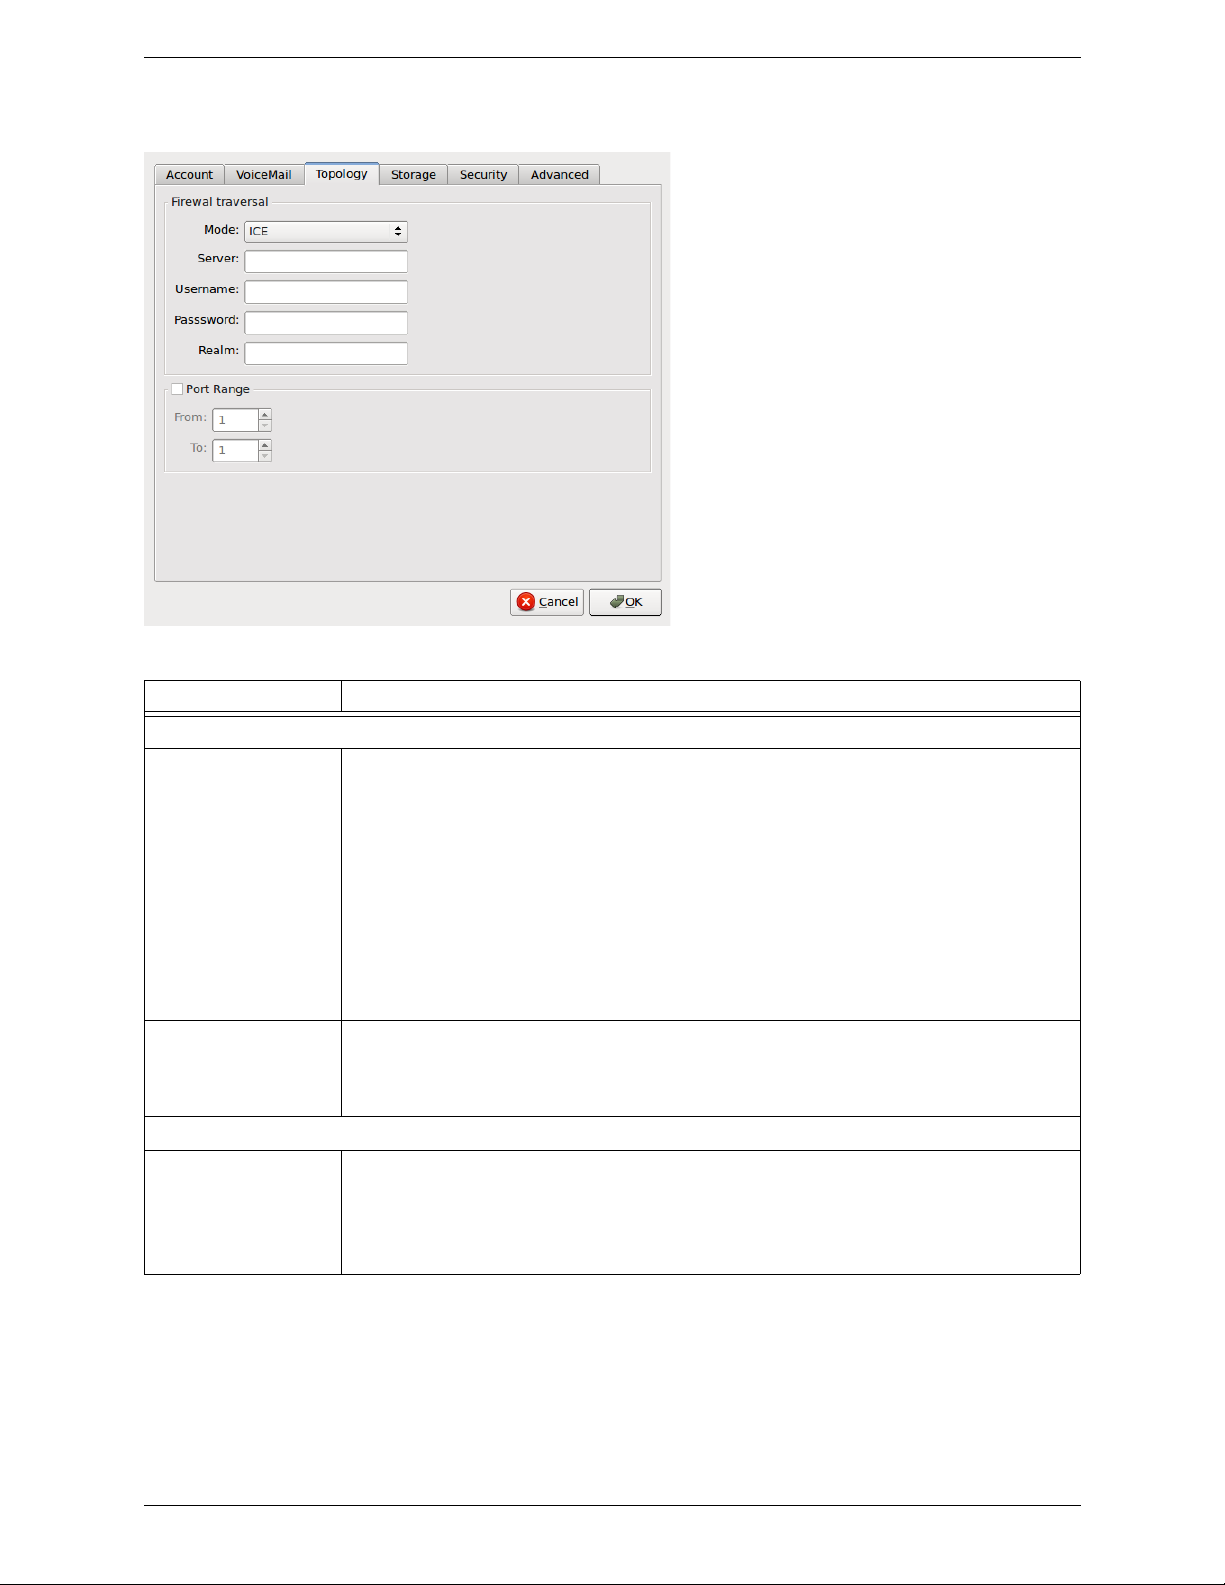
3.3 SIP Account Properties – Topology
Table 3: SIP Account Properties – Topology
Field Description
Firewall traversal
Mode • ICE: Automatically determine the contact address for signaling traffic.
Advertise the local IP, public IP (discovered via STUN, if available), and media relay IP
(discovered via TURN, if available), and use these to automatically determine the best route for
media traffic during calls.
• STUN: Advertise the public IP address (discovered via STUN) for the contact address for
signaling traffic, and for the connection address for media traffic.
• TURN: Advertise the public IP address (discovered via STUN) for the contact address for
signaling traffic.
Advertise the address of a media relay server (discovered via TURN) for the connection address
for media traffic.
• None: Advertise the local IP address only for both signaling and media traffic.
Server address • Empty: Discover the address of the firewall traversal server (the STUN or TURN server), if
available, using DNS SRV.
• Specified: Use the firewall traversal server specified as either an IP address or a fully qualified
hostname.
Ports
Port range The appropriate setting depends on your computer setup:
• Checked: If your computer is behind a restrictive firewall that only allows specific port ranges to
be used. Enter the range of ports to use for your SIP account. (You must also open those ports on
your firewall; refer to applicable firewall documentation for information.)
• Unchecked: If your computer is not behind a restrictive firewall.
13
Page 18
CounterPath Corporation
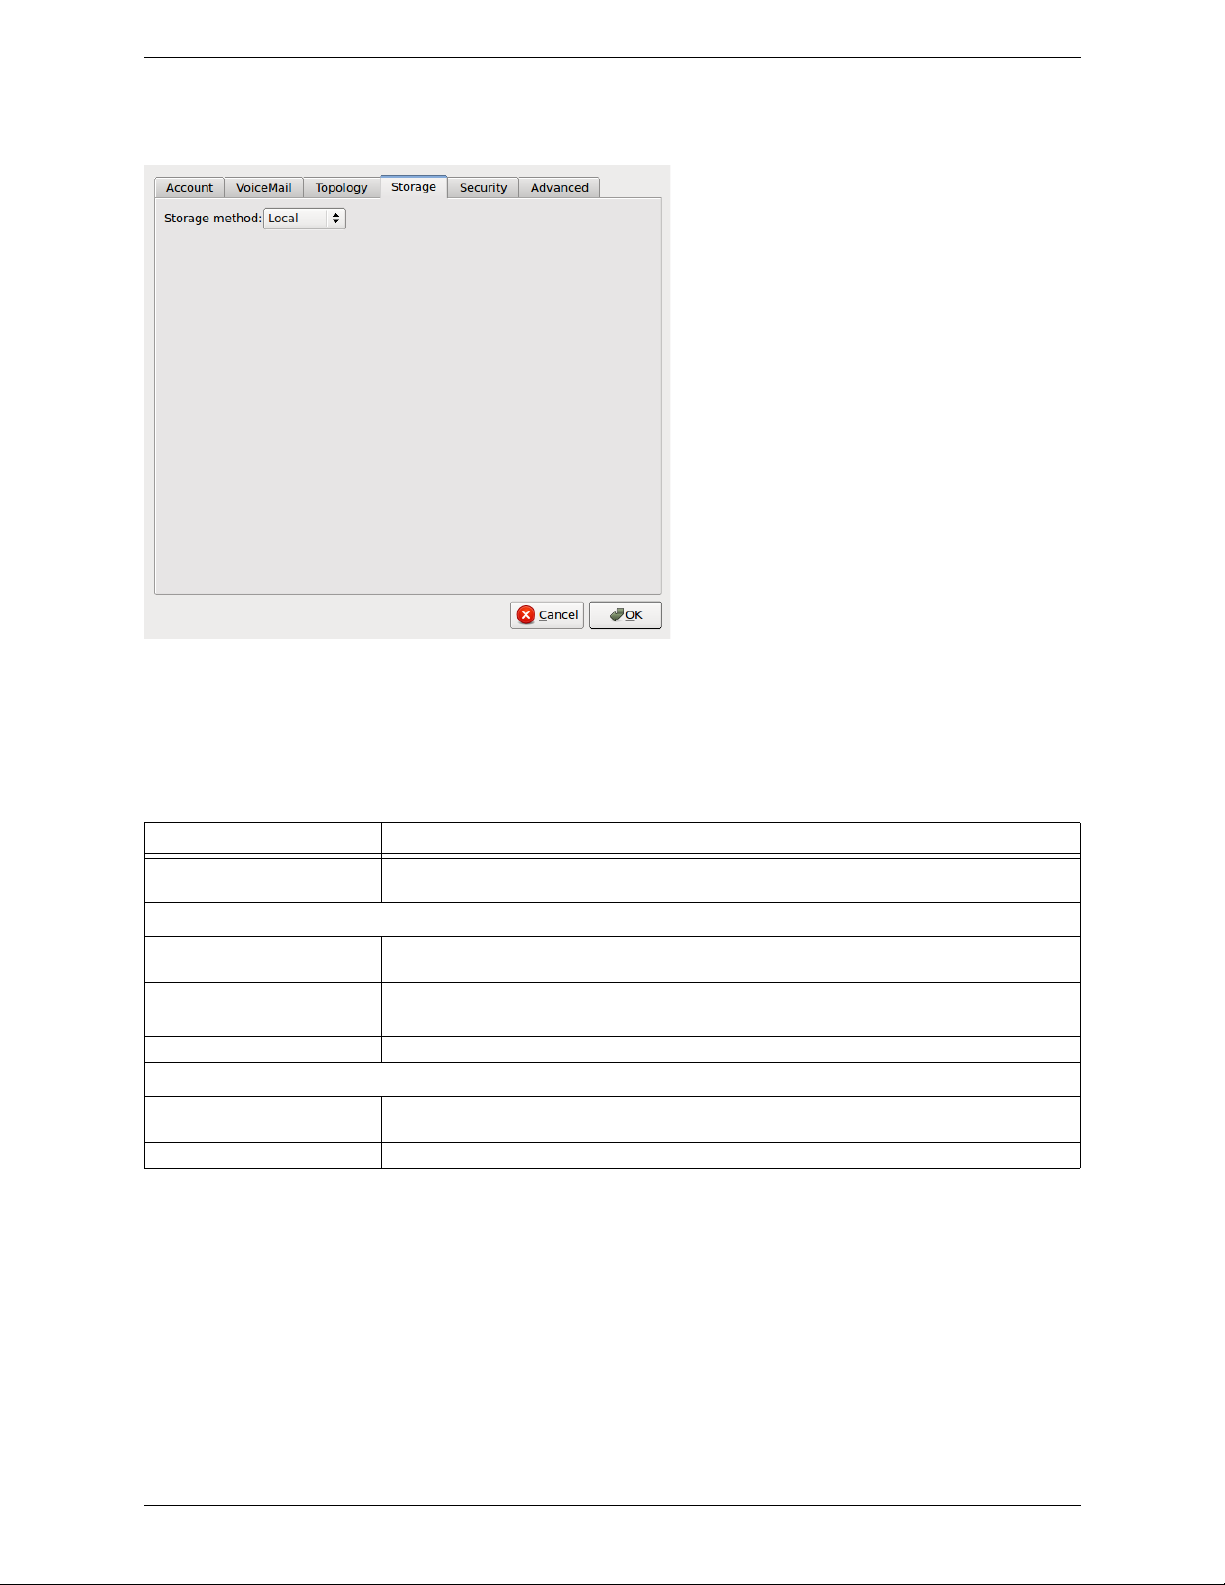
3.4 SIP Account Properties – Storage
These settings let you set up a remote storage system for your contact list. The options are:
• Local: The contact list is stored only on the user’s computer.
• WebDAV or XCAP: The contact list is stored remotely via the specified method and is also stored locally,
on the user’s computer.
Table 4: SIP Account Properties – Storage
Field Description
Storage method The storage method to be used for the Contact list file. The file can be stored locally or both
locally and on a remote computer.
WebDAV Settings
Root URL URL of an appropriate root folder on the remote server. The factory setting is https://
webdav.$domain$/webdav/$username$/
WebDAV poll time The time that elapses between polling for new contact data from the remote server.
The factory setting is 600.
Username and password The user name and password to log into the storage server.
XCAP Settings
Root URL URL of an appropriate root folder on the remote server. The factory setting is https://
xcap.$domain$/xcap/$username$/
Username and password The user name and password to log into the storage server.
14
Page 19
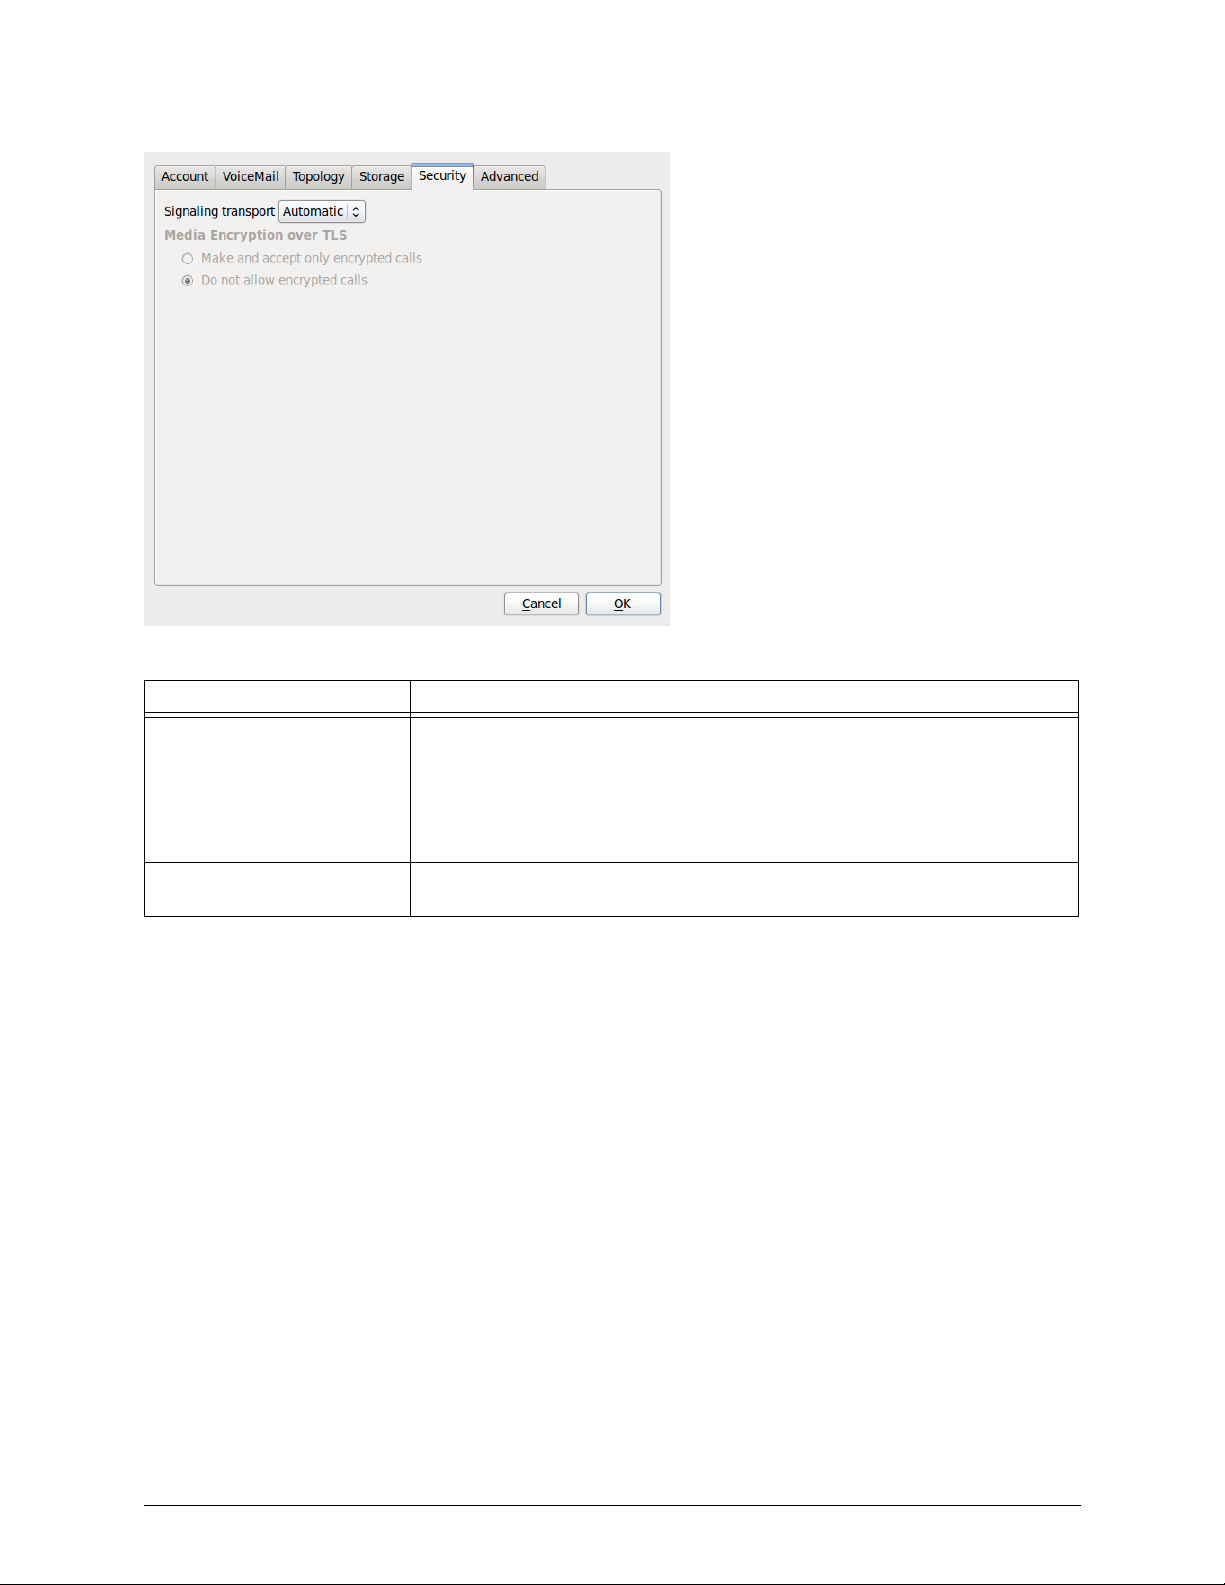
3.5 SIP Account Properties – Security
Table 5: SIP Account Properties – Security
Field Description
Signaling Transport • Automatic: Bria sets up the transport based on the capabilities of the network and the
Bria computer. Choose this option if you do not care which transport is used.
• TCP: This transport provides no signaling security.
• UDP: This transport provides no signaling security.
• TLS: Choose this option to request signaling encryption or both signaling and media
encryption.
Media Encryption over TLS See Table 6 on page 16.
The factory setting is Do not allow encrypted call.
You can set up Bria for the type of security (encryption) you want for incoming and outgoing calls.
Bria supports:
• Signaling encryption using TLS
• Media encryption using SRTP.
Setting up for Security outside of Bria
When using TLS, you must have the root certificate that signs the proxy's chain of certificates. In most cases,
the root certification will already be installed. Procedures for the exchange of certificates are outside the scope
of this documentation. The certificates must be stored on the Bria computer, in the root certificate store.
Setting up the root certificate on your computer en sures th at the connection to the proxy is TLS secure (the first
hop). Any proxy in the chain (between you and the caller) that does not support TLS may cause an insecure link
in the chain. Therefore, if the other party is outside your domain, you cannot be completely sure that the call is
secured at the signaling level, which means that you cannot be sure that it is secured at the media level.
15
Page 20

CounterPath Corporation
Setting up for Security within Bria
The options for media encryption are described in the following table.
Table 6: Media Encryption Options
Option How Outgoing Calls are Handled How Incoming Calls Are Handled
Make and accept only
encrypted calls
Do not allow encrypted
calls
Bria will place all calls with TLS. The call
INVITE
will specify SRTP media encryption.
If the correct certificates are not in place or if the
other party does not accept encrypted calls, the call
will fail.
Bria will place only unencrypted calls.
If the other party does not accept unencrypted
calls, the call will fail.
Bria will only accept INVITEs that are for
encrypted calls.
If Bria receives a call INVITE that is not
encrypted, the call will be rejected.
Bria will only accept
unencrypted calls.
If Bria receives a call
call will be rejected.
INVITEs that are for
INVITE that is encrypted, the
16
Page 21
Bria 3 for Linux Administrator Guide
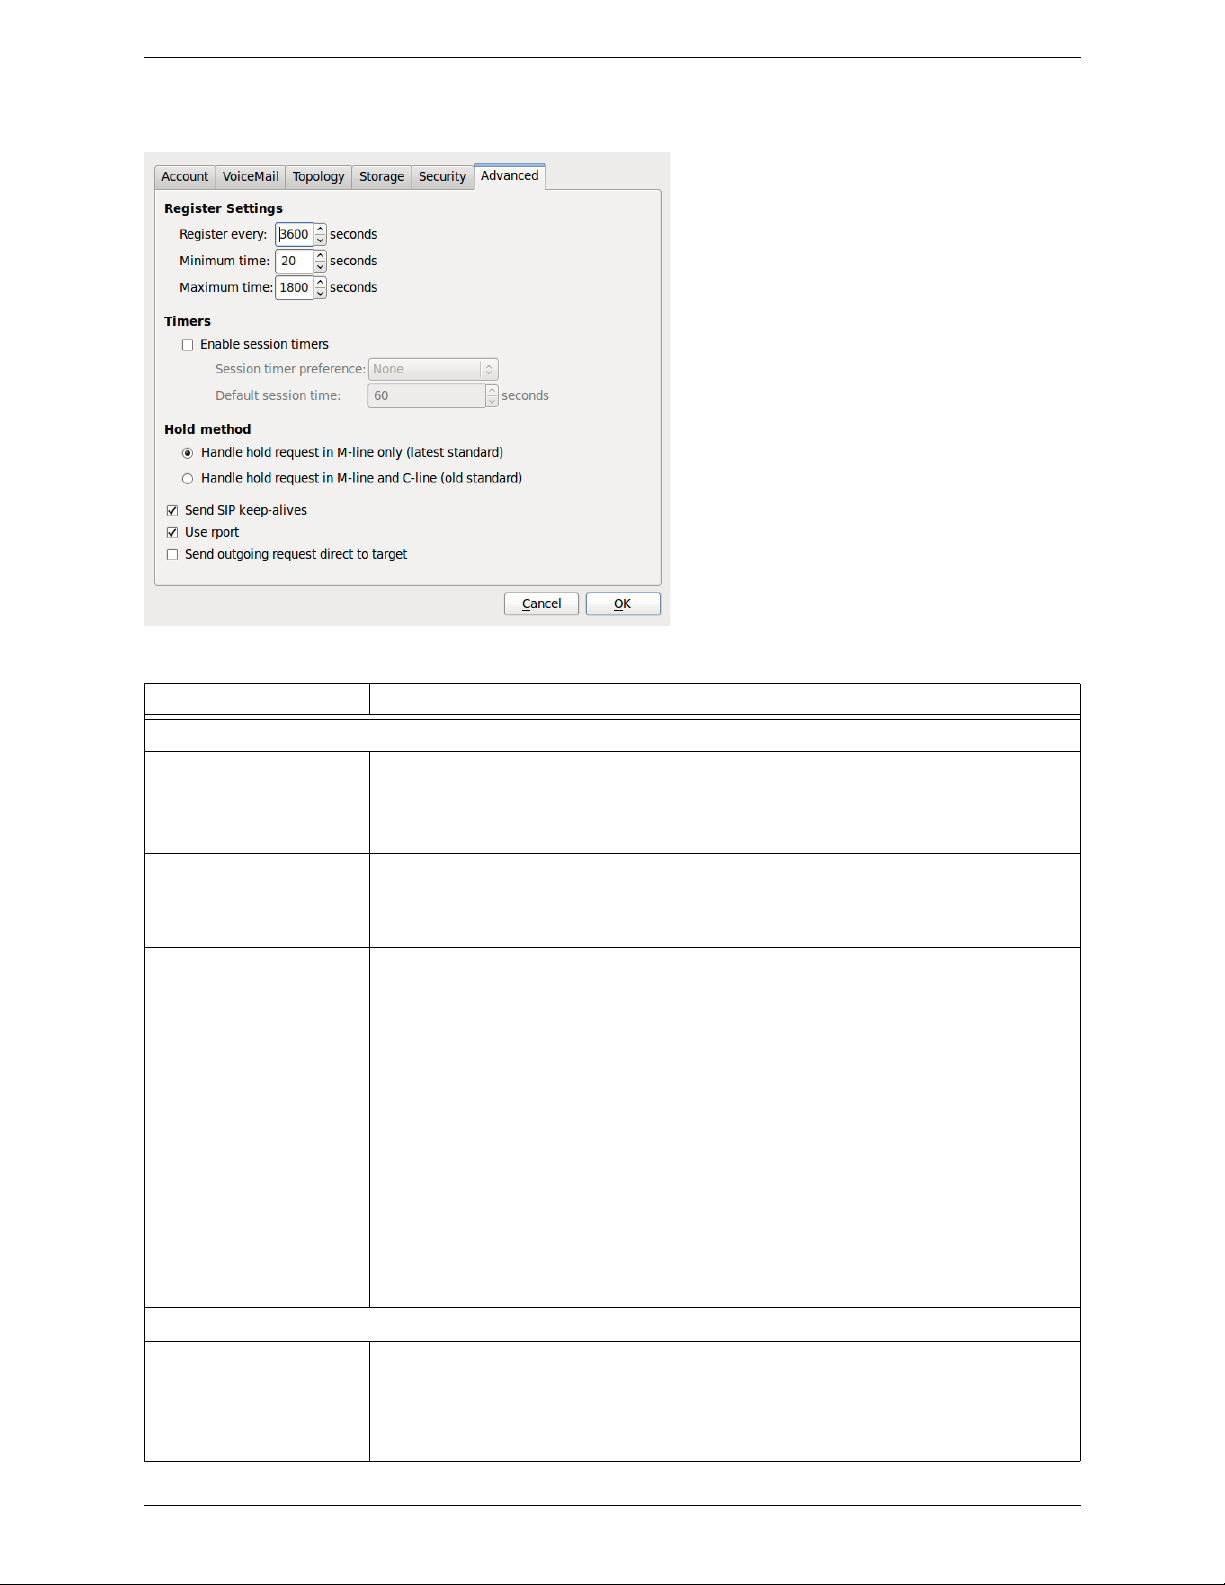
3.6 SIP Account Properties – Advanced
s
Field Description
Register Settings
Reregister every The time interval between Bria’s attempts to reregister in order to refresh the account registr ation.
A value of zero means not to reregister after the initial registration.
This value is placed in the “Expires” header field of the
The factory setting is 3600.
Minimum time If the reregistration fails, Bria will wait this amount of time, then attempt to reregister. If the
second attempt fails, Bria will wait twice this time and try again, then four times this time, and so
on, until reregistration succeeds.
The factory setting is 20.
Maximum time This is the maximum wait time between attempts to reregister. Once this maximum is reached,
Bria will wait this time for all subsequent attempts.
For example, the min. time is 20 secs, the maximum time is 120 secs. Bria will attempt to
reregister as follows:
• Wait 20 secs.
• Attempt to connect.
• If fail, wait 40 secs.
• Attempt to connect.
• If fail, wait 80 secs.
• Attempt to connect.
• If fail, wait 120 secs (the maximum)
• Attempt to connect.
• If fail, wait 120 secs, and so on.
The factory setting is 1800.
Timers
Enable session timers
Default session time
A session timer is a mechanism to detect whether a call session is still active from the signaling
point of view. When the timer expires, a refresh is sent from one party to the other. The timer is
then reset.
• Turn on to enable session timer. Enter a value in Default session time. The facto ry setting is 6 0.
• Turn off to disable session timer; refreshes will never be sent.
Table 7: SIP Account Properties – Advanced
REGISTER message.
17
Page 22

CounterPath Corporation
Table 7: SIP Account Properties – Advanced
Field Description
Session timer preference This field specifies your preference for which party should send the refresh. The preference is not
a guarantee that the refresh will be performed by the specified party. The choices are:
• None: No preference.
• Local refreshes: Your computer sends.
• Remote refreshes: The other party sends.
• UAC refreshes: The user agent client (the party that initiated establishment of the
communications) sends.
• UAS refreshes: The user agent server (the other party) sends.
Send SIP keep-alives Typically on, to instruct Bria to send SIP keep-alive messages in order to maintain a “pinhole”
through your firewall for SIP messaging.
Use rport Typically on.
Send outgoing request
directly to target
When checked, requests with a complete URI (user@ABC.com) go to ABC.com and the “Send
outbound via” field on the Account tab (page 10) is ignored.
If you check this field, make sure you also set “Send outbound via” (on Accounts > Account) to
“Domain”.
Typically off. This field is intended for test labs and may cause problems in a NAT environment.
18
Page 23

Bria 3 for Linux Administrator Guide
4 Preferences Reference
Choose Bria > Preferences. The Preferences window appears.
The Preferences panels let users control the way that they work with Bria. It also contains fields to configure
features that apply globally, rather than on a per-account basis.
The following sections discuss only the tabs and fields that you, the administrator, should complete. Other
fields, which control user preferences, are not discussed.
19
Page 24

CounterPath Corporation
4.1 Preferences – Network
Table 8: Preferences – Network
Field Description
Network Connection Speed Select the type of network connection for your computer.
The sliders move to show the bitrate that will be used for sending and receiving. These rates are
typical rates for the selected configuration.
If you know that your computer and network can handle a faster sending speed, click Custom
and move the slider.
It is recommended that you not change the receiving speed.
You will know that you have set the sending speed too high if the remote audio is garbled.
20
Page 25

4.2 Preferences – Audio Codecs
Bria 3 for Linux Administrator Guide
This panel shows all the codecs that are included in the retail version of Bri a. You can enable or disabl e codecs
as desired.
With only one codec enabled, all calls made will use that codec. With more than one codec enabled, Bria
automatically chooses the best codec based on the other party’s capability, the available bandwidth, and
network conditions.
You cannot change the properties of any codecs.
About Codecs
Audio codecs describe the format by which audio streams are compressed for transmission over networks.
Codecs can be categorized as either narrowband or wideband:
• Narrowband codecs work with low bandwidth such as a dialup internet connection. These codecs have a
sampling rate of 8 kHz.
• Wideband co decs work wit h high ban dwidths and result in be tter audi o quality. However , th ey do not wo rk
with PSTN. These codecs have a sampling rate of 16 kHz.
21
Page 26

CounterPath Corporation
Supported Codecs
Bria supports a wide range of codecs.
Codec Narrowband Wideband
DVI4 33
DVI4 Wideband 33
G.711aLaw * 33
G.711uLaw * 33
GSM 33
iLBC 33
L16 PCM Wideband 33
Speex 33
Speex FEC 33
Speex Wideband 33
Speex Wideband FEC 33
* Generally , at least on e of these codecs mu st be enabled in order to place a PSTN (land
line) call.
Included in Retail
Bria 3 for Linux
22
Page 27
Bria 3 for Linux Administrator Guide
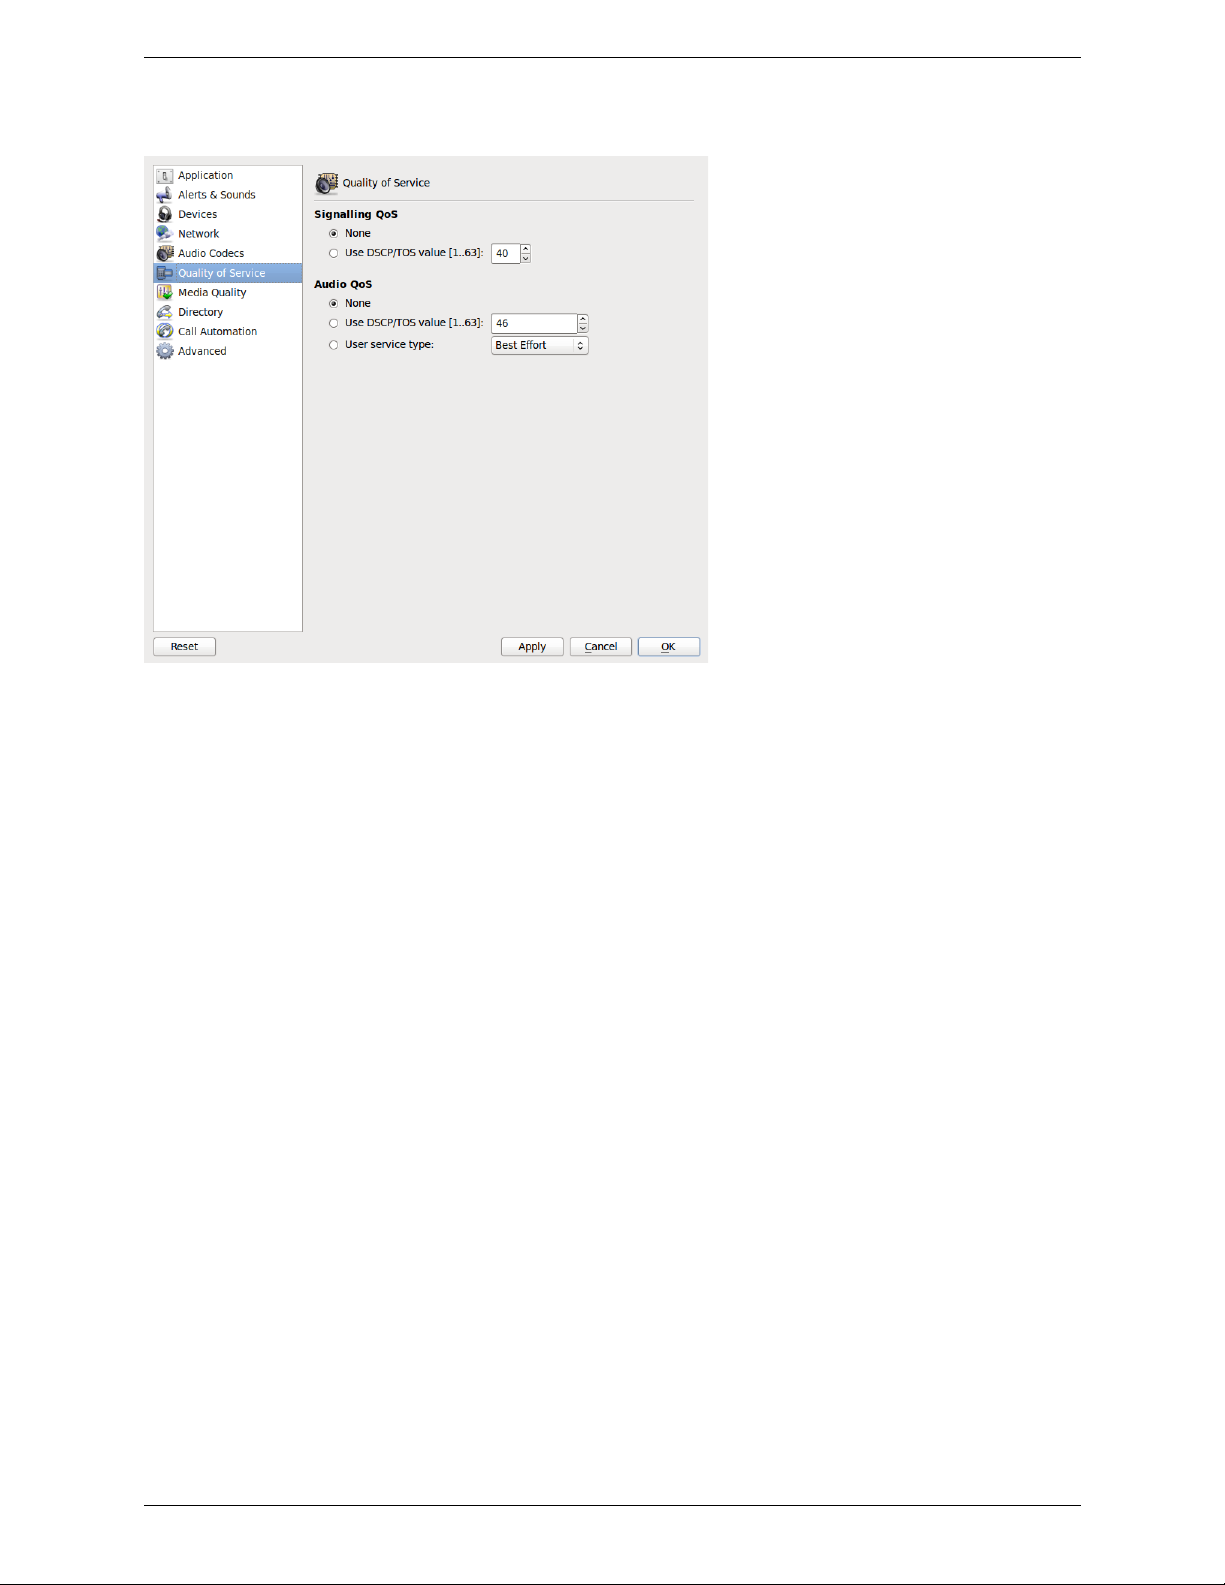
4.3 Preferences – Quality of Service
The Quality of Service panel lets you request a specific transport service for audio, video and signaling
traffic.This service is through DSCP (also known as ToS). In a network that has the default configuration, the
recommended value for audio is 46, because “46” is the standard marking for audio.
The Quality of Service panel lets you request a specific transport service for audio, video and signaling traffic.
There are two types of services. The service to use depends on what your VoIP service provider supports:
• GQoS, which is available for audio and video.
• DSCP (also known as ToS), which is available for audio, video and signaling.
In a network that has the default confi guratio n, th e recommen ded valu e for audio is 46, becau se “46 ” is the
standard marking for audio.
Bria supports 802.1p QoS packet tagging. If you set up for QoS, Bria will include the specified information in
the packets that it sends to the network provider. Whether the packet is delivered with the specified service
depends on whether your broadband router and the network provider between you and the other party supports
multiple transport services. In other words, whether each network provider reads the QoS information and
prioritizes packet delivery based on the requested service.
23
Page 28

CounterPath Corporation
4.4 Preferences – Directory
If your organization has an LDAP se rver, you can configure Bria to connect to that server. The entries from the
directory will appear in the Directory tab (alongside the Contacts and History tabs).
In Directory Type, select LDAP; other fiel ds appears; see below.
Field Description
Server Settings
Server The hostname or IP address of the directory server. For example, ldap.example.com.
Authentication method Anonymous or Simple.
Choose Simple if your LDAP server requires a valid login in order to allow binding and searching
the directory.
Username The full DN of the username that will be used for authenticating to the directory.
For example:
CN=ldapauthuser,OU=users,OU=company,DC=example,DC=com
Leave blank if Authentication is set to Anonymous.
Credential The password for the username. Leave blank if Authentication is Anonymous.
Root DN The “base” DN of the server where searches will begin. The entire subtree under the Root DN will
Search expression The query used to filter valid users in the directory. This query can be used to retrieve only
Attribute Mapping
All fields In this section, map the names of the attributes that are in your directory to the corresponding
be used for searching. For example:
OU=users, OU=company, DC=example,DC=com
members of a group, for example. For example:
(memberOf=CN=Corporate Users, Ou=Groups, OU=company, DC=example,DC=com)
fields in Bria. The field label is the Bria field. The field box specifies the attribute name.
24
Page 29

4.5 Preferences – Advanced
Bria 3 for Linux Administrator Guide
DTMF
RTP
Logging
Table 9: Preferences – Advanced
Field Description
Choose the method for sending DTMF that is supported by your VoIP service provider.
In-band means that Bria will encode the DTMF signals in the audio stream as regular sound.
Typically, DTMF is not sent in-band; in-band is only used in specific situations.
One scenario in which it might be advisable to send in-band is if you own your gateways and:
• One or more of these gateways does not support 2833 or does not handle it well, and
• Your gateway is using codes that reproduce DTMF tones well.
In this case, sending in-band will ensure that DTMF tones get through (because the DTMF tones
will bypass the gateway) and that they reproduce accurately at the receiving end.
Another scenario is:
• One or more of these gateways does not support 2833 or does not handle it well.
• Your gateway is using codecs that do not reproduce DTMF tones well (because they are
designed to handle human voice rather than artificial sounds).
In this scenario, using in-band will not help ensure DTMF ones get through. There is in fact no
solution in this scenario.
The RTP inactivity timers control how phone calls are disconnected when RTP and/or RTCP are
not detected. You can choose to enable or disable the timers. The timers are enabled by default.
If you leave the timers enabled, you can set the value of the RTCP timer. The RTP timer is fixed
at 30 seconds.
• Bria ends a call if it has never detected R TCP in the call and no RTP is received for the length
of the RTP timer (30 seconds).
• Bria ends a call if it has detected RTCP on this call but then it does not receive an RTCP for
the length of the RTCP timer (default value: 300 seconds). You can change the length of this
timer.
See below.
25
Page 30

CounterPath Corporation
Logging (Diagnostics)
Users can enable logging to files. Logging uses computer resources, so you should make sure your users only
enable it when you or a customer support representative instruct them to do so.
Configuring
You should configure the folder where logging files will be saved. You should also make sure the logging is
initially disabled.
Activity on Bria will be logged to. csv files in the specified folder. A new set of files is started each time t he user
logs on. In order not to create large files when logging (which may create computer problems), make sure your
users do not remain logged on indefinitely when logging. They should occasionally exit and rest art Bria.
You can delete log files from the specified folder as you woul d any other data file.
Sending Files to Customer Support
If requested by a customer support representative, you can:
• Open the logging folder and then open a log file using a text editor.
• Email the logs in the specified folder to customer support: Click Send log file. A dialog box appears
showing all the logs. Select files and click Open; the selected files are sent and the dialog box closes.
26
Page 31

Bria 3 for Linux Administrator Guide
A Dial Plan
When a call attempt is made, the call input (what you type, select or drag onto the Call display) i s processed to
select the SIP account to use and to modify the input if that is required to ensure that the call gets placed
successfully. Each dial plan contains one or more patterns; if the input matches a particular pattern, then the
input is modified according to the rules for that pattern, and then the call is placed using the account that the dial
plan belongs to.
Determining whether You Need a Dial Plan
If you are deploying Bria in an enterprise, you will typically need to modify the default dial plan.
1. Check with your V oIP service provider for any dial plan information. If you service provider has a dial plan,
use it. If you have several SIP accounts, each with a different service provider, obt ain the dial plan for e ach
account. Enter the dial plan in the account information, page 6.
2. If no ready-made dial plan is available for an account, enable only that acc ount and make dif ferent types of
phone calls:
• Calls to another SIP address (rather than to the PSTN).
• Local calls to the PSTN (if your VoIP service provider supports these calls)
• Long-distance calls to the PSTN (if your VoIP service provider supports these calls).
Try placing calls by typing in the entry field and also by selecting a contact.
3. If all types of calls succeed, the default dial plan does not need to be modified for that account.
If at least one type of call fails, you must modify the default dial plan for that account.
The Default Dial Plan
The default dial plan is:
#n\a\a.T;match=1;prestrip=2;
where #n is the account prefix (#1 for the first account in the list (proxy0), #2 for the second account (proxy1),
and so on).
If the input is the account prefix and the number (for example, #16045551212), then the Account for this dial
plan is selected. The account prefixed is stripped from the number before the call is placed.
If all Accounts use this dial plan, then the behavior is as follows: if the input includes the account, then that
account is used. In other words, you can force selection of a specific account by inclu ding the acco unt prefix. If
the input does not include #n, then the default account is used.
27
Page 32

CounterPath Corporation
A.1 How Dial Plans Are Used
When you make a call, Bria takes the phone number (the input) and performs the following:
Cleanup
Input is cleaned up by removing spaces, dashes, open brackets, and close brackets. Cleanup allows Bria to
support calls placed using contacts from a contact list, including Microsoft® Outlook®.
Matching
The input is compared to the patterns defined by the dial plan for each enabled account. Each account has one
dial plan, and each dial plan has one or more patterns.
• When a match is found between the input and the pattern, the account that this pattern belongs to is se lected
and the transformation for this patter n is performed.dial plan
• If no match is found, the first enabled account is selected and no transformation is performed.
For details on matching see “How the Input Is Processed” on page 30.
Transformation
The selected transformation is performed.
Place Call
Then the call is placed using the transformed input.
A.2 Dial Plan Syntax
In Bria, the dial plan establishes the expected patterns of characters for a telephone number or softphone
address, and allows for modification (transformation) of input based on the match to a pattern. The dial plan has
the following syntax:
pattern[|pattern];match=1;<transformation>=<value>;[match=2;
<transformation>=<value>;]
Where:
• Items in [ ] are optional.
• Pattern: the pattern that will be matched. One or more patterns. Each pattern is separated by a | pipe. The
pipe is optional after the last pattern. Each pattern is implicitly numbered, starting from 1.
• Match; Transformation: A pair that identifies the pattern number to compare with the input, and the
transformation to perform on the input when a match is obtained. The transformation is optional (meaning
that if there is no transformation for a pattern, then the input that matches this pattern is not transformed).
One or more pairs.
“match=” is a literal. “n” identifies the pattern. “transformation=” is replaced by a keyword, see below.
“value” is replaced by a value.
Spaces are allowed only in the <value> items.
Remember that dial plans are applied after the input has been cleaned up (page 28)!
28
Page 33

Bria 3 for Linux Administrator Guide
Example
\a\a.T|xxxxxxxxxx;match=1;prestrip=2;match=2;pre=8;
where:
• \a\a.T is the first pattern.
• xxxxxxxxxx; is the second pattern.
• match=1;prestrip=2; is the first match-transformation pair.
• match=2;pre=8; is the second match-transformation pair.
Pattern
Valid Content
The content for a pattern follows the digit map rules of RFC 2705, supplemented by the rules for regular
expressions. Where there is an overlap between the digit map and regular expression rules, the digit map rules
apply. For this reason, there are some special cases, included in the table below.
The following table describes the most common elements. As mentioned, all regular expression elements are
supported.
Element Origin Description
0 1 2 3 4 5 6 7 8 9 Literals Literal digits, used as is.
# * a to z Literals Literal characters, used as is. Special cases:
• The literal x character is represented by \x.
• The literal t character is represented by \t.
x Digit map rules Wildcard for any single digit, 0 to 9.
\a Regular
[digit-digit] Regular
[charactercharacter]
[digit1, digit2,
digit3]
. Digit map rules Repeat the last elemen t 0 or more times. For example, xxxx. means repeat the last x 0 or
T Digit map rules A timeout period will take place before automatic dialing starts.
expression rules
expression rules
Regular
expression rules
Regular
expression rules
Wildcard for any single alphanumer ic character.
A digit within the specified range.
A character within the specified range.
One of the characters in the collection.
more times, which means this pattern matches three or more digits (not four or more
digits)! Use of this element results in a pattern with “minimum requirements”.
The T timer forces Bria to wait after a match is made. This timer should always be
included in these situations:
• Any pattern that uses the . (dot). For example, if the pattern is xxxx. then adding a
timer lets you type three or more digits. If there is no timer, then as soon as you type
three digits, Bria makes the match as soon as you type three digits.
• Any dial plan that has two patterns that are similar in elements but different in length.
For example, if one pattern is xxx and the other pattern is xxxxxxx, then adding the
timer lets you continue typing past three digits, in order to get a match on the second
pattern.
In this situation, the T timer should be included in the shorter pattern.
29
Page 34

CounterPath Corporation
Timers
There are two timers, the T timer and the long timer.
These timers are used in input comparison, as described in “How the Input Is Processed” on page 30.
Transformation Keywords
Keyword Description
prestrip Strip the first n characters from the input before placing the call.
poststrip Remove n number of characters from the end of the input before placing
pre Add the specified account prefix to the input before placing the call.
post Attach the specified postfix to the input before placing the call.
replace Replaces the input with the specified string before placing the call.
the call.
Order of Transformations
These transformations are always performed in the following order (the order in which the transformations are
entered in the dial plan is not significant):
prestrip > poststrip > pre > post > replace
A.3 How the Input Is Processed
Comparing Input to the Dial Plan Patterns
The input is compared to each dial plan in turn, starting with the first listed account. The process is slightly
different depending on how the call is placed:
• If the input was dragged or selected, then the entire input is compared t o each dial plan. If a complete match
is found, then that account is selected and the associated tran sfor matio n is p erformed. If no match is fo und,
the default account is selected and no transformation is performed.
• If you are typing the input, the digits are compared one by one as they are entered. The comparison will
result in one of the types of matches described in the table below.
It is possible for the same input to get matched to different dial plans depending on whether the input is entered
on the fly or dragged. It is important to keep this in mind when design ing dial plan patterns.
30
Page 35

Results of the Comparison
Bria finds a match according to the following rules. These rules work on three elements:
• The patterns specified in the dial plan.
• The T timer, if it is included in the pattern.This timer is a short (critical) timer. T timer is 4 seconds.
• The long timer, which is always effective (it does not have to be included in the pattern). The long timer is
20 seconds.
Type of Match Conditions
Partial match The characters typed so far follow the pattern but
there are not yet enough characters for a pending
or complete match.
Pending match • The pattern has no . (dot) but does have the T
timer. Th ere is a perfect match.
• The pattern has a . (dot) and the T timer. The
minimum requirements are met.
Complete match • The pattern has no . (dot) and no T timer.
There is a perfect match.
• The pattern has a . (dot) but does not have the
T timer. The minimum requirements are met.
No match The characters typed do not match the patterns
for any dial plan.
Result if You Press
Enter or Dial
The default account is
selected. No transformation
is performed.
This pattern's account is
selected and the
transformation is
performed.
This pattern's account is
selected and the associated
transformation is
performed.
The default account is
selected and no
transformation is
performed.
Result if You Stop Typing
If you stop typing for the long
timer length (20 seconds), then
the default account is selected.
No transformation is
performed on the characters
typed so far.
If the T timer expires, this
pattern's account is selected
and the transformation is
performed.
This pattern's account is
selected and the associated
transformation is performed.
Nothing happens even after the
T timer and long timer have
expired.
31
Page 36

CounterPath Corporation
A.4 Examples
Example 1
\a\a.T|xxxxxxx.T;match=2;pre="9"
This simple example shows how to differentiate between a PSTN number and a softphone address, and how to
add a “9” dialing prefix only to the PSTN number.
Example 2
3xxT|1xxxxxxxxxx|[2-9]xxxxxxxxx|+x.T;match=2;pre="9";
match=3;pre="91";match=4;prestrip=1;pre="9011"
3xxT
1xxxxxxxxxx
[2-9]xxxxxxxxx
+x.T;
match=2;pre="9";
match=3;pre="91";
match=4;prestrip=1;
pre="9011"
The first pattern is any three-digit number beginning with 3. No transformation. The
assumption is that this is an internal extension. The timer forces Bria to wait aft er det ec ting a
three-digit number beginning with 3, in case you are actually dialing a local call starting with
3.
The second pattern is any eleven-digit number beginning with 1. Prefix with 9 and dial as is.
The assumption is that this is a long-distance PSTN call within North America (within North
America, all long-distance calls start with 1).
The third pattern is any ten-digit number beginning with a number other than 1. The
assumption is that this is a local PSTN call within a ten-digit dialing zone.
The fourth pattern is a number of any length that begins with +, to indicate an international
PSTN call from North America. Delete the +, prefix with 9011 (011 is the number to access
an international line from North America).
For the second pattern, prefix 9 to access an outside line.
For the third pattern, prefix 9 and 1 to access an outside line and enter the long-distance code.
For the fourth pattern, remove the + and prefix 9011 to access an outsid e line and enter the
international code.
Example 3
#1xxxxxxxT|#19xxxxxxx|xxxxxxxT|9xxxxxxx|;match=1;prestrip=2;pre=9;match=2;
prestrip=2;match=3;pre=9;
#1xxxxxxxT
#19xxxxxxx
xxxxxxxT
9xxxxxxx
The pattern is an account prefix followed by seven digits. The timer forces Bria to wait to
allow a match to the second pattern. The #1 is stripped off and 9 is prepended to access an
outside line.
The pattern is an account prefix followed by a 9 and seven digits. The #1 is stripped off.
The pattern is seven digits. The timer forces Bria to wait to allow matching to the fourth
pattern. 9 is prepended to access an outside line.
The pattern is a 9 and seven digits. The input is not transformed.
This example assumes that the dial plan belongs to the first account.
The dial plan is slightly trivial, because it do es not cover al l the situations that a dial p lan should be designed for
(local calls, long-distance calls, international calls, and so on for the locale).
32
Page 37

Bria 3 for Linux Administrator Guide
However, the example does illustrate two ideas:
• Handling of the account prefix (#1), if you are upgrading from eyeBeam and are accustomed to ente ring the
account number.
Use of # to identify the account is now deprecated. The dial plan should be capable of determining the
account to use for this number. However, since users may still b e in the hab it of enteri ng the acco unt prefix,
you may want to include this pattern to handle such a scenario.
• Distinguishing between a local seven-digit call in which 9 is not dialed (to access an outside line) and one
in which 9 is dialed to access an outside line.
33
Page 38

CounterPath Corporation
34
Page 39

Bria 3 for Linux Administrator Guide
B Contact List Headings
Following is a list of all the headings that are used in the Bria contact list. This list can be useful when
formatting a contact list in order to import it into Bria. For details, see “Setting up Contacts” on page 7.
uri
display-name
entry_id
given_name
surname
email_address
email_addressn, where n is 2 t o 6
sip_address
sip_addressn, where n is 2 to 6
business_number
business_numbern, where n is 2 to 6
mobile_number
mobile_numbern, where n is 2 to 6
home_number
home_numbern, where n is 2 to 6
fax_number
fax_numbern, where n is 2 to 6
groups
comment
postal_address
default_address
default_address_type
sms_addresss
custom_fields
custom_fieldsn, where n is 2 to 4
35
Page 40

CounterPath Corporation
36
Page 41

Bria 3 for Linux Administrator Guide
C Glossary
Codec The format by which audio or video streams are compressed for transmission over
networks.
Dial plan The rules that Bria follows in order to interpret the softphone address or phone
number that the user has entered and to modify the number or address, as require d, to
ensure that the call will be placed successfully.
DTMF Dual-tone multi frequency. DTMF is the system that is used in interactive voice-
response menu systems such as the menu system for accessing voicemail messages.
The DTMF system allows the user to interact with the menu by pressing keys on a
dialpad or keyboard.
Enterprise user A Bria user who is working in an office and who has support from a system
administrator.
MWI Message Waiting Indicator. An indicator that there is a voicemail message for the
owner of an account.
Retail user A Bria user who is not working in an office and is therefore their own “system
administrator”.
SIP The signaling protocol followed by Bria for handling phone calls.
SIP account An account that provides the user the ability to make VoIP phone calls.
softphone address The address used to connect to a SIP endpoint. In other words, the “phone number”
used in a VoIP phone call. For example, sip:joseph@domainA.com.
URI A name or address that identifies a location on the world wide web. A softphone
address is a type of URI.
URL A URI that both identifies a name or address and indicates how to locate it.
vCard An electronic business card that is often attached to an email. It often appears as a
“signature” block that identifies the person, their title, and their business.
37
Page 42

CounterPath Corporation
38
 Loading...