

Page 1
Chainsaw Sharpener
Kedjeslipmaskin
Kjedeslipemaskin
Important!
Read the entire instruction manual carefully
and make sure that you fully understand
it before you use the equipment. Keep the
manual for future reference.
Viktig information:
Läs hela bruksanvisningen noggrant och
försäkra dig om att du har förstått den innan
du använder utrustningen. Spara manualen
för framtida bruk.
Viktig informasjon:
Les disse anvisningene nøye og forsikre deg
om at du forstår dem før du tar produktet i bruk.
Ta vare på anvisningene for seinere bruk.
Tärkeää tietoa:
Lue nämä ohjeet huolellisesti ja varmista
että olet ymmärtänyt ne, ennen kuin alat
käyttää laitetta. Säilytä ohjeet myöhempää
tarvetta varten.
ENGLISH
SVENSK ANORSKSUOMI
Teräketjun hiomakone
Kettenschleifmaschine
Wichtiger Hinweis:
Vor Inbetriebnahme die komplette
Bedienungsanleitung durchlesen und
aufbewahren.
DEUTSCH
Art.no Model
18-3057 2002-UK
30-9678 2002
Ver. 20150728
Original instructions
Bruksanvisning i original
Original bruksanvisning
Alkuperäinen käyttöohje
Original Bedienungsanleitung
Page 2

Page 3

Chainsaw Sharpener
Art.no 18-3057 Model 2002-UK
30-9678 2002
Please read theentire instruction manual before using and save for future use. We apologise for any text
or photo errors and any changes of technical data. If you have any questions concerning technical problems
please contact our Customer Service Department (see address on reverse.)
Safety
General Safety Instructions
Warning:
When using this tool all basic safety precautions must be followed to avoid therisk of fire, electrocution and
personal injury. Read these instructions carefully before using theproduct and keep them for future reference.
1. Keep theworking area clean. Cluttered areas and benches invite accidents.
2. Consider your work area environment. Do not expose thetool to rain. Do not use thetool in moist or wet
areas. Keep theworking area well lit. Never operate thetool near flammable liquid or gas.
ENGLISH
3. Avoid electric shocks. Avoid body contact with earthed objects, such as pipes, radiators, ovens or
refrigerators.
4. Keep other people at asafe distance. Do not allow anyone not involved in thework process to touch
thetool or its electric cable, especially children. Keep all bystanders at adistance.
5. Store thetool in asafe place. When your tools are not in use, keep them in alocked, dry area, away from
children.
6. Do not overload thetool. The correct feed rate makes thetool work better and safer.
7. Use thecorrect tool for thejob. Do not try to use small tools to perform jobs requiring more powerful tools.
Do not use atool for apurpose for which it was not designed, e.g. using acircular saw for lopping branches
off trees.
8. Wear suitable clothing. Do not wear loose-fitting clothing or jewellery, that could get caught in moving parts.
Non-slip shoes are recommended for outdoor work. Wear ahairnet or similar if you have long hair.
9. Always use safetywear. Wear safety glasses. Use aface mask or dust filter when working in dusty
environments.
10. Use dust extractors. If thetool is equipped with or connected to adust extractor/collector, make sure that it
is turned on and used correctly.
11. Do not abuse thelead. Do not jerk thelead, grip theplug itself when disconnecting thepower. Make sure
that themains lead does not come into contact with heat, oil, or sharp edges.
12. Firmly secure theworkpiece. If possible use vices or clamps to hold theworkpiece in place. This is much
safer than holding theworkpiece in one hand.
13. Do not overreach. Make sure that you stand steady and balanced all times.
3
Page 4

14. Look after you tools. Make sure that they are clean and that theedges are sharp for maximum effect and
best results. Follow themanuals recommendations regarding lubrication and replacement of accessories.
Inspect themains lead regularly. If it is damaged it should be replaced by aqualified service technician.
Inspect all leads and cables regularly to check for any damage. Make sure that themachine’s/tool’s handles
ENGLISH
and controls are clean, dry and free from oil and grease.
15. Turn thepower off. Pull out theplug and push in theemergency stop button before servicing or changing
any blades, drill bits, cutters or sanding discs.
16. Remove all spanners and repair tools. Make ahabit of checking to make sure that themachine is free of all
spanners and tools before turning thepower on.
17. Avoid accidental starting. Do not walk around with your finger on thetrigger of apower tool if it is plugged
in. Make sure that theon/off switch is set to OFF before plugging in any power tool.
18. Use thecorrect extension leads. If you use extension leads outdoors, only use those designed for outdoor
use. Only use extension leads with thick enough diameter core wires and roll out thewhole lead.
19. Use common sense and be careful. Think before carrying out any task, so that it is carried out safely.
Never operate machines/power tools when you are tired or under theinfluence of medicine.
20. Check thefollowing before turning thetool on:
- That all guards and other parts are whole and in working order.
- That moving parts are free and correctly aligned.
- That no moving parts can get caught.
- That no defects are apparent.
Other factors that can influence work execution.
A safety guard or any other part that is damaged should be repaired by atradesman or replaced. Damaged
power leads and switches must always be replaced by atradesman. Never operate atool if you cannot stop
or start thetool comfortably.
21. Use only recommended accessories. The use of non-recommended accessories can cause accidents and
personal injury.
22. Should only be repaired by aqualified technician. The tool conforms to current safety requirements. Repairs
to thetool should only be carried out by atradesman using original spares; otherwise thetool could cause
accidents and personal injury.
Specific Safety Rules
• Always use safety glasses.
• Never use damaged grinding discs.
• Never use thechainsaw sharpener unless theguard is attached and undamaged.
• Only use grindings discs recommended by themanufacturer and that are rated at thesame or higher speed
than themaximum rated speed of themachine.
• Read themanufacturer’s instructions accompanying thegrinding disc.
4
Page 5

Before Starting the Machine
• Make sure that thepower switch is set on 0 before connecting themachine to awall socket. Only connect
themachine to anearthed wall socket.
• Make sure that thegrinding wheel is well centred and undamaged and that theguard is attached and intact
before use.
• Use only grinding wheels with thecorrect diameter and which are approved for thespeed of themachine.
• Protect thegrinding wheel from moisture and blows.
• Make sure that thegrinding wheel can rotate freely before starting themachine.
• Always pull theplug out of thewall socket before servicing and adjusting thechainsaw sharpener.
Whilst Operating the Machine
• Pull out theplug if themachine is left unattended.
• Stand steady and hold themachine firmly in both hands.
• Keep aneye on theelectric cable whilst using themachine so that it is not damaged by thegrinding wheel
or thesharp edges of thechain.
• Grip thechain securely in thevice before starting to grind.
• Do not use themachine around flammable materials. The grinding process causes sparks which can ignite
fires or explosions.
• Position thesharpener below eye level in awell-lit place.
• Wait until thegrinding wheel arm is completely raised before feeding thechain forward to thenext link.
• Bear in mind that thelinks of thechain are sharp, keep fingers well clear when feeding thechain forward
to thenext link.
• This sharpener is only intended for sharpening chainsaw chains, thegrinding or cutting of items other than
these chains is not permitted. Do not use grinding tools other than grinding wheels.
ENGLISH
Turn the machine off immediately if…
• The machine starts to behave strangely, e.g. emits smoke, sparks, strange noises or starts vibrating.
• The machine’s power switch or electric cable is damaged.
Product safety symbols and their meaning
Read theentire instruction
manual before using
theproduct.
Always use safety glasses.
Always use ear protection.
5
Page 6

Product Description
1. Power Switch Off (0) / On (I)
ENGLISH
2. Vice Locking Knob
3. Grinding Wheel Guard
4. Grinding Wheel Arm
5. Grinding Wheel
6. Depth Stop with Lock Nut
101
7. Length Adjustment Screw
with Lock Nut
8. Chain Stop
9. Chain Vice
10. Chain Locking Lever
Not included
104
105
108
1010
107
109
107
104
103
106
102
6
Page 7

Installation, mounting
1. Position thesharpener on theworkbench in such away that thetwo feet on thebottom rest against thelip
of theworkbench and thevice locking knob (2) is accessible. Bear in mind that work area needs to be well-lit
for adjusting and using thesharpener.
2. Bolt thechainsaw sharpener to theworkbench using thetwo holes in thebase.
Fitting and replacing the grinding wheel
1. Raise thegrinding wheel arm (4) to maximum elevation.
2. Undo thetwo screws holding thegrinding wheel guard (3) in place and remove it, keep thescrews safe.
3. Unscrew theflange nut (11) holding thegrinding wheel (5) in place and remove both thelock nut and
grinding wheel. (turn thelock nut anticlockwise to undo it).
4. Insert anew grinding wheel onto thespindle making sure that it is centred and that theflanges are clean
and flat. Tighten theflange nut (11) by hand, if theflanges are tightened too much thegrinding wheel could
become damaged, which could lead to theoperator being seriously injured if thewheel shatters during use.
Use only recommended grinding wheels according to thespecifications. Make sure that theflange nut (11)
is theright way round; thecupped side should be facing thegrinding wheel.
5. Screw thegrinding wheel guard (3) back on.
ENGLISH
6. Always test newly attached wheels by starting
themotor and letting thewheel spin for aminute
or two before starting work. Whilst testing
thewheel you should remain at asafe distance
and not allow anyone else to come close in
case thedisc shatters.
If you notice that thewheel vibrates
when turned on or during operation,
themachine should be stopped
immediately and thewheel
should be inspected.
1011
105
Warning:
Never try to stop thegrinding wheel with your hand even if you are wearing safety gloves.
Contact with agrinding wheel spinning at high speed can cause burns and scrapes.
7
Page 8
Adjustment
7.
10.
8.
ENGLISH
Warning:
All adjustments should be made when themachine is turned off and unplugged.
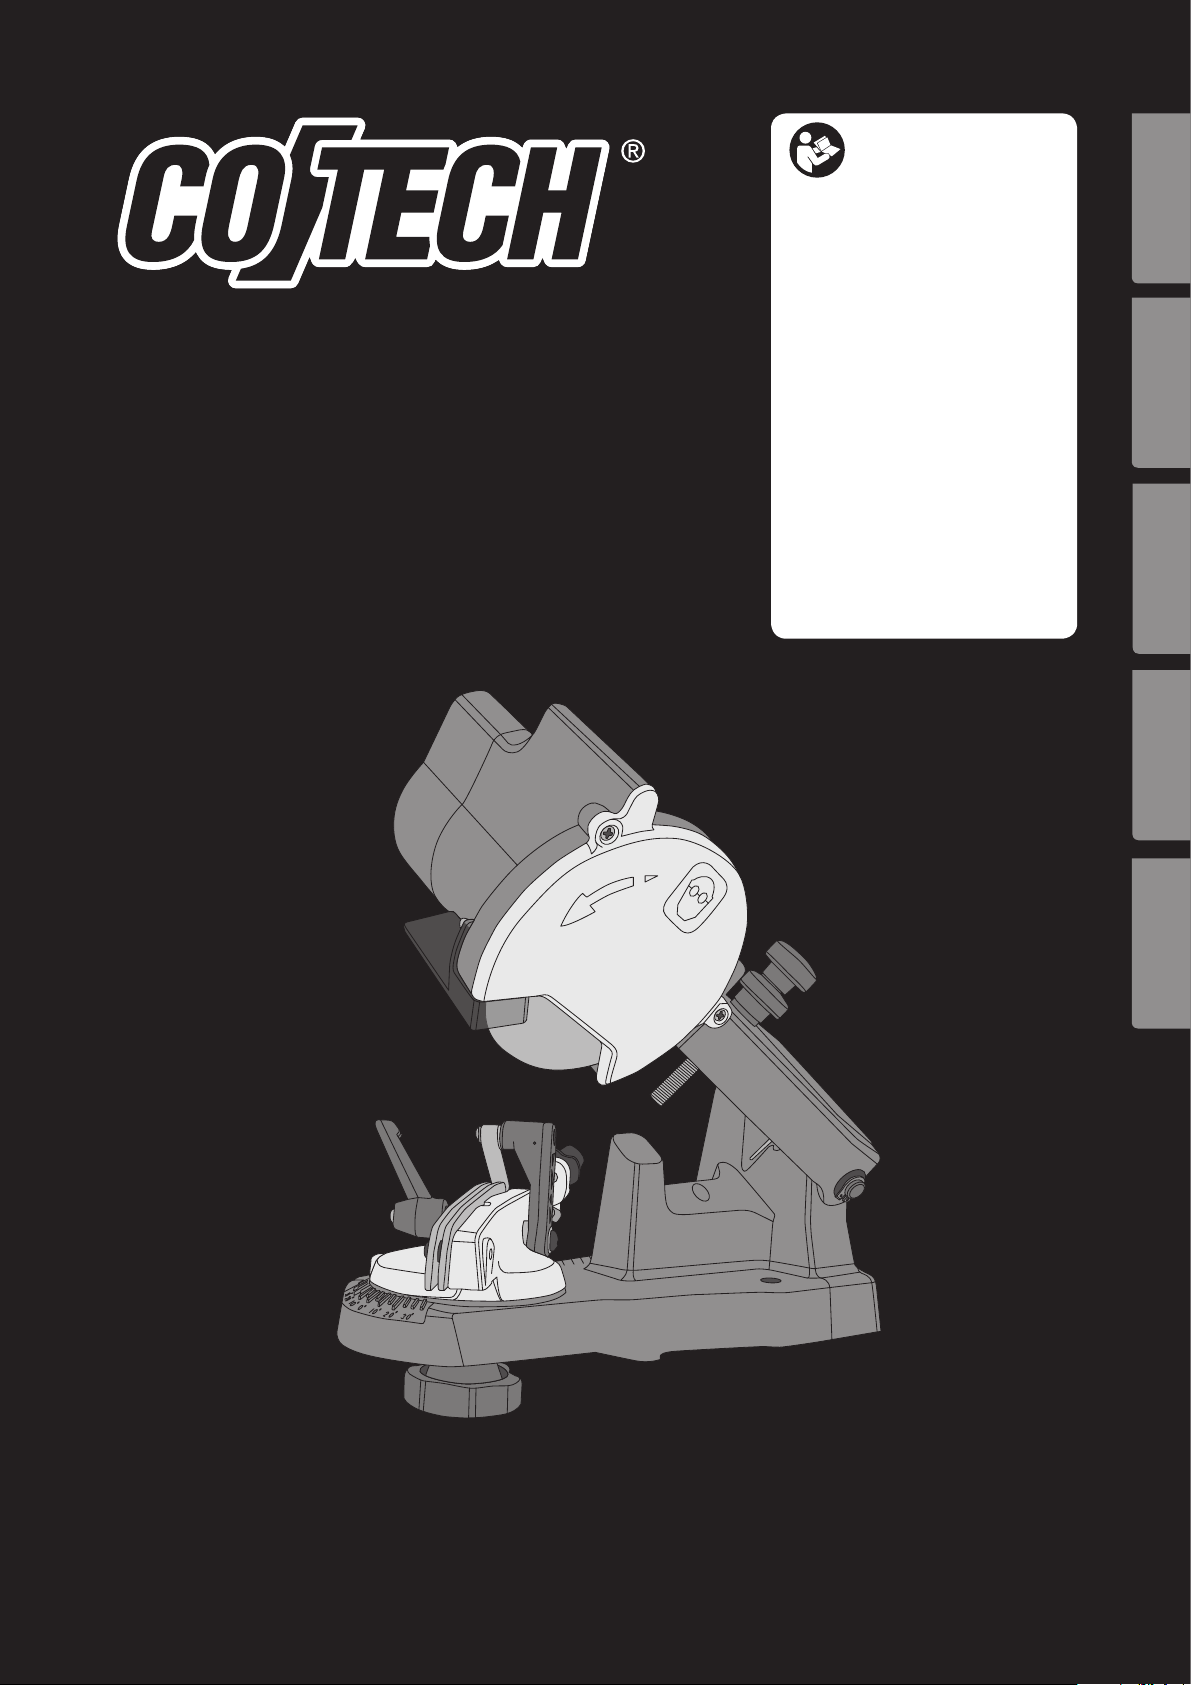
1. Check which type of chain you have, set thecorrect filing angle (most chains have afiling angle of 30° or 35°),
tighten thelocking knob (2) on thebottom.
108
1010
107
2. Lay thechain in thevice and lower thechain stop (8) behind thelink to be sharpened first.
3. Carefully lower thegrinding wheel arm (4) all adjustments should be made with themotor turned off.
The chain stop (8) should rest against theback of thelink to be sharpened, adjust thechain stop (8) using
thelength adjuster screw (7) so that thegrinding wheel will come into contact with thecutting edge of
thelink when it is lowered.
4. Fix thelength adjuster screw (7) by tightening thelock nut.
5. Tighten thevice lock knob to hold thechain in place, if it gets caught on your arm it can be adjusted as
follows: Undo thechain locking lever and move it to thedesired position.
6. Carefully lower thegrinding wheel arm (4) again and set thedesired cutting depth using thedepth stop (6),
tighten thelock nut.
7. Lower thegrinding wheel arm (4) and test if thesetting is correct before starting themotor.
8. The sharpener is now set up.
104
103
106
107
8
102
Page 9

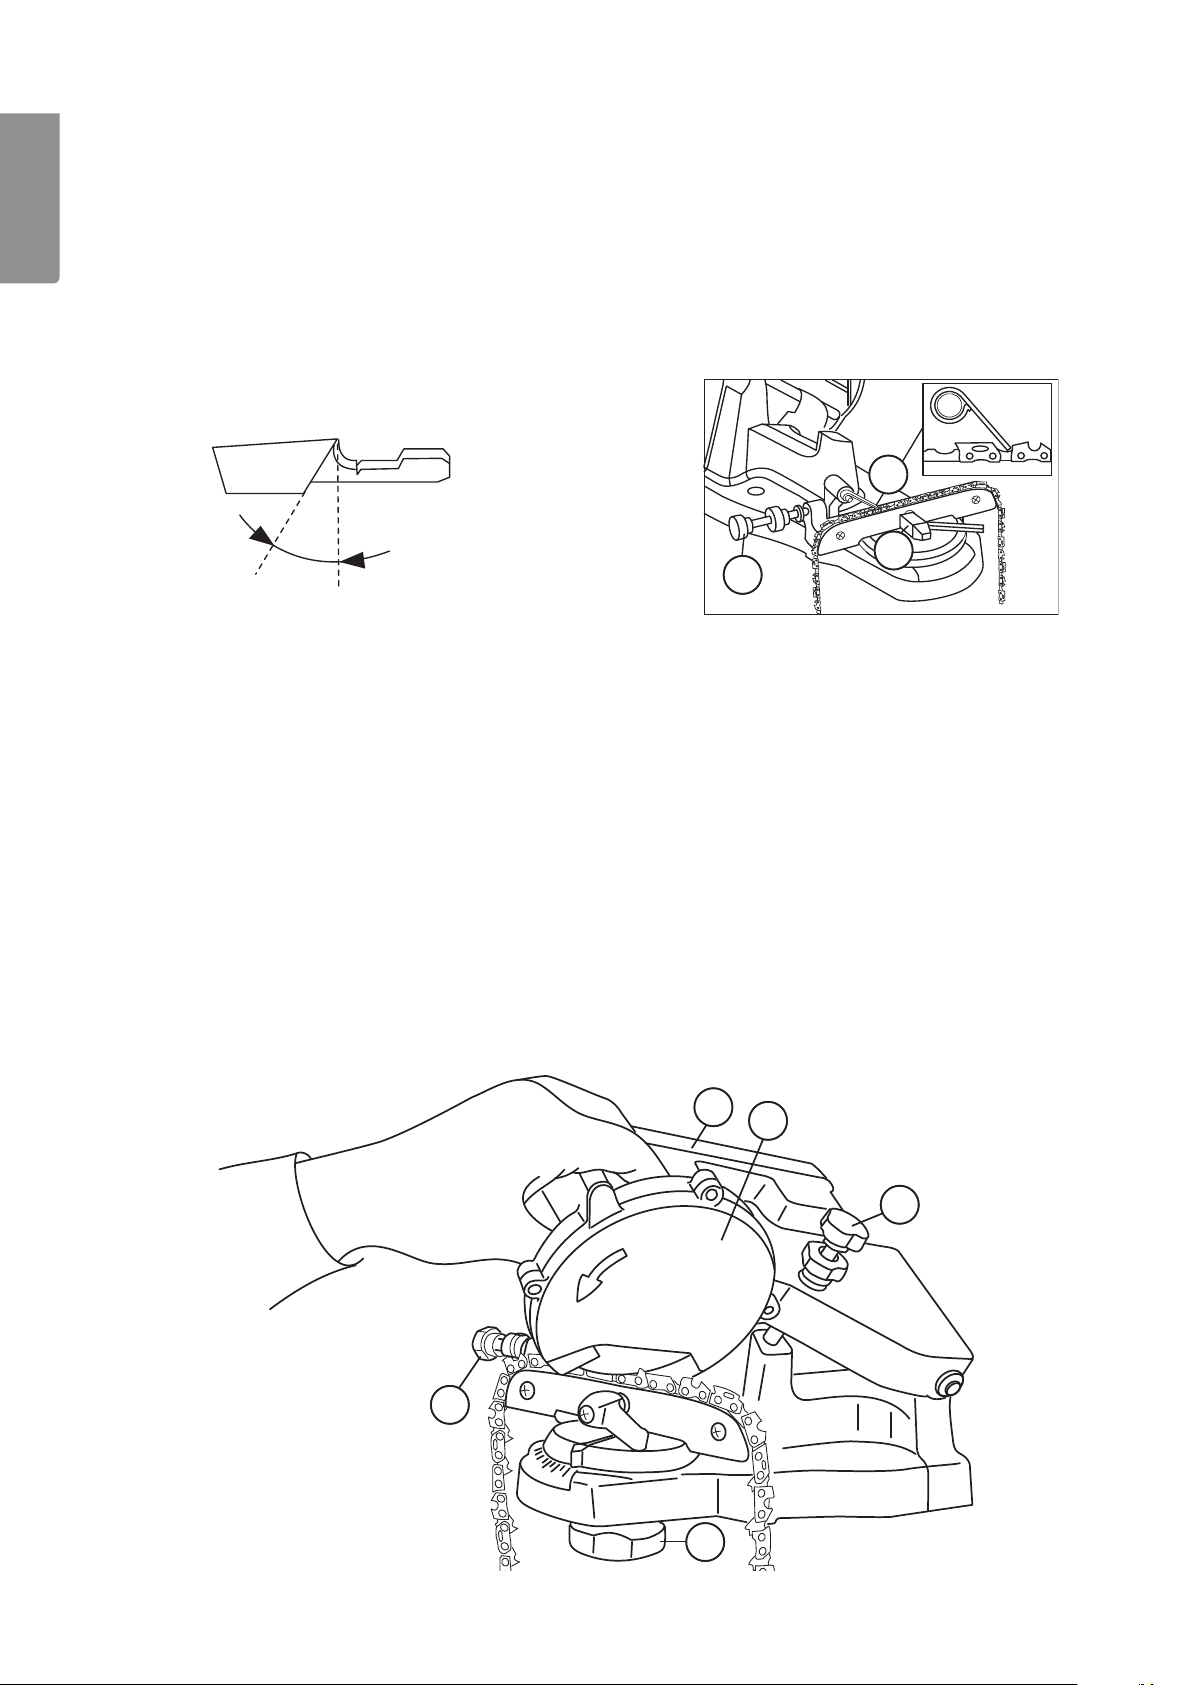
Use
Warning:
Never try to stop thegrinding wheel with your hand even if you are wearing safety gloves.
Contact with agrinding wheel spinning at high speed can cause burns and scrapes.
1. Clean thechain thoroughly before sharpening, do not use aflammable solvent. Allow thechain to dry before
starting to sharpen it.
2. Lay thechain in thevice (9), lower thechain stop (8) against theback of thelink and stretch thechain
backwards toward thechain stop, tighten thevice locking lever (10) so that thechain is locked in place.
3. Lower thegrinding wheel arm (4) and test if thesetting is correct before starting themotor.
Remember to put your safety glasses on before starting themotor!
4. Push thegreen start button to start themotor and let it come up to speed.
5. Carefully lower thegrinding wheel arm and test it on one of thelinks, carefully raise thearm again,
check theresults, turn themotor off and adjust if necessary. If thesettings are correct you can continue
sharpening. Bear in mind that best results are achieved if thecontact between thegrinding wheel and
thechain link occurs gradually and gently, do not grind thesame link for too long.
6. Fully elevate thegrinding wheel arm, undo thevice locking lever (10) and move thechain forwards to
thenext link (which is facing thesame way) stretch thechain backwards against thechain stop (8),
tighten thevice locking lever (10).
ENGLISH
7. Take your hand off thechain and continue sharpening.
8. Continue in thesame way with all thecutting links that are facing thesame way.
9. Undo thelocking knob (2) on thebottom, turn thevice (9) and set thecorrect filing angle for therest of
thecutting links that face theother way, tighten thelocking knob (2) on thebottom. Continue until thewhole
chain is sharpened. Remember to unplug themachine after use.
10. Discard thechain if thecutting edge is ground down to under 3 mm.
min 3 mm (1/8″)
Raker Clearance, Setting the Cutting Depth of the Chain
It is therelationship between thecutting edge of thelink and theheight of theraker that determines how much
material is removed by thechain. It is therefore very important that this relationship is maintained for thelife of
thechain. The correct clearance is very important both for safety and optimum stock removal.
If thechain has been grinded 2 to 4 times (depending upon how much material has been ground away)
therakers might need to be filed down to maintain thesame raker clearance (and depth of cut). Use aflat file
and afile guide/depth gauge to file therakers.
9
Page 10
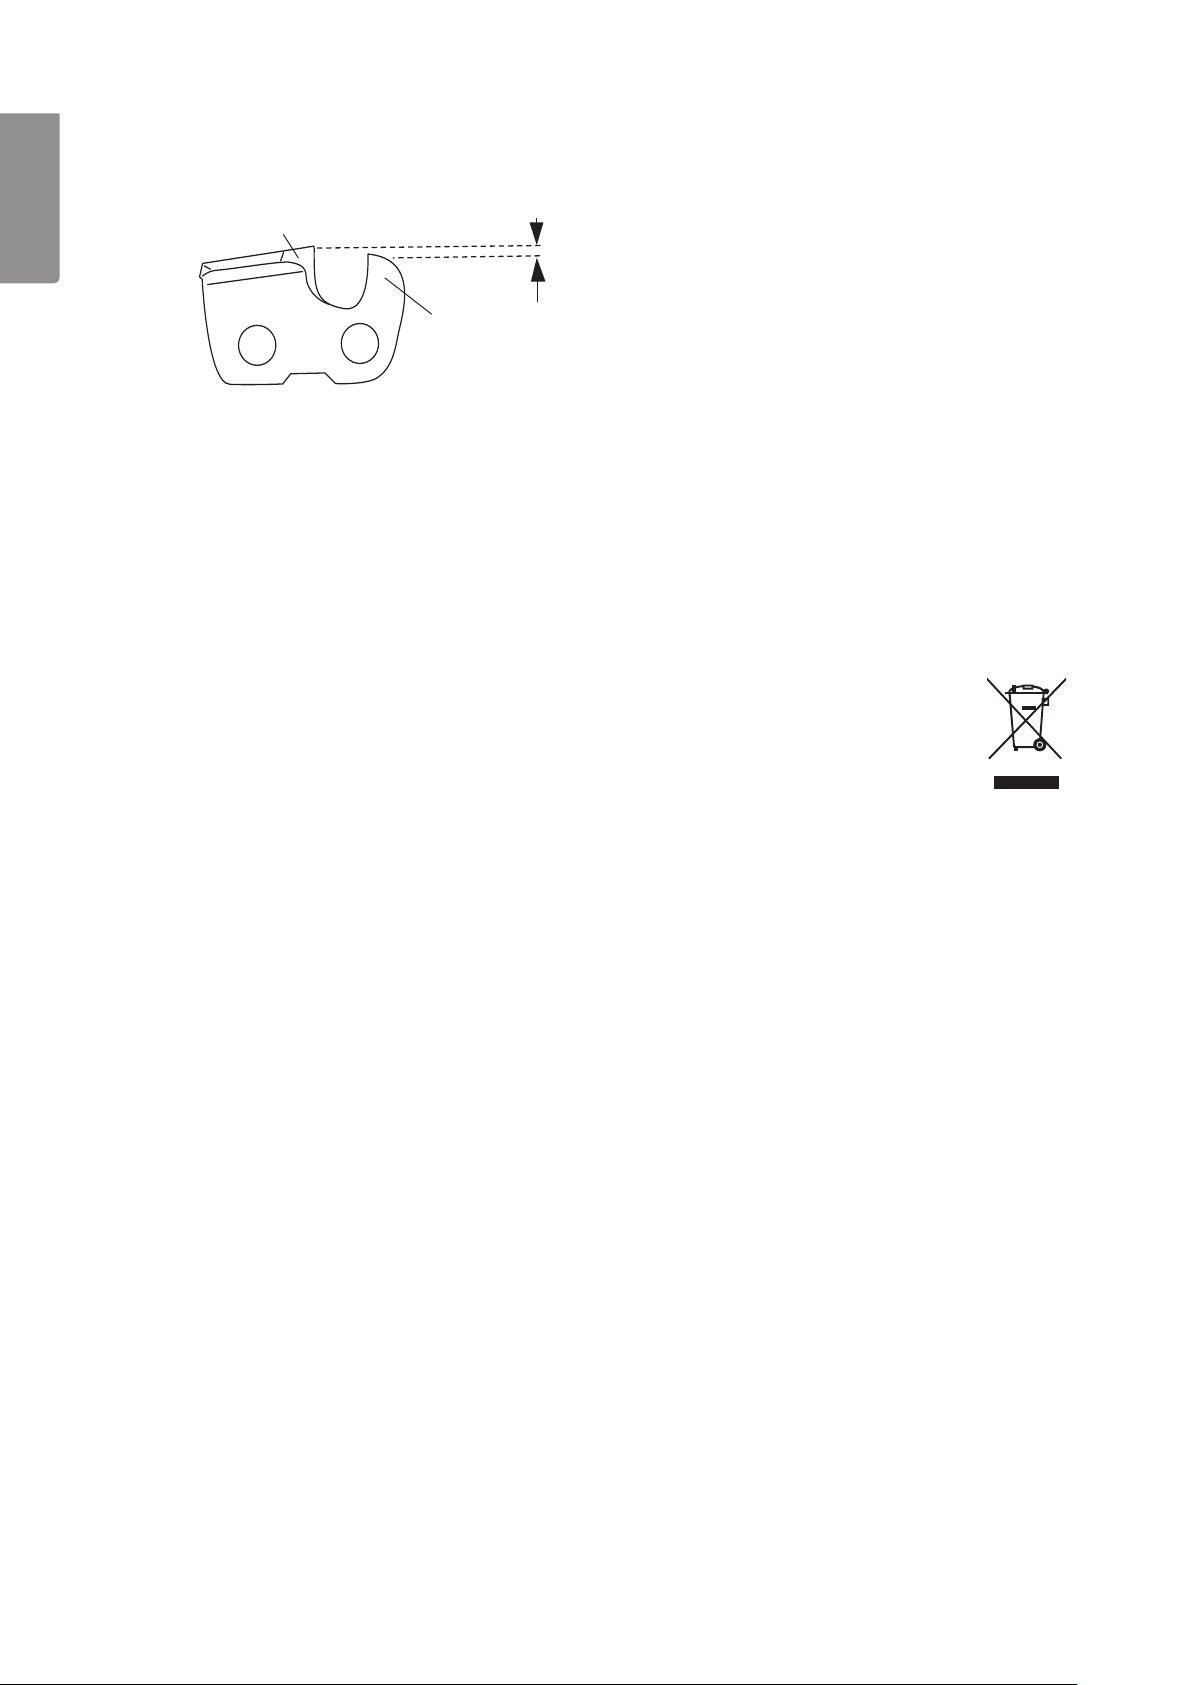
If you do not have afile guide for setting theraker clearance you can use aflat file and file two strokes off each
of therakers as shown in thefigure.
ENGLISH
Cutting Edge Raker Clearance
Raker
Care and Maintenance
• Keep thesharpener free of dust and metal filings.
• Replace thegrinding wheel when it is worn down to Ø 75 mm.
• Store thesharpener in adry place out of children’s reach.
Disposal
Follow local ordinances when disposing of this product. If you are unsure about how to dispose
of this product contact your municipality.
Transportation
The packaging that this machine comes in can be recycled. The package should be handled with care
as it must not be subjected to knocks during its transportation.
Specifications
Electrical grinder for sharpening chainsaw chains.
Power Supply 230 V AC, 50 Hz, 85 W
Output Power 85 W
Weight 2.4 kg
Grinding Wheel Size Outer diameter 105 mm, inner diameter (bore) 22 mm
Grinding Wheel Thickness 3.0 mm / 4.5 mm (not included)
Max. Speed 4800 RPM
Sound Power (Lwa) 93 dB(A)
Sound Pressure (LpA) 80 dB(A)
Compatible with these sizes of chain: Chain Pitch 1/4″ – 0.325″ – 3/8″ – 0.404″
10
Page 11

Kedjeslipmaskin
Art.nr 18-3057 Modell 2002-UK
30-9678 2002
Läs igenom hela bruksanvisningen före användning och spara den sedan för framtida bruk. Vi reserverar oss
för ev. text- och bildfel samt ändringar av tekniska data. Vid tekniska problem eller andra frågor, kontakta vår
kundtjänst (se adressuppgifter på baksidan).
Säkerhet
Generella säkerhetsinstruktioner
Varning!
När du använder detta verktyg ska grundläggande försiktighetsåtgärder iakttas för att minska risken för brand, elektrisk
chock och personskada. Läs alla dessa instruktioner innan du använder produkten och spara dessa instruktioner.
1. Håll arbetsplatsen ren. Belamrade ytor och bord inbjuder till olyckor.
2. Tag hänsyn till arbetsmiljön. Utsätt inte verktygen för regn. Använd inte verktygen i fuktiga eller våta utrymmen.
Håll arbetsplatsen väl upplyst. Använd inte verktygen i närheten av lättantändliga vätskor eller gaser.
3. Undvik elektrisk chock. Undvik kroppskontakt med jordade föremål som t.ex. vattenledningar,
element, köksspisar och kylskåp.
4. Håll andra människor på avstånd. Låt inga människor, speciellt inte barn, som inte deltar i arbetet röra vid
verktyget eller dess skarvsladdar. Håll dem på avstånd från arbetsplatsen.
5. Förvara verktyget i ett säkert utrymme. När verktygen inte används, förvara dem i ett torrt låst utrymme utom
räckhåll för barn.
6. Överbelasta inte verktyget. Det gör jobbet bättre och säkrare med avsedd matningshastighet.
7. Använd rätt verktyg. Pressa inte små verktyg att utföra stora jobb som kräver kraftfulla verktyg. Pressa inte
ett verktyg eller en tillsats att göra ett arbetsmoment som den inte är gjord för; använd t.ex. inte en cirkelsåg
för att kapa trädgrenar eller timmer.
SVENSK A
8. Bär lämplig klädsel. Bär inga löst sittande kläder eller smycken, de kan fastna i roterande delar.
Halksäkra skor rekommenderas vid arbete utomhus. Bär hårnät eller liknande om du har långt hår.
9. Bär alltid skyddsutrustning. Bär skyddsglasögon. Använd också dammfilter eller skyddsmask vid
dammande arbeten.
10. Använd utsugningsutrustning. Om verktyget är förberett för anslutning av utrustning för utsugning
och uppsamling av damm, se till att utrustningen är ansluten och korrekt använd.
11. Misshandla inte nätsladden. Ryck inte i sladden, utan dra i stickproppen när du ska ta ur den
ur vägguttaget. Se till att nätsladden inte kommer i kontakt med värme, olja eller vassa kanter.
12. Spänn fast arbetsstycket ordentligt. När det är möjligt, använd tvingar eller skruvstäd för att spänna fast
arbetsstycket. Det är säkrare än att hålla fast arbetsstycket med ena handen.
13. Sträck dig inte för långt. Se till att du hela tiden står säkert med god balans.
11
Page 12

14. Håll verktygen i trim. Se till att de är rena och eggarna vassa för optimal effekt och ett säkert resultat.
Följ manualens rekommendationer för smörjning och byte av tillbehör. Kontrollera nätsladden regelbundet.
Om den är skadad ska den bytas av en kvalificerad servicetekniker. Syna alla skarvsladdar regelbundet så att de
inte är skadade. Se till att maskinens/verktygets handtag och reglage är torra, rena och helt fria från olja, fett etc.
15. Slå av strömmen. Dra ur stickproppen och tryck in nödstopp före service och vid byte av tillbehör som
hyvelstål, borrar, stål, slipband eller blad.
16. Ta bort alla nycklar och serviceverktyg. Gör det till en vana att kontrollera att alla nycklar och serviceverktyg
är borttagna från maskinen innan du slår på strömmen.
17. Undvik oavsiktlig start. Bär inte ett verktyg med ett finger på strömbrytaren/avtryckaren om sladden sitter
SVENSK A
i ett uttag. Se till att strömbrytaren står på OFF när du sätter in stickproppen.
18. Använd rätt skarvsladdar. Om du använder skarvsladdar utomhus, använd endast de som är avsedda för
utomhusbruk. Använd skarvsladdar med tillräcklig ledararea och rulla ut hela sladden.
19. Använd sunt förnuft och var försiktig. Tänk efter innan du utför ett arbetsmoment, så att du kan utföra det
på ett säkert sätt. Använd inte maskinen/verktyget när du är trött, påverkad av mediciner etc.
20. Kontrollera följande innan du startar verktyget:
- Att alla skydd och övriga delar är oskadade och fyller sin funktion.
- Att rörliga delar kan rotera fritt och är rätt inriktade.
- Att inga rörliga delar kan fastna.
- Att ingen defekt har uppstått.
- Andra omständigheter som kan påverka arbetets utförande.
Ett skydd eller någon annan del som skadats, skall repareras fackmässigt eller bytas ut. Skadade nätsladdar
och strömbrytare ska alltid bytas ut av fackman. Använd aldrig verktyget om du inte kan stänga av eller starta
det på ett betryggande sätt.
21. Använd rekommenderade tillbehör. Användning av ej rekommenderade tillbehör kan vålla olyckor eller risk
för personskada.
22. Repareras endast av kvalificerad tekniker. Verktyget överensstämmer med gällande säkerhetskrav.
Reparationer av verktyget ska alltid utföras av fackman, med originalreservdelar, annars kan verktyget vålla
olyckor eller risk för personskada.
Särskilda säkerhetsregler
• Använd alltid skyddsglasögon.
• Använd aldrig skadade slipskivor.
• Använd aldrig kedjeslipmaskinen om inte skydden är monterade och oskadade.
• Använd endast de slipskivor som rekommenderas av tillverkaren och är märkta med samma eller högre
varvtal än det max varvtal som anges på maskinens märkskylt.
• Läs tillverkarens bruksanvisning som medföljer slipskivan.
12
Page 13

Innan maskinen startas
• Kontrollera att strömbrytaren står i läge 0 innan stickkontakten ansluts till ett el-uttag. Anslut endast
maskinen till ett jordat el-uttag.
• Kontrollera att slipskivan är väl centrerad och oskadad samt att skydden är monterade och hela innan
användning.
• Använd endast slipskivor som har rätt diameter och är godkända för maskinens spindelvarvtal.
• Skydda slipskivor mot fukt och stötar.
• Kontrollera att slipskivan kan rotera fritt innan du startar maskinen.
• Dra alltid ut nätsladdens stickpropp ur uttaget innan service och justering av kedjeslipmaskinen!
Under arbete med maskinen
• Dra ur stickproppen om du lämnar maskinen utan uppsikt.
• Stå stadigt och håll i maskinen med båda händerna.
• Håll uppsikt på elkabeln under användning av maskinen, så att den inte skadas av slipskivan eller
sågkedjans skärlänkar.
• Fäst sågkedjan säkert i skruvstycket innan slipning.
• Använd inte maskinen om det finns brännbara ämnen i närheten. Under slipningsarbetet ger slipskivan
upphov gnistor som kan förorsaka brand eller explosion.
• Placera slipmaskinen under ögonhöjd på en plats med bra belysning.
• Vänta till sliparmen har återgått till sitt översta läge innan kedjan matas fram till nästa skärlänk.
• Tänk på att skärlänkarna är vassa, undvik att placera fingrarna nära eggen när kedjan matas fram till
nästa skärlänk.
• Slipmaskinen är endast avsedd för slipning av kedjor till motorsågar och elektriska sågar, slipning eller
kapning av annat än dessa kedjor är inte tillåtet. Använd inte andra slipverktyg än slipskivor.
SVENSK A
Stäng av maskinen omedelbart om...
• Maskinen börjar uppträda konstigt som t.ex. gnistor, rök, vibrationer eller onormala ljud.
• Maskinens strömbrytare eller elkabel är skadade.
Produktmärkning med säkerhetssymboler på maskinen
Läs hela bruksanvisningen innan
användningen av maskinen.
Använd alltid skyddsglasögon.
Använd alltid hörselskydd.
13
Page 14

Produktbeskrivning
1. Strömbrytare Av (0) / På (I)
2. Låsratt för skruvstycke
3. Slipskiveskydd
4. Sliparm
5. Slipskiva
SVENSK A
6. Djupstopp med låsmutter
101
7. Längdjusteringsratt med låsmutter
8. Kedjestopp
9. Skruvstycke för kedja
10. Låsspak för kedja
Medföljer ej
104
105
108
1010
107
109
107
14
102
104
103
106
Page 15

Installation, montering
1. Placera slipmaskinen på en arbetsbänk så att de två klackarna på undersidan ligger an mot bänkskivans
kant så att låsratten (2) på undersidan är åtkomlig, tänk på att du behöver god belysning vid inställning och
användning av slipmaskinen.
2. Fäst slipmaskinen i arbetsbänken med bultar (medföljer ej) i de två monteringshålen.
Montering och byte av slipskivan
1. Lyft upp sliparmen (4) i dess översta läge.
2. Lossa de tre skruvarna som håller fast slipskiveskyddet (3) och ta bort det, håll rätt på skruvarna så att
de inte försvinner.
3. Skruva loss flänsmutter (11) som håller fast slipskivan (5) och ta bort flänsmuttern och slipskivan.
(vrid moturs för att lossa låsratten).
4. Sätt fast en ny slipskiva på spindeln, se till att den blir centrerad på spindeln, kontrollera att flänsarna är
rena och plana och dra sedan fast flänsmutter (11) för hand, om flänsarna dras åt för hårt vid montering av
slipskivan kan den skadas vilket kan ge upphov till att operatören skadas allvarligt om slipskivan splittras
under drift. Använd endast rekommenderade slipskivor enligt specifikation. Kontrollera att flänsmutter (11)
är vänd rätt, den kupade sidan ska vara inåt mot slipskivan.
SVENSK A
5. Skruva tillbaka slipskiveskyddet (3).
6. Testa alltid nymonterade slipskivor genom att starta
motorn och låta slipskivan snurra under åtminstone
en minut innan slipningsarbetet inleds. Under
testen skall du hålla dig på behörigt avstånd
och se till att inga andra personer befinner
sig i närheten om slipskivan brister.
Om du märker att slipskivan vibrerar vid
starten eller under drift skall du genast
stoppa slipmaskinen och kontrollera
att slipskivan är felfri
och rätt monterad.
1011
105
Varning!
Försök aldrig stanna slipskivan med handen, även om du bär skyddshandskar. Kontakt med en slipskiva som
snurrar med hög hastighet kan förorsaka brännskador och skrapsår.
15
Page 16

Inställning
7.
10.
8.
Varning!
Samtliga inställningar skall göras när maskinen är avstängd och stickproppen utdragen.
1. Kontrollera vilken typ av kedja som du har, ställ in rätt filningsvinkel (de vanligaste sågkedjorna ska ha
filningsvinkel 30º eller 35º), dra åt låsratten (2) på undersidan.
SVENSK A
108
1010
107
2. Lägg i kedjan i skruvstycket, vik ner kedjestoppet (8) bakom den skärlänk som ska slipas först.
3. Tryck försiktigt ner sliparmen (4) när all inställning sker skall motorn vara avstängd. Kedjestoppet (8) ska ligga
an mot bakkanten av skärlänken som ska slipas, justera kedjestoppet (8) med längdjusteringsratten (7) så
att slipskivan kommer att möta skärlänkens egg när den trycks ner.
4. Fixera längdjusteringsratten (7) genom att dra åt låsmuttern.
5. Dra åt skruvstyckets låsspak så att kedjan fixeras, om den tar i armen kan den justeras så här:
Dra ut låsspaken och vrid den till önskat läge.
6. Tryck försiktigt ner sliparmen (4) igen och ställ in önskat slipdjup med djupstoppet (6) och dra åt låsmuttern.
7. Tryck ner sliparmen (4) och prova om inställningen är rätt en gång utan att starta motorn.
8. Nu är inställningen klar.
104
103
106
107
102
16
Page 17

Användning
Varning!
Försök aldrig stoppa slipskivan med handen, även om du bär skyddshandskar. Kontakt med en slipskiva som
snurrar med hög hastighet kan förorsaka brännskador och skrapsår.
1. Rengör kedjan noga före slipning, använd inte något eldfarligt lösningsmedel. Låt kedjan torka innan du
börjar slipa kedjan.
2. Lägg i kedjan i skruvstycket (9), vik ner kedjestoppet (8) på baksidan av en skärlänk och sträck kedjan bakåt
mot kedjestoppet, dra åt skruvstyckets låsspak (10) så att kedjan fixeras.
3. Tryck ner armen och prova om inställningen är rätt en gång utan att starta motorn. Kom håg att ta på
skyddsglasögonen innan motorn startas!
4. Tryck på den gröna startknappen för att starta motorn och låt den gå upp i varv.
5. Tryck försiktigt ner sliparmen och prova på en skärlänk, släpp upp sliparmen försiktigt, kontrollera resultatet
och stäng av och justera vid behov. Om inställningarna är korrekta kan du fortsätta med slipningen.
Kom ihåg att du får ett bra resultat om kontakten mellan slipskivan och skäret sker gradvis och mjukt,
slipa inte för länge på samma skär.
6. Släpp upp armen helt, öppna sedan skruvstyckets låsspak (10) och dra fram kedjan till nästa skärlänk
(som är vänd åt samma håll) sträck kedjan bakåt mot kedjestoppet (8), dra åt skruvstyckets låsspak (10).
SVENSK A
7. Ta bort handen från kedjan och fortsätt med slipningen.
8. Fortsätt på samma sätt med alla skärlänkarna som är vända åt samma håll.
9. Lossa låsratten (2) på undersidan, vrid skruvstycket (9) och ställ in rätt filningsvinkel för resten av
skärlänkarna som är vända åt andra hållet, dra fast låsratten (2) på undersidan. Slipa färdigt kedjan.
Kom ihåg att dra ur stickproppen efter användning.
10. Kassera kedjan när skärlänkarnas längd är nerslipad till ca 3mm.
min 3 mm (1/8″)
Underställning, inställning av kedjans skärdjup
Det är förhållandet mellan skärtandens skäregg och underställningsklackens (ryttarens) höjd som avgör hur
mycket material som avverkas av sågkedjan, därför är det mycket viktigt att det förhållandet bibehålls under
kedjans hela livslängd. Rätt underställning är mycket viktigt för säkerheten och för optimal avverkning
Om kedjan har slipats 2 till 4 gånger (beroende på hur mycket material som slipas bort) kan kedjans
djupinställning (underställning) behöva filas ner med en flatfil, använd någon typ av filmall och fila ner
underställningsklackarna (ryttarna).
17
Page 18

Om du inte har någon mall för underställningen kan du undantagsvis använda en flatfil och fila två drag
på varje underställningsklack (ryttare) som bilden visar.
Skäregg
Underställningsklack
SVENSK A
Underställning
Skötsel och underhåll
• Håll slipmaskinen ren från damm och metallspån.
• Byt slipskiva när den är nersliten till Ø 75 mm.
• Förvara slipmaskinen på en torr plats utom räckhåll för barn.
Avfallshantering
När du ska göra dig av med produkten ska detta ske enligt lokala föreskrifter.
Är du osäker på hur du ska gå tillväga, kontakta din kommun.
Transport
Maskinen levereras i kartong som kan återvinnas. Kartongen skall hanteras med försiktighet för att den inte skall
utsättas för stötar under transporten.
Specifikationer
Elektrisk slipmaskin för kedjor till kedjesågar.
Drivspänning 230 V AC, 50 Hz
Effekt 85W
Vikt 2,4 kg
Slipskivans storlek Yttre diameter 105 mm, inre diameter 23,5 mm
Slipskivans tjocklek 3,2 mm
Maximal hastighet 4800 RPM
Ljudeffekt (LwA) 93dB(A)
Ljudtryck (LpA) 80dB(A)
Avsedd för dessa kedjetyper: Kedjedelningar 1/4″ – 0,325″ – 3/8″ – 0,404″
18
Page 19

Kjedeslipemaskin
Art.nr. 18-3057 Modell 2002-UK
30-9678 Modell 2002
Les nøye igjennom hele bruksanvisningen og ta vare på den til senere bruk. Vi reserverer oss for ev. tekst- og
bildefeil, samt forandringer av tekniske data. Ved tekniske problemer eller andre spørsmål, ta kontakt med vårt
kundesenter (se opplysninger på baksiden).
Sikkerhet
Generelle sikkerhetsinstruksjoner
Advarsel!
Dette verktøyet må brukes med stor forsiktighet for å redusere faren for brann, elektrisk støt og personskader.
Les alle disse instruksjonene før du tar produktet i bruk, og spar dem til ev. senere bruk.
1. Hold arbeidsplassen ren. Rot på arbeidsplassen kan forårsake ulykker.
2. Ta hensyn til arbeidsmiljøet. Ikke utsett verktøyet for regn. Bruk ikke verktøyet i fuktige eller våte omgivelser.
Hold arbeidsplassen godt opplyst. Bruk ikke verktøyet i nærheten av lettantennelige væsker eller gasser.
3. Unngå elektrisk støt. Unngå kroppskontakt med jordede gjenstander som f.eks. rør, ovner, komfyrer og
kjøleskap etc.
NORSK
4. Hold andre personer på avstand. Ikke la andre personer, spesielt Ikke barn, som ikke deltar i arbeidet,
får røre verktøyet eller dens ledninger. Hold dem på god avstand fra arbeidsplassen.
5. Oppbevar maskinene på et sikker sted. Når verktøyet ikke er i bruk må det oppbevares tørt i et låst rom
og utenfor barns rekkevidde.
6. Overbelast ikke verktøyet. Det gjør jobben bedre og sikrere med normal matingshastighet.
7. Bruk riktig verktøy! Press ikke små verktøy til å utføre jobb som krever verktøy med større kapasitet.
Press ikke et verktøy til å utføre et arbeidsmoment som en ikke er beregnet til å utføre.
8. Benytt fornuftige arbeidsklær. Bruk ikke løstsittende klær eller smykker. De kan feste seg i roterende deler.
Bruk sklisikkert fottøy. Bruk hårnett eller tilsvarende, hvis du har langt hår.
9. Benytt alltid verneutstyr. Bruk vernebriller. Bruk også støvmaske eller vernemaske ved støvende arbeid.
10. Bruk utsugningsutstyr. Dersom støv, verktøyet er utstyrt med tilkobling for utsugingsutstyr og oppsamler
av støv. Påse da at dette utstyret blir montert og brukt riktig.
11. Påse at ikke strømledningen blir skadet. Dra ikke i ledningen, men i stikket når strømledning skal kobles fra
nettet. Påse at strømledningen ikke kommer i kontakt med varme, olje eller skarpe kanter.
12. Spenn arbeidsstykket ordentlig fast. Når det er mulig må skrustikke eller tvinger brukes for å spenne fast
arbeidsstykket. Det er sikrere enn å holde fast emnet med den ene hånden.
13. Strekk deg ikke for langt. Pass på at du hele tiden står stødig og har god balanse.
14. Vedlikehold verktøyet. Påse at de er rene og eggene skarpe for optimal effekt og et sikkert resultat.
Følg manualens anbefalinger for smøring og bytte av tilbehør. Kontroller strømledningen regelmessig.
Hvis den er skadet skal den byttes av en kyndig servicetekniker. Sjekk alle skjøteledninger regelmessig så
de ikke er skadet. Påse at maskinens/verktøyets håndtak og brytere er tørre, rene og helt fri for olje, fett etc.
19
Page 20

NORSK
15. Slå av strømmen! Dra ut støpslet og trykk inn nødstopp før service, og ved bytte av tilbehør som høvelstål,
bor, skjær, slipebånd eller blad.
16. Fjern alle nøkler og serviceverktøy! Gjør det til en vane å kontrollere at alle nøkler og serviceverktøy er fjernet
fra maskinen før du slår på strømmen.
17. Unngå uønsket oppstart. Bær ikke et verktøy med en finger på strømbryteren hvis ledningen sitter i et uttak.
Påse at strømbryteren står på OFF når du setter inn støpslet.
18. Bruk riktige skjøteledninger! Dersom du bruker skjøteledninger utendørs, bruk kun de som er beregnet for
utendørsbruk. Bruk skjøteledninger med tilstrekklig lengde, rull ut hele ledningen!
19. Bruk sunn fornuft, og vær forsiktig! Tenk deg om før du utfører en arbeidsoperasjon, så du kan utføre det
på en sikker måte! Bruk ikke maskinen/verktøyet når du er sliten, trøtt, påvirket av medisiner etc.
20. Kontroller følgende før du starter verktøyet:
- At all beskyttelse og øvrige deler er uskadde, og fyller sin funksjon.
- At bevegelige deler kan rotere fritt og er riktig innstilt.
- At ingen bevegelige deler kan sette seg fast.
- At ingen defekt har oppstått.
- Andre omstendigheter som kan påvirke utførelsen av arbeidet.
En beskyttelse eller noen annen del som er skadd, skal repareres av fagmann eller byttes ut. Skadde strøm ledninger og strømbrytere skal alltid byttes ut av fagmann. Bruk aldri verktøyet hvis du ikke kan stoppe eller
starte det på en betryggende måte.
21. Bruk anbefalt tilbehør! Bruk av tilbehør som ikke er anbefalt av produsent kan forårsake ulykker eller risiko
for personskade.
22. Repareres kun av kvalifisert tekniker! Verktøyet følger gjeldende sikkerhetskrav. Reparasjoner av verktøyet
skal alltid utføres av fagmann, med originale reservedeler, ellers kan verktøyet forårsake ulykker eller risiko
for personskade.
Spesielle sikkerhetsregler
• Benytt alltid vernebriller.
• Bruk aldri slipeskiver som er skadet.
• Bruk aldri kjedeslipemaskinen hvis ikke beskyttelsen er montert eller dersom denne er skadet.
• Bruk kun de slipeskiver som er anbefalt av produsent. De skal være merket for samme eller høyere turtall
enn maks. turtall for slipemaskinen (se merking).
• Les bruksanvisningen som følger med slipeskiven.
20
Page 21

Før maskinen startes
• Kontroller at strømbryteren står på 0, før kontakten kobles til et strømuttak. Maskinen må kun kobles til
jordet uttak.
• Kontroller at slipeskiven er sentrert og uskadet, samt at beskyttelsen er hel og montert, før bruk.
• Bruk bare slipeskiver, som har riktig diameter og som er godkjent for akkurat denne maskinens spindelturtall.
• Beskytt slipeskiver mot fuktighet og støt.
• Kontroller at slipeskiven kan rotere fritt før du starter maskinen.
• Trekk alltid ut støpselet fra uttaket før service og justering av maskinen.
Under arbeid med maskinen
• Trekk ut støpselet, hver gang du forlater maskinen uten tilsyn.
• Stå stødig og hold i maskinen med begge hendene.
• Hold et øye med strømkabelen ved bruk av maskinen så den ikke skades av slipeskiven eller sagkjedets skjær.
• Spenn sagekjedet godt fast i skrustikken før sliping.
• Ikke bruk maskinen hvis det er brannbare emner i nærheten. Når du sliper vil det oppstå gnister som kan
forårsake brann eller eksplosjon.
• Plasser slipemaskinen under øyehøyde og på en plass med god belysning.
• Vent til slipearmen har gått til sin øverste posisjon før kjedet mates fram til neste skjær.
• Husk at skjærene er skarpe. Unngå å plassere fingrene nær eggen når kjedet mates fram til neste skjær.
• Slipemaskinen er kun beregnet til å slipe kjeder til motorsager og elektriske sager. Sliping eller kapping av
annet en disse kjedene er ikke tillatt. Ikke bruk annet slipeverktøy enn slipeskiver.
NORSK
Skru av maskinen umiddelbart når
• Maskinen begynner å opptre merkelig som f.eks. gnister, røyk, vibrasjoner eller unormal lyd.
• Maskinens strømbryter eller strømkabel er skadet.
Produktmerking med sikkerhetssymboler på maskinen
Les hele bruksanvisningen før du
begynner å bruke maskinen.
Bruk alltid vernebriller.
Bruk alltid hørselsvern.
21
Page 22

Produktbeskrivelse
1. Strømbryter: Av (0) / På (I)
NORSK
2. Låseratt for skruestykke
3. Beskyttelse for slipeskive
4. Slipearm
5. Slipeskive
6. Dybdeanhold med låsemutter
7. Lengdejusteringsratt med låsemutter
8. Kjedestopp
9. Skruestykke for kjede
10. Låsespak for kjede
Medfølger ikke
101
104
105
108
107
107
104
1010
109
103
106
22
102
Page 23

Installasjon, montering
1. Plasser slipemaskinen på en arbeidsbenk med de to knottene på undersiden liggende an mot benkeplatens
kant. Pass på at det er mulig å nå låserattet (2) på undersiden. Husk at du trenger godt arbeidslys ved
montering og bruk av slipemaskinen.
2. Fest slipemaskinen til arbeidsbenken med bolter (følger ikke med) gjennom de to monteringshullene.
Montering og skifte av slipeskiven
1. Løft opp slipearmen (4) i sin øverste posisjon.
2. Løsne de tre skruene som holder fast slipeskivebeskyttelsen (3) og fjern den. Pass på at du ikke mister
skruene.
3. Skru løs flensmutter (11) som holder slipeskiven (5) fast og fjern flensratt og slipeskiven. Vri moturs for
å løsne på låserattet.
4. Fest en ny slipeskive på spindelen. Pass på at den blir sentrert. Kontroller at flensene er rene og plane.
Dra til flensmutteren (11) for hånd. Hvis flensene dras for hardt til ved montering av slipeskiven, kan den
skades, noe som kan medføre at operatøren skades alvorlig hvis slipeskiven går i stykker ved bruk.
Bruk kun slipeskiver som er anbefalt. Kontroller at flensmutteren (11) er vendt riktig vei. Den konvekse
siden skal være innover mot slipeskiven.
5. Skru på plass slipeskivebeskyttelsen (3) igjen.
6. Test alltid nymonterte slipeskiver ved å starte motoren
og la slipeskiven snurre i minst ett minutt før
slipearbeidet starter. Under denne testen skal du
holde deg på god avstand og påse at det ikke er
andre personer i nærheten heller, i tilfelle noe
skulle skje med slipeskiven.
Hvis slipeskiven vibrerer i startfasen
eller under drift, skal du umiddelbart
stoppe slipemaskinen og
kontrollere at slipeskiven
er feilfri og riktig montert.
1011
105
NORSK
Advarsel!
Forsøk aldri å stanse slipeskiven med bare hendene. Ikke engang hvis du har arbeidshansker på deg.
Kontakt med slipeskiven, når den snurrer rundt med høy hastighet, kan forårsake brannskader og sår.
23
Page 24

NORSK
7.
10.
8.
Innstilling
Advarsel!
Alle innstillinger og justeringer skal utføres mens maskinen er slått av og stikkontakten er er trukket ut av støpselet.
1. Sjekk hvilket type kjede du har, still inn riktig filevinkel (det mest vanlige er 30° og 35°), dra til låserattet (2)
på undersiden.
108
1010
107
2. Plasser kjedet i skrustikken, bend kjedestoppet (8) bak det skjæret du skal slipe først, nedover.
3. Trykk slipearmen forsiktig nedover. Motoren skal være avskrudd mens du stiller inn og justerer.
Kjedestoppet (8) skal ligge an mot bakkanten av skjærelenken som skal slipes. Kjedestoppet justeres
med lengdejusteringsrattet (7) slik at slipeskiven møter skjærelenkens egg når den trykkes ned.
4. Fest lengdejusteringsrattet (7) ved å dra til låsemutteren.
5. Dra til skruestykkets låsespak slik at kjedet festes. Det kan justeres på følgende måte:
Dra ut låsespaken og vri den til ønsket posisjon.
6. Trykk slipearmen (4) forsiktig ned og still inn ønsket slipedybde med dybdestopperen (6).
Dra til låsemutteren.
7. Trykk ned slipearmen (4) og sjekk om innstillingen er riktig uten å starte motoren.
8. Nå er innstillingen ferdig.
104
103
106
107
102
24
Page 25

Bruk
Advarsel:
Forsøk aldri å stanse slipeskiven med bare hendene. Ikke engang hvis du har arbeidshansker på deg.
Kontakt med slipeskiven, når den snurrer rundt med høy hastighet, kan forårsake brannskader og skrubbsår.
1. Rengjør kjedet grundig før sliping. Ikke bruk brannfarlig løsemiddel. La kjedet tørke før du begynner
å slipe det.
2. Plasser kjedet i skrustikken (9), bend ned skjedestoppet på baksiden av skjærlenken og strekk kjedet
bakover mot kjedestoppet. Dra til skruestykkets låsespak slik at kjedet er festet.
3. Trykk ned armen og sjekk om innstillingen er riktig uten å starte motoren. Husk å ta på vernebriller
før motoren startes!
4. Trykk på den grønne startknappen for å starte motoren og la den komme opp i turtall.
5. Trykk forsiktig ned armen og test på en skjærelenke. Slipp opp armen forsiktig og kontroller resultatet.
Skru av og juster dersom det er behov for det. Hvis innstillingene er riktige kan du fortsette med slipingen.
Husk at du får et bra resultat hvis kontakten mellom slipeskiven og skjæret skjer gradvis og mykt.
Slip ikke for lenge på samme skjær.
6. Slipp armen helt opp og åpne deretter skrustykkets låsespak (10). Dra så fram kjedet til neste skjærlenke
(som vender samme vei), strekk kjedet bakover mot kjedestoppet (8) og dra til låsespaken igjen.
7. Ta hendelen bort fra kjedet og fortsett slipingen.
NORSK
8. Fortsett slik til du har gått over alle skjær som vender samme vei.
9. Løsne på låserattet på undersiden, vri skrustykket og still inn riktig filevinkel for resten av lenken (Alle dem
som vendte den andre veien). Dra til låserattet igjen. Slip ferdig kjedet. Husk å dra ut stikkontakten når
du er ferdig.
10. Når skjærlenkenes lengde er nedslipt til 3 mm må kjedet kasseres.
min 3 mm (1/8″)
Understilling, innstilling av kjedets skjærdybde
Det er forholdet mellom skjærtennenes skjæreegg og understillingsknottenes høyde som avgjør hvor mye
materiale som slipes bort på sagkjedet. Derfor er det viktig at dette forholdet opprettholdes hele tiden.
Riktig understilling er meget viktig for sikkerheten og for optimal avvirking
Hvis kjedet har blitt slipt 2 til 4 ganger (avhengig av hvor mye materiale som er slipt bort) kan kjedets
dybdeinnstilling (understilling) trenge å files ned med en flatfil. Bruk en slags filemal og fil ned understillingsknottene.
25
Page 26

Hvis du ikke har en mal for understillingen, kan du unntaksvis bruke en flatfil og file to drag på hver knott som
vist på bildet.
NORSK
Skjæreegg
Understillingskloss
Understilling
Vedlikehold
• Hold slipemaskinen fri for støv og metallspon.
• Skift slipeskive når den er nedslitt til Ø 75 mm.
• Oppbevar slipemaskinen på en tørr plass utenfor barns rekkevidde.
Avfallshåndtering
Når du skal kvitte deg med produktet, skal dette skje i henhold til lokale forskrifter.
Er du usikker på hvordan du går fram, ta kontakt med lokale myndigheter.
Transport
Maskinen leveres i kartong som kan gjenvinnes. Kartongen skal håndteres med forsiktighet for at den ikke skal
utsettes for støt under transporten.
Spesifikasjoner
Elektrisk slipemaskin for kjeder til kjedesager.
Drivspenning 230 V AC, 50 Hz
Effekt 85 W
Vekt 2,4 kg
Størrelse slipeskive Ytre diameter 105 mm, indre diameter 22,0 mm
Tykkelse slipeskive 3,2 mm
Maksimal hastighet 4800 o/min
Lydeffekt (LWA) 93 dB(A)
Lydtrykk (LpA) 80 dB(A)
Beregnet på følgende kjedetyper: 1/4″ – 0,325″ – 3/8″ – 0,404″
26
Page 27

Teräketjun hiomakone
Tuotenro 18-3057 Malli 2002-UK
30-9678 Malli 2002
Lue käyttöohjeet ennen tuotteen käyttöönottoa. Säilytä käyttöohjeet tulevaa tarvetta varten.
Pidätämme oikeuden teknisten tietojen muutoksiin. Emme vastaa mahdollisista teksti- tai kuvavirheistä.
Jos laitteeseen tulee teknisiä ongelmia, ota yhteys myymälään tai asiakaspalveluun
(yhteystiedot käyttöohjeen lopussa).
Turvallisuus
Yleisiä turvallisuusohjeita
Varoitus!
Noudata tavanomaisia turvallisuutta lisääviä toimenpiteitä käyttäessäsi porakonetta. Näin vähennät tuli palon,
sähköiskujen ja henkilövahinkojen vaaraa. Lue kaikki ohjeet, ennen kuin alat käyttää tuotetta ja säästä nämä ohjeet.
1. Pidä työtilat siisteinä. Täynnä tavaraa olevat työtasot lisäävät huomattavasti onnettomuusriskiä.
2. Ota huomioon työympäristösi. Älä altista työkonetta sateelle. Älä käytä työkonetta kosteissa tai märissä
tiloissa. Pidä työskentelyalue hyvin valaistuna. Älä käytä konetta jos läheisyydessä on helposti syttyviä
kaasuja tai nesteitä.
3. Vältä sähköiskuja! Vältä koskettamasta maadoitettuja esineitä, kuten putkia, lämpöpattereita, hellaa tai
jääkaappia.
4. Pidä vierailijat pois työskentelyalueelta. Älä anna henkilöiden, jotka eivät osallistu työhön, etenkään lasten,
oleilla koneen tai sen sähköjohdon parissa. Pidä vierailijat riittävän kaukana työpisteestä.
5. Säilytä laitetta turvallisessa paikassa. Kun konetta ei käytetä, säilytä se kuivassa tilassa lasten
ulottumattomissa.
6. Älä ylikuormita työkalua. Anna koneen työskennellä puolestasi oikealla syöttönopeudella.
7. Käytä oikeita työkaluja. Pienkonetta ei saa pakottaa työstöihin, jotka vaativat voimakasta konetta. Älä pakota
konetta tai lisäosaa tehtävään, johon sitä ei ole tarkoitettu. Esim. pyörösahan käyttö puunkaatoon tai oksien
katkontaan.
8. Käytä tarkoituksenmukaisia vaatteita. Älä käytä löysiä vaatteita tai koruja, jotka saattavat juuttua liikkuviin
osiin. Käytä liukuestekenkiä ulkotöissä. Pitkät hiukset tulee suojata hiusverkolla tai vastaavalla.
9. Käytä aina suojavarusteita. Käytä suojalaseja.Käytä myös hengityssuojainta ja suojanaamaria, pölyävissä
töissä.
10. Käytä pölynpoistolaitteita. Jos laitteessa on pölynpoistovalmius, tarkasta, että se on asianmukaisesti liitetty ja
käytössä.
11. Käsittele sähköjohtoa varoen. Kun irrotat pistokkeen, vedä pistokkeesta, älä johdosta. Johtoa ei saa altistaa
kuumuudelle, öljylle tai teräville esineille.
SUOMI
12. Kiinnitä materiaali kunnolla. Jos mahdollista, käytä ruuvipuristimia tai ruuvipenkkiä työkappaleen
kiinnitykseen. Tämä on turvallisempaa kuin työkappaleesta kiinni pitäminen toisella kädellä.
13. Älä kurota liian kauas. Varmista, että työasentosi on tasapainoinen työn jokaisessa vaiheessa.
27
Page 28

14. Pidä työvälineet kunnossa. Varmista työvälineiden puhtaus ja terien terävyys. Näin työskentely on
turvallisempaa ja tehokkaampaa sekä lopputulos parempi. Noudata voiteluohjeita ja varusteiden
vaihtamisesta annettuja ohjeita. Tarkista virtajohdon kunto säännöllisesti. Anna sähkömiehen vaihtaa
vioittunut virtajohto. Tarkista johdot säännöllisesti ja varmista että ne ovat kunnossa. Varmista, että työkalun
kahvat, säätimet ym. ovat puhtaita, ja että niissä ei ole öljyä ym.
15. Katkaise virta. Irrota pistoke ja paina hätäkatkaisinta ennen huoltoa ja laitteiden vaihtoa, esim. höylän terät,
poranterät, hiomanauhat ja terät.
16. Poista kaikki avaimet ja työkalut. Ota tavaksesi poistaa ne koneesta ennen virran kytkemistä.
17. Vältä tahatonta käynnistystä. Konetta kannettaessa sormi ei saa olla virtakytkimellä/liipaisimella johdon
ollessa seinässä. Kun pistoke liitetään pistorasiaan, tulee virtakytkimen olla OFF-asennossa.
18. Käytä oikeita jatkojohtoja. Käytä ulkona ainoastaan ulkokäyttöön tarkoitettuja jatkojohtoja. Jatkojohdon
johtimen pinta-alan tulee olla riittävä. Kierrä koko johto auki.
19. Käytä tervettä järkeä ja ole varovainen. Suunnittele työvaiheet etukäteen, niin työ sujuu turvallisemmin!
Älä käytä laitetta väsyneenä, lääkkeiden vaikutuksen alaisena jne.
20. Varmista ennen koneen käynnistämistä, että:
- Kaikki suojat ja muut osat on ehjiä ja toimivat moitteetta.
- Kaikki liikkuvat osat liikkuvat vapaasti ja että ne on suunnattu oikein.
- Liikkuvat osat eivät pääse juuttumaan.
- Että muita vikoja ei ole ilmennyt.
- Ei ole ilmennyt muita seikkoja, jotka saattavat häiritä työskentelyä.
SUOMI
Ainoastaan ammattilainen saa vaihtaa tai korjata vioittuneet suojat ja muut osat. Johdot ja virtakytkimet tulee
vaihdattaa valtuutetulla henkilöllä. Älä käytä työkalua, mikäli et voi käynnistää ja sammuttaa sitä turvallisesti.
21. Käytä vain suositeltuja lisälaitteita. Muiden kuin suositeltujen lisälaitteiden käyttö saattaa johtaa
onnettomuuksiin tai henkilövahinkoihin.
22. Korjauksen saa suorittaa ainoastaan ammattihenkilö.Laite on voimassa olevien turvallisuusvaatimusten
mukainen. Laitteen saa korjata vain ammattilainen. Korjauksessa tulee turvallisuussyistä käyttää ainoastaan
alkuperäisosia. Muuten työkalu voi aiheuttaa onnettomuuksia ja henkilövahinkoja.
Laitetta koskevia turvallisuusohjeita
• Käytä aina suojalaseja.
• Älä käytä vahingoittuneita hiomalaikkoja.
• Älä käytä hiomakonetta ilman suojia tai jos suojat ovat vioittuneet.
• Käytä ainoastaan valmistajan suosittelemia hiomalaikkoja, joissa on sama tai korkeampi
maksimikierroslukumerkintä kuin koneen merkkikilvessä.
• Lue hiomalaikan mukana tuleva käyttöohje.
28
Page 29

Ennen koneen käynnistämistä
• Varmista, että virtakytkin on asennossa 0, ennen kuin liität pistokkeen pistorasiaan. Laite tulee liittää
maadoitettuun pistorasiaan.
• Varmista, että hiomalaikka on ehjä ja keskitetty, ja että suojat ovat ehjät ja paikoillaan.
• Käytä ainoastaan hiomalaikkoja joiden halkaisija on oikea ja jotka ovat hyväksytty laitteen kierrosluvuille.
• Älä altista hiomalaikkoja kosteudelle tai iskuille.
• Varmista ennen käynnistämistä, että hiomalaikka pääsee pyörimään vapaasti.
• Poista aina pistoke pistorasiasta ennen koneen huoltoa ja säätöä.
Työskentely koneen kanssa
• Irrota pistoke mikäli jätät laitteen ilman valvontaa.
• Seiso tukevasti ja pidä kiinni laitteesta molemmin käsin.
• Huolehdi laitteen käytön aikana, että virtajohto ei joudu kosketuksiin hiomalaikan tai teräketjun
leikkuuhampaiden kanssa ja vahingoitu.
• Kiinnitä teräketju kunnolla ruuvipuristimeen ennen hiomista.
• Älä käytä konetta, jos lähettyvillä on palovaarallisia aineita. Hiomislaikasta syntyy hiomisen aikana kipinöitä,
jotka saattavat aiheuttaa tulipalon tai räjähdyksen.
• Sijoita hiomakone katseen korkeudelle hyvin valaistuun tilaan.
• Odota, kunnes hiomavarsi on palautunut ylimpään asentoon, ennen kuin ketju syötetään seuraavaan
leikkuuhampaaseen.
• Muista, että leikkuuhampaat ovat teräviä. Varo pitämästä sormiasi terän läheisyydessä, kun ketju syötetään
seuraavaan leikkuuhampaaseen.
• Hiomalaite on tarkoitettu ainoastaan moottorisahojen ja sähkökäyttöisten sahojen hiontaan.
Muiden ketjujen hionta ja katkaisu ei ole sallittua. Älä käytä muita hiontavälineitä kuin hiontalaikkaa.
SUOMI
Sammuta kone välittömästi, mikäli
• Laite käyttäytyy omituisesti, esim. kipinöi, savuaa, tärisee tai kuulostaa epätavalliselta.
• Laitteen virtakytkin tai virtajohto on vioittunut.
Tuotteen merkinnät ja turvallisuussymbolit
Lue koko käyttöohje huolellisesti
ennen laitteen käyttöä.
Käytä aina suojalaseja.
Käytä aina kuulosuojaimia.
29
Page 30

Tuotekuvaus
1. Virtakytkin Pois (0) / Päälle (I)
2. Ruuvipuristimen lukitus
3. Hiomalaikan suoja
4. Hiomavarsi
5. Laikka
6. Syvyydenrajoitin, jossa lukkomutteri
104
105
101
7. Pituudensäätö, jossa lukkomutteri
8. Ketjun lukitus
9. Ketjun ruuvipuristin
10. Ketjun lukitusvipu
108
SUOMI
Ei sisälly
107
107
104
1010
109
103
106
30
102
Page 31

Asetukset, asennus
1. Aseta hiomakone työpöydälle niin, että alapuolen kaksi korkoa ovat vasten pöytälevyn reunaa niin
että pääset käsiksi alapuolen lukitusrattiin (2). Huomaa, että tarvitset hyvän valaistuksen hiomakoneen
käyttämiseen ja huoltamiseen.
2. Kiinnitä hiomakone työpöydän kahteen asennusreikään pulteilla (eivät sisälly pakkaukseen).
Hiomalaikan asennus ja vaihto
1. Nosta hiomavarsi (4) ylimpään asentoon.
2. Irrota kolme ruuvia, jotka pitävät hiomalaikan suojaa (3) paikallaan. Irrota hiomalaikan suoja.
Älä hukkaa ruuveja!
3. Ruuvaa hiomalaikkaa (5) kiinni pitävä laippamutteri (11) irti, ja irrota lukitusratti ja hiomalaikka.
Käännä vastapäivään, niin laipparattii irtoaa.
4. Aseta karaan uusi hiomalaikka ja varmista että se tulee karan keskelle. Tarkista, että laipat ovat puhtaat
ja tasaiset. Kiristä sitten laippamutteri (11) käsin. Jos kiristät laipat liian kireälle, hiomalaikka voi vaurioitua,
ja aiheuttaa henkilövahinkoja hajotessaan käytön aikana. Käytä ainoastaan suositeltuja hiomalaikkoja.
Tarkista, että laippamutteri (11) on oikein päin: kuperan puolen tulee olla sisäänpäin kohti hiomalaikkaa.
5. Ruuvaa hiomalaikan suoja takaisin paikalleen (3).
6. Testaa aina uuden hiomalaikan toiminta
asennuksen jälkeen käynnistämällä moottori
ja antamalla hiomalaikan pyöriä vähintään
minuutin ajan ennen työskentelyn aloittamista.
Pysyttele testin ajan riittävän kaukana
laitteesta. Varmista myös, ettei muita
ihmisiä ole laitteen lähellä.
Jos huomaat, että hiomalaikka
tärisee käynnistettäessä tai
työskentelyn aikana, pysäytä
hiomakone välittömästi.
Varmista, että hiomalaikka
on ehjä ja että se on
asennettu oikein.
SUOMI
1011
105
Varoitus!
Älä yritä pysäyttää hiomalaikkaa kädellä, vaikka kädessäsi olisi suojahansikkaat. Suurella nopeudella
pyörivä hiomalaikka voi aiheuttaa palovammoja ja naarmuja.
31
Page 32

Säädöt
7.
10.
8.
Varoitus!
Säädä laitetta ainoastaan silloin kun se on sammutettu ja pistoke on irrotettu pistorasiasta.
1. Tarkista ketjun tyyppi ja aseta oikea viilauskulma (useimpien teräketjujen viilauskulma on 30° tai 35°).
Kiristä alapuolen lukitusratti (2).
108
1010
107
2. Aseta ketju ruuvipuristimeen. Taita ketjun lukitus (8) sen leikkuuhampaan taakse, joka hiotaan ensin.
3. Paina hiontavarsi (4) varovasti alas. Huom.! Kun säädät laitetta, moottorin tulee olla sammutettu.
Ketjun lukituksen (8) on oltava hiottavan leikkuuhampaan takareunaa vasten. Säädä ketjun lukitusta (8)
pituuden säädöllä (7) niin että hiomalaikka kohtaa leikkuuhampaan terän, kun se painetaan alas.
SUOMI
4. Kiinnitä pituuden säätö (7) paikalleen kiristämällä lukitusmutteria.
5. Kiristä puristimen lukitusvipua niin että ketju kiinnittyy paikalleen. Jos se koskettaa hiomavarteen, voit säätää
sitä seuraavalla tavalla: Vedä lukitusvipu auki ja käännä sitä haluamaasi asentoon.
6. Paina hiontavarsi (4) uudestaan varovasti alas ja aseta haluamasi hiontasyvyys syvyydensäätimellä (6).
Kiristä lopuksi lukitusmutteri.
7. Paina hiontavarsi (4) alas ja testaa säätö käynnistämättä moottoria.
8. Nyt säätö on valmis.
104
103
106
107
102
32
Page 33

Käyttö
Varoitus!
Älä yritä pysäyttää hiomalaikkaa kädellä, vaikka kädessäsi olisi suojahansikkaat.
Suurella nopeudella pyörivä hiomalaikka voi aiheuttaa palovammoja ja naarmuja.
1. Puhdista ketju huolellisesti ennen hiontaa. Älä käytä helposti syttyviä liuottimia. Anna ketjun kuivua, ennen
kuin aloitat hionnan.
2. Aseta ketju ruuvipuristimeen (9) ja taita ketjun lukitus (8) alas leikkuuhampaan takapuolelle. Kiristä ketju
taaksepäin ketjun lukitusta vasten ja kiristä ruuvipuristimen lukitusvipu (10) niin että ketju kiinnittyy.
3. Paina hiontavarsi alas ja testaa säätö käynnistämättä moottoria. Käytä suojalaseja aina kun moottori
on päällä.
4. Käynnistä moottori painamalla vihreää käynnistyspainiketta. Anna moottorin kiihtyä täysille kierroksille.
5. Paina hiontavarsi varovasti alas ja testaa toimintaa leikkuuhampaaseen. Päästä hiontavarsi varovasti ylös,
tarkista hiontatulos. Sammuta laite ja tee lisäsäätöjä tarvittaessa. Jos asetukset ovat kohdallaan, voit jatkaa
hiontaa. Parhaan tuloksen saat, jos hiontalaikka koskettaa terää asteittain pehmeästi. Älä hio liian kauan
samaa terää.
6. Päästä hiontavarsi yläasentoon. Avaa sitten ruuvipuristimen lukitusvipu (10) ja vedä ketju seuraavaan
leikkuuhampaaseen (joka on samansuuntainen). Kiristä ketju taaksepäin ketjun lukitusta (8) vasten ja
kiristä ruuvipuristimen lukitusvipu (10).
7. Ota kätesi pois ketjusta ja jatka hiontaa.
8. Jatka samalla tavalla kaikkien samansuuntaisten leikkuuhampaiden hiontaa.
9. Avaa alapuolen lukitusratti (2). Käännä ruuvipuristinta (9) ja säädä oikea viilauskulma lopuille erisuuntaisille
leikkuuhampaille. Kiristä alapuolen lukitusratti (2). Hio ketju valmiiksi. Muista aina poistaa pistoke
pistorasiasta, kun hionta on valmis.
10. Poista ketju käytöstä, kun leikkuuhampaiden pituus on noin 3 mm.
min 3 mm (1/8″)
SUOMI
Ketjun leikkuusyvyyden säätö
Teräketjun leikkaaman materiaalin määrä riippuu leikkuuhampaan leikkuuterän ja syvyydensäätöhampaan
korkeuden suhteesta. Siksi tämän suhteen ylläpitäminen on erittäin tärkeää koko ketjun elinkaaren ajan.
Oikea leikkuussyvyys on erittäin tärkeää turvallisuuden ja optimaalisen teräketjun toiminnan kannalta.
Jos ketjua on hiottu 2−4 kertaa (riippuen hiotun materiaalin määrästä), voit joutua viilaamaan ketjun
syvyydensäätöä litteällä viilalla. Käytä syvyydensäätöhampaiden viilaamiseen viilamallia.
33
Page 34

Jos käytössäsi ei ole viilamallia, voit viilata litteällä viilalla kaksi vetoa jokaisesta syvyydensäätöhampaasta, kuten
kuvasta näkyy.
Leikkuuterä
Leikkuusyvyys
Syvyydensäätöhammas
Huolto ja ylläpito
• Puhdista hiomakone säännöllisesti pölystä ja metallijätteestä.
• Vaihda hiomalaikka, kun sen halkaisija on 75 mm.
• Säilytä hiomakonetta kuivassa paikassa lasten ulottumattomissa.
Kierrätys
Kierrätä tuote asianmukaisesti, kun poistat sen käytöstä. Ota yhteys kuntasi jäteneuvontaan,
mikäli olet epävarma.
SUOMI
Kuljetus
Koneen pahvilaatikko voidaan kierrättää. Käsittele pakkausta varovasti.
Se ei saa altistua iskuille kuljetuksen aikana.
Tekniset tiedot
Sähköhiomakone ketjusahan teräketjuille.
Käyttöjännite 230 V AC, 50 Hz
Teho 85 W
Paino 2,4 kg
Hiomalaikan mitat Ulkohalkaisija 105 mm, sisähalkaisija 22,0 mm
Hiomalaikan paksuus 3,2 mm
Enimmäisnopeus 4800 kierrosta minuutissa
Melutaso (LWA) 93 dB(A)
Äänenpaine (LpA) 80 dB(A)
Tarkoitettu seuraaville ketjutyypeille: 1/4″ – 0,325″ – 3/8″ – 0,404″
34
Page 35

Kettenschleifmaschine
Art.Nr. 18-3057 Modell 2002-UK
30-9678 2002
Vor Inbetriebnahme diekomplette Bedienungsanleitung durchlesen und aufbewahren. Irrtümer, Abweichungen
und technische Änderungen behalten wir uns vor. Bei technischen Problemen oder anderen Fragen freut sich
unser Kundenservice über eine Kontaktaufnahme (Kontakt siehe Rückseite).
Sicherheitshinweise
Allgemeine Sicherheitsanweisungen
Warnung:
Bei derVerwendung dieses Werkzeugs sind grundsätzliche Vorsichtsmaßnahmen zu beachten, damit dieGefahr
von Feuer, Elektroschlägen und Verletzungen auf ein Minimum beschränkt bleibt. Vor Gebrauch des Produkts
sämtliche Anweisungen durchlesen und diese aufbewahren.
1. Der Arbeitsplatz ist sauber zu halten. Vollgestellte Flächen und Tische erhöhen dasRisiko von Unfällen.
2. Rücksicht auf dasArbeitsumfeld nehmen. Das Werkzeug niemals Regen aussetzen. Das Werkzeug nicht in
Räumlichkeiten mit Feuchte oder Nässe verwenden. Den Arbeitsplatz immer gut beleuchten. Das Werkzeug
nicht in derNähe von leicht entzündlichen Flüssigkeiten oder Gasen verwenden.
3. Stromschläge vermeiden. Körperkontakt mit geerdeten Gegenständen wie Wasserleitungen, Heizungen,
Kochherd oder Kühlschrank vermeiden.
4. Andere Personen auf Abstand halten. Personen (insbesondere Kinder), dienicht ander Arbeit teilnehmen,
dasWerkzeug oder dessen Verlängerungskabel nicht anfassen lassen. Bei diesen Personen ist auf
ausreichenden Abstand vom Arbeitsplatz zu achten.
5. Das Werkzeug aneinem sicheren Ort aufbewahren. Nicht verwendetes Werkzeug in einem trockenen,
verschlossenen Raum und außer Reichweite von Kindern aufbewahren.
6. Das Werkzeug nicht überlasten. Es leistet bessere und sicherere Arbeit mit dervorgesehenen
Vorschubgeschwindigkeit.
7. Das richtige Werkzeug einsetzen. Kleines Werkzeug nicht mit großen Arbeiten überbeanspruchen,
für dieeigentlich kräftigere Geräte erforderlich sind. Werkzeuge oder Zubehör nicht für Arbeitsschritte
zweckentfremden, für diesie nicht vorgesehen sind, also z. B. nicht eine Kreissäge zum Entasten
verwenden.
8. Geeignete Kleidung tragen. Keine lockeren Kleidungs- oder Schmuckstücke tragen, da sie anrotierenden
Teilen hängenbleiben können. Für dieArbeit im Freien wird dasTragen rutschfester Schuhe empfohlen.
Bei langem Haar ein Haarnetz oder Ähnliches tragen.
9. Immer persönliche Schutzausrüstung tragen. Augenschutz tragen. Bei staubenden Arbeiten einen Staubfilter
oder eine Schutzmaske anwenden.
DEUTSCH
10. Absaugvorrichtung verwenden. Wenn Staubabsaug- und -auffangvorrichtungen montiert werden können,
ist sicherzustellen, dass diese angeschlossen sind und korrekt angewendet werden.
11. Niemals dasNetzkabel zweckentfremden. Nicht am Kabel, sondern am Stecker ziehen, wenn dieMaschine
vom Strom genommen wird. Sicherstellen, dass dasAnschlusskabel nicht mit Hitze, Öl oder scharfen
Kanten in Kontakt kommt.
12. Das Werkstück ordentlich festspannen. Wenn möglich, Zwingen oder einen Schraubstock verwenden, damit
dasWerkzeug mit beiden Händen geführt werden kann. Das ist sicherer, als dasWerkstück mit einer Hand
zu halten.
35
Page 36

13. Nicht zu weit nach vorne strecken. Für einen sicheren Stand und gutes Gleichgewicht sorgen.
14. Die Werkzeuge mit Sorgfalt pflegen. Sicherstellen, dass sie für optimale Leistung und ein sicheres Ergebnis
sauber und ihre Klingen scharf sind. Zum Schmieren und beim Wechsel von Zubehör den Empfehlungen
aus derBedienungsanleitung folgen. Das Netzkabel regelmäßig kontrollieren. Bei Beschädigungen
dasNetzkabel von einem qualifizierten Servicetechniker wechseln lassen. Sämtliche Verlängerungskabel
regelmäßig auf Schäden kontrollieren. Sicherstellen, dass Griffe und Schalter derMaschine/des Werkzeugs
trocken, sauber und frei von Öl, Fett usw. sind.
15. Den Strom abschalten. Vor Servicearbeiten und Wechsel von Zubehör wie Hobelklinge, Bohrer, Stahl,
Schleifband oder Schneidblättern den Stecker herausziehen und den Nothalt betätigen.
16. Alle Schlüssel und Servicewerkzeuge entfernen. Routinemäßig überprüfen, ob sämtliche Schlüssel und
Servicewerkzeuge von derMaschine entfernt sind, bevor derStrom eingeschaltet wird.
17. Versehentliches Einschalten vermeiden. Das Werkzeug nicht mit einem Finger am Startschalter tragen, wenn
dasKabel in derSteckdose steckt. Sicherstellen, dass derStartschalter auf OFF steht, wenn derStecker in
dieSteckdose gesteckt wird.
18. Geeignete Verlängerungskabel verwenden. Im Außenbereich ausschließlich Verlängerungskabel benutzen,
diefür diesen Zweck zugelassen sind. Verlängerungskabel mit ausreichendem Querschnitt verwenden und
immer dasgesamte Kabel abrollen.
19. Mit Vernunft und Achtsamkeit andie Arbeit gehen. Die einzelnen Arbeitsschritte gut planen, damit sie sicher
durchgeführt werden können. Bei Müdigkeit, unter Einfluss von Medikamenten etc. nicht mit derMaschine/
dem Werkzeug arbeiten.
20. Vor dem Starten des Werkzeugs ist Folgendes sicherzustellen:
- Schutzvorrichtungen und sonstige Teile müssen unbeschädigt sein und ihre Funktion erfüllen.
- Bewegliche Teile müssen korrekt eingestellt sein und sich frei drehen können.
- Bewegliche Teile dürfen sich nicht verfangen oder festfahren.
- Es darf kein Defekt vorliegen.
- Es dürfen keine sonstigen Umstände dieAusführung derArbeit behindern.
DEUTSCH
Beschädigte Schutzvorrichtungen und Schäden ananderen Teilen müssen fachgerecht repariert oder
ausgetauscht werden. Defekte Kabel und Schalter müssen immer von einer Fachkraft ausgewechselt
werden. Niemals ein Werkzeug verwenden, dassich nicht sicher ein- oder ausschalten lässt.
21. Das empfohlene Zubehör verwenden. Die Verwendung von nicht empfohlenem Zubehör kann zu Unfällen
oder Verletzungen führen.
22. Reparaturen nur von qualifizierten Technikern ausführen lassen. Das Werkzeug erfüllt diegeltenden
Sicherheitsanforderungen. Reparaturen des Werkzeugs müssen immer von einem Fachmann und mit
Original-Ersatzteilen ausgeführt werden. Andernfalls kann es zu Unfällen oder Verletzungen kommen.
Gesonderte Sicherheitsvorschriften
• Immer einen Augenschutz tragen.
• Niemals beschädigte Schleifscheiben verwenden.
• Niemals dieKettenschleifmaschine verwenden, wenn derSchutz nicht montiert ist oder beschädigt ist.
• Ausschließlich vom Hersteller empfohlene Schleifscheiben verwenden, diemit dergleichen oder einer
höheren Drehzahl als diemaximale Drehzahl, dieauf dem Typenschild derMaschine angegeben ist,
gekennzeichnet sind.
• Bedienungsanleitung des Herstellers für dieSchleifscheibe lesen.
36
Page 37

Vor dem Einschalten der Maschine
• Bevor derStecker in dieSteckdose gesteckt wird, sicherstellen, dass derEin-/Ausschalter auf 0 steht.
Die Maschine ausschließlich angeerdete Stromanschlüsse anschließen.
• Vor dem Gebrauch sicherstellen, dass dieSchleifscheibe mittig angeordnet und unbeschädigt sowie
derSchutz montiert und intakt ist.
• Ausschließlich Schleifscheiben mit dem richtigen Durchmesser, diefür dieSpindeldrehzahl derMaschine
zugelassen sind, verwenden.
• Schleifscheiben vor Feuchtigkeit und Stößen schützen.
• Vor dem Start derMaschine sicherstellen, dass sich dieSchleifscheibe frei drehen kann.
• Vor Wartungs- und Einstellarbeiten ander Kettenschleifmaschine stets den Stecker des Netzkabels aus
derSteckdose ziehen.
Während der Arbeit mit der Maschine
• Wenn dieMaschine unbeaufsichtigt ist, den Stecker ziehen.
• Immer stabil stehen und Maschine mit beiden Händen festhalten.
• Bei laufender Maschine immer darauf achten, dass dasStromkabel nicht von derSchleifscheibe oder den
Schneidgliedern derSägekette beschädigt wird.
• Vor dem Schleifen die Sägekette sicher im Schraubstock befestigen.
• Maschine nicht verwenden, wenn brennbaren Stoffe in derNähe sind. Bei Schleifarbeiten erzeugt
dieSchleifscheibe Funken, diezu Brand oder Explosion führen können.
• Schleifmaschine unter Augenhöhe aneinem Ort mit guter Beleuchtung aufstellen.
• Warten, bis derSchleifarm in dieoberste Lage zurückgekehrt ist, bevor dieKette zum nächsten
Schneidglied bewegt wird.
• Darauf achten, dass dieSchneidglieder scharf sind. Vermeiden, dass sich dieFinger in derNähe
derSchneide befinden, wenn dieKette zum nächsten Schneidglied bewegt wird.
• Die Schleifmaschine ist ausschließlich für dasSchleifen von Ketten für Motor- und Elektrosägen ausgelegt.
Das Schleifen oder Kappen von anderen Objekten als entsprechende Ketten ist nicht zulässig. Keine
anderen Schleifwerkzeuge als Schleifscheiben verwenden.
Die Maschine ist sofort abzuschalten, wenn...
• Sie ein außergewöhnliches Verhalten zeigt und z. B. Funken, Rauch, Vibrationen oder ungewöhnliche
Geräusche von sich gibt.
• Ein-/Ausschalter oder Netzkabel derMaschine beschädigt ist.
Produktkennzeichnung mit Piktogrammen
Vor derVerwendung derMaschine
diegesamte Bedienungsanleitung
durchlesen.
Immer Augenschutz tragen.
Immer Gehörschutz tragen.
DEUTSCH
37
Page 38

Produktbeschreibung
1. Ein-/Ausschalter Ein (0) / Aus (I)
2. Drehknopf für Schraubstock
3. Schleifscheibenschutz
4. Schleifarm
5. Schleifscheibe
6. Tiefenanschlag mit Kontermutter
101
7. Längeneinstellrad mit Kontermutter
8. Kettenanschlag
9. Schraubstock für Kette
10. Feststellhebel für Kette
104
105
108
Separat erhältlich
1010
107
DEUTSCH
109
107
38
102
104
103
106
Page 39

Montage
1. Schleifmaschine so auf eine Werkbank setzen, dass diebeiden Zapfen ander Unterseite ander Kante
derWerkbankplatte anliegen und dasFeststellrad (2) ander Unterseite zugänglich ist. Zum Einstellen und
Benutzen derSchleifmaschine ist eine gute Beleuchtung erforderlich.
2. Schleifmaschine ander Werkbank mit Schrauben (separat erhältlich) in den beiden Montagelöchern befestigen.
Montage und Wechseln der Schleifscheibe
1. Schleifarm (4) in oberste Stellung anheben.
2. Drei Schrauben zur Befestigung des Schleifscheibenschutzes (3) lösen und entfernen. Schrauben festhalten,
damit diese nicht verlorengehen.
3. Flanschmutter (11) zur Befestigung derSchleifscheibe (5) abschrauben und Flanschmutter sowie
Schleifscheibe entfernen. (Zum Lösen des Feststellrades entgegen dem Uhrzeigersinn drehen.)
4. Eine neue Schleifscheibe ander Spindel befestigen. Sicherstellen, dass dieFlansche sauber und plan
sind und anschließend Flanschmutter (11) von Hand anziehen. Wenn dieFlansche bei derMontage
derSchleifscheibe zu stark angezogen werden, kann dieScheibe beschädigt werden. Wenn
dieSchleifscheibe dann im Betrieb splittert, kann derBenutzer schwer verletzt werden.
Ausschließlich empfohlene Schleifscheiben gemäß den technischen Daten verwenden. Sicherstellen,
dass dieFlanschmutter (11) richtig aufgesetzt wird. Die gewölbte Seite muss nach innen zur
Schleifscheibe zeigen.
5. Schleifscheibenschutz (3) wieder anschrauben.
6. Stets neu montierte Schleifscheiben testen, indem
derMotor gestartet und dieSchleifscheibe mindestens
eine Minute lang laufen gelassen wird, bevor mit
derSchleifarbeit begonnen wird. Beim Test
ausreichenden Abstand einhalten und darauf
achten, dass sich keine anderen Personen
in derNähe befinden, für den Fall, dass
dieSchleifscheibe zersplittert.
Wenn dieSchleifscheibe beim
Start oder im Betrieb vibriert,
Schleifscheibe unverzüglich
stoppen und sicherstellen,
dass dieSchleifscheibe
fehlerfrei und ordnungsgemäß montiert ist.
DEUTSCH
1011
105
Warnung:
Niemals versuchen, dieSchleifscheibe mit derHand zu stoppen, auch nicht mit Schutzhandschuhen. Der Kontakt mit
einer Schleifscheibe, diesich mit hoher Geschwindigkeit dreht, kann Verbrennungen und Schürfwunden verursachen.
39
Page 40

Einstellen
7.
10.
8.
Warnung:
Für sämtliche Einstellarbeiten muss dieMaschine ausgeschaltet und derStecker gezogen sein.
1. Kettentyp überprüfen, richtigen Feilwinkel einstellen (die meisten Sägeketten müssen einen Feilwinkel von
30° oder 35° aufweisen) und Feststellrad (2) ander Unterseite anziehen.
108
1010
107
2. Kette in Schraubstock setzen und Kettenanschlag (8) hinter dem Schneidglied, daszuerst geschliffen
werden soll, nach unten klappen.
3. Schleifarm (4) vorsichtig nach unten drücken. Für alle Einstellarbeiten muss derMotor ausgeschaltet sein.
Der Kettenanschlag muss ander Rückseite des Schneidglieds, dasgeschliffen werden sollen, anliegen.
Kettenanschlag (8) mit Längeneinstellrad (7) so einstellen, dass dieSchleifscheibe dieSchneide des
Schneidglieds berührt, wenn er nach unten gedrückt wird.
4. Längeneinstellrad (7) durch Anziehen derKontermutter fixieren.
5. Feststellhebel des Schraubstocks zum Fixieren derKette anziehen. Wenn er in den Arm greift, kann er wie
folgt eingestellt werden: Feststellhebel herausziehen und in gewünschte Stellung drehen.
6. Schleifarm (4) wieder vorsichtig nach unten drücken, gewünschte Schleiftiefe mit dem Tiefenanschlag (6)
einstellen und Kontermutter anziehen.
DEUTSCH
7. Schleifarm (4) nach unten drücken und ohne Starten des Motors einmal testen, ob dieEinstellung richtig ist.
8. Die Einstellung ist jetzt abgeschlossen.
104
103
106
107
40
102
Page 41

Verwendung
Warnung:
Niemals versuchen, dieSchleifscheibe mit derHand zu stoppen, auch nicht mit Schutzhandschuhen. Der Kontakt mit
einer Schleifscheibe, diesich mit hoher Geschwindigkeit dreht, kann Verbrennungen und Schürfwunden verursachen.
1. Vor dem Schleifen Kette sorgfältig reinigen. Kein feuergefährliches Lösungsmittel verwenden. Vor dem
Schleifen derKette diese trocknen lassen.
2. Kette in Schraubstock (9) setzen, Kettenanschlag (8) ander Rückseite eines Schneidglieds nach unten
klappen und Kette nach hinten bis zum Kettenanschlag ziehen. Feststellhebel (10) des Schraubstocks
anziehen, um dieKette zu fixieren.
3. Arm nach unten drücken und ohne Starten des Motors einmal testen, ob dieEinstellung richtig ist.
Vor Starten des Motors Augenschutz aufsetzen.
4. Zum Starten des Motors grünen Startknopf drücken und warten, bis dievolle Drehzahl erreicht ist.
5. Schleifarm vorsichtig nach unten drücken und aneinem Schneidglied testen. Schleifarm vorsichtig nach
oben klappen, Ergebnis prüfen und ausschalten. Bei Bedarf nachstellen. Wenn dieEinstellungen in Ordnung
ist, kann derSchleifvorgang fortgesetzt werden. Das Ergebnis wird verbessert, wenn derKontakt zwischen
Schleifscheibe und Schneide schrittweise und sanft erfolgt. Nicht zu lange ander gleichen Schneide
schleifen.
6. Arm vollständig nach oben klappen, Feststellhebel (10) des Schraubstocks öffnen und Kette zum nächsten
Schneidglied (das in diegleiche Richtung zeigt) vorziehen. Kette nach hinten bis anden Kettenanschlag (8)
ziehen und Feststellhebel (10) anziehen.
7. Hand von Kette nehmen und Schleifvorgang fortsetzen.
8. Auf diegleiche Weise mit allen Schneidgliedern fortsetzen, diein diegleiche Richtung zeigen.
9. Feststellrad (2) ander Unterseite lösen, Schraubstock (9) drehen und richtigen Feilwinkel für dierestlichen
Schneidglieder einstellen, diein dieandere Richtung zeigen. Feststellrad (2) ander Unterseite anziehen.
Kette fertig schleifen. Nach dem Gebrauch Stecker ziehen.
10. Kette entsorgen, wenn dieLänge derSchneidglieder auf ca. 3 mm abgeschliffen ist.
mind. 3 mm (1/8″)
DEUTSCH
Tiefenbegrenzung, Einstellen der Schneidtiefe der Kette
Dabei handelt es sich um dasVerhältnis zwischen derSchneide des Schneidzahns und derHöhe derTiefenbegrenzungsnase, dasentscheidet, wie viel Material von derSägekette abgetragen wird. Daher muss dieses
Verhältnis während dergesamten Lebensdauer derKette gleich bleiben. Die richtige Tiefenbegrenzung ist für
dieSicherheit und ein optimales Abtragen äußerst wichtig.
Wenn dieKette zwei bis vier Mal geschliffen wurde (je nachdem, wie viel Material abgeschliffen wurde),
muss dieTiefeneinstellung derKette (Tiefenbegrenzung) mit einer Flachfeile abgefeilt werden. Feilschablone
verwenden und Tiefenbegrenzungsnasen abfeilen.
41
Page 42

Wenn keine Schablone für dieTiefenbegrenzung zur Verfügung steht, kann ausnahmsweise eine Flachfeile
verwendet und zweimal anjeder Tiefenbegrenzungsnase gefeilt werden (siehe Abbildung).
Schneide
Tiefenbegrenzungsnase
Tiefenbegrenzung
Pflege und Wartung
• Schleifmaschine frei von Staub und Metallspänen halten.
• Schleifscheibe auswechseln, wenn sie bis auf Ø 75 mm abgeschliffen ist.
• Schleifmaschine aneinem trockenen Ort außerhalb derReichweite von Kindern aufbewahren.
Hinweise zur Entsorgung
Bitte dasProdukt entsprechend den vor Ort geltenden Bestimmungen entsorgen. Weitere Informationen
sind von derGemeinde oder den kommunalen Entsorgungsbetrieben erhältlich.
Transport
Die Maschine wird in einem Karton geliefert, derrecycelt werden kann. Den Karton vorsichtig handhaben und
während des Transports keinen Stößen aussetzen.
Technische Daten
DEUTSCH
Elektrische Schleifmaschine für Ketten von Kettensägen.
Betriebsspannung 230 V AC, 50 Hz
Leistungsaufnahme 85 W
Gewicht 2,4 kg
Größe derSchleifscheibe Außendurchmesser 105 mm, Innendurchmesser 23,5 mm
Stärke derSchleifscheibe 3,2 mm
Maximale Drehzahl 4800 /min
Geräuschpegel (LwA) 93 dB(A)
Schalldruckpegel (LpA) 80 dB(A)
Ausgelegt für diese Kettentypen: Kettenteilungen 1/4″ – 0,325″ – 3/8″ – 0,404″
42
Page 43

Declaration of Conformity
Försäkran om överensstämmelse
Samsvarerklæring
Vakuutus yhdenmukaisuudesta
Konformitätserklärung
CLAS OHLSON AB
SE-793 85 INSJÖN, SWEDEN
Declares that this product complies with the requirements of the following directives and standards
Intygar att denna produkt överensstämmer med kraven i följande direktiv och standarder
Bekrefter at dette produktet er i samsvar med følgende direktiver og standarder
Vakuuttaa, että tämä tuote täyttää seuraavien direktiivien ja standardien vaatimukset
Erklärt hiermit, dass dieses Produkt die Anforderungen und Bestimmungen folgender Richtlinien erfüllt
CHAINSAW SHARPENER
Machinery directive
2006/42/EC
EN 61029-1:2009
+A11:2010
Applicable parts of
EN61029-2-10:2010
Cotech 30-9678 / 18-3057
2002 / 2002-UK
EMC directive
2004/108/EC
EN 55014-1:2006+A1:2009
EN 55014-2:1997
+A1:2001+A2:2008
EN 61000-3-2:2006
+A1:2009 +A2:2009
EN 61000-3-3:2008
Klas Balkow
President
Low voltage directive
2006/95/EC
Insjön, Sweden, 2013-11-20
Page 44

SVERIGE
KUNDTJÄNST Tel: 0247/4 45 0 0
Fax: 0247/4 45 0 9
E-post: kundservice@clasohlson.se
INTERNET www.clasohlson.se
BREV Clas Ohlson AB, 793 85 INSJÖN
NORGE
KUNDESENTER Tlf.: 23 21 40 00
Faks: 23 21 40 80
E-post: kundesenter@clasohlson.no
INTERNETT www.clasohlson.no
POST Clas Ohlson AS, Postboks 485 Sentrum, 0105 OSLO
SUOMI
ASIAKASPALVELU Puh.: 020 111 2222
Sähköposti: asiakaspalvelu@clasohlson.fi
INTERNET www.clasohlson.fi
OSOITE Clas Ohlson Oy, Maistraatinportti 4 A, 00240 Helsinki
UNITED KINGDOM
CUSTOMER SERVICE Contact number: 020 8247 9300
E-mail: customerservice@clasohlson.co.uk
INTERNET www.clasohlson.co.uk
POSTAL 10 – 13 Market Place
Kingston Upon Thames
Surrey
KT1 1JZ
DEUTSCHLAND
KUNDENSERVICE Unsere Homepage www.clasohlson.de besuchen
und auf Kundenservice klicken.
 Loading...