

Page 1
The lightning flash with ar
rowhead symbol, within
an equilateral triangle, is
intended to alert the user to the pres-
ence of uninsulated “dangerous voltage” within the product’s enclosure
that may be of sufficient magnitude to
constitute a risk to persons.
USER’S MANUAL
WARNING/CAUTION
FCC
This device complies with Part15 of
the FCC Rules. Operation is subject
to the following two condition: (1)this
device may not cause harmful
interference,and (2) this device must
accept any interference received,in-
cluding interference that may cause
undesired operation.
NOTICE
The exclamation point,
within an equilateral
triangle, is intended to
alert the user to the presence of im-
portant operating and maintenance
(servicing) instructions in the literature
accompanying the appliance.
1
DTV Converter Box
Please be aware that new software may
change the functionality of the converter
box.
The photo and the function explanation
involved in this specification is for
reference only. If there is any mistake,
please refer to the entity.
Any changes or modifications not
expressly approved by the party
responsible for compliance could void
the user’s authority to operate the
equipment.
Page 2
SAFETY INSTRUCTIONS
Please read these safety instructions through carefully, before operating the receiver.
Please observe all warnings and instructions on the equipment and contained in
these operating instructions.
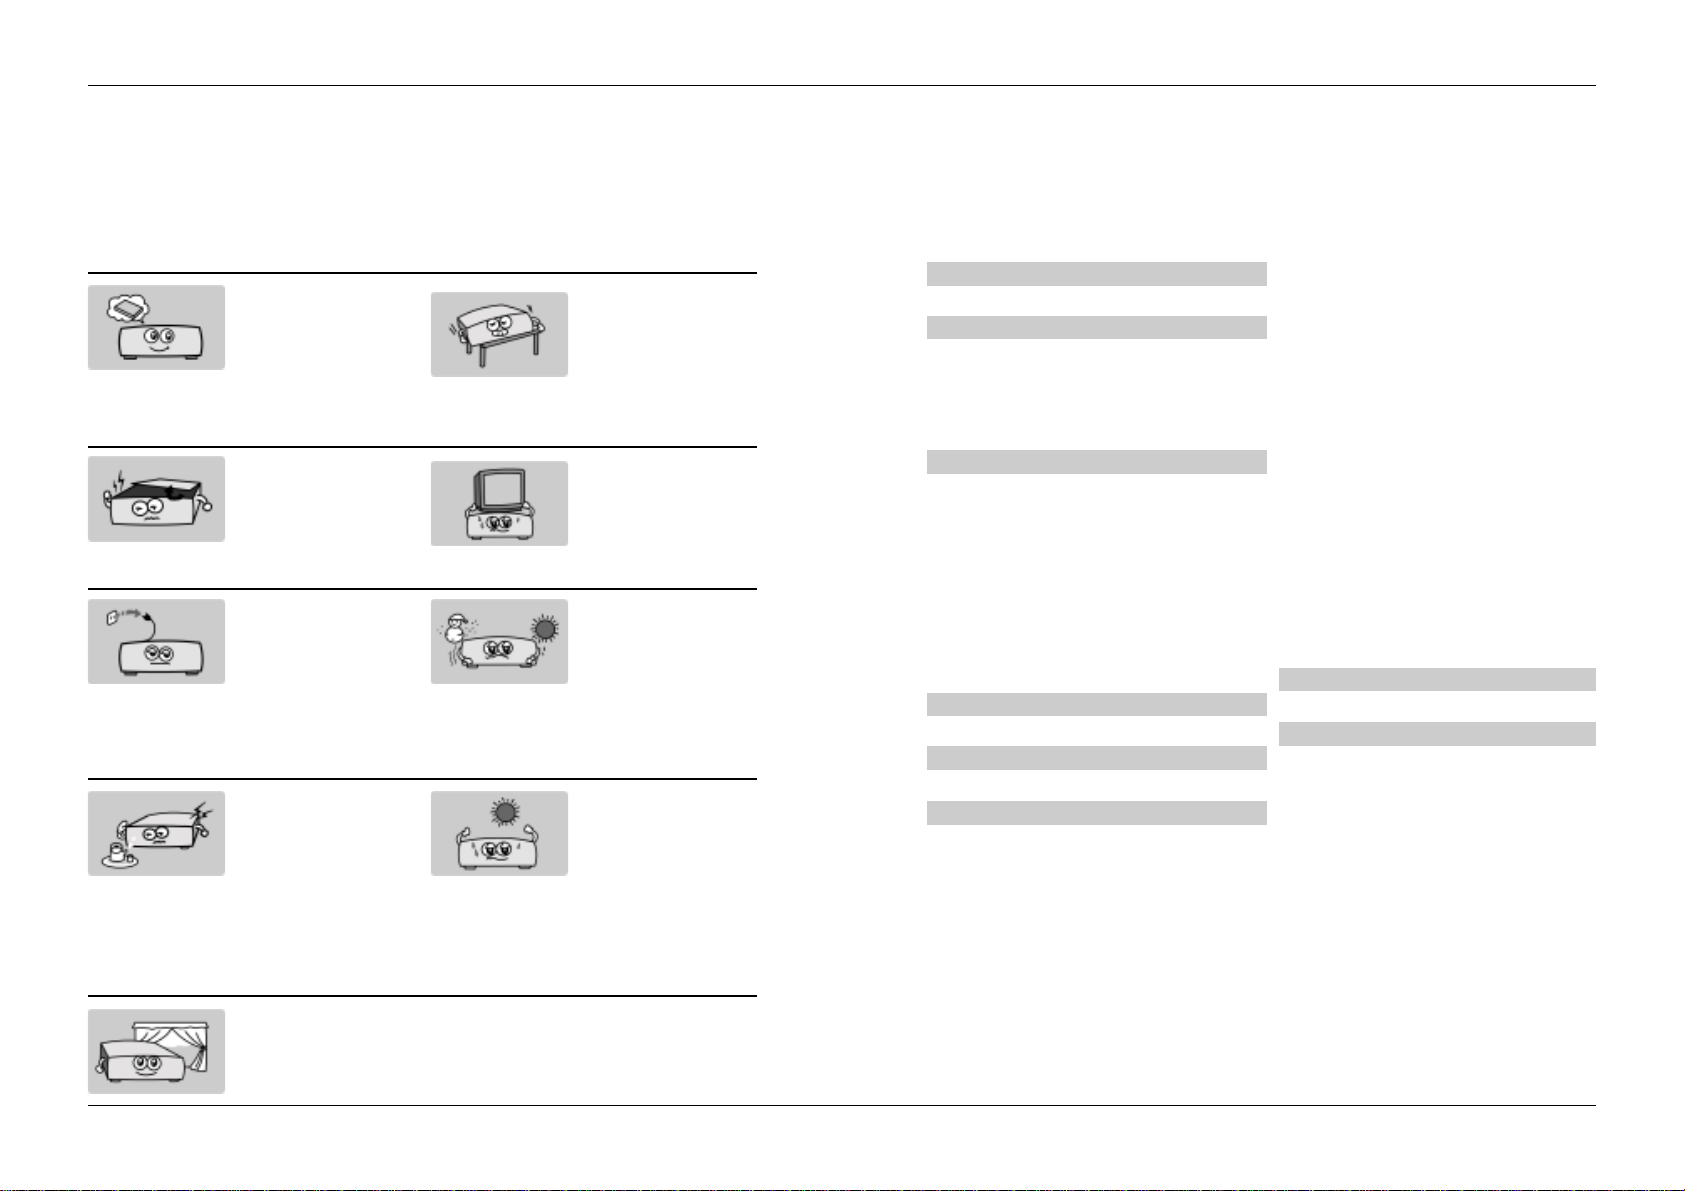
Be sure to read this
user’s manual before
starting your operation.
Never open the cover.
Don’t touch the inside
of the unit,otherwise it
may cause possible
electric shock.
If the receiver is not in
use for long periods,
always unplug the receiver from its power
source.Don’t use
damaged power cord.
Install the unit
horizontally. Unbalanced installation may
cause the unit to be
damaged by itself.
Do not put heavy objects on the unit.
When the location of
the unit will move from
heat area to cold area,
turn off the power for
at least 1-2 hrs before
you restart the receiver.
Table of Contents
SAFETY INSTRUCTIONS 2
GENERAL INFORMA TION 4
1. Main Features 4
2. Unpacking 4
OVERVIEW OF THE EQUIPMENT 5
1. Front Panel 5
2. Rear Panel 6
3. Remote Control Unit 7
4. Installation of STB 8
FIRST STEPS 12
MENU INFORMATION 12
USER’S MANUALUSER’S MANUAL
2.2 Aspect Ratio 17
2.3 Language 18
2.4 Audio Language 18
2.5 Caption Select 18
2.6 DCC Setup 19
2.7 Sleep Mode 19
3. LOCK 20
3.1 Lock System 20
3.2 Set Password 20
3.3 Block Channel 21
3.4 TV Rating-Children 21
3.5 TV Rating-General 22
3.6 Movie Rating 23
3.7 Downloadable RRT 23
TECHNICAL SPECIFICA TION 24
TROUBLE SHOOTING 24
Do not touch the power
with wet hand. Take off
the power cord from
the outlet if there’s liquid flowing into the
unit,otherwise,it may
cause fire or electric
shock.
Place the unit in a well
ventilated and no heat
environment.
2
DTV Converter Box
Install the unit in a
place with:
good ventilation
suitable temperature
no direct sunrays
low humidity
low vibration influence
ON SCREEN MENUS SELECTION 13
1. Main Menu 13
2. Channel 14
1.1 Channel Scan 14
1.2 Channel Add 15
1.3 Channel Edit 15
1.4 Manual Scan 16
1.5 Output Channel 16
2. OPTION 17
2.1 Clock 17
3
DTV Converter Box
Page 3
USER’S MANUALUSER’S MANUAL
GENERAL INFORMA TION
Incorporating the highly integrated
single chip, N99901T is a cost-ef-
fective and high performance digi-
tal ATSC receiver. N9901T provides
FTA (Free-To-Air) channels with
user-friendly OSD (On Screen
Display) , which undoubtedly makes
it an ideal choice for viewers like you
to enjoy the digital life.
1. Main Features
Fully ATSC compliant for USA
with NTIA Certification
Receives ATSC Terrestrial
broadcast Channels 2-69
mation Protocol Data
Multi-language OSD (English,
French, Spanish)
Multi-language audio supported
Multi-language Subtitle output
supported
Support Channel Display, Closed
Caption, EAS and Parental Controls(V-
Chip)
Support 4:3 and 16:9 Aspect Ra-
tios
OVERVIEW OF THE EQUIPMENT
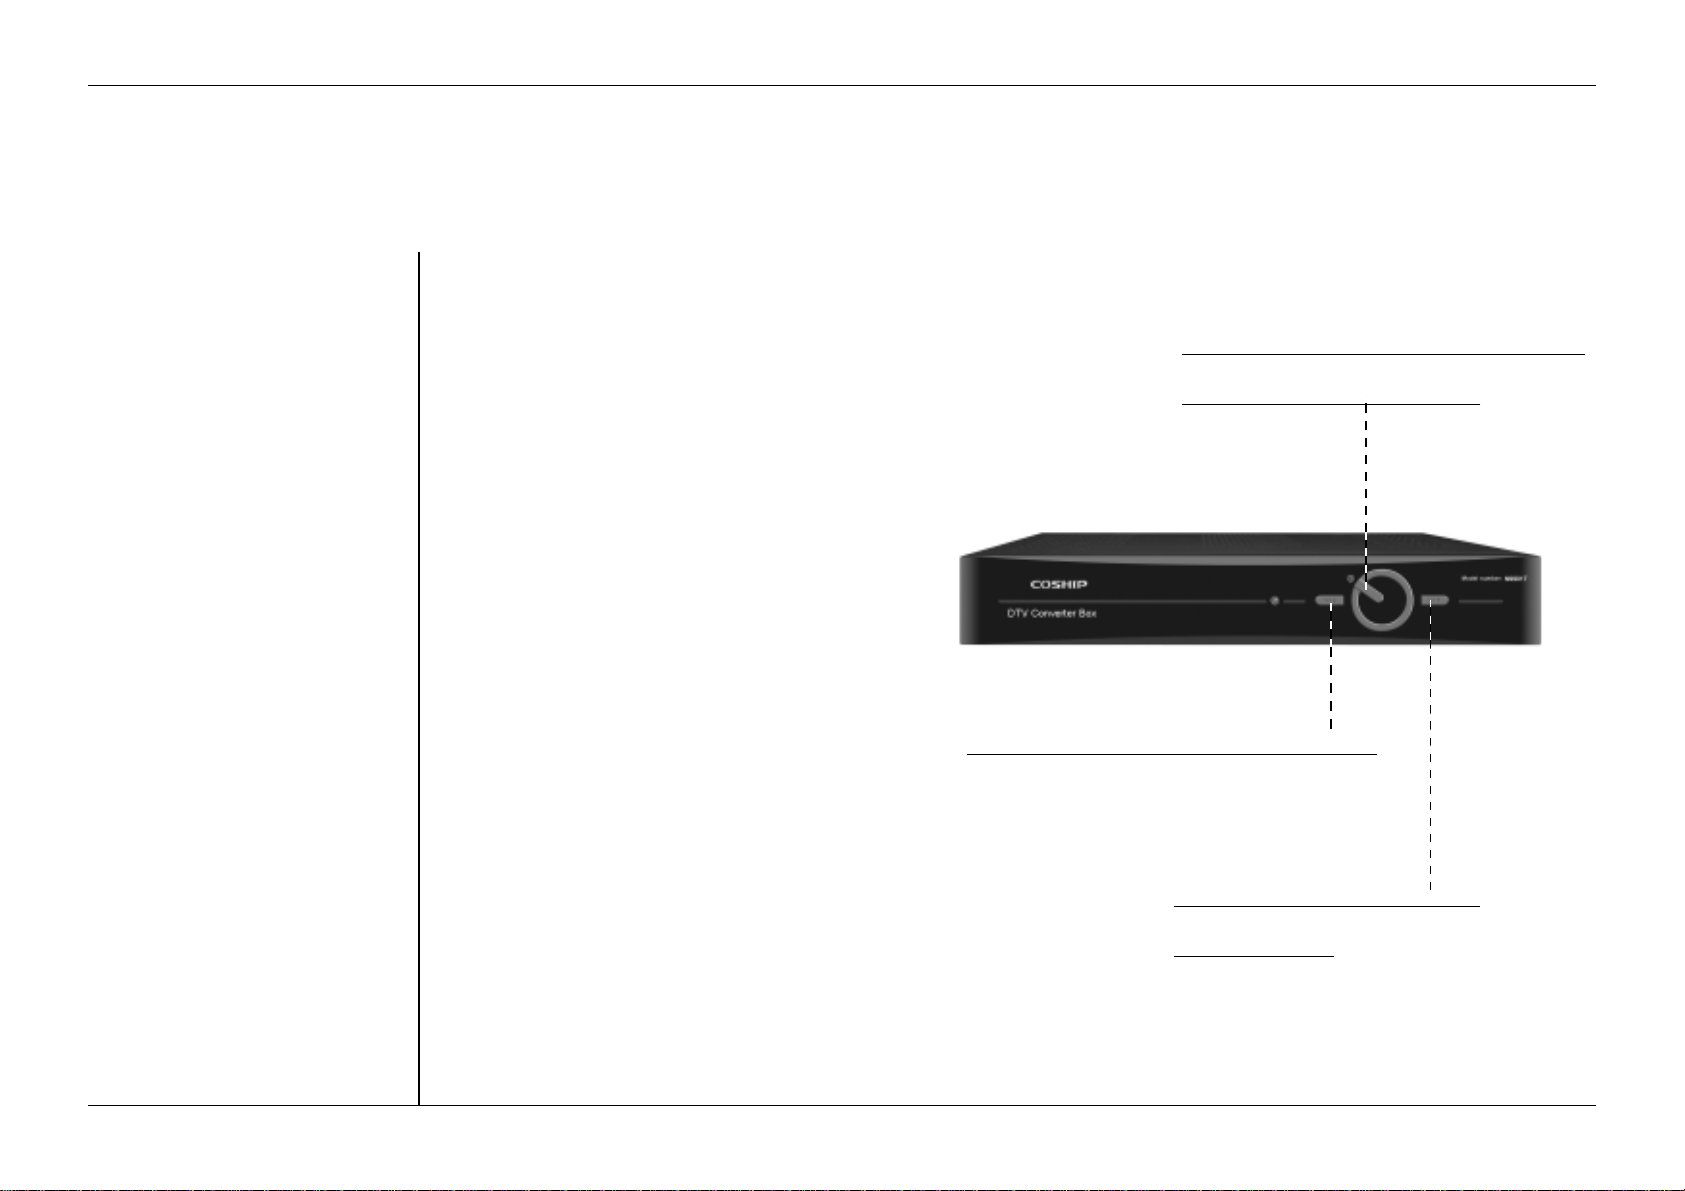
1. Front Panel
Operation /Standby button: press to switch be-
tween Operation and Standby mode.
Receiving and Presenting
Audio/Video Formats Contains in
ATSC A/53E
256 colors on screen display
(OSD) supported
Full Compliant with ATSC A/
74, Receiver Performance Guide-
lines
Process and Display ATSC
A/65C Program and System Infor-
4
DTV Converter Box
2. Unpacking
Unpack the receiver and check to
make sure that all of the following
items are included in the packaging.
1 x Remote Control Unit
1 x User’s Manual
1 x DTV converter box
Channel up button: press to move to next channel
Channel down button: press to move
to previous channel
5
DTV Converter Box
Page 4
2. Rear Panel
USER’S MANUALUSER’S MANUAL
3. Remote Control Unit
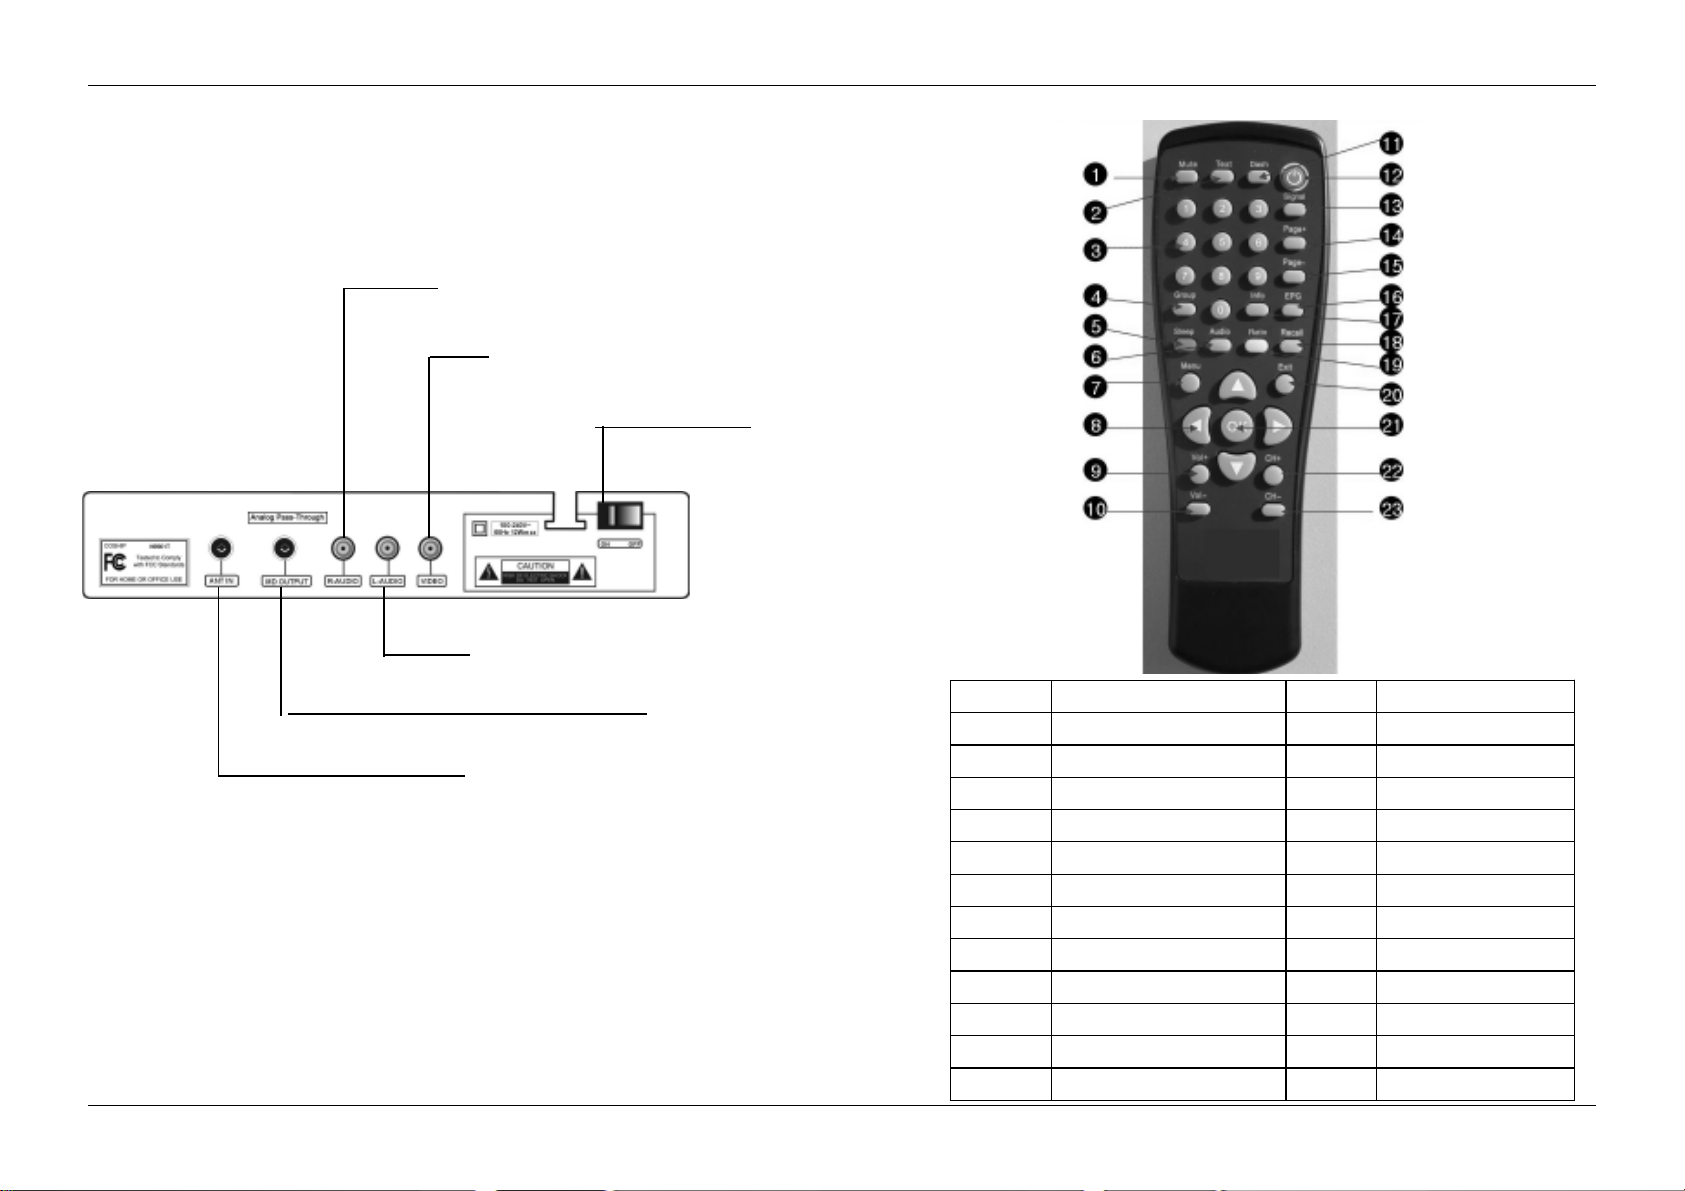
Right audio
VIDEO
Main power switch
Left audio
Channel 3 or 4 output to TV set’s antenna in
Connect to terrestrial antenna
6
DTV Converter Box
NO. Function NO. Function
1 Mute 13 Signal strength
2 CC 14 Page+
3 Numeric Key 15 Page-
4 Reserved for future use 16 Guide
5 Sleep Mode 17 Information
6 Audio 18 Recall
7 Menu 19 Ratio
8 Arrow key 20 Exit
9 VOL+ 21 OK
10 VOL- 22 CH+/PAGE+
11 Dash 23 CH-/PAGE-
12 Stand by
7
DTV Converter Box
Page 5
4. Installation and channel set up
USER’S MANUALUSER’S MANUAL
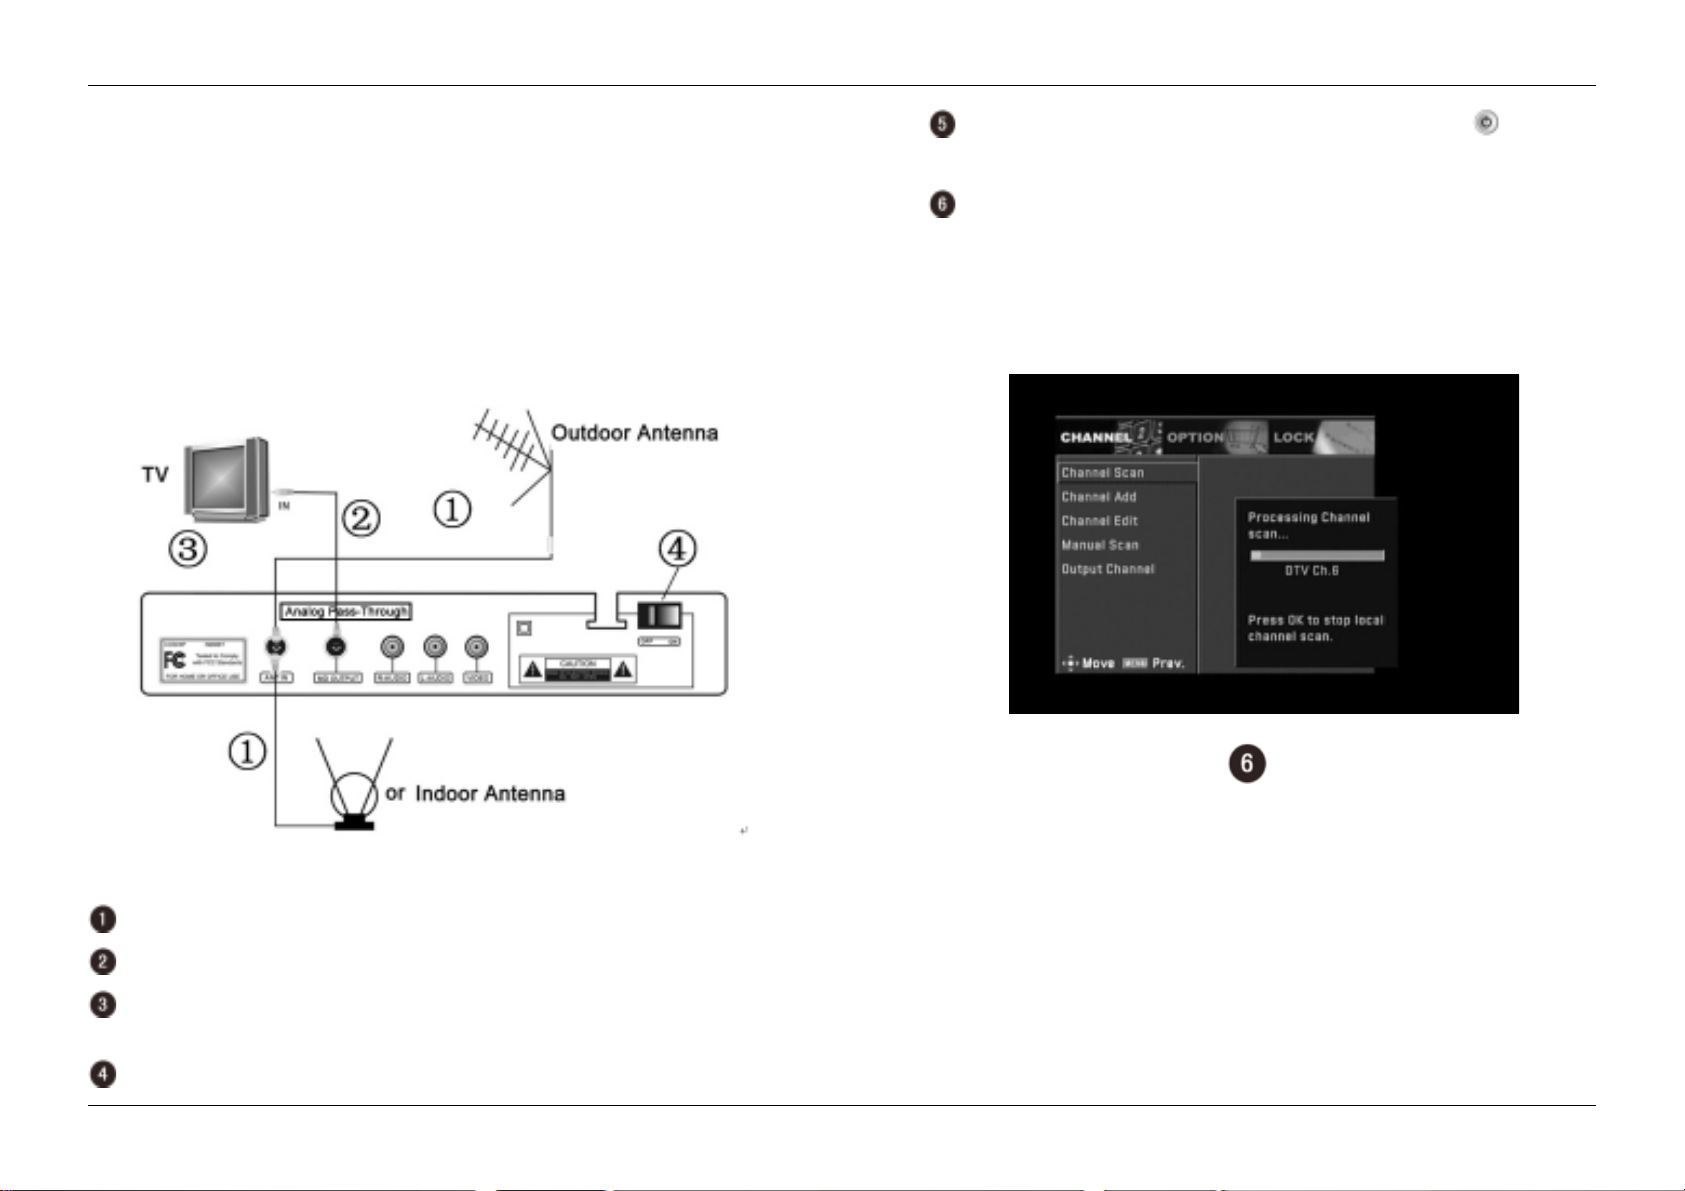
Tune the converter box to “operation” mode, by pressing key on the
remote control (when in “operation” mode, LED on front panel is GREEN)
4. Installation and channel set up
You can choose one of the two ways below (not both) to install and scan digital TV
channels
1) To receive digital channels with MD output (RF output)
(RF cable is included in the package)
Press “menu” button on the remote control to enter main menu, select
“channel scan”, press “OK” button to start channel scan, when the scan
finishes, channels will broadcast automatically, then press “exit” button on
remote control to close the menu and enjoy the digital TV programs.
Connect outdoor or indoor antenna to the “ANT IN” of the rear panel
Connect the converter box (MD output) and TV set (RF/ATN in) with RF cable
Turn on the TV set, tune to channel 4(or channel 3, but the converter system sets
channel 4 as default)
Power on the converter box by putting the power switch to “on” of rear panel
8
DTV Converter Box
*** Analog pass through
Do above and below steps, it will allow you to watch analog channels with analog
pass through function:
If you would like to transfer to analog channels(if available), you just need to tune the
converter box to “Standby” mode the converter box and the analog signal will pass to
the TV set through the converter box, means the TV will receive analog channels.
Please note that when you are watching analog channels, you need to use the TV’s
remote control or front buttons for channel operation. If you would like to come back
to digital channels, you need to tune the converter box to “operation” mode.
9
DTV Converter Box
Page 6
USER’S MANUALUSER’S MANUAL
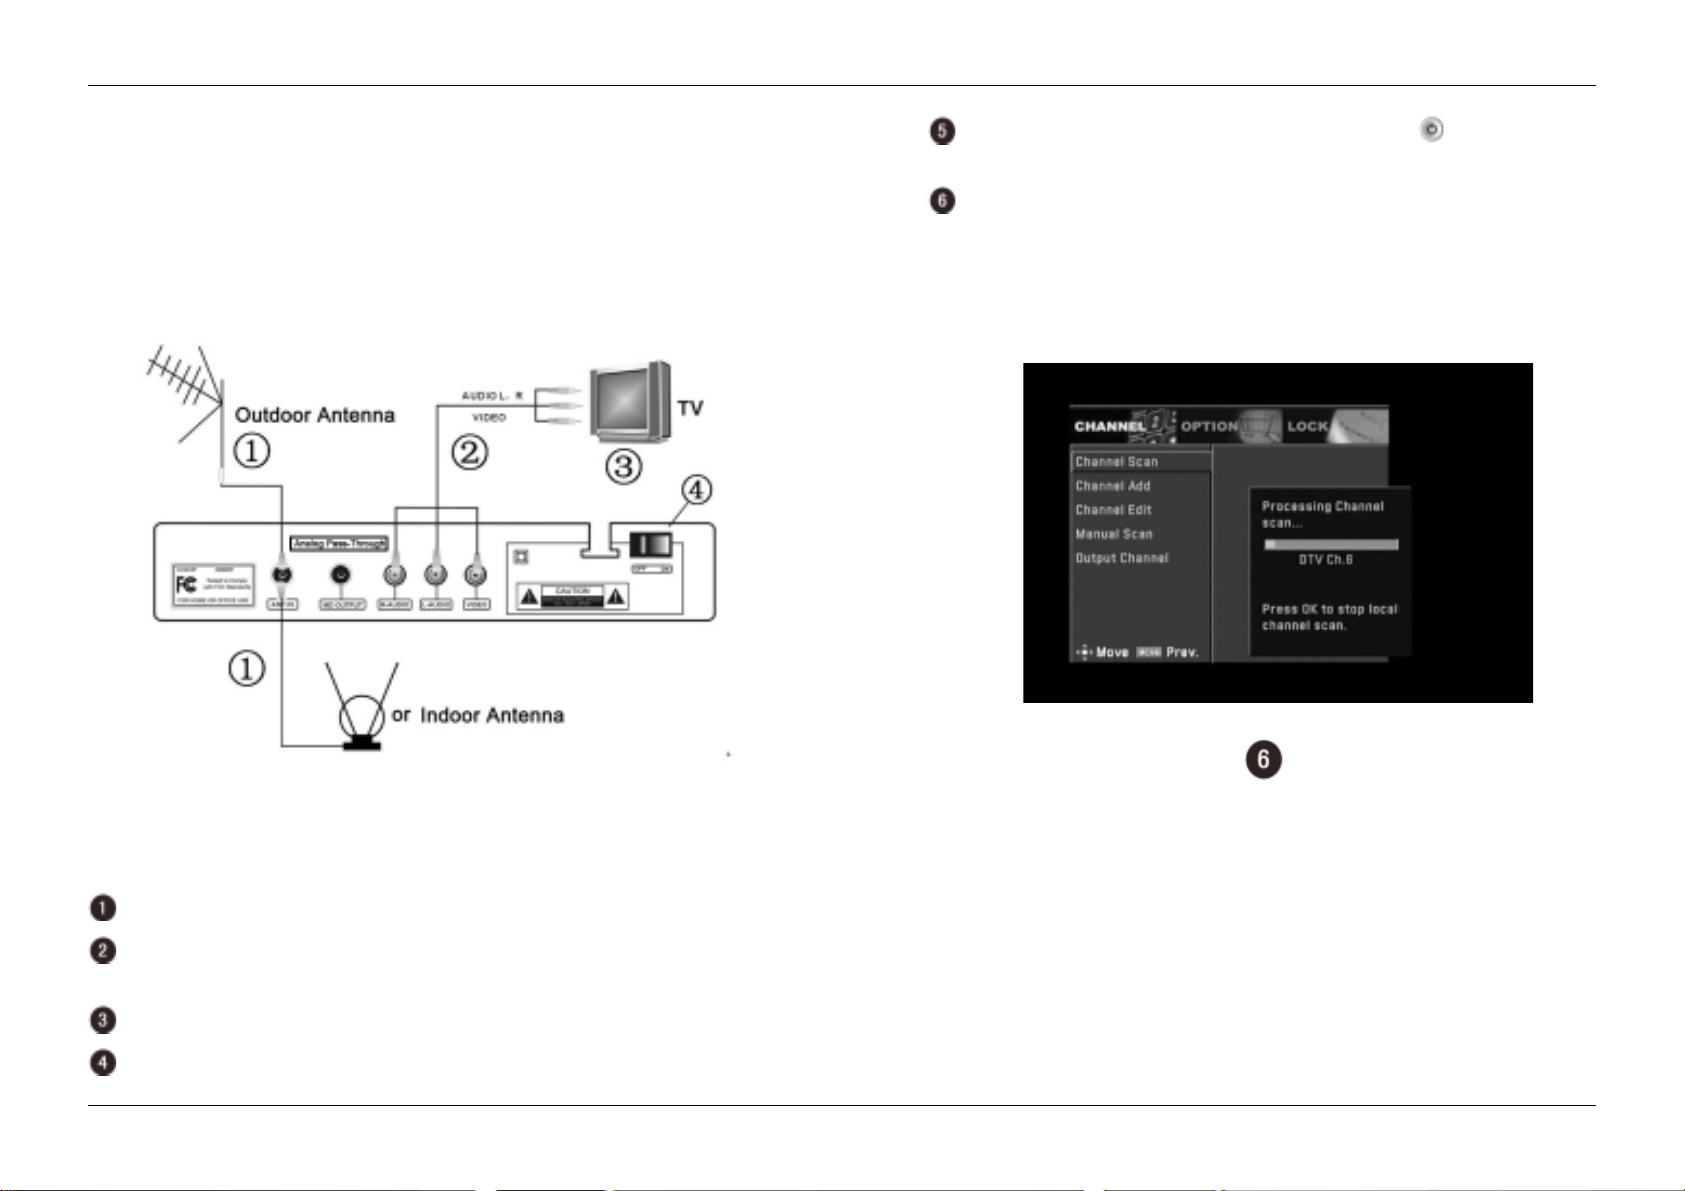
Tune the converter box to “operation” mode, by pressing key on the remote
2) T o receive digital channels with RCA output (RCA cable is not included in the
package)
control (when in “operation” mode, LED on front panel is GREEN)
Press “menu” button on the remote control to enter main menu, select “channel
scan”, press “OK” button to start channel scan, when the scan finishes, channels
will broadcast automatically, then press “exit” on remote control to close the menu
and enjoy the digital TV programs.
Connect outdoor or indoor antenna to the “ANT IN” of the rear panel
Connect the converter box and TV with RCA cable, please make sure the colors
of plugs (yellow, red, white) match the colors of sockets (yellow, red, white)
Turn on the TV set, tune it to AV mode
Power on the converter box by putting the power switch to “on” of rear panel
10
DTV Converter Box
Note: if you you connect with RCA cable rather than RF cable, the analog pass
through function won’t work. So if you would like to use analog pass through
function, please connect with RF cable.
11
DTV Converter Box
Page 7
FIRST STEPS
Connect the receiver to power source by inserting the receiver’s plug in the power
socket, and turn on the main power switch on the rear panel.
The receiver starts up in Standby mode when the front LED is RED color.
Connect the auxiliary devices with power sources, and turn them on.
To see if there are any new channels, then activate the channel search.
CAUTION !
Before connect the receiver to power source,check to make sure all of the devices
(including antena)are well connected.
MENU INFORMATION
The user interface has various ways to navigate through the menu and functions.
Some of the keys on the remote control unit provide direct access to functions, such
as MENU,OK key and colored keys. Other keys are multi-functional ,since their func-
tions will change according to the different mode you are in.
Unless otherwise specified; this note explains the way you can operate the pages of
the user menu.
1. Press the
2. Press the
3. Press the OK key to enter the sub-menu.
4. Press the EXIT key to escape from the current menu, and return to view mode.
5. In a sub-menu:
-Press OK key to confirm your selection;
-The green or white bar indicates the active selection
keys to move the cursor left or right, from one line to another line.
keys to move the cursor up or down in the sub-menu.
USER’S MANUALUSER’S MANUAL
ON SCREEN MENUS SELECTION
1. Main Menu
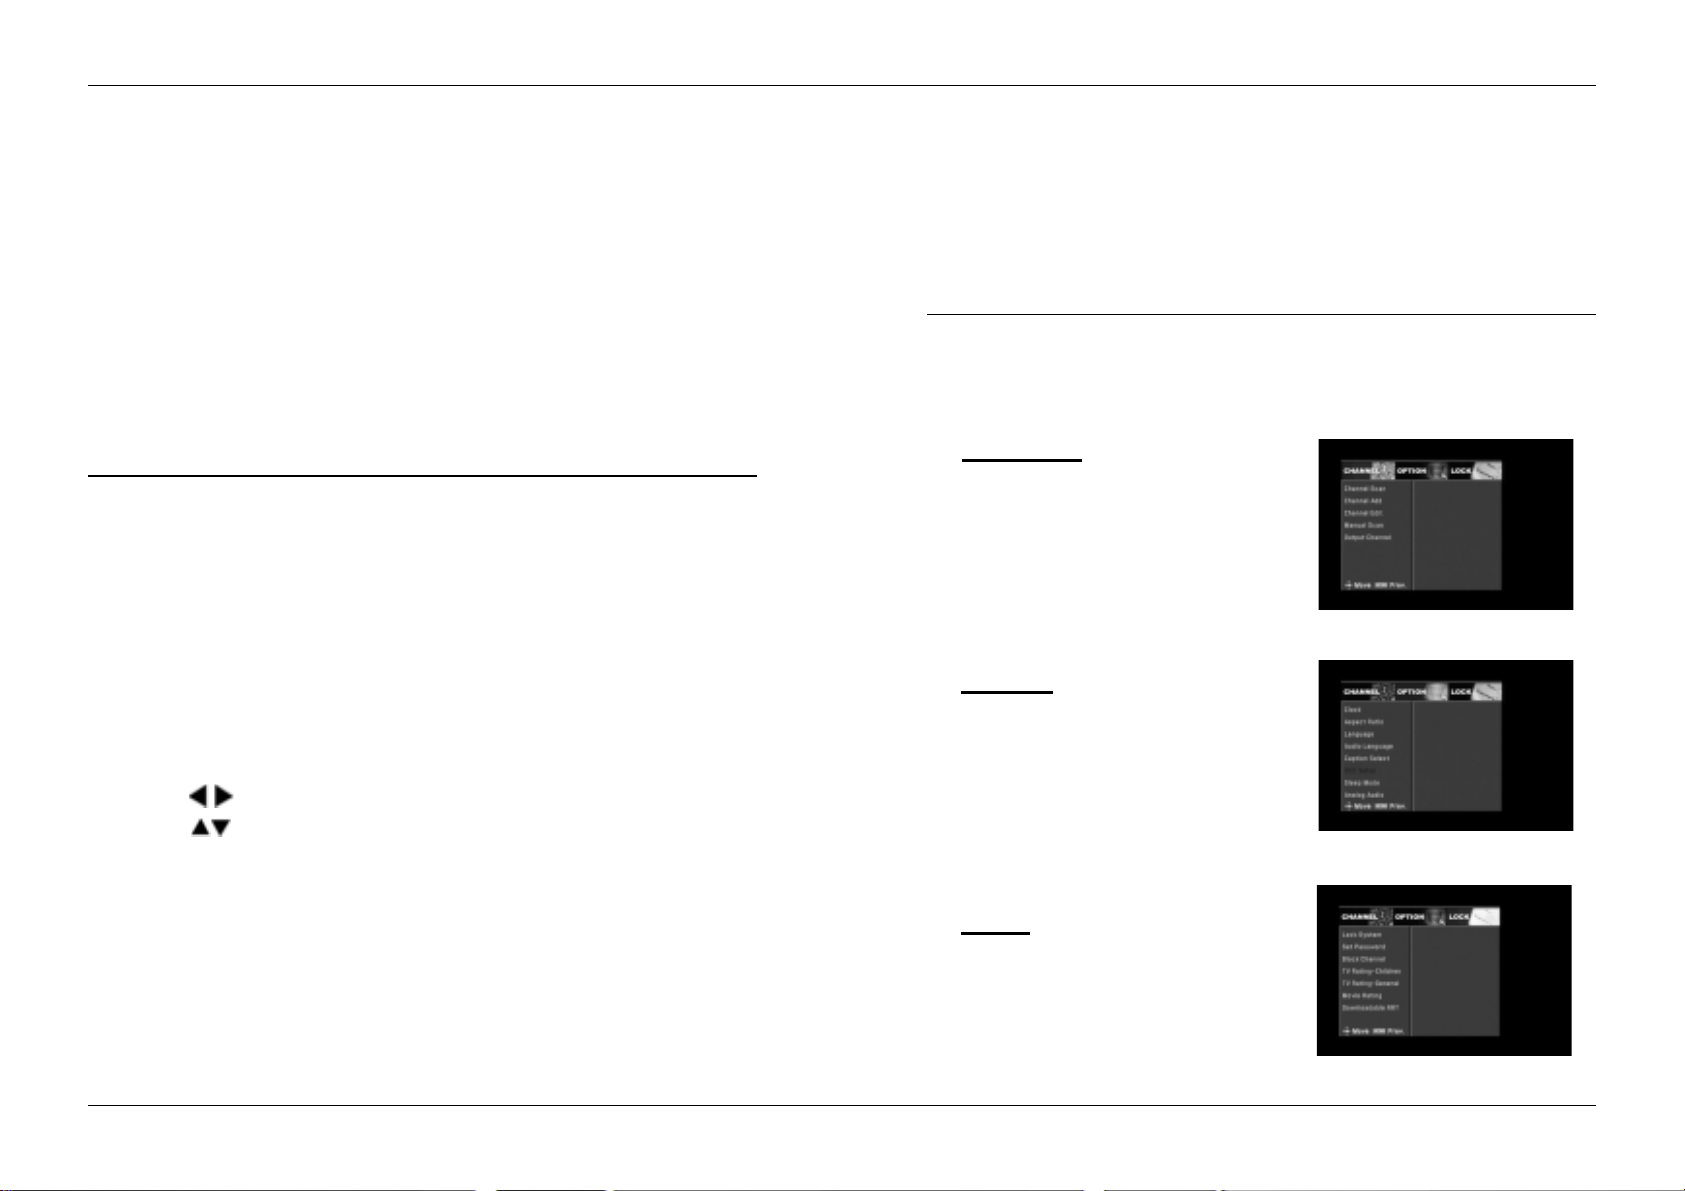
Pressing the MENU key will display the Main Menu. This menu provides three options.
CHANNEL
Channel searching:
Search the desired channels for play.
OPTION
Set up the receiver’s parameter of the
video & audio frequency,language and
subtitle.
LOCK
Set up the parental lock and its password.
12
DTV Converter Box
13
DTV Converter Box
Page 8
USER’S MANUALUSER’S MANUAL
2. Channel
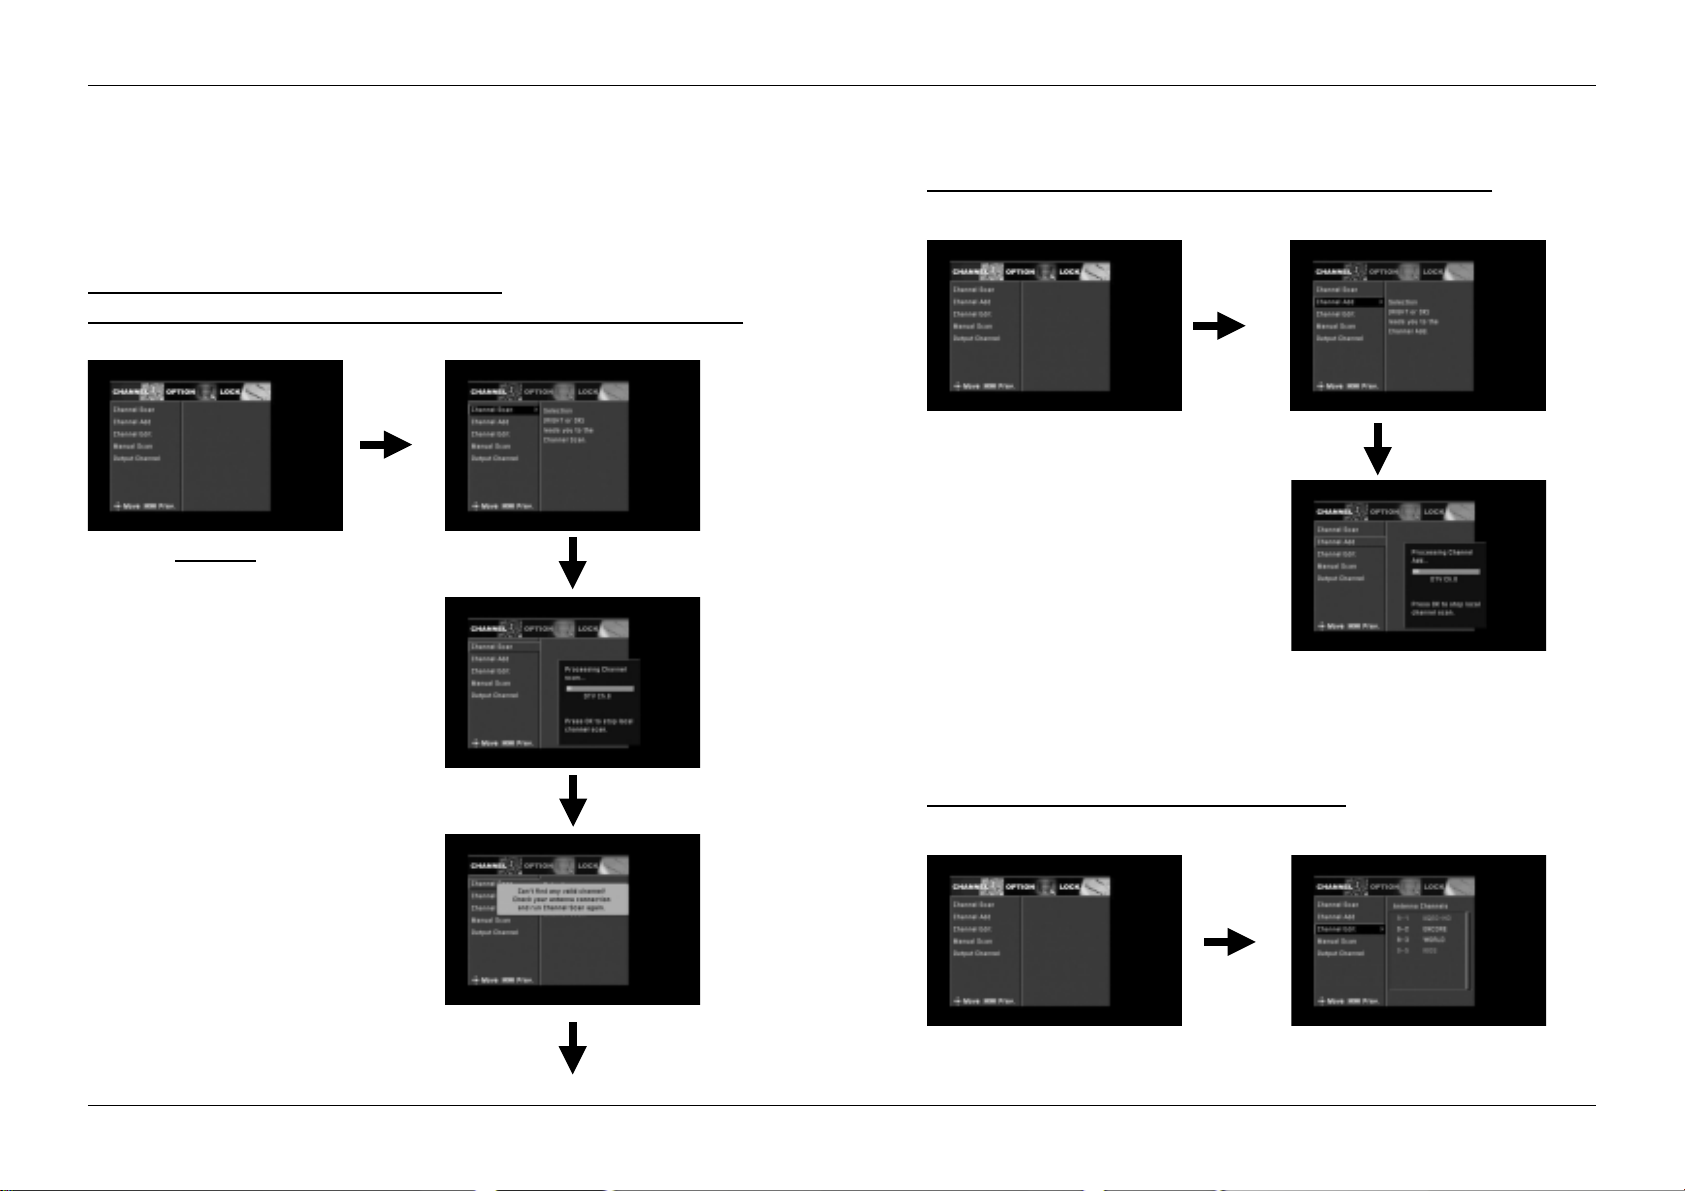
1.1 Channel Scan
From here, press OK key to scan the channels.
During the searching process, OK key is used to cancel the whole process.
CHANNEL
The guage shows:
Channel scan 1:
Auto-searching can search through all of
the exsited channels.
Channel scan 2:
The guage shows the speed of auto-
searching process.
Channel Scan 1
Channel Scan 2
1.2 Channel Addtion
The right arrow key or OK key to lead you to the channel adding.
Channel addtion:
Channel addition has the same function
as auto-searching in increasing the
channels.
New channels will be reserved after
addition.
1.3 Channel Edit
Press OK to delete or add the selected channel.
Channel scan 3:
Finish the channel searching by showing
a dialog box.
14
DTV Converter Box
Channel Scan 3
Channel edit is used to edit the selected channels, also can rename these channels.
15
DTV Converter Box
Page 9
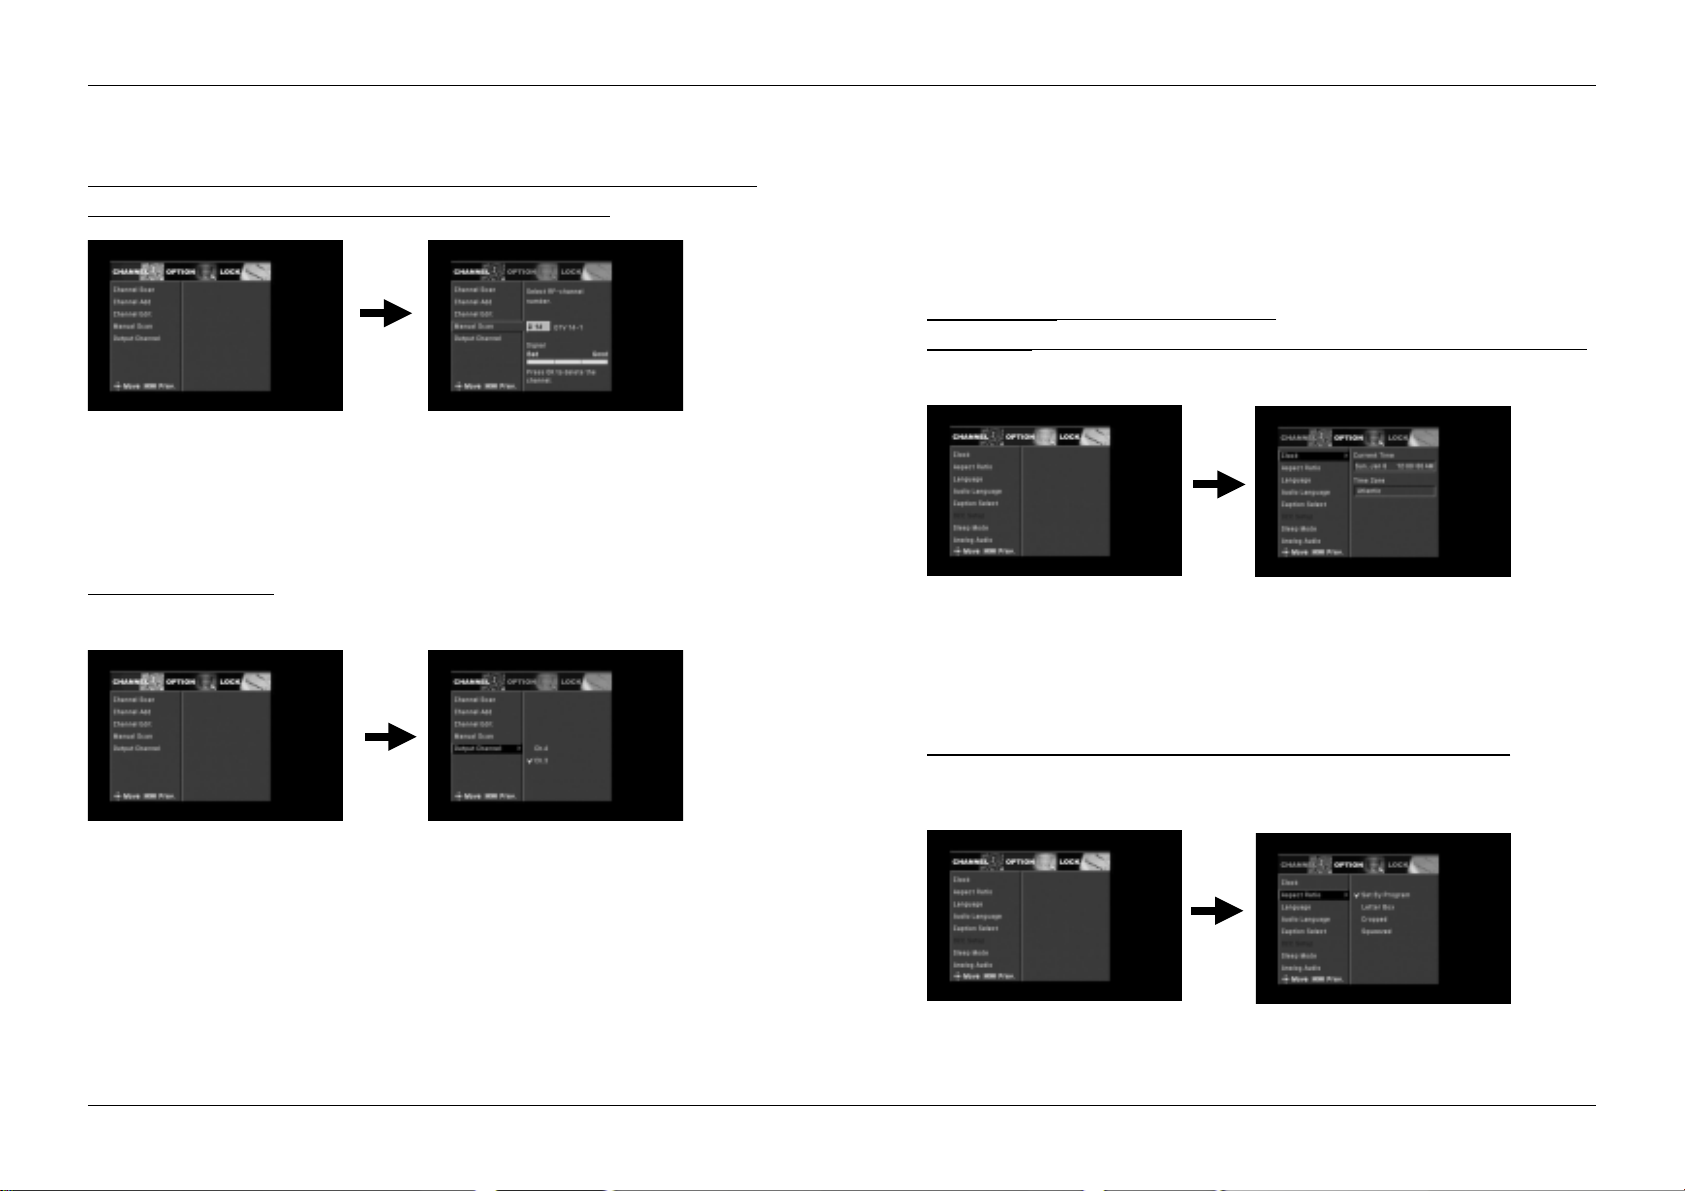
1.4 Manual Scan
USER’S MANUALUSER’S MANUAL
In this mode, only one RF channel can be searched. You can use the function
to scan the desired channel. Select the RF-channel number.
Manual scan, users can add channels according to the related frequency index.
1.5 Output Channel
Select the CH3 or CH4
2. OPTION
2.1 Clock
Current Time: Display the current time.
Time Zone: Select proper option according to the time zone you have been.
Setup to select user’s local time zone.
2.2 Aspect Ratio
This option allows you to select the aspect ratio of the video output.
16
DTV Converter Box
Setup the proportion of the display (Main screen).
17
DTV Converter Box
Page 10
USER’S MANUALUSER’S MANUAL
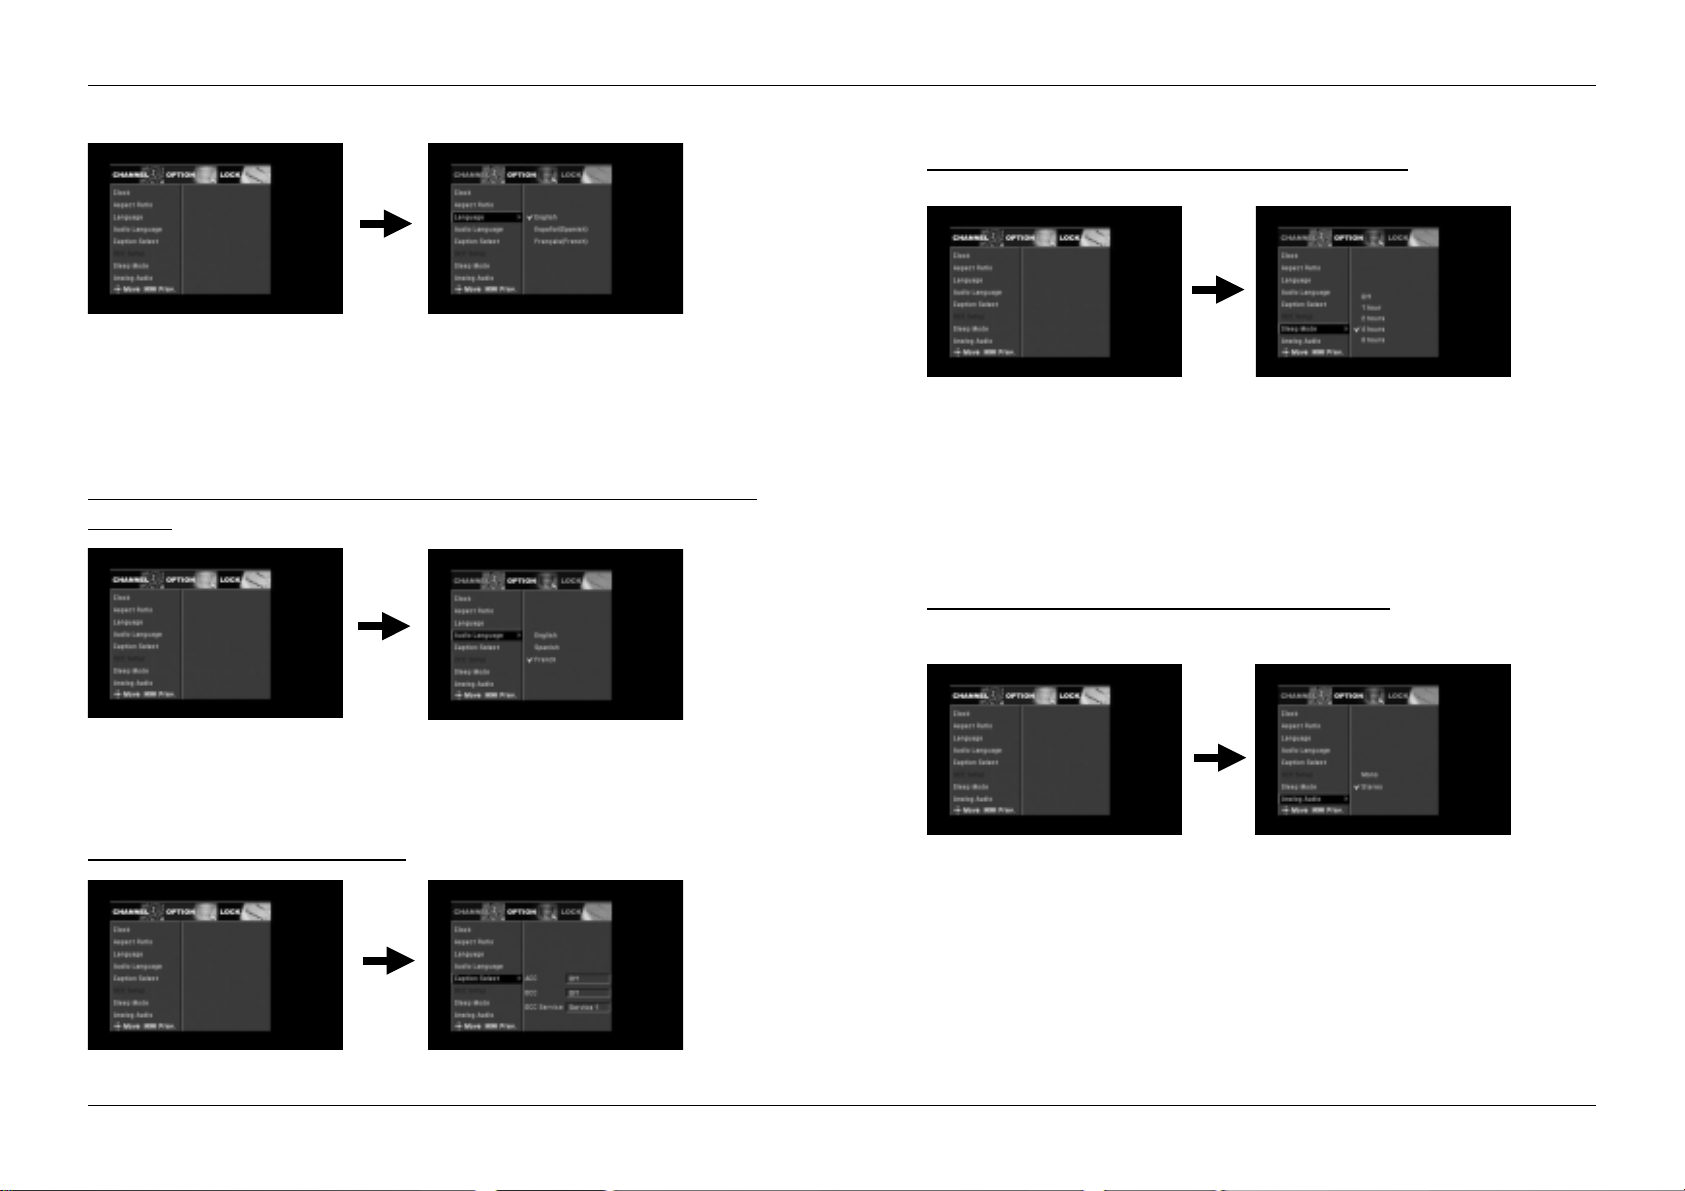
2.3 Language
Select the desired language for main menu.
Options available:English,Spanish,French.
2.4 Audio Language
This option allows you to select your first and second choice of the audio
language.
2.6 Sleep Mode
Sets the time after which the receiver switches itself off.
Select the time interval,and set up auto-turnoff when no operation being taken
for a long periods.
2.7 Analog audio
Select the desired option for RF Analog Audio Output.
Select the language of audio frequency if multi-language options are available.
2.5 Caption Select
Select the desired option for caption.
Set up the caption of the programs.
18
DTV Converter Box
19
DTV Converter Box
Page 11
USER’S MANUALUSER’S MANUAL
3. LOCK
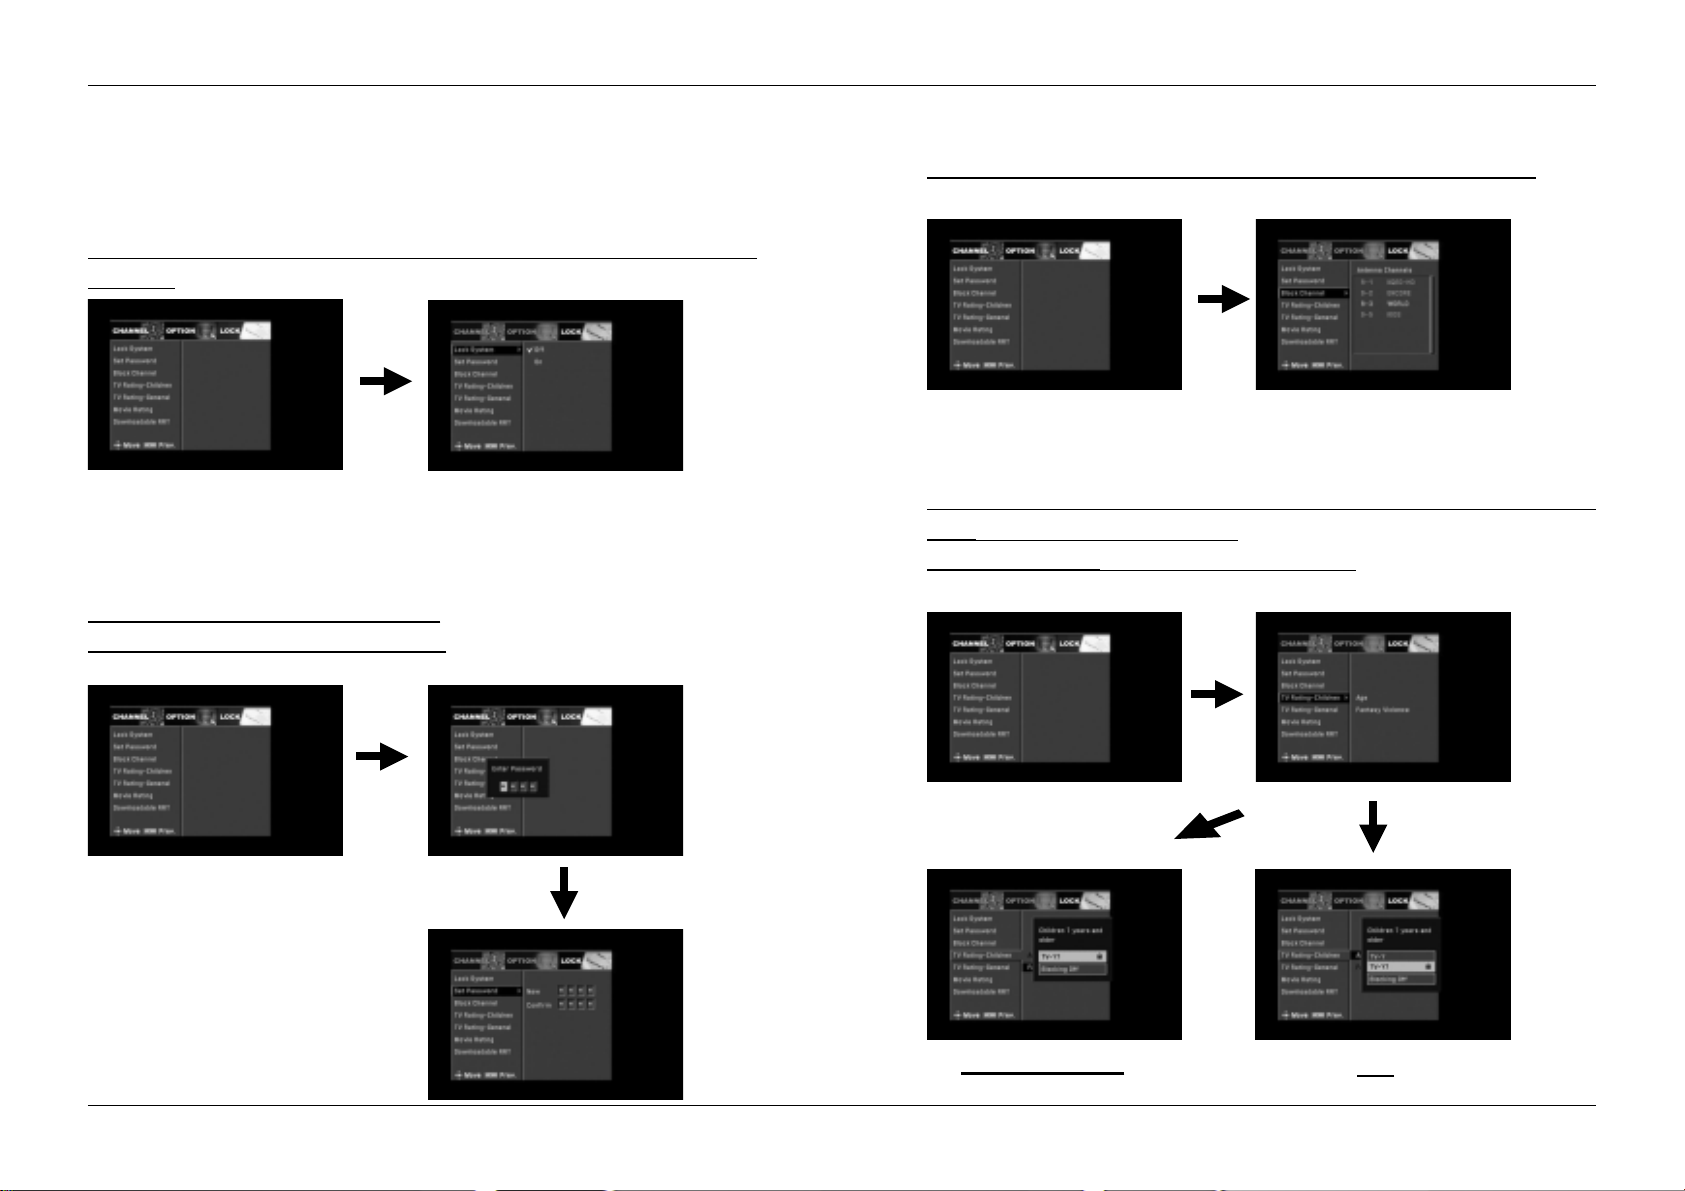
3.1 Lock System
Select On or Off. If On is selected, a password is needed before you entering
the menu.
Parental lock, used to open/close the menu.
3.2 Set Password
Enter a new password at the “New” item.
Enter the new password again to confirm.
3.3 Block Channel
Select the channels which you tend to lock, then press OK to confirm.
3.4 TV Rating-Children
This function can help to prevent children from watching illegal channels.
Age: TV-Y, TV-Y7 and Blocking Off.
Fantasy Violence: Select TV-Y7 or Blocking Off.
Set up the password of parental lock,
the defaut password is: 0000
20
DTV Converter Box
Fantasy Violence
21
DTV Converter Box
Age
Page 12
USER’S MANUALUSER’S MANUAL
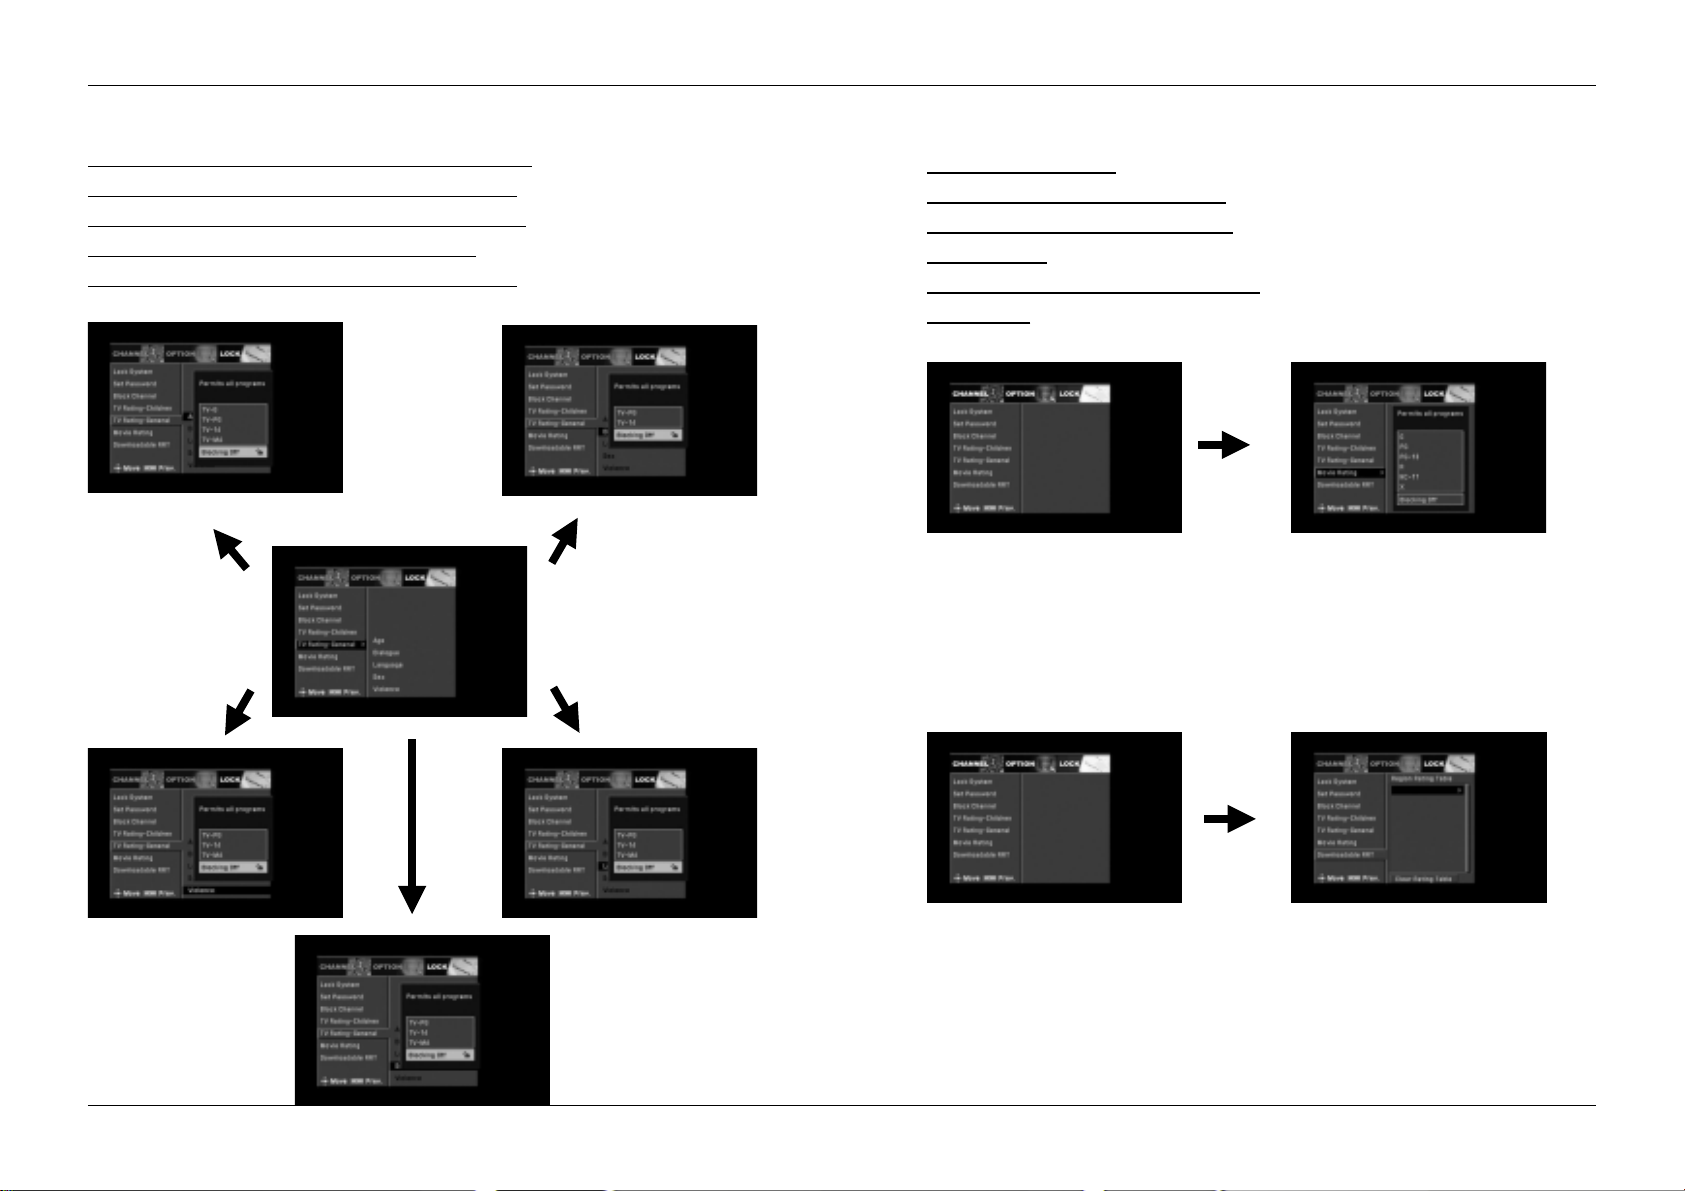
3.5 TV Rating-General
Age: TV-G, TV-PG, TV-14, TV-MA and Blocking Off.
Dialogue: TV-PG, TV-14, TV-MA and Blocking Off.
Language: TV-PG, TV-14, TV-MA and Blocking Off.
Sex: TV-PG, TV-14, TV-MA and Blocking Off.
Violence: TV-PG, TV-14, TV-MA and Blocking Off.
3.6 Movie Rating
G:General audiences.
PG: Parental guidance suggested.
PG-13: Parents strongly cautioned.
R: Restricted.
NC-17: No one 17 and under admitted.
x:Adult only
3.7 Downloadable RRT(Region Rating Table)
22
DTV Converter Box
23
DTV Converter Box
Page 13
USER’S MANUAL
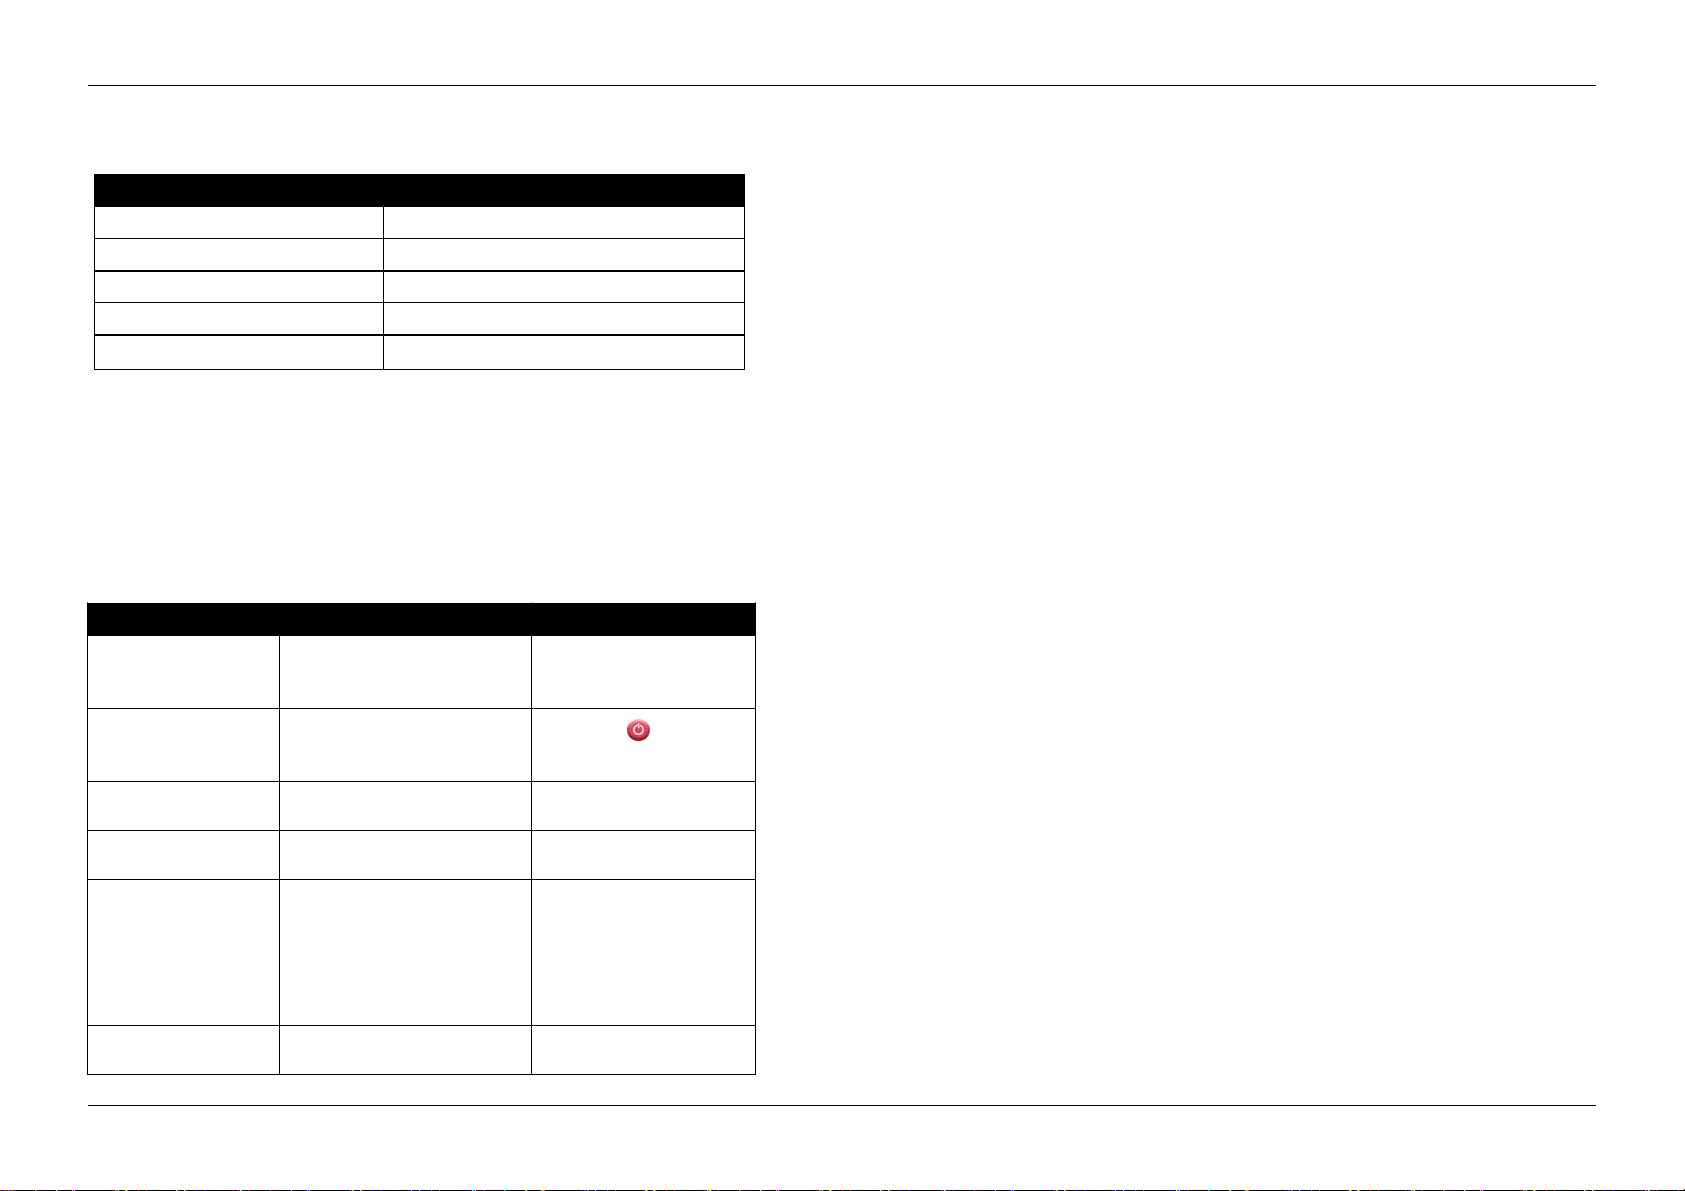
TECHNICAL SPECIFICA TION
TUNER ATSC
Input frequency 57MHz ~ 803MHz(Center Frequency)
Bandwidth 6M
Input level -83 ~ -5dBm
Input impedance 75Ω
Signal Input: RF type(ANT IN), RF type(MD output)
TROUBLE SHOOTING
Note : If you cannot solve the problem by referring to the above trouble shooting,
please contact your re-seller.
Problem Possible Causes What To Do
The display on the
front panel does not
light up.
No sound and picture,
but the front panel
shows time.
No sound or picture.
Bad picture/ Blocking
error.
There is interference
on your digital
terrestrial channel.
The RCU is not
working.
Main cable is not connected.
The unit is in standby mode.
Poor signal quality or bad
interconnections
Signal is too strong.
The system is connected using
RF leads and the output
channel of the receiver
interferes with an existing
terrestrial channel or Video
signal.
Battery exhausted. Change the battery.
Check that the main cable
is plugged into power
socket.
Press the
RCU.
Check the antenna system
Check cable connections.
Try a signal attenuator to
the RF IN port.
Change the receiver output
channel to a more suitable
channel.
key on the
24
DTV Converter Box
 Loading...