COSA Xentaur Xentaur XDTL-HT User Manual
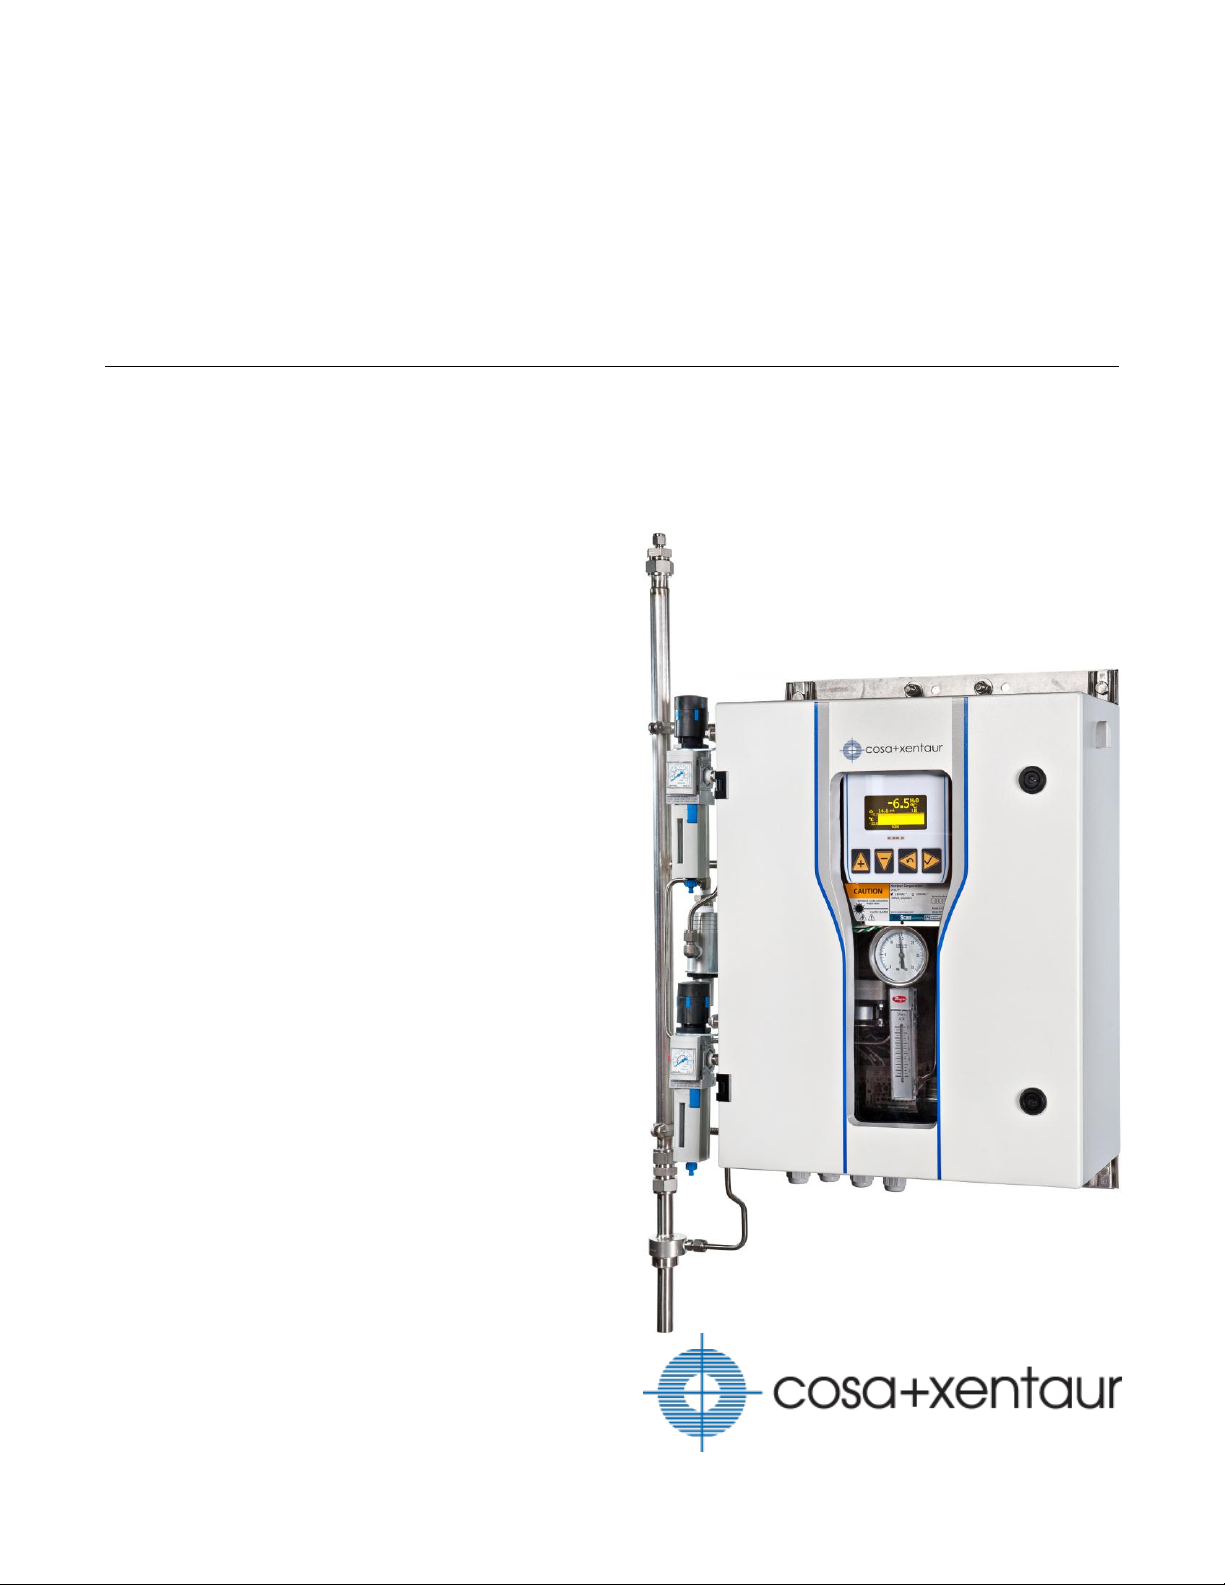
XTDL-HT™
Optical Moisture Dew Point Analyzer
User Manual

LAS.99.D.10027 Rev 1
September, 2013
COSA Xentaur Corporation
www.cosaxentaur.com
Copyright © 2013
All rights reserved.
The contents of this publication are presented for informational purposes only. While every effort has been made
to ensure this document error-free, it should not be construed as warranties or guarantees, expressed or implied,
regarding the product or services described herein or its use or applicability.
COSA Xentaur Corporation reserves the right to change or modify the product specification and/or appearance at
any time without notice. Therefore, the information in this document is subject to change without notice and
does not represent a commitment on the part of COSA Xentaur Corporation.
The customer agrees that in accepting and using this instrument COSA Xentaur Corporation’s
liability arising from or in any way connected with this instrument shall be limited exclusively to
performing a new calibration or replacement or repair of the instrument or sensor and at their
sole option, as covered by the warranty. In no event shall COSA Xentaur Corporation be liable for
any incidental, consequential or special damages of any kind or nature whatsoever, including but
not limited to lost profits arising from or in any way connected with this instrument or items
hereunder, whether alleged to arise from breach of contract, express or implied warranty, or in
tort, including without limitation, negligence, failure to warn or strict liability.

Table of Contents
Unpacking _________________________________________________________________________ 5
Warning Labels _____________________________________________________________________ 5
Overview __________________________________________________________________________ 6
Specifications ______________________________________________________________________ 7
Theory of Operation _________________________________________________________________ 8
Installation _______________________________________________________________________ 10
Enclosure Installation ____________________________________________________________________ 10
Extractive Installation____________________________________________________________________ 11
Electrical Connections ___________________________________________________________________ 12
Connecting Power ______________________________________________________________________ 13
Interfacing to Analog Output ______________________________________________________________ 13
Interfacing to RS-232/RS-485 ______________________________________________________________ 14
Interfacing to Ethernet ___________________________________________________________________ 14
Wiring Relay Contacts ___________________________________________________________________ 15
Startup _______________________________________________________________________________ 15
User Interface _____________________________________________________________________ 17
Status Indicators ________________________________________________________________________ 17
Display ________________________________________________________________________________ 17
Touch Keys ____________________________________________________________________________ 18
Chart Operation ________________________________________________________________________ 19
Readings ______________________________________________________________________________ 19
Menu Access ___________________________________________________________________________ 19
Main Menu ____________________________________________________________________________ 20
Measurements ____________________________________________________________________ 21
Moisture Measurement __________________________________________________________________ 21
TruTune™ _____________________________________________________________________________ 21
Setup Menu ___________________________________________________________________________ 22
Modbus Communication ____________________________________________________________ 23
Setup Menu ___________________________________________________________________________ 24
Modbus RTU ___________________________________________________________________________ 24
Modbus/TCP ___________________________________________________________________________ 25
3

Analog Outputs ___________________________________________________________________ 26
Current Output _________________________________________________________________________ 26
Voltage Output _________________________________________________________________________ 26
Setup Menu ___________________________________________________________________________ 27
Remote Controlled ______________________________________________________________________ 28
Relays ___________________________________________________________________________ 29
Setup Menu ___________________________________________________________________________ 30
Time Controlled ________________________________________________________________________ 31
Remote Controlled ______________________________________________________________________ 31
PID Controllers ____________________________________________________________________ 32
Setup Menu ___________________________________________________________________________ 32
Support Information ________________________________________________________________ 34
Restoring default values __________________________________________________________________ 34
Setting clock ___________________________________________________________________________ 34
Troubleshooting ___________________________________________________________________ 35
Maintenance______________________________________________________________________ 37
Warranty ______________________________________________________________________________ 37
Maintenance Policy _____________________________________________________________________ 37
Spare List ______________________________________________________________________________ 38
Appendix A: Enclosure Dimensional Drawing ____________________________________________ 39
Appendix B: Modbus Registers _______________________________________________________ 40
Coil Registers __________________________________________________________________________ 40
Discrete Input Registers __________________________________________________________________ 40
Input Registers _________________________________________________________________________ 41
Holding Registers _______________________________________________________________________ 43
Index ____________________________________________________________________________ 55
4
Unpacking
Unpack the XTDL-HT™ in a clean, dry area. Check the packing list for an itemized record of all
equipment shipped. Examine all packing material for miscellaneous parts before discarding. Save the
container until you determine that no shipping damage has occurred. Inspect the equipment for any
signs of damage that may have occurred during shipment. If any part is damaged during shipment, file
a claim against the carrier. Report the damage in detail, taking photographs if possible. Report any
shipping damage to COSA Xentaur at the address listed on the back of this manual.
Warning Labels
The symbols shown below or their likeness may appear on the instrument to alert the user of
potentially hazardous conditions.
Class 3B invisible laser radiation. When opened, avoid direct eye exposure. Class 1 laser
product.
Caution – Risk of Electric Shock
Caution – Hot surface
5

1
Overview
The COSA Xentaur XTDL-HT™ is a tunable diode laser moisture analyzer with a new proprietary
measurement cell designed for harsh environments, such as the dirty blanket gases in heat treating
applications, where high particulate counts and corrosive gases cause other measuring systems to fail.
It frees from the worry of cleaning the optics or frequently replacing sensing elements due to frequent
drift or failure. Once calibrated at the factory, no further recalibration is required. A reliable on-line
moisture system will improve the quality of the finished product and alert to process upsets, thus
preventing the costly reworking of parts.
The XTDL-HT™ employs proprietary backscatter GasScan™1 Wavelength Modulation Spectroscopy
(WMS) technique developed by Physical Sciences Inc. With no mirrors in the gas flow path, the XTDLHT™ can handle extreme gas stream conditions with high particulate without compromising the
measurement. This adaptive measurement method is also independent of the light level so
approximately 80% of the light intensity can be lost while still making an accurate measurement.
The integrated sample conditioning system aspires the sample from the low pressure furnace by
means of an eductor, eliminates particulates through a self-cleaning sintered stainless steel tube filter
and regulates the flow and pressure of the sample. The measurement cell is temperature and pressure
controlled to ensure measurement accuracy and consistent results from the analyzer. This instrument
software allows up to 6 different stored factory calibration curves based on the gas matrix or ambient
conditions. Real-time pressure correction is employed to further enhance measurement repeatability.
The instrument comes factory calibrated against a NIST traceable reference standard. Under normal
conditions, the instrument should not require calibration in the field due a proprietary algorithm,
TruTune™, which checks and aligns the light source automatically in the background ensuring the
instrument is properly tuned.
Up to three user-selected variables can be displayed: two in text form and a third in graphical form.
The interface is flexible and allows the end user to display any combination of available variables. Even
a single variable can be displayed in three different sets of engineering units.
GasScan™ is a trademark of Physical Sciences Inc.
6

Specifications
Measurement Range
3,000-25,000ppmV H2O
-8.2 to 20.9°C (at 14.696 psiA)
Accuracy
±2% or ±200ppm, whichever is greater
Pressure Range
Operating: 0-30psiA
Temperature Range
Operating: -20 to 50°C
User Interface
Ultra high contrast graphical display
Touch keys operation for user interface
Analog Output
1 standard, 1 optional
High resolution (16-bit)
4-20mA, 0-20mA, 0-24mA, 0-5V, 0-10V, ±5V, ±10V options
Isolated output option available
Alarm Contacts
1 standard, 2 optional
SSR and Class I Division 2 relays option available
Digital Communication
Modbus RTU and Modbus/TCP support
RS-232, RS-485 serial communication,
Isolated interface option available
Ethernet communication, 10/100 Mbps
Supply Voltage
110/220VAC 50-60Hz
Maximum power consumption: 700VA
Enclosure
Wall mounting or pipe mounting
Dimension
21”Wx37”Hx10"D
Weight
Approximately 20 kg (53lbs) depending on options
Specifications
7
Laser Diode
Sinusoidal
Generator
Sample Cell Photodetector
Demodulator
Calibration Curve
Reading
f
f
f
1, f2
Theory of Operation
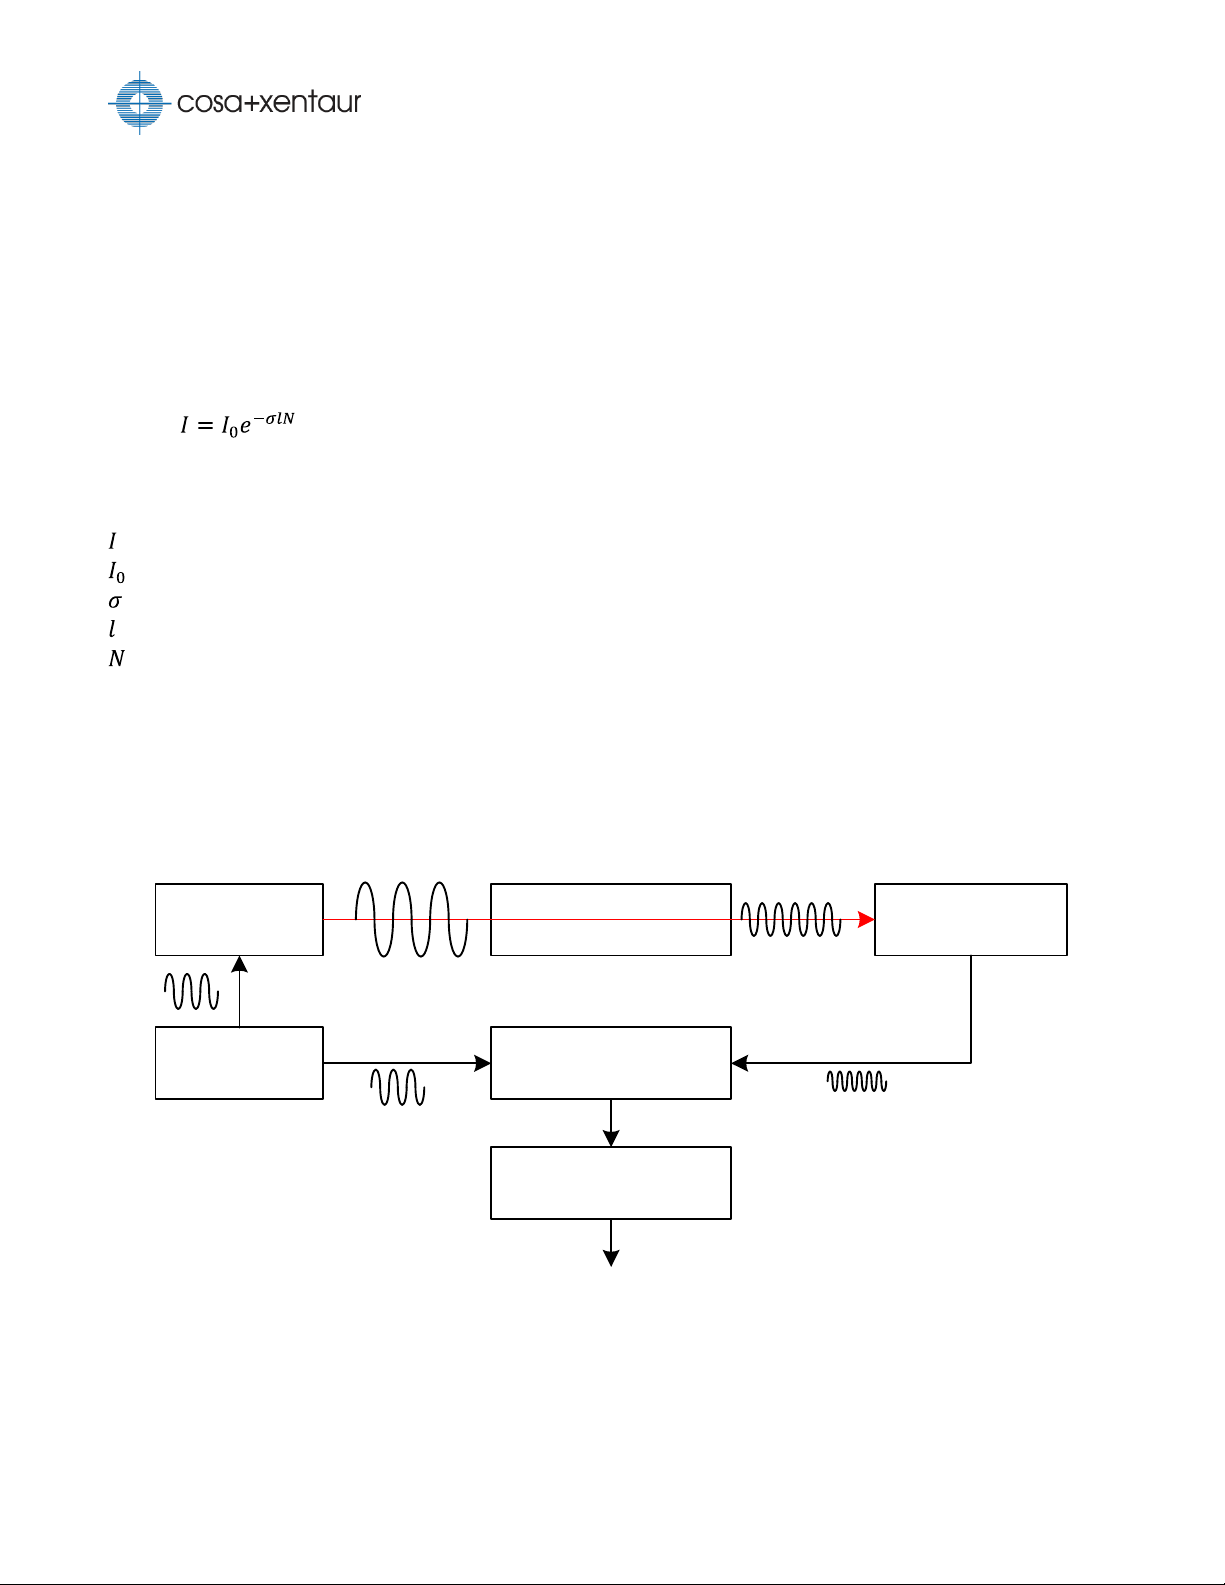
Atoms and molecules have absorption spectra that are distinctive to their species. The XTDL-HT™
measures water vapor in a sample by measuring an absorption line (wavelength) from the water vapor
absorption spectrum. As a near-infrared laser beam passes through the sample cell, a photodetector
measures the reduction in light intensity due to interaction with the sample. By Beer-Lambert law,
where
is the intensity of the transmitted light
is the intensity of the incidental light
is the instrument-dependent absorption coefficient
is the beam pathlength
is the density of the absorbing particles
the instrument can calculate the water concentration. To improve the signal-to-noise ratio, the XTDLHT™ employs the wavelength modulation spectroscopy (WMS) technique. In WMS, wavelength of the
laser light is continuously modulated with a sinusoidal waveform with the target wavelength at the
center, and the signal is detected as harmonics of the modulation frequency. The measurement value
is computed using the harmonic amplitudes over the stored calibration curve.
The absorption coefficient in the Beer-Lambert law is a function of sample temperature and pressure.
To ensure stable and accurate reading, the XTDL-HT™ maintains the sample temperature with a heated
enclosure and the sample pressure is fixed with a back pressure regulator.
8

Theory of Operation
In typical laser absorption instruments, light beam is reflected on one or two mirrors inside the sample
cell before reaching to the photodetector. When the mirror becomes fouled due to particulates or
contamination, measurement will no longer be possible. The angle of reflection may change and the
received light intensity may decrease too much affecting the calibration. Unlike these instruments, the
XTDL-HT™ does not use any mirror in its sample cell; it uses a black body target allowing light to scatter
inside the cell. It measures the water vapor concentration as a ratio of the harmonic amplitude to the
absorbed light intensity. This allows accurate measurement regardless of how much light is received
from scattering.
9
Calibration Gas
Inlet
Process Gas Inlet
Instrument Air
Inlet
Electrical Wiring Cable Grips
Vent
Pressure
Gauge
Flow Meter
Keypad
Display
Mounting Plate
Mounting Bracket
Status
Indicators
Instrument Air
Inlet
Outlet
Eductor
Inlet
Eductor
Gas Sampling
Filter
Inlet Air
Regulator
Outlet Air Regulator
Installation
Enclosure Installation
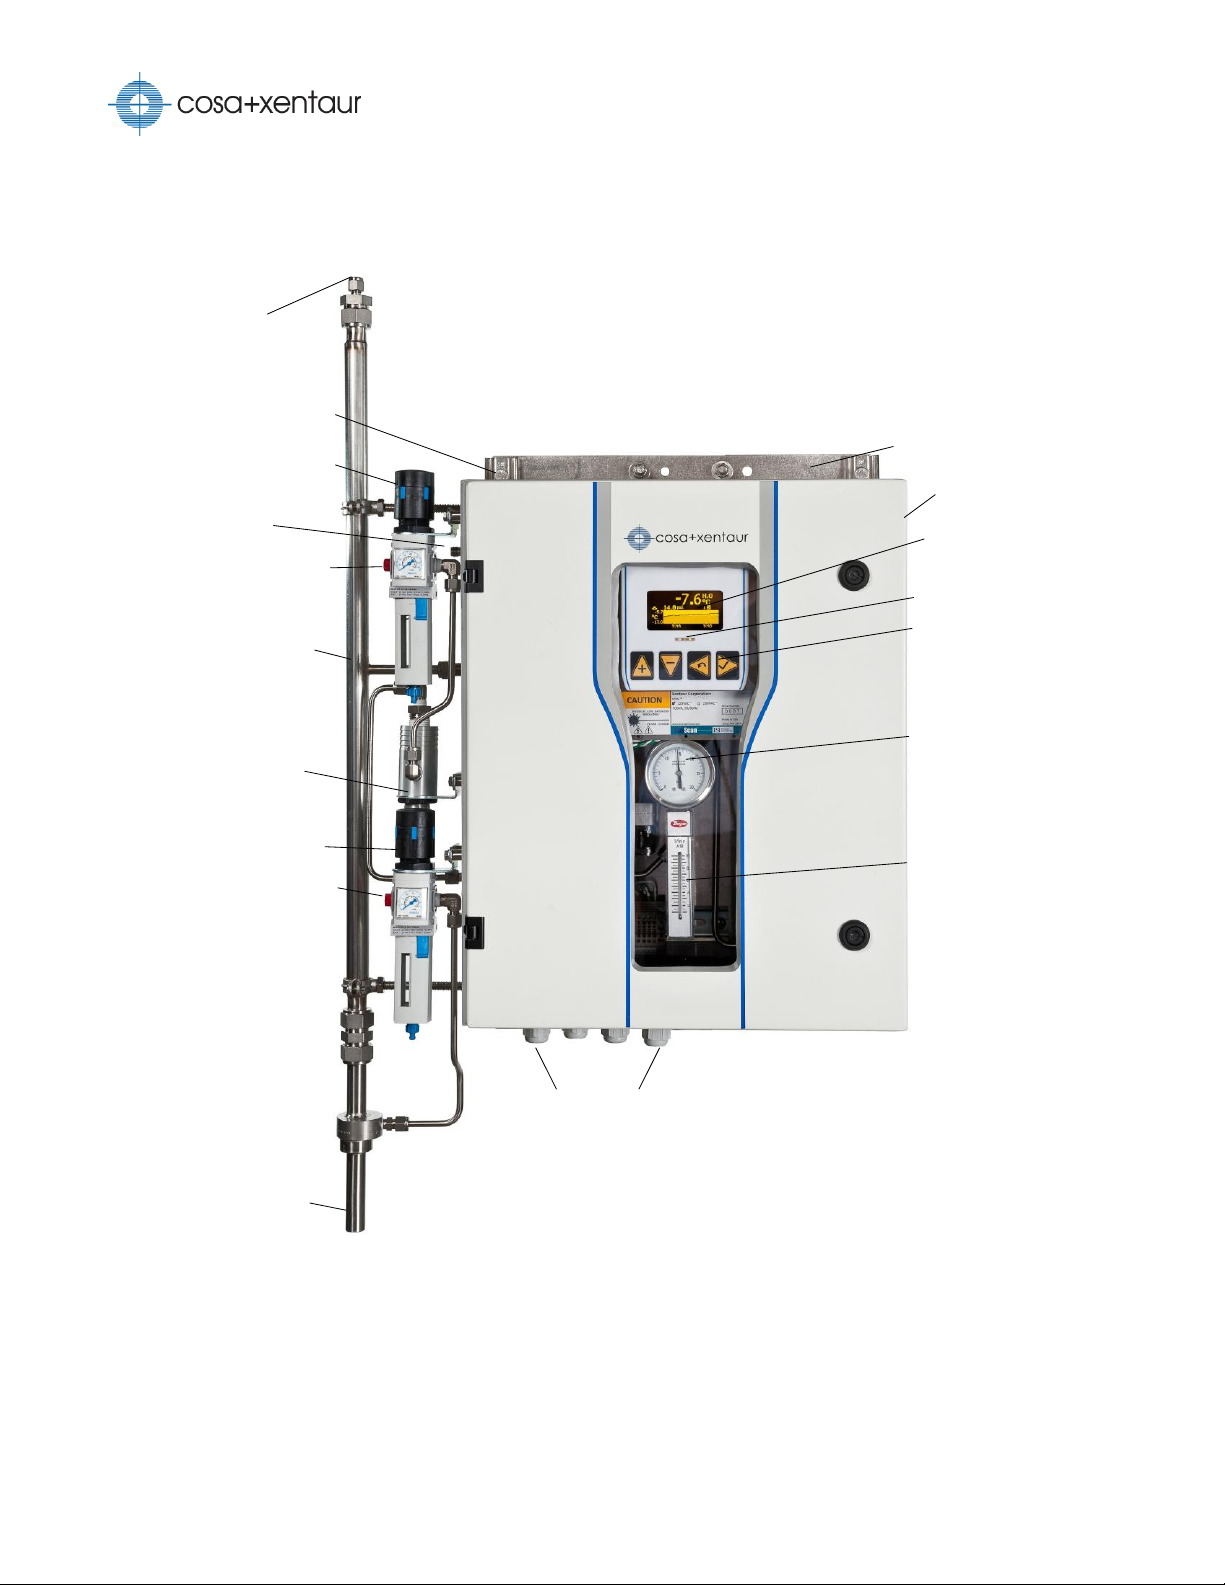
For wall mounting installation, remove the top and bottom mounting plates and bolt the four
mounting brackets to the wall. For pipe mounting installation, install pipe clamps (p/n ESS.98.M.0205)
over the top and bottom mounting plates. Sunshade (p/n ESS.S2.M.9365) is recommended for outdoor
installation.
10
Installation
Enclosure
1
6
4
8
9
Calibration
Gas Inlet
Process
Gas Inlet
Sample
Gas
Exhaust
7
pipeline
Pipe Nipple
Thredolet
Ball Valve
Baseplate
Housing
Regulator
Relief Valve
Ball Valve
Outlet Connector
Pressure Gauge
Notes:
Enclosure insulated on all sides to
maintain nomially 34°C ± 1°C in a
temperature range of -20°C to 50°C.
Inlet rated to 6000 psig maximum.
Flow rate is 2 l/min nominal.
All ¼” Swaglok fittings and tubing.
Shop Air
Inlet
Shop Air
Inlet
Sample
Gas
Exhaust
5
5
2
2
10
1. Back pressure regulator
5. Adjustable regulator
9. Pressure gauge (0-30 psig)
2. Eductor
6. 3-way valve
10. Gas sampling filter
3. All ¼” stainless steel tubing
7. XTDL-HT™ laser cell
4. Flow meter
8. Enclosure heater
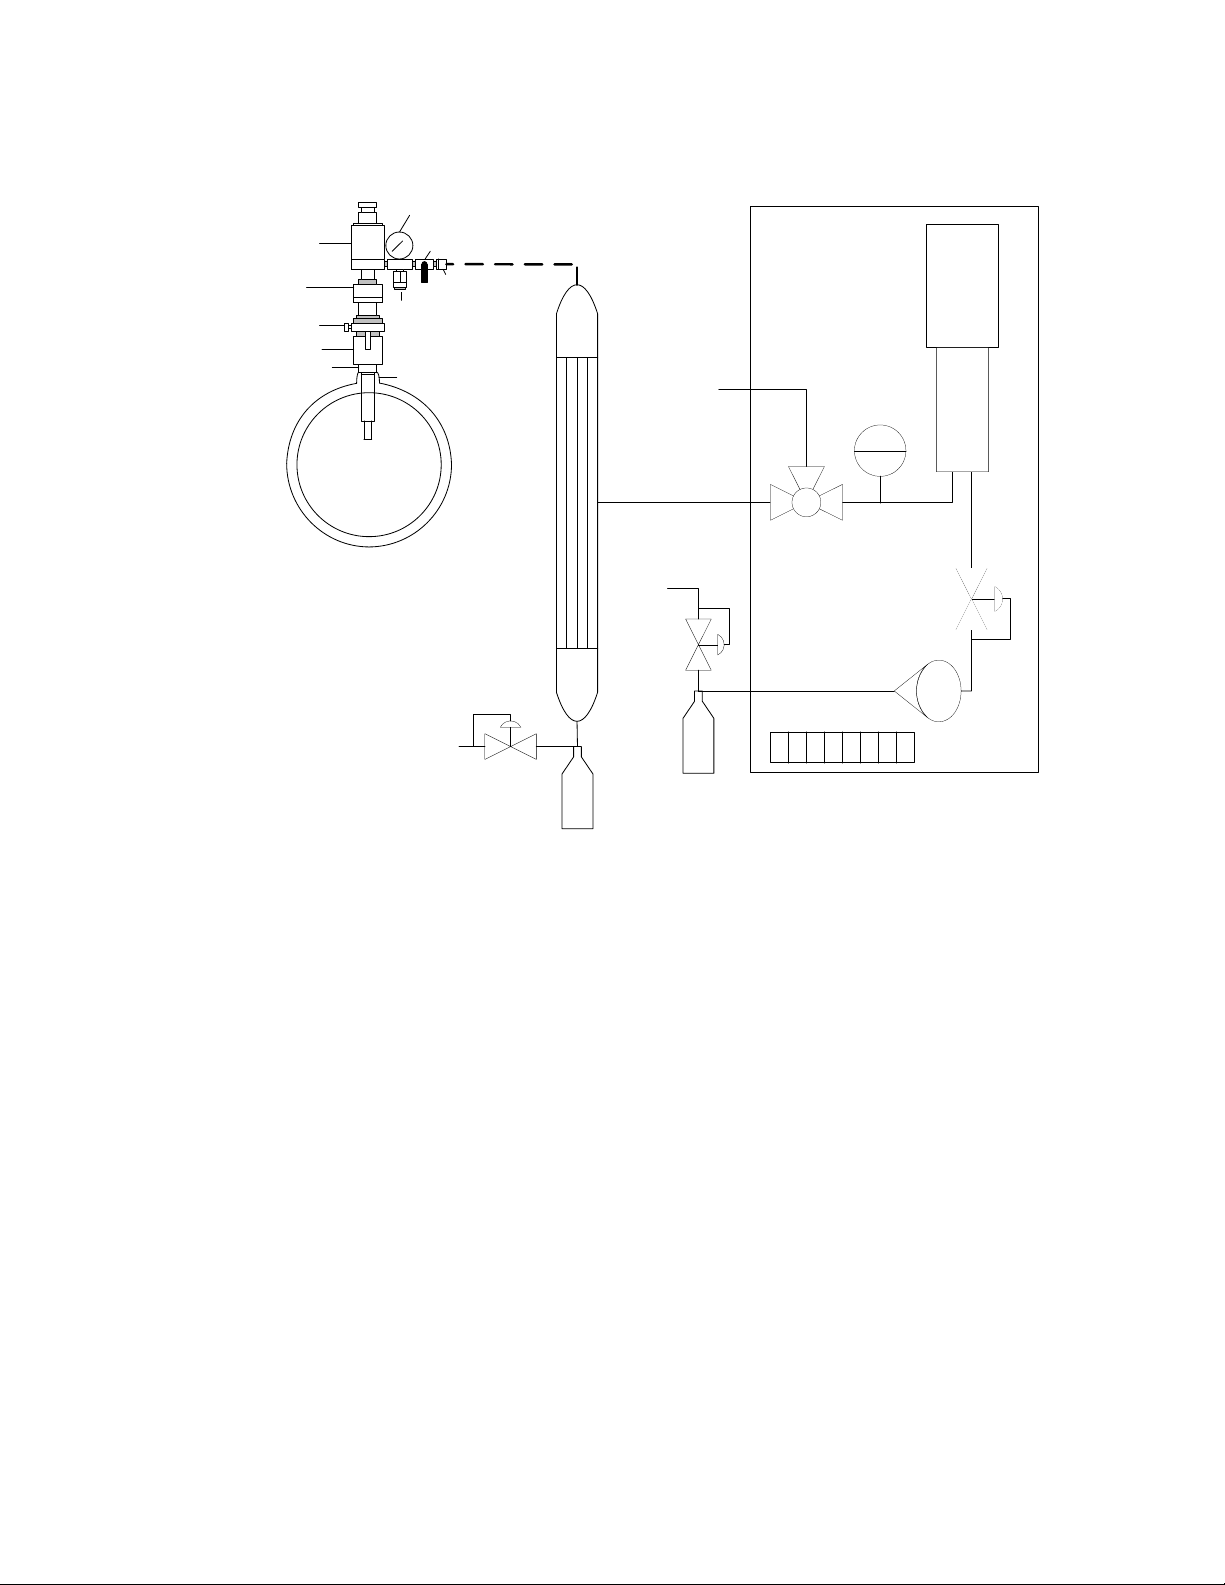
Extractive Installation
The instrument should be installed in a slip stream of process gas. Please make sure that:
The sample is taken from the upper surface of the main gas line to avoid problem of
contamination.
The sample is taken away from the pipe wall where flow rates may be low, and dewpoint change
may lag.
If regulators or shut-off valves are used up stream of the instrument, make sure that these do not
contain rubber or other hygroscopic materials.
Stainless steel tubing is preferred. Copper tubing is acceptable. Do not use plastic, rubber, or
Tygon tubing due to water retention in these materials.
Use small diameter pipes (1/4” or 1/8” OD).
Do not install other devices up stream of the instrument, such as other measurement systems,
which are not absolutely necessary as these are potential leak sources.
11
Control Board
Laser Cell
Display Keypad
Terminal Block Fan Heater
Thermistor
Pressure Transducer
Detector Signal
Optical Fiber
J4
J5
J7
J2
J10 J13
J6
J12
J8
Ethernet
RJ45
(optional)
USB-A
Connector
(optional)
WMS Board
J3
J7
J25
Attenuator
Optical Fiber
Terminal Block Layout
Terminal Signal
1 AC Live In
2 AC Live
3 AC Neutral In
4 Fan Heater AC Neutral
5 Ground
6 Fan Heater Ground
7 Relay 1 Common
8 Relay 1 NO
9 AC Live
10 Fan Heater AC Live
11 RS-485-, RS-232 TX
12 RS-485+, RS-232 RX
13 RS-485/RS-232 Common
14 Analog Output
15 Analog Ground
Laser
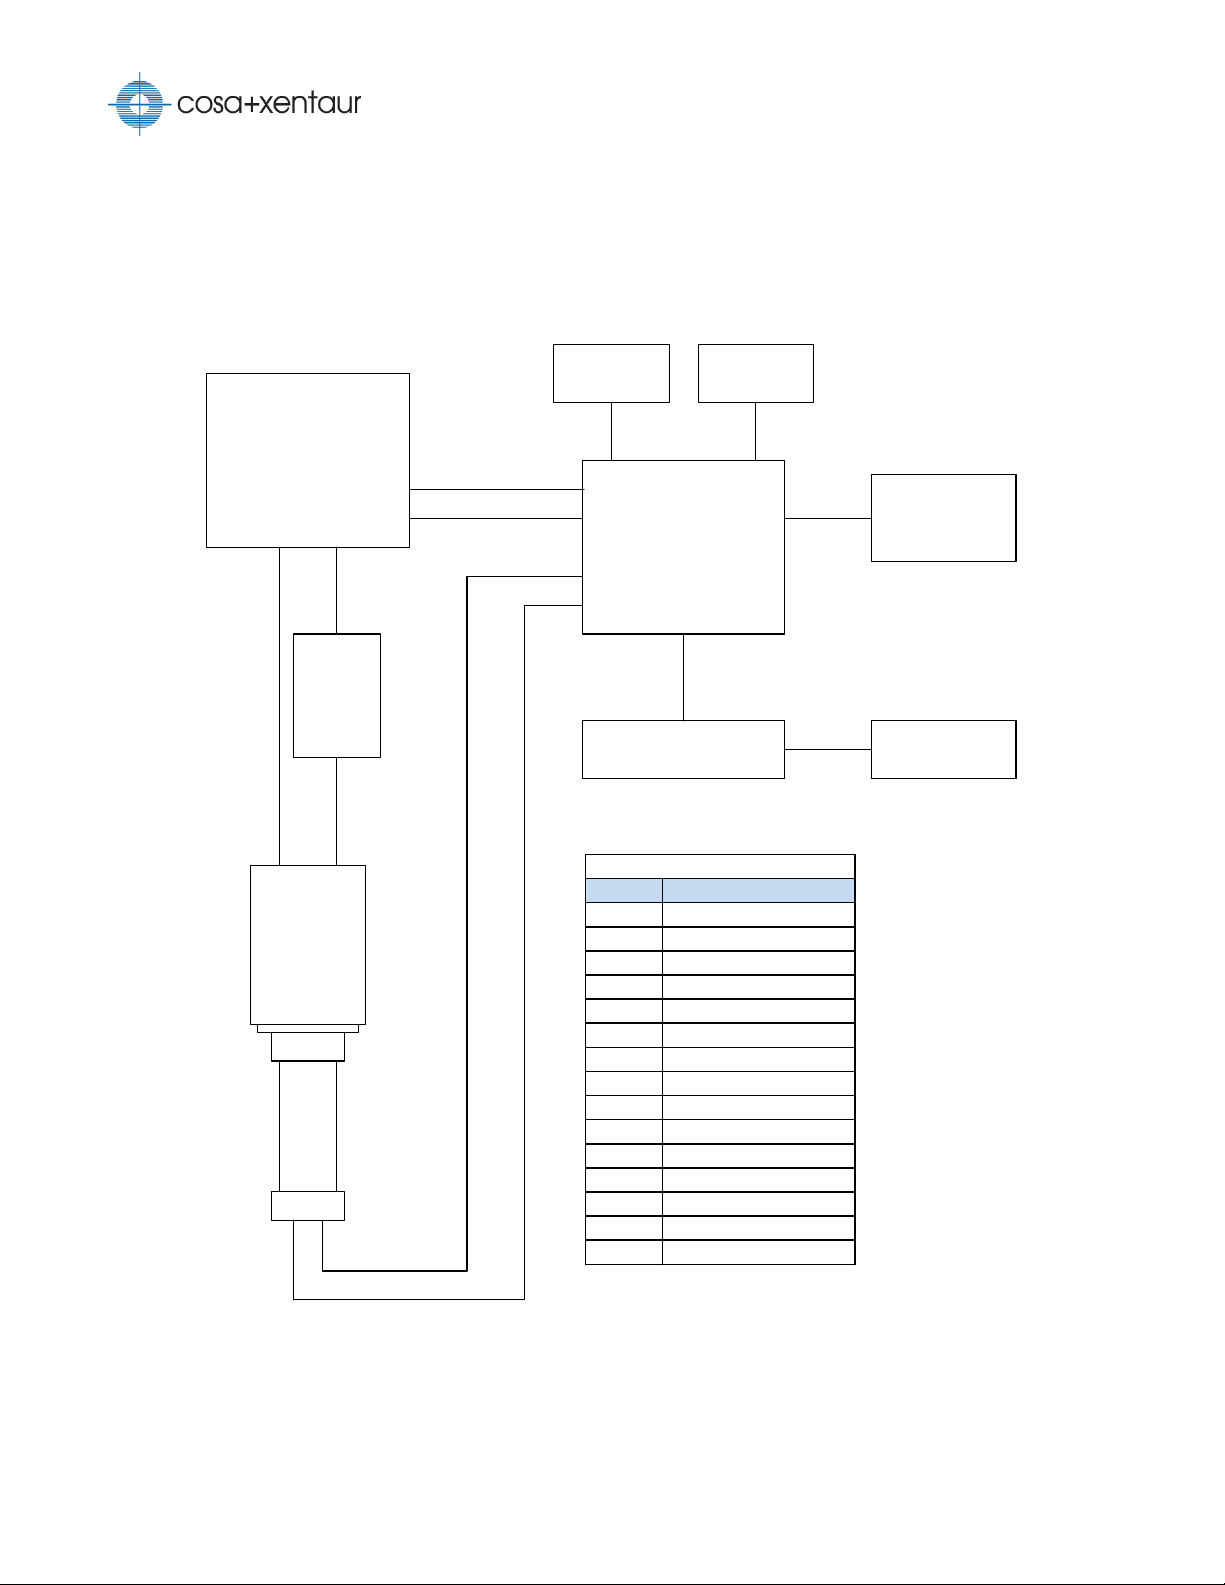
Electrical Connections
There are four watertight cable grips on the bottom of XTDL-HT™ enclosure. They accommodate cables
with diameter between 0.197” (5mm) and 0.472” (12mm).To install a cable, loosen the nut, and feed
the cable through the grip. After connecting the cable, tighten the nut. Unused cable grips should be
plugged to maintain integrity of the enclosure.
12
Electrical and optical connections
Installation
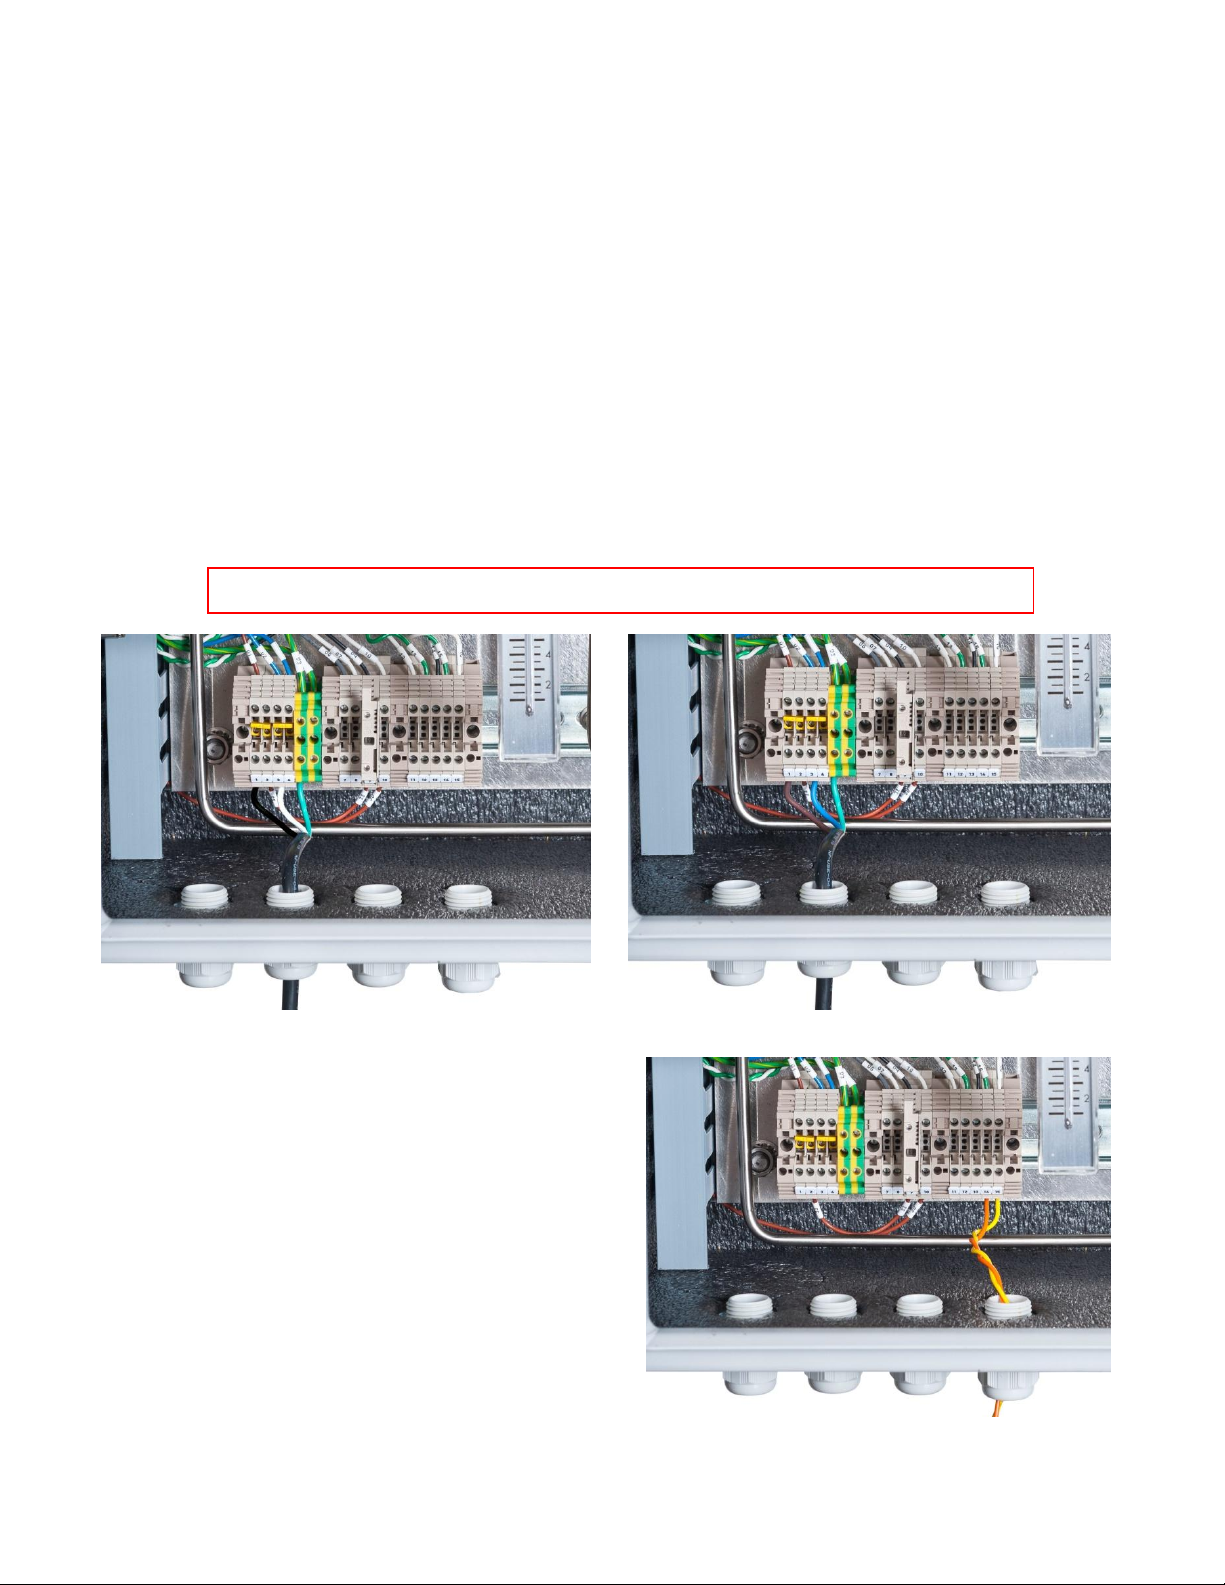
CAUTION: Do not connect to AC power without a proper grounding connection.
Analog output cable installation
North American power cable installation
European and other international power cable installation
Connecting Power
The XTDL-HT™ requires AC power of 110/230VAC, 50/60 Hz. The voltage rating should be specified on
the order and it is marked on the front panel label. Each instrument is provided with an international
approved AC power cable, terminated with a connector according to the ordered option. This cable is
provided strictly for testing the instrument; it should not be used in the final installation. For
installation, the instrument must be field wired permanently connected and installed according to local
and nationally recognized procedure for equipment of this type and stated power requirements. For
North American installations, use UL 62 and/or CSA C22.2 No 49, 16AWG cable with black, white, and
green color codes. For European and other international installations, use CENELEC harmonized type
cable, with 1.31 mm² wire size or equivalent, with brown, light blue, and green/yellow stripe color
codes. Power cable must be wired to the DIN-mounted terminal blocks marked 1 (AC live In), 3 (AC
neutral In), and 5 (AC ground). The cable must be fed through one of the cable grips (second cable grip
is recommended).
Interfacing to Analog Output
The optional analog outputs can be voltage or
current depending on the ordered configuration. The
analog output cable should be fed through one of
the cable grips (fourth cable grip is recommended).
Channel 1 output should be wired to the DINmounted terminal blocks marked 14 (positive) and
15 (negative). Isolation option on the analog outputs
is available upon request. Refer to Analog Output
chapter for setup information.
13
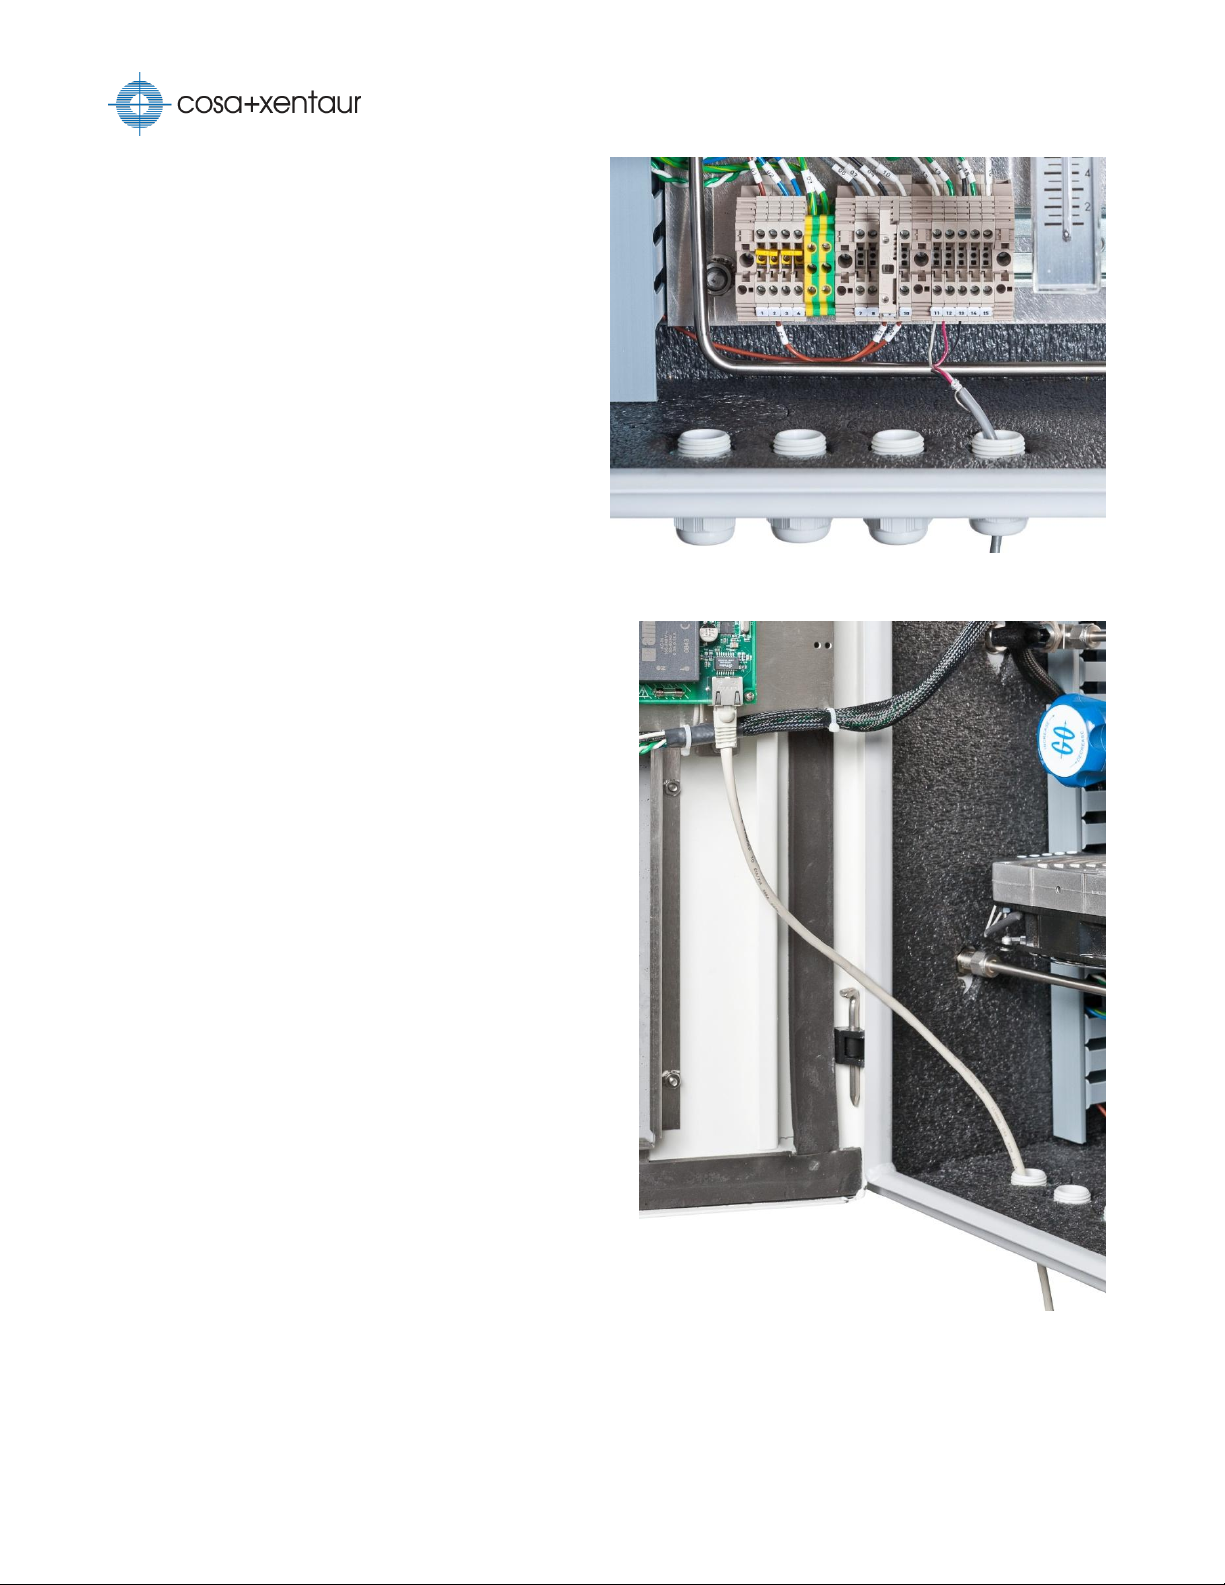
Serial cable installation
Ethernet cable installation
Interfacing to RS-232/RS-485
Depending on the ordered configuration, the
XTDL-HT™ supports RS-232 or half-duplex RS-485
serial interface option. The serial cable should be
fed through one of the cable grips (fourth cable
grip is recommended). For RS-232, TxD, RxD, and
Common Ground signals should be wired to the
DIN-mounted terminal blocks marked 11, 12, and
13, respectively. For RS-485, the inverting signal
(TxD-/RxD-) should be wired to the terminal
block marked 11, non-inverting signal
(TxD+/RxD+) to the block marked 12, and
common signal to the block marked 13. Isolation
option is available on either interface. Refer to
Modbus RTU section for setup information.
Interfacing to Ethernet
To use the optional Modbus/TCP communication,
Ethernet cable once fed through a cable grip (first
cable grip is recommended) should be hooked up to
the RJ-45 connector on the Control Board. Make
sure that there is enough cable slack to allow the
door fully opened. Cat-5 or compatible cabling
should be used. Refer to Modbus/TCP section for
setup information.
14
Installation
Relay cable installation
3-way valve
Back pressure regulator
Lift and Turn knob to
set regulator pressure
Wiring Relay Contacts
Standard XTDL-HT™ has one mechanical relay for user
control. Two more relays are available when optional
I/O board is installed. Depending on the ordered
option, the instrument can be installed with:
Mechanical relays (250VAC, 10A max. rating)
Solid state relays (240VAC, 5A max. rating)
Class I Division 2 relays (250VAC, 6A max. rating)
Use wiring appropriate for the voltage and current that
will be switched by the relays. Wires to the relays
should be fed through one of the cable grips (third
cable grip is recommended). For relay 1, connect the
wires to the DIN-mounted terminal blocks marked 7
and 8. Refer to Relays chapter for setup information.
Startup
The instrument air pressure should be set at 60-70 psi on both regulators to
allow sufficient pulling force to the eductors. The sample pressure should be
held at a fixed value in order to maintain the measurement accuracy. This is
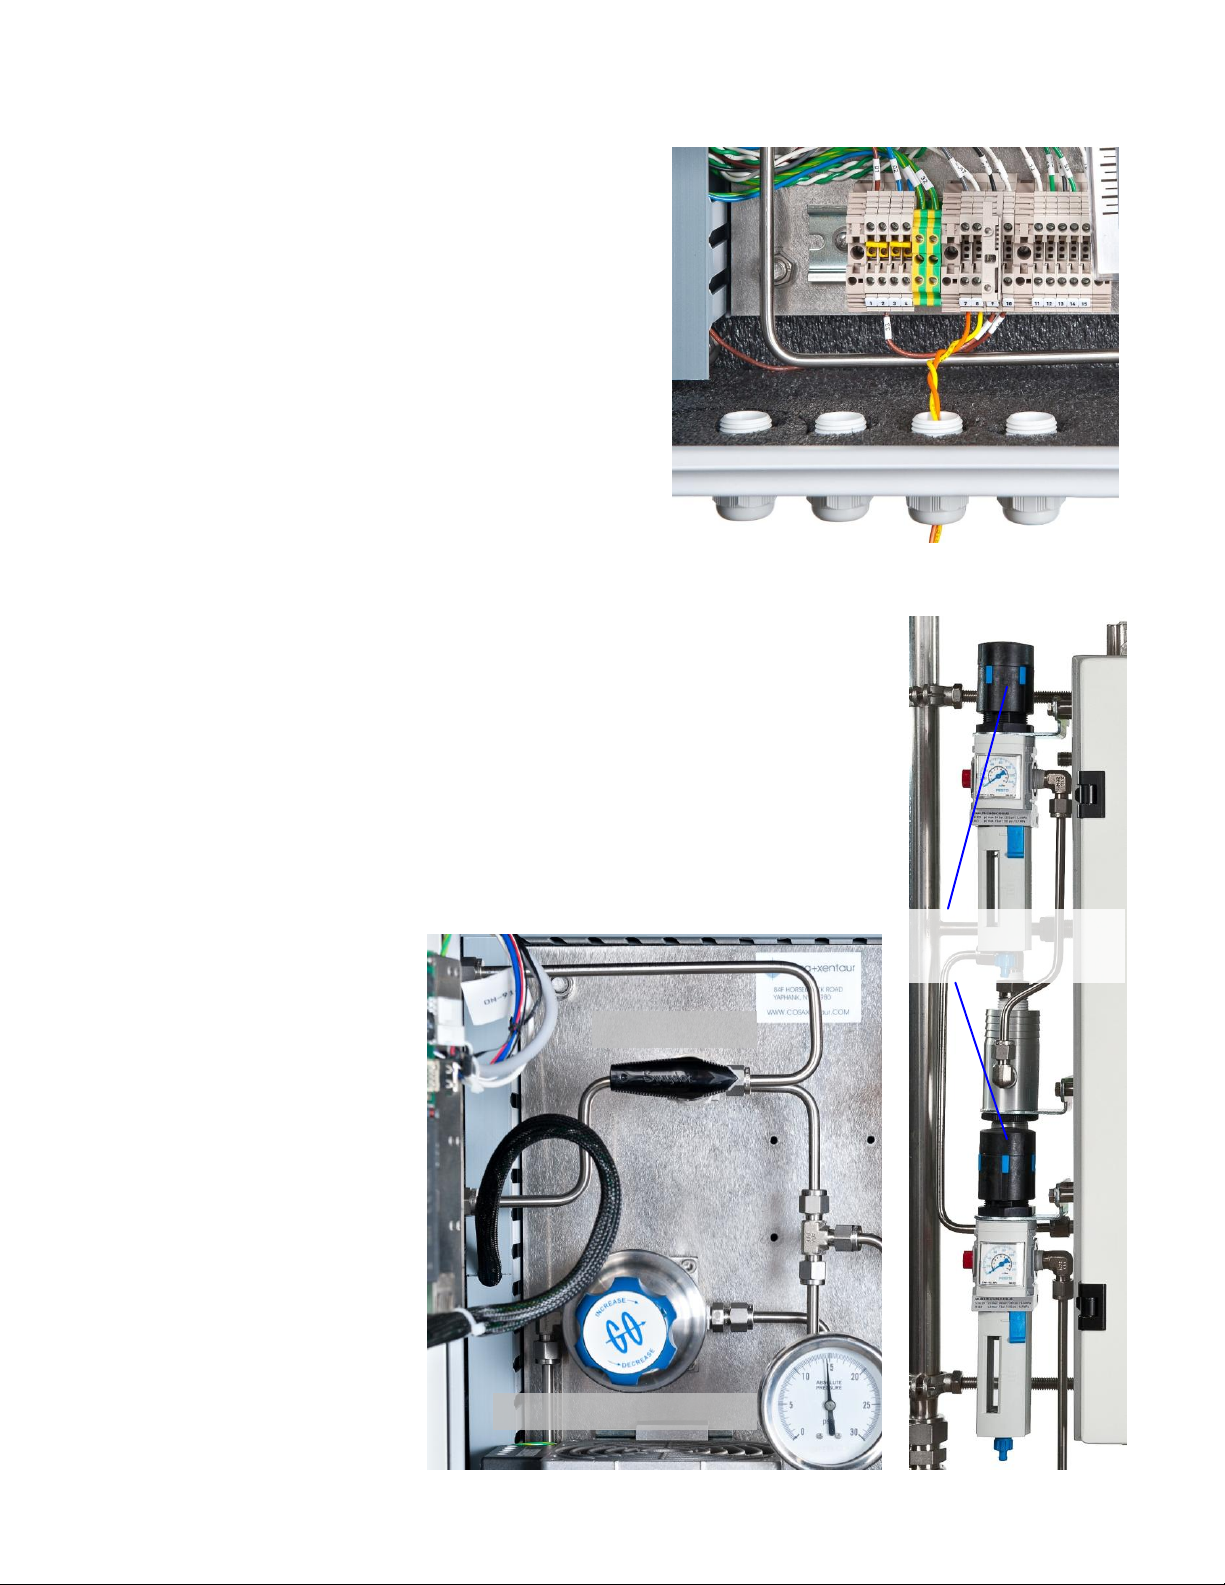
accomplished by setting the back pressure regulator inside the enclosure. Any
value in the operating range can be used as the instrument has pressure
compensation on measurement. 1-2 psi below atmospheric pressure is
recommended. To set the pressure:
1. Set the 3-way valve to
process gas.
2. Set the back pressure
regulator until the sample
pressure is at the desired
setpoint.
Close the enclosure door after
the pressure is set. It will take
about 1 ½ hours to reach the
desired internal temperature
depending on the ambient
environment. Measurement
reading may fluctuate until
then. Monitor the sample
temperature for stability if
15

TIP: Flow rate has no impact on instrument accuracy. Low flow rate increases the response
time slightly. Therefore, it is more important to control the pressure than the flow rate.
unsure whether accurate measurement is ready. If the instrument has been inactive for more than a
month, run TruTune™ once before using measurement.
16
User Interface
Primary Reading
Secondary Reading
Secondary Reading
Type
Primary Reading Type
Relay Status
Chart
Error
Condition
User Interface
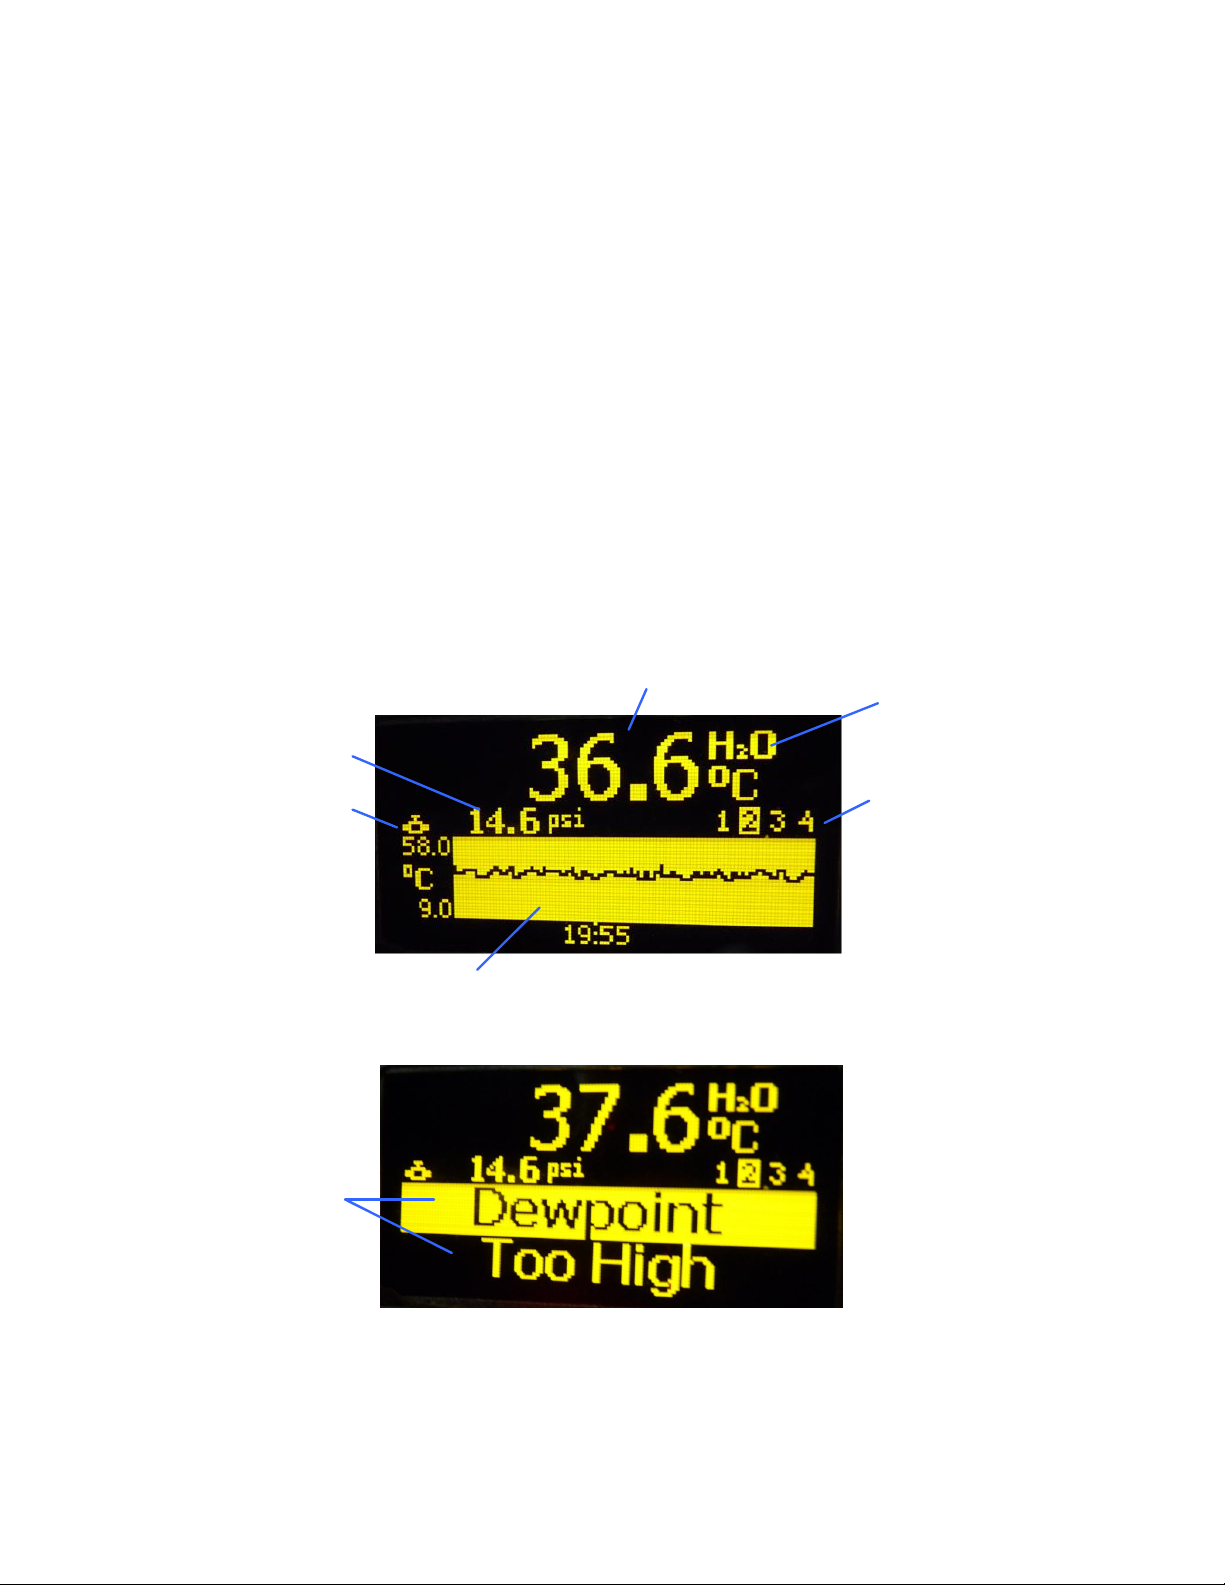
The user interface consists of a graphical display, status indicators, and a keypad.
Status Indicators
There are two LED indicators between the display and keypad. The green LED is lit when power is
applied to the instrument. The red LED is lit when an error condition is detected.
Display
The XTDL-HT™ uses a high contrast OLED display. This allows both indoor and outdoor operation. The
main screen shows two measurement readings (primary and secondary), a chart, and the states of the
relays. The readings and chart are customizable via the menu system and the Modbus communication
protocol.
In the event of a fault, the chart would be replaced with the flashing error information.
17
 Loading...