INSTALLATION, OPERATION
AND
MAINTENANCE MANUAL
GENERAL PURPOSE & EXPLOSION PROOF
COSA 9610™
Software version: 3.10.0.0
Revision date: Mar 30, 2011
Version: 1.4.1
Print date: 03/30/11
CAL.01.D.9826

INSTALLATION, OPERATION AND MAINTENANCE MANUAL – COSA 9610™
COSA INSTRUMENT CORPORATION
New Jersey
Sales Office:
Texas Sales & Service Offices:
55 Oak Street
7125 North Loop East
Norwood, NJ 07648
Houston, TX 77028
Tel: 201-767-6600
Tel: 713-947-9591
Copyright © 2009
All rights reserved.
The contents of this publication are presented for informational purposes only. While every effort has been
made to ensure this document error-free, it should not be construed as warranties or guarantees,
expressed or implied, regarding the product or services described herein or its use or applicability.
COSA Instrument Corporation reserves the right to revise or to improve the design or specifications of the
COSA 9610™ at any time and without notice.
Fax: 201-767-6804 Fax: 713-947-7549
New York Corporate &
Manufacturing Offices
84G Horseblock Rd. sales@cosaxentaur.com
Yaphank, NY 11980
Tel: 631-345-3434 http://www.cosaxentaur.com
Fax: 631-345-5349
E-mail:
:
Page 2 of 44

INSTALLATION, OPERATION AND MAINTENANCE MANUAL – COSA 9610™
Table of Contents
1. INTRODUCTION ................................................................. 5
1.1. INTRODUCTION.............................................................................. 5
1.1.1. Purpose of the analyzer ...........................................................................5
1.2. THE COSA 9610™ ANALYZER .......................................................... 5
1.2.1. Oven with oxygen sensor.........................................................................6
1.2.2. The sample system (SCS) ........................................................................7
1.3. CALIBRATION PROCEDURE................................................................. 8
1.4. EXTENDED (DUAL) RANGE OPTION.................................................... 10
1.4.1. Operation .............................................................................................10
1.5. SPECIFICATIONS COSA 9610™ WOBBE INDEX ANALYZER ....................... 11
1.5.1. Analyzer performance............................................................................11
1.5.2. Utilities .................................................................................................11
1.5.3. Installation............................................................................................11
2. INSTALLATION................................................................. 12
2.1. GENERAL ................................................................................... 12
2.2. STORAGE ................................................................................... 12
2.3. PLACEMENT ................................................................................ 12
2.3.1. General.................................................................................................12
2.3.2. COSA 9610™ in general purpose execution (Type 01 & 02) .....................13
2.3.3. COSA 9610™ in explosion proof execution (Type 01-Ex & 02-Ex) .............13
2.4. MECHANICAL CONNECTIONS ............................................................ 14
2.4.1. General.................................................................................................14
2.4.2. Sample supply.......................................................................................15
2.4.3. Calibration gasses .................................................................................15
2.5. ELECTRICAL CONNECTIONS.............................................................. 16
2.5.1. COSA 9610™ in general purpose execution.............................................16
2.5.2. COSA 9610™ in explosion proof execution ..............................................16
3. IN OPERATION................................................................. 18
3.1. START-UP SAMPLE CONDITIONING SYSTEM .......................................... 18
3.1.1. Inspection, visual and external connections ............................................18
3.1.2. Air orifice selection ................................................................................18
3.1.3. Opening of shut-off valves .....................................................................19
3.1.4. Setting of gas pressure reducer..............................................................19
3.1.5. Adjusting flow with flow meters .............................................................19
3.1.6. Adjusting booster relays ........................................................................19
3.2. START-UP OF THE CONTROL UNIT ..................................................... 21
3.2.1. Description ...........................................................................................21
Page 3 of 44

INSTALLATION, OPERATION AND MAINTENANCE MANUAL – COSA 9610™
3.2.2. Programming the measurement parameters............................................21
3.2.3. Main screen ..........................................................................................21
3.3. PROGRAMMING MENUS .................................................................. 26
3.3.1. Calibration Menu ...................................................................................26
3.3.2. Operation Menu ....................................................................................27
3.3.3. Measurement Menu...............................................................................28
3.3.4. Output Menu.........................................................................................29
3.3.5. Communications Menu...........................................................................30
3.3.6. System Menu ........................................................................................32
3.3.7. Display Menu ........................................................................................33
3.3.8. Reset Alarms Menu................................................................................34
3.4. TEMPERATURE CONTROLLED OVEN .................................................... 35
3.4.1. Furnace temperature control unit ...........................................................35
3.4.2. Adjustment procedure temperature regulator..........................................36
4. PREVENTIVE MAINTENANCE ............................................. 37
4.1. WEEKLY / MONTHLY MAINTENANCE ................................................... 37
4.1.1. Compressor (optional) ...........................................................................37
4.1.2. Filters ...................................................................................................37
4.4. TROUBLESHOOTING ...................................................................... 39
4.5. REPLACEMENT OF RESIDUAL OXYGEN SENSOR ....................................... 40
5. INSTALLATION DRAWING................................................. 41
6. ORDERING OF SPARE PARTS ............................................ 42
4.2. THREE (3) MONTH MAINTENANCE ..................................................... 37
4.2.1. Compressor (optional) ...........................................................................37
4.3. ANNUAL MAINTENANCE .................................................................. 38
7
.
CERTIFICATIONS ............................................................. 44
Page 4 of 44

INSTALLATION, OPERATION AND MAINTENANCE MANUAL – COSA 9610™
1. INTRODUCTION
1.1. INTRODUCTION
1.1.1. Purpose of the analyzer
The continuous COSA 9610™ analyzer determines online the Wobbe-index of a gas. The
COSA 9610™ can be used both, as feed forward and feedback analyzer for gases mixing
or as a feed forward analyzer for burning control. In order to achieve an optimal
performance of the analyzer system it is necessary to read this manual thoroughly before
installation and start-up.
For the combustion of gas, air is required. When supplying the right quantity of air, the
gas will completely burn. This is the so-called stoichiometric air requirement of the gas.
Because of this, the Wobbe-index can also be seen as a value for the need of air in gas.
By burning the gas with a small excess of air, the flue gas will contain the remaining
oxygen from the air, which has not taken part in the combustion. When the Wobbeindex of a gas changes, the stoichiometric air requirement and the percentage of the
remaining oxygen in the flue gas will change simultaneously. By measuring the
concentration of oxygen in the flue gas, after calibrating the instrument with two gasses
with known Wobbe-index, the Wobbe index can be calculated.
1.2. THE COSA 9610™ ANALYZER
The COSA 9610™ features fast response time and high accuracy. These features make it
unique over conventional Wobbe index analyzers. The oxygen concentration in the air is
considered as constant, namely 20.95%. Functionally we can divide the analyzer-unit in 3
major parts:
• Sample System
• Electronics compartment
• Oven compartment
Optionally the COSA 9610™ can be built in an explosion proof execution. In explosion
proof execution, the analyzer is extended with a purge system.
WARNING - Potential Electrostatic Charging Hazard.
Due to the materials construction of the viewing port, there is a potential to build up an
electrostatic charge across the surface. Suitable precautions should be taken to reduce
this risk.
Page 5 of 44

INSTALLATION, OPERATION AND MAINTENANCE MANUAL – COSA 9610™
1.2.1. Oven with oxygen sensor
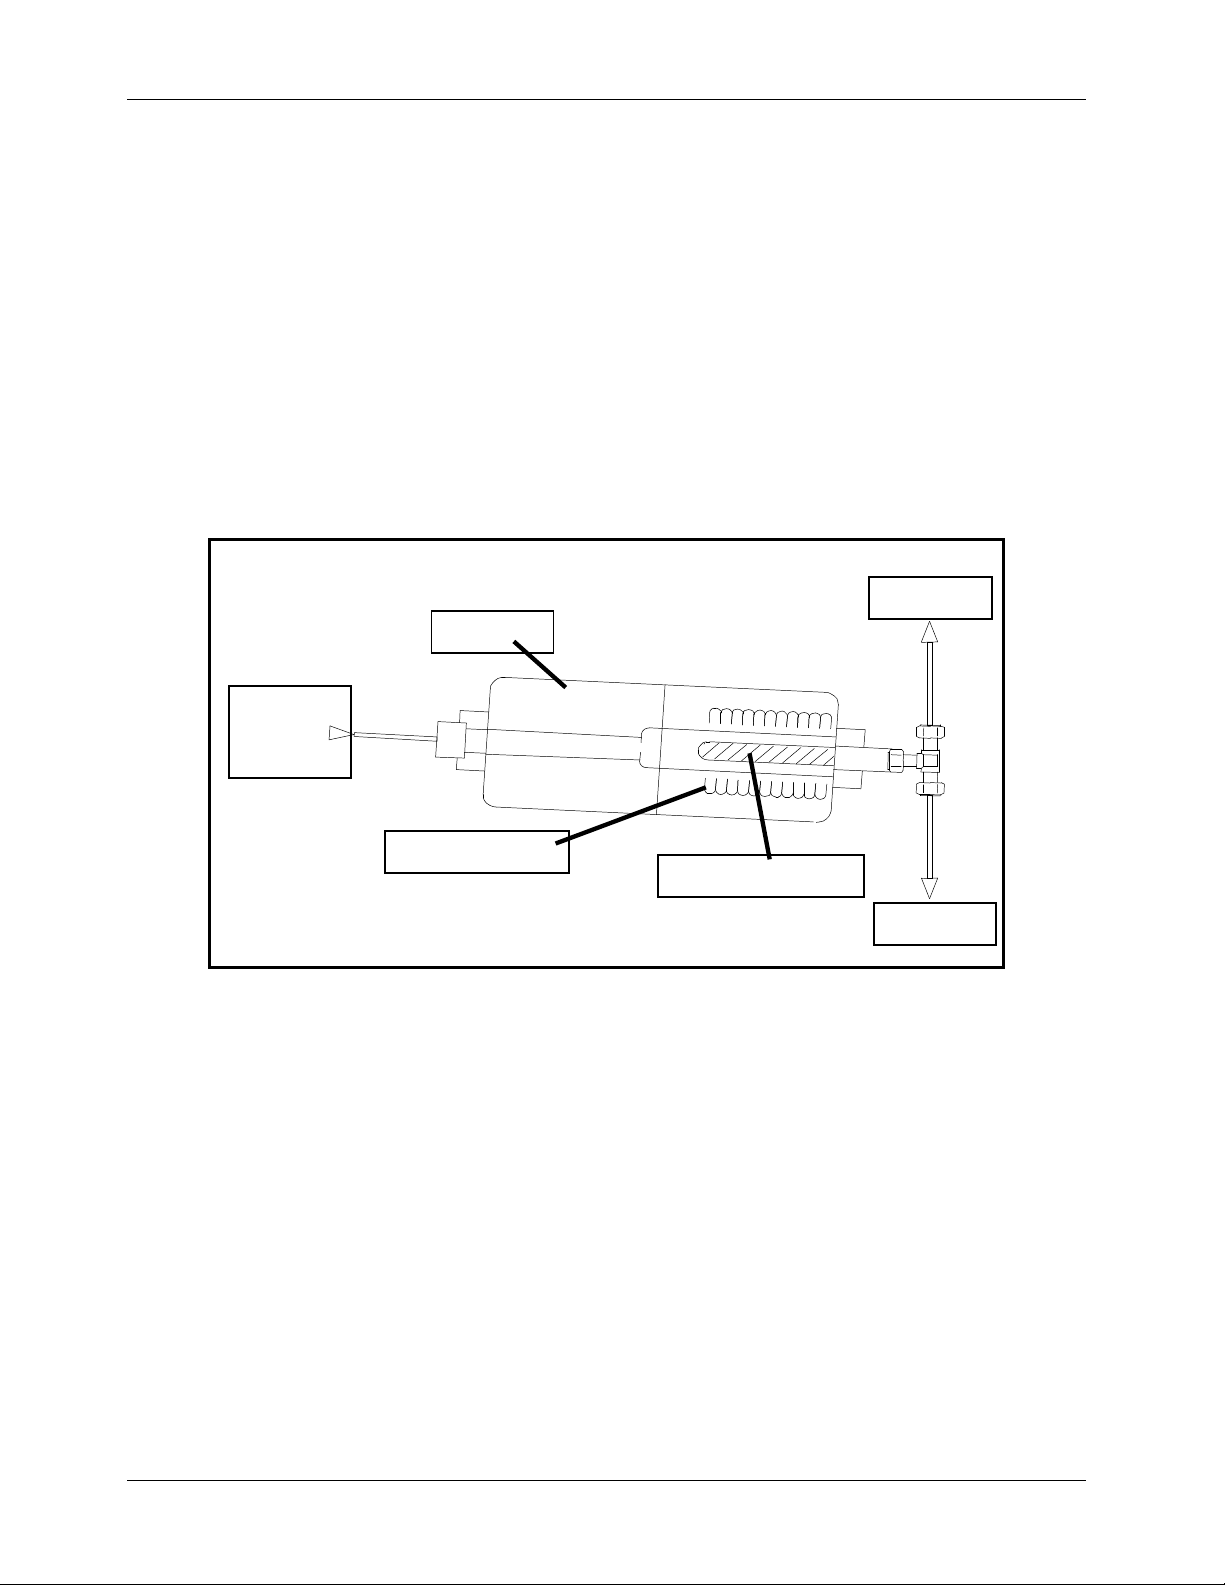
The gas/air mixture is burnt catalytically in an oven, which is kept at 812ºC with a burning
spiral. The temperature is maintained with a temperature controller using a K-type
thermocouple. The oxygen sensor in the oven is a zirconium oxide cell. This is mounted
such, that one side is in contact with the outside air and the other side with the flue
gasses. At high temperatures, (600ºC) O2-ions in the ZrO2 grating become mobile through
vacancies herein. By fixing porous Pt-electrodes at both sides of the ZrO2, O2, gas
molecules can through diffusion by and uptake of two electrons from the Pt electrode enter
the ZrO2 as O2-ion, move to the other electrodes and be converted in gaseous O2 again by
release of the two electrons.
Inlet
Air/Gas
Mixture
Oven
Heating Spiral
Oxygen Sensor
Drain
Vent
Page 6 of 44

INSTALLATION, OPERATION AND MAINTENANCE MANUAL – COSA 9610™
1.2.2. The sample system (SCS)
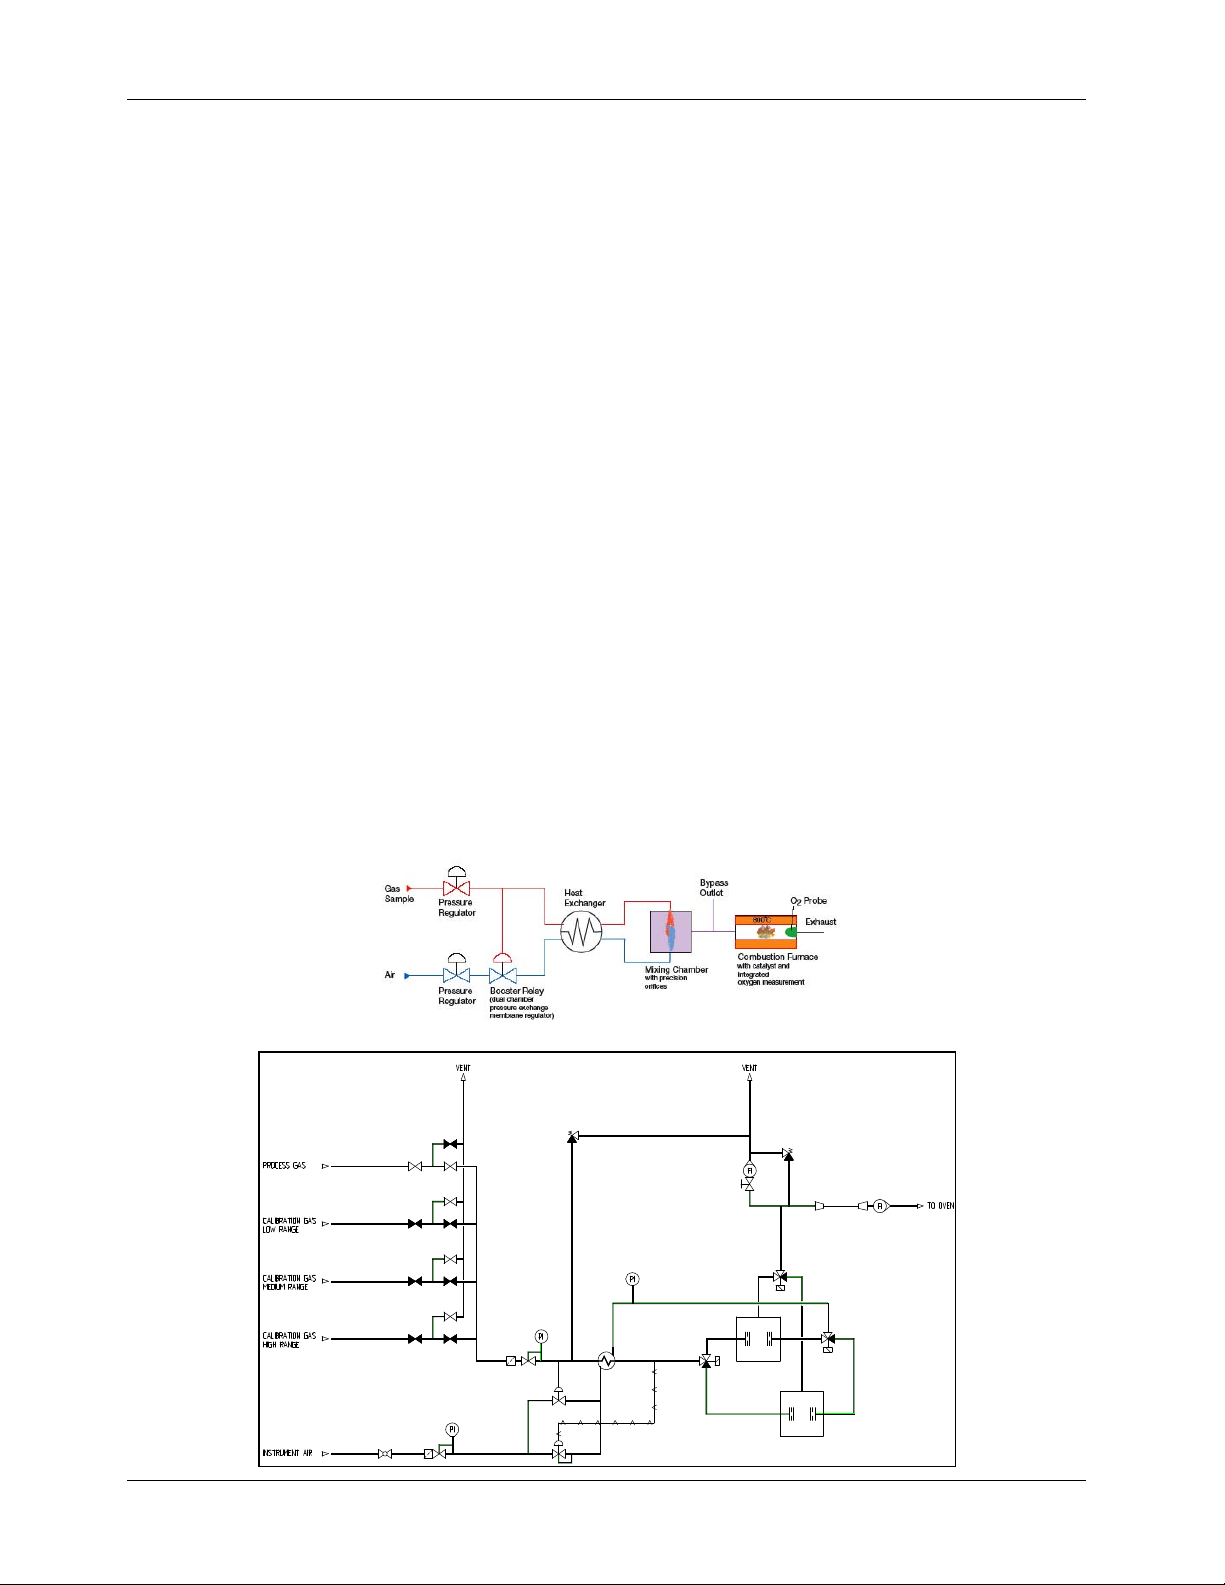
In the sample conditioning system (SCS), gas and air are mixed in a constant proportion,
such that a small excess of air is present (± 2.5% oxygen) in the flue gas. The gas and air
pressure, are equalized by a dome-loaded pressure reducer (or booster relay), where the
gas pressure governs the air pressure.
The booster relay has a temperature reducing effect; the gas/air mixing proportion can
therefore vary as consequence of variations in viscosity. Therefore, the temperature of the
gas and the air are equalized in a heat exchanger. The gas and air temperature are still at
surrounding temperatures, however, as long as gas and air fluctuate to the same extent
this hardly influences the mixing proportion. In case of large surrounding temperature
fluctuations, the calibration sequence has to be performed more often. Hereafter gas and
air are mixed in the mixing chamber. The mixing chamber is equipped with orifices in the
inlet nozzles. The gas and airflow are determined by a critical expansion over the orifices.
The turbulence created provides a homogeneous mixture.
The diameter ratio of the orifices, together with the ratio between gas and air pressure,
determine the mixing proportion.
After the mixing chamber, the mixture flow is divided into an excess flow to vent and a
flow to oven. The flow to the burning oven will be approximately 30-50 Nl/hr. The vented
stream is approximately 500 Nl/hr with a maximum 1000 Nl/hr.
Page 7 of 44

INSTALLATION, OPERATION AND MAINTENANCE MANUAL – COSA 9610™
1.3. CALIBRATION PROCEDURE
The analyzer can be calibrated in three different ways:
• Single point calibration
Only one calibration gas is used. The value of the gas is chosen middle of the
measuring range. This is only used to correct any offset error to the measurements.
• Two point calibration
Two calibration gases are used. The low calibration gas is set at ± 20% of the
measuring range. The high calibration gas is set at ± 80% of the measuring range.
The advantage over a single point calibration is the increased accuracy over the entire
span.
• Three point calibration
This method uses three calibration gases and is mandatory for a dual range analyzer.
The medium range calibration gas must be in the middle of the measuring range.
All three calibration methods can be performed both manually and automatically:
• Manually
The operator navigates the procedure via on-screen menu to open the correct gas
valves to the analyzer. The operator controls the timing.
• Automatically
The analyzer itself controls the timing of the valves switching. When the measured
values stay within the specified tolerances, the newly calculated calibration
parameters will be accepted. Otherwise, the analyzer will keep the old value and
generates a CAL ERROR on the display and switch the system fault contact and
calibration fault contact.
The automatic calibration can be started as followed:
• Programmable time schedule (Timed calibration)
• Initiated manually via on-screen menu (Semi-automatic calibration)
• External host activates the calibration request contact (Remote calibration)
The one-point calibration/validation procedure will be executed as followed:
1. Analyzer activates calibration/validation contact.
2. The procedure pauses for the specified “Calibration Start Delay” time for the
external host to prepare for calibration/validation.
3. Process gas is switched off and the calibration gas is switch on.
4. The analyzer waits for the readings to stabilize up to the “Switch Time”.
5. Calibration gas is switched off and the process gas is switched on.
6. Analyzer deactivates calibration/validation contact.
Page 8 of 44

INSTALLATION, OPERATION AND MAINTENANCE MANUAL – COSA 9610™
The two-point calibration/validation procedure will be executed as followed:
1. Analyzer activates calibration/validation contact.
2. The procedure pauses for the specified “Calibration Start Delay” time for the
external host to prepare for calibration/validation.
3. Process gas is switched off and the low calibration gas is switch on.
4. The analyzer waits for the readings to stabilize up to the “Switch Time”.
5. Low calibration gas is switched off and the high calibration gas is switched on.
6. The analyzer waits for the readings to stabilize up to the “Switch Time”.
7. High calibration gas is switched off and the process gas is switched on.
8. Analyzer deactivates calibration/validation contact.
The three-point calibration/validation procedure will be executed as followed:
1. Analyzer activates calibration/validation contact.
2. The procedure pauses for the specified “Calibration Start Delay” time for the
external host to prepare for calibration/validation.
3. Process gas is switched off and the low calibration gas is switch on.
4. The analyzer waits for the readings to stabilize up to the “Switch Time”.
5. Low calibration gas is switched off and the medium calibration gas is switched on.
6. The analyzer waits for the readings to stabilize up to the “Switch Time”.
7. The analyzer switched the gas stream to the high range mixing chamber.
8. The analyzer waits for the readings to stabilize up to the “Switch Time”.
9. Medium calibration gas is switched off and the high calibration gas is switched on.
10. The analyzer waits for the readings to stabilize up to the “Switch Time”.
11. High calibration gas is switched off and the process gas is switched on.
12. Analyzer deactivates calibration/validation contact.
Between each step of the calibration process a switch time is programmed enabling the
analyzer to stabilize. After the switch time the new value is used in the calibration
algorithm. The calibration gas switch time is user programmable. By default, it is set at
120 seconds. Depending on the distance to the calibration gases it may be necessary to
change to a longer or shorter delay.
Page 9 of 44

INSTALLATION, OPERATION AND MAINTENANCE MANUAL – COSA 9610™
1.4. EXTENDED (DUAL) RANGE OPTION
1.4.1. Operation
When the measuring range of the analyzer is larger than 1150BTU/SCF, an extended range
option is available which covers a Wobbe index of 3000.BTU/SCF. This is accomplished by
adding a second gas-mixing orifice and selection valves to make changeover possible.
The dilution ratios of each mixing orifice are chosen such that the measuring ranges overlap.
Via the software it is possible to create a 4/20mA
It is necessary to establish a switch over point that must be calibrated.
For this reason the calibration system is expanded with an extra solenoid valve.
current loop signal that covers the whole range.
Page 10 of 44

INSTALLATION, OPERATION AND MAINTENANCE MANUAL – COSA 9610™
1.5. SPECIFICATIONS COSA 9610™ WOBBE INDEX ANALYZER
1.5.1. Analyzer performance
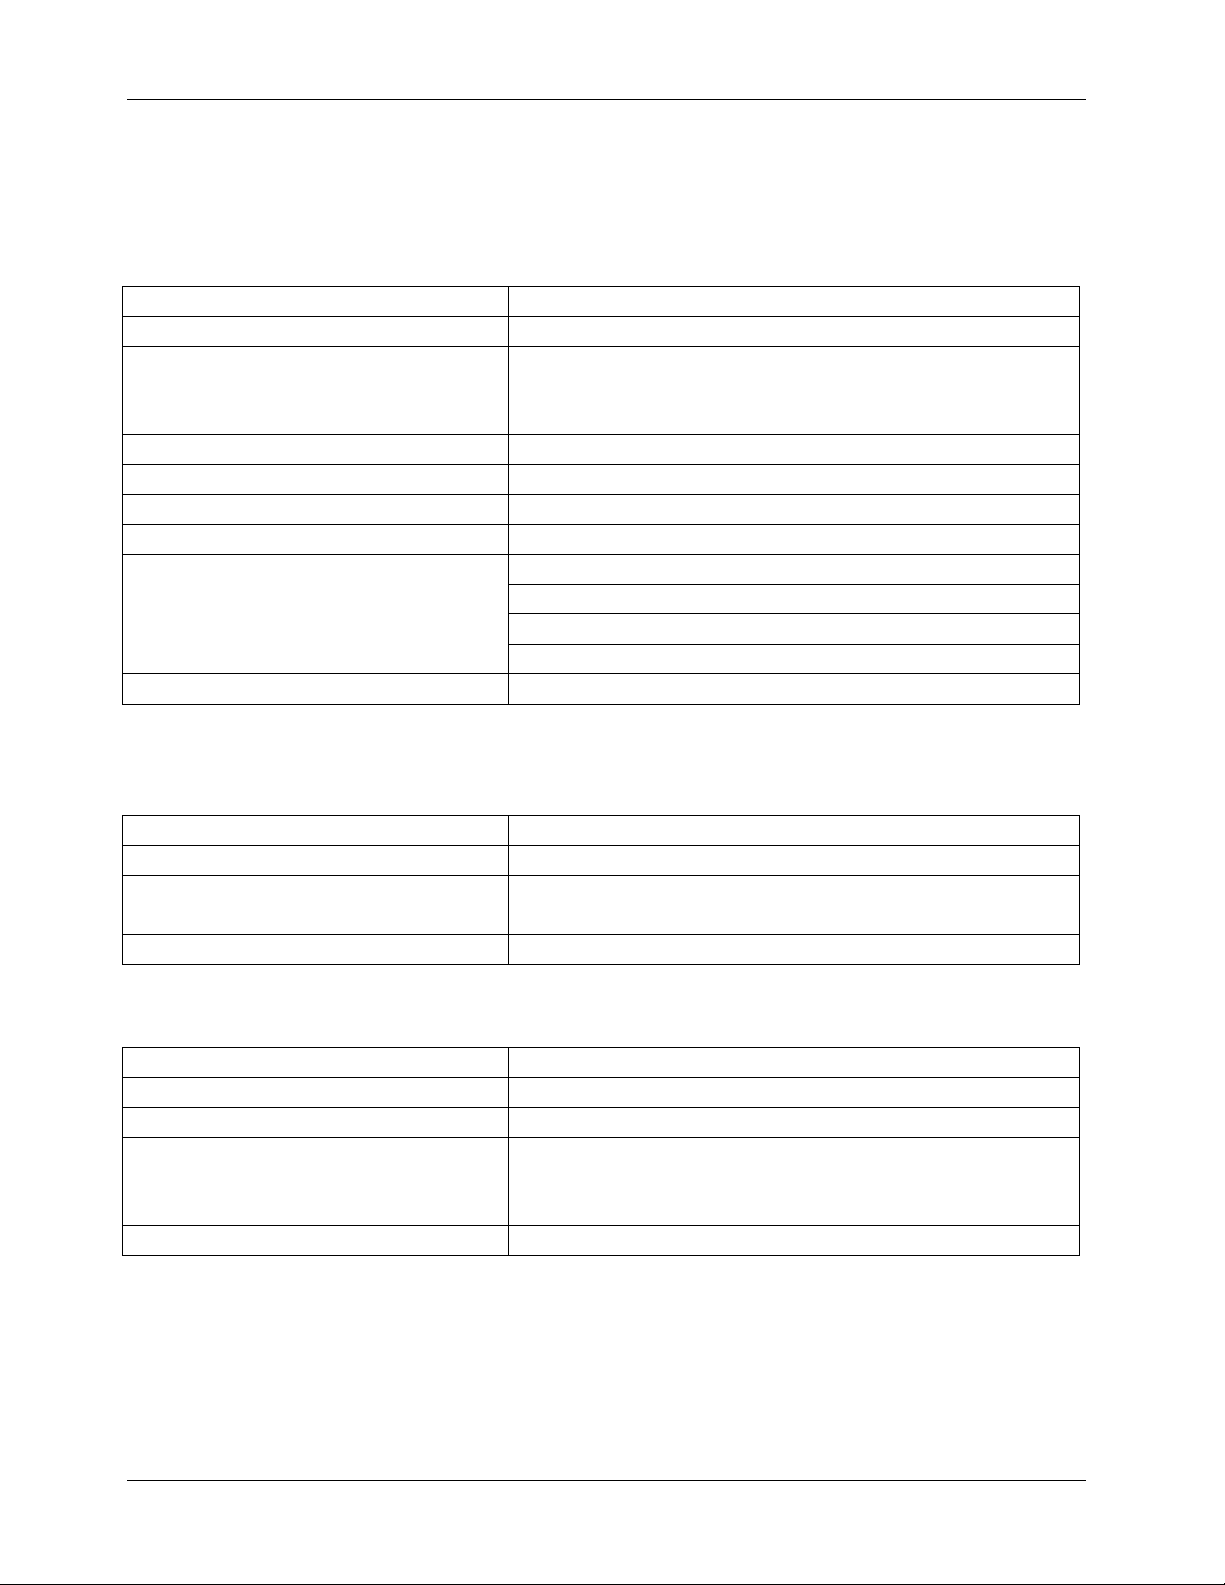
Make
Cosa Instrument Corporation
Service
Ranges
Accuracy
± 0.4% of measuring value natural gas
Repeatability
±0.7 BTU/scf (±0.03 MJ/Nm3)
Drift
±0.4 BTU/scf (±0.01 MJ/Nm3), 24 hours
Response time
T90<5 seconds†
2 isolated 4-20 mA outputs, 4 outputs total optional
Span and service selectable
Display & Optional Digital Output
Output
8 User-programmable contact relays
Safety
General area or Explosion proof
† Wobbe w/o density cell or with streaming S.G. option
1.5.2. Utilities
Power supply
Power consumption
Instrument air
Sample
1.5.3. Installation
Mounting
Dimensions
39 x 39 x 16 inches (1000 x 1000 x 400 mm)
Weight
± 330 lbs (150 kg)
Ambient temperature
Allow ambient temperature variation: ±45ºF (7 °C)
per 24 hours
Humidity
0-90%
Natural gas, fuel-gas, biogas, etc.
Wobbe index 0-3000 BTU/scf (0-95 MJ/Nm3), span
0-1150 BTU/scf (40 MJ/Nm3) (selectable
CARI 0-20, span 0-10)
110 VAC, 50/60 Hz or 230 VAC/50 Hz
430 VA maximum
0.353 SCF/min (analyzer) at 3 barG (43psig)
0.706 SCF/min (purge system) at 5.5 barG (80psig)
0.035 SCF/min at 2 barG (29psig)
Freestanding Frame.
40-113º F (+5 to 45 °C)
Page 11 of 44

INSTALLATION, OPERATION AND MAINTENANCE MANUAL – COSA 9610™
2. INSTALLATION
2.1. GENERAL
Upon receipt and unpacking of the COSA 9610™ a visual inspection must be carried out
to check for any visual damage, caused by transport. Any damage must be reported
immediately to:
COSA INSTRUMENT CORPORATION
New Jersey Office:
Texas Office:
55 Oak Street
7125 North Loop East
Norwood, NJ 07648
Houston, TX 77028
Tel: 201-767-6600
Tel: 713-947-9591
Fax: 201-767-6804
Fax: 713-947-7549
New York Office:
E-mail:
84G Horseblock Rd.
cosa@cosaic.com
Yaphank, NY 11980
Tel: 631-345-3434
Fax: 631-345-5349
We kindly ask you to submit photographs of the damage.
If the COSA 9610™ is supplied by the COSA INSTRUMENT CORPORATION, as part of a
complete package and built into a shelter or house, installation may differ from
hereunder described.
2.2. STORAGE
The COSA 9610™ must be stored frost-free and at a maximum temperature of 122ºF
(50°C), preferably in it’s original packing, and protected against direct sunlight and (rain)
water.
2.3. PLACEMENT
2.3.1. General
The COSA 9610™ can operate under ambient conditions between +41º F (5°C) and
+113ºF (45°C) and a maximum humidity of 90%.
Page 12 of 44

INSTALLATION, OPERATION AND MAINTENANCE MANUAL – COSA 9610™
2.3.2. COSA 9610™ in general purpose execution (Type 01 & 02)
The COSA 9610™ is to be mounted against an even wall or structural steel construction.
Fixing lugs are located on each corner of the cabinet. Fixings used must be suitable for
the weight of the COSA 9610™ (±331 lbs/150kg).
The COSA 9610™ must be mounted on such a level above the floor or underneath
located obstacles that the oven drain can be connected to a drain header or a condense
bottle.
2.3.3. COSA 9610™ in explosion proof execution (Type 01-Ex & 02-Ex)
frame enable the COSA 9610™ to be fixed to the floor.
The COSA 9610™ can optionally be supplied on a 304SS freestanding frame.
This frame is to be placed on a flat surface (i.e. concrete slab). Two holes
in the base of the frame enable the COSA 9610™ to be fixed to the floor .
The COSA 9610™ is supplied on a 304SS freestanding frame. This frame
is to be placed on a flat surface (i.e. concrete slab). Two holes in the base of the
Page 13 of 44

INSTALLATION, OPERATION AND MAINTENANCE MANUAL – COSA 9610™
2.4. MECHANICAL CONNECTIONS
2.4.1. General
• Location and amount of connections may vary depending on type and execution of
the analyzer. See the project specific drawings of your order.
• Tubing connections on the COSA 9610™ are Swagelok double ferrule compression
type fittings for imperial sizes. (Reducers to metric fittings or NPT thread are
available)
• Only seamless and annealed imperial size instrument tubing according ASTM A-249 at
a maximum permissible hardness of Rockwell B-90 may be used.
• Tubing must be cut off straight and de-burred thoroughly. (Inside and outside of
tubing cutting edge)
• The outside surface of the tube ends entering the fittings must be clean and free from
scratches.
• Nuts and ferrules do not have to and must not be removed to avoid mixing up of the
nuts and or ferrules
• Tubing must be pushed into the fitting onto the seat
•
•
• Before connecting the tubing to the analyzer they must be blown through with dry
nitrogen or instrument air to remove all particles.
• All connections must be checked against leakage prior to putting the analyzer in
operation or installing the tubing.
• Pressurise the lines with nitrogen or instrument air at 7bar maximum to perform leak
test. Check each connection with soap. (e.g. snoop)
• Make sure before pressurizing for leak-test that the power to the analyzer is off
(sample and calibration selection valves closed) and that the instrument air supply
isolation valve in the analyzer is closed.
• Vent connections must not be pressure tested while connected to the analyzer.
Disconnect and cap these tubes if leak test is required.
• Re-connection of the fittings is done by hand tightening the nut followed by wrench
tightening for 1/4 turn.
• If a leak is detected, it might be fixed by tightening the fitting step by step a little
more (up to a 1/4 turn) until it is tight. Then the fitting has to be inspected if it has
not been over-tightened. This is done by disconnecting the fitting and to check if the
ferrules can still be rotated in relation to each other and the pipe. (If the ferrules can
•
Hand-tighten the nut and mark the nut against the fitting
Use a correct size wrench to lock the body of the fitting and tighten the nut with another
correct size wrench for 1- 1/4 turn for 1/4" fittings, 3/4 turn for 1/8" fittings. (Watch the marks)
also be moved in an axial direction the fitting is too loose) If the ferrules are stuck, the
pipe has to be cut just after the nut and newly installed according above instructions
using new ferrules. (The nut can be re-used)
If this does not solve the problem, remove the fitting and inspect the fitting body for
damage. If it is damaged the complete fitting must be replaced.
Page 14 of 44
 Loading...