

Page 1

MIX600 Digital Music Control Station
d
Now that you Own it...
product manual.
Read it!
iPod™ Not Included
iPod™ is a registered trademark of Apple Computer, Inc.
Page 2
Important Notice
Before operating this unit, please verify that you have the latest firmware version available from our
website - http://www.cortex-pro.com. New versions of the DMIX-600 firmware will include additional
features, bug fixes, and enhanced compatibility to guarantee optimum performance of your unit. There
are even Spanish and French language versions, to make operating the DMIX-600 easier than ever!
Additionally, please also download our FREE Cortex Database Creation Software, which allows you to
create searchable databases of your entire music collection within minutes, as well as create playlists
for use on your unit! This indispensable utility is designed to save you time when preparing large storage devices to use with the DMIX-600.
To find out what version of DMIX-600 firmware you are running:
1. Power on the DMIX-600 with NO DEVICES CONNECTED.
2. At the prompt that says ‘Insert Devices,’ press the INFO button.
3. The screen will display the version number of the currently installed DMIX-600
firmware.
To upgrade your firmware to the newest version:
1. Using your PC, download the firmware update to the root directory of your USB storage device (X:\ where X is the letter of the drive). We recommend Internet Explorer.
2. Connect the USB storage device to the DMIX-600.
3. Power on the DMIX-600, and select the aforementioned device.
4. The unit will display the date/version of the new update, and will ask if you want to
update. Select ‘YES,’ and press enter.
5. The unit will go through a 8-step update procedure, after which the power will automatically shut down. When the unit is powered on again, you will be running the latest
firmware.
Warning: If the power is interrupted or the USB device is removed during this process, it can
damage the operating system of the unit. As well, it is advisable that the unit is not moved
during the update process to make sure that the process is uninterrupted.
For more detailed information about Firmware Updates, including screen shots, please
see the Firmware Updates section of the manual (page 25).
Page 3

Table of Contents
Warnings and WEEE.............................................................................................2
Introduction..............................................................................................................3
Features...................................................................................................................4
Compatibility and Recommended Peripherals.................................................5
Device Requirements..............................................................................................5
Care and Maintenance.........................................................................................6
Operating Conditions............................................................................................6
Legal Info.................................................................................................................6
Setup Guide ..........................................................................................................7
Front & Rear Panels ........................................................................................7
Top Panel & Functions..................................................................................8-9
Setup Guide
Using the DMIX-600...........................................................................................10
Preparing for Use & Connections...............................................................10
Selecting Devices & Database Creation...................................................11
File Browser & Search Options (Part I).....................................................12
USB keyboard & Search Options (Part II)................................................13
Search Options (Part III)...............................................................................14
Waveform, Time Display & Search Options (Part IV)............................15
Info Button & Track Attributes......................................................................16
Play Mode & Single Auto Cue....................................................................17
Pitch Control, Key Adjust & Master Tempo...............................................18
Jog Mode & Playback Navigation Controls.............................................19
Shuffle Mode..................................................................................................19
Cue Points and Cue Memorization.............................................................20
Hot Cues...........................................................................................................21
Loop Feature...................................................................................................22
Setup Preferences..........................................................................................23
Device Menu...................................................................................................24
Soft Power & Firmware Updates................................................................25
Mixer Section........................................................................................................26
Mixer Section (continued)..............................................................................27
Effects................................................................................................................28
Setting up your Cortex and iTunes®........................................................29-30
Error Messages.....................................................................................................31
Technical Specifications......................................................................................32
Warranty Information.........................................................................................33
Page 4
IMPORTANT WARNING & SAFETY INSTRUCTIONS
P L E A S E R E A D P R I O R T O O P E R A T I N G T H I S D E V I C E !
CAUTION: This product satisfies FCC regulations
when shielded cables and connectors are used to
connect the unit to other equipment. To prevent electromagnetic interference with electric appliances
such as radios and televisions, use shielded cables
and connectors for connections.
The exclamation point within an equilateral triangle is intended to alert the user to the presence of
important operating and maintenance (servicing)
instructions in the literature accompanying the appliance.
The lightning flash with arrowhead symbol, within
an equilateral triangle, is intended to alert the user
to the presence of uninsulated "dangerous voltage"
within the product's enclosure that may be of sufficient magnitude to constitute a risk of electric shock
to persons.
READ INSTRUCTIONS: All the safety and operating
instructions should be read before the product is
operated.
RETAIN INSTRUCTIONS: The safety and operating
instructions should be retained for future reference.
HEED WARNINGS: All warnings on the product and
in the operating instructions should be adhered to.
FOLLOW INSTRUCTIONS: All operating and use
instructions should be followed.
CLEANING: The product should be cleaned only
with a polishing cloth or a soft dry cloth. Never clean
with furniture wax, benzine, insecticides or other
volatile liquids since they may corrode the cabinet.
ATTACHMENTS: Do not use attachments not recommended by the product manufacturer as they may
cause hazards.
WATER & MOISTURE: Do not use this product near
water, for example, near a bathtub, wash bowl,
kitchen sink, or laundry tub; in a wet basement; or
near a swimming pool; and the like.
ACCESSORIES: Do not place this product on an
unstable cart, stand, tripod, bracket, or table. The
product may fall, causing serious injury to a child or
adult, and serious damage to the product. Use only
with a cart, stand, tripod, bracket, or table recommended by the manufacturer, or sold with the product. Any mounting of the product should follow the
manufacturer's instructions, and should use a mounting accessory recommended by the manufacturer.
CART: A product and cart combination should be
moved with care. Quick stops, excessive force, and
uneven surfaces may cause the product and cart
combination to overturn. S
VENTILATION: Slots and openings in the cabinet
are provided for ventilation and to ensure reliable
operation of the product and to protect it from overheating, and these openings must not be blocked or
covered. The openings should never be blocked by
placing the product on a bed, sofa, rug, or other
similar surface. This product should not be placed in
a built-in installation such as a bookcase or rack
unless proper ventilation is provided or the manufacturer's instructions have been adhered to.
EE FIGURE A.
POWER SOURCES: This product should be operated
only from the type of power source indicated on the
marking label. If you are not sure of the type of
power supply to your home, consult your product
dealer or local power company.
LOCATION: The appliance should be installed in a
stable location.
NON-USE PERIODS: The power cord of the appliance should be unplugged from the outlet when left
unused for a long period of time.
GROUNDING OR POLARIZATION:
- If this product is equipped with a polarized alternating current line plug (a plug having one blade
wider than the other), it will fit into the outlet only
one way. This is a safety feature. If you are unable
to insert the plug fully into the outlet, try reversing
the plug. If the plug should still fail to fit, contact
your electrician to replace your obsolete outlet. Do
not defeat the safety purpose of the polarized
plug.
- If this product is equipped with a three-wire
grounding type plug, a plug having a third (grounding) pin, it will only fit into a grounding type power
outlet. This is a safety feature. If you are unable to
insert the plug into the outlet, contact your electrician to replace your obsolete outlet. Do not defeat
the safety purpose of the grounding type plug.
POWER-CORD PROTECTION: Power-supply cords
should be routed so that they are not likely to be
walked on or pinched by items placed upon or
against them, paying particular attention to cords at
plugs, convenience receptacles, and the point where
they exit from the product.
OUTDOOR ANTENNA GROUNDING: If an outside
antenna or cable system is connected to the product,
be sure the antenna or cable system is grounded so
as to provide some protection against voltage
surges and built-up static charges. Article 810 of the
National Electrical Code, ANSI/NFPA 70, provides
information with regard to proper grounding of the
mast and supporting structure, grounding of the
lead-in wire to an antenna discharge unit, size of
grounding conductors, location of antenna-discharge unit, connection to grounding electrodes, and
requirements for the grounding electrode. S
LIGHTNING: For added protection for this product
during a lightning storm, or when it is left unattended and unused for long periods of time, unplug it
from the wall outlet and disconnect the antenna or
cable system. This will prevent damage to the product due to lightning and power-line surges.
POWER LINES: An outside antenna system should
not be located in the vicinity of overhead power
lines or other electric light or power circuits, or
where it can fall into such power lines or circuits.
When installing an outside antenna system, extreme
care should be taken to keep from touching such
power lines or circuits as contact with them might be
fatal.
OVERLOADING: Do not overload wall outlets,
extension cords, or integral convenience receptacles
as this can result in a risk of fire or electric shock.
OBJECT & LIQUID ENTRY: Never push objects of
any kind into this product through openings as they
may touch dangerous voltage points or short-out
parts that could result in a fire or electric shock.
Never spill liquid of any kind on the product.
EE FIGURE B.
SERVICING: Do not attempt to service this product
yourself as opening or removing covers may expose
you to dangerous voltage or other hazards. Refer
all servicing to qualified service personnel.
DAMAGE REQUIRING SERVICE: Unplug this product from the wall outlet and refer servicing to qualified service personnel under the following conditions:
- When the power-supply cord or plug is dam-
aged.
- If liquid has been spilled, or objects have fallen
into the product.
- If the product has been exposed to rain or water.
- If the product does not operate normally by following the operating instructions. Adjust only those
controls that are covered by the operating instructions as an improper adjustment of other controls
may result in damage and will often require extensive work by a qualified technician to restore the
product to its normal operation.
- If the product has been dropped or damaged in
any way.
- When the product exhibits a distinct change in
performance, this indicates a need for service.
REPLACEMENT PARTS: When replacement parts
are required, be sure the service technician has used
replacement parts specified by the manufacturer or
have the same characteristics as the original part.
Unauthorized substitutions may result in fire, electric
shock, or other hazards.
SAFETY CHECK: Upon completion of any service or
repairs to this product, ask the service technician to
perform safety checks to determine that the product
is in proper operating condition.
WALL OR CEILING MOUNTING: The product should
not be mounted to a wall or ceiling.
HEAT: The product should be situated away from
heat sources such as radiators, heat registers, stoves,
or other products (including amplifiers) that produce
heat.
DISPOSAL: This product shall not be treated as
household waste. Instead it shall be handed over to
the applicable collection point for the recycling of
electrical and electronic equipment. By ensuring this
product is disposed of correctly, you will help prevent potential negative consequences for the environment and human health, which could otherwise
be caused by inappropriate waste handling of this
product. The recycling of materials will help to conserve natural resources. For more detailed information about recycling of this product, please contact
your local city office, your household waste disposal
service or the shop where you purchased the product.
2
Page 5

Introduction
Foreword
hank you for purchasing our Cortex DMIX-600.. We are confident that the Cortex platform of products will not only make your life easier through
T
the use of the latest technogical advancements in cross-platform connectivity and sound reproduction but will raise the bar for DJ and pro audio
products. With the proper care & maintenance, your unit will likely provide years of reliable, uninterrupted service. All Cortex products are backed
by a 1-year limited warranty*.
Preparing for First Use
Please insure that you find these accessories included with the DMIX-600:
Power supply...........................................................................................................1
Operating instructions............................................................................................1
We Want You Listening For A Lifetime!
Dear Customer:
Selecting fine audio equipment such as the unit you
have just purchased is only the start of your musical enjoyment. Now it’s time to consider how you can maximize the
fun and excitement your equipment offers. This
Manufacturer and the Electronic Industries Association’s
Consumer Electronics Group want you to get the most out
of your equipment by playing it at a safe level.One that lets
the sound come through loud and clear without annoying
blaring or distortion-and, most importantly, without affecting
your sensitive hearing.
Sound can be deceiving. Over time your hearing “comfort level” adapts to higher volumes of sound. So what's
sounds “normal” can actually be loud and harmful to your
hearing. Guard against this by setting your equipment at a
safe level BEFORE your hearing adapts.
To establish a safe level:
- Start your volume control at a low setting.
- Slowly increase the sound until you can hear it
comfortably and clearly, and without distortion.
Once you have established a comfortable sound level:
- Set the dial and leave it there.
Used wisely, your new sound equipment will provide a
lifetime of fun and enjoyment. Since hearing damage from
loud noise is often undetectable until it is too late, This
Manufacturer and the Electronic Industries Association’s
Consumer Electronics Group recommend you avoid prolonged exposure to excessive noise. This list of sound levels is included for your protection.
Decibel
Level Example
30 Quiet library, soft whispers
40 Living room, refrigerator, bedroom away from traffic
50 Light traffic, normal conversation, quiet office
60 Air conditioner at 20 feet, sewing machine
70 vacuum cleaner, hair dryer, noisy restaurant
80 Average city traffic, garbage disposals, alarm clock
at two feet
THE FOLLO W I N G N O I S ES C A N B E D A N G E ROUS
UNDER CONSTANT EXPOSURE
90 Subway, motorcycle, truck traffic, lawn mower
100 Garbage truck, chain saw, pneumatic drill
120 Rock band concert in front of speakers, thunderclap
140 Gunshot blast, jet plane
180 Rocket launching pad
Information courtesy of the Deafness Research Foundation.
Taking a minute to do this now will help to prevent
hearing damage or loss in the future. After all, we want you
listening for a lifetime.
3
Page 6

Operational Notes
Features
The Cortex DMIX-600 has been designed & engineered to provide digital music playback and manipulation features demanded by profession-
l users. The DMIX-600 is designed to liberate DJs from the issues asso-
a
ciated with PC-based solutions, by eliminating the need for a computer
during performance. The DMIX-600 also offers superior portability and
flexibility over that of a typical PC.
Jog Wheel (Touch wheel)
The Jog Wheel(Touch Wheel) on the DMIX-600 provides highly precise
control for a variety of functions. With the Jog Wheel, the User can
search, pitch bend or even scratch just as if it were a vinyl turntable! As
well, this can provide an extremely powerful navigation tool for searching menus, changing parameters and selecting music on your hard drive.
Pitch Control
High precision 60mm slide potentiometer for accurate adjustment of
speed.
• 0.05% pitch precision
In order to provide more precise pitch adjustment, the unit is able to
advance in increments of 0.05%. This aids in beat-matching between
two musical programs, with much finer pitch resolution than can be found
on most conventional professional CD players.
• Multiple pitch ranges
With pitch ranges of 4, 8, 12, and 24%, the pitch control’s minimum and
maximum values can be altered to augment or reduce the amount of
pitch adjustment to a musical program.
• Pitch ON/OFF
By pressing the PITCH + and PITCH - buttons simultaneously, this toggles
whether or not the unit will respond to changes via the PITCH CONTROL
slide. The Pitch ON/OFF feature also functions as a pitch reset, when it
is used to turn the pitch OFF.
CD Audio support
The DMIX-600 offers an unparalleled level of connectivity with all driverless USB devices. The Cortex line of products are the first to offer the
ability to manipulate music stored on USB devices such as hard drives,
lash memory, optical drives, and personal music players, regardless of
f
platform. Through this innovation, DJs are able to consolidate the
amount of equipment and music needed during a performance. Even
more USB devices can be connected with the use of a compatible USB
hub.
Database-Driven Music Management
Despite the fact that a vast majority of people have access to USB storage devices or portable music players, the Cortex DMIX-600 supports
the playback of CD Audio discs through a compatible USB external CDROM, CD-RW, DVD-ROM, or DVD-RW drive. This is particularly useful
for DJs making a gradual migration, or for playing CDs provided by
clients.
Playlist Support
The entire line of Cortex Digital Music Players allows for the management of music collections via a database-driven system. Using this
method, the database can be queried based on a number of different
criteria. This allows DJs to search by artist, title, genre, album, or search
string. Using this method allows the DJ to find a specific music selection
within seconds. The database is saved to the storage device the music is
being drawn from, so that it can be used with any Cortex unit, whether
it’s in your personal rig or at a club! Cue Points that have been memorized using the DMIX-600 are also stored along with the database information on the active storage device. Once a Cue Point has been stored,
DJs have the ability to recall it each time that track is loaded.
Built in Audio Mixer
The DMIX-600 comes with a full featured 2 Channel mixer with features
like 3 band EQ on each channel,microphone input with dedicated EQ,
replacable crossfader and on board digital effects. You also have have
a seperate booth output and balanced XLR outputs for more professional
applications.
Backlit displays
The backlit 20 Character LCD screen shows a variety of information,
including track titles, times, pitch, setup options, waveforms, loops and
search parameters. This display allows more extensive visualization of
parameters than a conventional CD player.
Digital Effects
The built in digital effects give you additonal tools to enhance your mix,
by using either the FILTER the FLANGER or the REVERB you are armed
with an added variety of tricks to compliment your mixing style.
Cross-Platform USB Connectivity
The DMIX-600 supports both iPod™ and User created Playlists, which
can be created using Apple iTunes™ (in the case of an Ipod™) or our
own DB SE software. When there are iPod™ Playlists available to be
loaded, a menu option will appear in the main Search Options menu.
Otherwise, user created playlists are accessible from the Playlist menu.
4
Page 7

Operational Notes
Compatability & Recommended Peripherals
A Word About Compatability
The DMIX-600 (and all Cortex products) are designed to interface with
all driverless USB devices. This means that if the product does not
require proprietary driver software and can be accessed natively by a
PC or Macintosh computer, it should be compatible with the Cortex.
Note that just because the product works on a computer without using an
included driver disk, that does not mean that it is truly driverless.
In theory (but sometimes not in practice), any device that doesn’t require
a driver should work just fine with the Cortex. However, varying specifications of certain products (primarily USB flash memory) sometimes might
present an incompatability issue. As one might imagine, testing every
USB peripheral on the market would be a lifelong quest, and the introduction of new peripherals on the daily basis would make it even more
difficult.
If you are having trouble with a specific peripheral, please find the compatability advisory section of our website, and let us know! In the vast
majority of cases, support can be added for sub-standard units that
deviate from typical specifications.
Device Requirements
• DAE capability for Audio CD playback via CD-ROM/DVD-ROM drive
In order to play back audio CDs on a CD-ROM/DVD-ROM drive, the
rive itself must support bit-accurate Digital Audio Extraction (DAE for
d
short). If the drive does not support bit-accurate DAE, it is possible that
you may notice anomolies such as pops & clicks during playback.
USB Hubs must be Powered, not Passive (non-powered)
•
Although the Cortex is able to provide power to the vast majority of
USB-powered devices, USB Hubs should be powered. Although a passive hub itself will function, the extraneous current draw of the devices
connected to it may cause instability when operating the Cortex.
• Write-protection must be Disabled (where applicable)
When using a writeable device (hard drive, music player, flash memory),
any write-protection must be disabled. Otherwise the Cortex will not be
able to store the database it has created.
Certified-Compatible Devices
For a list of devices that have been tested and are certified to be compatible with the DMIX-600, please visit the support section of our website at http://www.cortex-pro.com
• USB Compliance
The storage device must comply to USB 1.0, 1.1, or 2.0 specifications.
Wireless USB devices are not supported.
• Devices should be dedicated for use with the Cortex, if possible
For optimal performance, the storage devices you use should be decicated for audio-only use. No other files should be stored on the device,
other than the audio and database files used by the Cortex.
• Drives must be unpartitioned
The DMIX-600 cannot switch between multiple partitions - it recognizes
the first partition on the active device. This is crucial for the efficiency of
the database driven search.
• FAT32, NTFS, or HFS+ File System for Flash Memory and Hard Drives
All storage devices must be formatted using FAT32, NTFS, or HFS+ file
systems. On Windows PCs, all hard drives will use FAT32 or NTFS file
systems, with NTFS common for Windows XP and later. HFS+ is the file
system that is used by Macintosh and Linux-based machines.
• NTFS is read-only!
If you are using an external hard drive that is formatted using the NTFS
file system, you will not be able to create a database using the DMIX600 unit. Instead, you should use the Cortex Database Creation (DBC)
software for PC or Mac. This should not impact the majority of users, as
the only devices that will be typically formatted using NTFS are extremely large hard drives over 32 gigs. When there is a large music collection,
using the DBC software will be dramatically faster at creating a database.
5
Page 8

Operational Notes
Additional Information
Maintaining Storage Devices
When using writeable storage devices, such as hard drives, and harddrive-based music players (iPod, Zen), certain maintenance might be
required. Because the Cortex units use streaming technology to manipulate more than one music file from one device simultaneously, hard drives
and hard-drive based units need to be defragmented regularly to
ensure the integrity of the streamed files.
Fragmentation refers to “the condition of a disk in which files are divided into pieces scattered around the disk. Fragmentation occurs naturally
when you use a disk frequently, creating, deleting, and modifying files.
At some point, the operating system needs to store parts of a file in noncontiguous clusters. This is entirely invisible to users, but it can slow down
the speed at which data is accessed because the disk drive must search
through different parts of the disk to put together a single file.”
Maintaining these storage devices must be done via your computer, and
should be performed whenever there has been a substancial change to
your music library (adding/deleting music). Note that failure to maintain
your storage devices might result in delayed access times and glitchy
audio playback.
• With Windows™ based machines
First, connect the storage device that you wish to defragment. If you are
connecting a hard-drive based music player, such as an Apple iPod or
Creative Zen, make sure to exit any applications that may be launched
on connection.
Cleaning the Unit
To clean the DMIX-600, use only a dry soft cloth and/or compressed air.
If the unit is soiled with stubborn dirt, we suggest using a 2:1 solution of
distilled water and 30% isopropyl alcohol. Avoid using harsh cleaning
chemicals such as benzene, paint thinner, bleach, or hydrochloric acid,
which will damage the unit.
Operating Conditions
For optimum performance, the temperature of the operating environment
should be between +5º C to +35º C (+41º F - +95º F). Failure to maintain proper operating temperature may result in difficulty reading the
LCD display, thermal overload, or system-wide instability. Avoid exposing the unit to direct sunlight.
When placing the unit in an installation, make sure that it is placed on a
stable surface, as far away from vibrations as possible. Even though the
Cortex is impervious to vibration, the storage devices (specifically hard
drive based ones) that are designed to be used in conjunction with it are
typically not. Also be sure not to place or use the player on heat generating sources, such as amplifiers or near spotlights.
Never use any other power supply other than the one provided with the
unit, as doing so may damage the unit and void the warranty. The power
supply included with the DMIX-600 is a custom made supply and is not
commercially available.
To load Disk Defragmenter, go to the Start menu, and find Disk
Defragmenter under Accessories/System Tools.
When Disk Defragmenter has been loaded, select the device to be
defragmented, and click the ‘Defragment’ button at the bottom of the
window.
For more information on defragmenting, consult the Windows Help guide.
• With Apple Macintosh Machines
According to Apple, provisions within the HFS file allocation system
diminish the need for any type of defragmentation. Because of this,
there is no software included in OSX to accomplish this. However, this
does not guarantee that defragmentation will not be necessary for
external storage devices and portable music players.
For more information on Apple’s claims, see this article:
http://docs.info.apple.com/article.html?artnum=25668
Always Make Backups!
Due to the sometimes fragile state of PC components, we insist that you
make backups of the storage devices that you plan on using with the
Cortex. All hard drives (and hard-drive-based portable music players),
are prone to failure - they have moving parts inside. Instead of taking a
chance that your hard drive will last one more performance, one more
month, or one more year, it is a far more intellegent choice to back up
your data for the worst case scenario.
Lawful Use of DMIX-600
Neither Cortex nor its dealers assume responsibility for the use made of
the DMIX-600. The user must ensure he/she has all relevant licences and
consents in place (whether for copyright/public performance, performers
rights, moral rights or otherwise) to allow the lawful use of the DMIX-
600. This is likely to include licences from organizations administering
performance rights in audio recordings or consents from any other relevant rights holders.
The Cortex line of units, although designed to streamline the process by
which DJs perform, is not designed as a tool to facilitate media piracy.
We urge that our users legitimately purchase the music they plan to use,
and support the artists who make it possible for them to sustain a career
as a professional entertainer.
Neither Cortex nor your retailer will be held responsible for data loss
because of the lack of backups.
6
Page 9
Setup Guide
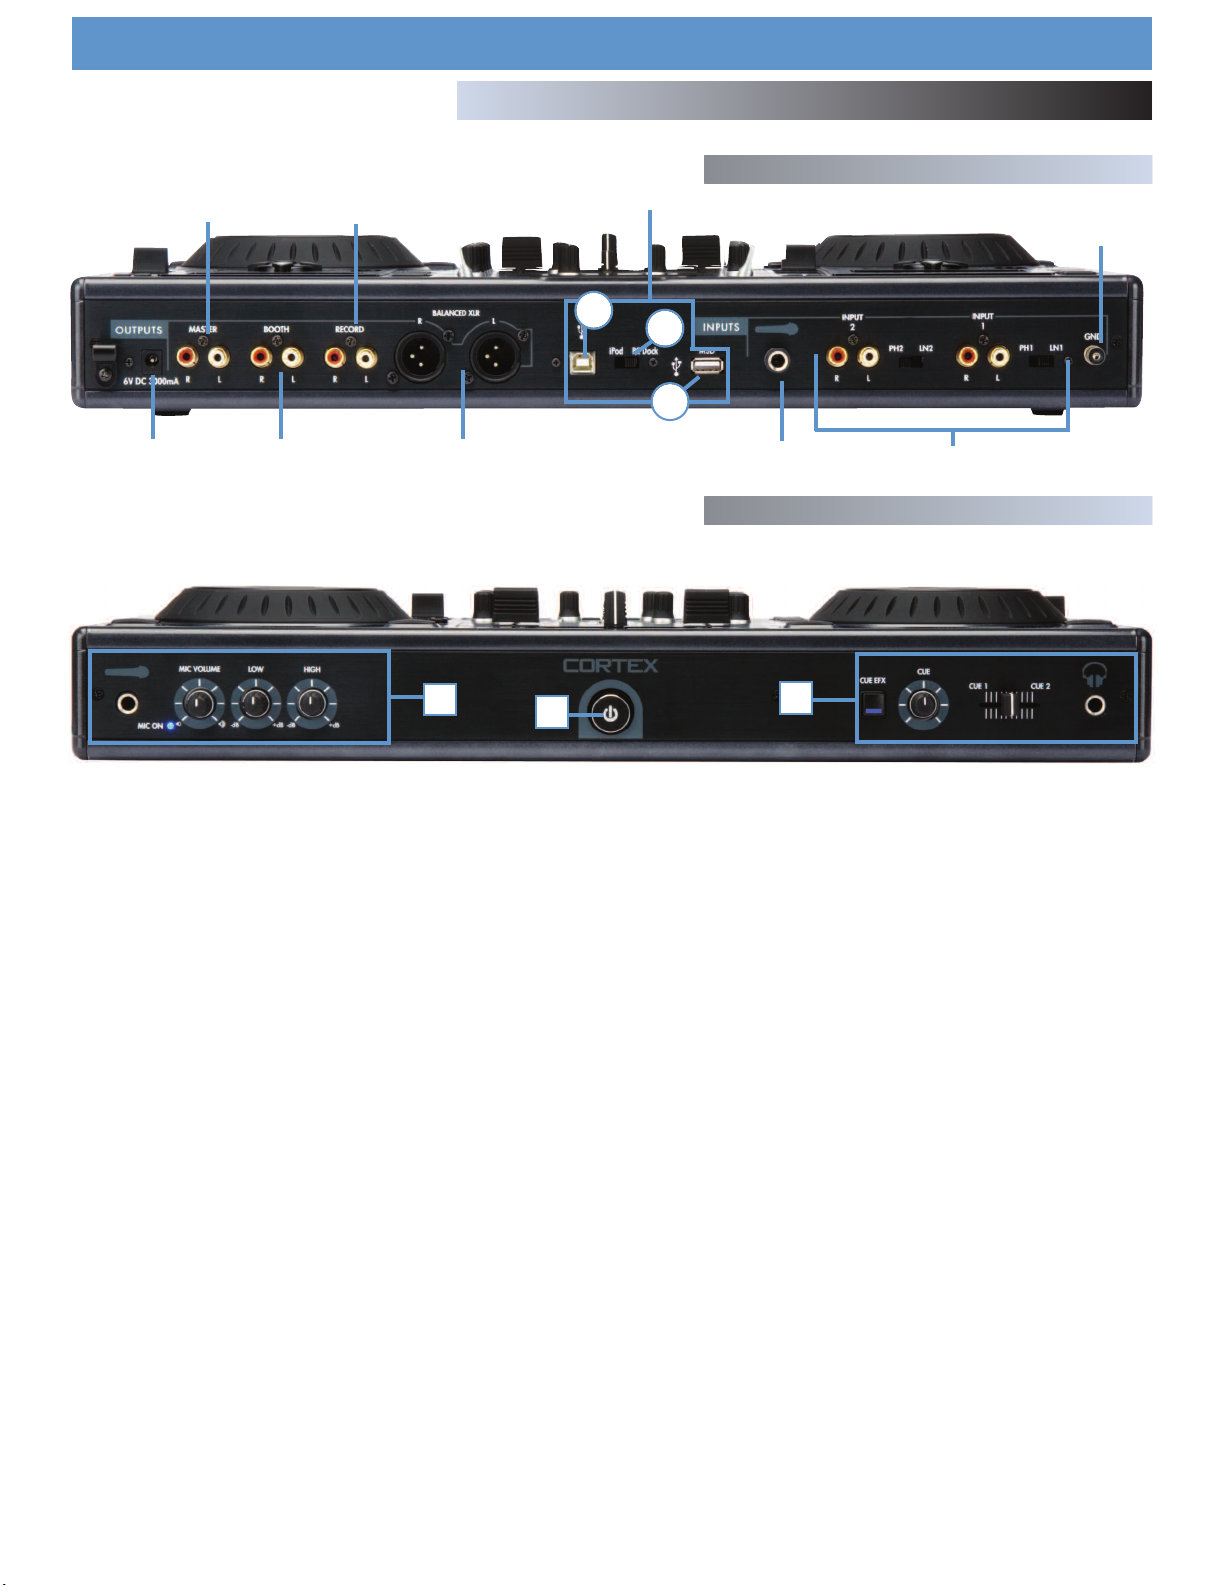
Front & Rear Panels
Rear Panel
2
4
6
9
1
1. DC inlet w/security clamp
This connector is used in conjunction with the AC/DC adaptor to power the unit.
Next to the DC inlet connector is a security clamp, which can be fastened over
top of the cable to prevent it from being dislodged.
2. MASTER OUT L/R RCA connectors (UNBALANCED)
RCA type unbalanced stereo audio output. These connectors output audio signal also generated from the DMIX-600 unit.
3
5
7
10
B
C
A
7. MICROPHONE INPUTS
The DMIX-600 has two microphone inputs, one located on the front panel, and
one on the back. Both are controlled by the same microphone volume control
rotatry which is also located on the front panel. The volume rotary features an
on/off switch built into its design, so when you rotate the control all the way to
the left counter clockwise it will “click” to the off position and the blue LED will
turn off indicating the microphone channel is OFF. The microphone channel also
has a 2 band EQ allowing you to adjust the tone of the microphone input.
7
Front Panel
11
8
3. BOOTH OUT L/R RCA connectors (UNBALANCED)
RCA type unbalanced stereo audio output. These connectors output the booth
monitor signal of the DMIX-600 unit.
4. RECORD OUT L/R RCA connectors (UNBALANCED)
RCA type unbalanced stereo audio output. These connectors output the RECORD
signal of the DMIX-600 unit.
5. MAIN OUT 2 L/R XLR connectors (BALANCED)
XLR type balanced stereo audio output. These connectors output audio signal
generated from the DMIX-600 unit
6. USB i/o and DOCK/MSD Switch
A. USB MSD INPUT This connector is used to attach the USB mass stor age
device that contains your music library. Suitable mass storage devices include,
but are not limited to: external hard drives, flash memory, portable digital music
players, CD/DVD-ROM drives, memory card readers, and active USB hubs.
B. USB iPOD OUTPUT This connector allows you to connect to a PC or laptop
and lets you use the DOCK in the DMIX-600 as a stamdard iPod Dock.
C. DOCK / MSD SWITCH This switch allows you to choose weather you are
going to use your iPod as a MSD (mass storage device) or DOCK the iPod and
connect it to your PC like a regular iPod DOCK.
8. CONVERTIBLE PHONO/LINE INPUTS and SWITCHES
These small switches allow you to choose between a PHONO (Turntable) input
or a LINE level (Mp3, CD, Tape player etc..).and require the proper switching.
When switched to the PHONO position you may use any Turntable with a magnetic cartridge. And when the switch is in the LINE position you may connect any
line level device like (Mp3, CD, Tape etc).
9. GROUNDING SCREW
When using (a) turntable(s), you will need to ground the RCA cable(s) by screwing in the grounding fork(s) to the GROUNDING SCREW located on the rear
panel of the DMIX-600.
10. POWER BUTTON
Press and hold the Power Button for 1 second to boot up the unit. To
turn the unit off the power button must be held down for 3 seconds to
protect from the unit being accidently shut down.
3. Headphone jack and Cue Controls
The headphone jack located on the front of the Dmix 600 is designed to accept
any standard headphone using a 1/4’‘ jack. Use the Cue fader to fade between
channels one and two for cue preview. Use the cue volume control to control
headphone volume.The CUE EFFECTS button when ON allows you to cue the current effect in the headphones
7
Page 10
Setup Guide
1
18
9
12
Top Panel & Functions
Top Panel
10
2
3
4
13
19
20
21
22
5
14
6
23
15
7
11
16
8
1. iPod Dock
This can be used to dock any Ipod (Gen 3 and above) to the unit. As well, when
used together with the USB type B connector on the rear of the unit the Ipod can
be connected to a PC through the Dmix 600 for file transfers.
2. Time and Single buttons
Press the TIME button to toggle between Time Remaining and Time Elapsed on
the Play screen when playing an audio file. Use the Single button to toggle
between Single and Continuous play modes.
3. Master Volume
Use this knob to change the volume of the Master output on the rear of your unit.
4. Booth Volume
Use this knob to change the volume of the Booth output on the rear of your unit.
5. Effects Controls
This section controls the three on board effects FILTER, FLANGER and REVERB.
The effects can be assigned to either channel individually or to the master output mix. You can also adjust the parameter and the DRY/WET mix of the effect.
6. Master/Cue VU meter switch
The Master/Cue switch located above the VU meter is used to choose what is
displayed on the VU meter. Switch to the MASTER position to have the LEDs display the volume of the Master output. Switch to the Cue position to monitor the
volume of channels One and Two in relation to each other.
17
8. Crossfader/Fader Curve
The Crossfader is used to fade between channels one and two. The crossfader
is user replaceble from the top panel. FADER CURVE settings, positioning the
switch to the right will give you a gradual CROSSFADE and positioning the
switch to the left will give you a quick CROSSFADE.
9. MSD/Line-Phono switch
This switch toggles between the MSD (Ipod/USB) and Line/Phono inputs on your
mixer.
10.Gain and EQ knobs
Use the High, Mid and Low knobs to effect the tone of your music. Use the Gain
knob in conjunction with your Channel fader to change the volume of your music..
11.Line Fader
The Line Faders on each channel are used to control volume. Use these in conjunction with the Gain and EQ on each channel to control the Volume and Tone
of each channel.
12.Info/Play/Search Buttons
Use the INFO button to view the information of a playing file. Use the SEARCH
button to enter the search menu. Use the PLAY button to re-enter the Play screen.
13.SHIFT button
Holding down the SHIFT button extends the use of certain buttons on the unit, by
providing alternate functions.
7. VU meter
The VU meter displays the current volume of either the Master output or Cue output, depending on the position of the Master/Cue switch.
14.JOG MODE button/indicator
This button controls alternately whether the JOG WHEEL will function as PITCH
BEND or FF/REW. When the LED indicator is lit, it indicates that the JOG WHEEL
will function as FF/REW. When not lit the JOG WHEEL functions as a PITCH
BEND.
8
Page 11

Setup Guide
1
18
9
12
Top Panel & Functions (Continued)
Top Panel
10
2
3
4
13
19
20
21
22
5
14
6
23
15
7
11
16
8
15.JOG WHEEL
The JOG WHEEL controls many aspects of the unit, and can be used for
navigating through menus, searching through music and manipulation of pitch.
The behavior of the JOG WHEEL is dependent on the mode of operation, as
well as the status of the PITCH ON/OFF indicator and JOG MODE. The JOG
WHEEL is also touch sensitive allowing you to press down on it to stop the music
and/or manipulate your music like a vinyl turntable would.
16.CUE button/indicator
When the LED indicator which illuminates this button is lit, it indicates that there
is a CUE POINT memorized.
17.PLAY/PAUSE button/indicator
When the LED indicator which illuminates this button is lit solidly, it indicates that
the unit is in PLAY mode. When the LED indicator is flashing, it indicates that the
unit is in PAUSE mode.
18.LCD DISPLAY panel
This blue-backlit display is a 20 Character LCD that displays information such as
track/waveform, folders, parameter adjustments and search information.
Contrast is available in the Edit menu.
19.Hot Cue Section
There are two HOT CUES for each side and both can be made on the fly,
Additionaly by pressing SHIFT plus either CUE button you can edit the start time
of the CUE point.
17
21.Master Tempo and Key Adjust buttons
These buttons engage functions that change how the pitch is used. Master Tempo
changes the speed without changing the pitch. Key adjust changes the key of the
song without changing the speed .Both Master Tempo and Key can be used in
combination. When Key Adjust is enabled then the PITCH BEND buttons act to
change KEY instead of acting as a PITCH BEND.
22.Pitch Fader, PITCH ON/OFF indicator and PITCH BEND buttons
This slide, when pushed towards the bottom of the unit (+), increases the tempo
of playback. When the slide is pushed towards the top of the unit (-), the tempo
of playback is decreased. The Pitch Bend buttons can be used to make temporary increases and decreases in pitch for matching tempo, and when both buttons are pressed together the pitch is turned on and off (as indicated by the
Pitch On/Off indicator LED).
23. Loop section
The loop function allows you to set an “IN point and an “OUT’ point and repeat
(LOOP) whatever information is between those two points indefinitly. You also
have the abilty to adjust the “IN” point and the “OUT” point by simply pressing
SHIFT at the same time as either IN button or the OUT button, This will engage
the loop editor give you the abilty fine tune the loop to your desired result. At
anytime you can release or disengage the loop by pressing “OUT” again. Later
to recalll the loop you need only press the reloop button to re-engage the loop
from its original ‘IN “point
20.NAVIGATOR keypad
These buttons allow the user to navigate through menus and features of the
Dmix-600. Depending on the mode of the unit, the buttons may serve different
purposes.
9
Page 12

Using the DMIX-600
Preparing for Use
STEP ONE
Connect the AC/DC adaptor to the DC Inlet, found on the rear of the unit. Fasten the Security Clamp (found directly below the DC Inlet jack) on top
of the cable, so that it is not possible for the cable to become dislodged.
STEP TWO
Connect either the XLR type (Balanced) audio output and/or the RCA type (Unbalanced) Audio Outputs to a suitable source (see diagram below). The
DMIX-600 features a wide variety of output choices depending on your requirements, all outputs can be used simultaneously.
STEP THREE
Connect your primary USB device to the port found in the middle of the rear panel. You may choose any driverless device that follows FAT32, NTFS,
or HFS+ file systems. You may also connect a powered (active) USB hub to augment the amount of available ports, giving you the advantage of
connecting either a USB keyboard or more USB storage devices (see diagram below).
STEP FOUR
Press the Power button located to the left of the front panel. The unit will take about 5 seconds to boot up as well as detect any USB devices that are currently connected.
Connections
OUTPUTS USB INPUTS
MIC CUE
10
Page 13
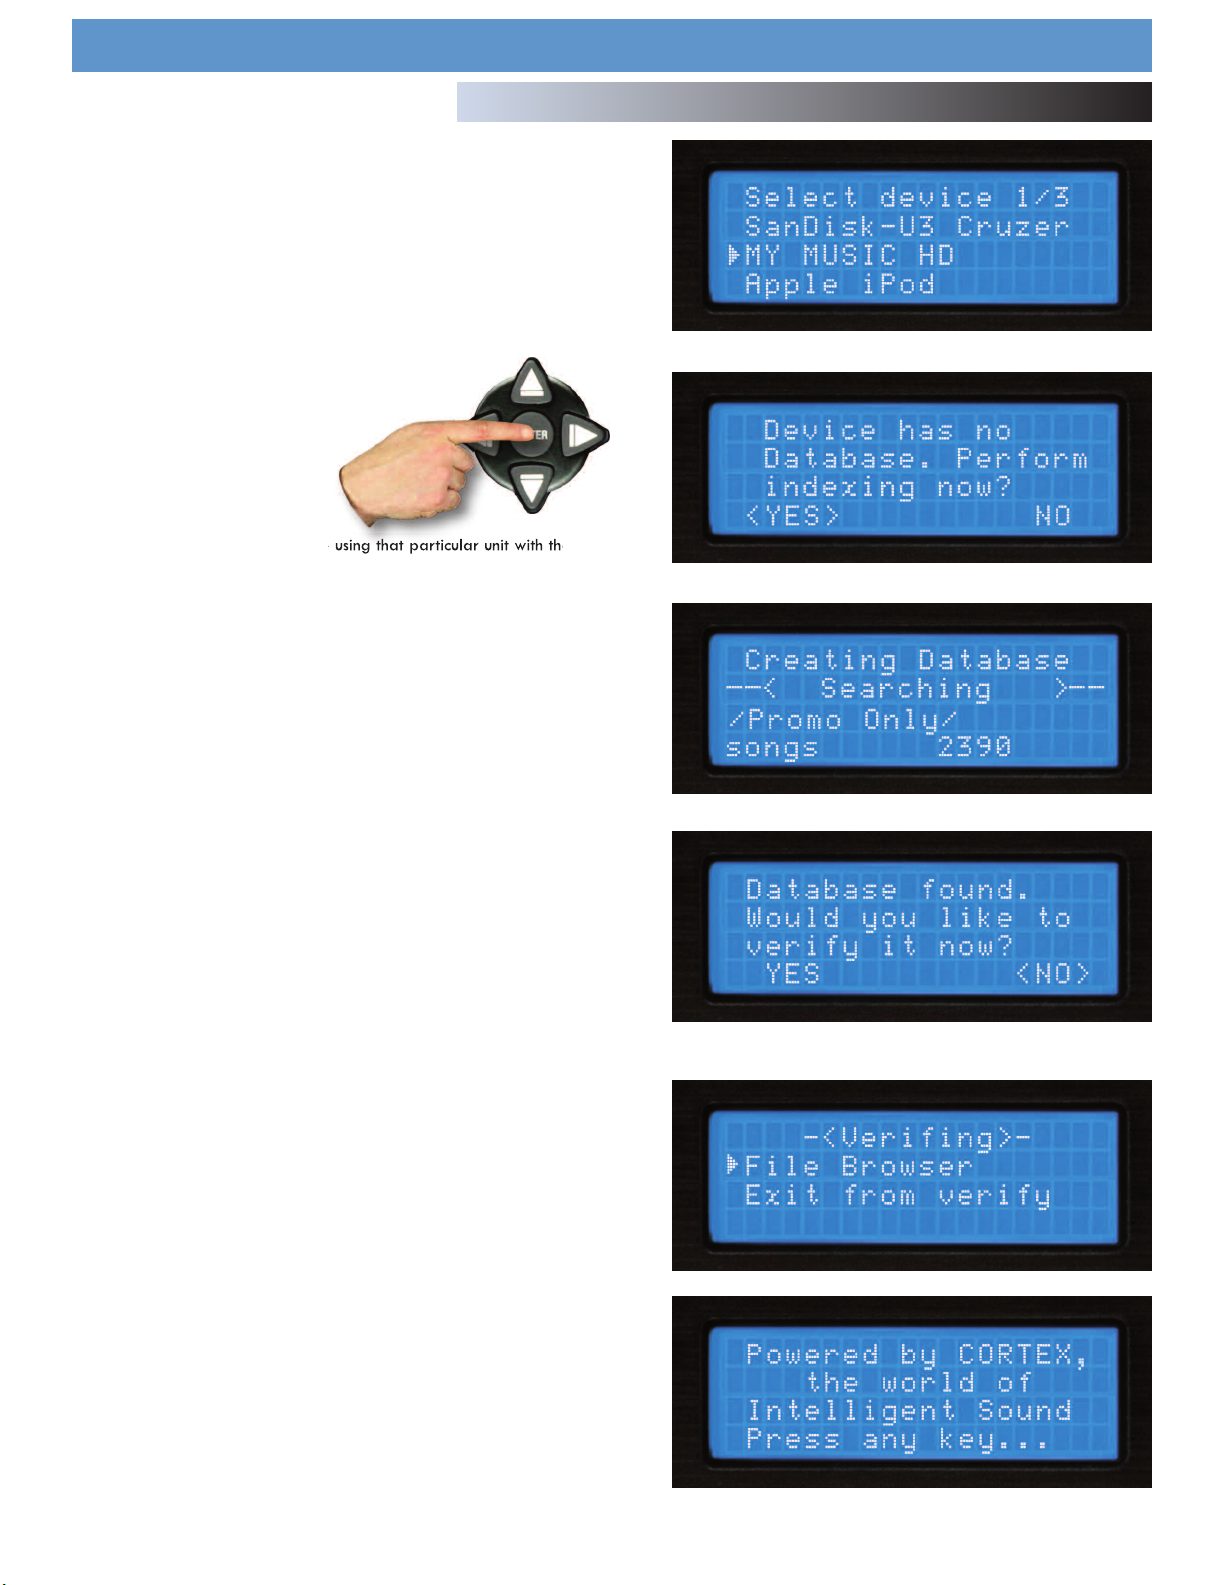
STEP ONE - DEVICE SELECTION
When prompted, select the desired storage device, on each side,that you
wish to access. Use the Navigator Keypad to advance through the list of
evices, and press Enter to select.
d
If necessary, you can also connect other USB storage devices without
powering down the unit.
Note that when you select a storage device on one side, the unit will be
required to complete any necessary Database Creation before being
able to select a device on the opposite side.
During this time, the opposite screen will display
“Wait for other side.”
STEP TWO - INDEXING
Once you have selected a device,
the unit will search for a database
of the music that exists on that
device. If it is the first time you are using that particular unit with the
DMIX-600, the unit will prompt you to perform indexing, so that you can
search for any song within seconds. If you already have used the storage device with the DMIX-600, skip to STEP TWO - VERIFICATION.
Using the DMIX-600
Selecting Devices & Database Creation
Fig 2.1 - Select USB device
Fig 2.2 - Create Database by selecting ‘YES’
If you wish to create the database using the DMIX-600, select ‘YES’ from
this prompt.
During the indexing procedure, the unit must create a database based
off of the ID3 tags that exist on the storage device. The speed of this
procedure directly relates to how many songs are stored on the connected device. If you are using a hard drive over 20 gigs, or an NTFS
device, we suggest that you use the Cortex Database Creation PC application to perform the indexing, as it will save time (especially with a fast
CPU). The Cortex Database Creation software is available for FREE
from http://www.cortex-pro.com.
Once the indexing procedure has begun, it can be cancelled by pressing
the Info button.
VERIFICATION
If your storage device has already been indexed, you will be presented
with a prompt allowing you to verify the database. For each time that
you add files to your storage device, you will either have to use the
Verify function to add those files to the index, or use the Cortex
Database Creation PC application.
We strongly suggest using the Database Creation application, as it can
process files at many times the speed of the DMIX-600 itself.
Once the verification procedure has begun, it can be cancelled by pressing the Info button.
Fig 2.3 - Database Creation Screen
Fig 2.4 - Everytime music is added to your storage device, the database must be verified and updated in order to index the new songs.
Once you are finished with verifying, simply choose the option labeled
‘Exit from Verify.’
Congratulations! You are now ready to start searching through your
music library quickly and efficiently. Using this method will help you
locate any song in your collection quicker than ever before.
Fig 2.5 -Exit Verify
Fig 2.6 - Welcome screen shows unit is ready for use
11
Page 14
Using the DMIX-600
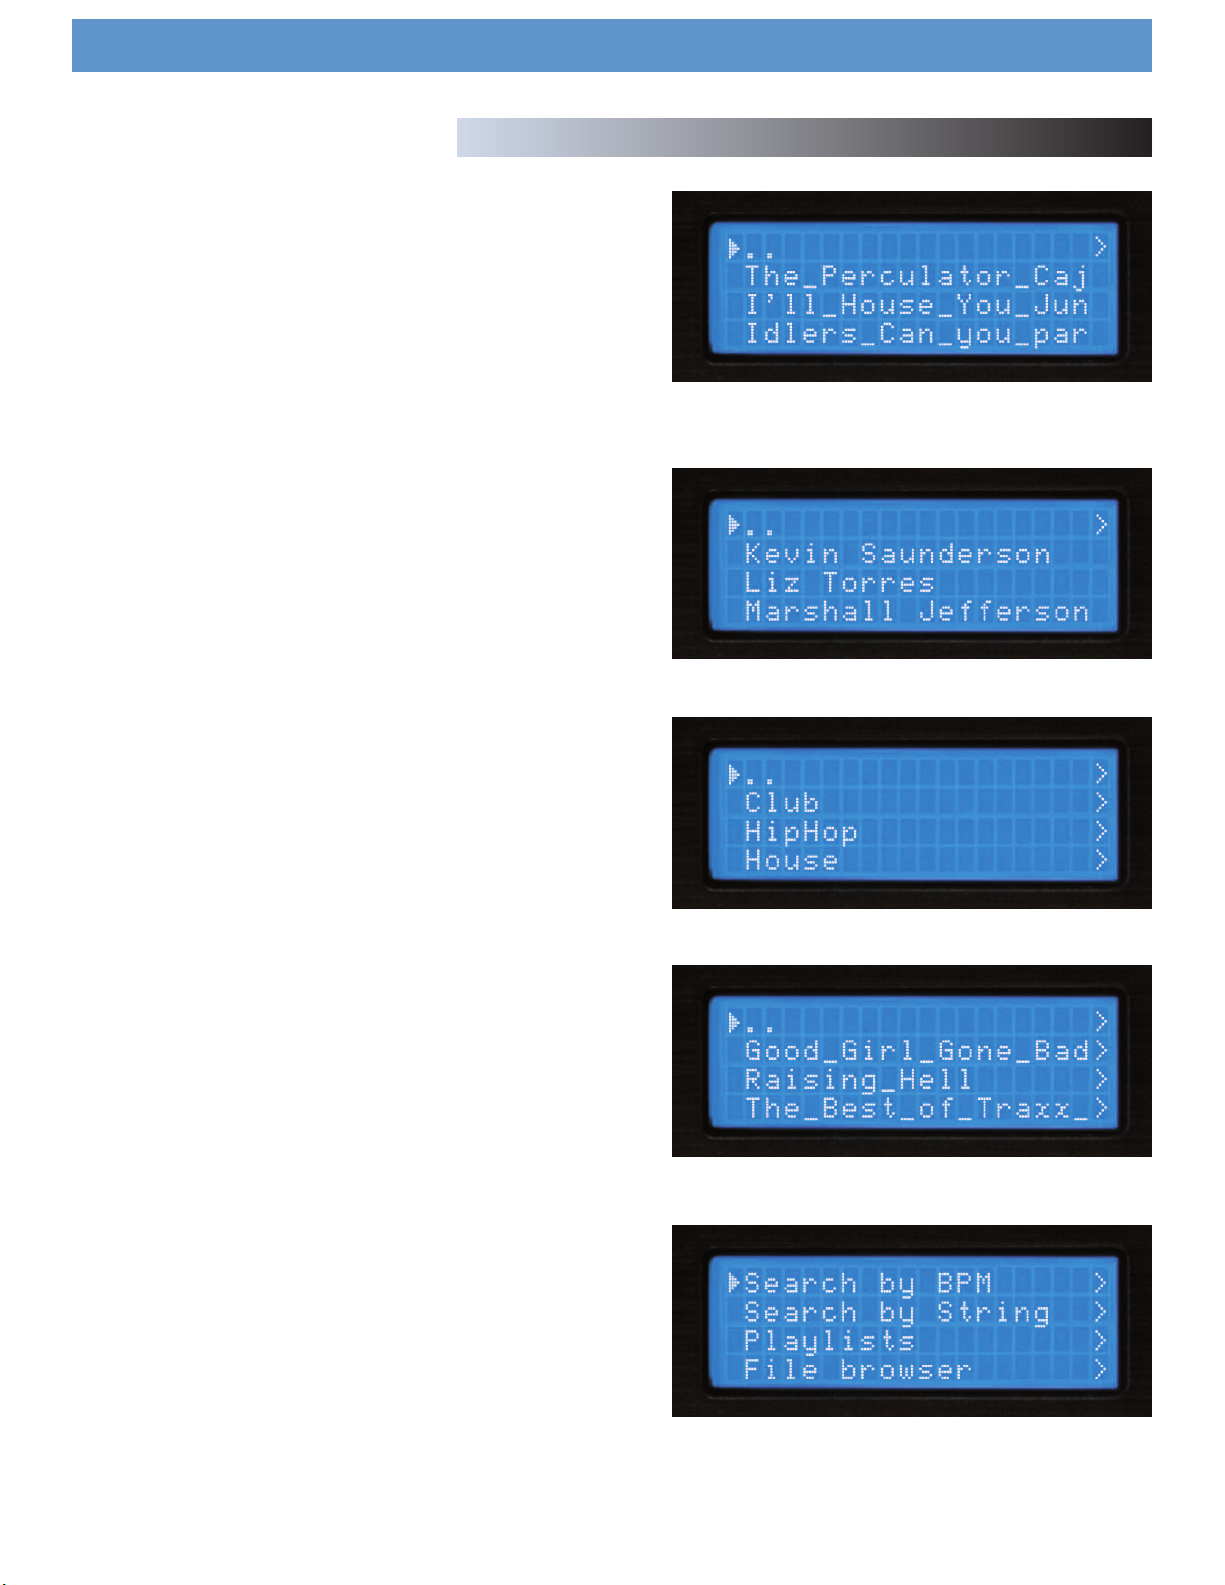
EARCH OPTIONS
S
The database-driven searching of the DMIX-600 provides DJs with a
quick and easy way to find tracks amongst a large library, by allowing
the user to search by Song, Artist, Genre, Album, BPM, String, Playlists,
File browser, Recently added, Top 100 and Last 100. Simply choose
one of these Search Options, and that particular criteria will be displayed in alphabetical order.
Search by Songs
When you Search by Songs, you will see presented with all of the track
titles in the database that has been created by the DMIX-600 or the
helper software application.
Search by Artists
When you choose Search by Artists, you can narrow down the amount of
results by first selecting the artist you wish to browse, then you can easily
select the track you want to play.
Search Options (
Fig 2.7 - Searching by song title
Fig 2.8 - Searching by artist
PART I)
Search by Genres
When Search by Genres is chosen, you will be presented with a list of
all of the genres found in the database. Because not every MP3 has ID3
genre tagging, some tracks may not be displayed in this search. Once
you select a genre from the list, you will be able to browse all songs
within that genre
Search by Album
Using the Search by Album option will allow you to search by the name
of the album that a track is from. Keep in mind that this option also may
not allow you to access all tracks, because sometimes singles are sold
separately and are not taken from any specific album. Once you select
an album, all of the tracks found under that album will be displayed.
Search by BPM
The DMIX-600 can read the BPM off of your songs ID3-tags and search
by BPM, if your songs do not have a BPM in thier ID3-tag they will be
considered 0 BPM and the unit will display songs from lowest to higest
BPM.
Fig 2.9 - Searching by genre
Fig 3.0 - Searching by album
NOTE: The DMIX-600 does not calculate the BPM it just displays the information contaiined in the id3tag. There are many third party programs that
will allow you to automaticaly or manualy input the BPM’s for all your
music.
Fig 3.1 - Search by BPM
12
Page 15
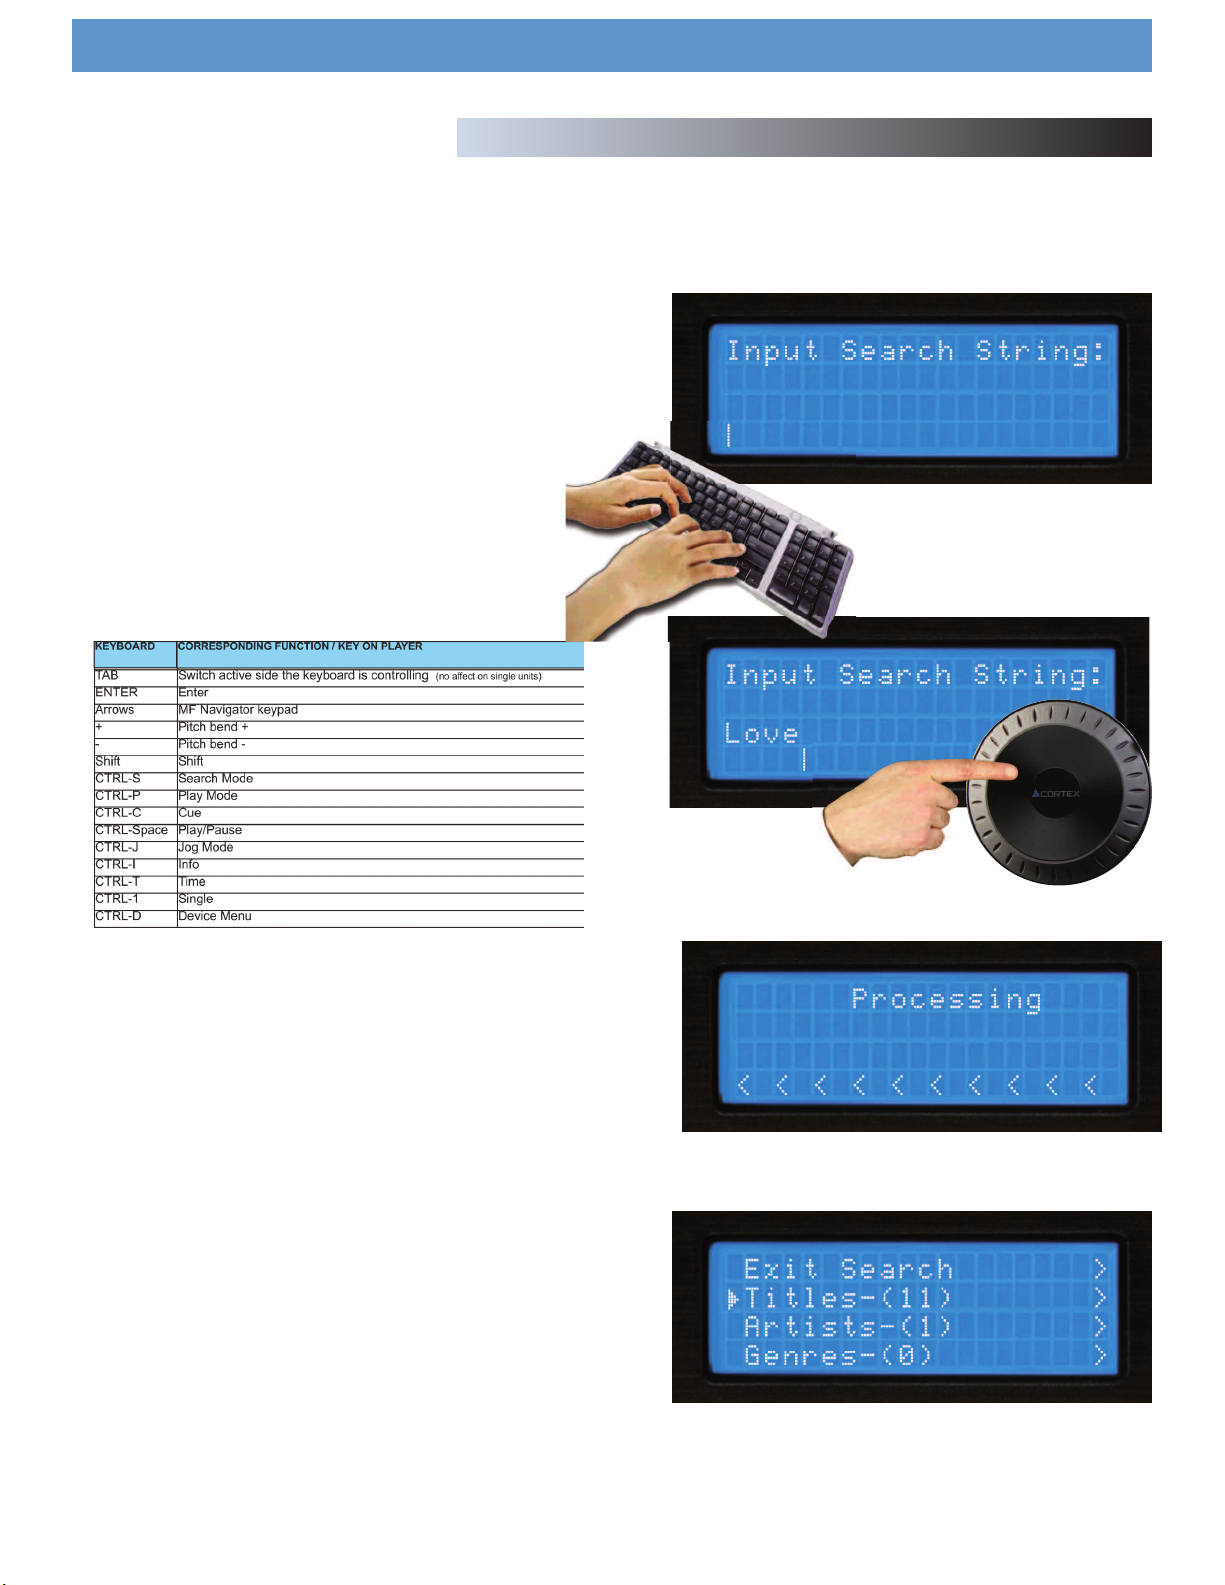
earch by String
S
One of the most convenient features of the DMIX-600 is string search,
which allows you to find a specified word or string of words within the
database. This is exceptionally helpful when you (or your client) has a
request, but does not know the exact title or artist.
Once you have selected ‘Search by String,’ you will be presented with a
prompt where you may input a word or series of words that will be used
when querying the database.
You can control your DMIX-600 by from any wireless or corded USB
keyboard. Just plug in a USB keyboard into any of the USB jacks
and you can string search for songs to input directly into the player
you can also control many of the functios of your player from the
keyboard, below is a list of key names and thier corresponding
functions.
NOTE: No matter what mode you are in, when you start typing, the DMIX-600 will jump to the string search screen.
Using the DMIX-600
Search Options (PART II)
Fig 3.2- String Search input prompt
You can also use the Jog Wheel or Up/Down arrows (on the Navigator
Keypad), to input the first letter of the Search String. Use the Right
arrow or the Enter Key to advance to the next space, and enter the next
letter. You may press the Left arrow to go back to the previous letter, or
press Shift+Left to backspace (deletes the previous letter).
Finally, when the Search String is entered, you will need to press the
Enter key twice, and the unit will execute the search.
Once you press Enter twice, the unit will begin processing your search.
Depending on the size of your library, this may take awhile.
After the unit is finished executing the search, it will display the results
that were found for each category: Titles, Artists, Genres, and Albums each of which can be accessed by using the Navigation Pad Arrow Keys
or the Jog Wheel. Note that the amount of results found under each
category will be displayed in parenthesis. In this example, there are 10
titles of songs with the word “LOVE” in them, and 1 artist.
Fig 3.3 - Using Jog Wheel to input a string
Fig 3.4 - Processing the Search
Fig 3.5 - Displaying result categories
13
Page 16
Using the DMIX-600
STRING SEARCH (CONTINUED)
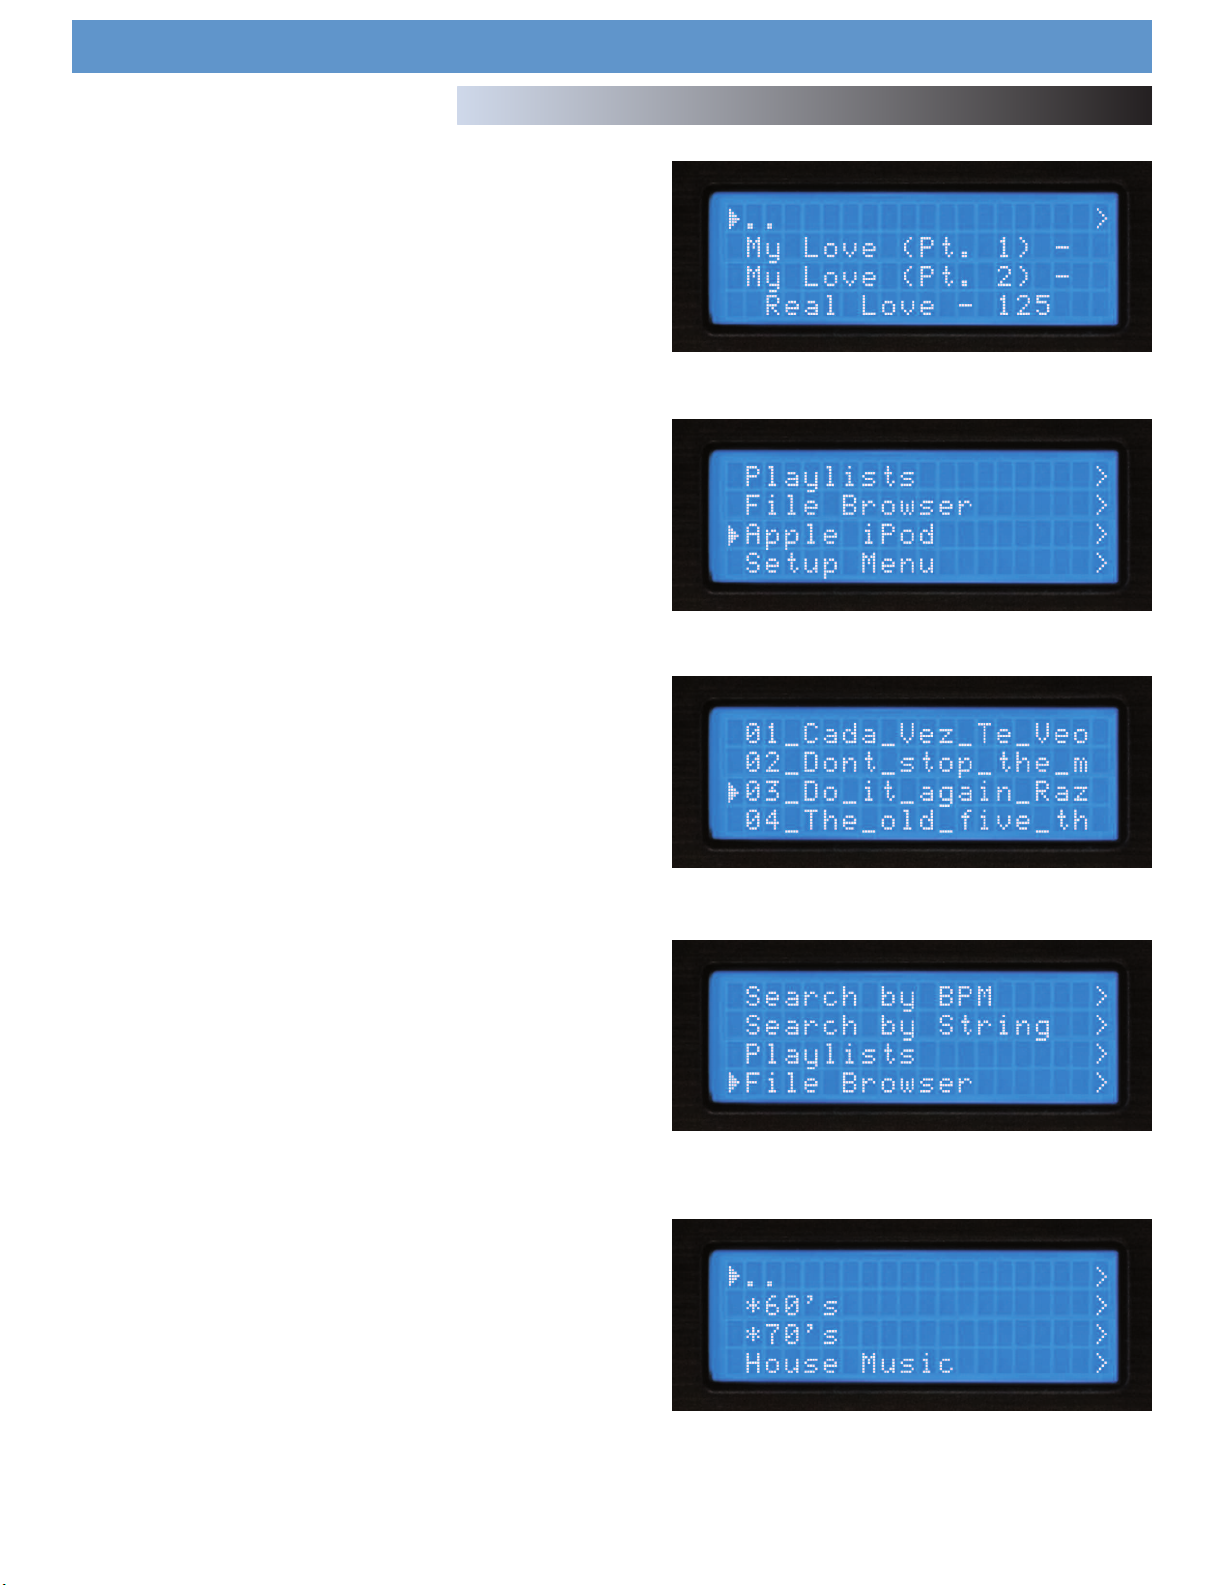
Once you have chosen a category - Titles, Artists, Genres, or Albums, you
will browse through the selections as if you were in any of the other
search modes. Once again, you may select a track using the Jog Wheel
or Navigation Pad, and press Enter to load it.
iPod ™ Playlist Support
Although there is no facility to create playlists on the DMIX-600 unit, you
can load iPod™ playlists that are created using iTunes® .
Once a playlist has been constructed using iTunes®, it can be loaded from
the main Search Options screen.
Creating a Simple Playlist
When using the File Browser with Single Mode OFF, you can play all of the
files in a specified directory simply by choosing the first file and letting the
unit continue playing. If you change the filenames (via your PC) to be preceeded by a number, the DMIX-600 will play them in numeric order.
Search Options (
Fig 3.6 - Selecting a matching title from the executed search
Fig 3.7 - iPod/XML Playlist option from the Search Menu
PART III)
File Browser
The File Browser is designed to allow you to view the directory structure
found on a connected storage device, rather than search by specific criteria. This can be helpful if you keep your music collection in order, but
can also help to locate a song that may not have the appropriate ID3
tag information. When a track does not have an ID3 tag, it will not be
added to the searchable database of tracks.
Once you enter the File Browser, you will be presented with the file structure exactly as it exists on the storage device. Use the Jog Wheel or the
Navigator Keypad to advance through entries. To go back to the Main
Menu, press the left Arrow Key.
When you have found the MP3 file that you wish to play, simply press
Enter, and the track will load. You may press the Search Mode button,
found to the left of the display of the unit, at any time to return to the
Search Options menu. Similarly, when you are in Search Mode, you may
press the Play Mode button to return to the play screen.
Fig 3.8 - Simple Playlist by using numbered files with File Browser
Fig 3.9 - Selecting File Browser from Main Menu
Fig 4.0 - Browsing file/directory structure using File Browser
14
Page 17
Using the DMIX-600
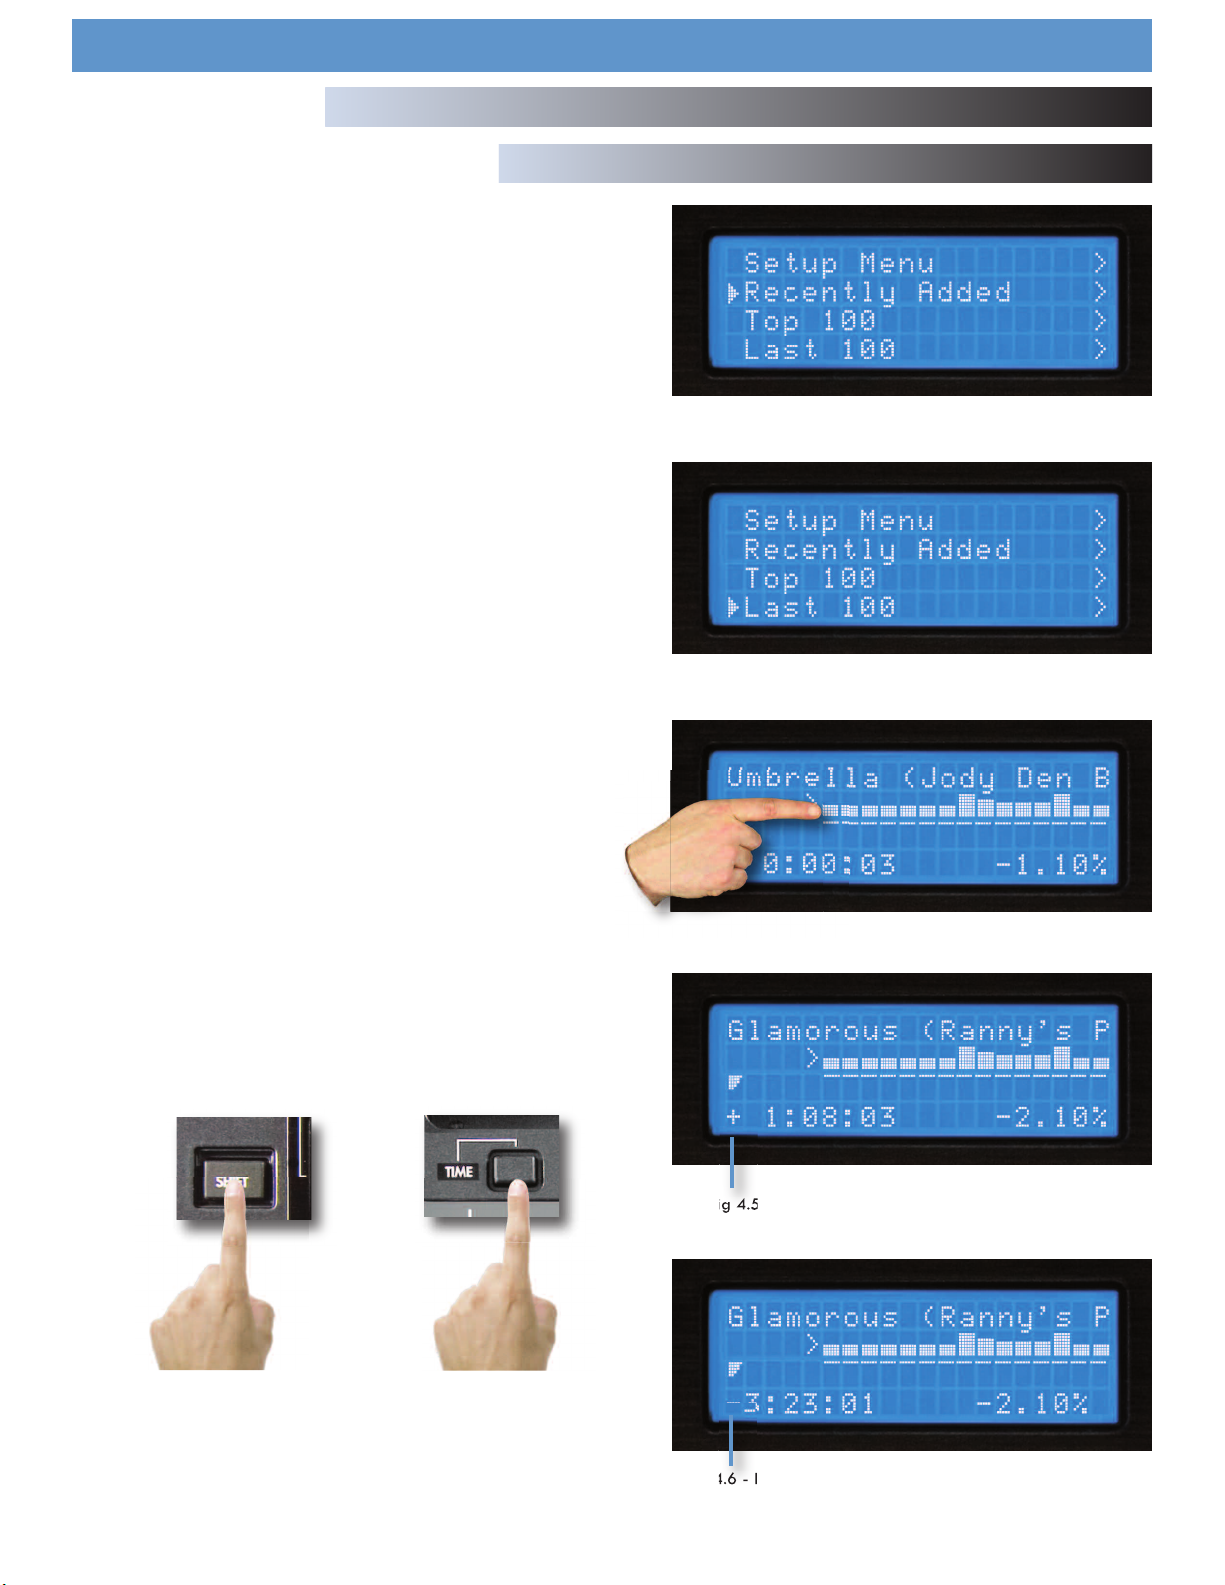
ecently Added
R
The DMIX-600 keeps track of the recently added music to your database and allows youto search just by those particular songs, it will display those songs in alphabetical order.
Top 100
s well as keeping track of the music you have added, the DMIX-600
A
keeps track of the most commonly played songs in your set and will display 100 of those songs in order of most to least played.
Last 100
You can also search through the last 100 songs you played, even if the
system has been turned of the DMIX-600 will save all this information to
the storge device that was used.
WAVEFORM
This feature allows you to see a block
diagram representation of the high and low volume peaks for
the chosen song, which scrolls along while the songs plays, an arrow represents the exact point at which the song is playing.
Search Options (
PART IV)
Waveform and Time Display
Fig 4.1 - Search by recently added
Fig 4.2 - Aearch by last 100
To disengage the WAVEFORM display feature just hit the PLAY button in
the display mode section.
By using the DB SE software (Downloadable off our website)
WWW.CORTEX-PRO.COM you can create waveforms for all
your music files.
Time Display Modes
Changing the Time Display Mode is as simple as pressing the Time button to toggle between elapsed and remaining time. Elapsed Time shows
how much time has past since the beginning of the track, and Remaining
Time shows how much time is left before the track is over.
You may press Shift+Time to change the Time Display Mode .
+
Fig 4.3 - Waveform
Fig 4.5 - LCD Display and progress indicator in time elapsed
When the Time Display Mode is changed, you will also notice that the
Progress Indicator will also change to reflect either Elapsed Time or
Remaining Time.
Fig 4.6 - LCD Display and progress indicator in time remaining
15
Page 18
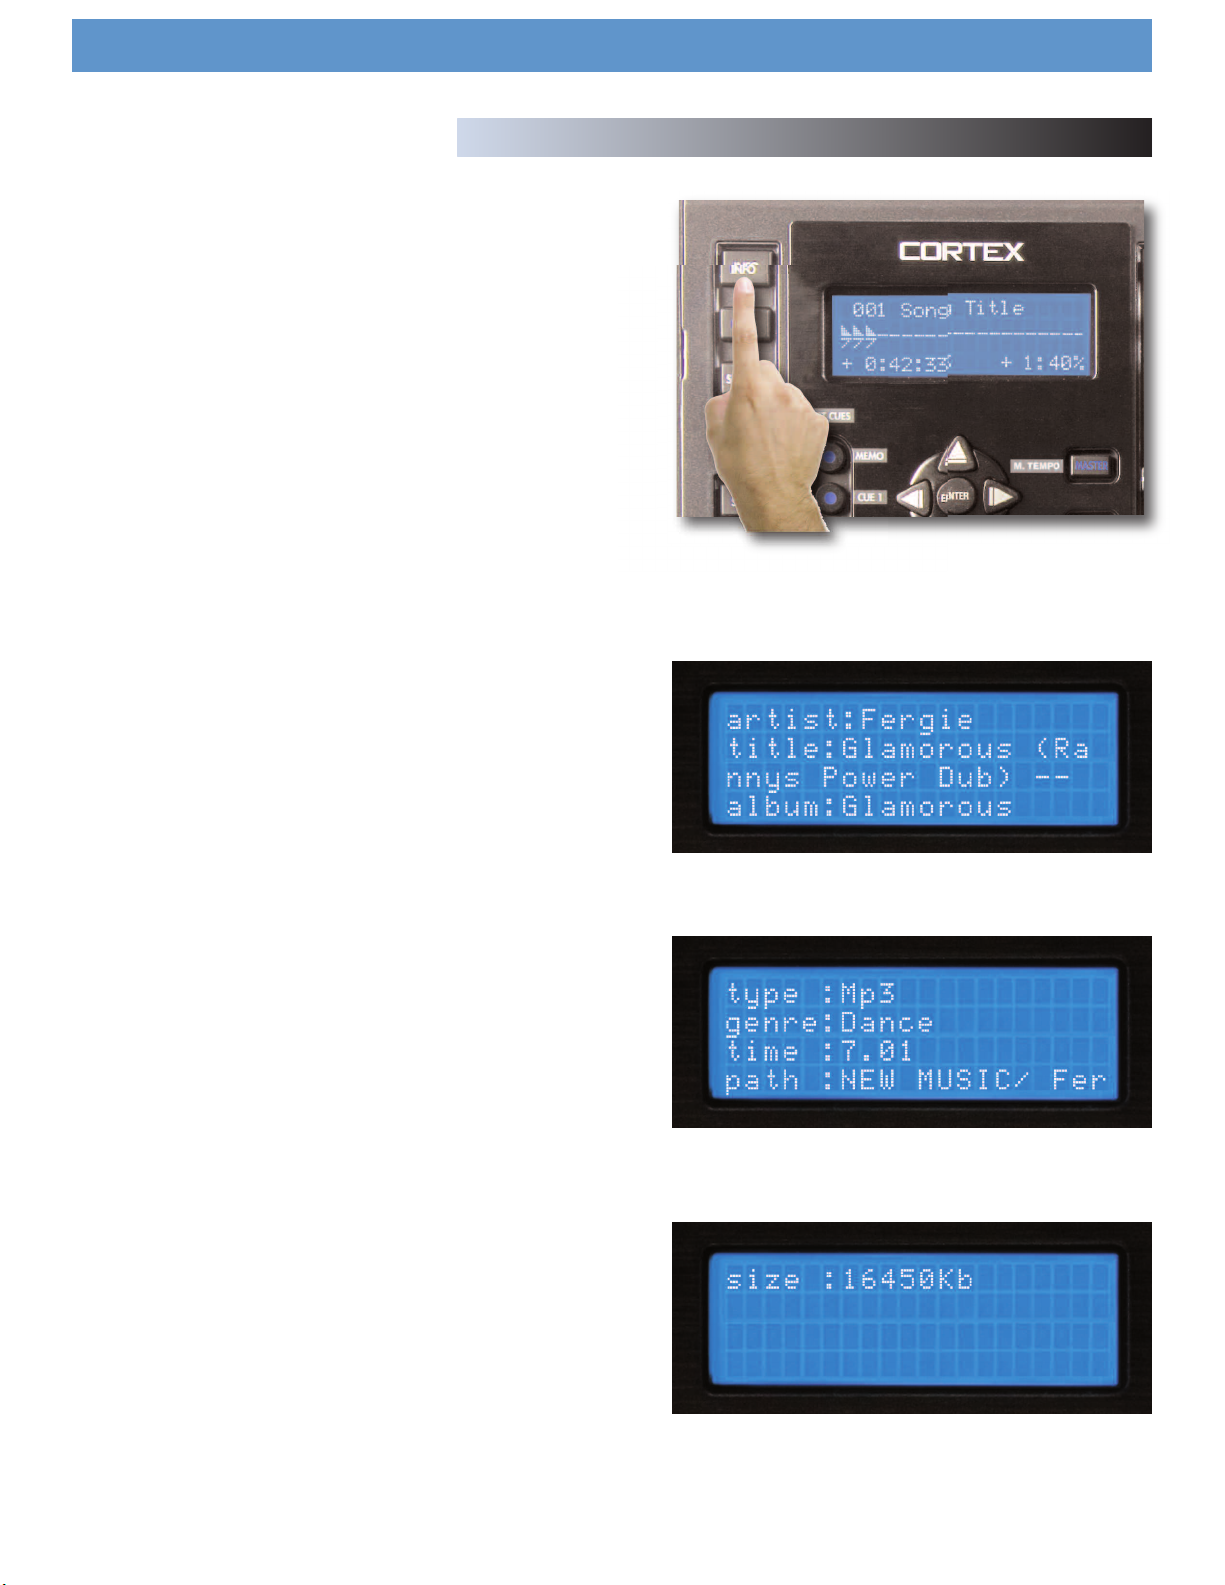
INFO BUTTON
You will find that the Info Button, located to the top left of either side of
the DMIX-600 will become an indispensable part of using the DMIX-
600. Despite the DMIX-600 being able to display an adequate amount
of information on the LCD, not every attribute of each track can be displayed all at once. Additionally, there will be times when you may run
into two tracks with the same title, and the Info Button will help to reveal
which track you truly want to select.
While in Play Mode or Search Mode, pressing the Info button will display all attributes relating to the currently playing or currently selected
track (depending on whether you are in Play or Search Mode).
Using the DMIX-600
Info Button & Track Attributes
Fig 4.7 - The Info Button is used to display all track attributes
The Info function displays:
Artist - Artist as per what is listed in the ID3 tag
Title - Title as per what is listed in the ID3 tag
Album - Album as per what is listed in the ID3 tag
Type of File - Whether the file is MP3 or WAV
Genre - Genre as per what is listed in the ID3 tag
Path & Filename - Exactly how it exists in the directory structure of the
storage device
Note that most of the attributes are taken directly from the ID3 tag
found in the MP3 file. If the ID3 tag is missing any of these attributes,
they will not be displayed in the Info screens.
Once you have pressed the Info button, you will be presented with all of
the attributes relating to the currently playing or selected track. You
may use the Navigation Pad Arrow Keys or the Jog Wheel to scroll up
and down to view all of the information.
Fig 4.8 - Information Screen 1 of 3
Fig 4.9 - Information Screen 2 of 3
To exit the Info screens, you may press the Info Button again, or you may
press either the Search or Play Mode buttons to jump immediately to
those modes, when applicable.
Fig 5.0 - Information Screen 3 of 3
16
Page 19
Using the DMIX-600
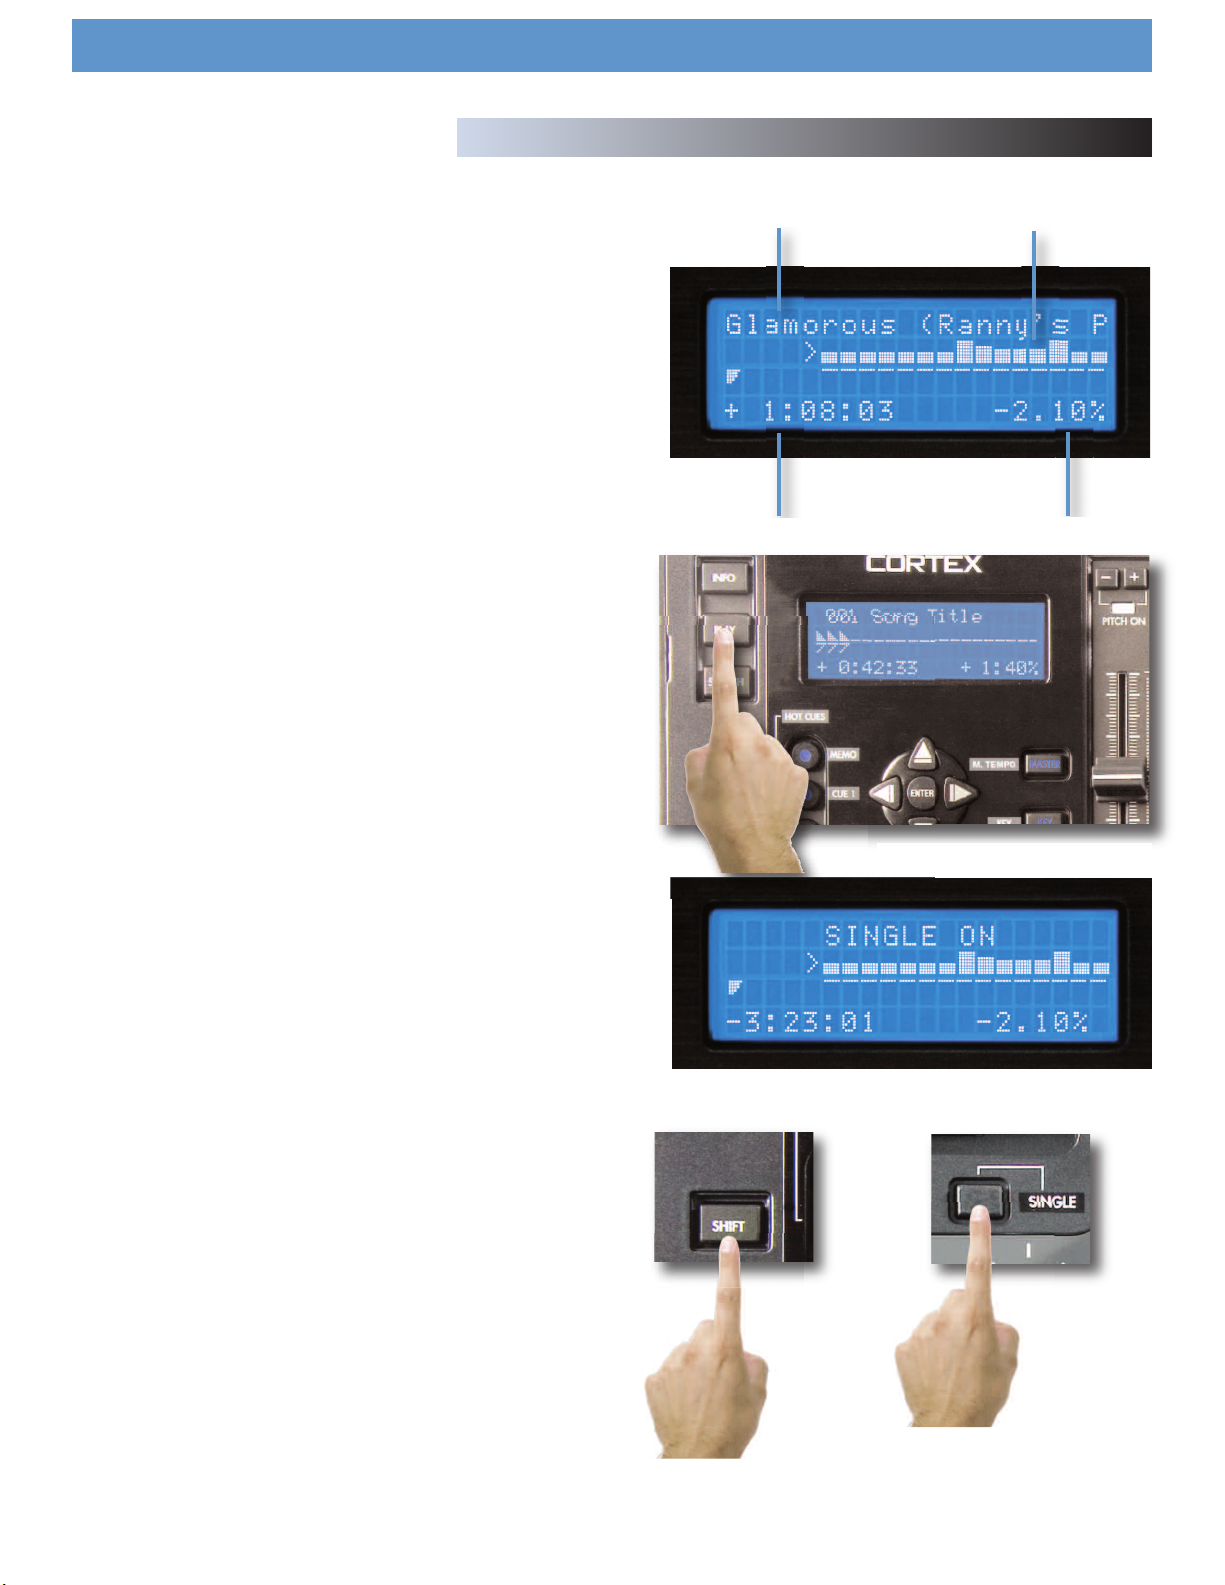
Play Mode and Single Auto Cue
Section Five: Play Mode
The Play Mode is the heart of the Cortex DMIX-600. Just like conventional CD players, the DMIX-600 allows you to select multiple pitch
ranges, memorize cue points, and frame accurate searching. The DMIX600 excels over traditional CD players, as it is much faster at loading
and starting playback, it has a more informative LCD display, and it can
memorize cue points for future performances.
Entering Play Mode
By default, when you press Enter to select a track from Search Mode, the
unit will immediately load the track and enter Play Mode.
If music is already playing and you wish to return to the Play Mode
screen, simply press the Play Mode button.
Track Title
Fig 5.1 - Play Mode Screen
Time Display
Progress Indicator/Waveform
Pitch Value
Single Mode (Single Auto Cue)
Single Mode, when a track is loaded, it will automatically cue to the first
frame of audio, and then wait for you to press Play. At the end of that
track, the unit will pause. To engage this mode, press Shift+Single on
each side you wish to engage this mode on.
When Single Mode is off when loading a track, the unit will begin playing immediately. At the end of that track, the unit will continue to play
the next file displayed in the Search Results. When Single Mode is off,
this gives you the ability to play all of the Search Results in the order
that they were displayed. Pressing Shift+Single will also allow you to
turn Single Mode off.
Fig5.2 - Entering Play Mode
Fig 5.3 - LCD Display shows status of Single Mode
+
Fig 5.4 - Using Shift+Single to toggle Single or Continuous modes
17
Page 20

Pitch Control, Master Tempo & Key Adjust
Pitch Control, Pitch Bend, and Pitch Ranges
The Pitch Control allows you to speed up or slow down the playback of a
track by a desired percentage. The HDTT-5000 offers Pitch Ranges of
4, 8, 16, and 24%, in order to provide a wide level of flexibility when
manipulating digital music files. In all modes, 0.05% Pitch Resolution can
be achieved, allowing for a more precise level of adjustment.
To toggle Pitch On or Off (the unit will not respond to pitch changes
when Pitch is Off), press both the Pitch Bend (+) and Pitch Bend (-) buttons simultaneously. The LED indicator will illuminate when Pitch has been
turned On.
To change Pitch Ranges, press Shift+Pitch Bend (+) OR Pitch Bend (-)
buttons simultaneously. The Pitch Display on the LCD screen of that
respective side will momentarily display the new Pitch Range.
Using the DMIX-600
Fig 5.5 - Pitch On/Off by pressing both buttons simultaneously
For a momentary change in Pitch, the Pitch Bend (+) and Pitch Bend (-)
buttons will temporarily increase or decrease pitch relative to the amount
of time either button is held down.
When the Jog Mode is not engaged (LED remains unlit), you may also
use the Jog Wheel to perform a Pitch Bend.
Key Adjust and Master Tempo
The Key Adjust and Master Tempo controls allow you to have independent controls of Key Adjust and Tempo. When Master Tempo and Key
adjust are enabled, the Pitch Bend (+) and Pitch Bend (-) buttons
become Key Adjust buttons, with a range of +-5 half steps, displayed in
Sharp/Flat for +/-, and the Pitch Slider and Jog Wheel control Master
Tempo and Master Tempo bend.
To enable Master Tempo and Key Adjust, first you need to press the
Master Tempo button. If you press Key alone Key will not be enabled,
and must be turned on within Master Tempo mode.
To disengage Key Adjust, simply press the Key Adjust button at any time,
and the Key will return to it’s original value. To return to Pitch mode simply press Master Tempo or press Pitch Bend (+) and Pitch Bend (-) . If
Key adjust is enabled then that will be turned off as well at this time.
Fig 5.6 - Use either thePitch control slider the
Pitch + & -buttons or the Jog wheel to
adjust pitch
Fig 5.7 Master tempo & Key adjust
18
Page 21
Jog Mode
hen the Jog Mode LED is unlit, the Jog Wheel (when in Play Mode) will
W
perform a Pitch Bend.
When the Jog Mode button is pressed, the LED indicator will illuminate,
and the Jog Wheel will then allow you to search (FF/REW) through each
track. The faster the Jog Wheel is moved, the faster the unit will search
through the playing track. In order to use the Jog Mode, the unit must
be in the process of playing, not paused.
Using the DMIX-600
Jog Mode and Playback Navigation
Fig 5.8 - Engaging Jog Mode for FF/REW using the Jog Mode button
Playback Navigation Functions
Using the Navigation keypad left & right buttons, you can search through
a track similar to using the Jog Mode function.
Using the Navigation keypad up & down buttons will allow you to skip
to the previous or next track that was found in the Search Results. For
instance, if you searched by Artist, and your Search Results displayed 10
tracks by that Artist, using the Navigation keypad up & down buttons will
allow you to skip between those tracks.
Shuffle Mode
A useful feature for unattended playback is Shuffle Mode. This feature
randomly selects tracks based on what is narrowed down using the Search
Criteria. For instance, if you select All Songs as your Search Criteria, then
the unit will ramdomly select any song in that list. If you select Search by
Artist, the unit will randomly select music from that Artist only. The same
applies to Genre, Album, String, or even the File Browser.
Up/Down - Track Skip
Left/Right - FF/REW Search
Fig 5.9 - Navigation keypad functions in Play mode
Shuffle Mode is toggled on and off by pressing Shift+Info, the LCD
display will indicate when Shuffle has been engaged or disengaged
Fig 6.0 - LCD Display shows Shuffle Status
19
Page 22
Using the DMIX-600
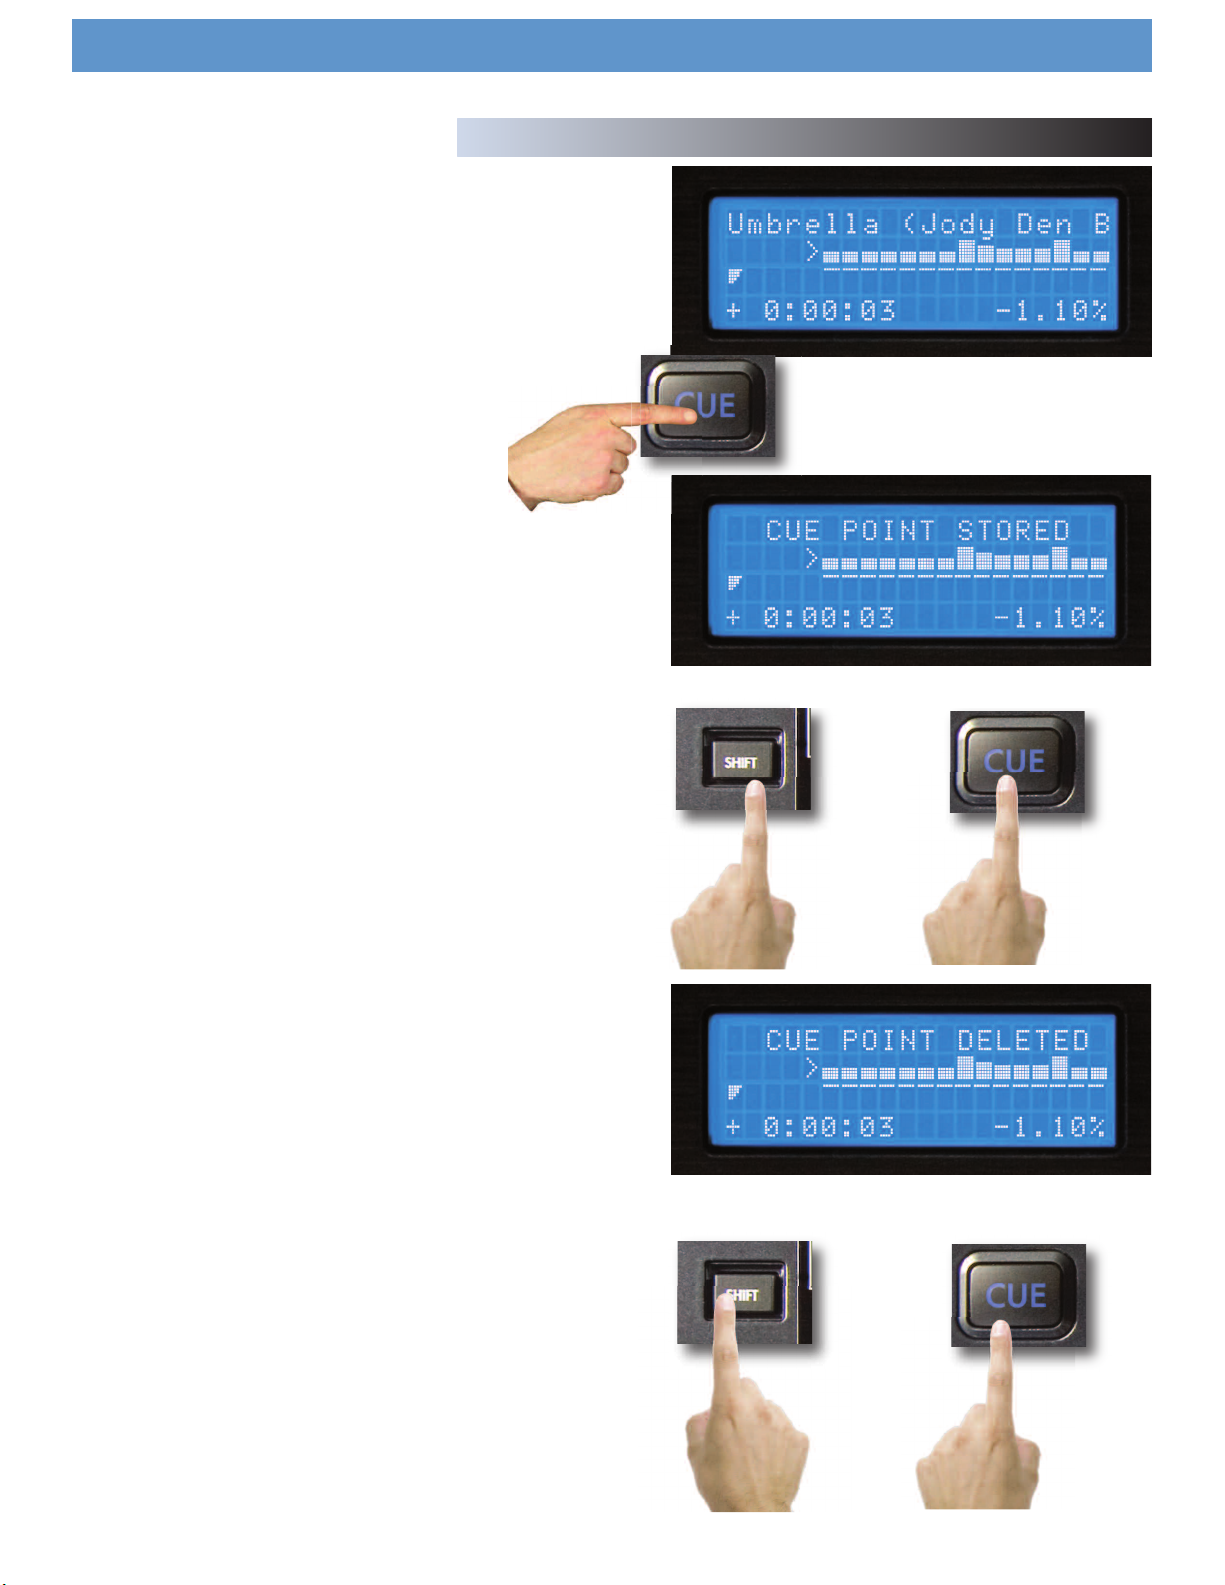
Cue Points & Memorization
Setting and Memorizing Cue Points
With the DMIX-600, creating and memorizing cue points is
quick and easy.
By default, when there is no Cue Point set (or memorized),
pressing the Cue button returns the unit to the beginning of
the track (0:00.00) and pauses.
To set a Cue Point during playback at a time of your choice, simply press
Pause, and then use the Navigation keypad left & right buttons or Jog
Wheel to make any adjustments by frame. When Play is pressed to
resume playback, the Cue Point will be stored.
To memorize the Cue Point and save it to the USB storage device (to be
recalled each time the track is loaded), find the exact frame that you wish
to set as a Cue Point, and press Shift+Cue. This will permanently set &
save the Cue Point to the storage device. This process can also be done
on the fly, without the unit being paused. The screen will indicate when a
Cue Point has been stored.
To advance back to the set Cue Point, simply press the Cue button during
playback. Do not press Pause first, as this will instead set a new point.
Once advanced to the Cue Point, the unit will remain in Pause mode.
Fig 6.1 - Pressing CUE to return to 0:00:00.
Fig 6.2 - Cue Point Memorization using Shift+Cue
+
To memorize a new Cue Point, you do not have to erase the previously set
one. You can simply press Shift+Cue again, and it will replace the old Cue
Point.
Please note that in order for a Cue Point to be saved to the connected USB
storage device, it must be a FAT32 file system.
To erase the saved Cue Point completely, hold Shift and press Cue for two
seconds, until the screen indicates that the Cue Point has been deleted.
Fig 6.3 - Cue Point Deletion using Shift+Cue
+
2s
20
Page 23
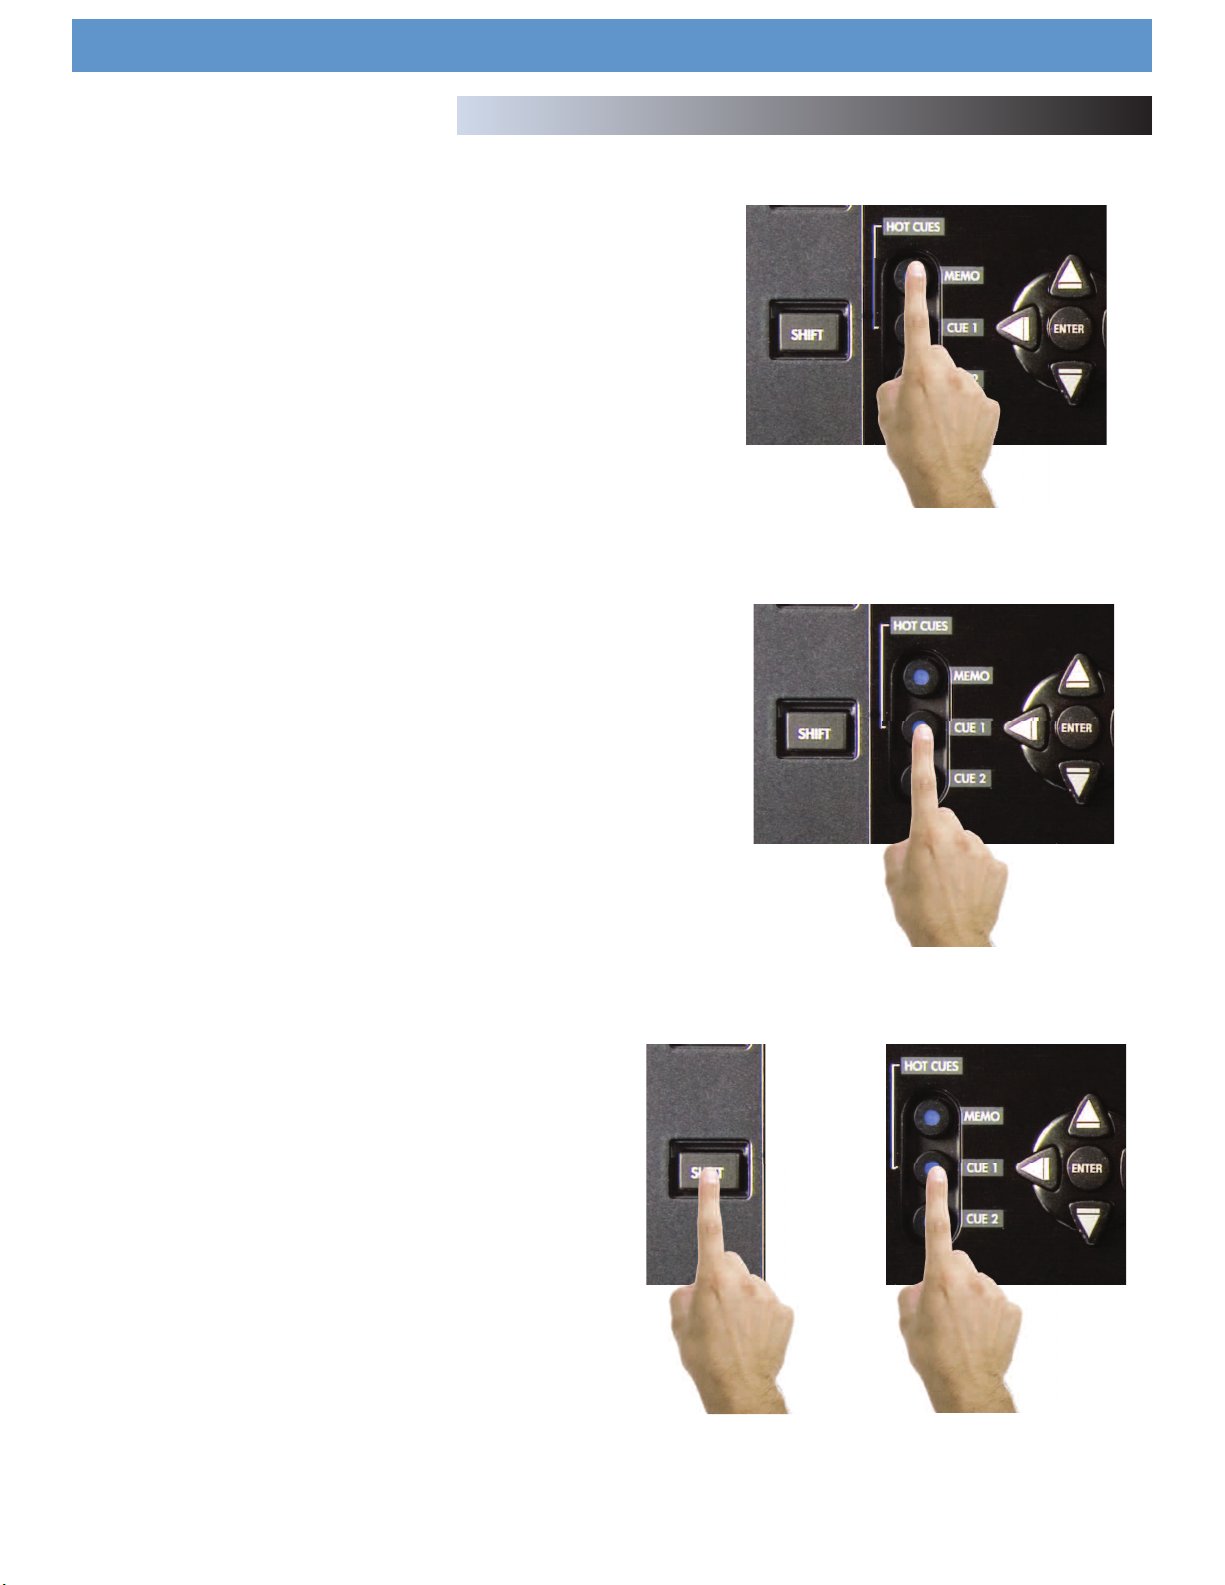
Hot Cue Mode
Hot Cues are cue points that can be set on the fly (while the song is
playing) and differ from traditional cue points in that the program material will continue to play from the point that you press the button, instead
of needing to continue to hold the play button down. To make use of the
hot cues, first press the MEMO button to engage the hot cue .
To record a hot cue, first press the corresponding button (1 or 2) to the
location you wish to save to. To alter the hot cue position press the SHIFT
button and the cue number youwish to edit, then use the Jog wheel to
alter time. To delete the hot cue, press shift plus the chosen location
and hold for 2 seconds and when the buttons light goes off the cue point
is cleared.
Hot Cues are saved to the MSD on a per-song basis, and are automatically recalled with each song if the AUTO RECALL option is turned on in
the EDIT menu. They will remain in memory until they are deleted, so if
you create a Hot Cue that you wish to save don’t worry-it’s already
saved! Keep in mind that loading these points will create a slight pause
with the loading of your songs, so if you do not need to save these
points you can leave it off to speed up song loading.
Using the DMIX-600
Hot Cues
Fig 6.4 - Engage hot cues
Fig 6.5 - Choose Cue number
+
Fig 6.5 - Press Shift and Cue number to edit
21
Page 24
Using the DMIX-600
.
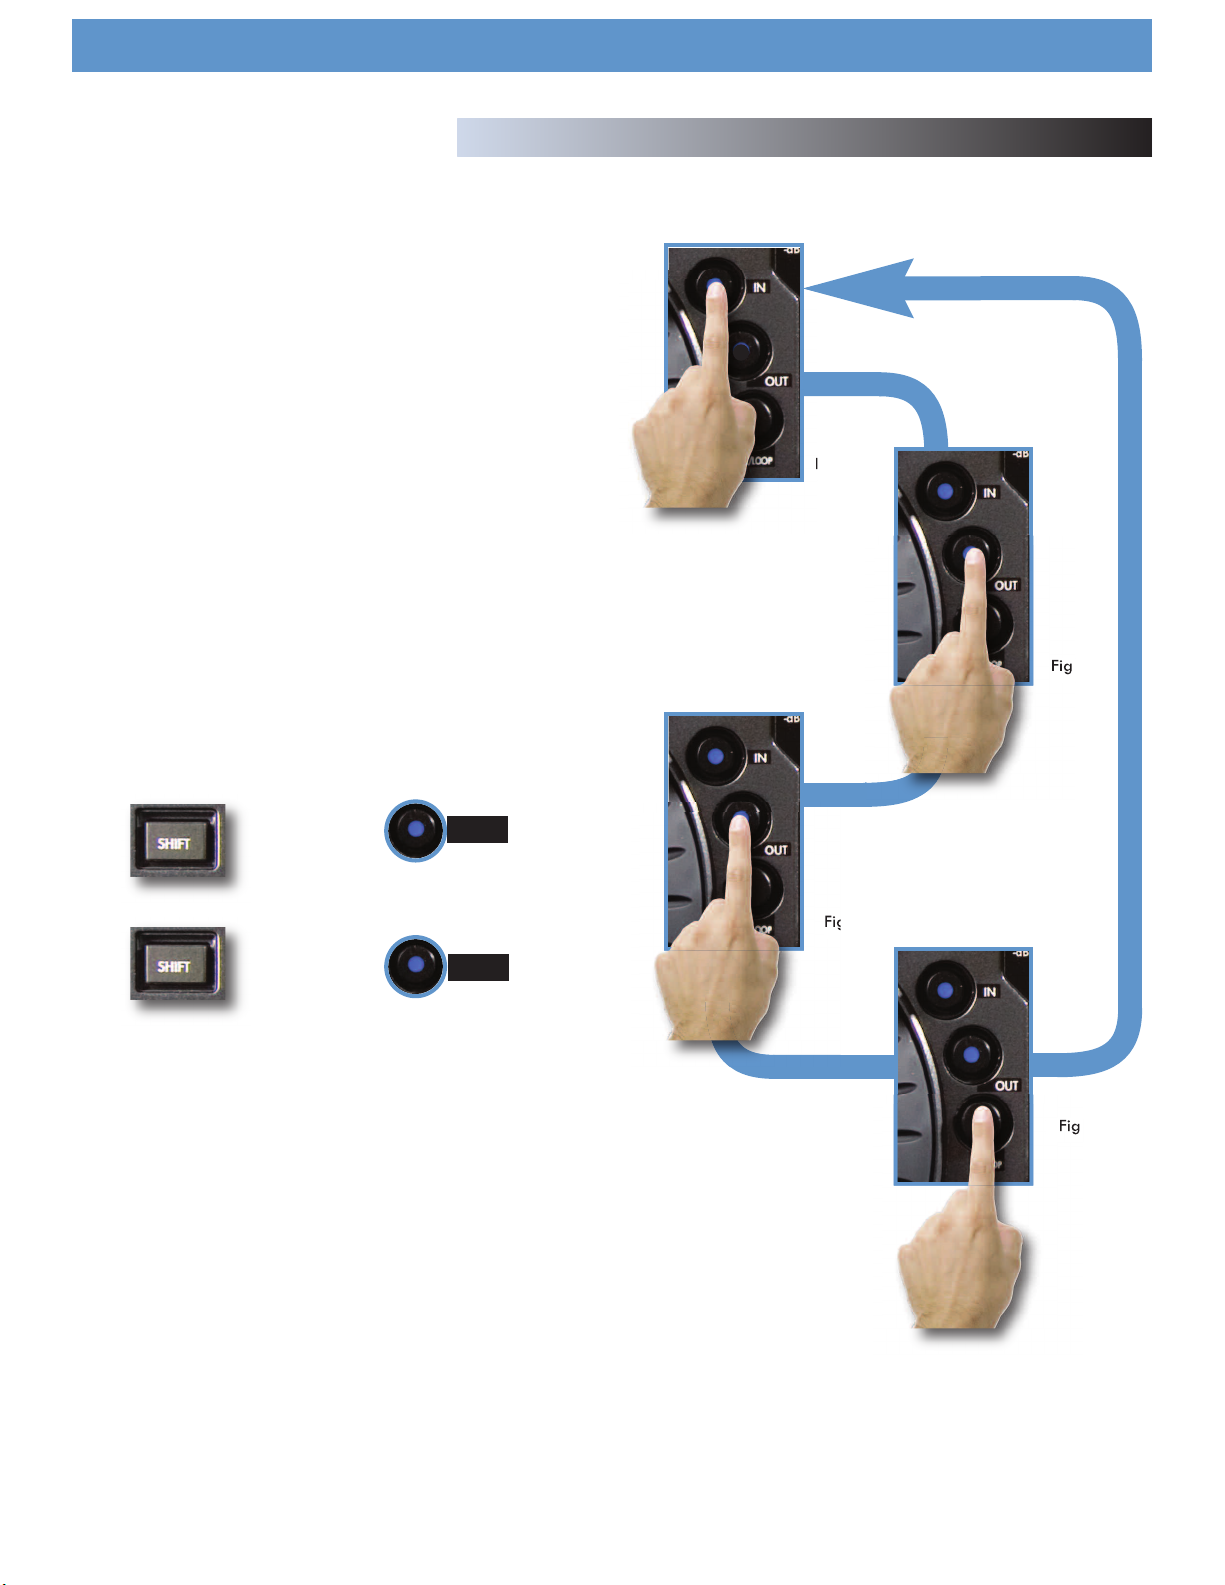
Loop feature
The DMIX-600 can repeat or LOOP a segment of a song that is loaded
on either side, and will save that loop point so it can be recalled everytime you load that song.*
* Loop points are saved to the storage device that was being used when you made the loop
nd will only be recalled from that particular storage device
a
Set loop
o set the start point press the IN button once and the button will illumi-
T
nate indicating the IN point of the loop is SET (Fig A) on the display this
point is represented by a lowercase (i).
Then press the OUT button and the OUT button will illuminate indicating
that the loop is complete , the DMIX-600 will now continue to loop
between these two point indefinitely, this OUT point is represented by a
lowercase (o) on the corresponding display.
Edit loop points
Once the loop points are set you can adjust either the IN point or the OUT
point, press the SHIFT button and IN and the display will say PLEASE EDIT
IN POINT , which means you can use the JOG wheel to adjust the IN point
of the loop, likewise if you press SHIFT and OUT the display will say
PLEASE EDIT OUT POINT and you will be able to adjust the OUT point of
the loop. To exit this mode just press SHIFT and the button you were editing and the display should return to its previous position.
.
Loop Feature
Fig A
Fig B
+
IN
OR
+
Exit loop
To exit the loop and continue playing the song press the OUT button
again. (Fig C) and the song will continue playing. If you wish to RELOOP
or to re-engage the same LOOP press the RELOOP button (FIG D) and
the loop will start again continuing until The OUT button is pressed.
Erase loop
To erase the current loop press SHIFT and the R/LOOP button for two seconds and the loop will be erased, also the IN and OUT buttons will turn
off, at this point you can create another loop. You can keep making as
many loops as you wish but the DMIX-600 will ONLYsave the last loop
you made with that particular song to the drive that the song was played
from. This feature must be turned on in the settings menu.
OUT
Fig C
Fig D
22
Page 25
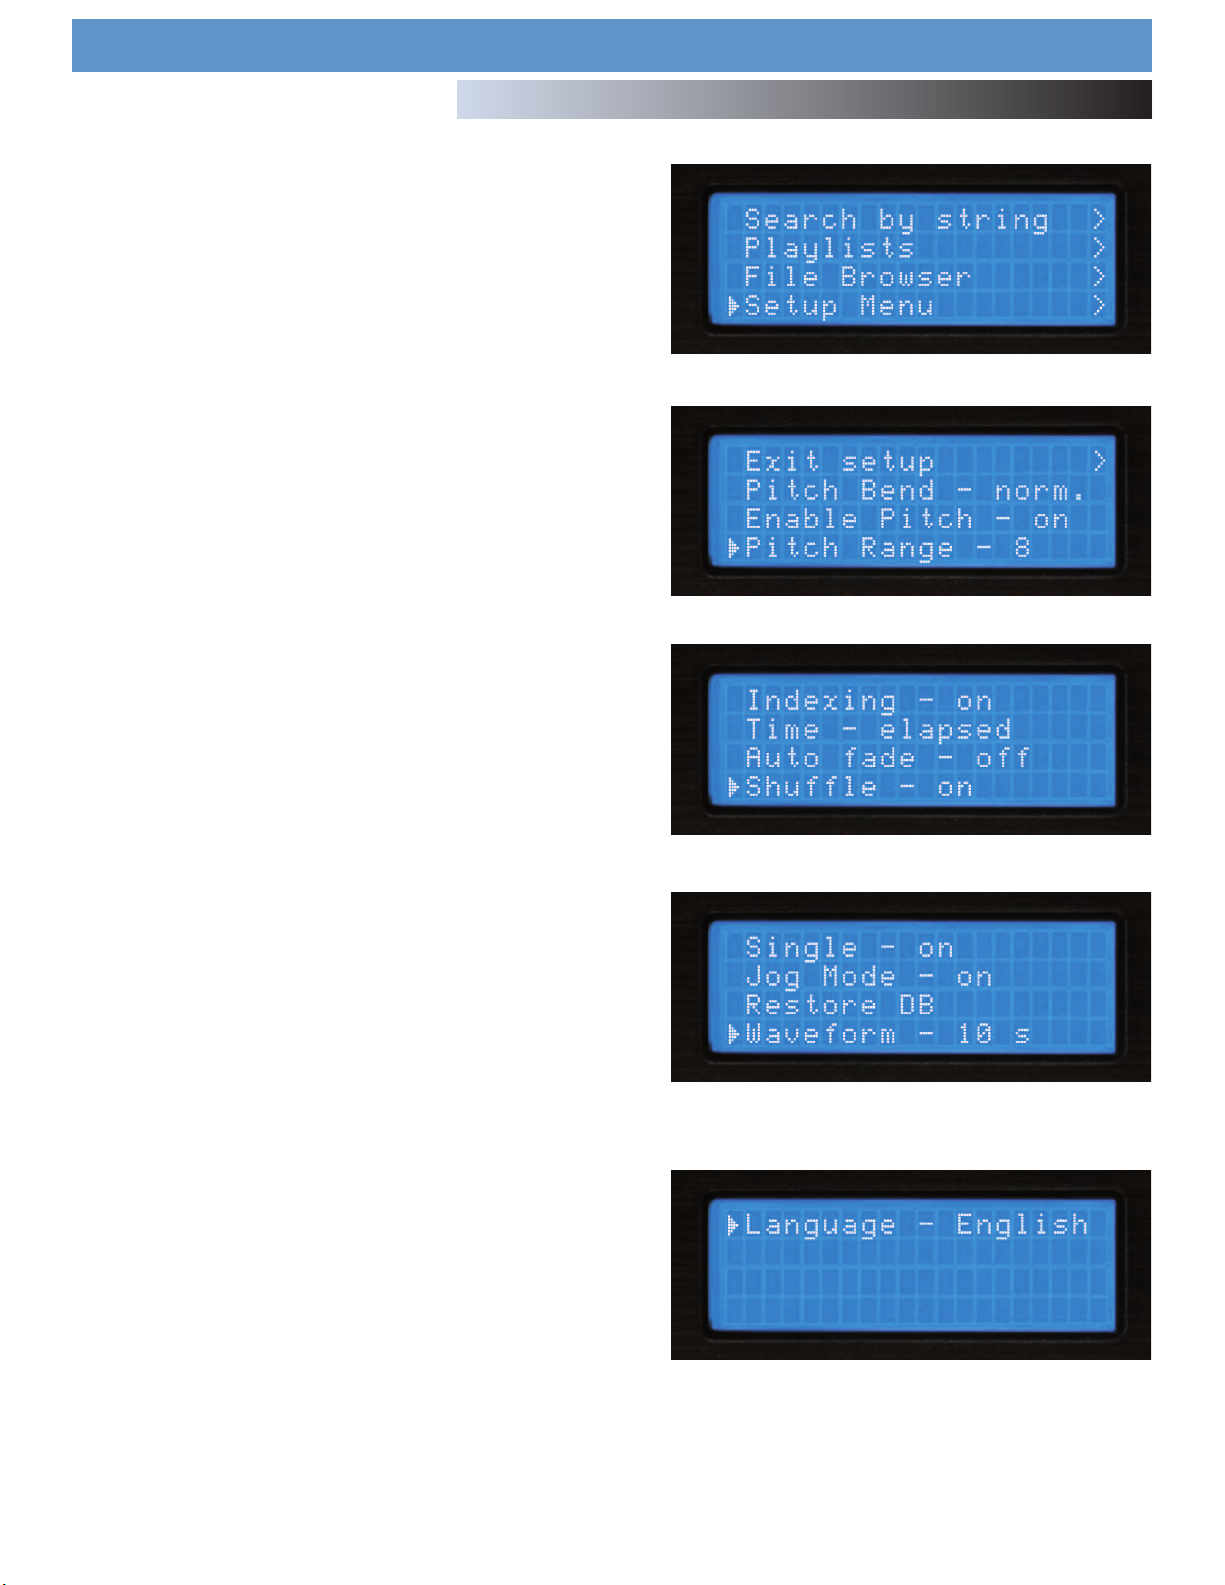
Setup Menu
The Setup Menu can be accessed as the final option on the Main Menu.
Each option is changed by pressing the Enter key repeatedly. To exit the
etup Menu, simply press the left arrow key on the Navigator keypad.
S
Pitch Bend - slow, norm, and fast
- slow : bends at a rate of approx. 1% per second
- norm : bends at a rate of approx. 2% per second
- fast : bends at a rate of approx. 4% per second
Using the DMIX-600
Setup Preferences
Enable Pitch - on/off
This determines whether or not the pitch function will be enabled on startup or not. Some entertainers who never use the pitch function will prefer
to turn this ‘off’.
Pitch Range - 4, 8, 16, 24%
This determines the default Pitch Range when the unit is first powered on.
4 or 8% Pitch Range will allow much finer adjustment, using 0.05% Pitch
Resolution.
Indexing - on/off
When this is set to ‘off,’ the unit will never prompt to create a database.
This is useful for DJs that already keep a meticulous organization system
of directories, or for permanent installations.
Time - elapsed/remain
This option toggles the default time display to show either time elapsed or
time remaining during the playback of each track.
Auto Fade - 0-12 sec/ Off
When in either continous mode or playing from a playlist Autofade in the
ON position will cut the gap between songs and fade between them, you
can set the length of the fade from 0-12 seconds.
Shuffle - on/off
When this option is enabled, the unit will play at random, based on the
search criteria. If you select ‘All Songs’, it will shuffle all songs. If you
select ‘The Kinks’ as an Artist, it will shuffle all songs by The Kinks.
Fig 6.6 - Setup Menu is the last option from the Search Options
Fig 6.7 - Setup Menu page 1 of 4
Fig 6.8 - Setup Menu page 2 of 4
Single - on/off
This toggles whether the unit will default to Single Auto-Cue mode or
Continuous mode when powered on.
Jog Mode On/ Off
The same as the JOG button this changes the JOG WHEEL function to
either PITCH BEND or SEARCH.
Restore DB
If your DB gets corrupted in the DMIX-600, Restore DB will reload the
saved DB from your mass storage device.
Waveform Size 5 sec, 10 Sec, 20 Sec, 40 sec
Changes the the length of time that the waveform will display.
Autoload Waveform Yes/No
Will determine if the waveform will be displayed.
BPM from ID3 Tag On/Off
The DMIX-600 will Display the BPM information from the id3 tag of a song
file if the songfile has no BPM information the BPM display will remain
blank.
Language English,Spanish and French
Lets you choose which langugae the DMIX-600 will display in its MENU.
Fig 6.9 - Setup Menu page 3 of 4
Fig 7.0 - Setup Menu page 4 of 4
23
Page 26
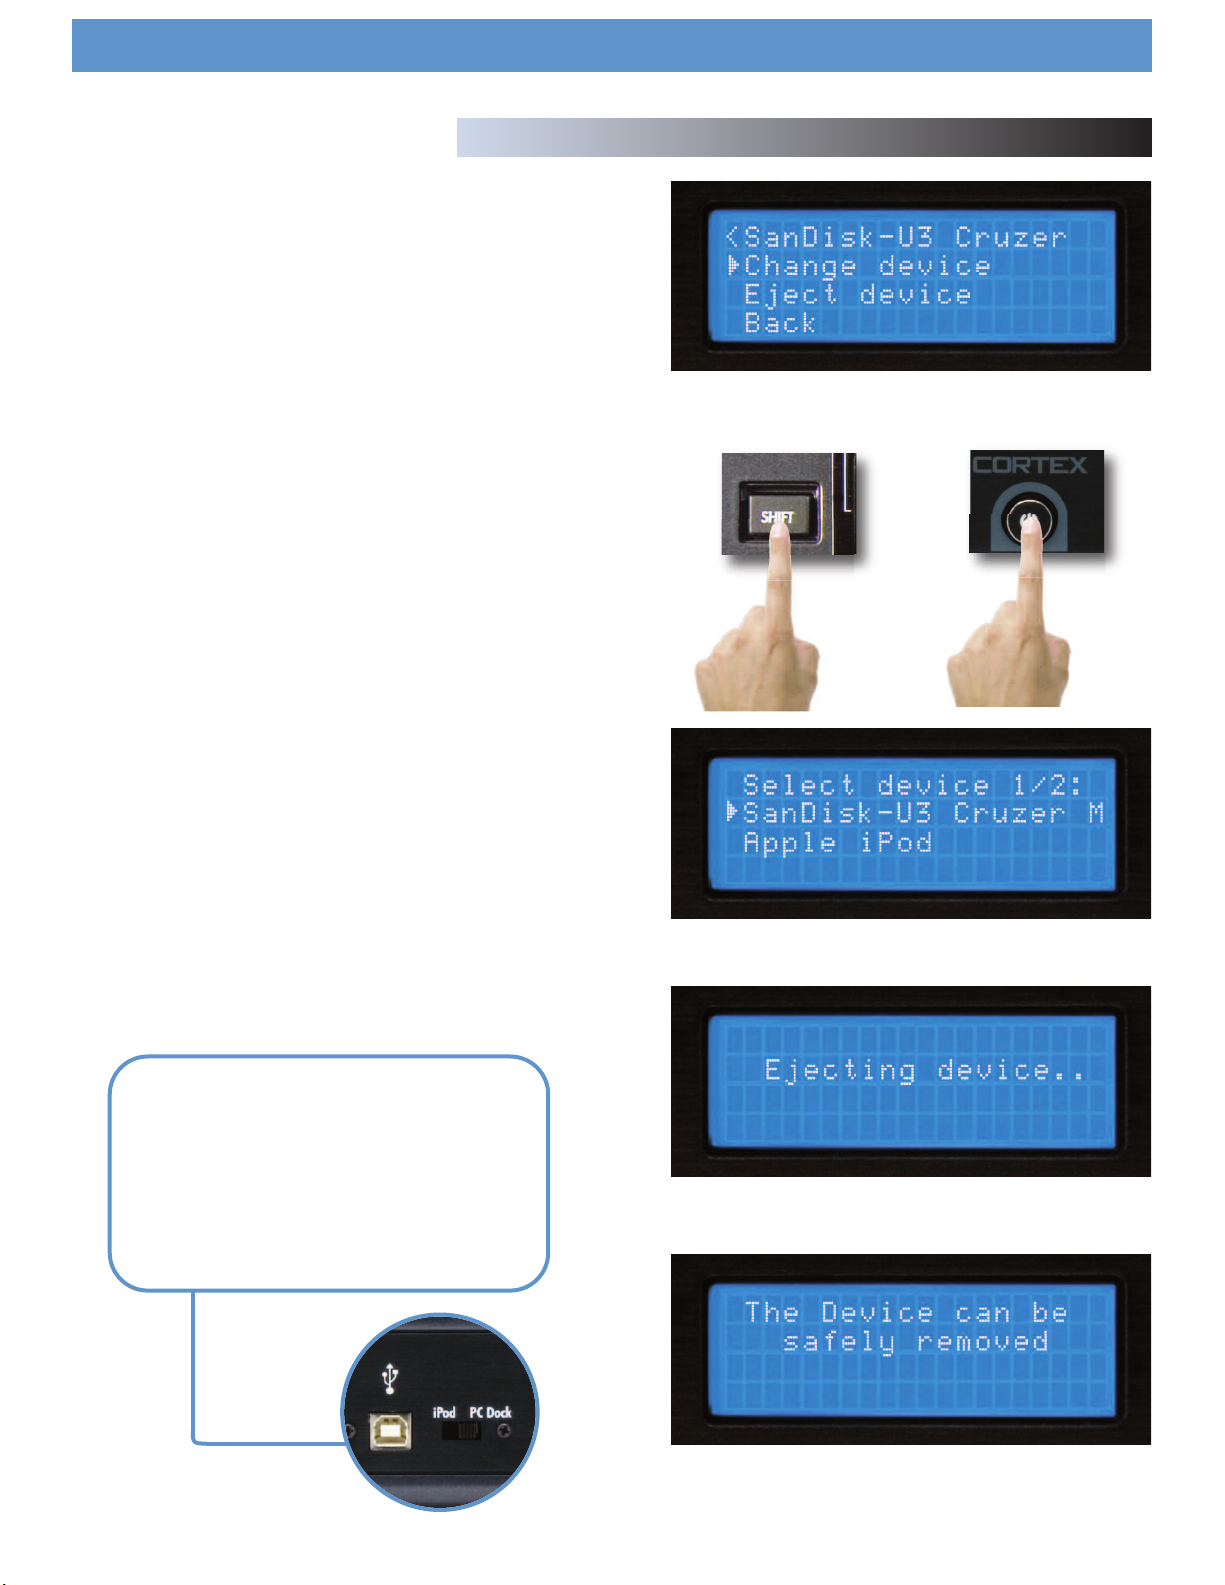
Section 11: Changing, Adding, and Ejecting USB Storage Devices
To access the Device Menu from any screen, press Shift+Power. From this
menu, you can choose to Change or Eject Devices.
Since USB is hot-swappable, you can connect (but not disconnect) a USB
device at any time, regardless of whether the unit is powered On or not
and regardless of what mode the unit is in.
To Change devices:
-
1. Select Change device from the Device Menu.
2. Select the new device you wish to switch to using the Navigation key-
pad or Jog Wheel.
Using the DMIX-600
Device Menu
Fig 7.1 - Pressing Shift+Power to access the Device Menu
3. Perform any necessary cataloguing or verification (as found in Section
Two: Selecting Devices & Database Creation)
- To Eject devices:
1. Select Eject device from the Device Menu.
2. Select the new device you wish to Eject using the Navigation keypad or
Jog Wheel. Press Enter to eject the device.
3. If the device you have ejected is being used by both sides of the Dmix600, the unit will warn you by displaying “The device is also attached to
other side!” This simply means that if you intend to remove the device from
the Dmix-600, you must eject both sides before unplugging it.
4. When the display reads “The device can be safely removed,” you may
disconnect the USB device.
5. If you are using a USB CD-ROM or DVD-ROM drive, you must use the
Eject procedure in order to open the CD/DVD tray.
If the Eject procedure is not followed, there is risk of corrupting any files
that are open when the device is disconnected.
To connect your Dmix to your PC as an Ipod dock:
+
Fig 7.2 - Selecting another device using the Keypad/Jog Wheel
1.Seat your Ipod in the Ipod dock located at the top of
the unit.
2.Set the switch located next to the USB Type B connector on the rear of the unit to “PC Dock”.
3.Connect the USB type B port to your PC. Your PC
should see your Ipod.
Fig 7.3 - Wait while device ejects
Fig 7.4 - Only remove the USB device after the eject procedure
24
Page 27
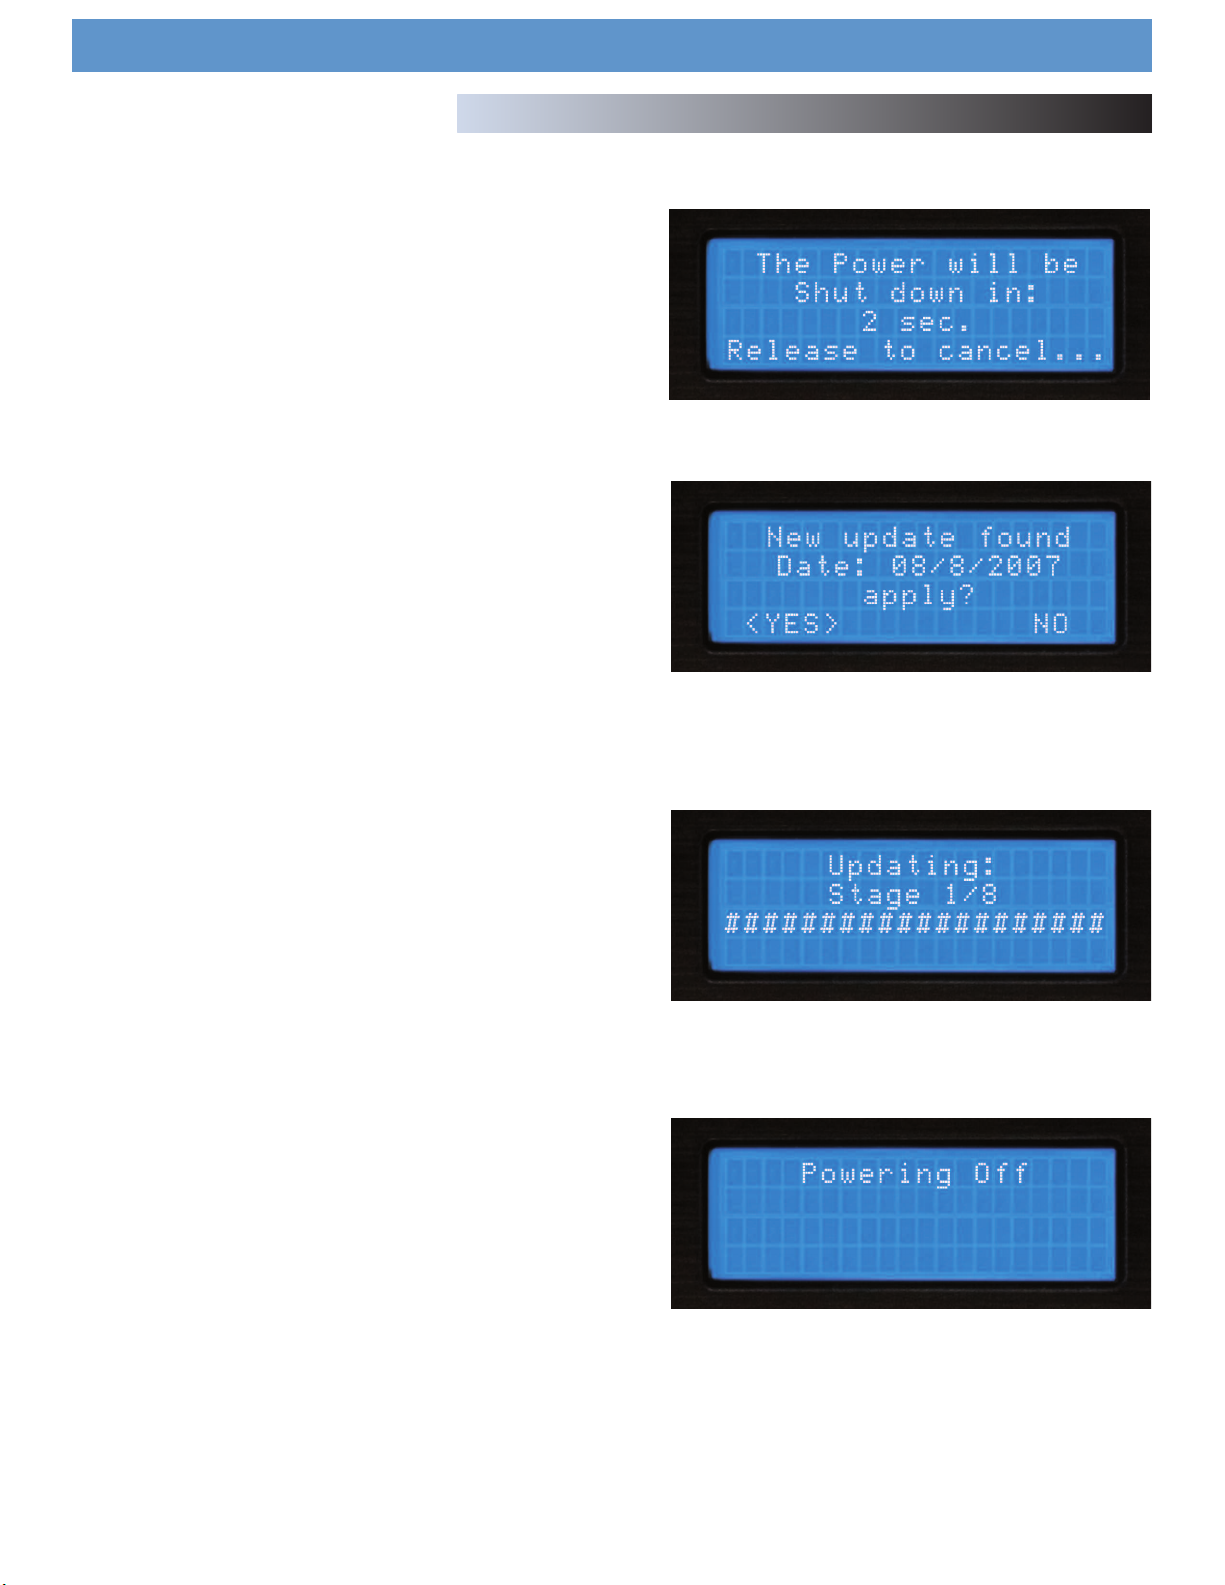
Powering the Unit Off
Similar to modern computers, the DMIX-600 has a soft-power-off feature,
as the unit has to close all connections with USB devices and go through a
hut down procedure before the power is removed. This also protects
s
against accidentally turning the power off.
In order to power down the DMIX-600, simply hold the Power Button
down for 3 seconds.
Using the DMIX-600
Soft Power & Firmware Updates
Firmware Updates
One of the most powerful features of the DMIX-600 is the capability to
upgrade the internal software. This lends itself to the addition of new features and support, the optimization of current processes, and the capability to fix bugs as they arise.
Firmware updates will be issued periodically at http://www.cortexpro.com.
We suggest that you stay as current as possible with all updates in order
to insure the highest level of functionality and compatibility that Cortex has
to offer.
To check the version of firmware installed:
1. Power on the DMIX-600 with NO DEVICES CONNECTED.
2. At the prompt that says ‘Insert Devices,’ press the INFO button.
3. The screen will display the version number of the currently installed
DMIX-600 firmware.
To update the firmware, follow these steps:
1. Using Internet Explorer ONLY, download the latest firmware upgrade
from http://www.cortex-pro.com. Other web browsers may rename the
file extension, which will result in the unit not recognizing the update file.
Fig 7.5 - DMIX-600 Shutdown Procedure
Fig 7.6 - Automatic detection of new firmware, option to update
2. Place the file in the root directory of your external USB storage device.
3. Connect the USB storage device to the DMIX-600, and select it from
the Device Menu (during startup). Make sure your DMIX-600 is connected
to a stable power source, where there is no potential of the unit losing
power during update.
4. When the DMIX-600 detects the firmware in the root directory of the
USB storage device, it will ask you if you want to apply the update. You
must answer YES. If the version of firmware on the storage device is the
same or older than what you have, it will be ignored.
5. When updating, the unit will go through 8 stages. This will take only a
few minutes. If the power is interrupted or the USB device is removed during this process, it can damage the operating system of the unit.
6. When the update is completed, the unit will shut itself down. You must
press power to restart the unit. Once the unit has booted up again, the
new software will take effect. You may then erase the firmware update
from your USB device at your convenience (it will not be detected again
Fig 7.7 - Updating the firmware in 8 stages
Fig 7.8 - Power shuts off completely when the update is complete
25
Page 28
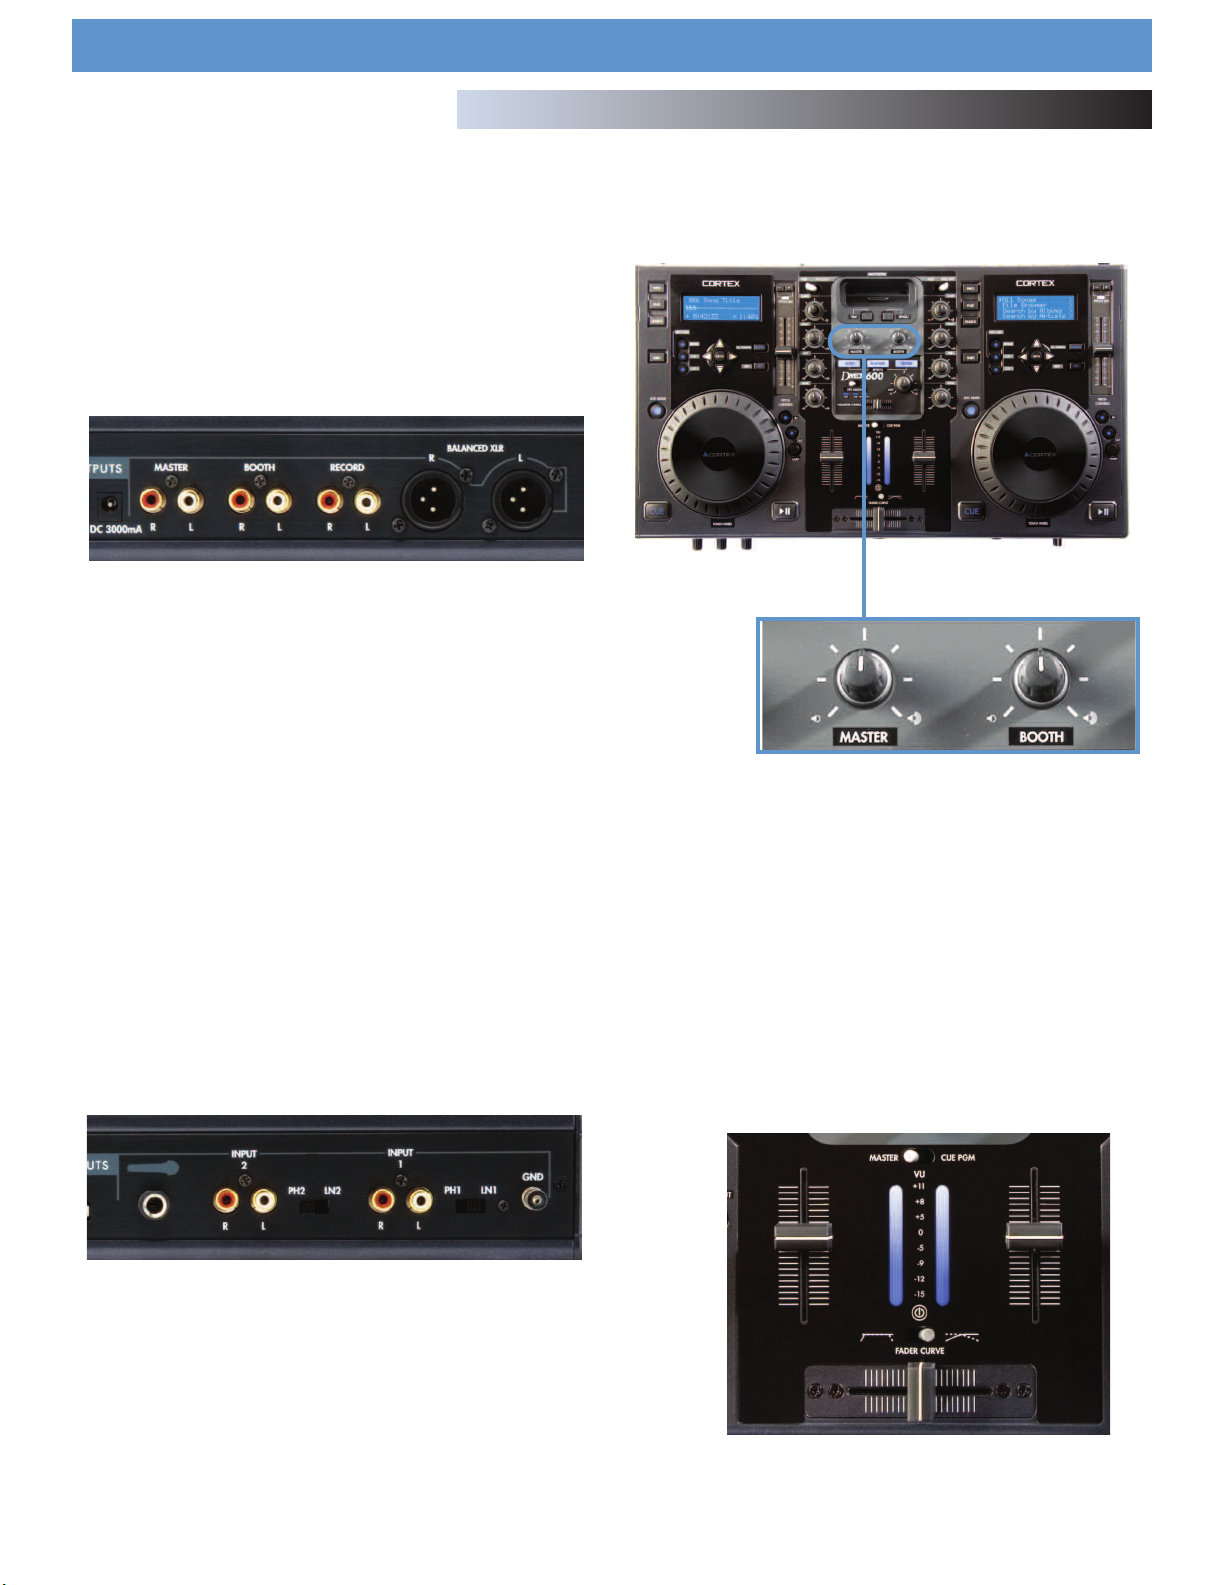
Using the DMIX-600
Mixer Section
DMIX-600 MIXER SECTION
The integrated mixer section in the DMIX-600 is split into 5 sections-the
Input/Output section, Gain/EQ, Faders Microphone and Cue. Over the
next few pages we will go over the basics of each section and how to
use your DMIX-600 to both play songs internally as well as hook up
external equipment.
OUTPUT SECTION
Fig 7.9- Output section of the Dmix 600
The DMIX-600 has the ability to output to 3 sperate devices as well as
accept 2 stereo devices (Line or Phono level). The output section consists
of the following-
Master-The main output of your mixer. This is the output you will connect
to your amplifier, powered speakers or external mixing board and is
controlled by the MASTER rotary knob located just under and to the left
of the iPod dock.
The Master and Booth controls
These two rotary knobs control the level of the MASTER output and the
BOOTH output levels.
Fig 8.0 - Master and Booth controls
Booth-Like the Master output, but to be connected to your monitoring
speakers and is controlled by the BOOTH rotary knob located just under
and to the right of the iPod dock.. Use this output for your speaker set in
the DJ booth.
Record-A third output, with no volume control and set to output at a consistant level for recording. Use this to connect to a recording device.
Balanced XLR-The balanced XLR outputs mirror the MASTER output
except that are balanced for use in professinal installations, they are
also controlled by the MASTER rotary knob.
INPUT SECTION
Fig 8.1 - Input section of the Dmix 600
The DMIX-600 has the ability to accept up to two analog sources along
with it’s two internal Digital channels from the connected USB MSD
devices. The input section consists of 2 analog RCA inputs, labeled Input
1 and Input 2. When used together with the Line/Phono switch on each
channel, these can accept either a line level source (CD Player, Cassette
Deck) or a Turntable with a Magnetic Cartridge. Set the switch to LINE if
you wish to connect a Line Level source. Set the switch to PHONO if you
wish to connect a Phono level source.
Line and Cross Faders
The next section of the DMIX-600 is the mixer section are the Line and
Cross Faders. The Line fader is the Volume Control of your channel-use it
to adjust output volume of each individual channel. The Crossfader on
the other hand can be used to fade between each channel. The speed in
which the volume comes in on each side of the Cross Fader can be controlled by the Fader Curve Switch, located above the Cross Fader.
The Crossfader is user relaceable, and can be ordered from any
Authorized Cortex dealer or from our own Tech Support department
Fig 8.2 - Crossfader/Linefader/VU section of the Dmix-600
26
Page 29
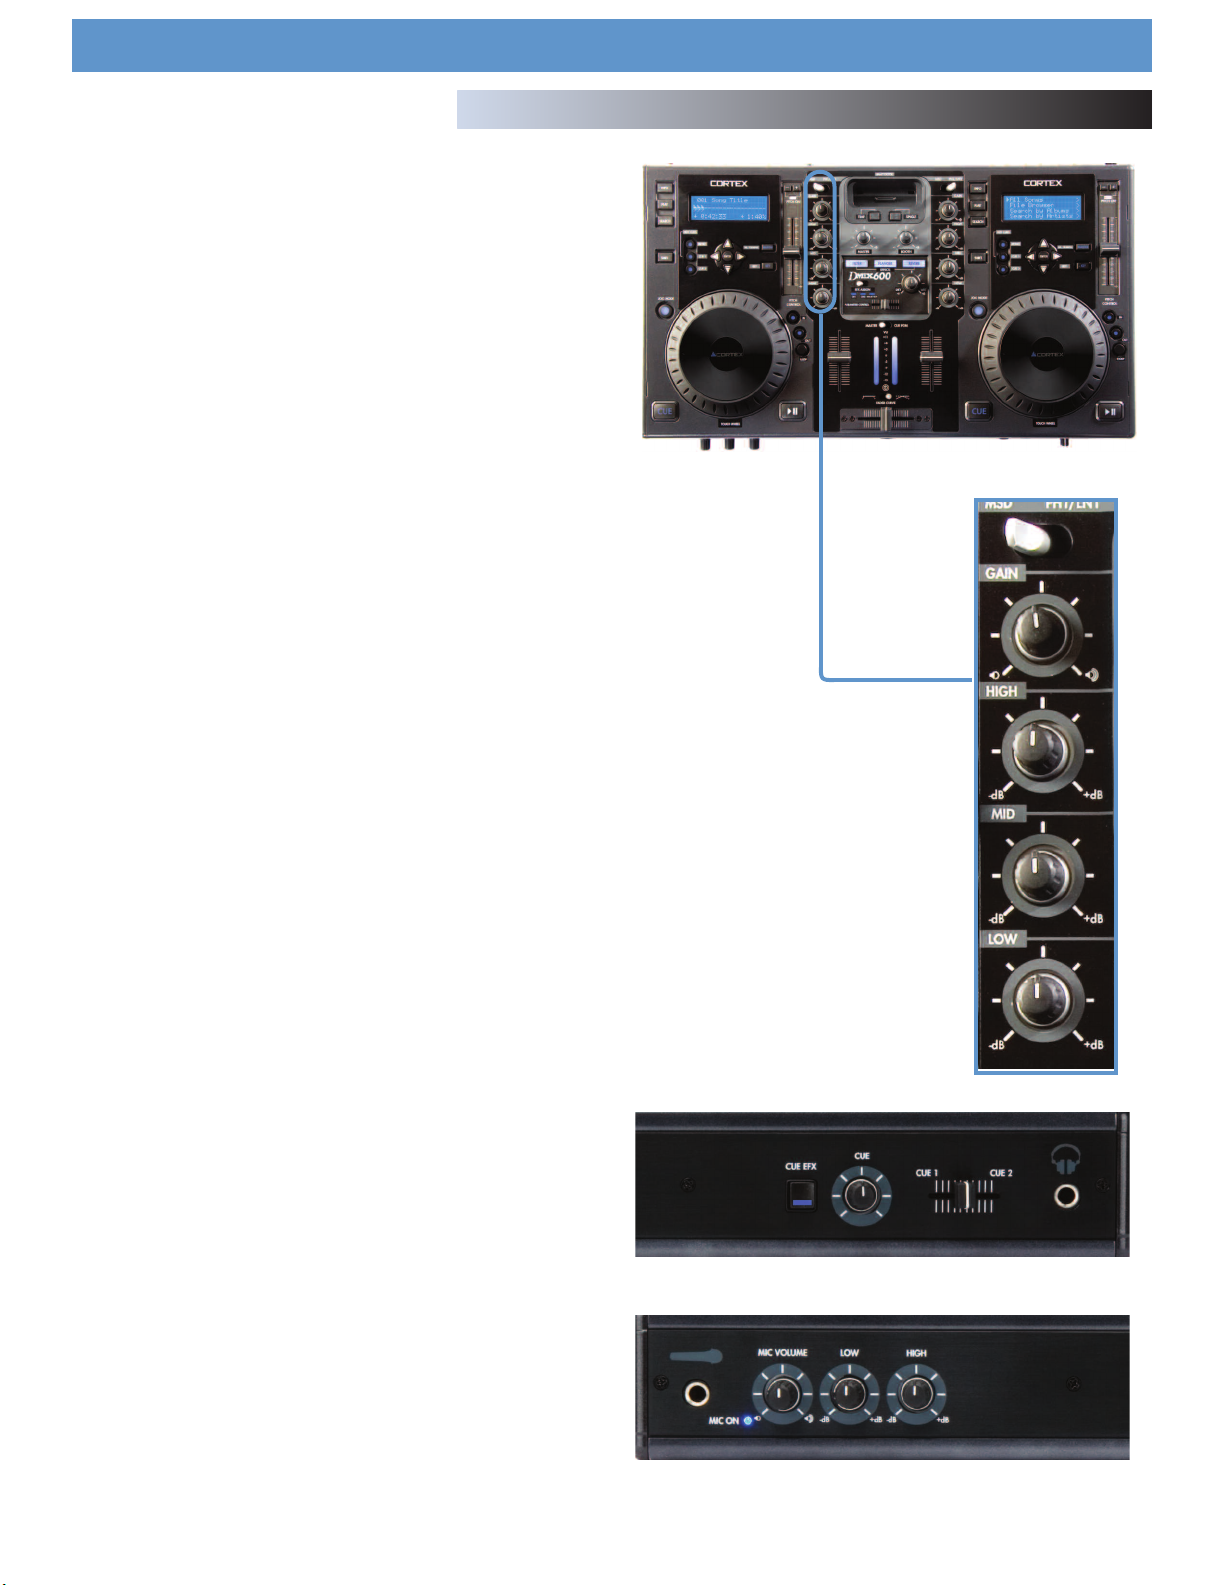
Using the DMIX-600
.Gain/EQ section
The DMIX-600 has a 3 band EQ and Gain above each channel. The
Gain may be used to set the audio level prior to the Line faders to
achieve optimal audio volume. As well, you may use the
HIGH/MID/LOW to adjust the Treble, Mid Range and Bass of your
channel.
FOR OPTIMAL PERFORMANCE, BEGIN PROGRAM MIX WITH ROTARY
Note-
GAIN CONTROLS SET TO MINIMUM (ROTATE IT COUNTERCLOCKWISE TO
THE COUNTER CLOCKWISE POSITION). MAKE ALL ADJUSTMENTS IN
SOUND OUTPUT WITH THE USE OF YOUR CHANNEL SLIDE CONTROLS AND
ASTER VOLUME ROTARY CONTROLS. THIS WILL PREVENT SIGNAL OVER-
M
LOADAND DECREASEDISTORTION. ONCEYOU HAVEMODIFIED YOUR SOUND AND
WOULD LIKETOINCREASE THE OUTPUT OF YOUR SOUND, THEN YOU MAY
DJUST THE ROTARY GAIN CONTROL IF NEEDED
A
Line and Cross Faders
The next section of the DMIX-600 is the mixer section are the Line and
Cross Faders. The Line fader is the Volume Control of your channel-use it
to adjust output volume of each individual channel. The Crossfader on
the other hand can be used to fade between each channel. The speed in
which the volume comes in on each side of the Cross Fader can be controlled by the Fader Curve Switch, located above the Cross Fader.
Mixer Section
(CONTINUED)
The Crossfader is user relaceable, and can be ordered from any
Authorized Cortex dealer or from our own Tech Support department.
VU Meter
The VU meter can be used to view the volume level of both the Master
output of your Dmix-600 as well as the individual channel output. This
can be controlled by using the Cue/PGM switch located above the VU
meter. Set the switch to CUE to view the volume of Channel 1 and
Channel 2. Set the Switch to PGM to view the volume of the Master
Output. To avoid distortion, try to keep the volume level of the Master
Output at between 0 and +5dB on the VU meter.
Cue Section
The Cue section of the Dmix-600 allows the user to preview Channels 1
and 2 before fading them in to be heard through the Main output section. To use the Cue preview function, first plug in a set of headphones to
the front mounted Headphone jack. Then, using the Cue fader located on
the front right hand side of the unit, fade between the two channels. You
may use the Cue Volume knob to increase or decrease volume going to
the headphones. The CUE EFX button allows you to preview the effect
that has been assigned to either channel in your headphones.
Microphone Section
Fig 8.3 -EQ/Gain/Input Select
section of the Dmix 600
Fig 8.4 - Cue Section of the Dmix-600
The Microphone section of the Dmix-600 allows for the user to plug in up
to two microphones at the same time. Both microphone jacks are 1/4’‘ TS
(Tip-Sleave) style jacks, and share both Volume and EQ controls which
are located on the left hand side of the front panel. You can use the Mic
High and Low controls to change the tone of the signal, and the Mic
Volume control to change the overall volume. Again, please note that
these controls alter both tone and volume of both the front and rear
mounted microphone jacks.
Fig 8.5 -Microphone Section of the Dmix-600
27
Page 30
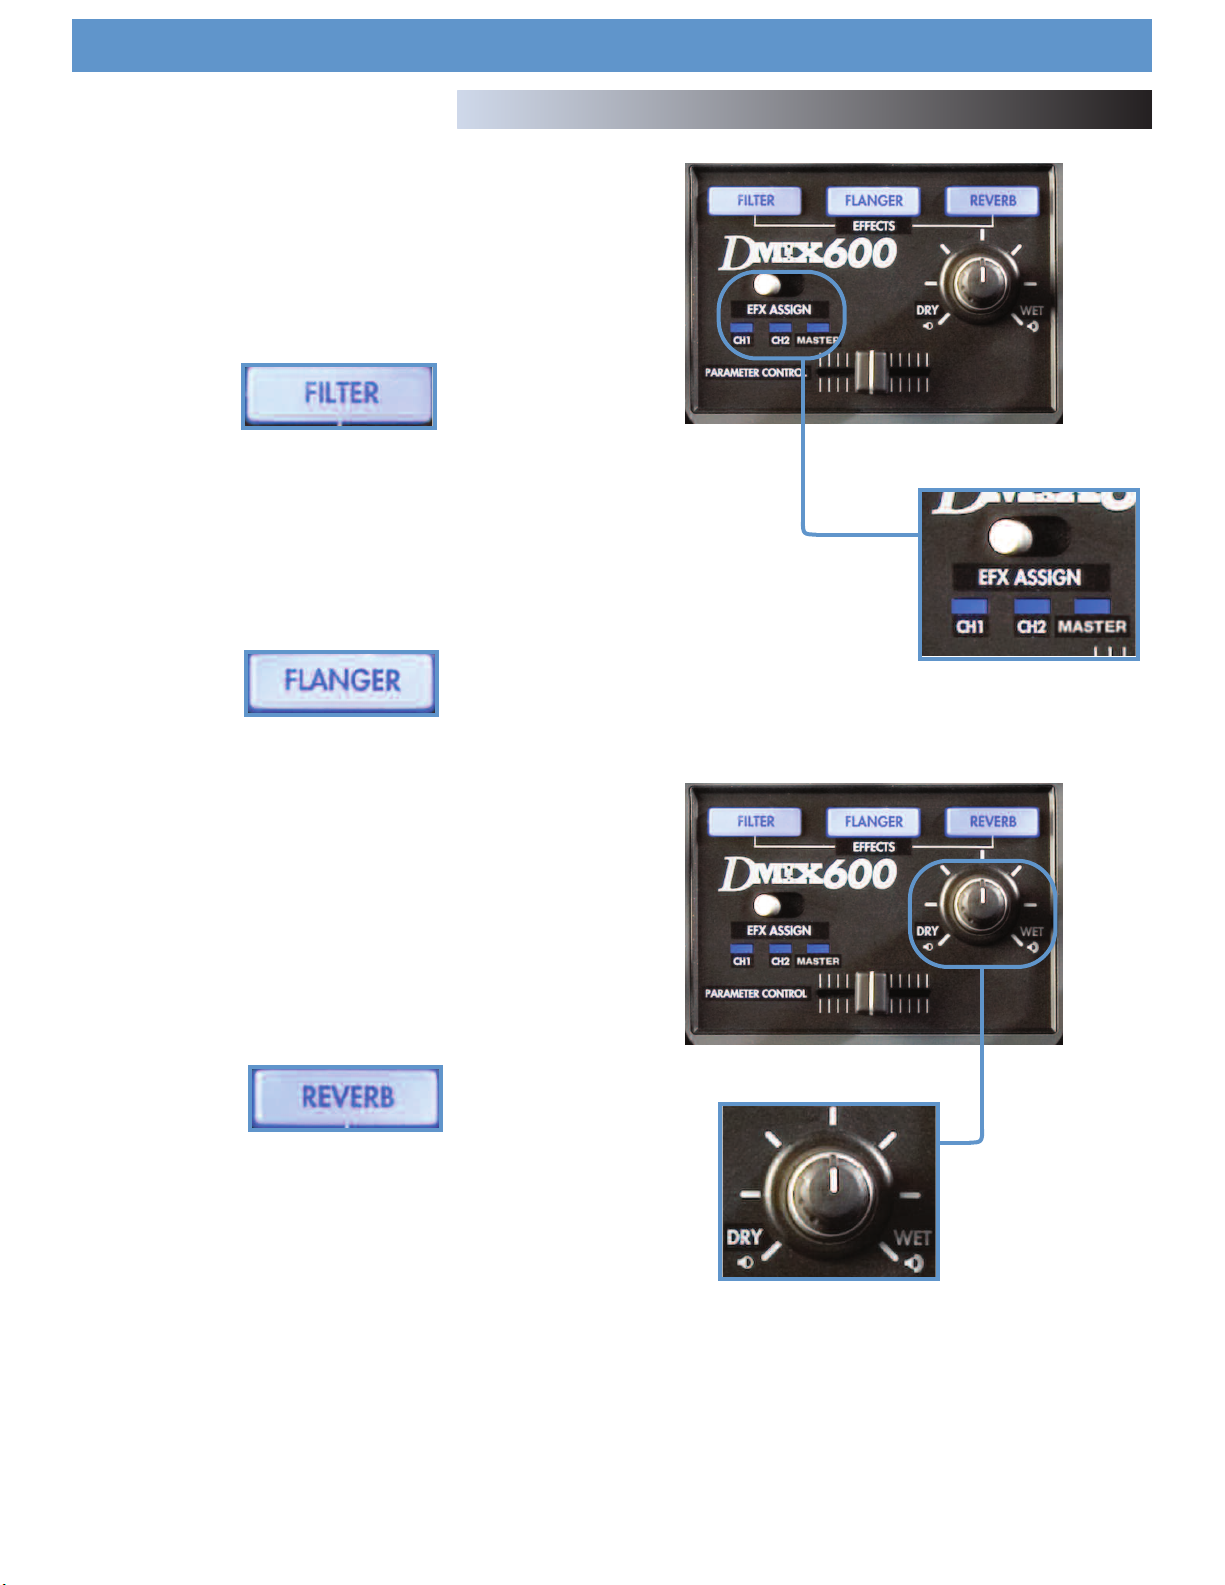
Using the DMIX-600
Effects Section
Effects Section
he DMIX-600 has three built in effects that can be assigned to either
T
channel including the microphone channel individually, each effects volume mix can be adjusted by turning the DRY/WET rotary counter clock
wise for DRY and clockwise for WET.
hese effects are:
T
Filter
The Filter effect is a band pass Filter and will filter out either the high
frequencies or the low frequencies depending on the position of the
parametr control slider, in the center position the parameter control slider
has no effect on the sound, slide it to the left and the high frequencies
will be removed gradually until there is just lowend (bass), and if you
slide the parameter control slider to the right the low frequencies will
gradually be removed until there is only high frequencies (treble).
-
Fig 8.6 Effects section
Fig 8.7 Channel assign switch
Flanger
Flanging is a time-based audio effect that occurs when two identical signals are mixed together, but with one signal time-delayed by a small
and gradually changing amount, usually smaller than 20 ms (milliseconds). This produces a swept 'comb filter' effect: peaks and notches are
produced in the resultant frequency spectrum, related to each other in a
linear harmonic series. Varying the time delay causes these to sweep up
and down the frequency spectrum.
By sliding the parameter control slide to the left the flanger gets slower
and when you slide the paremeter control to the right the flanger gets
faster.
Reverb
Reverberation is the persistence of sound in a particular space after the
original sound is removed. When sound is produced in a space, a large
number of echoes build up and then slowly decay as the sound is
absorbed by the walls and air, creating reverberation, or reverb. This is
most noticeable when the sound source stops but the reflections continue,
decreasing in amplitude, until they can no longer be heard. Large chambers, especially such as cathedrals, gymnasiums, indoor swimming pools,
large caves, etc., are examples of spaces where the reverberation time
is long and can clearly be heard. Different types of music tend to sound
best with reverberation times appropriate to their characteristics.
Fig 8.8 Adjusts the effects mix
By sliding the parameter control slide to the left the reverb space gets
smaller and when you slide the paremeter control to the right the the
reverb space gets larger.
28
Page 31

Using iTunes™ to optimize your sound files
Before you dock your iPod™ and use it with the DMIX-600 there
are a few setup tasks you must do first:
(A) Enable your iPod™ for disk use
(B) Prepare your computer so that when you rip music into your
omputer it will be of the supported format.
c
(C) Convert any files that you have pre-ripped and or
downloaded so they will work with your DMIX-600
ENABLE YOUR iPOD™ FOR DISK USE
First and most important is setting up your iPod™ so your Cortex
player can read it. Plug in your iPod™ to your computer and wait
for iTunes™ to identify it. When you see a representation of your
iPod™ on your main screen, scroll down to options and un-click
the “manually manage music” box and make sure that the
“Enable for disk use” box is checked. Then you can re-check “the
manually manage music box depending on whether you do or do
not want iTunes™ to manage your music.
Using the DMIX-600
First where it says “On CD insert” choose “ Ask to import CD”
ption, which will set iTunes™ to prompt you when a disc is
o
inserted, so iTunes will not automatically start ripping a cd when
inserted.
Then, next to the “Import Using” you can choose one of two formats.
NO COMPRESSION(WAV)
If you wish to keep your music files Full quality (No compression)
you may set the Import Using button to WAV encoder, and set
the “Setting” menu to automatic, The rest of the setting should
stay as they were.
iTunes™ SETUP FOR MAC OR PC (PC SHOWN)
The following are the prefered settings you will want, to optimize
iTunes and ensure all your music files are supported and will play
on your DMIX-600.
On your Mac or PC open iTunes™, then under the “EDIT” pull
down menu (iTunes™ menu for MAC) go to preferences, when
the preferences box opens choose the “ADVANCED” pane, and
in the “ADVANCED” pane choose the Importing button
Settings for importing as WAV.
But remember files that were downloaded or ripped to Mp3
will not sound any better by converting them to this format
all you will be doing will be increasing thier size 300%!
29
Page 32

Using iTunes™ to optimize your sound files (continued)
COMPRESSION(Mp3)
Cortex chose to use the Mp3 format because it is the most widely
used format for digital music compression.
So when Mp3 Encoder is chosen set the SETTINGS menu to
CUSTOM because although the default setting is Higher Quality
192 kbps) we recommend (320 Kbps) because its a generous
(
increase in sound quality without sacrificing file size.
Next to Stereo Bit Rate:
hoose (320 kbps) and
C
under it make sure that
the “Use Variable Bit
Rate Encoding (VBR)”
box IS NOT CHECKED!
VBR files are not as reliable as Constant Bit
Rate (CBR) files which is
the default.
The rest of the settings
can stay as the default with the exception of the last box (Filter
Frequencies Below 10Hz) should be unchecked because
although it may be fine to filter those frequencies for your laptop
that barely audible low end can go a long way in a big club system.
Using the DMIX-600
then click on kind and the music will sort by its format, you can
then highlight the ones that are not mpeg (Mp3), but before you
convert anything you must highlight the files that say protected
and or DRM and copy them to a seperate folder as they are not
currently compatible and WILL NOT BE ABLE TO BE
CONVERTED! after you have highlighted and copied those files
to a seperate folder you can delete them from iTunes™.
Then you can highlight all other files that are not WAV or Mp3
and from the “ADVANCED” pull down menu select the “Convert
Selection” to Mp3 and iTunes™ will go to work, this process may
take a while depending on how many songs you are converting.
Finally the Mp3
encoder settings box
should look like this.
Once that is done hit OK
twice and iTunes™ will
be ready to rip/convert
all your files to the proper form of Wav and or
Mp3 used by your
DMIX-600.
AAC and DRM FILES
Most downloaded or ripped music is in the
appropriate Mp3 format,however you may have ripped CD’s on to
your drive with the default settings in iTunes™ or another ripping
program which would have created files that may not be currently
supported. Or you may have purchased songs from iTunes and
those files may be copy protected and are also known as DRM
files, which must be sorted out of your iTunes because they cannot be converted.
Here are a few easy steps to quickly identify,sort and/or convert
all other files including AAC and DRM files which are not currently
supported with your DMIX-600.
First you must identify the different type of files and to do that you
must sort them by file type also known as “KIND”, if you do not
have a “KIND” column displayed in iTunes™ you can set
iTunes™ to display one by right clicking on the top of the NAME
column and adding “Kind” as one of the sort column’s,
Once the conversion is done you will see both files in the
iTunes™ window, the old files should still be highlighted, now
you may either hit DELETE if the old files are still highlighted, or
just sort by kind again and delete the old non-MP3 files.
Once completed your files are ready and you may either use
them off your hardrive or SYNC them back to your iPod™ or simply add them to your iPod™.
Remember to use the DBSE software to verify your database
The resulting files will work perfect with your DMIX-600.
30
Page 33

Error Messages
If you experience an error message while navigating the unit, here are a
few explanations of those errors and how they can be corrected. For a
more complete troubleshooting guide, consult our website at
http://www.cortex-pro.com
“Can’t access device” will be displayed because of one of the following
problems with the storage device:
- Device is write protected
In the case of a USB flash drive, some units have a switch to enable writeaccess.
- Device has already been ejected using the eject procedure.
Remove the USB device and plug it back in.
- Device is using an unsupported file system
The file systems supported are FAT32, NTFS, HFS+, CDFS, and UDFS.
.
Using the DMIX-600
Error Messages
- Device is not able to run without a proprietary hardware driver
Some devices require proprietary hardware device drivers. Although with
the introduction of USB, this is less common, it still sometimes presents an
issue. These devices are not compatible with the DMIX-600.
- Device has been removed while before using the eject procedure
If the device is removed from the USB port without using the proper ejection procedure, it is possible that the unit will not detect the absence of a
USB storage device, and will try to access the port anyway.
- If the device is powered by an external power supply, make sure that the
unit is receiving power.
- If the device has just been plugged in, and it was immediately selected,
the drive might not be ready to be accessed. Wait 10 seconds and try
again.
“Error creating DB” may be displayed if there is not a sufficient amount
of space left on your storage device to create the necessary database
files required to search through your music library.
- If you are out of space, try to delete some files and try the database
process again.
- Check the USB cable that is being used to connect the storage device to
the DMIX-600.
Fig 8.9 - Error message, drive full or not responding
- If the device is powered by an external power supply, make sure that the
unit is receiving power.
31
Page 34

Other (Specifications)
Specifications
1. General
Type of unit.................................................Streaming Digital Audio Controller
Format compatibility.......................................................MP3, WAV, CD-Audio
MP3 format......................................8 kbps ~ 320 kbps, CBR/VBR, 44.1 kHz
WAV format....................................................................44.1 kHz, 16 bit stereo
Instant Start.........................................................................................<0.1 second
itch ranges.....................................................................................4, 8, 16, 24%
P
Pitch increment..............................................................................................0.05%
Power.............................................................................................6V DC 3000mA
Power consumption....................................................................................12 watts
Operating environment temp................+5º C to +35º C (+41º F - +95º F)
Operating environment humidity..............................................................5-85%
Weight.........................................................................................................9.68 lbs
........................................................................................................................4.4 kgs
Dimensions........................................................................19 x 10.5 x 2.5 inches
.................................................................................................482 x 267 x 64mm
Adapter........................................................................AC 100~240V, 50/60Hz
2. Audio Mixer section
Audio input...................................................................................4 Channel (2x2)
Input connectors...............................................................Unbalanced RCA Type
Audio output................................................................................8 Channel (2x4)
Output level...................................................................1.2 V RMS (1 kHz, 0dB)
Output connectors......................................................................(2) Balanced XLR
......................................................................................(6) Unbalanced RCA Type
Frequency response.....................................................................20 Hz - 22 kHz
S/N ratio..........................................................................................................90dB
Total harmonic distortion..........................................................................<0.05%
3. USB interface section
Connector type.............................................................................USB Types A&B
USB protocol support.....................1.0, 1.1 (Full Speed) and 2.0 (Hi-Speed)
Number of ports.....................................................................................................2
Maximum number of connected devices (via USB hub, sold separately)....
.....................................................................................................4 (Plus Keyboard)
ile system support.......................................FAT32, NTFS, HFS+, CDFS, UDFS
F
4. Included Accessories
Power supply...........................................................................................................1
Operating instructions............................................................................................1
Ipod Mini/Nano Support Stand..........................................................................2
5. Replaceable Parts (order from GCI by part number if needed)
Power supply......................................................................USA 110v 059-370-R
....................................................................................VDE (Europe) 059-371-R
.........................................................................................................UK 059-372-R
................................................................................................JIS (Japan) 059-373
Power cable strain relief clamp.........................................................049-231-R
Pitch control knob..................................................................................002-603-R
Should your Cortex product require warranty or non-warranty service in
the USA, or if you wish to purchase replacement parts, operating instructions, or accessories, please contact GCI Technologies at the phone number listed below:
732-346-0061
Do not, under any circumstance, ship your product to GCI without first
calling the Technical Support Department at the number listed above.
Failure to establish an RMA (Return Merchandise Authorization) number
prior to shipping your product will delay your repair indefinitely. GCI
reserves the right to refuse all packages that arrive without an RMA number.
For warranty information, please refer to the warranty page included in
this manual.
Once an RMA number is established, your unit should be sent to the
address specified by your customer service representative, with the
RMA clearly written on the outer carton:
For support or repair outside of the USA, please visit the Cortex website at http://www.cortex-pro.com
.
Published by GCI Technologies Corporation
Copyright © 2007 GCI Technologies Corp.
All rights reserved.
Features & specifications subject to c hange without notice.
GCI Technologies USA: +1 (732)346-0061
GCI Latin America and Caribbean: +1 (305)592-4746
GCI United Kingdom LTD: +44 (0)87 087-00880
GCI France + 33 1 69 79 97 72
GCI SA (Spain): +34 93 436 37 00
GCI GmbH (Germany): +49 8131 39171-0
32
Page 35

USA Warranty Info
Cortex products are designed and manufactured to the highest standards in professional audio. With proper care and maintenance, your product will
provide years of reliable service. Please register your product online at http://www.cortex-pro.com
Limited Warranty:
In the USA, Cortex guarantees its products against defects in workmanship for the period of One (1) year* from the original date of purchase.
This limited warranty does not cover damage or failure caused by abuse, misuse, abnormal use, faulty installation, improper maintenance or any repairs
other than those provided by an authorized service center.
There are no obligations of liability on the part of GCI, Cortex, or any of its retailers for consequential damages arising out of or in connection with
the use or performance of the product or other indirect damages with respect to loss of property, revenues, profit, or costs of removal, installation, or
reinstallation. All implied warranties for GCI, including implied warranties for fitness, are limited in duration to One (1) year from the original date of
purchase, unless otherwise mandated by local statutes.
Returning Your Product for Service:
In the U.S.A., please call our helpful Customer Service Representatives at (732) 346-0061, and they will be happy to give you a Return Merchandise
Authorization (RMA) number and the address of an authorized service center closest to you.
After receiving an RMA, include a copy of the original sales receipt, with defective product and a description of the defect. Send by insured freight
to GCI Technologies Corporation, and use the address provided by your customer service representative. Your RMA must be written on the outside
of the package, or processing will be delayed indefinitely! GCI reserves the right to refuse all packages that arrive without an RMA number.
Service covered under warranty will be paid for by GCI and returned to you. For non-warrantees products, GCI will repair your unit after payment is
received. Repair charges do not include return freight.
Your warranty is valid only in the country where the unit has been purchased. Repairs performed outside of the country of purchase will be treated as
out-of-warranty.
For warranty service, you pay for shipping to GCI; we pay for return shipping within the Continental United States. Alaska, Hawaii, Puerto Rico,
Canada, Bahamas, and the Virgin Islands will be charged for freight.
Please allow 2-4 weeks for return of your product. Under normal circumstances your product will spend no more than 10 working days at GCI. We
are not responsible for shipping times.
For repairs and warranty information outside of the USA, please call the GCI affiliate closest to where you reside, listed on the specifications page of
this manual (page 18), or visit the Cortex website at http://www.cortex-pro.com
* Unless otherwise mandated by local statutes.
.
For Your Records
Model Number of Product:
(HDC-1000, HDC-3000, DMIX-600 DMIX-3ß00)
Serial Number of Product:
found on rear panel of unit
Original Purchase Date:
Name of Retailer:
Please register your warranty online at http://www.cortex-pro.com
33
Page 36

Nota Importante
Antes de operar con esta unidad, por favor verifique que usted tiene la última actualización del
firmware en nuestra web - http://www.cortex-pro.com. Las nuevas versiones del firmware del Dmix600 incluyen funciones adicionales, arreglos, y mejoras de compatibilidad con las unidades que utilice.
Hay incluso versiones en Español y Frances, que harán mas fácil que nunca operar con su Dmix-600!
Además, descarguese el software GRATIS de creación de database de Cortex, que le permitirá crear
bases de busqueda de toda su colección de música en solo unos minutos! Esta utilidad es indispensable
cuando trabaje con grandes unidades de almacenamiento con el Dmix-600.
Para encontrar que versión de firmware Dmix-600 está utilizando:
1. Encienda el Dmix-600 con NINGUNA UNIDAD CONECTADA.
2. Con la pregunta ‘Inserte Dispositivo,’ pulse el botón INFO.
3. La pantalla mostrará el número de versión actual instalado en el Dmix-600.
Actualizar el firmware a una versión nueva:
1. Utilizando su PC, descargue la actualización de firmware al directorio raiz de su
unidad de almacenamiento USB (X:\ donde X es la letra de su unidad). Recomendamos
usar Internet Explorer.
2. Conecte su unidad USB al Dmix-600.
3. Encienda el Dmix-600, y seleccione la unidad anterior.
4. La unida mostrará la fecha/versión de la nueva actualización, y le preguntará si
quiere actualizar. Seleccione ‘SI,’ y pulse enter.
5. La unidad procederá a la actualización de 6 pasos, y despues se apagará automaticamente. Cuando se vuelva a encender, estará funcionando con el nuevo firmware.
Precaución: Si la alimentación se interrumpe o la unidad USB se desconecta durante este
proceso, se puede dañar el sistema operativo de esta unidad.
Para más detalles sobre actualización de Firmware, incluyendo pantallas, vea la sección
del manual Actualizaciones de Firmware (página 25).
Page 37

Tabla de contenidos
Precauciones y WEEE............................................................................................2
Introducción.............................................................................................................3
Características........................................................................................................4
Compatibilidad y Perifericos recomendados..................................................5
Requirimientos de unidades................................................................................5
Cuidados y Mantenimiento..................................................................................6
Condiciones de Funcionamiento..........................................................................6
Información Legal..................................................................................................6
G.uia de inicio .......................................................................................................7
Panel trasero y frontal ..................................................................................7
Panel superior & Funciones........................................................................8-9
Usando el DMIX-600..........................................................................................10
Preparado para Usar y conecciones.........................................................10
Selección unidades & creación Database.................................................11
Ficheros & Opciones de busqueda............................................................12
Teclado USB ..................................................................................................13
Opciones de busqueda (continuación)...............................................13-14
Waveform display.........................................................................................14
Botón Info & Atributos de pistas.................................................................15
Modo Play & Single Auto Cue....................................................................16
Display de tiempo..........................................................................................17
Pitch Control....................................................................................................17
Jog Mode........................................................................................................18
Repetición Navigation Controls...................................................................18
Puntos Cue y memorización de Cue...........................................................19
Menu de unidades.........................................................................................20
Modo Shuffle .................................................................................................21
Características Loop .....................................................................................21
Preferencias de montaje...............................................................................22
Soft Power.......................................................................................................23
Actualizaciones de programa.....................................................................23
Guia de instalación
Sección Mezclador..............................................................................................24
Sección Mezclador (continuación)................................................................25
Efectos................................................................................................................26
Ajuste su Cortex and iTunes®.....................................................................27-28
Mensajes de error...............................................................................................29
Especificaciones técnicas....................................................................................30
Información de Garantia...................................................................................31
Page 38

AVISOS E INSTRUCCIONES DE SEGURIDAD
P O R FAVO R L E A A N T E S DE U T I L I Z A R ES T A U N I D A D !
ATENCIÓN: Este producto cumple con la normati-
va legal si se utilizan cables y conectores blindados
para conectar la unidad a otro equipo. Para evitar
interferencias electromagnéticas con otros aparatos
eléctricos, como radios y televisores, deben
emplearse cables y conectores blindados.
Los signos de exclamación dentro de un triángulo
que puedan aparecer en la documentación que
acompaña a la unidad pretenden alertar al
usuario de instrucciones de operación o mantenimiento importantes.
El signo de un rayo dentro de un triángulo pretende alertar al usuario de la presencia de "voltaje peligroso" no aislado en el inte-rior de la
unidad, que podría ser de suficiente intensidad
como para constituir riesgo de descarga eléctrica.
LEA LAS INSTRUCCIONES: Deben leerse todas
las indicaciones de uso y seguridad antes de usar
este producto.
CONSERVE LAS INSTRUCCIONES: Las instrucciones de uso y seguridad deben conservarse para
referencias futuras.
ATIENDA A LAS ADVERTENCIAS: Deben seguirse
todas las advertencias sobre este producto que
figuran en el manual de instrucciones.
SIGA LAS INSTRUCCIONES: Deben seguirse
todas las instrucciones del manual.
LIMPIEZA: Este producto debe limpiarse con una
mopa suave o con un paño seco. Nunca utilice cera
para muebles, gasolina, insecticidas u otros líquidos
volátiles, ya que podrían corroer la carcasa.
COMPLEMENTOS: No utilice accesorios que no
estén recomendados por el fabricante, pues
podrían dañar la unidad.
AGUA Y HUMEDAD: No use este producto cerca
de medios acuáticos, como una bañera, un cubo de
agua, un fregadero o un lavadero; tampoco en un
sótano húmedo, ni cerca de una piscina o similar.
ACCESORIOS: No coloque el producto sobre un
carrito, soporte, trípode, brazo o mesa. Podría caer
y causar graves daños a un niño o adulto, así como
a la propia unidad. Úsese sólo con un carrito,
soporte, trípode, brazo o mesa recomendado por
el fabricante. Al montar la unidad deben seguirse
siempre las instrucciones y emplearse accesorios
recomendados por el fabricante.
CARRITO: Si el producto va sobre un carrito,
debe moverse el conjunto con cuidado. Detenciones
bruscas, una fuerza excesiva o superficies inadecuadas pueden provocar la caída de todo el conjunto. Véase Figura A.
VENTILACIÓN: Las aperturas y ranuras de la
carcasa están diseñadas para la ventilación, aseguran un manejo fiable y lo protegen de cualquier
sobrecalentamiento, por tanto, nunca deben
cubrirse ni bloquearse. Estas aperturas no deben
taparse colocando el producto sobre un sofá, una
cama, una alfombra o superficies similares. Nunca
debe colocarse en una estructura prefabricada,
como una caja o un rack, a menos que tengan la
ventilación adecuada o lo permitan las instrucciones del fabricante.
FUENTES DE ALIMENTACIÓN: Esta unidad debe
utilizarse exclusivamente con el tipo de suministro
eléctrico indicado en la etiqueta correspondiente.
Consúltelo antes de enchufar el producto si no está
seguro del tipo de suministro del lugar donde lo va
a usar.
UBICACIÓN: Este aparato debe colocarse en una
ubicación estable.
PERIODOS SIN USARLO: Si no se va a usar la
unidad durante un tiempo prolongado, desenchúfelo de la corriente eléctrica.
TOMA DE TIERRA O POLARIZACIÓN:
- Si este producto lleva una clavija de corriente
alterna polarizada (con un pivote más grueso que
otro, tipo inglés), sólo entrará en una posición. Es
una medida de seguridad. Si no puede introducir
la cla-vija en el enchufe, gírela. En ningún caso
debe forzarse. Si sigue sin entrar, un electricista
debería cambiar el enchufe.
- Si la unidad lleva una clavija con tres pivotes (el
tercero corres-ponde a la toma de tierra), sólo
entrará en un tipo de enchufe. Se trata de una
medida de seguridad. Si el enchufe y la clavija no
son compatibles, un electricista deberá cambiar el
enchufe. En ningún caso deberá forzarse.
PROTECCIÓN DEL CABLE DE CORRIENTE: Los
cables de corriente deben protegerse para que
nadie los pise ni corran el riesgo de pinzarse por
elementos colocados encima o que los aprisionen.
Debe prestarse especial atención al cable, al
enchufe, a los extensores de cable y al punto por
donde el cable sale de la unidad.
TIERRA DE LA ANTENA EXTERIOR: Si el pro-
ducto lleva conectada una antena exterior o sistema de cables, asegúrese de que cuenta con la
toma de tierra correspondiente, a fin de proteger
la unidad de variaciones de voltaje y cargas de
electricidad estática. Existe documentación oficial
acerca de la correcta utilización de la toma de
tierra y de las medidas de seguridad pertinentes,
conexión de los electrodos de descarga y sus requisitos. Véase Figura B.
RAYOS: Como protección adicional del producto
durante una tormenta eléctrica, o durante periodos
prolongados sin usarlo, desenchúfelo de la corriente y desconecte la antena o sistema de cables.
De este modo se protegerá el producto de los
daños que pueda producir la caída de un rayo o
las fluctuaciones de la red eléctrica.
LÍNEAS ELÉCTRICAS: Nunca debe situarse un sis-
tema de antena cerca de líneas eléctricas u otros
circuitos de corriente. Tampoco debe colocarse en
lugares donde pueda caer sobre dichos circuitos
eléctricos. Al instalar un sistema de antenización
exterior, debe tomarse la extrema precaución de
no tocar dichas líneas eléctricas, pues el mas minimo contacto puede ser fatal.
SOBRECARGA: No sobrecargue los enchufes de
la pared con ladrones o instalando enchufes múltiples, pues correría el riesgo de electrocución o
incendio.
ENTRADA DE OBJETOS O LÍQUIDOS: Nunca
introduzca objetos de ningún tipo en el interior del
producto, pues podrían tocar una parte eléctrica y
cortocircuitar el aparato, lo que resultaría en un
incendio o descarga eléctrica. No verter nunca
ningún líquido sobre el producto.
REPARACIÓN: No intente reparar el producto
por cuenta propia, ya que abrir o retirar la carcasa le expondría a un voltaje peligroso u otros
peligros. Diríjase siempre a un centro de servicio
técnico autorizado.
DAÑOS QUE REQUIEREN REPARACIÓN:
Desenchufe el aparato de la corriente y diríjase a
un servicio técnico autorizado si se da alguna de
las siguientes situaciones:
El cable de alimentación o la clavija están dañados.
-
- Se ha vertido líquido o ha caído algún objeto sobre la
nidad.
u
El aparato se ha expuesto a la lluvia o a salpicaduras.
La unidad se ha caído al suelo o dañado de algún
-
modo.
- El aparato no funciona con normalidad, ni aun siguien-
o las instrucciones. Ajuste sólo los mandos que se indican
d
en las instrucciones, ja que la manipulación inadecuada de
otros controles podría dañar la unidad y requeriría un
ayor trabajo de un técnico para restablecer su fun-
m
cionamiento normal.
- Si el producto muestra anomalías en su fun-
cionamiento, necesita revisión por parte de un servicio técnico autorizado.
RECAMBIOS: Cuando se necesite alguna pieza de
recambio, asegúrese de que el servicio técnico utilice piezas originales autori-zadas o que tengan las
mismas características que las originales. Los reemplazos no autorizados pueden causar descargas
eléctricas, incendios u otros daños.
COMPROBACIÓN DE SEGURIDAD: Tras la
reparación, solicite al técnico que efectúe las comprobaciones de seguridad necesarias para determinar que el producto se encuentra en las condiciones adecuadas para su funcionamiento.
MONTAJE EN UNA PARED O TECHO: Este pro-
ducto nunca debe montarse en una pared o en el
techo.
CALOR: Este producto debe alejarse de fuentes
de calor, como radiadores, estufas u otros aparatos
que irradien calor, incluyendo amplificadores.
DESECHO: Este producto no debe ser tratado como
residuo domestico. En su caso debe ser entregado
en el punto de reciclaje y desechos para su posterior reciclage de elementos electricos y electronicos.
Haciendo esto usted se asegura de no estar dañando el entorno ni a la salud publica que de otra manera podria producirse al manipular de forma incorrecta este aparato. El recicalje de materiales ayuda
a la conservación de la naturaleza. Para mayor
información sobree reciclaje, por favor contacte con
su oficina local de reciclaje, ayuntamiento o en la
tienda donde compro el producto.
2
Page 39

Introducción
Presentación
racias por la compra de su Cortex Dmix-600.. Confiamos en que la plataforma de productos Cortex no solo la haga más fácil la vida utilizando
G
los últimos avances en tecnología de conectividad y reproducción de sonido, sino que además suba el listón del equipamiento de Dj y audio profesional. Con el cuidado y mantenimiento adecuados, esta unidad le dará años de satisfacción y servicio. Los productos Cortex están amparados por
1 año de garantía limitada*.
Preparando para empezar
Por favor asegurese que tiene los accesorios incluidos en el DMIX-600:
Alimentador............................................................................................................1
Manual de instrucciones........................................................................................1
Queremos que usted escuche toda su vida!
Usado de forma correcta, su nuevo equipo de sonido la
dará una vida de satisfacción. Piense que los daños auditivos no son detectables hasta que es muy tarde. Este fabricante y la Asociación de Consumidores de Productos
Electrónicos le recomiendan que evite la exposición prolon-
Querido Cliente:
Seleccionar un producto de audio de calidad como el
que acaba de adquirir es solo el principio del disfrute auditivo. Ahora es el momento de considerar como maximizar
el placer que nuestro equipo puede darle. Este fabricante
y la Asociación de Consumidores de Productos
Electrónicos quieren que usted le saque el máximo partido
a su equipo dentro de los limites saludables de audición.
Ese punto que permita un sonido fuerte y claro sin crear
barullo ni distorsión, y lo que es más importante, sin afectar la sensibilidad de su oido.
El sonido puede ser degradante. Como más tiempo utilice como “nivel de confort” un volumen alto más se adaptará su oido. De forma que lo considere como “normal”
puede ser fuerte y estridente para su oido. Asegurese de
ajustar su equipo a niveles seguros antes de que su oido
se acostumbre.
Para fijar un nivel seguro:
- Arranque con un nivel de volumen bajo.
- Lentamente incremente el volumen hasta que pueda oirlo
de forma confortable, claro y sin distorsión.
gada a niveles excesivos de ruido. Incluimos esta lista de
niveles de ruido para su protección.
Decibelios
Nivel Ejemplo
30 Biblioteca, susurros
40 Sala de estar, nevera, dormitorio interior
50 Tráfico suave, conversación normal, oficina
60 Aire acondicionado a 60 cm, maquina de coser
70 aspirador, secador de pelo, restaurante ruidoso
80 Trafico de ciudad, trituradoras de basura, desperta-
dor a medio metro.
LO S RUI D OS S I GUIE N TES P U EDE N SE R PEL I -
GROSOS SI HAY EXPOSICION PROLONGADA
90 Metro, motocicleta, tráfico de camiones,cortacesped
100 Camión de basura, motosierra, martillo pneumatico
120 Concierto Rock delante de los altavoces, trueno
140 Disparo, avión a reacción
180 Rampa de disparo de cohetes
Una vez fijado un nivel de volumen confortable:
- Fije el dial y dejelo ahi.
Tomese un minuto para hacer esto y prevendrá daños
futuros en su audición. Después de todo, queremos que
escuche durante toda su vida!
Información cortesía de Deafness Research Foundation.
3
Page 40

Nota Operativa
Características
El Cortex Dmix-600 ha sido diseñado para permitir la reproducción y
manipulación de la música digital para los usuarios profesionales. El
mix-600 está diseñado para liberar a los DJs de los problemas asoci-
D
ados al trabajo con ordenadores PC, eliminando la necesidad de usar
un ordenador durante la sesión. El Dmix-600 también ofrece una mayor
calidad de sonido y flexibilidad frente al típico PC.
Jog Wheel (Touch wheel)
Los Jog Wheels en el Dmix-600 dan alta precisión en el control de múltiples funciones. Con el Jog Wheel, el Usuario puede buscar, pitch bend o
incluso hacer scratch como si lo hiciera en un giradiscos! También ofrece
un sistema potente de navegación para buscar en los menú s, cambiar
parámetros y seleccionar música en su disco duro ..
Pitch Control
Potenciómetros de alta precisión deslizables de 60mm para ajuste
preciso de la velocidad.
• Precisión 0.05% pitch
Para dar una mayor precisión en el ajuste de pitch, la unidad puede
avanzar en incrementos de 0.05%. Esto ayuda a cuadrar beats entre
dos programas musicales. La precisión 0.05% solo es posible en los rangos de 4 y 8% pitch.
• Múltiples rangos pitch
Con rangos de pitch de 4, 8, 12, y 24%, el control mínimo y máximo del
pitch pueden alterarse para aumentar o reducir el ajuste del programa
musical.
• Pitch ON/OFF
Pulsando los botones PITCH + y PITCH - simultáneamente, se conmuta
entre responder o no a los cambios vía deslizante PITCH CONTROL. El
Pitch ON/OFF también funciona como cambio rápido a pitch cero, cuando se usa como pitch OFF.
Soporte CD Audio
l Dmix-600 ofrece un nivel de conectividad sin precedentes con todos
E
las unidades sin driver USB. La línea de productos Cortex es la primera
en ofrecer la posibilidad de manipular la música almacenada en
unidades USB como hard drives, memorias flash, unidades ópticas, y
eproductores personales de música, sin importar la plataforma. Gracias
r
a esta innovación, el DJ será capaz de reducir la cantidad de equipo y
música necesaria para una sesión.Incluso más unidades USB pueden
conectarse con un hub compatible USB.
Sistema de gestión de base de datos
Aunque la mayoría de los usuarios tienen acceso a unidades de almacenamiento USB o reproductores portátiles de música, el Cortex Dmix-600
soporta la reproducción de Audio CD a través de CD-ROM, CD-RW,
DVD-ROM, o DVD-RW externos por USB. Esto es particularmente útil
para que los Dj hagan una migración gradual o para reproducir CD que
traen los clientes.
Soporte Playlist
La línea entera de reproductores Cortex Digital permiten el manejo de
colecciones de música vía sistema de base de datos. Usando este método, la base de datos puede buscar por distintos criterios. Esto permite
al DJ buscar por artista, título, género, álbum, o por palabra. Usando
este método el Dj encontrará la música específica en segundos. La base
de datos se almacena en la unidad que se está utilizando, por lo que
puede ser usada con cualquier unidad Cortex, sea en tu casa o en el
club! Los puntos Cue memorizados usando el Dmix-600 se almacenan
también en la base de datos en la unidad de almacenamiento activa.
Una vez un punto Cue se ha guardado, los DJs pueden rellamarlos cada
vez que la pista se carga.
Mezclador de Audio Integrado
EL DMIX-600 incorpora un mezclador de 2 Canales con características
como EQ de 3 bandas en cada canal, entrada de micrófono con EQ
dedicado, crossfader reemplazable y efectos digitales en el mismo mezclador. También tiene una salida booth separada y salidas XLR equilibradas para los más profesionales.
Display retroiluminado
El display iluminado de 20 caracteres muestra una gran variedad de
información, incluyendo titulo de canción, tiempo, pitch, opciones de
ajuste, y parámetros de búsqueda. En oposición al reproductor convencional, este display permite una extensa visualización de parámetros.
Efectos Digitales
Los efectos digitales integrados proporcionan herramientas adicionales
que mejora la mezcla, usando el FILTER el FLANGER o el REVERB
dispones se una variedad de trucos para completar el estilo de mezcla.
Plataforma de Interconexión USB
El DMIX-600 soporta tanto iPod ™ como Playlists personales, que se
puede crear usando los Apple iTunes ™ (en el caso de un Ipod ™) o
nuestro propio DB SE el software. Cuando iPod ™ Playlists esta cargado, una opción de menú aparecerá el menú principal de Opciones de
búsqueda. De otra manera, las playlists personales son accesibles del
menú Playlist.
4
Page 41

Compatibilidad y Perifericos Recomendados
Una palabra sobre Compatabilidad
Los DMIX-600 (y todos los productos Cortex) han sido diseñados para
operar con todos los dispositivos USB sin driver. Esto significa que si el
producto no requiere un driver propietario y puede ser direccionado de
forma nativa por un PC o Macintosh, debería ser compatible con Cortex.
Nótese que aunque un producto funcione en un ordenador sin haber
instalado un driver de un disco incluido con el producto, no significa que
este sea accesible de forma nativa.
Esto quiere decir que si el producto no requiere el software de conductor
propietario y puede ser tenido acceso natalmente por un ordenador
personal o el ordenador de Macintosh, debería ser compatible con la
Corteza. Note que solamente(justo) porque el producto trabaja sobre un
ordenador sin usar un disco de conductor incluido, que no significa(piensa) que es realmente driverless.
En teoría (pero a veces no en la practica), cualquier dispositivo que no
requiera driver debe funcionar bien con Cortex. Sin embargo, las diversas especificaciones de ciertos productos (sobre todo memorias USB)
podrían presentar alguna incompatibilidad. Se entiende que la prueba
de cada periférico USB del mercado sería un búsqueda inacabable y la
aparición de nuevos periféricos a diario aún lo complica más.
Si usted tiene algún problema con un periférico específico, encuentre por
favor la sección consultiva de la compatibilidad de nuestra página Web
y conózcanos! En la mayoria de los casos, el soporte a estos periféricos
se pude instalar para dispositivos que no siguen las especificaciones
habituales
Requerimientos en los dispositivos
Notas Operacionales
rande de música, usar el programa DBC será drásticamente más rápido
g
para crear una base de datos.
DAE capacidad para reproducción de Audio CD mediante unidades
•
CD-ROM/DVD-ROM
A la hora de reproducir audio CDs en una unidad CD-ROM/DVD-ROM,
dicha unidad debe soportar bit-accurate Digital Audio Extraction (DAE
or short). Si la unidad no cumple este registro, es posible que se apre-
f
cien anomalías durante la reproducción como pueden ser saltos y
pequeños ruidos.
• Los Hubs USB deben ser Alimentados, no usar Hubs Pasivos (no
alimentados)
Aunque el Cortex es capaz de alimentar la gran mayoría de dispositivos
USB alimentados, los Hubs USB deben ser alimentados a parte. Aunque
un hub pasivo puede funcionar, la desconocida corriente de los dispositivos conectados a él pude ocasionar inestabilidad al operar con el
Cortex.
• La protección de escritura debe estar Desactivada (donde proceda)
Cuando se usa un dispositivo gravable (disco duro, reproductor de música, memoria flash), cualquier protección de escritura debe ser desactivada. De lo contrario el Cortex no podrá guardar la base de datos que
haya creado.
Dispositivos Certificados como compatibles
• Compatibilidad USB
El dispositivode almacenaje debe cumplir las especificaciones USB 1.0,
1.1, or 2.0 . Los dispositivos Wireless USB no están soportados.
• A ser posible, los dispositivos USB deben estar diseñados específicamente para Cortex
Para un mayor rendimiento, los dispositivos de almacenaje deben ser
específicamente utilizados para uso exclusivo de audio. Es aconsejable
no almacenar otros ficheros en el dispositivo a parte de ficheros de
audio y ficheros de base de datos de Cortex.
• Las unidades no deben estar particionadas
El DMIX-600 no puede trabajar con múltiples particiones -solo reconoce
la primera partición activa del dispositivo. Esto es crucial para la efectividad del motor de búsqueda de la base de datos.
•Sistemas de ficheros de Memorias Flash y discos duros FAT32, NTFS,
o HFS+
Todos los dispositivos de almacenaje deben estar formateados usando
los sistemas de ficheros FAT32, NTFS, o HFS+ . En PCs con Windows,
todos los discos duros usan los sistemas FAT32 o NTFS , a partir
deWindows XP o posterior solo NTFS. Los ordenadores Macintosh y los
basados en Linux usan el sistema HFS+.
• NTFS es solo de lectura!
Si se esta usando un disco duro externo formateado en NTFS, no se
podrá crear una base de datos usando una unidad DMIX-600. En cambio, se podrá usar el programa Cortex Database Creation (DBC) para
PC o Mac. Esto no sorprenderá a la mayoría de usuarios, dado que los
únicos dispositivos que estarán típicamente formateados en NTFS son discos duros con capacidad de más 32GB. Cuando hay una colección
Para una lista de los dispositivos que se han probado y se certifican
para ser compatibles con el DMIX-600, visite por favor la sección de
la ayuda de nuestra página Web site en http://www.cortex-pro.com
5
Page 42

Notas Operacionales
Información Adicional
Mantenimiento de unidades almacenamiento
Cuando utilice unidades de almacenamiento, como hard drives, y reproductores de música basados en hard-drive (iPod, Zen), hay que realizar
cierto mantenimiento. Debido a que Cortex utiliza tecnología de flujo
para manipular más de un fichero de música simultáneamente desde
una única unidad, los hard drives y unidades basadas en hard-drive
deben ser desfragmentadas regularmente para asegurar la integridad
de los ficheros enviados en paquetes.
Fragmentación se refiere a “la condición del disco donde los ficheros
están divididos en trozos repartidos por el disco. La fragmentación
ocurre siempre cuando se usa el disco frecuentemente, creando, borrando, y modificando ficheros. En cierto momento, el sistema operativo
necesita guardar partes de un fichero en clusters no consecutivos. Esto es
totalmente invisible para el usuario, pero ralentiza la velocidad de acceso a los datos porque el controlador del disco debe buscar en varios
sitios para juntar un fichero.”
El mantenimiento de estas unidades debe realizarse a través del ordenador, y debe hacerse cada vez que hay cambios sustanciales en la biblioteca musical. Note que si no hace esto, se producirán retardos de
acceso saltos en la reproducción de audio.
• Con maquinas basadas en Windows XP
Primero conecte la unidad que quiera desfragmentar. Si está conectando
un reproductor basado en hard-drive, como un Apple iPod o Creative
Zen, asegúrese de salir de cualquier aplicación que entre al conectar.
Limpieza de la unidad
Para limpiar el Dmix-600, use solo un paño seco y suave y/o aire comprimido. Si la unidad está pegajosa, le sugerimos utilizar una solución de
2:1 de agua destilada y 30% de alcohol isopropilico. Evite usar productos quimicos abrasivos como gasolina, disolventes, lejía, o ácido
clorhídrico, que dañarían la unidad..
Condiciones de fucionamiento
Para un óptimo funcionamiento, la temperatura del entorno de trabajo
debe ser de +5º C a +35º C (+41º F - +95º F). No mantener esta temperatura de trabajo puede dificultar la lectura del LCD display, sobrecargas termales, o inestabilidad de todo el sistema. Evite exponer la
unidad al sol directo.
Cuando coloque la unidad en una instalación, procure que este en una
superficie estable, tan lejos de vibraciones como sea posible. Aunque los
Cortex no se afectan por vibración, las unidades de memoria (especialmente las basadas en hard drive) que se utilizan en conjunción con ellos,
no están protegidas. Asegúrese también de no colocar o usar el reproductor en superficies que generen calor, como amplificadores o cerca de
focos.
Nunca use otra fuente de alimentación que la suministrada con el aparato, ya que podria dañar la unidad y anular la garantia. El adaptador
suministrado es personalizado y no puede encontrarse en el mercado.
Para cargar el Desfragmentador, vaya a Menú Inicio, y encuentre el
Desfragmentador de disco en el menu Accesorios/Herramientas.
Cuando el Desfragmentador se ha cargado, seleccione la unidad a
desfragmentar y click el botón ‘Desfragmentar’ abajo de pantalla.
Para más información en desfragmentar, consulte ayuda Windows.
• Con maquinas basadas en Apple Macintosh
Según Apple, al estar provistos del sistema de localización de ficheros
HFS no es necesario ningún tipo de desfragmetación. Por esto, no hay
ningún software incluido en OSX para hacer esto. De todas formas, esto
no garantiza que la desfragmentación no sea necesaria en los periféricos conectados a ellas.
Para mas información de temas Apple, vea este articulo:
http://docs.info.apple.com/article.html?artnum=25668
Siempre tenga copias de seguridad!
Debido a la fragilidad de algunos componentes de PC, insistimos en que
debe hacer copias de seguridad de las unidades a trabajar con Cortex.
Todos los hard drives (reproductores de música basados en hard-drive),
pueden dar fallos - tienen partes móviles en el interior. En lugar de
jugar a tener suerte que su hard drive no va a tener fallos un mes mas,
o un año mas, es más inteligente optar por hacer una copia de seguridad de sus datos para evitar el peor de los casos.
Uso legal de DMIX-600
Ni Cortex ni sus distribuidores asumen la responsabilidad sobre el uso
hecho del Dmix-600. El usuario debe asegurarse que el/ella tienen las
licencias y consentimientos en regla (sobre copyright/publicación, derechos de reproducción, derechos morales u otros) para permitir el uso
legal de Dmix-600. Esto es valido para licencias de organizaciones,
administraciones, derechos de reproducción en grabaciones de audio o
consentimientos de cualquier otro derecho.
La línea de productos Cortex, están diseñados para hacer más eficiente
el trabajo de los DJs, no están diseñados como herramienta para facilitar la piratería. Pedimos a nuestros usuarios que compren legítimamente
la música que vayan a utilizar, y ayuden a los artistas a mantenerse
como profesionales de este mercado.
Ni Cortex ni su distribuidor se harán responsables de perdidas de datos
por falta de copia de seguridad.
6
Page 43

Guia de inicio
Panel trasero y frontal
Panel Trasero
2
4
6
9
1
1.DC entrada c/enclave de seguridad
Este conector se usa para el adaptador de corriente AC/DC. Al lado
del conector hay un enclave de seguridad que puede asegurar el
cable para evitar desconexiones accidentales
2. Conectores (NO BALANCEADOS) MASTER OUT L/R RCA
Salida RCA tipo audio stereo no balanceada. Estos conectores proporcionan la
señal de audio generada en la unidad DMIX-600.
3. Conectores (NO BALANCEADOS) BOOTH OUT L/R RCA
Salida RCA tipo audio stereo no balanceada. Estos conectores proporcionan la
señal de booth monitor del DMIX-600.
4. Conectores (NO BALANCEADOS) RECORD OUT L/R RCA
Salida RCA tipo audio stereo no balanceados. Estos conectores proporcionan la
señal de RECORD generada en la unidad DMIX-600.
5. Conectores (BALANCEADOS)MAIN OUT 2 L/R XLR
Salida XLR tipo audio estereo balanceada. Estos conectores proporcionan la
señal de audio generada en la unidad DMIX-600.
6. Conmutador USB i/o DOCK/MSD
3
5
7
10
B
C
A
7
8
Panel Frontal
11
7. ENTRADAS DE MICROFONO
El Dmix-600 tiene dos entradas de micro una en el frente y otra en la
parte trasera. Ambas están controladas por el mismo control rotativo de vol-
umen ubicado en el panel frontal. El control rotatorio de volumen esta dotado
de interruptor on/off, así que al girar totalmente el control hacia la izquierda
en sentido contrario a las agujas del reloj pasará a la posición de off y el LED
azul se apagara indicando que el canal del micrófono esta apagado. El canal
del micrófono un EQ de 2 bandas permitiendo así ajustar el tono de la entrada de micro.
8. ENTRADAS CONMUTADAS PHONO/LINE INPUTS y CONMUTADORES.
Estos pequeños conmutadores permiten escoger entre la entrada PHONO
(Giradiscos) o el nivel de la entrada LINE (Mp3, CD, Radio Caset,etc..).y
requieren una conmutación correcta.
Cuando se conmuta a la posición PHONO se debe usar un Giradiscos con cartucho magnético. Y cuando se conmuta a la posición LINE se debe conectar
cualquier dispositivo de nivel lineal como (Mp3, CD, Radio caset, etc).
9. TORNILLO DE TIERRA
Cuando se usa un giradiscos, se necesita derivar a tierra los cables RCA atornillados a las horquillas de tierra hasta el tornillo de tierra ubicado en el panel
trasero del DMIX-600.
A. ENTRADA USB MSD Este conector se usa para conectar un dispositivo de
almacenamiento masivo USB que contenga su blibioteca musical. Lo que incluye,
pero no esta limitado a discos duros externos, memorias flash, reproductores
digitales de musica portatiles, unidades CD/DVD-ROM, lectores de targetas de
memoria y hubs USB activos.
B. SALIDA USB iPOD Este conector permite conectarse a un PC o portatil y
usar el DOCK en el DMIX-600 com un iPod Dock estandar.
C. CONMUTADOR DOCK / MSD Este conmutador permite escoger si se va a
usar un iPod como MSD (dispositivo de almacenaje masivo) o como DOCK de
iPod y conectado a un PC como un DOCK de iPod normal.
Botón de encendido
10.
Pulse y mantenga el botón de encendido durante 1 segundo para iniciar la
unidad. Para apagar la unidad, el botón debe ser mantenido durante 3 segundos para evitar que la unidad se apague accidentalmente.
11.
Jack de auriculares y controles Cue
El jack de auriculares situado en el frontal del Dmix 600 está diseñado para
aceptar cualquier auricular estándar de 1/4’‘. Use el fader de Cue para balancear entre canales para pre-escucha. Use el volumen cue para controlar el
volumen del auricular. El botón CUE EFFECTS cuándo está en ON permite un
efecto en los auriculares.
7
Page 44

Guia de instalación
1
18
9
12
Panel Superior y Funciones
Panel Superior
10
2
3
4
13
19
20
21
22
5
14
6
23
15
7
11
16
8
1.Base Ipod
Este sirve para conectar cualquier Ipod (Gen 3 y superior) a la unidad.
Así mismo, usando el conector USB tipo B en la trasera, el iPod puede
conectarse a su PC a traves del Dmix-600 para transferencia de
ficheros.
2. BotonesTime y Single
Presione el botón TIME para cambiar entre Time Remaining y Time
Elapsed en la pantalla de reproducción mientras se reproduce un
fichero de audio. Use el botón Single para cambiar entre los modos
Single y Continuous.
3. Volumen Master
Use este botón para cambiar el volumen de la salida Master de su
.
unidad.
4.Volumen de Cabina
Use este botón para cambiar el volumen de la salida Cabina de su
unidad.
5. Controles Effects
Este aparato controla los tres efectos de la tabla FILTER, FLANGER y
REVERB. Los efectos pueden ser asignados a cada canal individualmente o a la salida de mezclas principal. También se puede ajustar el
parámetro y la mezcla DRY/WET del efecto.
6. Medidor Master/Cue VU interruptor
El interruptor de Master/Cue situado bajo el VU meter se usa para
elegir lo que se muestra en el VU meter. En posición MASTER se
mostrará el volumen de la salida Master. En posición Cue para monitorizar el volumen de los canales Uno y Dos en relación uno del otro.
7. VU meter
El VU meter muestra el nivel de la salida Master o Cue según la selección del interruptor Master/Cue.
17
8. Crossfader/Curva de Fader
El Crossfader se usa para pasar del canal uno al dos. Este crossfader
puede cambiarse por el usuario
cionado el conmutador a la derecha se obtiene un CROSSFADE gradual y posicionándolo a la izquierda un CROSSFADE rápido.
9. MSD/Linea-Phono
Este interruptor elige la entrada de MSD (Ipod/USB) y Linea/Phono de
su mezclador.
10.Botones de Ganancia y EQ
Use los controles Agudos, Medios y Graves para realzar el tono de su
música. Use el control Ganancia juntamente con el fader para cambiar
el volumen de su música.
11.
Fader de Line
Los Faders de cada canal se usan como control de volumen. Use estos
junto con la Ganancia y Eq de cada canal para ajustar Volumen y
Tono.
12.Info/Play/Search Botones
Use el botón INFO para ver la información de la reproducción. Use el
botón SEARCH para entrar en el menú de búsqueda. Use el botón
PLAY para re-entrar en la pantalla de reproducción
SHIFT botón
13.
Manteniendo el botón SHIFT se extiende el uso de ciertos botones de
la unidad, dando funciones alternativas.
14.MODOS JOG botón/indicador
El botón controla alternativamente si el JOG WHEEL funcionará como
PITCH BEND o FF/REW. Cuando el indicador LED está encendido, indica que el JOG WHEEL funciona como FF/REW.
se enciende funciona como un PITCH BEND.
. Configuraciones FADER CURVE, posi-
.
.
Cuándo el JOG WHEEL no
8
Page 45

Guia de instalación
1
9
12
Panel Superior y Funciones (Continuación)
18
Panel Superior
10
2
3
4
13
19
20
21
22
5
14
6
23
15
7
11
16
8
15.JOG WHEEL
El JOG WHEEL controla muchos aspectos de la unidad, y puede usarse
para navegar por los menús, buscar en la música y manipular el pitch.
La respuesta del JOG WHEEL depende del modo de operación, así
como del status del indicador PITCH ON/OFF y JOG MODE. El JOG
WHEEL también es sensible al tacto permitiendo presionarlo para
parar la música y/o trabajar sobre la música como si de un giradiscos
se tratara.
16.CUE botón/indicador
Cuando el indicador LED que ilumina este botón esta encendido, indica
que hay un punto CUE POINT memorizado.
17.PLAY/PAUSA botón/indicador
Cuando el indicador LED que ilumina este botón queda encendido fijo,
indica que la unidad esta en modo PLAY. Cuando el indicador LED
parpadea, indica que la unidad esta en modo PAUSA.
18.LCD DISPLAY panel
Este display azul iluminado es de 20 carácteres e informa sobre la
pista/onda, carpetas, parámetros y ajustes e información de búsqueda. El contraste se regula en el menú de Edición.
19..Sección Hot Cue
Hay dos HOT CUES por lado y ambos pueden usarse al vuelo. Adicionalmente
pulsando SHIFT con el botón CUE se puede editar el tiempo de entrada del
punto CUE.
20.
NAVEGADOR teclado
Estos botones permiten al usuario navegar por los menús y características del Dmix-300. Dependiendo del modo de la unidad, los botones
pueden servir para distintos propósitos.
17
21Botones Master Tempo y Key Adjust
Estos botones efectúan funciones que cambian el uso del diapasón. El
Master Tempo cambia la velocidad sin cambiar el diapasón. El Key
adjust cambia la clave de la canción sin cambiar la velocidad. Ambos
pueden combinarse entre si. Cuando el Key Adjust esta habilitado
entonces los botones PITCH BEND actuan para cambiar la clave en vez
de actuar como PITCH BEND.
22.Pitch Fader, PITCH ON/OFF indicador y botones PITCH BEND
Este deslizante, cuando se empuja hacia arriba de la unidad (+),
aumenta el tempo de la reproducción. Cuando se desliza hacia abajo
(-), el tempo de la reproducción disminuye. Los botones de Pitch Bend
pueden utilizarse para modificar temporalmente el incremento o
descenso del pitch para cuadrar el tempo, y cuando se pulsan los dos
botones a la vez el pitch se enciende o apaga (visualizado en los LED
de Pitch On/Off).
23. Sección Loop
La función Loop permite establecer un punto “IN i otro “OUT’ y repetir
(LOOP) cualquier información que este entre estos dos puntos
indefinidamente. También hay la posibilidad de ajustar el punto “IN”y
el otro “OUT” simplemente presionando SHIFT al mismo tiempo que
cada botón IN o OUT, esto proporciona al editor loop la habilidad de
calibrar el loop al resultado deseado. EN cualquier momento se pude
activar y desactivar el loop presionando “OUT”. Posteriormente para
reactivar el loop solo hay que presionar el botón reloop reenganchando el loop desde el punto original ‘IN “.
9
Page 46

Usando el DMIX-600
Preparando para usar
PASO UNO
Conecte el adaptador AC/DC al DC Inlet, ubicado por detrás de la unidad. Sujete la presilla de seguridad (situado directamente debajo del DC
Inlet jack) del cable, de modo que el cable no se desconecte.
PASO DOS
Conecte cada salida tipo XLR (Balanceada) y/o tipo RCA (No Balanceada) a la fuente apropiada (mirar el diagrama abajo). Las características del
DMIX-600 comprenden una gran variedad de salidas donde usar escoger dependiendo de sus requerimientos, todas las salidas pueden usarse
simultániamente.
PASO TRES
Conecte su dispositivo USB primario al puerto situado en medio del panel trasero. Puede escoger un dispositivo libre de instalación de driver como
pueden ser los basados en los sistemas de ficheros FAT32, NTFS, o HFS+. También puede conectar un hub
USB (activo) alimentando para ampliar el numero de puertos disponibles, ofreciendole la ventaja de
conectar un teclado USB o más dispositivos de almacenamiento USB (mirar el diagrama de abajo).
PASO CUATRO
Pulse el botón Power situado a la izquierda del panel frontal. La unidad tardara unos 5
segundos en iniciarse mientras detecta cualquier dispositivo USB que haya es ese momento
conectado.
SALIDAS USB ENTRADAS
Conexiones
MIC CUE
10
Page 47

Selección del dispositivo y Creación Base de datos
PASO UNO - SELECCIÓN DEL DISPOSITIVO
Cuando convenga, seleccione el dispositivo de almacenamiento deseado,
a cada lado, al que se quiera acceder. Use el Navigator Keypad para
vanzar a través de la lista de dispositivos, y presione Enter para selec-
a
cionarlo.
Si es necesario, puede conectar más dispositivos de almacenamiento USB
sin apagar la unidad.
Usando el DMIX-600
Nótese que cuando se selecciona un dispositivo en un lado de la unidad
necesitará completar la Creación de una Base de
datos antes de poder seleccionar el dispositivo en
el otro lado. Durante este tiempo, la
pantalla opuesta mostrará
“Esperando al otro lado.”
PASO DOS - INDEXANDO
Una vez seleccionando el dispositivo, la unidad buscará la base de datos de música existente en ese dispositivo. Si es la primera vez que se esta usando ese dispositivo en el
DMIX-600, la unidad indicará que está indexando para que se pueda
buscar en ella cualquier canción en segundos. Si ya se ha usado ese dispositivo de almacenamiento en el DMIX-600 pase al paso de PASO
DOS - VERIFICACIÓN.
Si se quiere crear la base de datos usando el DMIX-600, seleccione
‘YES’ a esa sugerencia.
Durante el procedimiento de indexación, la unidad creara una base de
datos basada es los tags ID3 que haya en el dispositivo de almacenamiento. Si se esta usando un disco duro de más de 20GB, o un dispositivo NTFS, sugerimos que se use el programa Cortex Database Creation
para PC mejorando así la indexación, eso ahorrara tiempo (especialmente con una CPU rápida). El programa Cortex Database Creation
está disponible de forma gratuita en http://www.cortex-pro.com.
Fig 2.1 - Seleccione dispositivo
Fig 2.2 - Crear Database seleccionando ‘SI’
Fig 2.3 - Database Creación
Una vez ha iniciado el proceso de indexación, este puede ser cancelado presionando el Botón Info.
VERIFICACIÓN
Si esta usando un dispositivo de almacenamiento que ya ha sido indexado, le será indicado con una leyenda permitiéndole verificar la base de
datos. Cada vez que se añadan ficheros al dispositivo de almacenamiento, habrá que usar la función de verificación para añadir estos
ficheros al índice, o usar la aplicación Cortex Database Creation PC .
Es muy recomendable usar el programa Database Creation, dado que
puede procesar ficheros mucho más rápido que el DMIX-600.
Una vez el proceso de verificación ha iniciado puede ser cancelado presionado el botón info. Una vez haya finalizado la verificación, simplemente elija la opción etiquetada ‘Salir Verificación.’
Felicidades! Está preparado para empezar a buscar a través de su biblioteca musical rápida y eficientemente. Usar este método le ayudará a
localizar cualquier canción en su colección mucho más rápido que antes.
Fig 2.4 - Cuando añada música a su dispositivo, la database debe
ser verificada y actualizada para indexar las nuevas canciones.
Fig 2.5 -Salir de Verificar
Fig 2.6 - Ventana de bienvenida, la unidad está lista
11
Page 48

Usando el DMIX-600
PCIONES DE BÚSQUEDA
O
La base de datos de búsqueda del DMIX-600 proporciona al DJs una
manera rápida y fácil de encontrar pistas en una extensa biblioteca
permitiendo al usuario buscar por canción, artista, genero, álbum, BPM,
cadena listas de reproducción, navegador de ficheros y últimamente
añadido por top 100 y las últimas 100. Simplemente escoja unas de
estas opciones de búsqueda, y este criterio en particular será mostrado
por orden alfabético.
Búsqueda por canción
Cuando busque por canción verá presentado todos los títulos de las pistas de la base de datos que ha sido creada por el DMIX-600 o la
aplicación de ayuda.
Búsqueda por artista
Cuando escoja la búsqueda por artista se pude estrechar el número de
resultados seleccionando primero el artista deseado, y posteriormente
seleccionando la pista que se quiera reproducir.
Opciones de Búsqueda (
Fig 2.7 - Búsqueda por título
Fig 2.8 - Búsqueda por artista
PARTE I)
Búsqueda por género.
Cuando escoja la búsqueda por género, verá una lista de todos los
géneros encontrado en la base de datos. Dado que no todos los MP3
tienen el campo género definido en las etiquetas ID3, algunas de las
pistas no serán mostradas en esta búsqueda. Una vez se seleccione un
género de la lista, se podrá acceder a todas las canciones de ese
género
Búsqueda por álbum.
Usar la opción de búsqueda por álbum le permitirá buscar el nombre
del álbum al cual pertenece a una pista. Tenga en cuenta que esta
opción no le permitirá acceder a todas las pistas porqué a veces hay
singles que se venden por separado y no pertenecen a u álbum especifico. Una vez seleccionado el álbum, se mostrarán todas las pistas que
pertenezcan al mismo.
Búsqueda por BPM
El DMIX-600 puede leer el BPM de los tags ID3 de sus canciones y buscar por BPM, si sus canciones no tienen BPM en sus etiquetas ID3 este
campo será considerado como cero y la unidad mostrará canciones del
más bajo al más alto BPM.
NOTA: El DMIX-600 no calcula el BPM sólo muestra la información contenida en la etiqueta ID3. Hay muchos programas de terceros que le permiten
automática o manualmente introducir los BPM de toda su música.
Fig 2.9 - Busqueda por genero
Fig 3.0 - Búsqueda por álbum
Fig 3.1 - Búsqueda por BPM
12
Page 49

Búsqueda por Cadena
Una de las mejores características del DMIX-600 es la búsqueda por
cadena, la cual le permite encontrar una palabra específica o cadena
e palabras dentro de la base de datos. Esto le será de gran ayuda
d
cuando usted (o su cliente) tenga una búsqueda que hacer, pero no
sepa exactamente que titulo o artista es.
Una vez haya seleccionado “Búsqueda por Cadena” se le presentará
una casilla donde introducir palabras o cadenas de palabras que serán
usadas para consultar la base de datos.
Pude controlar su DMIX-600 mediante cualquier teclado Wirelees o
USB. Solo tiene que enchufar el teclado USB en cualquiera de las
ranuras USB y ya podrá buscar palabras para introducir canciones
directamente al reproductor.También se puede controlar muchas de
las funciones de su reproductor desde el teclado, abajo hay una
lista de los nombres claves y sus correspondientes funciones.
Usando el DMIX-600
Opciones de Búsqueda (PARTE II)
Fig 3.2- String Search input prompt
NOTA: No importa en el modo en que se encuentre, cuando
empiece a teclear, DMIX-600pasará a la ventana de búsqueda por
cadena.
También se pude usar el Jog Wheel o flechas Up/Down arrows (en el
Navigator Keypad), para entrar la primera letra de la Cadena de
Búsqueda. Use la flecha derecha o la tecla enter para avanzar hacia el
siguiente espacio y teclee la siguiente letra. Debe presionar la flecha
izquierda para volver a la letra previa o presionar Shift+Left to Para
introducir un espacio (esto borrara la letra previa).
Finalmente, cuando la búsqueda por cadena se haya introducido, necesitará presionar la tecla enter dos veces, y la unidad ejecutará la búsqueda.
Una vez haya presionado dos veces enter la unidad empezará a procesar su búsqueda. Dependiendo de la magnitud de su biblioteca, esto
tardará un momento.
Después de que la unidad haya finalizado la ejecución de la búsqueda,
esta mostrará los resultados encontrados para cada categoría: Títulos,
Artistas, Géneros y álbum – cada uno de los cuales podrá ser accedido
usando el Navigation Pad Arrow Keys o el Jog Wheel. Nótese que la
cantidad de resultados encontrada para cada categoría será mostrada
entre paréntesis. En este ejemplo, hay 10 títulos de canciones con la palabra “LOVE” en ellas, y un artista.
Fig 3.3 - Using Jog Wheel to input a string
Fig 3.4 - Processing the Search
Fig 3.5 - Displaying result categories
13
Page 50

Usando el DMIX-600
BÚSQUEDA POR CADENA (CONTINUACIÓN)
Una vez seleccionada una categoría – Títulos, Artistas, Géneros o
Álbumes, usted podrá navegar a través de las selecciones como lo haría
en los demás modos. Una vez más puede seleccionar una pista usando el
Jog Wheel o el Navigation Pad, y presione Enter para cargarla.
Soporte a listas de reproducción iPod ™
unque no es fácil crear listas de reproducción en la unidad DMIX-600 se
A
pueden cargar listas de reproducción iPod™ que hayan sido creadas
usando iTunes® .
Una vez la lista de reproducción haya sido creada usando iTunes®, esta
se puede cargar desde la pantalla principal de Opciones de Búsqueda.
Creando Listas de Reproducción Simples
Cuando use el navegador de ficheros en Single Mode OFF, usted puede
reproducir todos los ficheros de un directorio específico simplemente seleccionando el primer fichero y dejando que la unidad siga reproduciendo.
Si usted cambia los nombres de los ficheros (desde su PC) para que vayan
precedidos por un número, el DMIX-600 lo reproducirá por orden numérico.
Opciones de Búsqueda (
Fig 3.6 - Selecting a matching title from the executed search
Fig 3.7 - iPod/XML Playlist option from the Search Menu
PARTE III)
Navegador de Ficheros
El Navegador de ficheros está diseñado para permitirle ver la estructura de directorios encontrada en el dispositivo de almacenamiento,
después de haber buscado por un criterio específico. Esto puede ser útil
si usted mantiene su colección de música en orden, pero puede localizar
una canción que no tenga la información de etiqueta ID3 apropiada.
Cuando una pista no tiene etiqueta ID3 esta no será añadida a la base
de datos de pistas para buscar.
Cuando usted entre en el navegador de ficheros, usted verá exactamente la estructura de ficheros que haya en el dispositivo de almacenamiento. Use el Jog Wheel o el Navigator Keypad para avanzar a
través de las entradas. Para retroceder en el Menú Principal, presione la
tecla de flecha izquierda.
Cuando haya encontrado el fichero MP3 que quiera reproducir, simplemente presione Enter, y la pista se cargará. Usted debe presionar el
botón Search , encontrado a la izquierda de la pantalla de la unidad,
en cualquier momento para volver al menú de opciones de Búsqueda.
Igualmente, cuando usted esta en modo de Búsqueda, debe presionar el
botón Play para volver a la pantalla de reproducción.
Fig 3.8 - Simple Playlist by using numbered files with File Browser
Fig 3.9 - Selecting File Browser from Main Menu
Fig 4.0 - Browsing file/directory structure using File Browser
14
Page 51

Usando el DMIX-600
ecientemente Añadidas
R
El DMIX-600 mantiene las pistas recientemente añadidas a la base de
datos y le permite buscar justamente en esas canciones en particular, se
mostraran estas canciones en orden alfabético.
Top 100
sí como guarda las pistas de música que ha añadido, el DMIX-600
A
también guarda las pistas más reproducidas y mostrara 100 de estas
canciones en el orden de más reproducida a menos reproducida.
Last 100
También se pueden buscar a través de las 100 últimas canciones reproducidas, si el sistema ha sido apagado el DMIX-600 guardará toda
esta información en el dispositivo de almacenamiento que haya usado.
FORMA DE ONDA
Esta característica le permite ver un diagrama de bloques que representa del pico más alto al más bajo de volumen para la canción escogida,
recorriéndola a lo largo de la reproducción de la canción, una flecha
representa el punto exacto donde se esta reproduciendo la canción.
Opciones de Búsqueda (
PARTE IV)
Forma de Onda y Display de tiempo
Fig 4.1 - Search by recently added
Fig 4.2 - Aearch by last 100
Para iniciar la función FORMA DE ONDA solo pulse el botón PLAY en la
sección de modo pantalla.
Usando el programa DB SE (colgado en nuestra página web)
WWW.CORTEX-PRO.COM Puede crear formas de onda para todos
sus ficheros de música.
Modo Time Display
Cambiando el Modo Time Display es tan simple como presionar el botón
Time para pasar de tiempo transcurrido a tiempo restante. Tiempo tran-
scurrido muestra cuanto tiempo ha pasado desde el inicio de la pista y
el Tiempo Restante muestra cuanto tiempo falta para el final de la pista.
Debe presionar Shift+Time para cambiar el Modo Time Display.
+
Fig 4.3 - Waveform
Fig 4.5 - LCD Display and progress indicator in time elapsed
Cuando se cambia el modo Time Display notará el Indicador de
Progreso también cambiará para indicar el Tiempo Transcurrido o el
Tiempo Restante.
Fig 4.6 - LCD Display and progress indicator in time remaining
15
Page 52

BOTÓN INFO
Encontrará que el botón info, ubicado arriba a la izquierda de cada
lado del DMIX-600 se convertirá en una parte indispensable del uso del
DMIX-600. A parte del DMIX-600 es capaz de mostrarle una apropiada cantidad de información en el LCD, no todos los atributos de cada
pista pueden ser mostrados al mismo tiempo. Adicionalmente habrá
momentos cuando usted deba trabajar con dos pistas con el mismo titulo,
el Botón info le ayudará a conocer que pista realmente quiere seleccionar.
Usando el DMIX-600
Botón Info y Atributos de pista
Mientras esta en el modo Play o Búsqueda, presionando el botón info
mostrará todos los atributos relacionados a la reproducción en curso o
de la pista seleccionada (dependiendo en que modo Play o Búsqueda
se encuentre).
La funcion Info muestra:
Artista- Artista tal como se lista en la etiqueta ID3
Título – Título tal como se lista en la etiqueta ID3
Álbum- Álbum tal como se lista en la etiqueta ID3
Tipo de fichero – si el fichero es MP3 o WAV
Género- Género tal como se lista en la etiqueta ID3
Directorio y nombre de fichero – exactamente como exista en la estructura
del directorio del dispositivo de almacenamiento
Nótese que la mayoría de atributos se muestran directamente de la etiqueta ID3 encontrada en el fichero MP3. Si la etiqueta ID3 no existe
ninguno de estos atributos, serán mostrados en la pantalla Info.
Fig 4.7 - The Info Button is used to display all track attributes
Fig 4.8 - Information Screen 1 of 3
Fig 4.9 - Information Screen 2 of 3
Una vez haya presionado el botón Info, usted verá todos los atributos
relativos a la pista de reproducción en curso o pista seleccionada. Debe
usar el Navigation Pad Arrow Keys o el Jog Wheel .. para desplazarse
arriba y abajo y ver toda la información.
Para salir de la pantalla de Info, debe presionar debe presionar el
botón info otra vez o también puede presionar los botones Search o
Play Modepara acceder inmediatamente a estos dos modos, cuando
proceda.
Fig 5.0 - Information Screen 3 of 3
16
Page 53

Usando el DMIX-600
Modo Play y Single Auto Cue
Sección Cinco: Modo Play
El modo Play es el corazón del Dmix-300. Como los reproductores de
CD convencionales, el Dmix-300 le permite seleccionar múltiples rangos
de pitch, memorizar puntos cue, y buscar trozos de pista con precisión.
El Dmix-300 se destaca del CD tradicional, en que es mucho más rápido
en cargar y empezar una reproducción, da mucha más información en el
display, y puede memorizar cues para otras sesiones.
.
Entrando en Modo Play
Por defecto, cuando pulse Enter para seleccionar una pista en modo
busqueda, la unidad inmediatamente cargará la pista y entrará en
Modo Play.
Si la música está sonando y desea volver a la pantalla de Modo Play,
simplemente pulse botón Play Mode.
Track Title
Fig 5.1 - Play Mode Screen
Time Display
Progress Indicator/Waveform
Pitch Value
Modo Single (Single Auto Cue)
En modo Single, cuando se carga una pista, se desplazará al inicio físico
de la música, y alli esperará que pulse Play. Al final de la pista, la
unidad entra en Pausa. Para poner este Modo, pulse Shift+Single en
cada lado que quiera este modo.
Cuando se anula el modo Single, la unidad entrará en reproducción
inmediatamente. Al final de la pista, la unidad seguirá reproduciendo la
próxima pista. Cuando apagamos el modo Single, podemos reproducir
en secuencia todos los resultados que tenemos de una busqueda.
Pulsando de nuevo Shift+Single encada lado podremos cambiar el
modo Single a encendido o apagado.
Pulsando solo el botón Single se visualizará, en ambos lados, el estado
de este modo - si está encendido o apagado.
Fig5.2 - Entering Play Mode
Fig 5.3 - LCD Display shows status of Single Mode
+
Fig 5.4 - Using Shift+Single to toggle Single or Continuous modes
17
Page 54

Display de tiempo, Pitch Control y Key Adjust
Pitch Control, Pitch Bend, y rangos Pitch
El Pitch Control permite acelerar (o disminuir) la reproducción de la pista
en el porcentage deseado. El Dmix-600 ofrece rango de Pitch de 4, 8,
16, y 24%, para dar una gran flexibilidad para manipular sus ficheros
de música. En modo 4 y 8% , la resolución de Pitch es de 0.05%, permitiendo un ajuste preciso de nivel.
Para pasar de Pitch On a Off (la unidad no responde a los cambios del
deslizante cuando esta en Off), pulse simultaneamente ambos Pitch
Bend (+) y Pitch Bend (-). El indicador LED se enciende cuando el Pitch
está en On.
Para cambiar el rango de Pitch, pulse Shift+Pitch Bend (+) o Pitch
Bend (-) simultaneamente. El display de Pitch en la pantalla LCD
mostrará momentaneamente al nuevo rango de Pitch.
Usando el DMIX-600
Fig 5.5 - Pitch On/Off by pressing both buttons simultaneously
Para un cambio momentaneo de Pitch, utilice los botones Pitch Bend (+)
y Pitch Bend (-), para incrementar o disminuir temporalmente el pitch y
con relación al rato que este pulsando estos botones.
Cuando el Jog Mode no está conectado (LEDapagado), puede usar también el Jog Wheel como Pitch Bend.
Tecla de Ajuste y Master tempo
La tecla de ajuste y controles master tempo le permiten tener un control
independiente de la tecla de ajuste y tiempo. Cuando master tempo y
la tecla de ajuste están habilitadas, los botones Pitch Bend (+) y Pitch
Bend (-) hacen de botones key adjust con un rango de +-5 medios
pasos, mostrados en Sharp/Flat for +/-, y el Pitch Slider y el Jog Wheel
controlan el Master Tempo y el Master Tempo bend.
Para habilitar el Master Tempo y Key Adjust, primero necesita presionar el botón Master Tempo. si presiona solo Key no se habilitará, y
debe ser activado en el modo Master Tempo.
Para separar Key Adjust, .. simplemente presione el botón Key Adjust en
cualquier momento, y el Key volverá a su valor original para volver al
modo Pitch simplemente presione Master Tempo o precione Pitch Bend
(+) y Pitch Bend (-) . Si Key adjust está habilitado entonces esto lo
desactivará en ese mismo mometo.
Fig 5.6 - Use either thePitch control slider the
Pitch + & -buttons or the Jog wheel to
adjust pitch
Fig 5.7 Master tempo & Key adjust
18
Page 55

Modo Jog y Navegación en reproducción
Jog Mode
uando el LED Jog Mode esta apagado, el Jog Wheel (en modo repro-
C
ducción) actuará de Pitch Bend.
Cuando el botón Jog Mode está pulsado, el indicador LED se ilumina, y
el Jog Wheel te permitirá buscar (FF/REW) a traves de la pista. Cuanto
mas rapido muevas el Jog Wheel, más rápido se desplazará por la
pista. Para utilizar el Modo Jog, la unidad debe estar reproduciendo no
en modo pausa..
Usando el DMIX-600
Fig 5.8 - Engaging Jog Mode for FF/REW using the Jog Mode button
Funciones de Navegación en reproducción
Usando las Teclas de Navegación izq & der, puede buscar a traves de la
pista igual que usando el Modo Jog.
Usando las Teclas de Navegación Arriba & Abajo podrá pasar a la previa o próxima pista que encontro en busqueda. Por ejemplo, si buscó por
Artista, y su busqueda dió 10 pistas por Artista, usando las Teclas de
Navegación podrá elegir entre estas pistas.
Modo Random
Un modo muy util de no tener que atender su reproducción es el modo
Random. Este sistema selecciona de forma aleatoria pistas basadas en el
criterio de busqueda que usted haya fijado. Por ejemplo, si usted selecciona Todas las Canciones, la unidad seleccionará al azar cualquier canción dela lista. Si selecciona por artista, la unidad elegirá al azar una canción solo de ese artista. Lo mismo con Genero, Album, Clave, o incluso por
directorio.
Up/Down - Track Skip
Left/Right - FF/REW Search
Fig 5.9 - Navigation keypad functions in Play mode
El modo aleatorio se activa y desactiva pulsando Shift+Info, el display
LCD indica cuando el modo aleatorio esta activo o no.
Fig 6.0 - LCD Display shows Shuffle Status
19
Page 56

Usando el DMIX-600
Puntos Cue y Memorización
Marcando y Memorizando puntos Cue
Con el Dmix-600, crear y memorizar puntos cue es muy fácil.
y rápido. Por defecto, cuando no hay puntos Cues fijados (o
memorizados), pulsando el botón Cue retornamos al principio de la pista (0:00.00) y entramos en pausa
Para fijar un punto cue durante la reproducción, simplemente
pulse Pausa, y use las teclas de Navegación izq & der o Jog
Wheel para ajustar el momento exacto. Al pulsar Play para reanudar la
reproducción, el punto Cue ya está fijado.
Para memorizar el Punto Cue y guardarlo en la unidad de almacenamiento USB (para recuperarlo cada vez que la canción se carga), encuentre el
punto exacto que desea fijar como punto Cue, y pulse Shift+Cue. Esto
fijará y guardará de forma permanente el punto Cue en la unidad de
memoria. Este proceso también puede hacerse sobre la march, sin para la
reproducción. La pantall mostrará cuando se ha almacenado un punto
Cue..
Para volver al punto Cue, simplemente pulse el botón Cue durante la
reproducción. No pulse primero Pause, ya que esto marcaria un nuevo
punto. Una vez desplazado al punto Cue, la unidad quedará en Pausa.
Para memorizar un nuevo punto Cue, no necesita borrar el punto fijado
previamente. Simplemente pulse Shift+Cue de nuevo, y reemplazará al
punto Cue viejo.
Dese cuenta que para grabar un punto Cue en al unidad conectada por
USB, esta debe tener formato FAT32.
Fig 6.1 - Pressing CUE to return to 0:00:00.
Fig 6.2 - Cue Point Memorization using Shift+Cue
+
Para borrar completamente el Cue Point guardado, mantenga Shift y presione Cue durante dos segundos, hasta que la pantalla indique que el Cue
Point ha sido eliminado.
Fig 6.3 - Cue Point Deletion using Shift+Cue
+
2s
20
Page 57

Modo Hot Cue
ot Cues son puntos Cue que pueden ser configurados al momento
H
(mientras la canción se preproduce) y difieren de los puntos Cue tradicionales en que el programa continua reproduciendo desde el punto que
usted presione el botón, haciendo que sea necesario continuar manteniendo pulsado el botón Play. Para usar los hot cues primero presione el
botón MEMO para derivar el hot cue.
Para grabar un hot cue, primero presione el botón correspondiente (1 o
2) hacia la ubicación donde quiera guardarlo. Para alterar la posición
del hot cue presione el botón SHIFT y el número de cue que quiera editar, entonces use el Jog wheel para alterar el tiempo. Para borrar el
hot cue, presione más la ubicación escogida y manténgalo durante 2
segundos y cuando los botones se apaguen el cue será borrado.
Hot Cues se guardan en la memoria en base a cada canción, y son
automáticamente activados por cada canción si la opción AUTO RECALL
está activada en el menú EDIT. Ellos permanecerán en memoria hasta
que sean borrados, así que si crea un Hot Cue que quiera guardar no se
preocupe ya está guardado! Tenga en cuenta que cargando estos puntos creará una pequeña pausa en la carga de sus canciones, así que si
no necesita guardar estos puntos debe dejarlos apagados para una
mayor velocidad de carga de canciones..
Usando el DMIX-600
Hot Cues
Fig 6.4 - Engage hot cues
Fig 6.5 - Choose Cue number
+
Fig 6.5 - Press Shift and Cue number to edit
21
Page 58

Usando el DMIX-600
.
Función Loop
El DMIX-600 puede repetir un segmento de la canción que este cargada
en cada lado, y guardará este punto LOOP así que este podrá ser rellamado cada vez que cargue esa canción.*
Los puntos Loop son guardados en el dispositivo de almacenamiento que se
*
estaba usando cuando se hizo el Loop y solo podrán ser rellamados desde ese
dispositivo en concreto.
onfiguración loop
C
Para configurar los puntos de inicio presione el botón IN una vez y el
botón se iluminará indicando el punto In donde se ha configurado el Loop
(Fig. A) en la pantalla esta representado por una minúscula (i).
Entonces presione el botón OUT y este se iluminará indicando que el Loop
se ha completado, el DMIX-600 continuará repitiendo entre estos dos
puntos indefinidamente, este punto OUT esta representado por (o) en la
pantalla correspondiente.
Edición de puntos loop
Una vez configurado los puntos Loop se puede ajustar cada punto IN o
OUT, presionando el botón SHIFT e IN y la pantalla PLEASE EDIT IN
POINT, lo que significa que puede usar el JOG para ajustar el punto IN
del loop, , por otro lado si usted presiona SHIFT y OUT la pantalla indicará PLEASE EDIT OUT POINT y podrá ajustar el punto OUT del loop.
Para salir de este modo presione SHIFT y el botón que estaba editando y
la pantalla volverán a su posición previa.
Función Loop
Fig A
Fig B
+
IN
OR
+
Salir del loop
Para salir del Loop y continuar reproduciendo la canción presione el
botón OUT otra vez. (Fig. C) y la canción continuará reproduciéndose. Si
quiere activar un LOOP o reactivar el LOOP anterior presione el botón
RELOOP (FIG D) y el loop empezará otra vez siguiendo mientras que el
botón OUT este presionado.
Borrar loop
TPara borrar el Loop actual presione SHIFT y el R/LOOP durante 2
segundos y el Loop se borrará, los botones IN y OUT se apagarán, en
este momento podrá crear otro Loop. Puede seguir creando todos los
Loops que quiera pero el DMIX-600 SOLO guardará el ultimo Loop que
haya creado con la canción con la canción en particular para la cual fue
creado ese Loop. Esta característica se pude activar en el menú de configuración.
OUT
Fig C
Fig D
22
Page 59

enú de Configuración
M
El Menú de Configuración se puede acceder con la opción final en el Menú
Principal. Cada opción es cambiada al presionar repetidamente Enter
key. Para salir del Menú de Configuración, simplemente presione la tecla
lecha izquierda en el Navegador keypad.
f
Pitch Bend - lento, normal, y rápido
- lento : señal a un período aprox. a 1% por segundo
- normal : señal a un período aprox. a 2% por segundo
- rápido : señal a un período aprox. a 4% por segundo
Habilitar Pitch - on/off
Este determina como se habilitado la función pitch al inicio o no. Algunos
artistas que nunca utilizan la función pitch, preferirán dejarlo al ‘off’.
Rango Pitch - 4, 8, 16, 24%
Este determina el Pitch Range por defecto cuando la unidad se encendiende. El Pitch Range al 4 o 8% permitirá un ajuste más fino, usando una
Resolución 0.05% Pitch.
Indexación - on/off
Cuando este está puesto en ‘off,’ la unidad nunca creará una base de
datos. Este es muy útil para los DJs ya que a veces son muy meticulosos
con la organización del sistema de directorios o ficheros o para las instalaciones permanentes.
Usando el DMIX-600
Preferencias de Configuración
Fig 6.6 - Setup Menu is the last option from the Search Options
Tiempo - transcurrido/restante
Esta opción selecciona por defecto la pantalla de tiempo para mostrar el
tiempo transcurrido o restante durante la reproducción de cada pista.
Auto Fade - 0-12 seg/ Off
Cuando en algun modo continuo o la reproducción de una lista de reproducción Autofade en la posición ON cortará el salto entre canciones y las
combinará entre ellas, usted puede configurar la longitud de combinación
de 0-12 segundos.
Shuffle - on/off
Cuando esta opción está habilitada la unidad de reproducción aleatoriemente, basandose en los criterios de búsqueda. Si usted selecciona
‘Todas las canciones’, mezclará todas las canciones. Si usted selecciona
‘‘The Kinks’ como un Artista, reproducirá todas laas caniones The Kinks.
Single - on/off
Esto selecciona por defecto cuando la unidad se enciende el modo Single
Auto-Cue o Continuous.
Jog Mode On/ Off
Igual que el botón JOG este cambia la funcionalidad de JOG WHEEL
entre PITCH BEND o SEARCH.
Restore DB
Si su base de datos se corrumpe en el DMIX-600, Restore DB recargará
la base de dabtos guardada en su dispositivo de almacenamiento.
Fig 6.7 - Setup Menu page 1 of 4
Fig 6.8 - Setup Menu page 2 of 4
Fig 6.9 - Setup Menu page 3 of 4
Waveform tamaño 5 seg, 10 Seg, 20 Seg, 40 seg
Cambiará la longitud del tiempo que se visualizará.
Autoload Waveform Si/No
Determinará si la forma de onda será visualizada.
BPM from ID3 Tag On/Off
ElDMIX-600 visualizará la información delBPM de la etiqueta id3 de un
archivo de la canción si el archivo de la canción no tiene ninguna información de BPM se visualizará en blanco.
Lenguage Ingles, Español y Frances
El DMIX-600 le deja elegir los lenguages en el MENU de la pantalla.
Fig 7.0 - Setup Menu page 4 of 4
23
Page 60

Sección 11: Cambiando, Añadiendo, Sacando un dispositivo de almacenamiento USB.
Para acceder al Menú del Dispositivo desde cualquier pantalla, presione
s Shift+Power. Desde ese menú usted podrá escoger Cambiar o sacar el
Dispositivo. .
Si el USB soporta hot-swap , usted puede conectar (pero no desconectar)
un dispositivo USB en cualquier momento, independientemente de si la
unidad esta alimentada o no e independientemente del modo en el que
ste la unidad.
e
- Para Cambiar Dispositivos.
1. Seleccione el Dispositivo a Cambiar desde el Menú de Dispositivo .
2.Seleccione el nuevo dispositivo que quiera cambiar usando el
Navigation keypad o el Jog Wheel.
3. Ejecute cualquier catalogación o verificación que sea necesaria (como
puede ver en la Sección Dos: Seleccionando dispositivos y Creación de
base de datos)
- Para Sacar Dispositivos:
1.Seleccione el dispositivo a sacar del Menú de Dispositivo.
Usando el DMIX-600
Menú del dispositivo
Fig 7.1 - Pulsando Shift+Power se accede al menú Dispositivos
+
2.Seleccione el nuevo dispositivo que quiere sacar usando el Navigation
keypad o el Jog Wheel. Presione Enter para sacar el dispositivo.
3.Si el dispositivo que ha sacado estaba siendo usado por los dos lados
del Dmix-600, la unidad le avisará mostrando “el dispositivo aún está
conectado al otro lado!”Eso simplemente significa que si usted intenta
quitar el dispositivo del Dmix-600, usted debe sacar los dos lados antes
de desconectarlo.
4.Cuando la pantalla indique “es dispositivo se ha quitado con seguridad”
podrá desconectar el dispositivo USB.
5. Si usted está usando una unidad CD-ROM o DVD-ROM USB
usted debe sacar el CD/DVD usando el procedimiento Eject para que se
habrá la bandeja.
Si el procedimiento Eject no se sigue, existe el riesgo de corromper
cualquier fichero que haya abierto cuando el dispositivo sea desconectado..
Para conectar su Dmix a su PC como si fuera un Ipod
dock:
1.Coloque su Ipod en el Ipod dock situado arriba de la unidad.
2.Seleccione el interruptor situado al lado del conector USB tipo B
detrás de la unidad hacia “PC Dock”.
Fig 7.2 - Selección de otro dispositivo usando el Jog Wheel/teclado
Fig 7.3 - Espere mientras el dispositivo se desconecta
3.Conecte el puerto USB tipo B s su PC. Su PC debería ver su Ipod.
Fig 7.4 - Solo retire el dispositivo USB después de este proceso
24
Page 61

Apagado progresivo & actualización Firmware
Apagando la unidad
Similar a los modernos ordenadores, el DMIX-600 tiene un sistema de
apagado progresivo, ya que la unidad tiene que cerrar todas las conex-
ones por USB y realiza un proceso de apagado progresivo antes de
i
desconectar la alimentación. Ese proceso protege también de desconexiones accidentales.
Para apagar el DMIX-600, simplemente mantenga apretado el Botón de
Encendido durante 3 segundos.
ctualizaciones Firmware
A
Una de las caracteristicas esenciales del Dmix-600 es la capacidad de
mejorar su software interno. Esto permite el añadir nuevas funciones y
compatibilidades, la optimización de procesos actiales, y la capacidad de
resolver problemas que aparezcan.
Las actualizaciones de Firmware aparecerán periodicamente en
http://www.cortex-pro.com.
Le sugerimos este atento a estas actualizaciones para poder asegurar el
máximo nivel de funcionalidad y compatibilidad que Cortex pueda ofrecer.
.
Usando el DMIX-600
Fig 7.5 - DMIX-600 Procedimiento de apagado
Para comprobar la versión instalada:
1. Conecte el Dmix-600 cuando NO HAYA CONECTADO UNIDADES
2. Cuando pida “inserte dispositivo”, pulse el botón INFO.
3. La pantalla mostrará el número de versión actual.
Para actualizar el firmware, siga estos pasos:
1. Usando una conexión a internet Explorer, descargue la última versión
del firmware desde http://www.cortex-pro.com.
2. Coloque el fichero en el directorio raiz de su unidad de almacenamiento externo USB.
3. Conecte la unidad USB al Dmix-600, y seleccionelo en el Menu de
Dispositivos (durante el arranque). Asegurese que su Dmix-600 está
conectada a una fuente de alimentación estable, donde no haya posibilidades de perdida de alimentación durante el proceso.
4. Cuando el Dmix-600 detecte el firmware en el directorio raiz de la
unidad de almacenamiento USB, le preguntará si desea aplicar esta mejora. Responda SI.
Si la versión de firmware en la unidad de almacenamiento es igual o anterior a la actual, será ignorada.
Fig 7.6 - Detección automática de nuevo firmware, actualizar?
Fig 7.7 - Actualizar firmware en 8 pasos
5. Cuando se actualice la unidad pasará por 6 etapas. Puede tardar
algunos minutos. Si la alimentación se interrumpe durante este proceso,
puede dañar el sistema operativo de la unidad..
6. Cuando la actualización esta completa, la unidad se desconecta. Debe
pulsar el interruptor general para encender de nuevo. Una vez se encienda de nuevo, el nuevo software tomará efecto. Entonces puede borrar la
actualización del firmware de su unidad de almacenamiento USB si lo
desea (no será detectado de nuevo).
Fig 7.8 - Apagado completo cuando el firmware se ha cargado
25
Page 62

DMIX 600 SECCION MEZCLADOR
El mezclador integrado del Dmix 600 se compone de 5 secciones: la
sección Entrada/Salida, Ganancia y Eq, Faders, Micrófono y Preescucha.
En las próximas páginas le hablaremos de estas secciones y de como
utilizar su Dmix-600 para reproducir sus canciones.
SECCION DE SALIDA
Fig 7.9- Sección salida de Dmix 600
El Dmix 300 puede alimentar de audio a 3 distintas unidades así como
aceptar 2 entradas estereo (Line o Phono). Las salidas son las siguientes:
Usando el DMIX-600
Sección Mezclador
Master-Salida principal de su mezclador. Esta es la salida donde conec-
tará su amplificador, altavoces autoamplificados o mezclador externo.
Cabina-Como la salida Master, pero para conectar sus altavoces para
monitorizar. Use esta salida para los altavoces que tiene en cabina.
Grabación-Una tercera salida sin estar afectada por el volumen y fijada a un nivel constante de grabación. Conecte aqui su unidad grabadora.
Balanceada XLR-Las salidas balanceadas XLR son iguales a la salida
MASTER excepto en que estan balanceadas para uso en instalaciones
profesionales, y se controlan también por el volumen MASTER.
SECCION DE ENTRADAS
El Dmix 600 permite aceptar 2 fuentes de sonido analogico además de
los dos canales internos digitales de la unidad conectada por USB. La
sección de entradas consiste en do entradas RCA. Cuando se utilizan
conjuntamente con el selector de nivel de entrada Linea/Phono, estas
entradas aceptarán unidades de nivel linea (CD Player, Cassette Deck) o
giradiscos con cápsula magnética.
Fig 8.0 - Controles Master y cabina
Linea y Cross Faders
La próxima parte de su Dmix 300 es las lineas y Cross Faders. Los
faders de linea le permiten ajustar el volumen de cada canal. El
Crossfader se utiliza para pasar de un canal a otro. La velocidad de
paso puede ser controlado con el control de curva del Fader justo encima del Cross Fader.
El Crossfader es reemplazable por el usuario y puede pedirse a
cualquier centro tecnico autorizado de Cortex.
Fig 8.1 - Sección entradas del Dmix 600
Ponga el conmutador en LINE si quire conectar fuentes de tipo linea.
Ponga PHONO si quiere conectar un giradiscos.
Controles Master y Cabina
Estos dos controles rotativos controlan el nivel de salida de MASTER y de
BOOTH (cabina) respectivamente.
Fig 8.2 - Sección Crossfader/Fader de Linea/VU meter
26
Page 63

.Sección Ganancia/EQ
El Dmix 600 tiene ecualización de 3 bandas y Gananciua por canal. La
ganancia puede usarse para ajustar el nivel de audio antes de que
llegue al fader para conseguir un óptimo volumen. Así mismo ajuste los
AGUDOS/MEDISO /GRAVES para conseguir un balanceado tono en su
canal.
PARA UNA CORRECTA REPRODUCCION, EMPIECE EL PROGRAMA
Nota-
CON LOS CONTROLES DE GANANCIA AL MINIMO (GIRELOS EN CONTRA
DEL SENTIDO DEL RELOJ). REALICE TODOS LOS AJUSTES DE SONIDO CON
SU FADER Y CONTROL MASTER DE VOLUMEN. ESTO PREVIENE UN EXCESO
E SEÑAL Y LA APARICION DE DISTORSION. UNAVEZ REALIZADOSLOS
D
AJUSTES, SI DESEAMAS NIVEL DE VOLUMENAUMENTE EL NIVELDE GANANCIA.
VU Meter
El VU meter puede utilizarse para visualizar el volumen de Master de su
Dmix 600 así como los de los canales individuales. Esto se controla con
el Cue/PGM situado encima del VU meter. Pongalo en CUE para ver el
nivel de Canal 1 y Canal 2. Pongalo en PGM para ver el volumen de
Master. Para evitar distorsión, intente mantener el volumen de Master
por debajo de 0 y +5db en el VU meter.
Usando el DMIX-600
Sección mezclador (Cont.)
Sección Cue
La sección Cue del Dmix 600 permite al usuario hacer preescucha del
canal 1 y 2 antes de pasarlos a la sección principal para su escucha.
Para usar esta función conevcte unos auriculares a la entrada del frontal.
Luego usando el fader de Cue a la derecha de la unidad pase de un
canal a otro. Utilice si es necesario el volumen de Cue para aumentar o
disminuior el volumen de los auriculares.
El botón CUE EFX permite la preescucha del efecto asignado a cada
canal de los auriculares.
Sección Micrófono
La sección Micrófono del Dmix 300 permite al usuario conectar 2 micrófonos a la vez. Ambos microfonos deben ser de jack 1/4’‘ TS (TipSleave), y comparten el mismo volumen y EQ a la izquierda de la
unidad. Puede usar los controles de Agudos y Graves para cambiar el
tono de la señal y el volumen para variar el nivel de sonido. De nuevo
le repetimos que estos controles sirven para los dos micros a la vez.
Fig 8.3 -Sección EQ / Ganancia
/ Selector entradas
Fig 8.4 - Sección Cue del Dmix-600
Fig 8.5 -Sección micrófono del Dmix-600
27
Page 64

Usando el DMIX-600
Sección Efectos
Sección Efectos
l DMIX-600 tiene tres efectos incorporados que pueden ser facilmente
E
asignados a cualquier canal incluido el micrófono de forma individual, la
mezcla de efecto se puede regular con el control rotativo DRY/WET
entrando mas efecto o menos.
Estos efectos son:
Filtro
El efecto Filter es un filtro pasa banda que filtrará las altas o bajas frecuencias dependiendo de la posición del deslizante de parametros. En el
centro el deslizante no afectará al sonido, moviendolo a la izquierda se
reducirán gradualmente las altas frecuencias hasta dejar solo graves, y
deslizando el potenciometro a la derecha las bajas frecuencias desaparecerán gradualmente hasta dejar solo agudos.
Flanger
-
Fig 8.6 Sección Efectos
Fig 8.7 Asignación de canal
Flanger es un efecto de audio basado en el tiempo que se crea cuando
dos señales identicas se mezclan juntas, pero con un pequeño retardo en
tiempo de una de ellas que cambia gradualmente este retardo que normalmente es menor a 20 ms (millisegundos). Esto produce un efecto de
“comba”: los picos y descensos de la señal producen una frecuencia
resultante relacionada con la señal original en una serie de armonicos.
Variando este tiempo de retardo se consigue una subida o bajada de
este espectro de frecuencias.
Moviendo el deslizante de parametro a la izquierda el flanger será mas
lento y con el deslizante a la derecha el flanger será mas rápido.
Rever
La reverberación es la persistencia del sonido en un espacio determinado cuando el sonido original se ha quitado. Cuando hay un sonido en el
espacio, un gran numero de ecos se crean y desaparecen al ser
absorbidos por las paredes y el aire creando reverberación o efecto
rever. Esto se nota más cuando el sonido original desaparece y la
reflexión continua, decayendo en amplitud hasta desaparecer. Los
grandes salones, especialmente las catedrales, gimnasios, piscinas
cubiertas, grandes cuevas, etc, son ejemplos de espacios con donde el
tiempo de reverberación es largo y puede ser claramente escuchado.
Distintos tipos de música tienden a sonar mejor con distintos tiempos de
reverberación apropiados a sus caracteristicas.
Fig 8.8 Ajuste mezcla de efecto
Moviendo el deslizante de parametros a la izquierda el espacio de
reverberación se hace más pequeño y moviendolo a la derecha el espacio de reverberación se aumenta.
28
Page 65

Usando iTunes™ para optimizar tus ficheros de música
Antes de conectar su iPod™ y usarlo con el DMIX-600 hay una
serie de pasos que debe realizar:
(A) Permita que su iPod™ se use como disco
(B) Prepare su ordenador para que al entrar su música sea en el
ormato correcto para su utilización.
f
(C) Convierta los ficheros que ya han sido descargados y almacenados para que puedan trabajar en su DMIX-600
PERMITA EN SU iPOD™ LA FUNCION DISCO
Lo primero y más importante es configurar su iPod™ para que el
reproductor Cortex pueda leerlo. Conecte su iPod™ a su ordenador y espere que iTunes™ lo identifique. Cuando vea su
iPod™ en la pantalla, vaya a las opciones y desmarque la caja
“Gestionar la música manualmente” y asegurese que está marcada la caja “Activar el uso como disco”. Ahora ya puede marcar la
opción “gestionar la música manualmente” dependiendo si quiere
o no que iTunes™ controle su música.
Usando el DMIX-600
Primero, donde dice “Al insertar el CD” elija “Preguntar si quiere
mportar CD”, que hara que iTunes™ le pregunte cuando inserte
i
un disco y no cargará automaticamente el cd insertado.
Luego, en “Importar Usando” usted puede elegir entre dos for-
matos:
SIN COMPRESION(WAV)
Si quiere guardar su música a calidad completa (Sin compresión)
debe marcar en Importar usando Codificador WAV, y poner el
menú “Ajuste” en automático. El resto de ajustes quedan como
están.
Configuración iTunes™ para MAC o PC (PC mostrado)
Estas son las preferencias que debe marcar si desea optimizar
su iTunes y asegurarse que sus ficheros son compatibles y se
reproducirán en su DMIX-600.
En su Mac o PC abra el iTunes™, entonces abra el menú “EDICION” (menú iTunes™ para MAC) e ir a preferencias. Cuando
se abra la caja de preferencias, elija “AVANZADO”, y en “AVANZADO” elija la pestaña Importación
Ajustes para importar en WAV.
Pero recuerde que los ficheros descargados o convertidos
en Mp3, no sonarán mejor si los pasa a este formato. Solo
incrementará su tamaño en un 300%!
29
Page 66

Usando el DMIX-600
Usando iTunes™ para optimizar su música (continuación)
COMPRESION(Mp3)
Cortex eligió usar el formato Mp3 porque es el más utilizado en
el mundo como formato de compresión de ficheros de música.
or lo que al marcar el Codificador MP3 elija en el menú
P
AJUSTE la opción PERSONALIZAR ya que aunque la opción por
defecto es Alta Calidad (192 kbps) nosotros recomendamos (320
Kbps) que aumenta mucho la calidad de sonido sin sacrificar
spacio.
e
En Velocidad de Bits Estéreo elija (320 kbps) y asegurese que la
casilla de “Usar Velocidad de Bits Variable (VBR)” NO ESTA
ARCADA! Los ficheros VBR no son tan fiables como los de
M
velocidad constante de Bit (CBR) que está marcada por defecto.
El resto de preferencias deben permanecer como están excepto
la última casilla (Filtrar Frecuencias por debajo de 10Hz) que
debe estár no marcada ya que a pesar que puede estar bien el
filtrar estas frecuencias en su portatil que nunca se reproducirán,
pueden echarse en falta en un equipo profesional de un club.
Al final el cajetín de ajustes de codificación Mp3 debe ser
así.
Una vez hecho pulse OK dos veces y iTunes™ estará preparado
para convertir todos sus ficheros al sistema Wav y/o
Mp3 usado por su DMIX-300/600.
hacelo deberá ordenarlos por formato de fichero o “TIPO”. Si no
visualiza la columna “TIPO” en iTunes™ puede cambiar este
arámetro pulsando el botón derecho sobre la columna NOM-
p
BRE y añadiendo “Tipo” como columna de busqueda,
Entonces pulse en Tipo y la música se ordenará por formatos,
entonces marque las que no estén en formato mpeg (Mp3), pero
antes de poder convertir nada debe marcar los ficheros que sean
protegidos o DRM y copiarlos a una carpeta separada ya que de
momento no son compatibles y NO SERA POSIBLE CONVER-
TIRLOS! Despues de haber copiado estos archivos en carpeta
separada ya puede borrarlos de iTunes™.
Ahora puede marcar los otros ficheros que no sean WAV o Mp3
y desde el menú “AVANZADO” seleccionar la opción “Convertir
Selección a Mp3” y iTunes™ iniciará el trabajo. Este proceso
puede tardar un tiempo dependiendo de cuantas canciones deba
convertir.
Ficheros AAC y DRM
La mayoría de ficheros de música descargados estarán en formato apropiado Mp3,pero usted puede haber grabado CD’s en
su disco duro con los ajustes por defecto de iTunes™ u otro programa de carga que pueden haber creado ficheros en formatos
distintos. O puede haber comprado canciones en iTunes y esos
ficheros vienen protegidos a copia, los conocidos como ficheros
DRM, que deben ser reproducidos por iTunes porque no pueden
ser convertidos.
Aqui tiene unos sencillos pasos para identificar, ordenar y/o con-
vertir todos los ficheros incluyendo los formatos AAC y DRM que
no son compatibles en este momento en su DMIX-300/600.
Primero tiene que identificar los distintos tipos de ficheros y para
Una vez realizada la conversión, se tendrá los dos ficheros en la
ventana de iTunes™. Los ficheros originales aún permanecerán
marcados y es el momento para elegir BORRAR si desea eliminar los formatos originales y mantener solo los nuevos MP3.
Una vez completado sus ficheros están listos para usarse desde
su disco duro o SINCRONIZAR de nuevo su iPod™ o simplemente añadirlos a su iPod™.
Recuerde de utilizar el software DBSE para verificar la database.
Los ficheros, ahora funcionarán perfectamente en su DMIX-600.
30
Page 67

Mensajes de Error
Si encuentra algún mensaje de error durante su nevagación por esta
unidad, aquí tiene algunas explicaciones de esos errores y como pueden
ser corregidos. Para una extensa guia de solución de problemas, consulte
nuestra web en http://www.cortex-pro.com
“Can’t access device” se mostrará cuando ocurra uno de estos problemas
en la unidad de almacenamiento:
- Dispositivo es protegido a escritura
En este caso en una unidad USB, algunas de ellas tienen un interruptor
para proteger contra escritura.
- El dispositivo ha sido expulsado usando el procedimiento de expulsión.
Quite la unidad USB y vuelva a conectarla.
- Dispositivo con sistema de ficheros no soportado
Los sistemas de fichero soportados son FAT32, NTFS, HFS+, CDFS, y UDFS
.
- Dispositivo no puede funcionar sin drivers del fabricante
Algunos dispositivos requieren drivers especiales del fabricante. Aunque
desde la aparición del USB esto no es muy común, pueden presentarse
algunos casos. Estas unidades no son compatibles con el Dmix-300.
.
Usando el DMIX-600
Mensajes de Error
- Dispositivo ha sido extraido sin usar el procedimiento de extracción. Si el
dispositivo fué extraido sin ejecutar el apropiado proceso de extracción,
es posible que la unidad no detecte la absencia de unidad de almacenamiento USB, e intente acceder a ella.
- Si el dispositivo es alimentado externamente, compruebe que llegue corriente.
- Si la unidad se acaba de conectar, y se ha seleccionado inmediatamente,
puede que no pueda accederse. Espere 10 segundos e intentelo de nuevo
“Error creating DB” puede aparecer si no hay suficiente espacio restante
en su memoria para crear la database necesaria para la busqueda en la
biblioteca musical.
- Si no hay memoria, trate de borrar algunos ficheros e intente el proceso
de database de nuevo.
- Compruebe el cable USB que se utiliza para conectar la unidad de
almacenamiento con el Dmix-600
- Si el dispositivo es alimentado externamente, compruebe que llegue corriente.
Fig 8.9 - Erro, dispositivo lleno o no responde
31
Page 68

Otros (Especificaciones)
Especificaciones
1. General
Tipo de unidad....................................................Controlador de Audio Digital
Compatibilidad de formatos .........................................MP3, WAV, CD-Audio
MP3 formato......................................................8 kbps ~ 320 kbps, CBR/VBR
WAV formato..................................................................44.1 kHz, 16 bit stereo
Arranque instantaneo...................................................................<0.1 segundos
itch rangos.....................................................................................4, 8, 16, 24%
P
Pitch increment0...........................................................................................0.05%
Alimentación................................................................................6V DC 3000mA
Consumo......................................................................................................12 watts
Temperatura de Trabajo........................+5º C to +35º C (+41º F - +95º F)
Humedad de Trabajo.................................................................................5-85%
Peso..............................................................................................................9.68 lbs
........................................................................................................................4.4 kgs
Dimensiones......................................................................19 x 10.5 x 2.5 inches
.................................................................................................482 x 267 x 64mm
Adaptador...................................................................AC 100~240V, 50/60Hz
2. Sección mezclador audio
Entradas ...................................................................................4 Canales (2x2)
Conectores de entrada ............................................No balanceado tipo RCA
Salida...........................................................................................8 Canales (2x4)
Nivel salida ..................................................................1.2 V RMS (1 kHz, 0dB)
Conectores de salida...........................................................(2) Balanceado XLR
........................................................................................(6) No balanceado RCA
Respuesta en frecuencia............................................................20 Hz - 22 KHz
Relación S/R....................................................................................................90dB
Distorsión Armónica Total........................................................................<0.05%
3. Sección USB interface
Tipo conector.................................................................................USB Type A y B
USB protocolo .................................1.0, 1.1 (Full Speed) and 2.0 (Hi-Speed)
Numero de puertos................................................................................................2
Maximas unidades conectadas (via USB hub, se vende separado)............4
Sistemas ficheros soportados.....................FAT32, NTFS, HFS+, CDFS, UDFS
4. Accesorios Incluidos
Alimentación..........................................................................................................1
Manual de Instrucciones........................................................................................1
Bases para Ipod Mini/Nano.........................................................................2
5. Partes Reemplazables (pedir a GCI con numero de parte )
Alimentación .....................................................................USA 110v 059-370-R
....................................................................................VDE (Europa) 059-371-R
.........................................................................................................UK 059-372-R
................................................................................................JIS (Japan) 059-373
Cable alimentación.......................................................................049-231-R
Botón de Pitch.......................................................................................002-743-R
Tanto si su producto Cortex requiere servicio en garantia o fuera de
garantia en USA, o si desea comprar partes reemplazables, instrucciones, o accesorios, por favor contacte con GCI Technologies en el
numero de telefono listado aquí:
732-738-9003
Bajo ninguna circunstancia mande su producto a GCI sin haber llamado
primero al Technical Support Deparment en el numero anterior. Si no
tiene un numero de RMA (Return Merchandise Authorization) antes de
mandar su producto la reparación se retrasará indefinidamente. GCI se
reserva el derecho a rechazar paquetes que lleguen sin la autorización
RMA.
Para información de garantia, vea la pagina de garantia incluida en
este manual..
Una vez tenga numero RMA, la unidad debe ser enviada a la dirección especificada por atención al cliente, con el numero RMA claramente escrito en el cartón exterior.
Para servicio fuera de USA, visite la web de Cortex en
http://www.cortex-pro.com
Publicado por GCI Technologies Corporation
Copyright © 2007 GCI Technologies Corp.
Todos los derechos reservados
Caracteristicas y especificaciones sujetas a cambio.
GCI Technologies USA: +1 (732)346-0061
GCI Latin America and Caribbean: +1 (305)592-4746
GCI United Kingdom LTD: +44 (0)87 087-00880
GCI France + 33 1 69 79 97 72
GCI España: +34 93 436 37 00
GCI GmbH (Germany): +49 8131 39171-0
32
Page 69

Información garantía USA
Los productos Cortex está diseñados y fabricados con los más altos estandares de calidad en audio profesional. Con el apropiado cuidado y mantenimiento, su producto le dará años de servicio correcto. Por favor, registre su producto enlinea en http://www.cortex-pro.com
Garantía limitada:
En USA, Cortex garantiza sus productos contra defectos de fabricación por un periodo de Un (1) año* desde la fecha de compra.
Esta garantía limitada no cubre daños causados por abuso, mal uso, uso fuera de lo normal, fallos de instalación, mantenimiento incorrecto o reparaciones no realizadas por el Servicio autorizado.
No hay obligación implicita par GCI, Cortex, o cualquiera de sus distribuidores por daños provocados por fallos de conexión o el uso del producto u
otros daños indirectos con respecto a la perdida de propiedad, devoluciones, beneficios o coste de reposición, instalación o reinstalación. Todas las
garantias implicitas de GCI, incluyendo las de fitness, están limitadas a una duración de Un (1) año desde la fecha original de compra, a no ser por
otros mandatos de estatutos locales.
Envio de su producto para reparación:
En U.S.A., por favor llame al Servicio de Atencion al cliente al (732)738-9003, y ellos le darán un Return Merchandise Authorization (RMA) y la
dirección del centro autorizado más cercano a usted.
Cuando tenga un RMA, incluya copia de factura original de compra, con el producto defectuosa y la descripción del fallo. Mandelo por transporte
asegurado a GCI Technologies Corporation, y use la dirección que le han dado en el servicio de atención al cliente. Su RMA debe estar claramente
escrita en la parte exterior del paquete, o el proceso puede retrasarse indefinidamente! GCI se reserva el derecho a refusar todos los paquetes
que lleguen sin número RMA.
Las reparaciones en garantia, serán costeadas por GCI y devueltas a usted. Las no-garantias, GCI reparará la unidad después de recibir el pago. Los
cargos por reparación no incluyen los portes de devolución. Los portes se añadirán al coste de reparación.
Su garantía es valida unicamente en el país donde ha comprado la unidad. Fuera del pais de compra serán tratadas como fuera de garantía.
Para reparaciones en garantía, usted paga el envio hasta GCI; nosotros pagamos la devolución del producto dentro del territorio de Estados
Unidos Continental. Alaska, Hawaii, Puerto Rico, Canada, Bahamas, y las Islas Virgenes deberán pagar el porte.
Por favor espere 2-4 semanas la devolución de su producto. Bajo condiciones normales su producto no tardará más de 10 dias laborales en GCI. No
somos responsables del tiempo de transito en los envios.
Para información de reparaciones y garantía fuera de USA, por favor contacte con la oficina de GCI más próxima a usted, o visite la página de
Cortex en http://www.cortex-pro.com
* Bajo leyes de garantia local.
.
Para su Registro
Modelo del Producto:
(HDC-1000, HDC-3000, DMIX-600 DMIX-300)
Número de Serie Producto:
found on rear panel of unit
Fecha de Compra:
Nombre de la Tienda:
Por favor registre su garantía online en http://www.cortex-pro.com
33
Page 70

Notice Importante
Avant toute utilisation de l’appareil, vérifiez que vous possédez bien la dernière version du progiciel
disponible sur le site: http://www.cortex-pro.com. Les mises à jour du progiciel du dMIX-600 inclueront
de nouvelles fonctionnalités, des solutions aux problèmes constatés & amélioreront la compatibilité afin de
garantir des performances optimales à votre appareil dans le temps. Votre dMIX-600 peut être configuré en Français ou en Espagnol pour encore plus de convivialité !
Nous vous recommandons de télécharger notre logiciel GRATUIT Cortex Database Creation (DBSE), qui
vous permettra d’accéder plus facilement et rapidement à l’ensemble de vos morceaux ! Cet utilitaire vous
permettra de gagner un temps précieux lors de l’édition de bases de données volumineuses.
Vérification de la version du progiciel installée sur votre Dmix-600:
1. Mettre votre dMIX-600 sous tension avec AUCUN PERIPHERIQUE CONNECTE.
2. Au moment du message ‘Connectez vos périphériques,’ appuyez sur la touche INFO.
3. L’écran LCD affichera alors la version du progiciel installée sur le dMIX-600.
Mise à jour du progiciel avec la version la plus récente:
1. Téléchargez la mise à jour du progiciel sur votre PC. Décompressez le fichier et copiez
le sur votre périphérique USB de stockage (X:\ X étant la lettre du périphérique connecté
dans la directory). Nous recommandons Internet Explorer.
2. Connectez le périphérique USB de stockage au dMIX-600.
3. Mettez le dMIX-600 sous tension & sélectionnez le périphérique mentionné ci-dessus.
4. L’appareil affichera la date et la version de la mise à jour, puis vous demandera si vous
souhaitez installer la mise à jour. Sélectionnez ‘OUI,’ puis appuyez sur entrée.
5. L’appareil démarrera une procédure de 8 étapes, après laquelle il s’éteindra automatiquement. Lorsque vous remettrez l’appareil sous tension, vous utiliserez le progiciel le plus
récent.
Attention: Si l’alimentation est coupée et/ou le périphérique USB déconnecté durant cette
procédure, cela peut endommager le système de votre appareil. Veillez à ne pas déplacer
l’appareil durant cette manipulation.
Pour toute information complémentaire sur la Mise à Jour du Progiciel, à l’aide des images
écran, consultez le chapitre Mises à Jour du Progiciel (page 25) de ce manuel.
Page 71

Guide Rapide de Démarrage du dMIX-600
Sommaire
Mises en Garde & Normes WEEE......................................................................2
Introduction..............................................................................................................3
Caractéristiques......................................................................................................4
Périphériques Compatibles & Recommandés...................................................5
Informations Additionnelles..................................................................................5
Maintenance & Entretien de votre Appareil....................................................6
Conditions de Fonctionnement.............................................................................6
Utilisation Légale du dMIX-600..........................................................................6
Guide d’Installation & Schémas..........................................................................7
Face Arrière & Connexions............................................................................7
Face Avant & Fonctions...............................................................................8-9
Utilisation du dMIX-600.....................................................................................10
Avant de Commencer & Connexions..........................................................10
Sélection des Périphériques & Création de la Base de Données........11
Explorateur de Fichier & Options de Recherche.....................................12
Clavier USB.....................................................................................................13
Options de Recherche (Suite)................................................................13-14
Affichage de la Waveform.........................................................................14
Touche Info & Attributs du Morceau...........................................................15
Mode Lecture & Single Auto Cue...............................................................16
Affichage du Temps.......................................................................................17
Contrôle du Pitch............................................................................................17
Jog Mode (Molette).......................................................................................18
Playback Navigation Controls.....................................................................18
Points Cue & Mémorisation de Points Cue................................................19
Menu des Périphériques...............................................................................20
Mode Shuffle (Lecture aléatoire)...............................................................21
Fonction Loop (Boucle parfaite)..................................................................21
Menu Préférences..........................................................................................22
Mise sous Tension............................................................................................23
Mises à Jour du Progiciel.............................................................................23
Section Console de Mixage..............................................................................24
Section Console de Mixage (Suite)..............................................................25
Effets..................................................................................................................26
Configuration de votre iPod® et de iTunes®.........................................27-28
Messages d’Erreur...............................................................................................29
Caractéristiques Techniques...............................................................................30
Information sur la Garantie...............................................................................31
Page 72

MISE EN GARDE & CONSIGNES DE SÉCURITÉ
M E R C I D E L I R E AVA N T U T I L I S A T I O N D E L ’ A P P A R E I L
ATTENTION: Cet appareil répond aux certifications
FCC lorsqu'il est connecté à d'autres appareils à
l'aide de cordons blindés. Afin de prévenir tout
risque de parasites électromagnétiques avec un
poste radio ou TV, veuillez utiliser des cordons blindés.
Le point d'exclamation situé dans un triangle est
destiné à attirer votre attention durant l'utilisation de
votre appareil ou d'un entretien périodique de ce
dernier. Vous en trouverez plusieurs dans le mode
d'emploi de l'appareil.
LIRE LES INSTRUCTIONS: Toutes les instructions et
consignes d'utilisation doivent être lues avant l'utilisation de l'appareil.
CONSERVEZ LES INSTRUCTIONS: Nous vous recommandons de conserver les instructions et consignes
d'utilisation en cas de nécessité ultérieure.
RESPECT DES CONDITIONS D'UTILISATION: Nous
vous recommandons de respecter les instructions d'utilisation.
SUIVRE LES INSTRUCTIONS D'UTILISATION: Nous
vous recommandons de respecter la chronologie des
instructions d'utilisation.
NETTOYAGE: L'appareil doit être nettoyé avec un
chiffon légèrement humide. Ne pas utiliser de produits chimiques corrosifs & volatiles (cire, essence,
insecticide…) afin de ne pas endommager l'appareil.
CORDON: Ne pas utiliser de cordons non préconisés
par le fabricant afin de ne pas endommager l'appareil.
EAU & HUMIDITE: Ne pas utiliser l'appareil à proximité d'une source d'eau (cuisine, salle de bain,
lavabo…), ni dans un endroit sujet à l'humidité
(piscine…).
ACCESSOIRES: Ne pas installer cet appareil sur un
support ou dans un endroit instable. L'appareil pourrait tomber au risque de blesser une personne et être
endommagé. Veiller à utiliser des accessoires (Pied,
support, crochet..) recommandés par le fournisseur
ou vendu avec l'appareil. Tout montage ou installation doit respecter les instructions du fabricant et
utiliser des accessoires d'installation recommandés
par le fabricant.
TRANSPORT SUR CHARIOT: Tout produit installé sur
un chariot doit être manipulé avec précaution. Un
déplacement brusque ou trop rapide sur une surface
non plane pourrait entraîner la chute de l'ensemble
et endommager l'appareil. V
VENTILATION: Les ouvertures et ouïes d'aération
situées sur l'appareil permettent une ventilation optimale de ce dernier afin d'éviter toute surchauffe.
Ces ouvertures ne doivent jamais être obstruées. Ne
pas placer l'appareil sur un support souple risquant
de bloquer les ouïes d'aération (Lit, sofa, canapé…).
Si l'appareil est intégré dans une installation ou dans
un rack, veillez à la ventilation et consultez le fabricant pour toute information complémentaire.
ALIMENTATION: Veillez à respecter la tension d'al-
OIR FIGURE A.
imentation située au dos de l'appareil. Si vous n'êtes
pas certain de la tension d'utilisation dans votre
pays, contactez votre revendeur.
EMPLACEMENT: Veillez à installer l'appareil sur un
support stable.
PERIODE DE NON UTILISATION: Débranchez le
cordon d'alimentation de l'appareil en cas de non
utilisation prolongée.
MISE A LA TERRE:
- Si l'appareil est équipé d'une alimentation à
courant alternatif (Prise possédant un contact plus
large que l'autre), celle-ci se connectera correctement à la prise uniquement si vous respectez le sens
de branchement. Il s'agit là d'une mesure de sécurité.
Si vous n'arrivez pas à insérer la fiche dans la prise,
inversez la fiche. Si vous ne pouvez toujours pas
insérer cette dernière, contactez un électricien afin
de remplacer votre prise électrique qui est obsolète.
Veillez à respecter cette consigne.
- Si l'appareil est équipé d'une fiche d'alimentation
avec terre, veillez à la connecter à une prise électrique équipée d'une connexion à la terre. Il s'agit
d'une mesure de sécurité. Si vous ne pouvez insérer
la fiche dans la prise électrique, contactez un électricien afin de remplacer votre prise électrique qui
est obsolète. Il est important de respecter cette
mesure de sécurité.
INSTALLATION DU CORDON D'ALIMENTATION:
Les cordons d'alimentation doivent être déroulés et
rangés proprement afin d'éviter de se prendre les
pieds dedans, en particulier les cordons reliés aux
prises électriques.
ANTENNE EXTERIEURE: Si vous reliez votre
appareil à une antenne ou un câble extérieur,
assurez-vous de la présence d'une connexion à la
terre afin d'éviter les surtensions et les décharges
d'électricité statique. L'article 810 du National
Electrical Code, ANSI/NFPAS 70, précise toutes les
informations nécessaires afin d'effectuer correctement le branchement à la terre du pylône ou de la
structure porteuse, la connexion du câble à l'antenne
de décharge, dimensions des connecteurs de mise à
la terre, connexions des électrodes, consignes de
mise à la terre des électrodes. V
ORAGE/FOUDRE: En cas d'orage et de non utilisation prolongée, débranchez le cordon d'alimentation,
le câble d'antenne et les cordons audio. Ceci afin
d'éviter les dégâts occasionnés par la foudre et les
surcharges électriques.
LIGNES ELECTRIQUES: Une antenne extérieure ne
doit pas être située à proximité immédiate de lignes
électriques et/ou d'un transformateur électrique, afin
de ne pas tomber dessus en cas de chute. Lors de l'installation d'une antenne extérieure, veillez à éviter
tout contact avec des lignes électriques : tout contact
peut être fatal.
SURCHARGE: Ne surchargez pas les prises électriques, blocs multiprises & rallonges en y connectant
trop d'appareils. Ceci afin d'éviter tout risque de
surcharge électrique ou d'incendie (Surchauffe).
INSERTION D'OBJET & DE LIQUIDE: N'insérez pas
d'objets dans les fentes ou ouvertures de l'appareil
afin d'éviter tout risque de choc électrique et d'incendie. Ne jamais renverser de liquide sur l'appareil.
SERVICE APRES VENTE: N'essayez pas de réparer
cet appareil ; en l'ouvrant ou en le démontant afin
OIR SCHÉMA B.
d'éviter tout risque de choc électrique. En cas de
problème, veuillez prendre contact avec votre revendeur.
PANNE/SITUATION NECESSITANT UN RETOUR EN
SAV: Débranchez l'appareil de la prise électrique,
remettez le dans son emballage d'origine et contactez votre revendeur en tenant compte des situations suivantes :
- Lorsque le cordon d'alimentation est endommagé.
- Si un liquide a été renversé dessus.
- Si l'appareil a été exposé à la pluie.
- Si l'appareil ne fonctionne pas correctement malgré le respect des instructions d'utilisation. Ajustez
uniquement les réglages préconisés dans le mode
d'emploi, toute manipulation ou réglage non conseillés dans ce dernier peut endommager l'appareil et
procurer plus de travail en cas d'intervention SAV
afin de remettre l'appareil en état de marche.
PIECES DE RECHANGE: Lorsque vous avez besoin de
remplacer des pièces de l'appareil, veillez à utiliser
des pièces d'origine ou possédant des caractéristiques identiques. L'utilisation de pièces non
autorisées peut endommager l'appareil : surchauffe,
court-circuit, choc électrique…
CONTROLE DE SECURITE: Avant de récupérer votre
appareil, assurez vous que le SAV a effectué tous les
contrôles de sécurité nécessaires afin de vous
restituer un appareil en état de marche.
INSTALLATION AU PLAFOND OU SUR UN MUR:
Ce type d'installation est déconseillé.
CHALEUR: Veillez à installer l'appareil loin de toute
source de chaleur telle que radiateur, réchaud ou
tout autre appareil produisant de la chaleur.
RECYCLAGE: Cet appareil ne doit pas être considéré comme un déchet domestique à usage unique.
Vous devez le déposer dans un point de collecte destiné au recyclage des appareils électroniques et
électroménagers. AInsi vous préserverez l'environnement et éviterez les problêmes de santé publique
vis à vis de conséquences négatives; liées à leur
dépôt dans un endroit non approprié. Le recyclage
contribue à préserver les ressources naturelles. Pour
plus d'informations sur les conditions de recyclage de
l'appareil, veuillez contacter les autorités de votre
pays, les institutions locales ou votre revendeur.
2
Page 73

Introduction
Préface
élicitations pour votre achat de la plate-forme Cortex dMIX-600. Nous sommes certains que cette nouvelle génération de produits Cortex ne va pas
F
seulement vous rendre la vie plus simple, mais qu’elle va également vous permettre de profiter des toutes dernières avancées technologiques présentes
dans ces plateformes de contrôle développées autour de connexions de type USB & conçues pour les DJs et utilisateurs de produits audio professionnels. Avec un entretien régulier, le dMIX-600 vous apportera fiabilité et performance durant de nombreuses années. les appareils Cortex sont couverts
par une garantie durant 1 an.
Conseils pour la première utilisation
Assurez vous d’être en possession des accessoires listés ci-dessous et livrés
avec le dMIX-600:
Alimentation...........................................................................................................1
Manuel d’utilisation............................................................................................1
Préservez votre capital auditif !
réglage. il contribuera à éviter des pertes auditives partielles ou totales. Plus que tout, nous voulons préserver
votre capital auditif.
Utilisez convenablement votre appareil afin que celui-ci
vous offre un maximum de plaisir pour une très longue
Cher utilisateur:
L’acquisition d’un appareil audio de haute qualité comme
celui que vous venez d’acheter, ne constitue que la première étape dans votre démarche de plaisir musical. Il est
temps à présent de considérer comment obtenir encore plus
de satisfaction en utilisant cet appareil. Ce fabricant et l’
Electronic Industries Association’s Consumer Electronics
Group sont désireux de faire le maximum pour votre plaisir,
mais aussi afin de sauvegarder vos oreilles. L’important est
d’avoir un son de bonne qualité, sans distorsion et surtout
sans affecter votre sensibilité auditive.
Votre système auditif est capable de s’adapter à des sons
de plus en plus fort, après quelques temps d’accommodation, un son pourtant très fort et dangereux pour vos oreilles
vous paraitra d’un niveau normal.
Afin de vous préservez de ce danger, il est important de
régler un niveau sonore maximum avant que vos oreilles ne
s’habituent.
Etablir un niveau sonore maximum:
- Commencer par un réglage de niveau audible très bas.
- Augmenter doucement et régulièrement le niveau jusqu’à
obtenir une audition parfaite, claire et sans distorsion.
durée. Sachez que l’excès de bruit peut entrainer des
séquelles irréversibles qui ne sont décelables que lorsqu’il
est déjà trop tard. Ce fabricant et l’Electronic Industries
Association’s Consumer Electronics Group vous recommandent de ne pas avoir d’expositions prolongées &
répétées aux bruits excessifs. Voici quelques niveaux
sonores qui vous aideront à vous protéger:
Echelle du bruit au quotidien (En dB)
30 Bibliothèque
40 Bruit de spectateurs au cinéma
50 Restaurant tranquille
60 Conversation normale
70 Aspirateur, sèche cheveux, restaurant bruyant
80 Bruit de rue trafic important, aboiement d’un chien
LES BRUITS SUIVANTS PEUVENT ETRE DANGEREUX LORS D’UNE
EXPOSITION CONSTANTE;
90 Métro, moto, circulation de camions
100 Camion poubelle, marteau piqueur
120 Concert de rock (En étant placé devant les
enceintes). Seuil de douleur
140 Réacteur d’avion à quelques mètres
Une fois ce réglage effectué :
- Le réglage de niveau qui vient d’être effectué, est un
réglage maximum qu’il ne faudra pas dépasser. Ne plus
toucher à ce réglage.
Il est important de prendre le temps d’effectuer ce
Informations gracieusement fournies par la Fondation pour la Recherche
sur la Surdité (Deafness Research Foundation).
3
Page 74

Consignes d’Utilisation
Caractéristiques
Le dMIX-600 de Cortex a été dessiné & développé afin d’apporter une
solution professionnelle permettant de travailler à partir de toutes sources
udio existantes. Le dMIX-600 permet de libérer les DJs des contraintes
a
inhérentes à l’utilisation de logiciel via un ordinateur, en éliminant tout simplement l’ordinateur. Le dMIX-600 offre, de plus, une flexibilité & une
portabilité largement supérieures.
Jog Wheel (Molette)
Les Jog Wheels du dMIX-600 autorisent un contrôle précis de plusieurs
fonctions. Grâce à la Jog Wheel, l’utilisateur peut rechercher,
accélérer/ralentir & même scratcher ! Elles permettent aussi de naviguer
précisemment dans les menus et de modifier les paramètres & sélectionner
la musique sur le(s) périphérique(s) de stockage.
Pitch Control (Réglage de la Vitesse de Lecture)
Potentiomètre Haute Précision de 60mm permettant un réglage précis de
la vitesse lecture.
• Précision de 0.05%
Pour vous permettre un réglage précis de la vitesse (Pitch), l’appareil peut
modifier la vitesse de lecture par pas de 0.05%. Très pratique pour l’ajustement au tempo de deux morceaux, avec une précision non disponible
sur la majorité des doubles lecteurs CD conventionnels.
• Echelles Multiples de pitch
Grâce à une échelle de pitch réglable de 4, 8, 12, 24%, les valeurs minimales & maximales peuvent être réglées afin d’optimiser le réglage de
la vitesse (Pitch) du morceau en cours de lecture.
• Pitch ON/OFF
En appuyant simultanément sur les touches PITCH + & PITCH -, vous activez
ou désactivez le potentiomètre rectiligne de réglage de vitesse (Pitch). Le
Pitch ON/OFF permet également la remise à zéro de la fonction Pitch
lorsque vous souhaitez éteindre ce dernier (Mode OFF).
Compatibilité CD Audio
Malgré la généralisation de périphériques USB de stockage, l’appareil
Cortex dMIX-600 peut lire les CDs audios via un lecteur externe USB compatible CD-ROM, CD-RW, DVD-ROM ou DVD-RW. Cette possibilité per-
et aux DJs de migrer sereinement vers les nouvelles technologies tout en
m
conservant la possibilité de lire des CDs traditionnels. Notez qu’un seul
lecteur sert à alimenter les deux côtés de l’apareil, mais un seul morceau
peut être lu à la fois. Pour bénéficier des fonctionnalités d’un double
lecteur CD, branchez alors deux lecteurs externes USB.
Gestion de la Musique via la Base de Données.
Les Contrôleurs de Musique Numérique Cortex permettent une gestion efficace des bases de données comprenant des fichiers musicaux via un programme spécifique. Différents critères de tri peuvent être utilisés permettant aux DJs une recherche par artiste, titre, genre, album, BPM ou mot clé.
Cette méthode offre un accès instantané au morceau recherché. La base
de données est sauvegardée sur le périphérique de stockage source, et
peut être utilisée par tout appareil Cortex, le vôtre ou celui d’un club. Les
Points Cue mémorisés via le dMIX-600 sont stockés avec les informations
de la base de données sur le périphérique de stockage. Dès qu’un Point
Cue a été sauvegardé, les DJs peuvent le rappeler à tout moment dès lors
que le morceau, sur lequel se situe celui-ci, est en lecture.
Compatibilité Playlist
Le dMIX-600 accepte les playlists iPod et celles créées par l’utilisateur à
l’aide d’Apple iTunes® (Dans le cadre d’un usage avec un Ipod) ou de
notre logiciel Cortex DB SE. Lors de la présence de Playlists iPod, le menu
option apparaîtra dans le menu Options de Recherche Principale. Sinon,
les playlists créées sont accessibles à partir du menu Playlist.
Console de Mixage Intégrée
Le dMIX-600 est équipé d’une console de mixage 2 voies avec gain &
correction paramétrique 3 bandes par voie, une entrée micro avec correction paramétrique dédiée, crossfader remplaçable par l’utilisateur & un
multi-effet numérique. 2 sorties séparées dont la sortie principale (Master)
doublée en symétrique sur connecteurs XLR.
Ecrans LCD
Les écrans LCD haute visibilité de 4 lignes de 20 caractères affiche un
grand nombre d’informations: titre, affichages temps, pitch, options de
configuration, boucles & paramétres de recherche. Cet écran permet l’affichage de bien plus d’informations que tout lecteur CD conventionnel.
Effets Numériques
Les effets numériques intégrés vous permettront d’enrichir à volonté et
selon votre inspiration votre mix, en utilisant au choix le FILTRE, le
FLANGER ou la REVERBERATION.
Plate-Forme de Connexion USB
Le dMIX-600 offre un niveau incomparable de connexion avec différents
périphériques USB. Les produits Cortex sont les premiers à autoriser le
mixage de fichiers musicaux stockés dans des périphériques USB tels que
disque dur, clé USB, lecteur/graveur externe & baladeur numérique.
Grâce à cette innovation, les DJs peuvent travailler de façon plus traditionnelle sans avoir à transporter plusieurs appareils. Vous avez la possibilité de connecter d’autres périphériques USB via l’utilisation d’un hub
USB.
4
Page 75

Consignes d’Utilisation
Périphériques Compatibles & Recommandés
Un Mot sur la Compatibilité
Le dMIX-600 (Et tous les produits Cortex) ont été conçus afin de fonctionner avec tous les périphériques USB ne nécessitant pas de drivers spécifiques. Cela signifie que le périphérique sera alors compatible PC ou Mac,
il devrait donc l’être aussi avec les appareils Cortex. Notez que même si
votre périphérique est livré sans CD d’installation, cela ne veut pas dire
pour autant qu’il fonctionne sans pilotes spécifiques d’installation.
En théorie, tout périphérique ne nécessitant pas de driver d’installation
devrait fonctionner parfaitement avec le Cortex. Cependant, la diversité
des caractéristiques de certains produits USB (Surtout les clés USB) peut
amener à des problèmes de compatibilité. Etant donné la quantité de
périphériques USB actuellement disponibles sur le marché, il est totalement
impossible de tous les tester et de vous garantir une compatibilité totale.
Cette tâche serait d’autant plus impossible que chaque jour, de nouveaux
périphériques USB sont mis en vente sur le marché.
Si vous rencontrez un problème de compatibilité avec un périphérique spécifique, merci de nous le faire savoir par le biais de notre site internet
(Rubrique: recommandation de compatibilité / périphériques compatibles). Dans la majorité des cas, il est possible de rendre compatible certains périphériques dont les spécifications techniques diffèrent de la
norme.
Conditions d’Utilisation des Périphériques
• Compatibilité DAE pour la Lecture de CD Audio sur Lecteur Externe
CD-ROM/DVD-ROM.
fin de lire les CDs Audio sur un lecteur CD-ROM/DVD-ROM, le lecteur
A
doit être capable de supporter le DAE ( Digital Audio Extraction). Si le
lecteur ne supporte pas le DAE, il est possible que vous rencontriez des
anomalies en lecture tels que des “clicks” ou autres bruits.
Tout Hub USB Utilisé doit ête Alimenté & non Passif (Alimentation par
•
le port USB).
Tout appareil Cortex est capable d’alimenter la plupart des Périphériques
USB, cependant les Hubs USB doivent être alimentés extérieurement. Le
fait de connecter un Hub USB passif peut générer une instabilité de fonctionnement.
• Le Mode Protection en Ecriture doit être Désactivé.
Les disques durs, lecteurs MP3, clés USB, etc... ne doivent pas être protégés
en écriture. Si tel est le cas, il sera impossible pour le Cortex de stocker la
base de données tout juste créée.
Périphériques Compatibles & Certifiés
Pour consulter la liste des périphériques testés et certifiés compatibles
avec le dMIX-600, merci de visiter la section “Support” de notre Site Web:
http://www.cortex-pro.com
.
• Conformité USB
Les périphériques de stockage doivent être compatibles USB1.0, 1.1 ou
2.0. Les périphériques USB sans fil (Exemple Wi-Fi) ne sont pas reconnus.
• Les périphériques de stockages utilisés avec le Cortex ne doivent être,
si possible, utilisés que pour cette application.
Pour des performances optimales, le périphérique de stockage que vous
utilisez avec le Cortex doit être réservé uniquement à cette application
audio. Aucun fichier autre que les fichiers audio et fichiers de base de
données utilisés par le Cortex ne doivent être stockés sur ce périphérique.
• Les drivers ne doivent pas être partitionnés
Le dMIX-600 ne peut pas commuter sur différentes partitions. Il ne reconnaît que la première partition sur le périphérique actif. Ceci est crucial
pour l’efficacité de la recherche sur la base de données.
• FAT32, NTFS ou HFS+. Systèmes de Fichier pour Mémoires flash et
Disques Durs.
Tous les périphériques de stockage doivent être formatés en FAT32, NTFS,
ou HFS+. Sur les PCs utilisant Windows, les disques durs sont en FAT32 ou
NTFS. Sous Windows XP, vos disques durs sont formatés en NTFS. HFS+ est
le formatage requis par Apple et les machines utilisant Linux.
• NTFS: Seule la lecture sera possible !
Si vous utilisez un disque dur externe formaté en NTFS, il vous sera impossible de créer la base de données avec le dMIX-600. Il vous sera néanmoins possible de la créer en utilisant le logiciel Cortex Database Creation
(CDC) pour PC et MAC. Pour une collection importante de morceaux de
musique (> 32 Go), l’utilisation du logiciel DBC réduira de façon importante
le temps de création de la base de données.
5
Page 76

Consignes d’Utilisation
Informations Additionnelles
Maintenance des Périphériques de Stockage
Lors de l’utilisation de périphériques de stockage tels que les disques durs
et lecteurs MP3 à disque dur interne (iPod, Zune), une maintenance de ces
derniers doit être effectuée. Cortex a en effet besoin d’accès très rapides
pour gérer plusieurs fichiers en même temps, il est fortement recommandé
d’effectuer régulièrement des défragmentations pour assu-rer l’intégrité
des fichiers stockés.
La fragmentation est en fait la division en plusieur petites parties d’un seul
et même fichier éparpillé dans le disque dur. Cette fragmentation apparaît lors de création, de modification et de suppression de fichiers sur votre
disque dur. La fragmentation est totalement invisible pour l’utili- sateur
mais elle ralentit sérieusement la vitesse d’accès aux informations du
disque dur.
Cette maintenance doit être effectuée à l’aide votre ordinateur; et ce
régulièrement après l’ajout ou la suppression de fichiers musicaux sur votre
disque dur. Notez qu’une mauvaise maintenance de votre disque dur
entrairera une augmentation des temps d’accès et des perturbations lors
de la lecture de vos fichiers.
• Avec un PC équipé en Windows XP
Connectez le périphérique de stockage que vous souhaitez défragmenter.
Si vous connectez un lecteur MP3 type Apple iPod ou Microsoft Zune,
assurez vous de quitter toute application qui s’ouvrirait automatiquement
lors de la connexion.
Cliquez sur Démarrer, Tous les programmes, Accessoires, Outils sys-
tèmes, et enfin : Défragmenteur de disque.
Nettoyage de votre Appareil
Pour nettoyer votre dMIX-600 en toute sécurité, utilisez un chiffon très
légèrement humide ou une bombe d’air de dépoussériage. Pour des salissures plus importantes, nous vous conseillons d’utiliser de l’alcool dilué avec
de l’eau (2 doses d’eau / 1 dose d’alcool à 30%). L’utilisation de produit
corrosif tel que l’acide, eau de javel, nettoyant peinture ou autre détergent abimera irrémédiablement votre appareil.
Conditions de Fonctionnement
Pour des performances optimales d’utilisation, la température de l’environnement de fonctionnement doit être comprise entre +5º C / +35º C (+41º
F / +95º F). L’utilisation de l’appareil avec des températures en dehors de
cette plage entrainera: problème de fonctionnement, difficulté de lecture,
écran LCD illisible, risque de surchauffe et instabilité du système. Ne pas
exposer l’appareil en plein soleil.
Lors d’une installation, veillez à placer votre appareil sur une surface
plane, stable et isolée de toutes vibrations extérieures. Même si les
appareils Cortex sont insensibles aux vibrations, vos périphériques de
stockage tels que les disques durs le sont. Assurez vous également de ne
pas installer votre appareil au dessus d’une source de chaleur tels qu’un
amplificateur ou près d’un spot de lumière.
N’utilisez jamais un bloc d’alimentation secteur autre que celui fourni, sous
peine d’endommager sérieusement l’appareil et d’annuler la garantie.
L’alimentation secteur fourni avec le dMIX-600 est un modèle spécial conçu
uniquement pour cet appareil. Vous ne trouverez pas d’équivalent dans le
commerce.
Lorsque le Défragmenteur de disque est ouvert, sélectionnez le disque à
défragmenter puis cliquez sur “Défragmenter” en bas de la fenêtre.
Pour plus d’information sur la défragmentation, consultez l’AIDE de
Windows.
Avec un Apple Macintosh
Grace au système de gestion de fichier HFS d’Apple, la défragmentation
n’est pas nécessaire. C’est la raison pour laquelle vous ne trouverez aucun
logiciel de défragmentation inclus sur OSX. Cependant, ceci n’exclue pas
la nécessité d’une défragmentation sur un disque externe ou un lecteur
baladeur MP3.
Pour plus d’informations, reportez vous à cet article:
http://docs.info.apple.com/article.html?artnum=25668
Sauvegardes de Sécurité !
Par mesure de sécurité pour votre collection musicale, nous vous incitons à
effectuer des sauvegardes de sécurité (Backups) des disques durs que vous
utilisez avec votre appareil Cortex. Tous les disques durs ou disques durs
internes des lecteurs balladeurs MP3 sont potentiellement sujets à des dysfonctionnements. Ne prenez pas le risque de tout perdre, faites le choix
d’effectuer une sauvegarde de sécurité.
Cortex ne pourra pas être tenu pour responsable des données que vous
perdriez faute d’avoir effectué une sauvegarde de sécurité.
Utilisation Légale du dMIX-600
Ni Cortex et ses revendeurs ne seront tenus pour responsables de l’utilisation faite du dMIX-600. L’utilisateur doit s’assurer qu’il possède les autorisations et licenses en vigueur (Copyright, diffusion musicale en public,
droits d’auteurs ou autres) pour une utilisation légale de l’appareil.
La gamme de produits Cortex a été conçue pour accroître les possibilités
de travail des DJs et en aucun cas pour faciliter le piratage de médias.
Nous recommandons à nos utilisateurs d’acquérir légalement la musique
qu’ils diffusent et soutenons les artistes afin qu’ils puissent continuer à créer
et ainsi permettre aux DJs de travailler comme professionnels.
6
Page 77

Consignes d’Utilisation
Faces Avant & Arrière
Face arrière
2
4
6
9
1
1. Embase pour Alimentation Externe AC/DC avec Sécurité
Cette embase permet le branchement de l’alimentation externe fournie
avec l’appareil. A côté de cette embase, se situe un crochet permettant
de sécuriser la connection et d’éviter tout débranchement accidentel.
2. Sortie PRINCIPALE (MASTER) G/D RCA (Assymétrique)
Sortie stéréo assymétrique RCA.
3. Sortie CABINE (BOOTH) G/D RCA (Assymétrique)
Sortie stéréo assymétrique RCA auxilaire permettant d’alimenter un retour cabine par exemple
4. Sortie Enregistrement G/D RCA (Assymétrique)
Sortie stéréo assymétrique RCA.
5. Sortie Principale G/D XLR (Symétrique)
Sortie stéréo symétrique XLR.
6. Entrées/Sorties USB & Commutateur DOCK/MSD
A. Entrée USB MSD Ce connecteur permet de relier tout périphérique de stockage de masse contenant l’ensemble de vos morceaux. Celui-ci peut-être: disque
dur externe (HD), carte mémoire flash, lecteur média portable, lecteur/graveur
externe CD/DVD-ROM, lecteur de carte mémoire & tout HUB USB actifs.
B. Sortie USB iPOD Ce connecteur permet de relier à l’appareil à tout ordinateur (Fixe ou portable) afin d’utiliser le DOCK du dMIX-600 comme un DOCK
standard iPod.
C. Commutateur DOCK / MSD Permet de sélectionner l’usage du iPod connecté à l’appareil: MSD (Mass Storage Device/Périphérique de Stockage de
Masse) ou DOCK standard pour iPod relié à l’ordinateur.
3
5
7
10
B
C
A
7
8
Face avant
11
7. Entrées Microphone
Le dMIX-600 possède deux entrées pour microphone situées, l’une en
face avant et la seconde en face arrière. Les deux entrées microphone
utilisent les mêmes réglages (Gain & Correction 2 bandes), ainsi qu’une
connectique de type Jack 6.35mm. Le potentiomètre de réglage de
volume intègre un commutateur afin de mettre les microphones sous ou
hors tension. Un ‘’Clic” sera perceptible à chaque manipulation de ce
bouton.
8. Entrées Commutables Phono/Ligne & Commutateurs
Ces commutateurs vous permettent de sélectionner la source utilisée: PHONO
(Platine vinyle) ou LIGNE (MP3, CD, K7, MD...). En position PHONO, vous devez
utiliser une platine vinyle équipée d’une cellule magnétique. En position LIGNE
vous pouvez utiliser toute souce de niveau ligne (MP3, CD, K7, MD...).
9. Mise à la Terre
Lorsque vous utilisez une ou deux platines vinyles, vous devez relier le cordon de
masse de chaque platine vinyle à la VIS DE MASSE (GROUNDING SCREW) située
en face arrière du dMIX-600.
10. Touche Power
Maintenez la touche Power enfoncée durant 1 seconde pour allumer
l’appareil. Maintenez cette touche enfoncée durant 3 secondes pour éteindre l’appareil (Cela permet aussi d’éviter la mise hors tension accidentelle
de l’appareil).
3. Prise Casque & Réglage de la Pré-écoute
Le casque se connecte au dMIX-600 par l’intermédiaire du Jack
6.35mm situé en face avant. Utilisez le fader Cue afin de sélectionner
l’une des deux voies en pré-écoute. Utilisez le réglage de volume cue
afin d’ajuster le volume de la pré-écoute. La touche
tion ON, vous permet de vérifier l’effet en cours dans le casque.
CUE EFFECT, en posi-
7
Page 78

Consignes d’Utilisation
1
18
9
12
Face Supérieure & Fonctions
Face Supérieure
10
2
3
4
13
19
20
21
22
5
14
6
23
15
7
11
16
8
1. Ipod Dock (Emplacement pour iPod)
Permet de connecter tout modèle iPod (G3 & au delà) à l’appareil.
Ainsi que de transférer des fichiers vers un ordinateur à l’aide de la
connexion USB de type B située à l’arrière du dMIX-600.
2. Touches Time (Temps) & Single (Lecture Simple/Continue)
Appuyez sur la touche TIME afin d’afficher le Temps Ecoulé ou le Temps
Restant sur l’écran de Lecture. Utilisez la touche Single afin de sélectionner le mode lecture Simple ou lecture Continue.
3. Volume Master (Sortie Principale)
Utilisez ce potentiomètre afin d’ajuster le volume de la sortie Master
(Située en face arrière de l’appareil).
4. Volume Booth (Sortie Retour)
Utilisez ce potentiomètre afin d’ajuster le volume de la sortie Booth
(Située en face arrière de l’appareil).
5. Contrôles & Réglages des Effets
Cette section vous permet de gérer les 3 effets: FILTRE, FLANGER & REVERBERATION. Les effets peuvent être assignés individuellement sur les voies ou sur la
sortie principale (Master). Vous pouvez modifier les paramétres de l’effet, ainsi
que son niveau (DRY/WET).
6.
Sélection de l’Affichage du VU-mètre (Master/Cue)
Le commutateur Master/Cue situé au-dessus du VU-mètre permet de
sélectionner le mode d’affichage du VU-mètre. En position MASTER,
vous visualiserez le niveau de sortie principal Master. En position Cue,
vous visualiserez le niveau de la pré-écoute (Casque) des voies 1 ou 2.
7. VU-mètre
Le VU-mètre affiche, au choix, le volume de la sortie Master ou celui
de la Pré-écoute (Cue). Utilisez le commutateur Master/Cue.
8. Crossfader/Réglage de la Courbe du Crossfader
Le Crossfader, situé en face avant, permet de passer de la voie 1 à la
17
voie 2 & inversement. Le Crossfader est remplaçable par l’utilisateur.Le
commutateur Fader Curve permet de sélectionner la courbe de réponse
du crossfader: lente ou rapide. Lorsque celui-ci est positionné à gauche,
la coupure sera rapide & franche (Scratch). Lorsqu’il est situé à droite
la coupure sera progessive.
9. Commutateur MSD/Line-Phono (Ligne/Phono)
Ce commutateur permet de sélectionner la source connectée à votre
console de mixage: périphérique de stockage de masse (MSD)
(iPod/Périphérique USB) ou Ligne/Phono.
10.Réglage de Gain & Corrections Paramétriques
Utilisez les potentiomètres High (Aigu), Mid (Médium) & Low (Basse)
afin de corriger la tonalité de la musique. Utilisez le potentiomètre
Gain conjointement avec le fader de voie afin de régler le volume de
la musique.
11.Fader de Voie
Les faders de voie permettent le contrôle du volume. Afin de contrôler
celui-ci, utilisez les conjointement avec le réglage de Gain et les
Corrections Paramétriques présentes aussi sur chaque voie.
12.Touches Info/Play/Search
La touche INFO affiche les infos concernant le morceau en cours de lecture. La touche SEARCH permet de rentrer dans le menu search
(Recherche). La touche PLAY permet de revenir à l’écran de Lecture.
13.Touche SHIFT
En conservant la touche SHIFT enfoncée, vous aurez accès à d’autres
fonctions en appuyant sur certaines touches de l’appareil.
14.Touche & Indicateur JOG MODE
Lorsque la LED est allumée, la JOG WHEEL est en mode recherche rapide
AV/AR. Lorsqu’elle est éteinte, la JOG WHEEL est en mode PITCH BEND
(CALAGE) afin de finaliser un mix avec précision.
8
Page 79

Guide de Démarrage
1
9
12
Face Supérieure & Fonctions (Suite)
18
Face Supérieure
10
2
3
4
13
19
20
21
22
5
14
6
23
15
7
11
16
8
15. MOLETTE (JOG WHEEL)
La MOLETTE contrôle plusieurs fonctions de l’appareil, elle peut être
ainsi utilisée pour naviguer dans les menus, dans le morceau en cours
de lecture et permet aussi de modifier la vitesse lecture (Pitch). Le fonctionnement de la MOLETTE dépend du mode opératoire assigné, ainsi
que de l’état de sélection des fonctions PITCH ON/OFF & JOG MODE.
Les molettes sont tactiles et vous permettent ainsi de contrôler directement la lecture & le scratch. Vous pouvez scratcher le morceau en cours
de lecture comme avec une platine vinyle !
16.Touche/Indicateur CUE
L’indicateur à LED est allumé lorsqu’un POINT CUE y a été mémorisé.
17.Touche/Indicateur PLAY/PAUSE
L’indicateur à LED est allumé lorsque l’appareil est en mode PLAY
(Lecture). En mode PAUSE, celui-ci clignote.
18.Ecran Bleu LCD Haute Visibilité
Cet écran LCD affiche sur 20 caractères & 4 lignes les informations
suivantes: morceau/waveform, dossiers, paramètres & informations de
recherche. Le contraste est réglable à partir du menu Edit.
19.Section Hot Cue
le dMIX-600 possède 2 points HOT CUE par côté qui peuvent être enregistrés
à la volée (Instantanément). Vous pouvez éditer (Afficher) les points HOT CUE en
appuyant simultanément sur les touches SHIFT & CUE (Celle du point concerné).
20.
Touches de NAVIGATION
Ces touches permettent de naviguer dans les différents menus &
17
options du dMIX-600. Selon le mode dans lequel se trouve l’appareil,
ces touches auront différentes fonctions.
21.Touches Master Tempo & Master Tempo (Key Adjust)
Ces touches permettent de modifier le fonctionnement du réglage de vitesse. La
fonction Master Tempo modifie la vitesse de lecture sans modifier la tonalité. La
fonction Key Adjust modifie la tonalité sans modifier la vitesse de lecture.
Lorsque la fonction Key Adjust est activée, les touches PITCH BEND (+/-) modifient uniquement la tonalité (KEY).
22.
Indicateur PITCH ON/OFF & Touches PITCH BEND
Le potentiomètre permet d’augmenter (+) ou de diminuer (-) le tempo du
morceau durant sa lecture. En le poussant vers le haut (-), vous diminuez le
tempo. Et inversement, en le poussant vers le bas (+), vous augmentez le
tempo de lecture. Les touches Pitch Bend permettent de modifier de façon
temporaire la vitesse de lecture/tempo lors du calage/mix. En appuyant
simultanément sur les deux touches + & -, vous éteignez ou allumez le
pitch (La LED Pitch On/Off est alors allumée ou éteinte).
23. Section Loop (Boucle Parfaite)
Cette fonction permet d’enregistrer un point d’entrée (IN) & un point de sortie
(OUT) afin de répéter indéfiniment ce passage ainsi sélectionné. La fonction
RELOOP permettant de revenir instantanément à la boucle enregistrée. Vous
pouvez modifier les points “IN” & “OUT” en appuyant simultanément sur les
touches SHIFT & IN ou OUT afin d’éditer ces points. Vous pouvez alors modifier
ces derniers plus précisément. Vous pouvez, à tout moment, sortir de la boucle
en appuyant sur la touche “OUT” une nouvelle fois. Vous pouvez instantanément
revenir à la boucle enregistrée en appuyant sur la touche reloop.
9
Page 80

Utilisation du dMIX-600
Avant de Commencer
ETAPE 1
Connectez le bloc d’alimentation secteur à l’embase pour alimentation située à l’arrière de l’appareil. Passez le câble dans le crochet de sécurité situé
juste à coté de l’embase d’alimentation. Bloquez le crochet, ce qui empêchera le câble de se débrancher par accident.
ETAPE 2
Connectez la sortie Master (XLR ou RCA) à votre console de mixage principale, amplificateur ou enceinte amplifiée à l’aide d’un cordon équipé de connecteurs XLR ou RCA. Si vous utilisez un système de retour (Booth), connectez la sortie Booth à ce système à l’aide de cordons RCA. Connectez la sortie
Record (Enregistrement) à l’appareil d’enregistrement que vous utilisez. Le dMIX-600 offre une grande flexibilité de part ses nombreuses sorties.
ETAPE 3
Connectez votre périphérique USB principal au port USB situé au milieu de la face arrière de l’appareil.
Vous pouvez y connecter tout périphérique USB (Ne demandant pas de pilote d’installation spécifique) formaté en FAT32, NTFS ou HFS+. Vous pouvez également y connecter un Hub USB auto-alimenté (Avec un bloc
secteur externe) pour augmenter le nombre de port USB. Si vous le désirez, vous pouvez également connecter un périphérique sur le port USB en face avant de l’appareil.
(Voir schéma ci-contre).
AaAAA
ETAPE 4
Appuyez sur la touche Power, située au centre de la face avant, durant 1 ou 2 secondes.
L’appareil a besoin de 5 à 10 secondes pour démarrer et détecter l’ensemble des
périphériques USB connectés.
SORTIES USB ENTREES
Connexions
MIC CUE
10
Page 81

Sélection des Périphériques et Création de la Base de Données
ETAPE 1 - SELECTION DU PERIPHERIQUE
Lorsque ce menu s’affiche, sélectionnez le périphérique auquel vous
désirez accéder, et ce, des deux côtés. Utilisez les touches de navigation
our vous déplacer dans la liste, appuyez sur Enter pour le sélectionner.
p
Si nécessaire, vous pouvez connectez d’autres périphériques USB sans
éteindre l’appareil.
Notez que lorsque vous avez sélectionné un périphérique sur un coté, vous
devrez attendre que la création de la base de données soit terminée
avant de sélectionner un autre périphérique du côté
opposé.
Le coté opposé affichera “Attendre
l’autre coté”.
ETAPE 2 - INDEXATION
Une fois le périphérique sélectionné,
l’appareil recherche si une base de
données existe déjà sur le périphérique. Si vous utilisez ce périphérique
pour la première fois avec le dMIX-600, l’appareil vous demandra si il
doit créer ou non cette base de données qui vous permettra de rechercher
instantanément les morceaux stockés dans ce périphérique. Si le
périphérique a déjà été utilisé avec le dMIX-600, allez directement à
l’ETAPE DEUX - VERIFICATION.
Utilisation du dMIX-600
Fig 2.1 - Sélection du Périphérique USB
Fig 2.2 - Création de la Base de Données en sélectionnant ‘Oui’
Si vous voulez créer la base de données avec le dMIX-600, sélectionnez
“Oui”.
Durant cette période d’indexation, l’appareil créé une base de données
basées sur les informations présentent dans chaque fichier de type MP3
(Informations de type ID3 tags). La durée de cette procédure dépend
directement de la quantité de morceaux stockés dans le périphérique. Si
vous utilisez un disque dur de plus de 20 Go, ou tout autre périphérique
NTFS, nous vous conseillons d’utiliser le logiciel de Création de Base de
données Cortex qui sera plus rapide (Surtout avec un processeur puissant).
Le logiciel Cortex Database Creation (“DBSE”) est disponible GRATUITE-
MENT à l’adresse suivante: http://www.cortex-pro.com dans la rubrique
dMIX-600.
Vous pouvez annuler l’indexation en cours en appuyant sur la touche Info.
VERIFICATION
Si votre périphérique a déja été indexé, l’appareil vous demandera si
vous désirez vérifier ou non la base de données existante. Pour chaque
ajout de fichiers dans le périphérique de stockage, vous devrez utiliser
cette fonction de vérification si vous voulez que vos nouveaux fichiers
soient visibles lors des recherches de morceaux. Vous pouvez également
effectuer cette vérification avec le logiciel Cortex Database Creation PC.
Nous vous recommandons l’utilisation du logiciel Cortex Database Creation
PC afin d’effectuer cette vérification rapidement (Cela est bien plus rapide qu’avec le dMIX-600).
Lorsque la procédure de vérification a commencé, vous pouvez la stopper en appuyant sur la touche Info.
Fig 2.3 - Ecran durant la Création de la Base de Données
Fig 2.4 - Lors de chaque ajout de fichier au sein de votre Base
de Données, celle-ci doit être vérifiée & mise à jour.
Fig 2.5 -Sortir du Menu Vérification
La vérification étant terminée, sortez de ce menu par “Arrêt vérification”
(‘Exit from Verify’).
Félicitations ! Vous avez maintenant la possibilité de rechercher instantanément vos morceaux en parcourant rapidement votre librairie musicale.
Cette méthode vous aide réellement à localiser un morceau dans votre collection musicale en un temps record.
Fig 2.6 - Ecran de Bienvenue vous invitant à utiliser l’appareil
11
Page 82

Utilisation du dMIX-600
PTIONS DE RECHERCHE
O
Le mode recherche de la base de données du dMIX-600 offre au DJ plus
de rapidité et d’efficacité pour trouver un morceau dans une vaste
librairie. Il peut ainsi lancer une recherche par: titre, artiste, genre, album,
mot clé, explorateur de fichier, morceaux récemment ajoutés, les 100
morceaux les plus lus, les 100 morceaux lus récemment. Choisissez simplement une de ces Options de Recherche, l’affichage se fera alors par ordre
alphabétique.
Recherche par Titre
Lors d’une recherche par Titre, tous les titres de morceaux présents dans
la base de données créée par le dMIX-600 ou le logiciel “DBSE”, s’afficheront à l’écran.
Recherche par Artiste
Lors d’une recherche par Artiste, vous réduisez le nombre de résultats possibles pour trouver plus rapidement le morceau que vous désirez jouer.
Options de Recherche (
Fig 2.7 - Recherche par Titre
Fig 2.8 - Recherche par Artiste
PARTIE I)
Recherche par Genre
Lors d’une recherche par Genre, vous obtiendrez la liste de tous les genres musicaux trouvés dans la base de donnée. Tous les fichiers MP3 ne possédant pas toujours d’information type Tag ID3, certains morceaux ne s’afficheront pas lors de cette recherche. Une fois le genre sélectionné, vous
pourrez choisir le morceau que vous désirez joué.
Recherche par Album
L’option de recherche par Album vous permettra de rechercher avec le
nom de l’album, un morceau provenant de celui-ci. N’oubliez pas que cette
option pourrait également ne pas vous permettre d’accéder à tous les
morceaux. En effet, les morceaux tirés de CDs “ single” ne comportent pas
de nom d’album. Une fois un album sélectionné, tous les morceaux présents
dans cet album s’afficheront.
Recherche par BPM
Le dMIX-600 peut lire l’information BPM présente dans les TAGS ID3 de
vos morceaux et l’utiliser comme critère de recherche. Si vos morceaux
MP3 n’ont pas cette information renseignée, l’information sera considérée
comme égale à 0. Les morceaux seront alors affichés après ceux possédant cette information et ce dans un ordre croissant (Du plus petit BPM au
plus grand).
Fig 2.9 - Recherche par Genre
Fig 3.0 - Recherche par Album
NOTE: Le dMIX-600 ne calcule pas le BPM. Il affiche cette information
lorsqu’elle est contenue dans le TAG ID3. Il existe de nombreux
programmes/logiciels disponibles gratuitement et permettant de calculer &
d’éditer les TAGS ID3 pour l’ensemble de vos morceaux.
Fig 3.1 - Recherche par BPM
12
Page 83

echerche par Chaîne de Caractères (Mot clé)
R
L’une des fonctions les plus pratiques du dMIX-600 est la recherche par
chaine de caractères. Cette option permet de retrouver un mot clé ou une
suite de mots dans la base de données. Très utile si vous recherchez un
morceau sans connaitre le titre exact ou un artiste sans connaitre son nom
exact. Une fois l’option “Recherche par mot clés” sélectionnée, l’affichage
vous invite à entrer une chaine de caractères ou un mot clé qui seront utilisés pour la recherche dans la base de données.
Vous pouvez contrôler votre dMIX-600 à partir de tout clavier USB (Avec
ou sans fil). Connectez le clavier USB à l’un des ports USB & tapez
directement votre mot clé.
Vous pouvez aussi contrôler de nombreuses fonctions de votre
appareil à partir du clavier. Vous trouverez ci-après la liste des accès
directs et leur touche correspondante à partir de votre clavier USB.
Utilisation du dMIX-600
Options de Recherche (PARTIE II)
Fig 3.2- Recherche instantanée par
mot clé
NOTE: Dès que vous tapez un mot clé, le dMIX-600 se commute
automatiquement en mode recherche par mot clé.
A l’aide de la Jog Wheel (Molette) ou des Flêches Haut/Bas du Clavier
de Navigation, entrez les premières lettres de la chaine de caractères ou
du mot clé. Utilisez la Flêche Droite ou la touche Enter pour vous déplacez
vers la droite et ainsi saisir une autre lettre. La Flêche Gauche du clavier
pour permettra de revenir en arrière. La combinaison des touches SHIFT +
Flèche Gauche permet d’effacer le caractère précédent.
Lorsque votre Chaine de Caractères est validée (Entrée), appuyez deux
fois sur la touche Enter pour commencer la recherche. Après avoir appuyé
deux fois sur le touche Enter, l’appareil démarrera votre recherche. La
durée de celle-ci dépend de la taille de votre librairie. Cet écran vous
indique que la recherche est en cours.
La recherche terminée, les résultats trouvés pour chaque catégorie: Titre,
Artiste, Genre et Album sont affichés. Vous pouvez accédez aux résultats
à l’aide des Flêches du Clavier de Navigation ou de la Molette (Jog
Wheel). Notez que le nombre de résultats trouvés sera affiché entre parenthèses. Exemple: 10 titres de morceaux trouvés, et 1 artiste, contenant
le mot “LOVE”.
Fig 3.3 - Utilisation de la Molette pour rentrer un mot clé
Fig 3.4 - Recherche en cours
Fig 3.5 - Affichage des résultats triés par critère de recherche
13
Page 84

Utilisation du dMIX-600
RECHERCHE PAR MOT CLE (SUITE)
Une fois la catégorie choisie - Titres, Artistes, Genres ou Albums, vous pourrez parcourir les sélections comme dans n’importe quel autre mode de
recherche. Une fois encore, la sélection se fera à l’aide des Flêches du
Clavier de Navigation ou la Molette (Jog Wheel), puis Enter pour valider.
iPod ™ Playlist Support
Bien que l’appareil dMIX-600 ne puisse créer de playlists pour iPod™,
vous pouvez lire une playlist iPod™ créée avec iTunes™.
Lorsqu’une playlist a été créée via iTunes™, celle-ci peut être ajoutée au
Menu Principal de Options de Recherche.
Création d’une Simple Playlist
A l’aide du Gestionnaire de Fichiers et le Mode Single éteint (OFF), vous
pouvez jouer tous les fichiers dans une directory spécifique simplement en
sélectionnant le premier morceau et en laissant l’appareil lire. Si vous
changez les noms de fichier (Via votre PC) par un nombre, l’appareil
dMIX-600 les lira alors dans cet ordre numérique.
Options de Recherche (
Fig 3.6 - Sélection du titre résultant de la recherche exécutée
Fig 3.7 - Sélection d’une Playlist iPod/XML à
partir du Menu de Recherche.
PARTIE III)
Explorateur de Fichier
L’explorateur de fichier vous permet de visualiser l’arborescence de
classement de vos morceaux directement sur le périphérique de stockage
sans aucun autre critère spécifique. Cela est utile lorsque l’ensemble de vos
morceaux sont correctement archivés, ou lorsqu’un morceau MP3 ne possède pas de TAG ID3 approprié ou incomplet. Lorsqu’un morceau ne possède pas de TAG ID3, celui-ci ne pourra être recherché dans la base de
données contenant les morceaux.
Une fois que vous avez activé l’Explorateur de Fichier, vous aurez à l’écran
les fichiers tels qu’ils sont rangés sur le périphérique de stockage. Utilisez
la Molette (Jog Wheel) ou les Touches de Navigation (Navigator Keypad)
afin de localiser le fichier que vous recherchez. Appuyez sur la Flêche
Gauche du Clavier de Navigation afin de revenir au Menu Principal.
Lorsque vous avez localisé le fichier MP3 recherché, appuyez simplement
sur la touche Enter & le morceau sera chargé. Appuyez sur la Touche
Search Mode, située à gauche de l’écran LCD, à tout moment, afin de
revenir au Menu Options de Recherche. De façon similaire, lorsque vous
êtes en Mode Recherche, appuyez sur la Touche Play Mode afin de
revenir à l’écran de lecture.
Fig 3.8 - Création d’une Playlist à partir de fichiers
numérotés via l’Explorateur de Fichier
Fig 3.9 - Sélection de l’Explorateur de
Fichier à partir du Menu Principal
Fig 4.0 - Recherche de Fichier/Dossier dans
l’arborescence via l’Explorateur de Fichier
14
Page 85

Utilisation du dMIX-600
orceaux/Fichiers Récemment Ajoutés
M
Le dMIX-600 vous permet - dorénavant - de rechercher les morceaux qui
vous avez récemment ajouté dans votre librairie musicale. Ces morceaux
seront affichés par ordre alphabétique.
Top 100 (Les 100 morceaux les plus lus)
e dMIX-600 vous permet d’afficher instantanément les 100 morceaux les
L
plus lus.
Last 100 (Les 100 morceaux lus dernièrement)
Le dMIX-600 vous permet d’afficher instantanément les 100 morceaux lus
dernièrement.
Fonction WAVEFORM
Cette fonction permet de visualiser sur l’écran les différentes phases du
morceau (Différences entre les niveaux les plus bas et les plus élevés). Une
flêche vous permet de répérer visuellement l’endroit précis du morceau
écouté.
Options de Recherche (
PARTIE IV)
Affichage de la Waveform & du Temps
Fig 4.1 - Recherche des morceaux récemment ajoutés
Fig 4.2 - Recherche des 100 derniers morceaux lus
Pour désactiver l’affichage de la WAVEFORM décocher la fonction en
appuyant sur la touche PLAY.
En utilisant le logiciel DBSE (Téléchargeable à partir du site WWW.CORTEX-PRO.COM), vous pouvez créer aisément la waveform pour chaque
fichier de votre bibliothèque musicale.
Modes Affichage Temps
Appuyez sur la touche Time pour passer de l’affichage du temps restant
à l’affichage du temps écoulé. Le temps écoulé vous indique le temps
écoulé depuis le début du morceau. Temps restant: le temps restant avant
la fin du morceau.
Vous pouvez appuyer sur Shift+Time afin de changer le mode temps.
+
Fig 4.3 - Waveform
Fig 4.5 - Affichage sur l’écran LCD du temps écoulé
En changeant le mode d’affichage du temps, notez que la barre de progression change de sens.
Fig 4.6 - Affichage sur l’écran LCD du temps restant
15
Page 86

TOUCHE INFO
Vous allez vite vous rendre compte que la touche INFO, située en haut à
droite de chaque molette, deviendra rapidement indispensable à l’utilidation du dMIX-600. Malgré les possibilités d’affichage d’informations sur
l’écran LCD, les attributs de chaque morceau ne peuvent tous être affichés
à la fois. Cette fonction vous aidera également à choisir parmi deux
morceaux ayant le même titre.
Pendant la Lecture ou le Mode Recherche, la touche Info vous permettra
d’afficher instantanément tous les attributs du morceau en cours de Lecture
ou du morceau trouvé lors de la Recherche.
Utilisation du dMIX-600
Touche INFO & Attributs du Morceau
The Info function displays:
Artiste - Tel qu’il est enregistré dans le tag ID3
Titre - Tel qu’il est enregistré dans le tag ID3
Album - Tel qu’il est enregistré dans le tag ID3
Type de Fichier Audio - MP3 ou WAV
Genre - Tel qu’il est enregistré dans le tag ID3
Chemin d’accès et Nom de Fichier - Exactement tel qu’il existe dans l’ar-
borescence du périphérique de stockage.
Notez que la plupart des attributs sont tirés du tag ID3 contenu dans le
fichier MP3. Si certains attributs (Informations concernant le titre) sont manquants dans le tag ID3, ces derniers ne seront pas affichés lors de l’utilisation de la fonction Info. Notez aussi que lors de l’utilisation de fichiers
.Wav, il n’y aura pas tags ID3. Le logiciel DB placera le nom du fichier
dans la section Titre du champ Info.
Appuyez sur la touche Info pour afficher tous les attributs du morceau en
cours de lecture ou du morceau sélectionné. Vous pouvez utiliser les
Touches du Clavier de Navigation ou la Jog Wheel afin de faire défiler
l’ensemble des informations.
Fig 4.7 - La touche Info est utilisée pour afficher
tous les attributs d’un morceau.
Fig 4.8 - Affichage de la Page/Ecran 1 sur 3
Fig 4.9 - Affichage de la Page/Ecran 2 sur 3
Pour sortir de cet affichage, appuyez à nouveau sur la touche INFO ou sur
l’une des touches MODE PLAY ou MODE SEARCH. Vous basculerez
automatiquement dans le mode sélectionné.
Fig 5.0 - Affichage de la Page/Ecran 3 sur 3
16
Page 87

Section 5: Mode Play (Lecture)
Le mode Lecture est le coeur même du Cortex dMIX-600. Comme tout
lecteur CD conventionnel, l’appareil dMIX-600 vous permettra de sélectionner plusieurs réglages de pitch, de mémoriser des points cue, d’effectuer des recherches à la frame. L’appareil dMIX-600 dépasse aisément
le lecteur de CD traditionnel car il est bien plus rapide en chargement et
départ de lecture. Il possède aussi un écran LCD affichant bien plus d’informations et peut mémoriser des points CUE ré-utilisables ultérieurement.
Entrez dans le mode Play (Lecture)
Par défaut, lorsque vous appuyez sur Enter pour sélectionner un morceau
depuis le Mode Search (Recherche), l’appareil charge automatiquement
le morceau sélectionné et passe en Mode Play.
Utilisation du dMIX-600
Mode Lecture et Single Auto Cue
Indicateur de progression
Titre du morceau
Fig 5.1 - Affichage
en Mode Lecture
Affichage du temps
/ Waveform
Valeur du Pitch
Si le morceau est déjà en lecture, et que vous désirez revenir à l’affichage
du Mode Lecture (PLAY), appuyez sur la Touche Play Mode.
Mode Single (Lecture simple) (Single Auto Cue)
En Mode Single, dès qu’un morceau a été chargé, l’appareil se cale à la
première note de musique, puis reste en attente, jusqu’au déclenchement
de la lecture en appuyant sur Play. A la fin du morceau, l’appareil se mettra automatiquement en Pause. Pour activer ce mode, appuyez simultanément sur Shift+Single du coté souhaité.
En Mode Single OFF (Désactivé) la lecture démarrera automatiquement
après sélection et chargement du morceau. A la fin du morceau, la lecture
passera au morceau suivant. Celui-ci est affiché dans la page des
Résultats de la Recherche. Avec le Mode Single désactivé, vous pouvez
jouer tous vos morceaux résultant de la Recherche, tels qu’ils sont affichés
à l’écran. Appuyez simultanément sur SHIFT et la touche Single permet de
désactiver le mode Single.
Fig5.2 - Passer en Mode Lecture
Fig 5.3 - Affichage du Mode Single (Lecture Simple)
+
Fig 5.4 - Utilisez les touches Shift+Single pour passer du Mode
Single (Lecture Simple) au Mode Continu (Lecture Continue).
17
Page 88

Réglage de Vitesse (Pitch Control), Master Tempo & Key Adjust
Réglage de vitesse (Pitch), Pitch Bend et Sélection du Réglage de
Vitesse.
Le Pitch vous permet d’accélérer ou de ralentir le tempo du morceau en
cours de lecture. Le dMIX-600 offre la possibilité de sélectionner l’échelle
de variation de cette vitesse. Réglages possibles : +/- 4, 8, 16 et 24%.
Vous gagnez ainsi en flexibilité. En mode 4 et 8%, la précision du Pitch est
de 0,05%.
Utilisation du dMIX-600
Pour passer de Pitch On (Pitch actif) à Pitch Off (Pitch inactif) et inversement, appuyez simultanément sur les touches Pitch Bend (+) et Pitch Bend
(-). La LED s’allume lorsque le Pitch est On (Actif). Le Potentiomètre de variation de Pitch n’aura aucun effet si le Pitch est Off (Inactif).
Pour choisir une autre échelle de variation du Pitch, appuyez simultanément sur Shift+Pitch Bend (+) ou Pitch Bend (-). L’écran LCD affichera
alors momentanément la nouvelle échelle sélectionnée.
Pour une variation momentanée de la vitesse (Pitch), les touches Pitch Bend
(+) et Pitch Bend (-) vous permettent alors d’augmenter ou de diminuer la
vitesse d’un pourcentage relatif au temps auquel vous garderez la touche
enfoncée.
Lorsque le JOG Mode n’est pas sélectionné (Voyant éteint), la Jog Wheel
(Molette) vous servira également pour contrôler une variation instantanée
de la vitesse (Pitch Bend).
Fonctions Key Adjust & Master Tempo
Les fonctions Key Adjust & Master Tempo vous permettent de contrôler
individuellement la Tonalité (Key) & le Tempo de tout morceau. Lorsque ces
fonctions sont activées, les touches Pitch Bend (+) & Pitch Bend (-) permet
tent de régler la tonalité par pas d’un demi ton. Le fader linéaire & la
Molette (Jog Wheel) servent alors à régler le Master Tempo (De façon
permanente - Fader linéaire - ou temporaire - Molette -).
Pour activer les fonctions Master Tempo & Key Adjust, appuyez sur la
touche Master Tempo. Si vous appuyez sur la touche Key uniquement,
cette fonction ne sera pas activée. Il vous faut impérativement activer
simultanément le mode Master Tempo.
Fig 5.5 - Activation du Réglage de Vitesse (Pitch) On/Off
en appuyant sur les deux touches simulltanément.
Fig 5.6 - Utilisez le Potentiomètre linéaire, les
touches + & - ou la Molette (Jog wheel) afin
de contrôler la vitesse de lecture.
Pour désactiver la fonction Key Adjust, appuyez simplement sur la touche
Key Adjust à tout moment, les valeurs originelles seront instantanément
restituées (Réglage original). Pour revenir au mode Pitch (Réglage de
vitesse), appuyez sur la touche Master Tempo ou appuyez sur les touches
Pitch Bend (+) & Pitch Bend (-). Si la fonction Key Adjust est activée, cette
procédure la désactivera simultanément.
Fig 5.7 Master tempo & Key adjust
18
Page 89

Jog Mode & Navigation en Cours de Lecture
Jog Mode
orsque le voyant de la touche Jog Mode est éteint, la Jog Wheel (En
L
mode lecture) fonctionne en mode Pitch Bend.
Une pression sur la touche Jog Mode (La LED s’allume) vous permet de
passer en mode recherche Avant/Arrière (FF/REW). Plus vous tournez
rapidement la Jog Wheel, plus vous vous déplacerez rapidement dans le
morceau. Afin d’utiliser le Jog Mode, assurez vous que l’appareil est en
mode lecture, et non en mode pause.
Fonctions de Navigation pendant la Lecture
En utilisant le Clavier de Navigation, vous pouvez vous déplacez dans le
morceau de la même manière qu’avec la Jog Wheel.
Utilisation du dMIX-600
Fig 5.8 - Activer le Mode Recherche Rapide AV/AR
à l’aide de la touche Jog Mode
En utilisant les Flêches Haut & Bas (Up & down) de Navigation vous pouvez accéder au morceau précédent ou suivant situé dans les Résultats de
la Recherche. Par exemple, si vous avez lancé une recherche par Artiste,
et que le dMIX-600 a trouvé 10 morceaux, vous pouvez choisir l’un de ces
morceaux grâce aux Flêches Haut & Bas (Up & down) de Navigation.
Mode Shuffle
Cette fonction du dMIX-600, très intéressante, permet une lecture aléatoire des morceaux. Celle-ci sélectionne au hasard les morceaux joués en
fonction de la sélection d’un critère de recherche. Exemple : vous avez
sélectionné “Tous les morceaux” comme Critère de Recherche et vous les
avez chargé dans la Playlist, l’appareil lira au hasard tous les morceaux
de cette liste. Si vous avez choisi un artiste comme critére de recherche,
tous les morceaux de cet artiste seront alors lus de façon aléatoire. Il en
est de même pour les autres critères de recherche: Genre, Album, Mot clé,
Explorateur de fichier...
Le Mode Shuffle s’active et se désactive en appuyant sur les touches
Shift+Info. L’écran LCD reflète alors cette activation de la fonction.
Left/Right (Gauche/Droite)
Up/Down (Haut/Bas) Saut de Plage
Fig 5.9 - Clavier de Navigation en Mode Lecture
Fig 6.0 - Affichage du Mode Shuffle (Lecture aléatoire) sur l’écran LCD
- Recherche Rapide
Avant/Arrière (FF/REW)
19
Page 90

Utilisation du dMIX-600
Création & Mémorisation de Points Cue
Création & Mémorisation de Points Cue
Avec le dMIX-600, la création et la mémorisation de points
cue est rapide et aisée.
Par défaut, lorsqu’aucun point CUE n’est créé ou mémorisé, si
vous appuyez sur la touche Cue, le morceau revient au début
(0:00:00 ) et se met en pause.
Pour placer un Point Cue pendant la lecture, à tout moment, appuyez sur
Pause, puis utilisez les Flêches Gauche et Droite du Clavier de
Navigation ou la Jog Wheel pour ajuster la position du point Cue à la
frame près. Appuyez maintenant sur la touche Play, le Point Cue est
enregistré.
Pour sauvegarder le Point Cue dans le périphérique de stockage USB (Afin
de le ré-utilisé ultérieurement), ajustez correctement la position du point
Cue désiré, puis appuyez sur Shift+Cue. Ce processus peut également
être effectué en pleine lecture, sans que celle-ci soit en Pause. L’afficheur
(Ecran LCD) indiquera alors que le Point Cue a bien été sauvegardé.
Pour revenir au Point Cue sélectionné, appuyez simplement sur la touche
Cue pendant la lecture. Ne pas appuyer sur la touche Pause, ce qui aura
pour effet de sélectionner un autre point Cue. Une fois revenu à ce Point
Cue, l’appareil se met automatiquement en mode Pause.
Fig 6.1 - Appuyez sur la touche CUE
pour revenir à 0:00:00.
Fig 6.2 - Mémorisation d’un Point Cue à l’aide des touches Shift+Cue
+
Pour mémoriser un nouveau Point Cue, vous n’avez pas besoin d’effacer le
précédent. Appuyez simplement sur Shift+Cue une nouvelle fois, l’ancien
point Cue sera alors remplacé par le nouveau.
Veuillez noter que tout enregistrement de Point Cue sur un périphérique
USB, nécessite un système de fichier FAT32. Si vous utilisez un iPod, celuici doit aussi être formaté sous Windows (FAT32).
Pour effacer le Point Cue sauvegardé, gardez enfoncée la touche Shift et
appuyez sur la touche Cue pendant deux secondes. L’afficheur (Ecran LCD)
vous indiquera que le Point Cue a bien été effacé.
Fig 6.3 - Effacez le Point Cue à l’aide des touches Shift+Cue
+
2s
20
Page 91

Mode Hot Cue
Les Hot Cues sont des points de démarrage de lecture qui peuvent être
créés à la volée (Durant la lecture d’un morceau) et différent des points
cue traditionnels dans le sens où la lecture démarre à partir du moment où
vous appuyez sur l’un des boutons, sans avoir à maintenir enfoncée la
touche play. Pour utiliser les hot cues, appuyez d’abord sur la touche
‘MEMO afin d’activer le menu hot cue.
Pour enregistrer un point hot cue, appuyez sur l’une des 2 touches. Pour
éditer un point hot cue, appuyez sur la touche SHIFT et sur l’une des 2
touches hot cue, puis utilisez la Molette (Jog Wheel) afin de localiser précisemment le point désiré. Pour effacer les points hot cue, appuyez sur la
touche Shift + celle du point hot cue à effacer durant 2 secondes. Lorsque
la touche s’éteint, cela signifie que le point hot cue a été effacé.
Les points Hot Cues sont sauvegardés par morceau sur le Périphérique de
Stockage de Masse (MSD) et sont automatiquement reconnus dès le
chargement du morceau si la fonction AUTO RECALL est activée à partir
du Menu Edit. Ces informations restent en mémoire jusqu’à leur effacement. Donc, si vous avez enregistré un point Hot Cue et que vous souhaitez
le sauvegarder, celui-ci est déjà sauvegardé ! Gardez en mémoire que le
chargement de ces points peut ralentir le chargement du morceau que
vous souhaitez lire. Si vous n’en avez pas besoin, nous vous recommandons
de ne pas les conserver en mémoire afin de charger plus rapidement les
morceaux à lire.
Utilisation du dMIX-600
Points Hot Cues
Fig 6.4 - Activation des points hot cues
Fig 6.5 - Sélection du Cue (1 ou 2)
+
Fig 6.5 - Appuyez sur la touche Shift & sur celle du
point Cue désiré (1 ou 2)
21
Page 92

Utilisation du dMIX-600
.
fonction Boucle Parfaite (Loop)
Le dMIX-600 possède une Boucle Parfaite (LOOP) par côté. Il s’agit d’un
passage sélectioné et pouvant être répété indéfiniment & rappelé à tout
moment lors de chaque chargement du morceau.
* Les points de la Boucle Parfaite (Loop) sont mémorisés sur le périphérique de stockage util-
sé lors de la création de la Boucle Parfaite (Loop) et pourront être rappelés uniquement à
i
artir de ce périphérique de stockage.
p
Enregistrement d’une Boucle Parfaite (Loop)
Appuyez sur la touche IN afin d’enregistre le point de départ - la touche
s’illumine alors - de la boucle (Fig A). Sur l’écran LCD apparaît alors ce
point représenté par l’icône (i).
Puis appuyez sur la touche OUT afin d’enregistrer le point de sortie de la
boucle. La touche OUT s’illumine alors indiquant que la boucle est enregistrée. Le dMIX-600 continuera à jouer cette boucle indéfiniment. Ce point de
sortie (OUT) est alors représenté par l’icône (o) sur l’écran LCD.
Edition des Points de la Boucle Parfaite (Loop points)
Lorsque la boucle a été enregistrée, vous pouvez éditer le point d’entrée
(IN) et le point de sortie (OUT), appuyez sur les touches SHIFT + IN. L’écran
affichera ENTREZ POINT D’ENTREE.. Vous pouvez utiliser la Molette (Jog
Wheel) afin de modifier le point d’entrée de la boucle (IN), de même
appuyez sur les touches SHIFT + OUT & l’écran affichera ENTREZ POINT DE
SORTIE. Vous pouvez alors ajuster le point de sortie (OUT) de la boucle.
Pour sortir de ce mode, appuyez sur SHIFT & le bouton du point édité,
l’écran revient alors à la position précédente.
Fonction Boucle Parfaite (Loop)
Fig A
Fig B
+
IN
OR
+
Sortir de la Boucle Parfaite (Loop)
Pour sortir de la boucle & reprendre la lecture du morceau, appuyez une
nouvelle fois sur la touche OUT (Fig C) & la lecture du morceau continuera.
Appuyez sur la touche RELOOP afin de revenir instantanément à la Boucle
(Loop) précédemment enregistrée (FIG D), la lecture de la boucle reprend.
Appuyez une nouvelle fois sur la touche OUT afin de sortir de la boucle.
Effacer une Boucle Parfaite (Loop)
Appuyez sur les touches SHIFT & R/LOOP durant 2 secondes. Les touches IN
& OUT s’éteindront. Vous pouvez alors créer une nouvelle boucle. Vous pouvez créer autant de boucles que vous souhaitez mais le dMIX-600 ne conservera en mémoire UNIQUEMENT la dernière boucle créée sur le morceau
en cours de lecture. Cette boucle sera alors sauvegardée sur le
périphérique utilisé. Cette fonction s’active à partir du menu réglages.
OUT
Fig C
Fig D
22
Page 93

Menu Configuration (Setup)
Parce que chacun de nous a ses propres préférences, nous avons ajouté un
Menu de Configuration simplifié au dMIX-600. A chaque mise en service
e l’appareil, vos préférences seront appliquées. Le Menu de
d
Configuration est accessible à la fin du Menu Principal (Main Menu).
Chaque option peut être modifiée en appuyant sur Enter. Pour sortir du
Menu de Configuration appuyez sur la Touche Gauche du Clavier de
Navigation.
Pitch Bend - lent, normal ou rapide
- lent : Varie d’un taux approximatif de 1% par seconde
- normal : Varie d’un taux approximatif de 2 % par seconde
- rapide : Varie d’un taux approximatif de 4 % par seconde
Activation de la fonction Pitch (Réglage de vitesse) - on/off
Vous permet d’activer ou non le Pitch au démarrage de l’appareil.
Certaines personnes n’utilisant jamais le Pitch, préfèreront le désactiver.
Echelle de variation de vitesse (Pitch ) - 4, 8, 16, 24%
Permet de choisir la plage de variation de vitesse. Notez que, 4 et 8%
vous proposent une précision de calage de l’ordre de 0.05%.
Utilisation du dMIX-600
Configuration des Préférences
Fig 6.6 - Le Menu Configuration est situé du Menu Options de Recherche
Indexation - on/off
En sélectionnant “OFF”, l’appareil ne vous demandra jamais si vous voulez
créer une base de données. Très pratique pour les DJs qui possèdent une
librairie musicale bien classée ou pour les installations fixes.
Auto Fade réglable de 1 à 12 secondes - on/off
Vous pouvez régler le temps de passage d’un morceau à un autre lors de
la lecture d’une playlist. Cette fonction s’active (ON) & se désactive (OFF).
Shuffle - on/off
En sélectionnant “ON”, la lecture des morceaux s’effectuera de façon
aléatoire en fonction du critère de tri sélectionné: Artiste, Album, Genre,
BPM, Dossier...
Single - on/off
Permet de sélectionner par défaut au démarrage le mode Single (Une
seule lecture avec Auto-Cue) ou le mode Continuous (Lecture continue ).
Jog Mode - On/ Off
Permet de modifier la fonction de la Molette (Jog Wheel): PITCH BEND
(CALAGE) ou SEARCH (RECHERCHE).
Restauration de la Base de Données (DB)
Si votre Base de Données vient à être endommagée, le dMIX-600, via
cette fonction, vous permet de récupérer les données sauvegardées sur le
périphérique de stockage.
Fig 6.7 - Menu Configuration - Page 1/4
Fig 6.8 - Menu Configuration - Page 2/4
Fig 6.9 - Menu Configuration - Page 3/4
Réglage d’Affichage de la Waveform (5s, 10s, 20s, 40 s)
Permet de régler la longueur du signal audio représenté par la Waveform
& affiché dans l’écran LCD.
Chargement de la Waveform - Oui/Non
Permet d’afficher ou non la Waveform sur l’écran LCD durant la lecture.
Affichage de l’Information BPM à partit du TAGID3 - On/Off
Permet d’afficher - si l’information est renseignée - le BPM du morceau
MP3 via son TAG ID3. Si celui-ci ne comporte pas d’information sur le BPM,
l’affichage restera blanc/vierge.
Sélection du Language: Anglais, Espagnol & Français
Permet de sélectionner un language utilisateur à partir du menu
Configuration.
Fig 7.0 - Menu Configuration - Page 4/4
23
Page 94

Section 11: Changer, Ajouter & Ejecter un Périphérique de Stockage USB
Pour accéder au Menu Périphériques (Device Menu), à tout moment,
appuyez sur Shift+Power. A partir de ce menu vous pouvez choisir de
changer ou d’éjecter un périphérique de stockage.
L’USB autorise la “Connexion à chaud” (Mais pas la déconnexion). Vous
pouvez donc, à tout moment, connecter un périphérique USB quelque soit
le mode en cours, et quelque soit l’état de l’appareil (Allumé ou éteint).
Utilisation du dMIX-600
Menu des Périphériques
- Pour changer de périphérique:
1. Sélectionnez Changer de Périphérique (Change device) depuis le
Menu Périphériques (Device Menu).
2. Sélectionnez le nouveau périphérique à l’aide des Touches de
Navigation ou de la molette (Jog Wheel).
3. Si nécessaire lancez une création de base de données ou une simple
vérification (Voir Section 2: Sélections des Périphériques & Création de
Bases de Données).
- Ejection d’un périphérique:
1. Sélectionnez Ejection du Périphérique (Eject device) depuis le Menu
Périphériques (Device Menu).
2. Sélectionnez le périphérique que vous désirez éjecter en utilisant les
Touches de Navigation ou la molette (Jog Wheel). Puis appuyez sur Enter
pour éjecter le périphérique.
3. Si le périphérique que vous essayez d’éjecter est utilisé par les deux
côtés du dMIX-600, un message d’alerte apparaitra à l’écran “Le
périphérique est aussi relié à l’autre côté” (“The device is also attached
to other side!”). Cela signifie que si vous voulez réellement éjecter ce
périphérique, il vous faudra l’éjecter des deux cotés du contrôleur avant
de débrancher le périphérique.
4. Lorsque l’écran affiche “Le périphérique peut être retiré en toute sécurité” (“The device can be safely removed“), vous pouvez alors retirer votre
périphérique.
5. Si vous utilisez un lecteur externe de CD-ROM/DVD-ROM, vous devez
utiliser la touche d’Ejection de celui-ci pour charger ou décharger le
disque.
Fig 7.1 - Pressez simultanément sur les touches
Shift+Power pour accéder au Menu Device
+
Fig 7.2 - Sélection d’un autre périphérique à l’aide du
Clavier de Navigation ou de la Molette (Jog Wheel)
Si la procédure d’Ejection n’est pas respectée, vous pouvez endommager
irrémédiablement les fichiers (Fichiers ouverts lors de la déconnexion).
To connect your Dmix to your PC as an Ipod dock:
1.Seat your Ipod in the Ipod dock located at the top of
the unit.
2.Set the switch located next to the USB Type B connector on the rear of the unit to “PC Dock”.
3.Connect the USB type B port to your PC. Your PC
should see your Ipod.
Fig 7.3 - Veuillez patienter durant l’éjection du périphérique USB
Fig 7.4 - Le périphérique USB peut maintenant
être débranché en toute sécurité
24
Page 95

Mise sous Tension & Mises à Jour du Progiciel
Mise Hors Tension de l’Appareil
Comme tout ordinateur récent, le dMIX-600 possède un mode d’extinction
similaire, l’appareil doit en effet déconnecter l’ensemble des
ériphériques USB connectés & fermer l’application (Progiciel) nécessaire
p
à son fonctionnement avant de s’éteindre complètement. Cela permet aussi
d’éviter toute extinction accidentelle.
Pour éteindre le dMIX-600, veuillez maintenir la Touche Power enfoncée
durant 3 secondes.
Mises à jour du Progiciel
ne des plus puissantes caractéristiques du dMIX-600 est la possibilité de
U
mettre à jour son programme interne. Ces mises à jour permettront une
optimisation permanente & continue des fonctions, ainsi que la correction
de dysfonctionnements éventuels.
Des mises à jour seront disponibles régulièrement sur le site
http://www.cortex-pro.com.
Nous vous recommandons de télécharger chaque nouvelle mise à jour afin
de vous garantir une fonctionnalité optimale, ainsi qu’une compatibilité
plus importante.
Utilisation du dMIX-600
Fig 7.5 - Procédure d’extinction du dMIX-600
Pour vérifier la version installée du progiciel:
1. Mettre le dMIX-600 sous tension et N’Y CONNECTER AUCUN
PERIPHERIQUE!
2. Au moment où l’appareil vous demande ”Connectez Périphériques”,
appuyez sur la touche INFO.
3. L’écran affiche la version du progiciel déjà installée dans le dMIX-600.
Pour télécharger la mise à jour du progiciel, suivre les étapes suivantes:
1. En utilisant Internet Explorer, téléchargez sur votre ordinateur la
dernière mise à jour disponible sur le site http://www.cortex-pro.com
2. Décompressez et copiez le fichier à la racine de votre périphérique de
stockage USB connecté à votre ordinateur.
3. Déconnectez le périphérique de stockage USB de votre ordinateur puis
connectez le au dMIX-600. Sélectionnez ce périphérique dans le Menu des
Périphériques (Device Menu). Important ! Assurez vous de la stabilité de
votre alimentation. Aucune déconnection ou coupure de courant ne sera
supportée durant la mise à jour.
4. Lorsque le dMIX-600 détecte la mise à jour du progiciel disponible sur
la racine du périphérique, il vous demandera si vous voulez ou non installer
cette mise à jour. Répondez: OUI. Si la version de la mise à jour présente
dans le périphérique de stockage est la même, ou plus ancienne, que celle
déja installée, elle sera ignorée.
Fig 7.6 - Détection automatique de mise à jour. Requête d’installation.
Fig 7.7 - Mise à jour du progiciel en 8 étapes
5. La mise à jour s’effectuera en 8 étapes. Cela ne prendra que quelques
minutes. Si l’alimentation est coupée pendant ce processus ou le
périphérique USB débranché, le programme interne de l’appareil pourrait
être sérieusement endommagé.
6. Lorsque la mise à jour est terminée, l’appareil s’éteindra tout seul. Vous
devrez alors appuyer sur Power pour le rallumer. Dès le redémarrage, le
nouveau progiciel installé prendra effet. Vous pouvez effacer le fichier de
mise à jour de votre périphérique de stockage USB, ou le laisser (Il ne sera
pas détecté une nouvelle fois).
Fig 7.8 - Extinction de l’appareil après installation de la mise à jour
25
Page 96

Utilisation du dMIX-600
Section Console de Mixage
CONSOLE DE MIXAGE DU DMIX-600
Cette partie, réservée à la console de mixage intégrée au dMIX-600,
comporte différentes sections: section Input (Entrée)/Output (Sortie), section Gain/EQ, section Faders & Crossfader, section Microphone & section
Cue. A travers les pages suivantes nous détaillerons les fonctins basiques
afin que vous puissiez découvrir, brancher & utiliser votre dMIX-600.
SECTION SORTIE
Fig 7.9 - Sorties du dMIX-600
Le dMIX-600 possède 3 sorties séparées & accepte 2 sources stéréo
(Ligne ou Phono). Les différentes sorties sont les suivantes:
Master (Sortie Principale) - Cette sortie doit être connectée à votre console de mixage principale, amplificateur ou enceinte amplifiée à l’aide de
cordons RCA.
Réglages des Volumes Master & Booth
Ces potentiomètres rotatifs vous permettent de régler individuellement le
niveau de chacune de ces sorties.
Booth (Retour) - Cette sortie doit être connectée à votre système d’amplification de retour. Utilisez cette sortie comme retour DJ par exemple.
Record (Enregistrement) - Cette sortie, dépourvue de réglage de volume,
permet d’amener le signal audio de la sortie Master à tout enregistreur
analogique de votre choix.
Balanced XLR - Sortie symétrique (Master) sur embases XLR recommandée pour toute application/installation professionnelle. Le volume est
géré par le potentiomètre rotatif MASTER.
SECTION INPUT (ENTREE)
Fig 8.1 - Entrées du dMIX-600
Le dMIX-600 permet de mélanger/mixer des sources analogiques traditionnelles avec sources Numériques en provenance de Périphérique(s) de
Stockage de Masse RCA USB. L’appareil possède 2 entrées analogiques
RCA, nommées Input (Entrée) 1 & Input (Entrée) 2. Elles acceptent les
sources de niveau ligne (Lecteur CD, platine K7...) ou toute Platine Vinyle
équipée de Cellule Magnétique. Vous devez positionner le commutateur
en position LINE pour toute source de niveau ligne ou en position PHONO
pour toute utilisation de Platine Vinyle.
Fig 8.0 - Réglages Sortie Principale (Master) & Sortie Auxiliaire (Booth)
Faders & Crossfader
Les Faders permettent de régler le son de chaque voie. Le Crossfader permet de passer d’une voie à l’autre. Vous pouvez modifier la courbe de
réponse du Crossfader à l’aide du Commutateur Fader Curve, situé au
dessus du Crossfader.
Le Crossfader est remplaçable par l’utilisateur. Celui-ci est disponible
auprès de tout revendeur Cortex agréé ou auprès du service technique de
l’importateur.
Fig 8.2 - Crossfader/Fader de voie/VU-mètre du dMIX-600
26
Page 97

Utilisation du dMIX-600
Section Gain/EQ (Corrections Paramétriques)
Le dMIX-600 possède, sur chaque voie, une Correction Paramétrique à 3
bandes, ainsi qu’un réglage de Gain. Le Gain permet un réglage précis
du niveau audio en complément du fader. De plus, vous pouvez utiliser les
corrections paramétriques HIGH (AIGU)/MID (MEDIUM)/LOW (BASSE)
afin de modifier la tonalité de la voie.
POUR OBTENIR DES PERFORMANCES AUDIO OPTIMALES, DEMAR-
Note -
REZ VOTRE MIX AVEC LE GAIN REGLE AU MINIMUM. REGLEZ LE NIVEAU
GENERAL A L’AIDE DU FADER ET DU REGLAGE DE VOLUME DE LA SORTIE
PRINCIPALE (MASTER). CECI AFIN D’EVITER UN NIVEAU AUDIO TROP ELEVE
DISTORSION) PUIS, A VOTRE CONVENANCE, AFFINEZ - A L’AIDE DU GAIN -
(
LE REGLAGE AFIN D’OBTENIR LE NIVEAU AUDIO DESIRE.
Faders & Crossfader
Les Faders permettent de régler le son de chaque voie. Le Crossfader permet de passer d’une voie à l’autre. Vous pouvez modifier la courbe de
réponse du Crossfader à l’aide du Commutateur Fader Curve, situé au
dessus du Crossfader.
Le Crossfader est remplaçable par l’utilisateur. Celui-ci est disponible
auprès de tout revendeur Cortex agréé ou auprès du service technique de
l’importateur.
Mixer Section
(CONTINUED)
VU-mètre
Le VU-mètre permet de visualiser le niveau de sortie stéréo de la sortie
Master (Principale) du dMIX-600, ainsi que le niveau individuel de chaque
entrée. Utilisez le commutateur Cue/PGM situé au dessus du VU-mètre.
Mettez le en position CUE afin de visualiser la Voie 1 ou la Voie 2. Mettez
le en position PGM afin de visualiser le niveau de sortie Master
(Principale). Afin d’éviter toute distorsion, nous vous recommandons de conserver un niveau audio entre 0 & +5dB sur le VU-mètre.
Section Cue (Pré-écoute)
Le dMIX-600 permet de pré-écouter chacune des Voies 1 & 2 avant de
les mélanger/mixer. Pour utiliser la fonction Cue (Pré-écoute), branchez un
casque à l’embase Jack 6.35mm située en face avant (Partie frontale) de
l’appareil. Puis, utilisez le fader Cue situé à droite en face avant (Partie
frontale) de l’appareil afin de passer d’une voie à l’autre. Utilisez le
potentiomètre rotatif Cue Volume pour augmenter ou diminuer le volume
du casque. La touche CUE EFX vous permet de vérifier, dans votre casque,
le niveau d’effet attribué au morceau en cours de calage.
Section Microphone
La section Microphone du dMIX-600 vous permet de brancher un ou deux
micros simultanément. Les prises destinées aux microphones sont de type
Jack 6.35mm, et partagent le réglage de Volume & les Corrections
Paramétriques (2 bandes). Ces réglages sont situés à gauche en face
avant (Partie frontale) de l’appareil. Vous pouvez modifier la tonalité à
l’aide de la double correction High (Aigu) & Low (Basse) & le volume à
l’aide du potentiomètre rotatif Mic Volume. N’oubliez pas que ces
réglages concernent les deux entrées microphone.
Fig 8.3 -Réglages Gain & Corrections
Paramétriques 3 bandes du dMIX-600
par voie
Fig 8.4 - Section Cue (Pré-écoute) du dMIX-600
Fig 8.5 - Section microphone du dMIX-600
27
Page 98

Utilisation du dMIX-600
Section Effets
Section Effets
e dMIX-600 possède 3 effets intégrés qui peuvent être assignés sur
L
chaque voie, y compris le microphone individuellement. Le volume de l’effet peut être dosé à l’aide du potentiomètre rotatif DRY/WET (Dans le
sens des aiguilles d’une montre afin de diminuer le volume d’effet - DRY -
inversement pour augmenter le volume d’effet - WET -).
&
Ces effets sont:
Filtre
Il s’agit d’un filtre passe bande qui permet d’éliminer les hautes ou basses fréquences en fonction de la position du potentiomètre de contrôle. En
position centrale, il n’y a aucun effet sur le son, positionnez le vers la
gauche et les hautes fréquences (Aigues) disparaîtront progressivement
afin de ne conserver que les basses fréquences. A l’inverse, positionnez le
potentiomètre de contrôle vers la droite et les basses fréquences disparaîtront progressivement, ne laissant d’audibles que les aigues.
-
Fig 8.6 Section effets
Fig 8.7 Assignation de l’effet sur la voie
Flanger
Le Flanger est un effet audio basé sur le temps qui permet, lorsque 2 signaux identiques sont mélangés simultanément de retarder l’un des 2 signaux progressivement par pas de quelques millisecondes (<20ms). Cela
produit un effet de filtre masquant basé sur une série d’harmoniques.
En modifiant le retard, cela modifie harmonieusement le spectre des
fréquences.
En positionnant le potentiomètre de contrôle vers la gauche, l’effet
flanger ralentit, à l’inverse, vers la droite il accélére.
Réverbération
La réverbération est la persistance d’un son original dans un espace particulier & défini. Lorsqu’un son est produit dans un espace donné, un écho
apparaît & ralentit la propagation du son compte tenu de la résistance de
l’air et des murs créant ainsi cet effet de réverbération. Ceci est plus perceptible lorsque le signal d’origine est stoppé, mais que les réflections continuent, baissant en amplitude, jusqu’à devenir inaudibles. Les pièces volumineuses, telles que les cathédrales, les gymnases, les piscines couvertes...
sont des exemples typiques dans lesquelles les réverbérations peuvent
être clairement audibles. Un certain nombre de musiques tendent à s’accomoder harmonieusement de cet effet. En positionnant le potentiomètre de
contrôle vers la gauche, la réverbération s’atténuera. A l’inverse, en le
positionnant vers la droite, la réverbération augmentera.
Fig 8.8 Réglage du volume des effets durant le mix
28
Page 99

Configuration de votre iPod™ & de iTunes™
Avant de connecter votre iPod™ à votre dMIX-600, il est nécessaire de suivre les instructions ci-dessous.
(A) Configurez votre iPod ™ en tant que disque dur
(B) Configurez votre ordinateur afin d’extraire la musique dans un
ormat compatible.
f
(C) Convertissez vos fichiers qui n’ont pas un format compatible
afin de les rendre compatible avec votre dMIX-600.
CONFIGUREZ VOTRE iPOD™ EN TANT QUE DISQUE DUR
Commencez par configurer votre iPod™ afin que votre appareil
Cortex puisse le lire. Connectez votre iPod™ à votre ordinateur et
attendez que iTunes™ le détecte. Lorsque votre iPod™ apparait,
décochez la case “Gérer manuellement la musique”, puis assurez
vous que l’option “Activer l’utilisation comme disque dur” soit bien
cochée. Vous pouvez maintenant re-cocher l’option “Gérer
manuellement la musique” si vous voulez ou non que le logiciel
iTunes™ gère automatiquement votre musique.
Utilisation du dMIX-600
A la ligne “ A l’insertion du CD:“ , choisissez “Demander si le CD
doit être importé“. iTunes vous demandera alors si vous voulez ou
non importer le CD . Il ne le fera plus automatiquement dès l’insertion du CD.
A la ligne “ Importer avec: “, vous avez le choix parmi deux formats
possibles.
CONFIGURATION iTunes™ POUR MAC OU PC (PC
illustré)
Ces réglages vous permettront d’optimiser iTunes et d’être sûr que
vos fichiers seront compatibles et correctement lus par votre dMIX-
600.
Sur Mac ou PC, ouvrez iTunes™, cliquez sur “Edition”(iTunes™
menu sur MAC), puis cliquez sur “Préférences”, puis sur l’onglet
“Avancé” et enfin sur l’onglet “Importation”.
ENCODEUR WAV
Si vous désirez garder votre musique en haute qualité (Qualité CD,
non compressée), choisissez l’encodeur WAV puis “ Automatique”
Configuration & Réglages des Morceaux au Format WAV.
comme “Réglage”. Les autres cases peuvent rester comme elles
sont.
Attention : Une fois que la musique a été compressée en MP3,
elle n’aura pas une meilleure qualité si vous la convertissez
en WAV... Vous ne ferez qu’augmenter la taille du fichier de
300% !!!
29
Page 100

Configuration de votre iPod™ & de iTunes™(suite)
Encodeur Mp3
Cortex a choisi le format MP3 car il s’agît du format de compression numérique le plus répandu dans le domaine de l’audio.
Si vous avez choisi “Encodeur MP3”, sélectionnez “Personnaliser”
dans l’option “Réglages”. Le taux de compression par défaut qui
pparaitra sera 192kbps, nous vous recommandons 320Kbps, la
a
qualité sera bien meilleure en n’augmentant que sensiblement la
taille du fichier.
la ligne “Débit stéréo”,
A
choisissez (320 kbps)
puis juste dessous,
assurez vous que l’option
“Utiliser l’encodage VBR”
est bien DECOCHEE! Les
fichiers encodés en VBR
sont bien moins fiables
que les fichiers CBR.
Les autres options peu-
vent rester par défaut à l’exception de l’option “Filtrer les
fréquences inférieures à 10 Hz”. Vous pouvez décocher cette
case. Les fréquences inférieures à 10 Hz ne sont pas nécessaires
pour la reproduction du son sur votre ordinateur, mais il peut être
intéressant des les garder lors d’une diffusion sonore sur un gros
système comme dans
une discothèque par
exemple.
Utilisation du dMIX-600
En appuyant sur “TYPE”, vos musiques seront triées par format,
sélectionnez celles qui ne sont pas au format mpeg (MP3). Avant
de convertir ces fichiers, vérifiez qu’ils se sont pas “protégés” ou
“DRM”. Si, certains fichiers sont de ce type, placez les dans un
dossier différent. ILS NE PEUVENT PAS ÊTRE CONVERTIS. Une fois ces
fichiers déplacés, vous pouvez les supprimer de votre bibliboth-
èque iTunes™.
Sélectionnez maintenant les fichiers restants qui ne sont ni MP3,
ni WAV puis cliquez sur “AVANCE” en haut de l’écran, puis
“Convertir la sélection en MP3”. iTunes™ démarre alors la conversion de tous les fichiers sélectionnés. Cela peut prendre un certain
temps & dépend du nombre de fichiers que vous avez à convertir.
La page réglages MP3
doit ressembler à celle-
ci.
Si vos réglages sont cor-
rects, cliquez deux fois
sur OK. iTunes™ est
maintenant prêt à
importer/convertir vos
fichiers dans le format
utilisé par le dMIX-600.
FORMAT AAC & FICHIERS DRM
La plupart des fichiers de musique compressés sont déjà en MP3
cependant, il se peut que vous possédiez déjà des fichiers compressés dans un autre format que MP3 ou WAV. Peut-être avezvous déjà acheté des fichiers audio via iTunes: ces fichiers sont
certainement protégés contre la copie (Fichiers DRM) et doivent
être séparés du reste de votre bibliothèque car il est impossible de
les convertir.
Triez et identifiez vos fichiers: Les fichiers AAC et DRM ne sont pas
compatibles avec le dMIX-600.
Vous devez tout d’abord identifier les différents types de fichiers,
pour cela, triez votre bibliothèque par “TYPE”. Si “TYPE” n’apparaît pas dans les choix en haut de votre liste, vous pouvez le
rajouter en faisant un “click droit” sur l’un des titres de colonne.
Une fois la conversion terminée, les “anciens” fichiers seront toujours visibles et surlignés. Appuyez alors sur la touche “Supprimer”
pour les effacer de la liste. Vous pouvez aussi relancer un tri par
“TYPE” puis supprimer tous les fichiers non MP3 ou non WAV.
Cette étape étant terminée, vous pouvez maintenant transférer
votre bibliothèque sur un disque dur externe, ou bien
“Synchroniser “ votre bibliothèque et votre iPod™.
N’oubliez pas d’utiliser le logiciel Cortex “DBSE software” pour
mettre à jour la base de données.
Votre bibliothèque est prête à être utilisée sur votre dMIX-600.
30
 Loading...