

Page 1

VOIP 2747
IP Phone
User Manual
274701-VIP-PAK
Cortelco
Release 5.1
Page 2

Contents
1 OVERVIEW.........................................................................................................4
1.1 I
1.2 K
1.3 H
NTRODUCTION .............................................................................................4
EY FEATURES..............................................................................................4
ARDWARE SPECIFICATION...........................................................................7
2 BASIC INSTALLATION ....................................................................................8
2.1 A
PPEARANCE INTRODUCTION ....................................................................... 8
2.1.1 Key parts of the 2747.............................................................................8
2.1.2 Rear and Back side Panel of the 2747...................................................9
2.1.3
KEYPAD DEFINITION ........................................................................................10
2.2 LCD
2.3 I
MENU LIST.........................................................................................14
NSTALLATION ENVIRONMENT ....................................................................18
3 CONFIGURATION FROM KEYPADS..........................................................19
3.1 N
ETWORK CONFIGURATION ........................................................................19
3.1.1 Dynamic IP Method (DHCP)...............................................................19
3.1.2 PPPoE Method.....................................................................................20
3.1.3 Static IP Method...................................................................................20
3.2 R
EGISTRATION TO GK / PROXY SERVER...................................................... 21
3.2.1 Registration to a gatekeeper (H.323 version)......................................21
3.2.2 Registration to a proxy server (SIP version)........................................22
3.3 R
3.4 C
EGISTRATION / STARTUP MESS AGE ............................................................24
ALL FORWARD CONFIGURATIONS .............................................................27
3.4.1 Immediate Forward..............................................................................27
3.4.2 Busy Forward.......................................................................................28
3.4.3 No Answer Forward.............................................................................28
3.5 C
ONFIGURATIONS UNDER “VIEW” ITEM ......................................................28
3.5.1 View current network settings..............................................................28
3.5.2 Ping another device .............................................................................28
3.5.3 Restart..................................................................................................29
3.5.4 Display current software version.........................................................29
3.5.5 Packet Trace for signal monitoring .....................................................29
4 WEB CONFIGURATION................................................................................. 30
4.1 N
ETWORK CONFIGURATION ON WEB...........................................................31
4.1.1 Basic.....................................................................................................31
1
Page 3

4.1.2 Others...................................................................................................31
4.1.2.1 MAC Address...................................................................................31
4.1.2.2 NTP Server.......................................................................................31
4.1.2.3 Time Zone ........................................................................................32
4.2 H.323
CONFIGURATION ON WEB .................................................................32
4.2.1 H.323 Parameters................................................................................32
4.2.2 Forward Mode.....................................................................................32
4.2.3 Advanced..............................................................................................33
4.2.3.1 Min Media Port :..............................................................................33
4.2.3.2 Max Media Port : .............................................................................33
4.2.3.3 Codec : ............................................................................................. 33
4.3 SIP
CONFIGURATION ON WEB......................................................................33
4.3.1 SIP Parameters....................................................................................34
4.3.2 Forward Mode.....................................................................................34
4.3.3 Advanced..............................................................................................34
4.3.3.1 Reg From .........................................................................................34
4.3.3.2 Reg To..............................................................................................34
4.3.3.3 Reg Expire .......................................................................................34
4.3.3.4 Min Media Port................................................................................34
4.3.3.5 Max Media Port ...............................................................................34
4.3.3.6 Codec ...............................................................................................34
4.4 P
HONE CONFIGURATION ON WEB ................................................................35
4.4.1 Prefix....................................................................................................35
4.4.2 Voice.....................................................................................................35
4.4.2.1 Ring Volume .................................................................................... 35
4.4.2.2 Handset Volume ...............................................................................36
4.4.2.3 Handsfree Volume............................................................................36
4.4.2.4 CodecTxGain ...................................................................................36
4.4.2.5 Ring Type.........................................................................................36
4.4.2.6 RTPLowBW.....................................................................................36
4.4.2.7 Jitter Buffering .................................................................................36
4.4.3 Others...................................................................................................36
4.4.3.1 VAD .................................................................................................36
4.4.3.2 BG Noise Level................................................................................37
4.5 S
YSTEM CONFIGURATION............................................................................37
5 CALL FUNCTIONS ..........................................................................................38
5.1 M
5.2 R
AKING CALLS ..........................................................................................38
ECEIVING CALLS.......................................................................................38
2
Page 4

5.3 CHECK CALL HISTORY (INCOMING / OUTGOING / MISSED CALLS).................38
5.4 R
5.5 C
5.6 C
EDIAL .......................................................................................................39
ALL FORWARD ..........................................................................................39
ALL TRANSFER .........................................................................................39
5.6.1 Blind Transfer......................................................................................39
5.6.2 Attended Transfer.................................................................................39
5.7 C
ALL HOLD.................................................................................................40
5.8 PHONE BOOK AND SPEED DIAL............................................................40
6 ATTACHMENT .................................................................................................41
6.1 H.323
6.2 SIP
INTEROPERABILITY LIST...................................................................41
INTEROPERABILITY LIST.......................................................................43
3
Page 5

1 Overview
1.1 Introduction
Cortelco Inc. and its suppliers believe that the next generation of networks
based on VoIP technologies will significantly change the way people communicate
with each other. To get the greatest benefit from these technologies, the use of VoIP
should be simple to most users. Our mission is to make your VoIP experience just
as straightforward as using a normal telephone set.
The VOIP 2747 is a next generation IP Phone that provides a cost-saving
solution for small business/home users for their telecommunication needs. The VOIP
2747 follows the open standard SIP/H.323 protocols to make sure that the user can
easily install this IP phone on most of the existing VoIP (Voice over IP) services. By
using state-of-the-art DSP (Digital Signal Processing) technology, the VOIP 2747
delivers outstanding voice quality that is comparable to PSTN.
With the built in LCD display, the user can easily configure the VOIP 2747 for
first time installation in just a few minutes. In addition to the advanced VoIP
functions and easy installation, the VOIP 2747 also provides rich telephone features
such as last number redial, speed dial, call forward/transfer, call history, volume
adjustment and speakerphone. Cortelco’s VOIP 2747 is your best VoIP solution for
the next generation of communication.
1.2 Key Features
• H.323 version 4 standard :
o Supports Fast start, Tunneling and H.245 DTMF relay.
• RFC-3261 SIP standard :
o Supports password authentication using MD5 digest and RFC-2833 for
DTMF relay.
• Dynamic IP support (DHCP and PPPoE) :
4
Page 6

Gets IP from DHCP server using DHCP protocol or through ADSL
o
modem using PPPoE protocol, automatically reconnects when PPPoE
loses connection.
• Pass through NAT devices:
o Can make outgoing and incoming calls under any NAT device (even
under two layer NAT devices) when working with the specific
gatekeeper/proxy device.
• Remote software upgrade capability (via ftp):
o FTP protocol provides reliable remote upgrade via Internet.
• Advanced Digital Signal Processing (DSP) technology to ensure superior
audio quality:
o Hardware System on a Chip solution with built in DSP processor
ensures perfect voice quality.
• Supports G.723.1, G.729A/B, G.711 (A-law/U-law) voice codecs :
o Follows ITU-T standard for best compatibility.
• Supports supplementary services, including immediate (unconditional) call
forwarding, busy call forwarding, no answer call forwarding and call
hold/transferring.
• Provides call history:
o Records incoming call history, outgoing call history, missed (not
accepted) call history, and lets users make a direct call from the call
history log.
• Phone Book : 50 entries
• Speed dial : 10 entries
• Supports Silence Suppression, VAD (Voice Activity Detection), CNG
(Comfort Noise Generation) :
o Silence suppression can save about half of the network bandwidth
needed during normal VoIP conversation.
• Ping function supported :
o Pings another device on the Internet from the VOIP 2747 to make sure
the Internet connection is ok.
• System status display on the LCD panel :
5
Page 7

User can easily observe if the VOIP 2747 is working normally and
o
monitor the system status (network status, registering status) from the
LCD panel display.
o A “PKT Trace” function is supported to display the packets received
on the LCD panel and helps network administrator find the problem on
line.
• Call with or without gatekeeper / proxy(direct IP dialing) :
o Follows standard SIP / H.323 protocol and is compatible with most
existing SIP proxy / H.323 gatekeepers.
• Provides easy configuration methods:
o Setting by keypads on the phone.
o Setting by web browser.
• Supports RFC-3261, H.323, TCP/UDP/IP, RTP/RTCP, HTTP, ICMP, ARP,
DNS, DHCP, NTP/SNTP, FTP, PPP, PPPoE protocols.
• Interoperable with most of the existing SIP/H.323 VoIP devices (IP-phone,
gateway, gatekeeper, proxy, soft-switch, IP-PBX), including Microsoft
NetMeeting, Cisco gateways / gatekeepers:
o Please refer to the section 6.2/6.3 Interoperability List for a complete
listing.
• The WAN Port works with either straight through or crossover Ethernet cable.
6
Page 8

1.3 Hardware Specification
HARDWARE SPEC
Spec\Model VOIP 2747
PC Port
WAN Port
LCD display
Phone Case
Universal Switching Power Adaptor
Speaker
Dimension
Weight
Operating Temperature
Humidity
EMI Compliance
Table 1. Hardware Specification of VOIP 2747
1xRJ45 10/100 Base-T Ethernet, line auto-sensing/switching.
1xRJ45 10/100 Base-T Ethernet, line auto-sensing/switching.
2x16 characters
36-button keypad
Input: 100-240V AC
Output: +7V DC, 800mA
8 Ohm/0.2 Watt speaker for speakerphone operation
19cm(W)x23cm(D)x9cm(H)
870 g
32 - 104°F (0 – 40°C)
10%-95% (non-condensing)
UL/EN/FCC Class B
7
Page 9

2 Basic Installation
2.1 Appearance Introduction
2.1.1 Key parts of the VOIP 2747
The key parts of the VOIP 2747 series IP Phone are shown in
figure 1, and include the following:
1. 2x16 LCD Display 5. Handset
2. Keypad 6. Ethernet Cable
3. Usage Indicator 7. Power Adaptor
4. User Manual
Figure 1. Key parts of the VOIP 2747 series IP Phone
8
Page 10
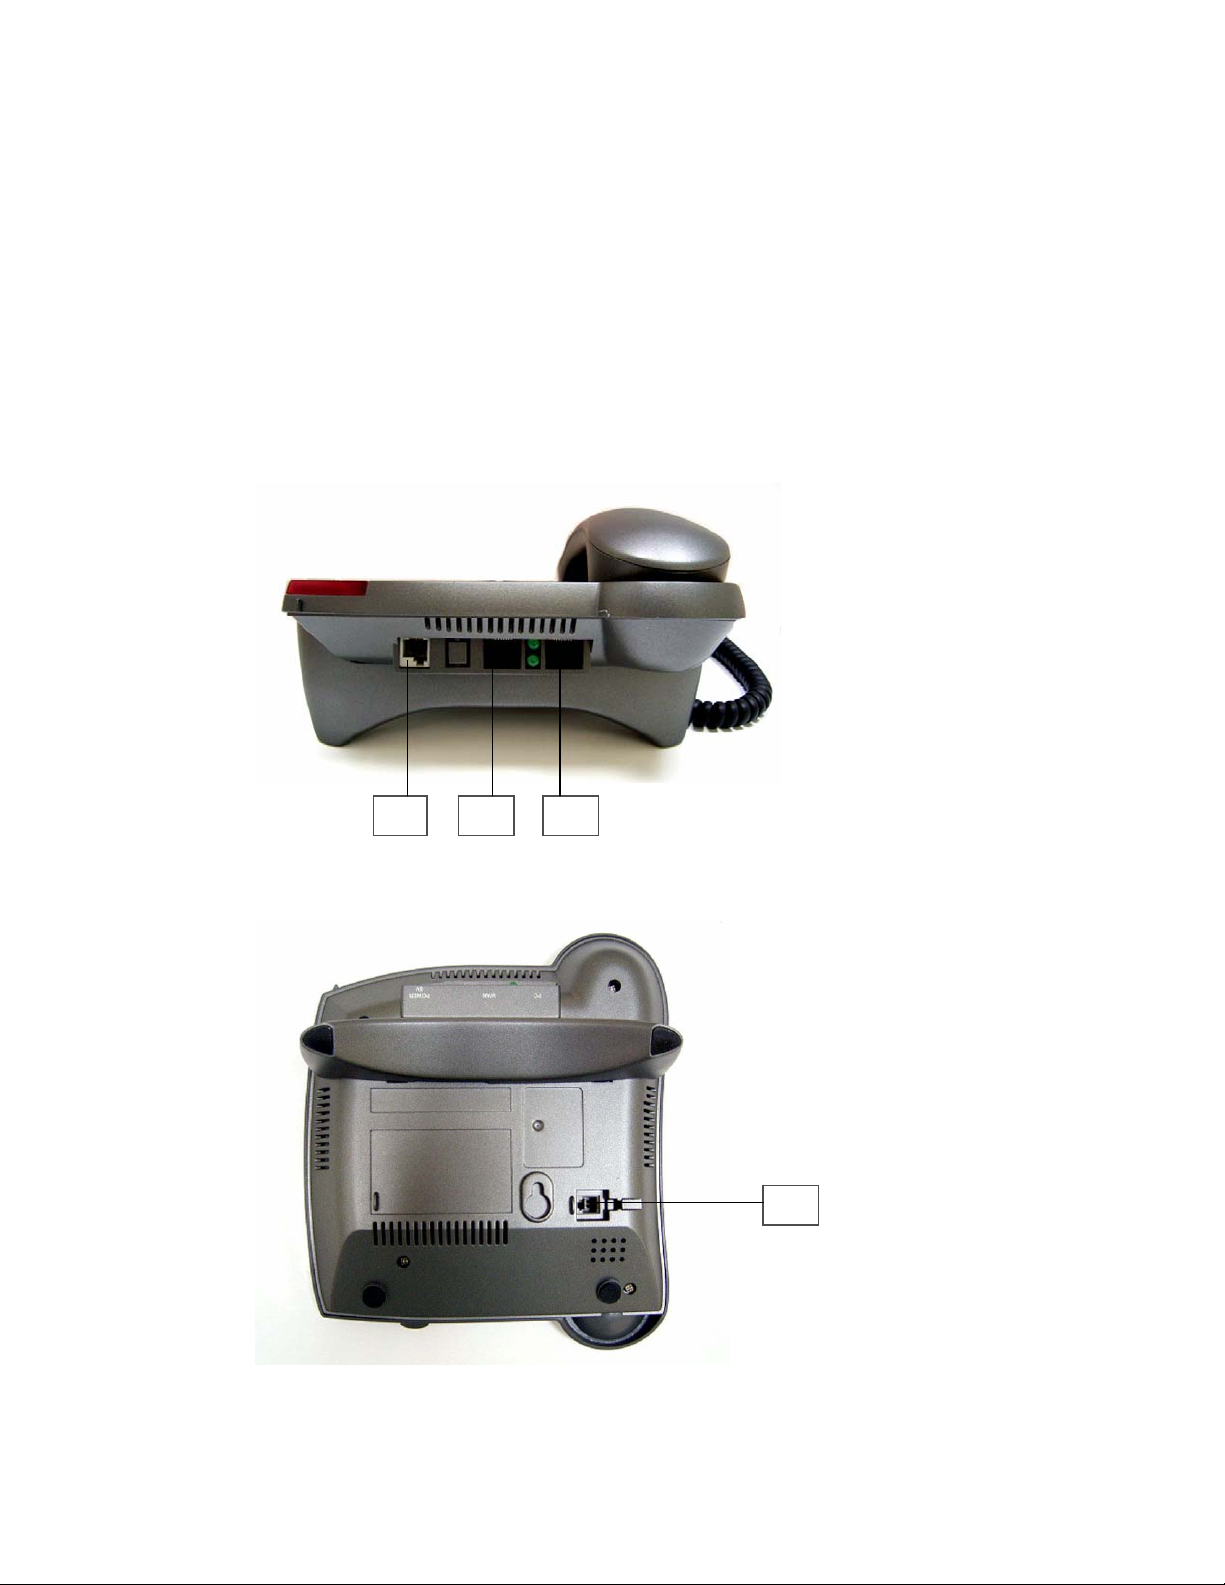
2.1.2 Rear and Back side Panel of the VOIP 2747
The rear and back side panel illustration is shown in figures 2 and 3;
main parts include:
1. RJ-45 Ethernet Port
2. RJ-45 Ethernet Port
3. Power Adaptor Jack
4. Handset Jack
Figure 2. Rear Panel of the IP Phone
Figure 3. Back Side Panel of the IP Phone
9
Page 11
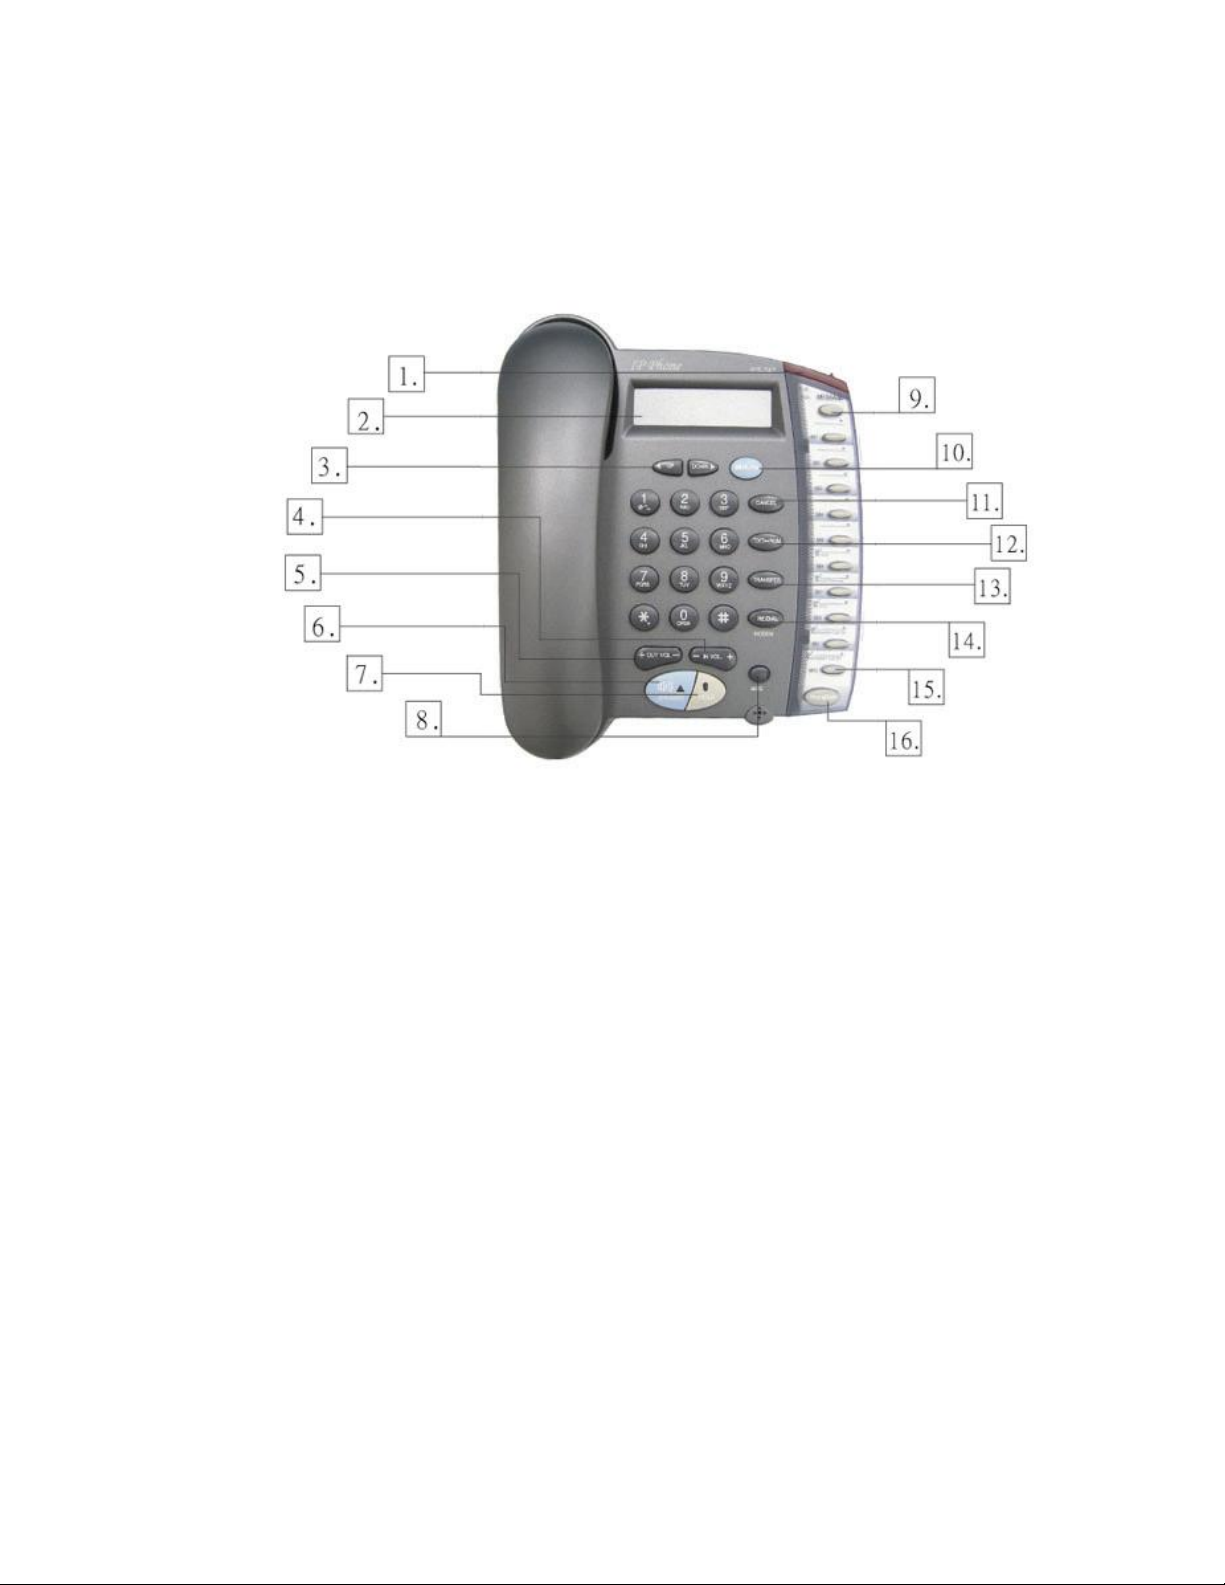
2.1.3 Keypad Definition
1. Light
The red light blinks when there is an incoming call and provides Message
Waiting indication.
2. LCD Display
Menu and all status displays for user.
3. “Í UP” Key
When the IP phone is in the menu selection mode, this key is used to scroll
up the menu items.
When the IP phone is editing menu item contents, this key is used as “ left
delete” to delete a digit upon each key press.
When the IP phone is in dial mode, the “Å” key is used as “delete” key.
Figure 3. Keypad illustration
10
Page 12

“Æ DOWN” Key
When the IP phone is in the menu selection mode, this key is used to scroll
down the menu items.
When the IP phone is editing menu item contents, this key is used as “ right
shift” to shift the cursor right a digit for each key press.
4. - IN VOL+
When the IP phone is in an idle state or user is talking on handset or speaker,
this key is used to increase/decrease the volume of the incoming voice.
The volume of speaker, handset and ring are separately adjusted according to
the mode of current usage. When in idle, “+” key increases the volume of
the ring tone, and “-” key decreases the volume of the ring tone; in
hands-free mode, “+” key increases the speaker volume, and “-” key
decreases the speaker volume; when in handset mode, “+” key increases the
volume of handset, “-” key decrease the volume of handset.
5. +OUT VOL-
Users are able to increase and/or decrease the volume which they transmit
out to a remote party.
6. SPEAKER
This key is pressed to switch between the using the handset and the speaker.
7. HOLD
This key places conversation on hold.
Also see Section 5.6.2.
8. NET
When users are not successfully registered to their service provider, this
button light will blink. User can press this button to try to register again to
their service provider.
9. MESSAGE
This key allows retrieval of Voice Mail messages.
11
Page 13

10. Menu / OK
When the IP phone is in idle state, this key is used as a “Menu” key to bring
up the menu selection on the LCD display.
When inside the menu selection/setting on the LCD display, this key is used
as an “OK” key to enter into a lower level of menu selection or to accept the
edited item’s contents.
When the IP phone is in dial mode, the “OK/Menu” key is used as a “Dial
Out” key.
11. Cancel
When the IP phone is in the menu selection, this key is used to escape to an
upper level of the menu selection.
When the IP phone is in menu edit mode, this key is used to cancel current
edit and escape to an upper level of the menu selection.
12. TXT ←→ NUM
When users need to enter information in text characters, press this button
and the alphabet shown on the keypads will be displayed.
13. TRANSFER
See Section 5.6.
14. Redial / Dial
When the IP phone is off-hook and a number is dialed, this key is pressed to
call out. The “#” key will also perform this function on many systems.
When the IP phone is off-hook and this key is pressed immediately, the last
dialed number will be called out right away.
12
Page 14

15. Speed Dial M1 – M10
Users are able to store 10 specific phone numbers in the slots of M1 - M10.
Users are able to make a speed dial call to the specific party by pressing the
speed dial key from M1 – M10.
16. Phone Book
Users are able to store up to 50 phone numbers by pressing the
“Phonebook” button. For each item of the 50 phone book numbers, the user
can store both the number and the name for display.
13
Page 15

2.2 LCD Menu List
The following is the roadmap for the menu on your IP phone:
(SIP & H.323 share a similar menu, different parts are written separately.)
View
¾ Network Value
¾ IP Address
¾ Network Mask
¾ Default Route
¾ DNS Server
¾ Ping
¾ Restart
¾ Image Version
¾ (Yes / No) PKT Trace
Configure (Password: 135)
¾ Network
¾ (Yes / No) Dynamic IP
¾ (Yes / No) PPPoE
¾ If yes:
¾ PPPoE User Name
¾ PPPoE Password
¾ Static IP
¾ IP Address
¾ Network Mask
¾ Default Route
¾ DNS Server
¾ Time Zone
¾ H323
¾ Number
¾ Password
¾ H.323 ID
¾ (Yes / No) Reg to GK
¾ (Yes / No) RTPLowBW
14
Page 16

¾ SIP
¾ Forward Mode
Advanced
¾ System
¾ Disp Name
¾ Login ID
¾ Number
¾ Password
¾ (Yes / No) Proxy On
¾ If Yes:
¾ Proxy Address
¾ Proxy Port
¾ (Yes / No) Outbound Proxy
¾ If Yes:
¾ Outbound Proxy IP
¾ Outbound Proxy Port
¾ (Yes / No) RTPLowBW
¾ (Yes / No) Immediate
¾ If Yes:
¾ Immediate Number
¾ (Yes / No) Busy
¾ If Yes:
¾ Busy Number
¾ (Yes / No) No Answer
¾ If Yes:
¾ No Answer Number
¾ No Answer Time
¾ DSP Version
¾ Upgrade / DnLoad
¾ FTP Server IP
¾ Image File Name
¾
Upgrade Image
¾ Upgrade Loader
¾ Config Profile
¾ Debut Mode
¾ Dump Address
¾ Dump Size
15
Page 17

¾ Dump!
¾ Network
¾ MAC Address
¾ NTP Server
¾ Restart Count
¾ RTP Proces s
¾ (Yes / No) Bypass Server
¾ (Yes / No) Jitter Buffer
¾ (Yes / No) Auto Upgrade
¾ Phone Advanced
¾ Codec
¾ G.711u
¾ G.711a
¾ G. 7 2 9
¾ G. 7 2 3
¾ Vo i c e
¾ (Yes / No) VAD
¾ BG Noise Level
¾ Vo l u m e
¾ Ring Volume
¾ Handset Volume
¾ Hand free Volume
¾ Codec Tx Gain
¾ Scrn Con (0-9)
¾ Ring Type (1-10)
¾ UI Mode
¾
Console
¾ Lcd
¾ Both
¾ SIP Advanced
¾ Protocol
¾ Min Media Port
¾ Max Media Port
¾ Reg From
¾ Reg To
¾ Reg Expire
¾ Reg Action
¾ Local Port
16
Page 18

¾ User Setting
¾ Platform
¾ Billing Server
¾ Login
¾ User Name
¾ Password
¾ Confirm Password
¾ Statistics
¾ User Statistics
¾ User Statistic
¾ Phone Statistic
¾ Phone Statistics
¾ Call Missed
¾ Call Received
¾ Call Dialed
¾ Additional
¾ International
¾ My Country Code
¾ Area Prefix Code
17
Page 19

2.3 Installation Environment
Figure 4. Installation Environment
Step 1:
Connect your IP phone to its handset by plugging one end of the coil cord
into the handset and the other end into the jack on the bottom of the IP
phone. To connect to the internet, plug into the middle jack on the back of
the IP phone. This jack is marked WAN. See figure 4 above
Step 2:
If you would like to have your PC online at the same time, please connect
the far right port to your PC. This Jack is marked PC. See figure 4
above.
Step 3:
Please plug in your power adaptor to your IP phone and power source.
LCD of your IP phone will display “Starting…….” and then “SIP / Hi xxx”
menu within approximately 4 seconds.
18
Page 20

3 Configuration from Keypads
The VOIP 2747 series IP Phone is designed to be installed easily and is very
user-friendly so almost all the configurations can be done through the keypad and
LCD screen display on the phone set in a few minutes. In order to make a VoIP
call, please configure through the keypad as described in the following few
sections:
Notice:
(1). When needing to input a character in any menu item, please press that key
button quickly to switch between different characters to set the correct one.
(2). When the input mode is in digit mode (you can only input ‘0’ – ‘9’ and ‘*’,
‘#’), and you want to input a character, please press “TXT
←→ NUM” key
first to toggle to “character” input mode.
3.1 Network Configuration
The first step in using the VOIP 2747 IP Phone is to set the network
configuration to let the IP Phone connect to internet. This step depends on
your network environment and phone models, so please use the proper
method in configuring the IP Phone for your internet connection.
3.1.1 Dynamic IP Method (DHCP)
Most of the network environment in an office, hotel room or at home is
under a NAT (IP sharing)/router device. Under this environment, the easiest way
to connect to internet is using DHCP. The IP Phone, when configured using the
following method, will get the IP parameters dynamically, and connect to the
internet automatically.
Configure ► Password:135 ► Network ► (Yes/No) Dynamic IP
Please press “ok” key to set Yes on (Yes / No) Dynamic IP when using
DHCP.
Most cable modem connections also use DHCP.
19
Page 21

3.1.2 PPPoE Method
Many of the broadband network connections now provided are ADSL
connections. Under this environment, the IP Phone can directly connect to the
ADSL modem by setting the PPPoE account (user name and password) provided
by the ADSL service provider.
Configure ► Password:135 ► Network ► (Yes/No) PPPoE
Please press “ok” key to set Yes on (Yes/No) PPPoE when using PPPoE
method, then key in the account from the ISP.
PPPoE Username – please input the user name of the account given by your
ADSL ISP.
PPPoE Password – please input the password of the account given by your
ADSL ISP.
3.1.3 Static IP Method
For the other network environments, the users will need to set the static IP
provided by their ISP or from the office MIS representative.
Configure ► Password:135 ► Network ► Static IP
Under the “Static IP” submenu, please key in the IP address, network mask
and default router settings provided by your ISP or a private IP address.
Once all the network settings are complete, please restart your IP phone.
To check whether your internet connection is working properly, go to View Æ
Ping, then key in a public IP address to ping it. If the response is ok, then the
network settings are complete.
20
Page 22

3.2 Registration to GK / Proxy Server
After the network environment is set and connected to the Internet, you can
register the IP Phone to your H.323 gatekeeper or SIP Proxy server. Please choose
one of the following methods to register to a gatekeeper or proxy server. (Method
depends on your IP Phone model)
3.2.1 Registration to a gatekeeper (H.323 version)
When the VoIP vendor/operator is running the H.323 system, use the VOIP
2747 to register to the gatekeeper. Configure the following parameters to do the
registration.
Configure ► Password:135 ►
A. Number – please input the phone number to register to the gatekeeper.
B. Password – please input the password to register to the gatekeeper.
This password is carried in the H.235 message for authentication
purpose. (Not every gatekeeper needs this field, if not needed, keep it
empty.)
C. H323_ID – please input the H.323 ID to register to the gatekeeper.
(Not every gatekeeper needs this field, if not needed, keep it empty.)
D. (Yes/No) Reg To GK – please select Yes and register to the gatekeeper.
The gatekeeper IP address is not configurable at the keypad if this IP
Phone is provided by the vendor/operator. If you really want to change this
setting, please go to “web settings” and change it under the H.323 web
configuration page.
If the IP Phone does not register to any gatekeeper, it can still call to
other IP phones by calling the IP address directly.
H323
E. (Yes/No) Full RRQ – whether to register with full RRQ(* Default (No))。
In a normal situation, the IP Phone will automatically re-register to the
gatekeeper periodically with minimum information to keep the connection
21
Page 23

alive. Some gatekeepers require the devices to keep re-registering to it using
the full information, in this case, please set the “FullRRQ” to “Yes”.
Note: The VOIP 2747 can pass the NAT/router devices if the gatekeeper supports
this function. The IP Phone will automatically detect if the gatekeeper supports
this and do the proper configuration to work under this NAT environment.
3.2.2 Registration to a proxy server (SIP version)
When the VoIP vendor/operator is running the SIP system, use the VOIP
2747 to register to the proxy server. Configure the following parameters to do
the registration.
Configure ► Password:135 ► SIP
A. Number – please input the phone number (username) to register to the proxy
server.
B. Password – please input the password to register to the proxy server.
This password is carried in the SIP Proxy-Authorization field using
MD5 digest method for authentication purposes. Not every proxy server
needs this field; if not needed, keep it empty.
Cortelco’s VOIP 2747 follows the standard RFC-2617 to do the
authentication.
C. Login ID – please input the username for registration authorization.
When the IP Phone is registering to the proxy server, the Authorization
field will have the username=”xxxxx” field; if the “Login ID” entry is empty,
the username will use the “Number” input value, but when the “Login ID”
field has some value, the username will use this “Login ID” value for
authorization.
D. (Yes / No) Proxy On – please select Yes and register to the proxy server.
After this item is enabled, two more menu items will appear. One is the
proxy server address, to set the IP address or domain name address of the
22
Page 24

proxy server. Another is the proxy server port, to set the port of the proxy
server; its value is usually 5060 unless specified by the service vendor.
If the IP Phone does not register to any proxy server, it still can call to
another IP phone by calling the IP address directly.
E. (Yes / No) Outbound Proxy – please set this item to Yes if the registration
needs to pass through the Outbound Proxy server.
23
Page 25

3.3 Registration / Startup message
When the network and registration configurations are set, please restart the IP
Phone. The LCD display on the IP phone will show one of the following
messages: (depends on whether the registration is ok or not.)
(a). When the IP Phone is registered to a H.323 gatekeeper successfully, the
LCD screen will display the following message:
Hi (number)
Date Time
This means that the VOIP 2747 is working OK and is ready for
outgoing/incoming calls. The number inside braces () is the IP phone’s
number.
Hi (GK Off)
Date Time
This means that the VOIP 2747 is working OK and is ready for
outgoing/incoming calls. However, if the “Reg to GK” flag is “No”, then the
IP Phone does not need to register. In this case, you can call the IP address of
other IP Phone directly.
(b). When the IP Phone is registered to a SIP proxy server successfully, the LCD
screen will display the following message:
SIP (number)
Date Time
This means that the VOIP 2747 is working OK and ready for
outgoing/incoming calls. The number inside braces () is the IP phone’s
number.
SIP (Proxy Off)
Date Time
This means that the VOIP 2747 is working OK and ready for outgoing /
24
Page 26

incoming calls. If the “Proxy On” flag is “No”, then the IP Phone does not
need to register. In this case, you can call the IP address of another IP Phone
directly.
(c). When the IP Phone is configured to use a gatekeeper or proxy server, but
has not yet registered successfully or failed, the LCD screen will display the
following message:
Registering (number)
Date Time
When the “Registering” message is displayed, the IP phone can not
make any calls. The menu selection and the on-hook / off-hook function
will work OK.
(d). If the IP Phone failed in registering to a H.323 gatekeeper or SIP proxy
server, the LCD screen will display the following message:
RegFail (failed message)
Date Time
The failed message could be one of the following:
(1). Duplicate: this means that the registering number is duplicated with
others, or the IP Phone’s previous registration information is still kept
in the gatekeeper/proxy server if not unregistered last time (this could
happen when the IP Phone is powered off instead of restarted from the
menu item). If the previous registration information is not cleared, you
may need to wait about 4 minutes to let the IP Phone register
successfully again.
(2). Security : this means that the account (username / password / H.323
ID) is not correct, please check your account again.
When the RegFail message is displayed, the IP phone can not make
any calls. The menu selection and the on-hook / off-hook function will work
OK.
25
Page 27

(e). When the IP Phone fails in obtaining an IP address from the DHCP server, the LCD
screen will display the following message :
DHCPFail (number)
Date Time
This means that the IP phone is configured to use DHCP to get an IP
address, but the DHCP procedure failed (cannot find a DHCP server or the
DHCP server rejected the IP assignment). The IP phone can not make any
calls and the on-hook / off-hook functions will not work, you can not hear
any sound on the handset or the speaker. Only the menu selections will
work.
The IP phone will continuously try to get the IP address from the
DHCP server, so, if the DHCP server is responding, the DHCPFail ()
display will change to Hi() display to notify that the IP phone is working
OK.
(f). When the IP Phone is set to use the PPPoE method for network connection,
but has some problem in finding the PPPoE server (ADSL modem), the
LCD screen will display the following message :
PPPoE FindFail(number)
Date Time
This means that the IP phone is configured to use PPPoE to get an IP
address, but the PPPoE procedure failed (can not find a PPPoE server or the
network connection has a problem). The IP phone can not make any calls,
but the menu selection and the on-hook / off-hook function will work OK.
(g). When the IP Phone is set to use the PPPoE method for network connection,
but has some problem in the PPPoE account, the LCD screen will display
the following message:
PPPoE AuthFail (numer)
Date Time
This means that the IP phone is configured to use PPPoE to get an IP
address, but the PPPoE server refuses the connection because the
26
Page 28

username/password is not correct. The IP phone can not make any calls, but
the menu selection and the on-hook / off-hook function will work OK.
(i). When the IP Phone is enabled to “Immediate Forward”, the LCD screen will
display the following message :
FWD(number)
Date Time
This means that the VOIP 2747 is working OK and ready for
outgoing/incoming calls. For any incoming call, it will be forwarded to the
“Immediate Forward Number”, and this IP Phone will not ring. See Sect.
3.4.
3.4 Call Forward Configurations
The phone supports three different Call Forwarding modes. These modes are
selected using the “Configure”Æ”Forward Mode” option.
3.4.1 Immediate Forward
To enable Immediate Forward mode, Press MENU/OK with Item 1 Immediate
selected. The display will change to 1. (Yes) Immediate and 2. Immed Number
will appear. Press DOWN Then MENU/OK to enter the target number for
Immediate Forwarding. The display will show Immed Number =. Enter the
number using the keypad and press MENU/OK. Then press CANCEL three
times. The display will show FWD(Ext Number). If Immediate forwarding is
selected, all calls to the phone will be sent to the target number.
When Immediate Forwarding is enabled, Busy Forward and No Answer
Forward can not be enabled.
27
Page 29

3.4.2 Busy Forward
To enable Busy Forward mode, Press MENU/OK with Item 2 Busy selected.
The display will change to 2 (Yes) Busy and 3. Busy Number will appear. Press
DOWN Then MENU/OK to enter the target number for Busy Forwarding. The
display will show Busy Number =. Enter the number using the keypad and
press MENU/OK. Then press CANCEL three times. The display will show
SIP(Ext Number). If Busy forwarding is selected, all calls to the phone will be
sent to the target number when the phone is in use.
3.4.3 No Answer Forward
To enable No Answer Forward mode, Press MENU/OK with Item 3 No
Answer selected. The display will change to 3 (Yes) No Answer and 4. NoAns
Number will appear. Press DOWN Then MENU/OK to enter the target number
for No Answer Forwarding. The display will show NoAns Number =. Enter
the number using the keypad and press MENU/OK. Then press CANCEL.
Now Press DOWN and then MENU/OK to enter the No Answer time. This sets
the amount of time in seconds before the call will be forwarded if it is not
answered. Enter the time and press CANCEL three times. The display will
show SIP(Ext Number).
3.5 Configurations under “View” item
Under the “View” menu item, there are many submenu items. These are mainly
for information about the phone’s current status, but they also provide simple
functions to check the status of the network.
3.5.1 View current network settings
By selecting “View”Æ”Network Value”, it is possible to see the current IP
Address, network mask, default router and DNS server address. The phone
may get its IP address from DHCP or PPPoE or it may have a static address. The
“View”Æ”Network” menu allows the user to determine the actual IP address.
3.5.2 Ping another device
The “Ping” function is one of the most commonly used tools to determine the
28
Page 30

state of a network connection. By selecting “View”Æ”Ping” and keying in the
IP address or domain name of another device, the phone can check the status of
its connection to that device. This can also be used to check the status of the
Internet connection by pinging another device that is already on the public
Internet.
3.5.3 Restart
By selecting “View”Æ”Restart”, the VOIP 2747 will perform a “warm restart.”
This will unregister the phone from the gatekeeper or proxy server, and will also
disconnect the modem connection if a modem is connected.
3.5.4 Display current software version
By selecting “View”Æ”Image Version”, the phone will display the current
software version. The software version is identified by the date of the release of
the software image.
3.5.5 Packet Trace for signal monitoring
Setting the “View”Æ”PKT Trace” to (Yes) will cause the phone to display all the
signaling messages received on the LCD screen. This may be useful for
debugging.
3.6 Advanced Configuration
DTMF Relay –For In-Band DTMF --Press “MENU” button, choose “Advanced”
and press “MENU/OK”. Password is “1230”, press “MENU/OK”. Choose
Phone Advanced Menu, press “MENU/OK”. Choose DTMF, press
“MENU/OK”. Choose DTMF Relay, press “MENU/OK”. Choose INFO, and
press “MENU/OK”. Restart the phone.
29
Page 31

4 Web Configuration
The phone provides a web interface for configuration. Please note that the
web interface will only work with Internet Explorer. To use this configuration
method, enter the IP address of the phone into the browser address bar. The
following login window will appear:
enter
root
****
Username:
Password:
The default username is “root”, and the default password is “1234”.
Please type these into the boxes shown and then click the “enter” button or press
Enter on your keyboard. This will bring up the home page of the phone as
shown below.
This page provides basic information and also allows selection of additional
pages for more detailed configuration.
30
Page 32

4.1 Network Configuration on web
Clicking on the “Network” icon on the left banner will bring up following
page to allow network configuration.
4.1.1 Basic
Please see section 3.1 for an explanation of each field.
4.1.2 Others
4.1.2.1 MAC Address
View the MAC Address of the IP Phone. The MAC Address cannot be
changed at this screen.
4.1.2.2 NTP Server
Set the NTP (Network Time Protocol) server’s IP Address. The
phone can use NTP to display the current date and time.
31
Page 33

4.1.2.3 Time Zone
Used to specify the time zone. Clicking the “View” icon will
display a list of all available time zones. For example, the value
should be set to -6 for US Central Time.
4.2 H.323 Configuration on web
Clicking on the “H.323” icon on the left banner will display the following page to
allow configuration of H.323 related parameters.
4.2.1 H.323 Parameters
Please see section 3.2 for the explanation of each field.
4.2.2 Forward Mode
Please see section 3.4 for the explanation of each field.
32
Page 34

4.2.3 Advanced
4.2.3.1 Min Media Port :
The minimum value of the range of the transmitted RTP packet’s port.
4.2.3.2 Max Media Port :
The maximum value of the range of the transmitted RTP packet’s port.
4.2.3.3 Codec :
The type of the Codec of the transmitted RTP packets.
4.3 SIP Configuration on web
Clicking on the “SIP” icon on the left banner will display the following page to
allow configuration of SIP related parameters.
33
Page 35

4.3.1 SIP Parameters
Please see section 3.2 for an explanation of each field.
4.3.2 Forward Mode
Please see section 3.4 for an explanation of each field.
4.3.3 Advanced
4.3.3.1 Reg From
Modifies the “From:” field in the SIP / SDP messages. This field
should be left empty in most cases.
4.3.3.2 Reg To
Modifies the “To:” field in the SIP / SDP messages. This field should
be left empty in most cases.
4.3.3.3 Reg Expire
Modifies the “Expires:” field in the SIP/SDP messages. This will
control the re-registration period.
4.3.3.4 Min Media Port
The minimum value of the range of the transmitted RTP packet’s port.
4.3.3.5 Max Media Port
The maximum value of the range of the transmitted RTP packet’s port.
4.3.3.6 Codec
The type of codec used to transmit RTP packets. In SIP calls, the type
of codec used is determined by the called party.
34
Page 36

4.4 Phone Configuration on web
Clicking on the “Phone” icon will display the following page to allow
configuration of phone related parameters.
4.4.1 Prefix
These entries are used for VoIP systems which require special treatment of
country codes, international codes, and area codes.
Any numbers placed in the “My Country Code” and “Area Prefix Code”
boxes will be appended to the front of dialed numbers.
Any numbers placed in the “International Code” box will be removed
from the front of dialed numbers.
In most cases, these values are not needed and the boxes should be left
empty.
4.4.2 Voice
4.4.2.1 Ring Volume
Adjusts the volume of ringing.
35
Page 37

4.4.2.2 Handset Volume
Adjusts the volume of incoming calls on the handset.
4.4.2.3 Handfree Volume
Adjusts the volume of incoming calls on the handsfree.
4.4.2.4 CodecTxGain
Adjust the output voice volume.
4.4.2.5 Ring Type
Changes the ringing type(ring pattern) of an incoming call.
4.4.2.6 RTPLowBW
Checking this box will cause the phone to decrease the voice packet
bandwidth in the transmit direction. This should only be used if the
internet bandwidth is not good enough to support normal packet
bandwidth.
4.4.2.7 Jitter Buffering
Checking this box will increase the jitter buffer from 150ms to 400ms.
This may improve the received voice quality in some internet
connections.
4.4.3 Others
4.4.3.1 VA D
Checking this box will enable Voice Activity Detection. With this feature
enabled, the phone will detect if the user is talking and will not send
packets when the user is silent. This can help to decrease the bandwidth
requirement.
36
Page 38

4.4.3.2 BG Noise Level
This value controls the sensitivity of the VAD detection.
4.5 System Configuration
Clicking on the “System” icon will display the following page to allow
configuration of system related parameters.
This page allows software upgrades, username/password changing, and rebooting
(restarting).
37
Page 39

5 Call Functions
5.1 Making Calls
To make a call, pick up the handset or press the SPEAKER button, dial the called
party’s number, and end with “#” key or RE/DIAL.
5.2 Receiving Calls
To answer a call when the phone is ringing, pick up the handset or press the
SPEAKER button.
5.3 Check call history (incoming / outgoing / missed calls)
The call history can be displayed on the LCD screen by pressing the “Å” key or
the “Æ” key when the phone is idle.
There are three kinds of call history:
Incoming is the record of numbers and time of the last 10 incoming calls when
answered
Outgoing is the record of numbers and time of the last 10 successful outgoing
calls.
Missed is the record of numbers and time of the last 10 incoming calls that were
not answered
When viewing the call history, press the “MENU/OK” key to do one of the
following three actions:
1.Dial – To call the number press the “MENU/OK” key again.
2.Delete – To delete this item from the call history press the DOWN key and
then press “MENU/OK”
3.To Phone Book – To add this item to the phone book, press the DOWN
key twice and then press “MENU/OK” Name = will appear on the
display. A name can be added to this number by using the keypad.
When finished, press MENU/OK and the added item will be sorted
alphabetically in the phone book.
38
Page 40

5.4 Redial
To call the last dialed number (redial), press the “RE/DIAL” key immediately
after going off-hook.
5.5 Call Forward
Call forwarding functions can be set via the keypad or by web configuration.
Please refer to section 3.5 for more details.
5.6 Call Transfer
This phone supports three types of call transfer. They are ringing transfer, blind
transfer and attended transfer.
5.6.1 Ringing Transfer
When a call is incoming and the IP phone is ringing, by pressing the “Transfer”
key and then another IP phone’s number you can transfer the call immediately to
another party without answering the call.
5.6.2 Blind Transfer
With blind transfer, the caller is transferred to a third party without informing the
third party who is transferring the call.
Example: A calls B and A wants B to transfer the call to C. B presses the
“TRANSFER” button and waits to hear dial tone. Then B dials C’s number and
hangs up. A is now transferred to C.
5.6.3 Attended Transfer
With attended transfer, the caller is transferred to a third party after the third
party is informed.
Example: A calls B and A wants B to transfer the call to C. B presses the
“HOLD” and waits for dial tone. Then B dial the C’s number and waits for C to
answer. B can now inform C of the call transfer. When B hangs up, A is
transferred to C.
39
Page 41

5.7 Call Hold
As described above, the HOLD button allows attended transfer. If the number
of the third party is not dialed in 8 seconds, the phone will go into the “Hold”
state. By pressing HOLD again, the call can be continued
5.8 Phone Book and Speed Dial
5.8.1 Phone Book
The Phone Book allows 50 names and numbers to be stored. To access the
Phone Book press the “PHONE BOOK” button, the display shows 1.Phone Book
2.Speed Dial. Press “MENU/OK.” The display now shows 1.Add, 2.Edit,
3.Delete, 4.Delete All
After selecting the Phone Book, press “MENU/OK” to select Add. The display
will show “Name=”. Use the keypad to enter the name and press “MENU/OK”.
The display now shows “Number=.” Use the keypad to enter the number and
press “MENU/OK.” Press “CANCEL” twice to return to the idle state.
After selecting the Phone Book, press “DOWN” and then “MENU/OK” to select
Edit. The display will show all the entries in the Phone Book in alphabetical
order. Used the “UP” and “DOWN” keys to scroll to the desired name and
press “MENU/OK”. The display now shows 1.Name 2.Number. To edit the
name, press “MENU/OK”. To edit the number, press “DOWN” and then press
“MENU/OK”. After pressing “MENU/OK” the display will show the current
information stored for the name or number. Use the UP and DOWN keys and
the keypad to make changes, then press “MENU/OK.” Press “CANCEL” four
times to return to the idle state.
After selecting the Phone Book, press “DOWN” twice and then “MENU/OK” to
select Delete. The display will show all the entries in the Phone Book in
alphabetical order. Used the “UP” and “DOWN” keys to scroll to the desired
name and press “MENU/OK” to delete this entry. The display will now show
the new Phone Book list. Press “MENU/OK” to delete another entry or press
“CANCEL” three times to return to the idle state.
5.8.1.1 Add
5.8.1.2 Edit
5.8.1.3 Delete
5.8.1.4 Delete All
After selecting the Phone Book, press “DOWN” three times and then
40
Page 42

“MENU/OK” to select Delete All. The display will show “Are You Sure?”.
Press “MENU/OK” to delete all Phone Book entries. Press “CANCEL” twice
to return to the idle state.
5.8.2 Speed Dial
To access Speed Dial, press the “PHONE BOOK” button, the display shows
1.Phone Book 2.Speed Dial. Press “DOWN” and then press “MENU/OK.”
The display now shows the ten speed dial locations M1 through M10. The
information in these buttons may be viewed or changed.
5.8.2.1 Speed Dial – View Settings
After accessing the Speed Dial, use the UP or DOWN key to select the desired
memory location, then press “MENU/OK” twice. The display will now show
Current Setting= XXXXX where XXXXX is the name stored in this location.
Press “CANCEL” four times to return to the idle state.
5.8.2.2 Speed Dial – Change Settings
After accessing the Speed Dial, use the UP or DOWN key to select the desired
memory location, press “MENU/OK”. Then press the “DOWN” key. Then
press “MENU/OK.” The display will now show a listing of names stored in the
phone book. Select the information to be stored and press “MENU/OK.”
Press “CANCEL” three times to return to the idle state.
6 Attachment
6.1 H.323 Interoperability List
The followings devices that have been tested to be interoperable with the 2747 IP
Phone.
- Client/Terminal
Microsoft NetMeeting, Version 3.01
OpenH323 Phone, Version 1.6.0
WellTech, LANPhone 101
Sagitta IP Phone
RadVision H.323v4 Protocol Stack (IMTC 2002)
Leadtek Research Inc., BVP8770 Video Phone (IMTC 2002)
Sony Electronics, PCS-6000 / PCS-1600 (IMTC 2002)
Aethra Srl (Italy), Vega Pro (IMTC 2002)
41
Page 43

IBM Corporation, Java-based Voice Server (IMTC 2002)
First Virtual Communications, Click To Meet Web Endpoint (IMTC 2002)
Innovaphone, IP200 (IMTC 2002)
UniData iW200
Cisco7905 IP Phone
- GateKeeper
Cisco AS5350 Gatekeeper function
Citron Network Inc. Gatekeeper
Radvision ProLab GateKeeper Simulator, Version 1.0, October 2001
OpenH323 GateKeeper, Version 1.3.2
GnuGK
III (Institute, Institute for Information Industry) GateKeeper, Version 1.0
NexTone Communications Inc., MSW (IMTC 2002)
MediaDigm Technology Inc. (Canada), SureKeeper (IMTC 2002)
Lucent iMerge gatekeeper
Wintel gatekeeper
MKY gatekeeper
EZTone gatekeeper
Tellink gatekeeper
Hivocal gatekeeper
GCard gatekeeper
- Gateway
D-Link 4-port gateway
Vanguard Managed Solutions, Vanguard (IMTC 2002)
AudioCodes Ltd., MP108 (IMTC 2002)
Cisco Systems Inc., Test Bed#1 (IMTC 2002)
Polycom Israel, GW-25 (IMTC 2002)
Antek Tech., 2~16 port gateway
WellTech gateway
Quintum gateway
- MCU
OpenH323 MCU, Version 1.1.3
Polycom Israel, MGC-100 (IMTC 2002)
42
Page 44

- SoftSwitch
ZTE Telcom. Softswitch
WalkerSun softswitch
6.2 SIP Interoperability List
The following devices have been tested to be interoperable with the 2747 series IP
Phone.
Client/Terminal
-SCS-Client V1.00
-SIPS 2.0.43.11
-SJ-Phone 1.10.187c
-X-Lite – FWD V2.0
-Softphone – Simems V0.90Bata27
-Estara V3.0.0.15
-Cisco ATA-186
-Cisco 7905
-BCM SIP Phone
-GrandStream SIP Phone
Proxy Server
-Wparty SIP V0.5.0
-Wparty SIP V0.5.5.2
-Asterisk 0.5.0
-Linux – Vovida V1.5
-SER 0.8.10
-WalkerSun softswitch
Gentrice proxy server
Inphonex platform
DeltaThree platform
NEC SV7000 IP PBX
Trunking Gateway
-Cisco 5300
-Quintum D2400
43
Page 45

LIMITED WARRANTY
If you purchased this product new in the U.S. or Puerto Ric o, CORTELCO warr ants it against defects in materi al
and workmanship for a period of one (1) year from the date of original purchase. This warranty is in lieu of all
other express warranties. During the warranty per iod, CORTELCO agrees to r epair or, at it s op t i o n, replace the
defective product, or any part of it without charge for parts or labor. This is your exclusive remedy. This
warranty does not cover damage resulting from accident, mis use, abuse, impro per installation or operation, lack
of reasonable care, the affixing of any attachment not provided by CORTELCO with the product and loss of
parts. The warranty is voided in the event any unauthorized p ers on a lt ers or re pai rs the u nit.
Telephone companies and ISP’s use different types of equipment and offer various types of services to
customers. CORTELCO does not warrant that this product is compatible with the type of equipment of
any particular phone company, the ISP, or the services provided by them.
CORTELCO DISCLAIMS ANY IMPLIED WARRANTY, INCLUDING THE WARRANTY OF
MERCHANTABILITY AND THE WARRANTY OF FITNESS FOR A PARTICULAR PURPOSE, AS OF THE
DATE ONE YEAR FROM THE ORIGINAL PURCHASE OF THE PRODUCT. CORTELCO ASSUMES NO
RESPONSIBILITY FOR ANY SPECIAL, INCIDENTAL OR CONSEQUENTIAL DAMAGES.
THIS WARRANTY GIVES YOU SPECIFIC LEGAL RIGHTS, AND YOU MAY HAVE OTHER RIGHTS, WHICH
VARY FROM STATE TO STATE. SOME STATES DO NOT ALLOW THE EXCLUSION OR LIMITATION OF
SPECIAL, INCIDENTAL OR CONSEQUENTIAL DAMAGES OR LIMITATIONS ON HOW LONG AN IMPLIED
WARRANTY LASTS, SO THE ABOVE EXCLUSION AND LIMITATION MAY NOT APPLY TO YOU.
If failure occurs and your 2747 VoIP is in warranty, service shall be provided by returning it to
CORTELCO - Repair Center, 1703 Sawyer Road, Corinth, Mississippi 38834, shipping
prepaid. The product will be repaired or replaced if examination by us determines the product to be
defective.
2747001VIPPAK
Revision 5.1
44
 Loading...