

Page 1
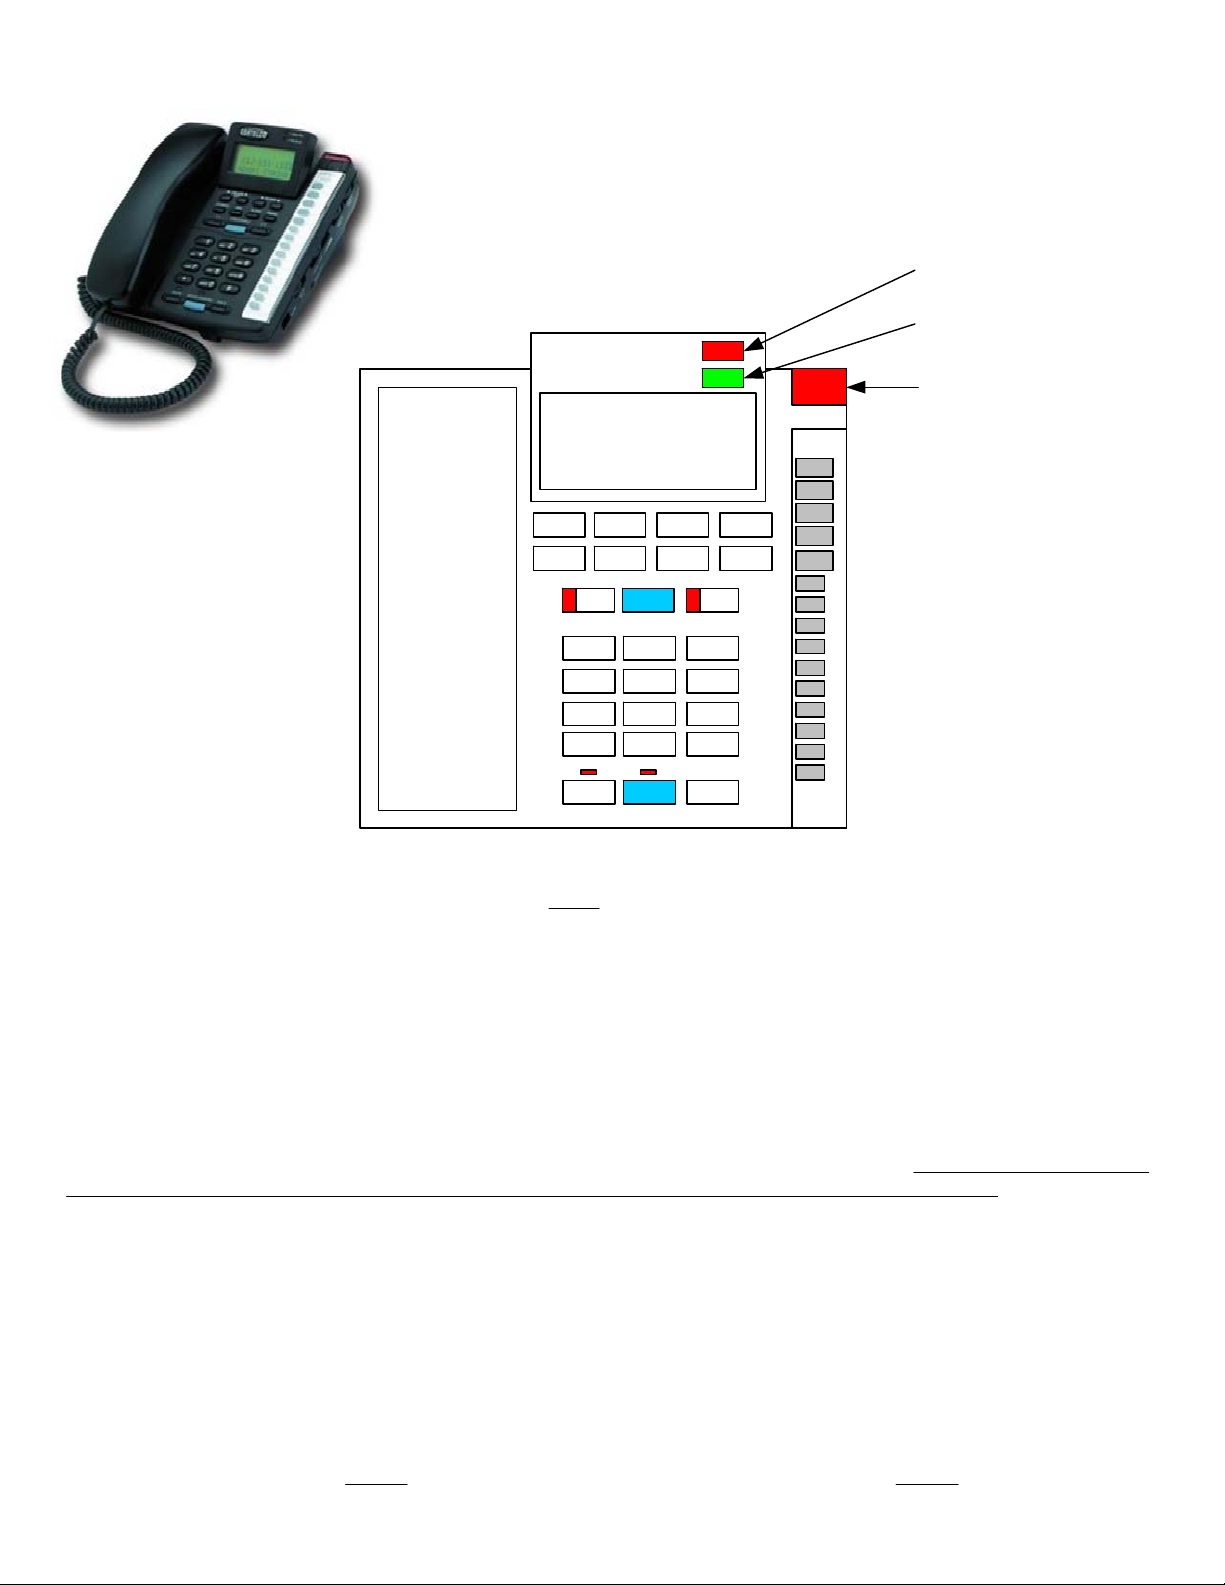
THE CORTELCO COLLEAGUE 2220 PHONE
UTM SPECIFIC INSTRUCTIONS
New call - Caller ID
Info stored
No function
Voicemail Message
Waiting Light
HANDSET
VOLUME
DOWN
OPTIONS
DISPLAY
VOLUMEUPREVIEW
DIAL
L1
DOWN
FLASH
REVIEW
L2CONF
12 3
45 6
78
0#
*
MUTE
9
HOLDSPEAKER
UP
REDIAL
CONTRAST
DIRECTORY
CALLER LIST
SAVE
DELETE
ON THE SIDE:
Ringer #1 Off/Hi/Lo switch
(your preferenc e)
Ringer #2 Off/Hi/Lo switch
(your preferenc e)
Heads e t On/Off (s e e b e l ow)
Headset jacks (see below)
Your phone comes from Telecommun ic ations with the large Message Waiting Light configured to work with our Voicemail
System. It will also flash when your phone is ringing. The green light labeled “MESSAGE” has no function. But since it’s
purpose is to work with other voic ema il s yst em s, yo u may occasionally see it flash as it looks fo r data.
The L1 and L2 lights are “Line In Use” indicat or s for y our main and second line. L1 will light when you pick up the phone,
or if someone you share the same number with is on their phone. It will also flash when your phone rings . The L2 ligh t
works in the same fashion, excep t tha t you will need to select it to call out on that line. If a call rings in on L2 you don ’t
need to press it to answer, you will autom atically connect to it when you pick up. The L1 and L2 buttons do not “lock”, so
after selecting L2 and hanging up, your phone will default back to L1.
The “CONFERENCE” button betwe en L1 and L2 allows y ou to “br idge” parties on both lines with in yo ur phone. It is also
non-locking and once your conference call is over your phone will default back to L1 operation. Please note that using this
function requires that you sta y on the line throughout the entire conf er enc e, and it ties up both your lines! If you do not
intend to be the conference “lea der ” , th en it may be prefer red to use the 3-party conferenc ing c apabilities of the UTM
telephone system. This is done by having one party already on the line, pressing the “FLASH” button, gett ing a se co nd
dialtone, calling the sec ond party and pressing “FLASH” agai n to connec t both parties and yourself. Usin g this me thod you
only use the one phone line, plus you can hang up and the other parties will still be connected.
IF THE POWER GOES OUT:
Since your phone uses a plug-in trans former instead of batteries , if the power goes out the display will go blan k, and no
lights except the Message Wai ting Light will work. You can still receive and ma ke call s using the handset.
When the power is off, your speed dial but tons won’t work, but they will remain in memor y when power re turns . Calls
received while the power is out will not be stored in the Caller ID memory, but records of call s prio r to the power failure will
remain when power returns.
Page 2
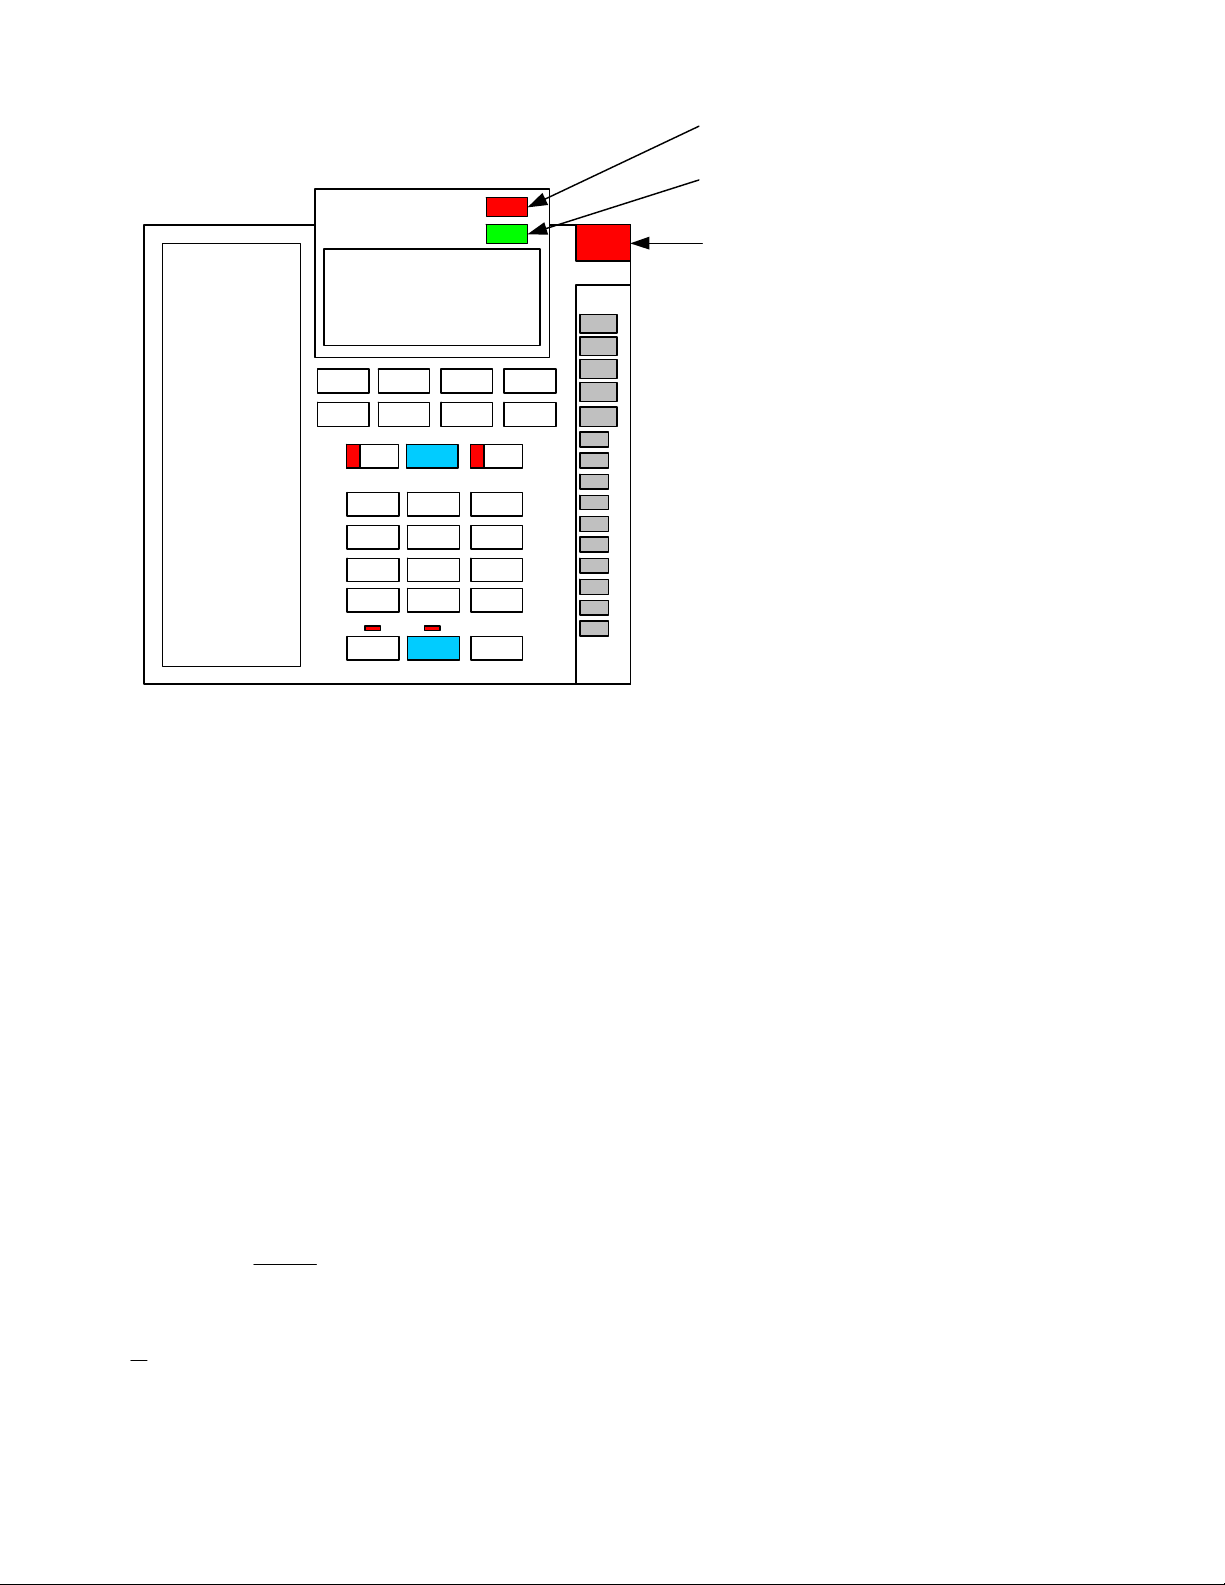
New call - Caller ID
Info stored
No function
Voicemail Message
Waiting Light
HANDSET
VOLUME
DOWN
OPTIONS
DISPLAY
VOLUMEUPREVIEW
DIAL
L1
DOWN
FLASH
REVIEW
L2CONF
12 3
45 6
78
0#
*
MUTE
9
HOLDSPEAKER
UP
REDIAL
CONTRAST
DIRECTORY
CALLER LIST
SAVE
DELETE
ON THE SIDE:
Ringer #1 Off/Hi/Lo switch
(your preferenc e)
Ringer #2 Off/Hi/Lo switch
(your preferenc e)
Heads e t On/Off (s e e b e l ow)
Headset jacks (see below)
AFTER A POWER FAILURE:
When power is restored the display will flash alternatel y between “SELECT LANGUAGE” and “1.ENG 2.ESP” for about 10
seconds then return to the nor m al “TOT A L:XX NEW:XX” (XX being the number of calls in the caller ID list ) . Your date and
time will not show back up until the next call comes in and is captured by the caller ID. From then on it will be set and
remain on the display.
CALLER ID INFORMATION:
Caller ID information comes in between the first and second rings . If you answer your phone before the caller ID inf o gets
there you may hear a “screech” similar to a fax or modem tone. That’s the caller ID data.
The red light labeled “NEW CALL” lets you know someone called - even if they didn’t leave a message. Press the
“CALLER LIST” button on the right and then the “REVIEW” up or down buttons to scroll through the list of incoming calls.
Once the entire list has been rev iewed, the “NEW CALL” light will go out. New calls will reac tivate the red light, and will
need to be reviewed before it will turn off again.
If you want to return a call to a number on the list :
ON CAMPUS (4 digit) numbers: Pick up the handset (or press “SPEAKERPHONE”), scroll to the number and press
“DIAL”.
OFF CAMPUS NUMBERS: You will have to inset the 9 and whatever other numbers (1, 731, etc.) you would nor m ally dial
that are not displayed when you scroll to the number in the Caller ID list. After entering the proper extra
digits, you can scroll to t he num ber you want to ret ur n and pr es s “DIAL”.
If you want to delete a number on the list, pr es s the “DELETE” button twice and the number will be er as ed. If you want to
delete all listin gs , pres s and hold the “DELETE” button until you see “DELET E ALL?” in th e dis play , release the “DELETE”
button and press it again.
Page 3

USING THE SPEAKERPHONE, HANDSET AND HEADSET :
Loudness for all thr ee is con trolled by the “VOLUME” pushbuttons . It has multiple steps and remains at the same sett ing
after hanging up.
If you have a headset, it plugs into either the 2.5mm jack (Chameleon heads ets) or handset-type jack (Plantronics
headsets) labeled on the right side of the phone. The “HEADSET ON/OFF” s witch on the right side selects whet her the
“SPEAKERPHONE” button will activate the internal speaker (off position) or your headset (on position).
The “MUTE” button will disable the microphone of whatever you are using… handset, speaker or headset. When selected
its light will be red and the dis play will show “MIC MUTED”. It will return to normal when yo u pre ss th e “MUTE” button
again or hang up.
PROGRAMMING THE SPEE D DIAL BUTTO N S:
There are 10 gray speed dial buttons on the right side of the phone under the “DE LE TE” butt on. You can program any
frequently dia l ed num ber s you ’d lik e on them. Suggestions are “#4” for call pick ups or the number s you frequently forward
calls to. To program a button f ollow these steps:
1. Press and hold the “SAVE” button until the display says “SAVE TO?”.
2. Press the gray button you wish to put the number on. The display will then say “ENTER NUMBER”.
3. Dial the number you want stored. (Remember to enter the 9 for outside calls!)
4. Press “SAVE” again. The display will then say “ENTER NAME”.
5. Use the dial to enter a name using the letters associated with the numbers .
6. Press “SAVE” again. The display will say "MEMORY STORING” and then return to normal.
You can use the “FLASH” button to enter a F(lash) , and the “REDIAL” button t o enter a P(ause) in step 3. If you need to
add a space or edit a mistake, use the “VOLUME (EDIT)" buttons.
EXAMPLE: You can program one of these buttons to dial Voicemail and then your security code. To do this, in step 3,
enter 7590, press the “RE DIAL” button twice , then enter your securi ty c ode. Follow steps 4 through 6 to finish.
To dial a programmed number, simply lift the handset (or press “SPEAKERPHONE”) and press the gray button you want to
use.
Your "DIRECTORY" button lets you program in 99 names and numbers to speed dial. To program, follow these steps:
1. Press and hold the “SAVE” button. The display will say “SAVE TO?”.
2. Press the “DIRECTORY” but ton. The display will say “ENTER NUM”.
3. Dial the number you want stored. (Remember to enter the 9 for outside calls!)
4. Press “SAVE” again. The display will then say “ENTER NAME”.
5. Use the dial to enter a name using the letters associated with the numbers .
6. Press “SAVE” again. The display will say "SAVED IN THE DIR” and then return to normal.
To dial one of these numbers, press “DIRECTORY” and use the “REVIEW” butt ons to sear c h thr ough the list. You can
press the numbers assoc iated with the first letter of a name to jump to those lis tings. When you find the one you want, lift
the handset (or press “SPEAKERPHONE”) and press the “DIAL” button.
OPTIONS BUTTON:
This button enters the phone’s Programming Mode. The options are all factory default except the Area Code, which is 731
and has been programme d by Telec om mu nic ations before your phone is deliv er ed. If you accidentally hit the “OPTIONS”
button and see “SELECT LANG UA GE” , sim ply lift the handset and the display will retur n to normal. In the event of a
problem, please contact us.
MORE INFO?
Just let us know and we’ll answe r your ques tions! If you would like the manufactur er ’s manual for your phone we will be
glad to email one to you.
QUESTIONS? PROBLEMS? CALL THE UTM HELP DESK AT 7900!
 Loading...