

Page 1
Datalog 3 - SMS Software A pplicat ion Sheet
SONY HSR-1P
DIGITAL CCTV RECORDER
Introduction
The Datalog 3 Alarm management software has been modified to incorporate a driver to
communicate with the Sony HSR-1P Digital Surveillance Recorder.
The driver Includes:
1. A set-up option allowing up to 3, out of the maximum 16, camera inputs to be assigned to a
Datalog zone when that zone is in alarm .
2. A user option available from a Main screen button or menu item to show an on-screen panel
with buttons and display to select Video recorder functions and display status. The panel
includes search routines either by alarm recording number, or time and date.
Installation
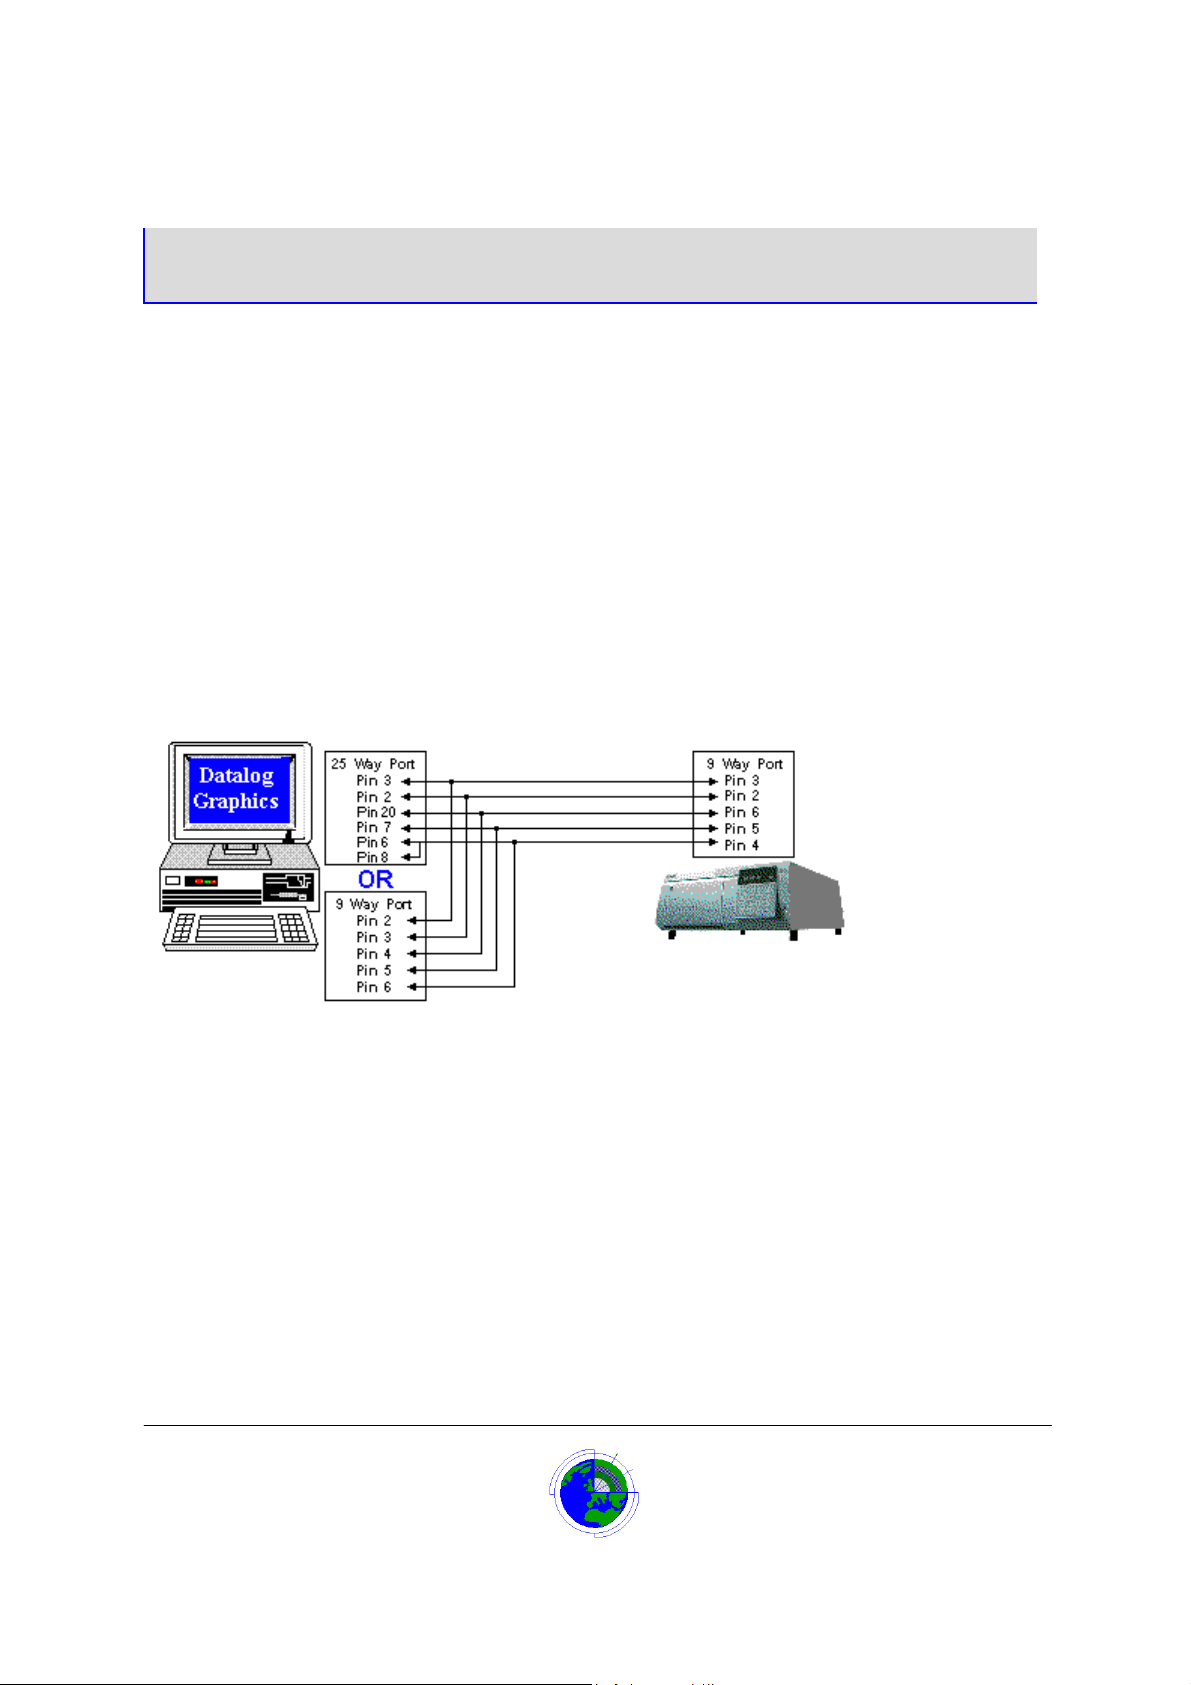
The Sony HSR-1P Digital Surveillance recorder should be connected to the Datalog 3 system
using a cable with the following connections:
The Data format is 9600baud, 8 data bits, 1 Stop bit, No Parity which is the default setting on the
Sony HSR-1P
.
Sony HSR-1P - Page 1 of 6
CORTECH DEVELOPMENTS LTD
Downloaded from: http://www.guardianalarms.net
Page 2
Datalog 3 - SMS Software A pplicat ion Sheet
Setting Up the Sony HSR-1P
Before using the Video recorder the unit must be programmed with:
Camera Connection
Monitor Display Structure
Play Display stru cture
Normal recording mode(s)
Alarm recording mode.
These options can not be set through the Datalog 3 system.
The date and time will be synchronised to the Datalog system on program start or whenever the
Datalog time/date is changed.
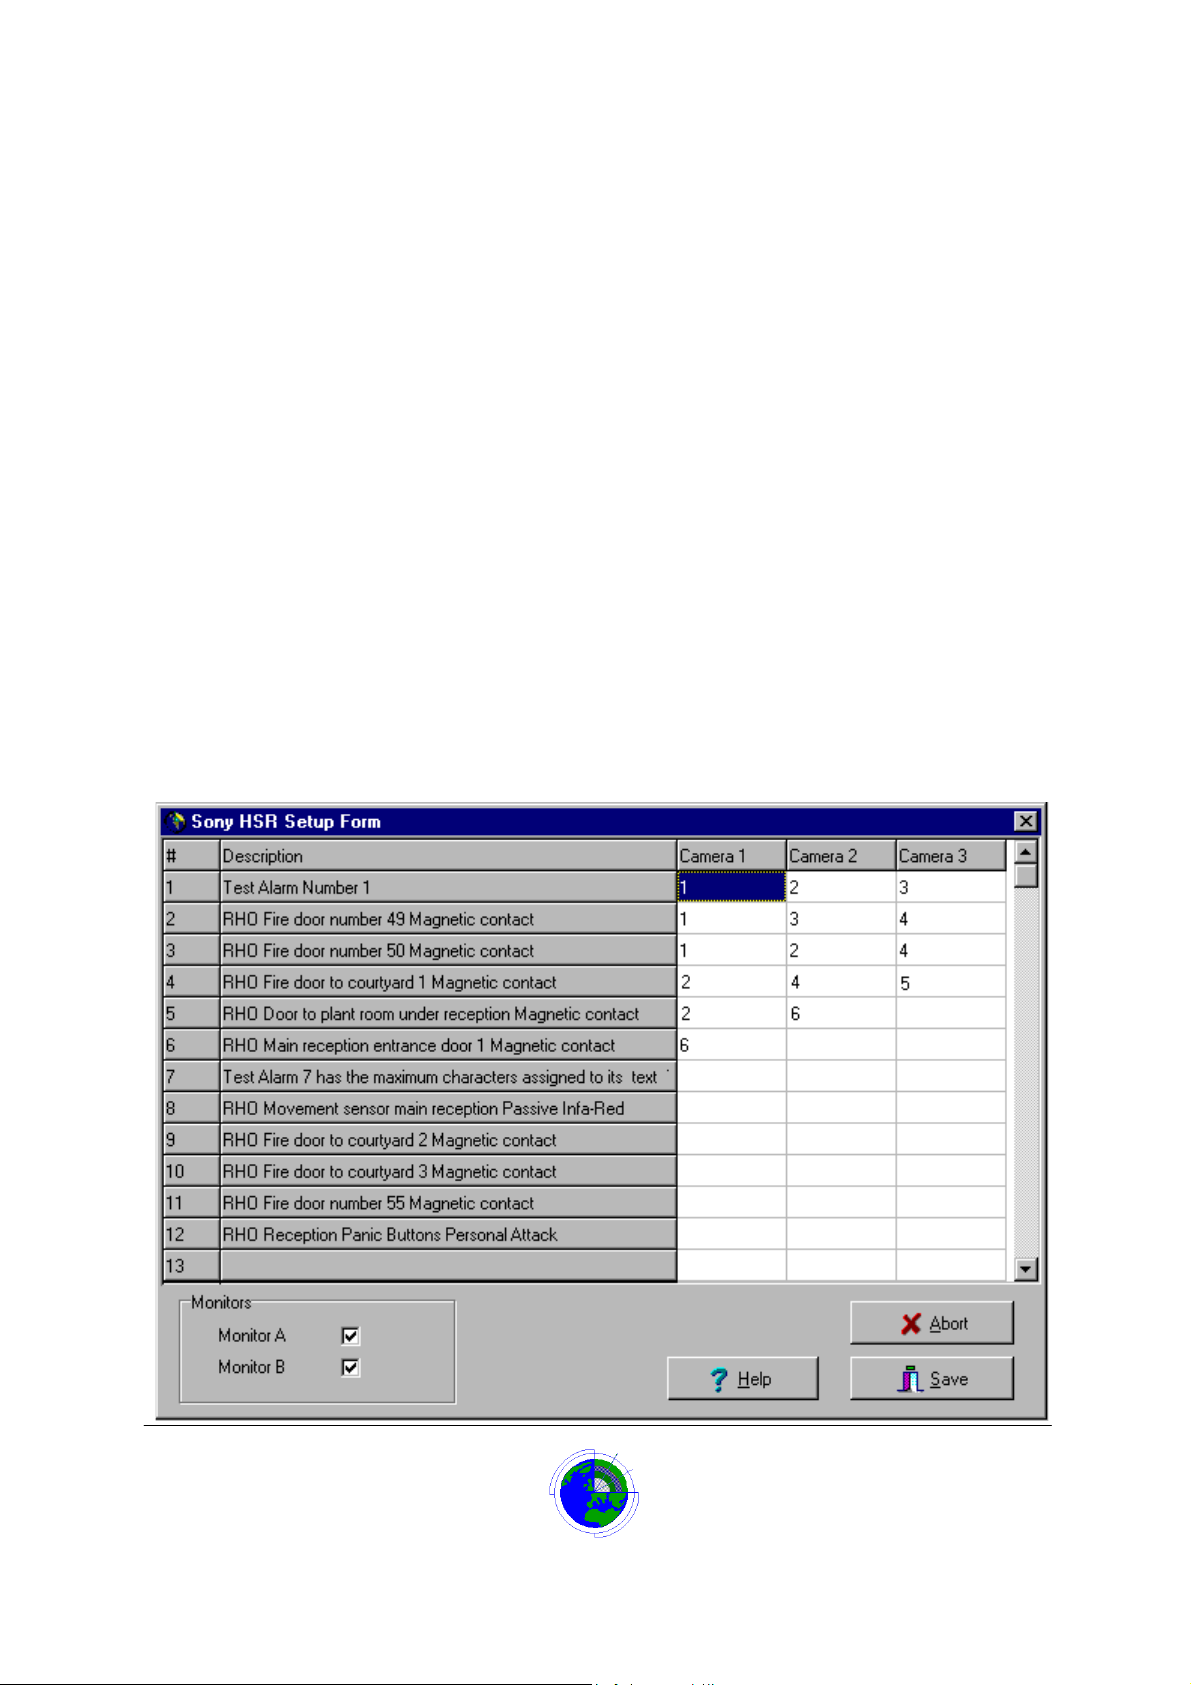
The Datalog system must be set up to inform the Datalog which monitors are connected to the
Sony HSR and to assign up to 3, out of the maximum 16, camera inputs to a Datalog zone to be
recorded when that zone is in alarm.
To achieve this:
Click ‘Log on’ button (or press F10 key)
Enter a valid password
Select System menu
Select User Setup menu option
Click ‘Sony HSR’ button
The following form will display listing all the Datalog zones:
Sony HSR-1P - Page 2 of 6
CORTECH DEVELOPMENTS LTD
Page 3

Datalog 3 - SMS Software A pplicat ion Sheet
/Continued….
Enter up to 3 camera numbers in the Camera 1, Camera 2 & Camera 3 columns for each zone.
These will be the cameras recorded when that particular alarm is activated.
In the monitors section:
Tick Monitor A and/or Monitor B if they are connec te d to the Son y HSR.
When complete click the ‘Save’ button to complete the set-up and save the changes to disk.
Sony HSR-1P - Page 3 of 6
CORTECH DEVELOPMENTS LTD
Page 4
Datalog 3 - SMS Software A pplicat ion Sheet
Operation
Once set-up of the Video and Datalog parameters has been completed, a video tape should be
installed and the tape rewound. The Video unit must be set in record mode before any alarm
recordings take place.
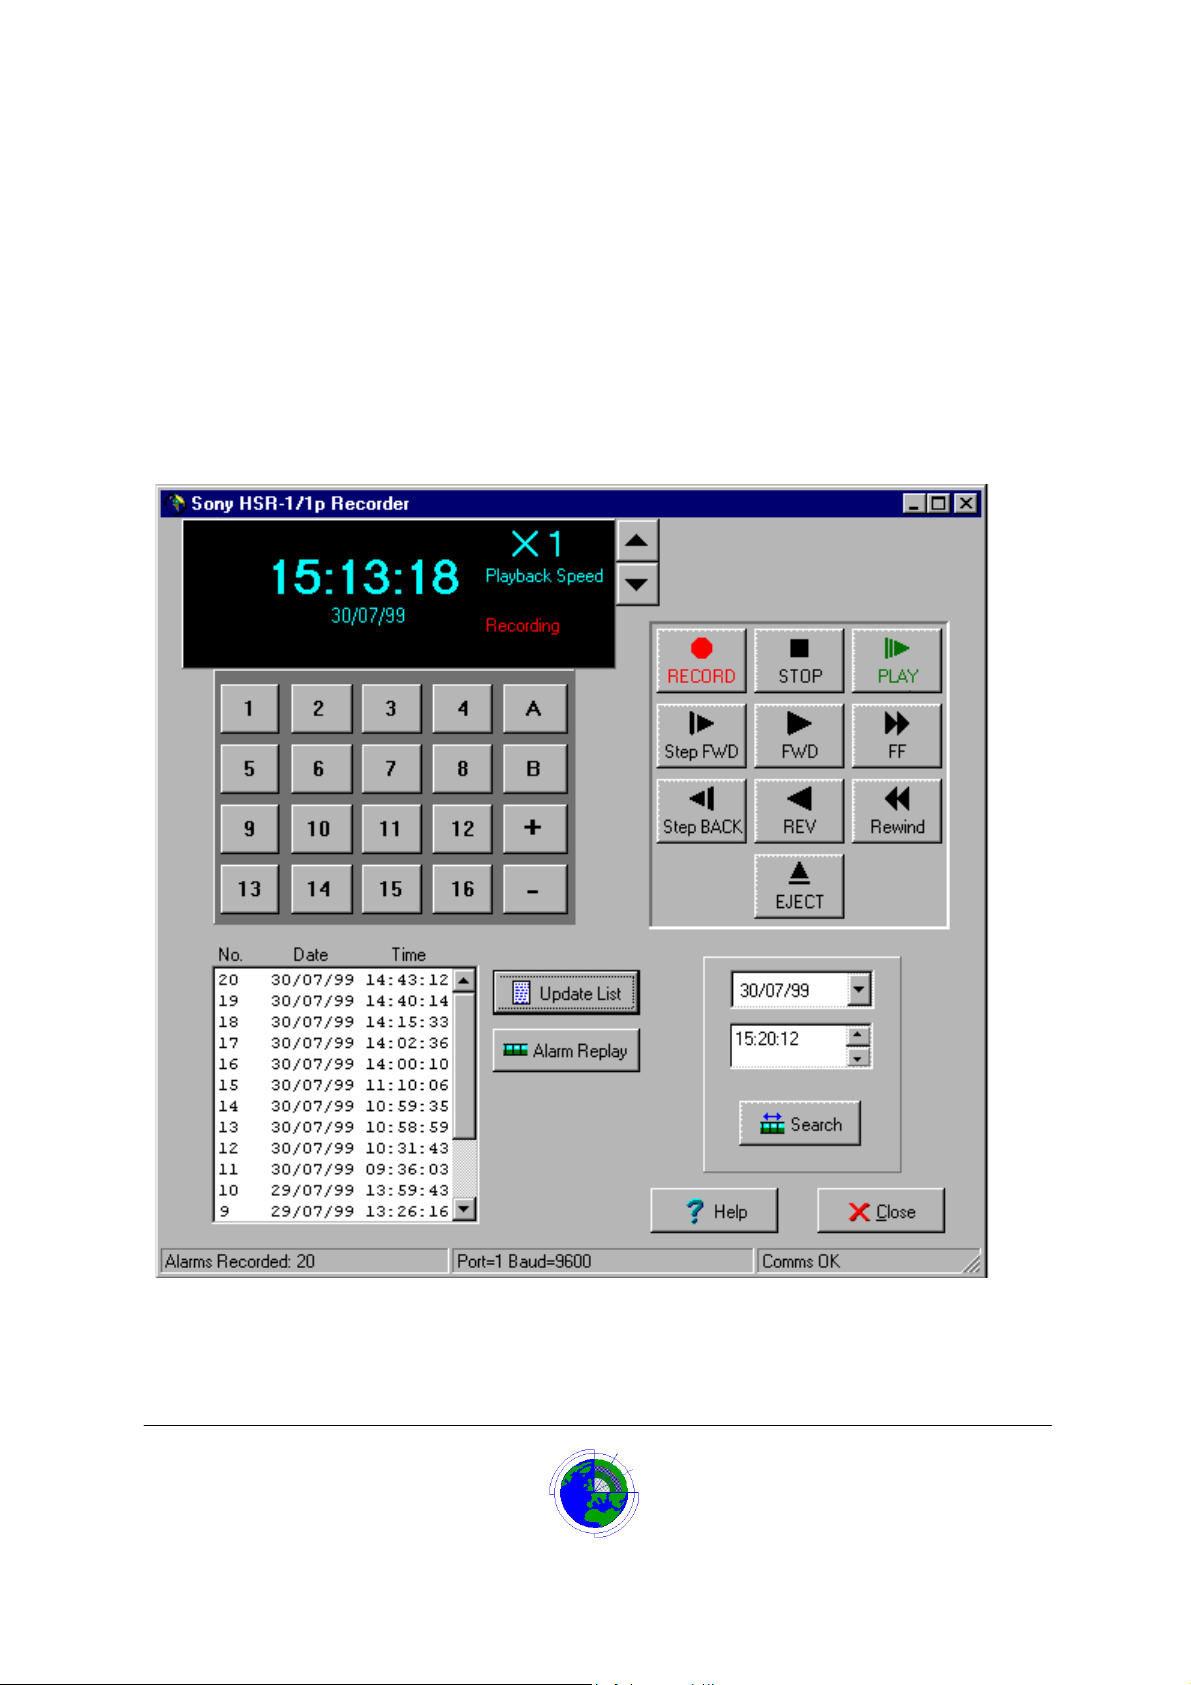
This can be achieved either by pressing the ‘REC’ button on the recorder or clicking the ‘Video
Operation’ button on the Datalog III Main screen to display the following operator Panel and
pressing the Record button.
Click on an area of the screen below to display help for that item:
Sony HSR-1P - Page 4 of 6
CORTECH DEVELOPMENTS LTD
Page 5

Datalog 3 - SMS Software A pplicat ion Sheet
The Display Panel
The display panel shows the current date and time when recording or stopped. In play mode, if the
unit is replaying a sequence, the date and time will be the date and time that sequence was
recorded.
In addition the display will show the playback speed selected, and several status messages such
as Stop, Play, Recording, Ejecting, and Cassette Tape Not Loaded.
Keypad
The numeric keys on the keypad (1-16) are used to switch cameras 1 to 16 to the screen when the
screen is not showing that camera. If the system has less than 16 cameras only the buttons will
display for the cameras available.
The A and B keys select the monitor output A or B as the current monitor and when a camera is
selected it will be switched to that monitor. If any of the Monitor A or B tick boxes on the set-up
form have not been ticked, it will not be possible to select that monitor.
The + key increases the number of divisions on the monitor, the – key decreases the number of
divisions.
Video Buttons
The video buttons allow selection of various video functions.
Record
The
Stop
The
performing this operation as it may prompt for further action.
Play
The
forward and backward and pause the picture.
Step Forward
The
recording moves forward 1 frame.
Forward Play
The
Fast Forward
The
Step Back
The
moves backward 1 frame.
Reverse Play
The
Rewind Button
The
Eject Button
The
button switches the system to record mode as per the recording set-up.
button ends any mode that the system is currently performing. Watch the monitor when
button sets the recorder to play mode it is then possible to play forward/backward/step
button allows the tape to pause then each time the button is pressed the
button plays the recording forward at the selected playback speed.
plays the recording at maximum forward speed.
button allows the tape to pause then each time the button is pressed the recording
button plays the recording backward at the selected playback speed.
rewinds the tape playing backwards at maximum speed.
ejects the tape.
Sony HSR-1P - Page 5 of 6
CORTECH DEVELOPMENTS LTD
Page 6

Datalog 3 - SMS Software A pplicat ion Sheet
Tape Speed Select buttons
Click the up arrow button to increase the playback speed, or the down arrow button to decrease the
playback speed and then click the Forward or reverse play buttons to run the tape at the set speed
Alarm List
The Alarm list will display the last alarm recordings (up to 256) that have taken place since the
current tape was inserted or the video recorder started. The list will show the alarm recording
number and the date and time that recording occurred.
If the system is not in recording mode, clicking on the list (to highlight a recording item) and then
pressing alarm replay will cause the recorder to search for that alarm sequence to allow replay via
the video buttons.
This list should build automatically but can be rebuilt with the update list button.
Time/Date Search
A search of the recorded data can be made for a specific date and time by entering the date and
time in the fields provided and then clicking the search button. A drop down calendar is available to
assist in date entry.
.
Status Bar
The Status bar has 3 panels:
The first gives the number of alarm recordings stored on the current tape and should correspond to
the number of items in the list.
The second panel gives the communication port number and speed of communication used by the
Sony HSR-1P.
The third panel gives the current communication status between the Sony unit and the PC.
Sony HSR-1P - Page 6 of 6
CORTECH DEVELOPMENTS LTD
 Loading...