

Page 1

CORSAIR.com
EMAIL: support@CORSAIR.com
FACEBOOK: facebook.com/CORSAIR
FORUM: forum.CORSAIR.com
TWITTER: twitter.com/CORSAIR
BLOG: blog.CORSAIR.com
USA and CANADA: (888) 222-4346 | INTERNATIONAL: (510) 657-8747 | FAX: (510) 657-8748
© 2017 CORSAIR Components, Inc. All rights reserved. CORSAIR and the sails logo are registered trademarks, and Professional Series is a trademark in the United States
and/or other countries. All other trademarks are the property of their respective owners. Product may vary slightly from those pictured. Document Number: 49-001548 rev AB
47100 Bayside Parkway • Fremont • California • 94538 • USA
TRACK LEVEL PERFORMANCE FOR YOUR BATTLE STATION
Page 2

ENGLISH ................................................................................................................
FRANÇAIS ............................................................................................................
DEUTSCH ...........................................................................................................
ESPAÑOL ...........................................................................................................
РОССИЮ ...............................................................................................................
中文 .......................................................................................................................
日本語 ...................................................................................................................
한국어 ...................................................................................................................
Page 3
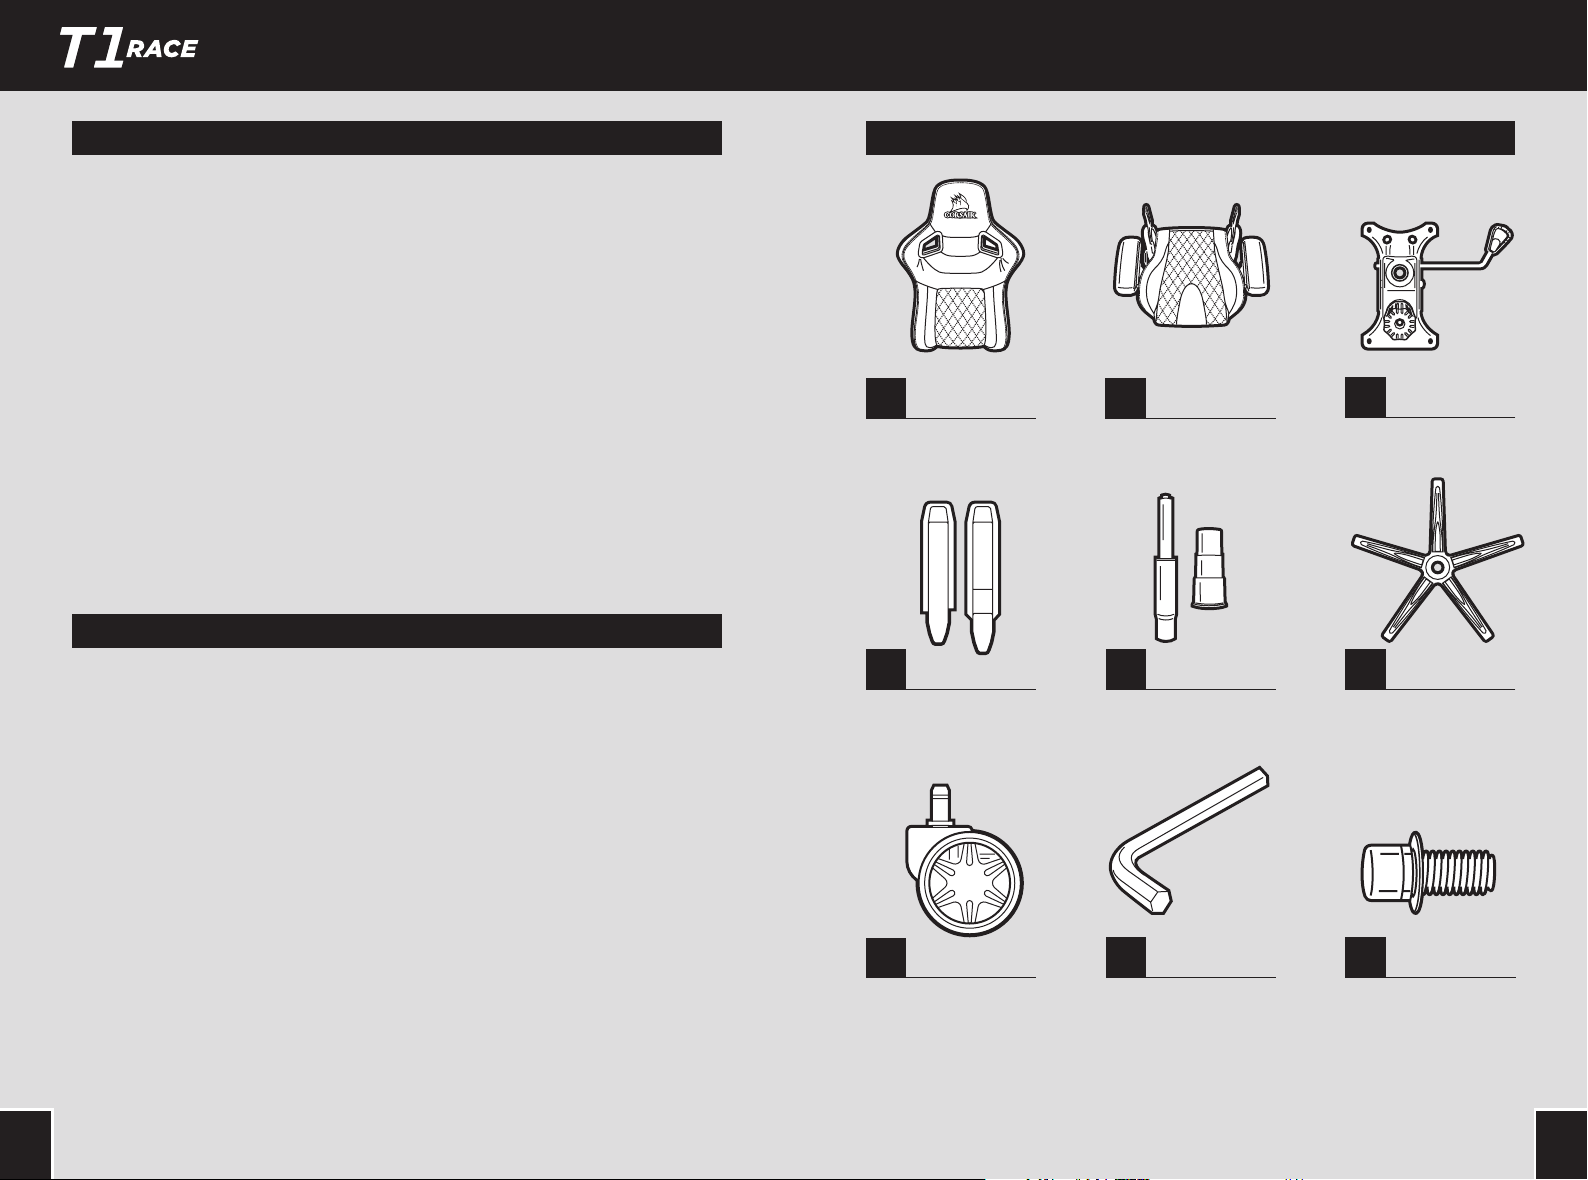
Table of Contents
Introduction .........................................................................................................
TRACEKitContents ......................................................................................
AssemblingTRACE .......................................................................................
TRACEFeatures ..............................................................................................
T1 RACE Box Contents
T1 RACE
The T1 RACE provides racing inspired design and comfort with high
quality materials for a premium gaming experience.
4D armrests allow optimization of your ergonomics for any
environment. The recline and rocking features provide further
adjustability and customization giving your experience at your battle
station the personal touch you want. Steel frames for the seat and
chair back with PU leather for the seating surfaces bring automotive
quality to your gaming environment. Expand your gaming experience
with the comfort and quality that the T1 RACE brings to your desk.
a
Seat back
d
Seat back mount covers
(Two are provided as extras)
g
Chair wheels
x1
x4
x5
b
Seat cushion
e
Gas lift
h i
M8 allen key
x1
x1
x1
c
Seat control base
f
Chair base
Mounting Screws
(provided as extras)
x1
x1
x2
Note:
Screw hardware has been pre-installed from the factory to ensure a proper fit and function
during assembly
21
Page 4

T1 RACE Assembly Instructions
1. Insert chair wheels into chair
base by pressing the stud
firmly into the hole on the
bottom of the base.
2. Install the gas lift and gas lift
cover into the top of the chair
base by placing the larger end
into the hole in the center of the
chair base.
A. Place the gas lift cover over the
gas lift with the larger opening
facing down.
B. Remove the red protective cover
from the top of the gas lift.
C. WARNING: The seat height
adjustment will not function if the
red protective cap is not removed
from the gas lift.
3. Place completed chair base
assembly to the side.
4. Chair seat assembly.
A. Remove the four screws from the seat cushion bottom using the M8
allen key provided.
B. The control base is labeled with a arrow showing the “front” of the unit
that needs to be installed facing the front of the chair.
C. Using the four screws from the seat cushion bottom attach the seat
control base to the seat cushion.
43 43
Page 5
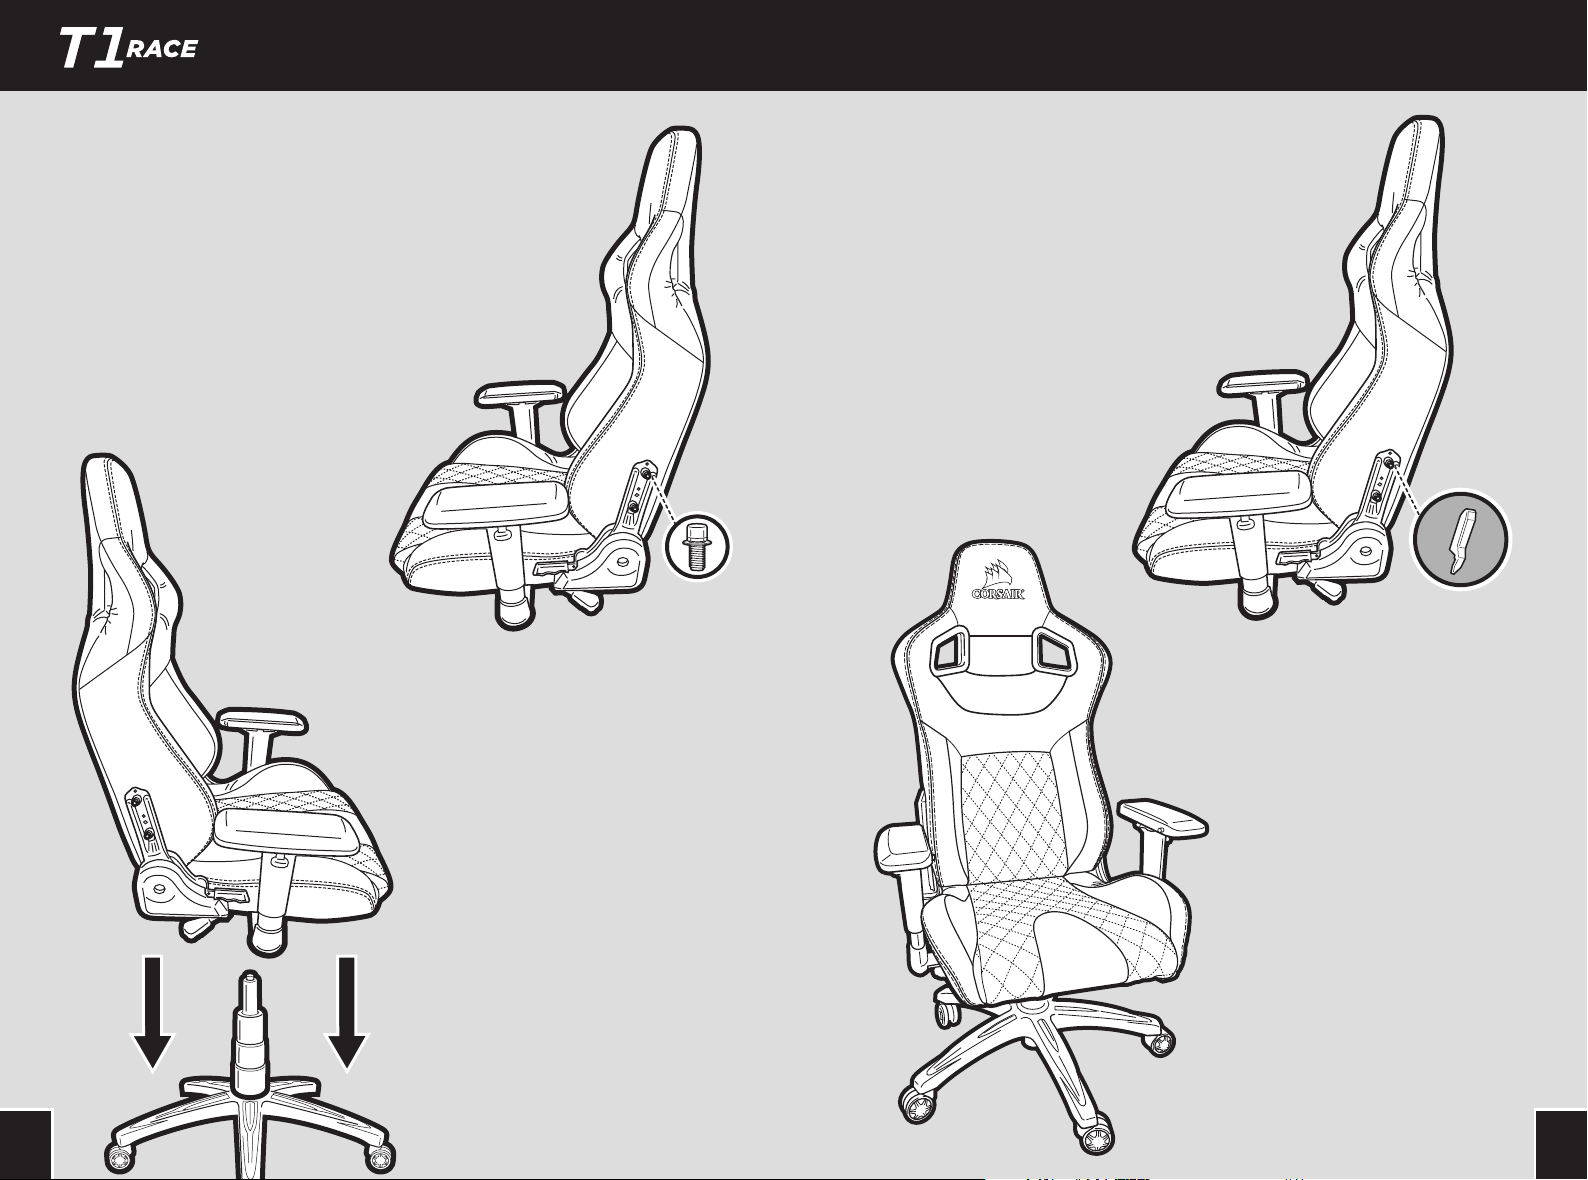
5. Chair back to seat assembly.
A. Remove the screws from the seat back
using the M8 allen key provided.
B. TIP: Start with the right side of the chair
with the recline mechanism. It is much
easier to start on this side as the mount
point is fixed in place. Do not tighten the
screws down completely until you have
both sides (all four bolts) started in the
seat back.
C. Use the screws taken from the seat back
to attach the seat cushion and the seat
back together.
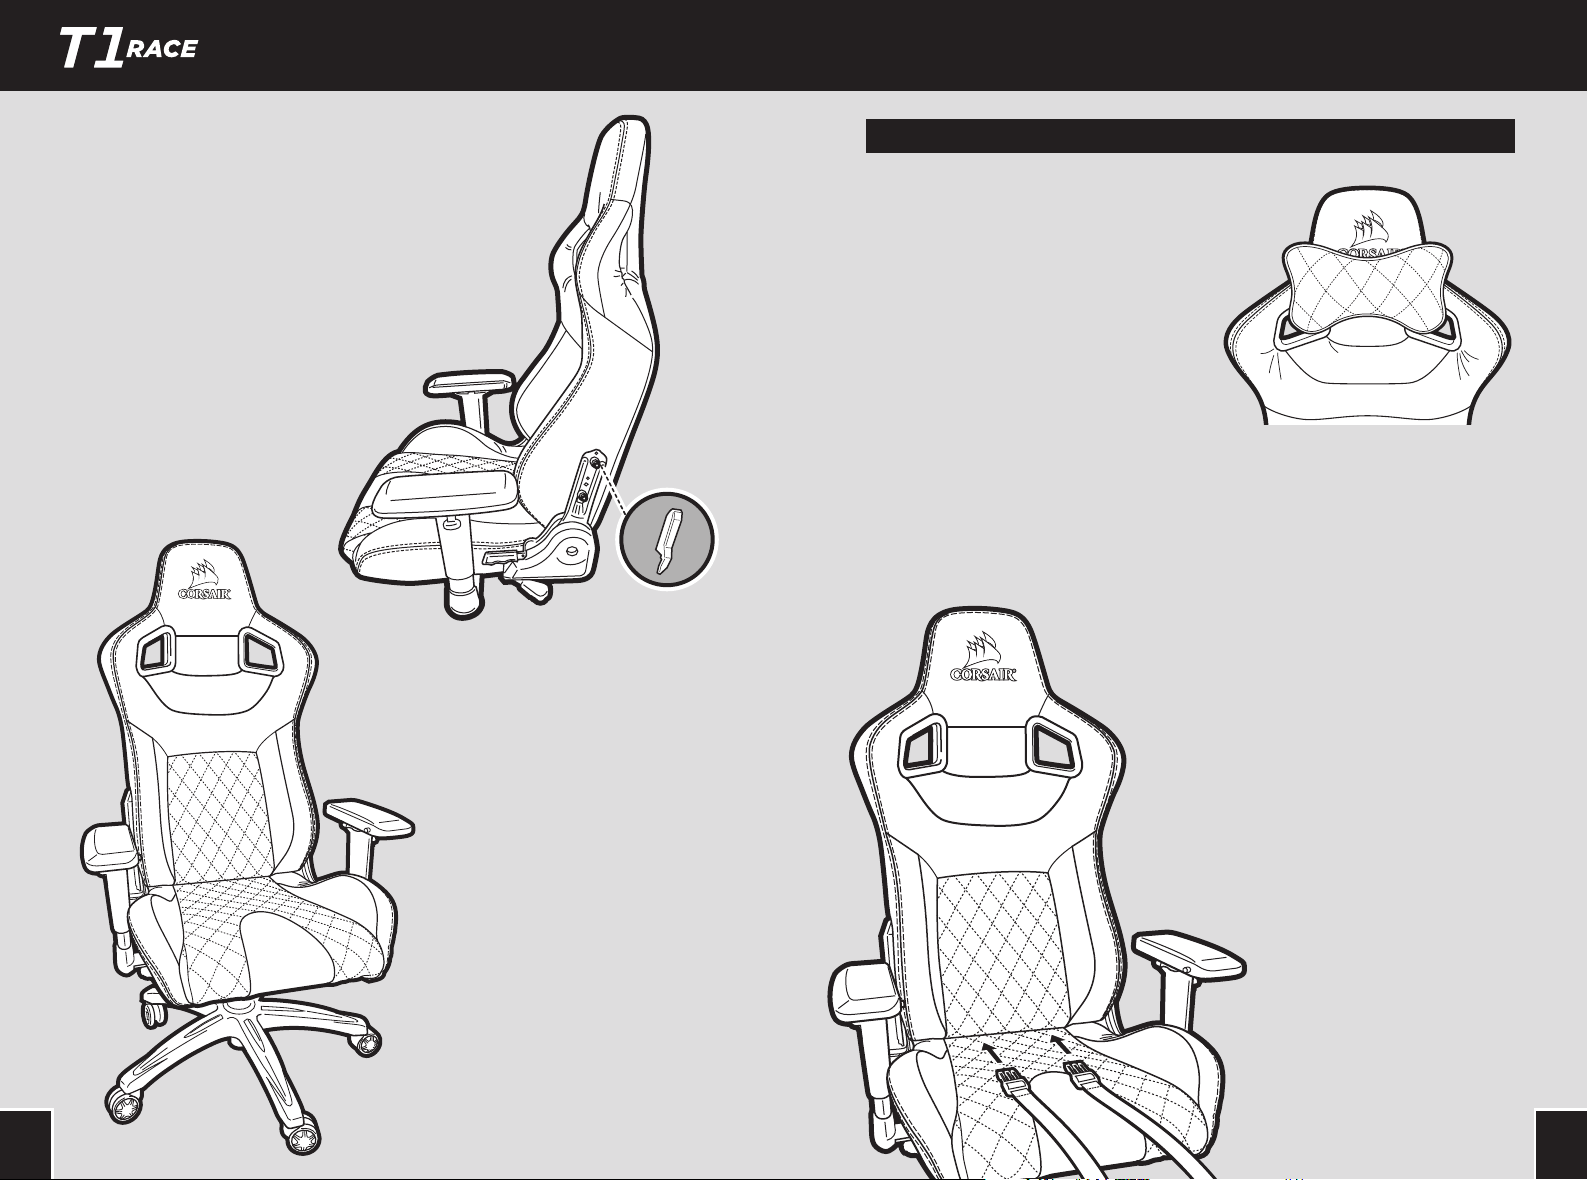
7. Snap the chair back covers into
place over the attachment points
between the seat cushion and
the seat back.
A. There is a right and left side cover.
The taller of the two covers is for
use over the side with the handle
for the recline function.
6. Place seat assembly onto
the chair base assembly by
inserting the gas lift cylinder
into the center hole in the seat
control base.
A. It will slide into place. Make
sure the seat assembly is firmly
pressed down into place before
using the chair.
8. Enjoy your new T1 RACE
gaming chair.
65 65
Page 6

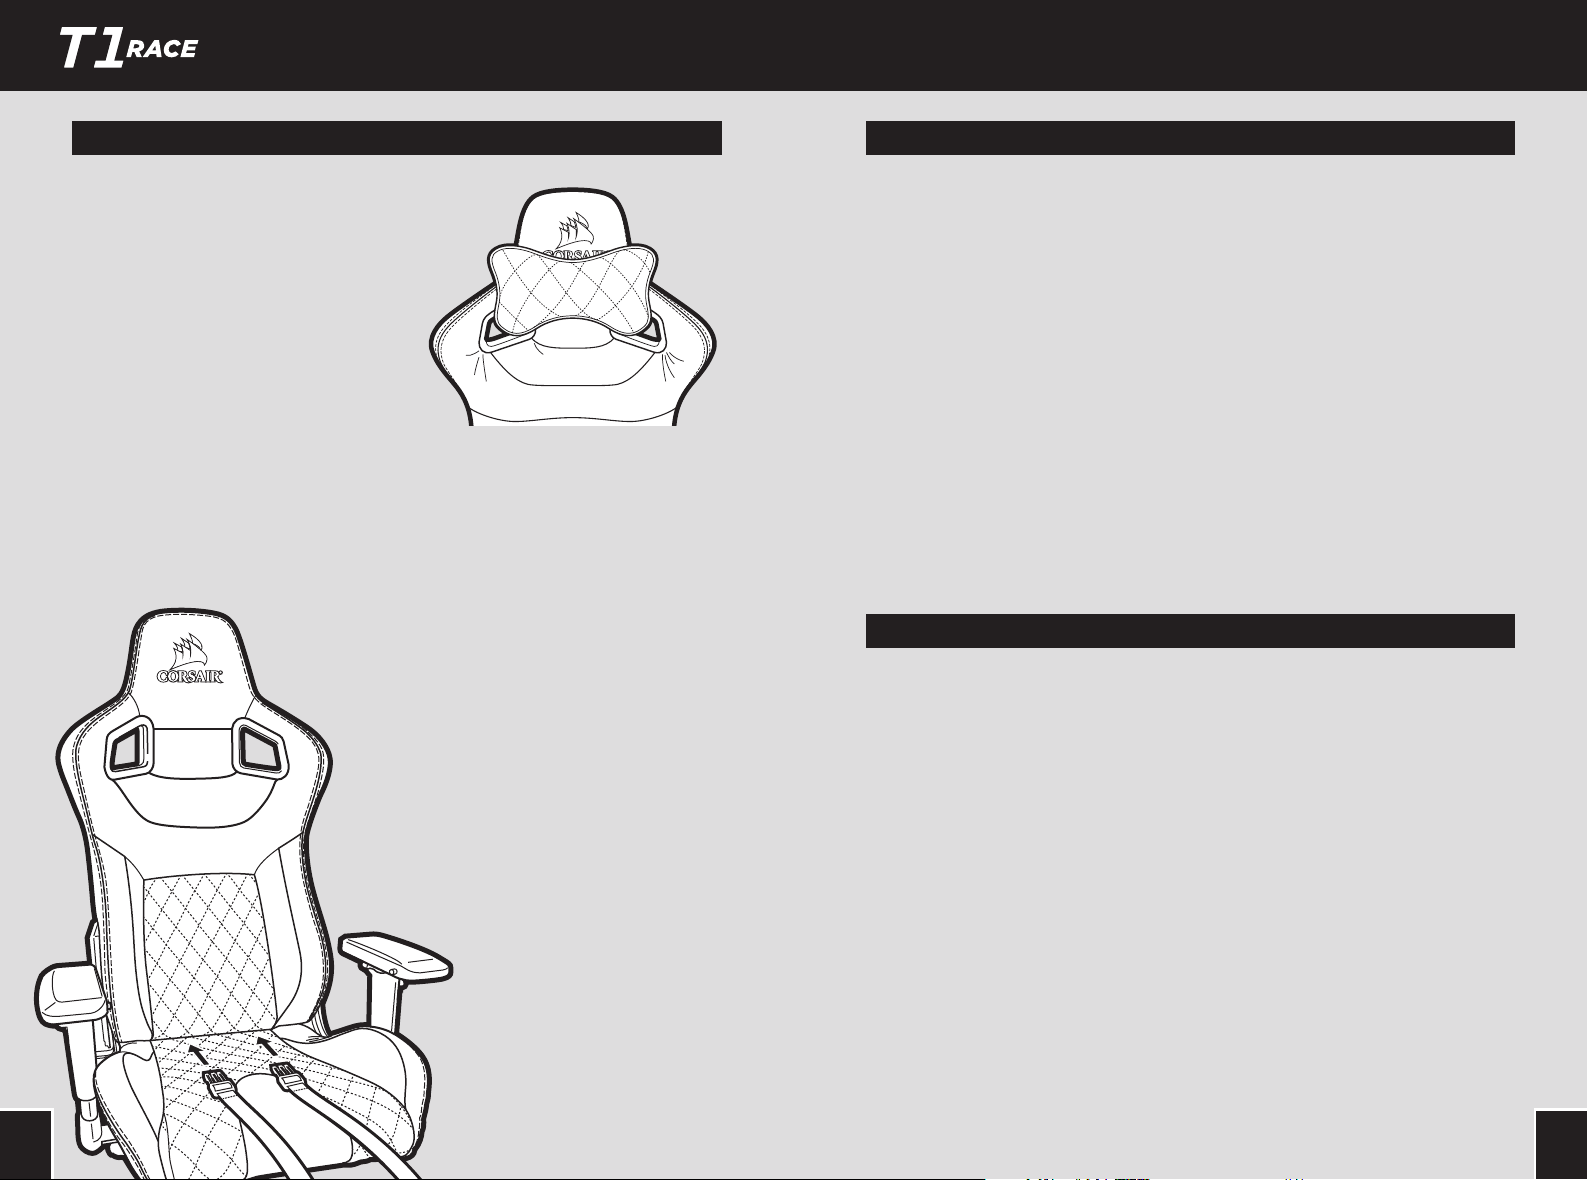
Full Features
Table des matières
1. Attach Neck Pillow
A. The neck pillow has a snap
attachment that allows the
pillow to be installed in two
dierent ways. You can slide
the band over the top
of the headrest for taller
placement of the pillow or
attach the pillow through the
holes in the neck area for a
lower placement of the pillow.
2. Attach Lumber Pillow
A. The straps for the lumbar pillow
will need to be run in two dierent
directions.
B. One set will go through the opening
between seat cushion and seat back.
C. The top will be routed through the
holes in the shoulder area
D. Once both sets of straps have been
routed they can be snapped together
on the backside of the chair.
E. In order to adjust the height of the
lumbar support you can slide it
up or down.
Introduction .........................................................................................................
ContenudukitTRACE .................................................................................
MontageduTRACE ....................................................................................
CaractéristiquesduTRACE .....................................................................
T1 RACE
Le fauteuil T1 RACE s’inspire du design et du confort du sport
automobile, et intègre des matériaux de grande qualité pour une
expérience de gaming exclusive. Les accoudoirs 4D améliorent votre
confort d’assise dans n’importe quel environnement. Les fonctions
d’inclinaison et de balancement vous permettent de régler et de
personnaliser au maximum votre expérience. Vous donnez à votre
station de jeu la touche personnelle qu’elle mérite. Le châssis en
acier du siège et du dossier couplé au similicuir en polyuréthane des
surfaces d’assise apporte la qualité du secteur de la compétition
automobile à votre environnement gaming. Donnez une nouvelle
dimension à votre expérience gaming grâce au confort et à la qualité
du fauteuil T1 RACE.
87 87
Page 7

Contenu du kit T1 RACE
Instructions de montage du T1 RACE
1. Insérez les roulettes du fauteuil
dans la base en enfonçant
fermement le goujon dans le
trou situé en bas de la base.
a
Dossier du fauteuil
d
Cache de fixation du dossier
(deux sont fournis en plus)
g
Roulettes
x1
x4
x5
b
Coussin d’assise
e
Vérin pneumatique
h i
Clé Allen M8
x1
x1
x1
c
Base de contrôle du
fauteuil
f
Base du fauteuil
Vis de fixation
(fournies en plus)
x1
x1
x2
2. Installez le vérin pneumatique et
son cache en haut de la base en
plaçant l’extrémité la plus grande
dans le trou situé au centre de la
base.
A. Placez le cache du vérin
pneumatique par-dessus le vérin,
ouverture plus grande tournée
vers le bas.
B. Retirez le cache de protection
rouge situé en haut du vérin
pneumatique.
C. AVERTISSEMENT: le système de
réglage de la hauteur du siège
ne fonctionne pas si le cache de
protection rouge n’est pas retiré
du vérin pneumatique.
Remarque:
garantir une position et un fonctionnement corrects lors du montage
le matériel de fixation a été préinstallé en usine dans les emplacements de montage en vue de
109
Page 8

3. Positionnez la base du fauteuil
montée sur le côté.
4. Montage de l’assise.
A. Retirez les quatre vis situées en bas du coussin d’assise à l’aide de la clé
Allen M8 fournie.
B. Sur la base de contrôle figure une flèche indiquant le côté avant de
l’unité qui doit être installé face orientée vers le devant du fauteuil.
C. À l’aide des quatre vis situées au bas du coussin d’assise, fixez la base
de contrôle du siège au coussin d’assise.
5. Montage du dossier sur l’assise.
A. Retirez les vis situées sur le dossier à l’aide
de la clé Allen M8 fournie.
B. CONSEIL: commencez par le côté droit du
fauteuil sur lequel est placé le mécanisme
d’inclinaison. Il est beaucoup plus simple
de commencer par ce côté, car le point de
fixation est déjà en place. Ne serrez pas
complètement les vis tant que les deux
côtés (les quatre boulons) ne sont pas
enclenchés dans le dossier.
C. Utilisez les vis provenant du dossier
pour fixer le coussin d’assise et le
dossier ensemble.
6. Placez l’assise sur la base en
insérant le cylindre du vérin
pneumatique dans le trou
central situé sur la base de
contrôle du siège.
A. Celui-ci va se mettre en position
après un mouvement de
coulissement. Assurez-vous que
l’assise est bien installée dans sa
position avant d’utiliser le siège.
1211 1211
Page 9
7. Mettez les caches du dossier en
position sur les points de fixation
situés entre le coussin d’assise et
le dossier.
A. Un cache latéral gauche et
un cache latéral droit sont
disponibles. L’extrémité des deux
caches est à placer sur le côté sur
lequel est située la poignée de la
fonction d’inclinaison.
8. Profitez de votre nouveau
fauteuil gaming T1 RACE.
Caractéristiques Complètes
1. Fixation du coussin cale-nuque
A. Le coussin cale-nuque possède
un mécanisme d’attache qui
ore deux modes d’installation.
Vous pouvez faire glisser le
bandeau sur le dessus de
l’appuie-tête pour un placement
haut du coussin, ou bien, fixer
le coussin dans les trous de la
zone du cou pour un placement
plus bas.
2. Fixation du coussin lombaire
A. Les sangles du coussin lombaire
doivent être installées dans deux
directions diérentes.
B. Une sangle doit aller dans l’ouverture
située entre le coussin de tête et le
dossier.
C. La sangle du haut doit passer dans les
trous situés dans la zone des épaules.
D. Une fois que les deux sangles sont
installées, vous pouvez les fixer
ensemble à l’arrière du fauteuil.
E. Pour régler la hauteur du support
lombaire, vous pouvez le faire glisser
vers le haut ou vers le bas.
1413 1413
Page 10

Inhaltsverzeichnis
Einführung .........................................................................................................
InhaltdesTRACE-Kits ...............................................................................
MontagedesTRACE ..................................................................................
FunktionendesTRACE .............................................................................
Lieferumfang des T1 RACE
T1 RACE
Der T1 RACE bietet von Rennstrecken inspiriertes Design und
Komfort dank hochwertiger Materialien für ein Gaming-Erlebnis
der Extraklasse. Mit den 4D-Armlehnen lässt sich die Ergonomie an
jede Umgebung anpassen. Die Neigungs- und Schaukelfunktionen
ermöglichen eine weitere Anpassbarkeit und Personalisierung Ihrer
Kampfstation. Stahlrahmen für den Sitz und die Sitzlehne sowie
Kunstleder für die Sitzflächen erinnern an die Ausstattung von
Fahrzeugen. Erweitern Sie Ihr Gaming-Erlebnis mit dem T1 RACE um
Komfort und Qualität für Ihren Schreibtisch.
a
Sitzlehne
d
4 Montageabdeckungen für
die Sitzlehne
(zwei als Zusatzteile)
g
Sitzrollen
x1
x4
x5
b
Sitzpolster
e
Gasdruckfeder
h i
M8-Innensechskantschlüssel
x1
x1
x1
c
Sitzkontrollbasis
f
Sitzsockel
x2
Befestigungsschrauben
(als Zusatzteile)
x1
x1
Hinweis:
Montage einen optimalen Sitz und eine korrekte Funktion zu gewährleisten.
Die Schrauben wurden werkseitig an den Montagepunkten vorinstalliert, um während der
1615
Page 11

Montageanweisungen für den T1 RACE
1. Setzen Sie die Sitzrollen in
den Sitzsockel ein, indem Sie
den Stift fest in die Önung
an der Unterseite des Sockels
drücken.
2. Installieren Sie die Gasdruckfeder
und deren Abdeckung an der
Oberseite des Sitzsockels, indem
Sie das größere Ende in die
Önung in der Mitte des Sockels
einsetzen
A. Platzieren Sie die Abdeckung
der Gasdruckfeder so über der
Gasdruckfeder, dass die größere
Önung nach unten zeigt.
B. Entfernen Sie die rote
Schutzabdeckung von der
Oberseite der Gasdruckfeder.
C. ACHTUNG: Die Einstellung der
Sitzhöhe ist erst möglich, wenn
die rote Schutzabdeckung von der
Gasdruckfeder entfernt wurde.
3. Legen Sie den montierten
Sitzsockel beiseite.
4. Montieren Sie den Sitz.
A. Entfernen Sie die vier Schrauben an der Unterseite des Sitzpolsters
mithilfe des beiliegenden M8-Innensechskantschlüssels.
B. Ein Pfeil an der Kontrollbasis verweist auf die „Front“ der Einheit, die so
installiert werden muss, dass sie zur Vorderseite des Stuhls zeigt.
C. Befestigen Sie mithilfe der vier Schrauben an der Unterseite des
Sitzpolsters die Sitzkontrollbasis am Sitzpolster.
1817 1817
Page 12

5. Montieren Sie die Sitzlehne.
A. Entfernen Sie die Schrauben an der
Sitzlehne mithilfe des beiliegenden
M8-Innensechskantschlüssels.
B. TIPP: Beginnen Sie an der
rechten Seite des Stuhls mit dem
Neigungsmechanismus. Es ist einfacher,
auf dieser Seite zu beginnen, da der
Montagepunkt hier fixiert ist. Ziehen
Sie die Schrauben erst fest an, wenn Sie
beide Seiten (alle vier Schrauben) an der
Sitzlehne befestigt haben.
C. Befestigen Sie mithilfe der Schrauben
von der Sitzlehne das Sitzpolster an der
Sitzlehne.
7. Lassen Sie die Abdeckungen
der Sitzlehne an den
Befestigungspunkten zwischen
dem Sitzpolster und der
Sitzlehne einrasten.
A. Es gibt jeweils eine Abdeckung für
die rechte und die linke Seite. Die
größere der beiden Abdeckungen
ist für die Seite bestimmt,
auf der sich der Hebel für die
Neigungsfunktion befindet.
6. Setzen Sie den Sitz auf den
Sitzsockel, indem Sie den
Zylinder der Gasdruckfeder
in die mittlere Önung der
Sitzkontrollbasis einsetzen.
A. Der Sitz wird in der korrekten
Position einrasten. Bevor Sie
den Stuhl verwenden, drücken
Sie den Sitz fest nach unten,
um sicherzustellen, dass er
in der korrekten Position
eingerastet ist
8. Genießen Sie Ihren neuen
T1 RACE-Gamingstuhl!
2019 2019
Page 13
Funktionsmerkmale
Table des matières
1. Befestigen Sie das Nackenkissen
A. Das Nackenkissen besitzt einen
Einrastmechanismus, mit dem
Sie es auf zwei verschiedene
Arten befestigen können. Um
das Nackenkissen höher zu
positionieren, schieben Sie das
Band über die Oberseite der
Kopfstütze. Um es tiefer zu
positionieren, befestigen Sie das
Kissen über die Önungen im
Nackenbereich des Stuhls.
2. Befestigen Sie die Lordosenstütze
A. Die Gurte für die Lordosenstütze
B. Ein Gurt verläuft durch die Önung
C. Das obere Ende wird durch die
D. Wenn beide Gurte angebracht wurden,
E. Um die Höhe der Lordosenstütze
müssen in zwei verschiedene
Richtungen weisen.
zwischen dem Sitzpolster und der
Sitzlehne.
Önungen im Schulterbereich geführt.
können sie an der Rückseite des Stuhls
miteinander verbunden werden.
einzustellen, schieben Sie sie einfach
nach oben oder unten
Introduction ......................................................................................................
ContenudukitTRACE ..............................................................................
MontageduTRACE ....................................................................................
CaractéristiquesduTRACE .....................................................................
T1 RACE
El T1 RACE ofrece comodidad y diseño inspirados en las carreras con
materiales de gran calidad para una experiencia de juegos premium.
Los reposabrazos 4D permiten optimizar su ergonomía en cualquier
entorno. Las características de reclinación y balanceo proporcionan
un mayor nivel de adaptabilidad y personalización para añadir el
toque personal que desea a su experiencia en su estación de batalla.
Los bastidores de acero del asiento y el respaldo de la silla en polipiel
para las superficies de asiento aportan calidad de automoción a su
entorno de juegos. Amplíe su experiencia de juegos con la comodidad
y la calidad que el T1 RACE incorpora a su mesa.
2221 2221
Page 14

Contenido de la caja del T1 RACE
Instrucciones de montaje del T1 RACE
1. Inserte las ruedas de la silla en
la base de la silla presionando el
pasador firmemente en el orificio
de la parte inferior de la base.
a
Respaldo del asiento
d
Cubiertas de montaje del
respaldo del asiento
(se proporcionan dos de repuesto)
g
Ruedas de silla
x1
x4
x5
b
Cojín del asiento
e
Muelle de gas
h i
Llave Allen M8
x1
x1
x1
c
Base de control del
asiento
f
Base de silla
Tornillos de montaje
(se proporcionan como
repuestos)
x1
x1
x2
2. Instale el muelle de gas y su
cubierta en la parte superior
de la base de la silla colocando
el extremo más grande en el
orificio del centro de la base de
la silla.
A. Coloque la cubierta del muelle de
gas sobre el muelle de gas con la
abertura más grande orientada
hacia abajo.
B. Retire la cubierta protectora roja
de la parte superior del muelle
de gas.
C. ADVERTENCIA: El ajuste de altura
del asiento no funcionará si la
tapa protectora roja no se extrae
del muelle de gas.
Nota:
La tornillería se ha preinstalado de fábrica en las ubicaciones de montaje para garantizar un ajuste y
funcionamiento adecuados durante el montaje
2423
Page 15

3. Coloque el conjunto de la base de
la silla completado en un lado.
4. Montaje del asiento de la silla.
A. Extraiga los cuatro tornillos de la parte inferior del cojín del asiento
utilizando la llave Allen M8 suministrada.
B. La base de control incluye una etiqueta con una flecha que muestra
la parte delantera de la unidad que se debe instalar orientada hacia la
parte delantera de la silla.
C. Con los cuatro tornillos de la parte inferior del cojín del asiento, acople
la base de control del asiento en el cojín del asiento.
5. Montaje del respaldo de la silla en el asiento.
A. Extraiga los tornillos del respaldo del asiento
utilizando la llave Allen M8 suministrada.
B. CONSEJO: Empiece por el lado derecho de la silla
con el mecanismo de reclinación. Es mucho más
sencillo empezar por este lado porque el punto de
montaje está fijado en su sitio. No apriete los tornillos
completamente hasta que haya situado ambos lados
(los cuatro pernos) en el respaldo del asiento.
C. Utilice los tornillos extraídos del respaldo del asiento
para acoplar el cojín del asiento y el respaldo del
asiento juntos.
6. Coloque el conjunto del asiento
sobre el conjunto de la base
de la silla insertando el cilindro
del muelle de gas en el orificio
central de la base de control
del asiento.
A. Se deslizará hasta acoplarse.
Presione hacia abajo para
asegurarse de que el conjunto
del asiento está firmemente
acoplado antes de usar la silla.
2625 2625
Page 16

7. Encaje las cubiertas del respaldo
de la silla sobre los puntos de
acoplamiento entre el cojín del
asiento y el respaldo del asiento.
A. Dispone de una cubierta lateral
izquierda y una derecha. La más
alta de ellas se debe utilizar sobre
el lateral con el mango para la
función de reclinación.
8. Disfrute de su nueva silla
para juegos T1 RACE.
Características Completas
1. Acoplamiento del cojín para el cuello.
A. El cojín para el cuello cuenta con
un acoplamiento de presión que
permite instalar el cojín de dos
formas distintas. Puede deslizar la
banda sobre la parte superior del
reposacabezas para una colocación
más alta del cojín o acoplar el cojín
a través de los orificios situados
en la zona del cuello para una
colocación más baja del cojín.
2. Acoplamiento del cojín lumbar
A. Las abrazaderas para el cojín lumbar
deben extenderse en dos direcciones
distintas.
B. Un conjunto recorrerá la abertura entre el
cojín del asiento y el respaldo del asiento.
C. La parte superior pasará por los orificios
de la zona de los hombros.
D. Una vez que ambos conjuntos de
abrazaderas estén colocados, se pueden
abrochar en la parte posterior de la silla.
E. Para ajustar la altura del apoyo lumbar,
puede deslizarlo hacia arriba o hacia
abajo.
2827 2827
Page 17

Содержание
Введение ..............................................................................................................
Содержимое комплектаTRACE ..................................................................
СборкаTRACE ...............................................................................................
Характеристики ...................................................................................................
Содержимое упаковки T1 RACE
T1 RACE
Дизайн кресла T1 RACE навеян атмосферой автодрома, а благодаря комфорту
и высококачественным материалам вы получите незабываемые впечатления
от игрового процесса. Подлокотники 4D позволяют выбрать оптимальные
настройки для любых условий. Функции наклона и качания обеспечивают
дополнительные возможности регулировки и настройки, позволяя
индивидуализировать вашу игровую станцию. Стальной каркас сиденья и
спинки стула наряду с обивкой сиденья из искусственной кожи на основе
полиуретана придают эффект нахождения в гоночном автомобиле. Откройте
для себя новые горизонты впечатлений от игрового процесса с комфортом и
ощущениями, которые дарит кресло T1 RACE.
a
Спинка сиденья
d
Монтажные крышки спинки
сиденья
(два дополнительных в комплекте)
g
Ролики для кресла
x1
x4
x5
b
Подушка сиденья
e
Газлифт
h i
Шестигранный ключ M8
x1
x1
x1
c
Основа с механизмом
регулировки сиденья
f
Основание кресла
Крепежные винты
(дополнительно)
x1
x1
x2
Примечание. Винтовые крепежные приспособления были установлены на заводе в местах
крепления для надлежащей подгонки и совмещения во время сборки.
3029
Page 18

Инструкции по сборке T1 RACE
1. Вставьте ролики для кресла
в основание кресла, вдавив
стержень в отверстие в нижней
части основания.
2. Установите газлифт и рычаг газлифта
в верхнюю часть основания кресла,
вставив его концом с большим
диаметром в отверстие в центре
основания кресла.
A. Установите кожух газлифта на газлифт
таким образом, чтобы конец с
большим диаметром находился внизу.
B. Снимите защитную крышку красного
цвета с верхней части газлифта.
C. Четырьмя винтами, извлеченными
из нижней части подушки сиденья,
прикрепите основание с механизмом
регулировки к подушке кресла.
3. Отложите собранный блок основания
кресла в сторону.
4. Блок сиденья кресла.
A. Удалите четыре винта из нижней части подушки сиденья шестигранным ключом
M8 из комплекта.
B. Основа с механизмом регулировки имеет маркировку в виде стрелки,
обозначающей переднюю часть устройства. При установке передняя часть
устройства должна быть направлена на переднюю часть кресла.
C. Четырьмя винтами, извлеченными из нижней части подушки сиденья, прикрепите
основание с механизмом регулировки к подушке кресла.
3231 3231
Page 19

5. Установка спинки кресла на сиденье
A. Удалите винты из спинки сиденья шестигранным
ключом M8 из комплекта.
B. РЕКОМЕНДАЦИЯ. Начинайте с правой части
кресла с механизмом наклона. С этой стороны
гораздо проще начать сборку, поскольку точка
крепления зафиксирована. Не затягивайте
винты полностью, пока обе стороны (все четыре
болта) не войдут в спинку сиденья.
C. Прикрепите подушку сиденья к спинке сиденья
винтами, извлеченными из спинки сиденья.
7. Защелкните задние крышки кресла над
точками крепления между подушкой
сиденья и спинкой сиденья.
A. В комплект входят крышки для левой и
правой стороны. Более высокая из двух
крышек предназначена для стороны, на
которой находится ручка управления
функцией наклона.
6. Поместите блок сиденья на
блок основания кресла, вставив
цилиндр газлифта в центральное
отверстие в основе сиденья с
механизмом регулировки.
A. Блок встанет на место. Перед
началом эксплуатации кресла
убедитесь в том, что блок сиденья
надежно закреплен.
8. Наслаждайтесь новым
игровым креслом T1 RACE.
3433 3433
Page 20

Все особенности
目录
1. Установка подушки для шеи
A. Подушка для шеи оснащена
креплением с защелкой, которая
позволяет устанавливать
подушку двумя способами. Вы
можете сдвинуть полосу над
верхней частью подголовника,
чтобы расположить подушку
выше, или прикрепить подушку
через отверстия в части, на
которую опирается шея, чтобы
расположить подушку ниже.
2. Установка подушки для поясницы
A. Ремешки подушки для поясницы необходимо
пропустить в двух направлениях.
B. Один комплект пропускается через отверстие
между подушкой сиденья и спинкой сиденья.
C. Верхний комплект пропускается через
отверстие в области, на которую опираются
плечи.
D. После того, как оба комплекта ремешков
пропущены, их концы необходимо соединить
на задней части кресла.
E. Для регулировки высоты подушки для
поясницы подушку необходимо сместить
вверх или вниз.
简介 .......................................................................................................................
TRACE配套内容 ............................................................................................
组装TRACE ....................................................................................................
TRACE特点 ....................................................................................................
T1 RACE
T1 RACE的设计采用赛车精神,高质量的材料提供舒适感,打造出高级的游戏
体验。4D扶手优化人体工学效果,适用于任何环境。倾斜和摇摆功能提供进一
步的可调性,而自定义让您在战斗位置展现个人的风格。钢材框架的座椅和椅
背,PU皮革的座椅表面,为您带来汽车质感的游戏体验。利用T1 RACE为您的
台式机带来舒适和质量,以扩展您的游戏体验。
3635 3635
Page 21

T1 RACE 盒内物品
T1 RACE 组装指示
1. 将椅轮插入椅座,把螺柱牢牢
压入椅座底部孔中。
a
椅背
d
椅背罩
(两个额外提供)
g
椅轮
x1
x4
x5
b
座垫
e
气举
h i
M8内六角扳手
x1
x1
x1
c
座椅控制座
f
椅座
安装螺丝
(额外提供)
x1
x1
2. 将气举和气举户盖安装到椅座顶端,
较大的一端放到椅座中央的孔中。
A. 将气举盖罩住气举,开口较大一边
面朝下。
B. 从气举顶端拆下红色保护盖。
C. 警告:如果未将红色保护盖从气举卸
下,座椅高度调整将无法作用。
x2
注:螺丝五金出厂时已预安装於安装位置,确保组装时妥善吻合和作用
3837
Page 22

3. 将整个椅座组件放到侧边。
4. 座椅组件。
A. 使用提供的M8内六角扳手将四个螺丝从座垫底部拆下。
B. 控制座上标有箭头的标签显示“前方”的地方需要面向椅子的前方安装。
C. 使用座垫底部的四个螺丝将座椅控制座装到座垫。
5. 椅背到座椅的组件。
A. 使用提供的M8内六角扳手将螺丝从椅背拆下。
B. 提示:使用倾斜机构从椅子的右侧开始。由这一侧
开始会容易得多,因为安装点是固定的。不要将螺
丝完全锁紧,除非椅背两侧(全部四个螺栓)都已
经开始。
C. 使用从椅背取出的螺丝将座垫和椅背组装在一起。
6. 将气举作用缸插入座椅控制座的
中央孔中,把座椅组件放到椅座
组件上。
A. 它会滑入定位。确保使用椅子之前座
椅组件已牢牢地压入定位。
4039 4039
Page 23

7. 将椅背罩卡入座垫和椅背之间的安装点。
A. 左右两侧都有罩子。两个罩子较高的一边是
用於具有倾斜用的把手那一侧。
8. 尽情享受您的新T1 RACE游戏椅。
完整功能
1. 安装颈枕
A. 颈枕具有卡扣式附接件,可有两种不同方式
安装。您可将枕头装在头枕上方,置於较高
的位置,或者将枕头穿过颈部区域的孔中,
置於较低的位置。
2. 安装腰枕
A. 腰枕的带子需要绕行两个不同方向。
B. 一组穿过座垫和椅背间的缝隙。
C. 上方则经由肩部区域的l孔洞
D. 两组带子都绕行之後,即可在椅子的
背面扣接在一起。
E. 为调整腰部支撑装置的高度,
您可以将其上下滑动。
4241 4241
Page 24

目次
はじめに ...............................................................................................................
TRACEキット同梱物 ....................................................................................
TRACEの組み立て ........................................................................................
TRACEの機能 ................................................................................................
T1 RACE 同梱物
T1 RACE
T1 RACE はレーシングカーにヒントを得たデザインで、高品質な材質で座り
心地がよく、上質なゲーミングエクスペリエンスを提供します。4D アーム
レストは人間工学に基づき、あらゆる環境向けに最適化されています。リク
ライニング機能とロッキング機能によってさらなる調整とカスタマイズを行
い、個人の好みに合わせたバトルステーション環境を実現できます。シート
とチェアバックはスチールフレーム製で座面には PU レザーが使用され、ゲ
ーミング環境に自動車クラスの品質をもたらします。T1 RACE がデスクにも
たらす快適さと品質がゲーミングエクスペリエンスを向上させます。
a
シートバック
d
シートバックマウントカバー
(2 つは予備用)
g
チェアホイール
x1
x4
x5
b
シートクッションョン
e
ガスリフトフト
h i
M8 六角レンチ
x1
x1
x1
c
シートコントロールベ
ースベース
f
チェアベース
取り付けネジ
(予備用
)
x1
x1
x2
注:組み立て時の適切な適合性と機能性を確保するため、ネジ部品は出荷時にあらかじめ
取り付け箇所に取り付けられています。
4443
Page 25

T1 RACE の組み立て手順
1. チェアベース底面の穴に、スタッ
ドをしっかり押し込んでチェアホ
イールを取り付けます。
2. チェアベース上面中央の穴に、ガス
リフトおよびガスリフトカバーの大
きい方を差し込んで取り付けます。
A. ガスリフトカバーの大きい方の穴を下
向きにしてガスリフトにかぶせます。
B. ガスリフト上面の赤い保護カバーを取
り外します。
C. 警告:ガスリフトの赤い保護キャッ
プが取り外されていない場合、シー
トの高さ調整ができなくなります。
3. 組み立てたチェアベースアセンブリを
横に置いておきます。
4. チェアシートアセンブリを組み立てます。
A. 付属の M8 六角レンチを使用して、シートクッション底面の 4 本のネジを取り
外します。
B. コントロールベースにはユニットの「前方」を示す矢印が表示されています。
この矢印が椅子の前方を指すように取り付ける必要があります。
C. シートクッション底面から 4 本のネジを使用して、シートコントロールベース
をシートクッションに取り付けます。
4645 4645
Page 26

5. チェアバックをシートアセンブリに取り付け
ます。
A. 付属の M8 六角レンチを使用して、シートバッ
クのネジを取り外します。
B. ヒント:リクライニング機構がある椅子の右側
から作業を開始してください。こちら側から開
始すると取り付け箇所が固定されるため、非常
に作業しやすくなります。シートバックの両側
(4 本のボルトすべて) のネジを完全に締めない
でください。
C. シートバックから取り外したネジを使用して、
シートクッションとシートバックを一緒に
取り付けます。
7. シートクッションとシートバックの
間の取り付け位置にチェアバックカ
バーを取り付けます。
A. 右カバーと左カバーがあります。2 つ
のうち高い方のカバーを、リクライニ
ング機能用ハンドルがある側に使用し
ます。
6. シートコントロールベース中央
の穴にガスリフトシリンダーを
差し込んで、シートアセンブリ
をチェアベースアセンブリに取
り付けます。
A. スライドしてはまります。椅子を
使用する前に、シートアセンブリ
がしっかり押し込まれていること
を確認してください。
8. 新しい T1 RACE ゲーミング
チェアをお楽しみください。
4847 4847
Page 27

すべての機能
목차
1. 首用ピローの取り付け
A. 首用ピローにはスナップ式の取
り付け具があり、2 種類の方法
で取り付けることができます。
ヘッドレストの上部にバンドを
スライドさせてピローが高くな
るように配置するか、首部分の
穴を通してピローを取り付けピ
ローが低くなるように配置する
ことができます。
2. 腰用ピローの取り付け
A. 腰用ピローのストラップは異なる 2 つの方
向に通す必要があります。
B. 一方はシートクッションとシートバックの
間の隙間に通します。
C. 上部は肩部分の穴を通します。
D. ストラップを両方通したら、椅子の裏側で
互いに留め合わせることができます。
E. 腰用サポートを上下にスライドさせて、
高さを調整することができます。
소개 .......................................................................................................................
TRACE키트 내용물 ......................................................................................
TRACE조립 ....................................................................................................
TRACE기능 ....................................................................................................
T1 RACE
T1 RACE는 레이싱에서 영감을 받은 디자인과 편안함을 제공하며 프리미엄
게임 환경을 위해 고급 소재를 사용합니다. 4D 팔걸이는 모든 환경에
인체공학적으로 최적화되게 도와줍니다. 기대거나 흔들리는 기능으로 추가
조절 및 사용자 정의가 가능하므로 배틀 스테이션 환경을 원하는 환경으로
맞출 수 있습니다. 시트와 의자 등받이의 강철 프레임, 그리고 시트 표면을
덮은 PU 가죽은 마치 자동차에 탑승한 것과 같은 느낌을 줍니다. T1 RACE가
책상에 구현한 편안함과 품질로 게임 환경을 한층 강화하십시오.
5049 5049
Page 28

T1 RACE 박스 내용물
T1 RACE 조립 설명
1. 의자 바퀴를 의자 베이스에 끼우기
위해 스터드를 베이스 밑면의
구멍에 꽉 눌러 끼웁니다.
a
시트등받이
d
시트 등받이 장착 커버
(2 개 여분으로 제공)
g
의자 바퀴
x1
x4
x5
b
시트 쿠션
e
가스 리프트
h i
M8 육각렌치
x1
x1
x1
c
시트 컨트롤 베이스
f
의자 베이스
장착 나사
(여분으로 제공)
x1
x1
x2
2. 가스 리프트와 가스 리프트 커버를
의자 베이스 윗면에 설치하기 위해
더 큰 끝을 의자 베이스 중앙의 홀
속에 집어넣습니다.
A. 가스 리프트 커버의 더 큰 구멍이
아래로 향하도록 가스 리프트에
올려놓습니다.
B. 가스 리프트 윗면의 빨간 보호 커버를
제거합니다.
C. 경고: 가스 리프트에서 빨간 보호 캡을
빼지 않으면 시트 높이를 조절할 수
없습니다.
참고: 나사 하드웨어는 공장에서 장착 위치에 미리 설치함으로써 조립 시 제대로 들어맞고
기능에 문제가 없음을 확인합니다.
5251
Page 29

3. 완성된 의자 베이스 조립을
옆에 놓습니다.
4. 의자 시트 조립.
A. 동봉된 M8 육각렌치를 사용하여 시트 쿠션 밑면에서 나사 4개를 뺍니다.
B. 컨트롤 베이스에는 장치의 “앞면”을 나타내는 화살표 라벨이 붙어 있는데,
이는 의자의 앞쪽을 바라보는 상태로 설치해야 합니다.
C. 시트 쿠션 밑면의 나사 4개를 사용하여 시트 컨트롤 베이스를 시트 쿠션에
붙입니다.
5. 의자 등받이와 시트 조립.
A. 동봉된 M8 육각렌치를 사용하여 시트
등받이에서 나사들을 뺍니다.
B. 팁: 기대는 구조를 지닌 의자 오른쪽부터
작업합니다. 장착 지점이 고정되어 있기 때문에
오른쪽부터 시작하는 게 훨씬 수월합니다. 시트
등받이의 양쪽 측면(볼트 4개 전부)을 모두
시작하기 전에는 한쪽 나사만 끝까지 꽉 죄지
마십시오.
C. 시트 등받이에서 뺀 나사를 사용하여 시트
쿠션과 시트 등받이를 서로 붙입니다.
6. 가스 리프트 실린더를 시트 컨트롤
베이스의 중앙 구멍에 삽입하여
시트 조립을 의자 베이스 조립 위에
올려놓습니다.
A. 제자리로 미끄러져 들어갈
것입니다. 의자를 사용하기 전에
먼저 시트 조립이 아래에 꽉
껴졌는지 확인합니다.
5453 5453
Page 30

7. 의자 등받이 커버가 시트 쿠션과
시트 등받이 사이의 부착점을 지나
달칵 껴지게 끼웁니다.
A. 오른쪽 커버와 왼쪽 커버가 있습니다.
2개의 커버 중 더 큰 쪽이 기대기
기능의 핸들이 있는 쪽과 같은
쪽입니다.
8. 새 T1 RACE 게임용 체어를
즐기십시오.
전체 기능
1. 목 베개 부착
A. 목 베개에는 달칵 껴지는 부착
부위가 있어 베개를 2가지 서로
다른 방법으로 설치할 수 있습니다.
베개를 높게 배치하려면 밴드를
머리 받침의 위에서부터 내려오게
끼면 되고, 베개를 낮게 배치하려면
베개를 목 부분의 구멍에 끼우면
됩니다.
2. 긴 베개 부착
A. 긴 베개의 스트랩은 2개의 서로 다른
방향으로 지나가야 합니다.
B. 한쪽은 시트 쿠션과 시트 등받이 사이의
개구부로 들어갑니다.
C. 위쪽은 어깨 부분의 구멍 속으로
들어갑니다.
D. 양쪽 스트랩의 배치가 모두 끝났다면
이제 의자 뒷면에서 서로 달칵 끼울 수
있습니다.
E. 요추 지지대를 위로 올리거나 아래로 내려
지지대의 높이를 조절할 수 있습니다.
5655 5655
 Loading...