

Page 1

SLJ TO QLT CONVERSION KIT
Installation Manual
Release Date: October 17, 2013
Publication Number: 740300001INS
Revision: A
Visit the Cornelius web site at www.cornelius.com
for all your Literature needs.
Page 2

The products, technical information, and instructions contained in this manual are subject to change without notice.
These instructions are not intended to cover all details or variations of the equipment, nor to provide for every possible
contingency in the installation, operation or maintenance of this equipment. This manual assumes that the person(s)
working on the equipment have been trained and are skilled in working with electrical, plumbing, pneumatic, and
mechanical equipment. It is assumed that appropriate safety precautions are taken and that all local safety and construction requirements are being met, in addition to the information contained in this manual.
This Product is warranted only as provided in Cornelius Commercial Warrant applicable to this Product and is subject
to all of the restrictions and limitations contained in the Commercial Warranty.
Cornelius will not be responsible for any repair, replacement or other service required by or loss or damage resulting
from any of the following occurrences, including but not limited to, (1) other than normal and proper use and normal
service conditions with respect to the Product, (2) improper voltage, (3) inadequate wiring, (4) abuse, (5) accident, (6)
alteration, (7) misuse, (8) neglect, (9) unauthorized repair or the failure to utilize suitably qualified and trained persons
to perform service and/or repair of the Product, (10) improper cleaning, (11) failure to follow installation, operating,
cleaning or maintenance instructions, (12) use of non-authorized parts (i.e., parts that are not 100% compatible with
the Product) which use voids the entire warranty, (13) Product parts in contact with water or the product dispensed
which are adversely impacted by changes in liquid scale or chemical composition.
Contact Information:
To inquire about current revisions of this and other documentation or for assistance with any Cornelius product contact:
www.cornelius.com
800-238-3600
Trademarks and Copyrights:
This document contains proprietary information and it may not be reproduced in any way without permission from
Cornelius.
This document contains the original instructions for the unit described.
CORNELIUS INC
101 Regency Drive
Glendale Heights, IL
Tel: + 1 800-238-3600
Printed in U.S.A.
Page 3
SLJ to QLT Conversion Kit
!
DANGER:
!
WARNING:
CAUTION:
!
!
WARNING:
!
SAFETY INSTRUCTIONS
READ AND FOLLOW ALL SAFETY INSTRUCTIONS
Safety Overview
Read and follow ALL SAFETY INSTRUCTIONS in this manual and any warning/caution labels on the unit (decals, labels or
laminated cards).
Read and understand ALL applicable OSHA (Occupational Safety and Health Administration) safety regulations before
operating this unit.
Recognition
RReeccooggnniizzee SSaaffeettyy AAlleerrttss
TThhiiss iiss tthhee ssaaffeettyy aalleerrtt ssyymmbbooll.. WWhheenn yyoouu sseeee iitt iinn tthhiiss mmaannuuaall oorr oonn tthhee uunniitt,,
bbee aalleerrtt ttoo tthhee ppootteennttiiaall ooff ppeerrssoonnaall iinnjjuurryy oorr ddaammaaggee ttoo tthhee uunniitt..
DIFFERENT TYPES OF ALERTS
Indicates an immediate hazardous situation which if not avoided WILL result in serious injury, death or equipment
damage.
Indicates a potentially hazardous situation which, if not avoided, COULD result in serious injury, death, or equipment
damage.
Indicates a potentially hazardous situation which, if not avoided, MAY result in minor or moderate injury or equipment
damage.
SAFETY TIPS
Carefully read and follow all safety messages in this manual and safety signs on the unit.
Keep safety signs in good condition and replace missing or damaged items.
Learn how to operate the unit and how to use the controls properly.
DDoo nnoott let anyone operate the unit without proper training. This appliance is not intended for use by very young children or
infirm persons without supervision. Young children should be supervised to ensure that they do not play with the appliance.
Keep your unit in proper working condition and do not allow unauthorized modifications to the unit.
QUALIFIED SERVICE PERSONNEL
Only trained and certified electrical, plumbing and refrigeration technicians should service this unit. ALL WIRING
AND PLUMBING MUST CONFORM TO NATIONAL AND LOCAL CODES. FAILURE TO COMPLY COULD
RESULT IN SERIOUS INJURY, DEATH OR EQUIPMENT DAMAGE.
© 2013, Cornelius Inc. - 1 - Publication Number: 740300001INS
Page 4

SLJ to QLT Conversion Kit
!
WARNING:
CAUTION:
!
CAUTION:
!
SAFETY PRECAUTIONS
This unit has been specifically designed to provide protection against personal injury. To ensure continued protection
observe the following:
Disconnect power to the unit before servicing following all lock out/tag out procedures established by the user. Verify
all of the power is off to the unit before any work is performed.
Failure to disconnect the power could result in serious injury, death or equipment damage.
Always be sure to keep area around the unit clean and free of clutter. Failure to keep this area clean may result in
injury or equipment damage.
SHIPPING AND STORAGE
Before shipping, storing, or relocating the unit, the unit must be sanitized and all sanitizing solution must be drained
from the system. A freezing ambient environment will cause residual sanitizing solution or water remaining inside the
unit to freeze resulting in damage to internal components.
Publication Number: 740300001INS - 2 - © 2013, Cornelius Inc.
Page 5
PARTS LIST
Concentrate
Bottle
Shelf
Nozzle
and
diffuser
Part no. Description Qty
620051471 Shelf Pouch Holder BIB Quest QLT 1
620053164 Pouch Holder SS 4.5 liter QE-QLT-2000 2
720521000 Electric Box Set Quest 2000 1
720522100 Platform assy Quest 2P (QLT) 1
720500007 Label Wiring Quest 2000 1
630400272 Label Serial Decal 2
620055633 Label Daily Flush & Cleaning 1
720201416 Brkt Platform Securing Qst2 1
0704105 Screw (For installing 720201416) 2
740300001INS Manual 1
740000288 Packaging 1
SLJ to QLT Conversion Kit
INSTALLATION INSTRUCTIONS
Table 1: Parts List
PROCEDURE
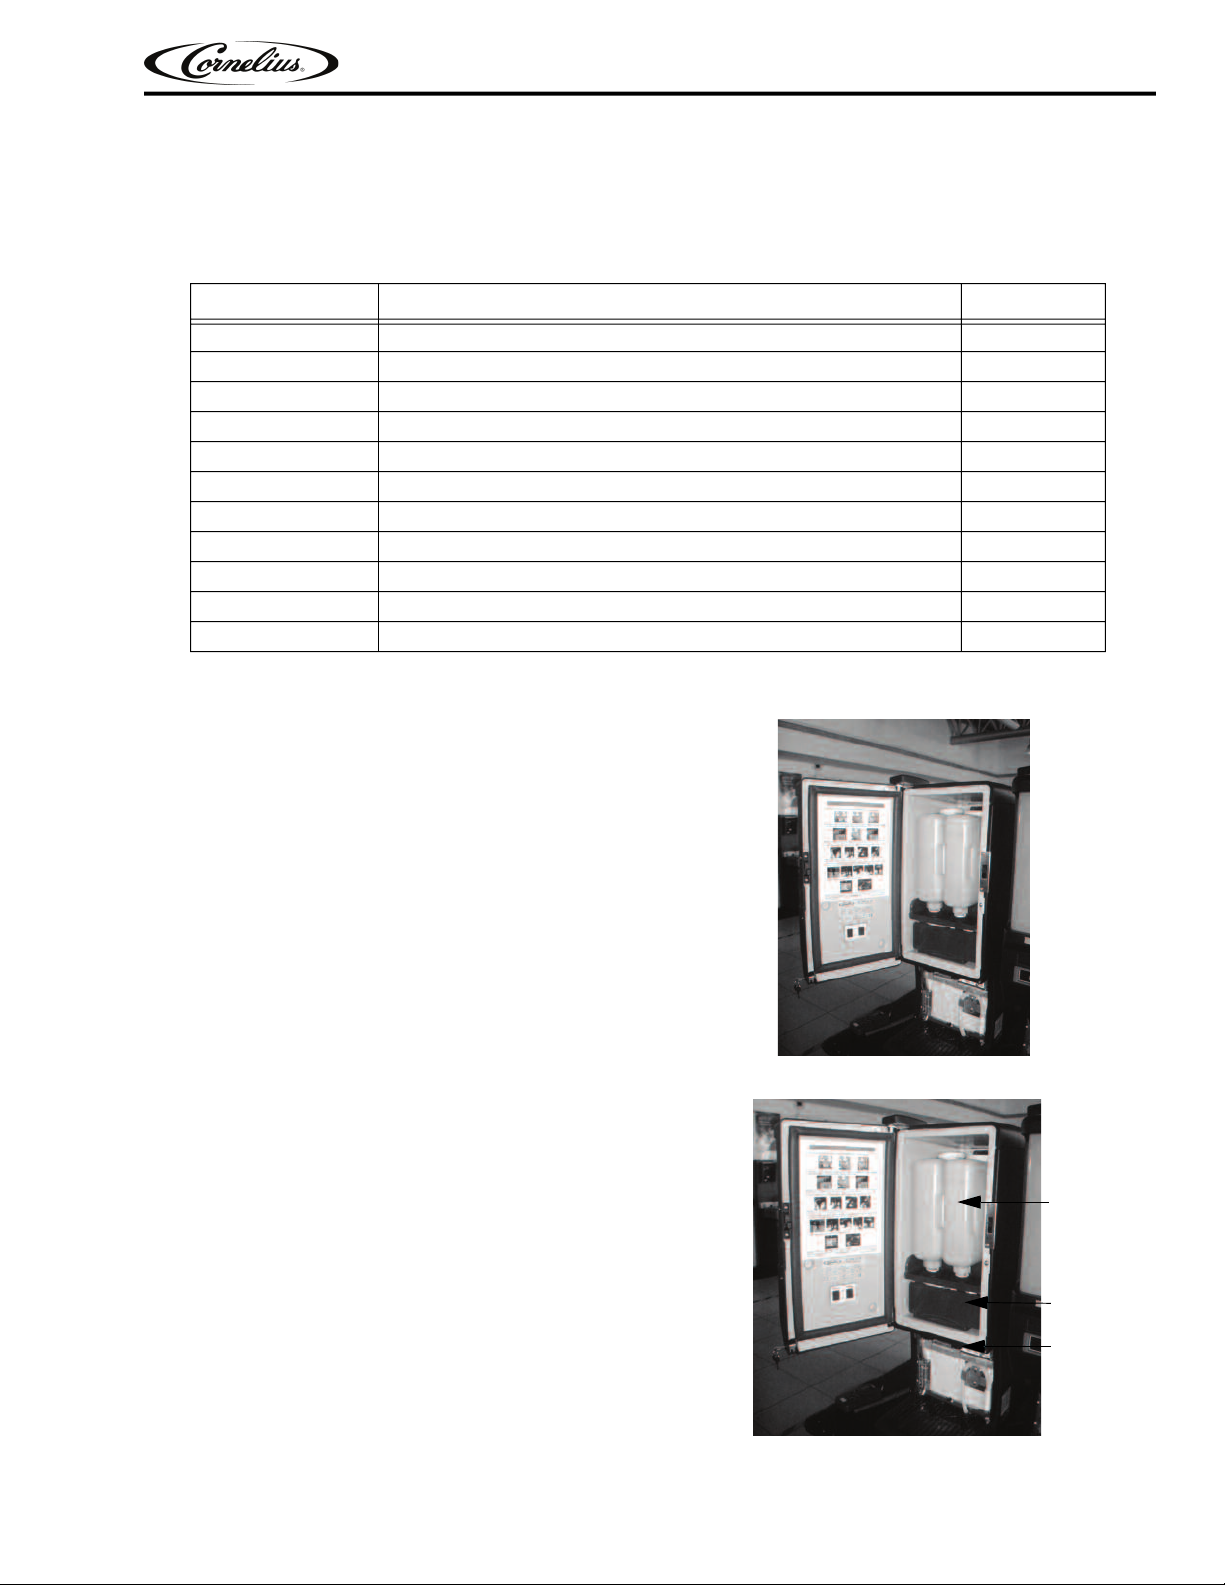
1. Open cabinet door.
2. Remove following items:
A. Bottles with concentrate.
B. Shelf
C. Nozzles and diffusers
Figure 1.
© 2013, Cornelius Inc. - 3 - Publication Number: 740300001INS
Figure 2.
Page 6

SLJ to QLT Conversion Kit
Power
Plug
Water
Connector
Screws
3. Disconnect Water and Power plug from the
pump deck
4. Disengage the lock on Pump deck by pulling
outwards.
Figure 3.
Figure 4.
5. Lift out the SLJ - 2F pump deck.
Figure 5.
6. Remove the two screws from the back panel.
Figure 6.
Publication Number: 740300001INS - 4 - © 2013, Cornelius Inc.
Page 7

7. Follow the procedure below to install the new parts.
8. Install the bracket platform as shown below using the screws provided.
Figure 7.
9. Place the QLT 2-F platform into the cabinet
SLJ to QLT Conversion Kit
Figure 8.
10. Connect power and water supply to the
platform.
Figure 9.
11. Clean and sanitise the nozzles and diffusers, and install onto the pump deck.
12. Remove the splash panel by removing the
screws on both sides.
Figure 10.
© 2013, Cornelius Inc. - 5 - Publication Number: 740300001INS
Page 8

SLJ to QLT Conversion Kit
13. Replace the electric wiring diagram (SLJ-type)
with the new QLT version.
14. Remove the screw that holds the electric box to
the chassis.
Figure 11.
Figure 12.
15. Pull the SLJ electric box assembly forward and
remove.
Figure 13.
16. Slide the QLT electric box assembly in.
17. Install the screw to secure the electric box, following the above process in reverse order.
18. Install the BIB Shelf.
Figure 14.
Publication Number: 740300001INS - 6 - © 2013, Cornelius Inc.
Page 9

SLJ to QLT Conversion Kit
Label
Label
Screws
19. Load the pouch holder(s) with concentrate, and hookup the silicone tube(s) to the mixing chamber(s) as
shown below.
Figure 15.
20. Replace serial number label(s) as shown,
record both the original SLJ serial number and
new QLT serial number.
21. Replace the door label with the new one
provided (P/N: 620055633).
22. Dismantle the merchandiser by removing two
screws as shown.
Figure 16.
Figure 17.
Figure 18.
© 2013, Cornelius Inc. - 7 - Publication Number: 740300001INS
Page 10

SLJ to QLT Conversion Kit
Orange
Brown
Green
Yellow
Blue
White
Black
Red
23. Remove the wire harnesses from the rear.
Figure 19.
24. Cut and gently remove the leads from the harness. Using AMP tool insert the wires in the reverse order.
Repeat the same procedure for the other harness also.
Figure 20.
25. Connect the harness to the respective slots as
shown.
Figure 21.
26. Re-install the merchandiser.
27. Complete Electrical Safety test in accordance with local regulations. See Electrical test in reference
section for instructions.
28. Power on the Quest unit.
29. Prime the water and syrup systems.
30. Start the calibration / brixing procedures (either with QLT splitter or Hydrometer).
31. After completing the brixing procedures, program the SM, MD and LG portion(s).
Publication Number: 740300001INS - 8 - © 2013, Cornelius Inc.
Page 11

REFERENCE
Wiring diagram
SLJ to QLT Conversion Kit
© 2013, Cornelius Inc. - 9 - Publication Number: 740300001INS
Page 12

SLJ to QLT Conversion Kit
Electrical test
1. Plug the power cord into the outlet of Hy-Pot.
2. Place the black pin within the unit.
Figure 22.
3. Press the Test button to activate the test. Allow the test
to run (about 1 second), the tester should turn off. If this
fails then try again or check the circuit for faulty
connections. Remove both pincers, record the test
results in the Traveler Hy pot.
Figure 23.
Figure 24.
Publication Number: 740300001INS - 10 - © 2013, Cornelius Inc.
Page 13

Page 14

Cornelius Inc.
www.cornelius.com
 Loading...