

Cornelius PRISM Owner's Manual
PRISM
Owner’s Manual
Release Date:
Publication Number: 548000096
Revision Date: November 5, 2018
Revision: C
Visit the Cornelius web site at
www.cornelius.com for all your Literature needs.

The products, technical information, and instructions contained in this manual are subject to change without notice.
These instructions are not intended to cover all details or variations of the equipment, nor to provide for every possible
contingency in the installation, operation or maintenance of this equipment. This manual assumes that the person(s)
working on the equipment have been trained and are skilled in working with electrical, plumbing, pneumatic, and
mechanical equipment. It is assumed that appropriate safety precautions are taken and that all local safety and con
struction requirements are being met, in addition to the information contained in this manual.
This Product is warranted only as provided in Cornelius’ Commercial Warranty applicable to this Product and is subject to all of the restrictions and limitations contained in the Commercial Warranty.
Cornelius will not be responsible for any repair, replacement or other service required by or loss or damage resulting
from any of the following occurrences, including but not limited to, (1) other than normal and proper use and normal
service conditions with respect to the Product, (2) improper voltage, (3) inadequate wiring, (4) abuse, (5) accident, (6)
alteration, (7) misuse, (8) neglect, (9) unauthorized repair or the failure to utilize suitably qualified and trained persons
to perform service and/or repair of the Product, (10) improper cleaning, (11) failure to follow installation, operating,
cleaning or maintenance instructions, (12) use of “non-authorized” parts (i.e., parts that are not 100% compatible with
the Product) which use voids the entire warranty, (13) Product parts in contact with water or the product dispensed
which are adversely impacted by changes in liquid scale or chemical composition.
Contact Information:
To inquire about current revisions of this and other documentation or for assistance with any Cornelius product contact:
www.cornelius.com
+1 800-238-3600
-
Trademarks and Copyrights:
This document contains proprietary information and it may not be reproduced in any way without permission from
Cornelius.
This document contains the original instructions for the unit described.
CORNELIUS INC
101 Regency Drive
Glendale Heights, IL
Correct Disposal of this Product
This marking indicates that this product should not be disposed with other household wastes throughout the EU. To
prevent possible harm to the environment or human health from uncontrolled waste disposal, recycle it responsibly to
promote the sustainable reuse of material resources. To return your used device, please use the return and collection
systems or contact the retailer where the product was purchased. They can take this product for environmental safe
recycling

Prism Owner’s Manual
TABLE OF CONTENTS
Safety Instructions . . . . . . . . . . . . . . . . . . . . . . . . . . . . . . . . . . . . . . . . . . . . . . . . . . . . . . . . . . . . . . . . . 1
Read and Follow all Safety Instructions . . . . . . . . . . . . . . . . . . . . . . . . . . . . . . . . . . . . . . . . . . . . . . 1
Safety Overview . . . . . . . . . . . . . . . . . . . . . . . . . . . . . . . . . . . . . . . . . . . . . . . . . . . . . . . . . . . . . 1
Recognition . . . . . . . . . . . . . . . . . . . . . . . . . . . . . . . . . . . . . . . . . . . . . . . . . . . . . . . . . . . . . . . . . 1
Different Types of Alerts . . . . . . . . . . . . . . . . . . . . . . . . . . . . . . . . . . . . . . . . . . . . . . . . . . . . . . . . . . 1
Safety Tips . . . . . . . . . . . . . . . . . . . . . . . . . . . . . . . . . . . . . . . . . . . . . . . . . . . . . . . . . . . . . . . . . . . . 1
Qualified Service Personnel . . . . . . . . . . . . . . . . . . . . . . . . . . . . . . . . . . . . . . . . . . . . . . . . . . . . . . . 2
Safety Precautions . . . . . . . . . . . . . . . . . . . . . . . . . . . . . . . . . . . . . . . . . . . . . . . . . . . . . . . . . . . . . . 2
Operation . . . . . . . . . . . . . . . . . . . . . . . . . . . . . . . . . . . . . . . . . . . . . . . . . . . . . . . . . . . . . . . . . . . . . . . . 3
Prism . . . . . . . . . . . . . . . . . . . . . . . . . . . . . . . . . . . . . . . . . . . . . . . . . . . . . . . . . . . . . . . . . . . . . . . . . 3
Optifill . . . . . . . . . . . . . . . . . . . . . . . . . . . . . . . . . . . . . . . . . . . . . . . . . . . . . . . . . . . . . . . . . . . . . 3
Sanitary Lever . . . . . . . . . . . . . . . . . . . . . . . . . . . . . . . . . . . . . . . . . . . . . . . . . . . . . . . . . . . . . . . 3
Push Button . . . . . . . . . . . . . . . . . . . . . . . . . . . . . . . . . . . . . . . . . . . . . . . . . . . . . . . . . . . . . . . . . 3
Cleaning Instruction . . . . . . . . . . . . . . . . . . . . . . . . . . . . . . . . . . . . . . . . . . . . . . . . . . . . . . . . . . . . . 4
Daily Cleaning . . . . . . . . . . . . . . . . . . . . . . . . . . . . . . . . . . . . . . . . . . . . . . . . . . . . . . . . . . . . . . . 4
User Instruction . . . . . . . . . . . . . . . . . . . . . . . . . . . . . . . . . . . . . . . . . . . . . . . . . . . . . . . . . . . . . . . . . 4
How to Check Prism Ratio . . . . . . . . . . . . . . . . . . . . . . . . . . . . . . . . . . . . . . . . . . . . . . . . . . . . . . . . 6
Knock Out Kit . . . . . . . . . . . . . . . . . . . . . . . . . . . . . . . . . . . . . . . . . . . . . . . . . . . . . . . . . . . . . . . . . . . 8
Knock Out Punch Instructions . . . . . . . . . . . . . . . . . . . . . . . . . . . . . . . . . . . . . . . . . . . . . . . . . . . . . 10
Installation Instructions . . . . . . . . . . . . . . . . . . . . . . . . . . . . . . . . . . . . . . . . . . . . . . . . . . . . . . . . . . . . . 12
Knock Out Adapter Plate . . . . . . . . . . . . . . . . . . . . . . . . . . . . . . . . . . . . . . . . . . . . . . . . . . . . . . . . 12
Knock Out Adapter Plate and Tubing . . . . . . . . . . . . . . . . . . . . . . . . . . . . . . . . . . . . . . . . . . . . . . . 12
Installation Kit. . . . . . . . . . . . . . . . . . . . . . . . . . . . . . . . . . . . . . . . . . . . . . . . . . . . . . . . . . . . . . . . . . 13
Back Block Installation . . . . . . . . . . . . . . . . . . . . . . . . . . . . . . . . . . . . . . . . . . . . . . . . . . . . . . . . . . 14
Valve Installation . . . . . . . . . . . . . . . . . . . . . . . . . . . . . . . . . . . . . . . . . . . . . . . . . . . . . . . . . . . . . . . 16
Locking Valve with Back Block Using Lock Pin . . . . . . . . . . . . . . . . . . . . . . . . . . . . . . . . . . . . . . . 18
Connection Diagram . . . . . . . . . . . . . . . . . . . . . . . . . . . . . . . . . . . . . . . . . . . . . . . . . . . . . . . . . . . . 19
Syrup and Water Maps . . . . . . . . . . . . . . . . . . . . . . . . . . . . . . . . . . . . . . . . . . . . . . . . . . . . . . . . . . 20
Touch Module and Cover Installation . . . . . . . . . . . . . . . . . . . . . . . . . . . . . . . . . . . . . . . . . . . . . . . 21
Schematics . . . . . . . . . . . . . . . . . . . . . . . . . . . . . . . . . . . . . . . . . . . . . . . . . . . . . . . . . . . . . . . . . . . . . . 22
Plumbing Diagram . . . . . . . . . . . . . . . . . . . . . . . . . . . . . . . . . . . . . . . . . . . . . . . . . . . . . . . . . . . . . 22
Wiring Diagram . . . . . . . . . . . . . . . . . . . . . . . . . . . . . . . . . . . . . . . . . . . . . . . . . . . . . . . . . . . . . . . . 23
Illustrated Parts List . . . . . . . . . . . . . . . . . . . . . . . . . . . . . . . . . . . . . . . . . . . . . . . . . . . . . . . . . . . . . . . 24
Valve Assembly . . . . . . . . . . . . . . . . . . . . . . . . . . . . . . . . . . . . . . . . . . . . . . . . . . . . . . . . . . . . . . . 24
Prism Decal . . . . . . . . . . . . . . . . . . . . . . . . . . . . . . . . . . . . . . . . . . . . . . . . . . . . . . . . . . . . . . . . . . . 26
© 2018, Cornelius Inc. Publication Number: 548000096

Prism Owner’s Manual
Publication Number: 548000096 © 2018, Cornelius Inc.
Prism Owner’s Manual
!
DANGER:
!
WARNING:
CAUTION:
!
!
SAFETY INSTRUCTIONS
READ AND FOLLOW ALL SAFETY INSTRUCTIONS
Safety Overview
• Read and follow ALL SAFETY INSTRUCTIONS in this manual and any warning/caution labels on the unit
(decals, labels or laminated cards).
• Read and understand ALL applicable OSHA (Occupational Safety and Health Administration) safety regulations
before operating this unit.
• Must wear required PPE before you start to service or maintain the equipment.
Recognition
Recognize Safety Alerts
This is the safety alert symbol. When you see it in this manual or on the unit,
be alert to the potential of personal injury or damage to the unit.
DIFFERENT TYPES OF ALERTS
Indicates an immediate hazardous situation which if not avoided WILL result in serious injury, death or equipment damage.
Indicates a potentially hazardous situation which, if not avoided, COULD result in serious injury, death, or equipment
damage.
Indicates a potentially hazardous situation which, if not avoided, MAY result in minor or moderate injury or equipment
damage.
SAFETY TIPS
• Carefully read and follow all safety messages in this manual and safety signs on the unit.
• Keep safety signs in good condition and replace missing or damaged items.
• Learn how to operate the unit and how to use the controls properly.
• This appliance can be used by children aged from 8 years and above and persons with reduced physical,
sensory or mental capabilities or lack of experience and knowledge if they have been given supervision or
instruction concerning use of the appliance in a safe way and understand the hazards involved. Children
shall not play with the appliance. Cleaning and user maintenance shall not be made by children without
supervision.
• Keep your unit in proper working condition and do not allow unauthorized modifications to the unit.
• Any modifications to be done by Factory Authorized Service personnel only.
• Any part replacement in the system shall be conducted with like components.
© 2018, Cornelius Inc. - 1 - Publication Number: 548000096

Prism Owner’s Manual
!
WARNING:
!
WARNING:
CAUTION:
!
QUALIFIED SERVICE PERSONNEL
Only authorized service personnel shall service the valve. ALL WIRING AND PLUMBING MUST CONFORM TO
NATIONAL AND LOCAL CODES. FAILURE TO COMPLY COULD RESULT IN SERIOUS INJURY, DEATH OR
EQUIPMENT DAMAGE.
SAFETY PRECAUTIONS
This unit has been specifically designed to provide protection against personal injury. To ensure continued protection
observe the following:
Disconnect power to the unit before servicing following all lock out/tag out procedures established by the user. Verify
all of the power is off to the unit before any work is performed.
Failure to disconnect the power could result in serious injury, death or equipment damage.
Always be sure to keep area around the valve clean and free of clutter.
Failure to keep this area clean may result in injury or equipment damage.
Publication Number: 548000096 - 2 - © 2018, Cornelius Inc.
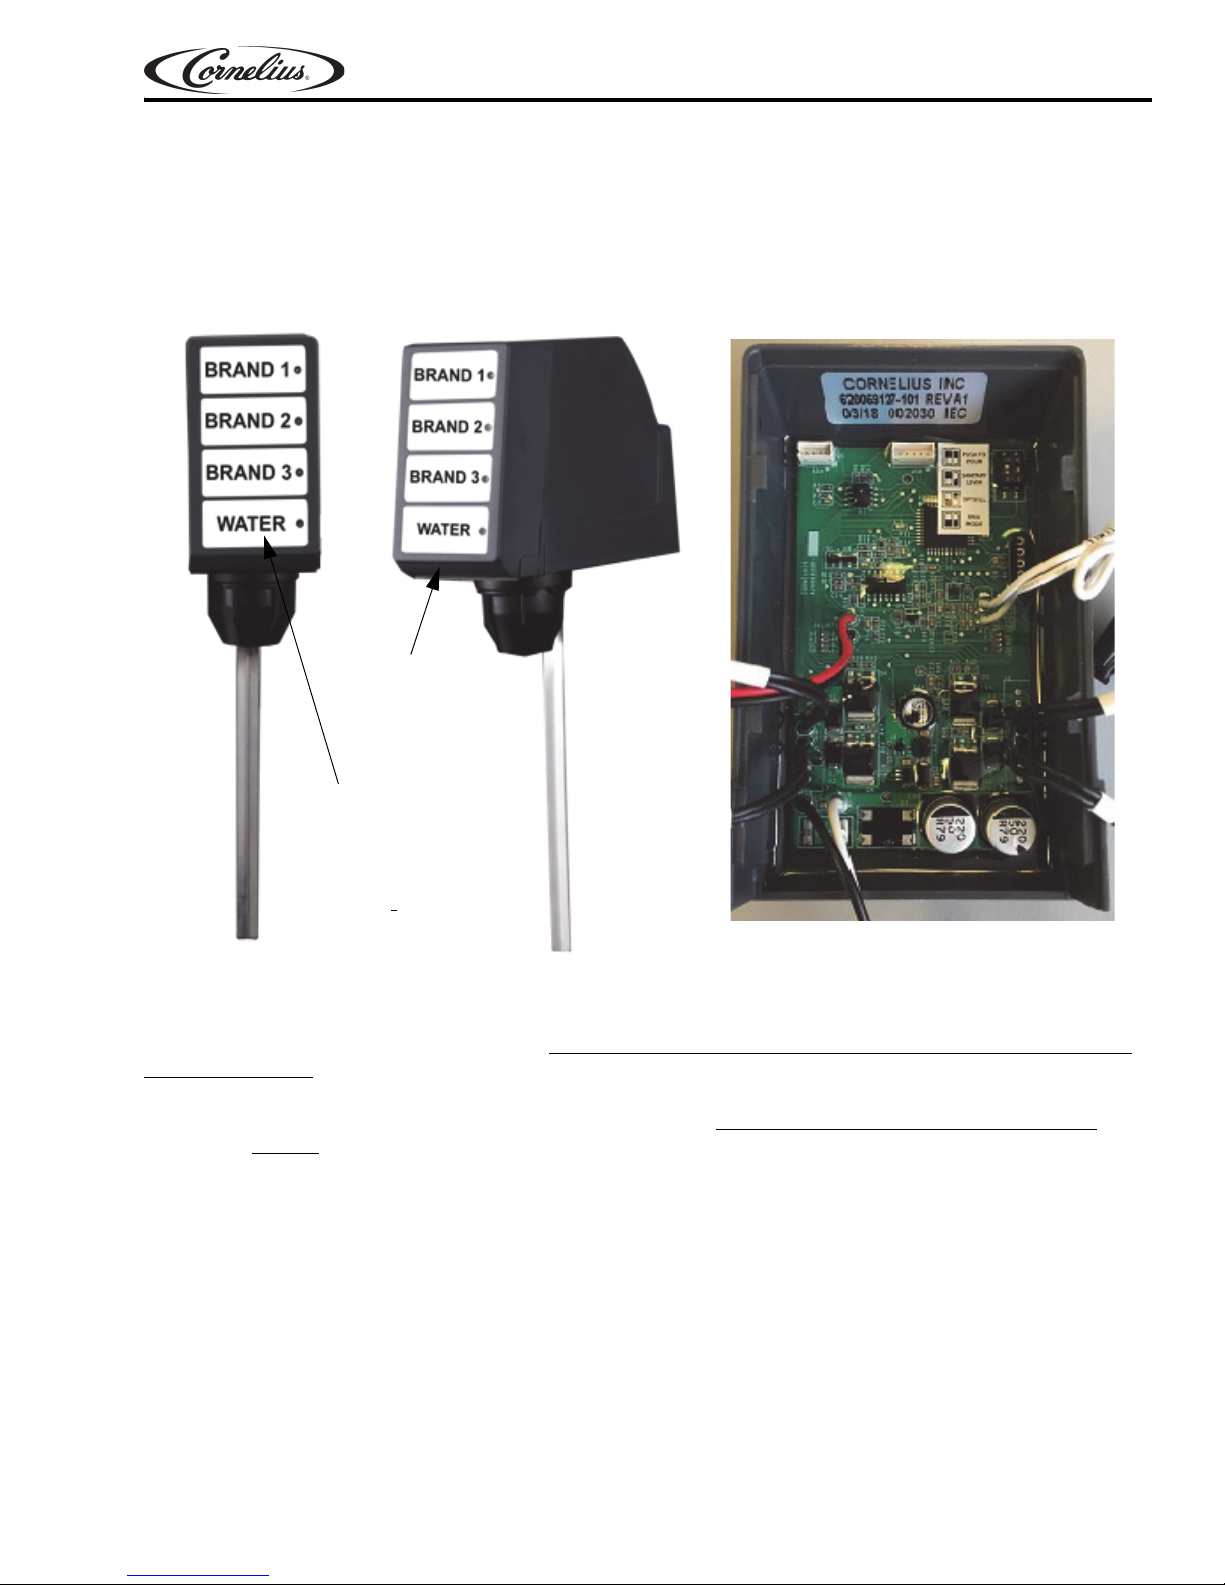
PRISM
Plain or Carbonated Water
FRONT COVER
REAR VIEW
Front Cover
Prism Owner’s Manual
OPERATION
The Cornelius Prism is capable of dispensing 3 CARBONATED BRANDS / SYRUP OR 3 NON CARBONATED
BRANDS / SYRUP and comes with 3 variants as below, refer Table 1 on page 4.
NOTE: Both carbonated and non carbonated beverages
VALVE
Figure 1.
CANNOT BE DISPENCED IN THE SAME
Optifill
The user places a cup against the dispensing lever, press the brand, and the valve automatically shuts off after the
cup begins to overflow.
Sanitary Lever
The user manually dispenses a beverage by selecting a brand and then pressing the cup against the dispensing
lever.
Push Button
The user manually dispenses a beverage by pressing the brand until the cup is full.
© 2018, Cornelius Inc. - 3 - Publication Number: 548000096

Prism Owner’s Manual
DIFFUSER
NOZZLE
DIFFUSER
CAUTION:
!
Table 1
Part No. Description
Sanitary Lever Valves
620069302 Prism, Ceramic regulator, with
mounting block and covers
620070464 Prism, Ceramic regulator, with covers
Push Button Valves
620069304 Prism, Ceramic regulator, with
mounting block and covers
620070465 Prism, Ceramic regulator, with covers
Optifill Lever Valves
620069308 Prism, Ceramic regulator, with
mounting block and covers
620070466 Prism, Ceramic regulator, with covers
CLEANING INSTRUCTION
Daily Cleaning
1. Remove nozzle and diffuser from the valve and clean with warm soapy water.Soak with sanitization with 2-
3 minutes and Rinse with clean water, reinstall them back onto the valves and allow to air dry.
2. Wash external surfaces with mild soap solution, rinse with clean water, and wipe dry.
NOTE: While cleaning the valve do not use abrasive or harsh cleaners on the unit.
NOTE: Diffuser is only compatible with Prism valve.
All sanitizing solution must be drained from the system. A freezing ambient environment will cause
residual sanitizing solution or water remaining inside the valve to freeze resulting in damage to internal
components.
USER INSTRUCTION
The user will have to pour directly from the valve into the ratio cup. User will have to pour water & syrup separately
(not at the same time).
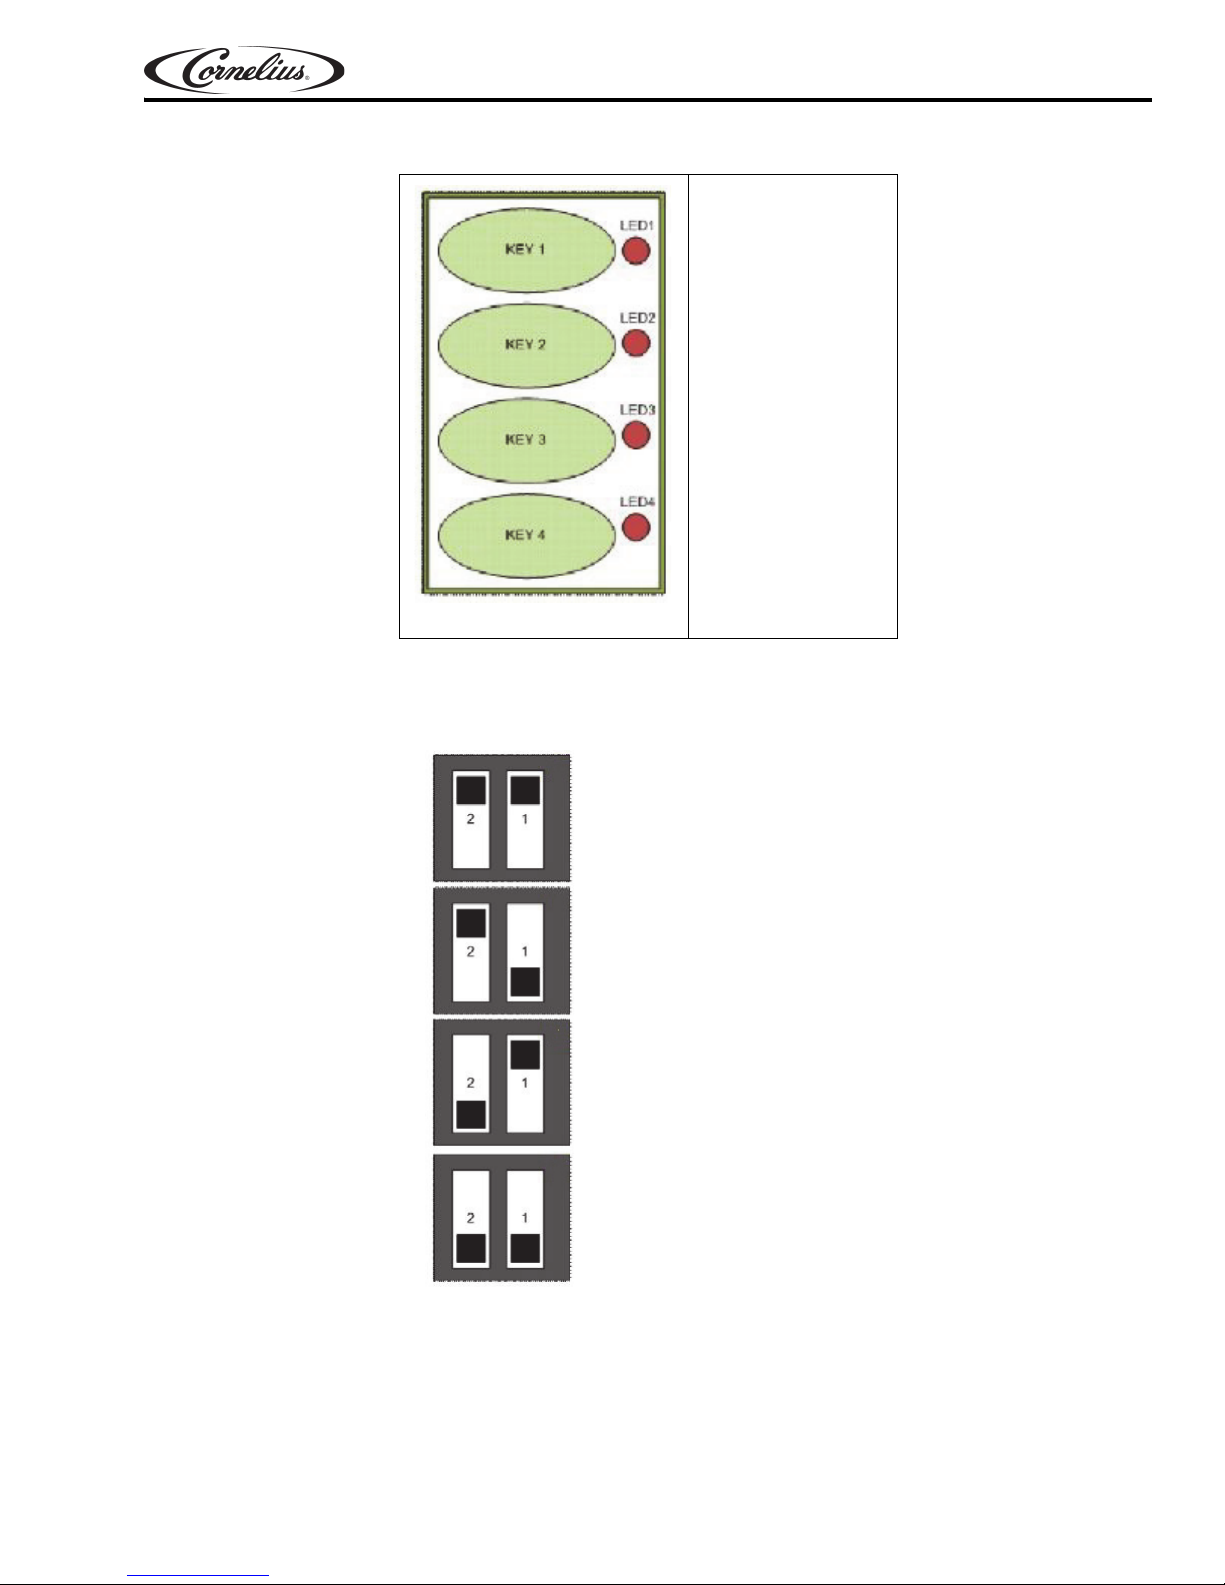
3. “The user has to enter into “ratio mode” via the dip switche
Figure 4. First adjust the water flow rate then press the water button. The valve will dispense a preset
mount of water. Adjust the flow rate using the valve flow control until the flow rate is adjusted properly.
a
ter water is adjusted properly - use the Brand buttons to dispense a preset amount of syrup. Adjust the
Af
Publication Number: 548000096 - 4 - © 2018, Cornelius Inc.
rresponding Brand flow control until the Brand flow rate is adjusted properly
co
Figure 2.
s on the board. Set the dip switches as shown in
Prism Owner’s Manual
Top
Bottom
PUSH TO POUR
SANITARY LEVER
RATIO MODE
OPTIFILL
Touch UI: 1x4
Figure 3.
Key 1 - Brand 1
Key 2 - Brand 2
Key 3 - Brand 3
Key 4 - Water
NOTE: The switch is located in the upper right hand corner of the back of the valve faceplate.
© 2018, Cornelius Inc. - 5 - Publication Number: 548000096
Figure 4.
Prism Owner’s Manual
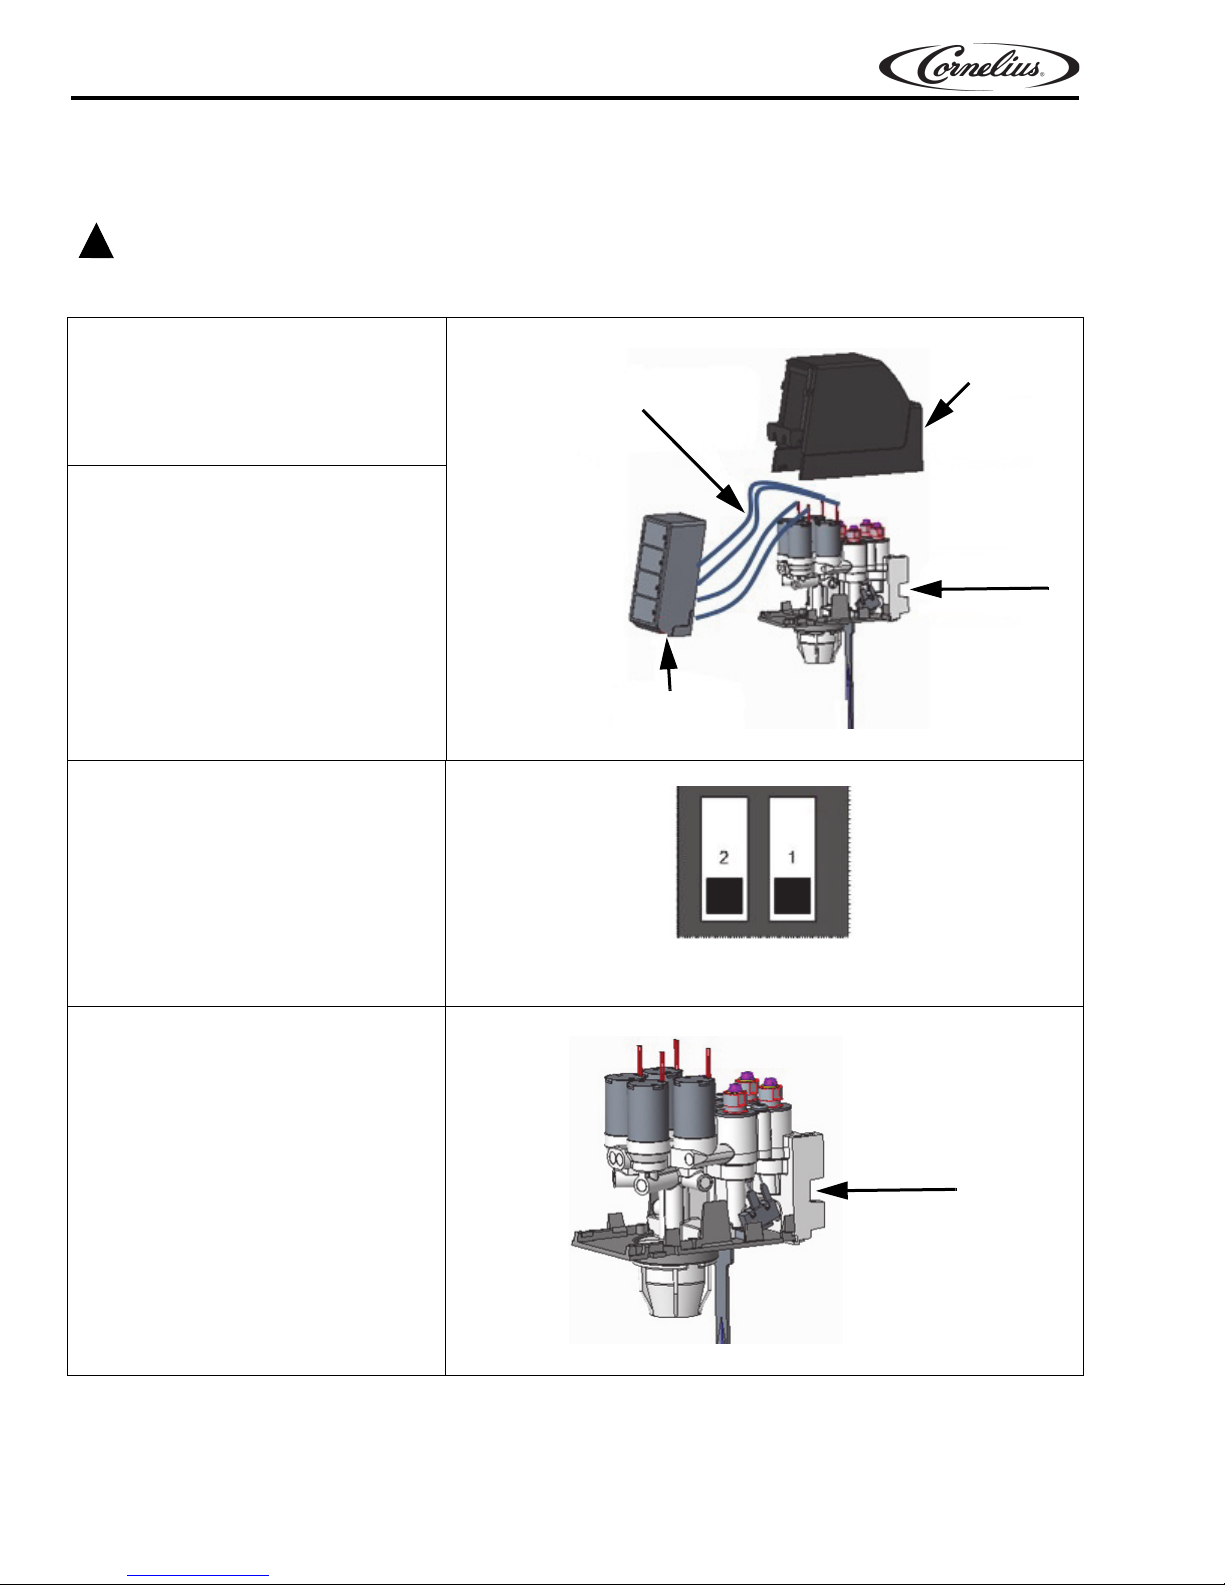
CAUTION:
!
to Capacitive touch modules
Wires from valve body
Rear Cover
Valve Body
Capacitive Touch Module
Valve Body
ratio mode
HOW TO CHECK PRISM RATIO
Do not expose the capacitive touch module wire to water.
Table 2.
1. Remove the capacitive touch
mo
dule by lifting it upward and
pulling out. Remove the rear
valve cover. Leave the wire
attached to the capacitive touch
module.
2. Place the ratio cup under the
valve.
3. Place the dip switch into “ratio
mo
de”.
4. Press the water button to activate
a time dispense of 5.8 sec. Target
14.5 oz into the water chamber of
the ratio cup.
NOTE: After the water flow is
justed, note the level of
ad
the ratio cup. Do not adjust
the water again for the
syrup.
Figure 5.
Ratio Mode
Figure 6.
Publication Number: 548000096 - 6 - © 2018, Cornelius Inc.
Figure 7.
 Loading...