

Page 1
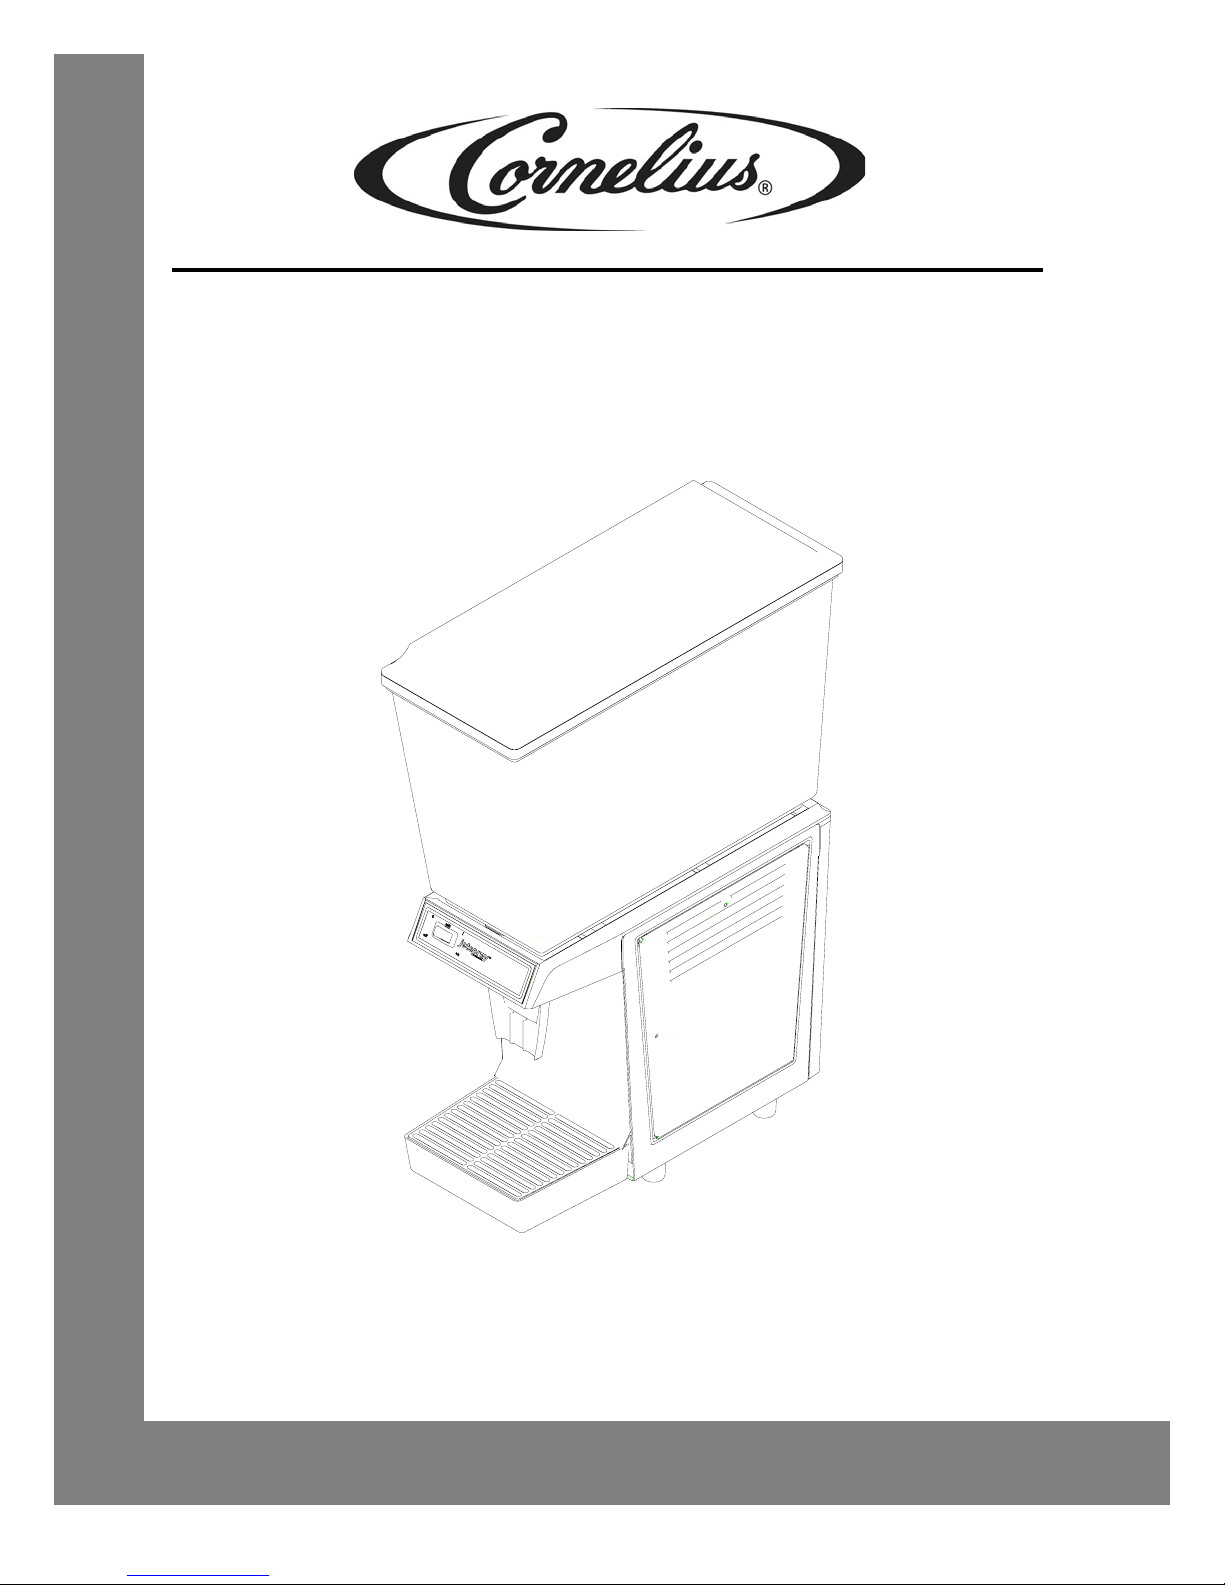
JetSpray Visual Display Dispenser
JS7C
Operator’s Manual
Release Date: July 9, 2009
Publication Number: 620047630OPR
Revision Date: November 23, 2009
Revision: B
Page 2

CONTACT INFORMATION
The products, technical information, and instructions cont ained in this man ual are subje ct to change without notice. These instructions are not intende d to cover all de tails or variat ion s of th e eq uip m en t, nor to
provide for every possible contingency in the installation, operation or maintenance of this equipment.
This manual assumes that the person(s) working on the equipment have been trained and are skilled in
working with electrical, plumbing, pneumatic, and mechanical equipment. Appropriate safety precautions
should be followed and all local safety and construction requirements should be met.
To inquire about current revisions of this and other documentation, or for assistance with any Cornelius
product contact:
www.cornelius.com
800-238-3600
Trademarks and Copyrights:
This document contains proprietary information and it may not be reproduced in any way without permis-
sion from Cornelius.
Printed in U.S.A.
Copyright © 2008-2009, All Rights Reserved , IMI Cornelius Inc.
Page 3

Introduction . . . . . . . . . . . . . . . . . . . . . . . . . . . . . . . . . . . . . . . . . . . . . . . . . . . . . . . . . . . . . . . . . . . . . . . . . . . . . 1
Safety . . . . . . . . . . . . . . . . . . . . . . . . . . . . . . . . . . . . . . . . . . . . . . . . . . . . . . . . . . . . . . . . . . . . . . . . . . . . . . . 1
Safety Instructions . . . . . . . . . . . . . . . . . . . . . . . . . . . . . . . . . . . . . . . . . . . . . . . . . . . . . . . . . . . . . . . . . . 1
Safety Overview . . . . . . . . . . . . . . . . . . . . . . . . . . . . . . . . . . . . . . . . . . . . . . . . . . . . . . . . . . . . . . . . . . . . 1
Recognition. . . . . . . . . . . . . . . . . . . . . . . . . . . . . . . . . . . . . . . . . . . . . . . . . . . . . . . . . . . . . . . . . . . . . . . . 1
Different Types of Alerts . . . . . . . . . . . . . . . . . . . . . . . . . . . . . . . . . . . . . . . . . . . . . . . . . . . . . . . . . . . . . . . . . 1
Danger . . . . . . . . . . . . . . . . . . . . . . . . . . . . . . . . . . . . . . . . . . . . . . . . . . . . . . . . . . . . . . . . . . . . . . . . . . . 1
Warning . . . . . . . . . . . . . . . . . . . . . . . . . . . . . . . . . . . . . . . . . . . . . . . . . . . . . . . . . . . . . . . . . . . . . . . . . . 1
Caution . . . . . . . . . . . . . . . . . . . . . . . . . . . . . . . . . . . . . . . . . . . . . . . . . . . . . . . . . . . . . . . . . . . . . . . . . . . 1
Safety Tips . . . . . . . . . . . . . . . . . . . . . . . . . . . . . . . . . . . . . . . . . . . . . . . . . . . . . . . . . . . . . . . . . . . . . . . . 1
Qualified Service Personnel . . . . . . . . . . . . . . . . . . . . . . . . . . . . . . . . . . . . . . . . . . . . . . . . . . . . . . . . . . . . . . 2
Safety Precautions . . . . . . . . . . . . . . . . . . . . . . . . . . . . . . . . . . . . . . . . . . . . . . . . . . . . . . . . . . . . . . . . . . . . . 2
Shipping And Storage. . . . . . . . . . . . . . . . . . . . . . . . . . . . . . . . . . . . . . . . . . . . . . . . . . . . . . . . . . . . . . . . . . . 2
Location. . . . . . . . . . . . . . . . . . . . . . . . . . . . . . . . . . . . . . . . . . . . . . . . . . . . . . . . . . . . . . . . . . . . . . . . . . . . . . 2
Power and Water . . . . . . . . . . . . . . . . . . . . . . . . . . . . . . . . . . . . . . . . . . . . . . . . . . . . . . . . . . . . . . . . . . . . . . 2
Power . . . . . . . . . . . . . . . . . . . . . . . . . . . . . . . . . . . . . . . . . . . . . . . . . . . . . . . . . . . . . . . . . . . . . . . . . . . . 2
Power Cord. . . . . . . . . . . . . . . . . . . . . . . . . . . . . . . . . . . . . . . . . . . . . . . . . . . . . . . . . . . . . . . . . . . . . . . . 2
Water . . . . . . . . . . . . . . . . . . . . . . . . . . . . . . . . . . . . . . . . . . . . . . . . . . . . . . . . . . . . . . . . . . . . . . . . . . . . 3
Operating Adjustments . . . . . . . . . . . . . . . . . . . . . . . . . . . . . . . . . . . . . . . . . . . . . . . . . . . . . . . . . . . . . . . . . . 3
Installation and Operating Instructions. . . . . . . . . . . . . . . . . . . . . . . . . . . . . . . . . . . . . . . . . . . . . . . . . . . . . . . 4
Setting Up Your JS7C. . . . . . . . . . . . . . . . . . . . . . . . . . . . . . . . . . . . . . . . . . . . . . . . . . . . . . . . . . . . . . . . . . . 4
Cleaning the Dispenser . . . . . . . . . . . . . . . . . . . . . . . . . . . . . . . . . . . . . . . . . . . . . . . . . . . . . . . . . . . . . . 4
To Assemble. . . . . . . . . . . . . . . . . . . . . . . . . . . . . . . . . . . . . . . . . . . . . . . . . . . . . . . . . . . . . . . . . . . . . . . 4
Operating Procedures . . . . . . . . . . . . . . . . . . . . . . . . . . . . . . . . . . . . . . . . . . . . . . . . . . . . . . . . . . . . . . . 6
Frequent Maintenance Procedures . . . . . . . . . . . . . . . . . . . . . . . . . . . . . . . . . . . . . . . . . . . . . . . . . . . . . . . . . . 7
Cleaning the Bowls . . . . . . . . . . . . . . . . . . . . . . . . . . . . . . . . . . . . . . . . . . . . . . . . . . . . . . . . . . . . . . . . . . . . . 7
Cleaning the Condensate Drains . . . . . . . . . . . . . . . . . . . . . . . . . . . . . . . . . . . . . . . . . . . . . . . . . . . . . . . . . . 7
Sanitizing the Unit. . . . . . . . . . . . . . . . . . . . . . . . . . . . . . . . . . . . . . . . . . . . . . . . . . . . . . . . . . . . . . . . . . . . . . 7
Ventilation . . . . . . . . . . . . . . . . . . . . . . . . . . . . . . . . . . . . . . . . . . . . . . . . . . . . . . . . . . . . . . . . . . . . . . . . . . . . 8
Cleaning the Filter and Condenser . . . . . . . . . . . . . . . . . . . . . . . . . . . . . . . . . . . . . . . . . . . . . . . . . . . . . . . . . 8
Cleaning the Paddles . . . . . . . . . . . . . . . . . . . . . . . . . . . . . . . . . . . . . . . . . . . . . . . . . . . . . . . . . . . . . . . . . . . 8
Bowl Leaks . . . . . . . . . . . . . . . . . . . . . . . . . . . . . . . . . . . . . . . . . . . . . . . . . . . . . . . . . . . . . . . . . . . . . . . . . . . 8
Specifications . . . . . . . . . . . . . . . . . . . . . . . . . . . . . . . . . . . . . . . . . . . . . . . . . . . . . . . . . . . . . . . . . . . . . . . . . . 10
Power Cord: . . . . . . . . . . . . . . . . . . . . . . . . . . . . . . . . . . . . . . . . . . . . . . . . . . . . . . . . . . . . . . . . . . . . . . 10
Size: . . . . . . . . . . . . . . . . . . . . . . . . . . . . . . . . . . . . . . . . . . . . . . . . . . . . . . . . . . . . . . . . . . . . . . . . . . . . 10
Beverage Bowl & Cover: . . . . . . . . . . . . . . . . . . . . . . . . . . . . . . . . . . . . . . . . . . . . . . . . . . . . . . . . . . . . 10
Cabinet: . . . . . . . . . . . . . . . . . . . . . . . . . . . . . . . . . . . . . . . . . . . . . . . . . . . . . . . . . . . . . . . . . . . . . . . . . 10
Capacity:. . . . . . . . . . . . . . . . . . . . . . . . . . . . . . . . . . . . . . . . . . . . . . . . . . . . . . . . . . . . . . . . . . . . . . . . . 10
Refrigeration: . . . . . . . . . . . . . . . . . . . . . . . . . . . . . . . . . . . . . . . . . . . . . . . . . . . . . . . . . . . . . . . . . . . . . 10
Refrigerant:. . . . . . . . . . . . . . . . . . . . . . . . . . . . . . . . . . . . . . . . . . . . . . . . . . . . . . . . . . . . . . . . . . . . . . . 10
Spray Drive and Fan Motor: . . . . . . . . . . . . . . . . . . . . . . . . . . . . . . . . . . . . . . . . . . . . . . . . . . . . . . . . . . 10
Power Drive Magnet: . . . . . . . . . . . . . . . . . . . . . . . . . . . . . . . . . . . . . . . . . . . . . . . . . . . . . . . . . . . . . . . 10
Net Weight:. . . . . . . . . . . . . . . . . . . . . . . . . . . . . . . . . . . . . . . . . . . . . . . . . . . . . . . . . . . . . . . . . . . . . . . 10
Shipping Weight: . . . . . . . . . . . . . . . . . . . . . . . . . . . . . . . . . . . . . . . . . . . . . . . . . . . . . . . . . . . . . . . . . . 10
Carton Cube: . . . . . . . . . . . . . . . . . . . . . . . . . . . . . . . . . . . . . . . . . . . . . . . . . . . . . . . . . . . . . . . . . . . . . 10
Machine Clearance: . . . . . . . . . . . . . . . . . . . . . . . . . . . . . . . . . . . . . . . . . . . . . . . . . . . . . . . . . . . . . . . . 10
Class of Windings: . . . . . . . . . . . . . . . . . . . . . . . . . . . . . . . . . . . . . . . . . . . . . . . . . . . . . .
. . . . . . . . . . . 10
Environment: . . . . . . . . . . . . . . . . . . . . . . . . . . . . . . . . . . . . . . . . . . . . . . . . . . . . . . . . . . . . . . . . . . . . . 11
Warranty . . . . . . . . . . . . . . . . . . . . . . . . . . . . . . . . . . . . . . . . . . . . . . . . . . . . . . . . . . . . . . . . . . . . . . . . . . . . . . . 12
Page 4

Page 5
Operator’s Manual
INTRODUCTION
SAFETY
The JS7C Dispenser is a countertop visual display action beverage di spenser . It is designed to dispense a variety
of products.
It dispenses fruit juice, lemonade or other non-carbonate d drinks.
Safety Instructions
ALWAYS read and follow ALL safety instructions.
Safety Overview
Read and follow ALL SAFETY INSTRUCTIONS in this manual and any warning or caution labels on the machine
(decals, labels or laminated cards).
Read and understand ALL applicable OSHA (Occupational Safety and Health Administration) safety regulations
before installing or operating this machine.
Recognition
Recognize Safety Alerts
This is the safety alert symbol. When you see it in this manual or on the machine, be alert to the potential of personal injury or damage to the machine.
DIFFERENT TYPES OF ALERTS
Danger
Danger - Indicates an immediate hazardous situation which if not avoided WILL result in serious injury,
death or equipment damage.
Warning
WARNING - Indicates a potentially hazardous situation which, if not avoided, COULD result in serious
injury, death, or equipment damage.
Caution
CAUTION - Indicates a potentially hazardous situation whic h, if not avoided, MAY result in minor or mod-
erate injury or equipment damage.
Safety Tips
• Carefully read all safety messages in this manual and safety signs on the machine.
• Keep safety signs in good condition and replace missing or damaged safety signs.
• Do not let anyone operate the machine without proper training. This appliance is not intended for
use by very young children or infirm persons without supervision. Young children should be
supervised to ensure that they do not play with the appliance.
© 2009, IMI Cornelius Inc. - 1 - Publication Number: 620047630OPR
Page 6

Operator’s Manual
• Keep your machine in proper working condition and do not allow unauthorized modifications to
the machine.
QUALIFIED SERVICE PERSONNEL
CAUTION - Only trained and certified electrical, plumbing and refrigeration technicians should service
this unit. ALL WIRING AND PLUMBING MUST CONFORM TO NATIONAL AND LOCAL CODES.
SAFETY PRECAUTIONS
This unit has been specifically designed to provide protection against personal injury. To ensure continued
protection observe the following:
IMPORTANT: Disconnect power to the unit before servicing or cleaning.
ALWAYS: be sure to keep area around the unit clean and free of clutter.
SHIPPING AND STORAGE
CAUTION - Before shipping, storing, or relocating the unit, syrup systems must be sanitized and all san-
itizing solution must be purged from the syrup systems. All liquids must be p urged from the unit af ter sanitizing. A freezing ambient environment will cause residual sanitizing solution or water remaining inside the
Unit to freeze resulting in damage to the internal components.
LOCATION
Place the dispenser on a solid, level surface with not part of the unit extending beyond the edge of that surface.
POWER AND WATER
Power
The JS7C requires a 120 Volt, 60Hz grounded receptacle for proper operation, grounding and safety.
NOTE: If the colors of the wires in the main leads of this unit do not correspond with the colored
markings identifying the terminals in your plug, proceed as follows:
The green and yellow wire must be connected to the terminal in the plug marked with one of the following
indicators.
1. The Letter E
2. Colored Green
3. The Earth Ground Symbol
4. Colored Green and Yellow
The blue wire must be connected to the terminal in the plug marked with the letter N or colored blue.
The brown wire must be connected to the terminal in the plug marked with the letter L or colored Orange.
Power Cord
If a power cord is damaged, do not attempt to replace it. Take your unit to your nearest authorized service center
for repair. A special tool is required to replace the cord.
Publication Number: 620047630OPR - 2 - © 2009, IMI Cornelius Inc.
Page 7

Operator’s Manual
Water
WARNING - The water supply should be consistent with proper water quality standards (neutral ph of
7.0 to 8.0), and should not be connected to a wate r softener. Drink quality may be affected by poor water
conditions. Water connections should be sized, inst alled and maint ained according to federal, state and local
laws.
NOTE: Unit should be filled from a potable water supply in accordance with Federal, State, and
Local codes. It is the operator’s responsibility to ensure that the potable water supply is
available.
NOTE: JetSpray dispensers conform to the requirements of the Model Water Bylaws of 1986, SI
11476.
NOTE: All surfaces that come into contact with food or drinking water are constructed of food
quality non-toxic materials, are non-corosive, non-tainting and do not support the growth of
bacteria.
OPERATING ADJUSTMENTS
WARNING - Dangerous voltages are present within the unit even if the power switch is turned off. Before
attempting any adjustments inside the machine, turn the unit off and unplug it from the electrical recept acle.
© 2009, IMI Cornelius Inc. - 3 - Publication Number: 620047630OPR
Page 8

Operator’s Manual
INSTALLATION AND OPERATING INSTRUCTIONS
SETTING UP YOUR JS7C
1. Set dispenser chassis in desired location. Dispenser should be level and locate d on a solid counter.
2. Be sure dispenser has adequate free space on bo th sides; approximately 3" away from any wall or
obstruction.
Cleaning the Dispenser
1. Removing the push handles. (See Figure 1)
Handle Support
a. Push handle back until it stops.
b. Grasp the clips on the handl e. Squeeze clips until they are free from the panel. Pull straight
2. Disassemble the bowl, lid, gasket. and pump housing assemblies.
CAUTION: Abrasive cleaners scratch plastic parts. NO NOT USE abrasive cleaners.
To Assemble
1. Slide the drip tray with grill into place.
2. Consider installation of a drain hose which connects to the outlet on drip tray bottom (Part No. S-
3379).
3. Turn bowl upside down and inser t gasket into groove. Wet gasket for ease of insertion, pressing gas-
ket into groove while following the number sequence (1 - 8) shown in Figure 2.
Sealing Button
Spout
Tube Path
down on the handle.
Clips
Handle
Figure 1
Publication Number: 620047630OPR - 4 - © 2009, IMI Cornelius Inc.
Figure 2
Page 9

Operator’s Manual
4. Check that bowl spout gasket is mounted properly to the base assembly, as shown in Figure 3.
Bowl Spout Gasket
Figure 3
5. Slide bowl over the cooling dome and assemble the bowl to the dispenser. Be careful not to wrinkle
the gasket. If gasket is wrinkled, beverage will leak out of bowl. (See Figure 4.)
Figure 4
6. Locate the blade in the bowl. The magnet self-locates the blade, once it is moved into position. Make
sure blade bearing is in place before placing it in the bowl, as shown in Figure 5.
Figure 5
7. Replace push handle and pinch tube.
a. Push the handle assembly straight up through the rectangular hole until the clips snap into
place. (See Figure 6.)
© 2009, IMI Cornelius Inc. - 5 - Publication Number: 620047630OPR
Page 10

Operator’s Manual
b. Remove pinch tube from the plastic bag and wash it.
c. Before installing, wet the bowl spout surface and pinch tube. Push back the handle until it stops.
d. Carefully insert pinch tube into the bowl spout opening and on into lower opening of the handle
support spout. Make sure the end of the tube does not get caught on the edge above the h andle
support spout opening. Pull the end of the tube to seat it firmly into the bowl spout seat. Make
sure the tube is free of wrinkles and extends below the support spout about a 1/4 inch. (See
Figure 7.)
Figure 6
Figure 7
Operating Procedures
1. Follow beverage manufacturer's directions in filling bowls. To aid in filling, the bowls have gallon and
liter markings up the center of the front wall. Gallons are on the left and liters are on the right.
2. Turn on the refrigeration and spray switches. Product should be cold enough to serve in 2 hours.
Switches should be left ON 24 hours a day to insure efficient operation.
NOTE: If unit is to be used to dispense beverage from only one bowl, use right hand bowl, but
add a gallon of water to left bowl to assure proper cooling.
3. The thermostat is preset at the factory and does not normally require resetting by owner.
Publication Number: 620047630OPR - 6 - © 2009, IMI Cornelius Inc.
Page 11

Operator’s Manual
FREQUENT MAINTENANCE PROCEDURES
CLEANING THE BOWLS
1. Before removing the bowls, turn off both the refrigeration and spray switches. Unplug the unit from
its power source.
2. Drain any beverage left in the bowls.
3. Remove pinch tube by pushing handle until it stops. Pull up on the pinch tube until it is free, then
remove the handle (see Page 3). Lift off the bowls, drip trays and covers. Clean them thoroughly.
4. Clean as described in “Cleaning the Dispenser” on page 4.
5. After cleaning, assemble as described in “To Assemble” on page 4. Replace the push handle and
insert the pinch tube into the bowls.
CLEANING THE CONDENSATE DRAINS
1. To remove the condensation drains, push in on the front panel, just under the drain and pull down
with fingers, as shown in Figure 8.
Figure 8
2. To replace the condensate drains, hold the drain against the front panel under the rectangular hole
(opening in side of drain should be toward front panel). Push up through the hole until the drain
snaps into place (see Figure 9).
Figure 9
SANITIZING THE UNIT
After cleaning, add one gallon of water at a temperature of between 75oF and 100oF to the bowl. Mix one
tablespoon of approved powdered chlorine sanitizer* to a pint of water and when dissolved, pour into bowl.
Replace the lid and run the unit for two or three minutes. Shut off the unit and drain the contents through the
pinch tube valve.
*Diversey-MultiChlor or equivalent powder or liquid sanitizer.
CAUTION: DO NOT run the refrigeration system while sanitizing the unit.
© 2009, IMI Cornelius Inc. - 7 - Publication Number: 620047630OPR
Page 12

Operator’s Manual
VENTILATION
AIR FLOW IS ESSENTIAL TO THE OPERATION OF THE UNIT. ALLOW AT LEAST 3 INCHES OF SPACE ON
THE BACK AND SIDE OF THE DISPENSER. LINT OR DUST COLLECTING ON THE CONDENSER RESULTS
IN POOR REFRIGERATION.
CLEANING THE FILTER AND CONDENSER
1. Turn off the power switch and unplug the power cord from the wall socket.
2. Remove back panel screws and remove the back panel by pulling out the bottom of the panel.
3. Clean the condenser with a vacuum cleaner or brush, being careful not to damage the condenser.
Make sure no loose dirt goes into the dispenser.
4. Clean the filter by running a stream of hot wate r thro ugh it. Filter does not need to be re moved from
the grill to clean it. Allow the filter to dry before replacing it.
5. Replace back panel, placing top edge up under condensate tray and pushing it in at the bottom.
6. Reinstall the back panel screws.
7. Plug the power cord into the wall socket.
CLEANING THE PADDLES
1. Be sure that both bowl switches are in the ON position.
2. Check the blades for proper installation position.
3. Check that the blades are positioned and spins freely on the bearing. Sugar and solids can
crystalize around the blade area and cause the blade to bind. Frequent washing eliminates this
problem. See Figure 10.
NOTE: Switch must be in the OFF position when insterting the pump housing assembly into the
bowl to assure magnetic coupling.
Figure 10
BOWL LEAKS
1. Do not confuse drippings from condensation on the outside of the bowl as bo wl or faucet leaks.
High humidity causes condensation on the bowls.
2. Be sure gasket has been installed properly. Check gasket for tears or cuts in the rubber.Tears
cause leaks in the gasket.
3. Remove and inspect pinch tube for holes.
Publication Number: 620047630OPR - 8 - © 2009, IMI Cornelius Inc.
Page 13

Operator’s Manual
L
C
PWR ON/OFF
A
115V BLACK
230 V BROWN
GROUND: GREEN/YELLOW
L
THERMOSTAT
CLOSES ON RISE
IN TEMPERATURE
OVERLOAD
115V BLACK
230 V BROWN
POWER CORD/PLUG
COMPRESSOR
CIRCUIT
1
2
START CAP.
(50HZUNITONLY)
N
B
N
B
COND.
FAN
B
MOTOR
MOTOR
A
AGITATOR
B
TERMINAL BOARD
LEGEND:
& WIRE MARKER
CONNECTION
115V
Figure 11. Model JS7C Wiring Diagram
WIRE MARKER
OVERSEAS ONLY
230 V
© 2009, IMI Cornelius Inc. - 9 - Publication Number: 620047630OPR
Page 14

Operator’s Manual
SPECIFICATIONS
Power Cord:
7 ft. w/ground connection (2.1 meters)
Size:
7-3/4 in. Wide X 19 in. Long X 26.625 in. High (19.7 cm Wide X 48.3 cm Long X 67.7 cm High)
Beverage Bowl & Cover:
Transparent, virtually unbreakable LEXAN® resin
Cabinet:
Stainless steel and beige LEXAN® resin
Capacity:
Over 3 US gallons; 11.4 liters
Over 5 US gallons; 19 liters
Refrigeration:
JetSpray 1/6 h.p. Hermetically Sealed System
Refrigerant:
R134a Refrigerant - 3.49 ounces (99 grams)
Spray Drive and Fan Motor:
No Oiling Required
Power Drive Magnet:
Permanent INDOX Magnet
Net Weight:
Base Only: 42.5 lbs. (193 kgs.)
Large Bowl: 3.5 lbs. (1.59 kgs.)
Small Bowl: 2.5 lbs. (1.13 kgs.)
Shipping Weight:
Base Only: 51 lbs. (23.3 kgs.)
Carton Cube:
Base Only: 3.5 cu. ft. (0.1 cu. m.)
Machine Clearance:
6 inches - Rear
6 inches - Sides
Open - Top
Class of Windings:
Compressor Motor - Class H (climatic rating: normal)
Condenser Fan Motor - Class B
Publication Number: 620047630OPR - 10 - © 2009, IMI Cornelius Inc.
Page 15

Environment:
Temperature:
Operating: 60
Storage : Above 20
Humidity: Below 95%
Operator’s Manual
o
F (16oC) to 110oF (43oC)
o
F (-7oC) with bowl empty and dry.
© 2009, IMI Cornelius Inc. - 11 - Publication Number: 620047630OPR
Page 16

Operator’s Manual
WARRANTY
IMI CORNELIUS Inc., ("CORNELIUS") does warrant to the original purchaser from CORNELIUS who buys solely
for commercial or industrial uses, or for resale in the ordinary course of business, that each of the Products
covered by this Commercial Warranty shall be free from defects in material and/or workmanship, under normal
and proper use and service conditions.
Any products covered by this Commercial Warranty (including components thereof demonstrated to have been
defective when shipped by CORNELIUS will be either repaired, replaced (with new or rebuilt replacement) or the
purchase price therefor refunded, as CORNELIUS may determine solely in its discretion. A Product or
component thereof covered by this Commercial Warranty supplied as a Warranty Replacement will assume the
balance of the Period of Warranty applicable to the original measured from the date of replacement. This
Commercial Warranty does not include, and CORNELIUS will not assume or pay, the expense of travel time or
mileage, any premium time of any party other than CORNELIUS; any re pair, replacement, analysis or any other
services or parts furnished by any p arty othe r than CORNELIUS unless specifically authorized in advance an d in
writing by CORNELIUS. This Commercial Warranty does not include labor for diagnosis, remova l or installation of
any products or components.
Products covered by this Commercial Warranty include all beverage and food dispensing or vending equipment
manufactured or sold by CORNELIUS after the date hereof (not excluded hereinafter) and this Commercial
Warranty is further limited to the use of that equipment in connection with soft drinks, soft drink syrups, beer,
coffee, hot chocolate, tea or food commodities for which use the particular product has been identified by
CORNELIUS.
Specific exclusions to this Commercial Warranty are OEM Sales, water filter cartridges, coin mechanisms, light
bulbs, fuses, glass, diaphragms, seals, o-rings, silicone or rubber parts, refrigeration access valves or related
refrigeration leaks, parts in contact with water or the product dispensed and which become inoperative due to
scale or chemical change, normal maintenance items. This Commercial Warranty shall not apply to damage
resulting from improper voltage, inadequate wiring, abuse, accident, alteration, misuse, neglect, unauthorized
repair, improper cleaning or failure to follow installation, operating or maintenance instructions. Remote
watercooled refrigeration systems must have properly sized and installed remote cooling towers or systems.
Failure of refrigeration components (compressor-valves) due to remote condenser system failure, incorrect
sizing, operation, or installation are not covered by this Commercial Warranty.
The Period of Warranty is (i) one (1) year from the date of installation, or, (ii) fifteen (15) months from the date of
shipment by CORNELIUS of a product covered hereby, whichever time period elapses first. For products
incorporating a refrigeration system the Period of Warranty, with respect to the refrigeration system only (defined
as the compressor , evapo ra to r, condenser, and interconnecting tubing [not to include any access valves]), is five
(5) years from the date of installation or sixty-three (63) months from the date of shipment by CORNELIUS,
whichever time period elapses first.
Any claim under this Commercial Warranty must be made as promptly as is reasonably possible, but in no event
later than sixty (60) consecutive calendar days, after the discovery of the defect. Such claims are to be directed to
the CORNELIUS SERVICE DEPARTMENT at 101 Broadway Street West, Osseo, MN 55369 (763) 488-8200.
Under no circumstances should the entire unit be r eturned to CORNELIUS exce pt for repair or replacement of the
sealed refrigeration unit. Whenever a product is returned to CORNELIUS for repair or replacement of the sealed
refrigeration system under the terms of the Commercial Warranty and the defect is found to exist in parts other
than the sealed refrigeration system (example: ice bank control, agit ator motor, condenser fan motor, start
capacitor or relay), an evaluation fee of twenty-five dollars ($25 .00) may be charged . If such defective pa rt needs
replacement or repair and is within its Period of Warranty, such part will be replaced or repaired at no charge,
except for labor for removal and installation of such part which will be the responsibility of the customer. If not
within its Period of Warranty, a charge for such part and the labor will be made.
The product covered by this Commercial Wa rranty, or components thereof, must no t be retu rned to CORNELIUS
without authorization from the CORNELIUS SERVICE DEPARTMENT. Instructions for return will be given with
any such authorization. All returned products and/or parts must be shipped prepaid to CORNELIUS. Return
shipping costs of repaired or replacement products or parts will be prepaid by CORNELIUS, except that as to
original purchasers in Alaska or Hawaii, CORNELIUS will pay shipping costs only to Seattle or San Francisco
Publication Number: 620047630OPR - 12 - © 2009, IMI Cornelius Inc.
Page 17

Operator’s Manual
respectively. CORNELIUS will not accept collect shipments. Replaced products or parts become the property of
CORNELIUS. Any product or parts returned to CORNELIUS under the terms of this Commercial Warranty must
be accompanied by a Returned Goods Tag, properly filled out as to unit model number and serial number and
detailed explanation of failure.
Except for descriptions of size, quantity and type, which may appear on CORNELIUS' invoices and other written
materials, and except for any statements of co nformity of CORNELIUS' products with specifications of certain
industry, government or professional organizations standards, which may appear as product information
disclosures in CORNELIUS' literature and other documents from time to time. THIS COMMERCIAL WARRANTY
IS IN LIEU OF AND EXCLUDES ALL OTHER WARRANTIES, EXPRESS OR IMPLIED, INCLUDING
WARRANTIES OF MERCHANTABILITY AND FITNESS FOR A PARTICULAR PURPOSE.
CORNELIUS' LIABILITIES ARE LIMITED SOLELY AND EXCLUSIVELY TO THE REPLACEMENT OR REPAIR
OF THE DEFECTIVE PRODUCT OR REFUND OF THE PURCHASE PRICE OF SAID PRODUCT . CORNELIUS
IS NOT LIABLE FOR ANY SPECIAL, INCIDENTAL OR CONSEQUENTIAL DAMAGES OF ANY KIND
WHATSOEVER, WHETHER ANY CLAIM FOR RECOVERY IS BASED ON THEORIES OF CONTRACT,
NEGLIGENCE OR TORT. Without limitation, these liabilities do not include shipping charges, labor, inst allation or
any other losses or expenses incurred in operation or inst allation o f any repl aced, rep aired o r return ed product or
component. In those jurisdictions where liability for damages cannot be disclaimed, the original purchaser's
recovery shall not exceed the cost of the product to which th is Com m er cia l Warranty may apply.
CORNELIUS neither assumes, nor authorizes any salesperson, distributor, employee, agent or other person to
assume for it, any liability of obligation of any kind which is different from the terms of this Commercial Warranty.
CORNELIUS MAKES NO WRITTEN WARRANTY OF ANY KIND WHATSOEVER TO ANY PURCHASER WHO
BUYS FOR PERSONAL. FAMILY OR HOUSEHOLD USE.
For CORNELIUS Warranties on products other than covered hereunder, see the Warranties covering each
product category.
CORNELIUS may in its discretion direct an Authorized Service Center reasonably proximate to the Original
Purchaser to perform its obligations under this Commercia l W arranty. That Service Center may also perform such
other services as the purchase may require at purchaser's expense.
IMI CORNELIUS INC.
101 Broadway Street West
Osseo, Minnesota 55369
880-238-3600
© 2009, IMI Cornelius Inc. - 13 - Publication Number: 620047630OPR
Page 18

Operator’s Manual
Publication Number: 620047630OPR - 14 - © 2009, IMI Cornelius Inc.
Page 19

Page 20

IMI Cornelius Inc.
www.cornelius.com
 Loading...