

Page 1
11
VICTORIA
Quick-start guide
HIGH-WALL DUCTLESS
AIR CONDITIONING &
HEATING SYSTEM
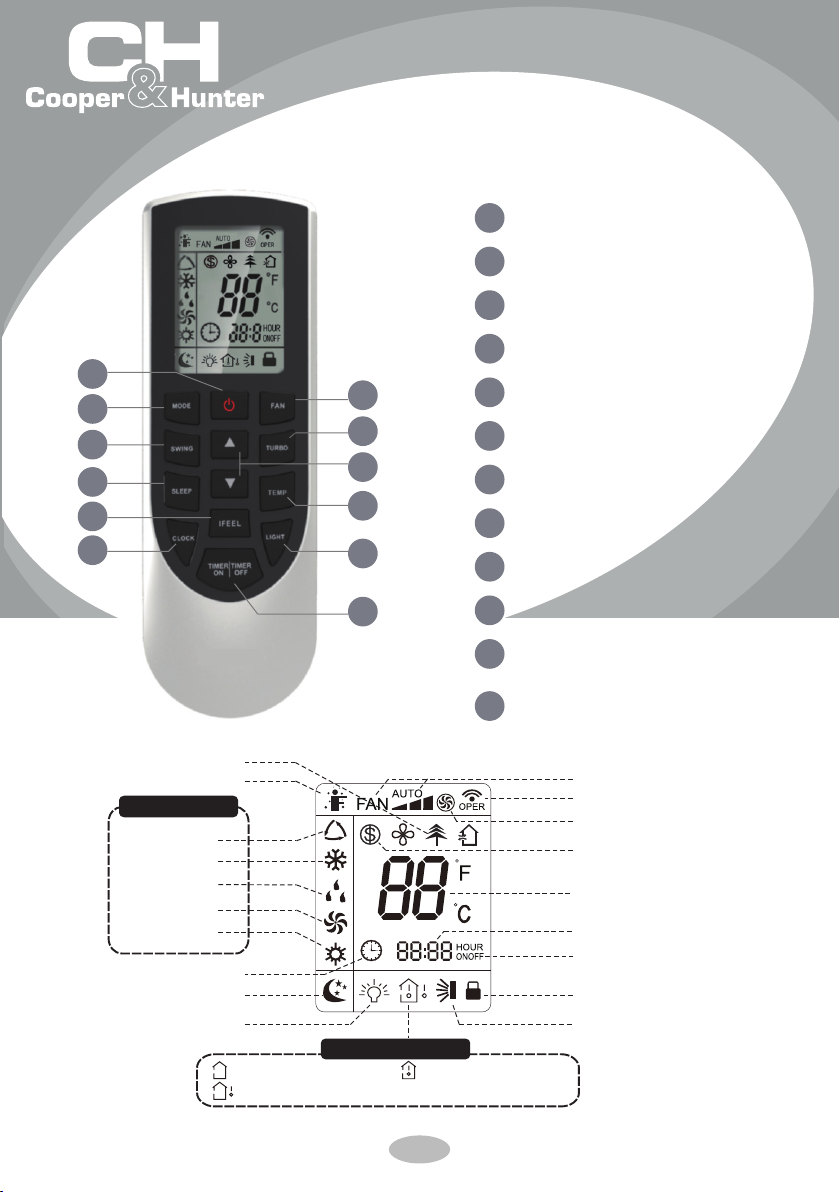
1
ON/OFF button
2
MODE button
3
FAN button
4
SWING button
1
2
4
7
9
3
5
6
8
10
12
5
TURBO button
6
▲/ button
7
SLEEP button
8
TEMP button
9
I FEEL button
10
LIGHT button
▲
health function
I feel
Operation mode
Auto mode
Cool mode
Dry mode
Fan mode
Heat mode
Clock
Sleep mode
Light
:Set temp.
Temp. display type
:Outdoor ambient temp.
11
CLOCK button
TIMER ON/TIMER OFF
12
button
:Indoor ambient temp.
1
Set fan speed
Send signal
Turbo mode
46°F( 8°C) heating
function
Set temperature
Set time
TIMER ON/
TIMER OFF
Child lock
Up&down swing
Page 2
Introduction for buttons on remote controller
Note:
● This is a general use remote controller, it could be used for the air conditioners
with multifunction; For some function, which the model doesn't have, if press
the corresponding button on the remote controller that the unit will keep the
original running status.
● After putting through the power, the air conditioner will give out a sound.
Operation indictor " " is ON (red indicator). After that, you can operate the air
conditioner by using remote controller.
●
Under ON status, pressing the button on the remote controller, the signal icon " "
on the display of remote controller will blink once and the air conditioner will give
out a “de” sound, which means the signal has been sent to the air conditioner.
● Under OFF status, set temperature and clock icon will be displayed on the display
of remote controller (If timer on, timer off and light functions are set, the corre sponding icons will be displayed on the display of remote controller at the same
time); Under on status, the display will show the corresponding set function icons.
ON/OFF button
1
Press this button can turn on or turn off the air conditioner. After turning on the air
conditioner, operation indicator " "on indoor unit’s display is ON (green indicator.
The colour is different for different models), and indoor unit will give out a sound.
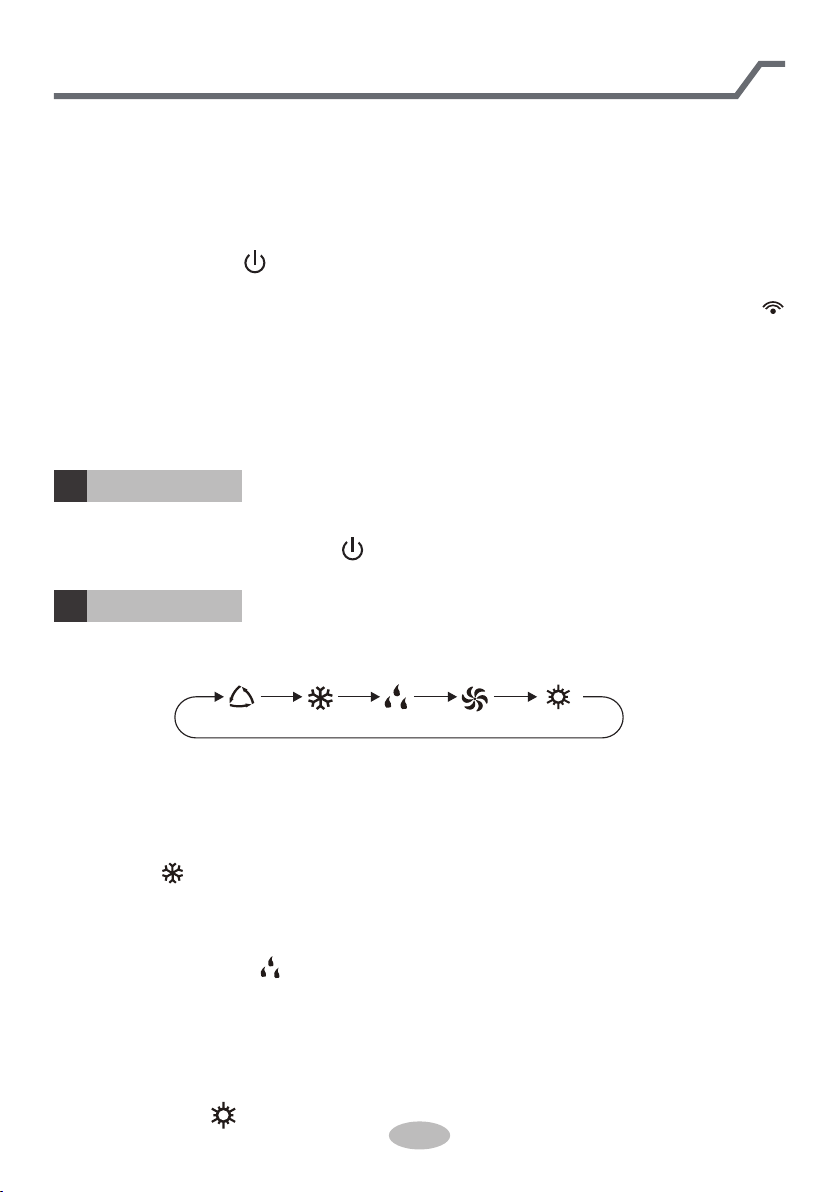
MODE button
2
Press this button to select your required operation mode.
AUTO COOL FANDRY HEAT
● When selecting auto mode, air conditioner will operate automatically according
to ex-factory setting. Set temperature can’t be adjusted and will not be displayed
as well. Press "FAN" button can adjust fan speed. Press "SWING" button can
adjust fan blowing angle.
● After selecting cool mode, air conditioner will operate under cool mode. Cool
indicator " "on indoor unit is ON. Press "▲" or " " button to adjust set tempe rature. Press "FAN" button to adjust fan speed. Press "SWING" button to adjust
fan blowing angle.
● When selecting dry mode, the air conditioner operates at low speed under dry
mode. Dry indicator " " on indoor unit is ON. Under dry mode, fan speed can’t
be adjusted. Press "SWING" button to adjust fan blowing angle.
● When selecting fan mode, the air conditioner will only blow fan, no cooling and
no heating. All indicators are OFF. Press "FAN" button to adjust fan speed. Press
"SWING" button to adjust fan blowing angle.
● When selecting heating mode, the air conditioner operates under heat mode.
Heat indicator " " on indoor unit is ON. Press "▲" or " " button to adjust set
▲
▲
2
Page 3
Introduction for buttons on remote controller
temperature. Press "FAN" button to adjust fan speed. Press "SWING" button to
adjust fan blowing angle. (Cooling only unit won’t receive heating mode signal. If
setting heat mode with remote controller, press ON/OFF button can’t start up the
unit).
Note:
● For preventing cold air, after starting up heating mode, indoor unit will delay 1~5
minutes to blow air (actual delay time is depend on indoor ambient temperature).
● Set temperature range from remote controller: 60.8~86°F (16~30°C); Fan
speed: auto, low
speed, medium speed, high speed.
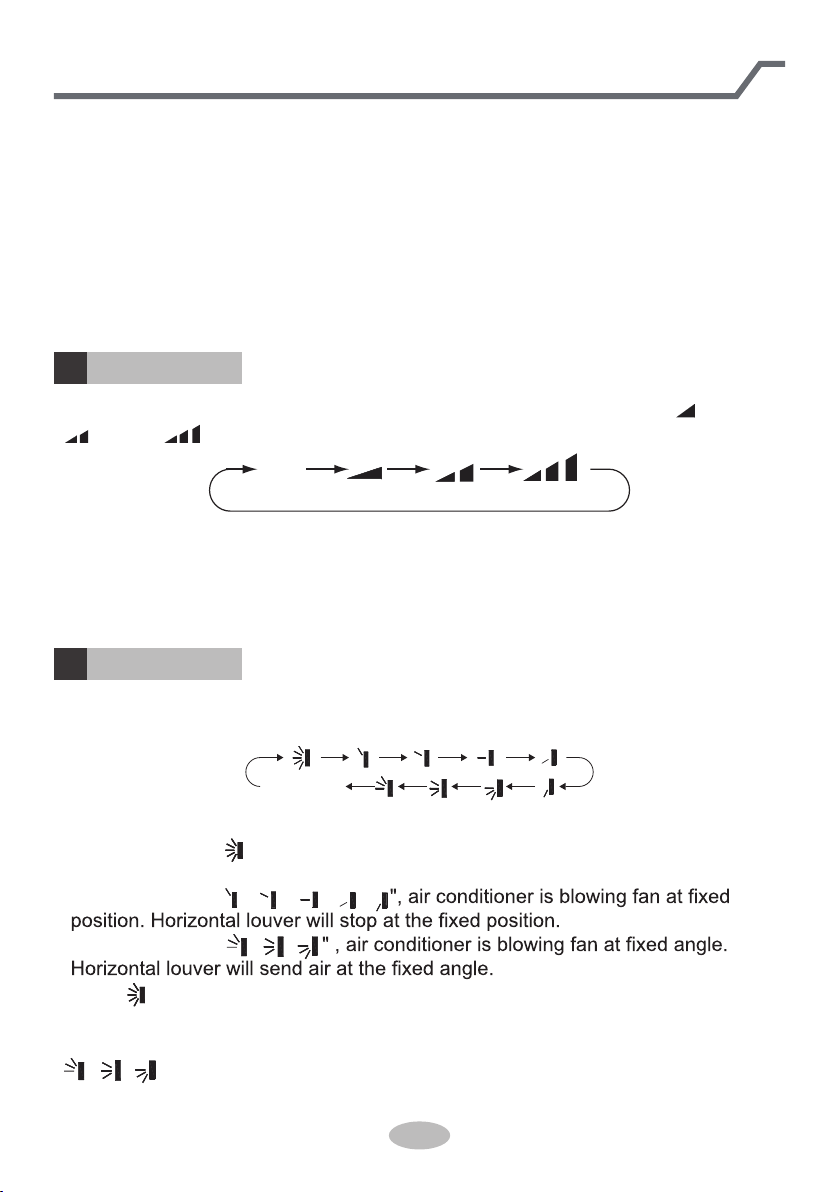
FAN button
3
Pressing this button can set fan speed circularly as: auto (AUTO), low( ), medium
( ), high( ).
Auto
Note:
● Under AUTO speed, air conditioner will select proper fan speed automatically
according to ex-factory setting.
● Fan speed under dry mode is low speed.
SWING button
4
Press this button can select up&down swing angle. Fan blow angle can be selected
circularly as below:
no display
(horizontal louvers stops
at current position)
● When selecting " ", air conditioner is blowing fan automatically. Horizontal
louver will automatically swing up&down at maximum angle.
● When selecting " 、 、 、
● When selecting " 、
● Hold " "button above 2s to set your required swing angle. When reaching your
required angle, release the button.
、
、
Note:
" 、 、 " may not be available. When air conditioner receives this signal, the
air conditioner will blow fan automatically.
3
Page 4

Introduction for buttons on remote controller
TURBO button
5
Under COOL or HEAT mode, press this button to turn to quick COOL or quick
HEAT mode. " " icon is displayed on remote controller. Press this button again
to exit turbo function and " " icon will disappear.
▲
▲/ button
6
● Press "▲" or " " button once increase or decrease set temperature 33.8°F(1°C).
Holding "▲" or " " button, 2s later, set temperature on remote controller will
change quickly. On releasing button after setting is nished, temperature indica-
tor on indoor unit will change accordingly. (Temperature can’t be adjusted under
auto mode)
● When setting TIMER ON, TIMER OFF or CLOCK, press "▲" or " " button to
adjust time. (Refer to CLOCK, TIMER ON, TIMER OFF buttons) When setting
TIMER ON, TIMER OFF or CLOCK, press "▲" or " " button to adjust time. (Refer
to CLOCK, TIMER ON, TIMER OFF buttons)
SLEEP button
7
Under COOL, HEAT or DRY mode, press this button to start up sleep function.
" " icon is displayed on remote controller. Press this button again to cancel sleep
function and " " icon will disappear.
▲
▲
▲
▲
TEMP button
8
By pressing this button, you can see indoor set temperature, indoor ambient temperature or outdoor ambient temperature on indoor unit’s display. The setting on
remote controlleris selected circularly as below:
no display
● When selecting " " or no display with remote controller, temperature indicator
on indoor unit displays set temperature.
● When selecting " " with remote controller, temperature indicator on indoor unit
displays indoor ambient temperature.
● When selecting " " with remote controller, temperature indicator on indoor unit
displays outdoor ambient temperature.
Note:
●
Outdoor temperature display is not available for some models. At that time, indoor
unit receives " " signal, while it displays indoor set temperature.
4
Page 5

Introduction for buttons on remote controller
● It’s defaulted to display set temperature when turning on the unit. There is no
display in the remote controller.
● Only for the models whose indoor unit has dual-8 display.
● When selecting displaying of indoor or outdoor ambient temperature, indoor
temperature indicator displays corresponding temperature and automatically turn
to display set temperature after three or ve seconds.
I FEEL button
9
Press this button to start I FEEL function and " " will be displayed on the remote
controller. After this function is set, the remote controller will send the detected
ambient temperature to the controller and the unit will automatically adjust the
indoor temperature according to the detected temperature. Press this button again
to close I FEEL function and " " will disappear.
● Please put the remote controller near user when this function is set. Do not put
the remote controller near the object of high temperature or low temperature in
order to avoid detecting inaccurate ambient temperature.
LIGHT button
10
Press this button to turn off display light on indoor unit. " " icon on remote
controller disappears. Press this button again to turn on display light. " " icon is
displayed.
CLOCK button
11
Press this button to set clock time. "
"▲" or " " button within 5s to set clock time. Each pressing of "▲" or " " button,
clock time will increase or decrease 1 minute. If hold "▲" or " " button, 2s later,
time will change quickly. Release this button when reaching your required time.
▲▲
================== ===================== ===================== ===================== ===================== =====================
" icon on remote controller will blink. Press
▲
Note:
● Clock time adopts 24-hour mode.
● The interval between two operation can’t exceeds 5s. Otherwise, remote contro ller will quit setting status. Operation for TIMER ON/TIMER OFF is the same.
TIMER ON / TIMER OFF button
12
● TIMER ON button
"TIMER ON" button can set the time for timer on. After pressing this button, " "
icon disappears and the word "ON" on remote controller blinks. Press "▲" or
▲
" "button to adjust TIMER ON setting. After each pressing "▲" or " " button,
▲
5
Page 6

Introduction for buttons on remote controller
TIMER ON setting will increase or decrease 1min. Hold "▲" or " " button, 2s
later, the time will change quickly until reaching your required time.
Press "TIMER ON" to conrm it. The word "ON" will stop blinking. " " icon
resumes displaying. Cancel TIMER ON: Under the condition that TIMER ON is
started up, press "TIMER ON" button to cancel it.
● TIMER OFF button
"TIMER OFF" button can set the time for timer off. After pressing this button, " "
icon disappears and the word "OFF" on remote controller blinks. Press "▲" or
▲
" " button to adjust TIMER OFF setting. After each pressing "▲" or " " button,
TIMER OFF setting will increase or decrease 1min. Hold "▲" or " " button, 2s
later, the time will change quickly until reaching your required time.
Press "TIMER OFF" word "OFF" will stop blinking. " " icon resumes displaying.
Cancel TIMER OFF. Under the condition that TIMER OFF is started up, press
"TIMER OFF" button to cancel it.
Note:
● Under on and off status, you can set TIMER OFF or TIMER ON simultaneously.
● Before setting TIMER ON or TIMER OFF, please adjust the clock time.
● After starting up TIMER ON or TIMER OFF, set the constant circulating valid.
After that, air conditioner will be turned on or turned off according to setting time.
ON/OFF button has no effect on setting. If you don’t need this function, please
use remote controller to cancel it.
▲
▲
▲
Function introduction for combination buttons
Energy-saving function
Under cooling mode, press "TEMP" and " CLOCK" buttons simultaneously to
start up or turn off energy-saving function. When energy-saving function is started
up, "SE" will be shown on remote controller, and air conditioner will adjust the set
temperature automatically according to ex-factory setting to reach to the best
energy-saving effect. Press "TEMP" and "CLOCK" buttons simultaneously again to
exit energy-saving function.
Note:
● Under energy-saving function, fan speed is defaulted at auto speed and it can’t
be adjusted.
●
Under energy-saving function, set temperature can’t be adjusted. Press "TURBO"
button and the remote controller won’t send signal.
● Sleep function and energy-saving function can’t operate at the same time. If
energy-saving function has been set under cooling mode, press sleep button will
cancel energy-saving function. If sleep function has been set under cooling
mode, start up the energy-saving function will cancel sleep function.
6
Page 7

Function introduction for combination buttons
8℃ heating function
Under heating mode, press “TEMP” and “CLOCK” buttons simultaneously to start
up or turn off 46°F(8°C) heating function. When this function is started up, “ ” and
“46°F(8°C)” will be shown on remote controller, and the air conditioner keep the
heating status at 46°F(8°C). Press “TEMP” and “CLOCK” buttons simultaneously
again to exit 46°F(8°C) heating function.
Note:
● Under 46°F(8°C) heating function, fan speed is defaulted at auto speed and it
can’t be adjusted.
● Under 46°F(8°C) heating function, set temperature can’t be adjusted. Press
"
TURBO" button and the remote controller won’t send signal.
● Sleep function and 46°F(8°C) heating function can’t operate at the same time. If
46°F(8°C) heating function has been set under cooling mode, press sleep button
will cancel 46°F(8°C) heating function. If sleep function has been set under cooling
mode, start up the 46°F(8°C) heating function will cancel sleep function.
● Under °F temperature display, the remote controller will display 46°F(8°C)
heating.
Child lock function
Press "▲" and " " simultaneously to turn on or turn off child lock function. When
child lock function is on, " " icon is displayed on remote controller. If you operate
the remote controller, the " " icon will blink three times without sending signal to
the unit.
▲
Temperature display switchover function
Under OFF status, press " " and "MODE" buttons simultaneously to switch temperature display between ℃ and ℉.
▲
7
Page 8

Operation guide
After putting through the power, press "ON/OFF" button on remote controller to
1.
turn on the air conditioner.
Press "MODE" button to select your required mode: AUTO, COOL, DRY, FAN,
2.
HEAT.
Press "▲" or " " button to set your required temperature. (Temperature can’t
3.
be adjusted under auto mode).
Press "FAN" button to set your required fan speed: auto, low, medium and high
4.
speed.
Press "SWING" button to select fan blowing angle.
5.
▲
Replacement of batteries in remote controller
1. Press the back side of remote controller marked
with " ", as shown in the g, and then push out
the cover of battery box along the arrow direction.
2. Replace two 7# (AAA 1.5V) dry batteries, and
make sure the position of "+" polar and "-" polar
are correct.
3. Reinstall the cover of battery box.
signal sender battery
reinstall
remove
Cover of battery box
NOTICE
● During operation, point the remote control signal sender at the receiving
window on indoor unit.
● The distance between signal sender and receiving window should be no
more than 8m, and there should be no obstacles between them.
● Signal may be interfered easily in the room where there is uorescent lamp
or wireless telephone; remote controller should be close to indoor unit during
operation.
● Replace new batteries of the same model when replacement is required.
● When you don’t use remote controller for a long time, please take out the
batteries.
● If the display on remote controller is fuzzy or there’s no display, please
replace batteries.
8
Page 9

KEY FEATURES & FUNCTIONS
DEFROST FUNCTION
This increases room comfort and saves energy by sensing the need for defrosting and
eliminating unnecessary defrost cycles.
SLEEP MODE
You design a cycle to automatically adjust room temperatures during your sleep time, to
maximize comfort and reduce utility bills.
TURBO MODE
This capacity boost function is the fastest way to reach a desired temperature setpoint,
either in heating or cooling. Once setpoint is achieved, you can deactivate Turbo Mode
for normal operation.
X-FAN MODE
Especially useful in humid areas, this function allows the indoor fan to run for a predetermined amount of time after the unit is turned off, to remove additional moisture from
the coil.
PRIVACY LOCK MODE
This prevents unauthorized access or tampering. To lock the remote controller, push the
“+” and “-” buttons simultaneously for 2 seconds. Repeat to unlock.
OPTIONAL PHOTOCATALYTIC FILTER
Advanced technology to improve indoor air quality and prevent the spread of bacteria
and viruses.
FAQs
Why does the fan continue to run even when the unit is not cooling or heating?
To maintain consistent temperatures and minimize energy-loss from constant starts and
stops, the fan keeps air flowing past the thermostat.
What temperature is displayed on the remote controller?
The remote always displays your desired indoor temperature. (You may view current
indoor and outdoor temperatures on the indoor unit’s Front Panel Display.)
What happens if the remote is lost or damaged?
Use the Manual Override button to manually operate the unit. Lift up the front panel
section on the indoor unit and locate the button right-hand side. Press the button to turn
ON the unit. (Not all functions will be available.) Press again to cancel Manual Override
Mode and transfer control back to the remote controller.
Not all features available on all models. Your actual air conditioning and heating system and related devices
may differ from the images shown in this manual
For complete instructions on these and other functions,
as well as important safety information, see the Owners Manual.
For more information, visit www.cooperandhunter.us
Specifications are subject to change without notice. Manufacturer reserves the right to discontinue, or change at any time, specifications or designs without notice or without incurring
obligations. © 2016
.All rights reserved.
.
66160000086
 Loading...