

Page 1
KAROLINA
2
4
3
1
(before opening cover (after opening cover
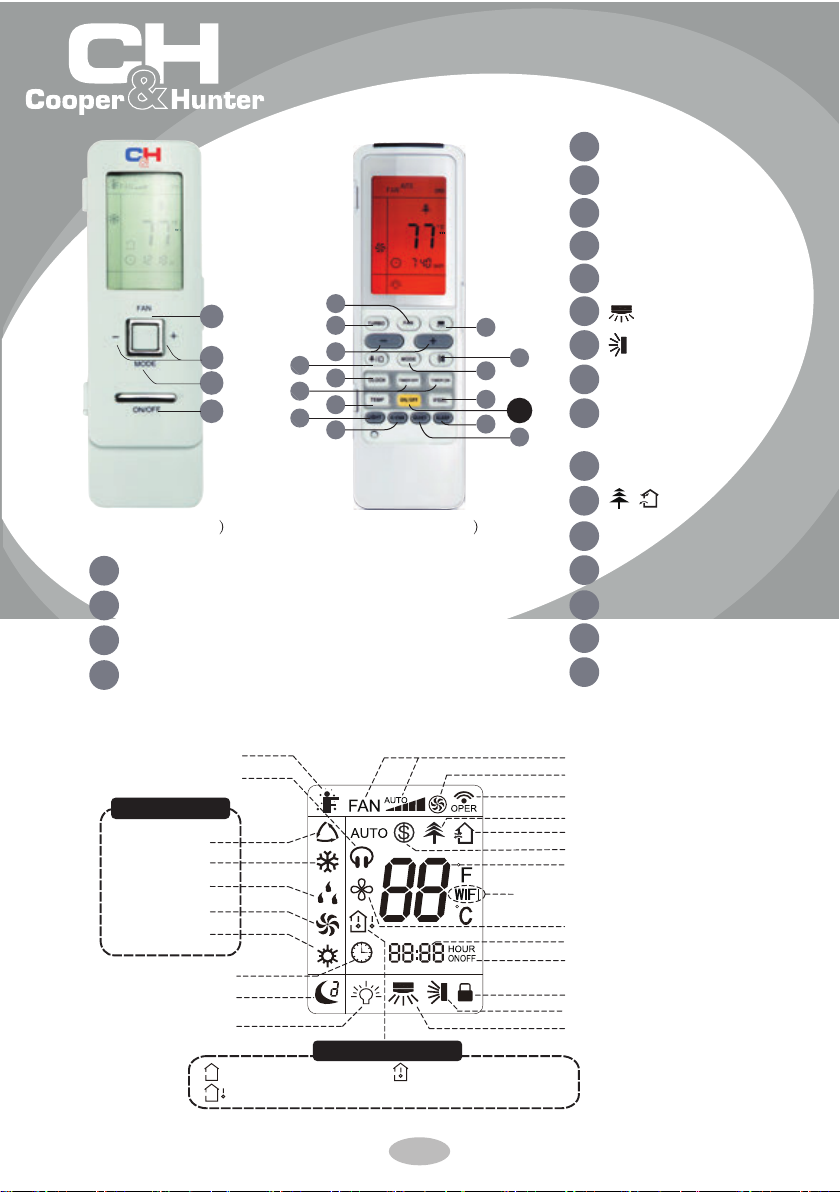
ON/OFF button
1
2
FAN button
3
MODE button
4
+/- button
2
5
4
11
8
9
10
13
14
Quick-start guide
ON/OFF button
1
2
FAN button
3
MODE button
4
+/- button
5
TURBO button
6
7
3
12
1
16
15
6
7
8
9
10
11
12
13
14
15
16
button
button
CLOCK button
TIMER ON/
TIMER OFF button
TEMP button
/
I FEEL button
LIGHT button
X-FAN button
QUIET button
SLEEP button
button
I feel
Quiet
Operation mode
Auto mode
Cool mode
Dry mode
Fan mode
Heat mode
Clock
Sleep mode
Light
Temp. display type
: Set temp.
: Outdoor ambient temp.
This is a general remote controller. Some
models have this function while some do
not. Please refer to the actual models.
: Indoor ambient temp.
1
Set fan speed
Turbo mode
Send signal
Healthy mode
Scavenging functions
8℃ heating function
Set temperature
X-FAN function
Set time
TIMER ON /TIMER OFF
Child lock
Up & down swing
Left & right swing
Page 2
Introduction for buttons on remote controller
Note:
●This is a general use remote controller, it could be used for the air conditioners
with multifunction; For some function, which the model don't have, if press the
corresponding button on the remote controller that the unit will keep the original
running status.
● After putting through the power, the air conditioner will give out a sound.
Operation indictor " " is ON (red indicator). After that, you can operate the air
conditioner by using remote controller.
●
Under on status, pressing the button on the remote controller, the signal icon " "
on the display of remote controller will blink once and the air conditioner will give
out a “de” sound, which means the signal has been sent to the air conditioner.
● Under off status, set temperature and clock icon will be displayed on the display
of remote controller (If timer on, timer off and light functions are set, the corre sponding icons will be displayed on the display of remote controller at the same
time); Under on status, the display will show the corresponding set function icons.
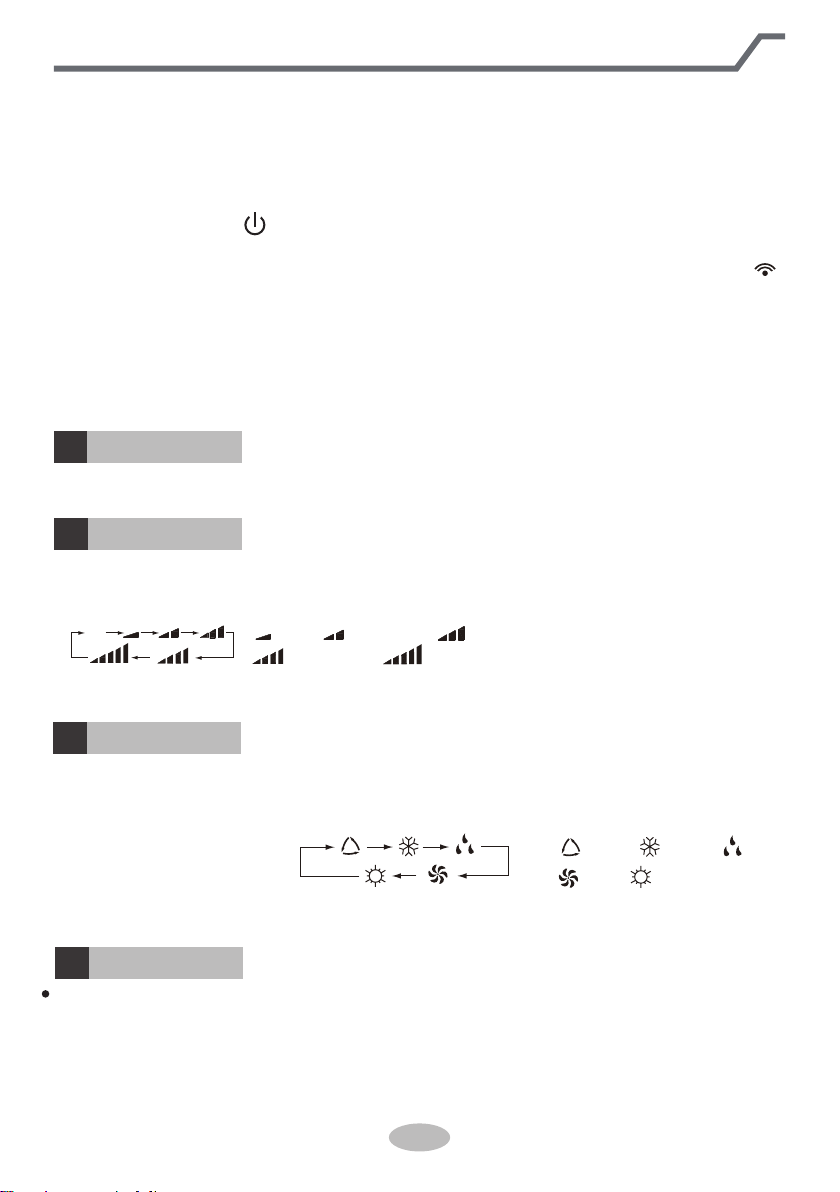
ON/OFF button
1
Press this button, the unit will be turned on, press it once more, the unit will be turned off. Sleep function will be canceled, while unit off.
FAN button
2
Press this button, Auto, Low, Medium-low, Medium, Medium-high, High speed can
be circularly selected. After powered on, Auto fan speed is default. Under DRY
mode, Low fan speed only can be set up.
ATUO
Note: If matching with smart zone controller for operation, under auto fan speed, the
fan speed display on smart zone controller will always be maintained at “auto high fan”.
MODE button
3
Press this button, Auto, Cool, Dry, Fan, Heat mode can be selected circularly. Auto
mode is default while power on. Under Auto mode, the temperature will not be displayed; Under Heat mode, the initial value is 82°C
initial value is 77°F(25°C).
(only for cooling and heating unit. As for cooling only unit, it won’t have any action
when it receives the signal of heating operation.)
+/- button
4
Presetting temperature can be increased. Press this button, the temperature can be
set up, continuously press this button and hold for two seconds, the relative contents
can quickly change, until unhold this button and send the order that the
will be displayed all the time. The temperature adjustment is unavailable under the
Auto mode, but the order can be sent if pressing this button. Temperature of Celsius
degree setting: 16-30; for Fahrenheit degree setting: 61-86.
Medium-low fan
Medium-high fan
High fan
2
Medium fanLow fan
(28°C); Under other modes, the
Note: It’s Low fan speed
under Dry mode.
AUTO COOL DRY
FAN
HEAT
°F (°C
) signal
Page 3
Introduction for buttons on remote controller
Presetting temperature can be decreased. Press this button, the temperature can
be set up, continuously press this button and hold for two seconds, the relative contents can quickly change, until unhold this button and send the order that the
( ) signal will be displayed all the time. The temperature adjustment is unavailable
under the Auto mode, but the order can be sent by if pressing this button.
TURBO button
5
Under Cool or Heat mode, press this button can turn on or turn off the Turbo function.
After the Turbo function turned on, the signal of Turbo will display. The signal will
be automatically cancelled if changing the mode or fan speed.
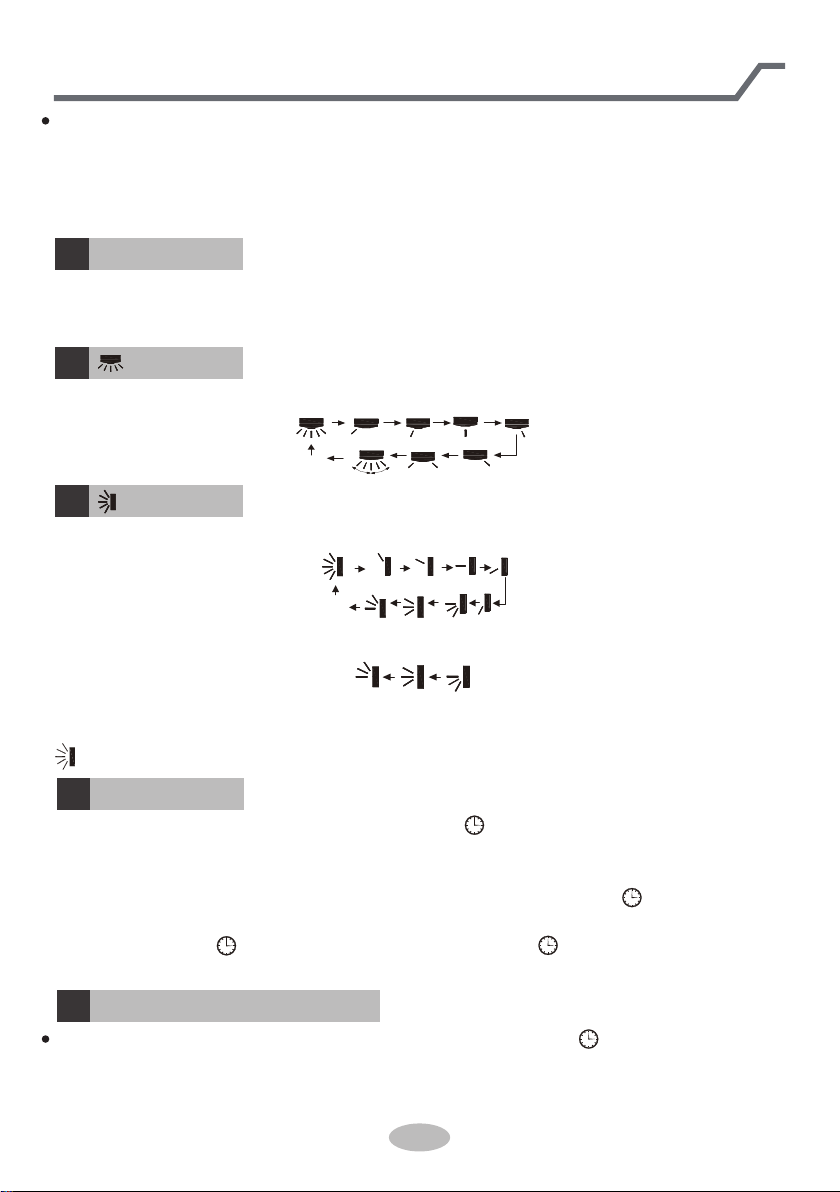
6
Press this button to set left & right swing angle cycling as below:
7
Press this button to set swing angle, which circularly changes as below:
This remote controller is universal. If it receives threes kinds of following status, the
swing angle will remain original.
If guide louver is stopped when it is swinging up and down, it will remian its present
position.
8
Press this button, the clock can be set up, signal blink and display. Within 5 seconds,
the value can be adjusted by pressing + or - button, if continuously press this button for 2
seconds above, in every 0.5 seconds, the value on ten place ofMinutewill be increased 1.
During blinking, repress the Clock button or Confirm button, signal will be constantly
displayed and it denotes the setting succeeded. After powered on, 12:00 is defaulted to
display and signal will be displayed. If there is signal be displayed that denotes
the current time value is Clock value, otherwise is Timer value.
button
OFF
button
OFF
indicates guide louver swings back and forth in the five places, as shown in the figure.
CLOCK button
TIMER ON/TIMER OFF button
9
Timer On setting: Sign al “ON” will blink and display, signal will conceal, the numerical section will become the timer on setting status. During 5 seconds blink, by
pressing + or - button to adjust the time value of numerical section, every press of
that button, the value will be increased or decreased 1 minute. Hold pressing + or -
3
Page 4

Introduction for buttons on remote controller
button, 2 seconds later, it quickly change, the way of change is: During the initial
2.5 seconds, ten numbers change in the one place of minute, then the one place
is constant, ten numbers change in the tens place of minu te at 2.5 seconds speed
and carry. During 5s blink, press the Timer button, the timer setting succeeds. The
Timer On has been set up, repress the timer button, the Timer On will be canceled.
Before sett ing the Timer, please adjust the Clock to the current actual time.
One press this key to enter into TIMER OFF setup, in which case the TIMER OFF
icon will blink. The method of setting is the sameas for TIMER ON.
TEMP button
10
Press this button, you can see indoor set temperature, indoor ambient temperature
or outdoor ambient temperature on indoor unit’s display. The setting on remote controller is selected circularly as below:
When selecting " " with remote controller or no display, temperature indicator on
indoor unit displays set temperature; When selecting " " with remote controller,
temperature indicator on indoor unit displays indoor ambient temperature; When
selecting " " with remote controller, temperature indicator on indoor unit displays
outdoor ambient temperature. 3s later it will return to the setting temprature or it
depends on the other received signal within 3s.
Attention: When displaying the outdoor ambient, the displaying range is 0-60°C
When it goes beyond the range, it keeps the threshold data (the smallest—0°C
and the largest 60°C).
Warm tips: When operating buttons on the cover please make sure the cover is
closed completely.
/
11
Press this button to achieve the on and off of healthy and scavenging functions in
operation status. Press this button for the first time to start scavenging function;
LCD displays " ". Press the button for the second time to start healthy and scavenging functions simultaneously; LCD displays " " and " ". Press this button
for the third time to quit healthy and scavenging functions simultaneously. Press the
button for the fourth time to start healthy function; LCD display " ". Press this button again to repeat the operation above.
NOTE: This function is applicable to partial of models.
button
no display
I FEEL button
12
Press this button once, to turn on the I FEEL function, then the figure of "I FEEL"
will be displayed, after every press of other function button, every 200ms to send
I FEEL once, after this function started, the remote controller will send temperature
to the main un it in every 10 minutes. When repress this button, this function will be
turned off.
4
Page 5

Introduction for buttons on remote controller
LIGHT button
13
Press this button at unit On or Off status, Light On and Light Off can be set up.
After powered on, Light On is defaulted.
X-FAN button
14
Pressing X-FAN button in COOL or DRY mode, the icon is displayed and the
indoor fan will continue operation for 2 minutes in order to dry the indoor unit even
though you have turned off the unit. After energization, X-FAN OFF is defaulted.
X-FAN is not available in AUTO, FAN or HEAT mode.
QUIET button
15
Press this button, the Quiet status is under the Auto Quiet mode (display " "
and "Auto" signal) and Quiet mode (display " " singal) and Quiet OFF (there
is no signal of " " displayed), after powered on, the Quiet OFF is defaulted.
Under the Quiet mode (Display " " signal).
SLEEP button
16
Press this button, can select Sleep 1 ( ), Sleep 2 ( ), Sleep 3 ( ) and
cancel the Sleep, circulate between these, after electrified, Sleep Cancel is defaulted.
Sleep 1 is Sleep mode 1, in Cool, Dehumidify modes: sleep status after run for
one hour, the main unit setting temperature will increase 1°C, 2 hours, setting temperature increased 2°C, the unit will run at this setting temperature; In Heat mode:
sleep status after run for one hour, the setting temperature will decrease 1°C, 2
hours, setting temperature will decrease 2°C, then the unit will run at this setting
temperature.
Sleep 2 is sleep mode 2, that is air conditioner will run according to the presetting
a group of sleep temperature curve.
In Cool mode:
(1) When setting the initial temperature 16°C-23°C, after turned on Sleep function,
the temperature will be increased 1°C in every hour, after 3°C the temperature
will be maintained, after 7hours, the temperature will be decreased 1°C, after
that the unit will keep on running under this temperature;
(2) When setting the initial temperature 24°C-27°C, after turned on Sleep function,
the temperature will be increased 1°C in every hour, after 2°C the temperature
will be maintained, after 7hours, the temperature will be decreased 1°C, after
that the unit will keep on running under this temperature;
(3) When setting the initial temperature 28°C -29°C, after turned on Sleep function,
the temperature will be increased 1°C in every hour, after 1°C the temperature
will be maintained, after 7hours, the temperature will be decreased 1°C, after
that the unit will keep on running under this temperature;
5
Page 6

Introduction for buttons on remote controller
(4) When setting the initial temperature 30°C, under this temperature setting, after
7hours, the temperature will be decreased 1°C, after that the unit will keep on
running under this temperature;
In Heat mode:
(1) Under the initial presetting temperature 16°C, it will run under this setting tem-
perature all along.
(2) Under the initial presetting temperature17°C-20°C, after Sleep function started
up, the temperature will decrease 1°C in every hour, after 1°C decreased, this
temperature will be maintained.
(3) Under the initial presetting temperature 21°C-27°C, after Sleep function started
up, the temperature will decrease 1°C in every hour, after 2°C decreased, this
temperature will be maintained.
(4) Under the initial presetting temperature 28°C-30°C, after Sleep function started
up, the temperature will decrease 1°C in every hour, after 3°C decreased, this
temperature will be maintained.
Sleep 3 - the sleep curve setting under Sleep mode by DIY:
(1) Under Sleep 3 mode, press "Turbo" button for a long time, remote controller en-
ters into user individuation sleep setting status, at this time, the time of remote
controller will display "1hour", the setting temperature "88" will display the corr-
esponding temperature of last setting sleep curve and blink (The first entering
will display according to the initial curve setting value of original factory);
(2) Adjust "+" and "-" button, could change the corresponding setting temperature,
after adjusted, press "Trubo" button for confirmation;
(3) At this time, 1hour will be automatically increased at the timer postion on the
remote controller, (that are "2hours" or "3hours" or "8hours"), the place of se-
tting temperature "88" will display the corresponding temperature of last setting
sleep curve and blink;
(4) Repeat the above step (2)~(3) operation, until 8hours temperature setting finished,
sleep curve setting finished, at this time, the remote controller will resume the
original timer display; temperature display will resume to original setting tem-
perature.
Sleep3 - the sleep curve setting under Sleep mode by DIY could be inquired:
The user could accord to sleep curve setting method to inquire the presetting sleep
curve, enter into user individuation sleep setting status, but do not change the temperature, press "Turbo" button directly for confirmation.
Note: In the above presetting or enquiry procedure, if continuously within10s, there
is no button pressed, the sleep curve setting status will be automatically quit
and resume to display the original displaying. In the presetting or enquiry procedure, press "ON/OFF" button, "Mode" button, "Timer" button or "Sleep"
button, the sleep curve setting or enquiry status will quit similarly.
6
Page 7

KEY FEATURES & FUNCTIONS
DEFROST FUNCTION
This increases room comfort and saves energy by sensing the need for defrosting and
eliminating unnecessary defrost cycles.
SLEEP MODE
You design a cycle to automatically adjust room temperatures during your sleep time, to
maximize comfort and reduce utility bills.
TURBO MODE
This capacity boost function is the fastest way to reach a desired temperature setpoint,
either in heating or cooling. Once setpoint is achieved, you can deactivate Turbo Mode
for normal operation.
X-FAN MODE
Especially useful in humid areas, this function allows the indoor fan to run for a predetermined amount of time after the unit is turned off, to remove additional moisture from
the coil.
PRIVACY LOCK MODE
This prevents unauthorized access or tampering. To lock the remote controller, push the
“+” and “-” buttons simultaneously for 2 seconds. Repeat to unlock.
OPTIONAL PHOTOCATALYTIC FILTER
Advanced technology to improve indoor air quality and prevent the spread of bacteria
and viruses.
FAQs
Why does the fan continue to run even when the unit is not cooling or heating?
To maintain consistent temperatures and minimize energy-loss from constant starts and
stops, the fan keeps air flowing past the thermostat.
What temperature is displayed on the remote controller?
The remote always displays your desired indoor temperature. (You may view current
indoor and outdoor temperatures on the indoor unit’s Front Panel Display.)
What happens if the remote is lost or damaged?
Use the Manual Override button to manually operate the unit. Lift up the front panel
section on the indoor unit and locate the button right-hand side. Press the button to turn
ON the unit. (Not all functions will be available.) Press again to cancel Manual Override
Mode and transfer control back to the remote controller.
Not all features available on all models. Your actual air conditioning and heating system and related devices
may differ from the images shown in this manual
For complete instructions on these and other functions,
as well as important safety information, see the Owners Manual.
For more information, visit www.cooperandhunter.us
Specifications are subject to change without notice. Manufacturer reserves the right to discontinue, or change at any time, specifications or designs without notice or without incurring
obligations. © 2016
.All rights reserved.
.
Page 8

66129923113
 Loading...