

Cooper&Hunter CH12SPH115V, CH09SPH115V, CH18SPH230V, CHS30FTXWSV, CH12SPH230V Quick Guide
...Page 1
SOPHIA
HIGH-WALL DUCTLESS
AIR CONDITIONING &
HEATING SYSTEM
Quick-Start Guide
ON/ OFF
TEM P
MODE
SWING
SWING
SLEEP
TURBO
SELF
CLEAN
LOCK
SILEN CE
FP
FAN
SPEED
TIMER
ON
TIMER
OFF
LED
FOLLO W
ME
RESET
Page 2

CON TENTS
Handling the remote controller ......................................................
Remote controller Specifications...................................................
Function buttons .................. .........................................................
Indicators on LCD ..........................................................................
How to use the buttons .................................................................
Auto operation.................................................................................
Cooling/Heating/Fan operation......................................................
Dehumidifying operation ...............................................................
Adjusting air flow direction............................................................
Timer operation...............................................................................
SLEEP/FRESH function..................................................................
LED/FOLLOW ME function ........................................................... 14
TURBO/SELF CLEAN function ..................................................... 14
10
13
2
3
5
7
8
8
8
9
9
Page 3

Handling the remote controller
Location of the remote controller.
Use the remote controller within a distance of 26,2ft
(8 meters) from the appliance, pointing it towards the
8m
M
O
D
E
S
W
I
N
G
S
HO
RT
T
C
EM
U
T
D
P
IRE
C
T
F
A
SPEE
N
T
I
ME
S
D
ON
L
R
E
FR
E
P
ESH
TI
M
E
S
T
OF
R
E
UR
LF
F
B
CL
O
E
A
N
F
L
O
E
L
D
LO
W
ME
RE
SE
T
LOC
K
CAUTIONS
receiver. Reception is confirmed by a beep.
The air conditioner will not operate if curtains, doors or other materials
block the signals from the remote controller to the indoor unit.
Prevent any liquid from falling into the remote controller. Do not expose
the remote controller to direct sunlight or heat.
If the infrared signal receiver on the indoor unit is exposed to direct
sunlight, the air conditioner may not function properly. Use curtains to
prevent the sunlight from falling on the receiver.
If other electrical appliances react to the remote controller. either move
these appliances or consult your local dealer.
Replacing batteries
The remote controller is powed by two dry batteries(R03/LR03X2) housed in the
rear part and protected by a cover.
(1) Remove the cover by pressing and sliding off.
(2) Remove the old batteries and insert the new batteries,placing the(+) and (-)
ends correctly.
(3) Reattach the cover by sliding it back into position.
NOTE: When the batteries are removed, the remote controller erases all programming. After inserting new batteries, the remote controller must be reprogrammed.
CAUTIONS
Do not mix old and new batteries or batteries of different types.
Do not leave the batteries in the remote controller if they are not
going to be used for 2 or 3 months.
Do not dispose batteries as unsorted municipal waste. Collection of such
waste separately for special treatment is necessary.
Page 4
Remote Controller Specifications
Rated Voltage
Signal Receiving
3.0V(Dry batteries R03/LR03×2)
26,2ft (
8m)
Range
Environment
Performance Feature
1. Operating Mode: AUTO, COOL, DRY, HEAT(Cooling only model without),
and FAN.
2. Timer Setting Function in 24 hours.
3. Indoor Setting Temperature Range: 62 F~86 F.
4. Full function of LCD (Liquid Crystal Display).
NOTE:
Butto ns de sign migh t be slight ly diffe rent from the ac tual one yo u
purch ased depe ndi ng on indiv idual mod els.
All the fu nct ions desc ribed are a ccompli she d by the indo or unit.
If the in door unit has no t his featu re, there i s no co rrespon ding
opera tion happ ene d when pres s the relat ive button on th e remote
contr oller.
O O
23 F~140 F
O O
Page 5
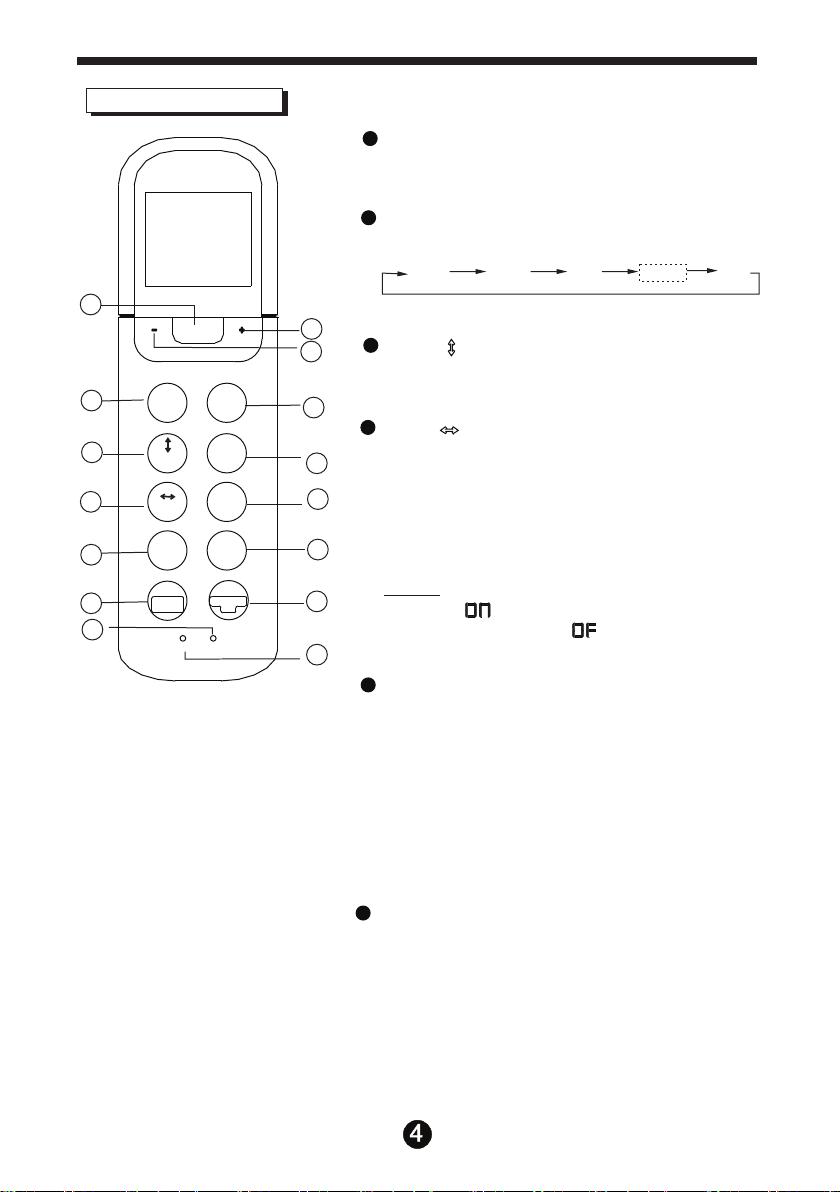
Function buttons
1
ON/O FF
TEM P
2
3
4
5
6
7
MODE
SWING
SWING
SLEEP
TURBO
SELF
CLEAN
LOCK
SILENC E
FP
FAN
SPEED
TIMER
ON
TIMER
OFF
LED
FOLLOW
ME
RESET
ON/OFF Button
1
Operation starts when this button is pressed
and stops when this button is pressed again.
MODE Button
2
Each time the button is pressed, the operation
mode is selected in a sequence of following:
NOTE: Heat mode is for Cooling & Heating models only.
8
3
Swing Button
9
Used to stop or start horizontal louver movement .
10
4
Swing Button
Used to stop or start vertical louver movement.
11
12
When the vertical louver swing feature is
activated, the display area of indoor unit
displays , flashes four times, then the
temperature setting reverts back. If the vertical
13
louver swing feature is stopped, it displays LC
and remains on for 3 seconds.
14
NOTE: For some units , the indoor units
display when the swing feature is
activated, and display when the swing
15
feature is stopped.
5
SLEEP Button
Active/Disable SLEEP function.
This function can maintain the most comfortable
temperature and save energy. This function is
available on COOL, HEAT or AUTO mode only .
For the detail, see Sleep operation in
,,
USER S MANUAL .
NOTE: While the unit is running under SLEEP
mode, it would be cancelled if press the MODE,
FAN SPEED or ON/OFF button.
AUTO
DRY
,
,
IIII
COOL
,
,
,
,,
,
,,
,
HEAT FAN
,
,,
,
6
TURBO/SELF CLEAN Button:
Active/Disable TURBO function. If pushing
more than 2 seconds, the SELF CLEAN
,
function will be activated, pushing more than
2 seconds again to disable.
,
Page 6

Function buttons
1
ON/O FF
TEM P
2
3
4
5
6
7
MODE
SWING
SWING
SLEEP
TURBO
SELF
CLEAN
LOCK
SILENC E
FP
FAN
SPEED
TIMER
ON
TIMER
OFF
LED
FOLLOW
ME
RESET
7
RESET Button:
When you press the recessed RESET button,
all current settings are cancelled and the
control will return to the initial settings.
UP Button( )
8
Push this button to increase the indoor
temperature setting in 1 F increments to 62 F.
+
o o
8
9
9
10
DOWN Button( )
Push this button to decrease the indoor
temperature setting in 1 F increments to 86 F.
-
o o
NOTE: Press and hold UP and DOWN buttons
11
together for 3 seconds will alternate the temperature display between the C & F scale.
O O
12
10
SILENCE/FP Button
13
Active/Disable SILENCE function.
When the Silence function is activated, the
14
compressor will operate at low frequency and
the indoor unit will bring faint breeze, which will
15
reduce the noise to the lowest level and create
a quiet and comfortable room for you. Due to
low frequency operation of compressor, it may
result in insufficient cooling and heating capacity.
During the heating operation(only when the
setting mode is HEAT),If pushing this button
more than 2 seconds, the FP function is
activated. The unit will operate at high fan
speed with the temperature automatically set to
O O
8 C(46 F).The display window of indoor unit
will display FP . For the unit without display
,,,,,,,
area, the Defrost indicator light will be
keeping on for 2 seconds, and then be off for
2 seconds by turns. Press ON/OFF,SLEEP,
FP,MODE, FAN SPEED,UP, DOWN button
while operating will cancel the FP function.
,
Page 7

11
FAN SPEED Button
Used to select the fan speed in four steps:
AUTO LOW MED HIGH
12
TIMER ON Button
Press this button to initiate the auto-on time
1
ON/O FF
TEM P
8
9
sequence. Each press will increase the
auto-timed setting in 30 minutes increments.
When the setting time displays 10H, each
press will increase the auto-timed setting
60 minutes increments. To cancel the
2
3
4
5
6
7
MODE
SWING
SWING
SLEEP
TURBO
SELF
CLEAN
LOCK
SILENC E
FP
FAN
SPEED
TIMER
ON
TIMER
OFF
LED
FOLLOW
ME
RESET
10
11
12
13
14
15
auto-timed program, simply adjust the
auto-on time to 0:0.
13
TIMER OFF Button
Press this button to initiate the auto-off time
sequence. Each press will increase the
auto-timed setting in 30 minutes increments.
When the setting time displays 10H, each
press will increase the auto-timed setting
60 minutes increments. To cancel the
auto-timed program, simply adjust the
auto-off time to 0:0
LED/FOLLOW ME Button
14
Disable/Active indoor screen Display. When
pushing more than 2 seconds, the FOLLOW
,
ME function will be activated, pushing more
,
than 2 seconds again to disable.
15
LOCK Button
When you press the recessed LOCK button,
all current settings are locked in and the
remote controller does not accept any
operation except that of the LOCK. Press
again to cancel the LOCK mode.
Page 8

Indicators on LCD
Transmission Indicator
This transmission indicator lights when remote
controller transmits signals to the indoor unit.
Mode display
Displays the current operation mode. Including
auto( ), cool( ), dry( ), heat( ) (Not
applicable to cooling only models), fan( )
and back to auto( ).
auto cool dry heat fan
SET TEMP. TIMER ONOFF
silence sleep follow me lock run
F
Temp./Timer display
Displays the temperature setting(62 F~86 F). When
you set the operating mode to FAN, no temperature
setting is displayed. And
shows the ON and OFF settings of the TIMER.
Fan speed display
Displays the selected fan speed, AUTO(no display)
and three fan speed levels " " (LOW) " " (MED)
" " (HIGH) can be indicated. The fan speed is AUTO
when the operating mode is either AUTO or DRY.
ON/OFF display
Displayed by pressing the ON/OFF button.
Press the ON/OFF button again to remove.
Lock Display
Displayed when LOCK mode is activated.
FOLLOW ME Display
Displayed when FOLLOW ME function is activated.
Sleep Display
Displayed under sleeping operation.
Press the SLEEP button again to remove.
Silence Display
Displayed when SILENCE function is activated.
if in the TIMER mode,
O O
Note:
All indicators shown in the figure are for the purpose
of clear presentation. But during the actual operation
only the relative functional signs are shown on the
display window.
Page 9

How to use the buttons
Auto operation
Ensur e the unit is p lug ged in and po wer is
avail able. Th e OPERATI ON indicator o n the
displ ay panel of t he in door unit s tarts fla shing.
3
1. Pres s the M ODE butto n to select Au to.
2. Pres s the UP/DOWN bu tton to set t he
desir ed temper atu re. The te mperatu re can
be set wi thi n a range of 62 F~86 F in 1 F
O O
O
incre ments.
3. Pres s the ON/OFFbu tton to start th e air
condi tioner.
NOTE
1. In the Auto mode, the air conditioner can logically
choose the mode of Cooling, Fan, and Heating
by sensing the difference between the actual
ambient room temperature and the setting
temperature on the remote controller.
2. In the Auto mode, you can not switch the fan speed.
MODE
SWING
SWING
SLEEP
TURBO
SELF
CLEAN
LOCK
ON/OF F
TEMP
SILENCE
FP
FAN
SPEED
TIMER
ON
TIMER
OFF
LED
FOLLOW
ME
RESET
2
2
1
It has already been automatically controlled.
3. If the Auto mode is not comfortable for you , the
desired mode can be selected manually.
Cooling /Heating/Fan operation
Ensur e the unit is plug ged in and po wer is
avail able.
4
1. Pres s the MODE butto n to select C OOL ,
2
HEAT( cooling & h eating mo del s only) or
FAN mode .
2. Pres s the UP/DOWN bu ttons to se t the
desir ed te mperatu re. The te mperatu re can
be set wi thi n a range of 62 F~86 F in 1 F
3
incre ments.
O O O
3. Pres s the FAN button to s elect the f an sp eed
in four s tep s- Auto, Low, M ed,or Hig h.
4. Pres s the ON/OFF but ton to start the a ir
condi tioner.
NOTE
In the FAN mode, the setting temperature is not
displayed in the remote controller and you are not
able to control the room temperature either. In this
case, only step 1, 3 and 4 may be performed.
MODE
SWING
SWING
SLEEP
TURBO
SELF
CLEAN
LOCK
ON/OF F
TEMP
SILENCE
FP
FAN
SPEED
TIMER
OFF
LED
FOLLOW
ME
RESET
TIMER
ON
2
1
Page 10

Dehumidifying operation
Ensur e the unit is plug ged in and po wer is
avail able. Th e OPERATI ON indica tor o n the
displ ay panel of t he in door unit s tarts fla shi ng.
1. Pres s the MODE butto n to select D RY mode .
2. Pres s the UP/DOWN bu ttons to se t the
desir ed temper atu re. The te mperatu re
can be se t within a range o f 62 F~86 F in 1 F
incre ments.
3
3. Pres s the ON/OFF but ton to start the a ir
2
condi tioner.
NOTE
In the Dehumidifying mode, you can not switch the
fan speed. It has already been automatically controlled.
Adjusting air flow direction
Use the SWING and SWING buttons to adjust
the desired airflow direction.
1. When push the SWING button, the horizontal
louver changes 6 degree in angle for each push.
If pushing more than 2 seconds, the louver
MODE
SWING
SWING
SLEEP
TURBO
SELF
CLEAN
ON/O FF
LOCK
TEMP
SILENC E
FP
FAN
SPEED
TIMER
ON
TIMER
OFF
LED
FOLLOW
ME
RESET
2
1
O O O
will automatically swing up and down.
2. When push the SWING button, the vertical
louver changes 6 degree in angle for each push.
If pushing more than 2 seconds, the louver
will automatically swing left and right.
NOTE: When the horizontal/vertical louver swing
or move to a position which would affect
the cooling or heating effect of the air
conditioner, it would automatically change
the swing/moving direction.
Page 11

MODE
SWING
SWING
SLEEP
TURBO
SELF
CLEAN
LOCK
ON/O FF
TEMP
SILENC E
FP
FAN
SPEED
TIMER
ON
TIMER
OFF
LED
FOLLOW
ME
RESET
Timer operation
Press the TIMER ON button can set the auto-on
time of the unit. Press the TIMER OFF button
can set the auto-off time of the unit.
To set the Auto-on time.
1. Press the TIMER ON button. The remote
controller shows TIMER ON, the last Auto-on
setting time and the signal "h" will be shown on
the LCD display area. Now it is ready to reset
the Auto-on time to START the operation.
2. Push the TIMER ON button again to set desired
Auto-on time. Each time you press the button,
the time increases by half an hour between 0
and 10 hours and by one hour between 10 and
24 hours.
3. After setting the TIMER ON ,there will be a one
1
second delay before the remote controller
transmits the signal to the air conditioner. Then,
2
after approximately another 2 seconds, the
signal "h" will disappear and the set temperature
will re-appear on the LCD display window.
To set the Auto-off time.
1. Press the TIMER OFF button. The remote
controller shows TIMER OFF, the last Auto-off
setting time and the signal "h" will be shown on
the LCD display area. Now it is ready to reset
the Auto-off time to stop the operation.
2. Push the TIMER OFF button again to set
desired Auto-off time. Each time you press the
button, the time increases by half an hour
between 0 and 10 hours and by one hour
between 10 and 24 hours.
3. After setting the TIMER OFF ,there will be a
one second delay before the remote controller
transmits the signal to the air conditioner. Then,
after approximately another 2 seconds, the
signal "h" will disappear and the set temperature
will re-appear on the LCD display window.
Page 12

!
CAUTION
The effective operation time set by the remote controller for the timer function
is limited to the following settings: 0.5, 1.0, 1.5, 2.0, 2.5, 3.0, 3.5, 4.0, 4.5, 5.0,
5.5, 6.0, 6.5, 7.0, 7.5, 8.0, 8.5, 9.0, 9.5, 10, 11, 12, 13, 14, 15,16,17, 18, 19, 20,
21, 22, 23 and 24.
Example of timer setting
TIMER ON
TIMER ON
(Auto-on Operation)
The TIMER ON feature is useful when you want
the unit to turn on automatically before you return
home. The air conditioner will automatically start
operating at the set time.
Start
Off
Example:
Set
6 hours later
To start the air conditioner in 6 hours.
1. Press the TIMER ON button, the last setting
of starting operation time and the signal "h"
will show on the display area.
2. Press the TIMER ON button to display "6:0h"
on the TIMER ON display of the remote
controller.
3. Wait for 3 seconds and the digital display
area will show the temperature again. The
"TIMER ON" indicator remains on and this
function is activated.
Page 13

TIMER OFF
TIMER OFF
(Auto-off Operation)
The TIMER OFF feature is useful when you want the
unit to turn off automatically after you go to bed. The
air conditioner will stop automatically at the set time.
Stop
On
Set 10 hours later
TIMER ON OFF
2 hours later
after setting
Stop
10 hours later
after setting
On
Set
Start
Example:
To stop the air conditioner in 10 hours.
1. Press the TIMER OFF button, the last setting of
stopping operation time and the signal "h" will
show on the display area.
2. Press the TIMER OFF button to display "10h" on
the TIMER OFF display of the remote controller.
3. Wait for 3 seconds and the digital display area
will show the temperature again. The "TIMER
OFF" indicator remains on and this function is
activated.
COMBINED TIMER
(S both ON and OFF )etting timers simultaneously
TIMER OFF → TIMER ON
(On → Stop → Start operation)
This feature is useful when you want to stop the air
conditioner after you go to bed, and start it again in
the morning when you wake up or when you return
home.
Example:
To stop the air conditioner 2 hours after setting and
start it again 10 hours after setting.
1. Press the TIMER OFF button.
2. Press the TIMER OFF button again to display
2.0h on the TIMER OFF display.
3. Press the TIMER ON button.
4. Press the TIMER ON button again to display 10h
on the TIMER ON display .
5. Wait for 3 seconds and the digital display area
will show the temperature again. The "TIMER
ON OFF" indicator remains on and this function is
activated.
Page 14

TIMER ON O FF
TIMER ON → TIMER OFF
(Off → Start → Stop operation)
This feature is useful when you want to start
the air conditioner before you wake up and
stop it after you leave the house.
Set
Off
2 hours later
after setting
Start
Stop
5 hours later
after setting
Example:
To start the air conditioner 2 hours after setting,
and stop it 5 hours after setting.
1. Press the TIMER ON button.
2. Press the TIMER ON button again to display
2.0h on the TIMER ON display.
3. Press the TIMER OFF button.
4. Press the TIMER OFF button again to display
5.0h on the TIMER OFF display .
5. Wait for 3 seconds and the digital display area
will show the temperature again. The "TIMER
ON OFF" indicator remains on and this function
is activated.
Page 15

LED/FOLLOW ME function
Press this button less than 2nds will initiate LED
function. And if keep pressing this button more
than 2nds,the FOLLOW ME function is initiated.
When th e Fol low Me func tion is act ivated,
the rem ote display is a ctual tem peratur e at
its loc ati on. The remote cont rol will se nd this
signa l to the air condi tioner ev ery 3 minut es
ON/O FF
TEMP
MODE
SILENC E
FP
FAN
SPEED
SWING
TIMER
SWING
ON
TIMER
SLEEP
OFF
TURBO
LED
SELF
2
CLEAN
LOCK
FOLLOW
ME
RESET
inter val until pres s the FOLLO W ME bu tton
again .
The Fol low Me functio n is not avai lable und er
DRY and FAN mo de.
Switc h the opera tio n mode or tur n off the un it
will ca ncel the Fo llo w Me functi on automa tic ally.
TRUBO/SELF CLEAN function
Press this button less than 2nds will initiate
TURBO function. And if keep pressing this
1
button more than 2nds,the SELF CLEAN
function is initiated.
Turbo function enables the unit to reach the
preset temperature at cooling or heating
operation in the shortest time(if the indoor unit
does not support this function, there is no
corresponding operation happened when
pressing this button.)
Under S ELF CLEAN mode , the air con ditione r
will au tomaticall y clean and d ry the Evap orator
and kee p it as fresh for th e next oper ation.
Page 16

FAQs
Why does the fan continue to run even when the unit is not cooling or heating?
To maintain consistent temperatures and minimize energy-loss from constant starts and
stops, the fan keeps air flowing past the thermostat.
What temperature is displayed on the remote controller?
The remote always displays your desired indoor temperature. (You may view current
indoor and outdoor temperatures on the indoor unit’s Front Panel Display.)
What happens if the remote is lost or damaged?
Use the Manual Override button to manually operate the unit. Lift up the front panel
section on the indoor unit and locate the button right-hand side. Press the button to turn
ON the unit. (Not all functions will be available.) Press again to cancel Manual Override
Mode and transfer control back to the remote controller.
Not all features available on all models. Your actual air conditioning and heating system and related devices
may differ from the images shown in this manual
For complete instructions on these and other functions,
as well as important safety information, see the Owners Manual.
For more information, visit www.cooperandhunter.us
.
Specifications are subject to change without notice. Manufacturer reserves the right to discontinue, or change at any time, specifications or designs without notice or without incurring
obligations. © 2016
.All rights reserved.
CR149-RG36F1EU1
2020550A9223
 Loading...