

Page 1

Instruction Manual
Please keep for future reference
-
Cookworks Mini Oven And Hob
2010-5
KH-H28RC-10Skh
Page 2

CAUTION
Read all the instructions carefully before using and retain
this for further reference.
The temperature of accessible surfaces may get hot when
the appliance is operating especially the metal top area
and the warming rack if any.
This appliance is not intended for use by young children
and persons with reduced physical, sensory or mental
capabilities, or lack of experience and knowledge.
This appliance can be used by children aged from 8 years
and above and persons with reduced physical, sensory or
mental capabilities or lack of experience and knowledge
if they have been given supervision or instruction
concerning use of the appliance in a safe way and
understand the hazards involved by a person responsible
for their safety. Children shall not play with the appliance.
Cleaning and user maintenance shall not be made by
children unless they are older than 8 and supervised.
Keep the appliance and its cord out of reach of children
less than 8 years.
Children should be supervised to ensure that they do not
play with the appliance.
The appliance is not intended to be operated by means of
an external timer or separate remote-control system.
Page 3

IMPORTANT SAFETY INSTRUCTIONS
Read all instruction before use and keep for future reference.
1.
Read all instructions.
2. Do not touch hot surfaces. Use handle or knobs.
3. Close supervision is necessary when any appliance is used by or near children.
4. To protect against electric shock, do not immerse cord, plug, or any parts of the oven in water or other liquids.
5. Do not let cord hang over edge of table or counter, or touch hot surfaces.
6. Do not operate appliance with damaged cord or plug or after the appliance malfunctions, or has been damaged
in any manner, return the appliance to the nearest Authorized Service Center for examination, repair, or
adjustment.
7. The use of accessory attachments not recommended by the appliance manufacturer may cause hazard or
injury.
8. Do not place on or near a hot gas or electric burner, or in a heated oven, or in a microwave oven.
9. When operating the oven, keep at least 12 cm of space on all sides of the oven to allow for adequate air
circulation.
10. Unplug from outlet when not in use, or before cleaning. Let it to cool down before putting on or taking off parts,
or before cleaning.
11. Do not cover CRUMB TRAY or any part of the oven with metal foil. This may cause overheating of the oven.
12. Extreme caution should be exercised when removing tray or disposing of hot grease or other hot liquids.
13. Do not clean the oven with metal scouring pads. Metal chippings would touch electrical parts, and endanger a
risk of electric shock.
14. A fire may occur if the oven is covered by or placed near the flammable material, including curtains, draperies,
walls, and the like, when in operation. Do not store any item on the oven during operation.
15. Extreme caution should be exercised when using containers constructed if anything other than metal or glass.
16. Do not place any of the following materials in the oven: cardboard, plastic, paper, or anything similar.
17. Do not store any materials, other than manufacturer’s recommended accessories, in this oven when not in use.
18. To disconnect, turn any control to “off”, then remove plug from wall outlet. Always hold the plug, but never pull
the cord.
19. Always wear protective, insulated oven mitts when inserting or removing items from the hot oven.
20. This appliance has a tempered, safety glass door. The glass is stronger than ordinary glass and more resistant
to breakage. Avoid scratching door surface or nicking edges. If the door glass has a scratch or nick, contact the
nearest Authorized Service Center for examination and repair.
21. Do not use outdoors.
22. Do not use appliance for other than intended use.
23. This appliance is for HOUSEHOLD USE ONLY.
24. The accessible surfaces are liable to get hot when the appliance is operating.
26. The appliance is not intended to be controlled by an external timer or separate remote-control system
27. If the surface of the hotplate is cracked, switch off the appliance to avoid the possibility of electric shock. Return
appliance the nearest Authorized Service Center for repair.
28. For appliance with type Y attachment, if the supply cord is damaged, it must be replaced by the manufacturer, its
services agent or similarly qualified persons in order to avoid a hazard.
29. This appliance is not intended for used by persons (including children) with reduced physical, sensory or mental
capabilities, or lack of experience and knowledge, unless they have been given supervision or instruction
concerning use of the appliances by a person responsible for their safety.
30. Children should be supervised to ensure that they do not play with the appliance.
31. Rear surface of appliances should be placed against a wall.
. NOTE – This product may emit some odour / smoke when it is first used. This is due to lubricant on the elements
32
burning off and is NORMAL It will not continue following further use.
VE THESE INSTRUCTIONS
SA
.noitisop nepo ylluf eht ni sdoog troppus tonnac rooD ssalG .52
1
Page 4

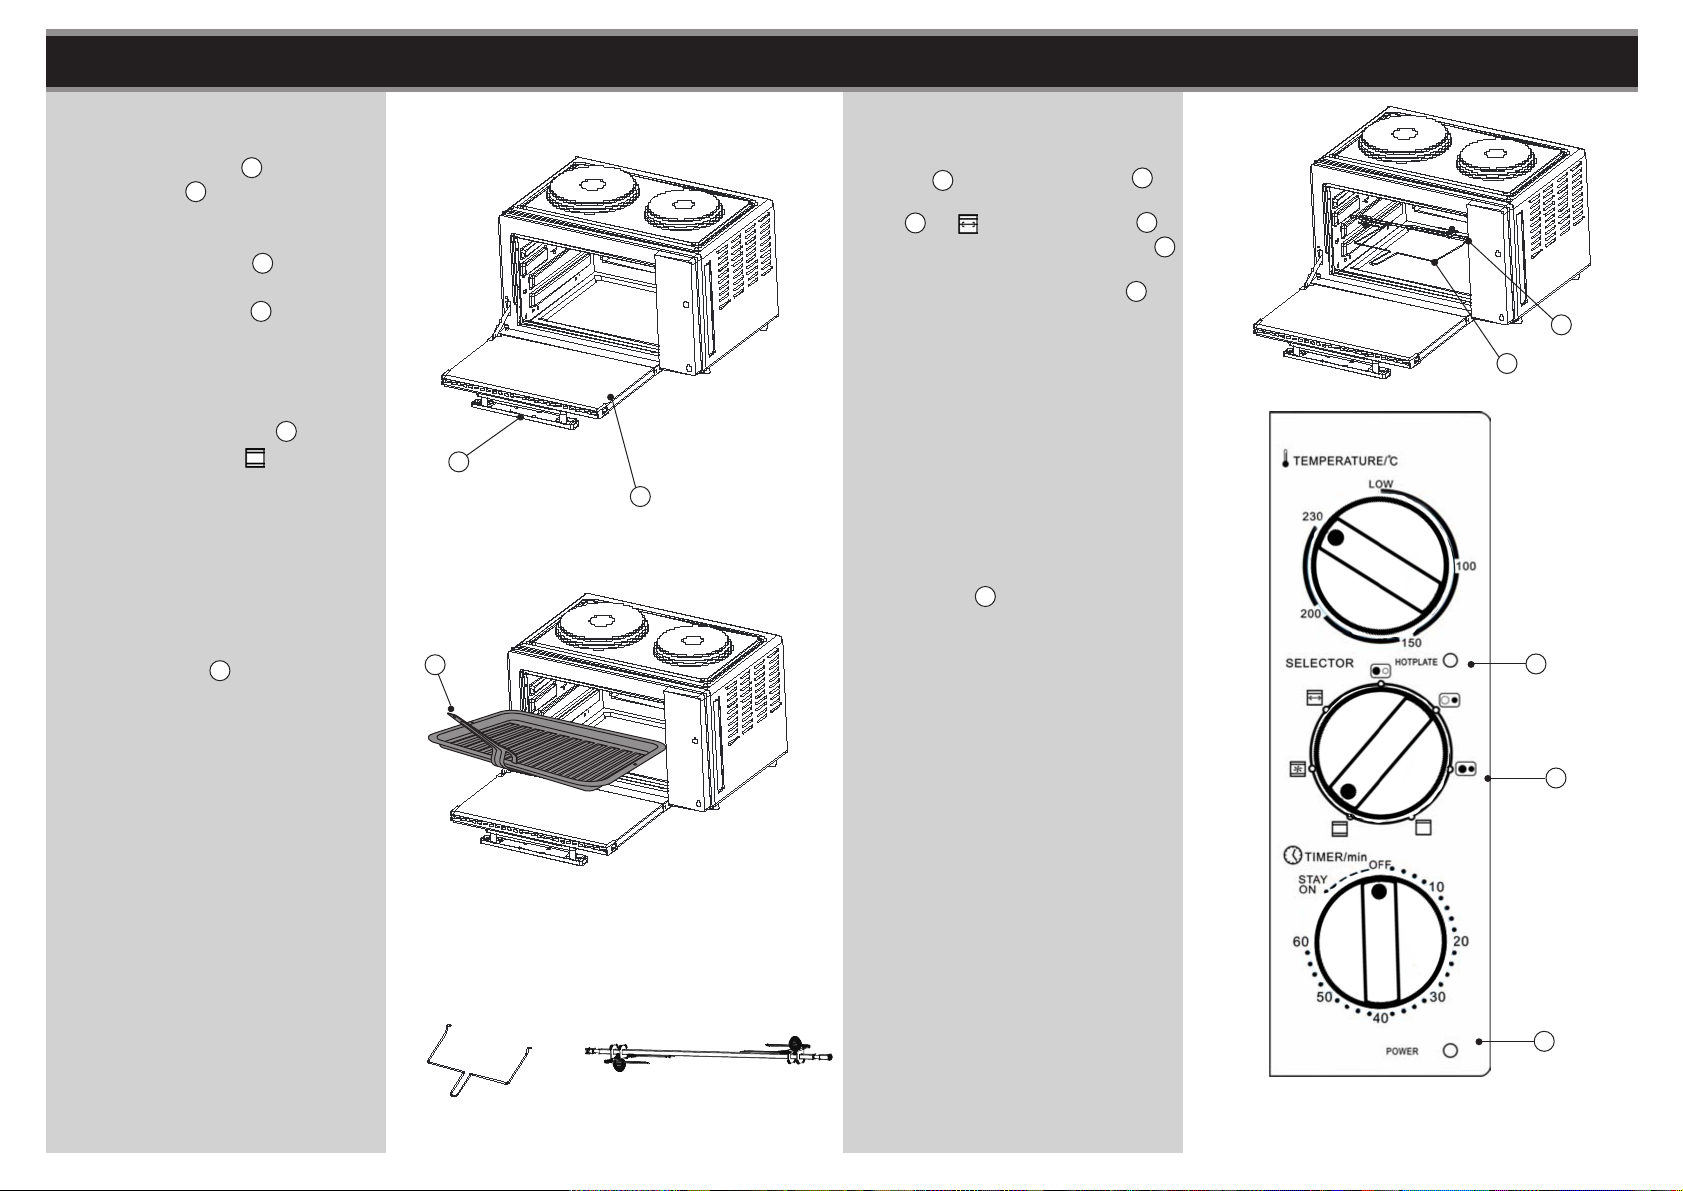
CONTENTS KNOW YOUR MACHINE
Know Your Machine ..........................................................................................3
Operation ...........................................................................................................
Care and Cleaning........................................................................................... 10
Specifications ....................................................................................................11
4
) GrillRack
(L
(H
) Door Handle
(A) Large Hotplate
(B) Small Hotplate
(J
) Glass Door
)Cont
(C
(D)
(Q)
l Panel
ro
perature Dial
Tem
Hotplate Indicator
(E) Function Dial
(G) Oven T
(F) Oven Power indicator
(M) B
aking Tray
imer Dial
(N
) Handle (For Food Tray and Grill Rack)
Rotisserie Spit
(P)
2
(O) Ro
tisserie Handle
3
Page 5

OPERATION OPERATION (OVEN)
Additional warningAdditional warningAdditional warningAdditional warningAdditional warningAdditional warningAdditional warningAdditional warningAdditional warningAdditional warningAdditional warningAdditional warningAdditional warningAdditional warningAdditional warningAdditional warningAdditional warningAdditional warningAdditional warningAdditional warningAdditional warningAdditional warningAdditional warningAdditional warningAdditional warningAdditional warningAdditional warningAdditional warningAdditional warningAdditional warningAdditional warningAdditional warningAdditional warningAdditional warningAdditional warningAdditional warningAdditional warningAdditional warningAdditional warningAdditional warningAdditional warningAdditional warningAdditional warningAdditional warningAdditional warningAdditional warningAdditional warningAdditional warningAdditional warningAdditional warningAdditional warningAdditional warningAdditional warningAdditional warningAdditional warningAdditional warningAdditional warningAdditional warningAdditional warningAdditional warningAdditional warningAdditional warningAdditional warningAdditional warningAdditional warningAdditional warningAdditional warningAdditional warningAdditional warningAdditional warningAdditional warningAdditional warningAdditional warningAdditional warningAdditional warningAdditional warning
Oven Operation
Plug into the mains socket.The
IMPORTANT:
lease read the important safety
P
instructions before use.
Before First Use
Preparing the Oven
- The oven, Grill Rack L and Baking
Tray M are coated in oil that needs
to be burnt off before using the
oven.
1. Insert the Grill Rack L and Baking
Tray M into the oven.
See fig. 1.
2. Set the Function dial E to
dial (G)
then set
dial D to
to turn the oven on, and
the Oven Temperature
Maximum.
See fig. 2.
3. After a few minutes a small amount
of smoke and the smell of burning
oil should come from the oven.
Open windows or doors, or use an
extraction fan if you have one to
remove the smell.
4. Once the oven has stopped
smoking and the smell has gone,
turn the oven OFF using the
Timer dial G , and set the
Oven Temperature dial
LOW.
See fig. 2.
4
and
to
D
L
M
fig. 1
D
E
G
fig. 2
1.
timer knob must turn OFF.
2. The Oven Power Indicator
F
light up.
See fig. 4.
3. Place the food on Grill Rack L or
Baking Tray M and close the
Glass Door J .
See fig. 3.
a. Do not use any paper or plastic
containers.
b. Use baking trays for any food
that is small in size or likely to
drip while cooking.
c. Place the food evenly on the
grill rack.
4. Set the Oven Temperature dial
D
to desired temperature.
5. Set the Function dial
E
to
desired position:
Top heater.
Top and Bottom heaters.
Top+bottom heaters
and Fan.
Top heater and Rotisserie
See fig. 4.
6. Set the timer dial (G) to desired time.
When food is ready, you should:
a. Use accessory handle or oven
gloves to remove hot food to
avoid burning hands.
b. Turn the Timer dial G to
"OFF" position and the Oven
Temperature dial D to "LOW"
position.
See fig. 4.
7. Remove the power plug from the
socket when not in use.
will
.
L
M
F
J
fig. 3
D
E
F
G
fig. 4
5
Page 6

OPERATION (OVEN) OPERATION (HOTPLATE)
Oven Cooking Guide:
1. Cooking time may vary depending
on food ingredients, temperature,
mass and portion. Please adjust the
recipe cooking times accordingly.
2. If cooking for long periods, cooking
times may need to be adjusted. It
is advisable to check the food
periodically.
NOTE: For more accurate cooking
times avoid removing food from
oven for extended periods or
frequently opening the oven
door.
3. Remove the Baking Tray M from
the oven and Grill Rack L if not
required.
4. Set the temperature of the oven by
turning the Oven Temperature
dial
.
D
See fig. 5.
5. Allow a few minutes for the oven
to heat up, then place the food in
the oven using the Baking Tray or
Grill Shelf.
NOTE: Exercise caution when
handling items from the oven,
use oven gloves to avoid burning
hands and place items removed
onto heat resistant surfaces.
ints for oven cooking with different setting Hints for oven cooking with different setting Hints for oven cooking with different setting Hints for oven cooking with different setting Hints for oven cooking with different setting Hints for oven cooking with different setting Hints for oven cooking with different setting Hints foroven cooking with different setting Hints for oven cooking with different setting Hints for oven cooking with different setting Hints for oven cooking with different setting Hints foroven cooking with different setting Hints for oven cooking with different setting Hints for oven cooking with different setting Hints for oven cooking with different setting Hints for oven cooking with different setting Hints for oven cooking with different setting Hints for oven cooking with different setting Hints foroven cooking with different setting Hints for oven cooking with different setting Hints for oven cooking with different setting Hints for oven cooking with different setting Hints foroven cooking with different setting Hints for oven cooking with different setting Hints for oven cooking with different setting Hints for oven cooking with different setting Hints for oven cooking with different setting
H
F
unction dial position
Top+bottom heaters
6
and Fan.
A B
Hotplate
The Hotplate is ideal for cooking
casserole dishes.
D
Cooking Utensils
-
For the best cooking result, use
pans with a diameter of 145 180mm with flat bottom and a lid.
fig. 6
- All utensils should be made from
ferrite materials such as enamel,
cast or stainless steel. Aluminum
or copper pans must not be used
as they can melt under high
temperature.
D
Hotplate Operations
1. Select the hotplate you wish to
turn on:
G
Small Hotplate B
Turn the timer dial (G) to turn
oven on.
Large Hotplate
A
F
See fig. 6 and 7.
fig. 5
Fu
nction
R
eco
mmended
for
food
cooking
Top heat
To
er
p + lower heater
Top
+ lower heater +
Fan
Top h
eater +
rotisserie
To
ast, meat, fish
To
ast, meat, fish
To
ast, meat, fish, bread
Ro
ast chicke n
The Hotplate Power Indicator
2.
will
ht up when a hotplate is on.
lig
F
See fig. 7.
3. When finished cooking turn the hot
plates off by turning the
Timer dial G to
"OFF".
See fig. 7.
NOTE: Both hotplates may be used
at the same time.
G
fig. 7
7
Page 7
OPERATION (Grill) OPERATION (Grill)
Operating the Grill
Use Door Handle H to open
1.
Glass Door
J .
See fig. 8.
2. Remove Grill Rack L.
3. Place Baking Tray M into the
slot nearest to the bottom of the
oven, this will act as a drip tray.
See fig. 9.
4. Turn the Function dial E to the
top heater setting , and wait
a few minutes for the grill to heat
up.
5. Place food to be grilled onto rack.
Spread out evenly for better
cooking results.
6. Attach Handle N to the rack and
use the handle to insert the tray
into the oven, sliding into the slots
nearest to the top of the oven.
Detach handle from rack as it
may become very hot during
cooking.
7. Rotisserie Handle: Allows you to
pick up Rotisserie Spit.
8. Rotisserie Spit: Use to roast a
variety of meats and poultry.
See fig. 10.
NOTE: Make sure there is
sufficient gap between the grill
elements and the food to
prevent burning.
H
N
(O
) RotisserieHandle
fig. 8
J
fig. 9
(P)
RotisserieSpit
fig. 10
roa
Use to
9.
and poultry., then use the rotisserie
handle pick up
put into oven, and set up the function
dial to “ ” and the timer dial to
desired time and temperature dial
to Max.When the food had finished
roast, use the
take out the rotisserie spit P from
the oven.
st a variety of meats
O
E
rotisserie handle
rotisserie spit
O
See fig. 11.
10.Check food periodically - do not
leave unattended, when food is
ready, reattach handle and
carefully remove rack from the
oven, placing it on a heat
resistant surface.
11.Turn off grill by rotating the
Timer dial G to the OFF
position and then close the glass
door.
See fig. 12.
NOTE: Clean the oven, grill rack
and baking tray after use.
Please ensure they are fully
cooled before cleaning.
The hob and oven cannot be
used at the same time.
.
-
P
G
D
P
O
fig. 11
F
E
G
fig. 12
98
Page 8

CARE AND CLEANING SPECIFICATIONS
Technical Data
NOTE:
Always Unplug and allow to cool
before cleaning
Power Consumption 220-240V~50/60Hz
Total Power 1750W
Hotplate (ø180) Output 1000W
Hotplate (ø145) Output
Oven Output 1500W
Electric Oven Capacity
750W
28 Litres
Wipe the surfaces with damp
sponge or cloth.
- Do not use steel wool scouring
pads, abrasive cleaners or scrape
surfaces with metal utensils as this
may damage the unit.
- Wash all accessories in hot water
or in a dishwasher.
- Wipe the door and clean with a
damp sponge. Dry with a paper
or cloth towel.
NOTE: Do not immerse in water or
any liquid
fig. 13
Connecting to Power
Check
that the voltage marked on the product corresponds with your supply voltage.
This product is fitted with a 13A plug complying with BS1363. If this plug is unsuitable
or needs to be replaced, please note the following :
Plug Replacement
If you need to replace the fitted plug.
WARNING :
Never connect live or neutral wires to the earth terminal of the plug.
Only fit an approved 13 Amp BS1363/A plug and the correct rated fuse.
If in doubt, consult a qualified electrician.
IMPORTANT
This unit is
with an Earthed Plug fitted with a 13A fuse.
The wires in this mains lead are coloured as follows:
Yellow & Green-Earth
Blue-Neutral
Brown-Live
As the colours of the wires in the mains lead of this
apparatus may not correspond with the coloured
markings identifying the terminals in your plug,
proceed as follows:
a Class 1 Appliance and must be fitted
YELLOW & GREEN
(EARTH)
BLUE
(NEUTRAL)
CABLE
GRIP
BROWN
(LIVE)
WASTE ELECTRICAL
DISPOSED OF WITH HOUSEHOLD WASTE. PLEASE
RECYCLE WHERE FACILITIES EXIST. CHECK WITH
YOUR LOCAL AUTHORITY FOR RECYCLING ADVICE.
PRODUCTS SHOULD NOT BE
The wire which is Coloured Yellow & Green must be connected to the terminal
which is marked E or coloured Yellow or Green. The wire which is coloured blue
must be connected to the terminal which is marked with N or coloured blue. The
wire which is coloured brown must be connected to the terminal which is marked
L or coloured brown. Always ensure that the plug cord grip is fastened correctly.
If a 13A (BS1363) fused plug is used it must be fitted with a 13A fuse conforming
to BS1362 and be ASTA approved. If in doubt contact a qualified electrician.
1110
Page 9

PRODUCT GU
ARANTEE
This product i
s guaranteed against manufacturing defects for a period of
Year
This product is guarante
Any defect that arises due to faulty materials or workmanship will either be replaced,
refunded or repaired free of charge where possible during this period by the dealer from
whom you purchased the unit.
The guarantee is subject to the following provisions:
y The guarantee does not cover accidental damage, misuse, cabinet parts, knobs or
consumable items.
y The product must be correctly installed and operated in accordance with the instructions
contained in this manual.
y It must be used solely for domestic purpose.
y The guarantee will be rendered invalided if the product is re-sold or has been damaged by
inexpert repair.
y Specifications are subject to change without notice.
y The manufacturer disclaims any liability for the incidental or consequential damages.
y The guarantee is in addition to, and does not diminish your statutory or legal rights.
ed for twelve months from the date of original purchase.
Guarantor: Argos Ltd
489 - 499 Avebury Boulevard
Central Milton Keynes
MK9 2NW
 Loading...