

Page 1
CONVOTHERM mini OES 6.06
Enodis
User Manual
Page 2
EN English
- 3 - EN
Page 3

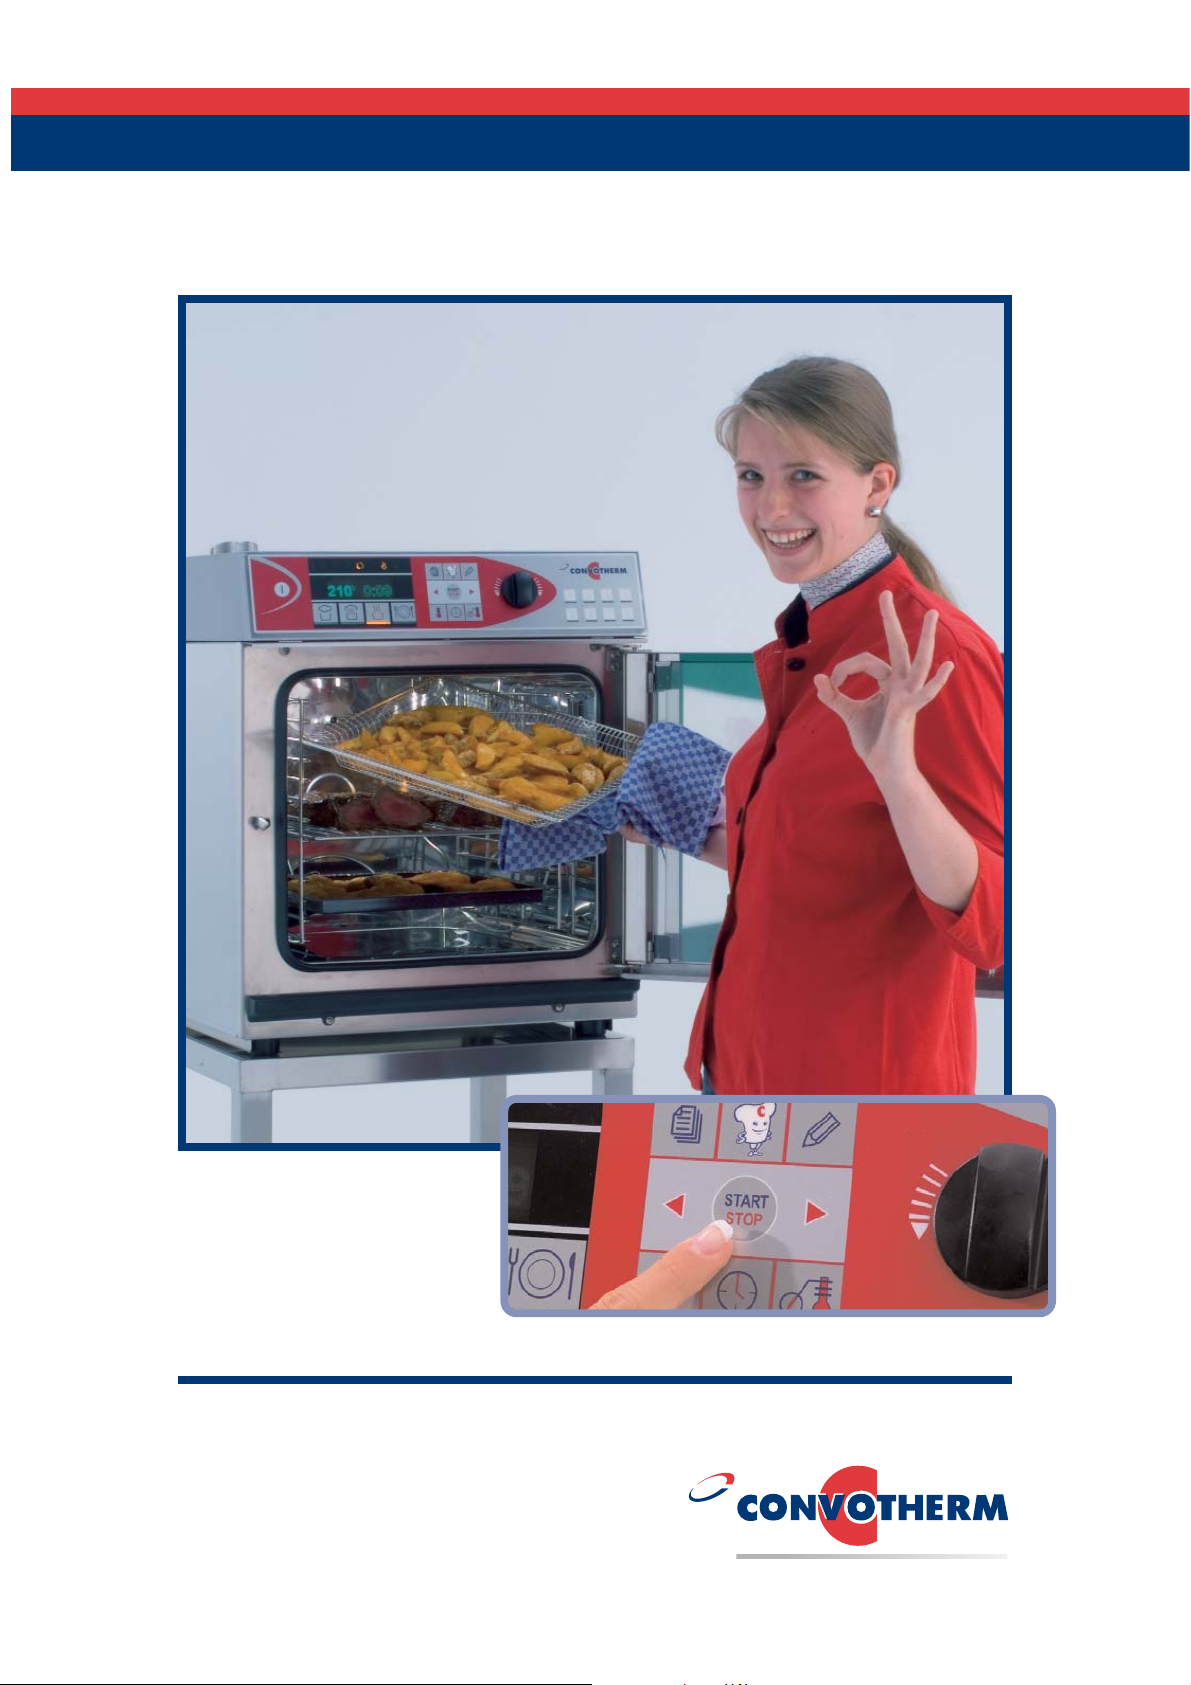
Thank you for choosing a CONVOTHERM.
Your new CONVOTHERM perfectly combines ease of use with first-class and co nstantly
reproducible quality for prepared dishes.
You will feel real satisfaction from your customers because: Best quality for your menus is
guaranteed with your CONVOTHERM. Time and time again.
To ensure your success from the outset, we would like to provide you with all the necessary
instructions and helpful hints for perfect dishes in this manual.
CONVOTHERM will take responsibility for the smooth functioning of your applian ce.
We offer:
• Our customer helpline on +49 (0) 8847 67 899 for questions relating to your
CONVOTHERM or by email at chefshotline@convotherm.de.
• You can find constantly updated information, a discussion forum for all questions related to
CONVOTHERM, and a selection of international recipes to downl oad on our website at
www.CONVOTHERM.com.
• The CONVOTHERM customer service line (technical emergencies) is open 24 hours a day;
announcement giving the current telephone number is available on +49(0)8847670.
• Rapid spare parts service, available by express delivery on request.
• The warranty conditions of your CONVOTHERM distributor shall apply. The warranty does
not include damage to glass, electric light bulbs and sealant material nor damage caused by
improper installation, usage, cleaning, maintenance, repair or de-scaling nor any alteration s
to the manufactured state.
We hope you enjoy using your CONVOTHERM oven and that you will have many satisfied
guests!
CONVOTHERM Elektrogeräte GmbH
This manual describes the features and facilities of our CONVOTHERM planned at the time of printing as
comprehensively as possible. Not all of these features will be available as standard. Some functions mentioned are only
available for particular models as optional extras. This manual may contain errors and is subject to technical
modifications.
- 4 -
EN
Page 4
To help you find what you are looking for more quickly, we have used various orientation
symbols.
You will find the following symbols in the text:
Warning to take special care
Risk of explosion
Warning of high voltage
Warning of superheated steam
Observe loading height
Use protective gloves
Use eye protection
Tips on usage
- 5 -
EN
Page 5
Contents
Safety instructions 7
Description of functions, correct use, danger of accidents,
risk prevention
Product information 11
Overview of appliance, technical data, accessories
CONVOTHERM 14
Functional parts, operating elements and their function
Setup 17
default settings, memo settings, temperature display,
network address, language
Signal tone, volume, time, date, cookbook index,
Cooking with CONVOTHERM 21
core temperature measurement, Delta-T-cooking,
Cook
Steaming, superheated steam, convection, regeneration,
&Hold
Game, Poultry, Bakery goods, Asia, Finger Food and much more
Practical hints for cooking 31
Cooking programme settings: Vegetables, Fish, Meat
Additional functions for cooking 39
Vapour reduction, Button lock, Manual addition of water
Pre-select start time, Crisp&Tasty, Tray Timer, Preheating,
CONVOTHERM Cookbook 44
Editing cooking recipes in the cookbook,
Working with Press&Go (symbols)
Working with cooking plans, Working with the cookbook,
Daily servicing and maintenance 51
Semi-automatic cleaning,
? What to do if ... 53
Index 57
- 6 - EN
Troubleshooting, operating in an emergency
Operation, food recipes
Page 6

Safety instructions
Improper maintenance or cleaning or
modifications to the appliance can lead to
serious injuries and damage to the
appliance.
Read the user’s manual carefully before
operating the appliance.
The appropriate country-specific standards
and regulations are to be observed.
How your CONVOTHERM Mini
works
You can prepare various foodstuffs in your
CONVOTHERM. Steam, convection or
superheated steam are used to do this.
Your CONVOTHERM therefore covers
nearly all possible methods of cooking food.
You can use it to steam, blanch, poach,
simmer, braise, boil, roast, stew, bake,
gratinate, grill, cook sous-vide, low-oxygen
cook at low temperature, regenerate and
defrost food. You place the food in your
CONVOTHERM in CONVOTHERM
approved accessories, select the cooking
programme, cooking time or core
temperature and start the appliance.
Correct use
• Your CONVOTHERM may only be
used for the cooking methods listed
above.
• Your CONVOTHERM is intended for
commercial use.
• The ambient temperature should not be
below 4°C.
• To avoid accidents and damage to the
CONVOTHERM, the operator must
train staff regularly. The appliance may
only be used by trained employees.
Regular safety training for operating staff
is mandatory.
The appliance should never
• be operated in toxic or poisonous
atmospheres
• be operated at a temperature <+4°C
• be operated outside without protection
from rain
• cook food in sealed containers (such as,
for example, tins and cans).
• be used to heat up flammable objects
such as, for example, oils, fats, cloths
or similar items, etc.
• heat non-foods (with the exception of
permitted appliance accessories).
Risk of death
• Electric shock
Before opening the housing cover and
carrying out repairs and maintenance
(by CONVOTHERM authorised
electricians only), turn off the
building’s electricity supply to the
CONVOTHERM.
Risk of an electric shock!
- 7 - EN
Page 7

Safety instructions
Risk of injury
• Place of operation
Avoid cooking appliances with fat baths
such as deep fat fryers, machines that
bake with fat, etc. near the
CONVOTHERM. There is a serious
risk of burns for the operator, if water
splashes into hot fat. A sufficient safe
distance should be kept between fat
baths or deep fat fryers and the
appliance (operating range of optional
hand-held spray).
• Do not install the CONVOTHERM
above appliances which give off a lot of
heat and/or steam, as this can affect
how the CONVOTHERM functions.
Risk of an electric shock.
• Cooking mode
– Caution: steam!
When opening the oven door,
proceed as follows: Turn handle
and slowly open the door. Escaping
steam may otherwise lead to burns,
for example on the hands and face.
– Risk of burns!
If containers filled with liquids or
with a foodstuff which is liquid
during cooking, no shelf levels
which are higher than those which
can be seen into may be used.
Please observe the additional
instructions / stickers on the
appliance.
• Kitchen logistics
Do not store or use flammable
gases or liquids near the appliance.
These could ignite due to the heat
given off by the appliance,
endangering both people and
product.
• Appliance malfunctions
– If you notice scratches, nicks or
cracks on the inside panel of the
appliance door, it must be replaced
immediately. Otherwise, the glass
panel could shatter during cooking,
leading to cuts.
–
The CONVOTHERM may only be
operated with a working magnetic
door switch. In the event of a
malfunction, inform
CONVOTHERM customer service
department immediately.
– Cleaning
When cleaning, wear suitable
protective clothing (gloves,
protective glasses).
–
Leave the door open a little, when
not operating for a while (e.g.
overnight).
• The use of non-original
CONVOTHERM cleaners may
harm health by irritating the lungs
or skin and may cause irreparable
damage to the stainless steel
surface.
Please follow the safety instructions
on the labels and/or on the safety
data sheets of the cleaners.
Possible damage to products or
buildings
• Before operating for the first time
– In the vicinity of the unit, connect
an accessible all pole isolation
switch with a contact gap of at least
3mm as part of the building's
installation. When carrying out
external cleaning, repair or
installation work, the appliance
must be disconnected from the
electrical supply.
- 8 - EN
Page 8

Safety instructions
– The exhaust pipe and its cover (top
left) can reach a high temperature
–
You can get more installation
advice from the installation
instructions. For the connected
wattage, voltage and fuse rating,
see the technical data or circuit
diagram in the CONVOTHERM’s
wiring space.
• All appliance models
– To ensure that your
CONVOTHERM is working troublefree, maintenance should be
carried out at least once a year by
a designated customer service
department authorised by
CONVOTHERM.
–
When not using the appliance for
extended periods, shut off the
water stopcock and disconnect the
building’s electricity supply to the
CONVOTHERM.
• Cleaning
– For the purposes of cleaning, the
optional hand-held shower must
only be used for the oven interior
and not for the outer housing. Do
not spray the air intake or outlet
apertures of the CONVOTHERM.
–
Only carry out cleaning and
maintenance work on the cold
CONVOTHERM.
Do not spray water into the hot
oven.
Allow the temperature in the
CONVOTHERM’s oven to cool
down to below 60°C.
–
Regular cleaning of the
CONVOTHERM, both inside and
out and including the door
appliance drip channel, after daily
use will guarantee you years of
pleasure with your CONVOTHERM!
–
Only use CONVOTHERM
approved cleaning agents.
See section “Daily maintenance
and care”. On no account use
irritating, highly alkaline cleaners or
scourers. In the event of damage
which can be traced back to
improper cleaning, any claim under
the warranty becomes invalid!
–
Do not use jet cleaners or water
sprays to clean your
CONVOTHERM!
–
Do not treat the CONVOTHERM
with acids or expose to acid steams,
as stainless steel can then corrode.
• Decalcification of the oven
- remove light calcium films by
spraying, letting CONVOCare work
and wiping out thoroughly with a
damp cloth
- heavy calcium deposits should
only be removed by approved
CONVOTHERM authorised customer
service department
On a day to day basis
• Before switching on
–
Lock the rack as instructed.
–
If the ambient temperature at the
installation site is below +4°C heat
the CONVOTHERM up to room
temperature before initial start up.
–
After transporting the
CONVOTHERM when the outside
temperature is below -4°C, the
safety temperature limiter may
have been triggered. This has to be
corrected by a CONVOTHERM
approved electrician.
–
In the case of an “E...” error
message, refer to the section “What
to do if ...”.
- 9 - EN
Page 9

Safety instructions
• Loading/removing dishes
– Risk of burns!
–
Depending on the cooking
temperature selected, high
temperatures can occur,
especially on the food
containers, shelves and on the
inside panel of the door. It is
advisable to wear protective
gloves.
–
During operation, the
temperature of the glass panel
in the door and the outer
housing can sporadically get
very hot.
– Risk of burns!
Containers containing hot,
liquid foods should only be
transported if covered to avoid
spillage of liquids.
–
The maximum permitted
loading weight:
20 kg (max. 10 kg per shelf)
–
Never reach behind the suction
plate during operation and
never stop the fans manually.
• Fixing the shelf rack
– Removing: Press shelf rack
upwards and unhook.
–
Ensure that the runners do not
become bent, otherwise
shelves, trays and containers
will no longer by safely
supported.
• Working with standard core
temperature sensor
– The core temperature sensor can
become hot. Use protective
gloves.
–
Ensure that you do not prick
yourself or others with the tip of the
sensor.
–
Do not allow the sensor to hang out
of the oven. Always hang it
correctly on the hook provided, as it
is a sensitive measuring instrument.
–
Before taking out dishes, remove
the sensor from the food.
General advice
• This user’s manual forms a part of your
CONVOTHERM
–
Always keep these instructions
near the appliance for future
reference.
–
Pass to any subsequent owner.
– Also see the Installation Manual for
the approved CONVOTHERM
authorised customer service
department or installer and the
printed Operating Instructions (A3)
for daily use.
- 10 - EN
Page 10

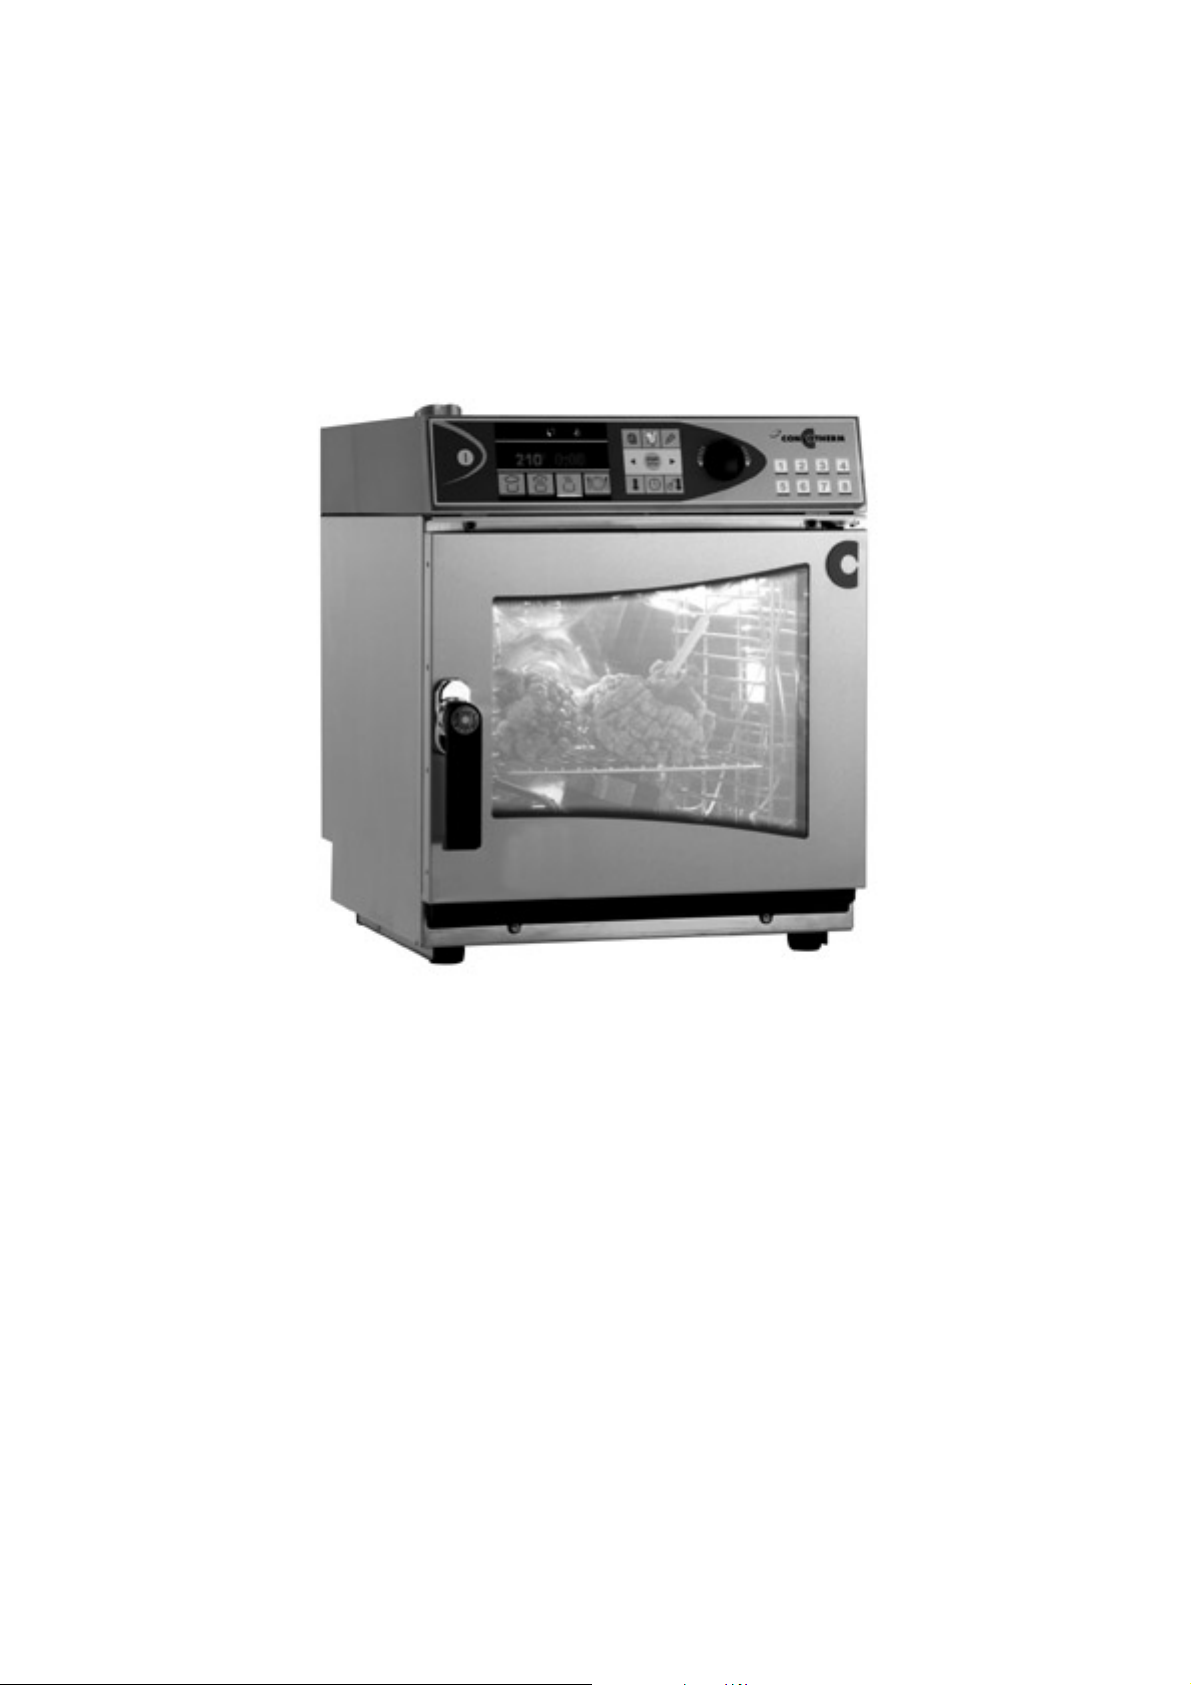
Product information
Product overview
- 11 -
EN
Page 11
Product information
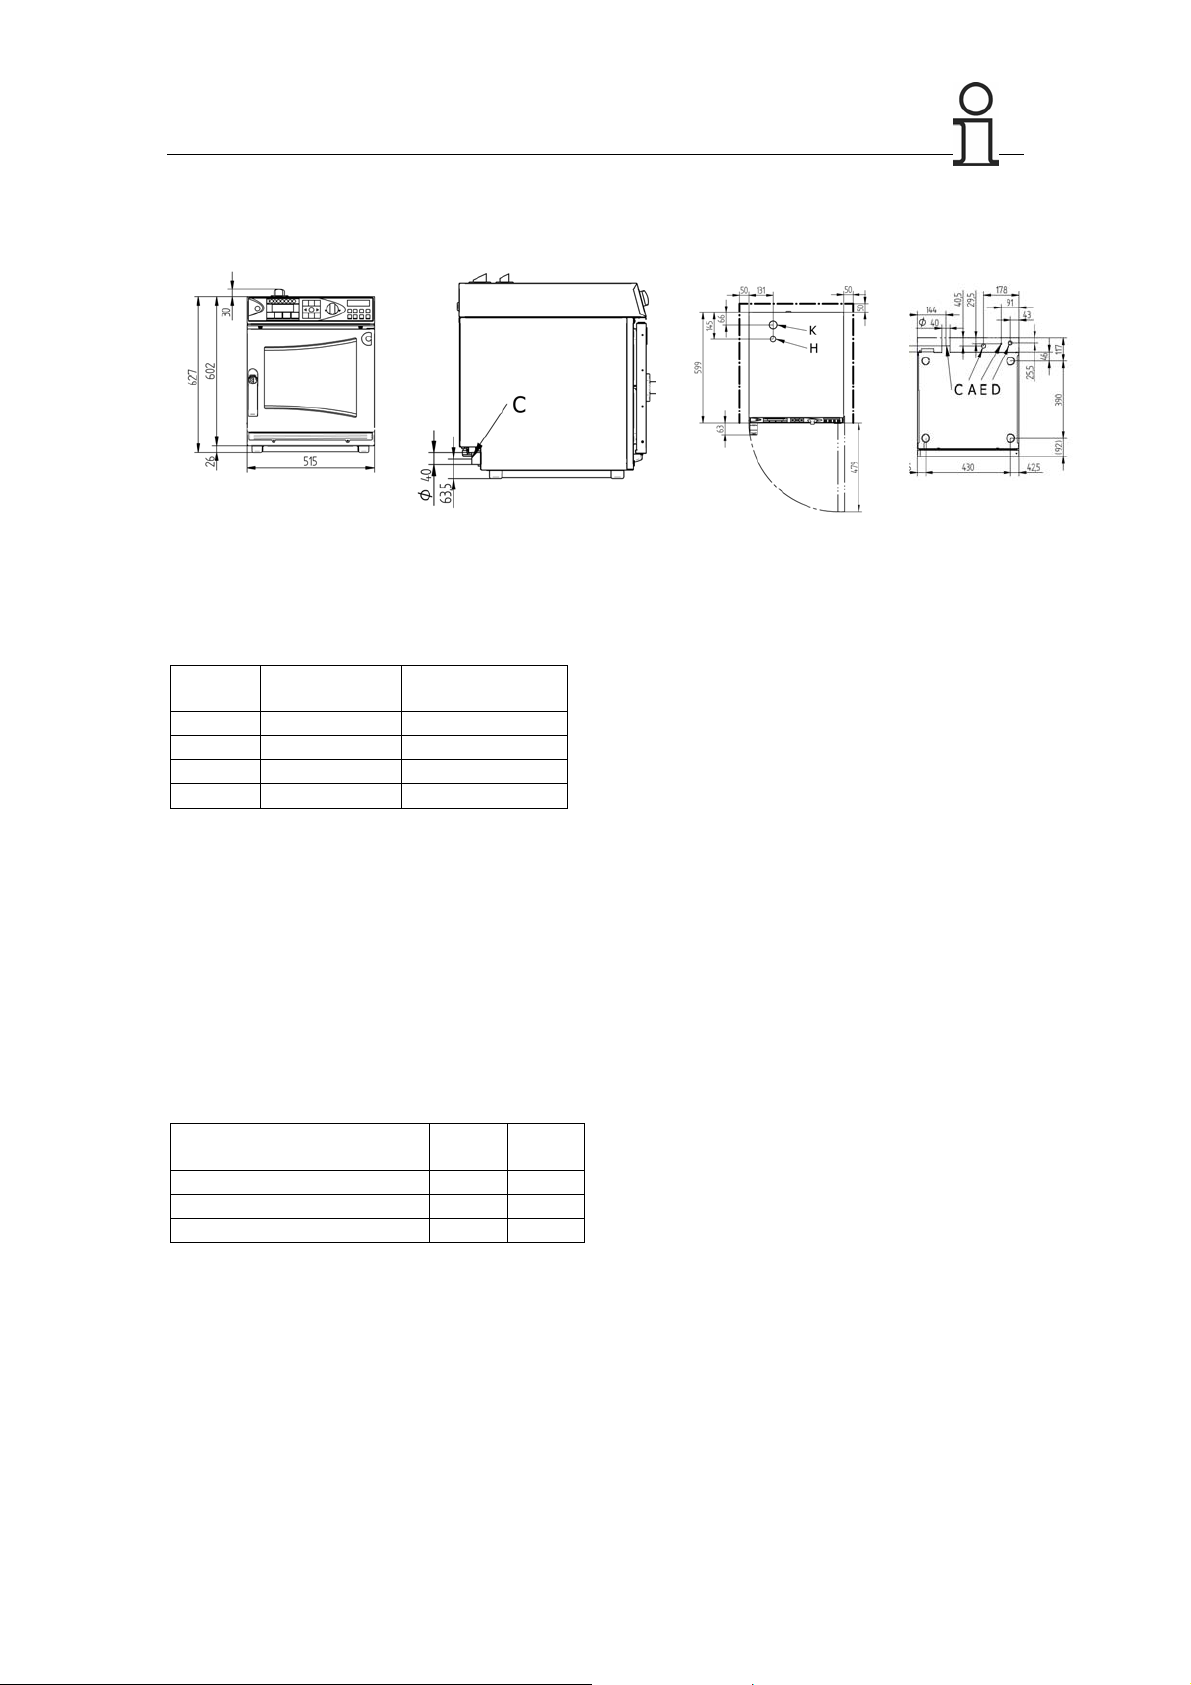
1. Setting up the appliance
Appliance dimensions:
Without
packaging
Width
Depth
Height
Weight
515 mm 580 mm
599 mm 730 mm
627 mm 800 mm
45 kg 60 kg
• Appliance must be installed level
Safety distances:
• Left-right : 50 mm
• Back : 50 mm
• Above : 500 mm (ventilation)
2. Connecting to the electrical supply
Either alternating current 1/N/PE 230V 50/60Hz
or three-phase current 3/N/PE 400V 50/60Hz
(can be converted on site by CONVOTHERM
authorised service partner)
Connected wattage [ kW]
Rated current [A]
Cable cross section* [mm²]
* recommended cable cross section open-air laid
at max. 5 m in length.
• Main switch (all-pole separator) is to be
installed by the customer in the vicinity of the
appliance.
• Connection for potential compensation.
• WARNING 1/N/PE connection causes
considerable power reduction and therefore
extension of the cooking time.
With
packaging
1/N/PE
230V
3,0 5,7
13,1 11,8
3 x 2.5 5 x 2.5
3/N/PE
400V
3. Connecting to the water supply:
• Cold water ¾” 2 to 6 bar flow pressure
• Water tap and filter are to be installed by
the customer in the vicinity of the
appliance
• Water: Drinking water quality with
Total hardness: 5-7°dH
(soft water)
pH: 6.5 to 8.5
Conductivity: 10-200µS/cm
-
: max 100mg/l
Cl
-
SO
: max 400mg/l
4
Fe: max 0.1mg/l
Mn: max 0.05mg/l
Cu: max 0.05mg/l
Cl
: max 0.1mg/l
2
if necessary, install water treatment
4. Water drainage
DN 40, recommended tundish funnel or
fixed connection
5. Ventilation
Sensible heat output 1100 kJ/h
Latent heat output 1000 kJ/h
6. Other data:
Splash protection IPX4
Conformity marking CE
Noise emission: < 70 dBA
Inserts 2/3 GN (325x354mm) 6
Shelf spacing 50 mm
- 12 -
EN
Page 12

Product information
Accessories
We can offer an extensive wide range of useful accessories for your CONVOTHERM 6.06.
Oven stand 3218570
For the safe setup of optimally adapted oven stands. There are several versions to chose from:
open, closed on three sides, closed on all sides with folding doors, each with 10 or 20 pairs of
shelf rails. We can also supply mobile oven stands on request.
Wall bracket 3418571
For safe setup in the front cooking area at working height.
Drainage set 3416709
For secure connection to the drainage system
Hand-held shower kit 3418722
For optimum cleaning
Gastronorm containers, oven shelves and trays
Sturdy chrome nickel steel containers, oven shelves and trays in all standard Gastronorm sizes.
Specially coated trays
Trays to optimise browning on the underside of food.
- 13 -
EN
Page 13
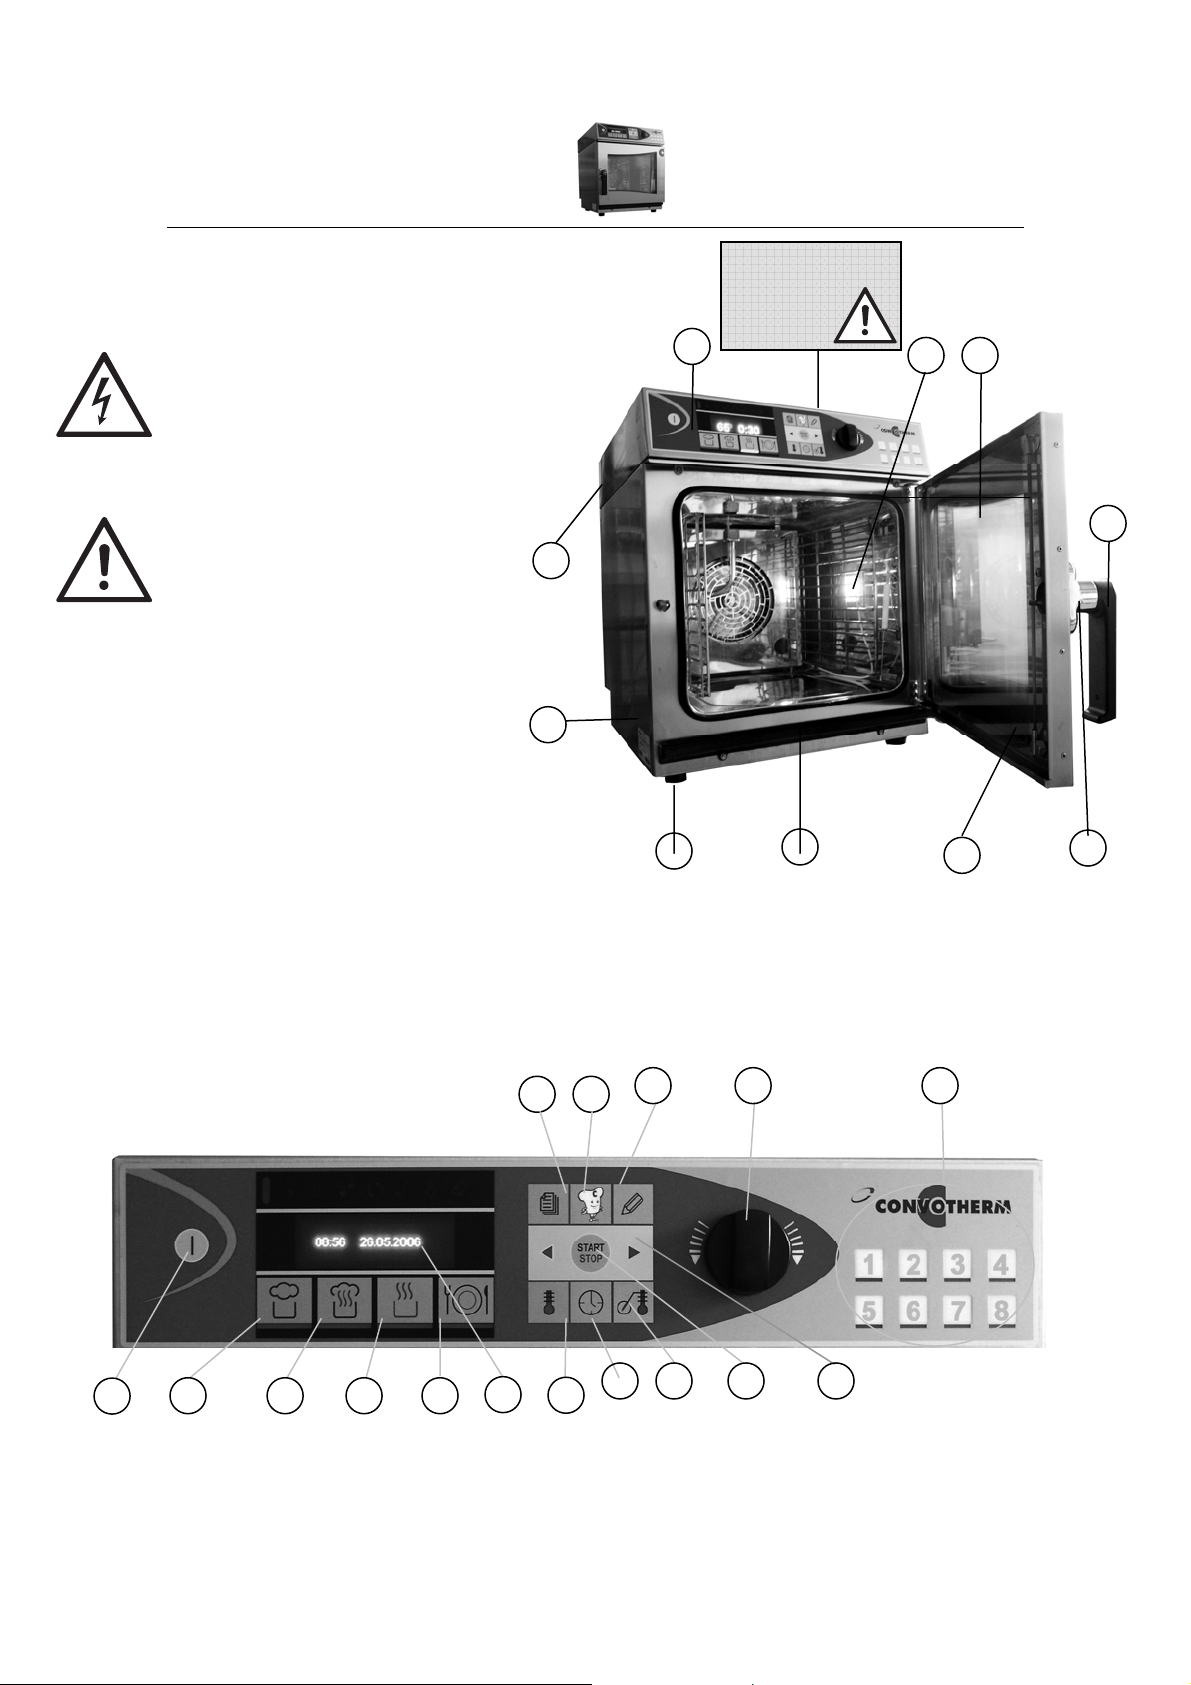
CONVOTHERM Mini
Construction
A. Control panel
Operating elements and their functions see below
B. Oven light
C. Door with double glazed panel
D. Door handle
• To open appliance: Turn handle to
E. Contact-free door contact switch
F. Door drip tray
integrated, self-emptying
G. Appliance drip tray
H. Appliance feet
I. Rating plate
with the following data: power
consumption, voltage, number of phases,
frequency and appliance type and
number
J. Air outlet pipe
the left or the right
Warning:
Appliance surfaces
can be hot!
A
J
I
H
G
B
C
D
E F
1
Control panel and its
functions
CONVOTHERM
2 4
3
5
12 13
6
7
14
8 9
15
10
16
11
- 14 - EN
Page 14
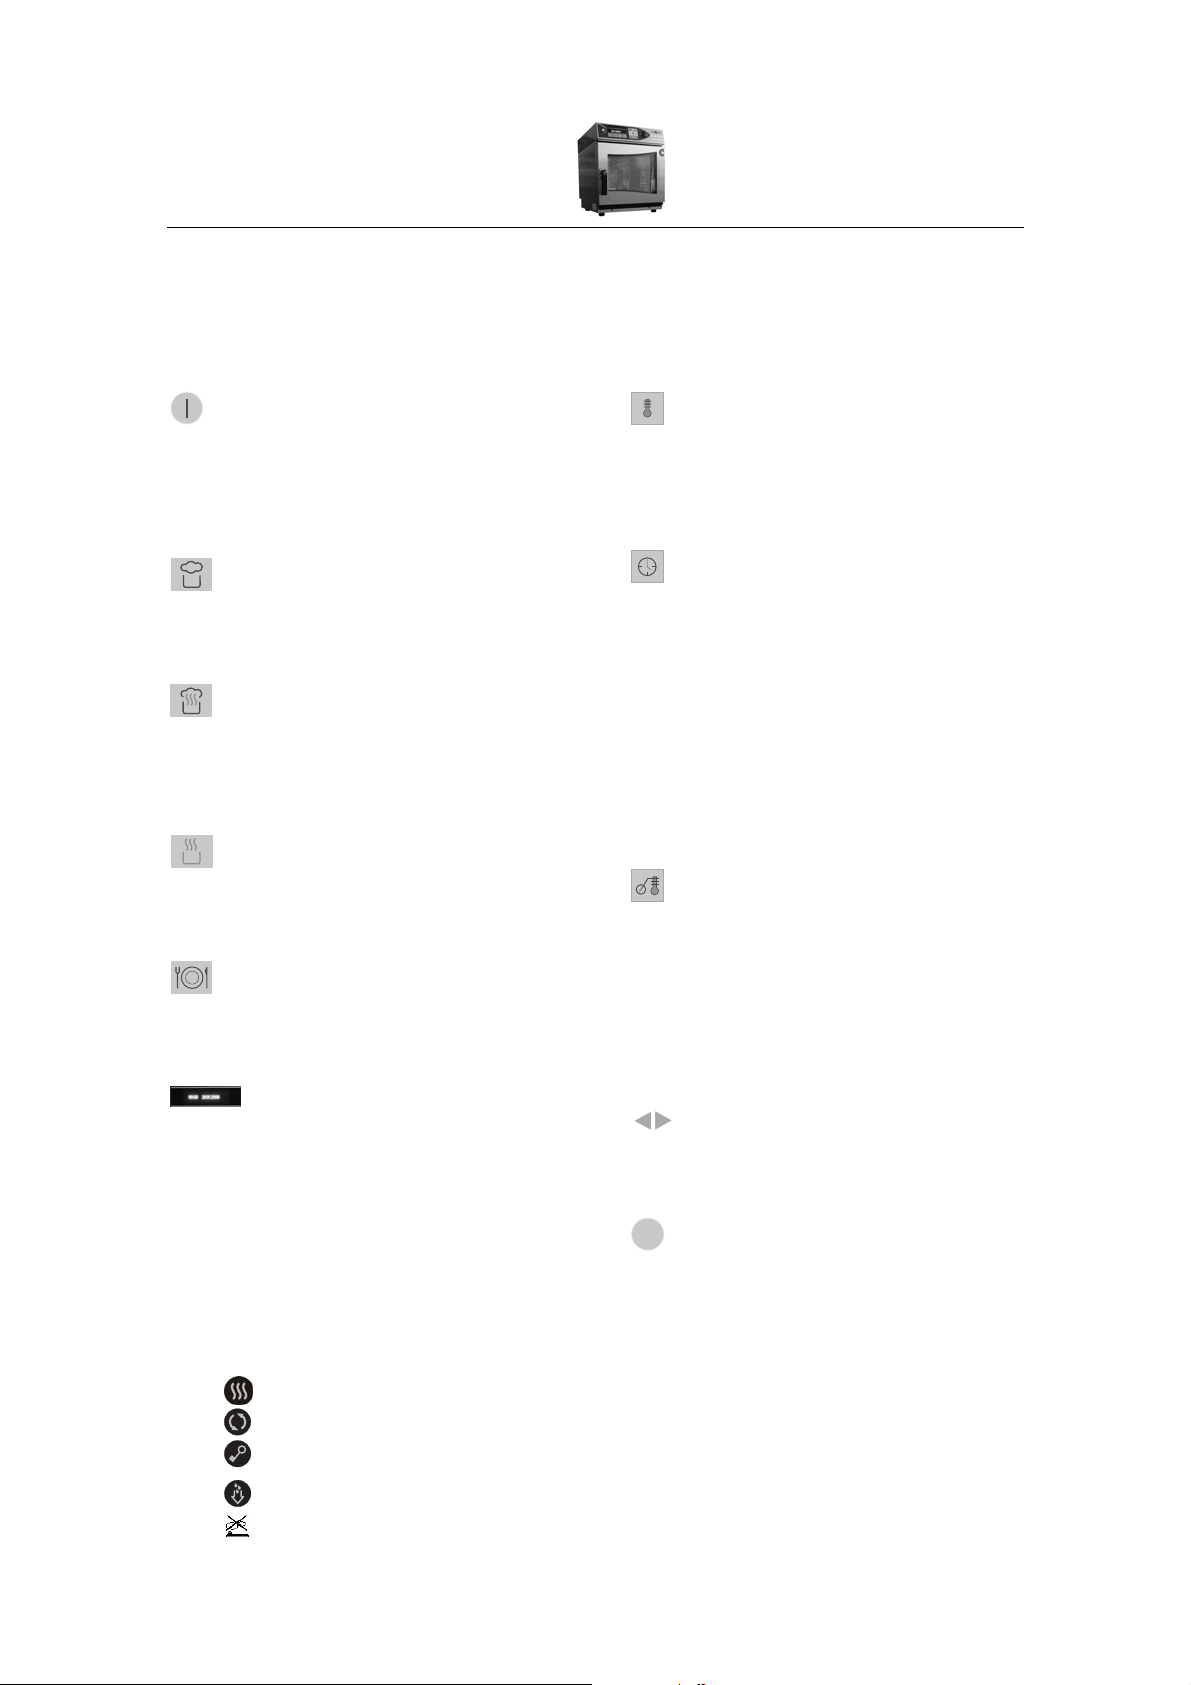
CONVOTHERM Mini
Control panel and its functions
CONVOTHERM
CONVOTHERM ON/OFF (1)
• CONVOTHERM goes into its ready
state:
– Self-diagnostics are performed
– Oven light goes on
Cooking programme ‘Steam’ (2)
• Oven temperature is continuously
variable to any temperature
between 30°C and 120°C
Cooking programme ‘Superheated
steam’ (3)
• Oven temperature is continuously
variable to any temperature
between 100°C and 250°C
Cooking programme ‘Convection’ (4)
• Oven temperature is continuously
variable to any temperature
between 30°C and 250°C
Cooking programme ‘Regenerate’ (5)
• Oven temperature is continuously
variable to any temperature
between 120°C and 160°C
Display (6)
• Displays in normal mode:
Date, time, oven temperature,
cooking time, core temperature
• Displays in programming mode:
Plain text, memory location
numbers, symbols:
Function and operating displays
• Lights if the relevant function or
cooking mode is active:
Electrical heat ing on
Cooking mode
Button lock
Crisp&Tasty (Demoisturisation)
Vapour reduction
Oven temperature (7)
• Setting the required oven
temperature
• Reading off the actual or required
oven temperature
Cooking time (8)
• Setting of the cooking time from 1
minute to 9 hours 59 minutes or
continuous mode (from 9:59 or 0:01
release selector dial and then turn it
to the right or left again)
• Reading off the actual or required
cooking time
• Calling up pre-select start time
• Reading off elapsed cooking time
when measuring core temperature
Optional core temperature (9)
• Setting the required core
temperature
• Reading off the actual or required
core temperature
• Reading off the actual core
temperature during cooking time
mode
Scrolling to the left or right (11)
One step forwards or backwards
(scrolling) in programming mode
START
STOP
Start/Stop (10)
• Starting the cooking programmes,
cooking plans and recipes from the
cookbook
• Stop:
– Stopping the active cooking
mode
– Confirming of the completed cooking
mode when the buzzer sounds
– Leaving Mr.C functions
(Esc function)
- 15 - EN
Page 15
CONVOTHERM Mini
Control panel and its
functions
CONVOTHERM
Cookbook (12)
• Calling up/exiting cookbook
• A list of stored cooking recipes
Mr.C (13)
• Setting extra functions
• CONVOTHERM’s set-up
Writing/Editing (14)
• Creating, changing, copying and
D
6019002_00
Selector dial (15)
• Oven temperature
• Cooking time
• Core temperature
• Programme name
• Programme number
• Selecting Mr.C functions and the
appears in the display
deleting cooking recipes
editing functions as well as cooking
recipes in the cookbook
Press&Go - buttons (16)
Starting cooking recipes directly
• LED below the button lights up
when corresponding recipe is
started
N.B.:
• Magnetic door switch
If you open the oven door while the programme is
running, the magnetic door switch automatically
interrupts the cooking programme. The cooking
time does not not continue in this situation. After
the oven door is closed, the CONVOTHERM will
automatically continue the cooking programme. If
you open the oven door when the buzzer sounds
at the end of a programme, it will automatically
switch it off.
• Never operate control panel with sharp objects
(e.g. knives).
- 16 - EN
Page 16
Set-up
You will work with the following symbols in the setup
You are able to set up your CONVOTHERM oven according to the requirements of your kitchen.
Signal tone Date Temperature display
Volume Cookbook index
Default setting or
Time
1. Press the button. → Various
memo settings
options will appear in the display.
Use the selector dial to select ‘Setup’
and confirm by pressing the
button.
2. Confirm ‘Yes’ with the button. →
Various options will appear in the
display:
N.B.:
• The various setup options are
described in detail below.
• You can exit the Mr. C options menu
START
again at any time by pressing the
STOP
button.
Signal tone
The signal tone is selected from the ‘Setup’
menu
.
1. Use the selector dial to select ‘Signal
tone’
and confirm by pressing the
button. → A list of the tones which
can be selected will appear in the
display.
2. To select a signal tone, use the selector
dial to switch between them. → If you
pause on a selected signal tone, the
tone will sound. Confirm by pressing
the
button.
Network address
Language
Volume
You can set the volume from the ‘Setup’
menu
1. Use the selector dial to select ‘Volume’
Mr.C recommends:
When selecting the volume, keep in mind
the noise levels in your kitchen when food
preparation is in progress.
.
and confirm by pressing the
button. → Various volume options will
appear in the display and the signal will
sound. Use the selector dial to select
the required volume and confirm by
pressing the
button.
- 17 - EN
Page 17
Set-up
Time
You can set the time from the ‘Setup’ menu
.
1. Use the selector dial to set ‘Time’
and confirm by pressing the
button. → A list of the possible time
formats will appear in the display.
Select the required format with the
selector dial.
2. Use the buttons
and to switch
between hours and minutes and set the
correct time with the selector dial.
Confirm by pressing the
button.
N.B.:
If the CONVOTHERM is disconnected from
the power supply for more than three days,
the date and time will have to be re-set.
Date
You can set the date from the ‘Setup’ menu
.
1. Use the selector dial to set ‘Date’
and confirm by pressing the
button.
→ A list of the possible date formats will
appear in the display. Select the
required format with the selector dial.
2. Use the buttons
and to switch
between day, month and year and set
the right date using the selector dial.
Confirm by pressing the button.
N.B.:
If the CONVOTHERM is disconnected from
the power supply for more than three days,
the date and time will have to be re-set.
Cookbook index
You can alphabetically index recipes in the
Cookbook or sort them according to
memory location number from the ‘Setup’
menu
.
1. With the selector dial select ‘Cookbook
alphabetical’
pressing the
2. Confirm ‘Yes’ with the
and confirm by
button.
button. →
Indexing will be set to alphabetical.
N.B.:
• To work with memory location numbers,
in the ‘Cookbook alphabetical’ menu,
select ‘No’. The CONVOTHERM will
now index according to memory
location number.
• Switching from alphabetical to
numerical indexing or vice versa can
take some time depending on the
number of recipes stored.
Mr.C recommends:
To enable you to find a particular
recipe in your Cookbook again quickly
without having to remember the
memory location number, you can
index the cooking recipes
alphabetically by recipe name.
- 18 - EN
Page 18
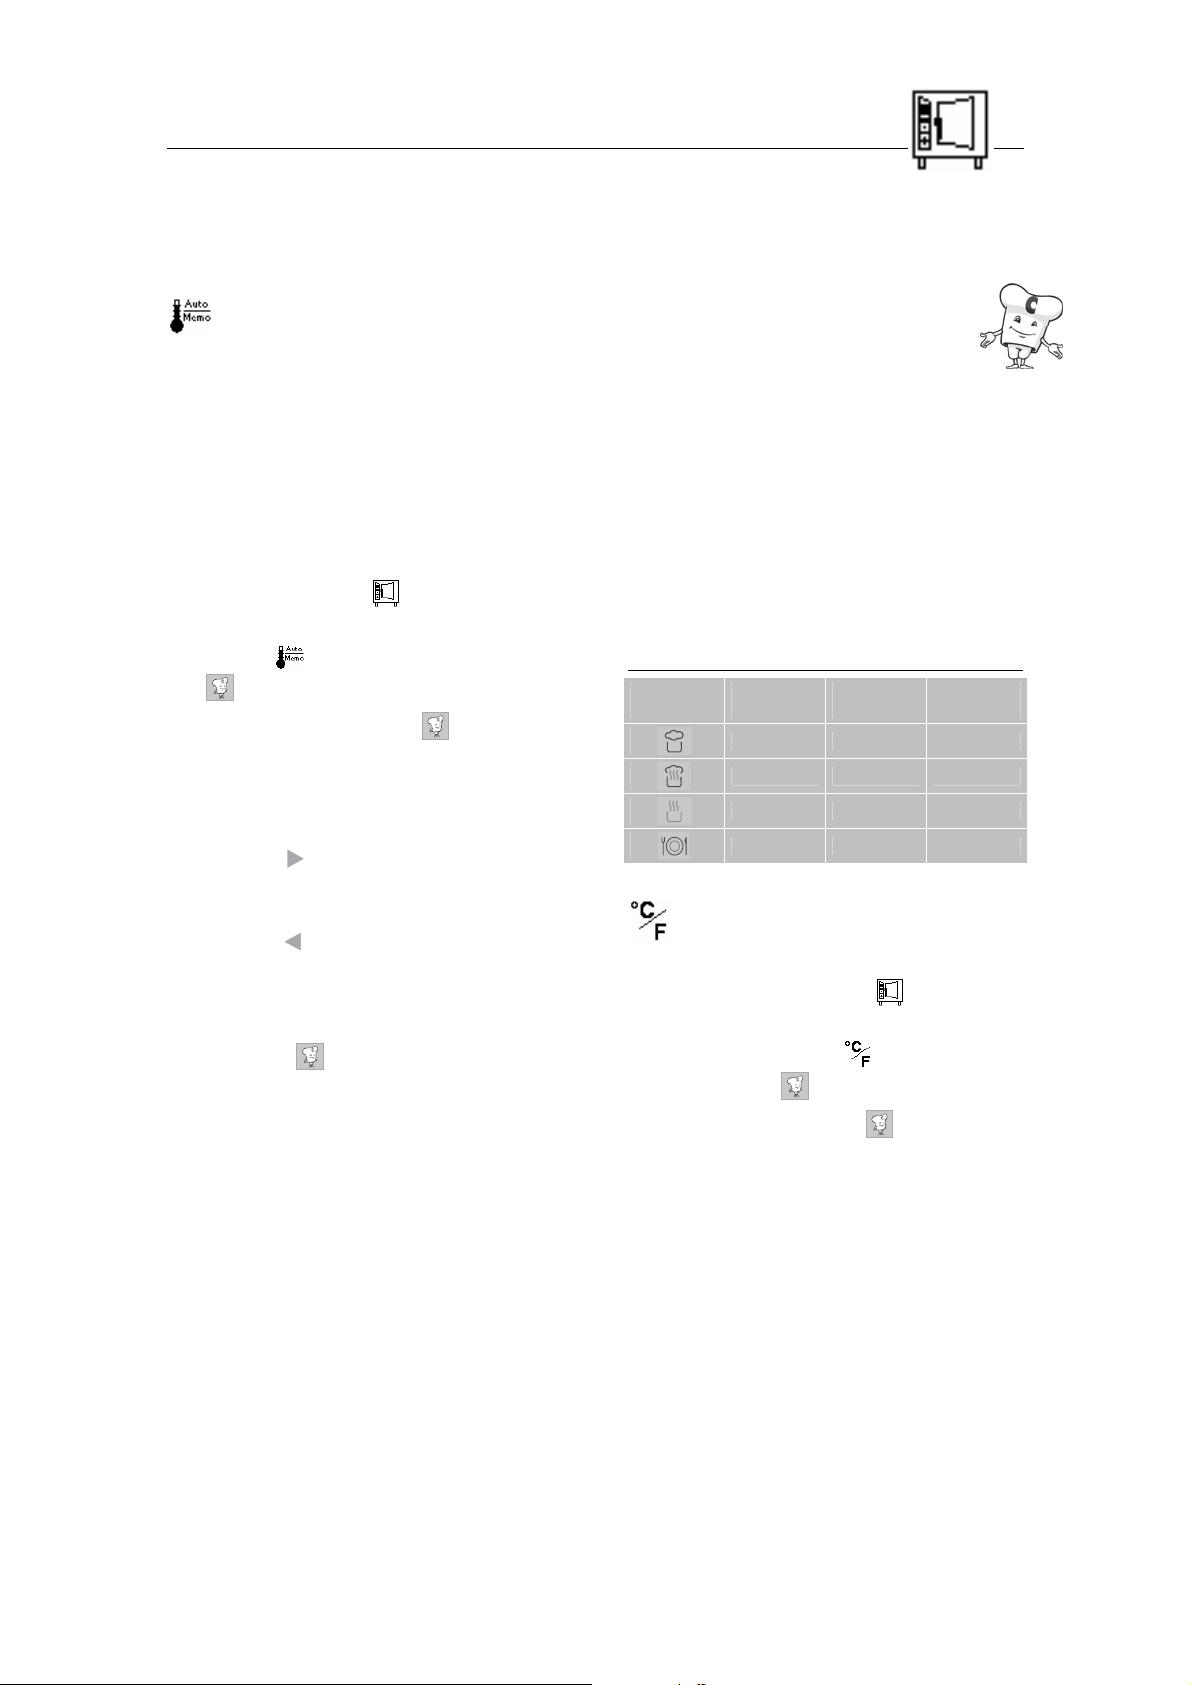
Set-up
Default setting or
memo setting
Here you can select whether the default
settings or the memo settings (i.e.the last
settings used) for cooking time and oven
temperature appear in the display when you
select a cooking programme.
You can also adjust the default settings
which are set in the factory (see table) to
your needs.
You can select default or memo settings
from the ‘Setup’ menu
1. Use the selector dial to select ‘Default
setting’
and confirm by pressing the
button.
2. Confirm ‘Yes’ with the button. →
A list of the default settings will
appear in the display. Select the
default setting to be changed using
the selector dial.
3. With the button, scroll through to the
right number and set the required
default setting using the selector dial.
4. Use the
button to scroll back to
transfer the setting.
5. To change more numbers, repeat the
procedure above.
6. Press the
button → Settings you
have made are confirmed.
To work with memo settings, select ‘No’ in
the ‘Default settings’ menu. The
CONVOTHERM will now use the memo
settings.
N.B.:
.
Mr.C recommends:
• If you work primarily with semi-
skilled staff, using the default settings
prevents incorrect usage. Every time a
cooking programme is selected, the
settings you enter will be stored.
• Memo settings are particularly suitable
if you regularly cook several batches
one after the other. There is then no
need to select time and temperature
settings and the cooking programme
can be started immediately.
Factory default settings
Cooking
programme
Oven
temperature
100°C 70°C 25 mins
150°C 70°C 70 mins
170°C 70°C 30 mins
135°C 70°C 5 mins
Core
temperature
Cooking
time
Temperature display
You can select °C or °F for temperature
display in the ‘Setup’ menu
.
1. Using the selector dial select
‘Temperature in °C’
pressing the
button.
2. Confirm ‘Yes’ with the
and confirm by
button.
→ The temperature display will be set
to °C.
N.B.:
To set the temperature display to °F, in the
‘Temperature in °C’ menu, select ‘No’. Now
the temperature display °F will be used.
- 19 - EN
Page 19

Set-up
Network address
The network address is required for the use
of PC Control, PC-HACCP and the
CONVOTHERM Service System.
You can set the network address from the
‘Setup’ menu
1. Use the selector dial to select ‘Network
address’
the
appear the network address that is
currently set. Using the selector dial,
select the desired network address
(1 - 99) and confirm by pressing the
button.
N.B.:
The network address 1 is always set in the
factory. Ensure that you select a different
network address for each of your
appliances.
.
and confirm by pressing
button. → In the display will
Language
You can select your language from the
‘Setup’ menu
.
1. Use the selector dial to select
‘Language’
the
button. → A list of the possible
and confirm by pressing
languages will appear in the display.
- 20 - EN
Page 20

Cooking with the CONVOTHERM mini
Steaming at 30°C to 120°C
The ‘Steaming’ programme allows you to “low oxygen organic cook", low temperature cook, boil,
steam, blanch, poach, simmer and preserve.
1.
Switch on using the button.
2. Press the button. → In the display
will appear 100°C and the default
setting or the last selected cooking time
for steaming.
START
STOP
To start immediately, press
button.
or:
Mr.C recommends:
• The following extra functions and
programmes are available in the
‘Steaming’ programme (see below).
Tray Timer
Pre-heating
3. Press the
button → The oven
temperature will be called up in the
display. Select the required oven
temperature using the selector dial.
4. Cooking time or core temperature mode:
• Cooking time: Press the
button.
→ Set the desired cooking time or
continuous operation mode (at 9:59
or 0:01, release dial and then turn
again to left or right).
• Core temperature:
Press the
button. Set the
desired core temperature.
START
5. Press the
STOP
button → The cooking
programme is started. The display will
show the required oven temperature
and the cooking time remaining or the
actual core temperature.
6. To alter the values set during operation,
press the
buttons and enter
the correct values.
7. You can read off the actual oven
temperature, the required cooking time
and the required core temperature by
pressing the relevant button either once
or twice as appropriate.
8. When the cooking time has elapsed or
the core temperature set has been
reached, the buzzer will sound and the
cooking programme finishes. Press the
START
STOP
button or open the door.
Vapour reduction
Caution:
• Hot steam!
→ Risk of scalding
• Hot containers, shelves and oven
interior! → Risk of burns
Steaming at 100°C
• Steaming is particularly good for
preserving vitamins, minerals and
secondary plant products such as
colours and dietary fibre.
• Flavours are not transferred if different
foods such as fish and vegetables are
steamed at the same time.
• You can work quickly since steam is
constantly available.
Steaming at 100°C for example:
Vegetables, rice, durum wheat pasta,
dumplings, potatoes
- 21 - EN
Page 21

Cooking with the CONVOTHERM mini
Steaming at 30°C to 99°C
• Your foodstuffs are prepared
particularly gently.
• Burst skins are avoided when boiling
or heating up sausage products.
• Optimum culinary results are achieved
for sensitive foodstuffs and dietary
foods.
• Temperatures which are precise to the
degree ensure optimum preservation
of proteins, i.e. they will not leak from
the food.
Steaming at 30°C to 99°C for
example:
Fish fillets, terrines, galantines, flans,
forcemeats, small dumplings, crème
caramel
Steaming at 101°C to 120°C
• Steaming at temperatures above
100°C is mainly for non-sensitive foods
such as jacket potatoes, beetroot,
turnips, pulses and cabbage.
Superheated steam 100°C to 250°C
The ‘Superheated steam’ programme is mainly intended for roasting large well cooked pie ce s of
meat and for baking.
1. Switch on using the
2. Press the
button. → The display
button.
will show the last required values set or
the default settings for superheated
steam.
To start immediately with the values
START
STOP
displayed, press the
button.
or:
3. Press the
button → The oven
temperature will be called up in the
display. Select the desired oven
temperature from 100°C to 250°C using
the selector dial.
4. Cooking time or core temperature mode:
• Cooking time: Press the
button.
→ Set the desired cooking time or
continuous operation mode (at 9:59
or 0:01, release the dial and then
turn again to the left or the right).
• Core temperature:
Press the
button. → Set the
desired core temperature.
START
STOP
5. Press the
button. → The
‘Superheated steam’ cooking
programme will start. The display will
show the required oven temperature
and the cooking time remaining or the
actual core temperature.
6. To alter the values set during operation,
press the
buttons and enter
the correct values.
7. You can read off the actual oven
temperature, the required cooking time
and required core temperature by
pressing the relevant button either once
or twice as appropriate.
8. When the cooking time set has elapsed
or the core temperature set has been
reached, the buzzer will sound and the
cooking programme finishes.
START
Press the
STOP
button or open the door.
N.B.:
To find out the core temperature reached in
cooking time mode, press and hold down
the
At the same time press the
button.
button. The
current core temperature will be shown in
the display.
- 22 - EN
Page 22

Cooking with the CONVOTHERM mini
Mr.C recommends:
• The following extra functions and
programmes are available in the
‘Superheated steam’ programme (see
below).
Crisp&Tasty (Demoisturisation)
Tray Timer
Pre-heating
Caution:
• Hot steam and vapour!
→ Risk of scalding
• Hot containers, shelves and
oven interior!
→ Risk of burns
Superheated steaming for example:
Well cooked large roasts, gratins
Vapour redu ction
Delta-T cooking
• You can find cooking recommendations
and tips in the ‘Practical hints’ section.
Superheated steam
• Using superheated steam you will
always achieve the optimum oven
climate.
• Moisture values need not be set
manually.
• Food will not dry out.
• Flavours are not transferred if different
foods are cooked at the same time.
and bakes, bakery goods such as
Danish pastries, baguettes etc.
• Bakery items such as yeast and bread
doughs and puff pastry rise perfectly
during baking.
• If required, the interior of the oven can
be demoisturised (Crisp&Tasty
function) to achieve succulent or crispy
products that are evenly browned all
over.
• In general reduce the oven
temperature by 10-20% compared with
traditional cooking methods
Convection 30°C to 250°C
The ‘Convection’ programme is suitable for all roasting and bakery products as well as for lowoxygen organic cooking, low temperature cooking and overnight cooking, all of which require no
moisture.
1. Switch on using the
2. Press the
button. → The display
button.
will show the last required values set or
the default settings for convection.
START
To start immediately, press the
STOP
button.
or:
3. Press the button. → The oven
temperature will be called up in the
display. Use the selector dial to set the
required oven temperature from 30°C to
250°C.
4. Cooking time or core temperature mode:
• Cooking time: Press the
button
→ Set the desired cooking time or
continuous operation mode (at 9:59
or 0:01, release the dial and then
turn again to the left or the right).
• Core temperature:
Press the
button. → Set the
desired core temperature.
- 23 - EN
Page 23

Cooking with the CONVOTHERM mini
START
5. Press the
STOP
button. → The
‘Convection’ cooking programme will
start. The display will show the required
oven temperature and the cooking time
remaining or actual core temperature.
6. To alter the values set during operation,
press the
the correct values.
buttons and enter
7. You can read off the actual oven
temperature, the required cooking time
and required core temperature by
pressing the relevant button either once
or twice as appropriate.
8. When the cooking time has elapsed or
the core temperature set has been
reached, the buzzer will sound and the
cooking programme finishes.
START
Press the
STOP
button or open the door.
N.B.:
To find out the core temperature reached in
cooking time mode, press and hold down
the
At the same time press the
button.
button. The
core temperature reached will be shown in
the upper part of the display.
Convection
• Pre-heat the CONVOTHERM for at
least 10-15 minutes prior to cooking at
a temperature of 20-30°C above the
cooking temperature.
• If necessary, the oven can be
demoisturised to create a crisp, crusty
dish which is evenly browned all over.
• When roasting, reduce the oven
temperature by 10-20% compared to
traditional processes.
• The higher the oven temperature, the
higher the meat loss (shrinkage).
Mr.C recommends:
• The following extra functions and
programmes are available in the
‘Convection’ programme (see below).
Crisp&Tasty (Demoisturisation)
Tray Timer
Pre-heating
Vapour reduction
Manual addition of moisture
Delta-T cooking
Convection cooking for example:
Quick roast items, finger food,
gratinating of gratins, deep frying of
potato products, etc.
Caution:
• Hot steam & vapour!
→ Risk of scalding
• Hot containers, shelves and oven
interior! → Risk of burns
Low temperature overnight cooking
• Large joints are roasted so gently that
the raw weight is almost entirely
retained.
• Low-temperature cooking can also be
used to prepare meals overnight.
• The meat becomes very tender and
succulent.
• This method of cooking creates no
crust.
Caution:
Only insert containers within the
bars. If the containers are laid
on the bars, they can skew
and tip out of the shelf rack or the
trolley.
- 24 - EN
Page 24

Cooking with the CONVOTHERM mini
Regeneration
The ‘Regenerate’ programme allows you to regenerate prepared dishes on plates or platters in
a short space of time.
1. Switch on using the
2. Press the
will show the last required values set or
the default settings for regeneration.
To start immediately, press the
button.
or:
3. Press the
temperature will be called up in the
display. Set the desired oven
temperature from 120°C to 160°C using
the selector dial.
4. Regenerating time or core temperature
mode:
• Regeneration time: Press the
button → Set the desired
regeneration time or continuous
operation mode (at 9:59 or 0:01,
release the switch and then turn
again to the left or the right).
• Core temperature:
Press the
desired core temperature.
5. Press the
‘Regenerate’ cooking programme will
start. The display will show the required
oven temperature and the regeneration
time remaining or the actual core
temperature.
6. To alter the values set during operation,
press the
the correct values.
7. You can read off the actual oven
temperature and the required
regeneration time by pressing the
relevant button either once or twice as
appropriate.
8. When the cooking time has elapsed or
the required core temperature has been
reached, the buzzer will sound and
button.
button. → The display
button. → The oven
button. → Set the
START
STOP
button. → The
buttons and enter
START
STOP
regeneration finishes. Press the
START
STOP
button or open the door.
Mr.C recommends:
• When regenerating, pre-heating is
particularly important. This is the only
way to ensure that dishes are
regenerated to the optimum.
• To achieve good quality, do not
interrupt the regeneration process.
• The following extra functions and
programmes are available in the
‘Regenerate’ programme (see below).
Tray Timer
Pre-heating
Vapour reduction
Caution:
• Hot steam!
→ Risk of scalding
• Hot plates, racks and oven
interior! → Risk of burns
Regeneration
• Always pre-heat the CONVOTHERM
• When regenerating you will always
achieve the optimum oven climate.
• Ready-prepared dishes will not dry out
during regeneration.
• Neither puddles of condensation nor
dry edges form on the plates
• After regenerating, pour sauces on to
plates with a sauce dispenser.
• Prepare dishes consistently at low
temperature.
- 25 - EN
Page 25

Cooking with the CONVOTHERM mini
Regeneration
• You can create dishes at quiet times
when not busy and arrange them on
plates or platters.
• For banquets, you can regenerate
however many plates you need on
demand.
• Large, compact pieces of foods such as
dumplings, roulades and oven bakes take
longer to regenerate than items such as
sliced meats, vegetable side dishes, rice
and quartered or diced potatoes.
• Place fish and meat on a base so that
it is evenly regenerated and does not
stick to the plate.
• Meat should be pre-roasted to ‘rare’, if
it is to be cooked to ‘medium’ after
regeneration.
• Vegetables, rice and pasta should be
buttered before regeneration.
• The parts of the meal should be
distributed evenly over the plate in small
pieces. Avoid overlapping by large
amounts and arranging food to different
heights.
Guide values for pre-heating temperatures, regeneration times and
regeneration temperatures when oven is fully loaded
(Regeneration times and temperatures are dependent on the number of plates to be regenerated)
CONVOTHERM
OES
Plate
capacity up to
32 cm dia.
Pre-heating
temperature
with
convection
Pre-heating
time
Regeneration
temperature
Regeneration
time
6.06
4 180°C 10 mins 120 – 130°C 4 - 8 mins
Reheating After the third regeneration, pre-heat again to the pre-heating
temperature.
Core temperature measurement
Measuring the core temperature is particularly recommended when coo kin g slow roasts and
when regenerating foodstuffs in GN containers.
1. Switch on using the
2. Insert the multi-point sensor through the
centre of the food item.
3. Select desired cooking programme
.
4. Press the
button. → The oven
temperature will be called up in the
display. Set the required oven
temperature using the selector dial.
button.
5. Press the
button. → Set the desired
core temperature.
START
STOP
6. Press the
cooking programme will start. The
button → The selected
display will show the required oven
temperature and the actual core
temperature.
7. To alter the values set during operation,
press the
- 26 - EN
Page 26

Cooking with the CONVOTHERM mini
buttons and enter the correct
values.
8. You can read off the actual oven
temperature and the required
regeneration time by pressing the
relevant button either once or twice as
appropriate.
9. When the core temperature set has
been reached, the buzzer will sound
and the cooking programme finishes.
START
STOP
Press the
button or open the door.
N.B.
• To find out the cooking time which has
already passed, press and hold the
button. At the same time press the
button. The time which has already
elapsed will be shown in the display.
• To find out the core temperature
reached in cooking time mode, press
and hold the
time press the
button. At the same
button. The current
core temperature will be shown in the
display.
You will experience the following
benefits:
• Irrespective of the size an d weight of the
joint, you will cook it just right.
•
There is no need to spend time and energy
keeping an eye on and checking the roast’s
degree of cooking.
•
Meat shrinkage is reduced by up to 50 %
compared with standard cooking methods.
•
The multi-point sensor always records the
optimum core temperature, prevents
incorrect insertion and simplifies handling.
•
Large roasting
items
Roast beef 50 – 55°C 48 – 58°C
Beef fillet 50 – 60°C 48 – 60°C
Roast veal 50 – 70°C 78°C
Neck of pork 50 – 70°C 78°C
Baked ham 50 – 60°C 78°C
∆ T Core
temperature
Mr.C recommends:
• The core temperature sensor is a multi-
point sensor. You will still achieve
optimum cooking results even if you
don't find the centre exactly.
• Only use the sensor to measure core
temperature and not in place of a meat
fork or similar tools; do not bend it and
do not pull on the cable. This will avoid
malfunctions.
• Cool down the sensor with cold water
before inserting into the meat.
• You can find cooking recommendations
and tips in the ‘Practical hints’ section.
Caution:
Core temperature sensor
• Can become hot
• When not in use, keep in holder
• Do not allow to hang out of the
combi steamer
• Remove from food before taking
items out of the oven
• Be careful not to accidentally stab
yourself or others.
Please note:
• The multi-point sensor should not be used
to remove food from the oven.
•
Insert the multi-point sensor through the
centre of the piece of meat.
•
When the buzzer sounds for the end of
cooking, slow roasts should be removed
immediately from the CONVOTHERM. This
will prevent overcooking.
•
When selecting the final core temperature,
ensure that slow roasts are able to recover
by approx. 3°C after being taken out of the
CONVOTHERM.
- 27 - EN
Page 27

Cooking with the CONVOTHERM mini
Guide values for core temperature
sensor:
Beef / Veal / Fish
Food
Beef fillet
Roast beef
Beef pot roast
Roulades
Soured boiled rump
Rack of veal Medium 55 – 62°C
Breast of veal
Shoulder of veal
Leg of veal Well done 76 – 78°C
Salmon steaks Medium 63 – 65°C
Degree of
cooking
Medium 52 – 58 °C
Well done
Well done 75 – 80°C
Core temp
85 – 90°C
90 – 95°C
Pork / Lamb/ Poultry
Food
Rack of pork
Neck of pork
Pork belly
Pork hock
Cured smoked
pork
Leg of lamb
Rack of lamb
Whole chicken
Chicken breast
Chicken leg
Degree of
cooking
Medium
Well done 82 – 85°
Medium 65 – 68°C
Medium
Well done
Core temp
65 – 68°C
74 – 77°C
58 – 62°C
52 – 56°C
88 – 92°C
75 – 77°C
85 – 89°C
Delta-T cooking
When using Delta-T-cooking you must use the core temperature sensor, since with this cook ing
programme the oven temperature increases depending on the core temperature. The oven
temperature will always be the
1. Switch on using the
2. Press the
button → In the display
will appear various options. Using the
selector dial select Delta-T-cooking
Confirm by pressing the
3. Confirm ‘Yes’ with the
4. Press the
button. → Set the desired
Delta-T temperature using the selector
dial.
You will experience the following
benefits:
Large roasts are prepared particularly
gently. They remain succulent and tender.
In addition you will experience less meat
shrinkage.
Please note:
• The higher the Delta-T temperature, the
greater the loss in weight but the more
intensively will the meat be browned.
temperature plus the core temperature (cf. illustration below).
button.
5. Press the
button. → Set the desired
final core temperature.
.
button.
button.
6. The Delta-T process will start. The
display will show the Delta-T
temperature and the actual core
temperature.
7. When the core temperature set has
been reached, the buzzer will sound
and the Delta-T process finishes. Press
START
STOP
the
button or open the door.
Mr.C recommends:
Delta-T-cooking allows you to make good
use of quiet operating times (for example,
at night). In these cases, use the pre-select
start time function.
N.B.:
Delta-T-cooking is only possible with the
core temperature sensor.
- 28 - EN
Page 28

Cooking with the CONVOTHERM mini
∆
Delta-T-cooking
T = Difference between oven temperature and core temperature
Start Desired core
temperature
reached
Cook & Hold
The Cook & Hold function includes a ‘Cook’ phase and a ‘Hold’ phase, in which food slowly
matures. The switch from Cook phase to Hold phase is automatic when the set switchover core
temperature is reached. (See illustration below.)
1. Switch on using the
2. Press the
will appear in the display. Use the
selector dial to select ‘New recipe’
and confirm by pressing the
3. For more information on the Cook
phase and entering recipe names, see
the CONVOTHERM Cookbook.
4. To enter the hold phase, when the
programme buttons flash, press the
button → In the display various options
will appear. Using the selector dial
select
button.
5. Confirm ‘Yes’ with the
6. Press the
Hold temperature. Confirm by pressing
the
button. → Various options
. Confirm by pressing the
button → Set desired
button.
button.
button.
button.
You will experience the following
benefits:
In the Cook phase, meat is cooked
particularly gently with the ‘Convection’ or
‘Superheated steam’ functions.
In the Hold phase, the food matures
extremely gently.
Please note:
In the Cook phase. a temperature range
from 120°C to 150°C in the ‘Convection’ or
‘Superheated steam’ programme is
appropriate.
The time at which the oven switches to the
Hold phase will depend on the volume
being cooked, the type of meat and size of
the meat items.
For the Hold temperature, select the
desired required core temperature so that
overcooking is impossible.
- 29 - EN
Page 29

Cooking with the CONVOTHERM mini
Mr.C recommends:
You can prepare food as normal during
quiet times, load the CONVOTHERM and
start the Cook & Hold process long before
the finished dishes are required.
N.B.:
Cook & Hold is only possible with the
core temperature sensor.
Cook & Hold can also be used for overnight
cooking.
Examples for Cook & Hold
Large roasting items Cooking programme Oven temperature
Roast beef
(Size about 2 kg)
Ham
(Size about 3 kg)
The principle behind Cook &
Hold
Oven pre-heatedStart
Convection
Cook & Hold
Convection
Cook & Hold
Switchover from Cook to
Hold at the switchover
core temperat ure
110 – 140°C
Cook & Hold 50°C
130°C
Cook & Hold 75°C
Switchover core
temperature
20°C
55 – 60°C
Hold-Phase Cook-Phase
Holding Maturing
Ready to serve Max. time for
Information
2-step cooking
programme
2-step cooking
programme
keeping warm
Desired final
core temperature =
Hold temperature
- 30 - EN
Page 30

Practical hints for cooking
Boiling
Steaming/
Blanching
Poaching
Vegetables,
accompaniments,
egg dishes
Pasta (durum wheat
semolina)
Long grain rice
Short grain rice
Basmati rice
Vegetables fresh, cauliflower,
carrots, asparagus
Vegetables, deep-frozen
(small pieces)
Vegetables, deep-frozen
(large pieces)
Potatoes
(quartered)
Dumplings
Eggs
Cabbage /pulses
Jacket potatoes
Turnips
Egg garnish ‘Royale’
Deep-frozen scrambled eggs
Deep-frozen omelette
Cooking
programme
Oven
temperature
100°C 10 - 14 mins -
100°C
100°C 8 - 15 mins -
100°C 10 - 15 mins -
100°C 15 - 20 mins -
100°C 35 - 45 mins -
100°C 20 - 25 mins -
100°C 8 - 15 mins -
110 - 115°C
85°C 20 - 25 mins -
Cooking time
30 mins
35-40 mins
25 mins
20-45 mins
25-40 mins
20-40 mins
temperature
Core
-
-
Information
use unperforated containers,
no need to stir, 1 part pasta,
min. parts cold water
use unperforated containers,
1 part rice, 1.5 - 2 parts cold water
chopped into pieces
or stock
before cooking, soak in salted
water for 15 minutes or sprinkle
with fine salt
place on greased trays, cover
directly after cooking
No need to pierce,
soft after approx. 10 mins,
hard after approx. 15 mins
Baking Vegetable bake
Caution:
Always open the CONVOTHERM
carefully. Escaping steam can cause
scalding.
Mr.C recommends:
• Seasoning
Rinse, season and butter vegetables
after steaming.
- 31 - EN
130 - 150°C 40 - 60 mins -
• Vegetables in sauce
Steam the vegetables in perforated containers
and catch the stock in an unperforated container.
• Aspargus
Cook bitter asparagus in unperforated containers
in an asparagus stock.
• Baking/Gratinating
Vegetables and side dishes can be gratinated
with the ‘Convection’ programme at 230°C 250°C in 2 - 5 minutes.
Steam vegetables before
preparing dish
Page 31

Practical hints for cooking
Roasting
Steaming
Fish, crustaceans, sous-vide
process
Trout
Plaice
Sole, whole
Salmon steak
Fish fillet, breaded, deep-frozen
Prawns
Lobster
Crayfish
Mussels
Trout
Cooking
programme
Oven
temperature
200 - 220°C 12 - 15 mins -
200 - 220°C 6 - 12 mins -
200 - 220°C 12 - 16 mins -
180 - 210°C 4 - 8 mins -
100°C
96°C 10 - 12 mins -
72°C 12 - 15 mins -
Cooking time
About.
12 mins
Core
temperature
-
Information
use every 2nd shelf
position
use every 2nd shelf
position
use every 2nd shelf
position
use a non-stick
baking sheet
use every 2nd shelf
position
use every 2nd shelf
position
Lay trout
on a tray with belly
flaps open
Poaching
Warning
Always open the CONVOTHERM carefully. Escaping steam can cause scalding.
Mr.C recommends:
• Oven temperature
• Trout au bleu
Prawns
Salmon fillets
Fish terrine
Fish dumplings
Forcemeat in vegetables
Trout in vacuum pouch
Terrines, galantines in
vacuum bags (sous vide)
Set the oven temperature about 10 - 20 °C lower compared with traditional methods.
Pour wine or vinegar over the trout.
72 - 80°C 4 - 8 mins -
65 - 72°C 4 - 8 mins -
65 - 72°C 60 - 70 mins 60 - 65°C
72°C 8 - 12 mins -
65°C 18 - 24 mins -
70°C
About
1- 2 hours
60 - 65°C
- 32 - EN
Page 32

Practical hints for cooking
Roasting
Meat, sausages
large joints
Neck of pork
Roast pork
Rack of pork
Pork hock
Knuckle of veal
Minced meat loaf, fresh
sausage meat 4 kg
Leg of lamb
Roast lamb
Meat loaf
Roast rump of veal
Roast veal
Fillet of beef in puff pastry
Cooking
programme
Oven
temperature
130 - 160°C 80 - 90 mins about. 75°C
130 - 160°C 70 - 90 mins about. 78°C Slash skin
1. 110 -120°C 60 - 90 mins
130 - 160°C 60 - 70 mins about. 62°C
140 - 160°C 70 - 80 mins
Cooking time
Core
temperature
Information
about.
68 - 72°C
form into a brick shape
about.
80 - 85°C
or pack into a baking
tin.
130 - 145°C 80 - 100 mins about. 80°C
140 - 180°C
20 - 25 mins
35 - 40 mins
50 - 55°C
Brush pastry lightly with
egg, sear fillet first.
Roast beef / Beef or veal fillet
Baked ham
Cabbage roulades
Peppers, stuffed
Braising
Roulade
Beef pot roast
Poaching Boiled ham
Mr.C recommends:
Seasoning
Rub seasoning well into large joints of meat, so they are not rinsed away.
• Co re temperature measurement
As a general rule, the best results are
achieved with the multi-point sensor. Every
degree in excess of the required core
temperature significantly increases meat
shrinkage.
• Meat shrinkage
The ‘Superheated steam’ programme
considerably reduces meat loss.
1.
2.
110 - 160°C 25 - 30 mins 48 - 55°C
1. about. 78°C
2. 180°C
120 - 150°C 60 - 70 mins -
130 - 145°C
about. 78°C 1 - 4 hours 65°C
• Roasting on enamelled trays or coated
-
40 - 60 mins
70 - 90 mins
trays
When roasting, these trays will provide
extremely good browning even on the
underside of the products.
Place roasting joints on oven shelves. This
will close the pores of the meat all the way
round, guaranteeing even cooking results
without having to turn the meat over.
1.60°C
2.65°C
-
depends on weight
Slash skin
2-step recipe
Cooking time
- 33 - EN
Page 33

Practical hints for cooking
Mr.C recommends:
• Roasting
Place roasting joints on an oven shelf
so that they cook evenly.
Pot roasts
Place pot roasts as usual in deep
containers and pour stock over.
• Searing
There is no need to carry out timeconsuming searing as with normal methods.
The steam will close the pores immediately.
• Roasting in pastry
Pre-heat the CONVOTHERM to achieve
high quality when roasting meat wrapped in
pastry.
• Pork rind
Rind can very easily be cut into if you first
steam the meat for approx. 10 minutes and
then cut into it and season.
• Sauces
There is no need to leave out the sauce or
sauce bases. Place the roasting joints on
an oven shelf and place a tray underneath
the shelf. To the tray add bones, mire poix
(vegetable mix for roasts) and flavourings
and gradually add water or stock.
• Poaching vegetables
Please be aware that the cooking
times for vegetables are longer for
poaching in comparison with
steaming.
• Poaching in vacuum pouches
Note that the cooking times for
vegetables will be longer when
poaching in a vacuum pouch
compared with steaming.
• Regeneration of vegetables and
accompaniments
Use the stock created to refine sauces.
• Fats and oils
When roasting in the CONVOTHERM, you
get good results with oils and fats with a
high smoking point.
• Greasing
Always grease quick roast items well. This
will give you better heat transfer.
• Heat tran sfer
Use enamelled or coated trays (Superpan).
This will give you better heat transfer and
provides a heat reservoir.
• Char-grill effect
If you wish to create a char-grill pattern,
pre-heat the oven shelves.
Arrange chilled foods on plates or platters and
regenerate using the Regeneration programme
from 120°C for 4 - 8 minutes.
• Grains
You can gently swell grains for wholefood dishes.
• Chilled foods
For rapid regeneration, steam chilled food in
covered GN containers at 120°C.
• Baking/Gratinating
Vegetables and side dishes can be gratinated
with the ‘Convection’ programme at 230°C 250°C in 2 - 5 minutes.
- 34 - EN
Page 34

Practical hints for cooking
Grilling
Meat, sausages,
quick roast items
Fillet steak, beef 180 g
Rump steak
180 - 200 g
Veal steak 160 g
Pork fillet 80 g
Slices of liver
Rissoles 150 g
Cured smoked pork chop
160 g
Rack of lamb
Cooking
programme
Oven
temperature
190 - 230° C 6 - 15 mins
190 - 230 ° C 6 - 12 mins
190 - 230°C 8 - 10 mins 56 - 62°° C
190 - 230°C 5 - 8 mins 56 - 62°° C
200 - 220°C 4 - 6 mins -
180 - 200°C
200 - 220°C
150 - 180° C 10 - 15 mins -
Cooking time
12 - 15 mins -
Core
temperature
44 -48° C
49 - 55° C
56 - 62° C
44 -48° C
49 - 55° C
56 - 62° C
Information
do not flour
grease trays, if necessary
(depending on amount)
Poaching
Meat kebab on spit
Breaded cutlet or escalope
Cordon bleu
Turkey escalope 200 g
Sausages
Sausages in jars (230 g)
Liver loaf in jars
Boiled sausage
Tinned sausage
200 g
400 g
Veal sausage
Frankfurters
Caution
Dripping fat residues may cause burns. After
roasting fatty foods, clean the interior of the oven
thoroughly. Otherwise, smoke may develop during
subsequent cooking processes.
180 - 210°C 15 - 20 mins -
180 - 220°C 10 - 15 mins -
180 - 215°C 12 - 16 mins -
180 - 210°C 10 - 15 mins -
100°C
75°C
75°C
100°C
Depending
on sausage
skin
About. 78°C
Mr.C recommends:
•
•
90 mins
30 mins/
70 mins
65 mins
90 mins
12 - 20 mins
12 - 20 mins
Pre-heating
Always pre-heat the oven well for quick roast
items.
Quick roasting
Place quick roast items on oven shelves or
baking trays. If possible, do not use deep
unperforated containers. These can lead to
uneven results.
72°C
-
-
Fill with bottled weight + 15 g,
close lid, cool down afterwards
- 35 - EN
Page 35

Practical hints for cooking
Roasting
Game and poultry
Leg of boar
about 2 - 2.5 kg
Leg of venison, boned
Duck
Goose
About 4.5 kg
Turkey
about 3 - 4 kg
Turkey breast
Saddle of hare
Cooking
programme
Oven
temperature
130 - 160°C 100 - 120 mins about 65°C
130 - 160°C 70 - 80 mins 60 - 68°C
130 - 180°C 50 - 65 mins -
130 - 180°C
120 - 180°C 110 - 120 mins about 80°C
120 - 180°C 40 - 50 mins about 60°C
120 - 160°C 15 - 20 mins 60 - 65°C
Cooking time
about
3 - 3.5 hours
Core
temperatu
-
Information
possibly lard or
marinate
possibly stuff with apples and
onions
add water at intervals during
cooking proces s
possibly stuff with forcemeat
and herbs
possibly stuff with forcemeat
and herbs
possibly lard or marinate
Roasting/
Braising
Braising Venison joint
Baking Venison pasties
Grilling
Leg of hare
Chicken
Chicken leg
Warning
Always open the CONVOTHERM carefully.
Escaping steam can cause scalding.
Mr.C recommends:
• Oven temperature
Select the oven temperature for large
roasting joints about 10 - 20 °C lower
compared with traditional cooking
methods.
• Heat tran sfer
For quick roast items, use enamelled
or coated baking trays (Superpan).
120 - 160°C 45 - 50 mins about 68°C
130 - 160°C 70 - 90 mins 55 - 60°C
1.160°C
2.120°C
160 - 200°C 35 - 40 mins -
160 - 210°C 25 mins -
• Co re temperature measurement
As a general rule, the best results for large
roasting joints are achieved with the multi-point
sensor. Every degree in excess of the required
core temperature significantly increases meat
shrinkage.
• Meat shrinkage
The ‘Superheated steam’ programme
considerably reduces meat loss
• Roasting
Place the roasting joints on an oven shelf so that
they cook evenly. It is not necessary to turn
meat.
1. about 15 mins
2. about 60 mins
-
possibly lard or braise in
stock
Place joint in deep container
and gradually add stock
always set up fume
extractors
2-step recipe
special chicken grid with
grease drip tray
rub seasoning in well
- 36 - EN
Page 36

Practical hints for cooking
Baking
Bakery goods and desserts
Tray bakes
Sponge bases
Cheesecakes
Madeira cake
Fruit flans
Viennese fingers
Shortcrust pastries
Pretzels
Apple strudel
Mixed-flour bread
Buns/rolls
Puff pastries
Flaky pastries
Croissants
Yeast plait
Buns/rolls, deep-frozen
Cooking
programme
Oven
temperature
Cooking time
Core
temperature
160 - 170°C 40 - 50 mins -
140 - 160°C 15 - 30 mins -
I.)105°C
II.)160°C
III.)80°C
I.)20 mins
II.)35 mins
III.)5 mins
140 - 160°C 50 - 60 mins -
140 - 160°C 12 - 18 mins -
140 - 170°C 40 - 50 mins -
150 - 170°C 30 - 40 mins -
150 - 180°C 15 - 25 mins -
140 - 165°C 12 - 15 mins -
140 - 160°C 25 - 35 mins -
150 - 180°C 6 - 12 mins -
-
Information
use every 2nd shelf position
use every 2nd shelf position,
3-step recipe
use every 2nd shelf position
number per sheet depends on
size; do not arrange items too
closely together
use every 2nd shelf position;
number per sheet depends on
size; do not arrange items too
closely together
use every 2nd shelf position;
number per sheet depends on
size; do not arrange items too
closely together
number per sheet depends on
size; do not arrange items too
closely together
number per sheet depends on
size; do not arrange items too
closely together
use every 2nd shelf position;
number per sheet depends on
size; do not arrange items too
closely together
number per sheet depends on
size; do not arrange items too
closely together
Poaching
number per sheet depends on
Baguettes, deep-frozen
Crème caramel
Crème Royal
Warning
Always open the CONVOTHERM carefully.
Escaping steam can cause scalding.
Mr.C recommends:
• Pre-heating
Before baking, pre-heat the appliance for at
least 10 to 15 minutes at a temperature of
20 - 30°C above the baking temperature.
150 - 180°C 6 - 12 mins -
80°C 35 - 50 mins -
• Yeast products
Leave yeast products made of yeast, bread or
brioche doughs to rise or work at a temperature
of 35°C.
Wait until the fan is still before loading the food.
This will avoid loss of heat. For deep-frozen
products, always pre-heat for at least 15 minutes
at 250°C.
size; do not arrange items too
closely together
use every 2nd shelf position,
use corrugated regeneration
grid
- 37 - EN
Page 37

Practical hints for cooking
Baking
without fat
using
Crisp&Tasty
function
(Demoisturi
sation)
Potato products, Asian
food, finger food
Chips (French fries)
Potato wedges /
cubes
Waffles
Mini spring rolls
Shrimp rolls
Cheese nuggets
Vegetable tempura
Samosas
Cooking
programme
Oven
temperature
210°C 8 - 12 mins
210°C 10 - 12 mins
210°C 8 - 10 mins
210°C 8 - 10 mins
210°C 8 - 10 mins
210°C 8 -10 mins
200°C 8 - 10 mins
210°C 8 - 12 mins
Cooking time
Core
temperature
Information
use CONVOTHERM frying
basket; use every 2nd shelf
position, max. 2kg of product
use CONVOTHERM frying
basket; use every 2nd shelf
use CONVOTHERM frying
basket; use every 2nd shelf
use CONVOTHERM frying
basket; possibly prepare with
combi phase
use CONVOTHERM frying
basket; possibly prepare with
combi phase; use every 2nd
shelf position
use CONVOTHERM black
use CONVOTHERM black
use CONVOTHERM frying
possibly prepare with combi
position
position
bakeware
bakeware
basket
phase
Steaming
Roasting
using
Crisp&Tasty
function
Caution:
Mr.C recommends:
• Sauces
• Pre-heating
Dim Sum
Sushi rice
Chicken fingers
Chicken wings
Chicken sticks
BBQ ribs
Always open the CONVOTHERM carefully.
Escaping steam can cause scalding.
Serve finger food with a tasty, fruity dip.
Simply use the automatic pre-heat
programme under Mister C.
100°C 8 - 12 mins
100°C 30 - 35 mins
210°C 10 - 14 mins
180°C
• Crisp&Tasty (Demoisturisation)
Breaded products achiebe an even crispier
finish.
• Finger food
Straight from the freezer into the pre-heated
CONVOTHERM.
• Rice
Soak rice; this leads to a shorter cooking
time.
75 - 78°C
use CONVOTHERM black
bakeware
use a 65 mm Gastronorm
use CONVOTHERM black
bakeware or grill
place on grills
- 38 - EN
Page 38

Cooking with the CONVOTHERM mini OES 6.06
Extra functions
With its additional functions, your CONVOTHERM enables you to optimise everyday work in the
kitchen and food preparation processes.
Pre-select start time
By pre-setting the start time, you can
determine when the CONVOTHERM
automatically starts the desired cooking
programme, cooking plan or cooking recipe.
1. Press and hold the
selector dial → The display will show,
for example, the following time details:
Explanation of the example
• top: total cooking time 1:00 (this value
only displayed in cooking time mode)
• bottom left: will start in 48 minutes
(displayed in cooking time and core
temperature mode)
• bottom middle: start time 10:23
(displayed in cooking time and core
temperature mode)
• bottom right: end of cooking time 11:23
(this value only displayed in cooking
time mode)
button. Turn the
N.B.:
Should you need to cancel the function
START
STOP
prematurely, press the
button. This will
delete the pre-select start time.
Mr.C recommends:
• Use these extra functions to avoid
bottlenecks in production and food
preparation.
• You can prepare food as normal, load
the CONVOTHERM and select the
desired programme and cooking time or
the core temperature long before the
cooking process is to start.
Caution:
Please be aware that storing
food for a long period of time
in the unrefrigerated, unheated
oven breaks the cold chain and is
therefore potentially harmful!
2. By holding the
button and turning
the selector dial at the same time,
select start time or end of cooking (in
cooking time mode only).
3. The CONVOTHERM automatically
switches to pre-select start time when
the
button is released.
4. To alter the pre-select start time set,
press and hold the
button. Use the
selector dial to set the correct value.
1. When the start time is reached, the
cooking programme set will start
automatically.
- 39 - EN
Page 39

Cooking with the CONVOTHERM mini OES 6.06
Extra functions that can be activated via
Mr.C
:
Crisp&Tasty (Demoisturisation)
Tray Timer
Pre-heating
Vapour reduction
Button lock
Manual addition of moisture
• Extra functions and their symbols will
only be available and visible if they are
appropriate to the selected cooking
programme.
• Mr. C functions can be selected and
activated/deactivated at any time during
operation by pressing the
button.
• You can combine Mr.C functions in any
way you like.
• Mr.C functions (apart from add moisture,
vapour reduction) can be programmed
i.e. they can be integrated into cooking
recipes.
• When a programme comes to an end,
the CONVOTHERM will automatically
reset the selected extra function (with
the exception of button lock) to the
standard setting.
• You can exit the Mr.C options menu at
START
STOP
any time by pressing the
button.
Crisp&Tasty
(Demoisturisation)
Use Crisp&Tasty for foods that contain a lot
of moisture. Excess moisture is drawn out
of the oven.
1. Press the
will appear in the display. Use the
selector dial to select ‘Crisp
confirm by pressing the
2. Confirm ‘Yes’ with the
3. Use the selector dial to select the
&Tasty level.
Crisp
low demoisturisation
medium demoisturisation
high demoisturisation
4. Confirm ‘Yes’ with the
The symbol
the display will show the required
values for the selected cooking
programme, cooking plan or cooking
recipe.
5. Press the
CONVOTHERM will start with the
&Tasty function.
Crisp
N.B.:
• Crisp&Tasty can be utilised in the
‘Convection’ and ‘Superheated steam’
programmes.
• You can combine Crisp
other extra functions in any way you
like.
• Crisp
&Tasty is programmable, i.e. it can
be integrated into cooking recipes.
• When the cooking programme comes
to an end, the CONVOTHERM
automatically resets Crisp
standard setting.
button. → Various options
&Tasty’
button.
button.
button. →
will be illuminated and
START
STOP
button. → The
&Tasty with
&Tasty to the
- 40 - EN
Page 40

Cooking with the CONVOTHERM mini OES 6.06
Mr.C recommends:
Using Crisp&Tasty you can remove
moisture from the oven. With the
&Tasty function on ‘high’ a lot of
Crisp
moisture is drawn out, whereas on the ‘low’
setting
on the other hand, only a little
moisture is removed.
Use:
for moist fruit flans, moussaka,
gratinating crusty roasts and gratins
for quick roast items, breaded
escalopes, flaky pastries
for omelettes.
Tray Timer
The Tray Timer function provides you with
several timers.
1. Press the
button. → Various options
will appear in the display. Use the
selector dial to select ‘Tray Timer’
and confirm by pressing the
button.
2. In the display will appear
Timer 1: 00:00 00:00
Timer 2: 00:00 00:00
Timer 3: 00:00 00:00
In the display the required time and the
time remaining are displayed.
3. Use the
button to change to required
time and use the selector dial to bring
up the timer. → The selected timers will
start as soon as a time greater than
0:00 is entered.
START
4. Use the
button or
STOP
leave the
timer function again.
5. When the timer time has elapsed, the
START
STOP
buzzer sounds. → Press the
button
or open the door.
6. Resetting a timer to 0:00 will stop the
timer function.
Mr.C recommends:
Use up to 20 Tray Timers for mixed
oven loads to keep track of the
optimum finish for each different dish.
Please note that the selected cooking
programme will continue to run even
after the buzzer has sounded.
Pre-heating
The pre-heating programme allows you to
pre-heat the CONVOTHERM for food
production. This will ensure that you can
guarantee your output.
1. Press the
will appear in the display. Use the
selector dial to select ‘Pre-heating’
and confirm by pressing the button.
2. Confirm ‘Yes’ with the
3. Press the
heating temperature
4. Press the
heating time.
5. Press the
CONVOTHERM will start the preheating programme. In the display will
appear the symbol
Mr.C recommends:
It is important always to pre-heat sufficiently
when baking and regenerating and for quick
roasting (20 – 30°C above the subsequent
required cooking temperature). When the
oven is fully loaded, it is recommended that
you set the maximum possible temperature
for 15 minutes.
button. → Various options
button.
button → Set the pre-
button → Set the pre-
START
STOP
button. → The
.
- 41 - EN
Page 41

Cooking with the CONVOTHERM mini OES 6.06
Button lock
Vapour reduction:
Vapour reduction allows you to reduce the
vapour discharge from the oven to the
greatest possible extent.
1. Press the
button. → Various options
will appear in the display. Use the
selector dial to select ‘Vapour reduction’
and confirm by pressing the
button.
2. Confirm ‘Yes’ with the
The symbol
will be illuminated and
button. →
the display will show the required
values for the cooking programme,
cooking plan or cooking recipe set.
3. Press the
button. → The
CONVOTHERM will start with vapour
reduction.
Mr.C recommends:
Use vapour reduction when there is a lot of
exhaust steam for the programmes:
Steaming and Superheated
steam
N.B.:
Manual vapour reduction can also be
programmed, i.e. You can include this extra
function in a cooking recipe.
You can lock nearly all the buttons on your
CONVOTHERM. Buttons can be locked and
unlocked with a PIN number.
You cannot lock the following controls:
START
STOP
the selector dial and the Press&Go
buttons, if available.
Locking:
1. Press the button. Æ Various
options will appear in the display.
Use the selector dial to select
‘Button Lock’
pressing the
and confirm by
button.
2. Confirm ‘Yes’ with the button.
The display will show “PIN 000”.
3. Use the selector dial to select the
PIN code and confirm by pressing
the
button.
(The factory setting is “PIN 001”. To
change the PIN, please contact your
service technician.)
Press the buttons to be locked one
4.
after the other. Buttons can be
locked or unlocked by pressing them
repeatedly. The display will show
‘Button locked’ or ‘Button unlocked’.
START
5.
Press the
STOP
button. Æ The button
lock is now activated and the symbol
for the button lock will be shown in
the display. The symbol
is
illuminated as soon as at least one
button has been locked.
- 42 - EN
Page 42

Cooking with the CONVOTHERM mini OES 6.06
Unlocking:
Press the button. Æ Various options
1.
will appear in the display. Use the
selector dial to select ‘Button Lock’
and confirm by pressing the
2.
Confirm ‘Yes’ with the button. The
display will show “PIN 000”.
Use the selector dial to select the PIN
3.
code (factory setting is ‘001’) and
confirm by pressing the
buttons are unlocked.
Unlocking, even when is locked:
Switch off CONVOTHERM using the
1.
button Æ The time and date will
appear in the display.
2.
Press the button. Æ The display will
show “PIN 000”.
For how to proceed, see the section
3.
‘Unlocking’.
Mr.C recommends:
The lock function allows you to prevent
•
unauthorised individuals from altering
settings on the CONVOTHERM. This will
give you peace of mind, knowing that
you can achieve optimum results for
your dishes and satisfaction for your
guests.
•
It is recommended that you choose a
PIN with a low number so as to reduce
the amount of time spent entering it.
button.
button. Æ all
Manual addition of moisture
To add moisture, you can activate the
steam supply. This will generate a jet of
steam.
1. Press the
will appear in the display. Use the
selection dial to select ‘Add Moisture’
and confirm by pressing the
button.
2. Confirm ‘Yes’ with the
The CONVOTHERM generates a jet of
steam.
N.B.:
The manual addition of moisture is not
programmable, i.e. You cannot include this
extra function in a cooking recipe.
button. Æ Various options
button. Æ
- 43 - EN
Page 43

CONVOTHERM Cookbook
You will encounter the following symbols in the Cookbook
Recording
Transfer
Copy cooking recipe Insert step
Delete cooking recipe Append step
New cooking recipe Change cooking recipe Delete step
Working with multi-step cooking plans
Dishes which you would like to create in one or more cooking steps can be easily prepared by
using cooking plans.
Creating a multi-step cooking
plan
Creating a cooking plan allows you to select
one or more programmes of your choice or
a cooking programme with different
required settings (max. 20) and set these to
operate automatically.
1. Enter first cooking step: Press one of
the buttons
3 seconds. → At the top of the display
you will see 01/01 for the first cooking
step, with the time and temperature
settings underneath.
2. Press the
temperature will be called up in the
display. Set the required oven
temperature using the selector dial.
3. Press the
Set the desired cooking time or core
temperature.
4. To enter more steps, proceed as above.
5. Press the
plan will start. If the cooking plan has
three steps, for example, in the display
the CONVOTHERM will show 01/03 at
the top for the first of the three cooking
steps. The time and temperature
settings of the active cooking step will
be shown underneath as usual.
6. When one cooking step has finished, the
CONVOTHERM switches automatically
from one cooking step to the next step
(display changes to 02/03).
7. When the cooking time has elapsed or
the core temperature has been reached,
for
button. → The oven
button or button. →
START
STOP
button. → The cooking
the buzzer will sound and the cooking
plan ends.
START
Press the
STOP
button or open the door.
8. To exit the cooking plan, press any
cooking programme button or restart
START
STOP
the plan with the
button.
N.B.:
• Extra functions, Delta-T cooking and
Cook & Hold cooking can also be
integrated into cooking plans. For more
information on how to proceed, see the
section on ‘Cooking with the
CONVOTHERM’.
• You can exit a cooking plan at any time
by briefly pressing a cooking
programme button. Any information
entered will be lost.
• You can check a cooking plan before
starting by pressing the buttons
and
. This allows you to change the oven
temperature, cooking time and/or core
temperature for each step. When
checking the cooking plan with the
buttons
and you cannot append
any further steps to the cooking plan.
Recording a Cooking Plan
To save all settings which you have entered
for a particular dish, start the recorder. It will
record all programme, temperature and
- 44 - EN
Page 44

CONVOTHERM Cookbook
time changes for up to 20 steps until you
stop it again.
1. To start the recorder, press the
button. → Various options will appear in
the display. Use the selector dial to
select ‘Recording’
pressing the
and confirm by
button.
2. Confirm ‘Yes’ with the button. →
Recorder will record until stopped
(maximum of 20 cooking steps). In
addition the display shows the
symbol
.
3. For more information, see the operating
instructions in the section ‘Cooking with
the CONVOTHERM’.
4. To stop the recorder, press the
button. → Various options will appear in
the display. Use the selector dial to
select ‘Recording’
pressing the
and confirm by
button.
N.B.:
START
You can also press the
STOP
button during
the cooking process, without your cooking
steps being lost or being overwritten.
The manual addition of moisture and
cooking steps of less than one minute are
not recorded.
Transferring a cooking plan
into the Cookbook
You can transfer the last cooking plan
created or recorded into the Cookbook.
1. Press the
will appear in the display. Use the
selector dial to select ‘Transfer’
confirm by pressing the
2. To enter the name of a recipe, select
the letters with the selector dial and use
the buttons
between placeholders. When the recipe
name has been written, confirm with the
button.
button. → Various options
and
button.
and to switch
3. Use the selector dial to select a
memory location and confirm with the
button.
4. The cooking plan will be stored as a
cooking recipe in the Cookbook.
N.B.:
Using the selector dial, you can also select
a memory location which is already being
used and overwrite it with a new recipe by
pressing the
button.
Mr.C recommends:
• The use of cooking plans is particularly
suitable for gently cooking food
through in the first cooking step and for
browning it perfectly in the second step.
This step-by-step procedure allows
you to create a succulent roast with a
crisped outside with very low meat
shrinkage.
• Use cooking plans for roasts and joints
with crisped outsides, poultry, bakes,
for Delta-T cooking, Cook & Hold
cooking, low-temperature cooking and
for patisserie.
• You can save particularly successful
dishes in the Cookbook. This allows
you to recreate these dishes to the
same level of quality any time you wish.
• Use cooking plans to try out dishes
which you prepare often or which are
complex to prepare, until you have the
perfect results. These perfected plans
can then be stored as recipes in the
CONVOTHERM Cookbook.
- 45 - EN
Page 45

CONVOTHERM Cookbook
Working with the Cookbook
Your CONVOTHERM allows you to combine up to 20 cooking steps to make a cooking recipe.
You can then save the cooking recipe under a name in the Cookbook, call it up and start it
whenever you wish.
Entering a cooking recipe
in the Cookbook
1. Press the button. → Various options
will appear in the display. Use the
selector dial to select ‘New recipe’
and confirm by pressing the button.
2. Cooking programme buttons will flash
→ 01/01 appears in the display. Select
the desired cooking programme and set
time and temperature settings. Transfer
by pressing the
3. Cooking programme buttons will flash
→ 02/02 appears in the display. Enter
further cooking steps as indicated
above. To end the entry of new cooking
steps when programme buttons are
flashing, press the
4. To enter the name of a recipe, select
the letters using the selector dial and
use the buttons
between the placeholders. Confirm
recipe name with the
5. Use the selector dial to select a
memory location and confirm with the
button.
6. The cooking recipe will be saved in the
Cookbook.
N.B.:
• You can also incorporate Delta-T
cooking, Cook & Hold and extra
functions into cooking recipes. For
more information on how to proceed,
see the section ‘Cooking with the
CONVOTHERM’.
• To check or modify individual cooking
steps, you can scroll back and forwards
using the buttons
• Using the selector dial, you can also
select a memory location which is
button.
button.
and to switch
button.
and .
already being used and overwrite it with
a new cooking recipe by pressing the
button.
Integrating pre-heating into a
cooking recipe
1. Press the button. → Various options
will appear in the display. Use the
selector dial to select ‘New recipe’
and confirm by pressing the button.
2. Cooking programme buttons will flash
→ 01/01 appears in the display. Use
the
Transfer by pressing the
3. Cooking programme buttons will flash
→ 02/02 appears in the display. Select
the desired cooking programme and set
time and temperature settings. Transfer
by pressing the
4. For more information on how to
proceed, see ‘Entering a recipe’
N.B.:
• When you start a cooking recipe which
includes integrated pre-heating time,
the buzzer will sound once pre-heating
is finished and the display will show
‘Open door and load’. The cooking
recipe will then continue after the door
have been closed.
• Caution: if the door is not opened and
closed, the CONVOTHERM will
interrupt the programme and pause the
cooking recipe at this point.
button to select Pre-heat .
button.
button.
.
- 46 - EN
Page 46

CONVOTHERM Cookbook
Integrating a buzzer signal
into a cooking recipe
1. Press the button. → Various options
will appear in the display. Use the
selector dial to select ‘New recipe’
and confirm by pressing the button.
2. Cooking programme buttons will flash
→ 01/01 appears in the display. Use
the
Transfer by pressing the
button to select buzzer .
button.
The display will show ‘Action’ if a recipe
with integrated buzzer is started.
3. Cooking programme buttons will flash
→ 02/02 appears in the display. Select
the desired cooking programme and set
time and temperature settings. Transfer
by pressing the
button.
4. For more information on how to
proceed, see ‘Entering a recipe’
Mr.C recommends
• Use the buzzer programming function
to remind yourself to switch something
off or place something in the oven, for
example.
• Be aware that when the buzzer sounds,
an ‘Action’ such as switching something
off or placing something in the oven
must be carried out. After you have
opened and then closed the door, the
CONVOTHERM will automatically
continue with the cooking recipe.
• If no ‘Action’ is performed, after
3 minutes of the buzzer sounding, the
cooking recipe will be continued with
the next cooking step.
.
Executing a cooking recipe from
the Cookbook
1. Press the button → The saved
cooking recipes will appear in the display.
Use the selector dial to select the d esired
cooking recipe.
START
STOP
2. Press the
CONVOTHERM will carry out the desir ed
cooking recipe. The cooking steps will
follow automatically one after t he ot her.
The display will show the recipe name,
the current cooking step and the number
of cooking steps at the top. The ti me and
temperature settings are shown at the
bottom as usual.
3. When the cooking time has elapsed or
the core temperature has been reached,
the buzzer will sound and the cooking
recipe ends. Press the
the door.
N.B.:
• If you have selected the desired recipe,
you can check the individual cooking
steps by pressing the
• You can alter the oven temperature and
the cooking time or core temperature of
a cooking recipe at any time while the
oven is operating.
• You can also save changes to a cooking
recipe while the oven is op erating. For
how to proceed, see ‘Transferring a
cooking plan into the Cookbook’.
• You can start any cooking recipe with
the pre-select start time. For more
information on how to proceed, see the
section ‘Pre-select start time’.
Mr.C recommends:
• Use the option of saving cooking recipes
in the Cookbook for dishes which are
regularly prepared by semi-skilled staff.
• To enable you to find a partic ular
cooking recipe in the Cookbook quickly,
you should sort recipes alphabetically by
recipe name.
button → The
START
STOP
button or open
button.
- 47 - EN
Page 47

CONVOTHERM Cookbook
Editing cooking recipes in the Cookbook
You can change, copy or delete recipes saved in the Cookbook at any time or also edit
individual cooking steps.
By pressing the button you can exit the cooking recipe at any time and return to the
Cookbook, without transferring the changes.
Copying a cooking recipe
1. Press the
cooking recipes will appear in the
display. Select the desired recipe.
2. Press the
will appear in the display. Select ‘Copy
cooking recipe’
pressing the
3. For more information on how to
proceed, see ‘Entering a cooking
recipe’
Deleting a cooking recipe
1. Press the button → The saved
cooking recipes will appear in the
display. Select the desired recipe.
2. Press the
will appear in the display. Select ‘Delete
cooking recipe’
pressing the
3. The cooking recipe will be deleted. The
memory location number occupied by
the deleted recipe is now free again.
Changing a cooking step in
a recipe
1. Press the
cooking recipes will appear in the
display. Use the selector dial to select
the desired cooking recipe.
2. Press the
will appear in the display. Use the
selector dial to select ‘Change cooking
recipe’
button → The saved
button. → Various options
and confirm by
button.
.
button. → Various options
and confirm by
button.
button → The saved
button. → Various options
.
3. Use the buttons
cooking step to be changed, correct
cooking programme and/or settings and
confirm by pressing the
4. For more information on how to
proceed, see ‘Entering a cooking
recipe’
.
Inserting a step into
and to select the
button.
cooking recipe
1. Press the button → The saved
cooking recipes will appear in the
display. Use the selector dial to select
the desired cooking recipe and confirm
using the
2. Select ‘Change cooking recipe’
confirm with the
3. Use the buttons
cooking step before which a cooking
step is to be inserted.
4. Press the
criteria will appear in the display. Select
‘Insert step’
pressing the
5. The CONVOTHERM will insert a new
cooking step at the selected point. All
subsequent cooking steps will be renumbered accordingly. The new
cooking step will be selected and all
cooking programme buttons will flash.
6. For more information on how to
proceed, see ‘Creating a cooking
recipe’
button.
and
button.
and to select the
button. → Selection
and confirm by
button.
.
- 48 - EN
Page 48

CONVOTHERM Cookbook
N.B.:
If a cooking recipe already has 20 cooking
steps, no more steps may be added.
Appending a cooking step
to a cooking recipe
1. Press the button → The saved
cooking recipes will appear in the
display. Select the desired cooking
recipe and confirm with the
2. Select ‘Change cooking recipe’
confirm using the
3. Use the buttons
cooking step before which a cooking
step is to be inserted.
4. Press the
criteria will appear in the display. Select
‘Append step’
pressing the
5. The CONVOTHERM will append a new
step at the selected point. The new
cooking step will be selected and all
programme buttons will flash.
6. For more information on how to
proceed, see ‘Creating a cooking
recipe’
N.B.:
If a cooking recipe already has 20 cooking
steps, no more steps may be added.
Deleting a cooking step
button. → Selection
.
button.
and to select the
and confirm by
button.
button.
and
from a cooking recipe
3. Use the buttons
cooking step before which a cooking
step is to be inserted.
4. Press the
criteria will appear in the display. Select
‘Delete step’
pressing the
5. The CONVOTHERM will delete the
selected cooking step. All subsequent
cooking steps will be re-numbered.
6. For more information on how to
proceed, see ‘Creating a cooking
recipe’
N.B.:
After deleting a cooking recipe with only
one cooking step or deleting the last
remaining step, all cooking programme
buttons will flash and you can then enter a
new cooking step.
Mr.C recommends:
• Use the edit cooking recipe function
if you change the ingredients of a
cooking recipe, for example. If
ingredients are modified, the time
required to cook a dish may change,
for example.
• By editing the cooking recipes, you can
make best, flexible use of your
creativity whenever the need arises.
.
and select the
button → Selection
and confirm by
button.
1. Press the button → The saved
cooking recipes will appear in the
display. Select the desired cooking
recipe and confirm with the
2. Select ‘Change cooking recipe’
confirm with the
button.
button.
and
- 49 - EN
Page 49

CONVOTHERM Cookbook
Working with Press&Go buttons
The CONVOTHERM allows you to assign cooking recipes stored in the Cookbook and cleaning
to Press
at any time with just one press of a Press
Assigning a cooking recipe or
semi-automatic cleaning to a
Press&Go button
1. Press the button → The saved
2. Hold down the desired Press
3. When the signal sounds, this means
N.B.:
• If the desired Press&Go button is
• When the signal sounds, this means
Executing a cooking recipe with
Press&Go
1. Press the Press&Go button → The
2. When the cooking time has elapsed or
&Go buttons (see above), so that you can start the assigned cooking recipe or cleaning
&Go button.
Mr.C recommends:
• Press
&Go buttons allow you to work
quickly and easily, since you do not
need to perform any settings.
cooking recipes will appear in the
display. Use the selector dial to select
the desired recipe or semi-automatic
cleaning.
&Go button
for three seconds.
• The Press
suitable for dishes which you prepare
on a regular basis, such as baking
pretzels, rolls and croissants. These
items can then be produced even by
semi-skilled staff to a very high quality
standard.
&Go buttons are particularly
• In addition by locking the control panel
the cooking recipe or cleaning process
has been assigned to the selected
Press
&Go button.
when working with the Press
&Go-
buttons you will make your production
process secure, as no changes can be
made by your staff.
• Assign a Press
&Go button to the pre-
heating programme to allow you to pre-
already being used, you can overwrite it.
Select cooking recipe and hold down
Press
&Go button for three seconds.
heat the CONVOTHERM quickly and
easily for food production.
the cooking recipe has been assigned
to the Press
&Go button.
CONVOTHERM will carry out the
desired cooking recipe. The display will
show the recipe name, current cooking
step and number of cooking steps at
the top. The time and temperature will
be shown underneath as usual.
the core temperature has been reached,
the buzzer will sound and the cooking
START
STOP
recipe ends. Press the
button or
open the door.
- 50 - EN
Page 50

Daily servicing and maintenance
Cleaning the oven
Caution:
In order to maintain the high
quality of the stainless steel in
the oven, to meet hygiene
requirements for daily work in the
CONVOTHERM and to prevent
interruptions to operation, please clean
the oven every day when you finish
operating the unit.
N.B.:
• With every new appliance you will
receive comprehensive information and
an order form for CONVOTHERM
cleaning materials.
• To prevent discoloration and corrosion
of the stainless steel you must clean
the steamer regularly, even if it is used
solely for steam programmes.
• The fan area behind the suction plate
should also be cleaned when it is dirty.
To do this remove the suction plate
fasteners and take out the suction plate.
After cleaning, re-insert the suction
plate again and fix in place with the
fasteners.
• For a clear view inside the appliance,
clean the interior double glazed door
regularly. To do this open the quick
release lock. Take care not to scratch
the glass. This can cause the glass to
break.
• Be careful not to scratch the oven
interior and rack. Scratches can cause
rust.
• Regular cleaning of the hygienic push-
in seal will increase its life. In the case
of severe soiling or grease build up, this
can be removed with no need for tools
(start with the corners) and cleaned.
The seal should be allowed to cool first.
Only use gentle, odour-neutral cleaning
agents (no abrasive agents or cleaning
processes which may attack the
surface). The seal, once dry, can be
replaced with no need for tools (at the
corners first).
• To clean outflow: clean outflow in the
oven of food residues. Spray on original
CONVOTHERM oven cleaner and
leave to take effect. Rinse out
thoroughly with the optional hand
shower or wipe out thoroughly with a
damp sponge.
• Flush out the door and appliance drip
trays regularly and ensure that the
outflow is not blocked.
• Flush out the appliance outflow
regularly and ensure that it is not
blocked.
• If a white deposit forms inside the oven
interior over time, the water softener is
not set correctly.
Correct the water hardness settings
(see page12; point 3.)
• Decalcification of the oven
- remove light calcium films by spraying
CONVOCare, letting it work and wiping
out thoroughly with a damp cloth
- heavy calcium deposits should only be
removed by approved CONVOTHERM
authorised customer service
department.
- 51 -
EN
Page 51

Daily servicing and maintenance
Semi-automatic cleaning of
the oven interior
The CONVOTHERM is equipped with a
semi-automatic oven cleaning programme
called “clean”.
1. Press the
will appear in the display. Use the
selector dial to select ‘Cleaning’
confirm by pressing the
2. Confirm ‘Yes’ with the
The symbol
the display will show the required
values for the cleaning programme.
3. Press the
CONVOTHERM will start the cleaning
process.
4. After the first signal, spray the oven
interior, oven floor outflow, oven
shelves, trays, etc. with original
CONVOTHERM oven cleaner. Close
the door and leave to take effect. The
cleaning programme will continue
automatically. (Do not press the
button again!)
5. After the next signal, switch off the
CONVOTHERM.
6. Using the optional hand shower
thoroughly rinse the oven interior and
accessories or just wipe out thoroughly
with a non abrasive sponge or cotton
cloth.
7. In the case of severe staining or soiling,
repeat the cleaning process.
8. Do not close the appliance door after
use or after cleaning, but leave it ajar.
button. → Various options
and
button.
button. →
will be illuminated and
button. → The
START
STOP
General safety advice
• When working with cleaners,
wear suitable protective
clothing, protective gloves and
protective glasses.
• Do not inhale the spray mist.
• Only use original CONVOTHERM
cleaning and nozzle rinsing agents
(no irritant, high-alcohol cleaners or
abrasive agents). In the event of
damage which can be traced back to
improper cleaning, any claim under
the warranty becomes invalid.
Follow the safety instructions on the
labels and on the safety data sheets
of the cleaners. Other cleaners can
cause damage to the appliance.
• Ensure that the suction plate and the
shelf racks are inserted and locked
in accordance with the instructions.
• Never leave spray bottles unused
and under pressure for long periods.
Turn the pump head slowly to relieve
air pressure.
• Rinse nozzle, nozzle extension and
nozzle connection after each use.
• Before heating up the appliance,
remove all cleaning residues
thoroughly.
- 52 -
EN
Page 52

What to do if…
?
Troubleshooting
CONVOTHERM combi steamers have a fully automatic error diagnosis system, which, in the event that an
error occurs, not only displays codes but also a description of the error. To continue operating, emergency
operation is available (see below).
The table below will help you should errors or malfunctions occur while your CONVOTHERM is operating.
It shows possible causes and remedies.
Error Message in the display Possible cause Remedy
E01 Not enough water
E02 Elec. temp. too high
E04 Electric fan malfunction Auxiliary fan faulty Call customer service
E11/E32
E15/E36
E33 Core temp. faulty Core temp. sensor faulty
E29 Earth connection of a
E80/E95/E96
E82 Working parameter error
Excess temp. in oven/oven
sensor failure
Excess temp. in condenser /
condenser sensor failure
sensor
ID error / software error /
connection faulty
Water tap closed Open water tap
Solenoid valve dirt filter has not been
cleaned
Solenoid valve faulty Call customer service
Wiring space ventilation faulty, air
supply blocked
Excessive oven temperature Call customer service
Oven sensor faulty Call customer service
Water tap closed Water tap closed
Excess temperature in the condenser
via hot water connection
Solenoid valve dirt filter has not been
cleaned
Solenoid valve faulty Call customer service
Condenser sensor faulty Call customer service
A temperature sensor faulty Call customer service
Controller faulty
Problems during switch between
°C / F
Link between operating module and
control module interrupted
Remove and clean filter
Let appliance cool down or
continue to cook at a lower oven
temperature, call customer
service
Connect appliance to cold
water, restart
Remove and clean filter
Set cooking programmes with
time, call customer service
Restart,
call customer service
Check settings in the cookbook,
if nec. check °C / F in appliance
setup.
Call customer service
- 53 -
EN
Page 53

What to do if…
The following table shows other operating irregularities which are not displayed with an error
message.
Error Possible cause Remedy
?
Suction plate not on its hinges
correctly
Required oven temperature too high
Uneven browning
Control elements not illuminated and
do not react when switched on
Appliance does not react to
information entered
Appliance cannot be switched on or
off
No oven lighting Oven lights faulty Call customer service
Water sprays from air outlet pipe when
door is closed
Water inside the oven Outflow blocked
Steam/water coming out of base of
appliance (condenser)
White or black marks in the oven
interior
Fan faulty Call customer service
Not pre-heated
Incorrect accessories, containers Use suitable accessories
No power connection, external fuse
triggered,
internal fuse F1 has triggered
The software has hung
ON/OFF is locked for 3 seconds Try again after 3 seconds
Appliance drain blocked Clean outflow
Air outlet pipe blocked or covered Remove object
Drainage installation faulty Correct installation
Outflow/condenser blocked
Incorrect cleaning agent
Water hardness too high
Hang suction plate correctly on its
hinges
Select lower temperature and increase
cooking time
Always pre-heat appliance, see.
‘General advice’
Call customer service
Hold down the ON/OFF button for 5
seconds or disconnect appliance from
the power supply for 5 seconds
Rinse condenser and appliance
outflow thoroughly, clean/check
building’s drainage system
Rinse condenser and appliance
outflow thoroughly, clean/check
building’s drainage system
Use original cleaning agents
CONVOClean forte or CONVOClean
new
Set total water hardness to 5° dH –
7° dH
Caution:
If an error cannot be rectified with the aid of this list, please contact the
CONVOTHERM authorised customer service team that is appropriate for
you.
- 54 -
EN
Page 54

What to do if…
?
Emergency operation
To ensure that you can continue to use your CONVOTHERM in the event of an error which
cannot be solved immediately, the controller has an 'emergency operation' function.
This allows you to use at least some of the appliance functions despite a malfunction. You must
however inform your customer service team of the problem in all cases!
Please note:
• Cooking times can be somewhat
longer than those you are accustomed
to from previous experience.
• Please carefully monitor the cooking
process and the state of your product
as it cooks.
Operating instructions for
emergency operation
When the appliance is in error mode:
– the buzzer will sound
– display of an error code, e. g. E 01
1. Press the
error).
The programmes which can be
selected will be indicated by flashing.
You can then proceed as normal.
2. Select a programme by pressing the
corresponding button (locked
programmes will not respond to buttons
being pressed).
3. Set operating information (as described
under the individual programmes).
Depending upon the error, only limited
operation will be possible (e. g. in
temperature selection).
4. To start, press the
5. When the cooking time has elapsed,
press the
6. When the error has been rectified, the
appliance will automatically switch back
to normal operation:
– the error number will no longer be
– the back lighting/function display of
– the buttons will react normally when
START
STOP
button. (This confirms the
START
STOP
button.
START
STOP
button.
displayed,
the programme buttons will not be
flashing,
they are pressed.
- 55 -
EN
Page 55

What to do if…
Hold
2)
X
X2)
?
Delta-T
up to
140°C
up to
140°C
The oven will operate if these errors occur
Error
E01 Not enough water X - E02 Elec. temp. too high X X up to 140°C
E04
E11
E15
E33 Core temp. fault X X X X X X X
E36
E 29
E80 ID error - - - - - - E81
E82
E83 Algo. error X X X X X X X
E89 I2C error X X X X X X X
Message
in the display
Electric fan
malfunction
Excessive oven
temperature
Excessive
temperature of
condenser
Condenser sensor
failure
Sensor earth
connection
Programme memory
error
Working parameter
error
OES Steaming
X X up to 140°C
- - - - - - -
X - -
X X
- - - - - - -
X X X X X X X
X X X X X X X
Superheated
steam
2)
up to 180°C
Convection Regeneration
up to
180°C
2)
up to
140°C
up to
140°C
up to
180°C
up to
180°C
2)
up to 140°C
up to 140°C
up to 180°C
Cook &
- X X
up to
140°C
up to
140°C
- X X
2)
X Operation possible
– Operation not possible
1) Injection of water into the condenser constantly activated (higher water
consumption)
- 56 -
EN
Page 56

Index
Operation
A
Accessories 13
Append step 49
B
Button lock 42
C
Change cooking recipe 48
Cleaning 51
Convection 23
Cook & Hold 29
Cookbook index 31
Cookbook 44
Cooking plan 44
Cooking recipe 46
Copy cooking recipe 48
Core temperature
measurement 37
Crisp
&Tasty
(Demoisturisation) 40
D
Date 18
Default setting 19
Delete cooking recipe 48
Delete step 48
Delta-T cooking 28
Demoisturisation 40
E
Emergency operation 55
Error messages 53,54
Extra functions 39
F
G
H
I
Insert step 48
Integrating buzzer tone 47
Integrating pre-heating 46
J
K
L
Language 53
M
Maintenance 51
Maintenance 51
Manual addition of moisture 43
Memo setting 19
N
Network address 31
New cooking recipe 46
O
P
Pre-heating 41
Pre-select start time 39
Press
&Go (symbol) 50
Programme lock 42
Q
R
Recording 45
Regeneration 36
S
Safety instructions 7
Semi-automatic cleaning 52
Setup 17
Signal tone 17
Steaming 32
Superheated steam 33
Symbols 50
T
Temperature display 19
Time 18
Transferring a cooking plan 45
Tray Timer 41
Troubleshooting 53,54
U
V
Volume 17
W
X
Y
Z
- 57 -
EN
Page 57

Index
Cooking recipes for foodstuffs
A
Apple strudel 37
Asparagus 31
B
Baguette 37
Baked ham 33
Beef fillet 35
Beef pot roast 33
Boiled ham 33
Boiled sausage 35
Buns 37
C
Cabbage roulades 33
Cabbage 31
Cabbage 31
Carrots 31
Cauliflower 31
Cheese Nuggets 38
Cheesecake 37
Chicken fingers 38
Chicken pieces 36
Chicken sticks 38
Chicken wings 38
Chicken, whole 36
Chips (French fries) 38
Cordon bleu 35
Crayfish 32
Crème caramel 37
Crème royal 37
Croissants 37
Cubes 38
Cured pork (Kassler) 35
D
Dim Sum 38
Duck 36
Dumplings 31
E
Egg garnish “Royale” 31
Eggs, boiled 31
F
Fish dumplings 32
Fish fillet, breaded 32
Fish terrine 32
Frankfurters 35
Fruit flans 37
G
Goose 36
H
I
J
Jacket potatoes 31
K
Knuckle of veal 33
L
Leg of boar 36
Leg of hare 36
Leg of lamb 33
Leg of venison 36
Lobster 32
M
Madeira cake 37
Meat kebab 35
Meat loaf 33
Minced meat loaf 35
Mixed-flour bread 37
Mussels 32
N
O
P
Pasta 31
Peppers, stuffed 33
Plaice 32
Pork fillet 35
Pork hock 33
Potatoes 31
Prawns 32
Pretzels 37
Puff pastry 37
Pulses 31
Q
R
Rice
Basmati 31
Long grain 31
Short-grain 31
Sushi 38
Rack of lamb 35
Rissoles 35
Roast beef 33
Roast pork 33
- 58 -
EN
Page 58

Index
Rolls 37
Roulade 33
Rump steak 35
S
Saddle of hare 36
Salmon 32
Samosas 38
Sausages in jars 35
Sausages 35
Shortcrust pastry 37
Shrimp roll 38
Side dishes 31
Sliced liver 35
Sole 32
Sponge 37
Spring rolls 38
T
Terrines 32
Tinned sausage 35
Tray bake 37
Trout 32
Turkey escalope 35
Turkey, breast 36
Turnips 31
U
V
Veal sausage 35
Vegetable bake 31
Vegetable tempura 38
Vegetables 31
Venison joint 36
W
Waffles 38
X
Y
Yeast plait 37
Z
- 59 -
EN
Page 59

CONVOTHERM Elektrogeräte GmbH | Talstr. 35 | 82436 Eglfing (Germany) | Tel.: +49 (0) 88 47/67-0 | Fax +49 (0) 88 47/414 | info@convotherm.de | www.convotherm.de
CONVOTHERM
mini OES 6.06
New technical developments, changes and errors excepted.
Enodis
Artikelnummer: 7016470 / 08/2006
 Loading...