

Convotherm C4ET-12.20GB, C4ET-20.20GS, C4ET-6.20ES, C4ET-20.10GB, C4ET-6.10ES SERVICE MANUAL
...Page 1
Combi Steamer
Convotherm 4 easyTouch
Operating Instructions USA – Original, ENG
Your meal. Our mission.
Read this manual before using
Page 2

Page 3

Table of Contents
Table of Contents
1 General Information 5
1.1 Customer Documentation Structure 6
1.2 Safety information that must be read without exception 7
1.3 About These Operating Instructions 8
2 easyTouch Functions 9
2.1 easyTouch Functions at a Glance 10
2.2 Selected cooking profile 12
3 Using the On-Screen Help Pages 13
3.1 The On-Screen Help Home Screen 14
3.2 Accessing the On-Screen Help Pages 15
3.3 On-Screen Help Page Navigation Tools 16
4 easyTouch User Interface Layout 18
4.1 Main Screen 19
4.2 Cooking Screens 20
4.3 Cooking Screens – Smoker 22
4.4 Press&Go Screen 23
4.5 Cookbook Screens 24
4.6 Rethermalization Screens 25
4.7 Cleaning Screens – Options 27
4.8 Cleaning Screens – ConvoClean+ 28
4.9 Cleaning Screens – Semi-Automatic 29
4.10 Settings Screen 30
4.11 Extra Functions Screen 31
4.12 Pre-Heating Screen 33
4.13 Cool down Screen 34
4.14 Cooking in Progress Screen 35
4.15 Cooking User Prompt Screen 36
4.16 Cleaning with ConvoClean+ in Progress Screen 37
4.17 Cleaning User Prompt Screen 38
5 Cooking and Rethermalizing Food with easyTouch 39
5.1 Instructions 40
5.1.1 Entering a Cooking Profile That Uses Steam 41
5.1.2 Entering a Cooking Profile That Uses Combi-Steam 43
5.1.3 Entering a Cooking Profile That Uses Convection 45
5.1.4 Entering a Cooking Profile That Uses the Smoker 47
5.1.5 Entering a Cooking Profile That Uses Rethermalization 48
5.1.6 Starting a Cooking Sequence 50
5.1.7 Stopping a Cooking Sequence 50
5.2 Cooking Workflows 51
5.2.1 Cooking Workflow with Pre-Heat Function 52
5.2.2 Cooking Workflow with Cool down Function 54
6 Using the Cookbook 56
6.1 Saving the Configured Cooking Profile in the Cookbook 57
6.2 Access the cooking profile in the cookbook 58
6.3 Delete the cooking profile from the cookbook 59
Operating instructions 3
Page 4

Table of Contents
7 Using Press&Go 60
7.1 Accessing Press&Go 61
8 Cleaning with easyTouch 62
8.1 Instructions 63
8.1.1 Configuring the Fully Automatic Oven Cleaning Profile 64
8.1.2 Starting a Cleaning Sequence 65
8.1.3 Stopping a Cleaning Sequence 65
8.2 Cleaning Workflows 66
8.2.1 Workflow for Oven Cleaning with Water 67
8.2.2 Workflow for Oven Cleaning with ConvoCare 69
8.2.3 Workflow for Fully Automatic Oven Cleaning with Canisters 71
8.2.4 Workflow for Fully Automatic Oven Cleaning with Single-Measure Dispensing 73
8.2.5 Semi-Automatic Oven Cleaning Workflow 76
9 Configuring Settings in easyTouch 78
9.1 Setting a language 79
9.2 Setting a date and time 80
9.3 Importing Cookbooks 81
9.4 Selecting a Cookbook 82
Operating instructions 4
Page 5

1 General Information
1 General Information
Purpose of this section
This section explains how to use these operating instructions.
Contents
This section covers the following subjects:
Customer Documentation Structure 6
Safety information that must be read without exception 7
About These Operating Instructions
Page
8
Operating instructions 5
Page 6

1 General Information
1.1 Customer Documentation Structure
Customer documentation parts
The customer documentation for the combi steamer is made up of the following:
Installation manual
Operating manual
easyTouch operating instructions (this manual, which is an extract from the on-screen help pages)
On-screen help integrated into easyTouch (complete instructions for using the software)
Installation manual topics
The installation manual is intended for trained qualified personnel; see “
installation manual.
It covers the following topics:
Configuration and functions: Describes the parts that are relevant when installing the combi
steamer
Safety: Goes over all the hazards involved in the various installation activities and how to prevent
and/or counter them
Transportation: Contains important information on transporting the combi steamer
Setup: Lists and describes the various setup options for the combi steamer
Installation: Goes over all the necessary utility and hose connections
Placing into operation: Explains how to put the combi steamer into operation for the first time
Removal from service: Goes over the activities that need to be carried out at the end of the combi
steamer’s lifecycle
Technical data, scale drawings, and connection points: Contain all the required technical
information concerning the combi steamer
Checklists: Includes checklists for the combi steamer’s installation and warranty
Operating manual topics
The operating manual is intended for briefed staff and trained qualified staff; see “
in the operating manual.
It covers the following topics:
Configuration and functions: Describes the parts that are relevant when using the combi steamer
Safety: Goes over all the hazards involved in using the combi steamer and how to prevent and/or
counter them
Cooking: Goes over the various rules, workflows, operating steps, and actions required for cooking
Cleaning: Lists and describes the cleaning processes, cleaning agents, workflows, operating steps,
and actions required for cleaning
Maintenance: Contains warranty information; the maintenance schedule; information on faults,
errors, and emergency mode; and the workflows, operating steps, and actions required for
maintenance
Staff Requirements
Staff Requirements
” in the
”
Operating instructions and on-screen help topics
The operating instructions and the on-screen help are intended for briefed staff and trained qualified
staff; see “
instructions will be an extract from the on-screen help pages.
The operating instructions and the on-screen help cover the following topics:
User interface layout: Goes over the combi steamer’s user interface
Using the software: Contains instructions on how to enter and access cooking profiles, access
cleaning profiles, and start cooking and cleaning sequences; describes the various settings and
goes over how to import and export data
Select cooking profiles: Lists tried-and-true cooking profiles
Operating instructions 6
Staff Requirements
” in the operating manual. For appliances with easyTouch, the operating
Page 7

1 General Information
1.2 Safety information that must be read without exception
Safety information found in the documentation for the customer
Only the installation manual and operating manual provide safety information for the combi steamer.
The installation manual provides safety information for the transportation, setup, installation, placing-
into-operation, and removal-from-service tasks it describes.
The operating manual provides safety information for the cooking, cleaning, and maintenance tasks it
describes.
When using the operating instructions, the operating manual or installation manual should always be
consulted in order to obtain the relevant safety information. When performing activities that go beyond
simply using the software, the safety information in the operating manual and installation manual must
always be observed.
Parts of the customer documentation that must be read without exception
These operating instructions are exclusively limited to describing how to use the appliance’s user
interface. The various sets of instructions all end when a process in which warnings need to be
observed (cooking and cleaning, for example) starts. For instructions on how carry out the
corresponding process, please refer to the installation manual or to the operating manual.
In order to ensure their safety and the safety of others, everyone working with/on the combi steamer
must read and understand the following customer documentation sections before starting any work:
The “
For Your Safety
the task being carried out
The sections in the installation manual or operating manual describing the work that will be carried
out
Failure to take the safety information in the installation and operating manuals into account may result
in death, injury, or property damage.
” section in the installation manual or in the operating manual, depending on
Operating instructions 7
Page 8

1 General Information
1.3 About These Operating Instructions
Purpose
The purpose of these operating instructions is to provide everyone working with/on the combi steamer
with an overview of its easyTouch software and how to use it, as well as to enable them to carry out
basic tasks with the software.
The complete instructions for using easyTouch are found in the software’s on-screen help pages.
Target groups
Name of target group Tasks
Cook Primarily takes care of organizational tasks, such as:
Entering cooking profile data
Editing existing cooking profiles in the cookbook
Coming up with new cooking profiles
Configuring the appliance’s settings
and takes care of all operator tasks as well if necessary.
Operator Actually operates the combi steamer, taking care of tasks such as:
Selecting cooking profiles
Starting cooking profiles
Selecting cleaning profiles
Operating instructions outline
Section / sub-section Purpose Target
General Information Explains how to use these operating instructions Cook
Using the On-Screen
Help Pages
easyTouch User
Interface Layout
Cooking and
Rethermalizing Food
with easyTouch
Using the Cookbook Explains how to use the cookbook Cook
Using Press&Go Explains how to operate the combi steamer with Press&Go Cook
Cleaning with
easyTouch
Configuring Settings in
easyTouch
group
Operator
Explains how to use the on-screen help pages Cook
Operator
Describes the user interface’s most important screens Cook
Operator
Includes instructions that explain how to use the user
interface in order to cook and rethermalize food
Goes over the software’s cooking and rethermalizing
workflows
Includes instructions that explain how to use the user
interface in order to clean the appliance
Goes over the software’s cleaning workflows
Explains how to configure the various settings Cook
Cook
Operator
Operator
Operator
Operator
Decimal mark used
In order to ensure that all numbers can be properly understood internationally, a decimal point is
always used.
Operating instructions 8
Page 9

2 easyTouch Functions
2 easyTouch Functions
Purpose of this section
easyTouch is the combi steamer’s user interface.
easyTouch enables you to quickly create your own cooking profiles, and has all the corresponding
functions available on a single user interface level.
This section provides an overview of the functions in easyTouch, as well as a selection of available
cooking profiles.
Contents
This section covers the following subjects:
easyTouch Functions at a Glance 10
Selected cooking profile 12
Page
Operating instructions 9
Page 10
2 easyTouch Functions
2.1 easyTouch Functions at a Glance
easyTouch operating modes
easyTouch features the following operating modes:
On the “Cooking” screen:
Steam
Combi-steam
Convection
Smoker (available only in appliances with the ConvoSmoker option)
On the “Rethermalization” screen:
À la carte rethermalization
Banquet regenerating
Plate regenerating
By using these modes together with the various cooking functions (ACS+ extra functions) and extra
functions, you can use a variety of cooking methods.
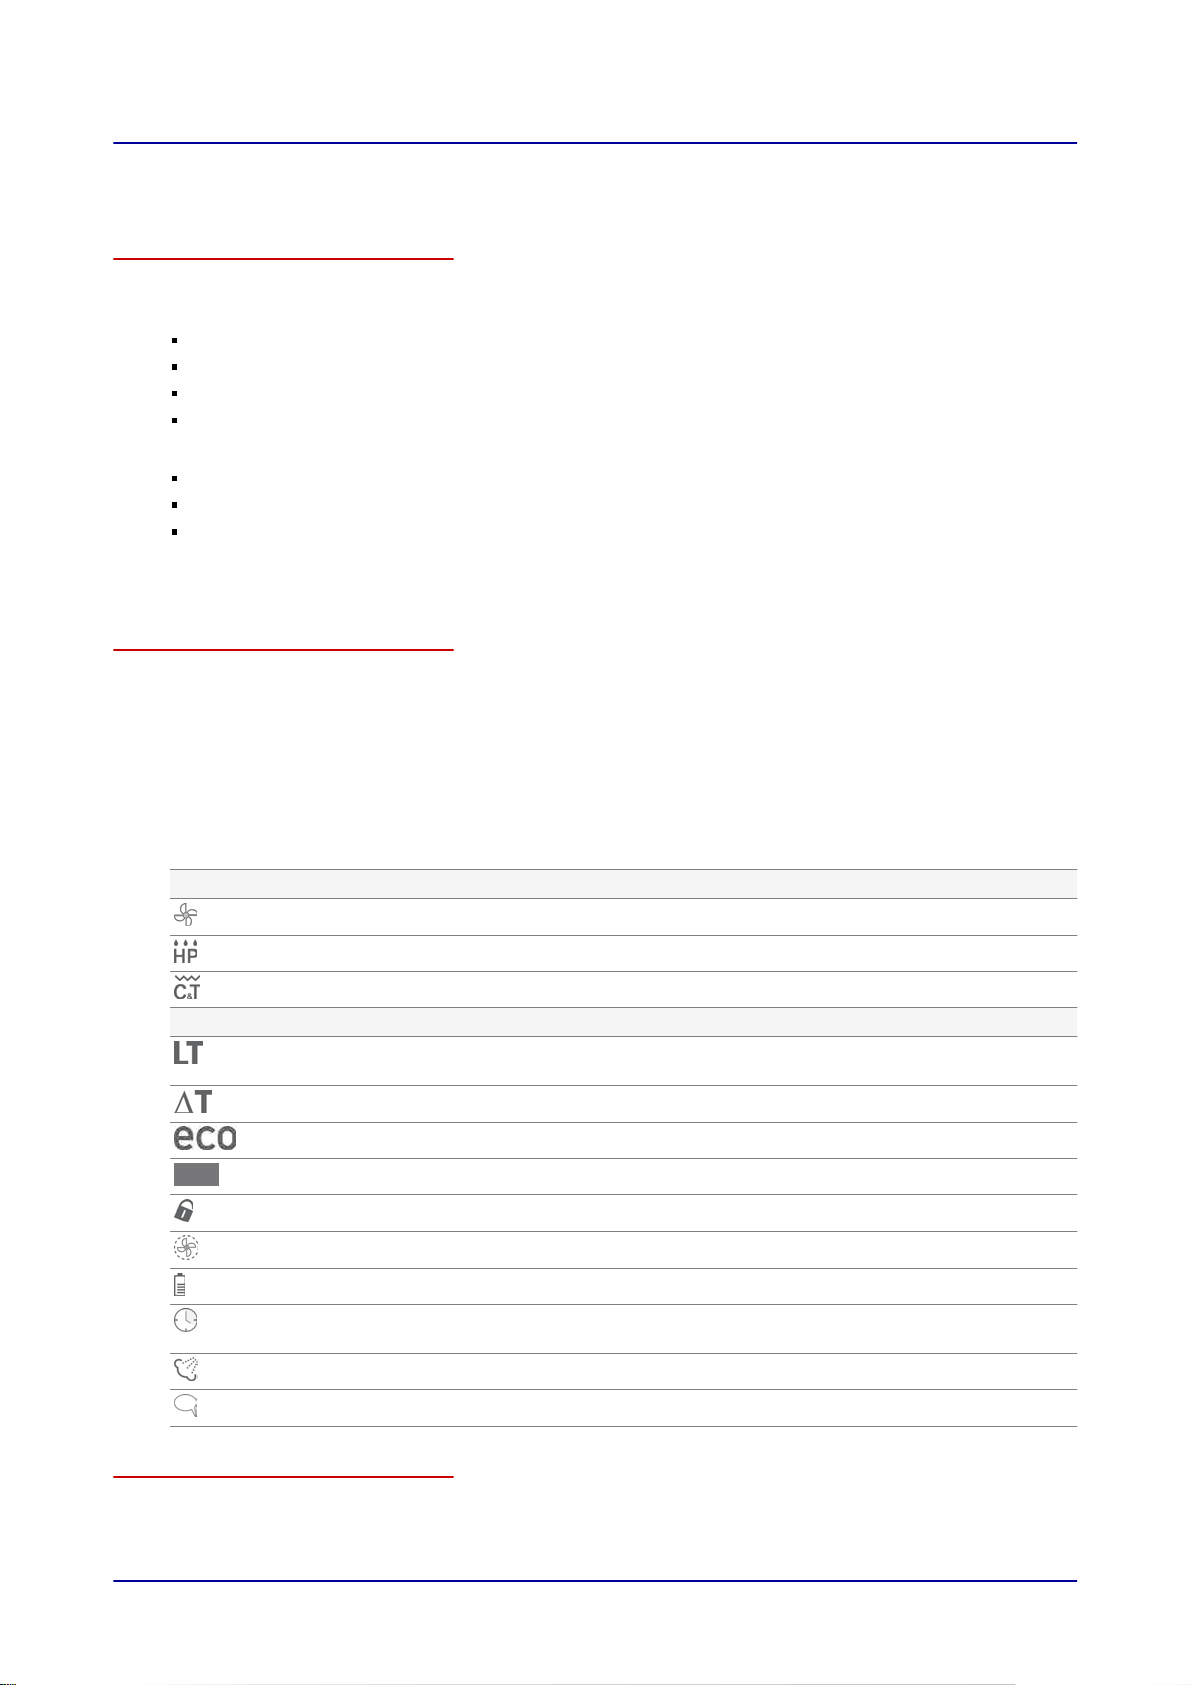
Available cooking functions and extra functions
The table below provides an overview showing which cooking functions (ACS+ extra functions) and
extra functions are available for which operating modes.
“Yes” means that a function is available for the corresponding operating mode.
“No” means that the function is not available for the corresponding operating mode.
When a function is not available, you will not be able to select it when configuring a cooking profile.
Button Function Steam Combi-
steam
Cooking function
Fan speed Yes Yes Yes No Yes
HumidityPro No Yes No No No
Crisp&Tasty No No Yes No No
Extra Function
Low-temperature
cooking
Delta-T cooking Yes Yes Yes No No
ecoCooking No Yes Yes No No
Cook&Hold Yes Yes Yes No No
Program lock Yes Yes Yes Yes Yes
Pulsed fan operation Yes Yes Yes No Yes
Reduced power Yes Yes Yes Yes Yes
Start time pre-
selection
BakePro No No Yes No No
Instruction step Yes Yes Yes Yes Yes
Yes Yes Yes No No
Yes Yes Yes Yes No
Convection Smoker Rethermaliza
tion
Cooking profiles and cookbook
A cooking profile is a combination of cooking parameters, such as cooking temperatures and cooking
times, that can include up to 20 cooking steps. You can create your own cooking profiles and manage
Operating instructions 10
Page 11

2 easyTouch Functions
up to 399 of them in the “cookbook.” In addition, the “cookbook” also comes with predefined cooking
profiles.
Press&Go
The Press&Go function enables you to automatically cook food by pressing one-touch buttons with
assigned cooking profiles. This ensures that you will get reliable and consistent results every single
time.
Oven cleaning with easyTouch
By using the appliance’s cleaning modes, you can access the various oven cleaning profiles that are
available:
“Rinse with water” cleaning profile
“Rinse with ConvoCare rinse aid” cleaning profile
ConvoClean+ fully automatic cleaning: Adjustable cleaning profiles for varying levels of soiling and
various cleaning times, with steam disinfection and drying functions available
Semi-automatic cleaning profile
Settings
The Settings screen can be used to configure the combi steamer’s settings, including language, date/
time, sound, etc.
Some of the available settings can only be accessed by entering a password. Moreover, the “Service”
screen can only be accessed by service technicians.
Operating instructions 11
Page 12
2 easyTouch Functions
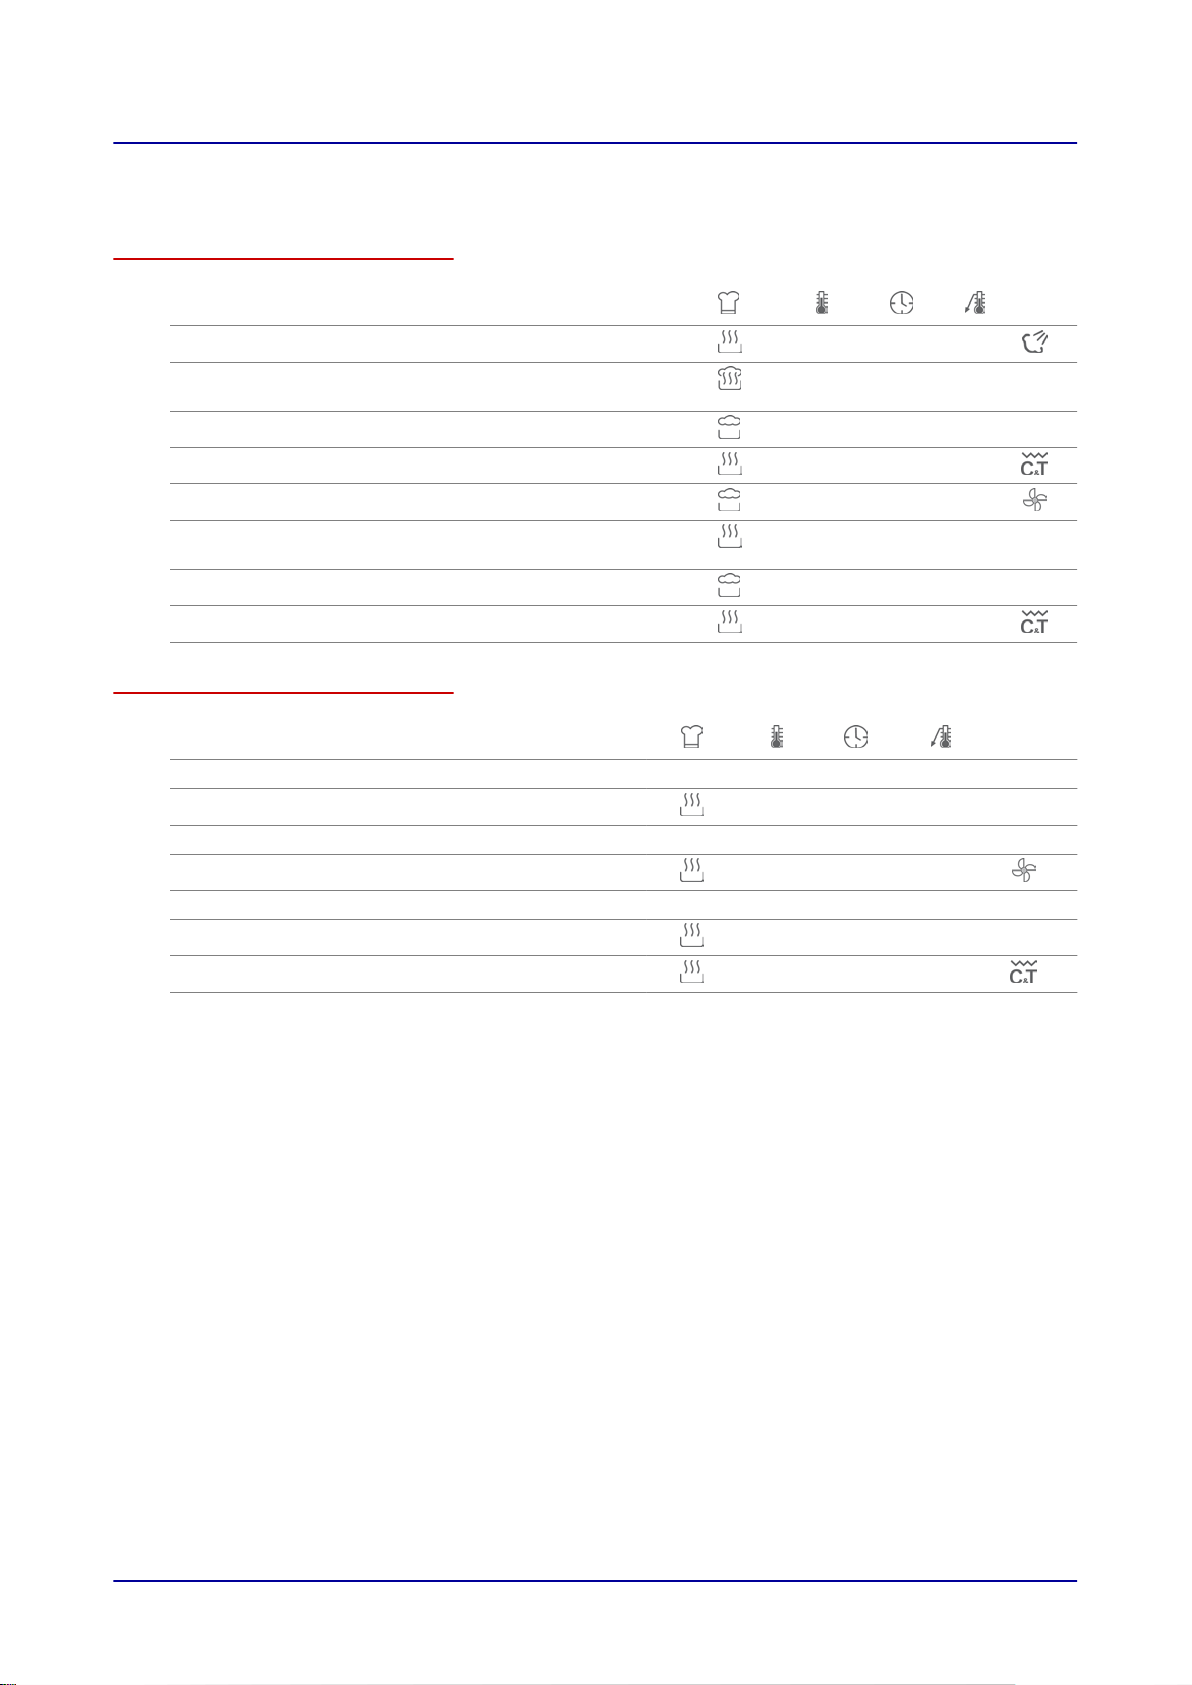
2.2 Selected cooking profile
Various cooking profiles
Product ACS+
Baguette, frozen 340 °F 15 min -
Baked potato 355 °F - 200
Flan 175 °F 35 min - -
Fish sticks 410 °F 12 min -
Leavening baked goods 95 °F 3 min -
Roasted chicken breast 455 °F - 160
Fresh carrots 210 °F 8 min - -
Pork schnitzel 391 °F 9 min -
Smoker cooking profiles
Product Step Smoker ACS+
Salmon steak 1 yes - - 15 min - -
Herb salt 1 yes - - 75 min - -
Chicken legs 1 yes - - 75 min - -
°F
°F
2 - 247 °F - 122 °F -
2 - 139 °F 20 min -
2 - 355 °F 3 min - -
1
-
5
1
-
3
2
3 - 337 °F 20 min -
5
Operating instructions 12
Page 13

3 Using the On-Screen Help Pages
3 Using the On-Screen Help Pages
Purpose of this section
To operate your combi steamer, you will need to use the various screens that make up the easyTouch
user interface on the control panel. In other words, all of the appliance’s functions can be found in
these screens in the form of buttons. To use one of these functions, simply touch the corresponding
button with your finger.
The on-screen help pages explain, in detail, how to use the easyTouch user interface and operate the
combi steamer. These pages can be viewed on the user interface.
This section explains how to access the on-screen help pages and navigate through them.
Contents
This section covers the following subjects:
The On-Screen Help Home Screen 14
Accessing the On-Screen Help Pages 15
On-Screen Help Page Navigation Tools 16
Page
Operating instructions 13
Page 14
3 Using the On-Screen Help Pages
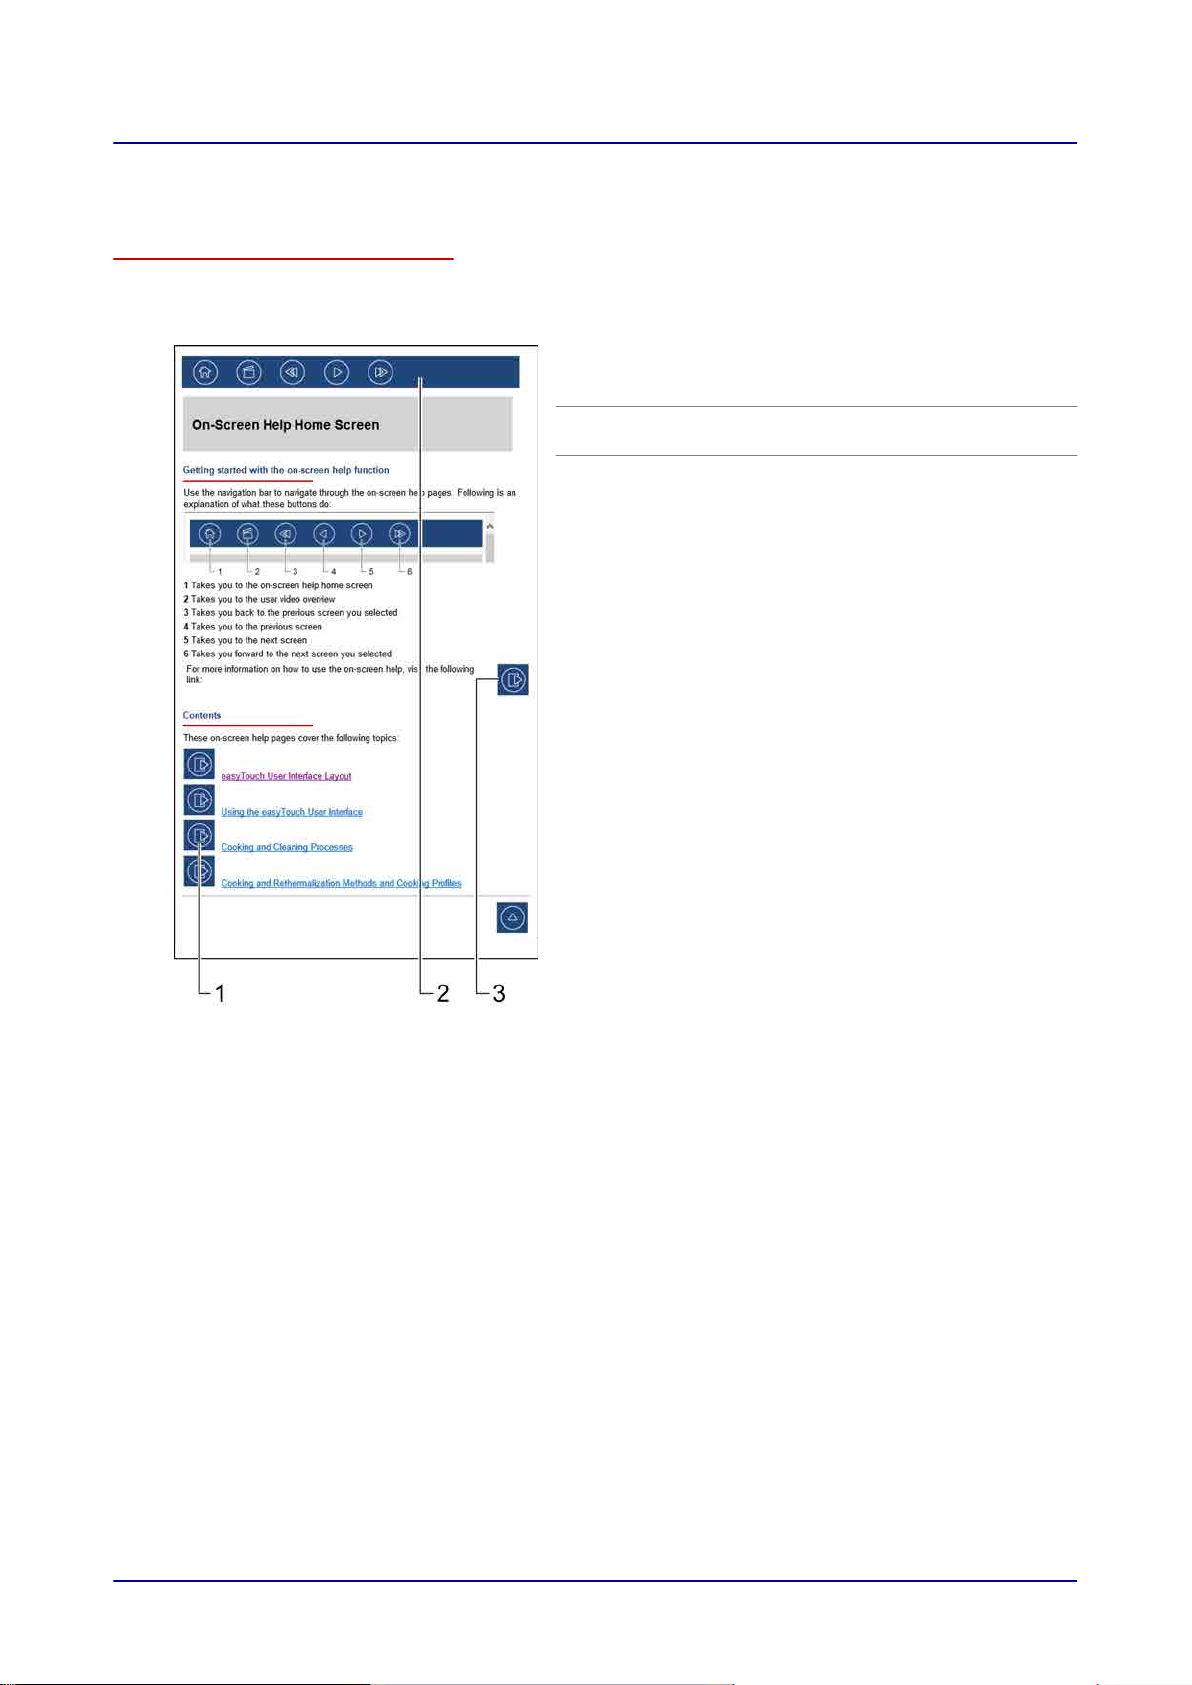
3.1 The On-Screen Help Home Screen
Home screen functions
The on-screen help home screen is the central starting point for navigating through the various onscreen help pages.
1
2
3
On-screen help table of contents:
Can be used to directly access a specific topic
by pressing the corresponding button
Navigation bar at the top of every on-screen
help page
Press this button to get a brief description
explaining how to use the on-screen help
pages
Operating instructions 14
Page 15
3 Using the On-Screen Help Pages
3.2 Accessing the On-Screen Help Pages
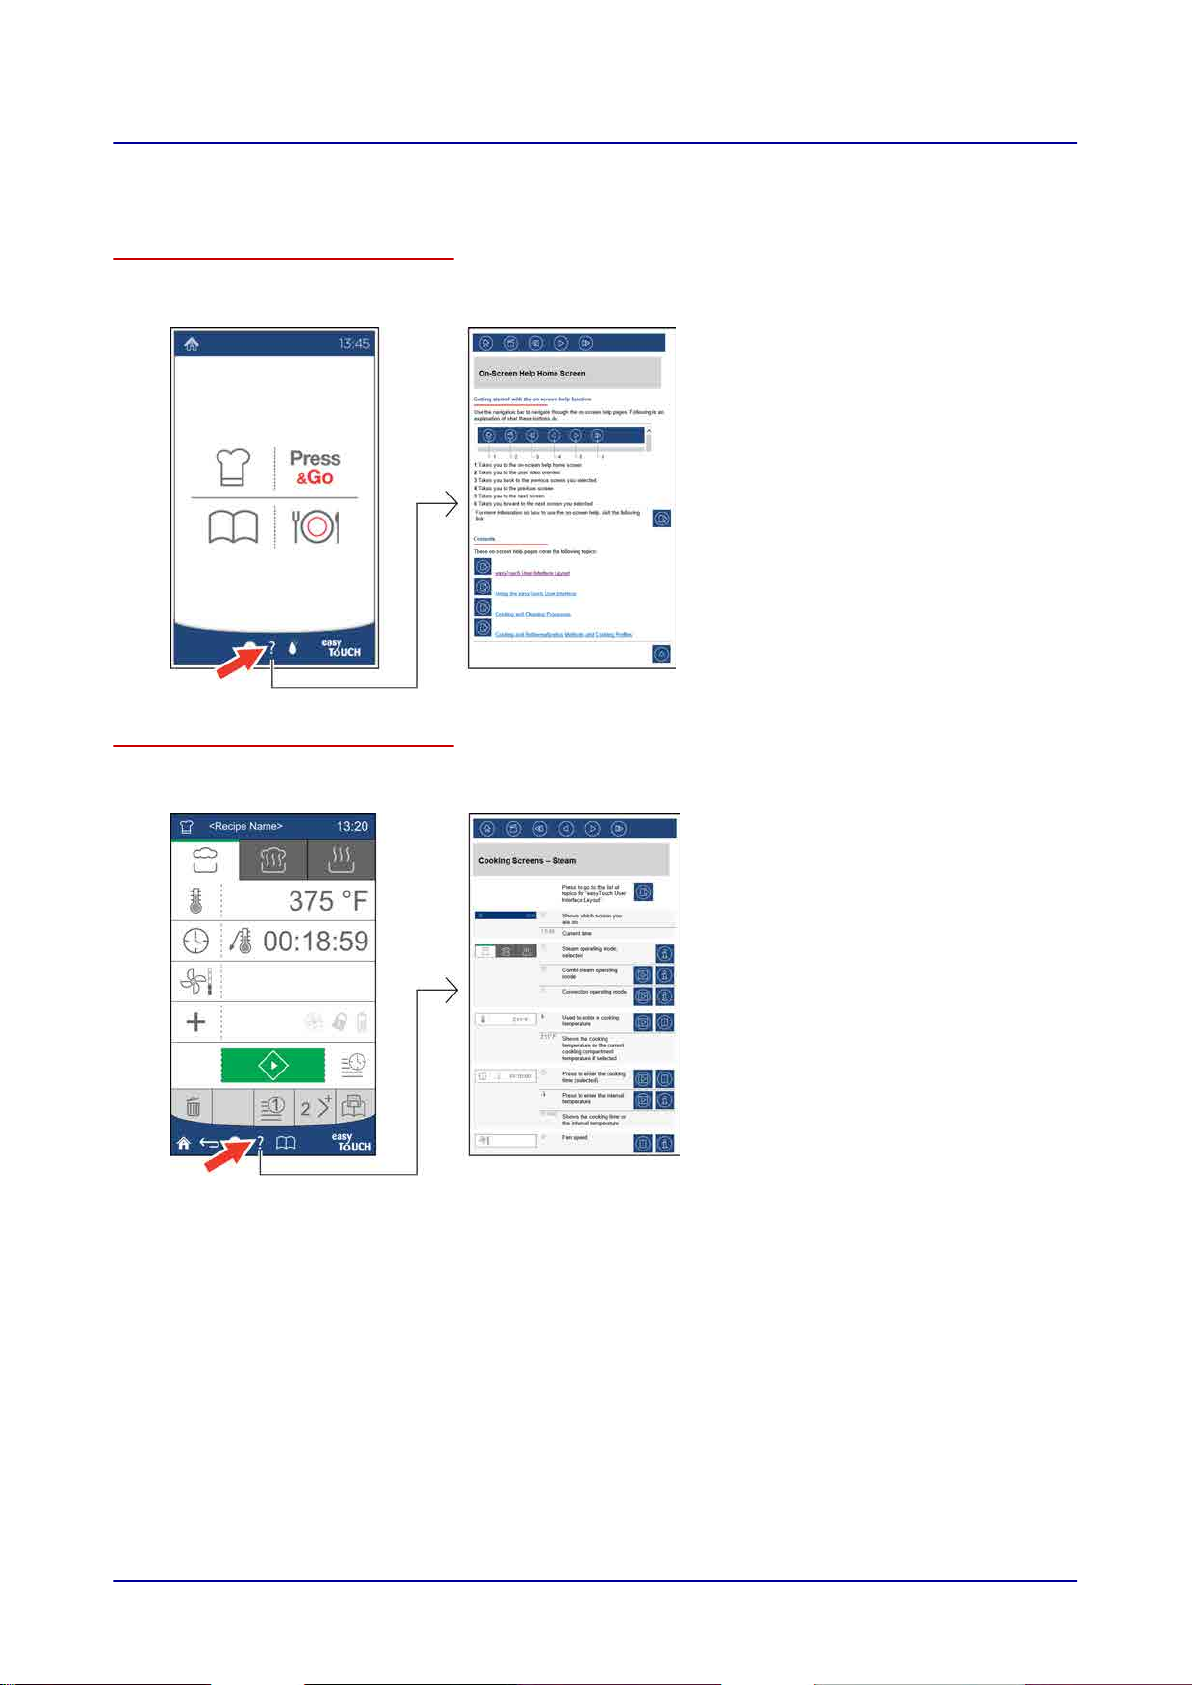
Accessing the home screen
To access the on-screen help home screen directly, press the question mark icon at the bottom of the
easyTouch user interface’s main screen:
Accessing a description for the screen that is currently open
To directly access a description of the easyTouch user interface screen that is currently open, press
the question mark icon at the bottom of the screen:
Operating instructions 15
Page 16
3 Using the On-Screen Help Pages
3.3 On-Screen Help Page Navigation Tools
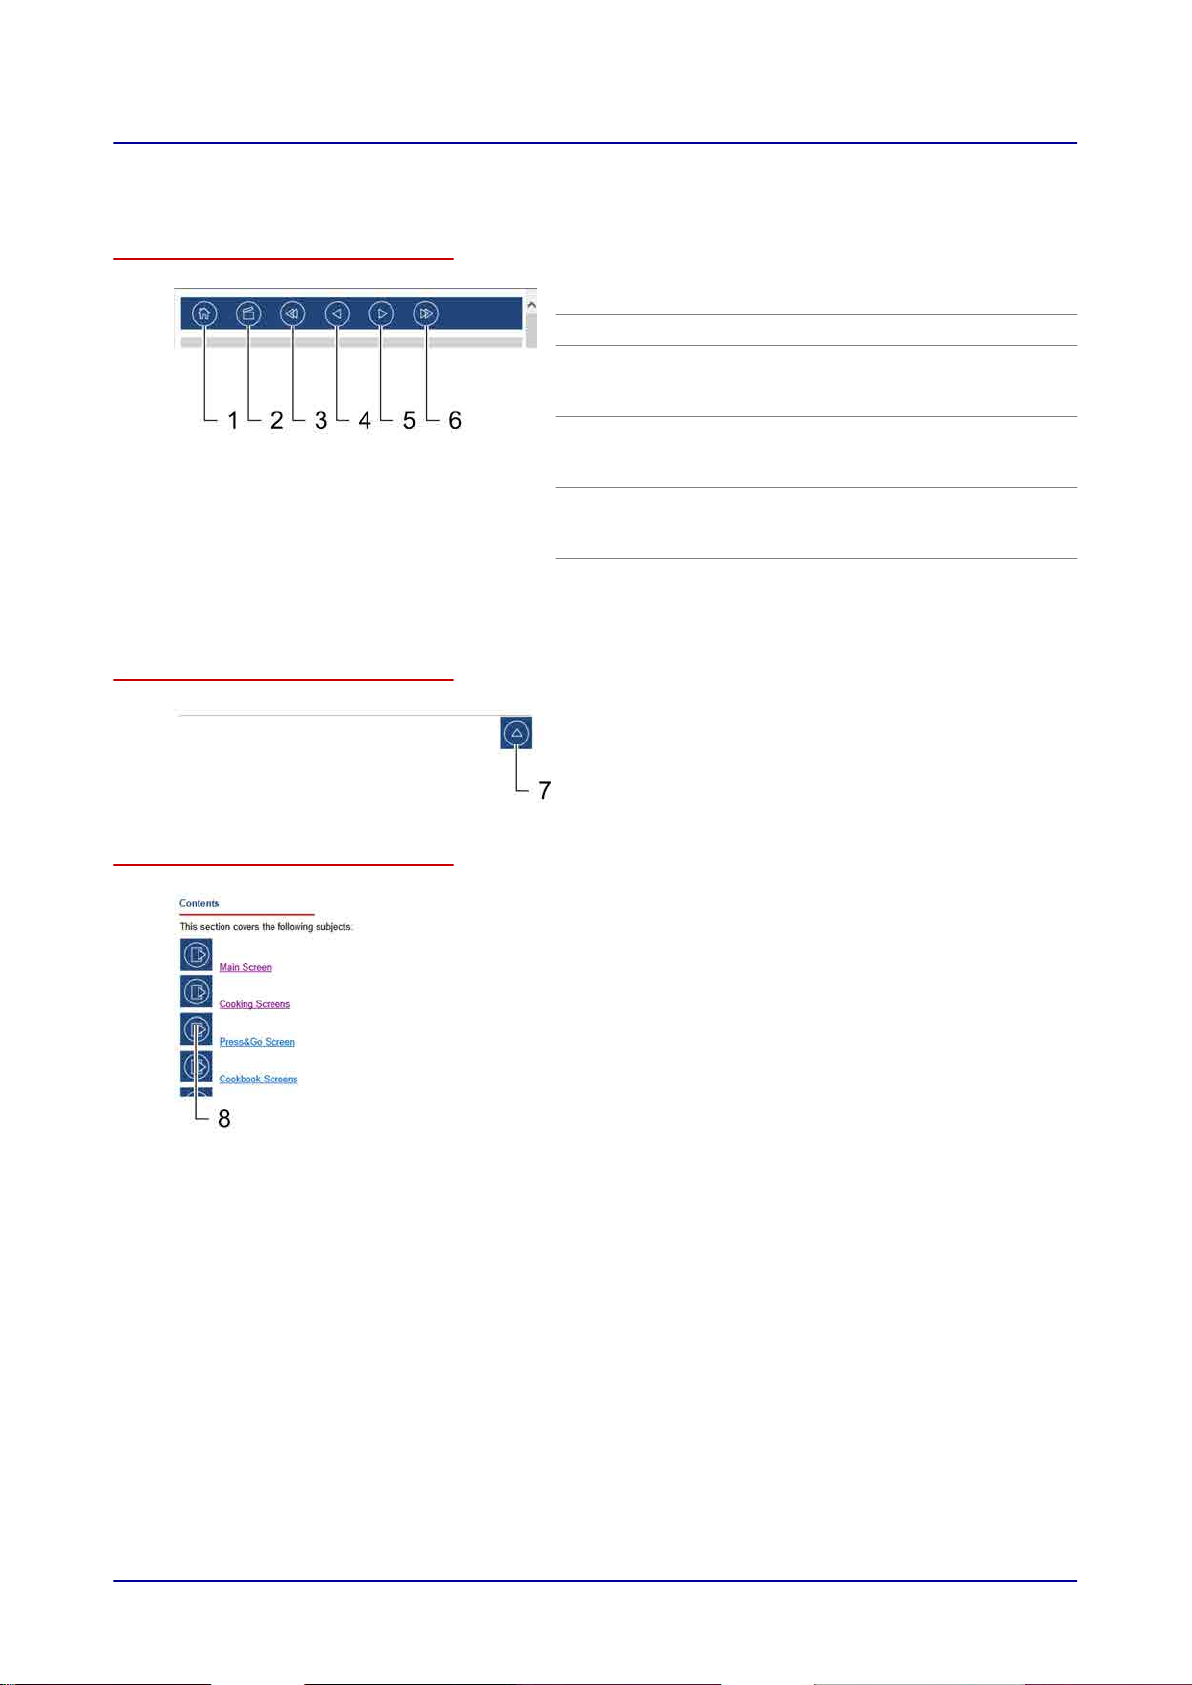
The navigation bar
Button for scrolling to the top of the screen
List of topics
1
2
3
4
5
6
7
Press to go to the on-screen help home screen
Press to go to the list of user videos
Double-arrow “Back” button:
Press to go back to the screen you were
viewing before the current one
Single-arrow “Back” button:
Press to go one screen back in the on-screen
help pages
Single-arrow “Forward” button:
Press to go one screen forward in the onscreen help pages
Double-arrow “Forward” button:
Press to return to the page you left when you
pressed the double-arrow “Back” button
Press to scroll all the way to the top of the
current screen
8
Can be used to directly access a specific topic
by pressing the corresponding button
Operating instructions 16
Page 17
3 Using the On-Screen Help Pages
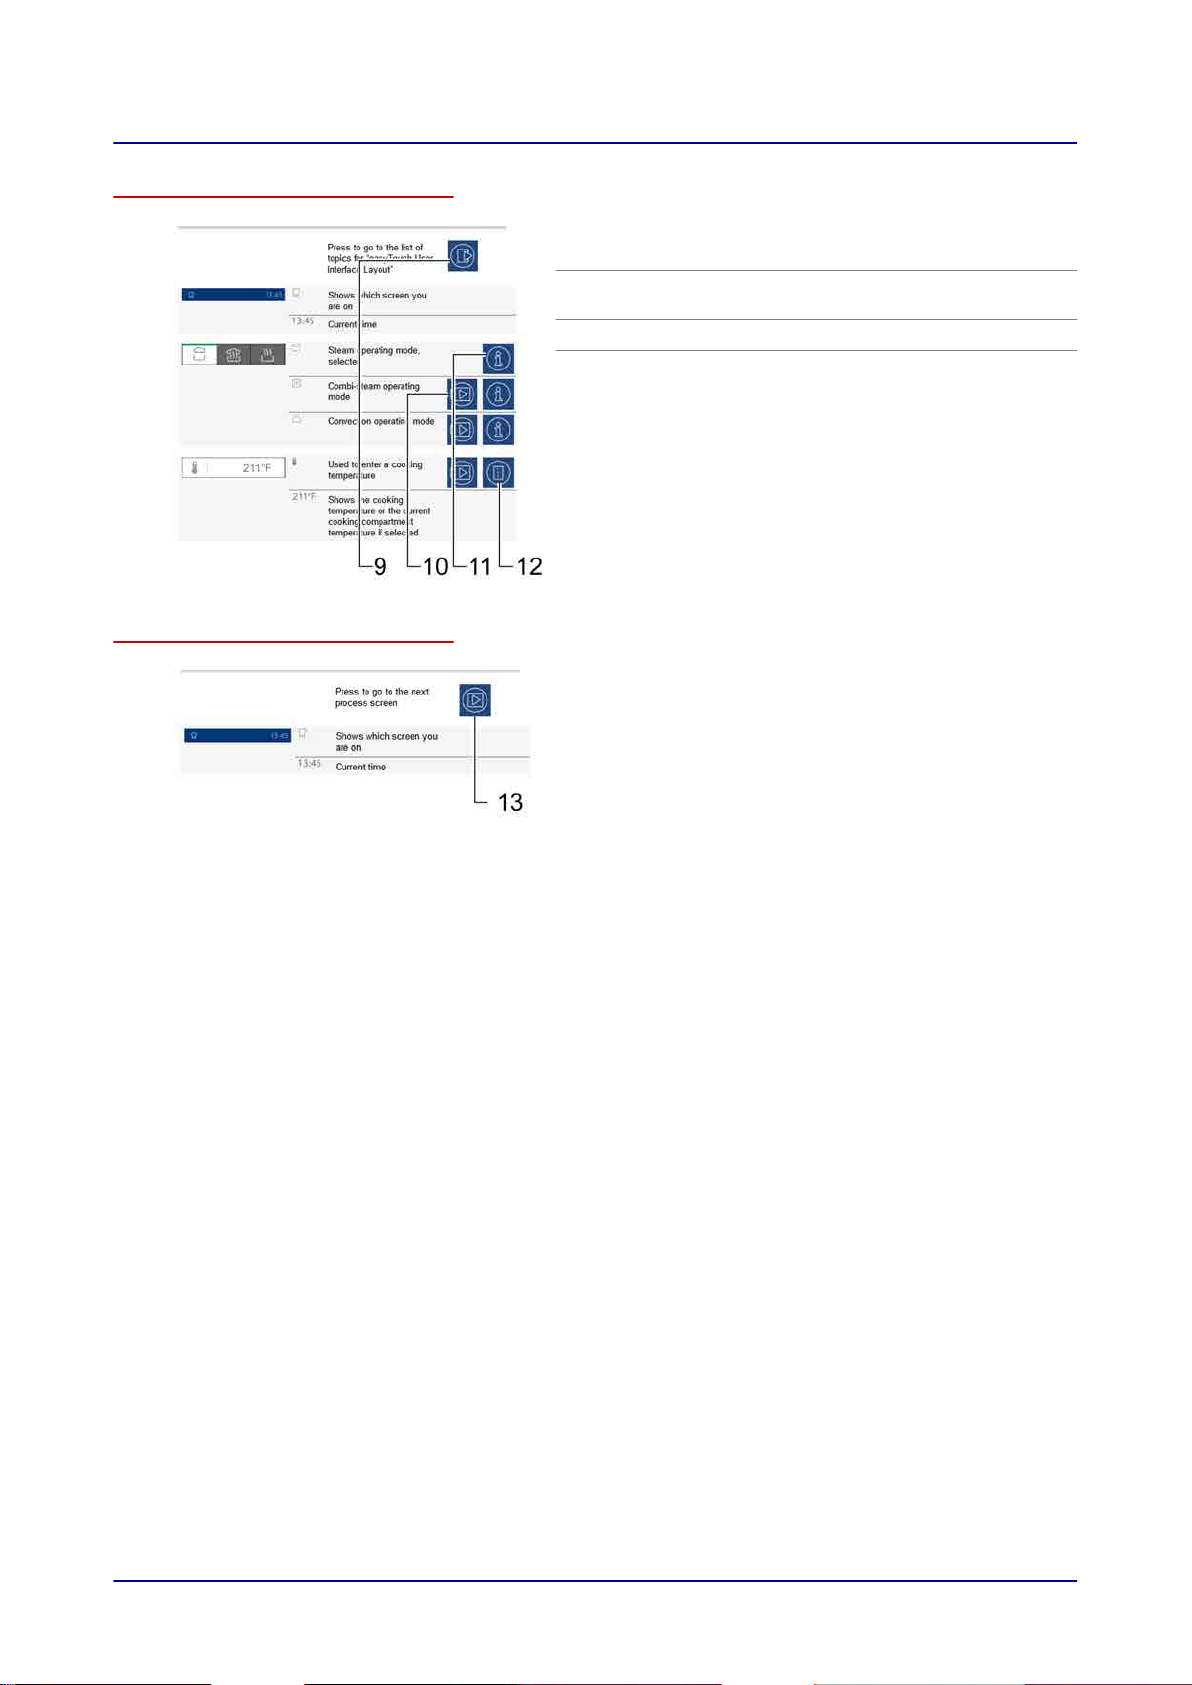
Text area buttons
Navigation tools in process screen descriptions
9
10
11
12
13
Press to view the list of topics for “easyTouch
User Interface Layout”
Press to get a description of the following
screen
Press to get additional information
Press to get instructions
Press to get a description of the following
process screen
Operating instructions 17
Page 18

4 easyTouch User Interface Layout
4 easyTouch User Interface Layout
Purpose of this section
To operate your combi steamer, you will need to use the various screens that make up the easyTouch
user interface on the control panel. In other words, all of the appliance’s functions can be found in
these screens in the form of buttons. To use one of these functions, simply touch the corresponding
button with your finger.
This section provides an overview of the most important screens in the easyTouch user interface and
explains the buttons in them and the corresponding functions. For a full description of the easyTouch
user interface, please consult the on-screen help pages.
Contents
This section covers the following subjects:
Main Screen 19
Cooking Screens 20
Cooking Screens – Smoker 22
Press&Go Screen 23
Cookbook Screens 24
Rethermalization Screens 25
Cleaning Screens – Options 27
Cleaning Screens – ConvoClean+ 28
Cleaning Screens – Semi-Automatic 29
Settings Screen 30
Extra Functions Screen 31
Pre-Heating Screen 33
Cool down Screen 34
Cooking in Progress Screen 35
Cooking User Prompt Screen 36
Cleaning with ConvoClean+ in Progress Screen 37
Cleaning User Prompt Screen 38
Page
Operating instructions 18
Page 19
4 easyTouch User Interface Layout
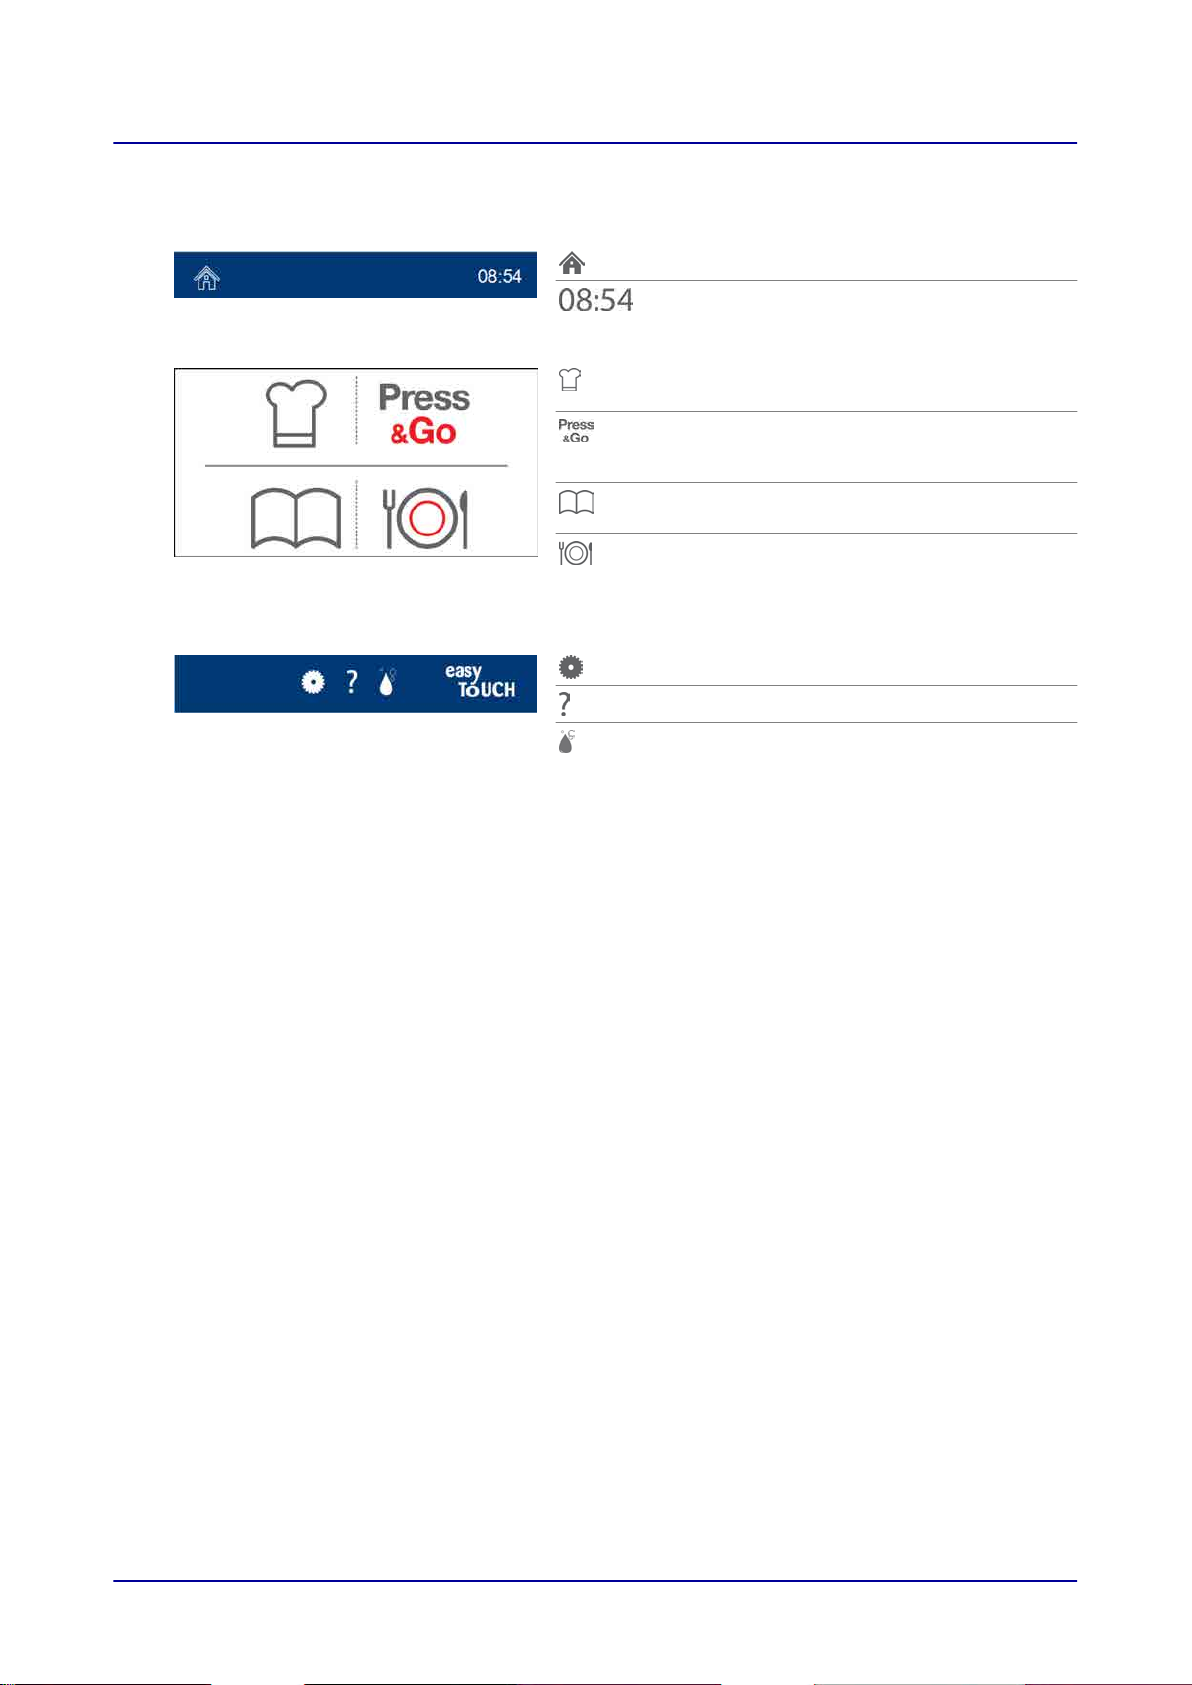
4.1 Main Screen
Indicates that you are on the main screen
Current time of day
Cook
Press to manually enter a cooking profile
Press&Go
Press for automatic cooking with quick-select
options
Cookbook
Press to manage the various cooking profiles
Rethermalize
Press to manually enter a rethermalizing
profile
Settings
Help
Clean
Operating instructions 19
Page 20
4 easyTouch User Interface Layout
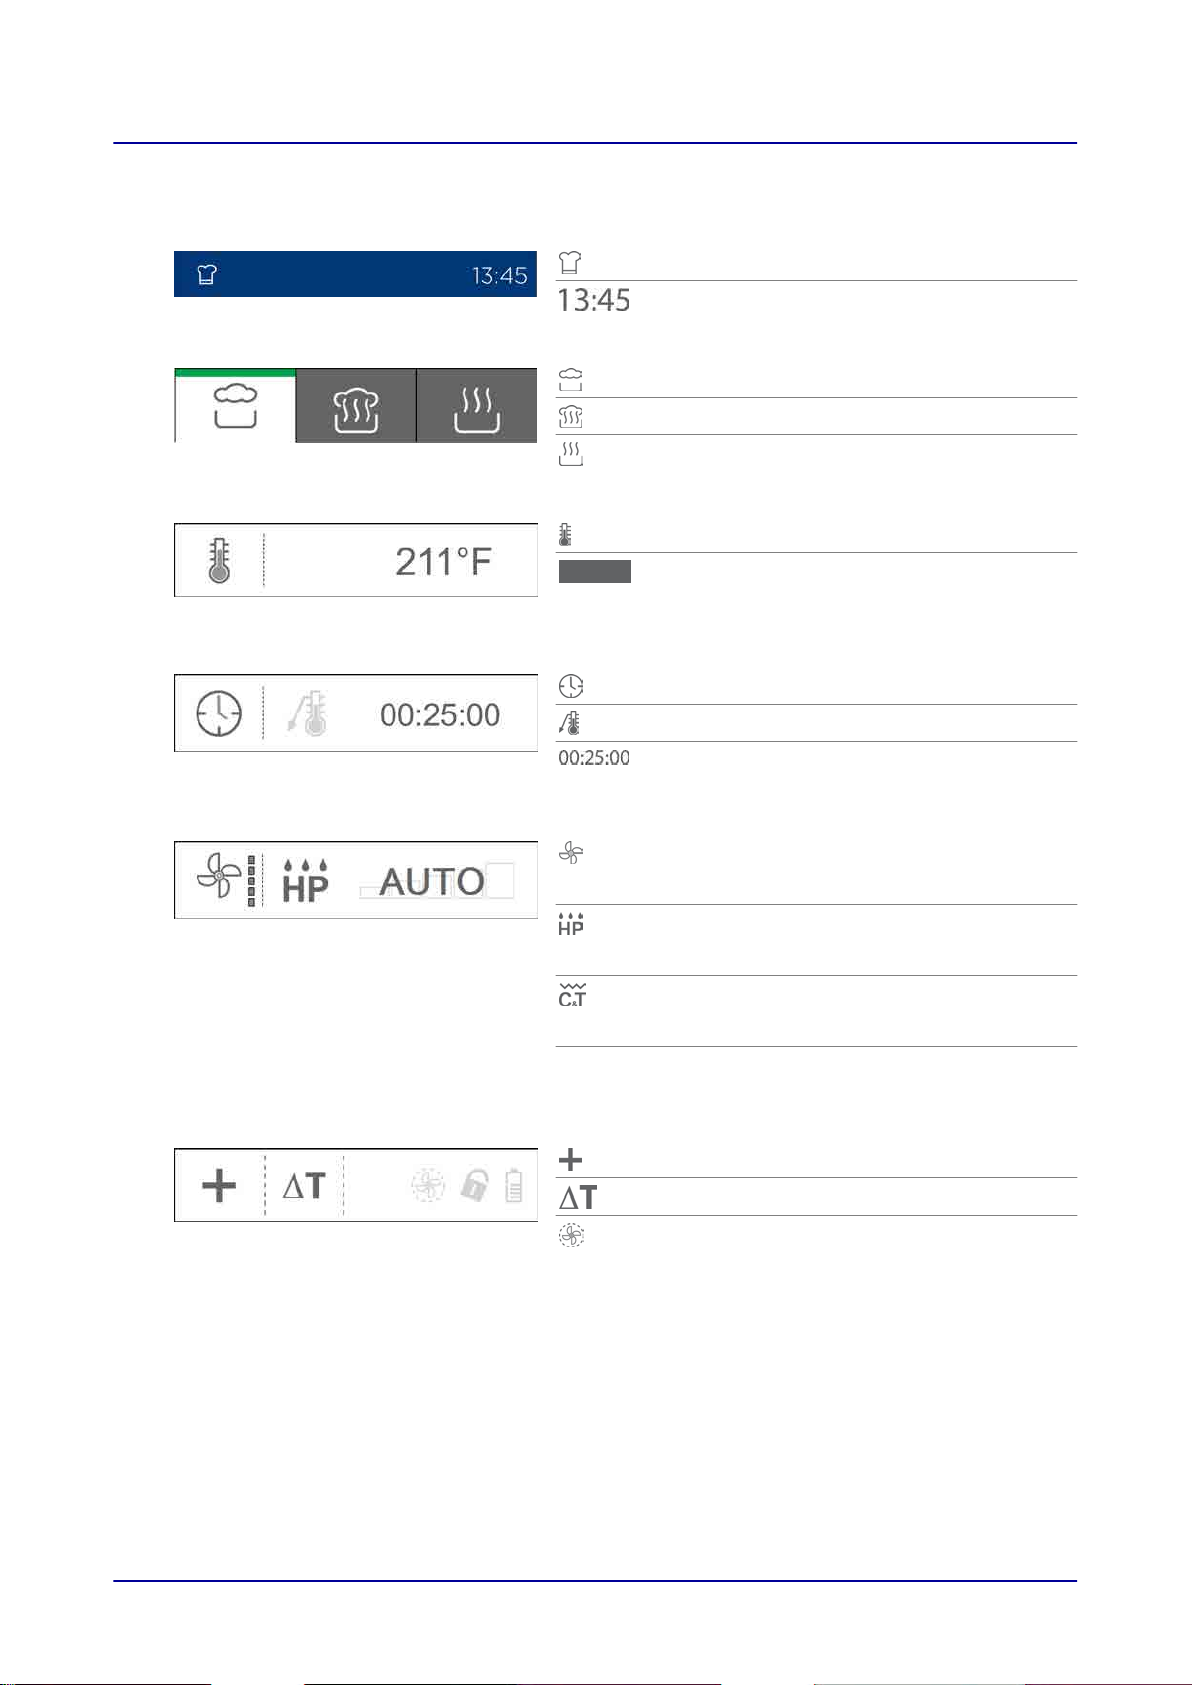
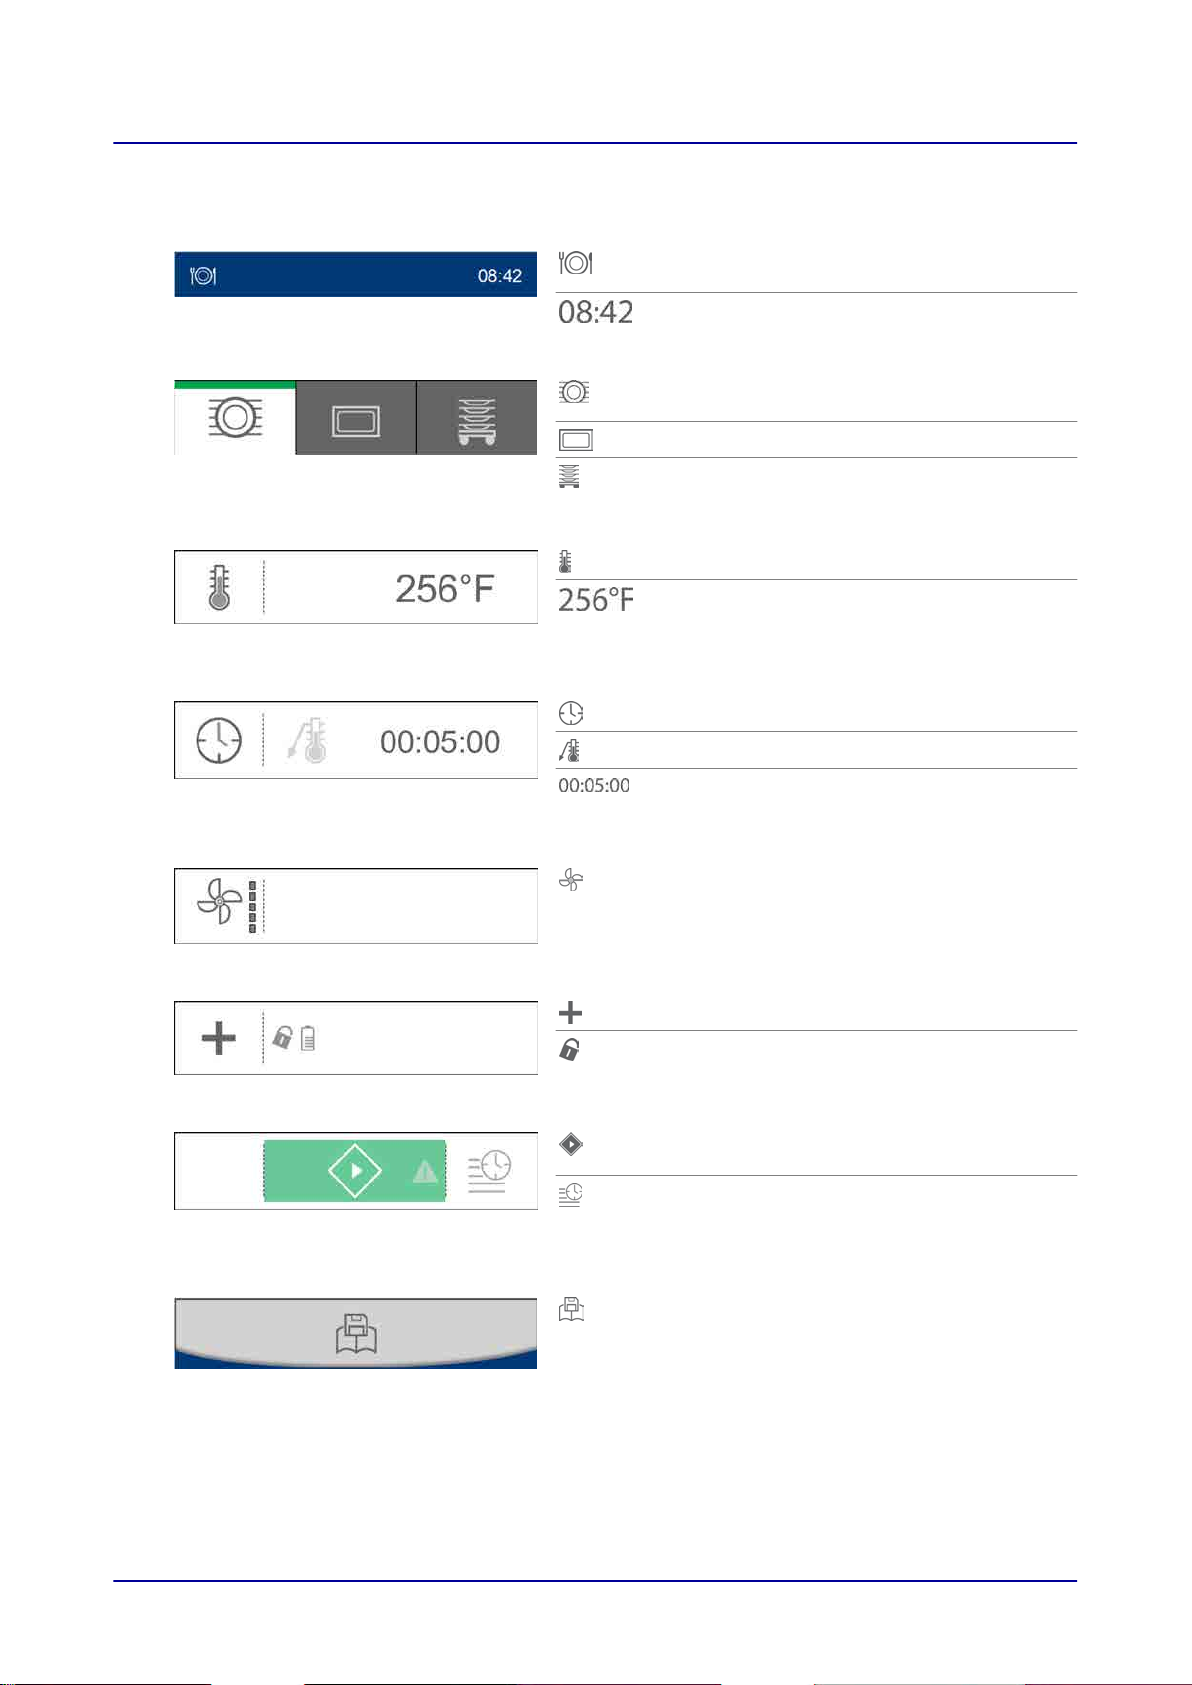
4.2 Cooking Screens
Indicates that you are on the cooking screen
Current time of day
Steam operating mode, selected
Combi-steam operating mode
Convection operating mode
Used to enter a cooking temperature
Shows the cooking temperature you entered
If you press on it, it will show the current
cooking compartment temperature instead
Press to enter the cooking time (selected)
AUTO
Press to enter the internal temperature
Shows the cooking time or the internal
temperature
Five Fan speed settings
Controls the airflow speed inside the cooking
compartment
Humidity Pro, five settings or automatic mode
Controls the moisture inside the cooking
compartment
Crisp&Tasty, five settings or automatic mode
Removes moisture from the cooking
compartment
Automatic mode
for “Humidity Pro” or “Crisp&Tasty”
Press to select extra functions
Shows the selected cooking method
Shows the selected extra functions
Operating instructions 20
Page 21
4 easyTouch User Interface Layout
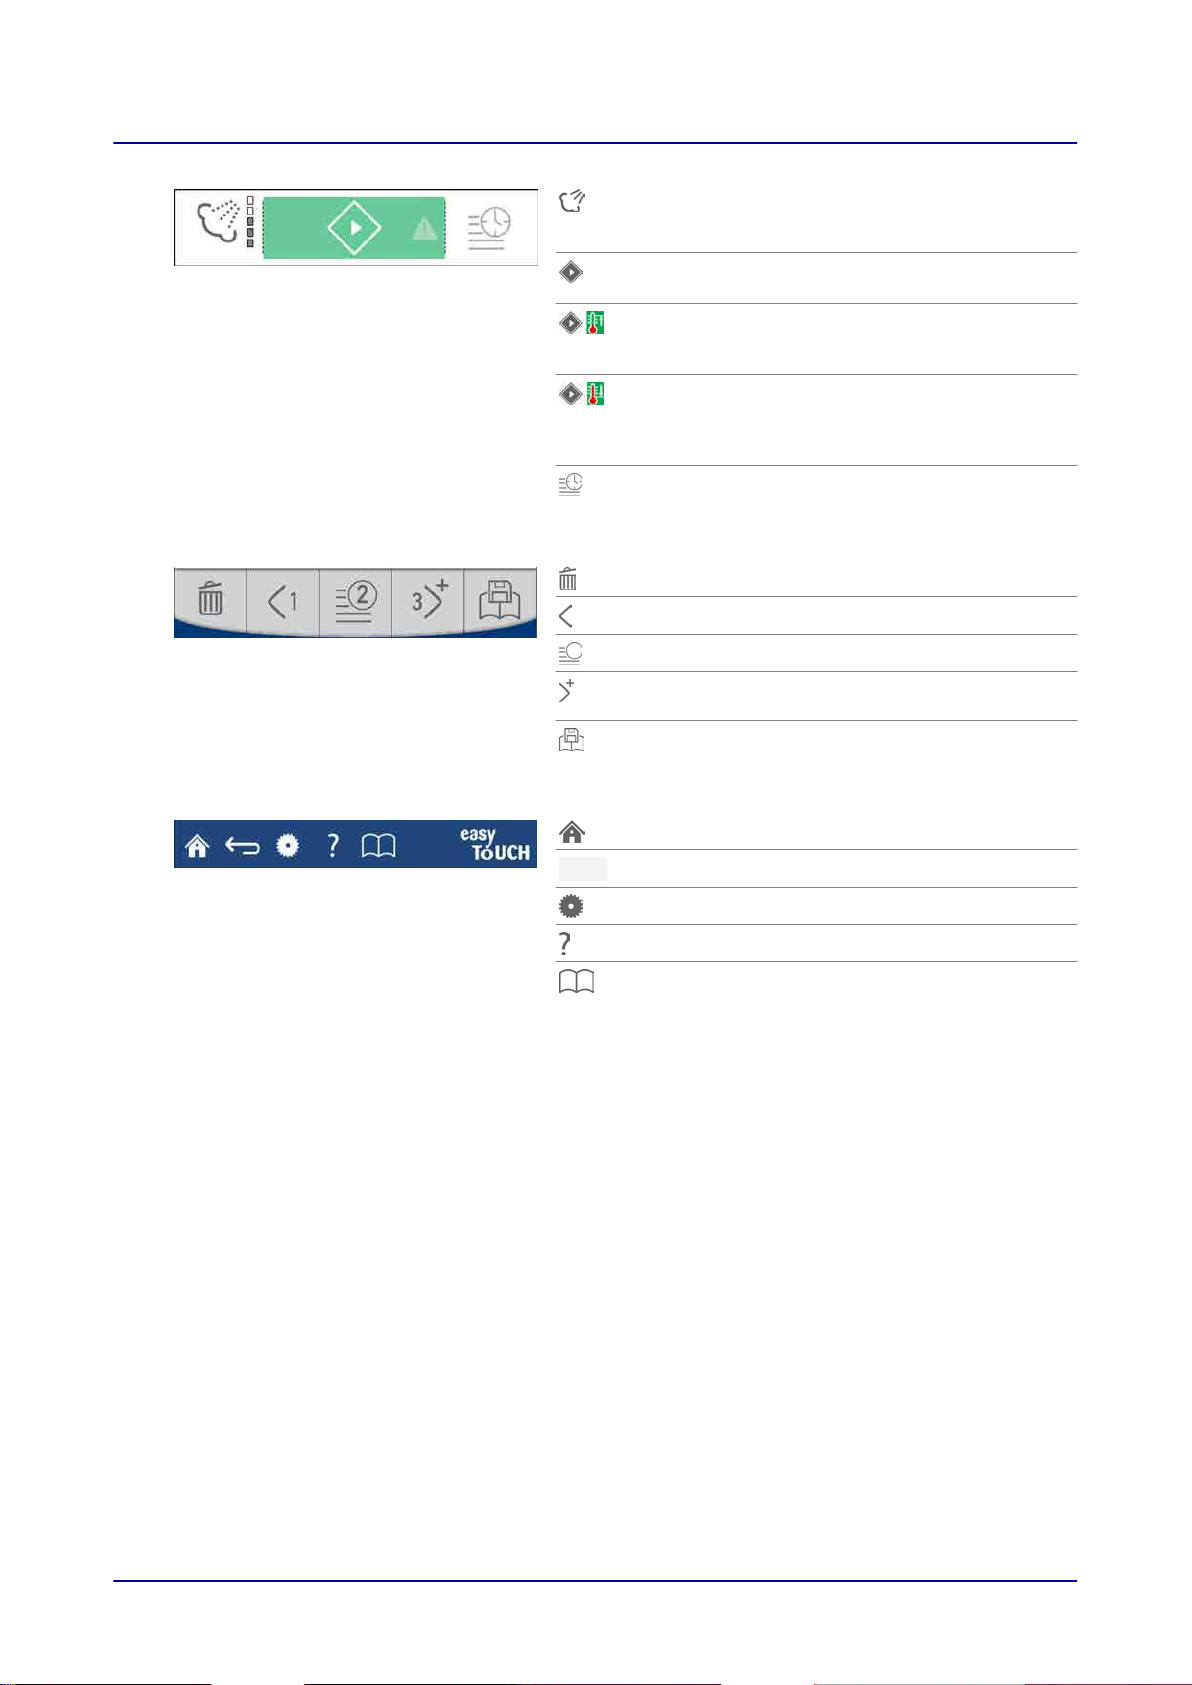
Manual steaming
Press to add moisture to the cooking
compartment during the cooking sequence.
Start
Press to start the cooking sequence
Start with pre-heating
Press to heat up the cooking compartment
while the appliance door is closed
Start with cool down
Press to cool down the cooking compartment
with the fan running while the appliance door is
open
TrayTimer
Timer that can be set for individual rack levels.
Press to delete the cooking step
Press to go one cooking step back
Cooking steps view
Press to add a cooking step/go to the next
cooking step
Press to save the cooking profile in the
cookbook
Main screen
Back
Settings
Help
Cookbook
Operating instructions 21
Page 22
4 easyTouch User Interface Layout
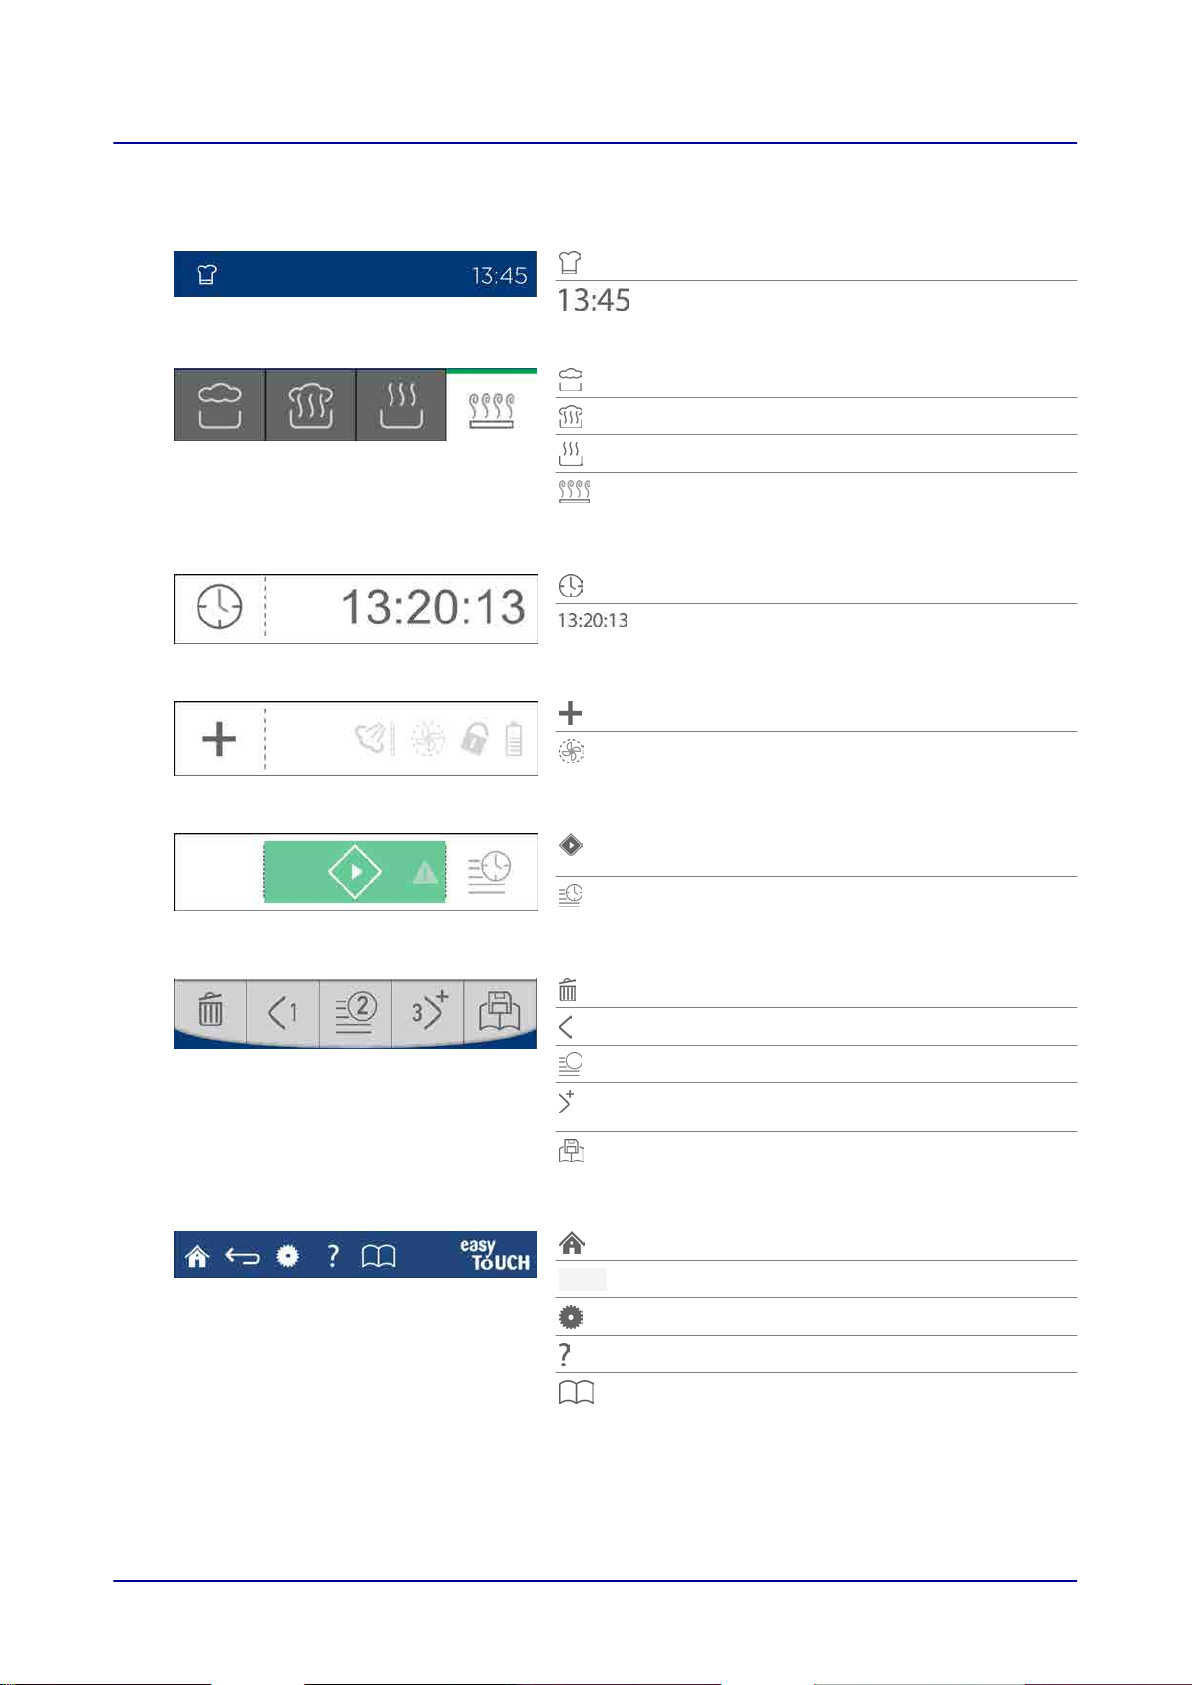
4.3 Cooking Screens – Smoker
Indicates that you are on the cooking screen
Current time of day
Steam operating mode
Combi-steam operating mode
Convection operating mode
Smoker operating mode (selected)
Used to smoke food; optional
Press to enter the smoking time
Shows the smoking time
Press to select extra functions
Shows the selected extra functions
Start
Press to start the cooking sequence
TrayTimer
Timer that can be set for individual rack levels.
Press to delete the cooking step
Press to go one cooking step back
Cooking steps view
Press to add a cooking step/go to the next
cooking step
Press to save the cooking profile in the
cookbook
Main screen
Back
Operating instructions 22
Settings
Help
Cookbook
Page 23
4 easyTouch User Interface Layout
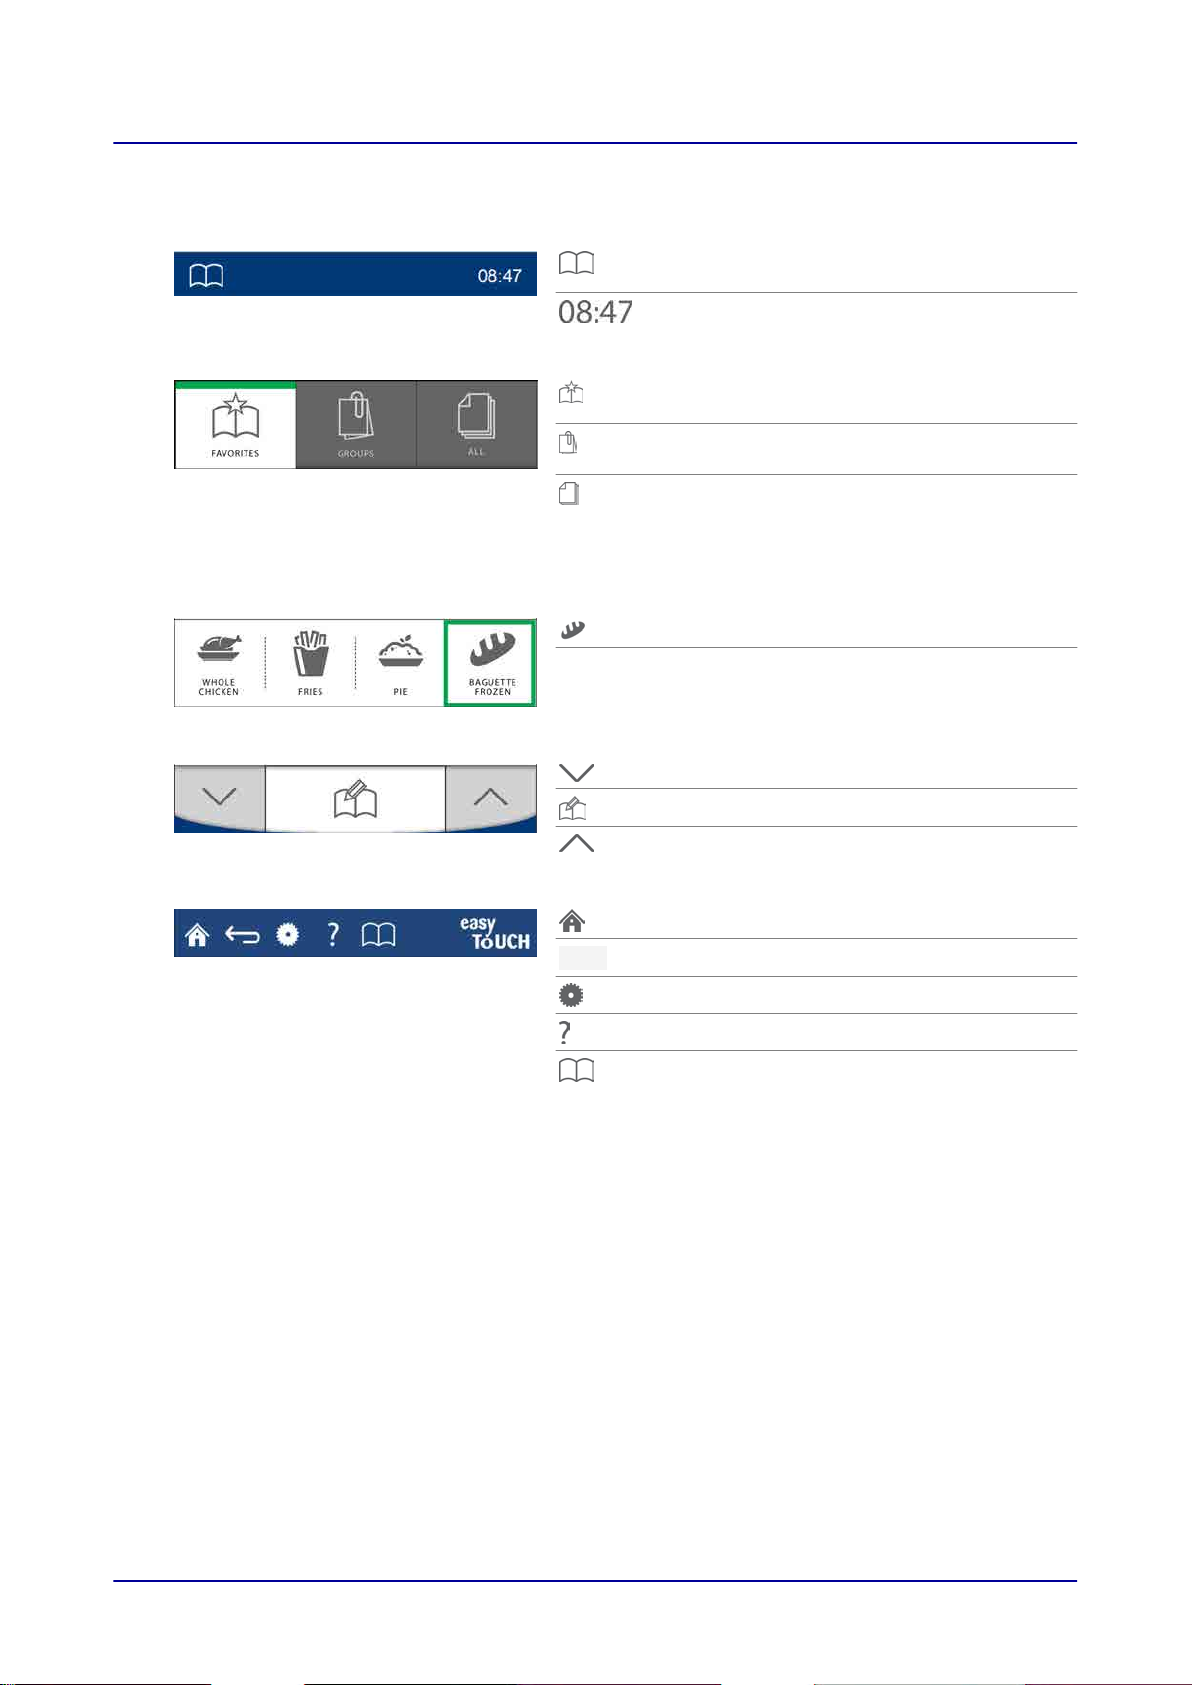
4.4 Press&Go Screen
Current time of day
Cooking profile (selected)
Additional favorites, product groups, or cooking
profiles
Press to scroll down
Press to scroll up
Main screen
Back
Settings
Help
Clean
Operating instructions 23
Page 24
4 easyTouch User Interface Layout
4.5 Cookbook Screens
Indicates that you are on the “Cookbook”
screen
Current time of day
Favorites (selected)
Selected cooking profile
Product groups
Cooking profiles grouped together in groups
Cooking profiles
All the cooking profiles in the cookbook,
max. 399 cooking profiles with up to 20
cooking steps each
Cooking profile (selected)
Additional favorites, product groups, or cooking
profiles
Press to scroll down
Press to switch cooking profile (selected)
Press to scroll up
Main screen
Back
Settings
Help
Cookbook
Operating instructions 24
Page 25
4 easyTouch User Interface Layout
4.6 Rethermalization Screens
Indicates that you are on the
“Rethermalization” screen
Current time of day
À la carte rethermalization operating mode
(selected)
Banquet rethermalization operating mode
Plate rethermalization operating mode
Used to enter a cooking temperature
Shows the cooking temperature you entered
If you press on it, it will show the current
cooking compartment temperature instead
Press to enter the cooking time (selected)
Press to enter the internal temperature
Shows the cooking time or the internal
temperature
Five Fan speed settings
Controls the airflow speed inside the cooking
compartment
Press to select extra functions
Shows the selected extra functions
Start
Press to start the cooking sequence
TrayTimer
Timer that can be set for individual loading
levels.
Operating instructions 25
Press to save the cooking profile in the
cookbook
Page 26

4 easyTouch User Interface Layout
Main screen
Back
Settings
Help
Cookbook
Operating instructions 26
Page 27

4 easyTouch User Interface Layout
4.7 Cleaning Screens – Options
Shows that you are on the “Cleaning” screen
Current time of day
Options cleaning mode (selected)
Press to clean with water or rinse aid only
ConvoClean+ cleaning mode
Press to use fully automatic oven cleaning with
cleaning agents supplied from connected
canisters
Semi-automatic cleaning mode
Press to clean with the program issuing
prompts indicating the next step
H2O (selected)
Press to rinse with water
ConvoCare
Press to rinse with ConvoCare rinse aid
Press to confirm your selections and start
cleaning
Main screen
Back
Settings
Help
Operating instructions 27
Page 28
4 easyTouch User Interface Layout
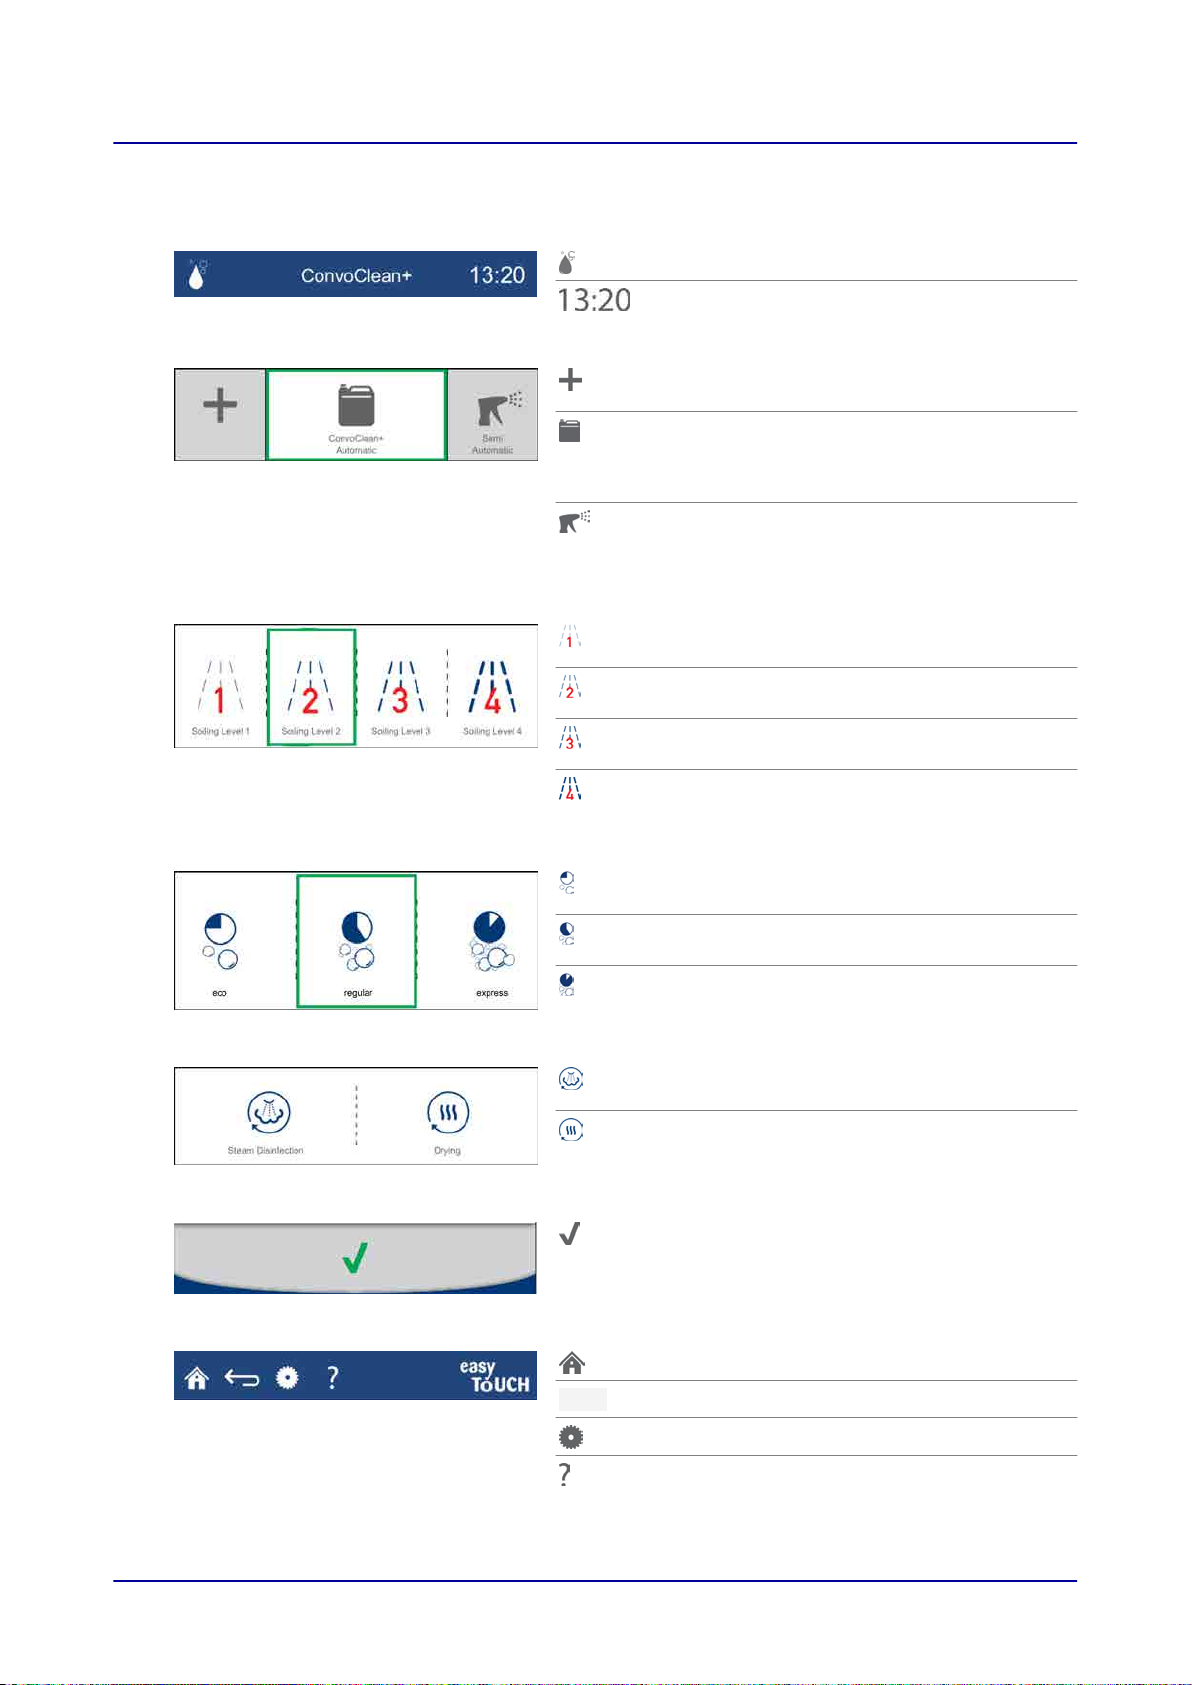
4.8 Cleaning Screens – ConvoClean+
Shows that you are on the “Cleaning” screen
Current time of day
Options cleaning mode
Press to clean with water or rinse aid only
ConvoClean+ cleaning mode (selected)
Press to use fully automatic oven cleaning with
cleaning agents supplied from connected
canisters
Semi-automatic cleaning mode
Press to clean with the program issuing
prompts indicating the next step
Cleaning level 1 for ConvoClean+
Light soiling
Cleaning level 2 for ConvoClean+ (selected)
Medium soiling
Cleaning level 3 for ConvoClean+
Heavy soiling
Cleaning level 4 for ConvoClean+
Extremely heavy soiling
eco
Economy cleaning duration for ConvoClean+
regular (selected)
Normal cleaning duration for ConvoClean+
express
Short cleaning duration for ConvoClean+
Steam disinfection
Cleaning function for ConvoClean+
Dry
Cleaning function for ConvoClean+
Press to confirm your selections and start
cleaning
Main screen
Back
Settings
Operating instructions 28
Help
Page 29

4 easyTouch User Interface Layout
4.9 Cleaning Screens – Semi-Automatic
Shows that you are on the “Cleaning” screen
Current time of day
Options cleaning mode
Press to clean with water or rinse aid only
ConvoClean+ cleaning mode
Press to use fully automatic oven cleaning with
cleaning agents supplied from connected
canisters
Semi-automatic cleaning mode (selected)
Press to clean with the program issuing
prompts indicating the next step
Press to confirm your selections and start
cleaning
Cleaning level 1
Appliance cleaning in progress
Cleaning level 2
Spray cleaning agent into cooking
compartment
Cleaning level 3
Appliance cleaning in progress
Cleaning level 4
Rinse cooking compartment with water
Main screen
Back
Settings
Help
Operating instructions 29
Page 30

4 easyTouch User Interface Layout
4.10 Settings Screen
Indicates that you are on the “Settings” page
Current time of day
General
General appliance settings for cooking and
cleaning
Language
Language setting for the user interface
Cookbook
Used to select a cookbook
Service
Support for maintenance work and
troubleshooting
Logbook
List with logged control interface actions and
error messages
Date/Time
Used to set the date and time
Sound
Used to set the tone and volume for acoustic
signals
Password
Used to set passwords
Import/Export
Used to import and export appliance data with
the help of a connected external data storage
device
Videos
Used to access tutorial videos
Backup/Restore
Used to back up and restore appliance data
with the help of a connected external data
storage device
Transfer
Used to set up data transfers to a connected
server
Operating instructions 30
Main screen
Back
Help
Page 31

4 easyTouch User Interface Layout
4.11 Extra Functions Screen
Indicates that you are on the cooking screen
Current time of day
Low-temperature cooking
Cooking method in which food is cooked at low
temperatures
Delta-T cooking
Cooking method in which the cooking
compartment temperature increases
depending on the food’s internal temperature
ecoCooking (selected)
Cooking method in which the heat output in the
finishing cooking stage is controlled using
cycles in order to reduce energy consumption
levels.
Cook&Hold
Cooking method consisting of a cooking stage
and a stage in which a specific temperature is
maintained. Requires the use of the core
temperature probe
Reduced power
Function that reduces heat output in order to
prevent load peaks during the cooking process
Pulsed fan (selected)
Function that reduces the motor frequency in
order to reduce the airflow speed inside the
cooking compartment
Program lock
Function that prevents connected energy
optimizing systems from interrupting cooking
sequences
Start time pre-selection
Function that can be used to set the start time
for a cooking sequence to a defined time in the
future
BakePro
Baking function with steaming and
automatically controlled fan stop times
Instruction step
Function used to show messages
Operating instructions 31
Press to confirm your selections
Page 32

4 easyTouch User Interface Layout
Main screen
Back
Settings
Help
Cookbook
Operating instructions 32
Page 33

4 easyTouch User Interface Layout
4.12 Pre-Heating Screen
Shows which screen you are on
Current time of day
Indicates that the pre-heating temperature
is being shown (optional)
Press to change the pre-heating
temperature
Pre-heating temperature
Tells the operator that the following step is
currently in progress: Pre-heating
Total progress during pre-heating, yellow,
clockwise
Current cooking compartment temperature
Stop
Press to stop pre-heating
Indicates that the hold time is being shown
(optional)
Press to change the hold time
Cooking compartment temperature hold time
after pre-heating
Press to go back to the “Cooking” screen
Operating instructions 33
Page 34

4 easyTouch User Interface Layout
4.13 Cool down Screen
Shows which screen you are on
Current time of day
Indicates that the cool down temperature is
being shown (optional)
Press to change the cool down temperature
Cool down temperature
Tells the operator that the following step is
currently in progress: Cool down
Total progress during cool down, yellow,
counterclockwise
Current cooking compartment temperature
Stop
Press to stop the cool down process
Press to go back to the “Cooking” screen
Operating instructions 34
Page 35

4 easyTouch User Interface Layout
4.14 Cooking in Progress Screen
Shows which screen you are on
Current time of day
Shows the operating mode for the current
cooking step
Cooking temperature or internal temperature
for the current cooking step
Selected cooking temperature or internal
temperature for the current cooking step
Current cooking profile step, red
Remaining cooking profile steps, gray
Total progress during cooking, red, clockwise
Remaining cooking time or current internal
temperature
Stop
Press to stop the cooking sequence
Total cooking time or elapsed cooking time
Total cooking time or elapsed cooking time for
the cooking profile
Manual steaming
Option available with the convection operating
mode
Used to add moisture (in the form of steam or
a spray mist) to the cooking compartment
during cooking.
TrayTimer
Timer that can be set for individual rack levels.
Operating instructions 35
Press to go back to the “Cooking” screen
Page 36

4 easyTouch User Interface Layout
4.15 Cooking User Prompt Screen
Shows which screen you are on
Current time of day
Cooking temperature or internal temperature
for the current cooking step
Selected cooking temperature or internal
temperature for the current cooking step
Prompt asking the operator to perform a
specific action for the current cooking step
Green color: Ready for operator action
Current cooking compartment temperature
Stop
Press to stop the cooking sequence
Press to go back to the “Cooking” screen
Operating instructions 36
Page 37

4 easyTouch User Interface Layout
4.16 Cleaning with ConvoClean+ in Progress Screen
Shows that you are on the “Cleaning” screen
Current time of day
Shows the cleaning level
Shows the cleaning duration
Shows that the steam disinfection extra
function is being used
Shows that the drying extra function is being
used
Tells the operator that the following step is
currently in progress: Cleaning
Total progress during cleaning, red, clockwise
Remaining cleaning time
Stop
Press to stop the cleaning sequence. Can only
be used before cleaning agent is sprayed in
No function
Operating instructions 37
Page 38

4 easyTouch User Interface Layout
4.17 Cleaning User Prompt Screen
Shows that you are on the “Cleaning” screen
Current time of day
Shows the cleaning level
Shows the cleaning duration
Shows that the steam disinfection extra
function is being used
Shows that the drying extra function is being
used
Prompt asking the operator to perform a
specific action for the current cleaning step
Yellow color: Prompt asking the operator to
perform an action
Stop
Press to stop the cleaning sequence
No function
Operating instructions 38
Page 39

5 Cooking and Rethermalizing Food with easyTouch
5 Cooking and Rethermalizing Food with easyTouch
Purpose of this section
This section provides step-by-step instructions for the most important tasks that need to be carried out
when cooking and rethermalizing food with easyTouch. It also describes the various workflows
involved.
For more detailed information, please consult the on-screen help pages.
Contents
This section covers the following subjects:
Instructions 40
Cooking Workflows 51
Page
Operating instructions 39
Page 40

5 Cooking and Rethermalizing Food with easyTouch
5.1 Instructions
Purpose of this section
This section provides step-by-step instructions for the most important tasks that need to be carried out
with the easyTouch user interface when cooking and rethermalizing food.
Contents
This section covers the following subjects:
Entering a Cooking Profile That Uses Steam 41
Entering a Cooking Profile That Uses Combi-Steam 43
Entering a Cooking Profile That Uses Convection 45
Entering a Cooking Profile That Uses the Smoker 47
Entering a Cooking Profile That Uses Rethermalization 48
Starting a Cooking Sequence 50
Stopping a Cooking Sequence 50
Page
Operating instructions 40
Page 41

5 Cooking and Rethermalizing Food with easyTouch
5.1.1 Entering a Cooking Profile That Uses Steam
Applications
The “steam” operating method is suitable for the following cooking methods:
Boiling
Poaching
The special cooking methods that use the “steam” operating mode are:
Low-oxygen slow cooking
Low-temperature cooking
Overnight cooking
Temperature range
When you use the “steam” cooking method, you will be working within a temperature range of 85 °F to
265 °F.
Available cooking functions
Five fan speed settings
Steaming
Preserving
Blanching
Available extra functions
Low-temperature cooking
Delta-T cooking
Cook&Hold
Reduced power
Pulsed fan operation
Program lock
Start time pre-selection
Instruction step
Entering the cooking profile
1.
2.
Press the “Cook” button on the main screen.
On the “Cooking” screen, select the “steam”
operating mode.
3.
4.
Operating instructions 41
Press the “cooking temperature” button.
Enter the cooking temperature you want on the
“Temperature” screen.
Page 42
5 Cooking and Rethermalizing Food with easyTouch
5.
6.
7.
8.
9.
Press the “Cooking time” button.
Enter the cooking time you want on the “Time”
screen.
Select the “fan speed” setting you want.
Press the “Extra functions” button.
On the “Extra functions” screen, select the extra
functions you want.
Result: You have now entered a cooking profile.
Next steps:
Starting the cooking sequence. For more information,
Saving the cooking profile in the cookbook. For more information,
For more information on cooking workflows,
go to
go to
Page 51
Page 50
go to
Page 57
Operating instructions 42
Page 43

5 Cooking and Rethermalizing Food with easyTouch
5.1.2 Entering a Cooking Profile That Uses Combi-Steam
Applications
Combi-steam is a combination of convection and steam. “Combi-steam” is an appliance operating
mode in which food is cooked using combi-steam, The “combi-steam” operating method is suitable for
the following cooking methods:
Roasting Baking Braising
Temperature range
When you use the “combi-steam” cooking method, you will be working within a temperature range of
85 °F to 480 °F.
Available cooking functions
Five fan speed settings
HumidityPro, either with five manual settings or in automatic mode
Available extra functions
Low-temperature cooking
Delta-T cooking
ecoCooking
Cook&Hold
Reduced power
Pulsed fan operation
Program lock
Start time pre-selection
Instruction step
Entering the cooking profile
1.
2.
Press the “Cook” button on the main screen.
On the “Cooking” screen, select the “combi-steam”
operating mode.
3.
4.
Operating instructions 43
Press the “cooking temperature” button.
Enter the cooking temperature you want on the
“Temperature” screen.
Page 44
5 Cooking and Rethermalizing Food with easyTouch
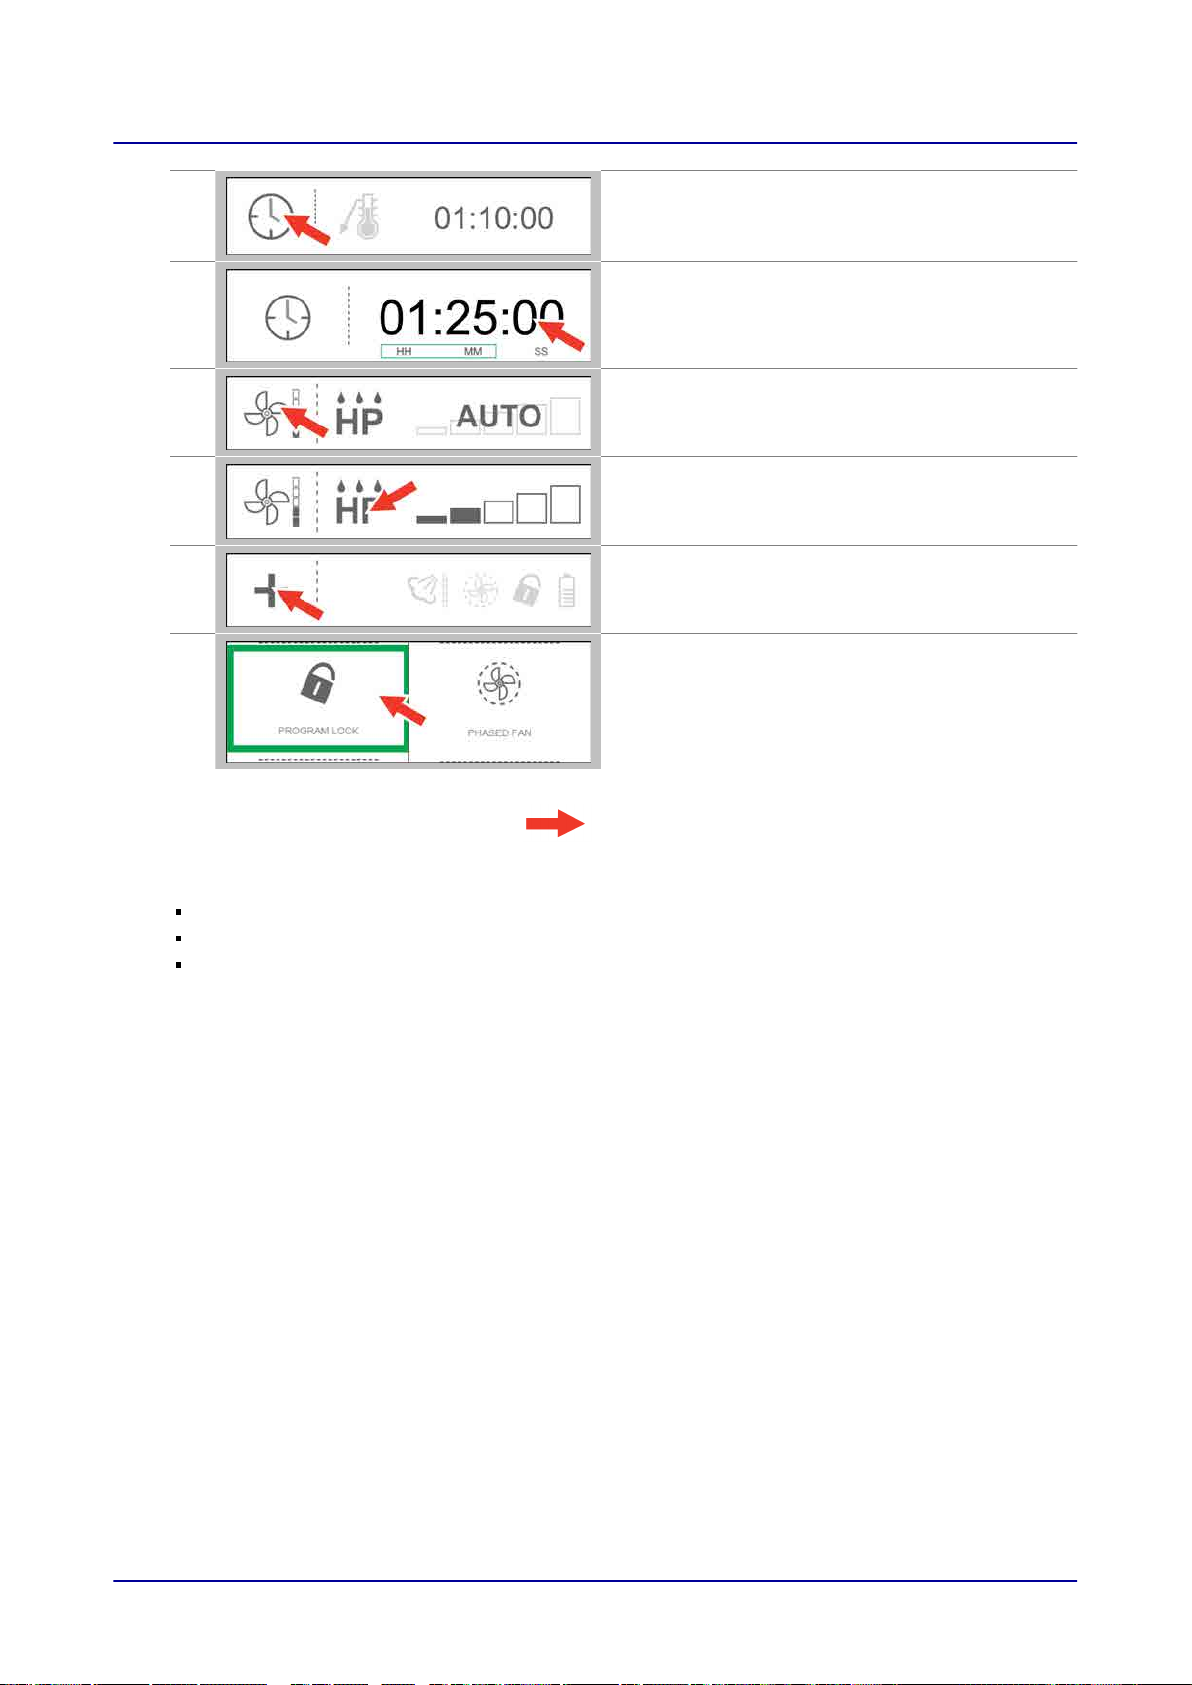
5.
6.
7.
8.
9.
10.
Press the “Cooking time” button.
Enter the cooking time you want on the “Time”
screen.
Select the “fan speed” setting you want.
Select the “HumidityPro” setting you want or select
“AUTO” if you want the appliance to control the
moisture level automatically.
Press the “Extra functions” button.
On the “Extra functions” screen, select the extra
functions you want.
Result: You have now entered a cooking profile.
Next steps:
Starting the cooking sequence. For more information,
Saving the cooking profile in the cookbook. For more information,
For more information on cooking workflows,
go to
go to
Page 51
Page 50
go to
Page 57
Operating instructions 44
Page 45
5 Cooking and Rethermalizing Food with easyTouch
5.1.3 Entering a Cooking Profile That Uses Convection
Applications
“Convection” is an appliance operating mode in which food is cooked using dry heat. The “convection”
operating method is suitable for the following cooking methods:
Roasting
Broiling
The special cooking methods that use the “convection” operating mode are:
DT cooking
Overnight cooking
Temperature range
When you use the “convection” cooking method, you will be working within a temperature range of
85 °F to 480 °F.
Available cooking functions
Five fan speed settings
Baking
Dry roasting
Cooking au gratin
Five Crisp&Tasty settings
Available extra functions
Low-temperature cooking
Delta-T cooking
ecoCooking
Cook&Hold
Program lock
Pulsed fan operation
Reduced power
Start time pre-selection
BakePro
Instruction step
Entering the cooking profile
1.
Press the “Cook” button on the main screen.
2.
3.
Operating instructions 45
On the “Cooking” screen, select the “convection”
operating mode.
Press the “cooking temperature” button.
Page 46
5 Cooking and Rethermalizing Food with easyTouch
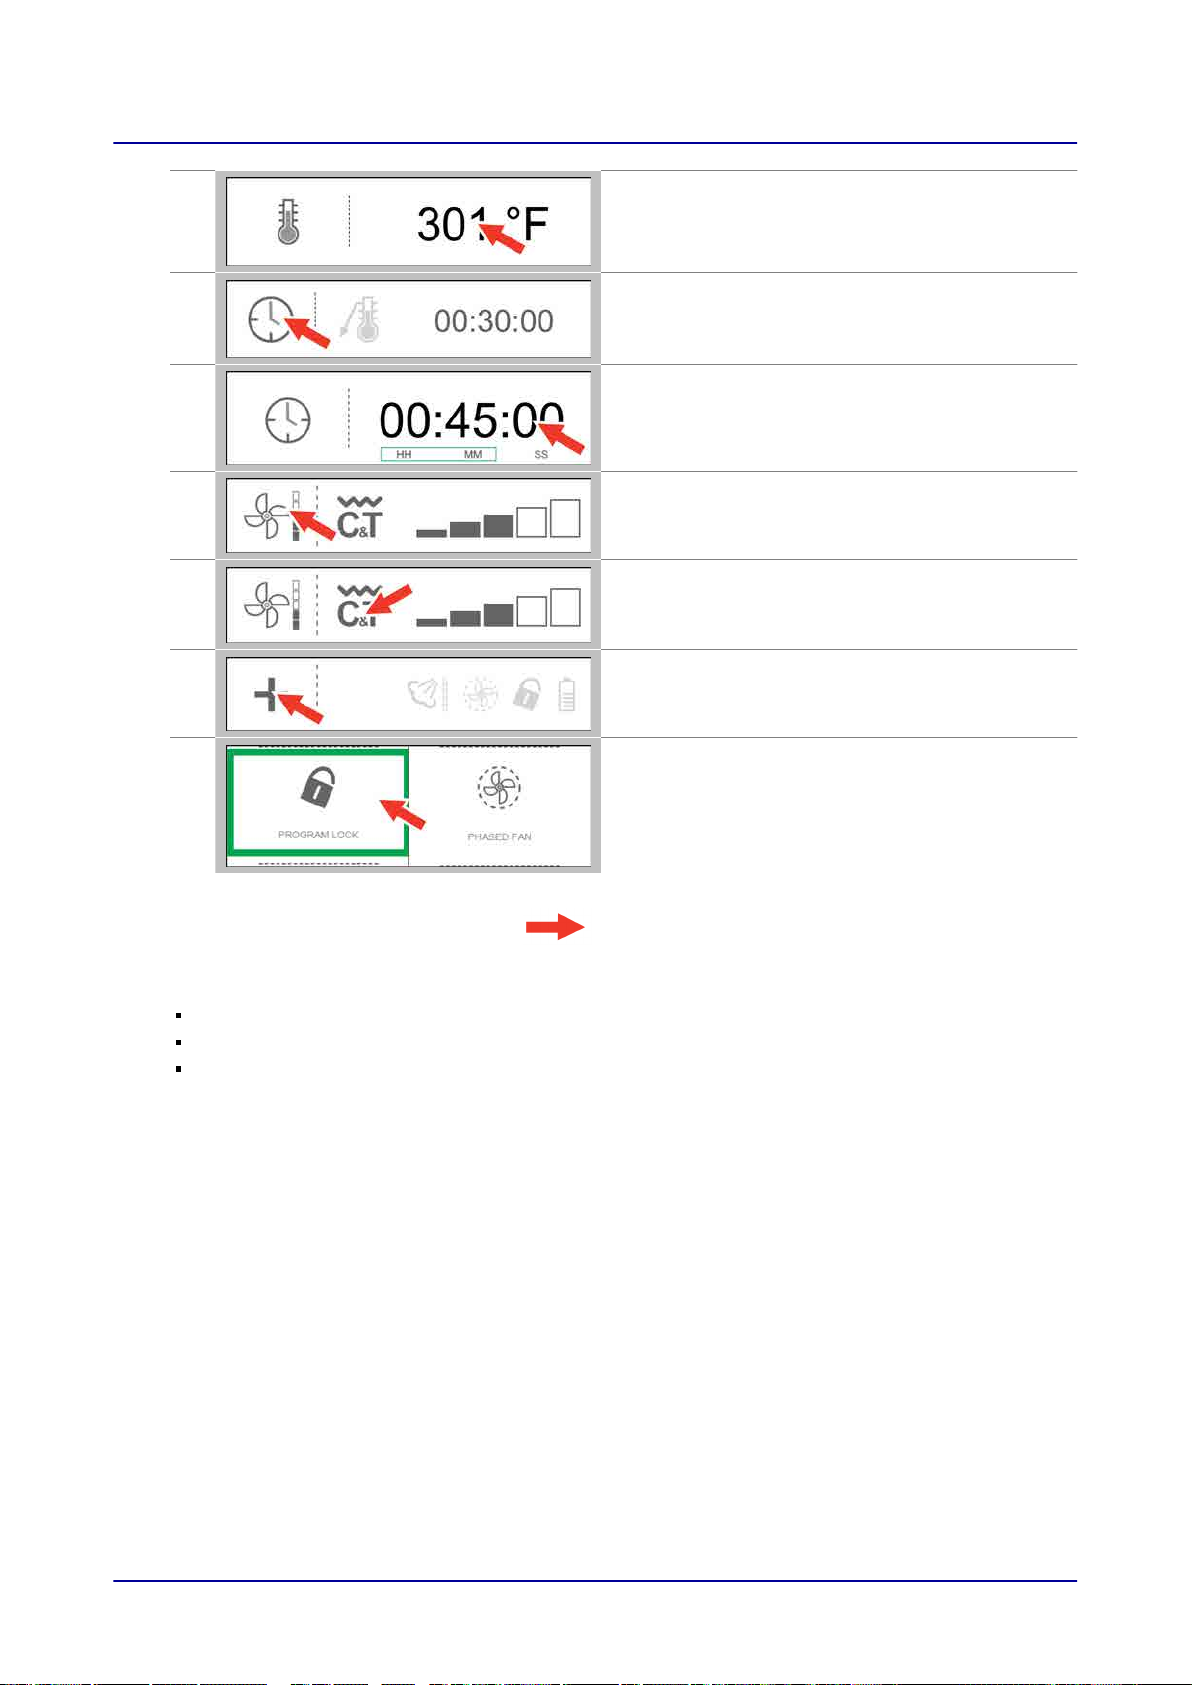
4.
5.
6.
7.
8.
9.
10.
Enter the cooking temperature you want on the
“Temperature” screen.
Press the “Cooking time” button.
Enter the cooking time you want on the “Time”
screen.
Select the “fan speed” setting you want.
Select the “Crisp&Tasty” setting you want.
Press the “Extra functions” button.
On the “Extra functions” screen, select the extra
functions you want.
Result: You have now entered a cooking profile.
Next steps:
Starting the cooking sequence. For more information,
Saving the cooking profile in the cookbook. For more information,
For more information on cooking workflows,
go to
go to
Page 51
Page 50
go to
Page 57
Operating instructions 46
Page 47
5 Cooking and Rethermalizing Food with easyTouch
5.1.4 Entering a Cooking Profile That Uses the Smoker
Applications
The “Smoker” operating mode is suitable for smoking food.
The “Smoker” operating mode will only be available in appliances with the smoker option. Before using
this operating mode, the appliance needs to be specifically set up for it.
Available extra functions
Reduced power
Program lock
Start time pre-selection
Instruction step
Entering the cooking profile
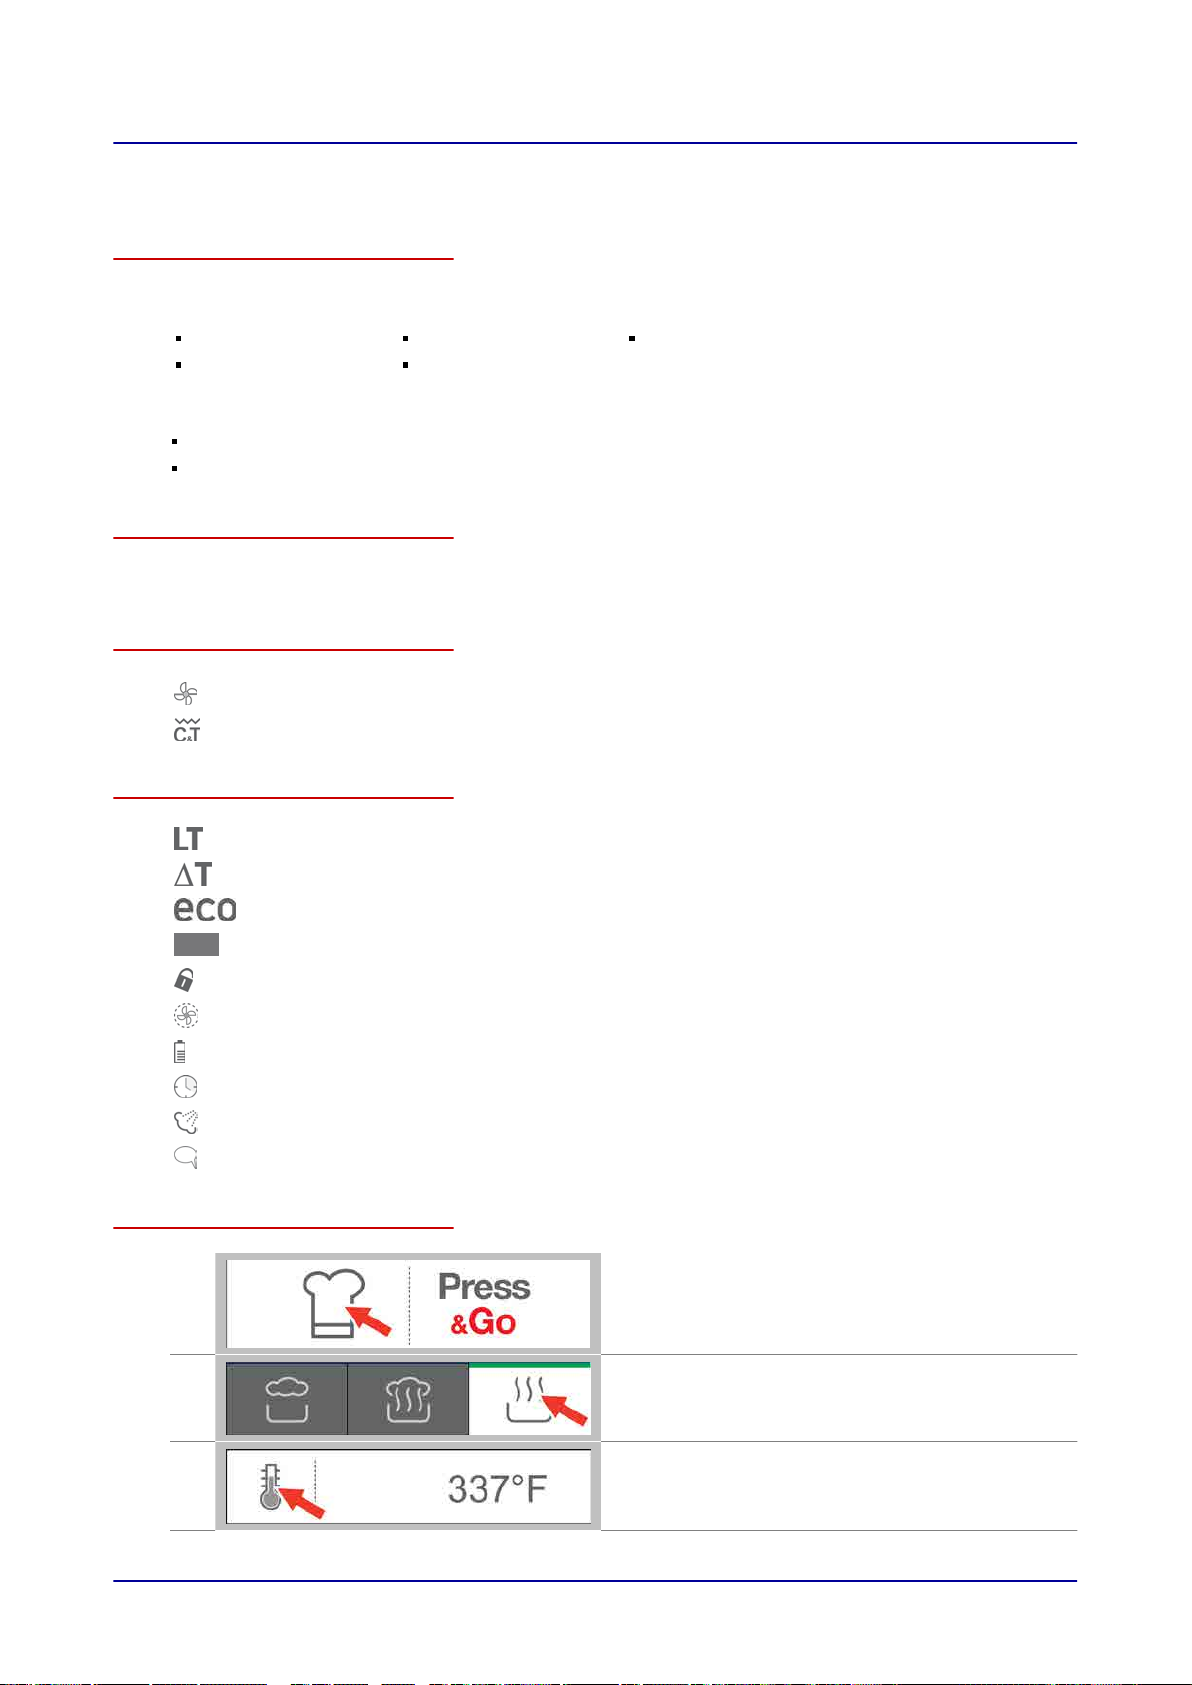
1.
2.
3
4.
5.
6.
Press the “Cook” button on the main screen.
On the “Cooking” screen, select the “smoker”
operating mode.
Press the “Cooking time” button.
Enter the smoking time you want on the “Time”
screen.
Press the “Extra functions” button.
On the “Extra functions” screen, select the extra
functions you want.
Next steps:
Starting the cooking sequence. For more information,
Saving the cooking profile in the cookbook. For more information,
For more information on cooking workflows,
Operating instructions 47
Result: You have now entered a cooking profile.
go to
Page 50
go to
Page 57
go to
Page 51
Page 48

5 Cooking and Rethermalizing Food with easyTouch
5.1.5 Entering a Cooking Profile That Uses Rethermalization
Applications
“Rethermalization” is a combi steamer operating mode in which pre-cooked food is heated up and fully
cooked so that it can be served. Almost any type of food can be rethermalized, although it needs to be
placed on a plate or in a container first.
There are three operating modes:
À la carte rethermalization
Banquet regenerating
Plate regenerating
Temperature range
When “rethermalizing” food, you will be working within a temperature range of 250 °F to 320 °F.
Available cooking functions
Five fan speed settings
Available extra functions
Reduced power
Reduced fan speed
Program lock
Instruction step
Entering the cooking profile
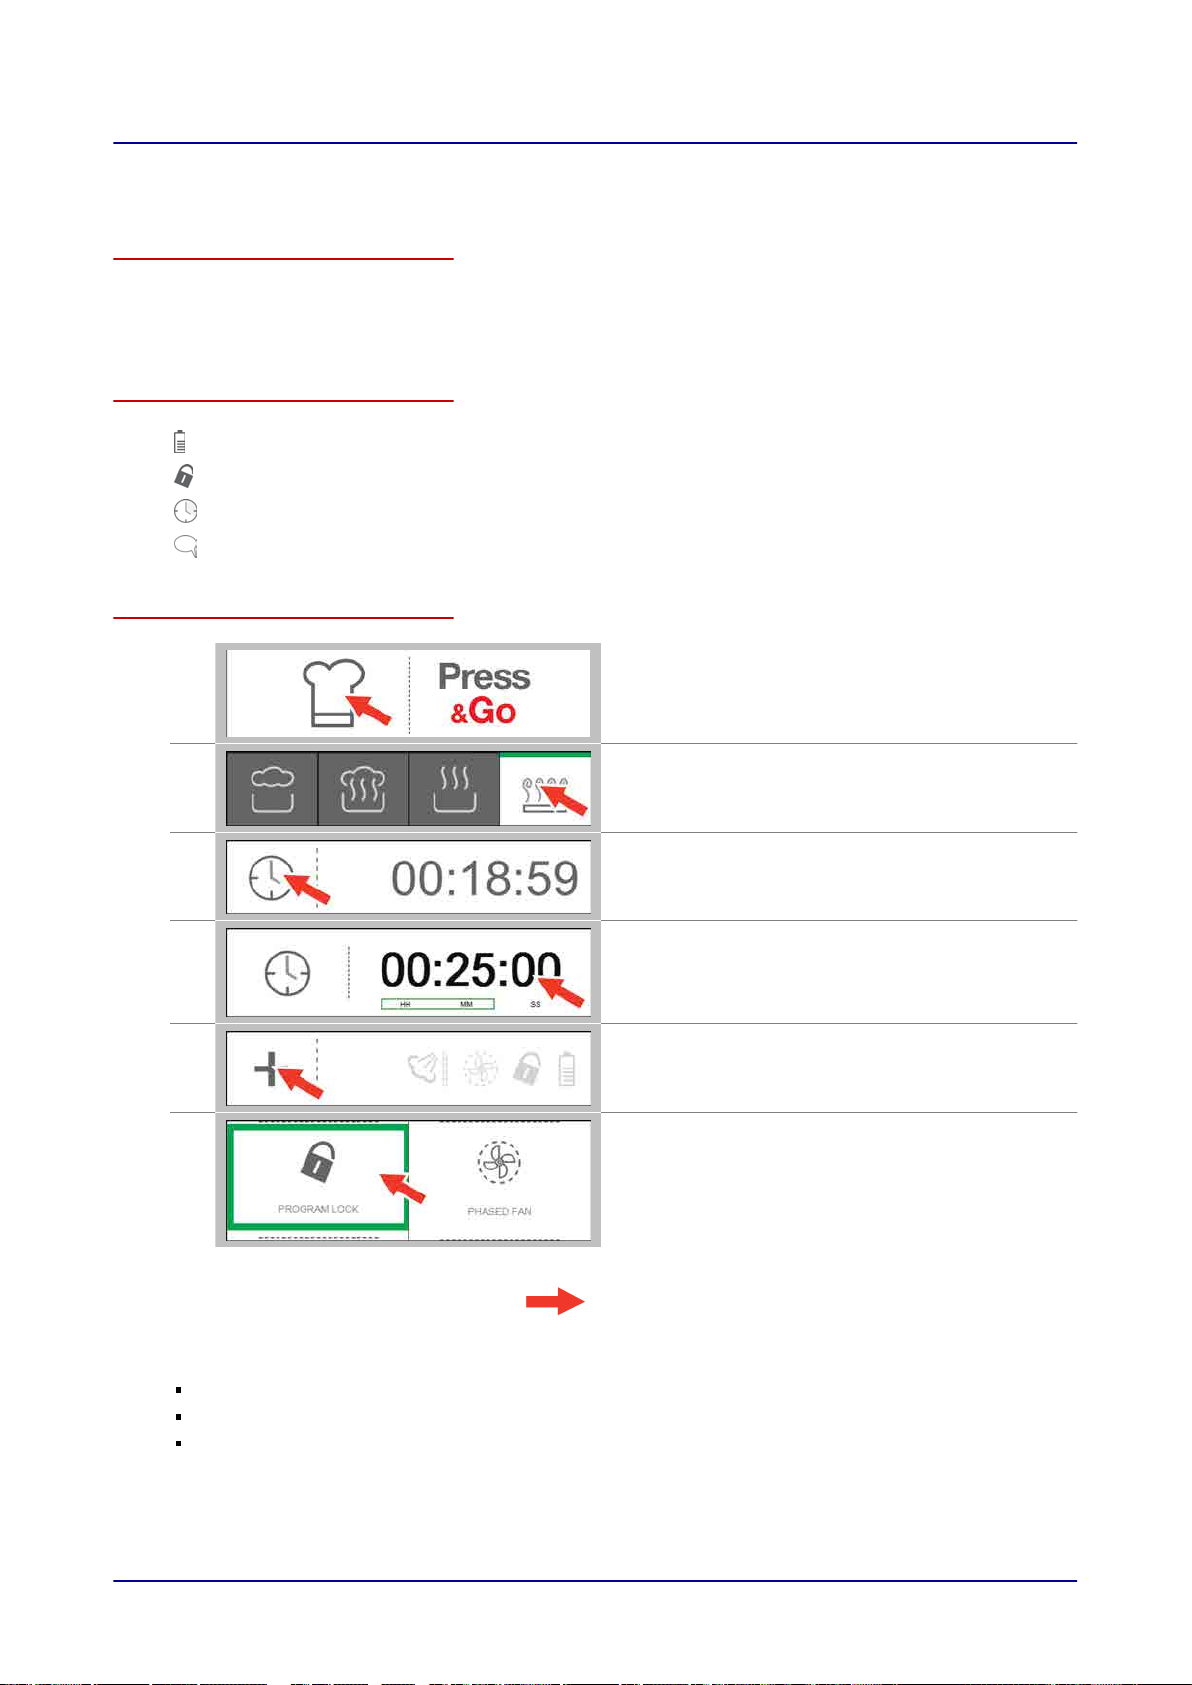
1.
2.
3.
4.
Press the “Rethermalize” button on the main
screen.
On the “Rethermalization” screen, select one of the
operating modes, e.g., “À la carte rethermalization”.
Press the “cooking temperature” button.
Enter the cooking temperature you want on the
“Temperature” screen.
5.
6.
Operating instructions 48
Press the “Cooking time” button.
Enter the cooking time you want on the “Time”
screen.
Page 49

5 Cooking and Rethermalizing Food with easyTouch
7.
8.
9.
Next steps:
Starting the cooking sequence. For more information,
Saving the cooking profile in the cookbook. For more information,
For more information on cooking workflows,
Select the “fan speed” setting you want.
Press the “Extra functions” button.
On the “Extra functions” screen, select the extra
functions you want.
Result: You have now entered a cooking profile.
go to
go to
Page 51
Page 50
go to
Page 57
Operating instructions 49
Page 50

5 Cooking and Rethermalizing Food with easyTouch
5.1.6 Starting a Cooking Sequence
Prerequisites
Before starting a cooking sequence, read and understand the rules, risks, and hazards associated
with safely using the appliance (as described in the operating manual) and follow all the
corresponding instructions.
You must have configured a new cooking profile.
Starting a Cooking Sequence
1.
Next steps:
Stopping the cooking sequence. For more information,
Cook with the cooking profile (for more on how to do this, please refer to the
Your Combi Steamer”
section in the operating manual)
5.1.7 Stopping a Cooking Sequence
Prerequisites
You must have started the cooking sequence already.
Stopping a Cooking Sequence
1.
Press the “Start” button to start the cooking
sequence.
Result: The cooking sequence will start.
go to
Page 50
“How to Cook with
Press the “Stop” button to stop the cooking
sequence.
Operating instructions 50
Result: The cooking sequence will stop and the
“Cooking” screen will be displayed.
Page 51

5 Cooking and Rethermalizing Food with easyTouch
5.2 Cooking Workflows
Purpose of this section
This section goes over the workflows that the appliance’s easyTouch software uses for cooking.
Contents
This section covers the following subjects:
Cooking Workflow with Pre-Heat Function 52
Cooking Workflow with Cool down Function 54
Page
Operating instructions 51
Page 52

5 Cooking and Rethermalizing Food with easyTouch
5.2.1 Cooking Workflow with Pre-Heat Function
Prerequisites
You must have entered a new cooking profile or opened one from the “cookbook.”
The cooking compartment temperature must be too low for the selected cooking profile.
Cooking workflow steps
Step 1
Step 2
Step 3
Start with pre-heating
The appliance lets the user know that the
cooking compartment will be pre-heated after
starting.
Pre-heating
After the “Start” button is pressed, the
appliance lets the user know that it is preheating the cooking compartment.
Automatic pre-heating
At the same time, the appliance will
automatically heat up the cooking
compartment to the cooking temperature set
in the cooking profile. The progress indicator
will show the process’ progress by lighting up
the progress bars with a yellow light
(clockwise).
Holding the cooking compartment
temperature
Once the cooking temperature is reached, the
appliance will continue to show the “Preheating” message.
Hold time countdown
At the same time, the appliance will hold the
cooking compartment temperature for
10 minutes and show the countdown for the
hold time. The progress indicator will show the
process’ progress by lighting up the progress
bars with a yellow light (clockwise).
Step 4
Operating instructions 52
The appliance prompts the user to put the
food inside
The appliance emits an acoustic signal and
prompts the user to put the food inside the
cooking compartment.
Appliance ready
At the same time, the appliance will show the
cooking temperature. The progress indicator
will change color to green.
Page 53

5 Cooking and Rethermalizing Food with easyTouch
Step 5
Step 6
The user puts the food inside the appliance
While the user is putting the food inside the
cooking compartment, the appliance shows a
prompt asking them to close the appliance
door.
Prompt asking the user to close the appliance
door
At the same time, the appliance will emit an
acoustic signal and the progress indicator will
change color to yellow.
Cooking
Immediately after the appliance door is
closed, the cooking sequence starts. The
appliance will show the cooking steps’
progress by changing the color of the
corresponding cooking step circle to red (from
left to right).
Automatic cooking sequence
At the same time, the appliance will show the
remaining cooking time or the internal
temperature reached, as applicable. The
progress indicator will show the corresponding
progress by lighting up the progress bars with
a red light (clockwise).
Step 7
The cooking process ends
Once cooking is done, the circle for the last
cooking step will change color to red.
The appliance prompts the user to confirm
At the same time, the appliance will emit an
acoustic signal and the prompt asking the
user to confirm will be shown. The progress
indicator will change color to green.
Operating instructions 53
Page 54

5 Cooking and Rethermalizing Food with easyTouch
5.2.2 Cooking Workflow with Cool down Function
Prerequisites
You must have entered a new cooking profile or opened one from the “cookbook.”
The cooking compartment temperature must be too high for the selected cooking profile.
Cooking workflow steps
Step 1
Step 2
Step 3
Step 4
Start with cool down
The appliance lets the operator know that the
cooking compartment will be cooled down
after starting.
Open appliance door
After the “Start” button is pressed, the
appliance prompts the user to open the
appliance door.
The appliance waits
At the same time, the appliance will emit an
acoustic signal and the progress indicator will
change color to yellow.
Cooling down with Cool down function
After the appliance door is opened, the
appliance shows a message indicating that it
is cooling down the cooking compartment with
the Cool down function.
Automatic cooling down
At the same time, the appliance will
automatically down the cooking compartment
down to the cooking temperature set in the
cooking profile. The progress indicator will
show the corresponding progress by lighting
up the progress bars with a yellow light
(counterclockwise).
The appliance prompts the user to put the
food inside
Once the cooking temperature is reached, the
appliance emits an acoustic signal and
prompts the user to put the food inside the
cooking compartment.
Appliance ready
At the same time, the appliance will show the
cooking temperature. The progress indicator
will change color to green.
Operating instructions 54
Page 55

5 Cooking and Rethermalizing Food with easyTouch
Step 5
Step 6
The user puts the food inside the appliance
While the user is putting the food inside the
cooking compartment, the appliance shows a
prompt asking them to close the appliance
door.
Prompt asking the user to close the appliance
door
At the same time, the appliance will emit an
acoustic signal and the progress indicator will
change color to yellow.
Cooking
Immediately after the appliance door is
closed, the cooking sequence starts. The
appliance will show the cooking steps’
progress by changing the color of the
corresponding cooking step circle to red (from
left to right).
Automatic cooking sequence
At the same time, the appliance will show the
remaining cooking time or the internal
temperature reached, as applicable. The
progress indicator will show the corresponding
progress by lighting up the progress bars with
a red light (clockwise).
Step 7
The cooking process ends
Once cooking is done, the circle for the last
cooking step will change color to red.
The appliance prompts the user to confirm
At the same time, the appliance will emit an
acoustic signal and the prompt asking the
user to confirm will be shown. The progress
indicator will change color to green.
Operating instructions 55
Page 56

6 Using the Cookbook
6 Using the Cookbook
Purpose of this section
This section provides step-by-step instructions for the most important tasks required in order to use
the easyTouch cookbook.
For more detailed information, please consult the on-screen help pages.
Contents
This section covers the following subjects:
Saving the Configured Cooking Profile in the Cookbook 57
Access the cooking profile in the cookbook 58
Delete the cooking profile from the cookbook 59
Page
Operating instructions 56
Page 57

6 Using the Cookbook
6.1 Saving the Configured Cooking Profile in the Cookbook
Prerequisites
This section assumes that you are on the “Cooking” or “Rethermalization” screen.
You must have configured a cooking profile already.
Saving the configured cooking profile in the cookbook
1.
2.
3.
4.
5.
On the “Cooking” or “Rethermalization” screen,
press the “Save as cooking profile” button.
Enter the name of the cooking profile on the
“Keyboard” screen.
Confirm your selections.
On the “Select symbol” screen, select a symbol.
Confirm your selections.
Result: The cooking profile is now stored in the
cookbook.
Operating instructions 57
Page 58

6 Using the Cookbook
6.2 Access the cooking profile in the cookbook
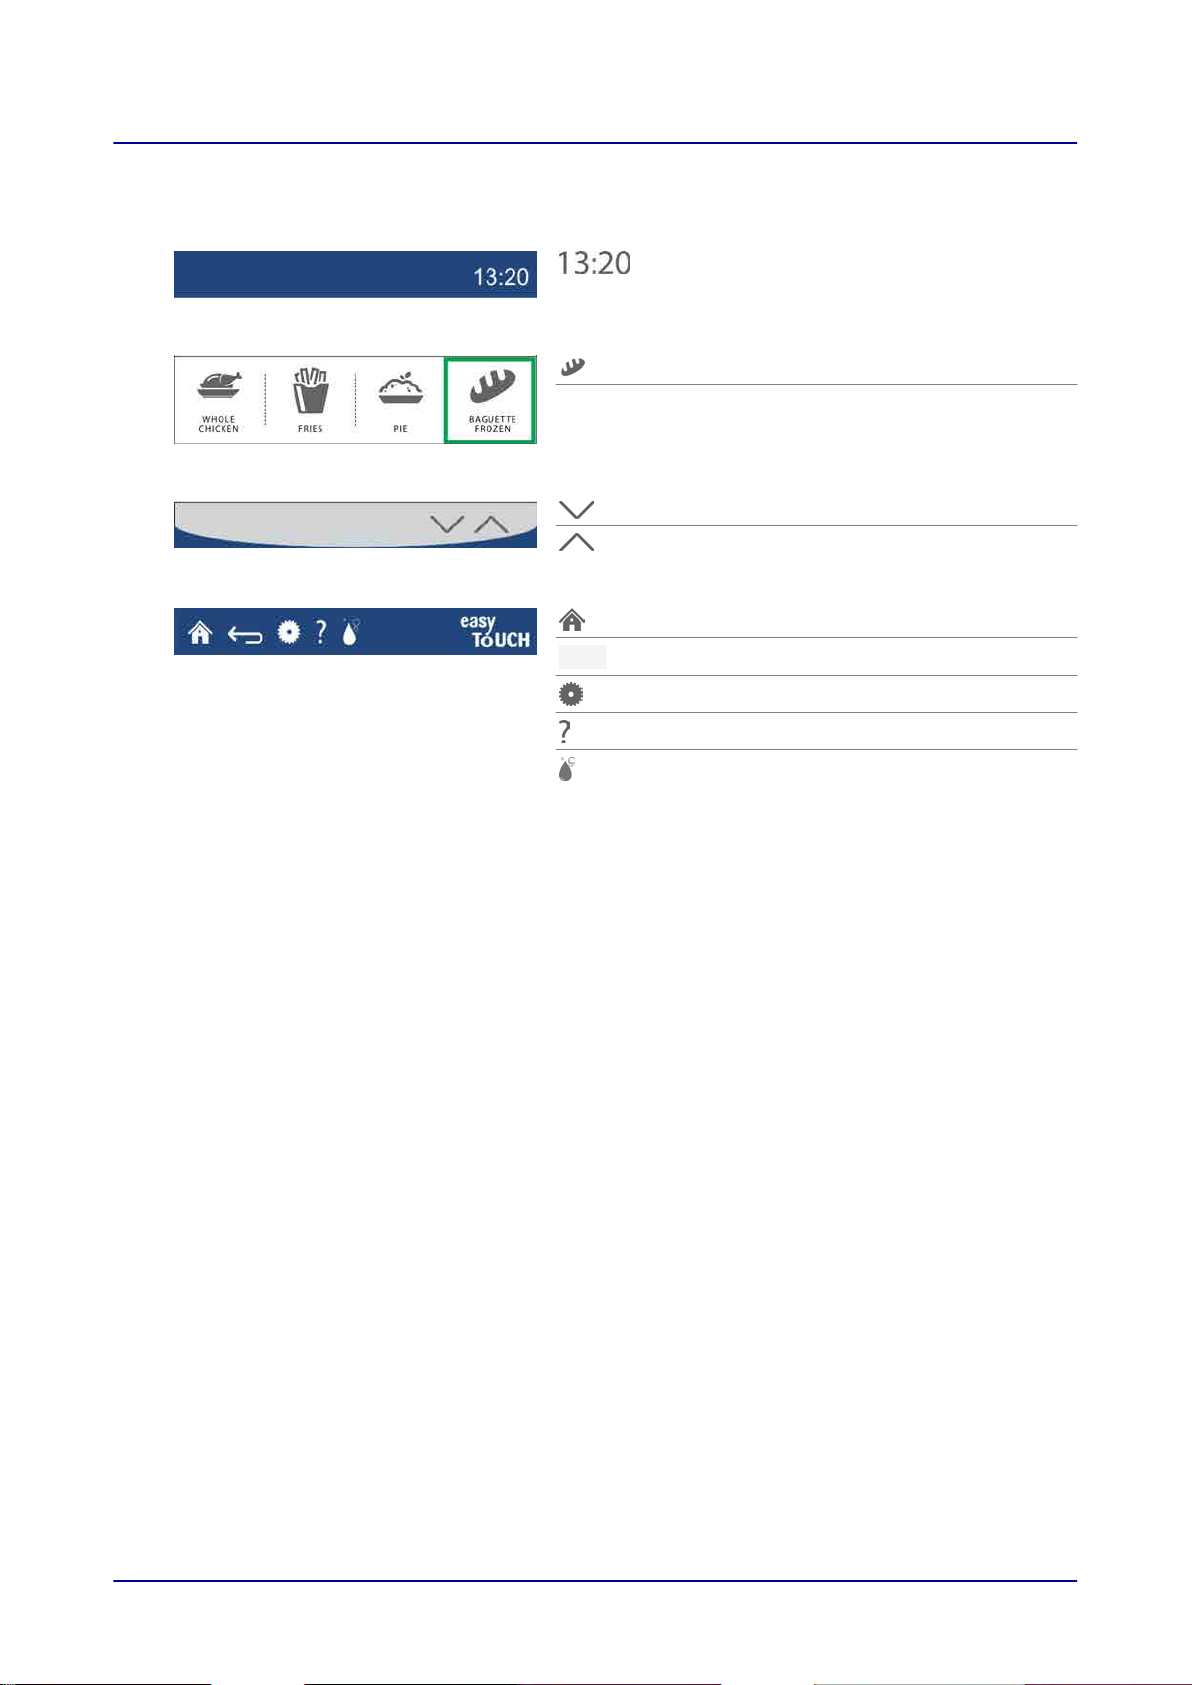
Accessing a cooking profile in the cookbook
1.
2.
3.
4.
Next steps:
Starting the cooking sequence. For more information,
For more information on cooking workflows,
go to
Press the “Cookbook” button while on the main
screen.
In the “Cookbook” screen, press the “Cooking
profiles” button in order to view all the cooking
profiles in the cookbook.
Select the cooking profile you want (“BAGUETTE
FROZEN,” for example)
Confirm your selections.
Result: The cooking profile will be opened and
displayed in the “Cooking” or “Rethermalization”
screen as applicable.
go to
Page 50
Page 51
Operating instructions 58
Page 59

6 Using the Cookbook
6.3 Delete the cooking profile from the cookbook
Delete the cooking profile from the cookbook
1.
2.
3.
4.
5.
Press the “Cookbook” button while on the main
screen.
In the “Cookbook” screen, press the “Cooking
profiles” button in order to view all the cooking
profiles in the cookbook.
In the “All cooking profiles” screen, select the
cooking profile you want to delete (“BAGUETTE
FROZEN,” for example).
Press the “Edit cooking profile” button.
In the “Edit cooking profiles” screen, press the
“Delete cooking profile” button.
Result: The cooking profile has now been deleted
from the cookbook.
Operating instructions 59
Page 60

7 Using Press&Go
7 Using Press&Go
Purpose of this section
This section provides step-by-step instructions for the most important tasks required in order to use
the easyTouch Press&Go function.
For more detailed information, please consult the on-screen help pages.
Contents
This section covers the following subjects:
Accessing Press&Go 61
Page
Operating instructions 60
Page 61

7 Using Press&Go
7.1 Accessing Press&Go
Accessing Press&Go
1.
2.
Next steps:
Selecting and starting a cooking sequence. For more information,
Press the “Press&Go” button while on the main
screen.
Enter the password
Result: The Press&Go screen will open.
go to
Page 50
Operating instructions 61
Page 62

8 Cleaning with easyTouch
8 Cleaning with easyTouch
Purpose of this section
This section provides step-by-step instructions for the most important tasks that need to be carried out
when cleaning with easyTouch. It also describes the cleaning workflows for the various cleaning
profiles.
For more detailed information, please consult the on-screen help pages.
Contents
This section covers the following subjects:
Instructions 63
Cleaning Workflows 66
Page
Operating instructions 62
Page 63

8 Cleaning with easyTouch
8.1 Instructions
Purpose of this section
This section provides step-by-step instructions for the most important tasks that need to be carried out
with the user interface when cleaning the appliance.
Contents
This section covers the following subjects:
Configuring the Fully Automatic Oven Cleaning Profile 64
Starting a Cleaning Sequence 65
Stopping a Cleaning Sequence 65
Page
Operating instructions 63
Page 64

8 Cleaning with easyTouch
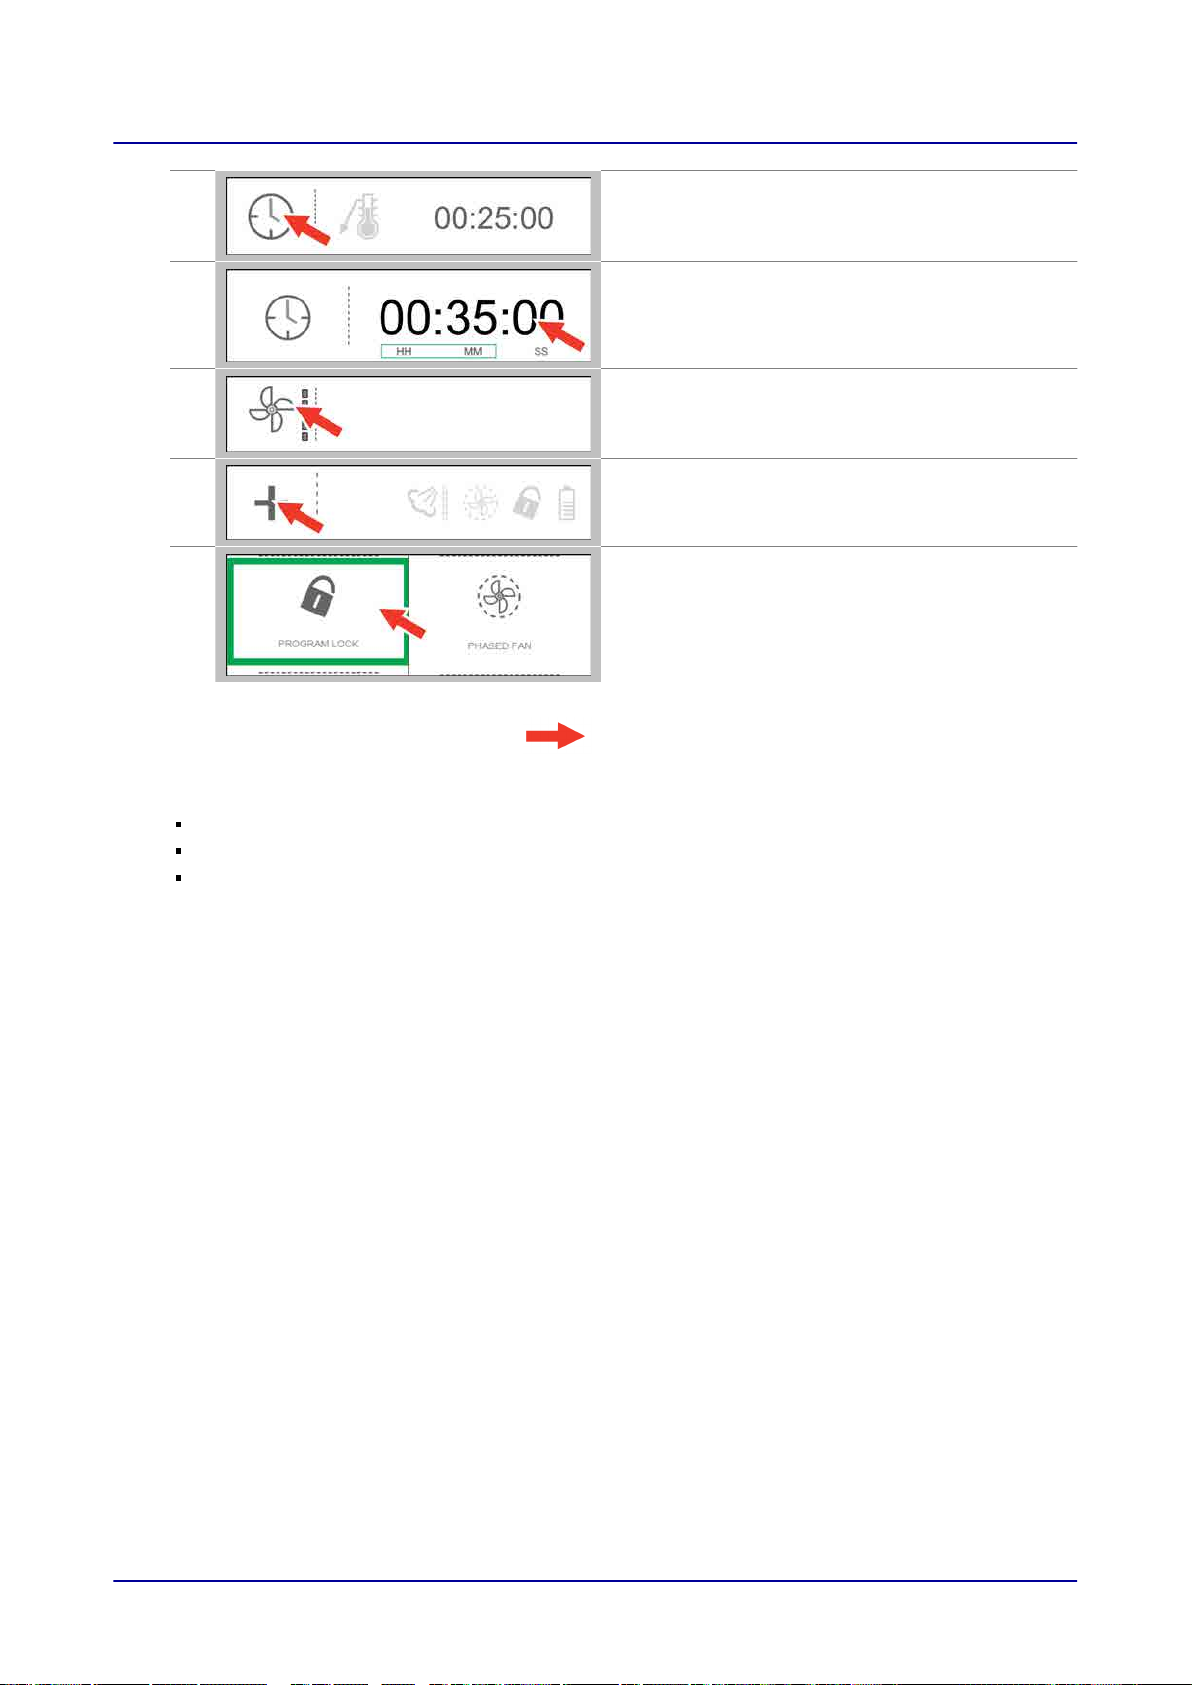
8.1.1 Configuring the Fully Automatic Oven Cleaning Profile
Configuring the cleaning profile
1.
2.
3.
4.
5.
Press the “Clean” button while on the main screen,
for example
On the “Cleaning” screen, select the
“ConvoClean+” cleaning mode.
Select the cleaning level you want
(cleaning level 2, for example).
Select the cleaning duration you want (“Regular,”
for example).
If you want, activate the “Disinfection” and/or
“Drying” extra functions.
Result: You have now configured the cleaning
profile.
Next steps:
Starting the cleaning sequence. For more information,
For more information on cleaning workflows,
go to
go to
Page 66
Page 65
Operating instructions 64
Page 65

8 Cleaning with easyTouch
8.1.2 Starting a Cleaning Sequence
Prerequisites
Before starting a cleaning profile, read and understand the rules, risks, and hazards associated
with safely using the appliance (as described in the operating manual) and follow all the
corresponding instructions.
You must have entered the cleaning profile you want.
Starting a Cleaning Sequence
1.
Next steps:
Stopping the cleaning sequence. For more information,
Clean with the cleaning profile (for more on how to do this, please refer to the
Combi Steamer
section in the operating manual)
8.1.3 Stopping a Cleaning Sequence
Prerequisites
You must have entered a cleaning profile.
You must have started the cleaning profile.
Stopping a Cleaning Sequence
Press the “Confirm” button to start the cleaning
sequence.
Result: The cleaning profile will start immediately.
go to
Page 65
How to Clean the
1.
Operating instructions 65
Press the “Stop” button to stop the cleaning
sequence.
Result: The cleaning sequence will stop (only
possible if no cleaning agent has been added yet).
Page 66

8 Cleaning with easyTouch
8.2 Cleaning Workflows
Purpose of this section
This section goes over the workflows that the appliance’s easyTouch software uses for cleaning.
Contents
This section covers the following subjects:
Workflow for Oven Cleaning with Water 67
Workflow for Oven Cleaning with ConvoCare 69
Workflow for Fully Automatic Oven Cleaning with Canisters 71
Workflow for Fully Automatic Oven Cleaning with Single-Measure Dispensing 73
Semi-Automatic Oven Cleaning Workflow 76
Page
Operating instructions 66
Page 67

8 Cleaning with easyTouch
8.2.1 Workflow for Oven Cleaning with Water
Prerequisites
The “oven cleaning with water” cleaning profile must have been selected and started.
The cooking compartment must be hotter than 105 °F.
Cleaning workflow steps
Step 1
Step 2
Step 3
Open appliance door and remove all food
from the cooking compartment
After the “Confirm” button is pressed, the
appliance prompts the user to remove all food
from the cooking compartment and open the
appliance door.
The appliance waits
At the same time, the appliance will emit an
acoustic signal and the progress indicator will
change color to yellow.
Cooling down with Cool down function
After the appliance door is opened, the
appliance shows a message indicating that it
is cooling down the cooking compartment with
the Cool down function.
Automatic cooling down
At the same time, the appliance will
automatically cool down the cooking
compartment. The progress indicator will
show the corresponding progress by lighting
up the progress bars with a yellow light
(counterclockwise).
Remove all food and close appliance door
After the cooking compartment has cooled
down, the appliance prompts the user to
remove all food and close the appliance door.
The appliance waits
At the same time, the appliance will emit an
acoustic signal and the progress indicator will
change color to yellow.
Step 4
Operating instructions 67
Cleaning starts
Immediately after the appliance door is
closed, the cleaning sequence starts.
Automatic cleaning sequence
At the same time, the appliance will show the
remaining cleaning time. The progress
indicator will show the corresponding progress
by lighting up the progress bars with a red
light (clockwise).
Page 68

8 Cleaning with easyTouch
Step 5
The cleaning process ends
After drying, the appliance will show a
message indicating that the cleaning
sequence is done.
The appliance prompts the user to confirm
At the same time, the appliance will emit an
acoustic signal lasting 60 seconds and the
prompt asking the user to confirm will be
shown. The progress indicator will change
color to green.
Operating instructions 68
Page 69

8 Cleaning with easyTouch
8.2.2 Workflow for Oven Cleaning with ConvoCare
Prerequisites
The “oven cleaning with ConvoCare” cleaning profile must have been selected and started.
The cooking compartment must be hotter than 105 °F.
Cleaning workflow steps
Step 1
Step 2
Step 3
Open appliance door and remove all food
from the cooking compartment
After the “Confirm” button is pressed, the
appliance prompts the user to remove all food
from the cooking compartment and open the
appliance door.
The appliance waits
At the same time, the appliance will emit an
acoustic signal and the progress indicator will
change color to yellow.
Cooling down with Cool down function
After the appliance door is opened, the
appliance shows a message indicating that it
is cooling down the cooking compartment with
the Cool down function.
Automatic cooling down
At the same time, the appliance will
automatically cool down the cooking
compartment. The progress indicator will
show the corresponding progress by lighting
up the progress bars with a yellow light
(counterclockwise).
Remove all food and close appliance door
After the cooking compartment has cooled
down, the appliance prompts the user to
remove all food and close the appliance door.
The appliance waits
At the same time, the appliance will emit an
acoustic signal and the progress indicator will
change color to yellow.
Step 4
Operating instructions 69
Cleaning starts
Immediately after the appliance door is
closed, the cleaning sequence starts.
Automatic cleaning sequence
At the same time, the appliance will show the
remaining cleaning time. The progress
indicator will show the corresponding progress
by lighting up the progress bars with a red
light (clockwise).
Page 70

8 Cleaning with easyTouch
Step 5
Step 6
The ConvoCare sequence starts
Immediately after the appliance door is
closed, the ConvoCare sequence starts.
Automatic cleaning sequence
At the same time, the appliance will show the
remaining cleaning time. The progress
indicator will show the corresponding progress
by lighting up the progress bars with a red
light (clockwise).
The cleaning process ends
After drying, the appliance will show a
message indicating that the cleaning
sequence is done.
The appliance prompts the user to confirm
At the same time, the appliance will emit an
acoustic signal lasting 60 seconds and the
prompt asking the user to confirm will be
shown. The progress indicator will change
color to green.
Operating instructions 70
Page 71

8 Cleaning with easyTouch
8.2.3 Workflow for Fully Automatic Oven Cleaning with Canisters
Prerequisites
A fully automatic oven cleaning profile must have been selected and started.
The cooking compartment must be hotter than 105 °F.
Cleaning workflow steps
Step 1
Step 2
Step 3
Open appliance door and remove all food
from the cooking compartment
After the “Confirm” button is pressed, the
appliance prompts the user to remove all food
from the cooking compartment and open the
appliance door.
The appliance waits
At the same time, the appliance will emit an
acoustic signal and the progress indicator will
change color to yellow.
Cooling down with Cool down function
After the appliance door is opened, the
appliance shows a message indicating that it
is cooling down the cooking compartment with
the Cool down function.
Automatic cooling down
At the same time, the appliance will
automatically cool down the cooking
compartment. The progress indicator will
show the corresponding progress by lighting
up the progress bars with a yellow light
(counterclockwise).
Remove all food and close appliance door
After the cooking compartment has cooled
down, the appliance prompts the user to
remove all food and close the appliance door.
The appliance waits
At the same time, the appliance will emit an
acoustic signal and the progress indicator will
change color to yellow.
Step 4
Operating instructions 71
Cleaning starts
Immediately after the appliance door is
closed, the cleaning sequence starts.
Automatic cleaning sequence
At the same time, the appliance will show the
remaining cleaning time. The progress
indicator will show the corresponding progress
by lighting up the progress bars with a red
light (clockwise).
Page 72

8 Cleaning with easyTouch
Step 5
Step 6
Step 7
The disinfection process starts
After cleaning, the appliance shows a
message indicating that the cooking
compartment is being disinfected with steam.
At the same time, the appliance will emit an
acoustic signal and show the remaining
disinfection time. The progress indicator will
show the corresponding progress by lighting
up the progress bars with a red light
(clockwise).
The drying process starts
Once the disinfection process is done, the
appliance shows a message indicating that
the cooking compartment is being dried.
At the same time, the appliance will emit an
acoustic signal and show the remaining drying
time. The progress indicator will show the
corresponding progress by lighting up the
progress bars with a red light (clockwise).
The cleaning process ends
After drying, the appliance will show a
message indicating that the cleaning
sequence is done.
The appliance prompts the user to confirm
At the same time, the appliance will emit an
acoustic signal lasting 60 seconds and the
prompt asking the user to confirm will be
shown. The progress indicator will change
color to green.
Operating instructions 72
Page 73

8 Cleaning with easyTouch
8.2.4 Workflow for Fully Automatic Oven Cleaning with Single-Measure Dispensing
Prerequisites
A fully automatic oven cleaning profile must have been selected and started.
The cooking compartment must be hotter than 105 °F.
Cleaning workflow steps
Step 1
Step 2
Step 3
Open appliance door and remove all food
from the cooking compartment
After the “Confirm” button is pressed, the
appliance prompts the user to remove all food
from the cooking compartment and open the
appliance door.
The appliance waits
At the same time, the appliance will emit an
acoustic signal and the progress indicator will
change color to yellow.
Cooling down with Cool down function
After the appliance door is opened, the
appliance shows a message indicating that it
is cooling down the cooking compartment with
the Cool down function.
Automatic cooling down
At the same time, the appliance will
automatically cool down the cooking
compartment. The progress indicator will
show the corresponding progress by lighting
up the progress bars with a yellow light
(counterclockwise).
Remove all food and close appliance door
After the cooking compartment has cooled
down, the appliance prompts the user to
remove all food and close the appliance door.
The appliance waits
At the same time, the appliance will emit an
acoustic signal and the progress indicator will
change color to yellow.
Step 4
Operating instructions 73
Cleaning starts
Immediately after the appliance door is
closed, the cleaning sequence starts.
Once the soaking stage is done, the appliance
prompts the user to add cleaning agent.
Automatic cleaning sequence
At the same time, the appliance will show the
remaining cleaning time. The progress
indicator will show the corresponding progress
by lighting up the progress bars with a red
light (clockwise).
Page 74

8 Cleaning with easyTouch
Step 5
Step 6
Add cleaning agent
After the appliance door is opened, the
appliance prompts the user to add cleaning
agent and shows the required number of
single-measure dispensing bottles.
The appliance waits
The software will show the required number of
single-measure dispensing bottles (up to five
bottles). At the same time, it will emit an
acoustic signal and the progress indicator will
change color to yellow.
Cleaning in progress
Once the cleaning agent is added and the
appliance door is closed, the cleaning
sequence starts.
The appliance will prompt the user to add
rinse aid after the cleaning stage is done.
Automatic cleaning sequence
At the same time, the appliance will show the
remaining cleaning time. The progress
indicator will show the corresponding progress
by lighting up the progress bars with a red
light (clockwise).
Step 7
Step 8
Step 9
Add rinse aid
After the appliance door is opened, the
appliance prompts the user to add rinse aid
and shows the required number of singlemeasure dispensing bottles.
The appliance waits
The software will show the required number of
single-measure dispensing bottles (up to three
bottles). At the same time, it will emit an
acoustic signal and the progress indicator will
change color to yellow.
Cleaning in progress
Once the rinse aid is added and the appliance
door is closed, the cleaning sequence starts.
Automatic cleaning sequence
At the same time, the appliance will show the
remaining cleaning time. The progress
indicator will show the corresponding progress
by lighting up the progress bars with a red
light (clockwise).
The disinfection process starts
After cleaning, the appliance shows a
message indicating that the cooking
compartment is being disinfected with steam.
At the same time, the appliance will emit an
acoustic signal and show the remaining
disinfection time. The progress indicator will
show the corresponding progress by lighting
up the progress bars with a red light
(clockwise).
Operating instructions 74
Page 75

8 Cleaning with easyTouch
Step 10
Step 11
The drying process starts
Once the disinfection process is done, the
appliance shows a message indicating that
the cooking compartment is being dried.
At the same time, the appliance will emit an
acoustic signal and show the remaining drying
time. The progress indicator will show the
corresponding progress by lighting up the
progress bars with a red light (clockwise).
The cleaning process ends
After drying, the appliance will show a
message indicating that the cleaning
sequence is done.
The appliance prompts the user to confirm
At the same time, the appliance will emit an
acoustic signal lasting 60 seconds and the
prompt asking the user to confirm will be
shown. The progress indicator will change
color to green.
Operating instructions 75
Page 76
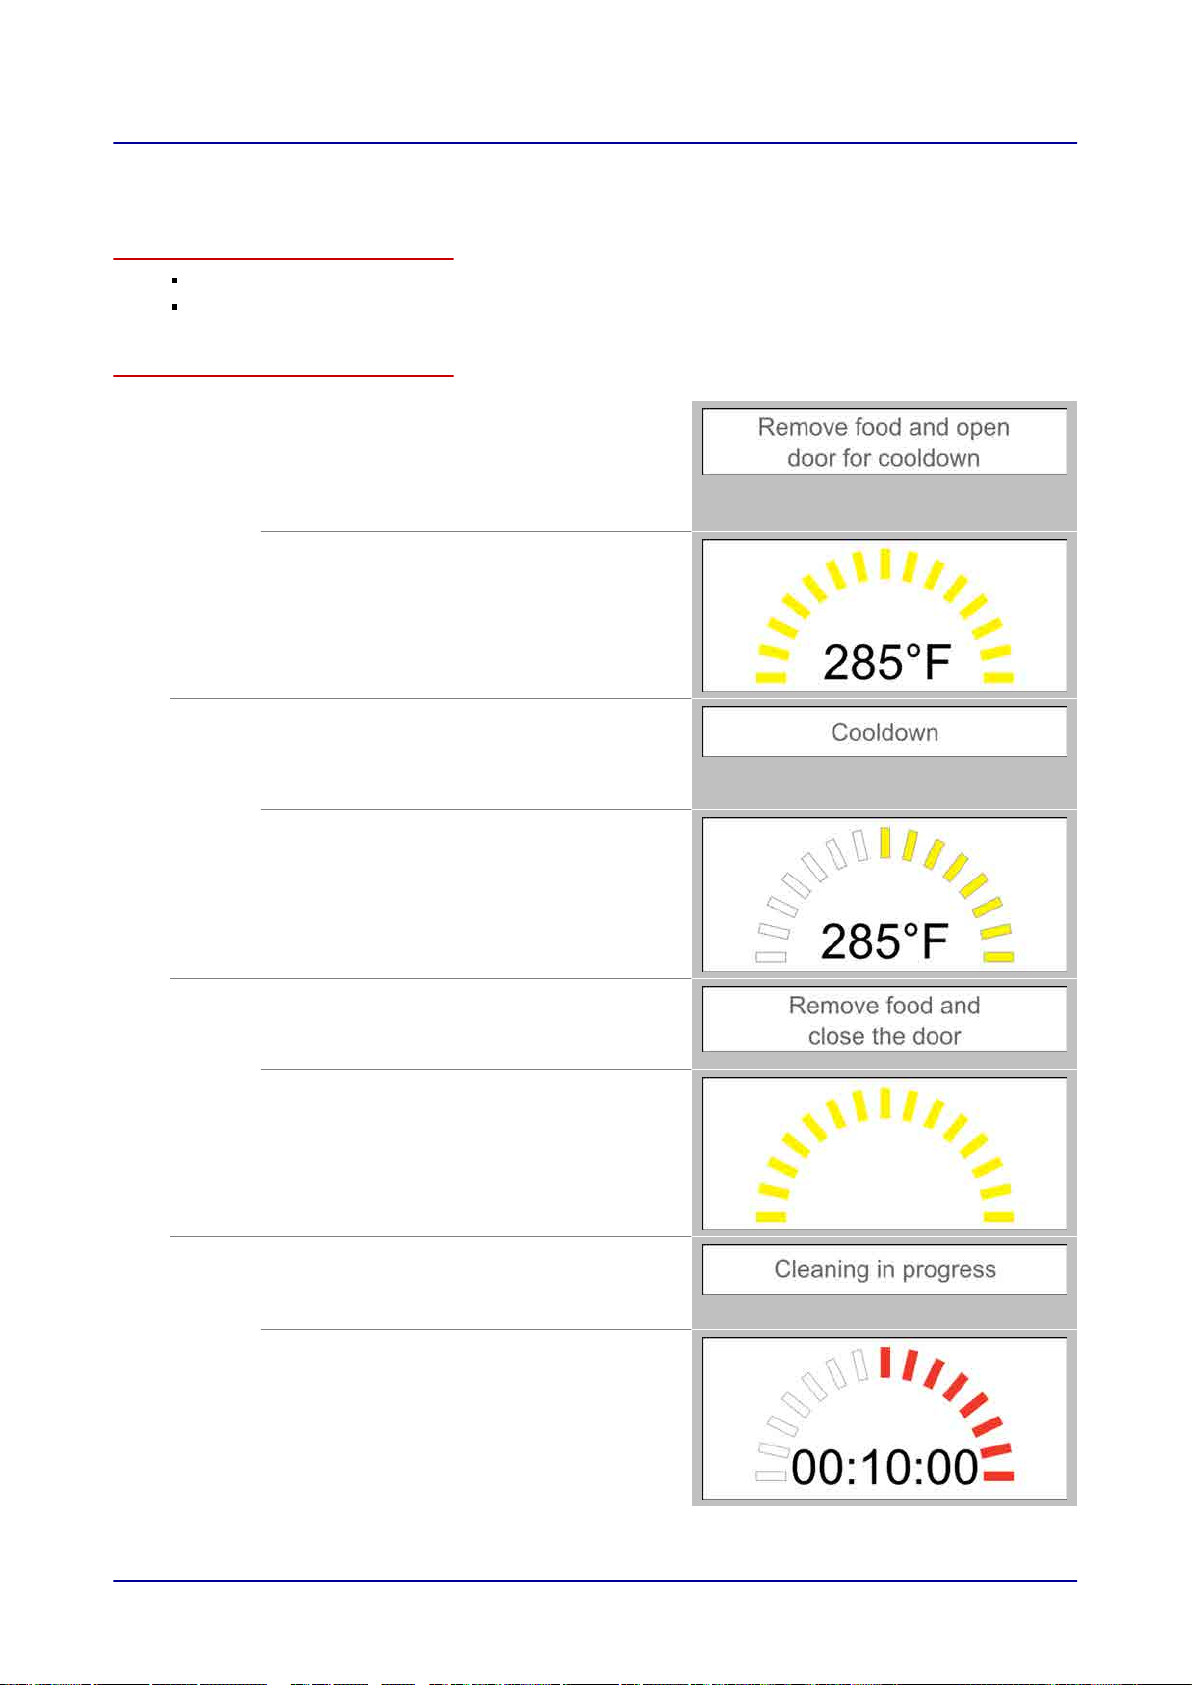
8 Cleaning with easyTouch
8.2.5 Semi-Automatic Oven Cleaning Workflow
Prerequisites
Semi-automatic oven cleaning must have been selected and started.
The cooking compartment must be hotter than 105 °F.
Cleaning workflow steps
Step 1
Step 2
Step 3
Open appliance door and remove all food
from the cooking compartment
After the “Confirm” button is pressed, the
appliance prompts the user to remove all food
from the cooking compartment and open the
appliance door.
The appliance waits
At the same time, the appliance will emit an
acoustic signal and the progress indicator will
change color to yellow.
Cooling down with Cool down function
After the appliance door is opened, the
appliance shows a message indicating that it
is cooling down the cooking compartment with
the Cool down function.
Automatic cooling down
At the same time, the appliance will
automatically cool down the cooking
compartment. The progress indicator will
show the corresponding progress by lighting
up the progress bars with a yellow light
(counterclockwise).
Remove all food and close appliance door
After the cooking compartment has cooled
down, the appliance prompts the user to
remove all food and close the appliance door.
The appliance waits
At the same time, the appliance will emit an
acoustic signal and the progress indicator will
change color to yellow.
Step 4
Operating instructions 76
1st cleaning stage
Immediately after the appliance door is
closed, the cleaning sequence’s 1st cleaning
stage (soaking stage) starts.
Automatic cleaning sequence
At the same time, the appliance will show the
remaining cleaning time. The progress
indicator will show the corresponding progress
by lighting up the progress bars with a red
light (clockwise).
Page 77

8 Cleaning with easyTouch
Step 5
Step 6
Step 7
The appliance prompts the user to spray
cleaning agent inside
After cleaning, the appliance prompts the user
to spray cleaning agent into the cooking
compartment.
The appliance waits
At the same time, the appliance will emit an
acoustic signal as long as the appliance door
is open and the progress indicator will change
color to yellow.
2nd cleaning stage
After the appliance door is closed, the 2nd
cleaning stage will start (actual cleaning
stage).
At the same time, the appliance will show the
remaining cleaning time. The progress
indicator will show the corresponding progress
by lighting up the progress bars with a red
light (clockwise).
The appliance prompts the user to rinse the
cooking compartment with water
After cleaning, the appliance prompts the user
to rinse the cooking compartment.
Step 8
The appliance waits
At the same time, the appliance will emit an
acoustic signal as long as the appliance door
is open and the progress indicator will change
color to yellow.
The cleaning process ends
After the appliance door is closed, the
appliance will show a message indicating the
cleaning sequence is done.
The appliance prompts the user to confirm
At the same time, the appliance will emit an
acoustic signal lasting 60 seconds and the
prompt asking the user to confirm will be
shown. The progress indicator will change
color to green.
Operating instructions 77
Page 78

9 Configuring Settings in easyTouch
9 Configuring Settings in easyTouch
Purpose of this section
This section provides step-by-step instructions for the most important tasks involved in the use of
easyTouch’s settings.
Please note that some of the settings screens are password-protected.
For more detailed information, please consult the on-screen help pages.
Contents
This section covers the following subjects:
Setting a language 79
Setting a date and time 80
Importing Cookbooks 81
Selecting a Cookbook 82
Page
Operating instructions 78
Page 79

9 Configuring Settings in easyTouch
9.1 Setting a language
Setting a language
1.
2.
3.
4.
5.
Press the “Settings” button while on the main
screen, for example
In the “Settings” screen, press the “Languages”
button.
In the “Languages” screen, select the language you
want.
Confirm your selections.
Confirm that you want the new language to be
applied.
Result: The language setting will be applied.
Operating instructions 79
Page 80

9 Configuring Settings in easyTouch
9.2 Setting a date and time
Setting a date and time
1.
2.
3.
4.
5.
Press the “Settings” button while on the main
screen, for example
In the “Settings” screen, press the “Date/Time”
button.
In the “Date/Time” screen, select the date you
want.
Press the “Enter time” button.
Enter the current time on the “Time” screen.
6.
Confirm your selections.
Result: The date and time settings will be applied.
Operating instructions 80
Page 81

9 Configuring Settings in easyTouch
9.3 Importing Cookbooks
Prerequisites
You must have a USB flash drive containing cookbook data.
Importing Cookbooks
1.
2.
3.
4.
5.
Press the “Settings” button while on the main
screen, for example
In the “Settings” screen, press the “Import/Export”
button.
Plug in the USB stick.
In the “Import/Export” screen, press the “Import
cookbook” button.
Confirm the import.
Operating instructions 81
Result: The cookbook will be imported from the
USB flash drive.
Page 82

9 Configuring Settings in easyTouch
9.4 Selecting a Cookbook
Prerequisites
You must have imported a cookbook.
Selecting a Cookbook
1.
2.
3.
4.
5.
Press the “Settings” button while on the main
screen, for example
In the “Settings” screen, press the “Cookbook”
button.
In the “Cookbook” screen, select the cookbook you
want.
Confirm your selections.
Confirm that you want the cookbook you just
selected to be used.
Result: You will now be able to select the
cookbook’s cooking profiles on the “Cookbook”
screen.
Operating instructions 82
Page 83

Page 84

CONVOTHERM ELEKTROGERÄTE GMBH, OVENS & ADVA NCED COOKING EMEA, MANITOWO C FOODSERVIC
E,
14
WWW.CONVOTHERM.COM, WWW.MANITOWOCFOODSERVICE.COM
TALSTR ASSE 35, 82436 EGLFING | GERMANY, T +49
8847 6 0, F +49 8847 4
Combi Steamer
Convotherm 4 easyTouch
Serial No.
Item no.
Order No.
Manitowoc Foodservice is a global company dedicated to bringing value to foodservice operators by equipping
them with highly individualized real-world answers that enhance menus, service, prots, and eciency.
To learn how Manitowoc Foodservice and its leading brands can equip you, visit our global web
site at www.manitowocfoodservice.com then nd the regional or local resources available to you.
© 2014 Manitowoc Foodservice Inc. unless otherwise indicated. All rights reserved.
9761726_02 ENG 11/14
 Loading...