


ENGLISH
User and Service Manual
Rodeo
Lightweight Tilt-In-Space Wheelchair
READ INSTRUCTIONS BEFORE USING
SAVE THIS BOOK FOR FUTURE REFERENCE

Customer Service Support
Toll Free: 1-844-US-Mobility (844-876-6245)
Phone: (310) 618-0111
Fax: (310) 618-8811
Email: sales@convaid.com
International Email: international@convaid.com
Website: www.convaid.com
Technical assistance or repair information hours are:
Monday-Friday, 6 a.m. to 4:30 p.m. PST
Before Calling:
Please fill in the following. Customer Service will be able to help you more quickly if the information indicated below is readily available.
Serial number of chair:__________________________________________
Model of chair:_________________________________________________
Date purchased:________________________________________________
Notice:
The information contained in this document is subject to change without notice.
No part of this document may be photocopied, reproduced, transmitted, transcribed, stored in a retrieval system or translated to another language or computer language, in any form or by any means, electronic, mechanical, magnetic, optical, chemical, manual or otherwise without the prior written consent of Convaid.
Use only Convaid accessories and parts on Convaid products. Convaid parts are not interchangeable with other manufacturers’ products. Replace any work parts immediately.
© Copyright 2019 by Convaid. All rights reserved.
i

Table of Contents
Product Overview |
|
Definition of Symbols…………………………………………………………………………... |
1 |
Warnings…………………………………………………………………………………………….. |
3 |
Rodeo With Seating Overview……………………………………….………………………. |
6 |
Rodeo Without Seating Overview…………………………………..……………………… |
7 |
Specifications……………………………………….....……………………...…………………. |
8 |
Setting Up |
|
Contents in the Box……………………………………………………………………………… |
9 |
How To Remove Chair from Box……………………………………...…………………….. |
9 |
Preparing the Chair for Use………………………………………………………………….. |
9 |
Tools Required……………………………………………..……………………………………… |
9 |
Push Handle Adjustment ……………………………………………….…………………….. |
10 |
Wheel Lock Operation………………………………………………......…………………….. |
10 |
Unfolding the Chair……………………………………………………………………………… |
11 |
Folding the Chair………………………………………………………….……………………… |
12 |
Fitting Guide |
|
Seat Back Height…………………………….........................................……………….. |
14 |
Seat Width…………………………………............................................…………………. |
14 |
Seat Depth……………………………………........................................………………….. |
15 |
Seat Depth Adjustment Without Seating…………………………......……………….. |
15 |
Seat Depth Adjustment With Seating………………………………....………………… |
16 |
Tilt Adjustment……………………………………………......................…………………… |
16 |
Recline Function……………………………………………....................…………………… |
17 |
Fabric Removal……………………………………………………...........…………………….. |
18 |
Seat Upholstery Attachment………………………………………………………………… |
19 |
Pelvic Positioning Belt…………………………………………….........……………………. |
19 |
Two-Point Positioning Belt……………………………………………..…………………….. |
19 |
Three-Point Positioning Belt…………………………………………………………………. |
20 |
H-Harness with Padded Covers………………...................................……………….. |
20 |
Footplate Adjustment…………….......................................................……………… |
21 |
Individual Footplates……………………………………………………..…………………….. |
22 |
Footbox Cover…………………………………………………….............…………………….. |
23 |
Wheels |
|
Specifications…………………………………….....................................………………… |
24 |
Rear Tire Removal……………………………………………………….....…………………… |
24 |
Rear Tire Installation……………………………………………………….…………………... |
25 |
Anti-Shimmy…………………………………………………………….......…………………….. |
25 |
Accessories |
|
Heavy Duty Under Storage Basket….…………………………………...………………… |
26 |
Full Torso Swing-Away Support Vest….………………………………...………………… |
26 |
Adjustable Firm Trunk Support….………………………………............……………….. |
27 |
Headrest Extension………………………………………..........................……………….. |
28 |
Padded Headwing………………………………………………………………………………... |
28 |
ii

Occi Headwing………………………………………..................................……………… |
29 |
Adjustable Canopy…………………………………..................................…………….. |
30 |
Oxygen Tank Bag…………………………………………………………....…………………. |
30 |
Elevating Leg Rest…………………………………………………………..…………………. |
31 |
Medial Thigh Support (Abductor)………………………………………...………………. |
31 |
Lateral Thigh Support (Adductor)………………………………………...………………. |
32 |
Anti-Tip Tubes.........................................................................................……….. |
32 |
Curb Tipper.........................................................................................………...... |
33 |
Caster Locks……………………………………………………………….....…………………. |
34 |
Utility Bag…………………………………………………………………......…………………. |
34 |
Shoe Holders………………………………………………………………....………………….. |
34 |
Optional Attendant Hand Brake……………………………………….......…………….. |
35 |
Upper Extremity Support Surface (Tray)………………………………....……………. |
36 |
Calf Panel………………………………………………………………….......…………………. |
36 |
Height Adjustable Flip-Up Armrests……………………………………….……………. |
37 |
Solid & Mesh Side Panels………………………………………..................…………… |
37 |
Seat Cushions………………………………………………………………….………………… |
38 |
Fitting…………………………………………………………………...............……………….. |
39 |
Caution………………………………………………………………….............……………….. |
39 |
Transit Models |
|
Transit Option…………………………………………………………….........……………….. |
40 |
Transit Mode Instructions……………………………………......................…………... |
41 |
Recommended Clear Zones in Vehicle……………………………...........………….. |
43 |
Providing Clear Space & Padding…………………………………….........…………… |
43 |
Proper Use of Equipment……………………………………......................……………. |
44 |
Restraining the Wheelchair Occupant ……………………………...........………….. |
47 |
Using Postural Belts & Supports……………………………………..........…………… |
48 |
Trays & Other Wheelchair Components……………………………..........………….. |
49 |
WTORS Manufacturers………………………………………………............…………….. |
49 |
Important Information |
|
Maintenance, Operating & Safety Instructions……………….............………….. |
50 |
Warranty……………………………………………………………..……………………..……….Back Cover
iii
CONVAID USER’S GUIDE
READ BEFORE USE
Read the user’s guide completely before use and fully understand its content. Familiarize yourself with the handling and functions of the product before use and practice them. Any caregiver that is going to operate this chair should also read the user’s guide in full.
You are responsible for the safety of the user. The safety of the user could be affected if you do not follow the instructions in this user’s guide. Nevertheless, not all possible circumstances and
unpredictable situations can be covered by this user’s guide. Reason, care, and circumspection are not features of the product; they are required of persons who use the product. If instructions are not clear and further explanation is necessary, please contact your Convaid provider. If you do not follow all instructions and warnings, damage to the chair or serious injury may occur. The latest version of all instructions and product safety notices are available on the Convaid website www.convaid.com and can be printed in larger sizes. Additional video instructions are also available for reference purposes.
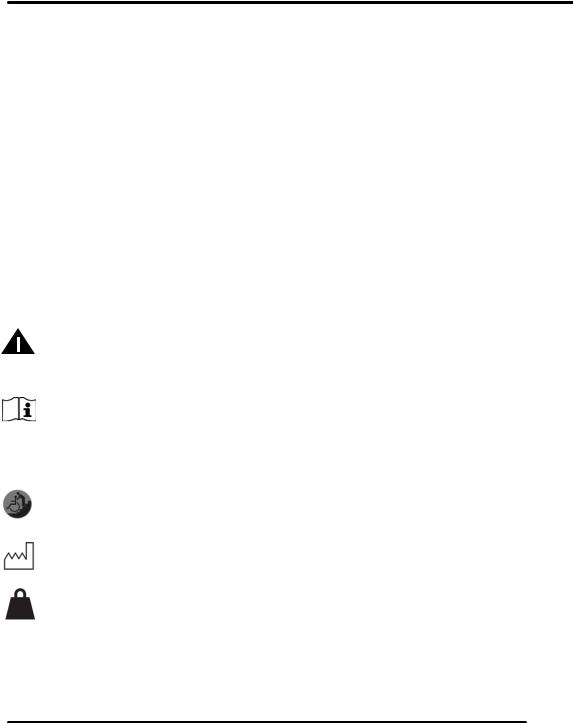
DEFINITION OF SYMBOLS
WARNING!
The word “WARNING” and/or the symbol shown above indicates practices that are unsafe or dangerous and could result in serious injury or death to the occupant of this chair or others.
WARNING! READ USER’S GUIDE!
Additional symbols are defined throughout this user’s guide along with operating instructions.
 This symbol indicates potential finger entrapment.
This symbol indicates correct lifting points for safe moving and handling.
This symbol indicates manufactured date.
This symbol indicates maximum user's weight.
1

CONVAID USER’S GUIDE
This symbol indicates a wheelchair which cannot be used in motor vehicle as vehicle seat. This wheelchair does not comply with WC19 (RESNA WC-4:2012 or ISO7176-19:2008) and cannot be used as a vehicle seat to transport the user in a vehicle.
This symbol indicates a wheelchair which can be used in motor vehicle as a vehicle seat. This wheelchair complies with WC19 (RESNA WC-4:2012 and ISO7176-19:2008) and can be used as a vehicle seat to transport the user in a vehicle.
This symbol indicates the position of an anchor point when using a 4 -point tiedown system (WTORS) during transit.
CHOOSE THE RIGHT CHAIR & SAFETY OPTIONS
There are several options available to meet the needs of the wheelchair user. Make sure that your (and your health care provider’s) choice of chair and other added options takes into account the user’s comfort, positioning, physical limitations, and hazards that may be encountered during daily use. Operating the manual wheelchair outside of the recommendations provided by the manufacturer can lead to a dangerous situation.
The wheelchair is not suitable for jogging, running, skating or similar activities. Swiveling front wheels tend to wobble at higher speeds and can cause a sudden stop, and the wheelchair can tip over. Use the wheelchair only at regular walking speed. Under no circumstance should you let go of the push handle while pushing.
The durability of this product is five years when it is used with proper care and maintenance according to the user’s guide.
2

CONVAID USER’S GUIDE
General Warnings
WARNING: The operator/caregiver must read and understand this user’s guide prior to operating this equipment. If you are unable to understand any part of the user’s guide, contact your supplier for assistance.
WARNING: The weight carried by the Rodeo chair must never exceed the total weight capacity of maximum occupant size plus any items carried. When using the chair in transit, all accessories must be removed from the chair and secured separately.
WARNING: To reduce the risk of an accident:
•ALWAYS carefully read the User’s Guide and become comfortable with operating the chair.
•ALWAYS watch for obstacles and avoid them as often as possible.
•MAKE SURE that the chair operates properly. Repair any problems before use.
•ALWAYS verify that the quick release axles are locked so that the back wheels do not come off.
•ALWAYS secure the user into the chair during use.
WARNING: Positioning belts should never be used as a safety restraint device in a motor vehicle when transporting chair with occupant. An additional WC19 compliant automotive type seat belt is required when the chair is used in transport vehicles.
WARNING: Changes & Adjustments
Adjustments made to the chair will change the balance and function of the chair and may increase risk of tip over. Consult your Convaid Service Dealer before making adjustments. Warranty will be voided if modifications that change the structure of frame of the chair are made without manufacturer’s authorization.
 WARNING: The chair should only be used on flat, firm terrain.
3

CONVAID USER’S GUIDE
WARNING: Do not go up or down stairs without the assistance of another person or with user in the chair. If devices such as ramps or elevators are available, please use them. If they are not available, then the chair should be carried over the obstacle by two people without the user in the chair.
WARNING: Pay particular attention when on slopes and inclines to prevent:
• The user from falling out of the chair.
•The chair from tipping over.
•The chair from rolling away.
WARNING: Accessories that can be removed without any tools will not cause adverse effects on the chair.
WARNING: Before removing the user from the chair and before returning the user to it, always engage the wheel lock. Never remove or place user without engaging the wheel lock.
WARNING: Never leave the user unattended in the chair even when they are strapped in and the wheel locks are engaged.
WARNING: Do not stand on the foot support when getting into or out of the chair.
WARNING: When the user reaches for objects in front, to the side, or behind the chair, be sure that they do not lean out of the chair too far since the shift in the center of gravity might cause the chair to tilt or tip over.
WARNING: Please keep packaging material away from children. Plastic packaging presents the danger of suffocation.
WARNING: The chair is only intended to carry one user at a time. Do not carry more than one user at a time.
WARNING: Whenever you change a setting on the chair, make sure that you firmly tighten any screws or knobs that have been loosened prior to placing the user in the chair.
4

CONVAID USER’S GUIDE
WARNING: Motor vehicle safety – The seating module is not designed, tested or intended to be used as a car seat. Never use the seating module as a car seat. Transfer the user from the chair to an approved motor vehicle adaptive car seat. If your chair is equipped with the transit option, refer to the transit section in this user’s guide regarding use of this chair for transit.
 WARNING: Never use this chair on an escalator because the chair may tip over.
WARNING: Many of the screws, bolts, and nuts used on this chair are specialized or high-strength fasteners. Only use fasteners purchased through Convaid or a Convaid service dealer.
WARNING: Do not use the chair unless it has proper tire pressure. (Front 36 psi/Rear 30 psi, 248kPa/200kPa, 2.5BAR/2.0BAR) Do not overinflate the tires.
Failure to follow these instructions may cause the tire to explode and cause harm. Tire size and maximum pressure as listed on the wheels.
WARNING: The chair could lose its flame-resistant characteristics when using aftermarket seating or cushion.
WARNING: Do not leave/store the chair in direct sun/heat over a long period of time. Check the temperature of the chair prior to usage.
WARNING: Always properly secure the Rodeo in a safe location when transporting as cargo.
5
CONVAID USER’S GUIDE
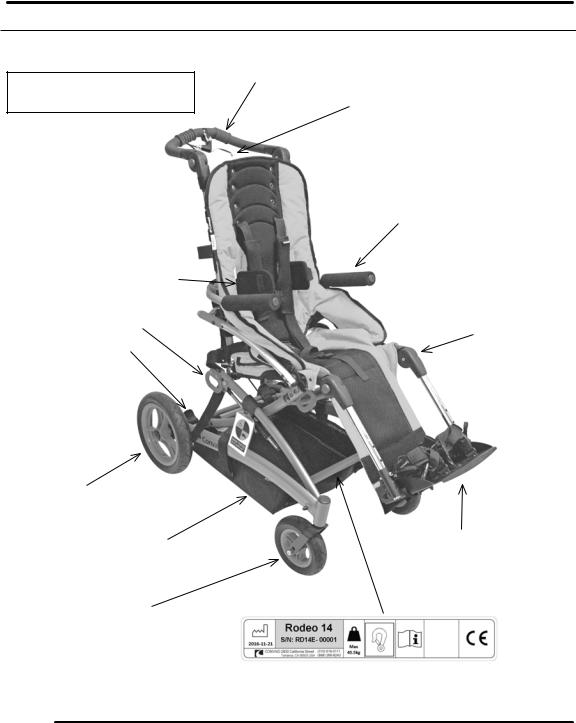
Rodeo With Seating Overview
Chair Warning Label
Never leave occupant unattended. Failure to read and follow user guide instructions could result in serious injury. To obtain a replacement user’s guide email sales@convaid.com or call 844-876-6245.
Swing Away Laterals (Option)
Transit Anchor (Option)
Single Foot Activated
Wheel Lock Bar
One Piece Height Adjustable Push Handle
Tilt Adjustment Lever
Height Adjustable Flip-Up Armrest (Option)
Elevating Leg Rest
290 mm x 60 mm Rear Solid Wheels
Medical Necessity Storage Basket (Option) |
One Piece Angle |
||
Adjustable Footplate |
|||
|
|
||
190 mm x 51 mm |
Serial Number Label |
|
|
Front Solid Wheels |
|
|
|
Fig. 1
6
CONVAID USER’S GUIDE
Rodeo Without Seating Overview
Chair Warning Label
Never leave occupant unattended. Failure to read and follow user guide instructions could result in serious injury. To obtain a replacement user’s guide email sales@convaid.com or call 844-876-6245.
Tilt Adjustment Lever
One Piece Height Adjustable Push Handle
Back Canes
Depth Adjustable Solid Seat Pan (Option)
Recline Release Strap
290 mm x 60 mm |
|
Rear Solid Wheels |
One Piece Angle Adjustable Footplate |
190 mm x 51 mm |
Serial Number Label |
Front Solid Wheels |
|
|
Fig. 2 |
7

CONVAID USER’S GUIDE
RODEO SPECIFICATIONS (Millimeters)
Model Size |
RD 12 |
RD 14 |
RD 16 |
|
Seat Width |
305 |
356 |
406 |
|
Seat Depth |
229 - 356 |
279 |
- 406 |
330 - 457 |
Seat Depth (without seating) |
229 - 356 |
279 |
- 406 |
330 - 457 |
Seat Back Height |
559 |
610 |
|
635 |
Seat to Footplate |
229 - 356 |
279 |
- 406 |
305 - 457 |
Seat to Floor Height |
533 |
559 |
559 |
|
Recline Adjustment |
90° or 110° |
90° or 110° |
90° or 110° |
|
Tilt Adjustment |
5 - 45° |
5 - 45° |
5 - 45° |
|
Overall Height |
1092 |
1118 |
1143 |
|
Overall Length |
889 |
889 |
914 |
|
Overall Width |
584 |
635 |
686 |
|
Maximum Slope for use |
11° |
11° |
|
11° |
of parking brakes |
|
|
|
|
Pivot Width |
1346 |
1372 |
1410 |
|
Folded Length |
864 |
864 |
1016 |
|
Folded Width |
584 |
635 |
686 |
|
Folded Height |
432 |
457 |
|
457 |
Armrest Height |
121 - 178 |
165 - 222 |
165 - 222 |
|
Headrest Extension |
203 |
203 |
203 |
|
Shoulder Strap Height |
381 - 533 |
406 - 559 |
457 - 610 |
|
Weight Capacity Regular |
34 kg |
45.5 kg |
77 kg |
|
Weight Capacity Transit |
30 kg |
45.5 kg |
75 kg |
|
Weight of Chair |
15 kg |
17 kg |
18 kg |
|
Push Handle Adjustment |
813 - 1232 |
737 |
- 1320 |
927 - 1359 |
Material (Mobility Base) |
Steel / Aluminum |
|
|
|
Material (Plastic Parts) |
Fiber glass strengthened polyamide |
|||
Material (Cushion) |
Fire-resistance foam* |
|
||
Material (Fabrics) |
Fire-resistance nylon, polyester* |
|
||
*Resistance to ignition of upholstered parts complies to BS-EN 1021-1 and -2
8

CONVAID USER’S GUIDE
Chair Set Up & Adjustment
Contents in the Box
List of items included in the box:
•Mobility base and seating module
•Set (pair) of rear wheels
•User’s Guide
•Accessories as ordered
•5/32” Allen wrench
How to Remove Chair from Box
1.Place box flat on the floor.
2.Verify that package is in good shape and that no damage has occurred during shipping.
3.Remove the chair from the packaging material.
4.Check to make sure that your order is complete.
Preparing the Chair for Use
Once you have all components as ordered, the directions for use in this User’s Guide will guide you through the process of preparing the chair for use.
Convaid recommends the initial fitting, adjustments, and setup take place with the help of your
Convaid Representative and/or Convaid Service Dealer. However, if the instructions contained in this user’s guide are followed carefully, a caregiver or attendant will be able to set up and assemble the chair.
Tools Required
•5/32” Allen wrench
•7/16” Wrench
•3/8” Wrench
•Phillips Screwdriver
9
CONVAID USER’S GUIDE
Setting Up
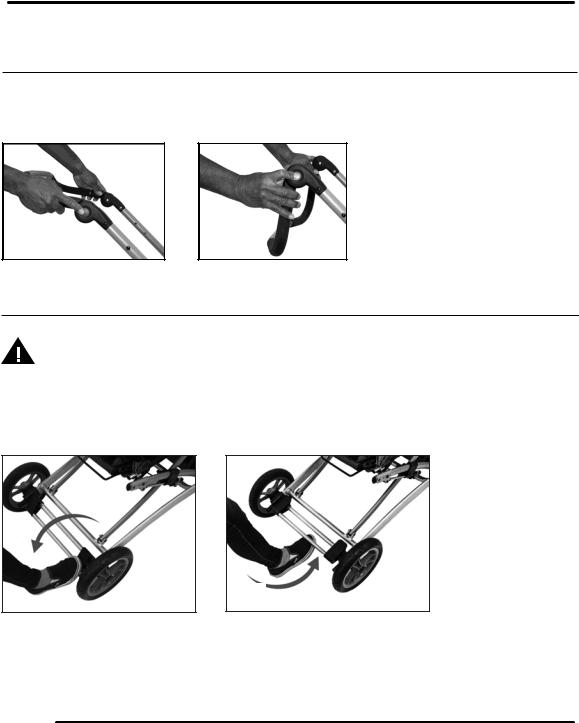
Push Handle Adjustment
1.Press both gray buttons on the outside of the pivot joints of the push handle simultaneously. Fig. 3
2.While holding the buttons down, move the push handle up or down to the desired position. Fig. 4
3.Release the gray buttons on the push handle.
Fig. 3 |
Fig. 4 |
Wheel Lock Operation
WARNING: Improper use may cause premature brake failure, which could damage wheel lock. Never use excessive force. This could damage the quick release plunger pins and the wheels could fall off and cause injury.
1.Lock the wheels by pushing the wheel lock bar downward. Fig. 5
2.Disengage the wheel lock by pulling the wheel lock bar upwards with the top of your foot. Fig. 6
DOWN UP
Fig. 5 Locking |
Fig. 6 Unlocking |
10

CONVAID USER’S GUIDE
Unfolding the Chair
1.Lay chair down with seat facing upward. Fig. 7
2.Unbuckle closure strap. Fig. 8
3.Push in gray buttons on leg rest extensions and swing them out and upward until parallel with the ground. Fig. 9 & 10
4.Open folded footplate and attach calf support to footplate with Velcro®. Fig 11
Fig. 8 |
Fig. 9 |
Fig. 7
Fig. 10 |
Fig. 11 |
5.Apply wheel lock. Fig. 12
6.Push in gray buttons on push handle, and lift upward until handle is at a 90-degree angle with the chair. Fig. 13
7.Place foot on the caster tube and push against back tubes using both hands. Make sure the safety lock clicks into place by visual inspection on both sides. Fig. 14 & 15
WARNING: Make sure the safety lock clicks into place. Two clicks will be heard. Fig. 14
Fig. 12 |
Fig. 13 |
Fig. 14 |
Fig. 15 |
WARNING: Look to see that safety lock pins are visible and fully exposed on both sides. (Fig. 15)
11
CONVAID USER’S GUIDE
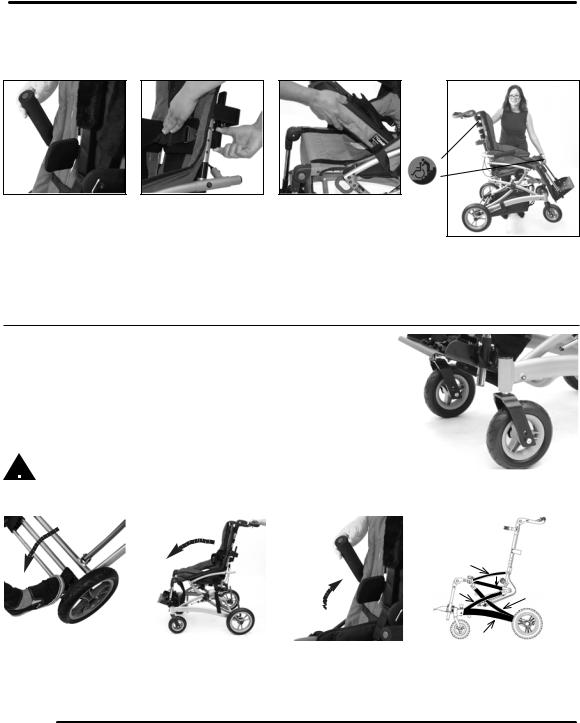
8.Adjust push handle and footplate into desired position.
9.If applicable, lower armrests, unfold lateral trunk supports and place seat cushion onto seat upholstery. Fig. 16, 17 & 18
Fig. 16 |
Fig. 17 |
Fig. 18 |
How to lift chair when unfolded:
Fig. 19
With one hand, hold leg rest tube; with the other, hold the back crossbar. Fig. 19
Folding the Chair
1. |
|
Before folding, front wheels of chair should be in a |
|
|
|
|
||||
|
|
|
|
|||||||
|
|
forward facing position. Fig. 20 |
|
|
|
|
||||
2. |
|
Apply wheel lock by pushing wheel lock bar downwards. |
|
|
|
|
||||
|
|
Fig. 21 |
|
|
|
|
||||
3. |
|
Position chair in a full upright position (not tilted or |
|
|
|
|
||||
|
|
reclined). Fig. 22 |
|
|
|
|
||||
|
|
WARNING: Keep fingers free of folding |
|
|
|
|
||||
|
|
|
|
|
|
|||||
|
|
mechanism. |
Fig. 20 |
|||||||
|
|
|||||||||
|
|
|
|
|
|
|
|
|
|
|
|
|
|
|
|
|
|
|
|
|
|
Fig. 21 Fig. 22 Fig. 23 Fig. 24 Note: Shaded
If applicable, flip up armrest, fold lateral trunk supports and remove seat |
areas indicate |
|
moving parts |
||
cushion. Fig. 23, 24, 25, 26 & 27 |
||
|
12

CONVAID USER’S GUIDE
|
|
|
|
|
Fig. 25 |
Fig. 26 |
|
Fig. 27 |
|
4.Push in gray buttons on leg rest extensions, swing them upward until parallel with the ground. (Fig. 28) Detach the calf panel and fold up footplate. Fig. 29
5.To disengage safety lock, grasp red levers and simultaneously squeeze them together with one hand. With the other hand hold top of push handle pulling towards you. Fig. 30 & 31
6.Push chair downward into the folded position. Fig. 32
7.Push in gray buttons on the push handle, and rotate handle back on to chair. Fig. 33
8.Secure closure strap to hold the chair in the folded position. Fig. 34
9.Push in gray buttons on leg rest, and rotate leg rest under chair. Fig. 35
10.With a straight back, bend knees and lift chair as shown in photo. Fig. 36
|
|
|
|
|
|
|
|
|
|
|
|
|
|
|
|
|
|
|
|
|
|
Fig. 28 |
|
Fig. 29 |
|
Fig. 30 |
||||||
|
|
|
|
|
|
|
|
|
|
|
Fig. 31 |
Fig. 32 |
Fig. 33 |
Fig. 34 |
Fig. 35 |
Fig. 36 |
WARNING: Apply lubricant to safety lock as needed.
13
CONVAID USER’S GUIDE
Fitting Guide
Correct seating and positioning encourages good posture, which in turn aids circulation, breathing and digestion.
Please take the time to properly adjust the chair to fit the user. If the user is not correctly positioned, check the accessories section of this user’s guide to see if one or more of our accessories would help to facilitate posture or consult a physical therapist.
Improper seating can cause problems. Please consult a physical therapist or doctor for additional guidance.
When properly fitted, Convaid chairs will provide years of comfortable use. As the user grows, refer back to this Fitting Guide to adjust the dimensions of the chair.
Seat Back Height
Seat back height
Fig. 37
The back height varies according to chair size. Headrest extensions are available when extra height is needed to support the head.
To determine the back height, measure from the seat to the upper part of the head. Fig. 37
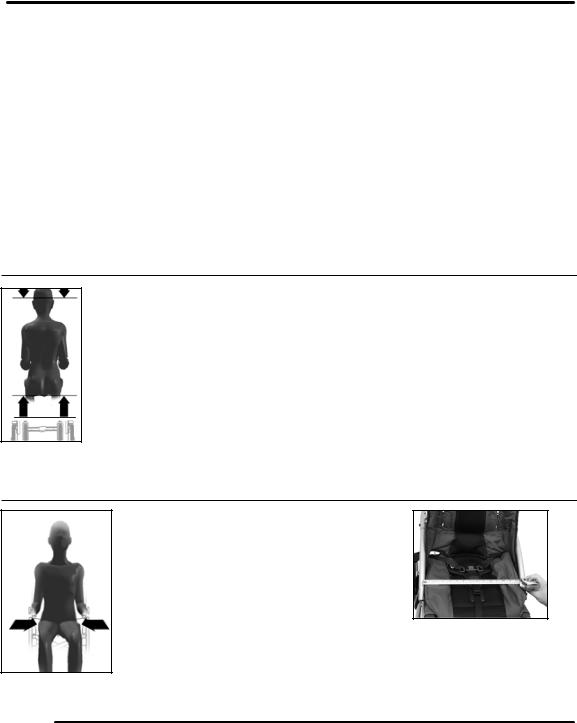
Seat Width
Proper seat width enables the user to sit comfortably and prevents problems from developing. While user is seated on a flat surface, measure from hip to hip. Fig. 38
The user should have enough room to prevent hips and thighs from rubbing against the frame. However, the chair should not be too wide or the user will slide around and posture could be affected.
Fig. 38
Fig. 39
Seat width is measured from the inside edge of the seat frame. Fig. 39
14
 Loading...