

Page 1
ControlBright
Welcome to ControlBright!
The ControlBright platform is the world's leading cloud controlled accent lighting solution. Effortlessly manage ANY DMX RGBW, RGB and Single
Color LED fixtures through a centralized web-based interface. Instantly manage thousands of locations with the click of a button.
ControlBright Portal
1. How-To's
2. Logging In
3. Dashboard
4. Locations
5. Device Management
a. Devices
b. Device Groups
6. Fixture Management
a. Fixtures
b. Fixture Groups
7. Scene Management
a. My Scenes
b. Schedule
ControlBright Portal
Here is helpful information, howto's, and user guides for the ControlBright Portal
1. How-To's
2. Logging In
3. Dashboard
4. Locations
5. Device Management
a. Devices
b. Device Groups
6. Fixture Management
a. Fixtures
b. Fixture Groups
7. Scene Management
a. My Scenes
b. Schedule
1. How-To's
Page 2
2. Logging In
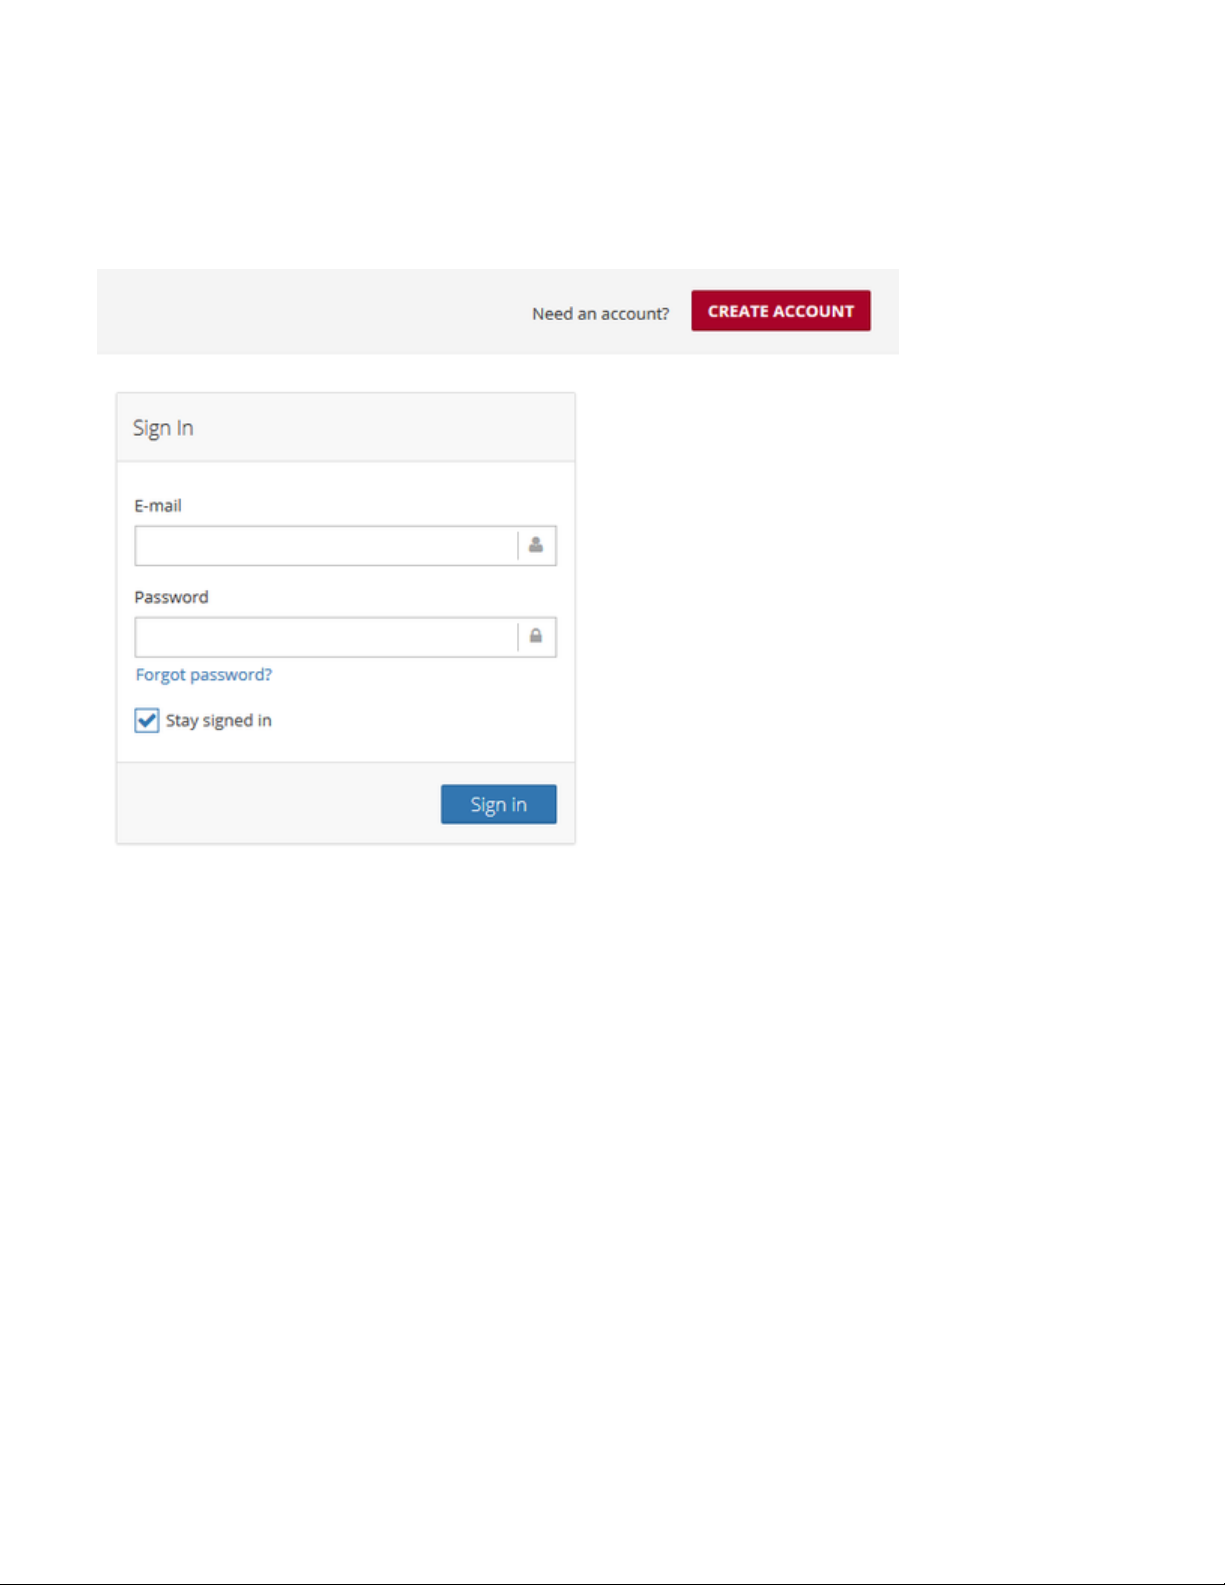
To log in, simply enter your email address or password. If you do not have an account setup, please use the Create Account button.
3. Dashboard
Once logged in, the dashboard displays a birds eye view of device locations, the current calendar displaying scheduled lighting events, as well as
the main navigation for the portal.
Page 3
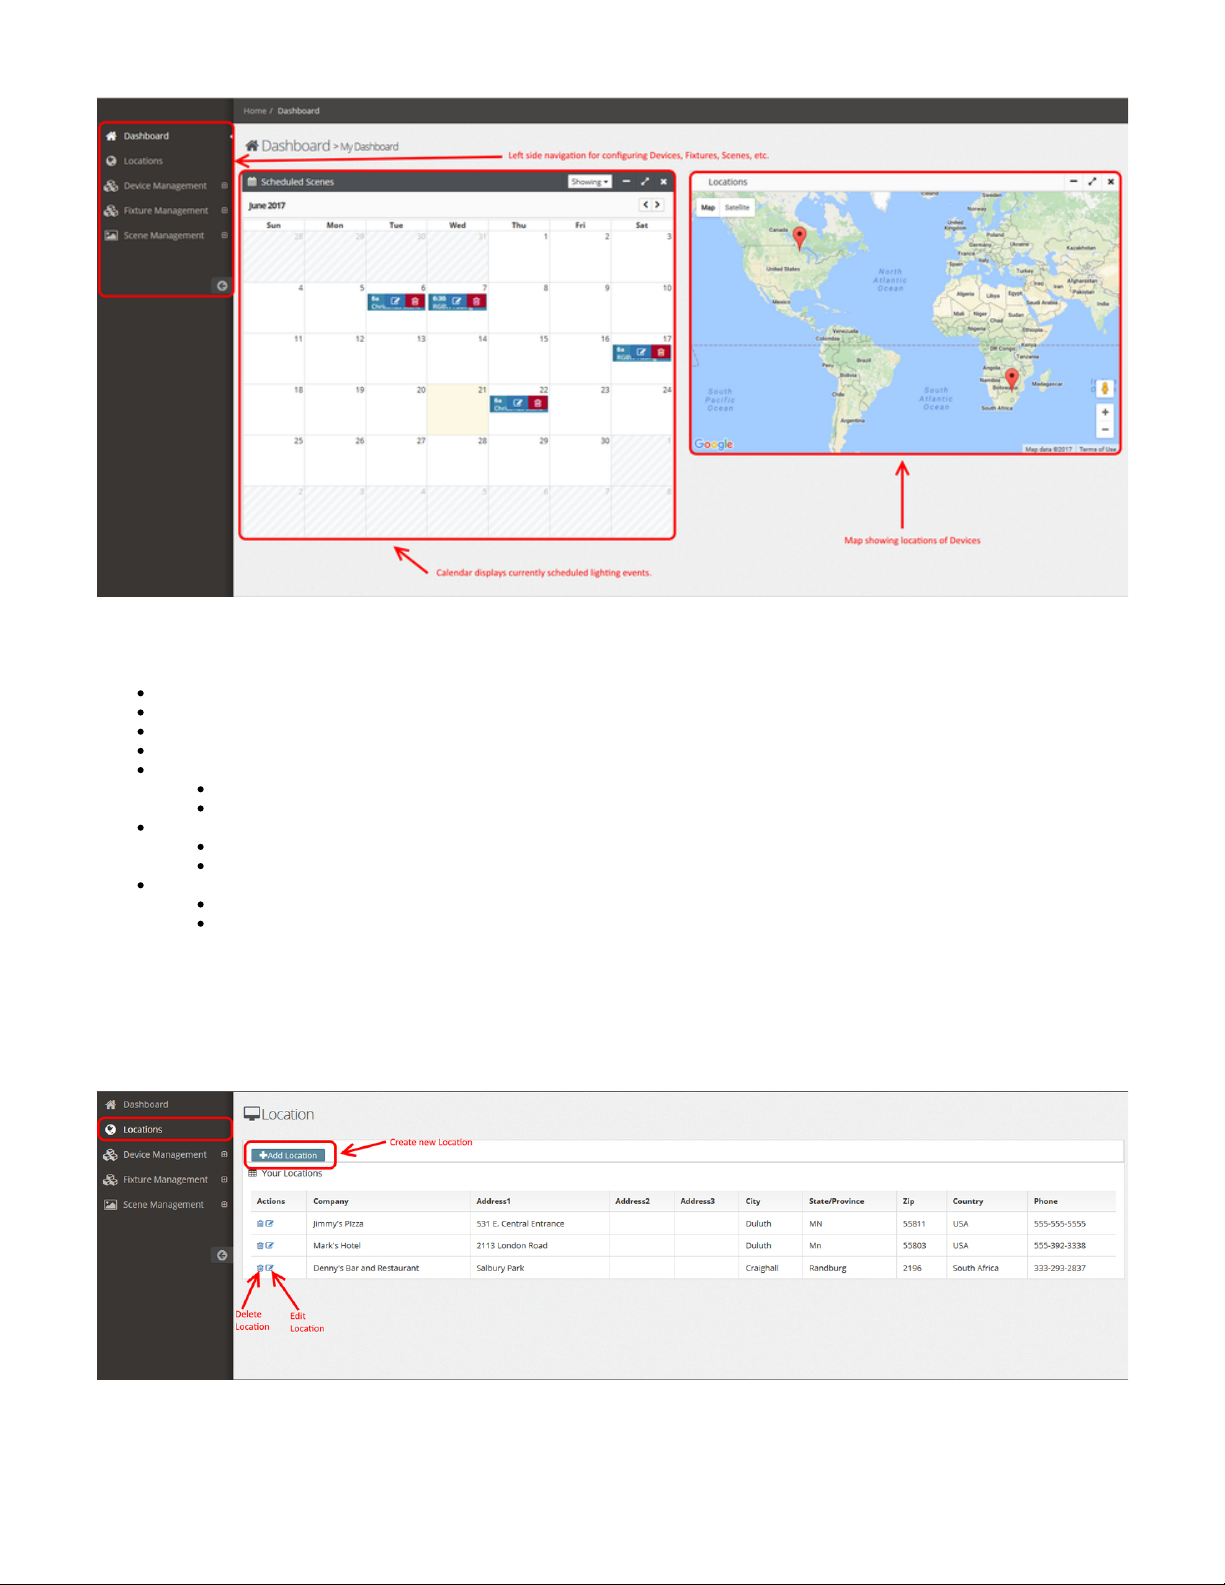
The left navigation is broken down as follows:
1. How-To's
2. Logging In
3. Dashboard
4. Locations
5. Device Management
a. Devices
b. Device Groups
6. Fixture Management
a. Fixtures
b. Fixture Groups
7. Scene Management
a. My Scenes
b. Schedule
4. Locations
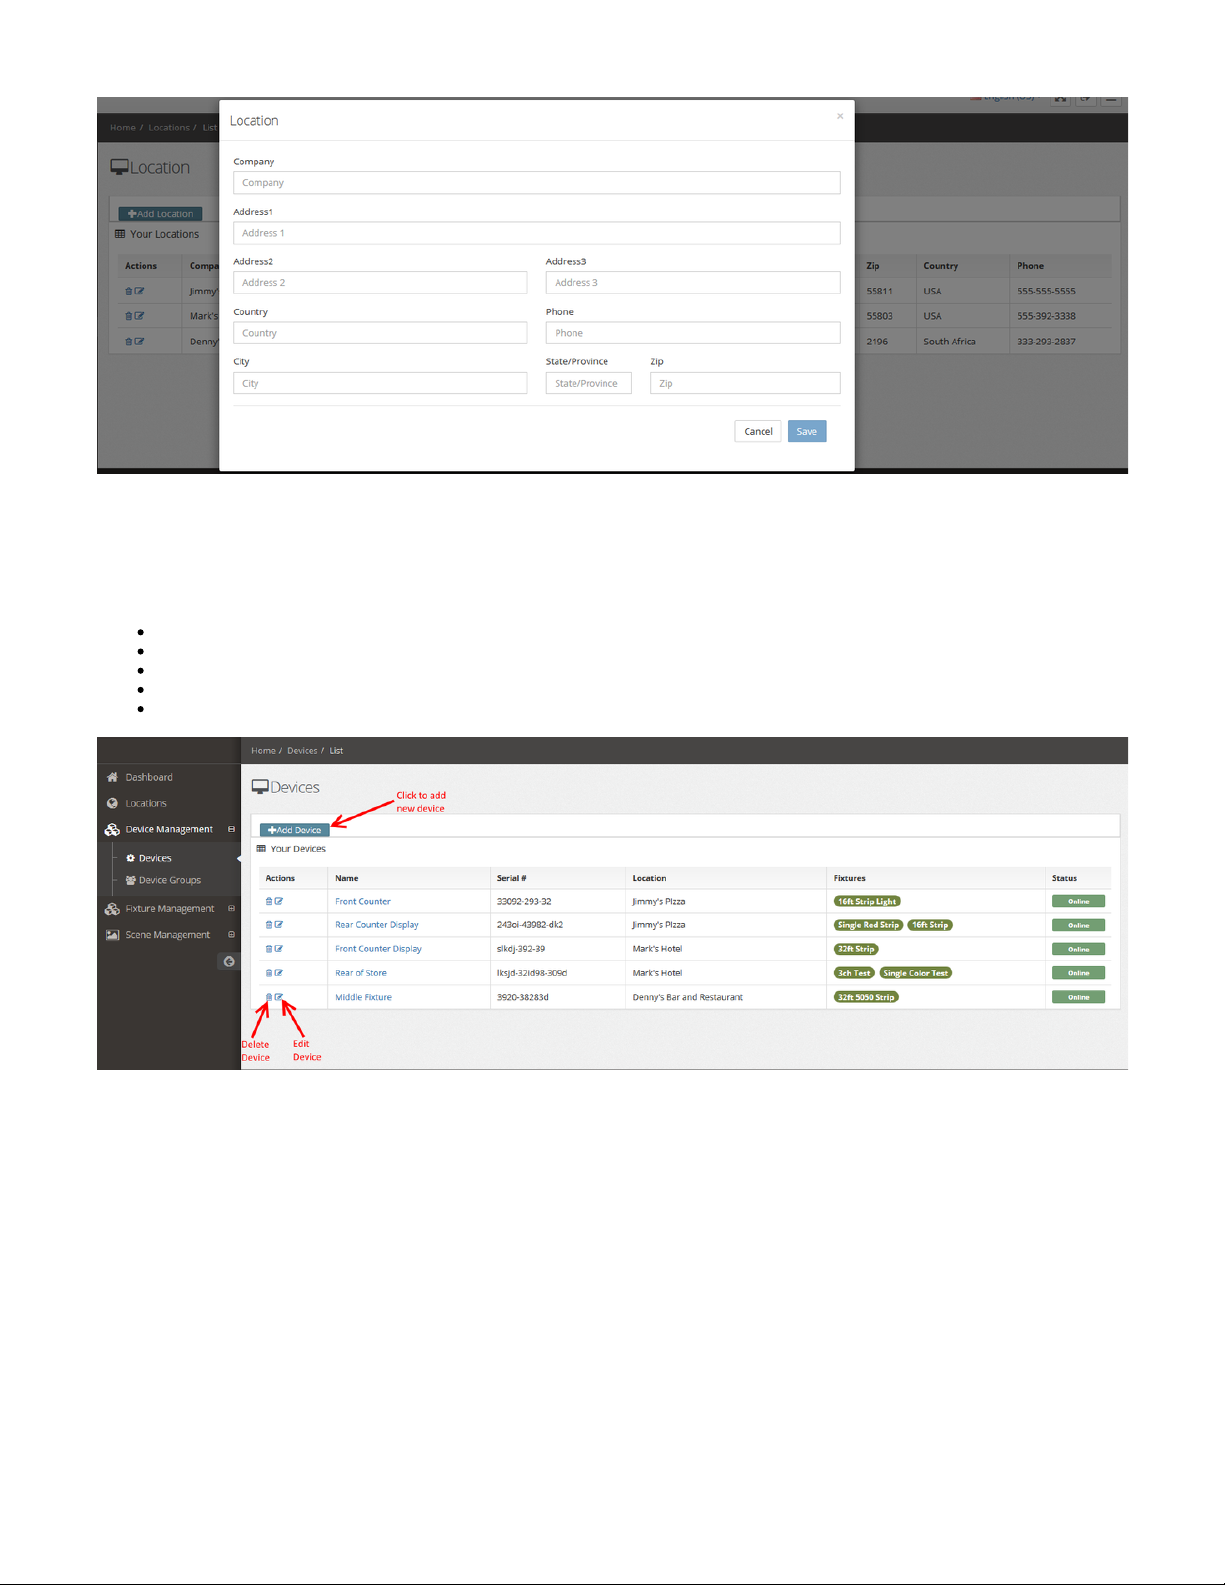
The Locations feature is used to manage the physical location of ControlBright Devices. For example, you may have a small chain of restaurants,
each with 4 ControlBright Light Engines per location. By assigning physical locations to these devices, you can easily track (via name or serial
number), which location has which device(s).
When clicking "Add Location", a modal box will pop up allowing you to complete Name, Address, Phone Number, etc. information for the location:
Page 4
5. Device Management
a. Devices
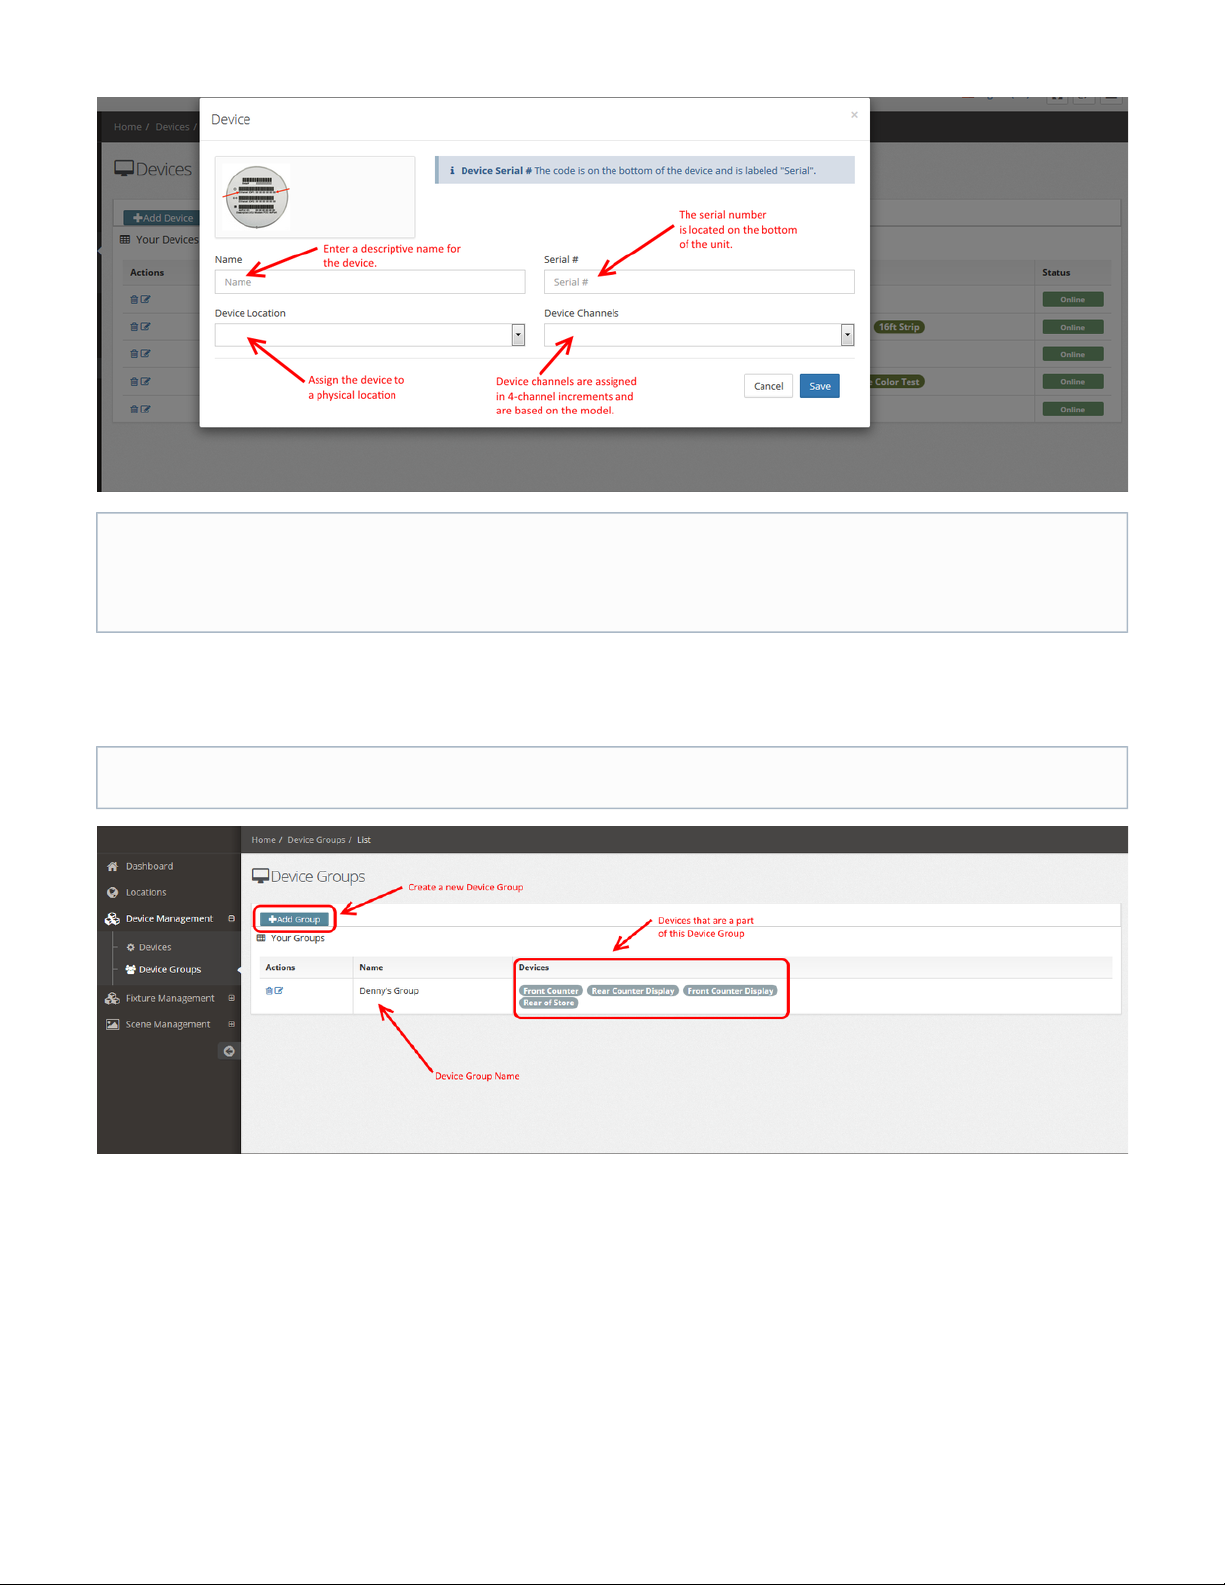
The Devices page displays the following parameters:
Device Name
Serial number of device
Physical Location
Fixtures attached to each device
Online/Offline status of device
Clicking "Add Device" opens a modal window that allows the user to enter all required information to setup a device.
Page 5
b. Device Groups
Device groups are used to associate individual devices into a logical group.
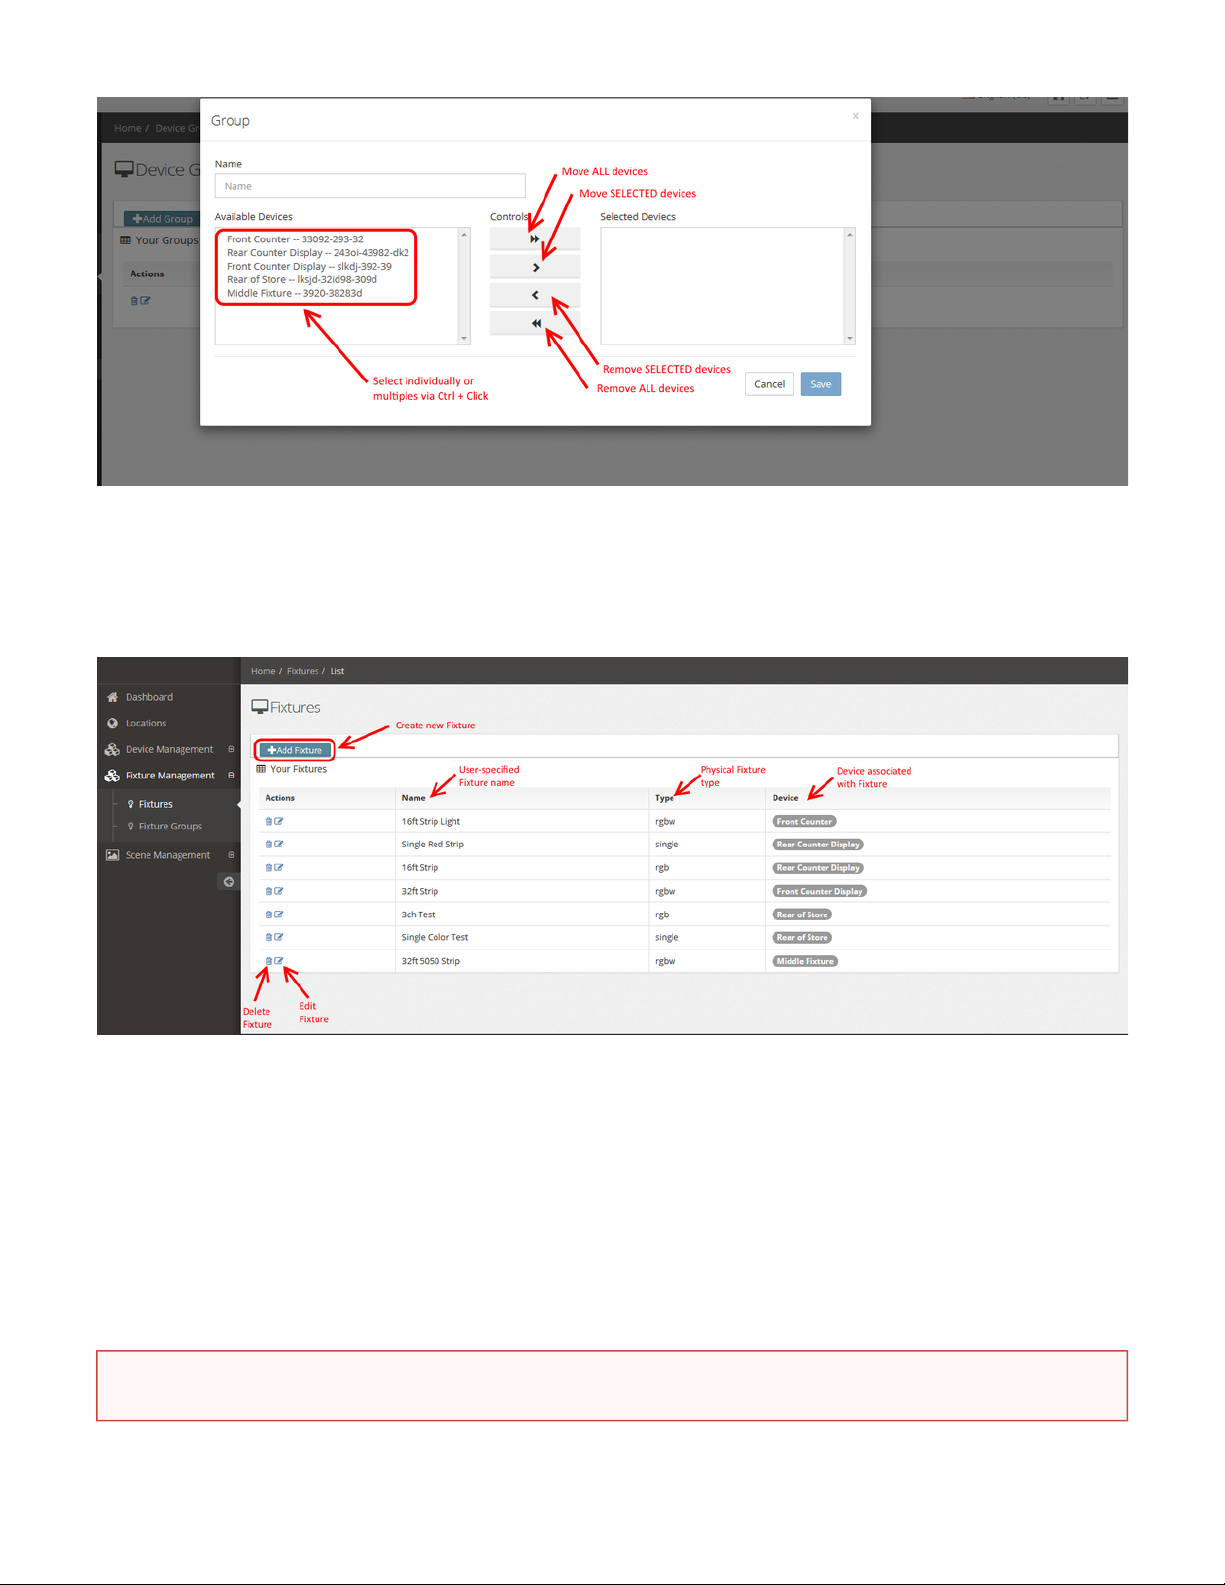
The Device Group Modal window is used to assign available devices to a particular group. Multiple devices can be selected at once by holding
the CTRL Key and clicking each device to highlight.
The Device name should be as descriptive as possible.
Fixture assignment is accomplished in the next section called "Fixture Management"
8 Device Channels are assigned to CB-8 models, and 24 Device Channels are assigned to CB-24 models.
Device Groups are for user reference only, they are not referenced by anything else in the portal.
Page 6
1.
2.
3.
4.
a.
b.
c.
d.
6. Fixture Management
a. Fixtures
Fixtures are 12v/24v Constant Voltage LED lights that are directly connected to the ControlBright Light Engine. These Fixtures include Single
Color, RGB (Red, Green, Blue), and RGBW (Red, Green, Blue, White). Each Fixture is assigned to a Device within the portal.
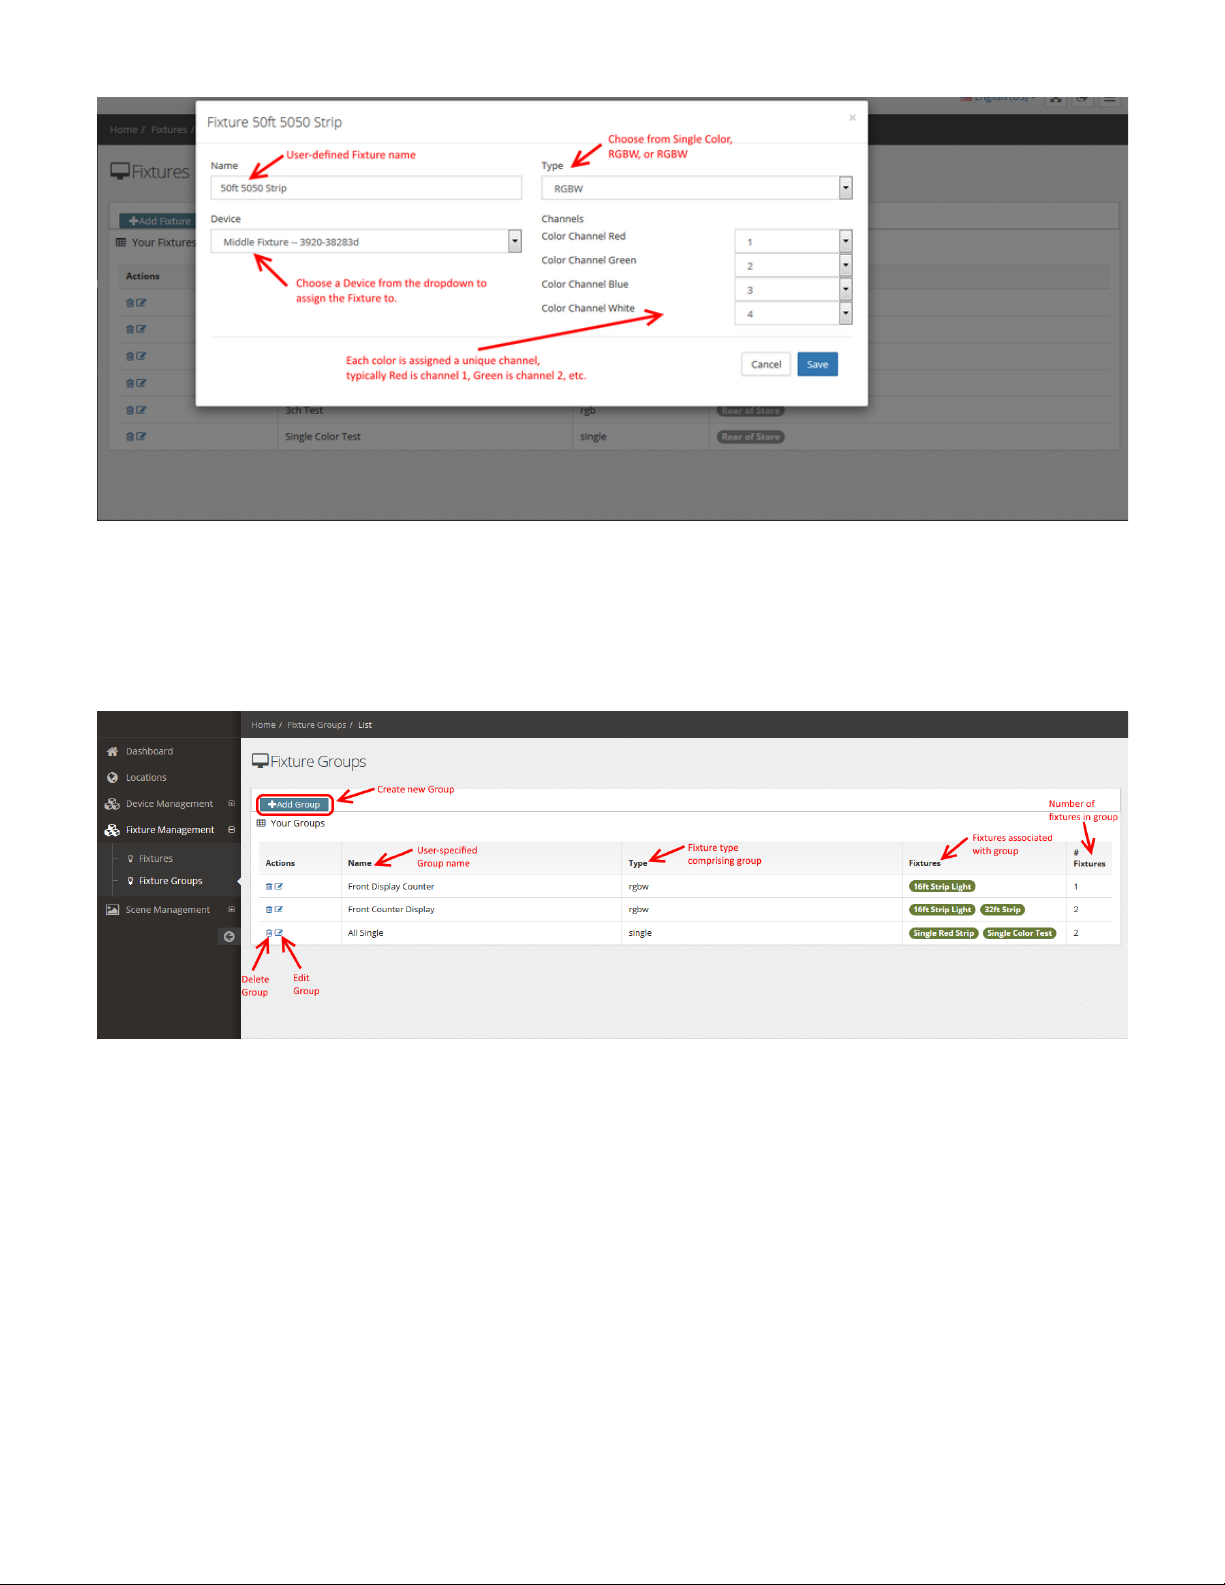
When adding a fixture, the following parameters need to be configured:
Fixture Name - This should include physical attributes of the Fixture, including: Length, LED Density, and LED Size
Fixture Type - Options include Single Color, RGB, and RGBW
Assigned Device - Each Fixture is assigned to certain channels on a specific Device. For example, the RGBW strip in the screenshot
below is assigned to channels 1-4 on Device: Middle Fixture - 3920-38283d (the serial number).
Fixture Channels - Each color in a Fixture is assigned a unique channel, and channels are configured on the Light Engines in groups of
4. For example, the CB-8 is an 8 channel device that is made up of two 4-channel banks. Bank A on the Light Engine is preset from the
factory starting at channel 1-4, and Bank B is preset to channel 5-8. The following color and channel assignments are typical:
Channel 1 - Red
Channel 2 - Green
Channel 3 - Blue
Channel 4 - White
Each Fixture color needs to be matched to the proper channel in the portal and Device. Mis-configuring channels and colors will result
in unexpected light performance (though the Fixture and Device will not be damaged).
Page 7
b. Fixture Groups
Fixture Groups are used to aggregate Fixtures into user-configurable pools that, when combined with the Scene Builder, allows the user to control
large numbers of fixtures at once. For example, a mid-size retail chain may want to assign a single scene to all front display fixtures across 1000
stores. By creating a fixture group, through one scene they can schedule and assign a lighting design across all locations instantly.
After clicking the "Add Group" button, a modal window will pop up allowing the user to configure a new Fixture Group:
Page 8
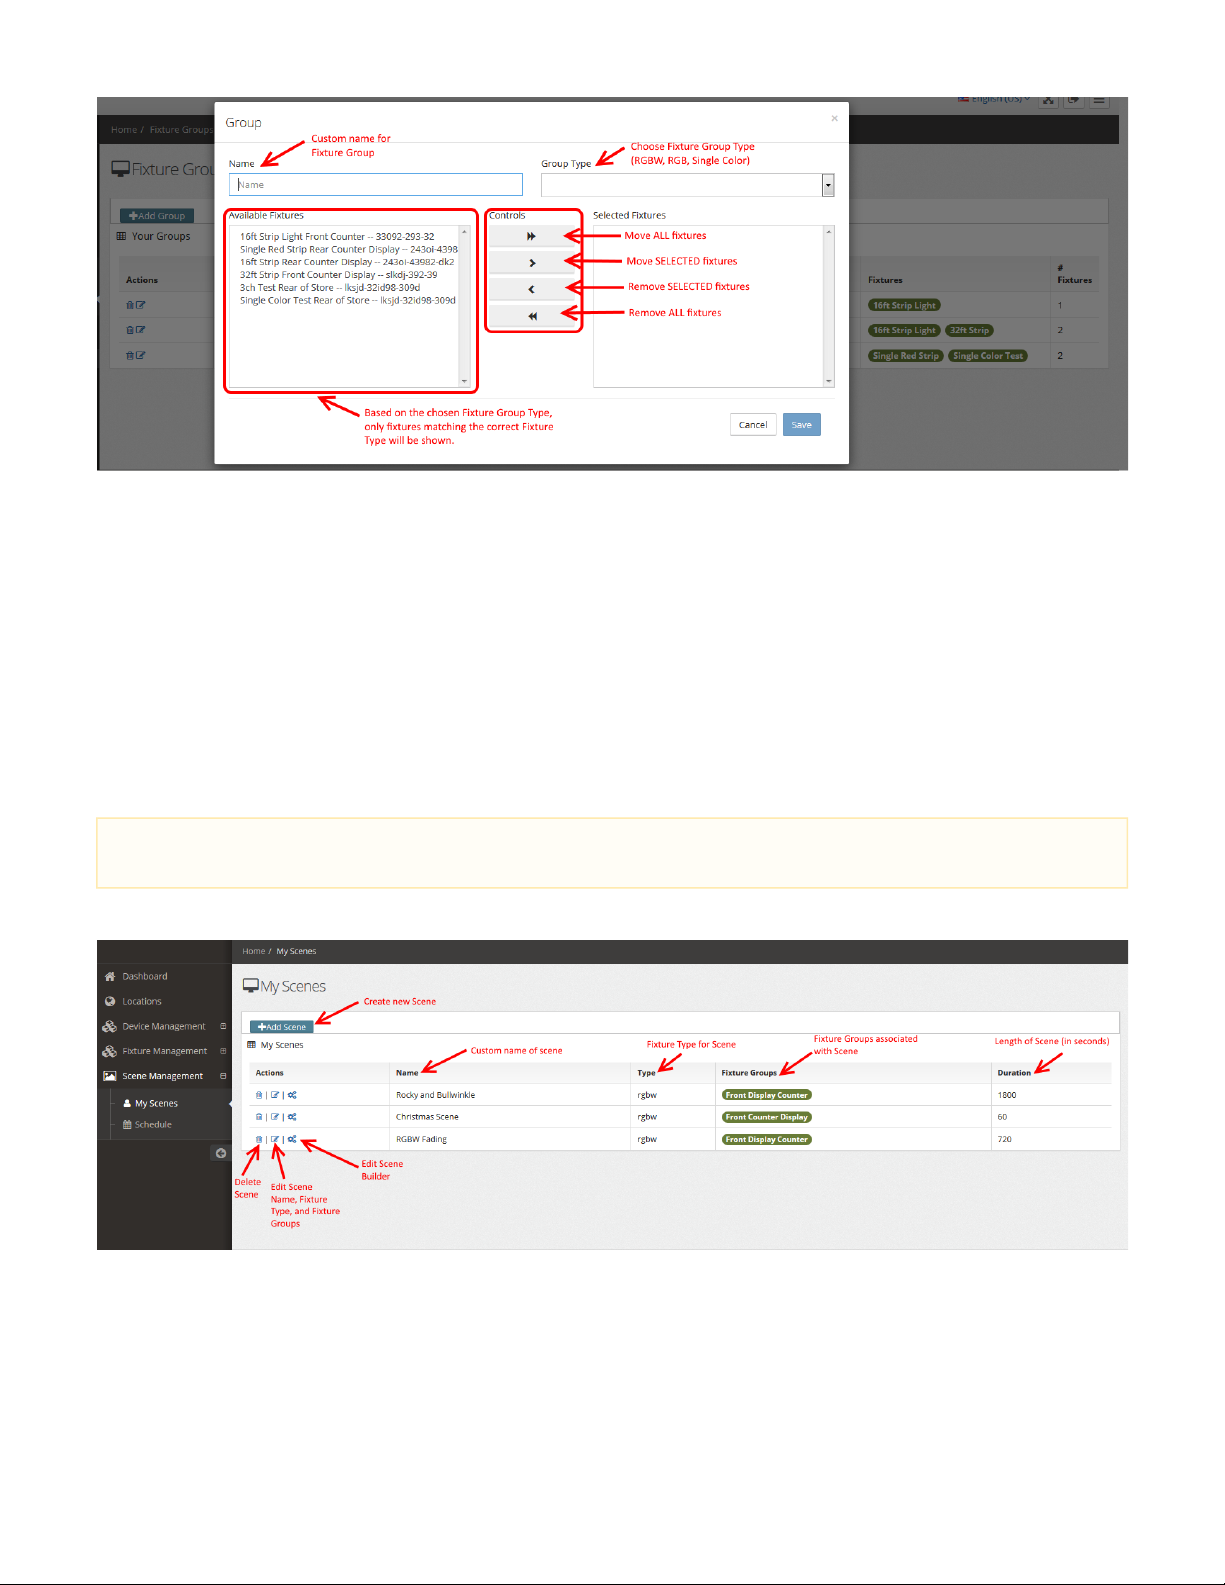
Based on the Group Type chosen, the Available Fixtures list will ONLY show compatible fixtures. For example, If a Group Type of RGBW is
chosen, only RGBW fixtures will be shown. The Available Fixtures list shows the type of Fixture, the location, and serial number of the Device it's
attached to for easy reference. Ctrl-Click and Shift-Click is support to highlight multiple fixtures.
7. Scene Management
a. My Scenes
The Scene Builder is one of the most powerful features of the ControlBright platform, consisting of a Drag-and-Drop style interface and
configurable options such as Color, Fade, Sleep, Blackout, and Loop. Everything from extremely simple scenes consisting of a single color all the
way to complex fading and multi-color shows can be built effortlessly.
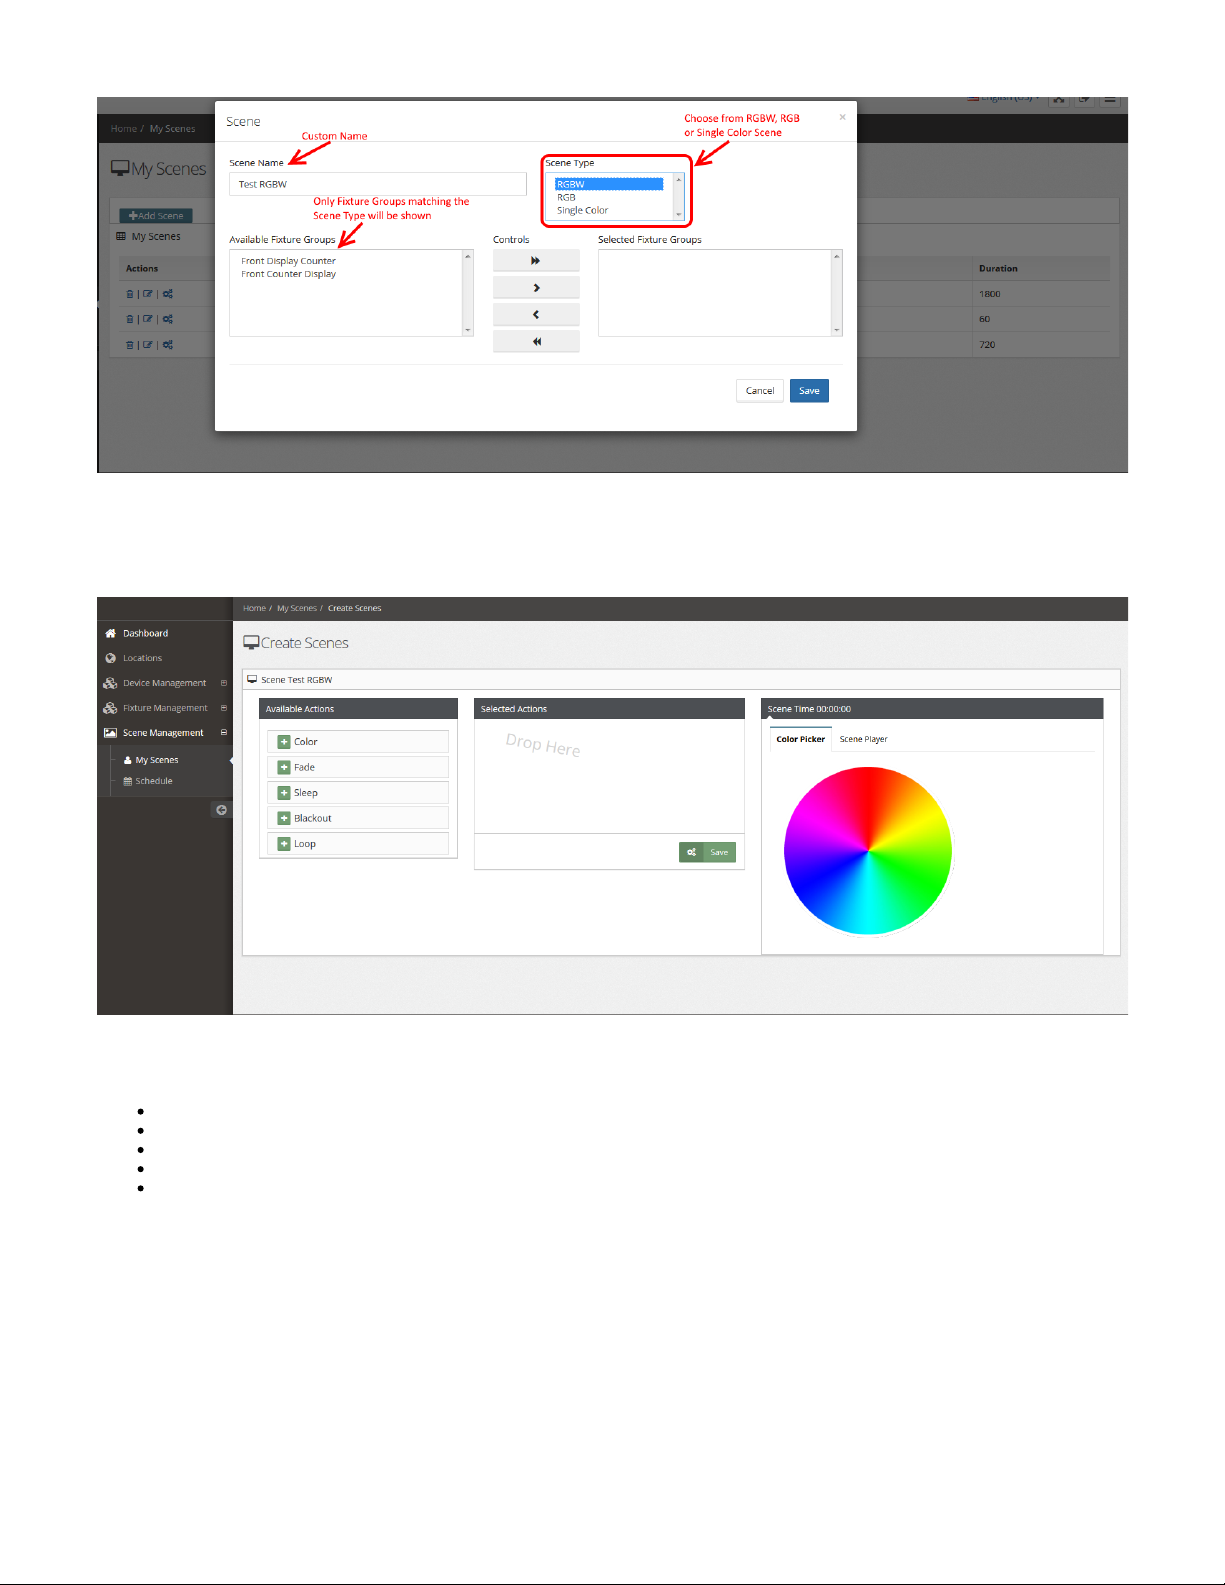
When clicking "Add Scene", a Modal window will be shown as follows:
Due to scheduling/calendar requirements, all scenes must be designed in whole-minute increments. For example, a scene that is 10
minutes and 30 seconds long cannot be saved, it must either be extended to 11 minutes or reduced to 10 minutes.
Page 9
1.
a.
After clicking "Save", the portal will automatically load the Scene Builder interface as follows:
The following actions are provided:
Color
Fade
Sleep
Blackout
Loop
Color
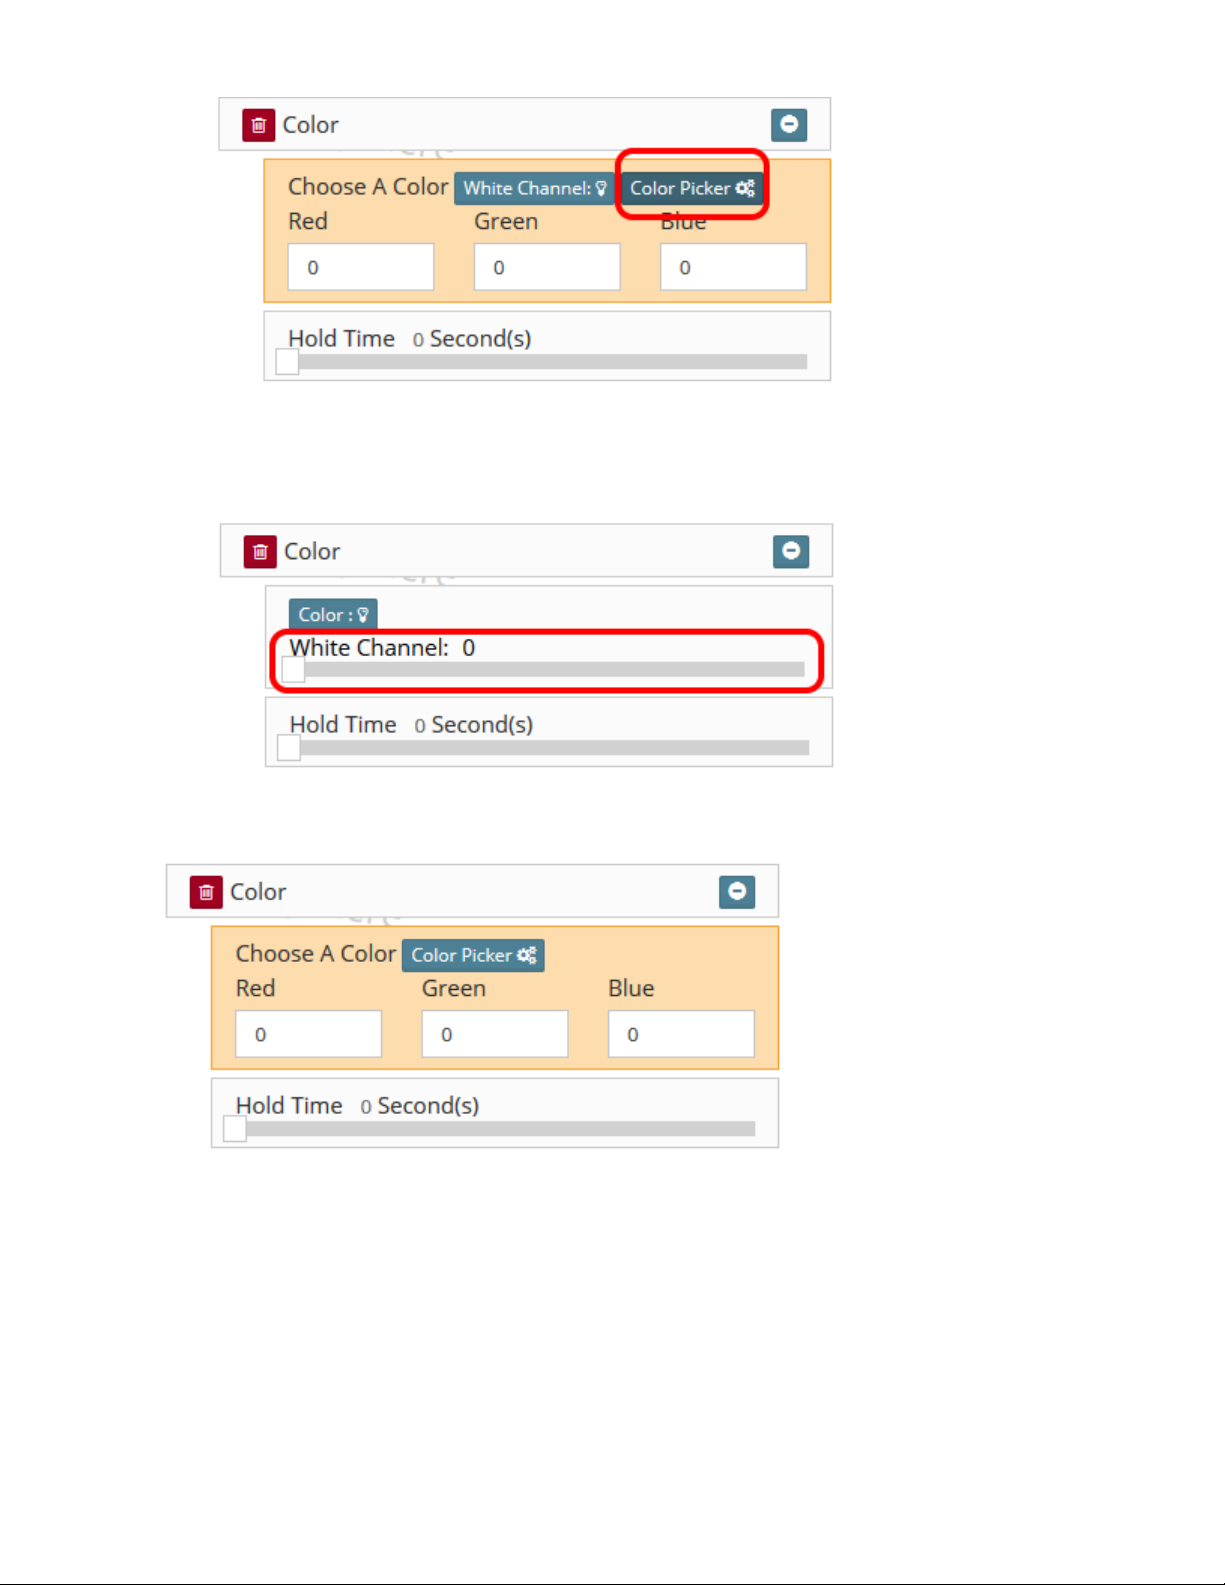
The Color Action is used to assign a specific color (or colors) to the scene. The Scene Builder requires the Color Action to be assigned FIRST,
before any other Actions. The Color Action is displayed based on the Fixture Type:
RGBW - The RGBW Color Action provides both a Color Picker as well as a White Channel option for assignment:
Color Picker - When clicking the Color Picker button, Red/Green/Blue input boxes are shown, as well as the color wheel:
Page 10
1.
a.
b.
2.
3.
These input boxes are dynamically updated as the cursor is moved around the Color Wheel. Alternatively, RGB values can be
manually input to arrive at a specific color. The tan background will also be dynamically updated to the color being chosen.
White Channel - When clicking the White Channel button, a slider will appear allowing the user to choose a value anywhere from
0-255, with 255 being 100% brightness. The Color Wheel on the right will be dimmed and disabled.
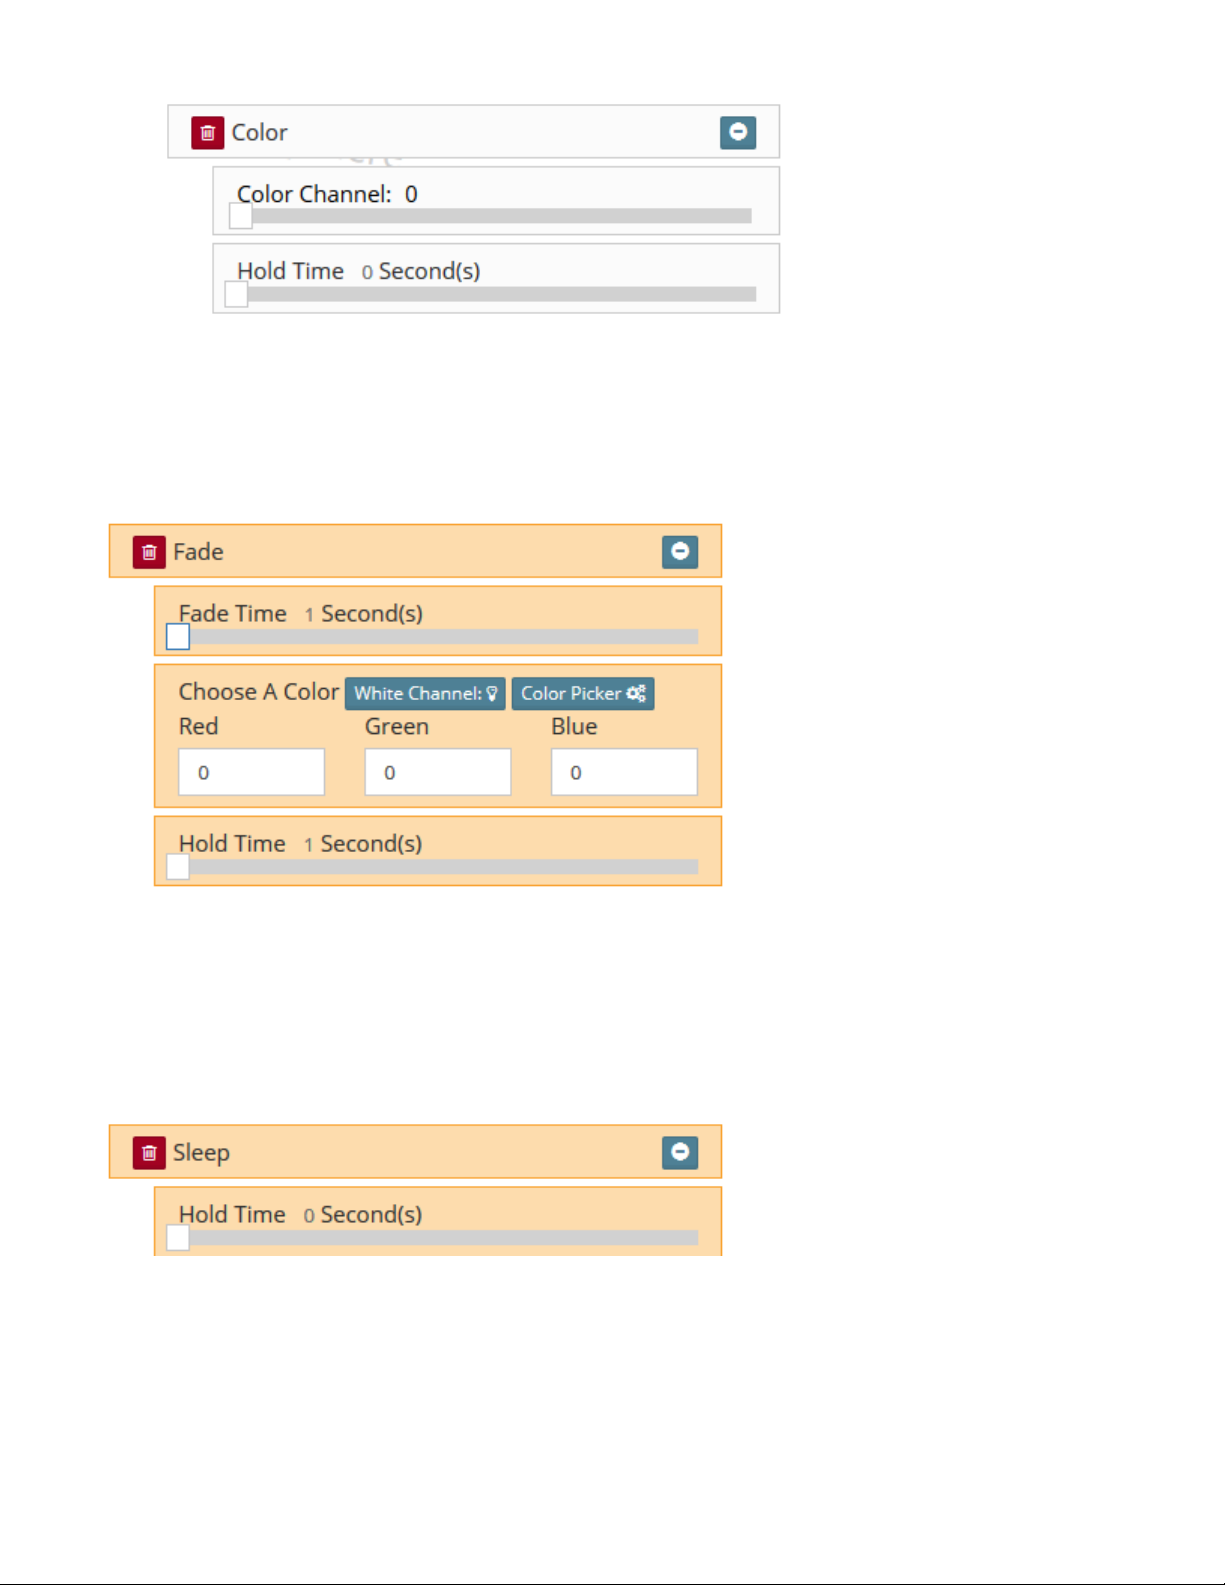
RGB - The RGB Color Action provides the RGB value input boxes and Color Wheel ONLY. The operation is identical to the RGBW Color
Action, without the White Channel option.
Single Color - The Single Color Action provides a slider, allowing the user to choose a value anywhere from 0-255, with 255 being 100%
brightness.
Page 11
4.
1.
2.
3.
Hold Time - The Hold Time Action provides the user with a slider that holds the color for anywhere from 0-240 seconds. For example, if a
user wants the first color to remain in effect for 1 minute, they would position the slider at the 60 Second mark.
Fade
The Fade Action allows the user to choose a Fade Time, a Color, and a Hold Time:
Fade Time - The Fade Time Action allows the user to choose a specific length of time (1-240 seconds) to transition from one color to
another.
Color - The user, based on the Fixture Type used in the scene, is able to choose a color to fade into.
Hold Time: The amount of time (1-240 seconds) that the color will remain in effect before being sent to the next Action for processing.
Sleep
The Sleep Action is used to extend the current Action for a period of time (1-240 seconds).
Blackout
The Blackout Action is used to turn off all channels for a period of time (1-240 seconds).
Page 12
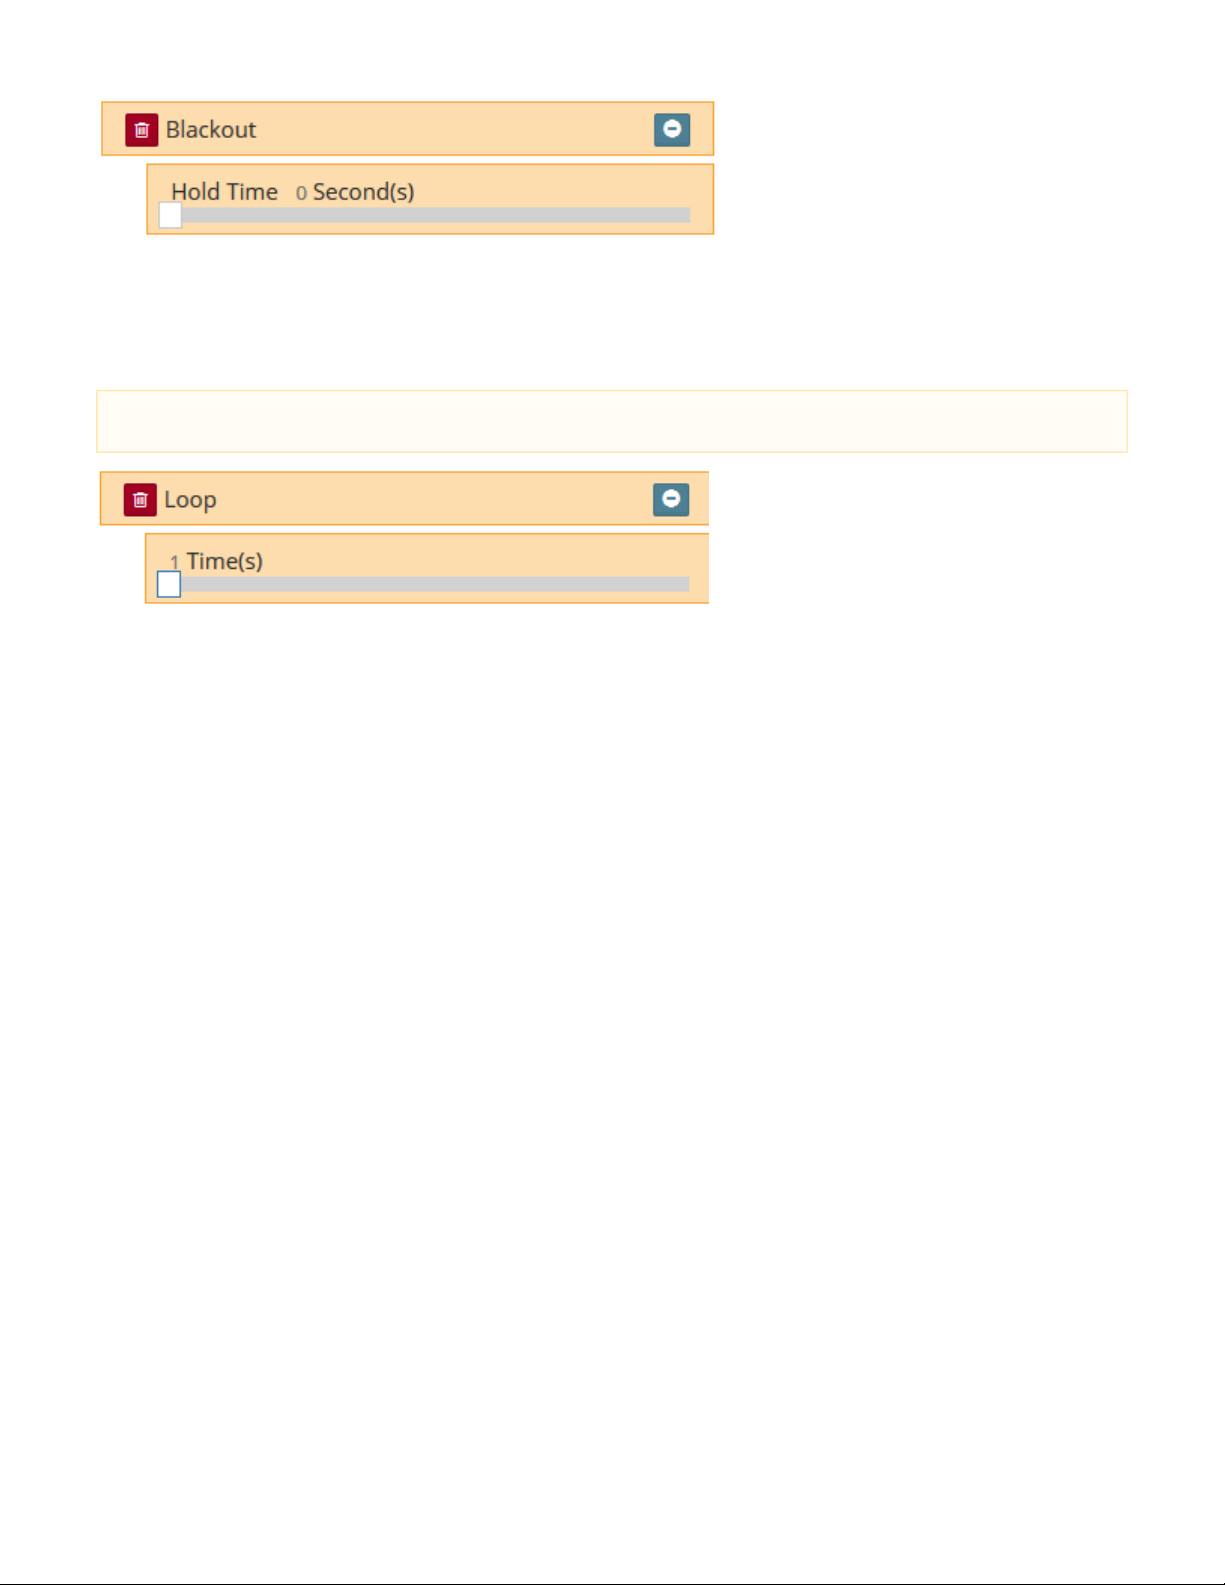
Loop
The Loop Action is used to cycle through the entire scene, up to 100 times. This is especially useful when the user is looking to put their scene on
"repeat" for a period of time.
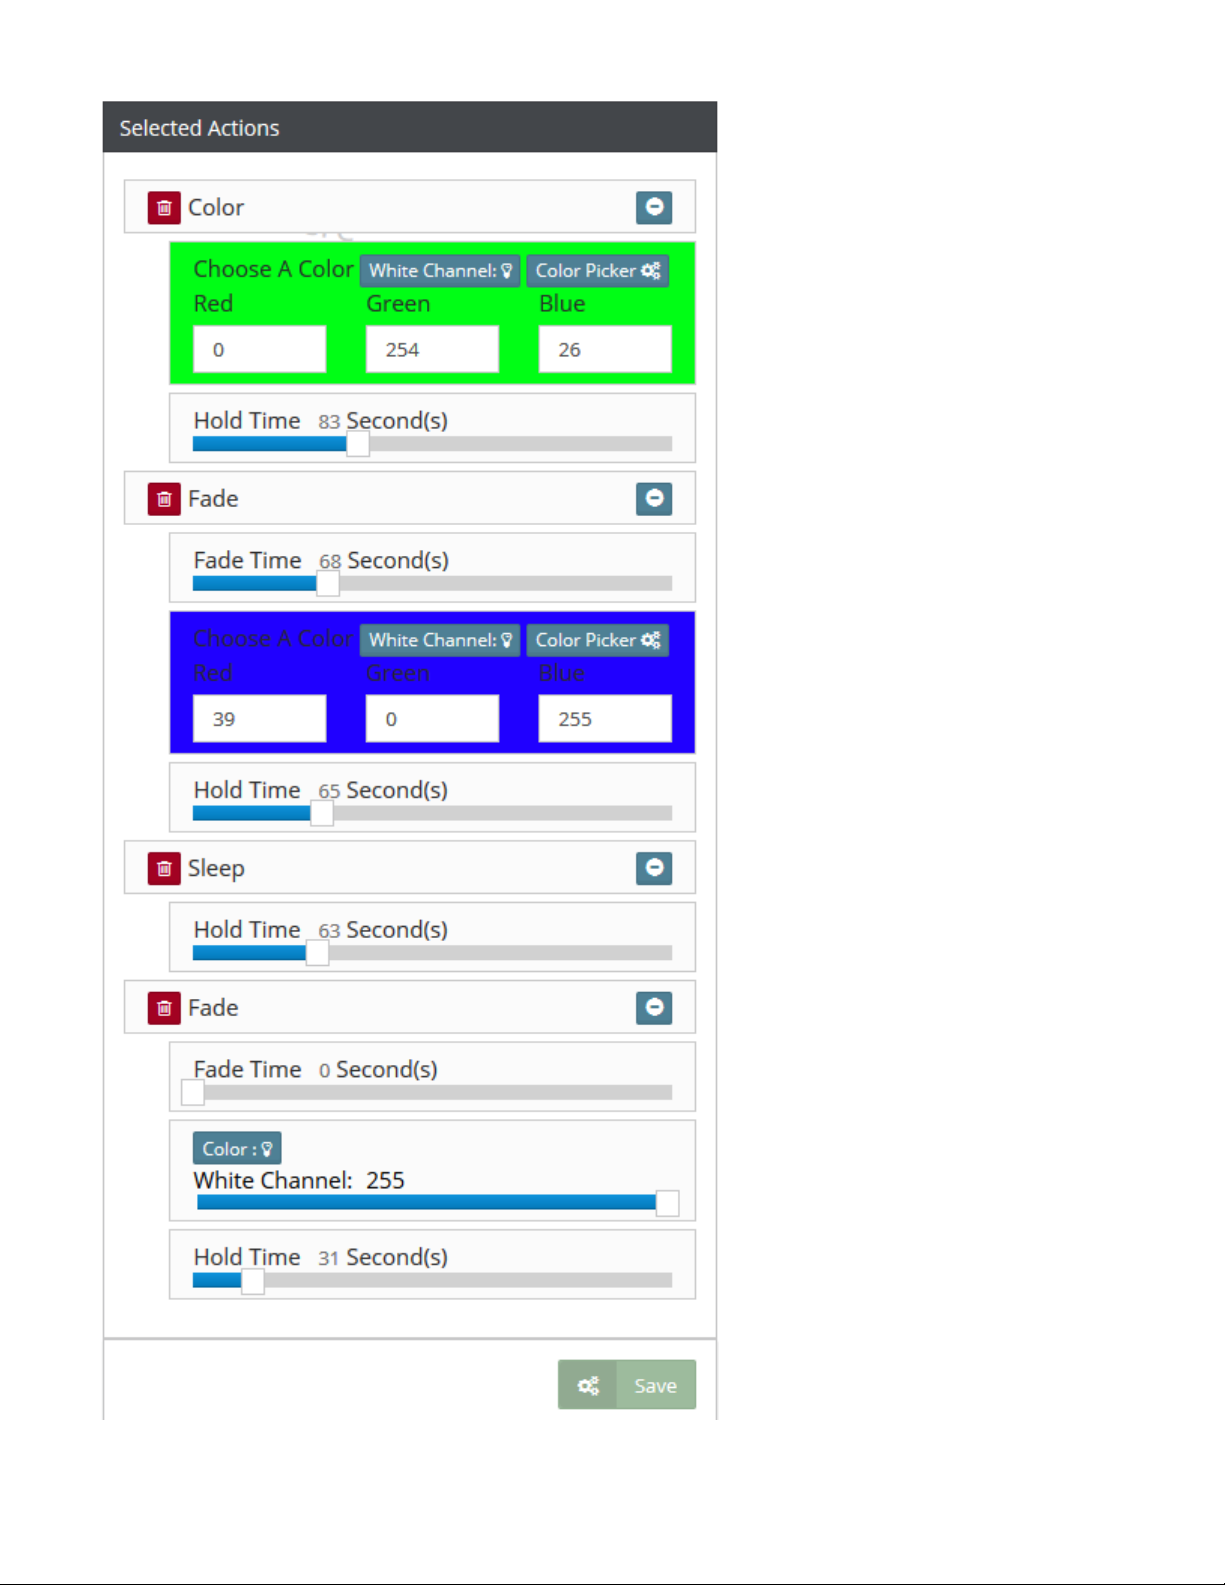
Multiple Actions of the same type may be used multiple times within the same Scene, allowing extremely complex Scenes to be created. For
example, 8 different colors may be used with 4 different fades and multiple blackouts within the same Scene:
The Loop Action is ALWAYS the last Action in the scene builder, no other Actions may be added after.
Page 13
Page 14
b. Schedule
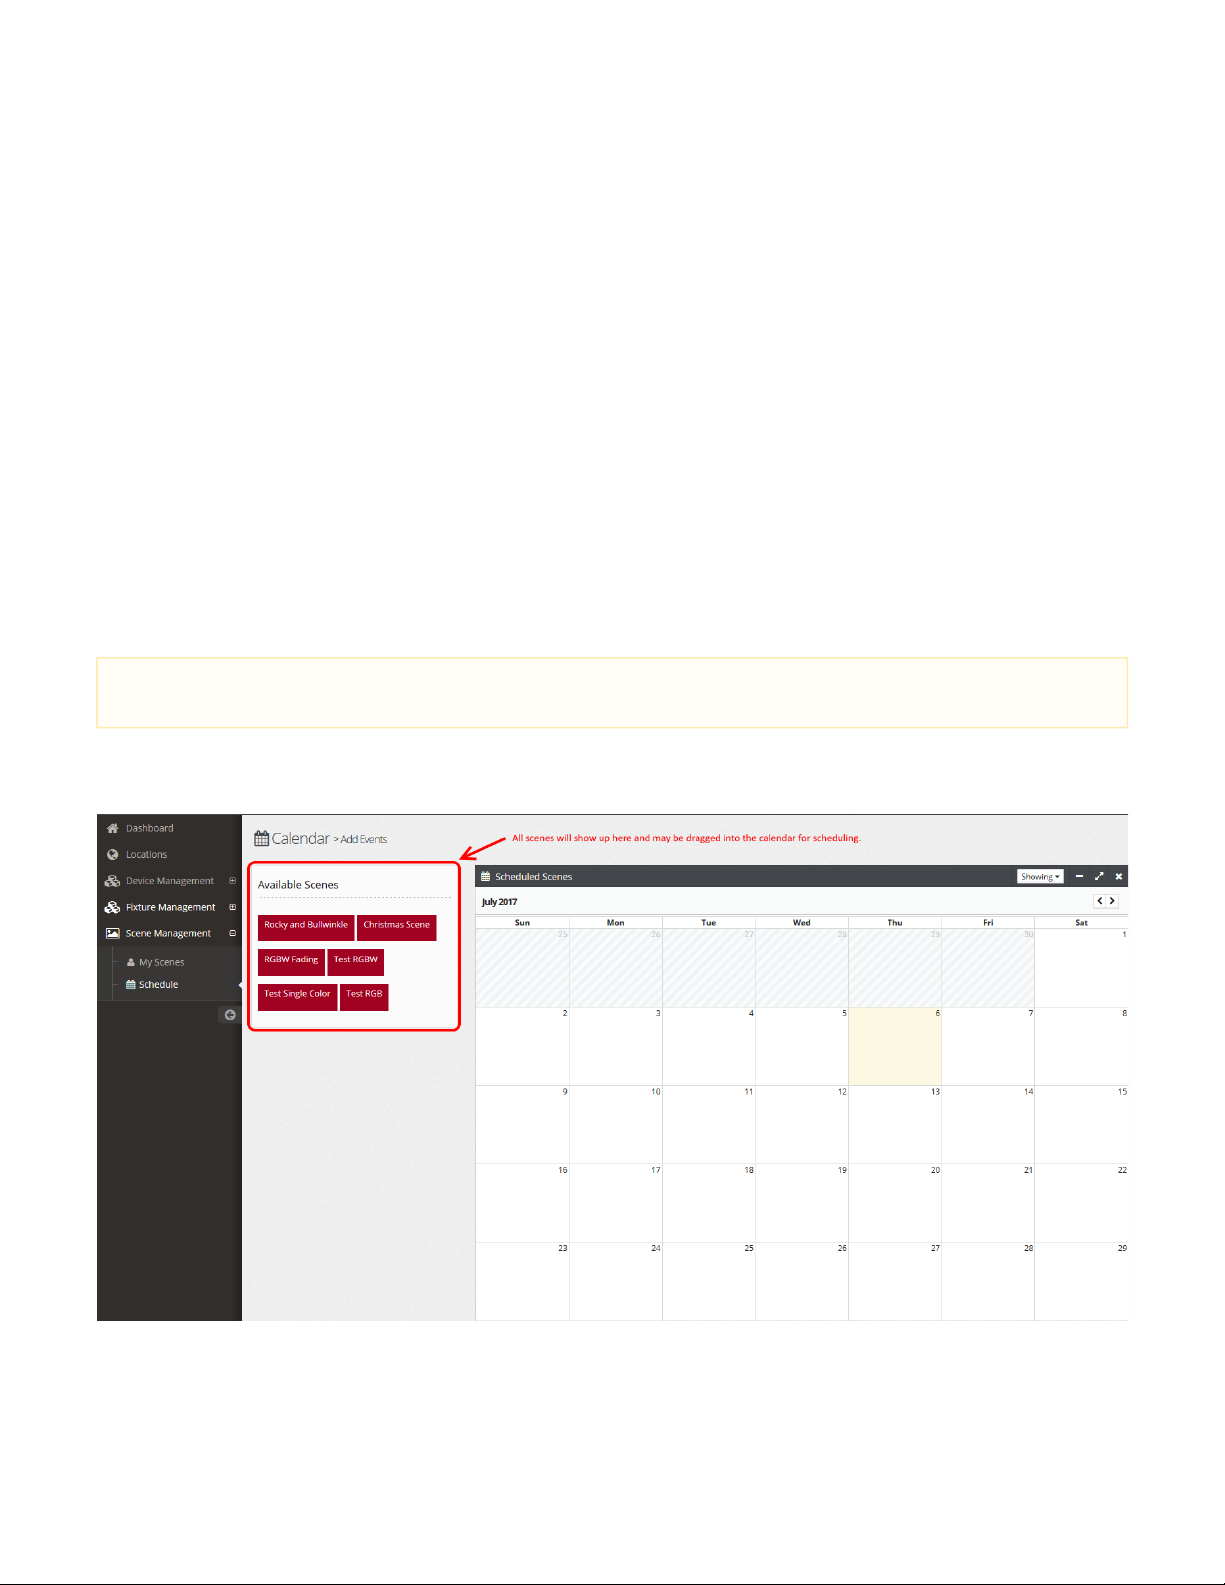
In order to apply a desired scene, it must be scheduled in the calendar. Whether the scene consists of a single color or something more complex,
the calendar is used to manage timing of scenes.
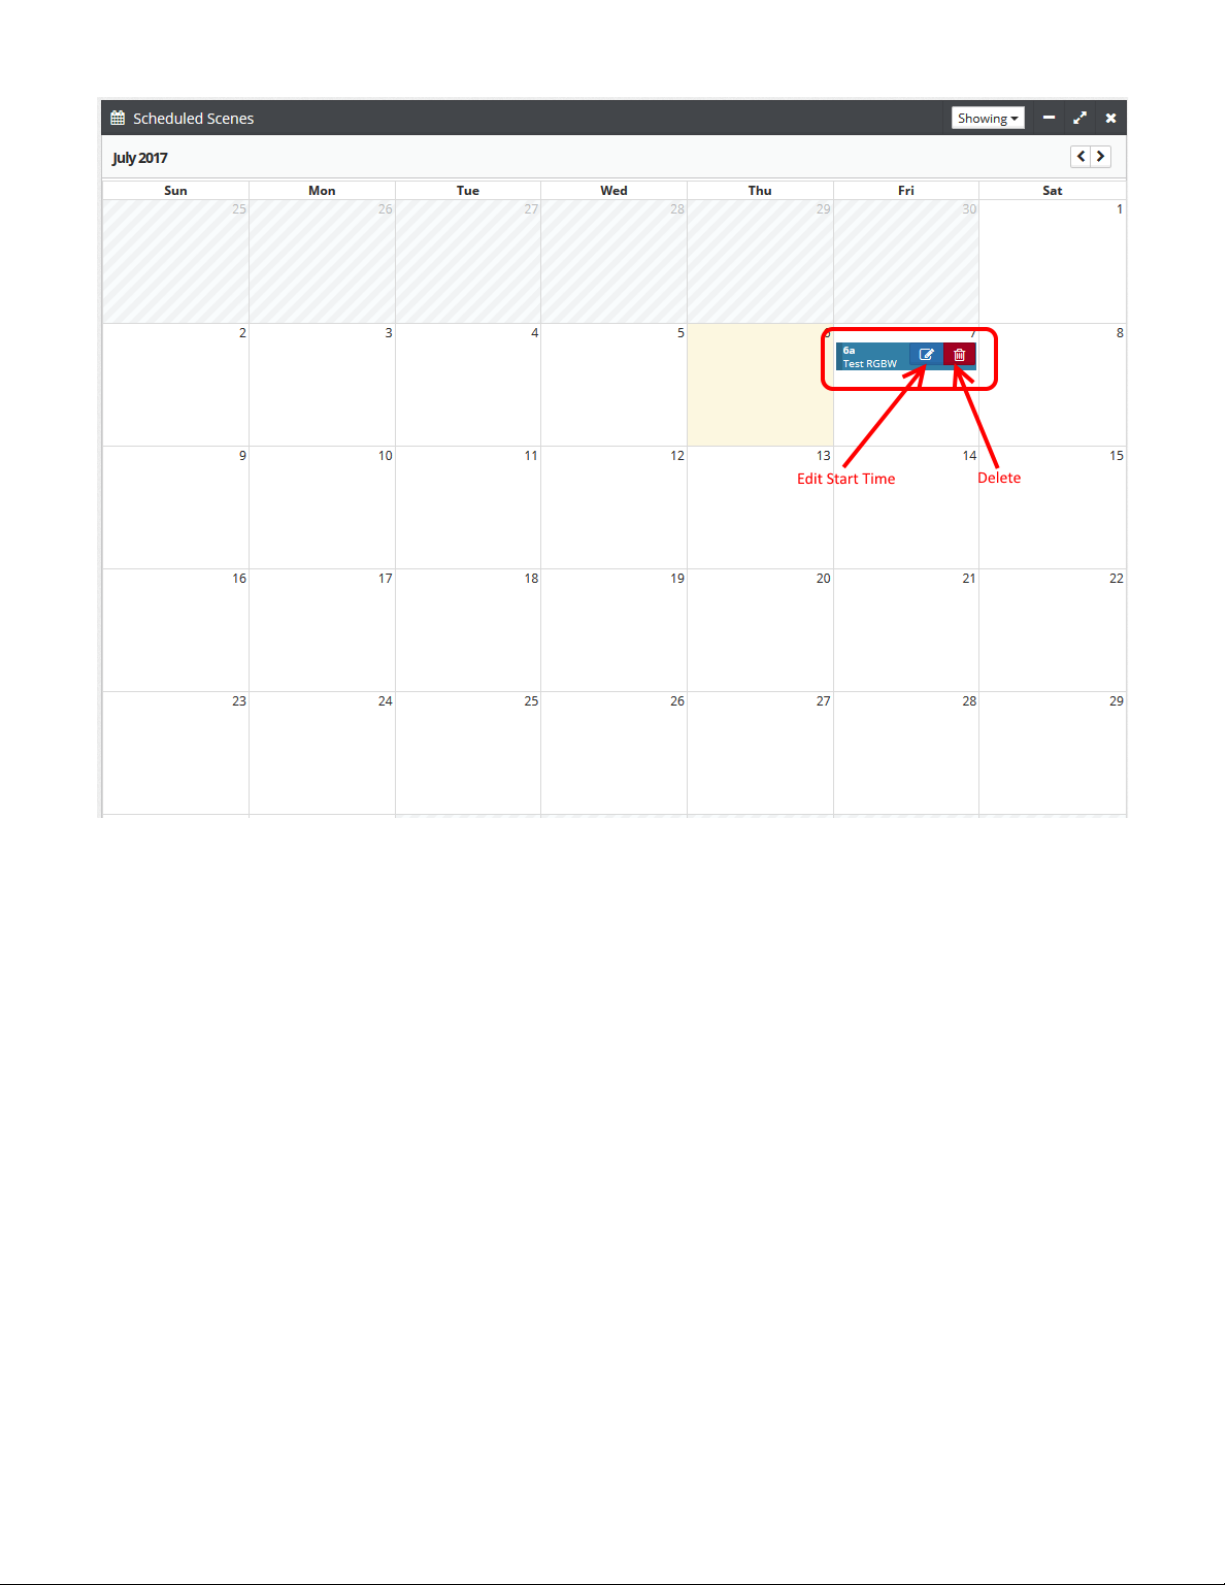
Once an Available Scene has been dragged onto the calendar, the Edit button allows the user to specify the start time:
The size of the scene icon in the calendar is dependent on the length of the scene selected. For example, a short scene will be thinner
in appearance than a longer length scene.
Page 15
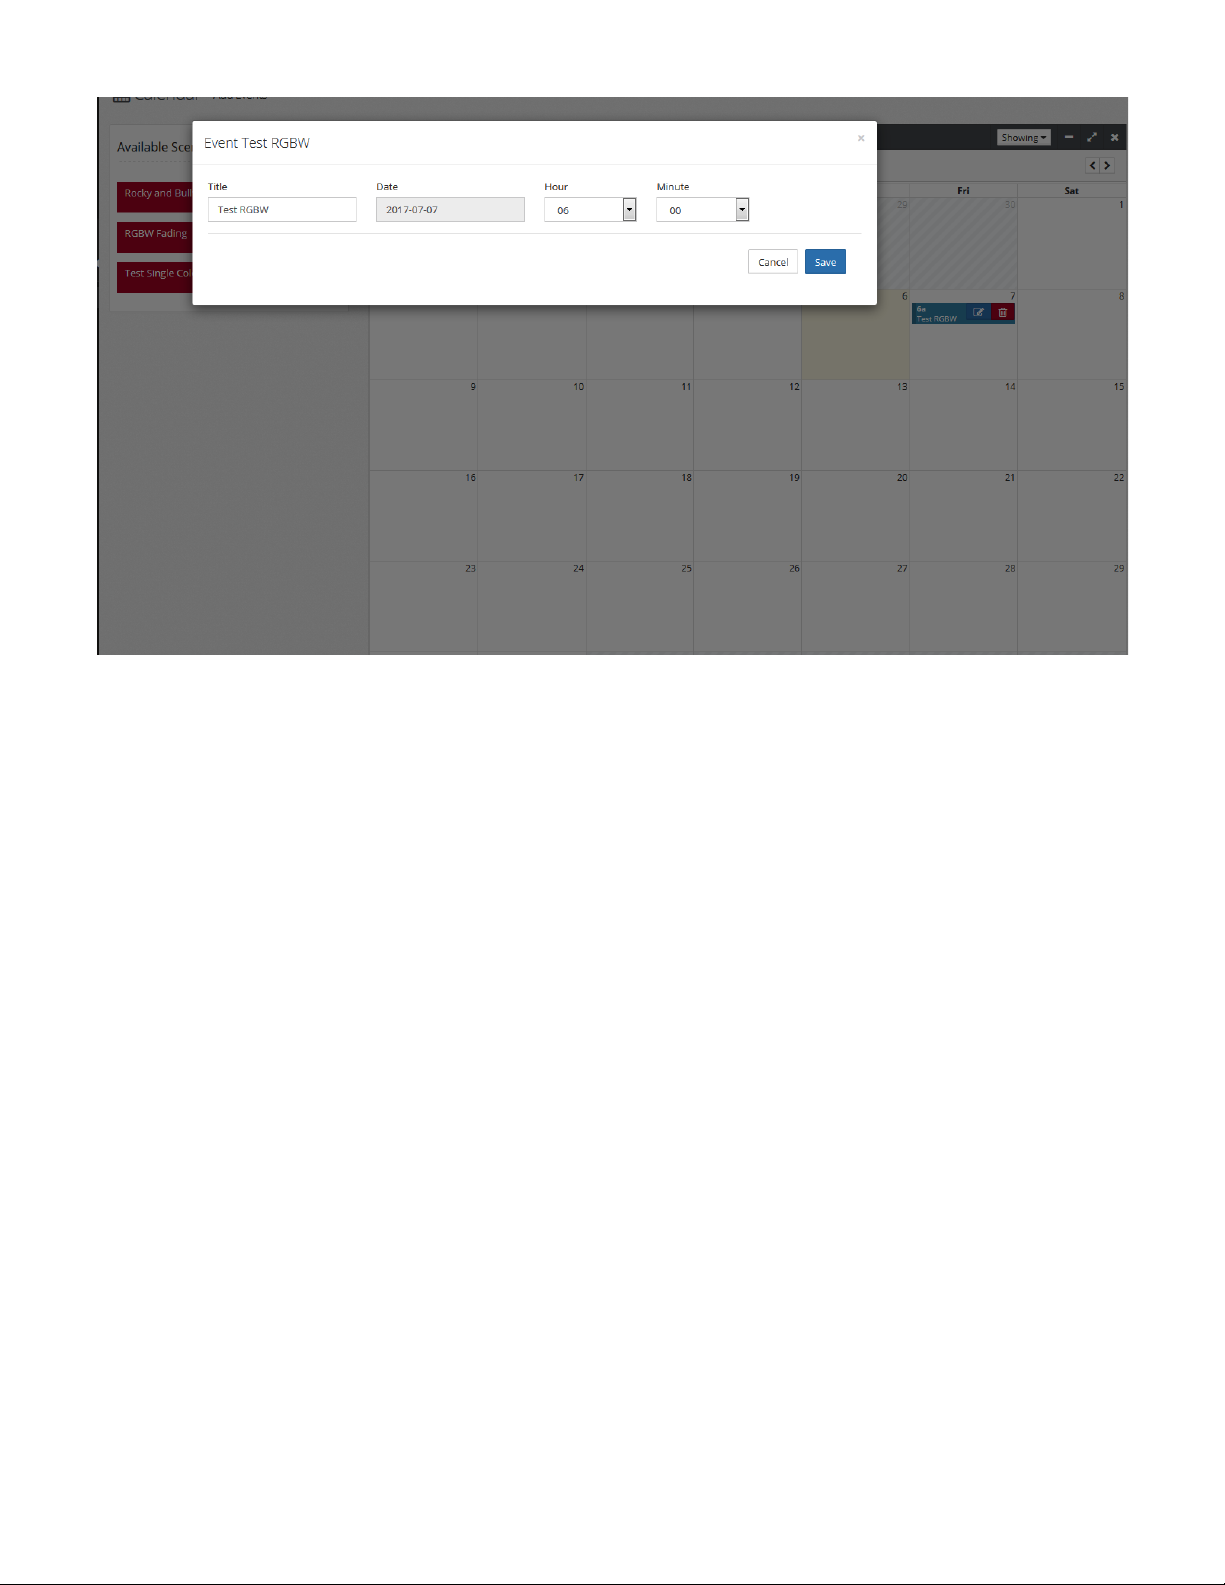
In the edit modal window, simply choose the proper hour and minute to start the selected scene:
Page 16
Power supply: DC12V/2A
Operating Temperature Range: 0-40℃
Page 17
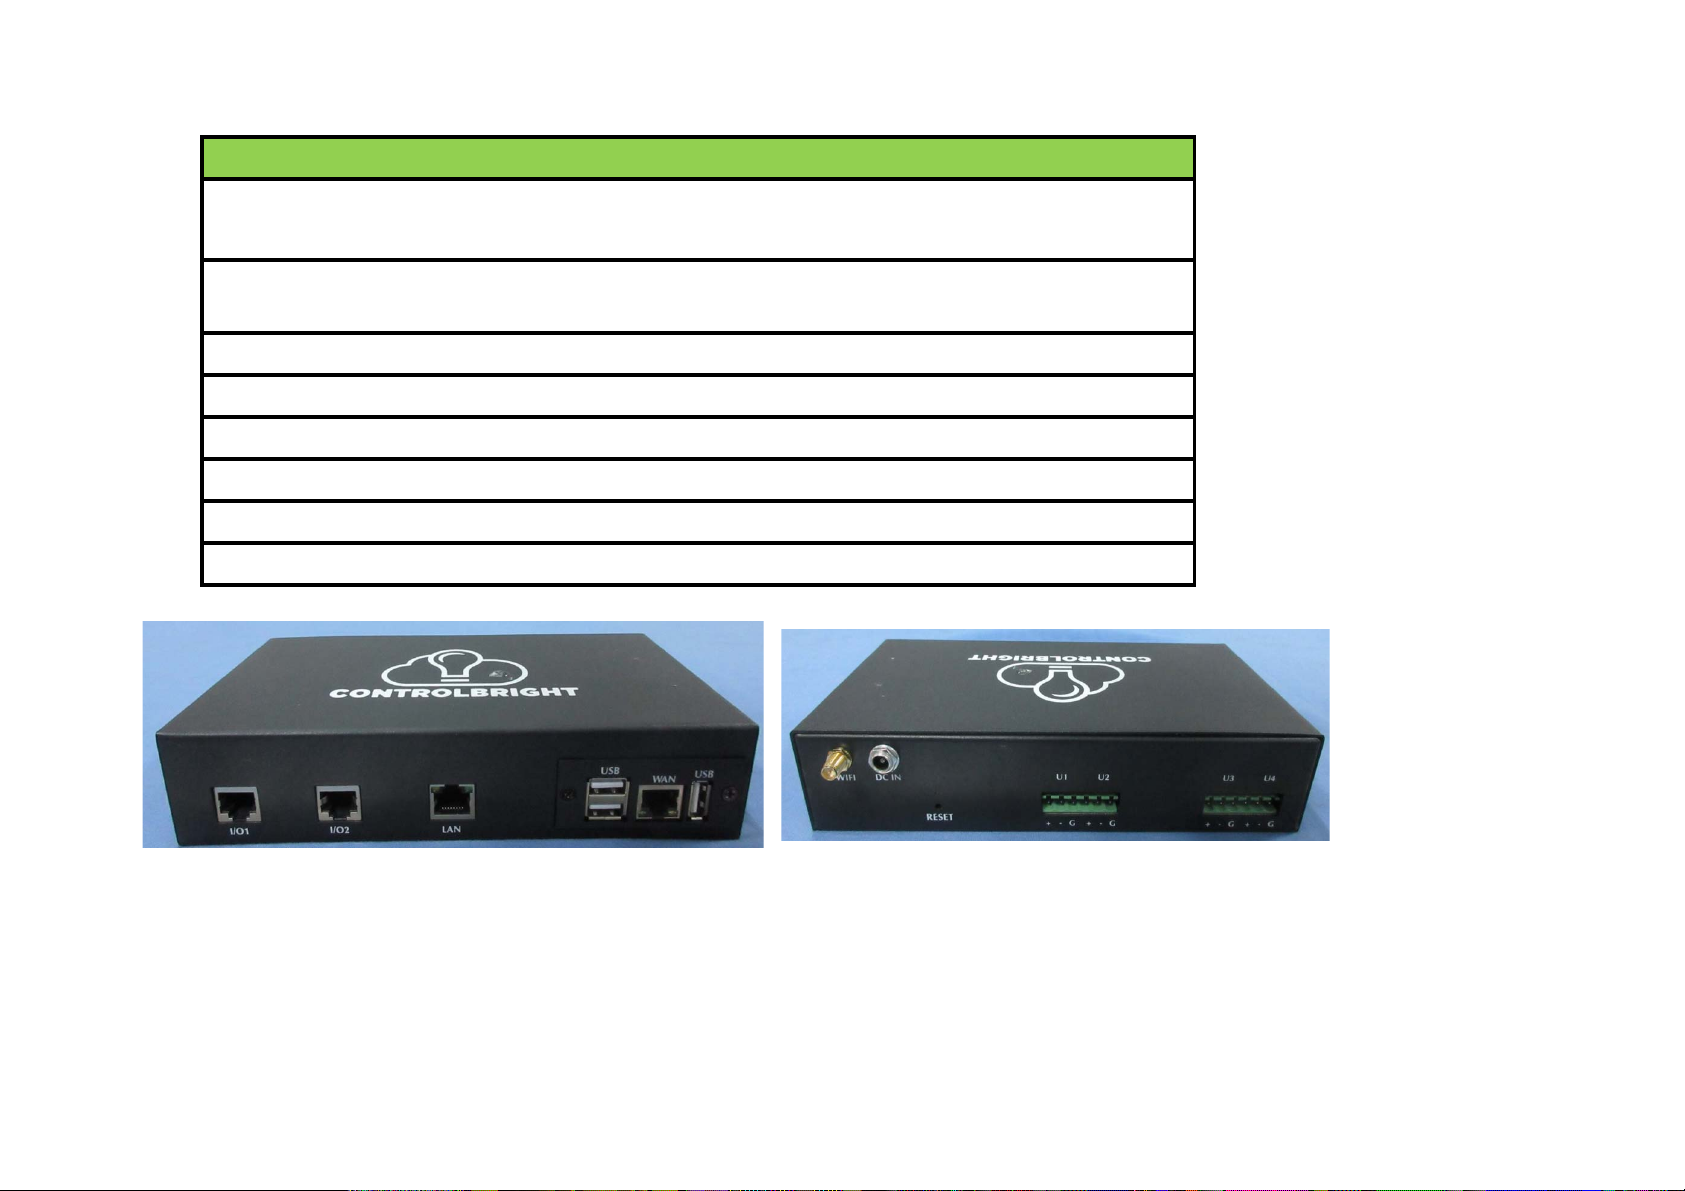
Interface Type Protocol Description
I/O1 RJ45 100M Ethernet
I/O2 RJ45 100M Ethernet
WAN RJ-45 100M Ethernet Ethernet ports for connection
LAN RJ-45 100M Ethernet Ethernet ports for connection
USB Port USB-A USB2.0 USB ports for connection
Power Connection DC Barrel 12V 12V DC,5.5mm X 2.5mm Barrel
DMX Port(U1,U2,U3,U4) Terminal DMX512 DMX512 Connection
WIFI SMA 802.11g Antenna adapter for WIFI connectivity
Internal use for the software upgrading,
and not open to the end user
Internal use for the software upgrading,
and not open to the end user
Page 18

FCC Warning:
This device complies with Part 15 of the FCC Rules. Operation is subject to the following two
conditions: (1) this device may not cause harmful interference, and (2) this device must
accept any interference received, including interference that may cause undesired operation.
Any changes or modifications not expressly approved by the party
responsible for compliance could void the user's authority to operate the
equipment.
NOTE: This equipment has been tested and found to comply with the limits for a Class B
digital device, pursuant to Part 15 of the FCC Rules. These limits are designed to provide
reasonable protection against harmful interference in a residential installation. This equipment
generates, uses and can radiate radio frequency energy and, if not installed and used in
accordance with the instructions, may cause harmful interference to radio communications.
However, there is no guarantee that interference will not occur in a particular installation. If
this equipment does cause harmful interference to radio or television reception, which can be
determined by turning the equipment off and on, the user is encouraged to try to correct the
interference by one or more of the following measures:
-- Reorient or relocate the receiving antenna.
-- Increase the separation between the equipment and receiver.
-- Connect the equipment into an outlet on a circuit different from that to which the receiver is
connected.
-- Consult the dealer or an experienced radio/TV technician for help.
Radiation Exposure Statement
This equipment complies with FCC radiation exposure limits set forth for an uncontrolledenvironment. this
equipment should be installed and operated with minimum distance 20cm between the radiator & your body.
 Loading...