

Page 1
Product Manual
IP-HDVR
HDTV Tuner-Digital Video Recorder
Version 2.3 March 23, 2007
17630 Davenport Road, Suite 113 • Dallas, TX 75252
Phone: 972-931-2728 • Toll-Free: 888-972-2728 • Fax: 972-931-2765
E-Mail: Sales@crwww.com
• Website: www.c rwww.com
Page 2

Table of Contents
Overview..............................................................................................................................................................4
Specifications.......................................................................................................................................................5
AV and Control Connection.................................................................................................................................. 7
RF..............................................................................................................................................................................7
AV Sources.................................................................................................................................................................7
AV Outputs.................................................................................................................................................................7
Digital Outputs............................................................................................................................................................7
Control.......................................................................................................................................................................7
Front Panel Setup ................................................................................................................................................8
Front Panel Menus ......................................................................................................................................................8
Display Formats..........................................................................................................................................................9
Getting Started ..................................................................................................................................................10
Front Panel Setup .....................................................................................................................................................10
Cable Box/AV Input Integration .................................................................................................................................10
AV Outputs...............................................................................................................................................................10
Control.....................................................................................................................................................................10
On-Screen Menus...............................................................................................................................................11
Analog and Digital Tuning .........................................................................................................................................11
TV Guide Setup...................................................................................................................................................12
Country ................................................................................................................................................................12
Cable/TV ..............................................................................................................................................................12
Cable Box .............................................................................................................................................................13
Cable Box Code.....................................................................................................................................................13
Confirm ................................................................................................................................................................13
Menu Setup........................................................................................................................................................14
Channel Menus.........................................................................................................................................................14
EZ Scan Channels..................................................................................................................................................14
Edit Channels........................................................................................................................................................14
DTV Signal............................................................................................................................................................14
Channel Labels......................................................................................................................................................15
Input Source.........................................................................................................................................................15
Troubleshooting....................................................................................................................................................15
Auto Demo ...........................................................................................................................................................15
Option Menus ...........................................................................................................................................................16
Audio Output ........................................................................................................................................................16
Audio Language ....................................................................................................................................................16
Clock....................................................................................................................................................................16
Aspect Ratio..........................................................................................................................................................16
Menu Language ....................................................................................................................................................16
DVI Level..............................................................................................................................................................16
Caption Menus..........................................................................................................................................................17
Caption Type ........................................................................................................................................................17
Caption Options ....................................................................................................................................................17
Lock Menus ..............................................................................................................................................................17
DVR Menus...............................................................................................................................................................18
Caption Type ........................................................................................................................................................18
Program List .........................................................................................................................................................18
HDD Format..........................................................................................................................................................18
Record Quality ......................................................................................................................................................18
DVR Control .......................................................................................................................................................19
Manual Recording .....................................................................................................................................................19
Program List.............................................................................................................................................................19
Playback...................................................................................................................................................................19
TimeShift..................................................................................................................................................................20
Video Clips ...............................................................................................................................................................20
Clip Edit................................................................................................................................................................20
Clip Record...........................................................................................................................................................20
Contemporary Research 2 IP-HDVR HD Tuner-DVR
Page 3

TV Guide Operation............................................................................................................................................21
Listings ....................................................................................................................................................................21
Layout..................................................................................................................................................................21
Recording.............................................................................................................................................................21
Schedule – Favorites/Record......................................................................................................................................22
Sort .........................................................................................................................................................................22
Setup - Channels ......................................................................................................................................................22
HDV-RC IR Remote............................................................................................................................................23
Ethernet Setup...................................................................................................................................................24
Ethernet Connection..................................................................................................................................................24
Reset IP Address ......................................................................................................................................................24
RS-232 and Telnet Terminal Communication.....................................................................................................24
Ethernet and RS-232 Control Protocol...............................................................................................................25
Overview................................................................................................................................................................25
General protocol specifications ............................................................................................................................25
Command String Structure ..................................................................................................................................25
Terminal Communication Commands .........................................................................................................................27
HDV-RC Remote Emulation........................................................................................................................................28
Response Strings ......................................................................................................................................................29
IP Control Options .............................................................................................................................................30
RS-232 Display Control..............................................................................................................................................30
TCP and UDP Connectivity.........................................................................................................................................30
Web Control Page............................................................................................................... ......................................30
RS-232 Cable Connections.................................................................................................................................31
Single Tuner............................................................................................................................................................. 31
Multiple Tuners.........................................................................................................................................................31
Rack Mounting...................................................................................................................................................32
Cable Box Codes.................................................................................................................................................33
IP-HDVR FAQ .....................................................................................................................................................34
TV Guide FAQ .....................................................................................................................................................35
Safety Instructions ............................................................................................................................................37
Limited Warranty...............................................................................................................................................38
Contemporary Research 3 IP-HDVR HD Tuner-DVR
Page 4

Overview
The IP-HDVR HDTV Tuner-DVR is an integrator-friendly HD tuner and Digital Video Recorder (DVR),
controllable from Ethernet, RS-232, IR, and onboard Web pages. A universal tuner, the IP-HDVR can receive
both ATSC and NTSC broadcasts from twin off-air antenna and cable RF inputs, decode clear-cable digital
QAM channels, as well as control an external analog cable box for subscription-based programming. When
integrating the IP-HDVR via Ethernet, a control system can also communicate with a video display or
projector through the HD tuner’s RS-232 control port.
Featuring a 120 GB hard drive, the IP-HDVR is also a powerful HD DVR, able to schedule recordin g from its
TV Guide On Screen™ program guide (no monthly fees) or VCR Plus+ codes. The unit can also record and
display digital video from IEEE-1394 ports or upscaled analog video from two AV inputs. In addition, users
can pause and review live programs at their leisure.
The tuner displays HD, SD, and analog broadcasts through Component, RGB, DVI, or composite video/SVideo outputs. View up to 2-megapixel quality video in 1080i, 720p, 480p, and 480i modes, in a variety of
aspect ratios. Dolby 5.1 surround sound is available from an optical output, and variable- and fixed-level
stereo audio ports.
Receives ATSC HD, SD and NTSC off-air, as well as analog, HD, and unscrambled QAM cable
•
channels simultaneously from TV and Cable RF inputs
• Records tuner and external AV to internal 120 GB hard drive
•
Pauses live video programming for delayed playback and review
•
Features subscription-free TV Guide On-Screen™ EPG for TV/Cable channel access and recording
•
Accepts VCR Plus+ commands for digital recording
•
Outputs HD,SD, and upscaled analog video to Component, DVI, RGB, or dual Video/S-Video ports
•
Switches and upscales cable box and other external AV sources from two analog inputs
•
Controls IR-format cable box for subscription-based programming
•
Shares digital video with specific IEEE-1394 FireWire devices (Page 6)
•
Links RS-232 control system communication to external video display when tuner is integrated via
Ethernet
• Integrates easily over Ethernet, RS-232, discrete IR and wired IR ports, and included HDV-RC IR
remote
•
Offers Dolby 5.1 surround sound from optical digital output and two analog variable and fixed-level
stereo outputs
• Sets up using front-panel control, easy on-screen menus, and control ports
•
Displays closed-captioning text and on-screen channel names
•
Mounts in 19" rack with optional RKHD kit
•
Includes HDV-RC IR remote and cables for component, DVI, RCA stereo audio, and antenna
Contemporary Research 4 IP-HDVR HD Tuner-DVR
Page 5
Specifications
Physical
Size (WHD): 17.0" [430 mm] x 3.0" [76.7 mm] x 12.8" [326 mm]
Weight: 10.2 lbs [4.6 kg]
Enclosure: Steel and aluminum with durable silver and black powder coat paint
Mounting: Shelf or rack-mount with optional RKHD Rack Kit)
Hard Drive: Internal 120 GB, approx. 12 hours HD, 24-119 hours SD quality video
Tuning Tools: Gemstar TV Guide On-Screen™ electronic program guide for tuning and recording,
and VCR Plus+ command
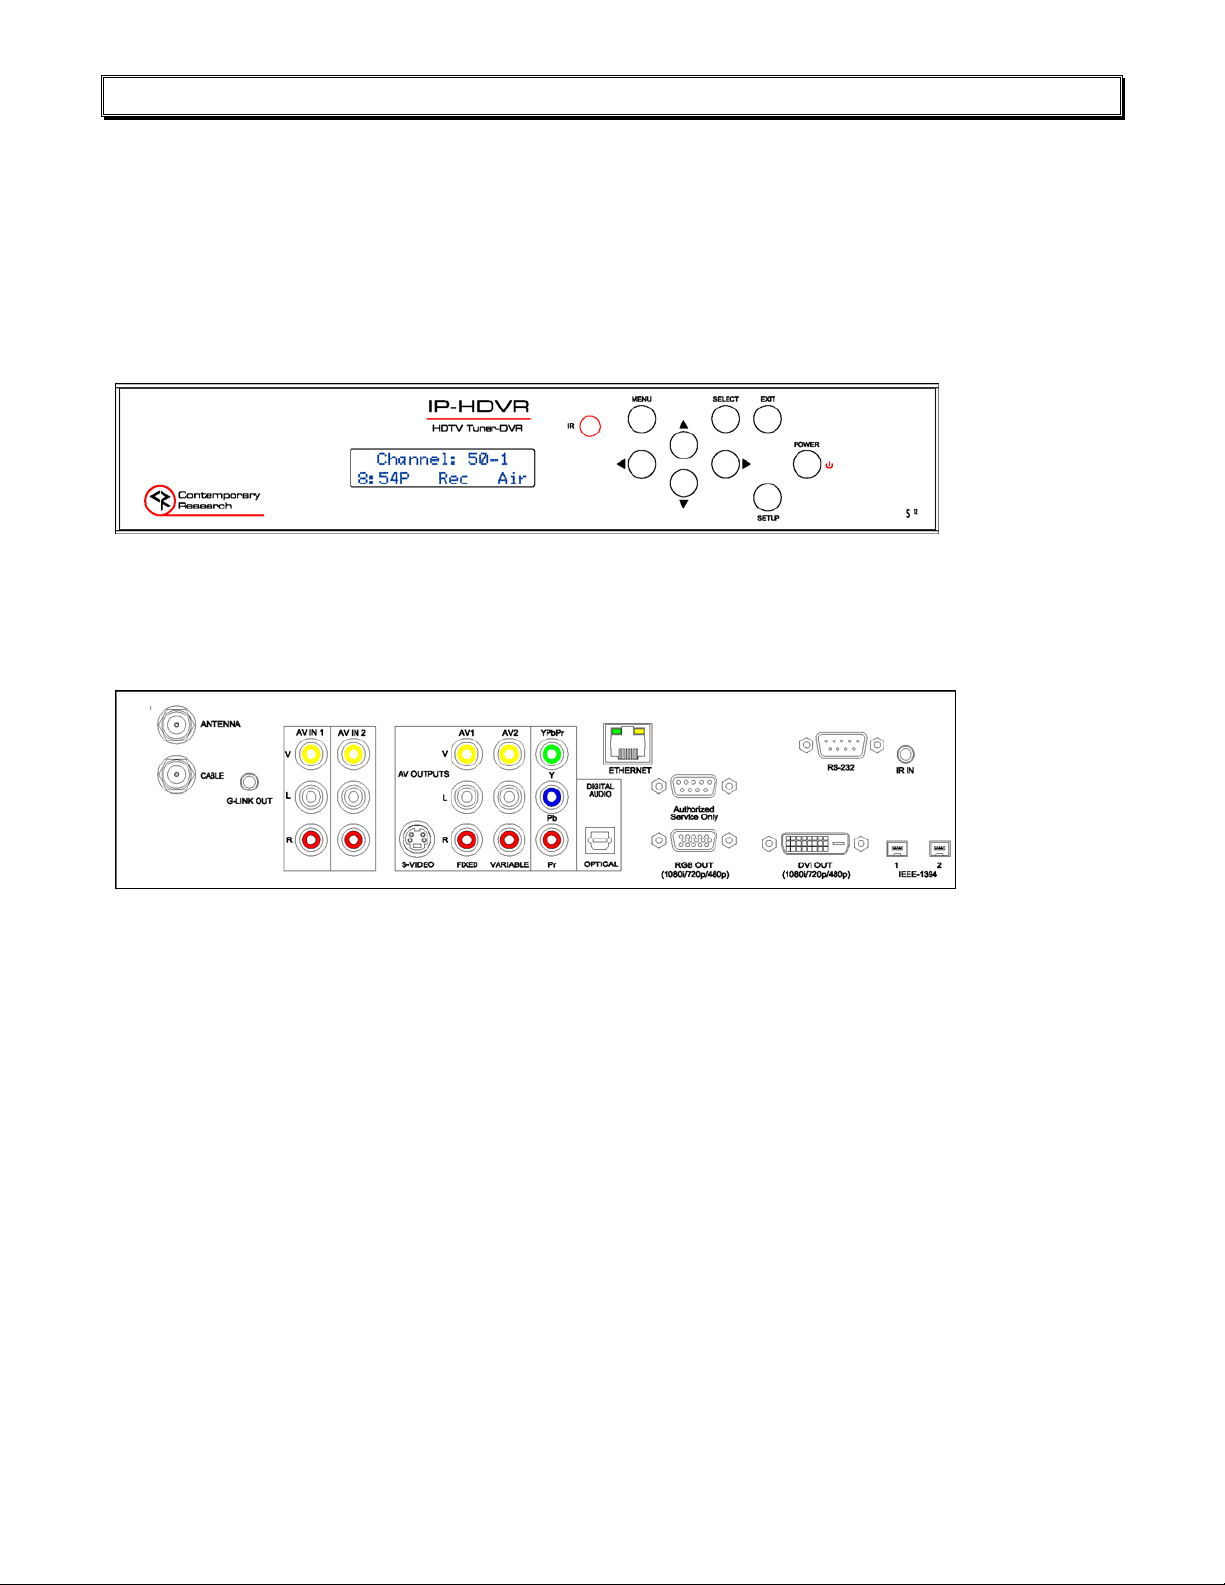
Front Panel
Display: Blue LCD, 2 lines of 20 characters each
IR: IR sensor, 57 kHz
Control: Buttons for Setup, Menu, Select, Exit, and Left, Right, Up, and Down operation
Rear Panel
TV In: 'F', female, 75 ohm
Cable In: ‘F', female, 75 ohm
Cable IR: 1/8” stereo jack for cable box control
AV 1 In: 3 RCA female jacks, Video, Left, Right - AV source or cable tuner
AV 2 In: 3 RCA female jacks, Video, Left, Right - AV source
S-Video Out: Mini DIN 4-pin, Y - 1V p-p at 75 ohms, C - 0.286 V p-p at 75 ohms
On-screen menu displayed when digital set to 480i
AV 1 Out: 3 RCA female jacks, Video, Variable Left, Right audio
AV 2 Out: 3 RCA female jacks, Video, Fixed Left, Right audio
YPbPr Out: 3 RCA Pr, Pb, Y outputs (1080i/720p/480p/480i)
Digital Audio: TOSlink optical output, Dolby Digital AC3
Service Port: DB-9 female RS-232 for factory service and firmware updates
RGB Out: RGB DB-15 femal e (1080i/720p/480p)
DVI Out: DVI-D with HDCP (1080i/720p/480p), HDMI video with optional adapter
IEEE-1394: 2 4-pin data ports, i-Link/1394
Ethernet Control: 10/100baseT RJ-45 jack
Ethernet LEDs: Right yellow LED indicates 100 baseT speed/10 baseT when off
Left green LED indicates link, blinks with data activity
RS-232 Control: DB-9 male, RS-232 data link to control system, PC, or RS-232 controlled display
300 to 115,200 baud (9600 default), 8 data bits, no parity, 1 stop bit
IR In: 3.5 mm stereo input for external IR sensor or wired IR
Discrete codes available
Power In: AC power cord, 120 VAC, 60 Hz, 35W (not shown above)
Contemporary Research 5 IP-HDVR HD Tuner-DVR
Page 6

Specifications
Video
Frequency Range: NTSC, NTSC and Clear QAM (cable) television 55.25 to 801.25 MHz
TV System: NTSC, ATSC DTV (1080i/720p/480p/480i)
Tuning: Off-air 2-69 and CATV 1-135
Aspect Ratio: Adjustable, variety of modes for widescreen 16:9 and normal 4:3 broadcasts
Captioning: DTV, set by program or customized for size, font and display attributes
Analog CC1-CC4, TT1-TT4, On/On with Mute/Off modes
Lock: Parental option for channels and/or rating
IEEE-1394 Devices
Compatible only with makes and models below:
Victor HM-DH30000
Panasonic NV-DH1, NV-DH2
Hitachi DT-DR20000, DT-DRX100
Toshiba A-HD2000
JVC HM-DH30000U
Mitsubishi HV-HD1000
Sony IP-7, IP-55, IP-220
Includes
RF loop cable
RCA composite video audio cable
Stereo RCA cable
Component YPbPr cable
HDV-RC IR Tuner Remote, 2 batteries (AA)
Options
RKHDV Kit for mounting single unit in 19" rack (2RU)
CC-232 RS-232 Cable
Contemporary Research 6 IP-HDVR HD Tuner-DVR
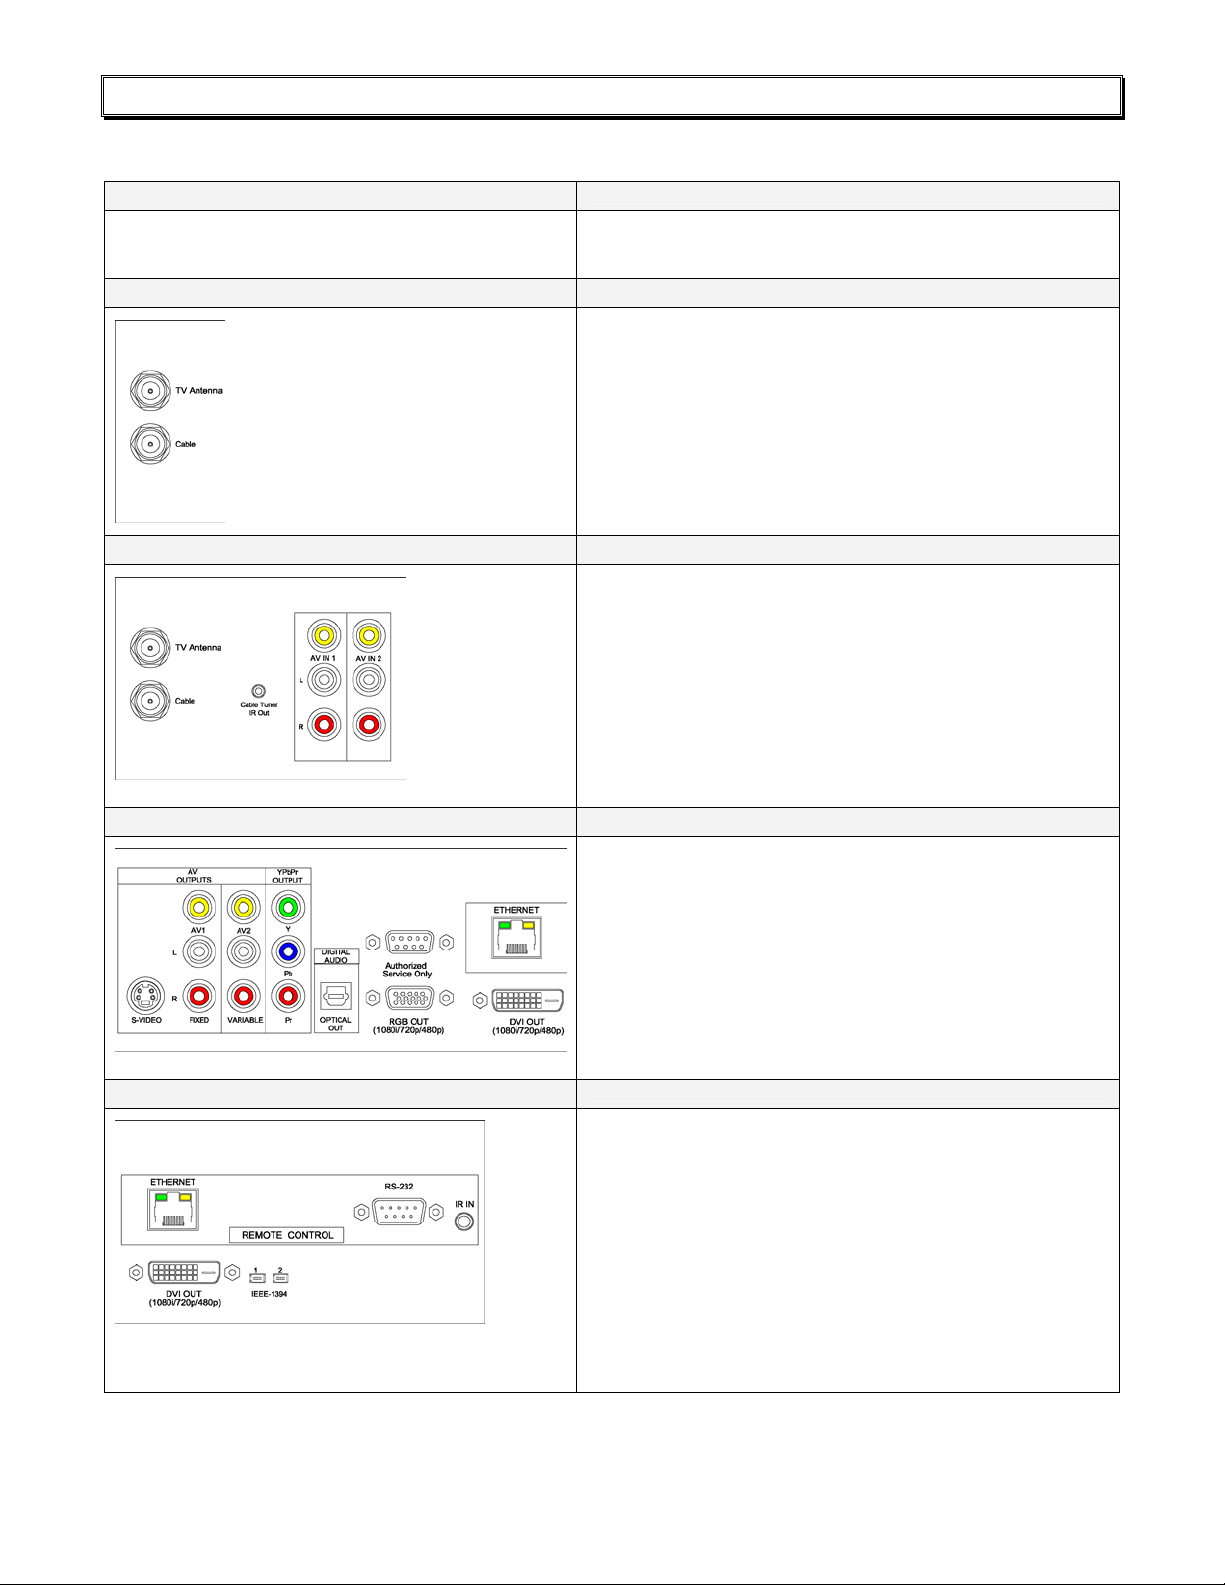
Page 7

AV and Control Connection
RF
TV Antenna F connector for off-air MATV signals
Cable F connector for CATV input
AV Sources
AV IN 1 RCA composite video, and stereo audio inputs – upscal ed to HD output settings, also
AV IN 2 Composite, S-Video, and stereo audio inputs – upscaled to HD output settings
Cable Box IR Out 1/8” mini jack connects G-Link cable for controlling cable box.
AV Outputs
AV 1 S-Video and RCA composite video and fixed-level analog audio outputs. Video is
AV 2 RCA composite video and variable-level analog audio outputs. Video is switched with
Digital Outputs
YPbPr 3 RCA Pr, Pb, Y outputs (1080i/720p/480p/480i)
Optical Audio TOSlink optical output, Dolby 5.1 or PCM digital audio
RGB RGB DB-15 female (1080i/720p/480p)
DVI DVI-D with HDCP (1080i/720p/480p), HDMI video with optional adapter
IEEE-1394 2 4-pin data ports, i-Link/1394
Control
Service RS-232 port for factory upgrades only
RS-232 DB-9 male acts as programming and control system port, also acts as pass-through
Ethernet RJ-45 connection offers bi-directional IP Telnet control and access to Web page
IR In Input accepts wired IR from control system, external IR-RXC sensor, or ChannelPlus,
The IP can receive both at the same time, when the TV Guide is set to receive Cable;
the tuner will first search for analog cable channels, then digital off-air broadcasts, and
then goes back to cable to search for digital cable broadcasts.
used for Cable Box AV input
switched with HD output, audio is always present
HD output, audio is always present
control port to video display, when control system integrated via Ethernet
Audioplex, SpeakerCraft, or Xantech remote IR sensors
Contemporary Research 7 IP-HDVR HD Tuner-DVR
Page 8

Front Panel Setup
There are a number of parameters that can be set by front-panel Setup commands. In normal operation the
Up/Down arrows select channels, and the Left/Right arrows adjust volume.
• Pressing Setup enters the setup menus, shows last menu accessed
(The Menu button accesses on-screen menus)
• Pressing Up and Down arrow keys steps through the IP-HDVR options
(Tip: Press Up to access output, Down to jump to IP menus)
• Pressing Left and Right keys steps through options for each front-panel menu
• Press Select to save desired option
• Pressing Exit or Setup exits the front-panel setup mode
Front Panel Menus
Menu Parameters
Output RGB
DVI
Component
Video
Format 1080i
720p
480p
480i (Component output only)
Variable 1
Variable 2
Variable 3
Native
See chart on next page for more information
Baud 300 9600 (default)
600 19.2K
1200 38.4K
2400 57.6K
4800 115.2K
Com 8,N,1 (default) 8,M,1
8,0,1 8,S,1
8,E,1 7,M,1
8,N,2 7,S,1
7,0,1
7,E,1
7,N,2
RS-232 CRTL 0=Disable
1=Enable (default)
Contemporary Research 8 IP-HDVR HD Tuner-DVR
Page 9
Front Panel Setup
Menu Parameters
Unit 1-9
Panel Lockout None (Default)
Ch+Menu
Vol+Menu
Ch+Vol+Menu
Pwr
Setup
Menu
All
Setup+Menu
Pwr+Set+Menu
Cursor buttons active for Setup or Menu modes, Exit returns buttons to current
locked or unlocked status
IR Receive 0 - No IR reception
10 - Normal (Default)
Display Line 2 Normal – Time, Air/Cable input, Control Function
Lights – represents status LEDs (LA:RX: TX: IR )
Link/Act status, RS-232 RX and TX, and IR In
IP Port IP port for Telnet communication - Left/Right steps through number positions
(blinking cursor position), Up/Down enters number 0-9, Select saves, Exit leaves
edits, stays at current menu
Gateway Quad address – Left/Right steps through number positions (blinking cursor
position), Up/Down enters number 0-9, Select saves, Exit leaves edits, stays at
current menu
Subnet Mask Quad address - Left/Right steps through number positions (blinking cursor
position), Up/Down enters number 0-9, Select saves, Exit leaves edits, stays at
current menu
IP Address Quad address – Left/Right steps through number positions (blinking cursor
position), Up/Down enters number 0-9, Select saves, Exit leaves edits, stays at
current menu (192.168.001.231=default, 0.0.0.0 = DHCP)
IP Mode Selects Static (default) or DHCP IP modes
Firmware Shows version
IP-HDVR V1.5
MAC Add Shows network MAC address
Ex: 0014C8 00 0001 (last 2 bytes is the serial number)
Display Formats
The Display Format setting direct how the IP-HDVR will output the signal in response to different formats in
broadcast programming.
Code Display Format Broadcast Format Output As
0 1080i All 1080i
1 720p All 720p
2 480p All 480p
3 480i All 480i
4 Variable 1 1080i 1080i
720p 720p
480p/480i 480p
5 Variable 2 1080i/720p 1080i
480p/480i 480p
6 Variable 3 1080i/720p 720p
480p/480i 480p
7 Native 1080i 1080i
720p 720p
480p 480p
480i
480i (YPbPr), 480p (RGB, DVI)
Contemporary Research 9 IP-HDVR HD Tuner-DVR
Page 10
Getting Started
Here’s a brief overview of the steps needed to integrate the IP-HDVR.
Front Panel Setup
RF Input
Cable Box/AV Input Integration
Use Front Panel Setup to select output, format, RS-232
parameters, and/or Ethernet settings.
• Connect TV Antenna and/or Cable RF feeds.
• TV Guide Setup will determine if tuner will
search for off-air only or cable analog/digital and
off-air digital channels.
• After TV Guide Setup (p10), use Channel Menus
to search, screen, and test broadcast channel
operation.
• Use TV Guide Channel Setup (p19) to filter
channels displayed in the Program Guide.
• Connect Cable Box AV output to:
o AV IN 1 inputs
o Cable input for AV on channel 2, 3, or 4
• Connect G-Link IR cable to Cable Tuner IR Out
• Attach IR emitter to underside of cable box, IR
emitter below the box’s IR sensor
• TV Guide Setup will link tuner to input and IR
codes for cable box control
• If you are not connecting a cable box, both AV
inputs can be switched through the tuner
AV Outputs
Control
• Connect high-definition display to Component,
RGB, or DVI outputs (Use optional adapter to
connect an HDMI source to the DVI output)
• Connect video display to AV 1 or AV 2 outputs
• The IP-HDVR can switch between HD and video
outputs (no video is present when an HD video
output is selected)
• Connect audio equipment to Optical and/or
analog outputs – AV 1 is fixed, AV 2 is variable
• Audio is always present for all outputs
• Connect Ethernet or RS-232 control cable to
control system
• Use front-panel menus to set IP address or RS232 parameters
• The IP-HDVR can also provide pass-through
bidirectional control of a display through the RS232 control port when the tuner is integrated via
the Ethernet port
• For IR control, connect external IR sensor or
wired IR system control port to IR IN, discrete IR
codes are available in AMX, Crestron, and Pronto
format
Contemporary Research 10 IP-HDVR HD Tuner-DVR
Page 11
On-Screen Menus
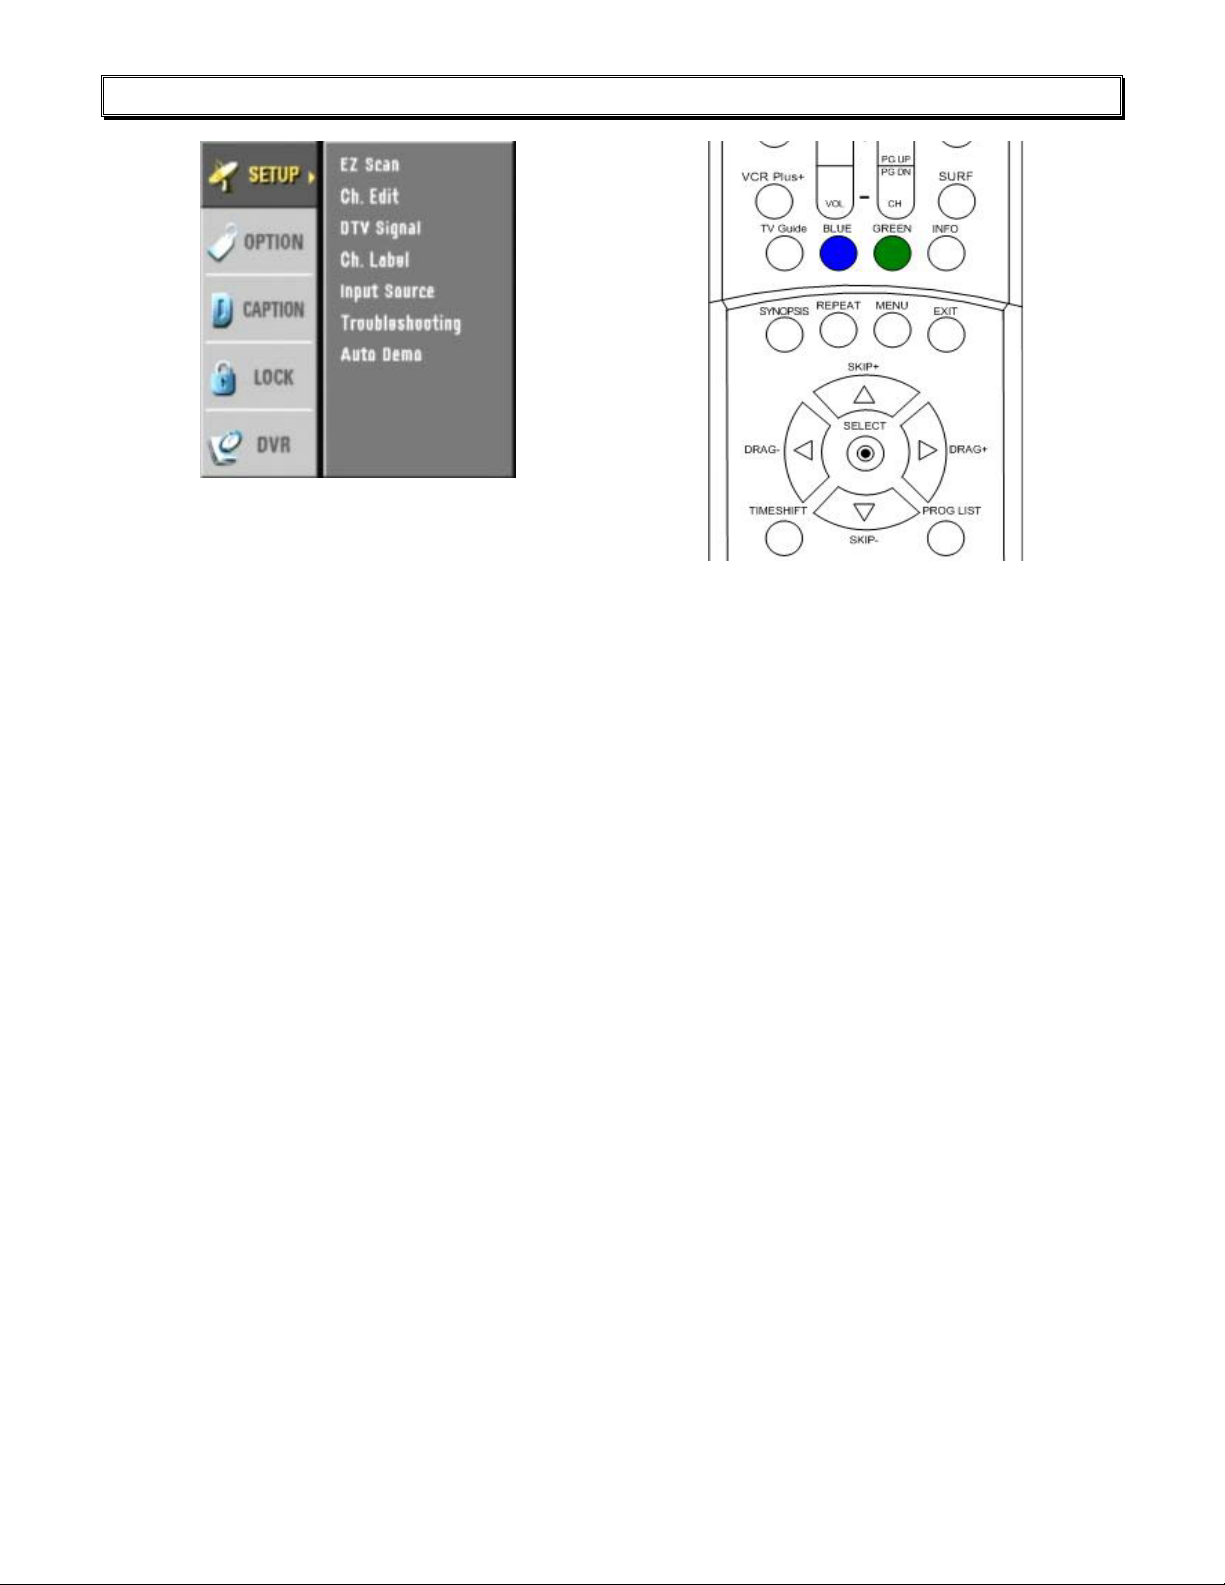
On-Screen Menus HDV-RC IR Remote
The remaining tuner capabilities can be set up by easy-to-use on-screen menus. The menus can be accessed
from the HD-RC IR remote control using the Menu, Arrow, Select (), Surf, and Exit buttons. You can also
use similar buttons on the IP-HDVR front panel.
• Menu – Displays the first level of the on-screen menu, step backward from menu levels
• TV Guide – Displays the TV Guide On Screen Electronic Program Guide (EPG)
• Arrows – Use up/down keys to select main menus, left/right arrow keys to move through sub-
menus
• Select – Can step forward into sub-menus or confirm an action, the button in the center of the
directional arrows is the same function as Select
• Surf – Selects channels for surf list in Edit Channel mode, steps through favorite channels in normal
operation
• Exit – Exits menu
Analog and Digital Tuning
One of the biggest paradigm shifts in digital TV is how channels are accessed. Gone is the familiar Channel
33. Now you have 33-0, 33-1, 33-2, and so on. In a nutshell, the new tuning options are:
• Analog Channels. Entering the number-0 accesses the traditional analog TV channel.
• Digital Channels. Entering the same channel-1 tunes the digital equivalent of the analog channel.
Note that the digital channel is broadcast on a UHF frequency. Digital tuners see the channel ID (NN-
1) in the signal and lists by that name instead of the actual frequency. This way, the broadcasters
keep their channel identity, even when analog goes away.
• Multicast Digital Channels. Because digital is more compressed than analog, broadcasters are
often including additional sub-channels, listed as NN-2, NN-3; up to 6 if the station is only
broadcasting SD quality programming.
• Two-Digit Tuning. If you are currently watching a digital channel, entering the old channel format,
such as 33, will access 33-1. If you are watching an analog channel, entering 33 will take you to
33-0.
Contemporary Research 11 IP-HDVR HD Tuner-DVR
Page 12
TV Guide Setup
It’s essential to setup TV Guide when you first install the IP-HDVR. The settings determine how EZ Scan
searches for channels. If the Guide is set for off-air, the tuner will not look for cable channels. If you set the
Guide for Cable, it will look for analog cable channels (CATV) then digital TV channels (DTV) it will return to
the Cable input and search for digital cable channels (DCATV). The following section covers the primary
setup screens – there are a number of screens not shown that will be obvious in function.
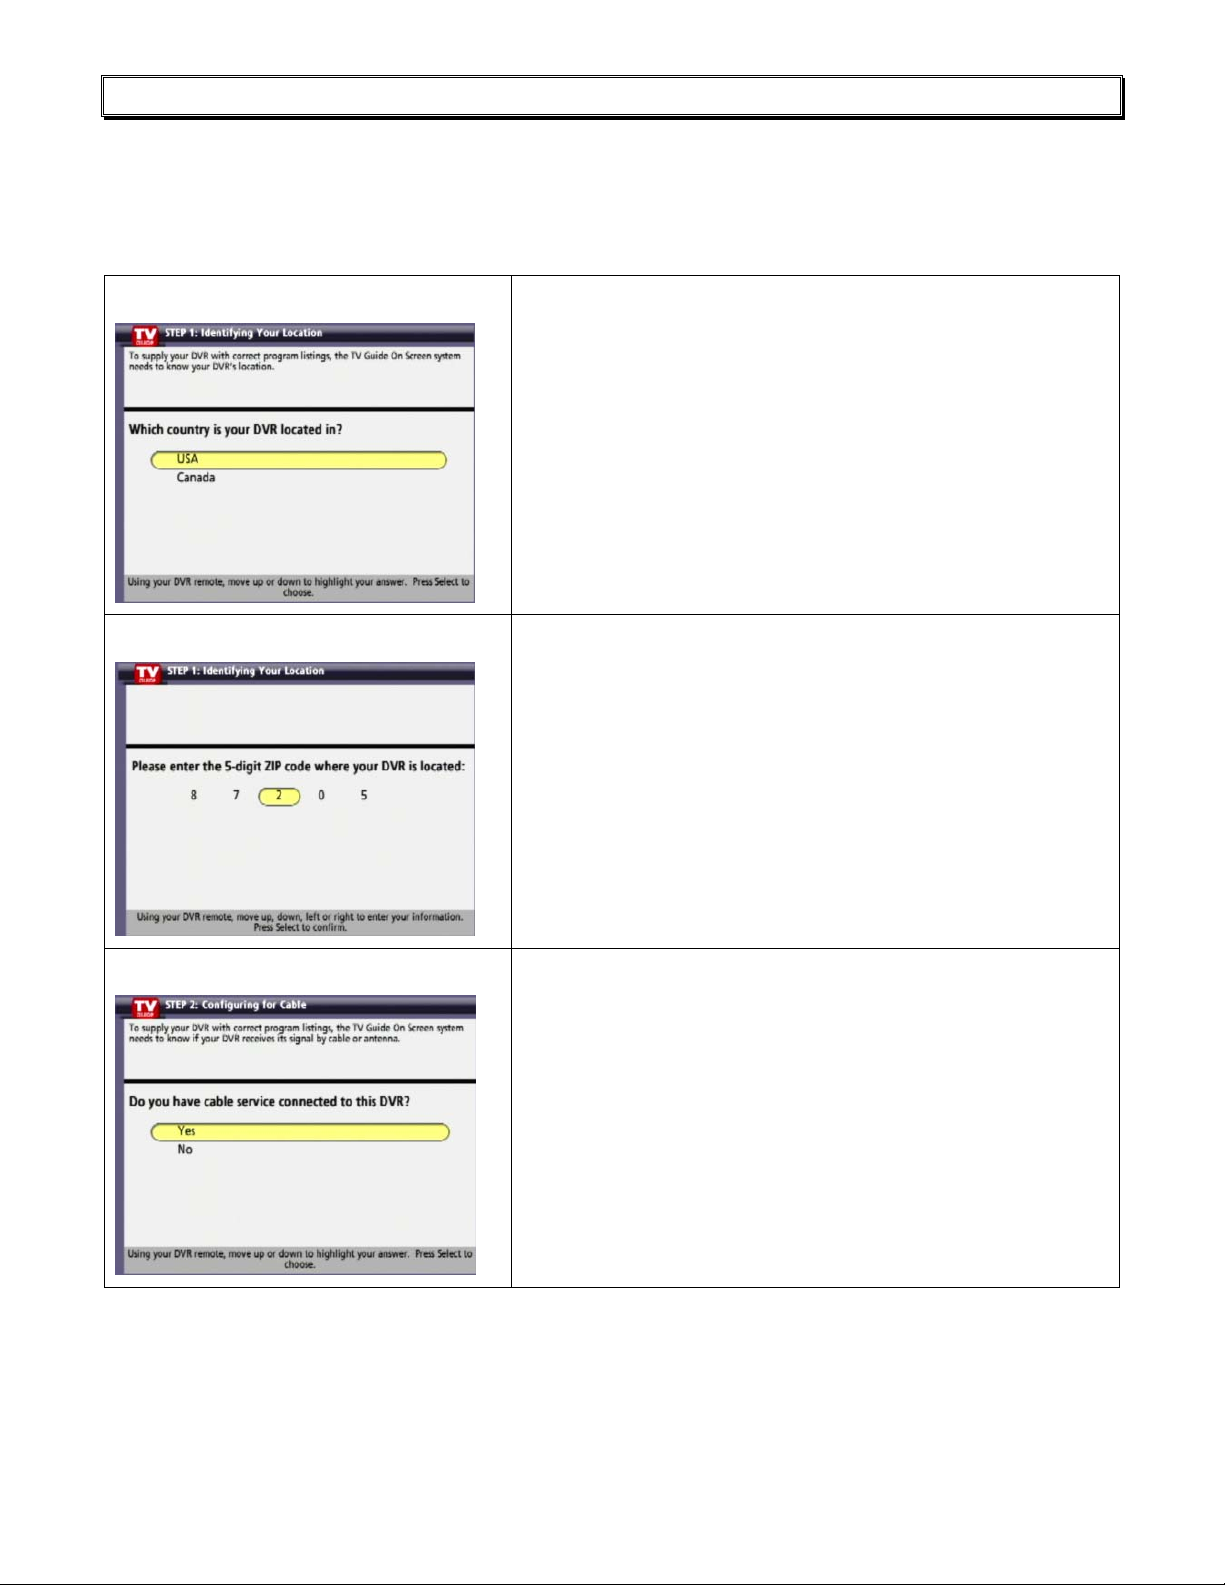
Country
ZIP
Press TV GUIDE, then MENU to enter the top menu bar. Press
the RIGHT ARROW key to select SETUP, then cursor down to
Change System Settings. Press SELECT to begin setup process.
Select USA or Canada.
Enter ZIP code.
Use LEFT and RIGHT arrows to position cursor, UP and DOWN
to change numbers.
Cable/TV
Select Cable or TV-only operation.
Contemporary Research 12 IP-HDVR HD Tuner-DVR
Page 13

TV Guide Setup
Cable Box
Cable Box Code
If you choose Cable, and also indicate that you have an
attached cable box, you can define if the video will be sent via
channel 2-4 or to the AV 1 input.
The next screen will ask for the make of cable box.
TV Guide supports 60 brands of cable boxes, a complete list is
provided at the end of this manual.
There additional screens to try out codes for boxes not listed,
and to test control operation.
Confirm
At the end of the process, you’ll have the option of confirming
the information, or to redo the operation.
You can change TV Guide settings at any time. This screen will
appear when you enter TV Guide Setup.
Contemporary Research 13 IP-HDVR HD Tuner-DVR
Page 14

Menu Setup
Channel Menus
EZ Scan Channels
Edit Channels
DTV Signal
Before starting scan, set up TV Guide for off-air or cable
operation. To receive both off-air and cable, set TV Guide
for cable operation.
• Press MENU to display the menu window
• Press SELECT or f to select the EZ Scan menu
• Use the ARROW keys to select off-air (Antenna) or
CATV (cable) format
• Press SELECT to enter format and begin auto-scanning
Note that re-scanning channel will erase Favorite Channel and
Surf settings. Go to Channel Edit to restore settings.
The Edit Channel window is useful, easy tool for managing your
favorite channels. The active channels (black) on the list will be
selected when you send Channel Up and Channel Down
commands. The inactive channels can still be selected from
direct numeric channel access commands (xx-xx)
• Select the Ch Edit menu
• Use the left/right arrows to select a channel group TV
(analog TV), CATV (analog cable), DTV (ATSC TV) ,
CADTV (ATSC cable)
• Highlight an active channel (black text) with arrows
• The IP-HDVR will display the highlighted channel
• Press SELECT to remove (dimmed text) or restore a
channel to the channel list
• Press SURF to add to Surf list
• Press MENU to exit channel editing
Press to view signal level of the current channel. Same as the
Signal IR and RS-232 command. Identical to Signal command on
remote or RS-232.
The Signal icon is real-time, so you can adjust antenna for best
reception.
Contemporary Research 14 IP-HDVR HD Tuner-DVR
Page 15

Menu Setup
Channel Labels
Input Source
Add TV channel logo, used when channel number is displayed or
Info button is pressed.
Use arrows to navigate icons, press Select to choose icon.
Change channels using Channel Up and Down on remote or RS-
232 commands.
Select current source:
• Digital channel – current digital channel
• Analog channel – current digital channel
• AV1 input
• AV 2 input
When you access the menu, the current source on screen will be
checked.
Troubleshooting
Auto Demo
This menu accesses an interactive troubleshooting guide for
basic tuner problems. For example, selecting “Unable to receive
TV Signal” will display an option to re-scan TV channels.
Plays a stored demonstration video
Contemporary Research 15 IP-HDVR HD Tuner-DVR
Page 16

Menu Setup
Option Menus
Audio Output
Audio Language
Selects Dolby digital or PCM digital audio output
Selects English, French or Spanish languages
Clock
Aspect Ratio
Menu Language
DVI Level
Use the Left Arrow button to select the year. TV Guide will insert
clock time.
Select to choose the default aspect ratio.
The Ratio command will rotate through the same options, but
the tuner will revert to the default ratio when the channel is
changed.
16:9 Widescreen, 170p, 1080i output
Set by Program, Standard, Expansion, Shrink, and Cinema Zoom
4:3 Standard Video, 170p, 1080i output
Set by Program, Normal, Wide, Spectacle, Zoom 1, Zoom 2, and
Cinema Zoom (2.35:1)
16:9 Widescreen, 480P, 480i output
Set by Program, Letter Box, Cropped, or Squeezed
English, French, or Spanish
Normal and Expanded (recommended)
Contemporary Research 16 IP-HDVR HD Tuner-DVR
Page 17

Menu Setup
Caption Menus
Caption Type
Caption Options
Lock Menus
Select Caption Type:
• Off
• CC 1-4
• Text 1-4
Select Caption style:
• Style – Set by Program or Custom
• Size – Standard (15 pixels), Large (21 pixels), or Small
(11 pixels)
• Font – Select from 8 font styles
• Text Color – Choose from 8 colors
• Text Opacity – Solid, Flashing, Translucent,
Transparent
• Edge Color – colors for selected edge type
• Edge Type – None, Raised, Depressed, Uniform, Left
Shadow or Right Shadow
• Background Color - Choose from 8 colors
• Background Opacity - Solid, Flashing, Translucent,
Transparent
Blocks access to inputs and channels
• Lock System – Activates parental control
• Set Password – Enter 4-number password
• Block Channels – Select specific channels from the
channel list
• Movie Rating – Select one or more ratings for blocking
• TV Rating-Children – Choose filtering by Age and
Fantasy Violence levels
• TV Rating-General – Choose filtering by Age, Dialog,
Language, Sex and Violence
• Aux Block, Inputs AV 1 and AV 2
Contemporary Research 17 IP-HDVR HD Tuner-DVR
Page 18

Menu Setup
DVR Menus
Caption Type
Program List
Displays the on-screen TV Guide.
More information available in the TV Guide System section.
Displays list of recorded Programs.
The graphic list displays a title, file information, and a thumbnail
image for each file.
• Play
• Delete
• Title Edit (On-screen keyboard)
• Detail (File information)
• DVHS Out – record to IEEE-1393 device
HDD Format
Record Quality
Select only if you want to delete all programs from the hard
drive.
Preset the recording quality for the DVR from analog broadcasts
and AV inputs. Recording quality for digital programs is preset.
• Best (24 hours)
• High (34 hours)
• Medium (64 hours)
• Basic (119 hours)
• HD digital (21 hours)
• SD digital (85 hours)
Actual recording hours above vary slightly according to content
variables. In addition, the Demo video cannot be erased, so
actual HDD space is less than 120 MB.
HD broadcasts average about .094 GB per minute, similar to
Best; SD recordings use about .024 GB per minute.
Contemporary Research 18 IP-HDVR HD Tuner-DVR
Page 19

DVR Control
Manual Recording
• Send the REC/EDIT IR or RS-232 command
• Press the UP/DOWN arrows to set recording
from No Limit, 30, 60, 90, 120, 180, or 210
minutes
• For No Limit, recording will continue until you
send a STOP or HDD is full
• Press REC/EDIT or SELECT to display elapsed
time record meter (does not show in recording) –
press EXIT to clear display
Program List
Playback
Standard Control
• Send PROGRAM LIST to display on on-screen
list of titles (also available from the DVR menus)
• Use the LEFT/RIGHT arrow keys to scan
through the list
• Use the DOWN arrow keys to display more
options for each title, including
o PLAY – play ti tle
o DELETE – delete title
o TITLE EDIT – edit title with on-screen
keyboard
o DETAIL – more info, including file size
o DVHS OUT – backup to DVHS
Several control options are available for playback of
recorded (and timeshifted) programs.
• PLAY begins playback
• PAUSE will pause the playback
• STOP will exit playback and return to current
broadcast
• REW and FF can scan forwards or back from X2
to X300 speeds
• Press PLAY/SLOW for slow-motion during
playback
• The START and END buttons will jump to the
start or end of the program
• Press REPEAT once to set a start point in the
playback, then later to set an end point
• Section will repeat until you press END or
REPEAT (you can use REW, FF, SKIP and
DRAG to set the points
Smart Control
• SKIP FWD and BACK looks at scenes to find
transition points, handy for skipping commercials
• DRAG FWD and BACK is a fast way to move
through the program – just hold down to jump to
a new point.
• SYNOPSIS is an auto SKIP search, stopping
briefly at points, then moving on
Contemporary Research 19 IP-HDVR HD Tuner-DVR
Page 20

DVR Control
TimeShift
Video Clips
Clip Edit
This feature gives you the ability to pause a live program
for later review. The video is saved in temporary HDD
memory, and will continue until HDD is out of space.
• Activate the TIMESHIFT function.
• The program will begin recording in the
background
• During the session, you can press TIMESHIFT
again to set a Bookmark (Blue) you can return to
during playback, pressing TIMESHIFT later on
will set a new bookmark (Green)
• During playback, press the BLUE or GREEN
buttons to jump to the Bookmarks
There are two ways you can lift video clips from recorded
or TimeShifted programming
• During playback of a recorded segment, press
REC/EDIT to set a start point for a video clip,
then press REC/EDIT at the end of the section
you want to mark.
• You can use FF, SKIP, and DRAG to move
quickly to the next point
• You can create 10 separate clip points within a
given program
• Press STOP to end the clip session
• Then make one of three responses to the on-
screen menu
o Save the marked clips as separate
programs
o Undo – clip marks are ignored
o Cancel – cancel all clips and watch
program
Only the selected clips are saved, the original, remaining
programming is discarded.
Only use STOP to end session – if you press POWER, the
clips may not be saved.
Clips need to last at least 10 seconds.
Clip Record
This function is similar, used while a program is being
recorded in TimeShift mode.
• Press REC/EDIT during a TIMESHIFT session
The selected clips are saved, the original, remaining
programming is saved in temporary TimeShift memory.
Only use STOP to end session – if you press POWER, the
clips may not be saved.
Clips need to last at least 10 seconds.
to set clip start and end points
• Repeat to set other clip points
• Press STOP to stop the TIMESHIFT and save
the clips
Contemporary Research 20 IP-HDVR HD Tuner-DVR
Page 21

TV Guide Operation
Listings
Layout
The TV GUIDE command displays a graphic channel
Guide. You can navigate the listings using your arrow
keys. The page is divided into three general sections;
Menu Bar, Video/Ad frame, and Info frame.
You can access the top Menu Bar by pressing MENU, then
pressing Right or Left arrow.
• Listings – show by channel and time
• Sort – show by category
• Promotions – display promotions
• Setup – select setup options
• Messages – display list of messages
• Schedule – Favorite and channels set for
recording
The Video/Ad frame on the left displays current channel
video at the top and two Features and Ad panes.
The Info frame shows the details selected by the Menu
Bar. You’ll notice that channel listings are coded by color:
• Green – Sports
• Purple – Movies
• Blue - Children’s
• Teal - Other
The TV Guide channel listings may not presently include all
local channels. Some small or independent stations may
not be listed in the Guide database, and some stations
may not be broadcasting digital program information as
yet.
Recording
When a title is selected, you’ll see an expanded listing
below that includes Station, time sl ot and program
information. The listing also activates three softkey
functions.
• BLUE Button = Add to Favorite TV Program list
• GREEN Button = Start Recording
o GREEN cancels recording
o BLUE select frequency
Once – this time only
Regularly, whenever program
appears on the same time and
channel
Weekly – when it appears on the
same day and time
• Info Button = displays full program information
Custom touch panel designs should include similar BLUE
and GREEN softkey icons, as they are used to access for
several features in TV Guide.
Contemporary Research 21 IP-HDVR HD Tuner-DVR
Page 22

TV Guide Operation
Schedule – Favorites/Record
Sort
Select the Schedule option on the top menu bar. This
displays a list of Favorite programs or those scheduled for
recording.
Using this tool, you can easily remove programs from the
Favorites list, or change the frequency (Once, Regularly, or
Weekly).
You can also view the list of programs listed for recording,
and change the frequency (recording cycle) or delete from
the schedule.
The Sort menu simplifies finding programs you want to
record.
Select Sort from the top menu, move down one step to the
Sort menu, and pick:
• Alphabetical
• Movies
• Sports
• Children
• Educational
• News
• Variety
• Series
• HDTV
The screen will display a list of programs by sorted by
category.
Setup - Channels
To screen channels displayed in the TV Guide, go to the
Setup option on the top menu, then cursor down and
select Change Channel Display.
Use the arrow keys to highlight any channel, then use the
GREEN and BLUE keys to remove a channel from viewing
in TV Guide.
Contemporary Research 22 IP-HDVR HD Tuner-DVR
Page 23

HDV-RC IR Remote
The HD-RC IR Remote included with the IP-HDVR can be used to setup the tuner and for daily operation. All
of the functions on the remote have equivalent commands in RS-232, Ethernet, and Wired IR formats. In
addition, the IP-HDVR front panel buttons can perform Power, Channel, Volume, and Menu control.
Power
Turns tuner on and off. Discrete on and off IR commands are
available as well.
Volume Control
Use the Vol+, Vol- and Mute buttons
Channel Selection
The key change in digital tuning is the need to add a dash (-) and
number after the traditional channel number. Analog channels are
accessed using XX-0, digital channels using XX-1 (or -2, -3, etc).
Ch+, Ch- and PrevCh can be used to access and recall channels.
The Surf button in the Menu section can step through a list of
favorite channels.
Menu Operation
Press Menu to access the on-screen menus.
Use the directional arrows, Surf, Select and Exit to navigate the
menus. The ~ button in the center of the directional arrows is the
same function as Select.
Special Functions
• CC steps through available closed-captioning options
• Audio selects Mono, Stereo, SAP analog audio output modes
• Signal displays an on-screen signal strength meter
• Ratio steps through aspect ratios, options depend on
channel and output types
Guides
• Info launches on-screen information window
• Station opens up the Station Guide
• Date selects the Date field in Guides
• Pgm displays the Program Guide
Contemporary Research 23 IP-HDVR HD Tuner-DVR
Page 24

Ethernet Setup
Ethernet Connection
The IP-HDVR typically communicates over a network using a static IP address, and is shipped set to a
default address:
IP Address: 192.168.1.231
Subnet Mask: 255.255.255.0
Gateway Address: 000.000.000.000
Local Port set to 23 (Telnet standard)
Odds are, at least the IP address will change when the IP-HDVR is connected to the client’s network. One
your first steps will be to obtain a static address from the client’s IT department, as well as an external
gateway IP address if you intend on supporting the system from your office or anywhere outside the site’s
firewall.
Once you change the settings, create a label noting the settings and attach to the back of the IP-HDVR.
Reset IP Address
Since its possible another network device is using the default IP address, the best approach is to enter the
new settings offline, outside the network. You can use one of two, requiring one of two offline options:
1. Direct PC Connection. Use an Ethernet “Crossover” cable to make a direct connection to the IP-HDVR
Ethernet port and your PC. Two pairs of wires are reversed at one end to create a direct
send/receive path for data.
2. Hub or Switch Connection. Another approach for connection is to use a standard Ethernet hub or
switch between your computer and the IP-HDVR. Using standard Cat5 Ethernet cables, connect your
PC to one port, and then connect the IP-HDVR to the second port.
RS-232 and Telnet Terminal Communication
You can communicate with the IP-HDVR with HyperTerminal using an RS-232 or TCP/IP connection to Port
23.
Contemporary Research 24 IP-HDVR HD Tuner-DVR
Page 25

Ethernet and
RS-232 Control Protocol
Overview
The IP-HDVR full duplex Ethernet/RS-232 scheme enables a system programmer to control all TV Tuner
functions as well as monitor 3 groups of TV Tuner status. All commands are sent as ASCII strings. No delays
between characters or commands are required, as data is interrupt driven and buffered.
The 3 status groups are: Channel/Source Select, Audio Levels/Mode and Front Panel. The Mute A/V buttonfunction status from the IP-HDVR front panel has been grouped with the Channel/Source for simplicity in the
most common modes of operation. Each of the groups has one ASCII status response string containing all of
the status data for that group. The current status string of a group is sent from the IP-HDVR whenever a
valid command for that group is received by the IP-HDVR RS-232 port or front panel. A group's status may
be requested at any time via the RS-232 port. Status of all 3 groups is sent at power up. The format of each
group's status response string remains the same always.
Up to 9 IP-HDVR units may be cabled together and addressed for individual control from a single RS-232
port. Each IP-HDVR is assigned a unique unit code.
Communications parameters (Front Panel Mode 1) are 300 to 9600 baud, 8 data bits, No parity, and 1 stop
bit. Factory default is 9600 baud, Unit#1.
All settings are saved to NVRAM in the IP-HDVR.
The tuner will accept non-standard RS-232 control such as voltage that swings from 0 to +5 VDC, commonly
found when IR ports are used to send RS-232 commands.
General protocol specifications
Characters in command strings to the IP-HDVR are common ASCII keyboard characters.
Command strings sent to the IP-HDVR begin with the ASCII > (greater than symbol) as an 'Attention'
character and end with carriage return - ASCII CR, Hex $0D, or keyboard Enter - as an 'End-of-command'
character.
Responses from the IP-HDVR begin with the ASCII < (less than symbol) as an 'Attention' character and end
with a carriage return followed by line feed an ASCII LF or Hex $0A as 'End-of-command' characters.
A carriage return is required at the end of each command and is assumed in all examples.
Command String Structure
[Attention] (Unit#) [Command] (Parameters) [Return]
Attention Single character (>) starts the string
Unit# The Unit# is expressed as an ASCII 0-9 when used in multiple tuner applications.
To address all units, use a Unit # of 0 (Zero)
No unit number will default to Unit#1
Command A two-character command
Parameters Added attributes to some commands
Return A carriage return ends the command string, you may use ASCII CR, Hex $0D, or keyboard
‘Enter’ in programming. For simplicity, the programming examples in the manual will not
show the ‘CR’ – so remember, you’ll need to add it in your control code.
Contemporary Research 25 IP-HDVR HD Tuner-DVR
Page 26

Ethernet and RS-232 Protocol
Code Function Operation
Data
IP= IP Address IP returns the current MAC address, current IP address,
subnet mask, and gateway. Response example (S or D at
end of IP signifies DHCP or Static address):
$MAC=0014C8000001 / 1 $IP=192.168.001.231S
IG=000.000.000.000 IM=255.255.255.000 IY=1
IP=xxx.xxx.xxx.xxx Defines IP address, then sends status
(0.0.0.0 = DHCP)
IG= IP Gateway IG Returns current MAC address and IP information
IG=xxx.xxx.xxx.xxx Defines IP gateway, then sends status
IM= IP Subnet Mask IM Returns current MAC address and IP information
IM=xxx.xxx.xxx.xxx Defines IP subnet mask, then sends status
IY= IP Mode IY Returns current mode
IY=1 Static (default)
IY=2 DHCP
IX= Telnet Port IX Returns current Telnet port (00023 default)
IX=xxxxx Defines Telnet port
Front Panel
S4= Set front panel lockout mode 0 None
1 Ch+Menu
2 Vol+Menu 6 Menu
3 Ch+Vol+Menu 7 All
4 Pwr 8 Setup+Menu
5 Setup 9 Pwr+Set+Menu
Q5= Set IR Receive mode 0 - No IR reception
10 - Normal (Default)
KK=105 Menu Opens on-screen menus
KK=106 Arrow Right Arrow Right
KK=107 Arrow Left Arrow Left
KK=108 Arrow Up Arrow Up
KK=109 Arrow Down Arrow Down
KK=110 Select Select
KK=111 Exit Exits menus
KK=89 Hel p Displays Menu Help screens
P1 Power On On
P0 Power Off Standby, mutes audio and video
PT Power Off/On Power toggle
XX Power On On (same as 232-series Mute Off)
XM Power Off Standby (same as 232-series Mute On)
XT Power Off/On Power toggle (same as 232-series Mute Toggle)
Tuning
TC= Select tuned channel
TU Tune channel up
Example: ‘>3TU’
TD Tune channel down Selects next lower channel in channel list
TP Previous channel Selects previously viewed channel
KK=88 Surf Selects next channel up in Surf list, cycles to beginning
Tunes analog (xxx-0) and digital (xxx-1) channels
Examples: ‘>TC=28:1’ Selects channel 28-1
‘>TC=28-2’ Selects channel 28-2
‘>TC=32’ Selects channel 32-1 (if current
channel is digital)
Selects next higher channel in channel list
Bumps Unit#3 tuned channel up
Contemporary Research 26 IP-HDVR HD Tuner-DVR
Page 27

Ethernet and RS-232 Protocol
Code Function Operation
Display
KK=82 Ratio Steps through aspect ratios, options depend on channel and
output types
KK=80 Freeze Freeze image, toggles
KK=81 Signal Displays an on-screen signal strength meter
KK=115 Closed captions Steps through captioning options
Audio
VU Ramp volume up Starts volume ramping up
VD Ramp volume down Starts volume ramping down
VX Volume Mute off Restores audio volume to previous level
VM Volume Mute on
Example: ‘>VM’
VV Stop volume ramp Stops volume ramping
VT Toggle Volume Mute A lternates audio mute on and off
KK=85 Audio Mode Step through audio mode options for mono, stereo, SAP
Status Request
SQ Request Q Mode status Unit sends “Q” Mode status string
SS Request Front Panel status Unit sends “S” Front Panel status string
ST Request Channel status
Example: ‘>ST’
SV Request AV status Unit sends “V” Audio status string
RS-232 Control
R4= RS-232 Control 0=Disable
R5= Baud Rate 1=300 6=9600 (default)
R6= Comm Parameters 0=8,N,1 (default) 11=8,M,1
A carriage return is required at the end of each command and is assumed in all examples. The ‘=’ sign for
parameters may be omitted if desired, though it is helpful for clarity in checking programming.
Turns off audio outputs
Mutes audio outputs
Unit sends “T” Channel/Source status string
Returns Channel/Source status response string
1=Enable (default)
2=600 7=19.2K
3=1200 8=38.4
4=2400 9=57.6
5=4800 10=115.2K
1=8,0,1 12=8,S,1
2=8,E,1 13=7,M,1
3=8,N,2 14=7,S,1
8=7,0,1
9=7,E,1
10=7,N,2
Terminal Communication Commands
EF Echo Off Characters received will not be re-transmitted (power up default).
EN Echo On Characters received will be re-transmitted.
Example: ‘>EN’ Characters received will be re-transmitted.
ID Product ID Returns the product model number and firmware version.
Z! Zap Reconfigures unit for all factory default settings.
Contemporary Research 27 IP-HDVR HD Tuner-DVR
Page 28

Ethernet and RS-232 Protocol
HDV-RC Remote Emulation
You can also emulate IR commands sent from the HDV-RC Wireless Remote. If you are using the numeric
keys to select a channel, the user or program will need to follow the numeric command with an Enter.
.
KK=<key> * = Reserved for future
products/applications
0=*
1=Play
2=Stop
3=Pause
4=Rew
5=FF
6=End
7=Start
8=Rec
9=Power (tog)
10=0
11=1
12=2
13=3
14=4
15=5
16=6
17=7
18=8
19=9
20=
21=Enter/Select
22=Ch Up
23=Ch Dn
24=Vol Up
25=Vol Dn
26=Vol Mute (tog)
27=Power On
28=Power Off
29=Menu
31=Input
58=Repeat
61=Station*
62=Date*
63=TV Guide
64=ezAdd*
65=1394
66=VCR+
67=Blue Button
68=Green Button
69=System Power*
78=Clear*
79=Mode*
80=Freeze
81=Signal
82=Ratio
83=Format
84=Angle*
85=Audio
86=Subtitle*
87=Bookmark*
88=Surf
89=Help*
90=TimeShift
91=Prog List
92=Synopsis
99=Dash 100=Info
101=FlashBk
102=Timer Reset*
104=Top Menu*
105=Menu
106=Cur Rt
107=Cur Lt
108=Cur Up
109=Cur Dn
110=Enter/Select
111=Exit
112=Top Menu*
114=Setup*
115=CC
116=Timer/Info*
141=Format 1080i
142=Format 720p
143=Format 480p
144=Format 480i
145=Format Var1
146=Format Var2
147=Format Var3
148=Format Native
149=Output RGB
150=Output DVI
151=Output YPbPr
152=Output Video
Contemporary Research 28 IP-HDVR HD Tuner-DVR
Page 29

Ethernet and RS-232 Protocol
Response Strings
Typical: [Attention] [Unit#] [data ...data] [cr] [lf]
IP-HDVR status response strings contain ASCII characters similar to those used for the same functions in
command strings. An ASCII 'carriage return' and ‘line feed' follow each response string. Functions shown as
NA are not applicable or available in the IP-HDVR; characters will appear in status strings as lower-case x.
Channel/Source Status Response String (T):
Start # CMD Power Major
1-9 U=On
M=Off
< 1 T U 032 U 0 A x 002 x 2
Channel
3 digits Un-
For compatibility with 232-series tuners, 232-ATSC (XXX-XX) channels are split into Channel 1 (Major) and
Channel 2 (Minor) sections.
Video
Mute
muted
Input RF NA Minor
0=Channel
1=AV1
2=AV2
A=Air
C=Cable
Channel
3 digits 0=None
NA Function
1=Play
2=Stop
3=Pause
4=FFwd
5=Rew
8=Rec
9=TimeShift
Audio Status Response String (V):
Start Unit CMD Power Volume 1 Volume Mute Stereo Volume 2
1-9 U=On
M=Off
0-63
Emulated
level
U=Unmuted
M=Mute
N/A 0-100
Actual level
3 digits
2 digits
< 1 V U 63 U x 100
Volume 1 emulates 232-series volume level for compatibility with existing applications.
Volume 2 shows actual IP-HDVR level, from 0-100 steps.
Front Panel Mode Status Response String (S):
Start Unit CMD Audio Tune
Mode
1-9 N/A N/A
1 digit
< 1 S x x 1 08 4 1 1 6 xxxx
Lockout Bass Treble Output Ratio
0-9 Fixed
2 digits
Fixed 0=RGB
1=DVI
2=YPbPr
3=Video
Current
0-3
0=1080i
1=720p
2=480p
3=480i
Ratio
Mode
1-7* 4
NA
digits
Current Ratio is the actual output ratio; Ratio Mode is the selected mode (see chart on page 9)
Q Mode Response String (Q):
Start Unit CMD Q0 Q1 Q2 Q3 Q4 Q5 N/A
1-9 N/A N/A N/A N/A N/A IR
0=Off
A=Normal
< 1 Q x x x x x A xxxx
4
digits
Contemporary Research 29 IP-HDVR HD Tuner-DVR
Page 30

IP Control Options
RS-232 Display Control
An IP-HDVR that is controlled over Ethernet can also offer a pathway for IP-driven RS-232 control to a
display or projector. This application takes advantage of the fact that multiple Telnet ports can communicate
over the same TCP connection.
• Set the control system to communicate with the IP-HDVR over Ethernet through Telnet Port 23, or a
different Telnet port you’ve defined in the IP-HDVR for control.
• Set the control system to control the display over Ethernet using Telnet Port 2001, same IP address
as the IP-HDVR.
• The IP-HDVR will pass data to and from the Telnet port 2001 through the RS-232 control port on the
back. This connection offers full bi-directional control of the display.
• The RS-232 baud rate can be changed via front-panel settings or programming, presently fixed at 8
data bits, no parity, one stop bit.
TCP and UDP Connectivity
The IP-HDVR can be controlled via TCP or UDP protocols. In most cases, a control system Ethernet port will
be set to connect using TCP/IP, which provides direct, two-way communication between the tuner and the
control system.
System programmers could opt to use UDP protocol instead, which is useful for simple, one-way control or
broadcasting control commands to all IP-HDVR tuners on the LAN. The tuners can send status information
back via UDP, but system programming will need to read the strings to interpret which IP address is sending
the data. Check with CR Support for more information on this option.
The IP-HDVR can communicate over both UDP and TCP protocols, no special settings or programming is
required.
Web Control Page
The IP-HDVR features on onboard Web page for remote IP control of the
tuner, accessed by entering the IP address of the tuner in a standard Web
browser.
Simply click on the Web panel buttons to control the tuner, and the text area
at the top will provide system feedback.
Contemporary Research 30 IP-HDVR HD Tuner-DVR
Page 31

RS-232 Cable Connections
Single Tuner
Control Wiring – Single Unit
RS-232
Control Port
5 GND
2 RXD
3 TXD RXD 2
Channel Down 9
GND 5
TXD 3
Channel Up 4
9-pin D-sub
female
RS-232 wiring for control or programming should only use pins 2, 3, 5. Cables with all pins wired can lock
out front-panel programming and data communication (Pins 4 and 9 are inputs).
Multiple Tuners
Up to nine tuners can be daisy-chained from one RS-232 control port. Remember that you will need to use
the Unit# address in your programming when you control more than one tuner from the same control port.
Set the first unit in the RS-232 chain to the highest Unit#, then wire in sequence to the last tuner in the
chain. The reason for this is that CR tuners use an intelligent data bus - the highest number tuner receives
all commands, and then passes on commands addressed to tuners with lower unit numbers. The next tuner
in the chain does the same, and so on until the last unit.
RS-232 Wiring – Two Units
RS-232
Control Port
5 GND
2 RXD
3 TXD RXD 2
GND 5
TXD 3
Unit 2
9-pin D-sub
female
RS-232
Control Port
GND 5
TXD 3
RXD 2
RS-232 Wiring – Three Units
5 GND
2 RXD
3 TXD RXD 2
GND 5
TXD 3
GND 5
TXD 3
RXD 2
GND 5
TXD 3
RXD 2
Unit 1
9-pin D-sub
female
Unit 3
9-pin D-sub
female
Unit 2
9-pin D-sub
female
Unit 1
9-pin D-sub
female
Contemporary Research 31 IP-HDVR HD Tuner-DVR
Page 32

Rack Mounting
RKHDVR HD Rack Kit
• Attach IP-HDVR to RKHDVR shelf
• Mount RKHD into 19” equipment rack
• Place cover plate into the RKHD front, attach with 2 mounting screws
Dimensions: 19" [487mm] wide x 3.4" [86mm] high (2RU) x 11” [279mm] deep
Weight: 10 oz [284g]
Enclosure: All aluminum with durable black powder coat paint
Hardware: Qty 4 CS, Phillip, Flathead, 82deg, Black, 8-32 x .25”
Contemporary Research 32 IP-HDVR HD Tuner-DVR
Page 33

Cable Box Codes
The following makes of cable box codes can be selected in the TV Guide Setup Screen
Archer Macom Regal
Cable Cinema Maestro Regency
Cabletenna Magnavox Rembrandt
CableView Matsushita Samsung
Centurion Motorola Scientific-Atlanta
Century Movietime Sheritech
Citizen NEC Signal
Clearview Next Level Sony
Curtis NovaPlex Sprucer
Diamond NovaVision Standard Components
Drake NSC Stargare
Eagle Oak Sylvania
Eastern Oak Sigma Teknika
Echostar Optimus Telecaption
Explorer Panasonic Teleview
GC Electronics Philips Texscan
Gemini Pioneer Tocom
GE ProScan DSS Toshiba
General Instruments Prime Star Uniden
Gerrard Pulser Unika
Hamlin Quest Universal
Hitachi Radio Shack Videoway
Hughes RCA Vidtek
Jasco Realistic Viewstar
Jerrold Recoton Zenith
Contemporary Research 33 IP-HDVR HD Tuner-DVR
Page 34

IP-HDVR FAQ
Can we daisy-chain RS-232 control as we do with 232-series CR tuners?
Yes. Up to nine IP-HDVR, 232-STS, 232-STA, and 232-MTA tuners are controllable from a single RS-232
control port. A command addressed to devices 1-9 will operate a specific tuner, all tuners will respond to
command sent to device 0.
Can the IP-HDVR be used as an HD video server?
No, but it’s a very common request. The internal drive records TV channels or AV input video so users
can watch programs at their leisure. Content-protection technology prevents external sharing of files to
and from the internal drive.
How does the unit schedule channel recording?
The IP-HDTV uses the built-in TV Guide EPG to schedule TV program recording. You can record video
from the AV inputs, but this must be done manually
How many hours of programming can be stored on the internal drive?
Recordings from analog broadcasts average 24-64 hours, depending on IP-HDTV quality
settings. Digital recording is preset, typically 21 hours for HD, 85 hours for SD. See page 18
for more information.
.
Contemporary Research 34 IP-HDVR HD Tuner-DVR
Page 35

TV Guide FAQ
Why aren't all my channels initially displayed?
There are two possibilities:
During initial setup and search the TV Guide On Screen system scans for video on each channel. If the
video is detected and the channel is included in the lineup information the channel should be displayed.
If not:
• The cable company has not yet informed industry sources of channel line-up changes. Use the
"CHANNEL EDITOR" feature to make adjustments.
• The channel is not included in the TV Guide On Screen listings data. Local and Public access channels
are examples of the type of stations that may not be listed in the TV Guide on Screen system.
Why do all my channels display "No Listing?"
There are two possibilities:
• There has been a loss of power either from a power failure or an unplugged TV.
• The TV Guide On Screen system has not yet received its first listings transmission (leave TV Guide
On Screen device OFF over-night).
In either case, the phrase "No Listings" will be replaced with program information during the next host
download cycle. Downloads will occur within the next 24 hour period.
Why do some of my channels display “No Listing?”
Answer: Possibilities include:
• The channels in question were recently turned ON (in the “CHANNEL EDITOR” screen) and TV Guide On
Screen has yet to receive its first listings transmission.
• After completing the initial set-up, the first listings transmission of the day was interrupted by powering
the device ON.
• After completing the initial set-up, the first listings transmission of the day was interrupted by a scheduled
recording.
• The device TV Guide On Screen is built in to was left powered ON for an extended period of time and the
TV Guide On Screen system was unable to receive program listings during normal host transmission
cycles.
• During the first listings transmission, the primary host station used to deliver the TV Guide On Screen
signal was down or off line for part or all of the day.
• Poor reception on the host station caused some of the data to be missed.
• The cable box was turned OFF. Remember: The television must be OFF and the cable box must remain
ON.
How long are host transmissions?
Answer: TV Guide On Screen data transmissions typically last a few hours. The TV Guide On Screen
system only requires one transmission per day to maintain up-to-date program listings. Because the
device hosting TV Guide On Screen must be powered off in order to receive new information, several
transmissions are scheduled during the course of the day and night.
How often do host transmissions take place?
Answer: Updated program information usually can be received by the TV Guide On Screen system
multiple times a day. Set-up information is transmitted 24 hours a day, 7 days a week.
How do I add, delete or change the assigned number of channels on the TV Guide On Screen system?
Answer: Use the "CHANNEL EDITOR" to make adjustments.
Can I move my favorite stations to the top of the TV Guide On Screen LISTINGS display?
Answer: Yes. Use the "CHANNEL EDITOR" to make adjustments.
Why do some days display "No Listing" on all my channels?
Answer: After initial setup it may take a few days for all 8 days of listings to be displayed. This is because
the amount of time it takes to transmit listings information for all of the channels in your area may
exceed the amount of time allotted for the download. To accommodate this the listings information is
broadcast in an order which cumulatively loads all 8 days of the TV Guide On Screen system.
Why are some of my broadcast or cable channels not listed on the "CHANNEL EDITOR" screen?
Answer: Presently, TV Guide On Screen does not list all channels in any given broadcast area. As a
result, channels are selected primarily on a "majority rules" basis. Channels with the highest potential
viewership are given top priority. Availability of program listings is another consideration.
Contemporary Research 35 IP-HDVR HD Tuner-DVR
Page 36

Why are some of my channels listed on the wrong number?
Answer: Three possibilities are:
• Initial set-up was done incorrectly. (i.e. The wrong ZIP/postal code or channel map were selected.)
On the TV Guide On Screen Main Menu Bar, highlight SETUP and choose "Change system settings".
• The cable company has not yet informed industry sources of channel line-up changes. Use the
"CHANNEL EDITOR" feature to make adjustments.
• The user is receiving broadcasts through a modified or boosted antenna system or satellite dish that
is not supported by TV Guide On Screen system. Use the "CHANNEL EDITOR" feature to make
adjustments.
Why doesn't the program highlighted match up with the video window on my TV screen?
Answer: Five possibilities are:
• Incorrect program listing information was transmitted to the TV Guide On Screen system.
• The station in question made a late change to its scheduled program listing and the TV Guide On Screen
system has not yet been updated.
• The user is receiving broadcasts through a modified or boosted antenna system or a satellite dish (not
supported by TV Guide On Screen system. Use the Channel Editor feature to make adjustments).
• Initial set-up was done incorrectly. (i.e. The incorrect ZIP or postal code was entered or the incorrect
channel line-up was selected.) On the TV Guide On Screen Main Menu Bar, highlight SETUP and choose
"Change system settings".
• The video window could be locked.
I get two stations on the same channel, BRAVO in the morning and CSPN2 in the evening. Why is only
BRAVO listed?
Answer: Channels like these are called "Split" channels. When a "Split" channel occurs only one channel
is usually displayed by default. However, if the user wishes to have both channels displayed this can be
accomplished through the "CHANNEL EDITOR" mode.
Why was that movie listed as a three star (***) movie? Who provides these ratings?
Answer: All listing information, including movie ratings, is provided by TV Guide editorial services.
Other tips and information on TV Guide On Screen operation are available at www.vgi.com.
Contemporary Research 36 IP-HDVR HD Tuner-DVR
Page 37

Safety Instructions
Read before operating equipment.
1. Cleaning - Unplug this product from the wall outlet before cleaning. Do not use liquid cleaners or
aerosol cleaners. Use a damp cloth for cleaning.
2. Power Sources - Use supplied or equivalent UL/CSA approved low voltage DC plug-in transformer.
3. Outdoor Antenna Grounding - If you connect an outside antenna or cable system to the product, be
sure the antenna or cable system is grounded so as to provide some protection against voltage surges
and built-up static charges. Section 810 of the National Electrical Code, ANSI/NFPA No. 70, provides
information with respect to proper grounding of the mast and supporting structure, grounding of the
lead-in wire to an antenna discharge unit, size of grounding conductors, location of antenna discharge
unit, connection to grounding electrodes, and requirements for the grounding electrode.
4. Lightning - Avoid installation or reconfiguration of wiring during lightning activity.
Power Lines - Do not locate an outside antenna system near overhead power lines or other electric light or
power circuits or where it can fall into such power lines or circuits. When installing an outside antenna
system, refrain from touching such power lines or circuits, as contact with them might be fatal.
5. Overloading - Do not overload wall outlets and extension cords as this can result in a risk of fire or
electric shock.
6. Object and Liquid Entry - Never push objects of any kind into this product through openings as they
may touch dangerous voltage points or short out parts, resulting in a fire or electric shock. Never spill
liquid of any kind on the product.
7. Servicing - Do not attempt to service this product yourself as opening or removing covers may expose
you to dangerous voltage or other hazards. Refer all servicing to qualified service personnel.
8. Damage Requiring Service - Unplug this product from the wall outlet and refer servicing to qualified
service personnel under the following conditions:
• When the power supply cord or plug is damaged.
• If liquid spills or objects fall into the product.
• If the product is exposed to rain or water.
• If the product does not operate normally by following the operating instructions. Adjust only those
controls that are covered by the operating instructions. An improper adjustment of other controls
may result in damage and will often require extensive work by a qualified technician to restore the
product to its normal operation.
• If the video product is dropped or the cabinet is damaged.
• When the video product exhibits a distinct change in performance, this indicates a need for
service.
* Note to CATV system installer: This reminder is provided to call CATV system installer's attention to
Article 820-40 of the National Electrical Code (Section 54 of Canadian Electrical Code, Part I), that
provides guidelines for proper grounding and, in particular, specifies that the cable ground shall be
connected to the grounding system of the building as close to the point of cable entry as possible.
Contemporary Research 37 IP-HDVR HD Tuner-DVR
Page 38

Limited Warranty
Contemporary Research Corporation (CR) warrants this product to be free from defects in material and
workmanship under normal use for a period of two years from the date of purchase from CR. Should such a
defect occur CR will repair or replace, at their option, the defective product at no cost for parts or labor.
This warranty extends to product purchased directly from CR or an Authorized CR Dealer. Consumers should
inquire from selling dealer as to the nature and extent of the dealer's warranty, if any.
All warranty claims must be shipped pre-paid to the factory. Call or fax to obtain a Return Material
Authorization (RMA) number.
CR is not liable for any damages caused by any of its products or for the failure of any products to perform,
including any lost profits, lost savings, incidental damages, or consequential damages. CR is not responsi ble
for any claim made by a third party or made for you by a third party. This limitation of liability applies
whether damages are sought, or a claim is made, under this warranty or as a tort claim (including
negligence and strict product liability), a contract claim, or any other claim. This limitation of liability cannot
be waived or amended by any person. This limitation of liability will be effective even if CR or an authorized
representative of CR has been advised of the possibility of any such damages.
Some states do not allow a limitation of how long an implied warranty lasts. Some states do not allow the
limitation or exclusion of incidental or consequential damages for consumer products. In such states, the
limitation or exclusion of the Limited Warranty may not apply to you. This Limited Warranty gives you
specific legal rights. You may also have other rights that may vary from state to state. You are advised to
consult applicable state laws for a full determination of your rights.
Except as expressly set forth in this Limited Warranty, CR makes no other warranties, expressed or implied,
including any implied warranties of merchantability or fitness for a particular purpose. CR expressly disclaims
all warranties not stated in this Limited Warranty. Any implied warranties that may be imposed by law are
limited to the terms of this Limited Warranty.
Contemporary Research 38 IP-HDVR HD Tuner-DVR
 Loading...