

Page 1
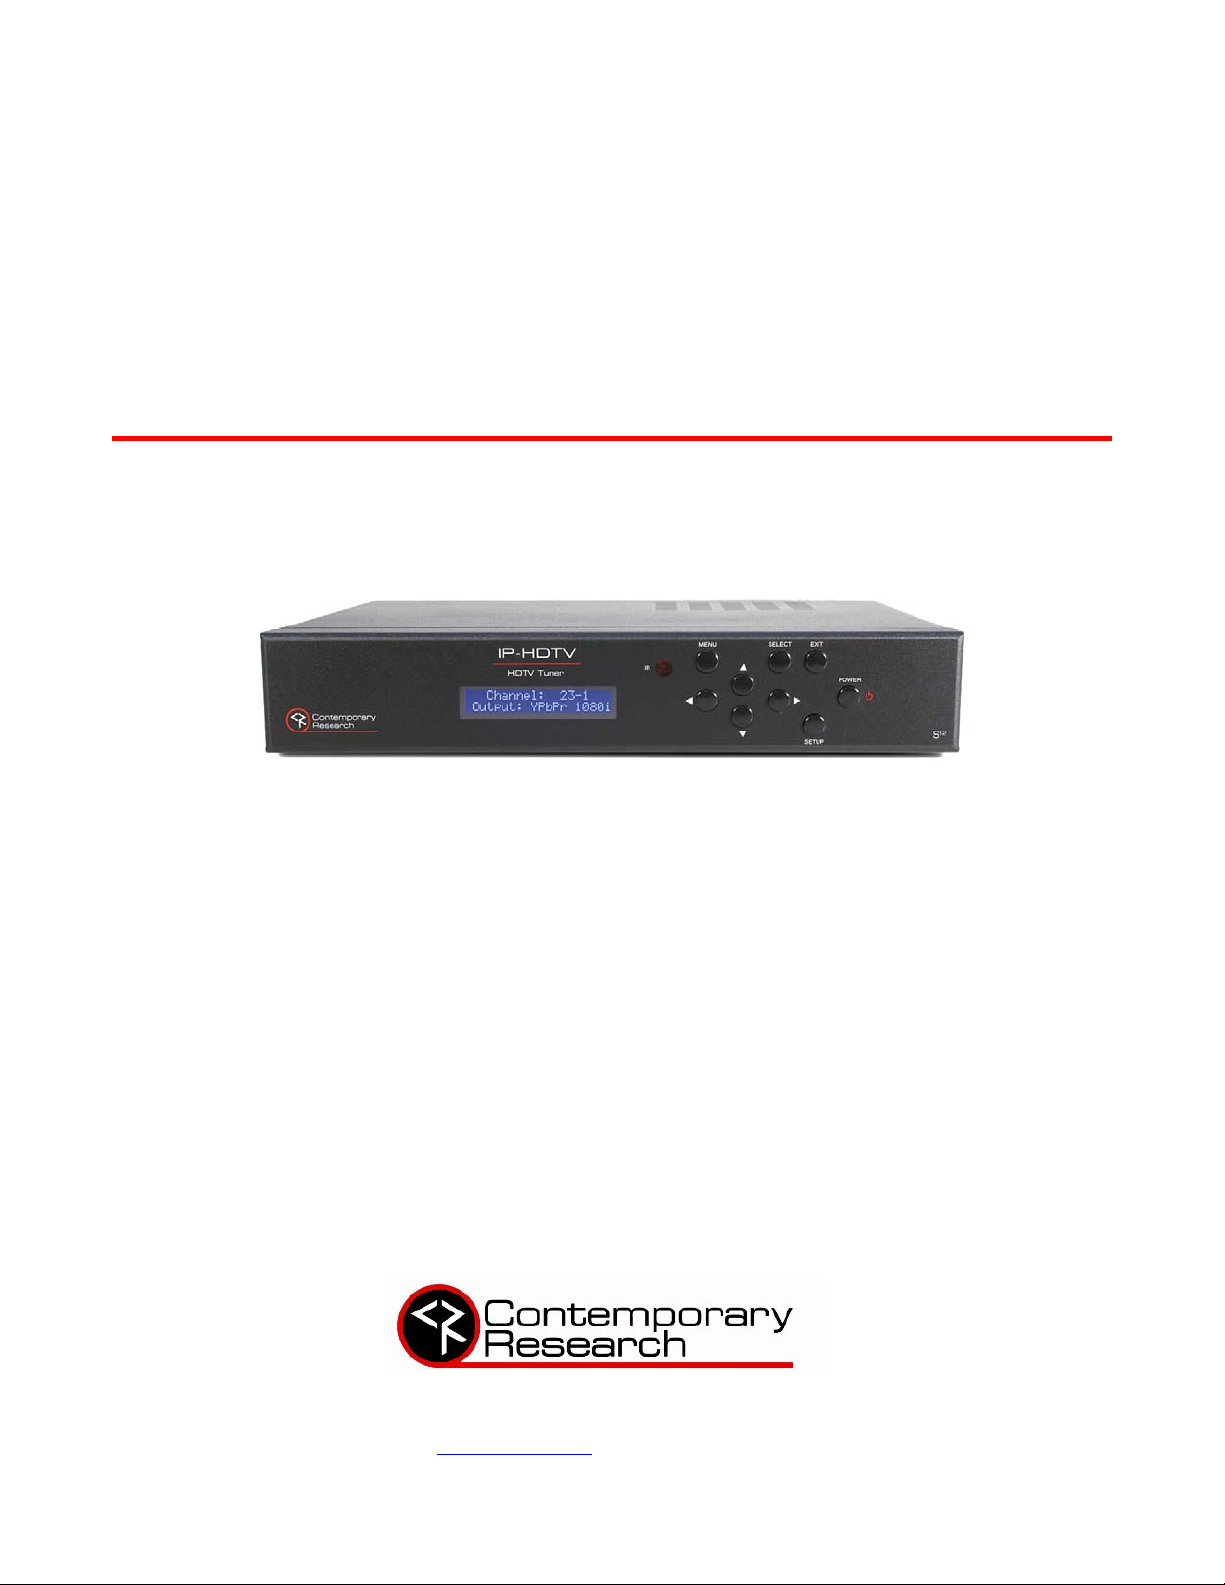
Product Manual
IP-HDTV
HD Tuner
Version 2.2 March 23, 2007
17630 Davenport Road, Suite 113 • Dallas, TX 75252
Phone: 972-931-2728 • Toll-Free: 888-972-2728 • Fax: 972-931-2765
E-Mail: [email protected]
• Website: www.c rwww.com
Page 2

Table of Contents
Overview..............................................................................................................................................................3
Specifications.......................................................................................................................................................4
AV and Control Connection.................................................................................................................................. 6
RF..............................................................................................................................................................................6
AV Outputs.................................................................................................................................................................6
Digital Outputs............................................................................................................................................................6
Control.......................................................................................................................................................................6
Front Panel Setup ................................................................................................................................................7
Front Panel Menus ......................................................................................................................................................7
Display Formats..........................................................................................................................................................8
On-Screen Menus - Channels...............................................................................................................................9
Analog and Digital Tuning ...........................................................................................................................................9
Auto-Scan Channels..................................................................................................................................................10
Edit Channels ...........................................................................................................................................................10
Add Channels Manually .............................................................................................................................................11
On-Screen Menus – Options...............................................................................................................................12
Clock........................................................................................................................................................................12
Aspect Ratio.............................................................................................................................................................13
SD 480i/480P Display................................................................................................................................................13
HD 1080i/720p Display..............................................................................................................................................14
Menu Language........................................................................................................................................................14
Audio Language........................................................................................................................................................14
Analog Audio............................................................................................................................................................14
Audio Output............................................................................................................................................................14
Audio Variable ..........................................................................................................................................................14
On-Screen Menus – Options...............................................................................................................................15
DTV Captions............................................................................................................................................................15
DTV Caption Style.....................................................................................................................................................15
Analog Captions........................................................................................................................................................15
On-Screen Menus – Lock....................................................................................................................................16
On-Screen Menus – Guides................................................................................................................................17
Program Guide..........................................................................................................................................................17
Station Guide............................................................................................................................................................18
Info Display..............................................................................................................................................................18
HD-RC IR Remote ..............................................................................................................................................19
Ethernet Setup...................................................................................................................................................20
Ethernet Connection..................................................................................................................................................20
Reset IP Address ......................................................................................................................................................20
RS-232 and Telnet Terminal Communication.....................................................................................................20
Ethernet and RS-232 Control Protocol...............................................................................................................21
Terminal Communication Commands .........................................................................................................................23
HD-RC Remote Emulation..........................................................................................................................................24
Response Strings ...............................................................................................................................................25
Channel/Source Status Response String (T):...............................................................................................................25
Audio Status Response String (V): .............................................................................................................................25
IP Control Options .............................................................................................................................................26
RS-232 Display Control..............................................................................................................................................26
TCP and UDP Connectivity.........................................................................................................................................26
Web Control Page............................................................................................................... ......................................26
RS-232 Cable Connections.................................................................................................................................27
Rack Mounting...................................................................................................................................................28
Safety Instructions ............................................................................................................................................29
Limited Warranty...............................................................................................................................................30
Contemporary Research 2 IP-HDTV HD Tuner
Page 3
Overview
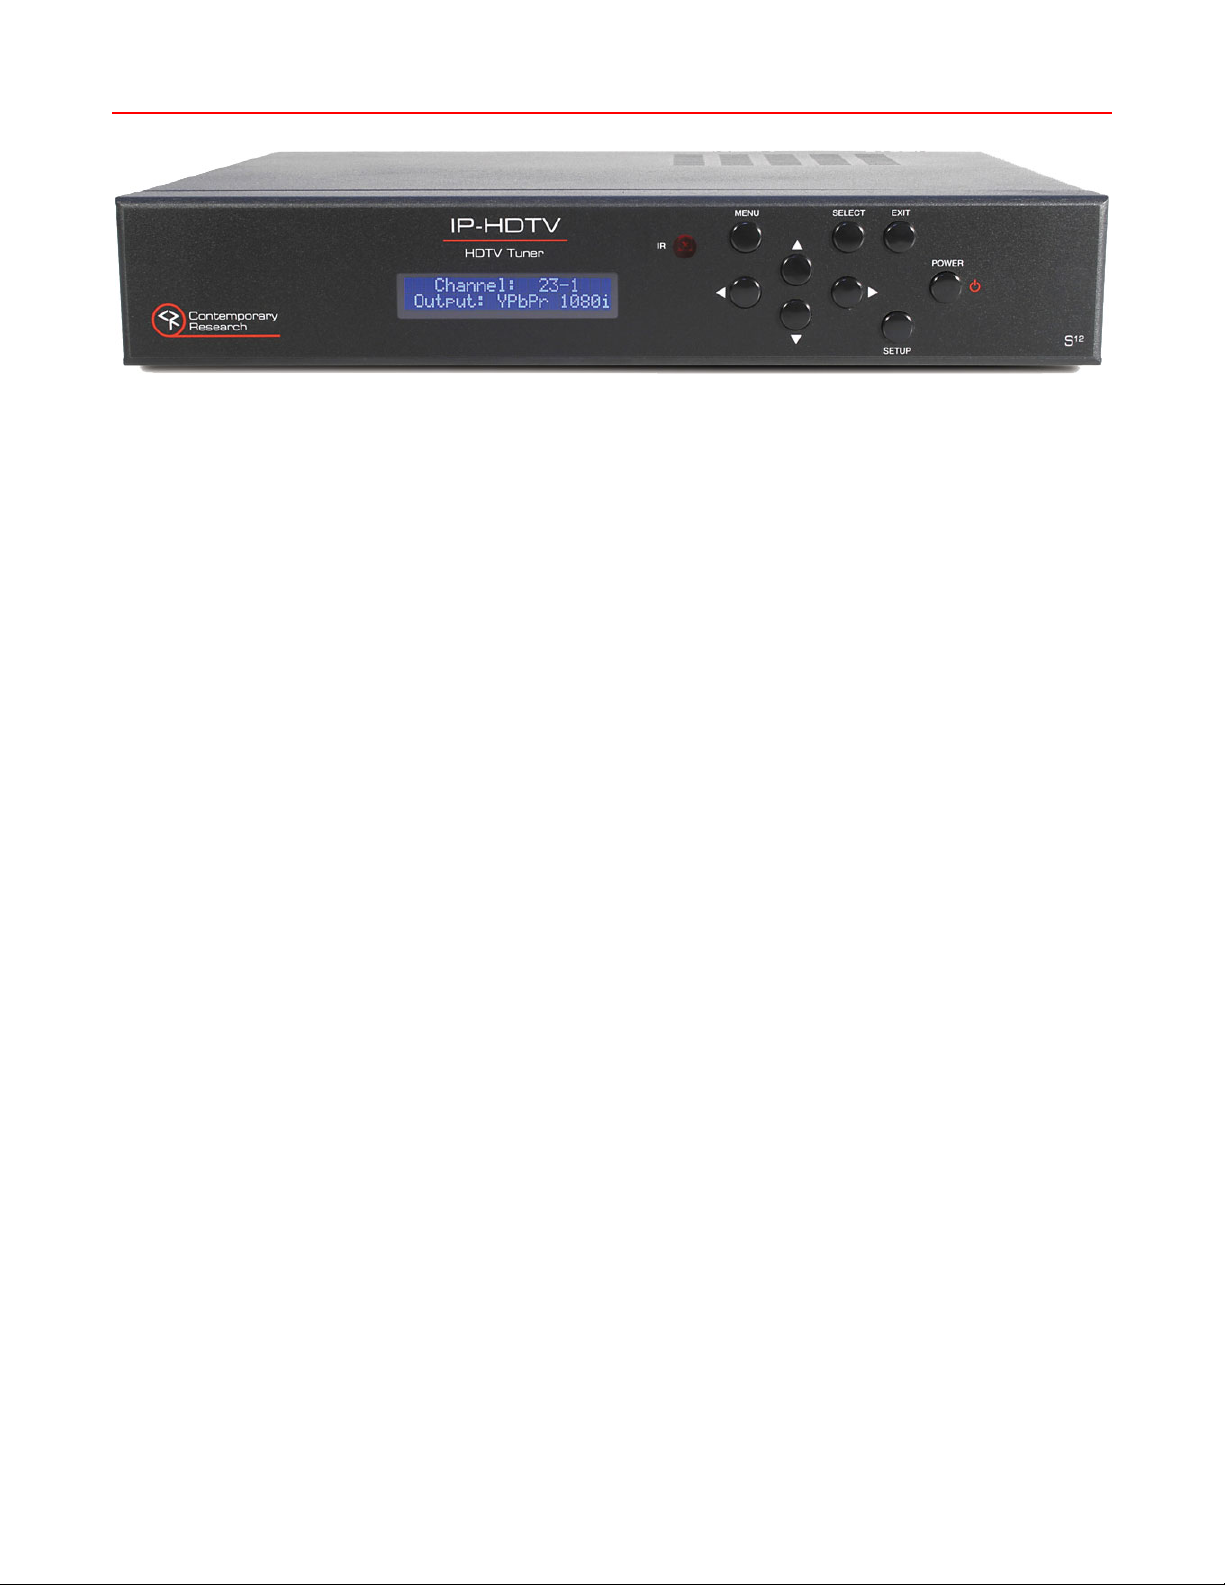
The Contemporary Research IP-HTDV is an HD tuner that offers analog and digital tuning, a variety of HD
and NTSC output options, and full systems integration via Ethernet, RS-232, or discrete IR control.
The IP-HDTV tuner is capable of receiving analog and unscrambled digital programming, either off-air or
CATV. High-definition and up-scaled NTSC video can be viewed from the tuner's component, RGB, or DVI
ports, in 1080i, 720p, 480p or 480i formats. Standard 480i video can be recorded or monitored from
composite and S-Video outputs. Stereo, mono, and Dolby 5.1 surround sound is available from optical, coax,
and two stereo analog audio channels. Closed captioning is provided in both analog and digital formats.
Full control can be integrated from Ethernet, RS-232, IR, and wired IR control ports. System setup can be
performed from a control system, front-panel controls, and on-screen menus from the included IR wireless
remote. In addition, the tuner can install on a shelf or rack-mounted with an optional rack kit.
Applications include HD and SD TV tuning for conference and meeting rooms, board rooms, and home
theaters.
• Receives ATSC HD and NTSC SD TV broadcast and unscrambled QAM cable channels
• Outputs 1080i/720p/480p HD and up-scaled SD video to Component YPbPr, DVI-HDCP, or RGB
outputs
• Provides simultaneous monitor/record 480i video from S-Video and composite connections
• Integrates easily from Ethernet, RS-232, discrete IR and wired IR control ports
• Enables RS-232 control of display or projector via an IP control system connection (See IP Control
Options)
• Offers Dolby 5.1 surround sound from optical and coax digital outputs and two variable-level stereo
channels
• Sets up using front-panel control, easy on-screen menus, and control ports
• Operates with included HD-RC IR wireless remote
• Displays closed-captioning text and on-screen channel names
• Inserts blue-screen video image when unit senses loss of video level
• Updates firmware using RS-232 software loader
• Mounts in 19" rack with optional RKHD kit
• Includes HD-RC IR remote and cables for component, DVI, RCA stereo audio, RCA coax audio, and
antenna
• HDMI video with optional DVI/HDMI adapter
Contemporary Research 3 IP-HDTV HD Tuner
Page 4
Specifications
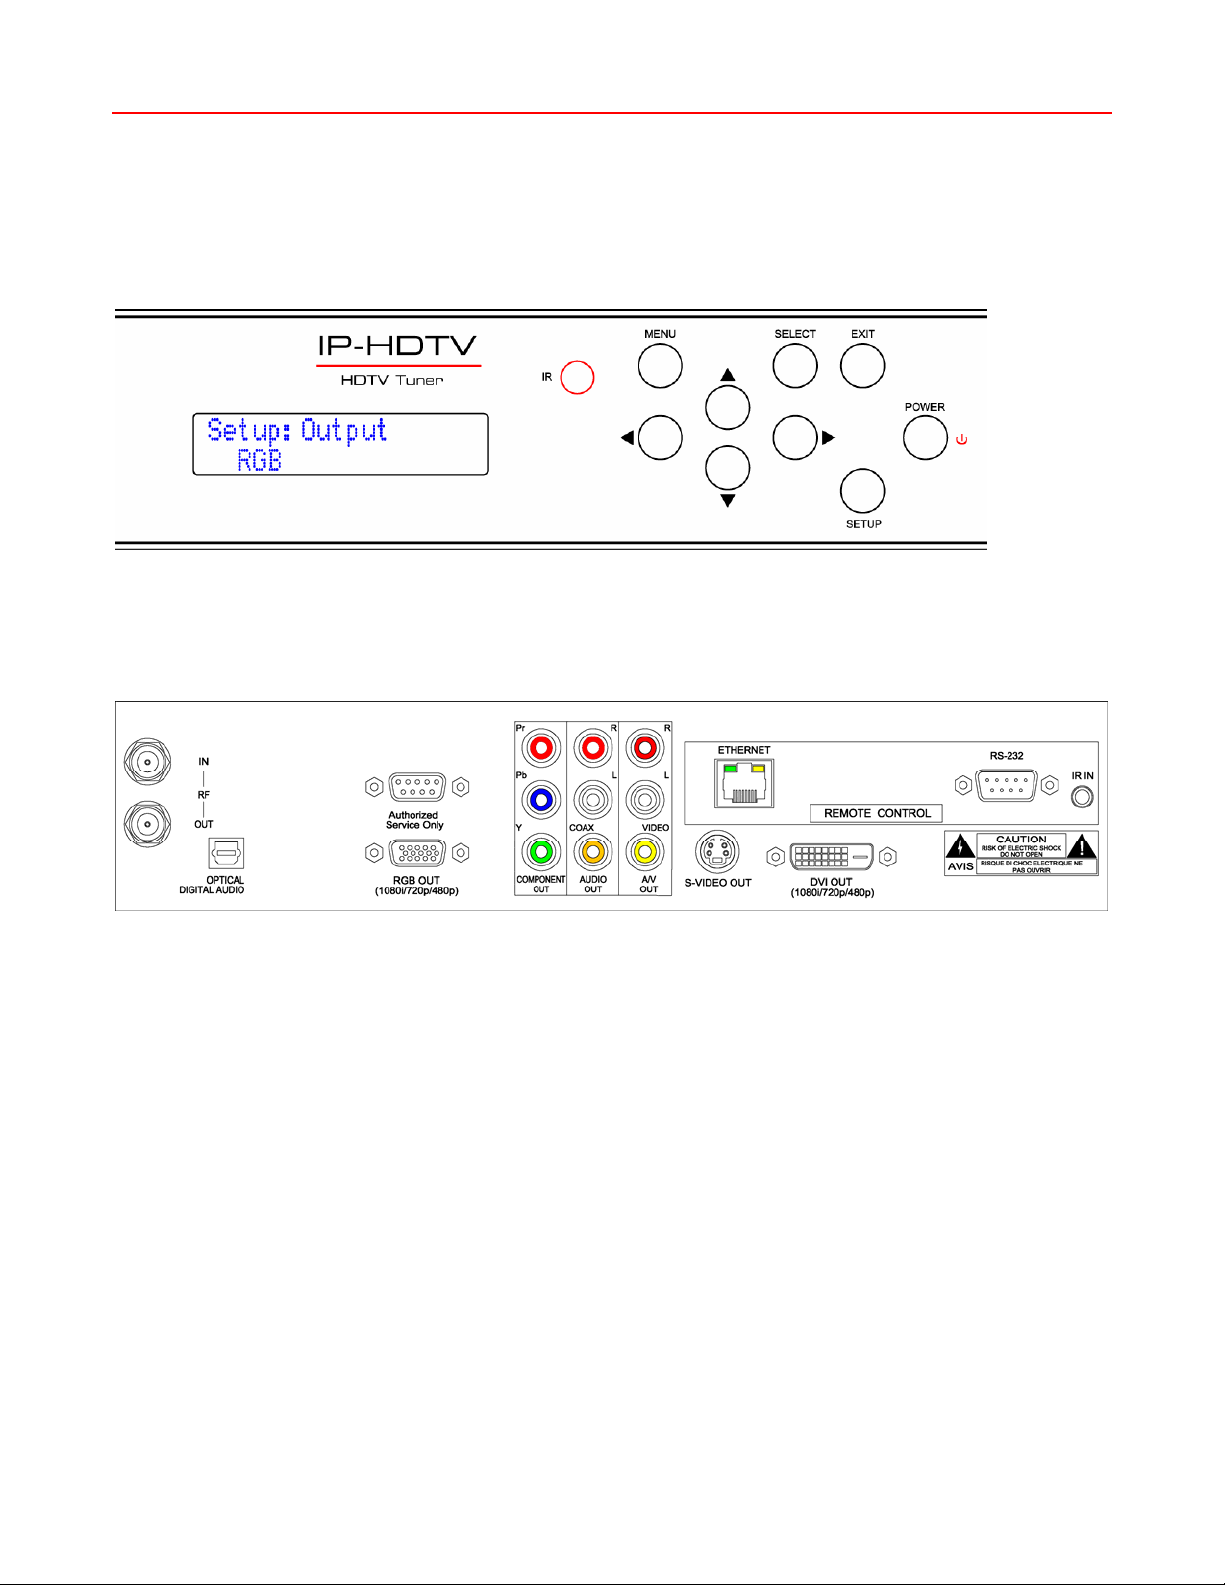
Physical
Size (WHD): 14.2" [360 mm] x 2.4" [60 mm] x 10.8" [274 mm]
Weight: 8.0 lbs [3.6 kg]
Enclosure: Steel and aluminum with durable silver and black powder coat paint
Mounting: Shelf or rack-mount with optional RKHD Rack Kit)
Front Panel
Display: Blue LCD, 2 lines of 20 characters each
IR: IR sensor, 57 kHz
Control: Buttons for Setup, Menu, Select, Exit, and Left, Right, Up, and Down operation
Rear Panel
RF In: 'F', female, 75 ohm impedance
RF Out: 'F', female, 75 ohm impedance loop out
Digital Audio: TOSlink optical output, Dolby Digital or PCM
Service only: DB-9 female RS-232 for factory service and firmware updates
RGB Out: RGB DB-15 female (1080i/720p/480p)
Component Out: Pr, Pb, Y outputs (1080i/720p/480p/480i)
Audio Out: Stereo RCA, Mono, Stereo, or SAP, fixed or variable level
RCA female, coax digital audio output
A/V Out: Stereo RCA audio, Mono, Stereo, or SAP, fixed or variable level
RCA composite video output, 1V p-p at 75 ohm impedance
Simultaneous 480i, on-screen menu displayed when digital set to 480i
S-Video Out: Mini DIN 4-pin, Y - 1V p-p at 75 ohms, C - 0.286 V p-p at 75 ohms
Simultaneous 480i, on-screen menu displayed when digital set to 480i
DVI Out: DVI-D with HDCP (1080i/720p/480p), HDMI video with optional adapter
Ethernet: 10/100baseT RJ-45 jack
Ethernet LEDs: Right yellow LED indicates 100 baseT speed, 10 baseT when off
Left green LED indicates link, blinks with data activity
RS-232: DB-9 male, RS-232 data link to control system, PC or RS-232 controlled display
300 to 115,200 baud (9600 default), 8 data bits, no parity, 1 stop bit
IR In: 3.5 mm stereo input for external IR sensor or wired IR (no carrier, discrete codes)
Power In: AC Power Cord, 120 VAC, 60 Hz, 16W (on right, not shown)
Contemporary Research 4 IP-HDTV HD Tuner
Page 5

Video
Frequency Range: NTSC, NTSC and Clear QAM (cable) television 55.25 to 801.25 MHz
TV System: NTSC, ATSC DTV (1080i/720p/480p/480i)
Tuning: Off-air 2-69 and CATV 1-135
Aspect Ratio: Letter Box, Cropped, or Squeezed
Captioning: DTV, set by program or customized for size, font and display attributes
Analog CC1-CC4, TT1-TT4, On/On with Mute/Off modes
Lock: Parental option for channels and/or rating
Includes
RF loop cable
RCA composite video/coax audio cable
Stereo RCA cable
Component YPbPr cable
HD-RC IR Tuner Remote, 4 batteries (AAA)
Options
RKHD Kit for mounting single unit in 19" rack (2RU)
CC-232 RS-232 Cable
Contemporary Research 5 IP-HDTV HD Tuner
Page 6
AV and Control Connection
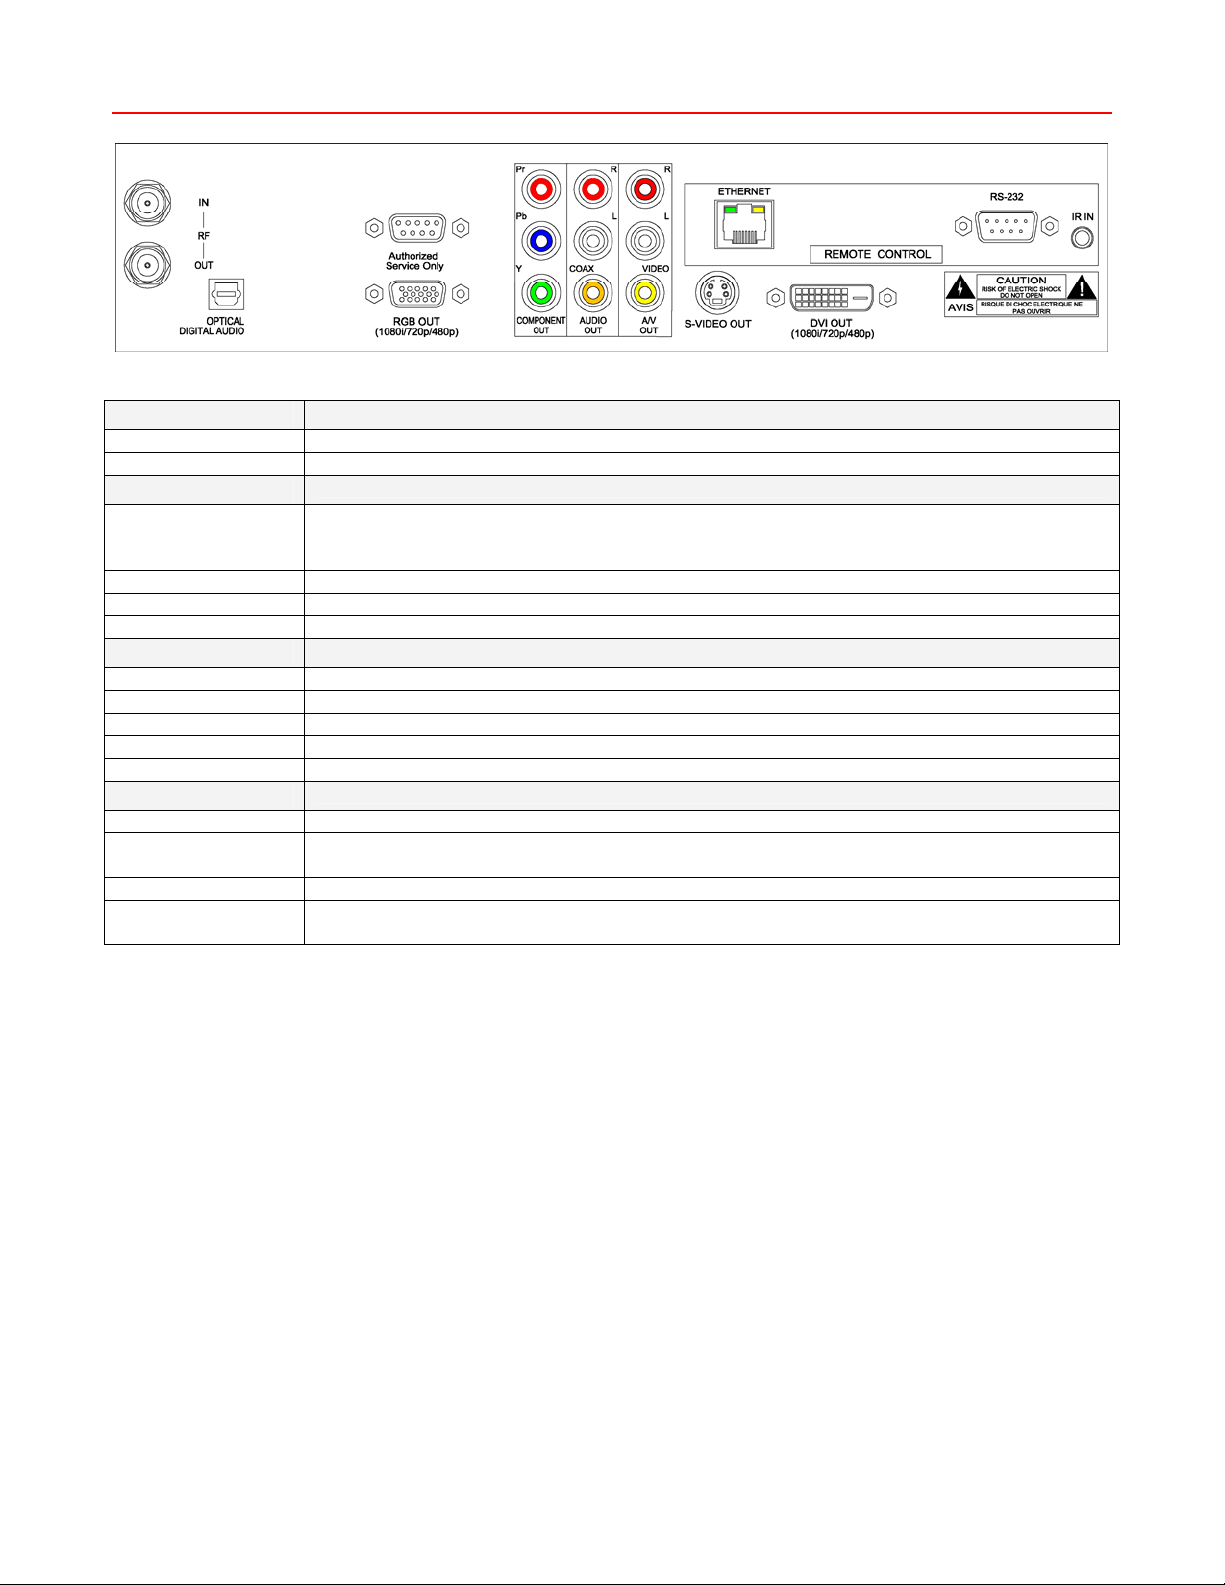
RF
OUT F connector for looped RF output
AV Outputs
Video RCA composite, video always present
S-Video S-Video, video always present
R-L Audio Analog audio, fixed or variable
R-L Audio Analog audio, fixed or variable
Digital Outputs
Optical Audio TOSlink optical output, Dolby 5.1 or PCM digital audio
RGB RGB DB-15 female (1080i/720p/480p)
YPbPr 3 RCA Pr, Pb, Y outputs (1080i/720p/480p/480i)
Coax Audio RCA digital coaxial cable output
DVI DVI-D with HDCP (1080i/720p/480p), HDMI video with optional adapter
Control
Service RS-232 port for factory upgrades only
RS-232 DB-9 male acts as programming and control system port, also acts as pass-through
Ethernet RJ-45 connection offers bi-directional IP Telnet control and access to Web page
IR In Input accepts wired IR from control system, external IR-RXC sensor, or ChannelPlus,
IN F connector for off-air MATV or CATV input
Note that on-screen menus will only be displayed through the SD outputs when the
Component output is selected from the front panel and set up 480i format.
control port to video display, when control system integrated via Ethernet
Audioplex, SpeakerCraft, or Xantech remote IR sensors
Contemporary Research 6 IP-HDTV HD Tuner
Page 7
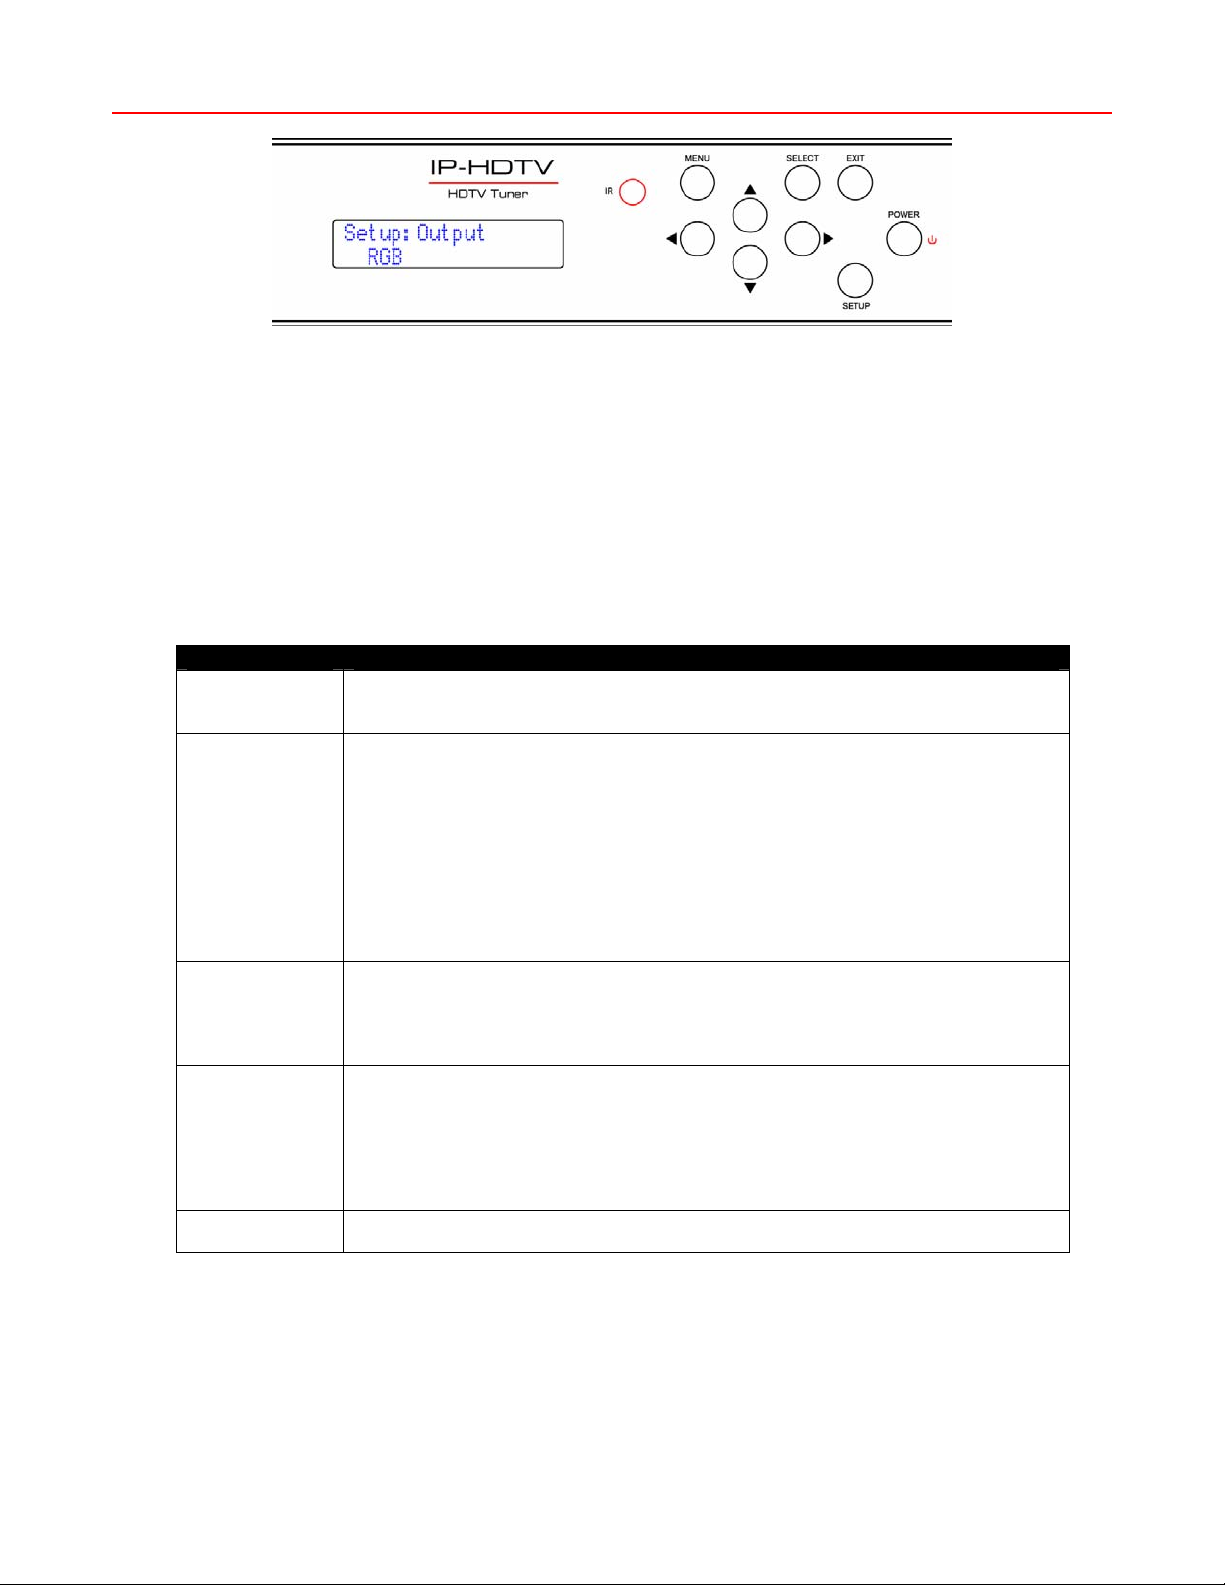
Front Panel Setup
There are a number of parameters that can be set by front-panel Setup commands. In normal operation the
Up/Down arrows select channels, and the Left/Right arrows adjust volume.
• Pressing Setup enters the setup menus, shows last menu accessed
(The Menu button accesses on-screen menus)
• Pressing Up and Down arrow keys steps through the IP-HDTV options
(Tip: Press Up to access output, Down to jump to IP menus)
• Pressing Left and Right keys steps through options for each front-panel menu
• Press Select to save desired option
• Pressing Exit or Setup exits the front-panel setup mode
Front Panel Menus
Menu Parameters
Output RGB
DVI
Component
Format 1080i
720p
480p
480i (Component output only)
Variable 1
Variable 2
Variable 3
Native
Auto DVI
See chart on next page for more information
Baud 300 9600 (default)
600 19.2K
1200 38.4K
2400 57.6K
4800 115.2K
Com 8,N,1 (default) 8,M,1
8,0,1 8,S,1
8,E,1 7,M,1
8,N,2 7,S,1
7,0,1
7,E,1
7,N,2
RS-232 CRTL 0=Disable
1=Enable (default)
Contemporary Research 7 IP-HDTV HD Tuner
Page 8
Front Panel Setup
Menu Parameters
Unit 1-9
Panel Lockout None (Default)
Ch+Menu
Vol+Menu
Ch+Vol+Menu
Pwr
Setup
Menu
All
Setup+Menu
Pwr+Set+Menu
Cursor buttons active for Setup or Menu modes, Exit returns buttons to current
locked or unlocked status
IR Receive 0 - No IR reception
9 - CR 9 (Default)
Display Line 2 Output – shows current output and format
Lights – represents status LEDs (LA:RX: TX: IR )
Link/Act status, RS-232 RX and TX, and IR In
IP Port IP port for Telnet communication - Left/Right steps through number positions
(blinking cursor position), Up/Down enters number 0-9, Select saves, Exit leaves
edits, stays at current menu
Gateway Quad address – Left/Right steps through number positions (blinking cursor
position), Up/Down enters number 0-9, Select saves, Exit leaves edits, stays at
current menu
Subnet Mask Quad address - Left/Right steps through number positions (blinking cursor
position), Up/Down enters number 0-9, Select saves, Exit leaves edits, stays at
current menu
IP Address Quad address – Left/Right steps through number positions (blinking cursor
position), Up/Down enters number 0-9, Select saves, Exit leaves edits, stays at
current menu (192.168.001.231=default, 0.0.0.0 = DHCP)
IP Mode Selects Static (default) or DHCP IP modes
Firmware Shows version
IP-HDTV V1.5
MAC Add Shows network MAC address
Ex: 0014C8 00 0001 (last 2 bytes is the serial number)
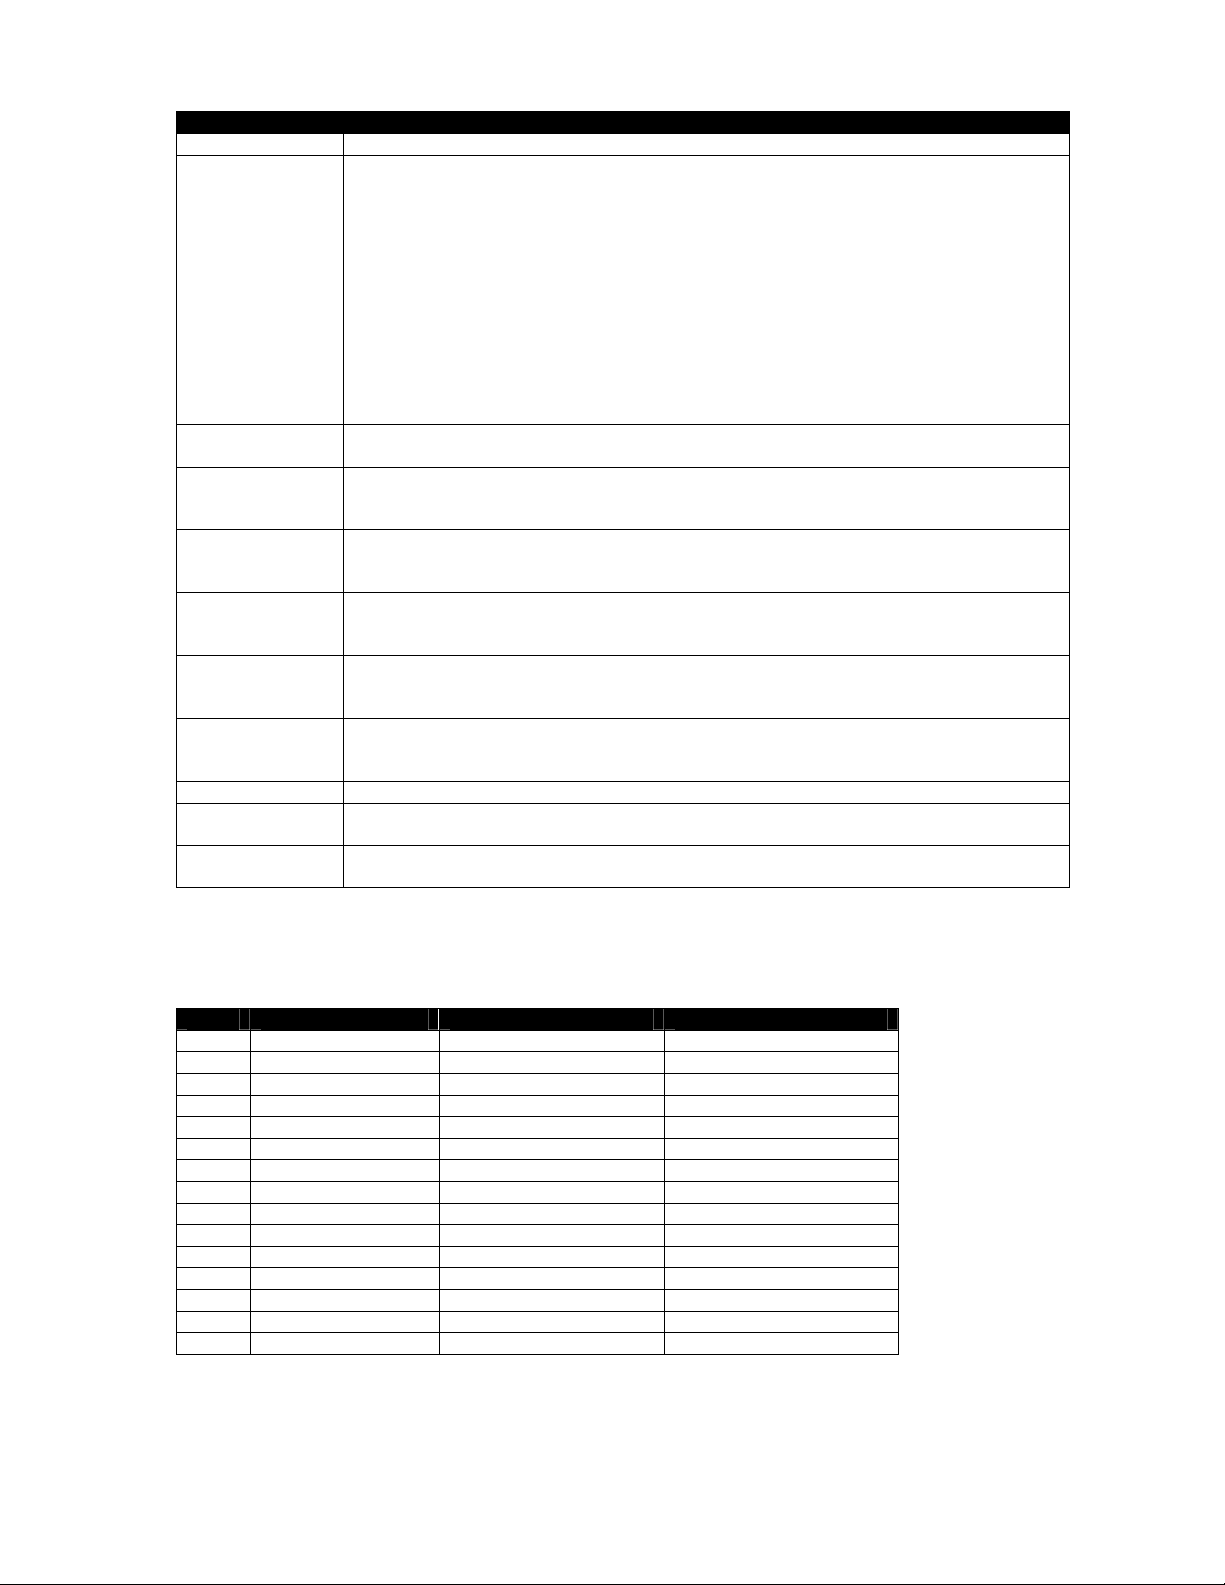
Display Formats
The Display Format setting direct how the IP-HDTV will output the signal in response to different formats in
broadcast programming.
Code Display Format Broadcast Format Output As
0 1080i All 1080i
1 720p All 720p
2 480p All 480p
3 480i All 480i
4 Variable 1 1080i 1080i
720p 720p
480p/480i 480p
5 Variable 2 1080i/720p 1080i
480p/480i 480p
6 Variable 3 1080i/720p 720p
480p/480i 480p
7 Native 1080i 1080i
720p 720p
480p 480p
480i 480i (480p RGB, DVI)
Contemporary Research 8 IP-HDTV HD Tuner
Page 9
On-Screen Menus - Channels
On-Screen Menus HD-RC IR Remote
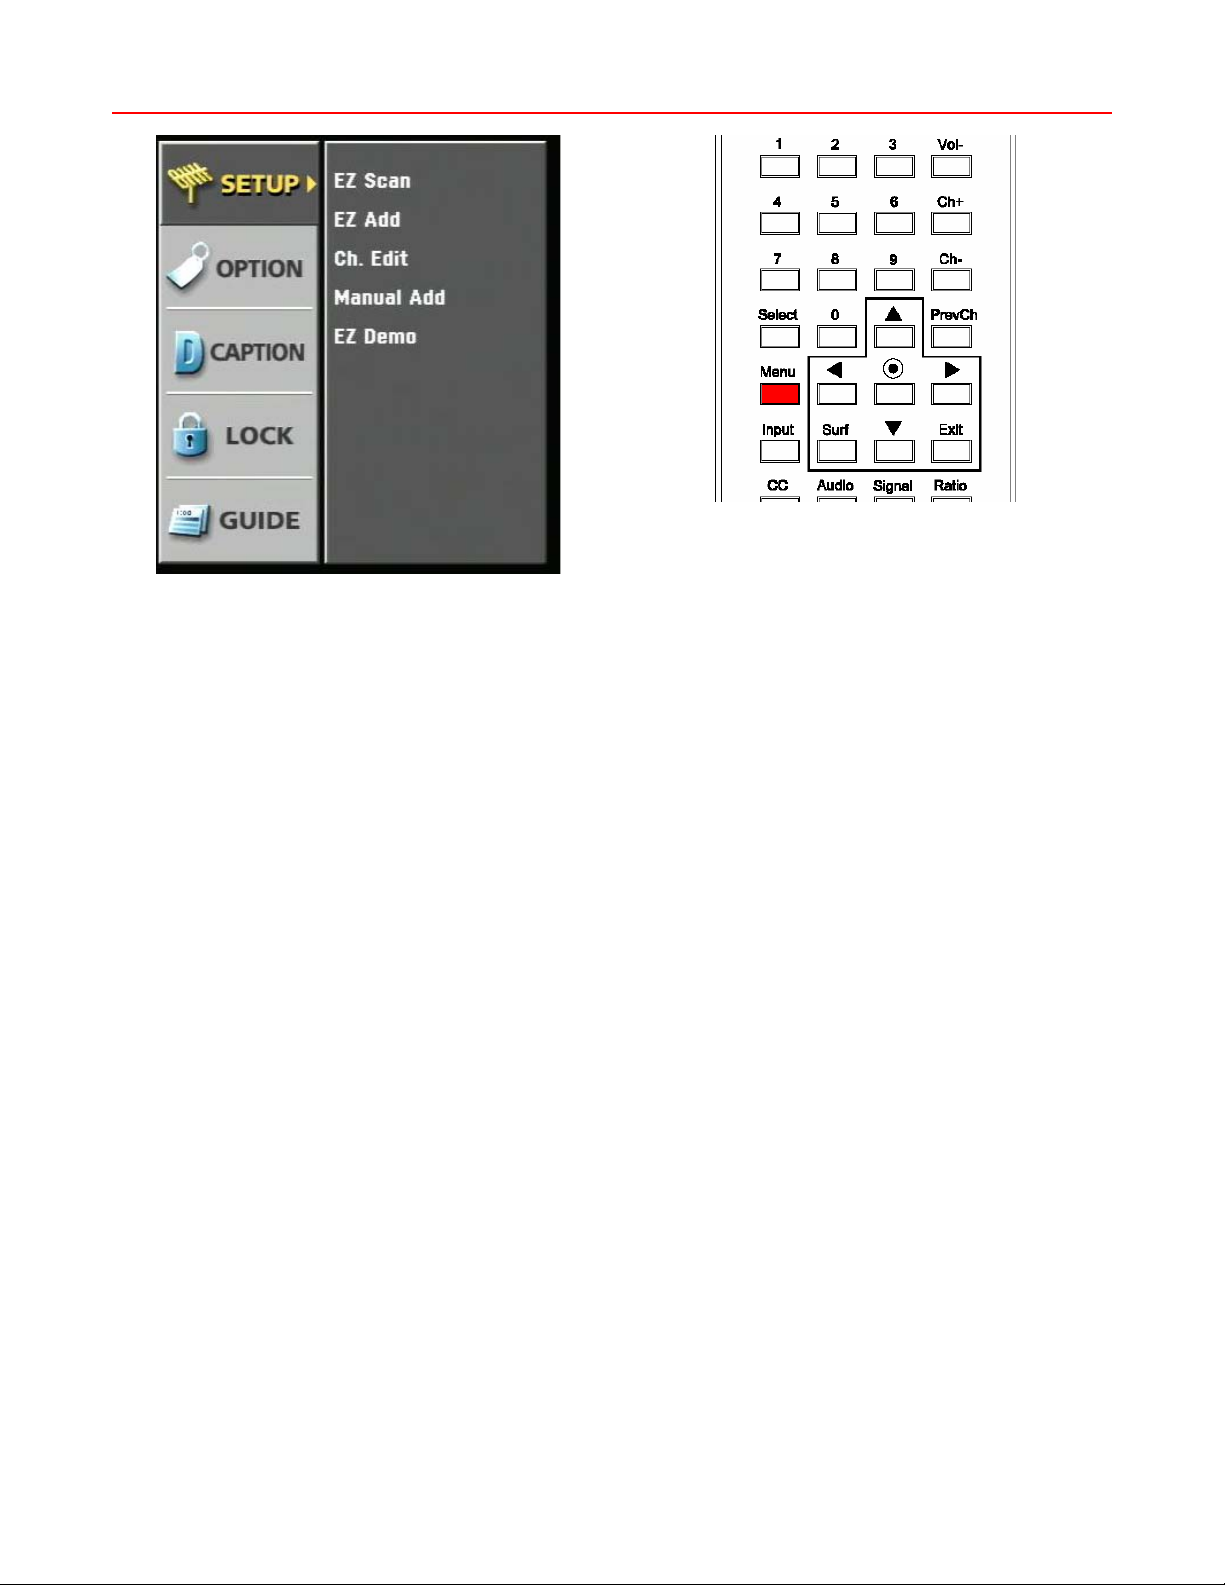
The remaining tuner capabilities can be set up by easy-to-use on-screen menus. The menus can be accessed
from the HD-RC IR remote control using the Menu, Arrow, Select (), Surf, and Exit buttons. You can also
use similar buttons on the IP-HDTV front panel.
• Menu – Displays the first level of the on-screen menu, step backward from menu levels
• Arrows – Use up/down keys to select main menus, left/right arrow keys to move through sub-
menus
• Select – Can step forward into sub-menus or confirm an action, the button in the center of the
directional arrows is the same function as Select
• Surf – Selects channels for surf list in Edit Channel mode, steps through favorite channels in normal
operation
• Exit – Exits menu
Analog and Digital Tuning
One of the biggest paradigm shifts in digital TV is how channels are accessed. Gone is the familiar Channel
33. Now you have 33-0, 33-1, 33-2, and so on. In a nutshell, the new tuning options are:
• Analog Channels. Entering the number-0 accesses the traditional analog TV channel.
• Digital Channels. Entering the same channel-1 tunes the digital equivalent of the analog channel.
Note that the digital channel is broadcast on a UHF frequency. Digital tuners see the channel ID (NN-
1) in the signal and lists by that name instead of the actual frequency. This way, the broadcasters
keep their channel identity, even when analog goes away.
• Multicast Digital Channels. Because digital is more compressed than analog, broadcasters are
often including additional sub-channels, listed as NN-2, NN-3; up to 6 if the station is only
broadcasting SD quality programming.
• Two-Digit Tuning. If you are currently watching a digital channel, entering the old channel format,
such as 33, will access 33-1. If you are watching an analog channel, entering 33 will take you to 33-
0.
Contemporary Research 9 IP-HDTV HD Tuner
Page 10
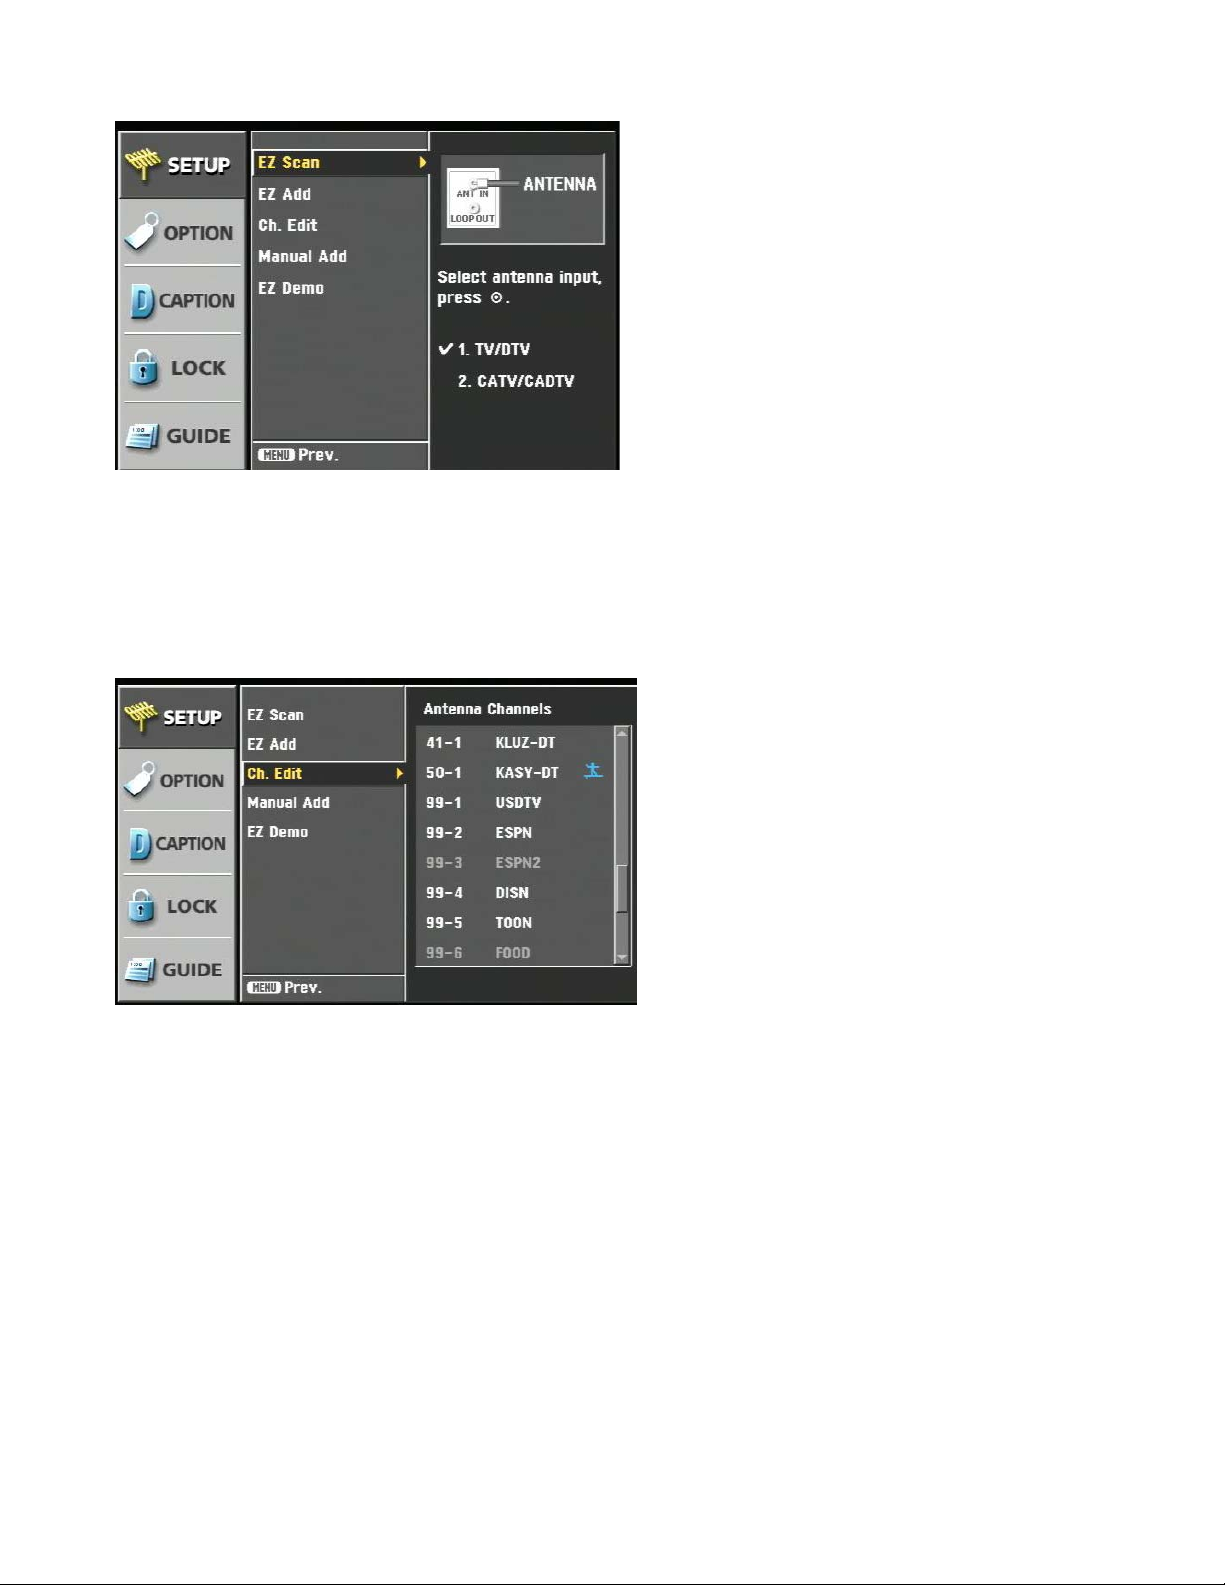
Auto-Scan Channels
• Press Menu to display the menu window
• Press Select or f to select the EZ Scan menu
• Use the arrow keys to select TV (off-air) or CATV (cable) format
• Press Select to enter format and begin auto-scanning
• You can also select EZ Add, then Select to start auto-scanning
Edit Channels
The Ch Edit window is useful, easy tool for managing your channels.
• Select the Ch Edit menu
• Use the Up/Down arrows to move a line at a time
• Use the Channel Up/Down arrows to move a page at a time
• The IP-HDTV will display any highlighted channel
• Press Select to remove (dimmed text) or restore a channel to the channel list
• The channels remain in the Edit list, so you can easily restore a channel to the list
• Press Surf on the HD-IC remote to add a channel to the Surf (a list of easy-access favorite channels)
Contemporary Research 10 IP-HDTV HD Tuner
Page 11
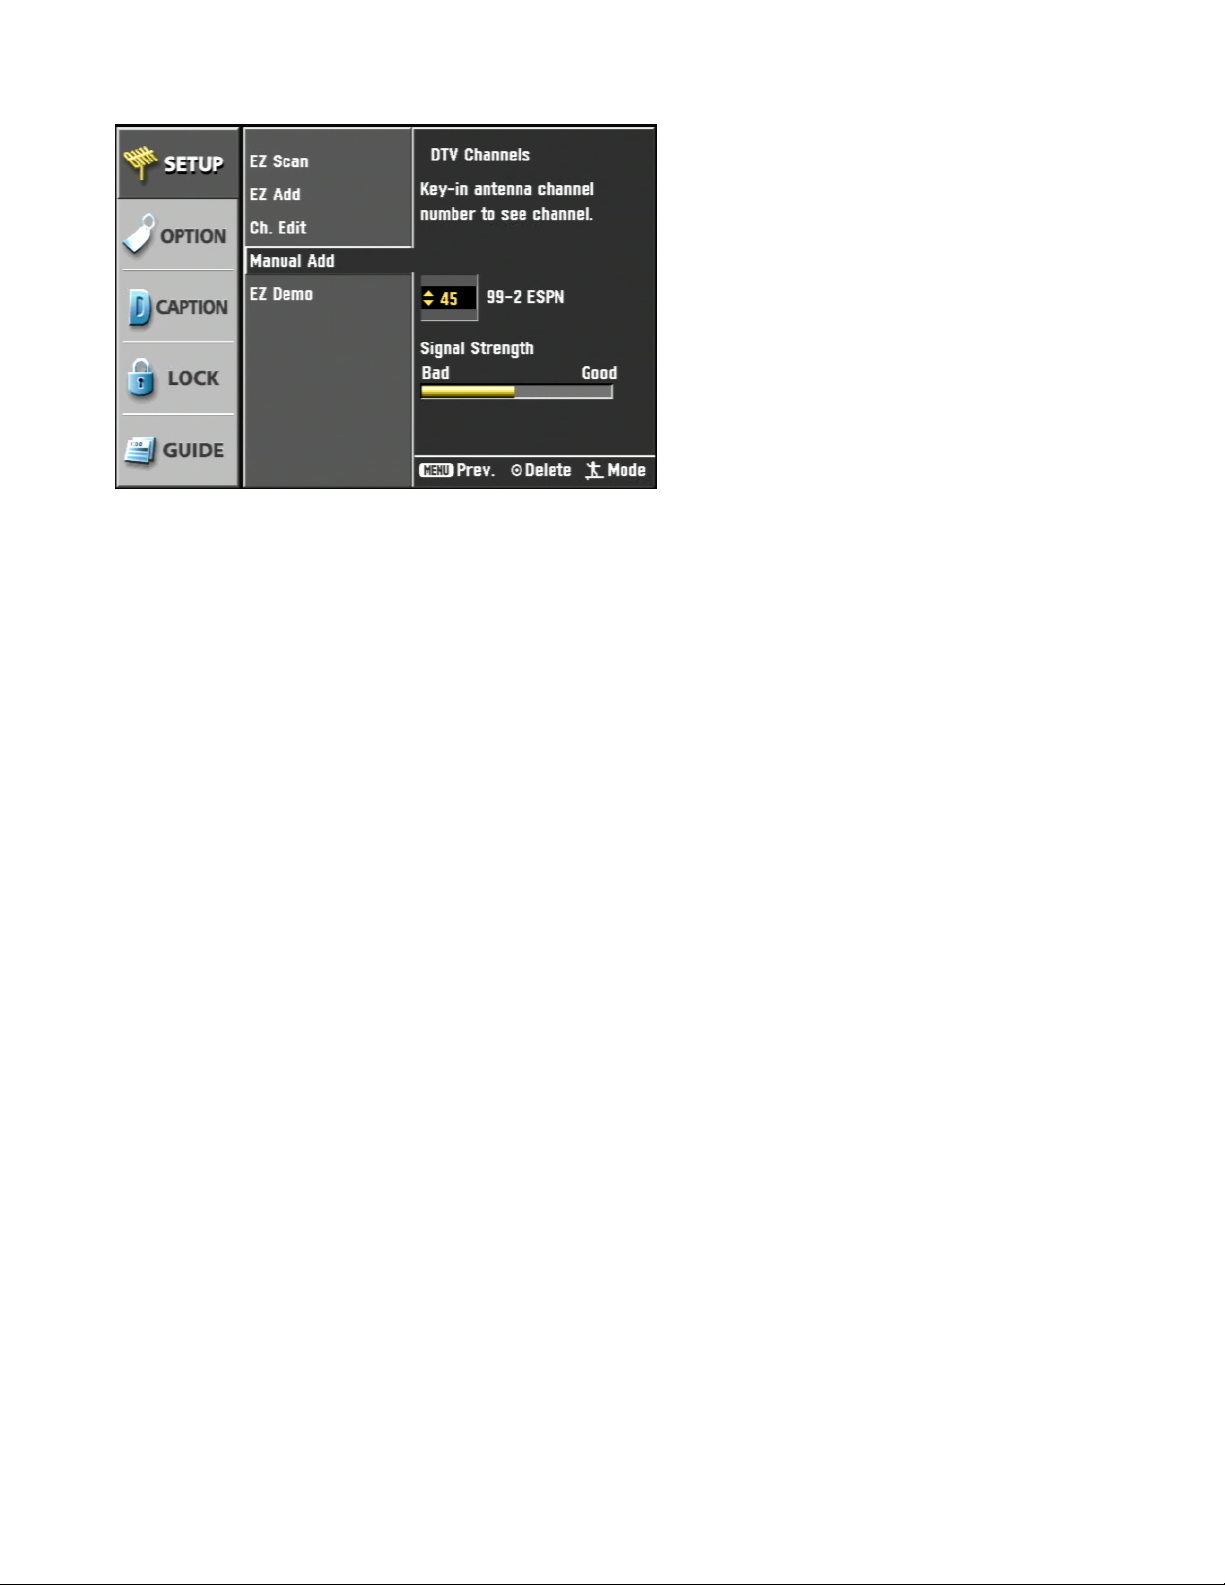
Add Channels Manually
To manually add channels:
• Select the Manual Add menu
• Press Select or f to enter the menu
• Use Up/Down arrows to select a channel number, or enter a number on the HD-RC remote.
• The tuner will first attempt to tune in the analog TV channel (XX-0)
• The window also displays the relative strength of the channel’s signal
• Press Surf to find the DTV equivalent of the channel (XX-1)
• If the station has other multi-cast channels (XX-2, XX-3, etc), they will be added automatically when
you select the primary DTV channel
• Press Select to add the channel to the list, again to remove the channel (dimmed text)
Note: This screen is a classic example of HD broadcasting operation. The tuner is set to UHF channel 45,
where the DTV program is broadcast. The channel identifier included with the broadcast is “99-9 HGTV”.
While the actual UHF channel is 45, the program will be found as 99-9 in the program list. Using this system,
it’s easy for people to find the DTV equivalent of the analog channel. The analog broadcast will appear as,
for example, 13-0, while the DTV version will be listed as 13-1.
Channel Edit Demo
Select EZ Demo, then press Select to view a demonstration of channel scanning and editing.
Contemporary Research 11 IP-HDTV HD Tuner
Page 12
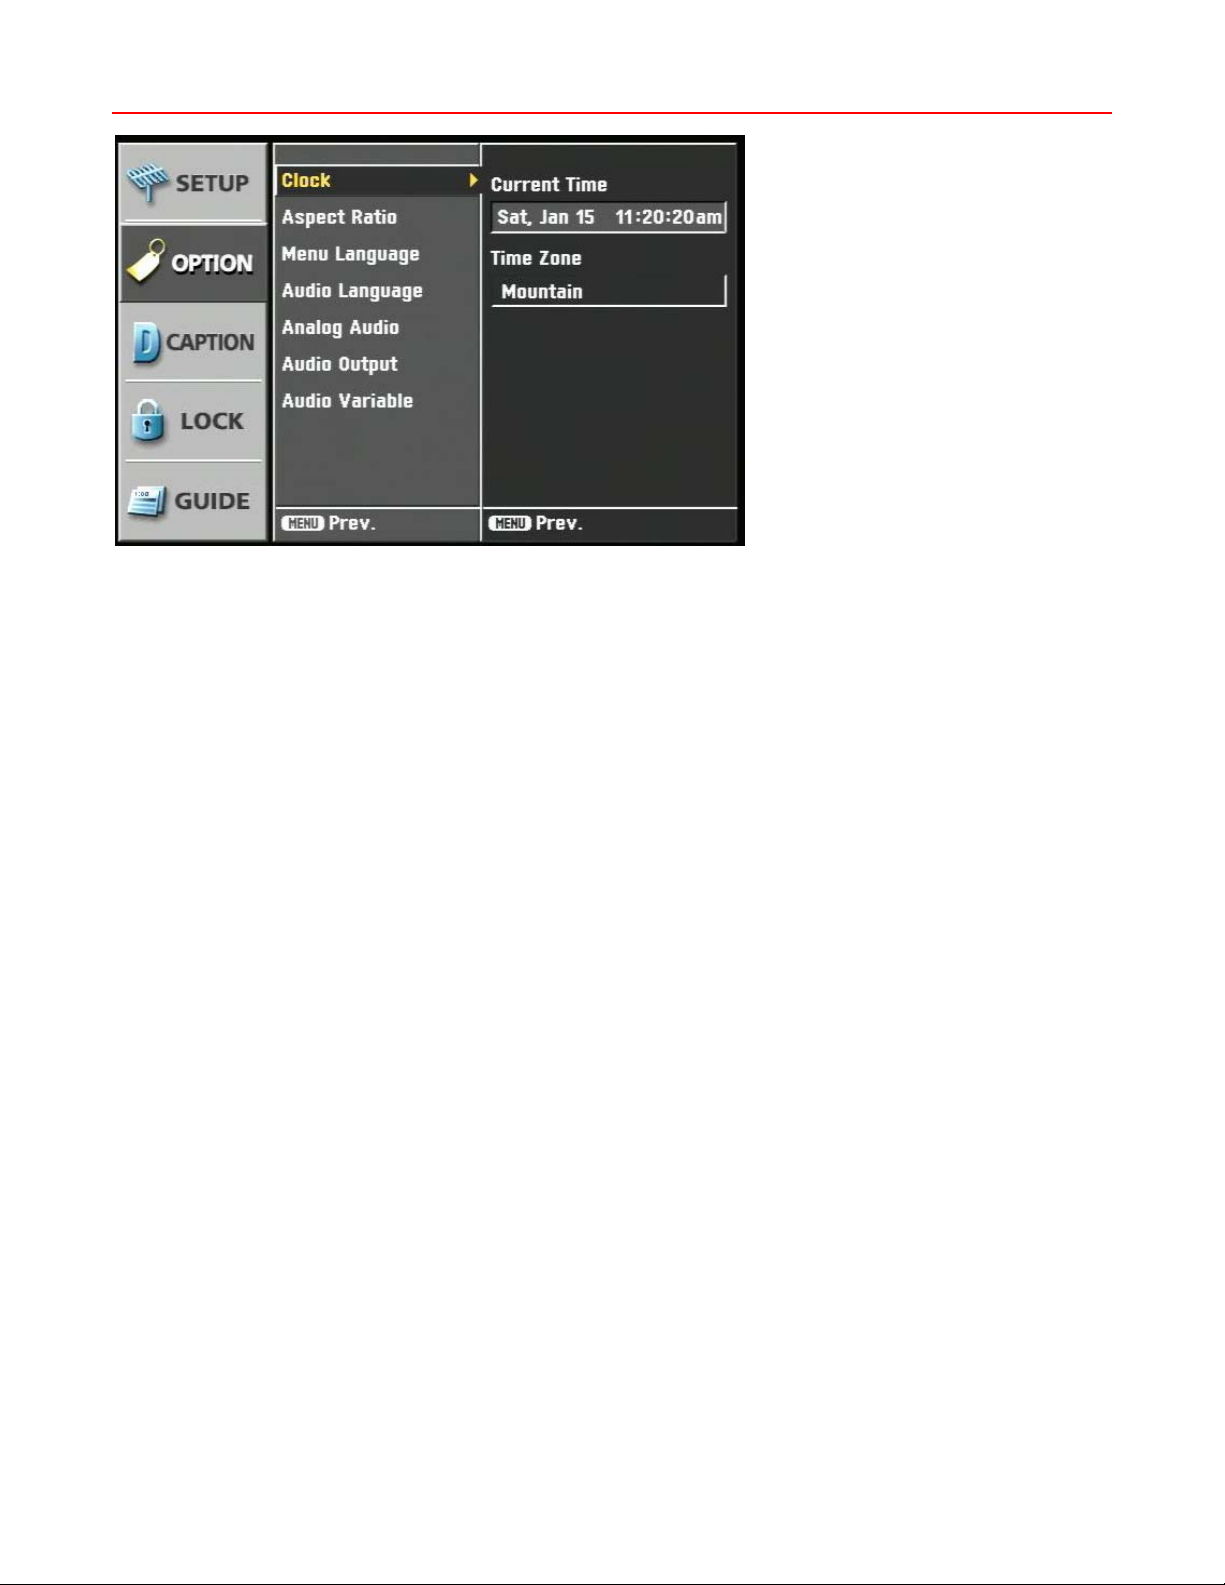
On-Screen Menus – Options
The Options menu defines key operation features of the IP-HDTV
Clock
Off-Air
• Select Clock from the Options menu
• Time is set automatically from DTV broadcasts
• Arrow down to Time Zone, use Left/Right arrows to select zone
CATV
• Select Clock from the Options menu
• Year, Date, and Time is set manually in cable mode
• Use Up/Down arrows to set Year, press fto advance to Date
• Arrow down to Time Zone, use Left/Right arrows to select zone
Contemporary Research 12 IP-HDTV HD Tuner
Page 13
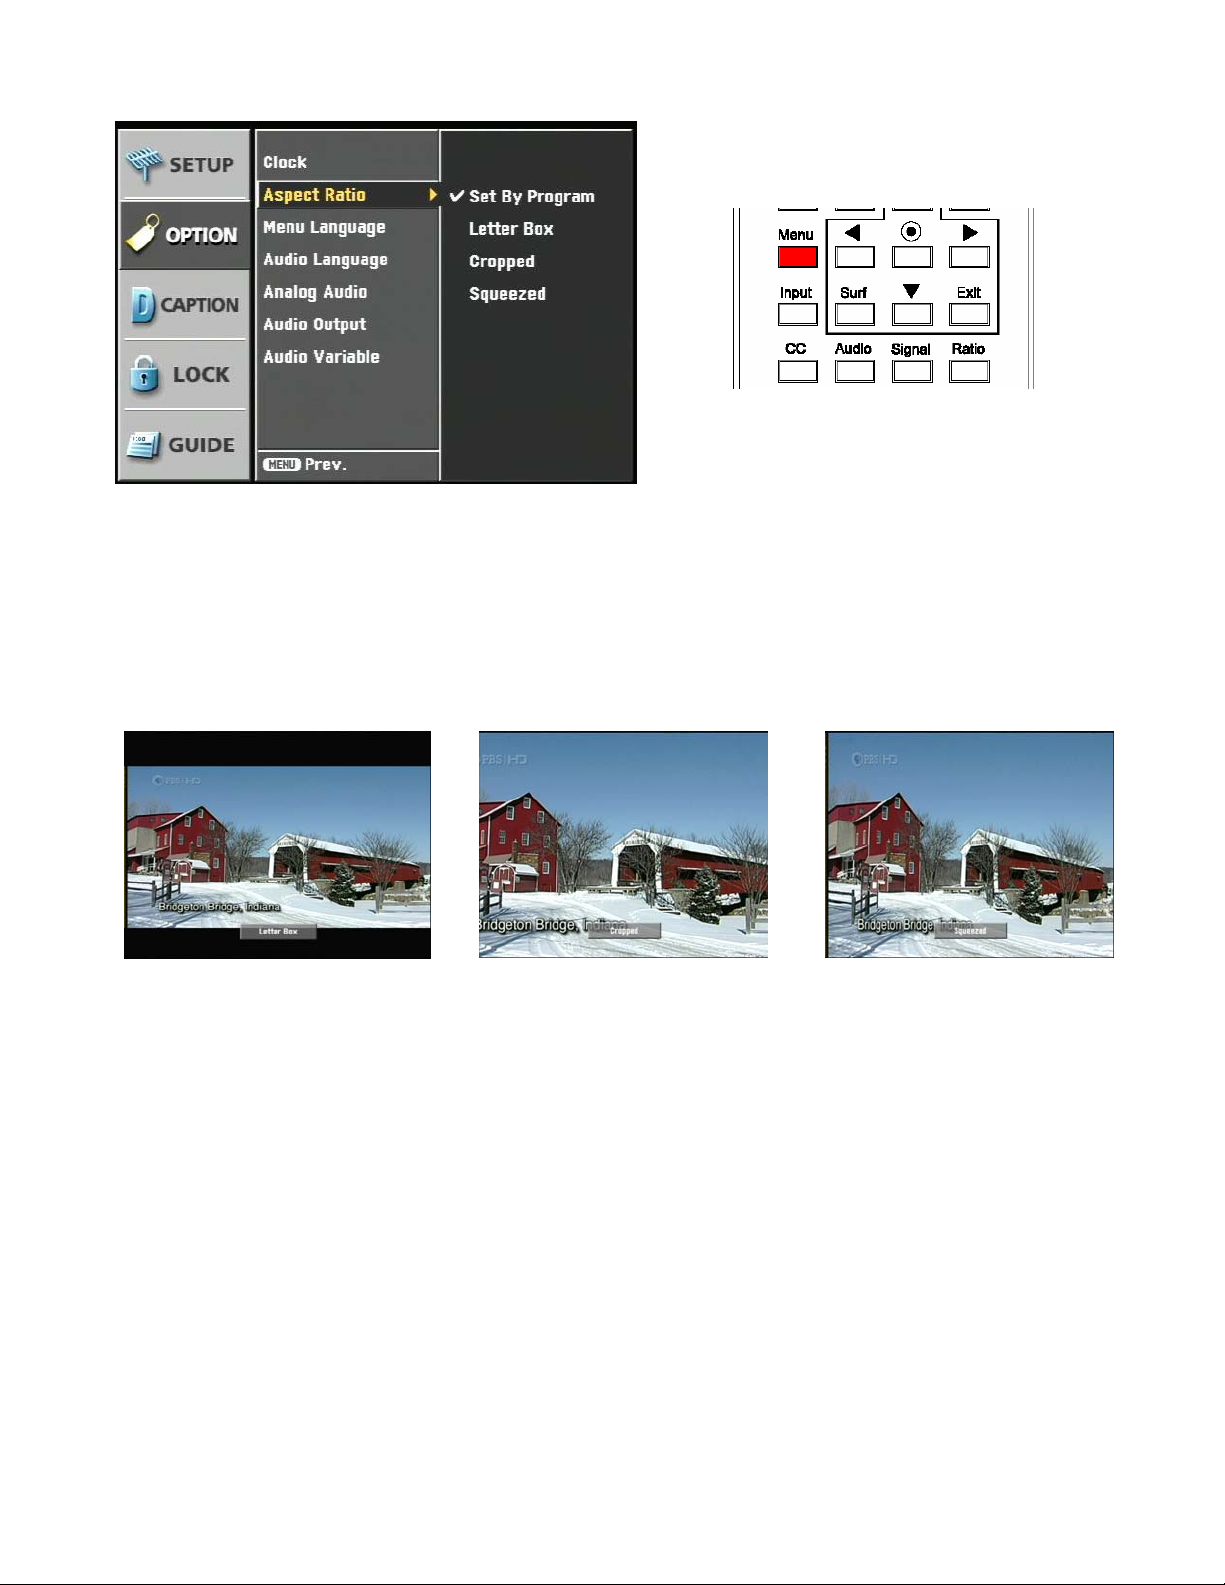
Aspect Ratio
Aspect Ratio Menu HD-RD Remote – Ratio Button
This menu sets the default screen format when video is displayed. There are two different menus that
appear, depending on whether the IP-HDTV is set for HD 1080i/720p mode (16:9) or SD 480i/480P mode
(4:3).
The Ratio command and button on the HD-RC remote will temporarily select the same aspect ratio options,
but the display will return to the default setting when the channel is changed.
SD 480i/480P Display
Letterbox Cropped Squeezed
Selects how a widescreen 16:9 image will be viewed on a 4:3 screen.
• Set by Program
• Letter box – black bars above and below image
• Cropped – image cropped to fit
• Squeezed – image squeezed to fit
Contemporary Research 13 IP-HDTV HD Tuner
Page 14

HD 1080i/720p Display
Selects how a 4:3 image will be displayed in widescreen format.
• Set by Program
• Normal– black bars at the sides of the image
• Wide – adjusts image horizontally in linear proportion to fill screen
• Horizon – adjusts image in non-linear format, more at both sides
• Zoom – stretched horizontally, cropped top and bottom
• Cinema Zoom – enlarge image in 16 steps
The following options are available to temporarily change a 16:9 im age in 1080i/720p mode:
• Standard – default setting
• Expand – stretch image to fit 16:9 ratio, left and right cropped
• Shrink – squeezed to fit 4:3 ratio – black or gray bars on sides
Menu Language
Selects language used in menus, English, French, or Spanish.
Audio Language
Selects English, French, or Spanish language audio channels, if available. You can also use the Audi o
command or HD-RC button to step through alternate languages.
Analog Audio
Sets default modes for analog audio channels – Mono, Stereo, or SAP. If the broadcaster offers the
options, you can also select using the Audio command or button.
Audio Output
Selects Dolby Digital or PCM formats for the digital audio outputs.
Audio Variable
Enables variable-level volume control from the IP-HDTV front panel buttons, HD-RC remote, or system
commands. Setting to Off disables volume control.
Contemporary Research 14 IP-HDTV HD Tuner
Page 15
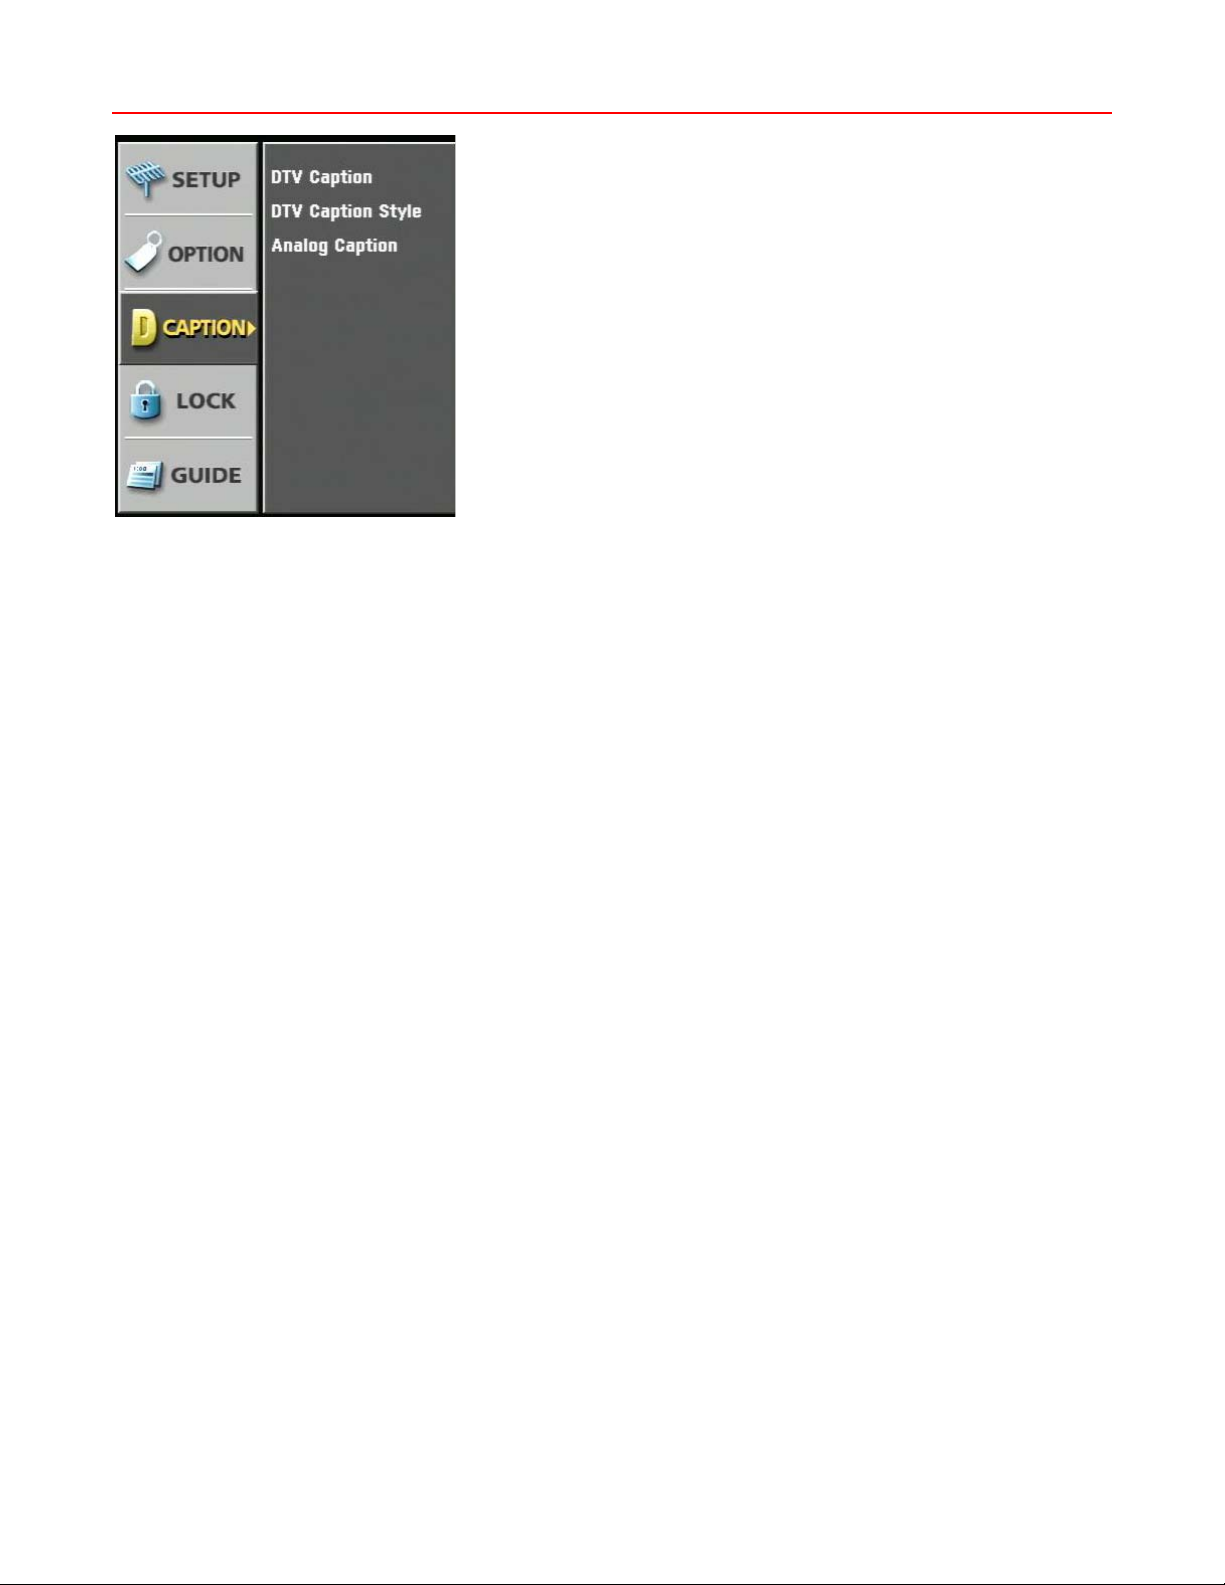
On-Screen Menus – Options
The Caption menus set up how closed-captioning is displayed.
DTV Captions
This turns DTV captioning off, or displayed in English, French or Spanish. The CC command or HD-RC button
will also step through available options. If a program has DTV and analog captioning, the DTV version will be
shown.
If captioning is available, a CC icon will appear in the Info display, Program Guide, and Station Guide.
DTV Caption Style
DTV adds a wide range of options for closed-captioning text, including:
• Style – Set by Program or Custom
• Size – Standard (15 pixels), Large (21 pixels), or Small (11 pixels)
• Font – Select from 8 font styles
• Text Color – Choose from 8 colors
• Text Opacity – Solid, Flashing, Translucent, Transparent
• Edge Color – colors for selected edge type
• Edge Type – None, Raised, Depressed, Uniform, Left Shadow or Right Shadow
• Background Color - Choose from 8 colors
• Background Opacity - Solid, Flashing, Translucent, Transparent
Analog Captions
Select Off or 8 caption styles. The CC command or button will also step through options if the current
channel is analog.
Contemporary Research 15 IP-HDTV HD Tuner
Page 16
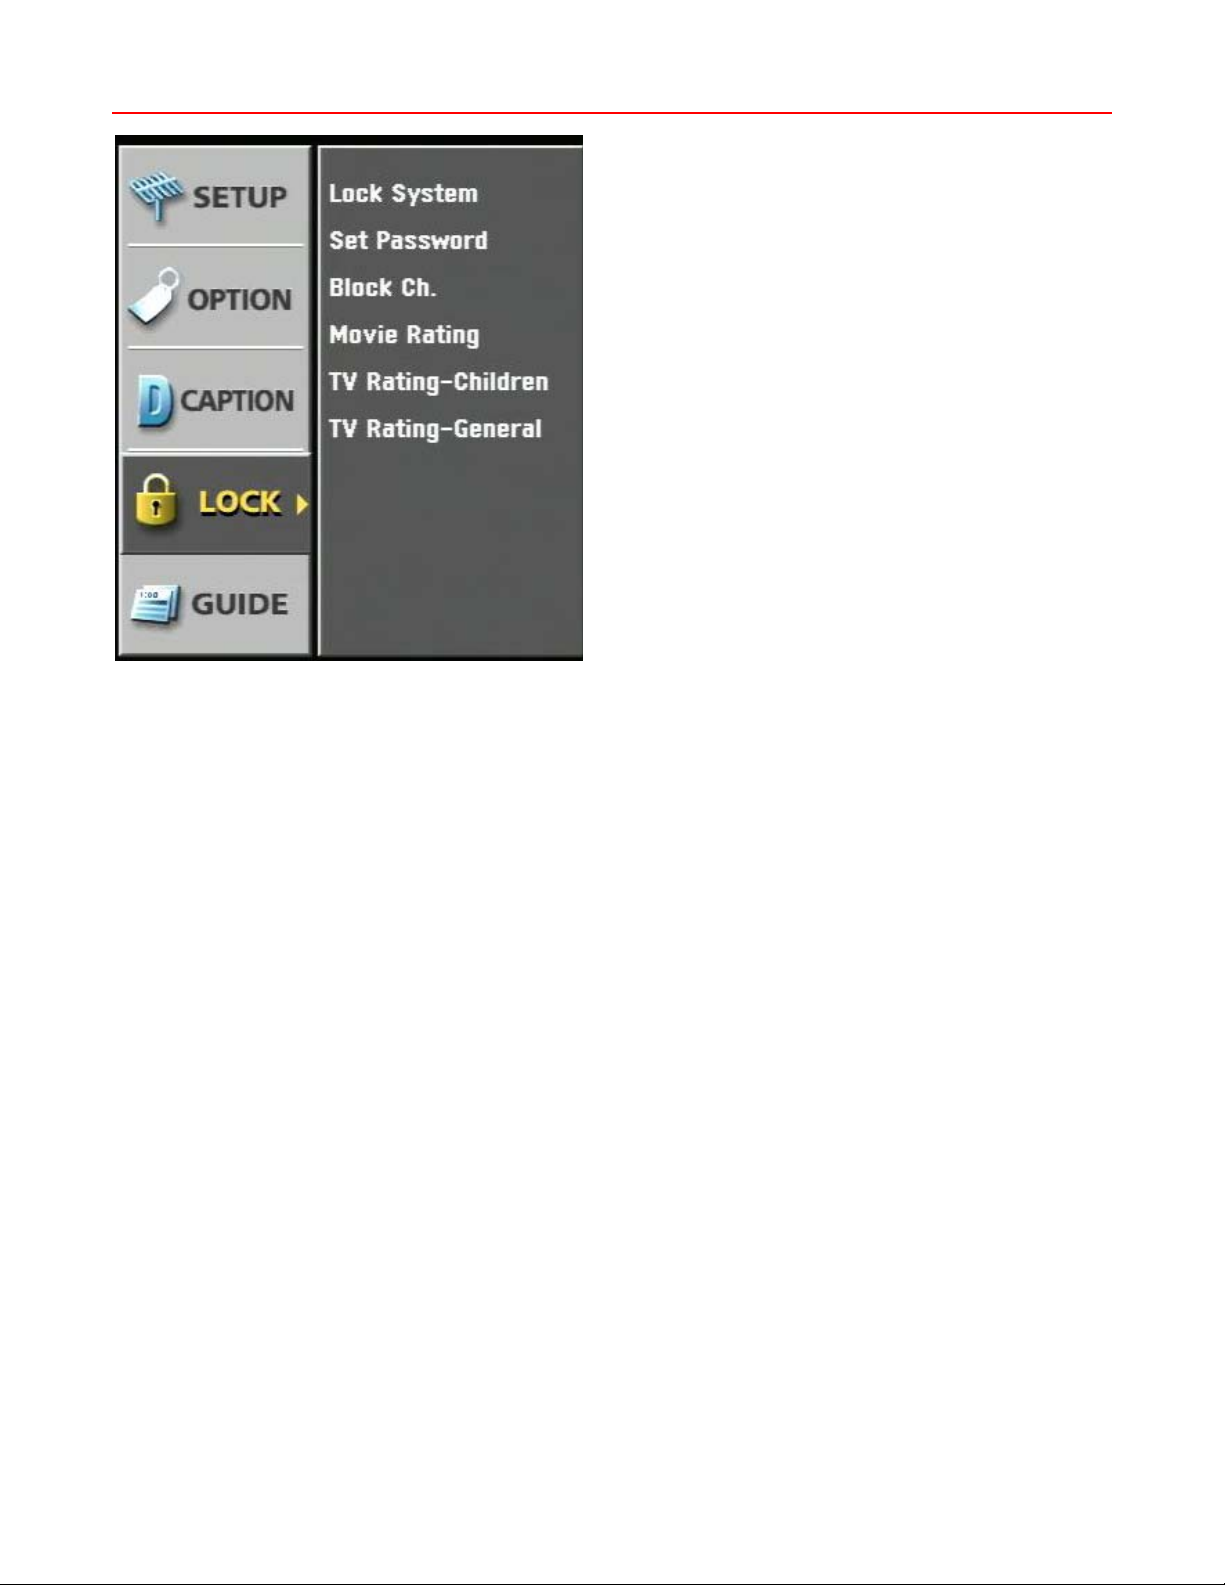
On-Screen Menus – Lock
This menu sets up parental controls for viewing. The menu will prompt for a password when you enter this
menu (0000 is the default password)
• Lock System – Activates parental control
• Set Password – Enter 4-number password
• Block Channels – Select specific channels from the channel list
• Movie Rating – Select one or more ratings for blocking
• TV Rating-Children – Choose filtering by Age and Fantasy Violence levels
• TV Rating-General – Choose filtering by Age, Dialog, Language, Sex and Violence
Contemporary Research 16 IP-HDTV HD Tuner
Page 17
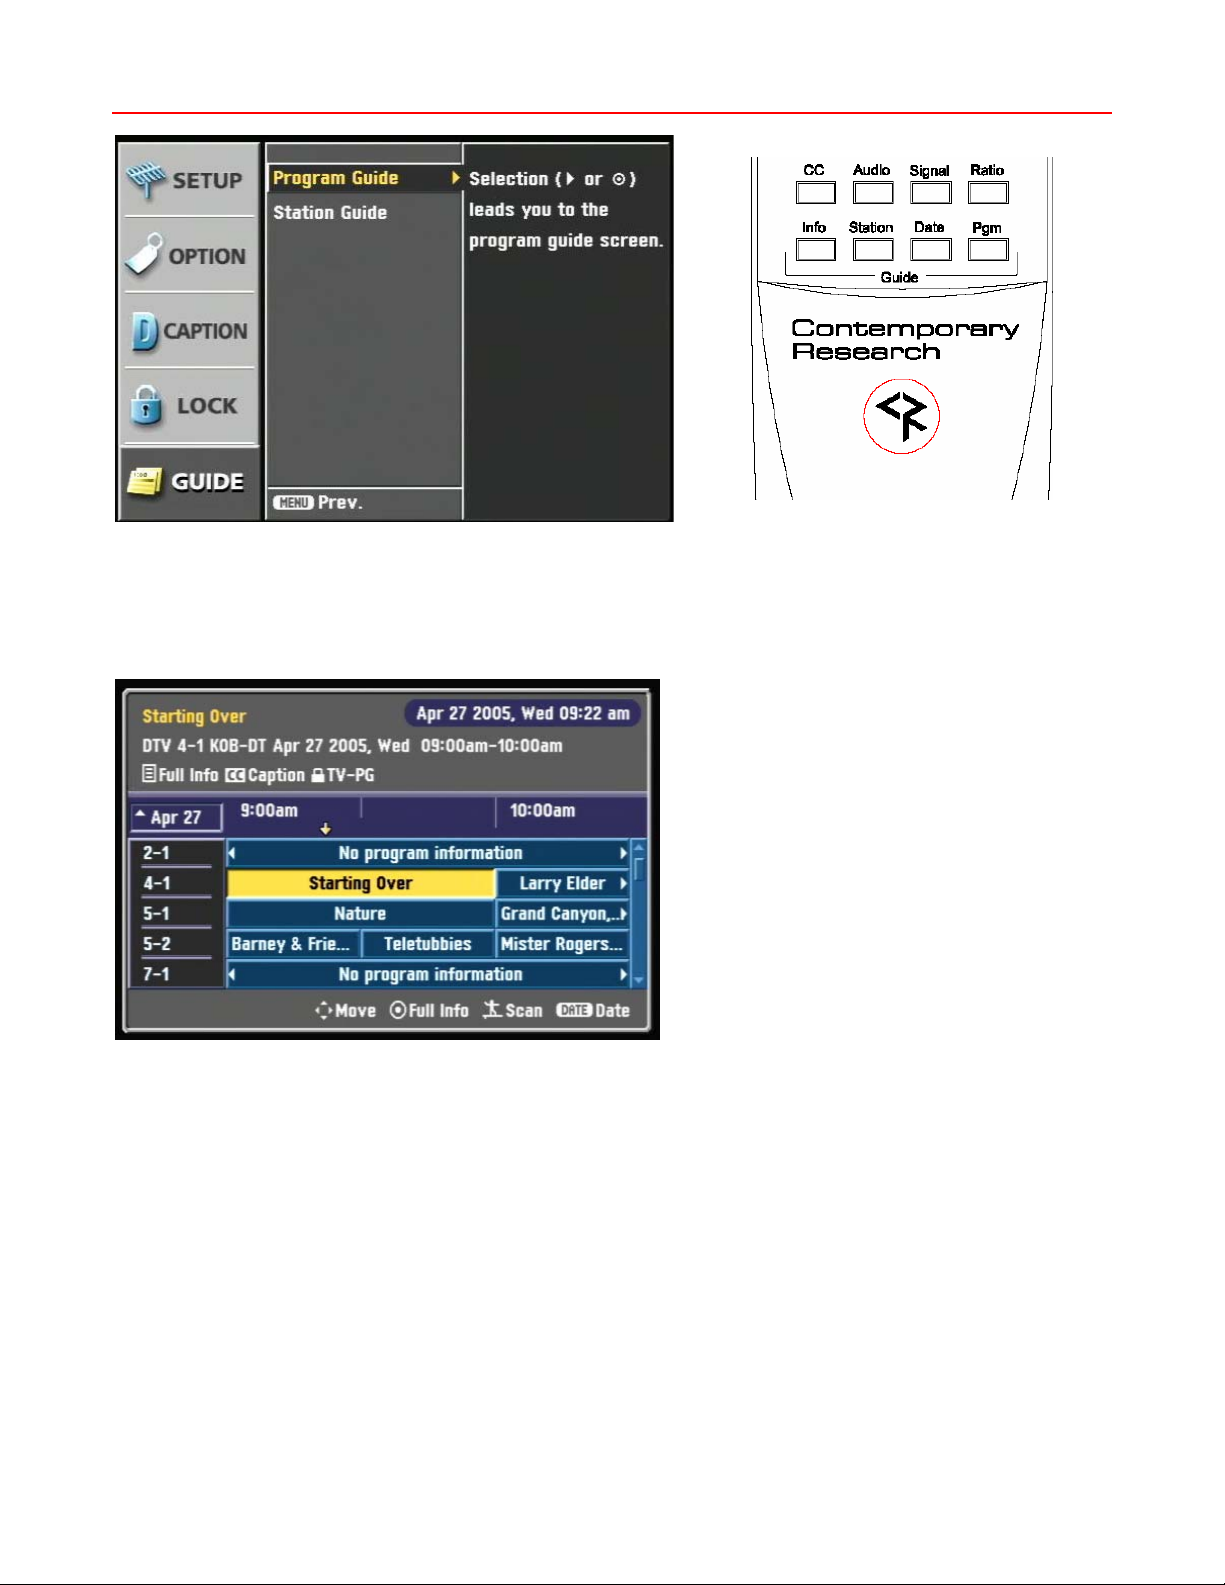
On-Screen Menus – Guides
Guide Menu HD-RD Remote – Guides
This menu displays the Program Guide or the Station Guide. You can also access Guides using the
Program and Station system commands and HD-RC buttons.
Program Guide
The Program Guide is an interactive display of the day’s programming schedule. You’ll notice that, at this
present time, not all broadcasters are providing Guide information. You can use your arrow keys to move
through the Guide. Select a program by pressing Select, which will display more information, and the option
of viewing the program.
Contemporary Research 17 IP-HDTV HD Tuner
Page 18
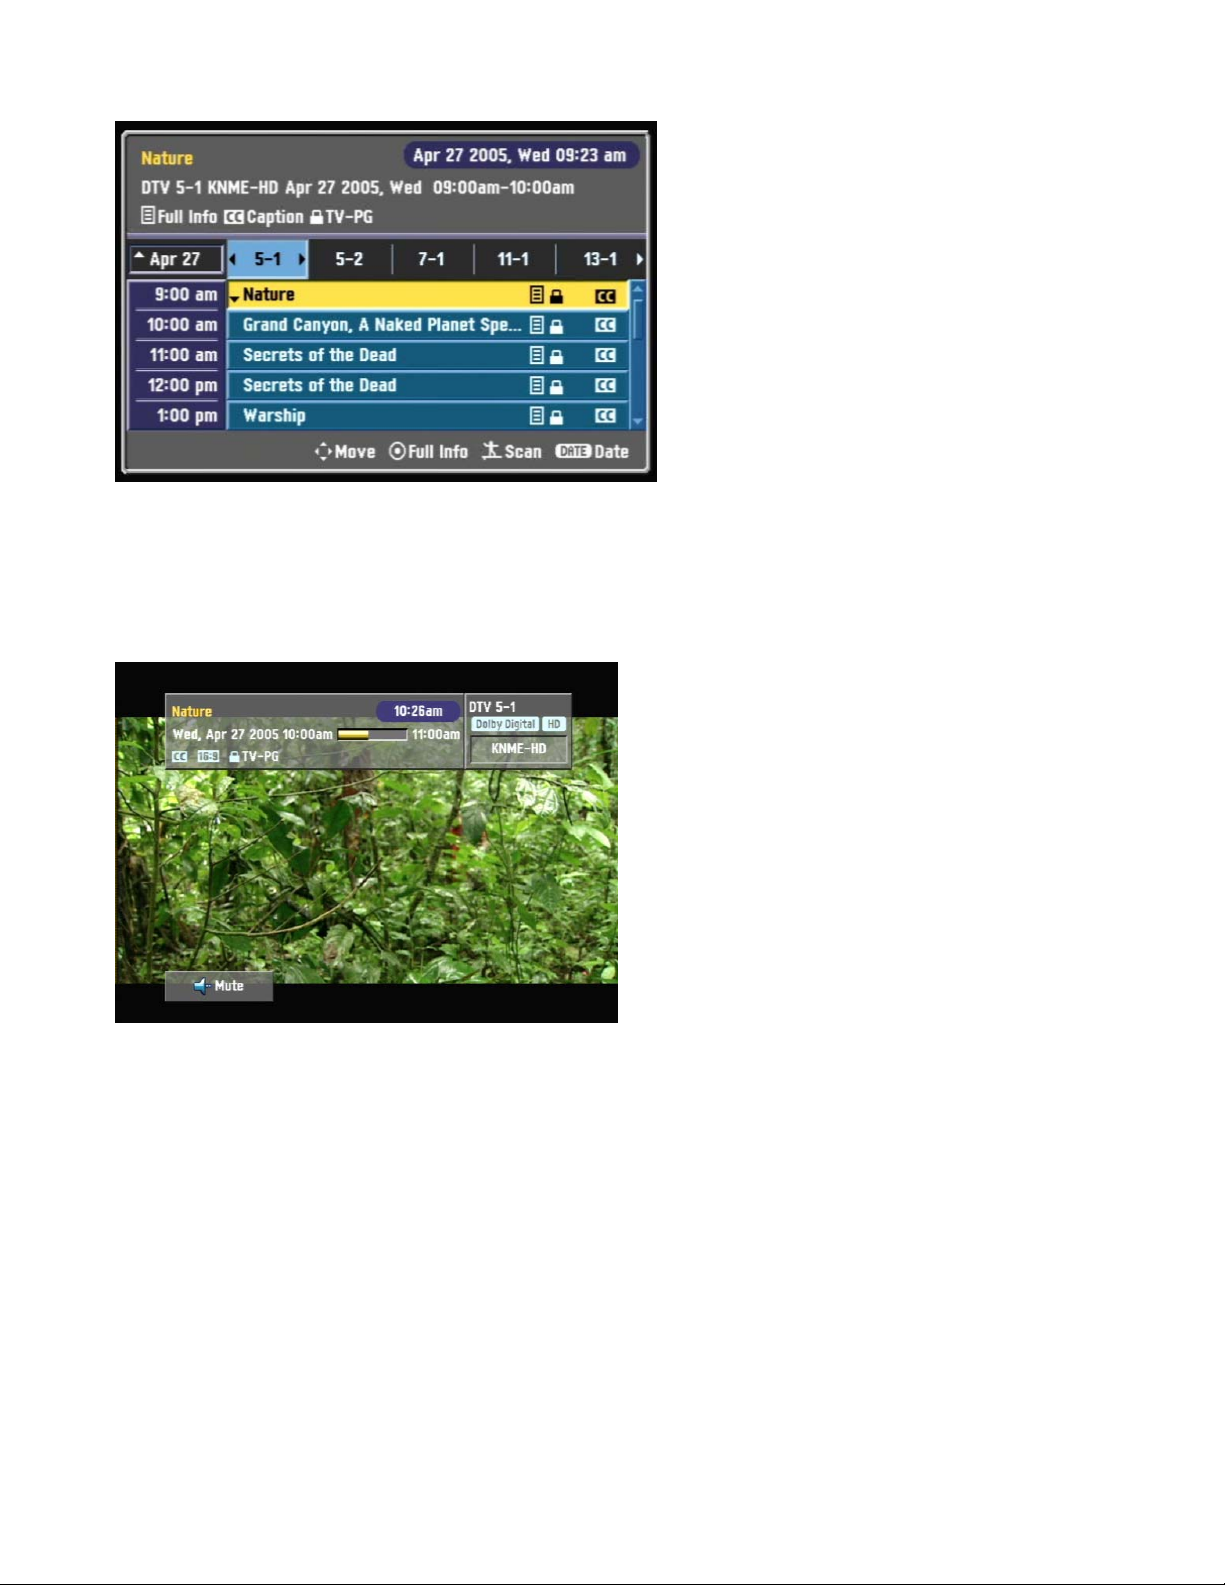
Station Guide
The Station Guide displays a channel’s program list for the day. You can browse through the Guide with the
arrow keys to view programs and change channel lists – as well as using Select to view a current program.
Using the Date command on the HD-RC remote, you can highlight the Date field and select a different day.
Info Display
The Info button on the remote will pop up an information bar over the current program, displaying the
program name, date and time, signal strength, channel information, and specific feature icons, such as
captioning and rating.
Contemporary Research 18 IP-HDTV HD Tuner
Page 19
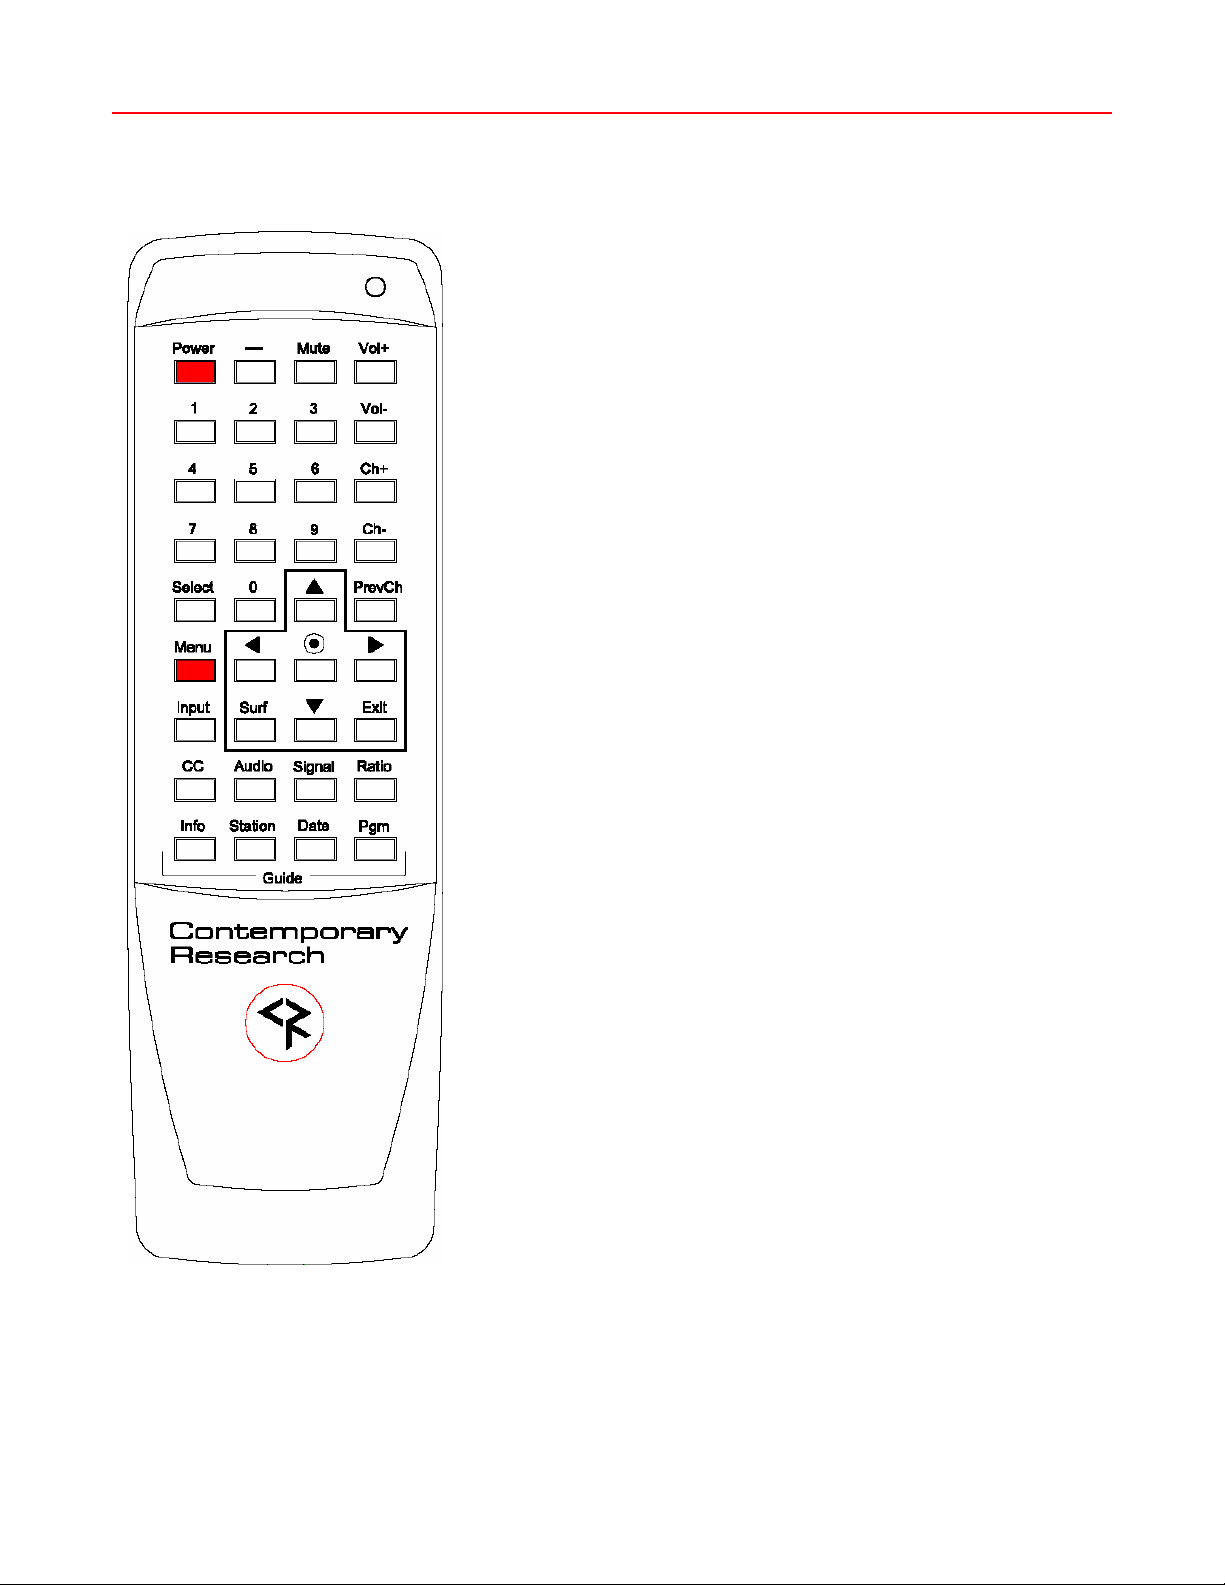
HD-RC IR Remote
The HD-RC IR Remote included with the IP-HDTV can be used to setup the tuner and for daily operation. All
of the functions on the remote have equivalent commands in RS-232, Ethernet, and Wired IR formats. In
addition, the IP-HDTV front panel buttons can perform Power, Channel, Volume, and Menu control.
Power
Turns tuner on and off. Discrete on and off IR commands are
available as well.
Volume Control
Use the Vol+, Vol- and Mute buttons
Channel Selection
The key change in digital tuning is the need to add a dash (-) and
number after the traditional channel number. Analog channels are
accessed using XX-0, digital channels using XX-1 (or -2, -3, etc).
Ch+, Ch- and PrevCh can be used to access and recall channels.
The Surf button in the Menu section can step through a list of
favorite channels.
Menu Operation
Press Menu to access the on-screen menus.
Use the directional arrows, Surf, Select and Exit to navigate the
menus. The ~ button in the center of the directional arrows is the
same function as Select.
Special Functions
• CC steps through available closed-captioning options
• Audio selects Mono, Stereo, SAP analog audio output modes
• Signal displays an on-screen signal strength meter
• Ratio steps through aspect ratios, options depend on
channel and output types
Guides
• Info launches on-screen information window
• Station opens up the Station Guide
• Date selects the Date field in Guides
• Pgm displays the Program Guide
IR Format – 3 Code Options
• CR 7 – hold down Select and 7
• CR 8 – hold down Select and 8
• CR 9 – hold down Select and 9 (default)
Contemporary Research 19 IP-HDTV HD Tuner
Page 20

Ethernet Setup
Ethernet Connection
The IP-HDTV typically communicates over a network using a static IP address, and is shipped set to a default
address:
IP Address: 192.168.1.231
Subnet Mask: 255.255.255.0
Gateway Address: 000.000.000.000
Local Port set to 23 (Telnet standard)
Odds are, at least the IP address will change when the IP-HDTV is connected to the client’s network. One
your first steps will be to obtain a static address from the client’s IT department, as well as an external
gateway IP address if you intend on supporting the system from your office or anywhere outside the site’s
firewall.
Once you change the settings, create a label noting the settings and attach to the back of the IP-HDTV.
Reset IP Address
Since its possible another network device is using the default IP address, the best approach is to enter the
new settings offline, outside the network. You can use one of two, requiring one of two offline options:
1. Direct PC Connection. Use an Ethernet “Crossover” cable to make a direct connection to the IP-HDTV
Ethernet port and your PC. Two pairs of wires are reversed at one end to create a direct
send/receive path for data.
2. Hub or Switch Connection. Another approach for connection is to use a standard Ethernet hub or
switch between your computer and the IP-HDTV. Using standard Cat5 Ethernet cables, connect your
PC to one port, and then connect the IP-HDTV to the second port.
RS-232 and Telnet Terminal Communication
You can communicate with the IP-HDTV with HyperTerminal using an RS-232 or TCP/IP connection to Port
23.
Contemporary Research 20 IP-HDTV HD Tuner
Page 21

Ethernet and RS-232 Control Protocol
Overview
The IP-HDTV full duplex Ethernet/RS-232 scheme enables a system programmer to control all TV Tuner
functions as well as monitor 3 groups of TV Tuner status. All commands are sent as ASCII strings. No delays
between characters or commands are required, as data is interrupt driven and buffered.
The 3 status groups are: Channel/Source Select, Audio Levels/Mode and Front Panel. The Mute A/V buttonfunction status from the IP-HDTV front panel has been grouped with the Channel/Source for simplicity in the
most common modes of operation. Each of the groups has one ASCII status response string containing all of
the status data for that group. The current status string of a group is sent from the IP-HDTV whenever a
valid command for that group is received by the IP-HDTV RS-232 port or front panel. A group's status may
be requested at any time via the RS-232 port. Status of all 3 groups is sent at power up. The format of each
group's status response string remains the same always.
Up to 9 IP-HDTV units may be cabled together and addressed for individual control from a single RS-232
port. Each IP-HDTV is assigned a unique unit code.
Communications parameters (Front Panel Mode 1) are 300 to 9600 baud, 8 data bits, No parity, and 1 stop
bit. Factory default is 9600 baud, Unit#1.
All settings are saved to NVRAM in the IP-HDTV.
The tuner will accept non-standard RS-232 control such as voltage that swings from 0 to +5 VDC, commonly
found when IR ports are used to send RS-232 commands.
General protocol specifications
Characters in command strings to the IP-HDTV are common ASCII keyboard characters.
Command strings sent to the IP-HDTV begin with the ASCII > (greater than symbol) as an 'Attention'
character and end with carriage return - ASCII CR, Hex $0D, or keyboard Enter - as an 'End-of-command'
character.
Responses from the IP-HDTV begin with the ASCII < (less than symbol) as an 'Attention' character and end
with a carriage return followed by line feed an ASCII LF or Hex $0A as 'End-of-command' characters.
A carriage return is required at the end of each command and is assumed in all examples.
Command String Structure
[Attention] (Unit#) [Command] (Parameters) [Return]
Attention Single character (>) starts the string
Unit# The Unit# is expressed as an ASCII 0-9 when used in multiple tuner applications.
To address all units, use a Unit # of 0 (Zero)
No unit number will default to Unit#1
Command A two-character command
Parameters Added attributes to some commands
Return A carriage return ends the command string, you may use ASCII CR, Hex $0D, or keyboard
‘Enter’ in programming. For simplicity, the programming examples in the manual will not
show the ‘CR’ – so remember, you’ll need to add it in your control code.
Contemporary Research 21 IP-HDTV HD Tuner
Page 22
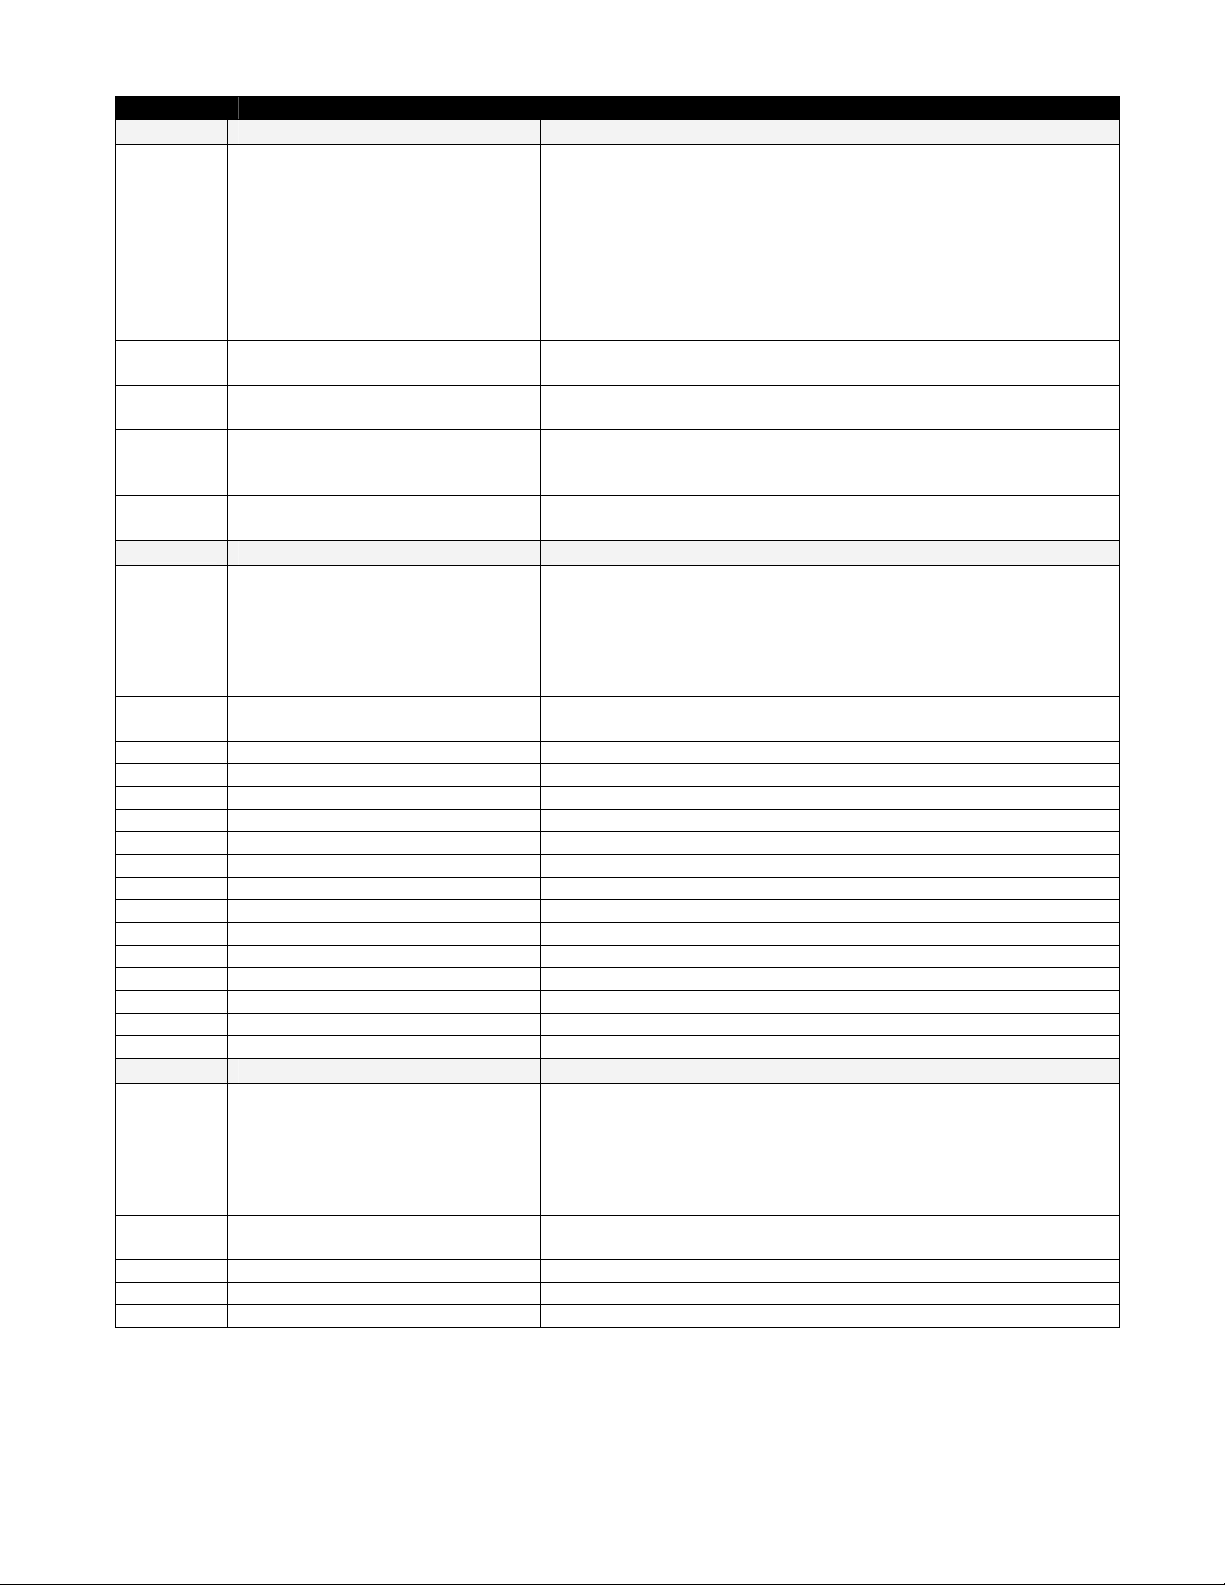
Code Function Operation
IP= IP Address IP returns the current MAC address, current IP address, subnet mask,
IG= IP Gateway IG Returns current MAC address and IP information
IM= IP Subnet Mask IM Returns current MAC address and IP information
IY= IP Mode IY Returns current mode
IX= Telnet Port IX Returns current Telnet port (00023 default)
S4= Set front panel lockout mode 0 None
Q5= Set IR Receive mode 0 - No IR reception
KK=105 Menu Opens on-screen menus
KK=106 Arrow Right Arrow Left
KK=107 Arrow Left Arrow Down
KK=108 Arrow Up Arrow Up
KK=109 Arrow Down Arrow Down
KK=110 Select Select
KK=111 Exit Exits menus
KK=89 Help Displays Menu Help screens
P1 Power On On
P0 Power Off Standby, mutes audio and video
PT Power Off/On Power toggle
XX Power On On (same as 232-series Mute Off)
XM Power Off Standby (same as 232-series Mute On)
XT Power Off/On Power toggle (same as 232-series Mute Toggle)
TC= Select tuned channel
TU Tune channel up
TD Tune channel down Selects next lower channel in channel list
TP Previous channel Selects previously viewed channel
KK=88 Surf Selects next channel up in Surf list, cycles to beginning
Data
Front Panel
Tuning
Example: ‘>3TU’
and gateway. Response example (S or D at end of IP signifies DHCP
or Static address):
$MAC=0014C8000001 / 1 $IP=192.168.001.231S
IG=000.000.000.000 IM=255.255.255.000 IY=1
IP=xxx.xxx.xxx.xxx Defines IP address, then sends status
(0.0.0.0 = DHCP)
IG=xxx.xxx.xxx.xxx Defines IP gateway, then sends status
IM=xxx.xxx.xxx.xxx Defines IP subnet mask, then sends status
IY=1 Static (default)
IY=2 DHCP
IX=xxxxx Defines Telnet port
1 Ch+Menu
2 Vol+Menu 6 Menu
3 Ch+Vol+Menu 7 All
4 Pwr 8 Setup+Menu
5 Setup 9 Pwr+Set+Menu
9 - CR 9 (Default)
Tunes analog (xxx-0) and digital (xxx-1) channels
Examples: ‘>TC=28:1’ Selects channel 28-1
‘>TC=28-2’ Selects channel 28-2
‘>TC=32’ Selects channel 32-1 (if current
channel is digital)
Selects next higher channel in channel list
Bumps Unit#3 tuned channel up
Contemporary Research 22 IP-HDTV HD Tuner
Page 23
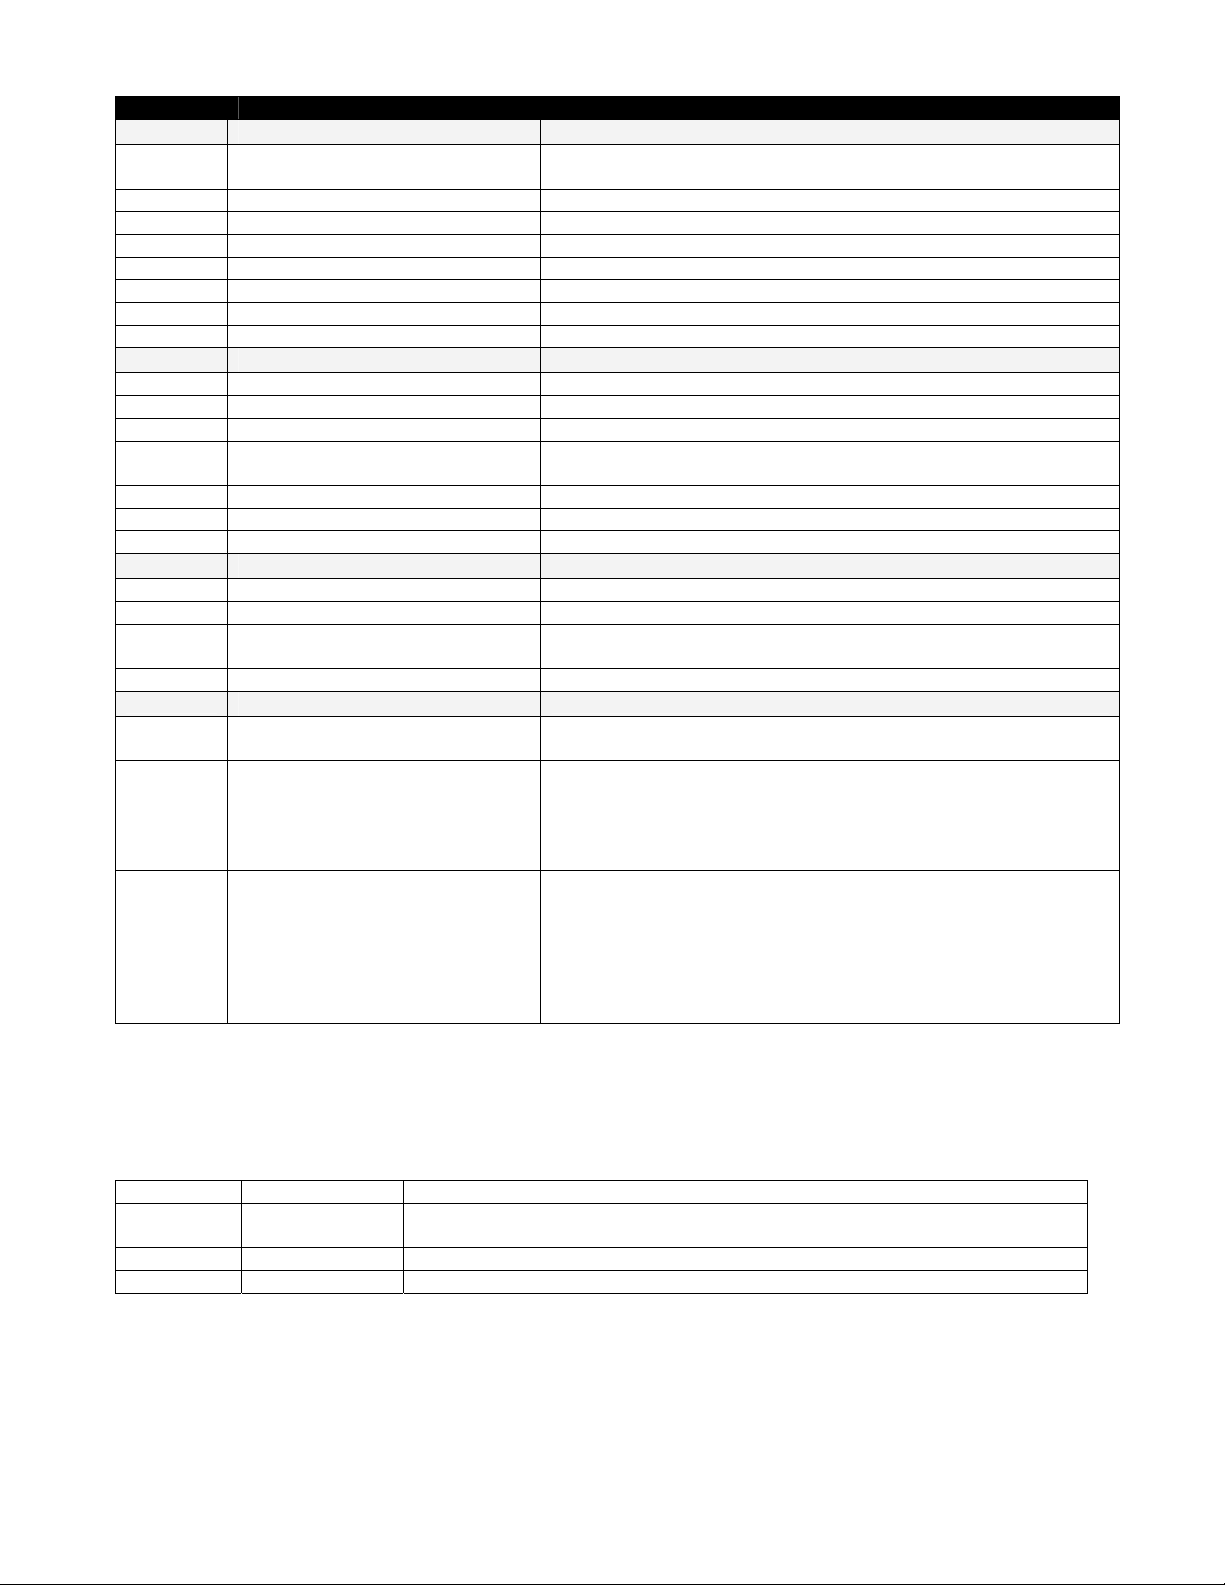
Code Function Operation
KK=82 Ratio Steps through aspect ratios, options depend on channel and
KK=80 Freeze Freeze image, toggles
KK=81 Signal Displays an on-screen signal strength meter
KK=100 Info Launches on-screen information window
KK=61 Station Opens up the Station Guide
KK=62 Date Selects the Date field in Guides
KK=63 Program Displays the Program Guide
KK=115 Closed captions Steps through captioning options
VU Ramp volume up Starts volume ramping up
VD Ramp volume down Starts volume ramping down
VX Volume Mute off Restores audio volume to previous level
VM Volume Mute on
VV Stop volume ramp Stops volume ramping
VT Toggle Volume Mute Alternates audio mute on and off
KK=85 Audio Mode Step through audio mode options for mono, stereo, SAP
SQ Request Q Mode status Unit sends “Q” Mode status string
SS Request Front Panel status Unit sends “S” Front Panel status string
ST Request Channel status
SV Request AV status Unit sends “V” Audio status string
R4= RS-232 Control 0=Disable
R5= Baud Rate 1=300 6=9600 (default)
R6= Comm Parameters 0=8,N,1 (default) 11=8,M,1
Display
Audio
Example: ‘>VM’
Status Request
Example: ‘>ST’
RS-232 Control
output types
Turns off audio outputs
Mutes audio outputs
Unit sends “T” Channel/Source status string
Returns Channel/Source status response string
1=Enable (default)
2=600 7=19.2K
3=1200 8=38.4
4=2400 9=57.6
5=4800 10=115.2K
1=8,0,1 12=8,S,1
2=8,E,1 13=7,M,1
3=8,N,2 14=7,S,1
8=7,0,1
9=7,E,1
10=7,N,2
A carriage return is required at the end of each command and is assumed in all examples. The ‘=’ sign for
parameters may be omitted if desired, though it is helpful for clarity in checking programming.
Terminal Communication Commands
EF Echo Off Characters received will not be re-transmitted (power up default).
EN Echo On Characters received will be re-transmitted.
Example: ‘>EN’ Characters received will be re-transmitted.
ID Product ID Returns the product model number and firmware version.
Z! Zap Reconfigures unit for all factory defaul t settings.
Contemporary Research 23 IP-HDTV HD Tuner
Page 24

HD-RC Remote Emulation
You can also emulate IR commands sent from the CR HD-RC Wireless Remote. If you are using the numeric
keys to select a channel, the user or program will need to follow the numeric command with an Enter.
.
KK=<key> * = Reserved for future
products/applications
0=*
1=*
2=*
3=*
4=*
5=*
6=*
7=*
8=*
9=Power (tog)
10=0
11=1
12=2
13=3
14=4
15=5
16=6
17=7
18=8
19=9
20=
21=Enter/Select
22=Ch Up
23=Ch Dn
24=Vol Up
25=Vol Dn
26=Vol Mute (tog)
27=Power On
28=Power Off
29=Menu
31=Input*
61=Station
62=Date
63=Program
64=ezAdd
65=*
69=System Power*
78=Clear*
79=Mode*
80=Freeze
81=Signal
82=Ratio
83=Format
84=Angle*
85=Audio
86=Subtitle*
87=Bookmark*
88=Surf
89=Help
99=Dash 100=Info
101=FlashBk
102=Timer Reset*
104=Top Menu*
105=Menu
106=Cur Rt
107=Cur Lt
108=Cur Up
109=Cur Dn
110=Enter/Select
111=Exit
112=Top Menu*
114=Setup*
115=CC
116=Timer/Info*
141=Format 1080i
142=Format 720p
143=Format 480p
144=Format 480i
145=Format Var1
146=Format Var2
147=Format Var3
148=Format Native
149=Output RGB
150=Output DVI
151=Output YPbPr
Contemporary Research 24 IP-HDTV HD Tuner
Page 25
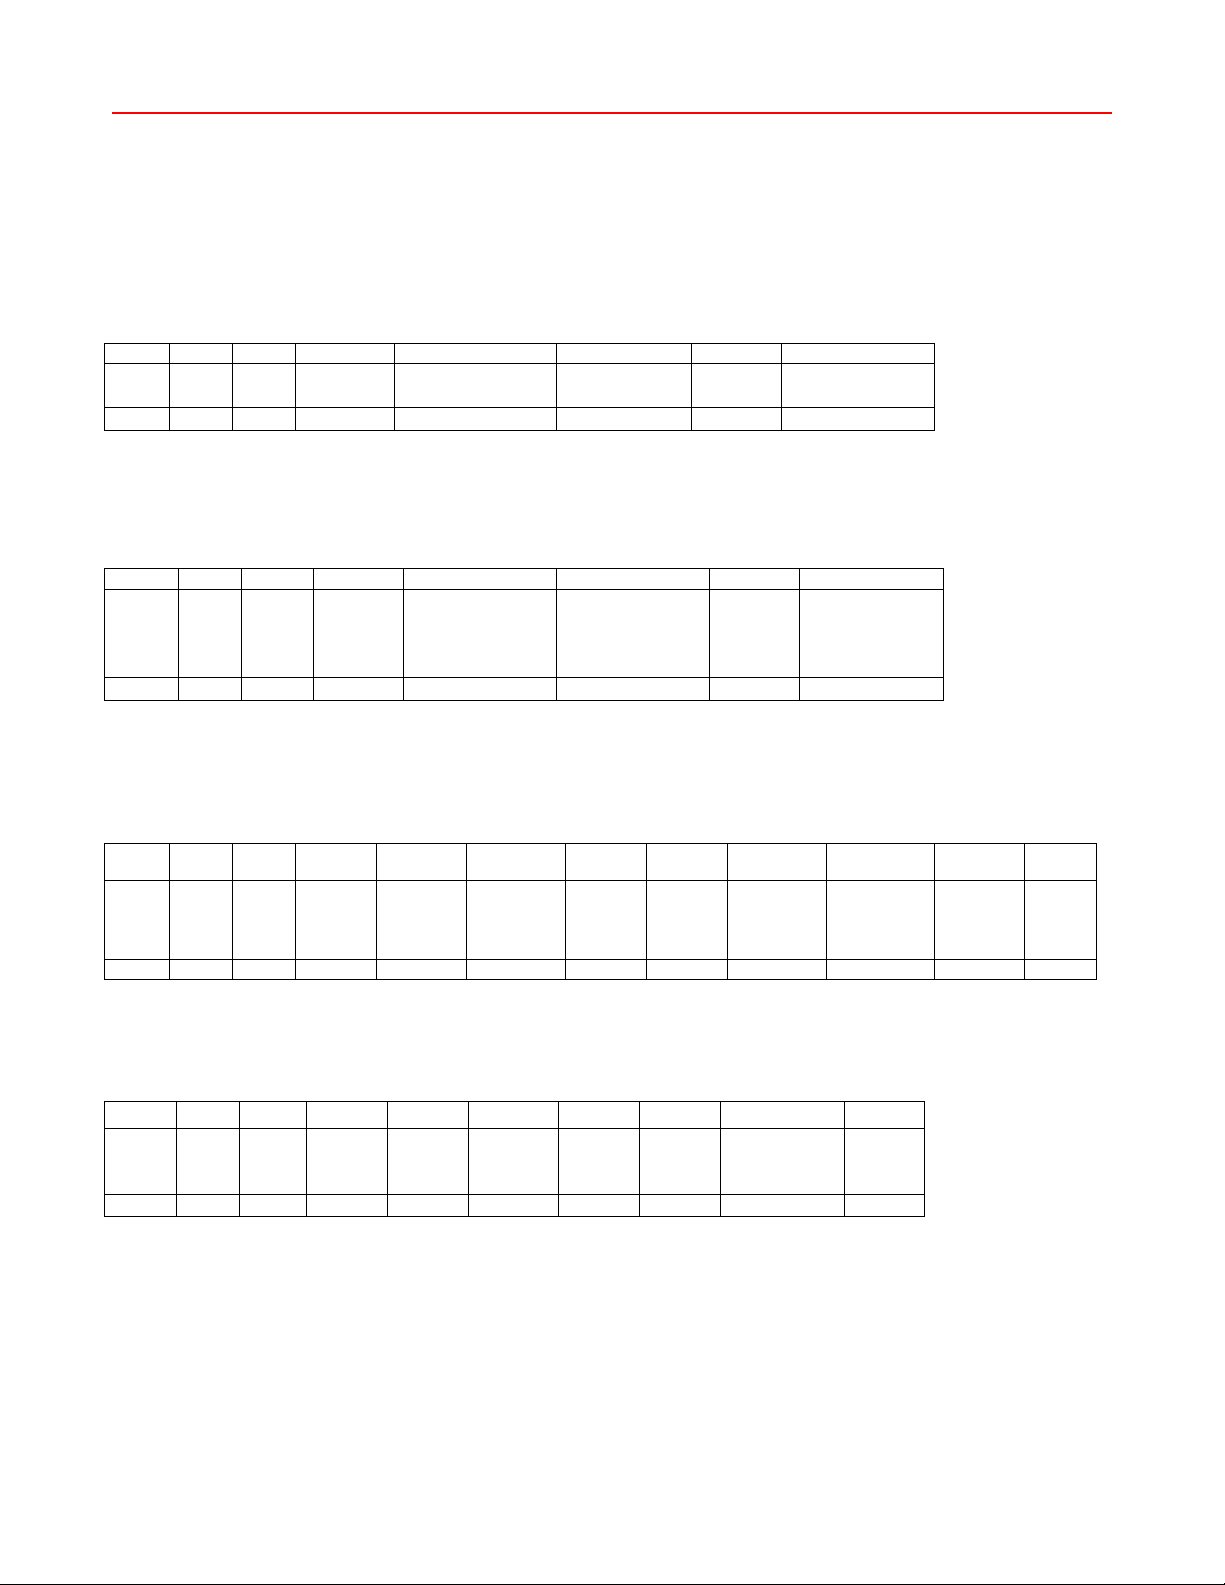
Response Strings
Typical: [Attention] [Unit#] [data ...data] [cr] [lf]
IP-HDTV status response strings contain ASCII characters similar to those used for the same functions in
command strings. An ASCII 'carriage return' and ‘line feed' follow each response string. Functions shown as
N/A are not applicable or available as yet in the IP-HDTV; characters will appear in status strings as lowercase x.
Channel/Source Status Response String (T):
Start
For compatibility with 232-series tuners, IP-HDTV (XXX-XX) channels are split into Channel 1 and Channel 2
sections.
Audio Status Response String (V):
Start Unit CMD Power Volume 1 Volume Mute Stereo Volume 2
Volume 1 emulates 232-series volume level for compatibility with existing applications.
Volume 2 shows actual IP-HDTV level, from 0-100 steps.
Unit CMD Power Major Channel Video Mute N/A Minor Channel
1-9 U=On
M=Off
< 1 T U 008 U xxx 001
1-9 U=On
M=Off
< 1 V U 63 U x 100
3 digits Unmuted 3 digits
0-63
Emulated
level
2 digits
U=Unmuted
M=Mute
N/A 0-100
3 digits
Actual level
3 digits
Front Panel Mode Status Response String (S):
Start Unit CMD Audio Tune
Mode
1-9 N/A N/A
1 digit
< 1 S x x 1 08 4 1 1 6 xxxx
Current Ratio is the actual output ratio; Ratio Mode is the selected mode (see chart on page 9)
Lockout Bass Treble Output Ratio
0-9 Fixed
2 digits
Fixed 0=RGB
1=DVI
2=YPbPr
Current
0=1080i
1=720p
2=480p
3=480i
Ratio
Mode
1-7* 4
N/A
digits
Q Mode Response String (Q):
Start Unit CMD Q0 Q1 Q2 Q3 Q4 Q5 N/A
1-9 N/A N/A N/A N/A N/A IR
0=Off
A=Normal
< 1 Q x x x x x A xxxx
4
digits
Contemporary Research 25 IP-HDTV HD Tuner
Page 26
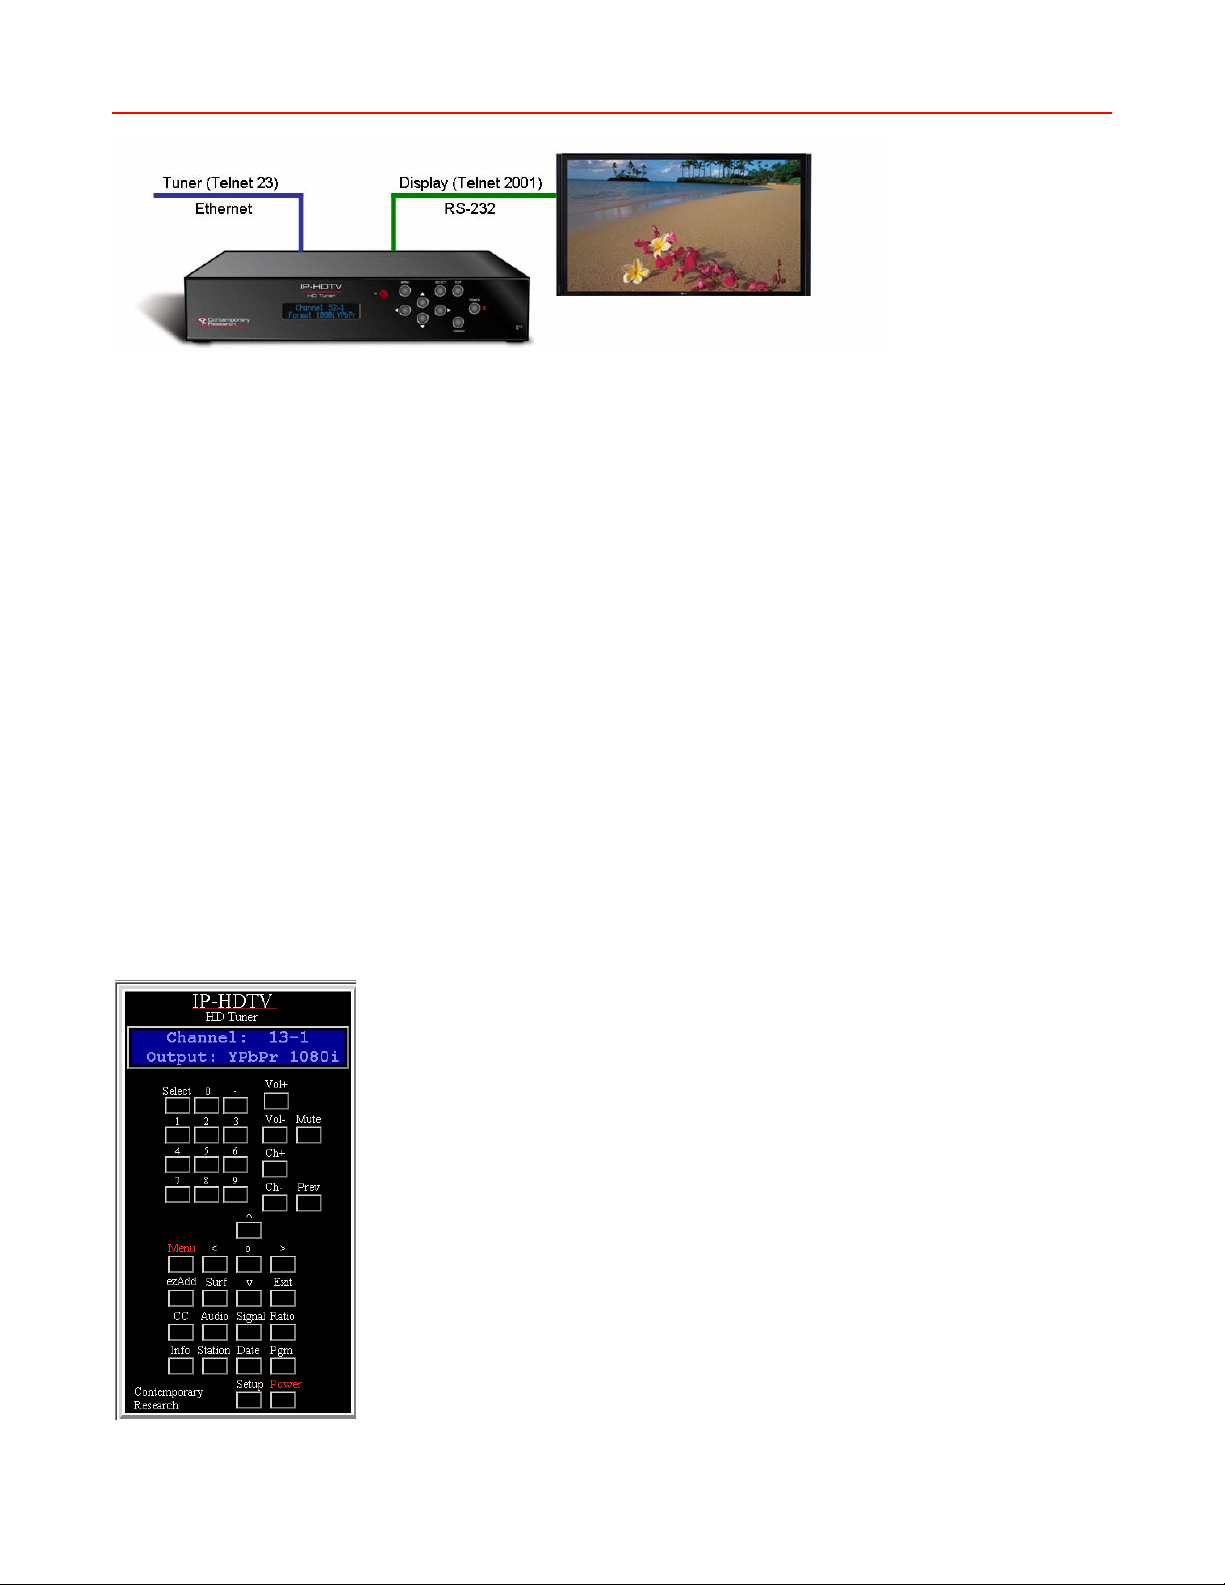
IP Control Options
RS-232 Display Control
An IP-HDTV that is controlled over Ethernet can also offer a pathway for IP-driven RS-232 control to a
display or projector. This application takes advantage of the fact that multiple Telnet ports can communicate
over the same TCP connection.
• Set the control system to communicate with the IP-HDTV over Ethernet through Telnet Port 23, or a
different Telnet port you’ve defined in the IP-HDTV for control.
• Set the control system to control the display over Ethernet using Telnet Port 2001, same IP address
as the IP-HDTV.
• The IP-HDTV will pass data to and from the Telnet port 2001 through the RS-232 control port on the
back. This connection offers full bi-directional control of the display.
• The RS-232 baud rate can be changed via front-panel settings or programming, presently fixed at 8
data bits, no parity, one stop bit.
TCP and UDP Connectivity
The IP-HDTV can be controlled via TCP or UDP protocols. In most cases, a control system Ethernet port will
be set to connect using TCP/IP, which provides direct, two-way communication between the tuner and the
control system.
System programmers could opt to use UDP protocol instead, which is useful for simple, one-way control or
broadcasting control commands to all IP-HDTV tuners on the LAN. The tuners can send status information
back via UDP, but system programming will need to read the strings to interpret which IP address is sending
the data. Check with CR Support for more information on this option. The IP-HDTV can communicate over
both UDP and TCP protocols, no special settings or programming is required.
Web Control Page
The IP-HDTV features on onboard Web page for remote IP control of the tuner,
accessed by entering the IP address of the tuner in a standard Web browser.
Simply click on the Web panel buttons to control the tuner, and the text area at
the top will provide system feedback.
Contemporary Research 26 IP-HDTV HD Tuner
Page 27
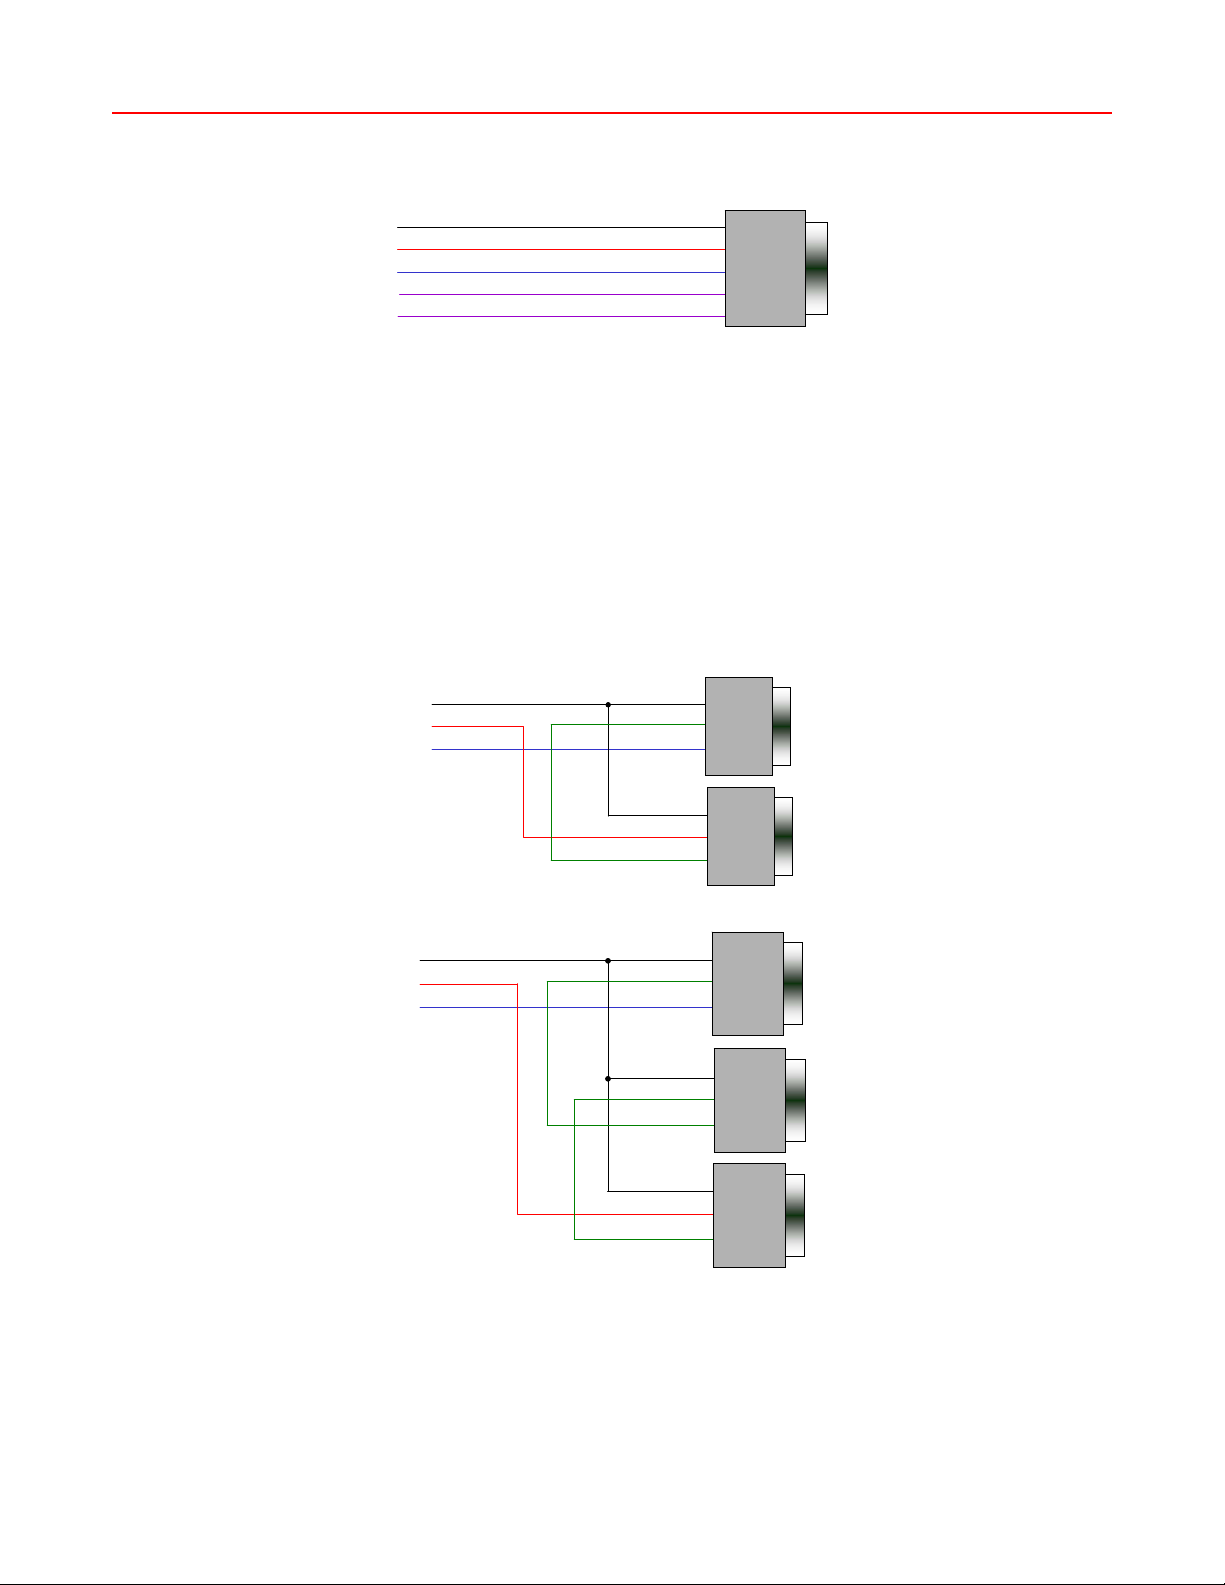
RS-232 Cable Connections
Single Tuner
Control Wiring – Single Unit
RS-232
Control Port
5 GND
2 RXD
3 TXD RXD 2
Channel Down 9
GND 5
TXD 3
Channel Up 4
9-pin D-sub
female
RS-232 wiring for control or programming should only use pins 2, 3, 5. Cables with all pins wired can lock
out front-panel programming and data communication (Pins 4 and 9 are inputs).
Multiple Tuners
Up to nine tuners can be daisy-chained from one RS-232 control port. Remember that you will need to use
the Unit# address in your programming when you control more than one tuner from the same control port.
Set the first unit in the RS-232 chain to the highest Unit#, then wire in sequence to the last tuner in the
chain. The reason for this is that CR tuners use an intelligent data bus - the highest number tuner receives
all commands, and then passes on commands addressed to tuners with lower unit numbers. The next tuner
in the chain does the same, and so on until the last unit.
RS-232 Wiring – Two Units
RS-232
Control Port
5 GND
2 RXD
3 TXD RXD 2
GND 5
TXD 3
Unit 2
9-pin D-sub
female
RS-232
Control Port
GND 5
TXD 3
RXD 2
RS-232 Wiring – Three Units
5 GND
2 RXD
3 TXD RXD 2
GND 5
TXD 3
GND 5
TXD 3
RXD 2
GND 5
TXD 3
RXD 2
Unit 1
9-pin D-sub
female
Unit 3
9-pin D-sub
female
Unit 2
9-pin D-sub
female
Unit 1
9-pin D-sub
female
Contemporary Research 27 IP-HDTV HD Tuner
Page 28
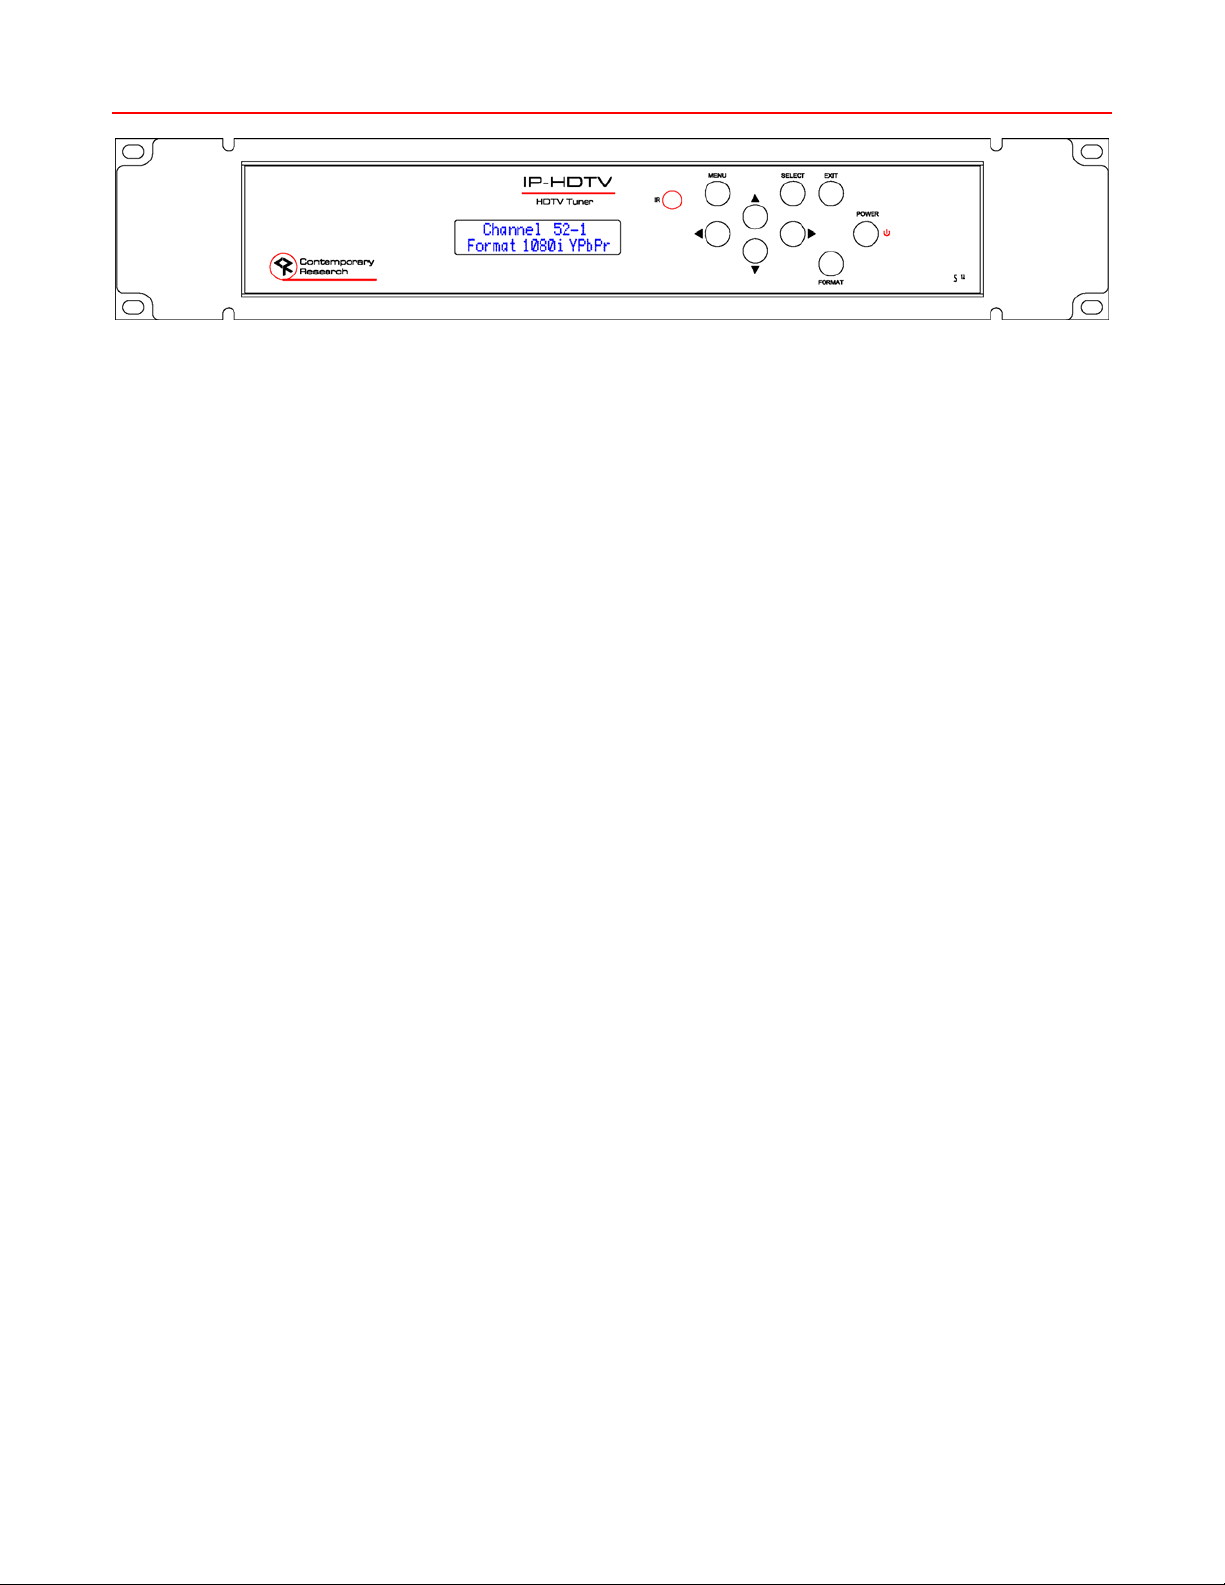
Rack Mounting
RKHD HD Rack Kit
• Attach IP-HDTV to RKHD shelf
• Mount RKHD into 19” equipment rack
• Place cover plate into the RKHD front, attach with 2 mounting screws
Dimensions: 19" [487mm] wide x 3.4" [86mm] high (2RU) x 11” [279mm] deep
Weight: 10 oz [284g]
Enclosure: All aluminum with durable black powder coat paint
Hardware: Qty 4 CS, Phillip, Flathead, 82deg, Black, 8-32 x .25”
Contemporary Research 28 IP-HDTV HD Tuner
Page 29

Safety Instructions
Read before operating equipment.
1. Cleaning - Unplug this product from the wall outlet before cleaning. Do not use liquid cleaners or
aerosol cleaners. Use a damp cloth for cleaning.
2. Power Sources - Use supplied or equivalent UL/CSA approved low voltage DC plug-in transformer.
3. Outdoor Antenna Grounding - If you connect an outside antenna or cable system to the product, be
sure the antenna or cable system is grounded so as to provide some protection against voltage surges
and built-up static charges. Section 810 of the National Electrical Code, ANSI/NFPA No. 70, provides
information with respect to proper grounding of the mast and supporting structure, grounding of the
lead-in wire to an antenna discharge unit, size of grounding conductors, location of antenna discharge
unit, connection to grounding electrodes, and requirements for the grounding electrode.
4. Lightning - Avoid installation or reconfiguration of wiring during lightning activity.
Power Lines - Do not locate an outside antenna system near overhead power lines or other electric light or
power circuits or where it can fall into such power lines or circuits. When installing an outside antenna
system, refrain from touching such power lines or circuits, as contact with them might be fatal.
5. Overloading - Do not overload wall outlets and extension cords as this can result in a risk of fire or
electric shock.
6. Object and Liquid Entry - Never push objects of any kind into this product through openings as they
may touch dangerous voltage points or short out parts, resulting in a fire or electric shock. Never spill
liquid of any kind on the product.
7. Servicing - Do not attempt to service this product yourself as opening or removing covers may expose
you to dangerous voltage or other hazards. Refer all servicing to qualified service personnel.
8. Damage Requiring Service - Unplug this product from the wall outlet and refer servicing to qualified
service personnel under the following conditions:
• When the power supply cord or plug is damaged.
• If liquid spills or objects fall into the product.
• If the product is exposed to rain or water.
• If the product does not operate normally by following the operating instructions. Adjust only those
controls that are covered by the operating instructions. An improper adjustment of other controls
may result in damage and will often require extensive work by a qualified technician to restore the
product to its normal operation.
• If the video product is dropped or the cabinet is damaged.
• When the video product exhibits a distinct change in performance, this indicates a need for
service.
* Note to CATV system installer: This reminder is provided to call CATV system installer's attention to
Article 820-40 of the National Electrical Code (Section 54 of Canadian Electrical Code, Part I), that
provides guidelines for proper grounding and, in particular, specifies that the cable ground shall be
connected to the grounding system of the building as close to the point of cable entry as possible.
Contemporary Research 29 IP-HDTV HD Tuner
Page 30

Limited Warranty
Contemporary Research Corporation (CR) warrants this product to be free from defects in material and
workmanship under normal use for a period of two years from the date of purchase from CR. Should such a
defect occur CR will repair or replace, at their option, the defective product at no cost for parts or labor.
This warranty extends to product purchased directly from CR or an Authorized CR Dealer. Consumers should
inquire from selling dealer as to the nature and extent of the dealer's warranty, if any.
All warranty claims must be shipped pre-paid to the factory. Call or fax to obtain a Return Material
Authorization (RMA) number.
CR is not liable for any damages caused by any of its products or for the failure of any products to perform,
including any lost profits, lost savings, incidental damages, or consequential damages. CR is not responsi ble
for any claim made by a third party or made for you by a third party. This limitation of liability applies
whether damages are sought, or a claim is made, under this warranty or as a tort claim (including
negligence and strict product liability), a contract claim, or any other claim. This limitation of liability cannot
be waived or amended by any person. This limitation of liability will be effective even if CR or an authorized
representative of CR has been advised of the possibility of any such damages.
Some states do not allow a limitation of how long an implied warranty lasts. Some states do not allow the
limitation or exclusion of incidental or consequential damages for consumer products. In such states, the
limitation or exclusion of the Limited Warranty may not apply to you. This Limited Warranty gives you
specific legal rights. You may also have other rights that may vary from state to state. You are advised to
consult applicable state laws for a full determination of your rights.
Except as expressly set forth in this Limited Warranty, CR makes no other warranties, expressed or implied,
including any implied warranties of merchantability or fitness for a particular purpose. CR expressly disclaims
all warranties not stated in this Limited Warranty. Any implied warranties that may be imposed by law are
limited to the terms of this Limited Warranty.
Contemporary Research 30 IP-HDTV HD Tuner
 Loading...