

Page 1

Product Manual
IP-232
Ethernet to RS-232 Interface
Ver. 1.0 September 08, 2008
Page 2

Table of Contents
Overview............................................................................................................................... ..............3
Specifications......................................................................................................................................4
Installation ............................................................................................................................... ..........5
DIP Switch Settings................................................................................................................................5
Default RS-232, IP and Telnet Settings.....................................................................................................5
Set Attributes via RS-232 Commands.......................................................................................................6
Set RS-232 Attributes via Web Page.........................................................................................................6
Set Up IP-232 RS-232 via Control System .......................................................................................6
RS-232/IP Control Protocol................................................................................................................7
RS-232 Commands .............................................................................................................................8
Ethernet................................................................................................................................................8
RS-232..................................................................................................................................................8
Terminal Communication Commands .......................................................................................................8
Safety Instructions.............................................................................................................................9
Limited Warranty and Disclaimer.......................................................................................................9
Page 3
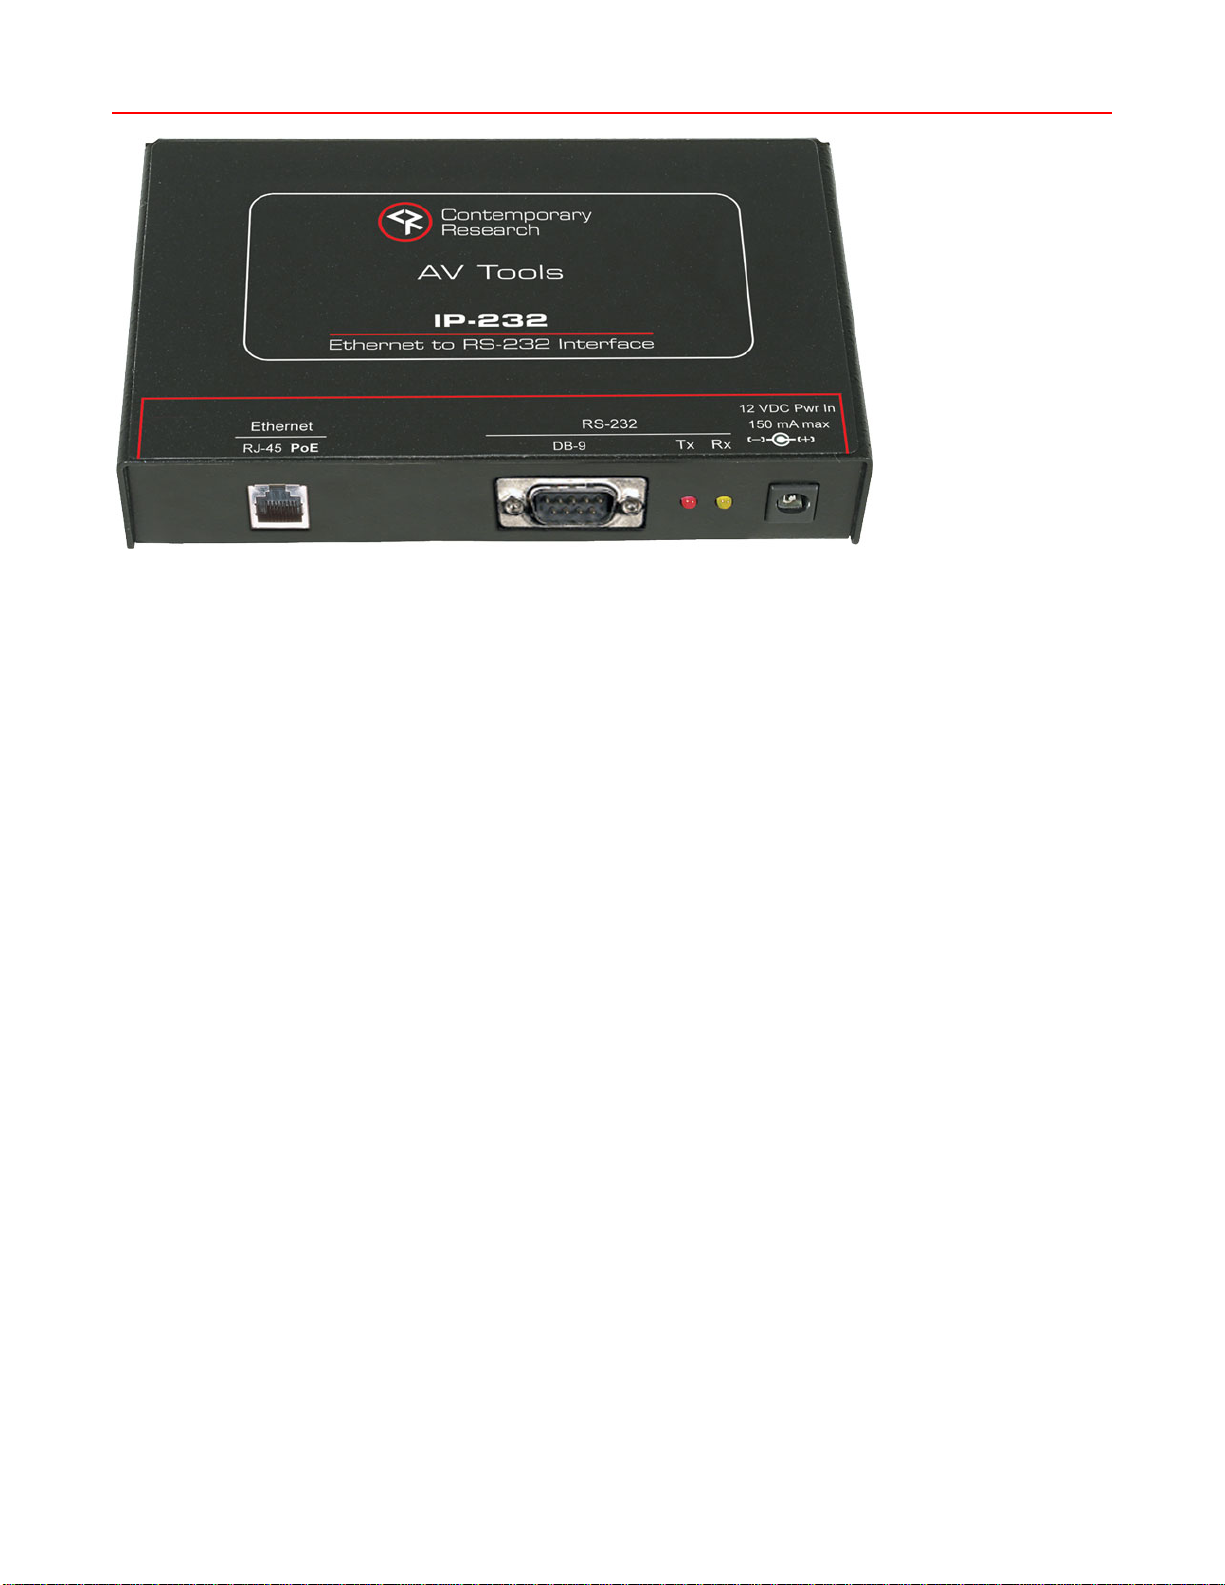
Overview
The IP-232 extends Ethernet control to CR’s 232-series TV tuners, video projectors, displays, and other RS232 controlled equipment. The IP-232 is PoE compliant, accepting power through the LAN in either A or B
modes. The unit is fully programmable, and includes switch settings to aid in installation.
A single IP-232 can control up to nine tuners over Ethernet, with a full 2-way data connection to custom
control systems or PC software. CR’s Tuner Helper 3, a free Windows application, can connect to the IP-232
for point-and-click Ethernet tuner control and setup.
• Extends RS-232 control over Ethernet
• Controls up to nine CR 232-series tuners (up to 9 can be daisy-chained from RS-232 port)
• Powers from Ethernet (PoE) in A and B modes
• Integrates any RS-232 controlled device, including video projectors, displays,
• Works with CR’s free Tuner Helper 3 software for graphic Ethernet tuner control for CR tuners
• Operates with Telnet commands from AMX, Crestron, Simtrol, other control systems, and PC
software
• Sets up from IP, RS-232 port, and onboard DIP switches
• Mounts in RK3 AV System Tool Rackmount or alongside AV tuner in RK-1 or RK-HD1 rack mounts.
• Includes power supply
• Meets RoHS safety and California energy standards
•
Operates from Crestron (24 VDC) and AMX (12 VDC) DC power supplies
Page 4

Specifications
Physical Size: 5.5” [140mm] wide x 1.1” [28mm] height x 3.5” [86mm] deep
Weight: 8 oz [226g]
Enclosure: All aluminum with durable black powder coat paint
Mounting: Mount alongside CR tuner in RK-1 or RK1-HD, rack-mount in RK3 rack kit
Standards: RoHS compliant and energy-efficiency meets new California standards
RS-232 Connector: DB-9 male, 300 to 19,200 baud (9600 default)
LEDs: Tx (Red), Rx (Yellow)
Ethernet Connector: 10/100baseT RJ-45 jack, RX/TX LEDs indicate Ethernet data send and receive
Power over Ethernet (PoE): Supports A and B modes
Setup DIP switches on bottom of case for in-field setup
Programmable via RS-232 port or remote setup via Ethernet
Power Power LED: Green LED lights when DC power is active
Power In: 2.1mm coaxial jack (inside center conductor positive), 150 mA maximum
11 to 28 VDC, 12 VDC typical (may be unregulated)
POE 1.6 watts
DIP Switches Two 8-position switches, S1 and S2 on the bottom of the enclosure
Includes 1 Space-saving 12 VDC 500 mA digital switching power supply (North American only)
Options CC-232 Custom RS-232 cable
RK-1 Rack Kit to mount IP-232 alongside CR analog 232-series tuner
RK-HD1 Rack Kit to mount IP-232 alongside CR IP-232 tuner
RK3 Rack Mount Kit, 1RU, accepts up to three AV Tools
Page 5

Installation
Installation is a simple and direct process:
1. Set IP address information locally via RS-232
2. Set RS-232 COM port baud rate and data parameters locally via RS-232 or remotely over IP
DIP Switch Settings
Use the DIP switch on the bottom of the unit for setup (turn IP-232 so switches are on the bottom of the case,
S1 is on the left, Up turns switches ON):
S1 Off Value On Value
1
2
3
4
5
6
7
8
S2
Off Value On Value
1
2
3
4
5
6
7 RS-232 Mode Command Mode
8 Current 9600, N,8,1
*Values in gray cells are the default settings.
• Command - Turn Switch 7 ON changes RS-232 from operation as a remote RS-232 port to receiving
setup commands via a Terminal program, turn off to return to remote RS-232 mode.
• Default RS-232 - Turn Switch 8 ON to operate RS-232 port at 9600 baud, no parity, 8 data bits, 1
stop bit, no handshaking. Switch to OFF to return to current settings.
• Default Settings – Turn S1 Switches 1-4 OFF, 5-8 ON, then all S2 switches ON, then reset power.
Sets to default IP, Telnet and RS-232 port settings below.
Default RS-232, IP and Telnet Settings
• RS-232: 9600 baud, no parity, 8 data bits, 1 stop bit, no handshaking
• IP Address:
Subnet Mask: 255.255.255.0
• Gateway Address: 000.000.000.000
• Telnet Port for RS-232: 4001
• Telnet Port for Setup Commands: 23
192.168.1.232
Page 6

Set Attributes via RS-232 Commands
Use a standard Null Modem DB9 F to DB9 F cable to connect a PC or USB COM port. Refer to RS-232
Commands in this manual for using Terminal to set up the IP-232 for your application.
Set RS-232 Attributes via Web Page
You can also set the RS-232 properties from an onboard Web page. Just set your browser to the unit’s IP
address and click to set.
Set Up IP-232 RS-232 via Control System
Once you’ve defined the IP address of the IP-232, you can also use your control system to configure the RS232 port. The typical approach is to send configuration commands via Telnet port 23 in the system start-up
sequence. With this approach, the programmer can define RS-232 port attributes in software, long before
the actual installation.
Page 7

RS-232/IP Control Protocol
Overview
The IP-232’s full duplex RS-232 and Telnet protocol enables a system programmer to set up RS-232 port
operation and IP addressing. All commands are sent as ASCII strings. No delays between characters or
commands are required, as data is interrupt driven and buffered. The same RS-232 protocol can be sent
over IP, sent to Telnet port 2728.
All settings are saved to NVRAM in the IP-232.
General protocol specifications
Characters in command strings to the IP-232 are common ASCII keyboard characters.
Command strings sent to the IP-232 begin with the ASCII > (greater than symbol) as an 'Attention'
character and end with carriage return - ASCII CR, Hex $0D, or keyboard Enter - as an 'End-of-command'
character.
Responses from the IP-232 begin with the ASCII < (less than symbol) as an 'Attention' character and end
with a carriage return followed by line feed an ASCII LF or Hex $0A as 'End-of-command' characters.
A carriage return is required at the end of each command and is assumed in all examples.
Command String Structure
[Attention] (Unit#) [Command] (Parameters) [Return]
Attention Single character (>) starts the string
Unit# The Unit# is expressed as an ASCII 0-9 when used in multiple tuner applications.
To address all units, use a Unit # of 0 (Zero)
No unit number will default to Unit#1
Command A two-character command
Parameters Added attributes to some commands
Return A carriage return ends the command string, you may use ASCII CR, Hex $0D, or keyboard
‘Enter’ in programming. For simplicity, the programming examples in the manual will not
show the ‘CR’ – so remember, you’ll need to add it in your control code.
Command and Status Response
Commands can be sent back to back at any time without any delay. To allow for rapid, multiple commands,
status responses are intentionally delayed by about 125mS, sending the most current status in response to
control commands or user actions.
Page 8

RS-232 Commands
Code Function Operation
Ethernet
- Use “>” symbol before each command
IP IP Address IP returns the current MAC address, Ethernet firmware
IG IP Gateway IG = Returns current MAC address, Ethernet firmware
IM IP Subnet Mask IM = Returns current MAC address, Ethernet firmware
IY= IP Mode IY Returns current mode
IX= Telnet Port (RS-232) IX Returns current Telnet port for RS-232 (4001 default)
RS-232
R5= Baud Rate 0=300 5=9600 (default)
R6= COM 0=8,N,1 (default)
Terminal Communication Commands
EF Echo Off Characters received will not be re-transmitted (power up default).
EN Echo On Characters received will be re-transmitted.
ID Product ID Returns the product model number and firmware version.
Z! Zap Reconfigures unit for all factory default settings.
Defines IP Operation
- End with carriage return to send
version, current IP address, subnet mask, and gateway.
Response example (S or D at end of IP signifies DHCP or
Static address):
$MAC=0014C8000201
$IP=192.168.001.232S IG=000.000.000. 000
IM=255.255.255.000 IY=1
IP = xxx.xxx.xxx.xxx Defines IP address, then sends status
(0.0.0.0 = DHCP)
version, current IP information
IG = xxx.xxx.xxx.xxx Defines IP gateway, then sends status
version, current IP information
IM = xxx.xxx.xxx.xxx Defines IP subnet mask, then sends
status
IY=1 Static (default)
IY=2 DHCP
IX=xxxxx Defines Telnet port
Telnet port for setup commands fixed at 23
Defines RS-232 Port Properties
1=600 6=19.2K
2=1200 7=38.4K
3=2400 8=57.6K
4=4800 9=115.2K
1=8,0,1 6=7,0,1
2=8,E,1 7=7,E,1
3=8,N,2 8=7,N,2
4=8,M,1 9=7,M,1
5=8,S,1 10=7,S,1
Example: ‘>EN’ Characters received will be re-transmitted.
Page 9

Safety Instructions
Read before operating equipment.
1. Cleaning - Unplug this product from the wall outlet before cleaning. Do not use liquid cleaners or
aerosol cleaners. Use a damp cloth for cleaning.
2. Power Sources - Use supplied or equivalent UL/CSA approved low voltage DC plug-in transformer.
3. Lightning - Avoid installation or reconfiguration of wiring during lightning activity.
4. Power Lines - Do not locate an outside antenna system near overhead power lines or other electric
light or power circuits or where it can fall into such power lines or circuits. When installing an outside
antenna system, refrain from touching such power lines or circuits, as contact with them might be
fatal.
5. Overloading - Do not overload wall outlets and extension cords as this can result in a risk of fire or
electric shock.
6. Object and Liquid Entry - Never push objects of any kind into this product through openings as they
may touch dangerous voltage points or short out parts, resulting in a fire or electric shock. Never spill
liquid of any kind on the product.
7. Servicing - Do not attempt to service this product yourself as opening or removing covers may expose
you to dangerous voltage or other hazards. Refer all servicing to qualified service personnel.
8. Damage Requiring Service - Unplug this product from the wall outlet and refer servicing to qualified
service personnel under the following conditions:
• When the power supply cord or plug is damaged.
• If liquid spills or objects fall into the product.
• If the product is exposed to rain or water.
• If the product does not operate normally by following the operating instructions. Adjust only those
controls that are covered by the operating instructions. An improper adjustment of other controls
may result in damage and will often require extensive work by a qualified technician to restore the
product to its normal operation.
• If the video product is dropped or the cabinet is damaged.
• When the video product exhibits a distinct change in performance, this indicates a need for
service.
Limited Warranty and Disclaimer
Contemporary Research Corporation (CR) warrants this product to be free from defects in material and
workmanship under normal use for a period of two years from the date of purchase from CR. Should such a
defect occur CR will repair or replace, at their option, the defective product at no cost for parts or labor.
This warranty extends to product purchased directly from CR or an Authorized CR Dealer. Consumers should
inquire from selling dealer as to the nature and extent of the dealer's warranty, if any.
All warranty claims must be shipped pre-paid to the factory. Call or fax to obtain a Return Material
Authorization (RMA) number.
CR is not liable for any damages caused by any of its products or for the failure of any products to perform,
including any lost profits, lost savings, incidental damages, or consequential damages. CR is not responsi ble
for any claim made by a third party or made for you by a third party. This limitation of liability applies
whether damages are sought, or a claim is made, under this warranty or as a tort claim (including
negligence and strict product liability), a contract claim, or any other claim. This limitation of liability cannot
be waived or amended by any person. This limitation of liability will be effective even if CR or an authorized
representative of CR has been advised of the possibility of any such damages.
Some states do not allow a limitation of how long an implied warranty lasts. Some states do not allow the
limitation or exclusion of incidental or consequential damages for consumer products. In such states, the
limitation or exclusion of the Limited Warranty may not apply to you. This Limited Warranty gives you
specific legal rights. You may also have other rights that may vary from state to state. You are advised to
consult applicable state laws for a full determination of your rights.
Except as expressly set forth in this Limited Warranty, CR makes no other warranties, expressed or implied,
including any implied warranties of merchantability or fitness for a particular purpose. CR expressly disclaims
all warranties not stated in this Limited Warranty. Any implied warranties that may be imposed by law are
limited to the terms of this Limited Warranty.
 Loading...