


6.4 Music
Click the icon , a nd th en cl ic k t o e nt er th e m us ic mo de , a nd
the n click one so ng to en jo y a nd th e i nt er fa ce wi ll be sh ow n a s b el ow .
1. Cl ic k to ente r pa rt y sh uf fl e mo de .
2. Cl ic k to sw it ch o ve r be tw ee n Pl ay A ll m od e an d Pl ay S in gl e
mode.
6.5 Ca me ra
Click t o en te r th e mode for shooting pictu re s.
To op er at e th e de vi ce i n th is a pp li ca ti on :
1.C li ck the i co n at th e lo we r r ig ht angl e t o sh oo t t he pict ur e. Yo u ca n
save th e p ic tu re to DC IM /C AM ER A un de r t he SD ro ot dire ct or y.
2.Mov e th e sl id e bl oc k on the i co n at the ri gh t, and you c an chan ge
fro m sh oo t mo de to v id eo mode .
3.C li ck t he icon on t he u pp er r ig ht c or ne r to v ie w th e pr ev io us p ic tu re ,
and where you can pe rf or m su ch o pe ra ti on s as d el et io n, s ha ri ng a nd s et ti ng
as wallpaper or as a c on ta ct p er so n ic on the . Click Finish to re tu rn t o
shootin g interface.
4.Mov e the le ft ico n ri gh tw ar d, and you ca n set su ch ite ms as storage
place , pict ur e si ze and pict ur e quality fo r th e came ra .
.
7. Tips and o ther inf ormation
7.1 So me f ast ope ra tio ns
To re tu rn t o th e ho me p ag e, cl ic k.
To ad ju st t he v ol um e, c li ck / .
11
7.2 Se tt ing for s ho rtc ut o perat io ns
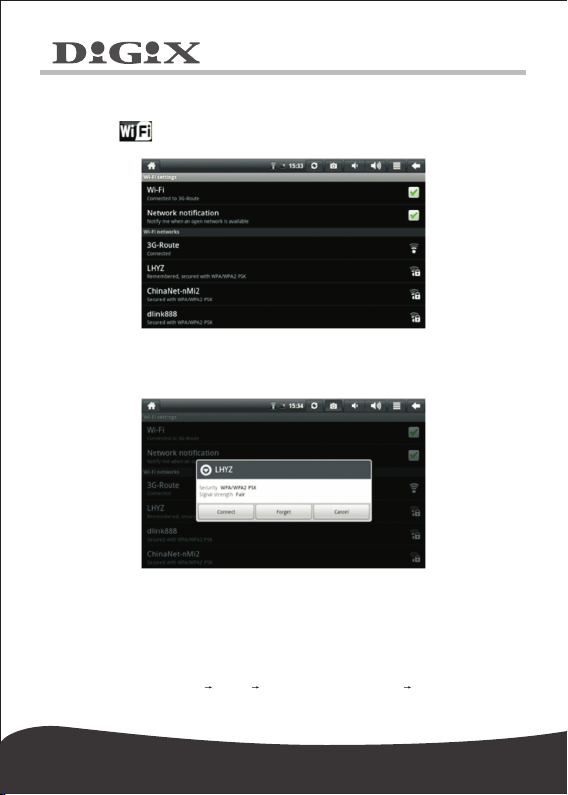
7.2 .1 A cc es s to I nt er ne t in a w ir el es s wa y
Click to ent er th e inte rf ac e for wire le ss access to the int er ne t,
as show n belo w:
7.2.2 Access to I nt er ne t
Click th e int er ne t acc es s ico n to acce ss th e int er ne t. Yo u can se t
the I P add re ss ma nu al ly , with the int er fa ce sh ow n bel ow :
7.3 About the battery
The large-size L CD s cr ee n of t he d ev ic e wi ll c on su me q ui te a l ot e le ct ri c
power. To extend t he w or ki ng t im e of the b at te ry , y ou m ay reduce t he use
of so me f un ct io ns .
1. Wa tch movies, listen to music or sh oo t pi ct ur es .
2.Brightness: Pr es s Setup Display(display s et ti ng ) Brightness
(lower t he b ri gh tn es s) .
12
3.Network se ar ch : P re ss Setup Wir el es s N et wo rk Conn ec t t o
Wireless N et wo rk WI FI S et ti ng Notification.
4. In term s of WI FI use, plea se set t he WIFI swit ch at the up pe r ri gh t
corner of the sc re en to OFF st at e (turn o ff WIFI ).
8. Custom ized set tings
To customize th e se tt in gs , cl ic k on t he shor tc ut m en u.
8.1 Wi re les s op erati on a nd ne tw ork
To turn your WI-FI on o r off, you ca n set th e WI FI swi tc h on the uppe r
right co rn er of the de vi ce as ON or O FF whe n th e WI FI ite ms are pr op er ly
configured.
Access to t he I nt er ne t in a w ir el es s wa y.
If yo u wa nt t o set a nd m an ag e co nn ec ti on po in t de si gn ed f or t he
wireless Network.access to t he I nt er ne t, p le as e pr es s Se tt in gs Wireless &
For det ai ls , ple as e refer to the se ct io n "s ee 2. 6" .
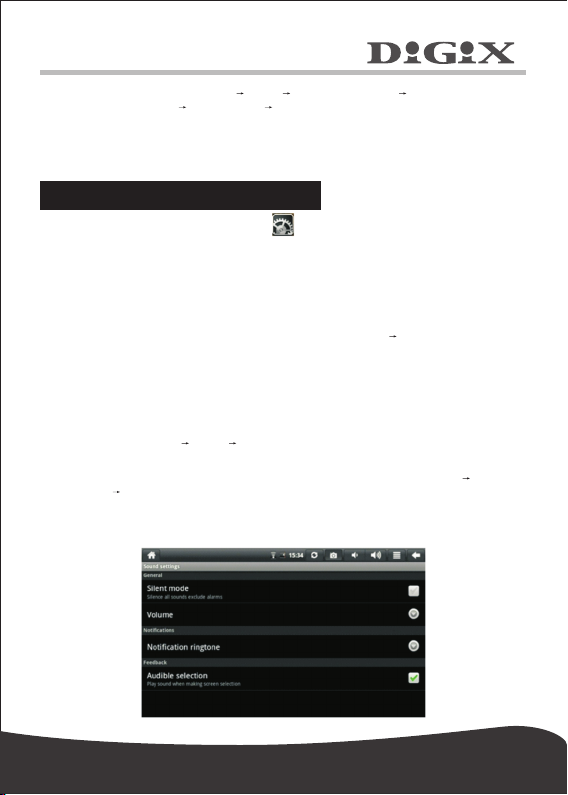
8.2 So un d
Set the sil ent mo de , n ot if ic at io n ri ng to ne a nd A ud ib le s el ec ti on .
1.Silent mode.
To s et t he s ys te m t o si le nt , ex ce pt fo r me di um a nd al ar m cl oc k, y ou
can pr es s Se tt in gs S ou nd Si le nt m od e.
2.Notification ringtone.
To set th e d ef au lt no ti fi ca ti on rin gt on e, you can pre ss Set ti ng s
Sound N ot if ic at io n ri ng to ne .
3. Au di le s el ec ti on .
To ma ke sound when you touch screen , you can select Audible selection.
13
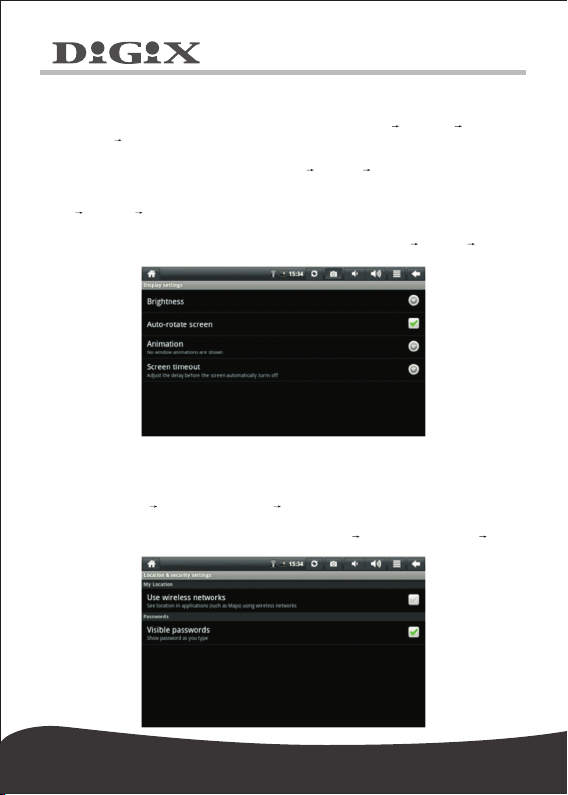
8.3 Di sp lay
1.Brightness.
To a dj us t t he b ri gh tn es s
Display Br ig ht ne ss .
2.Auto-rotate screen.
To atuo-rotate sc re en, pr es s Se tt in gs Di sp la y Auto-rotate screen.
3.Animation
To allow a ll or s om e win do w ani ma ti on s to be pl ay ed , p re ss Se tt in gs
Display Animation.
4. Sc re en t im eo ut .
To s et y ou r screen ti me t o s le ep mode, p re ss S et ti ng s Disp la y
Screen ti me ou t.
8.4 Lo ca tio n & se cu rit y
1.Use wireless networks.
To see lo ca ti on in ap pl ic at io n (su ch as Map s) us in g wir el es s net wo rk ,
press Sett in g Location & security Us e wi re le ss n et wo rk s.
2. Visible passwords.
To sho w pas sw or d as you ty pe , pre ss Se tt in g Loc at io n & secu ri ty
Visible pass wo rd s.
of the scr ee n,
pr es s M en u Se tt in gs
14

8.5 Ap pl icati on
1. Unknown resources.
Select th is it em t o p ermit t ha t a pp li ca ti on pr ov id ed by th e
unauthorized electronic market can be installed.
2. Ma nagement for application.
To manage or de le te the ins ta ll ed app li ca ti on , pres s Sett in gs
Application
3. Running services.
To view or c on tr ol the ru nn in g se rv ic e, pres s Se tt in gs A pp li ca ti on
Running Services.
4. Development.
To s et th e op ti on fo r de ve lo pm en t o f ap pl ic at io n, pr es s Settings
Management.
Development.Application
8.6 Ac co unts & sy nc
1.To sync you r da ta , y ou c an s el ec t ba ck gr ou nd a nd A ut o- sy nc .
2.To add account, please press Settings Account & Syn c Ad d ac co un t.
following in st ru ct io ns .
15

8.7 Se ar ch
To se t se ar ch , pl ea se p re ss Set ti ng s S ea rc h.
8.8 Pr iv acy
To re se t yo ur D ig ix Tab le t, p re ss S et ti ng s Priv acy Fact or y da ta r es et .
8.9 SD c ar d & devic e st ora ge
To k no w yo ur S D c ar d in fo rm at io n, p re ss Se tt in gs SD c ar d & device
storage SD 1 .
8.9.1
8.9.2 If you w an t to m ou nt y ou r Mi cr o SD ca rd a ga in , cl ic k Mount SD card.
16

8.10 Language and keyboard
In th is i te m, y ou c an s et t he l an gu ag e an d re gi on , ch ar ac te r en te ri ng
and automatic correction.
1. Se lect language and region.
To se le ct th e lan gu ag e and re gi on , press Set ti ng s l an gu ag e & keyboard
Select language.
2. An dr oi d key bo ar d.
To s et And ro id key bo ar d, pre ss Set ti ng s la ng ua ge & ke yb oa rd
Android key bo ar d.
3. User dicti onary.
To add w or ds i nt o or d el et e wor ds f ro m th e us er -d ef in ed dict io na ry ,
press Settings lan gu ag e & ke yb oa rd User dictionary.
8.11 D at e and t im e
To s et t he dat e, tim e, t im e z on e, tim e system and form at , you c an
press S et ti ng s Dat e an d ti me .
17

8.12 T ou ch sc re en c ali br ate
To c al ib ra te t he s cr ee n, p re ss S et ti ng s To uc h sc re en c al ib ra te . Th en
cal ib ra te th e to uc h sc re en b y fo ll ow in g the p ro mp ts . Af te r th at , th e sy st em
will p ro mp t yo u to r et ur n to the se tt in gs l is t.
8.13 G -S ens or c al ibr at e
To cali br at e th e G- se ns or of y ou r ta blet, Pres s Se tt in gs G-S en so r
calibrate, then cali br at e yo ur tabl et G-Se ns or following the pr om pt s.
After th at , th e sy st em will prom pt you to r et ur n to the se tt in gs list .
8.14 A bo ut th e de vi ce
In this item , you ca n view the info rm at io n on l aw , devi ce stat us and
softw ar e vers io n.
18

9. Using HD MI
With H DM I, vi de o c on te nt s b ei ng pl ay ed by yo ur Digix ta bl et ca n b e
transferred to ot he r d is pl ay s u si ng th e H DM I c ab le . Such as an LC D T V
that h as an HD MI po rt . T he ou tp ut s t he tablet s up po rt s c an of fe r a
maximum re so lu ti on of 72 0P . T he re la te d o pe ra ti on s a re as f ol lo ws :
1. Po we r on y ou r Di gi x ta bl et .
2. Co nn ec t D ig ix to HDMI mo ni to r w it h H DM I c ab le an d p ow er on th e
monitor. At th at ti me , o n t he st at us ba r messages ab ou t H DM I c on ne ct io n
will be po p u p.
3. Pl ay t he v id eo f il es o n yo ur D ig ix t ab le t.
4. Pr es s M EN U, a nd yo ur t ab le t s cr ee n will tu rn bl ac k, a pr oc es s la st in g
about 5 s ec on ds d ur in g w hi ch t he co nt en ts a re be in g switched to HD MI
monitor. P le as e b e pa ti en t.
5. Yo u ca n tr an sf er t he c on te nt s to t he t ab le t ag ai n by a ny o f th e fo ur
ways below:
1) Sys te m tr an sf er s to t ab le t au to ma ti ca ll y af te r th e pl ay in g is c om pl et ed .
2) Pre ss M en u du ri ng p la yi ng t o sw it ch t he v id eo c on te nt s to t he t ab le t.
3) P ul l ou t th e HDMI ca bl e du ri ng p la yi ng , after w hi ch t he v id eo co nt en ts
will b e tr an sf er re d to the ta bl et .
4) Pr es s Ba ck to e xi t th e pl ay in g mo de , af te r which t he vide o co nt en ts
will b e tr an sf er re d to the ta bl et .
10. Locking the device
Unlocking screen/device:
When t he s ys te m is t he s le ep mo de , yo u can sh or t pr es s th e power
switch t o en te r th e in te rf ac e f o r s cr ee n l oc king . T o un lo ck t h e scr e en ,
move the corresponding i co n upw ar d, and t he sy st em wil l ent er the s ta te
prior t o sle ep mod e.
11. Troub leshoo ting
11.1 T ur ning of f ap pli ca tions
Once a n ap pl ic at io n is t ur ne d o n, i t wi ll o cc up y s om e sp ac e, a nd i f t he re
are to o ma ny a pp li ca ti on s th at ha ve b ee n tu rn ed o n, it w il l sl ow d ow n t he
running sp ee d of t he d ev ic e. Th er ef or e yo u sh ou ld c lo se a ppli ca ti on s no t
being us ed i n a ti me ly m anne r, s o th at m or e s pa ce c an b e sa ve d a nd t he
device r un f as te r.
To tur n o ff the ap pl ic at io n, cli ck at th e sh or tc ut bar, and th e s ys te m
will en te r t he in te rf ac e o f s ys te m s et ti ng s, where y ou ca n s el ec t A pp li ca ti on
Running
Services, as sh own below:
19

Click the application to be closed, and the system will pop up a window which
asks you if you need to stop the service window, as shown below:
Click Stop, and the application will be closed and disappear within the window
being used.
11.2 C om pul so ry p owe r- off
1. Pre ss th e pow er sw it ch an d hol d dow n for 7 sec on ds , the devi ce
will be pow er ed of f in a comp ul so ry wa y.
2. Press R es t at t he r ig ht l ow er p ar t of t he d ev ic e, t he d ev ic e wi ll b e
powered off in a c om pu ls or y wa y.
11.3 R es tor e de fa ult s
If yo u wan t to res to re th e fa ct or y def au lt s and de le te al l oth er data,
please pr es s Sy st em S et ti ng s P ri va cy Fa ct or y da ta r es et .
Warn in g:
Onc e y ou se le ct Reset, t he Go og le account, d at a a nd settings o f t he
sys te m an d a pp li ca ti on an d t he down lo ad ed ap pl ic at io ns wi ll be dele te d.
Thu s, be ca re fu l w he n u si ng this fu nc ti on .
20

www.d ig ixm ed ia .co m
 Loading...