

Constructa Z2580X0, CA280410, T28V66N0NL, T28V66N0, PDR895B90N Installation instructions
...
9000485774 9000485774 900304
14x
min.
30
min. 600
805
778
min. 560
525
498
40
150
4
r 12,5
min. 50
min.
450
min.
760
900304 Ø Montageanleitung
Ú Installation instructions
Þ Notice de montage
â Istruzioni per il montaggio
é Installatievoorschrift
× Monteringsvejledning
ó Monteringsanvisning
ê Monteringsveiledning
Ý Asennusohje
Û Instrucciones de montaje
ì Instruções de montagem
Ù Οδηγίες εγκατάστασης
î Инструкция по монтажу
Ö Montážní návod
ë Instrukcja montażu
ô Montaj kılavuzu
SILICONE
760
480
max.
1 mm

en
de
Ø Montageanleitung
en
fr
Einbaumöbel vorbereiten
Die Gas-Kochmulde ist für den flächenbündigen Einbau in eine
Arbeitsplatte vorgesehen. Technische bedingt liegt die Oberkante der Topfträger geringfügig höher als die Arbeitsplatte.
Die Gas-Kochmulde kann in folgende temperatur- und wasserfeste Arbeitsplatten eingebaut werden:
■ Steinarbeitsplatten
■ Arbeitsplatten aus Kunststoff oder Corian
■ Edelstahl-Arbeitsplatten (verschweißt)
■ Massivholz-Arbeitsplatten: Nur in Abstimmung mit dem Her-
steller der Arbeitsplatte (Ausschnittskanten versiegeln)
Ein Einbau in andere Arbeitsplatten (z. B. Spanplatten) ist nicht
möglich.
Die Gas-Kochmulde nicht tiefer als die Arbeitsplattenoberkante
einbauen.
Das Einbaumöbel muss bis 90°C temperaturbeständig sein. Die
Stabilität des Einbaumöbels muss auch nach den Ausschnittarbeiten gewährleistet sein.
Hinweise
■ Alle Ausschnittarbeiten an der Arbeitsplatte sind in einer Fach-
werkstatt entsprechend der Einbauskizze durchzuführen. Der
Ausschnitt muss sauber und genau ausgeführt werden, da die
Schnittkante an der Oberfläche sichtbar ist. Die Ausschnittskanten mit einem geeigneten Reinigungsmittel reinigen und
entfetten (Verarbeitungshinweise des Silikonherstellers beachten).
■ Den Einbaurahmen mit allen beiliegenden Spannkrallen in der
Arbeitsplatte befestigen. Nur so ist ein einwandfreier Einbau
gewährleistet.
Rahmen einbauen
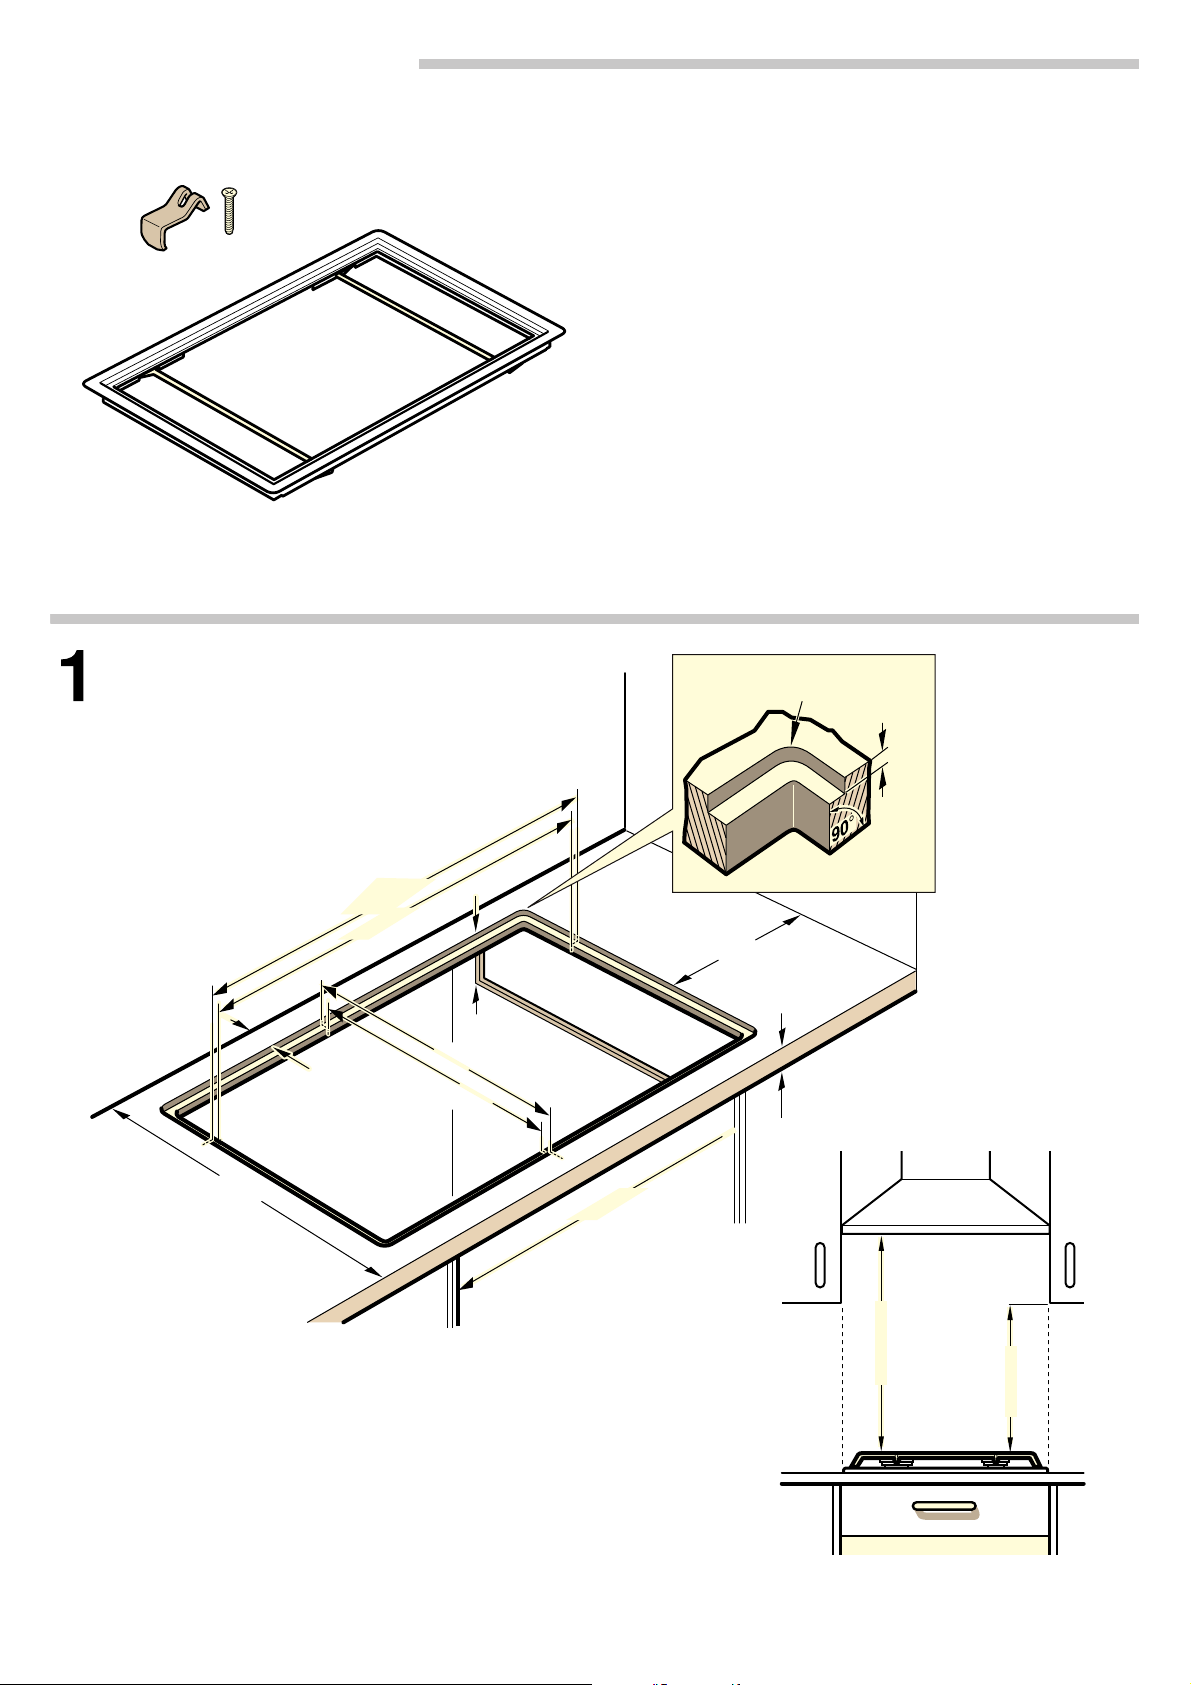
1. Ausschnitt in Arbeitsplatte entsprechend der Einbauskizze her-
stellen. Mindestabstände zu Rückwand und seitlichem Möbel
beachten (Bild 1).
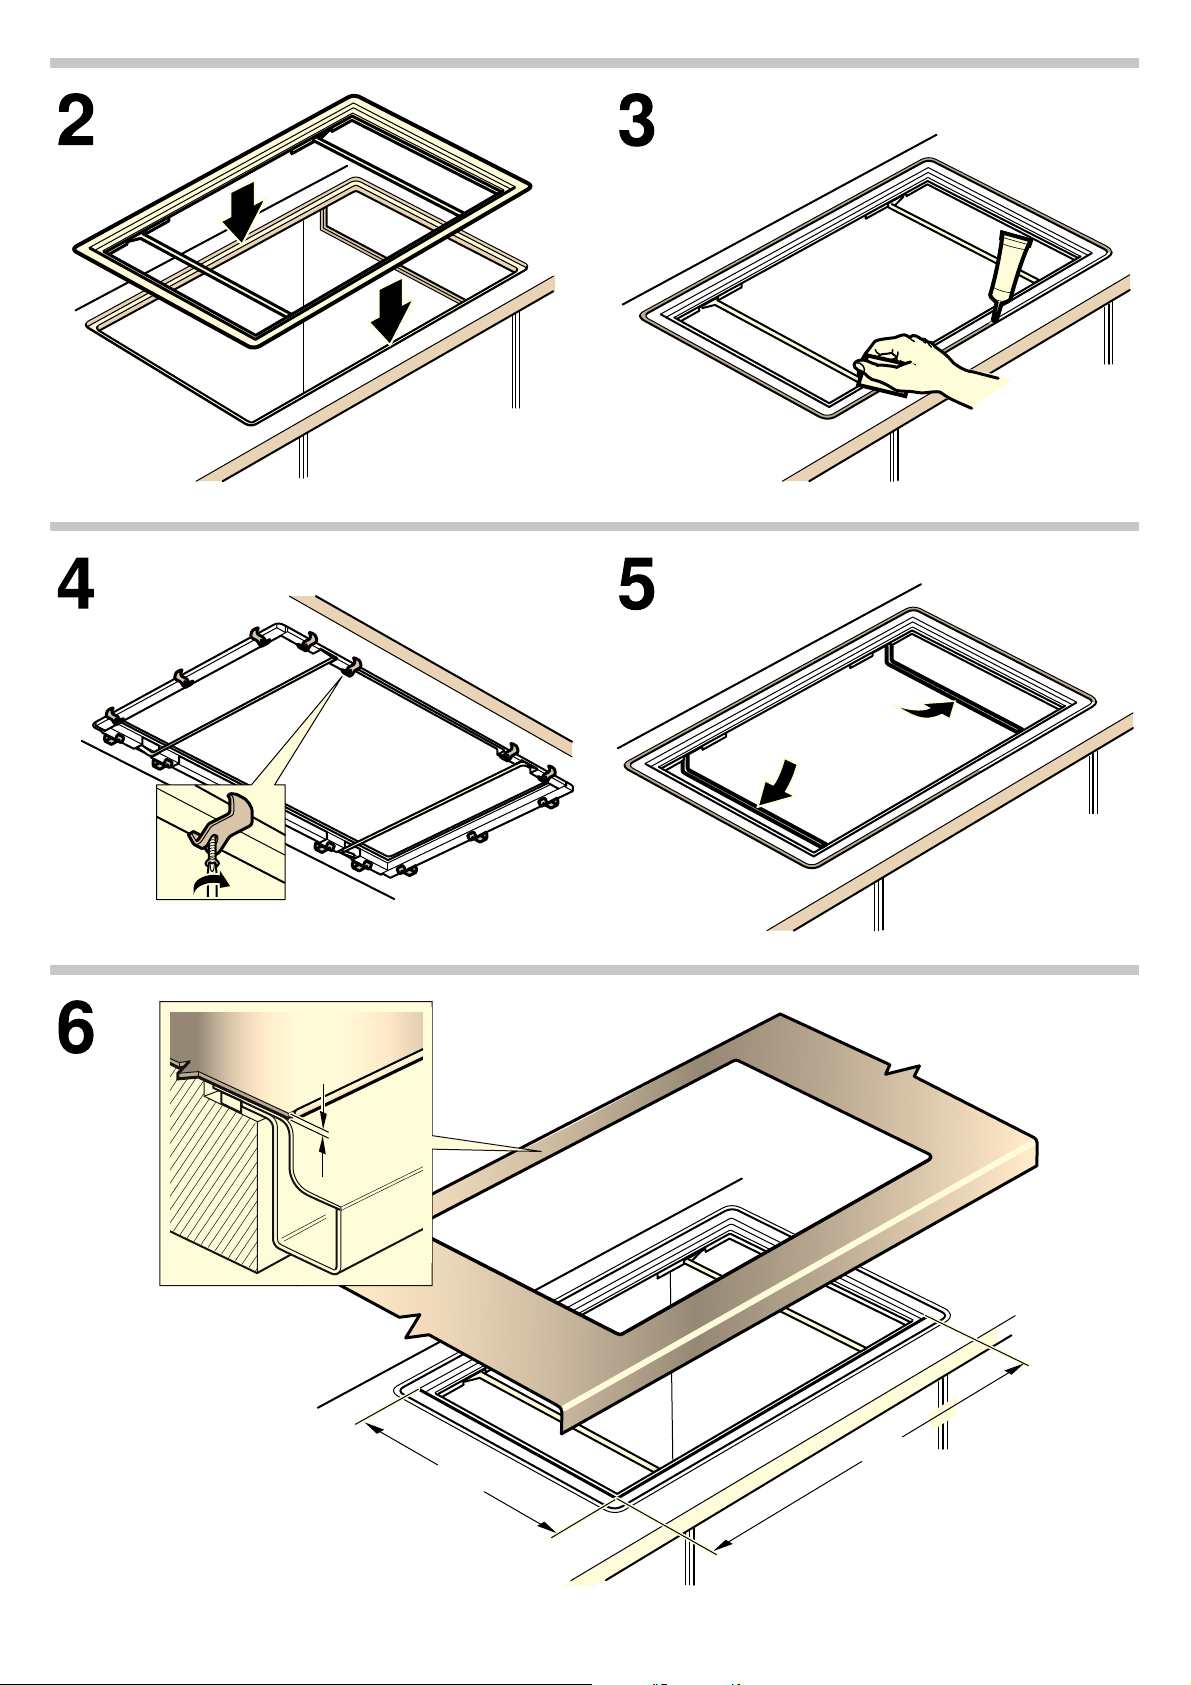
2. Rahmen in Ausschnitt einsetzen, die beiden Bohrlöcher müs-
sen hinten sein. Ausrichten, auf gleichmäßigen umlaufenden
Spalt achten (Bild 2).
3. Umlaufenden Spalt zwischen Arbeitsplatte und Rahmen mit
einem geeigneten, temperaturbeständigen Silikonkleber verfugen (z. B. Novasil, Pactan). Dazu ggf. den Rahmen wieder
herausnehmen und das Silikon im Ausschnitt aufbringen.
Dichtfuge mit dem vom Hersteller empfohlenen Glättmittel
glätten. Verarbeitungshinweise des Silikonklebers beachten
(Bild 3).
Achtung!
Ungeeigneter Silikonkleber führt bei Naturstein-Arbeitsplatten
zu dauerhaften Verfärbungen.
4. Alle Spannkrallen gleichmäßig festschrauben, um Planität
beim Einbau zu erreichen. Die Höhe kann durch Festschrauben der Spannkrallen max. 1 mm angeglichen werden. Planität des gesamten Rahmens prüfen (Bild 4).
Achtung!
Beschädigung des Rahmens: Spannkrallen nicht zu fest anziehen.
5. Beide Haltebügel nach unten klappen (Bild 5).
6. Gas-Kochfeld einbauen und anschließen (siehe Montageanlei-
tung Gas-Kochfeld). Kochfeld erst nach vollständigem Austrocknen des Silikonklebers in Betrieb nehmen (mindestens
24 Stunden, je nach Raumtemperatur).
Einbau in Edelstahl-Arbeitsfläche
Einbau in Edelstahl-Arbeitsfläche (Verschweißen) von Fachwerkstatt durchführen lassen (Bild 6).
Maximale Dicke der Edelstahl-Arbeitsfläche: 1 mm.
Ú Installation instructions
Preparing the kitchen units for fitting
The gas hob is intended to be fitted into a work surface, flush
with surrounding surfaces. As a result of the design, the upper
edge of the pan supports is slightly higher than the work
surface.
The gas hob can be fitted into the following types of heat and
water-resistant work surfaces:
■ Stone work surfaces
■ Work surfaces made of plastic or Corian
■ Stainless steel work surfaces (welded)
■ Solid wood work surfaces, following consultation with the
manufacturer of the work surface (sealing edges of cut-out)
Installation in other types of work surface (e.g. chipboard) is not
possible.
Do not install the gas hob lower than the upper edge of the work
surface.
The surrounding kitchen units must be heat-resistant up to
90°C.The surrounding kitchen units must retain their stability
after the cut-out work is complete.
Notes
■ All cut-out work on the work surface must be carried out in a
specialist workshop according to the installation drawing. The
cut-out must be removed cleanly and accurately because the
cut edge on the surface of the work surface remains visible.
Clean and degrease the edges of the cut-out with a suitable
cleaning agent (check the usage instructions of the silicone
manufacturer).
■ Fasten the support frame in the work surface with all of the
clamp fasteners provided. This is the only way to ensure
correct installation.
Fitting the frame
1. Cut out an opening in the work surface according to the
installation drawing. Check the minimum clearance from the
rear wall and adjacent kitchen units (picture 1).
2. Place the frame into the cut-out, with both drill holes at the
back. Align the frame, making sure that the gap around the
sides is even (picture 2).
3. Fill the surrounding gap between the work surface and the
frame with a suitable, heat-resistant silicone adhesive
(e.g. Novasil, Pactan). To do this, it may be necessary to
remove the frame and apply the silicone in the cut-out.
Smooth the sealing joint using a method recommended by
the smoothing agent manufacturer. Check the usage
information for the silicone adhesive (picture 3).
Caution!
Unsuitable silicone adhesives can cause permanent
discolouration on work surfaces made from natural stone.
4. Tighten all clamp fasteners evenly so that the frame is
installed flat in a level plane. Height can be adjusted a
maximum of 1 mm by tightening the clamp fasteners. Check
that the whole frame lies flat in a level plane (picture 4).
Caution!
Damage to the frame: do not overtighten the clamp fasteners.
5. Fold down both retaining bars (picture 5).
6. Installing and connecting the gas hob (see gas hob installation
instructions). Do not use the hob until the silicone adhesive has
completely dried (at least 24 hours depending on room
temperature).
Installing the hob in a stainless steel work surface
If you are fitting the hob in a stainless steel work surface, have
the installation (which involves welding) performed by a
specialist workshop (picture 6).
Maximum thickness of the stainless steel work surface: 1 mm.
Þ Notice de montage
Préparation du meuble d'encastrement
La table de cuisson gaz est prévue pour le montage à fleur
dans un plan de travail. Pour des raisons techniques le bord
supérieur des porte-casserole est situé légèrement plus haut
que le plan de travail.
La table de cuisson gaz peut être encastrée dans des plans de
travail étanches et thermostables suivants :
■ Plans de travail en pierre
■ Plans de travail en matière synthétique ou en Corian
■ Plans de travail en inox (soudé)
■ Plans de travail en bois massif : uniquement après
consultation du fabricant du plan de travail (sceller les arêtes
de découpe)
L'encastrement dans un plan de travail différent (p.ex. en
aggloméré) n'est pas possible.
Ne pas encastrer la table de cuisson gaz plus bas que le bord
supérieur du plan de travail.

Le meuble d'encastrement doit résister à des températures
it
nl
jusqu'à 90ºC. La stabilité du meuble d'encastrement doit aussi
être garantie après les travaux de découpe.
Remarques
■ Tous les travaux de découpe sur le plan de travail doivent être
effectués dans un atelier spécialiste conformément au croquis
d'installation. La découpe doit être exécutée proprement et
avec précision, car l'arête de coupe est visible à la surface.
Nettoyer et dégraisser les arêtes de la découpe avec un
nettoyant approprié (observer les consignes de mise en
oeuvre du fabricant du silicone).
■ Fixer le cadre d'encastrement sur le plan de travail en utilisant
toutes les griffes de serrage fournies. Ce n'est qu'ainsi qu'une
installation irréprochable est garantie.
Installation du cadre
1. Confectionner la découpe dans le plan de travail
conformément au croquis d'installation. Respecter les
distances minimales vers la paroi arrière et les meubles voisins
(fig. 1).
2. Placer le cadre dans la découpe, les deux trous de perçage
doivent se situer à l'arrière. Aligner, veiller à ce que l'espace
contournant soit uniforme (fig. 2).
3. Combler l'espace contournant, entre le plan de travail et le
cadre, avec une colle silicone appropriée, résistant à la
température (p.ex. Novasil, Pactan). Pour ce faire, réenlever
éventuellement le cadre et appliquer le silicone dans la
découpe. Lisser le joint d'étanchéité avec un produit lissant
recommandé par le fabricant. Observer les consignes de
mise en oeuvre de la colle silicone (fig. 3).
Attention !
L'utilisation d'une colle silicone inappropriée occasionne des
décolorations définitives sur des plans de travail en pierre
naturelle.
4. Visser uniformément toutes les griffes de serrage, afin
d'obtenir une parfaite planéité lors de l'encastrement. La
hauteur peut être adaptée à max. 1 mm en vissant les griffes
de serrage. Vérifier que tout le cadre soit plan (fig. 4).
Attention !
Endommagement du cadre : Ne pas trop serrer les griffes de
serrage.
5. Pivoter les deux étriers de fixation vers le bas (fig. 5).
6. Installer la table de cuisson gaz et la raccorder (voir la notice
de montage de la table de cuisson gaz). Mettre la table de
cuisson en service uniquement après le séchage total de la
colle silicone (au moins 24 heures, selon la température
ambiante).
Encastrement dans un plan de travail en inox
Pour l'encastrement dans un plan de travail en inox (soudage),
faire appel à un atelier spécialiste (fig. 6).
Epaisseur maximale du plan de travail en inox : 1 mm.
â Istruzioni per il montaggio
Predisposizione del mobile di installazione
Questo piano di cottura è previsto per essere montato a filo con
un piano di lavoro. Per ragioni tecniche, il bordo superiore dei
porta-pentola si trova leggermente più in alto rispetto al piano di
lavoro.
Il piano di cottura può essere montato nei seguenti piani di
lavoro idro- e termoresistenti:
■ Piani di lavoro in pietra
■ Piani di lavoro in materiale plastico o Corian
■ Piani di lavoro in acciaio inox (saldati)
■ Piani di lavoro in legno massiccio: solo previo accordo del
Costruttore del piano di lavoro (rivestire i bordi di taglio)
Non è consentito il montaggio in altri piani di lavoro (per es.
piani in compensato).
Non montare il piano di cottura più in basso rispetto al bordo
superiore del piano di lavoro.
Il mobile di installazione deve essere termoresistente fino a
90°C. La stabilità del mobile di installazione deve essere
garantita anche dopo i lavori di intaglio della superficie.
Avvertenze
■ Tutti i lavori di intaglio della superficie del piano di lavoro
devono essere effettuati presso un'officina specializzata
seguendo lo schema di montaggio. L'apertura deve essere
intagliata in maniera accurata e precisa, in quanto il bordo di
taglio è visibile sulla superficie. Pulire e sgrassare i bordi di
taglio con un detergente adeguato (seguire le indicazioni del
produttore del silicone).
■ Fissare il telaio di montaggio al piano di lavoro con tutti i
dispositivi di serraggio in dotazione. Solo in questo modo
verrà garantito un montaggio ottimale.
Montaggio del telaio
1. Eseguire l'apertura nel piano di lavoro seguendo lo schema di
montaggio. Prestare attenzione alla distanza minima tra la
parete posteriore e il mobile laterale (Figura 1).
2. Inserire il telaio nell'apertura, entrambi i fori devono trovarsi
nella parte posteriore. Eseguire l'allineamento, verificare che la
fessura sia di spessore uniforme (Figura 2).
3. Riempire la fessura tra la piastra di lavoro e il telaio con una
colla al silicone adeguata e termoresistente (per es. Novasil,
Pactan). A tale scopo estrarre eventualmente di nuovo il telaio
e applicare il silicone nell'apertura. Levigare la striscia di
silicone con uno dei prodotti raccomandati dal fabbricante.
Osservare le indicazioni di utilizzo della colla al silicone
(Figura 3).
Attenzione!
Una colla al silicone non adatta può macchiare indelebilmente
i piani di lavoro in pietra.
4. Serrare uniformemente tutti i dispositivi di fissaggio affinché il
montaggio avvenga in piano. Agendo sui dispositivi di
fissaggio l'altezza può essere regolata di max. 1 mm.
Verificare la planarità del telaio (Figura 4).
Attenzione!
Danni al telaio: non stringere eccessivamente i dispositivi di
fissaggio.
5. Ribaltare verso il basso le due staffe di supporto (Figura 5).
6. Montare il piano di cottura a gas ed effettuare l'allacciamento
(vedere le relative istruzioni di montaggio). Mettere in funzione
il piano di cottura solo dopo che la colla al silicone si è
completamente asciugata (almeno 24 ore, a seconda della
temperatura ambiente).
Montaggio in un piano di lavoro in acciaio
Se il piano di lavoro è in acciaio inox (saldatura), far eseguire il
montaggio da un'officina specializzata (Figura 6).
Spessore massimo della superficie di lavoro in acciaio inox:
1 mm.
é Installatievoorschrift
Inbouwmeubel voorbereiden
De gas-kookplaat is bestemd voor vlakke inbouw in een
werkblad. Vanwege technische redenen ligt de bovenkant van
de pannenhouder iets hoger dan het werkblad.
De gas-kookplaat kan in de volgende temperatuur- en
watervaste werkbladen worden ingebouwd:
■ stenen werkbladen
■ werkbladen van kunststof of Corian
■ werkbladen van roestvrij staal (gelast)
■ werkbladen van massief hout: alleen in overleg met de
producent van het werkblad (randen van de uitsnijding
beschermen)
Inbouw in andere werkbladen (bijv. spaanplaat) is niet mogelijk.
De gas-kookplaat niet lager inbouwen dan de bovenkant van
het werkblad.
Het inbouwmeubel moet tot 90°C temperatuurbestendig zijn. De
stabiliteit van het inbouwmeubel dient ook na de
uitsnijdingswerkzaamheden gewaarborgd te zijn.
Aanwijzingen
■ Alle uitsnijdingswerkzaamheden in het werkblad moeten in
een erkende werkplaats en volgens het inbouwschema
worden verricht. De uitsnijding moet heel precies worden
uitgevoerd, omdat de snijrand aan het oppervlak zichtbaar is.
De randen van de uitsnijding met een geschikt
reinigingsmiddel schoonmaken en ontvetten (houd u aan de
aanwijzingen van de fabrikant voor de verwerking van de
siliconenlijm).
■ Het inbouwraam met alle bijgevoegde spanklauwen in het
werkblad bevestigen. Alleen op deze manier is een juiste
inbouw gegarandeerd.

Raam inbouwen
da
sv
1. Uitsnijding in het werkblad maken volgens het inbouwschema.
Let op de minimale afstanden tot de achterwand en het meubel
aan de zijkant (Afbeelding 1).
2. Raam in de uitsnijding plaatsen, de beide boorgaten moeten
zich aan de achterkant bevinden. Uitrichten. Let hierbij op een
gelijkmatig omlopende spleet (Afbeelding 2).
3. Omlopende spleet tussen werkblad en raam voegen met een
geschikte, temperatuurbestendige siliconenlijm (bijv. Novasil,
Pactan). Hiervoor zo nodig het raam weer uitnemen en de
silicone in de uitsnijding opbrengen. Dichtingsvoegen met het
door de fabrikant aanbevolen gladstrijkmiddel gladmaken. U
dient zich te houden aan de aanwijzingen voor de verwerking
van de siliconenlijm (Afbeelding 3).
Attentie!
Ongeschikte siliconenlijm leidt bij werkbladen van natuursteen
tot blijvende verkleuringen.
4. Alle spanklauwen gelijkmatig vastschroeven, zodat het raam
vlak ingebouwd wordt. Door de spanklauwen aan te trekken
kan de hoogte max. 1 mm aangepast worden. Let erop dat
het hele raam vlak ligt (Afbeelding 4).
Attentie!
Beschadiging van het raam: spanklauwen niet te stevig
aantrekken.
5. Beide beugels naar beneden klappen (Afbeelding 5).
6. Gas-kookplaat inbouwen en aansluiten (zie
Installatievoorschrift gas-kookplaat). De kookplaat pas in
gebruik nemen nadat de siliconenlijm volledig is gedroogd
(minstens 24 uur, afhankelijk van de kamertemperatuur).
Inbouw in roestvrijstalen werkbladen
De inbouw in roestvrijstalen werkbladen (lassen) door een
erkende werkplaats laten uitvoeren (Afbeelding 6).
Maximale dikte van het roestvrijstalen werkblad: 1 mm.
× Monteringsvejledning
Forberede køkkenelementer til indbygning
Gaskogesektionen er beregnet til indbygning i niveau med en
bordplade. Af tekniske årsager er grydeholdernes overkanter
placeret en lille smule højere end bordpladen.
Gaskogesektionen kan indbygges i følgende temperatur- og
vandfaste bordplader:
■ Bordplader af sten
■ Bordplader af kunststof eller corian:
■ Bordplader af rustfrit stål (svejsede)
■ Bordplader af massivt træ: Kun efter aftale med producenten
af bordpladen (forsegling af udskæringskanter)
Indbygning i andre bordplader (f.eks. spånplader) er ikke mulig.
Gaskogesektionen må ikke indbygges under bordpladens
niveau.
Køkkenelementerne skal kunne tåle temperaturer på op til 90
ºC. Det skal sikres, at køkkenelementerne stadig er stabile efter
udskæring.
Anvisninger
■ Alle udskæringer i bordpladen skal udføres iht.
montagetegningen på et autoriseret værksted. Udskæringerne
skal udføres præcist med renskårne kanter, fordi snitkanterne
er synlige på overfladen. Udskæringens kanter skal rengøres
og affedtes med et egnet rengøringsmiddel (overhold
arbejdsanvisningerne fra silikoneproducenten).
■ Montagerammen skal fastgøres til bordpladen med alle de
leverede spændekløer. Kun således kan det sikres, at
apparatet bliver indbygget korrekt.
Montage af ramme
1. Foretag udskæringen i bordpladen iht. montagetegningen.
Overhold minimumafstande til bagvæg og køkkenelementer
ved siden af (figur 1).
2. Placer rammen i udskæringen, de to huller skal vende bagud.
Indjuster rammen, så spalten omkring rammen har samme
bredde på alle sider (figur 2).
3. Spalten mellem bordpladen og rammen skal udfuges hele
vejen rundt med en egnet, temperaturbestandig
silikonemasse (f.eks. Novasil, Pactan). Tag evt. rammen ud
igen, og påfør silikonen i udskæringen. Glat tætningsfugen
med det glattemiddel, som er anbefalet af producenten.
Overhold arbejdsanvisningerne for silikonemassen (figur 3).
Pas på!
Ved bordplader af natursten kan en uegnet silikonemasse
forårsage permanente misfarvninger.
4. Skru alle spændekløer fast med samme tilspændingsmoment,
så rammen bliver plan i forhold til køkkenelementet. Højden
kan indjusteres med makismalt 1 mm ved fastskruning af
spændekløerne. Kontroller, at hele rammen er plan (figur 4).
Pas på!
Beskadigelse af rammen: Spænd ikke spændekløerne for fast
til.
5. Vip de to holdebeslag ned (figur 5).
6. Indbyg og tilslut gaskogesektionen (se montagevejledningen
for gaskogesektionen). Tag først kogesektionen i brug, når
silikonemassen er gennemtør (tidligst efter 24 timer, afhængig
af rumtemperatur).
Montage i bordplade af rustfrit stål:
Indbygning i en bordplade af rustfrit stål (svejsning) skal udføres
af et autoriseret værksted (figur 6).
Maksimal tykkelse på den rustfri stålbordplade: 1 mm.
ó Monteringsanvisning
Förbereda stommarna
Gashällen är avsedd för plan inbyggnad i bänkskiva.
Överkanten på kärlstöden ligger av tekniska skäl något över
bänkskivan.
Gashällen går att bygga in i följande värme- och vattentåliga
bänkskivor:
■ Stenskivor
■ Bänkskivor av plast eller Corian
■ Rostfria bänkskivor (svetsade)
■ Massiva träbänkskivor: kolla med tillverkaren av bänkskivorna
(foga urtagskanterna)
Inbyggnad i andra bänkskivor (t.ex. spånskivor) fungerar inte.
Du får inte montera gashällen under överkant på bänkskivan.
Stommarna vara värmetåliga upp till 90ºC. Stommen ska vara
stabil även efter att du gjort urtag.
Obs
■ Låt hantverkare göra alla urtag i bänkskivan enligt
inbyggnadsritningen. Urtagen ska vara rena och exakta
eftersom kanten syns på ovansidan. Rengör och avfetta
urtagskanten med lämpligt rengöringsmedel (följ
anvisningarna på silikonet).
■ Fäst inbyggnadsramen samtliga medföljande fästbyglar i
bänkskivan. Det är enda sättet att få inbyggnaden att fungera
som den ska.
Sätta i ramen
1. Gör urtaget i bänkskivan enligt inbyggnadsritningen. Tänk på
minimiavstånd till bakvägg och stommar runtom (bild 1).
2. Sätt i ramen i urtaget, de båda borrhålen ska vara baktill.
Passa in, se till så att det blir en jämn spalt runtom (bild 2).
3. Mjukfoga runtom mellan bänkskiva och ram med passande,
värmetålig silikon (t.ex. Novasil, Pactan). Ta ev. ur ramen igen
och lägg på silikon i urtaget. Glätta mjukfogen med det medel
som tillverkaren rekommenderar. Följ anvisningarna på
silikonet (bild 3).
Se upp!
Använder du fel silikonmassa, så kan bänkskivor i natursten bli
missfärgade.
4. Dra åt alla fästbyglar jämnt, så att ramen är i våg. Höjden går
att anpassa max. 1 mm genom att dra åt fästbyglarna.
Kontrollera att hela ramen är i våg (bild 4).
Se upp!
Skador på ramen: dra inte åt fästbyglarna för hårt.
5. Fäll ned de båda fästbyglarna (bild 5).
6. Sätt i gashällen och anslut den (se gashällens
monteringsanvisning). Använd inte hällen förrän silikonet torkat
ordentligt (min. 24 timmar, beroende på rumstemperaturen).
Inbyggnad i rostfri bänkyta
Låt hantverkare sköta inbyggnader i rostfria bänkytor
(svetsjobb) (bild 6).
Maxtjocklek på rostfria bänkytor: 1 mm.

no
ê Monteringsveiledning
fi
es
Klargjøring av kjøkkenelementet til innbygging
Gass-koketoppen er laget for fluktende innbygging i en
arbeidsplate. Av tekniske årsaker er overkanten på
gryteholderne litt høyere enn arbeidsplaten.
Gass-koketoppen kan bygges inn i følgende
temperaturbestandige og vannfaste arbeidsplater:
■ arbeidsplater av stein
■ arbeidsplater av plast eller Corian
■ arbeidsplater av rustfritt stål (sveiset)
■ arbeidsplater av massivt tre: kun etter avtale med
produsenten av arbeidsplaten (kantene på åpningen må
forsegles)
Innbygging i andre arbeidsplater (f.eks. sponplater) er ikke
mulig.
Gass-koketoppen må ikke monteres lavere enn overkanten på
arbeidsplaten.
Kjøkkenelementet for innbygging må være temperaturbestandig
opptil 90 °C. Kjøkkenelementet for innbygging må være
tilstrekkelig stabilt, også etter at utskjæringen er utført.
Merknader
■ Alle utskjæringer i arbeidsplaten må utføres av fagfolk i
henhold til innbyggingsskissen. Utskjæringen må utføres rent
og nøyaktig, siden skjærekanten vil være synlig på overflaten.
Rengjør kanten på åpningen med et egnet rengjøringsmiddel,
og fjern fett (følg arbeidsanvisningene fra produsenten av
silikonmassen).
■ Fest innbyggingsrammen til arbeidsplaten med alle de
vedlagte strammeklørne. Det er eneste måte å sikre korrekt
innbygging på.
Montering av rammen
1. Lag en åpning i arbeidsplaten som vist i innbyggingsskissen.
Legg merke til minsteavstandene til bakveggen og møbler på
sidene (bilde 1).
2. Sett rammen i åpningen, de to borehullene må være bak.
Niveller, pass på at spalten som går rundt, blir jevn (bilde 2).
3. Spalten som går rundt mellom arbeidsplaten og rammen,
fuges med egnet temperaturbestandig silikonmasse (f.eks.
Novasil eller Pactan). Ta igjen ut rammen og påfør silikon i
utsnittet. Glatt pakningsfugen med glattemiddel som er
anbefalt av produsenten. Følg arbeidsanvisningene fra
produsenten av silikonmassen (bilde 3).
Obs!
Uegnet silikonmasse fører til varig misfarging av arbeidsplater
i naturstein.
4. Skru alle spennklørne like hardt til, slik at innbyggingen blir
plan. Høyden kan utjevnes med maks. 1 mm ved festing av
spennklørne. Kontroller at hele rammen er plan (bilde 4).
Obs!
Skader på rammen: Ikke trekk til spennklørne for hardt.
5. Fold ned begge holdebøylene (bilde 5).
6. Bygg inn og koble til gass-kokesonen (se gass-kokesonens
monteringsanvisning). Kokesonen må først tas i bruk når
silikonmassen er helt tørr (minst 24 timer, avhengig av
romtemperaturen).
Innbygging i arbeidsflate av rustfritt stål
Innbygging i arbeidsflater av rustfritt stål (sveising) må utføres
av fagfolk (bilde 6).
Maks. tykkelse på arbeidsflaten av rustfritt stål: 1 mm.
Ý Asennusohje
Kalusteen esivalmistelu
Kaasukeittosyvennys on tarkoitettu asennettavaksi samaan
tasoon työtason kanssa. Kattilankannattimen yläreuna on
teknisistä syistä hiukan työtason yläpuolella.
Kaasukeittosyvennys voidaan asentaa seuraaviin kuumuutta ja
vettä kestäviin työtasoihin:
■ kiviset työtasot
■ muoviset tai Corian-työtasot
■ teräksiset työtasot (hitsattu)
■ täyspuiset työtasot: vain työtason valmistajan hyväksynnän
jälkeen (aukon reunojen käsittely kuumuutta kestäviksi)
Asennus muihin työtasoihin (esimerkiksi lastulevyt) ei ole
mahdollista.
Älä asenna kaasukeittosyvennystä työtason yläreunan
alapuolelle.
Kalusteen kestettävä kuumuutta 90 °C:een asti. Kalusteen
vakauden on oltava taattu myös aukon tekemisen jälkeen.
Huomautuksia
■ Työtason leikkaustyöt on tehtävä ammattiliikkeessä
asennuskaavion mukaan. Leikkauksen on oltava tasainen ja
tarkka, koska leikkausreuna näkyy yläpuolella. Puhdista
aukon reunat ja poista niistä rasva tarkoitukseen sopivalla
puhdistusaineella (noudata silikonin valmistajan työstöohjeita).
■ Kiinnitä asennuskehys kaikilla mukana toimitetuilla kiristimillä
työtasoon. Vain siten taataan moitteeton asennus.
Kehyksen asennus
1. Tee työtasoon aukko asennuspiirroksen mukaan. Noudata
vähimmäisetäisyyksiä takaseinään ja viereisiin kalusteisiin
(kuva 1).
2. Aseta kehys asennusaukkoon, molempien ruuvinreikien pitää
olla takana. Suorista paikalleen ja varmista, että ympäröivä
rako on joka puolelta yhtä suuri (kuva 2).
3. Saumaa työtason ja kehyksen välinen rako joka puolelta
tarkoitukseen sopivalla, kuumuutta kestävällä silikoniliimalla
(esimerkiksi Novasil, Pactan). Ota sitä varten kehys
tarvittaessa taas pois paikaltaan ja levitä silikoni aukkoon.
Tasoita tiivistesauma valmistajan suosittelemalla silotteella.
Noudata silikoniliiman työstöohjeita (kuva 3).
Huomio!
Tarkoitukseen sopimaton silikoniliima aiheuttaa luonnonkivisiin
työtasoihin pysyviä värjäymiä.
4. Ruuvaa kaikki kiristimet tasaisesti kiinni, jotta saat asennettua
kehyksen suoraan. Korkeutta voidaan säätää kiristimiä
ruuvaamalla enintään 1 mm verran. Tarkasta, että kehys joka
puolelta suorassa (kuva 4).
Huomio!
Kehyksen vaurioituminen: älä ruuvaa kiristimiä liian tiukasti
kiinni.
5. Käännä kannatinkaaret alas (kuva 5).
6. Asenna kaasukeittotaso paikalleen ja liitä (ks.
kaasukeittotason asennusohje). Ota keittotaso käyttöön vasta,
kun silikoniliima on kuivunut täydellisesti (vähintään 24 tuntia,
huoneen lämpötilasta riippuen).
Asennus teräksiseen työtasoon
Teetä asennus teräksiseen työtasoon (hitsaus) ammattiliikkeellä
(kuva 6).
Teräksisen työtason enimmäispaksuus: 1 mm.
Û Instrucciones de montaje
Preparar el mueble empotrado
La placa de cocción de gas está prevista para el montaje
enrasado en una encimera. Por motivos técnicos, el borde
superior de la parrilla de soporte queda un poco por encima de
la encimera.
La placa de cocción de gas puede encastrarse en las
siguientes encimeras resistentes al agua y a altas temperaturas:
■ Encimeras de piedra
■ Encimeras de plástico o Corian
■ Encimera de acero inoxidable (soldadas)
■ Encimeras de madera maciza: solo tras la confirmación de la
idoneidad por parte del fabricante de la superficie de trabajo
(sellar las aristas de corte)
No es posible el montaje en otro tipo de encimeras (p. ej.
tableros de madera aglomerada).
No montar la placa de cocción de gas por debajo del borde
superior de la encimera.
El mueble empotrado debe resistir una temperatura de hasta
90°C. La estabilidad del mueble empotrado debe quedar
garantizada tras el trabajo de corte.
Notas
■ Todos los trabajos de corte que deban realizarse en la
encimera se han de efectuar en un taller especializado
siguiendo el esquema de montaje. El corte debe realizarse de
modo limpio y preciso, la arista de corte queda visible en la
superficie. Limpiar las aristas de corte con un producto de
limpieza apropiado y desengrasarlas (observar las
intrucciones de uso del fabricante del pegamento de base de
silicona).

■ Fijar el marco de montaje en la encimera con las garras
pt
el
tensoras suministradas. Solo de este modo se garantiza un
montaje impecable.
Montaje del marco
1. Recortar la encimera como se indica en el esquema de
montaje. Observar las distancias mínimas a la placa posterior
y los muebles adyacentes (figura 1).
2. Colocar el marco en el hueco recortado; ambos taladros
deben estar en la parte posterior. Alinear dejando un espacio
continuo regular (figura 2).
3. Llaguear la separación entre la encimera y el marco con un
pegamento de base de silicona resistente a altas
temperaturas (p. ej. Novasil, Pactan). Para ello, retirar el
marco en caso necesario y colocar la silicona en el hueco.
Alisar la junta con los productos para alisar recomendados
por el fabricante. Observar las indicaciones para el uso del
pegamento de base de silicona (figura 3).
¡Atención!
Un pegamento de base de silicona inadecuado puede dar
lugar a decoloraciones permanentes en encimeras de piedra
natural.
4. Atornillar todas las garras tensoras a la vez para conseguir un
montaje nivelado. La altura se puede igualar atornillando las
garras tensoras máx. 1 mm. Comprobar que el marco
completo es plano (figura 4).
¡Atención!
Daños en el marco: no apretar demasiado las garras tensoras.
5. Plegar hacia abajo ambos estribos de sujeción (figura 5).
6. Montar la placa de cocción de gas y conectarla (ver las
instrucciones de montaje de la placa de cocción de gas).
Poner en funcionamiento la placa de cocción solo tras el
secado completo del pegamento de base de silicona (por lo
menos 24 horas, en función de la temperatura ambiente).
Montaje en una superficie de trabajo de acero inoxidable
Encargar el montaje en una superficie de trabajo de acero
inoxidable (soldar) a un taller especializado (figura 6).
Espesor máximo de la superficie de trabajo de acero
inoxidable: 1 mm.
ì Instruções de montagem
Preparar o móvel onde o aparelho vai ser encastrado
A placa de cozinhar a gás destina-se a ficar nivelada com a
bancada de trabalho. Por razões de ordem técnica, a aresta
superior dos suportes de recipientes fica ligeiramente mais alta
do que a bancada de trabalho.
A placa de cozinhar a gás pode ser montada nas seguintes
bancadas de trabalho impermeáveis e resistentes à
temperatura:
■ Bancadas de trabalho em pedra
■ Bancadas de trabalho de material sintético ou em Corian
■ Bancadas de trabalho de aço inoxidável (soldadas)
■ Bancadas de trabalho de madeira maciça: carece de
consulta do fabricante da bancada (impermeabilizar as
arestas de corte)
O encastramento noutras bancadas de trabalho (por ex., de
contraplacado) não é possível.
A placa de cozinhar a gás não deve ser encastrada de forma a
ficar mais baixa do que a aresta superior da bancada de
trabalho.
O móvel onde o aparelho vai ser encastrado tem de ser
resistente a temperaturas até 90 °C. A estabilidade do móvel
tem de estar garantida, mesmo depois de ter sido recortado.
Indicaçãoes
■ Todos os trabalhos de recorte na bancada de trabalho devem
ser realizados numa oficina especializada, de acordo com o
esboço de encastramento. O recorte tem de ser realizado
com qualidade e precisão, pois a aresta de corte na
superfície é visível. Limpar e desengordurar as arestas de
corte com um produto de limpeza adequado (ter em atenção
as instruções de processamento do fabricante do silicone).
■ Fixar a estrutura de encastramento com todas as garras de
fixação fornecidas à bancada de trabalho. Só desta forma se
pode garantir uma montagem correcta.
Montar a estrutura
1. Executar o recorte na bancada de acordo com o esboço de
encastramento. Observar as distâncias mínimas em relação à
parede posterior e móveis laterais (figura 1).
2. Colocar a estrutura no recorte, os dois furos têm de ficar
posicionados atrás. Nivelar, assegurando que é deixada uma
fenda uniforme em toda a volta (figura 2).
3. Vedar a fenda em toda a volta entre a bancada e a estrutura
com uma cola de silicone resistente às temperaturas,
adequada (por ex., Novasil, Pactan). Para isso voltar
eventualmente a retirar a estrutura e aplicar o silicone no
recorte. Alisar a junta com um agente de alisamento
recomendado pelo fabricante. Ter em atenção as instruções
de processamento da cola de silicone (figura ).
Atenção!
Uma cola de silicone inadequada provoca manchas
permanentes em bancadas de pedra natural.
4. Aparafusar todas as garras de fixação uniformemente, para
obter uma montagem plana. A altura pode ser ajustada no
máx. 1 mm, aparafusando as garras de fixação. Verificar se a
estrutura está totalmente plana (figura 4).
Atenção!
Danos na estrutura: não apertar demasiado as garras de
fixação.
5. Baixar os estribos de fixação (figura 5).
6. Montar e ligar a placa de cozinhar a gás (ver instruções de
montagem da placa de cozinhar a gás). Utilizar a placa de
cozinhar apenas depois de a cola de silicone ter secado
completamente (24 horas no mínimo, dependendo da
temperatura ambiente).
Encastramento em bancada de aço inoxidável
O encastramento em bancadas de aço inoxidável (soldadura)
deve ser realizado por uma oficina especializada (figura 6).
Espessura máxima da bancada de aço inoxidável: 1 mm.
Ù Οδηγίες εγκατάστασης
Προετοιμασία του εντοιχιζόμενου ντουλαπιού
Η βάση εστιών αερίου προορίζεται για την ισόπεδη με την επιφάνεια
τοποθέτηση σ’ έναν πάγκο εργασίας. Για τεχνικούς λόγους η επάνω
ακμή από τις σχάρες των μαγειρικών σκευών βρίσκεται ελάχιστα
υψηλότερα από την επιφάνεια του πάγκου εργασίας.
Η βάση εστιών αερίου μπορεί να τοποθετηθεί στους ακόλουθους
ανθεκτικούς στη θερμοκρασία και στο
■ Πέτρινοι (μαρμάρινοι) πάγκοι εργασίας
■ Πάγκοι εργασίας από συνθετικό υλικό ή Corian
■ Πάγκοι εργασίας ανοξείδωτου χάλυβα (συγκολλημένοι)
■ Πάγκοι εργασίας από μασίφ ξύλο: Μόνο κατόπιν συνεννόησης με
τον κατασκευαστή του πάγκου εργασίας (σφράγισμα των ακμών
του ανοίγματος)
Η τοποθέτηση σε άλλο πάγκο εργασίας (π.χ. κοντραπλακέ) δεν είναι
δυνατή.
Μην τοποθετήσετε τη βάση εστιών αερίου χαμηλότερα από την
επάνω ακμή του πάγκου εργασίας.
Το εντοιχιζόμενο ντουλάπι πρέπει να είναι
θερμοκρασία μέχρι τους 90°C. Η σταθερότητα του εντοιχιζόμενου
ντουλαπιού πρέπει να εξασφαλίζεται επίσης και μετά από τις
εργασίες κοπής των ανοιγμάτων.
Υποδείξεις
■ Όλες οι εργασίες κοπής των ανοιγμάτων στον πάγκο εργασίας
πρέπει να γίνουν σ’ ένα ειδικό συνεργείο σύμφωνα με το σχέδιο
εγκατάστασης. Το άνοιγμα πρέπει να γίνει καθαρά και σωστά,
επειδή η ακμή της τομής στην επάνω επιφάνεια είναι εμφανής.
Καθαρίστε και απολιπάνετε τις ακμές του ανοίγματος με ένα
κατάλληλο υλικό καθαρισμού
επεξεργασίας του κατασκευαστή της σιλικόνης).
■ Στερεώστε το πλαίσιο τοποθέτησης με όλα τα συνημμένα
άγκιστρα σύσφιγξης στον πάγκο εργασίας. Μόνο έτσι
εξασφαλίζεται μια άψογη τοποθέτηση.
νερό πάγκους εργασίας:
ανθεκτικό στη
(προσέξτε τις υποδείξεις
Τοποθέτηση του πλαισίου
1. Κατασκευάστε το άνοιγμα του πάγκου εργασίας σύμφωνα με το
σχέδιο εγκατάστασης. Προσέξτε τις ελάχιστες αποστάσεις από το
πίσω τοίχωμα και τα πλαϊνά ντουλάπια (Εικ. 1).
2. Τοποθετήστε το πλαίσιο στο άνοιγμα, οι δύο τρύπες πρέπει να
βρίσκονται πίσω. Ευθυγραμμίστε το, προσέξτε να υπάρχει ολόγυρα
ένας ομοιόμορφος αρμός (Εικ. 2).
3. Γεμίστε
πλαισίου με μια κατάλληλη, ανθεκτική στη θερμοκρασία κόλλα
σιλικόνης (π.χ. Novasil, Pactan). Αφαιρέστε γι’ αυτό ενδεχομένως
ξανά το πλαίσιο και τοποθετήστε τη σιλικόνη στο άνοιγμα.
ολόγυρα τον αρμό μεταξύ του πάγκου εργασίας και του

Λειάνετε τον αρμό στεγανοποίησης με το συνιστούμενο από τον
ru
cs
κατασκευαστή υλικό λείανσης. Προσέξτε τις υποδείξεις
επεξεργασίας της κόλλας σιλικόνης (Εικ. 3).
Προσοχή!
Η ακατάλληλη κόλλα σιλικόνης οδηγεί στους πάγκους εργασίας
από φυσική πέτρα σε μόνιμες αποχρώσεις.
4. Βιδώστε όλα τα άγκιστρα σύσφιγξης ομοιόμορφα, για να
επιτευχθεί η επιπεδότητα στην τοποθέτηση. Το ύψος μπορεί να
εξισωθεί το πολύ κατά 1 mm, βιδώνοντας τα άγκιστρα σύσφιγξης.
Ελέγξτε την επιπεδότητα ολοκλήρου του πλαισίου (Εικ. 4).
Προσοχή!
Ζημιά του πλαισίου: Μη σφίξετε πάρα πολύ τα άγκιστρα σύσφιγξης.
5. Κατεβάστε τα δύο άγκιστρα συγκράτησης προς τα κάτω (Εικ. 5).
6. Τοποθετήστε και συνδέστε τη βάση εστιών αερίου (βλέπε οδηγίες
συναρμολόγησης της βάσης εστιών αερίου). Θέστε τη βάση εστιών
σε λειτουργία, αφού πρώτα στεγνώσει εντελώς η κόλλα σιλικόνης
(το λιγότερο 24
ώρες, ανάλογα τη θερμοκρασία του χώρου).
Τοποθέτηση στην επιφάνεια εργασίας ανοξείδωτου χάλυβα
Αναθέστε την εκτέλεση της τοποθέτησης στην επιφάνεια εργασίας
ανοξείδωτου χάλυβα (συγκόλληση) σε ένα ειδικό συνεργείο (Εικ. 6).
Μέγιστο πάχος της επιφάνειας εργασίας ανοξείδωτου χάλυβα:
1 mm.
î Инструкция по монтажу
Подготовка мебели для встраивания
Газовая варочная панель предназначена для встраивания
заподлицо со столешницей. Верхний край решётки для посуды
должен быть чуть выше уровня столешницы.
Газовая варочная панель может быть встроена только в
перечисленные ниже столешницы, выполненные из термо- и
влагоустойчивых материалов:
■ Каменные столешницы
■ Столешницы из пластика или кориана
■ Стальные столешницы (сварка)
■ Столешницы из массива дерева: только после согласования с
производителем столешницы (загерметизировать швы)
Встраивание в столешницы из других материалов (напр. ДСП)
запрещено.
Газовая панель не должна быть установлена ниже верхнего
края столешницы.
Мебель для встраивания должна выдерживать температуру до
90 °С. Кроме того, после выполнения выреза необходимо
убедиться в её устойчивости.
Указания
■ Все вырезы в столешнице должны быть выполнены в
специализированной мастерской в соответствии с
установочным чертежом. Вырез должен быть чистым и
аккуратным, так как края выреза будут видны на поверхности.
Очистите края выреза подходящим очистителем и обезжирьте
(следуйте инструкции изготовителя силиконового клея).
■ Прикрепите монтажную раму к столешнице всеми входящими
в комплект зажимами. Только таким образом можно
гарантировать безупречную установку.
Установка монтажной рамы
1. Сделайте в столешнице вырез в соответствии с установочным
чертежом. Соблюдайте указанные минимальное расстояние
до стены и стоящей рядом мебели (рис. 1).
2. Установите раму в вырез, отверстия под винты должны быть сзади. Выровняйте; проверьте, чтобы зазор по периметру был одинаковым (рис. 2).
3. Зазор между столешницей и рамой заполните подходящим
силиконовым
необходимости снова извлеките раму и нанесите
силиконовый клей по периметру выреза. Отполируйте швы
рекомендованным производителем средством.
Неукоснительно следуйте инструкции к силиконовому клею
(рис. 3).
Внимание!
При использовании неподходящего силиконового клея
столешница из натурального камня в некоторых местах может
изменить цвет.
4. Для обеспечения планарности при монтаже равномерно
затяните все зажимы. Регулировка высоты (макс. 1 мм)
возможна путём приворачивания зажимов. Проверьте
планарность всей рамы (рис. 4).
клеем (напр. Novasil, Pactan). Для этого при
Внимание!
Повреждение рамы: не затягивайте зажимы слишком сильно.
5. Разверните оба держателя вниз (рис. 5).
6. Установите газовую варочную панель и произведите её
подключение (см. инструкцию по монтажу газовой панели).
Варочную панель можно использовать только после полного
высыхания силиконового клея (мин. 24 часа, в зависимости от
температуры в помещении).
Монтаж в столешницу из нержавеющей стали
Монтаж в стальную столешницу (сварка) должен производиться
только в специализированной мастерской (рис. 6).
Максимальная толщина столешницы из нержавеющей стали
1 мм.
Ö Montážní návod
Příprava vestavného nábytku
Plynová varná deska je určená pro vestavbu do pracovní desky
v jedné rovině. Z technických důvodů je horní hrana mřížek
nepatrně výše než pracovní deska.
Plynovou varnou desku lze vestavět do následujících tepelně
a vodě odolných pracovních desek:
■ Kamenné pracovní desky
■ Pracovní desky z plastu nebo Corianu
■ Pracovní desky z ušlechtilé oceli (přivařeno)
■ Pracovní desky z masivního dřeva: Pouze po dohodě
s výrobcem pracovní desky (zacelit hrany výřezu)
Vestavba do jiných pracovních desek (např. dřevotřískových
desek) není možná.
Plynovou varnou desku nezabudovávejte hlouběji, než je horní
hrana pracovní desky.
Vestavný nábytek musí být tepelně odolný do 90 °C. Stabilita
vestavného nábytku musí být zajištěná i po provedení výřezu.
Upozornění
■ Veškeré výřezy do pracovní desky je nutno provést ve
specializované dílně podle obrázku vestavby. Výřez musí být
provedený čište a přesně, protože řezná hrana je na povrchu
vidět. Pomocí vhodného čisticího prostředku hrany výřezu
vyčistěte a zbavte mastnot (řiďte se pokyny pro použití od
výrobce silikonového tmelu).
■ Vestavný rám připevněte k pracovní desce všemi přiloženými
upínacími sponami. Jen tak je zaručena bezvadná vestavba.
Montáž rámu
1. V pracovní desce vytvořte výřez podle obrázku vestavby.
Dodržujte minimální vzdálenosti od zadní stěny a postranního
nábytku (obrázek 1).
2. Do výřezu nasaďte rám, oba vyvrtané otvory musí být vzadu.
Vyrovnejte ho, dbejte na stejnoměrnou spáru po obvodu
(obrázek 2).
3. Spáru po celém obvodu mezi pracovní deskou a rámem
vyplňte vhodným tepelně odolným silikonovým tmelem
(např. Novasil, Pactan). Za tímto účelem rám případně znovu
vyjměte a do výřezu naneste silikon. Těsnicí spáru vyhlaďte
hladicím prostředkem doporučeným výrobcem. Řiďte se
pokyny pro použití silikonového tmelu (obrázek 3).
Pozor!
Nevhodný silikonový tmel může u pracovních desek
z přírodního kamene způsobit trvalé změny barvy.
4. Všechny upínací spony stejnoměrně přišroubujte, aby byla
zajištěna vestavba v rovině. Výšku lze přizpůsobit utáhnutím
upínacích spon o max. 1 mm. Zkontrolujte, zda je celý rám
v rovině (obrázek 4).
Pozor!
Nebezpečí poškození rámu: Upínací spony neutahujte příliš
pevně.
5. Oba přídržné třmeny sklopte dolů (obrázek 5).
6. Namontujte plynovou varnou desku a zapojte ji (viz návod
k montáži plynové varné desky). Varnou desku uveďte do
provozu až po úplném zaschnutí silikonového tmelu
(minimálně 24 hod, v závislosti na pokojové teplotě).
Vestavba do pracovní desky z ušlechtilé oceli
Vestavbu do pracovní desky z ušlechtilé oceli (přivaření) nechte
provést specializovanou firmou (obrázek 6).
Maximální tloušťka pracovní desky z ušlechtilé oceli: 1 mm.

pl
ë Instrukcja montażu
tr
Przygotowanie mebli do zabudowy
Płyta gazowa przeznaczona jest do montażu
napowierzchniowego w blacie roboczym. Ze względów
technicznych górna krawędź kratki nieco wystaje nad blat.
Płytę gazową można zamontować w następujące, odporne na
działanie wody i wysokiej temperatury, blaty robocze:
■ blaty robocze z kamienia
■ blaty robocze z tworzywa sztucznego lub corianu
■ blaty robocze ze stali nierdzewnej (spawane)
■ blaty robocze z masywnego drewna: wyłącznie po
uzgodnieniu z producentem blatów (krawędzie wycięcia
zabezpieczyć odpowiednim środkiem)
Montaż w innych blatach roboczych (np. z płyty wiórowej) nie
jest możliwy.
Płyty gazowej nie montować poniżej górnej krawędzi blatu
roboczego.
Meble do zabudowy muszą być odporne na działanie
temperatury do 90 ºC. Stabilność mebli musi być
zagwarantowana również po wykonaniu wycięć.
Wskazówki
■ Wszystkie prace związane z wycinaniem blatu roboczego
należy przeprowadzić w warsztacie specjalistycznym zgodnie
ze szkicem montażowym. Wycięcie musi być czyste i
dokładne, ponieważ ucięta krawędź będzie widoczna na
powierzchni. Krawędzie wycięcia oczyścić odpowiednim
środkiem czyszczącym i odtłuścić (przestrzegać wskazówek
producenta sylikonu dotyczących sposobu użycia tych
środków).
■ Ramę do zabudowy zamocować w blacie roboczym przy
pomocy dostarczonych klamer. Wyłącznie w ten sposób
można zagwarantować prawidłowy montaż.
Montaż ramy
1. Wyciąć otwór w blacie roboczym zgodnie ze szkicem
montażowym. Zachować minimalne odległości od tylnej ściany
oraz sąsiadujących mebli (rys. 1).
2. Włożyć ramę w wycięcie, oba wywiercone otwory muszą
znajdować się z tyłu. Ułożyć ramę w wycięciu zwracając uwagę
na równomierną szczelinę wokół ramy (rys. 2).
3. Szczelinę między blatem roboczym a ramą zafugować
odpowiednim, odpornym na działanie wysokiej temperatury
klejem silikonowym (np. Novasil, Pactan). W tym celu
ewentualnie ponownie wyjąć ramę i wypełnić brzeg wycięcia
sylikonem. Fugę uszczelniającą wygładzić zalecanym przez
producenta środkiem wygładzającym. Przestrzegać
wskazówek dotyczących sposobu użycia kleju silikonowego
(rys. 3).
Uwaga!
Użycie nieodpowiedniego kleju silikonowego prowadzi w
przypadku blatów roboczych z kamienia naturalnego do
powstania trwałych przebarwień.
4. Równomiernie przykręcić wszystkie klamry, aby uzyskać
równe zamocowanie ramy. Dokręcając klamry można
regulować wysokość maks. o 1 mm. Sprawdzić, czy rama jest
równo zamocowana (rys. 4).
Uwaga!
Uszkodzenie ramy: nie przykręcać zbyt mocno klamer.
5. Oba pałąki mocujące obrócić do dołu (rys. 5).
6. Zamontować i podłączyć płytę gazową (patrz Instrukcja
montażu płyty gazowej). Płyty grzejnej używać dopiero po
całkowitym wyschnięciu kleju sylikonowego (najwcześniej po
24 godzinach, w zależności od temperatury otoczenia).
Gazlı pişirme ocağı, aşağıda belirtilen ısıya ve suya dayanıklı
mutfak tezgahlarına takılabilir:
■ Taş tezgahlar
■ Plastik veya Corian tezgahlar
■ Paslanmaz çelik tezgahlar (kaynaklı)
■ Masif ağaç tezgahlar: Sadece tezgahın üreticisiyle koordineli
şekilde (kesit kenarları yalıtılmalıdır)
Başka tezgahlara montaj (örn. sunta) mümkün değildir.
Gazlı pişirme ocağını, mutfak tezgahının üst kenarından daha
aşağı seviyeye takmayınız.
Gömme mobilya 90°C'ye kadar ısıya dayanıklı olmalıdır.
Gömme mobilya, kesit çalışmalarından sonra da sağlamlığını
muhafaza etmelidir.
Bilgiler
■ Mutfak tezgahındaki tüm kesit çalışmaları, yetkili bir atölyede
ve montaj şablonuna uygun olarak yapılmalıdır. Kesme kenarı
üst taraftan göründüğü için kesit işlemi temiz ve tam
yapılmalıdır. Kesit kenarlarını uygun bir temizlik maddesi ile
temizleyiniz ve yağlardan arındırınız (Silikon üreticisinin
silikonun işlemesine dair açıklamalarına dikkat ediniz).
■ Montaj çerçevesini, birlikte gönderilen tüm gergi tırnaklarıyla
tezgah içinde sabitleyiniz. Ancak bu şekilde kusursuz bir
montaj yapılmış olur.
Çerçevenin takılması
1. Montaj şablonuna göre mutfak tezgahında çerçevenin yerini
açınız. Arka duvara ve yandaki mobilyalara gerekli olan asgari
mesafelere dikkat ediniz (Resim 1).
2. Çerçeveyi tezgahta açtığınız yere yerleştiriniz, delikler arkaya
gelmelidir. Ayarlayınız, kenarlarındaki boşluğun eşit olmasına
dikkat ediniz (Resim 2).
3. Mutfak tezgahı ile çerçeve arasındaki boşluğu uygun ve ısıya
dayanıklı bir silikon yapıştırıcı ile doldurunuz (örn. Novasil,
Pactan). Bunun için gerekirse çerçeveyi tekrar sökünüz ve
silikonu boşluğa doldurunuz. Dolgu maddesini üretici firmanın
önerdiği düzeltme maddesiyle düzeltiniz. Silikon yapıştırıcının
işlemesine dair açıklamalara dikkat ediniz (Resim 3).
Dikkat!
Uygun olmayan silikon yapıştırıcı doğal taştan yapılmış mutfak
tezgahlarında kalıcı renk değişimlerine neden olur.
4. Montaj sırasında düzgünlüğü sağlamak için tüm tutma
kulplarını eşit oranda vidalayınız. Tutma kulplarının
vidalanması sırasında yükseklik maksimum 1 mm kadar
ayarlanabilir. Tüm çerçevenin düzgünlüğünü kontrol ediniz
(Resim 4).
Dikkat!
Çerçeve hasarı: Tutma kulplarını çok fazla sıkmayınız.
5. Her iki tutma kulpunu aşağıya doğru açınız (Resim 5).
6. Gazlı pişirme bölümünün takılması ve bağlanması (bkz. Gazlı
pişirme bölümü montaj kılavuzu). Pişirme bölümünü ancak
silikon yapıştırıcı tamamen kuruduktan sonra çalıştırınız (en az
24 saat, oda sıcaklığına bağlı olarak).
Paslanmaz çelik tezgaha takma işlemi
Paslanmaz çelik tezgaha takma işlemini (kaynak yapma) yetkili
atölyeye yaptırınız (Resim 6).
Paslanmaz çelik tezgahın maksimum kalınlığı: 1 mm.
Montaż w blacie roboczym ze stali nierdzewnej
Montaż w blacie roboczym ze stali nierdzewnej (spawanie)
zlecić fachowcowi (rys. 6).
Maksymalna grubość blatu roboczego ze stali nierdzewnej:
1 mm.
ô Montaj kılavuzu
Gömme mobilyanın hazırlanması
Gazlı pişirme ocağı, bir mutfak tezgahı içine tezgah yüzeyine sıfır
seviyede monte edilmek üzere tasarlanmıştır. Teknik
nedenlerden dolayı ocak ızgarasının üst kenarı mutfak
tezgahından biraz yüksektir.


 Loading...