


 Loading...
Virtual PC™
for Windows
Version 4.0
User Guide
June 2001
Copyright
Connectix makes no warranty of any kind with regard to this material, including, but not limited to, implied warranties of merchantability and fitness for a particular purpose.
Connectix shall not be liable for errors contained herein or for incidental consequential damages in connection with the furnishing, performance, or use of this material.
This document contains proprietary information that is protected by copyright. All rights are reserved. No part of this document may be photocopied, reproduced, or translated to another language without the prior written consent of Connectix.
The information in this document is subject to change without notice.
© 2001 Connectix Corporation
2955 Campus Drive
San Mateo, CA 94403
All Rights Reserved
Connectix, the Connectix logo, Connectix Virtual PC, Connectix OS Packs, and RAM Doubler are trademarks of Connectix Corporation. Microsoft, Windows, MS-DOS, Outlook and Front Page are registered trademarks and NetShow is a trademark of Microsoft Corporation. Red Hat Linux is a registered trademark of Red Hat, Inc. Linux is a registered trademark of Linus Torvalds. Intel, Pentium and MMX are registered trademarks of Intel Corporation. PowerPC, PC-DOS, IBM and OS/2 are registered trademarks of IBM Corporation. PostScript is a registered trademark of Adobe Systems, Inc. Sound Blaster is a registered trademark of Creative Technology Ltd. StuffIt Expander and Shrinkwrap are trademarks of Aladdin Systems, Inc. Zip and Jaz are registered trademarks of Iomega Corporation. S3 and Trio are registered trademarks of S3 Incorporated. QuarkXPress is a trademark of Quark, Inc. Game Wizard is a trademark of Micro Conversions, Inc. Epson and Epson Stylus are registered trademarks of Seiko Epson Corporation. ImageMate is a trademark of SanDisk Corporation. QuickCam is a trademark of Logitech, Inc. Imation and SuperDisk are registered trademarks of Imation Corp. Agfa is a trademark of Bayer Corporation. CanoScan is a trademark of Canon Computer Systems Inc.
All other trademarks are the property of their respective holders.
Contents
Chapter 1 Introduction / 1
About this User Guide / 1
If you need additional help / 2
Online Help / 2
Read Me file / 2
Connectix Web site / 2
Connectix Support / 3
Other products and license information / 3
Chapter 2 Touring Virtual PC / 5
What is Virtual PC? / 5 About the host PC / 6
Components of a virtual machine / 6 More about disk images / 6
Undoable disk images / 7
Running multiple virtual machines / 7 The Virtual PC window / 8
VPC Additions and virtual machine integration / 8 Printing with Virtual PC / 9
Networking with Virtual PC / 9 Help / 10
Creating a virtual machine / 10
Chapter 3 Setting Up Virtual PC / 11
Chapter topics / 11 Installation requirements / 12
Installing Virtual PC for Windows / 14 Registering Virtual PC / 15
Creating a virtual machine with an OS Pack / 15 Creating a virtual machine with a copy of an OS / 20
Creating a disk image / 20 Installing an OS / 24 Installing VPC Additions / 26
Contents
• • • •
i
Installing an application on a virtual machine / 29 Modifying the settings for a virtual machine / 30 Creating a virtual machine with standard settings / 31 Duplicating settings of an existing virtual machine / 32
Chapter 4 Using a Virtual Machine / 33
Chapter contents / 33 Starting up Virtual PC / 34 Using the host key / 34
Starting up a virtual machine / 35 Using CTRL+ALT+DELETE / 35
Changing the virtual machine display / 36
About video resolution / 36
Minimizing a virtual machine window / 36
Pausing, resuming, and restarting a virtual machine / 37 Running multiple virtual machines / 37
Using the VPC Toolbar / 38
Status and lights / 38
Host PC and virtual machine integration / 39
Pointer integration / 39 Drag and drop / 39 Copy and paste / 40 Sharing folders / 40 Sharing CDs / 40
Sharing other removable volumes / 41
Capturing a floppy image or floppy disk / 41
Floppy disk images / 41 Real floppy disks / 41
Releasing a disk or disk image / 41
Printing from a virtual machine / 42 Using a joystick / 42
Using sound / 42 Optimizing performance / 42
Host PC processor speed / 42 Host PC processor usage / 43 RAM allocation / 43
Backing up a virtual machine / 43 Shutting down a virtual machine / 43
ii |
• • • |
|
• |
Virtual PC 4.0 for Windows User Guide
Chapter 5 Networking with Virtual PC / 45
About the Networking setting / 45 Shared Networking option / 45
Modem access / 47
LAN, DSL, or cable access / 47
Virtual Switch option / 47
File sharing / 48
Switching the host PC network interface card / 49
Chapter 6 Changing Settings and Preferences / 51
Chapter topics / 51
Changing settings for a virtual machine / 52
PC Name setting / 52
Memory setting / 53
More RAM improves performance / 53
Real RAM required / 53
Hard Disk 1 setting / 54
About the Undoable option / 55
Hard Disk 2 and Hard Disk 3 settings / 55
CD-ROM setting / 56
Floppy setting / 57
Shared Folders setting / 58
Mouse setting / 59
COM1 and COM2 settings / 60
LPT1 (Printing) setting / 61
Networking setting / 62
Deleting settings for a virtual machine / 63
About global preferences / 64
PC Performance preference / 64
Sound preference / 65
Virtual Switch preference / 66
Keyboard preference / 67
Mouse preference / 68
Contents
• • • •
iii
Chapter 7 Using Virtual Disk Wizard / 69
Creating a hard disk image / 69
More about hard disk image types / 70
Disk image file splitting / 72
Creating a floppy disk image / 73
Examining or modifying a disk image / 74
Fixed-size disk images / 74
Dynamically expanding disk images / 75
Differencing disk images / 75
Disk images linked to a host volume / 75
Disk images linked to a host physical drive / 76
Chapter 8 Using PC-DOS / 77
Introduction to PC-DOS / 77 The command prompt / 78
Typing a command / 78
The PC-DOS directory structure / 79
Viewing the directory (dir) list of files / 79 Viewing one screen at a time / 79
Viewing the contents of a directory in wide format / 80 Using wildcard commands / 80
Changing drives / 80 Changing directories / 81
Creating a directory and subdirectories / 82 Deleting a directory / 83
Printing under PC-DOS / 84 Copying files / 85
Copying a single file / 85 Copying multiple files / 86
File naming / 86 Renaming files / 87 Deleting files / 87
Deleting a single file / 87 Deleting a group of files / 88 Deleting a directory / 88
Getting PC-DOS Help / 89
iv |
• • • |
|
• |
Virtual PC 4.0 for Windows User Guide
Appendix A Technical Specifications / 91
Processor / 91
Motherboard / 91
BIOS / 91
Memory / 91
IDE controller / 92
Hard drive images / 92
CD-ROM / 93
Video / 93
Keyboard controller / 93
Keyboard / 93
Mouse / 93
Floppy / 93
Serial ports / 94
Parallel port / 94
Sound / 94
Ethernet / 94
Appendix B
Appendix C
Command Line Parameters / 95
Volume License Guidelines / 97
Preparing for large-scale deployment of Virtual PC / 97
Building a disk image for deployment / 97 Building a drive image “from scratch” / 98 Starting with a disk image from Connectix / 99
Deployment / 99
Networking / 100
Legal Issues / 100
Managing Multiple COAs / 100
Contents
• • • •
v
vi |
• • • |
|
• |
Virtual PC 4.0 for Windows User Guide
C h a p t e r 1
• • • • • • • • • • •
Introduction
Welcome to Virtual PC for Windows—a sophisticated software emulation program that lets you run multiple virtual machines each with a different operating system on a single host PC.
This introduction provides a road map to the chapters in this guide and information about getting additional assistance.
About this User Guide
Here is a brief description of each chapter and appendix in this guide. Please read Chapter 2, “Touring Virtual PC,” before you install the program.
Chapter 1 Introduction
—this chapter
Chapter 2 Touring Virtual PC
—reviewing the major features of Virtual PC
Chapter 3 Setting Up Virtual PC
—installing Virtual PC and creating a virtual machine
Chapter 4 Using a Virtual Machine
—using the key features of a virtual machine
Chapter 5 Networking with Virtual PC
—choosing networking options for Virtual PC
Chapter 6 Changing Settings and Preferences
—changing settings for a virtual machine or global preferences for Virtual PC
Chapter 7 Using Virtual Disk Wizard
—creating various types of disk images with Virtual Disk Wizard
•• Introduction •
•
1
Chapter 8 Using PC-DOS
—using the PC-DOS operating system
Appendix A Technical Specifications
—technical specifications for Virtual PC
Appendix B Command Line Parameters
—using Virtual PC command line parameters
Appendix C Volume License Information
—information about volume licensing
If you need additional help
If you need additional help, please consider these options:
Online Help
Use the online Help feature in Virtual PC. (In the Virtual PC window, on the Help menu, click Virtual PC Help.)
Read Me file
Check the Read Me file in the Connectix folder on your PC or on the Virtual PC CD. It provides late-breaking information on known problems and solutions.
Connectix Web site
Check the Connectix Web site at http://www.connectix.com for the latest information or updates for Virtual PC for Windows.
2 |
• • • |
|
• |
Virtual PC 4.0 for Windows User Guide
Connectix Support
Before you contact Connectix Support, please have the following information available:
!Your Virtual PC for Windows serial number
!Software version number—In the Virtual PC window, on the
Help menu, click About Virtual PC.
!Basic information about your host PC such as the processor type and the RAM memory installed
!The version of Windows running on your host PC
!The operating systems running on your virtual machines
!Your notes on the events that led to a problem
Connectix support information is available online at
http://www.connectix.com/support.
Other products and license information
For more information about other Connectix products or about volume license agreements for Virtual PC, please contact Connectix Sales:
!
!
!
E-mail: sales@connectix.com
Fax: 650-571-0850
Phone: 800-950-5880 (US and Canada) or 650-571-5100 (international)
Introduction
• • • •
3
4 |
• • • |
|
• |
Virtual PC 4.0 for Windows User Guide

C h a p t e r 2
• • • • • • • • • • •
Touring Virtual PC
This chapter provides a tour of Virtual PC for Windows. Look it over to get an understanding of key features before you install the program.
What is Virtual PC?
Virtual PC lets you create one or more virtual machines or guest PCs on a host PC. A virtual machine runs its own operating system.
2-1
Touring Virtual PC
• • • •
5
About the host PC
The host PC, where you install Virtual PC and create one or more virtual machines, must be running Windows Me, Windows 2000, or Windows NT 4.0. (For details of other host PC requirements, see page 12.)
Components of a virtual machine
A basic virtual machine (or guest PC) consists of three components:
!
!
Settings that determine the operating relationship with the host PC, such as the amount of RAM allocated for the virtual machine, or the assignments for the COM1 and COM2 ports.
A disk image file that represents the boot drive (Hard Disk 1) of the virtual machine. By default, this disk image is a dynamically expanding file that grows in size as you install applications or store data on it. (Optionally, you can designate other disk images as Hard Disk 2 or Hard Disk 3 for a virtual machine.)
!An operating system installed on the boot disk image file. This OS can be almost any x86 compatible operating system, including Windows 95 or Windows 98. (An operating system running on a virtual machine is also called a guest OS.)
More about disk images
Virtual PC supports several types of disk images, including:
!Dynamically expanding—the size of the disk image file expands as you add information to it. For example, if you create a 1 GB dynamically expanding disk image, the initial file is only about 3 MB in size.
!
!
Fixed-size—the size of the disk image file is fixed at a size representing the entire virtual hard drive. For example, if you create a fixed-size hard disk image that represents a 1 GB hard drive, the image file is 1 GB in size.
Differencing—information you add is written to a differencing image file only, not to its associated disk image.
You can create, examine, or modify disk images using the Virtual Disk Wizard. (See page 69.)
6 |
• • • |
|
• |
Virtual PC 4.0 for Windows User Guide
Undoable disk images
You can designate any disk image as undoable. This means that any changes you make during a session with a virtual machine are saved to a separate, temporary file. At the time you shut down the virtual machine, you then have the option of discarding these changes or committing them to the disk image.
Running multiple virtual machines
You can create and simultaneously run several virtual machines on the same host PC. Since each virtual machine has its own OS, you can in effect run several different operating systems at the same time on a single PC.
2-2
Note that each guest PC requires its own allocation of RAM on the host PC.
Touring Virtual PC
• • • •
7
The Virtual PC window
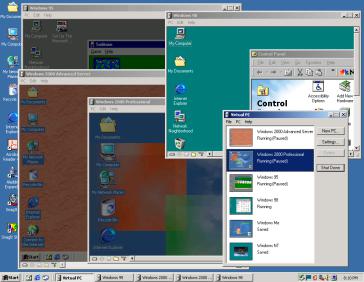
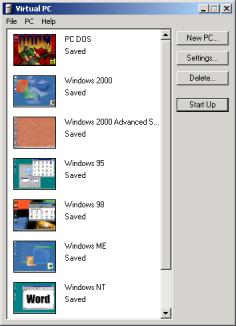
When you start up Virtual PC, the Virtual PC window appears. This is the “dashboard” for Virtual PC. From this window, you can start up a virtual machine, create a new virtual machine, change the settings for a virtual machine, or delete the settings for a virtual machine.
2-3
As you run a guest PC, its thumbnail picture in the Virtual PC window updates dynamically.
VPC Additions and virtual machine integration
A set of software components called “VPC Additions” can be installed on a guest OS. VPC Additions enable host PC and virtual machine integration. (VPC Additions are already installed in disk images provided in Connectix OS Packs.)
This integration takes several forms:
!You can drag and drop files and folders from the host PC desktop to a virtual machine, and vice versa.
!You can copy and paste between applications running in the two environments.
8 |
• • • |
|
• |
Virtual PC 4.0 for Windows User Guide
!You can share a folder or a volume between the host PC and a virtual machine. (You can even share the same folder with multiple guest PCs running at the same time.)
In addition, the clock of the virtual machine is synchronized with the clock of the host PC. (This is especially important when saving or restarting a virtual machine.)
Printing with Virtual PC
Applications running on a virtual machine can print in two ways:
!
!
over a network
through a parallel port on the host PC
For information about printing, see page 42.
Networking with Virtual PC
By default, a virtual machine is set for Shared Networking. This means the virtual machine can share a single network connection transparently with the host PC. If the host PC can access the World Wide Web, then the virtual machine can also access the Web.
Two other networking options are available:
!None—the equivalent of removing the emulated networking card from the virtual machine
!Virtual Switch—an advanced option only available when the host PC is running Windows 2000. One feature of Virtual Switch allows you to send network packets exclusively between virtual machines. You can actually set up a “virtual network” on the host PC and test network protocols without using your real network. (See page 45 for more details.)
NOTE Virtual PC emulates a Digital Equipment Corporation™ (DEC) 21041-based PCI Ethernet card.
Touring Virtual PC
• • • •
9
Help
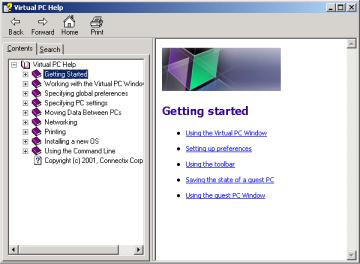
Virtual PC includes Help available on the screen. In the Virtual PC window, on the Help menu, click Virtual PC Help.
2-4
Creating a virtual machine
After you install Virtual PC on the host PC, you create one or more virtual machines. (Virtual PC for Windows ships with one virtual machine running PC-DOS already created.)
You can set up a virtual machine using a prepared boot disk image from a Connectix OS Pack. (See page 15.) This disk image already has an operating system and VPC Additions installed. Alternatively, you can set up a guest PC by creating a disk image and then installing your own copy of an OS on it. (See page 20.)
10 |
• • • |
|
• |
Virtual PC 4.0 for Windows User Guide
C h a p t e r 3
• • • • • • • • • • •
Setting Up Virtual PC
This chapter provides step-by-step instructions for setting up Virtual PC for Windows.
Chapter topics
The topics in this chapter include:
!Installation requirements - page 12
!Installing Virtual PC - page 14
!Registering Virtual PC - page 15
!Creating a virtual machine with a Connectix OS Pack - page 15
!Creating a virtual machine with your own copy of an OS - page 20
!Installing an application on a virtual machine - page 29
!Modifying the settings for a virtual machine - page 30
!Creating a virtual machine with standard settings - page 31
!Duplicating the settings of an existing virtual machine - page 32
Setting Up Virtual PC
• • • •
11
Installation requirements
Before you install Virtual PC for Windows on a host PC, note these requirements:
!Host PC processor
—Athlon, Duron, Celeron, K6-III, Pentium II, Pentium III, or Pentium 4
—266 MHz minimum, 500 MHz recommended
—Level 2 cache required
!Host PC OS
—Windows Me
—Windows 2000 (Service Pack 2 recommended)
—Windows NT 4 with service pack 6
!Host PC Disk space
Use the following table to determine the required disk space on the host PC. The total required disk space is the sum of the disk space required for each virtual machine you create on the host PC.
Virtual Machine OS |
Host PC Disk Space |
|
|
DOS |
50 MB |
|
|
Windows 3.1 |
100 MB |
|
|
Windows 95 |
500 MB |
|
|
Windows 98 |
500 MB |
|
|
Windows Me |
2 GB |
|
|
Windows 2000 Professional |
2 GB |
|
|
Windows 2000 Server |
2 GB |
|
|
Windows 2000 Advanced Server |
2 GB |
|
|
Windows NT 4.0 Workstation |
1 GB |
|
|
Windows NT 4.0 Server |
1 GB |
|
|
Windows NT 4.0 Enterprise |
1 GB |
|
|
Linux |
2 GB |
|
|
12 |
• • • |
|
• |
Virtual PC 4.0 for Windows User Guide
!Host PC RAM
Use the table below to determine the minimum physical RAM required for the host PC. First determine the minimum required RAM for the OS on the host PC (Windows 2000, Windows NT, or Windows Me). Then add the RAM requirement for the virtual machine or machines you intend to run. Additional memory beyond this minimum amounts usually improves performance.
Note that if you are going to run multiple virtual machines simultaneously, you need to add up the RAM requirements for all the virtual machines running.
For example, on a host PC running Windows 2000 Pro with a single guest PC running Windows 95 you need a minimum of 128 MB plus 32 MB (or 160 MB) of host PC RAM. On the same host PC, simultaneously running a second virtual machine with Windows Me installed would require 128 MB plus 32 MB plus 96 MB (or 256 MB) of host PC RAM. If you only intend to run one of these virtual machines at a time on this host PC, you would need a minimum of 128 MB plus 96 MB (or 224 MB) of RAM.
Also note that Virtual PC for Windows ships with a single virtual machine running PC-DOS already set up.
Host PC or Virtual Machine OS |
Minimum Host PC RAM |
|
|
DOS |
32 MB |
|
|
Windows 3.1 |
32 MB |
|
|
Windows 95 |
32 MB |
|
|
Windows 98 |
64 MB |
|
|
Windows Me |
96 MB |
|
|
Windows 2000 Professional |
128 MB |
|
|
Windows 2000 Server |
128 MB |
|
|
Windows 2000 Advanced Server |
192 MB |
|
|
Windows NT 4.0 Workstation |
64 MB |
|
|
Windows NT 4.0 Server |
64 MB |
|
|
Windows NT 4.0 Enterprise |
64 MB |
|
|
Linux |
64 MB |
|
|
Setting Up Virtual PC
• • • •
13
Installing Virtual PC for Windows
To install Virtual PC for Windows, follow these steps:
1Log in to the host PC as an administrator or as a user with administrative privileges.
2If you purchased Virtual PC for Windows online, decompress the file “Virtual PC for Windows.zip.” Then open the extracted folder and double-click the file “Install Virtual PC for Windows.exe.”
If you purchased a Virtual PC for Windows with an installation CD, insert this CD in the CD-ROM drive of the host PC.
This launches the Virtual PC installation program.
3-1
3Click the option to Install/Uninstall Virtual PC 4.0. This launches the InstallShield Wizard.
4Click Next.
5Read the license agreement and click Accept.
6Use the default location for the installation, or change the location, and click Next.
7Select a language for Virtual PC for Windows and click Next.
8Select a Program Folder and click Next.
9Leave the option to restart selected and click Finish.
Virtual PC for Windows is installed on the host PC.
14 |
• • • |
|
• |
Virtual PC 4.0 for Windows User Guide

Registering Virtual PC
If you purchased Virtual PC for Windows with an installation CD, please follow the directions provided to register your product at the Connectix Web site. You must register to receive support.
If you purchased Virtual PC for Windows online, you have already completed the registration process.
Creating a virtual machine with an OS Pack
With Virtual PC installed on the host PC, you can now create a virtual machine using a Connectix OS Pack. (Virtual PC for Windows ships with one virtual machine running PC-DOS already created.)
NOTE To set up a virtual machine with your own copy of an OS, see page 20.
A Connectix OS Pack includes a virtual machine boot disk image with a fully functional OS and VPC Additions installed. To set up a virtual machine using a Connectix OS Pack, follow these steps:
1Follow the instructions provided in the OS Pack and install the Connectix disk image on the host PC.
NOTE The following steps parallel the instructions in the OS Pack for “Creating a New PC (Windows).”
2Start up Virtual PC on your host PC. Click the Start button on the host PC desktop and point to Programs. Then point to the
Connectix Virtual PC submenu and click Virtual PC.
The Virtual PC window appears.
3-2
Setting Up Virtual PC
• • • •
15
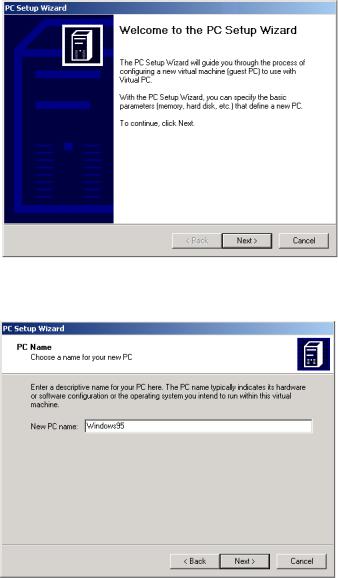
3Click New PC.
The PC Setup Wizard appears.
3-3
4Click Next.
5Type a name for the virtual machine and click Next.
3-4
16 |
• • • |
|
• |
Virtual PC 4.0 for Windows User Guide

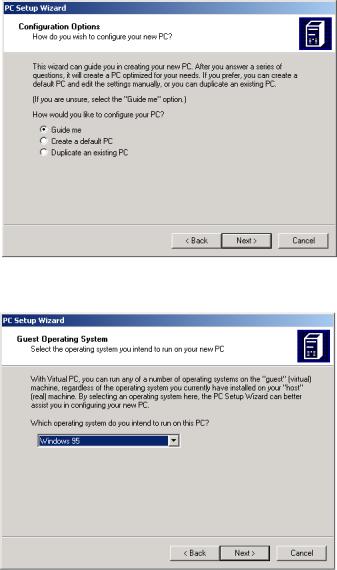
6 Choose the Guide me option and click Next.
3-5
7Use the drop-down menu to choose the operating system installed on the Connectix disk image. Then click Next.
3-6
Setting Up Virtual PC
• • • •
17
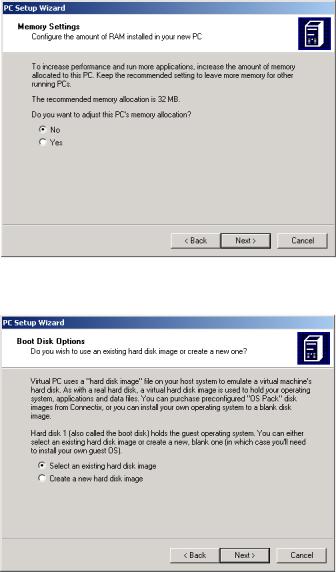
8Click No to keep the recommended memory setting and click Next. (You can always change the memory setting later.)
3-7
9Click the option Select an existing hard disk image and click Next.
3-8
18 |
• • • |
|
• |
Virtual PC 4.0 for Windows User Guide
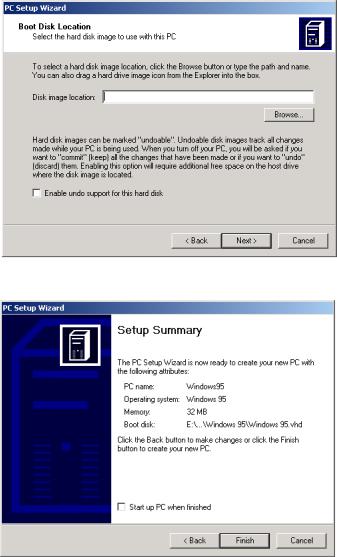
10Click Browse, navigate to the Connectix disk image installed on the host PC, and click Open. To make the disk image undoable, click the option Enable undo support. (See page 55 for more information about this option.) Then click Next.
3-9
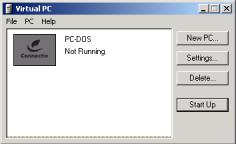
11 Check the information in Setup Summary and click Finish.
3-10
The new virtual machine now appears in the Virtual PC window. To install an application on the new virtual machine, see page 29.
Setting Up Virtual PC
• • • •
19
Creating a virtual machine with a copy of an OS
With Virtual PC installed on the host PC, you can now create a a virtual machine using your own copy of an OS. (Virtual PC for Windows ships with one virtual machine running PC-DOS already created.)
NOTE To create a virtual machine using a Connectix OS Pack, see page 15.
To create a virtual machine running with your own copy of an OS, you
!first create a disk image
!install an OS on this image
!then install VPC Additions (if available for the OS you are using)
Creating a disk image
To create the disk image for the virtual machine, follow these steps:
1Start up Virtual PC on your host PC. Click the Start button and point to Programs. Then point to the Connectix Virtual PC submenu and click Virtual PC.
The Virtual PC window appears.
3-11
20 |
• • • |
|
• |
Virtual PC 4.0 for Windows User Guide

2Click New PC.
The PC Setup Wizard appears.
3-12
3Click Next.
4Type a name for the virtual machine and click Next.
3-13
Setting Up Virtual PC
• • • •
21
5 Choose the Guide me option and click Next.
3-14
6Use the drop-down menu to choose the operating system you plan to install on the disk image. Then click Next.
3-15
22 |
• • • |
|
• |
Virtual PC 4.0 for Windows User Guide
Loading...