

Page 1

NEDERLANDS
Conceptronic CSM3PL
Snelstart handleiding
Hartelijk gefeliciteerd met de aanschaf van uw
Conceptronic CSM3PL.
In de bijgaande Snelstart handleiding wordt stap voor stap uitgelegd hoe u de Conceptronic
Grab‘n’GO 3,5” Media Player met Cardreader kunt gebruiken.
Ingeval van problemen adviseren wij u onze support-site te bezoeken (ga naar:
www.conceptronic.net
u hoogstwaarschijnlijk de oplossing voor uw probleem kunt vinden.
Heeft u andere vragen over uw product die u niet op de website kunt vinden, neem dan contact met
ons op via e-mail: support@conceptronic.net
Voor meer informatie over Conceptronic producten kunt u terecht op de Conceptronic website:
www.conceptronic.net
en klik op ‘Support’). Hier vindt u een database met veelgestelde vragen waar
.
1. Introductie
Voordat u met de bediening van het apparaat begint wordt geadviseerd om deze handleiding
uitvoerig te lezen en te bewaren voor toekomstige naslag.
1.1 Inhoud van de verpakking
Controleer de inhoud van de verpakking voordat u het apparaat aansluit op uw tv of monitor:
• 1x Conceptronic Grab‘n’GO 3,5” Media Player met Cardreader
• 1x Afstandsbediening met batterij
• 1x Spanningsadapter (12V DC, 2.5A)
• 1x Audio/Video kabel (Composiet)
• 1x Audio/Video (Composiet) naar SCART kabel
• 1x S-VIDEO naar S-VIDEO kabel
• 1x SPDIF Optische kabel
• 1x USB kabel
• 1x Meertalige Snelstart Handleiding
• 1x Standaard voor CSM3PL
1.2 Mogelijkheden
• Schakelt automatisch tussen PC en Media Speler optie:
Aangesloten op de PC werkt het apparaat als Massa-Opslag Apparaat.
Aangesloten op de TV/Monitor werkt het apparaat als Media Speler.
In PC stand:
• Plug-n-Play ondersteuning.
• Compatible met High Speed USB 2.0/1.1, 480Mb/s maximale data doorvoersnelheid.
1
Page 2

NEDERLANDS
In Media Speler stand:
• Ondersteuning voor Interne HDD, USB Apparaten en geheugenkaarten.
• Ondersteuning voor meerdere talen:
Engels, Nederlands, Spaans, Frans, Italiaans, Duits en Portugees.
• Ondersteuning voor meerdere partities.
• Voorbeeld van de aanwezige Media bestanden.
• Ondersteuning voor ondertiteling (.SMI/.SRT/.SUB/.SSA) voor MPEG4 (AVI), D1 resolutie.
• Ondersteuning voor AVI (MPEG4), MPG (MPEG1, MPEG2), DAT (VCD), VOB (DVD), WAV, WMA,
MP3, JPG.
• Ondersteuning voor diverse Codecs. Zie de website voor een lijst met ondersteunde Codecs.
• Uitgangen: Composiet video/Component video/RCA audio/Optical audio/VGA/S-video.
• Ondersteuning voor PAL/NTSC.
• Verschillende herhaalstanden mogelijk.
• Bestandsbewerking mogelijk (DELETE/RENAME/NEW FOLDER/PROPERTIES).
• Ingebouwde schermbeveiliging.
• Foto’s bekijken op verschillende manieren:
Slide show (foto’s achter elkaar laten zien) met achtergrondmuziek.
14 overgangsmogelijkeden; overgangs tussentijd instelbaar.
Zoom, rotatie, verplaats-functies.
• Aanwezige bestanden kunnen gesorteerd worden op naam/grootte/tijd/type.
1.3 Waarschuwingen
• Probeer de bijgeleverde spanningsadapter niet open te maken. De hoge spanning van de
adapter kan verwondingen veroorzaken. Indien de adapter defect is, neem dan contact op
met uw dealer of de helpdesk van Conceptronic.
• Houd het apparaat weg bij vuil en stof.
• Stel het apparaat niet bloot aan water of andere vloeistoffen.
• Als u het apparaat voor een langere tijd niet gebruikt, koppel deze dan los van de
stroomaansluiting.
• Vermijd het gebruik van het apparaat in een brandbare omgeving.
• Vervang de batterij van de afstandsbediening voor een batterij van hetzelfde type als deze
zwak of leeg is. Zorg voor een veilige manier om de batterijen af te voeren. Indien mogelijk,
recycle de batterijen. Om corrosie te voorkomen dient u de batterij uit de afstandsbediening
te verwijderen als deze langere tijd niet gebruikt wordt.
• Houd de afstandsbediening weg bij vocht; laat de afstandsbediening niet vallen.
• Gebruik de afstandsbediening niet bij intens zonlicht.
• NOOIT het apparaat schudden, laten vallen of tegen het apparaat stoten.
• Om oververhitting tegen te gaan dient u het apparaat niet af te dekken.
• De CSM3PL ondersteunt alleen het FAT / FAT32 bestandssysteem (NTFS wordt niet
ondersteund).
Let op:
Als u de harde schijf formatteert met het NTFS bestands-systeem zal het apparaat
alleen maar functioneren als Verwisselbare Schijf op uw computer. Formatteer de
schijf volgens FAT32 om gebruik te kunnen maken van de Media Speler mogelijkheid!
• De data op de interne Harde Schijf of op 1 van de aangesloten apparaten kan gefragmenteerd
zijn. Dit kan het afspelen beinvloeden. Het wordt geadviseerd om de interne Harde Schijf
en/of de aangesloten apparaten nu en dan te defragmenteren.
2
Page 3
NEDERLANDS
2. Functies van de Grab’n’GO 3,5” Media Player met Cardreader
2.1 Uitleg van de CSM3PL
•
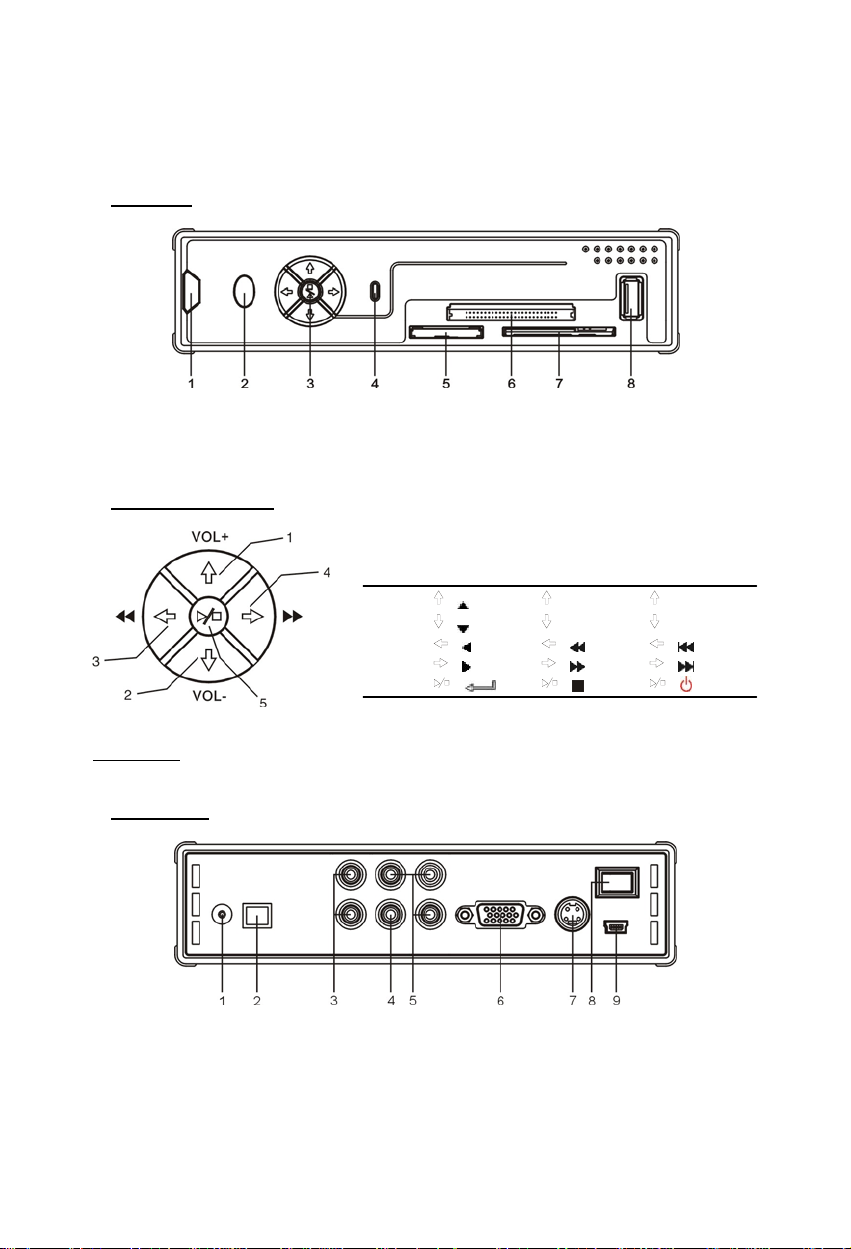
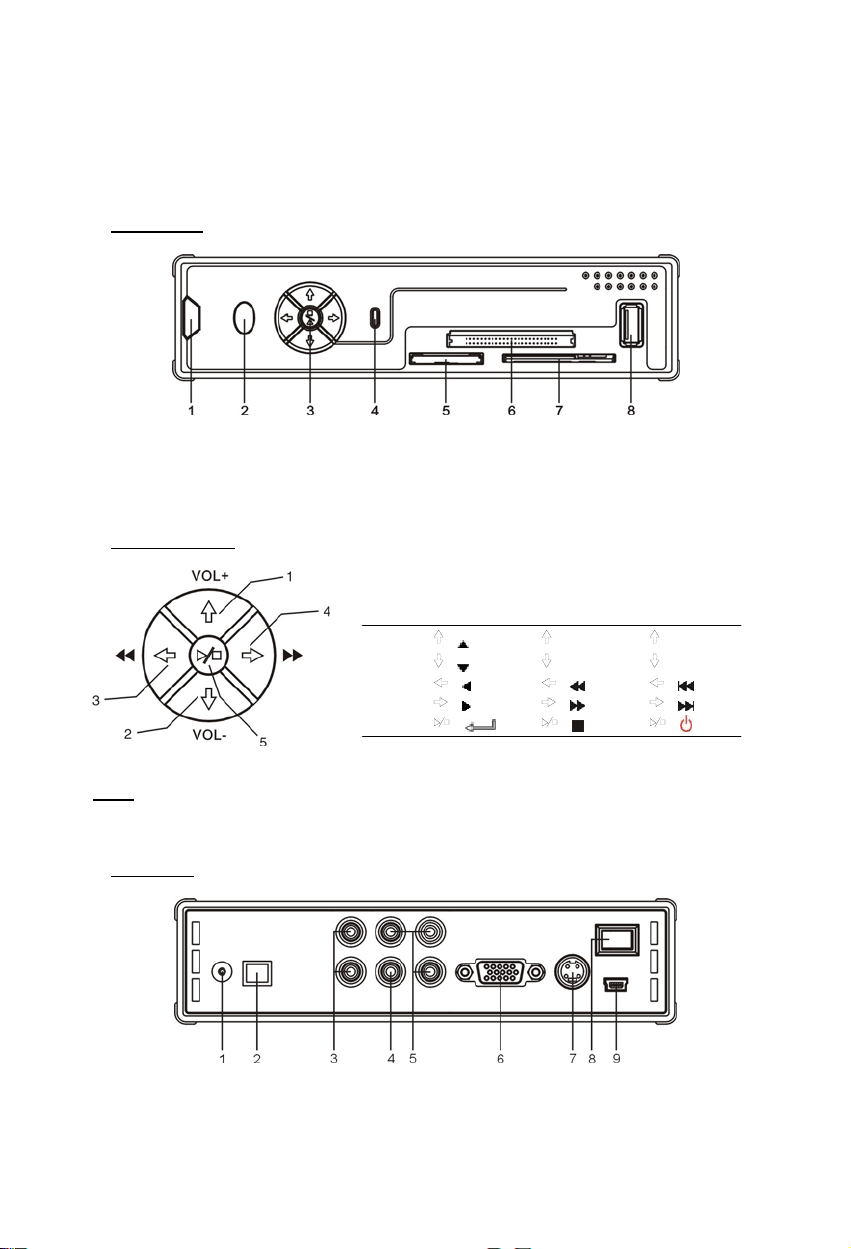
Voorzijde
1. Ontvanger voor Afstandsbediening 4. HDD LED 7. SM Kaart Slot
2. Spannings-Indicatie LED 5. MMC/MS/SD kaart Slot 8. USB HOST Aansluiting
3. Bedieningsknoppen 6. CF Kaart Slot
• Bedieningsknoppen
Nr.
Stop stand Speel stand
1
2
3
4
5
Opmerking:
•
Achterzijde
De functies van de bedieningsknoppen zijn hetzelfde als de functies op de
afstandsbediening. Voor informatie over elke knop, zie hoofdstuk 4.
Kort indrukken
( ) (VOL+) (P/N)
( ) (VOL-) (OUTPUT)
( ) ( ) ( )
( ) ( ) ( )
( ) ( ) ( )
Lang indrukken
1. Aansluiting Adapter 4. Composiet Video Uitgang 7. S-VIDEO Uitgang
2. Optische Uitgang 5. Component Video Uitgang 8. Aan-Uit Schakelaar
3. Geluidsuitgang 6. VGA Uitgang 9. USB Aansluiting
3
(Voor PC Connectie)
Page 4

NEDERLANDS
3. De Grab‘n’GO 3,5” Media Player met Cardreader aansluiten
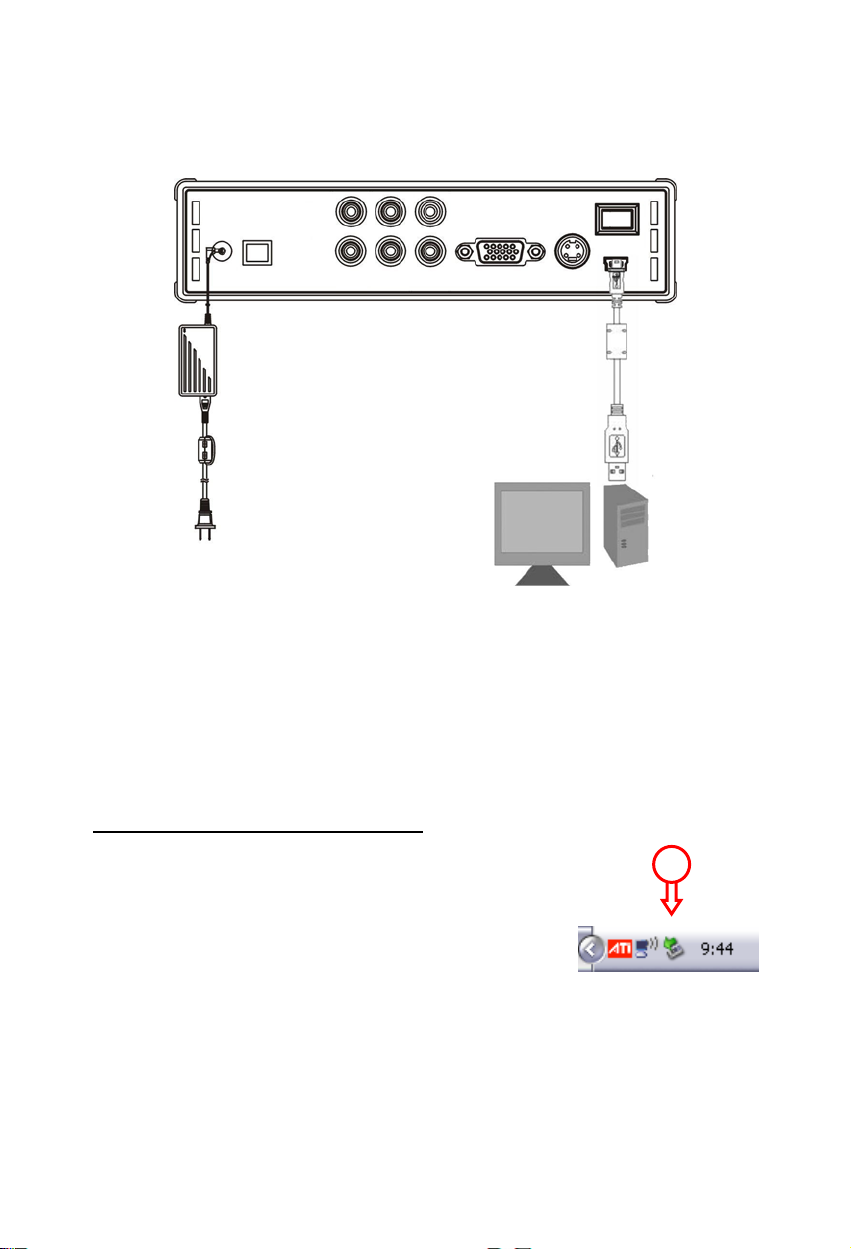
3.1 Verbinden met de computer
1. Zet uw computer aan.
2. Sluit de spannings-adapter aan op de CSM3PL en een vrij stopcontact.
3. Sluit de USB kabel aan op de CSM3PL en een vrije USB poort op uw computer.
De computer zal de CSM3PL automatisch herkennen en installeren, een stationsletter toewijzen
en gebruiken als Massa-Opslag Apparaat. (De harde schijf is geformatteerd met het FAT32
bestandssysteem).
De CSM3PL kan nu voorzien worden van films, muziek, foto’s, etc.
De CSM3PL ontkoppelen van uw computer
1. Klik op het “Veilig Verwijderen” icoon op de systeembalk.
2. Kies voor “Stop USB Massa-Opslag Apparaat” wanneer deze getoond wordt.
3. Wacht tot het bericht“Veilig Verwijderen” wordt getoond.
4. Koppel de USB kabel los.
1
4
Page 5
NEDERLANDS
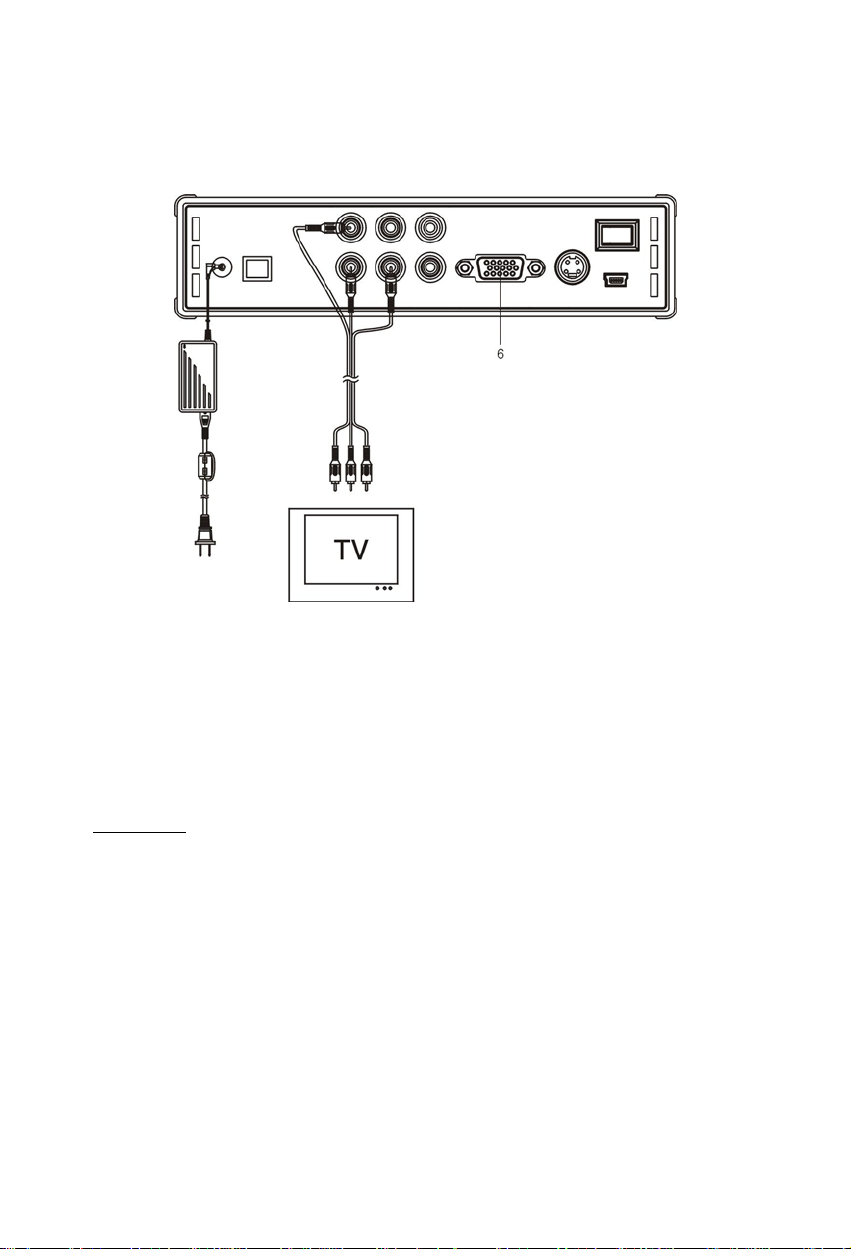
3.2 Verbinden met de TV
Verbindt het apparaat met de TV (zoals hieronder aangegeven)
De 3 RCA connectoren (geel, rood en wit gekleurd) van de AV kabel moeten overeenkomen met
de daarvoor bestemde ingangen van uw TV. Wanneer uw televisie geen Composiet aansluiting
heeft, gebruik dan de meegeleverde SCART naar Composiet/Audio kabel.
Om de Media Speler op een LCD/Plasma TV aan te sluiten kan ook de Component uitgang
gebruikt worden (Kabel niet bijgeleverd). Voor geluid kan tevens gekozen worden voor de SPDIF
Digitale Geluids-uitgang om de Media Speler op uw Versterker / Speakerset aan te sluiten (Kabel
is meegeleverd).
OPMERKING:
De Conceptronic CSM3PL kan gebruikt worden met een TV of monitor. Bij gebruik met een TV
kunt u gebruik maken van de S-VIDEO, Composiet, Composiet naar SCART of Component uitgang
van de CSM3PL. Controleer de handleiding van uw TV voor het selecteren van de juiste ingang
voor de CSM3PL. Als u de CSM3PL in VGA stand gebruikt, dient u op de knop OUTPUT op de
afstandsbediening te drukken om de juiste uitgang te selecteren.
Als u een monitor gebruikt dient u gebruik te maken van een VGA kabel welke verbonden moet
worden met de VGA OUT (6) aansluiting. Druk (een paar keer) op de OUTPUT knop tot de
monitor automatisch aanspringt (Uit de stand-by stand).
Om te kunnen wisselen tussen de verschillende uitgangen van de mediaspeler (VGA, TV, SVIDEO, etc.) dient u op de OUTPUT knop op de afstandsbediening te drukken.
5
Page 6
NEDERLANDS
4. De Afstandsbediening
De afstandsbediening wordt gebruikt om het apparaat te kunnen bedienen. Op de omslag van deze
handleiding vindt u een afbeelding van de afstandsbediening.
De nummers bij de knoppen komen overeen met de nummers in de onderstaande tabel om de
functies van de afstandsbediening uit te leggen.
Nr Knop Beschrijving
1 POWER ( ) Zet apparaat in/uit stand-by stand. (AAN/UIT)
2 R / L Selecteer de audio uitgang: rechts, links en stereo.
3 SLIDE Start de muziek-slideshow stand of stap-voor-stap afspelen.
4 SLOW Langzaam afspelen.
5 REPEAT Selecteer een herhaalstand.
6 DELAY Selecteer de tussentijd tussen 2 foto’s in de Slideshow.
7 TRANS Selecteer een overgangsstand of wijzig de equalizer instellingen.
8
, , , Verplaats de selectie.
9 AUDIO Selecteer / Wijzig geluidsspoor (Bij het afspelen van DVD’s).
10 MENU Toon Apparaatlijst of Bestandslijst (als er maar 1 apparaat is
Keer terug naar het DVD Menu (Bij het afspelen van DVD’s).
11 PLAY/PAUSE Start het afspelen van een bestand of DVD-MAP, of pauzeer het
12 VOL + / - Verhoog/verlaag het volume.
13 PREVIOUS (
24 REWIND (
15 FILE Ververs het FILE menu.
16 MUSIC Directe toegangsknop naar muziek.
17 0 – 9 Muziek kan afgespeeld worden zonder beeld (TV, monitor) door het
18 OUTPUT Selecteer het Video Uitgangssignaal
19 SETUP Open het Setup Menu.
20 PHOTO Directe toegangsknop naar foto’s.
21 VIDEO Directe toegangknop naar video’s.
22 FAST FORWARD (
23 NEXT (
24 STOP (
25 FUNC Laat het bestandsmenu zien.
26 SUB-T Selecteer / Wijzig film-ondertiteling (Bij MPEG4 & het afspelen van
27 ENTER (
28 ZOOM Zoom in / uit (Bij foto’s & het afspelen van DVD’s).
29 ROTATE Draai de foto’s.
30 DISPLAY Geef tijdens het afspelen de bestandsinformatie weer.
31 A – B Speel een geselecteerd stuk herhaald af. Druk 1 maal op de knop om
LET OP: Dit werkt alleen bij films, niet bij muziek!
32 TOP Ga naar de bovenzijde van de bestandslijst
33 P / N Selecteer het video systeem. (PAL / NTSC)
34 MUTE Dempen in- of uitschakelen.
) Ga naar het vorige bestand / hoofdstuk of ga naar de vorige pagina.
) Snel terugspoelen.
) Ga naar het volgende bestand / hoofdstuk of ga naar de volgende
) Stop het afspelen.
) Bevestig selectie.
aangesloten).
afspelen.
aanmaken van speciale mappen (uitleg verder in de handleiding)
) Snel vooruitspoelen.
pagina.
DVD’s).
het beginpunt <A> in te stellen; druk nogmaals om het eindpunt <B> in
te stellen en af te spelen; druk nogmaals om het spelen af te breken.
6
Page 7
NEDERLANDS
5. Belangrijke informatie
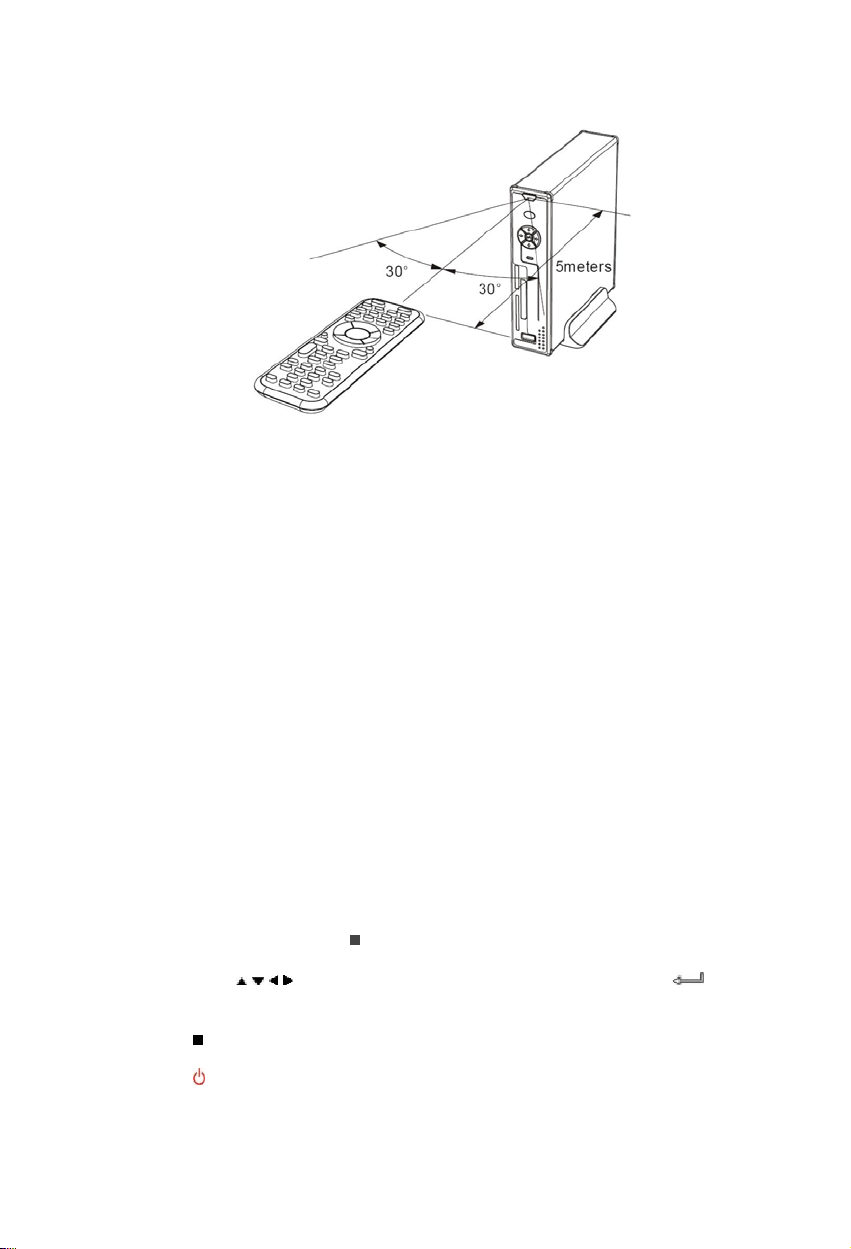
De maximale bedieningsafstand voor de afstandsbediening is ongeveer 5 meter.
1. Richt de afstandsbediening op de voorkant van het apparaat.
De ontvangsthoek is ±30 graden op een afstand van 5 meter.
2. Vervang de batterij als deze zwak of leeg is.
5.1 Standaard bediening
1. Sluit de adapter aan op een stopcontact en vervolgens op de CSM3PL.
2. Zet het apparaat aan met de schakelaar op de achterzijde. De spannings-indicatie LED zal
blauw oplichten. Het apparaat is nu klaar voor gebruik.
Als er geen andere apparaten zijn aangesloten op de CSM3PL wordt de Bestandslijst getoond
(Indien er maar 1 partitie aanwezig is op de Harde Schijf).
Als er een USB apparaat (Bijvoorbeeld een externe harde schijf of USB Stick) of geheugenkaart
is aangesloten op de CSM3PL zal het de CSM3PL een Apparaatlijst tonen met de gevonden
apparaten.
Als het aangesloten apparaat een groot aantal bestanden bevat kan het een korte tijd duren
voordat het apparaat wordt gevonden. Wacht na aansluiting tot de Apparaatlijst /
Bestandslijst getoond wordt op uw scherm.
Notities
• Normaal gesproken is het niet nodig om uw beeldinstelling te wijzigen (PAL/NTSC). Indien uw
TV alleen NTSC of PAL ondersteunt kunt u met de P/N knop op de afstandsbediening de juiste
beeldinstelling kiezen.
• Als “AUTO START” is ingeschakeld (druk op de SETUP knop->SETUP MENU-> PREFERENCES-
>AUTO START->ON), zullen alle bestanden op de aangesloten apparaten automatisch
afgespeeld worden.; Door op de
gestopt en wordt de lijst met bestanden getoond.
• Druk op 1 van de
knop om de selectie te bevestigen (Open de Bestandslijst, open de geselecteerde map of
begin met afspelen van het geselecteerde bestand).
• Druk op de
• Druk op de MENU knop om de Apparaatlijst of Bestandslijst te tonen.
• Druk op de
• Als u het apparaat voor een langere tijd niet gebruikt, koppel deze dan los van de
stroomaansluiting.
/ / / knoppen om de cursor te verplaatsen en gebruik de / ENTER
/ STOP knop om het spelen te stoppen en terug te keren naar de Bestandslijst.
/ POWER knop om stand-by in/uit te schakelen.
/ STOP knop te drukken wordt het automatisch afspelen
7
Page 8

NEDERLANDS
5.2 Uitgebreide bediening
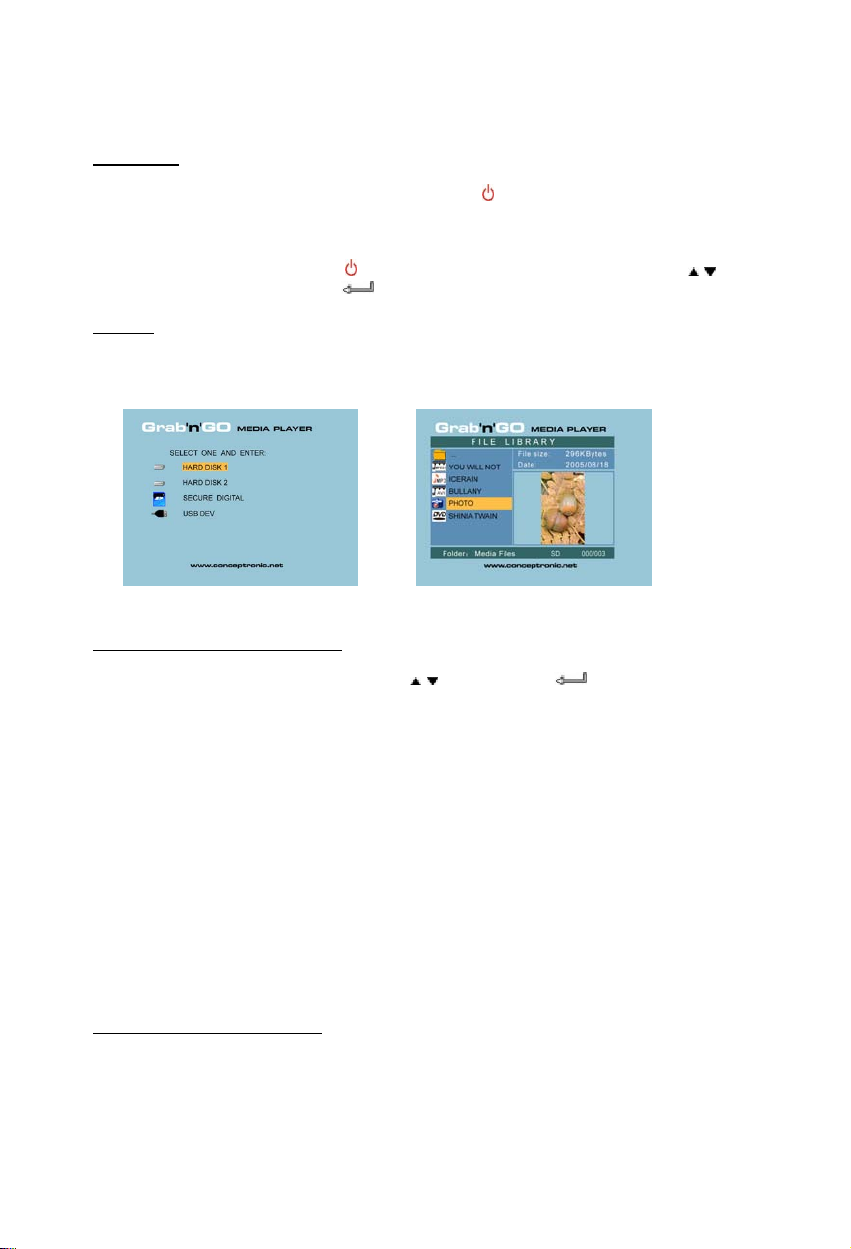
Bestandslijst
Als er geen externe apparaten zijn aangesloten op de CSM3PL (Alleen de interne harde schijf is
aanwezig) zal de Bestandslijst getoond worden op het scherm als de CMED3PLAY met de
POWER knop wordt ingeschakeld.
Als er meerdere apparaten zijn verbonden (USB stick, geheugenkaart,etc.) zal de Apparaatlijst
getoond worden zodra de CSM3PL ingeschakeld wordt. Gebruik de
verplaatsen en druk op de
OPMERKING:
Als u het apparaat aanzet kan het even duren voordat u door het menu kunt navigeren. Voordat
het menu wordt getoond worden de aangesloten apparaten geïndexeerd. Tijdens het indexeren
zult u alleen het Conceptronic Logo zien op uw TV.
/ ENTER knop om de Bestandslijst te openen.
/ knoppen om de cursor te
/
APPARAAT LIJST BESTANDSLIJST
Wisselen tussen de aangesloten apparaten:
Als er meerdere apparaten aangesloten zijn op de CSM3PL kunt u tussen deze apparaten wisselen
met behulp van de MENU knop, welke u terugbrengt naar de Apparaatlijst. Selecteer een
apparaat met de
/ knoppen en druk op de / ENTER knop.
6. Films, muziek en foto instellingen
Er zijn 3 hoofdfuncties aanwezig voor de Conceptronic CSM3PL
- Het afspelen en bekijken van films
Het afspelen en beluisteren van muziek
-
Het afspelen en bekijken van foto’s
-
6.1 Opties bij het afspelen en bekijken van films
Films afspelen
De CSM3PL ondersteunt diverse video formaten: MPEG2/1, MPEG 4 inclusief (XVID, VOB formaat)
inclusief ondersteuning voor het afspelen van MP3, AC3, AAC en MPG1/2 geluidssporen binnen
een videobestand).
Extra opties bij het afspelen van films
Ondersteuning voor het afspelen van MPEG4 video met ondertiteling:
De Conceptronic CSM3PL heeft ondersteuning voor .SMI, .SRT, .SUB en .SSA
ondertitelingsbestanden.
8
Page 9

NEDERLANDS
Als het ondertitelings bestand dezelfde bestandsnaam heeft als de film (met uitzondering van de
extensie), wordt de ondertiteling automatisch geladen als u het MPEG4 bestand afspeelt.
Als het ondertitelings bestand een andere bestandsnaam heeft dan de film die u wilt afspelen,
dient u het ondertitelings bestand te selecteren en vervolgens op SUB-T knop op de
afstandsbediening te drukken. Vervolgens selecteert u de film die u wilt afspelen en drukt u op
de
/ ENTER knop om de film af te spelen. De 2 bestanden worden nu aan elkaar gekoppeld
en de film zal met ondertiteling worden vertoond.
Herhaald afspelen
Om een gedeelte van een film herhaald af te spelen, druk op A/B.
Geluidskanalen
Druk op de R/L knop op de afstandsbediening om te kiezen tussen het volgende geluid: Mono
Links, Mono Rechts of Stereo Geluid
Sommige MPEG2/VOB bestanden bevatten meerdere geluidssporen. Door op de AUDIO knop op
de afstandsbediening te drukken kunt u wisselen tussen deze geluidssporen (1-1/8~1-8/8/, 21/8~2-8/8, 3-1/8~3-8/8) (totaal 24 geluidssporen). Als de afgespeelde film geen geluid bevat,
druk dan op de AUDIO knop om het juiste geluidsspoor te vinden.
Als u wisselt tussen MPEG2/VOB bestanden kunt u het geluid kwijtraken als dit op een ander
geluidsspoor zit. Om dit te voorkomen kunt u het geluid vastzetten. Druk tijdens het afspelen
van de film op de SETUP knop om het geluidsspoor vast te zetten. Deze optie houdt vervolgens
het geluidsspoor vast voor alle MPEG2/VOB bestanden.
Afspelen van films
Tijdens het afspelen van films kunt u met de SLIDE knop de film stap voor stap afspelen. In de
Foto stand van de mediaspeler worden de foto’s achter elkaar weergegeven met de SLIDE knop.
Tijdens het afspelen van films kunt u door de film spoelen met de
vervolgens op de ENTER/
Directe toegangsknop naar de “video” map
U kunt 1 video map aanmaken, welke direct benaderd kan worden door te drukken op VIDEOknop op de afstandsbediening. Maak een map genaamd ”VIDEO ***” (Waar *** verandert kan
worden naar wat u zelf wilt) in de root van de harde schijf en plaats video bestanden in deze
map. Wanneer de media speler gestart is en de VIDEO-knop wordt ingedrukt, dan wordt de map
automatisch geopend.
OPMERKING:
Wanneer u meer dan 1 map aanmaakt welke begint met “VIDEO ***”, zal het apparaat alleen de
eerste map openen.
OPMERKING:
De meeste Video Codec’s worden ondersteund door de CSM3PL (Zoals XviD, AVI, MPEG2, etc.)
maar de mogelijkheid bestaat dat een bestand een andere Codec vereist, welke niet wordt
ondersteund door de CSM3PL. Als u een bestand probeert af te spelen welke niet ondersteund
wordt zult u de melding “CODEC NOT SUPPORTED” zien op uw scherm.
knop om het normale afspelen te voort te zetten.
/ knoppen. Druk
9
Page 10
NEDERLANDS
DVD’s afspelen
De CSM3PL kan DVD’s van de harde schijf afspelen alsof het een normale DVD is. U kunt gebruik
maken van het DVD Menu, de ondertiteling of speektaal wijzigen, etc.
Mappenstructuur aanmaken
Voor het afspelen van DVD’s op de CSM3PL dient de mappenstructuur correct te zijn
aangemaakt.
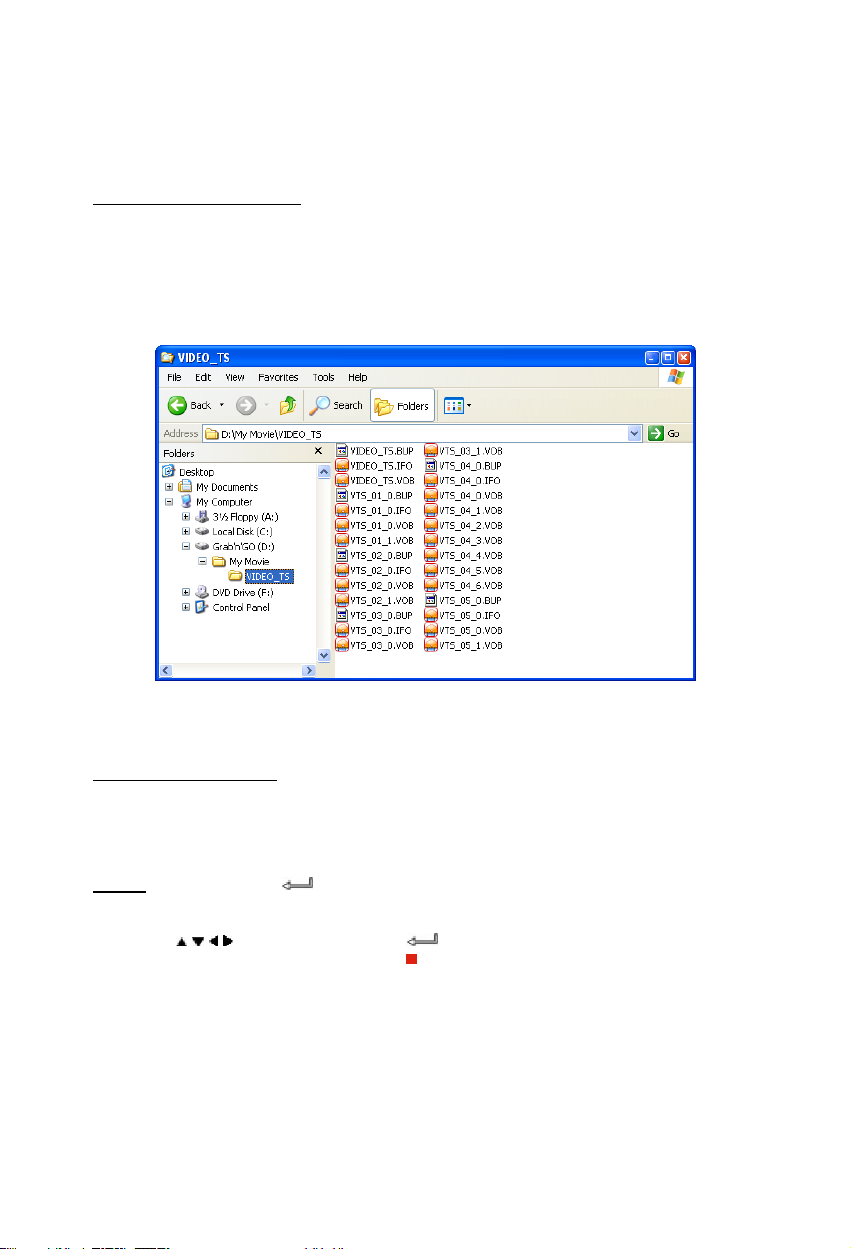
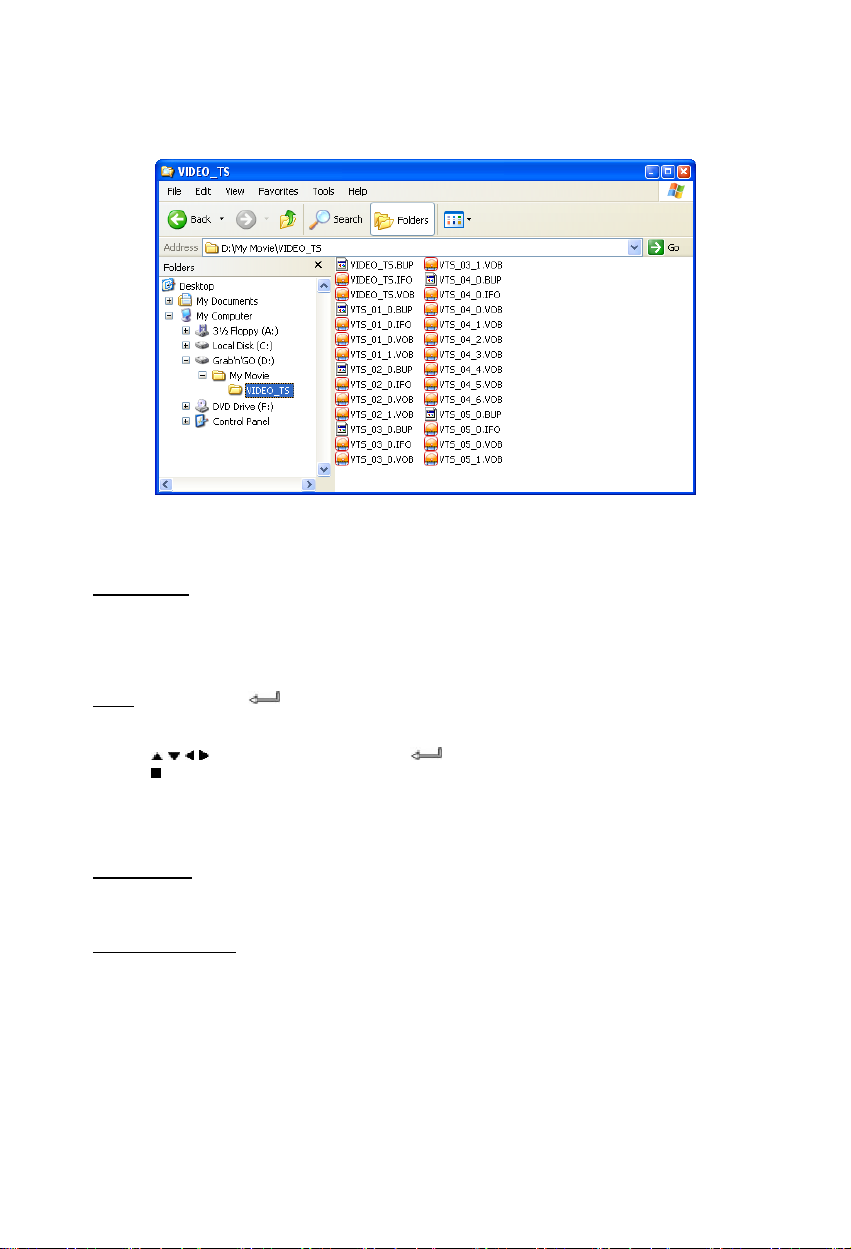
Creëer een map op de CSM3PL schijf met de naam van de DVD (bijv. “My Movie”)
Kopieer de VIDEO_TS map van de DVD naar de aangemaakte map op de CSM3PL schijf. Als het
kopieren is voltooid zal de inhoud er ongeveer uitzien als onderstaand voorbeeld:
Verbreek de verbinding tussen de CSM3PL en de computer en sluit het apparaat aan op uw TV.
Zet de CSM3PL aan.
Het afspelen van de DVD
Gebruik de navigatietoetsen op de afstandsbediening om de aangemaakte DVD map te selecteren
(In het voorbeeld: “My Movie”). Druk op de PLAY/PAUSE toets van de afstandsbediening om het
afspelen van de DVD te starten.
Let op:
Gebruik niet de / ENTER knop om te starten. Hierdoor wordt alleen de inhoud
Gebruik de
DVD menu te kunnen bedienen. Druk op de
beëindigen.
van de map getoond en niet de inhoud van de DVD afgespeeld.
/ / / navigatietoetsen en de / ENTER knop op de afstandsbediening om het
/ STOP knop om het afspelen van de DVD te
10
Page 11

NEDERLANDS
6.2 Opties bij het afspelen en beluisteren van muziek
Muziek afspelen
De Conceptronic CSM3PL heeft verschillende mogelijkheden om muziek af te spelen. (WAV, MP3
en WMA worden ondersteund)
Het afspelen van muziek:
Druk op MENU en kies de map met muziek die u wilt afspelen. Tijdens het afspelen zal de titel
van het nummer getoond worden en kunt u de Equalizer wijzigen (Met de TRANS knop).
Het is mogelijk om een nummer of map herhaald af te spelen:
Random: Speelt de geselecteerde map in random volgorde af.
Shuffle: Speelt de geselecteerde map in shuffle volgorde af.
Single: Speelt alleen het geselecteerde nummer af.
Folder: Speelt alleen de actieve map af.
REP-one: Herhaalt het geselecteerde nummer totdat dit gestopt wordt.
Folder repeat: Herhaalt de actieve map totdat dit gestopt wordt.
Tijdens het afspelen van muziekbestanden kunt u de
afspeelsnelheid te wijzigen. Druk vervolgens op de PLAY/PAUSE knop om terug te keren naar de
normale snelheid.
Muziekmappen met submappen afspelen
U kunt muziekmappen inclusief de submappen afspelen via de MUSIC knop op de
afstandsbediening. Gebruik de navigatietoetsen op de afstandsbediening om de map met muziek
te selecteren. Druk vervolgens op de MUSIC knop op de afstandsbediening om automatisch een
muzieklijst te genereren van alle muziekbestanden in de geselecteerde map en submappen.
Let op:
Als u op de / ENTER knop drukt in plaats van de MUSIC knop, zal de map geopend
Instellen van de map “MUSICDIR” voor snelle toegang
Om uw CSM3PL geschikt te maken voor het automatische afspelen van muziek, moet je een
special map aanmaken wanneer de CSM3PL verbonden is met uw computer.
1) Maak de map ”MUSICDIR” aan in de root van de eerste partitie.
2) Maak een sub-map aan aangeduid met drie digits, bijvoorbeeld, “001”, “002”, “003”, etc.
(Maximaal tot “999”).
3) Kopieer muziek bestanden naar deze map
Om de voorgedefinieerde muziekmap te gebruiken met een scherm aangesloten, volg de
volgende stappen als het apparaat operationeel is:
1) Geef de eerste digits van de map in en wacht totdat het volgende bericht op het scherm
verschijnt: “AUTO PLAY: MP3 -> ___”
2) Geef de andere 2 digits van de submap welke afgespeeld moet worden.
/ knoppen gebruiken om de
worden in plaats van afgespeeld worden.
11
Page 12

NEDERLANDS
Het is ook mogelijk om muziek af te spelen uit de voor gedefinieerde mappen, wanneer het
scherm uit is. We adviseren alleen mappen 000 – 009 te gebruiken voor dit onderdeel. Om
muziek uit deze mappen af te spleen, geef de digit van de map (0 – 9) en druk op de
PLAY/PAUSE knop. De muziek zal automatisch starten met spelen.
Opmerking:
De tijd tussen het invoeren van de eerste digit en de melding op je scherm kan toenemen,
wanneer er meer data op de hardeschijf staat.
6.3 Opties bij het afspelen en bekijken van foto’s
Als u foto’s aan het bekijken bent kunt u de ROTATE knop gebruiken om de foto’s te draaien.
Standaard wordt deze instelling per foto onthouden tot u het apparaat uitzet. Als u geen gebruik
wilt maken van het opslaan van deze informatie kunt u dit uitschakelen via SETUP MENU->
GENERAL SETUP-> ORIENTATION->OFF.
Tijdens het bekijken van foto’s kunt u op de TRANS knop drukken om de overgang tussen de
foto’s te wijzigen. De standaard overgangsinstelling kan ingesteld worden via SETUP MENU>SLIDESHOW SETUP->TRANSITION.
MODE 01: FULL SCREEN
MODE 02: RANDOM
MODE 03: ROLL: TOP TO BOTTOM
MODE 04: ROLL: BOTTOM TO TOP
MODE 05: ROLL: TOP/BOTTOM TO CENTER
MODE 06: ROLL: CENTER TO TOP/BOTTOM
MODE 07: BLIND: TOP TO BOTTOM
MODE 08: ROLL: LEFT TO RIGHT
MODE 09: ROLL: RIGHT TO LEFT
MODE 10: ROLL: LEFT/RIGHT TO CENTER
MODE 11: ROLL: CENTER TO LEFT/RIGHT
MODE 12: ROLL: IMPLODE
MODE 13: BLIND: LEFT TO RIGHT
MODE 14: CROSS FADE
Foto’s Inzoomen
Druk op de ZOOM knop om ZOOM mode in of uit te schakelen, of om de ZOOM factor te wijzigen.
Als een foto is vergroot kunt u met de
/ / / knoppen uw foto bekijken.
Muziek Slide-show (het bekijken van foto’s met achtergrondmuziek)
Selecteer de beginfoto en druk op SLIDE om te starten.
Als er geen muziek beschikbaar is in de foto map zal de SLIDE functie niet werken. U dient op de
/ ENTER knop te drukken om een slideshow zonder muziek te starten. Als u niet op de
‘SLIDE’ knop drukt zal een slideshow zonder muziek getoond worden.
In de SLIDE stand kunnen alleen foto’s en muziek afgespeeld worden als deze in dezelfde map
staan.
NOTE:
In de SLIDE stand zijn de functies ROTATE/ZOOM niet beschikbaar.
U kunt het bekijken van foto’s pauzeren door op de PLAY/PAUSE knop te drukken (de muziek zal
doorspelen). Druk nogmaals op PLAY/PAUSE om ook de muziek stop te zetten. Druk op de
PLAY/PAUSE knop om het afspelen te hervatten. U kunt de tussentijd tussen 2 foto’s instellen
met de DELAY knop. De standaard tussentijd kan ingesteld worden via SETUP MENU>PREFERENCES-> DELAY. Druk op de TRANS knop om de overgang van de foto’s te kunnen
wijzigen. Druk op de REPEAT knop om de foto’s in de map herhaald te laten zien.
12
Page 13
NEDERLANDS
Directe toegangsknop naar de “photo” map:
U kunt 1 fotomap aanmaken, welke direct benaderd kan worden door te drukken op de PHOTO
knop op uw afstandsbediening. Maak een map genaamd “PHOTO ***” (Waar *** verandert kan
worden naar wat u zelf wilt) in de root van de harde schijf en plaats fotobestanden in deze map.
Wanneer de media speler gestart is en de PHOTO-knop wordt ingedrukt, dan wordt de map
automatisch geopend.
OPMERKING:
Wanneer u meer dan 1 map aanmaakt welke begint met “PHOTO ***”, zal het apparaat alleen de
eerste map openen.
6.4 Opties in de bestandslijst
Gebruik de / knoppen om een bestand of map te selecteren;de / (PREV/NEXT)
knoppen kunnen gebruikt worden om naar de volgende/vorige pagina te gaan. Als een foto of
film is geselecteerd zal een voorbeeld met informatie getoond worden aan de rechterkant van
het scherm. Als een muziekbestand is geselecteerd zal de muziek beginnen met afspelen en
wordt de informatie getoond aan de rechterkant van het scherm.
Druk op de TOP knop om de selectie direct naar de bovenkant van de map te verplaatsen om
makkelijk naar een andere map te navigeren.
Druk op de
afspelen van muziekbestanden zal de muziek equalizer worden weergegeven). Druk op de
STOP knop om terug te keren uit het volledige scherm.
Druk op de REPEAT knop om een herhalings-stand in te schakelen. De volgende keuzes zijn
mogelijk: RANDOM/SHUFFLE/SINGLE/FOLDER/REP-ONE/FOLDER REPEAT.
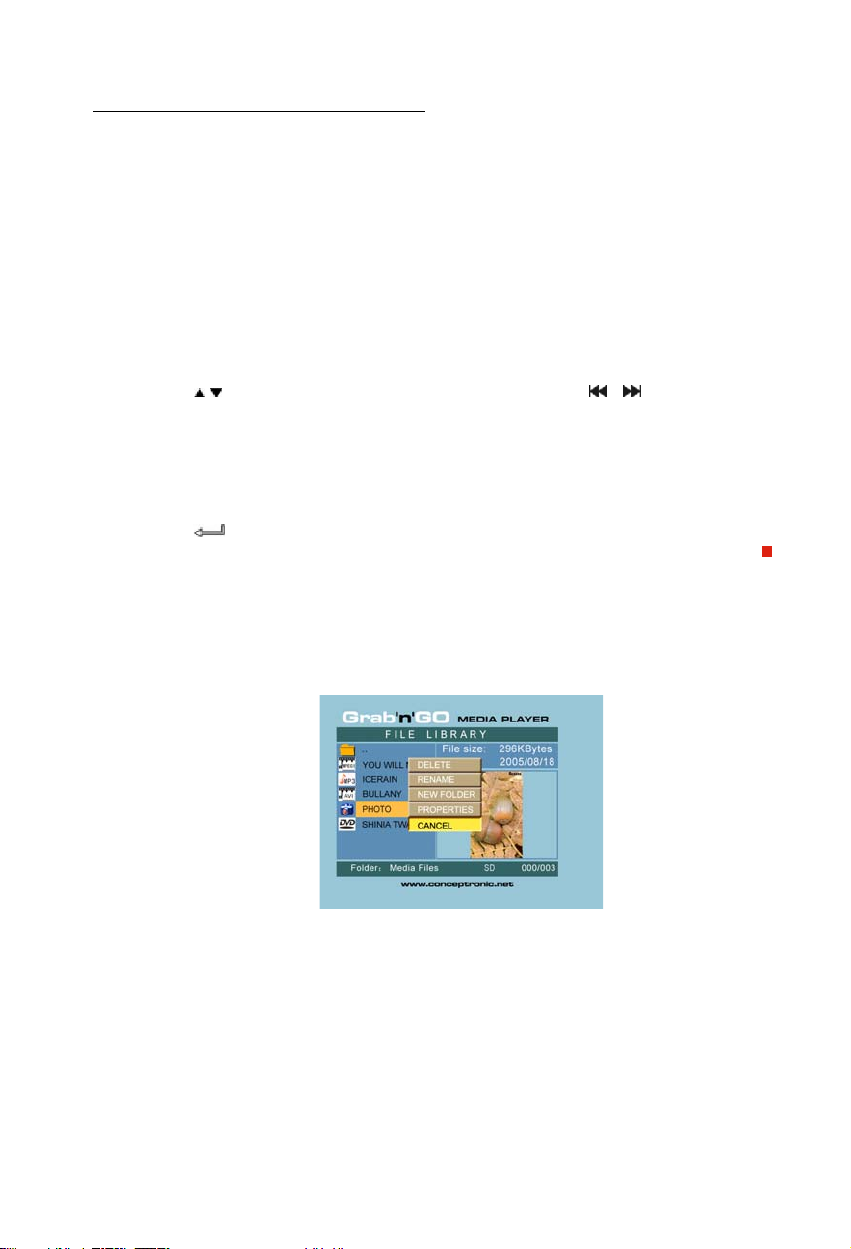
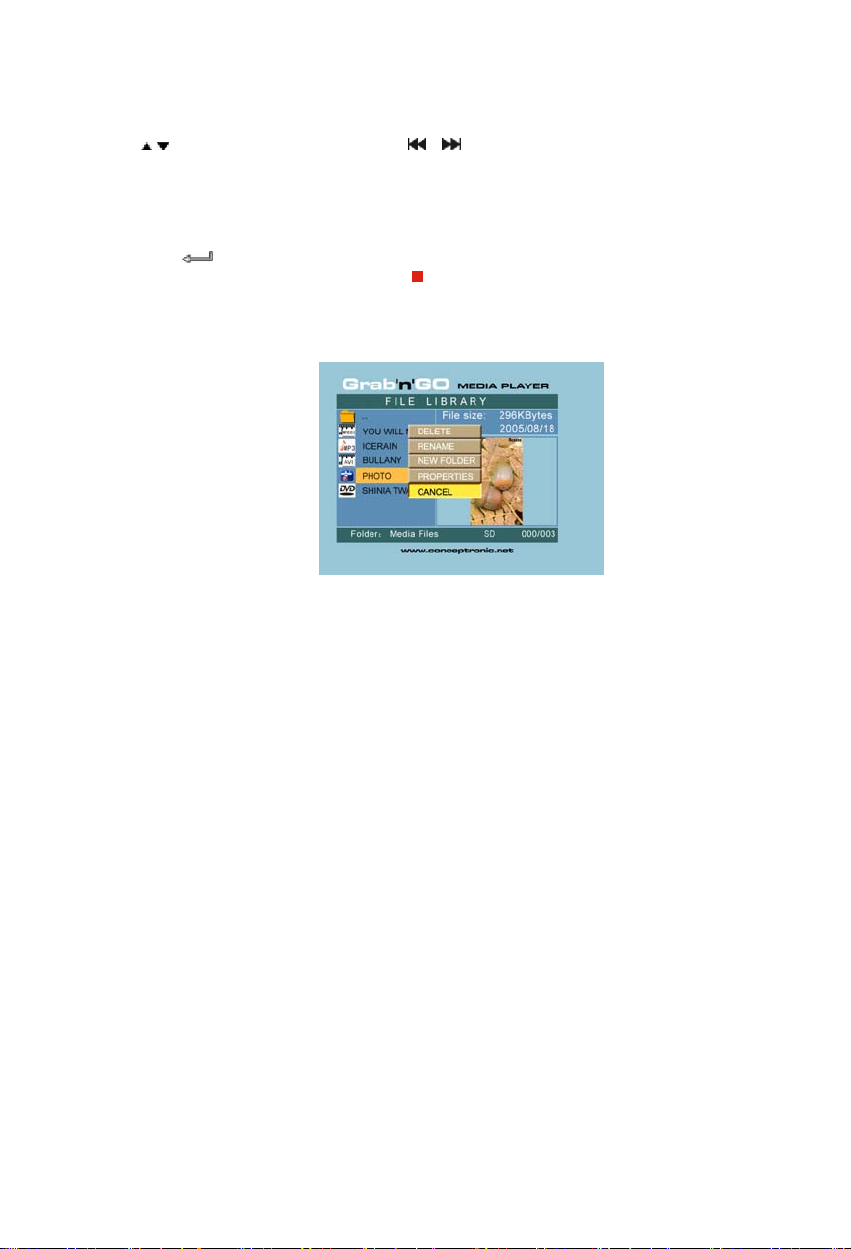
Als het apparaat in STOP stand staat kunt u de FUNC knop gebruiken om een menu te openen
met de volgende opties:
/ ENTER knop om een foto of film in volledig scherm te openen (bij het
/
DELETE: Verwijder de geselecteerde map of bestand.
RENAME: Hernoem de geselecteerde map of bestand.
NEW FOLDER: Maak een nieuwe map aan.
PROPERTIES: geef de bestandsinformatie weer, zoals grootte, datum en bestandsformaat.
13
Page 14
NEDERLANDS
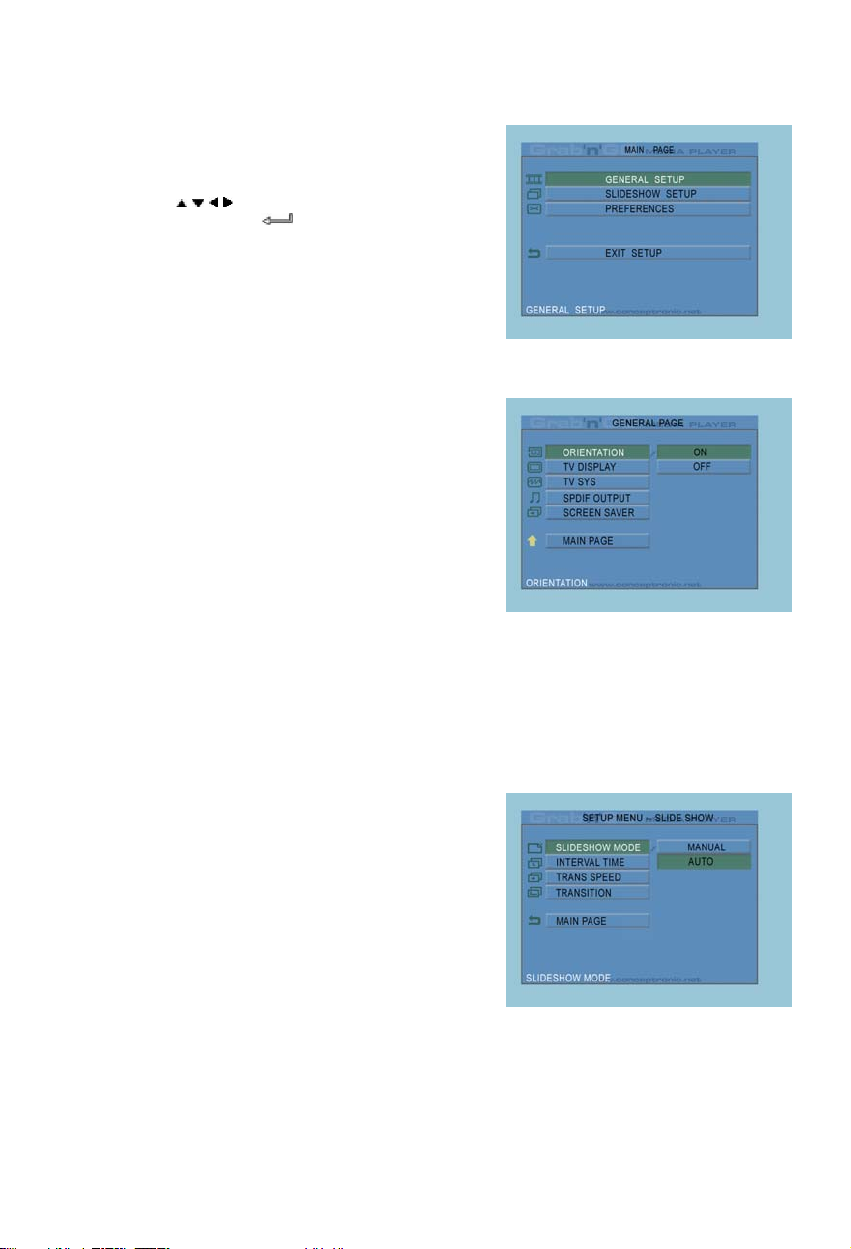
7. Setup Menu
Als het apparaat in STOP stand staat kunt u op de
SETUP knop drukken om het SETUP Menu te openen.
Gebruik de
wijzigen en druk op de
selectie te bevestigen.
Druk op de SETUP knop om het setup menu te
verlaten.
/ / / knoppen om de selectie te
/ ENTER knop om de
7.1 Algemene Setup (General setup)
• ORIENTATION: Onthoudt rotatie informatie.
Mogelijkheden: ON, OFF
Standaard: ON
• TV DISPLAY
Mogelijkheden: NORMAL/PS, NORMAL/LB, WIDE
Standaard: NORMAL/PS
• TV SYS: Selecteer een beeldinstelling.
Mogelijkheden: MULTI. SYSTEM, NTSC, PAL
Standaard: MULTI. SYSTEM
• SPDIF OUTPUT
Mogelijkheden: OFF, SPDIF/RAW, SPDIF/PCM
Standaard: OFF
• SCREEN SAVER: start de schermbeveiliging; de
schermbeveiliging zal verschijnen als het apparaat
een paar minuten niet gebruikt wordt.
Deze screensaver zal voorkomen dat uw scherm wordt beschadigd.
Mogelijkheden: ON, OFF
Standaard: ON
7.2 Dia show (Slideshow setup)
• SLIDESHOW MODE
Mogelijkheden: MANUAL; AUTO
Standaard: AUTO
• INTERVAL TIME: Selecteer de
tussentijd tussen 2 foto's.
Mogelijkheden: ONE SECOND, THREE
SECONDS, FIVE SECONDS,
TEN SECONDS
Standaard: THREE SECONDS
• TRANS SPEED
Mogelijkheden: FAST, SLOW
Standaard: FAST
• TRANSITION
Mogelijkheden: FULL SCREEN, RANDOM, TOP– >BOTTOM, BOTTOM– >TOP, T/B– >CENTER,
CENTER– >T/B, BLIND: T– >B, LEFT– >RIGHT, RIGHT– >LEFT, L/R– >CENTER, CENTER– >L/R,
IMPLODE, BLIND: L– >R, CROSS FADE
Standaard: RANDOM
14
Page 15
NEDERLANDS
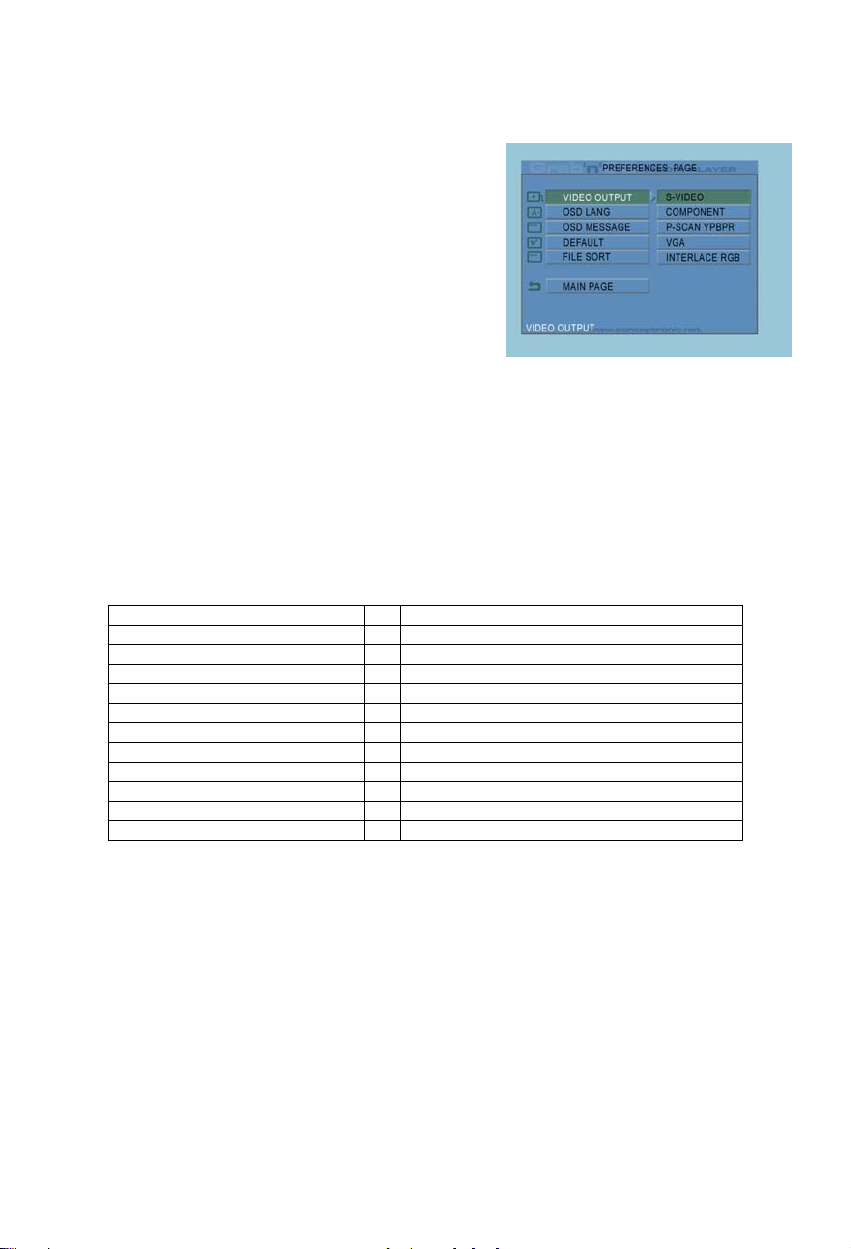
7.3 Voorkeuren (Preferences)
• VIDEO OUTPUT: Selecteer een video uitgang.
Mogelijkheden: S-VIDEO, COMPONENT,P-SCAN
YPBPR, VGA en INTERLACE RGB.
• OSD LANG: Selecteer een OSD taal.
Mogelijkheden: ENGLISH, FRENCH,
GERMAN, ITALIAN, PORTUGESE,
SPANISH, DUTCH
Standaard: ENGLISH
• OSD MESSAGE: Selecteer of OSD
Berichten worden weergegeven tijdens het
afspelen van een bestand.
Mogelijkheden: ON, OFF
Standaard: ON
• DEFAULT: gebruik de standaard fabrieksinstellingen.
• AUTO START: Speel de bestanden op de aangesloten apparaten automatisch af.
Mogelijkheden: ON; OFF
Standaard: OFF
• FILE SORT: Selecteer de sorteerstand van de bestanden op de aangesloten apparaten.
Mogelijkheden: BY NAME; BY SIZE; BY TIME; BY TYPE
Standaard: BY NAME
8. Specificaties
Spanning : 100~240VAC, 50/60HZ
Spannings-Verbruik : 11W (typical)
Afmetingen : 177×163×44 (T×B×H mm)
Kleur Systeem : PAL/NTSC
Reactie Frequentie : ±3dB(20HZ~20KHZ)
Signaal/Ruis Verhouding : ≥80dB
Audio Cross talk : ≥70dB
Audio Uitgang : 2,0±0,2V(rms)
Video Uitgang : 1,0±0,2Vp-p, 75Ω
USB Data Doorvoersnelheid : USB 2.0, Max. 480Mb/s
Bestands-ondersteuning : AVI/MPG/DAT/VOB/WAV/MP3/WMA/JPG
Ondersteund Bestandssysteem : FAT32
Specificaties kunnen veranderen zonder voorafgaande melding hiervan.
15
Page 16

NEDERLANDS
9. Tips & Problemen oplossen
Gebruik de onderstaande opties om problemen met de CSM3PL op te lossen als deze niet correct
functioneert:
De Spanningsindicatie LED brandt niet.
• De spanningsadapter is niet verbonden met de CSM3PL. Sluit de spanningsadapter aan op de CSM3PL.
Er is geen activiteit op het scherm.
• De CSM3PL staat in stand-by stand. Druk op de knop op de afstandsbediening om het apparaat in
te schakelen.
• De verkeerde ingang op uw TV is geselecteerd. Selecteer de correcte ingang.
• Het verkeerde video systeem is geselecteerd. Druk op de VGA knop op de afstandsbediening om het
correcte videosysteem te selecteren.
• De Video kabel is niet goed aangesloten. Controleer of de Video kabel correct is aangesloten op uw
TV.
Er is geen geluid.
• De Audio kabel is niet goed aangesloten. Controleer of de Audio kabel correct is aangesloten op uw
TV of versterker.
• De CSM3PL is aangesloten op een versterker, maar deze is uitgeschakeld. Schakel de versterker in.
• Het geluidsspoor van het MPEG2 of VOB bestand bevat geen geluid. Druk op de AUDIO knop op de
afstandsbediening om het juiste geluidsspoor te selecteren.
• De MUTE functie is ingeschakeld. Druk op de MUTE knop op de afstandsbediening om de MUTE
functie uit te schakelen.
• De CSM3PL staat in FF/FR stand. Druk op de PLAY/PAUSE knop op de afstandsbediening om terug te
keren naar standaard weergave.
Het beeld van de CSM3PL is verstoord.
• De CSM3PL staat in FF/FR stand. Druk op de PLAY/PAUSE knop op de afstandsbediening om terug te
keren naar standaard weergave.
• Een PAL film wordt afgespeeld op NTSC stand of andersom. Wijzig de beeldweergave met de P/N
knop op de afstandsbediening.
Als de SLIDE knop ingedrukt wordt, stopt de CSM3PL met reageren.
• Er staan veel foto’s of muziek in de geselecteerde map. Het kan even duren voordat de Music-Slide-
Show gestart wordt. Wacht op het afspelen van de Music-Slide-Show.
De afstandsbediening werkt niet.
• Richt de afstandsbediening op de CSM3PL ontvanger binnen een hoek van maximaal ±30 graden.
• Gebruik de afstandsbediening binnen een afstand van 5 meter.
• De batterij van de afstandsbediening is zwak of leeg. Vervang de batterij.
De ondertiteling van de film wordt niet weergegeven
• Een AVI file wordt afgespeeld, maar het ondertitelingsbestand heeft een andere naam. Zie
hoofdstuk 6.1 voor het weergeven van de ondertiteling.
Wanneer een film wordt afgespeeld wordt de melding “CODEC NOT SUPPORTED” getoond.
• Het film-bestand is gemaakt met een codec welke niet ondersteund wordt door de CSM3PL.
Kijk op de website, www.conceptronic.net voor een lijst met ondersteunde Codecs voor de CSM3PL.
16
Page 17

NEDERLANDS
De CSM3PL geeft niet alle HDD partities / data weer.
• De partitie op de HDD is niet primair. Formatteer de partitie opnieuw en zorg dat deze primair
wordt.
• De partitie op de HDD is niet FAT32 geformatteed. Formatteer de partitie opnieuw met het FAT32
bestandssysteem.
• Er zijn geen bestanden aanwezig op de geselecteerde partitie.
Welke geheugenkaarten worden ondersteund door de CSM3PL?
• De CSM3PL leest alle grote geheugenkaart-families waaronder:
Memorystick (MS), Secure Digital (SD), Multimedia Card (MMC), Smart Media Card (SM), Compact Flash
(CF), Microdrive (MD).
Kijk op de website, www.conceptronic.net voor een overzicht met ondersteunde kaarten voor de
CSM3PL.
Het afspelen van de DVD begint niet als de Play/Pause knop wordt ingedrukt.
Controleer of de juiste mappenstructuur is gebruikt. De mappenstructuur is beschreven in hoofdstuk
•
6.1.
• De DVD bestanden zijn niet compleet, corrupt of beschadigd. In dit geval is de CSM3PL niet in staat
om het afspelen te starten.
Tijdens de voorfilmpjes van de DVD blijft het scherm zwart.
Het huidige hoofdstuk eindigt met een zwart scherm of is te kort om af te spelen. Druk op /
•
NEXT om naar het volgende hoofdstuk te wisselen.
Mijn TV toont een zwart/wit beeld in plaats van een kleurenbeeld.
Uw TV kan niet overweg met het “Multi” TV systeem van de CSM3PL. Gebruik het Setup Menu om
•
het TV systeem op PAL te zetten (Zie hoofdstuk 7.1).
Na het wijzigen van het TV systeem dient u de CSM3PL uit en aan te zetten.
17
Page 18

ENGLISH
Conceptronic CSM3PL
Quick Installation Guide
Congratulations on the purchase of your
Conceptronic CSM3PL.
The enclosed Hardware Installation Guide gives you a step-by-step explanation of how to use the
Conceptronic Grab’n’GO 3,5” Media Player with Cardreader.
When problems occur, we advise you to go to our support-site (go to www.conceptronic.net
‘Support’. Here you will find the Frequently Asked Questions Database.
When you have other questions about your product and you cannot find it at our website, then
contact us by e-mail: support@conceptronic.net
For more information about Conceptronic products, please visit the Conceptronic Web Site:
www.conceptronic.net
.
.
1. Introduction
Before operating the unit, please read this manual thoroughly and retain it for future reference.
1.1 Contents of the package
Before connecting the device to your TV or computer/monitor please check if the contents of
the package are:
• 1x Conceptronic Grab ‘n’ GO 3,5” Media Player with Cardreader
• 1x Remote Control with battery
• 1x Power adapter (12V DC, 2.5A)
• 1x Audio/Video Cable (Composite)
• 1x Audio/Video (Composite) to SCART Cable
• 1x S-Video Cable
• 1x SPDIF Optical Cable
• 1x USB Cable
• 1x Multi language printed quick installation guide
• 1x Stand for CSM3PL
1.2 Features
• Auto switch between PC and Player Mode:
When connected to the PC, the device acts as an USB Storage Device.
When not connected to the PC, the device acts as a Media Player.
In PC mode:
• Supports Plug-n-Play.
• Compliant with High Speed USB 2.0/1.1, 480Mb/s maximum data transfer rate.
and click
18
Page 19

ENGLISH
In Player mode:
• Support for Internal HDD, USB Devices and memory cards.
• Multiple languages support:
English, Dutch, Spanish, French, Italian, German, Portuguese
• Supports multiple HDD partitions.
• Media files previewing.
• Supports text subtitle (.SMI/.SRT/.SUB/.SSA) for MPEG4 (AVI), D1 resolution.
• Supports AVI (MPEG4), MPG (MPEG1, MPEG2), DAT (VCD), VOB (DVD), WAV, WMA, MP3, JPG.
• Various Codec’s supported. Check our website for a full list of supported Codecs.
• Outputs: Composite video/Component video/RCA audio/Optical audio/VGA/S-video.
• Compliant with PAL/NTSC.
• Various repeat modes.
• File operations (DELETE/RENAME/NEW FOLDER/PROPERTIES).
• Screen Saver.
• Viewing photos in various ways
Slide show (slide photo play back) with background music.
14 transition modes; display interval changeable.
Zoom, rotation, move functions.
• Files can be sorted by name/size/time/type.
1.3 Cautions
• Do not attempt to disassemble the included power adapter. This may cause high-voltage
injuries. If the adapter needs to be fixed, please contact your dealer or the helpdesk of
Conceptronic.
• Keep the device away from excessive moisture.
• Do not immerse or expose the device to liquids.
• Disconnect the power adapter if you do not intend to use the device for an extended period of
time.
• Avoid using the device in a location near combustibles.
• Change the batteries of the remote control with the same kind when they are weak or dead.
Dispose of the old batteries safely. Recycle them where possible. To avoid corrosion, remove
the batteries if the remote is not to be used for a long time.
• Keep the remote away from excessive moisture; do not drop it.
• Do not operate the remote under intense sunlight.
• NEVER drop, shake or bump the device.
• To prevent overheating, do not cover the device.
• The CSM3PL only supports the FAT / FAT32 File system (NTFS is not supported).
Note:
When you format the Harddisk to NTFS, it only functions as removable Harddisk for your
computer. Reformat the Harddisk to FAT32 to activate the Media Player functionality.
• The data on the internal Harddisk and/or the connected device(s) can be fragmented. This
affects movies play back. It is recommended that you defragment the Harddisk and/or the
connected device(s) on your computer once in a while.
19
Page 20
ENGLISH
2. Functionalities of the Grab’n’GO 3,5” Media Player with Cardreader
2.1 Identify the parts of the CSM3PL
•
Front View
1. Remote Control Receiver 4. HDD LED 7. SM Card Slot
2. Power LED 5. MMC/MS/SD Card Slot 8. USB HOST Jack
3. Button Control 6. CF Card Slot
• Button Control
No.
Stop State Play State
1
2
3
4
5
Note:
The Button control functions are the same as the Remote Control Functions. Detailed
information about each button can be found in chapter 4.
•
Rear view
Short Press
( ) (VOL+) (P/N)
( ) (VOL-) (VGA)
( ) ( ) ( )
( ) ( ) ( )
( ) ( ) ( )
Long Press
1. DC In 4. Video Out 7. S-VIDEO Out
2. Optical Out 5. Component Video Out 8. On-Off Switch
3. Audio Out 6. VGA Out 9. USB Jack (For PC Connection)
20
Page 21
ENGLISH
3. How to connect the Grab’n’GO 3,5” Media Player with Cardreader
3.1 Connecting to your Computer
1. Turn on your computer.
2. Connect the powersupply to the CSM3PL and to the power outlet.
3. Connect the USB Cable to the CSM3PL and your computer.
The computer will automatically detect and configure the device, assign new drive letter(s), and
then use it as a mass storage device. (Your drive is pre-formatted in FAT32 file system).
You can now add movies,music,photo’s, etc. to the CSM3PL.
Disconnect the CSM3PL from your computer
1. Single-click the “Safe Removal” icon on the systemtray.
2. Select “Stop USB Mass Storage Device” when prompted.
3. Wait for the message “Safe to remove Hardware”.
4. Disconnect the USB cable.
1
21
Page 22

ENGLISH
3.2 Connection to your Television
Connecting the device with a TV (illustrated as follows)
The three RCA connectors (yellow, red, white color) of the AV cable should match with the
corresponding input jacks on your TV. If your TV has no Composite input available, use the
included SCART to Composite/Audio cable.
You can also use the Component Output of the Media Player to connect to your LCD/Plasma TV
(No Cable included). For sound, you can also use the SPDIF Output of the Media player to
connect to your Amplifier / Speakerset (Cable included).
NOTE:
The Conceptronic CSM3PL can be used with a television or with a monitor.
When using a TV you can use the S-VIDEO, Composite, Composite to SCART or Component output
of the CSM3PL. Please check the manual of your TV to select to correct input channel to display
the video output of the CSM3PL. If you have used the CSM3PL in VGA mode, please press the
OUTPUT button on your remote control to change the VIDEO output again to your TV.
When using a monitor you have to use a monitor VGA cable and connect it to the VGA OUT (6)
connector. Press the OUTPUT button on the remote control (a number of times) until the
monitor is switched on automatically (out of Stand-By mode).
To switch between the various modes available (VGA, TV, S-VIDEO,etc.) you need to press the
OUTPUT button on the remote control.
22
Page 23
ENGLISH
4. The Remote Control
The remote control is used to control the unit. On the inside cover of this manual you will find a
picture of the remote control. The numbers of the buttons correspond with the table below, to
explain each function of the remote control.
Nr Button Description
1 POWER ( ) Enter or exit Standby mode. (ON/OFF)
2 R / L Select the audio output: right, left and stereo.
3 SLIDE Enter Music-slide-show mode or step-play.
4 SLOW Play back slowly.
5 REPEAT Select a repeat mode.
6 DELAY Select slide show (include music-slide-show) interval time.
7 TRANS Select a mode of transition or a type of music equalizer.
8
, , , Move cursor.
9 AUDIO Select / Change audio stream (DVD Playback).
10 MENU how DEVICE LIST or FILE LIBRARY (if there is only 1 device connected).
Return to the DVD Menu (DVD Playback).
11 PLAY/PAUSE Start the playback of a file or DVD-Folder, pause a playback.
12 VOL + / - Increase / decrease volume level.
13 PREVIOUS (
24 REWIND (
15 FILE Show the Directory Structure of the device.
16 MUSIC Direct Access button to music.
17 0 – 9 Music can be played without a display device (TV, monitor) by pre-
18 OUTPUT Select the Video Output Signal.
19 SETUP Function setup.
20 PHOTO Direct Access button to photos.
21 VIDEO Direct Access button to videos.
22 FAST FORWARD (
23 NEXT (
24 STOP (
25 FUNC Show file operations menu.
26 SUB-T Select / Change movie Subtitle (MPEG4 & DVD Playback).
27 ENTER (
28 ZOOM Zoom in / out (Photos & DVD Playback).
29 ROTATE Rotate photos.
30 DISPLAY Show file information during playback.
31 A – B Play a selected interval repeatedly. Press the button once to select the
32 TOP Go to the top of directory.
33 P / N Select video system. (PAL / NTSC)
34 MUTE Mute or cancel mute.
) Switch to previous file / chapter or page up.
) Fast Rewind.
setting the music folders (explained further in the manual).
) Fast forward.
) Switch to next file / chapter or page down.
) Stop playing.
) Confirm selection.
beginning <A> Point; Press the button again to select the ending <B>
Point; A-B interval will be repeated; Press the button again to cancel.
Only valid for video mode not music mode.
23
Page 24

ENGLISH
5. Important remarks
The maximum operational range of the remote control is about 5 meters.
1. Point the remote to the receiver on the front panel of the device.
The receiving angle is about ±30 degrees in the range of 5 meters.
2. Change the batteries when they are weak or empty.
5.1 Basic Operation
1. Plug the power adapter into a working electrical outlet and connect the other end of the
adapter to the device.
2. Switch the device on with the power switch on the back of the device. The Power LED will
become solid blue. The device is now operational.
When there is no other device connected to the CSM3PL, it will show the FILE LIBRARY with
the contents of your Harddisk (If only 1 partition is present).
When an USB Device (like a Harddisk or USB Flashdrive) or Memory Card is connected to the
CSM3PL, the screen will show the DEVICE LIST with all found devices. If the connected device
contains a large quantity of files, it can take a little while before the device is detected.
Please wait for the DEVICE LIST / FILE LIBRARY screen.
Notices
• Usually, it is not necessary to change your video system (PAL/NTSC), but if the TV only
supports NTSC or PAL, you should use the P/N button to select a color system to match your
TV system.
• If “AUTO START” is ON (press the SETUP button->SETUP MENU->PREFERENCES->AUTO START-
>ON), all files on the connected devices will be played automatically; Pressing the
button can stop auto-playing and display a full file list of the selected partition.
• Press one of the
confirm selection (enters media library, enters file folder, or starts playing files).
• Press the
• Press the MENU button to show the DEVICE LIST or FILE LIBRARY.
• Press the
• We advise you to disconnect the device from power if the device will not to be used for a long
time.
/ / / buttons to move the cursor, and use the / ENTER button to
/ STOP button button to stop playing and go back to FILE LIBRARY.
/ POWER button to enter/exit standby mode.
/ STOP
24
Page 25
ENGLISH
5.2 Detailed Operations
File Library
If there is no external device connected to the CSM3PL (only internal HDD present), the FILE
LIBRARY will appear on the TV screen when you press
(illustrated as follows).
If there are multiple devices connected (USB Stick, Memorycard), the DEVICE LIST will appear on
the TV screen first when you press
move the cursor, and pressing the
NOTICE:
It is possible that it will take a while until you can browse through the menu. Before the menu is
displayed your connected device(s) will be indexed. On screen you will see: SEARCHING. This
means that all suitable files will be indexed and displayed in your menu.
/ POWER button to enter working mode. Use / button to
/ ENTER button will to go to the FILE LIBRARY.
/ POWER button to enter working state
PARTITION LIST FILE LIBRARY
To change the connected device:
If there are more devices connected to the CSM3PL, you can press the MENU button to go to the
DEVICE LIST and select a device by pressing
/ button and the / ENTER button.
6. Movies, Music and Photo Set-up
There are 3 main functions for the Conceptronic CSM3PL
- Play & watch movies
Play & listen to Music
-
Play & watch Photos
-
6.1 Options how to play & watch a movie
Playing movies
The CSM3PL is supporting various video formats: MPEG2/1, MPEG 4 including (XVID, VOB format)
including support for playing MP3, AC3, AAC and MPG1/2 audio tracks within video).
Extra options for playing video
Support for playing MPEG4 video with text subtitles
The Conceptronic CSM3PL can support .SMI, .SRT, .SUB or .SSA subtitle files.
If the subtitle file has the same name as the selected video file (only extension is different) the
subtitle file will be loaded automatically when the MPEG4 file is played.
25
Page 26

ENGLISH
When the subtitle file has a different name than you need to select the subtitle file, press the
SUB-T button on the remote control and then select the MOVIE file to be played. (The two files
are associated). Press the
Repeat interval
To play a selected video interval repeatedly, press A/B.
Sound Channels
Press the R/L button on the remote control to play Mono Left, Mono Right or Stereo Sound.
Some MPEG2/VOB files contains two or more audio streams in it, press AUDIO button to cycle
through 1-1/8~1-8/8,2-1/8~2-8/8, 3-1/8~3-8/8 (total 24 audio streams). If a video has no sound
when playing, press AUDIO button to locate the proper audio stream.
If you switch MPEG2/VOB file, you can loose the audio if it is on another stream. To prevent this,
press the SETUP button during playback to “Lock” the current audio stream. This option will
keep the selected audio stream for all files.
Playing back videos
When playing back videos, press the SLIDE button to perform video step-play.
In this mode the Photos will be played continuously. When playing back videos, the
to play forward fast/ reverse fast, and press ENTER/
Direct access button to your video folder
You can create 1 video folder, which can be directly accessed by pressing the VIDEO-button on
the remote control. Create a folder called “VIDEO ***” (Where *** can be changed to whatever
you want) on the root of the hard disk and place video files in this folder. When the media
player is started and you press the VIDEO-button, the media player will automatically open the
folder.
NOTE:
If you create more than 1 folder beginning with “VIDEO ***”, the device will only open the first
folder.
NOTE:
Most Video Codec’s are supported on the CSM3PL (Like XviD, AVI, MPEG2, etc.) but it is possible
that you have files that require a Codec, which is not included with the CSM3PL.
If you try to playback a file with a not supported Codec, you will see the message “CODEC NOT
SUPPORTED”.
DVD Playback
The CSM3PL plays DVD’s from the hard disk as if they are a normal DVD. You can navigate
through the DVD Menu, choose subtitles, change audio languages, etc.
Folder Setup
To play DVD’s from your Harddisk, you need to setup the DVD folders on the CSM3PL correctly.
/ ENTER button to play the movie.
/ button
button to return to normal speed.
26
Page 27
ENGLISH
Create a folder on the CSM3PL Harddisk with the name of the DVD (i.e. “My Movie”)
Copy the VIDEO_TS Folder from your DVD to the created DVD folder on the CSM3PL Harddisk.
After copy is finished, it should look like below:
Disconnect the CSM3PL from your computer and connect it to your TV. Turn on the CSM3PL.
Play the DVD
Use the navigation keys on the remote control to select the folder of your DVD in the menu (In
the example: My Movie).
Press the PLAY/PAUSE button on the remote control to start the playback of the DVD.
Note:
Use the
Use the
Don’t use the / ENTER button in the CSM3PL Menu. This will only show the
files/subfolders and does not start DVD Playback.
/ / / navigation buttons and the / ENTER button to navigate in the DVD Menu.
/ STOP button to end DVD Playback.
6.2 Options how to play & listen to the music
Playing Music
The Conceptronic CSM3PL has various modes in which you can play music (WAV, MP3 and WMA is
supported)
To Play Music files:
Press Menu and select the correct folder to play music files from. The song is displayed and you
can select an equalizer setting (by pressing the TRANS button of your remote control)
If you want to repeat a song you can select:
Random: Play the selected folder in random order
Shuffle: Play the selected folder in shuffled order
Single: Play only this song one time
Folder: Play only the selected folder
REP-one: Repeat the selected song until you stop
Folder repeat: Repeat the selected folder until you stop
27
Page 28

ENGLISH
When playing back Music files, press
PLAY/PAUSE button to return to normal speed.
Music playback with subfolders
You can play music files including subfolders with the MUSIC button on the remote control.
Use the navigation keys on the remote control to select the folder which contains the music you
want to play. Press the MUSIC button on the remote control to make a list of all music files in
the selected folder and subfolders.
Note:
If you press the / ENTER button instead of the MUSIC button, the folder will be
Setting up the folder “MUSICDIR” for quick access
To prepare your CSM3PL to play music automatically you have to create a special folder when
you have connected your CSM3PL to your computer.
1) Create the folder ”MUSICDIR” on the root of the first partition.
2) Create sub-folders named by three digital numbers, for example, “001”, “002”, “003”, etc.
3) Copy music files into these folders
To use the predefined musicfolder with a screen connected, follow the next steps when the
device is in use:
1) Press the first digit of the folder and wait for the following message in your screen: “AUTO
2) Press the other 2 digits of the subfolder you want to play.
It is also possible to play the music from the predefined folders if you screen is off. We advise to
use only the folders 000 - 009 for this feature. To play the music from these folders, press the
digit of the folder (0 – 9) and press the PLAY/PAUSE button.
The music will start playing automatically.
Note:
The time between entering the first digit and the message on your screen will increase when you
have more data on your harddisk.
opened instead of played including subfolders.
(You can create folders upto “999”).
PLAY: MP3 -> ___”
/ button to adjust the play speed and press the
28
Page 29

ENGLISH
6.3 Options how to play & watch photos
While playing back photos, you can use the ROTATE button to turn around photos. By default the
rotation message of the photos is kept until you turn off the device or switch to standby mode. If
you do not want to keep the rotation message, you can disable this function via SETUP MENU ->
GENERAL SETUP-> ORIENTATION->OFF.
While playing back photos, you can use the TRANS button to change the the transition between
photos. Default transition mode can be set via SETUP MENU->SLIDESHOW SETUP->TRANSITION.
MODE 01: FULL SCREEN
MODE 02: RANDOM
MODE 03: ROLL: TOP TO BOTTOM
MODE 04: ROLL: BOTTOM TO TOP
MODE 05: ROLL: TOP/BOTTOM TO CENTER
MODE 06: ROLL: CENTER TO TOP/BOTTOM
MODE 07: BLIND: TOP TO BOTTOM
MODE 08: ROLL: LEFT TO RIGHT
MODE 09: ROLL: RIGHT TO LEFT
MODE 10: ROLL: LEFT/RIGHT TO CENTER
MODE 11: ROLL: CENTER TO LEFT/RIGHT
MODE 12: ROLL: IMPLODE
MODE 13: BLIND: LEFT TO RIGHT
MODE 14: CROSS FADE
Photo zoom
Press the ZOOM button to enter or exit ZOOM mode or change zoom ratio. When a photo is
enlarged, you can use the
/ / / buttons to move it.
Music-slide-show (viewing photos with background music)
Select a photo and press SLIDE to start.
When you do not press ‘SLIDE’ the music is not played and the images will be displayed in a nonmusic slideshow. When there is no music in the folder available the SLIDE functionality does not
work. You need to press the
In SLIDE mode, only photo and music files in the same folder will be played back.
NOTE: In this mode, ROTATE/ZOOM are not accessible.
/ ENTER button to have a slideshow of images without sound.
You can stop viewing the photo by press PLAY/PAUSE button once (music is still playing). Press
PLAY/PAUSE again, the music will stop. Press the PLAY/PAUSE button to resume playing.
You can set the interval display time between two photos by pressing the DELAY button. Default
interval time is set via SETUP MENU->PREFERENCES->DELAY. Press the TRANS button to change a
transition. Press the REPEAT button to play back photos repeatedly.
Direct access button to your photo folder
You can create 1 Photo folder, which can be directly accessed by pressing the PHOTO-button on
the remote control. Create a folder called “PHOTO ***” (Where *** can be changed to whatever
you want) on the root of the hard disk and place photo’s in this folder.
When the media player is started and you press the PHOTO-button, the media player will
automatically open the folder.
NOTE:
If you create more than 1 folder beginning with “PHOTO ***”, the device will only open the first
folder.
29
Page 30
ENGLISH
6.4 Operations in file library
/ button to select a file or folder; / (PREV/NEXT) button to page up/page down.
• Use
If a photo or a video is selected, its preview and information will be shown on the right hand
side of the TV screen. If a music file is selected, music will start playing while showing its
information on the right of the screen.
• You can press TOP button to move cursor straight to the top of file list and change to another
folder easily.
• Press the
EQUALIZER screen will appear). Press the
• Press REPEAT button to select a repeat mode: RANDOM/SHUFFLE/SINGLE/FOLDER/REP-
ONE/FOLDER REPEAT.
• In STOP state, press the FUNC button to show or close a floating menu of the file operation.
/ ENTER button to enter full screen mode (if playing music files, MUSIC
/ STOP button to escape full screen mode.
DELETE: directly delete a selected file or folder.
RENAME: rename a selected file or folder.
NEW FOLDER: create a new folder.
PROPERTIES: show/close file information such as size, date, and format.
30
Page 31

ENGLISH
7. Setup Menu
In stop state, press SETUP button to enter
SETUP MENU.
Press
/ / / button to move cursor, and press
the
/ ENTER button to confirm selection,
press SETUP button when finished.
7.1 General setup
• ORIENTATION: keep rotation information.
Options: ON, OFF
Default: ON
• TV DISPLAY
Options: NORMAL/PS, NORMAL/LB, WIDE
Default: NORMAL/PS
• TV SYS: Select a video system.
Options: MULTI. SYSTEM, NTSC, PAL
Default: MULTI. SYSTEM
• SPDIF OUTPUT
Options: OFF, SPDIF/RAW, SPDIF/PCM
Default: OFF
• SCREEN SAVER: start the screen saver;
the screen saver image appears when the unit
stops or the image is frozen for a few minutes.
This saver can keep the screen from being damaged.
Options: ON, OFF
Default: ON
7.2 Slideshow setup
• SLIDESHOW MODE
Options: MANUAL; AUTO
Default: AUTO
• INTERVAL TIME: select the
interval time between two photos.
Options: ONE SECOND, THREE
SECONDS, FIVE SECONDS,
TEN SECONDS
Default: THREE SECONDS
• TRANS SPEED
Options: FAST, SLOW
Default: FAST
• TRANSITION
Options: FULL SCREEN, RANDOM, TOP– >BOTTOM, BOTTOM– >TOP, T/B– >CENTER, CENTER ->
T/B, BLIND: T– >B, LEFT– >RIGHT, RIGHT– >LEFT, L/R– >CENTER, CENTER– >L/R, IMPLODE,
BLIND: L– >R, CROSS FADE
Default: RANDOM
31
Page 32

ENGLISH
7.3 Preferences
• VIDEO OUTPUT: Set video output.
Options: S-VIDEO, COMPONENT,P-SCAN YPBPR,
VGA and INTERLACE RGB.
Default: S-VIDEO.
• OSD LANG: select OSD languages.
Options: ENGLISH, FRENCH,
GERMAN, ITALIAN, PORTUGESE,
SPANISH, DUTCH
Default: ENGLISH
• OSD MESSAGE: select OSD
message during playing back a file.
Options: ON, OFF
Default: ON
• DEFAULT: use the manufacturer's default settings.
• AUTO START: Play all media files on all connected devices automatically.
Options: ON; OFF
Default: OFF
• FILE SORT: select file sorts at the current connected device(s).
Options: BY NAME; BY SIZE; BY TIME; BY TYPE
Default: BY NAME
8. Specifications
Power : 100~240VAC, 50/60HZ
Power Consumption : 11W (typical)
Dimensions : 177×163×44 (T×B×H mm)
Color System : PAL/NTSC
Frequency Response : ±3dB(20HZ~20KHZ)
Signal/Noise Ratio : ≥80dB
Audio Cross talk : ≥70dB
Audio Output : 2,0±0,2V(rms)
Video Output : 1,0±0,2Vp-p, 75Ω
USB Data Transfer Rate : USB 2.0, Max. 480Mb/s
File Format Supported : AVI/MPG/DAT/VOB/WAV/MP3/WMA/JPG
Supported File System(s) : FAT32.
Subject to change without prior notice.
32
Page 33

ENGLISH
9. Tips & Troubleshooting
Use the tips below for troubleshooting when your CSM3PL is not working properly:
The Power LED doesn’t light up
• The power supply is not connected to the CSM3PL. Reconnect the power supply to the CSM3PL.
There is no activity on the display.
• The CSM3PL is in standby state. Press the button on the remote control to activate it.
• The Wrong input source on your TV is selected. Change the input source.
• The Wrong video system selected. Press the OUTPUT button on your remote control to switch video
system.
• The Video cable is not connected properly. Check if the Video Cable is connected correctly.
There is no sound
• The Audio cable is not connected properly. Make sure the cable is connected correctly to your TV or
amplifier.
• The CSM3PL is connected with an amplifier, but the amplifier is turned off. Turn on the amplifier.
• The audio stream of the MPEG2 or VOB file is invalid. Press the AUDIO button on the remote control
to adjust to the proper audio stream.
• The Mute function is on. Press the MUTE button on the remote control again to cancel mute.
• The CSM3PL is functioning in FF/FR mode. Press the PLAY/PAUSE button on the remote control to
return to normal playback.
The display is distorted
The CSM3PL is functioning in FF/FR mode. Press the PLAY/PAUSE button on the remote control to
•
return to normal playback.
•
A PAL movie is played at NTSC mode or vice versa. Press the P/N button on the remote to change
the display settings.
When pressing the SLIDE button, the system freezes.
• There are too many photos or music in the current folder. It will take a long time to start Music-
Slide-Show. Please wait for playback.
The Remote control doesn’t work
• Point the remote control to the CSM3PL receiver in about ±30 degrees and directly.
• Use the remote control in the range of 5 meters.
• The remote control battery should be replaced.
The subtitles of the played movie are not displayed
• An AVI file is played, but the subtitle file contains a different filename. See chapter 6.1 how to
display the subtitles.
When trying to play video, the message “CODEC NOT SUPPORTED” is displayed.
• The movie file is created with a not-supported codec for the CSM3PL.
Refer to the website, www.conceptronic.net for a list of supported codecs for the CSM3PL.
The CSM3PL does not display all HDD partitions / content.
• The partition on the HDD is not primary. Re-partition the HDD again and make sure all partitions are
set to primary.
• The partition is not FAT32 formatted. Re-format the partition with FAT32 Filesystem.
• There are no mediafiles on the selected partition.
33
Page 34

ENGLISH
Which Memory Cards are supported by the CSM3PL?
• The CSM3PL reads all major Memory Card families, like:
Memorystick (MS), Secure Digital (SD), Multimedia Card (MMC), Smart Media Card (SM), Compact
Flash (CF), Microdrive (MD).
Refer to the website, www.conceptronic.net
The DVD playback does not start when the Play/Pause button is pressed.
Make sure you use the correct folder structure. The folder structure is described in chapter 6.1.
•
• The DVD Files are incomplete, corrupt or damaged. When this happens, the CSM3PL does not start
DVD playback.
During the intro-movies of the DVD, the screen goes blank.
The current chapter ends with a blank screen or is too short to playback. Press / NEXT to switch
•
to the next chapter.
My TV shows a black/white picture instead of colour.
Your TV cannot handle the "Multi" TV-System of the CSM3PL. Use the Setup menu to change the TV
•
System to PAL. (See chapter 7.1).
After changing the TV System, turn off and on the CSM3PL.
for a list of supported Memory Cards for the CSM3PL.
34
Page 35

ESPAÑOL
CSM3PL de Conceptronic
Guía de instalación rápida
Felicidades por la compra de su CSM3PL
DE Conceptronic.
La Guía de instalación de hardware adjunta le proporciona una explicación paso a paso sobre cómo
utilizar el reproductor multimedia de Conceptronic Grab’n’GO 3,5” con lector de tarjetas.
Si encuentra problemas, le aconsejamos que se dirija a nuestra página web www.conceptronic.net
haga clic en «Support». Aquí encontrará la base de datos de las preguntas más frecuentes o FAQ.
Si tiene otras preguntas sobre su producto y no las encuentra en nuestro sitio web, póngase en
contacto con nuestro servicio técnico por correo electrónico: apoyo@conceptronic.net
Para obtener más información acerca de productos de Conceptronic por favor visite el lugar Web de
Conceptronic: www.conceptronic.net
1. Introducción
Antes de utilizar la unidad, lea atentamente este manual y consérvelo para futuras consultas.
1.1 Contenido del paquete
Antes de conectar el dispositivo a su televisor u ordenador/monitor, compruebe si el paquete
incluye los siguientes elementos:
• 1x reproductor multimedia de Conceptronic Grab ‘n’ GO 3,5” con lector de tarjetas.
• 1x mando a distancia con batería
• 1x Adaptador de corriente (12V DC, 2.5ª).
• 1x Cable Audio/Vídeo (Composite).
• 1x cable de audio/vídeo (Composite) SCART
• 1x Cable S-VIDEO a S-VIDEO.
• 1x Cable SPDIF
• 1x Cable USB
• 1x Guía de Instalación Rápida multilingüe en formato papel.
• 1x Base para el CSM3PL
1.2 Características
• Conmutación automática entre PC y modo de reproducción:
Al conectarse al PC, el dispositivo funciona como un dispositivo de almacenamiento USB.
Cuando no está conectado al PC, el dispositivo funciona como un reproductor multimedia.
En modo PC:
• Compatible con Plug-n-Play.
• Compatible con USB de alta velocidad 2.0/1.1, velocidad máxima de transferencia de datos
de 480 Mb/s.
y
35
Page 36

ESPAÑOL
En modo reproductor:
• Compatible con unidades de disco duro internas, dispositivos USB y tarjetas de memoria.
• Información de apoyo en diversos idiomas:
inglés, holandés, español, francés, italiano, alemán y portugués.
• Compatible con múltiples particiones HDD.
• Previsualización de archivos multimedia.
• Compatible con archivos de subtítulos de texto (.SMI/.SRT/.SUB/.SSA) para MPEG4 (AVI),
resolución D1.
• Compatible con los formatos AVI (MPEG4), MPG (MPEG1, MPEG2), DAT (VCD), VOB (DVD), WAV,
WMA, MP3 y JPG.
• Compatible con diversos codecs. Visite nuestro sitio web para obtener la lista completa de los
codecs compatibles.
• Salidas: Cable de señal de vídeo compuesto/Component video/RCA audio/audio
óptico/VGA/S-video.
• Compatible con los formatos PAL/NTSC.
• Varios modos de repetición.
• Operaciones de archivos (ELIMINAR/CAMBIAR NOMBRE/NUEVA CARPETA/PROPIEDADES).
• Salvapantalla.
• Visualización de fotografías de diferentes maneras:
Presentación de imágenes tipo diapositivas (proyección de fotografías) con
acompañamiento musical.
14 modos de transición; intervalo de visualización variable.
Funciones de zoom, rotación y movimiento.
• Los archivos pueden clasificarse por nombre, tamaño, duración y tipo.
1.3 Aviso de precaución
• No intente desmontar el adaptador de corriente que incluye el paquete: el alto voltaje puede
causar lesiones. En caso de que el adaptador deba repararse, póngase en contacto con su
distribuidor o con el servicio de asistencia de Conceptronic.
• Mantenga el dispositivo apartado de ambientes excesivamente húmedos.
• No sumerja o coloque el dispositivo en sustancias líquidas.
• Desconecte el adaptador de corriente si no va a utilizar el dispositivo durante un largo período
de tiempo.
• Evite utilizar el dispositivo en lugares cercanos a sustancias combustibles.
• Reponga la pila del mando a distancia con el mismo tipo de batería cuando esté parcial o
totalmente agotada y deséchela en un lugar seguro: recíclela siempre que sea posible. Para
evitar la corrosión, retire la pila del mando a distancia si no va a utilizarlo durante un largo
período de tiempo.
• Mantenga el mando a distancia apartado de ambientes excesivamente húmedos; no lo deje
caer al suelo.
• No utilice ni exponga el mando a distancia a luz del sol intensa.
• NUNCA deje caer, sacuda o golpee el dispositivo.
• Para evitar su calentamiento, no cubra el dispositivo.
• El CSM3PL es compatible únicamente con el sistema de archivos FAT/FAT32 (no es compatible
con archivos NTFS).
ATENCIÓN: Al formatear el disco duro a NTFS, sólo funciona como disco duro extraíble para su
ordenador. Vuelva a formatear el disco duro a FAT32 para activar las funciones del
reproductor multimedia.
• Los datos del disco duro interno y/o los dispositivos conectados se pueden fragmentar. Esto
afecta a la reproducción de películas. Se recomienda desfragmentar de vez en cuando el disco
duro y/o los dispositivos conectados a su ordenador.
36
Page 37

ESPAÑOL
2. Funcionalidades del reproductor multimedia Grab‘n’GO 3,5” con lector de
tarjetas
2.1 Partes del CSM3PL
• Parte frontal
1. Receptor del mando a distancia 4. LED de disco duro 7. Ranura de tarjeta SM
2. LED de encendido 5. Ranura de tarjeta MMC/MS/SD 8. Entrada de host USB
3. Botones de control 6. Ranura de tarjeta CF
• Botones de control
Nota:
•
N.º
Estado Stop Estado Play
1
2
3
4
5
Las funciones de botones de control son las mismas que las funciones del mando a
distancia. La información detallada sobre cada botón se puede encontrar en el capítulo
4.
Parte trasera
Pulsar breve
( ) (VOL+) P/N (P/N)
( ) (VOL-) VGA (VGA)
( ) ( ) ( )
( ) ( ) ( )
( ) ( ) ( )
Pulsar largo
1. Entrada de corriente 4. Salida de vídeo 7. Salida de S-VIDEO
2. Salida óptica 5. Salida de Component Video 8. Botón de encendido y apagado
3. Salida de audio 6. Salida de VGA 9. Entrada de USB (para conexión a PC)
37
Page 38

ESPAÑOL
3. Cómo conectar el reproductor multimedia Grab ‘n’ GO 3,5” con lector de
tarjetas
3.1 Conexión al ordenador
1. Encienda el ordenador.
2. Conecte la alimentación al CSM3PL y a la toma de corriente.
3. Conecte el cable USB al CSM3PL y al ordenador.
El ordenador detectará automáticamente el dispositivo y lo configurará, le asignará una nueva
letra de unidad y luego lo utilizará como un dispositivo de almacenamiento masivo. (La unidad
está preformateada con el sistema de ficheros FAT32).
Ahora puede añadir películas, música, fotografías, etc. al CSM3PL.
Desconexión del CSM3PL del ordenador
1. Haga clic en el icono “Quitar hardware con seguridad” en la bandeja de sistema.
2. Seleccione “Extracción segura de Dispositivo de almacenamiento masivo USB”.
3. Espere a que aparezca el mensaje “Es seguro retirar el hardware”.
4. Desconecte el cable USB.
1
38
Page 39

ESPAÑOL
3.2 Conexión al televisor.
Conecte el dispositivo a un televisor (tal y como muestra la ilustración siguiente).
Los tres conectores RCA (de color amarillo, rojo y blanco) del cable AV deben coincidir con las
correspondientes tomas de entrada de su televisor. Si su TV no dispone de entrada mixta, utilice
el SCART que se incluye para el cable Mixto/ Audio.
También puede utilizar la salida Component del reproductor multimedia para conectarlo a una
pantalla LCD/TV de plasma (no se incluye el cable). Para el sonido, también puede utilizar la
salida SPDIF del reproductor multimedia para conectarlo a un amplificador / altavoz (cable
incluido).
NOTA
:
El CSM3PL de Conceptronic puede utilizarse tanto con un televisor como con un monitor.
Al utilizar una TV también puede utilizar la salida S-VIDEO, Composite, Composite to SCART o
Component del CSM3PL. Consulte el manual de su televisor para seleccionar correctamente el
canal de entrada y mostrar la salida de vídeo del CSM3PL. Si ha utilizado el CSM3PL en modo
VGA, pulse el botón VGA del mando a distancia para volver a cambiar la salida de vídeo en su
televisor.
Si utiliza un monitor, es necesario usar un cable VGA para monitor y conectarlo al conector VGA
OUT (6). Pulse el botón VGA del mando a distancia (varias veces) hasta que el monitor se
encienda automáticamente (en el modo Stand-by).
Para cambiar de un modo a otro de los disponibles (VGA, TV, S-VIDEO, etc.), deberá pulsar el
botón VGA del mando a distancia.
39
Page 40

ESPAÑOL
4. Mando a distancia
El mando a distancia se utiliza para manejar la unidad. Encontrará una representación del mando a
distancia detrás de la portada de este manual. Los números de los botones corresponden con los de la
tabla de abajo, en la cual se explica cada función del mando a distancia.
Núm. Botón Descripción
1 POWER ( ) Entrar o salir del modo Standby. (ON/OFF)
2 R / L Seleccionar la salida de audio: derecha, izquierda y estéreo.
3 SLIDE Entrar en el modo Music-slide-show o step-play.
4 SLOW Reproducir lentamente.
5 REPEAT Seleccionar un modo de repetición.
6 DELAY Seleccionar el tiempo de intervalo de slide show (diaporama) (incluido
7 TRANS Seleccionar un modo de transición o un tipo de ecualizador de música.
8
9 AUDIO Seleccionar / cambiar el flujo de audio (reproducción DVD).
10 MENU Mostrar la DEVICE LIST (lista de dispositivos) o FILE LIBRARY (biblioteca
Volver al menú del DVD (reproducción DVD).
11 PLAY/PAUSE Inicia la reproducción de un fichero o carpeta del DVD, interrumpe una
12 VOL + / - Aumentar / disminuir el volumen.
13 PREVIOUS (
24 REWIND (
15 FILE Mostrar la estructura de directorios del dispositivo.
16 MUSIC Botón de acceso directo a la música.
17 0 – 9 La música se puede reproducir sin dispositivo de imagen (TV, monitor)
18 OUTPUT Seleccionar la señal de salida de vídeo.
19 SETUP Configuración de funciones.
20 PHOTO Botón de acceso directo a las fotos.
21 VIDEO Botón de acceso directo a los vídeos.
22 FAST FORWARD (
23 NEXT (
24 STOP (
25 FUNC Mostrar el menú de operaciones de fichero.
26 SUB-T Seleccionar / cambiar los SUB-Títulos de la película (reproducción
27 ENTER (
28 ZOOM Alejar/acercar (reproducción fotografías y DVD).
29 ROTATE Rotar las fotografías.
30 DISPLAY Muestra la información del fichero durante su reproducción.
31 A – B Reproducir repetidamente un intervalo de reproducción. Pulsar el botón
32 TOP Ir al inicio del directorio.
33 P / N Seleccionar el sistema de vídeo. (PAL / NTSC)
34 MUTE Silencio o cancelar silencio.
, , , Mover el cursor.
) Rebobinar rápidamente.
) Pasa al fichero /capítulo o página siguiente.
) Abandonar una reproducción.
) Confirmar selección.
el slide show de música).
de ficheros) (si sólo hay un dispositivo conectado).
reproducción.
) Pasa al fichero / capítulo o página anterior.
preseleccionando las carpetas de música (explicación más detallada en
el manual).
) Avanzar rápidamente.
MPEG4 y DVD).
una vez para seleccionar el punto <A> inicial; pulsar el botón de nuevo
para seleccionar el punto <B> final; se repetirá el intervalo A-B; pulsar
el botón de nuevo para cancelar.
Válido únicamente para el modo vídeo, no para el modo música.
40
Page 41

ESPAÑOL
5. Indicaciones importantes
El alcance operativo del mando a distancia es de 5 metros aproximadamente.
1. Apunte en dirección al receptor que se encuentra en el panel frontal del dispositivo.
El ángulo de recepción es de unos 30º teniendo en cuenta alcance de 5 metros.
2. Reponga la pila cuando esté parcial o totalmente agotada.
5.1 Funcionamiento básico
1. Enchufe el adaptador de corriente a una toma de electricidad y conecte el otro extremo al
adaptador del dispositivo.
2. Encienda el dispositivo con el interruptor de alimentación de la parte trasera del dispositivo.
El LED de alimentación se verá azul. Ahora el dispositivo ya está operativo.
Cuando no haya otro dispositivo conectado al CSM3PL, mostrará la FILE LIBRARY (biblioteca de
ficheros) con los contenidos del disco duro (si sólo hay presente una partición).
Cuando un dispositivo USB (como un disco duro o Flashdrive USB) o una tarjeta de memoria
está conectado al CSM3PL, la pantalla mostrará la DEVICE LIST (lista de dispositivos) con todos
los dispositivos encontrados. Si el dispositivo conectado contiene una gran cantidad de
ficheros, la detección del dispositivo puede tardar un poco. Espere a que aparezca la pantalla
DEVICE LIST / FILE LIBRARY.
Observaciones
• Normalmente no es necesario cambiar el sistema de vídeo (PAL/NTSC). Sin embargo, si su
televisor sólo es compatible con los sistemas NTSC o PAL, deberá pulsar el botón P/N para
seleccionar un sistema de color que coincida con el sistema de su televisor.
• Si la función AUTO START está activada (para ello, pulse el botón SETUP -> SETUP MENU ->
PREFERENCES -> AUTO START -> ON), todos los archivos de los dispositivos conectados se
reproducirán automáticamente. Pulse el botón
reproducción automática y visualizar la lista completa de la partición seleccionada.
• Pulse uno de los botones
confirmar la selección (acceder a la biblioteca multimedia, a la carpeta de archivos o
empezar a reproducir archivos).
• Pulse el botón
(FILE LIBRARY).
• Pulse el botón MENU para mostrar la LISTA DE DISPOSITIVOS (DEVICE LIST) o la BIBLIOTECA
DE ARCHIVOS (FILE LIBRARY).
• Pulse el botón
• Le recomendamos que desconecte el dispositivo de la alimentación de corriente si no va a
utilizarlo durante un largo período de tiempo.
(STOP) pata detener la reproducción y volver a la BIBLIOTECA DE ARCHIVOS
(POWER) para activar/desactivar el modo Stand-by.
(STOP) para detener la función de
/ / / para mover el cursor, y utilice el botón (ENTER) para
41
Page 42

ESPAÑOL
5.2 Funcionamiento detallado
Biblioteca de archivos
Si no hay ningún dispositivo externo conectado al CSM3PL (sólo está presente el disco duro
interno), la FILE LIBRARY (biblioteca de ficheros) aparecerá en la pantalla de TV cuando pulse el
botón
/ POWER para entrar al estado de funcionamiento (como se ilustra a continuación).
En cambio, si hay varios dispositivos conectados (stick USB, tarjeta de memoria), la LISTA DE
DISPOSITIVOS (DEVICE LIST) aparecerá en primer lugar en la pantalla del televisor cuando pulse
el botón
Para ir a la BIBLIOTECA DE ARCHIVOS (FILE LIBRARY), pulse el botón
Advertencia
Es posible que deba esperar unos instantes hasta poder navegar por el menú. Antes de que el
menú aparezca, el o los dispositivos conectados se mostrarán en forma de índice. Usted verá lo
siguiente en la pantalla: SEARCHING, que significa que los archivos correspondientes aparecerán
en el índice y se mostrarán en el menú.
(POWER) para ponerlo en funcionamiento. Utilice el botón / para mover el cursor.
(ENTER).
:
LISTA DE DISPOSITIVOS BIBLIOTECA DE ARCHIVOS
Cambiar el dispositivo conectado
Si hay más dispositivos conectados al CSM3PL, puede pulsar el botón MENU para acceder a la
LISTA DE DISPOSITIVOS (DEVICE LIST) y seleccionar uno de ellos pulsando el botón
continuación, el botón
(ENTER).
/ y a
6. Configuración para la reproducción de películas, música y fotografías
El CSM3PL de Conceptronic ofrece 3 funciones principales:
- Reproducir y ver películas
Reproducir y escuchar música
-
-
Reproducir y visualizar fotografías
6.1 Opciones sobre la reproducción y visualización de películas
Reproducción de películas
El CSM3PL es compatible con diversos formatos de vídeo:MPEG2/1, MPEG 4 (incluidos los
formatos XVID y VOB), así como pistas de audio en formato MP3, AC3, AAC y MPG1/2 dentro de
archivos de vídeo.
Opciones adicionales de reproducción de vídeo
Compatible con formato de vídeo MPEG4 con subtítulos de texto.
42
Page 43

ESPAÑOL
Asimismo, el CSM3PL de Conceptronic es compatible con los formatos .SMI, .SRT, .SUB o .SSA de
archivos de subtítulos.
Si el fichero de subtítulo tiene el mismo nombre que el fichero de vídeo seleccionado (sólo la
extensión es diferente), el fichero de subtítulo se cargará automáticamente cuando se
reproduzca el fichero MPEG4.
Cuando el archivo de subtítulos tenga un nombre diferente, deberá seleccionar dicho archivo,
pulsar el botón SUB-T del mando a distancia y seleccionar el archivo de la película que desea
reproducir (los dos archivos están asociados). Pulse el botón
película.
Intervalo de repetición
Pulse el botón A/B para reproducir un intervalo de vídeo repetidamente.
Canales de sonido
Pulse el botón R/L del mando a distancia para reproducir el archivo en Sonido Mono a la
izquierda, Sonido Mono a la derecha o Sonido Estéreo.
Algunos archivos MPEG2/VOB contienen dos o más flujos de audio. Pulse el botón AUDIO para
recorrer todos los ciclos 1-1/8~1-8/8,2-1/8~2-8/8, 3-1/8~3-8/8 (un total 24 flujos de audio). Si
un vídeo no tiene sonido cuando se está reproduciendo, pulse el botón AUDIO para localizar el
flujo de audio correcto.
Si cambia un archivo MPEG2/VOB, puede perder el sonido si está en otro flujo. Para evitarlo,
pulse el botón SETUP durante la reproducción para bloquear el flujo de audio actual. Esta opción
mantendrá el flujo de audio seleccionado para todos los archivos.
Reproducción de vídeos
Cuando reproduzca vídeos, pulse el botón SLIDE si desea aplicar el modo de reproducción paso a
paso. De esta manera, los vídeos se visualizarán de forma continua.
Durante la reproducción de vídeos, pulse el botón
pulse el botón
Botón de acceso directo a su carpeta de vídeo
Usted puede crear 1 carpeta de vídeo a la que se puede acceder directamente pulsando el botón
VIDEO del mando a distancia. Cree una carpeta con el nombre de “VIDEO ***” (donde *** puede
cambiarse por lo que usted desee) en la raíz del disco duro y coloque archivos de vídeo en esta
carpeta.
Cuando se inicie el reproductor multimedia y usted pulse el botón VIDEO, el reproductor
multimedia abrirá automáticamente la carpeta.
NOTA:
Si usted crea más de 1 carpeta cuyo nombre empiece por “VIDEO ***”, el dispositivo sólo abrirá
la primera carpeta.
NOTA:
El CSM3PL es compatible con la mayoría de codecs de vídeo, como XviD, AVI, MPEG2, etc. Sin
embargo, es posible que usted necesite para sus archivos algún codec que no incluya el CSM3PL.
Si trata de reproducir un archivo con un codec no compatible, aparecerá el mensaje “CODEC
NOT SUPPORTED”(“CODEC NO COMPATIBLE”).
/ para su avance/rebobinado rápido, y
(ENTER) para volver a la velocidad normal.
(ENTER) para reproducir la
43
Page 44

ESPAÑOL
Reproducción de DVD
El CSM3PL reproduce archivos de DVD del disco duro como si fuese un DVD normal. Podrá
navegar por el Menú de DVD y elegir subtítulos, cambiar el idioma de audio, etc.
Configuración de carpetas
Para poder reproducir archivos DVD de su disco duro deberá configurar las carpetas de DVD del
CSM3PL correctamente.
Cree una carpeta en el disco duro del CSM3PL con el nombre del DVD (por ejemplo, “Mi
Película”).
Copie la carpeta VIDEO_TS de su DVD en la carpeta de DVD creada en el disco duro del CSM3PL.
Una vez realizada la copia, verá la imagen siguiente:
Desconecte el CSM3PL de su ordenador y conéctelo a su televisor. Encienda el CSM3PL.
Reproducción del DVD
Utilice las teclas de navegación del mando a distancia para seleccionar la carpeta de su DVD en
el menú (en el ejemplo: My Movie).
Pulse el botón PLAY/PAUSE del mando a distancia para iniciar la reproducción del DVD.
Nota:
No utilice el botón / ENTER en el menú del CSM3PL. Sólo mostrará los ficheros /
subcarpetas y no iniciará la reproducción del DVD.
Utilice los botones de navegación
DVD. Utilice el botón
/ / / y el botón / ENTER para navegar por el menú del
/ STOP para finalizar la reproducción del DVD.
44
Page 45

ESPAÑOL
6.2 Opciones sobre reproducir y escuchar música
Reproducción de música
El CSM3PL de Conceptronic ofrece diversos modos de reproducción de música (son compatibles
los formatos WAV, MP3 y WMA).
Reproducir archivos de música:
Pulse el botón MENU y seleccione la carpeta correspondiente donde se encuentran los archivos
de música que desea reproducir. La canción aparecerá en pantalla y, pulsando el botón TRANS
del mando a distancia, podrá seleccionar las opciones del ecualizador. Si desea volver a escuchar
una canción, puede seleccionar lo siguiente:
Random: Reproducir la carpeta seleccionada en orden aleatorio.
Shuffle: Reproducir la carpeta seleccionada siempre en el mismo orden aleatorio.
Single: Reproducir sólo la pista seleccionada.
Folder: Repetir la carpeta seleccionada.
REP-one: Repetir la canción seleccionada hasta que decida detener su reproducción.
Folder repeat: Repetir la carpeta seleccionada hasta que decida detener su reproducción.
Al reproducir ficheros de música, pulse el botón
PLAY/PAUSE para volver a la velocidad normal.
Reproducción de música incluyendo subcarpetas
Puede reproducir archivos de música, incluyendo subcarpetas, con el botón MUSIC del mando a
distancia.
Utilice las flechas de navegación del mando a distancia para seleccionar la carpeta que contiene
la música que desea reproducir. Pulse el botón MUSIC del mando a distancia para hacer una lista
con todos los archivos de música de la carpeta y subcarpetas seleccionadas.
Nota:
Si pulsa el botón / ENTER en vez del botón MUSIC, no se iniciará la reproducción
Configuración de la carpeta “MUSICDIR” para su acceso rápido
Para preparar su CSM3PL de manera que reproduzca música automáticamente, debe crear una
carpeta especial cuando haya conectado su CSM3PL al ordenador.
1) Cree la carpeta “MUSICDIR” en la raíz de la primera partición.
2) Cree subcarpetas con nombres de tres dígitos, por ejemplo, “001”, “002”, “003”, etc.
3) Copie los ficheros de música en estas carpetas.
Para utilizar la carpeta de música predefinida con una pantalla conectada, siga los pasos
siguientes cuando el dispositivo esté en uso:
1) Pulse el primer dígito de la carpeta y espere a que aparezca el mensaje siguiente en su
2) Pulse los otros 2 dígitos de la subcarpeta que quiera reproducir.
También es posible reproducir la música de las carpetas predefinidas si su pantalla está
desconectada. Aconsejamos utilizar solamente las carpetas 000 - 009 para esta función. Para
reproducir la música de estas carpetas, pulse el dígito de la carpeta (0 – 9) y pulse el botón
PLAY/PAUSE.
La música se empezará a reproducir automáticamente.
sino que se abrirá la carpeta seleccionada y sus subcarpetas.
(Puede crear hasta “999” carpetas.)
pantalla: “AUTO PLAY: MP3 -> ___”
/ para ajustar la velocidad y pulse el botón
45
Page 46

ESPAÑOL
Nota:
El tiempo entre que se introduce el primer dígito y que aparece el mensaje en pantalla
aumentará cuando tenga más datos en su disco duro.
6.3 Opciones sobre la reproducción y visualización de fotografías
Durante la visualización de fotografías, puede utilizar el botón ROTATE para girar las fotos. El
mensaje de rotación de las fotos se mantiene por defecto hasta que apague el dispositivo o lo
configure en modo Stand-by. Si no desea mantener el mensaje de rotación, puede desactivar
esta función mediante SETUP MENU->GENERAL SETUP-> ORIENTATION->OFF. Durante la
visualización de fotografías, puede utilizar el botón TRANS para cambiar el modo de transición
entre fotos. Si desea configurar el modo de transición, proceda tal y como se indica a
continuación: SETUP MENU->SLIDESHOW SETUP->TRANSITION.
MODO 01: FULL SCREEN (PANTALLA COMPLETA)
MODO 02: RANDOM (ALEATORIO)
MODO 03: ROLL: TOP TO BOTTOM (TRANSICIÓN: DE ARRIBA ABAJO)
MODO 04: ROLL: BOTTOM TO TOP (TRANSICIÓN: DE ABAJO ARRIBA)
MODO 05: ROLL: TOP/BOTTOM TO CENTER (TRANSICIÓN: DE ARRIBA/ABAJO AL CENTRO).
MODO 06: ROLL: CENTER TO TOP/BOTTOM (TRANSICIÓN: DEL CENTRO ARRIBA/ABAJO).
MODO 07: BLIND: TOP TO BOTTOM (EFECTO PERSIANA: DE ARRIBA ABAJO)
MODO 08: ROLL: LEFT TO RIGHT (TRANSICIÓN: DE IZQUIERDA A DERECHA)
MODO 09: ROLL: RIGHT TO LEFT (TRANSICIÓN: DE DERECHA A IZQUIERDA)
MODO 10: ROLL: LEFT/RIGHT TO CENTER (TRANSICIÓN: DE IZQUIERDA/DERECHA AL CENTRO)
MODO 11: ROLL: CENTER TO LEFT/RIGHT (TRANSICIÓN: DEL CENTRO A LA IZQUIERDA/DERECHA)
MODO 12: ROLL: IMPLODE (TRANSICIÓN DE TODOS LOS LADOS HACIA EL CENTRO)
MODO 13: BLIND: LEFT TO RIGHT (EFECTO PERSIANA: DE IZQUIERDA A DERECHA)
MODO 14: CROSS FADE (FUNDIDO ENCADENADO)
Zoom
Pulse el botón ZOOM para activar o desactivar la función de zoom o cambiar el grado de
ampliación o reducción. Una vez ampliada una fotografía, puede utilizar los botones
para moverla.
Presentación de imágenes tipos diapositivas con acompañamiento musical
(visualización de fotografías con música de fondo)
Seleccione una fotografía y pulse SLIDE para empezar. Si no pulsa el botón SLIDE la música no
sonará y las imágenes se visualizarán en formato de presentación de imágenes tipo diapositivas
sin música. Si en la carpeta no hay archivos de música, la aplicación SLIDE no funciona. Para
obtener la presentación de imágenes tipo diapositivas sin sonido, pulse el botón
En el modo SLIDE sólo pueden visualizarse los archivos de fotografías y música que se encuentren
en la misma carpeta. NOTA: En este modo no se pueden activar las funciones ROTATE/ZOOM.
Puede detener la visualización de la foto pulsando el botón PLAY/PAUSE (la música se continúa
reproduciendo). Pulse de nuevo PLAY/PAUSE para detener la música. Pulse el botón
PLAY/PAUSE para reanudar la reproducción de la música.
Si lo desea, puede configurar el intervalo de visualización entre dos fotografías pulsando el
botón DELAY. El intervalo predeterminado está configurado en SETUP MENU->PREFERENCES>DELAY. Pulse el botón TRANS para cambiar un modo de transición y si desea repetir la
visualización de las fotos, pulse el botón REPEAT.
(ENTER).
/ / /
46
Page 47

ESPAÑOL
Botón de acceso directo a su carpeta de fotografías
Usted puede crear 1 carpeta de fotografías a la que se puede acceder directamente pulsando el
botón PHOTO del mando a distancia. Cree una carpeta con el nombre “PHOTO ***” (donde ***
puede cambiarse por lo que usted desee) en la raíz del disco duro y coloque fotos en esta
carpeta. Cuando se inicie el reproductor multimedia y usted pulse el botón PHOTO, el
reproductor multimedia abrirá automáticamente la carpeta.
NOTA:
Si crea más de 1 carpeta cuyo nombre empieza por “PHOTO ***”, el dispositivo sólo abrirá la
primera carpeta.
6.4 Funcionamiento de la biblioteca de archivos
Utilice el botón / para seleccionar un archivo o una carpeta, y el botón /
(PREV/NEXT) para pasar a la página anterior/siguiente. Si selecciona una fotografía o un
vídeo, podrá disfrutar de una vista previa y de la información correspondiente en la parte
derecha de la pantalla. Si selecciona un archivo de música, la música empezará a sonar al
tiempo que en la parte derecha de la pantalla aparece la información correspondiente.
Pulse el botón TOP para mover el cursor directamente hacia la parte superior de la lista de
archivos y cambiar a otra carpeta con facilidad.
Pulse el botón
reproduciendo archivos de música, aparecerá la pantalla de ECUALIZADOR MUSICAL). Pulse
el botón
Pulse el botón REPEAT para seleccionar un modo de repetición:
RANDOM/SHUFFLE/SINGLE/FOLDER/REP-ONE/FOLDER REPEAT.
En el estado STOP, pulse el botón FUNC para mostrar u ocultar un menú desplegable del
funcionamiento del archivo.
(STOP) para desactivar el modo de pantalla completa.
(ENTER) para activar el modo de pantalla completa (en caso de estar
DELETE (ELIMINAR): eliminar el archivo o carpeta seleccionada.
RENAME (CAMBIAR NOMBRE): cambiar de nombre el archivo o carpeta seleccionada.
NEW FOLDER (NUEVA CARPETA): crear una nueva carpeta.
PROPERTIES (PROPIEDADES): mostrar/ocultar la información del archivo, como el tamaño,
la duración y el formato.
47
Page 48

ESPAÑOL
7. Menú de configuración
En estado STOP, pulse el botón SETUP para activar el
menú de configuración.
Pulse el botón
pulse el botón
selección. Una vez hecho esto, pulse el botón SETUP.
/ / / para mover el cursor y después
(ENTER) para confirmar la
7.1 Configuración general (General setup)
• ORIENTATION (ORIENTACIÓN):
sobre la información de rotación.
Opciones: ON, OFF
Predeterminado: ON
• TV DISPLAY (VISUALIZACIÓN TV)
Opciones:
NORMAL/PS, NORMAL/LB, WIDE
(NORMAL/PS, NORMAL/LB, ANCHO)
Predeterminado: NORMAL/PS
• TV SYS (SISTEMA TV): Seleccionar el sistema de vídeo
Opciones: MULTI SYSTEM, NTSC, PAL
Predeterminado: MULTI SYSTEM
• SPDIF OUTPUT (SALIDA SPDIF)
Opciones: OFF, SPDIF/RAW, SPDIF/PCM
Por defecto: OFF (DESCONEXIÓN)
• SCREENSAVER (SALVAPANTALLA): activa el salvapantalla, cuya imagen aparece cuando la unidad
se detiene o la imagen permanece congelada durante unos minutos. El salvapantalla protege la
pantalla y evita que se deteriore.
Opciones: ON, OFF
Predeterminado: ON
7.2 Configuración de la presentación de imágenes tipo diapositivas (Slideshow setup)
• SLIDESHOW MODE
MODO PRESENTACIÓN DE IMÁGENES
TIPO DIAPOSITIVAS
Opciones: MANUAL, AUTO
Predeterminado: AUTO
• INTERVAL TIME (INTERVALO): seleccione el
intervalo entre dos fotografías.
Opciones: ONE SECOND (UN SEGUNDO),
THREE SECONDS (TRES SEGUNDOS),
FIVE SECONDS (CINCO SEGUNDOS),
TEN SECONDS (DIEZ SEGUNDOS)
Predeterminado: THREE SECONDS (TRES SEGUNDOS)
• TRANS SPEED (VELOCIDAD DE TRANSICIÓN)
Opciones: FAST (RÁPIDO), SLOW (LENTO)
Predeterminado: FAST (RÁPIDO)
• TRANSITION (TRANSICIÓN)
Opciones: FULL SCREEN (PANTALLA COMPLETA), RANDOM (ALEATORIO), TOP– >BOTTOM (DE
ARRIBA ABAJO), BOTTOM– >TOP (DE ABAJO ARRIBA), T/B– >CENTER (DE ARRIBA/ABAJO AL
CENTRO), CENTER– >T/B (CENTRO– >DE ARRIBA/ABAJO), BLIND (EFECTO PERSIANA). T– >B (DE
ARRIBA ABAJO), LEFT– >RIGHT (DE IZQUIERDA A DERECHA), RIGHT– >LEFT (DE DERECHA A
IZQUIERDA), L/R– >CENTER (DE IZQUIERDA/DERECHA AL CENTRO), CENTER– >L/R (DEL CENTRO A
LA IZQUIERDA/DERECHA), IMPLODE (DE TODOS LOS LADOS HACIA EL CENTRO), BLIND (EFECTO
PERSIANA), L- >R (IZQUIERDA/DERECHA), CROSS FADE (FUNDIDO ENCADENADO)
Predeterminado: RANDOM (ALEATORIO).
48
Page 49

ESPAÑOL
7.3 Preferencias (Preferences)
• VIDEO OUTPUT (SALIDA DE VÍDEO):
Opciones: S-VIDEO, COMPONENT, P-SCAN YPBPR,
VGA e INTERLACE RGB.
• OSD LANG (IDIOMA EN PANTALLA):
Seleccionar el idioma en pantalla:
Opciones: INGLÉS, FRANCÉS,
ALEMÁN, ITALIANO, PORTUGUÉS,
ESPAÑOL, HOLANDÉS
Predeterminado: INGLÉS
• OSD MESSAGE (MENSAJE EN PANTALLA): Seleccionar
el mensaje en pantalla durante la reproducción de
un archivo.
Opciones: ON, OFF
Predeterminado: ON
• DEFAULT (PREDETERMINADO): Aplicar la configuración predeterminada por el fabricante.
• AUTO START (INICIO AUTOMÁTICO): Reproducir automáticamente todos los archivos multimedia
de todos los dispositivos conectados.
Opciones: ON, OFF
Predeterminado: OFF
• FILE SORT (CLASIFICACIÓN DE ARCHIVOS): Seleccionar archivos clasificados en el dispositivo o
dispositivos conectados actualmente.
Opciones: BY NAME; BY SIZE; BY TIME; BY TYPE (POR NOMBRE, POR TAMAÑO, POR DURACIÓN,
POR TIPO)
Predeterminado: POR NOMBRE)
8. Especificaciones
Alimentación : 100~240 VAC, 50/60 HZ
Consumo de energía : 11W (normal)
Dimensiones : 177×163×44 (profundo x ancho x alto
Sistema a color : PAL/NTSC
Respuesta de frecuencia : ±3 dB(20 HZ~20 KHZ)
Relación señal ruido : ≥80 dB
Diafonía de audio : ≥70 dB
Salida de audio : 2,0 ± 0,2V (rms)
Salida de vídeo: : 1,0 ± 0,2Vp-p, 75Ω
Velocidad de transferencia de datos USB
Formatos de archivo compatibles : AVI/MPG/DAT/VOB/WAV/MP3/WMA/JPG
Sistema(s) de archivos compatible(s) : FAT32.
Sujetas a cambios sin previo aviso.
mm)
: USB 2.0, máx. 480 Mb/s
49
Page 50

ESPAÑOL
9. Consejos y resolución de problemas
Aplique los consejos que indicamos a continuación para resolver los problemas que puedan surgir
en caso de que su CSM3PL no funcione correctamente:
El LED de encendido no se ilumina
• El CSM3PL no está conectado a la toma de alimentación. Conecte el CSM3PL a la toma de corriente.
No hay actividad en la pantalla
• El CSM3PL está en modo Stand-by. Pulse el botón del mando a distancia para activarlo.
• En su televisor está seleccionada una fuente de entrada incorrecta. Cambie la fuente de entrada.
• Está seleccionado un sistema de video incorrecto. Pulse el botón VGA del mando a distancia para
cambiar el sistema de video.
• El cable del vídeo no está bien conectado. Compruebe si el cable del vídeo está conectado
correctamente.
El sonido no funciona
• El cable de audio no está bien conectado. Compruebe que el cable está conectado correctamente al
televisor o al amplificador.
• El CSM3PL está conectado a un amplificador, pero éste está apagado. Encienda el amplificador.
• El flujo de audio del archivo MPEG2 o VOB no es válido. Pulse el botón AUDIO del mando a distancia para
ajustar el flujo de audio correctamente.
• La función MUTE está activada. Vuelva a pulsar el botón MUTE del mando a distancia para desactivar
esta función.
• El CSM3PL funciona en modo FF/FR. Pulse el botón PLAY/PAUSE del mando a distancia para volver a la
reproducción normal.
La imagen de la pantalla aparece distorsionada
•
El CSM3PL funciona en modo FF/FR. Pulse el botón PLAY/PAUSE del mando a distancia para volver a la
reproducción normal.
Las películas en formato PAL se reproducen en modo NTSC y viceversa. Pulse el botón P/N del mando a
•
distancia para cambiar la configuración de pantalla.
Al pulsar el botón SLIDE, el sistema se bloquea.
• La carpeta actual contiene demasiados archivos de fotografías o de música. La presentación de imágenes
tipo diapositivas con acompañamiento musical tardará varios minutos en empezar. Por favor,
manténgase a la espera.
El mando a distancia no funciona
• Apunte con el mando a distancia directamente hacia el receptor del CSM3PL en un ángulo de 30º
aproximadamente.
• Utilice el mando a distancia teniendo en cuenta su alcance operativo de 5 metros.
• La pila del mando a distancia debe reponerse.
No aparecen los subtítulos de la película que se está reproduciendo.
• Se está reproduciendo un archivo en formato AVI, pero el archivo de subtítulos tiene un nombre
diferente. Consulte el apartado 6.1 sobre la visualización de los subtítulos.
Al tratar de reproducir el vídeo, se muestra el mensaje “CODEC NOT SUPPORTED” (códec no
compatible).
• El fichero de la película se ha creado con un códec no compatible para el CSM3PL.
Vaya al sitio web www.conceptronic.net
para ver la lista de códecs compatibles con el CSM3PL.
50
Page 51

ESPAÑOL
El CSM3PL no muestra todas las particiones / contenido del disco duro.
• La partición del disco duro no es primaria. Vuelva a realizar la partición del disco duro y asegúrese de
que todas las particiones son primarias.
• La partición no se ha formateado como FAT32. Vuelva a formatear la partición con el sistema de ficheros
FAT32.
• No hay ficheros multimedia en la partición seleccionada.
¿Qué tarjetas de memoria son compatibles con el CSM3PL?
•
El CSM3PL lee todas las principales familias de tarjetas de memoria, como:
Memorystick (MS), Secure Digital (SD), Multimedia Card (MMC), Smart Media Card (SM), Compact Flash
(CF), Microdrive (MD).
Vaya al sitio web www.conceptronic.net
CSM3PL.
para ver la lista de las tarjetas de memoria compatibles con el
La reproducción de DVD no se inicia mientras la tecla Play/Pause esté pulsada.
Compruebe que utiliza la estructura de carpetas correcta. La estructura de carpetas se describe en el
•
apartado 6.1.
• Los archivos de DVD están incompletos, deteriorados o dañados. En ese caso, el CSM3PL no iniciará la
reproducción de DVD.
Durante la reproducción de las intro movies del DVD, la pantalla quedará en blanco.
•
La pista actual finaliza con la pantalla en negro o es demasiado corta para su reproducción. Pulse
(
NEXT) para avanzar a la pista siguiente.
Mi televisor muestra la imagen en blanco y negro en lugar de en color.
•
Su televisor no es compatible con el sistema de TV Multi del CSM3PL. Utilice el Menú de Configuración
para cambiar el sistema de TV a PAL (véase el apartado 7.1).
Una vez modificado el sistema de TV, apague y vuelva a encender el CSM3PL.
51
Page 52

DEUTSCH
Conceptronic CSM3PL
Schnellinstallationsanleitung
Wir gratulieren Ihnen zum Kauf Ihres
Conceptronic CSM3PL.
In beiliegendem Hardwareinstallationshandbuch finden Sie schrittweise Erklärungen für die
Verwendung Ihres Conceptronic Grab’n’GO 3,5“ Media Players mit Kartenleser.
Sollten irgendwelche Probleme auftreten, empfehlen wir ihnen, auf unsere Support-Seite im Internet
zu gehen (www.conceptronic.net
Questions" Datenbank finden.
Falls sie andere Fragen zu ihrem Produkt haben und sie diese nicht auf unserer Website finden
können, kontaktieren sie uns bitte per E-Mail: support@conceptronic.net
Weitere Informationen zu den Conceptronic Produkte finden Sie auf der Website von Conceptronic:
www.conceptronic.net
1. Einleitung
Lesen Sie bitte vor der Inbetriebnahme des Geräts dieses Handbuch sorgfältig durch und
bewahren Sie es als zukünftiges Nachschlagewerk auf.
1.1 Packungsinhalt
Überprüfen Sie bitte vor dem Anschluss des Geräts an den Fernseher oder Computer/Bildschirm
den Packungsinhalt. Folgendes sollte enthalten sein:
• 1x Conceptronic Grab‘n’GO 3,5” Media Player mit Kartenleser.
• 1x Fernbedienung mit Batterie
• 1x Netzteil (12V Gleichstrom, 2.5A)
• 1x Audio-/Videokabel (Composite)
• 1x Audio-/Video- (Composite-)Kabel für den Anschluss an SCART
• 1x S-VIDEO an S-VIDEO Kabel
• 1x SPDIF Kabel
• 1x USB Kabel
• 1x gedruckte Schnellinstallationsanleitung in mehreren Sprachen
• 1x Ständer für CSM3PL
1.2 Eigenschaften
Automatische Umschaltung zwischen PC- und Player-Modus:
Wenn das Gerät an einen PC angeschlossen ist, hat es die Funktion eines USB-
Speichergeräts.
Wenn es nicht an einen PC angeschlossen ist, hat das Gerät die Funktion eines Media
Players.
) und auf 'Support’ zu klicken. Dort werden sie die "Frequently Asked
52
Page 53

DEUTSCH
Im PC-Modus:
• Unterstützt Plug-n-Play.
• Kompatibel mit High Speed USB 2.0/1.1, maximale Datenübertragungsgeschwindigkeit 480
Mb/s.
Im Player-Modus:
• Unterstützt interne Festplatten, USB-Geräte und Speicherkarten.
• Unterstützt mehrere Sprachen:
Englisch, Niederländisch, Spanisch, Französisch, Italienisch, Deutsch, Portugiesisch
• Unterstützt mehrere Festplatten-Partitionen.
• Voransicht von Mediadateien.
• Unterstützt Text-Untertitel (.SMI/.SRT/.SUB/.SSA) für MPEG4 (AVI), D1-Auflösung.
• Unterstützt AVI (MPEG4), MPG (MPEG1, MPEG2), DAT (VCD), VOB (DVD), WAV, WMA, MP3,
JPG.
• Unterstützt verschiedene Codecs. Eine vollständige Liste der unterstützten Codecs finden
Sie auf unserer Webseite.
• Ausgänge: Composite-Video/Component-Video/RCA-Audio/optisch Audio/VGA/S-Video.
• PAL/NTSC-kompatibel.
• Verschiedene Wiederholfunktionen.
• Dateioperationen (DELETE [LÖSCHEN] /RENAME [UMBENENNEN]/NEW FOLDER [NEUER
ORDNER]/PROPERTIES [EIGENSCHAFTEN]).
• Bildschirmschoner.
• Verschiedene Anzeigearten von Fotos
Diashow (Slide Photo Play Back) mit Hintergrundmusik.
14 Übergangsmodi; einstellbares Anzeigeintervall.
Funktionen Zoom, Drehen, Verschieben.
Dateien können nach Namen/Größe/Zeit/Typ geordnet werden.
1.3 Warnungen
• Versuchen Sie nicht, das mitgelieferte Netzteil zu zerlegen. Dies könnte zu Verletzungen
aufgrund von Hochspannung führen. Wenn das Netzteil repariert werden muss, Kontaktieren
Sie bitte Ihren Händler oder das Helpdesk von Conceptronic.
• Setzen Sie das Gerät nicht extremer Feuchtigkeit aus.
• Tauchen Sie das Gerät nicht in Flüssigkeiten und setzen Sie es keinen Flüssigkeiten aus.
• Trennen Sie das Netzteil von der Stromversorgung, wenn Sie das Gerät für längere Zeit nicht
benutzen.
• Verwenden Sie das Gerät möglichst nicht in der Nähe von Brennstoffen.
• Ersetzen Sie die Batterien der Fernbedienung mit Batterien des gleichen Typs, wenn diese
schwach oder leer sind. Entsorgen Sie die alten Batterien auf sichere Weise. Führen Sie diese,
wenn möglich, der Wiederverwertung zu. Wenn Sie die Fernbedienung für längere Zeit nicht
verwenden, entfernen Sie die Batterien, um Korrosion zu verhindern.
• Setzen Sie die Fernbedienung nicht extremer Feuchtigkeit aus und lassen Sie sie nicht fallen.
• Verwenden Sie die Fernbedienung nicht bei intensiver Sonnenbestrahlung.
• Lassen Sie das Gerät NIEMALS fallen und setzen Sie es keinen Stößen oder Erschütterungen
aus.
• Decken Sie das Gerät nicht ab, um eine Überhitzung zu vermeiden.
• Der CSM3PL unterstützt nur das FAT- / FAT32-Dateisystem (NTFS wird nicht unterstützt).
ACHTUNG: Wenn Sie die Festplatte mit NTFS formatieren, kann sie nur als Wechselfestplatte für
• Die Daten auf der internen Festplatte und / oder den angeschlossenen Geräten können
Ihren Computer verwendet werden. Formatieren Sie die Festplatte wieder mit
FAT32, um die Funktionen des Media Players zu aktivieren.
fragmentiert werden. Dies hat eine Auswirkung auf die Wiedergabe von Filmen. Wir
empfehlen Ihnen, die Festplatte und/oder das/die angeschlossenen Gerät/-e auf Ihrem
Computer hin und wieder zu defragmentieren.
53
Page 54

DEUTSCH
2. Functionalities of the Grab’n’GO 3,5” Media Player with Cardreader
2.1 Funktionen des Grab ‘n’ GO 3,5” Media Players mit Kartenleser
• Vorderseite
1. Fernbedienungsempfänger 4. Festplatten-LED 7. SM-Kartensteckplatz
2. Power LED 5. MMC-/MS-/SD-Kartensteckplatz 8. USB HOST-Buchse
3. Steuerungstasten 6. CF-Kartensteckplatz
• Steuerungstasten
Hinweis:
•
Rückseite
Nr.
Stop-Modus Play-Modus
1
2
3
4
5
Die Funktionen der Steuerungstasten sind die selben wie die der Fernbedienung.
Genaue Informationen zu jeder Taste finden Sie in Kapitel 4.
Kurz drücken
( ) (VOL+) P/N (P/N)
( ) (VOL-) VGA (VGA)
( ) ( ) ( )
( ) ( ) ( )
( ) ( ) ( )
Lang drücken
1. Netzbuchse 4. Video-Ausgang 7. S-VIDEO-Ausgang
2. Optischer Ausgang 5. Component Video-Ausgang 8. Ein-/Aus-Schalter
3. Audio-Ausgang 6. VGA-Ausgang 9. USB-Buchse (Für PC-Anschluss)
54
Page 55

DEUTSCH
3. Anschluss des Grab‘n’GO 3,5” Media Players mit Kartenleser
3.1 Anschluss an den Computer
1. Schalten Sie Ihren Computer ein.
2. Schließen Sie den CSM3PL an die Stromversorgung an.
3. Schließen Sie das USB-Kabel an den CSM3PL und Ihren Computer an.
Der Computer entdeckt und konfiguriert das Gerät automatisch. Er ordnet ihm als
Massenspeichergerät einen neuen Laufwerkbuchstaben zu. (Ihr Laufwerk ist mit Dateisystem
FAT32 vorformatiert.)
Sie können jetzt Filme, Musik, Fotos usw. auf den CSM3PL laden.
Trennen des CSM3PL von Ihrem Computer
1. Klicken Sie auf das Symbol “Sicher entfernen” im System-Tray.
2. Wählen Sie „USB-Massenspeichergerät beenden”, wenn Sie dazu aufgefordert
werden.
3. Warten Sie, bis die Meldung „Hardware sicher entfernen“ erscheint.
4. Stecken Sie das USB-Kabel aus.
1
55
Page 56

DEUTSCH
3.2 Anschluss an den Fernseher
Anschluss an einen Fernseher (siehe folgende Abbildung)
Es muss darauf geachtet werden, dass die drei RCA-Anschlüsse (in den Farben gelb, rot, weiß)
des AV-Kabels mit den entsprechenden Eingangsbuchsen des Fernsehers verbunden werden.
Wenn Ihr Fernseher keinen freien Composite-Eingang hat, verwenden Sie das mitgelieferte
SCART-Kabel für den Anschluss an Composite/Audio.
Sie können auch den Media Player über den Component-Ausgang an einen LCD-/PlasmaFernseher anschließen (Kabel nicht im Lieferumfang enthalten). Sie können außerdem den Media
Player über den SPDIF-Ausgang an einen Verstärker / ein Lautsprecherset anschließen (Kabel im
Lieferumfang enthalten).
HINWEIS:
Der Conceptronic CSM3PL kann mit einem Fernseher oder mit einem Bildschirm verwendet
werden. Für Fernseher können Sie die S-VIDEO-, Composite-, Composite-SCART oder ComponentAusgänge des CSM3PL verwenden. Sehen Sie bitte im Handbuch Ihres Fernsehers nach, welches
der korrekte Eingangskanal für die Videoausgabe des CSM3PL ist. Wenn Sie den CSM3PL im VGAModus verwendet haben, betätigen Sie bitte die VGA-Taste auf der Fernbedienung, um die
VIDEO-Ausgabe wieder auf den Fernseher umzuschalten.
Bei der Verwendung mit einem Bildschirm benötigen Sie ein VGA-Kabel, das an den VGA-Ausgang
(6) angeschlossen werden muss. Betätigen Sie die Taste VGA auf der Fernbedienung (mehrere
Male), bis der Bildschirm automatisch eingeschaltet wird (aus dem Standby-Modus).
Um zwischen den verschiedenen verfügbaren Modi umzuschalten (VGA, TV, S-VIDEO, etc.),
müssen Sie die Taste VGA auf der Fernbedienung betätigen.
56
Page 57

DEUTSCH
4. Fernbedienung
Die Fernbedienung wird zur Steuerung des Geräts verwendet. Im inneren Einband dieses Handbuchs
finden Sie ein Bild der Fernbedienung. Die Zahlen der Tasten entsprechen denen der nachfolgenden
Tabelle mit Erklärungen aller Funktionen der Fernbedienung.
Nr. Taste Beschreibung
1 POWER ( ) Standby-Modus ein- oder ausschalten. (EIN/AUS)
2 R / L Audioausgang wählen: rechts, links und Stereo
3 SLIDE Musik-Slide-Show-Modus oder Einzelschritt-Wiedergabe
4 SLOW Langsame Wiedergabe
5 REPEAT Wiederholungsmodus auswählen
6 DELAY Intervalldauer für Slide-Show (umfasst Musik-Slide-Show)
7 TRANS Übergangsmodus oder Musik-Equalizertyp auswählen
8
, , , Cursor bewegen
9 AUDIO Audio-Stream (DVD-Wiedergabe) auswählen / ändern
10 MENU GERÄTELISTE oder DATEIBIBLIOTHEK anzeigen(falls nur 1 Gerät
11 PLAY/PAUSE Wiedergabe einer Datei oder eines DVD-Ordners starten, Wiedergabe
12 VOL + / - Lautstärke lauter / leiser.
13 PREVIOUS (
24 REWIND (
15 FILE Verzeichnisstruktur des Geräts anzeigen.
16 MUSIC Schaltfläche für Direktzugriff auf Musik.
17 0 – 9 Musik kann durch Voreinstellung der Musikordner ohne Anzeigegerät
18 OUTPUT Video-Ausgangssignal auswählen.
19 SETUP Einrichtung der Funktionen
20 PHOTO Schaltfläche für Direktzugriff auf Fotos
21 VIDEO Schaltfläche für Direktzugriff auf Videos
22 FAST FORWARD (
23 NEXT (
24 STOP (
25 FUNC Dateioperationsmenü anzeigen
26 SUB-T Film-Untertitel auswählen / ändern (MPEG4- & DVD-WIedergabe)
27 ENTER (
28 ZOOM Vergrößern / Verkleinern (Foto- & DVD-Wiedergabe)
29 ROTATE Fotos drehen
30 DISPLAY Datei-Informationen bei Wiedergabe anzeigen
31 A – B Wiederholtes Abspielen eines Intervalls. Schaltfläche einmal drücken,
32 TOP Zum Anfang des Verzeichnisses gehen
33 P / N Videosystem auswählen (PAL / NTSC)
34 MUTE Ton ausschalten oder wieder einschalten
) Zur vorherigen Datei / zum vorherigen Kapitel wechseln oder Bildlauf
) Schneller Rücklauf
) Zur nächsten Datei / zum nächsten Kapitel wechseln oder Bildlauf nach
) Stopp der WIedergabe
) Auswahl bestätigen
angeschlossen ist).
anhalten (Pause)
nach oben
(Fernseher, Monitor) abgespielt werden (wird weiter unten im
Handbuch erklärt)
) Schneller Vorlauf
unten
um Anfangspunkt <A> auszuwählen; Schaltfläche noch mal drücken, um
Endpunkt <B> auszuwählen; Intervall A-B wird wiederholt; Zum
Abbrechen Schaltfläche erneut drücken.
Gilt nur für den Videomodus, nicht für den Musikmodus.
57
Page 58

DEUTSCH
5. Wichtige Hinweise
Die Fernbedienung hat einen Betriebsbereich von ca. 5 Metern.
1. Richten Sie die Fernbedienung auf den Empfänger auf der Vorderseite des Gerätes.
Der Empfangswinkel beträgt ±30 Grad im Bereich von 5 Metern.
2. Ersetzen Sie die Batterien, wenn diese schwach oder leer sind.
5.1 Grundbetrieb
1. Schließen Sie das Netzteil an die Stromversorgung und das andere Ende des Kabels am Gerät
an.
2. Betätigen Sie den Power-Schalter auf der Rückseite des Geräts, um das Gerät einzuschalten.
Daraufhin leuchtet die Power-LED-Anzeige blau. Das Gerät ist jetzt betriebsbereit.
Wenn kein anderes Gerät am CSM3PL angeschlossen ist, wird die FILE LIBRARY
[DATEIBIBLIOTHEK] mit dem Inhalt Ihrer Festplatte angezeigt (wenn nur eine Partition
vorhanden ist). Wenn ein USB-Gerät (z.B. eine Festplatte oder ein USB-Flash-Laufwerk) oder
eine Speicherkarte am CSM3PL angeschlossen ist, wird die DEVICE LIST [GERÄTELISTE] mit
allen gefundenen Geräten angezeigt. Wenn das angeschlossene Gerät eine große Menge
Dateien enthält, kann es eine Weile dauern, bis das Gerät erkannt wird. Warten Sie bitte, bis
die Anzeige DEVICE LIST [GERÄTELISTE] / FILE LIBRARY [DATEIBIBLIOTHEK] erscheint.
Hinweise
• Normelweise ist es nicht erforderlich, das Videosystem zu ändern (PAL/NTSC). Wenn jedoch
Ihr Fernseher nur NTSC oder PAL unterstützt, sollten Sie über die Taste P/N ein ihrem TVSystem entsprechendes Farbsystem wählen.
• Wenn „AUTO START” auf ON ingestellt ist (dazu drücken Sie die Tastenfolge SETUP->SETUP
MENU ->PREFERENCES->AUTO START->ON , werden alle Dateien auf dem angeschlossenen
Gerät automatisch wiedergegeben. Wenn Sie die Taste
automatische Wiedergabe angehalten und es erscheint eine vollständige Dateiliste der
ausgewählten Partition.
• Bewegen Sie den Cursor mithilfe der Tasten
/ENTER, um die Auswahl zu bestätigen (Media-Bibliothek/Dateiordner werden aufgerufen
oder die Wiedergabe von Dateien beginnt).
• Drücken Sie die Taste
[DATEIBIBLIOTHEK] zurückzukehren.
• Drücken Sie die Taste MENU, um die DEVICE LIST oder FILE LIBRARY anzuzeigen.
• Drücken Sie die Taste
• Wir empfehlen Ihnen, das Gerät von der Stromversorgung zu trennen, wenn es für längere Zeit
nicht benutzt wird.
/ STOP, um die Wiedergabe anzuhalten und zur FILE LIBRARY
/ POWER, um den Standby-Modus zu aktivieren/deaktivieren.
/ / / und verwenden Sie die Taste
/ STOP betätigen, wird die
58
Page 59

DEUTSCH
5.2 Erweiterter Betrieb
File Library [Datei-Bibliothek]
Wenn kein externes Gerät am CSM3PL angeschlossen ist (nur die interne Festplatte vorhanden),
wird die FILE LIBRARY [DATEIBIBLIOTHEK] auf dem Fernsehbildschirm angezeigt, wenn Sie mit
der Taste
Wenn mehrere Geräte angeschlossen sind (USB-Stick, Speicherkarte), wird zuerst die DEVICE LIST
[GERÄTELISTE] auf dem Fernsehbildschirm angezeigt, wenn Sie mit der Taste
Gerät einschalten. Bewegen Sie den Cursor über die Tasten
HINWEIS:
Möglicherweise dauert es eine Weile, bis Sie das Menü durchsuchen können. Vor der Anzeige des
Menüs wird die Indizierung des/der angeschlossenen Geräts/-e durchgeführt. Auf dem Bildschirm
erscheint: SEARCHING [SUCHT]. Das bedeutet, dass alle betreffenden Dateien indiziert und in
Ihrem Menü angezeigt werden.
/ POWER das Gerät einschalten (siehe folgende Abbildung).
/ POWER das
/ und drücken Sie die Taste
/ENTER, um die FILE LIBRARY [DATEIBIBLIOTHEK] aufzurufen.
DEVICELIST [GERATELISTE] FILE LIBRARY [DATEIBIBLIOTHEK]
Auswahl des angeschlossenen Geräts:
Wenn mehrere Geräte an den CSM3PL angeschlossen sind, können Sie durch Drücken der Taste
MENU die DEVICE LIST [GERÄTELISTE] aufrufen und durch Drücken der Tasten
ENTER ein Gerät auswählen.
/ und /
6. Einstellungen für Filme, Musik und Fotos
Der Conceptronic CSM3PL hat 3 Hauptfunktionen:
- Filme wiedergeben/anschauen
Musik wiedergeben/hören
-
Fotos wiedergeben/anschauen
-
6.1 Optionen für die Filmwiedergabe
Wiedergabe von Filmen
Der CSM3PL unterstützt verschiedene Videoformate: MPEG2/1, MPEG 4 einschließlich XVID-,
VOB-Format und Wiedergabe von MP3-, AC3-, AAC- und MPG1/2-Audiotitel in der Videofunktion.
59
Page 60

DEUTSCH
Weitere Optionen für die Videowiedergabe
Unterstützt die Wiedergabe von MPEG4-Videos mit Text-Untertiteln
Der Conceptronic CSM3PL unterstützt .SMI-, .SRT-, .SUB- oder .SSA-Untertiteldateien.
Wenn die Untertiteldatei den selben Namen wie die ausgewählte Video-Datei hat (nur die
Endung ist anders), wird diese bei der Wiedergabe der MPEG4-Datei automatisch geladen.
Wenn die Untertiteldatei einen anderen Namen hat, müssen Sie diese auswählen, auf der
Fernbedienung auf die Taste SUB-T drücken und dann die MOVIE [FILM]-Datei auswählen, die
wiedergegeben werden soll. (Die beiden Dateien werden verbunden.) Drücken Sie die Taste
/ ENTER, um den Film wiederzugeben.
Wiederholte Wiedergabe eines ausgewählten Abschnitts
Um einen ausgewählten Abschnitt erneut wiederzugeben, drücken Sie die Taste A/B.
Klangkanäle
Drücken Sie die Taste R/L auf der Fernbedienung für Mono links, Mono rechts oder Stereoklang.
Einige MPEG2-/VOB-Dateien enthalten zwei oder mehrere Audioströme. Drücken Sie die Taste
AUDIO, um durch 1-1/8~1-8/8,2-1/8~2-8/8, 3-1/8~3-8/8 (insgesamt 24 Audioströme) zu
navigieren. Wenn bei der Wiedergabe eines Videos kein Ton zu hören ist, wählen Sie über die
Taste AUDIO den korrekten Audiostrom.
Wenn Sie von einer MPEG2- auf eine VOB-Datei wechseln, kann es sein, dass das Audio verloren
geht, wenn es sich auf einem anderen Strom befindet. Um dies zu verhindern, drücken Sie
während der Wiedergabe die Taste SETUP [EINSTELLUNGEN], um den gegenwärtigen Audiostrom
zu „sperren“. Mit dieser Option wird der gewählte Audiostrom für alle Dateien beibehalten.
Wiedergabe von Videos
Bei der Wiedergabe von Videos kann über die Taste SLIDE ein schrittweises Abspielen des Videos
bewirkt werden.
In diesem Modus werden die Fotos kontinuierlich angezeigt.
Drücken Sie während der Wiedergabe von Videos auf die Tasten
Schnellrücklauf zu aktivieren, und drücken Sie die Taste ENTER /
Geschwindigkeit zurückzukehren.
Taste für Direktzugriff auf Video-Ordner
Sie können einen Video-Ordner erstellen, auf den Sie durch Drücken der Taste VIDEO auf der
Fernbedienung direkt zugreifen können. Erstellen Sie einen Ordner mit dem Namen „VIDEO ***”
(wobei die Eingabe für *** frei wählbar ist) im Root der Festplatte und speichern Sie Ihre VideoDateien in diesem Ordner.
Wenn der Media Player gestartet und die Taste VIDEO gedrückt wird, öffnet der Media Player
automatisch diesen Ordner.
HINWEIS:
Wenn Sie mehr als einen Ordner erstellen, der mit „VIDEO ***” beginnt, öffnet das Gerät nur den
ersten Ordner.
HINWEIS:
Der CSM3PL unterstützt die meisten Video-Codecs (wie XviD, AVI, MPEG2 usw.). Es ist jedoch
möglich, dass Sie Dateien haben, die einen Codec erfordern, der auf dem CSM3PL nicht
vorhanden ist.
Wenn Sie versuchen, eine Datei mit einem nicht unterstützten Codec wiederzugeben, erscheint
die Meldung „CODEC NOT SUPPORTED [CODEC NICHT UNTERSTÜTZT]”.
/ , um den Schnellvorlauf /
, um zur normalen
60
Page 61

DEUTSCH
DVD-Wiedergabe
Der CSM3PL gibt DVDs von einer Festplatte wie normale DVDs wieder. Sie können durch das DVDMenü navigieren, Untertitel wählen, die Audiosprache ändern usw.
Ordner erstellen
Um DVDs von Ihrer Festplatte wiedergeben zu können, müssen Sie die DVD-Ordner auf dem
CSM3PL korrekt erstellen.
Erstellen Sie einen Ordner mit dem Namen der DVD (z.B. „Eigene DVD“) auf der Festplatte des
CSM3PL.
Kopieren Sie den Ordner VIDEO_TS von Ihrer DVD in den erstellten DVD-Ordner auf der
Festplatte des CSM3PL. Nachdem der Kopiervorgang abgeschlossen ist, sollte folgende Anzeige
erscheinen:
Trennen Sie den CSM3PL von Ihrem Computer und schließen Sie ihn am Fernseher an. Schalten
Sie den CSM3PL ein.
Abspielen einer DVD
Verwenden Sie die Navigationstasten der Fernbedienung, um den Ordner Ihrer DVD im Menü
auszuwählen (im Beispiel: My Movie).
Drücken Sie die Taste WIEDERGABE/PAUSE auf der Fernbedienung, um die Wiedergabe der DVD
zu starten.
Hinweis:
Verwenden Sie die Navigationsschaltflächen
durch das Menü der DVD zu bewegen. Verwenden Sie die Schaltfläche
Wiedergabe der DVD zu beenden.
Benutzen Sie nicht die Schaltfläche / ENTER im Menü des CSM3PL. Dadurch
werden lediglich die Dateien/Unterordner angezeigt, die Wiedergabe der DVD wird
aber nicht gestartet.
/ / / und die Schaltfläche / ENTER, um sich
/ STOPP, um die
61
Page 62

DEUTSCH
6.2 Optionen für die Musikwiedergabe
Wiedergabe von Musik
Der Conceptronic CSM3PL hat verschiedene Betriebsarten, in denen Musik wiedergegeben
werden kann. (WAV, MPW und WMA werden unterstützt.)
Für die Wiedergabe von Musikdateien:
Drücken Sie die Taste MENU und wählen Sie den Ordner, aus dem die Musikdatei wiedergegeben
werden soll. Der Titel wird angezeigt und Sie können über die Taste TRANS auf der
Fernbedienung eine Equalizer-Einstellung wählen.
Wenn Sie einen Titel wiederholen möchten, haben Sie folgende Möglichkeiten:
Random: Der ausgewählte Ordner wird im Zufallsmodus
wiedergegeben. Das Gerät entscheidet nach jedem
abgespielten Titel, welcher Titel als nächstes abgespielt
wird.
Shuffle : Der ausgewählte Ordner wird im Zufallsmodus
wiedergegeben. Wenn diese Option gewählt wird, legt das
Gerät von Anfang an eine Reihenfolge für die
Zufallswiedergabe fest.
Single: Nur der ausgewählte Titel wird wiedergegeben.
Folder : Nur der ausgewählte Ordner wird wiedergegeben.
REP-one : Der ausgewählte Titel wird wiederholt, bis die Taste STOP
betätigt wird.
Folder repeat: Der ausgewählte Ordner wird wiederholt, bis die Taste STOP betätigt wird.
Drücken Sie beim Abspielen von Musikdateien die Schaltfläche
Wiedergabegeschwindigkeit anzupassen, und drücken Sie die Schaltfläche WIEDERGABE/PAUSE,
um wieder die normale Geschwindigkeit einzustellen.
Wiedergabe von Musik mit Unterordnern:
Sie können über die MUSIC-Taste auf der Fernbedienung Musikordner inklusive deren Unterordner
wiedergeben.
Wählen Sie mithilfe der Navigationstasten auf der Fernbedienung den Ordner, der die Musik
enthält, die Sie abspielen möchten. Drücken Sie die MUSIC-Taste auf der Fernbedienung, um
eine Liste aller Musikdateien im Ordner und in den Unterordnern, die Sie ausgewählt haben, zu
erstellen.
Hinweis:
Einrichten des Ordners “MUSICDIR” für den Schnellzugriff
Um Ihren CSM3PL zum automatischen Abspielen von Musik vorzubereiten, müssen Sie einen
speziellen Ordner anlegen, nachdem Sie Ihren CSM3PL an den Computer angeschlossen haben.
1) Legen Sie den Ordner ”MUSICDIR” im Stammverzeichnis der ersten Partition an.
2) Legen Sie Unterordner an, die mit drei digitalen Nummern bezeichnet werden, z. B. „001“,
3) Kopieren Sie Musikdateien in diese Ordner.
Wenn Sie anstelle der MUSIC-Taste die / ENTER-Taste drücken, werden der
Ordner und die Unterordner nicht abgespielt, sondern geöffnet.
„002“, „003“, usw. (Es können Ordner mit einer Ziffernfolge bis „999“ angelegt werden.)
/ , um die
62
Page 63

DEUTSCH
Um den voreingestellten Musikordner mit einem angeschlossenen Bildschirm zu verwenden,
führen Sie bitte folgende Schritte aus, wenn das Gerät in Betrieb ist:
1) Drücken Sie die erste Ziffer des Ordners und warten Sie, bis folgende Nachricht auf Ihrem
Bildschirm angezeigt wird: “AUTO PLAY: MP3 -> ___”
2) Drücken Sie die anderen beiden Ziffern des Unterordners, den Sie abspielen möchten.
Es besteht auch die Möglichkeit, die Musik aus voreingestellten Ordnern abzuspielen, wenn der
Bildschirm ausgeschaltet ist. Wir empfehlen Ihnen, hierfür nur die Ordner 000 – 009 zu
verwenden. Um die Musik aus diesem Ordner abzuspielen, drücken Sie bitte die Ziffer des
Ordners (0-9) und anschließend die Schaltfläche WIEDERGABE/PAUSE.
Die Musikwiedergabe startet automatisch.
Hinweis: Der Zeitraum zwischen der Eingabe der ersten Ziffer und dem Erscheinen der Meldung
auf Ihrem Bildschirm wird größer, wenn Sie viele Daten auf Ihrer Festplatte
gespeichert haben.
6.3 Optionen für die Fotowiedergabe
Über die Taste ROTATE können Sie Fotos während der Anzeige drehen. Standardmäßig werden
Drehinformationen der Fotos aufbewahrt, bis das Gerät ausgeschaltet oder in den Standby-Modus
geschaltet wird. Wenn Sie die Drehinformationen nicht beibehalten möchten, können Sie diese
Funktion über SETUP MENU [EINSTELLUNGSMENÜ]->GENERAL SETUP [ALLGEMEINE
EINSTELLUNGEN]-> ORIENTATION [RICHTUNG]->OFF [AUS] deaktivieren.
Während der Anzeige der Fotos können Sie den Übergangsmodus zwischen Fotos über die Taste
TRANS ändern. Sie können den Übergangsmodus über SETUP MENU [EINSTELLUNGSMENÜ]>SLIDESHOW SETUP [DIASHOW EINSTELLUNGEN]->TRANSITION [ÜBERGANG] auswählen.
MODE 01: FULL SCREEN [VOLLBILD]
MODE 02: RANDOM [ZUFALLSWIEDERGABE]
MODE 03: ROLL: TOP TO BOTTOM [VON OBEN NACH UNTEN ÜBERBLENDEN]
MODE 04: ROLL: BOTTOM TO TOP [VON UNTEN NACH OBEN ÜBERBLENDEN]
MODE 05: ROLL: TOP/BOTTOM TO CENTER [VON OBEN/UNTEN ZUR MITTE ÜBERBLENDEN]
MODE 06: ROLL: CENTER TO TOP/BOTTOM [VON DER MITTE NACH OBEN/UNTEN
ÜBERBLENDEN]
MODE 07: BLIND: TOP TO BOTTOM [ROLLOEFFEKT VON OBEN NACH UNTEN]
MODE 08: ROLL: LEFT TO RIGHT [VON LINKS NACH RECHTS ÜBERBLENDEN]
MODE 09: ROLL: RIGHT TO LEFT [VON RECHTS NACH LINKS ÜBERBLENDEN]
MODE 10: ROLL: LEFT/RIGHT TO CENTER [VON LINKS/RECHTS ZUR MITTE ÜBERBLENDEN]
MODE 11: ROLL: CENTER TO LEFT/RIGHT [VON DER MITTE NACH LINKS/RECHTS ÜBERBLENDEN]
MODE 12: ROLL: IMPLODE [VON ALLEN SEITEN ZUR MITTE ÜBERBLENDEN]
MODE 13: BLIND: LEFT TO RIGHT [ROLLOEFFEKT VON LINKS NACH RECHTS]
MODE 14: CROSS FADE [SANFTE ÜBERBLENDUNG VON EINEM FOTO ZUM ANDEREN]
Fotozoom
Drücken Sie die Taste ZOOM, um den ZOOM-Modus zu aktivieren/deaktivieren und den
Zoombereich einzustellen. Sie können über die Tasten
verschieben.
/ / / ein vergrößertes Foto
63
Page 64

DEUTSCH
Musik-Diashow (Anzeige von Fotos mit Hintergrundmusik)
Wählen Sie ein Foto aus und drücken Sie die Taste SLIDE.
Wenn Sie die Taste SLIDE nicht drücken, wird die Musik nicht abgespielt und die Bilder als
normale Diashow ohne Musik wiedergegeben. Wenn in dem betreffenden Ordner keine
Musikdateien vorhanden sind, kann die Funktion SLIDE nicht verwendet werden. Um die Bilder in
einer Diashow ohne Ton anzuzeigen, müssen Sie die Taste
Im SLIDE-Modus werden nur Foto- und Musikdateien im selben Ordner wiedergegeben.
HINWEIS:
In diesem Modus können die Funktionen ROTATE [DREHEN] und ZOOM nicht verwendet werden.
Sie können die Anzeige des Fotos anhalten, indem Sie einmal WIEDERGABE/PAUSE drücken (die
Musik wird immer noch abgespielt). Drücken Sie noch einmal WIEDERGABE/PAUSE, und die Musik
wird angehalten. Drücken Sie ein weiteres Mal auf die Schaltfläche WIEDERGABE/PAUSE, um die
Wiedergabe wieder in Gang zu setzen.
Über die Taste DELAY können Sie das Anzeigeintervall zwischen zwei Fotos einstellen (Pfad
SETUP MENU [EINSTELLUNGSMENÜ]->PREFERENCES [PRÄFERENZEN]->DELAY [ANZEIGEINTERVALL].
Über die Taste TRANS können Sie den Übergang wählen. Über die Taste REPEAT können Sie Fotos
wiederholt anzeigen.
Taste für Direktzugriff auf Foto-Ordner
Sie können einen Foto-Ordner erstellen, auf den Sie durch Drücken der Taste PHOTO auf der
Fernbedienung direkt zugreifen können. Erstellen Sie einen Ordner mit dem Namen „PHOTO ***”
(wobei die Eingabe für *** frei wählbar ist) im Root der Festplatte und speichern Sie Ihre FotoDateien in diesem Ordner.
Wenn der Media Player gestartet und die Taste PHOTO gedrückt wird, öffnet der Media Player
automatisch diesen Ordner.
HINWEIS:
Wenn Sie mehr als einen Ordner erstellen, der mit „PHOTO ***” beginnt, öffnet das Gerät nur
den ersten Ordner.
/ ENTER drücken.
64
Page 65

DEUTSCH
6.4 Operationen in der File Library
Wählen Sie über die Tasten / eine Datei oder einen Ordner. Über die Tasten /
(VOR/ZURÜCK) können Sie vor-/zurückblättern. Sobald ein Foto oder ein Video ausgewählt
wurde, erscheint eine Voranzeige davon auf der rechten Seite des Fernsehbildschirms.
Wenn eine Musikdatei ausgewählt wurde, wird die Musikwiedergabe gestartet und die
entsprechenden Informationen werden auf der rechten Seite des Bildschirms angezeigt.
Sie können über die Taste TOP den Cursor zum Anfang der Dateiliste bewegen und auf
einfache Weise einen anderen Ordner aufrufen.
Über die Taste
Musikwiedergabe erscheint die Anzeige MUSIC EQUALIZER). Drücken Sie die Taste
um die Vollbildanzeige rückgängig zu machen.
Über die Taste REPEAT können Sie einen Wiederholmodus wählen: RANDOM
[ZUFALLWIEDERGABE]/ SHUFFLE [GEMISCHTE WIEDERGABE]/ SINGLE [EINZELNER]/ FOLDER
[ORDNER]/REP-ONE [EINZELNER WIEDERHOLEN]/ FOLDER REPEAT [ORDNER WIEDERHOLEN].
Drücken Sie im STOP-Status die Taste FUNC, um ein schwebendes Menü der Dateioperation
aufzurufen oder zu beenden.
/ENTER kann auf Vollbildanzeige gewechselt werden (bei
/ STOP,
DELETE : Direktes Löschen eines ausgewählten Ordners oder einer ausgewählten
RENAME : Umbenennen eines ausgewählten Ordners oder einer ausgewählten Datei.
NEW FOLDER : Erstellen eines neuen Ordners.
PROPERTIES : Dateiinformationen wie Größe, Datum und Format anzeigen/schließen.
Datei.
65
Page 66

DEUTSCH
7. Einstellungsmenü
Drücken Sie im STOP-Status die Taste SETUP,
um das SETUP MENU aufzurufen.
Bewegen Sie mithilfe der Tasten
und drücken Sie auf die Taste
Auswahl zu bestätigen. Drücken Sie danach die Taste
SETUP.
7.1 Allgemeine Einstellungen (General setup)
/ / / den Cursor
/ ENTER, um die
• ORIENTATION: Drehinformationen
beibehalten.
Optionen: ON [EIN], OFF
Grundeinstellung: ON
• TV DISPLAY
Optionen: NORMAL/PS, NORMAL/LB, WIDE
Grundeinstellung: NORMAL/PS
• TV SYS: Auswahl des Videosystems.
Optionen: MULTI. SYSTEM, NTSC, PAL
Grundeinstellung: MULTI. SYSTEM
• SPDIF OUTPUT [SPDIF-AUSGABE]
Optionen: OFF [AUS], SPDIF/RAW, SPDIF/PCM
Grundeinstellung: OFF [AUS]
• SCREEN SAVER: Der Bildschirmschoner erscheint,
wenn das Gerät angehalten wird oder wenn ein
Bild ohne Aktion für ein paar Minuten angezeigt wird. Dieser Schoner kann Schäden am
Bildschirm verhindern helfen.
Optionen: ON, OFF
Grundeinstellung: ON
7.2 Diashow-Einstellungen (Slideshow setup)
• SLIDESHOW MODE
Optionen: MANUAL; AUTO
Grundeinstellung: AUTO
• INTERVAL TIME: FESTLEGUNG DER
Intervallzeit zwischen zwei Fotos.
Optionen: EINE SEKUNDE, DREI
SEKUNDEN, FÜNF SEKUNDEN,
ZEHN SEKUNDEN
Grundeinstellung: DREI SEKUNDEN
• TRANS SPEED
Optionen: FAST, SLOW
Grundeinstellung: FAST
• TRANSITION
Optionen: FULL SCREEN [VOLLBILD], RANDOM , TOP– >BOTTOM [OBEN -> UNTEN], BOTTOM– >TOP
[UNTEN -> OBEN], T/B– >CENTER [O/U -> MITTE], CENTER– >T/B [MITTE -> O/U], BLIND: T– >B
[ROLLOEFFEKT O -> U], LEFT– >RIGHT [LINKS -> RECHTS], RIGHT– >LEFT [RECHTS -> LINKS], L/R–
>CENTER [L/R -> MITTE], CENTER– >L/R [MITTE -> L/R], IMPLODE [VON ALLEN SEITEN ZUR
MITTE], BLIND: L– >R [ROLLOEFFEKT L -> R], CROSS FADE GRUNDEINSTELLUNG: RANDOM
66
Page 67

DEUTSCH
7.3 Präferenzen (Preferences)
• VIDEOAUSGABE: EINSTELLEN DER VIDEOAUSGABE.
Optionen: S-VIDEO, COMPONENT, P-SCAN YPBPR,
VGA und INTERLACE RGB.
• OSD LANG [ON-SCREEN-DISPLAY SPRACHE]:
AUSWAHL DER OSD-SPRACHE.
Optionen: ENGLISH, FRANZÖSISCH,
DEUTSCH, ITALIENISCH, PORTUGIESISCH,
SPANISCH, NIEDERLÄNDISCH
Grundeinstellung: ENGLISCH
• OSD MESSAGE [OSD-MITTEILUNGEN]: OSD-MITTEILUNG
während der Wiedergabe einer Datei auswählen.
Optionen: ON [EIN], OFF [AUS]
Grundeinstellung: ON [EIN]
• DEFAULT [GRUNDEINSTELLUNGEN]:
Die Werkseinstellungen des Herstellers verwenden.
• AUTO START:
Automatisch alle Mediadateien auf den angeschlossenen Geräten wiedergeben.
Optionen: ON [EIN], OFF [AUS]
Grundeinstellung: OFF [AUS]
• FILE SORT [DATEISORTIERUNG]:
Auswahl Dateisortierung auf dem/-n gegenwärtig angeschlossenen Gerät/-en.
Optionen: BY NAME [NACH NAMEN]; BY SIZE [NACH GRÖSSE]; BY TIME [NACH ZEIT]; BY TYPE
Grundeinstellung: BY NAME [NACH NAMEN]
8. Spezifikationen
Power : 100~240VAC, 50/60HZ
Leistung : 11W (typisch)
Abmessungen : 177×163×44 (T×B×H mm)
Farbsystem : PAL/NTSC
Frequenzgang : ±3dB(20HZ~20KHZ)
Signal/Stör-Verhältnis : ≥80dB
Nebensprechen : ≥70dB
Audioausgabe : 2,0±0,2V(rms)
Videoausgabe : 1,0±0,2Vp-p, 75Ω
USB-Datenübertragungsrate : USB 2.0, Max. 480Mb/s
Unterstützte Dateiformate : AVI/MPG/DAT/VOB/WAV/MP3/WMA/JPG
Unterstützte/-s Dateisystem/-e : FAT32.
Diese Angaben können ohne Benachrichtigung geändert werden.
67
Page 68

DEUTSCH
9. Tipps zur Fehlerbeseitigung
Im Folgenden finden Sie Tipps zur Fehlerbeseitigung, wenn Ihr CSM3PL nicht ordnungsgemäß
funktioniert:
Die Power-LED-Anzeige leuchtet nicht
• Der CSM3PL ist nicht an die Stromversorgung angeschlossen. Schließen Sie den CSM3PL an die
Stromversorgung an.
Es erscheint keine Anzeige auf dem Display.
• Der CSM3PL befindet sich im Standby-Modus. Drücken Sie Taste xx auf der Fernbedienung, um den
Standby-Modus zu deaktivieren.
• Auf dem Fernseher wurde die falsche Eingangsquelle ausgewählt. Ändern Sie die Eingangsquelle.
• Das falsche Videosystem wurde ausgewählt. Drücken Sie die Taste VGA auf Ihrer Fernbedienung,
um das Videosystem zu ändern.
• Das Videokabel wurde nicht korrekt angeschlossen. Vergewissern Sie sich, dass das Videokabel
korrekt angeschlossen ist.
Kein Ton
• Das Audiokabel wurde nicht korrekt angeschlossen. Vergewissern Sie sich, dass das Kabel korrekt
an Ihrem Fernseher oder Verstärker angeschlossen ist.
• Der CSM3PL ist an einen Verstärker angeschlossen, der Verstärker ist jedoch ausgeschaltet.
Schalten Sie den Verstärker ein.
• Der Audiostrom der MPEG2- oder VOB-Datei ist ungültig. Drücken Sie die Taste AUDIO auf der
Fernbedienung, um den korrekten Audiostrom einzustellen.
• Die Funktion Stummschaltung ist aktiviert. Drücken Sie die Taste MUTE auf der Fernbedienung,
um die Stummschaltung zu deaktivieren.
• Der CSM3PL wird im FF [Schnellvorlauf]-/FR [Schnellrücklauf]-Modus betrieben. Drücken Sie die
Taste PLAY/PAUSE auf der Fernbedienung, um zur normalen Wiedergabegeschwindigkeit
zurückzukehren.
Die Anzeige ist gestört
• Der CSM3PL wird im FF [Schnellvorlauf]-/FR [Schnellrücklauf]-Modus betrieben. Drücken Sie die
Taste PLAY/PAUSE auf der Fernbedienung, um zur normalen Wiedergabegeschwindigkeit
zurückzukehren.
• Ein PAL-Film wird im NTSC-Modus wiedergegeben oder umgekehrt. Drücken Sie die Taste „P/N“
auf der Fernbedienung, um die Display-Einstellungen zu ändern.
Wenn die Taste SLIDE gedrückt wird, blockiert das System
• Im aktuellen Ordner befinden sich zu viele Foto- oder Musikdateien. Deshalb dauert es lange, bis
die Musik-Diashow gestartet wird. Warten Sie bitte, bis die Wiedergabe beginnt.
Die Fernbedienung funktioniert nicht
• Richten Sie die Fernbedienung direkt oder in einem Winkel von ±30 Grad auf den Empfänger des
CSM3PL.
• Verwenden Sie die Fernbedienung in einem Bereich von 5 Metern.
• Ersetzen Sie ggf. die Batterie der Fernbedienung.
Die Untertitel des wiedergegebenen Films werden nicht angezeigt
• Es wird eine AVI-Datei wiedergegeben, die Untertitel-Datei hat jedoch einen anderen
Dateinamen. Für die Anzeige der Untertitel siehe Kapitel 6.1.
Beim Versuch, ein Video abzuspielen, erscheint die Meldung “CODEC NOT SUPPORTED
[CODEC NICHT UNTERSTÜTZT]”.
• Die Filmdatei wurde mit einem Codec erzeugt, den der CSM3PL nicht unterstützt.
Eine Liste der vom CSM3PL unterstützten Codecs finden Sie auf unserer Webseite unter
www.conceptronic.net.
68
Page 69

DEUTSCH
Der CSM3PL zeigt nicht alle(n) Festplatten-Partitionen / Inhalt an.
• Die Partition auf der Festplatte ist keine Primärpartition. Partitionieren Sie die Festplatte erneut
und stellen Sie sicher, dass alle Partitionen primär sind.
• Die Partition ist nicht FAT32-formatiert. Formatieren Sie die Partition erneut mit dem FAT32-
Dateisystem.
• Die ausgewählte Partition enthält keine Mediadateien.
Welche Speicherkarten unterstützt der CSM3PL?
• Der CSM3PL unterstützt alle gängigen Speicherkarten wie:
• Memorystick (MS), Secure Digital (SD), Multimedia Card (MMC), Smart Media Card (SM), Compact
Flash (CF), Microdrive (MD).
• Eine Liste der vom CSM3PL unterstützten Speicherkarten finden Sie auf unserer Webseite unter
www.conceptronic.net.
Die DVD-Wiedergabe startet erst, nachdem die Play/Pause Taste gedrückt wurde.
•
Vergewissern Sie sich, dass Sie die richtige Ordnerstruktur verwenden. Die Ordnerstruktur ist in Kapitel
6.1 beschrieben.
• Die DVD-Dateien sind unvollständig, unbrauchbar oder beschädigt. In diesem Fall startet der CSM3PL die
DVD-Wiedergabe nicht.
Während den Intro-Movies der DVD ist der Bildschirm leer.
•
Das aktuelle Kapitel endet mit einem leeren Bildschirm oder ist zu kurz zum Wiedergeben. Drücken Sie
/ NEXT, um zum nächsten Kapitel zu wechseln.
auf
My TV zeigt ein Schwarz/Weiß- statt ein Farbbild.
Ihr Fernseher unterstützt das „Multi” TV System des CSM3PL nicht. Ändern Sie das TV-System im Setup-
•
Menü auf PAL. (vgl. Kapitel 7.1).
Nachdem Sie das TV-System geändert haben, schalten Sie den CSM3PL aus und wieder ein.
69
Page 70

FRANÇAIS
CSM3PL de Conceptronic
Guide d’installation rapide
Nous vous félicitons pour l’acquisition
de ce CSM3PL de Conceptronic.
Le Guide d’Installation de Hardware livré avec votre appareil vous expliquera pas à pas comment
utiliser le lecteur multimédia Conceptronic Grab‘n’GO 3,5" avec Lecteur de carte.
En cas de problèmes, nous vous recommandons de vous adresser à notre service technique (allez à
www.conceptronic.net
Données des Foires Aux Questions.
Si vous avez d’autres questions concernant votre produit et que vous ne trouvez pas la solution sur
notre site web, contactez-nous par e-mail : support@conceptronic.net
Pour plus d'informations sur les produits de Conceptronic, visitez notre Site Internet Conceptronic:
www.conceptronic.net
1. Introduction
Avant de mettre l’appareil en marche, merci de lire attentivement ce manuel et de le conserver
pour toute consultation ultérieure.
1.1 Contenu
Avant de connecter l’appareil à votre téléviseur ou à votre ordinateur/moniteur, merci de
vérifier que le paquet contient bien les éléments suivants :
• 1x lecteur multimédia Conceptronic Grab’n’GO 3,5" avec Lecteur de carte.
• 1x Télécommande avec batterie
• 1x adaptateur électrique (12 V DC, 2.5A)
• 1x câble audio/vidéo (composite)
• 1x Câble audio/vidéo (Composite) à SCART
• 1x câble S-VIDEO vers S-VIDEO
• 1x Câble SPDIF
• 1x Câble USB
• 1x Guide d’installation rapide multilingue, sur papier
• 1x Support pour CSM3PL
1.2 Caractéristiques
• Un commutateur automatique entre Mode PC et Mode Lecture :
Lorsqu'il est connecté à un PC, ce dispositif agit comme un Dispositif de Stockage USB.
Lorsqu'il n'est pas connecté à un PC, ce dispositif agit comme Lecteur Multimédia.
En mode PC :
• Supporte la fonction Plug-n-Play.
• Conforme à USB 2.0/1.1 à Grande Vitesse, vitesse de transfert des données maximum de 480
Mb/s.
et cliquez sur « support »). Vous trouverez dans cette section la Base de
.
.
70
Page 71

FRANÇAIS
En mode Lecture :
• Support des Disques durs internes, des Dispositifs USB et des cartes de mémoire.
• Support multilingue :
anglais, néerlandais, espagnol, français, italien, allemand, portugais
• Compatible avec des unités de disque dur à partitions multiples.
• Prévisualisation des fichiers médias.
• Compatible avec les sous-titres de texte (.SMI/.SRT/.SUB/.SSA) pour MPEG4 (AVI),
résolution D1.
• Compatible avec les formats AVI (MPEG4), MPG (MPEG1, MPEG2), DAT (VCD), VOB (DVD),
WAV, WMA, MP3, et JPG.
• Compatible avec plusieurs Codecs. Consulter notre site web pour la liste complète des
Codecs compatibles.
• Sorties : Composite vidéo/Composant vidéo/RCA Audio / Optique /VGA/S-vidéo.
• Compatible PAL/NTSC.
• Plusieurs modes de répétition.
• Fonctions de fichiers (DELETE/RENAME/NEW FOLDER/PROPERTIES).
• Économiseur d’écran.
• Plusieurs modes de visualisation des photographies :
Présentation en diapositives (slide photo play back) avec fond musical.
14 modes de transition ; intervalle d’écran modifiable.
Fonctions de zoom, rotation, mouvement.
• Les fichiers peuvent être ordonnés par nom/taille/date/type.
1.3 Précautions d’usage
• N’essayez pas de démonter l’adaptateur électrique fourni avec l’appareil. Cela pourrait
provoquer des blessures par décharges électriques. En cas d’intervention nécessaire sur
l’adaptateur, veuillez prendre contact avec votre distributeur ou avec le service technique
de Conceptronic.
• Maintenir l’appareil à l’écart d’une humidité excessive.
• Ne pas le submerger ni l’exposer à des liquides.
• Débranchez l’adaptateur électrique si vous prévoyez de ne pas utiliser l’appareil pendant
une longue période.
• Évitez d’utiliser l’appareil à proximité de combustibles.
• Substituez les batteries de la télécommande par le même type de batteries lorsque ces
dernières sont faibles ou épuisées. Jeter les vieilles batteries de manière sure. Recyclez-les
si possible. Pour éviter la corrosion des batteries, retirez-les de la télécommande si vous
prévoyez de ne pas l’utiliser pendant une longue période.
• Maintenez la télécommande à l’abri d’une humidité excessive ; ne la faites pas tomber.
• N’utilisez pas la télécommande exposée à des rayons solaires intenses.
• Ne JAMAIS faire tomber, secouer ou porter des coups à l’appareil.
• Pour éviter toute surchauffe, ne couvrez pas l’appareil.
• Le CSM3PL n’est compatible qu’avec le système de fichiers FAT / FAT32 (non compatible
avec NTFS).
ATTENTION: Lorsque vous formatez votre disque dur sur NTFS, il ne fonctionne que comme
Disque dur amovible pour votre ordinateur. Formatez de nouveau le Disque dur sur
FAT32 pour activer les fonctions de Lecteur Multimédia.
• Les données du Disque dur interne et/ou le/s dispositif/s connectés peuvent être
fragmenté/s. Ceci concerne la reproduction de films. Il est conseillé de défragmenter de
temps en temps le Disque dur et/ou le/s dispositif/s connecté/s sur votre ordinateur.
71
Page 72

FRANÇAIS
2. Fonctions du Lecteur multimédia Conceptronic Grab’n’GO 3,5" avec
Lecteur de carte
2.1 Identification des composants du CSM3PL
•
Partie avant
1. Récepteur de Télécommande 4. LED Disque dur 7. Encoche de Carte SM
2. Led d'Alimentation 5. Encoche de Carte MMC/MS/SD 8. Prise USB HOST
3. Bouton de Commande 6. Encoche de Carte CF
• Bouton de Commande
Remarque:
•
Vue arrière
Nº.
État arrêt État reproduction
1
2
3
4
5
Le Bouton de commande a les mêmes fonctions que la Télécommande. Pour plus
d'informations sur chaque bouton, consultez le chapitre 4.
Pulsation rapide
( ) (VOL+) P/N (P/N)
( ) (VOL-) VGA (VGA)
( ) ( ) ( )
( ) ( ) ( )
( ) ( ) ( )
Pulsation longue
1. Entrée DC 4. Sortie Video 7. Sortie S-VIDÉO
2. Sortie Optique 5. Sortie Composant Video 8. Bouton Marche / Arrêt
3. Sortie Audio 6. Sortie VGA 9. Prise USB (pour connexion
avec un PC)
72
Page 73

FRANÇAIS
3. Comment brancher le Lecteur multimédia Grab’n’GO 3,5" avec Lecteur
de carte
3.1 Brancher sur votre Ordinateur
1. Allumez votre ordinateur.
2. Branchez l'alimentation électrique sur le CSM3PL et sur la prise électrique.
3. Branchez le câble USB sur le CSM3PL et sur votre ordinateur.
L’ordinateur détecte automatiquement l’appareil et le configure, lui attribue une lettre
correspondant à un nouveau lecteur, puis l’utilise comme système de stockage de données.
(Votre lecteur est formaté avec le système de fichier FAT 32).
Vous pouvez dès à présent enregistrer des films, de la musique, des photos, etc. sur le CSM3PL.
Débrancher le CSM3PL de votre ordinateur
1. Cliquez une fois sur l'icône "Retrait en Toute Sécurité" de votre barre d'état du système.
2. Sélectionnez l'option "Arrêter le Dispositif de Stockage de Masse USB" dans la fenêtre pop-up.
3. Attendez le message "Vous pouvez retirer le dispositif"
Débranchez le câble USB.
1
73
Page 74

FRANÇAIS
3.2 Branchement à votre téléviseur
Branchement de l’appareil à un téléviseur (illustré ci-dessous)
Les trois connecteurs RCA (jaune, rouge et blanc) du câble AV doivent correspondre aux entrées
jacks existantes sur votre téléviseur. Si votre télévision ne dispose d’aucune entrée Composite,
utilisez le câble SCART > Composite/Audio.
fourni) Vous pouvez aussi utiliser la Sortie SPDIF du Lecteur Multimédia pour brancher votre
Amplificateur / Haut-parleur (Câble fourni).
REMARQUE
Le CSM3PL de Conceptronic peut être utilisé avec un téléviseur ou un moniteur.
Lorsque vous utilisez une TV, vous pouvez utiliser les sorties S-VIDÉO, Composite, Composite à
SCART ou Composant du CSM3PL. Merci de consulter le manuel de votre téléviseur pour
déterminer le bon canal d’entrée permettant d’afficher la sortie vidéo du CSM3PL. Si vous avez
utilisé auparavant le CSM3PL avec un moniteur VGA, appuyez sur la touche VGA de votre
télécommande pour repasser à la sortie VIDÉO de votre téléviseur.
Pour fonctionner avec un moniteur, vous devez utiliser un câble VGA et le brancher au
connecteur de SORTIE VGA (6). Appuyez sur la touche VGA de la télécommande (un certain
nombre de fois) jusqu’à ce que le moniteur s’allume automatiquement (sortir du mode standby).
Pour passer d’un mode de fonctionnement à l’autre (VGA, TV, S-VIDEO, etc.), appuyez
successivement sur la touche VGA de la télécommande.
:
74
Page 75

FRANÇAIS
4. Télécommande
La commande à distance est utilisée à des fins de contrôle de l’unité. Sur la couverture intérieure de
ce manuel, vous trouverez une image de la commande à distance. Les chiffres des boutons coïncident
avec la table ci-dessous, laquelle a pour but d’expliquer chaque fonction propre à la commande à
distance.
N° Bouton Description
1 POWER ( ) Entrer ou sortir du mode Standby. (ON/OFF)
2 R / L Sélectionne la sortie audio : droite, gauche et stéréo.
3 SLIDE Entre en mode présentation de diapositives en musique ou en mode
4 SLOW Reproduction lente
5 REPEAT Sélectionne un mode de répétition.
6 DELAY Sélectionne le débit de la présentation de diapositives (y compris la
7 TRANS Sélectionne un mode de transition ou un type d'égalisateur de musique.
8
, , , Déplace le curseur
9 AUDIO Sélectionne/Modifie le flux audio (Lecture DVD)
10 MENU Présente la LISTE du DISPOSITIF ou la BIBLIOTHÈQUE DE FICHIERS (si
Retour au Menu DVD (Lecture DVD)
11 PLAY/PAUSE Commence la lecture d'une fichier ou d'un répertoire DVD, met une
12 VOL + / - Augmente / réduit le volume sonore.
13 PREVIOUS (
24 REWIND (
15 FILE Présente la Structure du Répertoire du dispositif
16 MUSIC Bouton d'accès direct à la musique.
17 0 – 9 La musique peuvent être reproduite sans dispositif d’affichage (TV,
18 OUTPUT Sélectionne le Signal de Sortie Vidéo.
19 SETUP Fonction réglages
20 PHOTO Bouton d'accès direct aux photos.
21 VIDEO Bouton d'accès direct aux vidéos.
22 FAST FORWARD (
23 NEXT (
24 STOP (
25 FUNC Présente le menu de fonctionnement du fichier.
26 SUB-T Sélectionner / Modifier le sous-titrage du film (MPEG4 & Lecture DVD)
27 ENTER (
28 ZOOM Zoom + ou – (Photos & Lecture DVD)
29 ROTATE Faire tourner les photos.
30 DISPLAY Affiche les informations du fichier pendant la lecture.
31 A – B Reproduit un intervalle de manière répétée. Appuyez une fois sur le
32 TOP Passe en haut du répertoire.
33 P / N Sélectionne le système vidéo. (PAL / NTSC)
34 MUTE Passe en mode muet ou annule le mode muet.
) Passe au fichier / chapitre précédent ou à la page supérieure.
) Retour Rapide
) Passe au fichier suivant / chapitre ou page précédente.
) Arrêt de la reproduction.
) Confirme la sélection.
lecture pas à pas.
présentation de diapositives en musique)
seul un dispositif est branché).
lecture en pause
écran) en sélectionnant au préalable les répertoires de musique
(expliqué ci-après dans ce manuel).
) Avance Rapide
bouton pour sélectionner le Point de départ <A> ; Appuyez de nouveau
sur le bouton pour sélectionne le Point de fin <B> ; l’intervalle A-B sera
répété ; Appuyez de nouveau sur le bouton pour annuler. Uniquement
valable en mode vidéo, pas en mode musique.
75
Page 76

FRANÇAIS
5. Considérations importantes
Le portée de fonctionnement de la télécommande est d’environ 5 mètres.
1. Orientez la télécommande vers la face avant de l’appareil.
L’angle de réception est d’environ +/- 30 degrés dans un rayon de 5 mètres.
2. Substituez les batteries lorsque ces dernières sont faibles ou épuisées.
5.1 Fonctionnement de base
1. Branchez l’adaptateur électrique à une prise de courant et connectez son autre extrémité à
l’adaptateur de l’appareil.
2. Branchez le dispositif à l'aide de la prise électrique à l'arrière du dispositif. La LED
d'alimentation s'allume en bleu. Le dispositif est à présent prêt à fonctionner.
Lorsqu'il n'y a aucun autre dispositif connecté sur le CSM3PL, il affiche la BIBLIOTHÈQUE DE
FICHIERS avec les contenus de votre Disque dur (s'il n'y a qu'une seule partition).
Lorsqu'un Dispositif USB (Comme un Disque dur ou un lecteur de mémoire flash USB) ou une
Carte de Mémoire est branché sur le CSM3PL, l'écran présente la LISTE du DISPOSITIF avec tous
les dispositifs trouvés. Si le dispositif connecté contient une grande quantité de fichiers, le
système peut mettre quelques secondes à détecter le dispositif. Veuillez attendre l'écran de
LISTE DE DISPOSITIF / BIBLIOTHÈQUE DE FICHIERS.
Remarques :
• En général, il n’est pas nécessaire de changer votre système vidéo (PAL/NTSC), mais si le
téléviseur n’est compatible qu’avec NTSC ou PAL, vous devrez appuyer sur la touche P/N pour
sélectionner le système de couleur correspondant au système de votre TV.
• Si le mode AUTO START est activé (appuyez sur la touche SETUP -> SETUP MENU ->
PREFERENCES -> AUTO START -> ON), tous les fichiers se trouvant dans les dispositifs
connectés seront lus automatiquement ; en appuyant sur la touche
stopper la lecture automatique et faire afficher la liste de tous les fichiers de la partition
sélectionnée.
• Appuyez sur l’une des touches
ENTER pour confirmer votre sélection (pour entrer dans la liste des médias, dans les
répertoires de fichiers, ou pour commencer à lire les fichiers).
• Appuyez sur la touche
(répertoires des fichiers).
• Appuyez sur la touche MENU pour revenir à DEVICE LIST (liste des appareils) ou à FILE LIBRARY
(répertoires des fichiers).
• Appuyez sur la touche
• Nous vous conseillons de débrancher l’appareil du secteur si vous prévoyez de ne pas l’utiliser
pendant une longue période.
/ STOP pour stopper la lecture et pour revenir à FILE LIBRARY
/ / / pour déplacer le curseur, et utilisez la touche /
/ POWER pour entrer/sortir du mode stand-by.
76
/ STOP, vous pouvez
Page 77

FRANÇAIS
5.2 Fonctionnement plus détaillé
FILE LIBRARY (répertoires des fichiers)
Si aucun dispositif externe n'est branché sur le CSM3PL (seul le disque dur interne est présent),
la BIBLIOTHÈQUE DE FICHIERS s’affiche à l’écran de TV lorsque vous appuyez sur le bouton
POWER pour entrer en mode de fonctionnement (illustré ci-après).
Si plusieurs dispositifs sont connectés (stylo mémoire USB, carte à mémoire), le menu DEVICE
LIST (liste des appareils) apparaîtra tout d’abord à l’écran de votre TV en appuyant sur la touche
/ POWER. Appuyez sur les touches / pour déplacer le curseur, et appuyez sur la touche
/ ENTER pour aller dans le menu FILE LIBRARY (répertoires des fichiers).
REMARQUE :
Cette opération peut tarder quelques instants avant de pouvoir accéder au menu. Avant
d’afficher le menu, votre(vos) dispositif(s) connecté(s) seront indexés. Vous verrez apparaître à
l’écran : SEARCHING. Cela signifie que tous les fichiers reconnus seront indexés et disponibles à
travers votre menu.
/
LISTE DES APPAREILS DOSSIERS DE FICHIERS
Pour changer d’appareil connecté :
Si plusieurs dispositifs sont connectés au CSM3PL, vous pouvez appuyer sur la touche MENU pour
aller dans la DEVICE LIST (liste des appareils) afin de sélectionner un autre appareil en appuyant
sur l’une des touches
/ , puis sur la touche / ENTER.
6. Configuration pour films, musique et photographies
Le CSM3PL de Conceptronic dispose de 3 modes de fonctionnement principaux :
- Play & watch movies (reproduire des films)
Play & listen to Music (écouter de la musique)
-
Play & watch Photos (voir des photographies)
-
6.1 Fonctions du mode Play & watch movies (reproduction des films)
Reproduction de films
Le CSM3PL est compatible avec plusieurs formats vidéos : MPEG2/1, MPEG 4 (XVID, VOB), avec la
compatibilité audio des formats MP3, AC3, AAC et MPG1/2 pour les morceaux audio des films).
Fonctions avancées pour la reproduction de films vidéo
Compatibilité vidéo MPEG4 avec les sous-titres de texte.
77
Page 78

FRANÇAIS
Le CSM3PL de Conceptronic est compatible avec les fichiers de sous-titres .SMI, .SRT, .SUB et
.SSA.
Si le fichier de sous-titre a le même nom que le fichier de vidéo sélectionné (seule l’extension
change), le fichier de sous-titre sera automatiquement chargé lorsque le fichier MPEG4 sera
reproduit.
Si le fichier de sous-titres présente un nom différent, vous devrez alors sélectionner le fichier de
sous-titres ; appuyez sur la touche SUB-T de la télécommande puis sélectionner le fichier du film
correspondant (les deux fichiers seront alors associés). Appuyez sur la touche
commencer la reproduction du film.
Répétition d’un intervalle
Pour lire de manière répétée un intervalle vidéo présélectionné, appuyez sur la touche A/B.
Canaux audio
Appuyez sur la touche R/L de la télécommande pour obtenir successivement les modes Mono
gauche, Mono droite ou le son stéréo.
Certains fichiers MPEG2/VOB contiennent deux ou plusieurs canaux audio ; appuyez sur la touche
AUDIO pour obtenir les différentes gammes : 1-1/8~1-8/8~2-1/8~2-8/8, 3-1/8~3-8/8 (total : 24
possibilités audio). Si un film lu ne présente pas de son, appuyez sur la touche AUDIO afin de
déterminer le bon canal audio lui correspondant.
Si vous passez à un autre fichier MPEG2/VOB, vous pouvez perdre le son. Pour éviter cela,
appuyez sur la touche SETUP pendant la lecture pour mémoriser le type de canal audio en cours
d’utilisation. Cette fonction gardera ce canal audio sélectionné pour tous les fichiers.
Reproduction de films vidéos
Pendant la lecture d’un film vidéo, appuyez sur la touche SLIDE pour obtenir une visualisation
image par image.
Dans ce mode, les photographies seront affichées de manière continue.
Pendant la lecture de films vidéos, appuyez sur les touches
en avant / en arrière, et appuyez sur la touche ENTER/
Touche d’accès direct à votre répertoire de documents vidéo
Vous pouvez créer 1 répertoire de documents vidéos auquel vous pouvez accéder directement en
appuyant sur la touche VIDEO de la télécommande. Créez un répertoire appelé « VIDEO *** » (***
peut être modifié autant de fois que vous le voudrez) dans la racine du disque dur et copiez-y
vos fichiers vidéos.
Une fois la lecture lancée, si vous appuyez sur la touche VIDEO, l’application lira
automatiquement le fichier.
REMARQUE:
Si vous créez plus d’un répertoire dont le nom commence par « VIDEO *** », l’application
n’ouvrira que le premier répertoire.
REMARQUE:
La plupart des Codecs vidéos sont compatibles avec votre CSM3PL (comme XviD, AVI, MPEG2,
etc.) mais il se peut que certains fichiers utilisent un Codec qui n’est pas inclus dans votre
CSM3PL.
Si vous essayez de lire un fichier utilisant un Codec non compatible, le message suivant
apparaîtra : « CODEC NOT SUPPORTED ».
/ pour faire défiler rapidement
pour revenir à la vitesse normale.
/ ENTER pour
78
Page 79

FRANÇAIS
Lecture de DVD
Le CSM3PL lit les DVD à partir du disque dur comme s'il s'agissait d'un DVD normal. Vous pouvez
naviguer dans le Menu DVD, choisir les sous-titres, modifier les langues, etc.
Configuration des Répertoires
Pour lire les DVD de votre Disque dur, vous devez organiser correctement les répertoires DVD sur
le CSM3PL.
Créez un répertoire sur le Disque dur du CSM3PL avec le nom du DVD (par ex. "My Movie")
Copiez le Répertoire VIDEO_TS de votre DVD sur le répertoire DVD créé sur le Disque dur du
CSM3PL. Lorsque la copie est terminée, elle doit avoir cette apparence :
Débranchez le CSM3PL de votre ordinateur et connectez-le sur votre poste de TV. Allumez le
CSM3PL.
Lecture de DVD
Utilisez les touches de navigation de la télécommande pour sélectionner le répertoire de votre
DVD dans le menu (dans l'exemple : My Movie).
Utilisez la touche PLAY/PAUSE de la télécommande pour commencer à lire le DVD
Remarque:
Utilisez les touches de navigation
Menu DVD. Utilisez la touche
N'utilisez pas la touche / ENTER dans le menu CSM3PL. Elle ne sert qu'à afficher
les fichiers / sous-répertoires mais pas à lancer la lecture du DVD.
/ / / et la touche / ENTER pour naviguer dans le
/ STOP pour mettre fin à la lecture du DVD.
79
Page 80

FRANÇAIS
6.2 Fonctions du mode Play & listen to the music (écouter de la musique)
Écouter de la musique
Le CSM3PL de Conceptronic dispose de plusieurs modes vous permettant d’écouter de la musique
(les formats WAV, MP3 et WMA sont compatibles).
Pour lire des fichiers musicaux :
Appuyez sur la touche Menu et sélectionner le bon répertoire dans lequel se trouvent les fichiers
à lire. Le morceau apparaît à l’écran et vous pouvez configurer l’égaliseur (en appuyant sur la
touche TRANS de votre télécommande)
Si vous voulez répéter la lecture d’un morceau, vous pouvez sélectionner :
Random : lecture des morceaux choisis de manière aléatoire.
Shuffle : lecture des morceaux selon un ordre prédéfini au hasard.
Single : Lecture d’un seul morceau sélectionné
Folder : Lecture d’un seul répertoire sélectionné.
REP-one: Répétition d’un morceau sélectionné jusqu’à ce que vous arrêtiez.
Folder repeat: Répétition du répertoire sélectionné jusqu’à ce que vous arrêtiez.
Lorsque vous reproduisez des fichiers de musique, appuyez sur la touche
vitesse de lecture puis appuyez sur la touche PLAY/PAUSE pour revenir à la vitesse normale.
Lecture de musique avec sous-dossiers
Vous pouvez lire des fichiers de musique comprenant des sous-dossiers à l’aide du bouton MUSIC
de la commande à distance.
Utilisez les touches de navigation de la commande à distance pour sélectionner le dossier
contenant la musique que vous souhaitez écouter. Appuyez sur le bouton MUSIC de la commande
à distance pour dresser une liste de tous les fichiers de musique du dossier et des sous-dossiers
sélectionnés.
Remarque:
Si vous appuyez sur le bouton / ENTER (ENTRÉE) au lieu du bouton MUSIC, le
Configuration rapide du répertoire "MUSICDIR" pour accès rapide
Pour préparer votre CSM3PL pour reproduire de la musique automatiquement vous devez créer
un répertoire spécial lorsque vous avez connecté votre CSM3PL sur votre ordinateur.
1) Créez le répertoire "MUSICDIR" sur la racine de votre première partition.
2) Créez les sous-répertoires dont les noms commencent par trois chiffres, par exemple
« 001 », «002 », « 003 », etc (Vous pouvez créer des répertoires jusqu'à "999").
3) Copiez les fichiers de musique dans ces répertoires.
Pour utiliser le répertoire de musique défini à l'avance avec un écran connecté, procédés comme
suit lorsque l'appareil est en cours d'utilisation :
1) Appuyez sur le premier chiffre du répertoire et attendez le message suivant à votre écran :
“AUTO PLAY: MP3 -> ___”
2) Appuyez sur les 2 autres chiffres du sous-répertoire que vous voulez reproduire.
Il est aussi possible de reproduire de la musique à partir des répertoires prédéfinis si votre écran
est éteint. Nous vous conseillons de n'utiliser que les répertoires 000-009 pour cette fonction.
Pour lire de la musique à partir de ces répertoires, appuyez sur le chiffre du répertoire (0-9) et
appuyez sur la touche PLAY/PAUSE .
La musique est automatiquement reproduite.
/ pour régler la
dossier sera ouvert et non reproduit, y compris les sous-dossiers.
80
Page 81

FRANÇAIS
Remarque:
Plus la quantité de données enregistrées sur votre disque dur est grande, plus le
laps de temps entre l'introduction du premier chiffre et l'affichage du message à
l'écran sera long.
6.3 Fonctions du mode Play & watch photos (voir des photographies)
Pendant la visualisation de photographies, vous pouvez utiliser la touche ROTATE pour en
modifier l’orientation. Par défaut, le message de rotation des photos est mémorisé jusqu’à ce
que l’appareil soit éteint ou revenu en mode stand-by. Si vous ne souhaitez pas conserver le
message de rotation, vous pouvez désactiver cette fonction à travers SETUP MENU -> GENERAL
SETUP -> ORIENTATION -> OFF.
Pendant la visualisation des photographies, vous pouvez utiliser la touche TRANS pour modifier
la transition entre chaque photo. Le mode de transition par défaut peut être modifié à travers
SETUP MENU -> SLIDESHOW SETUP -> TRANSITION.
MODE 01 : PLEIN ÉCRAN
MODE 02 : ALÉATOIRE
MODE 03 : BALAYAGE : DU HAUT VERS LE BAS
MODE 04 : BALAYAGE : DU BAS VERS LE HAUT
MODE 05 : BALAYAGE : DU HAUT/DU BAS VERS LE MILIEU
MODE 06 : BALAYAGE : DU MILIEU VERS LE HAUT/LE BAS
MODE 07 : EFFET DE RIDEAU HORIZONTAL : DU HAUT VERS LE BAS
MODE 08 : BALAYAGE : DE LA GAUCHE VERS LA DROITE
MODE 09 : BALAYAGE : DE LA DROITE VERS LA GAUCHE
MODE 10 : BALAYAGE : DE LA GAUCHE/DROITE VERS LE MILIEU
MODE 11 : BALAYAGE : DU CENTRE VERS LA GAUCHE/DROITE
MODE 12 : BALAYAGE : IMPLOSION
MODE 13 : EFFET DE RIDEAU VERTICAL : DE LA GAUCHE VERS LA DROITE
MODE 14 : FONDU ENCHAÎNÉ
Zoomer sur les photographies
Appuyez sur la touche ZOOM pour entrer ou sortir du mode ZOOM ou pour modifier le taux de
zoom. Lorsqu’une photographie est agrandie, vous pouvez utiliser les touches
déplacer.
Music-slide-show (visualisation de photos avec fond musical)
Sélectionnez une photographie et appuyez sur la touche SLIDE pour commencer. Si vous
n’appuyez pas sur la touche SLIDE, vous n’obtiendrez pas de musique et les images seront
présentées sans aucun fond musical. Si aucune musique n’est disponible dans le répertoire, la
fonction SLIDE n’est pas disponible. Vous devez appuyer sur la touche
une visualisation des images sans fond musical.
En mode SLIDE, seuls les fichiers musicaux et les photographies d’un même répertoire peuvent
être lus. REMARQUE : dans ce mode, les fonctions ROTATE/ZOOM ne sont pas disponibles.
Vous pouvez arrêter de visualiser les photos en appuyant sur le bouton PLAY/PAUSE une fois (la
musique est toujours reproduite). Appuyez de nouveau sur PLAY/PAUSE , la musique s’arrête.
Appuyez sur le bouton PLAY/PAUSE pour reprendre la lecture.
Vous pouvez configurer un temps d’apparition entre deux photographies en appuyant sur la
touche DELAY. Ce temps d’intervalle par défaut est configuré à travers SETUP MENU ->
PREFERENCES -> DELAY. Appuyez sur la touche TRANS pour changer de transition. Appuyez sur la
touche REPEAT pour visualiser les photographies de manière répétée.
/ / / pour la
/ ENTER pour obtenir
81
Page 82

FRANÇAIS
Touche d’accès direct à votre répertoire de photographies
Vous pouvez créer 1 répertoire de photographies auquel vous pouvez accéder directement en
appuyant sur la touche PHOTO de la télécommande. Créez un répertoire appelé « PHOTO *** »
(*** peut être modifié autant de fois que vous le voudrez) dans la racine du disque dur et copiezy vos fichiers de photographies. Une fois la visualisation lancée, si vous appuyez sur la touche
PHOTO, l’application lira automatiquement le fichier.
REMARQUE:
Si vous créez plus d’un répertoire dont le nom commence par « PHOTO *** », l’application
n’ouvrira que le premier répertoire.
6.4 Fonctionnement du mode FILE LIBRARY (répertoires des fichiers)
Utilisez les touches / pour sélectionner un fichier ou un répertoire ; la touche /
(PREV/NEXT) permet de faire défiler vers le haut ou vers le bas. Si une photographie ou un
fichier vidéo est sélectionné, sa pré-visualisation et l’information correspondante apparaîtront
à droite de l’écran TV. Si un fichier musical est sélectionné, la musique commencera, avec
l’information correspondante apparaissant à droite de l’écran.
Vous pouvez appuyer sur la touche TOP pour déplacer le curseur vers le haut de la liste des
fichiers ou pour sélectionner facilement un autre répertoire.
Appuyez sur la touche
d’écouter des fichiers musicaux, l’écran MUSIC EQUALIZER apparaîtra). Appuyez sur la touche
/ STOP pour sortir du mode plein écran.
Appuyez sur la touche REPEAT pour sélectionner parmi les modes de lecture suivants :
RANDOM / SHUFFLE / SINGLE / FOLDER / REP-ONE / FOLDER REPEAT.
En mode STOP, appuyez sur la touche FUNC pour ouvrir ou fermer un menu flottant
correspondant au fichier.
/ ENTER pour activer le mode en plein écran (si vous êtes en train
DELETE : permet de supprimer directement un fichier ou un répertoire sélectionné.
RENAME : permet de renommer un fichier ou un répertoire sélectionné.
NEW FOLDER : permet de créer un nouveau répertoire.
PROPERTIES : fait apparaître/referme le menu d’information sur le fichier : taille, date, et
format.
82
Page 83

FRANÇAIS
7. Menu de configuration (SET UP)
En mode STOP, appuyez sur la touche SETUP pour
entrer dans le menu SETUP.
Appuyez sur la touche
curseur, puis appuyez sur la touche
confirmer votre sélection ; appuyez sur la touche SET
UP une fois l’opération terminée.
7.1 Configuration générale (General setup)
• ORIENTATION : contient l’information de rotation.
Options : ON, OFF
Valeur par défaut : ON
• ÉCRAN TV
Options : NORMAL/PS, NORMAL/LB, LARGE
Valeur par défaut : NORMAL/PS
• SYS TV : permet de sélectionner le système
vidéo.
Options : MULTI. SYSTEM, NTSC, PAL
Valeur par défaut : MULTI. SYSTEM
• SORTIE SPDIF
Options : OFF, SPDIF/RAW, SPDIF/PCM
Par défaut : OFF
• ÉCONOMISEUR D’ÉCRAN : permet d’activer le mode
économiseur d’écran ; l’image de l’économiseur
d’écran apparaît lorsque l’appareil s’arrête de
fonctionner ou au bout de quelques minutes, lorsque
l’image est congelée. Cet économiseur d’écran peut éviter que l’écran ne soit endommagé.
• Options : ON, OFF
Valeur par défaut : ON
7.2 Présentation de diapositives (Slideshow setup)
• MODE SLIDE-SHOW (SLIDESHOW MODE)
Options : MANUEL, AUTO
Valeur par défaut : AUTO
• TEMPS D’INTERVALLE (INTERVAL TIME) :
Permet de fixer le temps d’intervalle
entre deux photographies.
Options : UNE SECONDE, TROIS
SECONDES, CINQ SECONDES,
DIX SECONDES
Valeur par défaut : TROIS SECONDES
• VITESSE DE TRANSITION (TRANS SPEED)
Options : RAPIDE, LENT
Valeur par défaut : RAPIDE
• TRANSITION
Options : PLEIN ÉCRAN, ALÉATOIRE, DÉBUT –> FIN, FIN –> DÉBUT, DÉBUT/FIN –> MILIEU, MILIEU
–> DÉBUT/FIN, EFFET DE RIDEAU : DÉBUT –> FIN, GAUCHE –> DROITE, DROITE –> GAUCHE,
GAUCHE/DROITE –> MILIEU, MILIEU –> GAUCHE/DROITE, IMPLOSION, EFFET DE RIDEAU :
GAUCHE –> DROITE, FONDU ENCHAÎNÉ
Valeur par défaut : ALÉATOIRE
/ / / pour déplacer le
/ ENTER pour
83
Page 84

FRANÇAIS
7.3 Préférences (Preferences)
• SORTIE VIDÉO : configure la sortie vidéo.
Options : S-VIDÉO, COMPONENT,P-SCAN YPBPR,
VGA et INTERLACE RGB.
• OSD LANG: sélection des langages OSD.
Options : ANGLAIS, FRANÇAIS,
ALLEMAND, ITALIEN, PORTUGAIS,
ESPAGNOL, NÉERLANDAIS
Valeur par défaut : ANGLAIS
• OSD MESSAGE : sélection du message OSD
pendant la lecture d’un fichier.
Options : ON, OFF
Valeur par défaut : ON
• DEFAULT : rétablit les paramètres par défaut du fabricant.
• AUTO START : lecture automatique de tous les fichiers médias des appareils connectés.
Options : ON; OFF
Valeur par défaut : OFF
• FILE SORT : sélection du mode de tri des fichiers du ou des appareils connectés.
Options : PAR NOM, PAR TAILLE, PAR DATE, PAR TEMPS
Valeur par défaut : PAR NOM
8. Caractéristiques
Alimentation : 100 ~ 240 V AC, 50/60 HZ
Consommation électrique : 11W (typique)
Dimensions : 177 × 163 × 44 (P × L × H mm)
Système de couleur : PAL / NTSC
Fréquence de réponse : ± 3 dB (20 HZ ~ 20 kHz)
Rapport signal/bruit : ≥ 80 dB
Diaphonie audio : ≥ 70 dB
Sortie audio : 2,0 ± 0,2 V (rms)
Sortie Vidéo : 1,0 ± 0,2 V p-p, 75 Ω
Vitesse de Transfert des Données USB : USB 2.0, Max. 480Mb/s
Formats de fichiers compatibles : AVI/MPG/DAT/VOB/WAV/MP3/WMA/JPG
Système de fichier compatible : FAT32
Ces caractéristiques peuvent faire l’objet de toute modification sans préavis.
84
Page 85

FRANÇAIS
9. Conseils & résolution de possibles dysfonctionnements
Suivez les conseils figurant ci-dessous pour résoudre tout problème en cas de dysfonctionnement
de votre CSM3PL :
Le voyant LED d’alimentation ne s’allume pas.
• Le CSM3PL n’est pas branché à l’alimentation électrique. Branchez l’alimentation électrique au
CSM3PL.
L’écran n’indique rien.
• Le CSM3PL est en mode stand-by. Appuyez sur la touche de la télécommande pour l’allumer.
• Une mauvaise source d’entrée est sélectionnée sur votre TV. Changez de source d’entrée.
• Un mauvais système vidéo est sélectionné. Appuyez sur la touche VGA de votre télécommande pour
changer de système vidéo.
• Le câble vidéo n’est pas bien branché. Vérifiez s’il est correctement connecté.
Absence de son.
• Le câble audio n’est pas bien branché. Vérifiez s’il est correctement connecté à votre TV ou à votre
amplificateur.
• Le CSM3PL est connecté à un amplificateur, et ce dernier est éteint. Allumez l’amplificateur.
• Le signal audio du fichier MPEG2 ou VOB n’est pas bien défini. Appuyez sur la touche AUDIO de la
télécommande pour l’ajuster en fonction du bon signal audio.
• La fonction de sourdine Mute est activée. Appuyez sur la touche MUTE de la télécommande pour la
désactiver.
• Le CSM3PL fonctionne en mode FF/FR. Appuyez sur la touche PLAY/PAUSE de la télécommande pour
revenir en mode normal de lecture.
Distorsion d’image à l’écran.
• Le CSM3PL fonctionne en mode FF/FR. Appuyez sur la touche PLAY/PAUSE de la télécommande pour
revenir en mode normal de lecture.
• Un film en format PAL est reproduit en mode NTSC ou vice-versa. Appuyez sur le bouton P/N de la
télécommande pour modifier les paramètres d'affichage.
En appuyant sur la touche SLIDE, le système se fige.
• Le répertoire en lecture contient beaucoup de photographies ou de fichiers musicaux. Le temps de
démarrage sera long avant de commencer la présentation sous forme de diapositives avec fond
musical. Soyez patient.
La télécommande ne fonctionne pas.
• Orientez directement la télécommande vers le récepteur du CSM3PL, dans un rayon de +/- 30
degrés.
• Utilisez la télécommande à moins de 5 mètres de l’appareil.
• La batterie de la télécommande doit être substituée.
Les sous-titres du film reproduit ne s'affichent pas.
• Un fichier AVI est reproduit, mais le fichier de sous-titrage a un nom de fichier différent. Voyez le
paragraphe 6.1 pour savoir comment afficher les sous-titres.
Lorsque vous essayez de lire une vidéo, le message "CODEC NON SUPPORTÉ" s'affiche.
• Le fichier de film est créé avec un codec non supporté par le CSM3PL.
Consultez le site web www.conceptronic.net pour connaître la liste des codecs supportés par le
CSM3PL.
85
Page 86

FRANÇAIS
Le CSM3PL ne lit pas toutes les partitions / contenus du Disque dur.
• La partition du Disque dur n'est pas primaire. Fragmentez de nouveau le disque dur et vérifiez que
toutes les partitions sont bien primaires.
• La partition n'est pas formatée en FAT32. Formatez de nouveau la partition avec le Système de
fichier FAT 32.
• AAucun fichier média n'est présent sur la partition sélectionnée.
Quelles Cartes de Mémoire sont supportées par le CSM3PL ?
• Le CSM3PL lit toutes les principales familles de Carte de mémoire comme :
Memorystick (MS), Secure Digital (SD), Multimedia Card (MMC), Smart Media Card (SM), Compact Flash
(CF), Microdrive (MD). Consultez le site web www.conceptronic.net
Cartes de mémoire supportées par le CSM3PL.
pour connaître la liste des
La lecture de DVD ne commence pas lorsque la touche Play/Pause est enfoncée.
Vérifiez que la structure de fichiers est bien correcte. La structure de fichiers est décrite au
•
chapitre 6.1.
• Les Fichiers DVD sont incomplets, corrompus ou endommagés. Dans ce cas, le CSM3PL ne commence
pas à lire le DVD.
Pendant les films intro du DVD, l'écran est vide.
•
Le chapitre en cours s'arrête sur un écran vide ou est trop court pour être lu. Appuyez sur / NEXT
pour passer au chapitre suivant.
Mon écran de TV affiche une image en noir et blanc et pas en couleurs.
Votre TV ne supporte pas le Système TV "Multi" du CSM3PL. Utilisez le menu Setup pour transformer
•
le Système TV en PAL. (Voir chapitre 7.1).
Après voir modifié le Système TV, éteignez et rallumez le CSM3PL.
86
Page 87

ITALIANO
CSM3PL Conceptronic
Guida d’installazione rapida
Vi ringraziamo per l’acquisto del CSM3PL Conceptronic.
Il presente Manuale per l’installazione dell’hardware spiega passo a passo come usare il Media player
Grab’n’GO 3,5” con lettore di schede di Conceptronic.
Se dovessero esserci dei problemi, vi consigliamo di visitare il nostro sito di supporto (andate su
www.conceptronic.net
Domande più Frequenti (FQA).
Se doveste avere altre domande riguardanti il prodotto che non trovate sul nostro sito Web vi
preghiamo di contattarci attraverso l’e-mail: support@conceptronic.net
Per ulteriori informazioni dei prodotti Conceptronic, la preghiamo di visitare il sito Web della
Conceptronic: www.conceptronic.net
1. Introduzione
Prima di utilizzare il prodotto, si consiglia di leggere attentamente il presente manuale e di
conservarlo per una successiva consultazione.
1.1 Contenuto della confezione
Prima di collegare il dispositivo alla TV o al computer/monitor, è necessario controllare che
nella confezione vi siano tutti i seguenti elementi:
• 1x Media player Grab‘n’GO 3,5” con lettore di schede Conceptronic
• 1x Telecomando con batteria
• 1x adattatore di corrente (12V DC, 2,5A)
• 1x cavo audio/video (composito)
• 1x Cavo audio/video (composito) to SCART
• 1x cavo S-VIDEO to S-VIDEO
• 1x Cavo SPDIF
• 1x Cavo USB
• 1x breve guida d’installazione multilingue su supporto cartaceo
• 1x Base del CSM3PL
1.2 Caratteristiche
• Cambia automaticamente da modalità PC a modalità Lettore e viceversa:
Quando è collegato a un PC, l’apparecchio funziona come un dispositivo di memoria USB.
Quando invece non è collegato a un PC, funziona come un lettore multimediale.
In modalità PC:
• Supporta Plug-n-Play.
• In ottemperanza con lo standard USB 2.0/1.1 ad alta velocità, tassa massima di trasferimento
dati 480 Mb/s.
e cliccate ‘support’), dove potrete trovare il Database delle Risposte alle
.
87
Page 88

ITALIANO
In modalità lettore:
• Supporta unità disco rigido, dispositivi USB e schede di memoria.
• Supporta diverse lingue: inglese, olandese, spagnolo, francese, italiano, tedesco e portoghese
• Supporta molteplici partizioni dell’unità disco rigido.
• Anteprima dei file multimediali.
• Supporta l’opzione di sottotitolazione (.SMI/.SRT/.SUB/.SSA) per MPEG4 (AVI), risoluzione D1.
• Supporta AVI (MPEG4), MPG (MPEG1, MPEG2), DAT (VCD), VOB (DVD), WAV, WMA, MP3, JPG.
• Sono supportati diversi Codec. Controllare sul sito web l’elenco completo dei Codec
supportati.
• Uscite: composita video / component video / RCA audio / audio ottico / VGA / S-video.
• Conforme con PAL / NTSC.
• Modalità di ripetizione versatili.
• Operazioni di file (ELIMINA / RINOMINA / NUOVA CARTELLA / PROPRIETÀ).
• Salvaschermo.
• Le immagini possono essere visualizzate in diverse maniere
Presentazione (riproduzione di diapositive) con musica di fondo.
14 modalità di dissolvenza; intervallo della visualizzazione variabile.
Funzioni di zoom, rotazione, spostamento.
• I file possono essere organizzati in base al nome, alle dimensioni, al tempo o al tipo.
1.3 Avvertenze
• Non cercare di smontare l’adattatore di corrente accluso, poiché ciò potrebbe provocare
danni dovuti all’alto voltaggio. Nel caso in cui sia necessario riparare l’adattatore, vi
preghiamo di rivolgervi al vostro rivenditore o al Centro di Assistenza di Conceptronic.ic.
• Mantenere il dispositivo lontano da fonti di estrema umidità.
• Non immergere il dispositivo o esporlo a liquidi.
• Nel caso in cui il dispositivo non venga utilizzato per un lungo periodo di tempo, scollegare
l’adattatore di corrente.
• Astenersi dall’usare il dispositivo in luoghi nelle vicinanze di combustibili.
• Quando non più funzionanti, sostituire le batterie del telecomando con altre pile dello stesso
tipo. Smaltire opportunamente le batterie scariche, e se possibile riciclarle. Per evitare
problemi di corrosione, estrarre le batterie dal telecomando nel caso in cui questo non venga
utilizzato per un lungo periodo di tempo.
• Mantenere il telecomando lontano da fonti di umidità estrema; non farlo cadere.
• Non utilizzare il telecomando in presenza di un’intensa illuminazione solare.
• NON far cadere, urtare o colpire MAI il dispositivo.
• Per evitarne il surriscaldamento, non coprire mai il dispositivo.
• Il CSM3PL supporta esclusivamente il file system FAT / FAT32 (NTFS non è supportato).
AVVERTENZA: Quando il formato dato al disco rigido è NTFS, il dispositivo funzionerà
nuovo il disco rigido con FAT32 per poter così attivare la funzione di lettore
• I dati contenuti nel disco rigido interno e/o dei dispositivi collegati si possono frammentare,
• però tale operazione influirà sulla riproduzione dei filmati. Si consiglia di deframmentare di
esclusivamente dome disco rigido amovibile per computer. Formattare di
tanto in tanto il disco rigido e/o i dispositivi collegati al computer.
88
Page 89

ITALIANO
2. Funzionalità del Media Player Grab’n’GO 3,5” con lettore di schede
2.1 Descrizione della parti del CSM3PL
• Parte frontale
1. Ricevitore telecomando 4. LED HDD 7. Ingresso schede SM
2. LED di accensione 5. Ingresso schede MMC/MS/SD Card 8. Presa jack USB HOST
3. Pulsanti di controllo 6. Ingresso schede CF
• Pulsanti di controllo
N. Premuto leggermente Premuto a lungo
In stop In riproduzione
( ) (VOL+) P/N (P/N)
( ) (VOL-) VGA (VGA)
( ) ( ) ( )
( ) ( ) ( )
( ) ( ) ( )
Nota:
I pulsanti di controllo offrono le stesse funzioni del telecomando. Nel capitolo 4 vengono
fornite spiegazioni più dettagliate di ciascun tasto.
•
Pannello posteriore
1
2
3
4
5
1. Ingresso DC 4. Uscita Video 7. Uscita S-VIDEO
2. Uscita ottico 5. Uscita Component Video 8. Pulsante On-Off
3. Uscita Audio 6. Uscita VGA 9. Presa jack USB (per collegamento a PC)
89
Page 90

ITALIANO
3. Come collegare il Media player Grab’n’GO 3,5” con lettore di schede.
3.1 Collegamento su computer
1. Accendere computer.
2. Collegare il cavo di alimentazione al CSM3PL e alla presa di corrente.
3. Collegare il cavo USB al CSM3PL e al computer.
Il computer rileverà e configurerà automaticamente il dispositivo, gli assegnerà una nuova
lettera di unità, dopo di che lo utilizzerà come dispositivo di memoria di massa (l’unità deve
essere stata previamente formattata nel sistema FAT32).
Ora è possibile trasferire sul CSM3PL filmati, brani musicali, foto, ecc.
Come scollegare il CSM3PL dal computer
1. Fare un solo clic sull’icona di “Rimozione sicura” nel vassoio di sistema.
2. Selezionare “Stop USB Mass Storage Device” (Scollegamento o rimozione di una periferica
hardware) quando richiesto.
3. Attendere fino a quando apparirà il messaggio “Safe to remove Hardware” (Rimozione
hardware sicura).
4. Scollegare il cavo USB.
1
90
Page 91

ITALIANO
3.2 Connessione alla TV
Come collegare il dispositivo a una TV (come da illustrazione)
I tre connettori RCA (giallo, rosso e bianco) del cavo AV devono concordare con le corrispondenti
prese d’ingresso della TV. Nel caso in cui la TV utilizzata non disponga di nessun ingresso
composito, servirsi del cavo Scart > Composito/Audio.
È anche possibile utilizzare l’uscita Component del Media player per collegarlo a uno schermo
LCD / o a una TV al plasma (il cavo non è compreso). Per l’audio, si può usare anche l’uscita
SPDIF del Media player per collegarlo all’amplificatore o agli altoparlanti (cavo compreso).
NOTA:
Il CSM3PL Conceptronic si può utilizzare con una TV o con un monitor.
Quando viene usata una TV si possono utilizzare le uscite S-VIDEO, Composita, Composita to
SCART o Component del CSM3PL..
d’ingresso corretto per mostrare l’uscita video del
modalità VGA, premere il pulsante del telecomando della VGA per impostare di nuovo l’uscita
VIDEO sull’impianto televisivo.
Quando viene usato un monitor, sarà necessario un cavo VGA per monitor da collegare al
connettore di uscita VGA (6). Premere il pulsante del telecomando della VGA (diverse volte) fino
a quando il monitor si accenderà automaticamente (dopo essere uscito dalla modalità di
standby).
Per saltare da una modalità all’altra (VGA, TV, S-VIDEO, etc.) sarà necessario premere il
pulsante del telecomando della VGA.
Consultare il manuale della TV per selezionare il canale
CSM3PL. Se il CSM3PL è stato utilizzato in
91
Page 92

ITALIANO
4. Il telecomando
Il telecomando serve per controllare il dispositivo. Nella copertina interna del presente manuale
viene riportata un’immagine del telecomando. I numeri dei pulsanti corrispondono a quelli della
tabella che appare qui di seguito, per spiegare ogni funzione del telecomando.
N. Pulsante Descrizione
1 POWER ( ) Entra o esce della modalità di standby (ON/OFF)
2 R / L Seleziona l’uscita audio: destra, sinistra e stereo
3 SLIDE Entra nella modalità di presentazione diapositive con musica mode e
4 SLOW Riproduzione lenta.
5 REPEAT Selezione modalità di ripetizione.
6 DELAY Selezione intervallo di tempo fra una diapositiva e l’altra (compreso
7 TRANS Selezione modalità di transizione o un tipo di equalizzatore audio.
8
, , , Servono per spostare il cursore
9 AUDIO Seleziona o modifica il flusso audio (riproduzione DVD).
10 MENU Mostra l’ELENCO dei DISPOSITIVI o la BIBLIOTECA FILE (nel caso in cui ci
Ritorna al Menu DVD (riproduzione DVD).
11 PLAY/PAUSE Inizia la riproduzione di un file o di una cartella DVD, mette in pausa la
12 VOL + / - Alza / abbassa il livello del volume.
13 PREVIOUS (
24 REWIND (
) Va la file / capitolo precedente o pagina su.
) Riavvolgimento veloce.
15 FILE Mostra la struttura di directory del dispositivo.
16 MUSIC Pulsante di accesso diretto alla musica.
17 0 – 9 È possibile ascoltare musica senza dispositivo dotato di schermo (TV,
18 OUTPUT Selezione segnale uscita video.
19 SETUP Configurazione funzione.
20 PHOTO Pulsante di accesso diretto alle foto.
21 VIDEO Pulsante di accesso diretto ai video.
22 FAST FORWARD (
23 NEXT (
24 STOP (
) Va la file / capitolo successivo o pagina giù.
) Stop riproduzione.
25 FUNC Mostra il menu delle operazioni per il file.
26 SUB-T Seleziona / Modifica i sottotitoli (riproduzione MPEG4 e DVD) del film.
27 ENTER (
) Conferma selezione.
28 ZOOM Zoom avanti / indietro (foto e riproduzione DVD).
29 ROTATE Rotazione foto.
30 DISPLAY Mostra le informazioni del file durante la riproduzione.
31 A – B Riproduce l’intervallo selezionato ripetutamente. Premere il pulsante
32 TOP Va all’inizio della directory.
33 P / N Selezione sistema video. (PAL / NTSC)
34 MUTE Mette in silenzio l’audio o annulla il silenzio audio.
nel fermo immagine.
musica della presentazione).
sia solo un dispositivo collegato).
riproduzione.
monitor) preconfigurando le cartelle audio (spiegato più avanti nel
manuale).
) Avanzamento veloce.
una volta per selezionare il Punto d’inizio <A>; premerlo di nuovo per
selezionare il Punto finale <B>; l’intervallo A-B verrà ripetuto; Premere
di nuovo il pulsante per annullare la selezione.
Valido solo per la modalità video. Non valido perl a modalità musica.
92
Page 93

ITALIANO
5. Informazioni importanti
Il range operativo del telecomando è di circa cinque metri.
1. Dirigere il telecomando verso il ricevitore, posto sul pannello anteriore del dispositivo.
L’angolo di ricezione è di ±30 gradi, a una distanza massima di cinque metri.
2. Sostituire le batterie quando sono deboli o non funzionano più
5.1 Operazioni di base
1. Inserire l’adattatore di corrente in una presa elettrica funzionante e collegare l’altra
estremità dell’adattatore al dispositivo.
2. Accendere il dispositivo con il tasto di accensione posto sulla parte posteriore. Il LED di
accensione diventerà blu. La periferica è pronta per essere usata.
Nel caso in cui non vi sia nessun altro dispositivo collegato al CSM3PL, verrà mostrata la
BIBLIOTECA FILE con il contenuto del disco rigido (se solo è presente la partizione 1).
Quando invece è collegato un dispositivo USB (come un disco rigido o un’unità flash USB) o una
scheda di memoria al CSM3PL, sullo schermo apparirà l’ELENCO DEI DISPOSITIVI con tutte le
periferiche rilevate. Se il dispositivo collegato contiene una grande quantità di file, potrebbe
essere necessario un po’ di tempo prima che esso possa essere rilevato. Attendere fino a
quando apparirà lo schermo relativo all’ELENCO DEI DISPOSITIVI / BIBLIOTECA FILE.
Avviso
• Di solito non è necessario cambiare il sistema video usato (PAL / NTSC); se però la TV
supporta solo il sistema NTSC o PAL, sarà necessario ricorrere al pulsante P/N per selezionare
un sistema cromatico compatibile con il sistema televisivo utilizzato
• Se è attivata l’opzione di “AUTO START” (Avvio automatico), (si attiva premendo il pulsante
SETUP, entrando nel SETUP MENU, poi PREFERENCES, AUTO START e ON), tutti i file dei
dispositivi connessi verranno automaticamente visualizzati. Premendo il pulsante di
verrà interrotta la riproduzione automatica e apparirà un elenco di tutti i file contenuti nella
partizione selezionata
• Premere uno dei pulsanti
confermare la selezione (si può accedere alla biblioteca multimediale, alla cartella dei file o
si può avviare la riproduzione dei file).
• Premere il pulsante
• Premere il pulsante MENU per mostrare l’ELENCO DISPOSITIVI o la BIBLIOTECA FILE.
• Premere il pulsante
• È consigliabile scollegare il dispositivo dall’alimentazione o estrarne le batterie se non verrà
utilizzato per un lungo periodo di tempo.
/ / / per spostare il cursore, e usare il pulsante / ENTER per
/STOP per interrompere la riproduzione e tornare alla BIBLIOTECA FILE
/ POWER per entrare o uscire dalla modalità standby.
/ STOP
93
Page 94

ITALIANO
5.2 Operazioni dettagliate
Biblioteca file
Nel caso in cui non vi sia nessun dispositivo esterno collegato la CSM3PL (in cui è presente solo
l’unità disco rigido), sullo schermo della TV apparirà la BIBLIOTECA FILE, dopo aver premuto il
pulsante
Nel caso di diversi dispositivi collegati (stick di memoria USB, scheda di memoria), l’ELENCO
DISPOSITIVI apparirà sullo schermo della TV, non appena verrà premuto il pulsante
per accedere alla modalità operativa. Usare i pulsanti
tasto
AVVISO:
Potrebbe essere necessario un po’ di tempo prima di poter sfogliare il menu; prima di
visualizzarlo, il/i dispositivo/i collegato/i verrà indicizzato. Sullo schermo apparirà la scritta:
RICERCA IN CORSO. Ciò significa che tutti i file disponibili verranno indicizzati e visualizzati nel
menu.
/ POWER per entrare in modalità operativa (come da illustrazione).
/ per spostare il cursore; premendo il
/ ENTER sarà possibile accedere alla BIBLIOTECA FILE.
/ POWER
ELENCO DISPOTIVITI I BIBLIOTECA FILE
Come cambiare il dispositivo connesso:
Nel caso in cui vi sia più di un solo dispositivo connesso al CSM3PL, è possibile premere il
pulsante MENU per accedere all’ELENCO DISPOSITIVI e selezionarne uno premendo i tasti
/ ENTER.
6. Configurazione film, musica e foto
Il CSM3PL Conceptronic è dotato di tre funzioni principali:
- Consente di riprodurre e vedere film
Consente di riprodurre e ascoltare musica
-
Consente di riprodurre e visualizzare foto
-
6.1 Come riprodurre e vedere un film: opzioni
Riproduzione film
Il CSM3PL supporta diversi formati video: MPEG2/1, MPEG4 (formati XVID, VOB) ed è in grado di
supportare anche i formati MP3, AC3, AAC e MPG1/2 per la riproduzione delle tracce audio
contenute nel filmato).
94
/ e
Page 95

ITALIANO
Opzioni extra per la riproduzione di video
Supporto per la riproduzione di video MPEG4 con sottotitoli
Il CSM3PL Conceptronic supporta i file di sottotitolazione .SMI, .SRT, .SUB o .SSA.
Se il file di sottotitolazione possiede lo stesso nome file video selezionato (con l’unica differenza
nell’estensione) il file di sottotitolazione verrà caricato automaticamente durante la
riproduzione del file MPEG4
Quando invece il file di sottotitolazione possiede un nome diverso, in tal caso sarà necessario
selezionare il file desiderato, premere il pulsante SUB-T del telecomando, dopo di che
selezionare il file del FILM da riprodurre (così verranno associati i due file). Premere
ENTER per iniziare la riproduzione del film.
Ripetizione dell’intervallo
Per riprodurre continuamente un intervallo video selezionato, premere A/B.
Canali audio
Premere il pulsante R/L del telecomando per attivare l’opzione audio Mono Sinistra, Mono Destra
o Stereo.
Alcuni file MPEG2/VOB possono contenere due o più flussi audio; in tal caso premere il pulsante
AUDIO per selezionare fra 1-1/8~1-8/8,2-1/8~2-8/8, 3-1/8~3-8/8 (24 flussi audio in totale). Nel
caso in cui un video non sia accompagnato da audio durante la riproduzione, premere il pulsante
AUDIO per localizzare il flusso audio appropriato.
Scambiando un file MPEG2/VOB, si potrebbe perdere l’audio nel caso in cui questo si trovi in un
altro flusso. Per evitare questo problema, premere il pulsante di SETUP durante la riproduzione
per “bloccare” il flusso audio in uso. Con questa opzione il flusso audio selezionato verrà
mantenuto per tutti i file.
Riproduzione di video
Durante la riproduzione di un video, premendo il tasto SLIDE è possibile attivare la funzione di
fermo immagine. In questa modalità le foto verranno riprodotte in maniera continua.
Durante la riproduzione di un video, il pulsante
maniera veloce il filmato; per riportarlo alla velocità normale premere il pulsante ENTER /
Pulsante di accesso diretto alla cartella video
È possibile creare una cartella video, alla quale è possibile accedere direttamente premendo il
pulsante VIDEO del telecomando. Creare una cartella dal nome “VIDEO ***” (in cui *** può essere
sostituito da qualunque cosa desideri l’utente) nella radice del disco rigido, e conservarvi i file
video. Quando verrà acceso il lettore multimediale e verrà premuto il pulsante VIDEO, il lettore
multimediale aprirà automaticamente tale cartella.
NOTA:
Nel caso in cui venga creata più di una cartella dal nome “VIDEO ***”, il dispositivo aprirà solo ed
esclusivamente la prima cartella.
NOTA:
Sebbene il CSM3PL sia in grado di supportare la maggior parte dei video Codec (come ad esempio
XviD, AVI, MPEG2, ecc.), potrebbero esistere comunque file che hanno bisogno di un Codec non
compreso nel CSM3PL.
Nel caso in cui si cerchi di riprodurre un file con un Codec non supportato, apparirà il seguente
messaggio: “CODEC NON SUPPORTATO”.
/ serve per far avanzare o riavvolgere in
95
/
.
Page 96

ITALIANO
Riproduzione DVD
Il CSM3PL riproduce i DVD contenuti nel disco rigido come se si trattasse di DVD normali. Sarà
possibile consultarne il menu, selezionarne i sottotitoli, modificarne la lingua, ecc.
Configurazione cartella
Per riprodurre i DVD contenuti nel disco rigido, sarà necessario configurare correttamente le
cartelle DVD nel CSM3PL.
Creare una cartella nel disco rigido del CSM3PL con il nome del DVD (ad esempio “My Movie”)
Copiare la cartella VIDEO_TS contenuta nel DVD nella cartella DVD appena creata nel disco
rigido del CSM3PL. Dopo averla copiata, dovrebbe apparire un’immagine come questa qui in
basso:
Scollegare il CSM3PL dal computer e collegarlo alla TV. Accendere il CSM3PL.
Riproduzione del DVD
Usare i tasti di navigazione del telecomando per selezionare la cartella del DVD nel menu
(nell’esempio: My Movie).
Premere il pulsante PLAY/PAUSE del telecomando per avviare la riproduzione del DVD.
Nota:
Non usare il pulsante / ENTER nel Menu del CSM3PL, poiché in questo modo
verranno solo visualizzati i file e le sottocartelle e non verrà avviata la riproduzione del
DVD.
Usare i tasti di navigazione
Usare il tasto
/ / / e il pulsante / ENTER per sfogliare il Menu del DVD.
/ STOP per terminare la riproduzione del DVD.
96
Page 97

ITALIANO
6.2 Come riprodurre e ascoltare musica: opzioni
Riproduzione della musica
Il CSM3PL Conceptronic è dotato di diverse modalità per riprodurre la musica (vengono
supportati i sistemi WAV, MP3 e WMA)
Come riprodurre file musicali:
Premere Menu e selezionare la cartella nella quale sono contenuti i file con la musica
desiderata. Verrà visualizzata la traccia audio, dopo di che sarà possibile selezionare
un’impostazione di equalizzatore (premendo il pulsante TRANS del telecomando). Se si desidera
ripetere una canzone, è possibile selezionare:
Singola: per riprodurre solo la canzone ancora una volta
Cartella: per riprodurre solo la cartella selezionata
Random: (Riproduzione aleatoria) serve per riprodurre la cartella selezionata in ordine
aleatorio.
Shuffle: (Riproduzione casuale) serve per riprodurre la cartella selezionata in ordine
casuale
Single: (Ripetizione singola) serve per ripetere solo il brano selezionato
Folder: (Ripetizione cartella) serve per ripetere solo la cartella selezionata.
REP-one: (Ripetizione una) continua a ripetere il brano selezionato fino a quando
verrà premuto Stop.
Folder repeat: (Ripetizione cartella) continua a ripetere la cartella selezionata fino a quando
verrà premuto Stop
Quando vengono riprodotti file musicali, premere il pulsante
riproduzione e premere PLAY/PAUSE per tornare alla velocità normale.
Riproduzione musica con sottocartelle
È possibile riprodurre file audio, comprese le sottocartelle, utilizzando il pulsante MUSIC del
telecomando.
Usare i tasti di navigazione del telecomando per selezionare la cartella contenente la musica che
si desidera riprodurre. Premere il pulsante MUSIC del telecomando per creare un elenco di tutti i
file audio contenuti nella cartella selezionata, e nelle rispettive sottocartelle.
Nota:
Se viene premuto il pulsante / ENTER invece di MUSIC, la cartella verrà solo
aperta, e non riprodotta, comprese le sottocartelle.
Comnfiogurazione della cartella “MUSICDIR” per un accesso rapido
Per preparare il CSM3PL affinché riproduca musica automaticamente, è necessario creare una
cartella speciale dopo aver collegato il CSM3PL al computer.
1) Creare la cartella ”MUSICDIR” nella root della prima partizione.
2) Creare sottocartelle con un nome formato da tre numeri digitali, ad esempio, “001”, “002”,
“003”, ecc. (è possibile crear cartelle fino a “999”).
3) Copiare i file musicali all’interno di tali cartelle.
Per usare la cartella audio predefinita con uno schermo collegato, seguire i passi qui riportati,
quando il dispositivo è operativo:
1) Premere il primo digito della cartella e aspettare fino a quando apparirà il seguente
messaggio sullo schermo: “AUTO PLAY: MP3 -> ___”
2) Premere gli altri due digiti della sottocartella che si vuole ascoltare.
/ per regolare la velocità di
97
Page 98

ITALIANO
È anche possibile riprodurre la musica dalle cartelle predefinite, nel caso in cui lo schermo sia
spento. Si consiglia di usare solo le cartelle 000 - 009 per questa opzione. Per riprodurre musica
da queste cartelle, premere il digito della cartella (0 – 9) e premere il pulsante PLAY/PAUSE.
La musica inizierà ad ascoltarsi automaticamente
Nota: l’intervallo di tempo che intercorre fra l’introduzione del primo digito e l’apparizione del
messaggio sullo schermo aumenterà proporzionalmente alla quantità di dati contenuti nel
disco rigido.
6.3 Come riprodurre e visualizzare foto: opzioni
Quando vengono visualizzate le foto, è possibile utilizzare il pulsante ROTATE per farle scorrere.
Per default il messaggio di scorrimento resta attivo fino a quando viene spento il dispositivo o
entra in modalità standby. Se si preferisce disattivare l’opzione di scorrimento, si dovrà
procedere nella maniera seguente: entrare in SETUP MENU -> GENERAL SETUP -> ORIENTATION > OFF.
Durante la riproduzione delle foto è possibile usare il pulsante TRANS per modificare la modalità
di dissolvenza tra una foto e l’altra.
La modalità di dissolvenza impostata per default può essere configurata entrando in SETUP MENU
-> SLIDESHOW SETUP -> SETUP -> TRANSITION.
MODALITÀ 01: TUTTO SCHERMO
MODALITÀ 02: CASUALE
MODALITÀ 03: DISSOLVENZA: DALL’ALTO VERSO IL BASSO
MODALITÀ 04: DISSOLVENZA: DAL BASSO VERSO L’ALTO
MODALITÀ 05: DISSOLVENZA: DALL’ALTO/BASSO VERSO IL CENTRO
MODALITÀ 06: DISSOLVENZA: DAL CENTRO VERSO L’ALTO/BASSO
MODALITÀ 07: EFFETTO TENDINA: DALL’ALTO VERSO IL BASSO
MODALITÀ 08: DISSOLVENZA: DA SINISTRA VERSO DESTRA
MODALITÀ 09: DISSOLVENZA: DA DESTRA VERSO SINISTRA
MODALITÀ 10: DISSOLVENZA: DA SINISTRA/DESTRA VERSO IL CENTRO
MODALITÀ 11: DISSOLVENZA: DAL CENTRO VERSO SINISTRA/DESTRA
MODALITÀ 12: DISSOLVENZA: DA TUTTI I LATI VERSO IL CENTRO
MODALITÀ 13: EFFETTO TENDINA: DA SINISTRA VERSO DESTRA
MODALITÀ 14: DISSOLVENZA INCROCIATA
Zoom foto
Premere il pulsante ZOOM per entrare o uscire dalla modalità ZOOM o per modificare la
percentuale di ingrandimento desiderata. Quando una foto viene ingrandita, è possibile usare i
pulsanti
/ / / per spostarsi da un alto all’altro della stessa.
Presentazione con musica (visualizzazione delle foto con musica di fondo)
Selezionare una foto e premere SLIDE per avviare la presentazione.
Se non viene premuto “SLIDE” la musica non verrà riprodotta e le immagini verranno mostrate
come presentazione senza traccia audio associata. Se non vi è nessuna traccia audio disponibile
nella cartella, la funzione di SLIDE non sarà operativa. Sarà quindi necessario premere il
pulsante
/ ENTER per ottenere presentazioni di immagini senza audio.
In modalità SLIDE è possibile riprodurre solo foto e file musicali contenuti nella stessa cartella.
NOTA: In questa modalità, non è possibile accedere alle funzioni di ROTATE e ZOOM.
98
Page 99

ITALIANO
È possibile terminare la visualizzazione delle foto premendo una volta il pulsante PLAY/PAUSE
(la musica sarà ancora in funzionamento). Premere di nuovo PLAY/PAUSE e la musica verrà
interrotta. Premere il pulsante PLAY/PAUSE per riavviare la riproduzione.
È possibile impostare l’intervallo di tempo fra una foto e l’altra premendo il pulsante DELAY.
L’intervallo di default viene configurato entrando in SETUP MENU -> PREFERENCES -> DELAY.
Premere il pulsante TRANS per cambiare il tipo di dissolvenza. Premere il pulsante REPEAT per
riprodurre continuamente le immagini.
Pulsante di accesso diretto alla cartella foto
È possibile creare una cartella foto, alla quale è possibile accedere direttamente premendo il
pulsante PHOTO del telecomando. Creare una cartella dal nome “PHOTO ***” (in cui *** può
essere sostituito da qualunque cosa desideri l’utente) nella radice del disco rigido, e conservarvi
le foto. Quando verrà acceso il lettore multimediale e verrà premuto il pulsante PHOTO, il
lettore multimediale aprirà automaticamente tale cartella.
NOTA:
Nel caso in cui venga creata più di una cartella dal nome “PHOTO ***”, il dispositivo aprirà solo
ed esclusivamente la prima cartella.
6.4 Operazioni in Biblioteca File
Usare il pulsante
per andare una pagina in alto o una pagina in basso. Nel caso in cui vengano selezionati una
foto o un video, l’anteprima e le informazioni relative verranno mostrate sul lato destro dello
schermo TV. Se viene selezionato un file musicale, la traccia audio inizierà la riproduzione,
mentre sul lato destro dello schermo appariranno tutte le informazioni relative
È possibile premere il pulsante TOP per spostare il cursore direttamente all’inizio dell’elenco
dei file e passare facilmente a un’altra cartella.
Premere il pulsante
vengano riprodotti file musicali, apparirà la videata relativa all’EQUALIZZATORE MUSICALE).
Premendo il pulsante
Premere il pulsante REPEAT per selezionare una modalità di ripetizione: RANDOM / SHUFFLE /
SINGLE / FOLDER / REP-ONE / FOLDER REPEAT.
Quando è in STOP, premendo il pulsante FUNC si può aprire o chiudere un menu fluttuante
delle operazioni relative al file.
/ per selezionare un file o una cartella e il pulsante / (PREV/NEXT)
/ ENTER per entrare nella modalità a tutto schermo (nel caso in cui
/ STOP si uscirà dalla modalità a tutto schermo.
ELIMINA: elimina direttamente un file o una cartella selezionati
RINOMINA: rinomina un file o una cartella selezionati
NUOVA CARTELLA: crea una nuova cartella
PROPRIETÀ: mostra/nasconde le informazioni relative al file, quali le dimensioni,
la data e il formato.
99
Page 100

ITALIANO
7. Menu di configurazione
Quando il dispositivo è in STOP, premere il pulsante
SETUP per entrare nel Menu di configurazione (SETUP
MENU).
Premere il pulsante
dopo di che premere il tasto
confermare la selezione; una volta terminato,
premere il pulsante SETUP.
/ / / per spostare il cursore,
/ ENTER per
7.1 Configurazione generale (General setup)
• ORIENTATION (ORIENTAZIONE): contiene le
informazioni sullo scorrimento
Opzioni: ON, OFF
Default: ON
• TV DISPLAY (DISPLAY TV)
Opzioni: NORMALE/PS, NORMALE/LB, AMPIO
Default: NORMALE/PS
• TV SYS (SISTEMA TV): serve per selezionare
un sistema video
Opzioni: SISTEMA MULTI, NTSC, PAL
Default: SISTEMA MULTI
• SPDIF OUTPUT (USCITA SPDIF)
Opzioni: OFF, SPDIF/RAW, SPDIF/PCM
Default: OFF
• SCREEN SAVER (SALVASCHERMO): attiva il salvaschermo; l’immagine del salvaschermo appare
ogni volta che l’unità si interrompe o che si blocca l’immagine per alcuni minuti. Grazie al
salvaschermo lo schermo può evitare eventuali danni.
Opzioni: ON, OFF
Default: ON
7.2 Configurazione presentazione (Slideshow setup)
• SLIDESHOW MODE (MODALITÀ PRESENTAZIONE):
OPZIONI: MANUALE; AUTO
Default: AUTO
• INTERVAL TIME (INTERVALLO DI TEMPO):
serve per selezionare l’intervallo di tempo
che intercorre fra una foto e un’altra.
Opzioni: UN SECONDO, TRE
SECONDI, CINQUE SECONDI,
DIECI SECONDI
Default: TRE SECONDI
• TRANS SPEED (VELOCITÀ DI DISSOLVENZA)
Opzioni: VELOCE, LENTO
Default: VELOCE
• DISSOLVENZA
Opzioni: TUTTO SCHERMO, ALEATORIA, DALL’ALTO VERSO IL BASSO, DAL BASSO VERSO L’ALTO,
DALL’ALTO/BASSO VERSO IL CENTRO, DAL CENTRO VERSO L’ALTO/BASSO, EFFETTO TENDINA:
DALL’ALTO VERSO IL BASSO, DA SINISTRA VERSO DESTRA, DA DESTRA VERSO SINISTRA, DA
SINISTRA/DESTRA VERSO IL CENTRO, DAL CENTRO VERSO SINISTRA/DESTRA, DA TUTTI I LATI
VERSO IL CENTRO, EFFETTO TENDINA: DA SINISTRA VERSO DESTRA, DISSOLVENZA INCROCIATA
Default: ALEATORIA
100
 Loading...