

Page 1

NEDERLANDS
1
Conceptronic CSATA2P
Snelstart handleiding
Hartelijk gefeliciteerd met de aanschaf van uw
Conceptronic Serial ATA Controller kaart.
In de bijgaande Snelstart handleiding wordt stap voor stap uitgelegd hoe u de Conceptronic
Serial ATA Controller kaart kunt installeren.
In geval van problemen adviseren wij u onze support-site te bezoeken (ga naar:
www.conceptronic.net
en klik op ‘Support’). Hier vindt u een database met veelgestelde
vragen waar u waarschijnlijk de oplossing voor uw probleem kunt vinden.
Heeft u andere vragen over uw product die u niet op de website kunt vinden, neem dan
contact met ons op via e-mail: support@conceptronic.net
.
Voor meer informatie over Conceptronic producten kunt u terecht op de Conceptronic
website: www.conceptronic.net
.
De software configuratie beschreven in deze handleiding kan afwijken op uw computer. Dit is
afhankelijk van het besturingssysteem dat u gebruikt.
1. Pakket Inhoud
De volgende onderdelen dienen aanwezig te zijn in de verpakking van de Conceptronic
Serial ATA Controller kaart:
• Conceptronic Serial ATA Controller kaart
• Serial ATA Kabel
• Deze meertalige Snelstart handleiding
• Stuurprogramma CD-ROM
Page 2

NEDERLANDS
2
2. Hardware installatie
1. Schakel uw computer uit en ontkoppel de spanningskabel aan de achterzijde.
2. Open de kap van uw computer door de schroeven aan de achterzijde te
verwijderen.
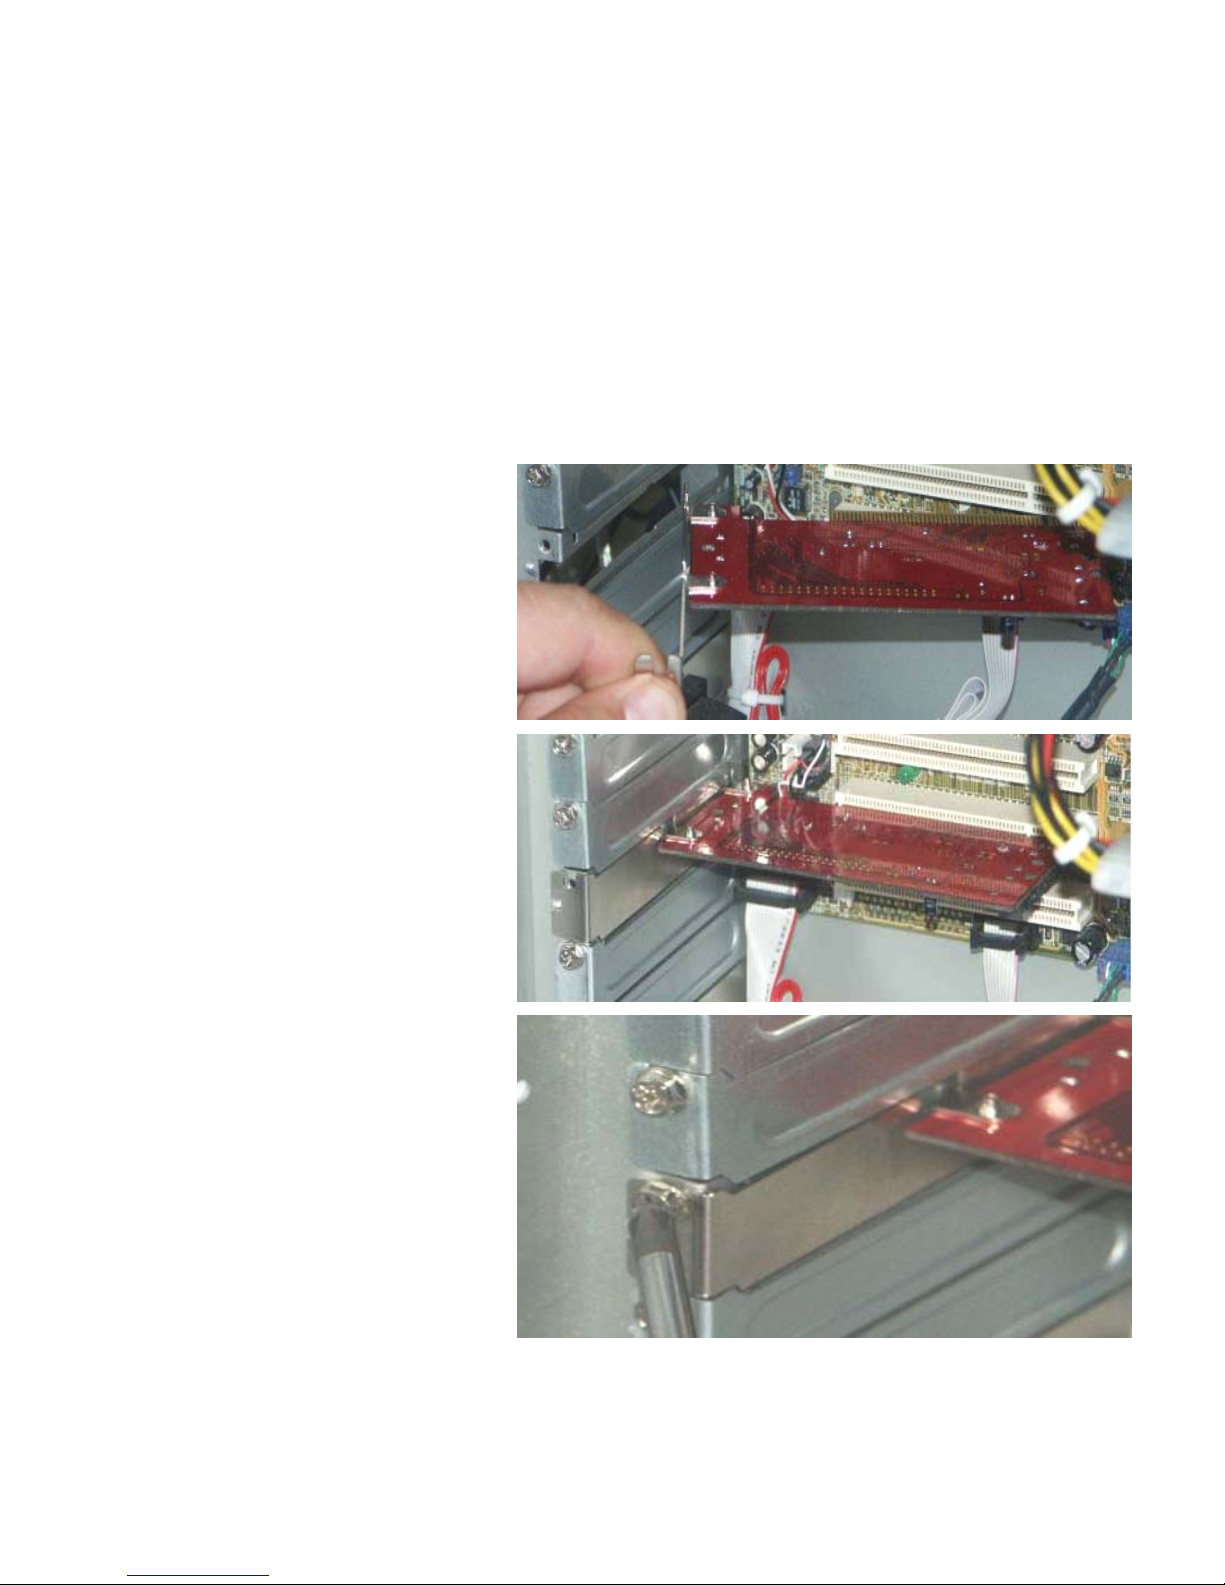
3. Zoek een leeg PCI slot in uw computer en verwijder het bijhorende
beschermplaatje uit de computerkast.
4. Plaats de CSATA2P
Controller kaart in het
vrije PCI slot.
5. Zet de CSATA2P Controller
kaart met een
schroevendraaier vast aan
de binnenzijde van de
computer.
Page 3

NEDERLANDS
3
3. Pre-Windows Stuurprogramma Installatie
Wanneer u de CSATA2P Controller kaart gaat gebruiken om uw Windows
besturingssysteem te starten dient u een nieuwe installatie van Windows uit te voeren
op de harde schijf die met de CSATA2P verbonden is. Tijdens deze installatie dient u
een pre-install stuurprogramma te installeren voor de correcte werking van de CSATA2P
Controller kaart.
Let op
: Als het Windows besturingssysteem op een andere harde schijf staat en u de
CSATA2P Controller kaart gebruikt voor een extra harde schijf kunt u dit
hoofdstuk overslaan en doorgaan bij hoofdstuk 3.2.
U dient het pre-install stuurprogramma eerst op een 3,5” diskette of een USB-Flashdrive
te zetten voordat u begint met een nieuwe Windows installatie.
Let op
: De setup van Windows 2000 en XP ondersteunen het gebruik van een USB-
Flashdrive tijdens de installatie niet
! Voor Windows 2000 en XP kunt u alleen
de 3,5” diskette optie gebruiken voor het pre-install stuurprogramma.
3.1 De Stuurprogramma Diskette / Flashdrive voorbereiden
1. Plaats de CD-ROM in uw CD-ROM speler. Het Autorun Menu zal automatisch
verschijnen. Als het Autorun Menu niet getoond wordt, ga dan naar “Mijn
Computer” en dubbelklik op de CD-ROM speler om het Autorun Menu te starten.
2. Klik in het menu op “Browse”. Er zal een verkenner scherm geopend worden die
de inhoud van de CD-ROM zal tonen.
3. Kies de map welke overeenkomt met de Windows versie die u wilt installeren:
“Win2kXP” of “WinVista”.
4. Open de map “drvdisk” door op deze map te dubbelklikken.
5. Kopieer de inhoud van de map “drvdisk” naar een lege 3,5” diskette of naar een
USB-Flashdrive als u Windows Vista gaat installeren.
Wanneer het kopieerproces is voltooid, zijn de voorbereidingen voor de nieuwe
installatie gereed. U kunt nu starten met de (nieuwe) Windows installatie op uw
computer.
Page 4

NEDERLANDS
4
3.2 Pre-install Windows 2000/XP
1. Herstart de computer en plaats de Windows Installatie CD in uw CD-ROM speler.
2. Plaats de pre-install stuurprogramma diskette in uw diskette station.
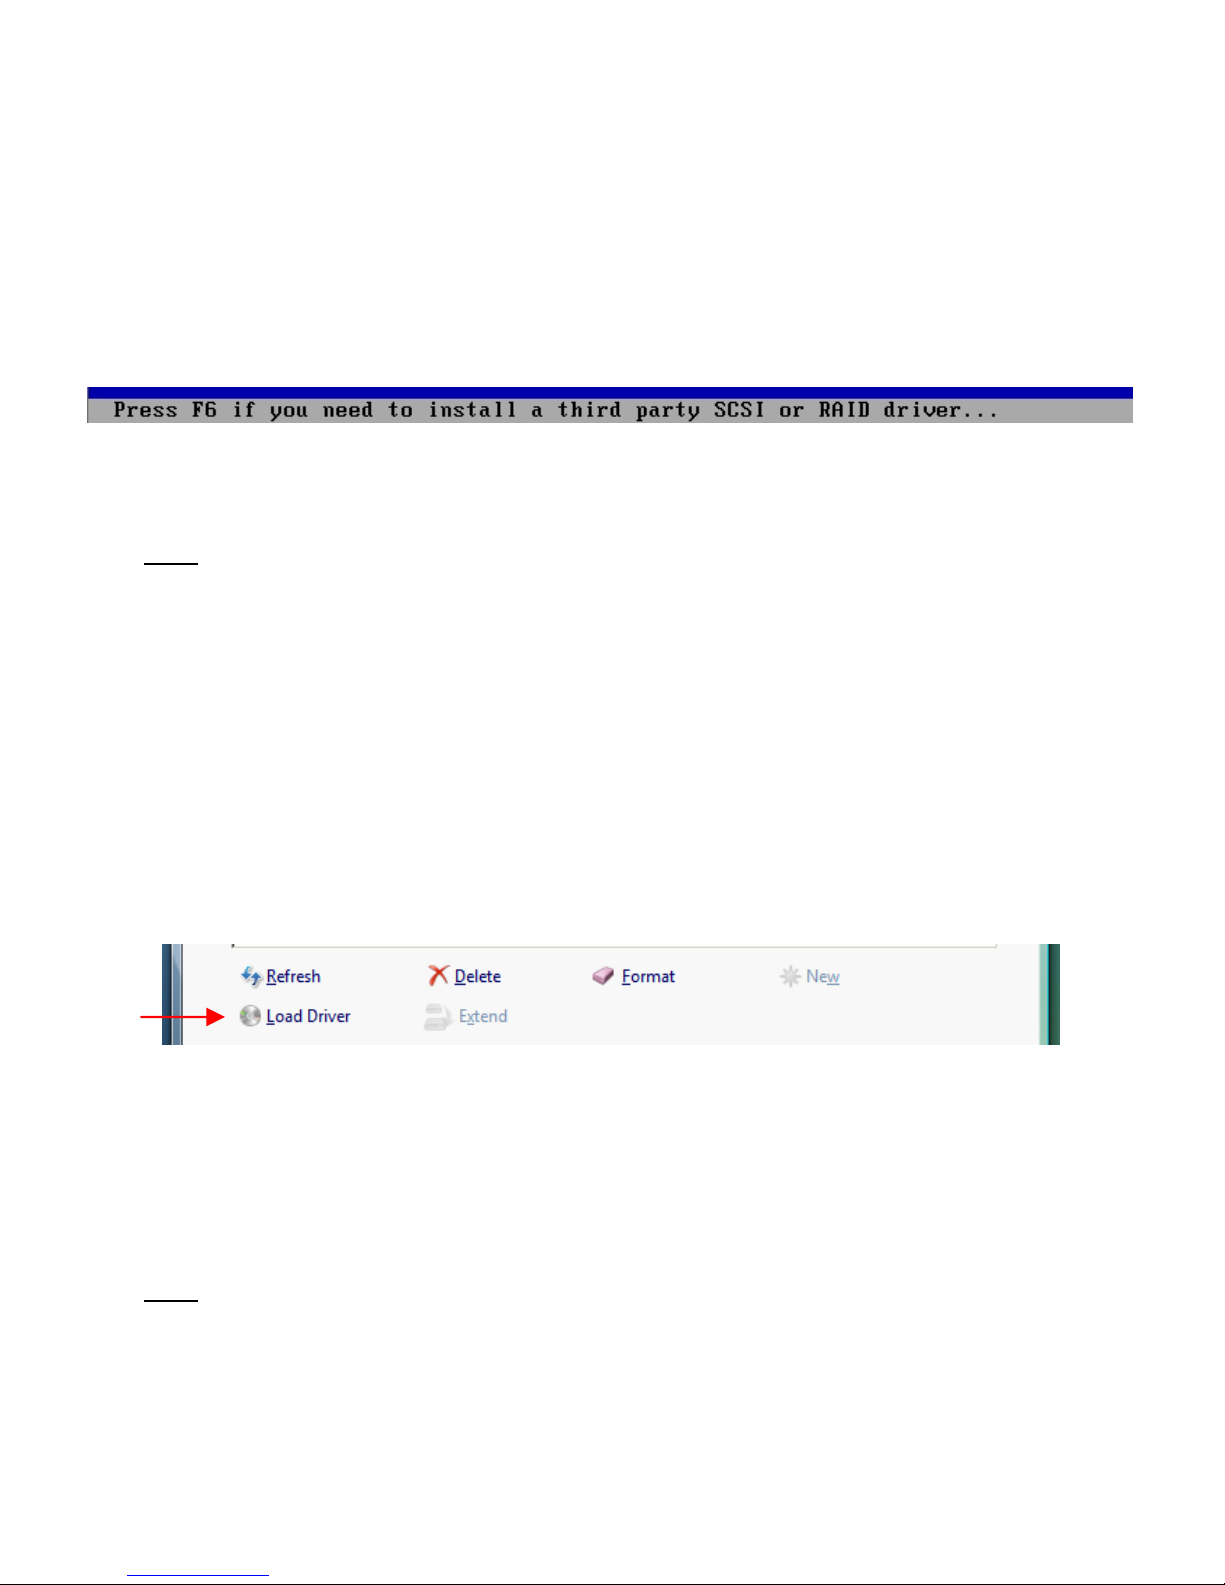
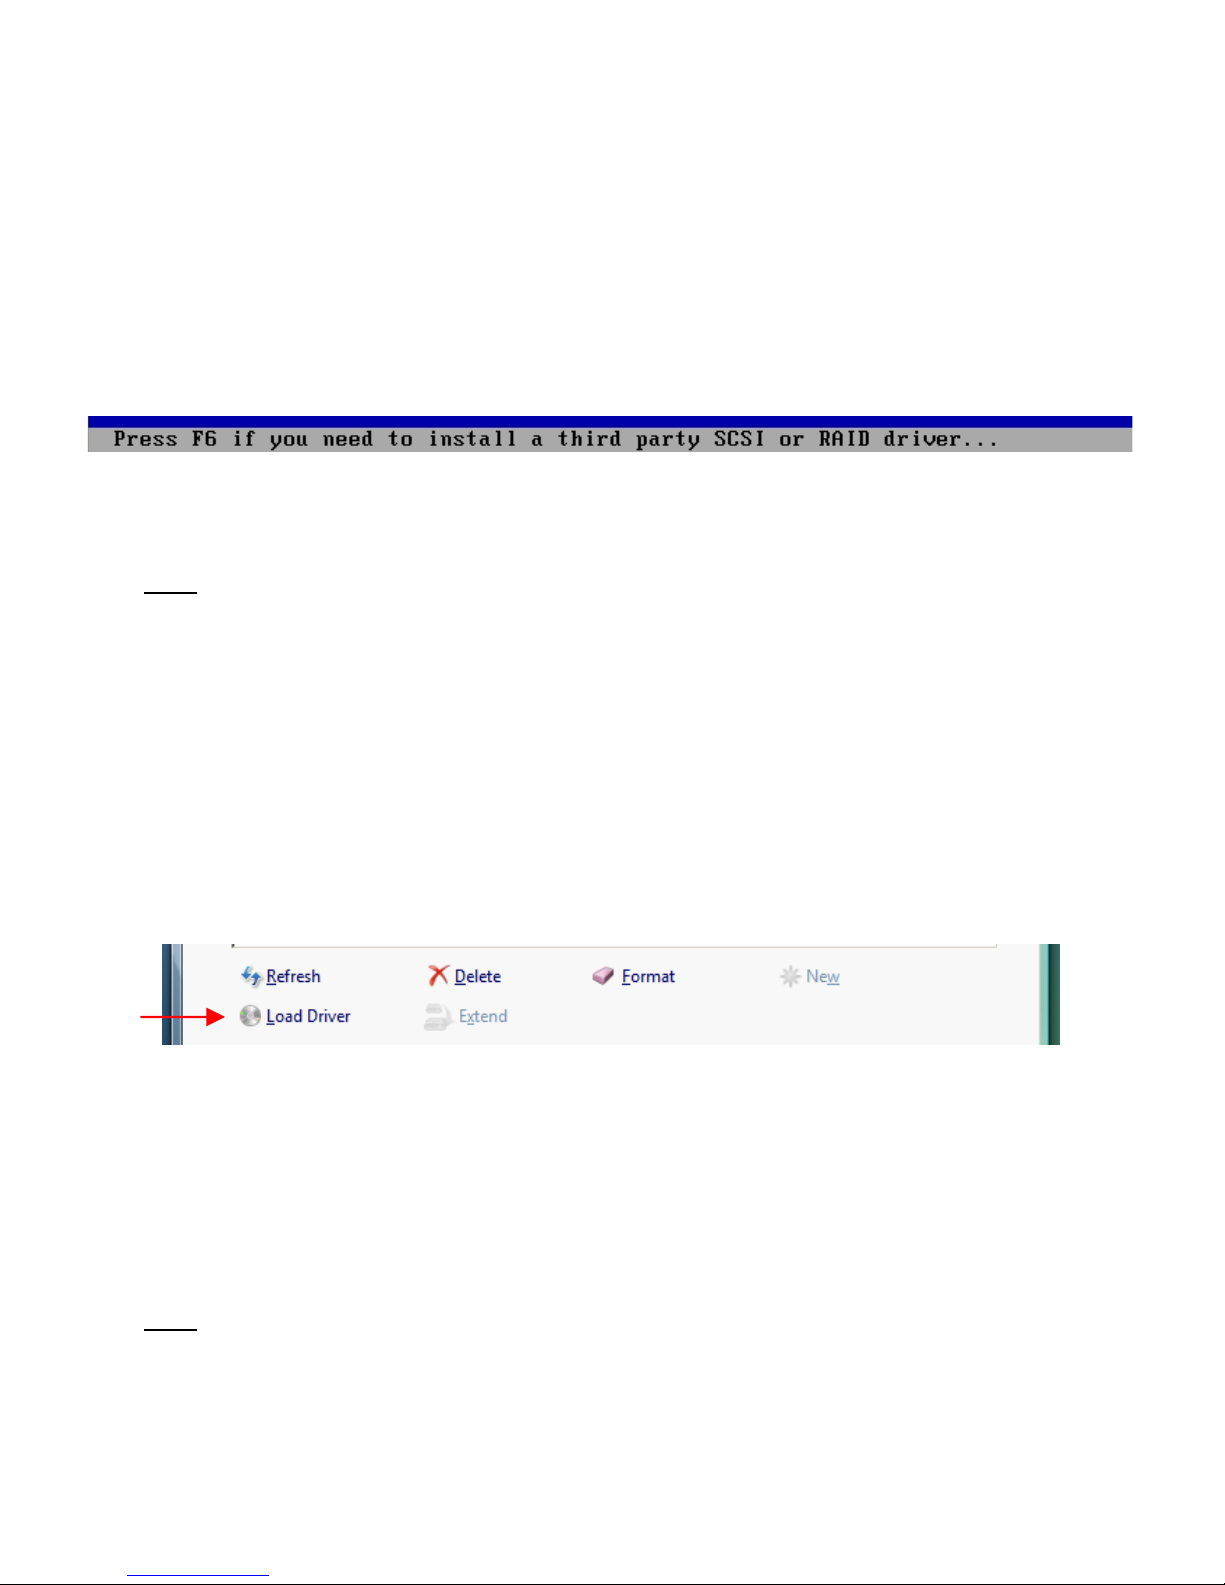
3. Wanneer onderstaande melding getoond wordt drukt u op “F6” om de
stuurprogramma diskette te specificeren.
4. Volg de scherminstructies van de Windows setup om het stuurprogramma te
installeren en door te gaan met de Windows installatie.
Let op
: Wanneer de installatie van Windows is voltooid, dient u tevens het
stuurprogramma via het CD-ROM menu te installeren. Wij adviseren om dit als
eerste te doen voordat u verder gaat met het installeren van overige
stuurprogramma’s en applicaties. De installatie van het stuurprogramma is
beschreven in hoofdstuk 4.
3.3 Pre-install Windows Vista
1. Herstart de computer en plaats de Windows Installatie CD in uw CD-ROM speler.
2. Volg de Setup Wizard tot u de locatie voor de Windows Vista installatie kunt
kiezen.
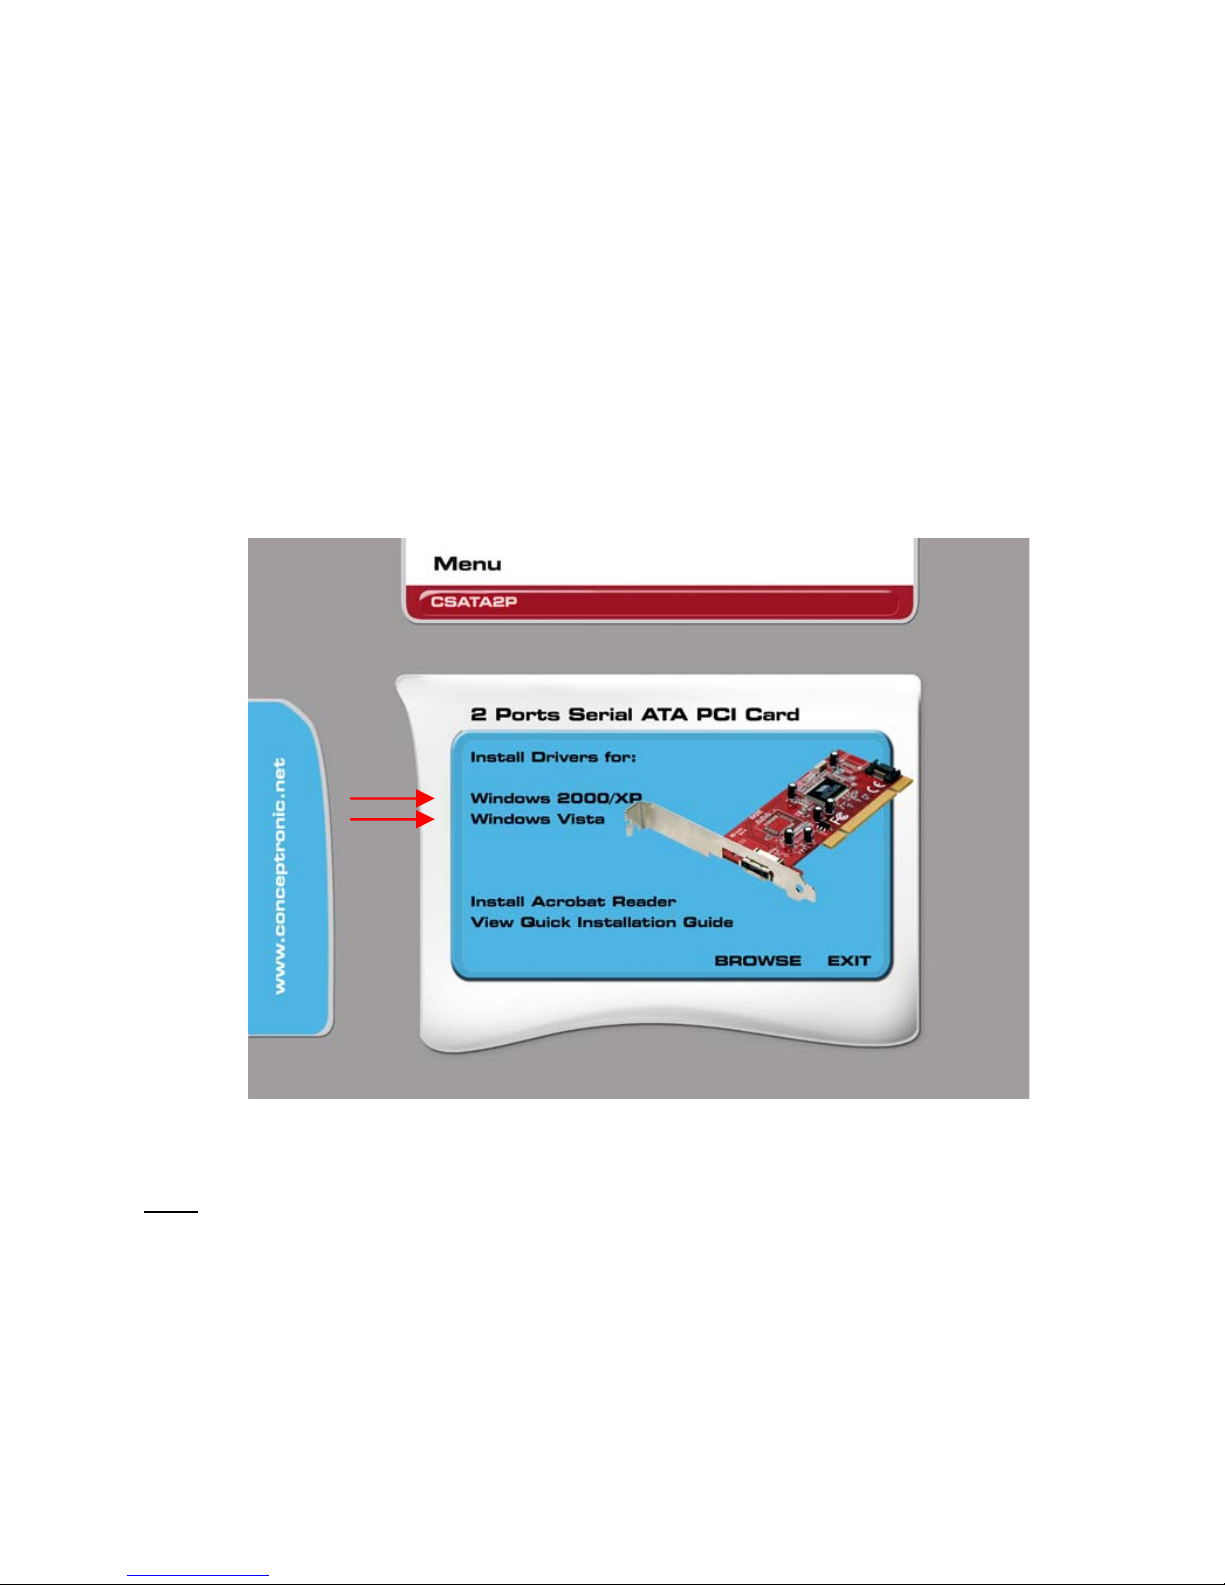
3. Klik op de knop “Load Driver”.
4. Plaats de diskette met het pre-install stuurprogramma in het diskette station of
plaats de geprepareerde USB-Flashdrive in een vrije USB Poort en klik op “OK”.
5. Volg de scherminstructies van de Windows setup om het stuurprogramma te
installeren en door te gaan met de Windows installatie.
Let op
: Wanneer de installatie van Windows is voltooid, dient u tevens het
stuurprogramma via het CD-ROM menu te installeren. Wij adviseren om dit als
eerste te doen voordat u verder gaat met het installeren van overige
stuurprogramma’s en applicaties. De installatie van het stuurprogramma is
beschreven in hoofdstuk 4.
Page 5

NEDERLANDS
5
4. Windows Stuurprogramma Installatie
Voordat u gebruik kunt maken van de CSATA2P Controller kaart dient u de
stuurprogramma’s te installeren op uw computer. Deze stuurprogramma’s kunt u vinden
op de meegeleverde CD-ROM.
1. Als Windows is opgestart zal de “Nieuwe Hardware Wizard” getoond worden. Klik
op “Annuleren” om de “Nieuwe Hardware Wizard” te sluiten.
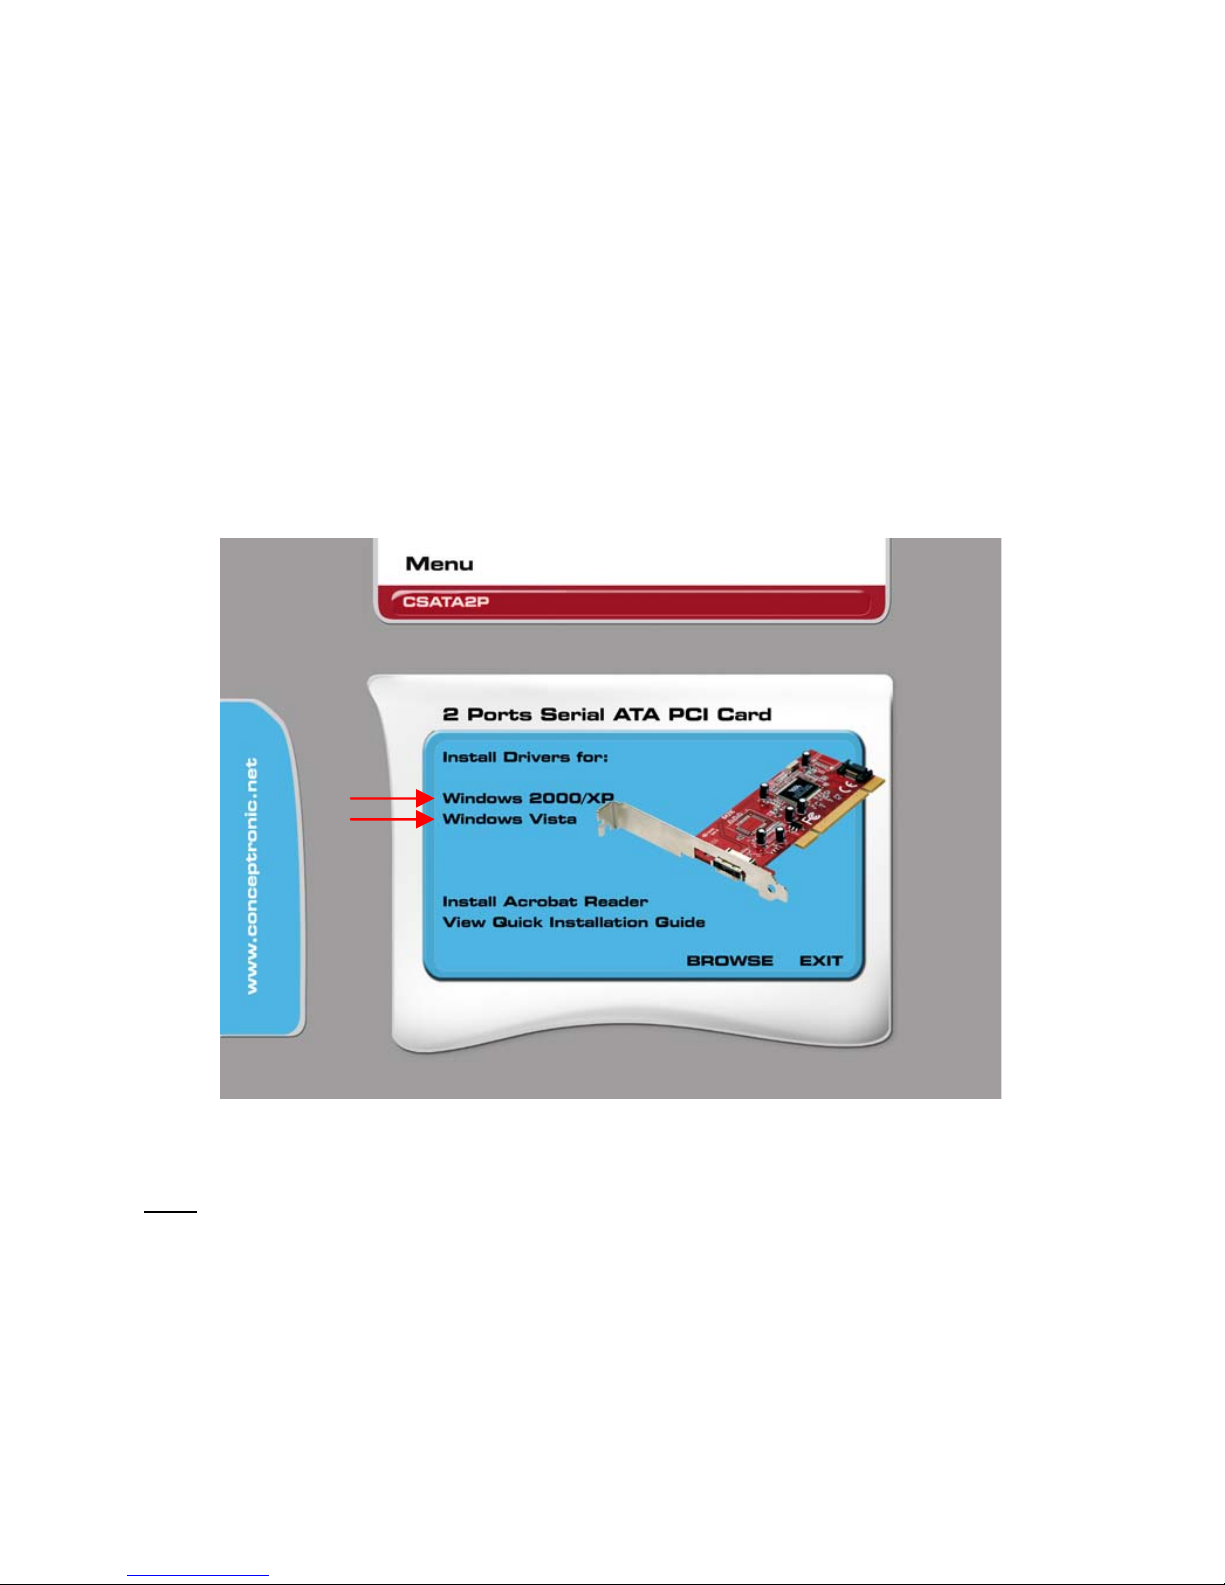
2. Plaats de CD-ROM in uw CD-ROM speler. Het Autorun Menu zal automatisch
verschijnen. Als het Autorun Menu niet getoond wordt, ga dan naar “Mijn
Computer” en dubbelklik op de CD-ROM speler om het Autorun Menu te starten.
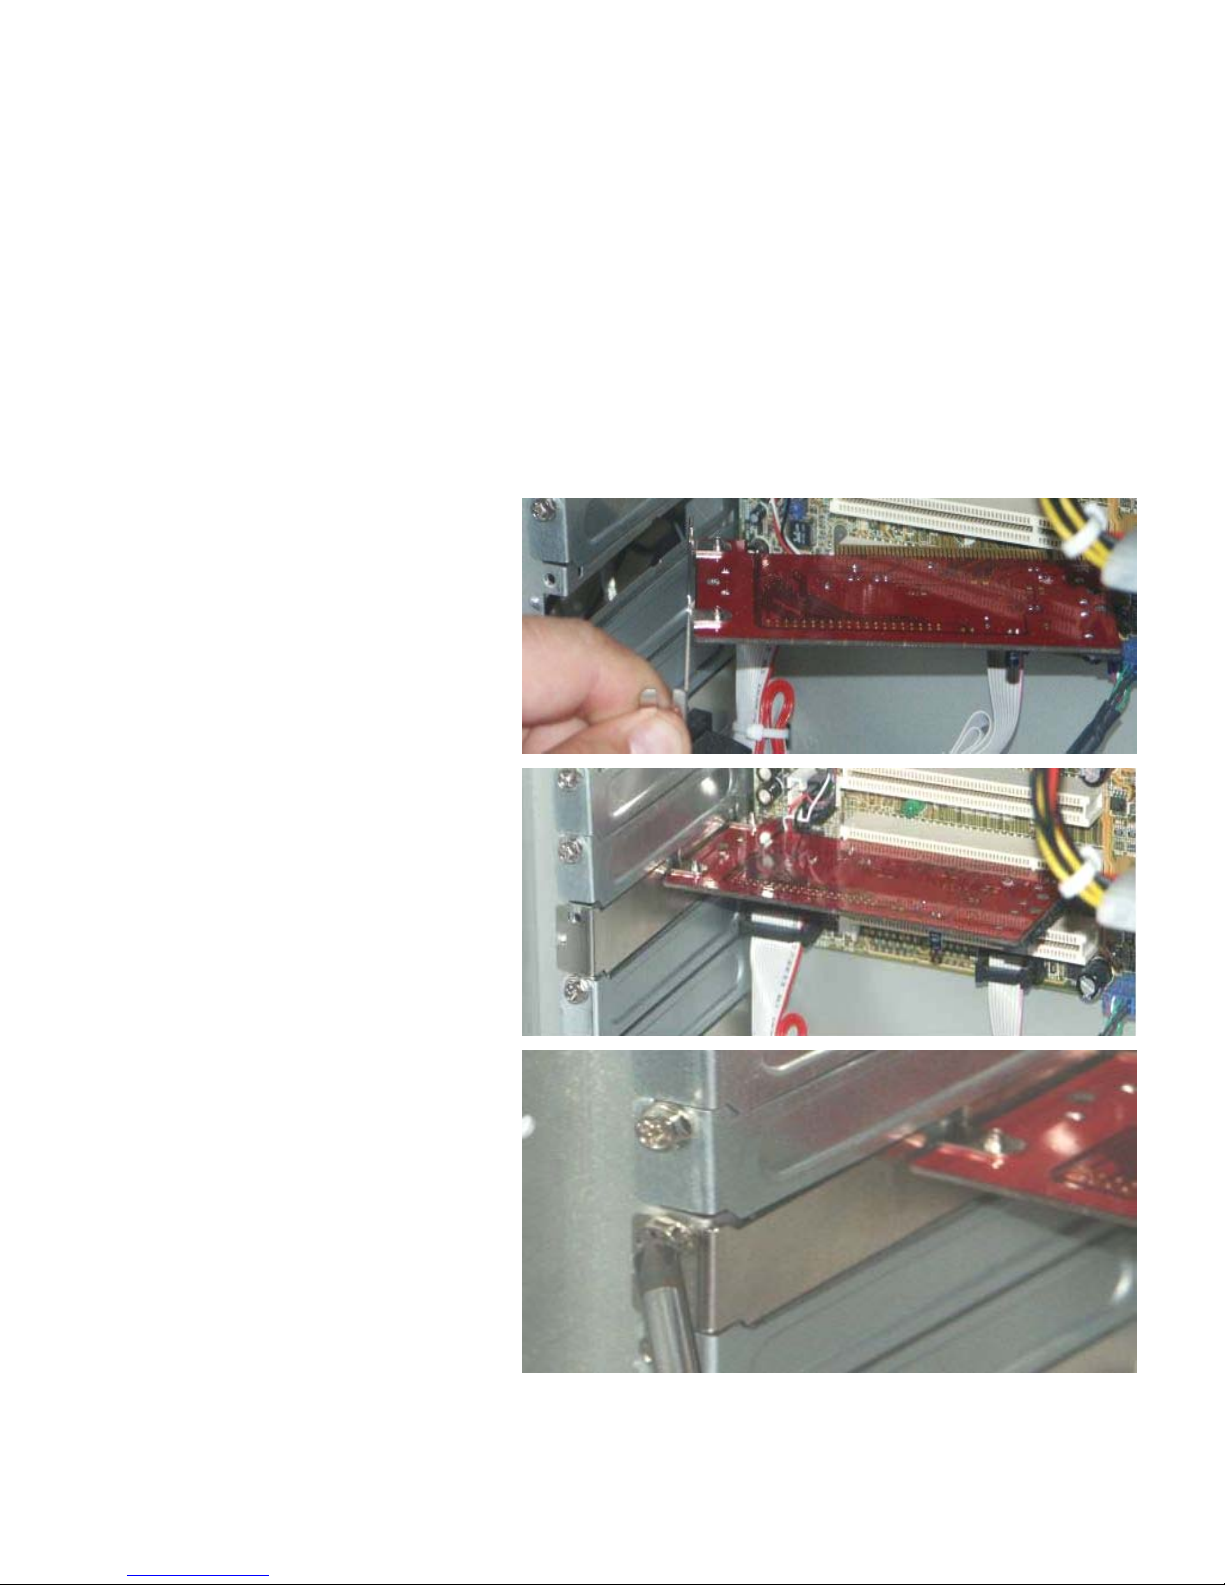
3. Selecteer het juiste stuurprogramma voor uw geïnstalleerde Windows versie.
Let op
: Zorg ervoor dat u het juiste stuurprogramma selecteert voor uw Windows
versie: Als u gebruik maakt van Windows 2000/XP, kies dan de optie
“Windows 2000/XP”.
Als u gebruik maakt van Windows Vista kiest u voor de optie “Windows Vista”.
4. De VIA Setup Wizard zal getoond worden. Klik op “Next” om door te gaan.
5. Accepteer de License Agreement door te kiezen voor “I Agree” en klik vervolgens
op “Next” om door te gaan.
Page 6

NEDERLANDS
6
6. Kies welke componenten u wilt installeren. Standaard worden de VIA Driver en de
VIA V-Raid Utility geïnstalleerd. Klik op “Next” om door te gaan.
7. De Setup Wizard zal een overzicht tonen van de geselecteerde componenten. Klik
op “Next” om de installatie te starten.
8. Na de installatie zal een installatie overzicht getoond worden. Klik op “Next” om
door te gaan.
9. Selecteer de optie “Yes, I want to restart my computer now” en klik op “Finish”
om de installatie te voltooien.
Als uw computer is herstart is de CSATA2P Controller kaart
gereed voor gebruik.
V-RAID Utility Notitie:
De VIA V-Raid Utility kan alleen gestart worden als u ingelogd bent als “Beheerder”
(Administrator) of als u het programma als ‘Beheerder” uitvoert.
Als u de VIA V-Raid Utility uitvoert zonder beheerrechten zal het programma een
foutmelding geven en niet de configuratie van de aangesloten harde schijven
tonen. Sluit het programma en voer het programma nogmaals uit met
beheerrechten.
(Rechtermuisknop, “Uitvoeren als…”).
eSATA Notitie
:
De CSATA2P Controller kaart is voorzien van een eSATA aansluiting op het achterpaneel.
Deze eSATA aansluiting kunt u gebruiken om externe eSATA behuizingen aan te
sluiten, zoals de Conceptronic CHD3UES.
De chipset van de CSATA2P Controller kaart heeft geen
Hot-Plug ondersteuning. Wij
adviseren om de computer te herstarten nadat u de externe eSATA behuizing heeft
aangesloten op de CSATA2P Controller kaart.
Page 7

ENGLISH
7
Conceptronic CSATA2P
Quick Installation Guide
Congratulations on the purchase of your
Conceptronic Serial ATA Controller Card.
The enclosed Hardware Installation Guide gives you a step-by-step explanation of how to
install the Conceptronic Serial ATA Controller Card.
When problems occur, we advise you to go to our support-site (go to www.conceptronic.net
and click ‘Support’. Here you will find the Frequently Asked Questions Database.
When you have other questions about your product and you cannot find it at our website,
contact us by e-mail: support@conceptronic.net
For more information about Conceptronic products, please visit the Conceptronic Web Site:
www.conceptronic.net
The Software installation as described below may be slightly different from the installation
on your computer. This depends on the Windows version you are using.
1. Package Contents
The following items are present in the package of the Conceptronic Serial ATA
Controller Card:
• Conceptronic Serial ATA Controller Card
• Serial ATA Cable
• Multi Language Quick Installation Guide
• Driver CD-ROM
Page 8
ENGLISH
8
2. Hardware installation
1. Turn off your computer and disconnect the power cable from the back of the
computer.
2. Open the cover of your computer by removing the screws on the back of the
computer.
3. Find a free PCI slot in your computer and remove the corresponding back plate.
4. Insert the CSATA2P
Controller Card gently in
the free PCI slot.
5. Fasten the CSATA2P
Controller Card in the
back plate of the
computer with a screw
and screwdriver.
Page 9

ENGLISH
9
3. Pre-Windows Driver Installation
When you want to use the CSATA2P Controller Card for booting your Windows System,
you need to install Windows on the Harddisk while it is connected to the CSATA2P.
During this installation, you need to provide the pre-install driver for a correct function
of the CSATA2P Controller Card.
Note
: If you are running Windows from another hard disk and use this SATA controller
for extra hard disks, you can skip this chapter and continue to chapter 3.2.
You need to prepare the pre-install driver on a 3.5” Floppy Disk or USB-Flashdrive
before you begin the new Windows installation.
Note
: The setup of Windows 2000 and XP does not support the use of an USB-
Flashdrive during the installation. For Windows 2000 and XP, you can only
prepare a 3,5” Floppy Disk.
3.1 Prepare Driver Disk / Flashdrive
1. Insert the CD-ROM in your CD-ROM Drive. The Autorun should appear automatically.
If the Autorun menu does not appear, navigate to “My Computer” and double-click
on the CD-ROM drive to start the Autorun menu.
2. Click the “Browse” option in the Menu. An explorer window will appear, showing
you the contents of the CD-ROM.
3. Choose the folder corresponding with your preferred Windows Version: “Win2kXP”
or “WinVista”.
4. Open the folder “drvdisk” by double-clicking on the folder.
5. Copy the contents of the “drvdisk” folder to an empty 3.5” Floppy Disk or to an
USB-Flashdrive if you are installing Windows Vista.
When the copy process is complete, the preparations for the new installation are ready.
You can now start with the Windows installation on your computer.
Page 10
ENGLISH
10
3.2 Pre-install Windows 2000/XP
1. Reboot the computer and insert the Windows Installation CD-ROM in your CD-ROM
drive.
2. Insert the pre-install Driver Disk in the Floppy drive.
3. When the message below appears, press “F6” to specify the Driver Disk.
4. Follow the onscreen instructions for installing the driver and continue the Windows
installation.
Note
: When Windows is installed on your computer, you need to install the driver
through the CD-ROM menu. It is advised to do this as first installation before you
proceed with the installation of other drivers and software. The installation of
the driver is described in chapter 4.
3.3 Pre-install Windows Vista
1. Reboot the computer and insert the Windows Installation CD-ROM in your CD-ROM
drive.
Follow the Windows Vista Setup Wizard until you can select the location for Windows
Vista.
2. Click the button “Load Driver”.
3. Insert the pre-install Driver Disk in the Floppy drive or connect the pre-install USB-
Flashdrive to a free USB Port and click “OK”.
4. Follow the onscreen instructions for installing the driver and continue the Windows
installation.
Note
: When Windows is installed on your computer, you need to install the driver
through the CD-ROM menu. It is advised to do this as first installation before you
proceed with the installation of other drivers and software. The installation of
the driver is described in chapter 4.
Page 11
ENGLISH
11
4. Windows Driver Installation
Before you can use the CSATA2P Controller Card, you need to install the drivers. These
drivers can be found on the CD-ROM included in your CSATA2P package.
1. When Window starts, a “New Hardware Wizard” will appear. Click “Cancel” to
abort the “New Hardware Wizard”.
2. Insert the CD-ROM in your CD-ROM Drive. The Autorun should appear automatically.
If the Autorun menu does not appear, navigate to “My Computer” and double-click
on the CD-ROM drive to start the Autorun menu.
3. Select the correct driver for your installed Windows version.
Note
: Make sure you select the correct Driver for your Windows Version. If you use
Windows 2000/XP, select the option “Windows 2000/XP”. If you use Windows
Vista, select the option “Windows Vista”.
4. The VIA Setup Wizard will appear. Click “Next” to continue.
5. Accept the License Agreement by selecting “I Agree” and click “Next” to continue.
6. Select the components to install. By default, the VIA Driver and the VIA V-Raid
Utility will be installed. Click “Next” to continue.
Page 12

ENGLISH
12
7. The Setup Wizard will show a summary of the selected components. Click “Next”
to start the installation.
8. When the installation is complete, you will see an installation overview. Click
“Next” to continue.
9. Select the option “Yes, I want to restart my computer now” and click “Finish” to
complete the installation.
When your computer is restarted, the CSATA2P Controller Card is
ready to use.
V-RAID Utility Note:
The VIA V-Raid Utility can only be started when you are logged in as “Administrator” or
when you run the program as ‘Administrator”.
If you run the VIA V-Raid Utility without Administrator Rights, the program will generate
an error and does not allow you to review/change the configuration of the connected
hard disks. Please exit the program and restart the VIA V-RAID Utility with Administrator
Rights.
(Right-click, and choose “Run as…”).
eSATA Note:
The CSATA2P Controller Card has an eSATA connection on the backplate. This eSATA
connection can be used to connect eSATA enclosures, like the Conceptronic CHD3UES.
The chipset of the CSATA2P Controller Card does not
support Hot-Plug functionality.
Therefore, it is strongly advised to reboot your computer after you connected the
enclosure to the CSATA2P Controller Card.
Page 13

ESPAÑOL
13
CSATA2P de Conceptronic
Guía de instalación rápida
Felicidades por la compra de su
tarjeta controladora Serial ATA de Conceptronic.
Esta guía de instalación le orientará paso a paso sobre cómo instalar la tarjeta controladora
Serial ATA de Conceptronic.
En caso de surgir cualquier problema, visite nuestra página web de asistencia técnica (haga
clic en el apartado “Soporte” de www.conceptronic.net) En esa sección podrá consultar la
base de datos de Preguntas Frecuentes (F.A.Q.).
Si tiene otras preguntas sobre su producto y no las encuentra en nuestro sitio web, póngase
en contacto con nosotros por correo electrónico: apoyo@conceptronic.net
Si desea información adicional sobre los productos de Conceptronic, visite nuestro sitio web:
www.conceptronic.net
La instalación del software que se detalla a continuación puede diferir ligeramente de la
instalación en su ordenador. Ello dependerá de la versión de Windows que utilice.
1. Contenido del paquete
El paquete de la tarjeta controladora Serial ATA de Conceptronic contiene los
elementos siguientes:
• Tarjeta controladora Serial ATA de Conceptronic
• Cable Serial ATA
• Guía de instalación rápida en varios idiomas
• CD-ROM con los drivers
Page 14
ESPAÑOL
14
2. Instalación del hardware
1. Apague el ordenador y desconecte el cable de alimentación de la parte trasera del
ordenador.
2. Quite la carcasa del ordenador. Para ello, quite los tornillos de la parte trasera del
ordenador que la sujetan.
3. Busque una ranura de tarjeta PCI libre en su ordenador y quite la placa metálica
trasera correspondiente .
4. Introduzca suavemente la
tarjeta controladora
CSATA2P en la ranura PCI.
5. Atornille la tarjeta
controladora CSATA2P en
el soporte de la parte
trasera del ordenador.
Page 15

ESPAÑOL
15
3. Instalación del driver previa a Windows
Si desea utilizar la tarjeta controladora CSATA2P para iniciar su sistema Windows,
necesitará instalar Windows en el disco duro cuando el disco esté conectado a la tarjeta
CSATA2P. Durante esta instalación, necesitará disponer de un driver previo a la
instalación para que la tarjeta CSATA2P pueda funcionar correctamente.
Nota
: Si está utilizando Windows desde otro disco duro y utilizará esta tarjeta
controladora SATA para discos duros suplementarios, puede omitir este capítulo
y pasar directamente al capítulo 3.2.
Antes de empezar la nueva instalación de Windows necesitará preparar un disquete de
3,5” o una memoria Flash USB con el driver previo a la instalación.
Nota
: Con Windows 2000 o XP no podrá utilizar una memoria Flash USB durante la
instalación. Para Windows 2000 o XP sólo podrá preparar un disquete de 3,5”.
3.1 Preparación del disquete o memoria flash con el driver
1. Introduzca el CD-ROM en la unidad de CD-ROM. El menú autoejecutable aparecerá
automáticamente. En caso de que esto no ocurra, vaya a “Mi PC” y haga doble clic
en la unidad de CD-ROM para iniciar el menú autoejecutable.
2. Haga clic en la opción “Examinar” del menú. Aparecerá una ventana que mostrará
el contenido del CD-ROM.
3. Escoja la carpeta correspondiente a la versión de Windows que utilice. “Win2kXP”
o “WinVista”.
4. Abra la carpeta “drvdisk” haciendo doble clic en ella.
5. Copie el contenido de la carpeta “drvdisk” a un disquete de 3,5” vacío, o a una
memoria Flash USB si está utilizando Windows Vista.
Una vez se haya copiado la carpeta, todos los preparativos para la nueva instalación
estarán listos. Ahora puede iniciar la instalación de Windows en su ordenador.
Page 16
ESPAÑOL
16
3.2 Pre-instalar Windows 2000 o XP
1. Reinicie el ordenador e introduzca el CD-ROM de instalación de Windows en su
unidad de CD-ROM.
2. Introduzca el disquete con el driver en la disquetera.
3. Cuando aparezca el mensaje mostrado abajo, pulse “F6” para especificar el disco
con el driver.
4. Siga las instrucciones de la pantalla para instalar el driver y proseguir con la
instalación de Windows.
Nota
: Cuando se haya instalado Windows, deberá instalar el driver mediante el menú
del CD-ROM. Se recomienda hacer primero esta instalación antes de proceder a
instalar otros drivers o software. La instalación del driver se describe en el
capítulo 4.
3.3 Pre-instalar Windows Vista
1. Reinicie el ordenador e introduzca el CD-ROM de instalación de Windows en su
unidad de CD-ROM.
Siga las instrucciones del asistente de instalación de Windows Vista hasta que pueda
seleccionar la ubicación de Windows Vista.
2. Haga clic en el botón “Load Driver” [Cargar driver].
3. Introduzca el disquete con el driver previo a la instalación de Windows en la
disquetera (o conecte el dispositivo Flash USB con el driver en un puerto USB libre)
y haga clic en “OK”.
4. Siga las instrucciones de la pantalla para instalar el driver y proseguir con la
instalación de Windows.
Nota
: Cuando se haya instalado Windows, deberá instalar el driver definitivo mediante
el menú del CD-ROM. Se recomienda hacer esta instalación antes de proceder a
instalar cualquier otro driver o software. La instalación del driver se describe en
el capítulo 4.
Page 17
ESPAÑOL
17
4. Instalación del driver con Windows
Antes de poder utilizar la tarjeta controladora CSATA2P, deberá instalar el driver.
Encontrará el driver necesario en el CD-ROM incluido en el paquete del producto.
1. Cuando inicie Windows, aparecerá el “Asistente para nuevo hardware”. Cuando
aparezca el asistente, haga clic en “Cancelar”.
2. Introduzca el CD-ROM en la unidad de CD-ROM. El menú autoejecutable aparecerá
automáticamente. En caso de que esto no ocurra, vaya a “Mi PC” y haga doble clic
en la unidad de CD-ROM para iniciar el menú autoejecutable.
3. Seleccione el driver correspondiente a su versión de Windows.
Nota
: Asegúrese de que selecciona el driver correcto según su versión de Windows. Si
utiliza Windows 2000 o XP, seleccione la opción “Windows 2000/XP”. Si utiliza
Windows Vista, seleccione la opción “Windows Vista”.
4. A continuación aparecerá el Asistente de Configuración de VIA. Haga clic en
“Siguiente” para continuar.
5. Acepte el Contrato de Licencia que se muestra seleccionando “Acepto”, y haga
clic en “Siguiente” para continuar.
Page 18

ESPAÑOL
18
6. Seleccione los componentes que desea instalar. Por defecto, se instalarán el driver
de VIA y la utilidad V-Raid de VIA. Haga clic en “Siguiente” para continuar.
7. El asistente de configuración mostrará la relación de componentes seleccionados.
Haga clic en “Siguiente” para comenzar la instalación.
8. Cuando se haya completado la instalación verá un resumen de la misma. Haga clic
en “Siguiente” para continuar.
9. Seleccione la opción “Sí, deseo reiniciar mi ordenador ahora” y haga clic en
“Finalizar” para completar la instalación.
Cuando se haya reiniciado el ordenador, la tarjeta controladora
CSATA2P estará lista para ser utilizada.
Nota sobre la utilidad V-RAID:
Sólo podrá iniciar la utilidad V-Raid de VIA cuando haya iniciado sesión como
“Administrador” o cuando utilice el programa como “Administrador”.
Si utiliza la utilidad V-Raid de VIA sin derechos de administrador, el programa generará
un error y no le permitirá revisar o cambiar la configuración de los discos duros
conectados. Salga del programa y reinicie la utilidad V-Raid de VIA con derechos de
administrador.
(Haga clic con el botón derecho y seleccione “Run as…” [Ejecutar como...]).
Nota sobre la conexión eSATA:
La tarjeta controladora CSATA2P dispone de una conexión eSATA. Esta conexión eSATA
puede ser utilizada para conectar discos duros externos eSATA, como el CHD3UES de
Conceptronic.
El chipset de la tarjeta controladora CSATA2P no
es compatible con la funcionalidad
Hot-Plug [Conexión en caliente]. Por este motivo, es muy recomendable reiniciar el
ordenador después de haber conectado un disco duro externo a la tarjeta controladora
CSATA2P.
Page 19

DEUTSCH
19
Conceptronic CSATA2P
Schnellinstallationsanleitung
Wir gratulieren Ihnen zum Kauf Ihrer
Conceptronic Serial ATA Controller-Karte.
In beiliegender Hardware-Installationsanleitung wird Ihnen Schritt für Schritt gezeigt, wie die
Conceptronic Serial ATA Controller-Karte installiert werden muss.
Wenn Probleme auftreten sollten, besuchen Sie unsere Support-Seite (unter
www.conceptronic.net
) und klicken Sie auf ‚Support’. Dort steht Ihnen unsere FAQ-
Datenbank mit den häufig gestellten Fragen zur Verfügung.
Wenn Sie weitere Fragen zu Ihrem Produkt haben, die Sie auf unserer Webseite nicht
beantworten können, kontaktieren Sie uns per E-Mail: support@conceptronic.net
Detaillierte Informationen über Conceptronic Produkte finden Sie auf unserer Webseite:
www.conceptronic.net
Möglicherweise weicht die Softwareinstallation auf Ihrem Computer von der im Folgenden
beschriebenen etwas ab. Dies hängt vom Windows-Betriebssystem ab, das Sie verwenden.
1. Packungsinhalt
In der Verpackung der Conceptronic Serial ATA Controller-Karte ist Folgendes enthalten:
• Conceptronic Serial ATA Controller-Karte
• Serielles ATA-Kabel
• Mehrsprachige Schnellinstallationsanleitung
• Treiber-CD-ROM
Page 20

DEUTSCH
20
2. Installation der Hardware
1. Schalten Sie Ihren Computer aus und stecken Sie das Stromkabel auf der Rückseite
des Computers aus.
2. Öffnen Sie die Abdeckung Ihres Computers, indem Sie die Schrauben auf der
Rückseite des Computers entfernen.
3. Entfernen Sie die Rückplatte an einen freien PCI-Steckplatz Ihres Computers.
4. Führen Sie die CSATA2P
Controller-Karte
vorsichtig in den freien
PCI-Steckplatz ein.
5. Befestigen Sie die
CSATA2P Controller-Karte
mit Schraube und
Schraubenzieher in der
Rückplatte des
Computers.
Page 21

DEUTSCH
21
3. Pre-Windows Treiberinstallation
Wenn Sie die CSATA2P Controller-Karte für das Hochfahren Ihres Windows-Systems
verwenden möchten, müssen Sie Windows auf der Festplatte installieren, während diese
mit der CSATA2P verbunden ist. Während dieser Installation müssen Sie für eine
korrekte Funktion der CSATA2P Controller-Karte den Pre-Install-Treiber bereitstellen.
Hinweis
: Wenn Windows auf einer anderen Festplatte installiert ist und Sie diesen SATA
Controller für zusätzliche Festplatten verwenden, können Sie dieses Kapitel
überspringen und mit dem Kapitel 3.2 fortfahren.
Sie müssen den Pre-Install-Treiber auf einer 3,5“-Diskette oder einem USB-FlashLaufwerk vorbereiten, bevor Sie mit der neuen Windows-Installation beginnen.
Hinweis
: Das Setup von Windows 2000 und XP unterstützt die Verwendung eines USB-
Flash-Laufwerks während der Installation nicht
. Für Windows 2000 und XP
können Sie nur eine 3,5“-Diskette verwenden.
3.1 Vorbereitung der Diskette / des Flash-Laufwerks mit den Treibern
1. Legen Sie die CD-ROM in Ihr CD-ROM-Laufwerk ein. Das Autorun-Menü sollte
automatisch starten. Wenn das Menü nicht erscheint, gehen Sie zu Ihrem
„Arbeitsplatz“ und doppelklicken Sie auf das CD-ROM-Laufwerk, um das AutorunMenü zu starten.
2. Klicken Sie auf die Option „Durchsuchen“ im Menü. Es wird ein Explorer-Fenster
geöffnet, in dem der Inhalt der CD-ROM angezeigt wird.
3. Wählen Sie den Ordner mit Ihrer Windows-Version: „Win2kXP” oder „WinVista”.
4. Öffnen Sie den Ordner „drvdisk”, indem Sie darauf doppelklicken.
5. Kopieren Sie den Inhalt des Ordners „drvdisk“ auf eine leere 3,5“-Diskette oder
ein USB-Flash-Laufwerk, wenn Sie Windows Vista installieren.
Mit beendetem Kopierprozess sind die Vorbereitungen für die neue Installation
abgeschlossen. Sie können jetzt mit der Windows-Installation auf Ihrem Computer
beginnen.
Page 22

DEUTSCH
22
3.2 Vorinstallation von Windows 2000/XP
1. Starten Sie den Computer neu und legen Sie die Windows-Installations-CD-ROM in
Ihr CD-ROM-Laufwerk ein.
2. Führen sie die Pre-Install-Treiber-Diskette in das Diskettenlaufwerk ein.
3. Wenn folgende Meldung erscheint, drücken Sie „F6“, um die Treiberdiskette
anzugeben.
4. Befolgen Sie für die Installation des Treibers die Anweisungen auf dem Bildschirm
und führen Sie die Windows-Installation fort.
Hinweis
: Wenn Windows auf Ihrem Computer installiert ist, müssen Sie den Treiber
über das CD-ROM-Menü installieren. Wir empfehlen Ihnen, dies als Erstes zu
tun, bevor Sie andere Treiber und Software installieren. Die Installation des
Treibers ist im Kapitel 4 beschrieben.
3.3 Vorinstallation von Windows Vista
1. Starten Sie den Computer neu und legen Sie die Windows-Installations-CD-ROM in
Ihr CD-ROM-Laufwerk ein.
Befolgen Sie die Anweisungen des Einrichtungsassistenten von Windows Vista, bis Sie
den Speicherort für Windows Vista wählen können.
2. Klicken Sie auf die Schaltfläche „Load Driver [Treiber laden]”.
3. Führen Sie die Pre-Install-Treiber-Diskette in das Diskettenlaufwerk ein oder
stecken Sie das Pre-Install-USB-Flash-Laufkwerk in einen freien USB-Port ein und
klicken Sie auf „OK“.
4. Befolgen Sie für die Installation des Treibers die Anweisungen auf dem Bildschirm
und führen Sie die Windows-Installation fort.
Hinweis
: Wenn Windows auf Ihrem Computer installiert ist, müssen Sie den Treiber
über das CD-ROM-Menü installieren. Wir empfehlen Ihnen, dies als Erstes zu
tun, bevor Sie andere Treiber und Software installieren. Die Installation des
Treibers ist im Kapitel 4 beschrieben.
Page 23

DEUTSCH
23
4. Installation des Windows-Treibers
Bevor Sie die CSATA2P Controller-Karte verwenden können, müssen Sie die Treiber
installieren. Diese Treiber befinden sich auf der im Lieferumfang der CSATA2P
enthaltenen CD-ROM.
1. Beim Starten von Windows erscheint der „Assistent für das Suchen neuer
Hardware“. Klicken Sie auf „Abbrechen“, um den „Assistenten für das Suchen
neuer Hardware” zu beenden.
2. Legen Sie die CD-ROM in Ihr CD-ROM-Laufwerk ein. Das Autorun-Menü sollte
automatisch starten. Wenn das Menü nicht erscheint, gehen Sie zu Ihrem
„Arbeitsplatz“ und doppelklicken Sie auf das CD-ROM-Laufwerk, um das AutorunMenü zu starten.
3. Wählen Sie den korrekten Treiber für Ihre installierte Windows-Version.
Hinweis
: Vergewissern Sie sich, dass Sie den korrekten Treiber für Ihre Windows-
Version wählen. Wenn Sie Windows 2000/XP verwenden, wählen Sie die
Option „Windows 2000/XP". Wenn Sie Windows Vista verwenden, wählen Sie
die Option „Windows Vista".
Page 24

DEUTSCH
24
4. Es erscheint der VIA-Einrichtungsassistent. Klicken Sie auf „Next [Weiter]“.
5. Akzeptieren Sie die Lizenzvereinbarung, indem Sie „I Agree [Akzeptieren]“
auswählen und klicken Sie auf „Next [Weiter]“.
6. Wählen Sie die zu installierenden Komponenten. Standardmäßig werden der VIA-
Treiber und das VIA V-Raid Utility installiert. Klicken Sie auf „Next [Weiter]“.
7. Der Einrichtungsassistent zeigt eine Aufstellung der gewählten Komponenten.
Klicken Sie auf „Next’ [Weiter]“, um die Installation zu starten.
8. Sobald die Installation abgeschlossen ist, erscheint ein Installationsüberblick.
Klicken Sie auf „Next [Weiter]“.
9. Wählen Sie die Option „Yes, I want to restart my computer now [Ja, Computer
jetzt neu starten]” und klicken Sie auf „Finish [Fertigstellen]”, um die
Installation abzuschließen.
Nach dem Neustart Ihres Computers ist die CSATA2P Controller-
Karte betriebsbereit.
Hinweis zum V-RAID Utility:
Das VIA V-Raid Utility kann nur gestartet werden, wenn Sie als „Administrator”
angemeldet sind oder wenn Sie das Programm als ‚Administrator” starten.
Wenn Sie das VIA V-Raid Utility ohne Administratorrechte starten, erzeugt das
Programm einen Fehler und lässt nicht zu, dass Sie die Konfiguration der
angeschlossenen Festplatten einsehen/ändern. Schließen Sie bitte das Programm und
starten Sie das VIA V-RAID Utility mit Administratorrechten neu.
(Rechtsklicken und „Run as... [Ausführen als…]" wählen).
Hinweis zu eSATA:
Die CSATA2P Controller-Karte hat einen eSATA-Anschluss auf der Rückplatte. Dieser
eSATA-Anschluss kann für den Anschluss von eSATA-Gehäusen wie das Conceptronic
CHD3UES verwendet werden.
Der Chipsatz der CSATA2P Controller-Karte unterstützt Hot-Plug nicht. Deshalb
empfehlen wir dringend, den Computer neu zu starten, nachdem Sie das Gehäuse an der
CSATA2P Controller-Karte angeschlossen haben.
Page 25

FRANÇAIS
25
CSATA2P de Conceptronic
Guide d'installation rapide
Nous vous félicitons d'avoir acheté votre
Carte de Contrôleur ATA en Série de Conceptronic.
Vous trouverez dans le Guide d'Installation du Hardware fourni avec le produit une
explication détaillée de l'installation de la Carte de Contrôleur ATA en Série de
Conceptronic.
En cas de problème, nous vous conseillons de vous rendre sur notre site de support
technique (adresse :www.conceptronic.net
et cliquez sur "Support". Vous trouverez ici la
Base de données de la Foire aux Questions.
En cas de questions concernant votre produit et si vous n’obtenez pas de réponse sur notre
site web, n’hésitez pas à nous contacter par e-mail : support@conceptronic.net
Pour plus d'informations concernant les produits Conceptronic, veuillez consulter notre site
web : www.conceptronic.net
L’installation du Software décrite ci-après peut être légèrement différente de l’installation
sur votre ordinateur. Cela dépendra de la version Windows que vous utilisez.
1. Contenu du Coffret
Les éléments suivants sont fournis dans le coffret avec la Carte de Contrôleur ATA en
Série de Conceptronic :
• Carte de Contrôleur ATA en Série de Conceptronic
• Câble ATA en série
• Guide d'Installation Rapide en Plusieurs Langues
• CD-ROM de Driver
Page 26

FRANÇAIS
26
2. Installation du hardware
1. Éteignez votre ordinateur et débranchez le câble électrique de l'arrière de
l'ordinateur.
2. Ouvrez le châssis de votre ordinateur en dévissant les vis de la façade arrière de
l'ordinateur.
3. Trouvez une encoche PCI libre sur votre ordinateur et démontez la plaque arrière
correspondante.
4. Insérez doucement la
Carte de Contrôleur
CSATA2P dans l'encoche
PCI libre.
5. Fixez la Carte de
Contrôleur CSATA2P sur la
plaque arrière de
l'ordinateur avec une vis
et un tournevis.
Page 27

FRANÇAIS
27
3. Installation du Driver avant Windows
Si vous souhaitez utiliser la Carte de Contrôleur CSATA2P pour amorcer votre Système
Windows, vous devez installer Windows sur le Disque Dur lorsqu'il est connecté au
CSATA2P. Pendant l'installation, vous devez disposer du driver de pré-installation pour
que la Carte de Contrôleur CSATA2P fonctionne correctement.
Remarque
: Si vous faites fonctionner Windows à partir d'un autre disque dur et que
vous utilisez ce contrôleur SATA pour des disques durs supplémentaires,
vous pouvez ignorer ce chapitre et poursuivre au chapitre 3.2.
Vous devez préparer le driver de pré-installation sur une disquette 3.5" ou sur une clé
USB avant de démarrer la nouvelle installation de Windows.
Remarque
: Si votre ordinateur fonctionne sous Windows 2000 et XP vous ne pourrez
pas utiliser la clé USB pendant l'installation. Pour Windows 2000 et XP, vous
aurez besoin de préparer une disquette 3.5".
3.1 Préparer la Disquette ou Clé USB de Driver
1. Placez le CD-ROM dans votre lecteur de CD-ROM. Le Menu à Lancement
Automatique doit apparaître automatiquement. Si le Menu à Lancement
Automatique n'apparaît pas, naviguez dans "Mon Ordinateur" et cliquez deux fois
sur le lecteur de Cd-Rom pour lancer le menu à lancement automatique.
2. Cliquez sur l'option "Browse" [Naviguer] du Menu. Une fenêtre d'exploration
apparaît et vous présente les contenus du Cd-Rom.
3. Choisissez le répertoire correspondant à votre Version de Windows préférée :
“Win2kXP” ou “WinVista”.
4. Ouvrez le répertoire "drvdisk" en cliquant deux fois sur le répertoire.
5. Copiez les contenus du répertoire "drvdisk" sur une disquette 3.5" vide ou sur une
clé USB si vous installez Windows Vista.
Lorsque l'opération de copie est terminée, les préparations de la nouvelle installation
sont terminées. Vous pouvez à présent lancer l'installation de Windows sur votre
ordinateur.
Page 28

FRANÇAIS
28
3.2 Pré-installation de Windows 2000/XP
1. Redémarrez l'ordinateur et insérez le Cd-Rom d'Installation de Windows dans votre
lecteur de Cd-Rom.
2. Insérez le Disque de Driver de pré-installation dans la disquette.
3. Lorsque le message ci-après apparaît, appuyez sur la touche "F6" pour indiquer le
Disque du Driver.
4. Suivez les instructions affichées à l'écran pour installer le driver et poursuivre
l'installation de Windows.
Remarque
: Lorsque Windows est installé sur votre ordinateur, vous devez installer le
driver par le menu du Cd-Rom. Nous vous conseillons de faire ceci comme
une première installation avant de poursuivre l'installation d'autres drivers
et logiciels. L'installation du driver est décrite au chapitre 4.
3.3 Pré-installation de Windows Vista
1. Redémarrez l'ordinateur et insérez le Cd-Rom d'Installation de Windows dans votre
lecteur de Cd-Rom.
Suivez les instructions de l'Assistant de Configuration de Windows Vista jusqu'à ce que
vous sélectionniez l'emplacement de Windows Vista.
2. Cliquez sur la touche "Load Driver" [Charger Driver].
3. Insérez le Disque de Driver de pré-installation dans la disquette (ou connectez la
clé USB avec le Driver sur un Port USB libre) et cliquez sur "OK".
4. Suivez les instructions affichées à l'écran pour installer le driver et poursuivre
l'installation de Windows.
Remarque
: Lorsque Windows est installé sur votre ordinateur, vous devez installer le
driver par le menu du Cd-Rom. Nous vous conseillons de faire ceci comme
une première installation avant de poursuivre l'installation d'autres drivers
et logiciels. L'installation du driver est décrite au chapitre 4.
Page 29

FRANÇAIS
29
4. Installation du Driver de Windows
Avant de pouvoir utiliser la Carte de Contrôleur CSATA2P, vous devez installer les
drivers. Ces drivers se trouvent sur le Cd-Rom fourni avec votre CSATA2P.
1. Lorsque Windows démarre, le message "Nouveau Hardware Détecté" apparaît.
Cliquez sur "Annuler" pour interrompre l'"Assistant de Nouveau Matériel".
2. Placez le Cd-Rom dans votre lecteur de Cd-Rom. Le Menu à Lancement
Automatique doit apparaître automatiquement. Si le Menu à Lancement
Automatique n'apparaît pas, naviguez dans "Mon Ordinateur" et cliquez deux fois
sur le lecteur de Cd-Rom pour lancer le menu à lancement automatique.
3. Sélectionnez le bon driver pour votre version de Windows installée.
Remarque
: Vérifiez que vous avez bien sélectionné le bon Driver pour votre Version de
Windows. Si vous utilisez Windows 2000 ou XP, sélectionnez l'option
"Windows 2000/XP". Si vous utilisez Windows Vista, sélectionnez l'option
"Windows Vista".
4. L'Assistant de Configuration de VIA apparaît. Cliquez sur « Suivant » pour
continuer.
Page 30

FRANÇAIS
30
5. Acceptez l'Accord de Licence en sélectionnant "J'accepte" et cliquez sur "Suivant"
pour poursuivre.
6. Sélectionnez les composants à installer. Par défaut, le Driver de VIA et l'Utilité V-
Raid de VIA seront installés. Cliquez sur « Suivant » pour continuer.
7. L'Assistant de Configuration vous présente un résumé des composants sélectionnés.
Cliquez sur « Suivant» pour continuer l'installation.
8. Lorsque l'installation est terminée, vous voyez un aperçu de l'installation. Cliquez
sur « Suivant» pour continuer.
9. Sélectionnez l'option "Oui, je veux redémarrer mon ordinateur maintenant" et
cliquez sur "Terminer" pour terminer l'installation.
Lorsque votre ordinateur a redémarré, vous pouvez utiliser la
Carte de Contrôleur CSATA2P.
Note sur l'Utilité V-RAID :
L'utilité V-Raid de VIA ne peut être lancée que si vous êtes inscrit comme
"Administrateur" ou lorsque vous lancez le programme en tant qu'Administrateur".
Si vous lancez l'Utilité V-Raid VIA sans Droits d'Administrateur, le programme crée une
erreur et ne vous permet pas de réviser/modifier la configuration des disques durs
connectés. Veuillez sortir du programme et redémarrer l'Utilité V-RAID de VIA avec les
Droits d'Administrateur.
(Cliquez avec le bouton de droite de la souris, et choisissez "Exécuter comme...").
Remarque eSATA :
La Carte de Contrôleur CSATA2P a une connexion eSATA sur la façade arrière de
l'ordinateur. Cette connexion eSATA peut être utilisée pour connecter des boîtiers
eSATA, comme le CHD3UES de Conceptronic.
La puce de la Carte de Contrôleur CSATA2P ne supporte pas
la fonction Hot-Plug. Il est
par conséquent fortement conseillé de redémarrer votre ordinateur après avoir
connecté le boîtier sur la Carte de Contrôleur CSATA2P.
Page 31

ITALIANO
31
Conceptronic CSATA2P
Guida d’installazione rapida
Vi ringraziamo per aver acquistato questa
Scheda controller Serial ATA di Conceptronic.
La presente Guida per l’installazione dell’hardware spiega passo a passo come installare la
Scheda Controller Serial ATA di Conceptronic.
In caso di problemi, si consiglia di consultare la pagina web di supporto (collegandovi con
www.conceptronic.net
e facendo clic su “Support”), dove troverete la banca dati con le
domande e i quesiti più frequenti, accompagnati dalle relative risposte.
In caso di domande e dubbi di altra natura riguardanti il prodotto e che non appariranno nel
nostro sito web, potete contattarci via e-mail al seguente indirizzo:
support@conceptronic.net
Per maggiori informazioni sui prodotti di Conceptronic potete consultare la pagina web di
Conceptronic: www.conceptronic.net
L’installazione del software descritta qui di seguito potrebbe essere leggermente diversa da
quella del vostro computer, poiché dipenderà dalla versione di Windows in uso.
1. Contenuto della confezione
Nella confezione della Scheda Controller Serial ATA di Conceptronic devono essere
contenuti i seguenti elementi:
• Scheda Controller Serial ATA di Conceptronic
• Cavo Serial ATA
• Guida d’installazione rapida multilingue
• Driver CD-ROM
Page 32

ITALIANO
32
2. Installazione dell’hardware
1. Spegnere il computer e scollegare il cavo di alimentazione dalla parte posteriore
del computer.
2. Estrarre la struttura di protezione del computer togliendo le viti poste sulla parte
posteriore del computer.
3. Cercare uno slot PCI disponibile nel computer e togliere la placca di protezione
corrispondente.
4. Inserire con delicatezza la
Scheda Controller
CSATA2P nello slot PCI
disponibile.
5. Fissare la Scheda
Controller CSATA2P alla
placca posteriore del
computer mediante una
vite e un cacciavite.
Page 33

ITALIANO
33
3. Driver di preinstallazione di Windows
Nel caso in cui si desideri usare la Scheda Controller CSATA2P per avviare il sistema
operativo di Windows, è necessario installare Windows sul disco rigido mentre
quest’ultimo è collegato alla CSATA2P. Durante il processo di installazione, sarà
necessario fornire un driver di preinstallazione affinché la Scheda Controller CSATA2P
funzioni correttamente.
Nota
: nel caso in cui Windows venga aperto da un altro disco rigido e il controller SATA
venga usato per altri dischi rigidi, si può saltare questo capitolo e procedere al
punto 3.2.
Prima di iniziare la nuova installazione di Windows, si deve preparare il driver di
preinstallazione su un floppy disk da 3,5” o su un’unità flash USB.
Nota
: Windows 2000 e XP non supportano l'uso di un’unità flash USB durante
l’installazione, per cui, in questi due casi l’unica soluzione è l’uso di un floppy
disk da 3,5”.
3.1 Preparazione del disco o l’unità flash del driver
1. Inserire il CD-ROM nell’apposita unità. Dovrebbe apparire automaticamente il Menu
di avvio. In caso contrario, aprire “Risorse del computer” e fare doppio clic
sull’unità del CD-ROM per aprire il Menu di avvio automatico.
2. Fare clic sull’opzione “Sfoglia” nel Menu. Apparirà una finestra dell’explorer, che
mostrerà il contenuto del CD-ROM.
3. Selezionare la cartella corrispondente alla versione di Windows preferita:
“Win2kXP” o “WinVista”.
4. Aprire la cartella “drvdisk” facendo doppio clic su di essa.
5. Copiare il contenuto della cartella “drvdisk” su un dischetto da 3,5” vuoto o su
un’unità flash USB, nel caso in cui si stia installando Windows Vista.
Una volta terminata la procedura di copia, tutto è pronto per la nuova installazione.
Ora è possibile passare all’installazione di Windows sul computer.
Page 34

ITALIANO
34
3.2 Preinstallazione di Windows 2000/XP
1. Riavviare il computer e inserire il CD-ROM d’installazione di Windows nell’unità CD-
ROM.
2. Inserire il disco driver di preinstallazione nell’apposita unità.
3. Quando apparirà il messaggio riportato qui in basso, premere “F6” per specificare
il disco driver.
4. Seguire le istruzioni a video per installare il driver e procedere con l’installazione
di Windows.
Nota
: una volta installato Windows sul computer, sarà necessario installare il driver
attraverso il menu del CD-ROM. Si consiglia di realizzare questa operazione per
prima, dopo di che sarà possibile passare all’installazione di altri driver o
software. Per l’installazione del driver, consultare il capitolo 4.
3.3 Preinstallazione di Windows Vista
1. Riavviare il computer e inserire il CD-ROM d’installazione di Windows nell’unità CD-
ROM.
Seguire le istruzioni del programma di configurazione assistita di Windows Vista fino a
potere selezionare la posizione di Windows Vista.
2. Fare clic sul pulsante “Load Driver”.
3. Inserire il disco driver di preinstallazione nell’apposita unità o collegare l'unità
flash USB di preinstallazione in una porta USB disponibile, dopo di che fare clic su
“OK”.
4. Seguire le istruzioni a video per installare il driver e procedere con l’installazione
di Windows.
Nota
: una volta installato Windows sul computer, sarà necessario installare il driver
attraverso il menu del CD-ROM. Si consiglia di realizzare questa operazione per
prima, dopo di che sarà possibile passare all’installazione di altri driver o
software. Per l’installazione del driver, consultare il capitolo 4
Page 35

ITALIANO
35
4. Installazione del Driver di Windows
Prima di poter usare la Scheda Controller CSATA2P, sarà necessario installare i driver,
che si possono trovare nel CD-ROM in dotazione del pack della CSATA2P.
1. Una volta aperto Windows, apparirà un “Assistente per l’installazione di un
nuovo hardware”. Fare clic su “Cancella” per uscire dal programma di
installazione.
2. Inserire il CD-ROM nell’apposita unità. Dovrebbe apparire automaticamente il Menu
di avvio. In caso contrario, aprire “Risorse del computer” e fare doppio clic
sull’unità del CD-ROM per aprire il Menu di avvio automatico
3. Selezionare il driver corretto relativo alla versione di Windows installata sul
computer.
Nota
: assicurarsi di selezionare il driver corretto relativo alla versione di Windows in
uso. Se si utilizza Windows 2000/XP, selezionare l’opzione “Windows 2000/XP”.
Se si usa Windows Vista, selezionare l’opzione “Windows Vista”.
Page 36

ITALIANO
36
4. Apparirà il programma di configurazione VIA. Fare clic su “Avanti” per continuare.
5. Accettare il Contratto di licenza selezionando “Accetto” e fare clic su “Avanti”
per continuare.
6. Selezionare i componenti da installare. Per default, verranno installati il driver VIA
e l’utilità VIA V-Raid . Fare clic su “Avanti” per continuare.
7. Il programma di configurazione assistita mostrerà un sunto dei componenti
selezionati. Fare clic su “Avanti” per iniziare l’installazione.
8. Una volta portata a termine l’istallazione, apparirà un riassunto d’installazione.
Fare clic su“Avanti” per continuare.
9. Selezionare l’opzione “Sì, riavviare il computer ora” e fare clic su “Fine” per
terminare l’installazione.
Una volta riavviato il computer, la Scheda Controller CSATA2P sarà
pronta per essere usata.
Nota relativa all’utilità V-RAID:
L’utilità VIA V-Raid si può avviare esclusivamente quando viene realizzato il login in qualità
di “Amministratore” o quando viene aperto il programma come “Amministratore”.
Nel caso in cui venga aperta l’utilità VIA V-Raid senza i diritti di amministratore, il
programma creerà un errore e non consentirà di revisionare o modificare la configurazione
dei dischi rigidi connessi. Uscire dal programma e riaprire l’utilità VIA V-RAID con i diritti di
amministratore.
(Facendo doppio clic e selezionado “Run as…”).
Nota realtica a eSATA :
La Scheda Controller CSATA2P è dotata di una connessione eSATA sulla backplate. Tale
connessione eSATA si può usare per collegare box eSATA , come ad esempio il CHD3UES di
Conceptronic.
Il chipset della Scheda Controller CSATA2P non
supporta la funzione di Hot-Plug, per cui si
consiglia vivamente di riavviare il computer dopo aver collegato il box alla Scheda Controller
CSATA2P.
Page 37

PORTUGUÊS
37
Conceptronic CSATA2P
Manual de Instalação Rápida
Parabéns pela compra da
Placa de controlador ATA de série da Conceptronic.
O Manual de Instalação de Hardware incluído fornece-lhe uma explicação passo a passo sobre
como instalar a Placa de controlador ATA de Série da Conceptronic.
Quando tiver algum problema, aconselhamo-lo a consultar a nossa página de suporte (vá a
www.conceptronic.net
) e clicar em ‘Support’ (Suporte). Aí vai encontrar a Base de Dados das
Perguntas Mais Frequentes.
Quando tiver outras questões sobre o seu produto e não encontrar resposta para elas na
nossa página, contacte-nos por e-mail: apoyo@conceptronic.net
Para mais informações sobre os produtos da Conceptronic, visite a página web da
Conceptronic em: www.conceptronic.net
A instalação do software tal como se descreve a seguir pode ser ligeiramente diferente da
instalação no seu computador. Depende da versão do Windows que estiver a usar.
1. Conteúdo da Embalagem
Existem os seguintes elementos na embalagem da Placa de controlador ATA de série da
Conceptronic:
• Placa de controlador ATA de série da Conceptronic
• Cabo ATA de série
• Guia de Instalação Rápida Multilingue
• CD-ROM com controladores
Page 38

PORTUGUÊS
38
2. Instalação do hardware
1. Desligue o seu computador e retire o cabo de alimentação da parte de trás do
computador.
2. Abra a caixa do seu computador retirando os parafusos na parte de trás do
computador.
3. Procure uma ranhura PCI disponível no seu computador e retire a chapa posterior
correspondente.
4. Insira a Placa de
controlador CSATA2P
cuidadosamente na
ranhura PCI disponível.
5. Aperte a Placa de
controlador CSATA2P na
chapa traseira do
computador com um
parafuso e uma chave de
parafusos.
Page 39

PORTUGUÊS
39
3. Instalação do controlador Pre-Windows
Quando quiser usar a Placa de controlador CSATA2P para arrancar o seu Sistema
Windows, tem de instalar o Windows no disco rígido enquanto está ligado à CSATA2P.
Durante a instalação, tem de fornecer o controlador de pré-instalação para um correcto
funcionamento da Placa de controlador CSATA2P.
Nota
: Se estiver a trabalhar com o Windows noutro disco rígido e usar este controlador
SATA para discos rígidos extra, pode avançar este capítulo e prosseguir com o
capítulo 3.2.
Tem de preparar o controlador de pré-instalação numa disquete de 3.5” ou numa
memória USB antes de dar início à nova instalação do Windows.
Nota
: A configuração do Windows 2000 e XP não suporta a utilização de uma memória
USB durante a instalação. Para o Windows 2000 e XP só pode preparar uma
disquete de 3.5”.
3.1 Preparação da disquete / memória Flash
1. Coloque o CD-ROM na sua unidade de CD-ROM. O Menu de Execução Automática
deverá aparecer automaticamente. Se o menu de Execução automática não
aparecer, vá a “My Computer” (O Meu Computador) e faça um duplo clique na
unidade de CD-ROM para iniciar o menu de Execução Automática.
2. Clique na opção “Browse” (Procurar) no Menu. Vai aparecer uma janela do
explorador a mostrar o conteúdo do CD-ROM.
3. Seleccione a pasta correspondente à sua versão do Windows preferida: “Win2kXP”
ou “WinVista”.
4. Abra a pasta “drvdisk” com um duplo clique em cima dela.
5. Copie o conteúdo da pasta “drvdisk” para uma disquete 3.5” vazia ou para uma
memória Flash no caso de estar a instalar o Windows Vista.
Quando o processo de cópia estiver concluído, os preparativos para a nova instalação
estão prontos. Já pode dar início à instalação do Windows no seu computador.
Page 40

PORTUGUÊS
40
3.2 Pré-instalação no Windows 2000/XP
1. Reinicie o computador e insira o CD-ROM de instalação do Windows na sua unidade
de CD-ROM.
2. Insira a disquete de pré-instalação na unidade de disquetes.
3. Quando a mensagem seguinte aparecer, carregue em “F6” para especificar a
disquete.
4. Siga as instruções que aparecem no ecrã para instalar o controlador e prosseguir
com a instalação do Windows.
Nota
: Quando o Windows estiver instalado no seu computador, tem de instalar o
controlador através do menu do CD-ROM. É aconselhável fazer isto como
primeira instalação antes de prosseguir com a instalação de outros controladores
e software. A instalação do controlador descreve-se no capítulo 4.
3.3 Pré-instalação do Windows Vista
1. Reinicie o computador e insira o CD-ROM de instalação do Windows na sua unidade
de CD-ROM.
Siga o Assistente de Configuração do Windows Vista até poder seleccionar a localização
para o Windows Vista.
2. Clique no botão “Load Driver” (Carregar Controlador).
3. Insira a disquete de pré-instalação na unidade de disquetes ou ligue a memória
Flash USB de pré-instalação a uma porta USB disponível e clique em “OK”.
4. Siga as instruções que aparecem no ecrã para instalar o controlador e prossiga com
a instalação do Windows.
Nota
: Quando o Windows estiver instalado no seu computador, tem de instalar o
controlador através do menu do CD-ROM. É aconselhável fazer isto como
primeira instalação antes de prosseguir com a instalação de outros controladores
e software. A instalação do controlador descreve-se no capítulo 4.
Page 41

PORTUGUÊS
41
4. Instalação do controlador no Windows
Antes de poder usar a Placa de controlador CSATA2P, precisa de instalar os
controladores. Estes controladores podem ser encontrados no CD-ROM incluído no
pacote do seu CSATA2P.
1. Quando o Windows iniciar, aparece um “New Hardware Wizard” (Assistente de
Novo Hardware). Clique em “Cancel” (Cancelar) para sair do “New Hardware
Wizard” (Assistente de Novo Hardware).
2. Coloque o CD-ROM na sua unidade de CD-ROM. O Menu de Execução Automática
deverá aparecer automaticamente. Se o menu de Execução automática não
aparecer, vá a “My Computer” (O Meu Computador) e faça um duplo clique na
unidade de CD-ROM para iniciar o menu de Execução Automática.
3. Seleccione o controlador correcto para a versão do Windows que tiver instalada.
Nota
: Certifique-se de que selecciona o controlador correcto para a sua versão do
Windows. Se trabalhar com o Windows 2000/XP, seleccione a opção “Windows
2000/XP”. Se trabalhar com o Windows Vista, seleccione a opção “Windows
Vista”.
Page 42

PORTUGUÊS
42
4. O Assistente de Configuração VIA aparece. Clique em “Next” (Seguinte) para
continuar.
5. Aceite o Acordo de Licença seleccionando “I Agree” (Concordo) e clique em
“Next” (Seguinte) para continuar.
6. Seleccione os componentes a instalar. Por defeito, é instalado o Controlador VIA e
o Utilitário VIA V-Raid. Clique em “Next” (Seguinte) para continuar.
7. O Assistente de Configuração apresenta um resumo dos componentes
seleccionados. Clique em ‘Next’ (Seguinte) para dar início à instalação.
8. Quando a instalação estiver concluída vai ver um resumo da instalação. Clique em
“Next” (Seguinte) para continuar.
9. Seleccione a opção “Yes, I want to restart my computer now” (Sim, quero
reiniciar o meu computador agora) e clique em “Finish” (Terminar) para concluir a
instalação.
Depois do seu computador reiniciar, a Placa de controlador
CSATA2P está pronta a usar.
Nota do Utilitário V-RAID:
O Utilitário VIA V-Raid só pode ser iniciado quando entrar como “Administrator”
(Administrador) ou quando executar o programa como “Administrator” (Administrador).
Se executar o Utilitário VIA V-Raid sem Direitos de Administrador, o programa vai gerar
um erro e não lhe permite rever/alterar a configuração dos discos rígidos ligados. Saia
do programa e reinicie o Utilitário VIA V-RAID com Direitos de Administrador.
(Clique com o botão direito do rato e seleccione “Run as…” (Executar como…)).
Nota eSATA:
A placa de controlador CSATA2P tem uma ligação eSATA na chapa posterior. Esta ligação
eSATA pode ser usada para ligar caixas eSATA, como o CHD3UES da Conceptronic.
O conjunto de chips da Placa de controlador CSATA2P não suporta a função Hot-Plug.
Assim, recomenda-se reiniciar o seu computador depois de ter ligado a caixa à Placa de
controlador CSATA2P.
Page 43

MAGYAR
43
Conceptronic CSATA2P
Gyorstelepítési útmutató
Köszönjük, hogy a Conceptronic soros ATA vezérlőkártyáját
választotta.
A mellékelt hardvertelepítési útmutató lépésről-lépésre elmagyarázza, miként kell a
Conceptronic soros ATA vezérlőkártyáját telepítenie.
Probléma esetén azt tanácsoljuk, keresse fel terméktámogatási webhelyünket (menjen a
www.conceptronic.net
webhelyre, majd ott kattintson a „Support”-ra). Itt található a
gyakran ismétlődő kérdések (GYIK) adatbázisa.
Ha további kérdése volna termékeinkkel kapcsolatban és arra választ webhelyünkön nem
talál, forduljon hozzánk e-mailben: support@conceptronic.net
.
A Conceptronic-termékekkel kapcsolatos további tájékozódás végett pedig keresse fel a
Conceptronic webhelyét: www.conceptronic.net
.
Az alábbiakban ismertetett szoftvertelepítés kicsit eltérhet az adott számítógépnél
alkalmazott telepítéstől. Mindez az éppen használt Windows-verziótól függ.
1. A csomag tartalma
A Conceptronic soros ATA vezérlőkártyáját tartalmazó csomagban a következők
találhatók:
• Conceptronic soros ATA vezérlőkártya
• Soros ATA-kábel
• Többnyelvű gyorstelepítési útmutató
• Illesztőprogram, CD-ROM-on
Page 44

MAGYAR
44
2. A hardver telepítése
1. Kapcsolja ki a számítógépet, majd annak hátoldalán húzza ki a hálózati kábelt.
2. A számítógép hátoldalán lévő csavarok eltávolításával nyissa fel a számítógép
burkolatát.
3. Keressen szabad PCI-bővítőhelyet a számítógépen, majd távolítsa el a megfelelő
hátlapot.
4. Óvatosan helyezze be a
CSATA2P vezérlőkártyát
szabad PCI-bővítőhelyre.
5. Rögzítse a CSATA2P
vezérlőkártyát csavar és
csavarhúzó segítségével a
számítógép hátlapján.
Page 45

MAGYAR
45
3. A Windows illesztőprogramjának telepítése előtt
Ha a Windows-rendszer indítására a CSATA2P vezérlőkártyát kívánja használni, a
Windows-t akkor kell a merevlemezre telepítenie, amikor az a CSATA2P-hez csatlakozik.
Az említett telepítés során — a CSATA2P vezérlőkártya megfelelő működésének
biztosításához — az előtelepítéshez szükséges illesztőprogramról majd gondoskodnia
kell.
Megjegyzés
: Ha a Windows-t éppen másik merevlemezről futtatja, és a többi
merevlemeznél ezt a SATA-vezérlőt használja, ezt a fejezetet
átugorhatja és továbbmehet egyenesen a 3.2. fejezethez.
Mielőtt az új Windows-telepítést megkezdené, az előtelepítéshez szükséges
illesztőprogramot 3,5-colos hajlékonylemezen vagy USB-flash meghajtón kell
előkészítenie.
Megjegyzés
: A Windows 2000, illetve XP beállítása nem támogatja USB-flash meghajtó
alkalmazását a telepítés során. Windows 2000, illetve XP esetén csak 3,5colos hajlékonylemezt lehet előkészíteni.
3.1 Az illesztőprogram lemezének/flash meghajtónak az előkészítése
1. Tegye be a CD-ROM-ot a CD-ROM-meghajtóba. Az Autorun-nak automatikusan meg
kell jelennie. Ha az Autorun menü nem jelenik meg, navigáljon a „My Computer”hez, majd kattintson kétszer a CD-ROM-meghajtóra az Autorun menü elindításához.
2. Kattintson a „Browse” választási lehetőségre a menün. Az Explorer ablak jelenik
meg, amely a CD-ROM tartalmát fogja mutatni.
3. Válassza az előnyben részesített Windows-verziónak megfelelő mappát:
„Win2kXP” vagy „WinVista”.
4. A mappára történő kétszeri rákattintással nyissa meg a „drvdisk” mappát.
5. Másolja át a „drvdisk” mappa tartalmát üres 3,5-colos hajlékonylemezre vagy USB-
flash meghajtóra, ha éppen Windows Vistá-t telepít.
Amikor a másolás befejeződött, minden készen áll az új telepítésre. Ezután a
számítógépen elindíthatja a Windows telepítését.
Page 46

MAGYAR
46
3.2 A Windows 2000/XP előtelepítése
1. Indítsa újra a számítógépet, majd tegye be a Windows-t telepítő CD-ROM-ot a CD-
ROM-meghajtóba.
2. Tegye be az előtelepítéshez szükséges illesztőprogramot tartalmazó lemezt a
hajlékonylemez-meghajtóba.
3. Amikor az alábbi üzenet látható, az illesztőprogram lemezének meghatározásához
kattintson az „F6”-ra.
4. Az illesztőprogram telepítéséhez kövesse a képernyőn megjelenő utasításokat,
majd folytassa a Windows telepítését.
Megjegyzés
: Amikor a Windows már telepítve van a számítógépre, az
illesztőprogramot a CD-ROM-menün keresztül kell telepítenie. Tanácsos
mindezt a végrehajtandó telepítések közül elsőként elvégezni, még
mielőtt a többi illesztőprogram, illetve szoftver telepítésével folytatná.
Az illesztőprogram telepítését a 4. fejezetben ismertetjük.
3.3 Windows Vista előtelepítése
1. Indítsa újra a számítógépet, majd helyezze be a Windows-t telepítő CD-ROM-ot a
CD-ROM-meghajtóba.
Addig kövesse a Windows Vista telepítővarázslójának utasításait, amíg ki nem tudja
jelölni a Windows Vista számára a megfelelő helyet.
2. Kattintson a „Load Driver” gombra.
3. Tegye be az előtelepítéshez szükséges illesztőprogramot tartalmazó lemezt a
hajlékonylemez-meghajtóba vagy csatlakoztassa az előtelepítéshez szükséges USBflash meghajtót szabad USB-porthoz, majd kattintson az „OK”-ra.
4. Az illesztőprogram telepítéséhez kövesse a képernyőn látható utasításokat, majd
folytassa a Windows telepítését.
Page 47

MAGYAR
47
Megjegyzés
: Amikor a Windows már telepítve van a számítógépre, az
illesztőprogramot a CD-ROM-menün keresztül kell telepítenie. Tanácsos
mindezt a végrehajtandó telepítések közül elsőként elvégezni, még
mielőtt a többi illesztőprogram, illetve szoftver telepítésével folytatná.
Az illesztőprogram telepítését a 4. fejezetben ismertetjük.
4. A Windows illesztőprogramjának telepítése
Mielőtt a CSATA2P vezérlőkártyát használná, telepítenie kell az illesztőprogramokat.
Ezek az illesztőprogramok a CSATA2P-csomaghoz tartozó CD-ROM-on megtalálhatók.
1. A Windows indulásakor „New Hardware Wizard” jelenik meg. A „New Hardware
Wizard” megszakításához kattintson a „Cancel”-re.
2. Tegye be a CD-ROM-ot a CD-ROM-meghajtóba. Az Autorun-nak automatikusan meg
kell jelennie. Ha az Autorun menü nem jelenik meg, navigáljon a „My Computer”hez, majd kattintson kétszer a CD-ROM-meghajtóra, hogy az Autorun menüt
elindítsa.
3. Jelölje ki a megfelelő illesztőprogramot a már telepített Windows-verzióhoz.
Page 48

MAGYAR
48
Megjegyzés
: Ügyeljen arra, hogy a helyes illesztőprogramot jelölje ki a Windows-
verzióhoz. Ha Windows 2000-et/XP-t használ, jelölje ki a „Windows
2000/XP” opciót. Ha Windows Vistá-t használ, jelölje ki a „Windows
Vista” opciót.
4. Ezután a VIA telepítővarázsló jelenik meg. A folytatáshoz kattintson a „Next”-re.
5. Az „I Agree” kijelölésével fogadja el a licencszerződést, majd a folytatáshoz
kattintson a „Next”-re.
6. Jelölje ki a telepítendő komponenseket. Alapértelmezésben a VIA illesztőprogram,
valamint a VIA V-Raid segédprogram telepítésére kerül sor. A folytatáshoz
kattintson a „Next”-re.
7. A telepítővarázsló megjeleníti a kijelölt komponensek összesítését. A telepítés
megkezdéséhez kattintson a „Next”-re.
8. Amikor a telepítés befejeződött, a telepítés áttekintése látható. A folytatáshoz
kattintson a „Next”-re.
9. Jelölje ki a „Yes, I want to restart my computer now” opciót, majd a telepítés
befejezéséhez kattintson a „Finish”-re.
A számítógép újraindításakor a CSATA2P vezérlőkártya
használatkész.
Megjegyzés a V-RAID segédprogrammal kapcsolatban:
A VIA V-Raid segédprogram csak akkor indítható, ha előtte már„Administrator”-ként
bejelentkeztek, vagy ha a programot valaki„Administrator”-ként futtatja.
Ha a VIA V-Raid segédprogramot a rendszergazdát megillető jogok nélkül futtatják, a
program hibát generál és nem engedi, hogy a csatlakoztatott merevlemezek konfigurációját
ellenőrizzék/megváltoztassák. Lépjen ki a programból, majd a rendszergazdát megillető
jogokkal indítsa újra a VIA V-RAID segédprogramot.
(Kattintson az egér jobb oldali gombjával, majd válassza a „Run as…”-t.)
Megjegyzés az eSATA-val kapcsolatban:
A CSATA2P vezérlőkártyának eSATA-csatlakozása van a hátlapon. Ez az eSATA-csatlakozás
olyan eSATA-dobozok csatlakoztatására használható, mint a Conceptronic CHD3UES.
A CSATA2P vezérlőkártya chipkészlete nem
támogatja a Hot-Plug (melegcserés v. üzem
közbeni) célalkalmasságot. Ennélfogva nyomatékosan javasoljuk a számítógép újraindítását a
doboznak a CSATA2P vezérlőkártyához történő csatlakoztatása után.
Page 49

TÜRKÇE
49
Conceptronic CSATA2P
Hızlı Kurulum Kılavuzu
Conceptronic Seri ATA Denetleyici Kartını
satın aldığınız için tebrik ederiz.
Ekteki Donanım Kurulumu Kılavuzu size Conceptronic Seri ATA Denetleyici Kartının adım adım
nasıl monte edileceği ve yükleneceği konusunda bilgi içermektedir.
Problem ortaya çıktığında, www.conceptronic.net
destek sitemize gitmenizi ve ‘Support’
(Destek) sayfasına tıklamanızı tavsiye ederiz. Burada Sıkça Sorulan Sorular Veritabanını
bulacaksınız.
Ürününüzle ilgili başka sorularınız varsa ve web sitemizde bulamıyorsanız, bize e-posta ile
ulaşabilirsiniz: support@conceptronic.net
Conceptronic ürünleri ile ilgili daha fazla bilgi için, lütfen Conceptronic Web Sitesini ziyaret
ediniz: www.conceptronic.net
Aşağıda açıklanan yazılım yüklemesi bilgisayarınızdaki yüklemeden biraz daha farklı olabilir.
Bu durum kullandığınız Windows sürümüne bağlıdır.
1. Paket İçeriği
Conceptronic Seri ATA Denetleyici Kartı paketinin içeriği aşağıdaki gibidir:
• Conceptronic Seri ATA Denetleyici Kartı
• Seri ATA Kablosu
• Çok Dilde Hazırlanmış Hızlı Kurulum Kılavuzu
• Sürücü CD-ROM’u
Page 50

TÜRKÇE
50
2. Donanım kurulumu
1. Bilgisayarınızı kapatın ve bilgisayarın arkasından güç kablosunu çıkarın.
2. Bilgisayarın arkasındaki vidaları sökerek bilgisayarınızın kapağını açın.
3. Bilgisayarınızda boş bir PCI yuvası bulun ve yuvaya karşılık gelen sırt plakayı
çıkarın.
4. CSATA2P Denetleyici
Kartını boş PCI yuvasına
hafifçe yerleştirin.
5. CSATA2P Denetleyici
Kartının sırt plaka
bağlantısını bir vida ve
tornavida kullanarak
yapın.
Page 51

TÜRKÇE
51
3. Ön-Windows Sürücü Kurulumu
CSATA2P Denetleyici Kartını Windows Sisteminizi ön-yüklemek için kullanmak isterseniz,
CSATA2P’ye bağlı olan Sabit diske Windows kurmanız gerekmektedir. Bu kurulum
sırasında CSATA2P Denetleyici Kartının doğru çalışması için ön kurulum sürücüsünü
tedarik etmeniz gerekecektir.
Not
: Windows’u başka bir sabit diskten çalıştırıyor ve bu SATA denetleyicisini ilave sabit
diskler için kullanıyorsanız, bu bölümü atlayıp bölüm 3.2.’ye geçebilirsiniz.
Yeni Windows kurulumuna başlamadan önce 3.5” Floppy Disk ya da USB-Flaş bellek
üzerinde ön kurulum sürücüsü hazırlamanız gerekir.
Not
: Windows 2000 ve XP kurulumu, kurulum sırasında USB-Flaş bellek kullanımını
desteklemez
. Windows 2000 ve XP için sadece 3,5” Floppy Disk hazırlayabilirsiniz.
3.1 Sürücü Diski / Flash Bellek Hazırlanması
1. CD-ROM’u CD-ROM Sürücüsüne yerleştirin. Otomatik çalıştırma menüsü ekrana
gelmelidir. Otomatik çalıştırma menüsü ekrana gelmezse “Bilgisayarım”
simgesinden CD-ROM sürücüsüne çift tıklayarak Otomatik çalıştırma menüsünü
çalıştırın.
2. Menüden “Göz at” seçeneğini tıklayın. Size CD-ROM’un içeriğini gösteren bir
explorer penceresi açılır.
3. Tercih ettiğiniz Windows Sürümüne karşılık gelen klasörü seçin: “Win2kXP” ya da
“WinVista”.
4. “drvdisk” klasörüne çift tıklayarak klasörü açın.
5. “drvdisk” klasörünün içeriğini boş bir 3.5” Floppy Diske ya da Windows Vista
kuruyorsanız bir USB-Flaş belleğe kopyalayın.
Kopyalama işlemi tamamland
ığında, yeni kurulum hazırlıkları bitmiştir. Artık
bilgisayarınızda Windows kurulumuna başlayabilirsiniz.
Page 52

TÜRKÇE
52
3.2 Windows 2000/XP Ön kurulumu
1. Bilgisayarı yeniden başlatın ve Windows Kurulum CD-ROM’unu CD-ROM sürücünüze
yerleştirin.
2. Ön kurulum Sürücü Disketini Floppy sürücüye yerleştirin.
3. Aşağıdaki mesaj görüldüğünde, Sürücü Diskini belirlemek için “F6”ya basın.
4. Sürücüyü yüklemek ve Windows kurulumuna devam etmek için ekrandaki
talimatları izleyin.
Not
: Bilgisayarınıza Windows kurulduğunda, sürücüyü CD-ROM menüsünden kurmanız
gerekir. Diğer sürücü ve yazılımların kurulumuna geçmeden önce ilk kurulum olarak
bunu yapmanız tavsiye edilir. Sürücü kurulumu bölüm 4’te açıklanmıştır.
3.3 Windows Vista Ön kurulumu
1. Bilgisayarı yeniden başlatın ve Windows Kurulum CD-ROM’unu CD-ROM sürücünüze
yerleştirin.
Windows Vista konumunu seçinceye kadar Windows Vista Kurulum Sihirbazını izleyin.
2. “Sürücü Yükle” (Load Driver) düğmesine tıklayın.
3. Floppy sürücüye ön kurulum Sürücü Disketini yerleştirin ya da ön kurulum USB-Flaş
belleğini boş bir USB yuvasına takın ve “TAMAM”a tıklayın.
4. Sürücüyü yüklemek ve Windows kurulumuna devam etmek için ekrandaki
talimatları izleyin.
Not
: Bilgisayarınıza Windows kurulduğunda, sürücüyü CD-ROM menüsünden kurmanız
gerekir. Diğer sürücü ve yazılımların kurulumuna geçmeden önce ilk kurulum olarak
bunu yapmanız tavsiye edilir. Sürücü kurulumu bölüm 4’te açıklanmıştır.
Page 53

TÜRKÇE
53
4. Windows Sürücü Kurulumu
CSATA2P Denetleyici Kartını kullanmaya başlamadan önce sürücüleri kurmanız gerekir.
Bu sürücüler CSATA2P paketinizdeki CD-ROM’da bulunabilir.
1. Windows başlatıldığında, “Yeni Donanım Sihirbazı” ekrana gelir. “Yeni Donanım
Sihirbazı”ndan çıkmak için “İptal”e tıklayın.
2. CD-ROM’u CD-ROM Sürücüsüne yerleştirin. Otomatik çalıştırma menüsü ekrana
gelmelidir. Otomatik çalıştırma menüsü ekrana gelmezse “Bilgisayarım”
simgesinden CD-ROM sürücüsüne çift tıklayarak Otomatik çalıştırma menüsünü
çalıştırın.
3. Kurulu Windows sürümünüz için doğru sürücüyü seçin.
Not
: Windows Sürümünüz için doğru Sürücüyü seçtiğinizden emin olun. Windows
2000/XP kullanıyorsanız, “Windows 2000/XP”yi seçin. Windows Vista kullanıyorsanız,
“Windows Vista”yı seçin.
4. VIA Kurulum Sihirbazı ekrana gelir. Devam etmek için “İleri”ye (Next) tıklayın.
5. “Kabul Ediyorum”u (I agree) seçerek Lisans Sözleşmesini kabul edin ve devam
etmek için “İleri”ye (Next) tıklayın.
Page 54

TÜRKÇE
54
6. Kurulum için bileşenleri seçin. Varsayılan olarak, VIA Sürücüsü ve VIA V-Raid
Yardımcı Programı yüklenir. Devam etmek için “İleri”ye (Next) tıklayın.
7. Kurulum Sihirbaz, seçili bileşenlerin bir özetini gösterir. Kurulumu başlatmak için
“İleri”ye (Next) tıklayın.
8. Kurulum tamamlandığında, kurulum genel açıklamasını göreceksiniz. Devam etmek
için “İleri”ye (Next) tıklayın.
9. “Evet, bilgisayarımı şimdi yeniden başlatmak istiyorum”u (Yes, I want to restart
my computer now) seçin ve kurulumu tamamlamak için “Bitir”i (Finish) tıklayı n.
Bilgisayarınız yeniden başlatıldığında, CSATA2P Denetleyici Kartı
kullanıma hazırdır.
V-RAID Yardımcı Programı Hakkında Not:
VIA V-Raid Yardımcı Programı sadece “Administrator” (Yönetici) olarak oturum açtığınızda
ya da programı “Administrator” olarak çalıştırdığınızda başlayabilir.
VIA V-Raid Yardımcı Programını Yönetici Hakları olmadan çalıştırırsanız, program bir hata
üretir ve bağlı sabit disklerin yapılandırma ayarlarını görüntüleme/değiştirmenize izin
vermez. Lütfen programdan çıkın ve VIA V-Raid Yardımcı Programını Yönetici Hakları ile
yeniden başlatın.
(Sağ tıklayarak “Farklı Çalış
tır...”ı seçin).
eSATA Hakkında Not:
Sırt plakada CSATA2P Denetleyici Karta ait bir eSATA bağlantısı bulunur. Bu eSATA bağlantısı
Conceptronic CHD3UES gibi eSATA eklentilerini bağlamak için kullanılabilir.
CSATA2P Denetleyici Kartının yonga seti (chipset) Tak-Çıkar özelliğini desteklemez
. Bu
nedenle, CSATA2P Denetleyici Kartına eklenti bağladıktan sonra bilgisayarınızı yeniden
başlatmanız önemle tavsiye edilir.
Page 55

Declaration of CE Conformity
55
The manufacturer Conceptronic
Address Databankweg 7
3821 AL Amersfoort
The Netherlands
Hereby declares that the product
Type SERIAL ATA 2 PORTS ESATA+SATA PCI CARD
Product CSATA2P
Complies with following directives:
89/336/EEC EMC directive:
Electromagnetic Compatibility
73/23/EEC Low Voltage Directive:
Electrical equipment designed for use within certain voltage limits
The following standards were consulted to assess conformity:
EN55022/9.98 Class B
EN55024/9.98
EN 50081-1/1994
EN 61000-3-2/3/4/1995
EN 50082-1/1994
EN 60950/1995
The CE symbol confirms that this product conforms to the above named standards and
regulations.
This product is suitable for all EU countries.
Place and date of issue: Amersfoort, The Netherlands, March 19, 2007
Herman Looijen, Product Marketing Manager
 Loading...