

Page 1

NEDERLANDS
Conceptronic CM3PVRD
Gebruikershandleiding
Gefeliciteerd met de aanschaf van uw
In deze gebruikershandleiding wordt u stap voor stap uitgelegd hoe u de Conceptronic Media Recorder &
Player kunt installeren en gebruiken.
In geval van problemen adviseren wij u onze support website te bezoeken (ga naar: www.conceptronic.net
en klik op ‘Support’).
Hier vindt u een database met veelgestelde vragen waar u hoogstwaarschijnlijk de oplossing voor uw
probleem kunt vinden.
Heeft u andere vragen over uw product die u niet op de website kunt vinden, neem dan via e-mail contact
met ons op: support@conceptronic.net
Voor meer informatie over Conceptronic producten kunt u terecht op de Conceptronic website:
www.conceptronic.net
Tip:
De firmware van de Conceptronic CM3PVRD kan worden bijgewerkt. Om uw apparaat bij te werken
met de nieuwste firmware-versie gaat u naar de Conceptronic website.
Tip:
Ga naar www.conceptronic.net voor de nieuwste lijst met codecs voor de ondersteunde
bestandsindelingen.
De volgende onderdelen dienen aanwezig te zijn in de verpakking van de Conceptronic Media Recorder &
Player:
• Conceptronic CM3PVRD Media Recorder & Player (beschreven als ‘apparaat’ in deze handleiding).
• Productstandaard voor CM3PVRD.
• Spanningsadapter (12v, 2.5A) met aansluitkabel.
• Afstandsbediening.
• 2 AAA-batterijen voor de afstandsbediening.
• RF antennekabel.
• Composiet videokabel (Rode, Witte en Gele RCA-aansluitingen).
• S-Video kabel.
• Component Video kabel (Rode, Groene en Blauwe RCA-aansluitingen).
• Coaxiale digitale audiokabel (Zwarte RCA-aansluitingen).
• SCART-adapter voor de Composiet videokabel / S-Video kabel.
• USB-kabel.
• Deze gebruikershandleiding.
Conceptronic Media Recorder & Player.
.
.
1. Pakket Inhoud
1
Page 2

NEDERLANDS
2. Productkenmerken
• Ingebouwde hybride tv-tuner met automatische zenderzoeker.
o Ondersteunt analoge tv
o Ondersteunt digitale tv (DVB-T)
• Tv-signaal opname.
• AV-signaal opname van bijvoorbeeld een VCR, DVD of videocamera.
• Interne kaartlezer met SD(HC), MMC en MS ondersteuning.
• Opname naar de interne HDD, geheugenkaart of USB-apparaat.
• Opname op DVD-kwaliteit in MPEG4 (AVI) formaat (kan afgespeeld worden op de PC of op een andere
mediaspeler).
• Opname mogelijkheden: Directe opname, geprogrammeerde opname, Time-shift.
• Afspeelmogelijkheid van MPEG1/2/4-, MP3-, WMA- en JPG-bestanden die opgeslagen zijn op de interne
HDD, geheugenkaart of USB apparaat.
• Bestanden kopiëren van geheugenkaart of USB-apparaat naar de interne HDD mogelijk.
• Schakelt automatisch tussen PC en Media Recorder & Player optie:
o Aangesloten op de PC werkt het apparaat als USB opslagapparaat of kaartlezer.
o Aangesloten op de TV werkt het apparaat als een Media Recorder & Player.
3. Opmerkingen & Waarschuwingen
• Probeer de bijgeleverde spanningsadapter niet open te maken. De hoge spanning van de adapter kan
verwondingen veroorzaken. Indien de adapter defect is, neem dan contact op met uw dealer of de
helpdesk van Conceptronic.
• Houd het apparaat weg bij vuil en stof.
• Stel het apparaat niet bloot aan water of andere vloeistoffen.
• Als u het apparaat voor langere tijd niet gebruikt, koppel deze dan los van de stroomaansluiting.
• Vermijd het gebruik van het apparaat in een brandgevaarlijke omgeving.
• Vervang de batterij van de afstandsbediening voor een batterij van hetzelfde type als deze zwak of leeg
is. Recycle de batterij indien mogelijk. Om corrosie te voorkomen dient u de batterij uit de
afstandsbediening te verwijderen als deze langere tijd niet gebruikt wordt.
• Houd de afstandsbediening weg bij vocht; laat de afstandsbediening niet vallen.
• Gebruik de afstandsbediening niet bij intens zonlicht.
• NOOIT het apparaat schudden, laten vallen of tegen het apparaat stoten.
• Om oververhitting te voorkomen dient u het apparaat niet af te dekken.
• Het apparaat ondersteunt alleen het FAT / FAT32 bestandssysteem (NTFS wordt niet ondersteund).
BELANGRIJK:
Let op:
Let op:
Als u de harde schijf formatteert met het NTFS bestandssysteem zal het apparaat alleen
maar functioneren als verwisselbare schijf op uw computer. Formatteer de schijf opnieuw
met het FAT32 systeem via het menu van het apparaat om de functies van de Media
Recorder & Player te activeren.
De data op de interne harde schijf of op een van de aangesloten apparaten kan gefragmenteerd
zijn. Dit kan het afspelen beïnvloeden. Het advies is om de interne harde schijf en/of de
aangesloten apparaten zo nu en dan te defragmenteren.
De hybride tuner van de CM3PVRD is geschikt voor zowel analoge als digitale (DBV-T) tv.
Het analoge gedeelte van de hybride tuner ontvangt analoge tv-uitzendingen via de kabel of
een antenne.
Het digitale gedeelte van de hybride tuner ontvangt uitsluitend zenders die beschikbaar zijn als
gratis (free to air) DVB-T signaal.
2
Page 3
NEDERLANDS
6 8
12
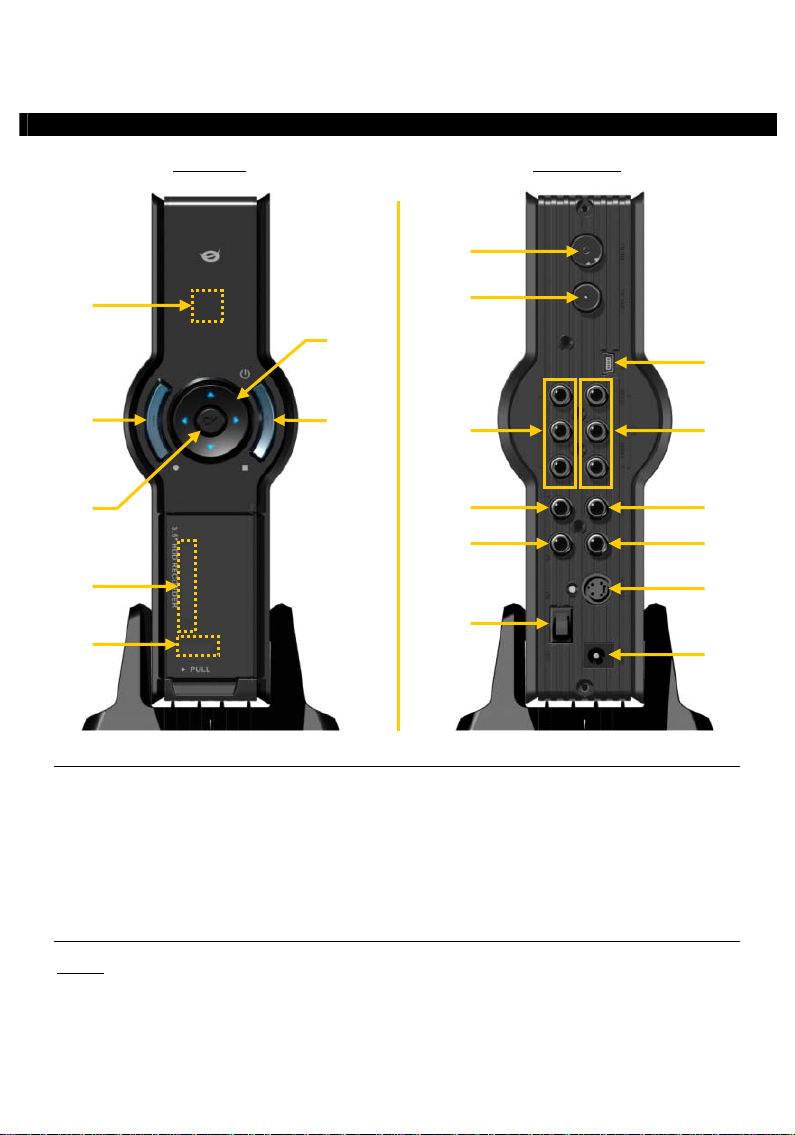
Voorzijde
4. Beschrijving van de CM3PVRD
Achterzijde
1
9
7
2
3
10
11
4
13
5
Beschrijving van de nummers:
1. Infrarood ontvanger 11. Component (Y) uitgang
2. Opname knop 12. Component (Pb) uitgang
3. OK / Enter knop 13. Hoofdschakelaar voor de spanning
4. MMC/MS/SD kaartslot 14. DC-ingang (12V, 2.5A)
5. USB-host poort 15. S-Video uitgang
6. Aan-Uit (3sec) / stopknop 16. Component (Pr) uitgang
7. Navigatieknoppen 17. Digitale coaxiale uitgang
8. Hybride TV-tuner ingang 18. AV-uitgang (Composiet video/audio)
9. Hybride TV-tuner uitgang 19. Mini-USB aansluiting (Naar PC)
10. AV-ingang (Composiet video/audio)
Let op:
De knoppen hebben dezelfde functies als de basisfuncties van de afstandsbediening.
19
18
17
16
15
14
3
Page 4
NEDERLANDS
5. Beschrijving van de afstandsbediening
De afstandsbediening wordt gebruikt om het apparaat te kunnen bedienen. Op de omslag van deze
handleiding vindt u een afbeelding van de afstandsbediening.
De nummers bij de knoppen komen overeen met de nummers in de onderstaande tabel om de functies van
de afstandsbediening uit te leggen.
Nr. Toets Beschrijving
1. AAN/UIT ( ) De speler inschakelen of op standby zetten
2. INFO Informatie over kanaal/zender/bestand tonen
3. SOURCE (bron) Omschakelen tussen tuner, AV-ingang en afspelen
4 AUDIO (geluid) Ander dvd-geluidsspoor kiezen
5. TITLE (titel) Terug naar dvd-titelmenu
6. 0-9 Navigatiemenu/directe kanaalkeuze
7. +10 + 10 kanalen
8. EPG EPG-gids tonen
9. FAVORITE (favorieten) De lijst met favoriete kanalen/zenders tonen
10. COPY (kopiëren) Het kopieermenu tonen
11 . REPEAT (herhalen) Herhaalstand voor afspelen aanpassen
12. VOLUME
13. VOLUME
14. RETURN (terug) Terug naar het vorige menu/kanaal
15.
, , , Navigatietoetsen: door de menu's navigeren
16. REC (opnemen) Opname starten/opnameduur verlengen (+30 minuten)
17. PLAY/PAUSE (afspelen) Afspelen starten/afspelen pauzeren/opnemen pauzeren/
timeshift aanzetten
18. TERUGSPOELEN (
19. VORIGE (
20. OUTPUT (uitvoer) Uitvoersignaal wijzigen (composiet, component of s-video)
21. SETUP (instellen) Het Setup (instellingen) menu op uw scherm weergeven
22. VOLGENDE (
23. VOORUITSPOELEN (
24. STOP Afspelen stoppen/opnemen stoppen/timeshift uitzetten
25. TIMER (programmeren) Geplande opnamen bewerken
26. ENTER Keuze bevestigen
27. STORAGE (opslagmedium) Een ander opslagapparaat activeren (HDD, USB, geheugenkaart)
28. KANAAL
29. KANAAL
30. MUTE (dempen) Geluid uitschakelen
31. QUALITY (kwaliteit) Opnamekwaliteit instellen
32. CLEAR (wissen) Ingave wissen/selectie verwijderen
33. SELECT (zenderkeuze) Snelkeuzemenu digitale tv-kanalen/zenders
34. EDIT (bewerken) Menu bestandsbewerking
35. 100 + 100 kanalen/zenders
36. ANGLE (camerahoek) Andere dvd-camerahoek kiezen
37. SUB-T (ondertitel) Andere dvd-ondertiteling kiezen
38. DTV – INFO Informatie over uw digitale tv-zender tonen
39. DTV – T/R Omschakelen tussen digitale tv en digitale radio
40. MENU Het hoofdmenu tonen
41. LED Geeft activiteit van de afstandsbediening aan
Geluid harder
Geluid zachter
) Versnelde weergave achteruit
) Vorig(e) bestand/nummer/hoofdstuk/afbeelding
) Volgend(e) bestand/nummer/hoofdstuk/afbeelding
) Versnelde weergave
Vorige zender/kanaal
Volgende zender/kanaal
4
Page 5
NEDERLANDS
6. Uw CM3PVRD aansluiten
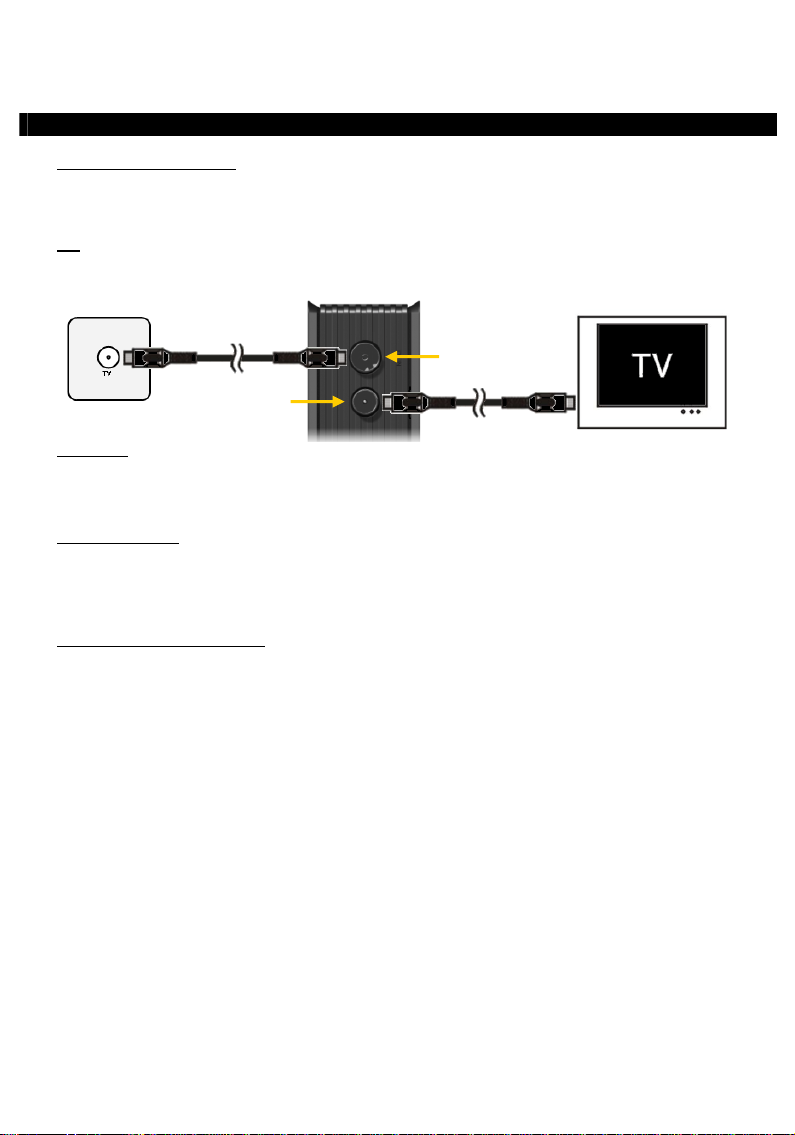
Antennekabel(s) aansluiten
De speler is voorzien van een hybride tuner. Hierdoor kunt u met deze speler zowel analoge als digitale
(DBV-T) tv-zenders ontvangen.
NB:
De tuner van de speler geeft het tv-ingangsignaal ongewijzigd door aan de tv-uitgang van de
tuner. Deze functie (pass-through) werkt ook wanneer de speler is uitgeschakeld of geen stroom
heeft, dus kunt u ook tv kijken wanneer de speler uit staat.
Tv-ingang
Tv-uitgang
Analoge tv:
• Haal de antennekabel uit uw tv en doe hem in de tv-ingang van de speler.
• Sluit de meegeleverde antennekabel aan op de tv-uitgang van de speler en op de antenne-ingang van uw
tv.
Digitale tv (DVB-T):
• Sluit een DVB-T antenne aan op de tv-ingang van de speler.
• Sluit de meegeleverde antennekabel aan op de tv-uitgang van de speler en op de antenne-ingang van uw
tv.
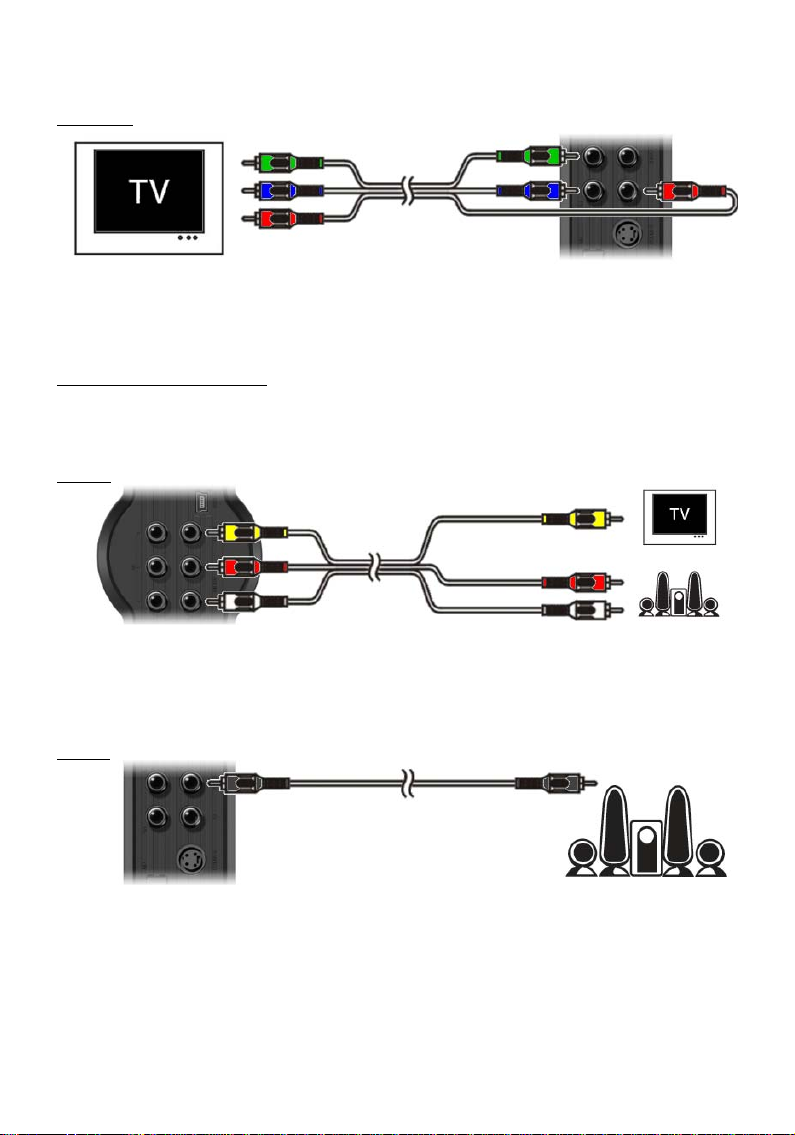
Aansluiten van de videokabel(s)
U kunt het apparaat op 4 verschillende manieren aansluiten op uw TV:
- Composiet
- SCART (door middel van de Composiet kabel & de SCART-adapter)
- S-Video **
- Component **
** Wanneer u de S-Video of Component aansluiting gebruikt wordt er alleen een videosignaal naar uw TV
gestuurd.
Voor het geluidssignaal kunt u gebruik maken van de RCA-aansluitingen van de Composietkabel (Rood,
Wit) of de coaxiale SPDIF-kabel.
5
Page 6
NEDERLANDS
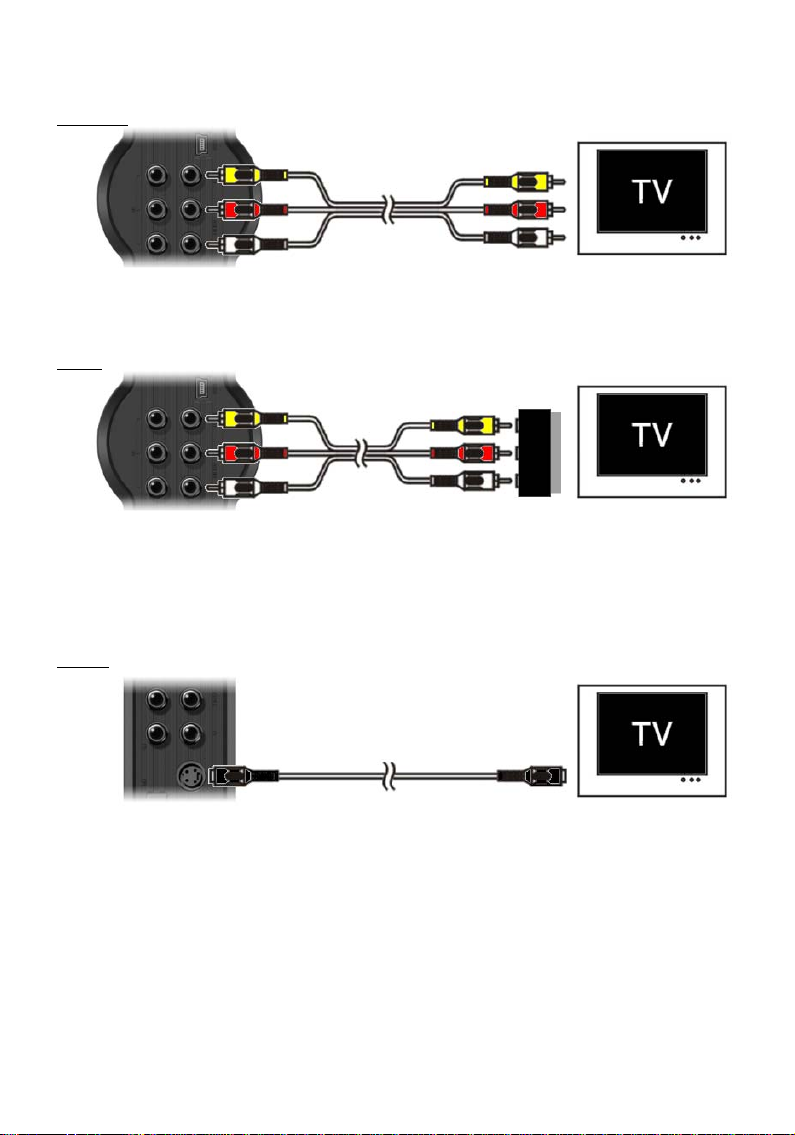
Composiet:
• Sluit de Composietkabel (Geel, Rood en Wit) aan op de overeenkomstige AV-uitgangen op het apparaat.
• Sluit de andere kant van de Composietkabel (Geel, Rood en Wit) aan op uw TV.
SCART:
• Sluit de Composietkabel (Geel, Rood en Wit) aan op de overeenkomstige AV-uitgangen op het apparaat.
• Sluit de andere kant van de Composietkabel (Geel, Rood en Wit) aan op de RCA-aansluitingen van de
SCART adapter.
• Set de schakelaar van de SCART-adapter op “Input”.
• Sluit de SCART-adapter aan op de SCART-ingang van uw TV.
S-Video:
• Sluit de S-Video kabel aan op de S-Video uitgang van het apparaat.
• Sluit de andere kant van de S-Video kabel aan op de S-Video ingang van uw TV.
6
Page 7
NEDERLANDS
Component:
• Sluit de Componentkabel (Rood, Groen en Blauw) aan op de Componentuitgang van het apparaat.
• Sluit de andere kant van de Componentkabel (Rood, Groen en Blauw) aan op de Componentaansluiting
van uw TV.
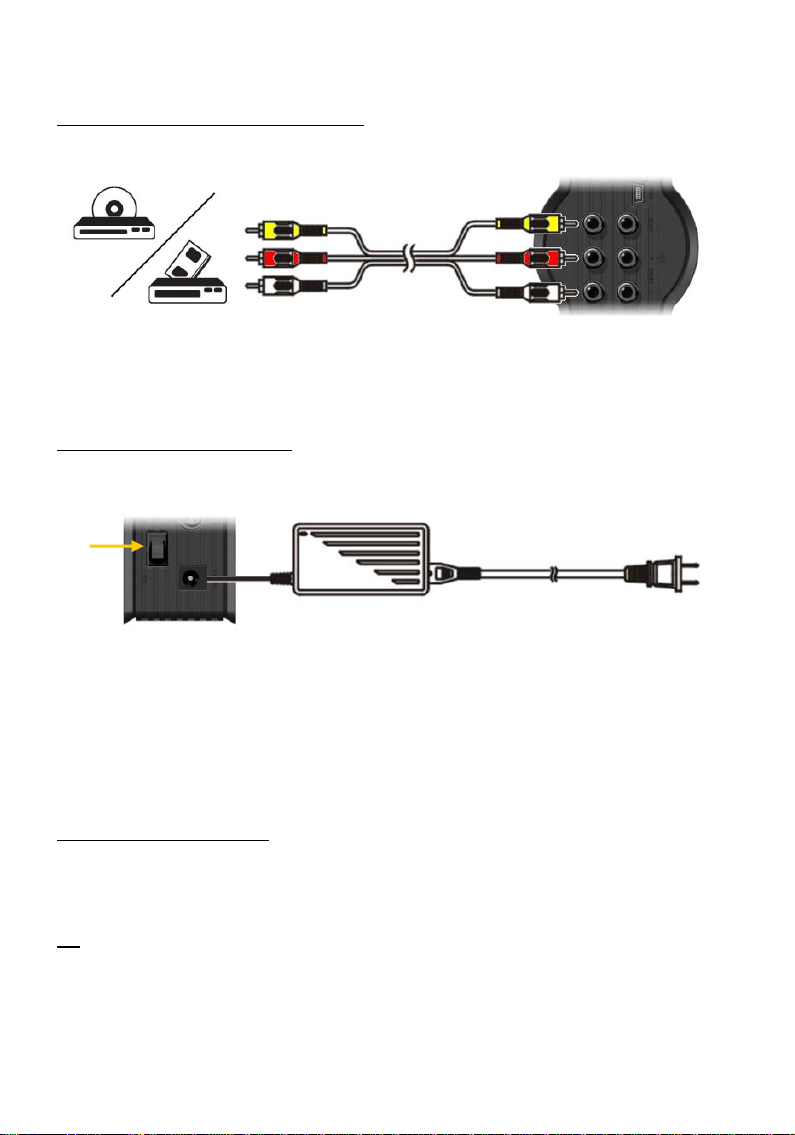
Aansluiten van de Audiokabel(s)
U kunt het apparaat op 2 verschillende manieren aansluiten op uw TV of home cinema systeem:
- Analoog, via de RCA-aansluitingen van de AV-uitgang van het apparaat
- Digitaal, via de coaxiale digitale SPDIF-uitgang van het apparaat
Analoog:
• Sluit de audiostekkers (Rood, Wit) van de Composietkabel aan op de geluidsaansluitingen van de AV-
uitgang op het apparaat.
• Sluit de andere kant van de Composietkabel aan op de geluidsaansluiting van uw TV of home cinema
systeem.
Digitaal:
• Sluit de Digitale coaxiale kabel aan op de Digitale coaxiale uitgang van het apparaat.
• Sluit de andere kant van de Digitale coaxiale kabel aan op de Digitale coaxiale ingang van uw home
cinema systeem.
7
Page 8
NEDERLANDS
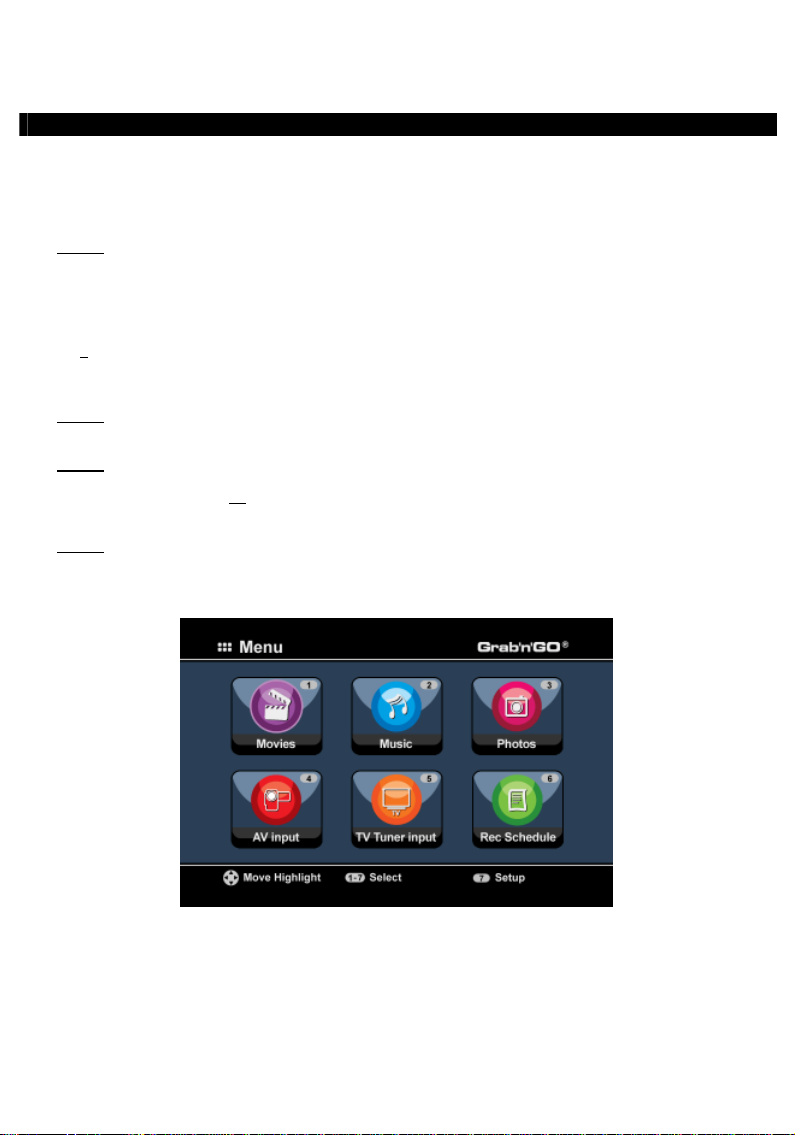
Aansluiten van overige audio/video apparatuur
U kunt overige audio/video apparatuur, zoals een VCR, DVD-speler of Set-top box aansluiten op het
apparaat zodat u vanaf deze bron kunt opnemen.
• Sluit de audio/videokabel die meegeleverd is met uw audio/video apparaat aan op de AV-uitgang van uw
audio/video apparaat.
• Sluit de andere kant van de Composietkabel (Geel, Rood en Wit) aan op de AV-ingangen van het
apparaat.
Aansluiten van de spanningsadapter
Wanneer het apparaat is aangesloten op uw audio/video apparatuur kunt u de spanningsadapter aansluiten
op het apparaat.
• Sluit de meegeleverde spanningsadapter aan op het apparaat en op een vrij stopcontact.
• Set de hoofdschakelaar op de achterzijde van het apparaat op ‘I’ om de spanning in te schakelen.
Het apparaat zal nu aangaan.
Wanneer het apparaat is ingeschakeld zullen de Navigatieknoppen (7), de Opnameknop (2) en de
Aan/uitknop (6) blauw oplichten.
Wanneer het apparaat in stand-by stand staat zullen de Navigatieknoppen (7) rood oplichten. De Opname
knop (2) en de Power knop (6) zullen niet branden.
Afstandsbediening voorbereiden
• Verwijder het batterijklepje van de achterkant van de afstandsbediening.
• Doe de meegeleverde AAA-batterijen in de afstandsbediening.
• Zet het batterijklepje terug op de achterkant van de afstandsbediening.
NB:
- De afstandsbediening werkt het best op een afstand tot ongeveer 5 meter.
- Richt de afstandsbediening op de infraroodsensor op het frontpaneel van de speler.
- De ontvangsthoek van de sensor is ±30 graden.
- Vervang de batterijen als ze zwak worden of leeg zijn.
8
Page 9
NEDERLANDS
7. Initiële configuratie
Het apparaat dient geconfigureerd te worden als deze voor de eerste keer wordt aangezet.
• Selecteer het juiste ingangskanaal op uw TV waar u het apparaat op heeft aangesloten. (Composiet,
SCART, S-Video of Component).
Let op:
Vanaf dit moment is de handleiding gebaseerd op het feit dat uw TV staat op het ingangskanaal
waarop u het apparaat heeft aangesloten. Alle verdere stappen hebben betrekking op het
• Controleer of de hoofdschakelaar op de achterzijde van het apparaat op ‘I’ staat.
• Schakel het apparaat in met de Aan/uitknop op de voorzijde van het apparaat, of met de ‘Power’-knop
Het apparaat zal aangaan en het menu zal op uw TV weergegeven worden.
Let op:
Let op:
Let op:
bedienen van het apparaat.
) op de afstandsbediening.
(1
Het apparaat zal de harde schijf initialiseren tijdens het opstarten. Dit kan even duren. Tijdens
de initialisatie zal de melding “Please Wait...” op uw scherm getoond worden.
Het standaard uitgangssignaal van het apparaat is Composiet. Als u een andere aansluiting van
het apparaat gebruikt is het mogelijk dat er niets getoond wordt op uw scherm. Druk op de
‘Output’-knop (20
wijzigen.
Wanneer u het apparaat voor de eerste keer gebruikt zal de harde schijf geformatteerd moeten
worden. Kies voor ‘Yes’ om het formatteren te starten. Als het formatteren gereed is kunt u
het apparaat configureren en gebruiken.
Wanneer de harde schijf wordt geformatteerd zal alle data op de schijf gewist worden!
) van de afstandsbediening om het uitgangssignaal van het apparaat te
9
Page 10

NEDERLANDS
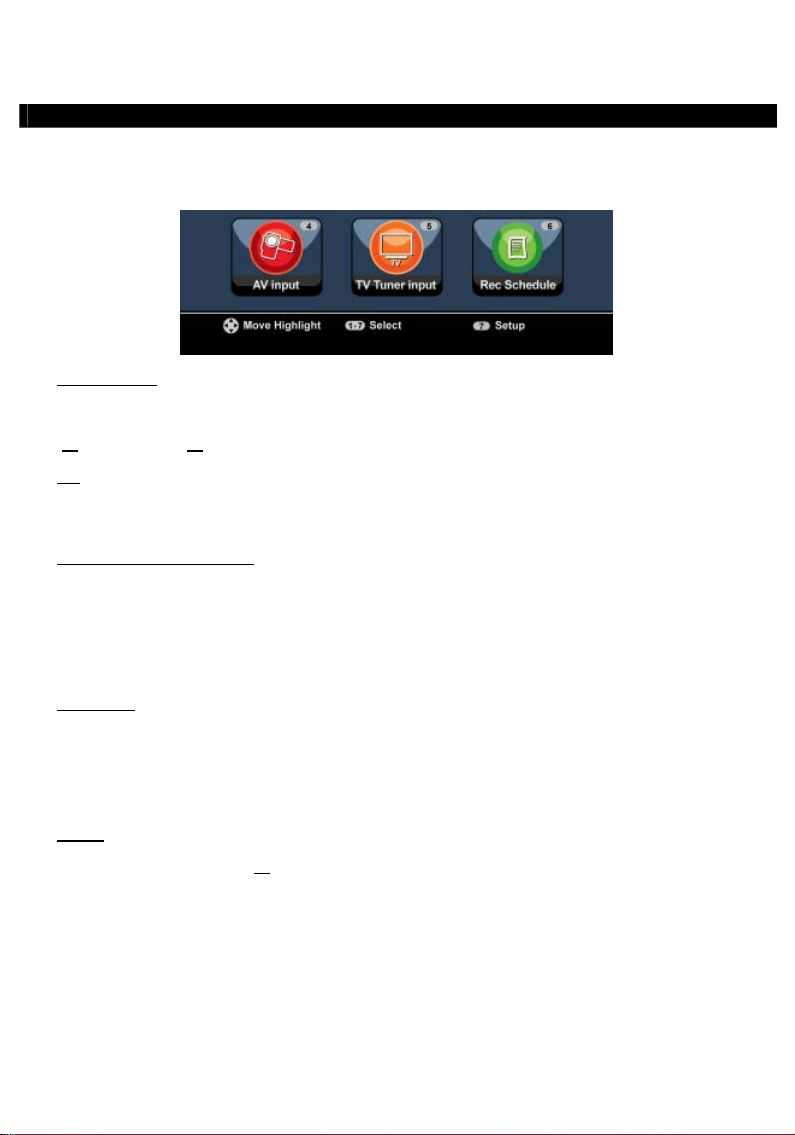
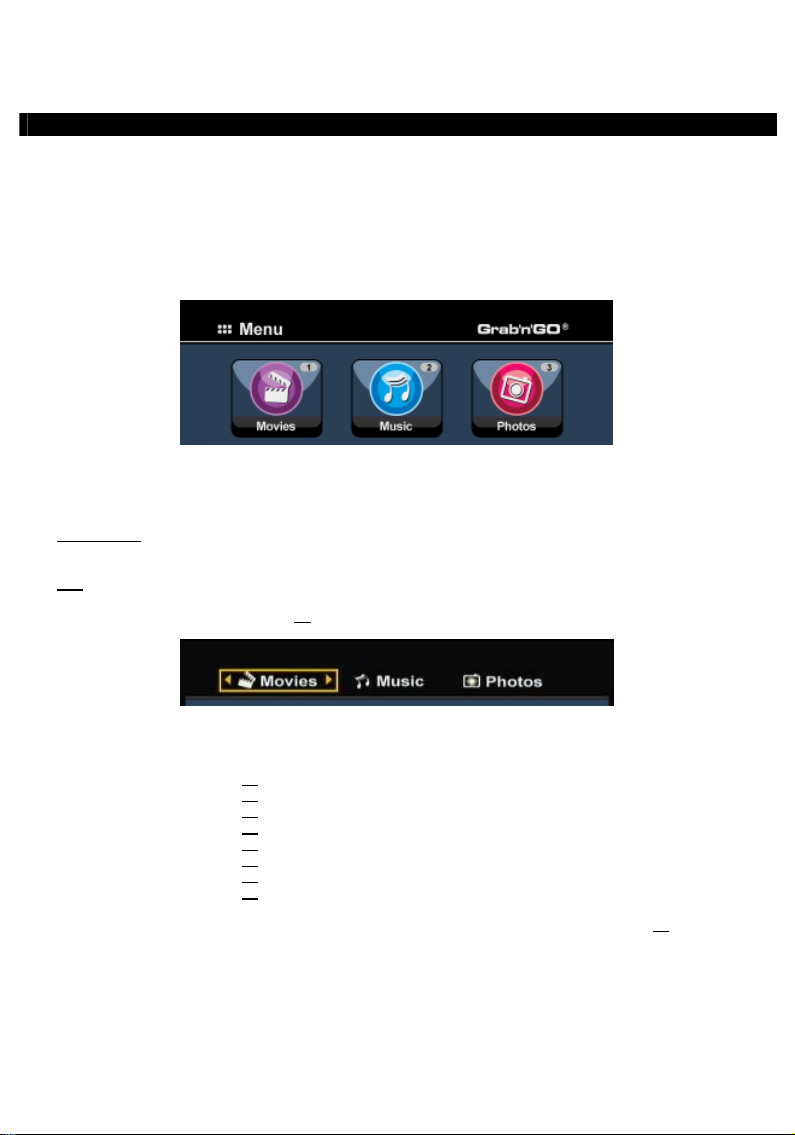
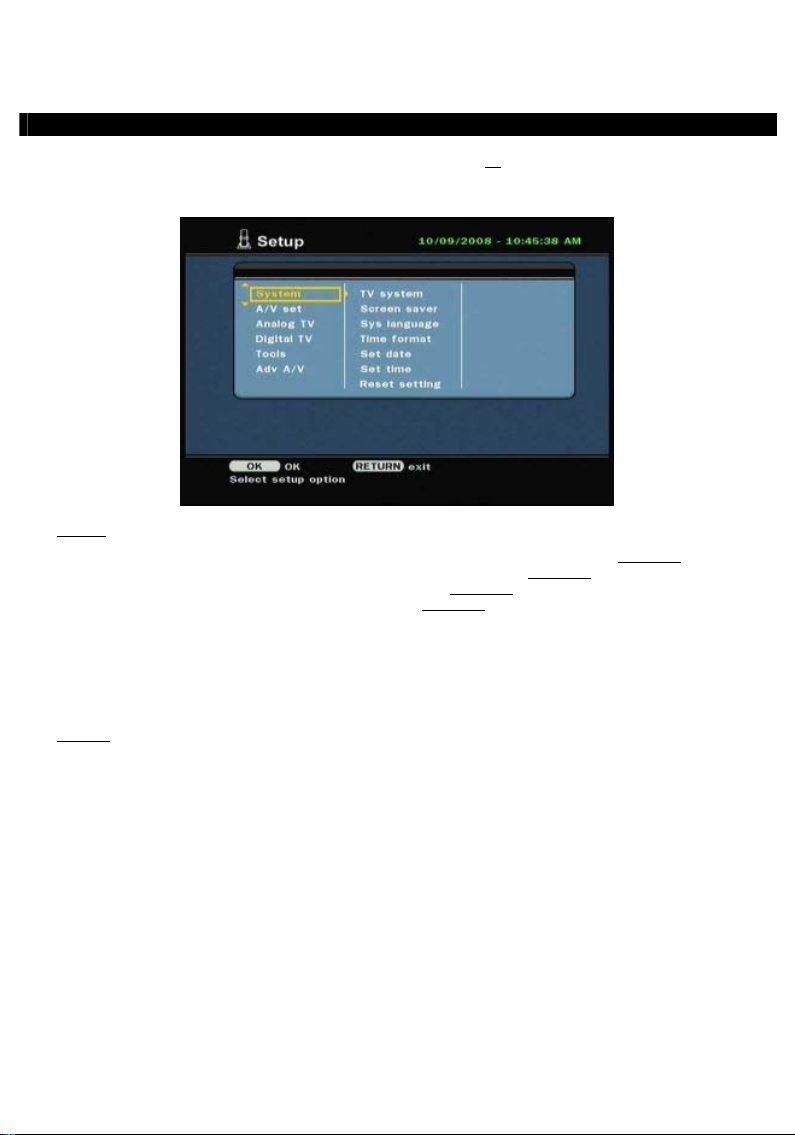
De volgende opties zijn beschikbaar in het hoofdmenu:
[1] – Movies
[2] – Music
[3] – Photos
[4] - AV Input
[5] - TV Tuner Input
[6] – Rec Schedule
[7] – Setup
Kies in het hoofdmenu voor 'Setup' [7] of druk op de 'Setup' toets (21
van de speler. Wanneer het Setup instellingenmenu verschijnt, kunt u uit de volgende mogelijkheden
kiezen:
- Systeem * (Basisconfiguratie)
- A/V Instelling * (Basisconfiguratie)
- Analog TV * (analoge tv-tuner configureren)
- Digital TV * (digitale tv-tuner configureren)
- Tools
- Geavanc. A/V
Let op:
Basisconfiguratie
Deze stappen helpen u om de basisinstellingen te configureren die benodigd zijn om het apparaat correct
te laten werken.
• Selecteer de optie ‘Systeem’ in het Setup menu.
• Stel de optie ‘TV Systeem’ in op het TV systeem dat door uw TV gebruikt wordt.
U kunt kiezen tussen PAL en NTSC.
• Kies de ‘Systeemtaal’ die u wilt gebruiken.
U kunt kiezen tussen ENGELS, NEDERLANDS, SPAANS, ITALIAANS, FRANS, PORTUGEES en DUITS.
• Stel de optie ‘Tijd Formaat’ in op het tijdsformaat van uw keuze.
U kunt kiezen tussen D_M_J_12 (12-uurs notitie met AM/PM) en D_M_J_24 (24-uurs notitie).
• Stel de Datum in op de juiste datum.
• Stel de Tijd in op de juiste tijd.
• Selecteer de optie ‘A/V Instelling’ in het Setup menu.
• Stel de ‘Video Uitgang’ in op de uitgang die u gebruikt heeft om het apparaat op de TV aan te sluiten.
• Stel het 'TV Type' in op de beeldverhouding van uw tv. U kunt kiezen uit '4:3 PS' (pan & scan), '4:3 LB'
(letterbox) en '16:9' (breedbeeld).
• Stel het 'TV input type' in op de tuner die u wilt gebruiken. U kunt kiezen uit 'Digital TV' en 'Analog TV'.
Tv-tuner configureren
De speler is voorzien van een hybride tuner zodat hij zowel analoge als digitale (DBV-T) tv-zenders kan
ontvangen. Hieronder wordt het configureren van de analoge tv-tuner en van de digitale tv-tuner
afzonderlijk behandeld:
Afspelen van opgeslagen opnames en films.
Afspelen van opgeslagen muziek.
Afspelen van opgeslagen foto’s en afbeeldingen.
Bekijk het audio/video kanaal.
Bekijk Live TV.
Programmeer een opname.
Wijzig de configuratie van het apparaat.
) om te beginnen met de configuratie
De Setup opties die met een * zijn gemarkeerd dienen correct ingesteld te worden voordat u
het apparaat kunt gebruiken.
10
Page 11
NEDERLANDS
Analoge tv-kanalen zoeken en vastleggen:
• Kies in het Setup instellingenmenu voor 'Analog TV'.
• Stel het ‘TV Signaal’ in op‘Kabel’ als u het apparaat heeft aangesloten op de kabel. Kies anders voor
‘Antenne’ als u het apparaat heeft aangesloten op een losse antenne.
• Selecteer de optie ‘Autom. Afst.’ om naar TV-kanalen te zoeken.
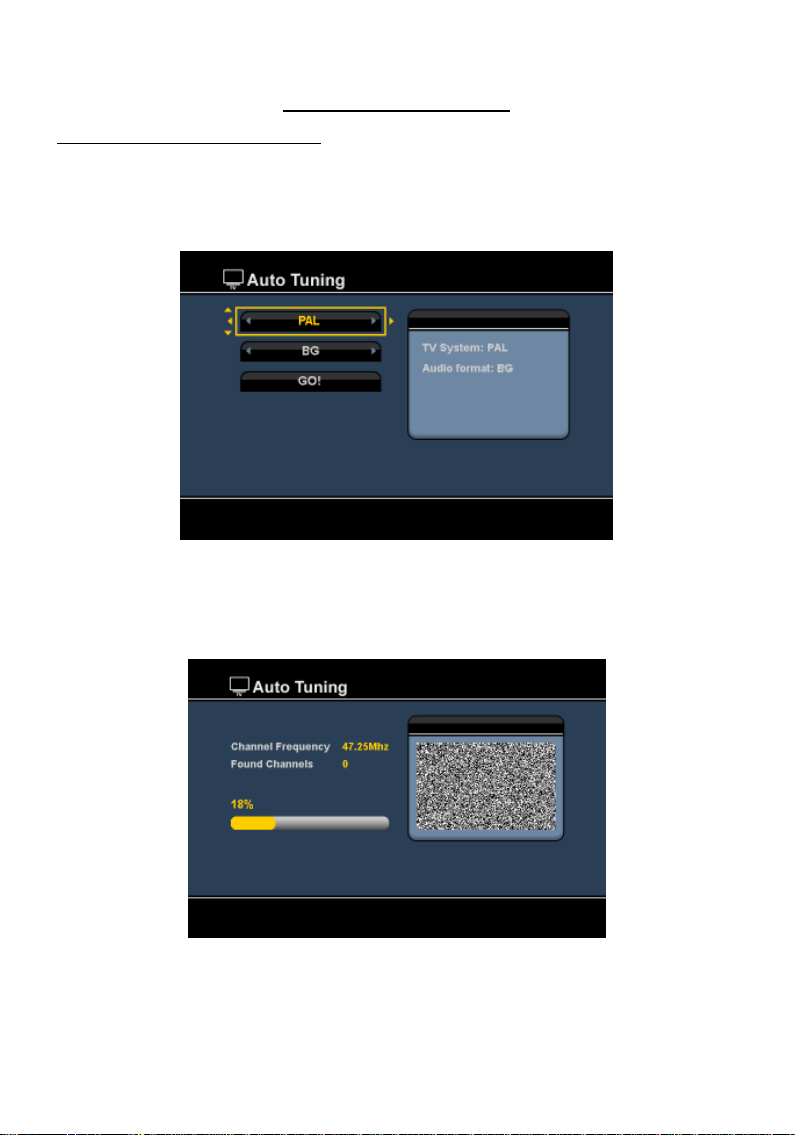
Analoge tv-tuner configureren
• Selecteer in het ‘Auto Tuning’ menu het juiste ‘TV Systeem’ en ‘Audio Formaat’ voor uw land.
De standaardinstelling is ‘PAL-BG’, wat de juiste instelling is voor de meeste Europese landen, behalve
Frankrijk, waar ‘SECAM L’ gebruikt wordt.
• Selecteer ‘Go!’ om te beginnen met het zoeken naar TV-kanalen.
Tijdens het zoeken naar TV-kanalen zullen alle gevonden kanalen automatisch opgeslagen worden in het
geheugen van het apparaat. Dit kan enige tijd duren.
Wanneer het zoeken van kanalen voltooid is zal het apparaat terugkeren naar het Setup menu.
11
Page 12

NEDERLANDS
TV-kanalen aanpassen:
Wanneer het apparaat klaar is met het zoeken van TV-kanalen kunt u de gevonden kanalen aanpassen.
• Selecteer de optie ‘TV Tuner’ in het Setup menu.
• Selecteer de optie ‘Kanaal Inst.’ In het TV Tuner menu.
Het ‘Kanaal Instellingen’ menu zal op de TV weergegeven worden.
Alle instellingen in het ‘Kanaal Instellingen’ menu kunnen gewijzigd worden met behulp van de ‘Navigatie’
knoppen (15
U kunt de volgende dingen wijzigen:
- Kanaal nummer Wijzig het kanaal wat u wilt aanpassen.
- Actief Toon of verberg het kanaal in de kanalenlijst.
- Fijnafst. Fijnafstemming voor het actieve kanaal.
- Audio Formaat Wijzig het Audioformaat van het actieve kanaal.
- Wissel Kanaal Gebruik de ‘Wissel Kanaal’ optie om 2 kanalen van plek te wisselen.
- Naam Kanaal Geef het actieve kanaal een naam. (Maximaal 4 karakters)
- Handm. Inst. Zoek naar een nieuw kanaal.
Om het ‘Kanaal Instellingen’ menu te sluiten kunt u op de ‘Return’ knop (14
drukken.
) op de afstandsbediening.
Selecteer de nieuwe locatie voor het actieve kanaal en druk op de
‘Enter’ knop (26
Bijvoorbeeld:
wisselen.
Als u kanaal 15 op positie 2 wilt zetten, zet dan het ‘Kanaal Nummer’ op
15 en ‘Wissel Kanaal’ op 2 en druk vervolgens op de ‘Enter’ knop (26
op de afstandsbediening.
Druk op de ‘Enter’ knop (26
zoeken naar een kanaal.
) op de afstandsbediening om de kanalen van plek te
) op de afstandsbediening om handmatig te
) op de afstandsbediening
12
)
Page 13
NEDERLANDS
Digitale tv-kanalen zoeken en vastleggen:
• Kies in het Setup instellingenmenu voor 'Digital TV'.
• Kies voor 'Area Setting' (land/regio instellen) en selecteer uw land in de lijst.
NB:
Als uw land niet in de lijst staat, kies dan het dichtstbijzijnde land.
• Kies voor 'Area Scan' (zenderzoeken) om naar beschikbare DVB-T kanalen/zenders te zoeken.
De speler zoekt naar beschikbare DVB-T kanalen in uw omgeving en toont de gevonden kanalen op het
scherm.
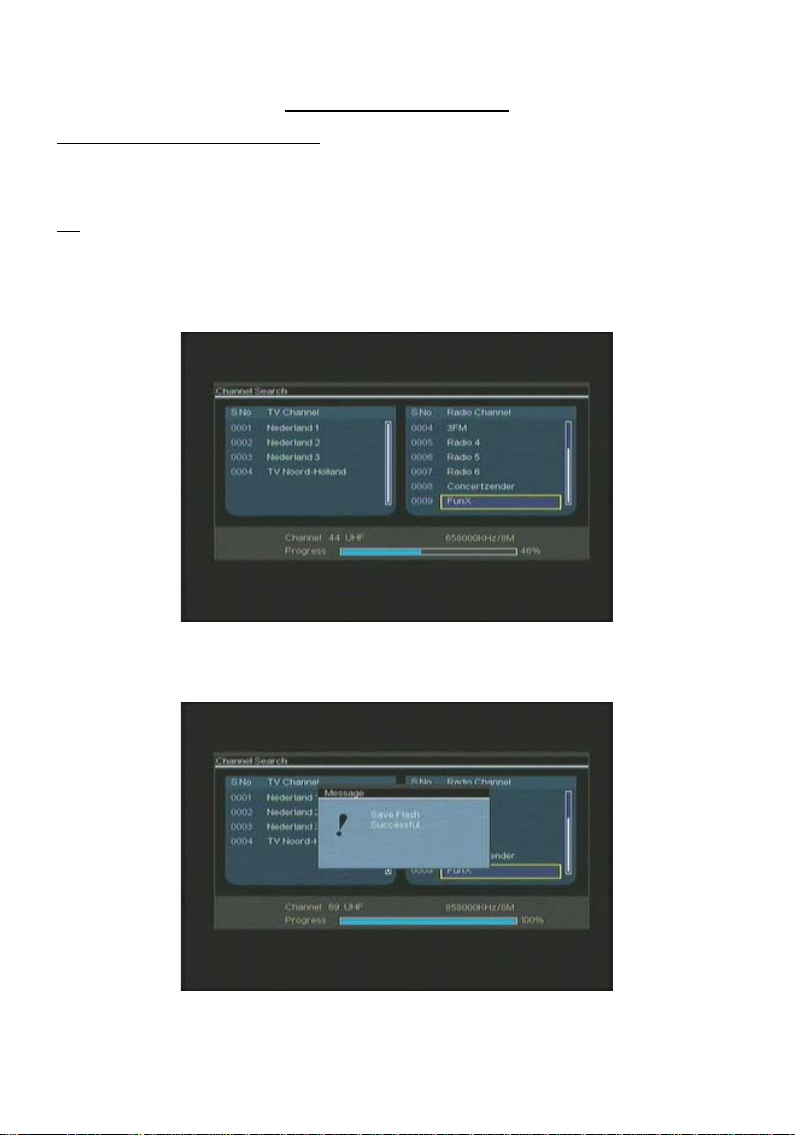
Digitale tv-tuner configureren
Nadat het zoeken naar DVB-T kanalen is beëindigd, worden de gevonden kanalen opgeslagen in het
geheugen van de speler. De melding 'Save Flash successful' (kanalen opgeslagen) geeft aan dat de kanalen
zijn vastgelegd en het beeld van de als eerste gevonden zender verschijnt op uw scherm.
13
Page 14
NEDERLANDS
Belangrijk: Na afloop van het zenderzoeken kunt u het beste meteen de interne klok van de speler
Ga hiervoor in het Setup instellingenmenu onder 'Digital TV' naar de keuze 'Date/Time Sync'
Digitale tv-kanalen aanpassen:
De volgorde van de digitale tv-kanalen kan niet worden gewijzigd. In plaats daarvan kunt u een
favorietenlijst maken, of kanalen die u niet wilt zien, verbergen in uw kanalenlijst.
• Kies in het Setup instellingenmenu voor 'Digital TV'.
• Kies in het menu Digital TV voor 'DTV Channel' (DTV-kanaal).
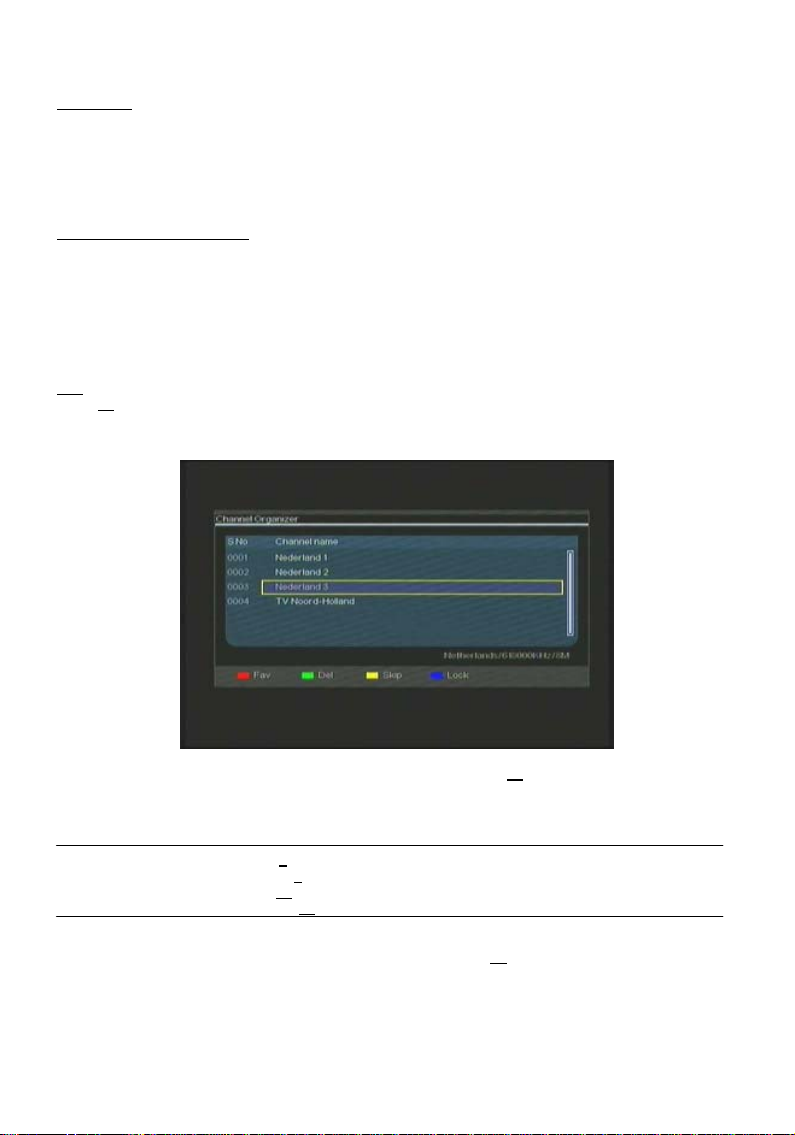
• Kies in het menu DTV Channel voor 'TV Editing' (tv bewerken).
Tip: In plaats van de bovenstaande 3 stappen kunt u ook naar 'TV Tuner Input' gaan en op de 'Edit' toets
De Channel Organizer (kanalen bewerken) verschijnt op uw tv:
gelijkzetten op de tijd van het digitale tv-signaal om problemen door een verkeerd
ingestelde tijd te voorkomen.
(datum/tijd gelijkzetten).
(34
) van de afstandsbediening drukken.
U kunt door de Channel Organizer bladeren met de 'navigatie' toetsen (15
U kunt in de Channel Organizer de volgende bewerkingen op de kanalen toepassen:
Bewerking Toets Beschrijving
Fav. Rode toets (5) Het kanaal toevoegen aan de favorietenlijst
Del (wissen) Groene toets (4
Skip (overslaan) Gele toets (37
Lock (verbergen) Blauwe toets) (36
Om de Channel Organizer af te sluiten, drukt u op de 'Return' toets (14
) Het kanaal verwijderen uit de favorietenlijst
) Het kanaal overslaan in de favorietenlijst
) Het kanaal verbergen in de favorietenlijst
) van de afstandsbediening.
) van uw afstandsbediening.
14
Page 15
NEDERLANDS
8. Live-TV & Live-A/V Kijken
Het apparaat heeft 2 ingangsbronnen voor het kijken en opnemen van programma’s:
• TV-Tuner Input (analoge of digitale tv-tuner)
• AV ingang (audio/video ingang)
TV-tuner ingang
U kunt naar live TV beelden kijken via het apparaat door de optie ‘TV Tuner Input’ te selecteren in het
hoofdmenu. Tijdens het kijken van live TV kunt u de kanalen wijzigen door te drukken op de ‘Channel +’
(29
) of ‘Channel -’ (28) knop op de afstandsbediening.
NB:
Wanneer in het hoofdmenu voor TV Tuner Input wordt gekozen, gaat de speler naar de analoge tv-
AV-ingang (audio/video ingang)
Het apparaat heeft een Composiet Audio/Video ingang op de achterzijde. Deze Composiet Audio/Video
ingang kan gebruikt worden om uw VCR, Set-Top Box, Video Camera of andere videoapparatuur op het
apparaat aan te sluiten.
U kunt naar het Live Audio/Video beeld kijken door de optie ‘A/V Input’ te selecteren in het hoofdmenu.
Timeshifting
Het apparaat ondersteund Timeshifting. De Timeshift optie ‘pauzeert’ het Live TV of Live Audio/Video
beeld door het huidige kanaal/ingang op te nemen wanneer Timeshift wordt ingeschakeld.
Wanneer de Timeshift optie is ingeschakeld zal het apparaat een buffer aanmaken van maximaal 55
minuten voor de Timeshift optie.
Let op:
Druk op de ‘Play/Pause’ knop (17
de Timeshift optie is geactiveerd zal het live TV of live A/V beeld worden ‘gepauzeerd’ en start het
apparaat op de achtergrond met de opname van het huidige kanaal.
tuner of de digitale tv-tuner; dit hangt af van de instelling bij 'TV Input Type' in het Setup
instellingenmenu.
U heeft minimaal 2,5GB vrije schijfruimte nodig om de Timeshift optie te kunnen gebruiken.
) op de afstandsbediening om de Timeshift optie te activeren. Wanneer
15
Page 16

NEDERLANDS
Tijdens Timeshift zal op het scherm de Timeshift informatiebalk getoond worden. U kunt deze balk
verbergen door op de ‘Info’ knop (2
) op de afstandsbediening te drukken.
Druk nogmaals op de ‘Play/Pause’ knop (17
het punt waar de Timeshift optie is geactiveerd.
Druk op de ‘Fast Forward’ (23
Timeshift buffer op hogere snelheid af te spelen.
Let op:
Tijdens pauzeren, snel vooruitspoelen of snel terugspoelen zal de Timeshift optie actief blijven
Druk op de ‘Stop’ knop (24
keren naar de normale live afspeelmodus. De Timeshift optie zal gestopt worden en de Timeshift buffer zal
geleegd worden.
Let op:
Digitale radio
Wanneer de digitale tuner aan staat, kunt u ook naar digitale radiokanalen luisteren.
• Kies in het hoofdmenu voor 'TV Tuner Input'.
Het scherm met digitale tv-kanalen verschijnt op uw tv.
• Druk op de 'DTV – T/R' toets (39
• Met de toetsen 'Channel +’ (29
• Om naar de digitale tv-stand terug te gaan, drukt u opnieuw op de 'DTV – T/R' toets (39
en doorgaan met opnemen.
Het is niet mogelijk om de Timeshift buffer op te slaan voor later gebruik.
afstandsbediening.
) of ‘Rewind’ (18) knop op de afstandsbediening om de opgenomen
) op de afstandsbediening om de Timeshift optie te deactiveren en terug te
) op de afstandsbediening om het afspelen te hervatten vanaf
) van de afstandsbediening om naar de digitale radiostand te gaan.
) en 'Channel -' (28) kunt u een digitaal radiostation kiezen.
) van de
16
Page 17

NEDERLANDS
9. Opnemen
Voor de opname
Voordat u begint met opnemen via het apparaat kunt u de opnamekwaliteit instellen. Het apparaat heeft 3
voorgeprogrammeerde kwaliteitsinstellingen die u kunt selecteren met de ‘Quality’ knop (31
afstandsbediening.
Let op:
Directe Opname
Wanneer u via het apparaat kijkt naar live TV of live A/V kunt u een opname starten van het huidige
kanaal door op de ‘Rec’ knop (16
opnemen totdat u op de ‘Stop’ knop (24
) op de
Het apparaat detecteert kopieerbeveiligingen op de aangesloten bron, bijvoorbeeld MacroVision
beveiliging op DVD’s. Wanneer de aangesloten bron beveiligd is tegen kopieren zal het apparaat
de opnamemogelijkheid blokkeren en een waarschuwing tonen wanneer u op de opnameknop
drukt.
) op de afstandsbediening te drukken. Het apparaat zal beginnen met
) drukt, of tot de maximale opnametijd van 6 uur is bereikt.
Wanneer u op de ‘Rec’ knop (16
worden, beginnend op het moment dat u op de ‘Rec’ knop heeft gedrukt.
De melding ‘OTR+30’ zal op het scherm getoond worden.
Druk nogmaals op de ‘Rec’ knop (16
van 360 minuten.
Het apparaat zal bijven opnemen totdat de opnametijd is verstreken, of tot u op de ‘Stop’ knop (24
afstandsbediening drukt.
Let op:
Tijdens de opname kunt u het kanaal niet wijzigen.
De opname zal opgeslagen worden met een naam gebaseerd op de datum en tijd van de opname, zoals
hieronder beschreven:
“MMDDhhmm.AVI” (MM = Maand, DD = Dag, hh = Uur, mm = Minuten)
) drukt tijdens een opname, zal de opnametijd op 30 minuten gezet
) om de opnametijd met 30 minuten te verlengen, tot een maximum
17
) op de
Page 18
NEDERLANDS
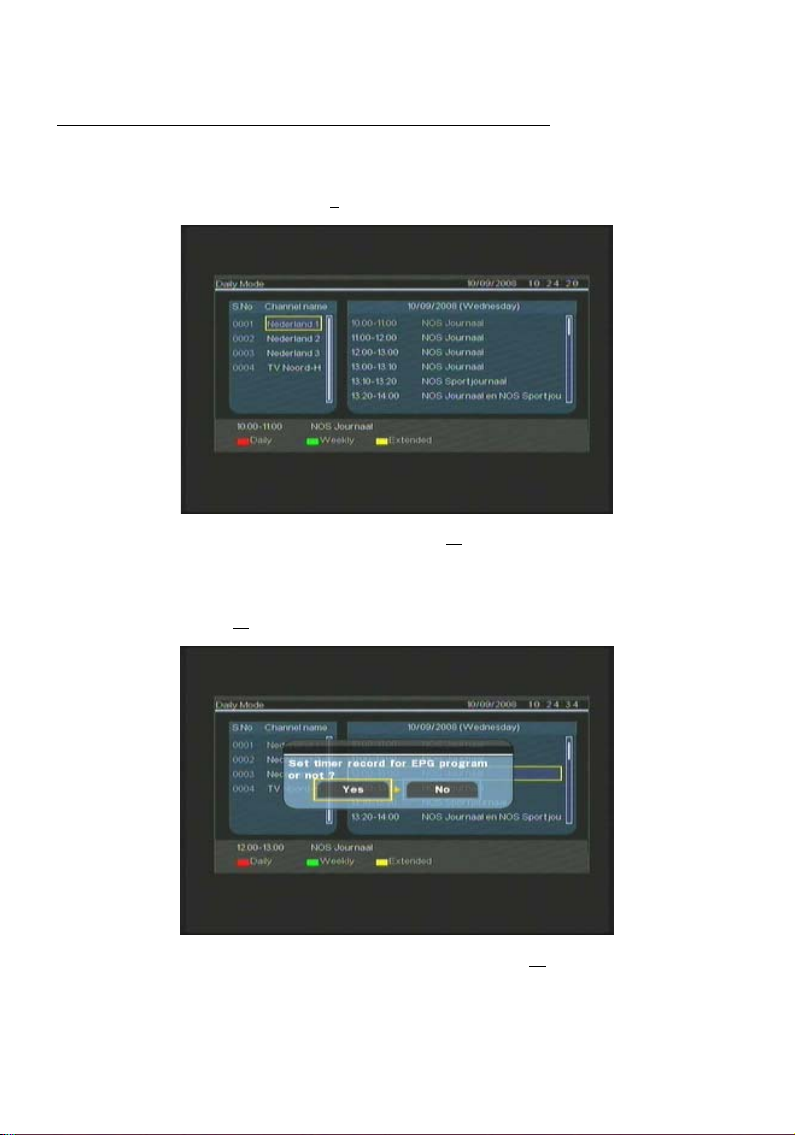
Opname programmeren vanuit de EPG-programmagids (alleen voor digitale tv)
Wanneer de digitale tv-tuner van de speler aan staat, kunt u opnamen programmeren met behulp van de
EPG-gids.
• Druk terwijl u tv kijkt op de 'EPG' toets (8
weergegeven:
) van de afstandsbediening. De EPG-gids wordt op uw tv
U kunt door de EPG-gids bladeren met de 'navigatie' toetsen (15
• Selecteer het kanaal in de linker kolom.
• Selecteer het programma dat u wilt opnemen in de rechter kolom.
• Druk op de 'Enter' toets (26
geplande EPG-opnamen.
• Bevestig de opname door 'Yes' (Ja) te selecteren en op de 'Enter' toets (26
drukken.
) van de afstandsbediening om het programma toe te voegen aan uw
18
) van de afstandsbediening.
) van de afstandsbediening te
Page 19
NEDERLANDS
De geprogrammeerde opname wordt vastgelegd.
Handmatig ingestelde opnamen (analoge of digitale tv-tuner)
U kunt het apparaat programmeren om kanalen op te nemen op ingestelde tijden. Er kunnen maximaal 8
opnamen geprogrammeerd worden in het apparaat.
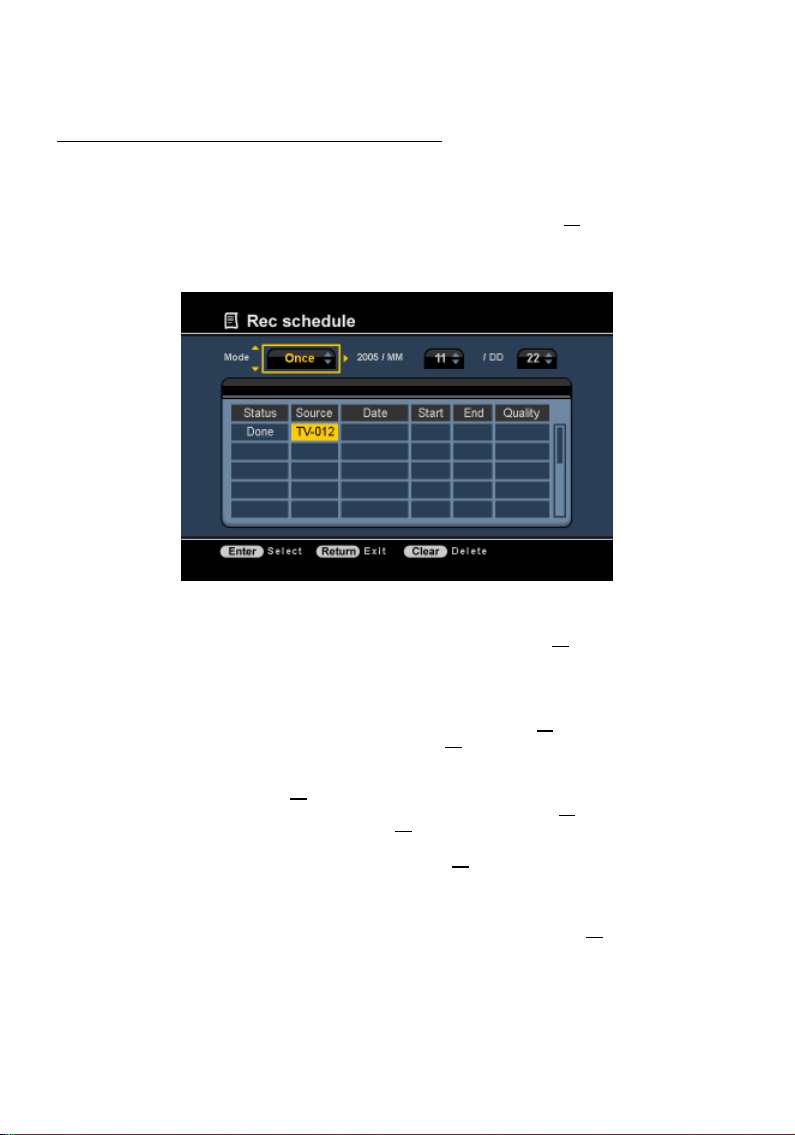
• Kies de optie ‘Rec Schedule’ in het hoofdmenu, of druk op de ‘Timer’ knop (25) op de
afstandsbediening tijdens het kijken van live TV via het apparaat.
Het scherm voor geprogrammeerde opname zal op het scherm getoond worden.
Standaard staat de eerste opname geselecteerd en is de optie ‘Bron’ actief.
• Selecteer de opname die u wilt programmeren en druk op de ‘Enter’ knop (26) op de afstandsbediening
om te beginnen met het programmeren.
• Selecteer de juiste bron voor uw geplande opname. U kunt kiezen voor analoge tv-tuner, digitale tv-
tuner of AV Input (audio/video-aansluiting).
Als u de optie ‘TV’ heeft gekozen kunt u op de ‘Rechter’ Navigatieknop (15
kiezen waarvan u wilt opnemen. Druk op de ‘Enter’ knop (26
) op de afstandsbediening om door te gaan.
) drukken en het kanaal
• Selecteer de opnamemodus: Eenmalig, Dagelijks of Wekelijks. Als u gekozen heeft voor ‘Eenmalig’ kunt
u op de ‘Rechter’ Navigatieknop (15
Als u heeft gekozen voor ‘Wekelijks’ kunt u op de ‘Rechter’ Navigatieknop (15
de opname in te stellen. Druk op de ‘Enter’ knop (26
) drukken om de Maand en Dag voor de opname in te stellen.
) drukken om de Dag voor
) op de afstandsbediening om door te gaan.
• Kies de starttijd voor de opname. Druk op de ‘Enter’ knop (26) op de afstandsbediening om door te
gaan.
• Kies de eindtijd voor de opname.
• Kies het doel voor de opname: ‘HDD’, ‘USB’ of ‘Card’. Druk op de ‘Enter’ knop (26) op de
afstandsbediening om door te gaan.
19
Page 20

NEDERLANDS
Let op:
Wanneer u wilt opnemen naar USB of geheugenkaart, controleer dan of u een ‘High-speed’
• Kies de opnamekwaliteit: ‘HQ’, ‘SP’ of ‘LP’. Druk op de ‘Enter’ knop (26) op de afstandsbediening om
Let op:
HQ:
SP:
LP:
De opname is nu geprogrammeerd en het apparaat zal beginnen met opnemen op de ingestelde tijd en
kanaal.
Wanneer het apparaat is geprogrammeerd kunt u deze in stand-by zetten.
De interne klik zal het apparaat 3 minuten voordat de opname start inschakelen en 1 minuut voordat de
opname start het juiste kanaal selecteren.
Let op:
De opname zal opgeslagen worden met een naam gebaseerd op de datum en tijd van de opname, zoals
hieronder beschreven:
“MMDDhhmm.AVI” (MM = Maand, DD = Dag, hh = Uur, mm = Minuten)
Wanneer de opname gereed is zal het apparaat vragen of deze in stand-by modus gezet moet worden. Als
deze vraag onbeantwoord blijft zal het apparaat automatisch na 15 seconden teruggaan naar stand-by
mode.
apparaat heeft aangesloten. (Een USB2.0 apparaat of een snelle geheugenkaart)
door te gaan.
Opnemen in ‘HQ’, ‘SP’ of ‘LP’ zal de kwaliteit van de opname en de benodigde schijfruimte
voor de opname beïnvloeden.
Bijvoorbeeld, als uw apparaat is uitgerust met een 500GB HDD zal de totale opnametijd het
volgende bedragen:
228 uur en 35 minuten. (ongeveer 2190MB per uur)
437 uur en 46 minuten. (ongeveer 1140MB per uur)
656 uur en 45 minuten. (ongeveer 760MB per uur)
Tijdens de opname kunt u het kanaal niet wijzigen.
20
Page 21
NEDERLANDS
10. Afspelen
Kies in het hoofdmenu de afspeelmodus die u wilt gebruiken. U kunt kiezen uit de volgende mogelijkheden:
[1] - Movies Speel uw opnamen en andere films af die opgeslagen zijn op het apparaat, USB-
[2] - Music Speel uw muziekbestanden af die opgeslagen zijn op het apparaat, USB-apparaat of
[3] - Photos Bekijk de foto’s die opgeslagen zijn op het apparaat, USB-apparaat of
apparaat of geheugenkaart.
geheugenkaart.
geheugenkaart.
Wanneer 1 van de bovenstaande opties is geselecteerd zal de bestandsverkenner op het scherm getoond
worden. De verkenner zal alleen de bestanden laten zien die overeenkomen met de geselecteerde optie in
het hoofdmenu.
Bijvoorbeeld:
Tip:
In de bestandsverkenner kunt u de volgende opties van de afstandsbediening gebruiken:
- Storage (27
- Navigatieknoppen (15
- Enter (26
- Edit (34
- Copy (10
- Play/Pause (17
- Next (22
- Previous (19
U kunt vanuit de bestandsverkenner terugkeren naar het hoofdmenu door op de ‘Menu’ knop (40
afstandsbediening te drukken.
Als u gekozen heeft voor de optie ‘Movies’ [1], zullen alleen videobestanden op het
scherm getoond worden.
Wanneer u in een van de standen 'Movies' [1], 'Music' [2] of 'Photos' [3] bent, kunt u eenvoudig
wisselen tussen deze standen in de bovenste balk van de mediabrowser.
Ga met de navigatietoetsen (15
) naar de bovenste balk en verander hier de stand.
) Wissel tussen HDD-, USB- en Card-modus.
) Navigeer door de mappen en bestanden.
) Speel het geselecteerde bestand af of open een map.
) Bewerk bestanden. (Afspeelmodus, Hernoem, Wis, Kopieer).
) Kopieer het geselecteerde bestand naar een andere locatie.
) Speel het geselecteerde bestand af.
) Ga naar de volgende pagina met bestanden.
) Ga naar de vorige pagina met bestanden.
) op de
21
Page 22

NEDERLANDS
Afspelen van uw opnamen & andere videobestanden
U kunt uw opgenomen programma’s en andere videobestanden, opgeslagen op de HDD van het apparaat,
afspelen op uw TV via de ‘Movies’ optie van het apparaat.
• Druk op de ‘Menu’ knop (40) op de afstandsbediening om terug te keren naar het hoofdmenu.
• Selecteer de optie ‘Movies’ [1] in het hoofdmenu met de ‘Navigatie’ knoppen (15) op de
afstandsbediening en druk op de ‘Enter’ knop (26
De bestandsverkenner zal op het scherm getoond worden met de ‘Records’ map op de HDD geselecteerd.
) om naar de ‘Film’ Modus te gaan.
Het apparaat zal alleen de filmbestanden tonen die op het apparaat aanwezig zijn. Andere bestanden
zullen niet getoond worden.
Tip:
Wanneer u in een van de standen 'Movies' [1], 'Music' [2] of 'Photos' [3] bent, kunt u eenvoudig
wisselen tussen deze standen in de bovenste balk van de mediabrowser.
Ga met de navigatietoetsen (15
) naar de bovenste balk en verander hier de stand.
• Selecteer het bestand dat u wilt afspelen met de ‘Navigatie’ knoppen (15) op de afstandsbediening.
• Druk op de ‘Enter’ knop (26) of de ‘Play/Pause’ knop (17) op de afstandsbediening om het afspelen van
het geselecteerde bestand te starten.
Tijdens het afspelen heeft u de volgende afspeelopties op de afstandsbediening:
- Play/Pause (17) Speel het geselecteerde bestand af of pauzeer het afspelen.
- Stop (24) Stop het afspelen.
- Rewind (18) Versneld terugspoelen.
- Fast Forward (23) Versneld vooruitspoelen.
- Previous (19) Speel het vorige bestand in de huidige map af.
- Next (22) Speel het volgende bestand in de huidige map af.
- Repeat (11) Wijzig de herhaaloptie van het huidige bestand/map.
- Info (2) Toon de details van het afspelen.
U kunt vanuit de bestandsverkenner terugkeren naar het hoofdmenu door op de ‘Menu’ knop (40
afstandsbediening te drukken.
22
) op de
Page 23

NEDERLANDS
Afspelen van ondertitels
De CM3PVRD kan ondertitels bij AVI bestanden afspelen.
Om AVI bestanden met ondertiteling te kunnen afspelen dient de ondertitel dezelfde naam te hebben als
het AVI bestand, bijvoorbeeld:
Filmnaam: Mijn_Film_Met_Ondertitel.AVI
Ondertitelnaam: Mijn_Film_Met_Ondertitel.SRT
• Druk op de ‘Menu’ knop (40) op de afstandsbediening om terug te keren naar het hoofdmenu.
• Selecteer de optie ‘Movies’ [1] in het hoofdmenu met de ‘Navigatie’ knoppen (15) op de
afstandsbediening en druk op de ‘Enter’ knop (26
• Selecteer het bestand dat u wilt afspelen met de ‘Navigatie’ knoppen (15) op de afstandsbediening.
• Druk op de ‘Enter’ knop (26) of de ‘Play/Pause’ knop (17) op de afstandsbediening om het afspelen van
het geselecteerde bestand te starten.
Het afspelen van de film zal beginnen en de bijbehorende ondertitel zal geladen worden.
Om de ondertiteling tijdens het afspelen uit of in te schakelen drukt u op de ‘Sub-t’ knop (37
afstandsbediening.
Tip:
De ondertitelingsbestanden worden tevens weergegeven in de verkenner als de 'Movies' optie is
gekozen vanuit het hoofdmenu, zodat u de ondertitelingsbestanden ook kunt kopiëren naar andere
locaties.
Afspelen van DVD Bestanden
De CM3PVRD kan DVD’s van de harde schijf afspelen alsof het een normale DVD is. U kunt gebruik maken
van het DVD Menu, een ondertiteling selecteren of de spreektaal wijzigen.
Let op:
De CM3PVRD ondersteunt enkel onbeveiligde DVD kopieën. CSS beveiliging wordt niet
Let op:
ondersteund door de CM3PVRD.
De CM3PVRD ondersteunt enkel Regio 2 of Regiovrije DVD kopieën.
• Sluit de CM3PVRD aan op uw computer. Zie het hoofdstuk “Koppeling met de computer”.
• Maak op de harde schijf van de CM3PVRD in de map 'VIDEO' een map met de naam van uw DVD film
(bijvoorbeeld: 'Film1').
• Kopieer de 'AUDIO_TS' en 'VIDEO_TS' (inclusief inhoud) van uw DVD naar de aangemaakte map
(bijvoorbeeld: ‘Film1’) op de CM3PVRD.
Na het kopiëren zal de structuur als volgt zijn:
- VIDEO
|-> Film1
|-> AUDIO_TS (optioneel, niet bij elke film aanwezig)
|-> VIDEO_TS (inclusief alle DVD bestanden)
) om naar de ‘Film’ Modus te gaan.
) op uw
23
Page 24

NEDERLANDS
• Verbreek de verbinding tussen de CM3PVRD en de computer en sluit het apparaat aan op uw TV. Zet de
CM3PVRD aan.
• Selecteer de optie ‘Movies’ [1] in het hoofdmenu met de ‘Navigatie’ knoppen (15) op de
afstandsbediening en druk op de ‘Enter’ knop (26
• Gebruik de ‘Navigatie’ knoppen (15) en de ‘Enter’ knop (26) op de afstandsbediening om naar de map
‘VIDEO’ op de interne schijf te bladeren.
De DVD map (in het voorbeeld
DVD-schijf icoon.
: ‘Film1’) zal getoond worden in de bestandsverkenner, aangegeven met een
• Selecteer de DVD die u wilt afspelen met de ‘Navigatie’ knoppen (15) op de afstandsbediening.
• Druk op de ‘Play/Pause’ knop (17) op de afstandsbediening om het afspelen van de geselecteerde DVD
te starten.
Let op:
Gebruik niet de ‘Enter’ knop (26) om te starten. Hierdoor wordt alleen de inhoud van de map
Tijdens het afspelen van DVD’s heeft u de volgende afspeelopties op de afstandsbediening:
getoond en niet de inhoud van de DVD afgespeeld.
- Play/Pause (17) Speel de geselecteerde DVD af of pauzeer het afspelen.
- Stop (24) Stop het afspelen.
- Navigatie knoppen (15) Navigeer door het DVD Menu.
- Enter (26) Bevestig selectie(s) in het DVD Menu.
- Rewind (18) Versneld terugspoelen.
- Fast Forward (23) Versneld vooruitspoelen.
- Previous (19) Vorige hoofdstuk.
- Next (22) Volgende hoofdstuk.
- Sub-t (37) Wijzig de ondertiteling of schakel deze uit.
- Audio (4) Wijzig het geluidsspoor van de DVD (als de DVD meerdere
- Menu (40) Terug naar het DVD Menu.
geluidssporen bevat).
- Title (5) Terug naar het DVD Menu.
) om naar de ‘Film’ Modus te gaan.
24
Page 25
NEDERLANDS
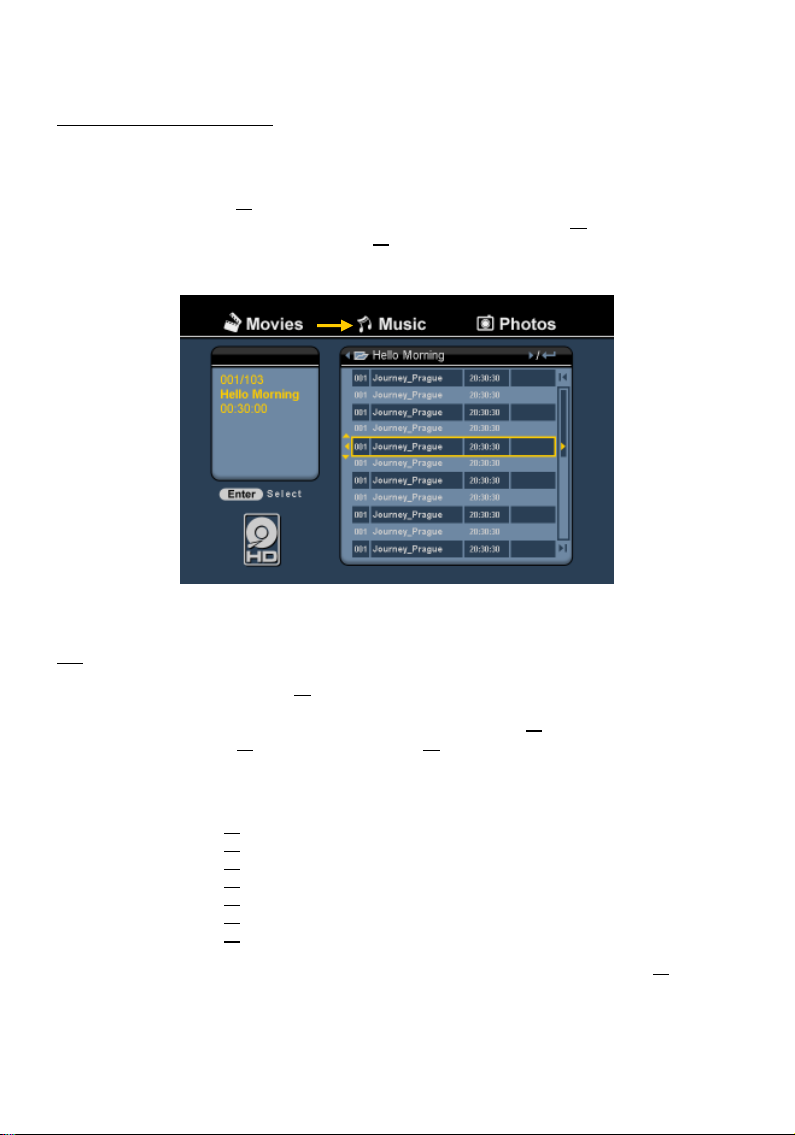
Afspelen van uw muziekbestanden
U kunt uw muziekbestanden, opgeslagen op de HDD van het apparaat, afspelen op uw TV via de ‘Music’
optie van het apparaat.
• Druk op de ‘Menu’ knop (40) op de afstandsbediening om terug te keren naar het hoofdmenu.
• Selecteer de optie ‘Music’ [2] in het hoofdmenu met de ‘Navigatie’ knoppen (15) op de
afstandsbediening en druk op de ‘Enter’ knop (26
De bestandsverkenner zal op het scherm getoond worden met de ‘Music’ map op de HDD geselecteerd.
) om naar de ‘Muziek’ Modus te gaan.
Het apparaat zal alleen de muziekbestanden tonen die op het apparaat aanwezig zijn. Overige bestanden
zullen niet getoond worden.
Tip:
Wanneer u in een van de standen 'Movies' [1], 'Music' [2] of 'Photos' [3] bent, kunt u eenvoudig
wisselen tussen deze standen in de bovenste balk van de mediabrowser.
Ga met de navigatietoetsen (15
) naar de bovenste balk en verander hier de stand.
• Selecteer het bestand dat u wilt afspelen met de ‘Navigatie’ knoppen (15) op de afstandsbediening.
• Druk op de ‘Enter’ knop (26) of de ‘Play/Pause’ knop (17) op de afstandsbediening om het afspelen van
het geselecteerde bestand te starten.
Tijdens het afspelen heeft u de volgende afspeelopties op de afstandsbediening:
- Play/Pause (17) Speel het geselecteerde bestand af of pauzeer het afspelen.
- Stop (24) Stop het afspelen.
- Rewind (18) Versneld terugspoelen.
- Fast Forward (23) Versneld vooruitspoelen.
- Previous (19) Speel het vorige bestand in de huidige map af.
- Next (22) Speel het volgende bestand in de huidige map af.
- Repeat (11) Wijzig de herhaaloptie van het huidige bestand/map.
U kunt vanuit de bestandsverkenner terugkeren naar het hoofdmenu door op de ‘Menu’ knop (40
afstandsbediening te drukken.
25
) op de
Page 26
NEDERLANDS
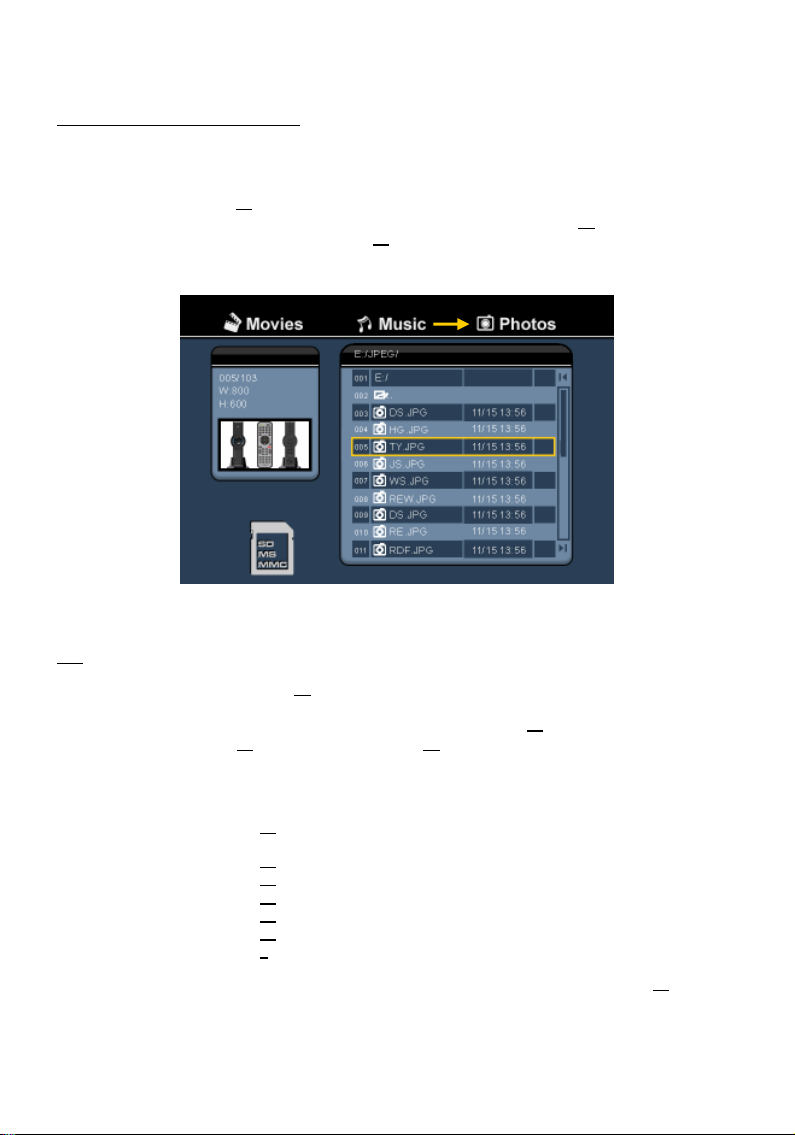
Afspelen van uw foto’s & afbeeldingen
U kunt uw foto’s en afbeeldingen, opgeslagen op de HDD van het apparaat, bekijken op uw TV via de
‘Photos’ optie van het apparaat.
• Druk op de ‘Menu’ knop (40) op de afstandsbediening om terug te keren naar het hoofdmenu.
• Selecteer de optie ‘Photos’ [3] in het hoofdmenu met de ‘Navigatie’ knoppen (15) op de
afstandsbediening en druk op de ‘Enter’ knop (26
De bestandsverkenner zal op het scherm getoond worden met de ‘Pictures’ map op de HDD geselecteerd.
) om naar de ‘Foto’ Modus te gaan.
Het apparaat zal alleen de fotobestanden tonen die op het apparaat aanwezig zijn. Overige bestanden
zullen niet getoond worden.
Tip:
Wanneer u in een van de standen 'Movies' [1], 'Music' [2] of 'Photos' [3] bent, kunt u eenvoudig
wisselen tussen deze standen in de bovenste balk van de mediabrowser.
Ga met de navigatietoetsen (15
) naar de bovenste balk en verander hier de stand.
• Selecteer het bestand dat u wilt bekijken met de ‘Navigatie’ knoppen (15) op de afstandsbediening.
• Druk op de ‘Enter’ knop (26) of de ‘Play/Pause’ knop (17) op de afstandsbediening om het bekijken van
het geselecteerde bestand te starten.
Tijdens het bekijken heeft u de volgende opties op de afstandsbediening:
- Play/Pause (17) Start een diaweergave met het geselecteerde bestand, of pauzeer
- Stop (24) Stop de diaweergave.
de diaweergave.
- Navigatie knoppen (15) Draai de getoonde foto.
- Previous (19) Toon het vorige bestand in de huidige map.
- Next (22) Toon het volgende bestand in de huidige map.
- Repeat (11) Wijzig de herhaaloptie van het huidige bestand/map.
- Info (2) Toon de details van de diaweergave.
U kunt vanuit de bestandsverkenner terugkeren naar het hoofdmenu door op de ‘Menu’ knop (40
afstandsbediening te drukken.
26
) op de
Page 27
NEDERLANDS
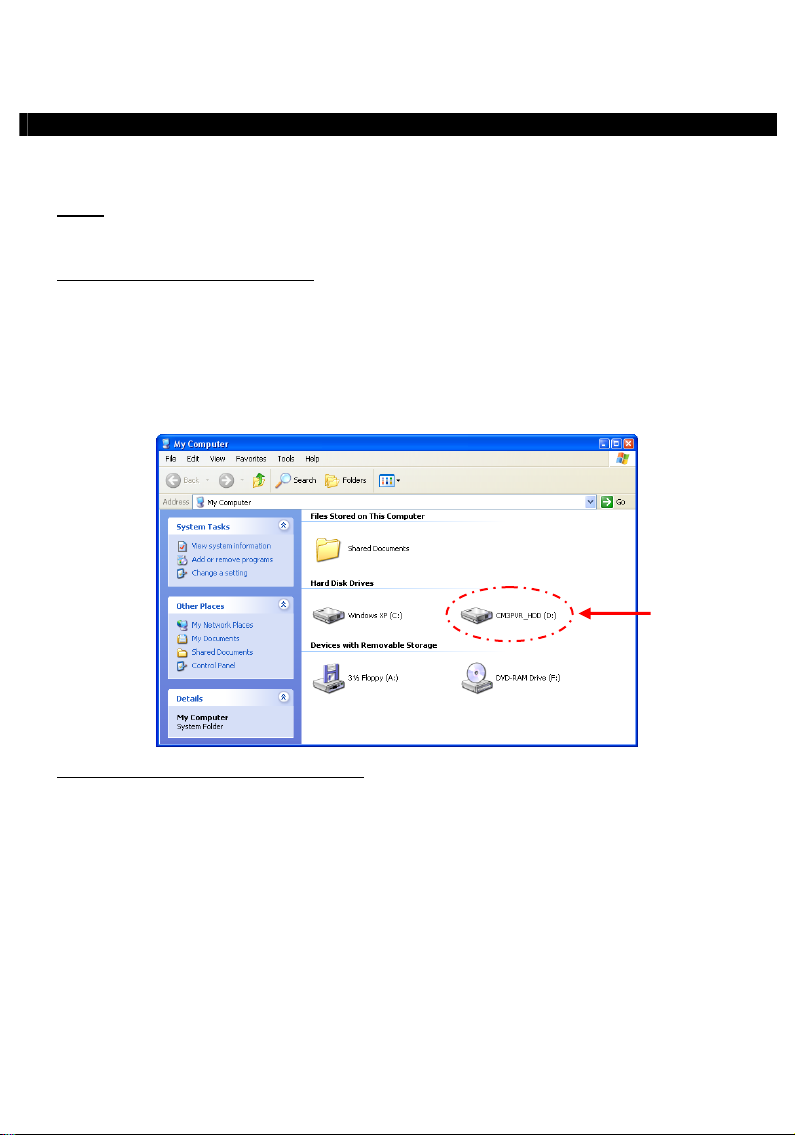
11. Koppeling met de computer
Het apparaat kan aangesloten worden op uw computer om data (films, muziek, foto’s, opnamen, etc.) van
en naar de interne HDD te kopiëren.
Let op:
In het onderstaande voorbeeld wordt gebruik gemaakt van een computer met Windows XP,
maar het apparaat kan aangesloten en gebruikt worden op alle computers met USB-
Het apparaat op uw computer aansluiten
• Sluit de meegeleverde USB naar Mini-USB kabel aan op de Mini USB-poort aan de achterzijde van het
• Schakel het apparaat in met de hoofdschakelaar op de achterzijde. Het apparaat zal automatisch
Standaard zal de interne HDD van het apparaat als een USB-opslagapparaat getoond worden.
ondersteuning en de mogelijkheid om FAT32 bestandssystemen te lezen & te schrijven.
apparaat en op een vrije USB-poort op uw computer.
gedetecteerd en geïnstalleerd worden, waarna het apparaat als een extra station op uw computer
getoond zal worden.
Wisselen tussen HDD modus en Kaartlezer modus
U kunt de kaartlezer van het apparaat ook gebruiken als een kaartlezer op uw computer. Wanneer u de
kaartlezer modus activeert zal de HDD niet zichtbaar zijn op uw computer.
• Houdt de ‘Pijl Omlaag’ knop op de voorzijde van het apparaat ongeveer 2 seconden ingedrukt terwijl
deze is aangesloten op de computer.
De interne HDD van het apparaat zal verdwijnen uit het ‘Mijn Computer’ scherm en er zal een
verwisselbare schijf getoond worden. De kaartlezer is nu actief.
• Om terug te schakelen naar de HDD modus drukt u nogmaals ongeveer 2 seconden op de ‘Pijl Omlaag’
knop op de voorzijde van het apparaat.
27
Page 28
NEDERLANDS
Afspelen op uw computer
U kunt de opnamen van het apparaat afspelen op uw computer als het apparaat is aangesloten op uw
computer. Voordat u de opnamen kunt afspelen dient u een XviD codec op uw computer te installeren en
dient het apparaat in HDD modus te staan.
De XviD codec is opgenomen in het FFDShow MPEG4 Codec Pack, welke u kunt downloaden van de volgende
website:
Na de installatie van het FFDShow MPEG4 Codec Pack en een herstart van uw computer kunt u de
opgenomen programma’s afspelen op uw computer.
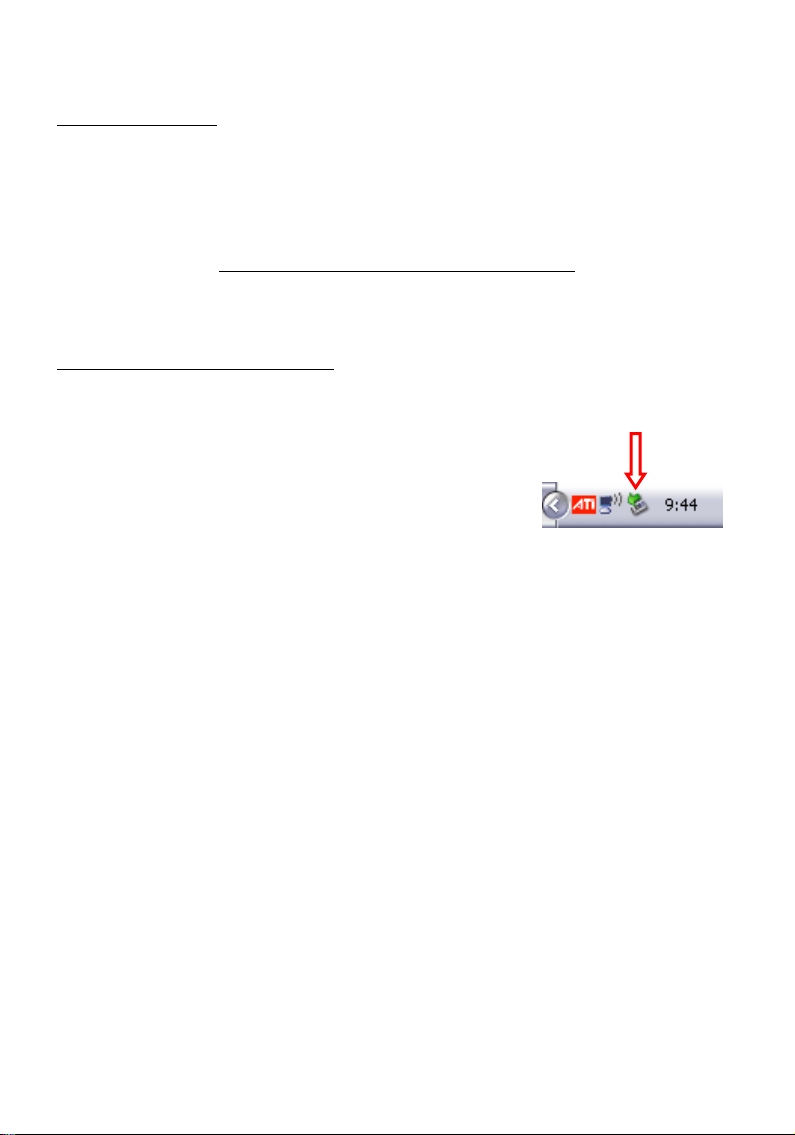
Het apparaat ontkoppelen van uw computer
• Klik met de linkermuisknop op het “Veilig Verwijderen” icoon in het systeemvak.
• Selecteer de optie “USB-apparaat voor massaopslag verwijderen” wanneer deze getoond wordt.
• Wacht op het bericht “Hardware kan veilig worden verwijderd”.
• Ontkoppel de USB-kabel.
http://www.free-codecs.com/download/FFDShow.htm
28
Page 29
NEDERLANDS
12. Systeemconfiguratie
Als u in het hoofdmenu voor 'Setup' [7] kiest of op de 'Setup' toets (21
verschijnt het Setup instellingenmenu op uw scherm. Hieronder vindt u alle beschikbare instellingen met
de bijbehorende beschrijving.
) van de afstandsbediening drukt,
System:
TV system Een videosysteem voor uw tv selecteren. U kunt kiezen tussen PAL en NTSC. (Standaard = PAL)
Screen saver De schermbeveiliging van de speler aan/uitzetten. (Standaard
Sys language Systeemtaal van de speler selecteren. (Standaard
Time format Gewenste tijdweergave instellen. (Standaard
Set date De huidige datum instellen.
Set time De huidige tijd instellen.
Reset setting De speler terugzetten op de standaard fabrieksinstellingen.
A/V Set:
Video Output Het video-uitgangsignaal selecteren dat bij de gebruikte uitgangen van de speler
TV Type Het 'TV Type' instellen op de beeldverhouding van uw tv.
TV Input Type Het 'TV input type' instellen op de tuner die u wilt gebruiken.
(Alleen de instellingen worden hersteld. De gegevens op uw harde schijf worden niet
verwijderd.)
hoort.
('4:3 PS' (pan & scan), '4:3 LB' (letterbox) of '16:9' (breedbeeld)).
('Digital TV' of 'Analog TV').
29
= English)
= D_M_J_24)
= On/aan)
Page 30

NEDERLANDS
Analog tv:
TV Signal Het tv-signaal selecteren dat door uw tv-bedrijf wordt geleverd. U kunt kiezen
Auto Tuning Tijdens 'Auto Tuning' wordt naar zenders gezocht en worden alle gevonden zenders
Channel Set Met de optie 'Channel Set' kunt u de gevonden kanalen aanpassen: fijnafstemmen en
Manual Tuning Onder 'Manual Tuning' kunt u handmatig naar kanalen zoeken en deze vastleggen.
Digital tv:
DTV Channel
Area Setting (land/regio instellen) Het gebied instellen waar u de speler gebruikt, om de juiste
Area Scan (zenderzoeken) Met 'Area Scan' zoekt de speler naar digitale (DVB-T) kanalen
Manual Scan (handmatig afstemmen) Handmatig zoeken naar digitale (DVB-T) kanalen.
Date/Time Sync (datum/tijd gelijkzetten) De interne klok van de speler gelijkzetten op de tijd van het
Tools (Extra):
Format Als u voor 'Format' kiest, kunt u uw interne harde schijf, USB-opslagapparaat of
File Sorted By De volgorde aanpassen waarin de bestanden in de mediabrowser verschijnen.
Slideshow Time Instellen hoe lang de foto's tijdens een diavertoning op het scherm blijven staan.
Adv. A/V:
Contrast Het contrast van het AV-ingangsignaal wijzigen.
Hue De tint van het AV-ingangsignaal wijzigen.
Saturation De kleurverzadiging van het AV-ingangsignaal wijzigen.
Brightness De helderheid van het AV-ingangsignaal wijzigen.
tussen 'Antenna' en 'Cable'. (Standaard
= Cable)
automatisch vastgelegd in het geheugen van de speler.
de volgorde en namen wijzigen.
TV Editing (tv bewerken) Lijst met tv-kanalen bewerken.
Radio Editing (radio bewerken) Lijst met radiokanalen bewerken.
Program Guide (EPG-programmagids) EPG-televisiegids tonen.
Radio EPG EPG-radiogids tonen.
Channel Mode (kanalen groeperen) Uw tv-kanalen in groepen indelen.
kanalen te kunnen vinden.
in de omgeving.
digitale tv-signaal.
geheugenkaart formatteren voor optimaal gebruik met de speler.
30
Page 31

ENGLISH
Conceptronic CM3PVRD
User Manual
Congratulations on the purchase of your
This User Manual gives you a step-by-step explanation how to install and use the Conceptronic Media
Recorder & Player.
When problems occur, we advise you to go to our support-site (go to www.conceptronic.net
‘Support’. Here you will find the Frequently Asked Questions Database.
When you have other questions about your product and you cannot find it at our website, contact us by email: support@conceptronic.net
For more information about Conceptronic products, please visit the Conceptronic Web Site:
www.conceptronic.net
Tip :
The Conceptronic CM3PVRD is firmware upgradable. To upgrade your unit with the latest firmware
version, you can visit the Conceptronic Web Site.
Tip :
Please check www.conceptronic.net for the latest codec list of supported files.
The following items should be present in the package of the Conceptronic Media Recorder & Player:
• Conceptronic CM3PVRD Media Recorder & Player (described as ‘unit’ in the manual).
• Product Stand for CM3PVRD.
• Power Supply (12v, 2.5A) with power cord.
• Remote Control.
• 2 AAA batteries for remote control.
• RF Antenna Cable.
• Composite Video Cable (Red, White, Yellow RCA Jacks).
• S-Video Cable.
• Component Video Cable (Red, Green, Blue RCA Jacks).
• Coaxial Digital Audio Cable (Black RCA Jacks).
• SCART Adapter for Composite Video Cable / S-Video Cable.
• USB Cable.
• This User Manual.
Conceptronic Media Recorder & Player.
and click
1. Package Contents
31
Page 32

ENGLISH
2. Product Features
Built-in hybrid TV Tuner with TV channel auto-search.
o Supports analog TV
o Supports Digital TV (DVB-T)
TV signal recording.
AV signal recording from e.g. a VCR, DVD or Video Camera.
Internal Cardreader with SD (HC), MMC and MS support.
Record to internal HDD, Memory Card or USB Device.
DVD quality of recorded files in MPEG4 (AVI) format (can be played on PC or other media player).
Record Options: One-key instant record, Timer record, Time-shift.
Playback of MPEG1/2/4, MP3, WMA, JPG files stored in internal HDD, Memory Card or USB Device.
Files copy from Memory Card or USB Device to internal HDD.
Auto switch between PC and Player Mode:
o When connected to the PC, the unit acts as an USB Storage Device or Cardreader.
o When not connected to the PC, the unit acts as a Media Recorder & Player.
3. Notes & Cautions
• Do not attempt to disassemble the included power adapter. This may cause high-voltage injuries. If the
adapter needs to be fixed, please contact your dealer or the helpdesk of Conceptronic.
• Keep the unit away from excessive moisture.
• Do not immerse or expose the unit to liquids.
• Disconnect the power adapter if you do not intend to use the unit for an extended period of time.
• Avoid using the unit in a location near combustibles.
• Change the battery of the remote control with the same kind when it is weak or dead. Recycle old
batteries where possible. To avoid corrosion, remove the battery when the remote will not be used for a
long time.
• Keep the remote away from excessive moisture; do not drop it.
• Do not operate the remote under intense sunlight.
• NEVER drop, shake or bump the unit.
• To prevent overheating, do not cover the unit.
• The unit only supports the FAT / FAT32 File system (NTFS is not supported).
IMPORTANT:
Note:
Note:
When you format the Hard disk to NTFS, it only functions as removable Harddisk for your
computer. Reformat the Harddisk to FAT32 through the menu of the unit to re-activate
the Media Recorder & Player functionalities.
The data on the internal Harddisk and/or the connected device(s) can be fragmented. This can
affect the playback of movies. It is recommended that you defragment the Harddisk and/or the
connected device(s) on your computer once in a while.
The hybrid tuner of the CM3PVRD can be used for Analog TV or DVB-T Digital TV.
The analog part of the hybrid tuner can be to warch channels received through an analog cable
signal, or an analog antenna signal.
The digital part of the hybrid tuner can only be used to watch & listen to channels received
through a free-to-air DVB-T signal.
32
Page 33

ENGLISH
6 8
12
Front View
4. Product Overview
Rear view
1
9
7
2
3
10
11
4
13
5
Description of the numbers:
1. Infrared Receiver 11. Component (Y) Output
2. Record Button 12. Component (Pb) Output
3. OK / Enter Button 13. Main Power Switch
4. MMC/MS/SD Card Slot 14. DC Input (12V, 2.5A)
5. USB Host Port 15. S-Video Output
6. Power (3sec) / Stop Button 16. Component (Pr) Output
7. Navigation Buttons 17. Digital Coaxial Output
8. Hybrid TV-Tuner Input 18. A/V Output (Composite Video/Audio)
9. Hybrid TV-Tuner Output 19. Mini-USB Jack (To PC)
10. A/V Input (Composite Video/Audio)
Note:
The buttons have the same functions as the basic remote control functions.
18
17
16
15
14
33
Page 34

ENGLISH
5. Remote Control Explanation
The remote control is used to control the unit. On the inside cover of this manual you will find a picture of
the remote control. The numbers of the buttons correspond with the table below, to explain each function
of the remote control.
Nr Button Description
1. POWER ( ) Turn the unit on or to standby mode
2. INFO Display Channel information / File information
3. SOURCE Switch between Tuner, AV & Playback
4. AUDIO Change the DVD Audio track
5. TITLE Return to the DVD Title screen
6. 0-9 Menu Navigation / Direct channel entry
7. +10 + 10 Channels
8. EPG Show the EPG Guide
9. FAVORITE Show the favorite channels list
10. COPY Display the Copy Menu
11. REPEAT Change the Playback Repeat Mode
12. VOLUME
13. VOLUME
14. RETURN Return to the previous screen / channel
15.
, , , Navigation Keys: Navigate through the Menu’s
16. REC Start Recording / Increase Record Time (+30 Minutes)
17. PLAY / PAUSE Start Playback / Pause Playback / Pause Recording /
Initiate Timeshift
18. REWIND (
19. PREVIOUS (
20. OUTPUT Change the Output signal (Composite, Component, S-Video)
21. SETUP Show the Setup Menu on your screen
22. NEXT (
23. FAST FORWARD (
24. STOP Stop Playback / Stop Recording / Disable Timeshift
25. TIMER Enter the Record Scheduler
26. ENTER Confirm selection
27. STORAGE Change the Active Storage Device (HDD, USB, Card)
28. CHANNEL
29. CHANNEL
30. MUTE Mute the sound
31. QUALITY Set the record quality
32. CLEAR Clear the input / Delete the selection
33. SELECT Show the Digital TV Quick Channel Select menu
34. EDIT File Edit Menu
35. 100 + 100 Channels
36. ANGLE Change the DVD Playback angle
37. SUB-T Change the DVD Subtitle
38. DTV – INFO Show information on your Digital TV channel
39. DTV – T / R Switch between Digital TV and Digital Radio
40. MENU Display the Main Menu
41. LED Indicates the operation of the remote control
Volume Up
Volume Down
) Rewind Playback
) Previous File / Track / Chapter / Picture
) Next File / Track / Chapter / Picture
) Fast Forward Playback
Channel Down
Channel Up
34
Page 35

ENGLISH
6. Connecting your CM3PVRD
Connecting the antenna cable(s)
The unit is equipped with a hybrid tuner. This allows you to use the unit for analog TV reception, or digital
(DVB-T) reception.
Note:
The Tuner of the unit supports Signal Pass-through, to redirect the TV signal from the Tuner
input to the Tuner output. The Pass-through function also works when the unit is turned off or
disconnected from the power, so you can keep watching to your TV even if the unit is turned
off.
Tuner Output
Tuner Input
Analog TV:
• Disconnect the main antenna cable from your TV, and connect it to the Tuner input of the unit.
• Connect the supplied antenna cable to the Tuner output of the unit and to the Tuner input of your TV.
Digital TV (DVB-T):
• Connect a DVB-T antenna to the Tuner input of the unit.
• Connect the supplied antenna cable to the Tuner output of the unit and to the Tuner input of your TV.
Connecting the Video Cable(s)
You can connect the unit in 4 different ways to your TV:
- Composite
- SCART (by using the Composite cable & Scart Adapter)
- S-Video **
- Component **
** When using S-Video or Component, only the video signal is send to your TV.
For the audio signal, use the Audio RCA Jacks on the Composite cable (Red, White), or the Coaxial
SPDIF cable.
Composite:
• Connect the Composite cable (Yellow, Red, and White) to the corresponding AV Output jacks on the
unit.
• Connect the other side of the Composite cable (Yellow, Red, and White) to your TV.
35
Page 36

ENGLISH
SCART:
• Connect the Composite cable (Yellow, Red, and White) to the corresponding AV output jacks on the
unit.
• Connect the other side of the Composite cable (Yellow, Red, and White) to the jacks on the SCART
Adapter.
• Set the switch of the SCART Adapter to “Input”.
• Connect the SCART Adapter to the SCART Input of your TV.
S-Video:
• Connect the S-Video cable to the S-Video jack of the unit.
• Connect the other end of the S-Video cable to the S-Video Input on your TV.
Component:
• Connect the Component Cable (Red, Green, and Blue) to the Component Jacks on the unit.
• Connect the other end of the Component cable to the Component Jacks on your TV.
36
Page 37

ENGLISH
Connecting the Audio Cable(s)
You can connect the unit to your TV and/or your home cinema system in 2 different ways:
- Analog, through the RCA Audio Jacks of the A/V Output
- Digital, Through the Coaxial Digital SPDIF Output
Analog:
• Connect the Audio Jacks (Red, White) of the Composite cable to the RCA Audio Jacks of the A/V Output.
• Connect the other end of the Composite cable to the RCA Audio Jacks of your TV or Receiver.
Digital:
• Connect the Digital Coaxial cable to the Digital Coaxial Output of the unit.
• Connect the other end of the Digital Coaxial cable to the Digital Coaxial Input of your Receiver.
Connecting other Audio/Video Equipment
You can connect an Audio/Video source, like a VCR, DVD Player or Set-Top Box to the unit so you can
record from the Audio/Video source.
• Connect the Audio/Video cable delivered with your Audio/Video device to the corresponding AV Output
jacks on the Audio/Video device.
• Connect the other side of the Composite cable (Yellow, Red, and White) to the AV Input jacks of the
unit.
37
Page 38

ENGLISH
Connecting the Power Cable
When the unit is connected to your Audio/Video equipment, you can connect the power supply to the unit.
• Connect the included power supply to the unit and to a free wall socket.
• Set the main power switch on the back of the unit to ‘I’ to power the unit.
The unit will now turn on.
When the unit is powered and operational, the Navigation Buttons (7), The Record Button (2) and the
Power Button (6) will burn Blue.
When the unit is powered and in standby, the Navigation Buttons (7) will burn Red. The Record Button (2)
and Power Button (6) will not burn.
Preparing the Remote Control
• Remove the battery cap from the back of the remote control
• Insert the included AAA batteries in the remote control.
• Replace the battery cap on the back of the remote control.
Notes:
- The best operational range of the remote control is about 5 meters.
- Point the remote control to the IR receiver which is embedded in the front panel of the unit.
- The receiving angle of the IR receiver is ±30 degrees.
- Change the batteries when they are weak or empty.
38
Page 39

ENGLISH
7. First-Time Configuration
The unit needs to be configured when you turn it on the first time.
• Select the correct input channel on your TV where the unit is connected to. (Composite, SCART, S-Video
or Component).
Note:
From this point, the manual is based on the fact that your TV is set to the input channel of the
unit. All steps described are related to the operation of the unit.
• Check if the main power switch on the back of the unit is set to ‘I’.
• Turn on the unit with the power button on the front of the unit, or with the ‘Power’ button (1) on the
remote control.
The unit will turn on and display the menu on your screen.
Note:
The unit needs to initialize the Harddisk when it is turned on. This can take a little while. During
initializing, the message “Please Wait...” is shown on your screen.
The default output signal is Composite. If you are using another output for the unit, it is possible
Note:
that your screen does not show the menu. Press the ‘Output’ button (20
switch the output signal of the unit.
Note:
When using the unit for the first time, the internal Harddisk must be formatted. Select ‘Yes’ to
format the internal Harddisk. After the format is complete, the unit can be configured and used.
When formatting the internal Harddisk, all data on the Harddisk will be erased!
) on the remote control to
The following options are available in the Main Menu:
[1] – Movies
[2] – Music
[3] – Photos
[4] - AV Input
[5] - TV Tuner Input
[6] – Rec Schedule
[7] – Setup
Playback of stored records and movies.
Playback of stored music.
Playback of stored photos.
View the Audio/Video Channel.
View Live TV.
Configure scheduled records.
Configure the unit.
39
Page 40

ENGLISH
Select the ‘Setup’ [7] option in the main menu, or press the ‘Setup’ button (21
configuration of the unit. When the Setup menu appears on your screen, you can select the following
options:
- System * (Basic Configuration)
- A/V Set * (Basic Configuration)
- Analog TV * (Analog TV Tuner Configuration)
- Digital TV * (Digital TV Tuner Configuration)
- Tools
- Adv. A/V
Note:
The Setup items marked with a * must be configured before the unit can be used properly.
Basic Configuration
These steps help you to configure the basic settings which are needed for a correct working unit.
• Select the option ‘System’ in the Setup Menu.
• Set the ‘TV System’ to the TV System used by your TV.
You can choose between PAL and NTSC.
• Set the ‘Sys Language’ to the language of your choice.
You can choose between ENGLISH, DUTCH, SPANISH, ITALIAN, FRENCH, PORTUGUES and GERMAN.
• Set the ‘Time Format’ to the time format of your choice.
You can choose between D_M_Y_12 (12hour notation with AM/PM) and D_M_Y_24 (24hour notation).
• Set the Date to the current date.
• Set the Time to the current time.
• Select the option ‘A/V Set’ in the Setup Menu.
• Set the ‘Video Output’ to the output which is used to connect the unit to the TV.
• Set the ‘TV Type’ to the correct aspect ratio of your TV. You can choose between ‘4:3 PS’ (Pan &
Scan), ‘4:3 LB’ (Letterbox) or ’16:9’ (Widescreen).
• Set the ‘TV input type’ to the correct tuner you want to use. You can choose between ‘Digital TV’ and
‘Analog TV’.
TV Tuner Configuration
The unit is equipped with a hybrid tuner which can handle Analog or Digital (DVB-T) TV signals. The
following section is splitted in Analog and Digital TV tuner configuration:
) to begin the
40
Page 41

ENGLISH
Search and store Analog TV Channels:
• Select the option ‘Analog TV’ in the Setup Menu.
• Set the ‘TV Signal’ to ‘Cable’ if you have connected the unit to your cable signal. Otherwise, select
‘Antenna’ if you have connected the unit to an aerial antenna.
• Select the option ‘Auto Tuning’ to search for TV channels.
Analog TV Tuner configuration
• In the ‘Auto Tuning’ Menu, select the correct ‘TV System’ and ‘Audio Format’ for your country.
The default setting is ‘PAL-BG’, which is used in most European countries, except France, which uses
‘SECAM L’.
• Select ‘Go!’ to start searching for channels.
During the channel search, all found channels will automatically be stored in the memory of the unit. This
can take some time.
When the channel search is complete, the unit will return to the Setup Menu.
41
Page 42

ENGLISH
Customize Analog TV Channels:
When the unit is finished with the search of TV Channels, you can customize the found channels.
• Select the option ‘TV Tuner’ in the Setup Menu.
• Select the option ‘Channel Set’ in the TV Tuner Menu.
The Channel Set Menu will be shown on your TV.
All settings in the Channel Set Menu can be changed with the ‘Navigation’ buttons (15
control.
You can change the following items:
- Channel Number Change the channel which you want to change.
- Active Show or hide the selected channel in the channel list.
- Fine-Tune Fine-tune the channel.
- Audio Format Change the Audio Format for the current channel.
- Swap Channel Use the ‘Swap Channel’ option to swap 2 channels.
For example:
- Channel Name Add a name to the current channel. (Max. 4 characters)
- Manual Tune Search for another channel.
To close the Channel Set Menu, press the ‘Return’ button (14
Select the new location for the current channel and press the ‘Enter’
button (26
If you want to set channel 15 on position 2, set the ‘Channel Number’ to
15 and ‘Swap Channel’ to 2 and press the ‘Enter’ button (26
remote control.
Press the ‘Enter’ button (26
Tune’ option.
) on the remote
) on the remote control to swap the channels.
) on the remote control to start the ‘Manual
) on your remote control.
42
) on the
Page 43

ENGLISH
Search and store Digital TV Channels:
• Select the option ‘Digital TV’ in the Setup Menu.
• Select ‘Area Setting’ and select your country from the list.
Note :
If your country is not listed, choose the country which is closest to your country.
• Select the option ‘Area Scan’ to search for DVB-T TV channels.
The unit will search for DVB-T channels in your area and shows the found channels on the screen.
Digital TV Tuner configuration
When the search for DVB-T channels is finished, the found channels are stored in the memory of the unit.
The message ‘Save Flash successful’ will be shown when the channels are stored and the unit will show
the first found TV channel on your screen.
43
Page 44

ENGLISH
Important :
You can do this in the Setup Menu, with the option ‘Date/Time Sync’ in the ‘Digital TV’
Customize Digital TV Channels:
Digital TV channels cannot be changed in order. Instead of changing the order, you can make a favorite
list, or lock channels which you do not want to show in your channel list.
• Select the option ‘Digital TV’ in the Setup Menu
• Select the option ‘DTV Channel’ in the Digital TV Menu.
• Select the option ‘TV Editing’ in the DVT Channel Menu.
Tip : Instead of above 3 steps, you can also go to the ‘TV Tuner Input’ and press the ‘Edit’ button (34) on
The Channel Organizer will be shown on your TV:
When the channel scan is completed, it is advised to synchronize the time send through the
Digital TV signal with the internal clock of the unit to prevent time setting errors.
section.
the remote control.
You can navigate through the Channel Organizer with the ‘Navigation’ buttons (15
You can use the following actions on the channels in the Channel Organizer:
Option Button Description
Fav. (‘Red’ Button) (5) Add the channel to the favorite list
Del. (‘Green’ Button) (4
Skip (‘Yellow’ Button) (37
Lock (‘Blue’ Button) (36
To close the Channel Organizer, press the ‘Return’ button (14
) Delete the channel from the channel list
) Skip this channel in the channel list
) Lock this channel in the channel list
44
) on the remote control.
) on your remote control.
Page 45

ENGLISH
8. Watching Live-TV & Live-A/V
The unit has 2 input sources to watch and record programs:
• TV-Tuner Input (Analog or Digital TV)
• AV Input (Audio/Video Input)
TV-Tuner Input
You can watch live TV through the unit by selecting the option ‘TV Tuner Input’ in the Main Menu. While
watching live TV, you can change the channels by pressing the ‘Channel +’ (29
on the remote control.
Note :
AV Input (Audio/Video Input)
The unit has a Composite Audio/Video-Input on the backside. This Composite Audio/Video Input can be
used to connect your VCR, Set-Top Box, Video Camera or other video equipment to the unit.
You can see the Live Audio/Video Input signal by selecting the option ‘A/V Input’ in the Main Menu.
Timeshifting
The unit supports Timeshifting. The Timeshift feature ‘pauses’ Live TV or Live Audio/Video by recording
the current channel/input when Timeshift is activated.
When the Timeshift feature is initialized, the unit will create a buffer of maximum 55 minutes for the
Timeshift feature.
Note:
Press the ‘Play/Pause’ button (17
When the Timeshift feature is initialized, the Live TV or Live A/V will be ‘paused’ and the unit will record
the channel on the background.
When the TV Tuner Input is selected from the Main Menu, the unit will go to the Analog TV tuner
or Digital TV tuner, depending on the ‘TV Input Type’ setting in the Setup Menu.
You need at least 2,5GB of free space on the HDD to use the Timeshift feature.
) on the remote control to initialize the Timeshift feature.
) or ‘Channel -’ (28) button
45
Page 46

ENGLISH
During Timeshift, the screen will display the Timeshift information bar on your screen. You can hide this
bar by pressing the ‘Info’ button (2
) on the remote control.
Press the ‘Play/Pause’ button (17
Timeshift was activated.
Press the ‘Fast Forward’ (23
Timeshift buffer in higher speeds.
Note:
During pause, fast forward or rewind, the Timeshift feature is still active and continues to record.
Press the ‘Stop’ button (24
Live Playback. The Timeshift record will be stopped and the Timeshift buffer will be cleared.
Note:
It is not possible to save the Timeshift buffer for later usage.
) on the remote control again to resume playback from the point where
) or ‘Rewind’ (18) buttons on the remote control to play through the
) on the remote control to deactivate the Timeshift feature and resume normal
Digital Radio
When you are using the Digital tuner function, you can also listen to digital radio channels.
• Select the ‘TV Tuner Input’ in the Main Menu.
The Digital TV channels will be shown on your screen.
• Press the ‘DTV – T/R’ button (39
• You can use the ‘Channel +’ (29
• To return to Digital TV mode, press the the ‘DTV – T/R’ button (39
) on the remote control to switch to Digital Radio mode.
) or ‘Channel -’ (28) buttons to select a digital radio station.
) on the remote control again.
46
Page 47

ENGLISH
9. Recording
Before Recording
Before you start recording with your unit, you can set the record quality. The unit has 3 preset quality
settings, which can be selected with the ‘Quality’ button (31
Note:
The unit detects copy protection on the connected source, for example MacroVision protection on
DVD discs. When a connected source is copy-protected, the unit will prevent recording and shows
a warning message when the record button is pressed.
One-Touch-Recording
While watching Live TV or Live A/V through the unit, you can start a record of the current channel by
pressing the ‘Rec’ button (16
button (24
) on the remote control, or until the maximum record time of 6 hours is reached.
) on the remote control. The unit starts recording, until you press the ‘Stop’
) on the remote control.
When you press the ‘Rec’ button (16
at the time you pressed the ‘Rec’ Button.
The message ‘OTR+30’ will be shown on your screen.
Press the ‘Rec’ button (16
minutes.
The unit keeps recording until the record time is elapsed, or until you press the ‘Stop’ button (24
remote control.
Note:
During recording, you cannot change the current channel.
The recording is stored with a name based upon the record date and time, with the following name:
“MMDDhhmm.AVI” (MM = Month, DD = Day, hh = Hour, mm = Minutes)
) again to increase the time with another 30 minutes, up to a maximum of 360
) during a record, the record time will be set to 30 minutes, starting
) on the
47
Page 48

ENGLISH
Recording through the EPG guide (Digital TV only)
When you are using the Digital TV tuner of the unit, you can use the EPG guide to schedule a recording.
• Press the ‘EPG’ button (8
your TV:
) on the remote control while watching TV. The EPG guide will be shown on
You can navigate through the EPG Guide with the ‘Navigation’ buttons (15
• Select the channel in the left row.
• Select the program you want to record in the right row.
• Press the ‘Enter’ button (26
recording.
• Confirm the recording by selecting ‘Yes’ and press the ‘Enter’ button (26
confirm.
The recording will be stored in the scheduler of the unit.
) on the remote control to add the program to your EPG scheduled
48
) on the remote control.
) on the remote control to
Page 49

ENGLISH
Manual Scheduled Recording (Analog TV and Digital TV)
You can program the unit to record channels on specific times.
You can program up to 8 scheduled recordings in the unit.
• Select the option ‘Rec Schedule’ in the Main Menu, or press the ‘Timer’ button (25) on the remote
control while watching Live TV through the unit.
The Scheduled Recording screen will be shown on your TV.
By default, the first schedule is selected, and the ‘Source’ is highlighted.
• Select the schedule number you want to program and press the ‘Enter’ button (26) on the remote
control to start programming the selected schedule.
• Select the Source of your scheduled recording. This can be the Analog TV Tuner, Digital TV Tuner or the
AV Input.
If you have selected the ‘TV’ option, press the ‘Right’ Navigation button (15
which you would like to record. Press the ‘Enter’ button (26
) on the remote control to continue.
) and select the channel
• Select the record mode: Once, Daily or Weekly. If you have selected ‘Once’, press the ‘Right’
Navigation Button (15
If you have selected ‘Weekly’, press the ‘Right’ Navigation button (15
Press the ‘Enter’ button (26
) to select the Month and Day for the record.
) to select the Day for the record.
) on the remote control to continue.
• Set the start time for the recording. Press the ‘Enter’ button (26) on the remote control to continue.
• Set the end time for the recording.
• Set the Target for the recording: ‘HDD’, ‘USB’ or ‘Card’. Press the ‘Enter’ button (26) on the remote
control to continue.
49
Page 50

ENGLISH
Note:
When recording to USB or Memory Card, make sure you have a High-speed device attached. (An
USB2.0 Device or High-Speed Memory Card)
• Set the quality for the recording: ‘HQ’, ‘SP’ or ‘LP’. Press the ‘Enter’ button (26) on the remote control
to continue.
Note:
Recording in ‘HQ’, ‘SP’ or ‘LP’ influences the quality of your record and the amount of space
For example, if you unit is equipped with a 500GB HDD, the record time will be:
HQ:
SP:
LP:
The recording is now programmed as a scheduled recording and the unit will start recording on the
programmed time and channel.
When the unit is programmed with scheduled recordings, you can put the unit into Standby.
The internal clock will turn on the unit 3 minutes before the scheduled recording starts and selects the
correct channel 1 minute before the recording starts.
Note:
The recording is stored with a name based upon the record date and time, with the following name:
“MMDDhhmm.AVI” (MM = Month, DD = Day, hh = Hour, mm = Minutes)
When the recording is completed, the unit will if standby must be activated. When there is no action
taken, the unit will automatically return to standby mode after 15 seconds.
needed for the record.
228 hours and 35 minutes. (app. 2190MB for 1 hour)
437 hours and 46 minutes. (app. 1140MB for 1 hour)
656 hours and 45 minutes. (app. 760MB for 1 hour)
During recording, you cannot change the current channel.
50
Page 51

ENGLISH
10. Playback
Select your preferred playback mode from the Main Menu.
You can select the following options:
[1] - Movies Play your records and other movies stored on the unit or
[2] - Music Play music files stored on the unit or USB Drive / Media Card.
[3] - Photos Display photos stored on the unit or USB Drive / Media Card.
USB Drive / Media Card.
When one of the above options is selected, the file browser will be shown on your screen. The file browser
will only show the files corresponding with the selected option on your screen.
For example:
Tip :
Use the navigation keys (15
In the file browser menu, you can use the following browser options on the remote control:
- Storage (27
- Navigation keys (15
- Enter (26
- Edit (34
- Copy (10
- Play/Pause (17
- Next (22
- Previous (19
You can return from the file browser menu to the Main Menu by pressing the ‘Menu’ button (40
remote control.
If you select ‘Movies’ [1], only movie files will be shown on your screen.
When you are in ‘Movies’ [1], ‘Music’ [2] or ‘Photos’ [3] mode, you can easily switch between
these options through the upper bar in the media browser.
) to go to the upper bar and change the mode.
) Change between HDD Mode, USB Mode and Card Mode.
) Navigate through the files and folders.
) Play the selected file or open the selected folder.
) Edit files. (Play Mode, Rename, Delete, Copy).
) Copy the selected file to another location.
) Play the selected file.
) Go to the next page with files.
) Go to the previous page with files.
) on the
51
Page 52

ENGLISH
Playback of your recordings & other movies
You can play the recorded programs and other movies, stored on the HDD of the unit, on your TV through
the ‘Movies’ option of the unit.
• Press the ‘Menu’ button (40) on the remote control to return to the Main Menu.
• Select the ‘Movies’ [1] icon in the Main Menu with the ‘Navigation’ buttons (15) on the remote control,
and press the ‘Enter’ button (26
The file browser of the unit will be shown on your screen, with the ‘Records’ folder on the HDD selected
by default.
) on the remote control to open the ‘Movies’ Mode.
The unit will only show the movie files which are available on your unit. Other files will not be shown.
Tip :
When you are in ‘Movies’ [1], ‘Music’ [2] or ‘Photos’ [3] mode, you can easily switch between
these options through the upper bar in the media browser.
Use the navigation keys (15
) to go to the upper bar and change the mode.
• Select the file you would like to play with the navigation buttons on the remote control.
• Press the ‘Enter’ button (26) or the ‘Play/Pause’ button (17) on the remote control to start the
playback of the selected file.
During playback, you can use the following playback options on the remote control:
- Play/Pause (17) Play the selected file or pause the playback.
- Stop (24) Stop the playback.
- Rewind (18) Rewind the playback.
- Fast Forward (23) Fast Forward the playback.
- Previous (19) Play the previous file in the current folder.
- Next (22) Play the next file in the current folder.
- Repeat (11) Change the Repeat option of the current file/folder.
- Info (2) Display the playback details.
You can return from the file browser menu to the Main Menu by pressing the ‘Menu’ button (40
remote control.
52
) on the
Page 53

ENGLISH
Playback of subtitles
The CM3PVRD can play subtitle files when playing AVI videofiles.
To play AVI files with subtitles, you need to assign the same name to the subtitle file as the AVI file, for
example:
Movie name: My_Movie_With_Sub.AVI
Subtitle name: My_Movie_With_Sub.SRT
• Press the ‘Menu’ button (40) on the remote control to return to the Main Menu.
• Select the ‘Movies’ [1] icon in the Main Menu with the ‘Navigation’ buttons (15) on the remote control,
and press the ‘Enter’ button (26
• Select the file you would like to play with the navigation buttons on the remote control.
• Press the ‘Enter’ button (26) or the ‘Play/Pause’ button (17) on the remote control to start the
playback of the selected file.
The AVI file will start playing with the corresponding subtitle file loaded.
To disable/enable subtitles during playback, press the ‘Sub-t’ button (37
Tip:
The subtitle files are also listed in the browser menu when 'Movies' is selected from the main
menu, so you can also copy subtitles to other locations.
DVD Playback functionality
The CM3PVRD plays DVD’s from the hard disk as if they are a normal DVD. You can navigate through the
DVD Menu, choose subtitles or change audio languages.
Note:
The CM3PVRD only supports the playback of unprotected DVD copies. CSS protection is not
Note:
The CM3PVRD only supports Region 2 or Regionfree DVD copies.
• Connect the CM3PVRD to your computer. See the chapter “Computer connectivity”.
• Create a folder on the CM3PVRD hard disk in the 'VIDEO' folder with the name of your DVD movie (for
example: 'Movie1').
• Copy the 'AUDIO_TS' and 'VIDEO_TS' (including content) from your DVD to the created folder (for
example: ‘Movie1’) on the CM3PVRD.
After copying, the structure should be:
- VIDEO
|-> Movie1
|-> AUDIO_TS (optional, not available for every DVD)
|-> VIDEO_TS (with all the DVD files inside)
) on the remote control to open the ‘Movies’ Mode.
) on the remote control.
supported by the CM3PVRD.
53
Page 54

ENGLISH
• Disconnect the CM3PVRD from your computer and connect it to your TV. Turn on the CM3PVRD.
• Select the ‘Movies’ [1] icon in the Main Menu with the ‘Navigation’ buttons (15) on the remote control,
and press the ‘Enter’ button (26
• Use the ‘Navigation’ buttons (15) and the ‘Enter’ button (26) on the remote control to navigate to the
‘VIDEO’ folder on the internal hard disk.
The DVD folder(in the example
icon.
• Select the DVD you want to play with the ‘Navigation’ buttons (15) on the remote control.
• Press the ‘Play/Pause’ button (17) on the remote control to start the playback of the selected DVD.
Note:
Do not use the ‘Enter’ button (26) to start. is will only show the files/subfolders and does not
start DVD Playback.
During DVD playback, you can use the following playback options on the remote control:
- Play/Pause (17) Play the selected DVD folder or pause the playback.
- Stop (24) Stop the playback of the DVD and return to the Movie browser.
- Navigation keys (15) Navigate through the DVD Menu.
- Enter (26) Confirm DVD Menu selection(s).
- Rewind (18) Fast Rewind.
- Fast Forward (23) Fast Forward.
- Previous (19) Previous Chapter.
- Next (22) Next Chapter.
- Sub-t (37) Change or turn off the subtitle of the DVD.
- Audio (4) Change the audio track of the DVD (when the DVD contains multiple
- Menu (40) Return to the DVD Menu.
- Title (5) Return to the DVD Menu.
) on the remote control to open the ‘Movies’ Mode.
: ‘Movie1’) will be shown in the file browser, indicated with a DVD Disc
audio tracks).
54
Page 55

ENGLISH
Playback of your Music
You can play music files, which can be stored on the HDD of the unit, on your TV through the ‘Music’
option of the unit.
• Press the ‘Menu’ button (40) on the remote control to return to the Main Menu.
• Select the ‘Music’ [2] icon in the Main Menu with the ‘Navigation’ buttons (15) on the remote control,
and press the ‘Enter’ button (26
The file browser of the unit will be shown on your screen, with the ‘Music’ folder on the HDD selected by
default.
) on the remote control to open the ‘Music’ Mode.
The unit will only show the music files which are available on your unit. Other files will not be shown.
Tip :
When you are in ‘Movies’ [1], ‘Music’ [2] or ‘Photos’ [3] mode, you can easily switch between
these options through the upper bar in the media browser.
Use the navigation keys (15
) to go to the upper bar and change the mode.
• Select the file you would like to play with the navigation buttons on the remote control.
• Press the ‘Enter’ button (26) or the ‘Play/Pause’ button (17) on the remote control to start the
playback of the selected file.
During playback, you can use the following playback options on the remote control:
- Play/Pause (17) Play the selected file or pause the playback.
- Stop (24) Stop the playback.
- Rewind (18) Rewind the playback.
- Fast Forward (23) Fast Forward the playback.
- Previous (19) Play the previous file in the current folder.
- Next (22) Play the next file in the current folder.
- Repeat (11) Change the Repeat option of the current file/folder.
You can return from the file browser menu to the Main Menu by pressing the ‘Menu’ button (40
remote control.
55
) on the
Page 56

ENGLISH
Playback of your Photos & Pictures
You can view your photos and pictures, which can be stored on the HDD of the unit, on your TV through the
‘Photos’ option of the unit.
• Press the ‘Menu’ button (40) on the remote control to return to the Main Menu.
• Select the ‘Photos’ [3] icon in the Main Menu with the ‘Navigation’ buttons (15) on the remote control,
and press the ‘Enter’ button (26
The file browser of the unit will be shown on your screen, with the ‘Pictures’ folder on the HDD selected
by default.
) on the remote control to open the ‘Photos’ Mode.
The unit will only show the photo and picture files which are available on your unit. Other files will not be
shown.
Tip :
When you are in ‘Movies’ [1], ‘Music’ [2] or ‘Photos’ [3] mode, you can easily switch between
these options through the upper bar in the media browser.
Use the navigation keys (15
) to go to the upper bar and change the mode.
• Select the file you would like to play with the navigation buttons on the remote control.
• Press the ‘Enter’ button (26) or the ‘Play/Pause’ button (17) on the remote control to start the
playback of the selected file.
During playback, you can use the following playback options on the remote control:
- Play/Pause (17) Start a slideshow starting with the selected file, or pause the
- Stop (24) Stop the slideshow.
slideshow.
- Navigation keys (15) Rotate the shown photo.
- Previous (19) Play the previous file in the current folder.
- Next (22) Play the next file in the current folder.
- Repeat (11) Change the Repeat option of the current file/folder.
- Info (2) Display the slideshow details.
You can return from the file browser menu to the Main Menu by pressing the ‘Menu’ button (40
remote control.
56
) on the
Page 57

ENGLISH
11. Computer Connectivity
The unit can be connected to your computer to copy data (movies, music, pictures, records, etc.) from and
to the internal HDD.
Note:
In our example below, we are using a computer running Windows XP, but the unit can be used on
all computers with USB support and the capability of reading & writing FAT32 file systems.
Connect the unit to your computer
• Connect the delivered USB to Mini-USB cable to the backside of the unit and to a free USB port on your
computer.
• Turn the unit on with the main power switch on the backside of the unit. The unit will be recognized
and installed automatically and will be shown as an extra drive on your computer.
By default, the internal HDD of the unit will be initialized as an USB storage device.
Switch between HDD Mode and Cardreader Mode
You can use the Cardreader of the unit as a Cardreader on your computer. When you enable the Cardreader
mode, the HDD is not accessible on your computer.
• Press and hold the ‘Arrow Down’ button on the front of the unit for 2 seconds while it is connected to
the computer.
The HDD will disappear from the ‘My Computer’ window, and a removable drive will be shown. The
Cardreader is now active.
• To switch back to the HDD Mode, press and hold the ‘Arrow Down’ button on the front of the unit for 2
seconds.
57
Page 58

ENGLISH
Playback on your computer
You can play the recorded programs on your computer, when the unit is connected to the computer. Before
you can play the recorded programs, you need to install a XviD codec on your computer.
The XviD codec is added to the FFDShow MPEG4 Codec Pack, which you can download on the following
website:
After the installation of the FFDShow MPEG4 Codec Pack and a reboot of your computer, you can play the
recorded programs on your computer.
Disconnect the unit from your computer
• Single-click the “Safe Removal” icon on the system tray.
• Select “Stop USB Mass Storage Device” when prompted.
• Wait for the message “Safe to remove Hardware”.
• Disconnect the USB cable.
http://www.free-codecs.com/download/FFDShow.htm
58
Page 59

ENGLISH
12. System Configuration
When you select the ‘Setup’ [7] option in the Main Menu, or press the ‘Setup’ button (21) on the remote
control, the Setup Menu will be shown on your screen. The explanation below shows all available settings
with the including description.
System:
TV System Select the TV System which corresponds with your TV. You can select between PAL
Screensaver Set the screensaver of the unit on or off. (Default
Sys Language Select the system language for the unit. (Default
Time Format Set the time format of your choice. (Default
Set Date Set the current date.
Set Time Set the current Time.
Reset Setting Reset the unit to the factory default settings.
A/V Set:
Video Output Select the Video Output signal which corresponds with the used output ports on the
TV Type Set the ‘TV Type’ to the correct aspect ratio of your TV.
TV Input Type Set the ‘TV input type’ to the correct tuner you want to use.
and NTSC. (Default
(Only the configuration will be restored. The data on your Harddisk will not be
erased).
unit.
(‘4:3 PS’ (Pan & Scan), ‘4:3 LB’ (Letterbox) or ’16:9’ (Widescreen)).
(‘Digital TV’ or ‘Analog TV’).
= PAL)
= On)
= English)
= D_M_Y_24)
59
Page 60

ENGLISH
Analog TV:
TV Signal Select the TV Signal which is provided by your TV Provider. You can select between
Auto Tuning Use the ‘Auto Tuning’ option to search and store all found channels automatically
Channel Set Use the ‘Channel Set’ option to customize the found channels, like fine-tuning,
Manual Tuning Use the ‘Manual Tuning’ option to search and store channels manually.
Digital TV:
DTV Channel
Area Setting Set the area where you are using this unit, so the correct channels can be found.
Area Scan Start an area scan for digital TV channels in your area.
Manual Scan Start a manual scan for digital TV channels.
Date/Time Sync Synchronize the time send through the Digital TV signal with the internal clock of
Tools:
Format Use the ‘Format’ option to format your Internal HDD, your USB Device or your
File Sorted By Change the way the files are sorted when you are browsing your media files.
Slideshow Time Change the time a photo is shown on your screen when you are using the slideshow
Adv. A/V:
Contrast Change the Contrast of the A/V Input Signal.
Hue Change the Hue of the A/V Input Signal.
Saturation Change the Saturation of the A/V Input Signal.
Brightness Change the Brightness of the A/V Input Signal.
‘Antenna’ and ‘Cable’. (Default
= Cable).
to the memory of the unit.
channel order and channel name.
TV Editing Edit the TV Channel List.
Radio Editing Edit the Radio Channel List.
Program Guide Show the TV EPG Guide.
Radio EPG Show the Radio EPG Guide.
Channel Mode Assign channel groups to your TV channels.
the unit.
Memory Card for optimal use with the unit.
feature.
60
Page 61

ESPAÑOL
Conceptronic CM3PVRD
Manual de usuario
Felicidades por la compra de su
Esta Guía de instalación rápida le orientará paso a paso sobre cómo utilizar el Reproductor grabador
multimedia de Conceptronic.
En caso de surgir cualquier problema, visite nuestra página web de asistencia técnica (haga clic en el
apartado “Soporte” de www.conceptronic.net). En esa sección podrá consultar la base de datos de
Preguntas Frecuentes (F.A.Q.).
Si tiene otras preguntas sobre su producto y no las encuentra en nuestro sitio web, póngase en contacto
con nosotros por correo electrónico: support@conceptronic.net
Si desea información adicional sobre los productos de Conceptronic, visite nuestro sitio web:
www.conceptronic.net
La instalación del software que se detalla a continuación puede diferir ligeramente de la instalación en su
ordenador. Ello dependerá de la versión de Windows que utilice.
Consejo:
Consejo:
El paquete del Reproductor grabador multimedia de Conceptronic debe incluir los siguientes artículos:
• Reproductor grabador multimedia CM3PVRD de Conceptronic (descrito como “unidad” en el manual).
• Base para el CM3PVRD.
• Fuente de alimentación (12v, 2,5 A) con cable eléctrico.
• Mando a distancia
• 2 pilas tipo AAA para el mando a distancia.
• Cable de antena RF.
• Cable de Vídeo Composite (conectores RCA rojo, blanco y amarillo).
• Cable S-Vídeo.
• Cable de Vídeo Component (conectores RCA rojo, verde y azul).
• Cable coaxial de audio digital (conectores RCA negros).
• Adaptador SCART de cable de video Composite / cable S-Vídeo.
• Cable USB.
• Este manual de usuario.
Reproductor grabador multimedia de Conceptronic.
El CM3PVRD de Conceptronic puede actualizarse mediante firmware. Para actualizar la unidad a
la última versión de firmware, visite el sitio web de Conceptronic.
Compruebe en www.conceptronic.net la lista de los últimos códecs de los archivos compatibles.
1. Contenido del paquete
61
Page 62

ESPAÑOL
2. Características del producto
• Sintonizador híbrido de TV incorporado con búsqueda automática de canales.
o Compatible con TV analógica
o Compatible con TV digital (DVB-T)
• Grabación de señal de TV.
• Grabación de señal A/V procedente, por ejemplo, de un aparato de vídeo, un DVD o una videocámara.
• Lector de tarjetas interno con compatibilidad con SD (HC), MMC y MS.
• Grabación al disco duro interno, a la tarjeta de memoria o al dispositivo USB.
• Archivos grabados en formato MPEG4 (AVI) con calidad DVD (pueden reproducirse en un PC o en otros
reproductores multimedia).
• Opciones de grabación: grabación instantánea, grabación con temporizador y grabación con TimeShift.
• Reproducción de archivos MPEG1/2/4, MP3, WMA o JPG almacenados en el disco duro interno, en la
tarjeta de memoria o en el dispositivo USB.
• Copiado de archivos desde la tarjeta de memoria o dispositivo USB hacia el disco duro interno.
• Modo PC o modo reproductor automáticos:
o Cuando está conectada al PC, la unidad actúa como dispositivo de almacenamiento USB o lector de
tarjetas.
o Cuando no está conectada al PC, la unidad actúa como reproductor grabador multimedia.
3. Consejos y recomendaciones
• No intente desmontar el adaptador de corriente incluido, ya que podría sufrir descargas de alto voltaje.
Si hay que reparar el adaptador, póngase en contacto con su distribuidor o con el servicio de atención
de Conceptronic.
• Mantenga la unidad alejada de la humedad excesiva.
• No moje o sumerja la unidad en líquidos.
• Desconecte el adaptador de corriente si no va a utilizarlo durante un período prolongado de tiempo.
• Evite usar la unidad en lugares cercanos a combustibles.
• Cambie las pilas del mando a distancia por unas del mismo tipo cuando empiecen a agotarse o se hayan
agotado completamente.
Recicle las pilas agotadas siempre que sea posible. Para evitar la corrosión, retire las pilas del mando a
distancia si no va a utilizarlo durante un largo período de tiempo.
• Mantenga el mando a distancia alejado de la humedad excesiva. Evite que se caiga al suelo.
• No utilice el mando a distancia bajo luz solar intensa.
• Evite SIEMPRE que la unidad se caiga o sufra sacudidas o golpes.
• Para prevenir su sobrecalentamiento, no cubra con nada la unidad.
• La unidad sólo es compatible con los sistemas de archivos FAT y FAT32 (no con NTFS).
IMPORTANTE:
Nota:
Nota:
Al formatear el disco duro en formato NTFS, en su ordenador sólo funcionará como disco
duro extraíble. Para recuperar las funcionalidades de reproductor y grabador multimedia,
vuelva a formatear el disco duro en formato FAT32 mediante el menú de la unidad.
Puede que los datos del disco duro interno o de los dispositivos que conecte estén fragmentados,
lo que puede afectar a la reproducción de películas. Se recomienda desfragmentar el disco duro y
los dispositivos que conecte a su ordenador de vez en cuando.
El sintonizador híbrido del CM3PVRD puede ser utilizado tanto para TV analógica como para TV
digital.
La parte analógica del sintonizador híbrido puede utilizarse para ver los canales recibidos a través
de un cable de señal analógica o de una antena analógica.
La parte digital del sintonizador híbrido sólo puede utilizarse para ver y escuchar los canales
recibidos a través de una señal de DVB-T gratuita.
62
Page 63

ESPAÑOL
6 8
12
Vista frontal
4. Descripción del producto
Vista posterior
1
9
7
2
3
10
11
4
13
5
Descripción de los números:
1. Receptor de infrarrojos 11. Salida Component (Y)
2. Botón de grabación 12. Salida Component (Pb)
3. Botón OK / Enter 13. Interruptor de alimentación
4. Puerto para tarjetas MMC/MS/SD 14. Entrada de corriente DC (12 V, 2,5 A)
5. Puerto USB Host 15. Salida S-Video
6. Botón de encendido (3sec) / Stop 16. Salida Component (Pr)
7. Botones de navegación 17. Salida Coaxial Digital
8. Entrada del sintonizador híbrido de TV 18. Salida A/V (Video/Audio Composite)
9. Salida del sintonizador híbrido de TV 19. Conector Mini-USB (a PC)
10. Entrada A/V (Video/Audio Composite)
Nota:
Los botones tienen las mismas funciones que las funciones básicas del mando a distancia.
19
18
17
16
15
14
63
Page 64

ESPAÑOL
5. Descripción del mando a distancia
El mando a distancia se utiliza para manejar la unidad. Encontrará una representación del mando a
distancia detrás de la portada de este manual. Los números de los botones corresponden con los de la tabla
de abajo, en la cual se explica cada función del mando a distancia.
Núm. Botón Descripción
1. POWER ( ) Encender la unidad o situarla en modo standby
2. INFO Mostrar la información del canal o del archivo
3. SOURCE Cambiar entre sintonizador, AV y reproducción
4. AUDIO Cambiar la pista de audio del DVD
5. TITLE Volver a la pantalla de títulos del DVD
6. 0-9 Navegación en el menú / Selección directa de canal
7. +10 +10 canales
8. EPG Mostrar la guía EPG
9. FAVORITE Mostrar la lista de canales favoritos
10. COPY Mostrar el menú de copiado
11. REPEAT Cambiar el modo de repetición
12. VOLUME
13. VOLUME
14. RETURN Volver a la pantalla o canal anterior
15.
, , , Teclas de navegación: navegar a través de los menús
16. REC Iniciar la grabación / Incrementar el tiempo de grabación (+30 minutos)
17. PLAY / PAUSE Iniciar la reproducción / Pausa / Pausa en la grabación /
Iniciar TimeShift
18. REWIND (
19. PREVIOUS (
20. OUTPUT Cambiar el tipo de señal de salida (Composite, Component, S-Vídeo)
21. SETUP Muestra el menú de configuración en pantalla
22. NEXT (
23. FAST FORWARD (
24. STOP Detener la reproducción / detener la grabación / desactivar el TimeShift
25. TIMER Acceder al programador de grabación
26. ENTER Confirmar la selección
27. STORAGE Cambiar el dispositivo activo de almacenamiento (HDD, USB, tarjeta)
28. CHANNEL
29. CHANNEL
30. MUTE Silenciar el sonido
31. QUALITY Establecer la calidad de grabación
32. CLEAR Desactivar la entrada / Borrar la selección
33. SELECT Mostrar el menú de selección rápida de canales de TV digital
34. EDIT Menú de edición de archivos
35. 100 + 100 canales
36. ANGLE Cambiar el ángulo de reproducción del DVD
37. SUB-T Cambiar los subtítulos del DVD
38. DTV – INFO Mostrar información sobre el canal actual de TV digital
39. DTV – T / R Cambiar entre TV digital y radio digital
40. MENU Mostrar el menú principal
41. LED Indica que el mando a distancia está funcionando.
Subir el volumen
Bajar el volumen
) Rebobinar
) Ir al archivo, pista, capítulo o imagen anterior
) Ir al archivo, pista, capítulo o imagen siguiente
) Avance rápido
Bajar un canal
Subir un canal
64
Page 65

ESPAÑOL
6. Conexiones del CM3PVRD
Conectar los cables de antena
La unidad está equipada con un sintonizador híbrido. Esto le permite utilizar la unidad para recibir señal
tanto analógica como digital (DVB-T) de TV .
Nota:
El sintonizador de la unidad es Signal Pass-through, para poder redireccionar la señal de TV de la
entrada a la salida del sintonizador. La función Pass-through también funciona cuando la unidad
está apagada o desconectada de la corriente, de forma que podrá seguir viendo la televisión
incluso cuando la unidad esté apagada.
Salida del
sintonizador
TV analógica:
• Desconecte el cable principal de antena de su televisor y conéctelo a la entrada del sintonizador de la
unidad.
• Conecte el cable de antena suministrado a la salida del sintonizador de la unidad y a la entrada del
sintonizador de su televisor.
TV digital (DVB-T):
• Conecte una antena DVB-T a la entrada del sintonizador de la unidad.
• Conecte el cable de antena suministrado a la salida del sintonizador de la unidad y a la entrada del
sintonizador de su televisor.
Conectar los cables de vídeo
Puede conectar la unidad a su televisor de 4 formas distintas:
- Composite
- SCART (utilizando el adaptador de cable Composite a Scart)
- S-Video **
- Component **
** Cuando utilice S-Video o Component, a su televisor sólo se enviará la señal de vídeo.
Para la señal de audio, use los conectores RCA de audio del cable Composite (rojo y blanco), o el
cable SPDIF coaxial.
Entrada del
sintonizador
65
Page 66

ESPAÑOL
Composite:
• Conecte el cable Composite (amarillo, rojo y blanco) a los correspondientes conectores de salida de A/V
de la unidad.
• Conecte el otro extremo del cable Composite (amarillo, rojo y blanco) a su televisor.
SCART:
• Conecte el cable Composite (amarillo, rojo y blanco) a los correspondientes conectores de salida de A/V
de la unidad.
• Conecte el otro extremo del cable Composite (amarillo, rojo y blanco) a los conectores del adaptador
SCART.
• Sitúe el interruptor del adaptador SCART a “Input” (“entrada”).
• Conecte el adaptador SCART a la entrada SCART de su televisor.
S-Video:
• Conecte el cable S-Vídeo al conector S-Vídeo de la unidad.
• Conecte el otro extremo del cable S-Vídeo a la entrada S-Vídeo de su televisor.
66
Page 67

ESPAÑOL
Component:
• Conecte el cable Component (rojo, verde y azul) a los conectores Component de la unidad.
• Conecte el otro extremo del cable Component a los conectores Component de su televisor.
Conectar los cables de audio
Puede conectar la unidad a su televisor o a su sistema de “home cinema” de dos formas distintas:
- Analógica, mediante los conectores de audio RCA de la salida de A/V
- Digital, mediante la salida SPDIF digital coaxial
Analógica:
• Conecte los conectores de audio (rojo y blanco) del cable Composite a los conectores RCA de audio de la
salida A/V.
• Conecte el otro extremo del cable Composite a los conectores RCA de audio de su televisor o receptor.
Digital:
• Conecte el cable coaxial digital a la salida coaxial digital de la unidad.
• Conecte el otro extremo del cable coaxial digital a la entrada coaxial digital de su receptor.
67
Page 68

ESPAÑOL
Conectar otros equipos de audio o vídeo
Puede conectar otras fuentes de audio o vídeo a la unidad, como por ejemplo un aparato de vídeo o DVD o
un sintonizador digital terrestre, y grabar su señal.
• Conecte el cable de audio o vídeo suministrado con su dispositivo a la salida correspondiente de A/V del
dispositivo.
• Conecte el otro extremo del cable Composite (amarillo, rojo y blanco) a la entrada de A/V de la unidad.
Conectar el cable de alimentación
Cuando la unidad esté conectada a su equipo de audio o vídeo, puede conectar la fuente de alimentación a
la unidad.
• Conecte la fuente de alimentación (suministrada) a la unidad y a un enchufe de pared disponible.
• Sitúe el interruptor de alimentación de la parte trasera de la unidad a la posición “I” para alimentar la
unidad.
La unidad se encenderá.
Cuando la unidad esté conectada a la corriente y operacional, los botones de navegación (7), el botón de
grabación (2) y el botón de alimentación (6) se encenderán de color azul.
Cuando la unidad esté conectada a la corriente y en standby, se encenderán de color rojo los botones de
navegación (7). El botón de grabación (2) y el de alimentación (6) no estarán encendidos.
Preparar el mando a distancia
• Quite la cubierta del compartimento de las pilas de la parte trasera del mando a distancia.
• Introduzca en el mando a distancia las pilas AAA incluidas.
• Vuelva a colocar la cubierta del compartimento de las pilas del mando a distancia.
- El alcance operacional óptimo del mando llega hasta unos 5 metros.
Notas:
- Apunte el mando hacia el receptor de infrarrojos situado en el panel frontal de la unidad.
- El ángulo de recepción del receptor infrarrojo es de ±30 grados.
- Cambie las pilas cuando estén parcial o totalmente agotadas.
68
Page 69

ESPAÑOL
7. Configuración inicial
Hay que configurar la unidad al encenderla por primera vez.
• Seleccione el canal correcto de entrada del televisor donde esté conectada la unidad (Composite,
SCART, S-Video o Component).
Nota:
A partir de este punto, en el manual se asume que en su televisor tiene seleccionado el canal de
entrada de señal de la unidad. Todos los pasos que se describen se refieren al modo de
funcionamiento de la unidad.
• Compruebe que el interruptor de alimentación de la parte trasera de la unidad está en posición ‘I’.
• Encienda la unidad con el botón de encendido de la parte frontal de la unidad, o con el botón ‘Power’
) del mando a distancia.
(1
La unidad se encenderá y mostrará el menú en la pantalla.
Nota:
La unidad debe inicializar el disco duro al encenderse, lo cual puede tardar cierto tiempo. Durante
la inicialización se mostrará el mensaje “Please Wait...” en la pantalla.
El tipo de señal de salida por defecto es Composite. Si está utilizando otro tipo de salida, es
Nota:
posible que en su pantalla no se muestre el menú. Pulse el botón ‘Output’ (20
distancia para cambiar el tipo de señal de salida de la unidad.
Nota:
Al utilizar la unidad por primera vez hay que formatear el disco duro. Seleccione “Sí” para
formatear el disco duro interno. Una vez se haya formateado, se podrá configurar y utilizar la
unidad. Cuando se formatea el disco duro interno, se borra toda la información en él contenida!
) del mando a
En el menú principal encontrará las siguientes opciones:
[1] – Movies
[2] – Music
[3] – Photos
[4] - AV Input
[5] - TV Tuner Input
[6] – Rec Schedule
[7] – Setup
Reproducción de las grabaciones y películas almacenadas.
Reproducción de la música almacenada.
Reproducción de las fotos almacenadas.
Ver el canal de entrada de Audio/Vídeo.
Ver la emisión en directo de TV.
Establecer grabaciones programadas.
Configurar la unidad.
69
Page 70

ESPAÑOL
Seleccione la opción ‘Setup’ [7] del menú principal o pulse el botón ‘Setup’ (21
configuración de la unidad. Cuando aparezca el menú en la pantalla, podrá seleccionar las siguientes
opciones:
Nota:
Configuración básica
Con estos pasos podrá configurar los parámetros básicos necesarios para el correcto funcionamiento de la
unidad.
- Sistema * (Configuración básica)
- Configuración de A/V * (Configuración básica)
- TV analógica * (Configuración de la sintonización analógica de TV)
- TV digital * (Configuración de la sintonización digital de TV)
- Herramientas
- A/V avanzado
Los ítems marcados con un * deben ser configurados para que la unidad pueda ser utilizada
correctamente.
) para iniciar la
• Seleccione la opción ‘Sistema’ en el menú de configuración.
• Seleccione el sistema de TV de su televisor.
Puede escoger entre PAL y NTSC.
• Escoja la lengua del sistema.
Puede escoger entre INGLÉS, HOLANDÉS, ESPAÑOL, ITALIANO, FRANCÉS, PORTUGUES y ALEMÁN.
• Seleccione el formato horario que prefiera utilizar.
Puede escoger entre D_M_A_12 (sistema 12 horas con indicación de AM o PM) y D_M_A_24 (sistema 24
horas).
• Introduzca la fecha actual.
• Introduzca la hora actual.
• Seleccione la opción ‘Configuración de A/V’ en el menú de configuración.
• En la opción ‘Salida de vídeo’, seleccione el tipo de salida utilizada para conectar la unidad al televisor.
• En ‘Tipo de TV’, escoja la relación de pantalla de su TV. Puede escoger entre ‘4:3 PS’ (Pan & Scan),
‘4:3 LB’ (Letterbox) o ’16:9’ (Panorámica).
• En ‘Tipo de entrada de TV’, escoja el sintonizador que desea utilizar. Puede escoger entre ‘TV digital’
y ‘TV analógica’.
Configuración del sintonizador de TV
La unidad está equipada con un sintonizador híbrido que puede sintonizar señal de TV analógica o digital
(DVB-T). A continuación se explica por separado la configuración de la sintonización analógica y la digital:
70
Page 71

ESPAÑOL
Buscar y almacenar canales analógicos de TV:
• Seleccione la opción ‘TV analógica’ en el menú de configuración.
• Si ha conectado la unidad a una señal por cable, seleccione ‘Cable’ en ‘Señal de TV’.
En cambio, si ha conectado la unidad a una antena, seleccione ‘Antena’.
• Para buscar canales de TV, seleccione la opción ‘Búsqueda automática’.
Configuración de la sintonización analógica de TV
• En el menú de ‘Búsqueda automática’, seleccione el ‘Sistema de TV’ y el ‘Formato de Audio’
correspondientes a su país.
La selección por defecto es ‘PAL-BG’, el más utilizado en los países europeos. En Francia se utiliza el
sistema ‘SECAM L’.
• Seleccione ‘Go!’ para empezar a buscar canales.
Durante la búsqueda de canales, todos los canales encontrados se guardarán automáticamente en la
memoria de la unidad. Este proceso puede durar unos minutos.
Una vez completada la búsqueda de canales, la unidad volverá a mostrar el menú de configuración.
71
Page 72

ESPAÑOL
Personalizar los canales de TV:
Cuando la unidad haya acabado de buscar los canales de TV, podrá personalizar los canales encontrados.
• Seleccione la opción ‘Sintonizador de TV’ en el menú de configuración.
• Seleccione la opción ‘Configuración de canales’ en el menú del sintonizador de TV.
El menú de configuración de canales se mostrará en su televisor.
Se pueden cambiar todos los parámetros del menú de configuración de canales con los botones de
‘Navegación’ (15
Puede cambiar los siguientes ítems:
- Número de canal Cambiar el número de canal.
- Activo Mostrar u ocultar en la lista de canales el canal seleccionado.
- Sintonización fina Realizar una sintonización fina del canal.
- Formato de audio Cambia el formato de audio del canal seleccionado.
- Intercambiar canales Utilice esta opción para intercambiar la posición de dos canales.
- Nombre del canal Añada un nombre al canal seleccionado (máx. 4 caracteres).
- Búsqueda manual Buscar otro canal.
Para cerrar el menú de configuración de canales, pulse la tecla ‘Return’ (14
) del mando a distancia.
Por ejemplo:
Si quiere situar el canal 15 a la posición número 2, escriba “15” en ‘Número
Escoja la nueva posición que desee para el canal seleccionado y pulse el botón
‘Enter’ (26
de canal’ y “2” en ‘Intercambiar canal’ y pulse el botón ‘Enter’ (26
mando a distancia.
Pulse el botón ‘Enter’ (26
‘Búsqueda manual’.
) del mando a distancia para intercambiar los canales.
) del mando a distancia para iniciar la opción
) del mando a distancia.
72
) del
Page 73

ESPAÑOL
Buscar y almacenar canales digitales de TV:
• Seleccione la opción ‘TV digital’ en el menú de configuración.
• Seleccione ‘Selección de país’ y escoja su país en la lista.
Nota:
Si su país no está en la lista, escoja el país más cercano al suyo.
• Seleccione la opción ‘Búsqueda en área’ para buscar canales de televisión DVB-T.
La unidad buscará canales de DVB-T en su área y mostrará en pantalla los canales encontrados.
Configuración de la sintonización digital de TV
Cuando haya finalizado la búsqueda de canales, los canales encontrados se almacenarán en la memoria de
la unidad. Cuando los canales se hayan almacenado se mostrará el mensaje ‘Canales guardados
correctamente’ y la unidad mostrará en pantalla el primer canal de TV encontrado.
73
Page 74

ESPAÑOL
Importante:
Puede hacerlo en el menú de configuración, con la opción ‘Sinc. fecha y hora’ de la sección
Personalizar los canales de TV digital:
No se puede cambiar el orden de los canales de TV digital. En vez de ello, puede crear una lista de canales
favoritos, o bloquear aquellos canales que no desee que aparezcan en la lista de canales.
• Seleccione la opción ‘TV digital’ en el menú de configuración.
• Seleccione la opción ‘Canales de TV digital’ en el menú de TV digital.
• Seleccione la opción ‘Editar TV’ en el menú de Canales de TV digital.
Consejo:
El organizador de canales se mostrará en su televisor:
Una vez completada la búsqueda de canales, se recomienda sincronizar la hora indicada por
la señal de TV digital con la hora del reloj interno de la unidad para evitar errores de
configuración horaria.
‘TV digital’.
En vez de los 3 pasos anteriores, también puede ir a ‘Entrada de sintonizador de TV’ y pulsar
el botón ‘Edit’ (34
) del mando a distancia.
Puede navegar por el organizador de canales mediante los botones de navegación (15
distancia.
Desde el organizador de canales puede realizar las siguientes operaciones:
Opción Botón Descripción
Fav. (Botón ‘Rojo’) (5) Añadir el canal a la lista de favoritos
Del. (Botón ‘Verde’) (4) Borrar el canal de la lista de canales
Skip (Botón ‘Amarillo’) (37) Saltarse este canal en la lista de canales
Lock (Botón ‘Azul’) (36) Bloquear este canal en la lista de canales
Para cerrar el organizador de canales, pulse el botón ‘Return’ (14) del mando a distancia.
) del mando a
74
Page 75

ESPAÑOL
8. Ver la televisión o la señal de la entrada A/V
La unidad tiene dos tipos de entrada para ver o grabar programas:
• Entrada del sintonizador de TV (TV analógica o digital)
• Entrada A/V (entrada de Audio/Vídeo)
Entrada del sintonizador de TV
Puede ver la televisión en directo a través de la unidad seleccionando la opción
‘TV Tuner Input’ del menú principal. Puede cambiar de canal pulsando los botones ‘Channel +’ (29
‘Channel -’ (28
Nota:
Cuando seleccione la entrada del sintonizador de TV en el menú principal, la unidad irá al
Entrada A/V (entrada de Audio/Vídeo)
La unidad tiene una entrada de Audio/Vídeo en la parte posterior. Esta entrada Composite de Audio/Vídeo
puede ser utilizada para conectar su aparato de vídeo, sintonizador digital terrestre, videocámara u otros
dispositivos de vídeo a la unidad.
Para ver la señal de la entrada de Audio/Vídeo, seleccione la opción ‘Entrada A/V’ del menú principal.
Opción TimeShift
La unidad dispone de la opción TimeShift. Esta función “pausa” la recepción de televisión o de la entrada
A/V y graba la emisión del canal o entrada que esté viendo mientras TimeShift está activado.
Al inicializarse la función TimeShift, la unidad reservará memoria para un máximo de 55 minutos de
grabación.
Nota:
Necesita al menos 2,5 GB de espacio libre en el disco duro para poder utilizar la función TimeShift.
Pulse el botón ‘Play/Pause’ (17
Cuando se haya inicializado la función, se “pausará” la recepción de televisión o de la entrada A/V y la
unidad empezará a grabar la señal internamente.
) del mando a distancia.
sintonizador analógico o al digital dependiendo del tipo de entrada de TV que haya configurado
en el menú de configuración.
) del mando a distancia para inicializar la función TimeShift.
) o
75
Page 76

ESPAÑOL
Durante el TimeShift, la pantalla mostrará la barra de información del TimeShift. Puede ocultar esta barra
pulsando el botón ‘Info’ (2
) del mando a distancia.
Pulse de nuevo el botón ‘Play/Pause’ (17
punto en el que el TimeShift fue activado.
Pulse los botones ‘Fast Forward’ (23
velocidad el contenido de lo guardado en la memoria del TimeShift.
Nota:
Durante la pausa, el rebobinado o el avance rápido, la característica TimeShift seguirá estando
activa y seguirá grabando contenido.
Para desactivar la característica TimeShift y continuar viendo la emisión o señal en el modo normal, pulse
el botón ‘Stop’ (24
borrará el contenido que haya grabado.
Nota:
No es posible guardar el contenido guardado por el TimeShift para un uso posterior.
Radio digital
Cuando utilice la función de sintonizador digital, también podrá escuchar canales digitales de radio.
• Seleccione la opción ‘Entrada del sintonizador de TV’ en el menú principal.
Se mostrarán en pantalla los canales de TV digital.
• Pulse el botón ‘DTV – T/R’ (39
• Puede utilizar los botones ‘Canal +’ (29
• Para volver al modo de TV digital, pulse de nuevo el botón ‘DTV – T/R’ (39
) del mando a distancia. En ese momento se detendrá la grabación del TimeShift y se
) del mando a distancia para continuar viendo la emisión desde el
) o ‘Rewind’ (18) del mando a distancia para reproducir a más
) del mando a distancia para cambiar al modo de radio digital.
) o ‘Canal -’ (28) para seleccionar una emisora de radio digital.
) del mando a distancia.
76
Page 77

ESPAÑOL
9. Grabación
Antes de grabar
Antes de empezar a grabar con la unidad, puede establecer el nivel de calidad de la grabación. La unidad
tiene 3 niveles de calidad de grabación predefinidos, y puede seleccionar uno de ellos mediante el botón
‘Quality’ (31
Nota:
La unidad detecta si la señal de la fuente de entrada tiene protección anti-copia, como por
Grabación instantánea
Cuando esté viendo la televisión o la señal de entrada de A/V a través de la unidad, puede empezar a
grabar instantáneamente la señal pulsando el botón ‘Rec’ (16
grabar y continuará grabando hasta que pulse el botón ‘Stop’ (24
alcance el tiempo máximo de grabación, 6 horas.
) del mando a distancia.
ejemplo la protección MacroVision en los discos de DVD. Cuando la fuente conectada esté
protegida anti-copia, la unidad no permitirá la grabación y mostrará un mensaje de alerta cuando
se pulse el botón de copiado.
) del mando a distancia. La unidad empieza a
) del mando a distancia, o hasta que se
Si pulsa el botón ‘Rec’ (16
contados a partir de la primera vez que pulsó el botón ‘Rec’ (para iniciar la grabación).
En la pantalla se mostrará el mensaje ‘OTR+30’.
Para incrementar este tiempo de grabación en 30 minutos más, pulse de nuevo el botón ‘Rec’ (16
hasta un máximo de 360 minutos.
La unidad continuará grabando hasta que haya finalizado el tiempo de grabación o hasta que pulse el botón
‘Stop’ (24
Nota:
La grabación se grabará en un archivo con un nombre basado en la fecha y hora de grabación, con el
siguiente formato:
“MMDDhhmm.AVI” (MM = mes, DD = día, hh = hora, mm = minutos)
) del mando a distancia.
Durante la grabación no podrá cambiar el canal seleccionado.
) durante una grabación, el tiempo de grabación se establecerá en 30 minutos
), y así
77
Page 78

ESPAÑOL
Grabar a través de la guía EPG (sólo en TV digital)
Cuando esté utilizando el sintonizador digital de la unidad, podrá utilizar la guía EPG para programar una
grabación.
• Mientras esté viendo la televisión, pulse el botón ‘EPG’ (8
mostrará en su televisor:
) del mando a distancia. La guía EPG se
Puede navegar por la guía EPG mediante los botones de navegación (15
• Seleccione el canal en la columna de la izquierda.
• Seleccione el programa que desee grabar en la columna de la derecha.
• Pulse el botón ‘Enter’ (26
través de EPG.
• Escoja ‘Sí’ para confirmar la grabación y pulse el botón ‘Enter’ (26
confirmar.
La grabación deseada quedará almacenada en el programador de grabaciones de la unidad.
) del mando a distancia para añadir el programa a su grabación programada a
) del mando a distancia.
) del mando a distancia para
78
Page 79

ESPAÑOL
Programación manual de grabaciones (TV analógica y digital)
Puede programar la unidad para que empiece a grabar a una hora determinada.
Puede establecer hasta 8 grabaciones programadas.
• Seleccione la opción ‘Rec Schedule’ del menú principal, o pulse el botón ‘Timer’ (25) del mando a
distancia mientras esté viendo la televisión a través de la unidad.
La pantalla de grabación programada se mostrará en su televisor.
Por defecto, estará seleccionada la primera de las grabaciones programadas y la fuente se mostrará
resaltada.
• Seleccione el número de grabación programada que desee programar y pulse el botón ‘Enter’ (26) del
mando a distancia.
• Seleccione el tipo de entrada para la grabación programada: sintonizador de TV analógica, sintonizador
de TV digital o la entrada de AV.
Si ha seleccionado la opción “TV”, pulse el botón de navegación “Derecha“ (15) y seleccione el canal
que quiera grabar. Pulse el botón ‘Enter’ (26
) del mando a distancia para continuar.
• Seleccione el modo de grabación: Una vez, Diario o Semanal. Si ha seleccionado ‘Una vez’, pulse el
botón de de navegación “Derecha“ (15
Si ha seleccionado ‘Semanal’, pulse el botón de de navegación “Derecha“ (15
de la grabación. Pulse el botón ‘Enter’ (26
) para seleccionar el mes y el día de la grabación.
) para seleccionar el día
) del mando a distancia para continuar.
• Establezca la hora de inicio de la grabación. Pulse el botón ‘Enter’ (26) del mando a distancia para
continuar.
• Establezca la hora de finalización de la grabación.
• Establezca el dispositivo en el que se guardará la grabación: ‘Disco duro’, ‘USB’ o ‘Tarjeta’. Pulse el
botón ‘Enter’ (26
Nota:
Cuando grabe en un USB o en una tarjeta de memoria, asegúrese de que el dispositivo conectado
es de alta velocidad (un dispositivo USB 2.0 o una tarjeta de memoria de alta velocidad)
) del mando a distancia para continuar.
79
Page 80

ESPAÑOL
• Establezca la calidad de la grabación: ‘HQ’, ‘SP’ o ‘LP’. Pulse el botón ‘Enter’ (26) del mando a
distancia para continuar.
Escoger ‘HQ’, ‘SP’ o ‘LP’ influirá en la calidad de la grabación y en el espacio necesario para dicha
Nota:
grabación.
Por ejemplo, si su unidad está equipada con un disco duro de 500 GB, el tiempo de grabación será:
HQ:
228 horas y 35 minutos. (aprox. 2.190 MB por 1 hora)
SP:
437 horas y 46 minutos. (aprox. 1.140 MB por 1 hora)
656 horas y 45 minutos. (aprox. 760 MB por 1 hora)
LP:
La grabación se encuentra ya programada y la unidad empezará a grabar el canal seleccionado en la fecha
y hora determinadas.
Cuando establezca grabaciones programadas, deje la unidad en modo standby.
El reloj interno encenderá la unidad 3 minutos antes de la hora de grabación especificada y seleccionará el
canal especificado un minuto antes de la grabación.
Nota:
Durante la grabación no podrá cambiar el canal seleccionado.
La grabación se grabará en un archivo con un nombre basado en la fecha y hora de grabación, con el
siguiente formato:
“MMDDhhmm.AVI” (MM = mes, DD = día, hh = hora, mm = minutos)
Una vez completada la grabación, la unidad preguntará si debe activarse el modo standby. Si no se da
ninguna respuesta, la unidad volverá automáticamente al modo standby al cabo de 15 segundos.
80
Page 81

ESPAÑOL
10. Reproducción
Seleccione el modo de reproducción que prefiera en el menú principal.
Puede seleccionar las siguientes opciones:
[1] - Movies Reproduce sus grabaciones u otras películas almacenadas en la unidad, en el
[2] - Music Reproduce los archivos de música almacenados en la unidad, en el dispositivo USB o
[3] - Photos Reproduce las fotos almacenadas en la unidad, en el dispositivo USB o en la tarjeta
dispositivo USB o en la tarjeta multimedia.
en la tarjeta multimedia.
multimedia.
Al seleccionar cualquiera de las opciones anteriores, aparecerá en la pantalla el buscador de archivos. Este
buscador sólo mostrará los tipos de archivo correspondientes a la opción seleccionada en la pantalla.
Por ejemplo:
Consejo:
Utilice los botones de navegación (15) para ir a la barra superior y cambiar el modo.
En el menú del buscador de archivos, puede utilizar las siguientes opciones del buscador del mando a
distancia:
- Storage (27
- Botones de naveg. (15
- Enter (26
- Edit (34
- Copy (10
- Play/Pause (17
- Next (22
- Previous (19
Puede volver del menú del buscador de archivos al menú principal pulsando el botón ‘Menu’ (40
mando a distancia.
Si selecciona ‘Movies’ [1], en la pantalla sólo se mostrarán los archivos de películas.
Cuando se encuentra en modo ‘Películas’ [1], ‘Música’ [2] o ‘Fotos’ [3] puede ir fácilmente de
un modo a otro utilizando la barra superior del buscador de contenido multimedia.
) Cambiar entre modo disco duro, modo USB o modo tarjeta.
) Desplazarse por los archivos y carpetas.
) Reproducir el archivo seleccionado o abrir la carpeta seleccionada.
) Editar archivos (modo de reproducción, renombrar, borrar, copiar).
) Copiar el archivo seleccionado a otra localización.
) Reproducir el archivo seleccionado.
) Ir a la página con archivos siguiente.
) Ir a la página con archivos anterior.
) del
81
Page 82

ESPAÑOL
Reproducción de sus grabaciones u otras películas
Puede reproducir en el televisor los programas grabados u otras películas almacenados en el disco duro
mediante la opción ‘Movies’ de la unidad.
• Pulse el botón ‘Menu’ (40) del mando a distancia para volver al menú principal.
• Seleccione el icono ‘Movies’ [1] del menú principal utilizando los botones de ‘Navegación’ (15) del
mando a distancia, y pulse el botón ‘Enter’ (26
Se mostrará el buscador de archivos de la unidad en la pantalla, con la carpeta ‘Records’ del disco duro
seleccionada por defecto.
) del mando a distancia para abrir el modo ‘Películas’.
La unidad sólo mostrará los archivos de películas disponibles en la unidad. No se mostrarán los otros
archivos.
Consejo:
Cuando se encuentra en modo ‘Películas’ [1], ‘Música’ [2] o ‘Fotos’ [3] puede ir fácilmente de
Utilice los botones de navegación (15) para ir a la barra superior y cambiar el modo.
un modo a otro utilizando la barra superior del buscador de contenido multimedia.
• Con los botones de navegación del mando a distancia, seleccione el archivo que quiere reproducir.
• Pulse el botón ‘Enter’ (26) o el botón ‘Play/Pause’ (17) del mando a distancia para iniciar la
reproducción del archivo seleccionado.
Durante la reproducción, puede utilizar las siguientes opciones de reproducción del mando a distancia:
- Play/Pause (17) Reproducir el archivo seleccionado o pausar la reproducción.
- Stop (24) Detener la reproducción.
- Rewind (18) Rebobinar.
- Fast Forward (23) Avance rápido.
- Previous (19) Reproducir el archivo anterior de la presente carpeta.
- Next (22) Reproducir el archivo siguiente de la presente carpeta.
- Repeat (11) Cambiar la opción de repetición del presente archivo o carpeta.
- Info (2) Mostrar la información de reproducción.
Puede volver del menú del buscador de archivos al menú principal pulsando el botón ‘Menu’ (40
mando a distancia.
) del
82
Page 83

ESPAÑOL
Reproducción de subtítulos
El CM3PVRD puede reproducir archivos de subtítulos durante la reproducción de archivos de vídeo AVI.
Para reproducir archivos AVI con subtítulos, debe asignar el mismo nombre al archivo de subtítulos y al
archivo AVI; por ejemplo:
Nombre del vídeo: Mi_video_con_sub.AVI
Nombre de los subtítulos: Mi_video_con_sub.SRT
• Pulse el botón ‘Menu’ (40) del mando a distancia para volver al menú principal.
• Seleccione el icono ‘Movies’ [1] del menú principal mediante los botones de navegación (15) del mando
a distancia y pulse el botón ‘Enter’ (26
• Seleccione el archivo que desea reproducir mediante los botones de navegación del mando a distancia.
• Pulse el botón ‘Enter’ (26) o el botón ‘Play/Pause’ (17) del mando a distancia para iniciar la
reproducción de ese archivo.
Se iniciará la reproducción del archivo AVI con el archivo de subtítulos cargado correspondiente.
Para desactivar o activar los subtítulos durante la reproducción, pulse el botón ‘Sub-t’ (37
distancia.
Consejo:
Los archivos de subtítulos también aparecen listados en el menú del buscador cuando se
selecciona 'Movies' en el menú principal, de forma que también puede copiar los subtítulos a otras
ubicaciones.
Funcionalidad de reproducción de DVD
El CM3PVRD reproduce DVD situados en el disco duro como si fueran DVD normales. Puede navegar en el
menú del DVD, escoger subtítulos o cambiar el idioma del audio.
Nota:
El CM3PVRD sólo puede reproducir copias de DVD sin protección. El CM3PVRD no puede
Nota:
reproducir DVD con protección CSS.
El CM3PVRD sólo puede reproducir DVD de la Región 2 o Sin región.
• Conecte el CM3PVRD a su ordenador. Vea el capítulo “Conexión al ordenador”.
• Cree una carpeta en el disco duro del CM3PVRD, dentro de la carpeta 'VIDEO', con el nombre de su
película en DVD (por ejemplo: 'Pelicula1').
• Copie 'AUDIO_TS' y 'VIDEO_TS' (incluido su contenido) desde el DVD a la carpeta creada (por ejemplo:
'Pelicula1') en el CM3PVRD.
) para abrir el modo ‘Movies’.
) del mando a
83
Page 84

ESPAÑOL
Después de haberlos copiado, la estructura debería ser:
- VIDEO
|-> Pelicula1
|-> AUDIO_TS (opcional, no disponible en todos los DVD)
|-> VIDEO_TS (contiene todos los archivos de DVD)
• Desconecte el CM3PVRD del ordenador y conéctelo a su TV. Encienda el CM3PVRD.
• Seleccione el icono ‘Movies’ [1] del menú principal mediante los botones de navegación (15) del mando
a distancia y pulse el botón ‘Enter’ (26
• Utilice los botones de navegación (15) y el botón ‘Enter’ (26) del mando a distancia para navegar hasta
la carpeta ‘VIDEO’ del disco duro interno.
La carpeta del DVD (en este ejemplo
icono representando un DVD.
• Seleccione el DVD que desee reproducir con los botones de navegación (15) del mando a distancia.
• Pulse el botón ‘Play/Pause’ (17) del mando a distancia para iniciar la reproducción del DVD
seleccionado.
Nota:
No utilice el botón ‘Enter’ (26) para iniciar la reproducción. Este botón sólo mostraría los archivos
o subcarpetas pero no iniciaría la reproducción del DVD.
Durante la reproducción de un DVD puede utilizar las siguientes opciones de reproducción del mando a
distancia:
- Play/Pause (17) Reproducir la carpeta de DVD seleccionada o pausar la reproducción.
- Stop (24) Detener la reproducción del DVD y volver al buscador de películas.
- Navigation keys (15) Navegar en el menú del DVD
- Enter (26) Confirmar la selección o selecciones hechas en el menú del DVD.
- Rewind (18) Rebobinado rápido.
- Fast Forward (23) Avance rápido.
- Previous (19) Capítulo anterior.
- Next (22) Próximo capítulo.
- Sub-t (37) Cambiar o desactivar los subtítulos del DVD.
- Audio (4) Cambiar la pista de audio del DVD (cuando el DVD incluya varias pistas
- Menu (40) Volver al menú del DVD.
- Title (5) Volver al menú del DVD.
) para abrir el modo ‘Movies’.
: ‘Pelicula1’) se indicará en el buscador de archivos, indicado con un
de audio).
84
Page 85

ESPAÑOL
Reproducción de música
Puede reproducir en su televisor los archivos de música almacenados en el disco duro de la unidad
mediante la opción ‘Music’ de la unidad.
• Pulse el botón ‘Menu’ (40) del mando a distancia para volver al menú principal.
• Con los botones de ‘Navegación’ (15) del mando a distancia, seleccione el icono ‘Music’ [2] del menú
principal y pulse el botón ‘Enter’ (26
Se mostrará el buscador de archivos de la unidad en la pantalla, con la carpeta ‘Music’ del disco duro
seleccionada por defecto.
) del mando a distancia para abrir el modo ‘Music’.
La unidad sólo mostrará los archivos de música disponibles en la unidad. No se mostrarán los otros archivos.
Consejo:
Cuando se encuentra en modo ‘Películas’ [1], ‘Música’ [2] o ‘Fotos’ [3] puede ir fácilmente de
Utilice los botones de navegación (15) para ir a la barra superior y cambiar el modo.
un modo a otro utilizando la barra superior del buscador de contenido multimedia.
• Con los botones de navegación del mando a distancia, seleccione el archivo que quiere reproducir.
• Pulse el botón ‘Enter’ (26) o el botón ‘Play/Pause’ (17) del mando a distancia para iniciar la
reproducción del archivo seleccionado.
Durante la reproducción, puede utilizar las siguientes opciones de reproducción del mando a distancia:
- Play/Pause (17) Reproducir el archivo seleccionado o pausar la reproducción.
- Stop (24) Detener la reproducción.
- Rewind (18) Rebobinar.
- Fast Forward (23) Avance rápido.
- Previous (19) Reproducir el archivo anterior de la presente carpeta.
- Next (22) Reproducir el archivo siguiente de la presente carpeta.
- Repeat (11) Cambiar la opción de repetición del presente archivo o carpeta.
Puede volver del menú del buscador de archivos al menú principal pulsando el botón ‘Menu’ (40
mando a distancia.
) del
85
Page 86

ESPAÑOL
Reproducción de fotos e imágenes
Puede reproducir en su televisor las fotos e imágenes almacenadas en el disco duro de la unidad mediante
la opción ‘Photos’ de la unidad.
• Pulse el botón ‘Menu’ (40) del mando a distancia para volver al menú principal.
• Con los botones de ‘Navegación’ (15) del mando a distancia, seleccione el icono ‘Photos’ [3] del menú
principal y pulse el botón ‘Enter’ (26
Se mostrará el buscador de archivos de la unidad en la pantalla, con la carpeta ‘Pictures’ del disco duro
seleccionada por defecto.
) del mando a distancia para abrir el modo ‘Photos’.
La unidad sólo mostrará los archivos de fotos e imágenes disponibles en la unidad. No se mostrarán los
otros archivos.
Consejo:
Cuando se encuentra en modo ‘Películas’ [1], ‘Música’ [2] o ‘Fotos’ [3] puede ir fácilmente de
un modo a otro utilizando la barra superior del buscador de contenido multimedia.
Utilice los botones de navegación (15) para ir a la barra superior y cambiar el modo.
• Con los botones de navegación del mando a distancia, seleccione el archivo que quiere reproducir.
• Pulse el botón ‘Enter’ (26) o el botón ‘Play/Pause’ (17) del mando a distancia para iniciar una
presentación de imágenes a partir del archivo seleccionado.
Durante la reproducción, puede utilizar las siguientes opciones de reproducción del mando a distancia:
- Play/Pause (17) Iniciar una presentación de imágenes a partir del archivo seleccionado o
- Stop (24) Detener la presentación.
pausar la presentación.
- Navigation keys (15) Hacer girar la foto seleccionada.
- Previous (19) Reproducir el archivo anterior de la presente carpeta.
- Next (22) Reproducir el archivo siguiente de la presente carpeta.
- Repeat (11) Cambiar la opción de repetición del presente archivo o carpeta.
- Info (2) Mostrar la información de la presentación.
Puede volver del menú del buscador de archivos al menú principal pulsando el botón ‘Menu’ (40
mando a distancia.
) del
86
Page 87

ESPAÑOL
11. Conexión al ordenador
Puede conectar la unidad a su ordenador para copiar datos (películas, música, imágenes, grabaciones, etc.)
desde y hacia el disco duro interno.
Nota:
En el ejemplo siguiente se ha utilizado un ordenador con sistema operativo Windows XP, pero la
unidad puede ser utilizada en cualquier ordenador con entrada USB y la posibilidad de leer y
escribir archivos con el sistema FAT32.
Conectar la unidad a su ordenador
• Conecte el cable adaptador de USB a Mini-USB (suministrado) a la unidad y a un puerto USB libre en su
ordenador.
• Encienda la unidad con el interruptor de alimentación de la parte trasera de la unidad. El ordenador
reconocerá e instalará automáticamente la unidad y la mostrará como una unidad extra en su listado de
unidades.
Por defecto, el disco duro interno de la unidad se inicializará como un dispositivo de almacenamiento USB.
Cambiar de modo disco duro a modo lector de tarjetas y viceversa
Puede utilizar el lector de tarjetas de la unidad como lector de tarjetas también en su ordenador. Cuando
active el modo lector de tarjetas, no podrá acceder al disco duro desde el ordenador.
• Con la unidad conectada al ordenador, pulse durante 2 segundos el botón ‘Flecha hacia abajo’ de la
parte frontal de la unidad.
El disco duro desaparecerá de la ventana ‘Mi PC’ y se mostrará en cambio un dispositivo extraíble. En este
momento el lector de tarjetas está activo.
• Para volver al modo disco duro, pulse durante 2 segundos el botón ‘Flecha hacia abajo’ de la parte
frontal de la unidad.
87
Page 88

ESPAÑOL
Reproducir en su ordenador
También puede reproducir los programas grabados en su ordenador cuando la unidad se encuentre
conectada al ordenador. Antes de poder reproducir los programas grabados en su ordenador, deberá
instalar un códec XviD en el ordenador.
El códec XviD está incluido en el FFDShow MPEG4 Codec Pack que podrá descargar en el siguiente sitio
web:
Después de haber instalado el FFDShow MPEG4 Codec Pack y reiniciado el ordenador, su equipo estará listo
para poder reproducir los programas grabados en su ordenador.
Desconectar la unidad de su ordenador
• Haga clic una vez en el icono de “Extracción segura” de la barra del sistema.
• Cuando aparezca, seleccione la opción “Extracción segura del dispositivo de almacenamiento masivo
USB”.
• Espere a ver el mensaje “Es seguro retirar el hardware”.
• Desconecte el cable USB.
http://www.free-codecs.com/download/FFDShow.htm
88
Page 89

ESPAÑOL
12. Configuración del sistema
Al seleccionar la opción ‘Setup’ [7] del menú principal o al pulsar el botón ‘Configurar’ (21
distancia, se mostrará el menú de configuración en la pantalla. Abajo se muestran todos los parámetros
configurables y su descripción correspondiente.
) del mando a
Sistema:
Sistema de TV Seleccionar el sistema de TV correspondiente a su televisor. Puede escoger
Salvapantallas Activar o desactivar el salvapantallas de la unidad (por defecto = Activado)
Idioma del sist. Seleccionar el idioma del sistema de la unidad (por defecto = Inglés)
Formato horario Escoger el formato horario preferido (por defecto = D_M_A_24)
Introd. fecha Introducir la fecha actual.
Fecha y hora Introducir la hora actual.
Reestablecer configuración Reestablecer la configuración que viene de fábrica.
Configuración A/V:
Salida de vídeo Seleccione el tipo de señal de la salida de vídeo correspondiente con los
Tipo de TV En ‘Tipo de TV’, escoja la relación de pantalla de su TV: ‘4:3 PS’ (Pan &
Tipo de entrada de TV En ‘Tipo de entrada de TV’, escoja el sintonizador que desea utilizar: ‘TV
entre PAL y NTSC. (por defecto
(Sólo se reestablecerá la configuración, no se borrarán los datos
almacenados en el disco duro).
puertos utilizados en la unidad.
Scan), ‘4:3 LB’ (Letterbox) o ’16:9’ (Panorámica).
digital’ o ‘TV analógica’.
= PAL)
89
Page 90

ESPAÑOL
TV analógica:
Señal de TV Seleccione el tipo de señal de TV utilizada. Puede seleccionar entre
Búsqueda automática Utilice la opción ‘Búsqueda automática’ para buscar y almacenar
Configuración de canales Utilice la opción ‘Configuración de canales’ para personalizar los canales
Búsqueda manual Utilice la opción ‘Búsqueda manual’ para buscar y almacenar canales
TV digital:
Canales de TV digitales
Editar TV Editar la lista de canales de TV.
Editar radio Editar la lista de canales de radio.
Guía de programas Mostrar la guía EPG de TV.
Radio EPG Mostrar la guía EPG de radio.
Modo de canal Asignar grupos de canales a sus canales de TV.
Selección de país Seleccionar el país en el que está utilizando la unidad para que pueda
Búsqueda en área Iniciar una búsqueda de los canales de TV digitales de su área.
Búsqueda manual Iniciar una búsqueda manual de canales digitales de TV.
Sinc. fecha y hora Sincronizar la hora indicada por la señal de TV digital con la hora del reloj
Herramientas:
Formatear Utilice la opción ‘Formatear’ para formatear el disco duro interno, un
Archivos ordenados por Cambiar la manera en que los archivos están ordenados al buscar en sus
Ritmo de presentación Cambiar el tiempo durante el que se muestran las fotos cuando esté
A/V avanzado:
Contraste Modifique el contraste de la señal de entrada de A/V.
Tonalidad Modifique la tonalidad del color de la señal de entrada de A/V.
Saturación Modifique la saturación de la señal de entrada de A/V.
Brillo Modifique el brillo de la señal de entrada de A/V.
‘Antena’ y ‘Cable’. (Por defecto = Cable).
automáticamente en la memoria de la unidad todos los canales
encontrados.
encontrados, como por ejemplo realizar sintonización fina, ordenar los
canales y nombrarlos.
manualmente.
encontrar los canales correctos.
interno de la unidad.
dispositivo USB o una tarjeta de memoria para una utilización óptima de la
unidad.
archivos multimedia.
utilizando la opción de pase de diapositivas.
90
Page 91

DEUTSCH
Conceptronic CM3PVRD
Benutzerhandbuch
Wir gratulieren Ihnen zum Kauf Ihres
In beiliegender Schnellinstallationsanleitung wird Ihnen Schritt für Schritt gezeigt, wie der Conceptronic
Media Recorder & Player installiert werden muss.
Wenn Probleme auftreten sollten, besuchen Sie unsere Support-Seite (unter www.conceptronic.net
klicken Sie auf ‚Support’. Dort steht Ihnen unsere FAQ-Datenbank mit den häufig gestellten Fragen zur
Verfügung.
Wenn Sie weitere Fragen zu Ihrem Produkt haben, die Sie auf unserer Webseite nicht beantworten können,
kontaktieren Sie uns per E-Mail: support@conceptronic.net
Detaillierte Informationen über Conceptronic Produkte finden Sie auf unserer Webseite:
www.conceptronic.net
Möglicherweise weicht die Softwareinstallation auf Ihrem Computer von der im Folgenden beschriebenen
etwas ab. Dies hängt vom Windows-Betriebssystem ab, das Sie verwenden.
Tipp:
Die Firmware des Conceptronic CM3PVRD kann upgegradet werden. Die neuste Firmware-Version
für das Gerät können Sie auf der Conceptronic-Webseite herunterladen.
Tipp:
Die aktuelle Codec-Liste der unterstützten Dateien finden Sie auf www.conceptronic.net.
In der Verpackung des Conceptronic Media Recorders & Players ist Folgendes enthalten:
• Conceptronic CM3PVRD Media Recorder & Player (im Handbuch als ‚Gerät’ bezeichnet).
• Produktständer für CM3PVRD.
• Netzteil (12V, 2,5A) mit Anschlusskabel.
• Fernbedienung
• 2x AAA-Batterien für Fernbedienung
• RF-Antennenkabel
• Composite-Video-Kabel (roter, weißer, gelber RCA-Stecker).
• S-Video-Kabel
• Component-Videokabel (roter, grüner, blauer RCA-Stecker).
• Digitales Koaxial-Audiokabel (schwarzer RCA-Stecker).
• SCART-Adapter für Composite-Video-Kabel/ S-Video-Kabel.
• USB-Kabel.
• Dieses Benutzerhandbuch.
Conceptronic Media Recorders & Players.
) und
1. Packungsinhalt
91
Page 92

DEUTSCH
2. Produkteigenschaften
• Integrierter Hybrid-TV-Tuner mit automatischer TV-Kanalsuche.
o Unterstützt Analog-TV
o Unterstützt Digital-TV (DVB-T)
• TV-Signalaufzeichnung.
• AV-Signalaufzeichnung z.B. ab VCR, DVD oder Videokamera.
• Interner Kartenleser mit SD- (HC-), MMC- und MS-Unterstützung.
• Aufzeichnung auf interne Festplatte, Speicherkarte oder USB-Gerät.
• DVD-Qualität der aufgezeichneten Dateien im MPEG4- (AVI-)Format (können auf PC oder anderen Media
Playern wiedergegeben werden).
• Aufzeichnungsmöglichkeiten: Sofortaufzeichnung auf Tastendruck, Timer-Aufzeichnung, Time-Shifting.
• Wiedergabe von MPEG1-/2-/4-, MP3-, WMA-, JPG-Dateien, die auf der internen Festplatte,
Speicherkarte oder einem USB-Gerät gespeichert sind.
• Dateikopie ab Speicherkarte oder USB-Gerät auf interne Festplatte.
• Automatische Umschaltung zwischen PC- und Player-Modus:
o Wenn das Gerät an einen PC angeschlossen ist, hat es die Funktion eines USB-Speichergeräts oder
Kartenlesers.
o Wenn es nicht an einen PC angeschlossen ist, hat das Gerät die Funktion eines Media Recorders &
Players.
3. Hinweise und Warnungen
• Versuchen Sie nicht, das mitgelieferte Netzteil zu zerlegen. Dies könnte zu Verletzungen aufgrund von
Hochspannung führen. Wenn das Netzteil repariert werden muss, kontaktieren Sie bitte Ihren Händler
oder das Helpdesk von Conceptronic.
• Setzen Sie das Gerät nicht extremer Feuchtigkeit aus.
• Tauchen Sie das Gerät nicht in Flüssigkeiten und setzen Sie es keinen Flüssigkeiten aus.
• Trennen Sie das Netzteil von der Stromversorgung, wenn Sie das Gerät für längere Zeit nicht benutzen.
• Verwenden Sie das Gerät möglichst nicht in der Nähe von Brennstoffen.
• Ersetzen Sie die Batterie der Fernbedienung mit einer Batterie des gleichen Typs, wenn diese schwach
oder leer ist. Führen Sie die alten Batterien, wenn möglich, der Wiederverwertung zu. Wenn Sie die
Fernbedienung für längere Zeit nicht verwenden, entfernen Sie die Batterie, um Korrosion zu
verhindern.
• Setzen Sie die Fernbedienung nicht extremer Feuchtigkeit aus und lassen Sie sie nicht fallen.
• Verwenden Sie die Fernbedienung nicht bei intensiver Sonnenbestrahlung.
• Lassen Sie das Gerät NIEMALS fallen und setzen Sie es keinen Stößen oder Erschütterungen aus.
• Decken Sie das Gerät nicht ab, um eine Überhitzung zu vermeiden.
• Das Gerät unterstützt nur das FAT- / FAT32-Dateisystem (NTFS wird nicht unterstützt).
WICHTIG:
Hinweis:
Hinweis:
Wenn Sie die Festplatte mit NTFS formatieren, kann sie nur als Wechselfestplatte für Ihren
Computer verwendet werden. Formatieren Sie die Festplatte wieder mit FAT32, um die
Funktionen des Media Recorders & Players wieder zu aktivieren.
Die Daten auf der internen Festplatte und / oder den angeschlossenen Geräten können
fragmentiert werden. Dies kann eine Auswirkung auf die Wiedergabe von Filmen haben. Wir
empfehlen Ihnen, die Festplatte und/oder das/die angeschlossenen Gerät/-e auf Ihrem
Computer hin und wieder zu defragmentieren.
Der Hyrid-Tuner des CM3PVRD kann sowohl für Analog-TV als auch für DVB-T-Digital-TV
verwendet werden.
Über den analogen Teil des Hybrid-Tuners können Kanäle, über ein analoges Kabelsignal oder
Antennensignal empfangen werden.
92
Page 93

DEUTSCH
Über den digitalen Teil des Hybrid-Tuners können nur TV- und Radiokanäle über Free-to-AirDVB-T-Signale empfangen werden.
93
Page 94

DEUTSCH
6 8
12
Vorderseite
4. Gerätekomponenten
Rückseite
1
9
7
2
3
10
11
4
13
5
Legende:
1. Infrarotempfänger 11. Component (Y)-Ausgang
2. Aufzeichnungstaste 12. Component (Pb)-Ausgang
3. OK-/ Enter-Taste 13. Haupt-Ein-Aus-Schalter
4. MMC-/MS-/SD-Kartensteckplatz 14. Gleichstromeingang (12V, 2,5A)
5. USB-Host-Port 15. S-Video-Ausgang
6. Power- (3sec) / Stopp-Taste 16. Component (Pr)-Ausgang
7. Navigationstasten 17. Digitaler Koaxialausgang
8. Hybrid-TV-Tuner-Eingang 18. A/V-Ausgang (Composite-Video/-Audio)
9. Hybrid-TV-Tuner-Ausgang 19. Mini-USB-Buchse (für Anschluss an PC)
10. A/V-Eingang(Composite-Video/-Audio)
Hinweis:
Die Funktionen der Steuerungstasten sind grundsätzlich die selben wie die der Fernbedienung.
19
18
17
16
15
14
94
Page 95

DEUTSCH
Die Fernbedienung wird zur Steuerung des Geräts verwendet. Im inneren Einband dieses Handbuchs finden
Sie ein Bild der Fernbedienung. Die Zahlen der Tasten entsprechen denen der nachfolgenden Tabelle mit
Erklärungen aller Funktionen der Fernbedienung.
Nr. Taste Beschreibung
1. POWER ( ) Einschalten des Geräts oder Umschalten in den Standby-Modus
2. INFO Anzeigen der Kanalinformationen / Dateiinformationen
3. SOURCE Umschalten zwischen Tuner, AV & Wiedergabe
4. AUDIO Ändern der DVD-Audiospur
5. TITLE Zurückkehren zur DVD-Titelanzeige
6. 0-9 Menünavigation / direkte Kanaleingabe
7. +10 + 10 Kanäle
8. EPG Anzeigen der elektronischen Programmzeitschrift
[Electronic Program Guide]
9. FAVORITE Anzeigen der Liste der bevorzugten Kanäle
10. COPY Anzeige des Kopiermenüs
11. REPEAT Ändern des Wiederholungsmodus der Wiedergabe
12. VOLUME
13. VOLUME
14. RETURN Zurückkehren zur vorherigen Anzeige / zum vorherigen Kanal
15.
, , , Navigationstasten: Navigieren durch die Menüs
16. REC Starten der Aufzeichnung / Erhöhen der Aufzeichnungszeit (+30 Minuten)
17. PLAY/PAUSE Starten/Anhalten der Wiedergabe + Aufzeichnung anhalten /
Aktivieren von Time-Shifting
18. REWIND (
19. PREVIOUS (
20. OUTPUT Ändern des Ausgabesignals (Composite, Component, S-Video)
21. SETUP Anzeige des Einstellungsmenüs auf dem Bildschirm
22. NEXT (
23. FAST FORWARD (
24. STOP Anhalten der Wiedergabe / Anhalten der Aufzeichnung /
Deaktivieren von Time-Shifting
25. TIMER Öffnen des Schedulers für programmierte Aufzeichnungen
26. ENTER Bestätigung der Auswahl
27. STORAGE Ändern des aktiven Speichergeräts (Festplatte, USB, Karte)
28. CHANNEL
29. CHANNEL
30. MUTE Stummschalten
31. QUALITY Einstellen der Aufzeichnungsqualität
32. CLEAR Löschen einer Eingabe / Auswahl
33. SELECT Anzeige des Schnellauswahlmenüs für Digital-TV-Kanäle
34. EDIT Dateibearbeitungsmenü
35. 100 + 100 Kanäle
36. ANGLE Ändern des DVD-Wiedergabewinkels
37. SUB-T Ändern der DVD-Untertitel
38. DTV – INFO Anzeige von Informationen über digitale TV-Kanäle
39. DTV – T / R Umschalten zwischen Digital-TV und Digital-Radio
40. MENU Anzeige des Hauptmenüs
41. LED-Anzeige Anzeige der Aktivität der Fernbedienung
Erhöhen der Lautstärke
Reduzieren der Lautstärke
) Nächste(r/s) Datei / Titel / Kapitel / Bild
5. Erläuterungen zur Fernbedienung
) Rücklauf der Wiedergabe
) Vorherige(r/s) Datei / Titel / Kapitel / Bild
) Schnellvorlauf der Wiedergabe
Einen Kanal tiefer
Einen Kanal höher
95
Page 96

DEUTSCH
6. Anschluss des CM3PVRD
Anschluss der Antennenkabel
Das Gerät ist mit einem Hybrid-Tuner ausgestattet. Dieser ermöglicht die Verwendung des Geräts für den
Empfang von Analog-TV oder Digital-[DVB-T]-TV.
Hinweis:
Der Tuner des Geräts unterstützt Signal-Pass-Through für das Umschalten des TV-Signals vom
Tuner-Eingang zum Tuner-Ausgang. Die Pass-Through-Funktion funktioniert auch, wenn das
Gerät ausgeschaltet oder von der Stromversorgung getrennt ist. Sie können also weiter
fernsehen, auch wenn das Gerät ausgeschaltet ist.
Tunerausgang
Tunereingang
Analog-TV:
• Trennen Sie das Hauptantennenkabel von Ihrem Fernseher und schließen Sie es am Tunereingang des
Geräts an.
• Schließen Sie das mitgelieferte Antennenkabel am Tunerausgang des Geräts und am Tunereingang Ihres
Fernsehers an.
Digital-TV (DVB-T):
• Schließen Sie eine DVB-T-Antenne am Tunereingang des Geräts an.
• Schließen Sie das mitgelieferte Antennenkabel am Tunerausgang des Geräts und am Tunereingang Ihres
Fernsehers an.
Anschluss des/der Videokabel/s
Sie haben 4 Möglichkeiten, das Gerät an Ihren Fernseher anzuschließen:
- Composite
- SCART (durch Verwendung des Composite-Kabels & Scart-Adapters)
- S-Video **
- Component **
** Wenn Sie S-Video oder Component verwenden, wird nur das Videosignal an Ihren Fernseher gesendet.
Verwenden Sie die RCA-Stecker des Composite-Kabels (rot, weiß) oder das Koaxial-SPDIF-Kabel für
das Audiosignal.
96
Page 97

DEUTSCH
Composite:
• Stecken Sie das Composite-Kabel (gelb, rot und weiß) in die entsprechenden AV-Ausgangsbuchsen des
Geräts.
• Stecken Sie die andere Seite des Composite-Kabels (gelb, rot und weiß) in Ihrem Fernseher ein.
SCART:
• Stecken Sie das Composite-Kabel (gelb, rot und weiß) in die entsprechenden AV-Ausgangsbuchsen des
Geräts.
• Stecken Sie die andere Seite des Composite-Kabels (gelb, rot und weiß) in die Buchsen des SCART-
Adapters ein.
• Stellen Sie den Schalter des SCART-Adapters auf „Input“.
• Schließen Sie den SCART-Adapter an den SCART-Eingang Ihres Fernsehers an.
S-Video:
• Schließen Sie das S-Video-Kabel an die S-Videobuchse des Geräts an.
• Stecken Sie das andere Ende des S-Video-Kabels am S-Video-Eingang Ihres Fernsehers ein.
97
Page 98

DEUTSCH
Component:
• Schließen Sie das Component-Kabel (rot, grün und blau) an den Component-Buchsen des Geräts an.
• Stecken Sie das andere Ende des Component-Kabels in die Component-Buchsen an Ihrem Fernseher ein.
Anschluss des/der Audiokabel/s
Sie haben 2 Möglichkeiten für den Anschluss des Geräts an Ihren Fernseher / Ihr Heimkinosystem.
- Analog, über die RCA-Audiobuchsen des A/V-Ausgangs
- Digital, über den digitalen Koaxial-SPDIF-Ausgang
Analog:
• Schließen Sie die Audiostecker (rot, weiß) des Composite-Kabels an den RCA-Audiobuchsen des A/V-
Ausgangs an.
• Schließen Sie das andere Ende des Composite-Kabels and die RCA-Audiobuchsen Ihres Fernsehers oder
Empfängers an.
Digital:
• Schließen Sie das digitale Koaxialkabel an den digitalen Koaxialausgang des Geräts an.
• Stecken Sie das andere Ende des digitalen Koaxialkabels im digitalen Koaxialeingang Ihres Empfängers
ein.
98
Page 99

DEUTSCH
Anschluss von anderen Audio-/Videogeräten
Sie können eine Audio-/Videoquelle wie einen VCR, DVD-Player oder eine Set-Top-Box an das Gerät
anschließen und von dieser Audio-/Videoquelle aufzeichnen.
• Schließen Sie das im Lieferumfang Ihres Audio-/Videogeräts enthaltene Audio-/Videokabel an die
entsprechenden AV-Ausgangsbuchsen des Audio-/Videogeräts an.
• Stecken Sie die andere Seite des Composite-Kabels (gelb, rot und weiß) in die AV-Eingangsbuchsen des
Geräts ein.
Anschluss des Stromversorgungskabels
Sobald das Gerät an Ihr Audio-/Videogerät angeschlossen ist, können Sie das Gerät an die Stromversorgung
anschließen.
• Schließen Sie das mitgelieferte Netzteil am Gerät und an einer freien Steckdose an.
• Stellen Sie den Haupt-Ein-Aus-Schalter auf der Rückseite des Geräts auf ‚I’, um das Gerät mit Strom zu
versorgen.
Daraufhin schaltet das Gerät ein.
Sobald das Gerät eingeschaltet und betriebsbereit ist, leuchten die Navigationstasten (7), die
Aufzeichnungstaste (2) und die Power-Taste (6) blau.
Wenn das Gerät eingeschaltet ist und sich im Standby-Modus befindet, leuchten die Navigationstasten (7)
rot. Die Aufzeichnungstaste (2) und die Power-Taste (6) leuchten nicht.
Vorbereiten der Fernbedienung
• Entfernen Sie die Batterieabdeckung von der Rückseite der Fernbedienung.
• Legen Sie die im Lieferumfang enthaltenen AAA-Batterien in die Fernbedienung ein.
• Setzen Sie die Batterieabdeckung auf der Rückseite der Fernbedienung wieder ein.
Hinweise:
- Die Fernbedienung funktioniert am besten bei einem Abstand bis ca. 5 Meter.
- Richten Sie die Fernbedienung auf den IR-Empfänger in der Frontblende des Geräts.
- Der Empfangswinkel des IR-Empfängers beträgt ±30 Grad.
- Ersetzen Sie die Batterien, wenn diese schwach oder leer sind.
99
Page 100

DEUTSCH
7. Erste Konfiguration
Das Gerät muss konfiguriert werden, wenn Sie es zum ersten Mal einschalten.
• Wählen Sie den Eingangskanal an Ihrem Fernseher, an den das Gerät angeschlossen ist. (Composite,
SCART, S-Video oder Component).
Hinweis:
Von dieser Stelle an basiert das Handbuch auf der Annahme, dass Ihr Fernseher auf den
Eingangskanal des Geräts eingestellt ist. Alle beschriebenen Schritte beziehen sich auf den
• Stellen Sie sicher, dass der Haupt-Ein-Aus-Schalter auf der Rückseite des Geräts auf ‚I’ eingestellt ist.
• Schalten Sie das Gerät mit der Power-Taste auf der Vorderseite des Geräts oder mit der ‚Power’-Taste
(1
Nachdem das Gerät eingeschaltet ist, wird das Menü auf dem Bildschirm angezeigt.
Hinweis:
Hinweis:
Hinweis:
Betrieb des Geräts.
) auf der Fernbedienung ein.
Das Gerät muss die Festplatte initialisieren, wenn es eingeschaltet wird. Dies kann eine
Weile dauern. Während der Initialisierung erscheint die Meldung „Please Wait...[Bitte
warten]” auf dem Bildschirm.
Das voreingestellte Ausgabesignal ist Composite. Wenn Sie eine andere Ausgabe für das Gerät
verwenden, wird möglicherweise das Menü nicht auf Ihrem Bildschirm angezeigt. Drücken Sie
die ‚Output’-Taste (20
Wenn Sie das Gerät zum ersten Mal benutzen, muss die interne Festplatte formatiert
werden. Wählen Sie ‚Yes [Ja]’, um die interne Festplatte zu formatieren. Sobald die
Formatierung abgeschlossen ist, kann das Gerät konfiguriert und benutzt werden.
Das Formatieren der internen Festplatte hat das Löschen aller Daten auf der Festplatte zur
Folge!
) auf der Fernbedienung, um das Ausgabesignal des Geräts zu ändern.
100
 Loading...