

Page 1

NEDERLANDS
1
Conceptronic CLLSPK21
Snelstart Handleiding
Gefeliciteerd met de aankoop van uw
Conceptronic Multimedia Speaker Systeem 2.1
De meegeleverde Hardware Installatie handleiding geeft u een stap voor stap uitleg hoe u
het Multimedia Speaker Systeem 2.1 kunt aansluiten.
Ingeval van problemen adviseren wij u onze support-site te bezoeken (ga naar:
www.conceptronic.net
en klik op ‘Support’). Hier vindt u een database met veelgestelde
vragen waar u hoogstwaarschijnlijk de oplossing voor uw probleem kunt vinden.
Heeft u andere vragen over uw product die u niet op de website kunt vinden, neem dan
contact met ons op via e-mail: support@conceptronic.net
Voor meer informatie over Conceptronic producten kunt u terecht op de Conceptronic
website: www.conceptronic.net
.
Page 2

NEDERLANDS
2
1. Inhoud van de verpakking
• 1x Subwoofer Luidspreker
• 2x Satelliet Luidsprekers
• 1x Gebruikers handleiding
• 1x Audio kabel (2 RCA to 3,5” stereo kabel)
• 1x mini jack naar mini jack kabel
2. Gebruik
Dit multimedia luidspreker systeem kan gebruikt worden in samenhang met een:
- Computer;
- Walkman / MP3-Player;
- Radio;
- TV, DVD, CD-Player etc.
3. Kenmerken
De Conceptronic Multimedia Luidspreker set heeft een subwoofer met 2 satelliet
luidsprekers welke magnetisch afgeschermd zijn en een actief gescheiden circuit heeft
voor de frequenties.
4. Technische Specificaties
Luidspreker: 1.5 inch + 1.5 inch stereo luidspreker
Subwoofer: 5”
Frequentie bereik: 60Hz – 120Hz (Subwoofer); 30 watt
120Hz – 20Khz (Satelliet) 2x 10 watt
Controle Paneel: Power / Volume / Line-In
Satelliet speaker grootte: 45mm(W) * 200mm(H) * 35mm(D)
Subwoofer: 162mm(W) * 237mm(H) * 230(D)
Page 3

NEDERLANDS
3
5. Let op!
1. De luidsprekers moeten op een vaste & stevige plek neergezet worden.
2. Trek niet aan de kabels wanneer deze afgekoppeld worden. Om de kabels af te
koppelen, trek dan aan de connector.
3. Open de behuizing niet. Dit kan een elektrische schok of ander incident
veroorzaken.
4. Zet de volume schakelaar uit of beperk deze tot het minimum voordat de
stroomschakelaar omgezet wordt. U kunt het volume nadat de spanning op het
apparaat staat wijzigen.
5. Voorkom blootstelling aan direct zonlicht en zet de luidsprekers niet op een hete
plek.
6. Als u de luidsprekers te lang met een extreem harde volume beluistert dan kan dit
uw gehoor beschadigen.
Let op:
De satelliet luidsprekers zijn uitgerust met een geïntegreerde rotatiebal. U kunt
de luidspreker in de door u gewenste positie zetten. Wanneer de elasticiteit
minder wordt (de rotatiebal komt losser te zitten) dan kunt u de schroeven aan de
onderkant weer steviger vast schroeven.
Tip:
Voor het verkrijgen van de beste geluidskwaliteit dient u de subwoofer op de
grond te plaatsen.
Page 4

NEDERLANDS
4
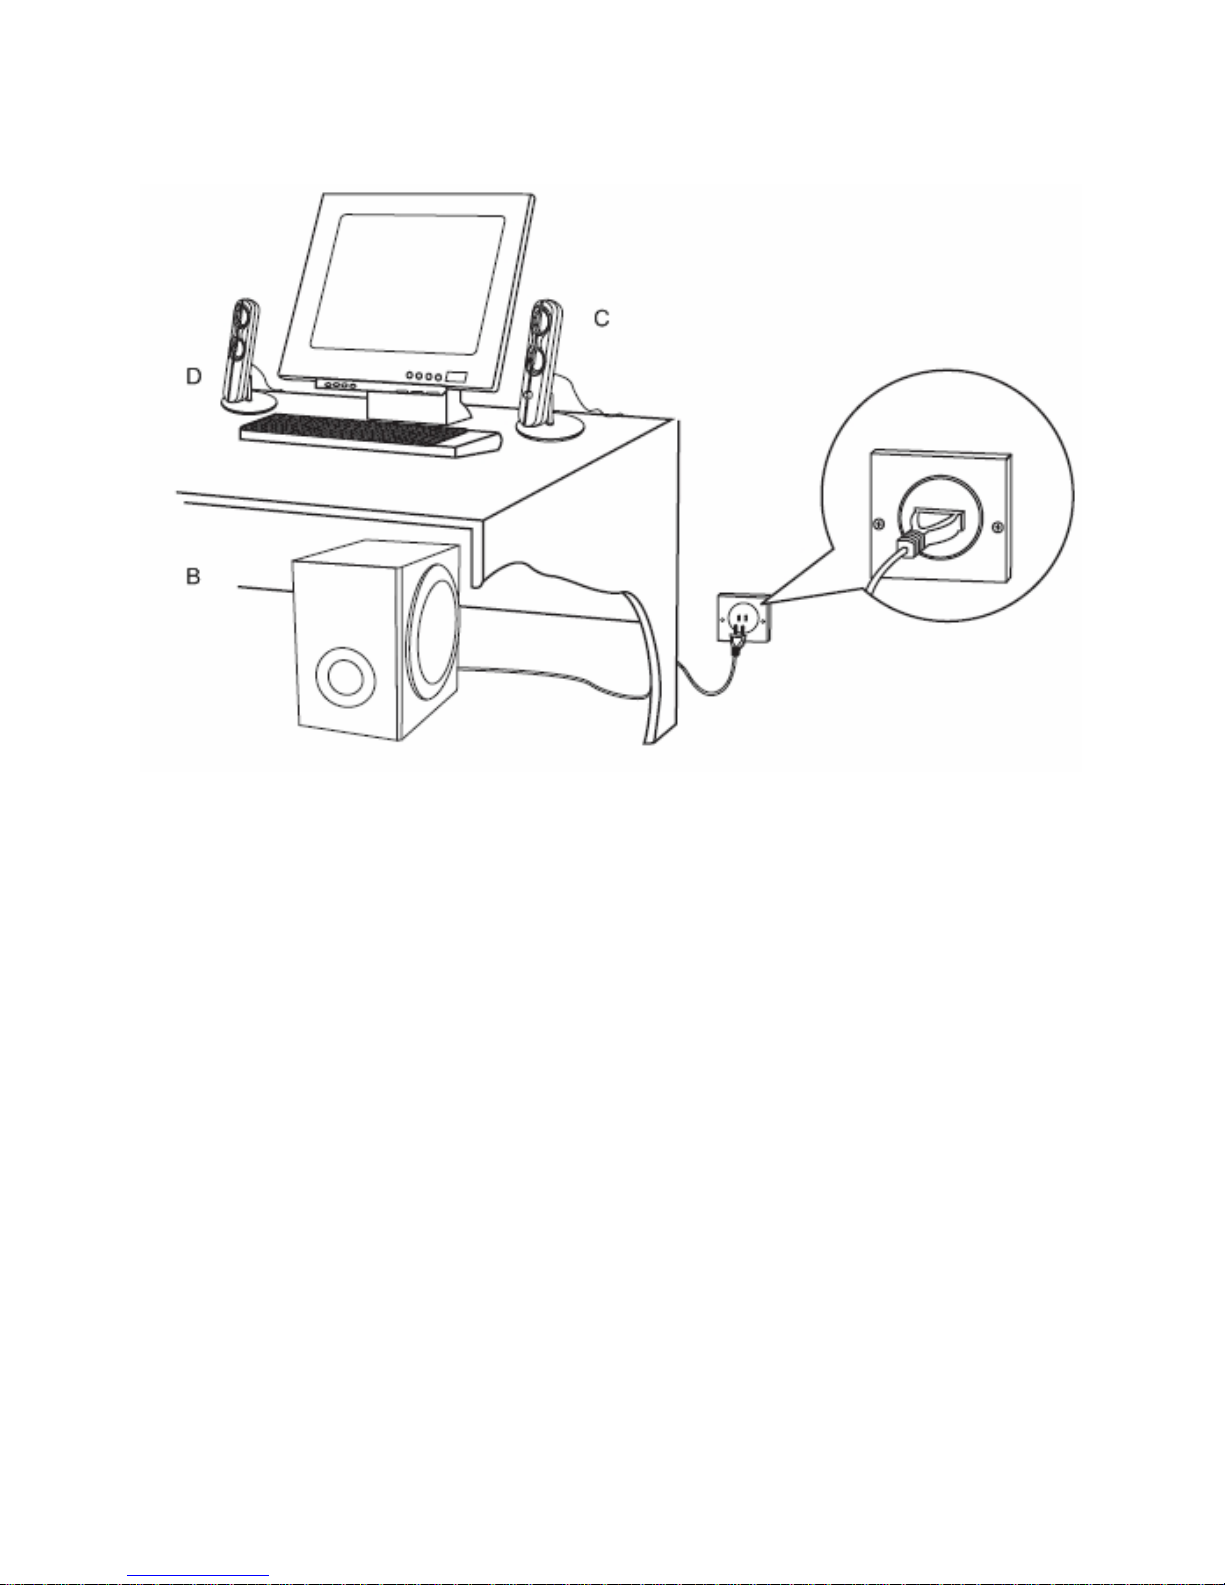
6. Installatie en gebruik
A. Haal de Subwoofer en Satelliet luidsprekers uit de doos.
B. Zet de speakers neer zoals bijvoorbeeld getoond in het bovenstaande beeld.
C. De luidspreker met de aan/uit Volume kop is de RECHTER luidspreker.
D. De luidspreker zonder een knop is de LINKER luidspreker.
E. Verbind de satelliet luidsprekers aan de subwoofer.
F. Verbind de RCA plug van de LINKER speaker aan de linker output van de subwoofer
(opdruk met L-SPK). De connectoren kunt u aan de achterzijde van de subwoofer
vinden.
G. Verbind de 9 PIN's aansluiting van de RECHTER luidspreker aan de 9 PIN aansluiting
van de subwoofer (opdruk met Control-OUT).
Page 5

NEDERLANDS
5
H. Verbind de luidspreker systeem aan een audio bron:
a. Verbind de MINI-JACK van aan de audio uitgang van een audio apparaat.
(Computer, walkman, MP3 Player, DVD speler, etc.)
b. Verbind de andere kant van de kabel in de audio ingang van de subwoofer.
(opdruk met R-INPUT) Verbind de witte RCA plug aan de witte input connector
en de rode RCA plug aan de rode input
I. Zet het volume uit of tot een minimale instelling.
J. Stop de stroomkabel in een stopcontact.
K. Schakel de audio bron waaraan de luidspreker systeem is verbonden aan.
L. Schakel de stroom in door de stroomschakelaar in te schakelen. Deze schakelaar
vindt u aan de achterkant van de subwoofer. Draai de volumeknop open en de LED
aan de voorkant zal oplichten.
M. Zet het volume op uw eigen voorkeur. U kunt de BAS instelling wijzigen aan de
achterkant van de subwoofer om het geluidsniveau aan te passen.
Page 6

NEDERLANDS
6
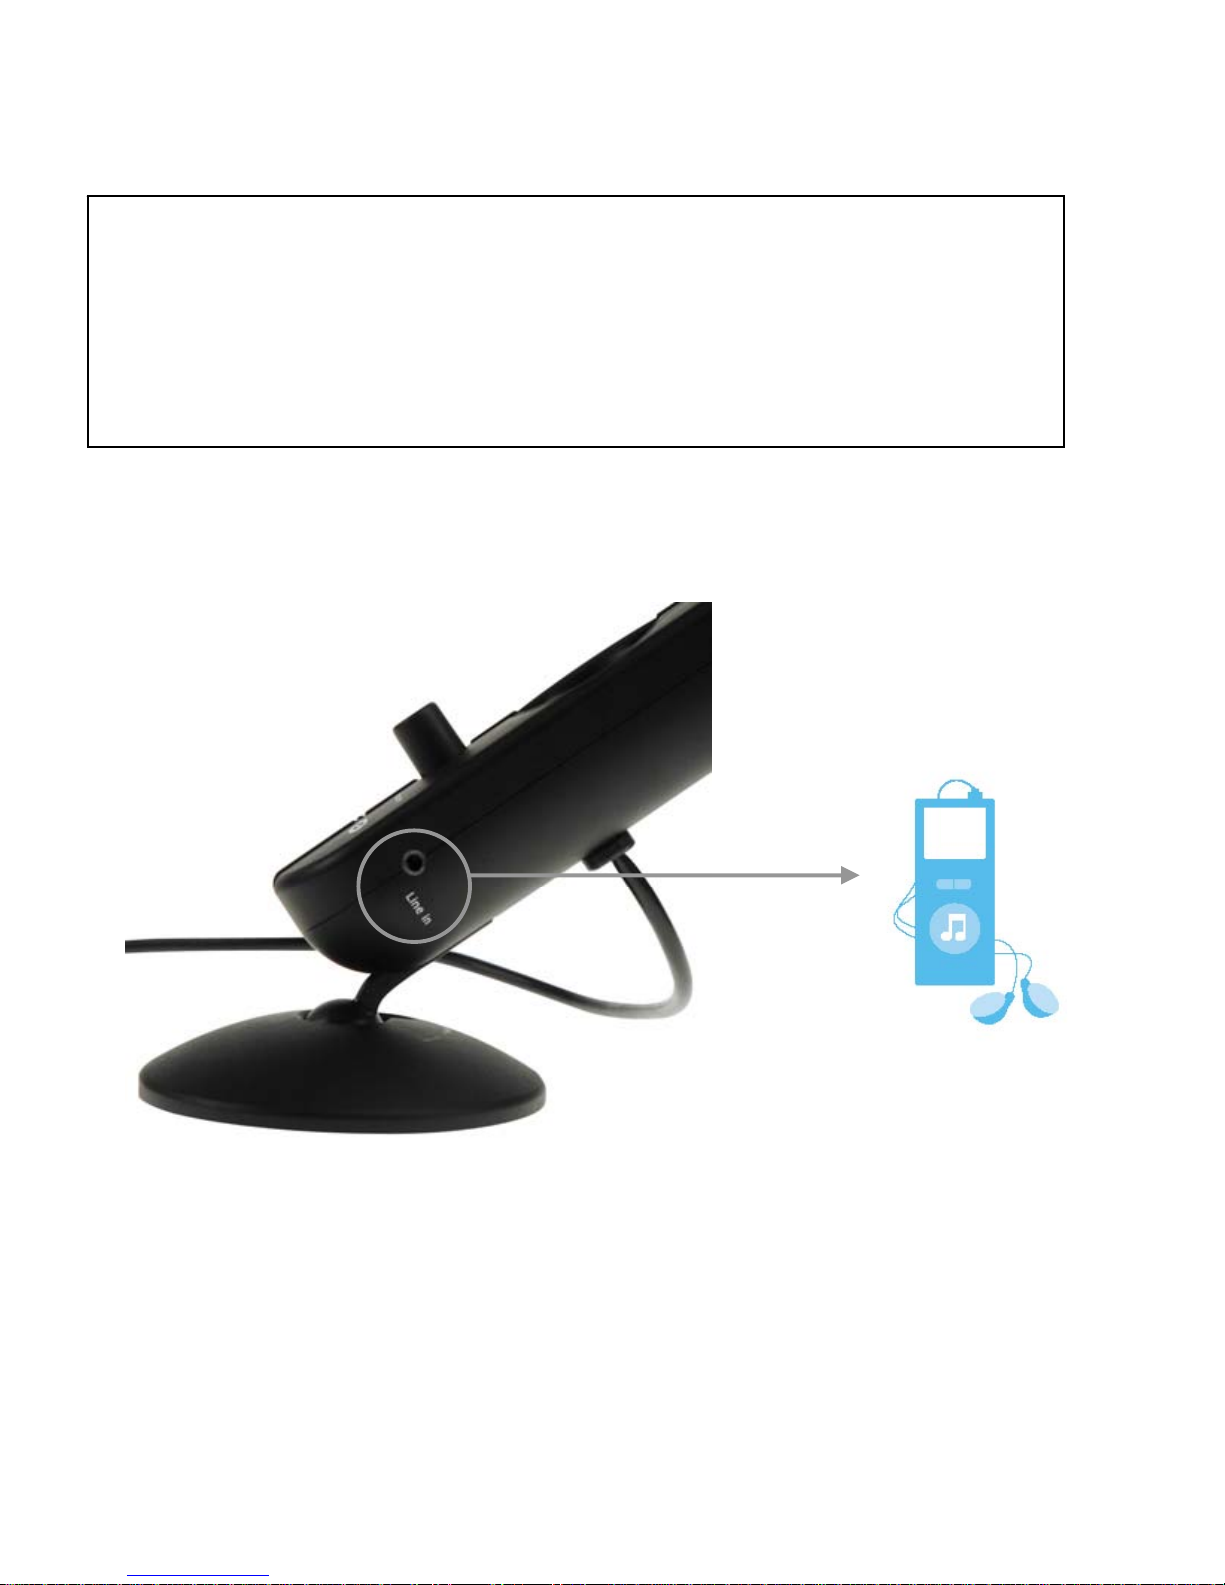
Let op:
Op de rechter luidspreker bevind zich ook een Line-In ingang, deze dient ervoor
om een andere audio bron aan te sluiten. Het systeem zal automatisch
omschakelen naar deze audiobron wanneer deze Line-In ingang gebruikt wordt.
Deze flexibele oplossing maakt het mogelijk om bijvoorbeeld een MP3 speler
makkelijk aan te sluiten.
Page 7

ENGLISH
7
Conceptronic CLLSPK21
Quick installation
Congratulations on the purchase of your
Conceptronic Multimedia Speaker System 2.1
The enclosed Hardware Installation Guide gives you a step-by-step explanation of how to
install the Multimedia Speaker System 2.1
When problems occur, we advise you to go to our support-site (go to www.conceptronic.net
and click ‘Support’. Here you will find the Frequently Asked Questions Database.
When you have other questions about your product and you cannot find it at our website,
then contact us by e-mail: support@conceptronic.net
For more information about Conceptronic products, please visit the Conceptronic Web Site:
www.conceptronic.net
Page 8

ENGLISH
8
1. Package Content
• 1x Subwoofer Speaker
• 2x Satellite Speaker
• User’s Manual
• 1x Audio Cable (2 RCA to 3,5” stereo cable)
• 1x mini jack to mini jack cable
2. Usage
This multimedia speaker system can be used together with a,
- Computer;
- Walkman / MP3-Player;
- Radio;
- TV, DVD, CD-Player etc.
3. Features
The Conceptronic Multimedia Speaker set has a Subwoofer speaker with 2 satellite
speakers what are magnetically shielded and have an active separated circuit for the
frequencies.
4. Technical Specification
Speaker: 1.5 inch + 1.5 inch stereo speaker
Subwoofer: 5”
Frequency Response: 60Hz – 120Hz (Subwoofer); 30 watt
120Hz – 20Khz (Satellite) 2x 10 watt
Control Panel: Power / Volume / Line-In
Size Satellite: 45mm(W) * 200mm(H) * 35mm(D)
Subwoofer: 162mm(W) * 237mm(H) * 230(D)
Page 9

ENGLISH
9
5. Precautions
1. The loudspeakers should be placed on a flat and solid surface
2. Do not pull the electric cord to unplug the connectors. You should hold the
connector to unplug it.
3. Do not open the housing to avoid electric shock or other accidents
4. turn the volume knob to the minimum position before turning on the power. You
can adjust the volume after turning the power on.
5. Avoid direct sunlight and keep the speakers from a source what can become heat.
6. Do not use the loudspeaker system for long hours under maximum volume. This can
damage your ears.
Note:
The satellite speakers are provided with an integrated rotation ball to make the
aiming of the music more flexible. When the elasticity is getting less, please
fasten the screws on the bottom of the satellite speaker.
Tip:
To get the best sound quality out of the speaker set, please put the subwoofer on
the ground.
Page 10
ENGLISH
10
6. Installation and operation guide
A. Unpack the Subwoofer and Satellite speakers.
B. Position the speakers as shown in the image or similar.
C. The Speaker with the knob on it is: Speaker RIGHT.
D. The Speaker without the knob is: Speaker LEFT.
E. Connect the satellite speakers to the subwoofer
F. Connect the RCA connector on the left speaker to the left output (printed as L-
SPK) at the back of the subwoofer.
G. Connect the RCA connector on the right speaker to the right 9 pin Jack (printed as
Control-OUT) at the back of the subwoofer.
Page 11

ENGLISH
11
H. Connect the speaker system to an audio source:
a. Plug the MINI-JACK of the signal input cable into the output port of a audio
source (Computer, walkman, MP3 Player, DVD Player, etc.)
b. Plug the other end of the cable into the input port (printed as R-INPUT) at the
back of the subwoofer, white coloured RCA jack into the white input and the
red coloured RCA jack into the red input.
I. Plug the power cable to an AC outlet.
J. Switch on the audio source to which the speaker is connected.
K. Make sure that all the knobs (Volume) are at the minimum settings.
L. Put the power switch on at the back of the subwoofer and switch on the speaker
system by rotating the power knob on the right speaker. The LED at the front will
light up.
M. Adjust the volume knob on the speaker. You can alter the bass knob at the back of
the subwoofer to adjust the sound effect.
Page 12
ENGLISH
12
Note:
At the right speaker you can also find a Line-In jack to provide an option for more
than one audio source. The system will automatically switch to the new source to
play songs for it when the line is inserted. This flexible solution allows you to
connect an MP3 player to it without disconnecting your existing line out jack to
the audio source.
Page 13

ESPAÑOL
13
CLLSPK21 de Conceptronic
Guía de instalación rápida
Felicidades por la compra de su
sistema de altavoces multimedia 2.1 de Conceptronic
Esta guía de instalación le orientará paso a paso sobre cómo instalar el sistema de altavoces
multimedia 2.1 de Conceptronic.
Si encuentra problemas, le aconsejamos que se dirija a nuestra página web
www.conceptronic.net
y haga clic en «Support». Aquí encontrará la base de datos de las
preguntas más frecuentes o FAQ.
Si tiene otras preguntas sobre su producto y no las encuentra en nuestro sitio web, póngase
en contacto con nuestro servicio técnico por correo electrónico:
support@conceptronic.net
Para obtener más información acerca de productos de Conceptronic por favor visite el lugar
Web de Conceptronic: www.conceptronic.net
Page 14

ESPAÑOL
14
1. Contenido del paquete
• 1 altavoz con subwoofer
• 2 altavoces satélite
• Manual del usuario
• 1 cable de audio (2 RCA a cable estéreo de 3,5”)
• 1 mini jack para cable mini jack
2. Uso
Este sistema de altavoces multimedia puede utilizarse con un
- ordenador,
- walkman / reproductor de MP3,
- radio, y
- TV, DVD, reproductor de CD, etc.
3. Características
El sistema de altavoces multimedia de Conceptronic tiene un altavoz para graves
(subwoofer) con dos altavoces satélite blindados magnéticamente y con un circuito
independiente para las frecuencias.
4. Especificaciones técnicas
Altavoz: 1,5 pulgadas + altavoz estéreo de 1,5 pulgadas
Subwoofer: 5”
Respuesta de frecuencia: 60 Hz – 120 Hz (subwoofer); 30 vatios
120 Hz – 20 kHz (satélite) 2 x 10 vatios
Panel de control: Alimentación / Volumen / Entrada de línea
Tamaño satélites: 45 mm (ancho) * 200 mm (alto) * 35 mm (largo)
Subwoofer: 162 mm (ancho) * 237 mm (alto) * 230 mm (largo)
Page 15

ESPAÑOL
15
5. Precauciones
1. Los altavoces deben colocarse sobre una superficie plana y sólida.
2. No tire del cable eléctrico para desenchufar los conectores. Sujete el conector
para desenchufarlo.
3. No abra la caja, evitará choques eléctricos u otros accidentes.
4. Gire el control del volumen hasta el mínimo antes de conectar la alimentación.
Ajuste el volumen después de conectar la alimentación.
5. Evite el contacto directo con la luz del sol y mantenga los altavoces alejados de
fuentes de calor.
6. No utilice el sistema de altavoces al máximo volumen durante un tiempo
prolongado, ya que puede dañar su oído.
Nota:
Los altavoces satélite vienen con un cojinete integrado que permite orientar la
música. Cuando la flexibilidad se vaya reduciendo, apriete los tornillos de la parte
inferior del altavoz satélite.
Consejo:
Para obtener la mayor calidad de sonido del sistema de altavoces, coloque el
subwoofer en el suelo.
Page 16

ESPAÑOL
16
6. Instalación y guía sobre el funcionamiento
A. Saque el subwoofer y los altavoces satélite del paquete.
B. Coloque los altavoces como se indica en la imagen o en una posición parecida.
C. El altavoz con el botón de control es el altavoz DERECHO.
D. El altavoz sin el botón de control es el altavoz IZQUIERDO.
E. Conecte los altavoces satélite al subwoofer.
F. Enchufe el conector RCA del altavoz izquierdo a la salida izquierda (L-SPK) de la
parte trasera del subwoofer.
G. Enchufe el conector RCA del altavoz derecho a la toma derecha de 9 pins (Control-
OUT) de la parte trasera del subwoofer.
Page 17

ESPAÑOL
17
H. Conecte el sistema de altavoces a una fuente de audio:
c. Enchufe el MINI-JACK del cable de entrada de señal en el puerto de salida de
una fuente de audio (ordenador, walkman, reproductor MP3, reproductor
DVD, etc.).
d. Enchufe el otro extremo del cable en el puerto de entrada (R-INPUT) de la
parte trasera del subwoofer, la toma RCA de color blanco en la entrada
blanca y la toma RCA de color rojo en la entrada roja.
I. Enchufe el cable de alimentación a una toma de corriente.
J. Encienda la fuente de audio a la que ha conectado los altavoces.
K. Asegúrese de que todos los botones de control (volumen) están en el mínimo.
L. Encienda el interruptor de alimentación de la parte trasera del subwoofer y
encienda el sistema de altavoces girando el botón de control del altavoz derecho.
El LED delantero se iluminará.
M. Ajuste el botón de control del volumen del altavoz. Puede girar el botón de control
de bajos en la parte trasera del subwoofer para ajustar el efecto de sonido.
Page 18

ESPAÑOL
18
Nota:
En el altavoz derecho también hay una toma de entrada de línea que permite
conectar más de una fuente de audio. El sistema se conectará automáticamente a
la nueva fuente para reproducir las canciones cuando se haya conectado la línea.
Esta solución flexible le permite conectar un reproductor MP3 sin desconectar la
toma de salida de línea actual de la fuente de audio.
Page 19

DEUTSCH
19
Conceptronic CLLSPK21
Schnellinstallationsanleitung
Wir gratulieren Ihnen zum Kauf Ihres
Conceptronic Multimedia Lautsprecher-Systems 2.1
In beiliegender Hardware-Installationsanleitung wird Ihnen Schritt für Schritt gezeigt, wie das
Multimedia Lautsprecher-System 2.1 von Conceptronic installiert werden muss.
Wenn Probleme auftreten sollten, besuchen Sie unsere Support-Seite (unter
www.conceptronic.net
) und klicken Sie auf ‚Support’. Dort steht Ihnen unsere FAQ-
Datenbank mit den häufig gestellten Fragen zur Verfügung.
Wenn Sie weitere Fragen zu Ihrem Produkt haben, die Sie auf unserer Webseite nicht
beantworten können, kontaktieren Sie uns per E-Mail: support@conceptronic.net
Detaillierte Informationen über Conceptronic Produkte finden Sie auf unserer Webseite:
www.conceptronic.net
Page 20

DEUTSCH
20
1. Packungsinhalt
• 1x Subwoofer-Lautsprecher
• 2x Satelliten-Lautsprecher
• Benutzerhandbuch
• 1x Audiokabel (2 RCA-3,5”-Stereokabel)
• 1x Minibuchse-Ministecker-Kabel
2. Anwendung
Dieses Multimedia Lautsprecher-System kann in Verbindung mit folgenden Geräten
verwendet werden:
- Computer;
- Walkman / MP3-Player;
- Radio;
- TV, DVD, CD-Player usw.
3. Eigenschaften
Das Multimedia Lautsprecher-System von Conceptronic hat einen SubwooferLautsprecher mit 2 Satelliten-Lautsprechern, die magnetisch abgeschirmt sind und einen
aktiven Schaltkreis zur Aufteilung der Frequenzen.
4. Technische Daten
Lautsprecher: 1,5 Zoll + 1,5 Zoll Stereo-Lautsprecher
Subwoofer: 5”
Frequenzgang: 60Hz – 120Hz (Subwoofer); 30 Watt
120Hz – 20Khz (Satellit) 2x 10 Watt
Systemsteuerung: Power / Lautstärke / Eingang
Abmessung Satellitenlautsprecher: 45mm (B) * 200mm (H) * 35mm (T)
Subwoofer: 162mm (B) * 237mm (H) * 230mm (T)
Page 21

DEUTSCH
21
5. Vorsichtsmaßnahmen
1. Die Lautsprecher sollten auf eine flache und feste Unterlage gestellt werden.
2. Ziehen Sie nicht am Kabel, um die Verbindung zu trennen. Halten Sie beim Trennen
der Verbindung den Stecker fest.
3. Das Gehäuse darf nicht geöffnet werden. Dies könnte Stromschläge oder andere
Unfälle zur Folge haben.
4. Drehen Sie die Lautstärkeregelung auf das Minimum, bevor Sie das Gerät
einschalten. Sie können die Lautstärke einstellen, nachdem Sie das Gerät
eingeschaltet haben.
5. Vermeiden Sie direkte Sonneneinstrahlung und stellen Sie die Lautsprecher nicht in
der Nähe von potentiellen Wärmequellen auf.
6. Verwenden Sie das Lautsprecher-System nicht über lange Zeit mit voller
Lautstärke. Dies kann schädlich für Ihre Ohren sein.
Hinweis:
Die Satellitenlautsprecher verfügen über eine integrierte Drehkugel, damit die
Lautsprecher flexibel in der Ausrichtung sind. Sollte die Elastizität nachlassen,
ziehen Sie bitte die Schrauben auf der Unterseite des Satellitenlautsprechers fest.
Tipp:
Das Lautsprecher-System erzielt die beste Klangqualität, wenn Sie den Subwoofer
auf den Boden stellen.
Page 22

DEUTSCH
22
6. Installations- und Betriebsanleitung
A. Packen Sie den Subwoofer und die Satelliten-Lautsprecher aus.
B. Positionieren Sie die Lautsprecher, wie in der Abbildung gezeigt oder auf ähnliche
Weise.
C. Der Lautsprecher mit dem Knopf ist der RECHTE Lautsprecher.
D. Der Lautsprecher ohne Knopf ist der LINKE Lautsprecher.
E. Schließen Sie die Satelliten-Lautsprecher am Subwoofer an.
F. Schließen Sie den RCA-Stecker des linken Lautsprechers am linken Ausgang (mit der
Kennzeichnung L-SPK) auf der Rückseite des Subwoofers an.
G. Schließen Sie den RCA-Stecker des rechten Lautsprechers an der rechten 9-Pin-
Buchse (mit der Kennzeichnung Control OUT) auf der Rückseite des Subwoofers an.
Page 23

DEUTSCH
23
H. Schließen Sie das Lautsprecher-System an eine Audioquelle an:
a. Stecken Sie die MINI-STECKER des Signaleingangskabels im Ausgang der
Audioquelle ein (Computer, Walkman, MP3-Player usw.)
b. Stecken Sie das andere Ende des Kabels im Eingang (mit der Kennzeichnung R
INPUT) auf der Rückseite des Subwoofers, den weißen RCA-Stecker in den weiß
gekennzeichneten Eingang und den roten RCA-Stecker in den rot
gekennzeichneten Eingang ein.
I. Schließen Sie das Stromkabel an der Stromversorgung an.
J. Schalten Sie die Audioquelle ein, an die der Lautsprecher angeschlossen ist.
K. Vergewissern Sie sich, dass alle Knöpfe (Lautstärke) auf das Minimum eingestellt
sind.
L. Betätigen Sie den Power-Schalter auf der Rückseite des Subwoofers und schalten
Sie das Lautsprecher-System durch Drehen des Power-Knopfes am rechten
Lautsprecher ein. Daraufhin leuchtet die LED-Anzeige auf der Vorderseite auf.
M. Regeln Sie die Lautstärke mithilfe des Knopfes auf dem Lautsprecher. Sie können
über den Bass-Knopf auf der Rückseite des Subwoofers den Klangeffekt verändern.
Page 24

DEUTSCH
24
Hinweis:
Am rechten Lautsprecher befindet sich auch eine Eingangsbuchse für den Anschluss
von weiteren Audioquellen. Sobald dort ein Gerät angeschlossen wird, gibt das
Lautsprecher-System automatisch die Musik von der neuen Quelle wieder. Dank
dieser flexiblen Lösung können Sie einen MP3-Player anschließen, ohne die
bestehende Verbindung mit der anderen Audioquelle trennen zu müssen.
Page 25

FRANÇAIS
25
Conceptronic CLLSPK21
Guide d’installation rapide
Félicitations pour l’achat de votre
Système de haut-parleurs Multimédia 2.1 de Conceptronic
Le guide d’installation du matériel ci-joint vous explique pas à pas comment installer le
Système de haut-parleurs Multimédia 2.1.
En cas de problèmes, nous vous recommandons de vous adresser à notre service technique
(allez à www.conceptronic.net
et cliquez sur « support »). Vous trouverez dans cette section
la Base de Données des Foires Aux Questions.
Si vous avez d’autres questions concernant votre produit et que vous ne trouvez pas la
solution sur notre site web, contactez-nous par e-mail : support@conceptronic.net
Pour plus d'informations sur les produits de Conceptronic, visitez notre Site Internet
Conceptronic: www.conceptronic.net
Page 26

FRANÇAIS
26
1. Contenu de l’emballage
• 1 haut-parleur subwoofer
• 2 haut-parleurs satellite
• Guide de l’utilisateur
• 1 câble audio (2 RCA à 3,5” câble stéréo)
• 1 mini jack pour câble mini jack
2. Utilisation
Ce système de haut-parleurs multimédia peut être utilisé avec :
- Ordinateur;
- Baladeur / Reproducteur MP3;
- Radio;
- TV, DVD, Reproducteur CD, etc.
3. Caractéristiques
Le jeu de haut-parleurs Multimédia Conceptronic se compose d’un haut-parleur
subwoofer et 2 haut-parleurs satellite protégés magnétiquement et disposant d’un
circuit indépendant pour les fréquences.
4. Caractéristiques techniques
Haut-parleur: haut-parleur stéréo de 1.5 pouces + 1.5 pouces
Subwoofer: 5”
Réponse en fréquence: 60Hz – 120Hz (Subwoofer); 30 watt
120Hz – 20Khz (Satellite) 2x 10 watt
Panneau de contrôle: Alimentation / Volume / Fiche entrée
Taille satellite: 45mm(L) * 200mm(H) * 35mm(P)
Subwoofer: 162mm(L) * 237mm(H) * 230(P)
Page 27

FRANÇAIS
27
5. Précautions
1. Les haut-parleurs doivent être placés sur une surface plane et solide
2. Ne tirez pas sur le câble pour débrancher, prenez-le par le connecteur.
3. N’ouvrez pas le boîtier afin d’éviter des chocs électriques ou d’autres accidents.
4. Mettez le volume au minimum avant d’allumer les haut-parleurs. Vous pourrez
régler le volume après les avoir mis en marche.
5. Evitez le contact direct avec la lumière du soleil et maintenez les haut-parleurs
éloignés des sources de chaleur.
6. N’utilisez pas le système de haut-parleurs pendant plusieurs heures au volume
maximum, ceci pourrait entraîner des pertes d’audition.
Remarque:
Les haut-parleurs satellite sont fournis avec une base rotative qui permet une
meilleure flexibilité pour orienter les haut-parleurs. Quand l’élasticité diminuera,
resserrez les vis de la partie inférieure du haut-parleur satellite.
Conseil:
Pour obtenir la meilleure qualité de son, placez le haut-parleur subwoofer à même
le sol.
Page 28

FRANÇAIS
28
6. Installation et guide de fonctionnement
A. Déballez les haut-parleurs subwoofer et satellite.
B. Placez les haut-parleurs dans une position semblable à celle que montre l’image.
C. Le haut-parleur qui a le bouton de contrôle du volume est le haut-parleur de
DROITE.
D. Le haut-parleur qui n’a pas de bouton est le haut-parleur de GAUCHE.
E. Connectez les haut-parleurs satellite au subwoofer.
F. Branchez le connecteur RCA du haut-parleur gauche (où on y lit L-SPK) à la sortie
gauche de la partie arrière du subwoofer.
G. Branchez le connecteur RCA du haut-parleur droit à la fiche de 9 broches située sur
la partie arrière du subwoofer (où on y lit Control-OUT).
Page 29

FRANÇAIS
29
H. Connectez le système de haut-parleurs à une source audio:
a. Connectez le MINI-JACK du câble d’entrée de signal au port de sortie d’une
source audio (Ordinateur, baladeur, reproducteur MP3, reproducteur DVD,
etc.)
b. Connectez l’autre extrémité du câble au port d’entrée (où on y lit R-INPUT),
sur la partie arrière du subwoofer, la prise RCA blanche dans la fiche blanche
et la prise RCA rouge dans la fiche rouge.
I. Branchez le câble d’alimentation à une prise de courant.
J. Mettez en marche la source audio connectée aux haut-parleurs.
K. Assurez-vous que tous les boutons (Volume) sont au minimum.
L. Mettez l’interrupteur d’alimentation (à l’arrière du subwoofer) en position ON et
mettez le système en marche en tournant le bouton de contrôle du haut-parleur de
droite. L’indicateur LED du haut-parleur s’allumera.
M. Réglez le volume sur le haut-parleur. Vous pouvez régler aussi la basse depuis la
partie arrière du subwoofer pour régler les effets de son.
Page 30

FRANÇAIS
30
Remarque:
Vous trouverez aussi sur le haut-parleur droit une fiche d’entrée qui permet plus
d’une source audio. Le système changera automatiquement à la nouvelle source
aussitôt qu’elle aura été branchée. Cette solution flexible vous permet de
connecter un reproducteur MP3 aux haut-parleurs sans avoir à déconnecter la ligne
à la source audio en usage.
Page 31

ITALIAN
31
CLLSPK21 Conceptronic
Guida d’installazione rapida
Vi ringraziamo per aver acquistato le
Casse multimediali 2.1 di Conceptronic
La presente guida per l’installazione dell’hardware spiega come installare passo a passo le
casse multimediali 2.1
Se dovessero esserci dei problemi, vi consigliamo di visitare il nostro sito di supporto (andate
su www.conceptronic.net
e cliccate ‘support’), dove potrete trovare il Database delle
Risposte alle Domande più Frequenti (FQA).
Se doveste avere altre domande riguardanti il prodotto che non trovate sul nostro sito Web vi
preghiamo di contattarci attraverso l’e-mail: support@conceptronic.net
Per ulteriori informazioni dei prodotti Conceptronic, la preghiamo di visitare il sito Web della
Conceptronic: www.conceptronic.net
Page 32

ITALIAN
32
1. Contenuto della confezione
• 1x subwoofer
• 2x casse satelliti
• Manuale d’uso
• 1x cavo audio (cavo stereo da 2 x RCA a 3,5”)
• 1x mini jack per cavo mini jack
2. Uso
Le presenti casse multimediali si possono usare congiuntamente con un:
- Computer
- Walkman / lettore MP3
- Radio
- TV, lettore di DVD, di CD, ecc.
3. Caratteristiche
Le casse multimediali Conceptronic sono composte da un subwoofer e due casse satelliti
schermate magneticamente, dotate di un circuito attivo separato per le frequenze.
4. Specifiche tecniche
Altoparlanti: Altoparlante stereo 1,5 pollici + 1,5 pollici
Subwoofer: 5”
Risposta in frequenza: 60Hz – 120Hz (subwoofer); 30 watt
120Hz – 20Khz (casse satellite) 2 x 10 watt
Pannello di controllo: Power / Volume / Ingresso linea
Dimensioni casse satellite: 45 mm (Lungh) * 200 mm (Alt) * 35 mm (Largh)
Subwoofer: 162 mm(Lungh) * 237 mm(Alt) * 230 mm(Largh)
Page 33

ITALIAN
33
5. Precauzioni
1. Gli altoparlanti si devono posizionare su una superficie piana e solida
2. Non tirare il cavo elettrico per scollegare i connettori. Si deve tirare direttamente
dal connettore per scollegarlo
3. Non aprire la struttura di protezione per evitare shock elettrici o altri incidenti
4. Ruotare la manopola del volume al livello minimo prima di accendere il dispositivo.
Il volume si potrà regolare dopo l’accensione
5. Evitare un’esposizione diretta ai raggi solari e mantenere le casse acustiche
lontano da sorgenti di calore
6. Non usare le casse acustiche per molte ore al volume massimo, poiché potrebbero
causare danni alle orecchie
Nota:
Le casse satelliti sono provviste di una sfera rotante per rendere più flessibile il
risultato audio. Quando l’elasticità diminuisce, stringere le viti poste nella parte
inferiore della cassa satellite.
Consiglio:
Per far sì che le casse acustiche offrano la miglior qualità audio è meglio
posizionare il subwoofer sul pavimento.
Page 34

ITALIAN
34
6. Come installare e utilizzare il dispositivo
A. Aprire la confezione contenente il subwoofer e le casse satelliti
B. Posizionare gli altoparlanti come da immagine o nel modo più simile ad essa
C. L’altoparlante con la manopola è l’altoparlante DESTRO
D. L’altoparlante senza la manopola è l’altoparlante SINISTRO
E. Collegare le casse satelliti al subwoofer
F. Collegare il connettore RCA dell’altoparlante sinistro all’uscita sinistra (dove
appare la scritta L-SPK) nella parte posteriore del subwoofer.
G. Collegare il connettore RCA dell’altoparlante destro alla presa destra jack a 9 pin
(dove appare la scritta Control-OUT) nella parte posteriore del subwoofer.
Page 35

ITALIAN
35
H. Collegare le casse acustiche a una sorgente audio:
a. Collegare la presa mini-jack del cavo d’ingresso segnale alla porta d’uscita di
una sorgente audio (computer, walkman, lettore MP3, lettore DVD, ecc.)
b. Collegare l'’altro estremo del cavo nella porta d’ingresso (dove appare la
scritta R-INPUT) nella parte posteriore del subwoofer, la presa jack RCA
bianca nell’ingresso bianco e la presa jack RCA rossa nell’ingresso rosso
I. Introdurre il cavo di alimentazione a una presa AC
J. Accendere la sorgente audio a cui è collegato l’altoparlante
K. Assicurarsi che tutte le manopole (volume) si trovano al minimo
L. Accendere il subwoofer mediante l’apposito pulsante posto nella parte posteriore e
accendere le casse acustiche ruotando la manopola di accensione dell’altoparlante
destro. La spia luminosa posta sulla parte frontale si accenderà.
M. Regolare la manopola del volume dell’altoparlante. È possibile modificare la
manopola dei bassi posta nella parte posteriore del subwoofer per regolare
l’effetto audio.
Page 36

ITALIAN
36
Nota:
Nell’altoparlante destro c’è anche una presa d’ingresso di linea nel caso in cui si
desideri più di una sorgente audio. Il sistema passerà direttamente alla nuova
sorgente per riprodurre brani audio quando la linea è inserita. Si tratta di una
soluzione flessibile grazie alla quale è possibile collegare lettori MP3 senza
scollegare dalla sorgente audio la presa di uscita di linea già esistente.
Page 37

PORTUGUÊS
37
CLLSPK21 Conceptronic
Instalação rápida
Parabéns por ter adquirido o
Multimedia Speaker System 2.1 da
Conceptronic
O guia de instalação do hardware incluído explica passo-a-passo como instalar o Multimedia
Speaker System 2.1
Se tiver algum problema, aconselhamos consultar o nosso site de assistência (vá a
www.conceptronic.net
e clique em ‘assistência’ Aqui pode encontrar a Base de Dados das
Perguntas Mais Frequentes.
Se tiver outras questões relativas ao nosso produto e não as conseguir encontrar no nosso
webiste, pode-nos contactar através do e-mail: support@conceptronic.net
Para mais informações sobre produtos de Conceptronic, por favor visite o Web Site da
Conceptronic: www.conceptronic.net
Page 38

PORTUGUÊS
38
1. Conteúdo da Embalagem
• 1 subwoofer
• 2 altifalantes satélites
• Manual do Utilizador
• 1 cabo de áudio (2 fichas RCA para cabo estéreo de 3,5”)
• 1 mini-ficha para o cabo de mini-ficha
2. Uso
Este sistema de altifalantes multimédia pode ser usado com:
- computador;
- walkman / reprodutor de MP3;
- rádio;
- TV, DVD, reprodutor de CD, etc.
3. Características
O sistema de altifalantes multimédia da Conceptronic é formado por um subwoofer e
dois altifalantes satélites que contam com protecção magnética e com a eficácia de um
circuito separado para as diferentes frequências.
4. Especificações técnicas
Satélites: altifalantes estéreo de 1,5” + 1,5”
Subwoofer: 5”
Frequência de resposta: 60 Hz – 120 Hz (subwoofer); 30 W
120 Hz – 20 kHz (satélites); 2 x 10 W
Painel de controlo: Ligar / Volume / Entrada (line-in)
Medidas:
satélites: 45 mm (L) * 200 mm (A) * 35 mm (P)
subwoofer: 162mm (L) * 237mm (A) * 35 mm (P)
Page 39

PORTUGUÊS
39
5. Precauções
1. Os altifalantes devem ser postos sobre uma superfície plana e sólida.
2. Não puxe o cabo eléctrico para desligar os conectores. Desligue-os puxando o
conector.
3. Não abra os altifalantes, a fim de evitar choques eléctricos ou outros acidentes.
4. Ponha o botão de volume em mínimo antes de ligar. O volume pode ser ajustado
depois de ligar o sistema.
5. Evite a exposição directa ao sol e mantenha os altifalantes longe de fontes de
calor.
6. Não utilize o sistema de altifalantes durante muitas horas com o volume máximo.
Isso pode causar danos aos ouvidos.
Nota:
Os altifalantes satélites possuem uma esfera de rotação que permite dirigir a
música de forma mais flexível. Quando a elasticidade for diminuindo, devem ser
apertados os parafusos existentes na parte inferior dos altifalantes.
Dica:
Para obter a melhor qualidade de som do sistema de altifalantes ponha o
subwoofer no chão.
Page 40

PORTUGUÊS
40
6. Guia de instalação e uso
A. Retire o subwoofer e os altifalantes satélites da embalagem.
B. Situe os altifalantes como indica a figura ou de forma semelhante.
C. O altifalante que tem o botão é o DIREITO.
D. O altifalante que não tem botão é o ESQUERDO.
E. Ligue os altifalantes satélites ao subwoofer
F. Ligue o conector RCA do altifalante esquerdo à saída esquerda (marcada como L-
SPK) situada na parte posterior do subwoofer.
G. Ligue o conector RCA do altifalante direito à tomada de 9 pinos (marcada como
CONTROL-OUT) situada na parte posterior do subwoofer.
Page 41

PORTUGUÊS
41
H. Ligue o sistema de altifalantes a uma fonte de áudio:
a. Introduza a MINI-FICHA do cabo de entrada do sinal na porta de saída da fonte
de áudio (computador, walkman, reprodutor de MP3, reprodutor de DVD,
etc.).
b. Introduza a outra extremidade do cabo na porta de entrada (marcada como R-
INPUT-L) situada na parte posterior do subwoofer: a ficha RCA branca na
entrada branca e a ficha RCA vermelha na entrada vermelha.
I. Ligue o cabo de alimentação a uma tomada eléctrica CA.
J. Ponha a funcionar a fonte de áudio à qual o sistema de altifalantes está ligado.
K. Assegure-se de que o botão de volume está em mínimo.
L. Ponha o interruptor de alimentação situado na parte posterior do subwoofer na
posição ON e ligue o sistema de altifalantes rodando o botão do altifalante direito.
O indicador LED situado na parte frontal do altifalante acender-se-á.
M. Ajuste o volume mediante o botão do altifalante. Pode-se ajustar o efeito sonoro
mediante o botão de baixos (BASS) situado na parte posterior do subwoofer.
Page 42

PORTUGUÊS
42
Nota:
No altifalante direito também há uma entrada (line-in) que permite a utilização de
outra fonte de áudio. O sistema seleccionará automaticamente a nova fonte
quando a ficha for introduzida nessa entrada. Esta solução flexível permite ligar
um reprodutor de MP3 ao sistema sem ter de desligar a ficha de saída da outra
fonte de áudio.
Page 43

MAGYAR
43
Conceptronic CLLSPK21
Gyorstelepítés
Köszönjük, hogy a Conceptronic 2.1 Multimedia Speaker System
multimédiás hangsugárzórendszert választotta
A mellékelt hardvertelepítési útmutató lépésről-lépésre elmagyarázza, miként kell a 2.1
Multimedia Speaker System-et telepítenie.
Probléma esetén javasoljuk, hogy vegye igénybe a Support-site-en nyújtott segítséget
(menjen a www.conceptronic.net
-re és kattintson a ‘Support’-ra. Itt megtalálja a Gyakran
Ismételt Kérdések adatbázist.
Ha termékünkkel kapcsolatban további kérdése lenne, és weboldalunkon nem talál rá
választ, forduljon hozzánk e-mailben: support@conceptronic.net
A Conceptronic termékekkel kapcsolatos további információért kérjük tekintse meg a
Conceptronic weboldalát: www.conceptronic.net
Page 44

MAGYAR
44
1. A doboz tartalma
• 1x mélysugárzó hangszóró
• 2x szatellithangszóró
• Felhasználói kézikönyv
• 1x audiokábel (a 2 RCA és a 3,5-colos közötti sztereokábel)
• 1x minijack—minijack kábel
2. Alkalmazás
Ezt a multimédiás hangsugárzórendszert a következőkkel együtt lehet használni:
- Számítógép;
- Walkman/MP3-lejátszó;
- rádió;
- tévé-, DVD-, CD-lejátszó stb.
3. Jellemzők
A Conceptronic multimédiás hangsugárzórendszer egy mélysugárzó hangszóróból és két
olyan szatellithangszóróból áll, amelyek mágneses árnyékolásúak és aktív, elkülönített
áramkörük van a frekvenciákhoz.
4. Műszaki jellemzők
Hangszóró: 1,5-colos + 1,5-colos sztereohangszóró
Mélysugárzó: 5-colos
Frekvencia jelleggörbe: 60 Hz – 120 Hz (mélysugárzó); 30 W
120 Hz – 20 kHz (szatellit) 2 x 10 W
Vezérlőpult: Teljesítmény/hangerő/line-in
Szatellit mérete: 45 mm (szélesség) * 200 mm (magasság) *
35 mm (mélység)
Mélysugárzó: 162 mm (szélesség) * 237 mm (magasság) *
230 mm (mélység)
Page 45

MAGYAR
45
5. Óvintézkedések
1. A hangszórókat vízszintes és szilárd felületen helyezze el
2. A csatlakozók kihúzásakor ne húzza az elektromos kábelt. Annak
kihúzására a csatlakozót használja.
3. Ne nyissa ki a burkolatot, mert így az áramütés vagy az egyéb baleset
elkerülhető.
4. Az áramellátás bekapcsolása előtt a hangerőszabályzó gombot forgassa el
a minimális érték szerinti állásra. Az áramellátás bekapcsolása után a
hangerő állítható.
5. Ne tegye közvetlenül a napra, egyszersmind tartsa távol a hangszórókat
olyan forrástól, amely felmelegedhet.
6. Ne használja a hangsugárzórendszert órákon át maximális hangerővel. Ez
ugyanis károsíthatja hallását.
Megjegyzés:
A szatellithangszórókhoz beépített forgatógolyó is tartozik, amelynek feladata a
zene irányzásának rugalmasabbá tétele. Ha a rugalmasság gyengül, húzza meg a
csavarokat a szatellithangszóró alján.
Ötlet:
Ha a lehető legjobb hangzást kívánja a hangsugárzórendszerből kihozni, tegye a
mélysugárzót a földre.
Page 46

MAGYAR
46
6. Telepítési és üzemeltetési útmutató
A. Csomagolja ki a mélysugárzót és a szatellithangszórókat.
B. A képen látható vagy ahhoz hasonló módon helyezze el a hangszórókat.
C. Az a hangszóró, amelyiken a gomb van: a JOBB OLDALI.
D. Az a hangszóró, amelyiken nincs gomb: a BAL OLDALI.
E. Csatlakoztassa a szatellithangszórókat a mélysugárzóhoz.
F. Csatlakoztassa a bal oldali hangszórón lévő RCA-csatlakozót a mélysugárzó
hátoldalán található bal oldali kimenethez (L-SPK-ként jelenik meg).
G. Csatlakoztassa a jobb oldali hangszórón lévő RCA-csatlakozót a mélysugárzó
hátoldalán lévő, jobb oldali, kilenclábas dugaszhüvelyhez (Control-OUT-ként
jelenik meg).
Page 47

MAGYAR
47
H. Csatlakoztassa a hangsugárzórendszert audioforráshoz:
c. dugja be a jelbemenet kábelének MINI-JACK-jét az audioforrás kimeneti
portjába (számítógép, walkman, MP3-lejátszó, DVD-lejátszó stb.),
d. dugja be a kábel másik végét a mélysugárzó hátoldalán lévő bemeneti
portba (R-INPUT-ként jelenik meg), a fehér RCA-jack-et a fehér
bemenetbe, a piros RCA-jack-et pedig a piros bemenetbe.
I. Dugja be a hálózati kábelt váltakozó áramú tápellátást biztosító dugaszolóaljzatba.
J. Kapcsolja be azt az audioforrást, amelyhez a hangszóró csatlakozik.
K. Ügyeljen arra, hogy minden gomb (hangerő) a minimális beállításon legyen.
L. Kapcsolja be a főkapcsolót a mélysugárzó hátoldalán, majd a jobb oldali
hangsugárzón lévő teljesítményszabályzó gomb elforgatásával kapcsolja be a
hangsugárzórendszert. Az elöl látható világítódióda kigyullad.
M. Állítsa be a hangerőszabályzó gombját. A hangeffektus beállításához a mélysugárzó
hátoldalán lévő mélyhangszabályzó gomb állását lehet változtatni.
Page 48

MAGYAR
48
Megjegyzés:
A jobb oldali hangszórón van még egy Line-In dugaszhüvely, amely egynél több
audioforrás alkalmazását teszi lehetővé. Amikor a vezetéket bedugja, a rendszer —
hogy az arról származó dalokat lejátszhassa — automatikusan átkapcsol az új
forrásra. Ez a rugalmas megoldás anélkül teszi lehetővé MP3-lejátszó
csatlakoztatását, hogy a meglévő, az audioforráshoz csatlakozó Line-Out
dugaszhüvelyt ki kellene iktatni.
Page 49

Declaration of CE Conformity
49
The manufacturer Conceptronic
Address Databankweg 7
3821 AL Amersfoort, the Netherlands
Hereby declares that the product
Type SPEAKER SYSTEM 2.1
Product CLLSPK21
Complies with following directives:
89/336/EEC EMC directive:
Electromagnetic Compatibility
73/23/EEC Low Voltage Directive:
Electrical equipment designed for use within certain voltage limits
The following standards were consulted to assess conformity:
ETS 300 328-2/2000
EN 301 489-17-2000
EN 301 489-1-2000
EN55022/9.98 Class B
EN 61000-3-2/3/4/1995
EN 50082-1/1994
EN 60950/1995
The symbols confirm that this product conforms to the above named standards and regulations.
This product is suitable for all EU countries.
Place and date of issue: Amersfoort, March 27, 2006
Herman Looijen, Product Marketing Manager
 Loading...