

Page 1

NEDERLANDS
1
Conceptronic CLLCHITCHAT
Snelstart Handleiding
Gefeliciteerd met de aanschaf van uw
Conceptronic Lounge’n’LOOK CHITCHAT.
In de bijgaande Snelstart handleiding wordt stap voor stap uitgelegd hoe u de
Conceptronic Lounge’n’LOOK CHITCHAT installeert.
In geval van problemen adviseren wij u onze support-site te bezoeken (ga naar:
www.conceptronic.net
en klik op ‘Support’). Hier vindt u een database met
veelgestelde vragen waar u hoogstwaarschijnlijk de oplossing voor uw probleem kunt
vinden.
Heeft u andere vragen over uw product die u niet op de website kunt vinden, neem
dan contact met ons op via e-mail: support@conceptronic.net
Voor meer informatie over Conceptronic producten kunt u terecht op de Conceptronic
website: www.conceptronic.net
.
Bij software/drivers installatie: Het is mogelijk dat onderstaande installatie iets
afwijkt van de installatie op uw computer. Dit is afhankelijk van de Windows versie
die u gebruikt.
1. Introductie
Met de Conceptronic Lounge’n’LOOK CHITCHAT kunt u elkaar zien tijdens het
chatten! De Lounge’n’LOOK CHITCHAT is compatible met alle messenger en chat
applicaties. U kunt de Lounge’n’LOOK CHITCHAT op uw bureau gebruiken of
vastklemmen op het scherm van uw notebook of TFT scherm.
Page 2

NEDERLANDS
2
2. Pakket Inhoud
De volgende onderdelen dienen aanwezig te zijn in de verpakking:
1x Conceptronic Lounge’n’LOOK Chitchat, bestaande uit :
1x Conceptronic Lounge’n’LOOK webcam (Cliqcam)
1x Conceptronic Lounge’n’LOOK headset
1x Stuurprogramma CD-ROM
1x Snelstart Handleiding
1x Garantiekaart
3. Minimale Systeemeisen
• Besturingssysteem: Windows 2000, Windows XP of Windows Vista
• 256 MB Intern Geheugen (of hoger)
• 100 MB Vrije harde schijf ruimte
• 1 (vrije) USB poort
• CD-ROM Station
• Geluidskaart
4. Stuurprogramma installatie
Let op: Installeer eerst de software voordat u de Lounge’n’LOOK CHITCHAT aansluit
op uw computer!
A. Plaats de Product CD-ROM in uw CD-ROM speler. Het Autorun Menu zal
automatisch verschijnen.
Als het Menu niet verschijnt, gebruik dan Windows Verkenner om naar de
CD-ROM te navigeren en om “Autorun.exe” uit te voeren.
B. Selecteer het juiste stuurprogramma voor uw geïnstalleerde Windows versie.
Let op
: Zorg ervoor dat u het juiste stuurprogramma selecteert voor uw Windows
versie: Als u gebruik maakt van Windows 2000/XP, kies dan de optie
“Windows 2000/XP”. Als u gebruik maakt van Windows Vista kiest u voor de
optie “Windows Vista”.
Page 3

NEDERLANDS
3
C. De Stuurprogramma Setup Wizard zal verschijnen. Klik op “Volgende” om door
te gaan.
D. Het stuurprogramma zal geïnstalleerd worden.
E. Klik op ‘Finish’ om de installatie te voltooien.
Page 4

NEDERLANDS
4
5. Hardware Installatie
Nadat het stuurprogramma is geïnstalleerd kunt u de Lounge’n’LOOK CHITCHAT
aansluiten op een vrije USB poort op uw computer of op een USB hub, verbonden met
uw computer.
5.1 Windows 2000 / XP
A. Windows zal een popup tonen met de melding “Found new hardware”. Wacht
tot Windows klaar is met de installatie.
B. Als de installatie gereed is, zal de melding “Your new hardware is installed and
ready to use” getoond worden.
Let op:
Wij adviseren om de computer te herstarten nadat de Webcam is
geïnstalleerd.
5.2 Windows Vista
A. Windows zal een popup tonen met de melding “Installing Device Driver
Software”.
B. Windows zal de ‘Found New Hardware Wizard’ tonen. Selecteer “Locate and
install driver software”. Wacht tot Windows Vista klaar is met de installatie.
C. Als de installatie gereed is zal de melding “Device driver software installed
successfully” tonen.
Let op: Wij adviseren om de computer te herstarten nadat de Webcam is
geïnstalleerd.
De webcam is nu gereed voor gebruik.
Page 5

NEDERLANDS
5
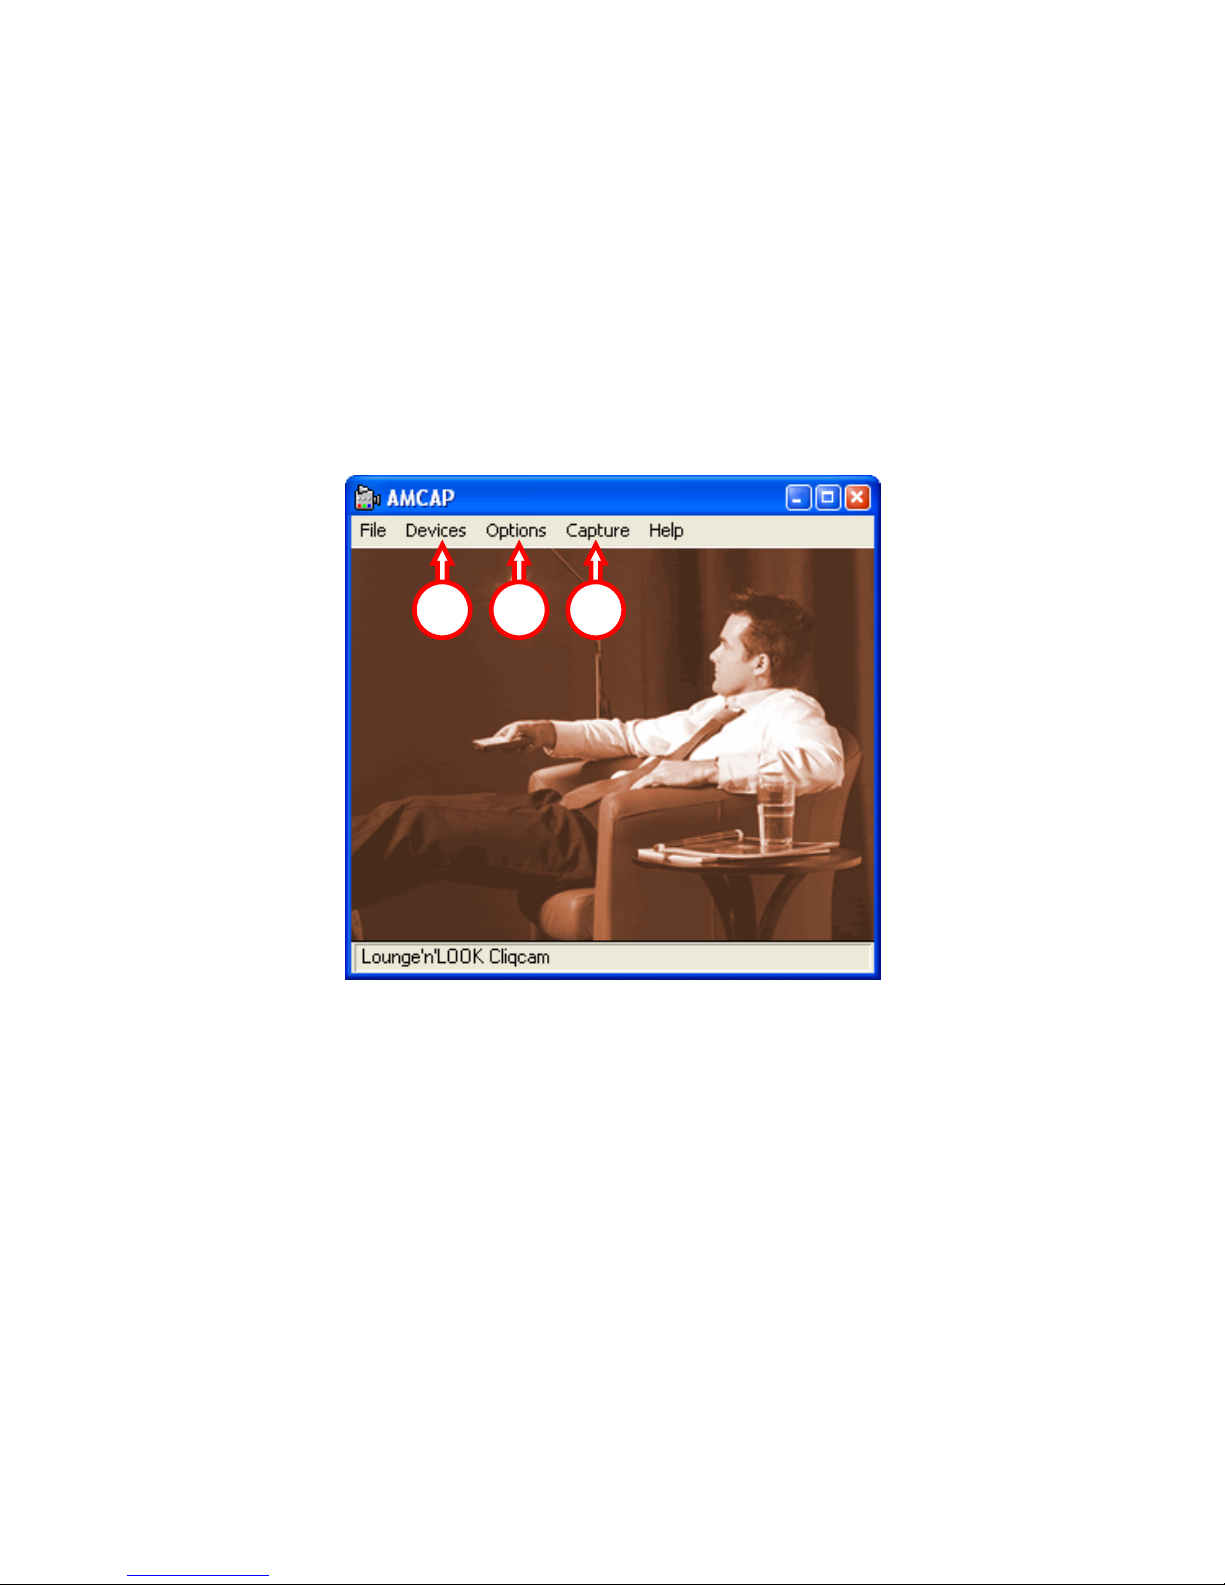
6. De Lounge’n’LOOK CHITCHAT gebruiken
Om de functionaliteit van de webcam te controleren kunt u het programma AMCAP
gebruiken. Het programma AMCAP is samen met de drivers geïnstalleerd. Dit
programma is een simpel programma om de webcam te configureren en om
videobeelden op te nemen.
Om het programma AMCAP te starten, klik op ‘Start’, ‘Programma’s’,
‘Conceptronic’, ‘Lounge’n’LOOK Cliqcam, en ‘AMCAP’. U zult een live beeld zien
van de webcam.
Indien er geen beeld weergegeven wordt, gebruik dan de optie ‘Devices’ (1) en
selecteer de ‘Lounge’n’LOOK Cliqcam’.
Via het menu ‘Options’ (2) kunt u wijzigingen aanbrengen in de standaard
instellingen van de Lounge’n’LOOK CHITCHAT. Het menu ‘Capture’ (3) geeft u de
mogelijkheid om videobeelden op te nemen op uw harde schijf.
De Lounge’n’LOOK CHITCHAT kan ook gebruikt worden in MSN Messenger. U dient
eerst MSN Messenger te configureren voordat u de webcam kunt gebruiken. Om te
configureren, gebruik de optie ‘Extra’, ‘Audio en Video instellen’ in het hoofdmenu
van MSN Messenger.
1 2 3
Page 6

NEDERLANDS
6
7. Extra Webcam Functies
De Lounge’n’LOOK CHITCHAT beschikt over ‘Image Effect’, ‘Photo Frame’ en ‘Face
Tracking’ opties.
Let op:
De ‘Image Effect’, ‘Photo Frame’ en ‘Face Tracking’ opties zijn alleen
beschikbaar bij het gebruik van Windows Vista. Bij Windows 2000 en
Windows XP zijn deze opties helaas niet beschikbaar.
Deze opties kunnen ingesteld worden via de eigenschappen van de webcam, welke u
op diverse manieren kunt oproepen:
AMCAP:
Start AMCAP en klik op “Options”, “Video Capture Filter”.
De eigenschappen van de Webcam zullen getoond worden.
MSN:
Start een gesprek met een contactpersoon en schakel de webcam in. Klik
met de rechtermuisknop op het webcambeeld en kies “Web Camera
Settings…”. Klik vervolgens op “Advanced” De eigenschappen van de
webcam zullen getoond worden.
Skype:
Start een gesprek met een contactpersoon en schakel de webcam in. Klik
met de rechtermuisknop op het webcambeeld en kies “Video Settings”. De
eigenschappen van de webcam zullen getoond worden.
7.1 Eigenschappen - Face Tracking
Op het tabblad “Face Tracking” kunt u digitale face tracking in of uitschakelen.
Selecteer de optie “Face Tracking” en klik op “OK” om de Face Tracking functie in te
schakelen. Om de Face Tracking functie weer uit te schakelen kiest u nogmaals voor
“Face Tracking”.
7.2 Eigenschappen – Stream Property
Op het tabblad “Stream Property” kunt u de weergave instellingen van de webcam
wijzigen, zoals contrast, helderheid en scherpte.
Page 7

NEDERLANDS
7
7.3 Eigenschappen – Effect Frame
Op het tabblad “Effect Frame” kunt u het beeld van de webcam voorzien van een
effect of foto-frame.
Om het webcambeeld van een effect te voorzien, selecteert u een effect uit het
‘Effect’ menu. Klik op ‘OK’ om het gekozen effect toe te passen.
Om een effect uit te schakelen kiest u de optie ‘Disable’ uit het ‘Effect’ menu. Klik
op ‘OK’ om het effect uit te schakelen.
Om het webcambeeld van een foto-frame te voorzien selecteert u een foto-frame uit
het ‘Frame’ menu. Klik op ‘OK’ om het gekozen foto-frame toe te passen.
Om een foto-frame uit te schakelen kiest u de optie ‘Disable’ uit het ‘Frame’ menu.
Klik op ‘OK’ om het foto-frame uit te schakelen.
Page 8

ENGLISH
8
Conceptronic CLLCHITCHAT
Quick Installation Guide
Congratulations on the purchase of your
Conceptronic Lounge’n’LOOK CHITCHAT.
The enclosed Quick Installation Guide gives you a step-by-step explanation of how to install
the Conceptronic Lounge’n’LOOK CHITCHAT.
When problems occur, we advise you to go to our support-site (go to
www.conceptronic.net
and click ‘Support’. Here you will find the Frequently Asked
Questions Database.
When you have other questions about your product and you cannot find it at our website,
contact us by e-mail: support@conceptronic.net
For more information about Conceptronic products, please visit the Conceptronic Web Site:
www.conceptronic.net
The Software installation as described below may be slightly different from the installation
on your computer. This depends on the Windows version you are using.
1. Introduction
With the Conceptronic Lounge’n’LOOK CHITCHAT, you are able to see each other while you
are chatting! The Lounge’n’LOOK CHITCHAT is compatible with all messenger programs and
chat applications. You can use the Lounge’n’LOOK CHITCHAT on your desk or attached to
the screen of your notebook or TFT screen.
Page 9

ENGLISH
9
2. Package Contents
The following items must be present in your package:
1x Conceptronic Lounge’n’LOOK CHITCHAT, existing out of :
1x Conceptronic Lounge’n’LOOK webcam (Cliqcam)
1x Conceptronic Lounge’n’LOOK headset
1x Driver CD-ROM
1x Quick Installation Guide
1x Warranty Card
3. System Requirements
• Operating Systems: Windows 2000, Windows XP or Windows Vista
• 256 MB System Memory (or higher)
• 100 MB Free Hard disk Space
• One (free) USB port
• CD-ROM Drive
• Soundcard
4. Driver Installation
Note: First install the software, before you connect the CLLCHITCHAT to the computer!
A. Insert the Product CD-ROM in your CD-ROM drive. The Autorun Menu should appear
automatically.
If the Menu does not appear, use Windows Explorer to navigate to the CD-ROM and
execute “Autorun.exe”.
B. Select the correct driver for your installed Windows version.
Note
: Make sure you select the correct Driver for your Windows Version. If you use
Windows 2000/XP, select the option “Windows 2000/XP”. If you use Windows Vista,
select the option “Windows Vista”.
Page 10

ENGLISH
10
C. The Driver Setup Wizard will appear. Click “Next” to continue.
D. The driver will be installed.
E. Click ‘Finish’ to complete.
Page 11

ENGLISH
11
5. Hardware Installation
After the driver installation is completed, you can connect the Lounge’n’LOOK CHITCHAT to
any available USB port on your PC or on any USB hub attached to your PC.
5.1 Windows 2000/XP
A. Windows will show a popup notification with the message “Found new hardware”.
Please wait until Windows finishes the driver installation.
B. When the installation is complete, the message “Your new hardware is installed and
ready to use” will appear.
Note:
We advise to reboot the computer after the webcam installation.
5.2 Windows Vista
A. Windows will show a popup notification with the message “Installing device driver
software”. Please wait until Windows Vista finishes the driver installation.
B. Windows will prompt a ‘Found New Hardware Wizard’. Select “Locate and install
driver software”. Please wait until Windows Vista finishes the driver installation.
C. When the installation is complete, the message “Device driver software installed
successfully” will appear.
Note: We advise to reboot the computer after the webcam installation.
The webcam is now ready to use!
Page 12
ENGLISH
12
6. Using the Lounge’n’LOOK CHITCHAT
To check the functionality of the webcam, you can use the program AMCAP.
The program AMCAP is installed together with the drivers. This program is a simple program
to configure the webcam and make video captures.
To execute the program AMCAP, click ‘Start’, ‘Programs’, ‘Conceptronic’,
‘Lounge’n’LOOK Cliqcam’ and ‘AMCAP’. You will see the live stream of the webcam
available in the program.
When no image of the webcam is visible, use the option ‘Devices’ (1) to select the
‘Lounge’n’LOOK Cliqcam’.
Through the menu ‘Options’ (2), you are able to change the default settings for the
Lounge’n’LOOK CHITCHAT. Using the menu ‘Capture’ (3) will allow you to save video
captures on your computer hard disk.
The Lounge’n’LOOK CHITCHAT can also be used within Microsoft MSN Messenger. You need
to configure MSN Messenger before you can use the webcam. To configure, use the ‘Tools’,
‘Audio and Video setup’ in the main MSN Messenger window.
1 2 3
Page 13

ENGLISH
13
7. Extra webcam options
The Lounge’n’LOOK CHITCHAT is equipped with “Image Effect”, “Photo Frame” and “Face
Tracking” options.
Note:
The “Image Effect”, “Photo Frame” and “Face Tracking” options are only
available for Windows Vista. If you use Windows 2000 or Windows XP, these
options will not be available.
These options can be set through the properties of the webcam, which can be accessed in
different ways:
AMCAP:
Start AMCAP and click “Options”, “Video Capture Filter”.
The properties of the webcam will be shown.
MSN:
Start a conversation with a contact and enable the webcam. Right-click on the
webcam image and select “Web Camera Settings…”. Click “Advanced” in the
shown window. The properties of the webcam will be shown.
Skype:
Start a conversation with a contact and enable the webcam. Right-click on the
webcam image and select “Video Settings”. The properties of the webcam will
be shown.
7.1 Properties – Face Tracking
On the “Face Tracking” page, you can enable or disable digital face tracking.
Select the option “Face Tracking” and click “OK” to enable the Face Tracking function.
To disable the Face Tracking function, deselect the option “Face Tracking” and click “OK”.
7.2 Properties – Stream Property
On the “Stream Property” tab, you can change several image settings for the webcam like
contrast, brightness and sharpness.
Page 14

ENGLISH
14
7.3 Properties – Effect Frame
On the “Effect Frame” tab, you can add a photo-frame or image effect to your webcam
image.
To manipulate your webcam image with an effect, select an effect from the “Effect” menu.
Click “OK” to enable the selected effect.
To disable a selected effect, select the option “Disable” from the “Effect” menu and click
“OK”.
To manipulate your webcam image with a photo-frame, select a photo-frame from the
“Frame” menu. Click “OK” to enable the selected effect.
To disable a selected photo-frame, select the option “Disable” from the “Frame” menu
and click “OK”.
Page 15

ESPAÑOL
15
Conceptronic CLLCHITCHAT
Guía de iniciación rápida
Enhorabuena por la compra del
CLLCHITCHAT de Conceptronic.
La Guía de instalación del hardware incluida le ofrece una explicación paso a paso de cómo
instalar CLLCHITCHAT de Conceptronic.
Si encuentra problemas, le aconsejamos que se dirija a nuestra página web
www.conceptronic.net
y haga clic en «Support». Aquí encontrará la base de datos de las
preguntas más frecuentes o FAQ.
Si tiene otras preguntas sobre su producto y no las encuentra en nuestro sitio web, póngase
en contacto con nuestro servicio técnico por correo electrónico:
apoyo@conceptronic.net
Para obtener más información acerca de productos de Conceptronic por favor visite el lugar
Web de Conceptronic: www.conceptronic.net
La instalación de software, tal y como se describe a continuación, puede ser algo diferente
de la instalación en su ordenador. Eso depende de la versión de Windows que esté usando.
1. Introducción
¡Con la Conceptronic Lounge’n’LOOK CHITCHAT podrán verse mientras chatean! La
Lounge’n’LOOK CHITCHAT es compatible con todos los programas de mensajería instantánea
y las aplicaciones de chat. Puede colocar la Lounge’n’LOOK CHITCHAT sobre su escritorio,
acoplarla al monitor de su portátil o a su monitor TFT.
Page 16

ESPAÑOL
16
2. Contenido del paquete
En el paquete deben encontrarse los siguientes elementos:
1x Conceptronic Lounge’n’LOOK CHITCHAT contiendo:
1x Conceptronic Lounge’n’LOOK webcam (Cliqcam)
1x Conceptronic Lounge’n’LOOK headset
1x CD-ROM con los drivers
1x Guía de instalación rápida
1x Tarjeta de garantía
3. Requisitos del sistema
• Sistemas operativos: Windows 200, Windows XP o Windows Vista
• 256 MB (mínimo) de memoria libre en el sistema
• 100 MB de espacio libre en disco
• Un puerto USB (libre)
• Unidad de CD-ROM
• Tarjeta de sonido
4. Instalación de los drivers
Nota:
¡Instale el software antes de conectar la CLLCHITCHAT al ordenador!
A. Introduzca el CD-ROM del producto en la unidad de CD-ROM. El menú Autorun deberá
aparecer automáticamente.
Si el menú no aparece, utilice el Explorer de Windows para examinar el CD-ROM y
ejecutar “Autorun.exe”.
B. Seleccione el driver correspondiente a su versión de Windows.
Nota
: Asegúrese de que selecciona el driver correcto según su versión de Windows. Si
utiliza Windows 2000 o XP, seleccione la opción “Windows 2000/XP”. Si utiliza
Windows Vista, seleccione la opción “Windows Vista”.
Page 17

ESPAÑOL
17
C. Aparecerá el asistente para la instalación de los drivers. Haga clic en “Siguiente” para
continuar.
D. Se instalará el driver.
E. Pulse ‘Finish’ (Terminar) para terminar. Reinicie el ordenador.
Page 18

ESPAÑOL
18
5. Instalación del hardware
Una vez terminada la instalación del driver, puede conectar la Lounge’n’LOOK CHITCHAT a
cualquier puerto USB disponible de su ordenador o a cualquier hub USB acoplado a su PC.
5.1 Windows 2000/XP
A. Windows mostrará una notificación emergente con el mensaje “Found new
hardware”. Espere hasta que Windows finalice la instalación del driver.
B. Cuando se haya completado la instalación, aparecerá el mensaje “Your new hardware
is installed and ready to use”.
Nota:
Aconsejamos reiniciar el ordenador después de instalar la webcam.
5.2 Windows Vista
A. Windows mostrará una notificación emergente con el mensaje “Installing device
driver software” [Instalando el driver del dispositivo]. Espere hasta que Windows Vista
finalice la instalación del driver.
B. Windows mostrará un “Asistente de nuevo disco duro encontrado" Seleccione
"Localizar e instalar el driver ". Espere a que Windows Vista finalice la instalación del
driver.
C. Cuando se haya completado la instalación, aparecerá el mensaje “Device driver
software installed successfully” [La instalación del driver se ha realizado
correctamente].
Nota: Aconsejamos reiniciar el ordenador después de instalar la webcam.
La webcam ya está lista para su utilización.
Page 19

ESPAÑOL
19
6. Usar la Lounge’n’LOOK CHITCHAT
Para comprobar el funcionamiento de la webcam, puede usar el programa AMCAP. El
programa AMCAP se instala junto con los drivers. Es un sencillo programa que se usa para
configurar la webcam y realizar capturas de vídeo.
Para ejecutar el programa AMCAP, pulse ‘Inicio, ‘Programas’, ‘Conceptronic’,
‘Lounge’n’LOOK Cliqcam’, y ‘AMCAP’. Verá la imagen en directo de la webcam disponible
en el programa.
Si no aparece ninguna imagen de la webcam, use la opción ‘Device’ (1) (Dispositivo) para
seleccionar ‘Lounge’n’LOOK Cliqcam’.
A través del menú ‘Options’ (2) (Opciones), puede cambiar las configuraciones
predeterminadas de la Lounge’n’LOOK CHITCHAT. El menú ‘Capture’ (3) (Captura) le
permitirá guardar capturas de vídeo en el disco duro de su ordenador.
La Lounge’n’LOOK CHITCHAT también se puede usar con el Microsoft MSN Messenger. Para
poder usar la cámara deberá configurar el MSN Messenger. Para configurarla, use los menús
‘Herramientas, ‘Configuración de Audio y Vídeo’ de la ventana principal del MSN
Messenger.
1 2 3
Page 20

ESPAÑOL
20
7. Opciones extra de la webcam
La webcam Lounge’n’LOOK está equipada con las opciones “Image Effect”, “Photo Frame”
y “Face Tracking”.
Nota:
Las opciones "Image Effect" (Efecto de imagen), "Photo Frame" (Marco de foto) y
"Face Tracking" (Seguimiento de la cara) sólo están disponibles para Windows
Vista. Si utiliza Windows 2000 o Windows XP, estas opciones no están disponibles.
Estas opciones se pueden configurar mediante las propiedades de la webcam, a las cuales
se puede acceder de varias maneras:
AMCAP:
Inicie AMCAP y haga clic en “Opciones”, “Filtro de captura de vídeo”.
Se mostrarán las propiedades de la webcam.
MSN:
Inicie una conversación con un contacto y active la webcam. Haga clic con el
botón derecho en la imagen de la webcam y seleccione “Configuración de la
cámara web…”. En la ventana que aparecerá, haga clic en “Avanzado”. Se
mostrarán las propiedades de la webcam.
Skype:
Inicie una conversación con un contacto y active la webcam. Haga clic con el
botón derecho en la imagen de la webcam y seleccione “Configuración de
video…”. Se mostrarán las propiedades de la webcam.
7.1 Propiedades - Face Tracking
En la página de "Face Tracking", puede activar o desactivar el seguimiento digital de la
cara.
Seleccione la opción "Face Tracking" y haga clic en "Aceptar" para activar la función de
seguimiento de la cara.
Para desactivar la función de seguimiento de la cara, deseleccione la opción "Face
Tracking" y haga clic en "Aceptar".
7.2 Propiedades – Stream Property
En la pestaña “Stream Property” podrá cambiar varios parámetros de la webcam como el
contraste, el brillo y la nitidez.
Page 21

ESPAÑOL
21
7.3 Propiedades - Effect Frame
En la pestaña "Effect Frame" (Marco de efecto), puede agregar un marco de foto o un
efecto de imagen a la imagen de su cámara web.
Para manipular la imagen de su cámara web con un efecto, seleccione un efecto del menú
"Effect" (Efecto). Haga clic en "Aceptar" para activar el efecto seleccionado.
Para desactivar un efecto seleccionado, seleccione la opción "Disable" (Desactivar) del
menú "Effect" y haga clic en "Aceptar".
Para manipular la imagen de su cámara web con marco de foto, seleccione un marco de
foto del menú "Frame" (Marco). Haga clic en "Aceptar" para activar el efecto seleccionado.
Para desactivar un marco de foto seleccionado, seleccione la opción "Disable" (Desactivar)
del menú "Frame" y haga clic en "Aceptar".
Page 22

DEUTSCH
22
Conceptronic CLLCHITCHAT
Quick Installation Guide
Herzlichen Glückwunsch zum Erwerb ihres
CLLCHITCHAT von Conceptronic.
In der beigefügten Intallationsanweisung für die Hardware finden Sie schrittweise
Erklärungen für die Verwendung ihres CLLCHITCHAT von Conceptronic.
Sollten irgendwelche Probleme auftreten, empfehlen wir ihnen, auf unsere Support-Seite
im Internet zu gehen (www.conceptronic.net
) und auf 'Support’ zu klicken. Dort werden sie
die "Frequently Asked Questions" Datenbank finden.
Falls sie andere Fragen zu ihrem Produkt haben und sie diese nicht auf unserer Website
finden können, kontaktieren sie uns bitte per E-Mail: support@conceptronic.net
Weitere Informationen zu den Conceptronic Produkte finden Sie auf der Website von
Conceptronic: www.conceptronic.net
Die nachstehend beschriebene Software-Installation kann sich bei Ihrem Rechner aufgrund
des verwendeten Windows-Version leicht unterscheiden.
1. Einleitung
Mit der Conceptronic Lounge’n’LOOK CHITCHAT können Sie sich beim Chatten sehen! Die
Lounge’n’LOOK CHITCHAT ist mit allen Messenger-Programmen und Chat-Anwendungen
kompatibel. Sie können Lounge’n’LOOK CHITCHAT auf dem Schreibtisch, am Bildschirm
eines Notebooks oder an einem TFT-Bildschirm befestigt verwenden.
Page 23

DEUTSCH
23
2. Packungsinhalt
In der Verpackung ist Folgendes enthalten:
1x Conceptronic Lounge’n’LOOK CHITCHAT:
1x Conceptronic Lounge’n’LOOK webcam (Cliqcam)
1x Conceptronic Lounge’n’LOOK headset
1x Treiber-CD-ROM
1x Schnellinstallationsanleitung
1x Garantiekarte
3. Systemanforderungen
• Betriebssysteme: Windows 2000, Windows XP oder Windows Vista
• 256 MB Systemspeicher (oder mehr)
• 100 MB freier Festplattenspeicher
• Einen (freien) USB-Port
• CD-ROM-Laufwerk
• Soundkarte
4. Treiberinstallation
Hinweis:
Installieren Sie zuerst die Software, bevor Sie die Lounge’n’LOOK CHITCHAT an
Ihren Computer anschließen!
A. Legen Sie die Produkt-CD-ROM in Ihr CD-ROM-Laufwerk ein. Das Autorun-Menü sollte
automatisch starten.
Wenn das Menü nicht startet, navigieren Sie mithilfe des Windows Explorer zur CD-ROM
und führen Sie „Autorun.exe“ aus.
B. Wählen Sie den korrekten Treiber für Ihre installierte Windows-Version.
Hinweis
: Vergewissern Sie sich, dass Sie den korrekten Treiber für Ihre Windows-Version
wählen. Wenn Sie Windows 2000/XP verwenden, wählen Sie die Option „Windows
2000/XP". Wenn Sie Windows Vista verwenden, wählen Sie die Option „Windows
Vista".
Page 24

DEUTSCH
24
C. Es erscheint der Einrichtungsassistent für Treiber. Klicken Sie auf „Weiter“.
D. Der Treiber wird installiert.
E. Klicken Sie auf ‚Fertigstellen’, um die Installation abzuschließen. Starten Sie den
Computer neu.
Page 25

DEUTSCH
25
5. Installation der Hardware
Nachdem die Treiberinstallation abgeschlossen ist, können Sie die Lounge’n’LOOK
CHITCHAT an einen freien USB-Port Ihres PCs oder an einen USB-Hub Ihres PCs anschließen.
5.1 Windows 2000/XP
A. Windows zeigt die Meldung „Found new hardware". Warten Sie bitte, bis Windows die
Installation abgeschlossen hat.
B. Sobald die Installation abgeschlossen ist, erscheint die Meldung „Your new hardware
is installed and ready to use“.
Hinweis: Wir empfehlen Ihnen, den Computer nach der Installation der Webcam neu zu
starten.
5.2 Windows Vista
A. Windows zeigt die Meldung „Installing device driver software [Gerätetreiber-Software
wird installiert]". Warten Sie bitte, bis Windows Vista die Installation abgeschlossen
hat.
B. Es erscheint die Windows-Anzeige ‚Neue Hardware gefunden“. Wählen Sie
„Treibersoftware suchen und installieren”. Warten Sie bitte, bis Windows Vista die
Installation abgeschlossen hat.
C. Sobald die Installation abgeschlossen ist, erscheint die Meldung „Device driver
software installed successfully [Gerätetreiber-Software erfolgreich installiert].
Hinweis: Wir empfehlen Ihnen, den Computer nach der Installation der Webcam neu zu
starten.
Damit ist die Webcam betriebsbereit.
Page 26

DEUTSCH
26
6. Verwendung der Lounge’n’LOOK CHITCHAT
Sie können die Funktionsfähigkeit der Webcam mit dem Programm AMCAP testen. Das
Programm AMCAP wird mit den Treibern installiert. Dabei handelt es sich um ein einfaches
Programm für die Konfiguration der Webcam und die Aufnahme von Videosequenzen.
Um das Programm AMCAP, zu starten, klicken Sie auf ‚Start’, ‚Programme’,
‘Conceptronic’, ‘Lounge’n’LOOK Cliqcam’ und ‚AMCAP’. Es erscheint der Lifestream der
Webcam, der im Programm verfügbar ist.
Wenn kein Bild der Webcam sichtbar ist, verwenden Sie die Option‚ Device [Gerät]’ (1) um
die ‚ Lounge’n’LOOK Cliqcam’ auszuwählen.
Über das Menü ‚Options’ (2) können Sie die Grundeinstellungen der Lounge’n’LOOK
CHITCHAT ändern. Über das Menü ‚Capture’ (3) können Sie aufgenommene Videosequenzen
auf der Festplatte Ihres Computers speichern.
Die Lounge’n’LOOK CHITCHAT kann auch mit dem Microsoft MSN Messenger verwendet
werden. Sie müssen den MSN Messenger konfigurieren, bevor Sie die Webcam verwenden
können. Dies erfolgt über die ‚Audio- und Videoeinstellungen’ im Menü ‚Extras’ im
Hauptfenster des MSN Messengers.
1 2 3
Page 27

DEUTSCH
27
7. Zusätzliche Optionen der Webcam
Die Lounge’n’LOOK CHITCHAT verfügt über die Optionen „Image Effect”, „Photo Frame”
und „Face Tracking“.
Hinweis:
Die Optionen „Image Effect [Bildeffekt]”, „Photo Frame [Fotorahmen]“ und
„Face Tracking [Gesichtsverfolgung]“ sind nur unter Windows Vista verfügbar.
Unter Windows 2000 oder Windows XP können Sie diese Optionen nicht benutzen.
Diese Optionen können über die Eigenschaften der Webcam eingestellt werden, auf die auf
verschiedene Arten zugegriffen werden kann:
AMCAP:
Starten Sie AMCAP und klicken Sie auf „Options [Optionen]“, „Video Capture
Filter [Videoaufnahmefilter]“
Daraufhin werden die Eigenschaften der Webcam angezeigt.
MSN:
Beginnen Sie ein Gespräch mit einem Kontakt und aktivieren Sie die Webcam.
Rechtsklicken Sie auf das Webcam-Symbol und wählen Sie „Web Camera
Settings… [Web-Kamera-Einstellungen]“. Klicken Sie im angezeigten Fenster auf
„Advanced [Erweitert]“. Daraufhin werden die Eigenschaften der Webcam
angezeigt.
Skype:
Beginnen Sie ein Gespräch mit einem Kontakt und aktivieren Sie die Webcam.
Rechtsklicken Sie auf das Webcam-Symbol und wählen Sie „Video Settings…
[Video-Einstellungen]“. Daraufhin werden die Eigenschaften der Webcam
angezeigt.
7.1 Eigenschaften – Face Tracking [Gesichtsverfolgung]
Auf der Seite „Face Tracking [Gesichtsverfolgung]“ können Sie die digitale
Gesichtsverfolgung aktivieren oder deaktivieren.
Wählen Sie die Option „Face Tracking [Gesichtsverfolgung]” und klicken Sie auf „OK”, um
die Funktion Gesichtsverfolgung zu aktivieren.
Um die Funktion Gesichtsverfolgung zu deaktivieren, wählen Sie die Option „Face Tracking
[Gesichtsverfolgung]“ ab und klicken Sie auf „OK“.
7.2 Eigenschaften – Stream Property
Auf der Registerkarte „Stream Property„ können Sie verschiedene Bildeinstellungen für die
Webcam wie den Kontrast, die Helligkeit und die Bildschärfe einstellen.
Page 28

DEUTSCH
28
7.3 Eigenschaften - Effect Frame [Effekt Rahmen]
Auf der Registerkarte „Effect Frame [Effekt Rahmen]“ können Sie dem Webcam-Bild einen
Fotorahmen oder Bildeffekt hinzufügen.
Um Ihrem Webcam-Bild einen Effekt hinzuzufügen, wählen Sie diesen aus dem Menü „Effect
[Effekt]”. Klicken Sie auf „OK“, um den gewählten Effekt zu aktivieren.
Um einen gewählten Effekt zu deaktivieren, wählen Sie die Option „Disable
[Deaktivieren]“ aus dem Menü „Effect [Effekt]“ und klicken Sie dann auf „OK“.
Um Ihrem Webcam-Bild einen Fotorahmen hinzuzufügen, wählen Sie diesen aus dem Menü
„Frame [Rahmen]”. Klicken Sie auf „OK“, um den gewählten Effekt zu aktivieren.
Um einen gewählten Fotorahmen zu deaktivieren, wählen Sie die Option „Disable
[Deaktivieren]“ aus dem Menü „Frame [Rahmen]“ und klicken Sie dann auf „OK“.
Page 29

FRANÇAIS
29
Conceptronic CLLCHITCH AT
Guide de démarrage rapide
Nous vous félicitons d'avoir acheté
le CLLCHITCHAT de Conceptronic.
Le Guide d'Installation du Matériel ci-joint vous expliquera pas à pas comment installer le
CLLCHITCHAT de Conceptronic.
En cas de problèmes, nous vous recommandons de vous adresser à notre service technique
(allez à www.conceptronic.net
et cliquez sur « support »).Vous trouverez dans cette section
la Base de Données des Foires Aux Questions.
Si vous avez d’autres questions concernant votre produit et que vous ne trouvez pas la
solution sur notre site web, contactez-nous par e-mail : support@conceptronic.net
Pour plus d'informations sur les produits de Conceptronic, visitez notre Site Internet
Conceptronic: www.conceptronic.net
Il est possible que l’installation du matériel décrite ci-dessous diffère parfois de
l’installation sur votre ordinateur. Cela dépend de votre version Windows que vous utilisez.
1. Introduction
Avec la Lounge’n’LOOK CHITCHAT de Conceptronic, vous allez être capable de voir votre
interlocuteur tout en discutant sur un chat ! La Lounge’n’LOOK CHITCHAT est compatible
avec tous les programmes messenger et toutes les applications de chat. Vous pouvez utiliser
la Lounge’n’LOOK CHITCHAT sur votre bureau, la fixer à l'écran de votre ordinateur
portable ou sur votre écran TFT.
Page 30

FRANÇAIS
30
2. Contenu du Coffret
Les éléments suivants sont fournis dans votre boîte :
1x Conceptronic Lounge’n’LOOK Chitchat:
1x Conceptronic Lounge’n’LOOK webcam (Cliqcam)
1x Conceptronic Lounge’n’LOOK headset
1x CD-ROM de Driver
1x Guide d'installation rapide
1x Carte de garantie
3. Conditions Minimales du Système
• Systèmes d’Exploitation : Windows 2000, Windows XP ou Windows Vista
• Mémoire Système de 256MB (ou plus)
• 100 MB d'espace libre sur le Disque Dur.
• Un Port USB (disponible)
• Lecteur de CD-ROM\
• Carte son
4. Installation du Driver
Remarque:
Installez d'abord le logiciel avant de brancher la Lounge’n’LOOK CHITCHAT sur
l'ordinateur !
A. Placez le CD-ROM du produit dans votre lecteur de CD-ROM. Le Menu à Lancement
Automatique doit apparaître automatiquement.
Si le Menu n'apparaît pas, utilisez Windows Explorer pour vous déplacer dans le Cd-Rom
et exécutez "Autorun.exe".
B. Sélectionnez le bon driver pour votre version de Windows installée.
Remarque
: Vérifiez que vous avez bien sélectionné le bon Driver pour votre Version de
Windows. Si vous utilisez Windows 2000 ou XP, sélectionnez l'option "Windows
2000/XP". Si vous utilisez Windows Vista, sélectionnez l'option "Windows
Vista".
Page 31

FRANÇAIS
31
C. L'Assistant de Configuration du Driver apparaît. Cliquez sur « Suivant » pour continuer.
D. Le driver est installé.
E. Cliquez sur "Terminer" pour finir. Redémarrez l'ordinateur.
Page 32

FRANÇAIS
32
5. Installation du hardware
Lorsque l'installation du driver est terminée, vous pouvez connecter la Lounge’n’LOOK
CHITCHAT sur un port USB disponible sur votre PC ou sur un concentrateur (hub) USB de
votre PC.
5.1 Windows 2000/XP
A. Windows fera apparaître une notification avec le message : « Found new hardware ».
Merci d’attendre que Windows ait terminé l’installation du driver.
B. Au terme de l’installation, le message « Your new hardware is installed and ready to
use » apparaîtra.
Remarque: Nous vous conseillons de réinitialiser votre ordinateur après avoir installé la
webcam.
5.2 Windows Vista
A. Windows fera apparaître une notification avec le message : « Installing device driver
software » (Installation en cours du driver du dispositif). Merci d’attendre que
Windows Vista ait terminé l’installation du driver.
B. Windows affiche « Assistant de Nouveau Matériel Détecté » Sélectionnez "Localiser
et installer le driver". Veuillez attendre que Windows Vista ait terminé d'installer le
driver.
C. Au terme de l’installation, le message « Device driver software installed
successfully » (Le driver du dispositif a été installé correctement) apparaîtra.
Remarque: Nous vous conseillons de réinitialiser votre ordinateur après avoir installé la
webcam.
Vous pouvez dès maintenant utiliser votre webcam !
Page 33

FRANÇAIS
33
6. Utilisation de la Lounge’n’LOOK CHITCHAT
Pour vérifier le fonctionnement de la webcam, vous pouvez utiliser le programme AMCAP.
Le programme AMCAP est installé avec les drivers. Ce programme est très simple et permet
de configurer la webcam et de faire des captures vidéos.
Pour exécuter le programme AMCAP, cliquez sur "Démarrage", "Programmes",
"Conceptronic”, “Lounge’n’LOOK Cliqcam" et sur "AMCAP". Vous verrez l'activité de votre
webcam disponible dans le programme.
Lorsque aucune image de la webcam n'est visible, utilisez l'option "Dispositif" (1) pour
sélectionner " Lounge’n’LOOK Cliqcam ".
Par le menu "Options" (2), vous pouvez modifier les paramètres par défaut de la
Lounge’n’LOOK CHITCHAT. Utilisez le menu "Capture" (3) pour enregistrer les captures
vidéo sur le disque dur de votre ordinateur.
La Lounge’n’LOOK CHITCHAT peut aussi être utilisée avec Microsoft MSN Messenger. Vous
aurez besoin de configurer MSN Messenger avant d'utiliser la webcam. Pour la configurer,
utilisez "Outils", "Réglage Audio et Vidéo" dans la fenêtre principale de MSN Messenger.
1 2 3
Page 34

FRANÇAIS
34
7. Options supplémentaires de la webcam
La caméra Lounge’n’LOOK CHITCHAT comprend les options « Image Effect » (Effet
d’image), « Photo Frame » (Cadre de Photo) et « Face Tracking » (Suivi intelligent du
visage).
Remarque:
Les options "Image Effect" [Effet Image], "Photo Frame"[Cadre Photo] et
"FaceTracking"[Suivi du visage] ne sont disponibles que pour Windows Vista.
Si vous utilisez Windows 2000 ou Windows XP, ces options ne sont pas
disponibles.
Ces options peuvent être configurées à l’aide des propriétés de la webcam auxquelles vous
pouvez accéder de différentes manières :
AMCAP
: Ouvrez AMCAP et cliquez sur « Options » puis « Video Capture Filter ».
Les propriétés de la webcam apparaîtront alors à l’écran.
MSN
: Commencez une conversation avec un de vos contacts et activez la webcam.
Cliquez à l’aide de la touche droite de la souris sur l’image de la webcam et
sélectionnez « Web Camera Settings… » (Paramètres de la webcam…). Cliquez
sur « Advanced » (Options avancées) dans la fenêtre qui apparaît alors à l’écran
afin d’accéder aux propriétés de la webcam.
Skype :
Commencez une conversation avec un de vos contacts et activez la webcam.
Cliquez à l’aide de la touche droite de la souris sur l’image de la webcam et
sélectionnez « Video Settings » (Paramètres vidéo) Les propriétés de la webcam
apparaîtront alors à l’écran.
7.1 Propriétés - Suivi de Visage
Sur la page "Face Tracking" vous pouvez activer ou désactiver l'option de suivi du visage.
Sélectionnez l'option "Face Tracking" et cliquez sur "OK" pour activer la fonction de Suivi
du Visage.
Pour désactiver la fonction de Suivi du Visage, désélectionnez l'option "Face Tracking" et
cliquez sur "OK".
Page 35

FRANÇAIS
35
7.2 Propriétés – Stream Property
Dans la section « Stream Property », vous pouvez modifier plusieurs configurations d’image
de la webcam, comme le contraste, la luminosité et la netteté.
7.3 Propriétés - Effet Cadre
Sur l'onglet "Effect Frame", vous pouvez ajouter un cadre de photo ou un effet d'image à
l'image de votre webcam.
Pour manipuler l'image de votre webcam avec un effet, sélectionnez un effet dans le menu
"Effect". Cliquez sur "OK" pour activer l'effet choisi.
Pour désactiver un effet choisi, sélectionnez l'option "Disable" dans le menu "Effect" et
cliquez sur "OK".
Pour manipuler l'image de votre webcam avec un cadre photo, sélectionnez un cadre photo
dans le menu "Frame". Cliquez sur "OK" pour activer l'effet choisi.
Pour désactiver un cadre photo choisi, sélectionnez l'option "Disable" dans le menu "Frame"
et cliquez sur "OK".
Page 36

ITALIANO
36
Conceptronic CLLCHITCH AT
Guida d’installazione rapida
Grazie per l’acquisto del CLLCHITCHAT Conceptronic.
La guida per l’installazione dell’hardware acclusa spiegherà passo a passo la CLLCHITCHAT
Conceptronic.
Se dovessero esserci dei problemi, vi consigliamo di visitare il nostro sito di supporto
(andate su www.conceptronic.net
e cliccate ‘support’), dove potrete trovare il Database
delle Risposte alle Domande più Frequenti (FQA).
Se doveste avere altre domande riguardanti il prodotto che non trovate sul nostro sito Web
vi preghiamo di contattarci attraverso l’e-mail: support@conceptronic.net
Per ulteriori informazioni dei prodotti Conceptronic, la preghiamo di visitare il sito Web
della Conceptronic: www.conceptronic.net
La successiva descrizione relativa all’installazione del software potrebbe essere
leggermente diversa dall’installazione sul vostro computer. Ciò dipende della versione di
Windows in uso.
1. Introduzione
Grazie alla Lounge’n’LOOK CHITCHAT di Conceptronic potrete vedere e farvi vedere da tutti
i vostri amici e familiari mentre siete in chat! La Lounge’n’LOOK CHITCHAT è compatibile
con tutti i programmi di messenger e applicazioni di chat. Si può usare direttamente sulla
scrivania o applicata sullo schermo del notebook o su qualsiasi monitor TFT.
Page 37

ITALIANO
37
2. Contenuto della confezione
La confezione deve contenere i seguenti elementi:
1x Conceptronic Lounge’n’LOOK Chitchat:
1x Conceptronic Lounge’n’LOOK webcam (Cliqcam)
1x Conceptronic Lounge’n’LOOK headset
1x Lounge’n’LOOK CHITCHAT Conceptronic, con piedistallo / clip acclusi
1x Driver CD-ROM
1x Guida d’installazione rapida
1x Scheda di garanzia
3. Requisiti di sistema
• Sistemi operativi: Windows 2000, Windows XP o Windows Vista
• 256 MB (o superiore) di memoria disponibile nel sistema
• 100 MB di spazio libero nel disco rigido
• Una porta USB (disponibile)
• CD-ROM Drive
• Scheda audio
4. Installazione del driver
Nota:
Prima di collegare la Lounge’n’LOOK CHITCHAT al computer si deve installare il
software!
A. Inserire il CD-ROM di prodotto nell’apposita unità. Il programma di installazione si
aprirà automaticamente.
In caso contrario, utilizzare Esplora Risorse per verificare il contenuto del CD-ROM e
aprire “Autorun.exe”.
B. Selezionare il driver corretto relativo alla versione di Windows installata sul computer.
Nota
: assicurarsi di selezionare il driver corretto relativo alla versione di Windows in uso.
Se si utilizza Windows 2000/XP, selezionare l’opzione “Windows 2000/XP”. Se si usa
Windows Vista, selezionare l’opzione “Windows Vista”.
Page 38

ITALIANO
38
C. Apparirà l’assistente per l’installazione del drvier. Fare clic su “Next” (Avanti) per
continuare.
D. Il driver verrà installato.
E. Fare clic su “Fine” per terminare l’installazione. Riavviare il computer.
Page 39

ITALIANO
39
5. Installazione dell’hardware
Dopo aver installato il driver è possibile collegare la Lounge’n’LOOK CHITCHAT a qualsiasi
porta USB disponibile del computer o a qualsiasi hub USB collegato al PC.
5.1 Windows 2000/XP
A. Windows mostrerà un messaggio a comparsa per notificare che si sta installando il
software del driver del dispositivo (Installing device driver software). Aspettare fino a
quando Windows avrà portato a termine l’installazione del driver.
B. Una volta completata l’installazione, apparirà il messaggio Your new hardware is
installed and ready to use.
Nota: si consiglia di riavviare il computer dopo l’installazione della webcam.
5.2 Windows Vista
A. Windows mostrerà un messaggio a comparsa per notificare che si sta installando il
software del driver del dispositivo (Installing device driver software). Aspettare fino a
quando Windows Vista avrà portato a termine l’installazione del driver.
B. Windows mostrerà un “Assistente d’installazione per un nuovo hardware”.
Selezionare "Locate and install driver software" (Individua e installa il software del
driver). Aspettare che Windows Vista concluda la procedura d’installazione del driver.
C. Una volta completata l’installazione, apparirà il messaggio Device driver software
installed successfully (Software del driver del dispositivo installato senza problemi).
Nota: si consiglia di riavviare il computer dopo l’installazione della webcam.
Ora la webcam è pronta per essere usata!
Page 40

ITALIANO
40
6. Come usare la Lounge’n’LOOK CHITCHAT
Per verificare che la webcam sia stata installata correttamente, si può usare il programma
AMCAP, che viene installato assieme ai driver; si tratta semplicemente di un programma
grazie al quale è possibile configurare la webcam e realizzare acquisizioni video.
Per aprire il programma AMCAP, fare clic su “Start”, “Programmi”, “Conceptronic”,
“Lounge’n’LOOK Cliqcam”, e “AMCAP”. Apparirà lo stream live della webcam disponibile
nel programma.
Nel caso in cui non appaia nessuna immagine della webcam, usare l’opzione “Device” (1)
(Dispositivo) per selezionare la “Lounge’n’LOOK Cliqcam”.
Nel menu “Opzioni” (2), si possono modificare le impostazioni di default della
Lounge’n’LOOK CHITCHAT. Con il menu “Capture” (3) (Acquisizione) potrete memorizzare
acquisizioni video sul disco rigido del computer.
La Lounge’n’LOOK CHITCHAT si può anche usare con Microsoft MSN Messenger; basta
configurare MSN Messenger prima di usare la webcam, accedendo alle opzioni di menu
“Tools” (Strumenti), “Audio e Video setup” (Configurazione audio e video) nella finestra
principale di MSN Messenger.
1 2 3
Page 41

ITALIANO
41
7. Opzioni extra della webcam
La CHITCHAT Lounge’n’LOOK è dotata delle opzioni Image Effect (Effetto immagine), Photo
Frame (Cornice foto) e Face Tracking (Tracciamento volto).
Nota:
Le opzioni di "Image Effect" (Effetto immagine), "Photo Frame" (Cornice foto) e
"Face Tracking" (Tracciamento del volto) solo disponibili esclusivamente per
Windows Vista. Nel caso in cui vengano usati Windows 2000 o Windows XP, tali
funzionalità non saranno operative.
I parametri di queste tre opzioni si possono impostare accedendo alle Proprietà della
webcam, alle quali si può arrivare in diverso modo:
AMCAP:
aprire AMCAP e fare clic su Options (Opzioni), Video Capture Filter (Filtro
acquisizione video).
In questo modo appariranno le proprietà della webcam.
MSN:
iniziare una conversazione con un contatto e attivare la webcam. Fare clic con il
pulsante destro sull’immagine della webcam e selezionare Web Camera
Settings… (Impostazione webcam). Fare clic su Advanced (Avanzate) nella
finestra mostrata. In questo modo appariranno le proprietà della webcam.
Skype:
iniziare una conversazione con un contatto e attivare la webcam. Fare clic con il
pulsante destro sull’immagine della webcam e selezionare Video Settings
(Impostazione video). In questo modo appariranno le proprietà della webcam.
Page 42

ITALIANO
42
7.1 Proprietà - Face Tracking
Quando viene aperta la pagina relativa al "Face Tracking", è possibile attivare o disattivare
l’opzione di tracciamento digitale del volto.
Selezionare l’opzione "Face Tracking" e fare clic su "OK" per abilitare tale funzione.
Per disattivare la funzione di tracciamento del volto, deselezionare l’opzione "Face
Tracking" e fare clic su "OK".
7.2 Proprietà – Stream Property
Se si accede alla linguetta relativa ai “Stream Property”, è possibile modificare diversi
parametri di configurazione dell’immagine della webcam, come ad esempio il contrasto, la
luminosità o la nitidezza.
7.3 Proprietà - Effect Frame
Quando viene aperta la linguetta con titolo "Effect Frame", è possibile selezionare cornici
da applicare alle foto o selezionare un effetto speciale per l’immagine trasmessa dalla
webcam.
Per modificare l’immagine della webcam con un effetto speciale, selezionare l’effetto
desiderato nel menu "Effect". Fare clic su "OK" per attivare l’effetto selezionato.
Se invece si desidera disattivare un effetto previamente selezionato, scegliere l’opzione
"Disable" nel menu "Effect" dopo di che fare clic su "OK".
Per modificare l’immagine della webcam con una cornice, selezionare la cornice nel menu
"Frame". Fare clic su "OK" per attivare l’effetto selezionato.
Se invece si desidera disattivare una cornice previamente selezionata, scegliere l’opzione
"Disable" nel menu "Menu" dopo di che fare clic su "OK".
Page 43

PORTUGUÊS
43
Conceptronic CLLCHITCH AT
Iniciação Rápida
Os nosso parabéns pela compra do seu
CLLCHITCHAT Conceptronic.
O Guia de Instalação do Hardware que se inclui fornece-lhe uma explicação passo a passo
de como instalar CLLCHITCHAT Conceptronic.
Se tiver algum problema, aconselhamos consultar o nosso site de assistência (vá a
www.conceptronic.net
e clique em ‘assistência’ Aqui pode encontrar a Base de Dados das
Perguntas Mais Frequentes.
Se tiver outras questões relativas ao nosso produto e não as conseguir encontrar no nosso
webiste, pode-nos contactar através do e-mail: apoyo@conceptronic.net
Para mais informações sobre produtos de Conceptronic, por favor visite o Web Site da
Conceptronic: www.conceptronic.net
A instalação do Software conforme se encontra descrita abaixo pode ser ligeiramente
diferente da instalação do seu computador. Isso depende da versão do Windows que está a
utilizar.
1. Introdução
Com a Lounge’n’LOOK CHITCHAT da Conceptronic pode ver o seu interlocutor enquanto
conversa! A Lounge’n’LOOK CHITCHAT é compatível com todos os programas de mensagens
e aplicações de conversação. Pode usar a Lounge’n’LOOK CHITCHAT na sua secretária ou
prendê-la ao ecrã do seu computador portátil ou ecrã TFT.
Page 44

PORTUGUÊS
44
2. Conteúdo da Embalagem
Devem existir os seguintes elementos na sua embalagem:
1x Conceptronic Lounge’n’LOOK Chitchat:
1x Conceptronic Lounge’n’LOOK webcam (Cliqcam)
1x Conceptronic Lounge’n’LOOK headset
1x CD-ROM com controladores
1x Manual de Instalação Rápida
1x Cartão de garantia
3. Requisitos do Sistema
• Sistemas operativos: Windows 2000, Windows XP ou Windows Vista
• 256 MB Memória do sistema (ou superior)
• 100 MB espaço disponível no disco rígido
• Uma porta USB (disponível)
• Unidade de CD-ROM
• Placa de som
4. Instalação do software
Nota: Instale primeiro o software antes de ligar a Lounge’n’LOOK CHITCHAT ao
computador!
A. Meta o CD-ROM do produto na sua unidade de CD-ROM. O Menu de Execução
Automática deverá aparecer automaticamente.
Se o Menu não aparecer, use o Explorador do Windows para procurar o CD-ROM e
execute “Autorun.exe”.
B. Seleccione o controlador correcto para a versão do Windows que tiver instalada.
Nota
: Certifique-se de que selecciona o controlador correcto para a sua versão do
Windows. Se trabalhar com o Windows 2000/XP, seleccione a opção “Windows
2000/XP”. Se trabalhar com o Windows Vista, seleccione a opção “Windows Vista”.
Page 45

PORTUGUÊS
45
C. O Assistente de Configuração dos Controladores aparece. Clique em “Next” (Seguinte)
para continuar.
D. O controlador é instalado.
E. Clique em ‘Finish’ (Terminar) para concluir. Reinicie o computador.
Page 46

PORTUGUÊS
46
5. Instalação do hardware
Quando terminar a instalação do controlador, pode ligar a Lounge’n’LOOK CHITCHAT a
qualquer porta USB disponível do seu PC ou a qualquer USB hub ligado ao seu PC.
5.1 Windows 2000/XP
A. O Windows vai mostrar uma notificação de contexto com a mensagem “Found new
hardware”. Por favor aguarde até o Windows terminar a instalação do controlador.
B. Quando a instalação estiver concluída, aparece a mensagem “Your new hardware is
installed and ready to use”.
Nota: É aconselhável reiniciar o computador após a instalação da câmara web.
5.2 Windows Vista
A. O Windows vai mostrar uma notificação de contexto com a mensagem “Installing
device driver software” (A instalar software do controlador do dispositivo). Por favor
aguarde até o Windows Vista terminar a instalação do controlador.
B.
O Windows apresenta um 'Found New Hardware Wizard' (Assistente de Novo Hardware
Encontrado). Seleccione "Locate and install driver software" (Localizar e instalar o
controlador). Por favor aguarde até o Windows Vista terminar a instalação do
controlador.
C. Quando a instalação estiver concluída, aparece a mensagem “Device driver software
installed successfully” (Software do controlador do dispositivo instalado com sucesso).
Nota: É aconselhável reiniciar o computador após a instalação da câmara web.
A câmara web já está pronta a usar.
Page 47

PORTUGUÊS
47
6. Usar a Lounge’n’LOOK CHITCHAT
Para verificar a funcionalidade da webcam, pode usar o programa AMCAP.
O programa AMCAP é instalado juntamente com os controladores. É um programa simples
para configurar a webcam e fazer capturas de vídeo.
Para executar o programa AMCAP, clique em ‘Start’ (Iniciar), ‘Programs’ (Programas),
‘Conceptronic’, ‘Lounge’n’LOOK Cliqcam’, e ‘AMCAP’. Vai ver a transmissão ao vivo da
webcam disponível no programa.
Quando não se vê nenhuma imagem da webcam, use a opção ‘Device’ (1) (Dispositivo) para
seleccionar a ‘Lounge’n’LOOK Cliqcam’.
Através do menu ‘Options’ (2) (Opções), pode alterar as predefinições da Lounge’n’LOOK
CHITCHAT. Através do menu ‘Capture’ (3) (Captura) pode gravar as capturas de vídeo no
disco rígido do seu computador.
A Lounge’n’LOOK CHITCHAT também pode ser usada com o Microsoft MSN Messenger. Tem
de configurar o MSN Messenger antes de poder usar a webcam. Para configurar, vá a ‘Tools’
(Ferramentas), ‘Audio and Video setup’ (Configuração de áudio e vídeo) na janela
principal do MSN Messenger.
1 2 3
Page 48

PORTUGUÊS
48
7. Opções extra da câmara web
A Lounge’n’LOOK CHITCHAT está equipada com as opções “Image Effect” (Efeitos de
imagem), “Photo Frame” (Moldura de fotografia) e “Face Tracking” (Seguimento de cara).
Nota:
As opções "Image Effect" (Efeito de Imagem,), "Photo Frame" (Moldura de
Fotografia) e "Face Tracking" (Seguimento de cara) só estão disponíveis para o
Windows Vista. Se usar o Windows 2000 ou o Windows XP, estas opções não
estarão disponíveis.
Estas opções podem ser configuradas através das propriedades da câmara web, às quais se
pode aceder de várias formas:
AMCAP:
Inicie o AMCAP e clique em “Options” (Opções), “Video Capture Filter” (Filtro de
captura de vídeo). As propriedades da câmara web aparecem.
MSN:
Inicie uma conversação com um contacto e ligue a câmara web. Clique com o
botão direito do rato na imagem da câmara web e seleccione “Web Camera
Settings…” (Definições da câmara web...). Clique em “Advanced” (Avançadas) na
janela que aparece. As propriedades da câmara web aparecem.
Skype:
Inicie uma conversação com um contacto e ligue a câmara web. Clique com o
botão direito do rato na imagem da câmara web e seleccione “Video Settings…”
(Definições de vídeo). As propriedades da câmara web aparecem.
Page 49

PORTUGUÊS
49
7.1 Properties (Propriedades) - Face Tracking (Seguimento de cara)
Na página de "Face Tracking" (Seguimento de cara), pode activar ou desactivar o
seguimento de cara digital.
Seleccione a opção "Face Tracking" (Seguimento de cara) e clique em "OK" para activar a
função de Seguimento de Cara.
Para desactivar a função de Seguimento de Cara, desseleccione a opção "Face Tracking"
(Seguimento de Cara) e clique em "OK".
7.2 Properties – Stream Property
No separador “Stream Property”, pode alterar várias configurações de imagem para a
câmara web como o contraste, o brilho e a nitidez.
7.3 Properties (Propriedades) - Effect Frame (Moldura de Efeito)
No separador “Effect Frame” (Moldura de efeito), pode adicionar uma moldura de
fotografia ou efeito de imagem à sua imagem da câmara web.
Para manipular a imagem da sua câmara web com um efeito, seleccione um efeito no menu
"Effect" (Efeito). Clique em "OK" para activar o efeito seleccionado.
Para desactivar o efeito seleccionado, seleccione a opção "Disable" (Desactivar) no menu
"Effect" (Efeito) e clique em "OK".
Para manipular a imagem da sua câmara web com uma moldura de fotografia, seleccione
uma moldura de fotografia no menu "Frame" (Moldura). Clique em "OK" para activar o
efeito seleccionado.
Para desactivar a moldura de fotografia seleccionada, seleccione a opção "Disable"
(Desactivar) no menu "Frame" (Moldura) e clique em "OK".
Page 50

MAGYAR
50
Conceptronic CLLCHITCHAT
Gyors installációs kalauz
Gratulálunk Önnek amiért a Conceptronic
Lounge’n’LOOK CHITCHAT-t. választotta
A mellékelt Hardver Installációs Kalauz részletes magyarázatot nyújt a Conceptronic
CLLCHITCHAT installálásához.
Probléma esetén javasoljuk, hogy vegye igénybe a Support-site-en nyújtott
segítséget(menjen a www.conceptronic.net
-re és kattintson a ‘Support’-ra, ahol megtalálja
a Gyakran Ismételt Kérdések adatbázist.
Ha termékünkkel kapcsolatban további kérdése lenne, és weboldalunkon nem talál rá
választ, forduljon hozzánk e-mailben: support@conceptronic.net
A Conceptronic termékekkel kapcsolatos további információért kérjük tekintse meg a
Conceptronic weboldalát: www.conceptronic.net
A továbbiakban leírt szoftver installáció kis mértékben eltérhet az Ön számítógépére való
installációtól attól függően, hogy Ön melyik Windows változatot használja.
1. Bevezetés
A Conceptronic Lounge’n’LOOK CHITCHAT-nek köszönhetően chat közben a
beszélgetőpartnerek láthatják egymást! A Lounge’n’LOOK CHITCHAT kompatibilis minden
messenger-programmal és chat alkalmazással. A Lounge’n’LOOK CHITCHAT-t használhatja
az íróasztalra, a notebook monitorjára vagy TFT-képernyőre rögzítve.
Page 51

MAGYAR
51
2. A csomag tartalma
A csomag az alábbiakat kell, hogy tartalmazza:
1x Conceptronic Lounge’n’LOOK Chitchat:
1x Conceptronic Lounge’n’LOOK webcam (Cliqcam)
1x Conceptronic Lounge’n’LOOK headset
1x Illesztőprogram, CD-ROM-on
1x Gyors Installációs Kalauz
1x Garancia
3. Rendszerkövetelmények
• Operációs rendszer: Windows 2000, Windows XP vagy Windows Vista
• 256 MB rendszermemória (vagy több)
• 100 MB szabad merevlemezterület
• Egy (szabad) USB port
• CD-ROM meghajtó
• Ses kartı
4. Az illesztőprogram telepítése
Megjegyzés:
Mielőtt csatlakoztatná a CLLCHITCHAT-t a számítógéphez, installálja a
szoftvert!
A. Tegye be a termékismertető CD-ROM-ot a CD-ROM-meghajtóba. Az Autorun menü
automatikusan megjelenik.
Ha a menü nem jelenik meg, a Windows Explorer-t használja a CD-ROM-hoz történő
navigálásra, majd hajtsa végre az „Autorun.exe”-t.
B. Jelölje ki a megfelelő illesztőprogramot a már telepített Windows-verzióhoz.
Megjegyzés
: Ügyeljen arra, hogy a helyes illesztőprogramot jelölje ki a Windows-
verzióhoz. Ha Windows 2000-et/XP-t használ, jelölje ki a „Windows
2000/XP” opciót. Ha Windows Vistá-t használ, jelölje ki a „Windows Vista”
opciót.
Page 52

MAGYAR
52
C. Megjelenik az illesztőprogramot telepítő varázsló. Ha tovább akar lépni, kattintson a
„Next”-re.
D. Az illesztőprogram települt.
E. A befejezéshez kattintson a ‘Befejez’-re. Indítsa újra a számítógépet.
Page 53

MAGYAR
53
5. Hardver installáció
A meghajtó installációjának befejezése után, csatlakoztathatja a Lounge’n’LOOK
CHITCHAT-t bármely a számítógépén rendelkezésre álló USB porthoz vagy bármely a
számítógéphez kapcsolt USB hub-hoz.
5.1 Windows 2000/XP
A. A Windows előbukkanó értesítést jelenít meg a következő üzenettel: „Found new
hardware”. Várjon, amíg a Windows be nem fejezi az illesztőprogram telepítését.
B. Amikor a telepítés befejeződött, a következő üzenet jelenik meg: „Your new
hardware is installed and ready to use”.
Megjegyzés: Tanácsoljuk, hogy számítógépét a webkamera telepítése után indítsa újra.
5.2 Windows Vista
A. A Windows előbukkanó értesítést jelenít meg a következő üzenettel: „Installing device
driver software” (az eszköz illesztőprogramjának telepítése). Várjon, amíg a Windows
Vista be nem fejezi az illesztőprogram telepítését.
B. A Windows a következő figyelmeztetést küldi: „Found New Hardware Wizard”.
Jelölje ki a „Locate and install driver software”-t. Várjon, amíg a Windows Vista be
nem fejezi az illesztőprogram telepítését.
C. Amikor a telepítés befejeződött, a következő üzenet jelenik meg: „Device driver
software installed successfully” (az eszköz illesztőprogramja sikeresen települt).
Megjegyzés: Tanácsoljuk, hogy számítógépét a webkamera telepítése után indítsa újra.
A webkamera használatkész!
Page 54

MAGYAR
54
6. A Lounge’n’LOOK CHITCHAT használata
A webkamera működésének ellenőrzéséhez használhatja az AMCAP programot.
Az AMCAP program a meghajtókkal együtt kerül telepítésre. Ez a program egy egyszerű
program, amely elvégzi a webkamerán a konfigurációkat és videó szerkesztéseket.
Az AMCAP program végrehajtásához, kattintson a ‘Start’-ra, ‘Programok’-ra,
‘Conceptronic’-ra, ‘Lounge’n’LOOK Cliqcam’-ra, és az ‘AMCAP’-ra. Megjelenik a
programon rendelkezésre álló webkamera livestream-je.
Amennyiben a webkamerán nem látható semmilyen kép, használja a ‘Device’ (1) opciót a
‘Lounge’n’LOOK Cliqcam’ kiválasztásához.
Az ‘Opciók’ (2) menü révén megváltoztathatja a Lounge’n’LOOK CHITCHAT alapértelmezett
beállításait. A ‘Capture’ (3) menü lehetővé teszi a videó felvételeknek a számítógép
merevlemezére való elmentését.
A Lounge’n’LOOK CHITCHAT Microsoft MSN Messenger-en belül is használható. A webkamera
használata előtt konfigurálnia kell a MSN Messenger-t. A beállításhoz használja a
‘Eszközök’-et, ‘Audio- és videó beállítás’-t a MSN Messenger fő ablakán.
1 2 3
Page 55

MAGYAR
55
7. További opciók a webkamerával kapcsolatban
A Lounge’n’LOOK csevegőkamera „Image Effect”, „Photo Frame” és „Face Tracking”
opcióval egészül ki.
Megjegyzés:
Az „Image Effect”, a „Photo Frame” és a „Face Tracking” alternatívák csak
a Windows Vista esetében állnak rendelkezésre. Ha Windows 2000-ese vagy
Windows XP-je van, ezek az opciók nem elérhetők
Ezek az opciók a webkamera különböző módon hozzáférhető tulajdonságain keresztül
beállíthatók:
AMCAP:
Indítsa el az AMCAP-et, majd kattintson az „Options”-ra, végül pedig a „Video
Capture Filter”-re. A webkamera tulajdonságai jelennek meg.
MSN:
Indítsa el a beszélgetést partnerével, majd engedélyezze a webkamerát. Az egér
jobb oldali gombjával kattintson a webkamera képére, majd jelölje ki a „Web
Camera Settings…”-t. Kattintson az „Advanced”-ra a megjelenő ablakban. A
webkamera tulajdonságai láthatók.
Skype:
Indítsa el a beszélgetést partnerével, majd engedélyezze a webkamerát. Az egér
jobb oldali gombjával kattintson a webkamera képére, majd jelölje ki a „Video
Settings”. A webkamera tulajdonságai láthatók.
7.1 Tulajdonságok – Arckövetés
A „Face Tracking” oldalon lehet a digitális arckövetést be-, illetve kikapcsolni.
Jelölje ki a „Face Tracking” alternatívát, majd kattintson a „OK”-ra, hogy az arckövetés
funkciót bekapcsolja.
Az arckövetés funkció kikapcsolásához törölje a „Face Tracking” alternatíva kijelölését,
majd kattintson az „OK”-ra.
7.2 Tulajdonásgok — Stream Property
A „Stream Property” fülön a webkamera több képbeállításán változtathat, mint pl.
kontraszt, fényerő és élesség.
Page 56

MAGYAR
56
7.3 Tulajdonságok – Effektuskocka
Az „Effect Frame” fülön fényképkerettel vagy képhatással egészítheti ki a webkamerás
képet.
A webkamerás képnek az ezzel az effektussal történő manipulálásához jelölje ki valamelyik
effektust az „Effect” menün. A kijelölt effektus bekapcsolásához kattintson az „OK”-ra.
A kijelölt effektus kikapcsolásához jelölje ki a „Disable” alternatívát az „Effect” menün,
majd kattintson az „OK”-ra.
A webkamerás képnek fényképkerettel történő manipulálásához jelöljön ki egy
fényképkeretet a „Frame” menün. A kijelölt effektus bekapcsolásához kattintson az „OK”-
ra.
A kijelölt fényképkeret kikapcsolásához jelölje ki a „Disable” alternatívát a „Frame”
menün, majd kattintson az „OK”-ra.
Page 57

TÜRKÇE
57
Conceptronic CLLCHITCHAT
Hızlı Kurulum Kılavuzu
Conceptronic Lounge’n’LOOK CHITCHAT
Satın Aldığınız İçin Tebrikler.
Bu Hızlı Kurulum Kılavuzu size Conceptronic Lounge’n’LOOK CHITCHAT kurulumunun adım
adım nasıl yapılacağı konusunda bilgi verir.
Problem ortaya çıktığında, destek sitemize gitmenizi (www.conceptronic.net
adresine
gidiniz ve ‘Support’ sayfasına tıklayınız) tavsiye etmekteyiz. Burada Sıkça Sorulan Sorular
Veritabanını bulacaksınız.
Ürününüz ile ilgili başka sorularınız olduğunda ve yanıtını web sitemizde bulamadığınız
takdirde bize e-posta gönderin: support@conceptronic.net
Conceptronic ürünleri ile ilgili daha fazla bilgi için lütfen Conceptronic Web Sitesini ziyaret
edin: www.conceptronic.net
Aşağıda açıklanan yazılım yüklemesi bilgisayarınızdaki yüklemeden biraz daha farklı olabilir.
Bu durum kullandığınız Windows sürümüne bağlıdır.
1. Giriş
Conceptronic Lounge’n’LOOK CHITCHAT ile sohbet ederken birbirinizi görebilirsiniz!
Conceptronic Lounge’n’LOOK CHITCHAT tüm anında mesajlaşma ve sohbet uygulamaları ile
uyumludur. Conceptronic Lounge’n’LOOK CHITCHAT’i masanızın üzerinde, dizüstü
bilgisayarınızın ekranına ya da TFT ekrana takarak kullanabilirsiniz.
Page 58

TÜRKÇE
58
2. Paket İçeriği
Pakette aşağıdaki parçalar bulunmalıdır:
1x Conceptronic Lounge’n’LOOK CHITCHAT, ayak / tutucu bağlantılı
1x Sürücü CD-ROM’u
1x Hızlı Kurulum Kılavuzu
1x Garanti Kartı
3. Sistem Gereksinimleri
• İşletim Sistemleri: Windows 2000, Windows XP ya da Windows Vista
• 256 MB Sistem Belleği (ya da üzeri)
• 100 MB Boş Sabit Disk Alanı
• Bir (boş) USB portu
• CD-ROM Sürücüsü
4. Sürücü Kurulumu
Not: CLLCHITCHAT’i bilgisayara bağlamadan önce yazılımı yükleyin!
A. Ürün CD-ROM’unu CD-ROM sürücüsüne yerleştirin. Otomatik çalıştırma menüsü ekrana
gelmelidir.
Menü ekrana gelmezse CD-ROM’da gezinmek için Windows Explorer’ı kullanın ve
“Autorun.exe”’yi çalıştırın.
B. Kurulu Windows sürümünüz için doğru sürücüyü seçin.
Not:
Windows Sürümünüz için doğru Sürücüyü seçtiğinizden emin olun. Windows 2000/XP
kullanıyorsanız, “Windows 2000/XP”yi seçin. Windows Vista kullanıyorsanız,
“Windows Vista”yı seçin.
Page 59

TÜRKÇE
59
C. Sürücü Kurulum Sihirbazı ekrana gelir. Devam etmek için “Next (İleri)”ye tıklayın.
D. Sürücü yüklenir.
E. Tamamlamak için ‘Finish (Son)’a tıklayın.
Page 60

TÜRKÇE
60
5. Donanım Kurulumu
Sürücü kurulumu tamamlandıktan sonra Lounge’n’LOOK CHITCHAT’i bilgisayarınızda mevcut
bir USB portuna ya da bilgisayarınıza bağlı bir USB hub’a bağlayabilirsiniz.
5.1 Windows 2000/XP
A. Windows tarafından “Found new hardware” açılır uyarı mesajı görüntülenir. Lütfen
Windows sürücü yükleme işlemini bitirmesini bekleyin.
B. Yükleme işlemi tamamlandığında “Your new hardware is installed and ready to use”
mesajı ekrana gelir.
Not:
Webcam kurulumundan sonra bilgisayarı yeniden başlatmanızı tavsiye etmekteyiz.
5.2 Windows Vista
A. Windows tarafından “Installing device driver software (Cihaz sürücü yazılımı
yükleniyor)” açılır uyarı mesajı görüntülenir. Lütfen Windows Vista’nın sürücü
yükleme işlemini bitirmesini bekleyin.
B. Windows tarafından ‘Found New Hardware Wizard (Yeni Donanım Bulundu
Sihirbazı)’ görüntülenir. “Locate and install driver software (Sürücü yazılımını bul
ve yükle)”yi seçin. Lütfen Windows Vista’nın sürücü yükleme işlemini bitirmesini
bekleyin.
C. Yükleme işlemi tamamlandığında “Device driver software installed successfully
(Cihaz sürücü yazılımı başarılı bir şekilde yüklendi)” mesajı ekrana gelir.
Not: Webcam kurulumundan sonra bilgisayarı yeniden başlatmanızı tavsiye ederiz.
Webcam artık kullanıma hazırdır!
Page 61

TÜRKÇE
61
6. Lounge’n’LOOK CHITCHAT’in Kullanımı.
Web kamerasının işlevselliğini kontrol etmek için AMCAP programını kullanabilirsiniz.
AMCAP programı sürücülerle birlikte yüklenir. Bu program web kamerasının yapılandırılması
ve video yakalama işlemlerinde kullanılan basit bir programdır.
AMCAP programını çalıştırmak için ‘Start (Başlat)’, ‘Programs (Programlar)’,
‘Conceptronic’, ‘Lounge’n’LOOK Cliqcam’ ve ‘AMCAP’e tıklayın. Programda web
kamerasının canlı yayınını göreceksiniz.
Web kamerasından görüntü gelmediği zaman, ‘Devices (Cihazlar)’ (1) seçeneğini kullanarak
‘Lounge’n’LOOK Cliqcam’ i seçin.
‘Options (Seçenekler)’ (2) menüsünden Lounge’n’LOOK CHITCHAT varsayılan ayarlarını
değiştirebilirsiniz. ‘Capture (Yakala)’ (3) menüsünü kullanarak bilgisayar sabit diskine
yakaladığınız videoları kaydedebilirsiniz.
Lounge’n’LOOK CHITCHAT, Microsoft MSN Messenger ile de kullanılabilmektedir. Web
kamerasını kullanmadan önce MSN Messenger’ı yapılandırmanız gerekir. Yapılandırmak için
MSN Messenger ana penceresinde ‘Tools (Araçlar)’, ‘Audio and Video setup (Ses ve Video
Kurulumu)’nu kullanın.
1 2 3
Page 62

TÜRKÇE
62
7. İlave web kamerası seçenekleri
Lounge’n’LOOK CHITCHAT “Image Effect”, “Photo Frame” ve “Face Tracking” seçenekleri
ile donatılmıştır.
Not:
“Image Effect”, “Photo Frame” ve “Face Tracking” seçenekleri sadece Windows
Vista için kullanılabilir. Windows 2000 ya da Windows XP kullanıyorsanız, bu
seçenekler kullanılamaz.
Bu seçenekler web kamerasının özellikleri içinden düzenlenebilir ve bu seçeneklere farklı
yollarla erişilebilir:
AMCAP:
AMCAP’i başlatın ve “Options (Seçenekler)”, “Video Capture Filter (Video
Çekim Filtresi)”ni tıklayın.
Web kamerasının özellikleri gösterilecektir.
MSN:
Bir kişi ile görüşme başlatın ve web kamerasını etkinleştirin. Web kamerası
görüntüsü üzerinde sağ tıklayın ve “Web Camera Settings…(Web Kamerası
Ayarları...)”nı seçin. Gösterilen pencerede “Advanced (Gelişmiş)”i tıklayın. Web
kamerasının özellikleri gösterilecektir.
Skype:
Bir kişi ile görüşme başlatın ve web kamerasını etkinleştirin. Web kamerası
görüntüsü üzerinde sağ tıklayın ve “Video Settings (Video Ayarları)”nı seçin. Web
kamerasının özellikleri gösterilecektir.
7.1 Properties – Face Tracking (Özellikler – Yüz Takibi)
“Face Tracking” sayfasında, dijital yüz takibini etkinleştirebilir ya da devre dışı
bırakabilirsiniz.
“Face Tracking” seçeneğini seçin ve Yüz Takibi fonksiyonunu etkinleştirmek için “OK
(TAMAM)”a tıklayın.
Yüz Takibi fonksiyonunu devre dışı bırakmak için “Face Tracking” seçeneğini kaldırın ve
“OK (TAMAM)”a tıklayın.
7.2 Properties – Stream Property (Özellikler – Akış Özelliği)
“Stream Property” sekmesinde kontrast, parlaklık ve keskinlik gibi çeşitli webcam görüntü
ayarlarını değiştirebilirsiniz.
Page 63

TÜRKÇE
63
7.3 Properties – Effect Frame (Özellikler – Efekt Çerçevesi)
“Effect Frame” sekmesinde web kamerası görüntünüze fotoğraf çerçevesi ya da görüntü
efekti ekleyebilirsiniz.
Web kamerası görüntünüzü efektle değiştirmek için “Effect” menüsünden bir efekt seçin.
Seçilen efekti etkinleştirmek için “OK (TAMAM)”a tıklayın.
Seçilen efekti devre dışı bırakmak için, “Effect” menüsünden “Disable” seçeneğini seçin ve
“OK (TAMAM)”a tıklayın.
Web kamerası görüntünüzü fotoğraf çerçevesi ile değiştirmek için “Frame” menüsünden bir
fotoğraf çerçevesi seçin. Seçilen efekti etkinleştirmek için “OK (TAMAM)”a tıklayın.
Seçilen fotoğraf çerçevesini devre dışı bırakmak için, “Frame” menüsünden “Disable”
seçeneğini seçin ve “OK (TAMAM)”a tıklayın.
Page 64

Declaration of CE Conformity
64
The manufacturer Conceptronic
Address Databankweg 7
3821 AL Amersfoort, the Netherlands
hereby declares that the product
Type Conceptronic Chitchat (Webcam + headset)
Product CLLCHITCHA
complies with following directives:
89/336/EEC EMC directive:
Electromagnetic Compatibility
73/23/EEC Low Voltage Directive:
Electrical equipment designed for use within certain voltage
limits
The following standards were consulted to assess conformity:
ETS 300 328-2/2000
EN 301 489-17-2000
EN 301 489-1-2000
EN55022/9.98 Class B
EN 61000-3-2/3/4/1995
EN 50082-1/1994
EN 60950/1995
The CE symbol confirms that this product conforms to the above named standards and
regulations.
This product is suitable for all EU countries.
Place and date of issue : Amersfoort, March 1, 2007
Herman Looijen, Product Marketing Manager
 Loading...