

Page 1

NEDERLANDS
- 1 -
Conceptronic 100S5/100S8/100S16
Hardware installatiehandleiding
Hartelijk gefeliciteerd met de aanschaf van uw
Conceptronic 5/8/16 poorts switch.
In de bijgaande Snelstart handleiding wordt stap voor stap
uitgelegd hoe u de Conceptronic 5/8/16 poorts switch installeert op
uw Notebook of PC. Ingeval van problemen adviseren wij u onze
support-site 2-Tech te bezoeken (ga naar www.conceptronic.net,
‘Technical support’ en klik op ‘on-line support’.) Hier vindt u
hoogstwaarschijnlijk de oplossing voor uw probleem.
Heeft u desondanks vragen met betrekking tot uw aankoop of
heeft u support nodig bij het aansluiten dan kunt u direct bellen
met het Conceptronic supportnummer
Voor Nederland: 0900-2024006 (€ 0,45 per minuut)
Voor België: 0902-41023 (€ 0,72 per minuut)
Of per e-mail: support@conceptronic.net
Om de gevraagde support te verlenen, hebben wij de volgende
gegevens van u nodig:
• Duidelijke probleemomschrijving
• Versienummer van de drivers die u gebruikt (controleer altijd
de Conceptronic website of u de laatste versie gebruikt).
• Type Notebook of computer systeem dat u gebruikt.
• Operating systeem dat u gebruikt.
Voor meer informatie over Conceptronic producten kunt u terecht
op de Conceptronic website: www.conceptronic.net. Bij
software/drivers installatie: Het is mogelijk dat onderstaande
Page 2

NEDERLANDS
- 2 -
installatie iets afwijkt van de installatie op uw computer. Dit is
afhankelijk van de Windows versie die u gebruikt.
Inleiding
Deze handleiding heeft betrekking op de Conceptronic
5/8/16-poorts 10/100 Mbps N-Way Mini Switch. De 5/8/16-poorts
10/100 Mbps N-Way Mini Switch is eenvoudig te installeren en
levert hoge prestaties in een omgeving waar het netwerkverkeer
en het aantal gebruikers voortdurend toenemen. Daardoor kunnen
nu ook kleinere bedrijven en bijvoorbeeld bijkantoren optimaal
profiteren van een snel 100Mbps Ethernet netwerk, zonder dat hun
PC’s, NICs, bekabeling, stuurprogramma’s en PC configuraties
aangepast hoeven te worden.
Inhoud verpakking
1. 5/8/16-poorts 10/100Mbps N-Way Mini Switch
2. Externe stroomadapter
3. Vier schroeven
4. Vier pluggen
5. Deze handleiding
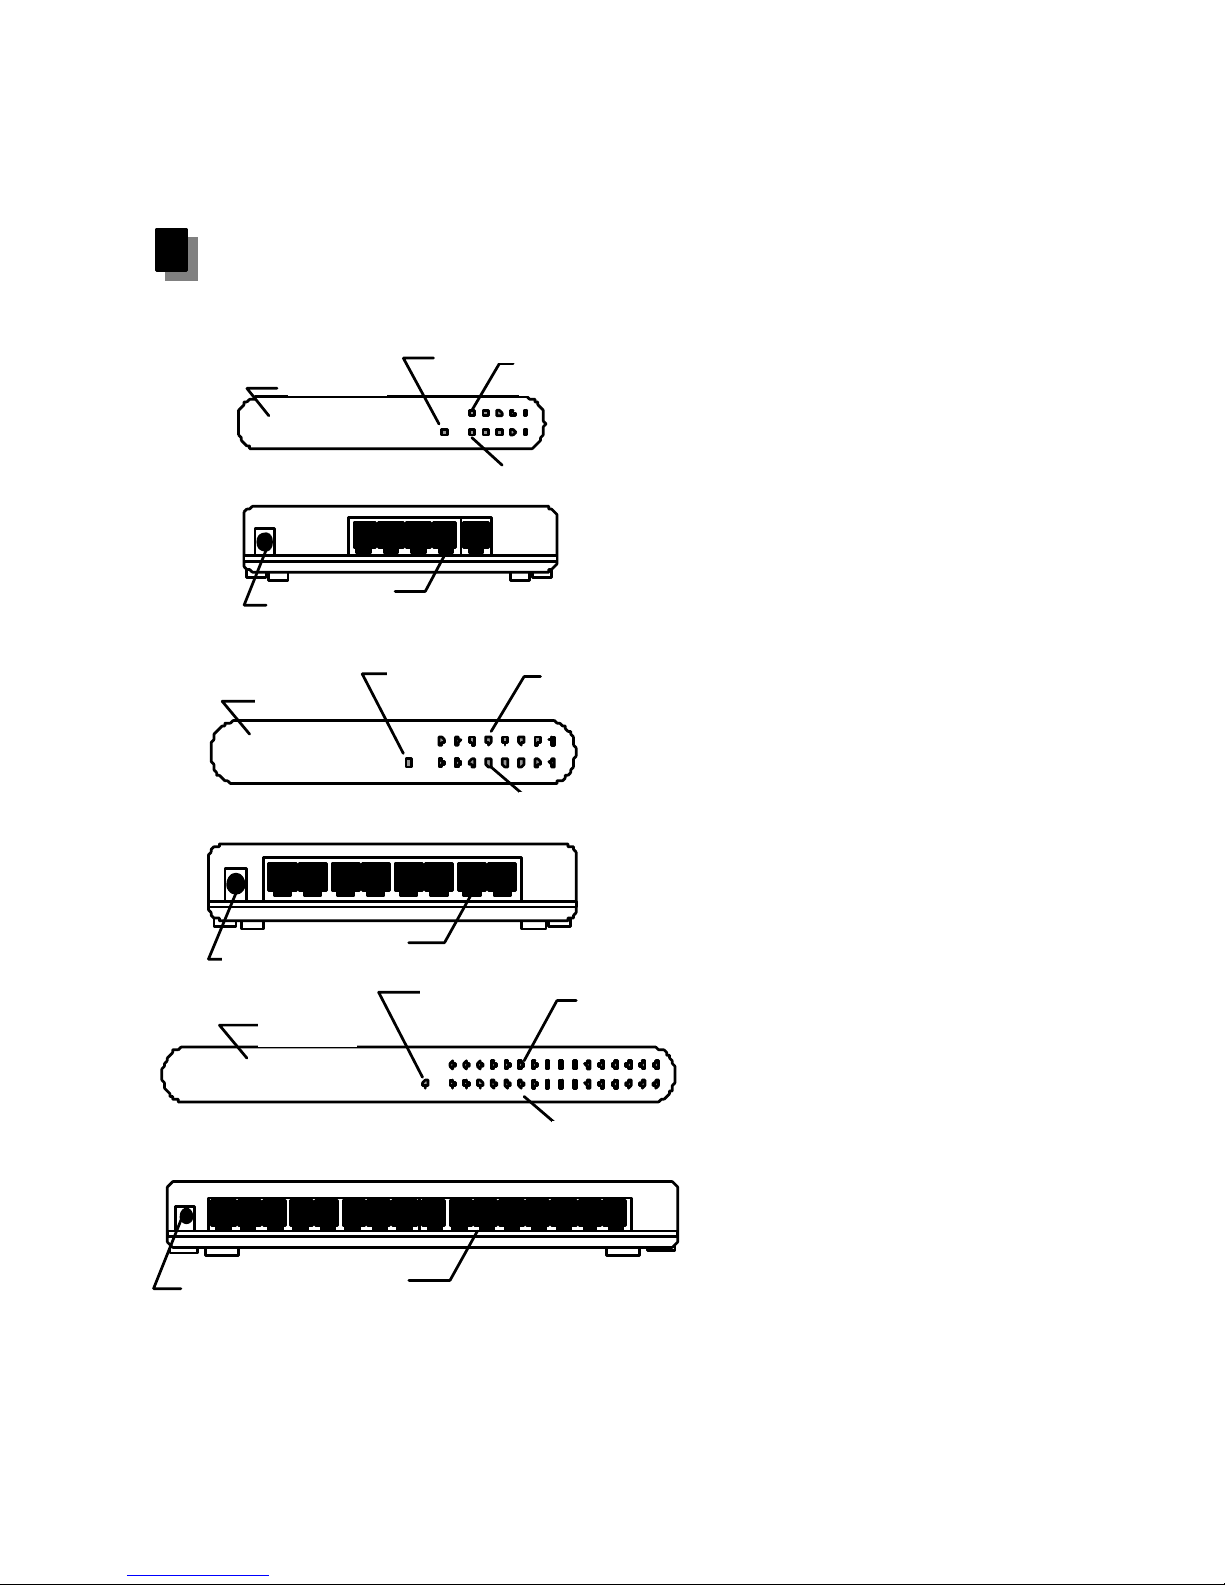
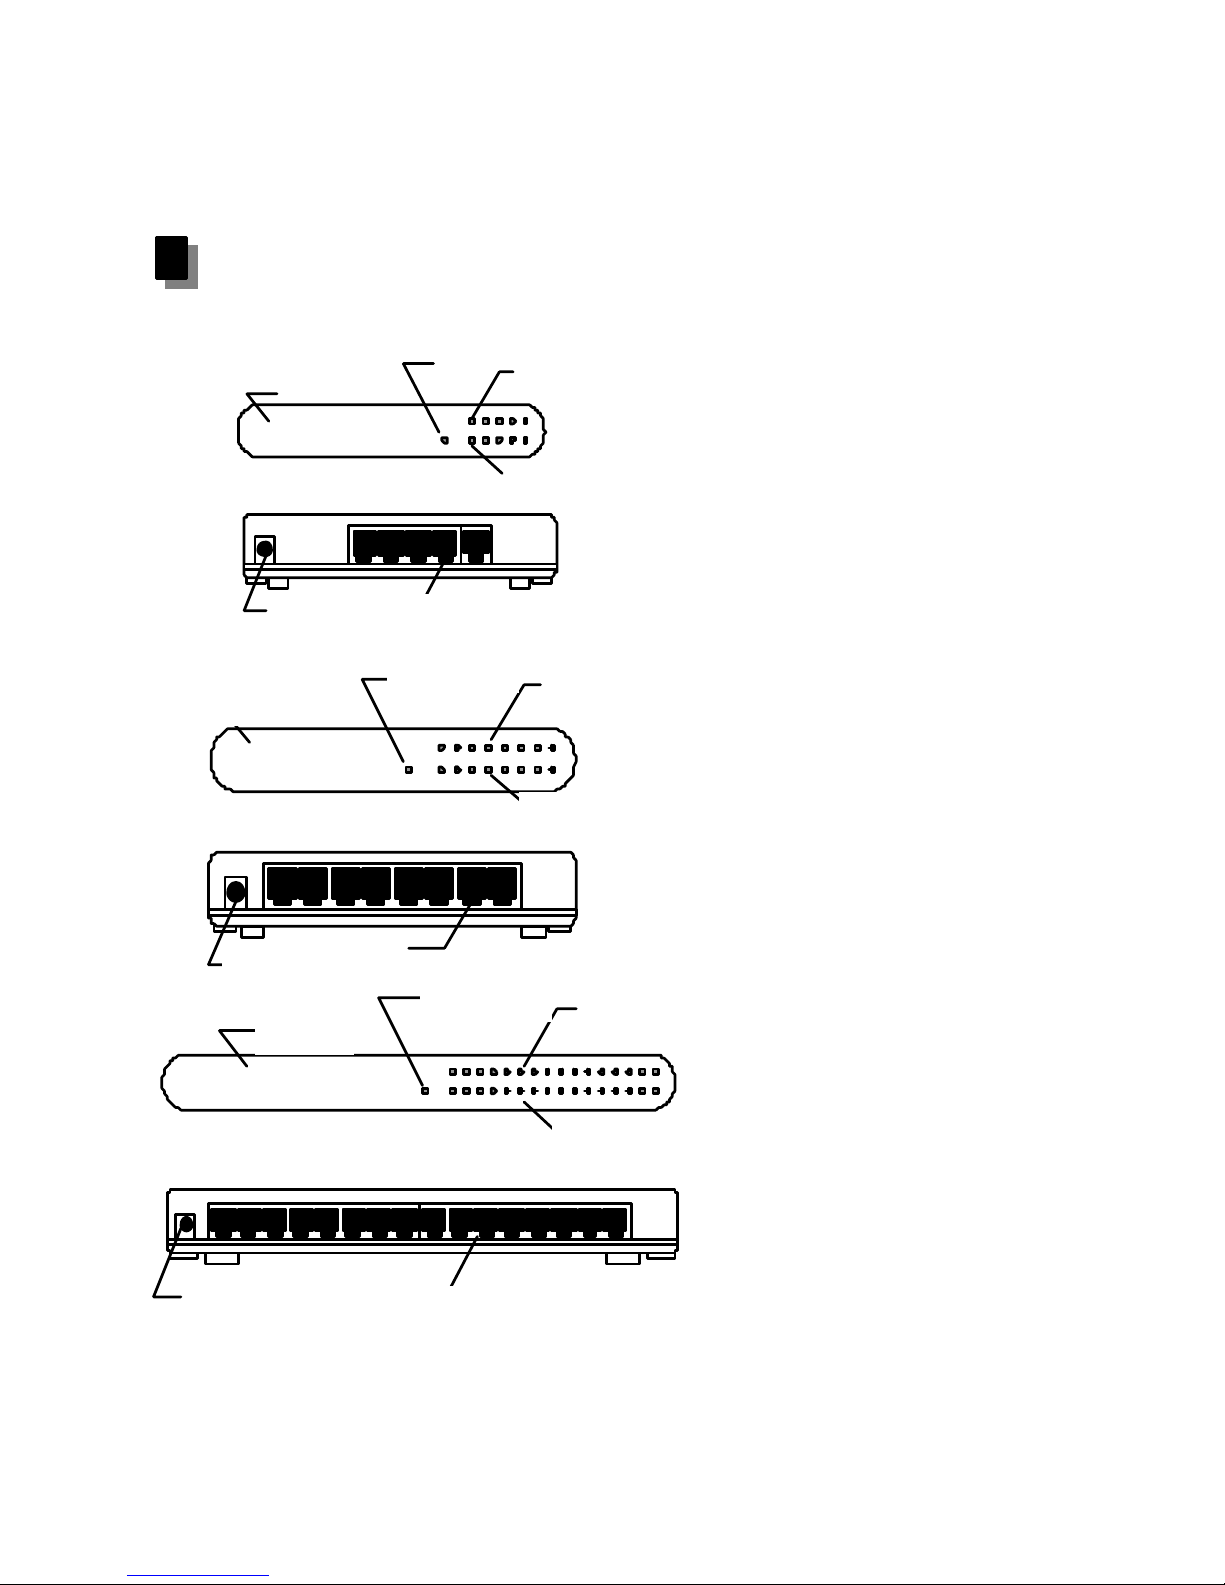
Hardware
Hieronder treft u een beschrijving aan van het frontpaneel en de
LED indicators van de 5/8/16-poorts 10/100Mbps N-Way Mini
Switch.
Page 3

NEDERLANDS
- 3 -
Voor- en achterzijde
5-ports Switch
LED panel
Power LED
100/10Mbps LED
Link/Activity LED
Power Connector
RJ45 Connectors
Link/Activity LED
10/100Mbps LED Power LED
LED panel
8-ports Switch
16-ports Switch
LED panel
Power LED
10/100Mbps LED
Link/Activity LED
RJ45 Connectors
RJ45 Connectors
Power
Connector
Power Connector
Page 4

NEDERLANDS
- 4 -
LED indicators
LED Kleur Status Beschrijving
PWR
(power)
Groen
Aan
Ingeschakeld
Aan
Status verbinding per
poort
LNK/Act
(Link /
Activity)
Groen
Knippert Status
gegevenstransport
per poort
Aan
100 Mbps via
betreffende poort
SPEED
snelheid
Geel
Uit 10 Mbps via
betreffende poort
1. RJ-45 aansluitingen
De 5/8/16 poorten hebben ieder een Mini RJ-45 aansluiting voor
UTP kabel. Alle poorten maken gebruik van automatische
onderhandeling en communiceren met een server, switch of hub
met een snelheid van10/100 Mbps.
2. Ingang stroomadapter
Deze ingang is voor de externe stroomadapter die op het
stopcontact wordt aangesloten.
Page 5
NEDERLANDS
- 5 -
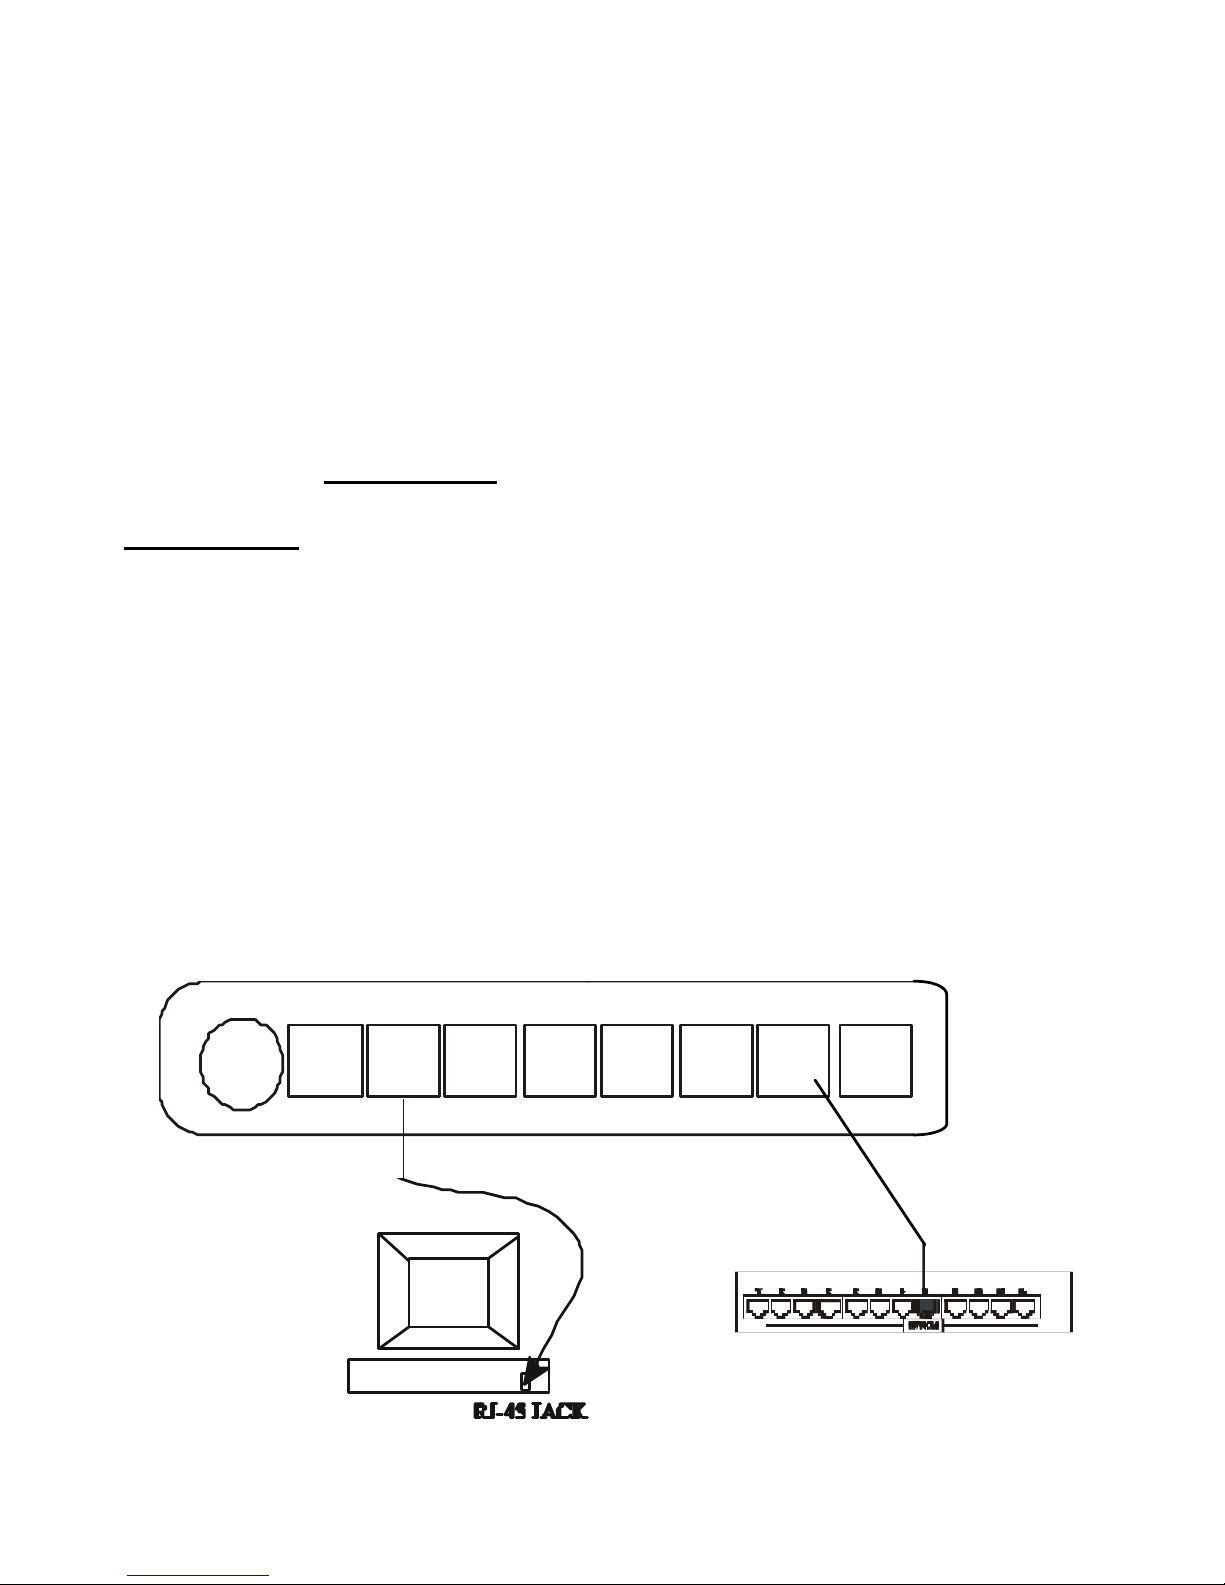
Netwerkverbinding
Verbinding maken van PC of Hub met de Switch
5/ 8/16-poorts switch
Gebruik hiervoor een normale kabel of een cross-cable. Sluit deze
aan op een willekeurige poort van uw switch en op een
willekeurige poort van uw hub. Alle poorten van de switch zijn
‘AUTO MDI/MDI-X’ wat wil zeggen dat deze automatisch de kabel
herkennen en de Uplink verbinding tot stand brengen wanneer dit
nodig is.
Illustratie: voorbeeld van de aansluiting van een 8-poorts switch
met een normale kabel/cross-cable naar een PC/ Hub
The 8-Port N-Way Mini Switch
1
2
345678
-
UpLink
Page 6

ENGLISH
- 6 -
Conceptronic 100S5/100S8/100S16
Hardware Installation Guide
Congratulations on the purchase of your
Conceptronic 5/8/16 ports switch.
The enclosed Hardware Installation Guide gives you a step by step
explanation of how to install the Conceptronic 5/8/16 ports switch
on your Notebook/PC. When problems occur, we advise you to go
to our support-site 2-Tech (go to www.conceptronic.net, ‘Technical
support’ and click ‘on-line support’.) Here you will find a lot of
possibilities to solve your problems.
In order to provide the requested support we need the following
details from you:
• A clear description of the problem;
• Version number of the drivers you are using (always check
the Conceptronic website to see whether you are using the
latest version);
• Type of Notebook/PC you are using;
• Operating system you are using
For more information about Conceptronic products, please visit the
Conceptronic Web Site: www.conceptronic.net
The Software installation as described below, may be slightly
different from the installation on your computer. This depends on
the Windows version you are using.
Introduction
This user guide is applied to the Conceptronic 5/8/16 ports 10/100
Mbps N-Way Mini Switch. The 5/8/16 ports 10/100 Mbps N-Way
Page 7

ENGLISH
- 7 -
Mini Switch is designed for easy installation and high performance
in an environment where traffic on the network and the number of
users increase continuously. Small businesses and corporate
branch offices can now take full advantage of 100Mbps Fast
Ethernet performance and preserve existing desktop investment
with no changes required to PCs, NICs, cabling, drivers, or PC
configurations.
Package Contents
1.One 5/8/16 Ports 10/100Mbps N-Way Mini Switch
2.One External Power Adapter
3. Four Screws
4. Four plugs
5.This User Guide
Hardware
The following describes the front panel and LED indicators of the
5/8/16-Ports 10/100Mbps N-Way Mini Switch.
Page 8

ENGLISH
- 8 -
Front / backpanel
5-ports Switch
LED panel
Power LED
100/10Mbps LED
Link/Activity LED
Power Connector
RJ45 Connectors
Link/Activity LED
10/100Mbps LED Power LED
LED panel
8-ports Switch
16-ports Switch
LED panel
Power LED
10/100Mbps LED
Link/Activity LED
RJ45 Connectors
RJ45 Connectors
Power
Connector
Power Connector
Page 9

ENGLISH
- 9 -
LED Indicators
LED Color Status Description
PWR
(power)
Green On Power on
On
Link status of
connected port
LNK/ACT
(Link/Activity)
Green
Flashing Data transmission
status of
connected port
On
100Mbps of
connected port
Speed Yellow
Off 10Mbps of
connected port
1. RJ-45 Ports
5/8/16 N-Way Mini RJ-45 UTP ports all come with auto-negotiation
and operate at 10/100Mbps for connection to servers and hubs.
2. Power Connector
The power connector is for the external power adapter that
connects to the power outlet.
Page 10

ENGLISH
- 10 -
Network Connection
Connect PC or Hub to the Switch
For 5, 8 and 16 Ports Switch
Use a straight or crossover cable and connect it from any of
the ports on your Switch to any of the ports on your Hub. All
ports on the 5, 8 or 16 Ports Switch are ‘AUTO MDI/MDI-X’
which means it automatically recognizes the cable you are
using and makes the Uplink when necessary.
Figure: Example of using straight / crossover cable on 8 Ports
Switch to PC and Hub
The 8-Port N-Way Mini Switch
1
2
345678
-
UpLink
Page 11

ESPAÑOL
- 11 -
Conceptronic 100S5/100S8/100S16
Guía de instalación de hardware
Enhorabuena por la compra de su
Conceptronic 100S5/8/16.
La Guía de instalación del hardware incluida le ofrece una
explicación paso a paso de cómo instalar el Conceptronic
100S5/8/16 en su ordenador Notebook/PC. Caso de experimentar
problemas, recomendamos acceda a nuestra página de soporte
2-Tech (acceda a www.conceptronic.net, ‘Technical support’
(soporte técnico) y haga clic en ‘on-line support’ (soporte en línea).
Ahí encontrará una gran cantidad de posibles soluciones a sus
problemas.
Para poder ayudarle, necesitamos que nos detalle la información
a continuación:
• Una descripción clara del problema;
• La versión de los controladores que está usando (siempre
debería de comprobar con el lugar Web de Conceptronic
para asegurar que está utilizando la última versión);
• El tipo de Notebook/PC que está utilizando;
• El sistema operativo que está utilizando.
Para obtener más información acerca de productos de
Conceptronic por favor visite el lugar Web de Conceptronic:
www.conceptronic.net
La instalación de software, tal y como se describe a continuación,
puede ser algo diferente de la instalación en su ordenador. Eso
depende de la versión de Windows que esté usando.
Page 12

ESPAÑOL
- 12 -
Introducción
Esta guía del usuario es válida para el N-Way Mini Switch a
10/100 Mbps de 5/8/16 puertos de Conceptronic. El N-Way Mini
Switch a 10/100 Mbps de 5/8/16 puertos está pensado para que
sea fácil de instalar y tenga un alto rendimiento en un entorno en
el que el tráfico en la red y el número de usuarios aumenta
continuamente. Las pequeñas empresas y las filiales ya pueden
aprovechar las prestaciones de una red Fast Ethernet a 100 Mbps
para preservar su inversión de escritorio y no tener que hacer
cambios en PC, NIC, el cableado, los controladores o las
configuraciones de los PC.
Contenido del paquete
1. Un N-Way Mini Switch de 5/8/16 puertos a 10/100 Mbps
2. Un adaptador de corriente externo
3. Quatro tornillos
4. Quatro conectores
5. Esta guía del usuario
Hardware
A continuación se describe el panel frontal y los indicadores
luminosos del N-Way Mini Switch de 5/8/16 puertos a 10/100
Mbps.
Page 13
ESPAÑOL
- 13 -
Entrepaño frontal e apoye
5-ports Switch
LED panel
Power LED
100/10Mbps LED
Link/Activity LED
Power Connector
RJ45 Connectors
Link/Activity LED
10/100Mbps LED
Power
LED
LED panel
8-ports Switch
16-ports Switch
LED panel
Power
LED
10/100Mbps LED
Link/Activity LED
RJ45 Connectors
RJ45 Connectors
Power
Connector
Power Connector
Page 14

ESPAÑOL
- 14 -
Indicadores luminosos
LED Color Estado Descripción
PWR
Energía
Verde
Encendido
Corriente encendida
Encendido
Estado del enlace del
puerto conectado
LNK/Act
Enlace/Act
Verde
Parpadeo Estado de la
transmisión de datos
del puerto conectado
Encendido
100 Mbps del puerto
conectado
SPEED
Velocidad
Amarillo
Apagado 10 Mbps del puerto
conectado
1. Puertos RJ- 45
Los puertos 5/8/16 N-Way Mini RJ-45 UTP vienen con
autonegociación y funcionan a 10/100 Mbps para la conexión con
servidores y concentradores.
2. Conector de corriente
El conector de corriente es para el adaptador de corriente
externo que se enchufa a la toma de corriente.
Page 15

ESPAÑOL
- 15 -
Conexión de red
continuación para conectarse a su concentrador/PC:
Para el conmutador de 5/8/16 puertos
Utilice un cable lineal o cruzado y conéctelo desde cualquier
puerto de su conmutador a cualquier puerto de su concentrador.
Todos los puertos del conmutador de son “AUTO MDI/MDI-X”, lo
que significa que el conmutador reconoce automáticamente el
cable que está utilizando y realiza la transmisión ascendente
cuándo necesario.
Figura: ejemplo de empleo de cable lineal / cruzado desde un
conmutador de 8 puertos a un concentrador/ PC.
The 8-Port N-Way Mini Switch
1
2
345678
-
UpLink
Page 16

DEUTSCH
- 16 -
Conceptronic 100S5/100S8/100S16
Hardwareinstallations-Anleitung
Herzlichen Glückwunsch zum Erwerb des
Conceptronic 5/8/16 ports Switch.
In der beigefügten Intallationsanweisung für die Hardware
finden Sie schrittweise Erklärungen für die Installation des
Conceptronic 5/8/16 ports Switch in Ihrem Notebook/PC. Falls
Schwierigkeiten auftreten sollten, empfehlen wir Ihnen
einen Besuch auf unserer Support-Site 2-Tech (gehen Sie
zu www.conceptronic.net, ‘Technical support’ (Technischer
Support) und klicken Sie auf ‘on-line support’.) Hier finden
Sie eine große Anzahl von Möglichkeiten, Ihr Problem zu
lösen.
Um Ihnen die angeforderte Unterstützung erbringen zu können,
benötigen wir von Ihnen
folgende Angaben:
• Eine eindeutige Beschreibung des Problems
• Versionsnummer der verwendeten Treiber (Überprüfen Sie
mit einem Besuch auf der Internet-Seite von Conceptronic,
ob Sie die aktuellste Version verwenden).
• Modell des verwendeten Notebooks/PCs.
• Verwendetes Betriebssystem.
Weiter Informationen zu den Conceptronic Produkte finden Sie
auf der Website von Conceptronic: www.conceptronic.net
Die nachstehend beschriebene Software-Installation kann sich bei
Ihrem Rechner aufgrund der verwendeten Windows-Version leicht
unterscheiden.
Page 17

DEUTSCH
- 17 -
Einleitung
Diese Bedienungsanleitung dient für das Gerät Conceptronic
5/8/16-Ports 10/100 Mb/Sek N-Way Mini-Switch. Der 5/8/16-Port
10/100 Mb/Sek N-Way Mini-Switch ist so konzipiert, dass er leicht
installiert werden kann und in allen Umgebungen mit einer
permanent wachsenden Anzahl von Benutzern eine hohe
Leistung erbringt. Nun können kleine Unternehmen und
Delegationen von Großfirmen die 100-Mb/Sek Fast
Ethernet-Leistung voll nutzen und die vorhandenen Investitionen
in Desktopgeräte schützen. An den PCs, NICs, Verkabelungen,
Treibern oder PC-Konfigurationen sind keine Veränderungen
erforderlich.
Inhalt des Pakets
1. Ein Gerät 5/8/16-Port 10/100 Mb/Sek N-Way Mini-Switch
2. Ein externes Netzteil
3. Vier Schrauben
4. Vier Stöpsel
5. Diese Bedienungsanleitung
Hardware
Nachstehend werden die Vorderseite und die LED-Anzeigen des
5/8/16-Port 10/100 Mb/Sek N-Way Mini-Switch erläutert.
Page 18

DEUTSCH
- 18 -
Vorder unt hinter Seite
5-ports Switch
LED panel
Power LED
100/10Mbps LED
Link/Activity LED
Power Connector
RJ45 Connectors
Link/Activity LED
10/100Mbps LED Power LED
LED panel
8-ports Switch
16-ports Switch
LED panel
Power LED
10/100Mbps LED
Link/Activity LED
RJ45 Connectors
RJ45 Connectors
Power
Connector
Power Connector
Page 19

DEUTSCH
- 19 -
LED-Anzeigen
LED Farbe Status Beschreibung
POWER
Strom
Grün An Stromversorgung
hergestellt
An
Verbindungsstatus des
angeschlossenen
Ports
LNK/ACT
Verbindung /
Aktiv
Grün
Blinkend Zustand der
Datenübertragung des
angeschlossenen
Ports
An
100 Mb/Sek des
angeschlossenen
Ports
SPEED
Geschwindigkeit
Gelb
Aus 10 Mb/Sek des
angeschlossenen
Ports
1. RJ-45-Anschlüsse
Alle 5/8/16-N-Way Mini RJ-45 UTP-Ports sind selbstverhandelnd
und arbeiten bei Verbindungen von Servers und Hubs mit 10/100
Mb/Sek.
2. Stromanschluss
Der Stromanschluss dient für das externe Netzteil, dass an die
Steckdose angeschlossen wird.
Page 20

DEUTSCH
- 20 -
Netzwerkanschluss
Anschluss vom PC oder Hub am Switch
5/8/16 -Port-Switch
Verwenden Sie ein direktes oder umgekehrt gepoltes Kabel
und verbinden Sie einen der Ports des Switchs mit einem
beliebigen Port an Ihrem Hub. Alle Ports des Switchs sind
‘AUTO MDI/MDI-X’, d.h. sie erkennen automatisch das
verwendete Kabel und konfigurieren es als Uplink wenn
benötigt.
Abbildung: Beispiel mit einem direkten / umgekehrt gepolten Kabel
an einem 8-Port-Switch mit Anschluss an einem Hub / PC.
The 8-Port N-Way Mini Switch
1
2
345678
-
UpLink
Page 21

FRANÇAIS
- 21 -
Conceptronic 100S5/100S8/100S16
Manuel d’installation du hardware
Nous vous félicitons d'avoir acheté le
5/8/16 ports switch de Conceptronic.
Le Guide d'Installation du Matériel ci-joint vous expliquera pas à
pas comment installer le 5/8/16 ports switch de Conceptronic sur
votre ordinateur portable. Lorsque vous rencontrez des problèmes,
nous vous conseillons d’aller consulter notre site d’assistance
technique 2-Tech (allez sur le site www.conceptronic.net,
‘’Assistance technique’’ et cliquez sur ‘’Assistance technique
on-line ’’.) Vous y trouverez un éventail de possibilités pour
résoudre vos problèmes.
Afin de pouvoir vous aider, nous aurons besoin des informations
suivantes:
• Une description claire du problème;
• Le numéro de version des pilotes que vous utilisez (vérifiez
toujours le Site Internet Conceptronic pour vous assurez que
vous utilisez la dernière version);
• Le type d'ordinateur que vous utilisez;
• Le système d'exploitation que vous utilisez.
Pour plus d'informations sur les produits de Conceptronic, visitez
notre Site Internet Conceptronic: www.conceptronic.net
Il est possible que l’installation du matériel décrite ci-dessous
diffère parfois de l’installation sur votre ordinateur. Cela dépend
de la version Windows que vous utilisez.
Page 22

FRANÇAIS
- 22 -
Introduction
Ce manuel de l’utilisateur vous donne les explications
nécessaires pour l’installation du N-Way Mini Switch à 5/8/16
ports de 10/100 MB/sec de Conceptronic. Ce N-Way Mini Switch
à 5/8/16 ports de 10/100 MB/sec est conçu pour permettre une
installation facile et obtenir des performances élevées dans un
environnement où le trafic du réseau ainsi que le nombre
d’utilisateurs sont en hausse constante. Les PME et les grandes
entreprises peuvent à présent profiter des performances du Fast
Ethernet 100MB/sec. tout en gardant leurs ordinateurs de bureau
existants et sans devoir effectuer des changements sur leurs PC,
NIC, câblage, drivers, ou configurations des PC.
Contenu de l’emballage
1. Un N-Way Mini Switch à 5/8/16 Ports 10/100MB/sec.
2. Un adaptateur de courant externe
3. Quatre vis
4. Quatre bouchons
5. Le présent manuel de l’utilisateur
Hardware
Cette section fournit des explications sur le panneau frontal et sur
les indicateurs LED du N-Way Mini Switch à 5/8/16 Ports
10/100MB/sec.
Page 23

FRANÇAIS
- 23 -
Panneau frontal et postérieur
5-ports Switch
LED panel
Power LED
100/10Mbps LED
Link/Activity LED
Power Connector
RJ45 Connectors
Link/Activity LED
10/100Mbps LED Power LED
LED panel
8-ports Switch
16-ports Switch
LED panel
Power LED
10/100Mbps LED
Link/Activity LED
RJ45 Connectors
RJ45 Connectors
Power
Connector
Power Connector
Page 24

FRANÇAIS
- 24 -
Indicateurs LED
LED Couleur
Etat Description
PWR
Power
Vert allumé Système allumé
allumé
Etat du port connecté LNK/Act
Link /
Activity
Vert
intermittent Etat de la
transmission de
données sur le port
connecté
allumé
100 MB/sec. du port
connecté
SPEED
Vitesse
Jaune
éteint 10 MB/sec. du port
connecté
1. Ports RJ-45
Les ports 5/8/16 N-Way Mini RJ-45 UTP sont tous équipés d’un
système d’auto- négociation et fonctionnent à des vitesses
comprises entre 10-100MB/sec. pour les serveurs et les hubs.
2. Connecteur électrique
Le connecteur électrique est conçu pour l’adaptateur de courant
externe qui est branché à la prise électrique.
Page 25

FRANÇAIS
- 25 -
Connexion au réseau
connexion de votre hub/PC au switch
Switch à 5/8/16 ports
Vous pouvez utiliser un câble droit ou un câble croisé et le
brancher à partir de n’importe quel port de votre Switch à
n’importe quel port de votre hub. Tous les ports des switchs
sont ‘AUTO MDI/MDI-X’ ce qui veut dire qu’ils
reconnaissent automatiquement le câble que vo us utilisez
et réalisent la connexion Uplink au besoin.
Image: exemple d’utilisation d’un câble droit ou câble croisé pour la
connexion d’un Switch 8 ports à votre hub / PC
The 8-Port N-Way Mini Switch
1
2
345678
-
UpLink
Page 26

ITALIANO
- 26 -
Conceptronic 100S5/100S8/100S16
Guida all’installazione dell’hardware
Grazie per l’acquisto del
Conceptronic switch con 5/8/16 porte.
La guida per l’installazione dell’hardware acclusa spiegherà passo
a passo come installare la Conceptronic switch con 5/8/16
porte.sul vostro Notebook o PC. Nel caso in cui dovessero
insorgessero problemi, raccomandiamo di entrare nella nostra
pagina di supporto 2-Tech (accedere a www.conceptronic.net,
‘Technical support’ (supporto tecnico) e fare click su ‘on-line
support’ (supporto in linea). Troverete qui una gran quantità di
possibili soluzioni ai vostri problemi.
Per poterle offrire un’efficiente servizio di assistenza, la
preghiamo di specificare i seguenti dati:
• Descrizione chiara del problema;
• Numero versione dei driver che si stanno utilizzando (si
consiglia di controllare sempre sul sito Web della
Conceptronic per verificare se si tratta dell’ultima
versione);
• Tipo di Notebook o PC in uso;
• Sistema operativo in uso.
Per ulteriori informazioni dei prodotti Conceptronic, la preghiamo
di visitare il sito Web della Conceptronic: www.conceptronic.net
La successiva descrizione relativa all’installazione del software
potrebbe essere leggermente diversa dall’installazione sul vostro
computer. Ciò dipende dalla versione di Windows in uso.
Introduzione
Il manuale dell’utente fa riferimento al Mini Switch NWay
Page 27

ITALIANO
- 27 -
Conceptronic 10/100 Mbps con 5/8/16 porte. Il Mini Switch NWay
Conceptronic 10/100 Mbps con 5/8/16 porte è facile da installare
e offre un alto rendimento in un ambiente in cui il traffico sulla rete
e il numero di utenti aumentano continuamente. Le piccole
imprese e le filiali ora possono trarre un gran profitto dal sistema
Fast Ethernet 100 Mbps, mantenendo gli investimenti esistenti per
desktop e senza nessun tipo di modificazione nece ssaria per PC,
NIC, cablaggio, driver o configurazioni PC.
Contenuto del pack
1. Un Mini Switch NWay Conceptronic 10/100 Mbps con 5/8/16
porte
2. Un adattatore di alimentazione esterna
3. Quattro viti
4. Quattro spine
5. Il presente manuale dell’utente
Hardware
Qui di seguito viene descritto l’aspetto del pannello frontale e degli
indicatori luminosi LED del Mini Switch NWay Conceptronic
10/100 Mbps con 5/8/16 porte.
Page 28

ITALIANO
- 28 -
Panello frontale e dorso
5-ports Switch
LED panel
Power LED
100/10Mbps LED
Link/Activity LED
Power Connector
RJ45 Connectors
Link/Activity LED
10/100Mbps LED Power LED
LED panel
8-ports Switch
16-ports Switch
LED panel
Power LED
10/100Mbps LED
Link/Activity LED
RJ45 Connectors
RJ45 Connectors
Power
Connector
Power Connector
Page 29

ITALIANO
- 29 -
Indicatori luminosi LED
LED Colore Stato Descrizione
POWER
Acceso o
spento
Verde On Acceso
On
Stato del link
della porta
connessa
LNK/Act
Link/Activity
Verde
Lampeggiante Stato della
trasmissione
dati della porta
connessa
On
100 Mbps della
porta connessa
SPEED
Velocità
Giallo
Off 10Mbps of
porta connessa
1. Porte RJ-45
Le 5/8/16 porte NWay Mini RJ-45 UTP sono fornite con
autonegoziazione e funzionano a 10/100 Mbps per collegamenti a
server e a hub.
2. Connettore di alimentazione
Il connettore di alimentazione serve per l’adattatore di
alimentazione esterna che si collega alla presa di corrente.
Page 30

ITALIANO
- 30 -
Collegamento della rete
Segue per collegare l’hub/PC
Per lo switch da 5/8/16 porte
Usare un cavo dritto o incrociato e collegarne le estremità a
una porta qualsiasi dello switch e a una porta qualsiasi
dell’hub. Tutte le porte dello switch uscite sono ‘AUTO
MDI/MDI-X’ cioè che riconoscono automaticamente il cavo
usato e realizzano l’uplink quando necessario.
Schema: come usare un cavo dritto / incrociato fra uno switch da
otto porte e un hub.
The 8-Port N-Way Mini Switch
1
2
345678
-
UpLink
Page 31

PORTUGUÈS
- 31 -
Conceptronic 100S5/100S8/100S16
Guia de Instalação de Hardware
Os nosso parabéns pela compra do seu
switch 5/8/16 portas da Conceptronic.
O Guia de Instalação do Hardware que se inclui fornece-lhe uma
explicação passo a passo de como instalar o switch 5/8/16 portas
da Conceptronic seu Portátil/PC. Quando tiver problemas,
aconselhámo-lo a ir ao nosso site de assistência 2-Tech (vá a
www.conceptronic.net, ‘Technical support’ (Assistência técnica) e
clique em ‘on-line support’ (assistência online). Aqui vai encontrar
muitas possibilidades de resolver os seus problema.
De maneira a lhe podermos prestar a assistência pedida,
precisamos que nos forneça os seguintes pormenores:
• Uma descrição clara do problema;
• Número da versão dos programas de gestão que está a
usar (consulte sempre o website da Conceptronic para
verificar se está a usar a última versão);
• Tipo de Portátil/PC que está a usar;
• Sistema operativo que está a usar
Para mais informações sobre produtos de Conceptronic, por favor
visite o Web Site da Conceptronic: www.conceptronic.net
A instalação do Software conforme se encontra descrita abaixo
pode ser ligeiramente diferente da instalação do seu computador.
Isso depende da versão do Windows que está a utilizar.
Page 32

PORTUGUÈS
- 32 -
Introdução
Este manual de utilizador destina-se ao N-Way Mini Switch 5/8/16
portas 10/100 Mbps da Conceptronic. O N-Way Mini Switch
5/8/16 portas 10/100 Mbps está desenhado para uma instalação
fácil e alta performance num ambiente em que o tráfico na rede e
o número de utilizadores aumenta continuamente. As pequenas
empresas e as filiais de grandes empresas podem tirar agora total
partido da performance Fast Ethernet 100Mbps e preservar os
investimentos electrónicos existentes sem qualquer alteração aos
PCs, NICs, cablagem, controladores, ou configurações de PC.
Conteúdo da Embalagem
1.Um N-Way Mini Switch 5/8/16 Portas 10/100Mbps
2.Um Adaptador de Potência Externo
3.Quatro Parafusos
4.Quatro Rolhas
5.Este Manual de Utilizador
Hardware
As seguintes figuras descrevem o painel frontal e os indicadores
LED do N-Way Mini Switch 5/8/16-Portas 10/100Mbps.
Page 33
PORTUGUÈS
- 33 -
Painel Frontal + Costas
5-ports Switch
LED panel
Power LED
100/10Mbps LED
Link/Activity LED
Power Connector
RJ45 Connectors
Link/Activity LED
10/100Mbps LED Power LED
LED panel
8-ports Switch
16-ports Switch
LED panel
Power LED
10/100Mbps LED
Link/Activity LED
RJ45 Connectors
RJ45 Connectors
Power
Connector
Power Connector
Page 34

PORTUGUÈS
- 34 -
Indicadores LED
LED Cor Estado Descrição
Potência Verde Ligado Potência ligada
Ligado
Estado da
ligação da porta
ligada
Link/Act Verde
A piscar Estado de
transmissão de
dados da porta
ligada
Ligado
100Mbps da
porta ligada
Velocidade Amarelo
Desligad
o
10Mbps da porta
ligada
1. Portas RJ-45
As portas 5/8/16 RJ-45 UTP do N-Way Mini vêm todas com ajuste
automático e funcionam a 10/100Mbps para ligar a servidores e
hubs.
2. Ficha de Alimentação
A ficha de alimentação destina-se ao adaptador de potência
externo que se liga à tomada.
Page 35

PORTUGUÈS
- 35 -
Ligação de Rede
ligue para um Hub / PC
Num Comutador de 5/8/16 Portas
Use um cabo normal ou um cabo de convergência e ligue-o de
qualquer uma das portas do seu Comutador a qualquer uma das
portas do seu Hub. Todas portas do Comutador de 16 Portas são
‘AUTO MDI/MDI-X’, o que significa que reconhecem
automaticamente o cabo que está a usar e fazem a Ligação a
montante quando necessário.
Figura: exemplo de utilização de um cabo normal / de convergência
de um Comutador de 8 Portas para um Hub / PC
The 8-Port N-Way Mini Switch
1
2
345678
-
UpLink
 Loading...