

Page 1

en suivant les « DIRECTIVES DE PRÉPARATION
TRÈS IMPORTANTES ».
• Appuyez sur le dessus du distributeur. Du même
coup, faites glisser le commutateur d’ajustage n°
3 pour verrouiller le dessus. Ceci fera couler le gel
à chauffer, dans le distributeur.
• Appuyez sur le bouton de mise en circuit sur le
dessus du distributeur.
• Après quelques minutes, le témoin de tempéra-
ture restera fixe.
• Appuyez sur le dessus du distributeur pour faire
sortir du gel chaud dans la paume de la main.
• Étalez le gel sur le visage comme d’habitude pour
un rasage à chaud confortable.
dessus de la cannette ou assurez-vous d’utiliser la
cannette de gel avec la buse pour le gel et qu’elle
est bien fixée.
Problème: Rien ne sort.
Solution: Le distributeur n’est pas bien fixé à la
cannette. Séparez-le de la cannette et réattachez-
le, vous assurant qu’il est solidement fixé au
dessus de la cannette, ou assurez-vous d’utiliser la
cannette de gel avec la buse pour le gel et qu’elle
est bien fixée.
Problème: La mousse est trop chaude ou il sort
trop de vapeur.
Solution: Réduisez la température ou remplacez la
cannette de gel/mousse car elle est presque vide.
- Unité de gel bien installée.
IMPORTANT:
Une grosse cannette de mousse pourra ne pas entrer
dans le socle. Le capuchon fonctionne avec une can-
nette de mousse sans base. Attention : Ne bloquez pas
la position
mousse
buse de
mousse
Page 2
IMPORTANT SAFETY
INSTRUCTIONS
When using an electrical appliance, basic
precautions should always be followed,
including the following:
Read all instructions
before using this
Appliance
DANGER
To reduce the risk of electric shock:
1. Do not reach for appliance if it has
fallen into the water. Unplug immediately.
2. Do not use while bathing or in the
shower.
3. Do not place or store the appliance
where it can fall or be pulled into a tub
or sink. Do not place in or drop into
water or any other liquid.
4. Always unplug the appliance from electrical outlet immediately after using.
5. Unplug the appliance before cleaning.
WARNING:
TO REDUCE THE RISK
OF BURNS, FIRE, ELECTRIC SHOCK OR INJURY TO
PERSONS:
1. The appliance should never be left unat-
tended when plug is in and power is
on.
2. This appliance should not be used by,
on or near children or the physically
challenged.
3. Use the appliance only for its intended
purpose as described in the Instruction
Booklet. Do not use attachments not
recommended by the manufacturer.
Do not pull or twist cord, or wrap cord
around appliance.
4. Never operate the appliance if it has a
damaged plug or cord, if it is not working properly, or if it has been dropped
or damaged, or dropped into water.
Return appliance to a service centre
for examination and repair.
5. Never drop or insert objects into
openings.
6. Do not use outdoors. Do not operate
where aerosol (spray) products are
being used or where oxygen is being
administered.
7. Use only on level surface.
8. Unplug the appliance before attaching
to shaving cream/gel cans.
9. Keep cord away from heated surfaces.
10. Never use a tool to remove anything
from the dispenser.
11. To disconnect, turn all controls to “off,”
then remove plug from outlet.
12. FOR HOUSEHOLD USE ONLY
13. Make sure gel nozzle is used for gel
and lather nozzle is used for lather.
SAVE THESE
INSTRUCTIONS
OPERATING
INSTRUCTION
To reduce the risk of electric shock, this
appliance has a polarized plug (one blade
is wider than the other). This plug will fit in
a polarized outlet only one way.
If the plug does not fit fully in the outlet,
reverse the plug. If it still does not fit,
contact a qualified electrician to install
the proper outlet. Do not change the plug
in any way. Do not attempt to defeat this
safety feature. Any other servicing should
be performed by an authorized service representative or that the appliance has no user
serviceable parts.
VARIABLE TEMPERATURE
CONTROL
This unit is equipped with a variable
temperature control dial. Adjust it until the
gel or lather is heated to a comfortable
temperature.
NOTE: At the same temperature control
position, the gel temperature would be
higher than the lather temperature.
11
2
1
8
10
7
6
5
4
12
3
9
13
LES PIÈCES DU DISTRIBUTEUR
DE MOUSSE/GEL CHAUD
1) Buse pour le gel
2) Bouton de
distribution
3) Commutateur
d’ajustage
4) Bouton de mise
hors circuit
5) Témoin de température
6) Bouton de mise en circuit
5 ÉTAPES SIMPLES POUR UN
SUPERBE RASAGE À CHAUD
DIRECTIVES DE PRÉPARATION TRÈS
IMPORTANTES
Mise en garde : Utilisez toujours la buse pour
le gel avec le gel et la buse pour la mousse avec
la mousse.
1
ÈRE
ÉTAPE
- Posez la buse appropriée, mousse
ou gel, en la tournant en place.
- Assurez-vous que le « bouton de
réglage » soit à la position
« mousse » pour la mousse ou
le gel.
2E ÉTAPE
3E ÉTAPE
- Placez l’appareil à l’envers, comme indiqué.
- Appuyez sur la « patte de verrouillage ».
- Alignez soigneusement la valve de mousse ou de
gel avec le joint central.
- Insérez soigneusement la valve de la cannette
dans le joint et relâchez la « patte de
verrouillage ».
- Appuyez sur la cannette jusqu’a qu’elle
s’enclenche.
4E ÉTAPE
*REMARQUE IMPORTANTE : Si la valve de
la cannette n’est pas bien insérée dans le joint
central, le gel va couler de l’appareil.
commutatueur
d’ajustage
capuchon de
commande
commutateur
d’ajustage
valve de
la cannette
patte de retenue
joint
central
Page 3

2
1
8
10
7
11
6
5
4
12
3
9
13
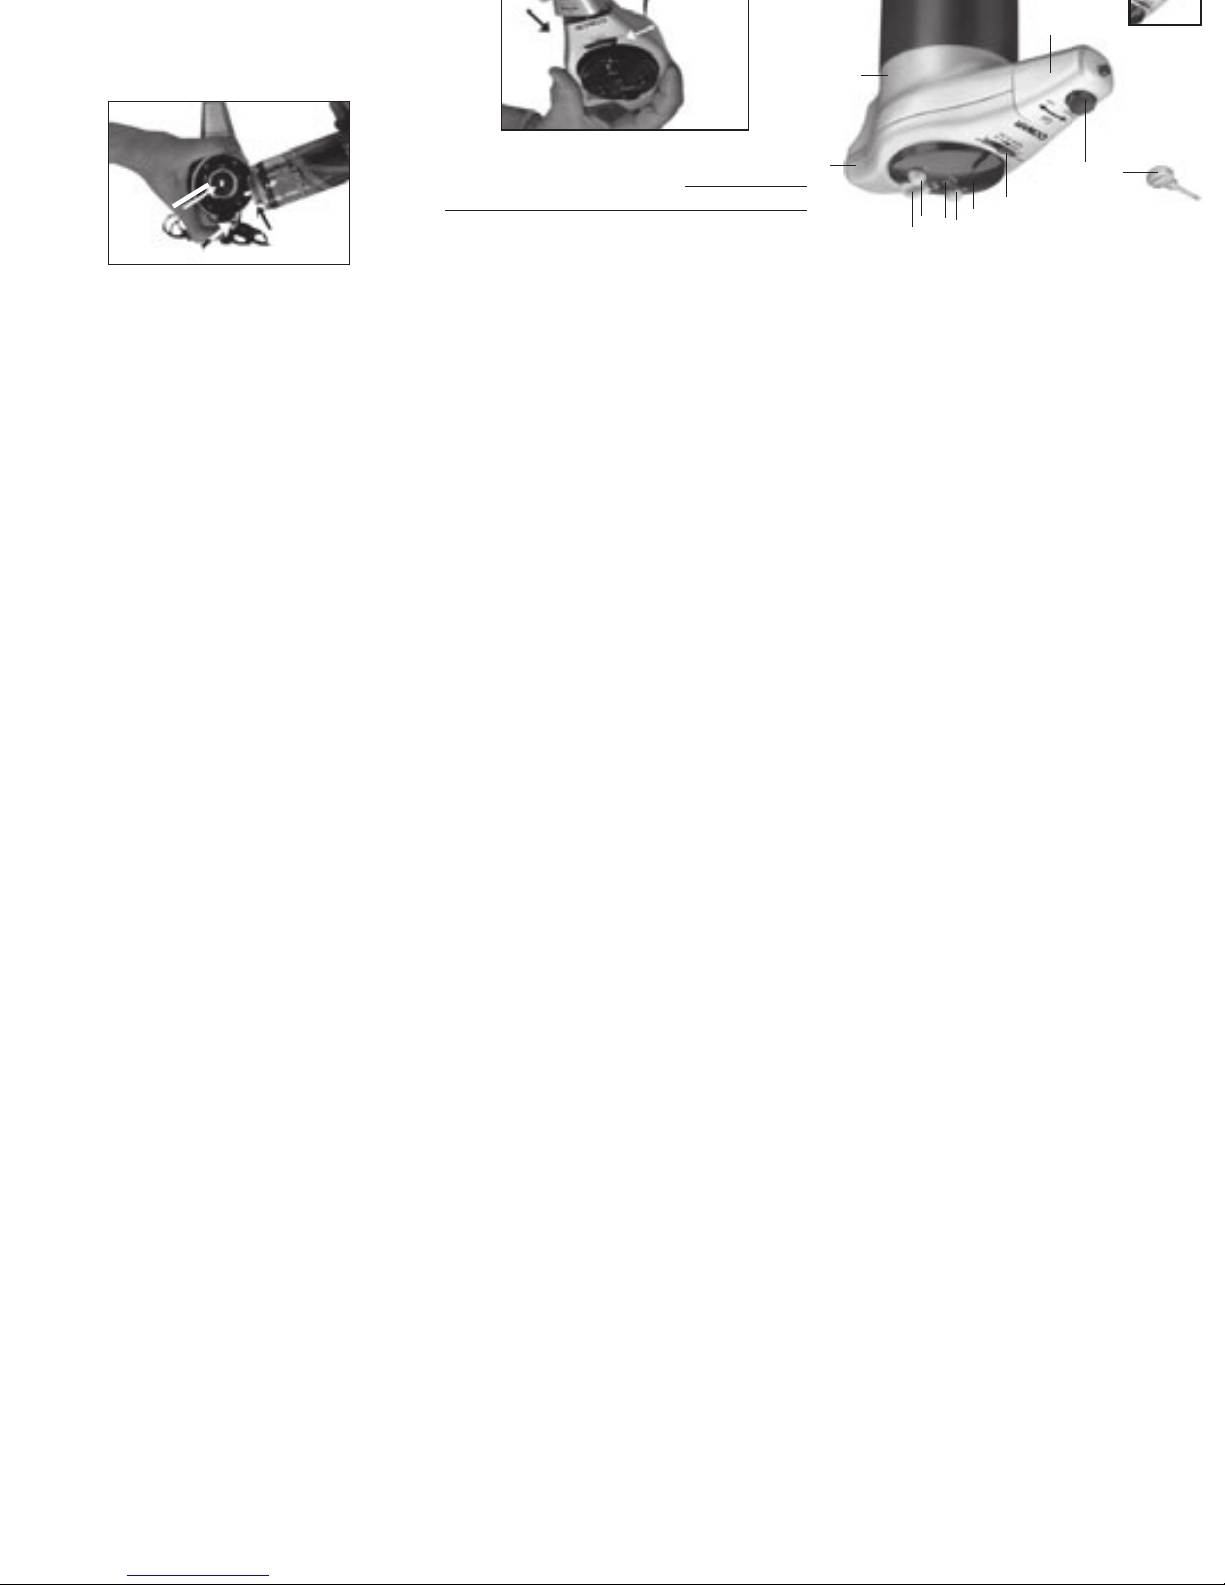
GETTING TO KNOW THE
HOT GEL/LATHER MACHINE
1) Gel nozzle
2) Gel release button
3) Adjustment switch
4) Power “OFF” button
5) Ready indicator light
6) Power “ON” button
7) Variable temperature control
8) Locking tab
9) Lather nozzle
10) Protective cylinder
11) 120v power cord
12) Top of machine: press down here to
dispense lather or press down here
and slide (3) adjustment switch to press
down and lock for gel use.
13) Cap removal key (stored at the bottom
of the protective cylinder)
5 SIMPLE STEPS TO A GREAT
HOT SHAVE
VERY IMPORTANT SET-UP INSTRUCTIONS
Caution: always use the gel nozzle for gel and
lather nozzle for lather
STEP 1
- Attach proper nozzle, lather or
gel, by twisting into place
- Be sure the “adjustment
switch”is in the “lather” postion
for lather or gel set-up
STEP 2
- Use “ cap removal tool” found
in the bottom of base to remove
plastic cap on can
STEP 3
- Turn unit upside down, as shown
- Depress “locking tab”
- Carefully line up lather or gel
valve with center seal
- Gently insert can valve into seal
and release “locking tab”
- Press can until it locks in place
STEP 4
To use with gel:
- Depress black “control cap” firmly
and slide the “adjustment switch “
as far as possible towards the gel
side. This step holds the “control
cap” down in the gel position
To use with lather:
- Move adjustment switch into lather
position
NOTE:
Slide adjustment switch as far as possible, it
may not be all the way to the gel position
*IMPORTANT NOTE:
If can valve is not properly
inserted into center seal, gel will leak out of unit.
CONSIGNES
IMPORTANTES
L’utilisation d’un électroménager demande
la prise de précautions élémentaires, dont
les suivantes :
Lisez toutes les
directives avant
d’utiliser l’appareil
DANGER
Afin de réduire le risque de choc électrique :
1. Ne saisissez pas l’appareil s’il est
tombé dans l’eau. Déconnectez-le
immédiatement.
2. Ne l’utilisez pas en prenant un bain ou une
douche.
3. Ne placez ni ne rangez l’appareil là où
il pourrait tomber ou être tiré dans une
baignoire ou un évier. Ne le placez ni ne
l’échappez dans l’eau ou un liquide.
4. Déconnectez toujours l’appareil de la prise
2. L’appareil ne devrait jamais être utilisé
par, sur ou près d’enfants ou de per-
sonnes souffrant de certaines infirmités.
3. N’utilisez l’appareil que pour l’usage prévu
dans ce livret. N’utilisez pas d’accessoires
non recommandés par le fabricant. Ne
tirez pas, ne tordez pas et n’enroulez pas
le fil autour de l’appareil.
4. N’utilisez jamais l’appareil si le fil ou la
fiche est endommagée, s’il ne fonctionne
pas correctement, s’il a été échappé ou
endommagé, ou s’il est tombé dans l’eau.
Présentez l’appareil à un service après-
vente agréé où il sera inspecté et réparé.
5. N’échappez ni n’insérez jamais d’objets
dans les ouvertures.
6. Ne l’utilisez pas à l’extérieur, là où l’on
utilise des aérosols, ni là où l’on adminis-
tre de l’oxygène.
7. Ne l’utilisez que sur une surface au
niveau.
8. Déconnectez l’appareil avant de poser
une cannette de mousse/gel de rasage.
9. Gardez le fil loin des surfaces chauffées.
10. N’utilisez jamais un outil pour enlever
CONSERVEZ CES
DIRECTIVES
DIRECTIVES
D’UTILISATION
Afin de réduire le risque de choc
électrique, cet appareil est muni d’une
fiche polarisée (une lame est plus large
que l’autre). Cette fiche ne convient que
d’une façon dans une prise polarisée.
Si elle ne s’enfonce pas complètement,
inversez-la. Si elle ne convient toujours
pas, consultez un maître-électricien. Ne
tentez pas de contrer cette mesure de
sécurité. Tout autre entretien devrait être
exécuté par un représentant agréé en
service après-vente; l’appareil ne contient
aucune pièce réparable par l’utilisateur.
COMMANDE DE TEMPÉRATURE
VARIABLE
Cet appareil est muni d’une commande de
température variable. Ajustez-la jusqu’à ce
adjustment
switch
can valve
locking tab
centre
seal
control cap
adjustable
switch
Page 4

 Loading...