

Page 1

GasTrac
Instant Access
Parts and Service
(800) 458-1960
(814) 437-6861
www.conairnet.com
The Conair Group, Inc.
One Conair Drive
Pittsburgh, PA 15202
Phone: (412) 312-6000
Fax:(412)-312-6001
Process Air Heater
UGD014/0497
Installation
Maintenance
Operation
Troubleshooting
Page 2

It’s a good idea to record the model and serial number(s) of
your equipment and the date you received it in the User
Guide. Our service department uses this information, along
with the manual number, to provide help for the specific
equipment you installed.
Please keep this User Guide and all manuals, engineering
prints and parts lists together for documentation of your
equipment.
Date:
Manual Number: UGD014/0497
Serial number(s):
Model number(s):
DISCLAIMER: The Conair Group, Inc., shall not be liable for errors
contained in this User Guide or for incidental, consequential damages in connection with the furnishing, performance or use of this
information. Conair makes no warranty of any kind with regard to
this information, including, but not limited to the implied warranties
of merchantability and fitness for a particular purpose.
Please record your
equipment’s model and
serial number(s) and
the date you received it
in the spaces provided.
Copyright 1997
All rights reserved
THE CONAIR GROUP, INC.
Page 3

UGD014/0497 GasTrac Process Air Heater
TABLE OF
CONTENTS
I
NTRODUCTION . . . . . . . . . . . . . . . . . . .1-1
Purpose of the User Guide . . . . . . . . . . . . . . . . . . . . . . . . .1-2
How the guide is organized . . . . . . . . . . . . . . . . . . . . . . . .1-2
Your responsibilities as a user . . . . . . . . . . . . . . . . . . . . . .1-2
ATTENTION: Read this so no one gets hurt . . . . . . . . . . .1-3
How to use the lockout device . . . . . . . . . . . . . . . . . . . . . .1-5
DESCRIPTION . . . . . . . . . . . . . . . . . . . .2-1
What is the GasTrac? . . . . . . . . . . . . . . . . . . . . . . . . . . . . .2-2
Typical applications . . . . . . . . . . . . . . . . . . . . . . . . . . . . . .2-2
How it works . . . . . . . . . . . . . . . . . . . . . . . . . . . . . . . . . . .2-4
Fuel train features and controls . . . . . . . . . . . . . . . . . . . . .2-6
Specifications: GasTrac . . . . . . . . . . . . . . . . . . . . . . . . . . .2-8
Specifications: Exhaust flue . . . . . . . . . . . . . . . . . . . . . . . .2-9
Specifications: Main power supply . . . . . . . . . . . . . . . . . . .2-9
INSTALLATION . . . . . . . . . . . . . . . . . . . .3-1
Unpacking the boxes . . . . . . . . . . . . . . . . . . . . . . . . . . . . .3-2
Preparing for installation . . . . . . . . . . . . . . . . . . . . . . . . . .3-3
Installing the GasTrac . . . . . . . . . . . . . . . . . . . . . . . . . . . .3-4
Replacing the host dryer’s process air heater . . . . . . . . . . .3-4
Installing the exhaust flue . . . . . . . . . . . . . . . . . . . . . . . . .3-5
Connecting process air lines . . . . . . . . . . . . . . . . . . . . . . . .3-6
Connecting the gas supply . . . . . . . . . . . . . . . . . . . . . . . . .3-6
Connecting the main power . . . . . . . . . . . . . . . . . . . . . . . .3-7
Installing the RTD probe . . . . . . . . . . . . . . . . . . . . . . . . . .3-7
Testing the installation . . . . . . . . . . . . . . . . . . . . . . . . . . . .3-8
OPERATION . . . . . . . . . . . . . . . . . . . . . .4-1
GasTrac operating features . . . . . . . . . . . . . . . . . . . . . . . . .4-2
The GasTrac control . . . . . . . . . . . . . . . . . . . . . . . . . . . . .4-3
To start drying . . . . . . . . . . . . . . . . . . . . . . . . . . . . . . . . . .4-4
To stop drying . . . . . . . . . . . . . . . . . . . . . . . . . . . . . . . . . .4-5
MAINTENANCE . . . . . . . . . . . . . . . . . . . .5-1
Preventative maintenance checklist . . . . . . . . . . . . . . . . . .5-2
Cleaning the combustion air filter . . . . . . . . . . . . . . . . . . .5-3
Cleaning the electrical enclosure filters . . . . . . . . . . . . . . .5-3
Replacing the spark igniter . . . . . . . . . . . . . . . . . . . . . . . .5-4
Cleaning the ultraviolet flame detector . . . . . . . . . . . . . . . .5-6
Cleaning the burner sight glass . . . . . . . . . . . . . . . . . . . . .5-6
i
Page 4

GasTrac Process Air Heater UGD014/0497
TABLE OF
CONTENTS
T
ROUBLESHOOTING . . . . . . . . . . . . . . . .6-1
Before beginning . . . . . . . . . . . . . . . . . . . . . . . . . . . . . . . .6-2
A few words of caution . . . . . . . . . . . . . . . . . . . . . . . . . . .6-2
When an alarm occurs . . . . . . . . . . . . . . . . . . . . . . . . . . . .6-3
How to identify the cause of an alarm . . . . . . . . . . . . . . . .6-3
Temperature controller alarms . . . . . . . . . . . . . . . . . . . . . .6-4
Burner controller alarms . . . . . . . . . . . . . . . . . . . . . . . . . .6-7
Variable speed controller alarms . . . . . . . . . . . . . . . . . . . .6-10
Flue gas high temperature limit switch . . . . . . . . . . . . . . .6-14
Process high temperature limit switch . . . . . . . . . . . . . . .6-15
APPENDIX
Service/Warranty Information . . . . . . . . . . . . . . . .Appendix A
ii
Page 5

1-1
UGD014/0497 GasTrac Process Air Heater
● Purpose of the User Guide . . . .1-1
● How the guide is organized . . . .1-2
●Your responsibilities as a user .1-2
● ATTENTION: Read this so
no one gets hurt . . . . . . . . . . .1-3
● How to use the lockout device .1-5
INTRODUCTION
Page 6

GasTrac Process Air Heater UGD014/0497
1-2 INTRODUCTION
This User Guide describes the GasTrac process air heater and
explains step-by-step how to install, operate, maintain and
repair this equipment.
Before installing this product, please take a few moments to
read the User Guide and review the diagrams and safety information in the instruction packet. You also should review manuals covering associated equipment in your system. This
review won’t take long, and it could save you valuable installation and operating time later.
Symbols have been used to help organize the User Guide and
call your attention to important information regarding safe
installation and operation.
Symbols within triangles warn of conditions that could
be hazardous to users or could damage equipment.
Read and take precautions before proceeding.
Numbers within shaded squares indicate tasks or steps
to be performed by the user.
A diamond indicates the equipment’s response to an
action performed by the user.
An open box marks items in a checklist.
A shaded circle marks items in a list.
You must be familiar with all safety procedures concerning
installation, operation and maintenance of this equipment.
Responsible safety procedures include:
● Thorough review of this User Guide, paying particular
attention to hazard warnings, appendices and related
materials and diagrams.
● Thorough review of the equipment itself, with careful
attention to voltage sources, gas supply, intended use and
warning labels.
● Thorough review of instruction manuals for associated
equipment.
● Step-by-step adherence to instructions outlined in this
User Guide.
PURPOSE OF
THE USER
GUIDE
HOW THE
GUIDE IS
ORGANIZED
1
◆
❒
●
!
YOUR
RESPONSIBILITY
AS A USER
Page 7

UGD014/0497 GasTrac Process Air Heater
INTRODUCTION 1-3
We design equipment with the user’s safety in mind. You can
avoid the potential hazards identified on this machine by following the procedures outlined below and elsewhere in the
User Guide and related instructional materials.
ATTENTION:
READ THIS SO NO
ONE GETS HURT
!
WARNING: Follow instructions carefully.
Incorrect installation, operation or maintenance of
this product can result in a fire, explosion or
other hazards causing property damage, severe
personal injury or loss of life.
Only licensed electrical/mechanical contractors, or
individuals experienced with the installation of natural gas piping, process air ducting, thermal insulation, exhaust ducting and regional codes for industrial gas appliances, should install the GasTrac.
The GasTrac should be maintained and repaired
by qualified technicians who are equipped with the
correct tools and are experienced in the maintenance and repair of industrial gas appliances.
Inspection and testing of gas supply piping,
exhaust ducting and the GasTrac gas controls and
safety features should be performed periodically to
ensure safe operation.
!
WARNING: If gas odor is detected...
❒ Open doors and/or windows to vent the gas.
❒ Do not touch electrical switches.
❒ Extinguish all open flames.
❒ Immediately have qualified personnel determine
the source of the gas leak and repair it.
!
WARNING: Do not store or place
aerosol, compressed gas or flammable
materials on or near this equipment.
The hot temperatures associated
with the drying process may
cause aerosols or other
flammable materials placed or
stored near the GasTrac to
explode.
!
Page 8

GasTrac Process Air Heater UGD014/0497
1-4 INTRODUCTION
WARNING: Hot surfaces.
Temperatures inside the GasTrac can
reach more than 800˚ F. Always shut
down the GasTrac and host dryer and
wait for them to cool before servicing. Do
not remove the safety guard covering the
GasTrac burner and heat exchanger.
WARNING: Disconnect and lock out
main power before servicing.
The GasTrac is connected to high voltage. Always disconnect and lock out the
main power source to the GasTrac before
servicing. Also disconnect and lock out
main power to the host dryer before servicing the GasTrac. Failure to disconnect
and lock out this voltage source could
result in severe personal injury.
WARNING: Shut off main gas supply
and purge heat exchanger and gas
lines before servicing.
If the fuel train, burner, ultraviolet sensor,
sight glass or ignition are to be serviced,
it is important that the GasTrac heat
exchanger and gas lines are purged of
natural gas. Failure to eliminate this
potential source of a gas leak could result
in severe damage, personal injury or loss
of life.
WARNING: Do not operate the
GasTrac with safety features disabled
or removed.
The GasTrac has been equipped with
numerous guards, controls and devices
to ensure safe operation.Never remove
or disable these devices to sustain production. Operating without these devices
could lead to hazardous conditions that
can damage the facility or cause severe
injury or loss of life.
ATTENTION:
READ THIS SO NO
ONE GETS HURT
!
!
!
Page 9

UGD014/0497 GasTrac Process Air Heater
INTRODUCTION 1-5
CAUTION: Before performing maintenance
or repairs on this product, you should disconnect
and lock out electrical power sources to prevent
injury from unexpected energization or start-up. A
lockable device has been provided to isolate this
product from potentially hazardous electricity.
Lockout is the preferred method of isolating machines or
equipment from energy sources. Your Conair product is
equipped with the lockout device pictured below. To use the
lockout device:
Stop or turn off the equipment.
Isolate the equipment from
electrical power.
Turn the rotary disconnect
switch to Off, or O position.
Secure the device with an
assigned lock or tag.
The equipment is now locked out.
WARNING: Before removing lockout
devices and returning switches to the ON position,
make sure that all personnel are clear of the
machine, tools have been removed and all safety
guards reinstalled.
HOW TO USE
THE
LOCKOUT
DEVICE
I
O
1
2
3
4
!
Page 10

Page 11

2-1
UGD014/0497 GasTrac Process Air Heater
● What is the GasTrac? . . . . . . . . .2-1
●Typical applications . . . . . . . . . .2-2
● How it works . . . . . . . . . . . . . . .2-4
● Fuel train features
and controls . . . . . . . . . . . . .2-6
● Specifications: GasTrac . . . . . . .2-8
● Specifications: Exhaust flue . . .2-9
● Specifications: Main power
supply wire . . . . . . . . . . . . . .2-9
DESCRIPTION
Page 12

The GasTrac Process Air Heater is a stand-alone, gas-fired
heater designed to replace the electric process air heater in an
existing dehumidifying dryer or crystalizer. The GasTrac
allows plastics processors to convert existing electric equipment to a less-expensive gas source.
The GasTrac contains a metal-ceramic burner, heat exchanger,
combustion system and temperature controller to set and
maintain the temperature of the air entering a drying hopper.
The host dryer’s desiccant beds dry the air. The host dryer’s
process blower circulates air through the GasTrac heat
exchanger and the hopper.
The GasTrac’s temperature controller, ignition system and
burner safeguards communicate with the host dryer through a
RS-485 serial interface port.
The GasTrac can be used successfully in applications that
require:
● Drying of hygroscopic plastics at temperatures ranging
from 250˚ F to 350˚ F.
● Hot air drying of non-hygroscopic plastics.
● Process, or drying, air flow of 600 to 1800 cfm. Higher
or lower air flow ranges may be achieved, depending on
the model of the host dryer and the GasTrac selected.
● Central drying, using an existing electric dryer with a
single GasTrac or multiple GasTrac units.
The GasTrac has been designed and configured at the factory
for use with natural gas only. If you want to use a different gas
fuel source, such as propane, you must contact Conair.
WHAT IS THE
GASTRAC?
GasTrac Process Air Heater UGD014/0497
2-2 DESCRIPTION
TYPICAL
APPLICATIONS
Page 13

TYPICAL
APPLICATIONS
UGD014/0497 GasTrac Process Air Heater
DESCRIPTION 2-3
The GasTrac may be installed on a mezzanine or on the floor
between the host dryer and the drying hopper. You can use
flexible hose or pipe to deliver air between the host dryer, the
GasTrac and the drying hopper.
Mezzanine
installation
Floor
installation
Page 14

HOW IT WORKS
GasTrac Gas-Fired process Air Heater UGD014/0497
2-4 DESCRIPTION
ESC SEL
Combustion
Blower
RUN
MAN
234.0
250.0
SP2
OP1
OP2
REM
HOLD
2216
ESC SEL
The GasTrac has three interfaced controls that:
● Ignite the metal-ceramic burner and monitor the GasTrac
combustion circuit.
● Heat the dry air to the setpoint temperature.
● Monitor the air temperature as it enters the drying hopper.
● Automatically adjust the mixture of combustion air and
gas to maintain the setpoint temperature.
Temperature
RTD probe at
the hopper
inlet
The Temperature Controller
You enter the setpoint temperature in the Temperature Controller on the
main GasTrac control. The temperature controller monitors temperature at
the drying hopper inlet. When the actual temperature must increase or
decrease to maintain setpoint, this controller sends a 4 to 20 MA signal to
the variable speed controller.
Burner Controller
The Burner Controller is activated
when you press the RUN button on
the main GasTrac control. The burner
controller sends a signal to the spark
igniter, which fires the metal-ceramic
burner. This controller continues to
monitor the fuel train, combustion
blower and other combustion systems
for possible problems.
Variable Speed Controller
The Variable Speed Controller automatically adjusts the speed of the combustion
blower by varying the frequency and voltage of the signal. Increasing the speed
increases the air-to-fuel mixture and the heat output of the burner.
4 to 20 MA
signal
varying
frequency
Page 15

HOW IT WORKS
UGD014/0497 GasTrac Process Air Heater
DESCRIPTION 2-5
100
150
200
250
300
350
400
0
50
100
150
200
50
0
100
150
200
250
300
350
400
0
50
100
150
200
50
0
The Process Air Circuit
The Combustion Air Circuit
The process blower in the host
dryer sends dehumidified air into
the GasTrac heat exchanger.
The heated dry air exits
the GasTrac. The air is
blown by the host dryer
to the drying hopper.
The air is heated to the setpoint temperature
as it passes over and around the burner
cylinder and surrounding baffles.
The combustion blower
pulls ambient air into
the combustion circuit
through a filter.The air
is then blown to the
proportional gas mixer.
1a
2
Gas and air are mixed
in the proportion
needed to achieve the
setpoint temperature.
The GasTrac has two separate air circuits: the combustion air
circuit and the process air circuit.
Gas enters
the fuel train.
1b
The air/gas mixture
enters the burner,
where it is ignited
by a spark.
3
Combustion air flows through the burner
cylinder and the exhaust tube bundles.
4
Combustion
gases exhaust
through a flue.
5
3
1
2
Page 16

GasTrac Process Air Heater UGD014/0497
2-6 DESCRIPTION
The fuel train includes two automatic and manual safety gas
shutoff valves, four pressure switches, and a gas regulator and
governor to assure safe feeding of gas to the combustion burner. The four pressure switches monitor gas pressure and
process air flow. The GasTrac will automatically shut down if
a pressure switch senses an unsafe condition.
FUEL TRAIN
FEATURES AND
CONTROLS
GasTrac horizontal models
Combustion air filter
Zero Gas Governor
controls the gas feed to
the proportional mixer.
Manual burner
inlet gas shutoff valve
Proportional Mixer
Mixes air and gas in
the correct proportion
to produce the required
heat.
Combustion air
pressure switch
Primary automatic
safety shutoff valve
Secondary
automatic safety
shutoff valve
Process air
differential
pressure switch
Combustion air blower
Low gas
pressure switch
High gas
pressure switch
Gas inlet pressure gauge
Manual gas supply
shutoff valve
Regulated gas pressure gauge
Gas pressure regulator
Page 17

UGD014/0497 GasTrac Process Air Heater
DESCRIPTION 2-7
GasTrac upright models
Combustion air filter
Proportional Mixer
Mixes air and gas in
the correct proportion
to produce the required
heat.
FUEL TRAIN
FEATURES AND
CONTROLS
Combustion air blower
Gas inlet
pressure gauge
Manual gas supply
shutoff valve
Regulated gas pressure gauge
Gas pressure regulator
Zero Gas Governor
controls the gas feed to
the proportional mixer.
Manual burner
inlet gas shutoff valve
Primary automatic
safety shutoff valve
Secondary
automatic safety
shutoff valve
Process air
differential
pressure switch
High gas
pressure switch
Low gas pressure switch
Combustion air
pressure switch
Page 18

SPECIFICATIONS: GASTRAC
GasTrac Process Air Heater UGD014/0497
2-8 DESCRIPTION
H
W
D
Dimensions H W D Weight Air inlet/outlet
in./cm in./cm in./cm lbs/kg diameter in./cm
CGT700HH Horizontal Model 61/154.9 37/93.9 74/187.9 1115/505.7 12/30
CGT700HV Upright Model 67/170.2 39/99 64/162.6 1115/505.7 12/30
CGT500HH Horizontal Model 61/154.9 37/93.9 64/162.6 880/399.2 8/20.3
CGT500HV Upright Model 65/165.1 39/99 64/162.6 880/399.2 8/20.3
CGT350HH Horizontal Model 54/137.2 29/73.7 66/167.6 695/315.2 8/20.3
CGT350HV Upright Model 58/147.3 31/78.7 56/142.2 695/315.2 8/20.3
Remotable GasTrac control 3.5/8.9 12.5/31.7 6/15.2 — —
W
H
W
D
CGTHH horizontal model
CGTHV upright model
H
D
Remotable
GasTrac control
CGT700 models CGT500 models CGT350 models
General
Temperature range 250-350˚F / 122-177˚C 250-350˚F / 122-177˚C 250-350˚F / 122-177˚C
Maximum Flue Temperature 750˚F / 399˚C 750˚F / 399˚C 750˚F / 399˚C
Combustion blower 1.5 Hp Peripheral 1 Hp Peripheral 1 Hp Peripheral
Ignition source Spark igniter, interrupted Spark igniter, interrupted Spark igniter, interrupted
Burner type Metal-ceramic Metal-ceramic Metal-ceramic
Minimum burner capacity 150,000 BTU/hr 125,000 BTU/hr 90,000 BTU/hr
Maximum burner capacity 700,000 BTU/hr 500,000 BTU/hr 350,000 BTU/hr
Gas consumption 230 CFH @ 250˚F/1200 CFM 150 CFH @ 250˚F/800 CFM 105 CFH @ 250˚F/600 CFM
675 CFH @ 350˚F/1800 CFM 465 CFH @ 350˚F/1200 CFM 325 CFH @ 350˚F/800 CFM
Gas pressure to regulator 10 - 20 inches of water / 2.49 - 4.98 kilopascals
Gas pressure from regulator 4 - 7 inches of water / 0.99 - 1.74 kilopascals
Gas heating value 1000 BTU/ft
3
Electrical
Available voltages / Total Amps
240 V/3 phase/60 Hz 4.8 A 2.5 A 2.0 A
380 V/3 phase/50 Hz 3.0 A 1.6 A 1.3 A
415 V/3 phase/50 Hz 2.7 A 1.5 A 1.2 A
480 V/3 phase/60 Hz 2.4 A 1.3 A 1.0 A
Total Kilowatts 1.9 kw 1.0 kw 0.8 kw
Emissions (all models)
Primary excess air 10% - 30%
Oxygen (O2) [Ideal 3%-4%] 2% - 5% acceptable range
Carbon Dioxide (CO2) 9% - 10.5%
Carbon Monoxide (CO) < 10 ppm corrected to 3% O
2
NOX < 20 ppm corrected to 3% O
2
Unburned hydrocarbons < 10 ppm corrected to 3% O
2
NOTE: Elevations 3000 feet above sea level must be specified at time of purchase.
All GasTrac models meet:
UL 372, UL 795, FM, CGA,
AGA, NFPA 54, NFPA 79,
NFPA 86 and IAS
Page 19

UGD014/0497 GasTrac Process Air Heater
DESCRIPTION 2-9
SPECIFICATIONS: MAIN POWER SUPPLY WIRE
The main power wire must be:
● Grounded and secured with a strain relief.
● Correctly sized for the current drawn.
Allowable ampacities of Copper Conductors
U.S.A. Canada European Community
75˚C insulation 90˚C insulation 70˚C insulation; 40˚C ambient air
Conductor 30˚C ambient air 40˚C ambient air Ground wire Conductor Maximum
Size AWG Maximum Full Load Amps Size AWG Size mm
2
Full Load Amps
14 15 13 14 2,5 16
12 20 17 12 4 23
10 30 27 10 6 29
8 43 47 10 10 40
NOTE: Local or regional electrical guidelines may have specifications that differ from the above national codes.
You should comply with the codes for your area.
SPECIFICATIONS: EXHAUST FLUE
The Conair GasTrac is classified under the National Fuel Gas Code [ANSI Z233.1]
as a Category III gas appliance. An exhaust flue is required to vent the combustion
gases produced by this appliance.The purchaser is responsible for installing an
exhaust flue that meets all local, regional and national codes in the installation area.
For you safety, Conair recommends that you consult a licensed mechanical contractor who is familiar with gas flue and ducting codes in your area.
GasTrac operating characteristics
Maximum flue temperature 750˚F / 399˚C
Minimum vent size (single unit installation) CGT350: 4 in. / 10.2 cm
CGT500: 6 in. / 15 cm
CGT700: 6 in. / 15 cm
Vent pressure at flue collar 1 to 2 in. water column
Installation recommendations
❒ Provide each GasTrac with a dedicated, vertical stack that exits the
building vertically through a rain-protected roof penetration. Limit any
horizontal ducting runs to 4 feet.
❒ Use a stainless steel, fabricated chimney flue.
❒Vent size should be 6 inches in diameter. If you connect multiple
GasTrac units to a stack manifold, adjust the stack size accordingly.
❒ Static pressure at the flue collar must not exceed 1 to 2 inches water
column.
❒ Install an induced draft fan between the GasTrac exhaust outlet and
stack ducting, if you have more than 1 to 2 inches water column pressure at the flue collar while the GasTrac is operating.
Page 20

Page 21

3-1
UGD014/0497 GasTrac Process Air Heater
● Unpacking the boxes . . . . . . . . .3-2
● Preparing for installation . . . . . .3-3
● Installing the GasTrac . . . . . . . .3-4
● Replacing the host dryer’s
process air heater . . . . . . . . .3-4
● Installing the exhaust flue . . . . .3-5
● Connecting process air lines . .3-6
● Connecting the gas supply . . . .3-6
● Connecting the main power . . .3-7
● Installing the RTD probe . . . . . .3-7
●Testing the installation . . . . . . . .3-8
INSTALLATION
Page 22

UNPACKING
THE
BOXES
GasTrac Process Air Heater UGD014/0497
3-2 INSTALLATION
Carefully remove the GasTrac and components
from their shipping containers.
Remove all packing material, protective paper, tape
and plastic. Be sure to examine packing material before
discarding. What looks like filler may contain parts, hardware or instructional materials.
Carefully inspect all components. Make sure you
have the correct model and all necessary hardware. Check
for any damage that may have occurred during shipping. If
you do find freight damage, you should immediately file a
damage claim against the delivering carrier.
Take a moment to record serial numbers, electri-
cal power and gas specifications in the blanks provided on
the back of the User Guide title page. This information
will be helpful if you ever need service or parts.
You are now ready to begin installation.
Follow all preparation steps beginning on the next page.
1
2
3
4
5
Optional Remote
Control Bracket
If you ordered the optional
bracket for mounting the
GasTrac control in a
remote location, see the
Appendix for installation
instructions.
Exhaust
flue elbow
Exhaust
flue Tee
1 “V” clamp
2 “V”
clamps
Temperature
probe (RTD)
Exhaust
flue Tee
Temperature
probe (RTD)
The GasTrac Process Air Heater arrives assembled. The RTD
temperature probe is packaged inside the electrical enclosure.
Depending on the model and options ordered, you also
should receive boxes containing V clamps and piping to
attach the GasTrac exhaust to a customer-installed flue.
CGT horizontal model
CGT upright model
Page 23

Select a location for the GasTrac. The location:
❒
Should be between the host dryer and the hopper.
For minimal heat loss, the GasTrac should be no more
than 10 feet from the drying hopper. The GasTrac control
must be within 10 feet of the drying hopper inlet, unless
optional cable extensions for the RTD temperature probe
have been purchased.
❒ Must allow for installation of an exhaust flue that
meets all local, regional and national codes. Ideally, each
GasTrac should have a dedicated vertical stack that exits
the building through a rain-protected roof penetration.
❒ Must provide minimum clearance for safe operation
and maintenance. For efficient combustion, you must not
obstruct air flow around the unit.
Install electrical power to the selected location.
The GasTrac requires a grounded, three-phase power
source. Check the GasTrac’s serial tag for the correct
amps, voltage and cycles for your model. All electrical
wiring should be completed by qualified personnel and
should comply with government codes in your region.
Install gas piping to the selected location.
Gas delivery piping should be sized to provide the rated
gas flow to the GasTrac at a delivery pressure of about 12
inches water column (about
1
/2psig). All gas piping
should be completed by qualified personnel and should
comply with government codes in your region.
PREPARING FOR
INSTALLATION
UGD014/0497 GasTrac Process Air Heater
INSTALLATION 3-3
WARNING: Follow instructions carefully.
Incorrect installation of this product can result in a
fire, explosion or other hazards causing proper ty
damage, severe personal injury or loss of life. Only
licensed electrical/mechanical contractors, or individuals experienced with the installation of natural
gas piping, process air ducting, thermal insulation
and exhaust ducting, should install the GasTrac.
!
1
3 feet
5 feet
2 feet
2 feet
3 ft.
18 inches
3 feet
5 feet
2 feet
2 feet
2
3
NOTE: For reliable longterm
performance, the gas supply
line should include:
❒
A water trap to collect
water condensing in the
gas line.
❒
An in-line, basket-type fil-
ter to collect rust, pipe
scale or welding slag.
Page 24

Move the GasTrac to the selected location.
Be sure to position the GasTrac so that you can easily:
❒ Connect the gas and main power supplies.
❒ Install the flue stack.
❒ Connect process air hoses or lines between the host
dryer, GasTrac and drying hopper.
Secure the GasTrac to the mounting surface.
We have provided 1 3/8-inch diameter holes in the base of
the GasTrac for bolting the unit to a mounting surface.
You must disconnect the host dryer’s process heater because
the GasTrac replaces it. You will need the wiring diagrams and
instruction manuals for your host dryer to determine which
wires to disconnect and which air lines to remove or reroute.
Disconnect and lock out power to the host
dryer.
If the dryer has been operating recently, wait for
the dryer too cool down before continuing to Step 2.
Disconnect the electrical wires between the host
dryer control and the process heating elements.
Disconnect and reroute the process air lines.
The host dryer’s process air outlet must be connected to
the GasTrac instead of the drying hopper. To reduce the
pressure drop in the process air circuit, you may need to
remove the process heater or reroute process air lines within the dryer to bypass the process heater. Refer to the manuals and diagrams that came with your dryer.
INSTALLING THE
GASTRAC
GasTrac Process Air Heater UGD014/0497
3-4 INSTALLATION
WARNING:You are responsible for the
structural integrity of this installation.
If you are installing the GasTrac on a mezzanine,
the host dryer or another device, be sure that the
mounting surface can support the weight of the
GasTrac. See the specification tables for weights.
!
CAUTION: Use a suitable lifting device to
move the GasTrac.
The GasTrac models weigh up to 1,400 pounds.
Always use a for klift or other suitable lifting device
to move the unit.The GasTrac has been equipped
with forklift rails.
!
1
2
DISCONNECTING
THE
DRYER’S
PROCESS AIR
HEATER
1
2
3
Page 25

The GasTrac is a forced draft system, using a variable speed
combustion blower and a sealed combustion chamber. The temperature of combustion gases in the flue can reach 750˚ F.
Install the exhaust ducting and flue.
Consult government codes and a qualified mechanical contractor for detailed installation instructions and assistance.
See the
SPECIFICATIONS pages of this User Guide for GasTrac
operating characteristics and general recommendations.
Connect the flue to the GasTrac’s exhaust outlet.
Attach the T pipe to the GasTrac’s
exhaust outlet using the V clamp
provided. Connect the T pipe to the
exhaust flue. On an upright model,
you must attach the elbow to the
exhaust outlet before connecting
the T pipe and flue.
Insulate the flue and exhaust T assembly.
Exhaust flue and T temperatures can reach 750˚ F.
Install a condensate trap and drain.
Condensate occurs where flue gases cool below their dew
point. This condensate can be highly corrosive. Draining
and disposal should be done in compliance with applicable
safety and environmental codes in your area.
INSTALLING THE
EXHAUST FLUE
UGD014/0497 GasTrac Process Air Heater
INSTALLATION 3-5
WARNING: Do not operate the GasTrac
without a properly installed exhaust flue.
You must install an exhaust flue to vent the combustion gases produced by the GasTrac.The installation
should comply with government codes in your area
and be done by a qualified mechanical contractor
familiar with industrial flue and ducting systems.
!
1
2
3
4
T pipe
T pipe
V clamp
Elbow
Flue
Exhaust outlet
Condensate
drain
Flue
Condensate
drain
V clamp
Exhaust
outlet
TIP: A condensate trap
and drain can be made
by bending a piece of
stainless
steel tubing.
Secure the
drain to the
T pipe using
the appropriate
compression fitting.
Page 26

The process air lines carry dehumidified air from the host
dryer to the GasTrac, and from the GasTrac to the drying hopper. These air lines can be flexible hose or pipe. The air line
between the GasTrac and host dryer can be uninsulated. We
recommend an insulated air line between the GasTrac and the
drying hopper to minimize heat loss.
Connect the GasTrac process air inlet to the host
dryer’s process air outlet. Secure the air lines with
hose or pipe clamps.
Connect the GasTrac process air outlet to the drying hopper air inlet. Secure the air lines with hose or
pipe clamps.
CONNECTING
PROCESS AIR
LINES
GasTrac Process Air Heater UGD014/0497
3-6 INSTALLATION
NOTE: Do not allow
the flexible hoses to
kink or crimp.
1
2
CONNECTING
THE
GAS SUPPLY
WARNING: For your safety, we recommend that
these steps be completed by a qualified mechanical
contractor in compliance with all applicable natural
gas codes in your region.
!
Check all gas lines for leaks. Use a gas detecting
device or apply soapy water around pipe and fittings.
Purge the gas lines after pipe and fittings are known
to be free of leaks. The lines must be free of air, rust,
scale, pipe dope and welding slag.
Connect the gas supply line to the inlet on the
GasTrac fuel train. Make sure that a water trap and inline
basket filter has been installed on the supply line.
1
2
GAS INLET FITTING SIZES
Model NPT size
CGT350 3/4 in.
CGT500
3
/4in.
CGT700 1 in.
Process air
from dryer
Process air
to hopper
Process air
to hopper
Gas supply
inlet
Upright model
Horizontal model
3
Page 27

Open the GasTrac electrical enclosure.
Turn the disconnect dial on the GasTrac’s door
to the Off position. Turn the captive screw, and
swing the door open.
Insert the main power
wire through the knockout in
the electrical enclosure. Secure the wire with a rubber
compression fitting or strain relief.
Connect the power wires
to the three terminals
at the top of the disconnect holder.
Connect the ground wire to either grounding
point shown in the diagram.
CONNECTING
MAIN POWER
UGD014/0497 GasTrac Process Air Heater
INSTALLATION 3-7
4
CAUTION: Electrical hazard.
Always disconnect and lock out the main
power sources before making electrical
connections. Electrical connections should
be made only by qualified personnel.
IMPORTANT:
Always refer to
the wiring diagrams that came with
the GasTrac for the most accurate
information about electrical components and connections.
O
1
2
3
Honeywell
ESCSEL
INSTALLING THE
RTD PROBE
The RTD probe monitors the temperature of the drying air as
it enters the hopper. If the probe is not installed correctly, temperature readings will be inaccurate.
Insert the probe in the
delivery air inlet
of the
hopper. The end of the probe
must not touch the walls of
the inlet pipe. Most hoppers
provide a hole that is compatible with the probe’s
1
/8-inch
NPT compression fitting.
Plug the probe’s cable
into the GasTrac control
box. Coil any excess cable and
secure with a wire tie.
1
2
Page 28

You have completed the installation. Now its time to make
sure everything works. Qualified electrical and mechanical
personnel should be available during the systems check and
the installation test.
Check all electrical connections.
❒ Shut off power to the unit and verify that the GasTrac
and its burner controller are adequately grounded.
Inadequate grounding can cause controller error messages and nuisance alarms.
❒ With power off to the GasTrac and the host dryer, verify
that all terminal connections are tight and all new
wiring has adequate strain relief.
Check gas piping and ducting.
❒ Verify that the gas delivery piping is rigidly supported.
❒ Verify that exhaust gas ducting is secured, adequately
insulated and free of leaks.
Check the GasTrac fuel train for leaks.
Turn on the gas supply to the GasTrac. Open the primary
gas shutoff valve. Use a gas leak detection device or a
squirt bottle of soapy water to detect leaks around gas pipe
and fitting joints. Open the secondary gas shutoff valve,
and continue checking for leaks using the same procedure.
Start the host dryer.
Monitor the dryer during the first few minutes of operation
to verify that the start-up operating sequences are correct.
Turn on the gas supply to the GasTrac.
All manual shut-off valves in the gas supply line and the
GasTrac fuel train must be in the open position. Before
proceeding, use a detection device or soapy water to check
for gas leaks in the GasTrac fuel train.
Turn on main power to the GasTrac.
Turn the main disconnect dial to the I or ON
position.
If everything is installed correctly:
◆ The variable speed control’s display will
illuminate.
GAS AND
ELECTRICAL
SYSTEM
CHECKS
GasTrac Process Air Heater UGD014/0497
3-8 INSTALLATION
1
2
3
WARNING: Be sure lines are free of leaks.
To prevent accident or injury, all gas lines, including
the GasTrac’s factor y-mounted gas train, should be
checked for leaks before firing the burner.
TESTING THE
INSTALLATION
1
2
3
I
Page 29

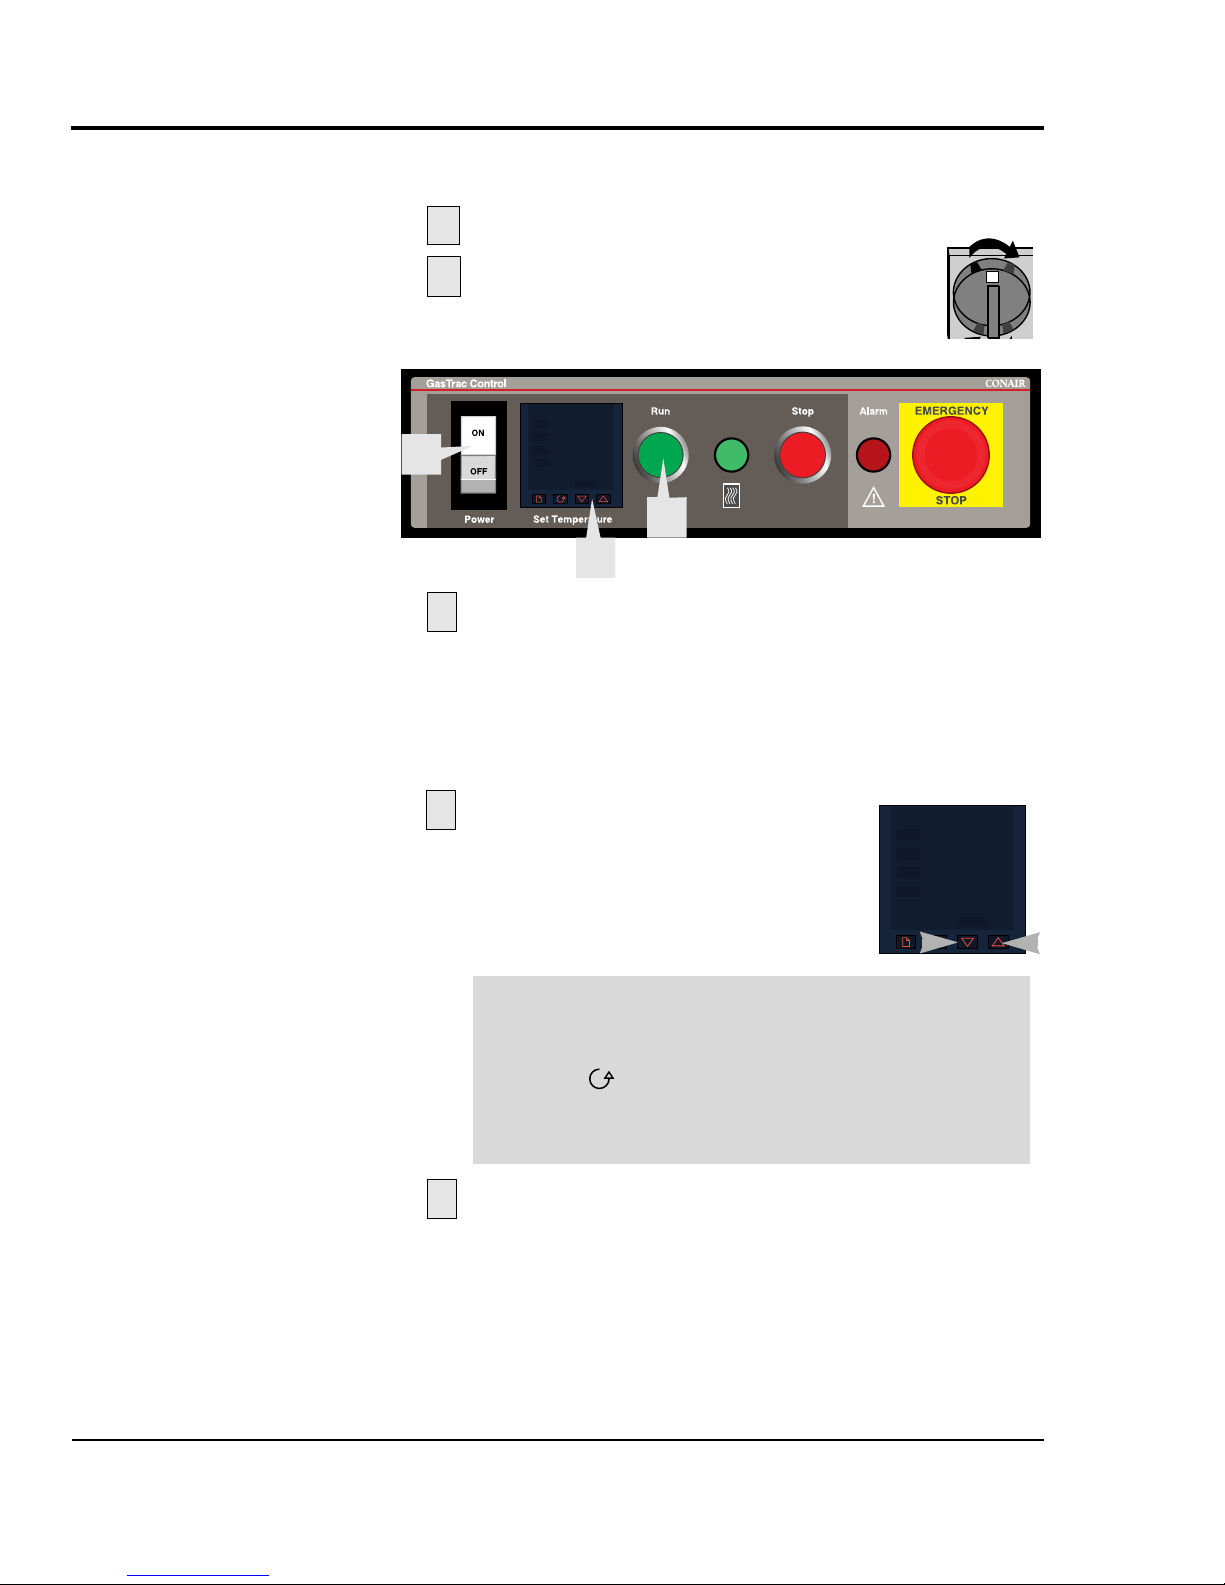
Press the Power switch to ON.
◆ The Power ON/OFF switch illuminates.
◆ The temperature controller begins a 3-second self-test.
The display will flash between
STANDBY and the set-
point temperature.
◆ The Burner Controller begins a 10-second initiation,
which ends when the display indicates
STANDBY.
Set the drying temperature.
Press the the up or down arrow on the temperature controller until 250˚F appears in the lower display.
Press the RUN button.
◆ The green RUN light will illuminate after the Burner
Controller finishes initializing.
◆ The combustion blower will start and run for 90 sec-
onds to purge any residual gas from the burner.
◆ After the 90-second purge, the burner will ignite on low
fire (low blower speed) for about 15 seconds. The burner will alternate between high and low fire as required
to maintain the setpoint temperature.
Verify the combustion blower is rotating in the
correct direction.
The combustion blower uses three-phase blower. Hold a
strip of paper or piece of string near the blower inlet filter.
If the paper or string blows away from the filter, the blower is rotating in the wrong direction. Stop the GasTrac.
Disconnect and lock out the main power source. Reverse
any two incoming electrical leads on the blower and repeat
the test procedure.
Allow the actual temperature to reach setpoint.
Press the STOP button.
◆ The green RUN indicator light turns off.
◆ The gas inlet valves should close.
◆ The combustion blower should stop.
◆ The burner and temperature controllers should display
STANDBY.
Allow the actual temperature to reach setpoint.
TESTING THE
INSTALLATION
UGD014/0497 GasTrac Process Air Heater
INSTALLATION 3-9
RUN
MAN
235.0
250.0
SP2
OP1
OP2
REM
HOLD
2216
5
6
4
4
5
6
7
6
8
9
10
BURNER START UP NOTE:
If the burner fails to ignite
and the red alarm light illuminates, there may still be air
in the gas lines. Check the
burner controller display. If
the alarm LED is illuminated,
press the reset button on the
front of the electrical enclosure. If not, refer to the
T
ROUBLESHOOTING
section of
the User Guide and the
burner controller manual.
Page 30

Page 31

4-1
UGD014/0497 GasTrac Process Air Heater
● GasTrac operating features . . . .4-2
●The GasTrac control . . . . . . . . . .4-3
●To start dr ying . . . . . . . . . . . . . .4-4
●To stop drying . . . . . . . . . . . . . .4-5
OPERATION
Page 32

GASTRAC
OPERATING
FEATURES
GasTrac Process Air Heater UGD014/0497
4-2 OPERATION
ESC SEL
Cooling Exhaust Filter
Prevents contaminants
from entering the electrical enclosure through
the exhaust vent.
The GasTrac Control
This is the primary operating control.You
turn the GasTrac on or off, enter the setpoint drying temperature and start or stop
the GasTrac using this remotable control. A
green light indicates the GasTrac is running.
A red light indicates an alarm condition.
Main Power
Disconnect Switch
Turn the lockable dial to
provide or disconnect
electrical power to the
GasTrac.
The OPERATING section introduces the GasTrac operating fea-
tures and explains how to use the primary GasTrac control to
start and stop drying. For detailed information about the
Temperature, Burner and Variable Speed Controllers, see the
manufacturer’s manuals in the instruction packet.
Electrical Enclosure
Cooling Fan and Filter
Draws outside air
through the enclosure
to cool electrical components.
Process High Temperature
Limit Switch
Shuts down the GasTrac when
the process, or drying, temperature exceeds 450˚F.
Flue Gas High Temperature
Limit Switch
Shuts down the GasTrac
when the combustion exhaust
temperature exceeds 800˚F.
High Temperature Limit
Switch Reset Button
Push to reset the flue gas and
process high temperature limit
switches.
Burner Controller
The Burner Controller is activated
when you press the RUN button
on the main GasTrac control. The
burner controller sends a signal to
the spark igniter, which fires the
metal-ceramic burner.This controller continues to monitor the
fuel train, combustion blower and
other combustion components for
possible problems.
Variable Speed Controller
The Variable Speed Controller automatically adjusts the speed of the combustion
blower by var ying the frequency and voltage of the signal. Increasing the speed
increases the air-to-fuel mixture and the
heat output of the burner.
Page 33

UGD014/0497 GasTrac Process Air Heater
OPERATION 4-3
THE GASTRAC
CONTROL
RUN
MAN
235.0
250.0
SP2
OP1
OP2
REM
HOLD
2216
The GasTrac control is the primary operator interface. This
control may have been mounted in a remote location.
Run Button
Push to start
the GasTrac.
Emergency Stop Button
Push to shutdown the
GasTrac during an emergency. Pull to restore
power before restarting.
Alarm Light
An illuminated light Indicates the
GasTrac has shutdown on an
alarm condition. The Troubleshooting section will help you
identify and correct the problem.
Run Light
An illuminated
light indicates
the GasTrac is
operating.
Power On/Off
This switch sends power to
the burner controller, the
GasTrac control and the
process and safeguard relay
devices The switch illuminates when power is ON.
Temperature Controller
OP1: Indicates the variable frequency controller output is active.
SP2: Indicates the controller will control to setpoint #2 when in automatic mode.
MAN: Indicates the controller is being manually operated by the operator.
Actual
temperature
Setpoint
temperature
Page button
Press to select parameter lists during setup and configuration of the controller.
Scroll button
Press to scroll through parameter lists to select a parameter to modify.
Down button
Press to decrease a value or scroll down through a list.
Up button
Press to increase a value or scroll up through a list.
See the Eurotherm Temperature
Controller manual in the instruction
packet for a full description of alarm
messages, programming modes and
parameters.
Stop Button
Push to stop
the GasTrac.
2216
OP1
OP2
234.0
SP2
REM
250.0
RUN
HOLD
MAN
Page 34
The temperature controller is factory configured to start and
operate in automatic mode.
Start the host dryer.
Turn the main power disconnect to
the
I or ON position.
◆ The variable speed controller turns on.
Press the Power switch to ON.
◆ The Power ON/OFF switch illuminates.
◆ The temperature controller begins a 3-second self-test.
The display will flash between
STANDBY and the setpoint
temperature.
◆ The Burner Controller begins a 10-second initiation,
which ends when the display indicates
STANDBY.
Set the drying temperature.
Press the the up or down arrow on the
temperature controller until the recommended drying temperature appears in
the lower display.
Press the RUN button.
◆ The green RUN light will illuminate after the Burner
Controller finishes initializing.
◆ The combustion blower will start and run for 90 sec-
onds to purge any residual gas from the burner.
◆ After the purge, the burner will ignite on low fire (low
blower speed) for about 15 seconds. The burner will
alternate between high and low fire as required to maintain the setpoint temperature.
TO START
DRYING
GasTrac Process Air Heater UGD014/0497
4-4 OPERATION
1
2
3
4
5
4
5
3
NOTE: The temperature units were set at the
factory in ˚F or ˚C, as specified in the order.
To see which temperature unit was set:
Press the button once. F or C will be displayed.
To change the temperature unit:
See the Eurotherm Temperature Controller manual
235.0
250.0
RUN
HOLD
MAN
2216
OP1
OP2
SP2
REM
OP1
OP2
234.0
SP2
REM
250.0
MAN
RUN
HOLD
I
2216
Page 35

UGD014/0497 GasTrac Process Air Heater
OPERATION 4-5
TO STOP
DRYING
Press the red STOP button.
◆ The green indicator light turns off.
◆ The gas inlet valves should close.
◆ The combustion blower should stop.
Press the ON/OFF switch to OFF.
◆ The burner control turns off.
◆ The temperature controller turns off.
Turn the main power disconnect off.
◆ The variable speed control display remains
lit for a brief period. Then it becomes blank.
Turn the host dryer off after at least 2 minutes.
1
2
3
4
1
2
IMPORTANT: Do not shut down the host dr yer before
stopping the GasTrac.
After stopping the GasTrac, allow the host dryer’s
process blower to continue running for a minimum of 2
minutes.This prevents excessive heat from building up
in the GasTrac.
O
CAUTION:Voltage present
Some voltage will be present in the variable speed drive for a brief period after
power has been turned off.When the voltage is gone, the variable speed control
display will become blank.
235.0
250.0
RUN
HOLD
MAN
2216
OP1
OP2
SP2
REM
Page 36

Page 37

5-1
UGD014/0497 GasTrac Process Air Heater
● Maintenance checklist . . . . . . . .5-2
● Cleaning the combustion
air filter . . . . . . . . . . . . . . . . . . .5-3
● Cleaning the electrical
enclosure filters . . . . . . . . . . . .5-3
● Replacing the spark igniter . . . .5-4
● Cleaning the ultraviolet
flame detector . . . . . . . . . . . . .5-6
● Cleaning the burner
sight glass . . . . . . . . . . . . . . . .5-6
MAINTENANCE
Page 38

PREVENTATIVE
MAINTENANCE
CHECKLIST
GasTrac Process Air Heater UGD014/0497
5-2 MAINTENANCE
Routine maintenance will ensure optimum operation and performance of the GasTrac. We recommend the following maintenance schedule and tasks.
● Weekly, or as often as needed
❒ Clean the GasTrac combustion air filter.
You may need to clean the filter more often than
weekly. Frequency depends on the amount of dust
in your facility’s air.
❒ Clean the GasTrac electrical enclosure filters.
You may need to clean the filters more often than
weekly. Frequency depends on the amount of dust
in your facility’s air.
● Monthly
❒ Inspect air hoses and hose connections.
Check for damage, kinks or loose hose clamps.
Replace any hoses that show signs of damage or
wear. Reposition and tighten loose hose clamps.
❒ Inspect and test safety controls.
Fuel safety shutoff valves, combustion safeguards
and temperature and pressure switches should be
inspected and tested by trained personnel.
❒ Inspect the burner sight glass.
Clean the sight glass, if needed. Replace the sight
glass if you see cracks or any other defect.
● Every six months
❒ Inspect the GasTrac metal-ceramic burner.
While the unit is fired, look through the sight glass
at the burner. The burner surface should be glowing
orange with an even flame. Blue flames, flames
projecting from the burner surface, or cracks or
dark spots on the burner surface indicate damage.
You may need to replace the burner.
❒ Inspect piping, wiring and electrical connections.
Check for leaks, corrosion and loose connections.
Replace any component that shows signs of damage or wear. Tighten loose connections.
● Annually
❒ Replace the spark igniter.
To assure optimum performance, you should
replace the spark igniter once a year.
❒ Clean the ultraviolet flame detector lens.
Use alcohol and a soft cloth.
Page 39

You must clean the combustion air intake filter periodically. A
clogged filter reduces air flow through the combustion circuit,
which reduces burner efficiency and heat output.
Stop the GasTrac.
Press the red STOP
button, then press the
rocker switch to
OFF.
Disconnect and lock out main power.
Remove the filter shroud.
Remove the wing nut and washer
that holds the shroud in place.
Lift the shroud up and off.
Remove the filter.
Remove the wing nut and washer
that holds the filter in place. Lift
the filter up and off.
Clean the filter.
Vacuum or blow dirt and debris
from the filter using vacuum or
low-pressure compressed
air. When using compressed air, blow from
inside the filter toward
the outside.
Reassemble .
Repeat steps 3 and 4 in
reverse order to replace
the filter.
CLEANING THE
COMBUSTION
FILTER
UGD014/0497 GasTrac Process Air Heater
MAINTENANCE 5-3
1
2
3
NOTE: Replace any
filter that has cracked
end gaskets or is
torn, worn or clogged
with so much dirt that
it cannot be cleaned.
4
5
3
4
CLEANING THE
ELECTRICAL
ENCLOSURE
FILTERS
Periodically, you should clean the filters covering the
cooling fan inlet and outlet on the electrical enclosure.
Remove the the thumb
screws and filters.
Clean the filters.
Use vacuum or low-pressure compressed air to remove loose debris.
Wash the filters in warm, soapy
water, then rinse and air dry.
Replace torn or worn filters.
Reassemble.
6
1
2
3
OP1
OP2
SP2
REM
235.0
250.0
RUN
HOLD
MAN
2216
ESCSEL
Page 40

The spark igniter should be replaced at least once a year to
assure trouble-free operation. You should replace the igniter
before the annual period, if you inspect it and find:
● The spark gap is less than 0.125 inch. The gap should
be between 0.07 and 0.09 inch.
● The igniter insulation is cracked
● The spark electrodes are warped or taper to a needle-
like shape.
Do not operate the GasTrac with a worn or damaged spark
igniter. A badly burned or warped igniter can cause burner
ignition failure.
Stop the GasTrac.
Press the red STOP
button, then press the
rocker switch to
OFF.
Disconnect and lock out main power.
Remove the igniter wire.
Pull the wire boot, not the wire,
away from the spark igniter. If the
wire or its boot is cracked, you
should replace it.
Remove the spark igniter.
Use a 7⁄8 inch spark
plug socket and ratchet
to loosen the igniter.
Pull the igniter straight
out of the GasTrac. Do
not allow the spark
igniter to touch the
burner surface.
REPLACING THE
SPARK IGNITER
GasTrac Process Air Heater UGD014/0497
5-4 MAINTENANCE
1
2
3
IMPORTANT: When
removing or inserting the
spark igniter, do not allow
the igniter electrode or
grounding rod to touch the
burner.You could damage
the burner surface.
3 4
4
TIP: Before removing the spark igniter for inspection,
use a felt tip marker to mark the position of the igniter
in its threaded hole. By
indexing the position,
you will able to return
the igniter to the correct
position after inspection.
The igniter must be
installed so that the
ground rod is 180˚
away from the
burner surface.
WARNING:
Hot surfaces
Allow the GasTrac
to cool before
removing the burner guard to perform
maintenance
OP1
OP2
SP2
REM
235.0
250.0
RUN
HOLD
MAN
2216
Page 41

Mark the position of the grounding rod on the
new spark igniter, using a felt tip marker. This index mark
must end up 180˚ away from the burner surface when the
spark igniter is inserted and tightened. The electrode
should be closest to the burner surface.
Coat the threads of the igniter with a high-temper-
ature conductive anti-seize compound.
Carefully insert the igniter into GasTrac.
Insert the igniter straight into the threaded fitting. Do not
bend the electrode, and do not allow the spark igniter to
touch the burner surface.
Screw the igniter into the threaded fitting.
Tighten by hand
first. Then use a
socket and ratchet
to tighten the
igniter one turn or
a partial turn until
the index mark on
the igniter is 180˚
away from the
burner surface.
Push the boot and wire onto the spark igniter.
Push until you feel the boot snap into place.
UGD014/0497 GasTrac Process Air Heater
MAINTENANCE 5-5
Electrode
Grounding rod
5
REPLACING THE
SPARK IGNITER
180˚
WARNING: Do not over tighten the spark igniter.
You could damage the porcelain insulator.
6
7
8
9
Page 42

A dirty ultraviolet flame detector may fail to recognize burner
ignition, which will cause the GasTrac to alarm and shut down
automatically.
Stop the GasTrac.
Press the red STOP button, then press the rocker switch to
OFF.
Disconnect and lock out main power.
Remove the flame detector.
Loosen the mounting nut while holding the flame detector, then pull the
detector away from the viewing hole.
Clean the viewing hole lens.
Use a soft cloth or cotton swab
moistened with alcohol.
Replace the flame detector.
Align the detector over the
viewing hole, and thread the silver
mounting nut onto the coupling.
Hand tighten first. Then use a
wrench to tighten the nut an
additional quarter turn.
GasTrac Process Air Heater UGD014/0497
5-6 MAINTENANCE
CLEANING THE
ULTRAVIOLET
FLAME
DETECTOR
RUN
MAN
235.0
250.0
SP2
OP1
OP2
REM
HOLD
2216
WARNING:
Hot surfaces
Allow the GasTrac
to cool before
removing the burner guard to perform
maintenance
1
2
3
4
5
CLEANING THE
BURNER SIGHT
GLASS
WARNING:
Hot surfaces
Allow the GasTrac
to cool before
removing the burner guard to perform
maintenance
A dirty sight glass prohibits inspection or viewing of the
metal-ceramic burner during operation.
Stop the GasTrac. Disconnect and lock out
main power.
Remove the screws on the
sight glass bracket.
Clean the sight glass.
Use a clean soft cloth or cotton swab
moistened with alcohol.
Coat the screw threads with
a high-temperature anti-seize compound.
Replace the sight glass.
Tighten the screws in the bracket
to hold the glass in place.
1
2
3
4
5
Page 43

6-1
UGD014/0497 GasTrac Process Air Heater
● Before beginning . . . . . . . . . . . .6-2
● A few words of caution . . . . . . .6-2
● When an alarm occurs . . . . . . . .6-3
● How to identify the cause
of an alarm . . . . . . . . . . . . . . . .6-3
●Temperature controller
alarms . . . . . . . . . . . . . . . . . . . .6-4
● Burner controller alarms . . . . . .6-7
● Variable speed controller
alarms . . . . . . . . . . . . . . . . . . .6-10
● Flue gas high temperature
limit switch . . . . . . . . . . . . . . .6-14
● Process high temperature
limit switch . . . . . . . . . . . . . . .6-15
TROUBLESHOOTING
Page 44

BEFORE
BEGINNING
GasTrac Process Air Heater UGD014/0497
6-2 TROUBLESHOOTING
You can avoid most problems by following the recommended
installation and maintenance procedures outlined in this Users
Guide. If you do have a problem, this section will help you
determine what caused it and tell you how to fix it.
Before you begin troubleshooting:
❒ Find the wiring and assembly diagram you
received with your GasTrac. These diagrams will note any
custom features such as special wiring or alarm capabilities not covered in the User Guide.
❒ Find the instruction manuals and diagrams that
were shipped with the GasTrac and your host dryer.
❒ Find any installation diagrams or notes which may
have been generated at the time the GasTrac was
installed.
A FEW WORDS
OF
CAUTION
WARNING: The GasTrac should be maintained
and repaired by qualified technicians who are
equipped with the correct tools and are experienced in the maintenance and repair of industrial
gas appliances.
WARNING: Hot surfaces.
Temperatures inside the GasTrac can reach more
than 800˚ F. Always shut down the GasTrac and
host dryer and wait for them to cool before servicing.
WARNING: Disconnect and lock out main
power before servicing.
The GasTrac is connected to high voltage.
Always disconnect and lock out the main power
source to the GasTrac before servicing. Also disconnect and lock out the main power to the host
dryer before servicing the GasTrac. Failure to disconnect and lock out this voltage source could
result in severe personal injury.
WARNING: Shut off main gas supply and
purge heat exchanger and gas lines before
servicing.
Failure to eliminate this potential source of a gas
leak could result in severe damage, personal
injury or loss of life.
Page 45

When there is a problem with the GasTrac the alarm light will
illuminate and the GasTrac will shutdown.
WHEN AN
ALARM OCCURS
UGD014/0497 GasTrac Process Air Heater
TROUBLESHOOTING 6-3
HOW TO
IDENTIFY THE
CAUSE OF AN
ALARM
RUN
MAN
235.0
250.0
SP2
OP1
OP2
REM
HOLD
2216
Alarm light
The single alarm may be caused by any one of five major
control components or another device within the GasTrac.
Check the controllers for alarm messages.
Causes of the more probable alarm messages can be
found in this section of the User Guide. If you don’t find
the alarm message here, then see the manufacturer’s manual for that particular controller. These manuals can be
found in the instruction packet that came with your
GasTrac.
Check the limit switches for contact closure.
Possible causes of switch failure can be found in this
section of the User Guide.
Check the GasTrac electrical and gas systems.
These checks should be performed only by trained electrical and gas technicians equipped with the proper tools.
Control components and indications of failure:
●
Temperature controller
Displays a flashing alarm message.
●
Burner controller
Displays a flashing alarm message.
●
Variable speed controller
Displays a flashing alarm message.
●
Process outlet high temperature limit switch
Ver ify switch contact closure.
●
Flue gas high temperature limit switch
Ver ify switch contact closure.
1
2
3
Page 46

TEMPERATURE
CONTROLLER
ALARMS
GasTrac Process Air Heater UGD014/0497
6-4 TROUBLESHOOTING
Alarm
Deviation
Band
The drying, or
process circuit, temperature is higher or
lower than the setpoint alarm band
allows.
Sensor
Break
The sensor input for
RTD temperature
probe has failed.
Possible cause
Is something blocking or
restricting the flow of
drying, or process, air?
Is the RTD temperature
probe installed correctly?
Is the temperature range
for the deviation band too
narrow?
Is the RTD temperature
probe connection loose or
incorrectly installed?
Is the RTD temperature
probe damaged?
Solution
❒ Check the process filter in
the host dryer. Clean or replace
the filter if it is clogged or
damaged.
❒ Check the process air hoses
for leaks, crimps, blockage or
loose connections. Remove
obstructions. Repair leaks or
loose connections.
❒ Check the process air blower in the host dryer. If it is not
running correctly, see the
dryer’s manual.
Make sure the sensing end of
the RTD probe is positioned
near the center of the process
air line at the hopper inlet.
Temperature readings will be
incorrect if the sensing end is
too close to the wall of the
inlet hose or pipe.
Increase the deviation band
5˚F at a time. The default setting is 20˚F. To avoid nuisance
alarms, do not adjust this band
more than necessary.
❒ Verify that the RTD temperature probe is installed.
❒ Check for a loose RTD connection at the GasTrac control
or the process air inlet of the
hopper.
Replace the RTD temperature
probe.
1dEV
S.br
The Temperature Controller will flash an alarm
message in the upper or lower display window.
WARNING: The GasTrac should be tested and repaired only by qualified technicians
equipped with the correct tools and trained in
the maintenance and repair of electrical systems and industrial gas appliances.
RUN
MAN
SP2
OP1
OP2
REM
HOLD
2216
!
Page 47

UGD014/0497 GasTrac Process Air Heater
TROUBLESHOOTING 6-5
Alarm
Loop
Break
The actual drying
temperature did not
approach the setpoint within the loop
break time. There
may be a problem in
the combustion or
process air circuit.
Power
Failure
The line voltage to
the Temperature
Controller is too low.
Possible cause
Is something blocking or
restricting the flow of
drying, or process, air?
Is the GasTrac combustion air filter dirty?
Is the Variable Speed
Controller operating correctly?
Is the setpoint correct?
Is the GasTrac being supplied with the correct
voltage?
Is there a loose or faulty
connection in the electrical circuit?
Solution
❒ Check the process filter in
the host dryer. Clean the filter,
or replace it if it is damaged.
❒ Check the process air hoses
for leaks, crimps, blockage or
loose connections. Remove
obstructions. Repair leaks or
loose connections.
❒ Check the process air blower in the host dryer. If it is not
running correctly, see the
dryer’s manual.
Clean the combustion air filter.
Replace the filter if it is torn or
too clogged with dirt to clean.
Check the Variable Speed
Controller for error or alarm
messages. See the Variable
Speed Controller pages in this
TROUBLESHOOTING section and in
the Allen-Bradley controller
manual.
Make sure the setpoint is within the range specified for your
GasTrac unit.
Check the main power supply
to the GasTrac and the electrical circuits supplying power to
the control panel and the temperature controller.
L.br
TEMPERATURE
CONTROLLER
ALARMS
Pwr.F
The Temperature Controller will flash an alarm
message in the upper or lower display window.
WARNING: The GasTrac should be tested and repaired only by qualified technicians
equipped with the correct tools and trained in
the maintenance and repair of electrical systems and industrial gas appliances.
RUN
MAN
SP2
OP1
OP2
REM
HOLD
2216
!
Page 48

GasTrac Process Air Heater UGD014/0497
6-6 TROUBLESHOOTING
Alarm
The ROM self test
failed.
The RAM self test
failed.
Watchdog Failure
Keyboard failure.
Input Circuit Failure
Possible cause
The temperature controller is defective.
The temperature controller is defective.
The temperature controller is defective.
A button on the temperature controller keypad is
stuck or was pressed during power up.
The temperature controller is defective.
Solution
Replace the temperature controller, or return it to the factory for repair.
Replace the temperature controller, or return it to the factory for repair.
Replace the temperature controller, or return it to the factory for repair.
Switch the power to the
GasTrac control off and the on
using the
POWER ON/OFF
switch. Do not touch any buttons on the temperature controller.
Replace the temperature controller, or return it to the factory for repair.
TEMPERATURE
CONTROLLER
ALARMS
The Temperature Controller will flash an alarm
message in the upper or lower display window.
WARNING: The GasTrac should be tested and repaired only by qualified technicians
equipped with the correct tools and trained in
the maintenance and repair of electrical systems and industrial gas appliances.
RUN
MAN
SP2
OP1
OP2
REM
HOLD
2216
Err1
Err2
Err3
Err4
Err5
!
Page 49

BURNER
CONTROLLER
ALARMS
UGD014/0497 GasTrac Process Air Heater
TROUBLESHOOTING 6-7
When there is a problem related to the
burner or ignition, the burner controller
displays a fault code and illuminates an
alarm light. To restart the GasTrac after a
burner controller alarm:
Press the GasTrac
STOP button.
Press the burner
RESET button.
Press the GasTrac
RUN button.
Alarm
Flame did not occur
within the 4-second
flame establishing
period.
WARNING:
The GasTrac
should be tested
and repaired only
by qualified technicians equipped
with the correct
tools and trained in
the maintenance
and repair of electrical systems and
industrial gas
appliances.
Possible cause
Is the spark igniter providing a spark?
Is there a problem with
the gas supply?
Is the lens of the ultraviolet sensor dirty?
Is negative pressure in
the building affecting static pressure of the combustion exhaust flue?
Is the burner controller
defective?
Solution
Restart the GasTrac while watching through the sight glass. If you
don’t see a spark during the 4second ignition period:
❒ Verify there is power supplied
to the transformer during the
ignition period.
❒ Check the wire and connec-
tions between the transformer
and spark igniter.
❒ Check the spark igniter.
Replace if damaged.
If the burner fails to light even
though you can see a spark:
❒ Verify that the gas supply is
on and that the gas shutoff
valves are open during the
ignition period.
❒ Restart the GasTrac 4 or 5
times to purge any air that may
be in the gas lines.
❒ Verify that the gas pressure
regulator is set to supply the
correct pressure.
If the burner ignites and then
goes out, check
the lens for dirt.
Clean if necessary.
Verify that the static pressure of
the combustion exhaust flue is 1
to 2 inches of water column. If
not, you may need to add a draft
fan to the flue to create the correct static pressure.
If none of the solutions above can
resolve the problem, you may
need to replace the burner controller.
1
2
3
LOCKOUT #16
*Flame Out Timer*
!
Page 50

GasTrac Process Air Heater UGD014/0497
6-8 TROUBLESHOOTING
Alarm
The main flame
failed after
RUN was
pushed and the
flame had been
established for at
least 10 seconds.
WARNING:
The GasTrac
should be tested
and repaired only
by qualified technicians equipped
with the correct
tools and trained in
the maintenance
and repair of electrical systems and
industrial gas
appliances.
Possible cause
Are the gas shutoff valves
open?
Did the ultraviolet flame
detector fail to send an
adequate signal?
Are the safety pressure
switches malfunctioning
or detecting incorrect
pressures?
Is the gas pressure regulator adjusted correctly?
Solution
❒ Verify that the manual gas
shutoff valves are open.
❒ Verify that the automatic gas
shutoff valves remain open
after burner ignition. If
automatic shutoff valves are
not opening, check the solenoid electrical connections.
During operation, the flame
signal should fluctuate
between 1.25V and 5V D.C.
❒ Verify that the ultraviolet
flame detector lens is clean.
❒ Check for blockage in the
cooling air line between the
ultraviolet sensor and combustion air blower. The temperature at the sensor must
be less than 215˚F.
❒ The sensor or flame amplifi-
er may need to be replaced.
Reset the GasTrac, press
RUN
and check the LED lights on
the process air, combustion air,
low gas and high gas pressure
switches during the 90-second
purge cycle. If a light is not
green, check for leaks, blockage or other problems that
could interfere with air or gas
flow detected by that switch.
Make sure the gas pressure
regulator is adjusted to supply
the pressure outlined in the
S
PECIFICATIONS pages.
BURNER
CONTROLLER
ALARMS
When there is a problem related to the
burner or ignition, the burner controller
displays a fault code and illuminates an
alarm light. To restart the GasTrac after a
burner controller alarm:
Press the GasTrac
STOP button.
Press the burner
RESET button.
Press the GasTrac
RUN button.
1
2
3
LOCKOUT #17
*Main Flame Fail*
!
Page 51

BURNER
CONTROLLER
ALARMS
UGD014/0497 GasTrac Process Air Heater
TROUBLESHOOTING 6-9
Alarm
OR
WARNING:
The GasTrac
should be tested
and repaired only
by qualified technicians equipped
with the correct
tools and trained in
the maintenance
and repair of electrical systems and
industrial gas
appliances.
Possible cause
Is the combustion blower
intake filter clogged?
Are the safety pressure
switches malfunctioning
or detecting incorrect
pressures?
Did the airflow interlock
fail closed?
Solution
Clean the filter. Replace the
filter if it is worn, torn or so
clogged with dirt that it can’t
be cleaned.
Reset the GasTrac, press
RUN
and check the LED lights on
the process air, combustion air,
low gas and high gas pressure
switches during the 90-second
purge cycle. If a light is not
green, check for leaks, blockage or other problems that
could interfere with air or gas
flow detected by that switch.
Switch the burner controller
RUN/TEST button to TEST.
Press the
RUN button on the
GasTrac control. Measure the
voltage between terminal 7 and
G (ground). You should find
120V present if the interlock is
working.
When there is a problem related to the
burner or ignition, the burner controller
displays a fault code and illuminates an
alarm light. To restart the GasTrac after a
burner controller alarm:
Press the GasTrac
STOP button.
Press the burner
RESET button.
Press the GasTrac
RUN button.
1
2
3
LOCKOUT #23
!
LOCKOUT #32
Page 52

VARIABLE SPEED
CONTROLLER
ALARMS
GasTrac Process Air Heater UGD014/0497
6-10 TROUBLESHOOTING
Alarm
Power Loss
Under Voltage
Over Voltage
Motor Stall
Possible cause
DC Bus Voltage remained
below 85% nominal for
more than 5 seconds on
power up.
DC Bus Voltage fell below
the minimum.
DC Bus Voltage exceeded
the maximum.
Motor has stalled.
Solution
Check for proper incoming AC
voltage.
Check for low incoming AC
voltage or power interruption.
The under voltage trip point
for 200-240 VAC units is: 210
VDC, which is equal to 150
VAC incoming voltage.
The under voltage trip point
for 380-460 VAC units is: 390
VDC, which is equal to 275
VAC incoming voltage.
Bus over voltage may be
caused by motor regeneration.
Check for high incoming AC
voltage.
The over voltage trip point for
200-240 VAC units is: 410
VDC, which is equal to 290
VAC incoming voltage.
The under voltage trip point
for 380-460 VAC units is:
815VDC, which is equal to
575 VAC incoming voltage.
Check for physical or mechanical blockage of the combustion blower fan.
07 03
07 04
07 05
07 06
ESC SEL
When a problem occurs, the variable speed
controller displays the parameter 07 and a
two-digit fault code. You must correct the
problem before restarting the GasTrac. To
restart after an alarm:
Turn the power disconnect
OFF then ON.
Press the GasTrac
RUN button.
1
2
WARNING: The GasTrac should be tested and
repaired only by qualified technicians equipped with the
correct tools and trained in the maintenance and repair
of electrical systems and industrial gas appliances.
!
Fault code
Page 53

UGD014/1097 GasTrac Process Air Heater
TROUBLESHOOTING 6-11
Alarm
Motor Overload
Over Temperature
Over current
EEPROM Fault
Possible cause
The internal electronic
overload tripped.
Excessive heat was
detected in the variable
speed control.
Excessively high current
was detected in the hardware trip circuit.
The controller EEPROM
has invalid data.
Solution
❒ Check for physical or
mechanical blockage of the
combustion blower fan.
❒ Check for a faulty combus-
tion blower motor.
❒ Clean the air filters on both
sides of the GasTrac electrical enclosure. Verify that the
cooling fan in the electrical
enclosure is operating correctly.
❒ Check for dirty or blocked
heat sink passages or a
faulty fan inside the variable
speed controller.
❒ Check for a short circuit at
the variable speed control
output.
❒ Check for physical or
mechanical blockage of the
combustion blower fan.
Reset EEPROM. See Resetting
Factory Defaults in the Allen
Bradley variable speed controller manual.
07 07
07 08
07 12
07 32
VARIABLE SPEED
CONTROLLER
ALARMS
ESC SEL
When a problem occurs, the variable speed
controller displays the parameter 07 and a
two-digit fault code. You must correct the
problem before restarting the GasTrac. To
restart after an alarm:
Turn the power disconnect
OFF then ON.
Press the GasTrac
RUN button.
1
2
WARNING: The GasTrac should be tested and
repaired only by qualified technicians equipped with the
correct tools and trained in the maintenance and repair
of electrical systems and industrial gas appliances.
!
Fault code
Page 54

GasTrac Process Air Heater UGD014/1097
6-12 TROUBLESHOOTING
Alarm
Phase U Fault
Phase V Fault
Phase W Fault
Phase UV Short
Fault
Phase UW Short
Fault
Possible cause
The controller has detected a phase U-to-ground
fault between the controller and combustion
blower motor.
The controller has detected a phase V-to-ground
fault between the controller and combustion
blower motor.
The controller has detected a phase W-to-ground
fault between the controller and combustion
blower motor.
Excessive voltage was
detected between the U
and V controller output
phases.
Excessive voltage was
detected between the U
and W controller output
phases.
Solution
❒ Check the wiring between
the control and motor for
damage or incorrect connections.
❒ Make sure the motor ground
is wired correctly.
❒ Check the wiring between
the control and motor for
damage or incorrect connections.
❒ Make sure the motor ground
is wired correctly.
❒ Check the wiring between
the control and motor for
damage or incorrect connections.
❒ Make sure the motor ground
is wired correctly.
❒ Check for a shorted condi-
tion in the wiring to the
controller.
❒ Check motor wiring for a
shorted condition.
❒ Check for a shorted condi-
tion in the wiring to the
controller.
❒ Check motor wiring
07 38
07 39
07 40
07 41
07 42
VARIABLE SPEED
CONTROLLER
ALARMS
ESC SEL
When a problem occurs, the variable speed
controller displays the parameter 07 and a
two-digit fault code. You must correct the
problem before restarting the GasTrac. To
restart after an alarm:
Turn the power disconnect
OFF then ON.
Press the GasTrac
RUN button.
1
2
WARNING: The GasTrac should be tested and
repaired only by qualified technicians equipped with the
correct tools and trained in the maintenance and repair
of electrical systems and industrial gas appliances.
!
Fault code
Page 55

UGD014/0497 GasTrac Process Air Heater
TROUBLESHOOTING 6-13
Alarm
Phase VW Short
Fault
Power Test Fault
Possible cause
Excessive voltage was
detected between the V
and W controller output
phases.
An electrical fault was
detected during the initial
start-up sequence.
Solution
❒ Check for a shorted condi-
tion in the wiring to the
controller.
❒ Check motor wiring
❒ Check wiring to the con-
troller..
❒ Check wiring to the motor.
07 43
07 48
VARIABLE SPEED
CONTROLLER
ALARMS
ESC SEL
When a problem occurs, the variable speed
controller displays the parameter 07 and a
two-digit fault code. You must correct the
problem before restarting the GasTrac. To
restart after an alarm:
Turn the power disconnect
OFF then ON.
Press the GasTrac
RUN button.
1
2
WARNING: The GasTrac should be tested and
repaired only by qualified technicians equipped with the
correct tools and trained in the maintenance and repair
of electrical systems and industrial gas appliances.
!
Fault code
Page 56

GasTrac Process Air Heater UGD014/0497
6-14 TROUBLESHOOTING
Alarm
The control panel
alarm light is on, but
no other controller
alarm messagesor
lights are displayed.
WARNING:
The GasTrac
should be tested
and repaired only
by qualified technicians equipped
with the correct
tools and trained in
the maintenance
and repair of electrical systems and
industrial gas
appliances.
Possible cause
Is the temperature limit
switch faulty?
Does the combustion
air/fuel train need tuning?
Solution
Push the reset button on the
GasTrac electrical enclosure
and restart the GasTrac. If the
alarm occurs again, a qualified
electrician should verify that
the latching alarm contacts of
the flue gas high temperature
limit switch are closed.
This must be done by a qualified technician who is trained
in the maintenance of industrial gas appliances, and who is
familiar with tuning procedures outlined in the various
controller, valve and switch
manuals that came with the
GasTrac.
If the alarm persists, call the
Conair Service Department.
The flue gas high temperature switch monitors the temperature of a type J thermocouple mounted in the flue gas outlet.
When the combustion exhaust gas temperature exceeds 800˚F,
the GasTrac shuts down and the alarm light illuminates.
FLUE GAS HIGH
TEMPERATURE
LIMIT SWITCH
RUN
MAN
235.0
250.0
SP2
OP1
OP2
REM
HOLD
2216
alarm light
!
Page 57

UGD014/0497 GasTrac Process Air Heater
TROUBLESHOOTING 6-15
Alarm
The control panel
alarm light is on, but
no other controller
alarm messagesor
lights are displayed.
WARNING:
The GasTrac
should be tested
and repaired only
by qualified technicians equipped
with the correct
tools and trained in
the maintenance
and repair of electrical systems and
industrial gas
appliances.
Possible cause
Is something blocking or
restricting the flow of
drying, or process, air?
Is the drying temperature
setpoint incorrect?
Is the temperature limit
switch faulty?
Is the temperature controller faulty?
Solution
❒ Check the process filter in
the host dryer. Clean or replace
the filter if it is clogged or
damaged.
❒ Check the process air hoses
for leaks, crimps, blockage or
loose connections. Remove
obstructions. Repair leaks or
loose connections.
❒ Make sure the process air
blower in the host dryer is running correctly.
Check the setpoint on the temperature controller. Enter a
new setpoint, if necessary.
Press the reset button on the
GasTrac electrical enclosure
and restart the GasTrac.
Press the reset button on the
GasTrac electrical enclosure
and restart the GasTrac.If the
alarm occurs again, a qualified
electrician should verify that
the latching alarm contacts of
the process high temperature
limit switch are closed.
If the alarm persists, replace
the temperature controller.
The process high temperature switch monitors the temperature
of a type J thermocouple mounted in the GasTrac process air
outlet. If the process air outlet temperature exceeds 450˚ F, the
GasTrac shuts down and the alarm light illuminates.
RUN
MAN
235.0
250.0
SP2
OP1
OP2
REM
HOLD
2216
alarm light
PROCESS HIGH
TEMPERATURE
LIMIT SWITCH
!
Page 58

Page 59

IMS0002/0797 SERVICE INFORMATION
APPENDIX A-1
Conair has made the largest investment in customer support in the plastics industry. Our service experts are available to help with any problem you might have installing
and operating your equipment. Your Conair sales representative also can help analyze the nature of your problem,
assuring that it did not result from misapplication or
improper use.
To contact Customer Service personnel, call:
From outside the United States, call:
814-437-6861
You can commission Conair service personnel to provide
on-site service by contacting the Customer Service
Department. Standard rates include an on-site hourly rate,
with a one-day minimum plus expenses.
If you do have a problem, please complete the
following checklist before calling Conair:
❒ Make sure you have all model, serial and parts list
numbers for your particular equipment. Service
personnel will need this information to assist you.
❒ Make sure power is supplied to the equipment.
❒ Make sure that all connectors and wires within
and between control systems and related
components have been installed correctly.
❒ Check the troubleshooting guide of this manual
for a solution.
❒ Thoroughly examine the instruction manual(s)
for associated equipment, especially controls.
Each manual may have its own troubleshooting
guide to help you.
❒ Check that the equipment has been operated as
described in this manual.
❒ Check accompanying schematic drawings for
information on special considerations.
BEFORE YOU
CALL ...
H
OW TO CONTACT
CUSTOMER
SERVICE
Additional manuals and
prints for your Conair
equipment may be
ordered through the
Customer Service or
Parts Departments for a
nominal fee.
WE’RE HERE
T O
HELP
Page 60

WARRANTY INFORMATION IMS0003/0796
APPENDIX A-2
EQUIPMENT
GUARANTEE
PERFORMANCE
WARRANTY
WARRANTY
LIMITATIONS
Conair guarantees the machinery and equipment on this
order, for a period as defined in the quotation from date of
shipment, against defects in material and workmanship
under the normal use and service for which it was recommended (except for parts that are typically replaced after
normal usage, such as filters, liner plates, etc.). Conair’s
guarantee is limited to replacing, at our option, the part or
parts determined by us to be defective after examination.
The customer assumes the cost of transportation of the
part or parts to and from the factory.
Conair warrants that this equipment will perform at or
above the ratings stated in specific quotations covering the
equipment or as detailed in engineering specifications,
provided the equipment is applied, installed, operated and
maintained in the recommended manner as outlined in our
quotation or specifications.
Should performance not meet warranted levels, Conair at
its discretion will exercise one of the following options:
● Inspect the equipment and perform alterations or
adjustments to satisfy performance claims. (Charges
for such inspections and corrections will be waived
unless failure to meet warranty is due to misapplication, improper installation, poor maintenance practices
or improper operation.)
● Replace the original equipment with other Conair
equipment that will meet original performance claims
at no extra cost to the customer.
● Refund the invoiced cost to the customer. Credit is
subject to prior notice by the customer at which time a
Return Goods Authorization Number (RGA) will be
issued by Conair’s Service Department. Returned
equipment must be well crated and in proper operating
condition, including all parts. Returns must be prepaid.
Purchaser must notify Conair in writing of any claim and
provide a customer receipt and other evidence that a claim
is being made.
Except for the Equipment Guarantee and Performance
Warranty stated above, Conair disclaims all other warranties with respect to the equipment, express or
implied, arising by operation of law, course of dealing,
usage of trade or otherwise, including but not limited to
the implied warranties of merchantability and fitness for
a particular purpose.
 Loading...