

Page 1
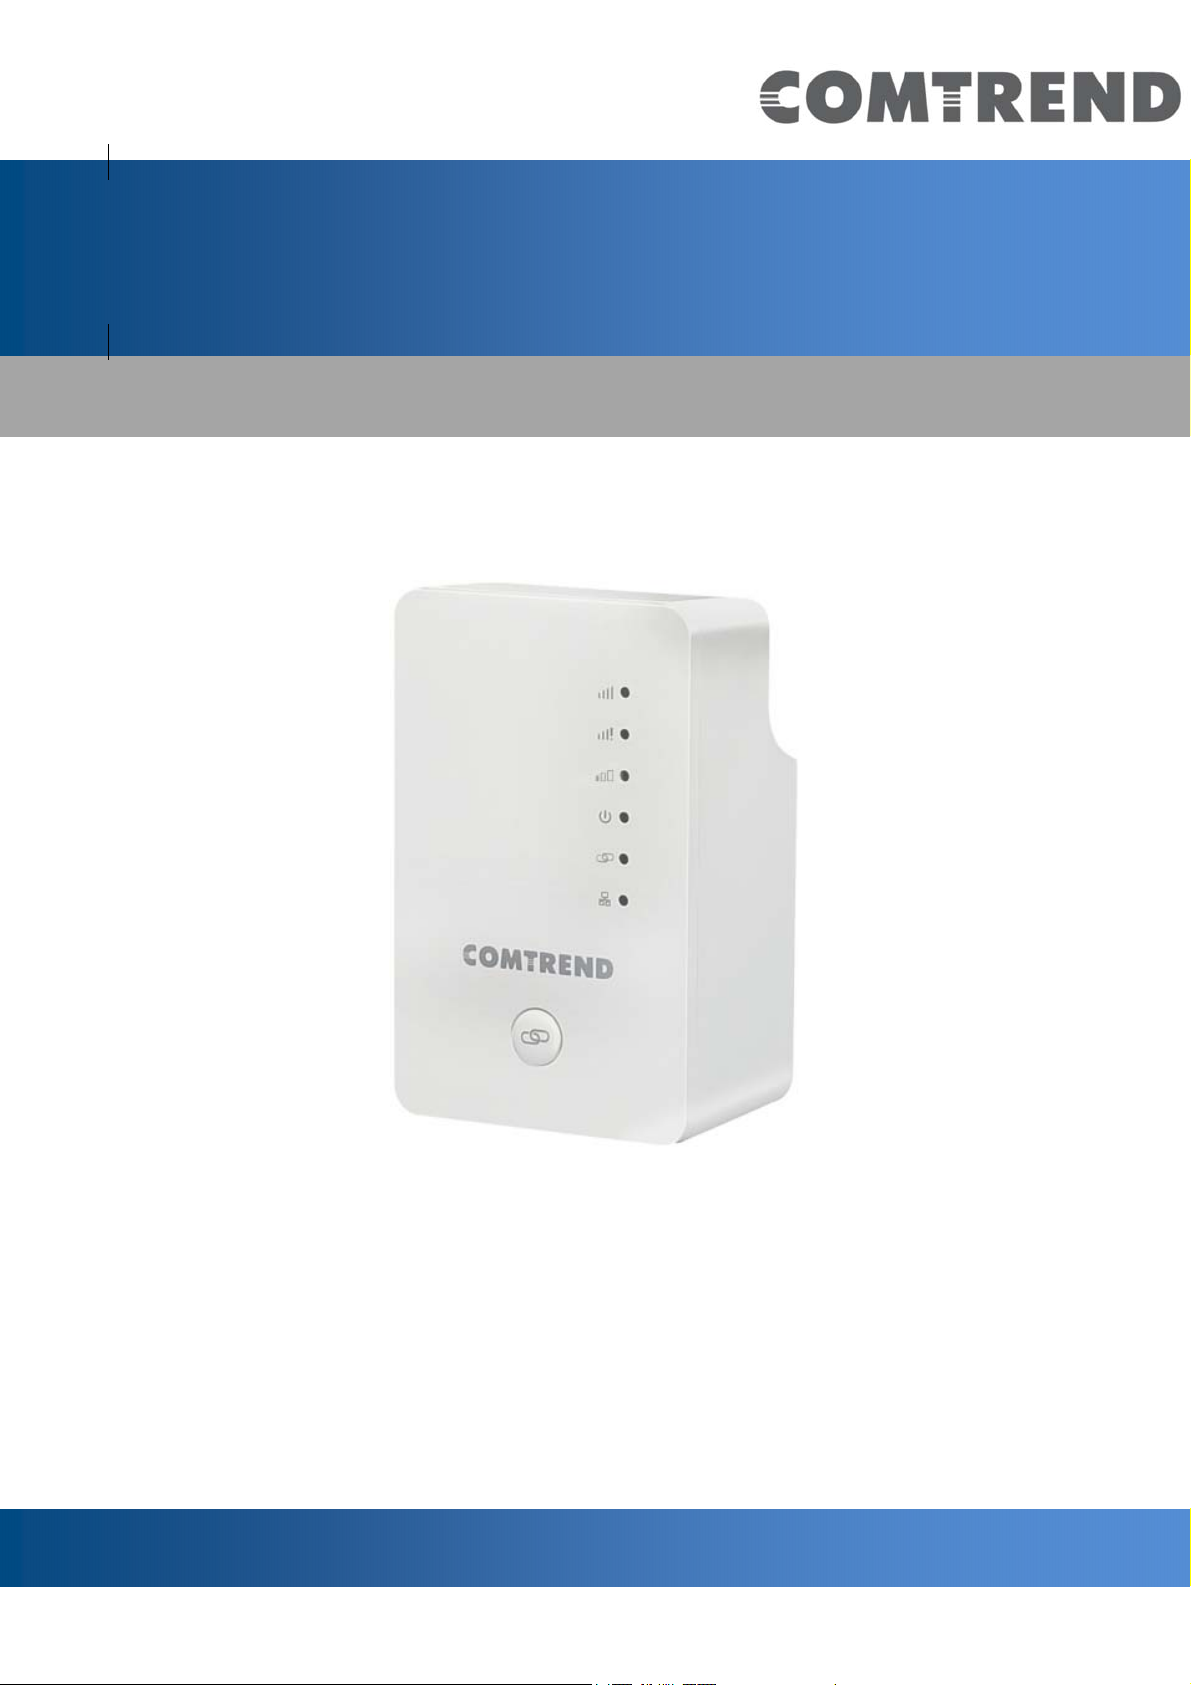
WAP-5922
AC1200 WiFi Extender
User Manual
Version A2.0, September 14, 2018
Page 2

Federal Communication Commission Interference Statement
This device and its antenna must not be co-located or operating in conjunction
with any other antenna or transmitter. This device complies with Part 15 of the
FCC Rules. Operation is subject to the following two conditions: (1) this device
may not cause harmful interference, and (2) this device must accept any
interference received, including interference that may cause undesired
operation. Any changes or modifications not expressly approved by the party
responsible for compliance could void the authority to operate equipment.
WiFi
To prevent interference with cordless phones, ensure that gateway is at least 5 feet
( 1.5m )from the cordless phone base station. This equipment complies with EU
radiation exposure limits set forth for an uncontrolled environment. This
equipment should be installed and operated with minimum distance 20cm between
the radiator & your body.
EMC Warning
This equipment complies with EU radiation exposure limits set forth for an
uncontrolled environment. This equipment should be installed and operated with
minimum distance 20cm between the radiator & your body.
Safety
1. This product is designed for indoor use only; DO NOT install the
adapter outdoors.
2. Do NOT use near water.
3. DO NOT put this product at or near hot or humid places, e.g. kitchen
or bathroom. DO NOT use any spray or liquids on it.
4. DO NOT touch the product with wet hands and DO NOT clean the
product with a wet cloth. Use a soft, dry cloth to clean the device.
5. DO NOT expose the product to lit candles, cigarettes, open flames,
high or low temperatures, etc.
6. DO NOT pull any connected cable with force; disconnect it from the
power first.
7. Ensure proper ventilation, so that air flows freely around the product.
8. If you find that the product is not working properly, please contact
your dealer of purchase and ask for help. Do NOT open the casing
9. DO NOT disassemble the product, warranty will be void.
Power Specifications
I/P: 100-240Vac, 50/60Hz, 0.16A
1
Page 3

Federal Communications Commission (FCC) Statement
15.21
You are cautioned that changes or modifications not expressly approved by the part
responsible for compliance could void the user’s authority to operate the equipment.
15.105(b)
This equipment has been tested and found to comply with the limits for a Class B
digital device, pursuant to part 15 of the FCC rules. These limits are designed to
provide reasonable protection against harmful interference in a residential installation.
This equipment generates uses and can radiate radio frequency energy and, if not
installed and used in accordance with the instructions, may cause harmful interference
to radio communications. However, there is no guarantee that interference will not
occur in a particular installation. If this equipment does cause harmful interference to
radio or television reception, which can be determined by turning the equipment off
and on, the user is encouraged to try to correct the interference by one or more of the
following measures:
-Reorient or relocate the receiving antenna.
-Increase the separation between the equipment and receiver.
-Connect the equipment into an outlet on a circuit different from that to which the
receiver is connected.
-Consult the dealer or an experienced radio/TV technician for help.
This device complies with part 15 of the FCC Rules. Operation is subject to the
following two conditions:
1) this device may not cause interference and
2) this device must accept any interference, including interference that may cause
undesired operation of the device.
FCC RF Radiation Exposure Statement:
1. This Transmitter must not be co-located or operating in conjunction with any
other antenna or transmitter.
2. This equipment complies with RF radiation exposure limits set forth for an
uncontrolled environment. This equipment should be installed and operated with a
minimum distance of 20 cm between the radiator and your body.
2
Page 4

ISED
Canadian Notice
This device contains licence-exempt transmitter(s)/receiver(s) that comply
with Innovation, Science and Economic Development Canada’s
licence-exempt RSS(s). Operation is subject to the following two conditions:
1. This device may not cause interference.
2. This device must accept any interference, including interference that
may cause undesired operation of the device.
Avis Canadien
L’émetteur/récepteur exempt de licence contenu dans le présent appareil est
conforme aux CNR d’Innovation, Sciences et Développement économique
Canada applicables aux appareils radio exempts de licence. L’exploitation est
autorisée aux deux conditions suivantes :
1. L’appareil ne doit pas produire de brouillage;
2. L’appareil doit accepter tout brouillage radioélectrique subi, même si le
brouillage est susceptible d’en compromettre le fonctionnement.
Caution: Exposure to Radio Frequency Radiation.
1. To comply with the Canadian RF exposure compliance requirements, this device and its
antenna must not be co-located or operating in conjunction with any other antenna or
transmitter.
2. To comply with RSS 102 RF exposure compliance requirements, a separation distance of
at least 20 cm must be maintained between the antenna of this device and all persons.
Attention: exposition au rayonnement radiofréquence.
1. Pour se conformer aux exigences de conformité RF canadienne l'exposition, cet appareil
et son antenne ne doivent pas être co-localisés ou fonctionnant en conjonction avec une
autre antenne ou transmetteur.
2. Pour se conformer aux exigences de conformité CNR 102 RF exposition, une distance de
séparation d'au moins 20 cm doit être maintenue entre l'antenne de cet appareil et toutes
les personnes.
Operationintheband5150‐5250MHzisonlyforindoorusetoreducethepotential
forharmfulinterferencetoco‐channelmobilesatellitesystems.
Labande5150‐5250MHzestréservésuniquementpouruneutilisationà
l'intérieurafinderéduirelesrisquesdebrouillagepréjudiciableauxsystèmesde
3
Page 5

satellitesmobilesutilisantlesmêmescanaux.
Forthefrequency5600‐5650MHz,nooperationispermitted
Pourlafréquence5600‐5650MHz,aucuneopérationestautorisée.
4
Page 6
Preface
This manual provides information related to the installatio n and operation of this
Dual-Band Wireless Mesh Point. The individual reading this manual is presumed to
have a basic understanding of home networking terminology and concepts.
If you find the product to be inoper able or mal functioning, pl ease contact technical
support for immediate service by email at [email protected]
For product updates, new product release, manual revision, or software upgrades,
please visit our website at http://www.comtrend.com
Copyright
Copyright© 2018 Comtrend Corporation. All rights reserved. The information
contained herein is proprietary to Comtrend Corporation. No part of this document
may be translated, transcri bed, reproduced, in any form, or by any means without
the prior written consent of Comtrend Corporation.
NOTE: This document is subject to change without notice.
Protect Our Environment
This symbol indicates that when the equipment has reached the end of
its useful life, it must be taken to a recycling center and processed
separate from domestic waste.
The cardboard box, the plastic in the packaging, and the parts that make up this
device can be recycled in accordance with regionally established regulations. Never
dispose of this electronic equipment along with your household waste.
You ma y be subject to penalties or sanctions under the la w. Instead, ask for disposal
instructions from your municipal government.
Please be responsible and protect our environment.
Save Our Environment
When this equipment has reached the end of its useful life, it must be taken to a
recycling centre and processed separately from domestic waste.
The cardboard box, the plastic in the packaging, and the parts that make up this
device can be recycled in accordance with regionally established regulations. Never
dispose of this electronic equipment along with your household waste.
You ma y be subject to penalties or sanctions under the la w. Instead, ask for disposal
instructions from your municipal government.
Please be responsible and protect our environment.
5
Page 7

6
Page 8

TableofContents
Chapter 1 Product Information ..................................... 9
1.1 Introduction and Features ........................................ 9
1.2 System Requirements ............................................. 10
1.3 Package Contents ................................................... 11
1.4 Get familiar with your Wireless Mesh Point ............ 12
Chapter 2 Mesh WiFi-Supported Installation ............... 16
2.1 Device Setup ........................................................... 16
2.1.1 WiFi Network Setup ............................................................ 19
Chapter 3 Repeater Mode ............................................ 21
3.1 Repeater Mode Quick Installation Guide ................. 21
3.1.1 Hardware WPS button setup ......................................... 22
3.1.2 Web browser quick setup ................................................ 24
3.2 Repeater mode Advanced Settings .......................... 31
3.2.1 Connect to web configuration menu ........................ 31
3.2.2 Home ............................................................................................ 33
3.2.3 WPS Setting ............................................................................. 35
3.2.4 Advanced Settings ............................................................... 37
3.2.5 WLAN 2.4G settings ............................................................ 40
3.2.6 WLAN 5G settings ................................................................ 42
3.2.7 MAC Address Filtering ....................................................... 44
3.2.8 How to find the MAC address of your device ....... 46
3.2.9 System Utility ......................................................................... 50
3.2.10 Configuration ....................................................................... 52
Chapter 4 AP Mode ...................................................... 56
4.1 AP Mode Quick Installation Guide ........................... 56
4.1.2 Web browser quick setup ................................................ 57
4.2 AP Mode Advanced Settings .................................... 62
4.2.1 Connect to web configuration menu ........................ 62
4.2.2 Home ............................................................................................ 63
4.2.3 WPS Setting ............................................................................. 65
4.2.4 Advanced Settings ............................................................... 67
4.2.5 WLAN 2.4G settings ............................................................ 71
4.2.6 WLAN 5G settings ................................................................ 73
4.2.7 MAC Address Filtering ....................................................... 74
7
Page 9

4.2.8 How to know the MAC address of your device ... 77
4.2.9 System Utility ......................................................................... 80
4.2.10 Configuration ....................................................................... 82
Chapter 5 Appendix..................................................... 85
5.1 Configuring TCP/IP on PC ....................................... 85
5.1.1 Windows XP IP address setup: .................................... 85
5.1.2 Windows Vista/Windows 7 IP address setup: ... 86
8
Page 10

Chapter 1 Product Information
1.1 Introduction and Features
The AC1200 Dual-Band Wireless Mesh Point has a compact design, and provides
excellent network performance to extend your Wi-Fi signal and wireless coverage.
Features of this Wireless Mesh Point include:
Easily extends the wireless signal inside your home or office.
Compact design while maintaining excellent network performance.
Supports 802.11a/b/g/n and 802.11ac standards, it can provide up to
300Mbps for 2.4Ghz on 11n mode and 866Mbps for 5Ghz on 11ac mode.
LED signal indicators to easily realize the best location placement to
extend the WiFi signal for best wireless performance.
Supports Repeater mode and AP mode.
WPS (Wi-Fi Protected Setup) hardware button for easy installation and
wireless security.
9
Page 11

1.2 System Requirements
Wireless network card which is compatible with 802.11a/b/g/n and 802.11 ac
wireless network standards.
Windows XP , Windows 7, Windows 8, Windows 10 or MAC OS or Linux oper ating
system.
10
Page 12

1.3 Package Contents
Before you start to use this Wireless Mesh Point, please check if there’s anything
missing in the package, and contact your place of purchase to claim for missing
items:
Wireless Mesh Point (1 pcs)
Quick Install Guide (1 pcs)
11
Page 13
1.4 Get familiar with your Wireless Mesh Point
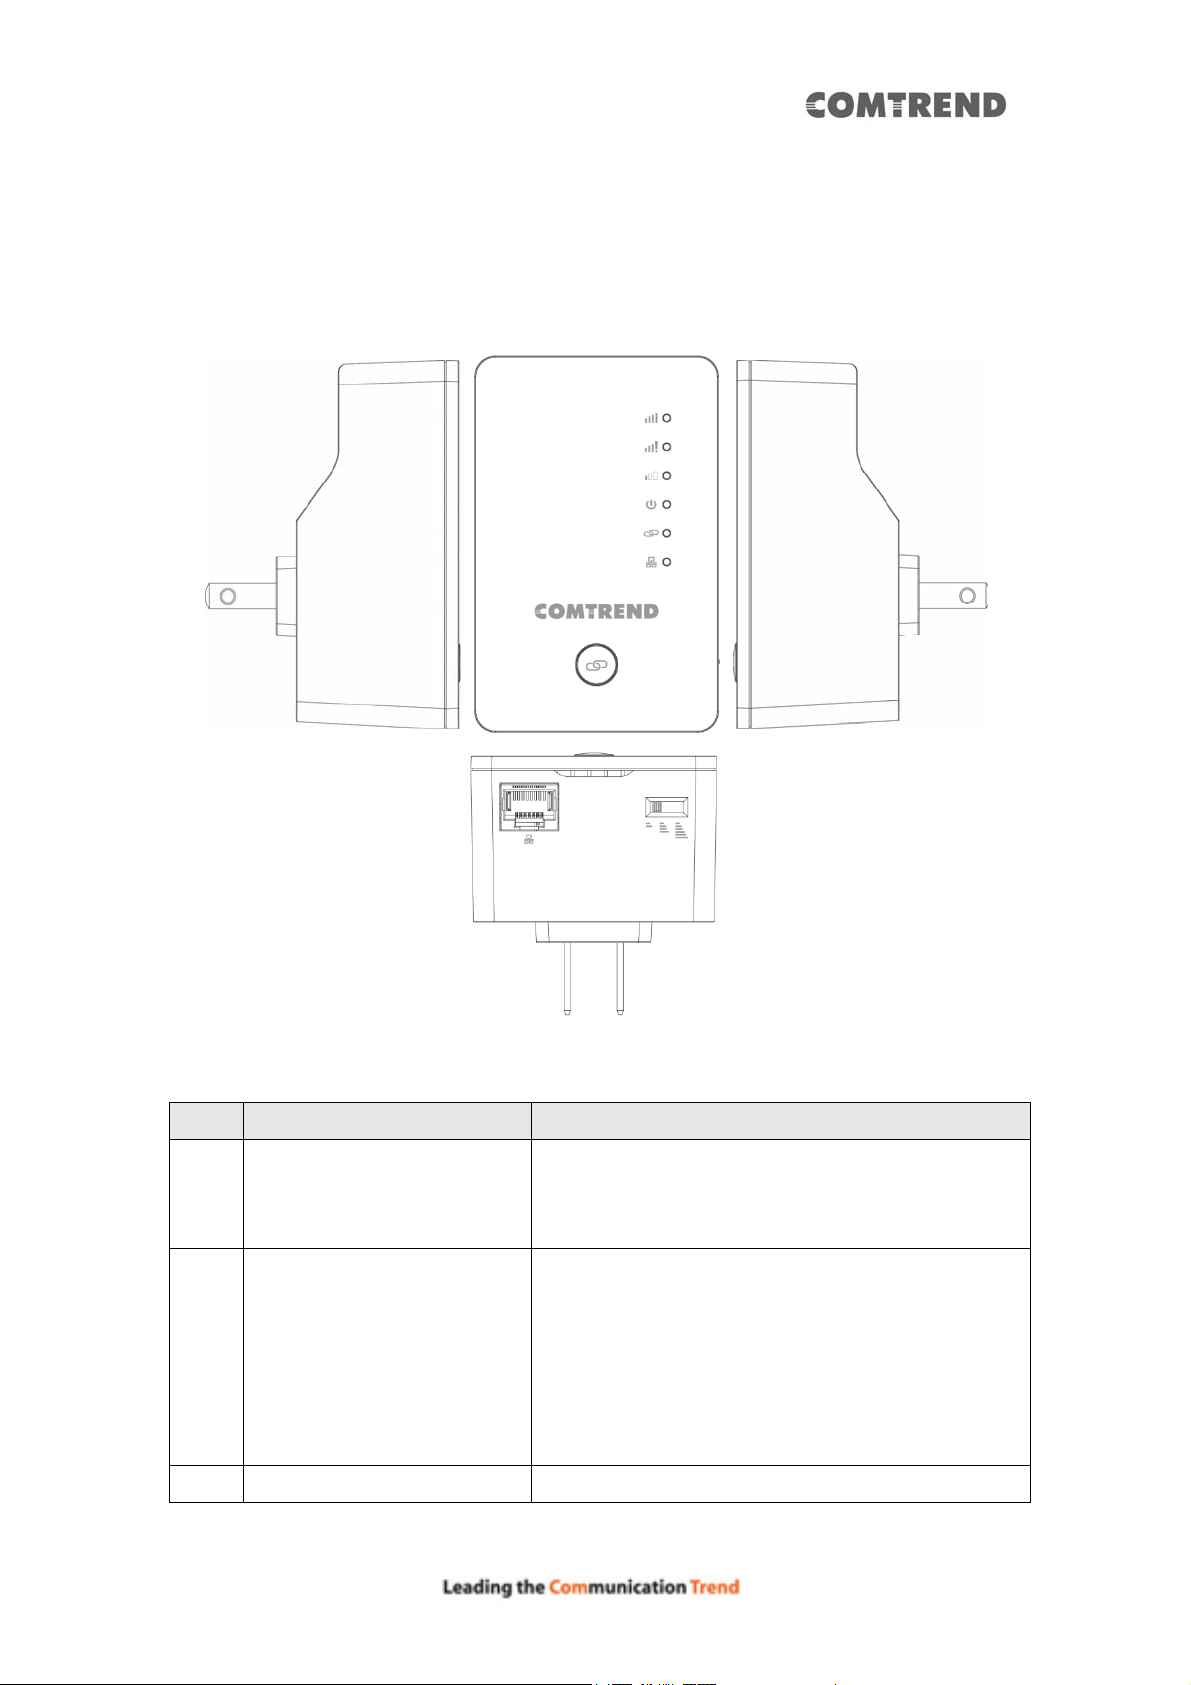
Interface Descriptions
B
Item Item Name Description
A LAN 10/100/1000M Ethernet LAN Port with
B Reset / WPS Reset the Wireless Mesh P oint to fac tory default
A C
Auto-MDI/MDI- X. Connect to a computer , switc h
or hub for local network sharing.
C
WiFi Output Power Switch
settings (clear all settings) or start the WPS
function. Press this button and hold for 10
seconds to restore all settings to factory
defaults, or press this button for less than 5
seconds to start the WPS function.
Switch the button to change.
12
Page 14
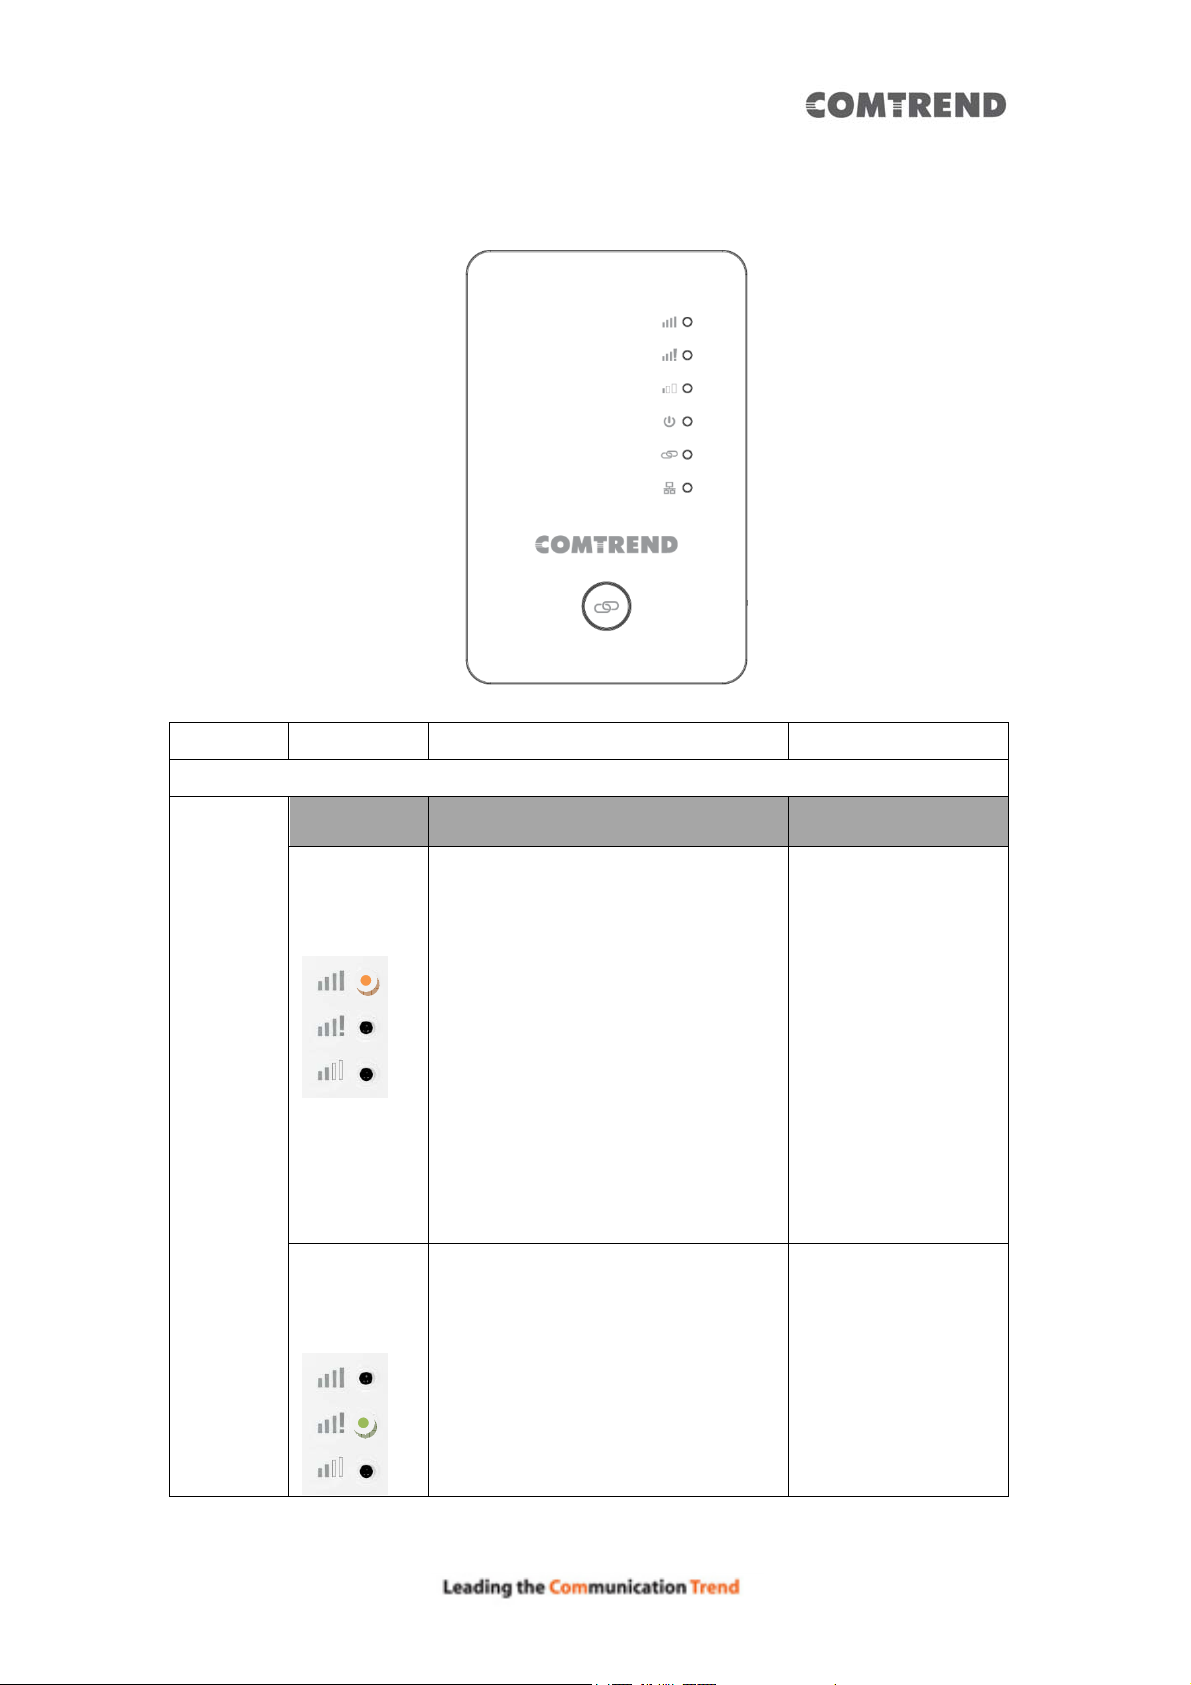
LED Activity
LEDs Behavior Description Note
Signal
Strength
LED1 on
LED2 off
LED3 off
LED1 off
1. The device is in repeater
mode, when LED2 & 3 are off
and LED1 is on. It means the
device has optimal signal
quality.
2. Device in AP mode, when
LED1 is solid on, it represents
the device is ready.
(Device ready means it
obtained an IP from the
uplink DHCP server.)
1. The device is in repeater
An optimal signal
means the Wireless
Mesh Point is placed
with proper
distance to help to
extend the
network.
Good signal:
-45 to -60dBm
Signal too strong:
LED2 on
LED3 off
mode, when LED1 & 3 are off
and LED2 is on. It indicates the
current placement is too close
to the uplink router, which is
not an effective placement of
the wireless mesh point.
13
> -45dBm
Page 15
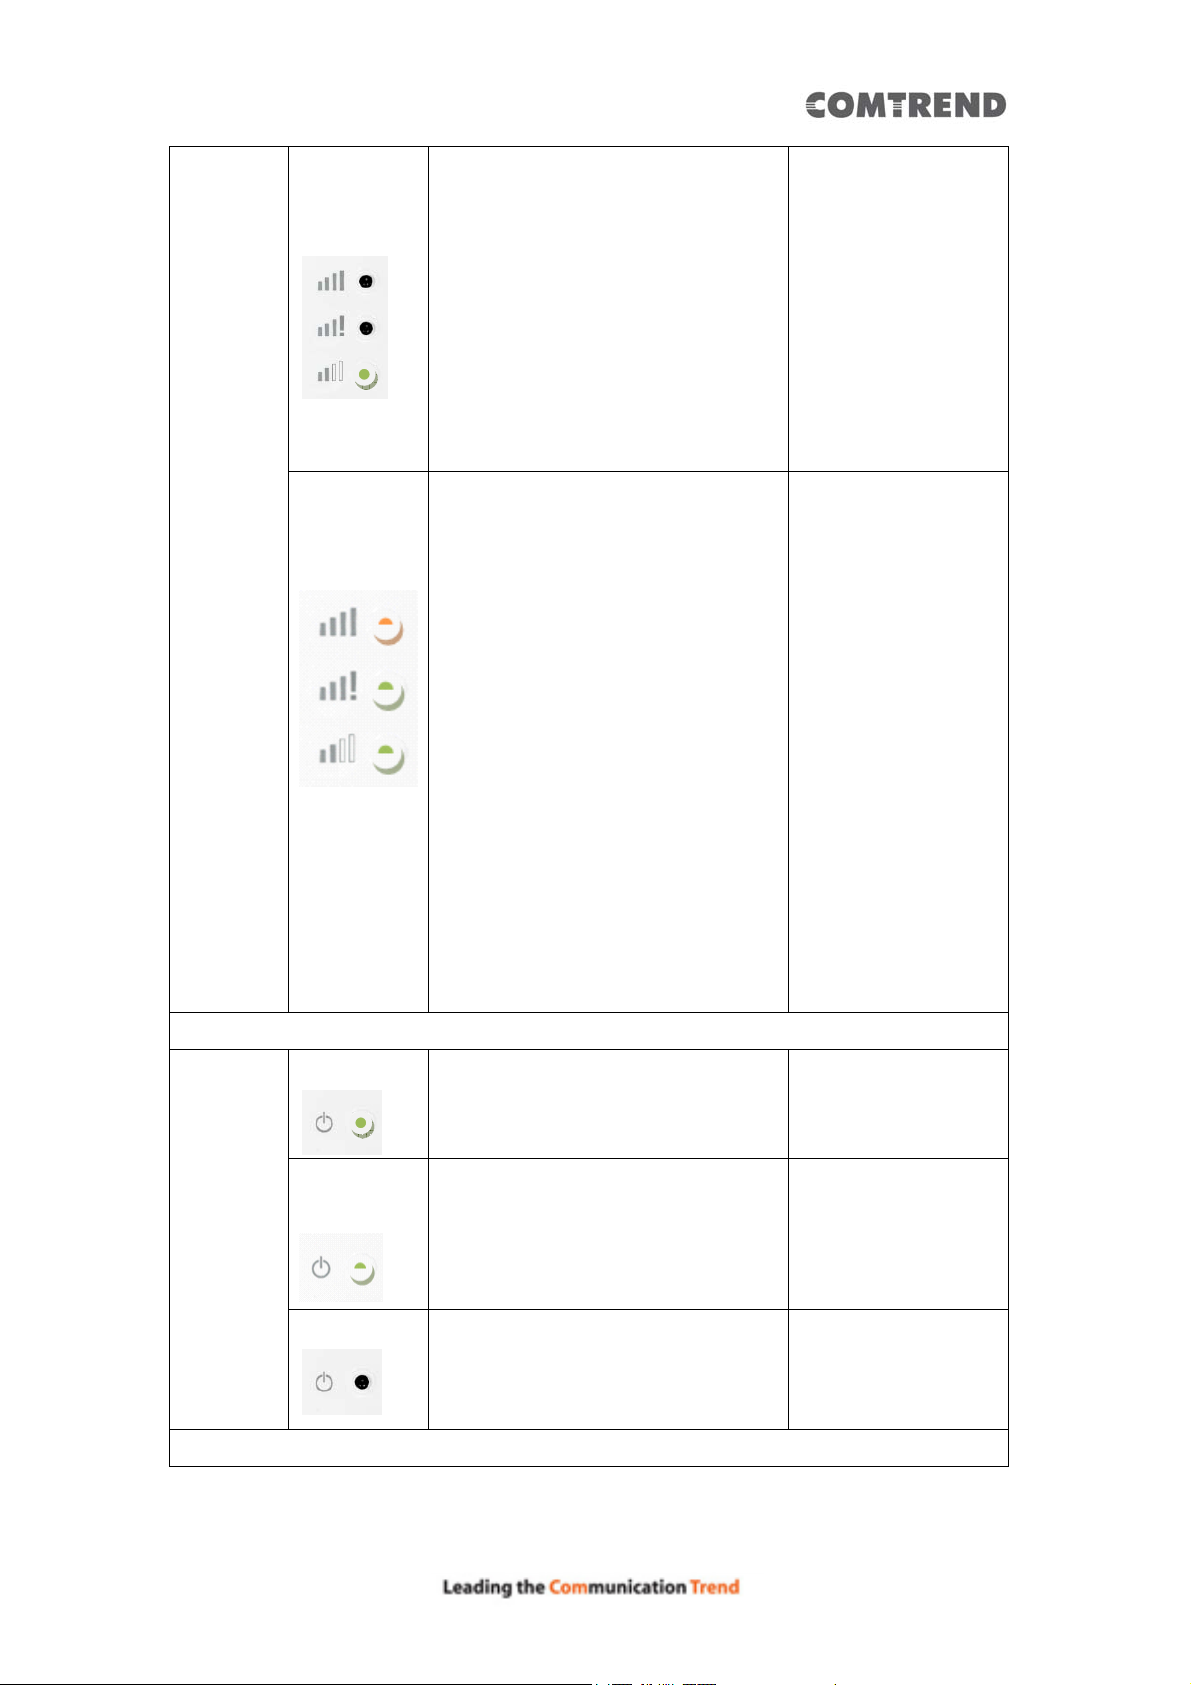
LED1 off
3. The device is in repeater
signal too weak:
LED2 off
LED3 on
LED1 LED2
LED3
flashing
mode, when LED1 & 2 are off
and LED3 is on. It indicates the
current placement is too far
from the uplink router, which
potentially makes the uplink
connection weak and may
result in slow speed or
disconnection.
1. The device is not with a stable
connection. It may be in the
progress of pairing, grouping,
and or synchronising.
2. The device will not be able to
configure before these 3 LEDs
stop flashing.
< -60dBm
The device in
factory default and
powered (with
power LED on), in
this state, it is not
ready to make any
configuration, and
it needs to wait
until LED1, 2 & 3
Power
LED 4 on
LED4
flashing
LED4 off
The device is powered on.
Firmware upgrading is taking
place.
Device is powered off or no power.
are flashing.
(If only the power
LED on, the
Wireless Mesh Point
is still in booting
process.)
14
Page 16
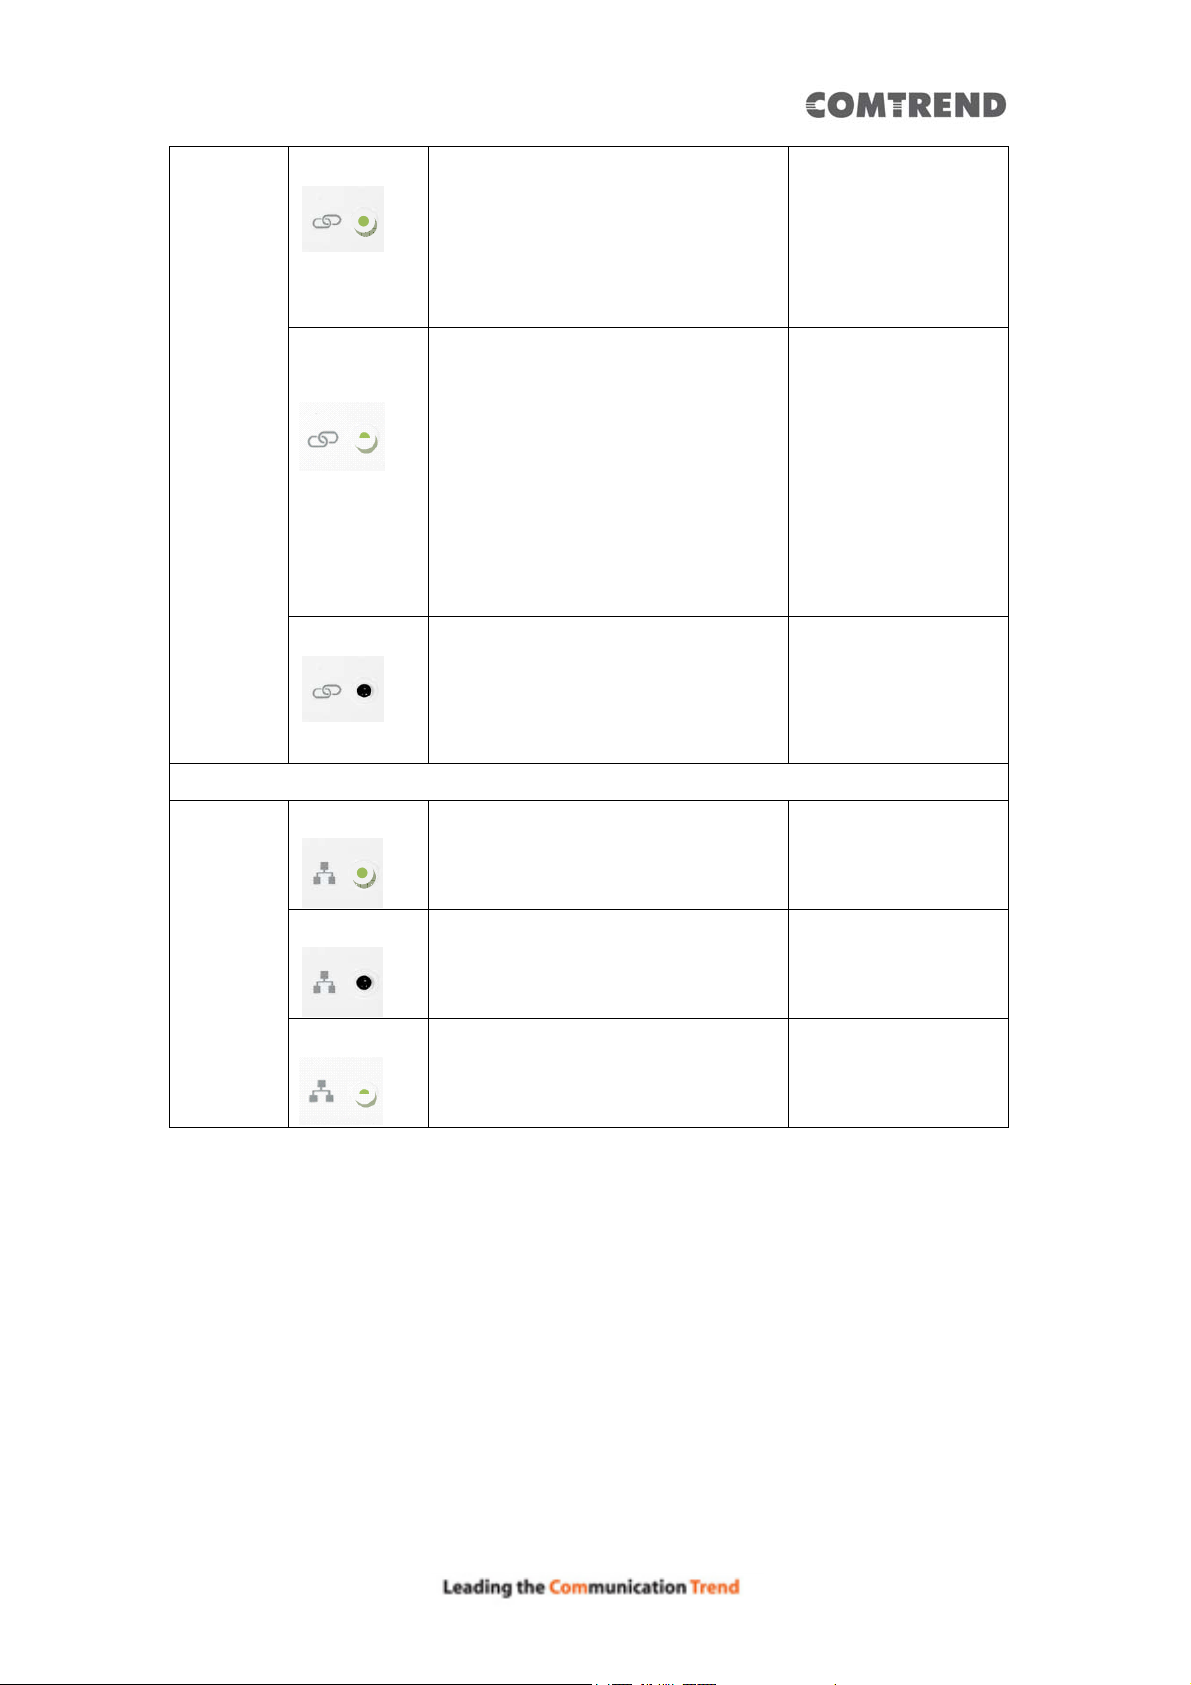
WPS &
LED5 on
1. The device is successfully
Paring
status
LED5
flashing
Off
finished WPS handshaking.
2. The device is already paired or
grouped with the current
network.
The device is processing WPS PBC
handshaking.
1. The device is not performing
WPS handshaking.
2. The device is not paired or
grouped with any network.
There is a 120
second open
window to process
WPS PBC
handshaking and
after 120 seconds
time out, the LED
will turn Off.
Ethernet LED6 on
Off
Flashing
The device is connected to
another device via Ethernet cable.
The device is not connected to
another device via Ethernet cable
or no Ethernet cable is attached.
There is Ethernet traffic.
15
Page 17
Chapter 2 Mesh WiFi-Supported Installation
Scenario 1: Using a Comtrend Mesh WiFi-Supported Gateway
Use anywhere from 1-10 Mesh Points on a single network.
Scenario 2: Using a Non-Comtrend Mesh WiFi-Supported Gateway
Use anywhere from 2-10 Mesh Points on a single network.
Note: A minimum of 2 Mesh Points are required to create a connection for this
scenario.
2.1 Device Setup
The following steps show how to setup your Whole-Home WiFi Mesh System
using Ethernet Pairing. For additional setup options (including WPS), please refer
to the User Manual available online.
NOTE: If you are using a Comtrend WiFi Mesh-Supported Gateway, then the
Mesh Points will work in conjunction with your Gateway’s WiFi. If you are not
using a Comtrend WiFi Mesh-Supported Gateway, then the WiFi Mesh Points will
create a separate WiFi Mesh System (Note: This application will require at least
two WiFi Mesh Devices to create a Mesh System).
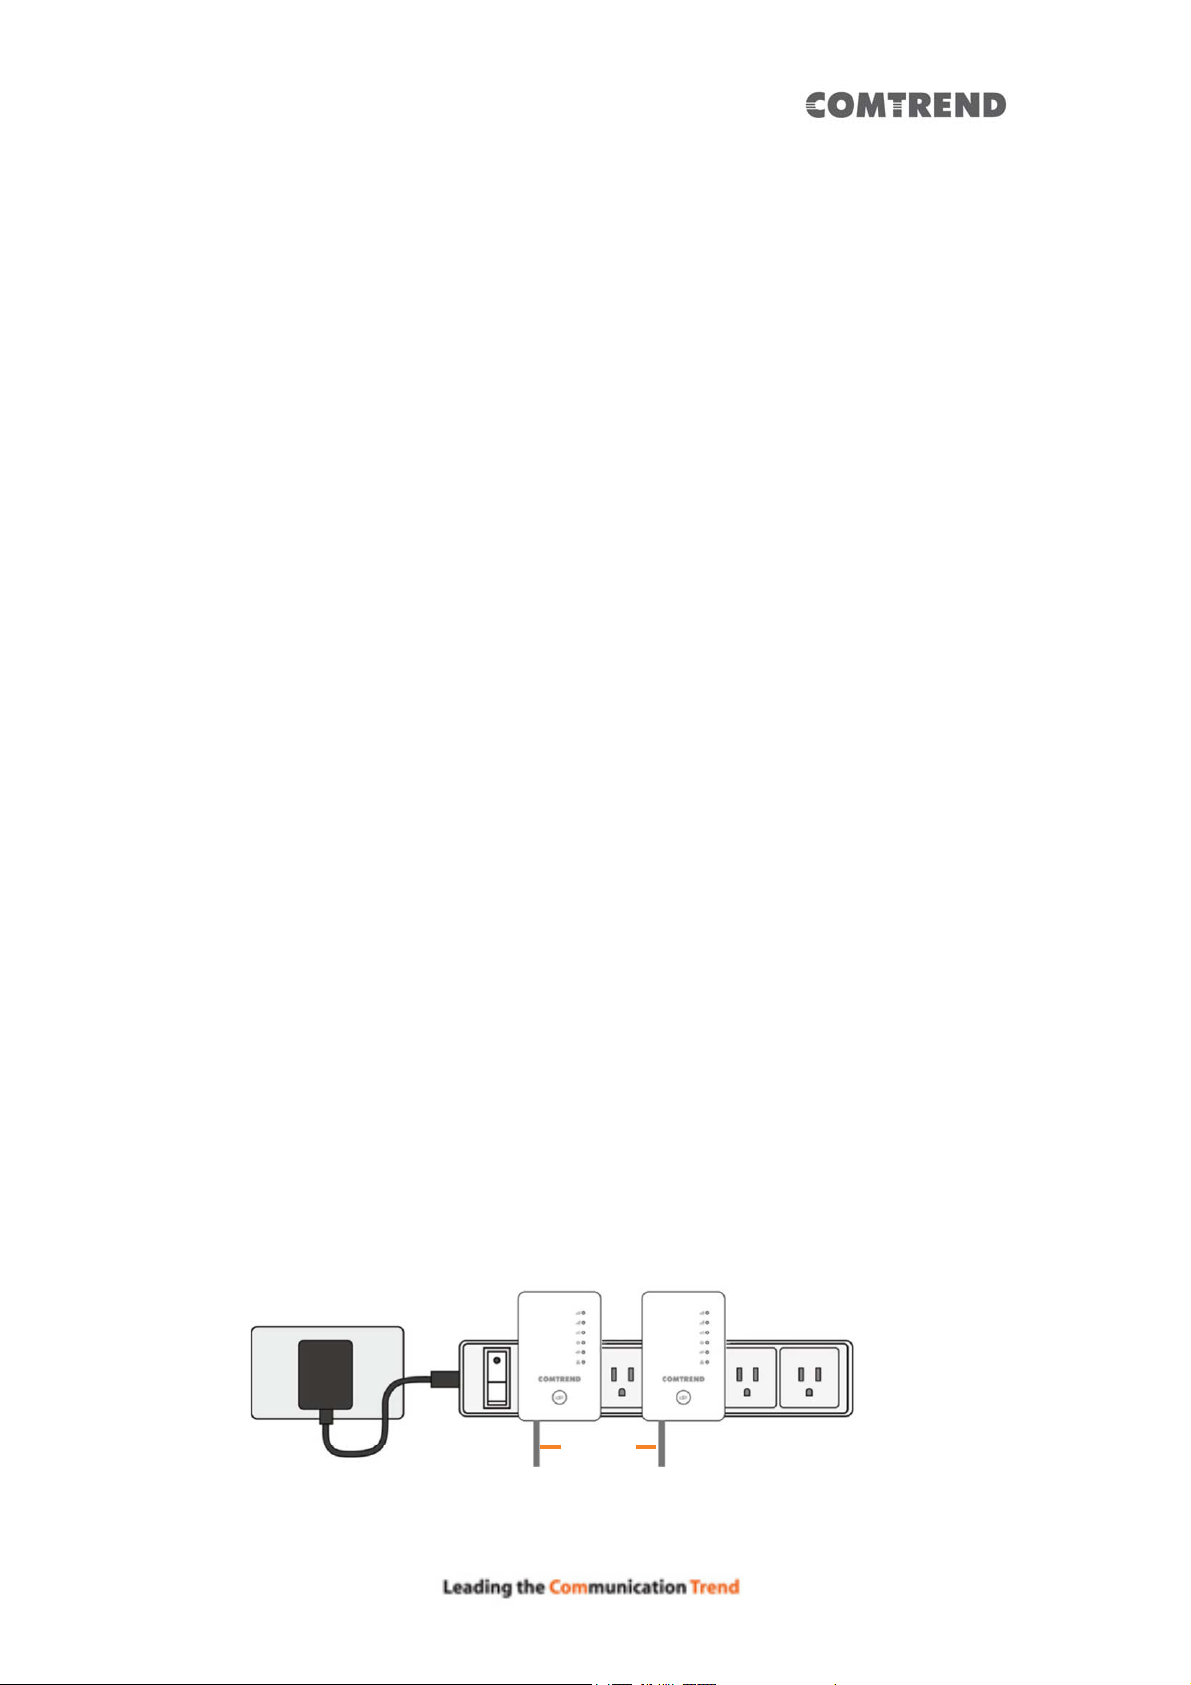
1. Connect one end of an Ethernet Cable into each Mesh Point (WAP-5922) that
you wish to have in your Whole-Home WiFi Mesh System. For this example, we
will use two Mesh Points.
2. Plug the Mesh Points into an outlet near your Network Device (Router,
Modem).
Ethernet
Cable
Steps 1-2
16
Page 18
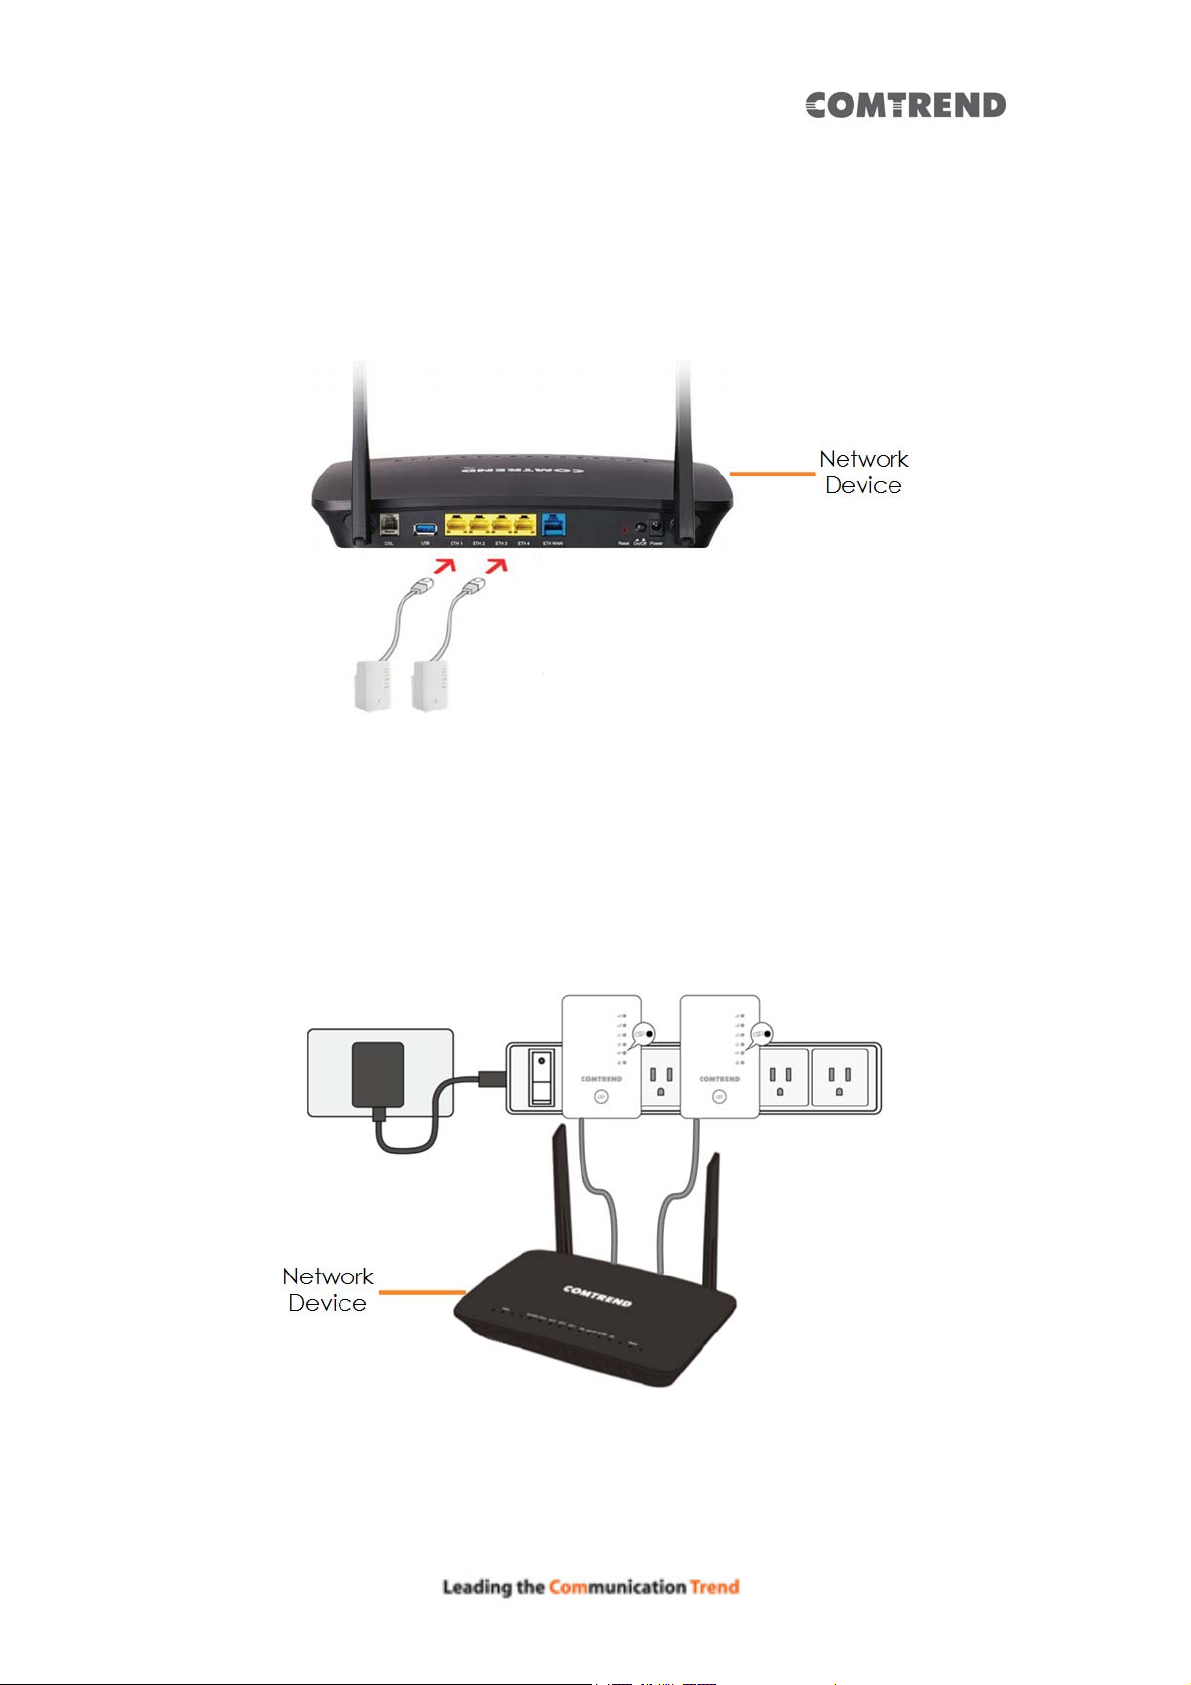
3. Connect the other end of the Ethernet Cables into your Network Device. The
pairing process will then automatically begin.
4. Wait until all WPS/Grouping LED’s light up solid (around 3 to 5 minutes). This
means the two Mesh Point’s are now in the same WiFi Mesh S ystem. If you are using
a Comtrend WiFi Mesh-Supported Gateway, then the two Mesh Points are now in the
same WiFi Mesh System as the Comtrend Gateway as well.
17
Page 19
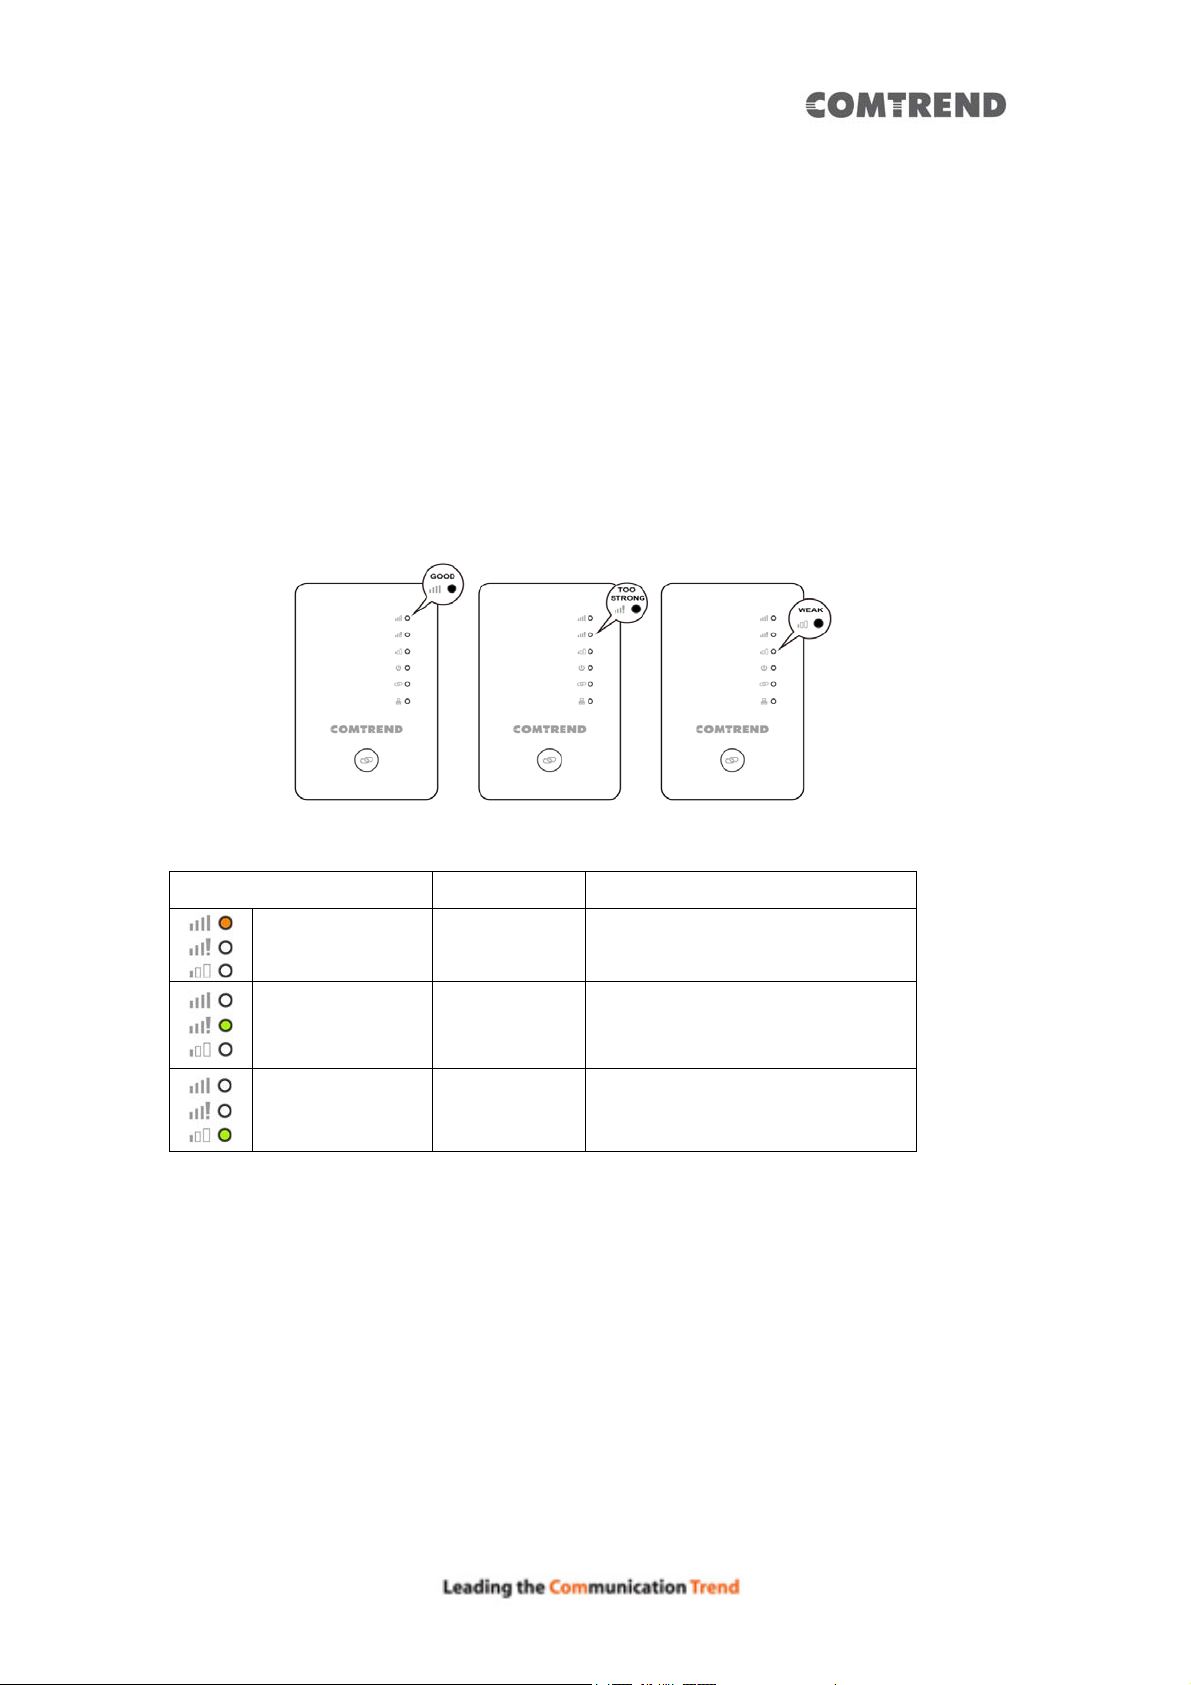
5. Disconnect the Ethernet Cables and unplug the Mesh Points. Then find a suitable
location for each Mesh Point with an accessible power outlet. The Mesh P oints should
be placed in different directions between the Network Device and the areas farthest
from the Network Device.
NOTE: If you are not using a Comtrend WiFi Mesh-Supported Gatew ay , then you will
need to leave one Mesh Point connected via Ethernet to the Network Device.
The following LED’s will show you if you
have the optimal placement.
LED / Icon Status Indication
The extender has an optimal signal
Signal - Optimal First LED On
Signal - Too Strong Second LED On
Signal - Too Weak Third LED On
connection with its uplink device. The
distance in between is ideal.
The extender has too strong a signal
connection with its uplink device. The
distance in between is too close.
The extender has too weak a signal
connection with its uplink device. The
distance in between is too far.
6. Once the Mesh Points are plugged into their new locations, wait for the
WPS/Grouping LEDs to light up solid. This means they are grouped again and the
WiFi Mesh System is ready to use.
7. To add new Mesh Points to the Mesh System, simply plug the new device(s)
into an outlet and press the WPS Button for 2-3 seconds. Within two minutes,
press the WPS Button on a Mesh Point in the existing syste m. The WPS/Grouping
LED will light up solid.
18
Page 20
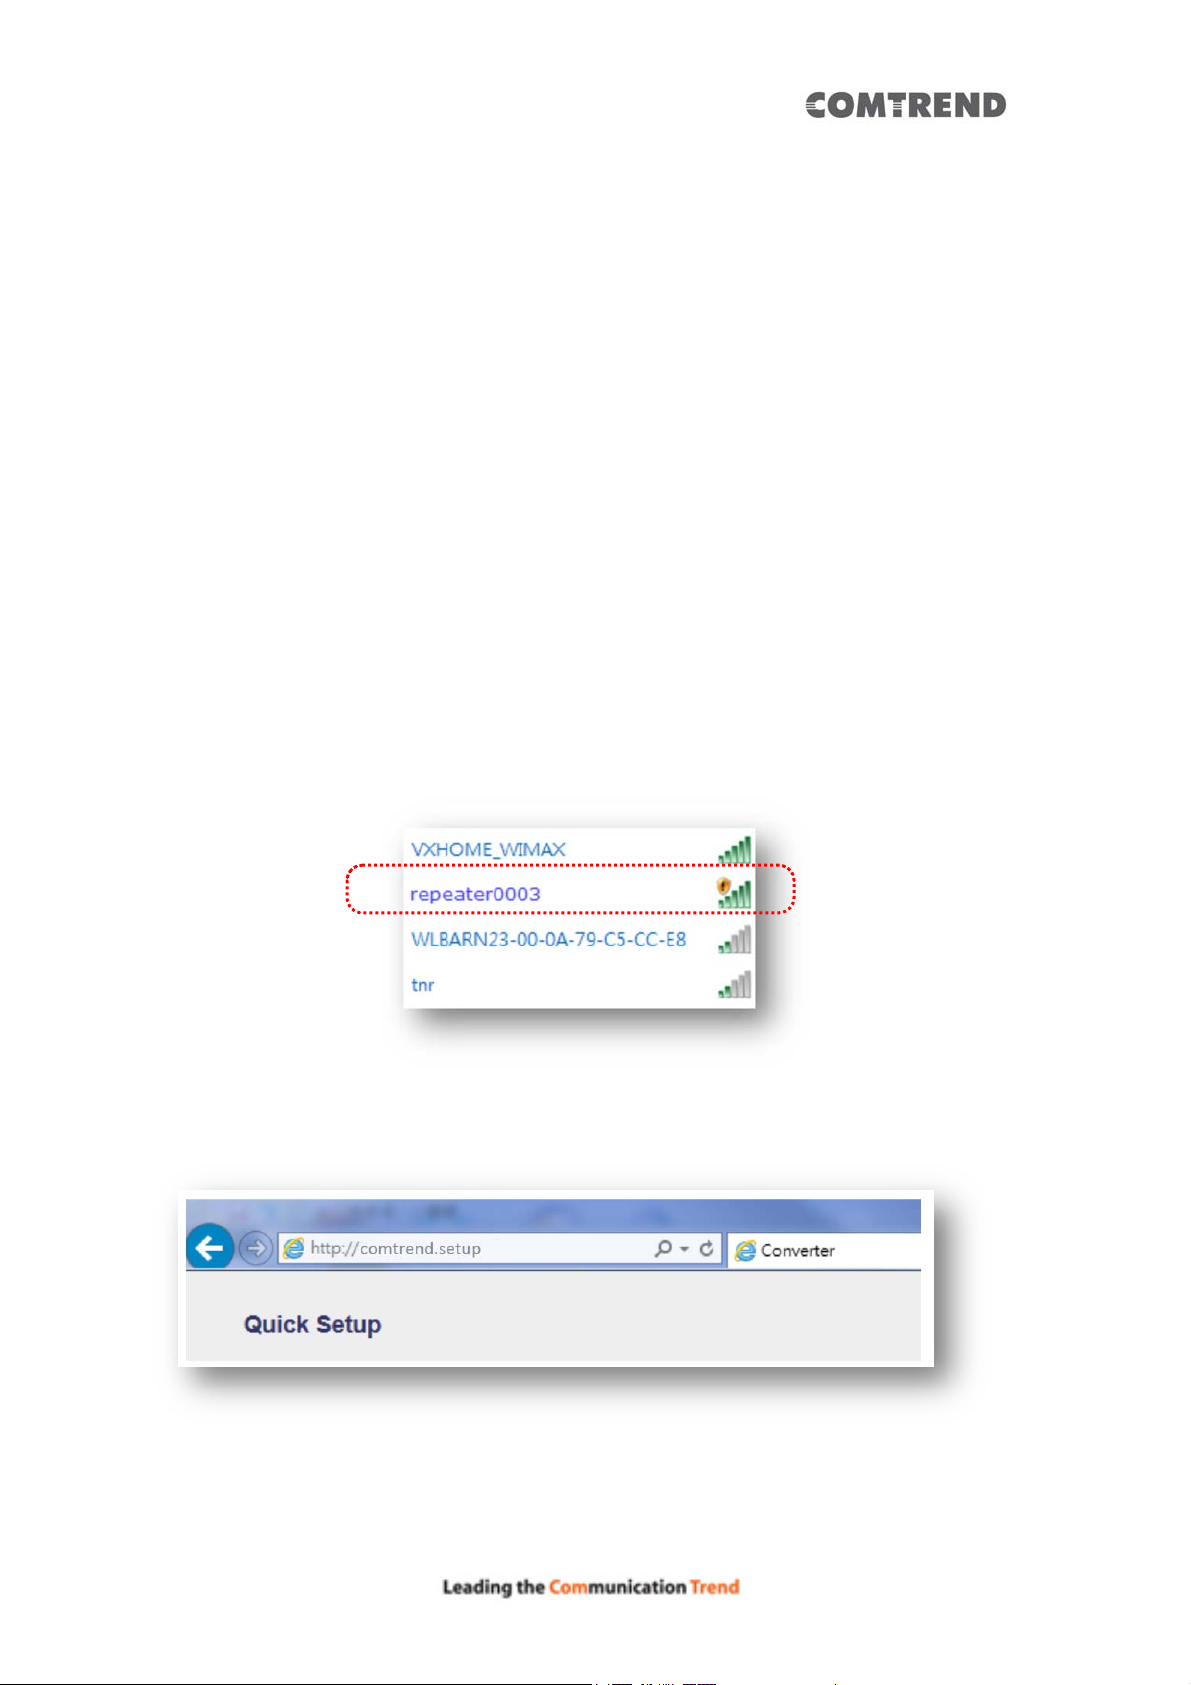
8. If you are using a Comtrend WiFi Mesh-Supported Gateway , then
the WiFi Mesh System will automatically use the original WiFi
settings on your Gateway. If you are using a Non-Comtrend
WiFi-Supported Gateway, then please reference the back of the
Mesh Point that is connected to the Gateway for the default SSID
and Password WiFi settings.
If you would like to change your network’s SSID or Password please
continue to section 2.1.1.
2.1.1 WiFi Network Setup
1. You can now use your computer’s Wireless configuration
utility to search for a Wireless Network name such as: repeater0003.
(The default SSID of this Mesh point is ‘repeater0003’, and 0003 is
for reference. It will be the last 4 digits of the device’s MAC number.)
2. Open your Web bro wser, and input ‘http://comtrend.setup’ in the address
bar.
19
Page 21
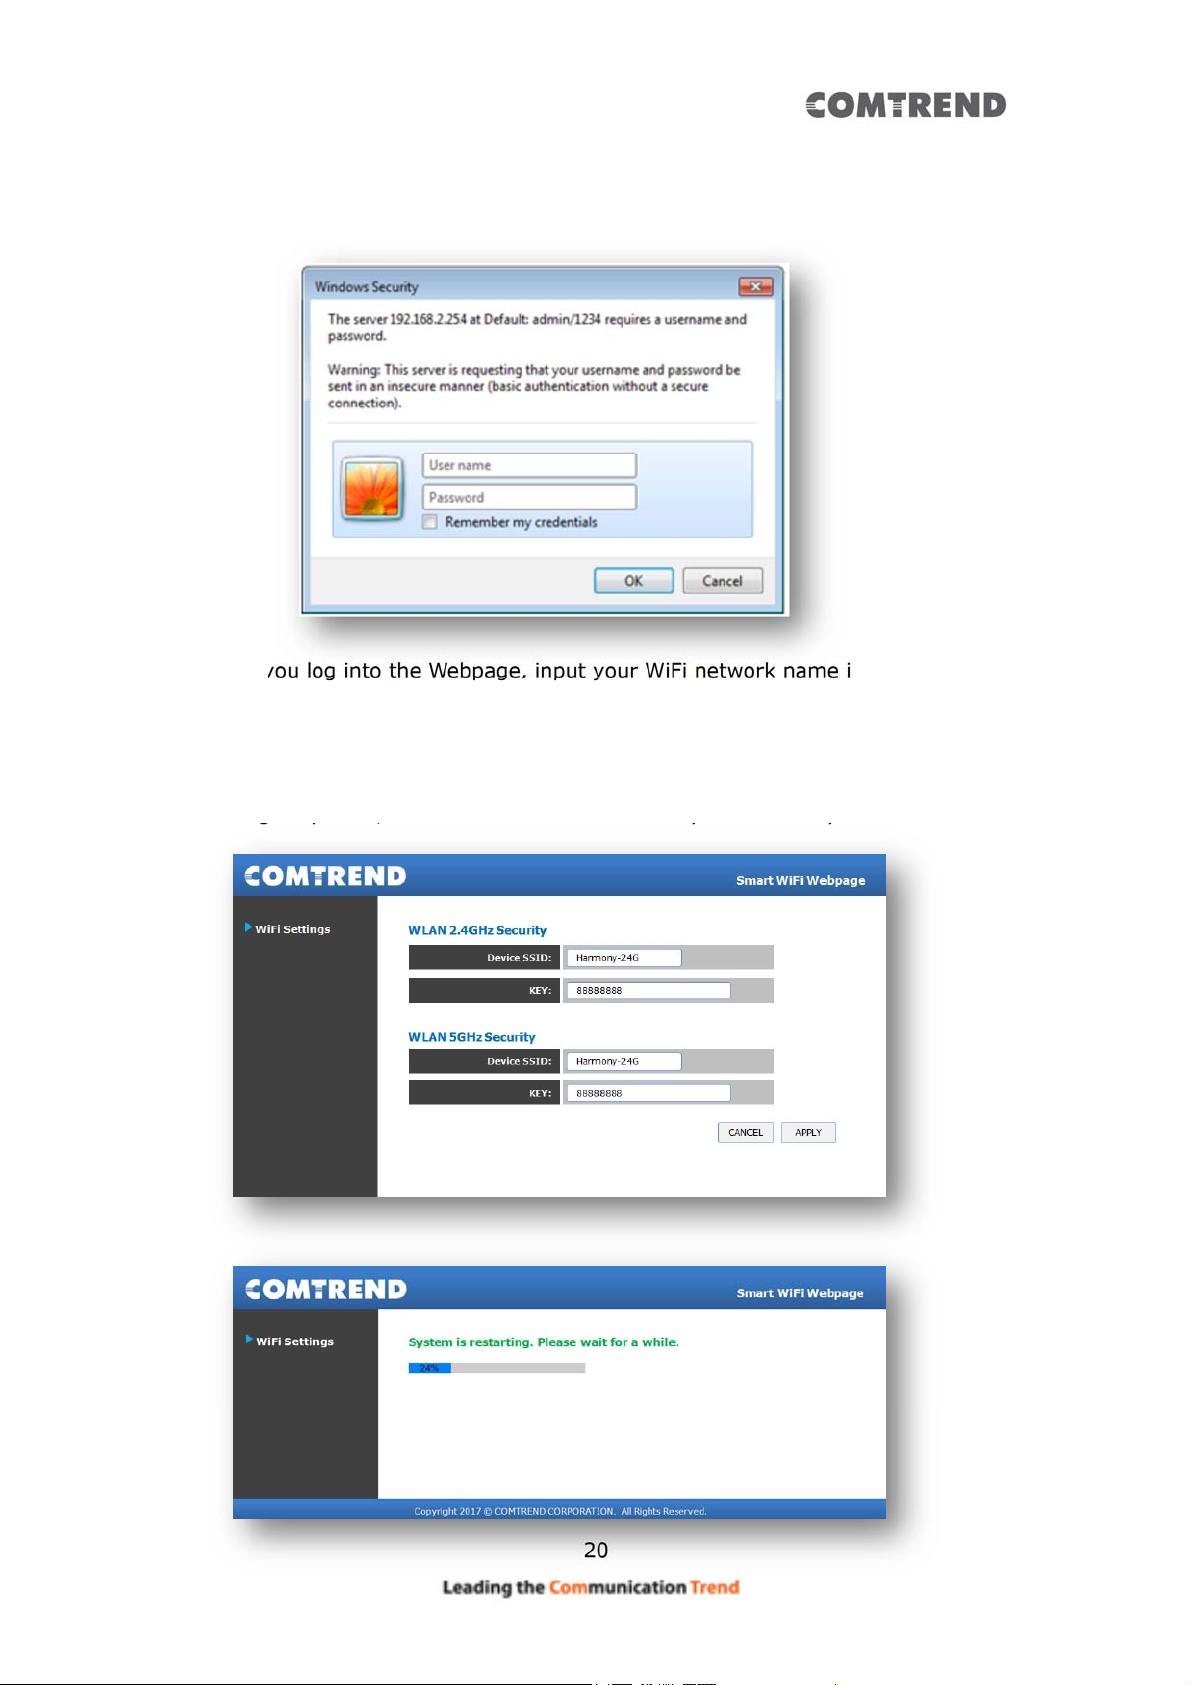
3. The system will prompt you to input the username and password. Default
username is ‘admin’ and password is ‘1234’. Click th e ‘OK’ button to continue.
4. After you log into the Webpage, input your WiFi network name in the ‘Device
SSID’ field, and also the password in the ‘KEY’ field for both the 2.4G Hz and 5GHz
WiFi networks. After the configurati on, click the ‘APPL Y’ button to fi nish the setup.
The devices will reboot, and when the WPS/Grouping LED s on all of the Mesh
Points light up solid, the Whole-Home WiFi Mesh System is ready.
20
Page 22
Chapter 3 Repeater Mode
This chapter will explain how to quickly install this device by usin g the qu ick setup
method and explain each detailed setting on the web user interface while in repeater
mode.
3.1 Repeater Mode Quick Installation Guide
For first time setup and installation, move this Wireless Mesh Point close to the
Wireless Broadband Router or Access point you wi sh to connect to. After installati on
is complete, move this Wireless Mesh Point to the place you wish to permanently
wish to use it.
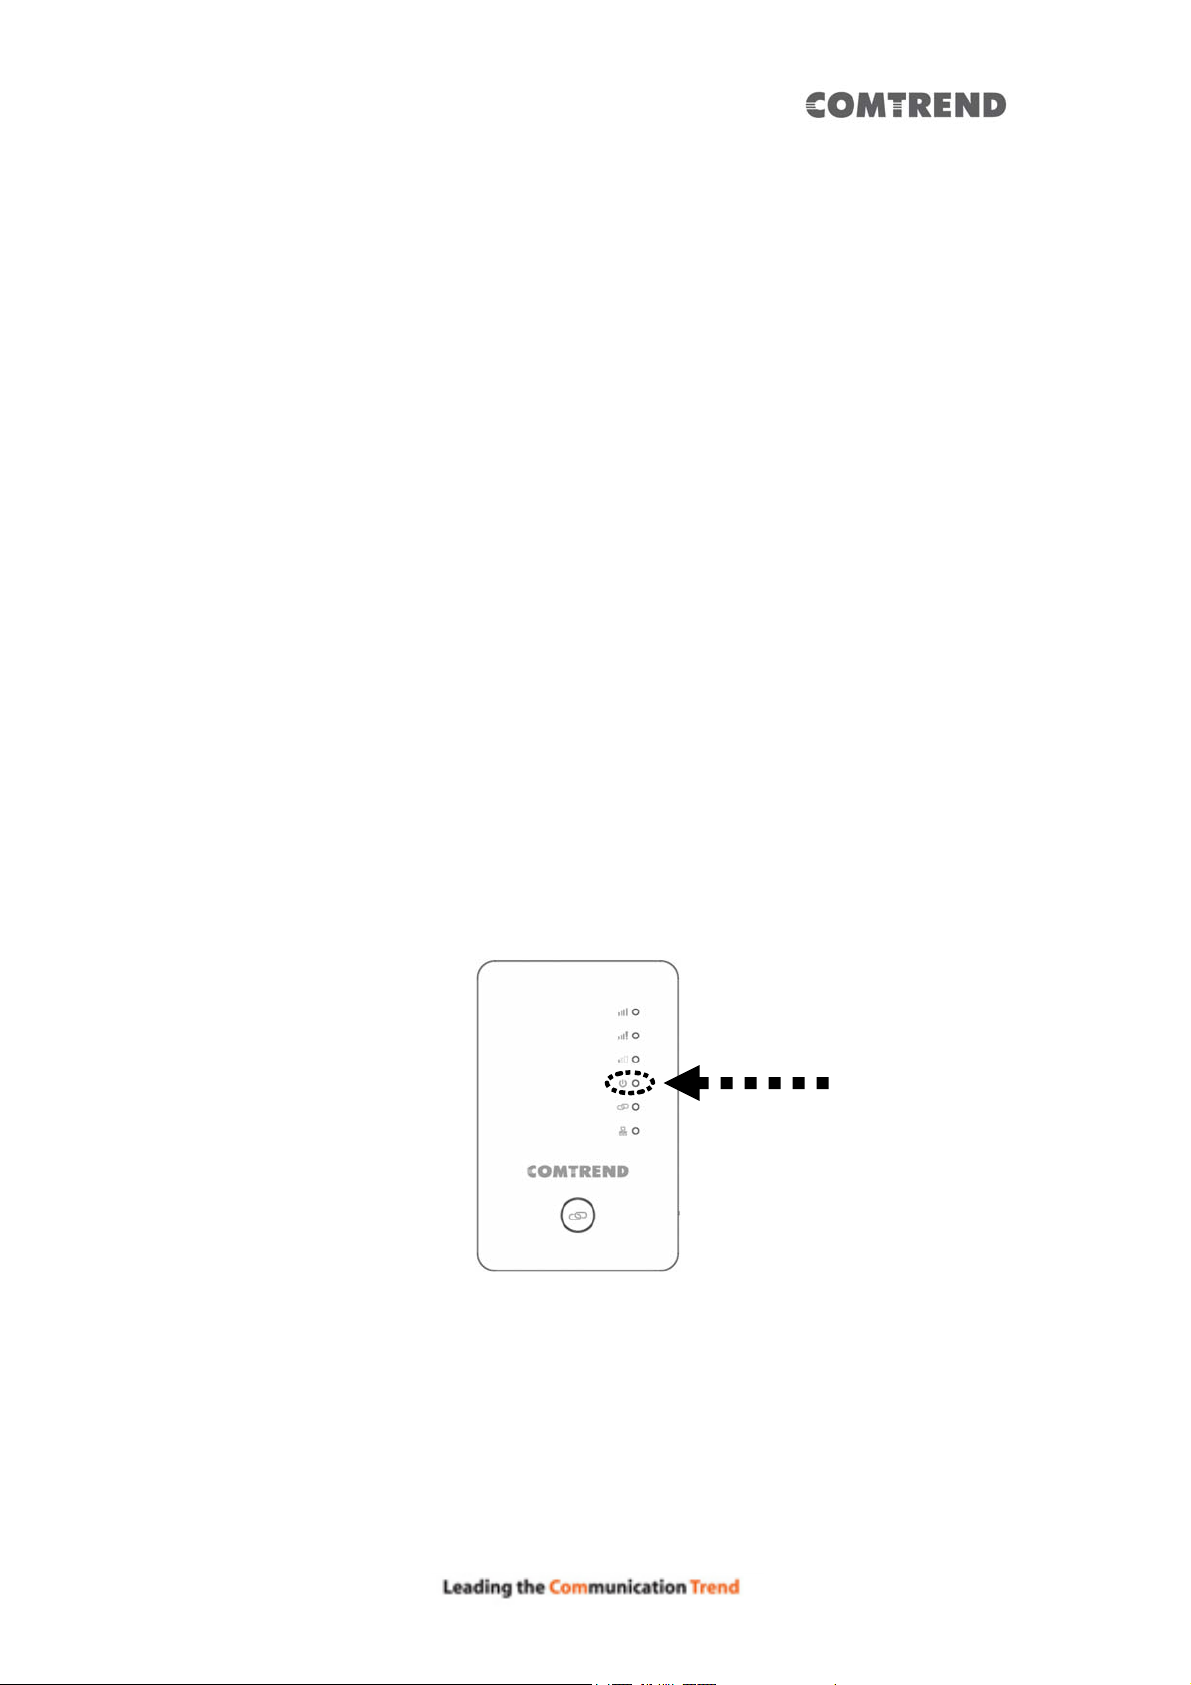
Plug this Wireless Mesh Point into a power outlet on the wall, and you should see the
‘Power’ LED light up in few seconds. If not, check if the power outlet you’re using is
working.
You can setup the wireless connection via the ‘Hardware WPS button’ or ‘Software
web browser’.
If your broadband router or access point also supports a ‘WPS button’, we
recommend you to use the WPS button to establish connection.
21
Page 23
Using WPS button - please go to section 3.1.1
Using Web browser - please go to section 3.1.2
3.1.1 Hardware WPS button setup
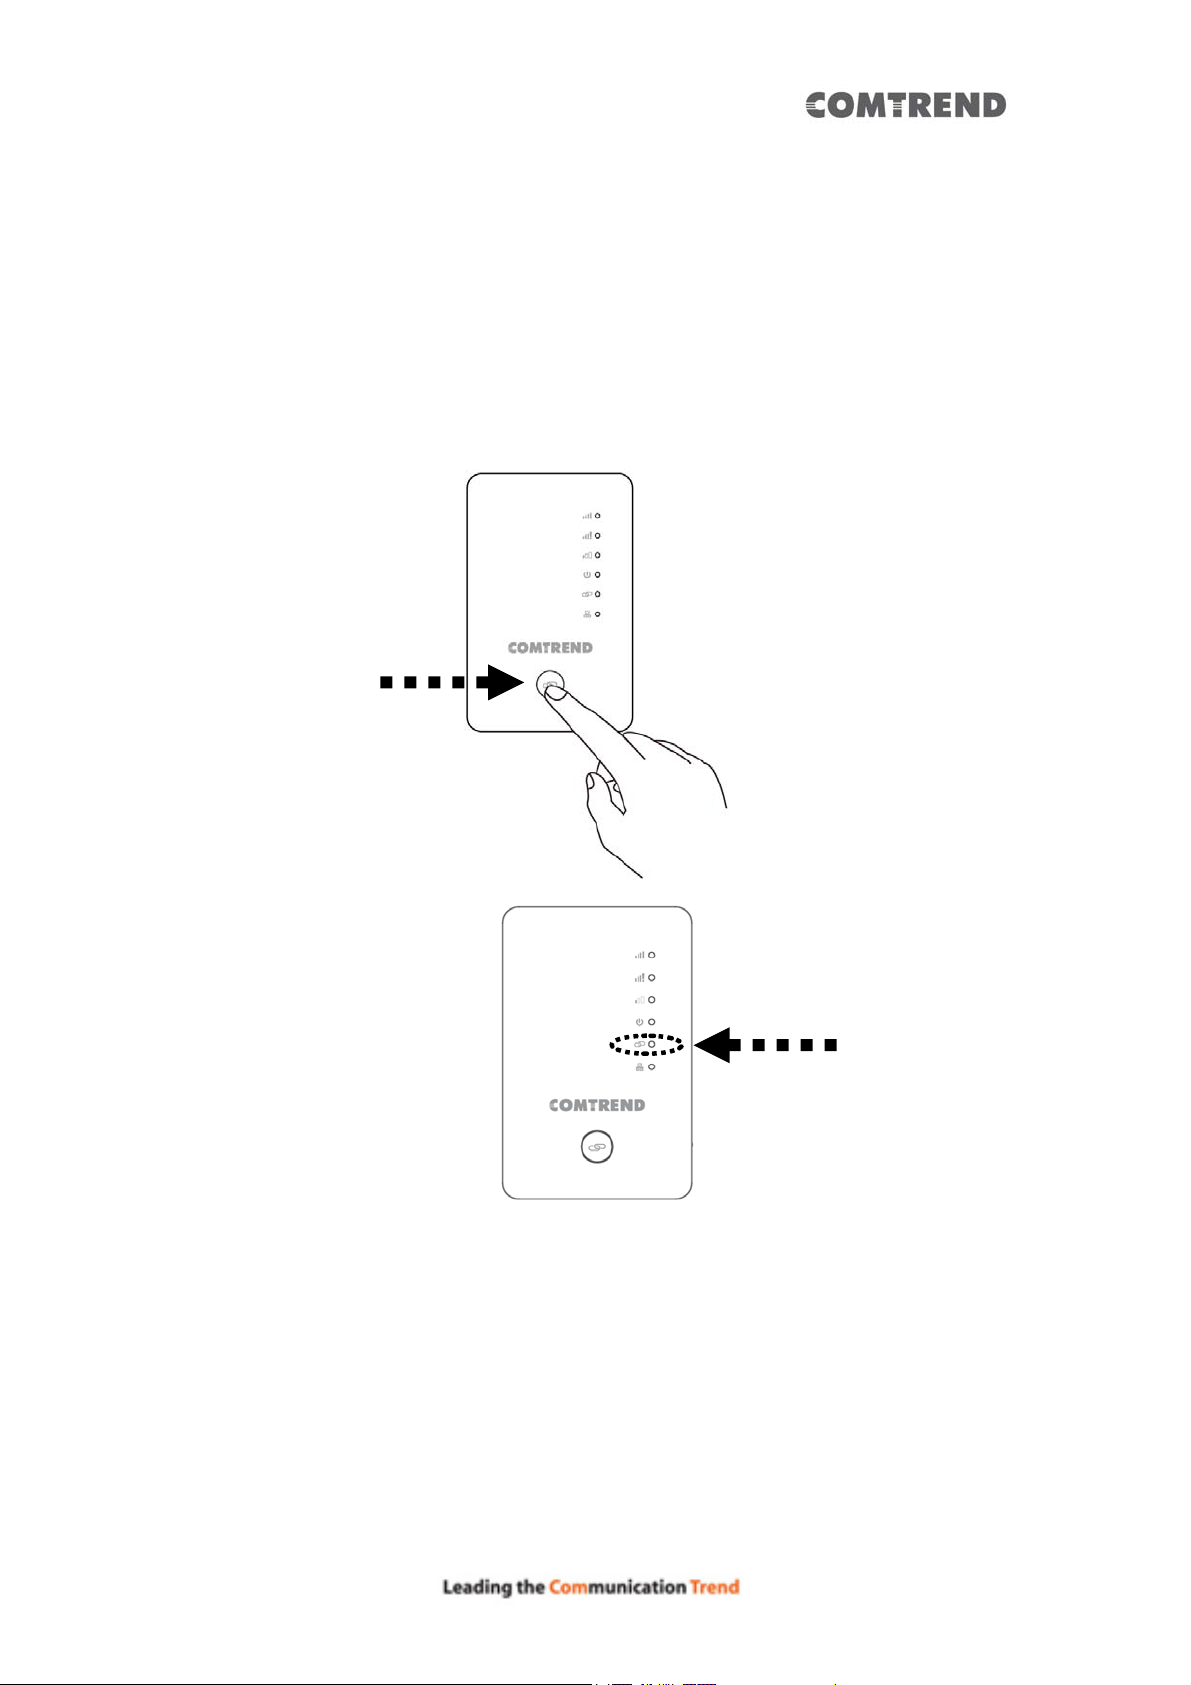
1. Press and hold the WPS button on the Wireless Mesh P oint for 2 seconds, the
‘WPS’ LED will start flashing.
WPS button
WPS LED
2. Press the WPS button on the wireless broadband router or access point you
wish to connect to within 2 minutes.
22
Page 24
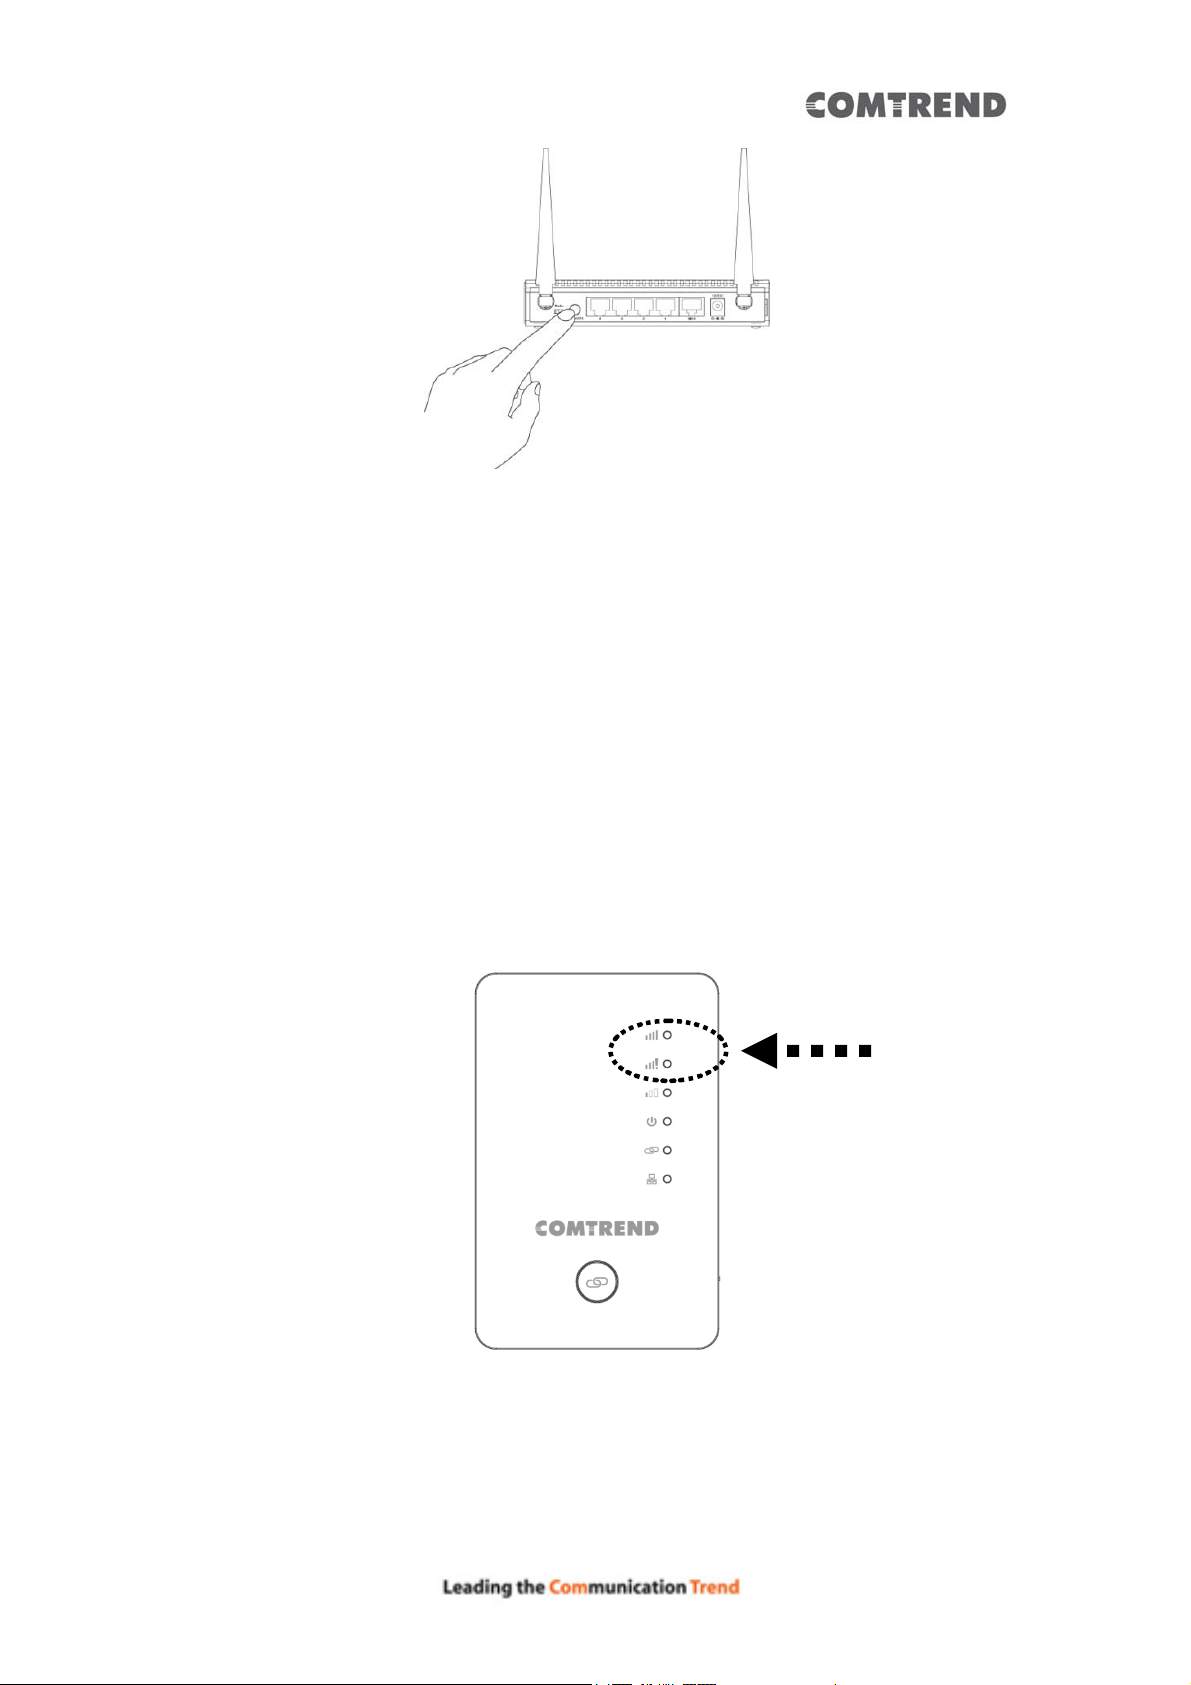
NOTE: the WPS button position on the access point above is for reference;
different devices may have different WPS button positions or locations.
TIP: If the access point you wish to connect to does not have a hardware
WPS button, you can also use its web configuration menu’s WPS function
to establish connection. Or you can login to the WAP-5922’s web user
interface to perform quick setup (for detailed setup refer to ‘3.1.2 Web
browser quick setup’ manual)
3. When WPS connection is successfully established, the Wireless Mesh Point will
reboot immediately to make your settings take effect ; if the ‘WPS’ LED flashes
fast, a problem has occurred, please wait for 2 minutes until the ‘WPS’ LED goes
off, and start from step(1) again.
When quick installation is successful, the ‘Signal’ LED will turn on.
Signal LED
4. Please plug this Wireless Mesh Point into a power outlet on the wall in the place
you wish to use it (the ideal place will be the center of your house) and, the
wireless connection will be established automatically as long as it’s within range
of your wireless router or access point.
23
Page 25
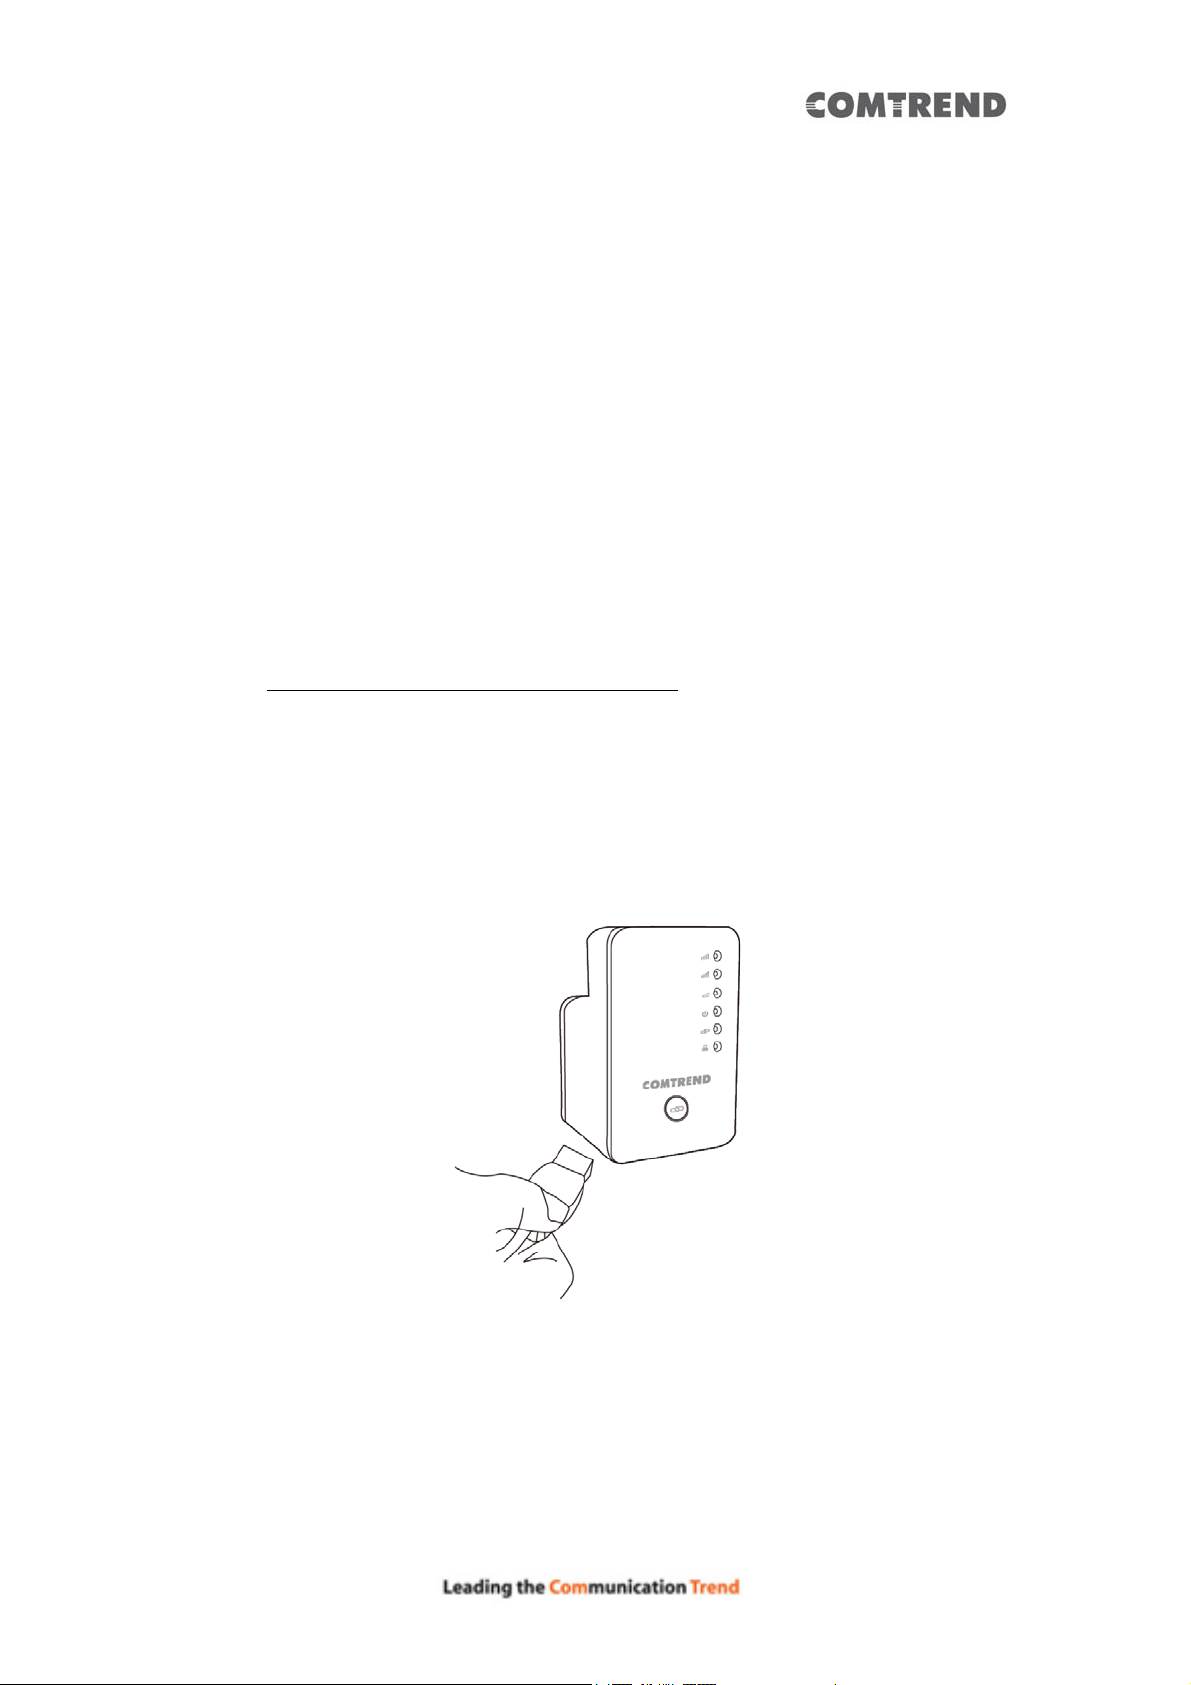
You can check the ‘Signal’ LED status to understand signal reception level.
(Please see the table on page 14 for details.)
If the Signal LED is off, it means the device is out of wireless range of your
wireless broadband router or access point. Move the Mesh Point closer to the
broadband router until the Wireless Mesh Point device can receive a signal from
the broadband router and extend its signal.
The quick installation setup is complete, you can refer to ‘3.2 Repeater mode
Advanced Settings’ to login to the web user interface for other advanced
settings.
3.1.2 Web browser quick setup
Before you can connect to the Wireless Mesh Point and start the configuration
procedures, your computer must be able to get an IP address automatically (use
dynamic IP address). If it’s set to use a static IP address, or you’re unsure, please
refer to ‘Chapter 6: 6.1 Configuring TCP/IP on PC’ to set your computer to use
dynamic IP address.
1. Use an Ethernet cable to connect your computer’s Ethernet port and the
wireless Mesh Point’s Ethernet port.
Or use your computer’s wireless configuration utility to search for an access
point named ‘repeater0003’ and get connected. (The default SSID of this
Wireless Mesh Point device is ‘repeater0003’, 0003 is for reference, it is the
last 4 digits of the device’s MAC number. Each device has a different MAC
number; please find it on your device label.)
24
Page 26
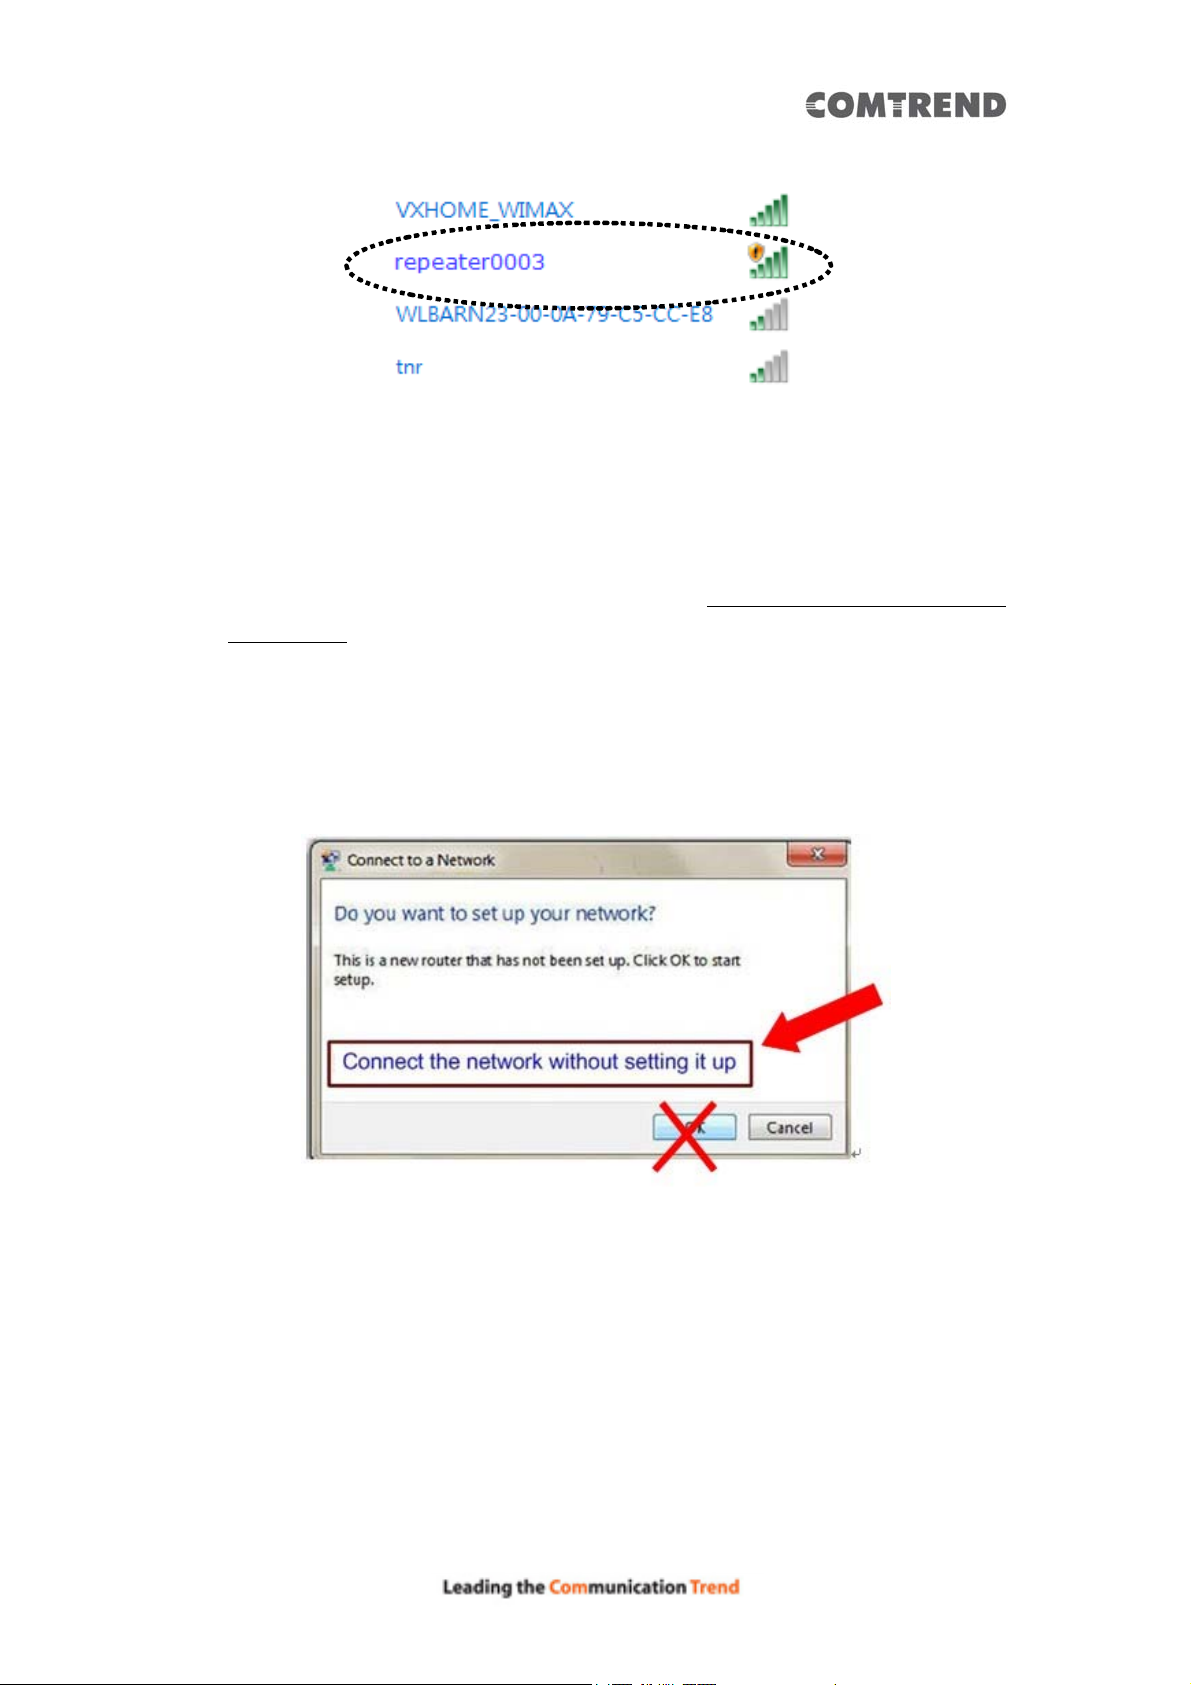
NOTE: this default SSID ‘repeater0003” is for reference, different devices
may have different last 4 digits.
If you are using a wireless connection in Windows Operating System and
encountered the following screen, please click “Connect the network without
setting it up” then you can successfully link to the Wireless Mesh Point. Do NOT
click “OK “.
In case you click ‘OK’, Windows Operating S ystem will ask for the security key,
please click “Cancel” to go back to this page.
NOTE: this ‘repeater0003” is for reference, 0003 are the last 4 digits of the
device’s MAC number. Each device has a different M AC number; please find
it on your device label.)
2. Open your web browser, it will redirect to the web user interface setting page.
(or you can input the default IP address in the address bar)
http://192.168.2.252
25
Page 27
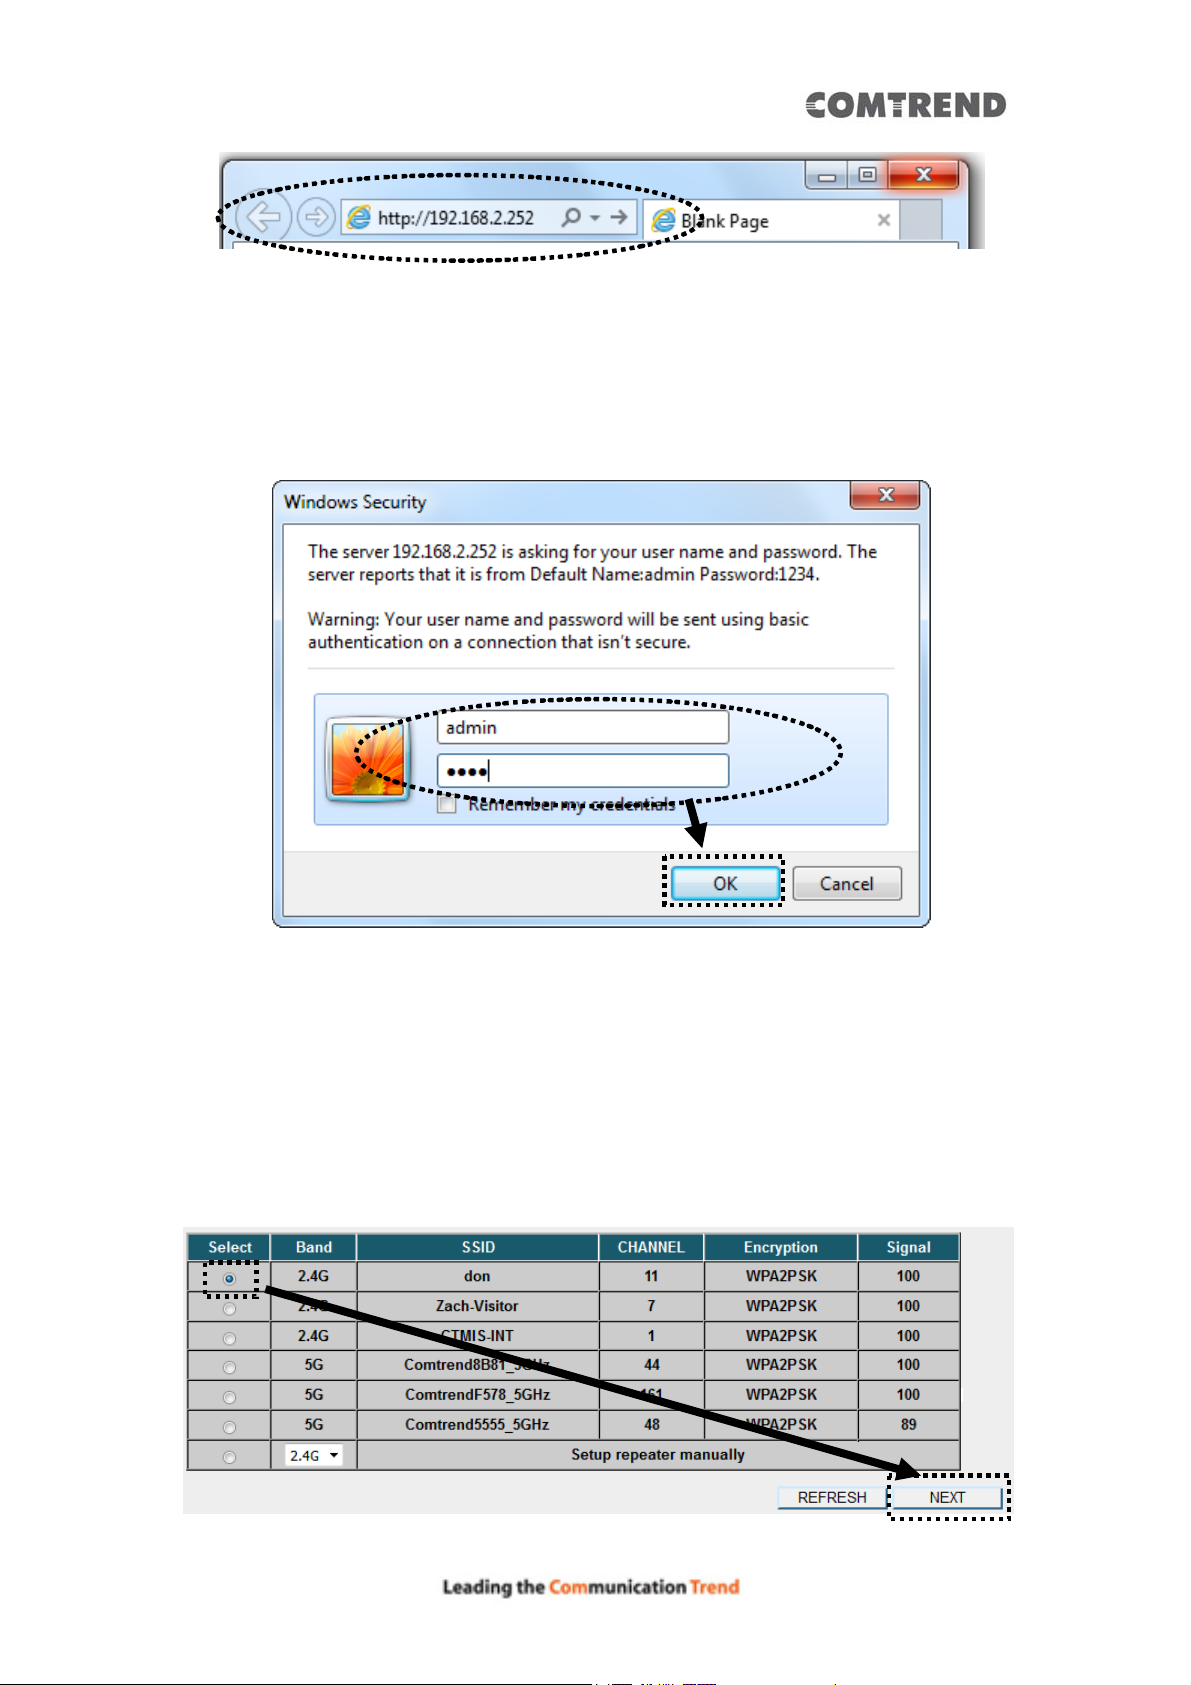
3. The Wireless Mesh Point will prompt you to input the username and password.
Default username is ‘admin’ and password is ‘1234’. Click the ‘OK’ button to
continue.
4. All wireless access points nearby will be displayed on the list. Select one access
point you want to connect to and click the ‘Next’ button to continue. If the
access point you wish to connect to does not appear here, click the ‘Refresh’
button until it appears on the list, or try to move the Wireless Mesh P oint closer
to the access point you wish to connect to.
26
Page 28
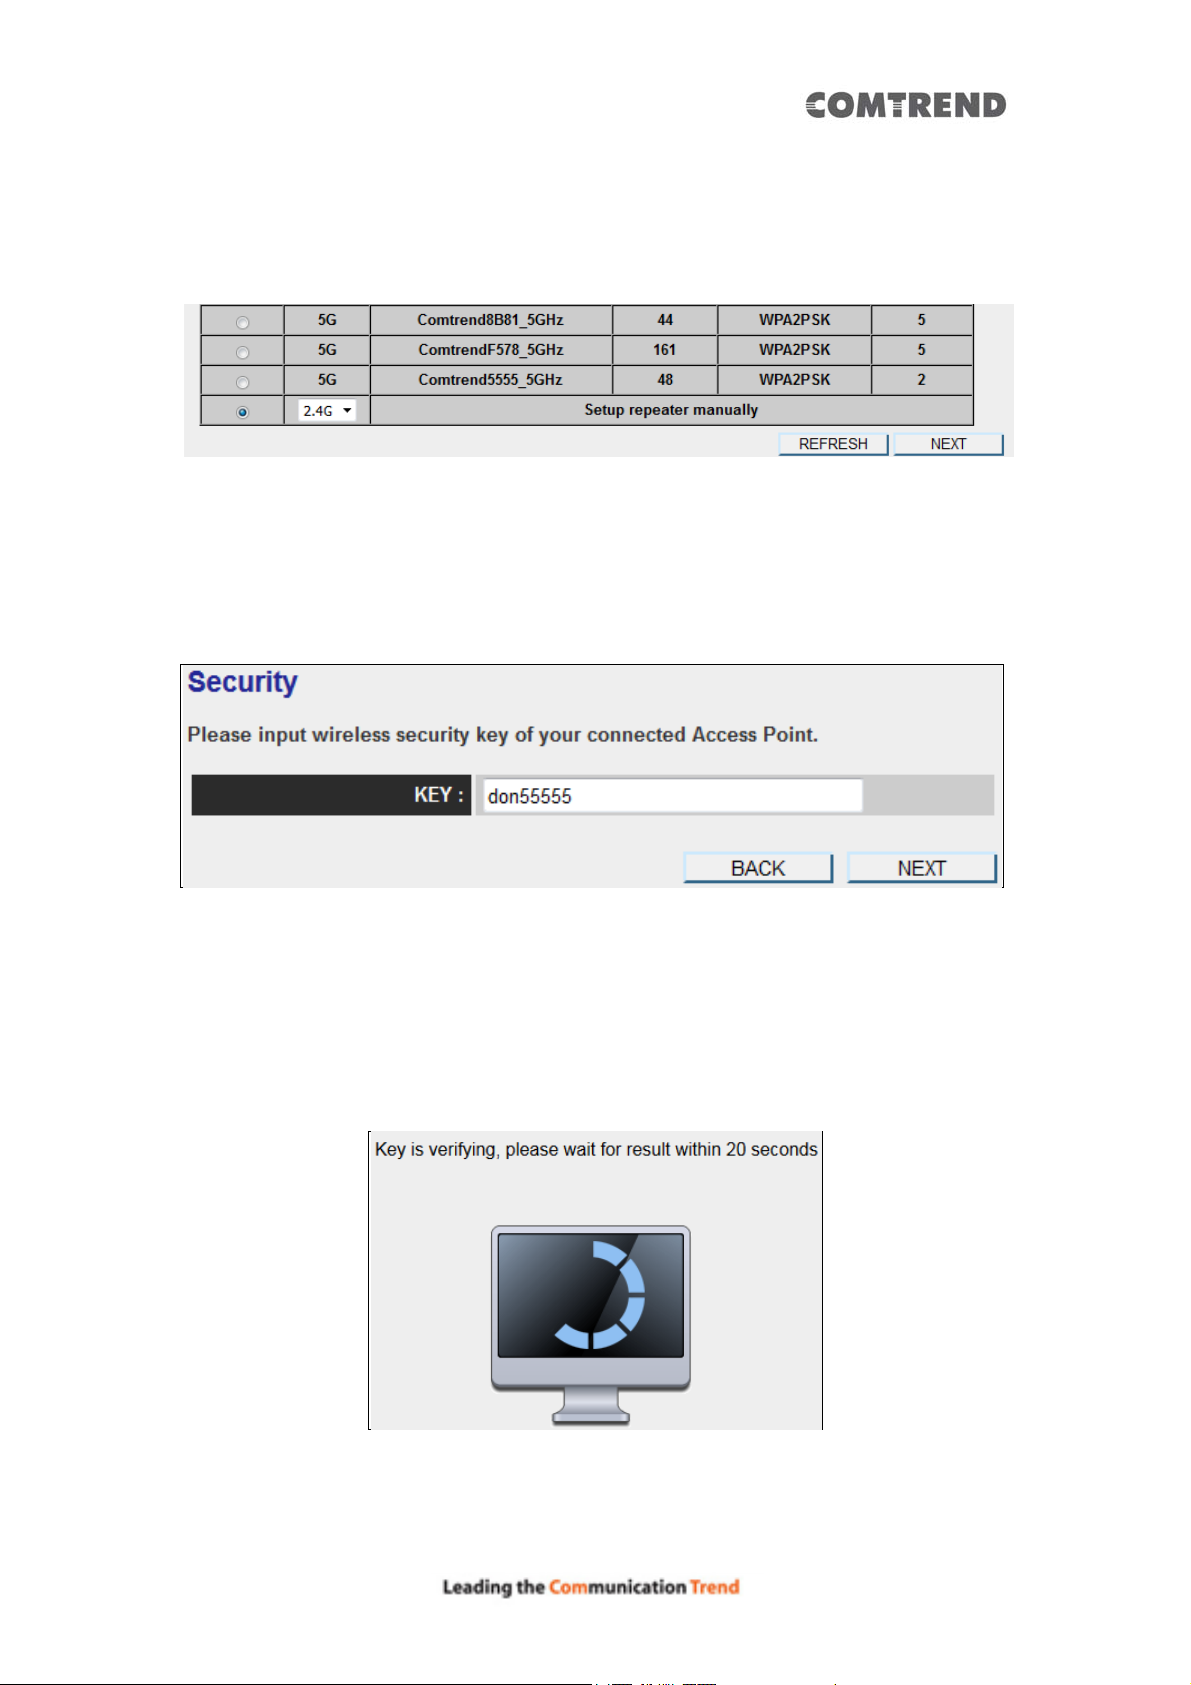
If you want to connect to a hidden access point, you can select "Setup
repeater manually" to input the wireless setting manually.
5. You’ll be prompted to input the access point’s wireless security key, input it in
the ‘KEY’ field and click the ‘Next’ button to continue.
6. It will start to verify the wireless key with your associated access point and
show you result within 20 seconds. Please follow the instructions to continue
setup.
27
Page 29
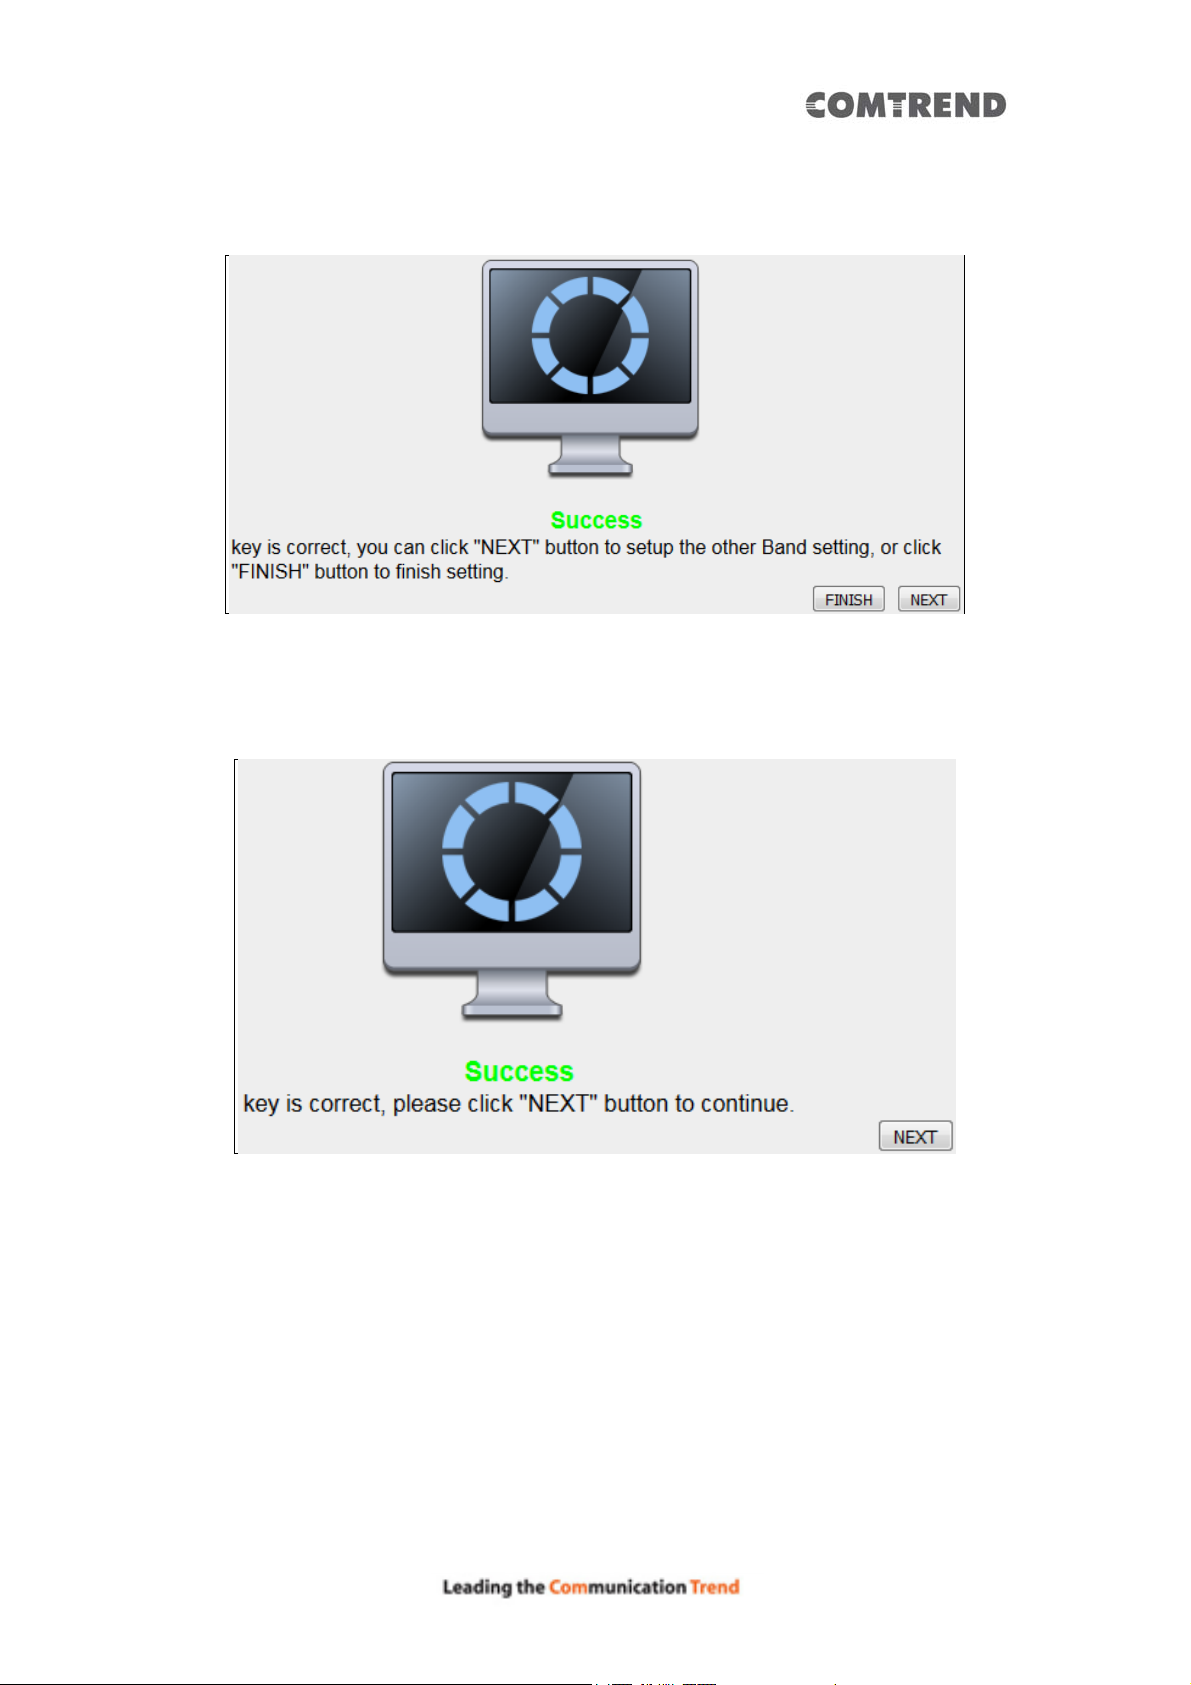
7. When the key is correct, this Wireless Mesh Point will display the connection
information for you.
8. When you have setup dual band successfully (or setup single band manually),
you will see the page below, press the “Next” button to continue.
28
Page 30
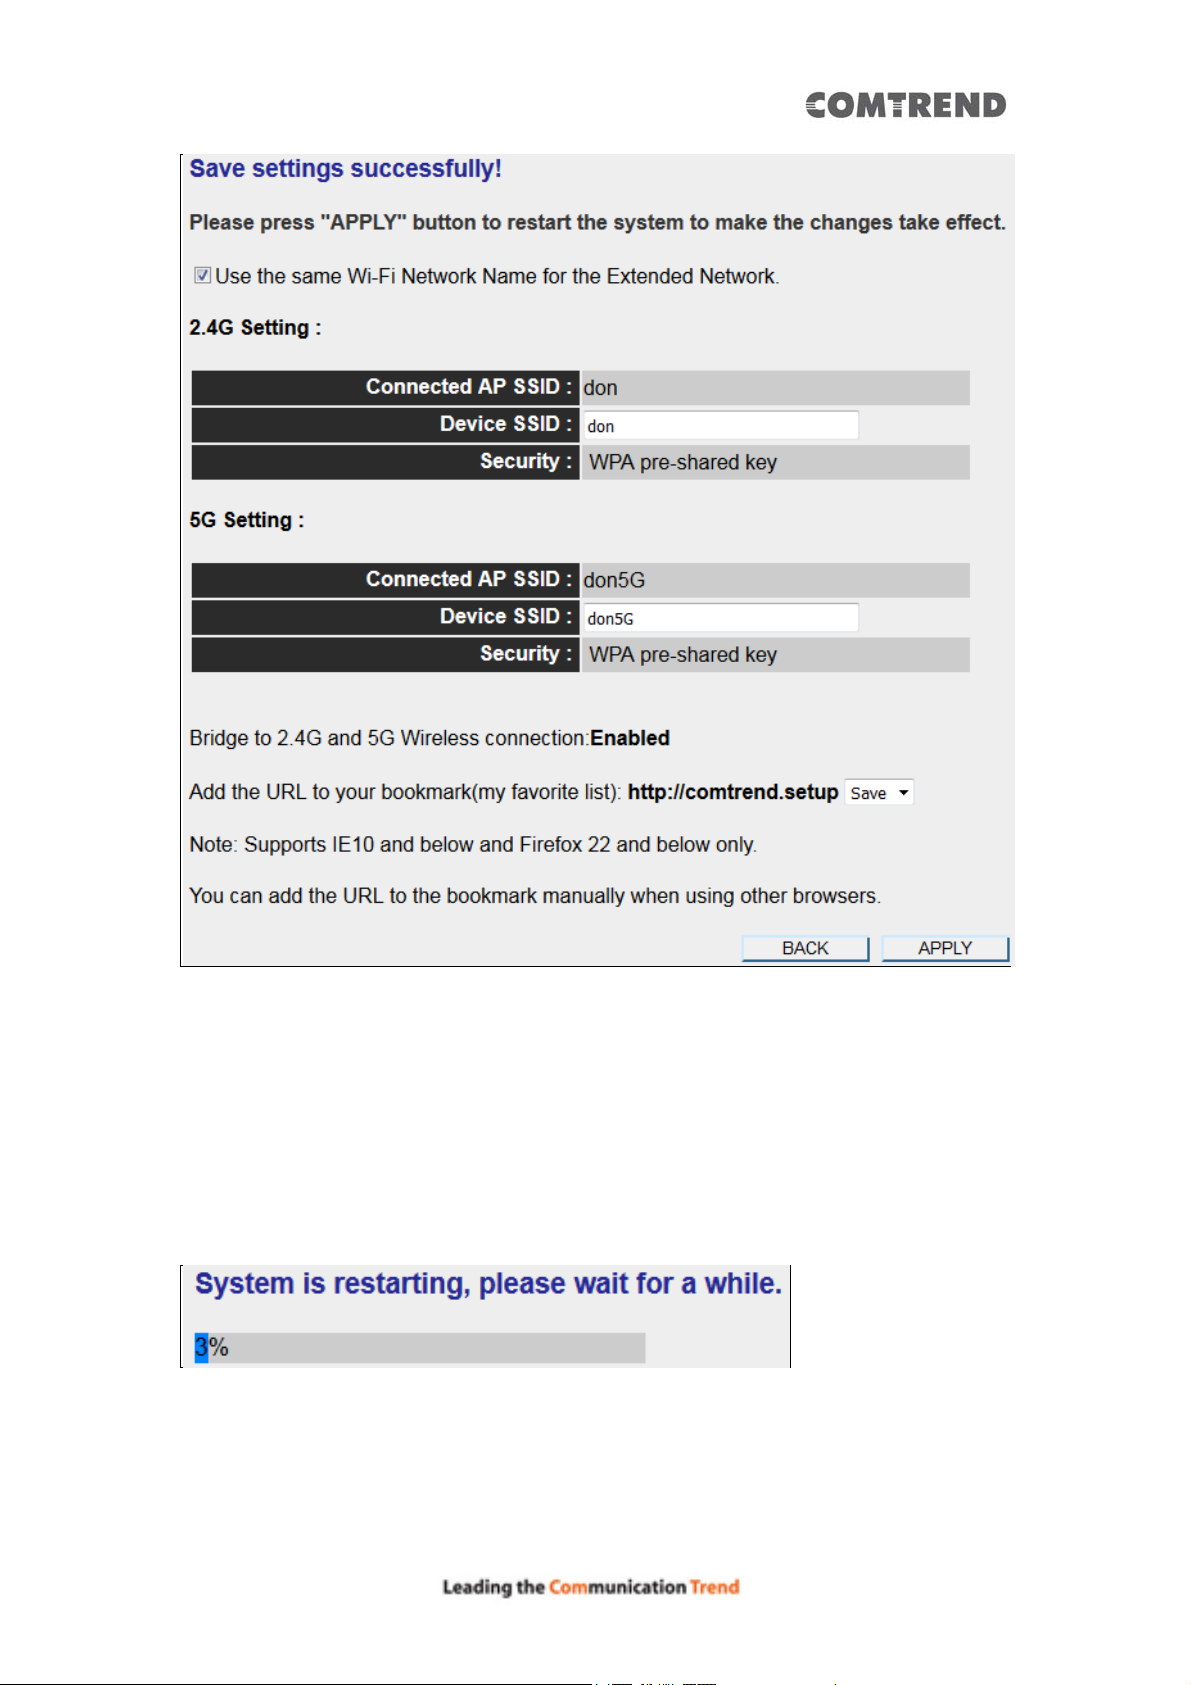
If everything is correct, click the ‘APPLY’ button to get connected.
The ‘Device SSID’ will be the same as the access point’s SSID you connected in this
step.
9. Please wait a few moments for the Wireless Mesh Point to restart.
29
Page 31
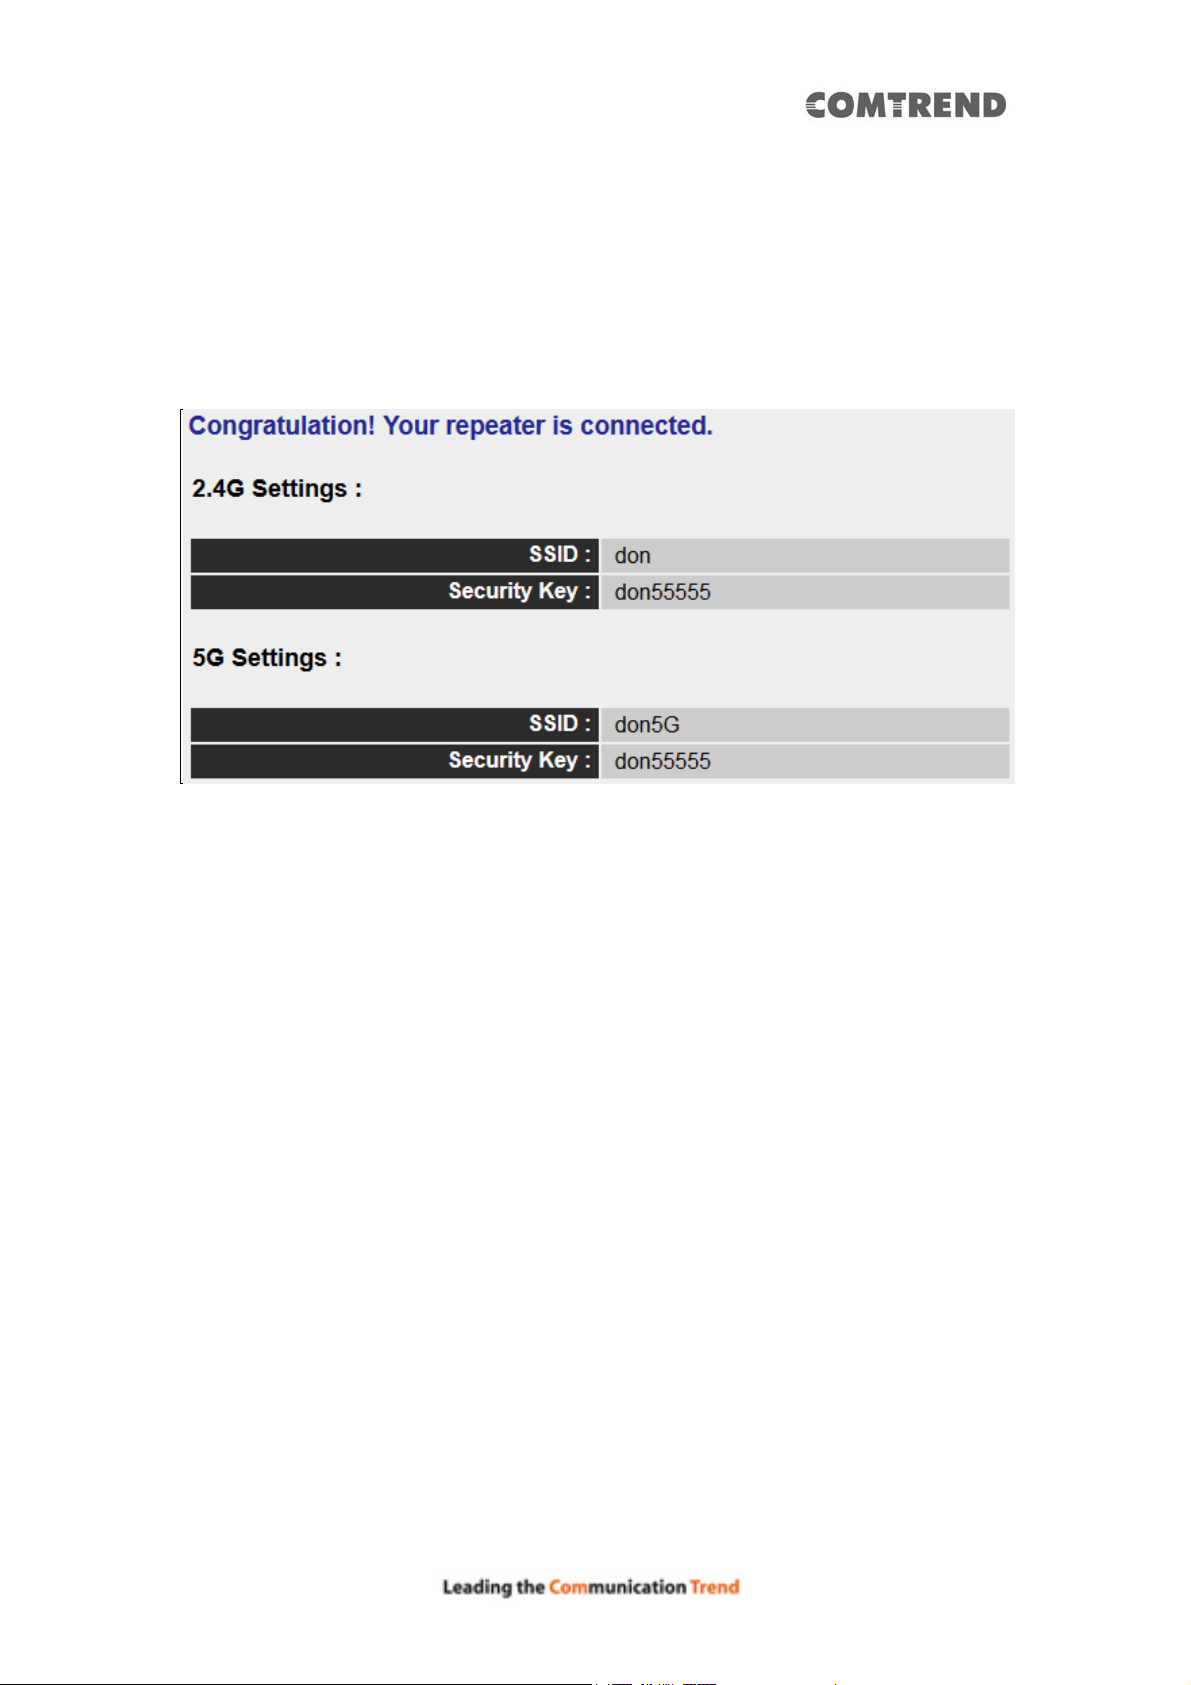
NOTE: After the wireless connection of this Wireless Mesh Point and
wireless broadband router is built, the Wireless Mesh Point is DHCP client
and will get an IP address from the broadband router automatically. If you
want to login to the web user interface of the Wireless Mesh Point, please
refer to ‘3.2 Repeater mode Advanced Settings’ for more functio ns or learn
how to login to the web user interface again.
30
Page 32
3.2 Repeater mode Advanced Settings
3.2.1 Connect to web configuration menu
Open your web browser (IE, Firefox, Chrome etc.) and find the ‘Wireless
Repeaterxxxx W eb UI’ firmw are link on your bookmark li st if you saved i t when you
installed this device for the first time.
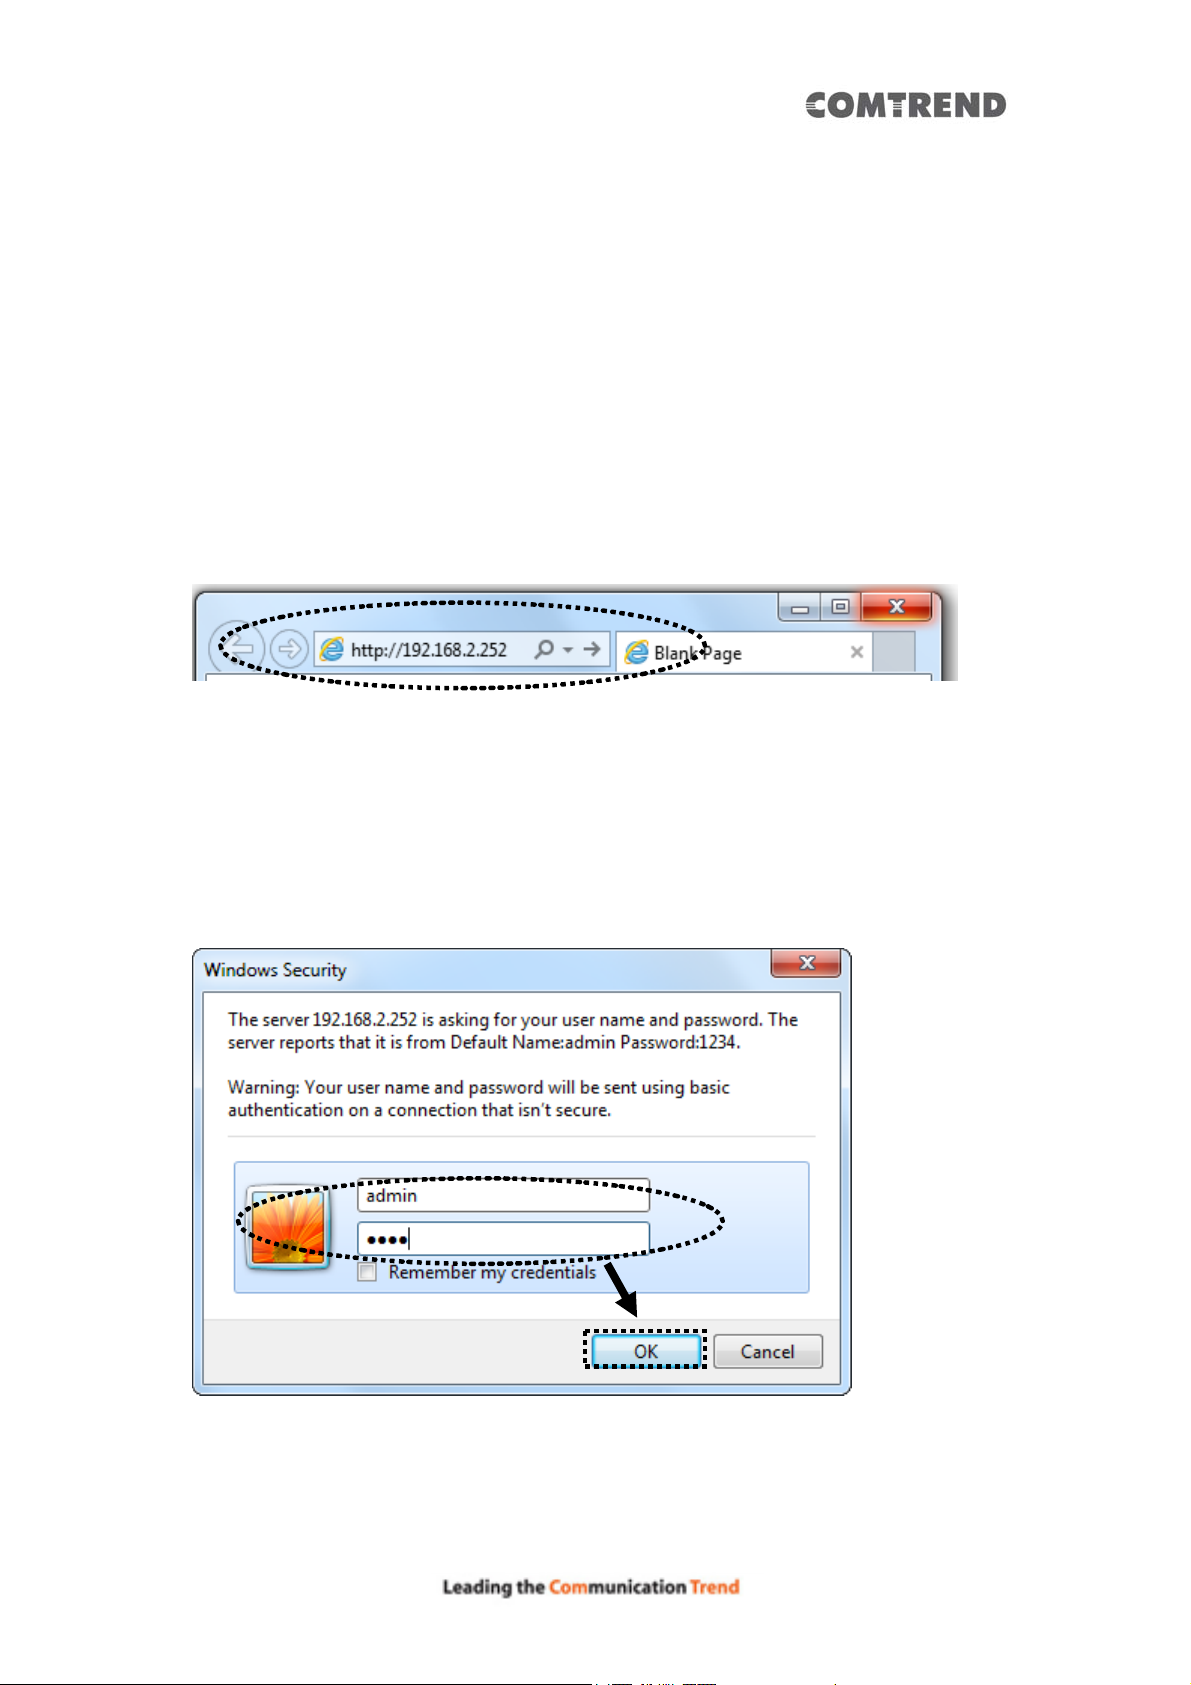
10. Input http://192.168.2.252 in the address bar, then press the ENTER key:
NOTE: The default IP address of repeater mode is 192.168.2.252
The Wireless Mesh Point will prompt you to input the username and password. The
default username is ‘admin’ and password is ‘1234’. Click the ‘OK’ button to
continue.
31
Page 33
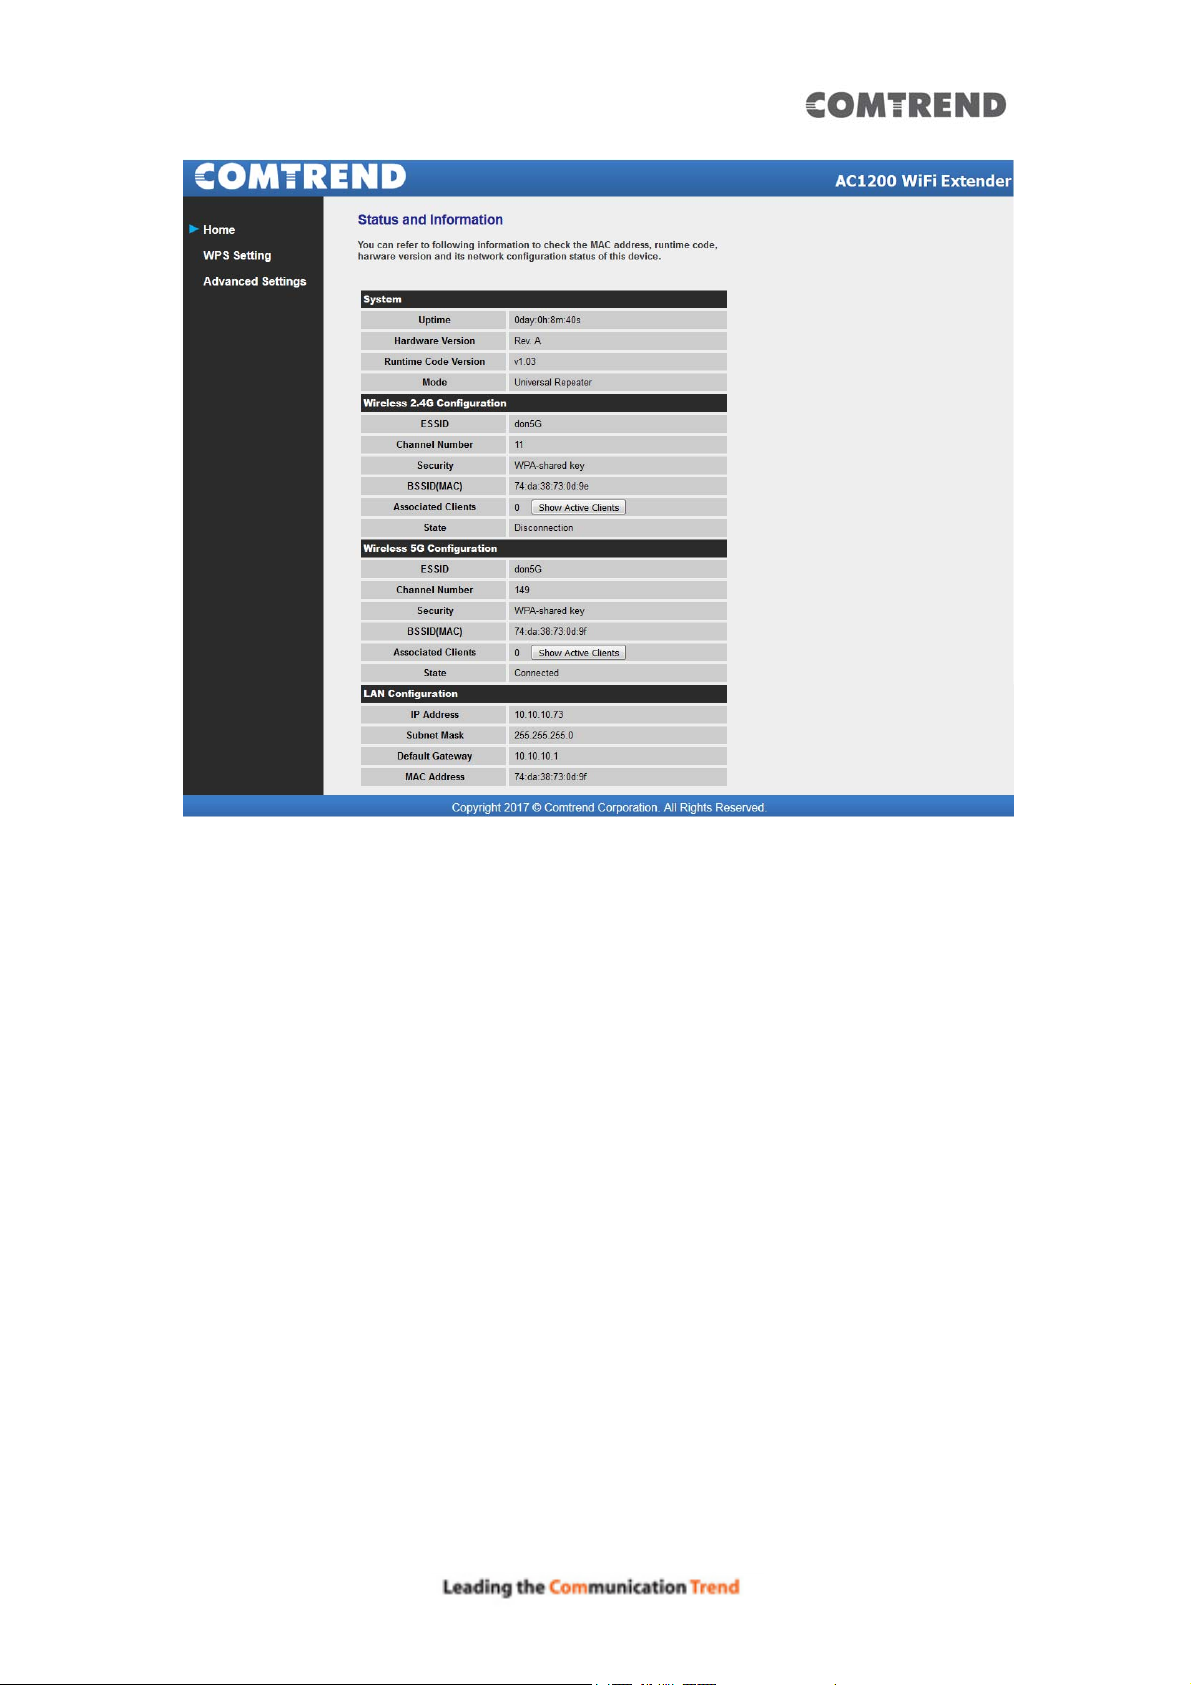
Detailed operation instructions will be given below.
32
Page 34
3.2.2 Home
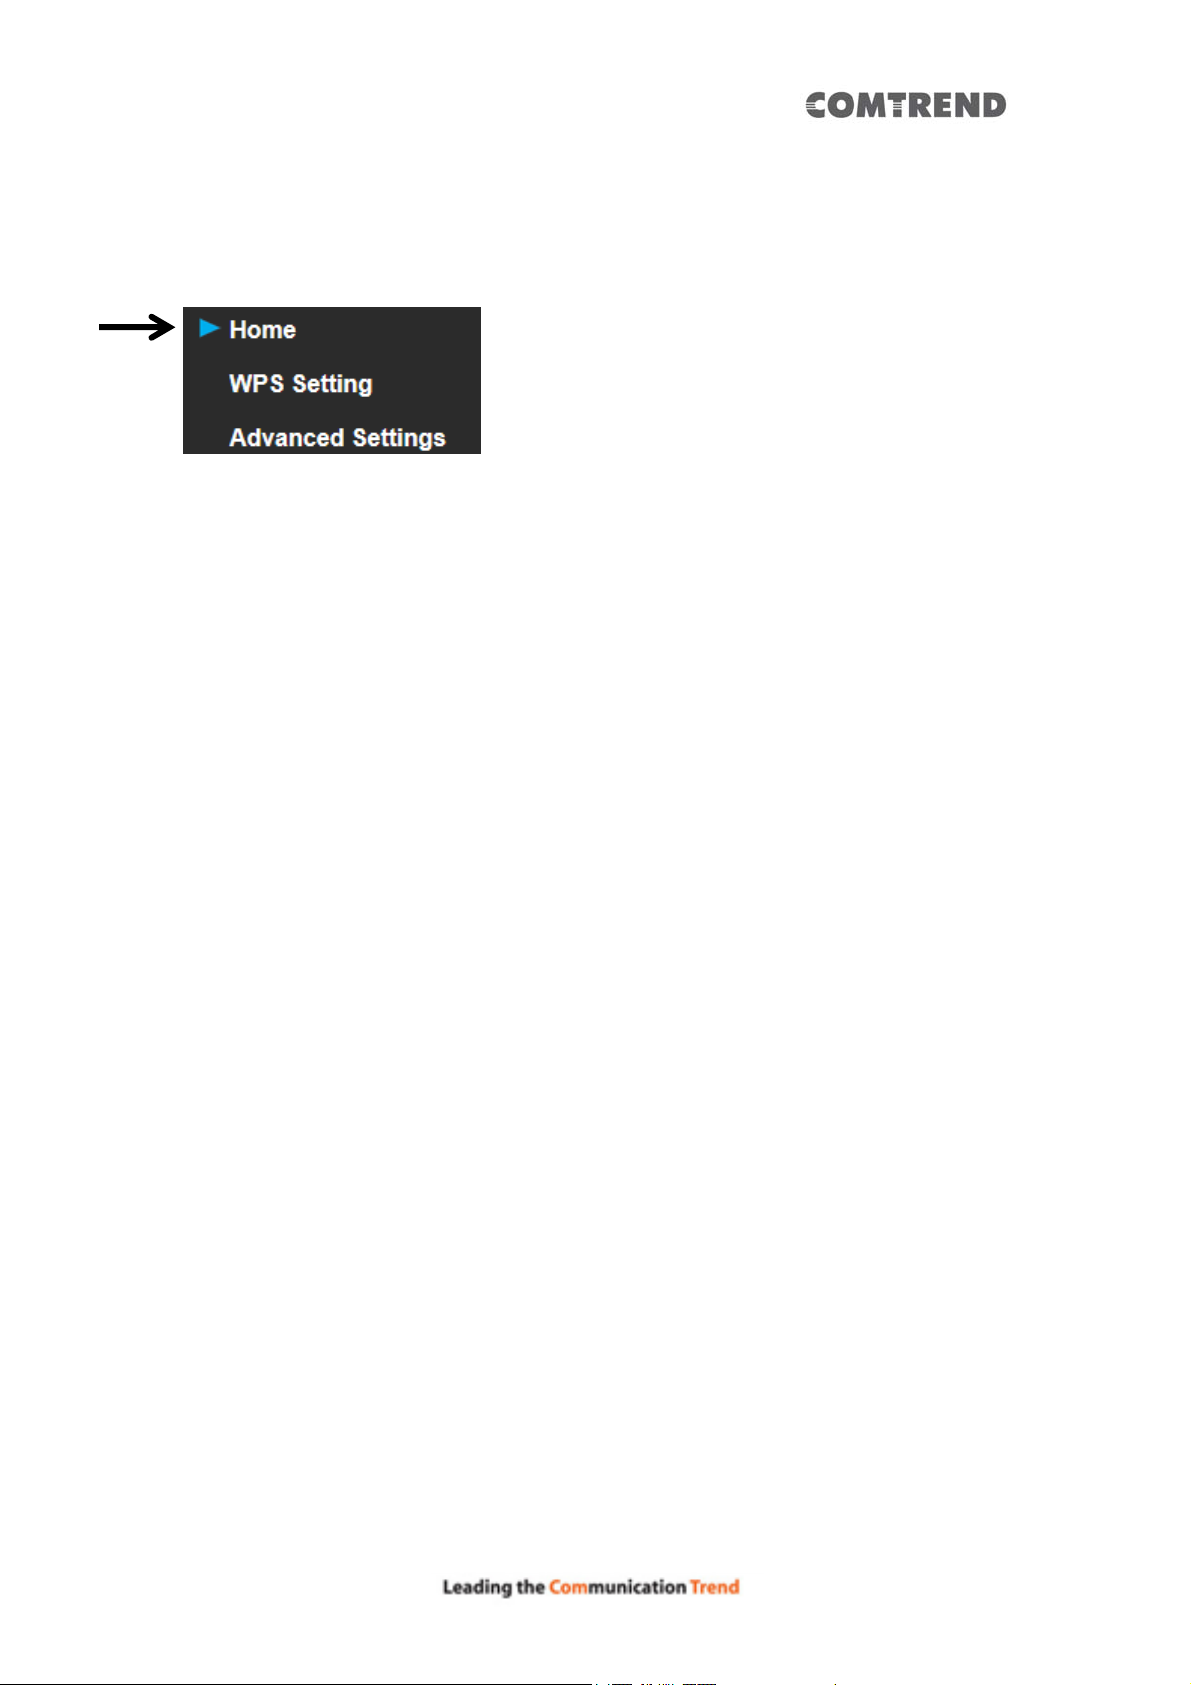
The following information provides an overview of this Wireless Mesh Point. To
access the ‘Home’ menu, click ‘Home’ on the left.
You should see a screen that looks like this (the contents will vary depending on
your actual settings):
33
Page 35
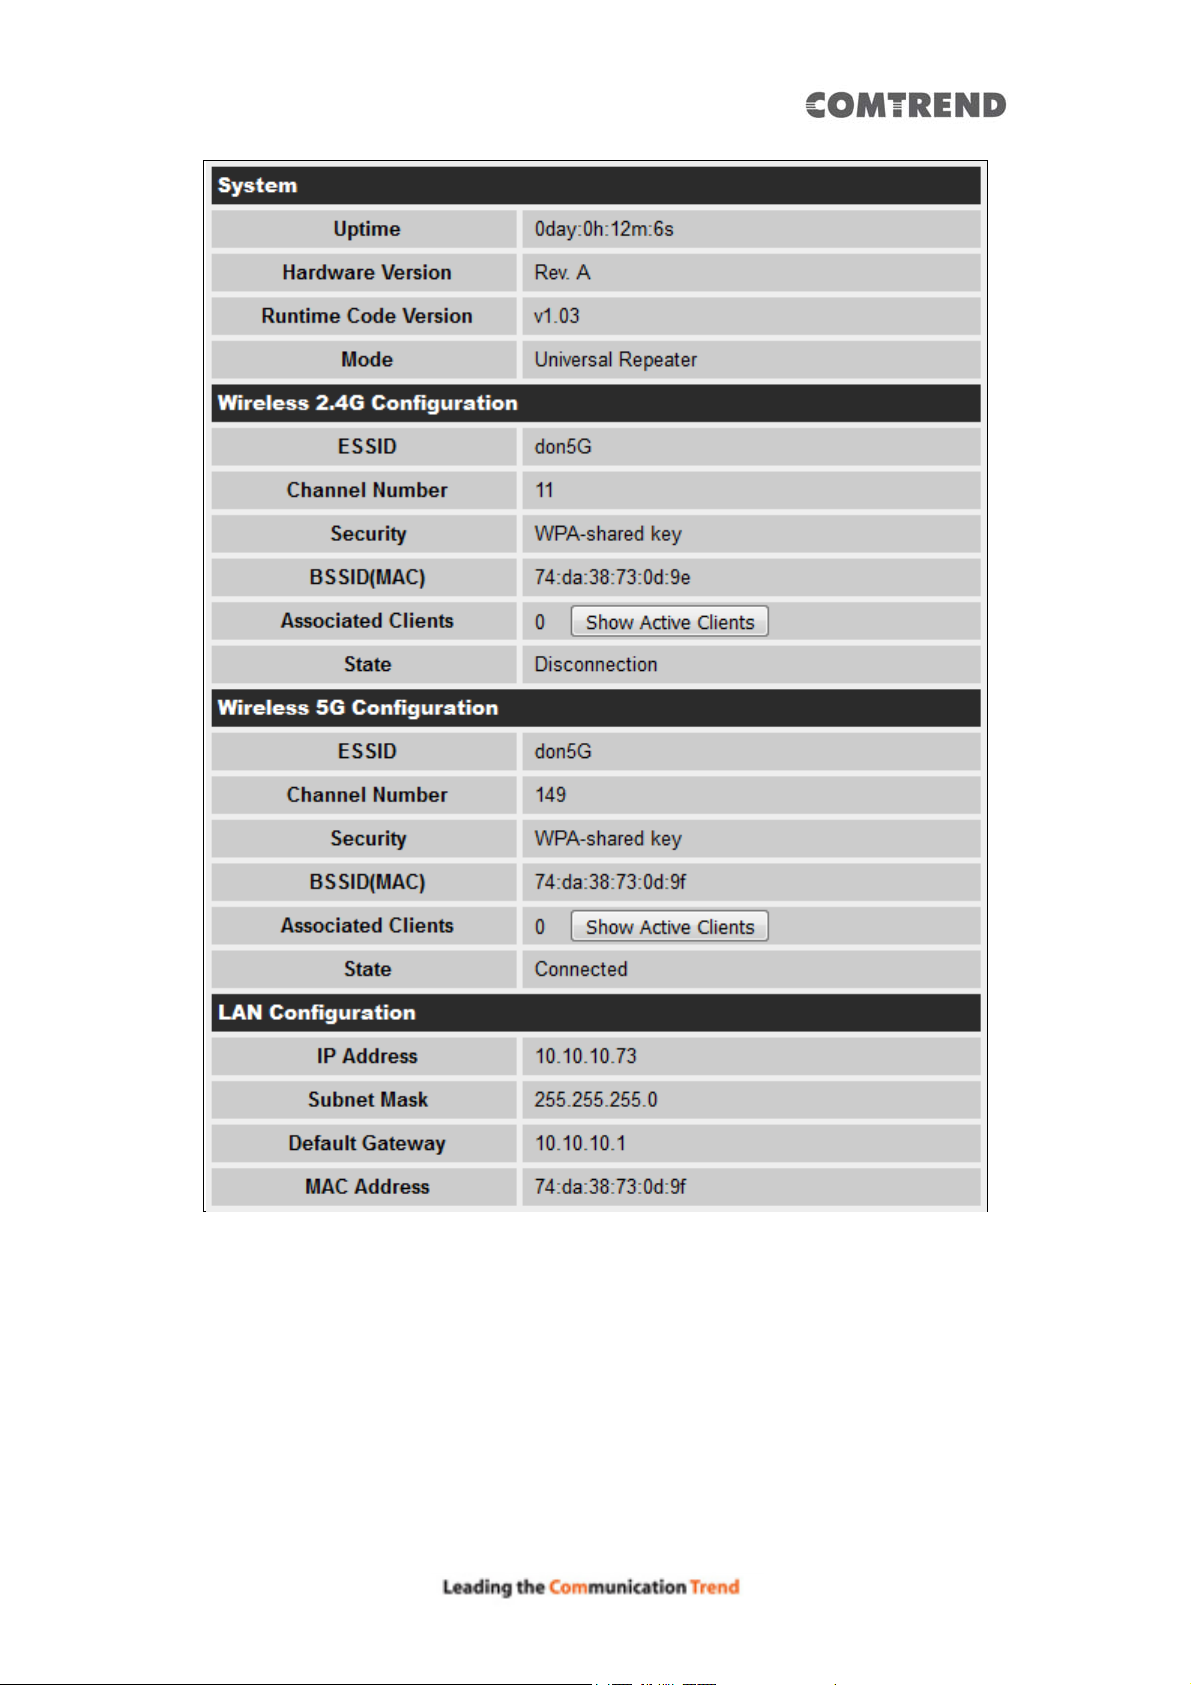
You can click the ‘Show Active Clients’ button to show all connected wireless clients.
Please note: By clicking the ‘Show Active Clients’ button, a new browser
window will appear. If your browser prevents the pop-up window from
appearing, please disable this function or you will not be able to use the
‘Show Client’ function.
34
Page 36
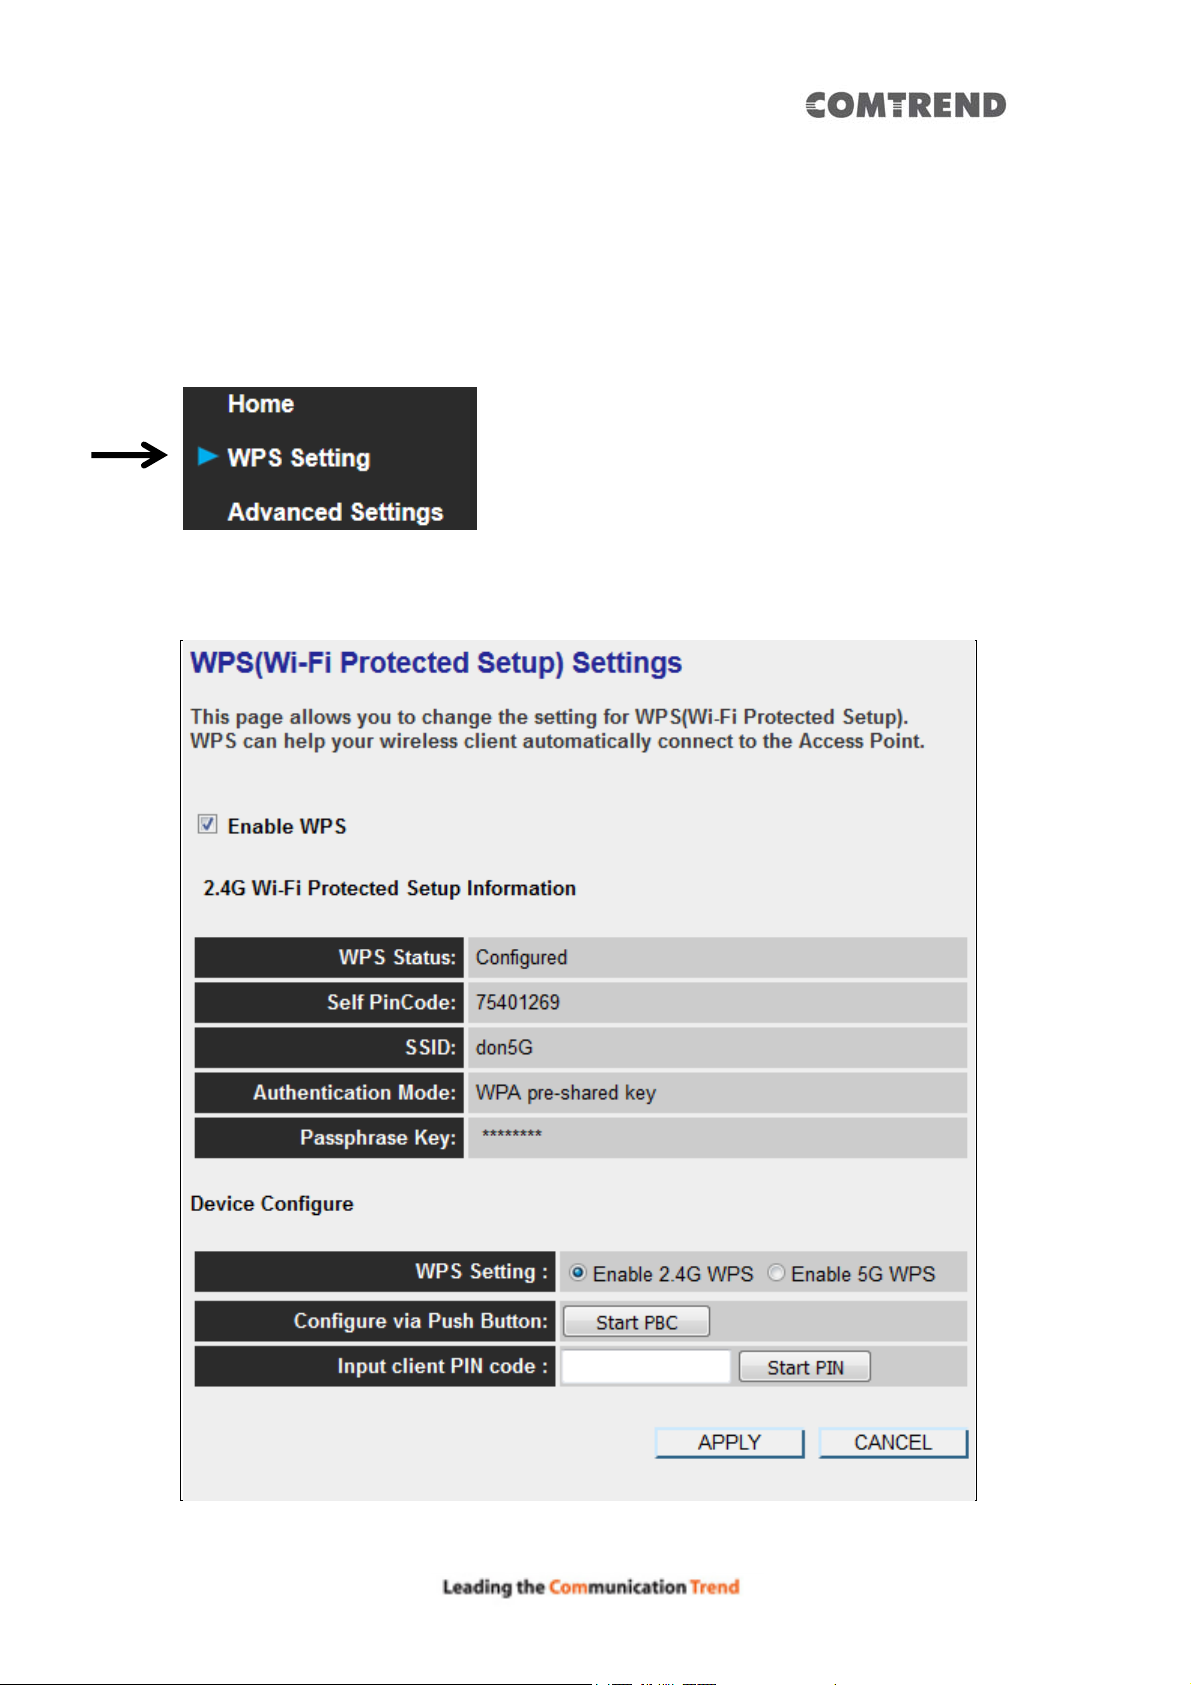
3.2.3 WPS Setting
You can configure WPS (Wi-Fi Protected Setup) here. By using WPS, you can
establish a secure connection between this Wireless Mesh Point and other wireless
devices which also support WPS in a fast and secure manner.
To access the ‘WPS Setting’ menu, click ‘WPS Setting’ on the left.
The following setup page will appear:
The description of every setup item is listed as follows:
35
Page 37
Item Description
WPS Status If the wireless security (encryption) function of this device
is properly set, the WPS status will display ‘Configured’. If
the wireless security function has not been set, the WPS
status will display ‘unConfigured’.
Self PinCode This displays an 8-digit number for WPS PIN-style
configuration. When another WPS-compatible device
wishes to connect to this Wireless Mesh Point and supports
Self-PIN type WPS, input this number to the wireless
device to establish connection.
SSID SSID stands for Service Set Identifier . All stations must be
configured with the correct SSID to access the Wireless
Network.
Authentication Mode Shows the authentication mode of this Wireless Mesh
Point.
Passphrase Key This shows asterisks (*) to indicate that the wireless
security is properly set.
WPS Setting Yo u can select w hich band (2 .4G or 5G) yo u w ant to buil d
the wireless connection via ‘Start PBC’ button. Default is
‘2.4G’.
Start PBC Click the ‘Start PBC’ button to start the Push-Button style
WPS setup procedure. This Wireless Mesh Point will wait
for WPS requests from another wireless device for 2
minutes.
The ‘WPS’ LED on the Wireless Mesh Point will be blinking
for 2 minutes when this Wireless Mesh Point is waiting for
an incoming WPS request.
Start PIN Input the PIN code of the wireless client you wish to
connect to, and the click ‘Start PIN’ button.
The ‘WPS’ LED on the wireless Mesh Point will be blinking
when this wireless Mesh Point is waiting for an incoming
WPS request.
NOTE: For WPS2.0 compliance specification, WEP and WPA-PSK can’t
support WPS connection; some of your wireless devices may follow this
latest WPS2.0 specification, so we recommend not using WEP and
WPA-PSK to avoid WPS interoperability problems.
36
Page 38
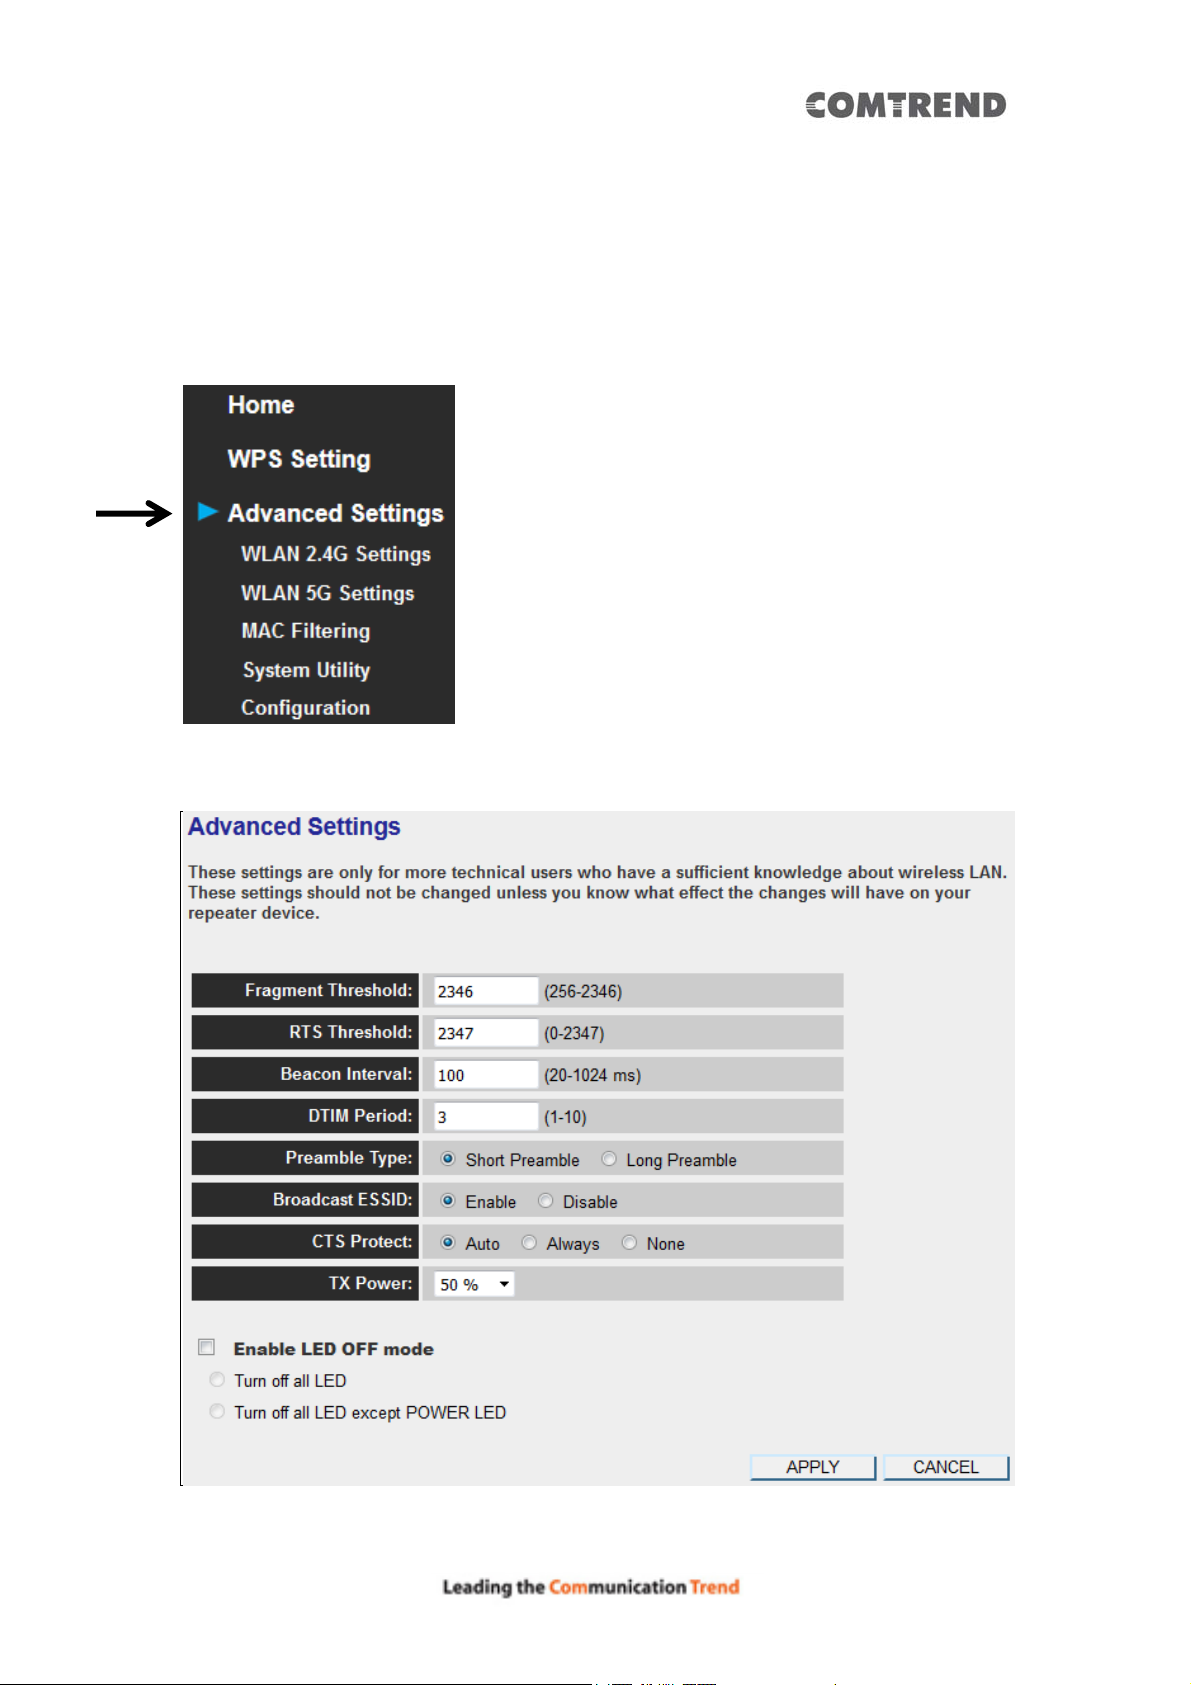
3.2.4 Advanced Settings
You can configure advanced wireless settings in this page. Please note that these
settings are not safe to be configured by novice users. Configure these setti ngs only
when you understand what you’re doing.
To access the ‘Advanced Settings’ menu, click ‘Advanced Settings’ on the left.
The following setup page will appear:
37
Page 39

The description of every setup item is listed as follows:
Item Description
Fragment Threshold The threshold (number of bytes) of the fragmentation
boundary for directed messages.
It is the maximum data fragment size that can be sent.
Input a value between 256 and 2346. Do not m odify the
default value if you don’t know what it is. The default
value is 2346.
RTS Threshold The RTS (Request To Send) threshold parameter controls
what size data packet (number of bytes) the low level RF
protocol issues to an RTS packet. The default is 2347. Do
not modify the default value if you don’t know what it is.
The default value is 2347.
Beacon Interval The Beacon Interval value indicates the frequency
interval of the beacon. Enter a value between 20 and
1000.
A beacon is a packet broadcast by the Router to
synchronize the wireless network. The default value is
100. Do not modify the default value if you don’t know
what it is. The default value is 100.
DTIM Period Configures DTIM (Delivery Traffic Indication Message)
send period. The default value is 3.
Preamble T ype The Preamble type defines the length of the CRC (Cyclic
Redundancy Check) block for communication between
the Access Point and roaming wireless adapters.
Do not modify the default value if you don’t know what it
is. The default setting is ‘Short Preamble’.
Broadcast ESSID When set to ‘enabled’, every wireless device can scan
and find this Wireless-N Range Mesh Point; when set to
‘disabled’ , only wireless clients who know the exact SSID
can get connected with this Wireless-N Range Mesh
Point. Setting to disabled will help to improve security.
CTS Protect This function provides CTS (Clear to Send) protection
when transferring data. Selecting ‘Auto’ for this option is
recommended.
38
Page 40
TX Power Select the wireless transmitting power level, from 10%
to 100%. When wireless clients are not too far from this
Wireless-N Range Mesh Point, you don’t have to sel ect a
higher power level, since this may cause some
individuals to attempt to break into your wireless
network if you have a bad password, or no password.
Enable LED off mode You can enable or disable LED lights. Check ‘Enable LED
OFF’ mode to setup LED behavior:
Turn off all LED: disables all LED lights.
T urn off all LED except POWER LED: all LED lights will be
disabled, except the ‘POWER’ LED.
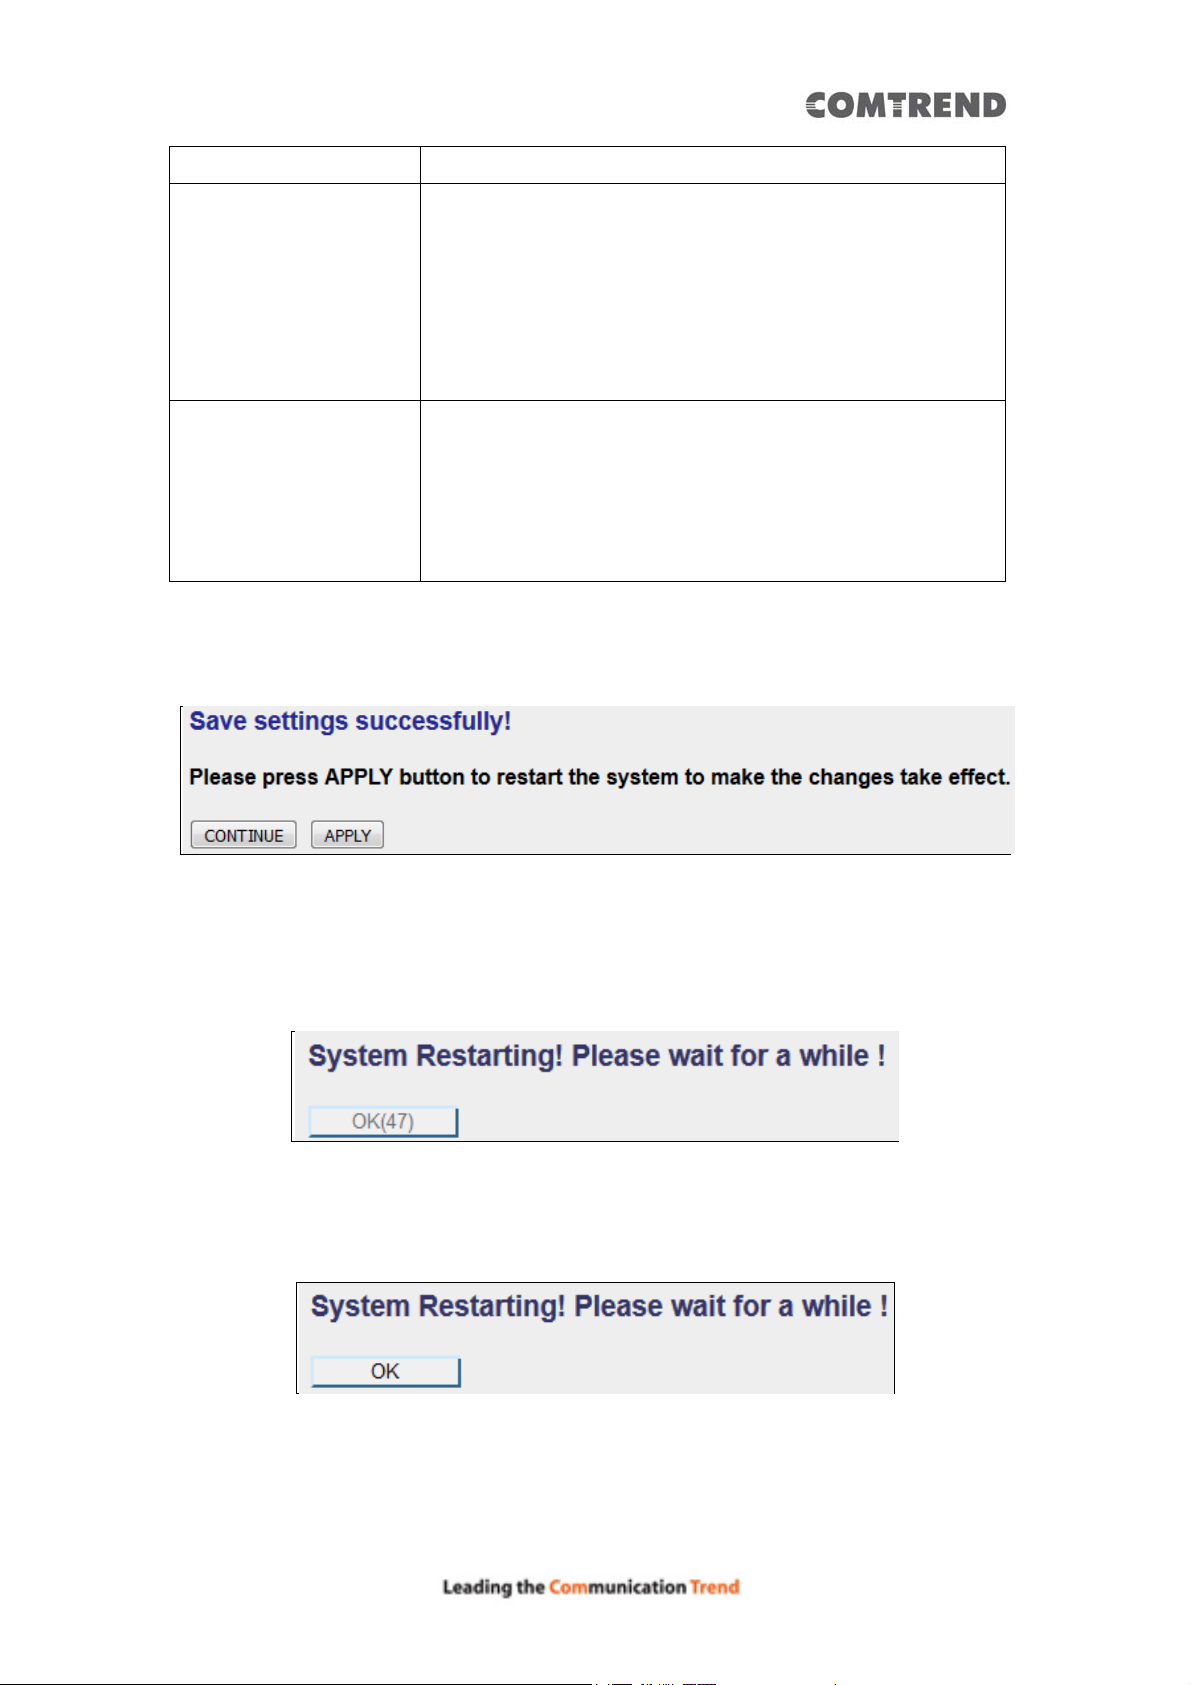
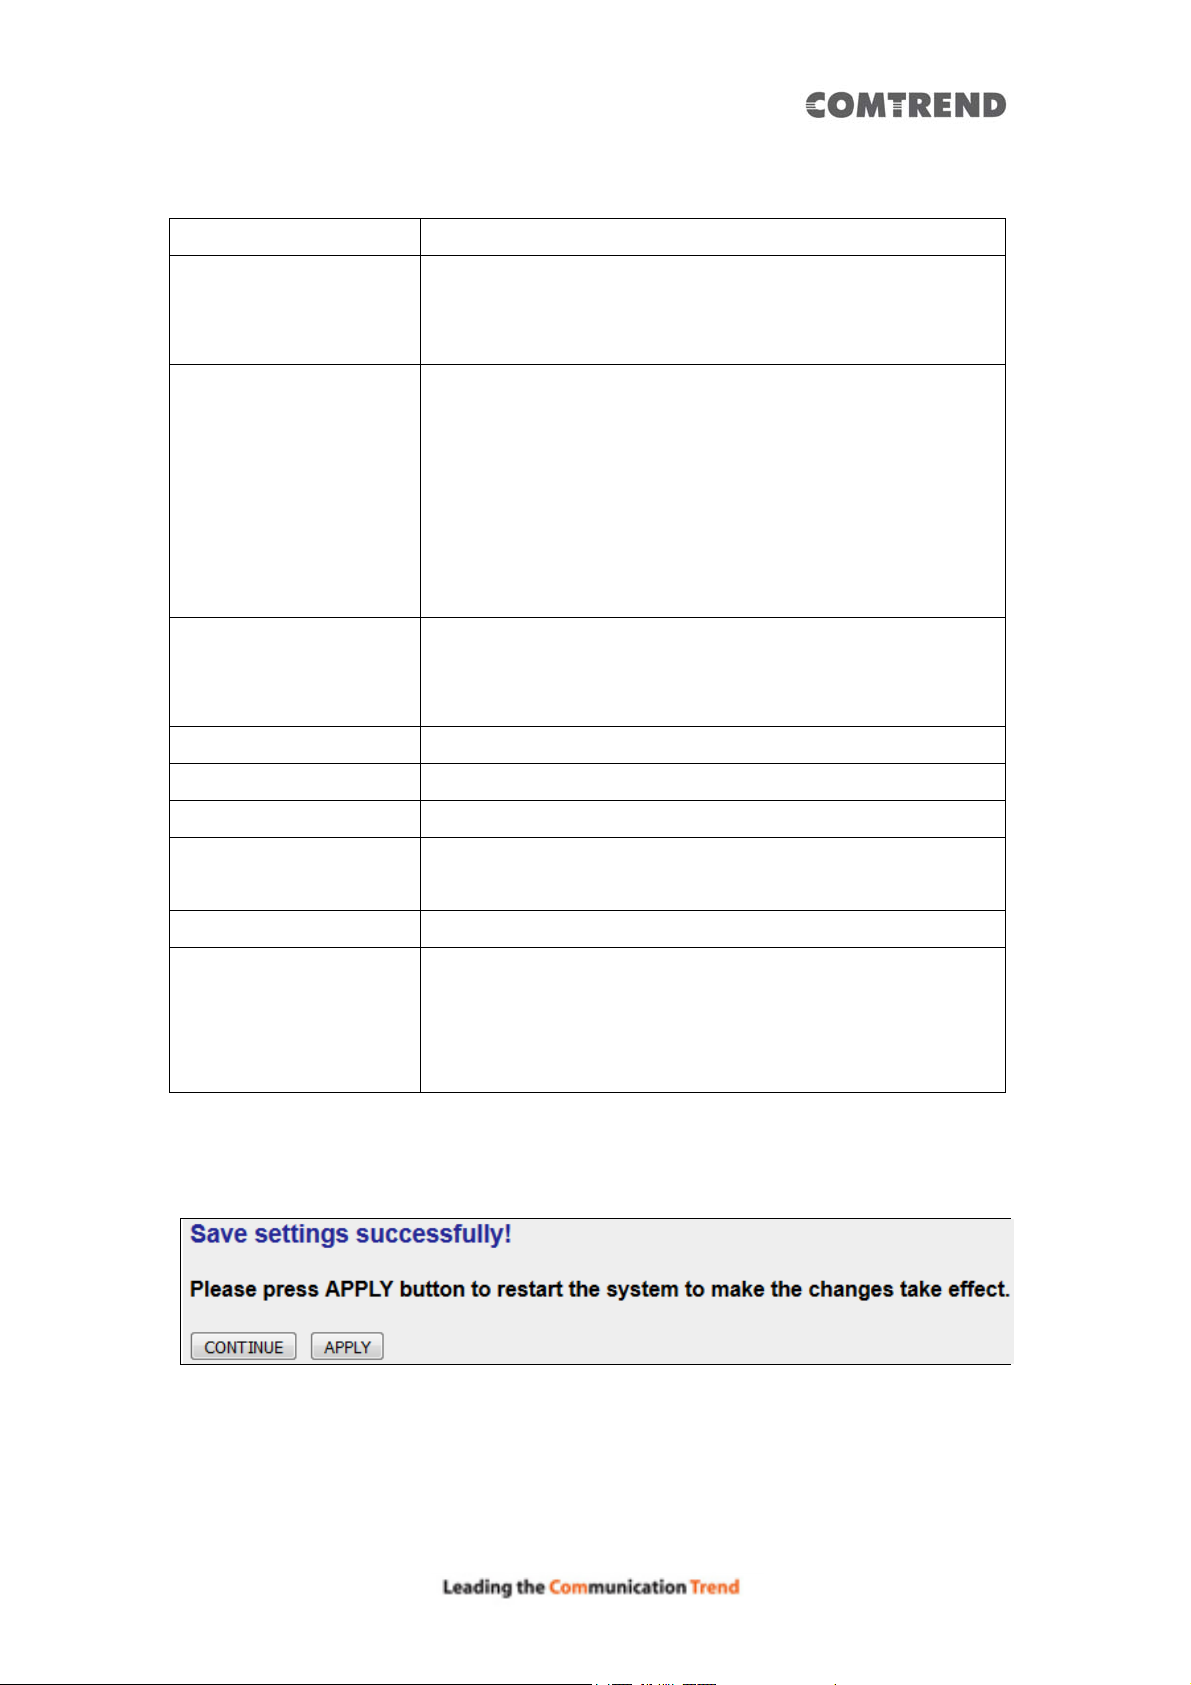
When you finish the settings in this page, click the ‘Apply’ button. You’ll see the
following message:
If you still need to configure this Wireless Mesh Point, click the ‘CONTINUE’ button;
if you want to save the changes and use it now, click the ‘APPLY’ button.
You’ll be prompted to w ait for 50 seconds before you can re connect to this Wireless
Mesh Point.
After the countdown click the ‘OK!’ button.
39
Page 41
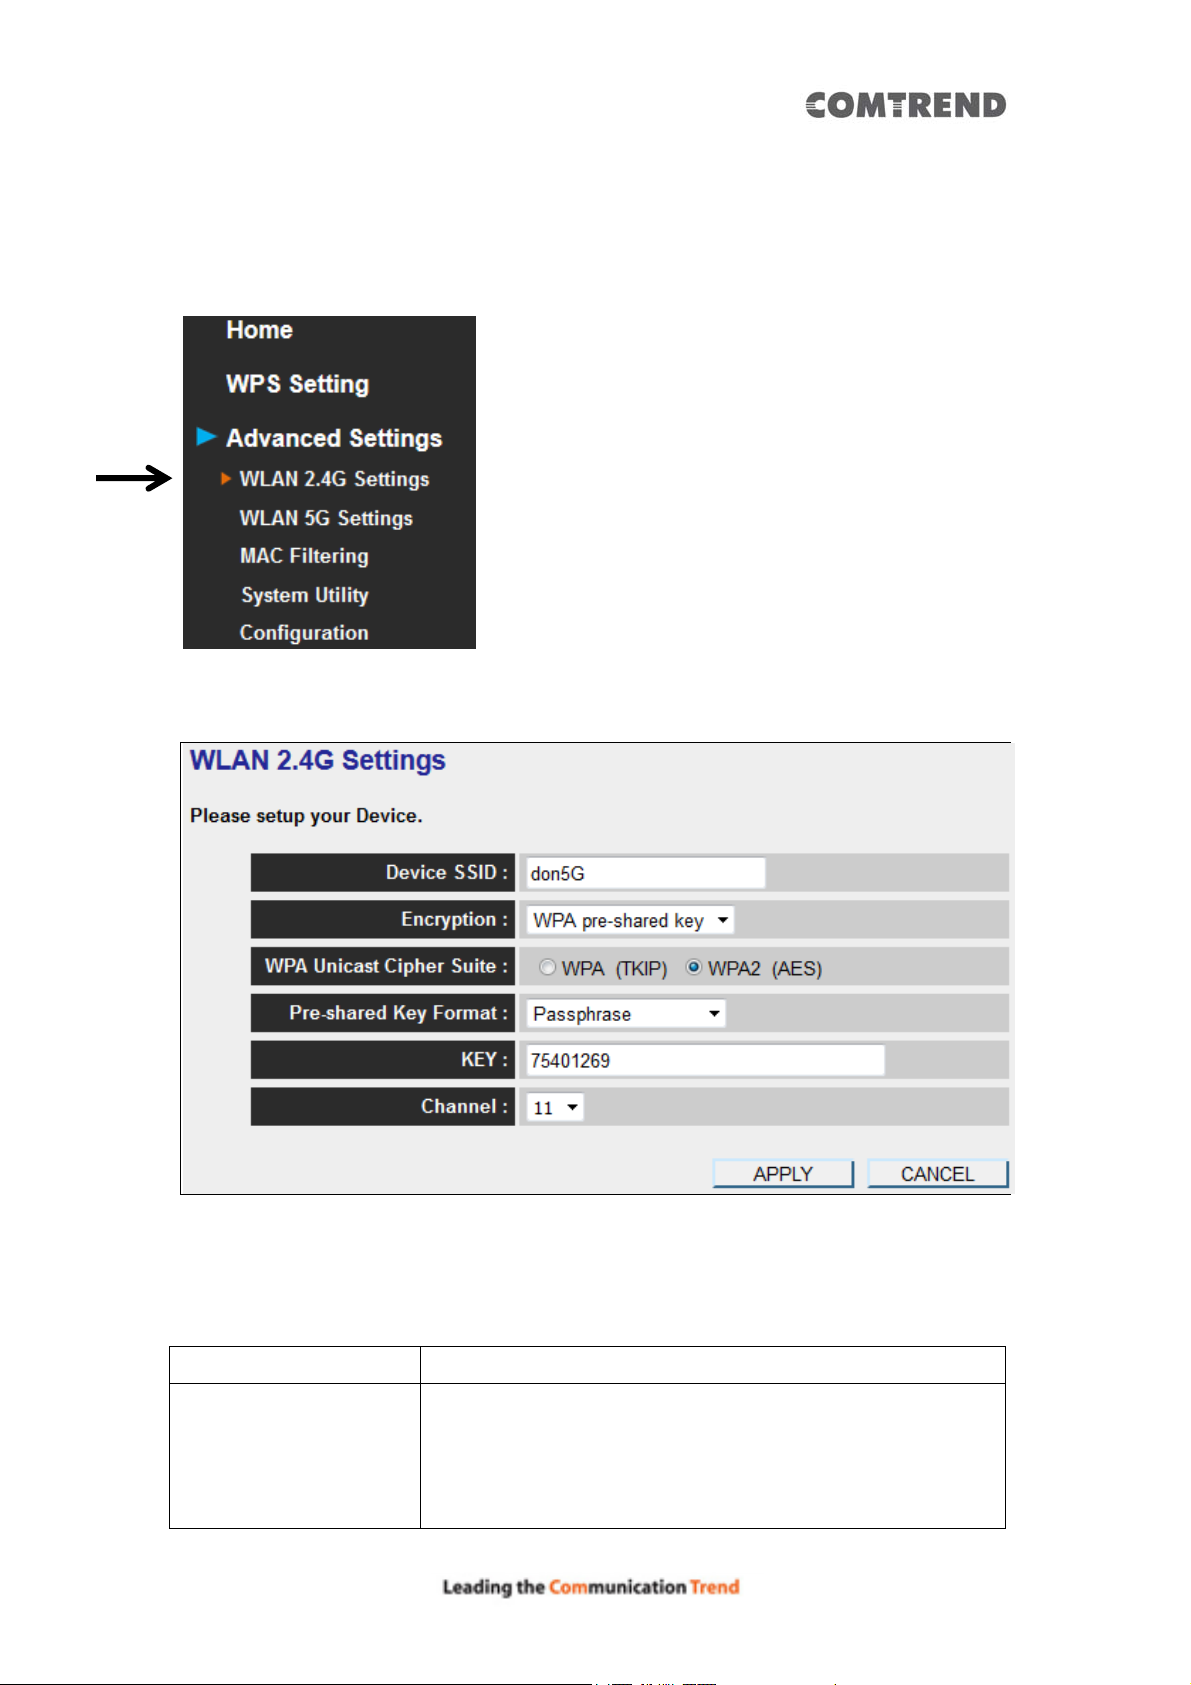
3.2.5 WLAN 2.4G settings
To access the 2.4GHz Wireless menu, click ‘WLAN 2.4G settings’ on the left.
The following setup page will appear:
Please Note: If your Wireless Mesh Point is working properly, it is not
recommended to make changes here.
The description of every setup item is listed as follows:
Item Description
Device SSID This is the current SSID name of the Mesh Point. The
SSID is used to identify your own Mesh Point from others
when there are other wireless devices in the same area.
You can type any alphanumerical characters to change
40
Page 42

the SSID here, maximum 32 characters.
Encryption This is the current security setup of the Wireless Mesh
Point. You can select an encryption method from the
drop-down menu, there are three options.
WPA Unicast Cipher
Suite
Pre-shared Key Format This is the current security setup of the Wireless Mesh
Key This is the current security setup of the Wireless Mesh
Channel This is the current channel of th e Wireless Mesh Point.
This is the current security setup of the Wireless Mesh
Point. Please select a type of WPA cipher suite.
Available options are: WPA (TKIP) and WPA2 (AES). You
can select one of them, but you have to make sure your
wireless client supports the cipher you selected.
Point. Y ou can select the type of pre-shared key, you can
select the Passphrase (8 or more alphanumerical
characters, up to 63), or Hex (64 characters of 0-9, and
a-f).
Point. Y ou can c hange the WPA passphrase here. It’ s not
recommended to use a word that can be found in a
dictionary due to security reasons.
41
Page 43
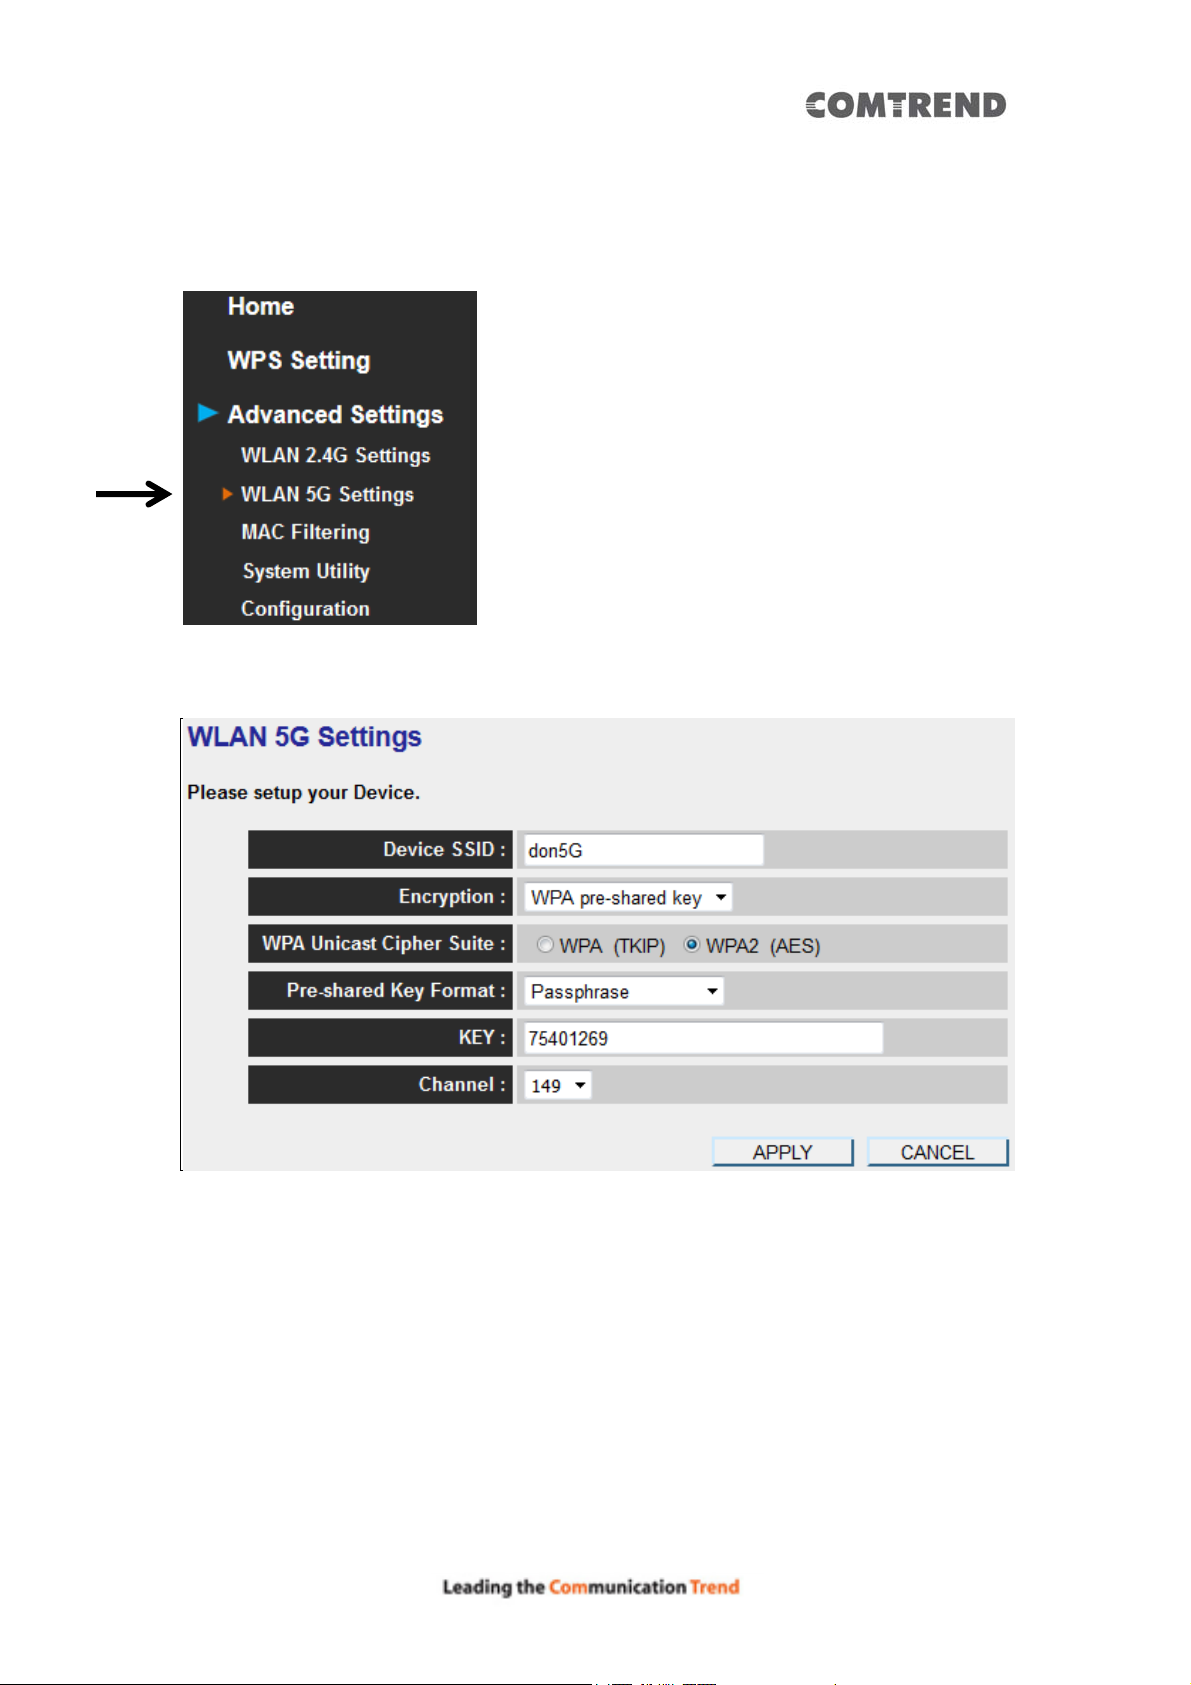
3.2.6 WLAN 5G settings
To access 5GHz Wireless menu, click ‘WLAN 2.4G settings’ on the left.
The following setup page will appear:
Please Note: If your Wireless Mesh Point is working properly, it is not
recommended to make changes here.
The description of every setup item is listed as follows:
42
Page 44

Item Description
Device SSID This is the current SSID name of the Wireless Mesh
Point. The SSID is used to identify your own Wireless
Mesh Point from others when there are other wireless
devices in the same area. You can type any
alphanumerical characters to change the SSID here,
maximum 32 characters.
Encryption This is the current security setup of the Wireless Mesh
Point. You can select an encryption method from the
drop-down menu, there are three options.
WPA Unicast Cipher
Suite
Pre-shared Key Format This is the current security setup of the Wireless Mesh
Key This is the current security setup of the Wireless Mesh
Channel This is the current channel of th e Wireless Mesh Point.
This is the current security setup of the Wireless Mesh
Point. Please select a type of WPA cipher suite.
Available options are: WPA (TKIP) and WPA2 (AES). You
can select one of them, but you have to make sure your
wireless client supports the cipher you selected.
Point. Y ou can select the type of pre-shared key, you can
select the Passphrase (8 or more alphanumerical
characters, up to 63), or Hex (64 characters of 0-9, and
a-f).
Point. Y ou can c hange the WPA passphrase here. It’ s not
recommended to use a word that can be found in a
dictionary due to security reasons.
43
Page 45
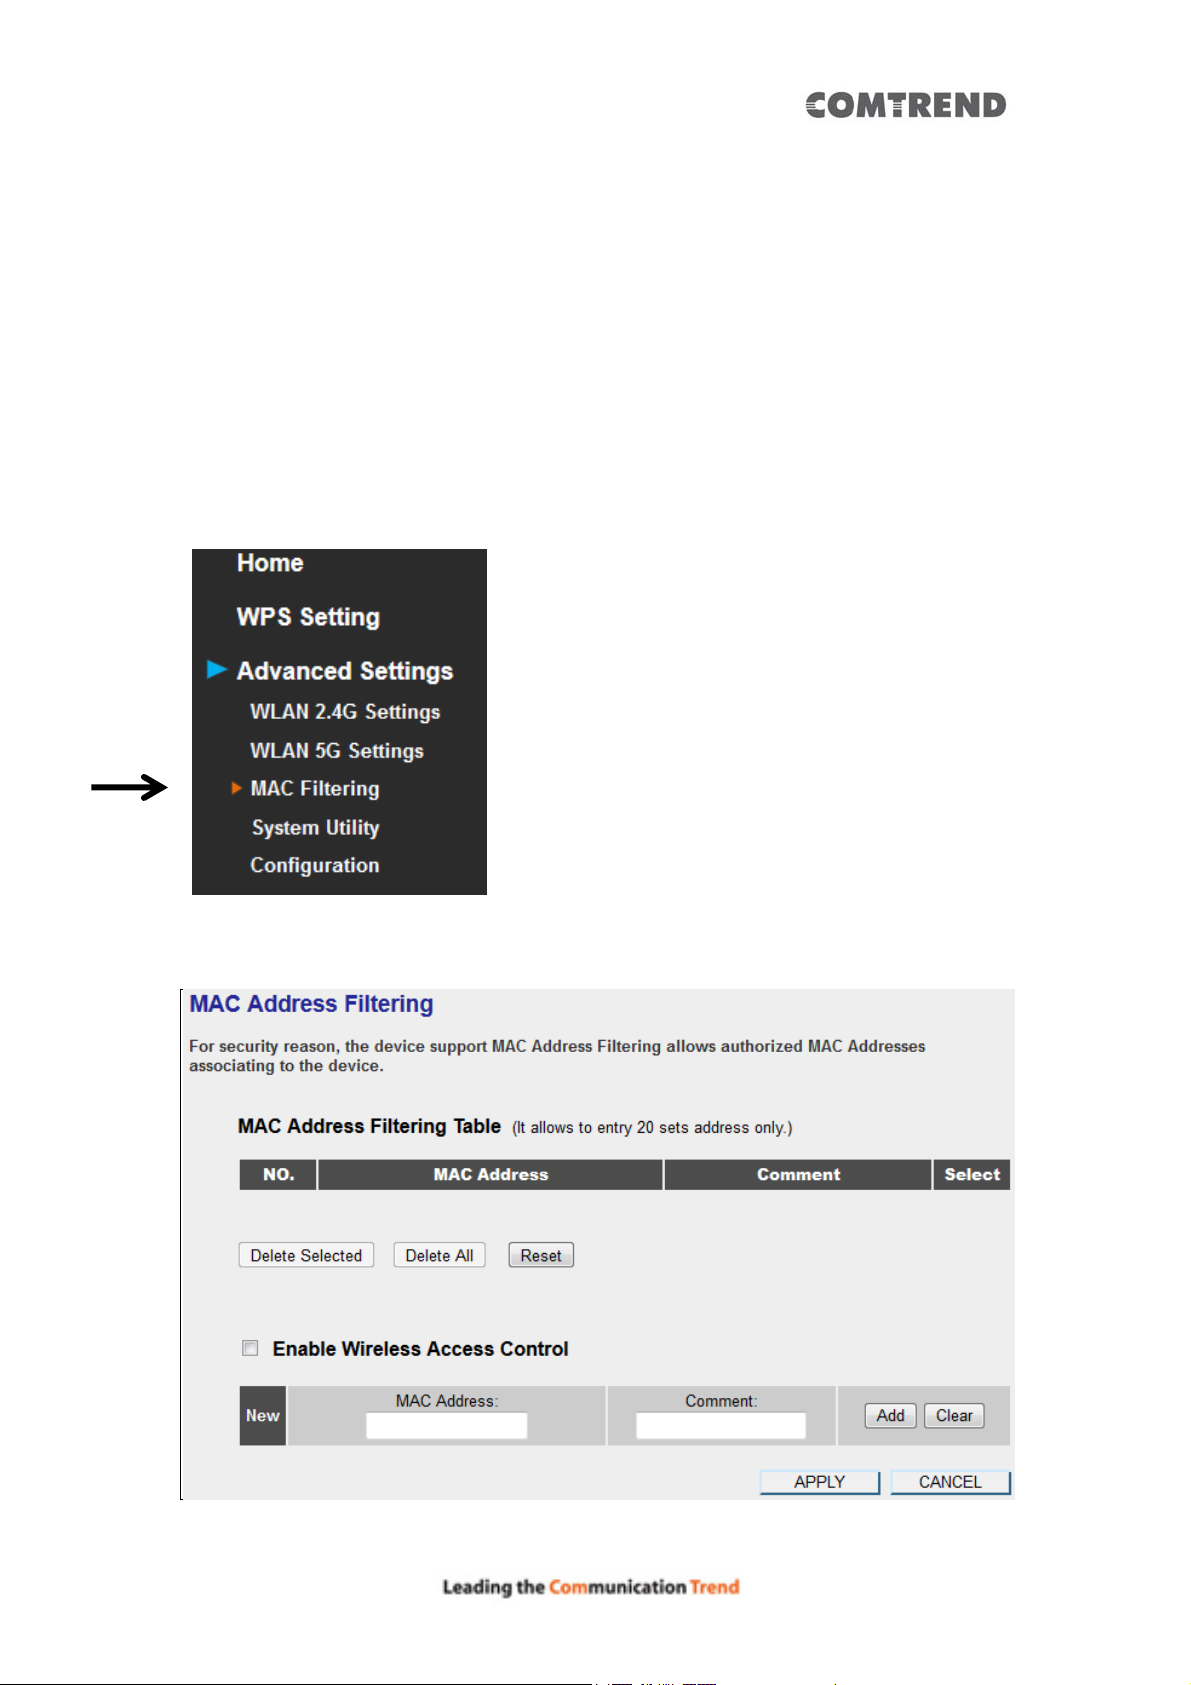
3.2.7 MAC Address Filtering
Besides using wireless security to only allow permitted wireless users to use this
Wireless Mesh Point, you can also use the MAC address filter to allow wireless users
with certain MAC addresses to use this Wireless Mesh Point.
This will enhance security because y ou can make a ‘whi te list’ to allow users o n the
list to use this Wireless Mesh Point. Clients who aren’t listed on this white list, can’t
get connected, even if they know the password.
To access the ‘MAC Filtering’ menu, click ‘MAC Filtering’ on the lef t.
The following setup page will appear:
44
Page 46
The description of every setup item is listed as follows:
Item Description
Enable Wireless Access
Control
MAC Address Input the MAC address of the clients you wish to deny or
Comment Input any descriptive text about th is rule, so you can
Add Add this MAC address to the list.
Clear Clear ‘MAC Address’ and ‘Comment’ field.
Delete Selected Delete MAC address(es) you selected.
Check this box to enable MAC filtering. If you do n’t check
this box, anyone who knows the wireless password can
get connected to this Wireless Mesh Point.
provide access to the Wireless Mesh Point into the MAC
address list. Input 12 HEX characters here, you don’t
have to add : (colon) or - (dash) characters every 2
characters.
If you don’t know how to get the MAC address of a
network client, see the following page.
remember the purpose of this rule. You can input up to
20 alphanumerical characters in this field.
Delete All Delete all MAC addresses on the list. You’ll be prompted
to confirm the deletion first.
Reset Uncheck all checked boxes.
Select All existing MAC addresses will be listed here. T o delete a
MAC address from the list, check the box of the MAC
address you wish to delete first. You can select more
than one MAC address here.
When you complete the settings in this page, click the ‘Apply’ button. You’ll see
the following message:
If you still need to configure this Wireless Mesh Point, click the ‘CONTINUE’ button;
if you want to save the changes and use it now, click the ‘APPLY’ button. You’ll be
prompted to wait for 50 seconds before you can reconnect to this Wireless Mesh
Point.
45
Page 47
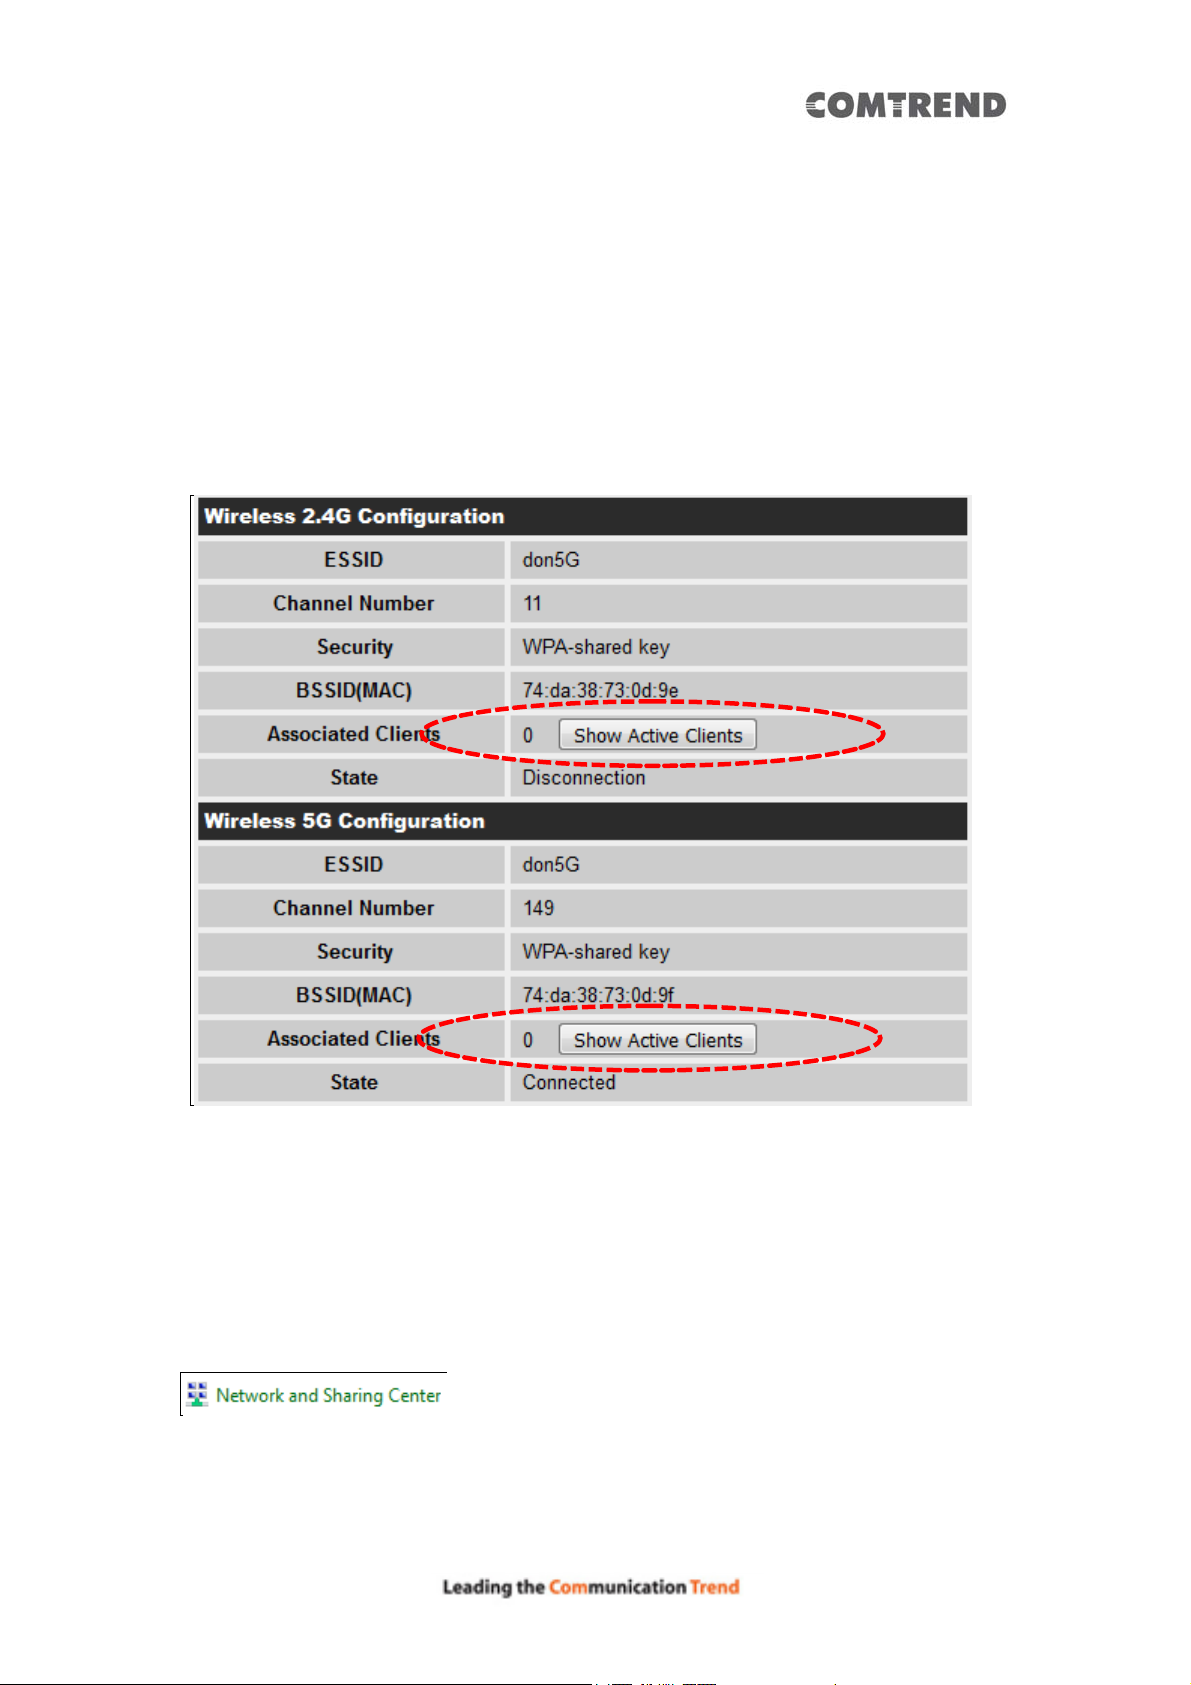
3.2.8 How to find the MAC address of your device
If you don’t know the MAC address of your computer or wireless device, you can
follow the procedure below:
For wireless devices and computers which are connected to this Wireless Mesh Point
already, you can click the ‘Show Active Clients’ button on the ‘Home’ setting page.
Their MAC address will be displayed in the ‘MAC Address’ field.
If you still can’t identify the MAC address of your computer, you can follow this
procedure:
Go to your computer’s Control Panel, Then click ‘Network and Sharing Center’.
46
Page 48
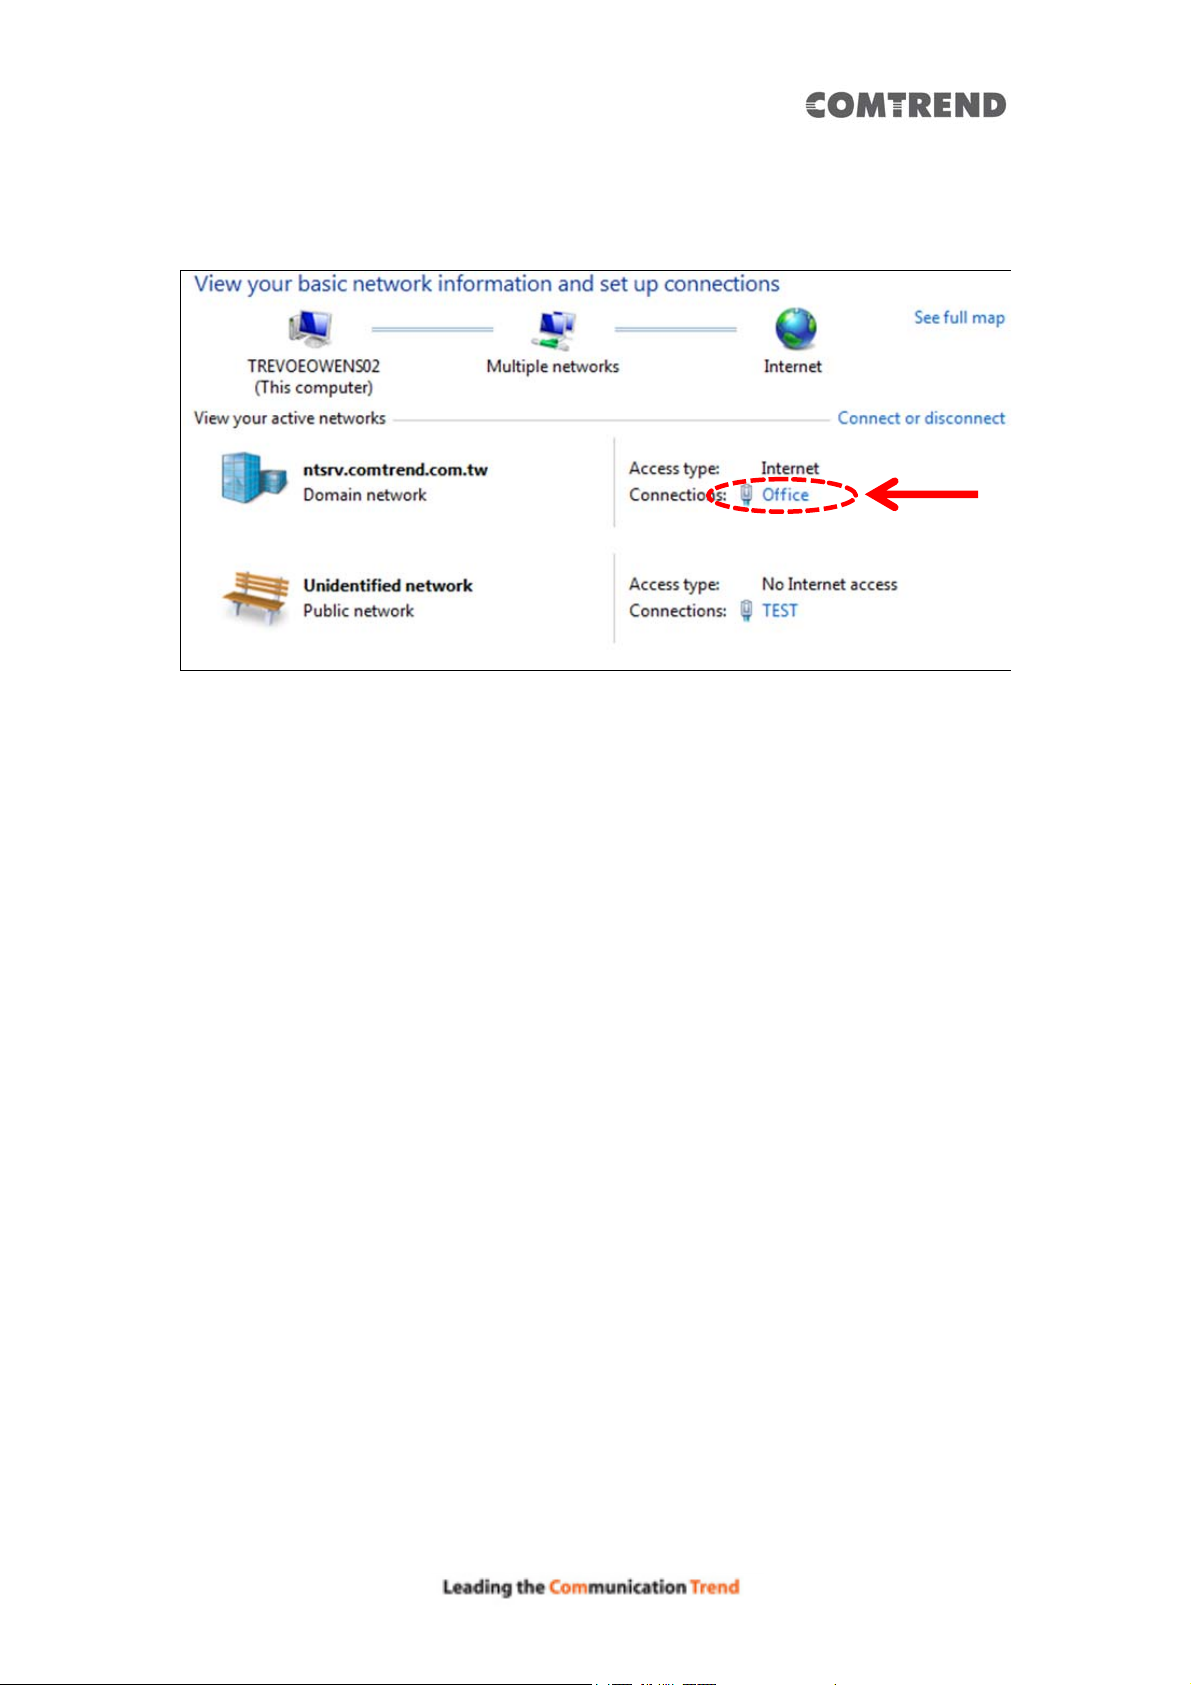
Click the connection that will be used to connect the Wireless Mesh Point (in this
example, ‘ofiice):
Click the ‘Details…’ button.
47
Page 49
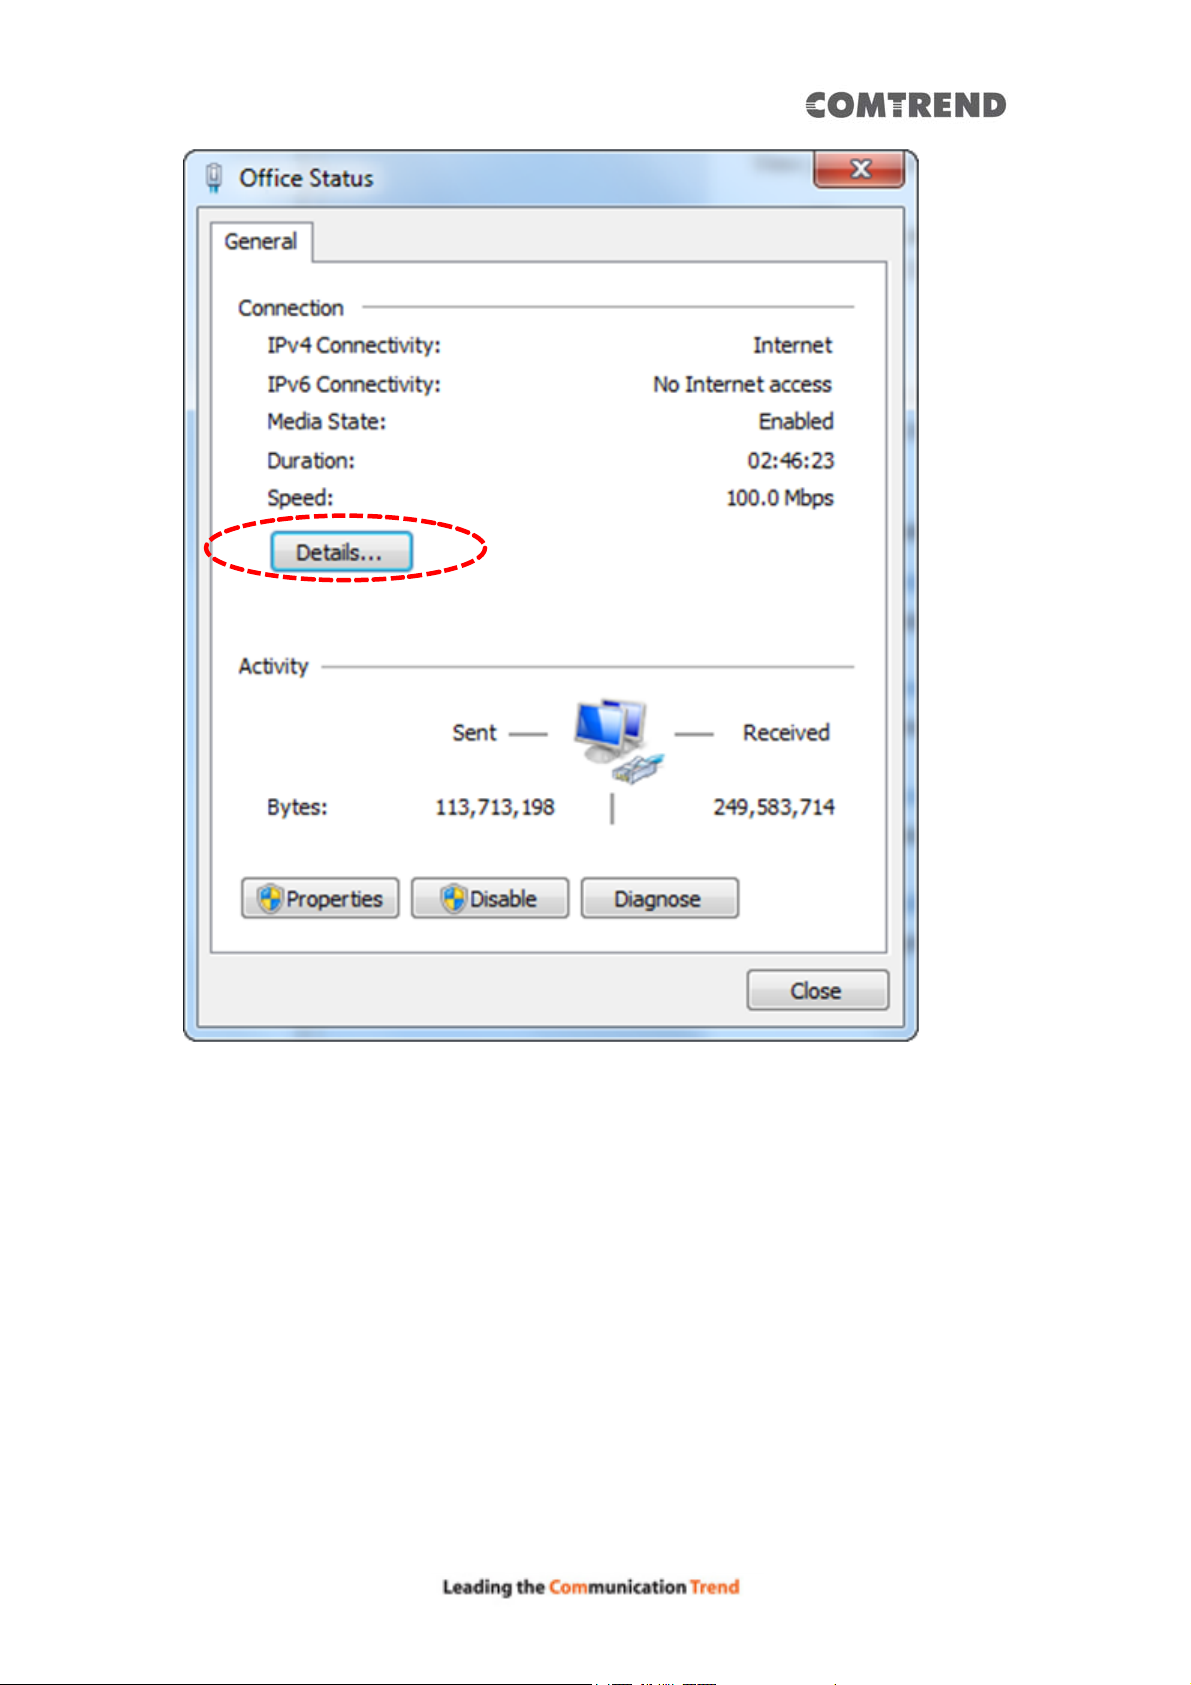
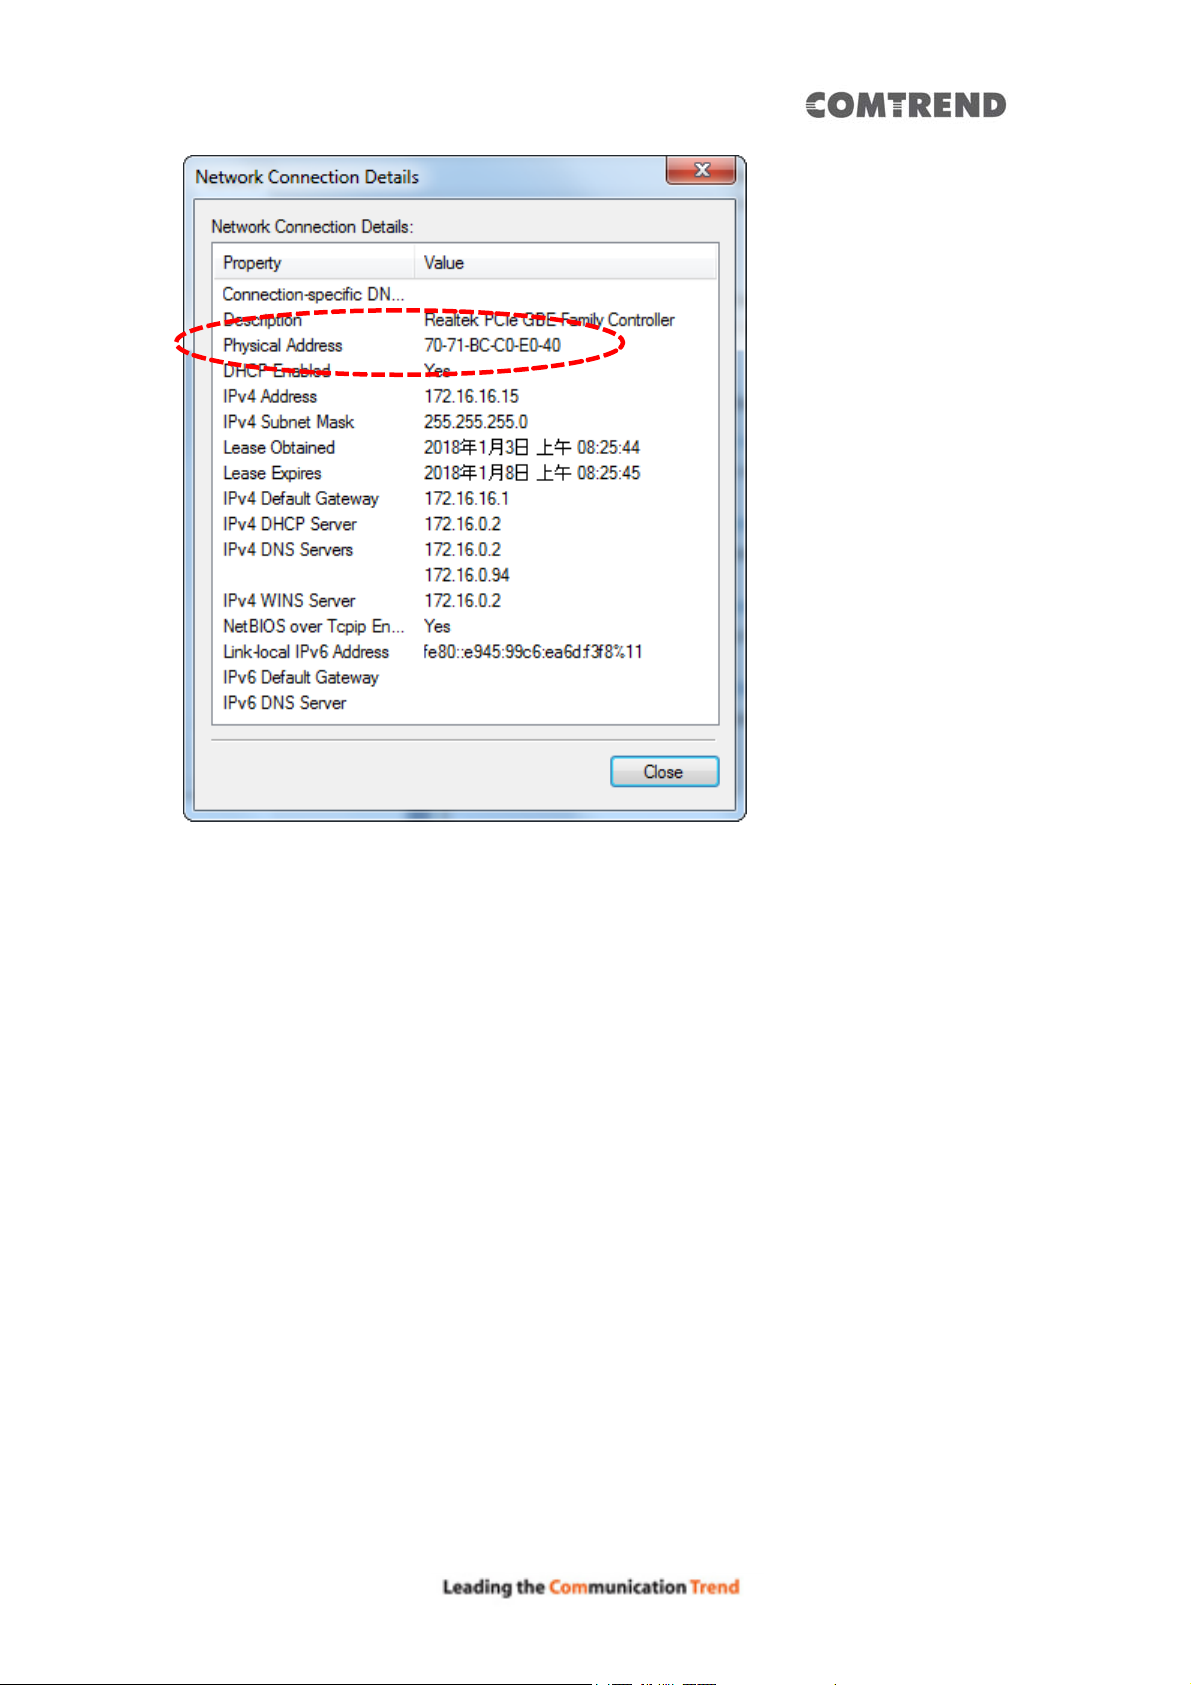
The MAC address of the selected network connection will be displayed here as
‘Physical Address’.
48
Page 50
49
Page 51
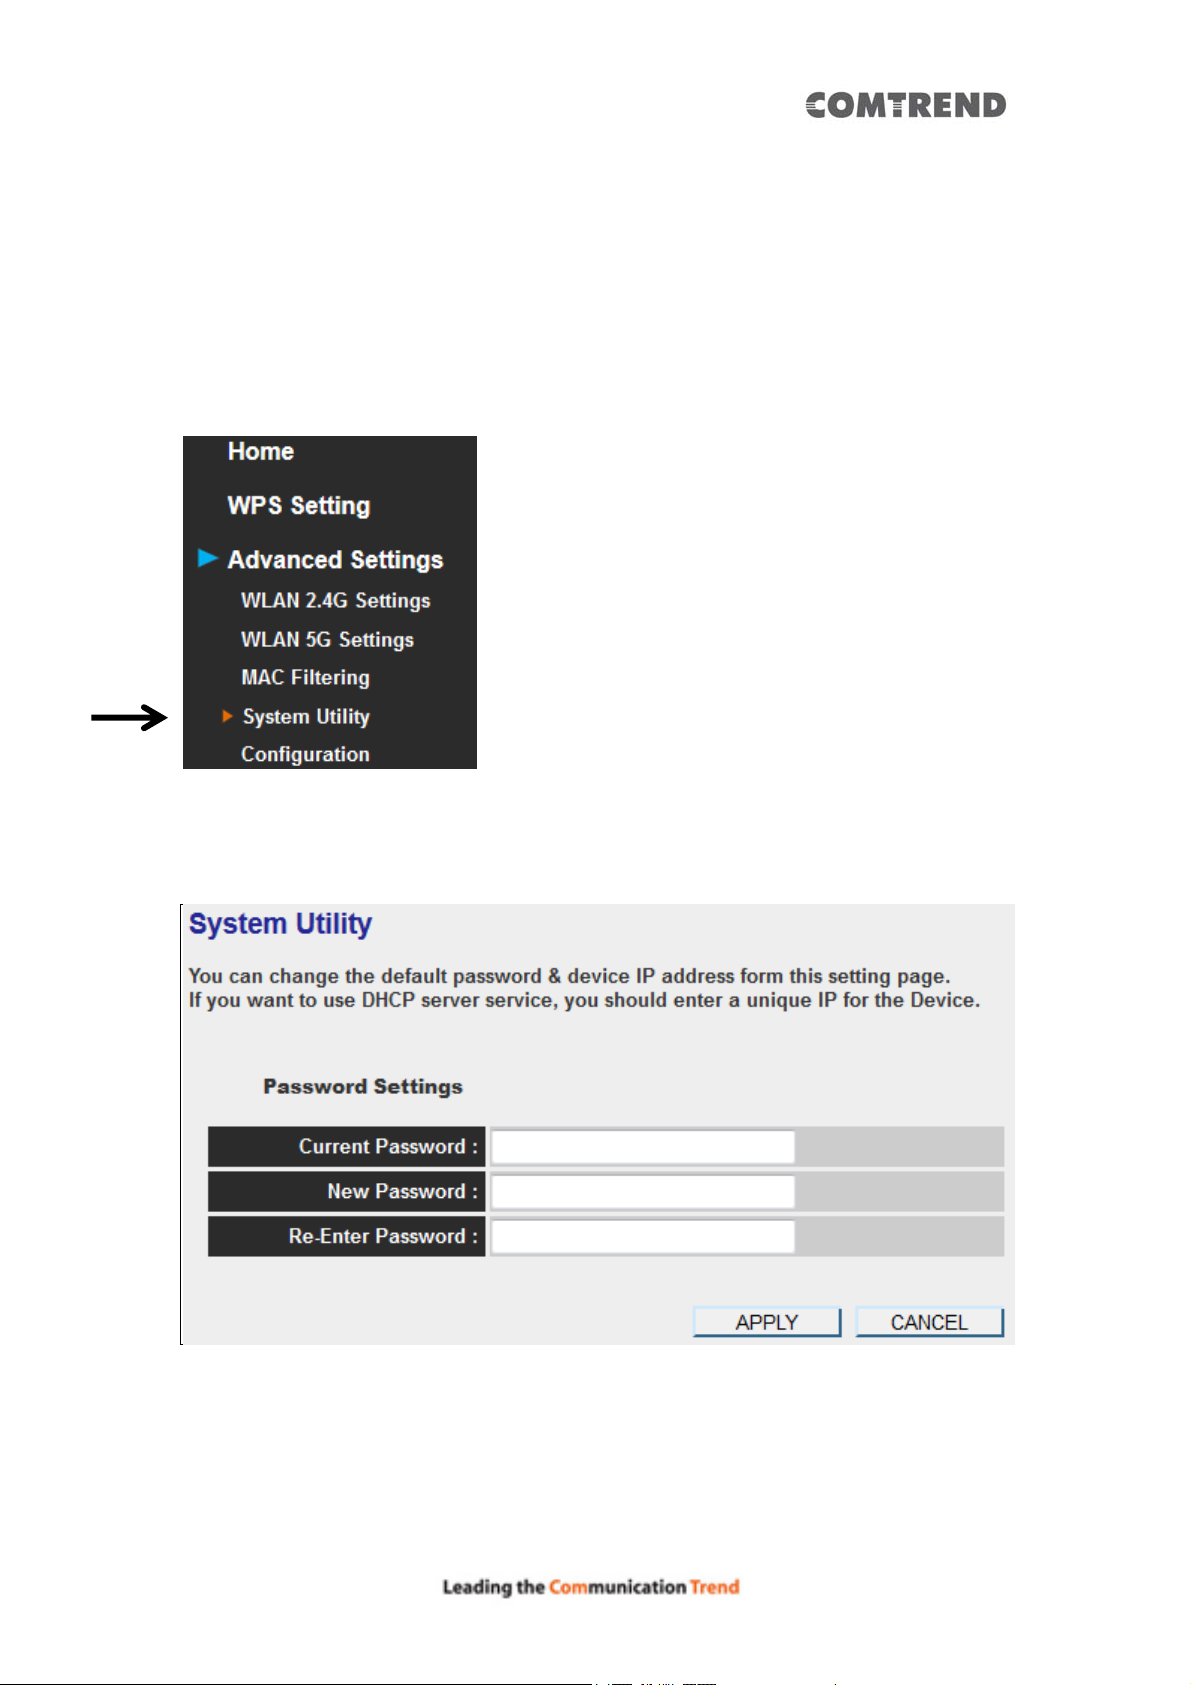
3.2.9 System Utility
You can change the settings of several system-level parameters in this page,
including the administrator’s password, and the IP address.
To access the ‘System Utility’ menu, click ‘System Utility’ on the left.
The following setup page will appear:
The description of every setup item is listed as follows:
50
Page 52
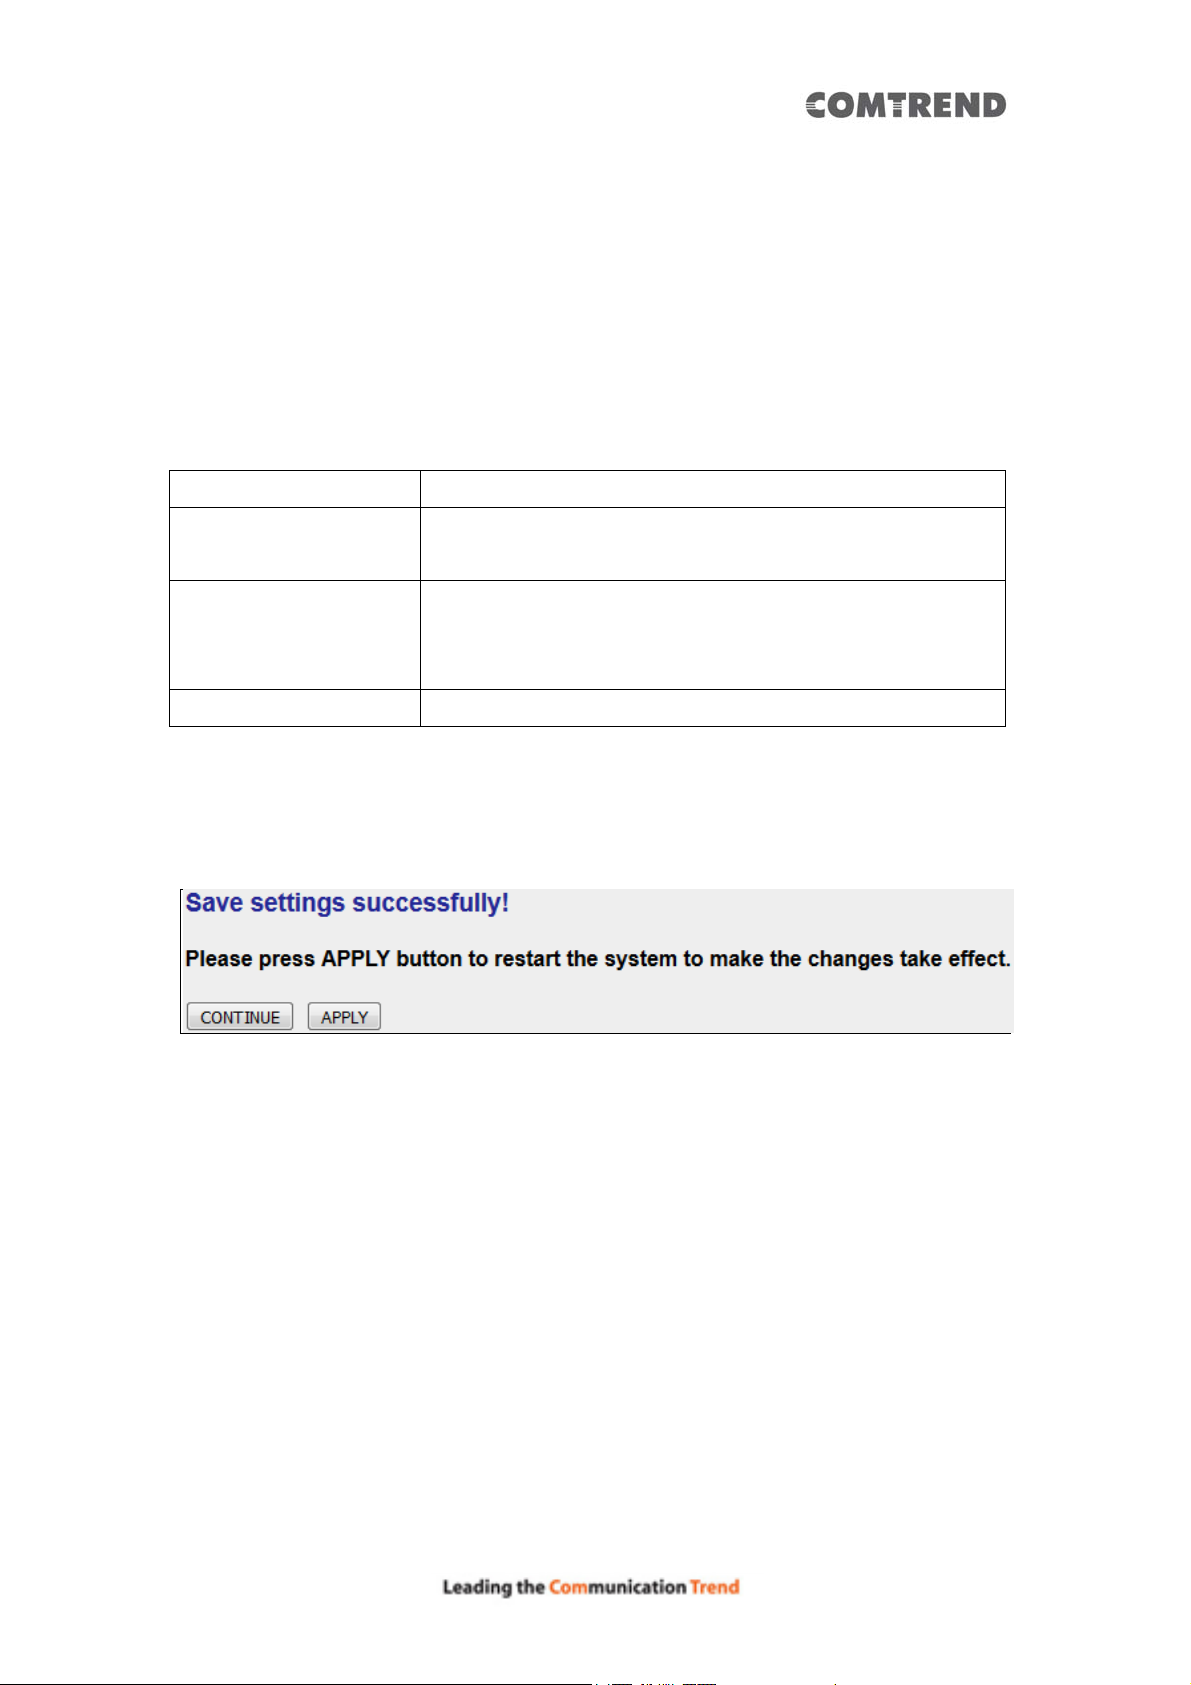
Password Settings
The default password of this Wireless Mesh Point is 1234, and it’s displayed on the
login prompt when accessed from the web browser. There’s a security risk if you
don’t change the default password, since everyone can see it. This is very important
when you have the wireless function enabled.
Here are descriptions of every setup item:
Item Description
Current Password To change the password, you have to input the current
password first.
New Password Input the new password here. You can use the
combination of letters, numbers, and symbols up to 20
characters.
Re-Enter Password Input the new password again for conformation.
When you complete the settings in this page, click the ‘Apply’ button. You’ll see the
following message:
If you still need to configure this Wireless Mesh Point, click the ‘CONTINUE’ button;
if you want to save the changes and use it now, click the ‘APPLY’ button. You’ll be
prompted to wait for 50 seconds before you can reconnect to this Wireless Mesh
Point.
51
Page 53
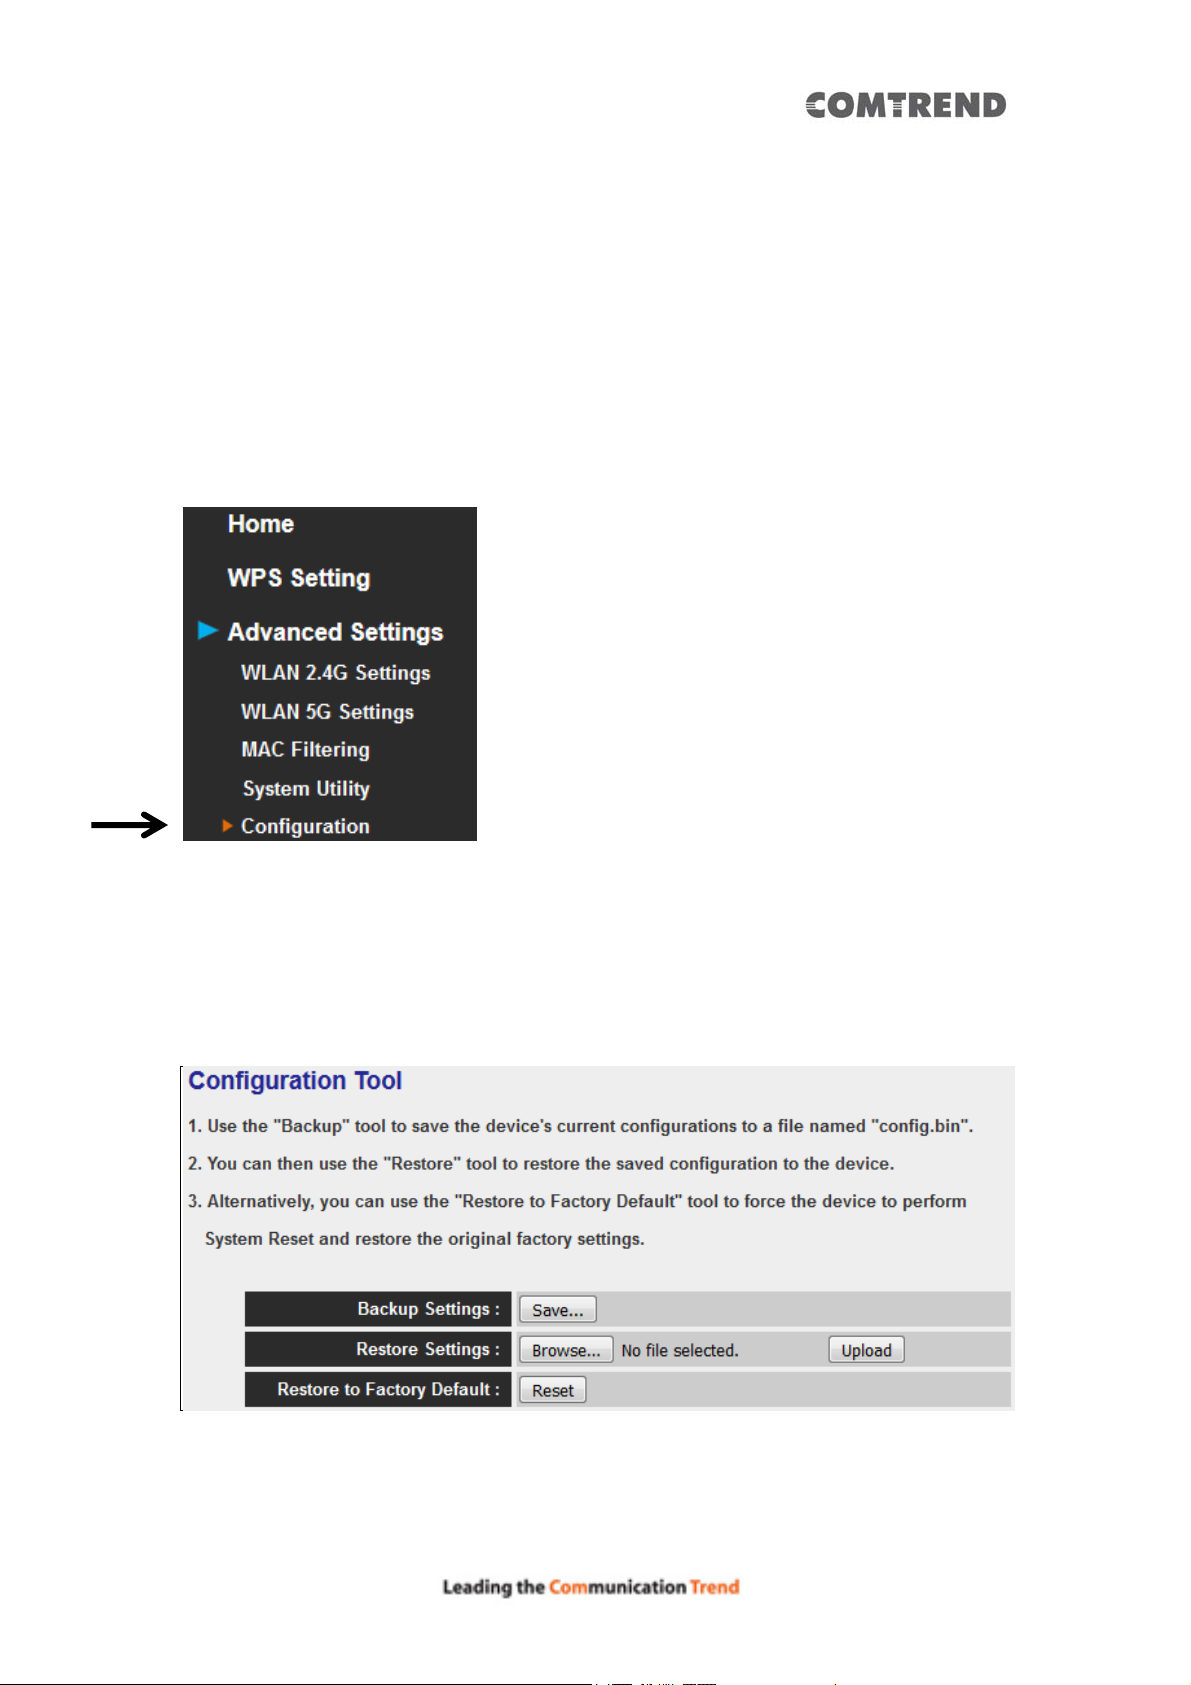
3.2.10 Configuration
You can backup and restore the configuration of this Wireless Mesh Point, so you can
recall all settings, without the need to reconfigure again. Th is functi on is especiall y
useful when you need to use this mini Wi-Fi Mesh Point in different places, like your
home and hotels.
To access the ‘Configuration’ menu, click ‘Configuration’ on the left.
3.2.10.1 Configuration Tool
The following setup page will appear:
The description of every setup item is listed as follows:
52
Page 54
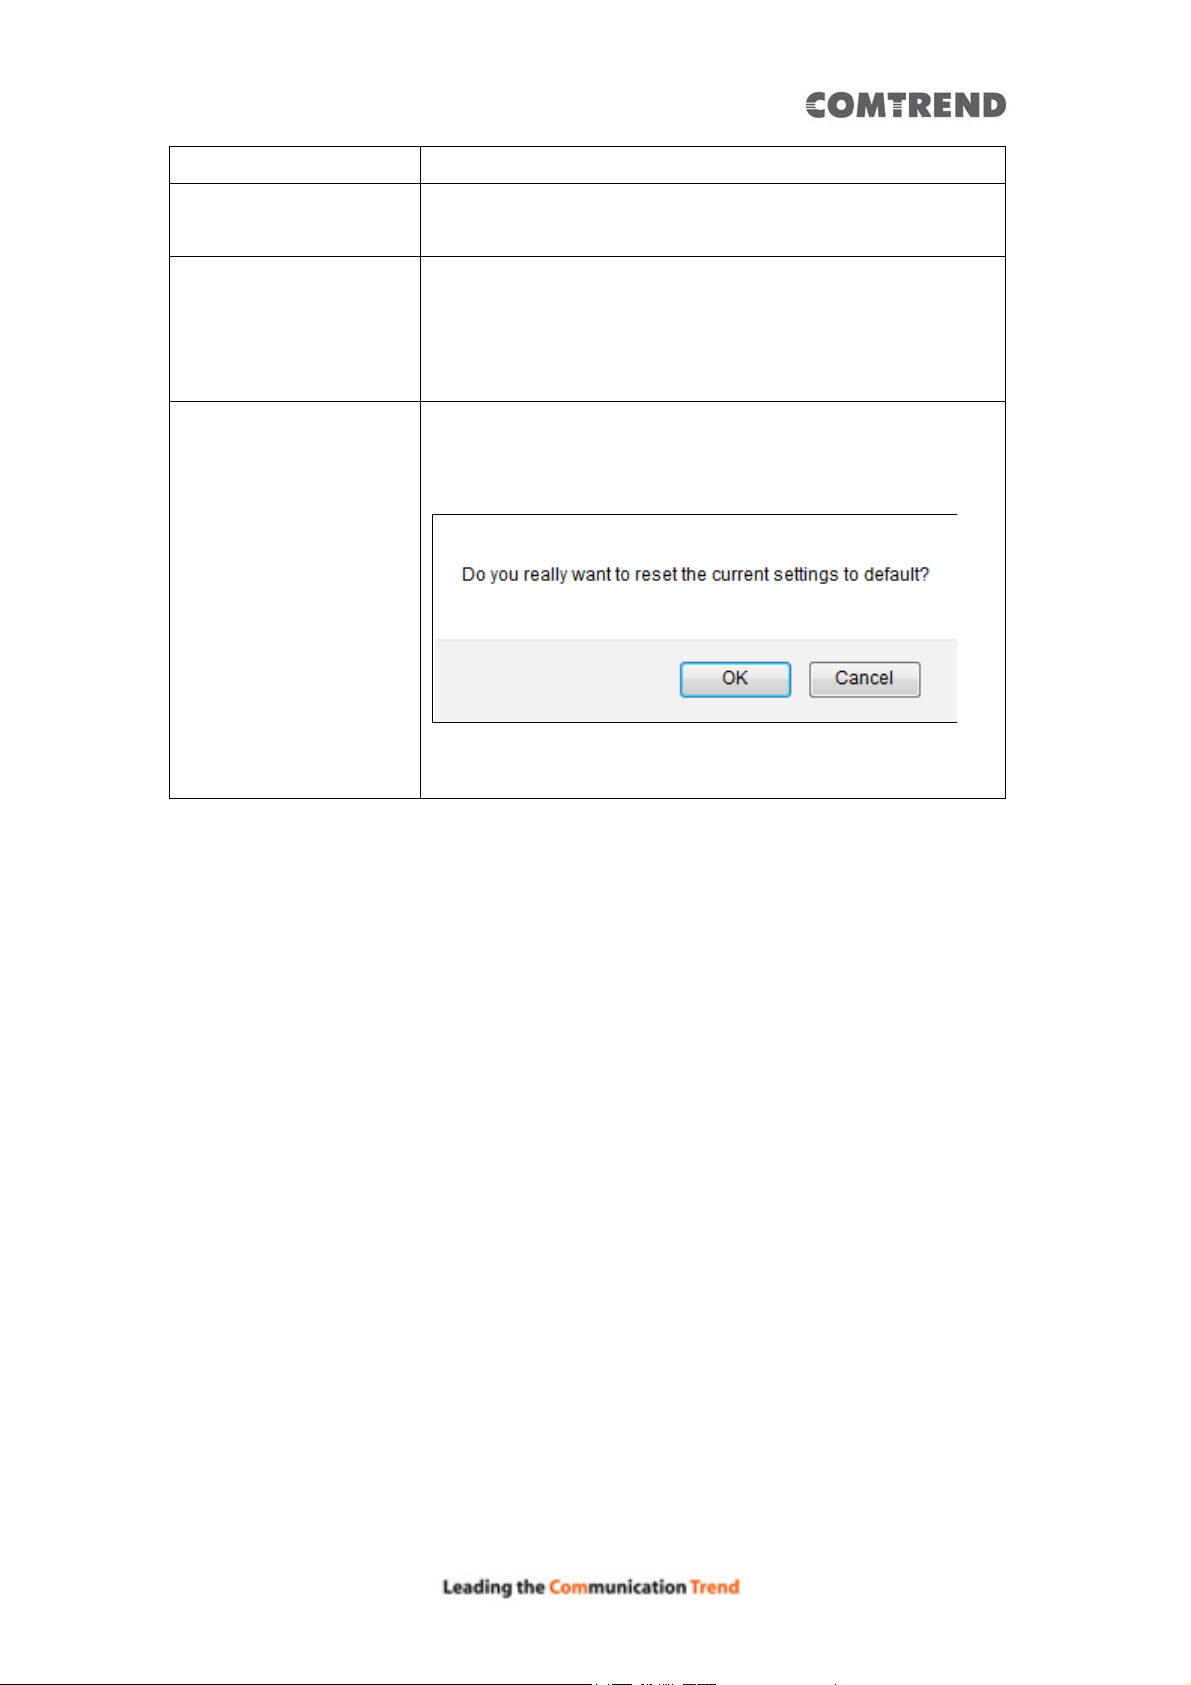
Item Description
Backup Settings Click the ‘Save’ button to save the current settings to a
file on your computer.
Restore Settings If you want to upload a saved configuration file to the
Wireless Mesh Point, click the ‘Browse’ button to select a
saved configuration file on your computer. Then click
the ’Upload’ button to replace the current settings.
Reset to Factory
Default
T o reset all settings of this Wireless Mesh Point to factory
defaults, including the password. You’ll be prompted to
confirm the settings reset:
Click ‘OK’ if you really want to restore all settings, or click
‘Cancel’ to abort.
53
Page 55
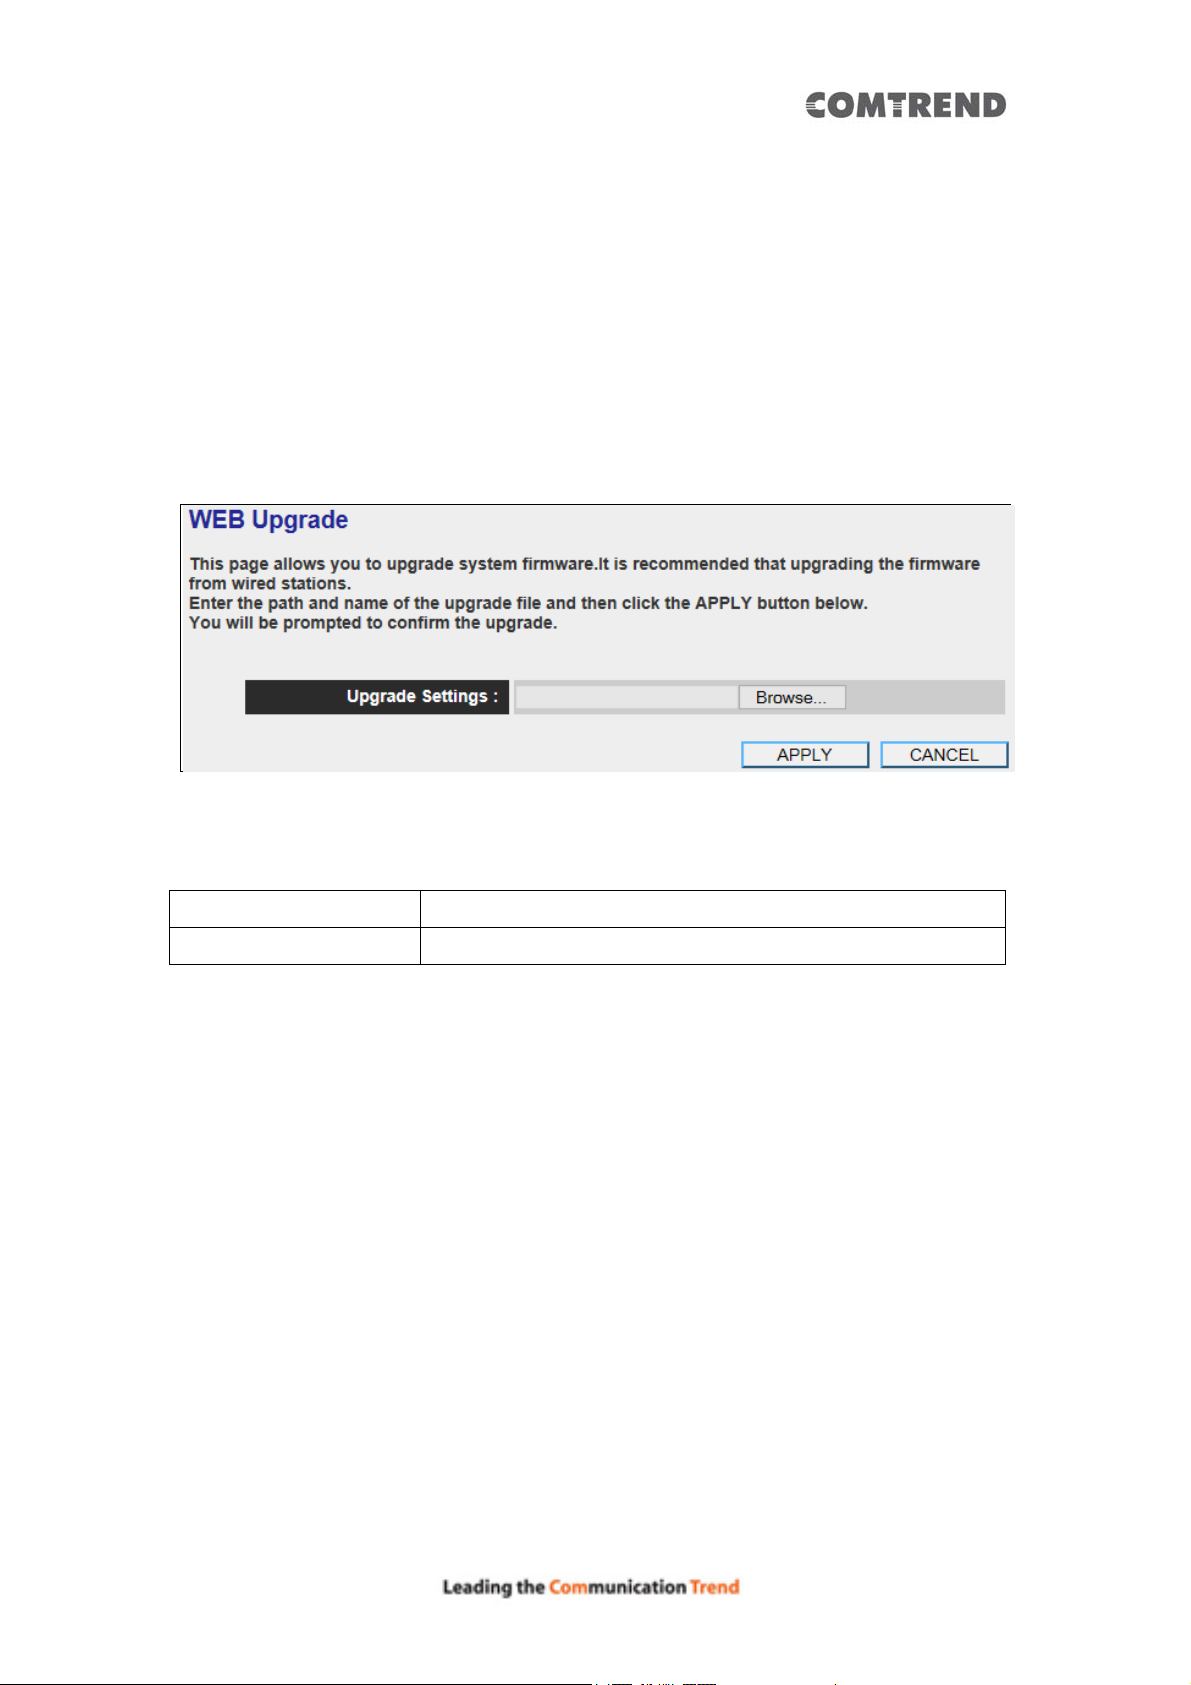
3.2.10.2 WEB Upgrade
The software running on this Wireless Mesh Point (i.e. ‘Firmware’) can be upgraded
to improve the functionality of this Wireless Mesh Point.
You can access our website to look for the latest firmware file. Then download the
latest firmware file and save on your computer and upload to this Wireless Mesh
Point.
The description of every setup item is listed as follows:
Item Description
Browse Select a firmware file saved on your computer.
When you are ready, click the ‘Apply’ button to start the firmware upgrade
procedure.
54
Page 56
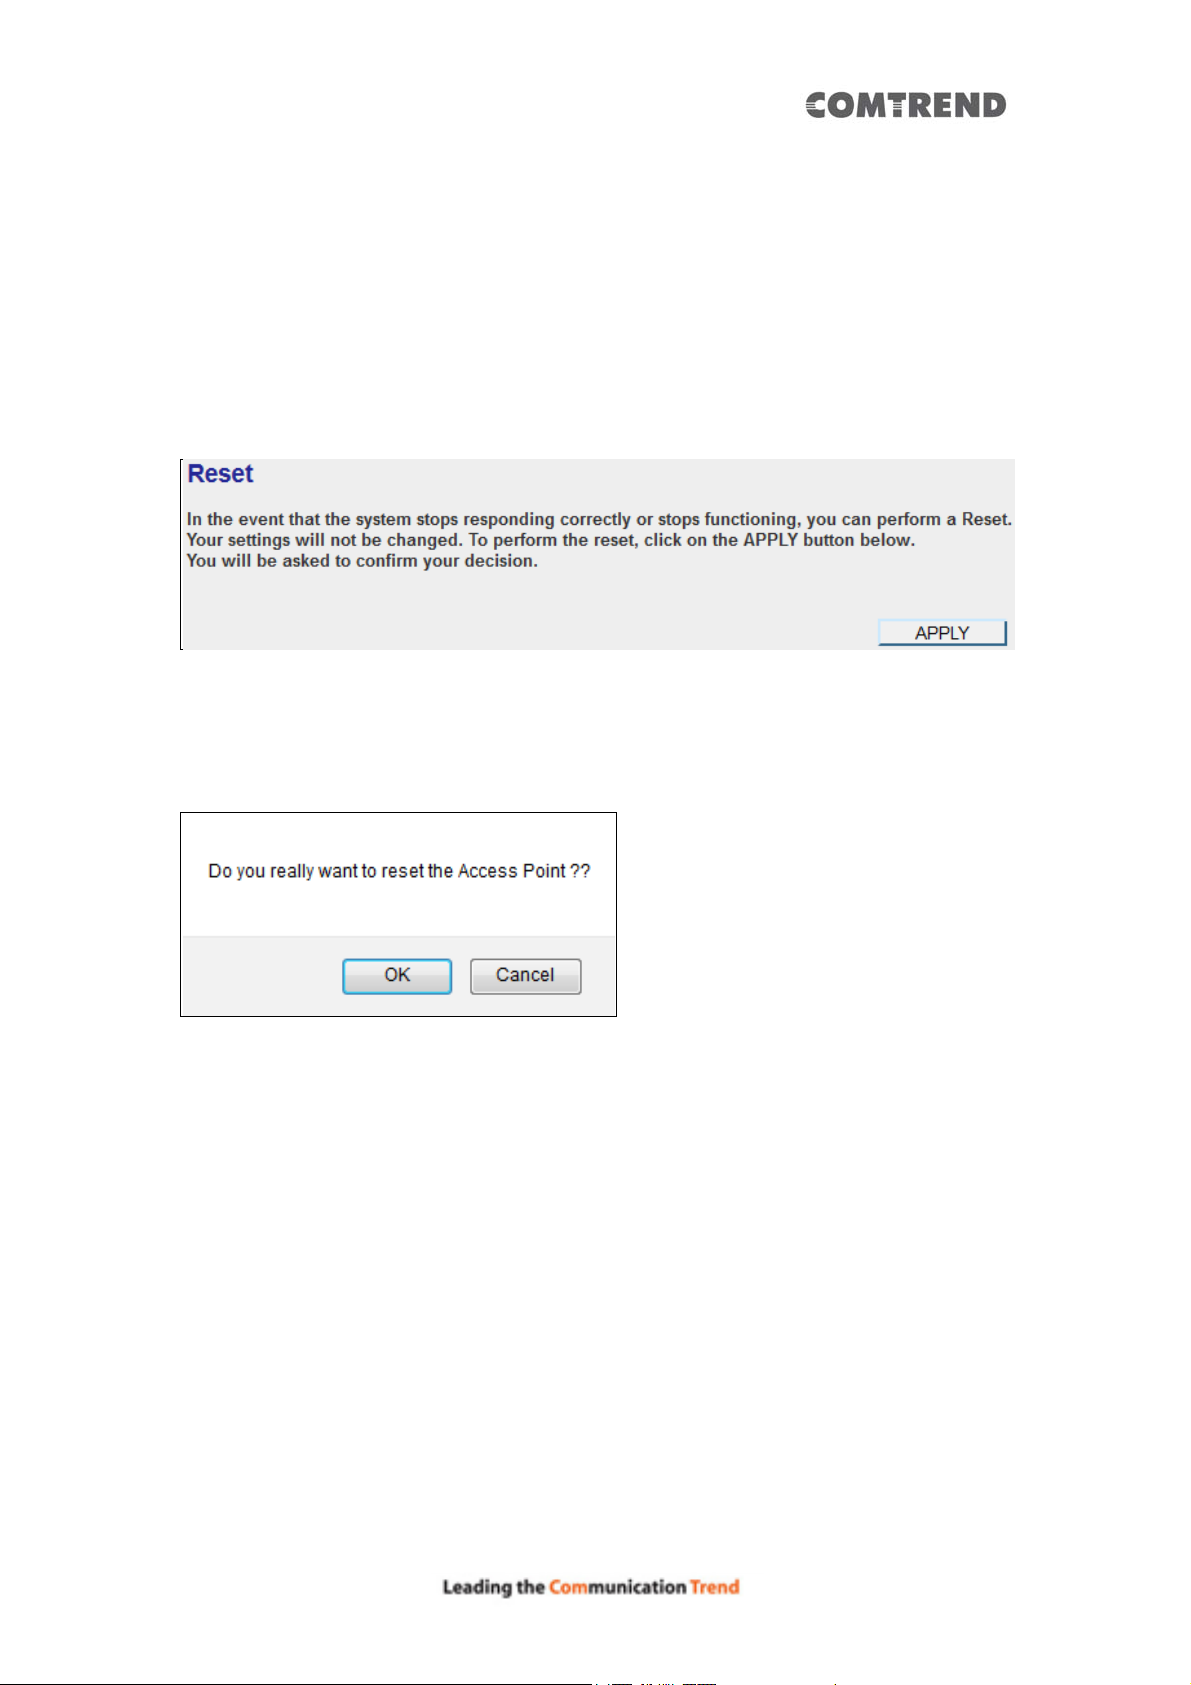
3.2.10.3 Reset
In the event that the system stops responding correctly or stops functioning, you
can perform a standard Reset or R eset to Defaults. A standard R eset will retain your
settings and reboot the Wireless Mesh Point, while resetting the device to defaults
will erase all configuration settings.
To reset this Wireless Mesh Point, click the ‘Apply’ button. You’ll be prompted to
confirm the reset:
Click the ‘OK’ button to reset the Wireless Mesh Point, or click ‘Cancel’ to abort.
55
Page 57
Chapter 4 AP Mode
You can build a wireless networking en vironment for the home or small office. Then
your wireless client users can access Internet by wirelessly connecting to this AP
without wired cable burden.
This chapter will show you how to quickly install this device by using quick setup and
explain each detailed setting on the web user interface page of AP mode.
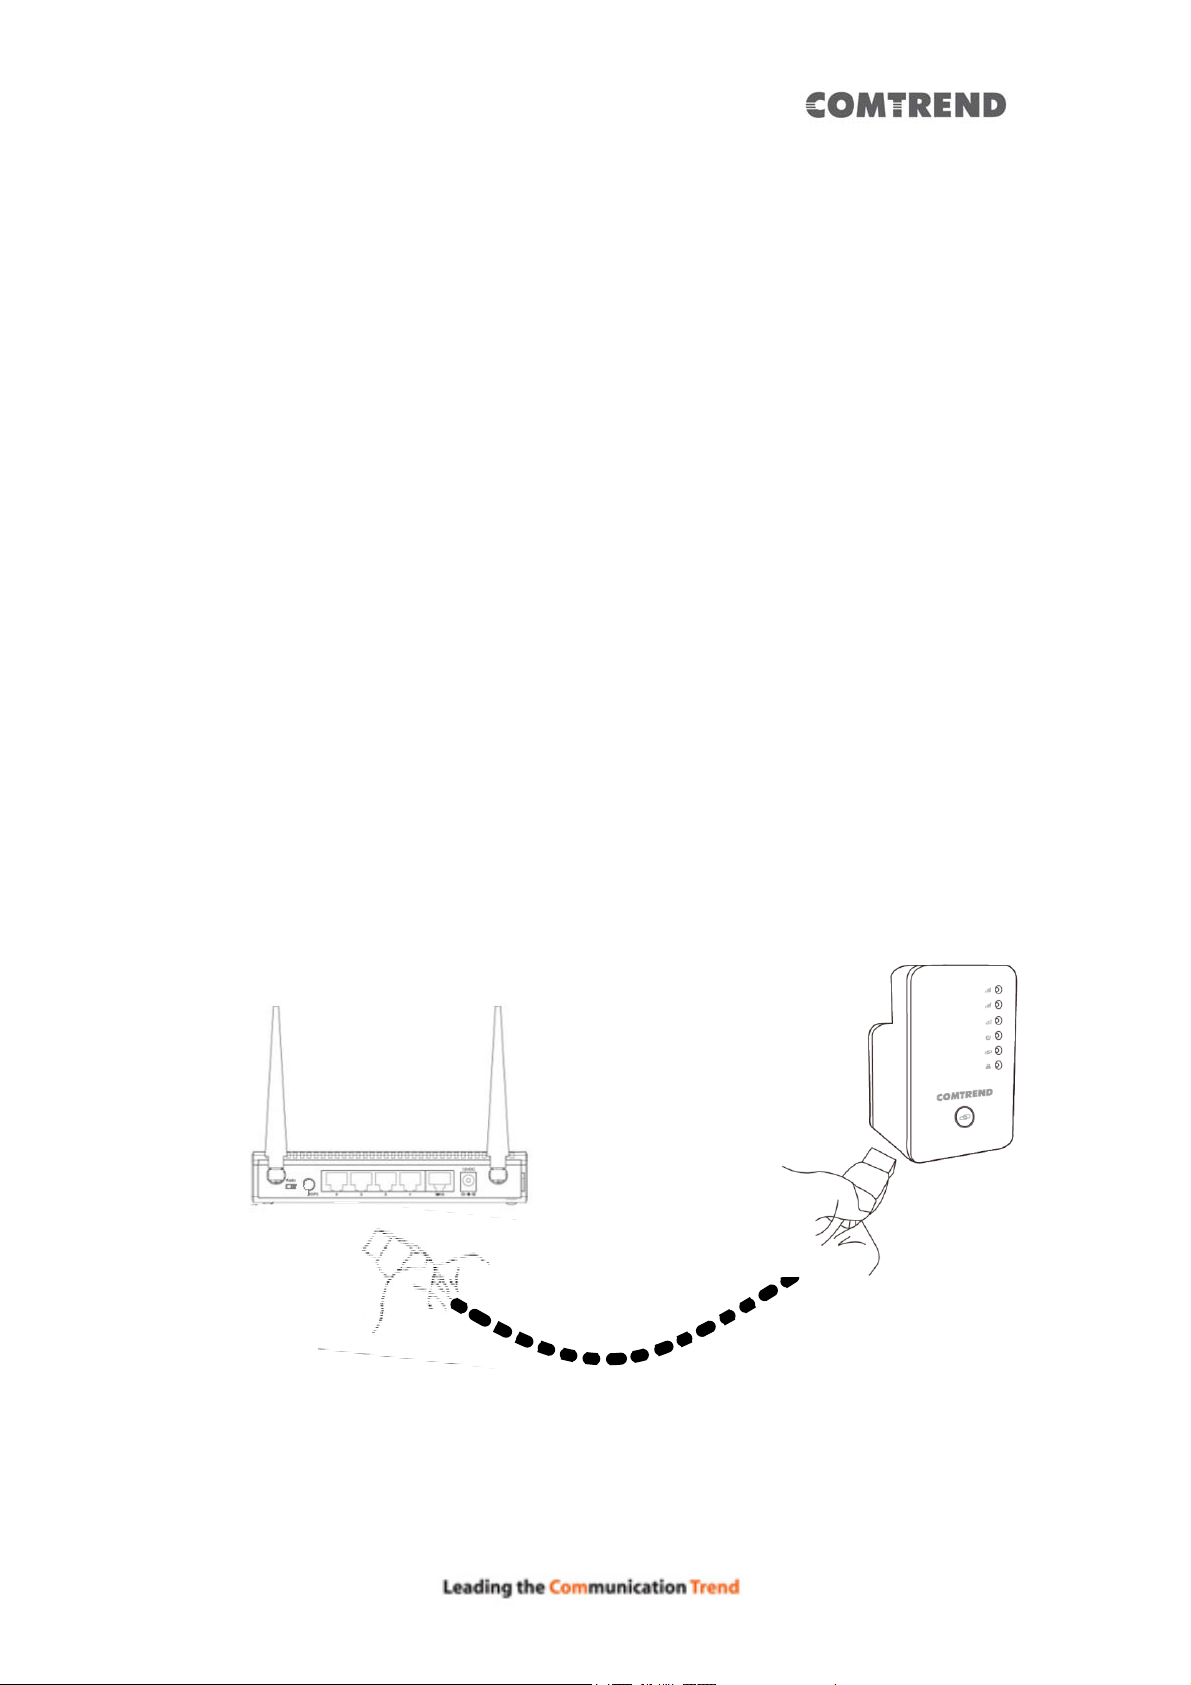
4.1 AP Mode Quick Installation Guide
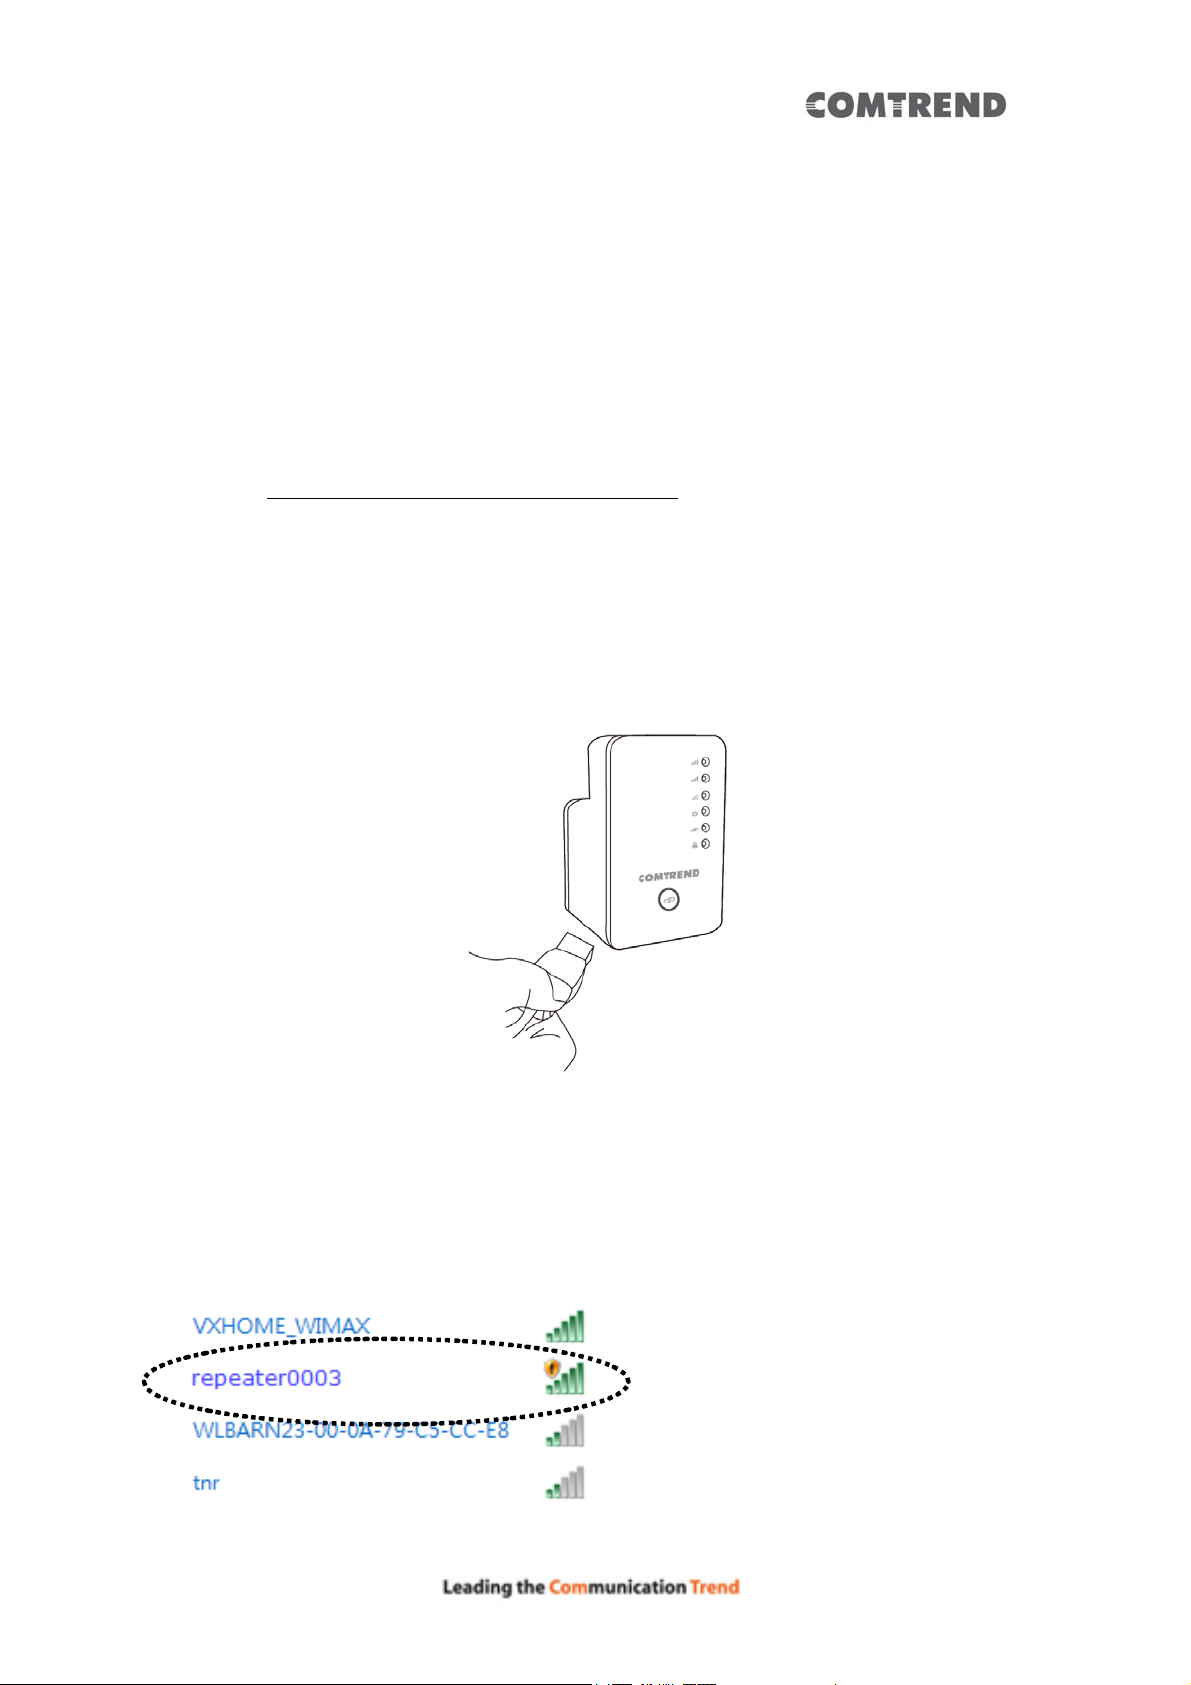
1. Connect this access point to an ADSL/VDSL modem, wired router, or
switch/hub in your network through the LAN port of the access point by
Ethernet cable.
The quick installation setup is complete, you can refer to ‘4.2 AP mode
Advanced Settings’ to login to the web user interface for other advanced
56
Page 58
settings.
4.1.2 Web browser quick setup
Before you can connect to the Wireless Mesh Point and start configuration
procedures, your computer must be able to get an IP address automatically (use
dynamic IP address). If it’s set to use static IP address, or you’re unsure, please
refer to ‘Chapter 6: 6.1 Configuring TCP/IP on PC’ to set your computer to use a
dynamic IP address.
1. Use an Ethernet cable to connect your computer’s Ethernet port and Wireless
Mesh Point’s Ethernet port.
Or use your computer’s wireless configuration utility to search for an access
point named ‘repeater0003’ and get connected. (The default SSID of this
Wireless Mesh Point device is ‘repeater0003’, 0003 is a reference, it is the last
4 digits of the device’s MAC number. Each device has a different MAC number,
please find it on your device label.)
57
Page 59
NOTE: this default SSID ‘repeater0003” is for reference, different devices
may have different last 4 digits.
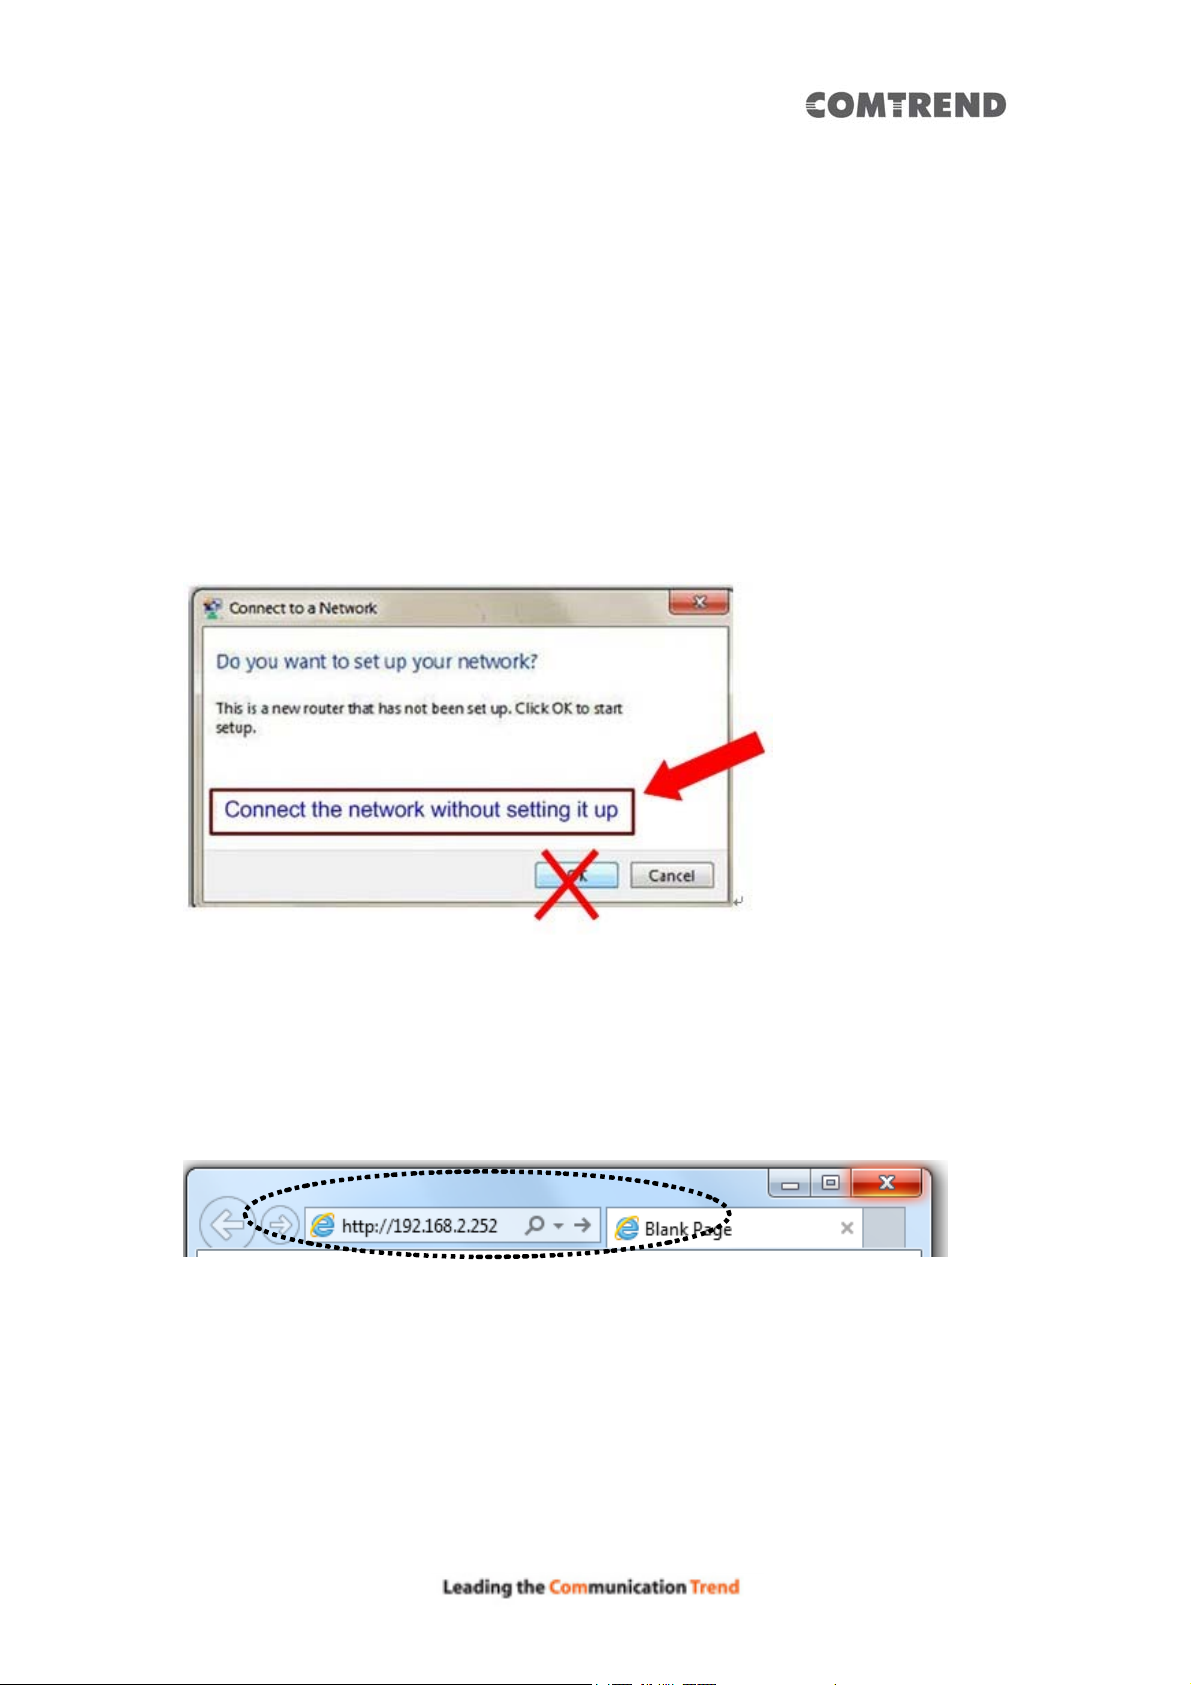
If you are using a wireless connection in Windows Operating System and
encountered the following screen, please click “Connect the network without
setting it up” then you can successfully link to the Wireless Mesh Point. Do NOT
click “OK “.
In case you click ‘OK’ , the Windows Operating System will ask for a security key ,
please click “Cancel” to revert back to this page.
2. Open your web browser, it will redirect to the web user interface setting page.
(or you can input the default IP address http://192.168.2.252 in the address
bar)
3. The Wireless Mesh Point will prompt you to input the username and password.
Default username is ‘admin’ and password is ‘1234’. Click the ‘OK’ button to
continue.
58
Page 60
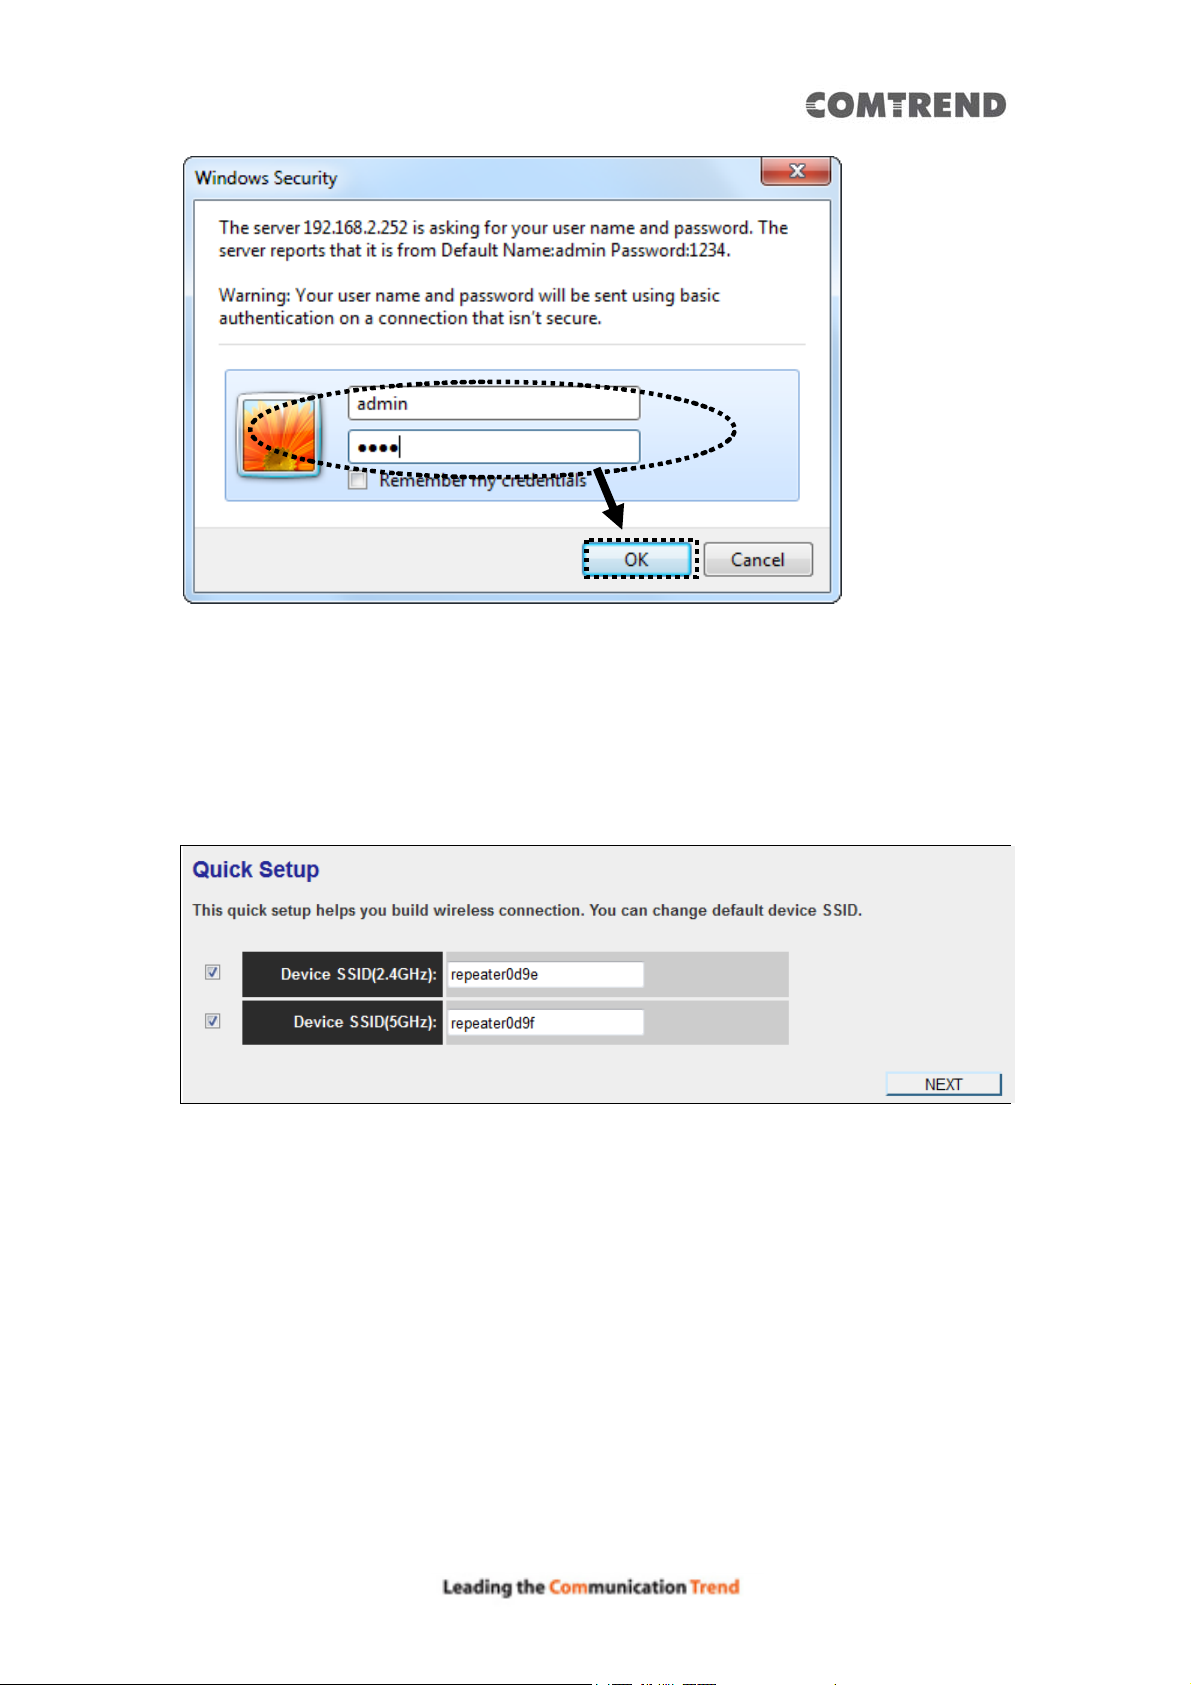
4. Please input an SSID (a name used to identify this access point) in the ‘Device
SSID(2.4GHz)’ and ‘Device SSID(5GHz)’ field, then click the ‘Next’ button. The
default SSID is repeaterxxxx, you can change this default SSID if you want.
5. Select security type of the wireless link to include 2.4Ghz and 5Ghz :
Encryption: Disable (no security), WEP, WPA pre-shared key, or WPA RADIUS.
59
Page 61
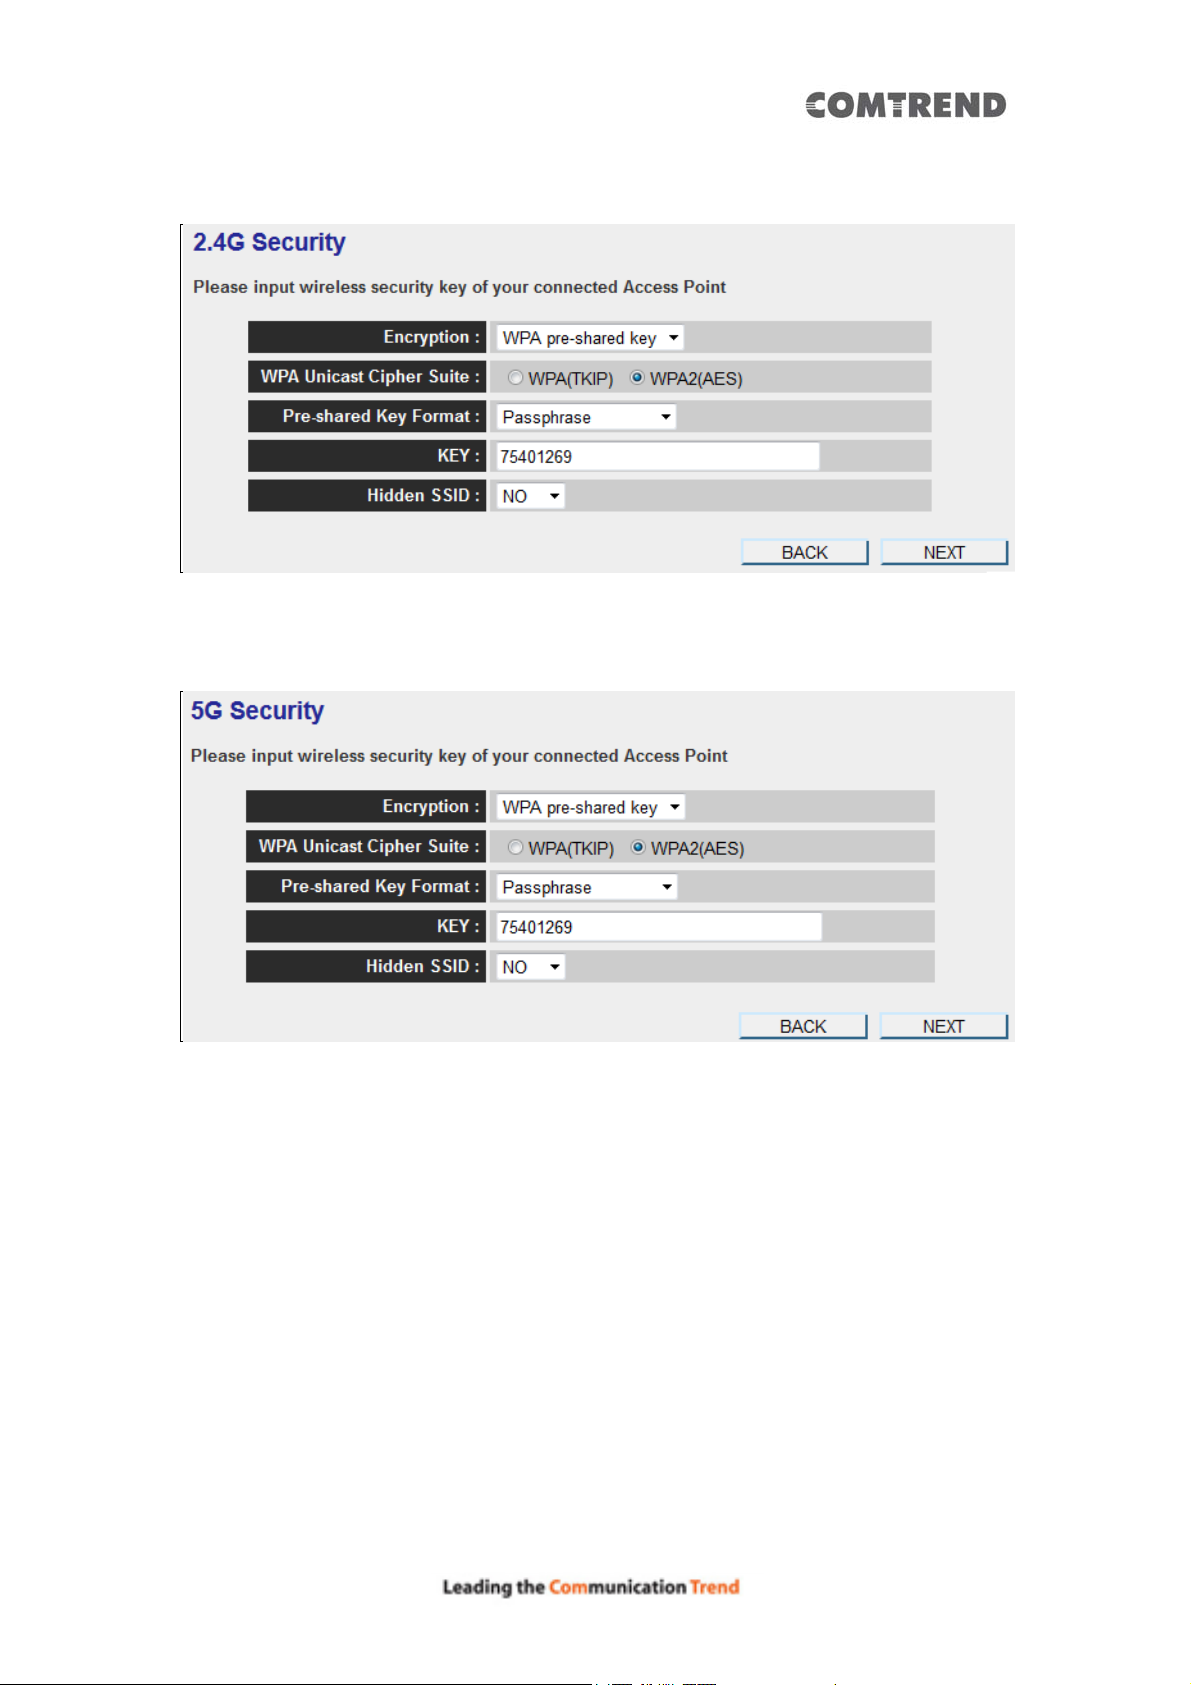
2.4GHz Wireless
5GHz Wireless
Note: WEP encryption: Select key length (64 or 128bit), key format (Hex or
ASCII characters), Default Tx Key (usually use ‘Key 1’), and input key
characters (refer to ‘Key Format’ you selected for number of characters).
WPA pre-shared key: Select one WPA Unicast Cipher Suite (usually use
default setting ‘WPA(TKIP)’), Pre-shared Key Format: Passphrase
(alphanumeric characters) or Hex (64 Hex Characters), and input key
characters in the ‘KEY’ field.
WPA RADIUS: Only use this option if you have a RADIUS authentication
server on your LAN. You have to input the RADIUS server’s parameters
(Server IP, port number, and password).
60
Page 62
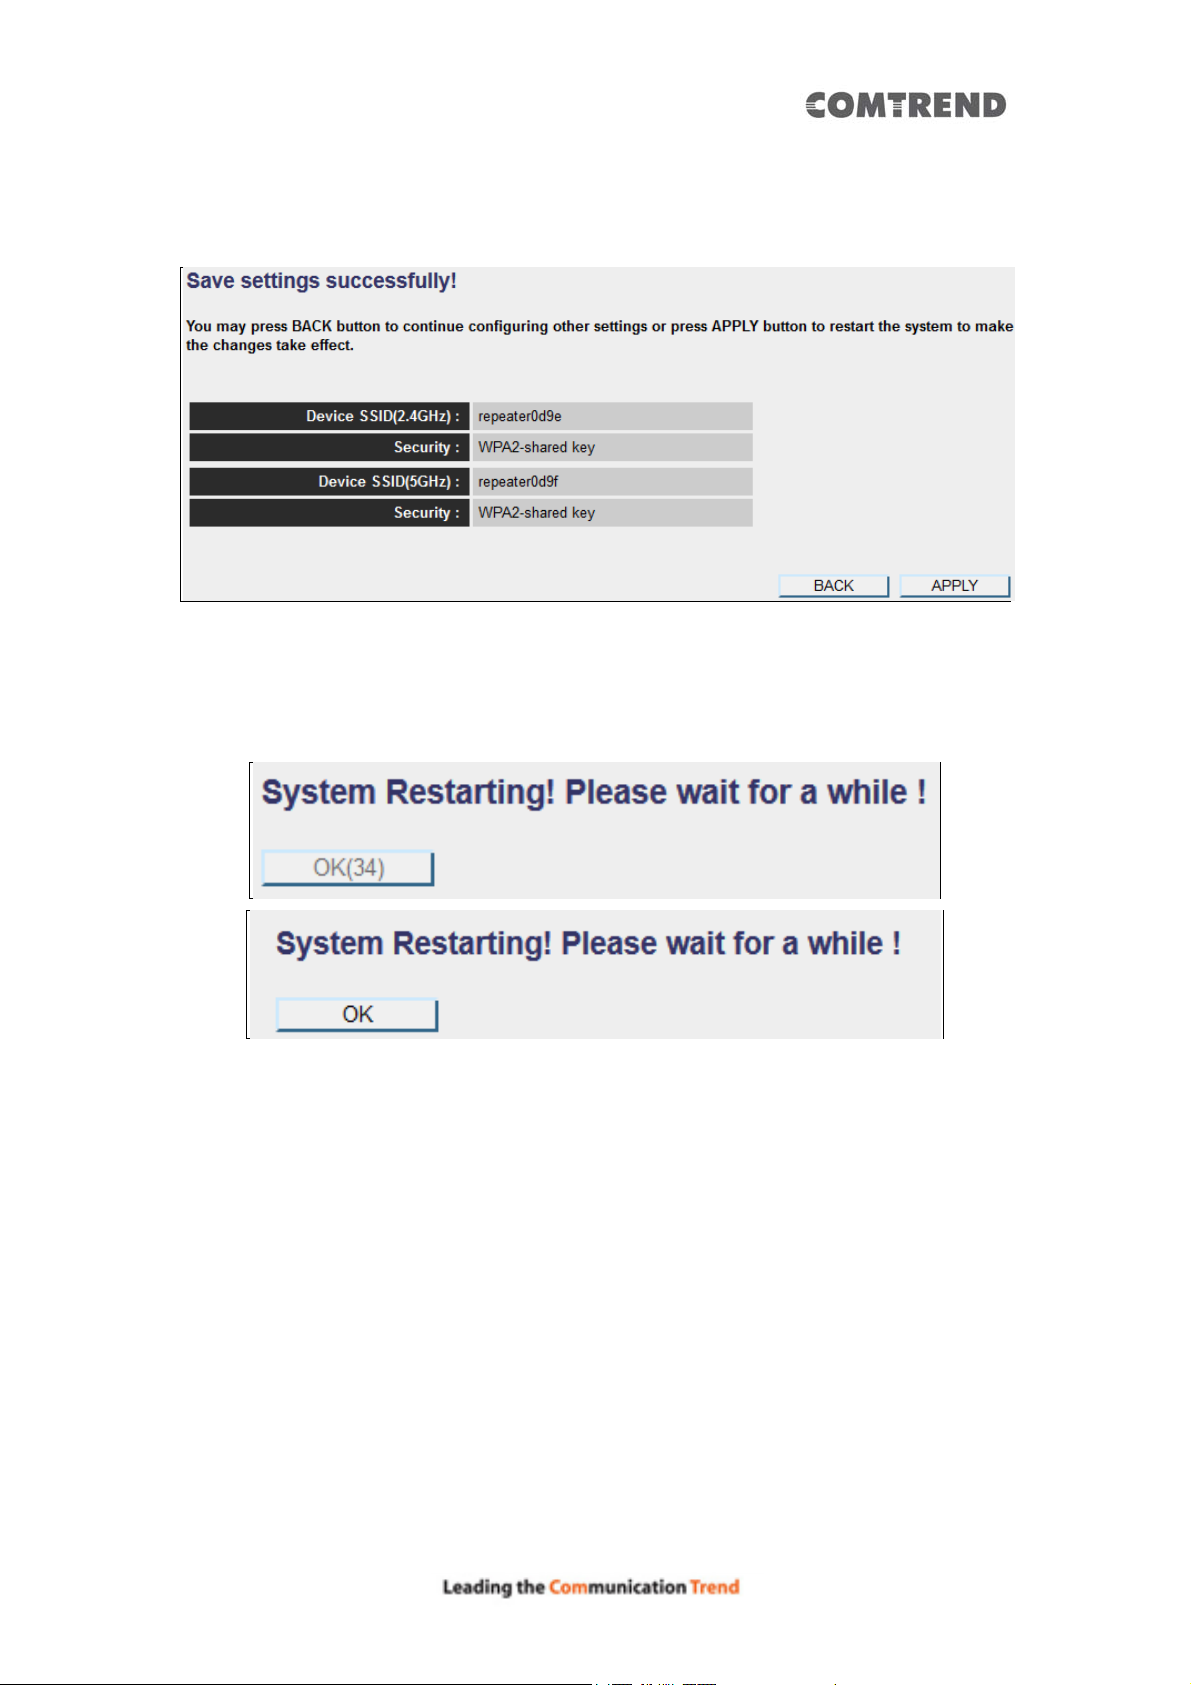
6. Please recheck the settings you made, and click ‘Apply’ to continue.
7. Please wait for few seconds for device to reboot.
8. After reboot is complete, you can close the browser to finish this quick setup
and connect this access point to an ADSL modem, wired router, or switch/hub
in your network through the LAN port of the access point by Ethernet cable.
NOTE: After quick installation is successful and you want to login to the
web user interface of the Wireless Mesh Point, please refer to ‘4.2 AP mode
Advanced Settings’ for more functions or learn how to login to the web
user interface again.
61
Page 63
4.2 AP Mode Advanced Settings
4.2.1 Connect to web configuration menu
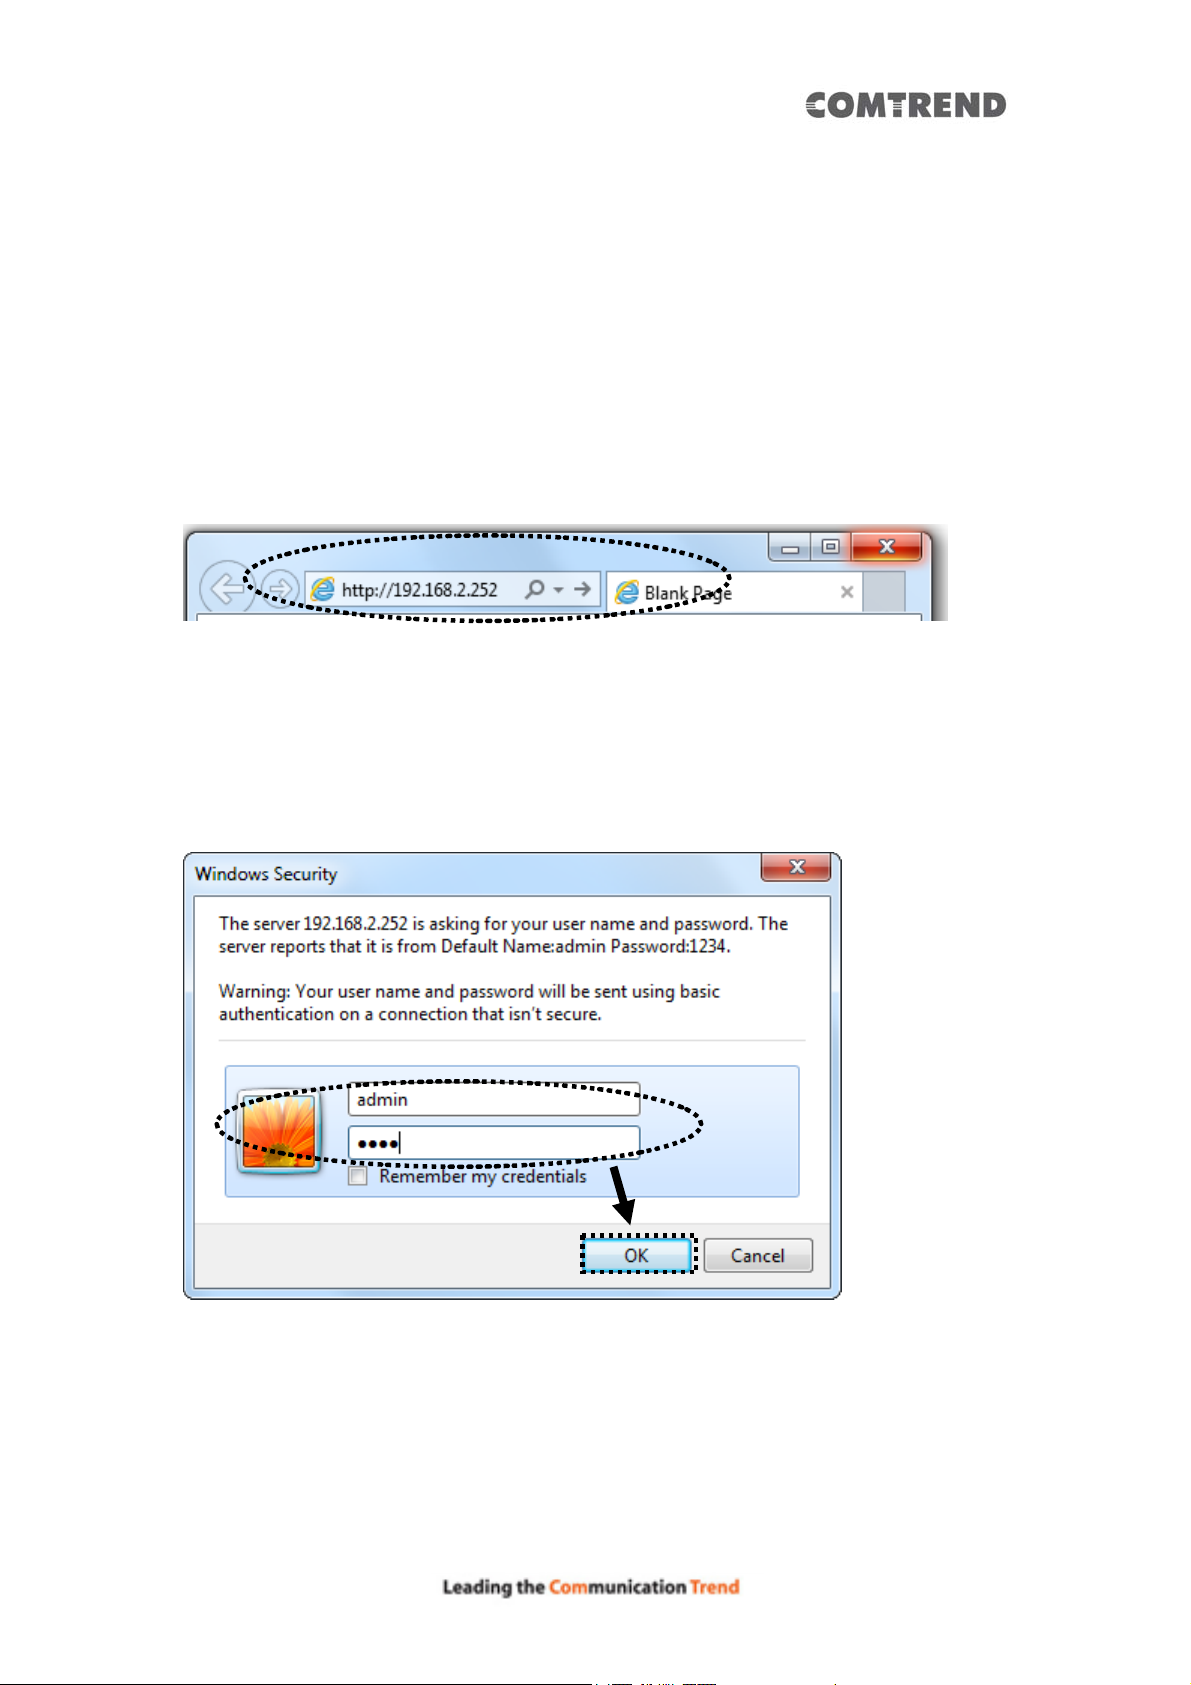
11. Please open your web browser (IE, Firefox, Chrome etc.) and
input ‘http:/ 192.168.2.252 in the address bar, then press the ENTER key:
The Wireless Mesh Point will prompt you to input the username and password. The
default username is ‘admin’ and password is ‘1234’. Click the ‘OK’ button to
continue.
You should be able to see the configuration page of this Access Point mode in a very
short time:
Detailed operation instructions will be given below.
62
Page 64
4.2.2 Home
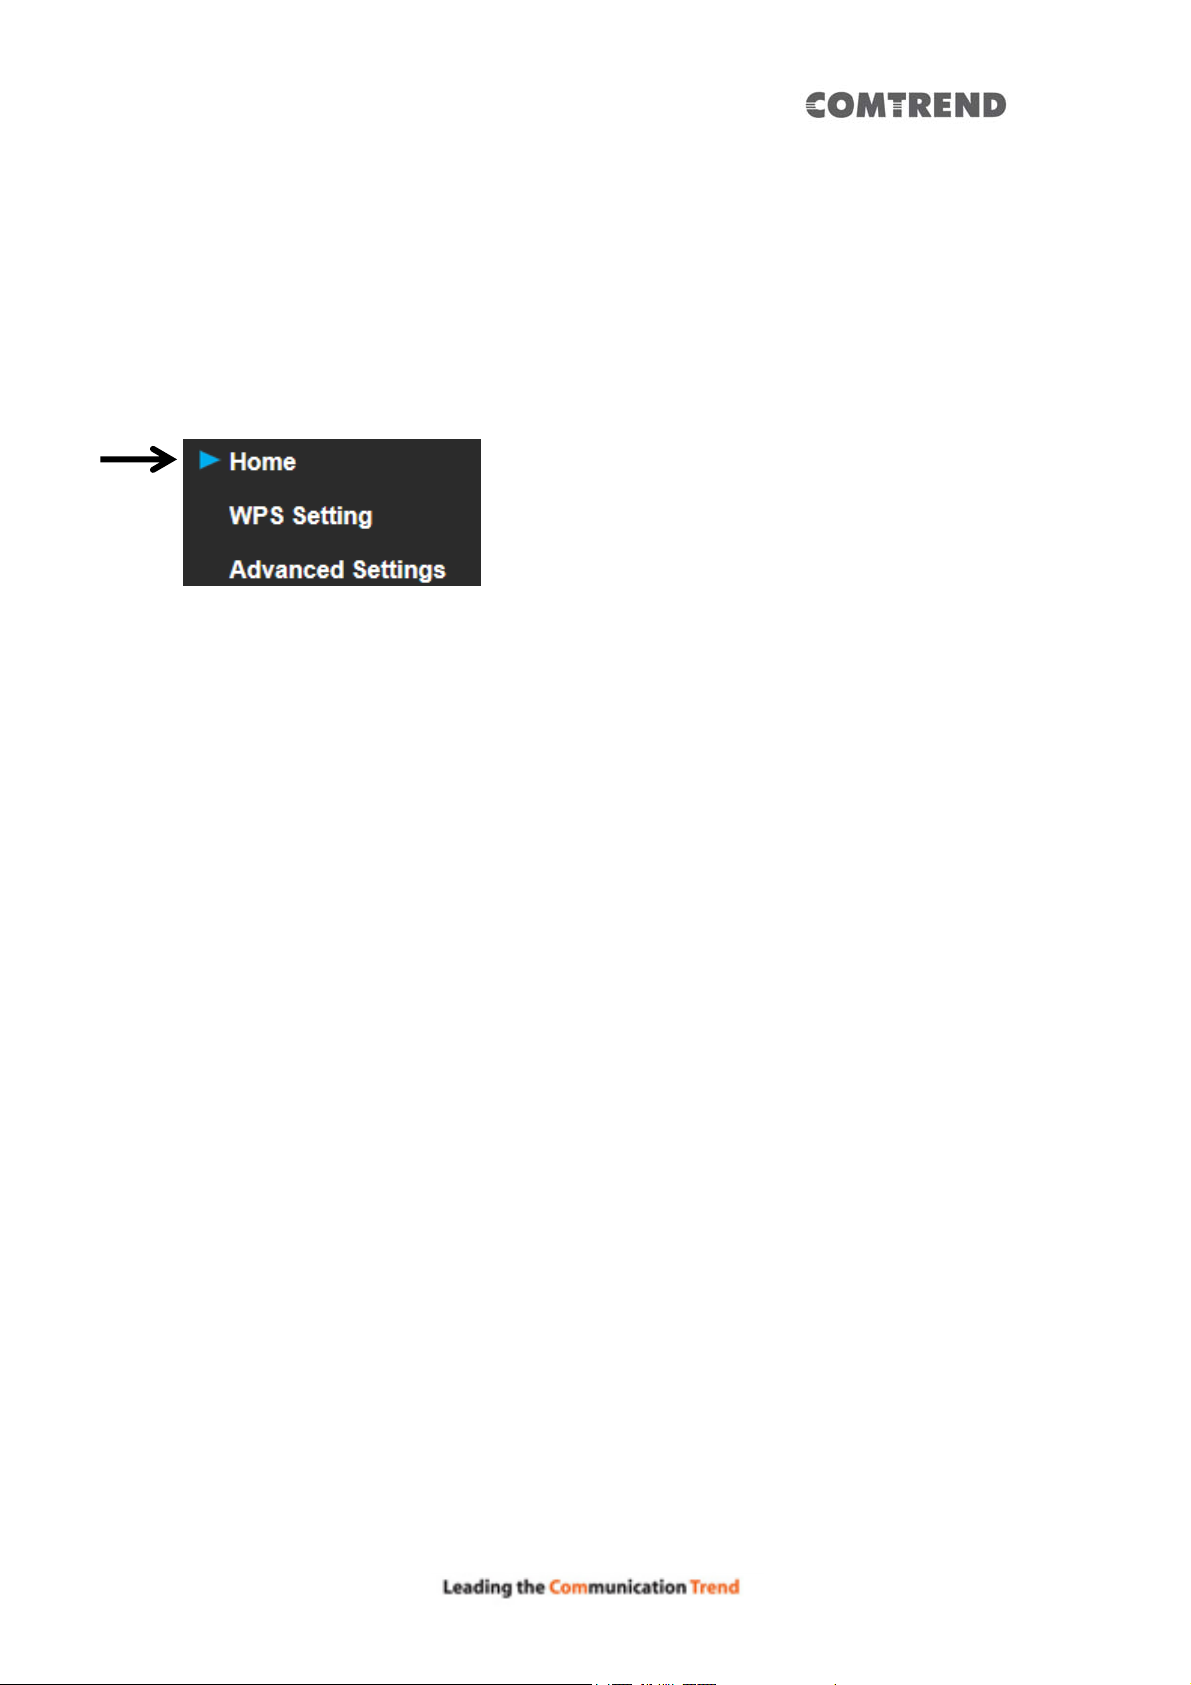
The status and information of this access point will be displayed here.
To access the ‘Home’ menu, click ‘Home’ on the left.
You should see the following (the contents will vary depending on your actual
setting):
63
Page 65
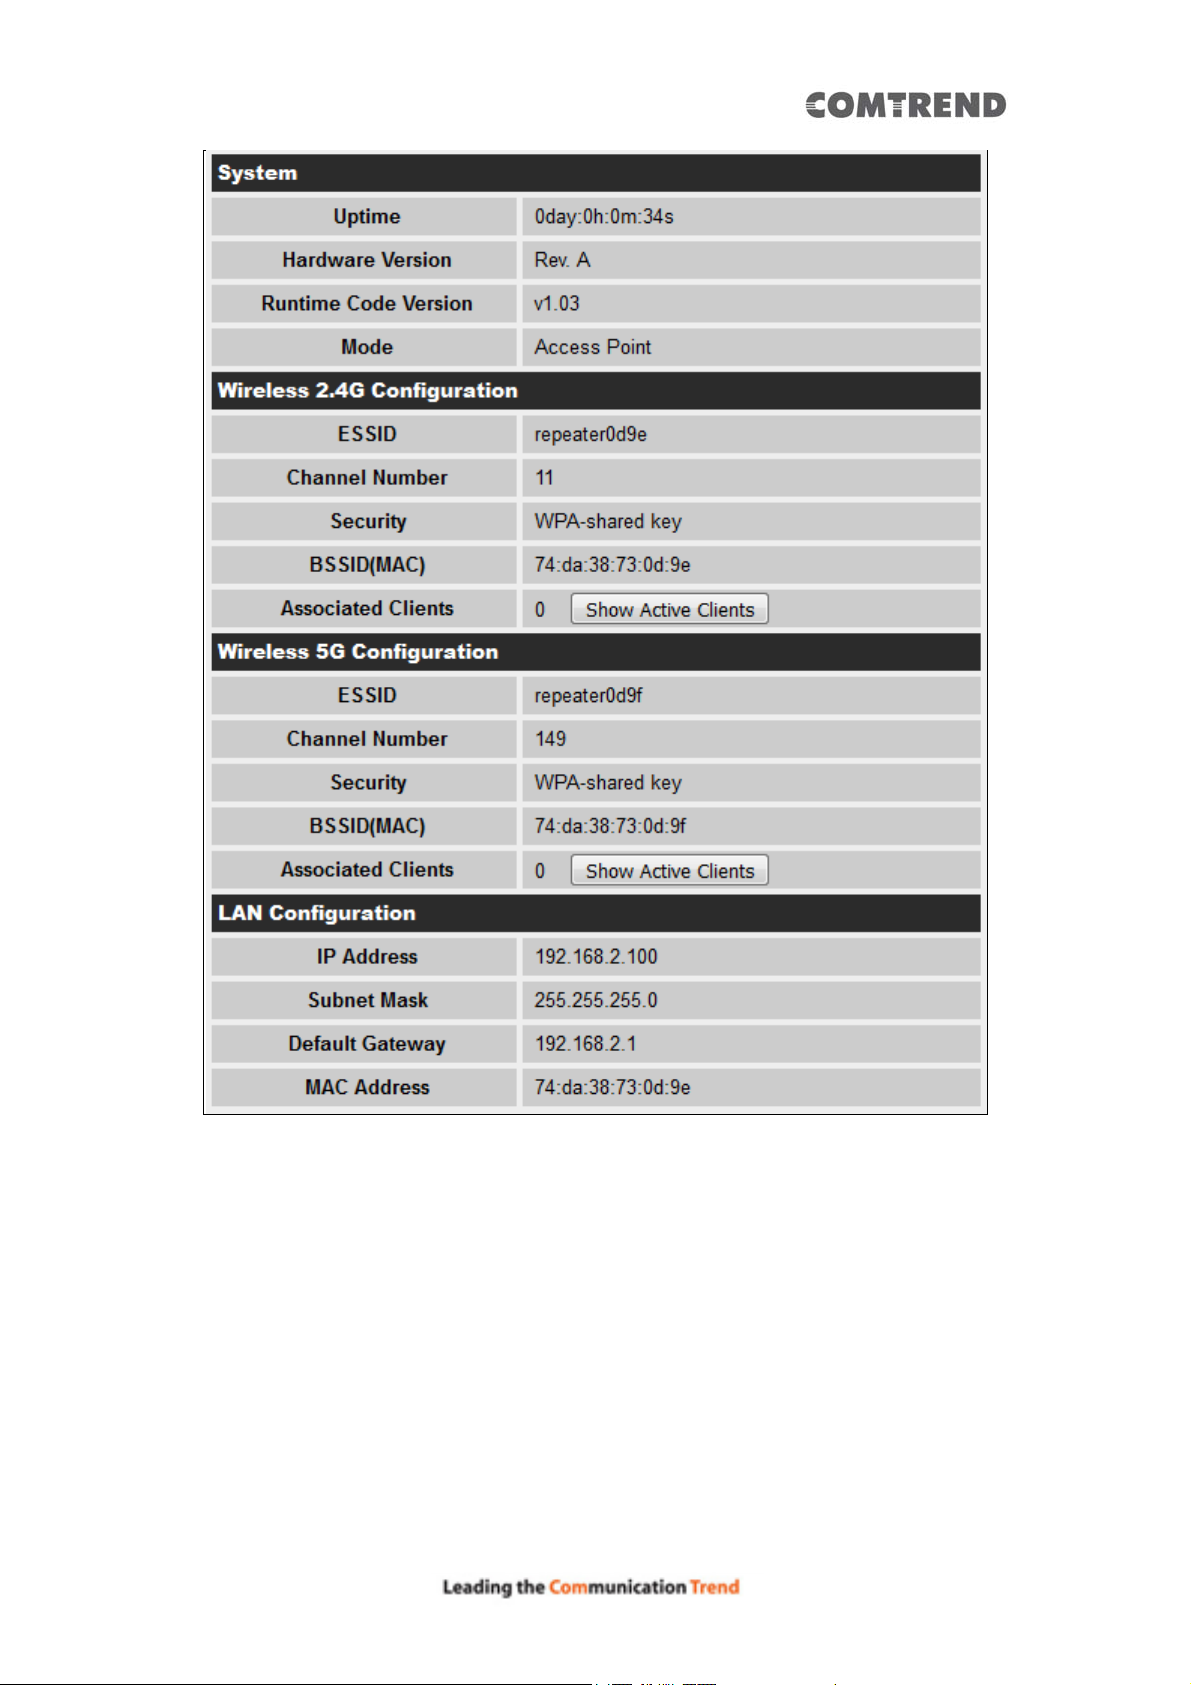
Yo u can click the ‘Show Active Clie nts’ button to show all connected wireless clients.
Please note: By clicking the ‘Show Active Clients’ button, a new browser
window will appear. If your browser prevents a pop-up window from
appearing, please disable this function or you will not be able to use the
‘Show Client’ function.
64
Page 66
4.2.3 WPS Setting
You can configure WPS (Wi-Fi Protected Setup) here. By using WPS, you can
establish a secure connection between this Wireless Mesh Point and other wireless
devices which also support WPS in a fast and secure manner.
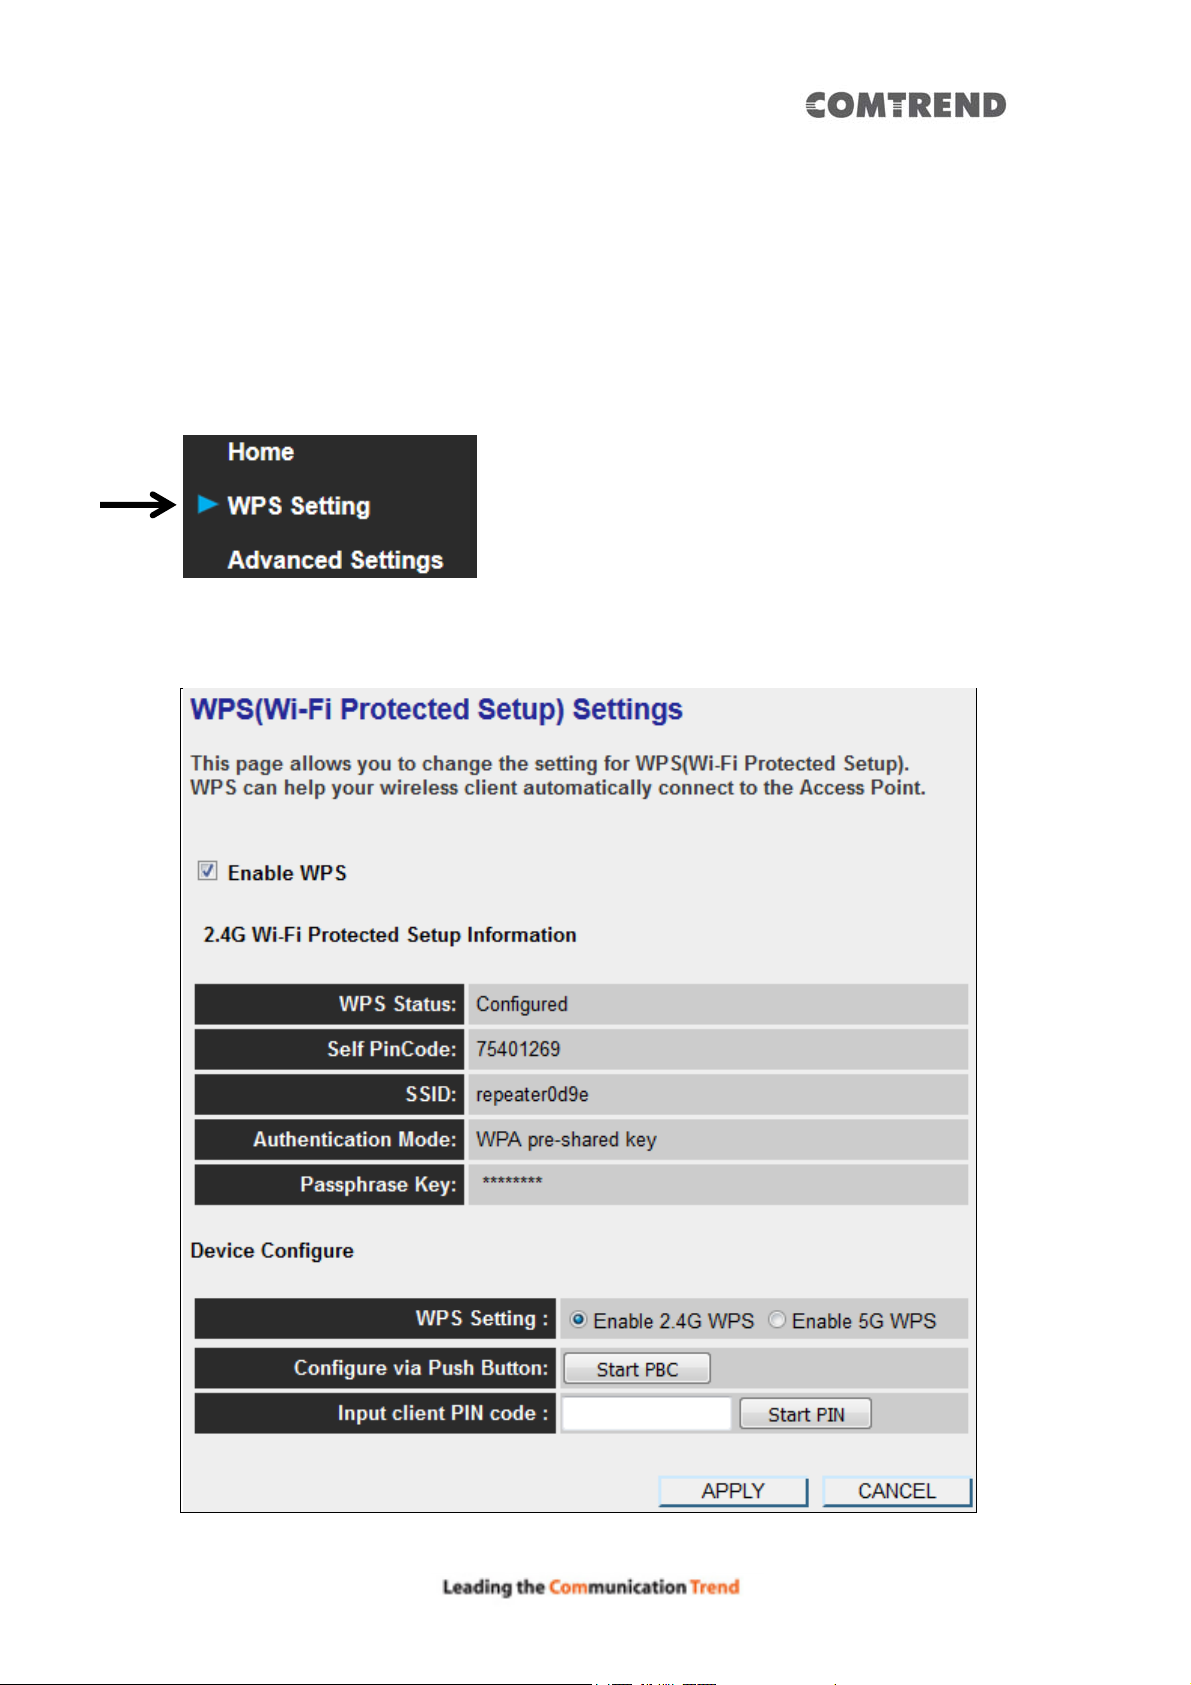
To access the ‘WPS Setting’ menu, click ‘WPS Settings’ on the left.
The following setup page will appear:
65
Page 67
The description of every setup item is listed as follows:
Item Description
WPS Status Shows the security setting status of WPS. If the wireless
security (encryption) function of this device is properly
set, you’ll see the ‘Configured’ message here. If the
wireless security function has not been set, you’ll see
‘unConfigured’.
Self PinCode This displays an 8-digit number for WPS PIN-style
configuration. When another WPS-compatible device
wishes to connect to this Wireless Mesh Point and supports
Self-PIN type WPS, input this number to the wireless
device to establish connection.
SSID Shows the SSID of this Wireless Mesh Point.
Authentication Mode Shows the authentication mode of this Wireless Mesh
Point.
Passphrase Key This shows asterisks (*) to indicate wireless security is
properly set.
WPS Setting You can select which band(2.4G or 5G) you want to build
wireless connection via the ‘Start PBC’ button. Default is
‘2.4G’.
Start PBC Click the ‘Start PBC’ button to start the Push-Button style
WPS setup procedure. This Wireless Mesh Point will wait
for WPS requests from another wireless device for 2
minutes.
The ‘WPS’ LED on the Wireless Mesh Point will be blinking
for 2 minutes when this Wireless Mesh Point is waiting for
an incoming WPS request.
Start PIN Please input the PIN code of the wireless client you wish to
connect, and click the ‘Start PIN’ button.
The ‘WPS’ LED on the Wireless Mesh Point will be blinking
when this Wireless Mesh Point is waiting for an incoming
WPS request.
NOTE: For WPS2.0 compliance specification, WEP and WPA-PSK can’t
support WPS connection, some of wireless devices may follow this latest
WPS2.0 specification, so we recommend not using WEP and WPA-PSK to
avoid WPS interoperability problems.
66
Page 68
4.2.4 Advanced Settings
You can configure advanced wireless settings in this page. Please note that these
settings are not safe to be configured by novice users. Configure these setti ngs only
when you understand what you’re doing.
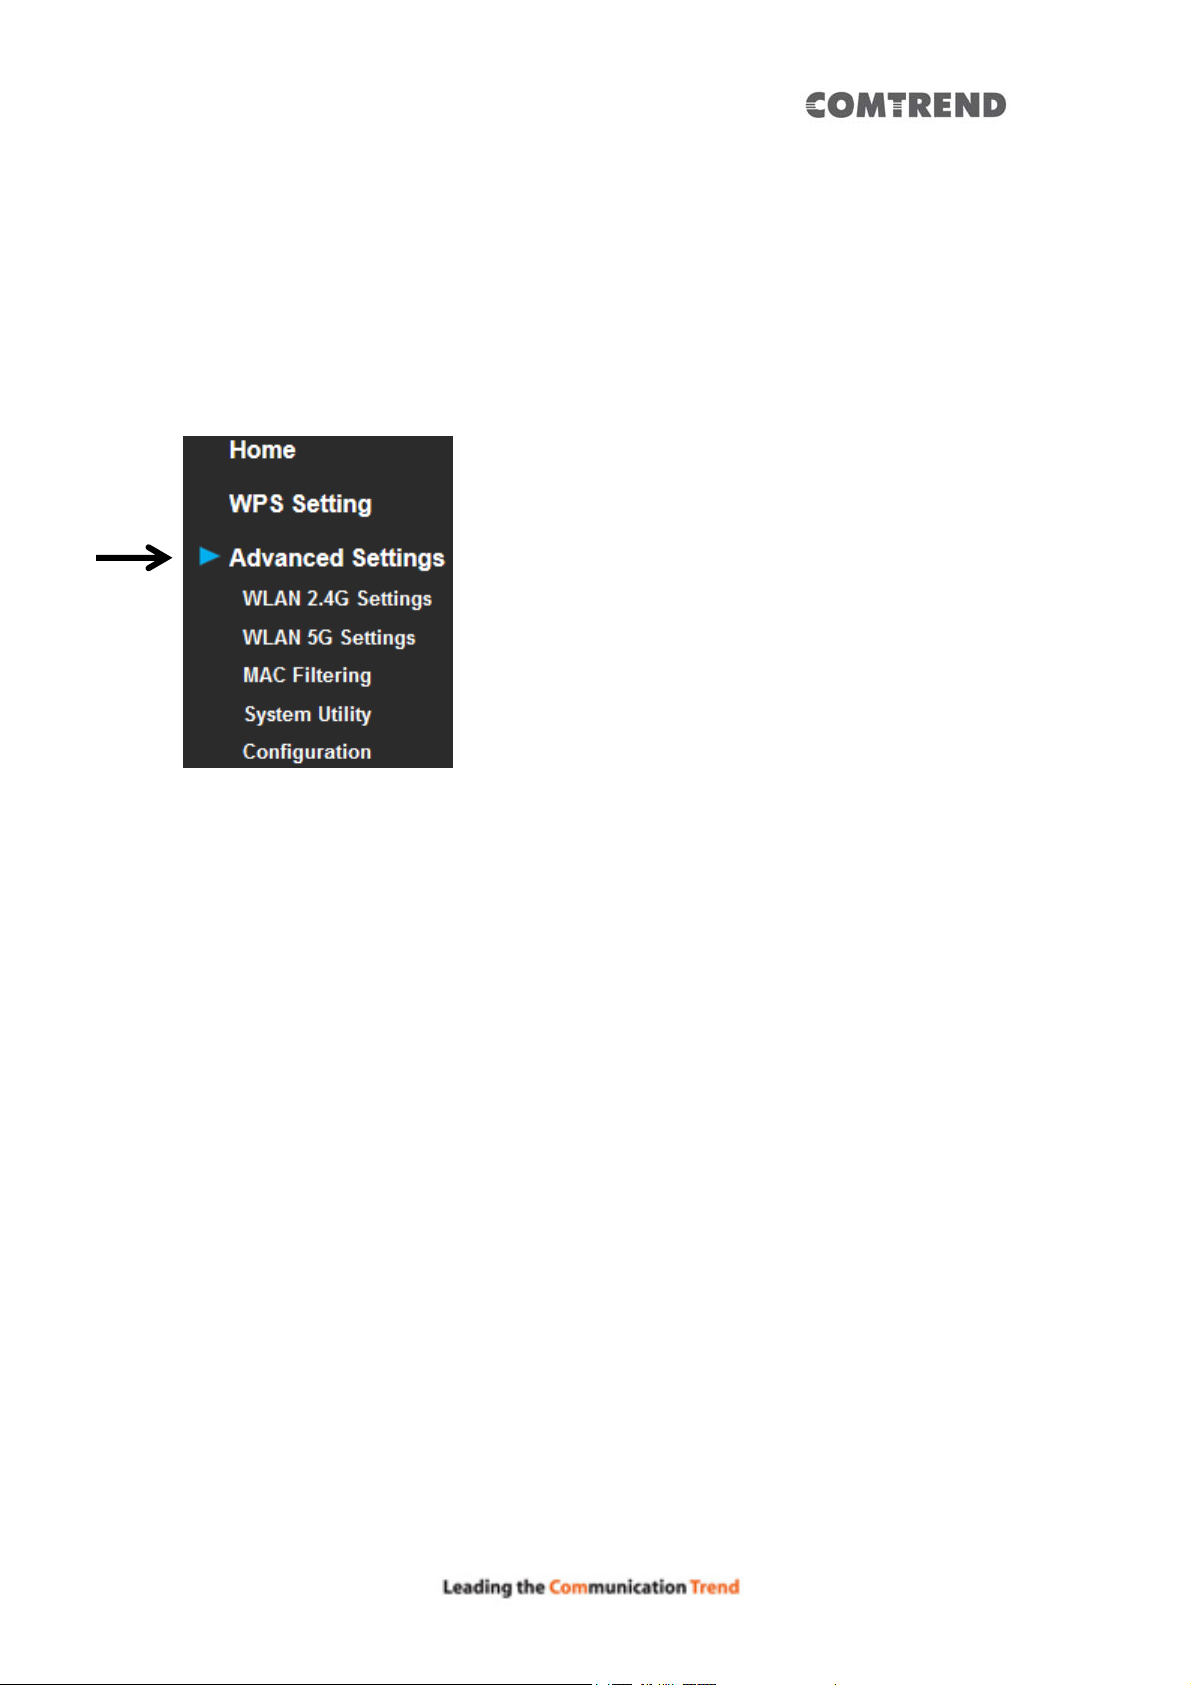
To access the ‘Advanced Setting’s menu, click ‘Advanced Settings’ on the left.
The following setup page will appear:
67
Page 69
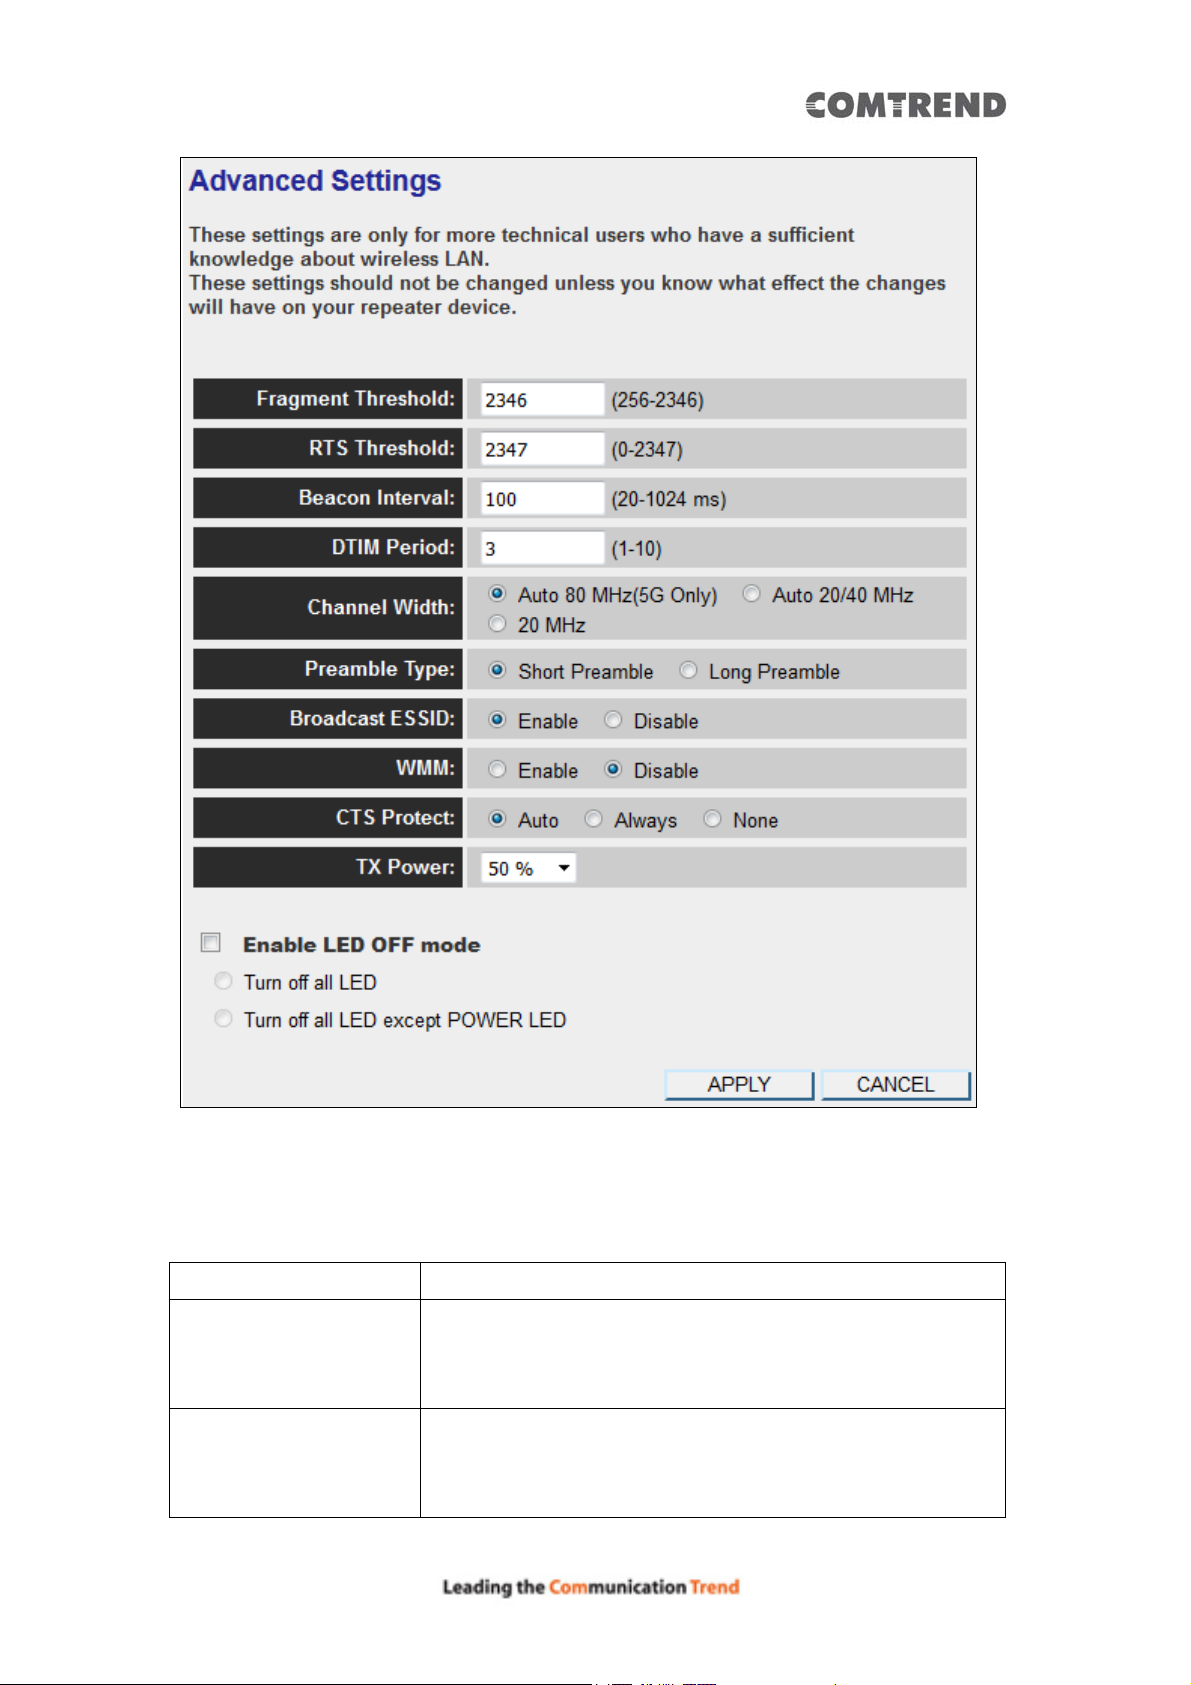
The description of every setup item is listed as follows:
Item Description
Fragment Threshold Set the Fragment threshold of wireless radio. Do not
modify the default value if you don’t know what it is. The
default value is 2346.
RTS Threshold Set the RTS threshold of wireless radio. Do not modify
the default value if you don’t know what it is. The default
value is 2347.
68
Page 70
Beacon Interval Set the beacon interval of wireless radio. Do not modify
the default value if you don’t know what it is. The default
value is 100.
DTIM Period Configures DTIM (Delivery Traffic Indication Message)
send period. The default value is 3.
Channel Width Set channel width of wireless radio. You can modify the
default value if you know what channel width you need,
default setting is ‘Auto 80MHz’.
Preamble T ype Set the type of preamble of wireless radio. Do not modify
the default value if you don’t know what it is. The default
setting is ‘Short Preamble’.
Broadcast ESSID When set to ‘enabled’, every wireless device can scan
and find this Wireless Mesh Point; when set to ‘disabled’ ,
only wireless clients who know the exact SSID can get
connected with this wireless Mesh Point. Set to disabled
will help to improve security.
WMM Enable or disable Wireless Multi-Media. When enabled,
the Wireless Mesh Point will give priority to multimedia
related network applications so they will have better
performance.
CTS Protect This function provides CTS (Clear to Send) protection
when transferring data. It’s recommended to select
‘Auto’ for this option.
TX Power Select the wireless transmitting power level, from 10%
to 100%. When wireless clients are not too far from this
Wireless Mesh Point, you don’t have to select a higher
power level, since this may cause some individuals to
attempt to break into your wireless network if you ha ve a
bad password or no password.
Enable LED off mode You can enable or disable LED lights. Check ‘Enable LED
OFF’ mode to setup LED behavior:
Turn off all LED: disables all LED lights.
T urn off all LED except POWER LED: all LED lights will be
disabled, except the ‘POWER’ LED.
When you complete the settings in this page, click the ‘Apply’ button. You’ll see the
following message:
69
Page 71
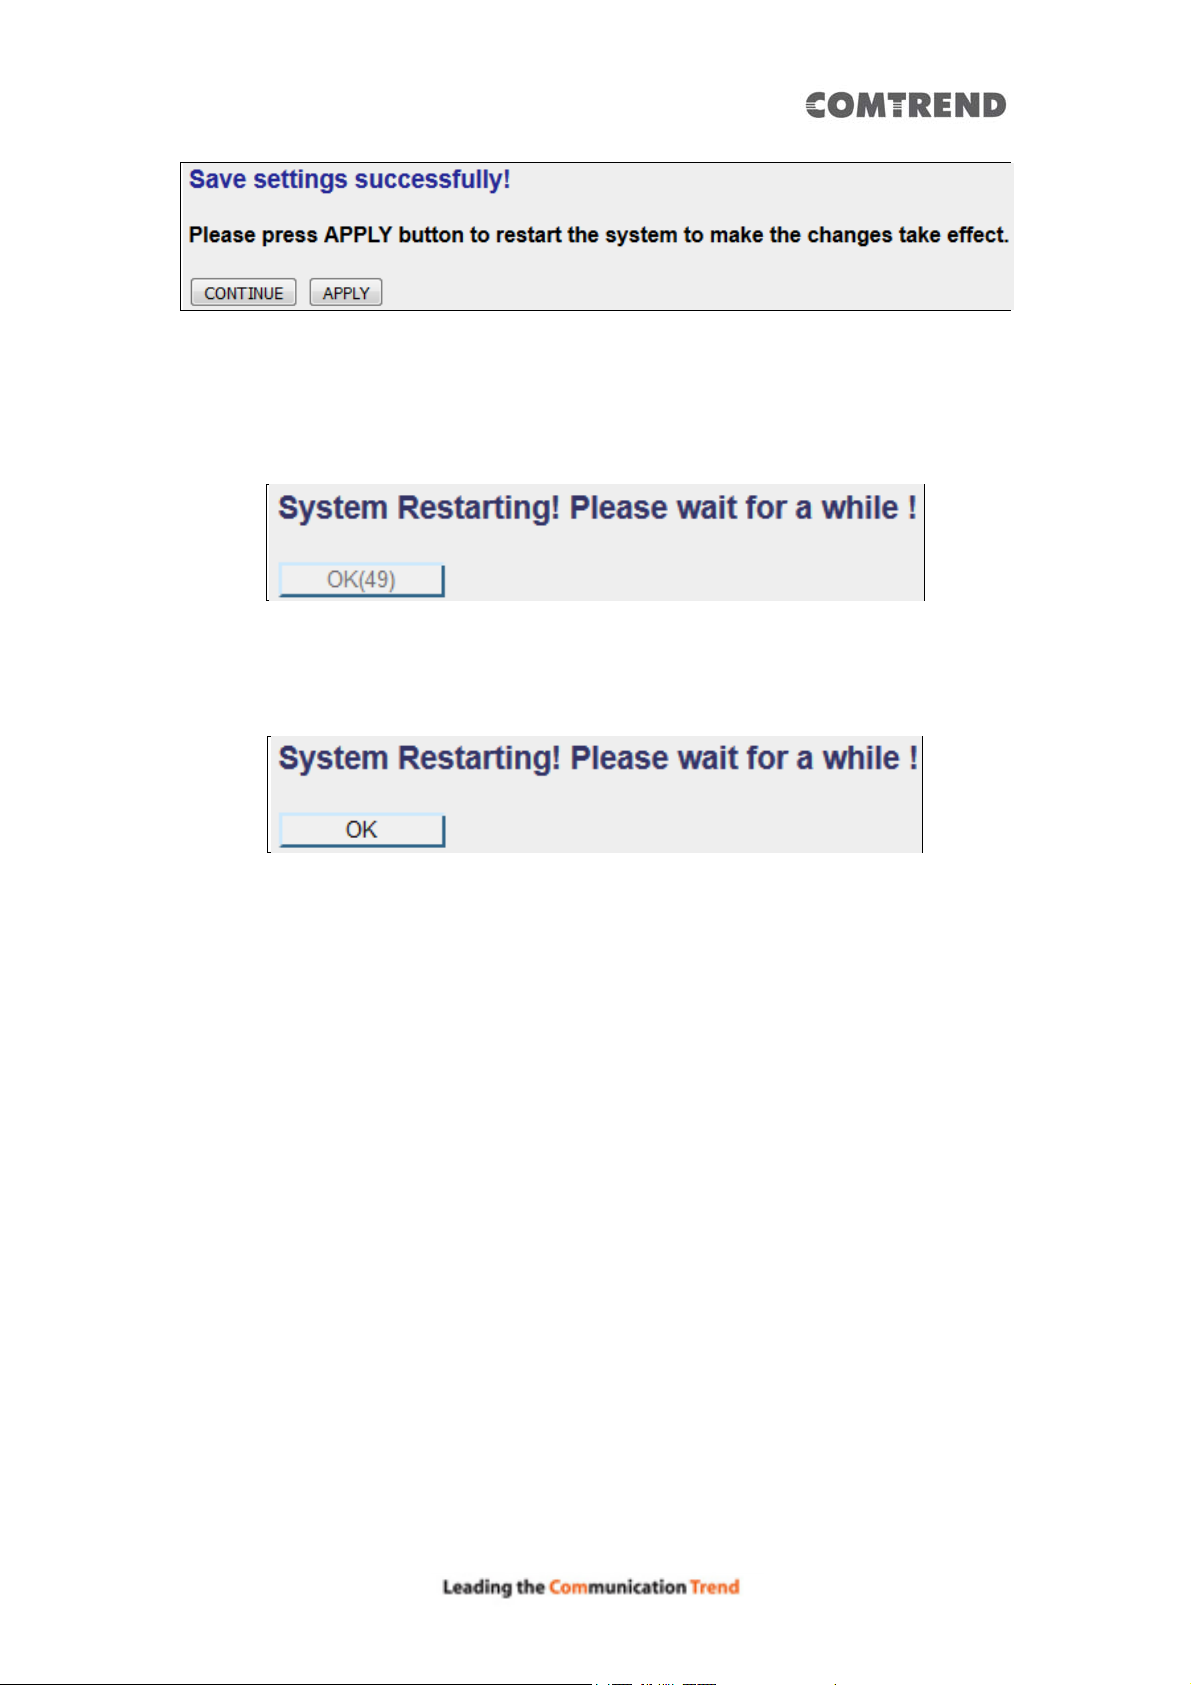
If you still need to configure this Wireless Mesh Point, click the ‘CONTINUE’ button;
if you want to save the changes and use it now, click the ‘APPLY’ button.
You’ll be prompted to wait for 50 seconds before you can re connect to the web user
interface of this access point.
After the countdown click the ‘OK!’ button.
70
Page 72
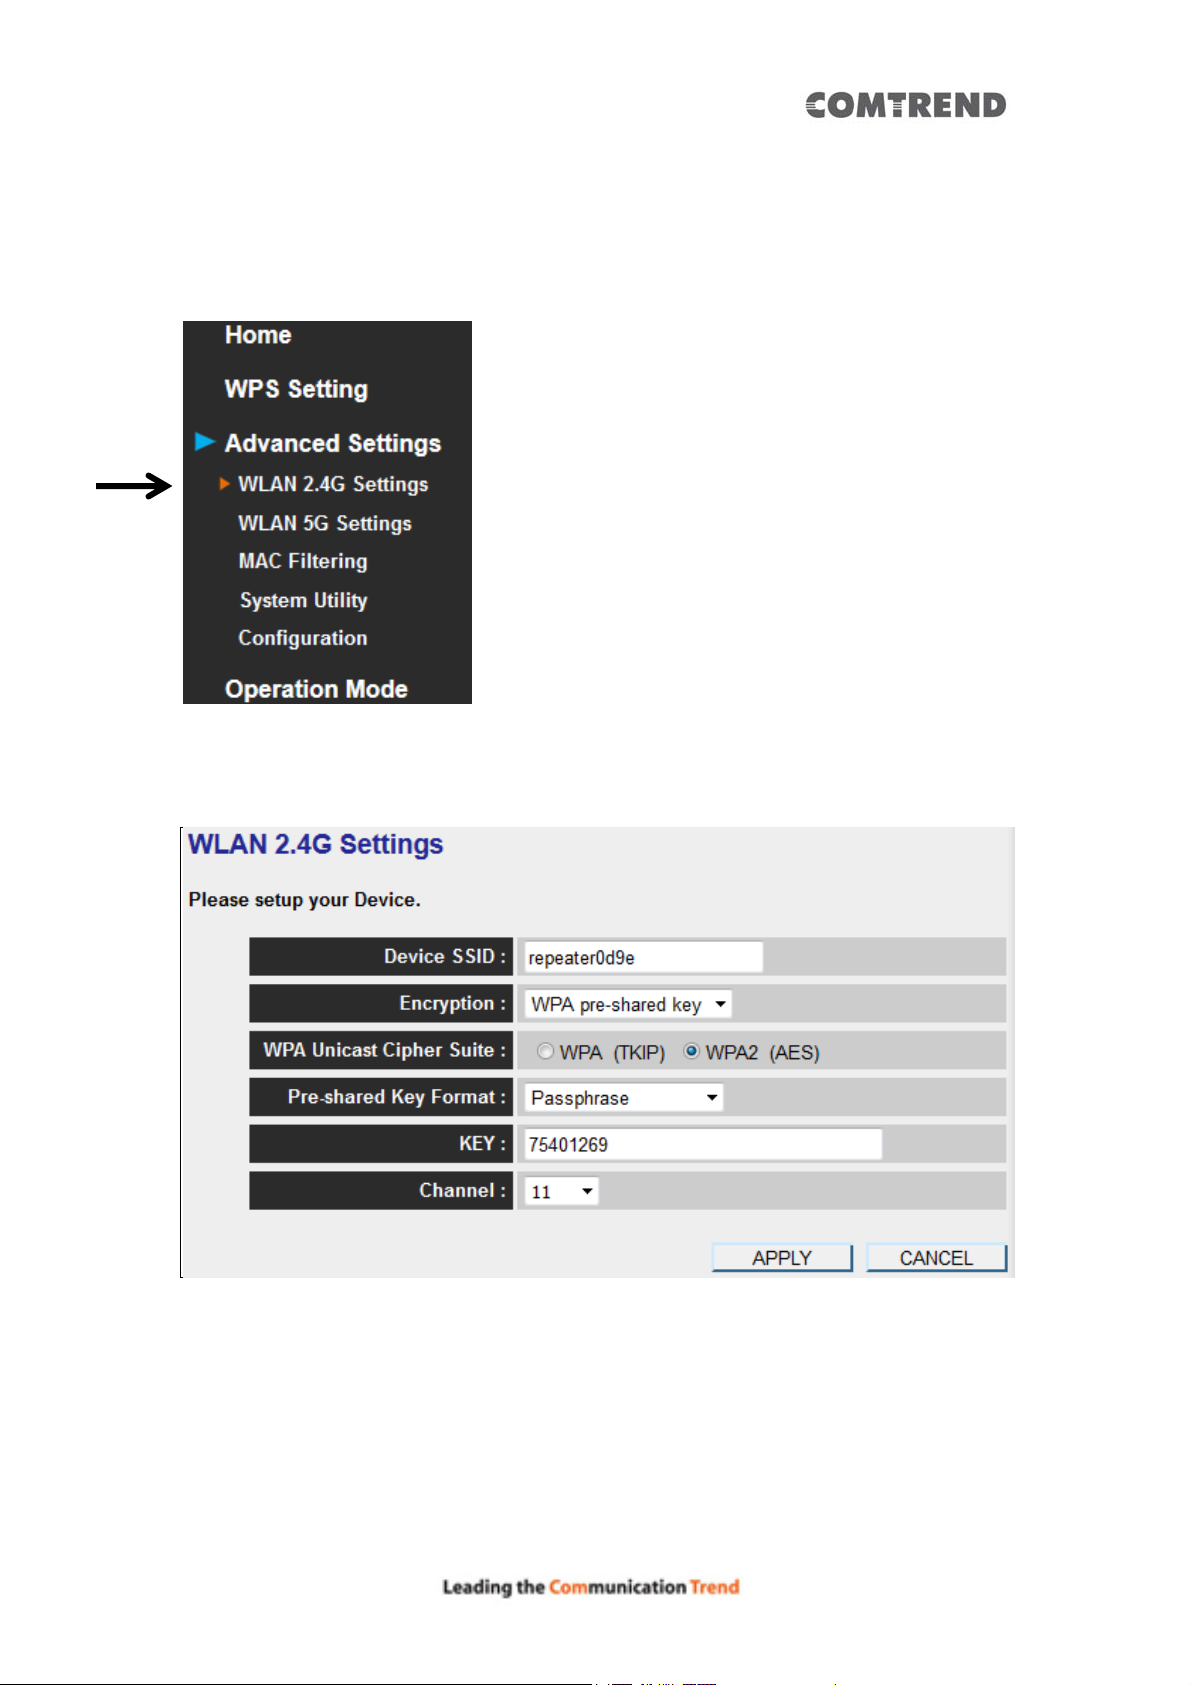
4.2.5 WLAN 2.4G settings
To access the 2.4GHz Wireless menu, click ‘WLAN 2.4G settings’ on the left.
The following setup page will appear, it is the settings that you have setup:
Please Note: If your Wireless Mesh Point is working properly, please do not
change the settings here.
The description of every setup item is listed as follows:
71
Page 73

Item Description
Device SSID This is the current SSID name of the Wireless Mesh
Point. The SSID is used to identify your own Wireless
Mesh Point from others when there are other wireless
devices in the same area. You can type any
alphanumerical characters to change SSID here,
maximum 32 characters.
Encryption This is the current security setup of the Wireless Mesh
Point. You can select an encryption method from the
drop-down menu, there are three options.
WPA Unicast Cipher
Suite
Pre-shared Key Format This is the current security setup of the Wireless Mesh
Key This is the current security setup of the Wireless Mesh
Channel This is the current channel of th e Wireless Mesh Point.
This is the current security setup of the Wireless Mesh
Point. Please select a type of WPA cipher suite.
Available options are: WPA (TKIP) and WPA2 (AES). You
can select one of them, but you have to make sure your
wireless client supports the cipher you selected.
Point. Y ou can select the type of pre-shared key, you can
select the Passphrase (8 or more alphanumerical
characters, up to 63), or Hex (64 characters of 0-9, and
a-f).
Point. Y ou can c hange the WPA passphrase here. It’ s not
recommended to use a word that can be found in a
dictionary due to security reasons.
72
Page 74
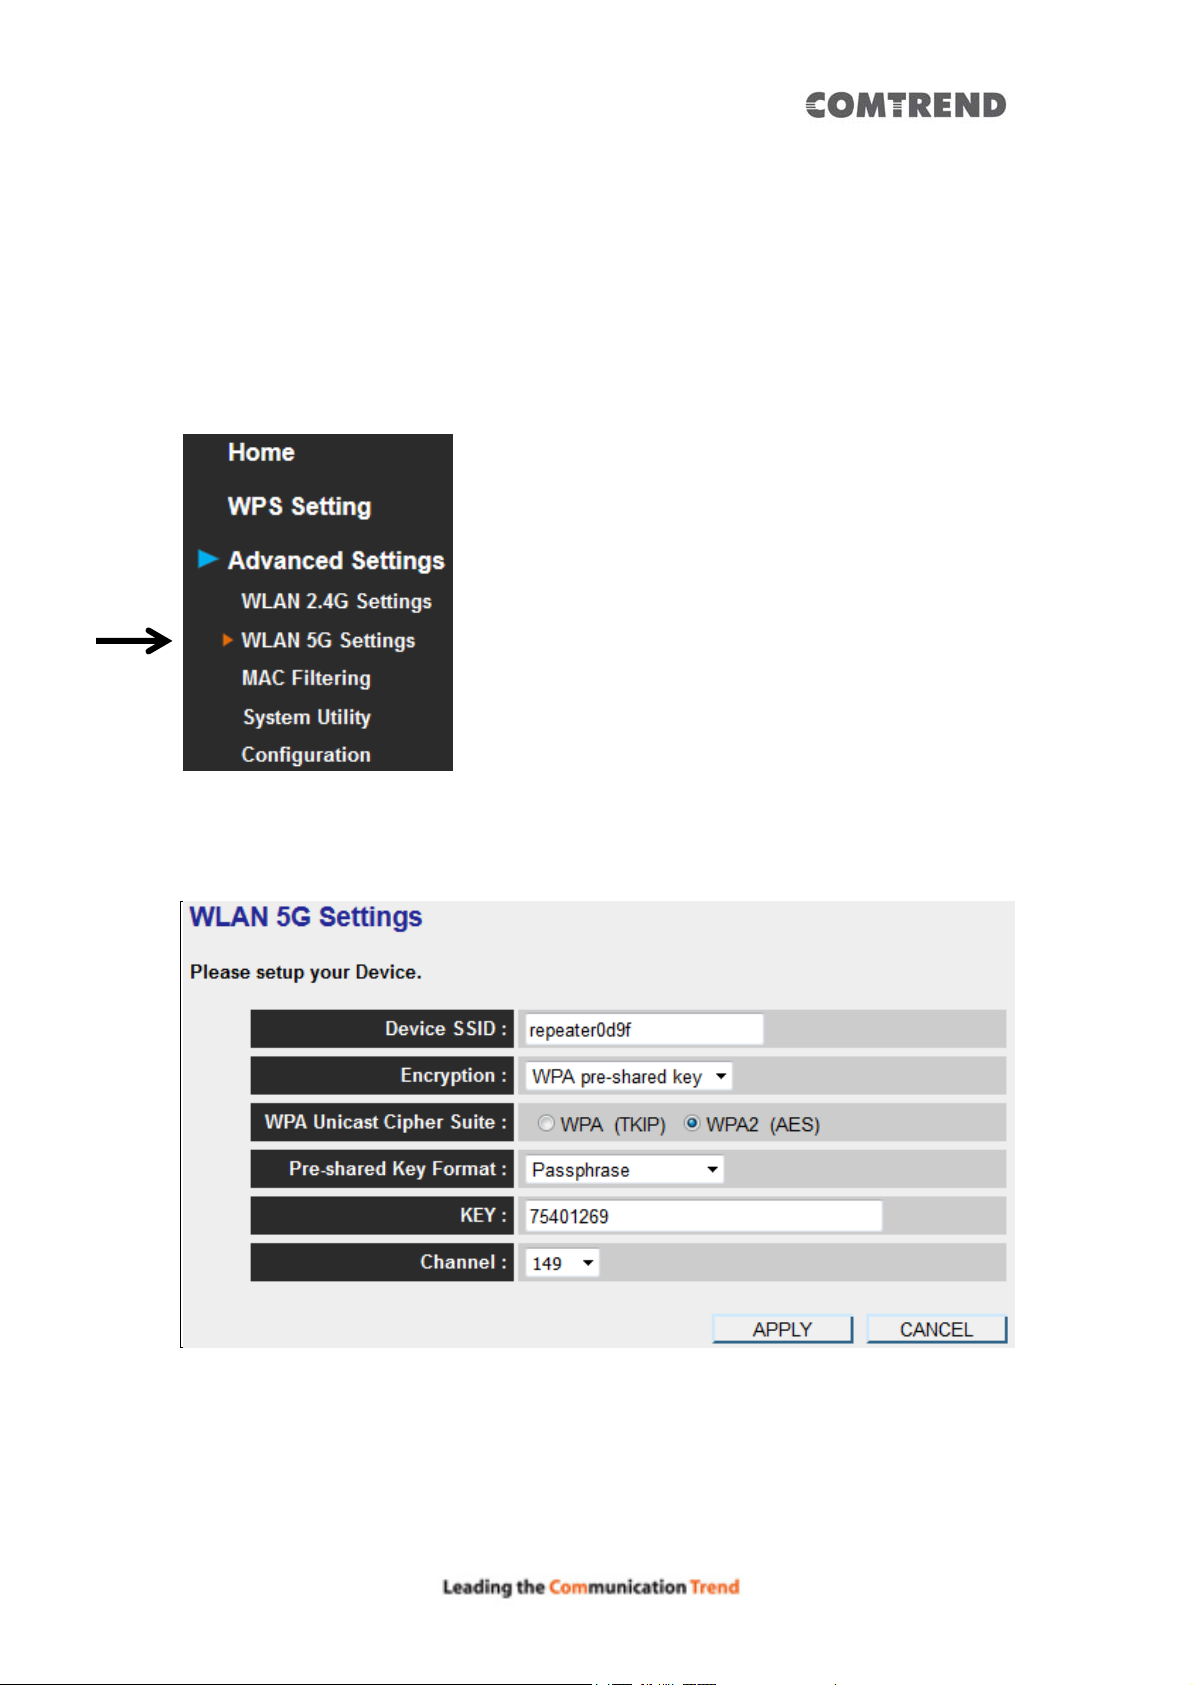
4.2.6 WLAN 5G settings
To access the 5GHz Wireless menu, click ‘WLAN 5G settings’ on the left.
The following setup page will appear, it is the settings that you have setup:
Please Note: If your Wireless Mesh Point is working properly, please do not
change the settings here.
The description of every setup item is listed as follows:
73
Page 75

Item Description
Device SSID This is the current SSID name of the Wireless Mesh
Point. The SSID is used to identify your own Wireless
Mesh Point from others when there are other wireless
devices in the same area. You can type any
alphanumerical characters to change the SSID here,
maximum 32 characters.
Encryption This is the current security setup of the Wireless Mesh
Point. You can select an encryption method from the
drop-down menu, there are three options.
WPA Unicast Cipher
Suite
Pre-shared Key Format This is the current security setup of the Wireless Mesh
Key This is the current security setup of the Wireless Mesh
Channel This is the current channel of th e Wireless Mesh Point.
This is the current security setup of the Wireless Mesh
Point. Please select a type of WPA cipher suite.
Available options are: WPA (TKIP) and WPA2 (AES). You
can select one of them, but you have to make sure your
wireless client supports the cipher you selected.
Point. Y ou can select the type of pre-shared key, you can
select the Passphrase (8 or more alphanumerical
characters, up to 63), or Hex (64 characters of 0-9, and
a-f).
Point. Y ou can c hange the WPA passphrase here. It’ s not
recommended to use a word that can be found in a
dictionary due to security reasons.
4.2.7 MAC Address Filtering
Besides using wireless security to only allow permitted wireless users to use this
wireless access point, you can also use the MAC address filter to allow wireless users
with certain MAC addresses to use this access point.
This will enhance security because y ou can make a ‘whi te list’ to allow users o n the
list to use this Wireless Mesh Point. Clients who aren’t listed on this white list, they
can’t get connected, even if they know the password.
74
Page 76
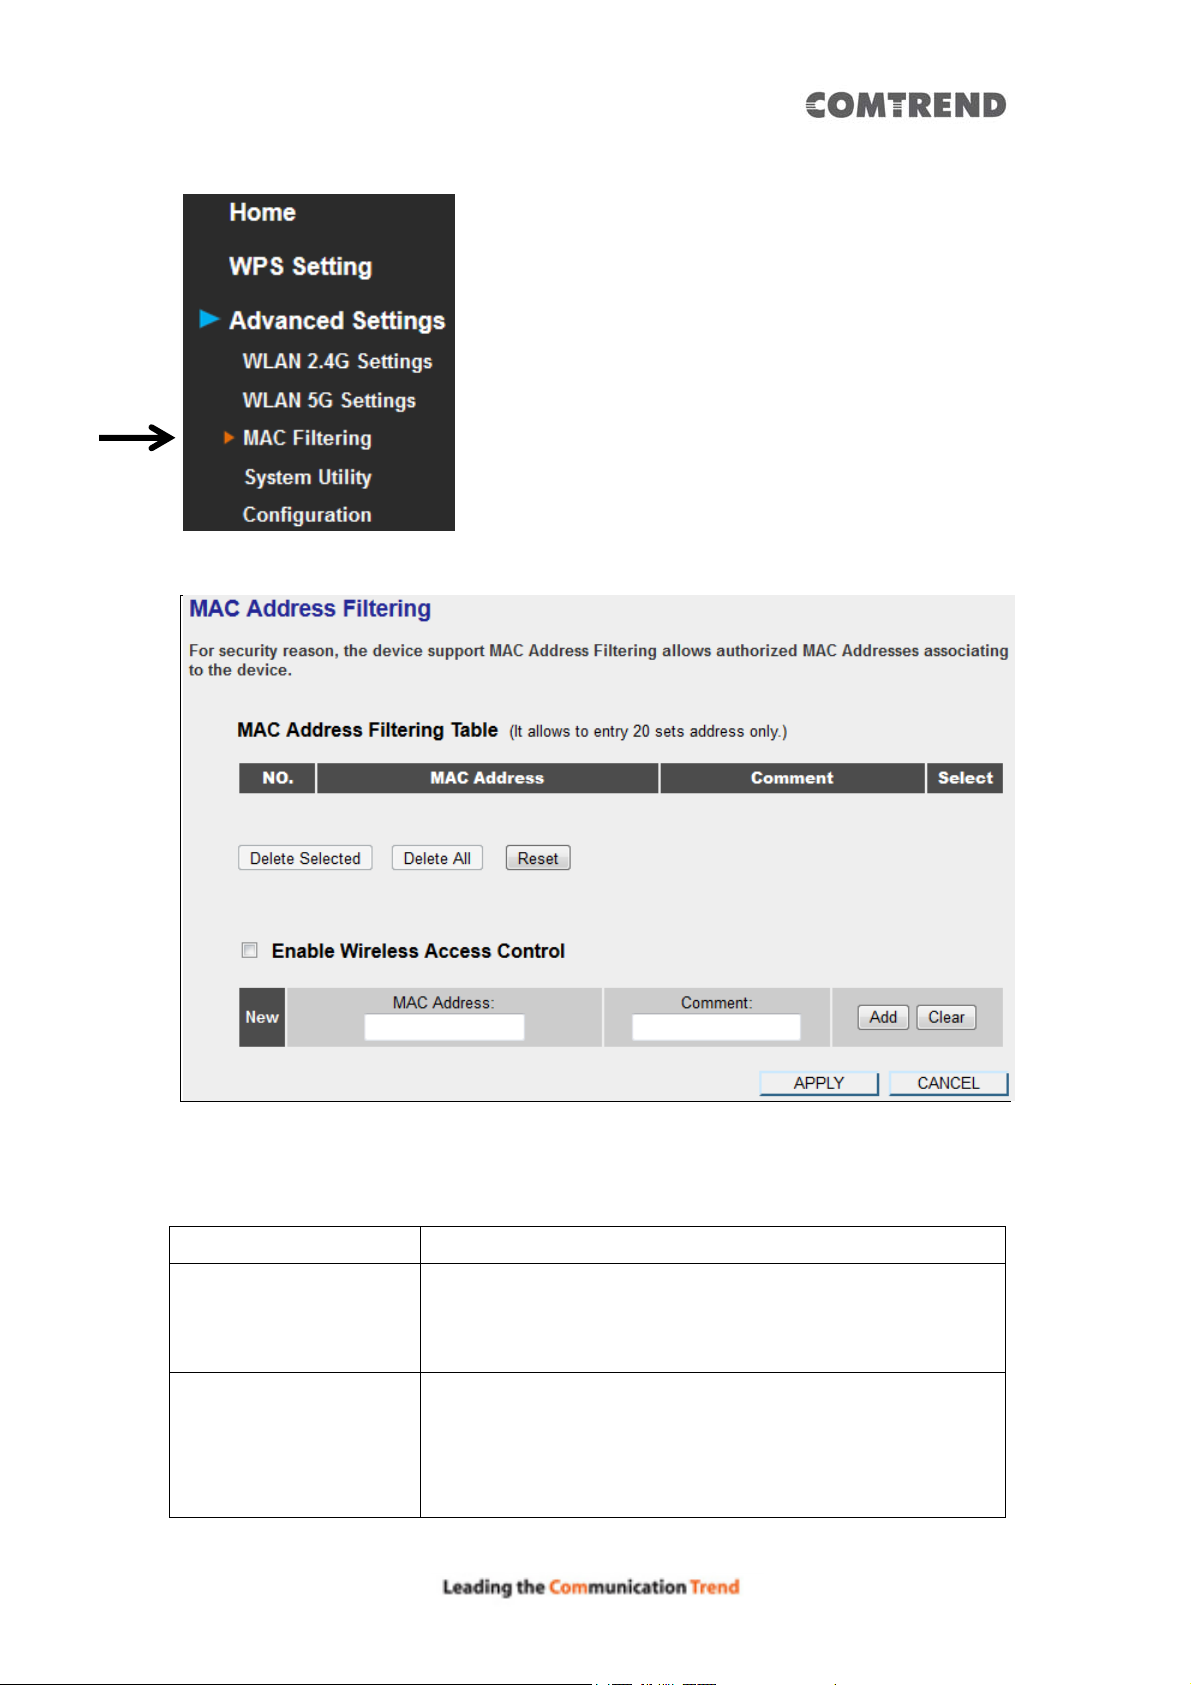
To access the ‘MAC Filtering’ menu, click ‘MAC Filtering’ on the lef t.
The following setup page will appear:
The description of every setup item is listed as follows:
Item Description
Enable Wireless Access
Control
MAC Address Input the MAC address of the clients you wish to deny or
Check this box to enable MAC filtering. If you do n’t check
this box, anyone who knows the wireless password can
get connected to this access point.
provide access to this AP into the MAC address list.
Please input 12 HEX characters here, you don’t have to
add : (colon) or - (dash) characters every 2 characters.
75
Page 77
If you don’t know how to get the MAC address of a
network client, see the following page.
Comment Input any descriptive text about th is rule, so you can
remember the purpose of this rule. You can input up to
20 alphanumerical characters in this field.
Add Add this MAC address to the list.
Clear Clear ‘MAC Address’ and ‘Comment’ field.
Delete Selected Delete MAC address(es) you selected.
Delete All Delete all MAC addresses on the list. You’ll be prompted
to confirm deletion first.
Reset Uncheck all checked boxes.
Select All existing MAC addresses will be listed here. T o delete a
MAC address from the list, check the box of the MAC
address you wish to delete first. You can select more
than one MAC address here.
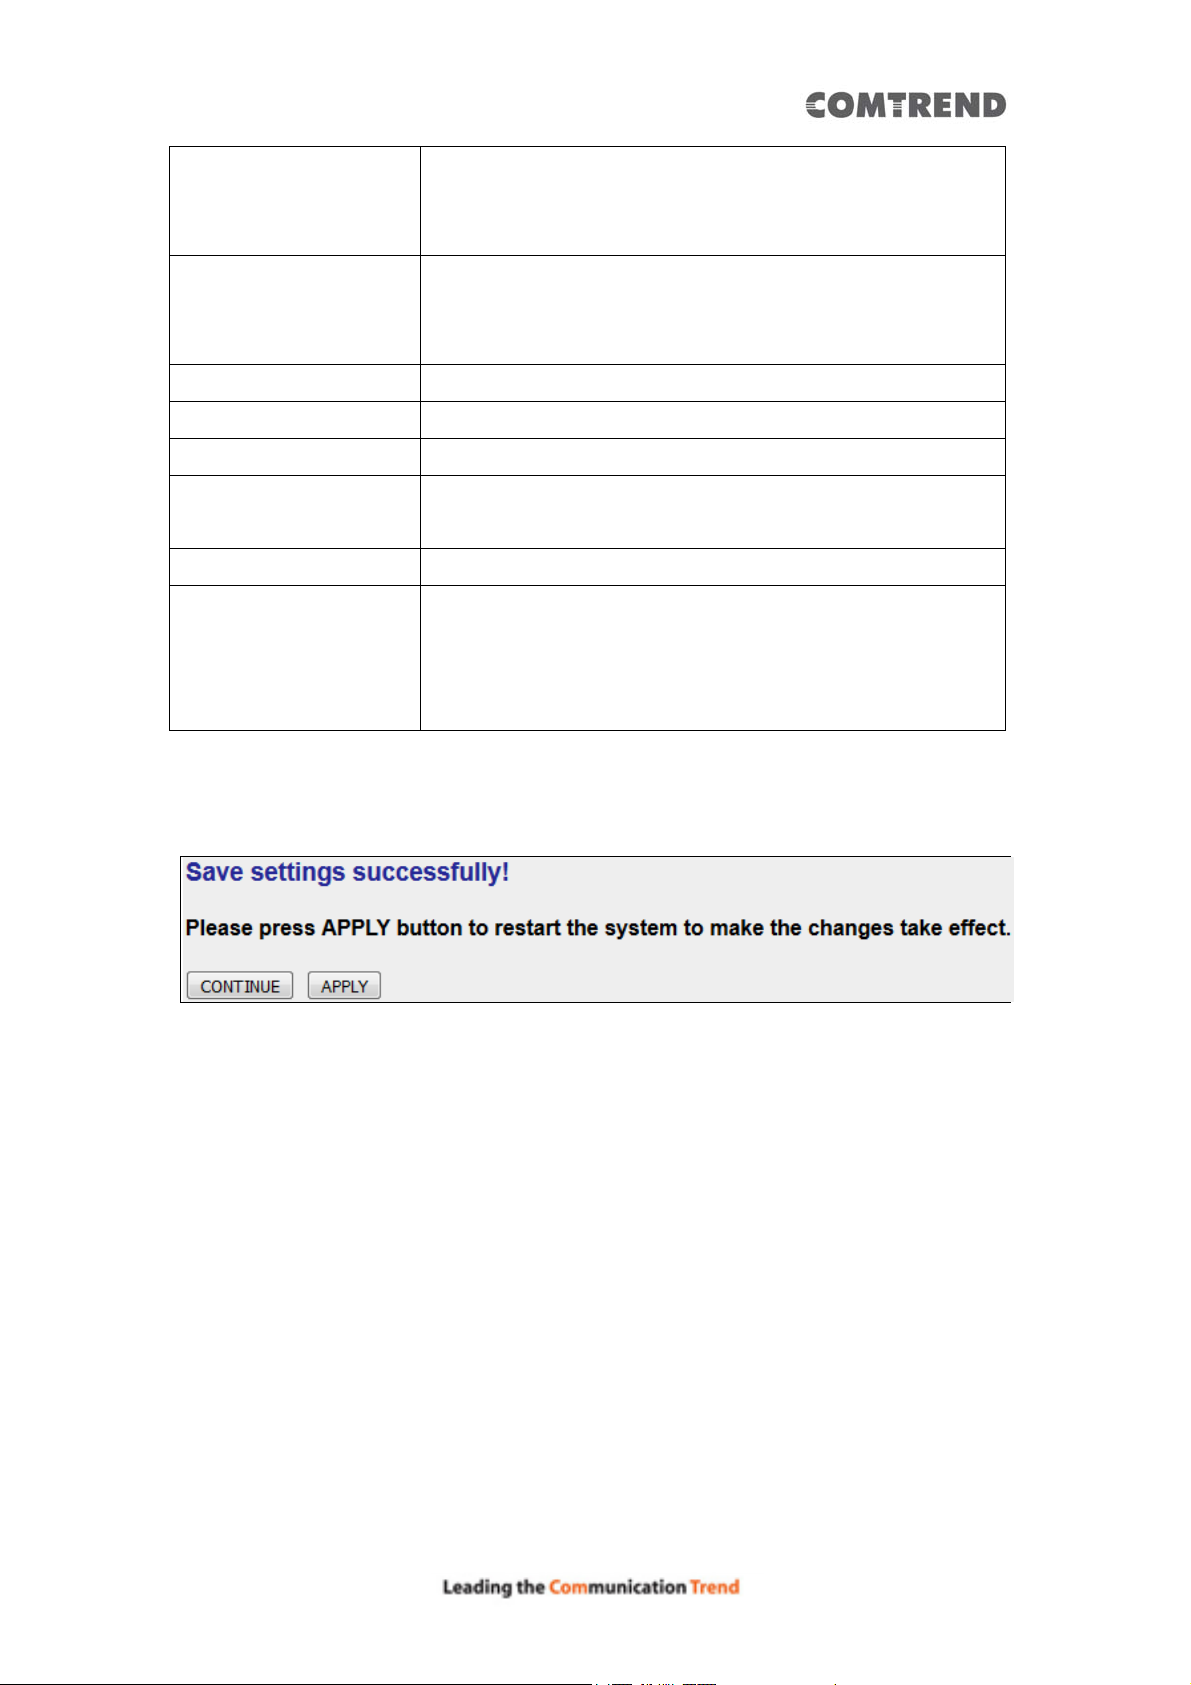
Click the ‘Apply’ button. You’ll see the following message:
If you still need to configure this Wireless Mesh Point, click the ‘CONTINUE’ button;
if you want to save the changes and use it now, click the ‘APPLY’ button. You’ll be
prompted to wait for 50 seconds before you can reconnect to this access point.
TIPS: If you don’t know the MAC address of your computer or wireless device, you
can the procedure below:
For wireless devices and computers which are connected to this Wireless Mesh Point
already, you can click the ‘Show Active Clients’ button on the ‘Home’ setting page.
76
Page 78
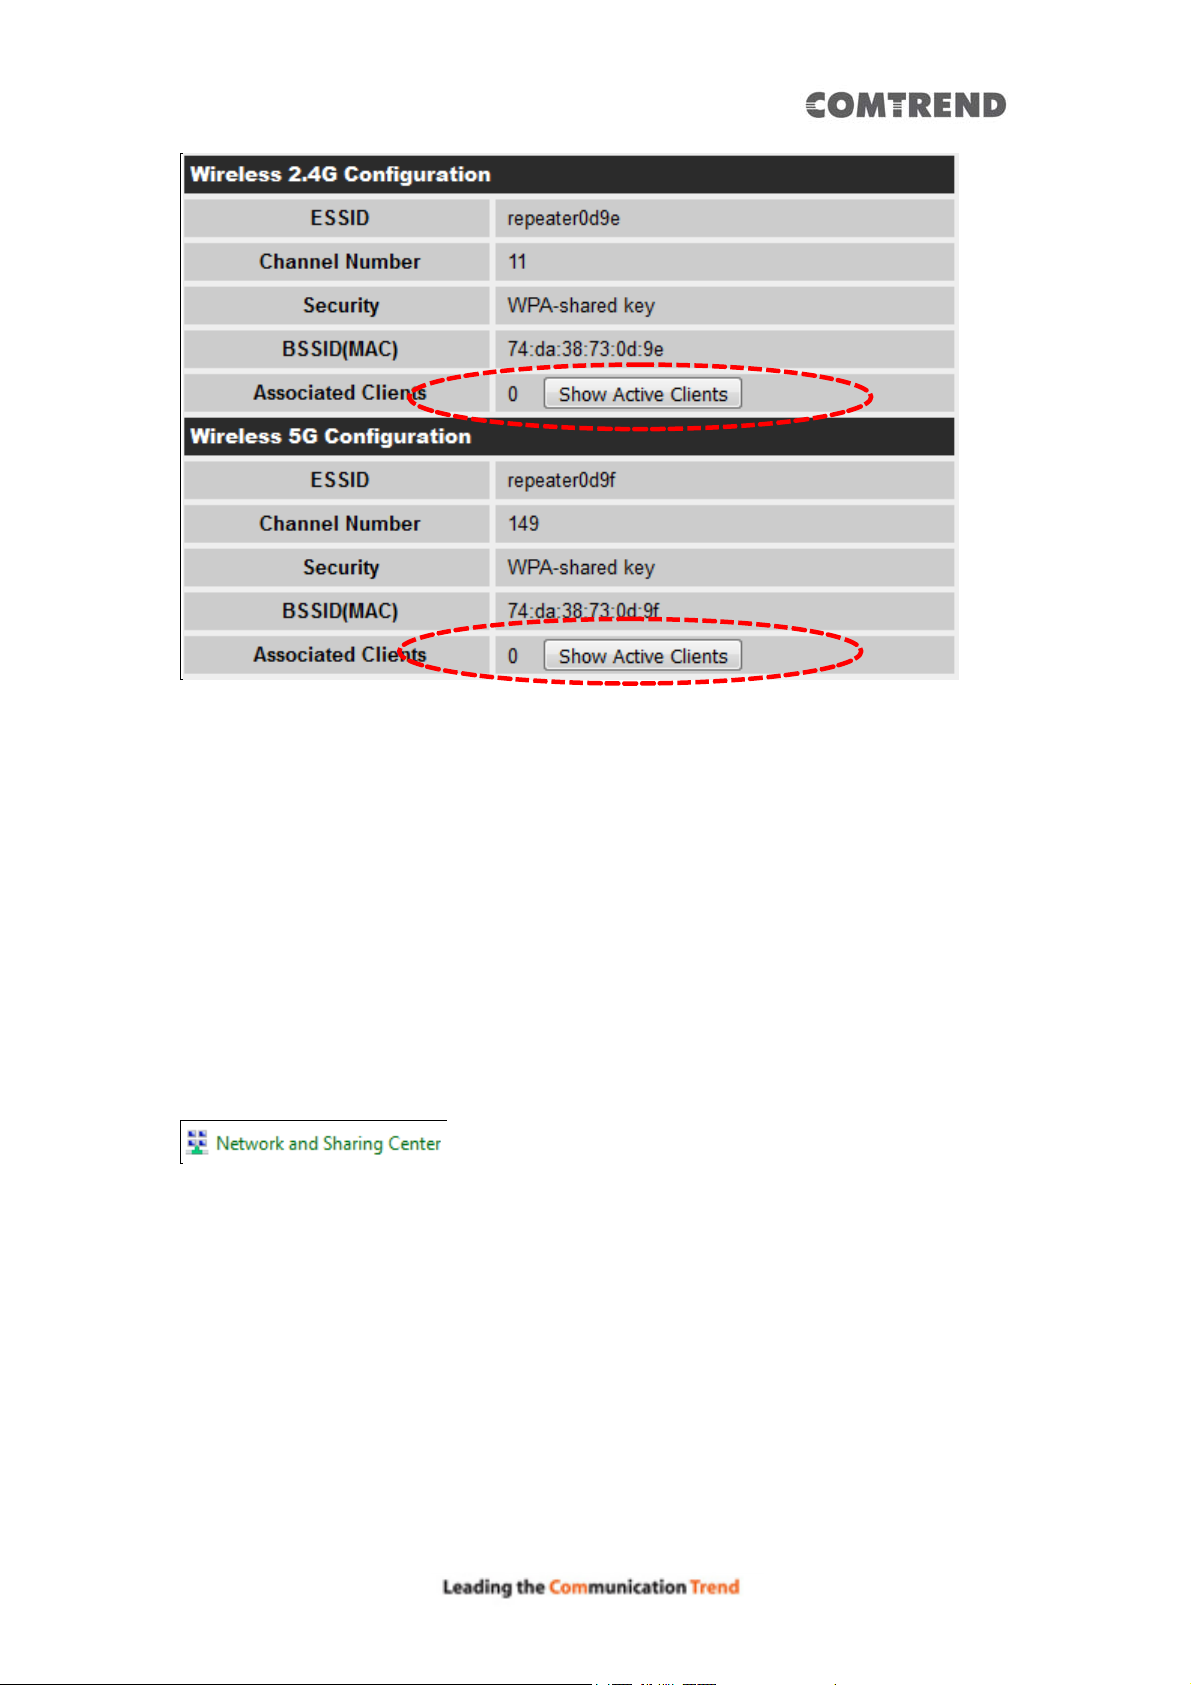
Their MAC address will be displayed in the ‘MAC Address’ field.
4.2.8 How to know the MAC address of your device
If you still can’t identify the MAC address of your computer, you can follow this
procedure:
Go to your computer’s Control Panel, Then click ‘Network and Sharing Center’.
Click the connection that will be used to connect th e wireless AP (in this example,
‘Local Area Connection’):
77
Page 79
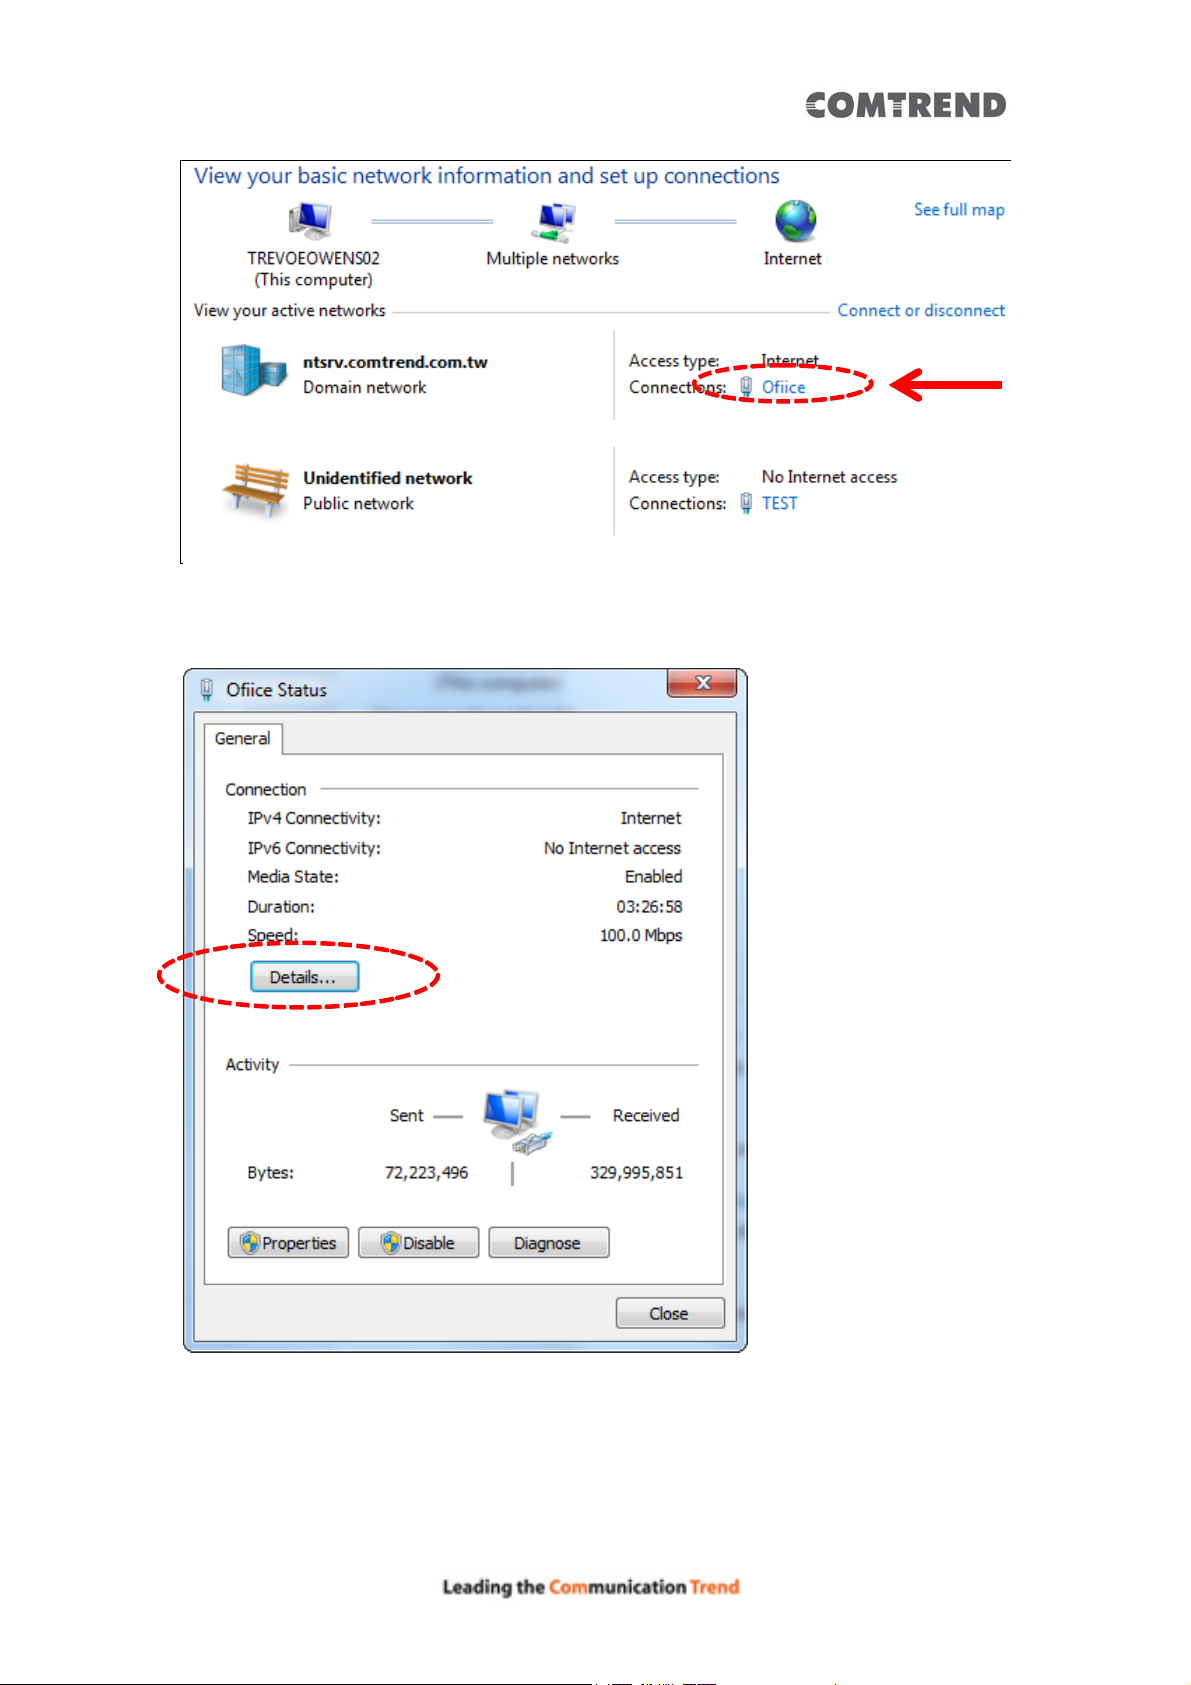
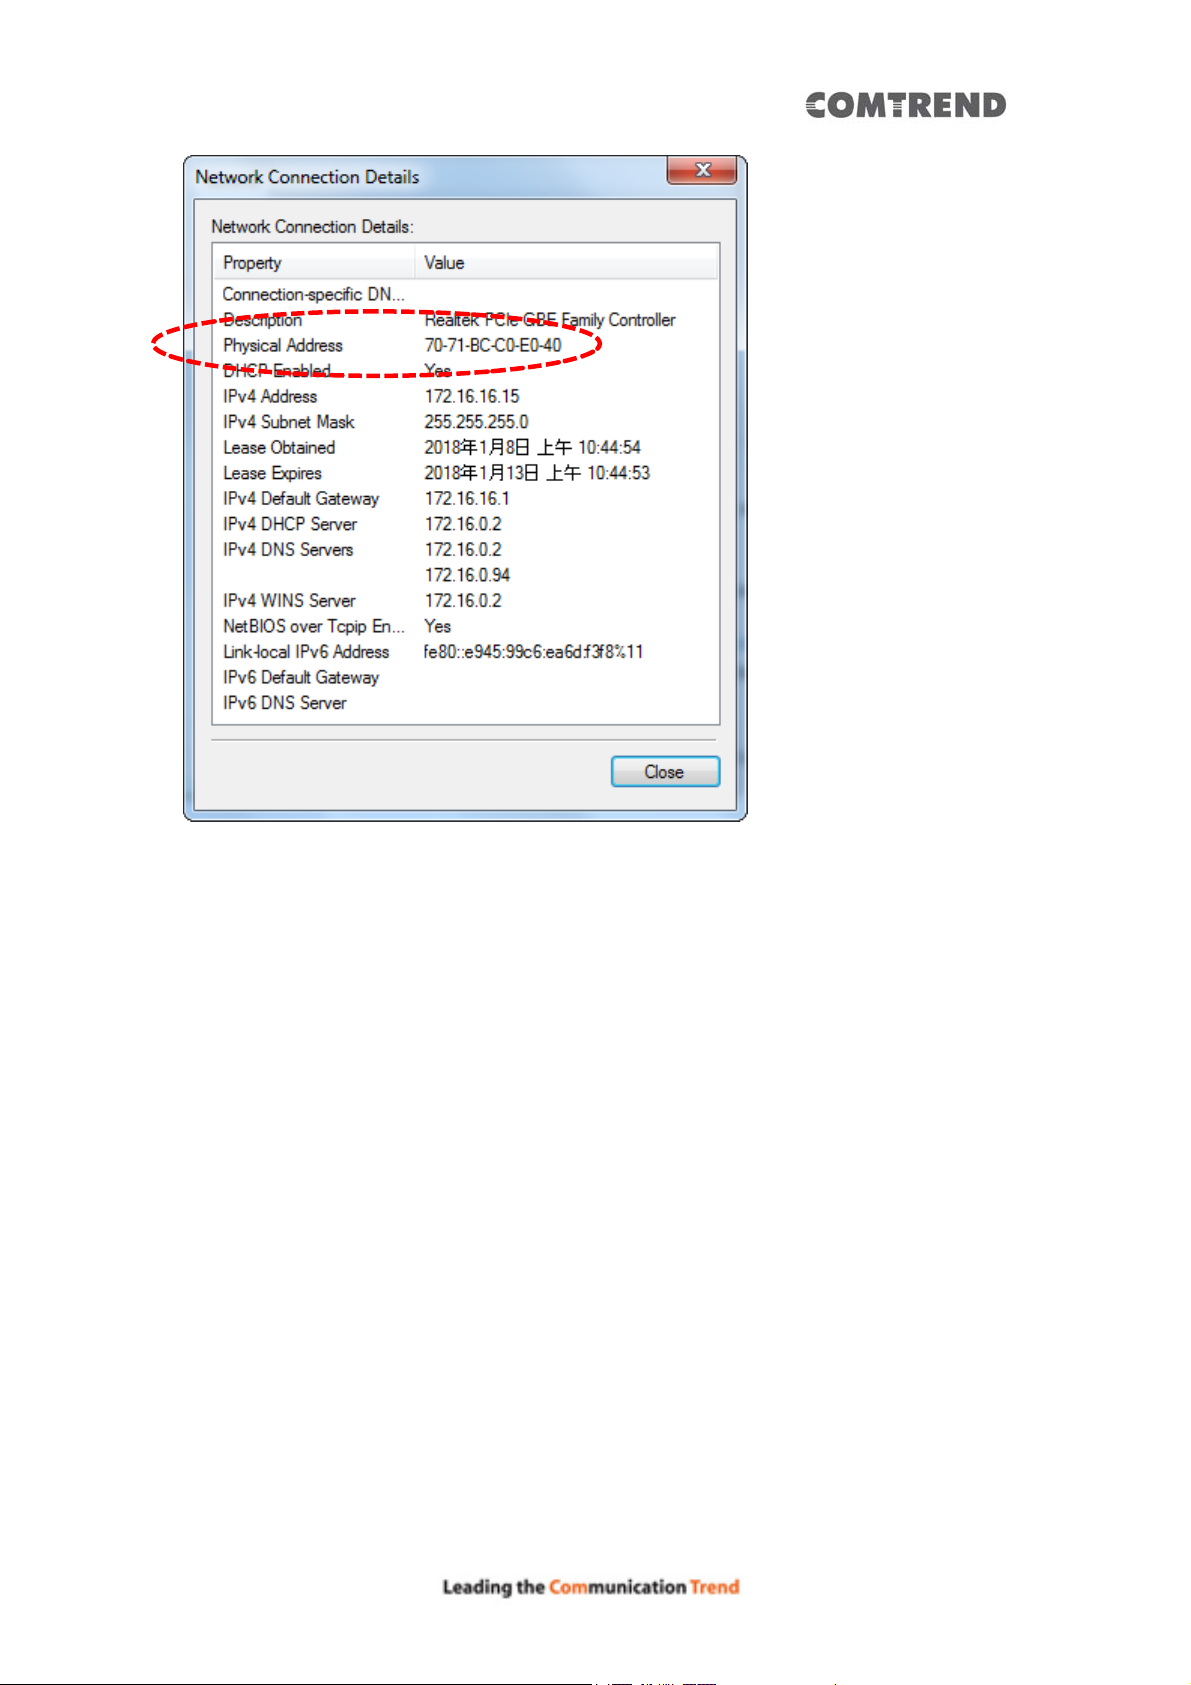
Click the ‘Details…’ button.
The MAC address of selected network connection will be displayed here as ‘Physical
Address’.
78
Page 80
79
Page 81
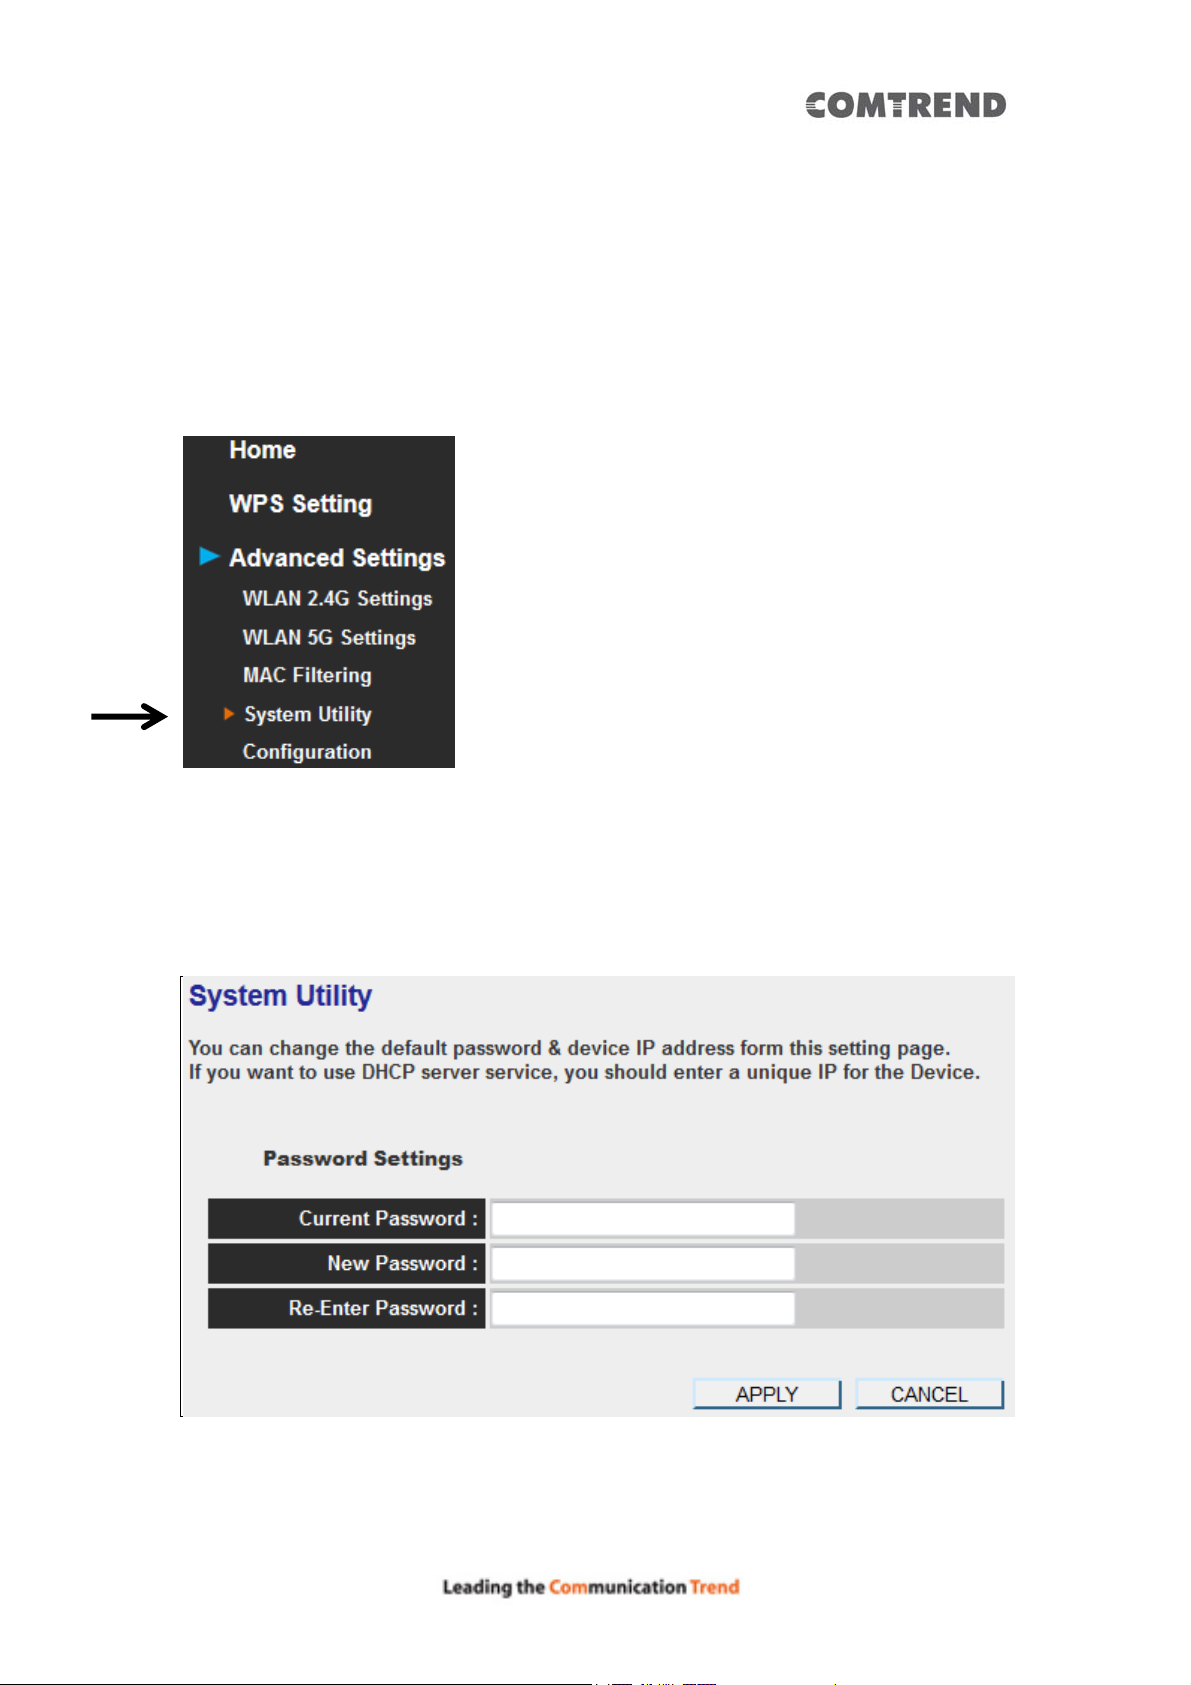
4.2.9 System Utility
You can change the settings of several system-level parameters in this page,
including the administrator’s password, and IP address.
To access the ‘System Utility’ menu, click ‘System Utility’ on the left.
The following setup page will appear:
The description of every setup item is listed as follows:
80
Page 82

4.2.9.1 Password Settings
The default password of this Wireless Mesh Point is 1234, and it’s displayed on the
login prompt when accessed from the web browser. There’s a security risk if you
don’t change the default password, since everyone can see it. This is very important
when you have the wireless function enabled.
Here are descriptions of every setup item:
Item Description
Current Password To change the password, you have to input the current
password first.
New Password Input the new password here. You can use the
combination of letters, numbers, and symbols up to 20
characters.
Re-Enter Password Input the new password again for conformation.
81
Page 83
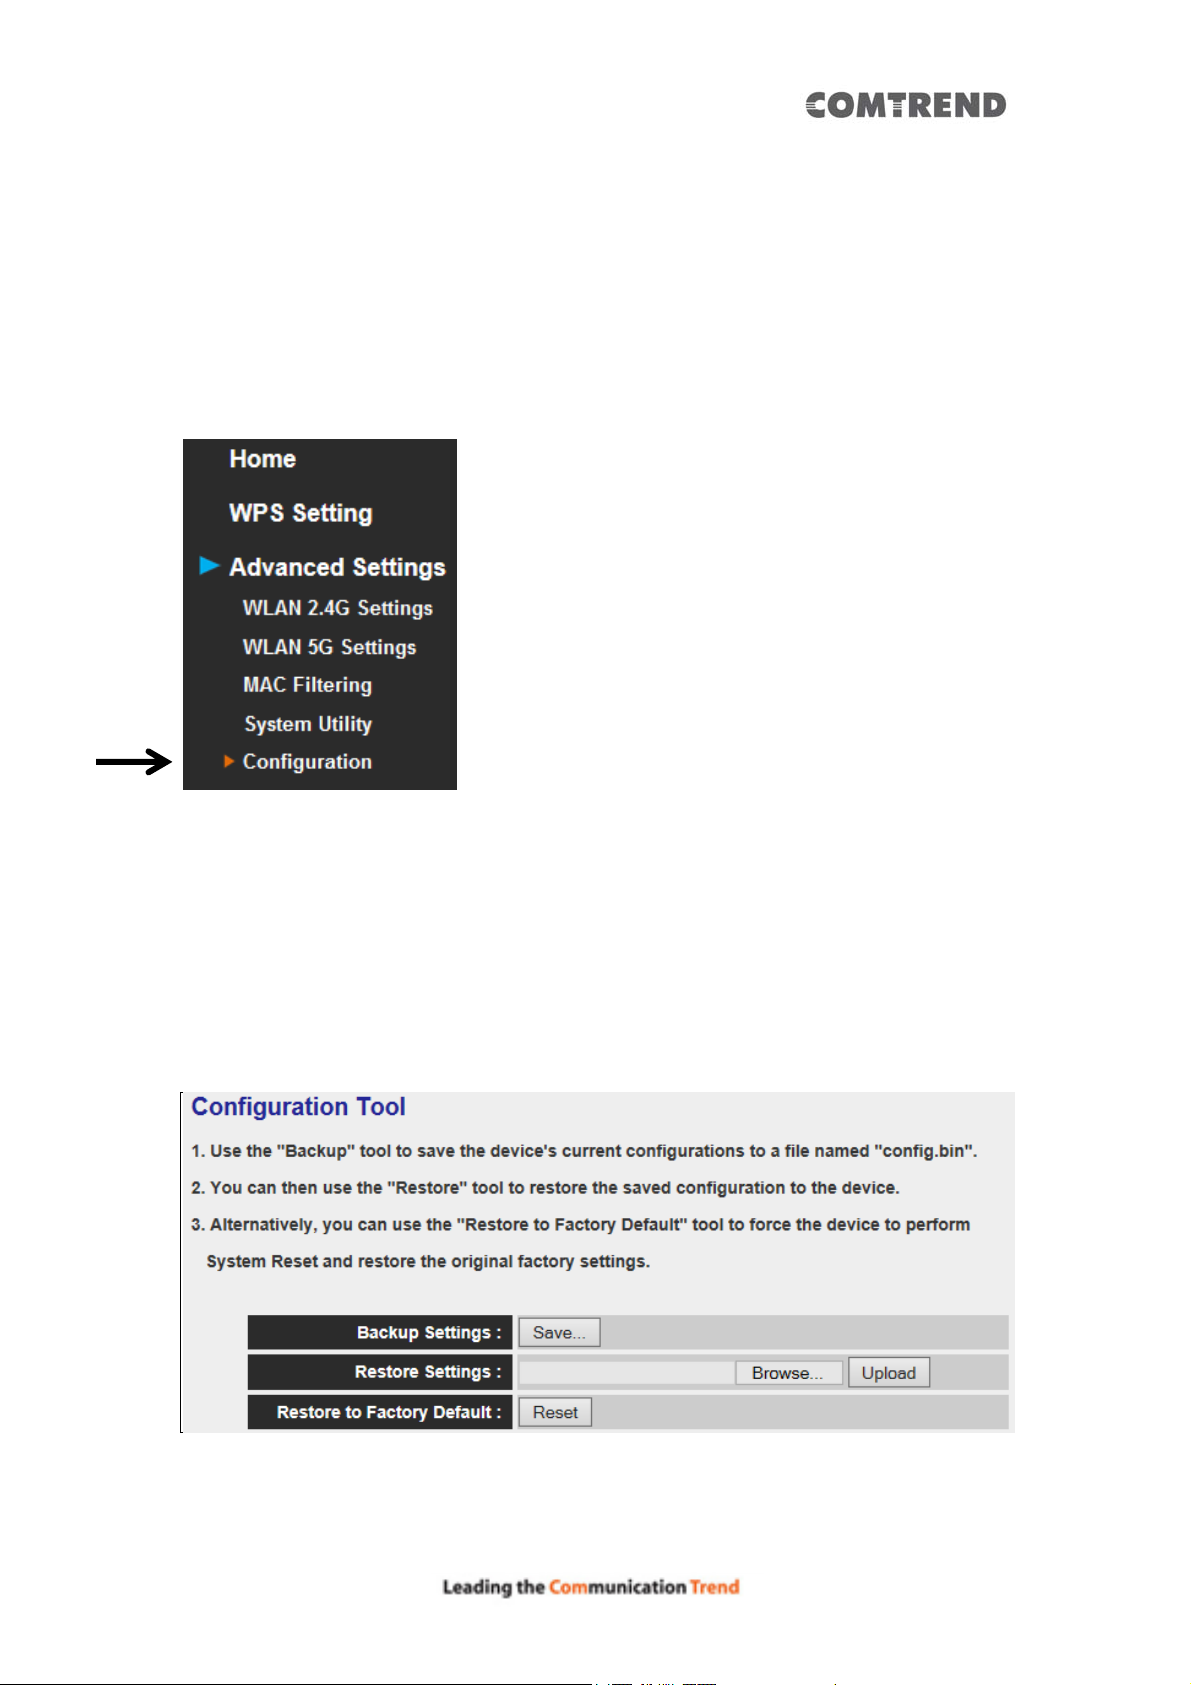
4.2.10 Configuration
You can bac kup and restore the configuration of this access point, so you can recall
all settings, without the needing to reconfigure again.
This function is especially useful when you need to use this mini Wi-Fi AP in different
places, like your home and hotels.
To access the ‘Configuration’ menu, click ‘Configuration’ on the left.
4.2.10.1 Configuration Tool
The following setup page will appear:
The description of every setup item is listed as follows:
82
Page 84
Item Description
Backup Settings Click the ‘Save’ button to save the current settings to a file on
your computer.
Restore Settings If you want to upload a saved configuration file to this device,
please click the ‘Browse’ button to select a saved configuration
file on your computer. Then click the ’Upload’ button to replace
the current settings.
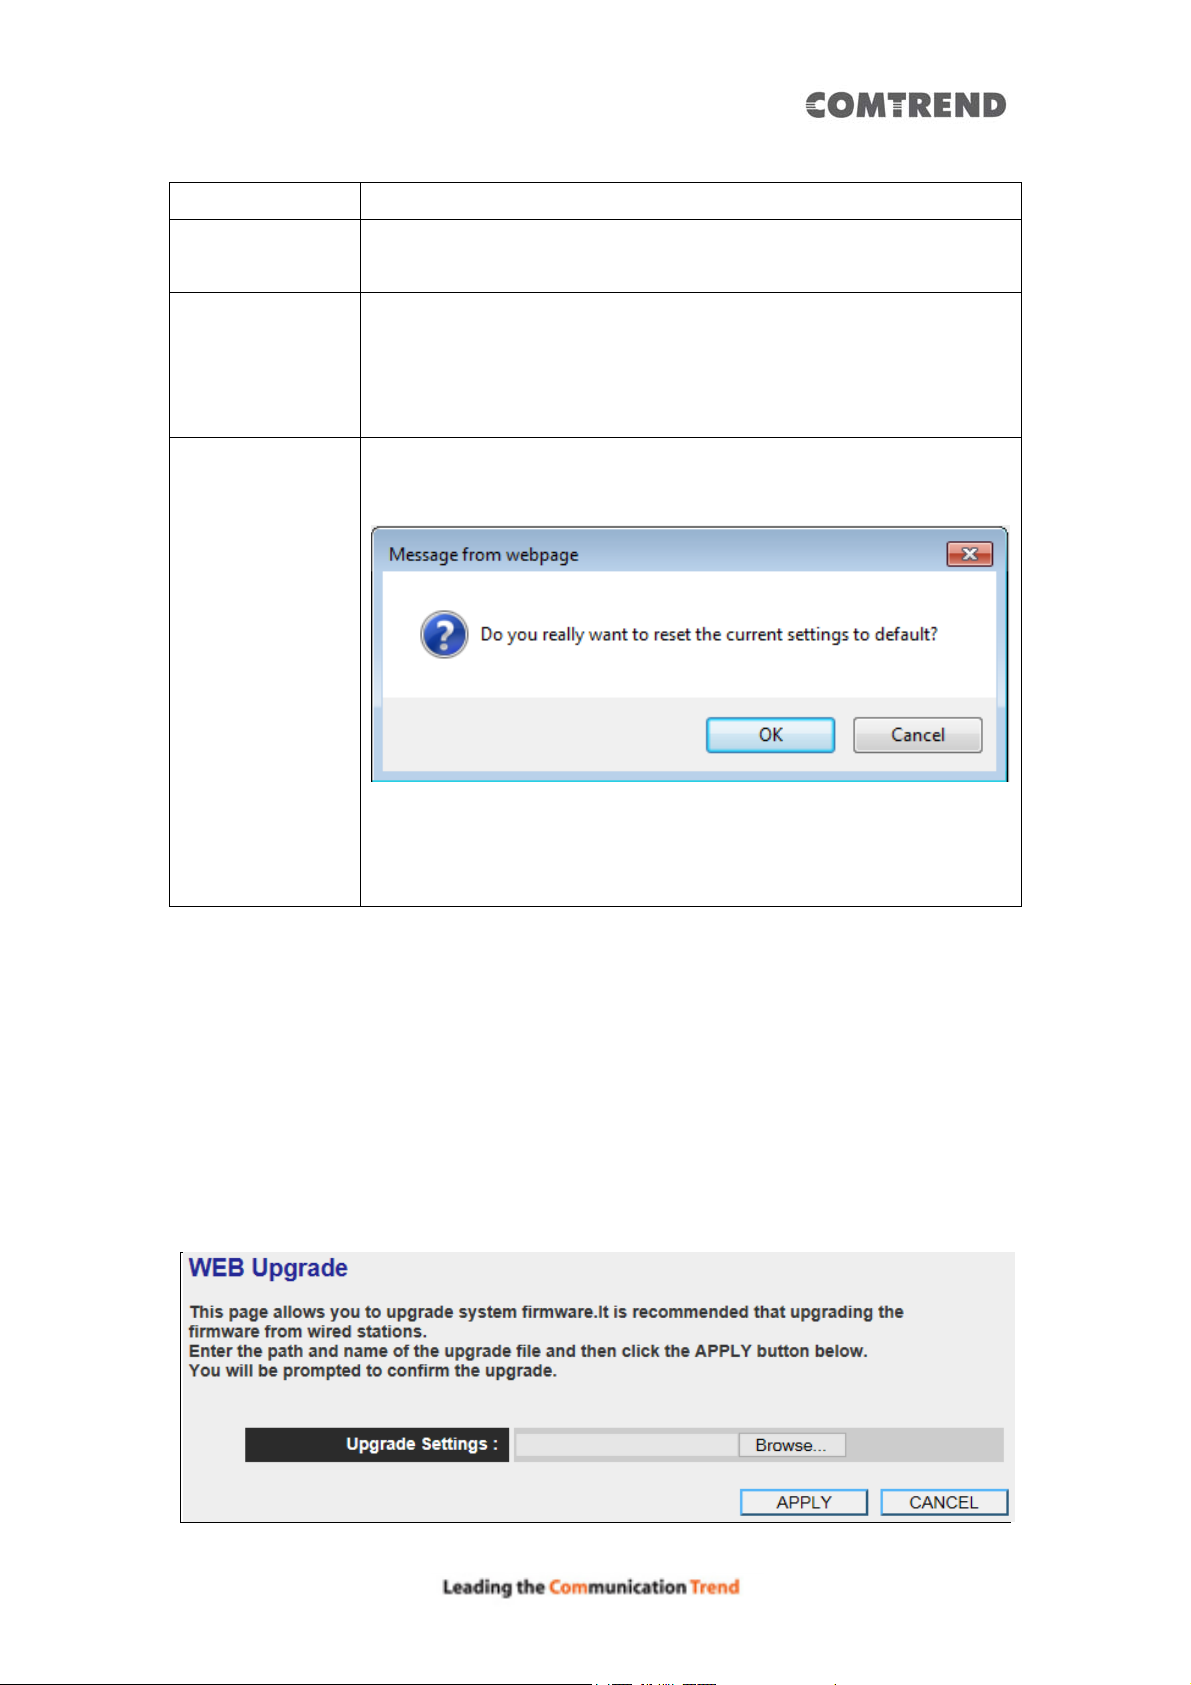
Reset to Factory
Default
4.2.10.2 WEB Upgrade
To reset all settings of this device to factory defaults, including
the password. You’ll be prompted to confirm the settings reset:
Click ‘OK’ if you really want to restore all settings, or click
‘Cancel’ to abort.
The software running on this device (i.e. ‘Firmw are’) can be upgr aded to impro ve
the functionality of this access point.
You can access our website to look for the latest firmware file. Then download the
latest firmware file and save on your computer and upload to this wireless AP.
83
Page 85
The description of every setup item is listed as follows:
Item Description
Browse Select a firmware file saved on your computer.
When you are ready, click the ‘Apply’ button to start the firmware upgrade
procedure.
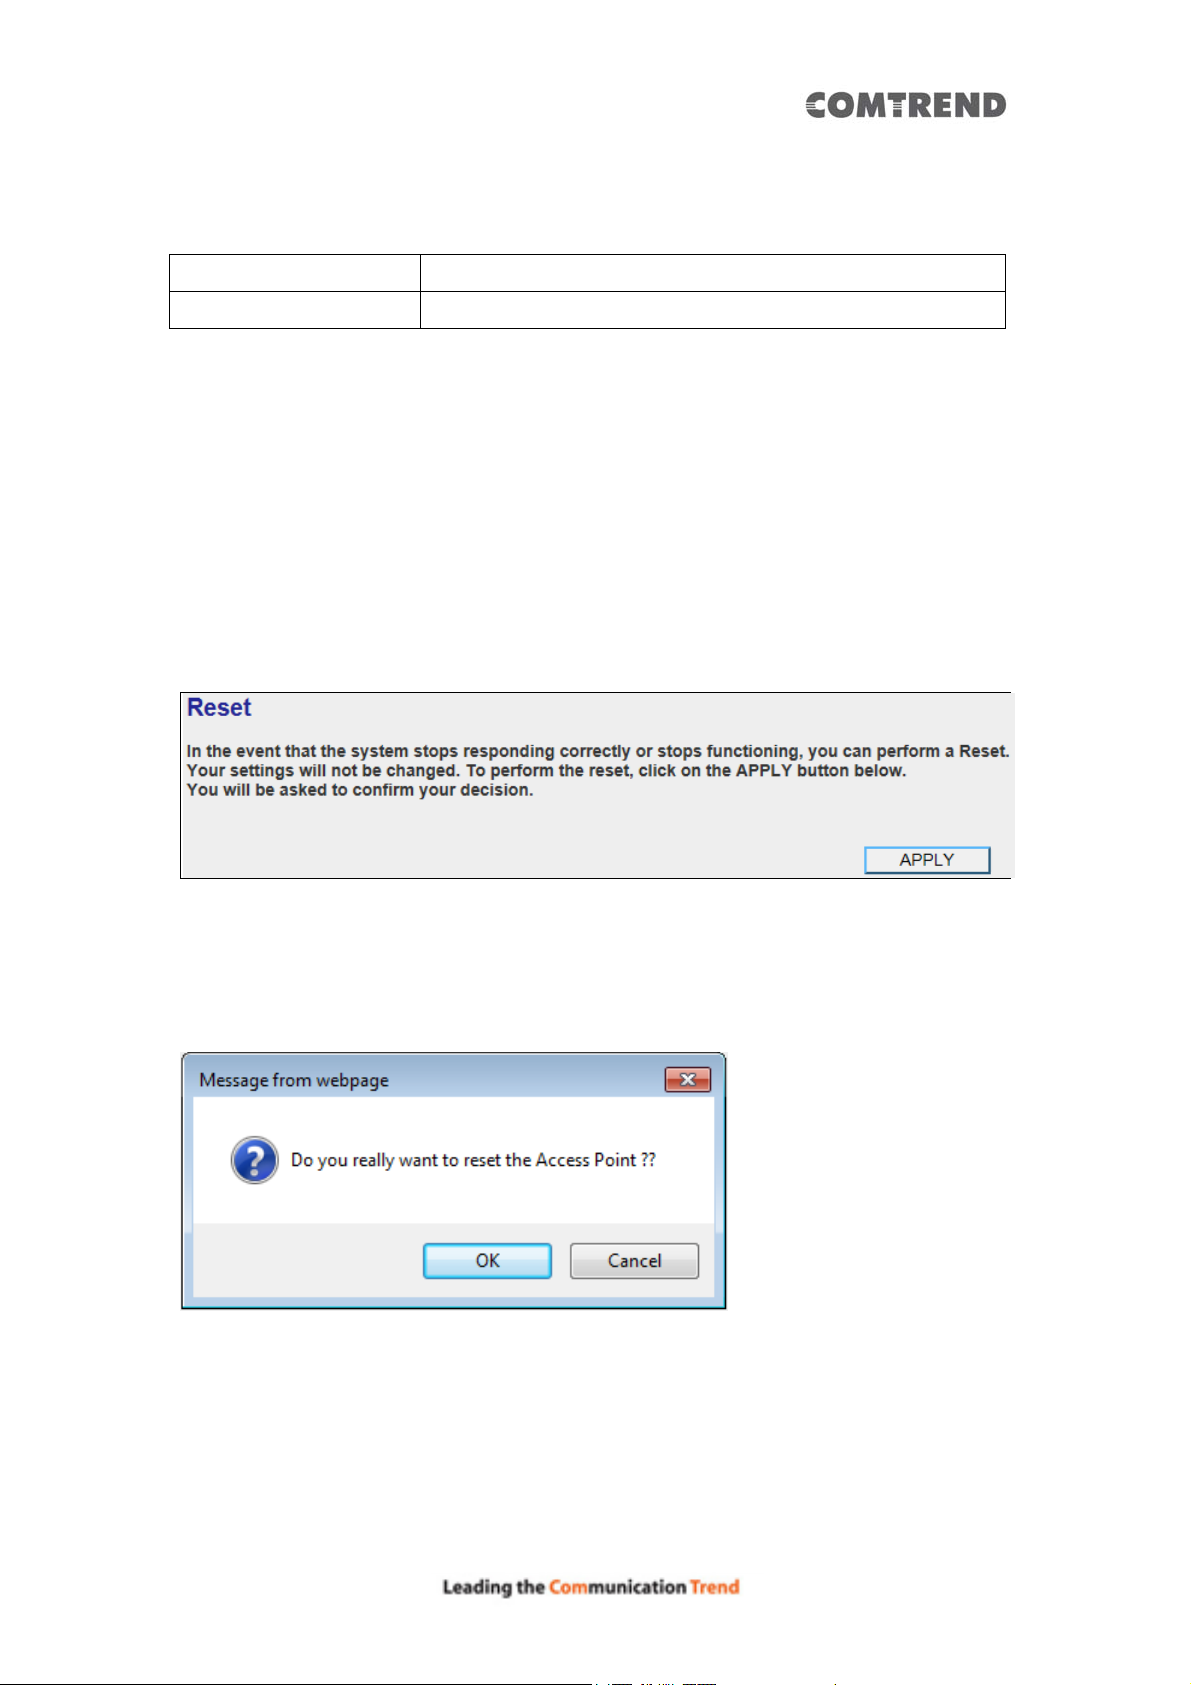
4.2.10.3 Reset
When you think this wireless AP is not working properly, resetting it may help.
To reset this Wireless Mesh Point, click the ‘Apply’ button. You’ll be prompted to
confirm the reset:
Click the ‘OK’ button to reset the Wireless Mesh Point, or click ‘Cancel’ to abort.
84
Page 86
Chapter 5 Appendix
5.1 Configuring TCP/IP on PC
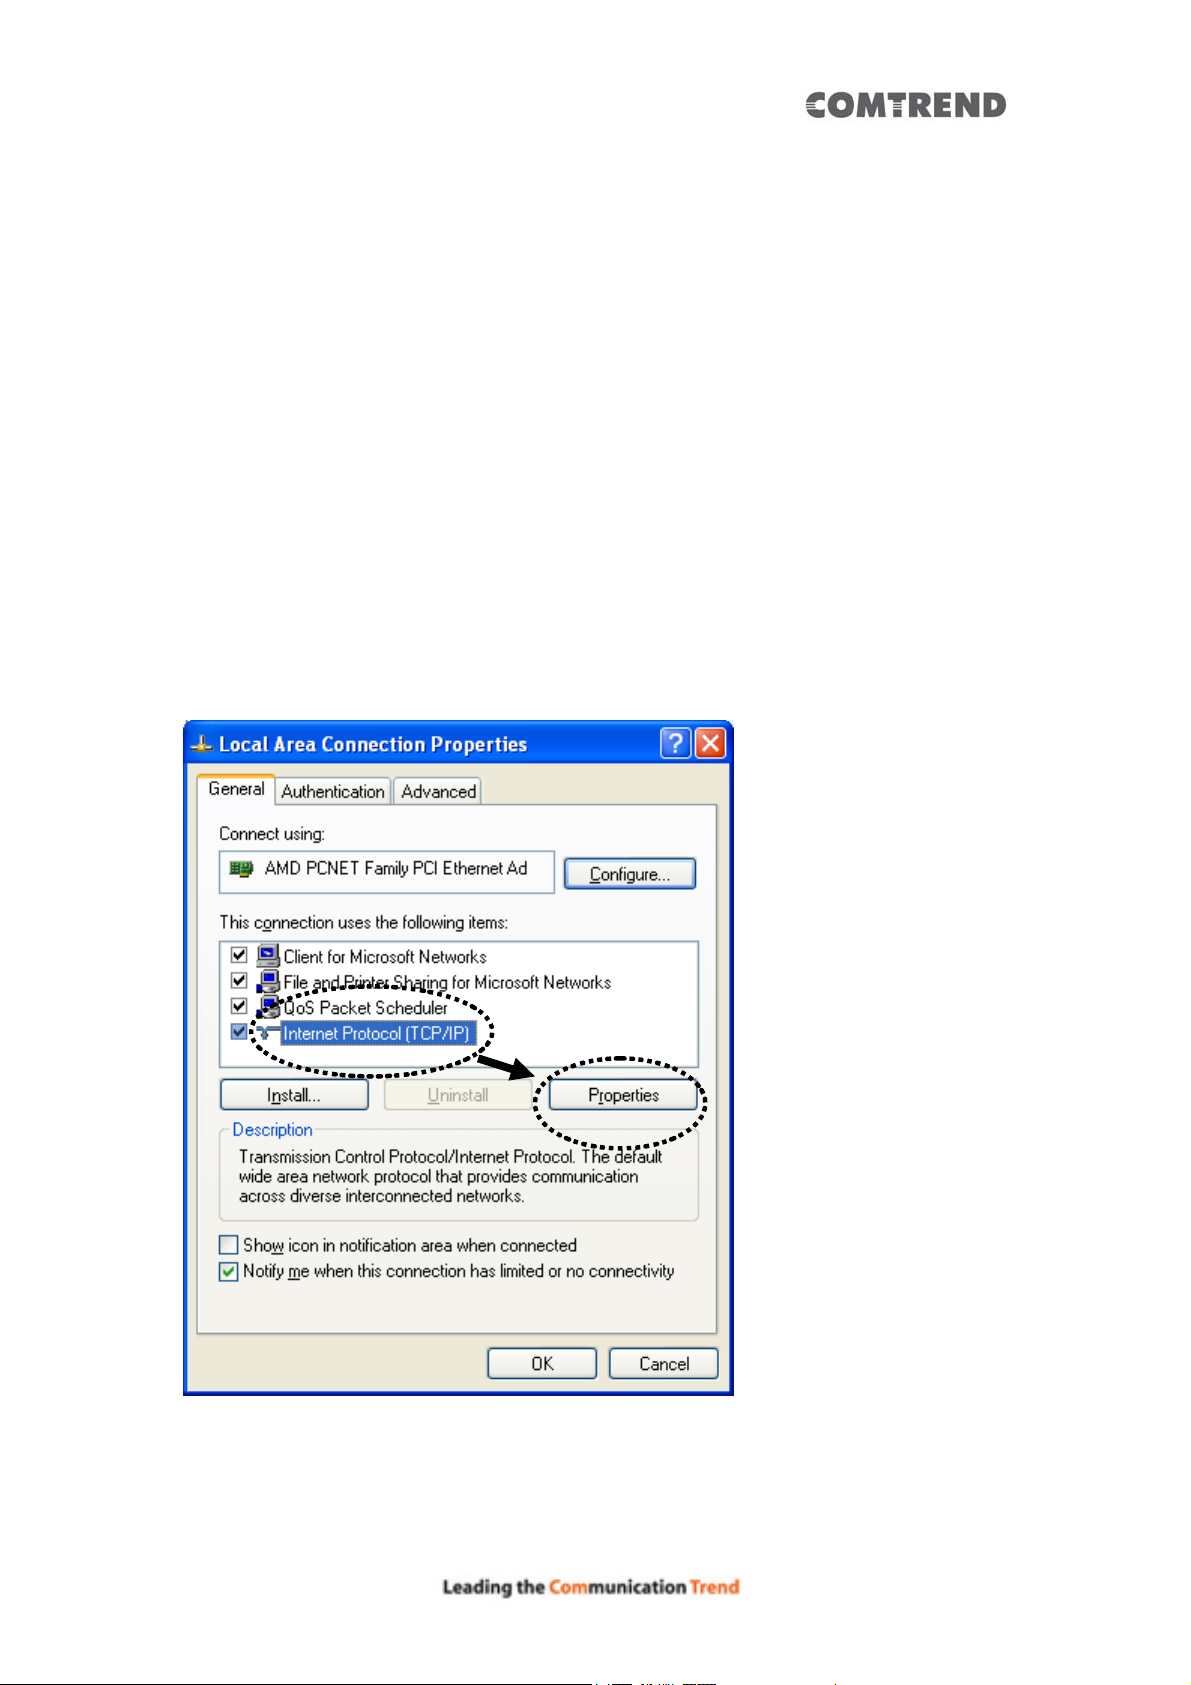
5.1.1 Windows XP IP address setup:
1. Click the ‘Start’ button (it should be located at the lower-left corner of your
computer screen), then click control panel. Double-click Network and
Internet Connections icon, and then click Network Connections, then
double-click Local Area Connection, the Local Area Connection Status
window will appear, and then click the ‘Properties’ button.
2. Select ‘Obtain an IP address automatically’ and ‘Obtain DNS server address
automatically’, then click the ‘OK’ button.
85
Page 87
5.1.2 Windows Vista/Windows 7 IP address setup:
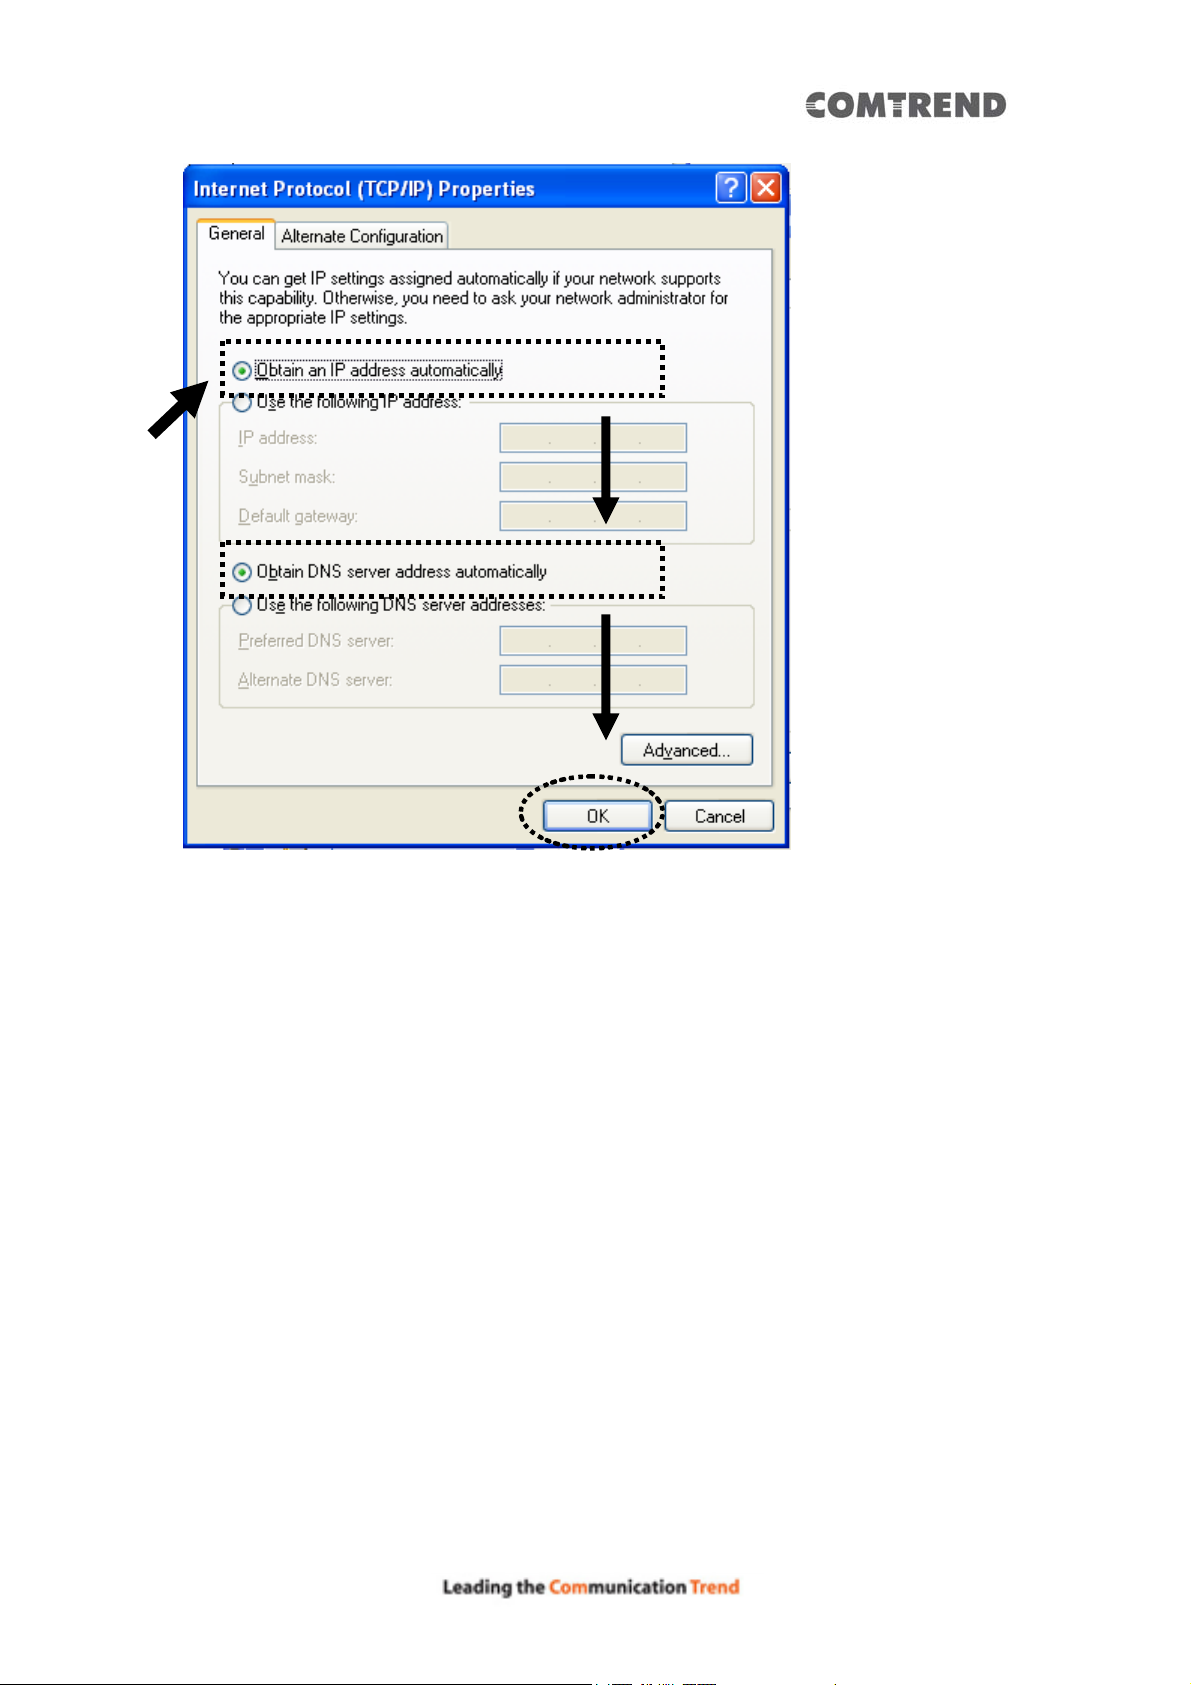
1. Click the ‘Start’ button (it should be located at lower-left corner of your
computer screen), then click control panel. Click View Network Status and
Tasks, and then click Manage Network Connections. Right-click Local Area
Network, then select ‘Properties’ . The Local Area Connection Properties window
will appear, select ‘Internet Protocol Version 4 (TCP / IPv4), and then click the
‘Properties’ button.
86
Page 88
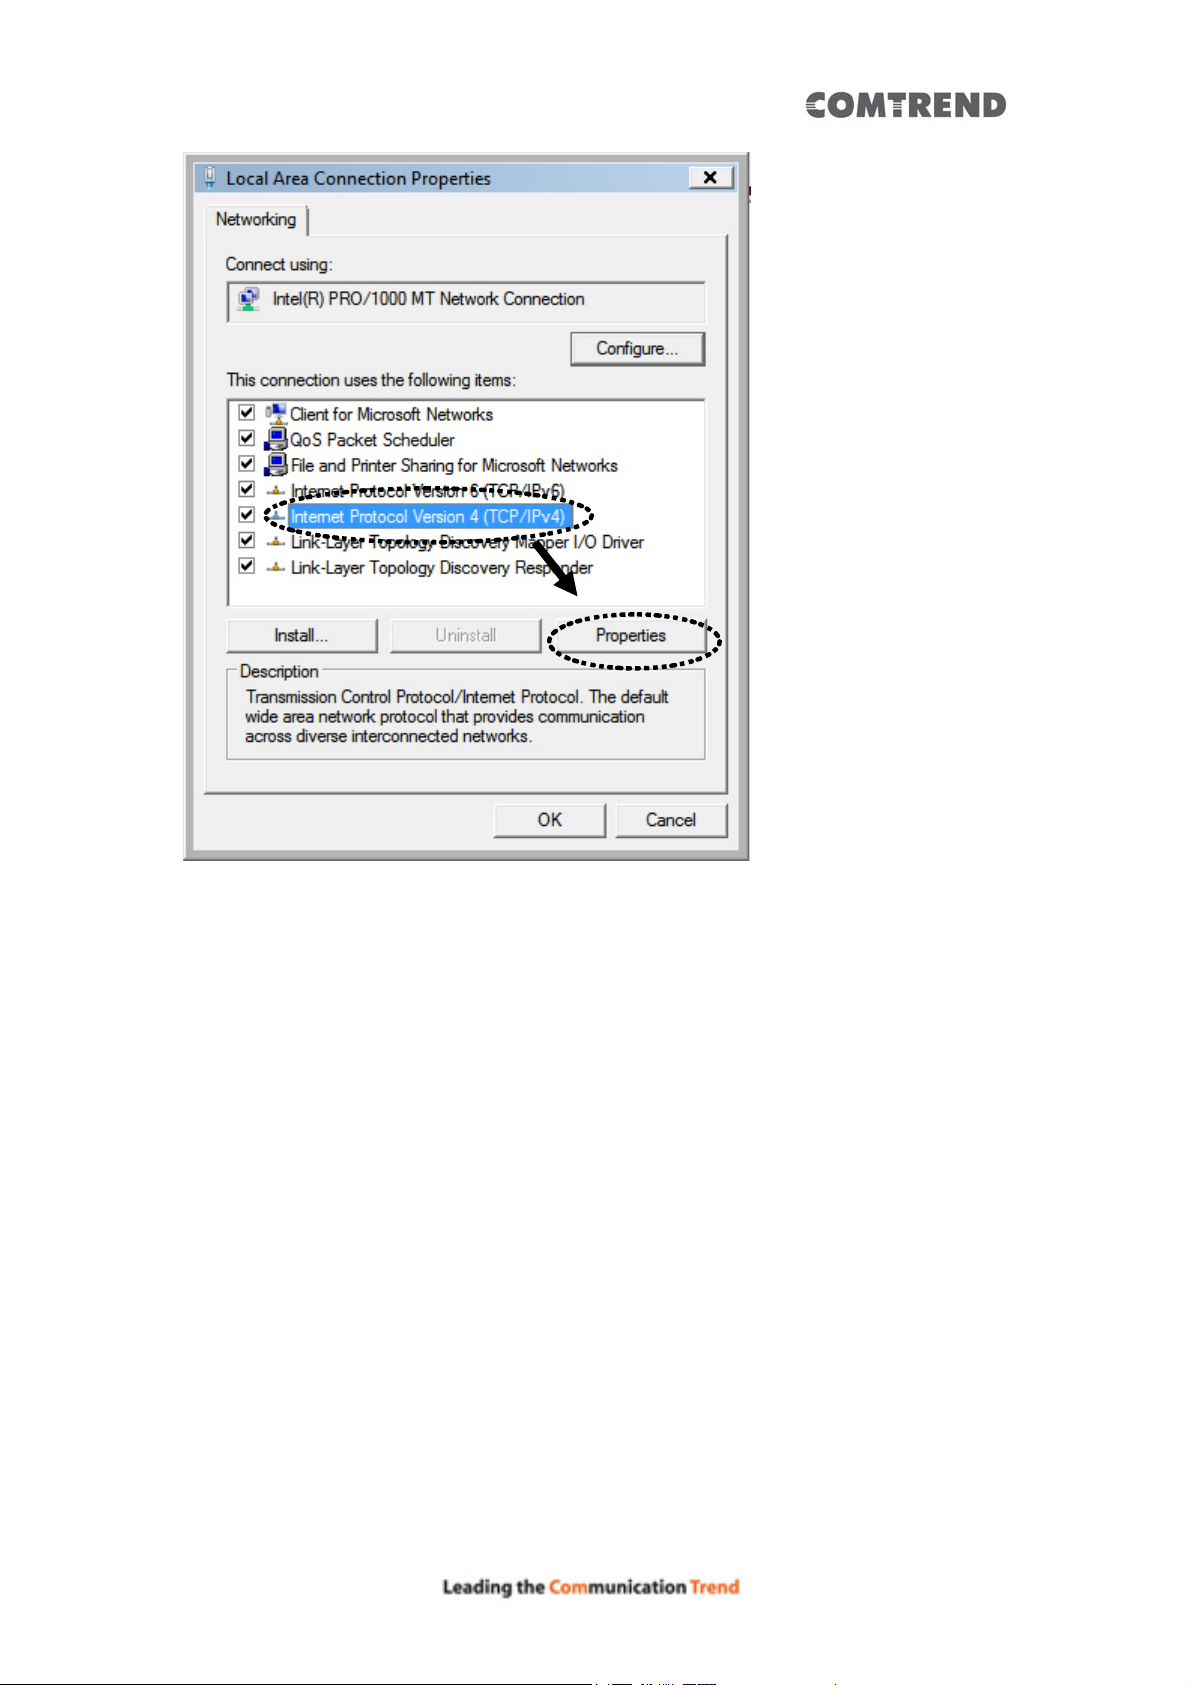
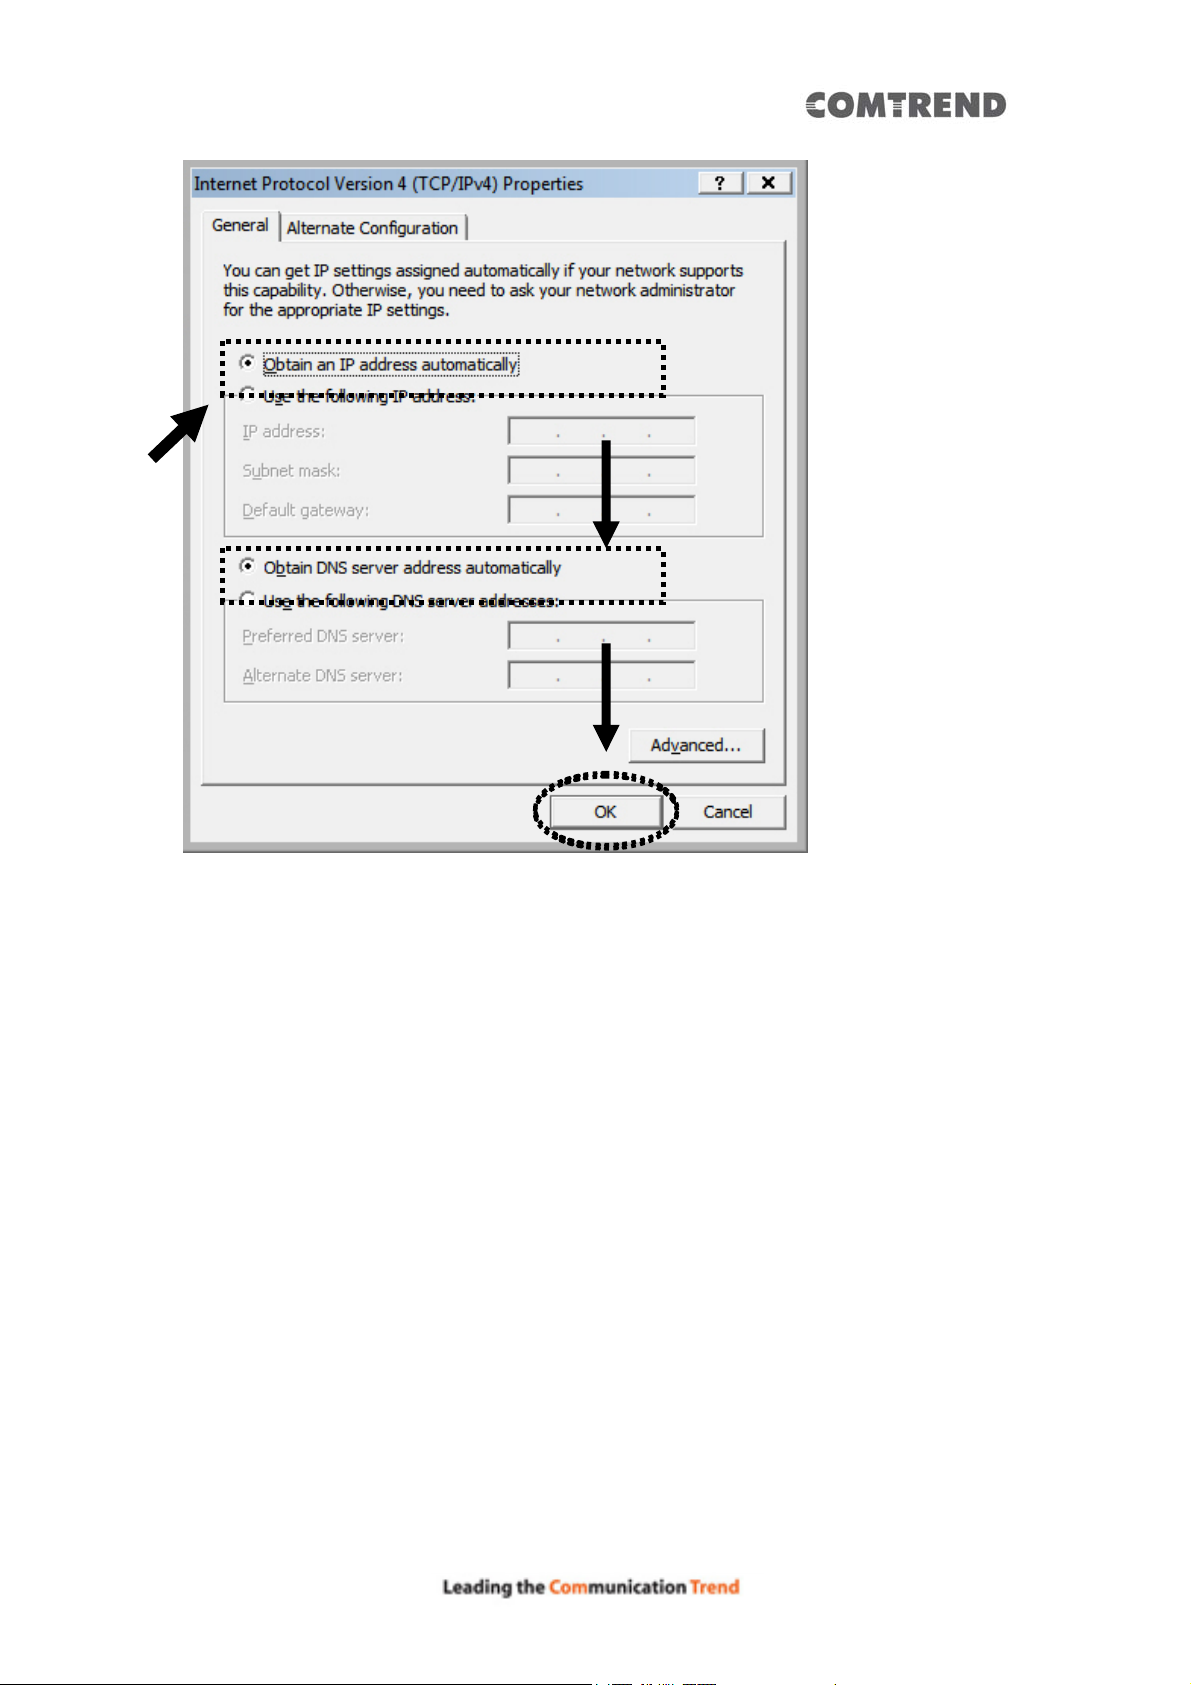
2. Select ‘Obtain an IP address automatically’ and ‘Obtain DNS server address
automatically’, then click the ‘OK’ button.
87
Page 89
88
 Loading...