

Page 1
LLooaaddiinngg PPaappeerr UUssiinngg tthhee LLoowweerr PPuusshh TTrraaccttoorr aanndd tthhee RReeaarr PPuullll TTrraaccttoorr
((ooppttiioonn))
For loading paper in this way, it is necessary to install the optional rear pull tractor. See later
With this paper path confi gura tio n pa per is l oaded contempora neously with the l owe r front push
tractor and the rear pull tractor. In this way it is possible to handle stronger paper.
Once the rear pull tractor is installed, the fanfold paper can be loaded only in push-pull mode.
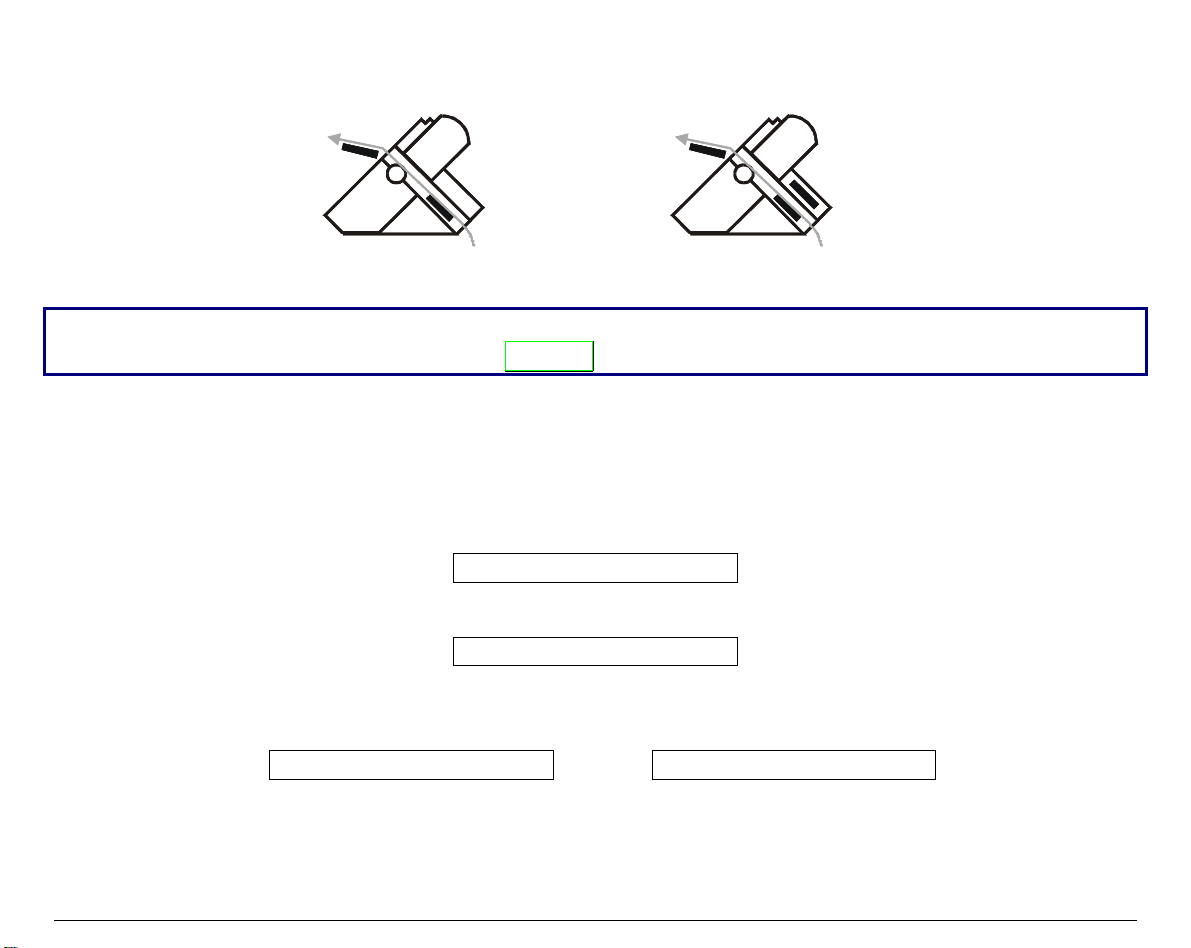
1. To select the push-pull tractor paper path press the
• If you have been using a different path, the display shows:
9078 plus model
"Options" section.
LOAD PUSH-PULL
PATH CHANGING
9078D plus model
PATH
key until the display shows:
• If you have been using fanfold paper in the upper tractor paper path, the printer
automatically starts the parki ng procedure. The display shows alternately:
TEAR IF NECESS.
and PARK PAPER
117
Page 2
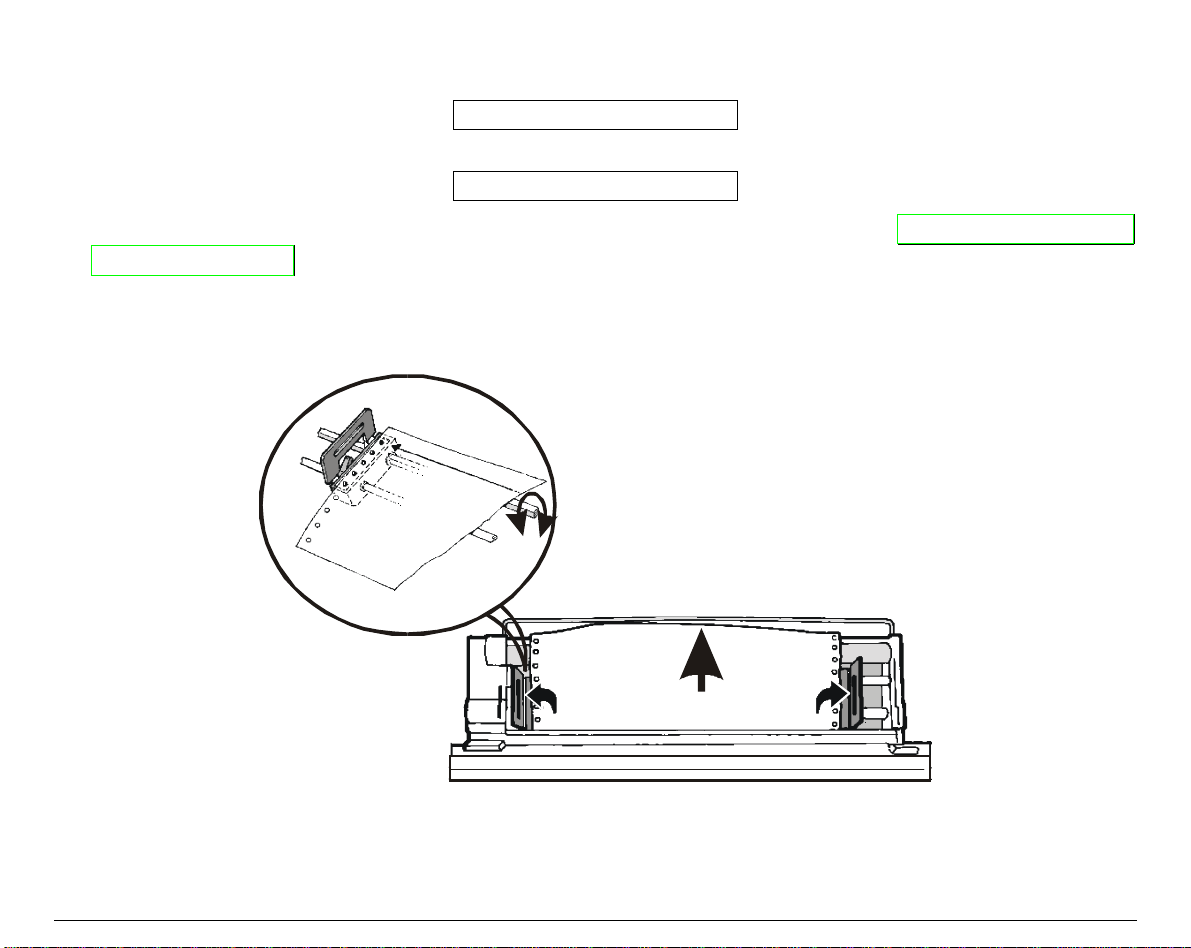
• Tear off the fanfold loaded with the upper tra ctor (if it is l onger than 18 i nches) and press
the
key. The display shows:
PARK
PARKING
followed by
LOAD PUSH-PULL
2. To load the fanfold paper on the l ower push tra ctor, foll ow the sequence Loading Paper Using
the Lower Tractor described before.
3. Ta ke up the slack of the paper exiti ng from the rear paper slot an d rotate the sprocket bar to
align the sprocket pins of the rear tractor with the paper perforation.
118
Page 3
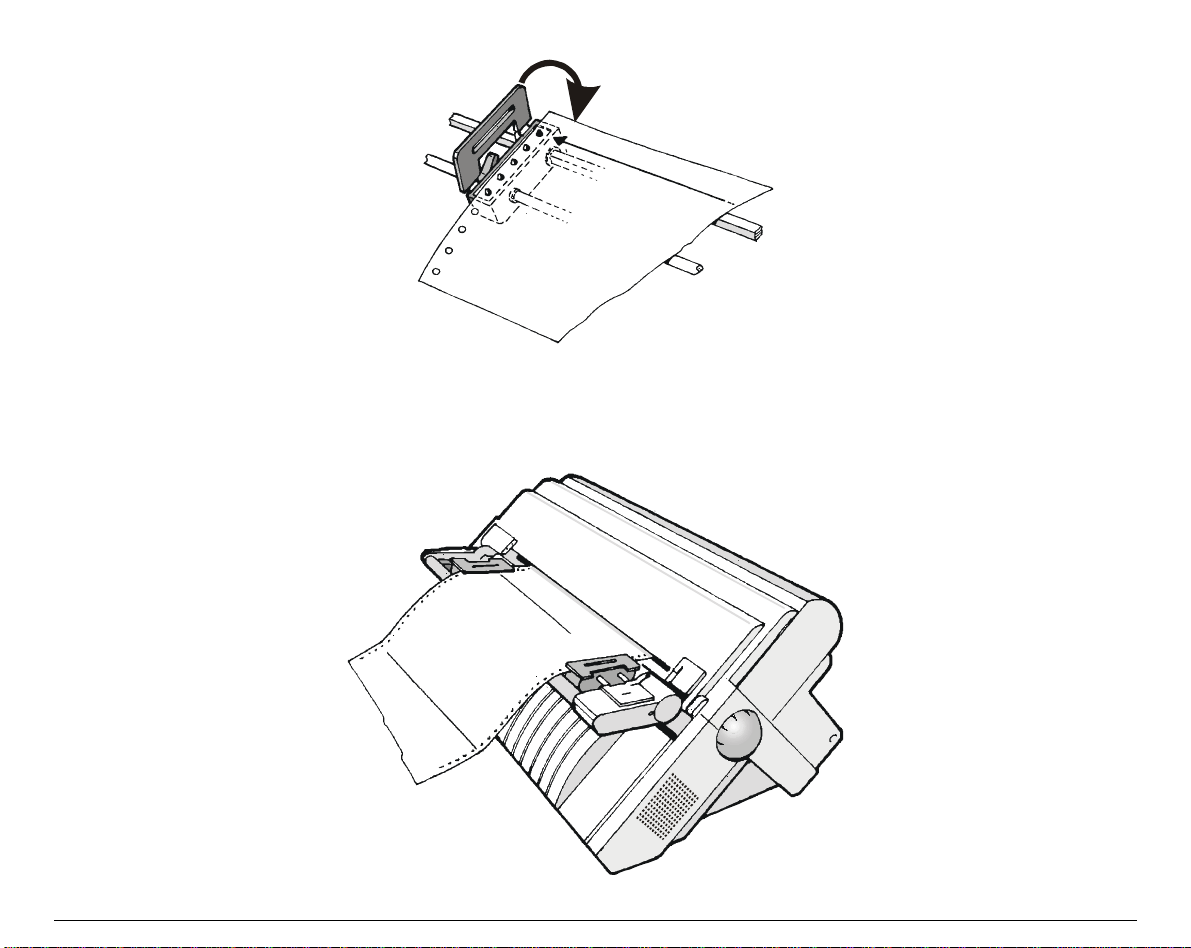
4. Lock the sprocket covers and lower the sprocket levers.
5. Press the
ON LINE
key to confirm that the paper loading is finished. The rear tractor engages.
6. The figure shows the correct paper loading.
119
Page 4

PPrriinntteerr MMaaiinntteennaannccee aanndd TTrroouubblleesshhoooottiinngg
CClleeaanniinngg tthhee PPrriinntteerr
Make sure the printer has been turned off for at least 15 minut es before start ing any cleaning
Periodic cleaning will help keep your printer in top condition so that it will always provide
optimal performance.
• Use a neutral detergent or water solution on a soft cloth to clean dirt and grease from the
cabinet of the printer.
• Do not use an abrasive cloth, alcohol, paint thinner or similar agents because they may cause
discoloration and scratching.
• Be especially careful not to damage the electronic and mechanical components.
operations.
120
Page 5
RReeppllaacciinngg tthhee RRiibbbboonn CCaarrttrriiddggee
1. Make sure that the printer is turned off for at least 15 minutes.
Pay attention to the print head because it becomes hot during operation
2. Open the top printer cover.
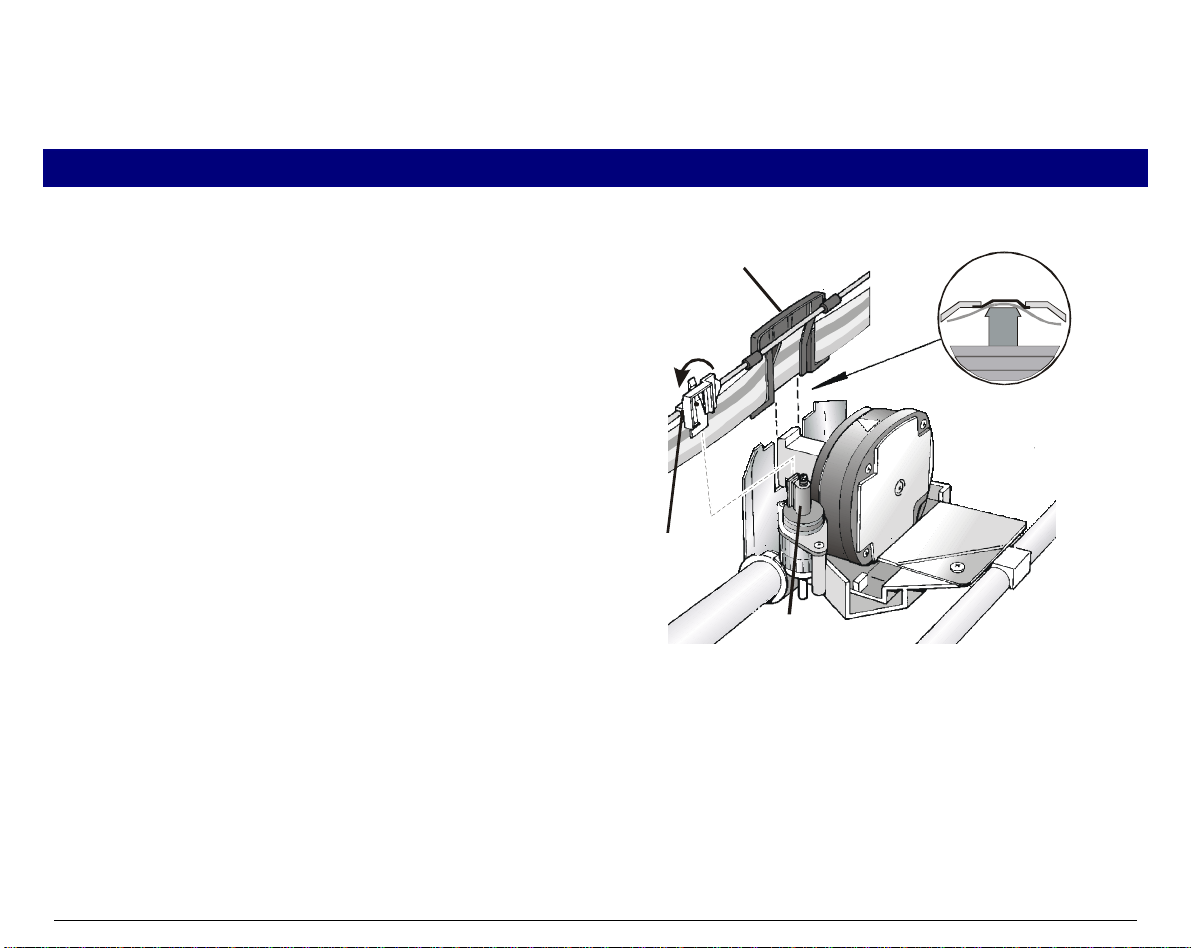
3. Slide the ribbon guide out of the print head.
If the color kit is installed on the printer,
unlock the white slider pressing and
holding the lever on the slider towards the
back of the printer and contemporaneously
lifting the slider off the color mechanism.
Ribbon Guide
Color Slider
Color Kit
.
121
Page 6
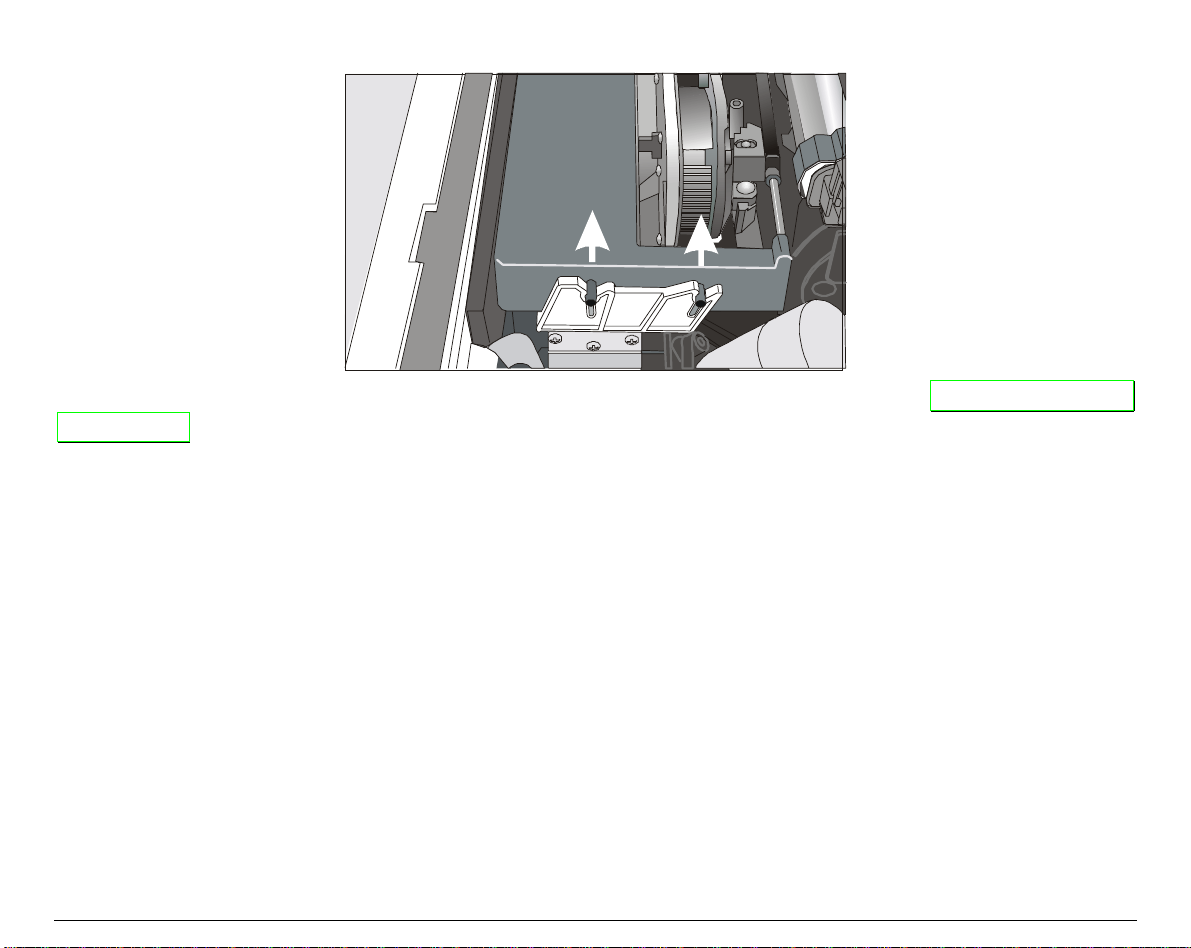
4. Remove the used ribbon cartridge by lifting it up.
Now, you are ready to insert the new ribbon cartridge. See before "Ribbon Cartridge
Installation"
PPrriinnttiinngg tthhee SSeellff TTeesstt
If you need to know any printer setting, and to check if the printer is working well, print the selftest.
Proceed as follows:
1. Keep the
RELEASE KEY.
2. When you release the key, the printer starts the self-test printout.
3. To stop the self-test printi ng, press the
ON LINE
key pressed while powering on the printer until the display shows
ON LINE
key again. The printer is offline.
122
Page 7

EErrrroorr HHaannddlliinngg
When an error condition occurs:
• the printer is disabled;
• the first message on the display indicates the error, while the second message gives more
details concerning the error conditions.
Press always the ON LINE key to reset the error condition.
123
Page 8

Error Message Description
Messages Indication
A.G.A NOT OPER
ADJUST THE GAP
BUFFER OVERFLOW
CHARACTER LOST
The automatic gap
adjustment (A.G.A) is
not enabled.
A buffer overflow
condition occurred (for
the serial interface).
Solution
Press the
ON LINE
key to reset the error
condition. Adjust the print head gap to a fixed
distance. Select the print head fixed ga p
adjustment function in the
Press the
•
disabled (
Program Setup
Press the ↓ key until the
•
PROGRAM
READY
indicator unlit) to enter the
Program Menu.
key when the printer is
USER MACRO
function is displayed. Press the → key until
the desired macro is displayed (
MACRO#
).
x
Press the → key to enter the macro parameters.
Press the ↓ key until the
FIXED GAP
parameter is displayed. P ress the → o ← keys to
select the fixed gap adjustment values. From
FIXED GAP 1
GAP 4
(multipart fanfold paper).
(simple fanfold paper) to
FIXED
Turn the printer off and on again, or press the
PROGRAM
and
ON LINE
key successively to
clear the buffer.
CUT NOT ALLOWED
NUM. LINES < 12
An error occurred with
the optional cutter.
The paper to be cut is shorter than 12 lines.
Turn the printer off and on again. If the error
is not solved, call the Customer Support.
124
Page 9

Messages Indication
DATA SET OFF
The DSR Signal is not
connected to the printer and
is not ready for data transfer
(if the serial interface is
selected). This condition may
happen in a remote
connection (via modem) and
the DSR (DATA SET
) signal is missing.
INTERLOCK ERROR
CHECK INSERTION
READY
Neither the rear tractor nor
the tractor cover are
installed on the printer.
JAM LOWER PATH
CHECK PAPER
JAM UPPER PATH
CHECK PAPER
A paper jam error condition
occurred in the paper path
A paper jam error condition
occurred in the paper path
Solution
Press the
ON LINE
key to reset the error
condition.
Install the rear tractor or the tractor cover
on the printer.
Check the paper path and remove the
jammed paper. Press the
ON LINE
key to
reset the error condition.
Check the paper path and remove the
jammed paper. Press the
ON LINE
key to
reset the error condition.
NO PATH AVAILABLE
PATH CHANGING
An electromechanical failure
occurs in the lower tractor
paper path. The printer
changes automatically to the
cut sheet paths (Manual or
ASF).
125
Call Service.
Page 10

Messages Indication
NVM CHANGE
REMOVE PAPER
If this error is displayed
during the printer power on,
an NVM error condition
occurred.
PAPER JAM
CHECK ALL PATHS
A paper jam error condition
occurs in one of the paper
paths.
PRINT INTEGRITY
Anomalous print out because
of a possible print carriage
blocking
RIBBON BLOCKED
CHECK RIBBON
UNKNOWN TRACTOR
The ribbon of the cartridge is
blocked
A tractor type that is not
recognized has been
mounted on the printer.
Solution
Turn the printer off and then on again. If
the problem is not solved call Service
Check all the paper paths and remove the
jammed paper. Press the
ON LINE
key to
reset the error condition.
¬ Do not move the platen knob.
Press the
ON LINE
key to reset the error
condition
Check that the ribbon is correctly inserted.
Turn the tension knob to make sure that
the ribbon is not jammed. Press the
key to reset the error condition.
LINE
ON
Check that the installed tractor is
compatible with the printer.
126
Page 11

OOppttiioonnss
TThhee RReeaarr PPuullll TTrraaccttoorr
The rear pull tractor is useful to handle particularly heavy paper.
IInnssttaalllliinngg tthhee RReeaarr PPuullll TTrraaccttoorr
1. Turn the printer off.
2. Remove the ASF cover, the rear tractor area cover and the two small tractor fixing area
covers.
Re ar tractor
area cover
ASF area cover
Tractor fixing
area s cov ers
Keep the covers in a safe place, as they must be reinstalled if the rear t ractor is removed.
3. Replace the ASF cover.
127
Page 12

4. Open the top cover, free (1) the paper bail and remove (2) it from the hooks on both sides of
the printer. Then install the rear pull tractor. Close the top cover
1
1
2
5. Insert the rear pull tra ctor and the corresponding fixing area cove rs (with the slot) as shown
in figure.
6. Turn the printer on.
The paper can be loaded in push-pull mode. See before "Loading Paper Using the Lower Push
Tractor and the Rear Pull Tractor".
128
Page 13

RReemmoovviinngg tthhee RReeaarr PPuullll TTrraaccttoorr
1. Push the lever on the rear pull tractor down and lift the tractor out of the printer.
2. Insert the rear tractor cover and make sure that the interlock connector is correctly inserted.
If the cover is not inserted, the printer is blocked.
3. Open the top cover. Move the print carriage to the right most position, then insert (1) the
paper bail pi ns into the hooks on both si des of the printer. Rotate (2) the paper bai l upwards
and gently push it on both sides towa rds the back of the printer until it clicks into place.
1
2
1
129
Page 14

Printing Characteristics
PPrriinntteerr SSppeecciiffiiccaattiioonnss
Print Head
Matrix 24 pins - 0.25 mm
Print Head Life 700 mil characters (draft)
Print Speed (cps)
Draft Quality
10 cpi Normal 700 LQ 133
Best 400 NLQ 266
Best LQ 200
Best NLQ 400
Throughput (pages/hour)
ECMA 132 Draft Quality
10 cpi Normal 540 LQ 220
Best 470 NLQ 310
Best LQ 290
Best NLQ 430
134
Page 15

Print Matrix (horizontal x v ertica l)
Draft Quality
10 cpi 12 x 12 36 x 24
12 cpi 10 x 12 30 x 24
15 cpi 12 x 12 24 x 16
17.1 cpi 12 x 12 36 x 24
20 cpi 12 x 12 30 x 24
24 cpi 12 x 12 24 x 16
Print Density (characters per inch)
Normal 10 - 12 - 15 - 17.1 - 20 - 24
Enlarged 5 - 6 - 7.5 - 8.55
Proportional
Line Length (number of characters)
10 cpi 136 17.1 cpi 233
12 cpi 163 20 cpi 272
15 cpi 204 24 cpi 326
135
Page 16

Vertical Spacing
6, 8, 12 lpi
3, 4, 6, 8, 12 lines/30 mm
N/72, n/144, n/216, n/360
Print Styles
Draft, Courier, OCR -B, Goth ic , OCR -A, S crip t
Print Attrib utes
Sub-Superscript, Underline, Overscore, Italics, Emphasized
Graphic Resolution (dots per inch)
horizontal 60, 80, 90, 120, 180, 240, 360
vertical 60, 72, 180
136
Page 17

Characters Sets
International character sets ASCII Normal and Slanted
Standard PC IBM Character Sets CS1 and CS2
EPSON National Variations USA, France, G ermany, United Kingdom, Denmark -1, Sweden, Italy, Spain-
IBM and EPSON Character Sets USA (CP437), Greek (CP437-G), Multilingual (CP850), Greek (CP851),
ISO Character Sets 8859/1 (Latin1), 8859/2 (Latin2), 8859/3 (Latin3), 8859/4 (Latin4), 8859/5
1, Japan, Norway, Denmark-2, Spain-2, Latin America
Eastern Europe (CP852), Turkish (CP 853), Cyrillic (CP855), Turkish
(CP857), Euro PC Multilingual (CP858), Por tugal (CP860), Hebrew (CP862),
Canada/France (CP863), Arabic (CP864), Denmark/Norway (CP865),
Russian (CP866), Turkish2 (CP867), OCR-A (CP876), OCRB (CP877),
Central Europe (CP1250), Cyrillic (CP 1251), Windows Latin 1 Ansi (CP
1252)
96 GREEK, GOST, TASS, MAZOWIA
(Latin/Cyrillic), 8859/6 (Latin/Arabic), 8859/7 (Latin/Greek), 8859/8
(Latin/Hebrew), 8859/9 (Latin5). 8859/15 (Latin9)
Bar Codes
EAN-8, EAN-13, UPC-A, UPC-E, UPC/EAN 2, UPC/EAN 5, Code GP, C25-3BAR, Code BCD, MSI Plessey,
Code 11, Code 93, 2/5 Bidirectional, 2/5 Interleaved, 2/5 Industrial, 2/5 Matrix, Code 39, Codabar, Code 128,
Postnet
Emulations
- EPSON LQ 1050-2550 (ESC/P) - IBM Proprinter XL24E/XL24 AGM
- IBM Personal Printer 2391+
137
Page 18

Paper Handling
9078 plus model Base Configuration
Fanfold Paper
1 LOWER PUSH TRACTOR
Fanfold width: 76 to 432 mm (3 to 17 inches)
Copies: 1 original + 7 copies Max. thickness 0,635 mm
Cut Sheets (loaded through the manual slot)
Sheet width: 114 to 432 mm (4,5 to 17 inches)
Standard formats: A5 - A4 - A3 - A 2 i n po rtrai t
Letter - Legal - Executive
Copies: 1 original + 7 copies Max. thickness 0,635 mm
9078D plus model Base Configuration
Fanfold Paper
1 LOWER PUSH TRACTOR
Fanfold width: 76 to 432 mm (3 to 17 inches)
Copies: 1 original + 7 copies Max. thickness 0,635 mm
1 UPPER PUSH TRACTOR
Fanfold width: 76 to 432 mm (3 to 17 inches)
Copies: 1 original + 7 copies Max. thickness 0,635 mm
138
Page 19

With the pull tractor option
Push-Pull Feeding
Front fanfold insertion with lower tractor in front push mode and rear tractor in pull mode.
Automatic Sheet Feeder Option
First tray Single sheets, envelopes and postcards
Second and third tray Single Sheets
Paper stacker
- Tray capacity 120 sheets (80 g/m2)
- Sheet width 88,9 to 304,8 mm (3,5 to 12 inches)
Copies 1 original + 2 copies
Coexisting with manual sheet (9078 plus model only)
Coexisting with fanfold in push mode
Standard Functions
•
Automatic print head gap adjustment (AGA)
•
Automatic paper path switching via operator panel or S/W commands
•
Paper parking
•
Plug & Play capability
•
Bar Code printing
•
Automatic fanfold positioning for tear-off
•
Setting and storage of paper format and print conditions for each paper path in the non volatile memory
139
Page 20

Physical and Electrical Characteristics
Interfaces
Parallel Centronics Compatible Bi-directional (IEEE-1284) nibble and byte modes - 36 pin
Amphenol connector
Receive Buffer: max. 64 Kbytes
Serial RS-232/C and RS-422/A - dB 25 connector
Baud Rate: 300 to 38400 bps
Automatic interface sw itch ing
Reliability
MTBF Mean Time between failure: 10000 hours at 25% DC
MTTR Mean Time To Repair: 30 minutes
Workload 43000 pages/month (ECMA 132 - 4 hours for 20 days)
Power Supply
120 V/ 60 Hz USA power cable
220 - 240 V / 50 Hz European power cable
UK power cable
Power Consumption Standby: 28W ---- Average Printing: 90 W
Noise Level
54 dBA
140
Page 21

Environment Conditions
Storage Conditions
Temperature -40° to 50° C
Relative Humidity 10%t o 90% RH (non condensing)
Operating Conditions
Temperature 10° to 38° C
Relative Humidity 10 % to 90 % RH (non condensing)
Paper Conditions
Temperature 16° to 24° C
Relative Humidity 40% to 60% RH (non condensing)
Physical dimensions
Height 315 mm (12,21 inches)
Width 670 mm (26,18 inches)
Depth 390 mm (15,35 inches)
Wei gh t 18 kg (44,15 lbs)
141
 Loading...