

Page 1

CDL
Programmer Manual
rel. - 001
Page 2

CDL – Programmer Manual
Sferal wwt srl
Via Martiri d’Italia, 26
10014 Caluso (TO)
Italy
©2007 Compuprint –Sferal wwt and the identifying product
names and numbers herein are trademarks of Compuprint. Copyright protection
claimed includes all forms and matters of copyrightable materials and information now allowed by statutory or judicial
law or hereinafter granted, including without limitation material generated from the software programs which are
displayed on the screen such as icons, screen display tools, etc. Products names used in this manual may be trademarks
or registered trademarks of their respective companies and are hereby acknowledged. All non Compuprint
brands and product names are trademarks or registered trademarks of their respective companies.
2
Page 3

CDL – Programmer Manual
3
1. C
ONTENTS
1. Contents___________________________________________________________________ 3
2. The programming language __________________________________________________ 4
2.1 The commands__________________________________________________________________4
2.1.1 Immediate (SOH) commands___________________________________________________________ 6
2.1.2 System (STX) commands _____________________________________________________________ 8
2.1.2.1 Label definition commands (STX L) _________________________________________________ 13
2.1.2.1.1 Local setting commands ________________________________________________________ 13
2.1.2.1.2 Special commands_____________________________________________________________ 19
2.1.2.1.3 Object definition commands _____________________________________________________ 19
2.2 Fonts and bar codes_____________________________________________________________ 21
2.2.1 Fonts ____________________________________________________________________________ 21
2.2.2 Bar codes_________________________________________________________________________ 28
2.3 Examples______________________________________________________________________ 36
2.3.1 Geometric figures __________________________________________________________________ 36
2.3.2 Alphanumerical fields _______________________________________________________________ 37
2.3.3 Bar codes_________________________________________________________________________ 39
2.3.4 Graphic images ____________________________________________________________________ 40
2.3.5 Dynamic fields_____________________________________________________________________ 42
2.3.6 Repeating the same field on the label ___________________________________________________ 44
2.3.7 Incremental fields __________________________________________________________________ 46
2.3.8 Saving the label ____________________________________________________________________ 47
3. ASCII Tables _____________________________________________________________ 50
4. Index of figures____________________________________________________________ 52
5. Index of tables_____________________________________________________________ 53
Page 4

CDL – Programmer Manual
2. T
In order to work, thermal printers require some commands that use a specific syntax.
The CDL language comprises a series of commands formed by printable characters (with the
exception of SOH and STX): this means that they can be used with any kind of computer.
The print file to be sent to the printer may be a text file (written using any editor); alternatively the
instructions may be sent by programming language (e.g. Basic) or the label may be prepared on
screen using WYSIWIG1 software or a word processor that, using a driver, converts the label into
instructions that can be understood by the printer. In the latter case, the user does not need to know
the programming language and can ignore sections 2.1 (page 4) and 2.3 (page 36) which serve only
to fully explain the functions and potentials of the machine.
This kind of software2 is very powerful and permits even users who are not very expert to create
labels using only a mouse and a keyboard. On the other hand, if you wish to optimise machine
performance, it may be more efficient to program the printer using the CDL language described
below.
HE PROGRAMMING LANGUAGE
2.1 The commands
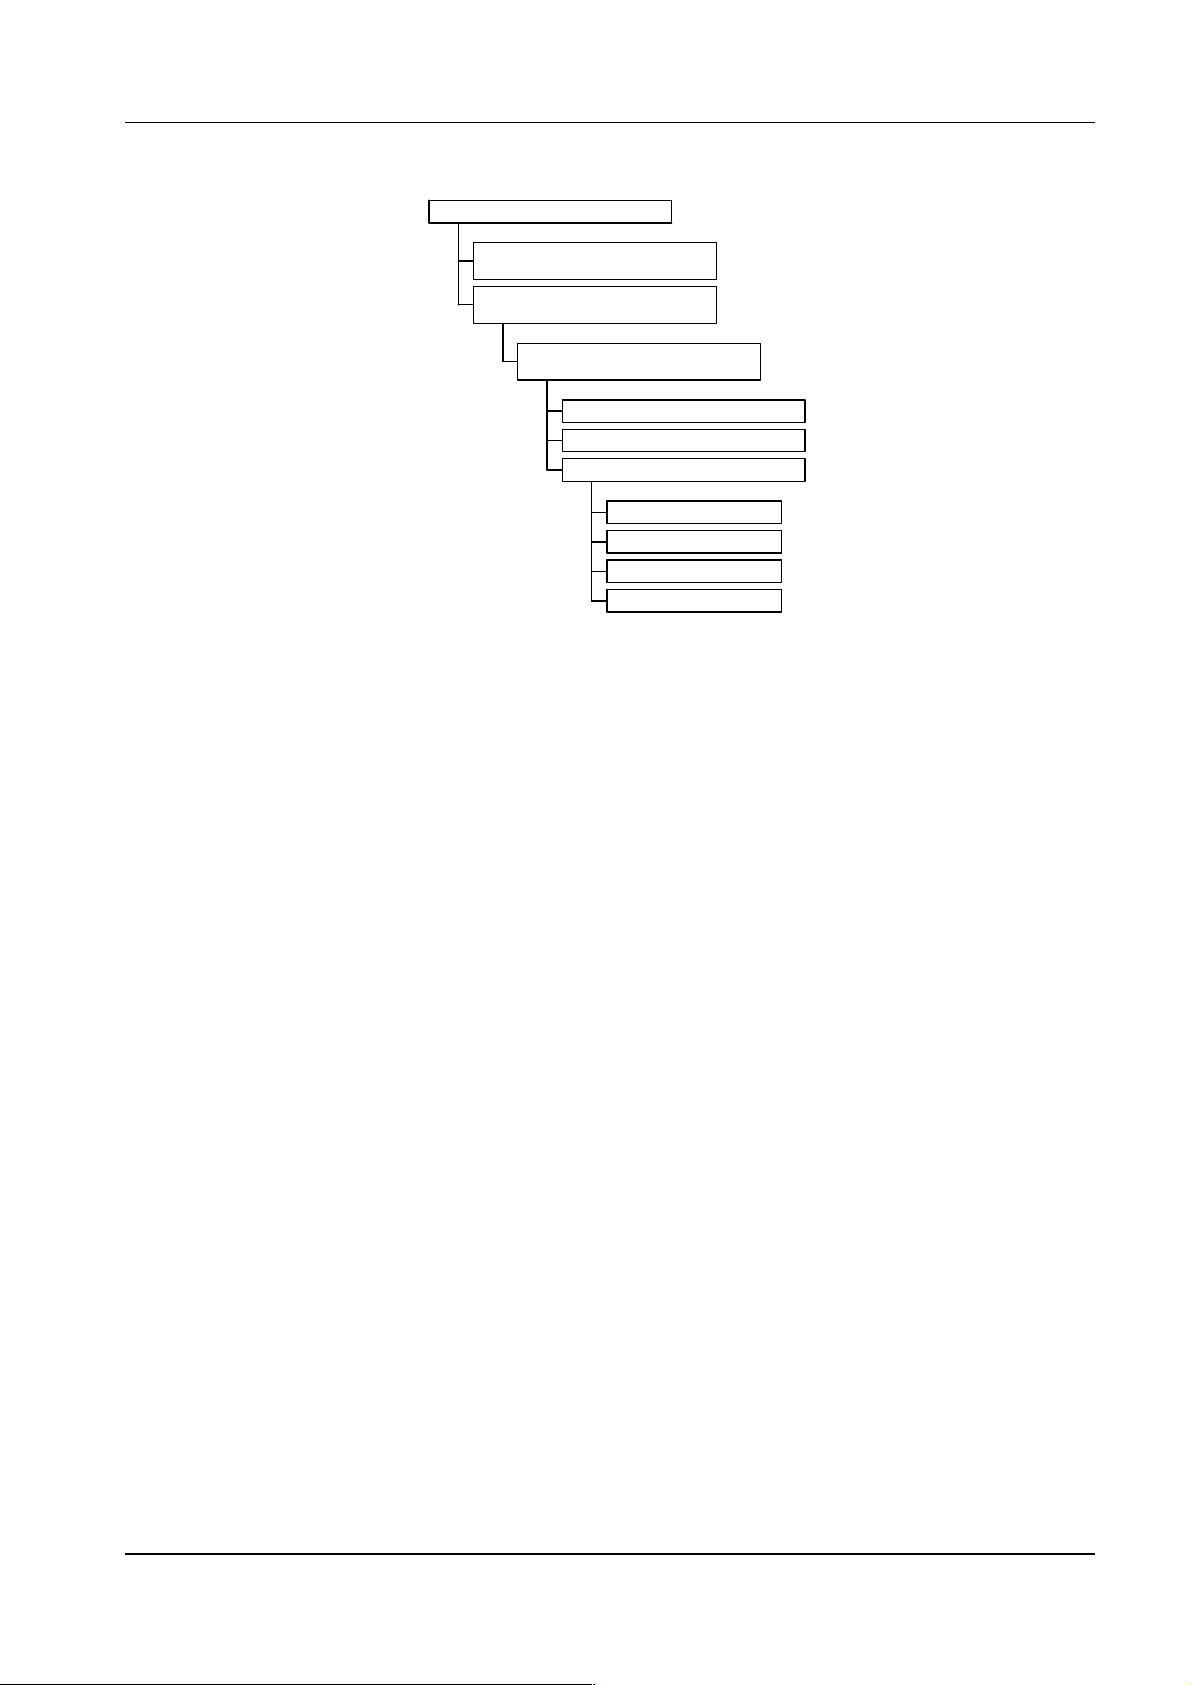
In particular, the software commands can be classed as follows (see fig. 1).
1
What You See Is What You Get.
2
See the respective installation and operating manuals.
4
Page 5
5
CDL commands
CDL – Programmer Manual
Immediate commands (SOH)
These commands, preceded by the ASCII characters SOH (0110, 01H), are immediate that is
they are executed as soon as they are received, and take priority over other commands.
They act “at high level” e.g. to reset the printer, to request its status or to disable the
interpreter.
Imm ediate comm an ds
System com m and s
SOH
STX
Label definition comm ands
STX L
Local setting com m and s
S p e c ia l c o m m a nd s
O b jec t d e finition co m m ands
Geometric figures
Alphanumeric fields
Barcod es
Graph ic im ag es
fig. 1 – Command hierarchy
System Commands (STX)
These commands are preceded by the ASCII characters STX (0210, 02H) and are executed in
the order in which they are received: only immediate commands (SOH) can “queue jump”.
Label definition commands (STX L)
STX L is an “opening” command (you close with E, X or s(A/B/C/D/E)nn...n) for the
label “building” operations. That is the instructions that permit you to creat e the label
are enclosed within STX L and E (X or s(A/B/C/D/E)nn...n).
In particular, the commands defining the label parameters can be classified as
follows:
Page 6

CDL – Programmer Manual
Local setting commands
Special commands
For each label it is possible to set local parameters such as the temperature of
the head, the print speed or the number of labels to be printed. These
parameters are, precisely,
local
that is valid only for the current label or job.
These commands, despite the
STX
prefix, are not system commands.
Object definition commands
The actual label is made up of a group of objects, the nature of which may
differ:
Geometric figures (lines and boxes)
Alphanumeric fields (characters or numbers)
Bar codes
Graphic images
The object definition commands must respect a well defined syntax (see sect.
2.1.2.1.3 on page 19) with which the desired characteristics are defined (e.g.
orientation, position, size etc.).
2.1.1 Immediate (SOH) commands
SOH # - Reset
Resets the printer just as if it had been turned off and on again: it empties the buffers and initialises
the memory. The effect is that all the variables are reset to their default values and any data stored in
the registers are cancelled. Obviously, the images and labels stored in the flash memory remain,
since it is not volatile.
After the command it is advisable to wait for the response3 (
in series, or 3-4 sec, before entering other commands.
CR T
) from the printer if it is connected
SOH A – Printer status (alphanumeric string)
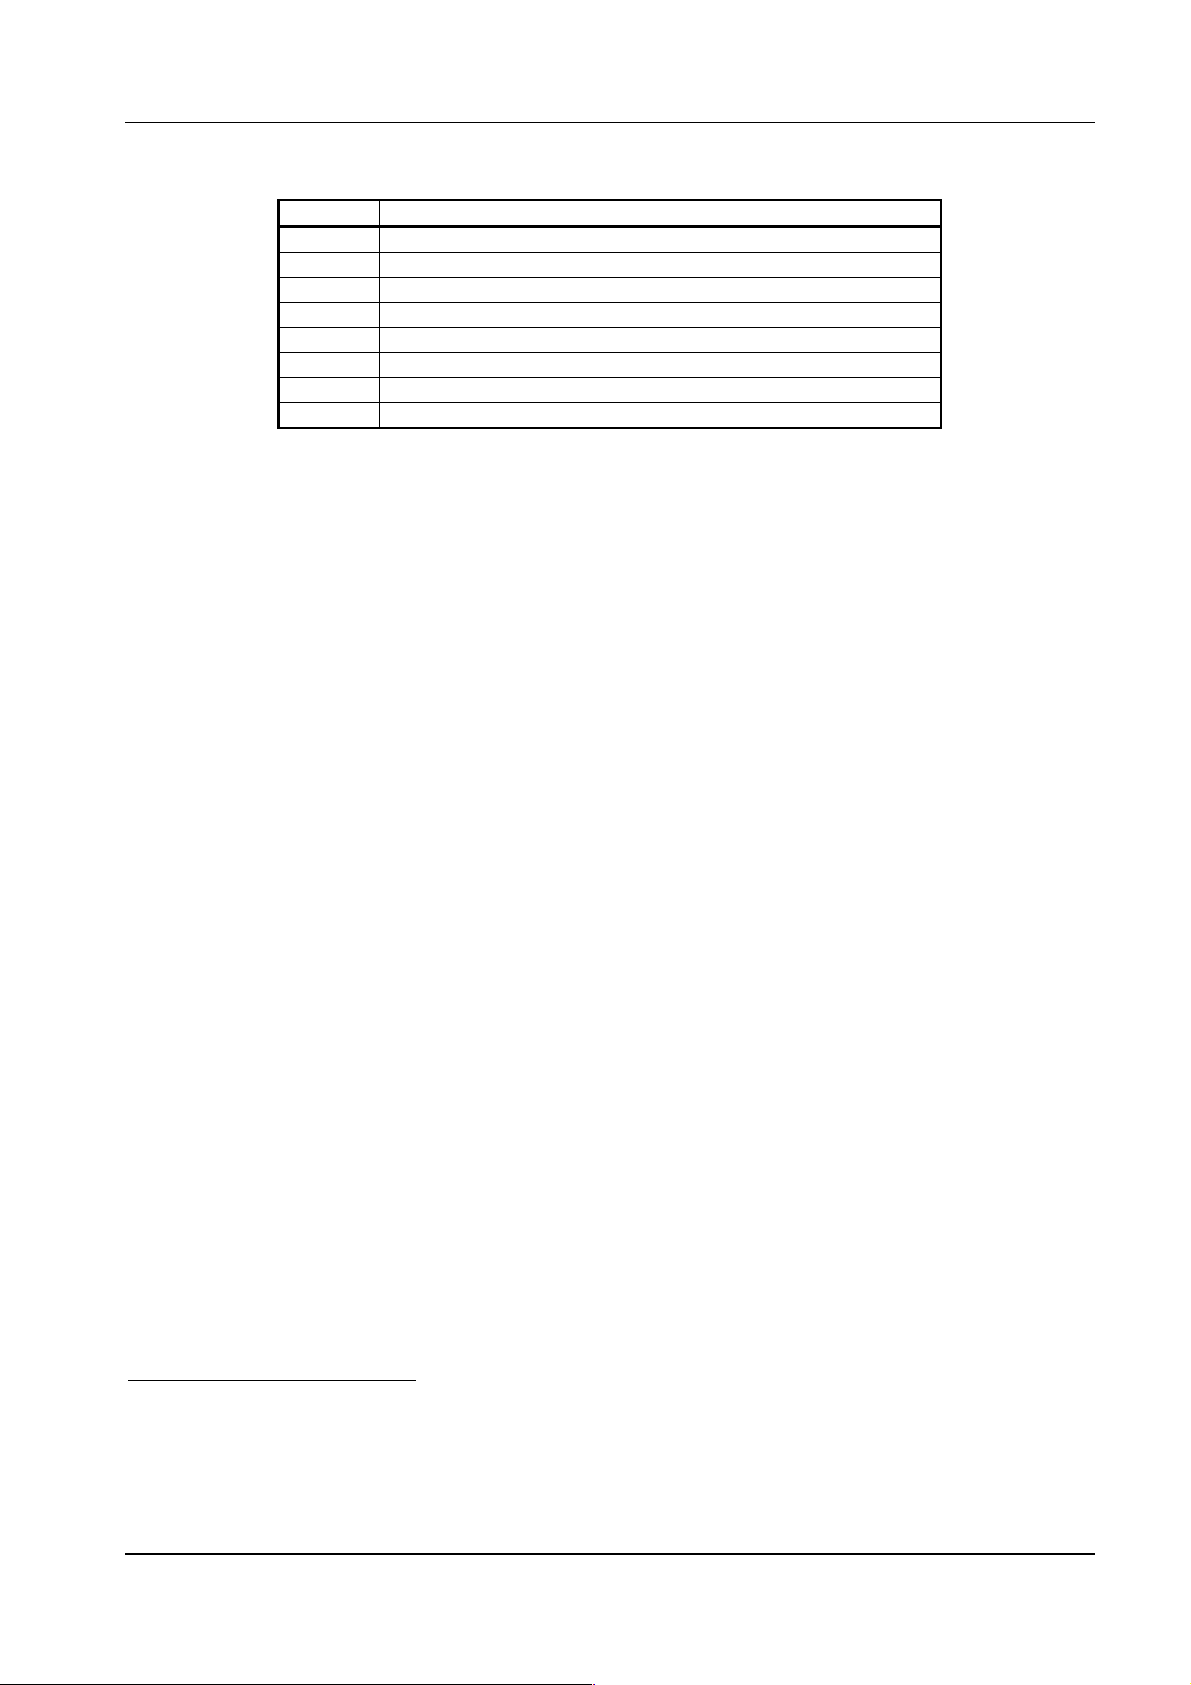
The printer sends the computer4 a sequence of 8 characters indicating its status. Each position has
an exact meaning as shown in the table below:
3
Only the RS 232 serial interface is two-way, therefore this command is effective only when the printer is connected to
the computer by means of a serial interface.
4
Only the RS 232 serial interface is two-way, therefore this command is effective only when the printer is connected to
the computer by means of a serial interface.
6
Page 7
CDL – Programmer Manual
7
Position Query
1 Is the command interpreter busy?
2 Is the paper feed empty?
3 Is the ribbon out (if thermal transfer printing is enabled)?
4 Is a job being printed?
5 Is it busy?
6 Is it off-line?
7 Is the label present?
8 Always N
The reply character is Y if the result of the query is positive, N if it is negative.
SOH B - On-line
Switches the printer status from on-line to off-line and back. It behaves exactly like the ON-LINE
button on the control panel.
SOH C - Cancel
This has the same effect as the CANCEL button on the front panel: the machine finishes printing
the current label and cancels the remaining labels (in the current job).
SOH D – Disabling the immediate command interpreter
After this command the printer will ignore all immediate commands.
Logos and graphic images are likely to contain SOH characters that could be erroneously interpreted
by the printer. Before loading logos, you therefore need to enter this command to inhibit the
immediate command interpreter; when loading ends it will be automatically enabled again.
SOH E – Number of labels still to be printed
The four digits that the printer transmits5 to the computer indicate the number of labels that still
have to be printed.
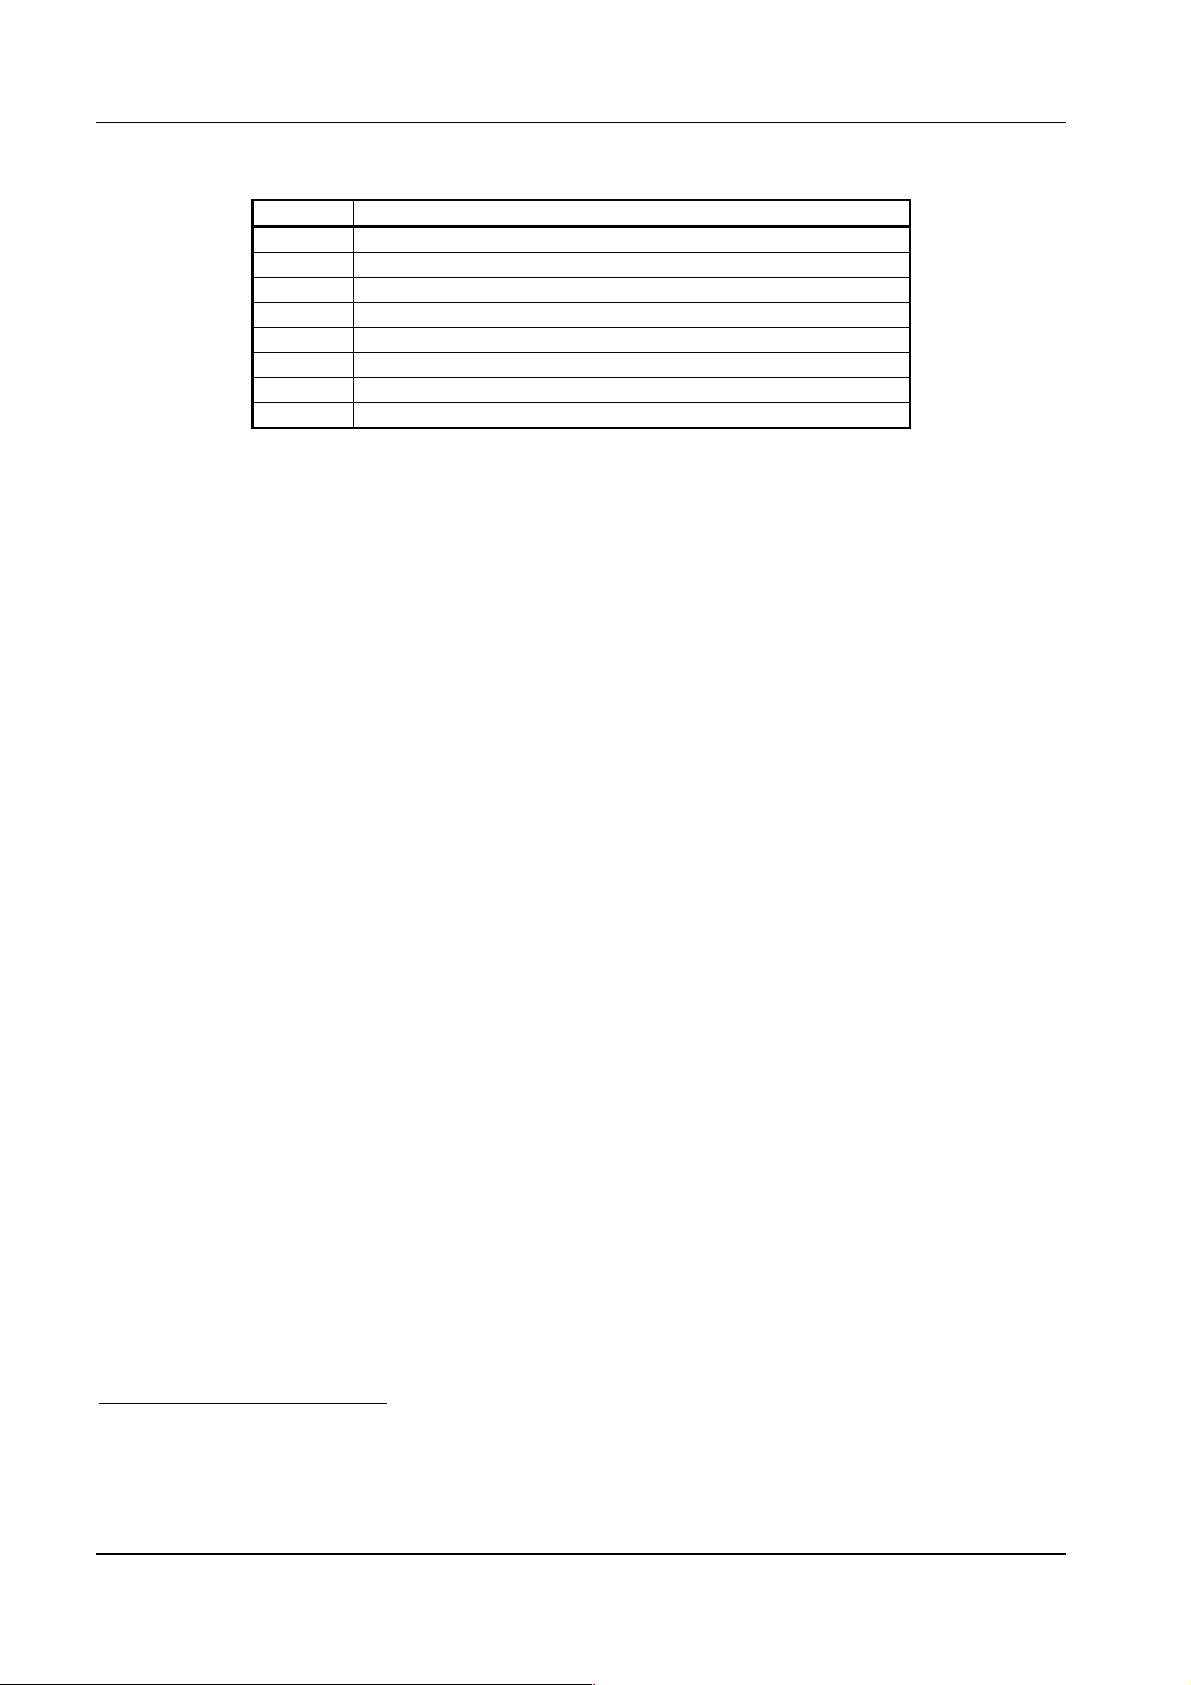
SOH F – Printer status (1 hexadecimal byte)
The printer sends the computer6 a byte, giving the status, in which each bit has the following
meaning:
5
Only the RS 232 serial interface is two-way, therefore this command is effective only when the printer is connected to
the computer by means of a serial interface.
6
Only the RS 232 serial interface is two-way, therefore this command is effective only when the printer is connected to
the computer by means of a serial interface.
Page 8
CDL – Programmer Manual
Position Query
1 Is the command interpreter busy?
2 Is the paper feed empty?
3 Is the ribbon out (if thermal transfer printing is enabled)?
4 Is a job being printed?
5 Is it busy?
6 Is it
7 Is the label present?
8 Always 0
off-line
?
Bit 1 is a positive answer, bit 0 is a negative answer.
2.1.2 System (STX) commands
Some of these commands set parameters that can also be changed from the configuration menu: in
any case the software commands overwrite the configuration parameters and are valid until the next
reset or until the machine is switched off.
STX a – Enabling of reply characters
This command enables the printer to send the computer
RS (30
characters.
The RS character is sent7 in reply after each label is printed, the US character is sent in reply after
each batch of labels has been printed.
10
1E
,
H
) and
US (31
10
,
1F
) reply
H
STX cnnnn – Form length
When labels without references are used (without gaps, black tick marks or holes) the printer has to
be told how long the label to be printed is. Before starting to print the labels, you need to enter this
command, where
each feed, the paper will advance by
nnnn
is the form length expressed in hundredths of an inch. From that moment, at
nnnn
hundredths of an inch8.
When the form length differs from 0, it is implicitly assumed that labels without references are
being used and therefore the paper sensor is enabled only to signal whether or not there is paper (it
does not detect any gaps or black tick marks).
STX c0250
e.g.
sets the form length at 2.5 inches.
STX Ennnn – Number of labels still to be printed
After saving the label to be printed, use the
labels indicated by the current
STX Ennnn
desired quantity.
e.g. with
STX E0020,
20 labels are printed.
STX G
command that follows to stamp the number of
command where
nnnn
is the number indicating the
7
Only the RS 232 serial interface is two-way, therefore this command is effective only when the printer is connected to
the computer by means of a serial interface.
8
After an
8
STX m
(see releva nt paragraph),
nnnn
is read as tenths of a millimetre.
Page 9

CDL – Programmer Manual
9
STX e – Paper sensor in transmission mode
After receiving this command, the sensor works in transmission mode (for paper sensor use and
operating modes see the user’s manual for the printer).
STX F - Form feed
It advances the paper of a label just as the FEED button on the control panel does: if a job is being
printed, the form feed is queued and executed at the end of it.
STX fnnn - Back feed
To tear the label off at the gap or cut it with the automatic cutter, once printing is completed, the
paper must advance just enough to reach the right position, and must then return before the next
label is printed.
With this command, the last label printed is made to advance beyond the print head by
hundredths of an inch9, then before the next one is printed the paper returns the same distance to
keep the printing aligned with the label itself.
The amount by which the paper advances depends on the kind of emulation used (for this, see the
user’s manual for the printer used): that is the actual back feed is the difference between
REFERENCE OFFSET
of the emulation that is being used.
nnn
nnn
and the
STX G – Print label
The label “closed” by the X command (see sect. 2.1.2.1.1 on page 13) is not printed immediately
but is held in the memory until the
STX G
command arrives.
STX Ennnn
indicates the number of
labels remaining to be printed (if it is missing, only one label is printed).
STX Isfnn...n – Load graphic images
Graphic images must be loaded into the RAM (volatile) or flash (non-volatile) memory before they
can be printed. To do this, use the
s
is the drive where the image is to be loaded. It may be
A: RAM10 (volatile) drive
B: Flash (non-volatile) drive of the base machine
C: Current11 drive
D: Flash drive of expander card n° 1 (see the user’s manual for the printer used)
E: Flash drive of expander card n° 2
f
is the image format. It may be
P: PCX format
p: “flipped” PCX format (mirror image)
B: BMP format
9
After a
10
Drive A of volatile memory (RAM) is available o nly when it is present (in an expander card) (for this, see the user’s
manual for the printer that is used).
11
The current default drive is B (flash) and A (RAM) when it is present (in an expander card). It is possible to change
the current drive using the
STX m
command (see relevent paragraph),
STX Xa
STX Isfnn...n
command, see relevant paragraph.
command where
nnn
is read as tenths of a millimetre.
Page 10

CDL – Programmer Manual
b: “flipped” BMP format
I: IMG format
i: “flipped” IMG format
F: FRG format
nn...n is the name you want to give to the image and by which it can be recalled in the label
definition (it can be different from the original name of the graphic file). It is an
alphanumeric string of no more than 8 capital characters ending with the character CR.
Immediately after entering this command, you must send the graphic file to be loaded to the printer.
This file may contain characters that could be misinterpreted by the immediate command interpreter
and for this reason the command must be preceded by SOH D (see sect. 2.1.1 on page 6) to
temporarily disable the interpreter.
e.g.
SOH D disables the immediate command interpreter
STX IAPxxx1 the graphic file that follows is in PCX (P) format and is loaded in RAM (A)
with the name xxx1.
STX J - Off-line after a label
After this command, the printer goes off-line after printing each label.
STX L – Label definition mode
This command “opens” the label definition mode (see sect. 2.1.2.1 on page 13). That is, all the
instructions included within the commands STX L and E (X or s(A/B/C/D/E)nn...n) are used to
“build” the label, or define which fields must be included, their size and where they must be placed.
STX Mnnnn – Maximum label length
If, after the paper has advanced by nnnn hundredths of an inch12, the machine does not find gap (a
black tick mark or a hole), it will signal an error. The default value for this advance is 10 inches but
it can be changed so that the printer will signal an error earlier.
e.g. with STX M0255 and a label height of 2.5 inches, an error will be signalled if there is no gap
within 2.55 inches (that is there is no label).
STX m – Metric system
After this command, all numerical parameters are read as tenths of a millimetre and no longer in
hundredths of an inch. To return to hundredths of an inch you must enter STX n.
STX n – Imperial system
After a STX m command, you can return to the default system in which all numerical parameters are
read as hundredths of an inch by entering STX n.
12
After an STX m command (see relevant paragraph), nnnn is read as tenths of a millimetre.
10
Page 11

CDL – Programmer Manual
11
STX Onnnn – Vertical offset
To move the whole label lengthwise with respect to the direction of the printing, you can enter a
vertical offset. The four digit number
nnnn
gives the offset in hundredths of an inch13 “according” to
the emulation used (for this, see the user’s manual for the printer used).
STX O0225
e.g.
(if you use the
REFERENCE
OFFSET
210
) gives an offset of 15 hundredths of an
inch, that is the printer, before starting to print, will advance the paper by 15 hundredths of an inch
and the printing will appear 15 hundredths of an inch “higher up” than “normal”.
If the offset is positive, it will take effect from the first label, if it is negative, from the second
onwards.
STX o – Immediate cut
When the automatic cutter is fitted and enabled, this command activates an immediate cut.
STX P – Dump mode
After this command, the printer goes into
dump
mode. This means that the command interpreter is
disabled and all characters received by the printer are printer as hex adecimals: t o exit th is mode the
printer must be switched off and on again. The command is equivalent to pressing both the ONLINE and FEED buttons when it is switched on (for further information, see the user’s manual for
the printer used) except that it does not print a test label.
STX p - Off-line after a batch of labels
This command causes the printer to go
off-line
paragraph, after each batch of labels it prints.
, unlike with the
STX J
command, see relevant
STX Q – Cancel all
This is equivalent to the commands
including RAM and flash memories.
STX qA
STX qB
+
STX qD
+
STX qE
+
: it cancels all the drives
STX q(A/B/C/D/E) - Cancel drive
This command “cleans” drives A, B, C, D, E14 respectively. The result is that all the images or
labels previously saved are cancelled. Cancelling the non-volatile flash memory may take several
seconds.
STX qB
e.g.
cancels the non-volatile flash memory of the base machine.
STX r – Paper sensor in reflection mode
After receiving this command, the sensor will operate in reflection mode (for the use of sensor
operating modes, see the user’s manual for the printer used).
13
After an
14
Volatile memory drive A (RAM), and flash memory drives D and E (non-volatile) are only available when present (in
an expander card) (for further information, see the user’s manual for the printer used).
STX m
command (see relevant paragraph),
nnnn
is read as tenths of a millimetre.
Page 12
CDL – Programmer Manual
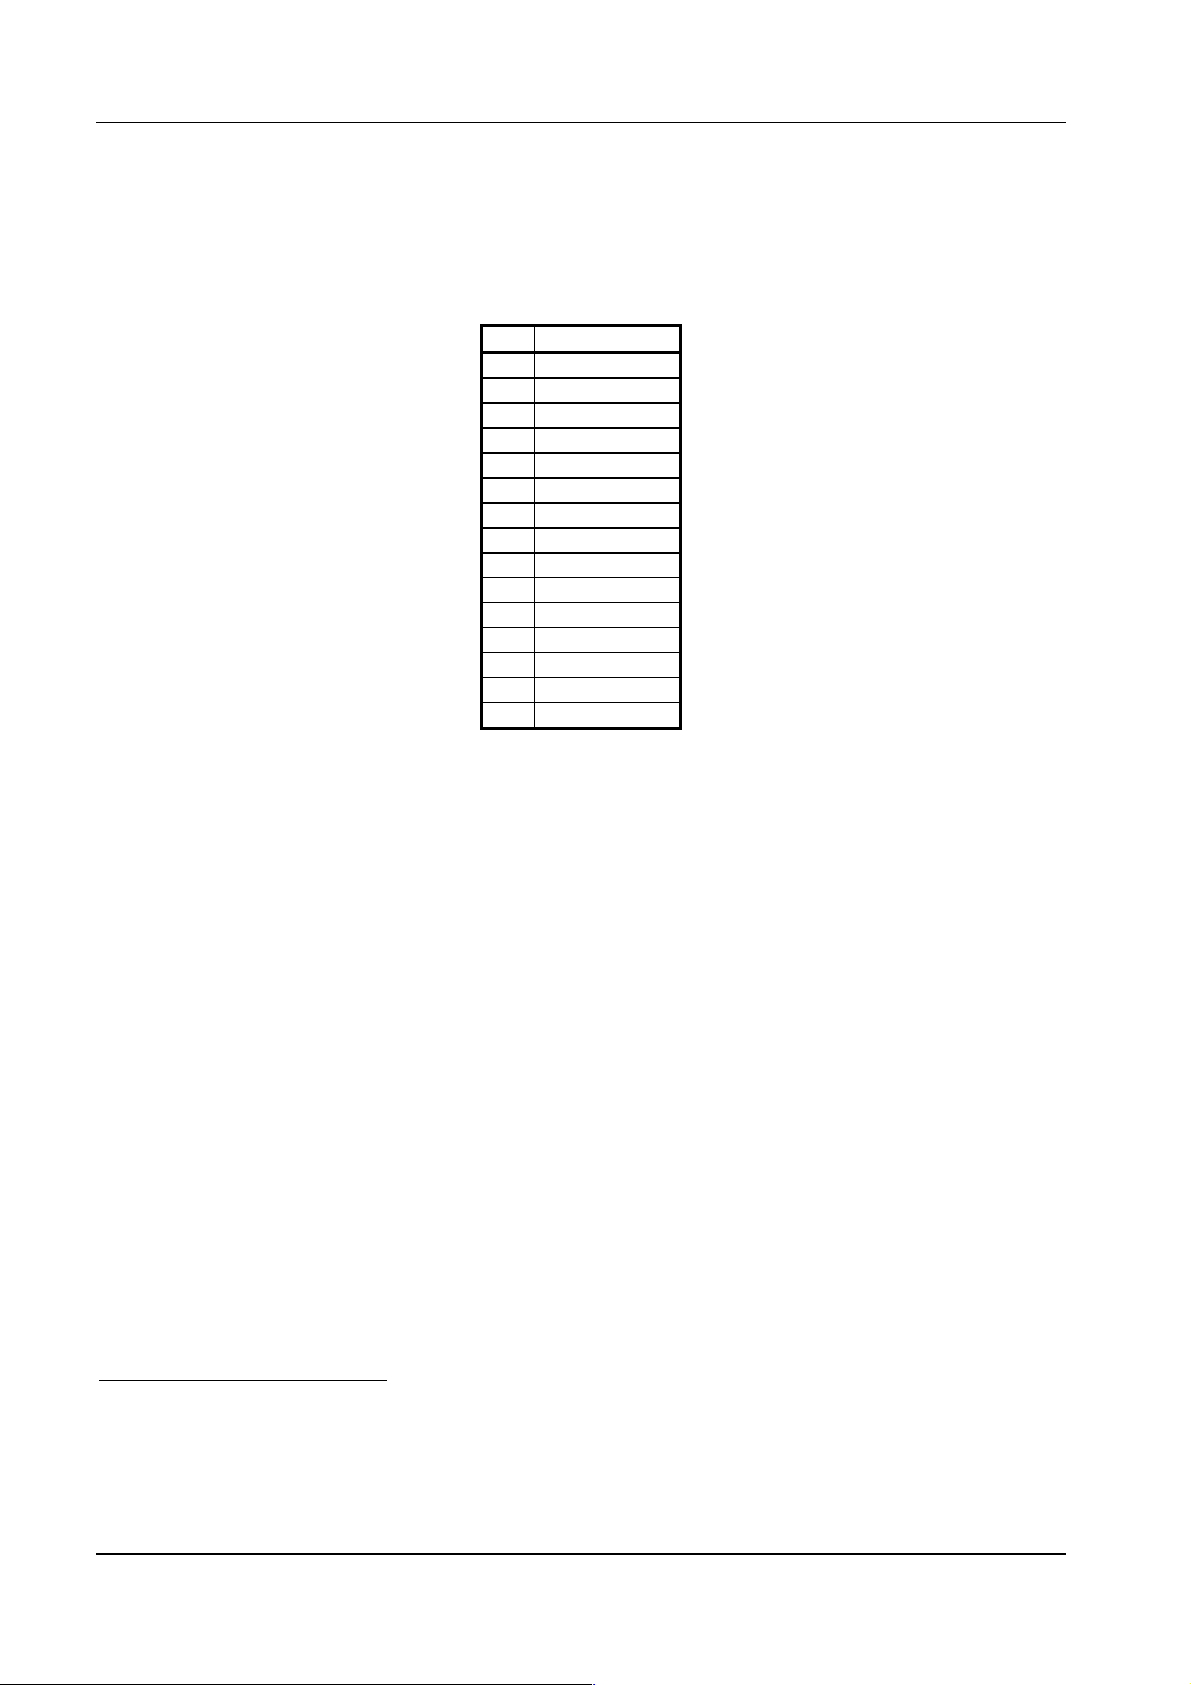
STX Sn – Feed speed
The paper advance speed can be selected by pressing the FEED button. The n (from A to O)
corresponds to the following table:
n Speed (ips15)
A 2
B 2
C 2
D 2,5
E 3
F 3,5
G16 4
H 4,5
I 5
J 5,5
K17 6
L 6,5
M 7
N 7,5
O18 8
e.g. After entering
STX SG
, the feed speed is 4 inches per second.
STX T – Print test
It prints a test label like the one printed by pressing the ON-LINE and FEED buttons when the
printer is switched on (for further information, see the user’s manual for the printer used) without
going into dump mode and without printing the configuration.
STX Unnss...s – Fill register
It fills register nn (two-digit number) with the alphanumerical string
CR
). The string
ss...s
may differ in length from the one previously saved in register nn.
ss...s
(which must end with
STX Vn – Enable cutter and present sensor
According to the number given at n the cutter or the present sensor are enabled/disabled as in the
following table:
15
Inches per second.
16
Default and max. speed.
17
Default speed for models with expander card .
18
Max. speed for models with expander card .
12
Page 13

CDL – Programmer Manual
13
n Present sensor Cutter
0 Disabled Disabled
1 Disabled Enabled
4 Enabled Disabled
5 Enabled Enabled
e.g. STX V4 enables the present sensor and disables the cutter.
STX v - RS 232 port configuration
It prints the configuration of the RS 232 port as it appears on the test label.
STX Xa – Current drive
With this command you can select the current drive C (see i commands STX Iafnn...n and
s(A/B/C/D/E)nn...n) as the volatile RAM memory (a=A) or as the non-volatile flash memory (a=B,
D o E)19.
e.g. STX XA selects drive C as the volatile RAM memory.
STX Z – Print test and configuration
It prints the configuration and the test label in the same way as when you press the ON-LINE and
FEED buttons when the printer is switched on (for further information, see the user’s manual for the
printer used) without, however, going into dump mode..
2.1.2.1 Label definition commands (STX L)
They are included between the STX L and the E (or X or s(A/B/C/D/E)nn...n) commands. They are
not generally preceded by any particular character (neit her STX or SOH) and “end” with the CR20
character.
2.1.2.1.1 Local setting commands
These commands permit you to set a number of local label parameters like temperature, print speed
and label quantity.
:nnnn – Cut command
Like the cnn command below (see), nnnn is the number of labels printed before the cutter operates
(if it is fitted and enabled). Unlike the cnn command which can contain only two digits, this
command accepts up to four digits.
19
The default current drive is B. The A when the RAM is installed (in an expander card). Drives A, D and E are
available only on expander cards.
20
The line terminator can be replaced, in label definition mode, by another character with the command T (see sect.
2.1.2.1.1 on page 13) which is a local command and therefore is valid only for the current label.
Page 14

CDL – Programmer Manual
An - XOR mode/transparent mode
.
XOR mode
the superimposed
21
n=1
the printer is
When two objects are superimposed on the label, if the printer is in
part appears white, while if it is in
set in
XOR mode
, if
n=2
transparent mode
in
When you want to obtain “reverse” text, you must use
transparent mode
.
this part appears black. If
XOR mode
Cnnnn – Horizontal offset (of columns)
When you want to move the whole label to the right (positive offset) without having to recalculate
all the column co-ordinates you can use the
Cnnnn
command in which
nnnn
are the four digits
indicating the column from which printing must begin.
e.g.
C0015
adds
15
to all the column co-ordinates and the labels appears transversally offset by 15
hundredths of an inch22 to the right.
cnn – Cut command
Like the command
:nnnn
, here too
automatically cuts the paper with the optional cutter (which must be enabled). Unlike
command accepts only two digits.
e.g. with
c02
the cutter operates every two labels that are printed.
nn
indicates the number of labels to be printed before the printer
:nnnn,
this
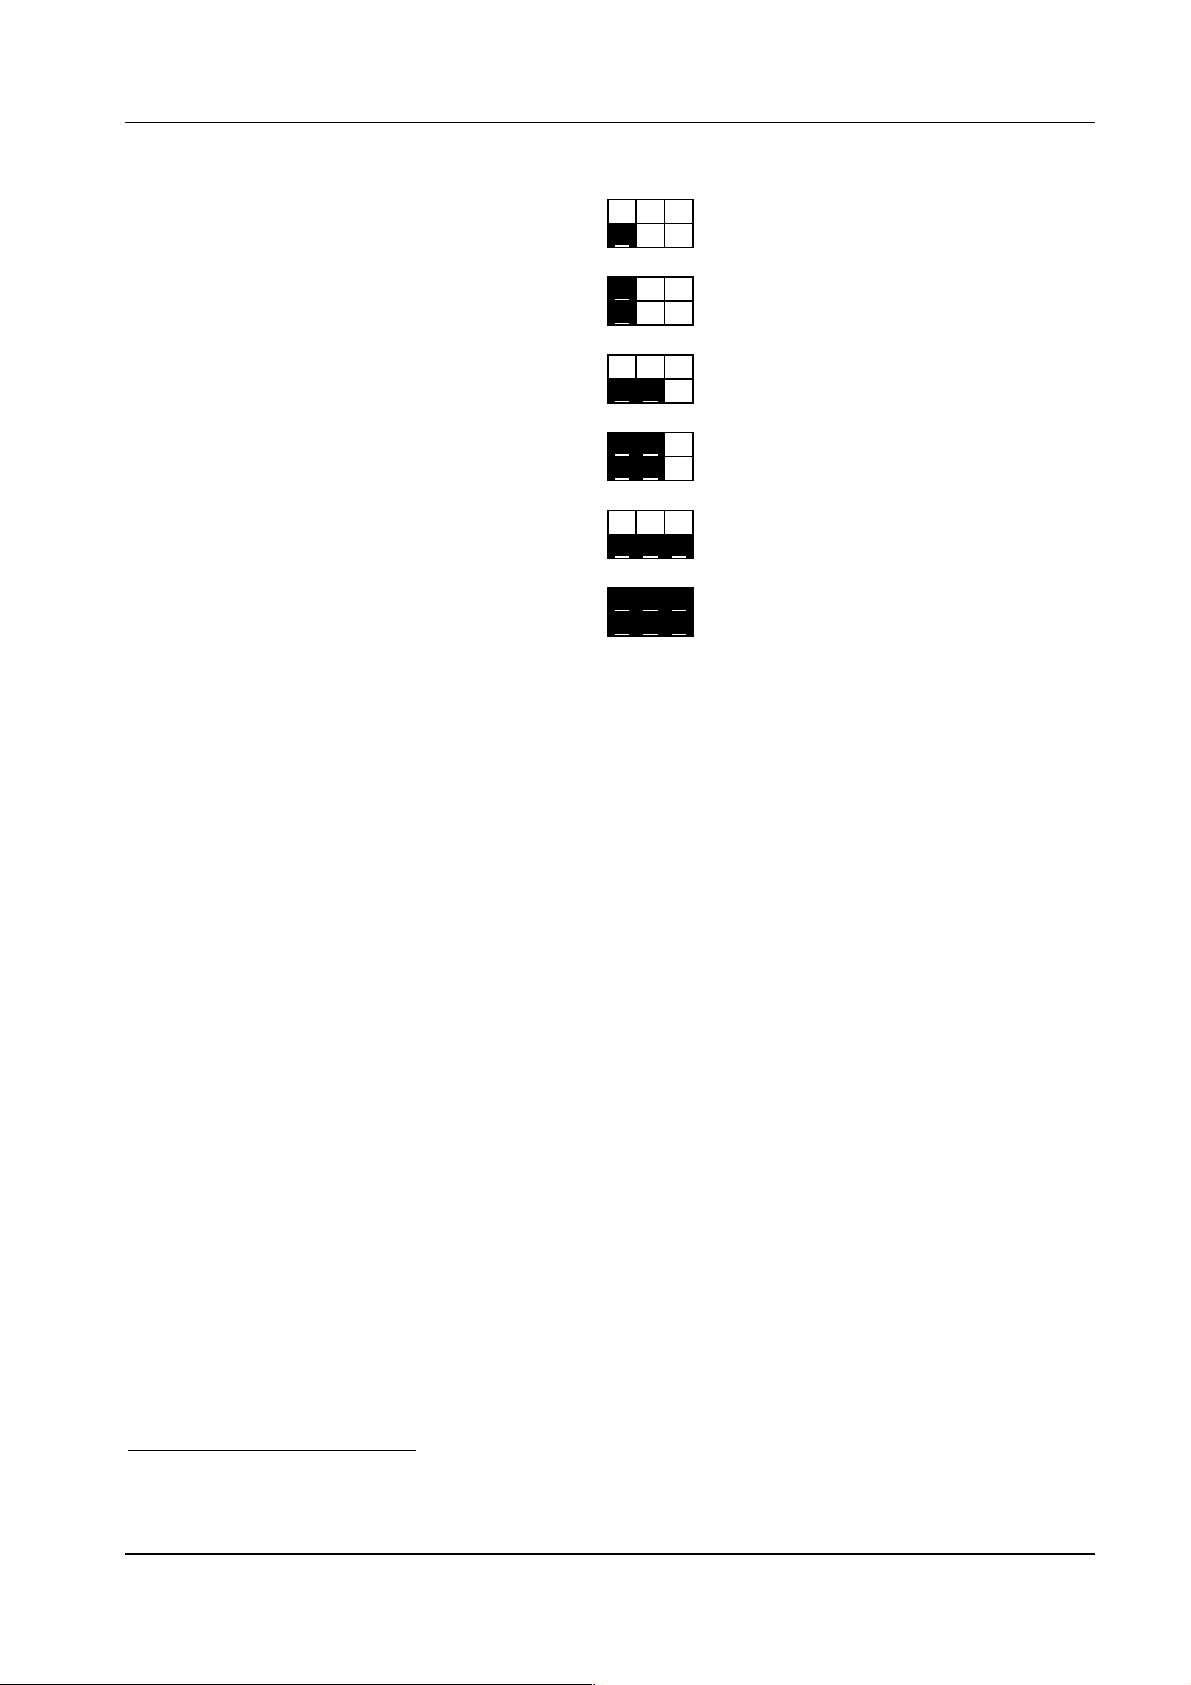
Dhv – Dot size
The dots (the smallest points that the printer can print) can be “grouped” in couples to form a larger
dot. That is, you can enlarge each dot horizontally (h) and/or vertically (v) as in fig. 2.
21
Default setting.
22
After an m (see relevant paragraph), 15 tenths of a millimetre.
14
Page 15
CDL – Programmer Manual
15
D11
D12
D21
D2223
D31
D32
fig. 2 – Dot sizes
The effect is that all the objects on the label can be expanded horizontally and/or vertically using
only one command.
D11 gives the highest resolution (on this subject, see the user’s manual for the printer used).
E – Label definition mode terminator
On receiving this command, the printer prints the current label and exits the label definition mode.
G – Register memory
The field preceded by this command is saved in the first free register. The registers are filled in
succession from A to Z and their value is retrieved with the command STX Sn, see relevant
paragraph.
In practice each field is saved in registers A-Z even without using the command G: the registers are
filled in succession starting from the first alphanumerical field of the label definition commands.
The current G command only makes the memorisation explicit, highlighting it.
Hnn – Head temperature
To achieve optimum print quality, it may be necessary to modify the default temperature set with
the HEAD TEMPER. SELECTION parameter (on this subject, see the user manual for the printer
used) using this command Hnn. For this purpose, nn may vary from 00 to 20. The optimum
temperature depends on the type of ribbon and on the type of surface: as an indication, you should
start with a temperature of 10 increasing it until you find the one that gives the best results.
23
Default setting.
Page 16
CDL – Programmer Manual
This command, since it is a label definition command, is a local command that is effective only on
the current label: the default value is the one set by the HEAD TEMPER. SELECTION parameter
mentioned above.
m – Metric system
After this command, the co-ordinates are read as tenths of a millimetre instead of hundredths of an
inch. To return to hundredths of an inch, you need to enter a subsequent command n.
n – Imperial system
After an m command, with a current n command the printer returns to the imperial system in which
all numerical parameters are read in hundredths of an inch (this is the default setting).
Pa – Printing speed
You can select the label printing speed with this command.
Since it is a label definition command, it is local.
a may be set at the following speeds:
a Speed (ips24)
A 2
B 2
C 2
D 2,5
E 3
F 3,5
G25 4
H 4,5
I 5
J 5,5
K26 6
L 6,5
M 7
N 7,5
O27 8
e.g. with command PG the printer prints the current label at a speed of 4 ips.
pa – Backfeed speed
With this command you can select the label backfeed speed (see command STX fnnn).
Since it is a label definition command, it is local.
a may be set at the following speeds:
24
Inches per second.
25
Default and max. speed.
26
Default speed for models with expander card.
27
Max. speed for models with expander card.
16
Page 17

CDL – Programmer Manual
17
a Speed (ips28)
A 2
B 2
C 2
D 2,5
E 3
F 3,5
G29 4
H 4,5
I 5
J 5,5
K30 6
L 6,5
M 7
N 7,5
O31 8
e.g. with command pG, the paper returns, if a backfeed has been set (see command STX fnnn), at a
speed of 4 ips.
Qnnnn – Quantity of labels to be printed
nnnn indicates the number of times you wish to repeat the current label.
e.g. with Q0030, the current label is printed 30 times.
Rnnnn – Vertical offset (of lines)
Just as you can set a “local” horizontal offset (see command Cnnnn), you can also set a vertical one
(positive) in which nnnn are the four digits that quantify the amount of the offset.
e.g. R0015 adds 15 to all the line co-ordinates and the label appears longitudinally offset 15
hundredths of an inch32 higher.
rnn...n – Retrieve saved label
You can save the current label using the command s(A/B/C/D/E)nn...n and later retrieve it with this
command.
nn...n is the name of the label to be retrieved.
Sa – Select paper advance speed
With this command you can select the label advance speed during the “not printing” phase: that is
the speed at which the paper advances once the actual printing has been done.
Since this is a label definition command, it is local.
a can be set at the following speeds:
28
Inches per second.
29
Default and max. speed.
30
Default speed for models with expander card .
31
Max. speed for models with expander card.
32
After an m (see relevant paragraph), 15 tenths of a millimetre.
Page 18

CDL – Programmer Manual
a Speed (ips33)
A 2
B 2
C 2
D 2,5
E 3
F 3,5
G34 4
H 4,5
I 5
J 5,5
K35 6
L 6,5
M 7
N 7,5
O36 8
e.g. with command SG the paper advances at a speed of 4 ips.
s(A/B/C/D/E)nn...n – Save the current label
You can save the current label in the RAM37 (A) or in the flash memory (
nn...n
and later retrieve it using the command
rnn...n
B, D,
or E) with the name
Tnn – Set the line terminator
For label definition commands and some system commands it is essential to end the line with the
character CR: otherwise the command interpreter cannot distinguish between the end of the previous
command and the beginning of the next one. Some computers do not allow you to send the line end
character CR and it must be replaced by another using this command. The two digit number nn is
the hexadecimal code of the replacement line terminator.
e.g. after the command
T00
, the character
NULL (00
10
00
,
) becomes the line terminator and all the
H
lines must “end” with this character.
X – Label definition mode terminator
On receiving this command, the printer exits the label definition mode and can once again receive
immediate and system commands. Unlike command E, with this command the label that is stored in
the memory is not printed until the command
STX G
is received, see relevant paragraph.
33
Inches per second.
34
Default and max. speed.
35
Default speed for models with expander card.
36
Max. speed for models with expander card.
37
Volatile memory drive A (RAM) is available only when installed (in an expander card) (on this subject, see the user’s
manual for the printer used).
18
Page 19

19
+pii – Increase the previous field
CDL – Programmer Manual
It increases the immediately preceding field by
are filled with the character p.
+01
e.g.
increases the previous field by 1 and “fills” digits that are not significant with 0.
-pii – Decreases the previous field
It decreases the immediately preceding field by
are filled with the character p.
-01
e.g.
decreases the previous field by 1 and “fills” digits that are not significant with 0.
>pii – Increase the previous field
It increases the immediately preceding field by
with the character p.
> 1
e.g.
character.
increases the previous field by 1 and “fills” the digits that are not significant with a space
<pii – Decreases the previous field
It decreases the immediately preceding field by
with the character p..
> 1
e.g.
character.
decreases the previous field by 1 and “fills” the digits that are not significant with a space
ii
with the exclusion of the let ters. The empt y spaces
ii
with the exclusion of the letters. The empty spaces
ii
including the letters. The empty spaces are filled
ii
including the letters. The empty spaces are filled
2.1.2.1.2 Special commands
Despite the fact that they are preceded by the character
one) are label definition commands and not system commands.
STX Sn – Retrieve the register
With command G, see relevant paragraph, the fields are progressively saved (from A to Z) in the
registers. To retrieve them you must use this command in which n is the register to be retrieved.
Since the registers are in any case filled, whether or not you use command G, when they are
retrieved you must bear in mind that the first field of the label is saved (regardless of the fact that it
is followed by G, or not) in register
STX SC
e.g.
retrieves the setting saved in register C, that is the third field of the label.
A,
the second in B and so on.
STX
, these commands (in effect there is only
2.1.2.1.3 Object definition commands
These commands are used to “build” the actual label. You can define the properties and the position
of geometric figures, alphanumerical fields (strings), bar codes and graphic images.
Generally, the syntax of the commands is as follows:
a b cd eee ffff gggg nn...n
a
is the rotation of the object. It may be
Page 20

CDL – Programmer Manual
1: rotation by 0°38
2: rotation by 90° clockwise
3: rotation by 180° clockwise
4: rotation by 270° clockwise
b indicates the type of object. It may be
X: geometric figures
0-9: alphanumerical fields (see sect. 2.2.1 on page 21)
A-O (a-p39): bar codes (see sect. 2.2.2 on page 28)
Y: graphic images
cd are the horizontal (c) and vertical (d) expansion coefficients; for bar codes it is the ratio.
They may be:
11: for the geometric figures
1-9 and A-O: for the alphanumerical fields
1-9 and A-O: for the bar codes40
1-9 and A-O: for the graphic images
eee have the following meaning
000: for the geometric figures
000: for alphanumerical fields from 0 to 8 (b=0-8)
001-010: for the alphanumerical field 9 (b=9)
000-999: for bar codes (this is the height in hundredths of an inch41)
000: for the graphic images
ffff is the line co-ordinate in hundredths of an inch42 for the bottom left corner of the object (starting
from the lower edge of the label).
gggg is the column co-ordinate in hundredths of an inch43 for the bottom left corner of the object
(starting from the left edge of the label). The bottom left corner of the label is identified by
co-ordinate 0000, 0000.
nn...n is the contents of the object.
For geometric figures it may be:
L hhh iii: L indicates that it is a line, hhh is the width in hundredths of an inch44, iii is
the height
l hhhh iiii: hhhh is the line width, iiii is the height
38
For geometric figures and graphic images, it is assumed that the rotation is always 1 whatever value is set.
39
When the bar code type is identified with an upper-case letter, whatever is coded in it appears decoded below it; when
the letter is lower-case no decoding appears under the bar code.
40
For specific bar codes (see sect. 2.2.2 on page 28) large and small bars must be in precise ratio so that the code may
be reliably read.
41
After an m (see sect. 2.1.2 . 1.1 on page 13), this is the height in tenths of a millimetre.
42
After an m (see sect. 2.1.2 . 1.1 on page 13), this is the line co-ordinate in tenths of a millimetre.
43
After an m (see sect. 2.1.2 . 1 . 1 on page 13), this is the column co-ordinate in tenths of a millimetre.
44
After an m (see sect. 2.1.2 . 1.1 on page 13), this is the line width in tenths of a millimetre.
20
Page 21

CDL – Programmer Manual
21
B hhh iii jjj kkk: B
is the height,
indicates that it is a box,
is the width of the lower and upper outlines,
jjj
is the width in tenths of an inch45,
hhh
is the width
kkk
iii
of the left and right outlines
b hhhh iiii jjjj kkkk: hhhh
the lower and upper outlines,
is the width of the box,
is the width of the left and right outlines.
kkkk
is the height,
iiii
is the width of
jjjj
For alphanumerical fields it is the string to be printed.
For bar codes it is the information to be coded.
For graphic images it is the name of the image itself.
2.2 Fonts and bar codes
As stated in sect. 2.1.2.1.3 (page 19) the second character of the command string (given as b)
identifies the type of object used. For alphanumerical fields, it identifies the font, for bar codes it
identifies the type.
In particular, in the first case it will be a number between 0 and 9, in the second a letter from A to O
and from a to p.
The characteristics of the fonts and of the bar codes that can be printed with the CDL emulation are
described below.
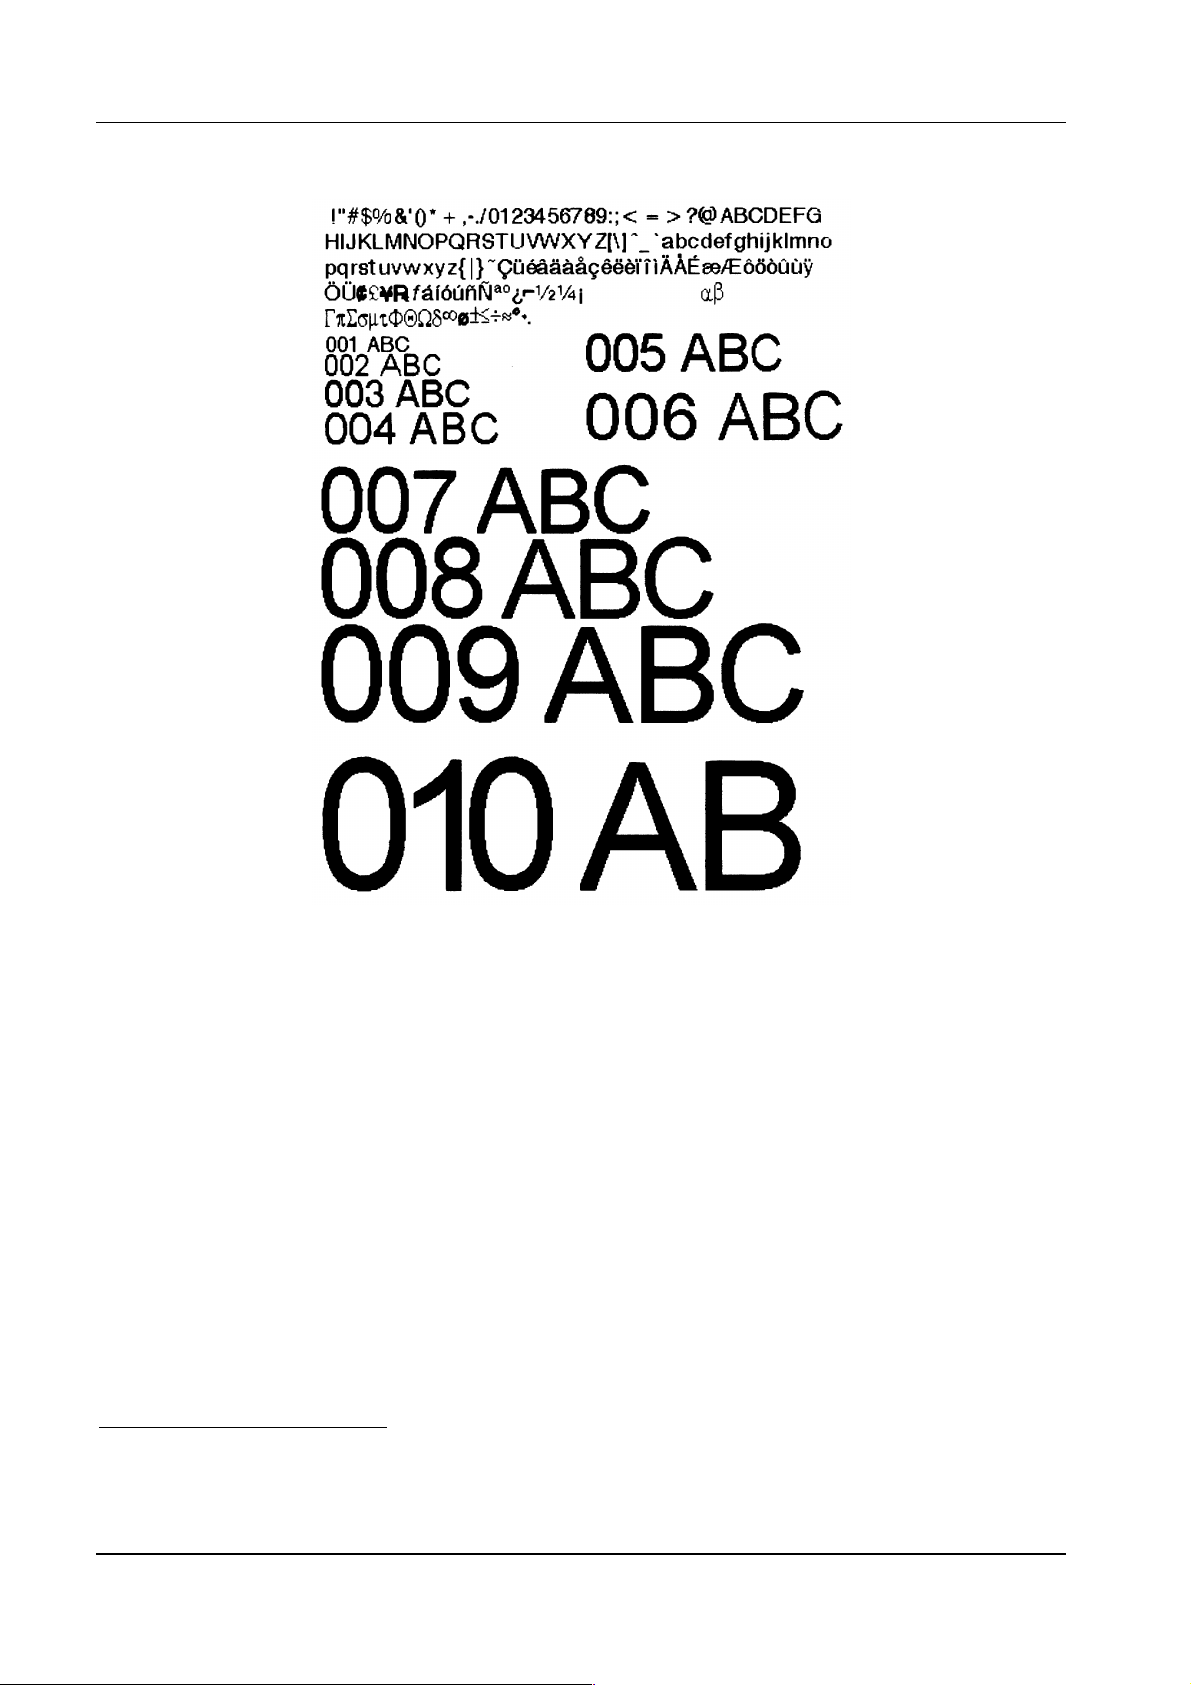
2.2.1 Fonts
Not all the characters in the ASCII tab. (see sect. 3 on page 50) can be printed with all the fonts. tab.
1 below gives the valid ASCII characters for each of the fonts.
Font Valid ASCII characters
0 32-127
1 32-168, 171, 172, 225
2 32-168, 171, 172, 225
3 32, 35-38, 40-58, 65-90, 128, 142-144, 146, 153, 154, 156, 157, 165, 168, 225
4 32, 35-38, 40-58, 65-90, 128, 142-144, 146, 153, 154, 156, 157, 165, 168, 225
5 32, 35-38, 40-58, 65-90, 128, 142-144, 146, 153, 154, 156, 157, 165, 168, 225
6 32, 35-38, 40-58, 65-90, 128, 142-144, 146, 153, 154, 156, 157, 165, 168, 225
7 32-126
8 32, 48-57, 60, 62, 67, 69, 78, 83, 84, 88, 90
9 32-126, 128-169, 171-173, 181-184, 189, 190, 198, 199, 208-216, 222, 224-237, 241, 243, 246-250
tab. 1 - Valid ASCII characters for fonts 0-9
45
After an m (see sect. 2.1.2.1.1 on page 13), this is the width of the box in tenths of a millimetre.
Page 22

CDL – Programmer Manual
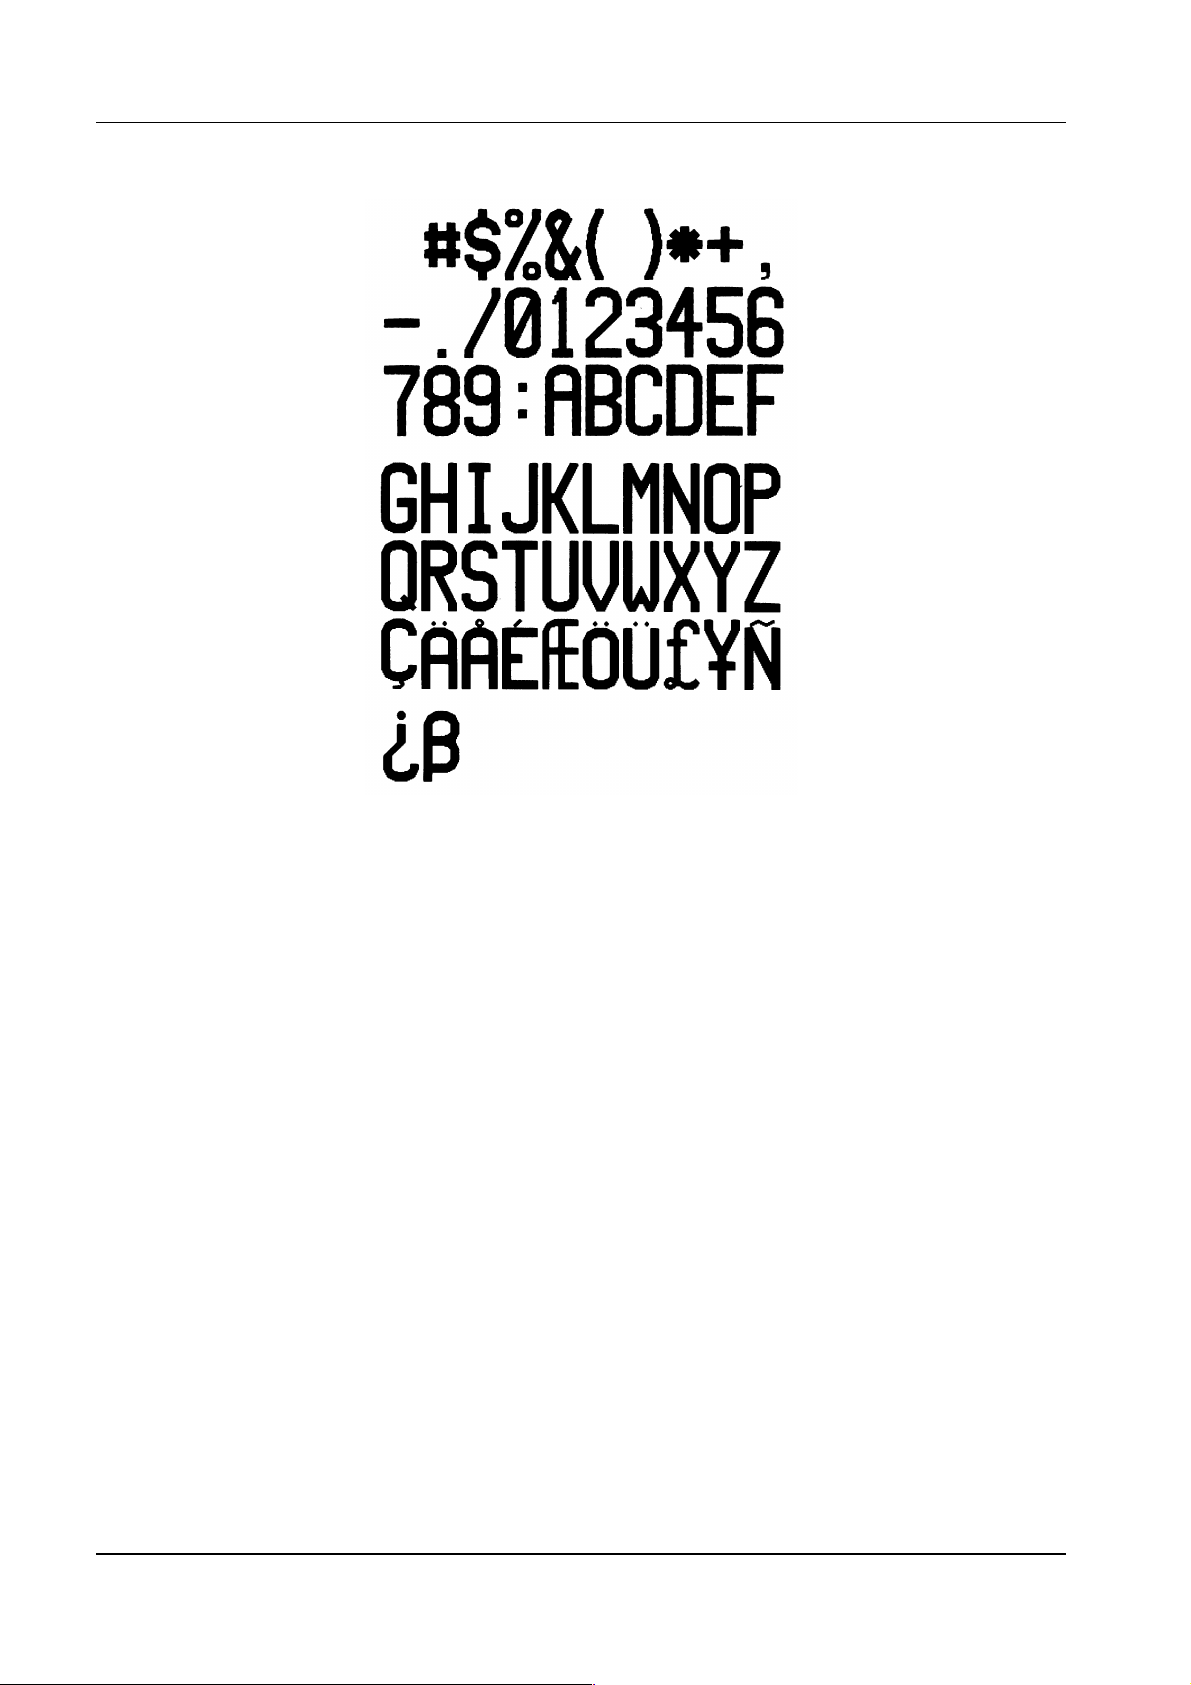
Font 0
In addition to all the upper and lower case letters, the space and numbers, the following characters
can also be printed with this font:
!Ò#$%&Ô()*+,-./:;<=>?@[\]^_`{|}~
fig. 3 - Font 0
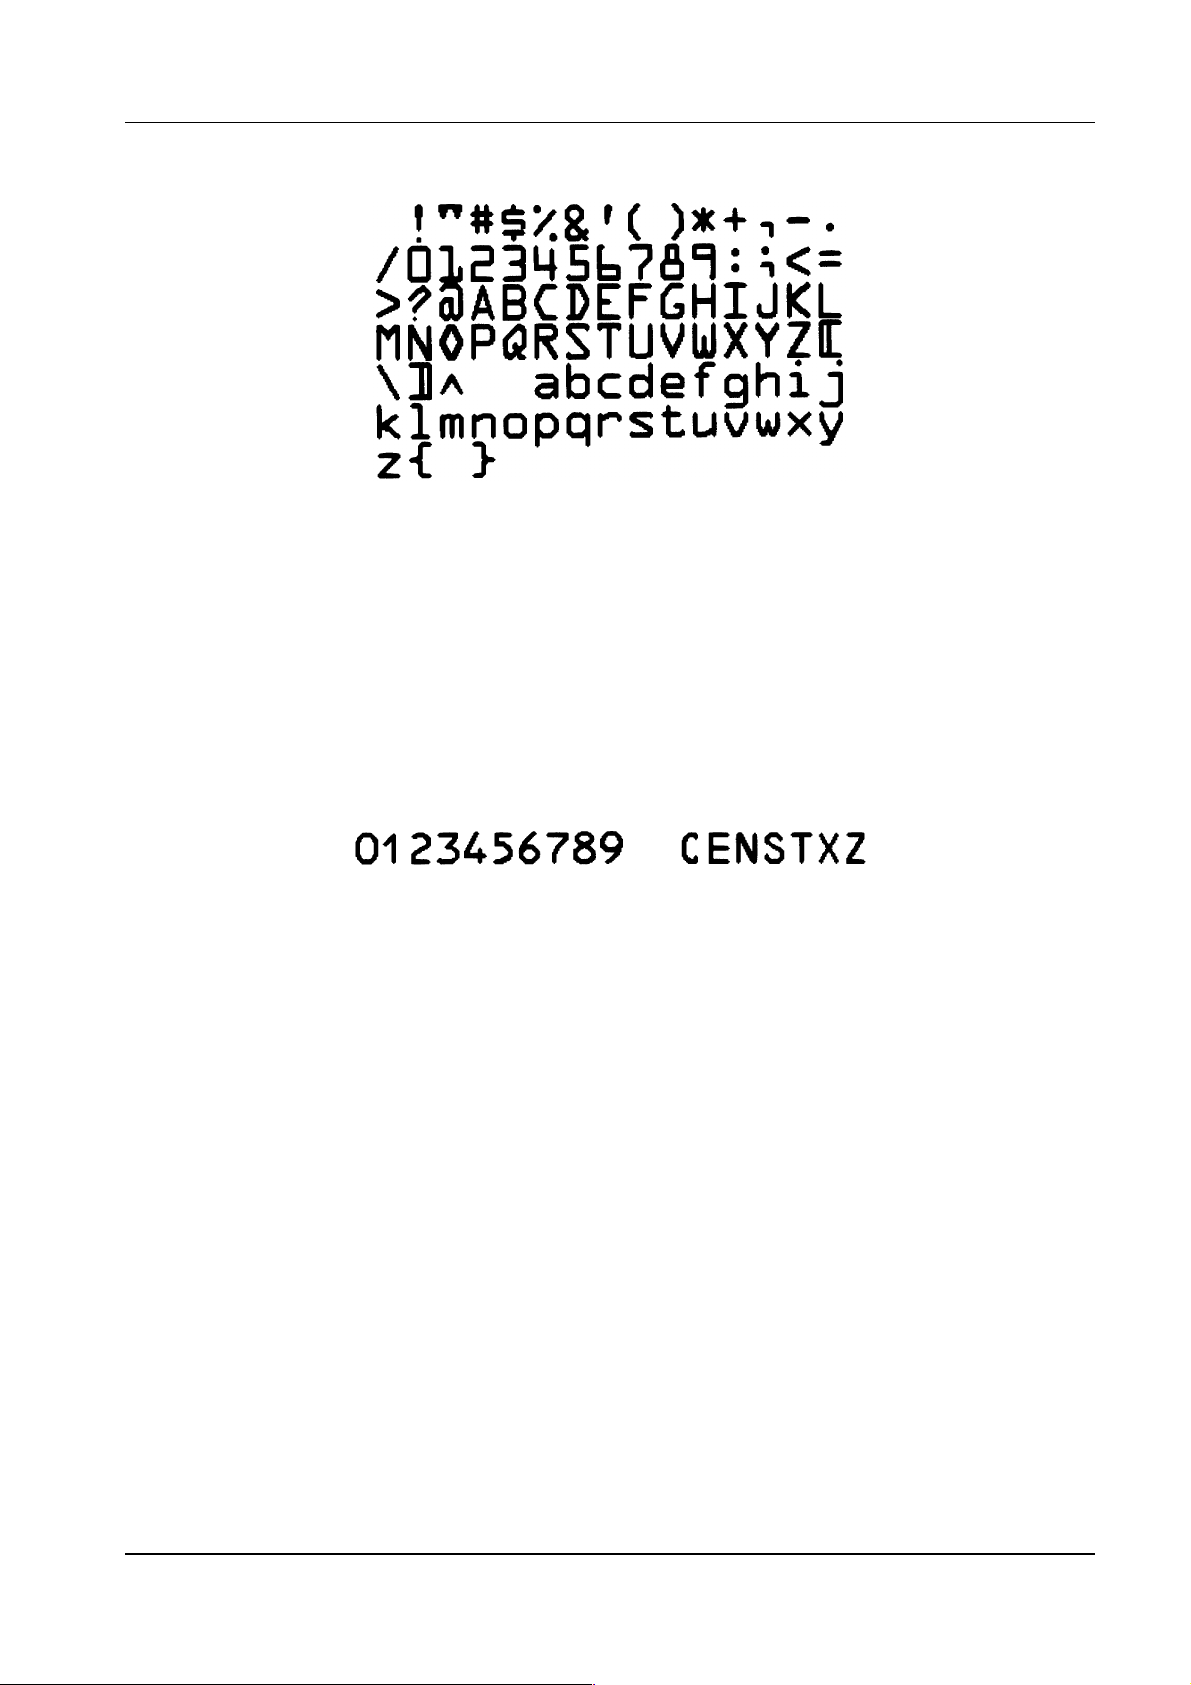
Font 1
In addition to all the upper and lower case letters, the space and numbers, the following characters
can also be printed with this font:
!Ò#$%&Ф()*+,-./:;<=>?@[\]^_`{|}~ЗьйвдаезклипомДЕЙжЖфцтыщяЦЬш£ШЧƒбнуъсСªº¿½¼Я
fig. 4 - Font 1
22
Page 23

CDL – Programmer Manual
23
Font 2
In addition to all the upper and lower case letters, the space and numbers, the following characters
can also be printed with this font:
!Ò#$%&Ф()*+,-./:;<=>?@[\]^_`{|}~ЗьйвдаезклипомДЕЙжЖфцтыщяЦЬш£ШЧƒбнуъсСªº¿½¼Я
fig. 5 - Font 2
Font 3
In addition to the upper case letters, the space and numbers, the following characters can also be
printed with this font:
#$%&()*+,-./:ЗДЕЙЖЦЬ£ØÑ¿ß
fig. 6 - Font 3
Page 24

CDL – Programmer Manual
Font 4
In addition to the upper case letters, the space and numbers, the following characters can also be
printed with this font:
#$%&()*+,-./:ЗДЕЙЖЦЬ£ØÑ¿ß
fig. 7 - Font 4
Font 5
In addition to the upper case letters, the space and numbers, the following characters can also be
printed with this font:
#$%&()*+,-./:ЗДЕЙЖЦЬ£ØÑ¿ß
24
Page 25

CDL – Programmer Manual
25
fig. 8 - Font 5
Font 6
In addition to the upper case letters, the space and numbers, the following characters can also be
printed with this font:
#$%&()*+,-./:ЗДЕЙЖЦЬ£ØÑ¿ß
Page 26
CDL – Programmer Manual
fig. 9 - Font 6
Font 7
In addition to all the upper and lower case letters, the space and numbers, the following characters
can also be printed with this font:
!Ò#$%&Ô()*+,-./:;<=>?@[\]^_`{|}~
26
Page 27
27
Font 8
CDL – Programmer Manual
fig. 10 - Font 7
In addition to numbers and the space, the following characters can also be printed with this font:
<>CENSTXZ
fig. 11 - Font 8
Font 9
In addition to all the upper and lower case letters, the space and numbers, the following characters
can also be printed with this font:
!Т#$%&Ф()*+,-./:;<=>?@[\]^_`{|}~ЗьйвдаезклипомДЕЙжЖфцтыщяЦЬш£ШЧƒбнуъсСªº¿®
½¼¡БВА©¢¥гГрРКЛИiНОПМУЯФТхХµюЮЪЫЩэЭ±¾ч¸°¨·
Page 28
CDL – Programmer Manual
fig. 12 - Font 9
2.2.2 Bar codes
Each bar code has specific characteristics that distinguish it from others. In particular some codes
have limits to their length (a higher or lower number of characters cannot be used), others have a
checksum character to make their decoding reliable, others still have limitations to the valid ASCII
characters (letters and certain “special” characters cannot be used).
All bar codes have a nominal ratio46 that guarantees reliable decoding.
In tab. 2 below, the characteristics of each of the bar codes are summarised.
46
The ratio is the relationship between the large and small bars (see positions c and d in the command syntax in sect.
2.1.2.1.3 on page 19).
28
Page 29
CDL – Programmer Manual
29
Type47 Description Length Checksum Valid ASCII characters Ratio48
A 3 of 9 Variable No 32, 36, 37, 42, 43, 45-57, 65-90 From 2:1 to 3:1
B UPC A 11 Yes 48-57
C UPC E 6 Yes 48-57
D 2 of 5 Interleaved Variable No 48-57 From 2:1 to 3:1
E 128 Variable Yes 32-126
F EAN 13 12 Yes 48-57
G EAN 8 7 Yes 48-57
H HIBC Variable Yes 32, 36-39, 42, 43, 45-57, 65-90 From 2:1 to 3:1
I Codabar Variable No 36, 43, 45-58, 65-90 From 2:1 to 3:1
J 2 of 5 Interleaved
with checksum
K Plessey <= 14 Yes 48-57 From 2:1 to 3:1
L 2 of 5 Interleaved
with checksum and
horizontal bars
M 2-digit addendum for UPC 2 Yes 48-57
N 5-digit addendum for UPC 5 Yes 48-57
O 93 Variable No 35-38, 42-58, 65-90, 97-122
p49 Postnet Variable Yes 48-57
Variable Yes 48-57 From 2:1 to 3:1
13 Yes 48-57 From 2:1 to 3:1
tab. 2 – Bar code characteristics
A - 3 of 9
This variable length code without a checksum, in addition to upper case letters, the space and
numbers, also accepts the following characters:
$%*+-./
The nominal ratio may vary from 2:1 to 3:1.
fig. 13 - 3 of 9 bar code
47
When the bar code is identified by the upper case letter, whatever is coded appears beneath it in decoded form; when
the letter is lower case no decoding appears beneath the bar code.
48
If no specific ratio is given fo r the bar code, the ratio between the horizontal and vertical expansion must be 1:1. This
does not mean, however, that the ratio between narrow and wide bars is 1:1.
49
No decoding is given beneath Postnet, and it is therefore defined only with a lower case letter.
Page 30
CDL – Programmer Manual
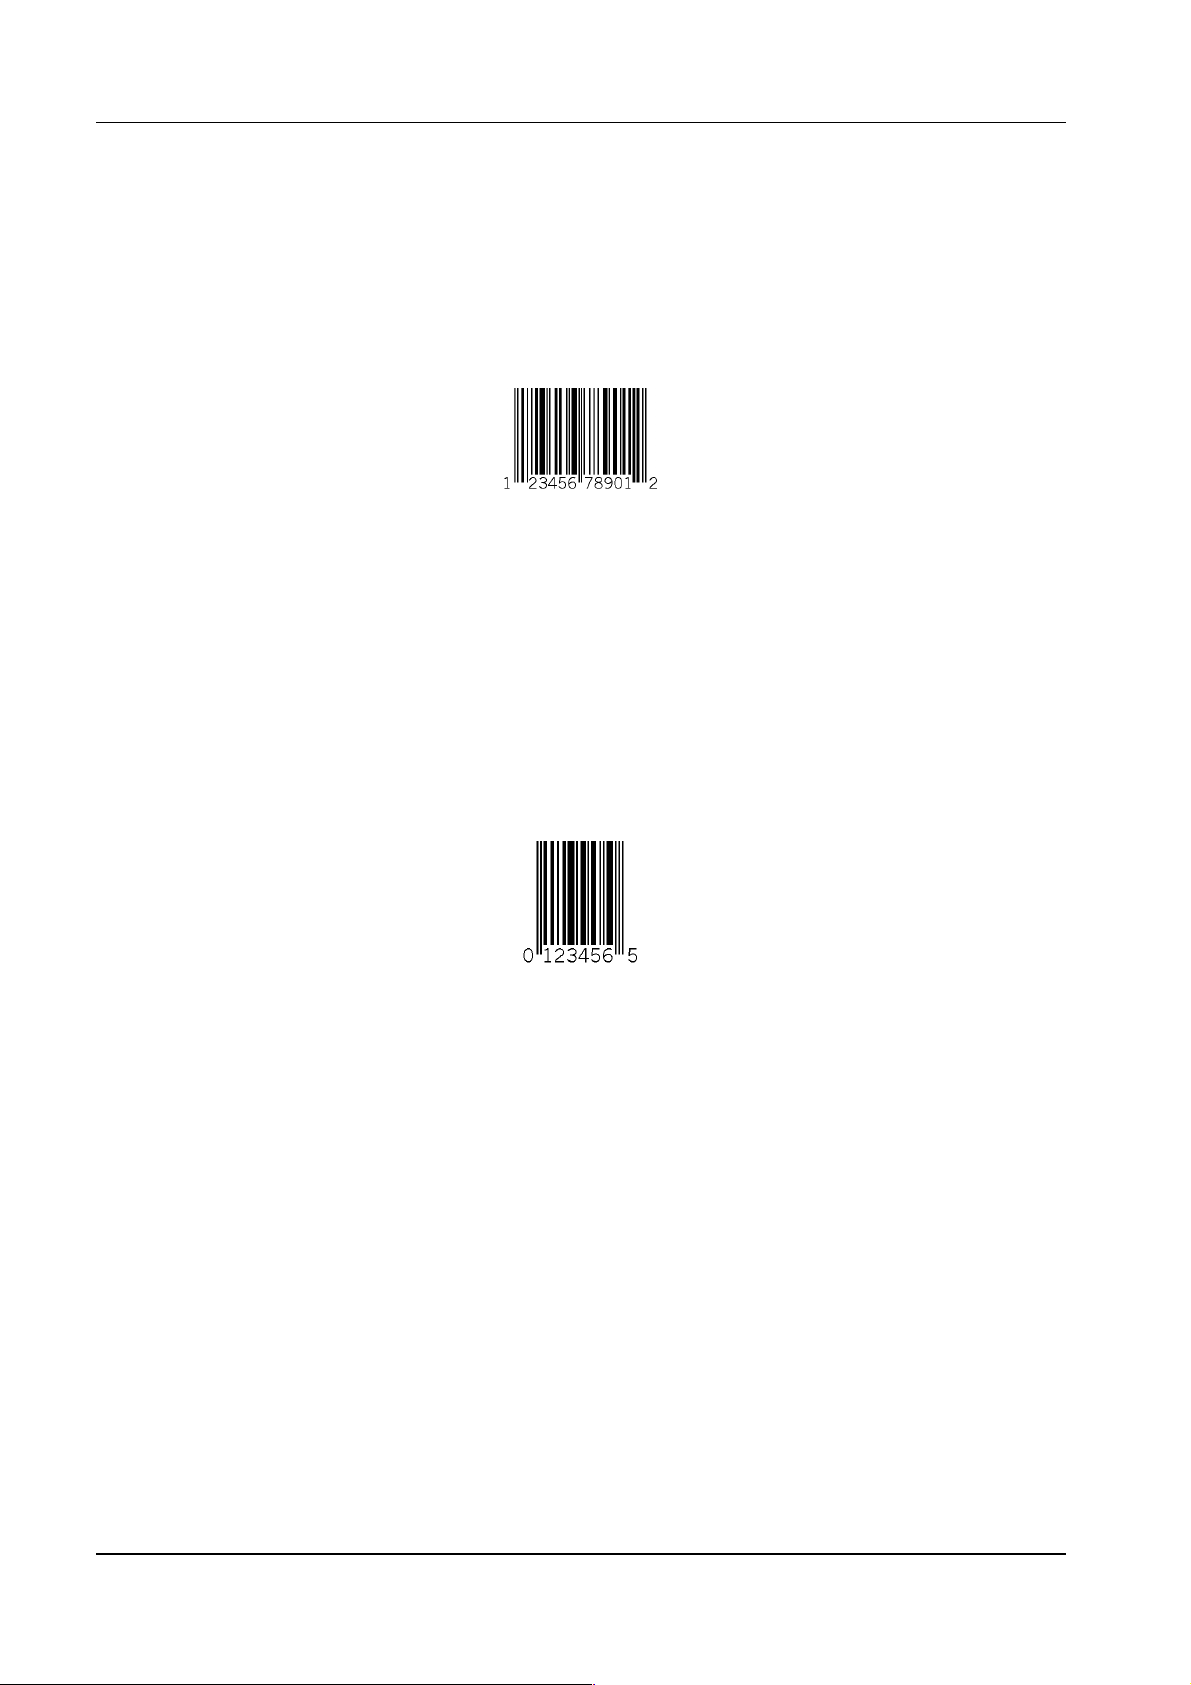
B - UPC A
This code accepts 11 characters (only numbers): in this case it calculates and adds the twelfth
checksum character. If there are already 12 characters, the printer will check that the twelfth
corresponds to the correct checksum: if it does not it will print 11 zeros and the expected checksum.
fig. 14 - UPC A bar code
C - UPC E
This code accepts 6 characters (only numbers): in this case it calculates and adds the seventh
checksum character. If there are already 7 characters, the printer will check that the seventh
corresponds to the correct checksum: if it does not it will print 6 zeros and the expected checksum.
fig. 15 - UPC E bar code
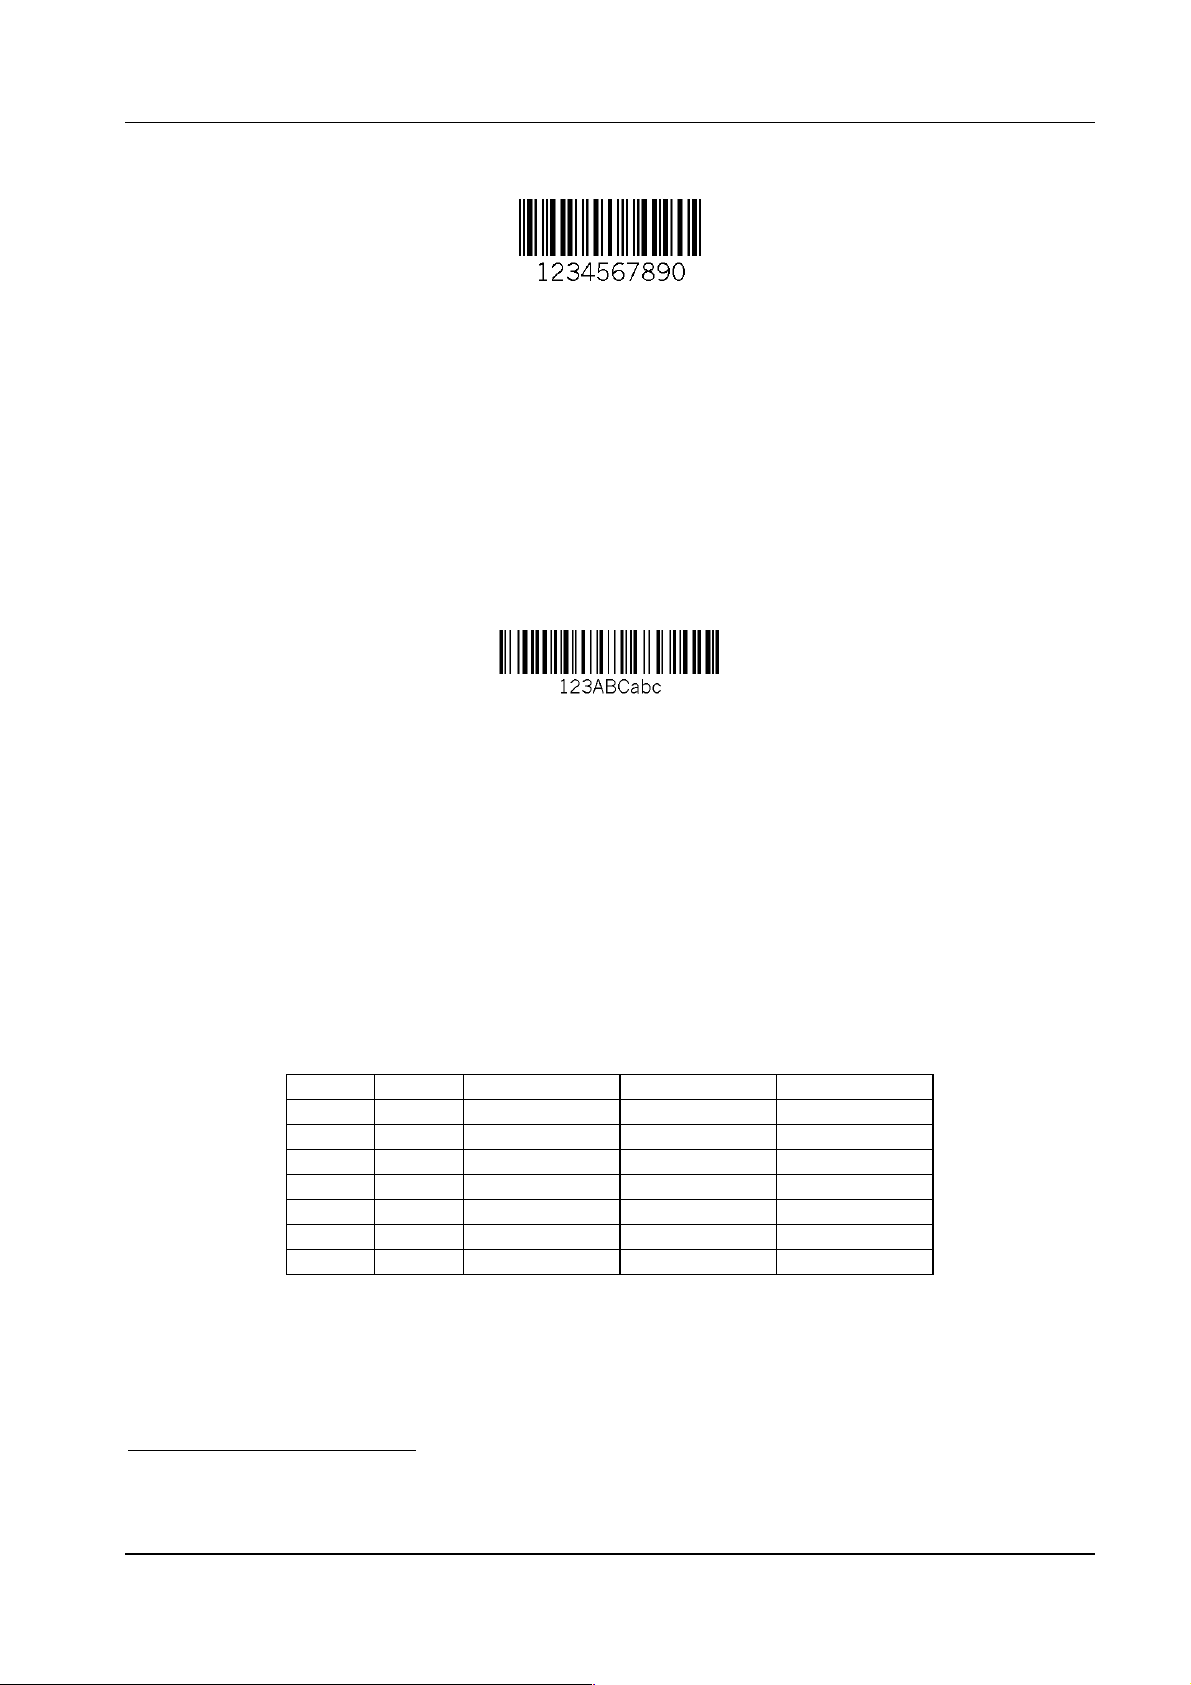
D – 2 of 5 Interleaved
This variable length code, with no checksum, accepts only numbers and its nominal ratio may vary
from 2:1 to 3:1.
30
Page 31
CDL – Programmer Manual
31
fig. 16 – 2 of 5 Interleaved bar code
E - 128
This variable length code, with checksum, in addition to all the lower and upper case letters, the
space and numbers, accepts the following characters:
!Ò#$%&Ö()*+,-./:;<=>?@[\]^_`{|}~
fig. 17 – 128 bar code
In this bar code there are 3 subsets of characters (A, B and C) which are selected by preceding the
string to be coded by the letter A, B50 or C.
Subset A includes all upper case letters plus special and control characters.
Subset B includes all upper and lower case letters plus special characters.
Subset C includes only the numbers (in even number).
To code the special charact ers, you need to send the printer a copy of the characters shown in the
column headed ‘CHAR’ in tab. 3.
ASCII CHAR A B C
96 &A FNC3 FNC3 not accepted
97 &B FNC2 FNC2 not accepted
98 &C SHIFT SHIFT not accepted
99 &D CODE C CODE C not accepted
100 &E CODE B FNC4 CODE B
101 &F FNC4 CODE A CODE A
102 &G FNC1 FNC1 FNC1
tab. 3 – Special characters for code 128 C
50
If no character is included, the default setting is subset B.
Page 32

CDL – Programmer Manual
F - EAN 13
This code accepts 12 characters (only numbers): in this case it calculates and adds the thirteenth
checksum character. If there are already 13 characters, the printer will check that the thirteenth
corresponds to the correct checksum: if it does not, it will print 12 zeros and the expected
checksum.
fig. 18 - EAN 13 bar code
G - EAN 8
This code accepts 7 characters (only numbers): in this case it calculates and adds the eight checksum
character. If there are already 8 characters, the printer will check that the eighth corresponds to the
correct checksum: if it does not, it will print 7 zeros and the expected checksum.
fig. 19 - EAN 8 bar code
H - HBIC
This code is like the
upper case letters, the space and numbers, it accepts the following characters:
$%&Ö*+-./
The nominal ratio may vary from 2:1 to 3:1.
You need to add a + before the data to be coded. For example, if you need to print a bar code
the data
0123456789
command syntax in sect. 2.1.2.1.3 on page 19).
3 of 9
with a checksum character: it has a variable length and, in addition to
the command string must be
1 H 21 050 0010 0010 +0123456789
with
(see
32
Page 33

CDL – Programmer Manual
33
fig. 20 – HIBC bar code
I - Codabar
This code has a variable length but must contain at least 3 characters, it has no checksum and the
valid characters, in addition to upper case letters and numbers, are as follows:
$+-./:
The nominal ratio varies from 2:1 to 3:1.
fig. 21 – Codabar bar code
J – 2 of 5 Interleaved with checksum
This code is similar to the 2 out of 5 Interleaved code described above except that it includes a
checksum character: it has a variable length and accepts only numbers.
The nominal ratio varies from 2:1 to 3:1.
fig. 22 - 2 out of 5 Interleaved bar code with checksum
K - Plessey
This code accepts up to a maximum of 14 characters (onl y num bers) and a checksum character is
added only if the last character to be coded is a +: in this case it is substituted with the checksum.
Page 34

CDL – Programmer Manual
The nominal ratio varies from 2:1 to 3:1.
fig. 23 – Plessey bar code
L - 2 of 5 Interleaved with checksum and horizontal bars
This is a variable length code but, to have horizontal bars, it must be 13 characters long (the
fourteenth is added as a checksum). It accepts only numbers and the nominal ration varies from 2:1
to 3:1.
fig. 24 - 2 of 5 Interleaved bar code with checksum and horizontal bars
M – 2-digit addendum for UPC
This code is used to extend the
number of characters (2 and only numbers), and includes a checksum character.
UPC
which is a fixed length code: it too accepts only a limited
fig. 25 – 2-digit addendum bar code for UPC
34
Page 35

35
N – 5-digit addendum for UPC
CDL – Programmer Manual
This code is used to extend the
UPC
which is a fixed length code: it too accepts only a limited
number of characters (5 and only numbers), and includes a checksum character.
fig. 26 - 5-digit addendum bar code for UPC
O - 93
This variable length code, without checksum, in addition to upper and lower case letters, and
numbers, accepts the following characters:
#$%&*+,-./:
fig. 27 – 93 bar code
p - Postnet
No decoding is envisaged beneath this code and it is therefore identified only by a lower case letter.
It has a variable length, with checksum and accepts only numbers.
fig. 28 – Postnet bar code
Page 36

CDL – Programmer Manual
2.3 Examples
Examples are given below as tex t files and in Basic so that they may be understood and tried out by
any user: this does not subtract from the general nature of these examples which could be written in
any other language and/or on any kind of computer.
To check the effect of each of them, you must in the first case send t he printer the text file, and in
the second “run” the Basic program.
In the examples given as text files, the convention of showing characters that cannot be printed from
the ASCII table (that is the first 32 of tab. 4 on page 50) between the symbols < and > has been
used so that they are not taken as ordinary character strings.
To write these characters with the keyboard you need to refer to the editor you are using. Generally,
you need to use a combination of the keys CTRL and/or ALT followed by the decimal code of the
character in question.
Character CR (1310, 0DH), required to end each line of instructions51, is automatically added by the
editor, together with LF (1010, 0AH), when you start a new line: in the examples it i s in any case
made explicit for greater clarity.
In the same way, the PRINT instruction in Basic automatically adds the CR and LF characters at the
end of the line that, even though they do not appear, permit the machine to work correctly in
accordance with what is stated above.
To better understand the examples, we advise you to refer frequently to the syntax of each of the
commands used (see sect. 2.1 on page 3).
2.3.1 Geometric figures
The following examples print the label shown in fig. 29: the first example is a text file and the
second is a Basic program.
<STX>L<CR>
D11<CR>
PC<CR>
H15<CR>
1X1100000000010B390230002004<CR>
1X1100000400014L382004<CR>
E<CR>
OPEN "com1:9600,n,8,1" FOR OUTPUT AS #1 'open serial port number 1
PRINT #1, CHR$(2); "L" 'STX L switch to label definition mode
PRINT #1, "D11" 'select the dot size (h=1; v=1)
PRINT #1, "PC" 'select the print speed (C=2 ips)
PRINT #1, "H15" 'select the temperature of the head
'box
51
The line end may be replaced, in label definition mode, by another character using command T (see sect. 2.1.2.1.1 on
page 13) which is a local command and therefore applies only to the cur r ent label.
36
Page 37

CDL – Programmer Manual
37
PRINT #1, "1"; "X"; "11"; "000"; "0000"; "0010"; "B"; "390"; "230"; "002"; "004"
' 1 = compulsory for geometric figures
' X = define an object as a geometric figure
' 11 = horizontal and vertical expansion
' 000 = compulsory for geometric figures
' 0000 = line co-ordinate
' 0010 = column co-ordinate
' B = define the box
' 390 = box width
' 230 = box height
' 002 = width of upper and lower outlines
' 004 = width of left and right outlines
'line
PRINT #1, "1"; "X"; "11"; "000"; "0040"; "0014"; "L"; "382"; "004"
' 1 = compulsory for geometric figures
' X = define an object as a geometric figure
' 11 = horizontal and vertical expansion
' 000 = compulsory for geometric figures
' 0040 = line co-ordinate
' 0024 = column co-ordinate
' L = define the line
' 382 = line width (length)
' 004 = line height (thickness)
PRINT #1, "E" 'exit label definition mode and prints
CLOSE #1 'close the serial port
fig. 29 – Example with geometric figures
2.3.2 Alphanumerical fields
For alphanumerical fields you need to define the t ype of font to be used. There are 9 fi xed space
fonts plus 10 proportional space fonts: for the first group b=0-8 and eee=000 (for the syntax , see
sect. 2.1.2.1.3 on page 19), for the second group b=9 and eee=001-010. For the characteristics of
each font, see sect. 2.2.1 on page 21.
Page 38

CDL – Programmer Manual
Both of the following examples produce the label shown in fig. 30: the first is a text file while the
second is a Basic program.
<STX>L<CR>
D11<CR>
PC<CR>
H15<CR>
1X1100000000010B390230002004<CR>
1X1100000400014L382004<CR>
103300000200140PRINT TEST<CR>
E<CR>
OPEN "com1:9600,n,8,1" FOR OUTPUT AS #1
PRINT #1, CHR$(2); "L"
PRINT #1, "D11"
PRINT #1, "PC"
PRINT #1, "H15"
'box
PRINT #1, "1"; "X"; "11"; "000"; "0000"; "0010"; "B"; "390"; "230"; "002"; "004"
'line
PRINT #1, "1"; "X"; "11"; "000"; "0040"; "0014"; "L"; "382"; "004"
'alphanumerical field
PRINT #1, "1"; "0"; "33"; "000"; "0020"; "0140"; "PROVA DI STAMPA"
' 1 = rotation by 0 degrees
' 0 = font no. 0
' 33 = horizontal and vertical expansion
' 000 = ignored the font used is between 0 and 8
' 0020 = line co-ordinate
' 0140 = column co-ordinate
' PR...A = string to be printed
PRINT #1, "E"
CLOSE #1
fig. 30 – Example of alphanumerical fields
38
Page 39

39
2.3.3 Bar codes
CDL – Programmer Manual
There are 16 bar code types available:
b=A-O
and
(for the syntax, see sect. 2.1.2.1.3 on page 19)
a-p
the detailed description of which can be seen in sect. 2.2.2 on page 28. The section mentioned gives
the characteristics of each of them and their
. The ratio is the relationship between the width of
ratio
the large bars and that of the small ones: it cannot be random, but depends on the code type.
Both of the following examples product the label shown in fig. 31: the first is a text file and the
second is a Basic program.
<STX>L
D11<CR>
PC<CR>
H15<CR>
1X1100000000010B390230002004<CR>
1X1100000400014L382004<CR>
103300000200140PRINT TEST<CR>
1X1100000180135L050015<CR>
225500002000040TEST<CR>
1A5205000500100ABC123<CR>
1C2205001500120123456<CR>
E<CR>
OPEN "com1:9600,n,8,1" FOR OUTPUT AS #1
PRINT #1, CHR$(2); "L"
PRINT #1, "D11"
PRINT #1, "PC"
PRINT #1, "H15"
'box
PRINT #1, "1"; "X"; "11"; "000"; "0000"; "0010"; "B"; "390"; "230"; "002"; "004"
'line
PRINT #1, "1"; "X"; "11"; "000"; "0040"; "0014"; "L"; "382"; "004"
'alphanumerical field
PRINT #1, "1"; "0"; "33"; "000"; "0020"; "0140"; "PRINT TEST"
'To obtain reverse print (i.e. white wording on black background) you
'must superimpose a line of suitable width over the alphanumerical field
'line
PRINT #1, "1"; "X"; "11"; "000"; "0018"; "0135"; "L"; "050"; "015"
' 1 = compulsory for geometric figures
' X = define an object as a geometric figure
' 11 = horizontal and vertical expansion
' 000 = compulsory for geometric figures
' 0018 = line co-ordinate
' 0135 = column co-ordinate
' L = define the line
' 050 = line width (length)
' 015 = line height (thickness)
'alphanumerical field
PRINT #1, "2"; "2"; "55"; "000"; "0200"; "0040"; "TEST"
' 2 = rotation by 90 degrees
' 2 = font n. 2
Page 40

CDL – Programmer Manual
' 55 = horizontal and vertical expansion
' 000 = ignored when the font used is between 0 and 8
' 0200 = line co-ordinate
' 0040 = column co-ordinate
' TEST = string to be printed
'bar code
PRINT #1, "1"; "A"; "52"; "050"; "0050"; "0100"; "ABC123"
' 1 = rotation by 0 degrees
' A = bar code A
' 52 = ratio 5:2
' 050 = bar code height
' 0050 = line co-ordinate
' 0100 = column co-ordinate
' AB...3 = string to be printed
'bar code
PRINT #1, "1"; "C"; "22"; "050"; "0150"; "0120"; "123456"
' 1 = rotation by 0 degrees
' C = bar code C
' 22 = ratio between horizontal and vertical expansion 1:1
' 050 = bar code height
' 0150 = line co-ordinate
' 0120 = column co-ordinate
' 12...6 = string to be printed
PRINT #1, "E"
CLOSE #1
fig. 31 – Example with bar codes
2.3.4 Graphic images
In order to print graphic images, they must first be loaded in the flash (non-volatile) or in the RAM
(volatile) memory. To do this, loading of the graphic file must precede the actual printing.
In the first of the examples below, the printer is prepared to receive the graphic file in PCX (P)
format in the flash memory (B) calling it
40
LOGO
.
Page 41

CDL – Programmer Manual
41
The graphic image is then sent to the printer: since it is stored in the flash memory, it will remain
available after the machine has been switched off too and it will be possible to use it on the label,
even repeated several times, when the label itself is defined.
The two lines below prepare the printer to receive the logo.
<SOH>D<CR>
<STX>IBPLOGO<CR>
At this point, the PCX format file can be sent to the printer, for example using the DOS command
COPY /B RECYCLE.PCX COM1:
The following commands are those that actually define the label.
<STX>L<CR>
D11<CR>
PC<CR>
H15<CR>
1X1100000000010B390230002004<CR>
1X1100000400014L382004<CR>
103300000200140PRINT TEST<CR>
1X1100000180135L050015<CR>
225500002000040TEST<CR>
1A5205000500100ABC123<CR>
1C2205001500120123456<CR>
1Y1100000650250LOGO<CR>
E<CR>
In the second example (written in Basic) loading and “placing” of the graphic image take place at
the same time, even though this is not strictly necessary. In particular, the file is copied in the printer
with a DOS command, then positioned and printed.
OPEN "com1:9600,n,8,1" FOR OUTPUT AS #1
'SOH D disables the immediate command interpreter
PRINT #1, CHR$(1); "D"
'STX IAPLOGO prepares the printer to load
'the graphic image (in PCX format) in FLASH (drive B) and
'calls it LOGO
PRINT #1, CHR$(2); "IBPLOGO"
'copies the graphic file in the printer memory
SHELL "COPY /B RECYCLE.PCX COM1:"
PRINT #1, CHR$(2); "L"
PRINT #1, "D11"
PRINT #1, "PC"
PRINT #1, "H15"
'box
PRINT #1, "1"; "X"; "11"; "000"; "0000"; "0010"; "B"; "390"; "230"; "002"; "004"
'line
PRINT #1, "1"; "X"; "11"; "000"; "0040"; "0014"; "L"; "382"; "004"
'alphanumerical field
PRINT #1, "1"; "0"; "33"; "000"; "0020"; "0140"; "PRINT TEST"
'line
PRINT #1, "1"; "X"; "11"; "000"; "0018"; "0135"; "L"; "050"; "015"
Page 42

CDL – Programmer Manual
'alphanumerical field
PRINT #1, "2"; "2"; "55"; "000"; "0200"; "0040"; "TEST"
'bar code
PRINT #1, "1"; "A"; "52"; "050"; "0050"; "0100"; "ABC123"
'bar code
PRINT #1, "1"; "C"; "22"; "050"; "0150"; "0120"; "123456"
'graphic image
PRINT #1, "1"; "Y"; "11"; "000"; "0065"; "0250"; "LOGO"
' 1 = rotation by 0 degrees
' Y = defines the object as a graphic image
' 11 = horizontal and vertical expansion
' 000 = compulsory for graphic images
' 0065 = line co-ordinate
' 0250 = column co-ordinate
' LOGO = name of the logo to be printed
PRINT #1, "E"
CLOSE #1
fig. 32 – Example of graphic images
2.3.5 Dynamic fields
Fields are called dynamic when their contents cannot be determined a priori when the label is
defined but vary when it is printed: e.g. when the printed is fitted to scales and one of the fields is
the weight, it is reasonable to decide to build the label once and for all and update the variable fields
when the label is printed. By doing so printing is more efficient and faster.
To manage dynamic fields you need to:
- provide sufficient space so that the field can contain the maximum number of characters
possible. To do this it is useful to fill the field with substitute characters such as X;
- end the label definition mode with the command X (instead of E);
42
Page 43
CDL – Programmer Manual
43
- when printing is carried out, which may be some time afterwards, fill the fields involved using
the command
STX Unnss...s
: since the fields are filled in succession,
nn=01
corresponds to the
first field, 02 to the second and so on up to 99;
- enter command
STX G
to print the label.
The following lines define the label without printing it.
<STX>L<CR>
PC<CR>
H15<CR>
131100001550200xxxxxx<CR>
131100001100200xxxxxx<CR>
131100000650200xxxxxx<CR>
131100000200200xxxxxx<CR>
X<CR>
At a later time, you can print the label defined as above with the current field values as follows.
<STX>U011234567<CR>
<STX>U0212345<CR>
<STX>U03123456<CR>
<STX>G<CR>
The following Basic program gives the same result (the one shown in fig. 33).
OPEN "com1:9600,n,8,1" FOR OUTPUT AS #1
PRINT #1, CHR$(2); "L"
PRINT #1, "PC"
PRINT #1, "H15"
PRINT #1, "1"; "3"; "11"; "000"; "0155"; "0200"; "xxxxxx"
' 1 = rotation by 0 degrees
' 3 = font no. 3
' 33 = horizontal and vertical expansion
' 000 = ignored when the font is not 9
' 0155 = line co-ordinate
' 0200 = column co-ordinate
' xx...x = space reserved for the field to be filled
PRINT #1, "1"; "3"; "11"; "000"; "0110"; "0200"; "xxxxxx"
' 1 = rotation by 0 degrees
' 3 = font no. 3
' 11 = horizontal and vertical expansion
' 000 = ignored when the font is not 9
' 0110 = line co-ordinate
' 0200 = column co-ordinate
' xx...x = space reserved for the field to be filled
PRINT #1, "1"; "3"; "11"; "000"; "0065"; "0200"; "xxxxxx"
' 1 = rotation by 0 degrees
' 3 = font no. 3
' 11 = horizontal and vertical expansion
' 000 = ignored when the font is not 9
' 0065 = line co-ordinate
' 0200 = column co-ordinate
' xx...x = space reserved for the field to be filled
PRINT #1, "1"; "3"; "11"; "000"; "0020"; "0200"; "xxxxxx"
' 1 = rotation by 0 degrees
Page 44

CDL – Programmer Manual
' 3 = font no. 3
' 11 = horizontal and vertical expansion
' 000 = ignored when the font is not 9
' 0020 = line co-ordinate
' 0200 = column co-ordinate
' xx...x = space reserved for the field to be filled
PRINT #1, "X" 'end label definition mode
'the following instructions fill in the dynamic fields defined
'during label definition and can be
'sent later
'assign value 1234567 to the first field
PRINT #1, CHR$(2); "U"; "01"; "1234567"
'assign value 12345 to the second field
PRINT #1, CHR$(2); "U"; "02"; "12345"
'assign value 123456 to the third field
PRINT #1, CHR$(2); "U"; "03"; "123456"
PRINT #1, CHR$(2); "G" 'print the label using the data just sent
CLOSE #1
fig. 33 – Example with dynamic fields
2.3.6 Repeating the same field on the label
When the same field is repeated more than once (e. g. an arti cle code first as a bar code and then
“decoded”), you can use command
any changes to the first field are repeated in the subsequent fields without errors.
Each field defined during label definition mode is saved in a register. This is done explicitly with
command G (see sect. 2.1.2.1.1 on page 13) or automatically in progressive order: the first field is
44
STX Sn
to make the processing more effective and ensure that
Page 45
CDL – Programmer Manual
45
saved in register A, the second in B and so on up to Z. The contents of these registers can be
retrieved using command
STX Sn
The following examples, the first in
in which n indicates the register to be retrieved.
format, the second in Basic, give the result shown in fig.
text
34.
<STX>L<CR>
D11<CR>
PC<CR>
H15<CR>
133300000200200HELLO<CR>
G<CR>
133300000650200<STX>SA<CR>
133300001100200<STX>SA<CR>
133300001550200<STX>SA<CR>
E<CR>
OPEN "com1:9600,n,8,1" FOR OUTPUT AS #1
PRINT #1, CHR$(2); "L"
PRINT #1, "D11"
PRINT #1, "PC"
PRINT #1, "H15"
PRINT #1, "1"; "3"; "33"; "000"; "0020"; "0200"; "HELLO"
'save the previous field in register A
PRINT #1, "G"
PRINT #1, "1"; "3"; "33"; "000"; "0065"; "0200"; CHR$(2); "SA"
' 1 = rotation by 0 degrees
' 3 = font no. 3
' 33 = horizontal and vertical expansion
' 000 = ignored when the font is not 9
' 0065 = line co-ordinate
' 0200 = column co-ordinate
' STX SA = enters the memorised field in register A
PRINT #1, "1"; "3"; "33"; "000"; "0110"; "0200"; CHR$(2); "SA"
' 1 = rotation by 0 degrees
' 3 = font no. 3
' 33 = horizontal and vertical expansion
' 000 = ignored when the font is not 9
' 0110 = line co-ordinate
' 0200 = column co-ordinate
' STX SA = enters the memorised field in register A
PRINT #1, "1"; "3"; "33"; "000"; "0155"; "0200"; CHR$(2); "SA"
' 1 = rotation by 0 degrees
' 3 = font no. 3
' 33 = horizontal and vertical expansion
' 000 = ignored when the font is not 9
' 0155 = line co-ordinate
' 0200 = column co-ordinate
' STX SA = enters the memorised field in register A
PRINT #1, "E"
CLOSE #1
Page 46

CDL – Programmer Manual
HE LLO
HE LLO
HE LLO
HE LLO
HE LLO
fig. 34 – Example with repeated fields
2.3.7 Incremen tal fields
It is often necessary to print a series of labels with a progressive number or letter. You can do this
by using the commands
filler character
a
that is the most significant positions are filled with the character p.
+pii (-pii
The following examples, the first in
) and
text
>pii (<pii
) (see sect. 2.1.2.1.1 on page 13). The p is used as
format, the second in Basic, give the result shown in fig.
35.
<STX>L<CR>
D11<CR>
PC<CR>
H15<CR>
133300001550200AAA<CR>
<01<CR>
133300001100200AAA<CR>
>01<CR>
133300000650200000<CR>
-01<CR>
133300000200200000<CR>
+01<CR>
Q0005<CR>
E<CR>
OPEN "com1:9600,n,8,1" FOR OUTPUT AS #1
PRINT #1, CHR$(2); "L"
PRINT #1, "D11"
PRINT #1, "PC"
PRINT #1, "H15"
PRINT #1, "1"; "3"; "33"; "000"; "0155"; "0200"; "AAA"
'decreases the previous field by 1 (alphanumerical fields)
PRINT #1, "<01"
PRINT #1, "1"; "3"; "33"; "000"; "0110"; "0200"; "AAA"
46
Page 47
CDL – Programmer Manual
47
'increases the previous field by 1 (alphanumerical fields)
PRINT #1, ">01"
PRINT #1, "1"; "3"; "33"; "000"; "0065"; "0200"; "000"
'decreases the previous field by 1 (numerical fields)
PRINT #1, "-01"
PRINT #1, "1"; "3"; "33"; "000"; "0020"; "0200"; "000" 'defines a field
'increases the previous field by 1 (numerical fields)
PRINT #1, "+01"
PRINT #1, "Q0005" 'to print 5 labels
PRINT #1, "E"
CLOSE #1
fig. 35 – Example with incremental fields
2.3.8 Saving the label
To avoid having to “load” the labels each time they need to printed, when, for example they are
complex, you can save them in RAM (volatile) or in flash (non-volatile) memory and retrieve them
for printing later. To do this, you can use commands s(A/B/C/D/E)nn...n and rnn...n respecti vely.
For information on these see sect. 2.1.2.1.1 on page 13.
The example below, in text format, saves the label in flash (B) with the name ETIC1.
<STX>L<CR>
D11<CR>
PC<CR>
H15<CR>
1X1100000000010B390230002004<CR>
1X1100000400014L382004<CR>
Page 48

CDL – Programmer Manual
103300000200140PRINT TEST<CR>
1X1100000180135L050015<CR>
225500002000040TEST<CR>
1A5205000500100ABC123<CR>
1C2205001500120123456<CR>
1Y1100000650250LOGO<CR>
sBETIC1<CR>
The following lines retrieve label ETIC1 and print it: since it has been saved in the flash memory, it
can be printed some time later even after the machine has been switched off.
<STX>L<CR>
rETIC1<CR>
E<CR>
The result shown in fig. 36 can also be achieved with the following Basic program.
OPEN "com1:9600,n,8,1" FOR OUTPUT AS #1
PRINT #1, CHR$(2); "L"
PRINT #1, "D11"
PRINT #1, "PC"
PRINT #1, "H15"
'box
PRINT #1, "1"; "X"; "11"; "000"; "0000"; "0010"; "B"; "390"; "230"; "002"; "004"
'line
PRINT #1, "1"; "X"; "11"; "000"; "0040"; "0014"; "L"; "382"; "004"
'alphanumerical field
PRINT #1, "1"; "0"; "33"; "000"; "0020"; "0140"; "PROVA DI STAMPA"
'line
PRINT #1, "1"; "X"; "11"; "000"; "0018"; "0135"; "L"; "050"; "015"
'alphanumerical field
PRINT #1, "2"; "2"; "55"; "000"; "0200"; "0040"; "TEST"
'bar code
PRINT #1, "1"; "A"; "52"; "050"; "0050"; "0100"; "ABC123"
'bar code
PRINT #1, "1"; "C"; "22"; "050"; "0150"; "0120"; "123456"
'graphic image
PRINT #1, "1"; "Y"; "11"; "000"; "0065"; "0250"; "LOGO"
'saves the current label in flash (drive B) calling it ETIC1
PRINT #1, "sBETIC1"
'The following lines retrieve from flash (drive B) the label called
'ETIC1
'N. B.: you can retrieve the label at any time: if it has been
'saved in flash, even after the machine has been switched off
PRINT #1, CHR$(2); "L"
PRINT #1, "rETIC1"
PRINT #1, "E"
CLOSE #1
48
Page 49

49
fig. 36 – Example of label saving
CDL – Programmer Manual
Page 50

CDL – Programmer Manual
3. ASCII T
Char Dec Hex Char Dec Hex Char Dec Hex Char Dec Hex
NULL 0 00 32 20 @ 64 40 ` 96 60
SOH 1 01 ! 33 21 A 65 41 a 97 61
STX 2 02 Ò 34 22 B 66 42 b 98 62
EXT 3 03 # 35 23 C 67 43 c 99 63
EOT 4 04 $ 36 24 D 68 44 d 100 64
ENQ 5 05 % 37 25 E 69 45 e 101 65
ACK 6 06 & 38 26 F 70 46 f 102 66
BEL 7 07 Ö 39 27 G 71 47 g 103 67
BS 8 08 ( 40 28 H 72 48 h 104 68
HT 9 09 ) 41 29 I 73 49 i 105 69
LF 10 0A * 42 2A J 74 4A j 106 6A
VT 11 0B + 43 2B K 75 4B k 107 6B
FF 12 0C , 44 2C L 76 4C l 108 6C
CR 13 0D - 45 2D M 77 4D m 109 6D
SO 14 0E . 46 2E N 78 4E n 110 6E
SI 15 0F / 47 2F O 79 4F o 111 6F
DLE 16 00 0 48 30 P 80 50 p 112 70
DC1 17 11 1 49 31 Q 81 51 q 113 71
DC2 18 12 2 50 32 R 82 52 r 114 72
DC3 19 13 3 51 33 S 83 53 s 115 73
DC4 20 14 4 52 34 T 84 54 t 116 74
NAK 21 15 5 53 35 U 85 55 u 117 75
SYN 22 16 6 54 36 V 86 56 v 118 76
ETB 23 17 7 55 37 W 87 57 w 119 77
CAN 24 18 8 56 38 X 88 58 x 120 78
EM 25 19 9 57 39 Y 89 59 y 121 79
SUB 26 1A : 58 3A Z 90 5A z 122 7A
ESC 27 1B ; 59 3B [ 91 5B { 123 7B
FS 28 1C < 60 3C \ 92 5C | 124 7C
GS 29 1D = 61 3D ] 93 5D } 125 7D
RS 30 1E > 62 3E ^ 94 5E ~ 126 7E
US 31 1F ? 63 3F _ 95 5F 127 7F
ABLES
tab. 4 - ASCII tab. (0-127)
50
Page 51

CDL – Programmer Manual
51
Char Dec Hex Char Dec Hex Char Dec Hex Char Dec Hex
Ç 128 80 á 160 A0 192 C0 Ó 224 E0
í
ü 129 81
é 130 82
â 131 83
ä 132 84
à 133 85
å 134 86
ç 135 87
ê 136 88
ë 137 89 ® 169 A9 201 C9 Ú 233 E9
è 138 8A 170 AA 202 CA Û 234 EA
ï 139 8B ½ 171 AB 203 CB Ù 235 EB
î 140 8C ¼ 172 AC 204 CC ý 236 EC
ì 141 8D ¡ 173 AD 205 CD Ý 237 ED
Ä 142 8E 174 AE 206 CE 238 EE
Å 143 8F ¯ 175 AF 207 CF 239 EF
É 144 90 176 B0 ð 208 D0 240 F0
æ 145 91 177 B1 Ð 209 D1
Æ 146 92 ² 178 B2 Ê 210 D2 242 F2
ô 147 93 ³ 179 B3 Ë 211 D3 ¾ 243 F3
ö 148 94 ´ 180 B4 È 212 D4 244 F4
ò 149 95 Á 181 B5 i 213 D5 245 F5
û 150 96 Â 182 B6 Í 214 D6
ù 151 97 À 183 B7 Î 215 D7 ¸ 247 F7
ÿ 152 98 © 184 B8 Ï 216 D8 ° 248 F8
Ö 153 99 ¹ 185 B9 217 D9 ¨ 249 F9
Ü 154 9A 186 BA 218 DA · 250 FA
ø 155 9B » 187 BB 219 DB 251 FB
£ 156 9C 188 BC 220 DC 252 FC
Ø 157 9D ¢ 189 BD 221 DD 253 FD
158 9E ¥ 190 BE Ì 222 DE 254 FE
×
ƒ 159 9F 191 BF 223 DF 255 FF
161 A1 193 C1
ó
162 A2 194 C2 Ô 226 E2
ú
163 A3 195 C3 Ò 227 E3
ñ
164 A4 196 C4 õ 228 E4
Ñ
165 A5 197 C5 Õ 229 E5
ª
166 A6 ã 198 C6
º
167 A7 Ã 199 C7 þ 231 E7
¿
168 A8 200 C8 Þ 232 E8
β
µ
±
÷
225 E1
230 E6
241 F1
246 F6
tab. 5 - ASCII tab. (128-255)
Page 52

CDL – Programmer Manual
FIG
. 1 – C
FIG
. 2 – D
FIG
FIG
FIG
FIG
FIG
FIG
FIG
FIG
FIG
FIG
FIG
FIG
FIG
FIG
FIG
FIG
FIG
FIG
FIG
FIG
FIG
FIG
FIG
FIG
FIG
FIG
FIG
FIG
FIG
FIG
FIG
FIG
FIG
FIG
ONT
. 3 - F
ONT
. 4 - F
ONT
. 5 - F
ONT
. 6 - F
ONT
. 7 - F
ONT
. 8 - F
ONT
. 9 - F
. 10 - F
. 11 - F
. 12 - F
. 13 - 3
. 14 - UPC A
. 15 - UPC E
. 16 – 2
. 17 – 128
. 18 - EAN 13
. 19 - EAN 8
. 20 – HIBC
. 21 – C
. 22 - 2
. 23 – P
. 24 - 2
. 25 – 2. 26 - 5. 27 – 93
. 28 – P
. 29 – E
. 30 – E
. 31 – E
. 32 – E
. 33 – E
. 34 – E
. 35 – E
. 36 – E
NDEX OF FIGURES
OMMAND HIERARCHY
OT SIZES
.............................................................................................................................................................15
4. I
...........................................................................................................................................5
0...................................................................................................................................................................22
1...................................................................................................................................................................22
2...................................................................................................................................................................23
3...................................................................................................................................................................23
4...................................................................................................................................................................24
5...................................................................................................................................................................25
6...................................................................................................................................................................26
ONT
7.................................................................................................................................................................27
ONT
8.................................................................................................................................................................27
ONT
9.................................................................................................................................................................28
OF 9 BAR CODE
BAR CODE
BAR CODE
OF
NTERLEAVED BAR CODE
5 I
BAR CODE
BAR CODE
BAR CODE
BAR CODE
ODABAR BAR CODE
OUT OF
LESSEY BAR CODE
OF
NTERLEAVED BAR CODE WITH CHECKSUM AND HORIZONTAL BARS
5 I
DIGIT ADDENDUM BAR CODE FOR
DIGIT ADDENDUM BAR CODE FOR
BAR CODE
OSTNET BAR CODE
XAMPLE WITH GEOMETRIC FIGURES
XAMPLE OF ALPHANUMERICAL FIELDS
XAMPLE WITH BAR CODES
XAMPLE O F GRAPHIC IMAGES
XAMPLE WITH DYNAMIC FIELDS
XAMPLE WITH REPEATED FIELDS
XAMPLE WITH INCREMENTAL FIELDS
XAMPLE OF LABEL SAVING
.................................................................................................................................................29
................................................................................................................................................30
................................................................................................................................................30
..........................................................................................................................31
....................................................................................................................................................31
..............................................................................................................................................32
................................................................................................................................................32
.................................................................................................................................................33
...........................................................................................................................................33
NTERLEAVED BAR CODE WITH CHECKSUM
5 I
.......................................................................................33
.............................................................................................................................................34
.........................................................34
UPC ............................................................................................................34
UPC.............................................................................................................35
......................................................................................................................................................35
............................................................................................................................................35
..................................................................................................................37
..............................................................................................................38
.................................................................................................................................40
............................................................................................................................42
........................................................................................................................44
.......................................................................................................................46
................................................................................................................47
................................................................................................................................49
52
Page 53

CDL – Programmer Manual
53
TAB
. 1 - V
TAB
. 2 – B
TAB
. 3 – S
TAB
. 4 - ASCII
TAB
. 5 - ASCII
5. I
ALID
AR CODE CHARACTE RISTICS
PECIAL CHARACTERS FOR CODE
CHARACTERS FOR FONTS
ASCII
..............................................................................................................................29
TAB
. (0-127)..............................................................................................................................................50
TAB
. (128-255)..........................................................................................................................................51
NDEX OF TABLES
0-9..........................................................................................................21
128 C...............................................................................................................31
 Loading...