

Page 1

Compuprint 4247 Serial Matrix Printers
Compuprint 4247 Model X03/Z03 Printers: Programmer Manual
MAN10299.00.00
Page 2

Before using this information and the product it supports, read the information in “Notices” on page 357.
First edition (October 2011)
This edition applies to the Compuprint 4247 X03-Z03 printers and to all subsequent releases and modifications
until otherwise indicated in new edition.
Internet
Visit our home page: http://www.compuprint.com
You can send comments by e-mail to : support@compuprint.com
Compuprint s.r.l.
Via Lombardore 282
10040 Leinì (Turin)
ITALY
ii Programmer Manual
or by mail to:
Page 3

Contents
Figures ....................................xiii
Tables ....................................xv
The 4247 Model X03/Z03 Serial Matrix Printers ....................xvii
Printer description ................................xvii
Print speeds .................................xvii
Paper paths .................................xvii
Print qualities ................................xviii
Printer interfaces ...............................xviii
Printer datastream emulations ..........................xviii
How to Use This Manual..............................xix
Chapter 1. Personal Printer Data Stream (PPDS) ....................1
Print Job Processing................................1
Page Printing Concept ...............................1
Page Presentation ................................1
Graphic and Control Character Sequences .......................3
PPDS Compatibility ................................4
One-Byte Controls ................................4
Null (NUL) ..................................4
Bell (BEL)...................................4
Backspace (BS) ................................5
Horizontal Tab (HT) ...............................5
Line Feed (LF) .................................5
Vertical Tab (VT) ................................5
Form Feed (FF) ................................5
Carriage Return (CR) ..............................5
Shift Out (SO) / Double-Wide Print .........................6
Shift In (SI) / Condensed Print ...........................6
Device Control 1 (DC1) / Select ..........................6
Device Control 2 (DC2) / Select ..........................6
Device Control 3 (DC3) / Select ..........................6
Device Control 4 (DC4) / Select ..........................7
Cancel (CAN) .................................7
Escape (ESC) .................................7
Space ....................................7
Escape Sequence Controls .............................7
Null (ESC NUL) ................................9
Bell (ESC BEL).................................9
Backspace (ESC BS) ..............................9
Horizontal Tab (ESC HT) .............................9
Line Feed (ESC LF) ...............................9
Vertical Tab (ESC VT) ..............................10
Form Feed (ESC FF) ..............................10
Carriage Return (ESC CR) ............................10
Shift Out (ESC SO) / Doube-Wide Print .......................10
Shift In (ESC SI) / Condensed Print.........................10
Device Control 1 (ESC DC1 / Select) ........................11
Device Control 2 (ESC DC2) / Select 10 CPI
Device Control 3 (ESC DC3) / Deselect .......................11
Device Control 4 (ESC DC4) / Cancel Double-Wide Print .................11
Cancel (ESC CAN) ...............................11
.....................11
iii
Page 4

Auto Underscore (ESC -) ............................12
Set 1/8 Inch Line Spacing (ESC 0) .........................12
Set 7/72 Inch Line Spacing (ESC 1) ........................12
Invoke Text Line Spacing (ESC 2) .........................12
Set Graphics Line Spacing (ESC 3) .........................12
Set Top of Form (ESC 4).............................13
Set Auto Line Feed (ESC 5) ...........................13
Select PC Character Set 2 (ESC 6) .........................13
Select PC Character Set 1 (ESC 7) .........................13
Set 12 CPI (ESC :) ...............................13
Unidirectional Printing (ESC <) ..........................13
Character Font Image Download (ESC =) ......................14
Select n/72 Inch Line Spacing (ESC A) .......................15
Set Vertical Tabs (ESC B) ............................15
Set Page Length (ESC C) ............................15
Set Horizontal Tabs (ESC D) ...........................16
Begin Emphasized Print (ESC E)..........................16
End Emphasized Print (ESC F) ..........................16
Begin Double-Strike Print (ESC G) .........................16
End Double-Strike Print (ESC H) ..........................16
Change Font (ESC I) ..............................16
Relative Move Baseline (ESC J) ..........................17
Normal Density Bit Image Graphics (ESC K) .....................18
Dual Density Bit Image Graphics Type 1 (ESC L)....................18
Begin Skip Perforation (ESC N) ..........................18
End Skip Perforation (ESC O) ...........................18
Proportional Space Mode (ESC P) .........................19
Deselect on Positive Query Reply (ESC Q) ......................19
Set Default Tabs (ESC R) ............................19
Begin Subscript/Superscript (ESC S) ........................19
End Subscript/Superscript (ESC T) .........................20
Set Print Direction (ESC U) ............................20
Double-Wide Continuous Mode (ESC W).......................20
Set Horizontal Margins (ESC X) ..........................20
Dual Density Bit Image Graphics Type 2 (ESC Y) ...................21
High Density Bit Image Graphics (ESC Z) ......................21
Print All Characters (ESC \)............................21
Reverse Line Feed (ESC ]) ............................21
Print Single Character (ESC ^) ..........................22
Continuous Overscore (ESC _) ..........................22
Relative Move Right (ESC d) ...........................22
Relative Move Left (ESC e)............................22
Select Line Scoring (ESC [ -) ...........................22
Set Presentation Highlight (SPH) (ESC [ @) .....................23
Set Font Global (SFG) (ESC [ I) ..........................23
Set Initial Conditions (SIC) (ESC [ K) ........................24
Select Code Page (SCP) (ESC [ T) .........................26
Set Print Quality (SPQ) (ESC [ d) .........................27
4247 Commands ................................28
Select EAN-8 Bar Code (DC4 DC4 ESC ! NN 1 PP EM) .................29
Select EAN-13 Bar Code (DC4 DC4 ESC ! NN 2 PP EM)
Select UPC-A Bar Code (DC4 DC4 ESC ! NN 3 PP EM) .................29
Select MSI Bar Code (DC4 DC4 ESC ! NN 4 PP EM) ..................30
Select UPC-E Bar Code (DC4 DC4 ESC ! NN 5 PP EM) .................30
Select UPC 2-Digit Bar Code (Magazine) (DC4 DC4 ESC ! NN 6 PP EM) ..........30
Select UPC 5-Digit Bar Code (Magazine) (DC4 DC4 ESC ! NN 7 PP EM) ..........31
................29
iv Programmer Manual
Page 5

Select 2 of 5 INTERLEAVED Bar Code (DC4 DC4 ESC ! NN 17 PP EM) ...........31
Select 2 of 5 INDUSTRIAL Bar Code (DC4 DC4 ESC ! NN 18 PP EM)............31
Select 2 of 5 MATRIX Bar Code (DC4 DC4 ESC ! NN 19 PP EM) .............32
Select CODE 3 of 9 Bar Code (DC4 DC4 ESC ! NN 20 PP EM) ..............32
Select CODABAR Bar Code (DC4 DC4 ESC ! NN 22 PP EM) ...............32
Select CODE 128 Bar Code (DC4 DC4 ESC ! NN 23 PP EM) ...............33
Select POSTNET Bar Code (DC4 DC4 ESC ! NN 24 PP EM) ...............33
Print Bar Code Selection (DC4 DC4 ESC ( GS {N1} {DATA1} GS {N2} {DATA2} EM).......34
Reinitialize Printer (DC4 DC4 ESC @) ........................34
Set Vertical Spacing n/144 Inch (DC4 DC4 ESC 1 NN) .................34
Set Vertical Spacing 12 Lines/30mm (DC4 DC4 ESC 3 1) ................34
Set Vertical Spacing 3 Lines/30mm (DC4 DC4 ESC 3 3) .................34
Set Vertical Spacing 4 Lines/30mm (DC4 DC4 ESC 3 4) .................35
Set Vertical Spacing 6 Lines/30mm (DC4 DC4 ESC 3 6) .................35
Set Vertical Spacing 8 Lines/30mm (DC4 DC4 ESC 3 8) .................35
Eject Single Sheet or Form Feed (DC4 DC4 ESC 5) ..................35
Set 15, 17.1, 20 CPI (DC4 DC4 ESC A) .......................35
Load or Park Fanfold from a Rear Path (DC4 DC4 ESC N) ................35
Load or Park Fanfold from a Front Path (DC4 DC4 ESC T) ................36
Select Emulation (DC4 DC4 ESC Y) ........................36
Select AFTA in Column (DC4 DC4 ESC Z) ......................36
Select Resident Font (DC4 DC4 ESC g) .......................36
Request to Read Configuration (DC4 DC4 ESC h) ...................36
Printer Configuration Response (DC4 DC4 ESC h) ...................37
Write Configuration Response (DC4 DC4 ESC i) ....................37
Write Configuration Acknowledgement (DC4 DC4 ESC i) .................37
Select Print Quality (DC4 DC4 ESC p)........................37
Buffer Terminating Conditions ............................38
Chapter 2. Epson FX-1050 Data Stream .......................39
Print Job Processing ...............................39
Page Printing Concept ..............................39
Page Presentation ................................39
One-Byte Controls ................................41
Null (NUL) ..................................41
Bell (BEL) ..................................41
Backspace (BS) ................................42
Horizontal Tab (HT)...............................42
Line Feed (LF) ................................42
Vertical Tab (VT)................................42
Form Feed (FF) ................................42
Carriage Return (CR) ..............................42
Shift Out (SO) / Double-Wide Print .........................43
Shift In (SI) / Condensed Print ...........................43
Device Control 1 (DC1) / Select ..........................43
Device Control 2 (DC2) / Cancel Condensed Print ...................43
Device Control 3 (DC3) / Deselect .........................43
Device Control 4 (DC4) / Cancel Double-Wide Print ...................44
Cancel (CAN) .................................44
Space (SP) ..................................44
Delete Character (DEL) .............................44
Escape Sequence Controls
.............................44
Escape (ESC).................................46
Null (ESC NUL) ................................46
Bell (ESC BEL) ................................46
Backspace (ESC BS) ..............................47
Contents v
Page 6

Horizontal Tab (ESC HT).............................47
Line Feed (ESC LF) ..............................47
Vertical Tab (ESC VT) ..............................47
Form Feed (ESC FF) ..............................47
Carriage Return (ESC CR) ............................48
Shift Out (ESC SO) / Double-Wide Print .......................48
Shift In (ESC SI) / Condensed Print.........................48
Device Control 1 (ESC DC1) / Select ........................48
Device Control 2 (ESC DC2) / Cancel Condensed Print .................48
Device Control 3 (ESC DC3) / Deselect .......................48
Device Control 4 (ESC DC4) / Cancel Double-Wide Print .................49
Cancel (ESC CAN) ...............................49
Set Intercharacter Spacing (ESC SP) ........................49
Master Select (ESC !) ..............................49
Cancel MSB Control (ESC #) ...........................49
Set Absolute Print Position (ESC $) .........................50
Select User-Defined Set (ESC %) .........................50
Define User-Defined Characters (ESC &).......................50
Select Graphics Mode (ESC *) ..........................51
Auto Underscore (ESC –) ............................51
Select Vertical Tab Channel (ESC /).........................51
Set 1/8 Inch Line Spacing (ESC 0) .........................51
Set 7/72 Inch Line Spacing (ESC 1) ........................52
Set 1/6 Inch Line Spacing (ESC 2) .........................52
Set n/216 Inch Line Spacing (ESC 3) ........................52
Select Italic Mode (ESC 4) ............................52
Cancel Italic Mode (ESC 5) ............................52
Printable Code Area Expansion (ESC 6) .......................53
Cancel Printable Code Area Expansion (ESC 7) ....................53
Copy ROM into Ram (ESC : NUL) .........................53
Select Unidirectional Mode (one line only) (ESC <) ...................53
Set MSB to 0 (ESC =)..............................53
Set MSB to 1 (ESC >)..............................53
Reassign Graphics Mode (ESC ?) .........................53
Initialize Printer (ESC @) ............................54
Select n/72 Inch Line Spacing (ESC A) .......................54
Set Vertical Tabs (ESC B) ............................54
Set Page Length (ESC C) ............................55
Set Horizontal Tabs (ESC D) ...........................55
Begin Emphasized Print (ESC E)..........................55
End Emphasized Print (ESC F) ..........................55
Begin Double-Strike Print (ESC G) .........................55
End Double-Strike Print (ESC H) ..........................56
Printable Code Area Expansion (ESC I) .......................56
Perform n/216 Inch Line Feed (ESC J) .......................56
Select Single Density Graphics Mode (ESC K).....................56
Select Double Density Graphics Mode (ESC L) ....................56
Select 12 CPI (ESC M)
Begin Skip Perforation (ESC N) ..........................57
End Skip Perforation (ESC O) ...........................57
Select 10 CPI (ESC P) .............................57
Select Right Margin (ESC Q) ...........................57
Select Character Set (ESC R) ...........................57
Begin Subscript/Superscript (ESC S) ........................58
End Subscript/Superscript (ESC T) .........................58
Set Print Direction (ESC U) ............................58
.............................57
vi Programmer Manual
Page 7

Double-Wide Continuous Mode (ESC W).......................59
Dual Density Bit Image Graphics Type 2 (ESC Y) ...................59
High Density Bit Image Graphics (ESC Z) ......................59
Set Relative Position (ESC \) ...........................60
Set Letter Quality Justification (ESC a) .......................60
Select Vertical Tabs in Channels (ESC b).......................60
Relative Move Right n/120 (ESC d) .........................60
Relative Move Left n/120 (ESC e) .........................60
Set 15 CPI (ESC g) ..............................61
Feed Paper n/216 Reverse (ESC j) .........................61
Select NLQ Font (ESC k) ............................61
Set Left Margin (ESC l) .............................61
Turn Proportional Mode On/Off (ESC p) .......................61
Quiet Printing (ESC s)..............................61
Select Character Table (ESC t) ..........................62
Double High Printing (ESC w) ...........................62
Select NLQ or DP Print Quality (ESC x) .......................62
4247 Commands ................................62
Select EAN-8 Bar Code (DC4 DC4 ESC ! NN 1 PP EM) .................63
Select EAN-13 Bar Code (DC4 DC4 ESC ! NN 2 PP EM) ................64
Select UPC-A Bar Code (DC4 DC4 ESC ! NN 3 PP EM) .................64
Select MSI Bar Code (DC4 DC4 ESC ! NN 4 PP EM) ..................64
Select UPC-E Bar Code (DC4 DC4 ESC ! NN 5 PP EM) .................65
Select UPC 2-Digit Bar Code (Magazine) (DC4 DC4 ESC ! NN 6 PP EM) ..........65
Select UPC 5-Digit Bar Code (Magazine) (DC4 DC4 ESC ! NN 7 PP EM) ..........65
Select 2 of 5 INTERLEAVED Bar Code (DC4 DC4 ESC ! NN 17 PP EM) ...........66
Select 2 of 5 INDUSTRIAL Bar Code (DC4 DC4 ESC ! NN 18 PP EM)............66
Select 2 of 5 MATRIX Bar Code (DC4 DC4 ESC ! NN 19 PP EM) .............66
Select CODE 3 of 9 Bar Code (DC4 DC4 ESC ! NN 20 PP EM) ..............67
Select CODABAR Bar Code (DC4 DC4 ESC ! NN 22 PP EM) ...............67
Select CODE 128 Bar Code (DC4 DC4 ESC ! NN 23 PP EM) ...............67
Select POSTNET Bar Code (DC4 DC4 ESC ! NN 24 PP EM) ...............68
Print Bar Code Selection (DC4 DC4 ESC ( GS {N1} {DATA1} GS {N2} {DATA2} EM).......68
Reinitialize Printer (DC4 DC4 ESC @) ........................69
Set Vertical Spacing n/144 Inch (DC4 DC4 ESC 1 NN) .................69
Set Vertical Spacing 12 Lines/30mm (DC4 DC4 ESC 3 1) ................69
Set Vertical Spacing 3 Lines/30mm (DC4 DC4 ESC 3 3) .................69
Set Vertical Spacing 4 Lines/30mm (DC4 DC4 ESC 3 4) .................69
Set Vertical Spacing 6 Lines/30mm (DC4 DC4 ESC 3 6) .................69
Set Vertical Spacing 8 Lines/30mm (DC4 DC4 ESC 3 8) .................70
Eject Single Sheet or Form Feed (DC4 DC4 ESC 5) ..................70
Set 15, 17.1, 20 CPI (DC4 DC4 ESC A) .......................70
Load or Park Fanfold from a Rear Path (DC4 DC4 ESC N) ................70
Load or Park Fanfold from a Front Path (DC4 DC4 ESC T) ................70
Select Emulation (DC4 DC4 ESC Y) ........................71
Select AFTA in Column (DC4 DC4 ESC Z) ......................71
Select Resident Font (DC4 DC4 ESC g) .......................71
Request to Read Configuration (DC4 DC4 ESC h) ...................71
Printer Configuration Response (DC4 DC4 ESC h)
...................71
Write Configuration Response (DC4 DC4 ESC i) ....................72
Write Configuration Acknowledgement (DC4 DC4 ESC i) .................72
Select Print Quality ...............................72
Buffer Terminating Conditions ............................72
Unsupported Command Processing..........................73
Chapter 3. Intelligent Printer Data Stream ......................75
Contents vii
Page 8

Overview ...................................75
Physical Medium.................................75
IPDS Coordinate Systems .............................76
X and Y Medium Coordinate System ........................76
Logical Page Layout ..............................77
I and B Coordinate System ............................78
Processing IPDS Commands ............................79
IPDS Command Format ..............................80
Acknowledge Requests and Replies .........................81
Acknowledge Reply (ACK) ............................82
Host Acknowledgment Requests ..........................83
Printer Acknowledgment Replies ..........................83
IPDS Data ...................................84
Mixing Rules ..................................85
IPDS Operating States ..............................86
Home State .................................86
Page State ..................................86
Overlay State .................................87
Page Segment State ..............................88
A Summary of the IPDS States and Commands .....................89
A Typical IPDS Command Sequence .........................91
Printer Initialization and Preparation Sequence.....................93
Page Segment Sequence ............................94
Overlay Sequence ...............................95
Page Sequence ................................96
Error Handling .................................97
Chapter 4. IPDS Programming Information ......................99
IPDS Initialization Defaults .............................99
Parameter Values ...............................100
Command Format ................................100
Supported IPDS Command Codes for the 4247 Printer ..................101
Command Function Sets .............................102
Device Control Function Set Commands .......................102
No Operation (NOP) ..............................103
Sense Type and Model (STM) ..........................103
Set Home State (SHS) .............................106
Acknowledge Reply (ACK)............................106
Load Font Equivalence (LFE) ..........................107
Code Page ID Values .............................109
Load Copy Control (LCC) ............................110
Logical Page Descriptor (LPD) ..........................111
Logical Page Position (LPP) ...........................113
Deactivate Font (DF) ..............................114
End Page (EP) ................................114
End (END) .................................114
Execute Order Home State (XOH) .........................114
Execute Order Any State (XOA)..........................124
Text Function Set Commands ...........................133
Load Equivalence (LE) .............................133
Write Text (WT)................................134
Image Function Set Commands
Write Image Control (WIC) ...........................142
Write Image (WI) ...............................144
End (END) .................................144
Graphics Function Set Commands..........................144
...........................142
viii Programmer Manual
Page 9

Drawing Order Coordinate System.........................144
Graphic Medium Presentation Space ........................145
Graphic Window ...............................146
Graphic Block Area ..............................146
Positioning the Graphic Window in the Graphic Block Area................147
Write Graphics Control (WGC) ..........................148
Write Graphics (WG)..............................159
Related Drawing Orders .............................177
Bar Code Function Set Commands .........................180
Write Bar Code Control (WBCC) .........................181
Write Bar Code (WBC) .............................190
Code 128 Character Set (EBCDIC) .........................192
Overlay Function Set Commands ..........................193
Begin Overlay (BO) ..............................194
Delete Overlay (DO) ..............................194
Include Overlay (IO) ..............................194
Page Segment Function Set Commands .......................195
Begin Page Segment (BPS) ...........................195
Include Page Segment (IPS) ...........................195
Deactivate Page Segment (DPS) .........................196
Loaded Font Function Set Commands ........................196
Load Symbol Set (LSS) .............................196
Chapter 5. IPDS Exception Reporting Codes .....................199
Command Reject - X'80' .............................199
Intervention Required - X'40' ............................199
Equipment Check - X'10' .............................200
Data Check - X'08' ...............................200
Specification Check-Bar Code - X'04'.........................200
Specification Check-Graphics - X'03' .........................202
Specification Check-General - X'02' .........................204
Conditions Requiring Host Notification - X'01' ......................213
Chapter 6. Print Samples and IPDS Coding Example ..................215
Text Print Samples ...............................215
Bar Codes ..................................216
Graphics Patterns ................................217
Graphics Example ................................218
IPDS Coding Example ..............................223
Appendix A. Code Pages ............................231
EBCDIC Code Pages ..............................231
USA/Canada/Canadian Bilingual .........................233
Canadian French ...............................234
Austrian/German ...............................235
Belgian Old .................................236
Brazilian ..................................237
Danish/Norwegian...............................238
Finnish/Swedish ...............................239
Italian ...................................240
Japanese English ...............................241
Portuguese .................................242
Spanish/Spanish Speaking ...........................243
English (UK)/Ireland
..............................244
Japanese Katakana ..............................245
French/French Azerty .............................246
Contents ix
Page 10

Arabic ...................................247
Greek (Old) .................................248
Hebrew Bulletin................................249
International 5/Swiss/Belgian ...........................250
Greek/Latin (ISO 8859-7) + euro .........................251
Korean ...................................252
Thai ....................................253
Latin 2/ROECE ................................254
Icelandic ..................................255
Greek New + euro ..............................256
Cyrillic ...................................257
Yugoslav (Old) ................................258
OCR-A ...................................259
OCR-B ...................................260
Latin 9 (ISO 8859) + euro ............................261
Cyrillic Multilingual...............................262
Latin-5 Turkey ................................263
Farsi....................................264
Baltic Multilingual ...............................265
Estonian ..................................266
USA/Canada + euro ..............................267
Austrian/German + euro ............................268
Danish/Norwegian + euro ............................269
Finnish/Swedish + euro .............................270
Italian + euro ................................271
Spanish/Spanish Speaking + euro .........................272
English/UK + euro...............................273
French + euro ................................274
International 5/Belgian New + euro ........................275
Icelandic + euro ...............................276
ASCII Code Pages ...............................277
USA (Personal Computer) A-54 ..........................278
Greek (MS DOS) ...............................279
Greek/Latin (ISO 8859-7) ............................280
Latin 1 (ISO 8859-1) ..............................281
PC Multilingual ................................282
Old Greek ..................................283
Latin 2/ROECE ................................284
Latin 3 (PC) .................................285
Cyrillic (PC) .................................286
Latin 5-Turkey + euro .............................287
PC Multilingual + euro .............................288
Portuguese .................................289
Icelandic ..................................290
Hebrew...................................291
Canadian French ...............................292
Arabic ...................................293
Danish/Norwegian...............................294
PC Data, Cyrillic, Russian ............................295
Greek New + euro ..............................296
....................................297
Thai
OCR-A ...................................298
OCR-B ...................................299
Latin 2 (ISO 8859-2) ..............................300
Latin 3 (ISO 8859-3) ..............................301
Latin 4 (ISO 8859-4) ..............................302
x Programmer Manual
Page 11

Cyrillic (ISO 8859-5) ..............................303
Latin 8 (ISO 8859-8) ..............................304
Latin 5 (ISO 8859-9) ..............................305
Baltic Multilingual ...............................306
Estonian ..................................307
Latin 9 (ISO 8859-15) + euro...........................308
Urdu....................................309
Arabic Extended ...............................310
Latin 6 (ISO 8859-6) ..............................311
Farsi (Personal Computer)............................312
Estonian (Personal Computer) ..........................313
Latvian (Personal Computer) ...........................314
Lithuanian (Personal Computer)..........................315
Central Europe Latin 2 .............................316
Cyrillic Windows + euro .............................317
Epson FX-series Code Pages ...........................318
Extended Graphics Character Table ........................318
Italic Character Table..............................319
Epson Extended Character Variables ........................320
Appendix B. Application Paper Source Selection ...................321
Application-controlled paper-source selection ......................321
PSF usage - z/OS and System i .........................321
System i media selection (other than FORMDEF) ...................321
Use of 'FORMS' parameters - z/OS and System i ...................322
Using 4247 with System i Host Print Transform ....................322
Appendix C. 4247 Bar Code and OCR Printing Options .................323
Bar Code Printing Options Charts ..........................323
Optical Character Recognition (OCR) Printing .....................325
OCR Symbols ................................325
OCR Scanning ................................326
Appendix D. Configuration Menu Lockout ......................327
Appendix E. Interfaces .............................329
The Parallel Interface ..............................329
Signals Description ..............................329
Operating Phases ...............................329
Parallel Interface Signals ............................330
Parallel Interface Signals Behaviour ........................331
The Serial Interface ...............................335
Serial Interface Signals .............................336
LAN Interface Port ..............................336
USB Interface Port ..............................336
Appendix F. Network Interface Technical Reference ..................337
4247 Network Configuration Parameters .......................337
Managing a Single Printer Configuration Using the 4247 Internal Webpage ...........339
Configuration Password.............................339
Storing and Saving Settings ...........................339
Managing Multiple Printers Using the 4247 Remote Printer Management Utility .........339
4247 Network Interface Summary ..........................339
IBM systems - LAN printing technical support documents on the world-wide-web ........342
32815, Configuring a *LAN 3812 SNMP Device Description ...............342
19934440, Recommended SNMP Port Number Values for *LAN 3812 SNMP Device Descriptions 343
Contents xi
Page 12

8983237, Configuring a Remote Output Queue (RMTOUTQ) ...............343
18762910, Configuring a *LAN 3812 Device Description that Uses the LPR Print Driver
(TSPLPRD) Exit Program ...........................343
IPDS Services Facility (PSF) printing ........................343
Appendix G. LAN Interface MIB Support ......................345
Appendix H. The Remote Printer Management Utility..................355
Operating System Compatibility ...........................355
Software Installation and Documentation .......................355
Notices . . . . . . . . . . . . . . . . . . . . . . . . . . . . . . . . . . . . 357
xii Programmer Manual
Page 13

Figures
1. The Physical Medium .............................76
2. The X
3. The Physical-Logical Page Relationship ......................77
4. The X and Y Coordinate System and the Logical Page .................78
5. The I and B Coordinate System on the Logical Page .................79
6. An Example of the IPDS Data Stream .......................79
7. A Sample Page Constructed on an IPDS Printer ...................85
8. The Relationship between Home State, Page State, and Block States ...........87
9. The Relationship between Home State, Overlay State, and Block State...........88
10. The Relationship between Home State, Page Segment State, and Block States .......89
11. The Complete IPDS State Diagram ........................91
12. Using the Load Page Descriptor Command to Specify the Logical Page ..........113
13. Using the Logical Page Position Command to Position ................113
14. Using the Set Media Size Command to Specify the Physical Medium ...........116
15. Exception Handling Control ..........................130
16. The Graphics X and Y Coordinate System .....................145
17. The Graphic Medium Presentation Space and Its Limits ................146
18. The Graphic Window within the Graphic Medium Presentation Space ...........146
19. The Graphic Block Area on the Physical Medium ..................147
20. Graphic Block Area Position Control and the Graphic Block Area.............149
21. Graphic Output Control and the Graphic Block Area .................151
22. Graphic Data Descriptor and the Graphic Medium Presentation Space ..........153
23. Scale-to-Fit Mapping .............................154
24. Center-and-Trim Mapping ...........................155
25. Position-and-Trim Mapping...........................156
26. Specifying the Bar Code Block Using the Bar Code Area Position Field ..........182
27. Specifying the Bar Code Block Size Using the Bar Code Output Control ..........184
28. Specifying the Bar Code Medium Presentation Space Size. Using the Bar Code Data Descriptor 188
29. An Example of Overlay Nesting .........................193
30. Print Sample from an IPDS Application Program ...................223
31. Mode Centronics ..............................334
32. Mode IEEE 1284 ..............................335
Medium Coordinate System ......................77
m,Ym
xiii
Page 14

xiv Programmer Manual
Page 15

Tables
1. Valid IPDS Command Codes for the 4247 Printer ...................81
2. IPDS Command Code Summary for the 4247 Printer .................89
3. An Example of an IPDS Command Sequence ....................92
4. IPDS Initialization Defaults ...........................99
5. Front and Rear with no linking .........................115
6. Related Drawing Order ............................177
7. Code 128 Character Set (EBCDIC) .......................192
8. Exception Reporting Group Codes ........................199
9. IPDS Coding Example ............................223
10......................................318
11. Bar Code Printing Options for Non-UPC Family Bar Codes ...............323
12. Bar Code Printing Options for UPC Family Bar Codes ................325
13. OCR Symbol Subsets ............................326
14. SYSTEM GROUP - RFC 1213 .........................345
15. INTERFACE GROUP - RFC 1213 ........................345
16. ADDRESS GROUP - RFC 1213.........................345
17. HOST RESOURCES - RFC 1213 ........................346
18. PRINTER - RFC 1759 ............................347
xv
Page 16

xvi Programmer Manual
Page 17
The 4247 Model X03/Z03 Serial Matrix Printers
The 4247 Model X03/Z03 printers are professional, industrial impact-matrix printers. The 4247 Model
X03/Z03 printers are rugged printers designed for harsh environments and demanding applications. Each
of the 4247 models offers user-installable interface cards.
The 4247 Model X03/Z03 printers can have either one or two straight continuous-forms paper paths. One
paper path is standard, and the second path is an optional feature. The printer operator panel is common
with these models and includes the same full-function, full-size, 2 line by 24 character display, making
messages and menus easy to understand.
Print-quality choices are Fast Draft mode (Model Z03 only), Data Processing mode (DP), DP Text mode
(DP Text), and Near Letter Quality mode (NLQ). Versatile paper-handling capability provides printing on up
to 8-part forms. Typical applications include transaction processing for invoices, office or internal business
documents, as well as barcodes, labels, and multipart forms.
Printer description
The 4247 Model X03/Z03 printers build on the strengths of previous models of the 4247 family while
providing a Fast Draft mode for the Model Z03 and a faster print speed for the Model X03.
Print speeds
The 4247 Model X03/Z03 printers print speeds (in characters per second):
Print Quality 4247 X03 4247 Z03
Fast Draft N/A 1100
Data Processing (DP) 800 800
DP Text 400 480
Near Letter Quality 200 240
Note: Print speed (CPS) at 10 CPI.
Paper paths
The 4247 Model X03/Z03 printers provide exceptional forms-handling flexibility. The base printer includes
one front continuous-forms tractor paper path, and an optional second continuous-forms tractor paper
path. Both continuous-form paper paths are front loading. Paper path linking is available when the optional
second tractor is installed.
Paper path nomenclature
Front continuous-forms tractor: The first tractor visible when opening the front tractor cover is called the
front continuous-forms tractor. In the standard (one tractor) configuration the installed tractor is called the
front continuous-forms tractor.
In the optional (two tractor) configuration the forward most installed tractor is called the front
continuous-forms tractor.
Rear continuous-forms tractor: In the optional (two tractor) configuration the tractor behind the front
continuous-form tractor is called the rear continuous-forms tractor.
xvii
Page 18
Print qualities
Fast Draft is a print quality available only for the 4247 Model Z03 printer. The Data Processing (DP), Data
Processing Text (DP Text), Near Letter Quality (NLQ), OCR-A, and OCR-B print qualities on the 4247
Model X03 printer is equivalent in character size, shape, and resolution to the print qualities available on
the 4247 Models Z03 printer.
Print quality selection
Print quality can be selected using program control or through the printer operator panel. Program control
datastream commands take precedence over operator panel settings and can not be overridden.
Available printer operator panel settings are:
Print Quality = Fast Draft (Model Z03 printer)
Fast Draft is the default setting for the Model Z03 printer.
Print Quality = DP
DP is the default setting for the Model X03 printer.
Print Quality = DP TEXT
Print Quality = NLQ
Print Quality = OCR-A
Print Quality = OCR-B
An 4247 Model Z03 printer operator panel feature, Host Fast Draft, is a setting that allows application
programs written for earlier printers in DP mode to print in Fast Draft mode without changes to the
application program. If Host Fast Draft is enabled then DP mode applications print in Fast Draft mode. If
Host Fast Draft is disabled then DP mode applications print in DP mode.
The following table summarizes the print quality for Fast Draft (model Z03 only), DP, DP Text, and NLQ:
Horizontal character
Print quality Horizontal DPI Vertical DPI
Fast Draft 45 72 9 9
(Model Z03 only)
DP 60 72 12 9
DP Text 100 72 20 9
NLQ 100 144 20 18
cell size (dots)
Vertical character
cell size (dots)
Printer interfaces
There are three Controller Board options:
v Allows a host connection to Parallel, Serial, and USB 2.0 interfaces
v Allows a host connection to Parallel and ASCII Ethernet 10/100 BaseT LAN Network interfaces.
v Allows a host connection to Parallel and ASCII-IPDS Ethernet 10/100 BaseT LAN Network interfaces.
Printer datastream emulations
v ASCII emulations for the IBM®4202 Proprinter III XL, IBM 2381 Personal Printer, and Epson FX printers
™
v IPDS
v IBM 4247 mode (native mode) extensions to ASCII and IPDS datastream emulations
emulations for the IBM 4224 and IBM 4230 printers
xviii Programmer Manual
Page 19

How to Use This Manual
The following lists describes the contents of each chapter and the appendixes:
Chapter 1, “Personal Printer Data Stream (PPDS),” on page 1 describes the Personal Printer Data Stream
(PPDS) programming commands for use when your printer is attached and emulation mode is set to 4247,
4202 III XL, or 2381 Personal Printer.
Chapter 2, “Epson FX-1050 Data Stream,” on page 39 describes Epson FX printers Data Stream
commands for use when your printer is attached and emulation mode is set to Epson FX.
Chapter 3, “Intelligent Printer Data Stream,” on page 75 explains the concepts and basic principles of the
Intelligent Printer Data Stream
™
(IPDS).
Chapter 4, “IPDS Programming Information,” on page 99 contains the technical details of IPDS commands
that the 4247 receives and sends.
Chapter 5, “IPDS Exception Reporting Codes,” on page 199 contains the exception reporting codes the
printer sends to the host in the NACK reply.
Chapter 6, “Print Samples and IPDS Coding Example,” on page 215 contains samples showing the
printing capabilities of the 4247 Printer.
Appendix A, “Code Pages,” on page 231 contains the code pages (both EBCDIC and ASCII) available on
this printer.
Appendix B, “Application Paper Source Selection,” on page 321 describes the differences between the
4247 Printer and other IBM compatible printers.
Appendix C, “4247 Bar Code and OCR Printing Options,” on page 323 describes the bar codes available
for the printer and describes the Optical Character Recognition (OCR) printing options.
Appendix D, “Configuration Menu Lockout,” on page 327 describes the Menu Lock function of the operator
panel.
The 4247 Model X03/Z03 Serial Matrix Printers xix
Page 20

xx Programmer Manual
Page 21

Chapter 1. Personal Printer Data Stream (PPDS)
The 4247 Model X03/Z03 printers implement a subset of PPDS. The environment in which the printer data
stream processor operates is described below.
Print Job Processing
There are no PPDS controls that explicitly define print job boundaries. A print job for the 4247 is
established by the host system and consists of any set of related print objects. A print job could be as
short as one character or could be many pages long.
As an aid to the printer operator, the printer provides a PROCESSING indicator on the operator panel.
When the PROCESSING indicator is flashing, it indicates that data is currently being received, processed,
or printing, or that data is buffered in the printer but cannot be immediately printed. If the PROCESSING
indicator is not lit, then all print jobs have been completed.
Configuration parameter values can be changed at any time; however, to obtain predictable results,
changes to operator panel configuration parameter values should be made before the print job is sent to
the printer and after the previous print job has completed printing. Changing configuration parameter
values while a print job is in progress may cause unpredictable results.
We recommend the following to ensure that your print jobs run correctly:
v Establish a known print environment, and end any previous print job. Start each print job with a Set
Initial Conditions control. This control resets the printer environment to the default settings. You can then
set additional controls depending on your print job environment.
v End each print job with a FORM FEED control. This control causes all data to be printed, and the
current position is set to the top-of-form position.
v If a print job is abnormally terminated, the job should be canceled. See “Cancel Print” in “Chapter 2.
Understanding the Operator Panel” in the User's Guide for your printer.
Page Printing Concept
The 4247 processes print jobs in terms of pages, as well as in lines and columns. A page is a logical entity
whose boundaries are defined by the width and the page length. These boundaries are established during
printer initialization using the printer defaults, and can be changed using the Configuration Menu or by
issuing the appropriate data stream controls.
As a job prints, the printer controller maintains both the logical position and the physical position on the
page. If a print job does not end with a proper job terminator (for example, FORM FEED), then:
v All data for the current page may not print
v The next print job may be misaligned on the form
v Residual data from a previous job could print with the new job.
Page Presentation
Many PPDS commands (tabs, margins, line spacing, for example) are described in terms of the
presentation surface. A presentation surface is a two-dimensional surface upon which the printer positions
symbols according to controls embedded in the incoming data stream. The presentation surface is defined
in absolute terms by the width and depth parameters of the page size control commands (Set Page
Length, Set Horizontal Margins, for example). The physical print position does not move outside the range
of these two parameters. The left margin (LM) and right margin (RM) are variable parameters within the
presentation surface. The logical print position does not move outside the range of the vertical margins nor
outside the horizontal margins + 1. The following figure shows the presentation surface and the
1
Page 22
relationships of some of these parameters.
CPP Current Print Position (LM ≤ CPP ≤ RM).
CPL Current Print Line
MPP Maximum Print Position (in characters at current CPI)
PMPP Physical Maximum Print Position. The largest number of characters that can be placed on one line
of the surface (the largest value that MPP can assume).
LM Left Margin
RM Right Margin
MPL Maximum Page Length (in lines at current LPI)
Notes:
1. The host should set the limits of the presentation surface if the default or previous values are not
acceptable.
2. The operator should align the physical paper so that it matches the logical presentation surface.
Also created with this surface is a pair of numbers (CPL and CPP) which specify the line number and
column number where the next graphic will be printed. These internal values are the logical position on the
presentation surface.
The variable parameters have default values which are established when the printer is initialized. The
standard power-on defaults are:
MPP (width) Operator panel setting
MPL (depth) Operator panel setting
CPI Operator panel setting
LPI Operator panel setting
LM 0 inches (Column 1)
2 Programmer Manual
Page 23

RM Equal to MPP
HT Horizontal tabs are set at each 8th column, starting with column 9 (9, 17,
25, 33, and so on.)
VT Vertical tabs are all cleared
Graphic and Control Character Sequences
PPDS uses an ASCII encoding scheme to define controls and printable graphics. Multiple code pages for
printable graphics are supported. Control characters are interpreted based on the environment established
by any preceding control characters and signals.
The 4247 supports several ASCII code pages. Within a code page, a code point can be treated as a
printable character (including space) or as a control code. The following data stream controls affect how a
code point is interpreted:
ESC 6 Select PC Character Set 2
ESC 7 Select PC Character Set 1
ESC \ Print All Characters
ESC ^ Print Single Character
ESC[K
Set Initial Conditions
The following code points are interpreted as control characters:
v PC Character Set 1
X'00' to X'1F'
X'7F' (treated as NULL)
X'80'' to X'9F'
v PC Character Set 2
X'00' to X'02'
X'07' to X'1F'
X'7F' (treated as NULL)
Note: No characters are treated as controls when they are part of a Print Single Character or Print All
Characters control.
The following code points are interpreted as printable graphic characters:
v PC Character Set 1
X'20' (space)
X'21' to X'7E'
X'A0'' to X'FE'
X'FF' (required space)
v PC Character Set 2
X'03' to X'06'
X'20' (space)
X'20' to X'7E'
X'80' to X'FE'
X'FF' (required space)
Note: All characters are treated as printable graphic characters when they are part of a Print Single
Character or Print All Characters control.
Chapter 1. Personal Printer Data Stream (PPDS) 3
Page 24
PPDS Compatibility
PPDS is supported in 4247, 2381 Personal Printer, and 4202 Proprinter III XL emulation modes. When
4247 is selected, PPDS control codes are supported in the same manner as if emulating the 2381
Personal Printer. The Emulation Mode can be selected from the Configuration Menu using the operator
panel. Emulation mode may also be selected using the Set Initial Conditions (ESC [ K) control sequence, if
the printer is set to 4247 or 2381 Personal Printer emulation mode.
One-Byte Controls
The printer uses the following one-byte controls:
Control Hex Name
NUL 00 (80) Null (no operation)
BEL 07 (87) Bell
BS 08 (88) Backspace
HT 09 (89) Horizontal Tab
LF 0A (8A) Line Feed
VT 0B (8B) Vertical Tab
FF 0C (8C) Form Feed
CR 0D (8D) Carriage Return
SO 0E (8E) Shift Out (Double-Wide Print)
SI 0F (8F) Shift In (Condensed Print)
DC1 11 (91) Device Control 1 (Select)
DC2 12 (92) Device Control 2 (Select 10 CPI)
DC3 13 (93) Device Control 3 (Deselect)
DC4 14 (94) Device Control 4 (Cancel Double-Wide Print)
CAN 18 (98) Cancel
ESC 1B (99) Escape (Multiple-byte control prefix)
SP 20 Space
Note: Control hex values within parentheses (nn) are recognized only within PC Character Set 1.
Null (NUL)
00
This control terminates the Set Horizontal Tab and Set Vertical Tab control codes. The printer ignores NUL
by itself.
Bell (BEL)
07
This control causes the audible alarm to sound, if enabled. The alarm may be disabled or enabled from
the Configuration Menu.
4 Programmer Manual
Page 25

Backspace (BS)
08
This control moves the print position horizontally one character width to the left. If the current print position
is at the left margin, the printer ignores this command.
Horizontal Tab (HT)
09
This control moves the print position to the next horizontal tab stop. If there are no tab stops to the right,
or if the next tab stop is beyond the current right margin, the control is ignored.
Line Feed (LF)
0A
This control advances the paper one line. The horizontal position does not change unless automatic
carriage return mode is activated from the operator panel Configuration Menu. If the paper advance
crosses the bottom margin, the printer completes all deferred printing on the current page and then does
an automatic form feed.
If skip perforation mode is active and the bottom margin is crossed, the vertical position on the new page
following the automatic form feed will be the top-of-form position. If skip perforation is not active, the
vertical position on the new page is the point immediately following the previous print line.
Vertical Tab (VT)
0B
This control causes the vertical print position to be advanced to the next vertical tab stop. The horizontal
position is not affected unless automatic carriage return mode is activated from the operator panel
Configuration Menu. If there are no tab stops past the current vertical print position, Vertical Tab is treated
as a Line Feed.
Form Feed (FF)
0C
This control causes a new page to be started. Form Feed is a line end and page end control; it causes all
deferred printing that may have been buffered for the current page to be completed and the form
physically advanced to eject the current page. The vertical print position advances to the top margin and
the horizontal print position is set to the left margin for subsequent printing.
Carriage Return (CR)
0D
Chapter 1. Personal Printer Data Stream (PPDS) 5
Page 26

This control moves the current horizontal print position to the left margin. The vertical print position does
not change unless automatic line feed mode is active (see “Set Auto Line Feed (ESC 5)” on page 13).
Shift Out (SO) / Double-Wide Print
0E
This control causes the printer to start double-width printing. Double-width printing prints the characters
twice as wide as the current character spacing. This results in half as many characters per inch. Each
character takes up the space of two single-width characters. A Carriage Return, Line Feed, Form Feed,
Vertical Tab, Double-Wide Continuous Mode, or Cancel Double-Wide Print with vertical movement
specified cancels the Shift Out control code.
Shift In (SI) / Condensed Print
0F
This control prints graphic characters in condensed pitch (15 CPI, 16.7 CPI, 17.1 CPI or 20 CPI).
Shift In is a buffer terminating control; if printable data at a different character-per-inch setting is buffered,
that data is printed before the setting is changed. The current print position becomes the next printable
column at the new character-per-inch setting. CPI can be changed within a print line, and this control
changes the maximum number of characters that can be printed on one line.
When Printer Compatibility 7 – Condensed Print option in the ASCII Configuration menu is set to 15 CPI,
then 15 CPI is selected, otherwise, 16.7 CPI or 17.1 CPI is selected.
A combination of 12 CPI and Condensed Print sets the printer to 20 CPI when Printer Compatibility 9 (20
CPI) option is set to Enabled in the ASCII Configuration menu. A combination of 12 CPI and Condensed
Print sets the printer to 12 CPI when Printer Compatibility 9 (20 CPI) option is set to Disabled in the ASCII
Configuration menu.
Device Control 1 (DC1) / Select
11
This control selects the printer.
Device Control 2 (DC2) / Select
12
This control sets 10 characters per inch. DC2 is a buffer terminating control; if printable data at a different
characters-per-inch setting is buffered, that data is printed before the setting is changed. The current print
position becomes the next printable column at the new character-per-inch setting. CPI can be changed
within a print line.
Device Control 3 (DC3) / Select
13
6 Programmer Manual
Page 27
This control is treated as a NUL.
Device Control 4 (DC4) / Select
14
This control cancels double-wide printing if double wide was selected with the Shift Out control. The
characters-per-inch setting returns to the previous value.
Cancel (CAN)
18
This control purges all buffered data. All data received after the most recent buffer terminating control is
discarded. For a list of buffer terminating controls, see “Buffer Terminating Conditions” on page 38. Any
data received after Cancel is processed normally. Cancel does not change the current print position.
Escape (ESC)
1B
This control is a prefix used in combination with supplementary control bytes to provide an extended set of
control functions.
Space
20
This control moves the print position one character space to the right.
Escape Sequence Controls
Escape sequence controls have an ESC followed by one or more control parameters. Supported escape
sequence controls are:
Control Hex Name
ESC NUL 1B 00 Null (no operation)
ESC BEL 1B 07 Bell
ESC BS 1B 08 Backspace
ESC HT 1B 09 Horizontal Tab
ESC LF 1B 0A Line Feed
ESC VT 1B 0B Vertical Tab
ESC FF 1B 0C Form Feed
ESC CR 1B 0D Carriage Return
ESC SO 1B 0E Shift Out (Double-Wide Print)
ESC SI 1B 0F Shift In (Condensed Printer)
ESC DC1 1B 11 Device Control 1 (Select)
ESC DC2 1B 12 Device Control 2 (Select 10 CPI)
Chapter 1. Personal Printer Data Stream (PPDS) 7
Page 28
Control Hex Name
ESC DC3 1B 13 Device Control 3 (Deselect)
ESC DC4 1B 14 Device Control 4 (Cancel Double-Wide Print)
ESC CAN 1B 18 Cancel
ESC EM 1B 19 Turn Auto Sheet Feeder On or Off
ESC - 1B 2D Auto Underscore
ESC 0 1B 30 Set 1/8 Inch Line Spacing
ESC 1 1B 31 Set 7/72 Inch Vertical Spacing
ESC 2 1B 32 Invoke Text Line Spacing
ESC 3 1B 33 Set Graphics Line Spacing
ESC 4 1B 34 Set Top of Form
ESC 5 1B 35 Set Auto Line Feed
ESC 6 1B 36 Select PC Character Set 2
ESC 7 1B 37 Select PC Character Set 1
ESC : 1B 3A Set 12 CPI
ESC < 1B 3C Unidirectional Printing
ESC = 1B 3D Character Font Image Download
ESC A 1B 41 Select n/72 Inch Spacing
ESC B 1B 42 Set Vertical Tabs
ESC C 1B 43 Set Page Length (Lines or Inches)
ESC D 1B 44 Set Horizontal Tabs
ESC E 1B 45 Begin Emphasized Print
ESC F 1B 46 End Emphasized Print
ESC G 1B 47 Begin Double-Strike Print
ESC H 1B 48 End Double-Strike Print
ESC I 1B 49 Change Font
ESC J 1B 4A Relative Move Baseline
ESC K 1B 4B Normal Density Bit Image Graphics
ESC L 1B 4C Dual Density Bit Image Graphics, Type 1
ESC N 1B 4E Begin Skip Perforation
ESC O 1B 4F End Skip Perforation
ESC P 1B 50 Proportional Space Mode
ESC Q 1B 51 Deselect on Positive Query Reply
ESC R 1B 52 Set Default Tabs
ESC S 1B 53 Begin Subscript/Superscript
ESC T 1B 54 End Subscript/Superscript
ESC U 1B 55 Set Print Direction
ESC W 1B 57 Double-Wide Continuous Mode
ESC X 1B 58 Set Horizontal Margins
ESC Y 1B 59 Dual Density Bit Image Graphics Type 2
ESC Z 1B 5A Dual Density Bit Image Graphics
ESC \ 1B 5C Print All Characters
8 Programmer Manual
Page 29

Control Hex Name
ESC ] 1B 5D Reverse Line Feed
ESC ^ 1B 5E Print Single Characters
ESC _ 1B 5F Continuous Overscore
ESC d 1B 64 Relative Move Right
ESC e 1B 65 Relative Move Left
ESC [ - (See Note) 1B 5B 2D Select Line Scoring
ESC [ @ 1B 5B 40 Set Presentation Highlights (SPH)
ESC [ I (See Note) 1B 5B 49 Set Font Global (SFG)
ESC [ K 1B 5B 4B Set Initial Conditions (SIC)
ESC [ T (See Note) 1B 5B 54 Select Code Page (SCP)
ESC [ d (See Note) 1B 5B 64 Set Print Quality (SPQ)
Note: Commands are only available in 4247 or 2381 emulation mode.
Null (ESC NUL)
1B 00
The printer ignores the NUL control by itself.
Bell (ESC BEL)
1B 07
This control causes the audible alarm to sound, if enabled. The alarm may be disabled or enabled from
the Configuration Menu.
Backspace (ESC BS)
1B 08
This control moves the print position horizontally one character width to the left. If the current print position
is at the left margin, the printer ignores this command.
Horizontal Tab (ESC HT)
1B 09
This control moves the print position to the next horizontal tab stop. If there are no tab stops to the right,
or if the next tab stop is beyond the current right margin, the control is ignored.
Line Feed (ESC LF)
1B 0A
Chapter 1. Personal Printer Data Stream (PPDS) 9
Page 30

This control advances the paper one line. The horizontal position does not change unless automatic
carriage return mode is activated from the operator panel Configuration Menu. If the paper advance
crosses the bottom margin, the printer completes all deferred printing on the current page and then does
an automatic form feed.
If skip perforation mode is active and the bottom margin is crossed, the vertical position on the new page
following the automatic form feed will be the top-of-form position. If skip perforation is not active, the
vertical position on the new page is the point immediately following the previous print line.
Vertical Tab (ESC VT)
1B 0B
This control causes the vertical print position to be advanced to the next vertical tab stop. The horizontal
position is not affected unless automatic carriage return mode is activated from the operator panel
Configuration Menu. If there are no tab stops past the current vertical print position, Vertical Tab is treated
as a Line Feed.
Form Feed (ESC FF)
1B 0C
This control causes a new page to be started. Form Feed is a line end and page end control; it causes all
deferred printing that may have been buffered for the current page to be completed and the form
physically advanced to eject the current page. The vertical print position advances to the top margin and
the horizontal print position is set to the left margin for subsequent printing.
Carriage Return (ESC CR)
1B 0D
This control moves the current horizontal print position to the left margin. The vertical print position does
not change unless automatic line feed mode is active (see “Set Auto Line Feed (ESC 5)” on page 13).
Shift Out (ESC SO) / Doube-Wide Print
1B 0E
This control causes the printer to start double-width printing. Double-width printing prints the characters
twice as wide as the current character spacing. This results in half as many characters per inch. Each
character takes up the space of two single-width characters. A Carriage Return, Line Feed, Form Feed,
Vertical Tab, Double-Wide Continuous Mode, or Cancel Double-Wide Print with vertical movement
specified cancels the Shift Out control code.
Shift In (ESC SI) / Condensed Print
1B 0F
This control prints graphic characters in condensed pitch (15 CPI, 16.7 CPI, 17.1 CPI or 20 CPI).
10 Programmer Manual
Page 31

Shift In is a buffer terminating control; if printable data at a different character-per-inch setting is buffered,
that data is printed before the setting is changed. The current print position becomes the next printable
column at the new character-per-inch setting. CPI can be changed within a print line, and this control
changes the maximum number of characters that can be printed on one line.
When Printer Compatibility 7 – Condensed Print option in the ASCII Configuration Menu is set to 15 CPI,
then 15 CPI is selected, otherwise, 16.7 CPI or 17.1 CPI is selected.
A combination of 12 CPI and Condensed Print sets the printer to 20 CPI when Printer Compatibility 9 (20
CPI) option is set to Enabled in the ASCII Configuration menu. A combination of 12 CPI and Condensed
Print sets the printer to 12 CPI when Printer Compatibility 9 (20 CPI) option is set to Disabled in the ASCII
Configuration menu.
Device Control 1 (ESC DC1 / Select)
1B 11
This control selects the printer.
Device Control 2 (ESC DC2) / Select 10 CPI
1B 12
This control sets 10 characters per inch. DC2 is a buffer terminating control; if printable data at a different
characters-per-inch setting is buffered, that data is printed before the setting is changed. The current print
position becomes the next printable column at the new character-per-inch setting. CPI can be changed
within a print line.
Device Control 3 (ESC DC3) / Deselect
1B 13
This control is treated as a NUL.
Device Control 4 (ESC DC4) / Cancel Double-Wide Print
1B 14
This control cancels double-wide printing if double wide was selected with the Shift Out control. The
characters-per-inch setting returns to the previous value.
Cancel (ESC CAN)
1B 18
This control purges all data in the preceding print buffer. Any data received after Cancel is processed
normally. Cancel does not change the current print position.
Chapter 1. Personal Printer Data Stream (PPDS) 11
Page 32

Auto Underscore (ESC -)
1B 2D NN
This control turns on and off the continuous underscore function.
If NN is 1, the printer underscores all text characters and spaces following this sequence. The printer does
not underscore white space caused by horizontal tabs.
If NN is 0, the printers stops the underscore of all data following this sequence.
Set 1/8 Inch Line Spacing (ESC 0)
1B 30
This control sets the line spacing to eight lines per inch.
The application program is responsible for keeping track of the vertical position on the current page
relative to the current line spacing. Changing the line spacing within a print job without changing the page
length can cause printing on the page perforation. For additional information, see “Set Page Length (ESC
C)” on page 15.
Set 7/72 Inch Line Spacing (ESC 1)
1B 31
This control sets the line spacing to 7/72 inch. The application program is responsible for keeping track of
the vertical position on the current page relative to the current line spacing. Changing the line spacing
within a print job without changing the page length can cause printing on the page perforation. For
additional information, see “Set Page Length (ESC C)” on page 15.
Invoke Text Line Spacing (ESC 2)
1B 32
This control sets the line spacing at the value set by the last Set Text Line Spacing (ESC A) control
received. The printer sets the line spacing to six lines per inch if no ESC A has been issued.
Set Graphics Line Spacing (ESC 3)
1B 33 NN
This control changes the line spacing to the value specified by NN.
NN is a value that specifies the line spacing in units of 1/216 inch. Valid values are 0 to 255. If N equals 0,
the printer ignores this control.
The application program is responsible for keeping track of the vertical position on the current page
relative to the current line spacing. Changing the line spacing within a print job without changing the page
length can cause printing on the page perforation. For additional information, see “Set Page Length (ESC
C)” on page 15.
12 Programmer Manual
Page 33

Set Top of Form (ESC 4)
1B 34
This control establishes the current vertical position as the top of form.
Set Auto Line Feed (ESC 5)
1B 35 NN
This control sets the automatic line feed mode of the printer. When automatic line feed is on, the printer
does a line feed each time it receives a carriage return. When automatic line feed if off, a carriage return
is processed normally. This control overrides the automatic line feed mode set in the operator panel
Configuration Menu.
If NN is 1, the printer turns automatic line feed mode on.
If NN is 0, the printer turns automatic line feed mode off.
Select PC Character Set 2 (ESC 6)
1B 36
This control selects PC Character Set 2 as the active character set. In PC Character Set 2, code points
X'03' to X'06', X'15', and X'80' to X'9F' are treated as graphic characters (not controls). See “Graphic and
Control Character Sequences” on page 3.
Select PC Character Set 1 (ESC 7)
1B 37
This control selects PC Character Set 1. In PC Character Set 1, code pointsX'03' to X'06', X'15', and X'80'
to X'9F' are treated as controls (not printable graphics). See “Graphic and Control Character Sequences”
on page 3.
Set 12 CPI (ESC :)
1B 3A
This control sets the pitch to 12 characters per inch. If the current font is proportionally spaced, this control
selects a horizontal resolution of 240 dots per inch. If the active font is OCR, the printer does not prohibit
the change in pitch; however, the printed OCR characters may be unreadable by automatic identification
equipment.
Unidirectional Printing (ESC <)
1B 3C
Chapter 1. Personal Printer Data Stream (PPDS) 13
Page 34

This command selects unidirectional printing for one line only. The print head moves to the home position
at the left side of the printer and prints one line, left to right. The command is then cancelled by the
carriage return that sends the print head back to the home position.
Character Font Image Download (ESC =)
1B 3D LL HH FF LF W H CP N XX...XX
This control downloads special character images.
A two-byte count (LL HH) indicates the number of bytes that follow in this control.
LL is the least significant byte of the count; HH is the most significant byte of the count. The number of
bytes that follow should equal HH × 256 + LL. If the count equals X'0000', the control is ignored.
FF is the format byte and must equal X'13'. LF is a one-byte font identifier that specifies the previously
initialized or selected font to be modified. See “Change Font (ESC I)” on page 16.
W is a one-byte value that specifies the width of the character cells in options. For DP fonts, the value is
X'0A'. For fixed pitch DP Text and NLQ fonts, the value is X'14'. For DP Text and NLQ, proportional fonts
values may vary. However, for all code points downloaded with this control, all character cells defined will
be Width options wide.
H is a one-byte value that specifies the height of the character cells in dots. Valid values are X'09' for DP
and DP Text and X'12' for NLQ.
CP is a one-byte value. This parameter specifies the first code point to download. A single code point or
multiple code points can be downloaded. If the font being downloaded was previously initialized, the
downloaded characters overlay the resident characters in the font.
N is a one-byte value that specifies the number of code points defined by this control. If the starting code
point plus the number of code points is greater than 256, the control is ignored.
XX .. XX is the font image download data. These data bytes define the character cells. Multiple bytes
define each vertical slice of the character cell. The slice data for each code point is in a contiguous format
(run-together) as follows:
v If the slice data is nine-bits high, byte 1 is put into the high-order bits in slice 1 and the high-order bit of
byte 2 is the low order bit of slice 1. The remaining seven bits of byte 2 are put into the high-order
seven bits of slice 2, and so on.
v If the slice data is 18-bits high, bytes 1 and 2 are put into the high-order bits of the first slice and the
two high-order bits of byte 3 complete the first slice. Slice 2 is composed similarly, starting with the
remaining six bits in byte 3.
Note: The contiguous format (run-together) does not occur from one code point to the next. The top dot of
the leftmost slice of each code point is always in the high-order bit of the first byte of image data for
that code point.
The number of data bytes required to define the image for each code point can be calculated as follows:
Image Length = (Width × Height) ÷ 8
Note: If there is a remainder from the division by 8, add 1 to the quotient.
Example: To define an image for a standard DP font where Width = 10 and Height = 9:
Image Length = (10 × 9) ÷ 8
14 Programmer Manual
Page 35
Image Length = 11 with a remainder of 2
Image Length = 12 bytes per character
If both printer provided images and downloaded images are to be printed from the same local font ID, we
recommend that the downloaded images be sent, using this control, at the start of a print job when the
print environment for the job is established. This ensures that the actual printed output appears as
intended.
It is also recommended that image data bits for the last vertical column of NLQ character patterns be all
zeros. The last vertical column will be clipped if NLQ character patterns are expanded for graphics
printing. Resident NLQ text character patterns do not contain image data (dots) in the last column of the
character box.
Select n/72 Inch Line Spacing (ESC A)
1B 41 NN
This control stores the line spacing value, in units of 1/72 inch, which is later selected by Invoke Text Line
Spacing (ESC 2). The valid values for NN are X'01' to X'FF' (1 to 255). The default line spacing is X'0C'
(six lines per inch).
A value of 0 is not valid and causes the printer to ignore this command. Following are example values for
NN:
X'00' No Change
X'18' 3 LPI
X'12' 4 LPI
X'0C' 6 LPI
X'09' 8 LPI
X'08' 9 LPI
X'06' 12 LPI
Set Vertical Tabs (ESC B)
1B 42 TT...TT 00
This control sets the vertical tab stops. The maximum number of tab stops supported is 64. The Null
control code terminates this sequence. If the Null terminator is missing, the printer treats the next 64 bytes
as tab stops and ignores all the data bytes following these 64 bytes until a Null is received. If the printer
receives this sequence without any tabs specified, all tab stops are cleared.
TT...TT are the tab values that specify the tab stops as line numbers, relative to the top of the physical
page. Tab stops must be specified in ascending order; entries not in ascending order are ignored.
Set Page Length (ESC C)
1B 43 LL IN
This control sets the physical page length in lines or inches and resets skip perforation mode.
LL is a one-byte hexadecimal number that specifies the page length in lines. The value is converted to
inches based upon the current line spacing. Valid values for LL are X'01' to X'FF', but the resulting page
length in inches must be less than 113.8 inches (2890 mm). If LL equals 0, then parameter II (length is
inches) is used.
Chapter 1. Personal Printer Data Stream (PPDS) 15
Page 36

IN is a one-byte hexadecimal number that specifies the page length in inches. IN is present only if
parameter LL equals 0. Valid values for IN are X'01' to X'71'. If IN is greater than the maximum value, the
maximum value is used. If both LL and IN are zero, the control is ignored.
Set Horizontal Tabs (ESC D)
1B 44 TT...TT 00
This control sets the horizontal tab stops. The maximum number of tab stops supported is 28. The
sequence terminates with the NUL control code. If the null terminator is missing, the printer treats the next
28 bytes as tab stops and ignores all the data bytes following the 28 bytes until a Null is received. If the
printer receives this control code with no tabs, all horizontal tab stops are cleared.
TT is the list of tab stops as character positions relative to the left edge of the physical page. Valid values
are X'01' to X'FF'. Tab stops must be specified in ascending order. Entries not in ascending order are
ignored.
Begin Emphasized Print (ESC E)
1B 45
This control starts emphasized print mode (bold style). Emphasized printing continues until the printer
receives an End Emphasized Print (ESC F) control or the printer is initialized.
End Emphasized Print (ESC F)
1B 46
This control ends emphasized print mode (bold style).
Begin Double-Strike Print (ESC G)
1B 47
This control starts double-strike printing (all text characters are double struck). Double-strike printing
continues until the printer receives an End Double-Strike Print control (ESC H) or the printer is initialized.
End Double-Strike Print (ESC H)
1B 48
This control ends double-strike printing.
Change Font (ESC I)
1B 49 NN
This control selects the font to be used for printing.
16 Programmer Manual
Page 37

NN is the one-byte local font identifier number that specifies the font. The mapping of the local font
identifier is dependent upon the printer's emulation mode setting. In the Configuration Menu, if the
emulation mode is set to 4202 III XL, the Change Font control code selects fonts compatible with the 4202
Proprinter III XL Printer. If the emulation mode is set to 4247 or 2381, Change Font selects the fonts
compatible with the 2381 Personal Printer.
Supported local font identifiers are shown in the following table.
Local Font
Identifier
(Hex) 4247 and 2381 Emulation Mode 4202 III XL Emulation Mode
00 Default (op. panel selection) DP
01 DP Fast Draft (for model Z03); DP (for model X03)
(See Note 1)
02 DP Text DP Text
03 NLQ (Courier/Gothic) NLQ (Courier/Gothic)
04 DP Text Proportional DP (Download)
05 NLQ Proportional (Courier/Gothic) DP (Download)
06 Fast Draft (for model Z03); DP (for model X03) DP text (Download)
07 Reserved NLQ (Download)
08-0F Reserved Reserved
10 OCR-A Reserved
11 OCR-B Reserved
12-5F Reserved Reserved
60 Reserved Default (op. panel selection)
61 Reserved Fast Draft (for model Z03); DP-Gothic (for model
X03) (See Note 1)
62 Reserved NLQ Proportional (Courier/Gothic)
63 Reserved OCR-A
64 Reserved OCR-B
65 Reserved Fast Draft (for model Z03); DP (for model X03)
(See Note 1)
66-FF Reserved Reserved
Notes:
1. If printer configuration Host Fast Draft setting is Enabled, then Fast Draft quality is selected. If Host
Fast Draft is disabled then DP quality is selected (only for model Z03).
2. If a downloaded font has not been previously downloaded with a Character Font Image Download
control (CFID), a Change Font control to select a downloaded font is ignored.
3. The NLQ font style is selected as defined in the Configuration Menu as either Courier or Gothic.
Relative Move Baseline (ESC J)
1B 4A NN
This control performs a vertical move relative to the current print position.
Chapter 1. Personal Printer Data Stream (PPDS) 17
Page 38
NN is a one-byte hexadecimal value that specifies the move amount in units of 1/216 inch. The printer will
adjust the value to the nearest 1/144 inch. If Automatic Carriage Return on Line Feed is set in the operator
panel Configuration Menu, a carriage return is also performed when a Relative Move Baseline code is
received (see “Carriage Return (CR)” on page 5).
Normal Density Bit Image Graphics (ESC K)
1B 4B LL HH NN...NN
This control prints the supplied bit image data at 60 horizontal pel by 72 vertical pel. Bit image data can be
mixed with text data on the same line.
A two-byte count (LL HH) indicates the number of bytes that follow in this control. LL is the least significant
byte of the count; HH is the most significant byte. (The number of bytes that follow should equal HH × 256
+ LL.) If the count equals X'0000', the control is ignored.
NN...NN are the bytes containing the bit image data. The data format is in 8-bit vertical slices, with the
least significant bit the bottom dot and the most significant bit the top dot. B'1' indicates a pel to be printed;
B'0' indicates an un-printed pel. Data that exceeds the right margin is discarded.
Dual Density Bit Image Graphics Type 1 (ESC L)
1B 4C LL HH NN...NN
This control prints the supplied bit image data at 120 horizontal by 72 vertical pel. Bit image data can be
mixed with text data on the same line.
A two-byte count (LL HH) indicates the number of bytes that follow in this control. LL is the least significant
byte of the count; HH is the most significant byte. (The number of bytes that follow should equal HH × 256
+ LL.) If the count equals X'0000', the control is ignored.
NN .. NN are the bytes containing the bit image data. The data format is in 8-bit vertical slices, with the
least significant bit the bottom dot and the most significant bit the top dot. B'1' indicates a pel to be printed;
B'0' indicates an un-printed pel. Data that exceeds the right margin is discarded.
Begin Skip Perforation (ESC N)
1B 4E NN
This control sets the number of lines to be skipped at the bottom of each page. Once this function is
activated, it stays active until the End Skip Perforation (ESC O) or Set Page Length (ESC C) control is
received or the printer is initialized.
NN is a one-byte hexadecimal value that specifies the number of lines to skip at the bottom of each page.
This value must be zero or greater and less than the length of the page in lines (from 0 to 255). Once
Begin Skip Perforation is activated, the number of lines that may be printed on a page is the page length
minus NN.
End Skip Perforation (ESC O)
1B 4F
18 Programmer Manual
Page 39

This control ends skip perforation.
Proportional Space Mode (ESC P)
1B 50 NN
This control starts or stops proportional space mode.
NN is a one-byte hexadecimal value that sets proportional space mode on or off.
v If NN is 1, proportional space mode is on.
v If NN is 0, proportional space mode is off.
Note: Code pages OCR-A (code page 876), OCR-B (code page 877), Arabic (code page 864), Cyrillic
(code page 855), Thai (code page 874), Extended Arabic (code page 1046), and Farsi Bilingual
(code page 1098) are not supported in proportional space mode.
Deselect on Positive Query Reply (ESC Q)
1B 51 NN
This control deselects the printer if the response to the query is positive.
NN is the query printer identifier. If the value matches the printer's ID, the query response is positive and
the printer deactivates the Select line. If the query is not positive, the control is ignored.
The printer must be reselected using a DC1 control after a positive response to ESC Q if the printer is to
be used.
Query Identifiers: If the emulation mode is set to 4202 III XL, the printer ID is X'16'. If the emulation
mode is set to 4247 or 2381, the printer ID is X'B8'.
Set Default Tabs (ESC R)
1B 52
This control resets both the horizontal and vertical tab stops. The horizontal tab stops are set to every
eighth position starting with the ninth column (9, 17, 25,...). The vertical tab stops are cleared.
Begin Subscript/Superscript (ESC S)
1B 53 NN
This control activates subscript and superscript printing. Once this printing is active, it stays active until
another Begin Subscript/Superscript control changes the mode, an End Subscript/Superscript control is
received, or the printer is initialized.
NN is a one-byte hexadecimal value that activates subscript or superscript printing.
v If NN is 1, subscript mode is active.
v If NN is 0, superscript mode is active.
Chapter 1. Personal Printer Data Stream (PPDS) 19
Page 40

End Subscript/Superscript (ESC T)
1B 54
This controls stops subscript and superscript printing.
Set Print Direction (ESC U)
1B 55 NN
This control specifies bidirectional or unidirectional printing.
v If NN is 1, unidirectional printing is selected.
v If NN is 0, bidirectional printing (default) is selected.
Double-Wide Continuous Mode (ESC W)
1B 57 NN
This control turns double-wide printing on or off. When double-wide printing is on, the width of subsequent
graphic characters is doubled (the characters per inch value is half of the single character value). For tabs,
the font width is not doubled (tab distance is based upon single character width).
NN is a one-byte hexadecimal value that turns double-wide printing on or off.
v If NN is 1, double-wide printing is turned on.
v If NN is 0, double-wide printing is turned off.
Note: Double-Wide Continuous Mode does the same function as Shift Out, except double wide printing is
not canceled when a new line begins.
Set Horizontal Margins (ESC X)
1B 58 LL RR
This control sets the left and right margins. The margins are specified in character positions relative to the
left edge of the physical page.
LL is a one-byte hexadecimal value from X'00' to X'FF', which specifies the starting print position relative to
the left edge of the physical page. If LL equals 0, the left margin is unchanged.
RR is a one-byte hexadecimal number from X'00' to X'FF' that specifies the rightmost print position relative
to the first print position. If RR equals 0, the right margin is unchanged.
Notes:
1. Set Horizontal Margins should be followed by a carriage return (CR) control to set the print position to
the new left margin.
2. LL should be at least one character width less than the page width.
3. If RR is greater than the page width or is less than LL, RR is set to the page width (MPP).
20 Programmer Manual
Page 41
Dual Density Bit Image Graphics Type 2 (ESC Y)
1B 59 LL HH NN...NN
This control prints the supplied bit image data at 120 horizontal pel by 72 vertical pel. Bit image data can
be mixed with text data on the same line. Horizontally adjacent dots are not allowed and will be removed if
specified.
A two-byte count (LL HH) indicates the number of bytes that follow in this control. LL is the least significant
byte of the count; HH is the most significant byte. (The number of bytes that follow should equal HH × 256
+ LL.) If the count equals X'0000', the control is ignored.
NN...NN are the bytes containing the bit image data. The data format is in 8-bit vertical slices, with the
least significant bit the bottom dot and the most significant bit the top dot. B'1' indicates a pel to be printed;
B'0' indicates an un-printed pel. Data that exceeds the right margin is discarded.
High Density Bit Image Graphics (ESC Z)
1B 5A LL HH NN...NN
This control prints the supplied bit image data at 240 horizontal per by 72 vertical pel. Bit image data can
be mixed with text data on the same line.
A two-byte count (LL HH) indicates the number of bytes that follow in this control. LL is the least significant
byte of the count; HH is the most significant byte. (The number of bytes that follow should equal HH × 256
+ LL.) If the count equals X'0000', the control is ignored.
NN...NN are the bytes containing the bit image data. The data format is in 8-bit vertical slices, with the
least significant bit the bottom dot and the most significant bit the top dot. B'1' indicates a pel to be printed;
B'0' indicates an un-printed pel. Data that exceeds the right margin is discarded.
Print All Characters (ESC \)
1B 5C LL HH
This control forces a specified number of characters to be interpreted as graphic characters, including
those that occur in the space normally reserved for controls.
A two-byte count (LL HH) indicates the number of bytes to be interpreted as printable graphics. LL is the
least significant byte of the count; HH is the most significant byte. (The number of bytes that follow should
equal HH × 256 + LL.) If the count equals X'0000', the control is ignored.
Reverse Line Feed (ESC ])
1B 5D
This command causes the contents of the buffer to be printed and advances the paper one line in the
reverse direction from the paper path.
Chapter 1. Personal Printer Data Stream (PPDS) 21
Page 42

Note: If Printer Compatibility 4 - Automatic Carriage Return on Line Feed is set to Enabled in the
Configuration Menu, the next print position is print position 1 at the left margin. If Printer
Compatibility 4 - Automatic Carriage Return on Line Feed is set to Disabled, the next print position
is the current print position.
Print Single Character (ESC ^)
1B 5E
This control specifies that the next character to follow is to be interpreted as a graphic character, including
those characters that occur in the space normally reserved for controls.
Continuous Overscore (ESC _)
1B 5F NN
This control turns on and off the continuous overscore function. All graphic characters and spaces that are
bounded by start and stop versions of this control are overscored. White space caused by horizontal tabs
is not overscored.
NN is a one-byte hexadecimal value that turns overscore on or off.
v If NN is 1, continuous overscore is on.
v If NN is 0, continuous overscore is off.
Relative Move Right (ESC d)
1B 64 N1 N2
This command moves the print position to the right (from the current position) in increments of 1/120 of an
inch.
Bytes N1 and N2 indicate the move distance based on the following:
(N1 + [N2 x 256])/120
Relative Move Left (ESC e)
1B 65 N1 N2
This command moves the print position to the left (from the current position) in increments of 1/120 of an
inch.
Bytes N1 and N2 indicate the move distance based on the following:
(N1 + [N2 x 256])/120
Select Line Scoring (ESC [ -)
1B 5B 2D 02 00 N1 N2
This command selects underscore, strikethrough, and overscore. This command is supported in 4247 or
2381 emulation mode only.
22 Programmer Manual
Page 43

The values for N1 are:
X'01' Underscore
X'02' Strikethrough
X'03' Overscore
X'00' Cancel
X'01' Single Line
X'02' Double Line
Set Presentation Highlight (SPH) (ESC [ @)
1B 5B 40 LL HH M1 M2 M3 M4
SPH activates or deactivates double wide, double high, and italic printing. This command is supported in
4247, 4202 III XL, and 2381 emulation with some exceptions as noted.
Once these highlights are active, they remain active until terminated, either by another SPH command or
an initialization. If double wide printing is activated by an SPH, a DC4 control can also cancel it.
A two-byte count (LL HH) indicates the number of bytes that follow in this control. LL is X'00' to X'04'. HH
is always X'00'. If the count equals X'0000', the control is ignored.
M1 .. M4 turn double wide, double high, or italics on or off.
M1 is a one-byte hexadecimal value that turns italics on or off as follows:
X'00' No change
X'01' Italics on (2381 and 4247 only)
X'02' Italics off (2381 and 4247 only)
M2 is always X'00'.
M3 is a one-byte hexadecimal that controls line feeds and character height (vertical spacing) as follows:
X'00' No change to line feed, no change to character height
X'01' Line feeds unchanged, standard character height
X'02' Line feeds unchanged, double character height
X'10' Single line feeds, character height unchanged (4202 only)
X'11' Single line feeds, standard character height
X'12' Single line feeds, double character height
X'20' Double line feeds, character height unchanged (4202 only)
X'21' Double line feeds, standard character height
X'22' Double line feeds, double character height
M4 is a one-byte hexadecimal value that turns double wide on or off as follows:
X'00' No Change
X'01' Turn double wide off
X'02' Turn double wide on
X'10' Single line feeds (2381 and 4247 only)
X'20' Double line feeds (2381 and 4247 only)
Set Font Global (SFG) (ESC [ I)
1B 5B 49 02 00 HF LF
This control selects font and pitch based on the values of HF and LF. (Supported in 4247 or 2381
emulation mode only.)
Chapter 1. Personal Printer Data Stream (PPDS) 23
Page 44

HF LF Font and Pitch
00 0B Courier 10
01 EB Courier 12
01 EC Courier 15
01 ED Courier 17
01 EE Courier 20
00 AB Courier Proportional
HF LF Font and Pitch
00 24 Gothic 10
01 8F Gothic 12
01 8E Gothic 15
01 8D Gothic 17
01 8C Gothic 20
00 AE Gothic Proportional
Set Initial Conditions (SIC) (ESC [ K)
1B 5B 4B LL HH INIT ID P1 P2
This control initializes the printer.
A two-byte count (LL HH) indicates the number of bytes that follow in this control. LL is the least significant
byte of the count; HH is the most significant byte. (HH is always X'00' for this command.) The number of
bytes is counted from the INIT byte.
The INIT byte is processed the same way in 4247, 4202 III XL, or 2381 emulation mode, but causes
different results in the P1 and P2 parameters, depending on the ID byte. The values for the INIT byte are:
INIT Mode Byte
X'00' Initializes printer to user-defined settings; downloaded fonts are not
initialized.
X'01' Initializes printer to user-defined settings; downloaded fonts are
initialized.
X'04' Initializes printer to factory settings; downloaded fonts are not
initialized. See Note.
X'05' Initializes printer to factory settings; downloaded fonts are initialized.
See Note.
X'FE' Initializes printer to user-defined settings; downloaded fonts are
initialized. Settings are saved in non-volatile memory (NVM).
X'FF' Initializes printer to factory settings; downloaded fonts are initialized.
See Note. Settings are saved in non-volatile memory (NVM).
ID Printer ID Byte:
X'B6' For 4247 or 2381 emulation
X'03' or X'16' For 4202 III XL emulation
P1 Parameter Byte for 4247 or 2381 Emulation
X'00' No Emulation Change
X'01' Switch to 2381 emulation
X'02' Switch to Epson FX printer emulation
X'03' to X'FF' No Emulation Change
24 Programmer Manual
Page 45

P1 Parameter Byte for 4201 III XL Emulation
Bit On Off
7 Discard Byte Ignore Process
6 Reserved
5 Alarm Disable Enable
4 Auto CR CR on Vertical Movement No CR on Vertical Movement
3 Auto LF Auto LF after CR No Auto LF after CR
2 Form Length 12 inch forms 11 inch forms
1 Zero Slashed Zero Normal Zero
0 Character Set PC Char Set 2 PC Char Set 1
P2 Parameter Byte for 4202 III XL Emulation
Bit On Off
7 Discard Byte Ignore Process
6 Print Language CP 850 Multilingual CP 437 ASCII
5 Direction Unidirectional Bidirectional
4 20 Condense 12+Condense = 12 CPI 12+Condense = 20 CPI
3 Select NLQ NLQ Gothic NLQ Courier
2 Form Feed Ignore FF if at TOF Honor all FF
1 Line Length 8 inch line 13.6 inch line
0 Sheet Feeder Enable Disable
Notes: The following parameters are changed to the manufacturing default by the INIT control byte in the
ASCII Configuration Menu only:
v Characters Per Inch (CPI)
v Lines Per Inch (LPI)
v Maximum Print Position (MPP)
v Maximum Page Length (MPL)
v Print Language
v Print Quality
v NLQ Typeface
v Character Set
v Printer Compatibility 3 - Automatic Line Feed on Carriage Return
v Printer Compatibility 4 - Automatic Carriage Return on Line Feed
v Printer Compatibility 5 - Form Feed Suppression
v Printer Compatibility 8 - Slashed Zero
v Printer Compatibility9-20CPI
v Alarm Control
The following parameters are NOT modified by the INIT control byte:
v Values in Any Custom Set
v Active Custom Set
v Default Attachment Selection
v Rear Tractor Use
v ASCII Configuration:
– Emulation Mode
– Printer Compatibility 6 – Init
Chapter 1. Personal Printer Data Stream (PPDS) 25
Page 46

– Printer Compatibility 7 – Condensed Print
– Interface Type
– Input Buffer Size
– Select-In Signal
– AutoFeed XT
v All Printer Adjustments Values
v All Printer Setup Values
v Display Language
v All Vital Product Data
v Active Form Path
Select Code Page (SCP) (ESC [ T)
1B 5B 54 04 00 00 00 HC LC
This control selects a code page for printing where HC and LC specify the code page in hexadecimal.
(Supported in 4247 or 2381 emulation mode only.)
The following table shows the values for HC and LC:
HC LC Character Set
01 B5 CP437 USA (Personal Computer) A-54
02 E1 CP737 Greek (MS DOS)
03 2D CP813 Greek/Latin (ISO 8859-7)
03 33 CP819 Latin 1 (ISO 8859-1)
03 52 CP850 PC Multilingual
03 53 CP851 Old Greek
03 54 CP852 Latin 2/ROECE
03 55 CP853 Latin 3 (PC)
03 57 CP855 Cyrillic (PC)
03 59 CP857 Latin 5-Turkey + euro
03 5A CP858 PC Multilingual + euro
03 5C CP860 Portuguese
03 5D CP861 Icelandic
03 5E CP862 Hebrew
03 5F CP863 Canadian French
03 60 CP864 Arabic
03 61 CP865 Danish/Norwegian
03 62 CP866 PC Data, Cyrillic, Russian
03 65 CP869 Greek New + euro
03 6A CP874 Thai
03 6C CP876 OCR-A
03 6D CP877 OCR-B
03 90 CP912 Latin 2 (ISO 8859-2)
03 91 CP913 Latin 3 (ISO 8859-3)
03 92 CP914 Latin 4 (ISO 8859-4)
26 Programmer Manual
Page 47

HC LC Character Set
03 93 CP915 Cyrillic (ISO 8859-5)
03 94 CP916 Latin 8 (ISO 8859-8)
03 98 CP920 Latin 5 (ISO 8859-9)
03 99 CP921 Baltic Multilingual
03 9A CP922 Estonian
03 9B CP923 Latin 9 (ISO 8859-15)
03 EE CP1006 Urdu
04 16 CP1046 Arabic Extended
04 41 CP1089 Latin 6 (ISO 8859-6)
04 4A CP1098 Farsi (Personal Computer)
04 5C CP1116 Estonian (Personal Computer)
04 5D CP1117 Latvian (Personal Computer)
04 5E CP1118 Lithuanian (Personal Computer)
04 E2 CP1250 Central Europe Latin 2
®
04 E3 CP1251 Cyrillic Windows
+ euro
Note: The following languages are all supported within code page 850 (PC Multilingual):
Austrian/German Italian
Austrian/German (alternate) Japanese English
Belgian Spanish/Spanish speaking
Brazilian Spain (alternate)
Finnish/Swedish United Kingdom
Finnish/Swedish (alternate) U.S.A./Canada
French/French Azerty Yugoslav
Set Print Quality (SPQ) (ESC [ d)
1B 5B 54 04 00 00 00 HC LC
This control allows the host application to specify the desired print quality when the printer is in 4247 or
2381 emulation mode. The setting remains in effect until changed by another Set Print Quality control or
until the printer is initialized. Bit image graphics (ESC K, L, Y, and Z) are not affected. Highlighting modes,
such as italics, emphasized, and double wide remain active if they were active when the SPQ control was
activated.
QQ specifies the quality of subsequent printing. Valid values are X'00' to X'FE' as follows:
Hex Function
X'00' No change (Default)
X'01 - 3F' Low quality level (highest speed) See Note
X'40 - 7F' Medium quality level (medium speed)
X'80 - FE' High quality level (lowest speed)
X'FF' Printer Initialization (Default)
Chapter 1. Personal Printer Data Stream (PPDS) 27
Page 48
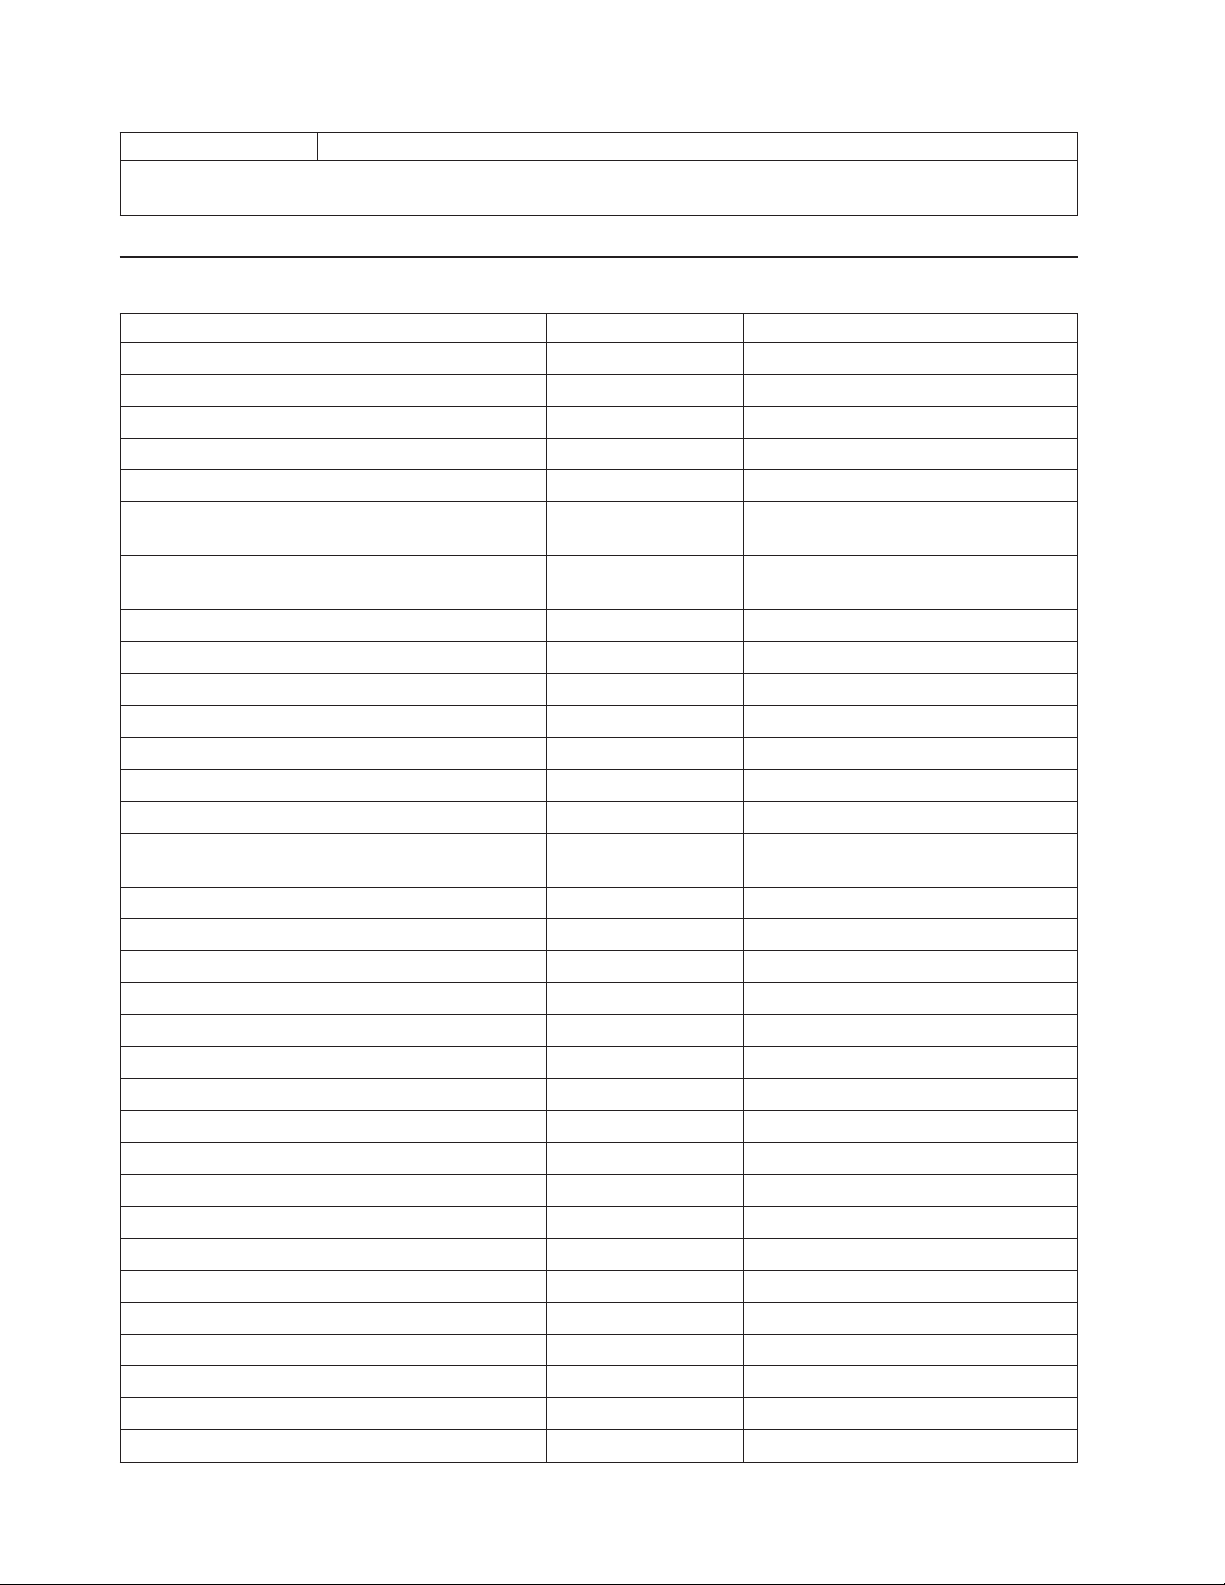
Hex Function
Note: If printer configuration Host Fast Draft setting is Enabled then Fast Draft quality is selected. If Host Fast Draft
is disabled then DP quality is selected. (Model Z03 only)
4247 Commands
Control Hex Name
DC4 DC4 ESC ! NN 1 PP EM 14 14 1B 21 01 Select EAN-8 Bar Code
DC4 DC4 ESC ! NN 2 PP EM 14 14 1B 21 02 Select EAN-13 Bar Code
DC4 DC4 ESC ! NN 3 PP EM 14 14 1B 21 03 Select UPC-A Bar Code
DC4 DC4 ESC ! NN 4 PP EM 14 14 1B 21 04 Select MSI Bar Code
DC4 DC4 ESC ! NN 5 PP EM 14 14 1B 21 05 Select UPC-E Bar Code
DC4 DC4 ESC ! NN 6 PP EM 14 14 1B 21 06 Select UPC 2-Digit Bar Code
(Magazine)
DC4 DC4 ESC ! NN 7 PP EM 14 14 1B 21 07 Select UPC 5-Digit Bar Code
(Magazine)
DC4 DC4 ESC ! NN 17 PP EM 14 14 1B 21 11 Select 2 of 5 INTERLEAVED Bar Code
DC4 DC4 ESC ! NN 18 PP EM 14 14 1B 21 12 Select 2 of 5 INDUSTRIAL Bar Code
DC4 DC4 ESC ! NN 19 PP EM 14 14 1B 21 13 Select 2 of 5 MATRIX Bar Code
DC4 DC4 ESC ! NN 20 PP EM 14 14 1B 21 14 Select CODE 3 of 9 Bar Code
DC4 DC4 ESC ! NN 22 PP EM 14 14 1B 21 16 Select CODABAR Bar Code
DC4 DC4 ESC ! NN 23 PP EM 14 14 1B 21 17 Select CODE 128 Bar Code
DC4 DC4 ESC ! NN 24 PP EM 14 14 1B 21 18 Select POSTNET Bar Code
DC4 DC4 ESC ( GS {N1} {DATA1} {N2} {DATA2}EM14 14 1B 28 1D
DD..DD 1D DD..DD 19
DC4 DC4 ESC @ 14 14 1B 40 Reinitialize Printer
DC4 DC4 ESC 1 NN 14 14 1B 31 Set Vertical Spacing n/144 Inch
DC4 DC4 ESC 3 1 14 14 1B 33 31 Set Vertical Spacing to 12 Lines/30mm
DC4 DC4 ESC 3 3 14 14 1B 33 33 Set Vertical Spacing to 3 Lines/30mm
DC4 DC4 ESC 3 4 14 14 1B 33 34 Set Vertical Spacing to 4 Lines/30mm
DC4 DC4 ESC 3 6 14 14 1B 33 36 Set Vertical Spacing to 6 Lines/30mm
DC4 DC4 ESC 3 8 14 14 1B 33 38 Set Vertical Spacing to 8 Lines/30mm
DC4 DC4 ESC 5 14 14 1B 35 Eject Single Sheet or Form Feed
DC4 DC4 ESC A 14 14 1B 41 Set 15, 17.1, or 20 CPI
DC4 DC4 ESC N 14 14 1B 4E Load or Park Fanfold from a Rear Path
DC4 DC4 ESC T 14 14 1B 54 Load or Park Fanfold from a Front Path
DC4 DC4 ESC Y 14 14 1B 59 Select Emulation
DC4 DC4 ESC Z 14 14 1B 5A Select AFTA in Column
DC4 DC4 ESC g 14 14 1B 67 Select Resident Font
DC4 DC4 ESC h 14 14 1B 68 Request to Read Configuration
DC4 DC4 ESC h 14 14 1B 68 ..... Printer Configuration Response
DC4 DC4 ESC i 14 14 1B 69 ..... Write Configuration Response
DC4 DC4 ESC i 14 14 1B 69 Write Configuration Acknowledgement
Print Bar Code Selection
28 Programmer Manual
Page 49
Control Hex Name
DC4 DC4 ESC p 14 14 1B 70 Select Print Quality
Select EAN-8 Bar Code (DC4 DC4 ESC ! NN 1 PP EM)
14 14 1B 21 NN 01 PP 19
This control selects the EAN-8 bar code.
The DATA field must contain only ASCII numeric (0 to 9) data, and must be eight bytes long, check digit
included.
NN is a one-byte hexadecimal number that specifies the height of the bar code symbol as 1 to 12 (1/6 to
12/6 inch, or 2 inches).
PP is a one-byte hexadecimal number that specifies whether or not to print the bar code in Human
Readable Characters as follows:
00 Do not print human readable characters
01 Print human readable characters
Select EAN-13 Bar Code (DC4 DC4 ESC ! NN 2 PP EM)
14 14 1B 21 NN 02 PP 19
The control selects the EAN-13 bar code.
The DATA field must contain only ASCII numeric (0 to 9) data, and must be thirteen bytes long, check digit
included.
NN is a one-byte hexadecimal number that specifies the height of the bar code symbol as 1 to 12 (1/6 to
12/6 inch, or 2 inches).
PP is a one-byte hexadecimal number that specifies whether or not to print the bar code in Human
Readable Characters as follows:
00 Do not print human readable characters
01 Print human readable characters
Select UPC-A Bar Code (DC4 DC4 ESC ! NN 3 PP EM)
14 14 1B 21 NN 03 PP 19
The control selects the UPC-A bar code.
The DATA field must contain only ASCII numeric (0 to 9) data, and must be twelve bytes long, including a
system digit at the leftmost position and a check digit at the rightmost position of the data field.
NN is a one-byte hexadecimal number that specifies the height of the bar code symbol as 1 to 12 (1/6 to
12/6 inch, or 2 inches).
PP is a one-byte hexadecimal number that specifies whether or not to print the bar code in Human
Readable Characters as follows:
Chapter 1. Personal Printer Data Stream (PPDS) 29
Page 50
00 Do not print human readable characters
01 Print human readable characters
Select MSI Bar Code (DC4 DC4 ESC ! NN 4 PP EM)
14 14 1B 21 NN 04 PP 19
The control selects the MSI bar code.
The DATA field for this bar code does not have a defined length, but the DATA field must contain only
ASCII numeric (0 to 9) data.
NN is a one-byte hexadecimal number that specifies the height of the bar code symbol as 1 to 12 (1/6 to
12/6 inch, or 2 inches).
PP is a one-byte hexadecimal number that specifies whether or not to print the bar code in Human
Readable Characters as follows:
00 Do not print human readable characters
01 Print human readable characters
Select UPC-E Bar Code (DC4 DC4 ESC ! NN 5 PP EM)
14 14 1B 21 NN 05 PP 19
The control selects the UPC-E bar code.
The DATA field must contain only ASCII numeric (0 to 9) data, and must be eight bytes long, including a
system digit at the leftmost position and a check digit at the rightmost position of the data field. The
system digit must bea0or1.
NN is a one-byte hexadecimal number that specifies the height of the bar code symbol as 1 to 12 (1/6 to
12/6 inch, or 2 inches).
PP is a one-byte hexadecimal number that specifies whether or not to print the bar code in Human
Readable Characters as follows:
00 Do not print human readable characters
01 Print human readable characters
Select UPC 2-Digit Bar Code (Magazine) (DC4 DC4 ESC ! NN 6 PP EM)
14 14 1B 21 NN 06 PP 19
This control selects the UPC 2-Digit bar code.
The DATA field must contain only ASCII numeric (0 to 9) data, and must be three bytes long, check digit
included.
NN is a one-byte hexadecimal number that specifies the height of the bar code symbol as 1 to 12 (1/6 to
12/6 inch, or 2 inches).
PP is a one-byte hexadecimal number that specifies whether or not to print the bar code in Human
Readable Characters as follows:
00 Do not print human readable characters
30 Programmer Manual
Page 51
01 Print human readable characters
Select UPC 5-Digit Bar Code (Magazine) (DC4 DC4 ESC ! NN 7 PP EM)
14 14 1B 21 NN 07 PP 19
This control selects the UPC 5-Digit bar code.
The DATA field must contain only ASCII numeric (0 to 9) data, and must be six bytes long, check digit
included.
NN is a one-byte hexadecimal number that specifies the height of the bar code symbol as 1 to 12 (1/6 to
12/6 inch, or 2 inches).
PP is a one-byte hexadecimal number that specifies whether or not to print the bar code in Human
Readable Characters as follows:
00 Do not print human readable characters
01 Print human readable characters
Select 2 of 5 INTERLEAVED Bar Code (DC4 DC4 ESC ! NN 17 PP EM)
14 14 1B 21 NN 11 PP 19
The control selects the 2 of 5 Interleaved bar code.
The DATA field for this bar code does not have a defined length, but the number of data bytes must be
even. The DATA field must contain only ASCII numeric (0 to 9) data.
NN is a one-byte hexadecimal number that specifies the height of the bar code symbol as 1 to 12 (1/6 to
12/6 inch, or 2 inches).
PP is a one-byte hexadecimal number that specifies whether or not to print the bar code in Human
Readable Characters as follows:
00 Do not print human readable characters
01 Print human readable characters
Select 2 of 5 INDUSTRIAL Bar Code (DC4 DC4 ESC ! NN 18 PP EM)
14 14 1B 21 NN 12 PP 19
The control selects the 2 of 5 Industrial bar code.
The DATA field for this bar code does not have a defined length, but the DATA field must contain only
ASCII numeric (0 to 9) data.
NN is a one-byte hexadecimal number that specifies the height of the bar code symbol as 1 to 12 (1/6 to
12/6 inch, or 2 inches).
PP is a one-byte hexadecimal number that specifies whether or not to print the bar code in Human
Readable Characters as follows:
00 Do not print human readable characters
01 Print human readable characters
Chapter 1. Personal Printer Data Stream (PPDS) 31
Page 52
Select 2 of 5 MATRIX Bar Code (DC4 DC4 ESC ! NN 19 PP EM)
14 14 1B 21 NN 13 PP 19
The control selects the 2 of 5 Matrix bar code.
The DATA field for this bar code does not have a defined length, but the DATA field must contain only
ASCII numeric (0 to 9) data.
NN is a one-byte hexadecimal number that specifies the height of the bar code symbol as 1 to 12 (1/6 to
12/6 inch, or 2 inches).
PP is a one-byte hexadecimal number that specifies whether or not to print the bar code in Human
Readable Characters as follows:
00 Do not print human readable characters
01 Print human readable characters
Select CODE 3 of 9 Bar Code (DC4 DC4 ESC ! NN 20 PP EM)
14 14 1B 21 NN 14 PP 19
This control selects the Code 3 of 9 bar code.
The DATA field for this bar code does not have a defined length, but must start and end with an *.
The DATA field may contain alphanumeric data as follows:
0123456789
ABCDEFGHIJKLMNOPQRSTUVWXYZ
Space-.$/+%
* (as start/stop character)
NN is a one-byte hexadecimal number that specifies the height of the bar code symbol as 1 to 12 (1/6 to
12/6 inch, or 2 inches).
PP is a one-byte hexadecimal number that specifies whether or not to print the bar code in Human
Readable Characters as follows:
00 Do not print human readable characters
01 Print human readable characters
Select CODABAR Bar Code (DC4 DC4 ESC ! NN 22 PP EM)
14 14 1B 21 NN 16 PP 19
This control selects the Codabar bar code.
The DATA field for this bar code does not have a defined length, and must contain only the data
characters listed below. Any combination of start/stop characters is allowed.
0123456789-$:/.+
ABCDENT*abcdent(asstart/stop characters)
32 Programmer Manual
Page 53
NN is a one-byte hexadecimal number that specifies the height of the bar code symbol as 1 to 12 (1/6 to
12/6 inch, or 2 inches).
PP is a one-byte hexadecimal number that specifies whether or not to print the bar code in Human
Readable Characters as follows:
00 Do not print human readable characters
01 Print human readable characters
Select CODE 128 Bar Code (DC4 DC4 ESC ! NN 23 PP EM)
14 14 1B 21 NN 17 PP 19
This control selects the Code 128 bar code.
The DATA field for this bar code does not have a defined length, and must contain only the data
characters belonging to the selected ASCII character set, including control characters.
Since GS and EM are control codes, the host application must set the high-order bit of the control code to
allow the printer to distinguish between encodable data and terminator strings.
Human Readable Characters will be centered below the bar code and can be wider than the encoded
area. The user is responsible for allowing space for Human Readable Characters to print without
overlapping adjacent data.
NN is a one-byte hexadecimal number that specifies the height of the bar code symbol as 1 to 12 (1/6 to
12/6 inch, or 2 inches).
PP is a one-byte hexadecimal number that specifies whether or not to print the bar code in Human
Readable Characters as follows:
00 Do not print human readable characters
01 Print human readable characters
Select POSTNET Bar Code (DC4 DC4 ESC ! NN 24 PP EM)
14 14 1B 21 NN 18 PP 19
This control selects the POSTNET [ZIP, ZIP+4, or Delivery Point Bar Code (DPBC)] bar code.
The DATA field for this bar code must contain only ASCII numeric (0 to 9) data. A data string of all zeroes
will be encoded if other than numeric data is detected in the job stream.
POSTNET bar code does not print Human Readable Characters, regardless of the PP byte. POSTNET
uses the tall and short bars required by the United States Postal Service standard, and encodes numeric
data streams regardless of length.
NN is a one-byte hexadecimal number that specifies the height of the bar code symbol as 1 to 12 (1/6 to
12/6 inch, or 2 inches).
PP is a one-byte hexadecimal number that specifies whether or not to print the bar code in Human
Readable Characters as follows:
00 Do not print human readable characters
01 Print human readable characters
Chapter 1. Personal Printer Data Stream (PPDS) 33
Page 54

Print Bar Code Selection (DC4 DC4 ESC ( GS {N1} {DATA1} GS {N2} {DATA2} EM)
14 14 1B 28 1D DD...DD 1D DD...DD 19
This sequence causes the bar code symbol to be printed according to the Bar Code Selection command.
Sequential bar codes of the same type and height may be printed. GS N# defines the distance from the
beginning of the line or between two bar code symbols in multiples of 1/72 of an inch. This command must
be closed with an EM character.
Note: Bar code symbols will print over any descenders in the previous character box if any text is present.
Example 1:
Print an EAN-8 bar code symbol, one inch from the right margin with the data set of 12345678.
ASCII: DC4 DC4 ESC ( GS 72 12345678 EM
HEX: 14 14 1B 28 1D 48 31 32 33 34 35 36 37 38 19
Example 2:
Print two Code 3 of 9 bar code symbols. The first symbol on the right margin; the second symbol one inch
to the right of the first symbol. Data sets are ABC+0123 and 12345678
ASCII: DC4 DC4 ESC ( GS 0 *ABC+123* GS 72 *1234* EM
HEX: 14 14 1B 28 1D 00 2A 41 42 43 2B 31 32 33 2A
1D 48 2A 31 32 33 34 2A 19
Reinitialize Printer (DC4 DC4 ESC @)
14 14 1B 40
This command reinitializes the printer. It resets the printer mode and clears the buffer of printable data.
Set Vertical Spacing n/144 Inch (DC4 DC4 ESC 1 NN)
14 14 1B 31 NN
This control sets a line spacing value for subsequent line feeds.
NN is a one-byte hexadecimal number that specifies the line spacing value of NN/144 inches. The value of
NN is 1 to 255.
Set Vertical Spacing 12 Lines/30mm (DC4 DC4 ESC 3 1)
14 14 1B 33 31
This command sets line spacing to 12 lines per 30 mm.
Set Vertical Spacing 3 Lines/30mm (DC4 DC4 ESC 3 3)
14 14 1B 33 33
34 Programmer Manual
Page 55
This command sets line spacing to 3 lines per 30 mm.
Set Vertical Spacing 4 Lines/30mm (DC4 DC4 ESC 3 4)
14 14 1B 33 34
This command sets line spacing to 4 lines per 30 mm.
Set Vertical Spacing 6 Lines/30mm (DC4 DC4 ESC 3 6)
14 14 1B 33 36
This command sets line spacing to 6 lines per 30 mm.
Set Vertical Spacing 8 Lines/30mm (DC4 DC4 ESC 3 8)
14 14 1B 33 38
This command sets line spacing to 8 lines per 30 mm.
Eject Single Sheet or Form Feed (DC4 DC4 ESC 5)
14 14 1B 35
This command causes a form feed on fanfold forms.
Set 15, 17.1, 20 CPI (DC4 DC4 ESC A)
14 14 1B 41 NN
This command sets horizontal spacing (characters per inch) to 15, 17.1 or 20.
The values for NN are:
4 15 CPI
5 17.1 CPI
6 20 CPI
Load or Park Fanfold from a Rear Path (DC4 DC4 ESC N)
14 14 1B 4E NN
This command loads or performs the Park function for fanfold paper fed from the rear path.
The values for NN are:
0 The printer selects the rear path. If fanfold paper is already loaded in a paper path that is not
requested, the printer automatically performs the Park function before loading the rear path. The
printer will then load the fanfold paper once data is received. For more information on the Park
function, see “PARK/PATH” in “Chapter 2. Understanding the Operator Panel” in the User's Guide
for your printer.
1 The printer performs the Park function for forms in the rear path.
Chapter 1. Personal Printer Data Stream (PPDS) 35
Page 56
Load or Park Fanfold from a Front Path (DC4 DC4 ESC T)
14 14 1B 54 NN
This command loads or performs the Park function for fanfold paper fed from the front path.
The values for NN are:
0 The printer selects the front path. If fanfold paper is already loaded in a paper path that is not
requested, the printer automatically performs the Park function before loading the front path. The
printer will then load the fanfold paper once data is received. For more information on the Park
function, see “PARK/PATH” in “Chapter 2. Understanding the Operator Panel” in the User's Guide
for your printer.
1 The printer performs the Park function for forms in the front path.
Select Emulation (DC4 DC4 ESC Y)
14 14 1B 59 NN
This command selects the printer emulation mode.
The values for NN are:
1 Epson FX 1050
2 4202 Proprinter III XL
5 4247 or 2381 Personal Printer
Select AFTA in Column (DC4 DC4 ESC Z)
14 14 1B 5A NN
This command selects the column at 10 CPI where the Automatic Forms Thickness Adjustment (AFTA) will
be made.
The value for NN is the column number.
Select Resident Font (DC4 DC4 ESC g)
14 14 1B 67 NN
This command selects the resident font based on the following values of NN:
0 Courier
1 Gothic
128 OCR-B
129 OCR-A
Request to Read Configuration (DC4 DC4 ESC h)
14 14 1B 68
This command requests the printer to send its configuration saved in non-volatile memory (NVM).
The printer must be configured for 1284 Parallel mode.
36 Programmer Manual
Page 57
Printer Configuration Response (DC4 DC4 ESC h)
14 14 1B 68 LL HH TT SS D1...DN CS
This is the response Request to Read Configuration command.
The printer must be configured for 1284 Parallel mode. LL and HH indicate the number of bytes that follow
this control. LL is the least significant byte of the count and HH is the most significant byte. (The number
of bytes that follow equal HH x 256 + LL.)
The other values are:
TT Model Type
SS Model Sub-type
D1...DN
Configuration Data
CS Checksum of the data bytes
Write Configuration Response (DC4 DC4 ESC i)
14 14 1B 69 LL HH TT SS D1...DN CS
This command writes configuration data to non-volatile memory (NVM).
The printer must be configured for 1284 Parallel mode. LL and HH indicate the number of bytes that follow
this control. LL is the least significant byte of the count and HH is the most significant byte. (The number
of bytes that follow equal HH x 256 + LL.)
The other values are:
TT Model Type
SS Model Sub-type
D1...DN
Configuration Data
CS Checksum of the data bytes
Write Configuration Acknowledgement (DC4 DC4 ESC i)
14 14 1B 69 NN
This command acknowledges that the configuration was written to the printer. This is the response to the
Write Configuration command.
The printer must be configured for 1284 Parallel mode.
NN is a single byte defined as follows:
X'00' Configuration Saved (Successful)
X'01' Configuration Not Saved (Error)
Select Print Quality (DC4 DC4 ESC p)
14 14 1B 70 NN
The values of NN are:
Chapter 1. Personal Printer Data Stream (PPDS) 37
Page 58

0 Fast Draft (Model Z03 only)
1DP
2 DP Text
3 NLQ
Buffer Terminating Conditions
The following controls cause buffered data to be released for printing:
v Carriage Return
v Line Feed
v Reverse Line Feed
v Form Feed
v Horizontal Tab (if there is print head movement)
v Vertical Tab
v Backspace
v Set 1/8 Inch Line Spacing
v Set 7/72 Inch Line Spacing
v Set Graphics Line Spacing
v Select n/72 Inch Line Spacing
v Invoke Text Line Spacing (if the line spacing is changed)
v Relative Move Right
v Relative Move Left
v Relative Move Baseline
v Shift In/Condensed Print
v Shift Out/Double-Wide Print
v Device Control 4/Cancel Double-Wide Print
v Begin Subscript/Superscript
v End Subscript/Superscript
v Begin Double-Strike Print
v End Double-Strike Print
v Begin Emphasized Print
v End Emphasized Print
v Set Presentation Highlight
v Continuous Overscore
v Auto Underscore
v Device Control 2/Select 10 CPI
v Set 12 CPI
v Proportional Space Mode
v Change Font
v Normal Density Bit Image Graphics
v Dual Density Bit Image Graphics Type 1
v Dual Density Bit Image Graphics Type 2
v High Density Bit Image Graphics
v Set Initial Conditions
v Select Score Line (2381 and 4247 only)
v Unidirectional Printing
v Set Horizontal Margins
The following conditions also cause buffered data to be released for printing:
v Parallel -INIT
v Automatic Line Wrap
An automatic line wrap consists of a carriage return and line feed inserted after the maximum number of
characters has been printed on a line. The next character is then printed at the left margin on the
following line. Automatic line wrap occurs for text data but not for bit image graphics.
38 Programmer Manual
Page 59

Chapter 2. Epson FX-1050 Data Stream
When the 4247 is in Epson emulation mode, the printer can print files coded for the Epson FX-1050 printer
using the Epson ESC/P printer control language. Use the Configuration menu to select Epson FX
emulation mode as the active printer configuration.
The following chapter describes the Epson FX-1050 emulation host control codes that are supported for
the printer.
Print Job Processing
There are no Epson FX-1050 controls that explicitly define print job boundaries. A print job for the 4247 is
established by the host system and consists of any set of related print objects. A print job could be as
short as one character or could be many pages long.
As an aid to the printer operator, the printer provides a Processing indicator on the operator panel. When
the Processing indicator is flashing, it indicates that data is currently being received, processed, or printing,
or that data is buffered in the printer but cannot be immediately printed. If the Processing indicator is not
lit, then all print jobs have been completed.
Configuration parameter values can be changed at any time; however, to obtain predictable results,
changes to operator panel configuration parameter values should be made before the print job is sent to
the printer and after the previous print job has completed printing. Changing configuration parameter
values while a print job is in progress may cause unpredictable results.
We recommend the following to ensure that your print jobs run correctly:
v Establish a known print environment, and end any previous print job. Start each print job with an
Initialize Printer/control. This control resets the printer environment to the default settings. You can then
set additional controls depending on your print job environment.
v End each print job with a Form Feed control. This control causes all data to be printed, and the current
position is set to the top-of-form position.
v If a print job is abnormally terminated, the job should be canceled. See “Cancel Print” in “Chapter 2.
Understanding the Operator Panel” in the User's Guide for your printer.
Page Printing Concept
The 4247 processes print jobs in terms of pages, as well as in lines and columns. A page is a logical entity
whose boundaries are defined by the width and the page length. These boundaries are established during
printer initialization using the printer defaults, and can be changed using the Configuration menu or by
issuing the appropriate data stream controls.
As a job prints, the printer controller maintains both the logical position and the physical position on the
page. If a print job does not end with a proper job terminator (for example, Form Feed), then:
v All data for the current page may not print
v The next print job may be misaligned on the form
v Residual data from a previous job could print with the new job.
Page Presentation
Many Epson ESC/P commands (tabs, margins, line spacing, for example) are described in terms of the
presentation surface. A presentation surface is a two-dimensional surface upon which the printer positions
symbols according to controls embedded in the incoming data stream. The presentation surface is defined
in absolute terms by the width and depth parameters of the page size control commands (Set Page
39
Page 60

Length, Set Horizontal Margins, for example). The physical print position does not move outside the range
of these two parameters. The left margin (LM) and right margin (RM) are variable parameters within the
presentation surface. The logical print position does not move outside the range of the vertical margins nor
outside the horizontal margins + 1. The following figure shows the presentation surface and the
relationships of some of these parameters.
CPP Current Print Position (LM ≤ CPP ≤ RM).
CPL Current Print Line
MPP Maximum Print Position (in characters at current CPI)
PMPP Physical Maximum Print Position. The largest number of characters that can be placed on one line
of the surface (the largest value that MPP can assume).
LM Left Margin
RM Right Margin
MPL Maximum Page Length (in lines at current LPI)
Notes:
1. The host should set the limits of the presentation surface if the default or previous values are not
acceptable.
2. The operator should align the physical paper so that it matches the logical presentation surface.
Also created with this surface is a pair of numbers (CPL and CPP) which specify the line number and
column number where the next graphic will be printed. These internal values are the logical position on the
presentation surface.
The variable parameters have default values which are established when the printer is initialized. The
standard power-on defaults are:
MPP (width) Operator panel setting
40 Programmer Manual
Page 61

MPP (depth) Operator panel setting
CPI Operator panel setting
LPI Operator panel setting
LM 0 inches (Column 1)
RM Equal to MPP
HT Horizontal tabs are set at each 8th column, starting with column 9 (9, 17,
25, 33, and so on.)
VT Vertical tabs are all cleared
One-Byte Controls
Note: Control hex values within parentheses are recognized only within PC Character Set 1.
The printer uses the following one-byte controls:
Control Hex Name
NUL 00 (80) Null (no operation)
BEL 07 (87) Bell
BS 08 (88) Backspace
HT 09 (89) Horizontal Tab
LF 0A (8A) Line Feed
VT 0B (8B) Vertical Tab
FF 0C (8C) Form Feed
CR 0D (8D) Carriage Return
SO 0E (8E) Shift Out (Double-Wide Print)
SI 0F (8F) Shift In (Condensed Print)
DC1 11 (91) Device Control 1 (Parallel Select)
DC2 12 (92) Device Control 2 (Cancel Condensed Print)
DC3 13 (93) Device Control 3 (Parallel Deselect)
DC4 14 (94) Device Control 4 (Cancel Double-Wide Print)
CAN 18 (98) Cancel
SP 20 Space
DEL 7F Delete Character
Null (NUL)
00
This control terminates the Set Horizontal Tab and Set Vertical Tab control codes. The printer ignores NUL
by itself.
Bell (BEL)
07
This control causes the audible alarm to sound.
Chapter 2. Epson FX-1050 Data Stream 41
Page 62

Backspace (BS)
08
This control moves the print position horizontally one character width to the left. If the current print position
is at the left margin, the printer ignores this command.
Horizontal Tab (HT)
09
This control moves the print position to the next horizontal tab stop. If there are no tab stops to the right,
or if the next tab stop is beyond the current right margin, the control is ignored.
Line Feed (LF)
0A
This control advances the paper one line. The horizontal position does not change unless automatic
carriage return mode is activated from the operator panel Configuration menu. If the paper advance
crosses the bottom margin, the printer completes all deferred printing on the current page and then does
an automatic form feed.
If skip perforation mode is active and the bottom margin is crossed, the vertical position on the new page
following the automatic form feed will be the top-of-form position. If skip perforation is not active, the
vertical position on the new page is the point immediately following the previous print line.
Vertical Tab (VT)
0B
This control causes the vertical presentation position to be advanced to the next vertical tab stop. The
horizontal position is not affected unless automatic carriage return mode is activated from the operator
panel Configuration menu. If there are no tab stops past the current vertical presentation position, Vertical
Tab is treated as a Line Feed.
Form Feed (FF)
0C
This control causes a new page to be started. Form Feed is a line end and page end control; it causes all
deferred printing that may have been buffered for the current page to be completed and the form
physically advanced to eject the current page. The vertical presentation position advances to the top
margin and the horizontal presentation position is set to the left margin for subsequent printing.
Carriage Return (CR)
0D
42 Programmer Manual
Page 63

This control moves the current horizontal print position to the left margin. If Carriage Return equals
Carriage Return + Line Feed, a Line Feed is executed when Carriage Return is received. Otherwise, the
vertical position does not change. Carriage Return is a line ending control code that causes buffered data
to print.
Shift Out (SO) / Double-Wide Print
0E
This control causes the printer to start double-width printing. Double-width printing prints the characters
twice as wide as the current character spacing. This results in half as many characters per inch. Each
character takes up the space of two single-width characters. A Carriage Return, Line Feed, Form Feed,
Vertical Tab, Double-Wide Continuous Mode, Cancel Double-Wide Print, or Set Presentation Position with
vertical movement specified cancels the Shift Out control code.
Shift In (SI) / Condensed Print
0F
This control prints graphic characters in condensed pitch (15, 17.1, or 20 CPI). If the current print option is
10 CPI this control will condense printing to 17.1 CPI. If the current print option is 12 CPI this control will
condense printing to 20 CPI. If the current print option is 15 CPI there is no change in density. This control
changes the maximum number of characters that can be printed on one line. Shift In is a buffer
terminating control; if printable data at a different character-per-inch setting is buffered, that data is printed
before the setting is changed. The current presentation position becomes the next printable column at the
new character-per-inch setting. CPI can be changed within a print line.
Device Control 1 (DC1) / Select
11
This control selects the printer.
Device Control 2 (DC2) / Cancel Condensed Print
12
This control cancels or ends condensed (17.1 or 20 CPI) printing. DC2 is a buffer terminating control; if
printable data at a different characters-per-inch setting is buffered, that data is printed before the setting is
changed. The current presentation position becomes the next printable column at the new
character-per-inch setting. CPI can be changed within a print line.
Device Control 3 (DC3) / Deselect
13
This control is treated as a NUL.
Chapter 2. Epson FX-1050 Data Stream 43
Page 64
Device Control 4 (DC4) / Cancel Double-Wide Print
14
This control cancels double-wide printing if double wide was selected with the Shift Out control. The
characters-per-inch setting returns to the previous value.
Cancel (CAN)
18
This control purges all buffered data. All data received after the most recent buffer terminating control is
discarded. For a list of buffer terminating controls, see “Buffer Terminating Conditions” on page 72. Any
data received after Cancel is processed normally. Cancel does not change the current presentation
position.
Space (SP)
20
This control moves the print position one character space to the right.
Delete Character (DEL)
7F
This control removes the last text character on the print line and does not affect control codes.
Escape Sequence Controls
Escape sequence controls have an ESC followed by one or more control parameters. Supported escape
sequence controls are:
Control Hex Name
ESC 1B Escape
ESC NUL 1B 00 Null (no operation)
ESC BEL 1B 07 Bell
ESC BS 1B 08 Backspace
ESC HT 1B 09 Horizontal Tab
ESC LF 1B 0A Line Feed
ESC VT 1B 0B Vertical Tab
ESC FF 1B 0C Form Feed
ESC CR 1B 0D Carriage Return
ESC SO 1B 0E Shift Out (Double-Wide Print)
ESC SI 1B 0F Shift In (Condensed Print)
ESC DC1 1B 11 Device Control 1 (Select)
ESC DC2 1B 12 Device Control 2 (Cancel Condensed Print)
44 Programmer Manual
Page 65
Control Hex Name
ESC DC3 1B 13 Device Control 3 (Deselect)
ESC DC4 1B 14 Device Control 4 (Cancel Double-Wide Print)
ESC CAN 1B 18 Cancel
ESC EM 1B 19 Turn Auto Sheet Feed On or Off
ESC SP 1B 20 Set Intercharacter Spacing
ESC ! 1B 21 Master Select
ESC # 1B 23 Cancel MSB Control
ESC $ 1B 24 Set Absolute Print Position
ESC % 1B 25 Select User-defined Set
ESC & 1B 26 Define User-defined Characters
ESC * 1B 2A Select Graphics Mode
ESC - 1B 2D Auto Underscore
ESC / 1B 2F Select Vertical Tab Channel
ESC 0 1B 30 Set 1/8 Inch Line Spacing (8 LPI)
ESC 1 1B 31 Set 7/72 Inch Vertical Spacing
ESC 2 1B 32 Set 1/6 Inch Line Spacing (6 LPI)
ESC 3 1B 33 Set n/216 Inch Line Spacing
ESC 4 1B 34 Select Italic Mode
ESC 5 1B 35 Cancel Italic Mode
ESC 6 1B 36 Printable Code Area Expansion
ESC 7 1B 37 Cancel Printable Code Area Expansion
ESC : NUL 1B 3A 00 Copy ROM into RAM
ESC < 1B 3C Set Unidirectional Mode (1 line only)
ESC = 1B 3D Set MSB to 0
ESC > 1B 3E Set MST to 1
ESC ? 1B 3F Reassign Graphics Mode
ESC @ 1B 40 Initialize Printer
ESC A 1B 41 Select n/72 Inch Line Spacing
ESC B 1B 42 Set Vertical Tabs
ESC C 1B 43 Set Page Length (Lines or Inches)
ESC D 1B 44 Set Horizontal Tabs
ESC E 1B 45 Begin Emphasized Print
ESC F 1B 46 End Emphasized Print
ESC G 1B 47 Begin Double-Strike Print
ESC H 1B 48 End Double-Strike Print
ESC I 1B 49 Printable Code Area Expansion
ESC J 1B 4A Perform n/216 Inch Line Feed
ESC K 1B 4B Select Single Density Graphics Mode
ESC L 1B 4C Select Double Density Graphics Mode
ESC M 1B 4D Select 12 CPI
ESC N 1B 4E Begin Skip Perforation
Chapter 2. Epson FX-1050 Data Stream 45
Page 66
Control Hex Name
ESC O 1B 4F End Skip Perforation
ESC P 1B 50 Select 10 CPI
ESC Q 1B 51 Set Right Margin
ESC R 1B 52 Select Character Set
ESC S 1B 53 Begin Subscript/Superscript
ESC T 1B 54 End Subscript/Superscript
ESC U 1B 55 Set Print Direction
ESC W 1B 57 Double-Wide Continuous Mode
ESC Y 1B 59 Dual Density Bit Image Graphics Type 2
ESC Z 1B 5A High Density Bit Image Graphics
ESC \ 1B 5C Set Relative Position
ESC a 1B 61 Set Letter Quality Justification
ESC b 1B 62 Set Vertical Tabs in Channel
ESC d 1B 64 Relative Move Right n/120
ESC e 1B 65 Relative Move Left n/120
ESC g 1B 67 Set 15 CPI
ESC j 1B 6A Feed Paper n/216 Reverse
ESC k 1B 6B Select NLQ Font
ESC l 1B 6C Set Left Margin
ESC p 1B 70 Turn Proportional Mode On/Off
ESC s 1B 73 Quiet Printing
ESC t 1B 74 Select Character Table
ESC w 1B 77 Double High Printing
ESC x 1B 78 Select NLQ or DP Print Quality
Escape (ESC)
1B
This control is a prefix used in combination with supplementary control bytes to provide an extended set of
control functions.
Null (ESC NUL)
1B 00
The printer ignores the NUL control by itself.
Bell (ESC BEL)
1B 07
46 Programmer Manual
Page 67

This control causes the audible alarm to sound, if enabled. The alarm may be disabled or enabled from
the Configuration menu.
Backspace (ESC BS)
1B 08
This control moves the print position horizontally one character width to the left. If the current print position
is at the left margin, the printer ignores this command.
Horizontal Tab (ESC HT)
1B 09
This control moves the print position to the next horizontal tab stop. If there are no tab stops to the right,
or if the next tab stop is beyond the current right margin, the control is ignored.
Line Feed (ESC LF)
1B 0A
This control advances the paper one line. The horizontal position does not change unless automatic
carriage return mode is activated from the operator panel Configuration menu. If the paper advance
crosses the bottom margin, the printer completes all deferred printing on the current page and then does
an automatic form feed.
If skip perforation mode is active and the bottom margin is crossed, the vertical position on the new page
following the automatic form feed will be the top-of-form position. If skip perforation is not active, the
vertical position on the new page is the point immediately following the previous print line.
Vertical Tab (ESC VT)
1B 0B
This control causes the vertical presentation position to be advanced to the next vertical tab stop. The
horizontal position is not affected unless automatic carriage return mode is activated from the operator
panel Configuration menu. If there are no tab stops past the current vertical presentation position, Vertical
Tab is treated as a Line Feed.
Form Feed (ESC FF)
1B 0C
This control causes a new page to be started. Form Feed is a line end and page end control; it causes all
deferred printing that may have been buffered for the current page to be completed and the form
physically advanced to eject the current page. The vertical presentation position advances to the top
margin and the horizontal presentation position is set to the left margin for subsequent printing.
Chapter 2. Epson FX-1050 Data Stream 47
Page 68

Carriage Return (ESC CR)
1B 0D
This control moves the current horizontal print position to the left margin. The vertical print position does
not change unless automatic line feed mode is active.
Shift Out (ESC SO) / Double-Wide Print
1B 0E
This control causes the printer to start double-width printing. Double-width printing prints the characters
twice as wide as the current character spacing. This results in half as many characters per inch. Each
character takes up the space of two single-width characters. A Carriage Return, Line Feed, Form Feed,
Vertical Tab, Double-Wide Continuous Mode, Cancel Double-Wide Print, or Set Presentation Position with
vertical movement specified cancels the Shift Out control code.
Shift In (ESC SI) / Condensed Print
1B 0F
This control prints graphic characters in condensed pitch (15, 17.1, or 20 CPI). If the current print option is
10 CPI this control will condense printing to 17.1 CPI. If the current print option is 12 CPI this control will
condense printing to 20 CPI. If the current print option is 15 CPI there is no change in density. This control
changes the maximum number of characters that can be printed on one line. Shift In is a buffer
terminating control; if printable data at a different character-per-inch setting is buffered, that data is printed
before the setting is changed. The current presentation position becomes the next printable column at the
new character-per-inch setting. CPI can be changed within a print line.
Device Control 1 (ESC DC1) / Select
1B 11
This control selects the printer.
Device Control 2 (ESC DC2) / Cancel Condensed Print
1B 12
This control cancels or ends condensed (17.1 or 20 CPI) printing. DC2 is a buffer terminating control; if
printable data at a different characters-per-inch setting is buffered, that data is printed before the setting is
changed. The current presentation position becomes the next printable column at the new
character-per-inch setting. CPI can be changed within a print line.
Device Control 3 (ESC DC3) / Deselect
1B 13
This control is treated as a NUL.
48 Programmer Manual
Page 69
Device Control 4 (ESC DC4) / Cancel Double-Wide Print
1B 14
This control cancels double-wide printing if double wide was selected with the Shift Out control. The
characters-per-inch setting returns to the previous value.
Cancel (ESC CAN)
1B 18
This control purges all buffered data. All data received after the most recent buffer terminating control is
discarded. For a list of buffer terminating controls, see “Buffer Terminating Conditions” on page 72. Any
data received after Cancel is processed normally. Cancel does not change the current presentation
position.
Set Intercharacter Spacing (ESC SP)
1B 20 NN
This control sets the amount of space to be added to the right of each character. The number of units of
space is equal to NN, from 0 to 127. Each unit of space is 1/120th of an inch.
Master Select (ESC !)
1B 21 NN
This control selects any valid combination of the modes in the table below. To determine the value of the
NN, add together the values of the modes you select from the table.
Mode Decimal Hex
10 CPI 0 00
12 CPI 1 01
Proportional 2 02
Condensed 4 04
Emphasized 8 08
Double-Strike 16 10
Double-Wide 32 20
Italic 64 40
Underline 128 80
This control applies to DP and NLQ. Proportional cannot be condensed and 10 CPI cannot be combined
with 12 CPI. Proportional overrides condensed if both proportional and condensed are selected.
Double-strike is ignored in NLQ.
Cancel MSB Control (ESC #)
1B 23
Chapter 2. Epson FX-1050 Data Stream 49
Page 70
Cancels the most significant bit (MSB) control.
Set Absolute Print Position (ESC $)
1B 24 N1 N2
This control specifies the distance that subsequent characters are to be printed from the set left margin in
1/60 inch units. Where the total number of dots equals N1 + (N2 × 256). If the position is beyond the right
margin, the control is ignored and the previous setting remains active. If the position is within the right
margin, subsequent characters will be printed at (N1 + [N2 × 256])/60 inches.
Select User-Defined Set (ESC %)
1B 25 NN 00
This control specifies the character set as default or user-defined. The following are the values of NN:
0 Selects the default character set.
1 Selects the user-defined character set.
Define User-Defined Characters (ESC &)
1B 26 NN MM W0 W1 W2 D0...DN
This control allows the definition of special characters that are not present in the character sets.
NN and MM are two decimal numbers that define the first and last characters to be replaced in the
character set in use. If you want to replace only one character, MM must be equal to NN. Any value in the
range of 0 to 127 is accepted, even code 32, which is the space character.
W0, W1, and W2 are numbers that specify the width of the character and the space around it. The space
on the left of the character (in columns of dots) is specified by W0; the space on the right of the character
is specified by W2. W1 specifies the number of columns of dots that must be printed to design the
character.
The following table lists the maximum value for W0, W1, and W2:
Printing W0 + W1 W0 + W1 + W2
DP 9 12
NLQ at 10 CPI 35 36
NLQ at 12 CPI 29 30
Proportional 41 42
D0...DN is the data of the character that is printed. Three bytes are needed for each column because it is
composed of 24 dot positions. In this way, the number of data bytes is W1 x 3. You can define a character
in superscript or subscript. Two bytes are needed for each column because it is composed of 16 dot
positions. The number of data bytes is W1 x 2.
50 Programmer Manual
Page 71
Select Graphics Mode (ESC *)
1B 2A MM N1 N2
This control selects the graphics mode MM from the table below. The total number of columns equals N1
+ (N2 ×256).
Horizontal
Alternate
Option
Single-Density ESC K 0 60
Double-Density ESC L 1 120
High-Speed Double-Density * ESC Y 2 120
Quadruple-Density * ESC Z 3 240
CRT I NONE 4 80
Plotter (1:1) NONE 5 72
CRT II NONE 6 90
Double-Density Plotter NONE 7 144
Code MM
Note: (*) Adjacent dots cannot be printed in this mode
Density
(dots/in.)
Auto Underscore (ESC –)
1B 2D NN
This control turns on and off the continuous underscore function.
If NN is an odd value (1, 3, 5 ...), the printer underscores all text characters and spaces following this
sequence. The printer does not underscore white space caused by horizontal tabs.
If NN is an even value (0,2,4,...), the printers stops the underscore of all data following this sequence.
Select Vertical Tab Channel (ESC /)
1B 2F CH
This control selects the vertical tab channel. The values for CH are 0 to 7. The channel selected by this
control is used for all subsequent vertical tab commands. Channel 0 is used if no channel has been
selected.
Set 1/8 Inch Line Spacing (ESC 0)
1B 30
This control sets the line spacing to eight lines per inch.
Chapter 2. Epson FX-1050 Data Stream 51
Page 72

The application program is responsible for keeping track of the vertical position on the current page
relative to the current line spacing. Changing the line spacing within a print job without changing the page
length can cause printing on the page perforation. For additional information, see “Set Page Length (ESC
C)” on page 55.
Set 7/72 Inch Line Spacing (ESC 1)
1B 31
This control sets the line spacing to 7/72 inch.
The application program is responsible for keeping track of the vertical position on the current page
relative to the current line spacing. Changing the line spacing within a print job without changing the page
length can cause printing on the page perforation. For additional information, see “Set Page Length (ESC
C)” on page 55.
Set 1/6 Inch Line Spacing (ESC 2)
1B 32
This control sets the line spacing at the value set by the last Set Text Line Spacing (ESC A) control
received. The printer sets the line spacing to six lines per inch if no ESC A has been issued.
Set n/216 Inch Line Spacing (ESC 3)
1B 33 NN
This control changes the line spacing to the value specified by NN.
NN is a value that specifies the line spacing in units of 1/216 inch. Valid values are 0 to 255. If NN equals
0, the printer ignores this control.
The application program is responsible for keeping track of the vertical position on the current page
relative to the current line spacing. Changing the line spacing within a print job without changing the page
length can cause printing on the page perforation. For additional information, see “Set Page Length (ESC
C)” on page 55.
Select Italic Mode (ESC 4)
1B 34
This control turns on italic character printing. This control is valid even if the Epson Extended Graphics
character set has been selected by the Character Table (ESC t) or the operator panel, but character
graphics cannot be italicized. This control is used in both DP and NLQ.
Cancel Italic Mode (ESC 5)
1B 35 NN
This control cancels italic character printing.
52 Programmer Manual
Page 73

Printable Code Area Expansion (ESC 6)
1B 36
This control enables codes X'80' through X'9F' from the active character set to become printable
characters instead of control characters.
Cancel Printable Code Area Expansion (ESC 7)
1B 37
This control cancels Printable Code Area Expansion (ESC 6).
Copy ROM into Ram (ESC : NUL)
1B 3A 00
This control copies the characters in ROM into RAM. Specific characters may be redefined.
Select Unidirectional Mode (one line only) (ESC <)
1B 3C
This control selects unidirectional printing from left to right for one line only. ESC < is cancelled by a
Carriage Return. The print head begins the line at the Home position, prints to the end of the line, then is
cancelled by the CR that returns the head to Home.
Set MSB to 0 (ESC =)
1B 3D
This control sets the most significant bit (MSB) of all incoming data to 0. The MSB is bit 7. This control
only affects text and control code data. This control can prevent the problem of some system applications
that always send data with the MSB set to 1, which results in italic or graphics printing in Epson printers.
Set MSB to 1 (ESC >)
1B 3E
This control sets the most significant bit (MSB) of all incoming data to 1. The MSB is 7. This control only
affects text and control code data.
Reassign Graphics Mode (ESC ?)
1B 3F S NN
This control reassigns a graphics command (ESC K, ESC L, ESC Y, or ESC Z) to a different mode (K, L,
Y, or Z).
Chapter 2. Epson FX-1050 Data Stream 53
Page 74

Horizontal
Density
Option Alternate Code NN
Single-Density ESC K 0 60
Double-Density ESC L 1 120
High-Speed Double-Density * ESC Y 2 120
Quadruple-Density * ESC Z 3 240
CRT I NONE 4 80
Plotter (1:1) NONE 5 72
CRT II NONE 6 90
Double-Density Plotter NONE 7 144
(dots/in.)
Note: (*) Adjacent dots cannot be printed in this mode.
Initialize Printer (ESC @)
1B 40
This control resets all print related parameters to values previously saved and clears the buffer of printable
data.
Select n/72 Inch Line Spacing (ESC A)
1B 41 NN
This control sets a line spacing value for subsequent line feeds.
NN is a one-byte hexadecimal number that specifies the line spacing value of NN/72 inches.
The value of NN is 0 to 85. Following are example values for NN:
X'18' 3 LPI
X'12' 4 LPI
X'0C' 6 LPI
X'09' 8 LPI
X'08' 9 LPI
X'06' 12 LPI
Set Vertical Tabs (ESC B)
1B 42 N1 N2...00
This control sets the vertical stops. The maximum number of tab stops supported is 16. The settings are
not affected by subsequent changes in line spacing. The tab settings must be in ascending order (N1, N2,
etc.) with the 0 character indicating the end of the command. Values of N are 1 to 255. All settings are
stored in Channel 0. See “Select Vertical Tabs in Channels (ESC b)” on page 60. To clear the tab settings,
use ESC B 0.
54 Programmer Manual
Page 75

Set Page Length (ESC C)
1B 43 LL IN
This control sets the physical page length in lines or inches and resets skip perforation mode.
LL is a one-byte hexadecimal number that specifies the page length in lines. The value is converted to
inches based upon the current line spacing. Valid values for LL are X'01' to X'FF', but the resulting page
length in inches must be less than 113.8 inches (2890 mm). If LL equals 0, then parameter II (length is
inches) is used.
IN is a one-byte hexadecimal number that specifies the page length in inches. IN is present only if
parameter LL equals 0. Valid values for IN are X'01' to X'71'. If IN is greater than the maximum value, the
maximum value is used. If both LL and IN are zero, the control is ignored.
Set Horizontal Tabs (ESC D)
1B 44 TT...TT 00
This control sets the horizontal tab stops. The maximum number of tab stops supported is 32. The
sequence terminates with the NUL control code. If the null terminator is missing, the printer treats the next
32 bytes as tab stops and ignores all the data bytes following the 32 bytes until a Null is received. If the
printer receives this control code with no tabs, all horizontal tab stops are cleared.
TT is the list of tab stops as character positions relative to the left edge of the physical page. Valid values
are X'01' to X'FF'. Tab stops must be specified in ascending order. Entries not in ascending order are
ignored.
Begin Emphasized Print (ESC E)
1B 45
This control starts emphasized print mode (bold style). Emphasized printing continues until the printer
receives an End Emphasized Print (ESC F) control or the printer is initialized.
End Emphasized Print (ESC F)
1B 46
This control ends emphasized print mode (bold style).
Begin Double-Strike Print (ESC G)
1B 47
This control starts double-strike printing (all text characters are double struck). Double-strike printing
continues until the printer receives an End Double-Strike Print control (ESC H) or the printer is initialized.
Chapter 2. Epson FX-1050 Data Stream 55
Page 76

End Double-Strike Print (ESC H)
1B 48
This control ends double-strike printing.
Printable Code Area Expansion (ESC I)
1B 49
This control defines whether codes X'00' through X'1F' and codes X'80' through X'9F' are printable
characters or control characters of the active character set.
When NN equals X'01', the codes become printable characters, which allows them to be used as
user-defined characters.
When NN equals X'00', the codes are returned to nonprintable characters.
Perform n/216 Inch Line Feed (ESC J)
1B 4A NN
This control performs a vertical move relative to the current presentation position.
NN is a one-byte hexadecimal value that specifies the move amount in units of 1/216 inch. The printer will
adjust the value to the nearest 1/144 inch. This control performs an immediate line feed, but does not
affect subsequent line spacing and does not produce a CR.
Select Single Density Graphics Mode (ESC K)
1B 4B LL HH NN...NN
This control prints the supplied bit image data at 60 horizontal pel by 72 vertical pel. Bit image data can be
mixed with text data on the same line.
A two-byte count (LL HH) indicates the number of bytes that follow in this control. LL is the least significant
byte of the count; HH is the most significant byte. (The number of bytes that follow should equal HH × 256
+ LL.) If the count equals X'0000', the control is ignored.
NN...NN are the bytes containing the bit image data. The data format is in 8-bit vertical slices, with the
least significant bit the bottom dot and the most significant bit the top dot. B'1' indicates a pel to be printed;
B'0' indicates an unprinted pel. Data that exceeds the right margin is discarded.
Select Double Density Graphics Mode (ESC L)
1B 4C LL HH NN...NN
This control prints the supplied bit image data at 120 horizontal by 72 vertical pel. Bit image data can be
mixed with text data on the same line.
56 Programmer Manual
Page 77

A two-byte count (LL HH) indicates the number of bytes that follow in this control. LL is the least significant
byte of the count; HH is the most significant byte. (The number of bytes that follow should equal HH × 256
+ LL.) If the count equals X'0000', the control is ignored.
NN .. NN are the bytes containing the bit image data. The data format is in 8-bit vertical slices, with the
least significant bit the bottom dot and the most significant bit the top dot. B'1' indicates a pel to be printed;
B'0' indicates an unprinted pel. Data that exceeds the right margin is discarded.
Select 12 CPI (ESC M)
1B 4D
This control selects 12 characters per inch printing.
Begin Skip Perforation (ESC N)
1B 4E NN
This control sets the number of lines to be skipped at the bottom of each page. Once this function is
activated, it stays active until the End Skip Perforation (ESC O) or Set Page Length (ESC C) control is
received or the printer is initialized.
NN is a one-byte hexadecimal value that specifies the number of lines to skip at the bottom of each page.
This value must be greater than zero and less than the length of the page in lines (from 0 to 127). If the
value is not valid, the control is ignored. Once Begin Skip Perforation is activated, the number of lines that
may be printed on a page is the page length minus NN.
End Skip Perforation (ESC O)
1B 4F
This control ends skip perforation.
Select 10 CPI (ESC P)
1B 50
This control selects 10 CPI printing and is normally used to cancel 12 CPI.
Select Right Margin (ESC Q)
1B 51 NN
This control sets the right margin to N columns at the current character width. Where NN is the number of
columns from the first print position to the end of the print line.
Select Character Set (ESC R)
1B 52 NN
Chapter 2. Epson FX-1050 Data Stream 57
Page 78

This control specifies an international character set as shown in the table below and is available in both
DP and NLQ. The following values for NN are:
Hex Codes
N Character Set
0 USA # $ @ [ \ ] ^ ' { ¦ } 1 France # $ à ° ç § ^ ' é ù è ..
2 Germany # $ § Ä Ö Ü ^ ' ä ö ü ß
3 United
Kingdom
4 Denmark I # $ @ Æ Ø Å ^ ' æ ø å 5 Sweden # ¤ É Ä Ö Å Ü é ä ö å ü
6 Italy # $ @ ° \ é ^ ù à ò è ì
7 Spain I $@ ¡ Ñ ¿ ^ ' .. ñ } 8 Japan # $ @ [ ¥ ] ^ ' { ¦ } 9 Norway # ¤ É Æ Ø Å Ü é æ ø å ü
A Denmark II # $ É Æ Ø Å Ü é æ ø å ü
B Spain II # $ á ¡ Ñ ¿ é ' í ñ ó ú
C Latin America
I
D French
Canadian
E Latin America
II
23 24 40 5B 5C 5D 5E 60 7B 7C 7D 7E
£$@[\]^'{¦}-
#$á¡Ñ¿éü í ñóú
#$авзк о фйщиы
#$@[Ñ] úí óáéü
Begin Subscript/Superscript (ESC S)
1B 53 NN
This control activates subscript and superscript printing. Once this printing is active, it stays active until
another Begin Subscript/Superscript control changes the mode, an End Subscript/Superscript control is
received, or the printer is initialized.
NN is a one-byte hexadecimal value that activates subscript or superscript printing.
v If NN is an odd value (1, 3, 5, ...), subscript mode is active.
v If NN is an even value (0, 2, 4, ...), superscript mode is active.
End Subscript/Superscript (ESC T)
1B 54
This controls stops subscript and superscript printing.
Set Print Direction (ESC U)
1B 55 NN
58 Programmer Manual
Page 79

This control specifies bidirectional or unidirectional printing.
v If NN is an odd value (1, 3, 5, ...) unidirectional printing is selected.
v If NN is an even value (0, 2, 4, ...), bidirectional printing (default) is selected.
Double-Wide Continuous Mode (ESC W)
1B 57 NN
This control turns double-wide printing on or off. When double-wide printing is on, the width of subsequent
graphic characters is doubled (the characters per inch value is half of the single character value). For tabs,
the font width is not doubled (tab distance is based upon single character width).
NN is a one-byte hexadecimal value that turns double-wide printing on or off.
v If NN is an odd value (1, 3, 5, ...), double-wide printing is turned on.
v If NN is an even value (0, 2, 4, ...), double-wide printing is turned off.
Note: Double-Wide Continuous Mode does the same function as Shift Out, except double wide printing is
not canceled when a new line begins.
Dual Density Bit Image Graphics Type 2 (ESC Y)
1B 59 LL HH NN...NN
This control prints the supplied bit image data at 120 horizontal pel by 72 vertical pel. Bit image data can
be mixed with text data on the same line. Horizontally adjacent dots are not allowed and will be removed if
specified.
A two-byte count (LL HH) indicates the number of bytes that follow in this control. LL is the least significant
byte of the count; HH is the most significant byte. (The number of bytes that follow should equal HH × 256
+ LL.) If the count equals X'0000', the control is ignored.
NN...NN are the bytes containing the bit image data. The data format is in 8-bit vertical slices, with the
least significant bit the bottom dot and the most significant bit the top dot. B'1' indicates a pel to be printed;
B'0' indicates an unprinted pel. Data that exceeds the right margin is discarded.
High Density Bit Image Graphics (ESC Z)
1B 5A LL HH NN...NN
This control prints the supplied bit image data at 240 horizontal per by 72 vertical pel. Bit image data can
be mixed with text data on the same line.
A two-byte count (LL HH) indicates the number of bytes that follow in this control. LL is the least significant
byte of the count; HH is the most significant byte. (The number of bytes that follow should equal HH × 256
+ LL.) If the count equals X'0000', the control is ignored.
NN...NN are the bytes containing the bit image data. The data format is in 8-bit vertical slices, with the
least significant bit the bottom dot and the most significant bit the top dot. B'1' indicates a pel to be printed;
B'0' indicates an unprinted pel. Data that exceeds the right margin is discarded.
Chapter 2. Epson FX-1050 Data Stream 59
Page 80

Set Relative Position (ESC \)
1B 5C N1 N2
This control moves the print head to a horizontal print position relative to the current print position using
1/120 inch increments. To calculate the correct values for N1 and N2, determine the displacement required
in 1/120 of an inch. Send the resulting number using the formula total number of dots equals N1 + (N2 ×
256). If the desired formula is to the left, subtract the number from 65536 before using the formula. The
print head will move (N1 + [N2 × 256])/120 inches relative to the current print position. The control is
ignored if it would move the print head beyond the page margins.
Set Letter Quality Justification (ESC a)
1B 61 NN
This control selects print justification according to the following values of NN:
0 Selects left justification
1 Selects center justification
2 Selects right justification
3 Selects full justification
Notes:
1. Left justification is the default setting (NN = 0).
2. The commands HT and BS are valid only when left justification is active.
3. For full justification, there must be no carriage returns within a paragraph.
Select Vertical Tabs in Channels (ESC b)
1B 62 CH N1 N2...00
This control sets vertical tabs to channels selected by the Set Vertical Tab Channel (ESC /) control. The
value of CH is 0 through 7 and the value of N1 is 0 through 255.
The distance of each tab stop from top of form is the current line spacing times the number of lines given
in N1.
If paper movement is commanded to a value of N1 greater than the page length, the paper movement
command is ignored. The values of N1 must be in ascending order. If they are not, the sequence up to
and including the out of sequence number is ignored. Skip over perforation is ignored. You can clear any
channel by sending ESC b CH 0, where CH is the channel number.
Relative Move Right n/120 (ESC d)
1B 64 N1 N2
This control spaces forward in 1/120s of an inch. To find the values for N1 and N2, determine the required
displacement in 1/120s of an inch. Send the resulting number in the formula: N1 + (N2 X 256).
Relative Move Left n/120 (ESC e)
1B 65 N1 N2
60 Programmer Manual
Page 81
This control spaces backward in 1/120s of an inch. To find the values for N1 and N2, determine the
required displacement in 1/120s of an inch. Send the resulting number in the formula: N1 + (N2 X 256).
Set 15 CPI (ESC g)
1B 67
This control prints any data stored in the print buffer, and initializes following text to print at 15 CPI.
Feed Paper n/216 Reverse (ESC j)
1B 6A
This command causes fanfold paper to feed backwards n/216 of an inch.
Select NLQ Font (ESC k)
1B 6B NN
This control selects an NLQ font based on the following values of NN:
0 Courier
1 Gothic
This control affects only NLQ.
Set Left Margin (ESC l)
1B 6C NN
This control sets the left margin to NN columns from the left edge of the physical page to the beginning of
the print line. Where NN is a hex value. The number of inches in the margin does not vary if the font,
character width, or horizontal dot density changes. This command automatically clears and resets
horizontal tabs to every eight characters, then performs a cancel operation. The smallest possible space
between the left margins is the width of one double-wide, 10 CPI character. If a margin control code
violates this minimum distance, it is ignored. Settings in proportional mode are treated as 10 CPI.
Turn Proportional Mode On/Off (ESC p)
1B 70 NN
This control sets proportional mode on or off to the following values of NN:
0 Mode is Off
1 Mode is On
This control overrides condensed and is available for DP, NLQ, and user-defined characters.
Quiet Printing (ESC s)
1B 73 NN
Chapter 2. Epson FX-1050 Data Stream 61
Page 82
This control activates and deactivates Quiet Mode (half-speed printing). The following are the values for
NN:
0 Set Quiet Mode Off
1 Set Quiet Mode On
Select Character Table (ESC t)
1B 74 NN
This control selects italic characters from the Epson Italic character set. The characters selected are ASCII
codes 128 to 255 (X'80' through X'FF').
The following values of NN are:
X'0' Select Epson Italic character set
X'1' Selects Epson Extended Graphics Italic character set (actually Code Page 437)
X'2' Remap DLL character set from positions 0 - 127 to 128 - 255.
Selecting Epson Extended Graphics does not disable italic printing. The value of NN must equal X'00' or
X'01'.
Double High Printing (ESC w)
1B 77 NN
This control activates and deactivates double-high printing. The following are the values for NN:
0 Set Double-High Mode Off
1 Set Double-High Mode On
Superscript, subscript, and condensed modes are not valid in double-high mode. This command is
available for both DP and NLQ printing.
Select NLQ or DP Print Quality (ESC x)
1B 78 NN
This control selects NLQ or DP from the following values of NN:
0 Selects Fast Draft or DP mode. (See Note).
1 Selects NLQ mode
Notes: If the printer configuration 'Host Fast Draft' setting is enabled then Fast Draft quality is selected. If
'Host Fast Draft' is disabled then DP quality is selected (model Z03 only).
4247 Commands
Control Hex Name
DC4 DC4 ESC ! NN 1 PP EM 14 14 1B 21 01 Select EAN-8 Bar Code
DC4 DC4 ESC ! NN 2 PP EM 14 14 1B 21 02 Select EAN-13 Bar Code
DC4 DC4 ESC ! NN 3 PP EM 14 14 1B 21 03 Select UPC-A Bar Code
DC4 DC4 ESC ! NN 4 PP EM 14 14 1B 21 04 Select MSI Bar Code
DC4 DC4 ESC ! NN 5 PP EM 14 14 1B 21 05 Select UPC-E Bar Code
62 Programmer Manual
Page 83
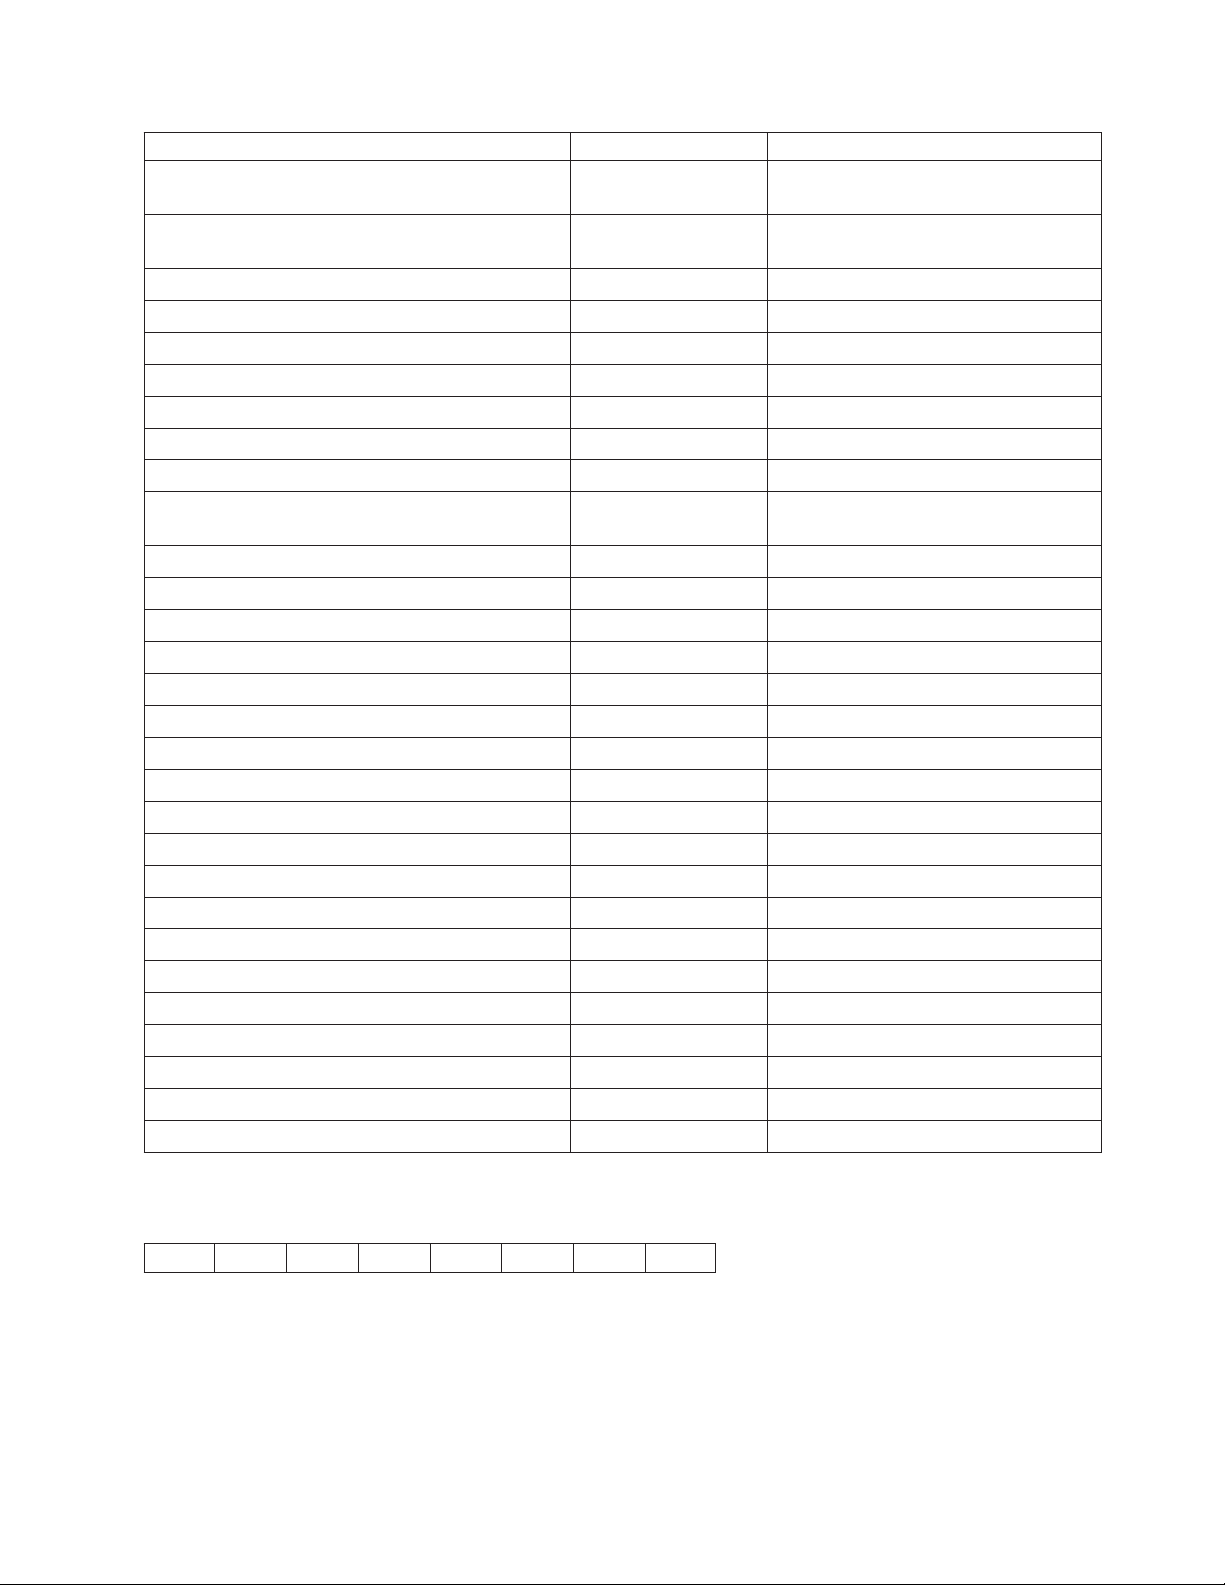
Control Hex Name
DC4 DC4 ESC ! NN 6 PP EM 14 14 1B 21 06 Select UPC 2-Digit Bar Code
(Magazine)
DC4 DC4 ESC ! NN 7 PP EM 14 14 1B 21 07 Select UPC 5-Digit Bar Code
(Magazine)
DC4 DC4 ESC ! NN 17 PP EM 14 14 1B 21 11 Select 2 of 5 INTERLEAVED Bar Code
DC4 DC4 ESC ! NN 18 PP EM 14 14 1B 21 12 Select 2 of 5 INDUSTRIAL Bar Code
DC4 DC4 ESC ! NN 19 PP EM 14 14 1B 21 13 Select 2 of 5 MATRIX Bar Code
DC4 DC4 ESC ! NN 20 PP EM 14 14 1B 21 14 Select CODE 3 of 9 Bar Code
DC4 DC4 ESC ! NN 22 PP EM 14 14 1B 21 16 Select CODABAR Bar Code
DC4 DC4 ESC ! NN 23 PP EM 14 14 1B 21 17 Select CODE 128 Bar Code
DC4 DC4 ESC ! NN 24 PP EM 14 14 1B 21 18 Select POSTNET Bar Code
DC4 DC4 ESC ( GS {N1} {DATA1} {N2} {DATA2}EM14 14 1B 28 1D
DD..DD 1D DD..DD 19
DC4 DC4 ESC @ 14 14 1B 40 Reinitialize Printer
DC4 DC4 ESC 1 NN 14 14 1B 31 Set Vertical Spacing n/144 Inch
DC4 DC4 ESC 3 1 14 14 1B 33 31 Set Vertical Spacing to 12 Lines/30mm
DC4 DC4 ESC 3 3 14 14 1B 33 33 Set Vertical Spacing to 3 Lines/30mm
DC4 DC4 ESC 3 4 14 14 1B 33 34 Set Vertical Spacing to 4 Lines/30mm
DC4 DC4 ESC 3 6 14 14 1B 33 36 Set Vertical Spacing to 6 Lines/30mm
DC4 DC4 ESC 3 8 14 14 1B 33 38 Set Vertical Spacing to 8 Lines/30mm
DC4 DC4 ESC 5 14 14 1B 35 Eject Single Sheet or Form Feed
DC4 DC4 ESC A 14 14 1B 41 Set 15, 17.1, or 20 CPI
DC4 DC4 ESC N 14 14 1B 4E Load or Park Fanfold from a Rear Path
DC4 DC4 ESC T 14 14 1B 54 Load or Park Fanfold from a Front Path
DC4 DC4 ESC Y 14 14 1B 59 Select Emulation
DC4 DC4 ESC Z 14 14 1B 5A Select AFTA in Column
DC4 DC4 ESC g 14 14 1B 67 Select Resident Font
DC4 DC4 ESC h 14 14 1B 68 Request to Read Configuration
DC4 DC4 ESC h 14 14 1B 68 ..... Printer Configuration Response
DC4 DC4 ESC i 14 14 1B 69 ..... Write Configuration Response
DC4 DC4 ESC i 14 14 1B 69 Write Configuration Acknowledgement
DC4 DC4 ESC p 14 14 1B 70 Select Print Quality
Print Bar Code Selection
Select EAN-8 Bar Code (DC4 DC4 ESC ! NN 1 PP EM)
14 14 1B 21 NN 01 PP 19
This control selects the EAN-8 bar code.
The DATA field must contain only ASCII numeric (0 to 9) data, and must be eight bytes long, check digit
included.
Chapter 2. Epson FX-1050 Data Stream 63
Page 84
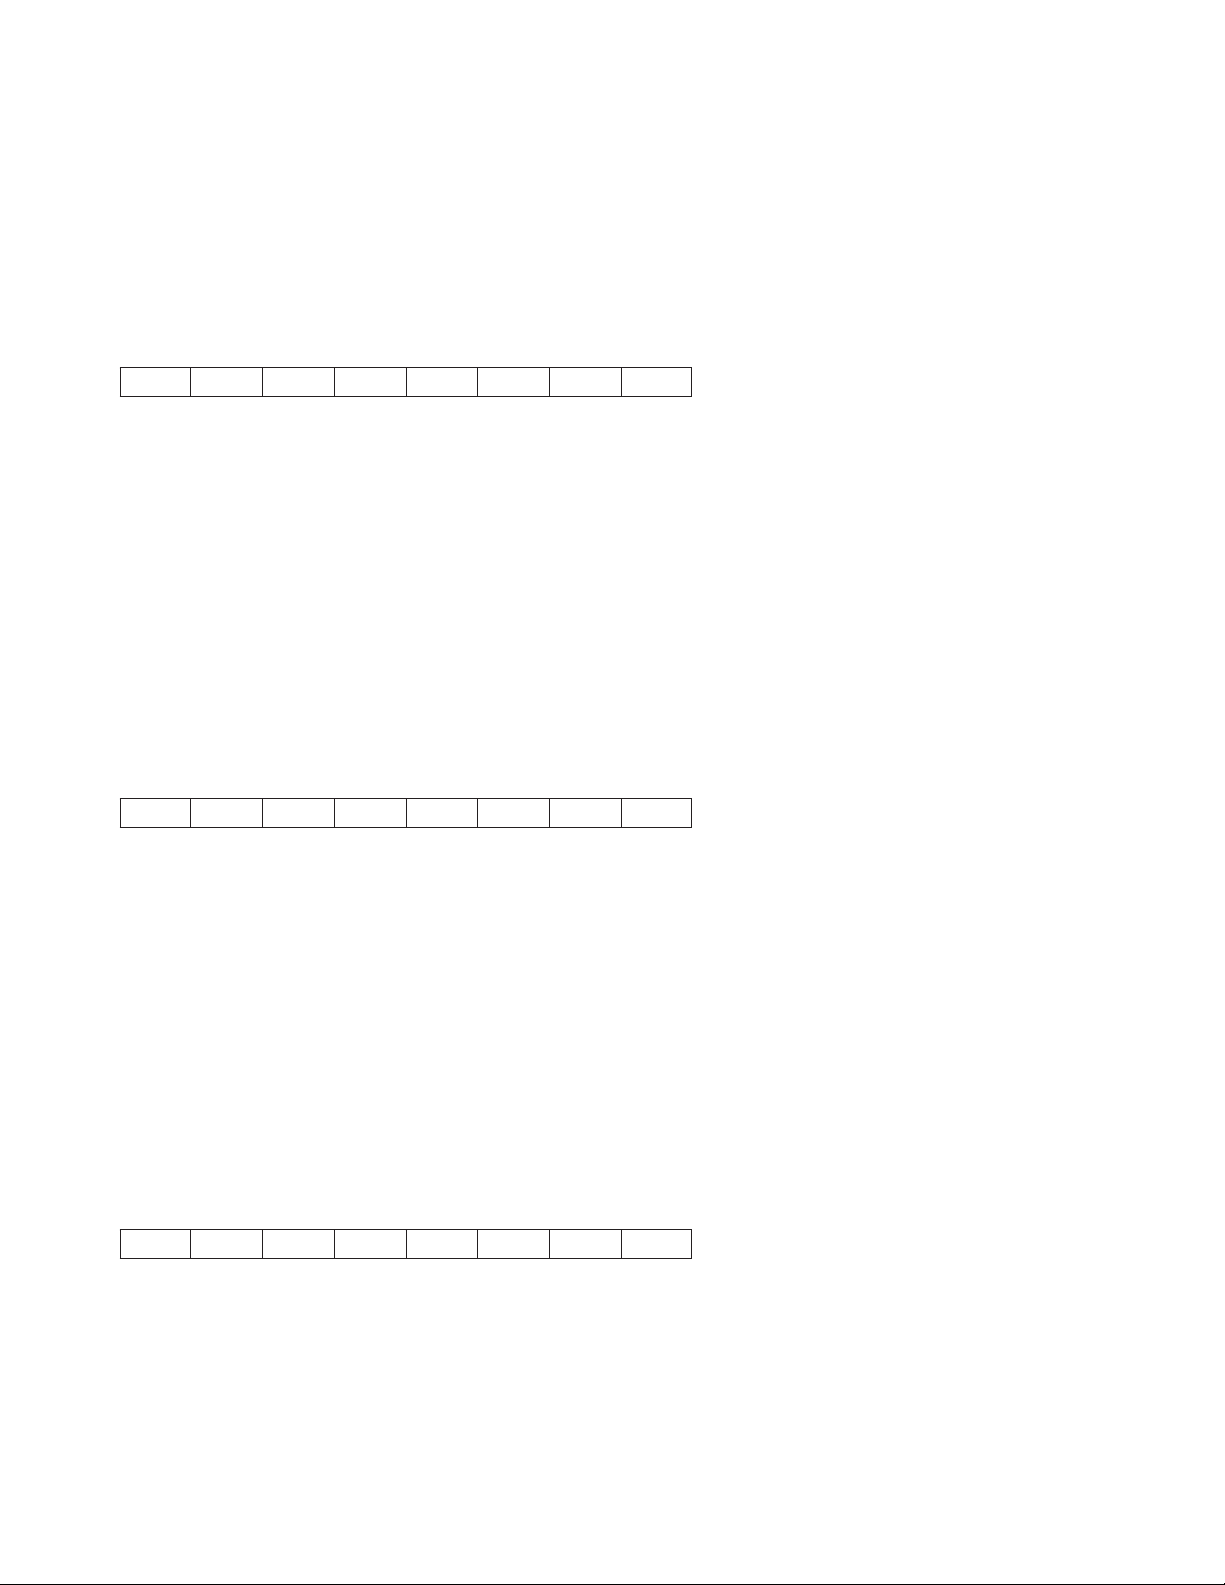
NN is a one-byte hexadecimal number that specifies the height of the bar code symbol as 1 to 12 (1/6 to
12/6 inch, or 2 inches).
PP is a one-byte hexadecimal number that specifies whether or not to print the bar code in Human
Readable Characters as follows:
00 Do not print human readable characters
01 Print human readable characters
Select EAN-13 Bar Code (DC4 DC4 ESC ! NN 2 PP EM)
14 14 1B 21 NN 02 PP 19
The control selects the EAN-13 bar code.
The DATA field must contain only ASCII numeric (0 to 9) data, and must be thirteen bytes long, check digit
included.
NN is a one-byte hexadecimal number that specifies the height of the bar code symbol as 1 to 12 (1/6 to
12/6 inch, or 2 inches).
PP is a one-byte hexadecimal number that specifies whether or not to print the bar code in Human
Readable Characters as follows:
00 Do not print human readable characters
01 Print human readable characters
Select UPC-A Bar Code (DC4 DC4 ESC ! NN 3 PP EM)
14 14 1B 21 NN 03 PP 19
The control selects the UPC-A bar code.
The DATA field must contain only ASCII numeric (0 to 9) data, and must be twelve bytes long, including a
system digit at the leftmost position and a check digit at the rightmost position of the data field.
NN is a one-byte hexadecimal number that specifies the height of the bar code symbol as 1 to 12 (1/6 to
12/6 inch, or 2 inches).
PP is a one-byte hexadecimal number that specifies whether or not to print the bar code in Human
Readable Characters as follows:
00 Do not print human readable characters
01 Print human readable characters
Select MSI Bar Code (DC4 DC4 ESC ! NN 4 PP EM)
14 14 1B 21 NN 04 PP 19
The control selects the MSI bar code.
The DATA field for this bar code does not have a defined length, but the DATA field must contain only
ASCII numeric (0 to 9) data.
NN is a one-byte hexadecimal number that specifies the height of the bar code symbol as 1 to 12 (1/6 to
12/6 inch, or 2 inches).
64 Programmer Manual
Page 85
PP is a one-byte hexadecimal number that specifies whether or not to print the bar code in Human
Readable Characters as follows:
00 Do not print human readable characters
01 Print human readable characters
Select UPC-E Bar Code (DC4 DC4 ESC ! NN 5 PP EM)
14 14 1B 21 NN 05 PP 19
The control selects the UPC-E bar code.
The DATA field must contain only ASCII numeric (0 to 9) data, and must be eight bytes long, including a
system digit at the leftmost position and a check digit at the rightmost position of the data field. The
system digit must bea0or1.
NN is a one-byte hexadecimal number that specifies the height of the bar code symbol as 1 to 12 (1/6 to
12/6 inch, or 2 inches).
PP is a one-byte hexadecimal number that specifies whether or not to print the bar code in Human
Readable Characters as follows:
00 Do not print human readable characters
01 Print human readable characters
Select UPC 2-Digit Bar Code (Magazine) (DC4 DC4 ESC ! NN 6 PP EM)
14 14 1B 21 NN 06 PP 19
This control selects the UPC 2-Digit bar code.
The DATA field must contain only ASCII numeric (0 to 9) data, and must be three bytes long, check digit
included.
NN is a one-byte hexadecimal number that specifies the height of the bar code symbol as 1 to 12 (1/6 to
12/6 inch, or 2 inches).
PP is a one-byte hexadecimal number that specifies whether or not to print the bar code in Human
Readable Characters as follows:
00 Do not print human readable characters
01 Print human readable characters
Select UPC 5-Digit Bar Code (Magazine) (DC4 DC4 ESC ! NN 7 PP EM)
14 14 1B 21 NN 07 PP 19
This control selects the UPC 5-Digit bar code.
The DATA field must contain only ASCII numeric (0 to 9) data, and must be six bytes long, check digit
included.
NN is a one-byte hexadecimal number that specifies the height of the bar code symbol as 1 to 12 (1/6 to
12/6 inch, or 2 inches).
Chapter 2. Epson FX-1050 Data Stream 65
Page 86
PP is a one-byte hexadecimal number that specifies whether or not to print the bar code in Human
Readable Characters as follows:
00 Do not print human readable characters
01 Print human readable characters
Select 2 of 5 INTERLEAVED Bar Code (DC4 DC4 ESC ! NN 17 PP EM)
14 14 1B 21 NN 11 PP 19
The control selects the 2 of 5 Interleaved bar code.
The DATA field for this bar code does not have a defined length, but the number of data bytes must be
even. The DATA field must contain only ASCII numeric (0 to 9) data.
NN is a one-byte hexadecimal number that specifies the height of the bar code symbol as 1 to 12 (1/6 to
12/6 inch, or 2 inches).
PP is a one-byte hexadecimal number that specifies whether or not to print the bar code in Human
Readable Characters as follows:
00 Do not print human readable characters
01 Print human readable characters
Select 2 of 5 INDUSTRIAL Bar Code (DC4 DC4 ESC ! NN 18 PP EM)
14 14 1B 21 NN 12 PP 19
The control selects the 2 of 5 Industrial bar code.
The DATA field for this bar code does not have a defined length, but the DATA field must contain only
ASCII numeric (0 to 9) data.
NN is a one-byte hexadecimal number that specifies the height of the bar code symbol as 1 to 12 (1/6 to
12/6 inch, or 2 inches).
PP is a one-byte hexadecimal number that specifies whether or not to print the bar code in Human
Readable Characters as follows:
00 Do not print human readable characters
01 Print human readable characters
Select 2 of 5 MATRIX Bar Code (DC4 DC4 ESC ! NN 19 PP EM)
14 14 1B 21 NN 13 PP 19
The control selects the 2 of 5 Matrix bar code.
The DATA field for this bar code does not have a defined length, but the DATA field must contain only
ASCII numeric (0 to 9) data.
NN is a one-byte hexadecimal number that specifies the height of the bar code symbol as 1 to 12 (1/6 to
12/6 inch, or 2 inches).
PP is a one-byte hexadecimal number that specifies whether or not to print the bar code in Human
Readable Characters as follows:
66 Programmer Manual
Page 87
00 Do not print human readable characters
01 Print human readable characters
Select CODE 3 of 9 Bar Code (DC4 DC4 ESC ! NN 20 PP EM)
14 14 1B 21 NN 14 PP 19
This control selects the Code 3 of 9 bar code.
The DATA field for this bar code does not have a defined length, but must start and end with an *.
The DATA field may contain alphanumeric data as follows:
0123456789
ABCDEFGHIJKLMNOPQRSTUVWXYZ
Space-.$/+%
* (as start/stop character)
NN is a one-byte hexadecimal number that specifies the height of the bar code symbol as 1 to 12 (1/6 to
12/6 inch, or 2 inches).
PP is a one-byte hexadecimal number that specifies whether or not to print the bar code in Human
Readable Characters as follows:
00 Do not print human readable characters
01 Print human readable characters
Select CODABAR Bar Code (DC4 DC4 ESC ! NN 22 PP EM)
14 14 1B 21 NN 16 PP 19
This control selects the Codabar bar code.
The DATA field for this bar code does not have a defined length, and must contain only the data
characters listed below. Any combination of start/stop characters is allowed.
0123456789-$:/.+
ABCDENT*abcdent(asstart/stop characters)
NN is a one-byte hexadecimal number that specifies the height of the bar code symbol as 1 to 12 (1/6 to
12/6 inch, or 2 inches).
PP is a one-byte hexadecimal number that specifies whether or not to print the bar code in Human
Readable Characters as follows:
00 Do not print human readable characters
01 Print human readable characters
Select CODE 128 Bar Code (DC4 DC4 ESC ! NN 23 PP EM)
14 14 1B 21 NN 17 PP 19
This control selects the Code 128 bar code.
Chapter 2. Epson FX-1050 Data Stream 67
Page 88
The DATA field for this bar code does not have a defined length, and must contain only the data
characters belonging to the selected ASCII character set, including control characters.
Since GS and EM are control codes, the host application must set the high-order bit of the control code to
allow the printer to distinguish between encodable data and terminator strings.
Human Readable Characters will be centered below the bar code and can be wider than the encoded
area. The user is responsible for allowing space for Human Readable Characters to print without
overlapping adjacent data.
NN is a one-byte hexadecimal number that specifies the height of the bar code symbol as 1 to 12 (1/6 to
12/6 inch, or 2 inches).
PP is a one-byte hexadecimal number that specifies whether or not to print the bar code in Human
Readable Characters as follows:
00 Do not print human readable characters
01 Print human readable characters
Select POSTNET Bar Code (DC4 DC4 ESC ! NN 24 PP EM)
14 14 1B 21 NN 18 PP 19
This control selects the POSTNET [ZIP, ZIP+4, or Delivery Point Bar Code (DPBC)] bar code.
The DATA field for this bar code must contain only ASCII numeric (0 to 9) data. A data string of all zeroes
will be encoded if other than numeric data is detected in the job stream.
POSTNET bar code does not print Human Readable Characters, regardless of the PP byte. POSTNET
uses the tall and short bars required by the United States Postal Service standard, and encodes numeric
data streams regardless of length.
NN is a one-byte hexadecimal number that specifies the height of the bar code symbol as 1 to 12 (1/6 to
12/6 inch, or 2 inches).
PP is a one-byte hexadecimal number that specifies whether or not to print the bar code in Human
Readable Characters as follows:
00 Do not print human readable characters
01 Print human readable characters
Print Bar Code Selection (DC4 DC4 ESC ( GS {N1} {DATA1} GS {N2} {DATA2} EM)
14 14 1B 28 1D DD...DD 1D DD...DD 19
This sequence causes the bar code symbol to be printed according to the Bar Code Selection command.
Sequential bar codes of the same type and height may be printed. GS N# defines the distance from the
beginning of the line or between two bar code symbols in multiples of 1/72 of an inch. This command must
be closed with an EM character.
Note: Bar code symbols will print over any descenders in the previous character box if any text is present.
Example 1:
Print an EAN-8 bar code symbol, one inch from the right margin with the data set of 12345678.
68 Programmer Manual
Page 89
ASCII: DC4 DC4 ESC ( GS 72 12345678 EM
HEX: 14 14 1B 28 1D 48 31 32 33 34 35 36 37 38 19
Example 2:
Print two Code 3 of 9 bar code symbols. The first symbol on the right margin; the second symbol one inch
to the right of the first symbol. Data sets are ABC+0123 and 12345678
ASCII: DC4 DC4 ESC ( GS 0 *ABC+123* GS 72 *1234* EM
HEX: 14 14 1B 28 1D 00 2A 41 42 43 2B 31 32 33 2A
1D 48 2A 31 32 33 34 2A 19
Reinitialize Printer (DC4 DC4 ESC @)
14 14 1B 40
This command reinitializes the printer. It resets the printer mode and clears the buffer of printable data.
Set Vertical Spacing n/144 Inch (DC4 DC4 ESC 1 NN)
14 14 1B 31 NN
This control sets a line spacing value for subsequent line feeds.
NN is a one-byte hexadecimal number that specifies the line spacing value of NN/144 inches. The value of
NN is 1 to 255.
Set Vertical Spacing 12 Lines/30mm (DC4 DC4 ESC 3 1)
14 14 1B 33 31
This command sets line spacing to 12 lines per 30 mm.
Set Vertical Spacing 3 Lines/30mm (DC4 DC4 ESC 3 3)
14 14 1B 33 33
This command sets line spacing to 3 lines per 30 mm.
Set Vertical Spacing 4 Lines/30mm (DC4 DC4 ESC 3 4)
14 14 1B 33 34
This command sets line spacing to 4 lines per 30 mm.
Set Vertical Spacing 6 Lines/30mm (DC4 DC4 ESC 3 6)
14 14 1B 33 36
This command sets line spacing to 6 lines per 30 mm.
Chapter 2. Epson FX-1050 Data Stream 69
Page 90

Set Vertical Spacing 8 Lines/30mm (DC4 DC4 ESC 3 8)
14 14 1B 33 38
This command sets line spacing to 8 lines per 30 mm.
Eject Single Sheet or Form Feed (DC4 DC4 ESC 5)
14 14 1B 35
This command causes a form feed on fanfold forms.
Set 15, 17.1, 20 CPI (DC4 DC4 ESC A)
14 14 1B 41 NN
This command sets horizontal spacing (characters per inch) to 15, 17.1 or 20.
The values for NN are:
4 15 CPI
5 17.1 CPI
6 20 CPI
Load or Park Fanfold from a Rear Path (DC4 DC4 ESC N)
14 14 1B 4E NN
This command loads or performs the Park function for fanfold paper fed from the rear path.
The values for NN are:
0 The printer selects the rear path. If paper fanfold is already loaded in a paper path that is not
requested, the printer automatically performs the Park function before loading the rear path. The
printer will then load the fanfold paper once data is received. For more information on the Park
function, see “PARK/PATH” in “Chapter 2. Understanding the Operator Panel” in the User's Guide
for your printer.
1 The printer performs the Park function for forms in the rear path.
Load or Park Fanfold from a Front Path (DC4 DC4 ESC T)
14 14 1B 54 NN
This command loads or performs the Park function for fanfold paper fed from the front path.
The values for NN are:
0 The printer selects the front path. If paper fanfold is already loaded in a paper path that is not
requested, the printer automatically performs the Park function before loading the front path. The
printer will then load the fanfold paper once data is received. For more information on the Park
function, see “PARK/PATH” in “Chapter 2. Understanding the Operator Panel” in the User's Guide
for your printer.
1 The printer performs the Park function for forms in the front path.
70 Programmer Manual
Page 91

Select Emulation (DC4 DC4 ESC Y)
14 14 1B 59 NN
This command selects the printer emulation mode.
The values for NN are:
1 Epson FX 1050
2 4202 Proprinter III XL
5 4247 or 2381 Personal Printer
Select AFTA in Column (DC4 DC4 ESC Z)
14 14 1B 5A NN
This command selects the column at 10 CPI where the Automatic Forms Thickness Adjustment (AFTA) will
be made.
The value for NN is the column number.
Select Resident Font (DC4 DC4 ESC g)
14 14 1B 67 NN
This command selects the resident font based on the following values of NN:
0 Courier
1 Gothic
128 OCR-B
129 OCR-A
Request to Read Configuration (DC4 DC4 ESC h)
14 14 1B 68
This command requests the printer to send its configuration saved in non-volatile memory (NVM).
The printer must be configured for 1284 Parallel mode.
Printer Configuration Response (DC4 DC4 ESC h)
14 14 1B 68 LL HH TT SS D1...DN CS
This is the response Request to Read Configuration command.
The printer must be configured for 1284 Parallel mode. LL and HH indicate the number of bytes that follow
this control. LL is the least significant byte of the count and HH is the most significant byte. (The number
of bytes that follow equal HH x 256 + LL.)
The other values are:
TT Model Type
SS Model Sub-type
Chapter 2. Epson FX-1050 Data Stream 71
Page 92

D1...DN
Configuration Data
CS Checksum of the data bytes
Write Configuration Response (DC4 DC4 ESC i)
14 14 1B 69 LL HH TT SS D1...DN CS
This command writes configuration data to non-volatile memory (NVM).
The printer must be configured for 1284 Parallel mode. LL and HH indicate the number of bytes that follow
this control. LL is the least significant byte of the count and HH is the most significant byte. (The number
of bytes that follow equal HH x 256 + LL.)
The other values are:
TT Model Type
SS Model Sub-type
D1...DN
Configuration Data
CS Checksum of the data bytes
Write Configuration Acknowledgement (DC4 DC4 ESC i)
14 14 1B 69 NN
This command acknowledges that the configuration was written to the printer. This is the response to the
Write Configuration command.
The printer must be configured for 1284 Parallel mode.
NN is a single byte defined as follows:
X'00' Configuration Saved (Successful)
X'01' Configuration Not Saved (Error)
Select Print Quality
14 14 1B 70 NN
The values of NN are:
0 Fast Draft (model Z03 only)
1DP
2 DP Text
3 NLQ
Buffer Terminating Conditions
The following controls cause buffered data to be released for printing:
v Carriage Return
v Line Feed
v Form Feed
v Reverse Line Feed
v Horizontal Tab
v Vertical Tab
72 Programmer Manual
Page 93

v Backspace
v Set 1/8 Inch Line Spacing
v Set 7/72 Inch Line Spacing
v Set 1/6 Inch Line Spacing
v Set n/216 Inch Line Spacing
v Set n/72 Inch Line Spacing
v Invoke Text Line Spacing (if the line spacing is changed)
v Move Right n/120
v Move Left n/120
v Feed Paper n/216 Reverse
v Relative Move Baseline
v Shift Out/Double-Wide Print
v Device Control 4/Cancel Double-Wide Print
v Begin Subscript/Superscript
v End Subscript/Superscript
v Begin Double-Strike Print
v End Double-Strike Print
v Begin Emphasized Print
v End Emphasized Print
v Set Presentation Highlight
v Continuous Overscore
v Auto Underscore
v Device Control 2/Select 10 CPI
v Set 12 CPI
v Shift In/Condensed Prin
v Proportional Space Mode
v Change Font
v Normal Density Bit Image Graphics
v Dual Density Bit Image Graphics Type 1
v Dual Density Bit Image Graphics Type 2
v High Density Bit Image Graphics
v Unidirectional Printing
v Set Horizontal Margins
v Set Initial Conditions
The following conditions also cause buffered data to be released for printing:
v Parallel -INIT
v Automatic Line Wrap
An automatic line wrap consists of a carriage return and line feed inserted after the maximum number of
characters has been printed on a line. The next character is then printed at the left margin on the
following line. Automatic line wrap occurs for text data but not for bit image graphics or advanced
function graphics.
Unsupported Command Processing
The following Epson controls are not supported by the 4247. If any of these commands are received, they
are ignored.
v Select 9 Pin Graphic Mode (ESC ^)
v Disable Paper-Out Sensor (ESC 8)
v Enable Paper-Out Sensor (ESC 9)
v Select Color (ESC r)
v Assign Character Table (ESC t)
Chapter 2. Epson FX-1050 Data Stream 73
Page 94

74 Programmer Manual
Page 95

Chapter 3. Intelligent Printer Data Stream
This chapter explains the concepts of the Intelligent Printer Data Stream (IPDS). IPDS is an orderable
feature for your printer. The intent of this chapter is to provide a basic overview of how IPDS works. The
Intelligent Printer Data Stream Reference provides detailed information about IPDS programming in
general while Chapter 4, “IPDS Programming Information,” on page 99 provides a detailed description of
the IPDS commands that the 4247 Model X03/Z03 printer uses. If the programming information in the
Intelligent Printer Data Stream Reference is different from the programming information in this manual, use
this manual to program the 4247 Model X03/Z03 printer.
Overview
The Intelligent Printer Data Stream (IPDS) is a structured-field data stream for managing and controlling
printer processes. IPDS uses all points addressability that allows users to position text, images, graphic
pictures, bar codes, and overlays at any defined point on a printed page. Later pages in this chapter
explain each of these data types and their uses.
IPDS offers the flexibility of creating data and commands independent of the type of attachment protocol
used by the printer or its system. Using the same data stream, printers can attach to control units or any
type of network link that does not restrict the transmission of data to the printer.
IPDS commands within the data stream enable the host processor to control and manage the downloading
of symbol sets and stored objects, such as overlays and page segments. The printer can later use these
stored objects to construct a printed page.
The IPDS command structure also provides the means for returning error information to the host, for
returning query information, and for performing error recovery actions.
Physical Medium
The 4247 Printer defines the physical medium as an area with boundaries of width and depth that define
the limits of this page. The maximum print position (MPP) defines the width of the current page in
characters.
MPP x 1/CPI = width in inches (CPI is the number of characters per inch).
The maximum page length (MPL) defines the depth of the current page in lines.
MPL x 1/LPI = depth in inches (LPI is the number of lines per inch).
The top margin on this page is the top-of-form position, as selected by pressing SET TOP OF FORM on
the operator panel. Figure 5-1 shows the physical medium layout.
75
Page 96
Figure 1. The Physical Medium
The physical medium defined above is assumed to coincide with the actual physical medium (form) as that
terminology is used in the following discussion.
IPDS Coordinate Systems
IPDS uses coordinate systems to define any point on a page. All IPDS commands containing location
parameters use these coordinate systems to define distance measurements. The coordinate systems
specify these distances in logical units called units.
Many IPDS commands contain parameters that specify values for position or size in units. For example,
one unit may equal approximately 0.018 mm (0.0007 in. [1/144 in.]). Before using these values, the 4247
Printer truncates the specified values to multiples of 0.18 mm (0.007 in. [1/1440 in.]) for all unit parameters
except those associated with DP, and DP Text baseline positioning. The 4247 Printer truncates DP, and
DP Text baseline positioning parameters to multiples of 0.36 mm (0.014 in. [1/72 in.]). The unit parameters
are identified in Chapter 4, “IPDS Programming Information,” on page 99.
X and Y Medium Coordinate System
The Xmand Ymcoordinates, known as the medium coordinate system, relate directly to the physical
medium. The X
change the origin and the orientation of these coordinates. The origin (X
left hand corner of the physical medium. Positive Xmvalues begin at the origin and increase along the top
of the sheet, from left to right. Positive Y
sheet moving downward toward the bottom of the sheet. Figure 2 on page 77 shows the Xm,Ymcoordinate
system:
coordinate system is fixed for each medium or form size. IPDS commands cannot
m,Ym
values begin at the origin and increase along the left side of the
m
=0, Ym=0) is always at the top
m
76 Programmer Manual
Page 97
Figure 2. The Xm,YmMedium Coordinate System
Logical Page Layout
IPDS describes the printed output in terms of logical pages. The logical page does not have to be
contained completely on the physical medium. However, printing can only occur where the two areas
overlap. Figure 3 shows the physical-logical page relationship.
Figure 3. The Physical-Logical Page Relationship
The logical page reference corner is the corner of the logical page that is at the smallest Xp, Yp position.
This corner does not necessarily have to coincide with the physical medium origin (X
=0, Ym=0). The
m
logical page size in the X dimension is the 'X-Extent', and the logical page size in the Y dimension is the
'Y-Extent'. IPDS commands specify the logical page size and location. Figure 5-4 shows the relationship
Chapter 3. Intelligent Printer Data Stream 77
Page 98
between the X and Y coordinates and the logical and physical medium.
Figure 4. The X and Y Coordinate System and the Logical Page
I and B Coordinate System
In addition to the X,Y coordinate system, IPDS uses another coordinate system, the I-B coordinate system.
These coordinates describe the placement and orientation of text or images on the logical page. The
printer places characters along the I-axis for a line of text. The B-axis is the direction in which the printer
places lines of text on the logical page. IPDS commands can change both the origin and the orientation of
the I and B axes (see Figure 5 on page 79).
Direction: As the printer places text characters on the page, the inline coordinate increases. The direction
of this increase is the positive inline direction or +I. The baseline coordinate also increases as the printer
places text lines on the page. The direction of this increase is the positive baseline direction or +B.
Location parameters within the IPDS commands specify the I and B directions. Chapter 4, “IPDS
Programming Information,” on page 99 contains specific information about these commands.
Distance: The inline coordinate increases a predetermined distance as the printer places the text
characters on the page. This distance is the character increment. The baseline coordinate also increases a
predetermined distance as the printer places lines of text on the page. This distance is the baseline
increment. Location parameters within the IPDS commands specify the I and B distances. Chapter 4,
“IPDS Programming Information,” on page 99 contains specific information about these commands.
Initial coordinates: The coordinates of the first print position on the logical page are the initial
coordinates. The initial inline print coordinate is I
. The initial baseline print coordinate is Bi.
i
Current coordinates: The coordinates of the current print position on the logical page are the current
coordinates. The current inline print coordinate is I
. The current baseline print coordinate is Bc. Figure 5
c
on page 79 shows the various I and B coordinates on the logical page:
78 Programmer Manual
Page 99
Figure 5. The I and B Coordinate System on the Logical Page
Notes:
1. The 4247 Printer text character box is 180 units high by 144 units wide at 10 CPI when the X
pYp
units
equal 1,440 per inch. The left edge of the character box is at the specified inline position and the
bottom edge of the character box is 20 units below the specified baseline position.
2. If the bottom edge of the character box falls below the printable area on the physical medium, the
character will not print. In this situation, a baseline move (Relative Move Baseline or Absolute Move
Baseline) text command can place the character box totally within the printable area.
Processing IPDS Commands
The structured field format of IPDS allows one or more commands to be sent to the printer in a continuous
stream. Each command is self-describing; the command length, type, optional parameters, and data are all
part of each specific command. The printer processes each command in the order it is received. Every
IPDS command contains a flag byte. Setting the Acknowledgment Required bit on in this flag byte
indicates to the printer the end of a command stream sequence. The printer then sends an Acknowledge
Reply to the host. Figure 6 shows an example of an IPDS data stream:
Figure 6. An Example of the IPDS Data Stream
Chapter 3. Intelligent Printer Data Stream 79
Page 100
IPDS Command Format
All of the printer commands use the following format:
Length Command Flag Correlation ID Data
Note: Bit numbering follows the EBCDIC convention with bit zero being the most significant bit. A
description of each field follows.
Length
Length is a two-byte field that specifies the length of this command. This count includes the two-byte
length field, the command field, the flag byte, and the optional fields (Correlation ID and Data Fields). The
Length field can be any value from 5 to 32,767 (X'7FFF').
Command
Command is a two-byte field that specifies the IPDS command code. See Table 1 on page 81 for a list of
valid command codes.
Flag
Flag is a one-byte field that contains the IPDS command stream flags.
Bit 0 of this byte is the Acknowledgment Required (ARQ) flag. If this bit is on, the host requests the printer
to send an Acknowledge Reply.
Bit 1 of this byte is the Correlation ID flag. If this bit is B'1', a two-byte correlation number follows this flag
byte. If this bit is B'0', the optional correlation number is not present and the following byte or bytes contain
the data field.
Bit 2 of this byte is the acknowledgement continuation flag. If this bit is B'1', the host is requesting
continuation of the current Acknowledge Reply. If this bit is B'0', the host is not requesting continuation.
Bits 3-7 of the flag byte are reserved and must be zero.
Correlation ID
Correlation ID is a two-byte value that specifies an identifier for this command. The Correlation ID is an
optional field and is only present if bit 1 of the flag byte is B'1'. The printer can use any value between
0000 and FFFF for this ID. If an error occurs on a command prior to acceptance for processing, the printer
sends a negative acknowledgement (NACK) to the host. If the printer recognizes the command that
caused the error, the Correlation ID field in the NACK will contain the ID of the command responsible for
the NACK. Correlation ID is also returned in response to commands that request information and
commands that request an acknowledgement.
80 Programmer Manual
Data
 Loading...