

Page 1

USER GUIDE of
NETWORK INTERFACE
Welcome to use Network Interface to perform network printing. Please perform the following
steps.
STEP 1: the Preparatory Stage
1. Network environment requirement: 10/100M Ethernet with TCP/IP
protocol
2. System requirement: Windows XP/Windows2000/Windows98/UNIX
3. The host used to assign the printer’s IP address in STEP 2 should
be in the same subnet as the printer.
4. The host used to configure the printer’s network interface in STEP
3 should be equipped with a Java enabled Web browser such as IE6.
(Alternatively, if you use Windows XP you can run the software NIM
(Network Interface Manager)to configure the printer’s network
interface).
5. Turn off the printer.
6. Find the MAC address on the back label of the printer, and write
it down. You will need it in SETP 2. The MAC address is composed
of 12 numbers, such as 00-0b-00-18-40-63.
7. Connect the printer to the Ethernet network with a twisted pair
cable(100BASET or 10BASET).
8. Turn on the printer, make sure the green LED is ON, which means
that it has been connected to network.
1
STEP2: Assigning an IP Address for Printer
Method 1: Use command “ARP” to assign an IP address.
1) If you are a Winows XP/Windows2000/Windows98 user, please
perform the following steps:
Page 2

1. Enter the DOS command line window
2. Type the following commands:
arp -s <IP address> <MAC address>
ping <IP address>
arp -d <IP address>
NOTE: the <IP address> is the IP address which you will
assign for the printer, the <MAC address> is the MAC address
of this printer copied in STEP1. For example, if you want
to assign an IP address 192.168.45.191 to a printer whose
MAC address is 00-0b-00-18-40-63, you should enter the
following commands:
arp -s 192.168.45.191 00-0b-00-18-40-63
ping 192.168.45.191
arp -d 192.168.45.191
then the response messages will be shown, such as:
Reply from 192.168.45.191...
This means that the IP address has been assigned
successfully.
2) If you are a UNIX user, please perform the following steps:
Enter “root” as the user id and “pass” as the password.
1.
2. Edit the file “/etc/hosts”, to assign a host name for
a prearranged IP address, which means add the line:
<IP address> <host name>
in the file “/etc/hosts”,
then save the file and quit.
NOTE: the <IP address> is the IP address which you assign
for the printer, the <host name> is its host name.
3. Type following commands in shell:
arp -s <host name> <MAC address> temp
ping <host name>
NOTE: the <MAC address> is the printer’s MAC address copied
in STEP 1, and the <host name> is the host name assigned
in file “/etc/hosts” just now. For example, if you want to
assign an IP address 192.168.45.191 and a host name
“name_001” to a printer with MAC-address 00-0b-00-18-40-63,
you should enter the following commands:
2
vi /etc/hosts
(add a line) 192.168.45.191 name_001
(save and quit)
Page 3
arp -s name_001 00-0b-00-18-40-63 temp
ping name_001
NOTE 1: The response messages will be shown, such as
“name_001 is alive”, and so on. This means that the IP address
has been assigned successfully.
NOTE 2: The format of the command “ARP” changes a little
in different UNIX system. In some BSD UNIX, the order of
<host name> and <Ethernet address> is reversed. And, in IBM
AIX system, a parameter “ether” should be added, such as:
arp -s ether <host name> 00:40:8c:10:00:86 temp
Method 2: If you use Winows XP, you can use the software named NIM
to assign the IP address.
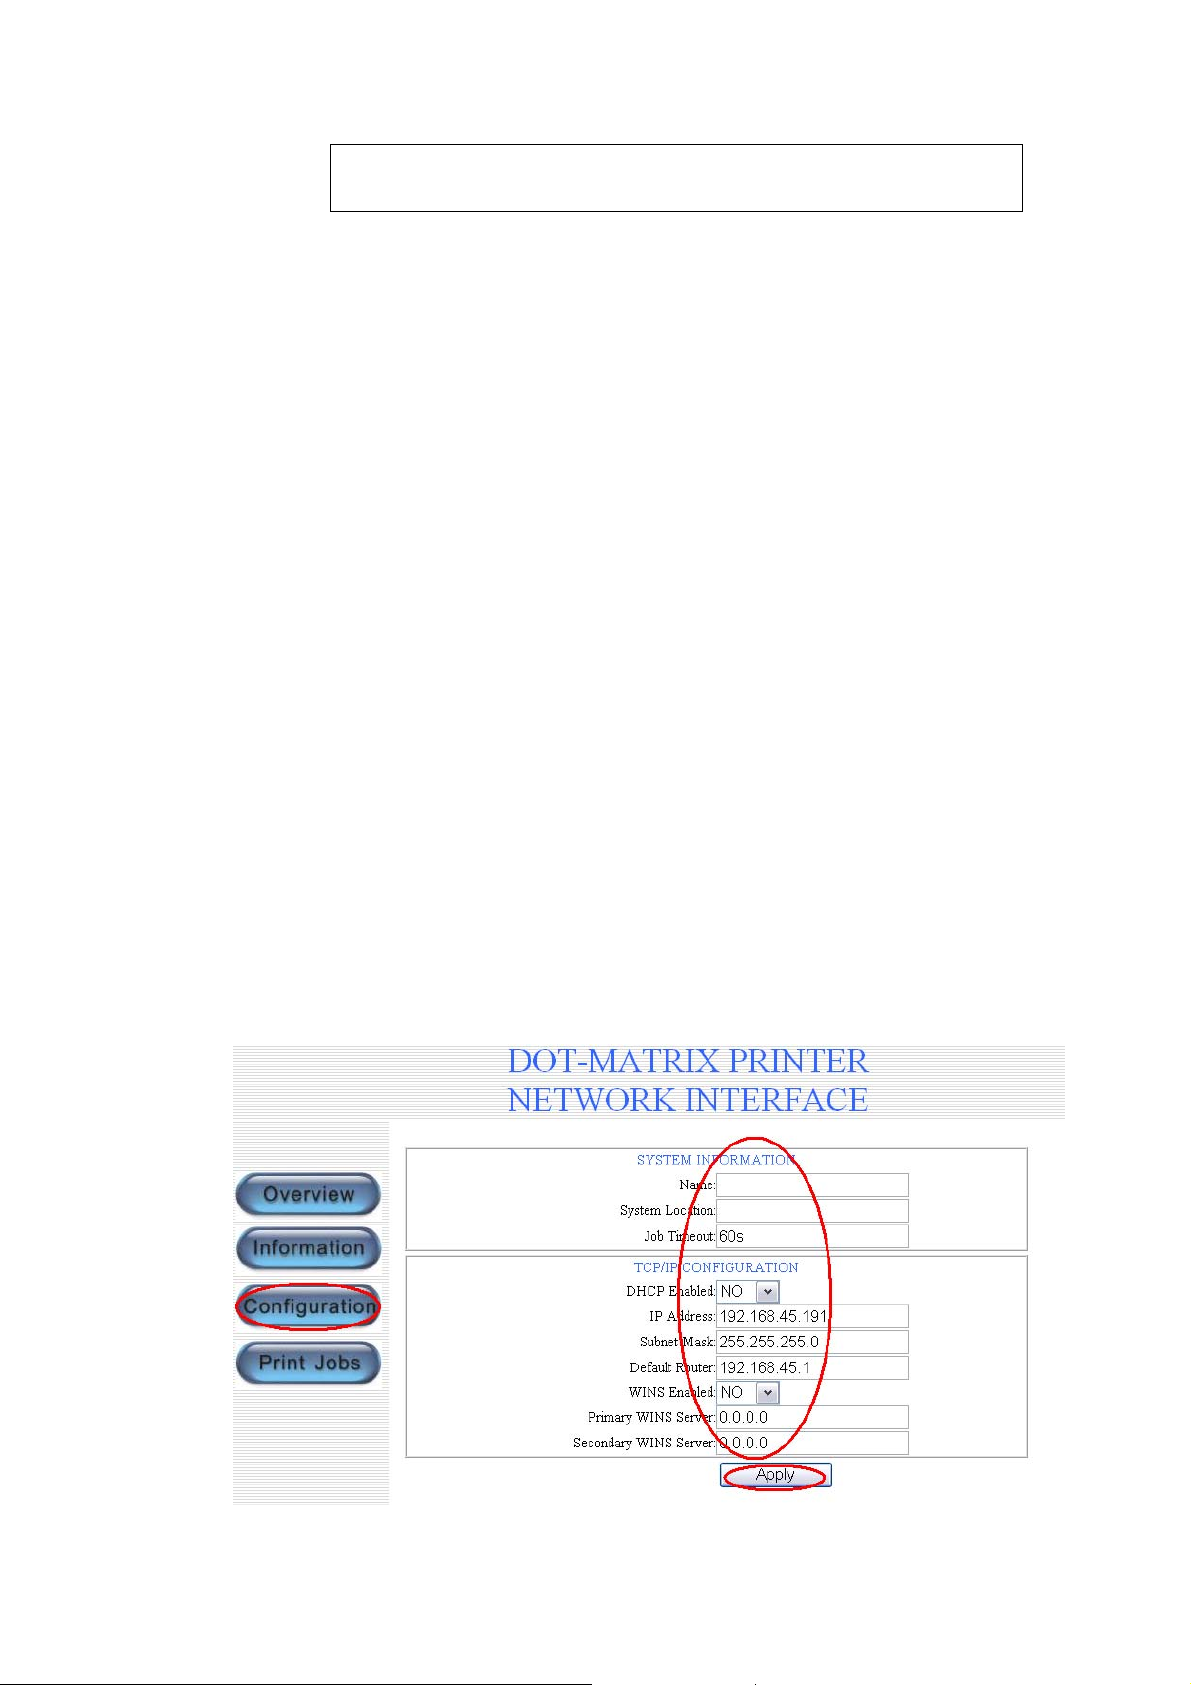
STEP 3 : Configuration
3
Method 1: Use Web browser such as IE6 to configure the printer’s
network interface.
1. Start a web browser, and enter the IP address assigned as a URL.
For example, fill in the address bar with “http://192.168.45. 191”,
if you assigned IP address 192.168.45.191 for your printer in STEP
1.
2. Click the “Configuration” button in the web page and set the
parameters.
z SYSTEM INFORMATION
Page 4

Name – The NETBIOS name in WINDOWS network, such as PS_I. The name
is valid only if the WINS(Windows Internet Name Service) is supported
and enabled.
System Location - A string of characters that can indicate the location
of the printer. It is a non-necessary parameter.
Job Timeout—when a print job is jammed ,the longest time that the
next print job in queue will wait. The default value is 60 seconds.
z TCP/IP CONFIGURATION
DHCP Enable –Enable the DHCP(Dynamic Host Configuration Protocol)
function. If it is enabled, the “IP Address”, ”Subnet Mask”
and ”Default Router” will be invalid.
IP Address -- Set the IP address of the printer manually.
Subnet Mask -- Set the Subnet Mask address of the printer manually.
Default Router -- Set the Default Router address of the printer
manually.
WINS Enabled -- Enable the WINS(Windows Internet Name Service). This
parameter is valid only if the user’s network supports WINS.
Primary /Second WINS Server -- Set the IP address of the WINS server.
4
STEP 4 : Add a Printing Port
z If you use WINDOWS XP/2000, you should add a standard TCP/IP port with
port number 9900 for network printing. Follow the steps below in WINDOWS
XP, and in Windows 2000 system take similar steps.
1.Click the “Properties” item in the Printer Menu of the pinter
window below.
Page 5
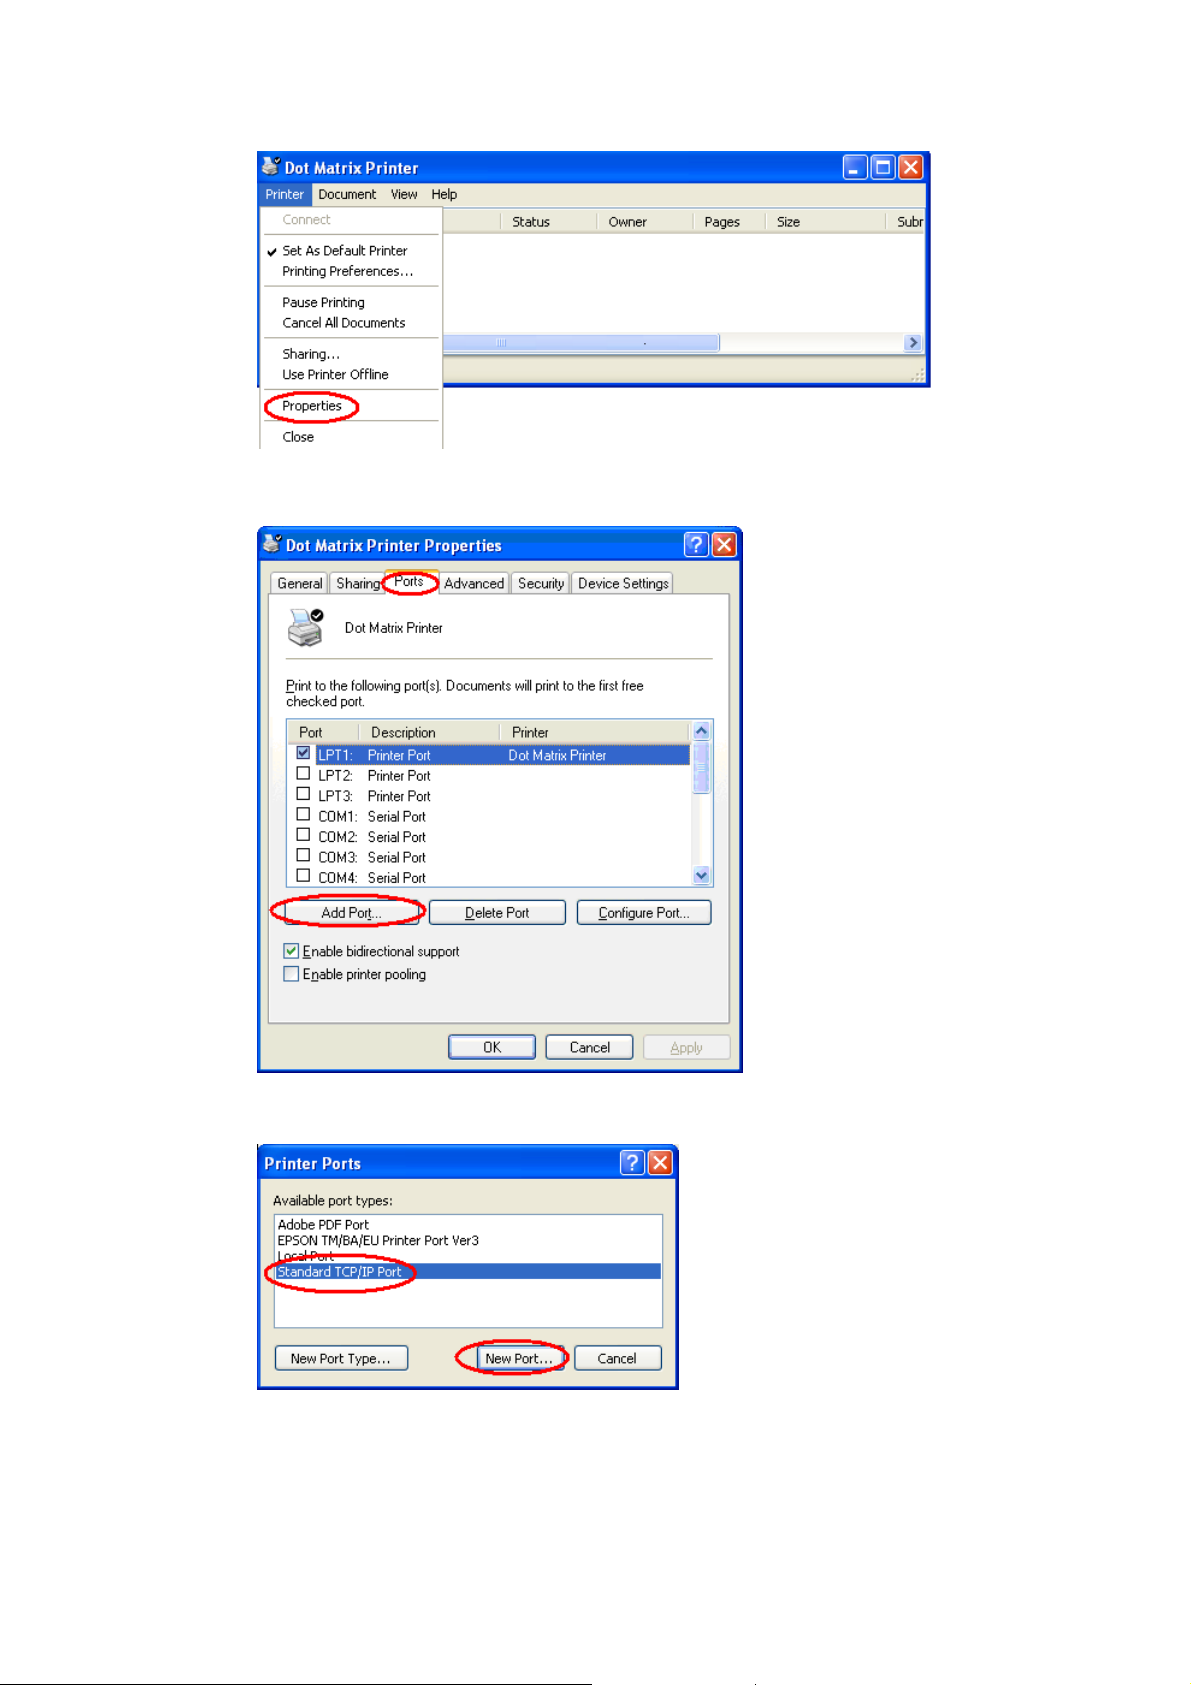
2.Click the “Port” tab, and then click the “Add Port…”button in
the window of the properties.
5
3.Click the “Standard TCP/IP Port” item, and then click the “New
Port…” button in the window of Printer Ports.
4.In the “Add Standard TCP/IP Printer Port Wizard” starting window,
click “Next” button and come to the window below. In item “Printer
Name or IP Address”, enter the IP address assigned in STEP 2 or
the name set in printer’s SYSTEM INFORMATION in STEP 3 if you use
Page 6
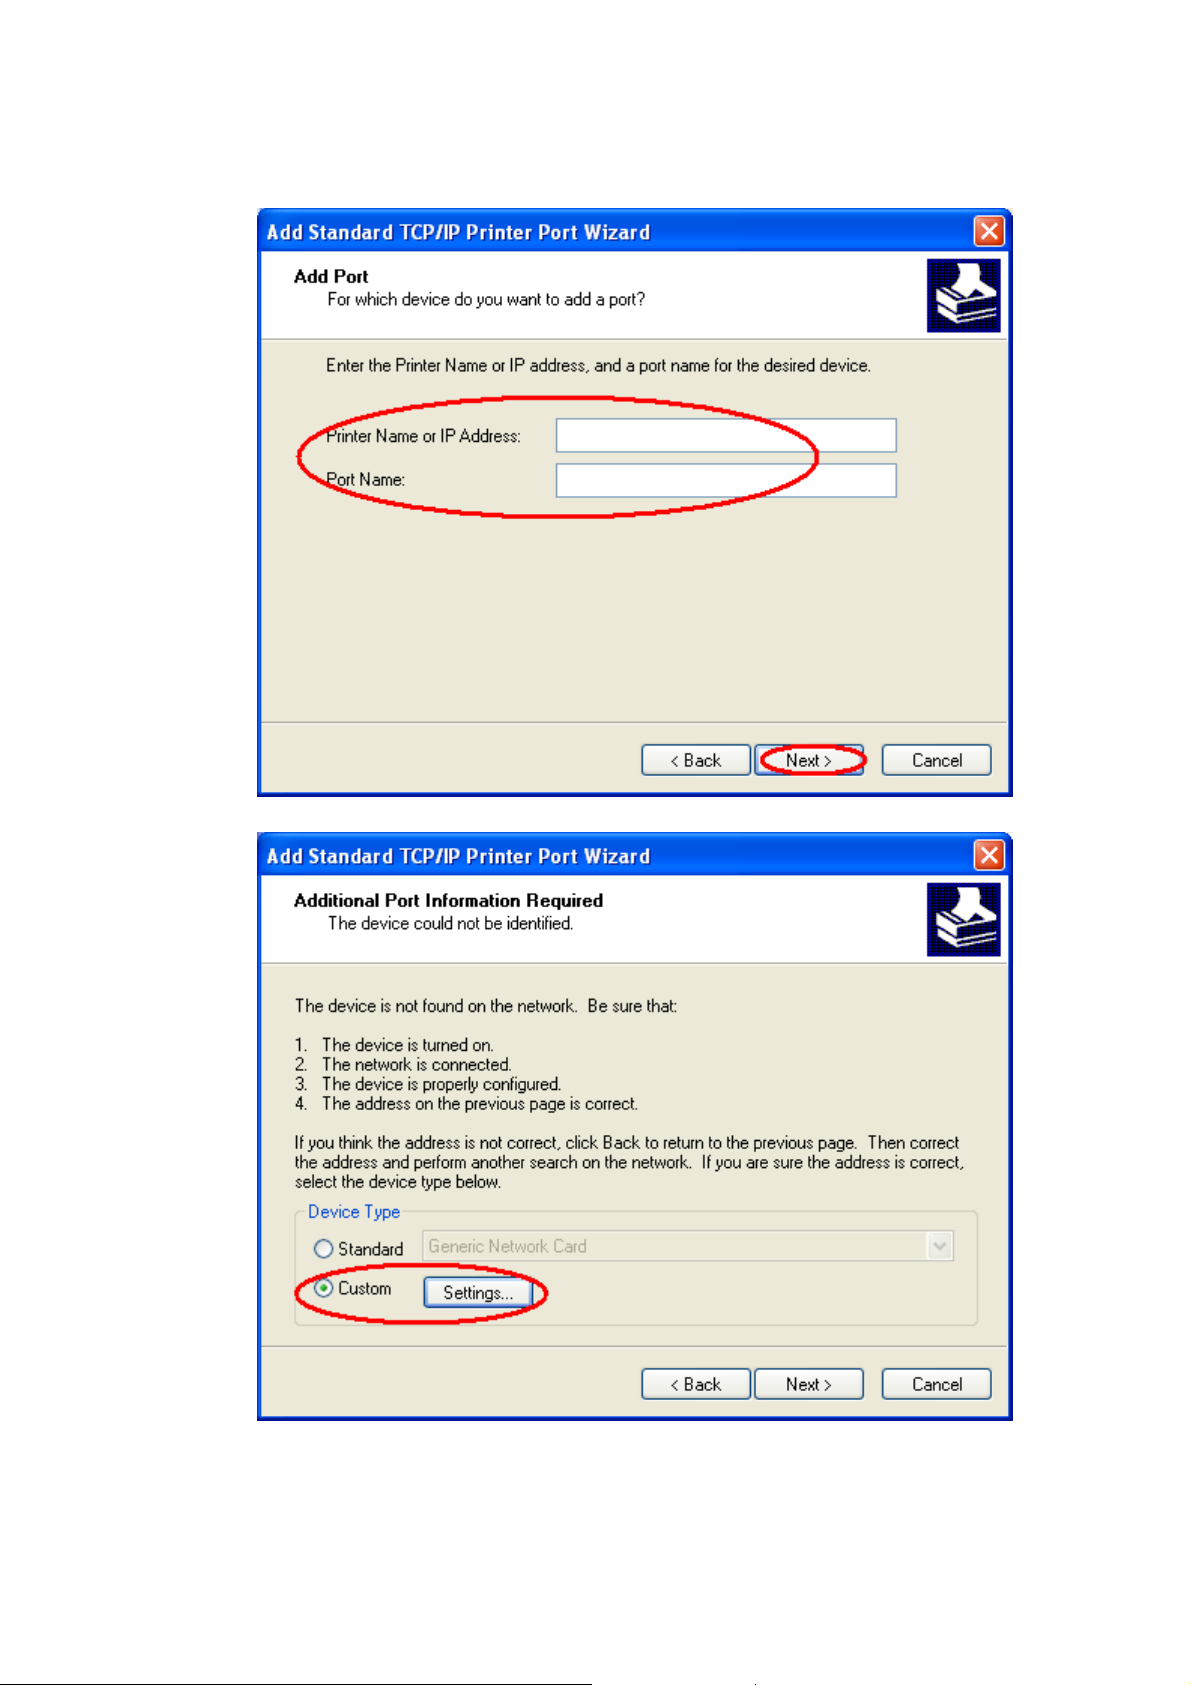
DHCP.You can also change the default “Port Name” if necessary. And
then click the “Next” button.
6
5.Select the “Custom” and click the “Settings” button.
6. Select the “RAW” in “Protocol”, and enter the number “9900” into
the item “Port Number”. And then click “OK” button.
Page 7

7
7. Complete the subsequent step .
Page 8

8
Page 9

z If you use WINDOWS 98, please run the software “Network Port Setup
for Win98” to add a network printing port for the printer.
z UNIX System
Method 1:Use SCOADMIN to add the network printer.
1.Enter SCOADMIN in shell.
9
2.Select the item ”Printers” and press “enter”.
Page 10

10
3.Select the item “Printer Manager” and press “enter”.
4.Enter the Printer Manager interface to install a remote printer.
Page 11

11
5.Select the “Host Name”.
Page 12

12
6.Type the printer name such as “name_001”. Select “OK” to quit.
Page 13

13
7.Config the Remote Print Services.
8.Quit and set it as the default printer:
Page 14

# /usr/lib/lpadmin –d name_001
Method 2: Use command-lines to add remote printer
1.Enter the following command in shell:
# rlpconf
14
2.Enter the printer name such as name_001.
Page 15

15
3.Install the remote printer.
4.Enter the name of remote host that name_001 is attached to, such
Page 16

as name_001.
16
5.Install the remote printer.
Page 17

17
6.Set it as the default printer.
7.Quit.
Page 18

18
STEP 5 : Printing and Monitoring
1.Printing
1)If you use WINDOWS, perform printing as usual, making sure that
the printer’s default port has been changed to the TCP/IP port added
in STEP 4.
Page 19

19
2)If you use UNIX, perform printing through the remote printer added
in STEP 4. For example, if the printer’s name is name_001, you can
enter the command as below to print out the file “/etc/hosts”.
lp –d name_001 /etc/hosts
2. Monitoring
You can use a Java enabled Web browser to monitor the network printing
jobs of the printer. Enter the IP address or printer name as the URL
to open the web page, and then click the “Print Job” Button. You can
find the print job that is being processed and the jobs that have
been completed.
 Loading...