

Page 1
Dlite Reference Guide
Page 2

Copyright © 2003 - 2008 Compulite Systems (2000) Ltd. All rights reserved.
This documentation is delivered subject to the following conditions and restrictions:
This document is protected by copyright and distributed under licenses restricting its use, copying, distribution and
decompilation. No part of this product or document may be reproduced in any form by any means without the prior
express written authorization of Compulite Systems (2000) Ltd. and its licensors (if any). The content of this
document is furnished for informational use only and is subject to change without notice. Compulite Systems
(2000) Ltd. assumes no responsibility or liability for errors or inaccuracies that may appear in this book.
Document Version
Version 20.0 June 2008 Dlite s/w 20.0R2
Version 10.4a March 2008 Dlite s/w 10.6R1
Version 10.4 February 2008 Dlite s/w 10.6R1
Version 10.3 June 2007 Dlite s/w 10.5R1
Note: Starting from this version, references
to Floppy Drive and Floppy disk have
been replaced by USB Drive and USB
stick. The procedures for all disk
management and file management are the
same.
Page 3

Table of Contents
Preface . . . . . . . . . . . . . . . . . . . . . . . . . . . . . . . . . . . . . . . . . . . . . . . . . . . . . . . . . . . . . . . . . i
How to use this guide . . . . . . . . . . . . . . . . . . . . . . . . . . . . . . . . . . . . . . . . . . . . . . . . . . . . . . . . . . i
Text conventions . . . . . . . . . . . . . . . . . . . . . . . . . . . . . . . . . . . . . . . . . . . . . . . . . . . . . . . . . . . . i
Chapter 1: System Overview . . . . . . . . . . . . . . . . . . . . . . . . . . . . . . . . . . . . . . . . . . . . . . 1
Dlite panels . . . . . . . . . . . . . . . . . . . . . . . . . . . . . . . . . . . . . . . . . . . . . . . . . . . . . . . . . . . . . . . . . . 1
Front panel . . . . . . . . . . . . . . . . . . . . . . . . . . . . . . . . . . . . . . . . . . . . . . . . . . . . . . . . . . . . . . . . 1
Back panel . . . . . . . . . . . . . . . . . . . . . . . . . . . . . . . . . . . . . . . . . . . . . . . . . . . . . . . . . . . . . . . . . 2
Setting up the system . . . . . . . . . . . . . . . . . . . . . . . . . . . . . . . . . . . . . . . . . . . . . . . . . . . . . . . . . . . 2
User interface . . . . . . . . . . . . . . . . . . . . . . . . . . . . . . . . . . . . . . . . . . . . . . . . . . . . . . . . . . . . . . . . 4
Touch screen . . . . . . . . . . . . . . . . . . . . . . . . . . . . . . . . . . . . . . . . . . . . . . . . . . . . . . . . . . . . . . . 4
Adjusting the touch screen . . . . . . . . . . . . . . . . . . . . . . . . . . . . . . . . . . . . . . . . . . . . . . . . . 5
External monitor . . . . . . . . . . . . . . . . . . . . . . . . . . . . . . . . . . . . . . . . . . . . . . . . . . . . . . . . . . . . 5
External monitor display modes . . . . . . . . . . . . . . . . . . . . . . . . . . . . . . . . . . . . . . . . . . . . . 6
Navigating and selecting displays . . . . . . . . . . . . . . . . . . . . . . . . . . . . . . . . . . . . . . . . . . . . 6
Live fixture displays . . . . . . . . . . . . . . . . . . . . . . . . . . . . . . . . . . . . . . . . . . . . . . . . . . . . . .7
Universal Keys (UKs) display . . . . . . . . . . . . . . . . . . . . . . . . . . . . . . . . . . . . . . . . . . . . . . 7
Output source color code on the external monitor . . . . . . . . . . . . . . . . . . . . . . . . . . . . . . . 7
Paging displays . . . . . . . . . . . . . . . . . . . . . . . . . . . . . . . . . . . . . . . . . . . . . . . . . . . . . . . . . . . . . 8
Scrolling displays . . . . . . . . . . . . . . . . . . . . . . . . . . . . . . . . . . . . . . . . . . . . . . . . . . . . . . . . . . . 8
Dlite menus . . . . . . . . . . . . . . . . . . . . . . . . . . . . . . . . . . . . . . . . . . . . . . . . . . . . . . . . . . . . . . . . . . 9
Menus and menu options . . . . . . . . . . . . . . . . . . . . . . . . . . . . . . . . . . . . . . . . . . . . . . . . . . . . .9
Universal procedures . . . . . . . . . . . . . . . . . . . . . . . . . . . . . . . . . . . . . . . . . . . . . . . . . . . . . . . . . 11
Show objects . . . . . . . . . . . . . . . . . . . . . . . . . . . . . . . . . . . . . . . . . . . . . . . . . . . . . . . . . . . . . . 11
Selecting objects and fixtures . . . . . . . . . . . . . . . . . . . . . . . . . . . . . . . . . . . . . . . . . . . . . . . . . 12
Storing objects . . . . . . . . . . . . . . . . . . . . . . . . . . . . . . . . . . . . . . . . . . . . . . . . . . . . . . . . . . . . 12
Store options . . . . . . . . . . . . . . . . . . . . . . . . . . . . . . . . . . . . . . . . . . . . . . . . . . . . . . . . . . . . . . 13
Updating (editing) objects . . . . . . . . . . . . . . . . . . . . . . . . . . . . . . . . . . . . . . . . . . . . . . . . . . .13
Deleting objects . . . . . . . . . . . . . . . . . . . . . . . . . . . . . . . . . . . . . . . . . . . . . . . . . . . . . . . . . . . 14
Adding text tags to objects . . . . . . . . . . . . . . . . . . . . . . . . . . . . . . . . . . . . . . . . . . . . . . . . . . .14
Dlite default times . . . . . . . . . . . . . . . . . . . . . . . . . . . . . . . . . . . . . . . . . . . . . . . . . . . . . . . . . . . . 15
Console output . . . . . . . . . . . . . . . . . . . . . . . . . . . . . . . . . . . . . . . . . . . . . . . . . . . . . . . . . . . . . . . 15
Output sources . . . . . . . . . . . . . . . . . . . . . . . . . . . . . . . . . . . . . . . . . . . . . . . . . . . . . . . . . . . . 15
Output Level Conventions . . . . . . . . . . . . . . . . . . . . . . . . . . . . . . . . . . . . . . . . . . . . . . . . . . . 15
HTP (Highest Takes Precedence) . . . . . . . . . . . . . . . . . . . . . . . . . . . . . . . . . . . . . . . . . . . 15
LTP (Latest Takes Precedence) . . . . . . . . . . . . . . . . . . . . . . . . . . . . . . . . . . . . . . . . . . . . 15
General master control . . . . . . . . . . . . . . . . . . . . . . . . . . . . . . . . . . . . . . . . . . . . . . . . . . . . . . 16
Getting help . . . . . . . . . . . . . . . . . . . . . . . . . . . . . . . . . . . . . . . . . . . . . . . . . . . . . . . . . . . . . . . . . 16
Chapter 2: Patching . . . . . . . . . . . . . . . . . . . . . . . . . . . . . . . . . . . . . . . . . . . . . . . . . . . . 17
About patching . . . . . . . . . . . . . . . . . . . . . . . . . . . . . . . . . . . . . . . . . . . . . . . . . . . . . . . . . . . . . . 17
Page 4

Setting the number of fixtures and assigning DMX addresses . . . . . . . . . . . . . . . . . . . . . . . . . . 18
Using the patch wizard . . . . . . . . . . . . . . . . . . . . . . . . . . . . . . . . . . . . . . . . . . . . . . . . . . . . .18
Patching channels using the wizard . . . . . . . . . . . . . . . . . . . . . . . . . . . . . . . . . . . . . . . . . 20
Patching spots . . . . . . . . . . . . . . . . . . . . . . . . . . . . . . . . . . . . . . . . . . . . . . . . . . . . . . . . . . 20
Patching extras . . . . . . . . . . . . . . . . . . . . . . . . . . . . . . . . . . . . . . . . . . . . . . . . . . . . . . . . .21
Patching scrollers . . . . . . . . . . . . . . . . . . . . . . . . . . . . . . . . . . . . . . . . . . . . . . . . . . . . . . .22
More patch features . . . . . . . . . . . . . . . . . . . . . . . . . . . . . . . . . . . . . . . . . . . . . . . . . . . . . . . . 22
Patching and clearing DMX addresses . . . . . . . . . . . . . . . . . . . . . . . . . . . . . . . . . . . . . . . 23
Deleting fixtures . . . . . . . . . . . . . . . . . . . . . . . . . . . . . . . . . . . . . . . . . . . . . . . . . . . . . . . .25
Patching external dimmers . . . . . . . . . . . . . . . . . . . . . . . . . . . . . . . . . . . . . . . . . . . . . . . . 25
Viewing the patch . . . . . . . . . . . . . . . . . . . . . . . . . . . . . . . . . . . . . . . . . . . . . . . . . . . . . . . . . . . . 26
DMX channel properties . . . . . . . . . . . . . . . . . . . . . . . . . . . . . . . . . . . . . . . . . . . . . . . . . . . . . . . 26
Proportional Patch . . . . . . . . . . . . . . . . . . . . . . . . . . . . . . . . . . . . . . . . . . . . . . . . . . . . . . . . . . 27
Dimmer curves . . . . . . . . . . . . . . . . . . . . . . . . . . . . . . . . . . . . . . . . . . . . . . . . . . . . . . . . . . . . 27
GM on or GM off . . . . . . . . . . . . . . . . . . . . . . . . . . . . . . . . . . . . . . . . . . . . . . . . . . . . . . . . . . 28
Pan and tilt orientation . . . . . . . . . . . . . . . . . . . . . . . . . . . . . . . . . . . . . . . . . . . . . . . . . . . . . . 29
Storing a default patch . . . . . . . . . . . . . . . . . . . . . . . . . . . . . . . . . . . . . . . . . . . . . . . . . . . . . . . . . 30
Patching in the editor . . . . . . . . . . . . . . . . . . . . . . . . . . . . . . . . . . . . . . . . . . . . . . . . . . . . . . . . . . 30
Viewing the patch . . . . . . . . . . . . . . . . . . . . . . . . . . . . . . . . . . . . . . . . . . . . . . . . . . . . . . . . . . 30
Selecting dimmer numbers . . . . . . . . . . . . . . . . . . . . . . . . . . . . . . . . . . . . . . . . . . . . . . . . . . . 31
Patching fixtures . . . . . . . . . . . . . . . . . . . . . . . . . . . . . . . . . . . . . . . . . . . . . . . . . . . . . . . . . . . 31
Using park . . . . . . . . . . . . . . . . . . . . . . . . . . . . . . . . . . . . . . . . . . . . . . . . . . . . . . . . . . . . . . . . 34
Testing dimmers . . . . . . . . . . . . . . . . . . . . . . . . . . . . . . . . . . . . . . . . . . . . . . . . . . . . . . . . . . . 35
Testing fixtures . . . . . . . . . . . . . . . . . . . . . . . . . . . . . . . . . . . . . . . . . . . . . . . . . . . . . . . . . . . . . . 36
Chapter 3: Selecting Fixtures and Setting Levels . . . . . . . . . . . . . . . . . . . . . . . . . . . . 37
About selecting fixtures . . . . . . . . . . . . . . . . . . . . . . . . . . . . . . . . . . . . . . . . . . . . . . . . . . . . . . . . 37
Selecting fixtures . . . . . . . . . . . . . . . . . . . . . . . . . . . . . . . . . . . . . . . . . . . . . . . . . . . . . . . . . . . . . 37
Command line numerical default . . . . . . . . . . . . . . . . . . . . . . . . . . . . . . . . . . . . . . . . . . . . . . 37
Selecting fixtures using the console keypad . . . . . . . . . . . . . . . . . . . . . . . . . . . . . . . . . . . . . . 38
Selecting fixtures using the universal keys . . . . . . . . . . . . . . . . . . . . . . . . . . . . . . . . . . . . . . . 39
Selecting fixtures on the touch screen . . . . . . . . . . . . . . . . . . . . . . . . . . . . . . . . . . . . . . . . . . 40
Selecting fixtures on the external monitor . . . . . . . . . . . . . . . . . . . . . . . . . . . . . . . . . . . . . . . 41
Filtering selections . . . . . . . . . . . . . . . . . . . . . . . . . . . . . . . . . . . . . . . . . . . . . . . . . . . . . . . . . 41
Activating spots . . . . . . . . . . . . . . . . . . . . . . . . . . . . . . . . . . . . . . . . . . . . . . . . . . . . . . . . . . . . . . 42
Setting parameter levels . . . . . . . . . . . . . . . . . . . . . . . . . . . . . . . . . . . . . . . . . . . . . . . . . . . . . . . 42
Wheels in parameter mode . . . . . . . . . . . . . . . . . . . . . . . . . . . . . . . . . . . . . . . . . . . . . . . . . . . 43
Paging wheel banks . . . . . . . . . . . . . . . . . . . . . . . . . . . . . . . . . . . . . . . . . . . . . . . . . . . . . . 43
Wheel and trackball resolution . . . . . . . . . . . . . . . . . . . . . . . . . . . . . . . . . . . . . . . . . . . . . 43
Selecting parameters . . . . . . . . . . . . . . . . . . . . . . . . . . . . . . . . . . . . . . . . . . . . . . . . . . . . . . . . 43
Setting dimmer intensity . . . . . . . . . . . . . . . . . . . . . . . . . . . . . . . . . . . . . . . . . . . . . . . . . . . . .44
Recalling the last editor level . . . . . . . . . . . . . . . . . . . . . . . . . . . . . . . . . . . . . . . . . . . . . . . . .45
Setting pan (x) and tilt (y) . . . . . . . . . . . . . . . . . . . . . . . . . . . . . . . . . . . . . . . . . . . . . . . . . . . . 45
Spot parameter types . . . . . . . . . . . . . . . . . . . . . . . . . . . . . . . . . . . . . . . . . . . . . . . . . . . . . . . . 45
Using the faders to set parameter levels . . . . . . . . . . . . . . . . . . . . . . . . . . . . . . . . . . . . . . . . . 46
Flip pan (x) and tilt (y) . . . . . . . . . . . . . . . . . . . . . . . . . . . . . . . . . . . . . . . . . . . . . . . . . . . . . . 47
Page 5

Changing pan (x) and tilt (y) orientation . . . . . . . . . . . . . . . . . . . . . . . . . . . . . . . . . . . . . . . . 47
Resetting the editor and recalling parameter levels . . . . . . . . . . . . . . . . . . . . . . . . . . . . . . . . 47
Releasing parameter levels from the editor . . . . . . . . . . . . . . . . . . . . . . . . . . . . . . . . . . . . 49
Resetting and recalling the editor . . . . . . . . . . . . . . . . . . . . . . . . . . . . . . . . . . . . . . . . . . . . . . . . 49
About groups . . . . . . . . . . . . . . . . . . . . . . . . . . . . . . . . . . . . . . . . . . . . . . . . . . . . . . . . . . . . . . . . 49
Working with groups . . . . . . . . . . . . . . . . . . . . . . . . . . . . . . . . . . . . . . . . . . . . . . . . . . . . . . .50
Storing groups . . . . . . . . . . . . . . . . . . . . . . . . . . . . . . . . . . . . . . . . . . . . . . . . . . . . . . . . . .50
Deleting groups . . . . . . . . . . . . . . . . . . . . . . . . . . . . . . . . . . . . . . . . . . . . . . . . . . . . . . . . .51
Copying groups . . . . . . . . . . . . . . . . . . . . . . . . . . . . . . . . . . . . . . . . . . . . . . . . . . . . . . . . . 51
Moving groups . . . . . . . . . . . . . . . . . . . . . . . . . . . . . . . . . . . . . . . . . . . . . . . . . . . . . . . . . 52
Updating groups . . . . . . . . . . . . . . . . . . . . . . . . . . . . . . . . . . . . . . . . . . . . . . . . . . . . . . . . 52
Adding text tags to groups . . . . . . . . . . . . . . . . . . . . . . . . . . . . . . . . . . . . . . . . . . . . . . . . 53
Using groups to select fixtures . . . . . . . . . . . . . . . . . . . . . . . . . . . . . . . . . . . . . . . . . . . . . . . . 53
Blind Editor . . . . . . . . . . . . . . . . . . . . . . . . . . . . . . . . . . . . . . . . . . . . . . . . . . . . . . . . . . . . . . . . . 55
Chapter 4: Programming Libraries . . . . . . . . . . . . . . . . . . . . . . . . . . . . . . . . . . . . . . . . 57
About libraries . . . . . . . . . . . . . . . . . . . . . . . . . . . . . . . . . . . . . . . . . . . . . . . . . . . . . . . . . . . . . . . 57
Storing libraries . . . . . . . . . . . . . . . . . . . . . . . . . . . . . . . . . . . . . . . . . . . . . . . . . . . . . . . . . . . . 58
Storing fixture or device libraries . . . . . . . . . . . . . . . . . . . . . . . . . . . . . . . . . . . . . . . . . . . . . . 58
Grabbing all bank parameters . . . . . . . . . . . . . . . . . . . . . . . . . . . . . . . . . . . . . . . . . . . . . . . . . 59
Copying libraries . . . . . . . . . . . . . . . . . . . . . . . . . . . . . . . . . . . . . . . . . . . . . . . . . . . . . . . . . . . 60
Moving libraries . . . . . . . . . . . . . . . . . . . . . . . . . . . . . . . . . . . . . . . . . . . . . . . . . . . . . . . . . . . 61
Adding text tags to libraries . . . . . . . . . . . . . . . . . . . . . . . . . . . . . . . . . . . . . . . . . . . . . . . . . .61
Editing Libraries . . . . . . . . . . . . . . . . . . . . . . . . . . . . . . . . . . . . . . . . . . . . . . . . . . . . . . . . . . . 61
Deleting libraries . . . . . . . . . . . . . . . . . . . . . . . . . . . . . . . . . . . . . . . . . . . . . . . . . . . . . . . . . . . 63
Using libraries to program scenes, steps, and cues . . . . . . . . . . . . . . . . . . . . . . . . . . . . . . . . . . . 63
Locking the soft keys to keep the library mode active . . . . . . . . . . . . . . . . . . . . . . . . . . . . . . 65
Chapter 5: Programming Lighting Objects . . . . . . . . . . . . . . . . . . . . . . . . . . . . . . . . . 67
About lighting objects . . . . . . . . . . . . . . . . . . . . . . . . . . . . . . . . . . . . . . . . . . . . . . . . . . . . . . . . . 67
Programming scenes . . . . . . . . . . . . . . . . . . . . . . . . . . . . . . . . . . . . . . . . . . . . . . . . . . . . . . . . . . 68
Storing scenes . . . . . . . . . . . . . . . . . . . . . . . . . . . . . . . . . . . . . . . . . . . . . . . . . . . . . . . . . . . . 68
Storing scenes on the playbacks . . . . . . . . . . . . . . . . . . . . . . . . . . . . . . . . . . . . . . . . . . . . 68
Storing scenes using the keypad, touch screen, or UKs . . . . . . . . . . . . . . . . . . . . . . . . . . 69
Programming scenes with libraries . . . . . . . . . . . . . . . . . . . . . . . . . . . . . . . . . . . . . . . . . . . . . 70
Adding text tags, copying, moving, and deleting . . . . . . . . . . . . . . . . . . . . . . . . . . . . . . . . . . 70
Programming QLists and cues . . . . . . . . . . . . . . . . . . . . . . . . . . . . . . . . . . . . . . . . . . . . . . . . . . 70
Storing QLists and cues . . . . . . . . . . . . . . . . . . . . . . . . . . . . . . . . . . . . . . . . . . . . . . . . . . . . .70
Storing QLists and cues on the playbacks and crossfader . . . . . . . . . . . . . . . . . . . . . . . . 71
Storing QLists and cues using the keypad, touch screen, or UKs . . . . . . . . . . . . . . . . . . . 72
Loops and links for cues . . . . . . . . . . . . . . . . . . . . . . . . . . . . . . . . . . . . . . . . . . . . . . . . . . . . .74
Programming loops . . . . . . . . . . . . . . . . . . . . . . . . . . . . . . . . . . . . . . . . . . . . . . . . . . . . . . 74
Programming links . . . . . . . . . . . . . . . . . . . . . . . . . . . . . . . . . . . . . . . . . . . . . . . . . . . . . . 75
Renumber cues . . . . . . . . . . . . . . . . . . . . . . . . . . . . . . . . . . . . . . . . . . . . . . . . . . . . . . . . . . . . 75
Programming cues with libraries . . . . . . . . . . . . . . . . . . . . . . . . . . . . . . . . . . . . . . . . . . . . . . 76
Adding text tags, copying, moving, and deleting . . . . . . . . . . . . . . . . . . . . . . . . . . . . . . . . . . 76
Page 6

Programming chases and chase steps . . . . . . . . . . . . . . . . . . . . . . . . . . . . . . . . . . . . . . . . . . . . . 76
Storing chases . . . . . . . . . . . . . . . . . . . . . . . . . . . . . . . . . . . . . . . . . . . . . . . . . . . . . . . . . . . . . 76
Storing chases and chase steps on the playbacks . . . . . . . . . . . . . . . . . . . . . . . . . . . . . . . 77
Storing chases and chase steps using the keypad, touch screen, or UKs . . . . . . . . . . . . . 78
Inserting chase steps . . . . . . . . . . . . . . . . . . . . . . . . . . . . . . . . . . . . . . . . . . . . . . . . . . . . . . . . 79
Changing step order . . . . . . . . . . . . . . . . . . . . . . . . . . . . . . . . . . . . . . . . . . . . . . . . . . . . . . . . 79
Chase attributes and run modes . . . . . . . . . . . . . . . . . . . . . . . . . . . . . . . . . . . . . . . . . . . . . . . 80
Chase patterns . . . . . . . . . . . . . . . . . . . . . . . . . . . . . . . . . . . . . . . . . . . . . . . . . . . . . . . . . .80
Setting the number of loops for chases . . . . . . . . . . . . . . . . . . . . . . . . . . . . . . . . . . . . . . . 81
Automatic rewind mode . . . . . . . . . . . . . . . . . . . . . . . . . . . . . . . . . . . . . . . . . . . . . . . . . . 81
Reversing chase direction . . . . . . . . . . . . . . . . . . . . . . . . . . . . . . . . . . . . . . . . . . . . . . . . . 82
Setting chases for manual operation . . . . . . . . . . . . . . . . . . . . . . . . . . . . . . . . . . . . . . . . . 82
Programming chases with libraries . . . . . . . . . . . . . . . . . . . . . . . . . . . . . . . . . . . . . . . . . . . . . 82
Adding text tags, copying, moving, and deleting . . . . . . . . . . . . . . . . . . . . . . . . . . . . . . . . . . 83
Updating and overwriting lighting objects . . . . . . . . . . . . . . . . . . . . . . . . . . . . . . . . . . . . . . . . . 83
Updating or overwriting lighting objects on the playbacks . . . . . . . . . . . . . . . . . . . . . . . . . . 83
Updating lighting objects on a range of playbacks . . . . . . . . . . . . . . . . . . . . . . . . . . . . . . . . . 84
Updating lighting objects via the editor . . . . . . . . . . . . . . . . . . . . . . . . . . . . . . . . . . . . . . . . . 84
Merge levels to update cues . . . . . . . . . . . . . . . . . . . . . . . . . . . . . . . . . . . . . . . . . . . . . . . . . . 85
Overwriting lighting objects via the editor . . . . . . . . . . . . . . . . . . . . . . . . . . . . . . . . . . . . . . . 86
Copying, moving, deleting, and adding text tags . . . . . . . . . . . . . . . . . . . . . . . . . . . . . . . . . . . . 87
Copying lighting objects . . . . . . . . . . . . . . . . . . . . . . . . . . . . . . . . . . . . . . . . . . . . . . . . . . . . .87
Copying parameter levels from scenes, chase steps, and cues . . . . . . . . . . . . . . . . . . . . . . . . 88
Copying parameter levels from console output . . . . . . . . . . . . . . . . . . . . . . . . . . . . . . . . . . . 89
Moving lighting objects . . . . . . . . . . . . . . . . . . . . . . . . . . . . . . . . . . . . . . . . . . . . . . . . . . . . .90
Deleting lighting objects . . . . . . . . . . . . . . . . . . . . . . . . . . . . . . . . . . . . . . . . . . . . . . . . . . . . . 91
Adding text tags to lighting objects . . . . . . . . . . . . . . . . . . . . . . . . . . . . . . . . . . . . . . . . . . . . 91
Setting fade times . . . . . . . . . . . . . . . . . . . . . . . . . . . . . . . . . . . . . . . . . . . . . . . . . . . . . . . . . . . . 92
Default fade time settings . . . . . . . . . . . . . . . . . . . . . . . . . . . . . . . . . . . . . . . . . . . . . . . . . . . .92
Setting fade times for lighting objects . . . . . . . . . . . . . . . . . . . . . . . . . . . . . . . . . . . . . . . . . . 93
Unique fade times for parameters . . . . . . . . . . . . . . . . . . . . . . . . . . . . . . . . . . . . . . . . . . . . . . 95
Examining objects . . . . . . . . . . . . . . . . . . . . . . . . . . . . . . . . . . . . . . . . . . . . . . . . . . . . . . . . . . . . 96
Chapter 6: Playbacks and the Crossfader . . . . . . . . . . . . . . . . . . . . . . . . . . . . . . . . . . 97
About playbacks . . . . . . . . . . . . . . . . . . . . . . . . . . . . . . . . . . . . . . . . . . . . . . . . . . . . . . . . . . . . . 97
Playback controls . . . . . . . . . . . . . . . . . . . . . . . . . . . . . . . . . . . . . . . . . . . . . . . . . . . . . . . . . . 98
Playbacks’ LED color code . . . . . . . . . . . . . . . . . . . . . . . . . . . . . . . . . . . . . . . . . . . . . . . . . . 98
Playback screen and options . . . . . . . . . . . . . . . . . . . . . . . . . . . . . . . . . . . . . . . . . . . . . . . . . . 99
Playing back scenes and chases . . . . . . . . . . . . . . . . . . . . . . . . . . . . . . . . . . . . . . . . . . . . . . . . . .99
Loading scenes and chases to playbacks . . . . . . . . . . . . . . . . . . . . . . . . . . . . . . . . . . . . . . . 100
Playback commands for scenes and chases . . . . . . . . . . . . . . . . . . . . . . . . . . . . . . . . . . . . . 100
Global off control . . . . . . . . . . . . . . . . . . . . . . . . . . . . . . . . . . . . . . . . . . . . . . . . . . . . . . 101
Global on/off commands for playbacks . . . . . . . . . . . . . . . . . . . . . . . . . . . . . . . . . . . . . 101
Pausing the playbacks . . . . . . . . . . . . . . . . . . . . . . . . . . . . . . . . . . . . . . . . . . . . . . . . . . . 101
Restarting paused playbacks . . . . . . . . . . . . . . . . . . . . . . . . . . . . . . . . . . . . . . . . . . . . . . 101
Using Solo . . . . . . . . . . . . . . . . . . . . . . . . . . . . . . . . . . . . . . . . . . . . . . . . . . . . . . . . . . . .102
Page 7

Chases on-the-fly . . . . . . . . . . . . . . . . . . . . . . . . . . . . . . . . . . . . . . . . . . . . . . . . . . . . . . . . . 102
Freeing playbacks . . . . . . . . . . . . . . . . . . . . . . . . . . . . . . . . . . . . . . . . . . . . . . . . . . . . . . . . . 103
Playing back QLists . . . . . . . . . . . . . . . . . . . . . . . . . . . . . . . . . . . . . . . . . . . . . . . . . . . . . . . . . . 103
Loading QLists to playbacks . . . . . . . . . . . . . . . . . . . . . . . . . . . . . . . . . . . . . . . . . . . . . . . . 103
Playbacks as crossfader . . . . . . . . . . . . . . . . . . . . . . . . . . . . . . . . . . . . . . . . . . . . . . . . . . . . 104
Playback behavior . . . . . . . . . . . . . . . . . . . . . . . . . . . . . . . . . . . . . . . . . . . . . . . . . . . . . . . . . . . 105
Controlling fade rates . . . . . . . . . . . . . . . . . . . . . . . . . . . . . . . . . . . . . . . . . . . . . . . . . . . . . . . . 106
Inhibit submasters . . . . . . . . . . . . . . . . . . . . . . . . . . . . . . . . . . . . . . . . . . . . . . . . . . . . . . . . . . . 107
About the crossfader . . . . . . . . . . . . . . . . . . . . . . . . . . . . . . . . . . . . . . . . . . . . . . . . . . . . . . . . . 108
In/Out crossfader masters . . . . . . . . . . . . . . . . . . . . . . . . . . . . . . . . . . . . . . . . . . . . . . . . . . . 109
Fade controls . . . . . . . . . . . . . . . . . . . . . . . . . . . . . . . . . . . . . . . . . . . . . . . . . . . . . . . . . . . . . 109
Playing Back QLists on the crossfader . . . . . . . . . . . . . . . . . . . . . . . . . . . . . . . . . . . . . . . . . 109
Controlling fade rates on the crossfader . . . . . . . . . . . . . . . . . . . . . . . . . . . . . . . . . . . . . . . . 110
Examining cues running on the crossfader . . . . . . . . . . . . . . . . . . . . . . . . . . . . . . . . . . . . . . 110
Linking QLists . . . . . . . . . . . . . . . . . . . . . . . . . . . . . . . . . . . . . . . . . . . . . . . . . . . . . . . . . . . 111
Chapter 7: Faders . . . . . . . . . . . . . . . . . . . . . . . . . . . . . . . . . . . . . . . . . . . . . . . . . . . . . 113
Faders and fader controls . . . . . . . . . . . . . . . . . . . . . . . . . . . . . . . . . . . . . . . . . . . . . . . . . . . . . 113
Fader LEDs . . . . . . . . . . . . . . . . . . . . . . . . . . . . . . . . . . . . . . . . . . . . . . . . . . . . . . . . . . . . . . 114
LED color code . . . . . . . . . . . . . . . . . . . . . . . . . . . . . . . . . . . . . . . . . . . . . . . . . . . . . . . . 114
LED intensity . . . . . . . . . . . . . . . . . . . . . . . . . . . . . . . . . . . . . . . . . . . . . . . . . . . . . . . . . 114
Paging faders . . . . . . . . . . . . . . . . . . . . . . . . . . . . . . . . . . . . . . . . . . . . . . . . . . . . . . . . . . . . . 114
Fader modes . . . . . . . . . . . . . . . . . . . . . . . . . . . . . . . . . . . . . . . . . . . . . . . . . . . . . . . . . . . . . . . 115
Context mode . . . . . . . . . . . . . . . . . . . . . . . . . . . . . . . . . . . . . . . . . . . . . . . . . . . . . . . . . . . . 115
Wide mode . . . . . . . . . . . . . . . . . . . . . . . . . . . . . . . . . . . . . . . . . . . . . . . . . . . . . . . . . . . . . . 116
Two preset (manual board) mode . . . . . . . . . . . . . . . . . . . . . . . . . . . . . . . . . . . . . . . . . . . . . 116
Using the grab fader . . . . . . . . . . . . . . . . . . . . . . . . . . . . . . . . . . . . . . . . . . . . . . . . . . . . . . . . . 117
Faders as editor . . . . . . . . . . . . . . . . . . . . . . . . . . . . . . . . . . . . . . . . . . . . . . . . . . . . . . . . . . . . . 117
Chapter 8: Show and Device File Management . . . . . . . . . . . . . . . . . . . . . . . . . . . . . 119
About file management . . . . . . . . . . . . . . . . . . . . . . . . . . . . . . . . . . . . . . . . . . . . . . . . . . . . . . . 119
Saving shows . . . . . . . . . . . . . . . . . . . . . . . . . . . . . . . . . . . . . . . . . . . . . . . . . . . . . . . . . . . . . . 119
Loading shows . . . . . . . . . . . . . . . . . . . . . . . . . . . . . . . . . . . . . . . . . . . . . . . . . . . . . . . . . . . . . . 120
Loading all show data . . . . . . . . . . . . . . . . . . . . . . . . . . . . . . . . . . . . . . . . . . . . . . . . . . . . . .121
Partial loading . . . . . . . . . . . . . . . . . . . . . . . . . . . . . . . . . . . . . . . . . . . . . . . . . . . . . . . . . . . . 121
Merging shows . . . . . . . . . . . . . . . . . . . . . . . . . . . . . . . . . . . . . . . . . . . . . . . . . . . . . . . . . . . 122
Deleting shows . . . . . . . . . . . . . . . . . . . . . . . . . . . . . . . . . . . . . . . . . . . . . . . . . . . . . . . . . . . . . 123
Deleting devices . . . . . . . . . . . . . . . . . . . . . . . . . . . . . . . . . . . . . . . . . . . . . . . . . . . . . . . . . . . . 123
Moving show and device files . . . . . . . . . . . . . . . . . . . . . . . . . . . . . . . . . . . . . . . . . . . . . . . . . . 124
Connecting . . . . . . . . . . . . . . . . . . . . . . . . . . . . . . . . . . . . . . . . . . . . . . . . . . . . . . . . . . .124
Sending files . . . . . . . . . . . . . . . . . . . . . . . . . . . . . . . . . . . . . . . . . . . . . . . . . . . . . . . . . .125
Chapter 9: Effects . . . . . . . . . . . . . . . . . . . . . . . . . . . . . . . . . . . . . . . . . . . . . . . . . . . . . 127
About effects . . . . . . . . . . . . . . . . . . . . . . . . . . . . . . . . . . . . . . . . . . . . . . . . . . . . . . . . . . . . . . . 127
Effect attributes . . . . . . . . . . . . . . . . . . . . . . . . . . . . . . . . . . . . . . . . . . . . . . . . . . . . . . . . . . . 127
Page 8

Fixture selection order . . . . . . . . . . . . . . . . . . . . . . . . . . . . . . . . . . . . . . . . . . . . . . . . . . . . .129
Generic effects . . . . . . . . . . . . . . . . . . . . . . . . . . . . . . . . . . . . . . . . . . . . . . . . . . . . . . . . . . . 129
Movement attributes . . . . . . . . . . . . . . . . . . . . . . . . . . . . . . . . . . . . . . . . . . . . . . . . . . . . . . . . . 129
Customize . . . . . . . . . . . . . . . . . . . . . . . . . . . . . . . . . . . . . . . . . . . . . . . . . . . . . . . . . . . . . . . 130
Base . . . . . . . . . . . . . . . . . . . . . . . . . . . . . . . . . . . . . . . . . . . . . . . . . . . . . . . . . . . . . . . . . . . . 130
Using libraries as base value for effects . . . . . . . . . . . . . . . . . . . . . . . . . . . . . . . . . . . . . 131
Direction and scope . . . . . . . . . . . . . . . . . . . . . . . . . . . . . . . . . . . . . . . . . . . . . . . . . . . . . . .131
Up . . . . . . . . . . . . . . . . . . . . . . . . . . . . . . . . . . . . . . . . . . . . . . . . . . . . . . . . . . . . . . . . . . 131
Down . . . . . . . . . . . . . . . . . . . . . . . . . . . . . . . . . . . . . . . . . . . . . . . . . . . . . . . . . . . . . . . . 132
Center . . . . . . . . . . . . . . . . . . . . . . . . . . . . . . . . . . . . . . . . . . . . . . . . . . . . . . . . . . . . . . . 132
Examples . . . . . . . . . . . . . . . . . . . . . . . . . . . . . . . . . . . . . . . . . . . . . . . . . . . . . . . . . . . . .132
Size . . . . . . . . . . . . . . . . . . . . . . . . . . . . . . . . . . . . . . . . . . . . . . . . . . . . . . . . . . . . . . . . . . . . 133
Time attributes . . . . . . . . . . . . . . . . . . . . . . . . . . . . . . . . . . . . . . . . . . . . . . . . . . . . . . . . . . . . . . 134
Rate . . . . . . . . . . . . . . . . . . . . . . . . . . . . . . . . . . . . . . . . . . . . . . . . . . . . . . . . . . . . . . . . . . . . 134
Offset . . . . . . . . . . . . . . . . . . . . . . . . . . . . . . . . . . . . . . . . . . . . . . . . . . . . . . . . . . . . . . . . . . 134
Examples of Offset uses . . . . . . . . . . . . . . . . . . . . . . . . . . . . . . . . . . . . . . . . . . . . . . . . . 135
Setting an effect to run in a wave or one-on offset . . . . . . . . . . . . . . . . . . . . . . . . . . . . . 135
Fixture grouping . . . . . . . . . . . . . . . . . . . . . . . . . . . . . . . . . . . . . . . . . . . . . . . . . . . . . . . 136
Basic effect programming . . . . . . . . . . . . . . . . . . . . . . . . . . . . . . . . . . . . . . . . . . . . . . . . . . . . .136
Releasing effects . . . . . . . . . . . . . . . . . . . . . . . . . . . . . . . . . . . . . . . . . . . . . . . . . . . . . . . . . . 137
Programming effect libraries . . . . . . . . . . . . . . . . . . . . . . . . . . . . . . . . . . . . . . . . . . . . . . . . . . .138
Include base levels in stored effects . . . . . . . . . . . . . . . . . . . . . . . . . . . . . . . . . . . . . . . . . . . 138
Copying effect libraries . . . . . . . . . . . . . . . . . . . . . . . . . . . . . . . . . . . . . . . . . . . . . . . . . . . .139
Deleting effect libraries . . . . . . . . . . . . . . . . . . . . . . . . . . . . . . . . . . . . . . . . . . . . . . . . . . . .139
Adding text tags to effect libraries . . . . . . . . . . . . . . . . . . . . . . . . . . . . . . . . . . . . . . . . . . . . 140
Using effect libraries as building blocks . . . . . . . . . . . . . . . . . . . . . . . . . . . . . . . . . . . . . . . . 140
Advanced effect programming . . . . . . . . . . . . . . . . . . . . . . . . . . . . . . . . . . . . . . . . . . . . . . . . . 140
Inverting effect size . . . . . . . . . . . . . . . . . . . . . . . . . . . . . . . . . . . . . . . . . . . . . . . . . . . . . . . 140
Setting the effect direction . . . . . . . . . . . . . . . . . . . . . . . . . . . . . . . . . . . . . . . . . . . . . . . . . .141
Determining fixture progression in effects . . . . . . . . . . . . . . . . . . . . . . . . . . . . . . . . . . . . . . 141
Synchronizing effects . . . . . . . . . . . . . . . . . . . . . . . . . . . . . . . . . . . . . . . . . . . . . . . . . . . . . .141
Using fan . . . . . . . . . . . . . . . . . . . . . . . . . . . . . . . . . . . . . . . . . . . . . . . . . . . . . . . . . . . . . . . . . . 142
Chapter 10: Snaps . . . . . . . . . . . . . . . . . . . . . . . . . . . . . . . . . . . . . . . . . . . . . . . . . . . . 147
About snaps . . . . . . . . . . . . . . . . . . . . . . . . . . . . . . . . . . . . . . . . . . . . . . . . . . . . . . . . . . . . . . . . 147
Working with snaps . . . . . . . . . . . . . . . . . . . . . . . . . . . . . . . . . . . . . . . . . . . . . . . . . . . . . . . . . . 147
Storing snaps . . . . . . . . . . . . . . . . . . . . . . . . . . . . . . . . . . . . . . . . . . . . . . . . . . . . . . . . . . . . . 147
Copying snaps . . . . . . . . . . . . . . . . . . . . . . . . . . . . . . . . . . . . . . . . . . . . . . . . . . . . . . . . . . . . 148
Moving snaps . . . . . . . . . . . . . . . . . . . . . . . . . . . . . . . . . . . . . . . . . . . . . . . . . . . . . . . . . . . . 149
Updating snaps . . . . . . . . . . . . . . . . . . . . . . . . . . . . . . . . . . . . . . . . . . . . . . . . . . . . . . . . . . . 149
Adding text tags to snaps . . . . . . . . . . . . . . . . . . . . . . . . . . . . . . . . . . . . . . . . . . . . . . . . . . . 150
Deleting snaps . . . . . . . . . . . . . . . . . . . . . . . . . . . . . . . . . . . . . . . . . . . . . . . . . . . . . . . . . . . . 150
Triggering snaps . . . . . . . . . . . . . . . . . . . . . . . . . . . . . . . . . . . . . . . . . . . . . . . . . . . . . . . . . . . . 151
Snap fade time . . . . . . . . . . . . . . . . . . . . . . . . . . . . . . . . . . . . . . . . . . . . . . . . . . . . . . . . . . . . . . 152
Page 9

Chapter 11: Advanced Programming . . . . . . . . . . . . . . . . . . . . . . . . . . . . . . . . . . . . . 153
Merging and filtering output to program lighting objects . . . . . . . . . . . . . . . . . . . . . . . . . . . . . 153
Using Active to select fixtures . . . . . . . . . . . . . . . . . . . . . . . . . . . . . . . . . . . . . . . . . . . . . . . 153
Using store options . . . . . . . . . . . . . . . . . . . . . . . . . . . . . . . . . . . . . . . . . . . . . . . . . . . . . . . . 155
Using one- parameter scenes on playbacks . . . . . . . . . . . . . . . . . . . . . . . . . . . . . . . . . . . . . 157
Excluding or including parameters when storing objects . . . . . . . . . . . . . . . . . . . . . . . . . . . 158
Using Highlight or Lowlight . . . . . . . . . . . . . . . . . . . . . . . . . . . . . . . . . . . . . . . . . . . . . . . . . . .159
Using Rem Dim . . . . . . . . . . . . . . . . . . . . . . . . . . . . . . . . . . . . . . . . . . . . . . . . . . . . . . . . . . . . . 160
Chapter 12: System Setup and Operations . . . . . . . . . . . . . . . . . . . . . . . . . . . . . . . . 163
About the setup screen . . . . . . . . . . . . . . . . . . . . . . . . . . . . . . . . . . . . . . . . . . . . . . . . . . . . . . . 163
System options . . . . . . . . . . . . . . . . . . . . . . . . . . . . . . . . . . . . . . . . . . . . . . . . . . . . . . . . . . . . . 164
Behavior . . . . . . . . . . . . . . . . . . . . . . . . . . . . . . . . . . . . . . . . . . . . . . . . . . . . . . . . . . . . . . . . 164
Defaults . . . . . . . . . . . . . . . . . . . . . . . . . . . . . . . . . . . . . . . . . . . . . . . . . . . . . . . . . . . . . . . . . 165
Tools . . . . . . . . . . . . . . . . . . . . . . . . . . . . . . . . . . . . . . . . . . . . . . . . . . . . . . . . . . . . . . . . . . . 166
In/Out . . . . . . . . . . . . . . . . . . . . . . . . . . . . . . . . . . . . . . . . . . . . . . . . . . . . . . . . . . . . . . . . . . 166
System upgrades . . . . . . . . . . . . . . . . . . . . . . . . . . . . . . . . . . . . . . . . . . . . . . . . . . . . . . . . . . 168
Shutdown . . . . . . . . . . . . . . . . . . . . . . . . . . . . . . . . . . . . . . . . . . . . . . . . . . . . . . . . . . . . . . . 168
Diagnostics . . . . . . . . . . . . . . . . . . . . . . . . . . . . . . . . . . . . . . . . . . . . . . . . . . . . . . . . . . . . . . 168
Connecting to a PC . . . . . . . . . . . . . . . . . . . . . . . . . . . . . . . . . . . . . . . . . . . . . . . . . . . . . . . . . . 169
Clearing all data on start up . . . . . . . . . . . . . . . . . . . . . . . . . . . . . . . . . . . . . . . . . . . . . . . . . . . . 169
Appendix A: Automated Playback . . . . . . . . . . . . . . . . . . . . . . . . . . . . . . . . . . . . . . . 171
SMPTE . . . . . . . . . . . . . . . . . . . . . . . . . . . . . . . . . . . . . . . . . . . . . . . . . . . . . . . . . . . . . . . . . . . 171
Setting up Dlite for SMPTE operation . . . . . . . . . . . . . . . . . . . . . . . . . . . . . . . . . . . . . . . . . 171
Using the SMPTE clock . . . . . . . . . . . . . . . . . . . . . . . . . . . . . . . . . . . . . . . . . . . . . . . . . 171
Setting SMPTE triggers for cues . . . . . . . . . . . . . . . . . . . . . . . . . . . . . . . . . . . . . . . . . . . . . 172
MIDI . . . . . . . . . . . . . . . . . . . . . . . . . . . . . . . . . . . . . . . . . . . . . . . . . . . . . . . . . . . . . . . . . . . . . 173
MIDI commands . . . . . . . . . . . . . . . . . . . . . . . . . . . . . . . . . . . . . . . . . . . . . . . . . . . . . . . . .173
Sound-to-Light . . . . . . . . . . . . . . . . . . . . . . . . . . . . . . . . . . . . . . . . . . . . . . . . . . . . . . . . . . . . . 174
Appendix B: Master/Slave Tracking Back Up . . . . . . . . . . . . . . . . . . . . . . . . . . . . . . 177
About master/slave tracking back up . . . . . . . . . . . . . . . . . . . . . . . . . . . . . . . . . . . . . . . . . . . . 177
Connecting the consoles . . . . . . . . . . . . . . . . . . . . . . . . . . . . . . . . . . . . . . . . . . . . . . . . . . . . 177
Configuring the slave console . . . . . . . . . . . . . . . . . . . . . . . . . . . . . . . . . . . . . . . . . . . . . . . . 177
Index . . . . . . . . . . . . . . . . . . . . . . . . . . . . . . . . . . . . . . . . . . . . . . . . . . . . . . . . . . . . . . . . 179
Page 10

Page 11

Preface
How to use this guide
Chapter 1, System Overview, allows you to familiarize yourself with the Dlite console and learn
about Dlite’s displays.
The chapter order, in this guide, is similar to your work flow when starting a new show:
Patching fixtures
Selecting fixtures and setting parameter levels
Programming libraries
Storing lighting objects, such as scenes, chases, and cues
Playing back your show
Saving your show
Subsequent chapters present Dlite’s advanced features
Text conventions
The actual keys on the console panel are referred to as KEYS. Panel KEYS are in BOLD CAPS.
The keys on the touch screens are referred to as BUTTONS. Touch screen BUTTONS are
BOLD, ITALICIZED CAPS.
Command line text and messages appear in italics. Command line refers to area where the
command chain is displayed.
# refers to numbers entered on the numeric keypad.
In operation sequences, optional keys or buttons appear in parentheses.
Example:
Key strokes are separated by commas when operation sequences are written in a single line.
Example:
When + appears between key or button names, it means: Press THIS (and) THAT at the same
time. Example:
The term Tap, Touch, and Click are used interchangeably when referring to the touch screen
SPOT # (#) @ 65.
SPOT, #,,#, ACTIVE
SHIFT + FREE. Generally used only in conjunction with shift pairs.
buttons.
Fixture is used for any lighting device.
i
Page 12

UKs refers to universal keys. UKs are represented on the touch screen grid when the editor is
active. UKs are also displayed on the external monitor in views 7 through 9.
Select key refers to the blank (multi-purpose) keys above the playbacks and crossfader and
looks like this:
Desk, console, and system are used interchangeably.
Storing and programming are used interchangeably.
Dlite offers a variety of procedure syntaxes to suit each programmer’s preference. When basic
SELECT.
procedures are introduced, various procedure syntaxes are explained separately. In subsequent
procedures, more general terminology is used. Example: When first discussed, the procedure
for storing a scene is shown using 4 different syntaxes. In subsequent procedures, which
include storing a scene, general language (such as, “Store the scene) is used.
Procedures often contain different options for the same step. They look like this:
1 Do this.
Or
Do this
Sometimes an alternate procedure is included under the same heading. In this case, it looks
like this:
1 Do this.
2 Now do this.
OR
1 Do this.
2 And do this.
ii
Page 13
Chapter 1 System Overview
This chapter includes:
Dlite panels (see page 1)
Setting up the system (see page 2)
User interface (see page 4)
Dlite menus (see page 9)
Universal procedures (see page 11)
Dlite default times (see page 15)
Console output (see page 15)
Getting help (see page 16)
Dlite panels
Front panel
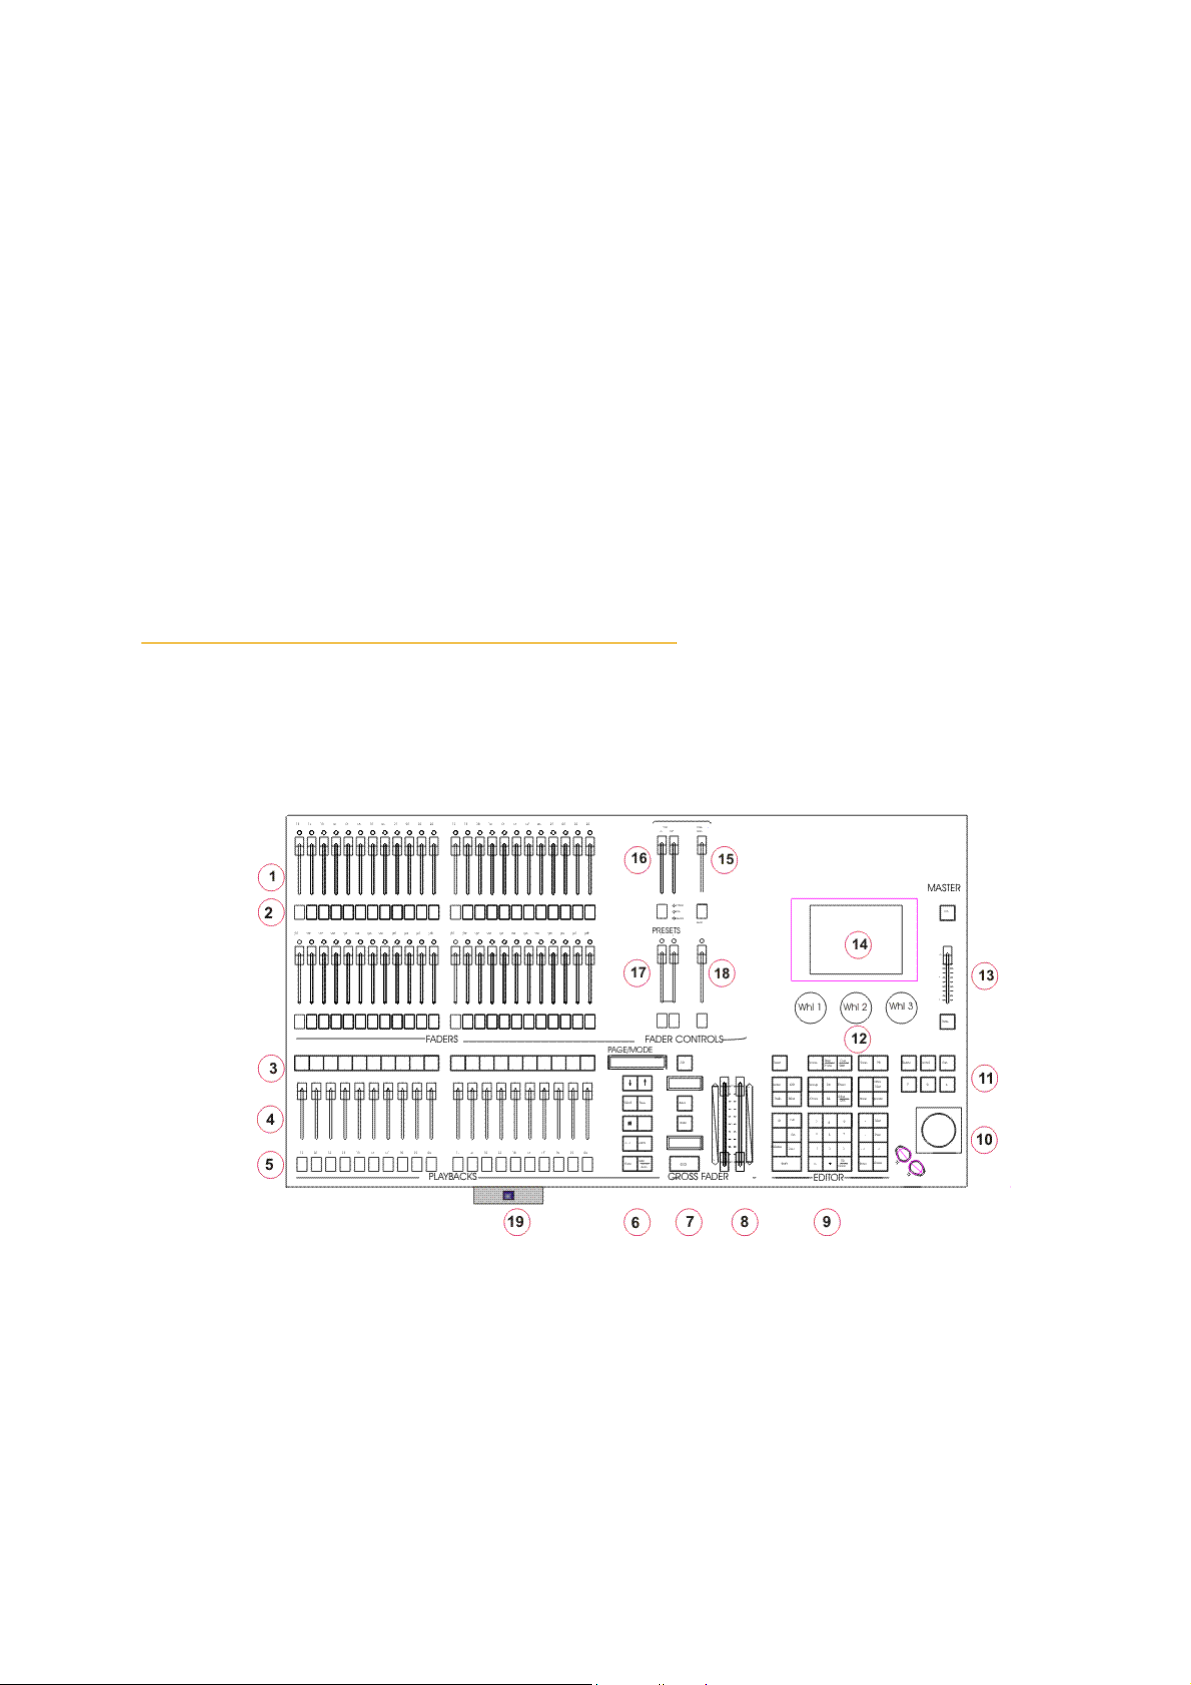
Figure 1: Dlite’s front panel with editing keys, integral touch screen, and playback devices
1
Page 14
Compulite
Chapter 1
No. Panel Controls No. Panel Controls
1 Faders 11 Parameter banks (Focus, Beam, Color)
and editing keys
Back panel
2 • Universal Keys (UKs) in
text mode
• Fader flash keys in
Preset modes
Wide or 2
Con-
12 Wheels
3 Playback - Select & On/Off keys 13 General intensity/rate master
4 Playback sliders 14 LCD touch screen
5 Flash keys 15 Flash level master
6 Playback modes and paging 16 Fade time master for 2 preset manual
operation
7 Crossfader controls 17 Preset master faders
8 Crossfader handles 18 Grab master
9 Editing keypad 19 USB drive
10 • Trackball with pan & tilt locks
• Trackball can operate as a
mouse
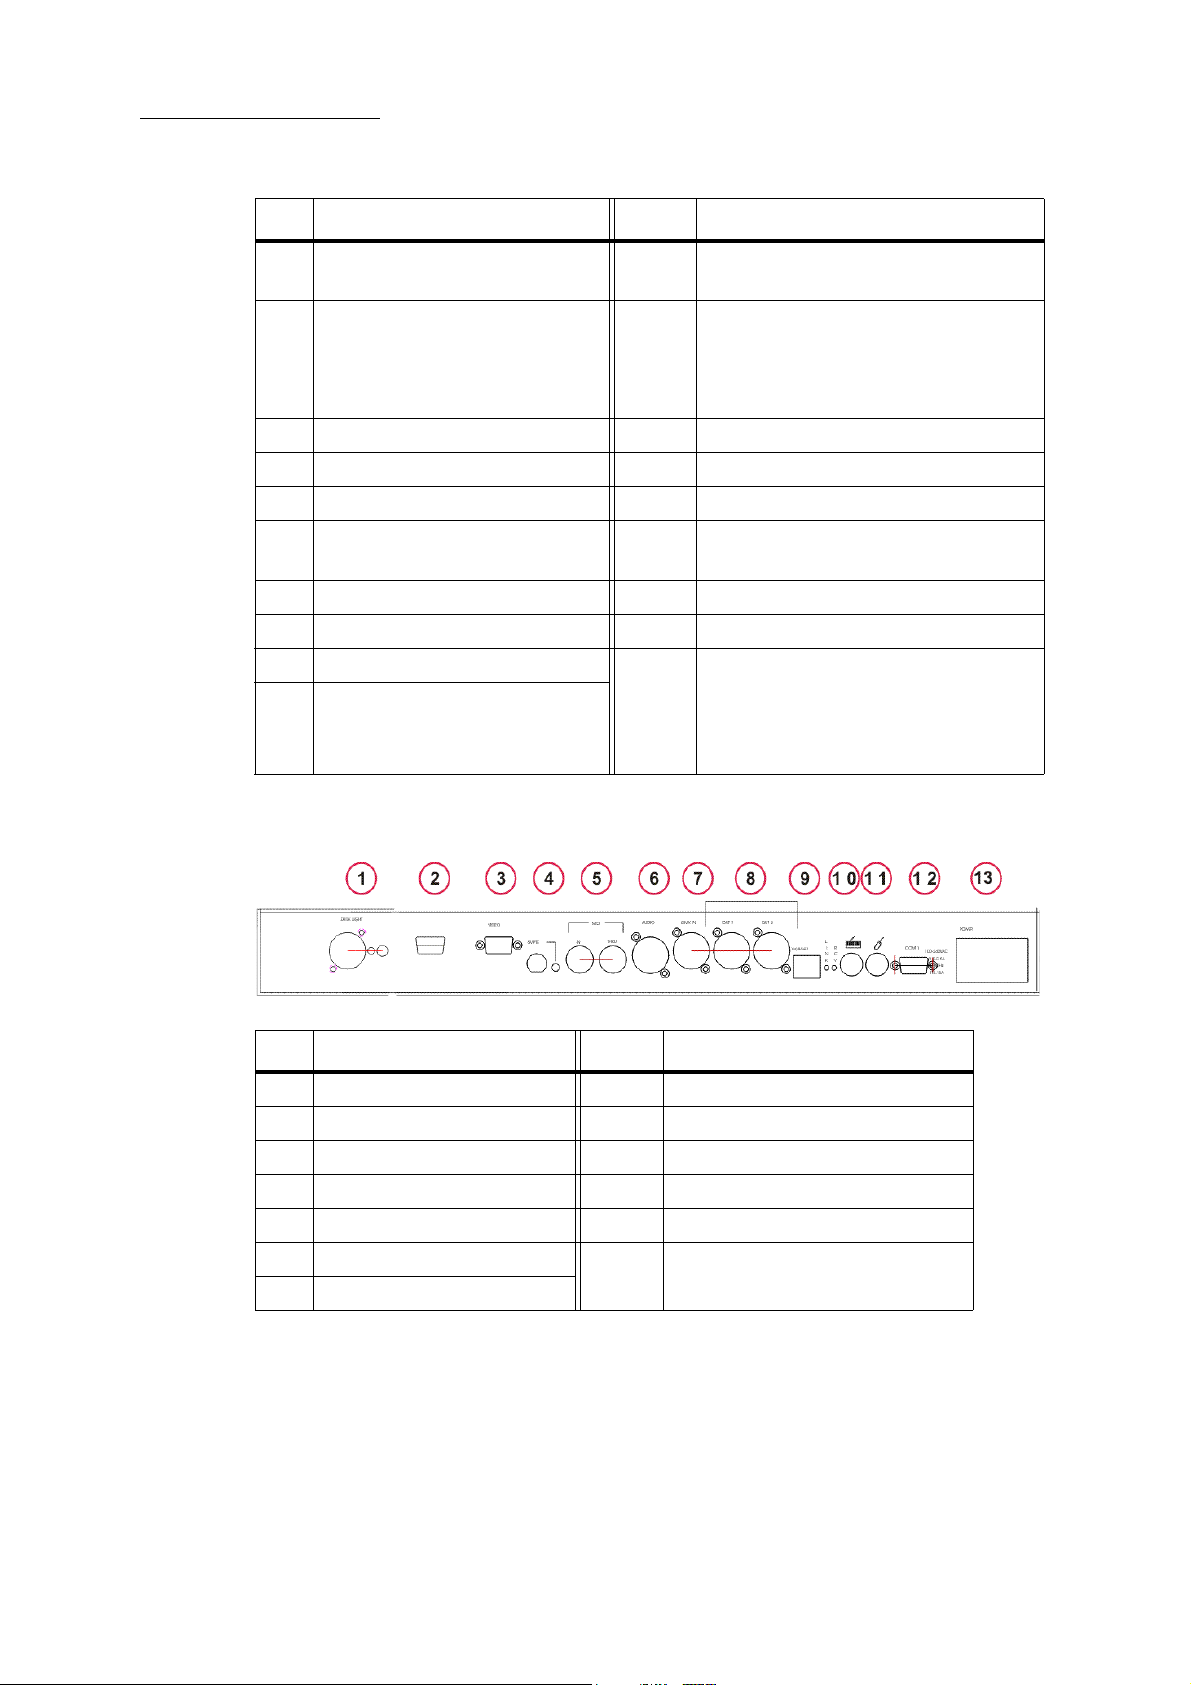
Figure 2: Dlite’s back panel
No. Connectors No. Connectors
1 Desklight 8 DMX Out
2 USB drive 9 Ethernet
3 Video (external monitor) 10 Keyboard serial
4 SMPTE 11 Mouse
5 MIDI 12 Connection to external PC
6 Audio 13 Power
7 DMX IN
2
Page 15

Setting up the system
Prepare a clean and stable work area with enough space for the console, the external monitor, and, if
used, a mouse and an alphanumeric keyboard.
Dlite is equipped with an auto-ranging power pack, which selects the correct mains power and
voltage.
To set up and power up Dlite
1 Place the system on a clean, level surface.
2 Connect Dlite to the mains supply using the cable supplied.
3 Connect the external monitor, if used, to the connector labelled Video.
4 Connect the mouse at the connector labelled with the standard mouse icon.
5 Connect the keyboard, if used, at the connector labelled with the standard keyboard icon.
6 Connect the DMX communication cables to the DMX-out connectors. The DMX cable
should be daisy chained through all of your DMX controlled devices (dimmers, moving
lights, smoke machines, etc).
DLITE
System Overview
7 Turn the power switch to on (—).
Dlite takes a approximately 30 - 45 seconds to boot up.
To shut down
It is recommended to use the shutdown option in the System Options menu to shut down the
application prior to switching off the power. This will extend the console’s battery life:
Press SETUP, tap SHUT DOWN. (see “System Setup and Operations” page 163).
To adjust the touch screen and LEDs
Holding down setup:
z Wheel 1 (touch contrast) adjusts touch screen contrast
z Wheel 2 (touch backlight) toggles the touch screen backlight on and off
z Wheel 3 (LED’s intensity) adjusts the fader LEDs minimum intensity.
3
Page 16
Compulite
Chapter 1
User interface
Dlite has two graphical user interfaces:
The touch screen
The external monitor
Touch screen
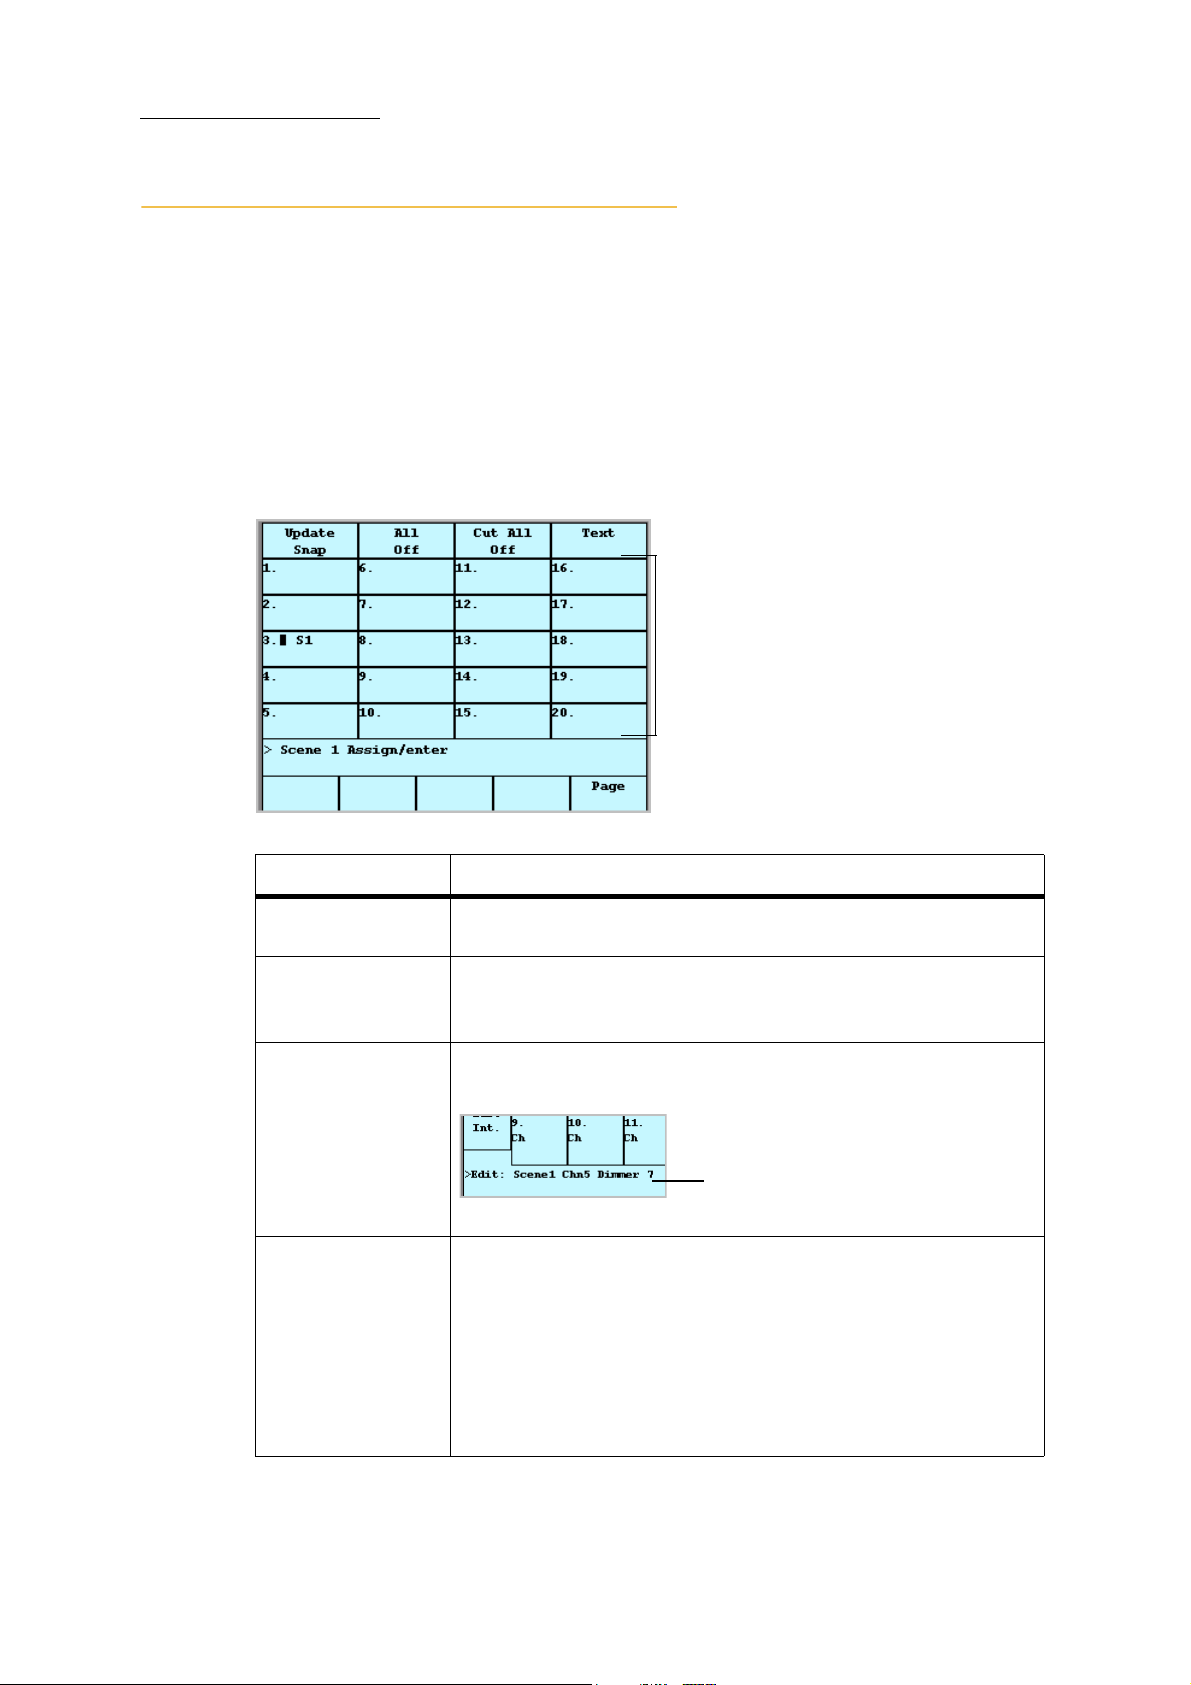
The touch screen contains a grid showing objects or playbacks, context sensitive soft buttons, wheel
labels, and a command line.
Soft Buttons
Touch screen grid
Command line
Wheel tags and soft buttons
Figure 3: When the editor is idle, the touch screen grid shows the loads on the playbacks
Touch screen area What it is
Soft buttons
Soft buttons are options available on the touch screen. The soft buttons
are context sensitive.
Touch screen grid
In object mode, the touch screen grid represents the UKs (universal
keys). Objects can be selected by tapping the object number on the touch
screen grid.
Command line
The command line is the area where commands, entered using the
console keys or the soft buttons, are displayed.
Command line
Figure 4: Touch screen detail showing the command line
Wheel tags
Wheel tags are context sensitive. The touch screen area above each
wheel shows the wheel’s use in the current operation. Examples:
• When a spot is selected, the wheels are used to set parameter levels.
• When editing fade times, the wheels are used to set the times for the
various options.
• When editing effects, the wheels are used to set effect attributes.
• Wheel 3 is used for paging the touch screen grid.
4
Page 17
Adjusting the touch screen
You can adjust the touch screen’s contrast and turn its backlight on or off.
To adjust the contrast
Press and hold SETUP and turn wheel 1 to adjust the touch screen’s contrast.
To turn the backlight on/off
Press and hold SETUP and turn wheel 2 to turn the touch screen’s backlight on or off.
External monitor
The display on the optional external monitor can be set to show:
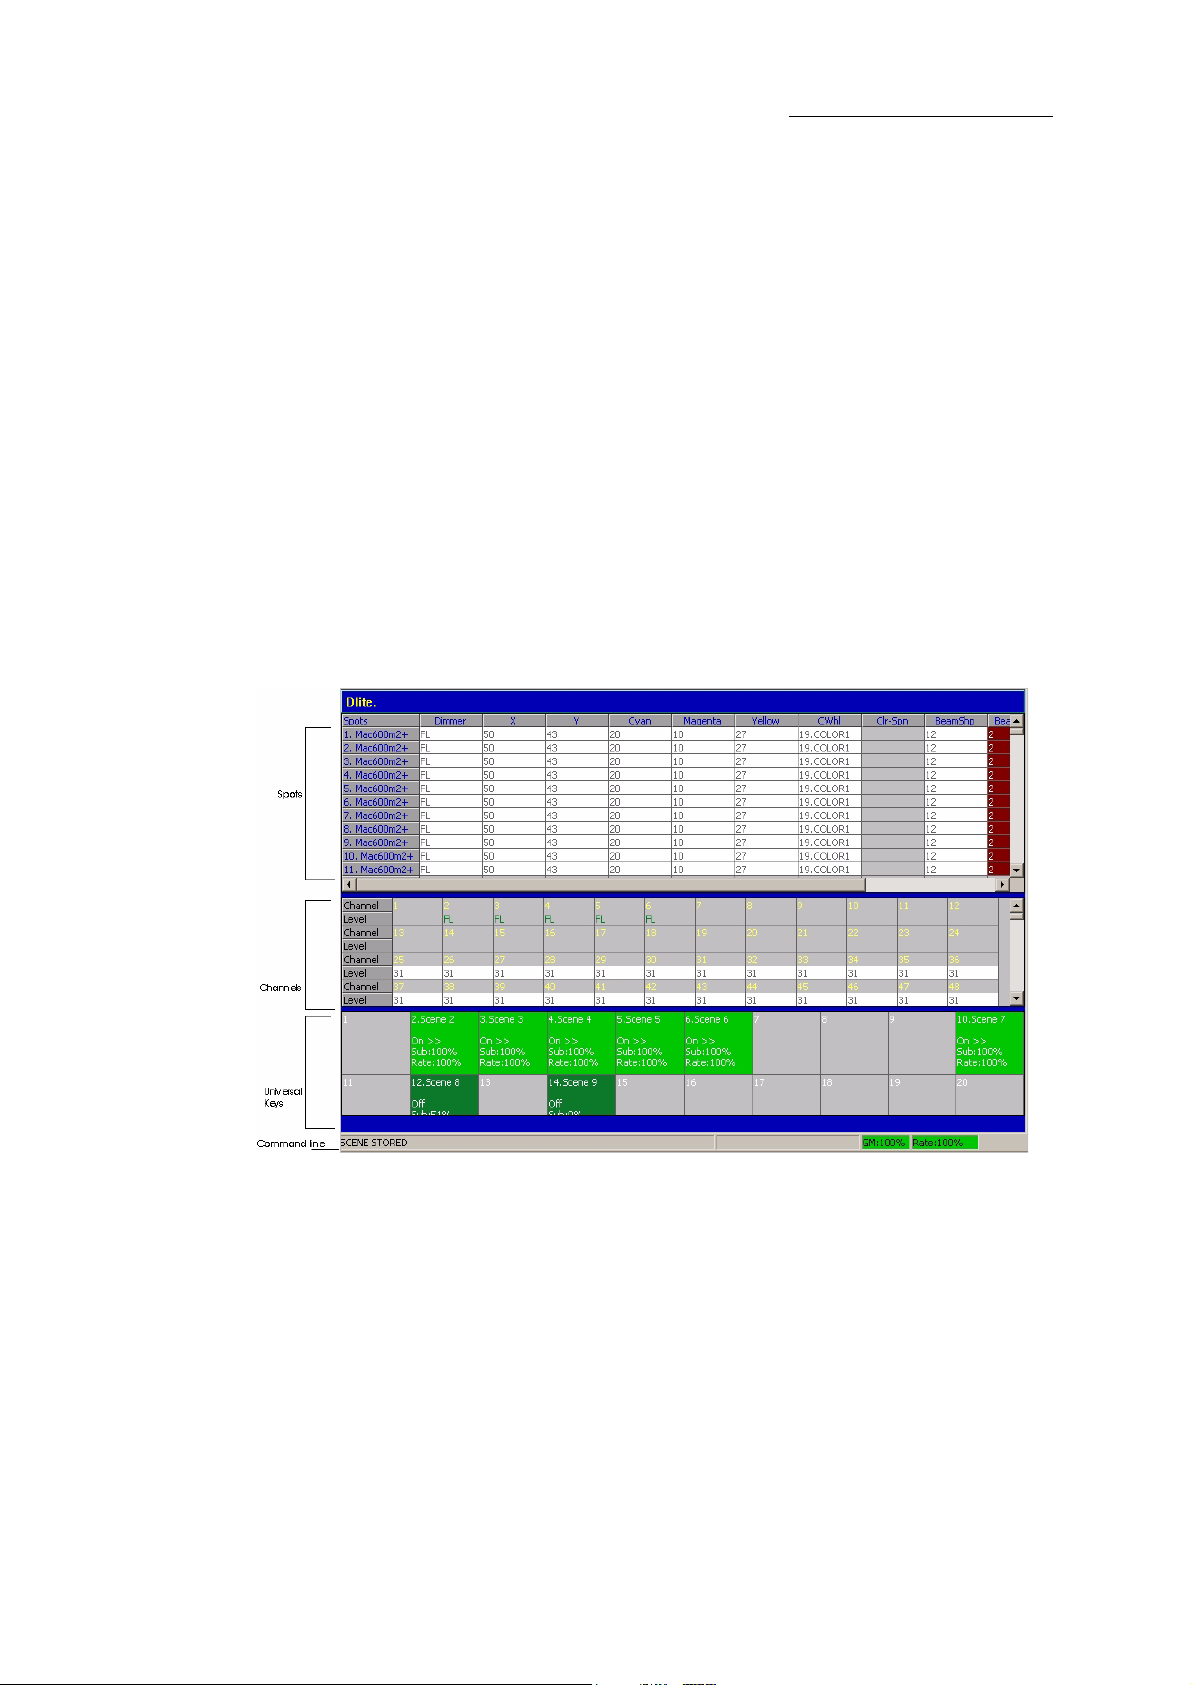
Live fixtures (spot or channel or extra) display - shows fixtures and their parameter levels.
Loads for all twenty playbacks or 12 faders/UKeys. The contents of the UKs depends on the
fader mode.
QList display - analogous to a cue sheet.
DLITE
System Overview
Figure 5: External monitor display option 7
5
Page 18
Compulite
Chapter 1
External monitor display modes
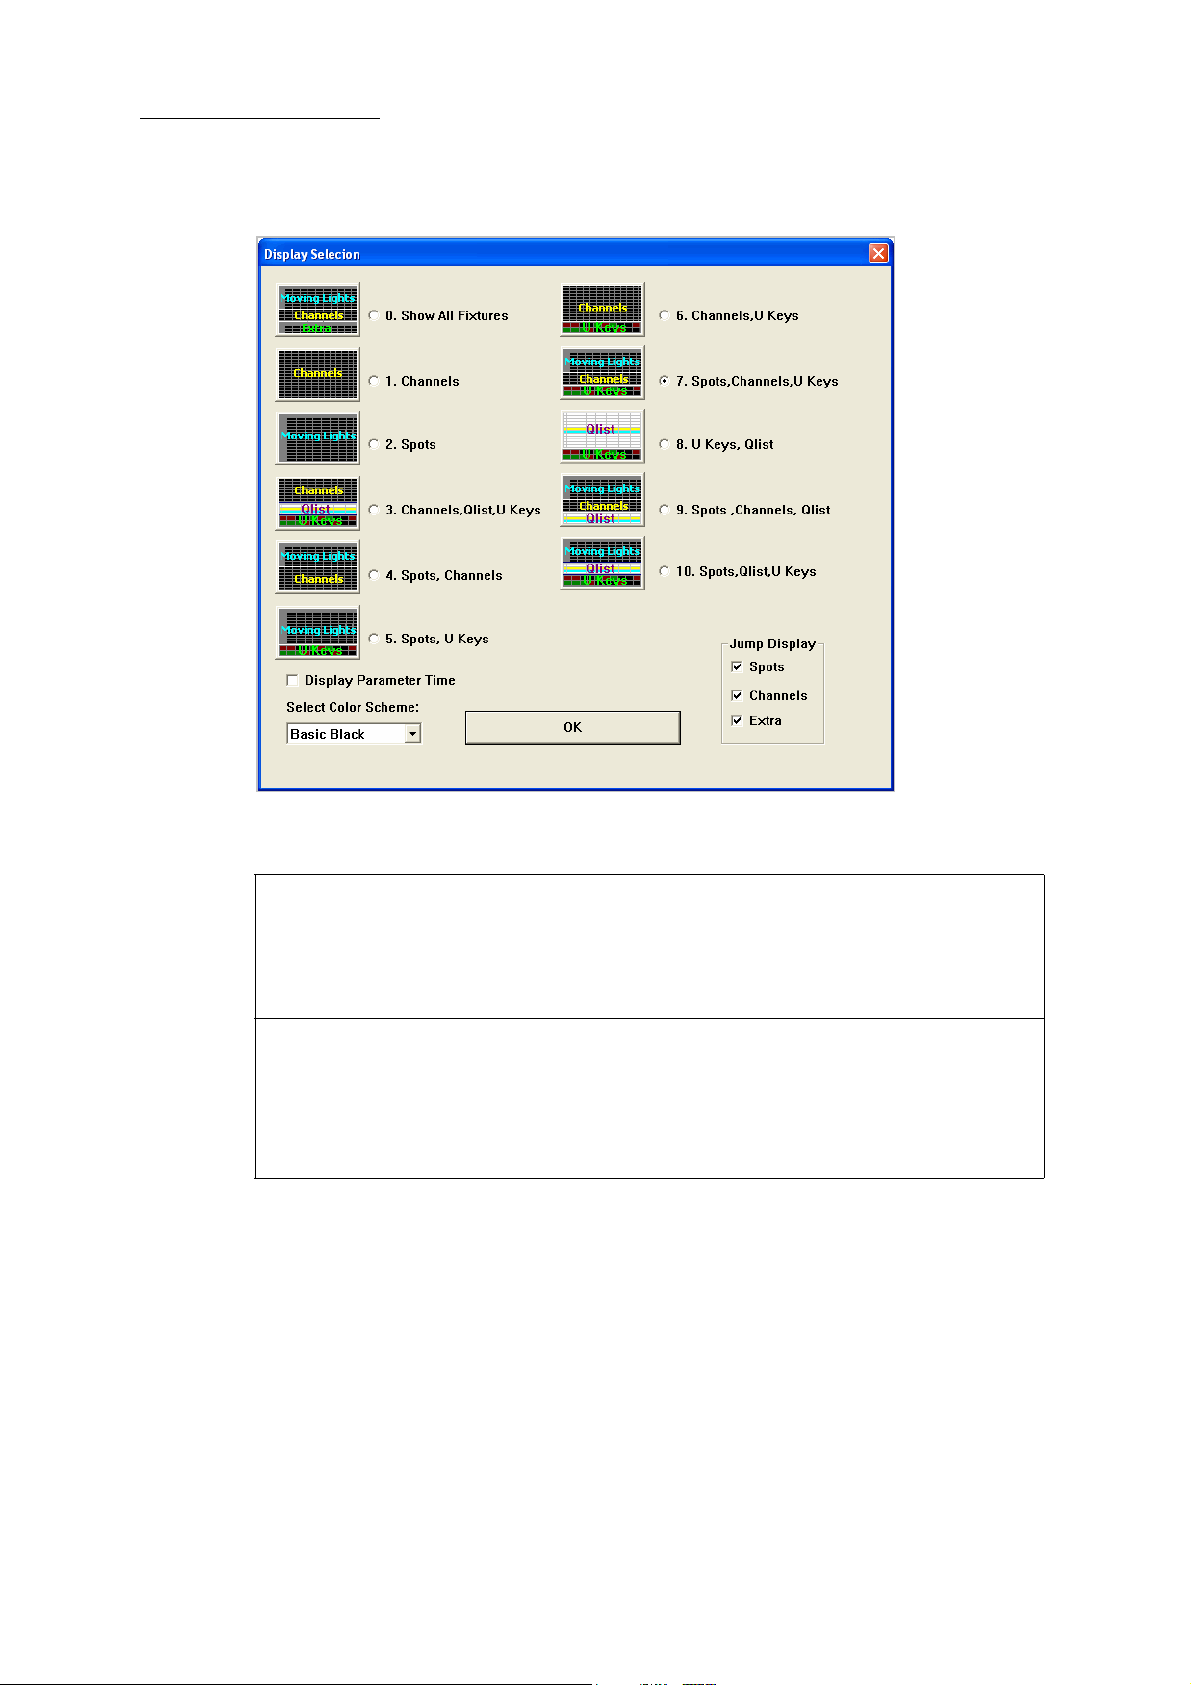
Figure 6: External monitor display dialog box
You can configure the external monitor display to show:
0. All Fixtures 4. Spots, channels 8. U Keys, QList
1. Channels 5. Spots, U Keys 9. Spots, Channels, QList
2. Spots 6. Channels, Ukeys 10 Spots, QList, U Keys
3. Extra 7. Spots, Channels, U Keys
Jump display The display jumps to the selected channel, extra, or spot parameter.
Display Parameter Fade
Time
Select color scheme
Navigating and selecting displays
You can navigate this dialog box and select the display:
Use the PREV and NEXT keys to navigate. Press the space bar on the external keyboard or z
on the console keypad to select the display.
Enter the display number on the console keypad and click OK to close the dialog box.
SHIFT + z selects view 10
Check to enable.
An extra row, showing parameter fade times, is added to the live fixture
displays. Check to enable.
Choose standard gray or basic black.
Using an external mouse, clicking to select the display. Then click OK to close the dialog box.
Using the trackball in mouse mode. Press the X or Y lock keys to select the display. Then click
OK to close the dialog box.
6
Page 19
To select a display
DLITE
System Overview
1 When the editor is idle, tap
2 Use the external mouse or the trackball in mouse mode, to enable the radio button for your
3 Ta p
OR
1 Press
Live fixture displays
The live fixture displays show:
Fixtures (spots, channels, or extras)
Fixtures editor status
Parameter levels
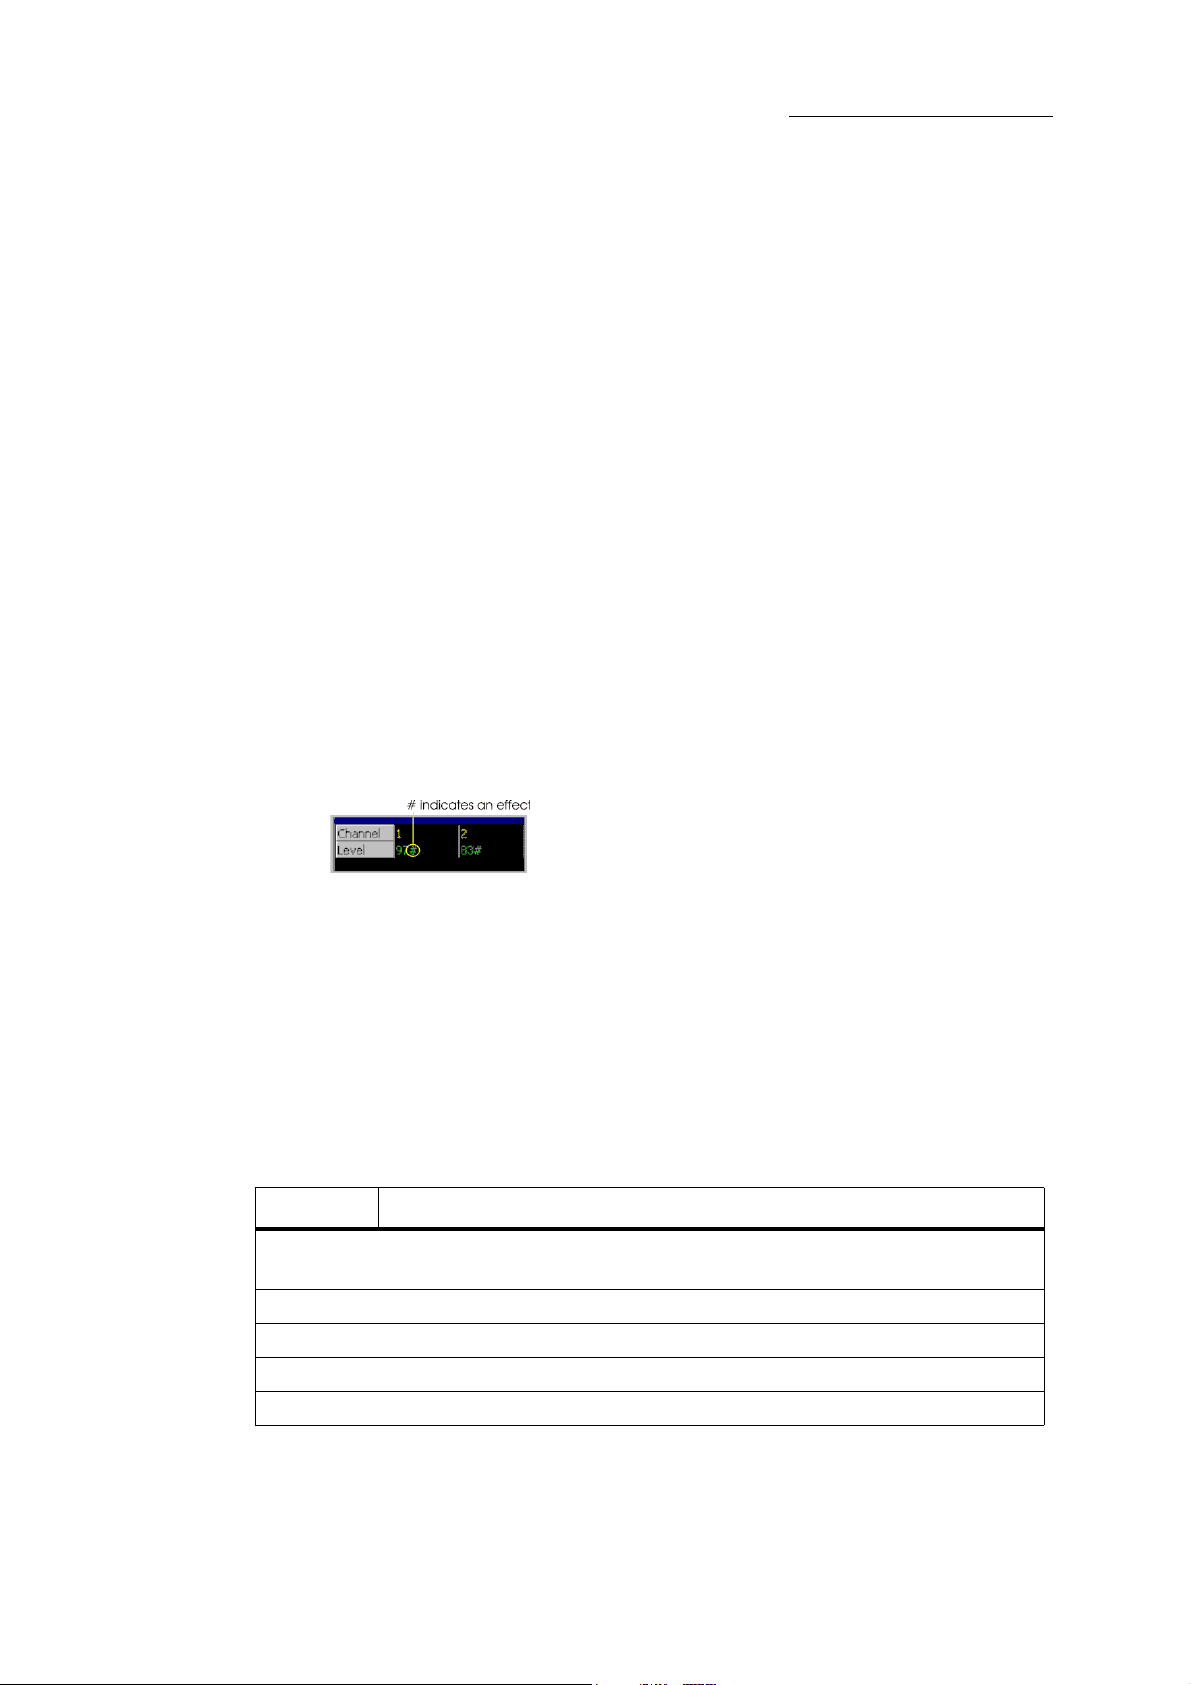
Special characters indicate effects and position libraries
– # represents effects
– * represents position libraries.
DISPLAY or press SHIFT + VIEW.
The view options are shown on the external monitor.
choice of views or enter the display number using the keypad.
OK, on the touch screen, to confirm your choice.
SHIFT and select the view number on the keypad.
Figure 7: Indications on the live channel display
Universal Keys (UKs) display
What appears on the UKeys display depends on the state of the editor and the fader mode
(see “Fader modes” page 115):
When the editor is idle, the UKeys display shows the playback loads.
When the editor is active, the UKeys display shows the objects in the selected category.
Example: If you pressed SCENE, the existing scenes are displayed.
Output source color code on the external monitor
-
Color Output source and object
Dark red Fixture numbers and levels that are selected in the editor and can be edited using
the wheels or keypad.
White Parameter levels in the editor.
Blue Cues on the crossfader or playbacks.
Green Scenes on playbacks.
Red Chases on playbacks.
7
Page 20
Compulite
Chapter 1
Color Output source and object
Dark Gray Channel levels output from the faders
Light Gray Parameter levels from tracking.
Orange Values output from the faders, in context mode, when previewing scenes, groups,
Paging displays
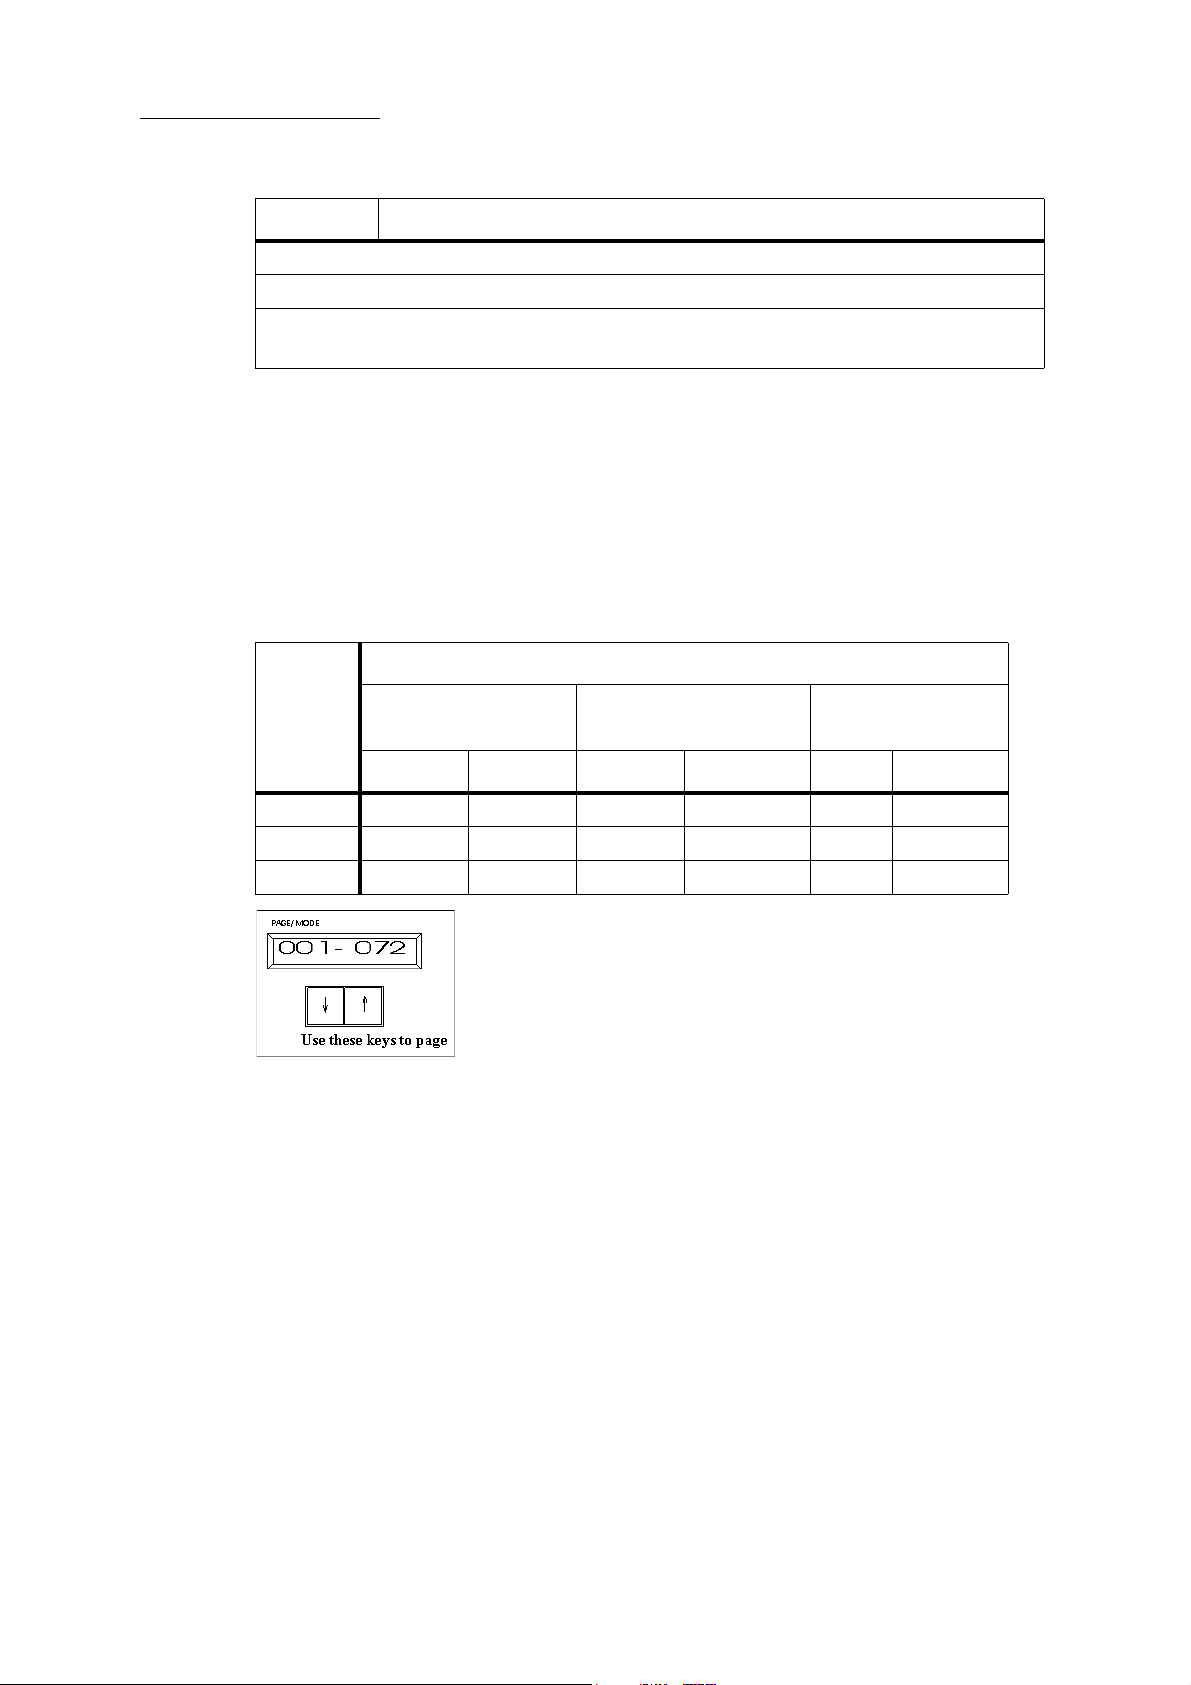
Paging cycles the faders and the touch screen grid display. The range of items on the current page is
shown on the panel display labelled
Each page is divided into sub-pages. Each sub-page contains 12 items. Sub-pages refer to what is
displayed on the touch screen object grid and the view on the external monitor. When sub-pages
reach the upper limit of the general page Dlite jumps to the next page. Page size is determined by
the Dlite model you are using. Dlite Compact does not have subpages.
and other objects. see “preview objects” page 116.
Page/Mode. Pages cycle from the last page to the first page.
Fader mode
Dlite
model
Wide
2 Preset
(channels only)
Context
Page Sub Page Page Sub Page Page Sub Page
36/72 72 12 36 12 72 12
24/48 48 12 24 12 48 12
Compact 20 n/a 20 n/a 20 n/a
Figure 8: The Page/Mode display showing the current page and the paging keys
To page pages
Press the arrow keys under the Page/Mode display until arriving at the required page.
To page sub-pages
Use wheel 3, when available, or use the arrow keys while holding down SHIFT until arriving at
the required page.
Scrolling displays
When mouse mode is enabled you can scroll the displays on the external monitor. When mouse
mode is operating, the wheels are used to scroll the displays.
Wheel 1 layer 1 - Scroll live spots
Wheel 1 layer 2 - Scroll live extras (Press SHIFT to access layer 2)
8
Page 21
Wheel 2 - Scroll live channels
Wheel 3 - Scroll QList display (if shown)
To use the trackball in mouse mode
Press MOUSE to enable the trackball for mouse functions.
To scroll the external monitor displays in mouse mode
Press MOUSE to enable mouse mode for the trackball and use the wheels to scroll.
For horizontal scrolling, press and hold down the wheel.
Dlite menus
Dlite’s menus are available in the Setup screen. The menus control many basic functions of the
console, such as saving and loading shows, and other advanced functions.
To access the setup screen
DLITE
System Overview
Press SETUP. The touch screen buttons now show the Setup options.
Menus and menu options
Menu Display grid Submenus What you can do here
LOAD
SHOW
save show Shows stored on
delete
show
shut down Confirmation
Diag Instructions Test LEDs, keys, faders, and playback
Shows stored on
the flash disk
the flash disk
Shows stored on
the flash disk
request
USB DRIVE
USB DRIVE
USB DRIVE
Select a show from the flash disk or
USB stick and load it to Dlite for editing
or playback.
Save a show to Dlite’s flash disk or to a
USB stick.
Select a show from the flash disk or
USB stick and delete it.
Shut down application prior to switching
off the power.
sliders.
9
Page 22
Compulite
Chapter 1
Menu Display grid Submenus What you can do here
SYSTEM
OPTIONS
CREATE
AND
PATCH
• Software
version
• % free memory
Instructions
Instructions
Instructions
Instructions
Current channel,
moving light, or
extras patch
BEHAVIOR
see “Behavior”
page 164
DEFAULTS
see “Defaults”
page 165
Tools
see “Tools”
page 166
I/O
see “In/Out”
page 166
SW UPGRADE
OS UPGRADE
PANEL UPGRADE
OUTPUT
UPGRADE
CLEAR
Set default behavior for playbacks.
• Set system defaults for fade times
• Set the default dimmer curve
• Set permissions
• Clear the current show data
Replace old software with new application software.
Replace old operating system software
with new system software.
Replace old panel files with new panel
files.
Replace old hardware files with new
hardware files.
Clear selected fixture and DMX assignment.
see “Patching” page 17
WIZARD
SAVE DEFAULT
Access the patch wizard to add fixtures.
Save the current patch as the system
default patch.
DEVICE
• DELETE (device from the Devices in
Use list)
•
FROM DISK - View devices stored on
flash disk or USB stick.
delete device Delete devices stored on the flash disk or
on a USB stick.
10
Page 23
Menu Display grid Submenus What you can do here
DLITE
System Overview
PATCH
BY
FIXT
(ure)
Channels, moving
lights, or extras
see “Patching” page 17
PATCH
BY
DIMMER
DMX addresses
for port 1.
see “Patching” page 17
Universal procedures
Selecting objects and fixtures, copying objects, adding text tags to objects, deleting objects, and
editing objects, follow the same basic procedures. This section provides general guidelines for basic
procedures. More detailed explanations appear in sections dealing with specific objects.
XY PATCH
DIMMER
PROPERTIES
NEXT PORT
SCROLLER
CLEAR
1-TO-1
Set pan and tilt orientation.
Note: Available when moving lights are
selected.
• GM (general master) ON
•GM OFF
• CURVE
• PROP(ORTIONAL) PATCH
View the next DMX port.
Patch scrollers.
Clear patch for the selected fixtures.
Patch fixtures to corresponding DMX
address. Example: Fixture 1 to DMX 1,
fixture 2 to DMX 2, etc.
Show objects
Show objects are programmed by the operator and can be selected, edited, copied, and stored.
Dlite has three types of show objects:
Lighting objects: Scenes - a lighting state.
Programming objects: Libraries - user defined, tracked database of
Playback objects Snaps
Chases - dynamic lighting looks.
Chase steps - a lighting state in a chase.
QLists - containers for cues.
Cues - a lighting state in a QList.
frequently used parameter settings.
Groups - database of frequently used fixture
selections.
11
Page 24

Compulite
Chapter 1
Selecting objects and fixtures
You can select fixtures (channels, moving lights, and extras) and objects (scenes, chases, chase
steps, cues, QLists, snaps, groups, and libraries) using the console keys, the touch screen grid, or
the universal keys with the faders in context mode.
To select objects and fixtures using console keys
Press the object key (CHANNEL, SCENE, GROUP, etc.) and enter its number on the keypad.
To select objects and fixtures using the touch screen grid
1 Press the object key (
2 Tap its number on the touch screen grid.
3 Select additional objects by tapping their number on the touch screen grid.
To select objects and fixtures using UKs (universal keys)
Press the object key (CHANNEL, SCENE, GROUP, etc.) and press the UK that corresponds
with the object’s number.
IMPORTANT! Faders must be in Context mode when selecting objects using the UKs.
Storing objects
You can store scenes, chases, chase steps, cues, QLists, snaps, groups, and libraries using a key
sequence, the touch screen grid, or the UKs (universal keys). With most objects, you generally
select fixtures and edit them before storing the object.
To store an object using console keys
1 Press
2 Optional - select a store option.
CHANNEL, SCENE, GROUP, etc.).
STORE.
12
3 Select the object type by pressing its key on the editing keypad. Example: Press
store a scene.
4 Choose a number on the keypad.
5 Press
ENTER or STORE.
The object is stored. Example: If you chose number 6 on the keypad, scene 6 is stored.
To store objects using the touch screen grid
1 Press
STORE.
2 Optional - select a store option.
3 Select the object type by pressing its key on the editing keypad. Example: Press
store a scene.
4 Tap an object number on the touch screen grid.
The object is stored. Example: If you tapped number 6 on the touch screen grid, scene 6 is
stored.
SCENE to
SCENE to
Page 25
To store objects using UKs
DLITE
System Overview
Store options
There are three options available when storing scenes, chase steps, and cues.
Options What is stored
INCLUDE
FADERS
INCLUDE ALL
STAGE
ALL IF ACTIVE For spots and channels with scrollers! If you have set a level for only one
1 Press
STORE.
2 Optional - select a store option.
3 Select the object type by pressing its key on the editing keypad. Example: Press
store a scene.
4 Press the UK that corresponds with the object’s number.
The object is stored. Example: If you pressed UK 6 on the keypad, scene 6 is stored.
Note: Faders must be in
Context mode when selecting objects using the UKs.
All active output from the faders is included when storing the new scene,
chase step, or cue.
Everything that comprises the stage picture is included when storing the
new scene, chase step, or cue. The output can originate from the crossfader, playbacks, faders, and editor.
parameter, all the parameters are stored in the new scene, chase step, or
cue. Example: Select spot 1, set a level for cyan. Storing a new scene using
this option includes all of spot 1’s parameters in the scene.
SCENE to
When using these store options all output that is included in the new scene, chase step, or cue is
captured in the editor.
For more information about using store options, see “Using store options” page 155.
Updating (editing) objects
Objects can be updated, or edited, with new information from the editor or by changing the objects
properties, such as fade times or adding text tags.
When updating exiting objects with new information from the editor you can either overwrite the
object’s content or merge the editor into the existing objects.
Pressing UPDATE merges new data, from the editor, into the object without overwriting the
object’s contents.
Pressing STORE overwrites the data in the object with data from the editor.
For more information about updating and overwriting objects, see “Updating or overwriting
lighting objects on the playbacks” page 83.
13
Page 26
Compulite
Chapter 1
Deleting objects
To delete objects
1 Press
DELETE.
2 Select the object type by pressing its key on the editing keypad. Example: Press
delete a scene.
3 Choose the object’s number on the editing keypad.
Or
Select a range of objects. Example:
4 Press
ENTER.
Confirmation is requested.
5 Ta p
OK or press ENTER.
The object is deleted.
Adding text tags to objects
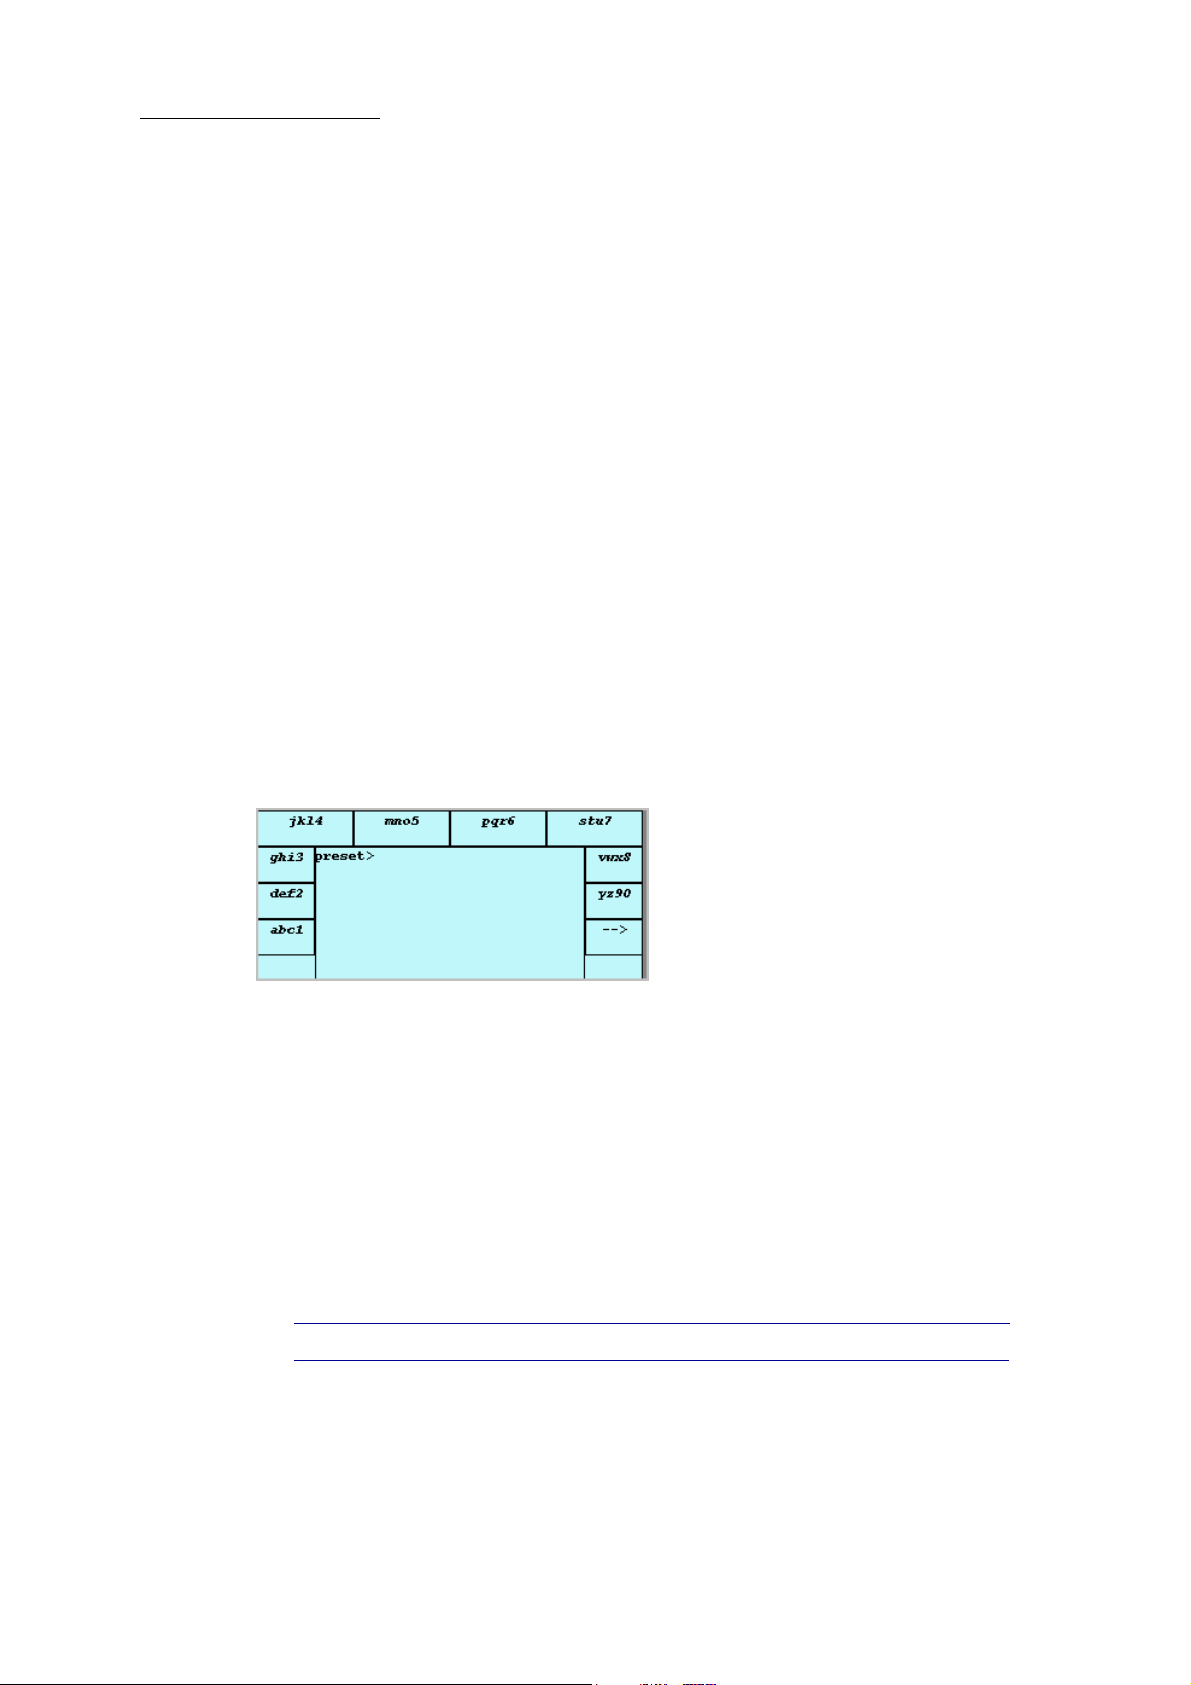
You can tag all objects with text tags for easy identification. Text is entered using the touch screen
text or an external keyboard. The maximum number of characters displayed on the touch screen is
18-20.
SCENE to
SCENE # #.
Figure 9: Touch screen text “keyboard”
To tag objects
1 Select the object.
2 Press
TEXT.
The text box opens.
3 Type text on the external keyboard or tap the touch screen text characters until the desired
character is displayed in the text field.
4 Ta p
OK or press STORE or press ENTER.
The object is stored with its text tag.
Tip! Press SHIFT for capital letters when using the touch screen text editor.
14
Page 27
Dlite default times
You can set default fade times for a number of operations.
For details, see “Defaults” page 165.
Console output
Output can originate from the editor, faders, playbacks, and crossfader. Output source is color
coded on the external monitor.
Output sources
Source What is output Color code on the external screen
Editor Levels for the active parameters • Red - active on the wheels
DLITE
System Overview
• White - present in the editor
Faders Channels in
Playbacks Scenes, chase steps, or cues • Green (scenes)
Crossfader Cues Light blue
Output Level Conventions
Output priority is determined by the parameter definition as defined in the Device Builder.
(see “Device Builder” page 167.) Dimmers, normally channels, are usually output as HTP, although
for moving lights dimmers may also be LTP. Most other parameters are output as LTP.
HTP (Highest Takes Precedence)
Intensity output works according to HTP (Highest Takes Precedence). When the dimmer is
controlled by more than one source, the highest intensity level between the sources is output.
Example: Channel 6 is in scene 1 @50%, in scene 5 @ FL, and in scene 9 @ 25%. Scene 1 is
loaded to playback 1, scene 5 to playback 5, and scene 9 to playback 9 and all the playback sliders
are full, therefore channel 6 is output according to its dimmer setting in scene 5 (FL). Pulling down
playback 5 fades channel 6 to 50% as output from scene 1 on playback 1.
Wide and 2 Preset modes Dark Gray
•Red (chases)
• Light blue (cues)
LTP (Latest Takes Precedence)
The last playback device that executed a playback command grabs output priority. Go commands, a
slider moved off its 0% limit, and pressing the flash key are playback commands.
Most parameters, except dimmer, usually work on the principle of LTP (Latest Takes Precedence).
LTP parameters may fade or jump between values.
15
Page 28
Compulite
Chapter 1
General master control
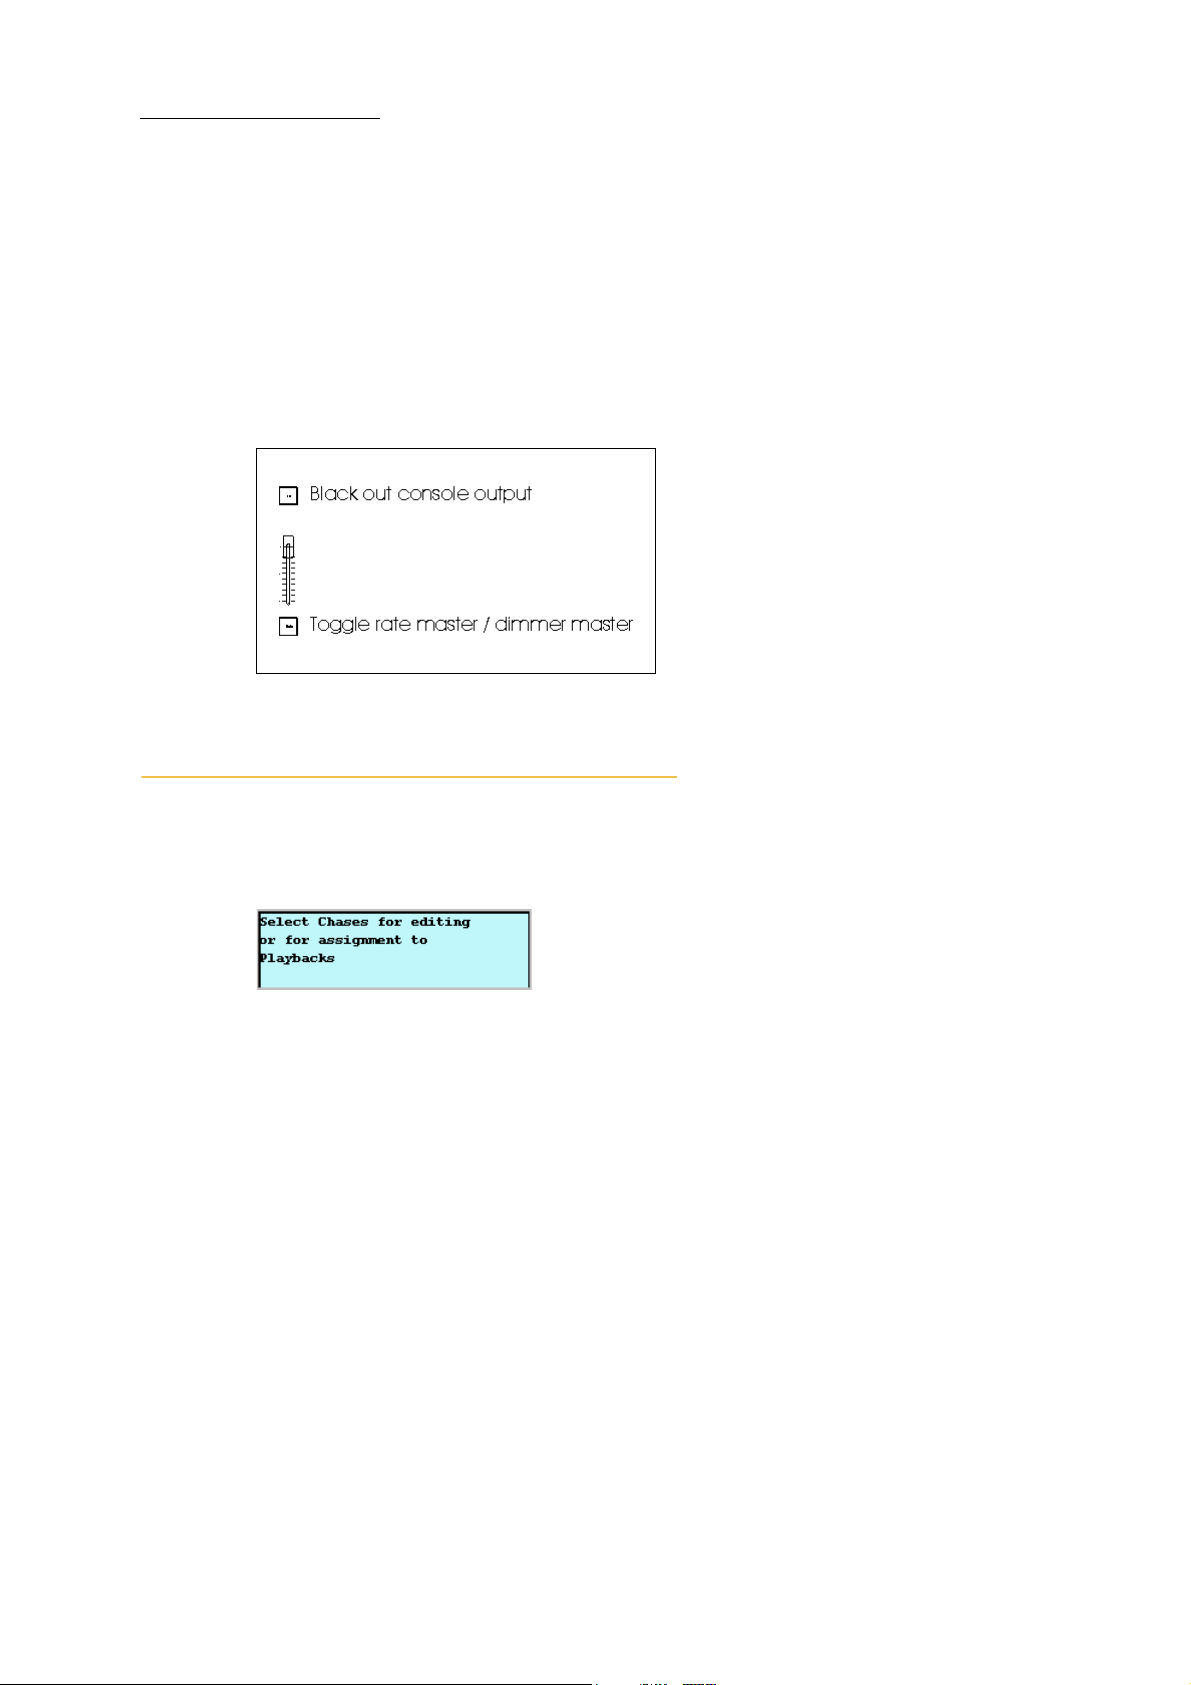
The general master controls the dimmer output for the entire console, its level overriding all other
playback devices. The general master consists of a slider and a black out key.
Use the slider to determine the upper output level. The
all dimmer output.
The general master can also be used for rate control. The rate level set by the general master affects
the rate on all playback devices.
Figure 10: General dimmer and rate master
Getting help
Dlite features key help. When in help mode, pressing a key displays a help screen for the selected
key.
B.O. key can be used for a quick blackout of
16
Figure 11: Typical help screen
To view help
Example: View the help screen for chases,
Press HELP and then press CHASE.
Page 29

Chapter 2 Patching
This chapter includes:
About patching (see page 17)
Setting the number of fixtures and assigning DMX addresses (see page 18)
Viewing the patch (see page 26)
DMX channel properties (see page 26)
Storing a default patch (see page 30)
Patching in the editor (see page 30)
Testing fixtures (see page 36)
About patching
When beginning work on a new show, you must:
Configure type of devices used in the show
Set the number of fixtures for each device
Patch the fixtures to DMX addresses
Three types of fixtures can be patched:
Channels (Chns) - Conventional fixtures that typically use one DMX channel. When a scroller
is mounted on a conventional fixture, the channel will need two DMX channels.
Spots - Automated fixtures that use more than one DMX channel, depending on the number of
parameters in the particular device.
Extras (other DMX controlled devices)
When accessing the patch for the first time, use the patch wizard for basic patching. Tapping
MORE...accesses additional patch options.
Use the patch wizard for configuration and assigning DMX addresses.
Use the features available under MORE... for soft patching, assigning DMX addresses, editing
the patch by clearing DMX addresses, deleting and updating devices.
17
Page 30
Compulite
Chapter 2
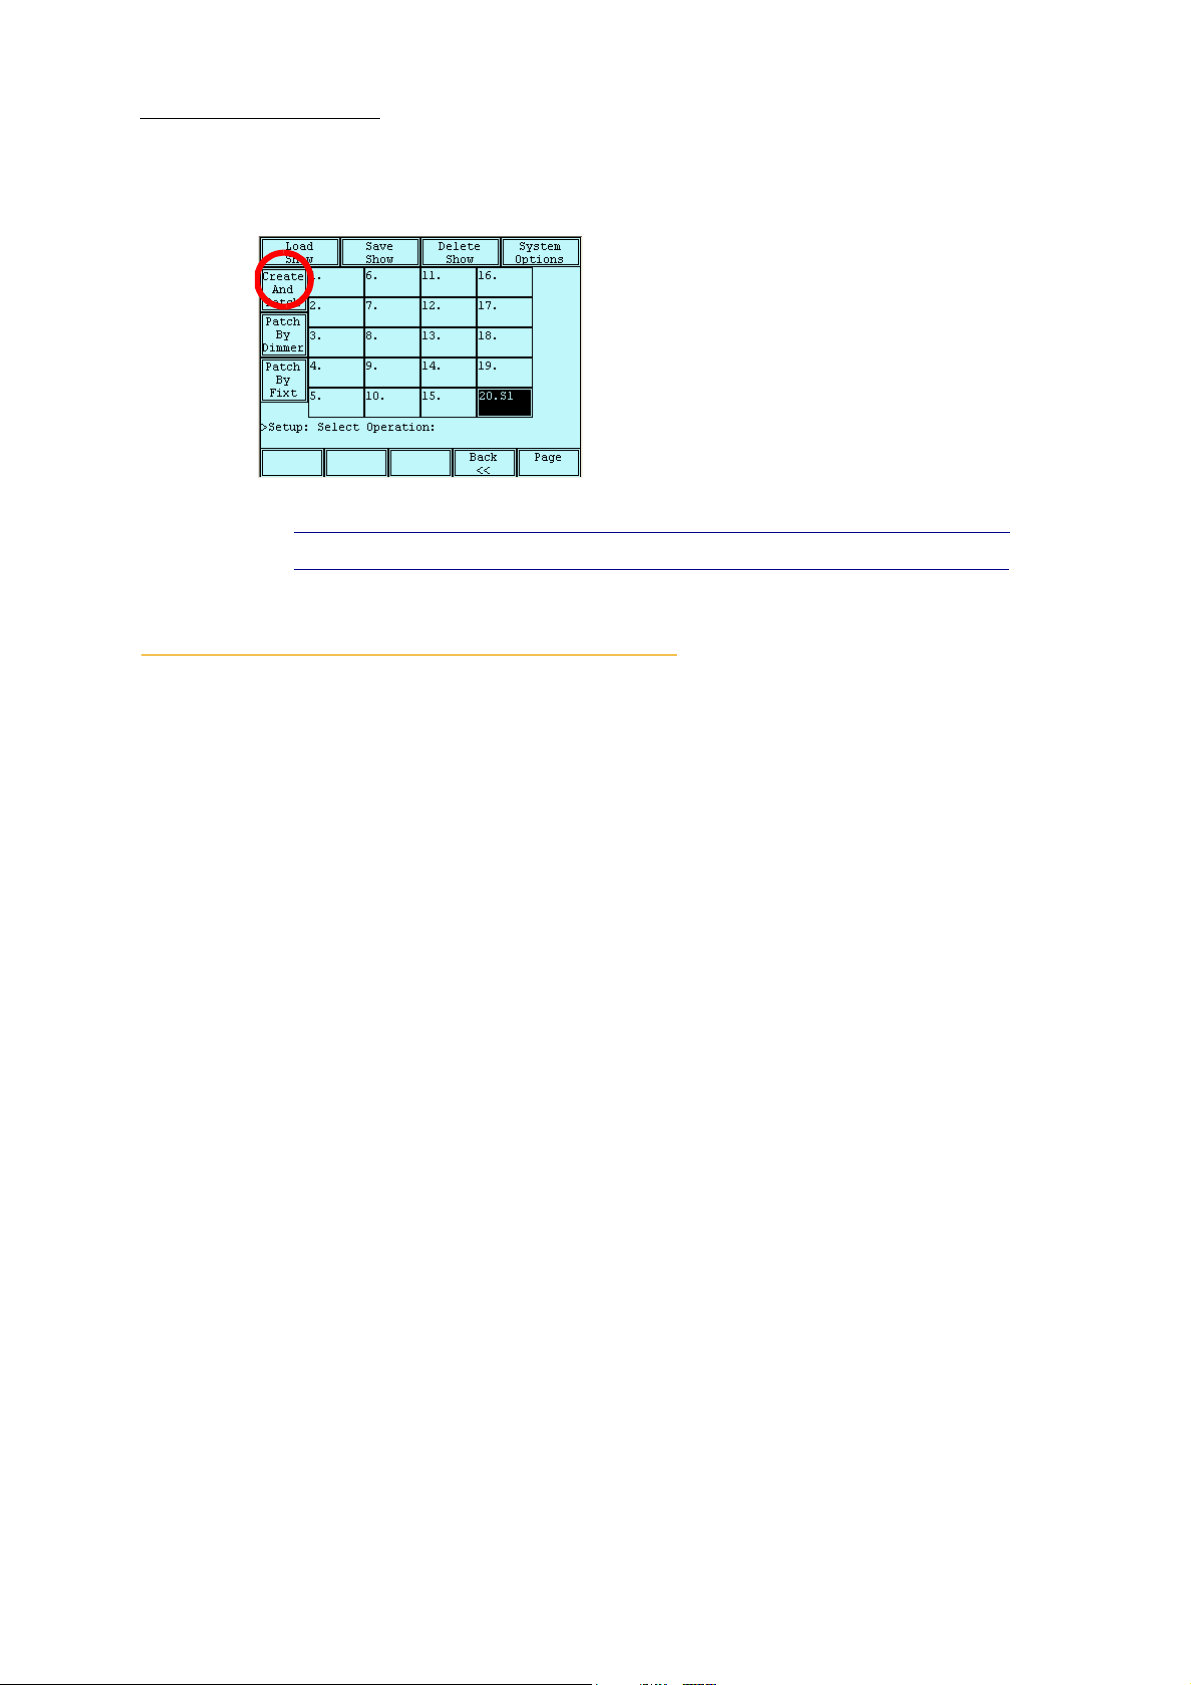
The patch is accessed by pressing SETUP to display the setup screen.
Figure 12: Setup screen
Tip! Use SHIFT + SETUP for quick access to the patch screen.
Setting the number of fixtures and assigning DMX addresses
The patch work flow is:
1. Access the patch menu and choose the patch wizard or
2. Select the fixture type by pressing
3. Select the number of fixtures to add to the show.
4. Select the start number for the first fixture.
5. Set the starting DMX address.
6. Select the device type from the device list.
7. Assign DMX addresses.
Dlite boots up with 48 or 72 channels (depending on the Dlite model) already patched to DMX
connector 1 and consecutively numbered from DMX address 1. See “Storing a default patch”
page 30.
Note: In Dlite Compact, there are no patched channels on start up.
Using the patch wizard
CHANNEL, SPOT, or EXTRA.
MORE....
18
The patch wizard simplifies configuring the system for fixture types and assigning DMX addresses
one DMX address to one fixture number:
For channels - The first channel fixture is patched to the first DMX start address, the second
fixture to the next DMX address., etc.
For spots - The first spot is patched to the DMX start address. Dlite automatically patches the
next spot to the next available DMX address. The interval depends how many DMX channels
are used by the type of spot.
Page 31
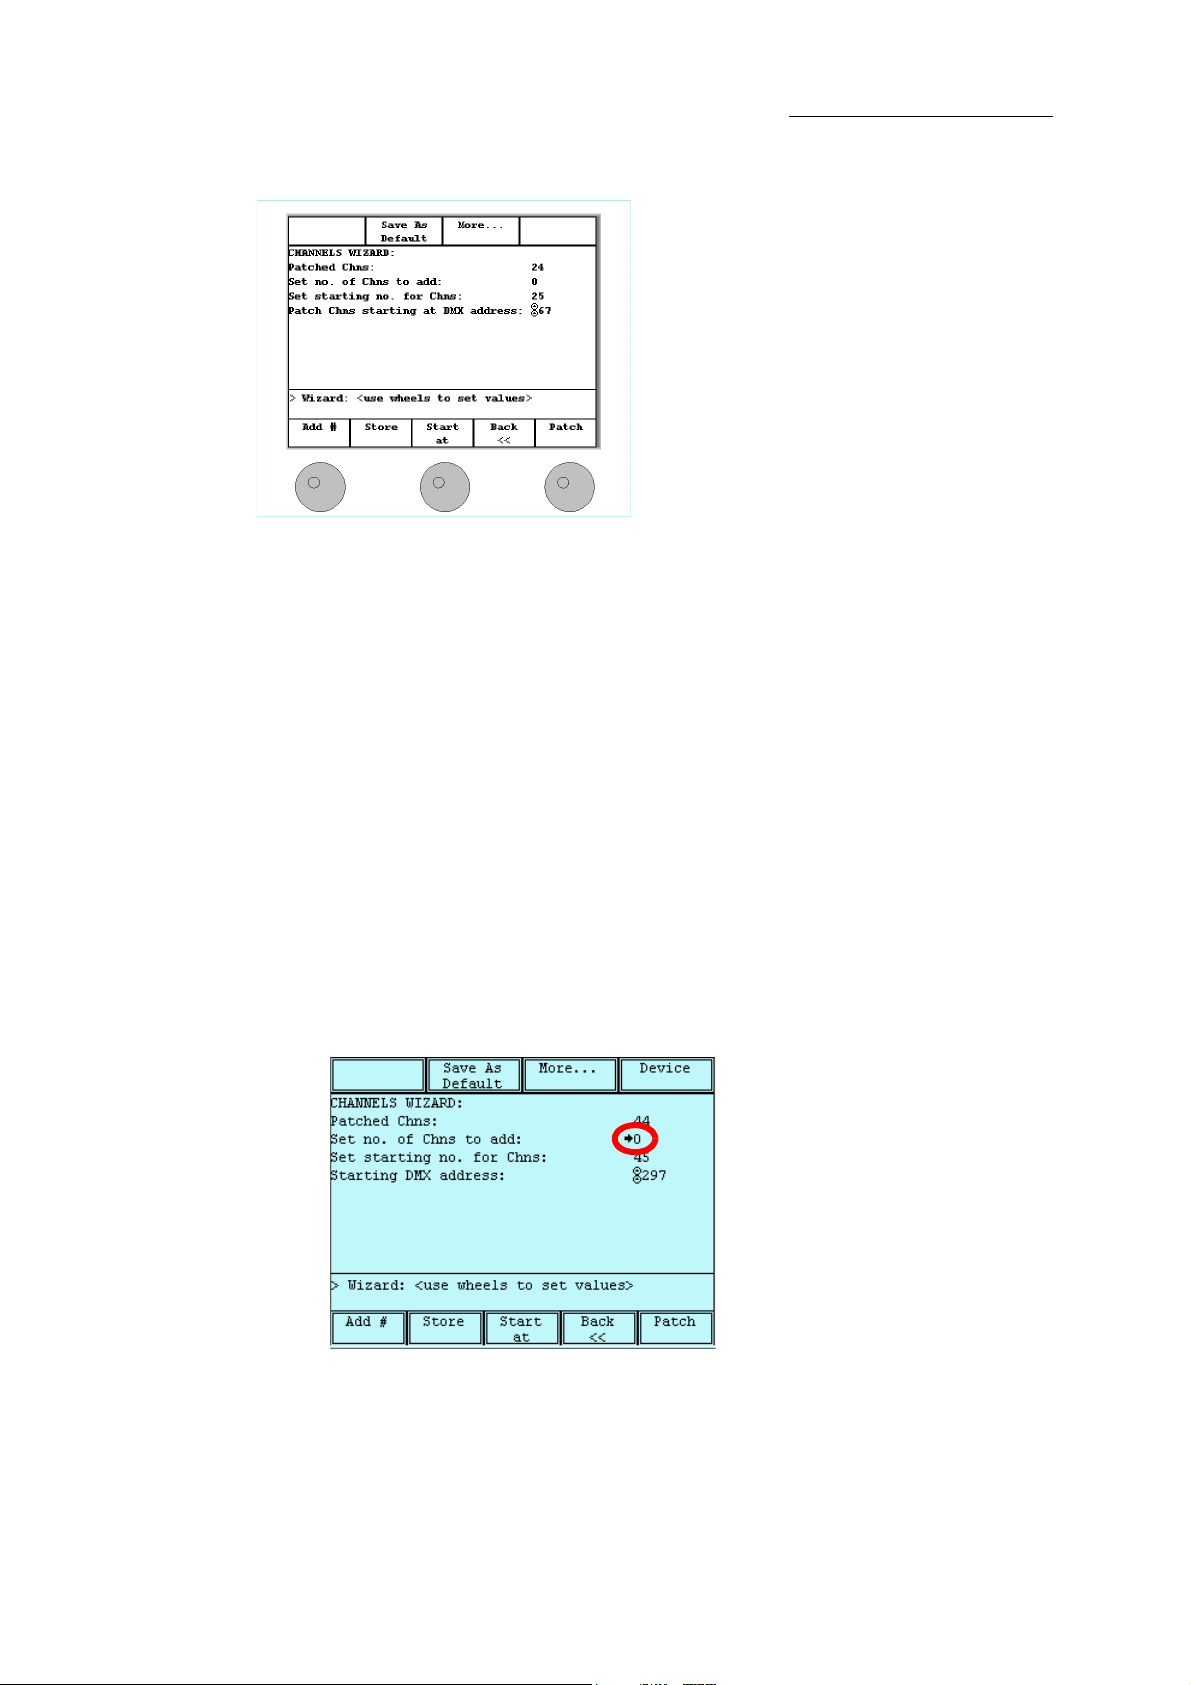
Figure 13: Patch wizard - main screen
In the patch wizard, use the wheels or the keypad to set numeric information.
Wheel 1 - Set the number of fixtures you are intending to add.
Wheel 2 - Set the start number for the channels, spots, or extras.
Wheel 3 - Set the starting DMX address.
To
To access the patch wizard
DLITE
Patching
1 Press
2 Ta p
SETUP.
CREATE AND PATCH.
The touch screen is now in patch mode.
3 Click
YES to use the patch wizard.
Existing fixtures and free DMX addresses are displayed.
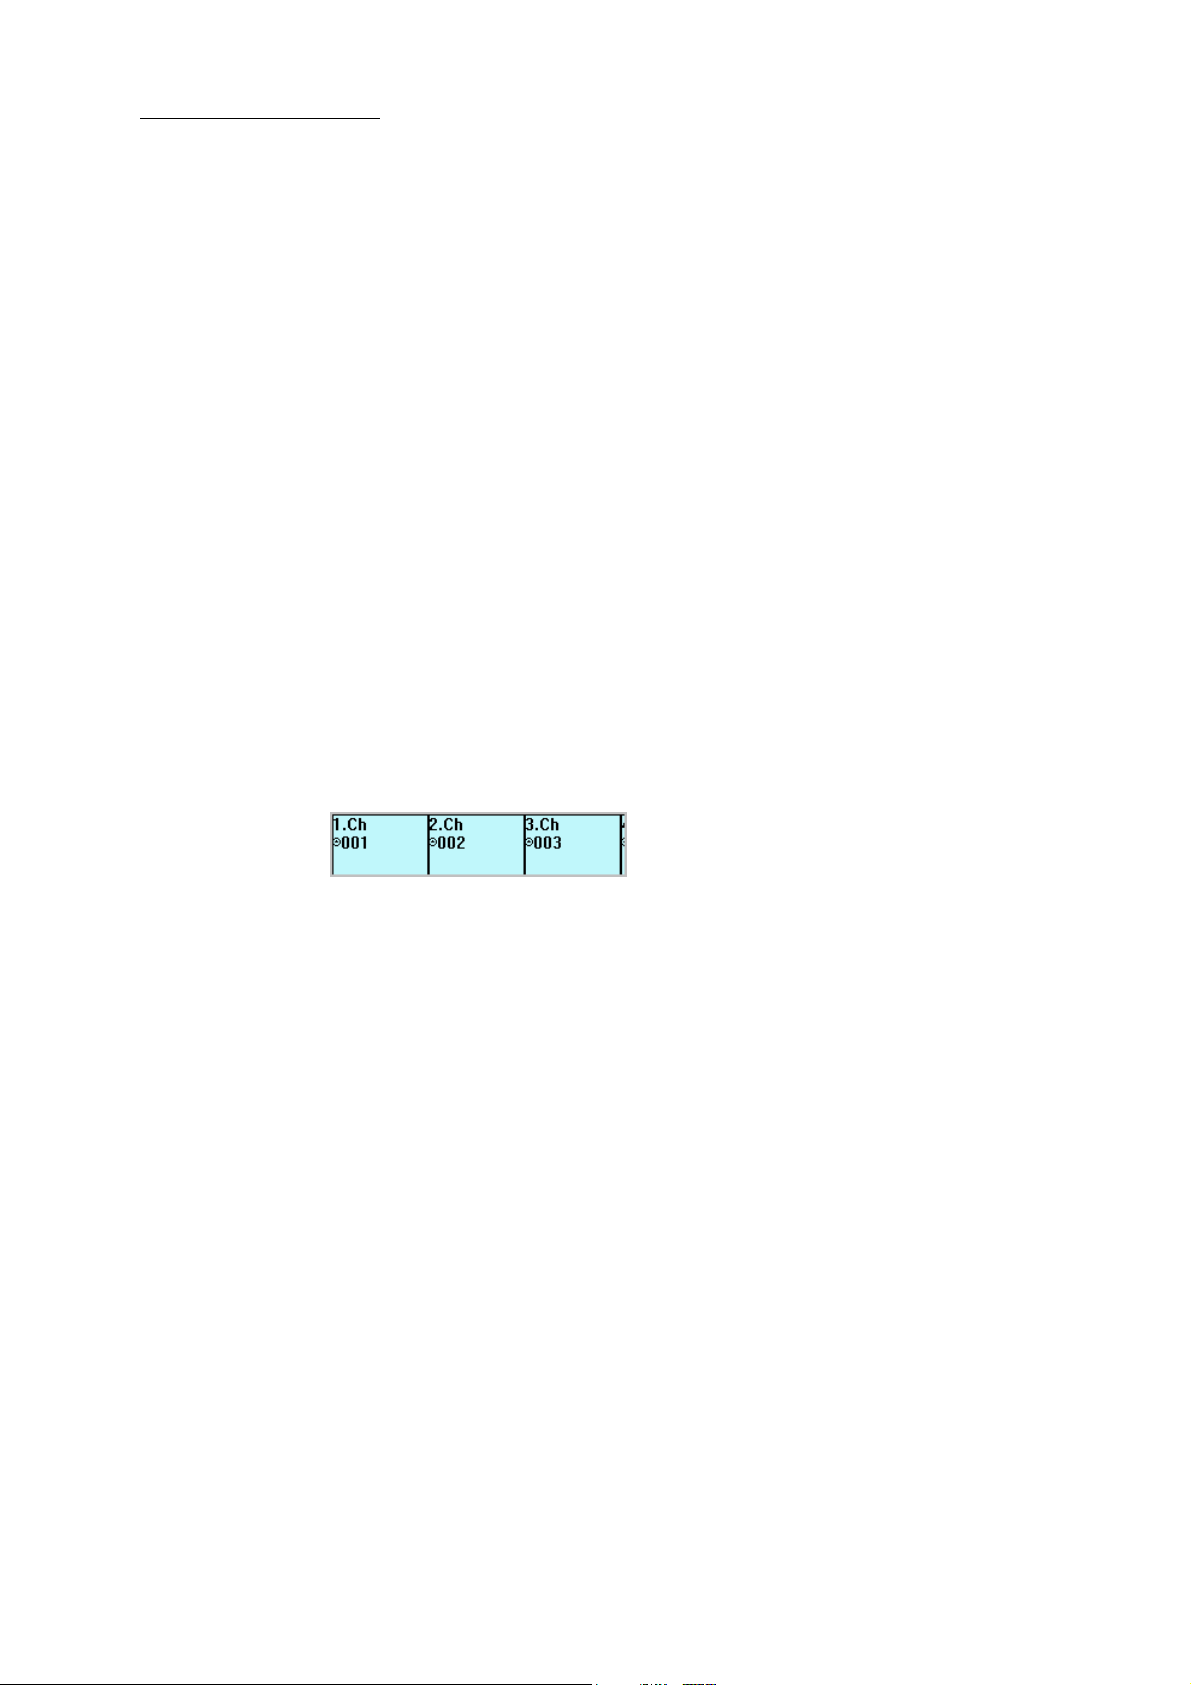
To navigate the fields and use the numeric keypad
1 Navigate fields, (adding fixtures, setting the fixture start number, or the starting DMX
address), by pressing .
Figure 14: A small arrow indicates the active field.
2 Enter the numerical data using the numbers on the console’s keypad or the wheels.
To clear an entry
Press CE.
19
Page 32
Compulite
Chapter 2
To enter an address in DMX universe 2
Use the keypad to enter an absolute value higher than 512. Example: for DMX universe 2,
offset 1, enter
513.
OR
Enter the universe number and then the offset separated by /. Example: for DMX universe 2,
offset 1, enter
To
2/1.
Patching channels using the wizard
Channels are, typically, lighting fixtures that use 1 DMX channel to control dimmer intensity.
To patch channels
1 Follow the steps to access the patch wizard.
Patching spots
Spots, or moving lights, are lighting devices that have more than one parameter. Spots may have
pan and tilt, color, beam shaping, and focus parameters. Generally, each parameter requires one
DMX channel, therefore a spot device is patched to more than one DMX address. When patching
spots Dlite automatically patches the required number of DMX channels to the device.
2 Press
CHANNEL.
3 Use wheel 1 or enter a number on the keypad to set the number of channels being added.
4 Set the first fixture number for the channels you are adding.
5 Set the starting DMX address.
6 Press
STORE or ENTER to store and continue.
A list of the patched channels and their DMX addresses is displayed.
Figure 15: Channels patched to DMX port 1 addresses
7 Ta p OK.
The main patch wizard page is displayed.
8 Optional - To continue, press
SPOT to patch spots, press EXTRA to patch extras, or to add
channels repeat steps 3 though 7.
9 Press
RESET to exit the patch wizard.
20
To patch spots using the wizard
1 Follow the steps to access the patch wizard.
2 Press
SPOT.
3 Set the number of spots being added.
4 Set the start number.
5 Set the starting DMX address.
Page 33

6 Ta p DEVICE.
A list of devices in use is displayed. The list is appears in alphabetical order. The default
device is channel.
DLITE
Patching
Patching extras
Extras include smoke machines and other DMX controlled devices. Extras are similar to the spot
patch behavior, as they usually require more than one DMX Address.
To patch extras using the wizard
7 If your device does not appear in the list of devices in use, tap
FROM DISK.
A list of the device types, stored on Dlite’s flash disk. is displayed.
8 Choose a device from the list. Use wheel 3 or the arrow keys to scroll the device list.
9 Ta p
10 Tap
STORE to apply.
OK.
A list of the patched spots is displayed.
11 Press
RESET to exit the patch wizard.
Note: If the device you need does not appear in the list, download the device from the
downloads section at
www.compulite.com and save it on a USB stick. The
connect the USB stick to Dlite’s USB drive, and tap USB DRIVE. You can also
use the Device Builder to configure it yourself.
1 Follow the steps to access the patch wizard.
2 Press
EXTRA.
3 Set the number of extras being added.
4 Set the start number.
5 Set the starting DMX address.
6 Click
DEVICE to advance to the next step.
A list of extras in use is displayed.
7 If the device has not been used and is therefore not available in the list of devices in use, tap
FROM DISK.
8 Choose the device from the list.
9 Click
STORE to apply.
The patched extras and their DMX addresses is displayed on the touch screen.
10 Tap
11 Press
OK to return to the main patch screen.
RESET to exit the patch wizard.
21
Page 34

Compulite
Chapter 2
Patching scrollers
Scrollers are usually mounted on a conventional light fixture. Channels with scrollers use 2 DMX
channels; one channel that controls the fixture’s dimmer and a second DMX channel that controls
the scroller mounted on the fixture. It is necessary to select only the fixture’s channel number to
access the dimmer and the scroller. The device list contains 4 channel/scroller devices:
Ch+Scrl 11F(rames)
Ch+Scrl 16F(rames)
Ch+Scrl 20F(rames)
Ch+Scrl 32F(rames)
The scroller is patched as an external dimmer. Of course, the patched DMX address must match the
local address set on the scroller.
To patch scrollers using the wizard
1 Press
2 Ta p
3 Press
4 Enter the number of channels in the
5 Ta p
SETUP.
CREATE AND PATCH.
CHAN.
Set no. of Chns [to add] field.
DEVICE and FROM DISK.
6 Choose a scroller device: Ch+Scrl 11F, Ch+Scrl 16F, Ch+Scrl 20F, or Ch+Scrl 32F.
7 Ta p
STORE.
8 Select the scrollers by tapping their cells on the touch screen.
9 Ta p
SCROLLER ADDRESS.
10 Navigate to the address for the first scroller and tap that cell.
11 Tap
SET.
Sequential DMX addresses, starting from the DMX start address, are set for the selected
scrollers.
IMPORTANT! The scroller’s local address and its patched DMX address must be
identical.
More patch features
Tapping MORE... in patch mode accesses additional patch functions:
Setting DMX addresses. Use this when soft patching (patching more than one dimmer to a
fixture number), patching scrollers, patching external dimmers.
Clearing DMX addresses
Deleting fixtures from the show
Deleting devices from the flash disk or USB stick
22
Page 35

Figure 16: More patch features display
To access more patch features
DLITE
Patching
1 Press
2 Ta p
SETUP.
CREATE AND PATCH.
The touch screen is now in patch mode.
3 Ta p
MORE....
Patching and clearing DMX addresses
Instead of using the patch wizard, you can manually set DMX address.
One fixture number, the number used to select fixtures in the editor, can control more than one
dimmer by patching more than one DMX address to the channel. This is known as soft patching.
Example: a number of PAR cans always work together. You can control all these PAR cans through
one fixture channel.
DMX address assignments are protected from accidental overwriting. To overwrite a fixture’s
DMX address, you must first clear the current address.
To patch multiple DMX addresses a to a fixture channel (soft patch)
Example: Patch DMX address 101, 201, 301, 401, to channel 11 which is currently patched to
DMX 11.
1 Press
SETUP.
2 Ta p
CREATE AND PATCH.
The touch screen is now in patch mode.
3 Ta p
MORE....
4 Select channel 11.
5 Ta p
PATCH BY DIMMER.
6 Page the DMX address display as required.
7 Tap the new address. In this example, tap
8 Ta p
SET.
101, 201, 301, 401.
Fixture channel 11 controls dimmers 11, 101, 201, 301, and 401.
23
Page 36

Compulite
Chapter 2
To clear the patch by fixtures
1 Press
2 Ta p
SETUP.
CREATE AND PATCH.
The touch screen is now in patch mode.
3 Ta p
4 Ta p
MORE....
PATCH BY FIXT.
You are prompted for a fixture number.
5 Select the fixture number by clicking its cell in the touch screen grid. If necessary, navigate
to the port and page where the fixture appears.
6 Ta p
CLEAR.
The fixture channel DMX address is cleared. The fixture no longer appears in the live
display.
To clear the patch by dimmers
1 Press
2 Ta p
SETUP.
CREATE AND PATCH.
The touch screen is now in patch mode.
3 Ta p
4 Ta p
MORE....
PATCH BY DIMMER.
You are prompted for a DMX address.
5 Select the DMX address.
6 Ta p
CLEAR.
The selected DMX address is cleared.
To change DMX addressing
Example: Fixture channel 10 is patched to DMX channel 10. Patch it to DMX 22.
1 Press
2 Ta p
SETUP.
CREATE AND PATCH.
The touch screen is now in patch mode.
3 If necessary, tap
4 Ta p
PATCH BY DIMMER.
MORE....
You are prompted for a fixture channel number.
5 Select channel 10.
6 Ta p
CLEAR.
Fixture channel 10’s DMX address is cleared.
7 Tap the new address. In this example, tap
22. If the required address does not appear on the
touch screen, use the arrow keys or the page wheel to page the DMX address display.
24
8 Ta p
SET.
Page 37

Fixture channel 10 is now patched to DMX address 22.
Note: If you are overwriting DMX address, a warning message appears. Choosing No,
exits the procedure.
To return to 1-to-1 patch
DLITE
Patching
Deleting fixtures
To delete fixtures
1 Press
2 Ta p
SETUP.
CREATE AND PATCH.
The touch screen is now in patch mode.
3 If necessary, tap
MORE....
4 Select the fixtures for patching by tapping the cells on the touch screen or using the keypad.
5 Ta p
6 Ta p
1 Press
2 Ta p
PATCH BY DIMMER.
1-TO-1.
The message
SETUP.
CREATE AND PATCH.
Patch Successful is displayed.
The touch screen is now in patch mode.
3 If necessary, tap
4 Press
CHANNEL, SPOT, or EXTRA and select the fixtures for deletion by tapping their
MORE....
cells on the touch screen grid or using the keypad.
5 Ta p
CLEAR, on the touch screen, or press DELETE.
Patching external dimmers
Some spots use a separate external DMX address for dimming.
To patch external dimmers (spots)
Example: Patch DMX address 300 to spot 1 and DMX address 320 to spot 1.
1 Patch the spots using the patch wizard.
2 Ta p
3 Ta p
MORE....
PATCH BY DIMMER.
4 Select the fixtures that use external dimmers.
5 Ta p
EXTERNAL ADDRESSES.
6 Choose addresses by tapping them.
7 Ta p
SET.
25
Page 38
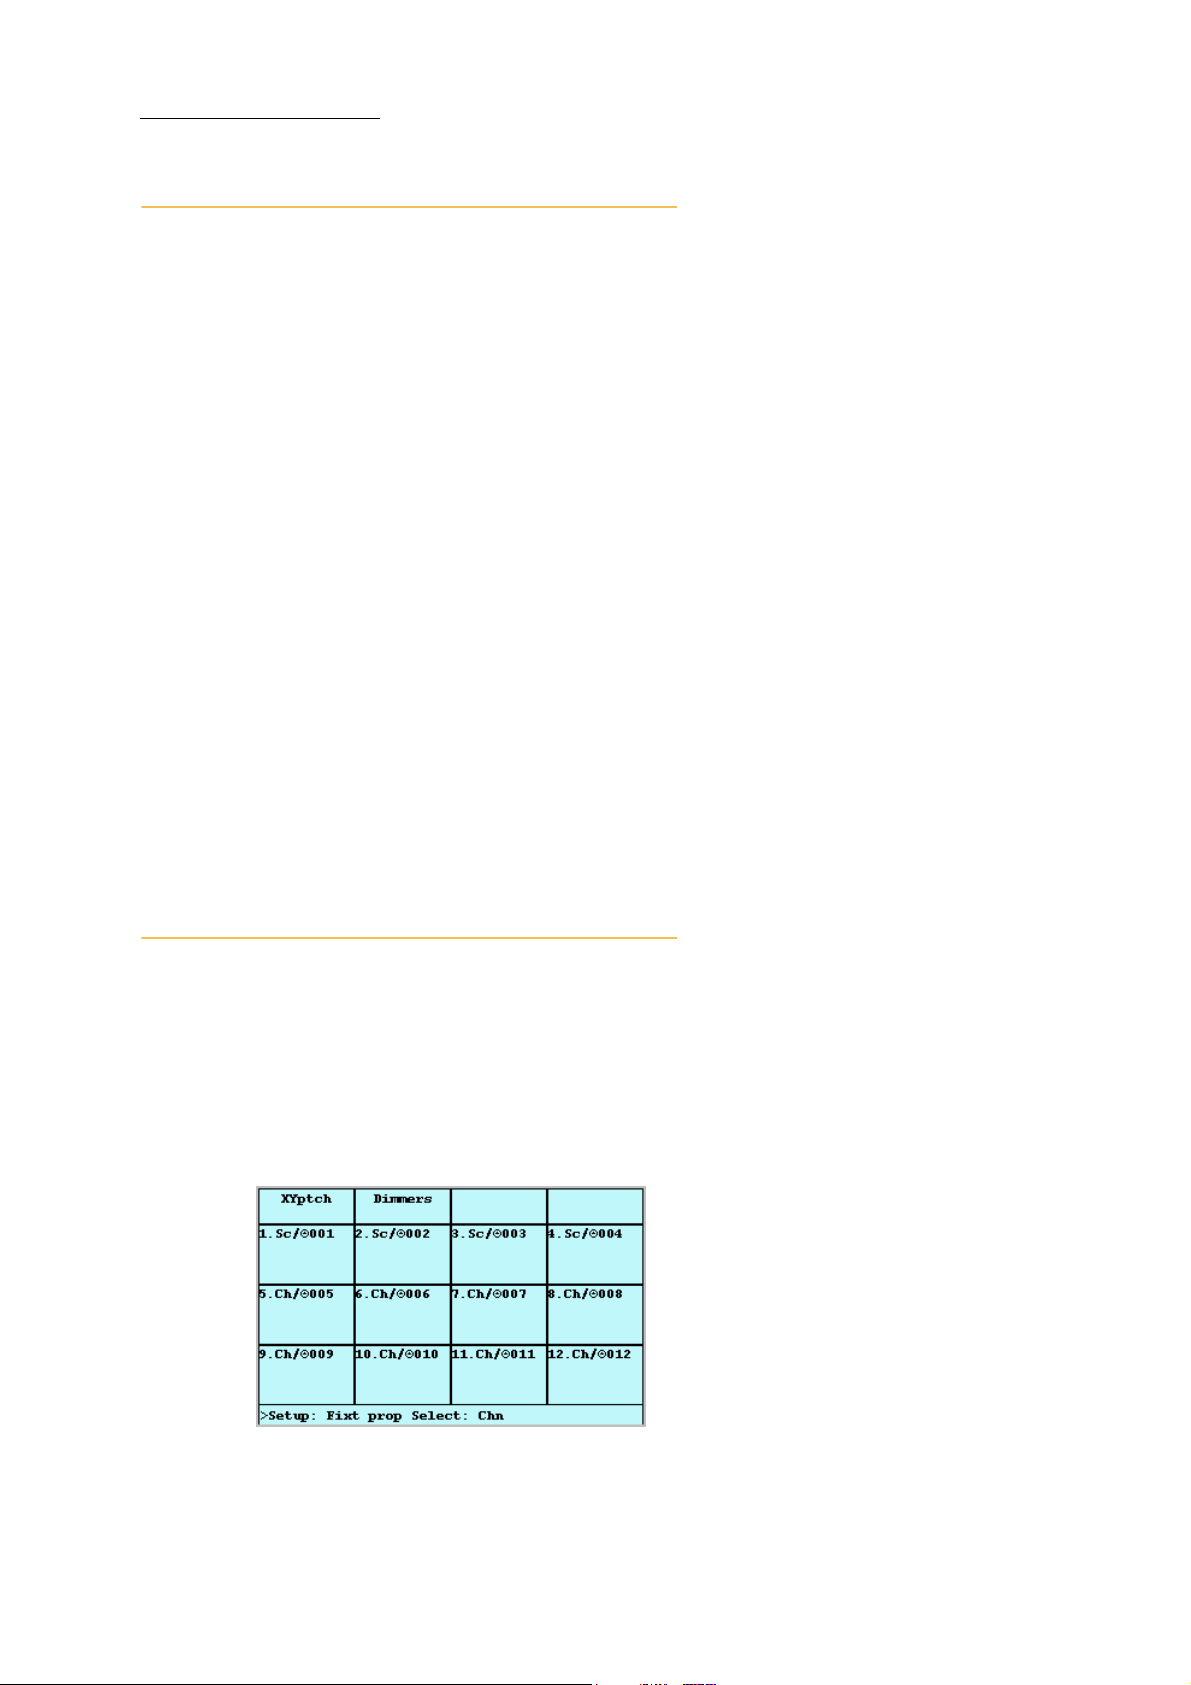
Compulite
Chapter 2
Viewing the patch
The patch is displayed on an external monitor in spread sheet format. If you are not using an
external monitor, the patch can be viewed on the touch screen.
To view the entire DMX grid
1 Press
2 Ta p
3 Ta p
SETUP.
CREATE AND PATCH.
DMX ADDRESSES.
The complete patch information is displayed on the external monitor.
4 Use the up and down arrows or the page wheel to page the display.
To view the spot, channel, or extra patch
1 Press
2 Ta p
3 Press
SETUP.
CREATE AND PATCH.
CHANNEL, SPOT, or EXTRA.
The patch information is displayed on the touch screen and on the external monitor.
To page the spot, channel, or extra patch
1 Press and hold
CHANNEL, SPOT, or EXTRA.
2 Turn wheel 1 to page the display.
DMX channel properties
26
DMX channel properties can be modified.
Set dimmer curves
Set a proportional patch
Enable GM control
Change pan and tilt orientation - invert or swap pan and tilt.
Figure 17: DMX properties screen
Page 39
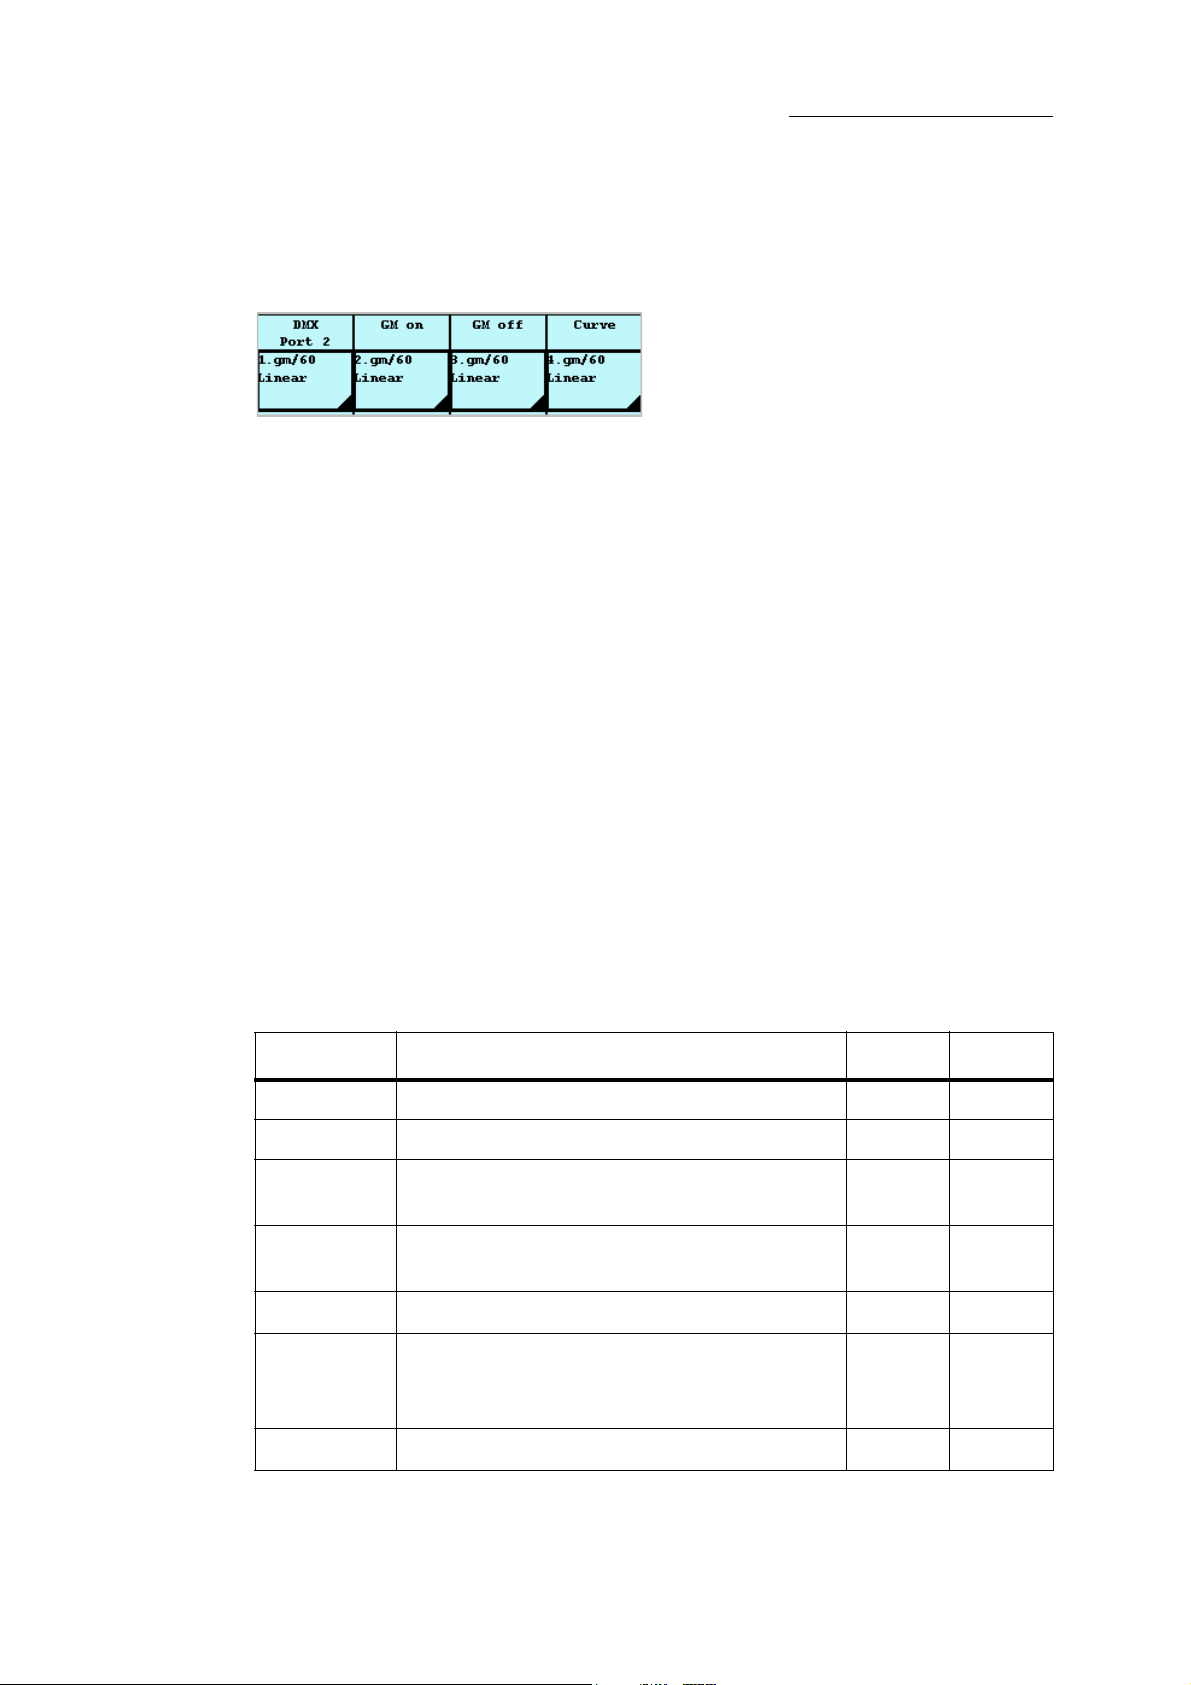
Proportional Patch
The proportional patch defines the dimmer intensity limits. Example: The output for a channel
proportionally patched at 60%, when the dimmer wheel is at FL, the output level is actually 60%.
Figure 18: Proportionate patch display
To define the proportional patch
Example: Set 60% as the highest level output for dimmers 10-12.
DLITE
Patching
1 Press
2 Ta p
3 Ta p
4 Select the dimmers.
5 Ta p
6 Use wheel 1 to set the dimmers Full level at 60%.
7 Ta p
Dimmer curves
The dimmer curve is the dimmer behavior when fading from 0%-100%. There are 5 dimmer curves
available.
Curve Type Description System Output
Linear
SETUP.
PATCH BY FIXTURE.
The
DMX Channel screen is displayed.
DIMMERS.
Dimmer information (curve, proportional patch, and GM status) is displayed on the touch
screen and the external monitor.
PROP. PATCH.
OK.
Dimmer behavior default. 10% 10%
Inverted
Non-dim
Park
Preheat
Pulse
25% -100%
Output is inverted 10% 90%
Output is either 0 or FL < 50%
> 50%
Dimmer output level is always at the parked level.
——
0
FL
Dimmers can only be parked at 100%.
The dimmer is always maintained at 5%.
The dimmer fades from 0% to Full and back to 0%.
—5%
0%
50%
Full
0%
Full
0%
The dimmer begins its fade when reaching 25%/
27
Page 40

Compulite
Chapter 2
To set the dimmer curve
Example: Set preheat for dimmer 10.
1 Press
2 Ta p
The
displayed on the external monitor.
3 Ta p
Dimmer information is displayed on the touch screen and the external monitor.
4 Select the dimmers.
5 Ta p
6 Ta p
7 Ta p
GM on or GM off
By default, all dimmers are under general master control. You can remove dimmers from general
master control. This is used for fixtures that should never go to black.
To remove dimmers from general master control
Example: Remove channel 10 from general master control.
1 Press
SETUP.
PATCH BY FIXTURE.
DMX Channel Properties screen is displayed on the touch screen. The patch is
DIMMERS.
CURVE.
PREHEAT.
OK.
SETUP.
2 Ta p
PATCH BY FIXTURE.
The
DMX Channel Properties screen is displayed on the touch screen. The patch is
displayed on the external monitor.
3 Ta p
DIMMERS.
Dimmer information (curve, proportional patch, and GM status) is displayed on the touch
screen and the external monitor.
4 Select the dimmers.
5 Ta p
6 Ta p
GM OFF.
OK.
To return dimmers to general master control
Example: Remove channel 10 from general master control.
1 Press
2 Ta p
SETUP.
PATCH BY FIXTURE.
The
DMX Channel Properties screen is displayed on the touch screen. The patch is
displayed on the external monitor.
3 Ta p
DIMMERS.
Dimmer information (curve, proportional patch, and GM status) is displayed on the touch
screen and the external monitor.
28
Page 41
4 Select the dimmers.
DLITE
Patching
5 Ta p
6 Ta p
GM ON.
OK.
Pan and tilt orientation
Sometimes spots are positioned so that the pan and tilt movement is not logically oriented to the
trackball. For example, one spot may be positioned with its head pointed to stage right, one with its
head pointed stage left, and another one lying on its back somewhere upstage.
You can change the axes orientation, so work with the trackball is logical.
Symbols XY Patch
-Y
-X
X Y Swap pan and tilt
NORMAL
Each fixture selected is automatically turned on so you can check the orientation using the X/Y
wheels or the trackball.
Invert tilt
Invert pan
Return pan and tilt to normal orientation
To set pan and tilt orientation
Example: Swap pan (X) and tilt (Y) orientation for fixtures 1 through 5.
1 Press
2 Ta p
SETUP.
PATCH BY FIXTURE.
The
DMX Channel Properties screen is displayed on the touch screen. The patch is
displayed on the external monitor.
3 Select spots 1 through 5.
The dimmers for spots 1 through 5 are automatically turned on so you can check their
orientation.
4 Ta p
5 Ta p
6 Ta p
XY PATCH.
X Y.
OK.
Tip! Use +/- keys to scroll through fixtures and set their orientation. Lock the X or the Y-
axis to check orientation on each axis.
29
Page 42

Compulite
Chapter 2
Storing a default patch
You can save a specific patch as default patch. The default patch is not erased after clearing all
system data (See “Clear System” page 166). Each new show you open already contains the default
patch.
To store a default patch
1 Follow the regular procedure for patching fixtures.
2 When patching is complete, tap
Dlite always reverts to this patch after cold start.
Patching in the editor
You can change the patch or patch any unpatched fixtures (channels, spots, extras) using the
keypad’s’
DMX numbers can be entered as absolute numbers or in port/DMX channel format. Example: 513,
or 2/1. is DMX channel 1 on port 2. Dimmer numbers can also be selected on the touch screen grid
in
DMX Address mode or on the UKs.
Viewing the patch
You can view the patch on the touch screen grid or on the external monitor. DMX PORT 2 on the
touch screen toggles between viewing port 1 and port 2.
To view the patch
DIM key. Patch functions that can be done in the editor:
Clearing patch
Patching fixtures to DMX offsets
SAVE AS DEFAULT.
30
1 Press
DIM.
The grid shows the DMX addresses on the selected port and the patched fixtures.
2 Ta p
DMX PORT 2 toggle between DMX port 1 and DMX port 2.
To view the patch for specific fixtures
1 Press
DIM.
The grid shows the DMX addresses on the selected port and the patched fixtures.
2 If necessary, tap
3 Press
CHANNEL, SPOT, or EXTRA.
DMX PORT 2 toggle between DMX port 1 and DMX port 2.
The grid shows the selected fixture type and the fixture’s DMX addresses.
To jump to a specific cell
1 Press
DIM.
Page 43
DLITE
Patching
The DMX address patch is displayed.
2 Enter the dimmer number in either #/# (Universe/Address) or ### (DMX address) format.
3 Press
ENTER.
4 The requested dimmer is displayed on a dark field.
To jump to a DMX universe
Use the wheels to jump the display to the next DMX universe.
Wheel What happens
2 (SCROLL DMX)
• Jump to the first address in the next DMX universe.
• If the last universe is displayed, pressing wheel 2 jumps to the first
universe.
3 (PAGE)
• Jump to the parallel address in the next DMX universe.
• If the last universe is displayed, pressing wheel 3 jumps to the first
universe.
1 Press
DIM.
The DMX address patch is displayed.
2 Press wheel 2 or wheel 3.
3 The display jumps to the next DMX universe.
Selecting dimmer numbers
Dimmer numbers can be entered as an absolute number of the DMX universe number and then,
separated by the slash, the dimmer number.
Use
NEXT and PREV to select the dimmer before or after the currently selected dimmer.
If the current selection is a range of dimmers, the selection continues from the last dimmer in
the range.
If current selection is the last dimmer in a DMX universe, PREV only is available.
If current selection is the first dimmer in a DMX universe, NEXT only is available.
Patching fixtures
Patching can be done using the console keypad or use the grid display which allows you to view the
current patch while working.
To patch a single fixture
Example: Patch channel fixture 5 to DMX address port 1 dimmer 50.
1 Press
2 Press
3 Enter the dimmer number on the numeric keypad.
CHANNEL and 5 to select the channel.
DIM.
31
Page 44

Compulite
Chapter 2
4 Press ENTER or STORE.
5 Press
RESET to exit the DMX port display.
OR
1 Press
2 Press
3 Press
CHANNEL and 5 to select the channel.
DIM.
1 (the port) / (slash) 50 (dimmer) or use the direct dimmer number, in this example,
50.
4 Press
5 Press
ENTER or STORE.
RESET to exit the DMX port display.
OR
1 Press
2 Press
CHANNEL and 5 to select the channel.
DIM.
The touch screen is in
DMX Address mode.
3 Page until dimmer 50 is visible and tap dimmer 50 to select.
4 Ta p
SET.
The new DMX offset for channel 5 is stored.
5 Press
RESET to exit the DMX port display.
To patch viewing the fixture grid
1 Press
2 Ta p
SETUP.
PATCH BY FIXTURE.
3 Select the fixture.
4 Press
DIM.
5 Select a DMX address.
6 Press
ENTER or tap SET.
To patch a range of fixtures
Example: Patch channels 1 through 10 to dimmers 51 through 60.
1 Select channels 1 through 10.
2 Press
DIM.
The touch screen is in
DMX Address mode.
3 Select DMX 51 either on the keypad or on the touch screen.
4 Press
ENTER or STORE or tap SET.
Channel 1 is patched to DMX 51, channel 2, to DMX 52, channel 3 to DMX 53, etc.
5 Press
RESET to exit the DMX port display.
32
Page 45

To patch scrollers
Example: Patch scrollers for channel fixtures 4 through 8 to DMX addresses 104 through 108.
1 Select channels 4 through 8.
DLITE
Patching
2 Press
3 Ta p
DIM.
SCROLLER.
4 Enter the first DMX address, in this example the first DMX address is 104.
5 Press
ENTER.
Or
Tap
SET.
The scroller patch is stored.
To patch more than 1 DMX address to a channel (soft patching)
Example: Patch Port 2, DMX addresses 12 - 24 to channel 1.
1 Select channel 1.
2 Press
3 Select the DMX addresses on the keypad:
4 Press
5 Press
DIM.
The touch screen is in
ENTER or STORE.
RESET to exit the DMX port display.
DMX Address mode.
2/12 2/24.
To clear patching
Example: Clear the patch assignment for channel 5 which is patched to port 1, DMX offset 5.
1 Press
DIM.
The touch screen is in
DMX Address mode.
2 Select dimmer 5.
3 Press
DELETE.
Confirmation is requested.
4 Press
DELETE or ENTER or tap OK.
The DMX address is cleared. Now a new DMX offset can be set for channel 5.
5 Press
RESET to exit the DMX port display.
OR
1 Press
DIM.
2 Select dimmer 5.
3 Ta p
CLEAR.
You are prompted to confirm the delete command.
4 Press
DELETE or ENTER or tap OK.
The DMX address is cleared. Now a new DMX offset can be set for channel 5.
33
Page 46
Compulite
Chapter 2
5 Press RESET to exit the DMX port display.
To overwrite an existing patch
Using park
Fixture parameter levels, dimmer levels, and scenes can be parked at specific levels. Parked items
constantly output at their parked level and do not respond to level changes in the editor or to the
general master.
The proportional patch affects the output of parked dimmers. Example: If a dimmer has a propor-
tional patch of 50% and the dimmer or its patched fixture is parked at 70%, the output is 35%. This
is valid only when the proportional patch has been set before parking the dimmer or fixture.
Pressing
1 Press
2 Press
DIMMER and select the range of DMX addresses.
CHANNEL and select the channel range.
3 Ta p S e t .
An overwrite warning is displayed.
4 Ta p
Note: The general black out key (
OK to confirm the command.
B.O.) overrides parked items.
PARK, displays the park options on the touch screen.
Park Options What it does
PARK
UNPARK
UNPARK ALL
To park fixture parameters
1 Press
PARK.
2 Select fixtures and parameters.
3 Set the parked level.
4 Press
PARK.
Or
Press
ENTER.
5 Ta p
OK.
To park dimmers
1 Press
2 Press
PARK.
DIM and select dimmers.
3 Set the parked level.
Park selected items at the specified levels.
Free the selected items from their parked state.
Free the all parked items from their parked state.
34
Page 47

4 Press PARK.
Or
Press
ENTER.
DLITE
Patching
5 Ta p
OK.
To unpark fixture parameters
1 Select the fixtures. Select the parameters you want to unpark.
2 Press
PARK.
The park options are displayed on the touch screen.
3 Ta p
UNPARK.
The selected parameters are removed from their parked state.
4 Ta p
OK to exit the park options screen.
To unpark DMX channels
1 Press
PARK.
The park options are displayed on the touch screen.
2 Ta p
PARK DIMMER.
DMX port 1 or 2 is displayed on the touch screen grid.
3 If necessary, toggle
DMX PORT 2 to display the correct DMX port.
4 Select the DMX channels.
5 Ta p
PARK.
6 Ta p
To unpark everything
1 Press
The park options are displayed on the touch screen.
2 Ta p
3 Ta p
Testing dimmers
You can test the DMX channels. In test mode, the selected dimmer is automatically set to 80%.
To test dimmers
1 Press
2 Select a DMX address on the touch screen grid.
3 Ta p
The selected dimmer turns on at 80%.
4 Press
OK to exit the park options screen.
PARK.
UNPARK ALL.
OK to exit the park options screen.
PARK.
TEST.
NEXT or PREV to cycle through the dimmers.
35
Page 48

Compulite
Chapter 2
5 Press RESET to exit.
OR
1 Press
The patch is displayed on the external monitor.
2 Press
The park screen is displayed.
Dimmer 1 is turned on at 80%. All other dimmers are forced to zero.
3 Press
4 Exit by pressing
Testing fixtures
Test the dimmers for selected fixtures. Use wheel 1 to set the dimmer testing level.
To set the test level
1 Select a fixture.
2 Press
3 Use wheel 1 to set a dimmer level.
4 Use
NEXT and PREV to cycle through the fixtures.
DIM and select a dimmer number.
SHIFT + PARK.
TEST is selected.
PREV or NEXT to cycle through the dimmers.
RESET or clicking OK.
SHIFT + TEST.
OR
1 Press
SHIFT + TEST.
2 Select a fixture.
3 Use wheel 1 to set a dimmer level.
4 Use
NEXT and PREV to cycle through the fixtures.
36
Page 49

Chapter 3 Selecting Fixtures and Setting
Levels
This chapter includes:
Selecting fixtures (see page 37)
Activating spots (see page 42)
Setting parameter levels (see page 42)
Resetting and recalling the editor (see page 49)
About groups (see page 49)
Blind Editor (see page 55)
About selecting fixtures
Fixtures must be selected, to make them available for editing. Parameter levels for the selected
fixtures are output from the editor and comprise all or part of a lighting look. The lighting look can
be stored as a scene, a chase step, or a cue in a QList (see “Show objects” page 11).
Selecting fixtures
Fixture selections can be made on the touch screen grid on the touch screen, by pressing the faders
Universal Keys, using console keys, or on the external monitor.
Note: Although Dlite Compact has no faders, the playbacks’
to select objects.
Command line numerical default
A command line default can be set so Dlite recognizes the first number entered as a belonging to
the default fixture type. The command line default can be set for:
Spot selection
Channel selection
SELECT keys can be used
Extra selection
37
Page 50
Compulite
Chapter 3
To set the command line selection default
Example: Set the command line default for spot or channel.
1 Press
SPOT twice. Spot appears in the command line. Dlite now recognizes the first
number selection as a spot selection, making it unnecessary to press this key before the
number selection.
OR
1 Press
CHANNEL twice. Chn appears in the command line. Dlite recognizes the first
number selection as a channel without needing to press this key.
Note: In the selection sequences examples, the instruction to press the keys
CHANNEL is included for clarity. If the command line default is appropriate to
the type of fixture selection there is no need to press these keys.
Selecting fixtures using the console keypad
:
Console keys used for fixture selection
Key What it does
SPOT
CHANNEL
EXTRA
Set the keypad for spot selection.
Set the keypad for channel selection.
Set the keypad for extra selection. Extras are DMX controlled devices,
such as smoke machines.
SPOT or
0 - 9
Use for numeric entries.
‘Thru’ for range selections.
—
+
Use to remove a channel/spot form a range selection.
Example:
CHANNEL, 1, , 5, —, 4, selects channels 1, 2, 3, 5.
Functions as an “and” key when used between channel selections.
Example:
CHANNEL, 1, +, 3, +, 7, +, 11, selects channels 1, 3, 7, and 11.
z Makes the last selection available.
To select a single fixture
SPOT, 1
Spot is displayed in the command line. All spot 1 parameters can now be selected and
edited using the parameter wheels or console keys.
CHANNEL, 1
Chn1 is displayed in the command line. You can now set a dimmer level for the channel.
EXTRA, 1
Extra1 is displayed in the command line. You can now set a level for the extra’s parameters.
38
Page 51

DLITE
Selecting Fixtures and Setting Levels
To select a sequential range of fixtures
SPOT (or CHANNEL, EXTRA), 1, , 24. Selects all the fixtures in the range.
To select a non-sequential range of fixtures
SPOT (or CHANNEL, EXTRA) or, 1, +, 6, +, 9. Selects fixtures 1, 6, and 9.
To remove fixtures from a range selection
SPOT, (or CHANNEL, EXTRA) 1, , 24, —, 12. Selects all fixtures in the range except 12.
To cancel the entire selection
1 Press
RESET.
To retrieve the last selection
1 Press the fixture type (channel, spot, or extra).
2 Press z. The fixtures in the last selection are now available for editing.
To select the next or previous fixture
Example: The previous selection was spot 10. Select spot 11 or spot 10.
1 Press
2 Press
Note: Pressing
SPOT.
NEXT or PREV.
If you pressed
If you pressed
NEXT, spot 11 is selected.
PREV, spot 10 is selected.
SHIFT + NEXT or SHIFT + PREV, adds the next or previous fixture to the
current selection. Example: If the current selection is spot 10, pressing
NEXT adds spot 11 to the selection.
Selecting fixtures using the universal keys
A quick way to select fixtures is to use the U(niversal) K(eys).
SHIFT +
ATTENTION! The faders must be in context mode.
To select fixtures
1 Press
MODE until context mode is active.
The green LED, located on the panel next to
2 Select the fixture type by pressing
CHANNEL, SPOT, or EXTRA.
3 Press the UKs that correspond to the fixture numbers.
The respective UK LEDs are blinking. The fixtures are selected in the editor and can be
edited.
To select a range of fixtures
1 Select the fixture type by pressing
CHANNEL, SPOT, or EXTRA.
Context, is on when context mode is selected.
39
Page 52
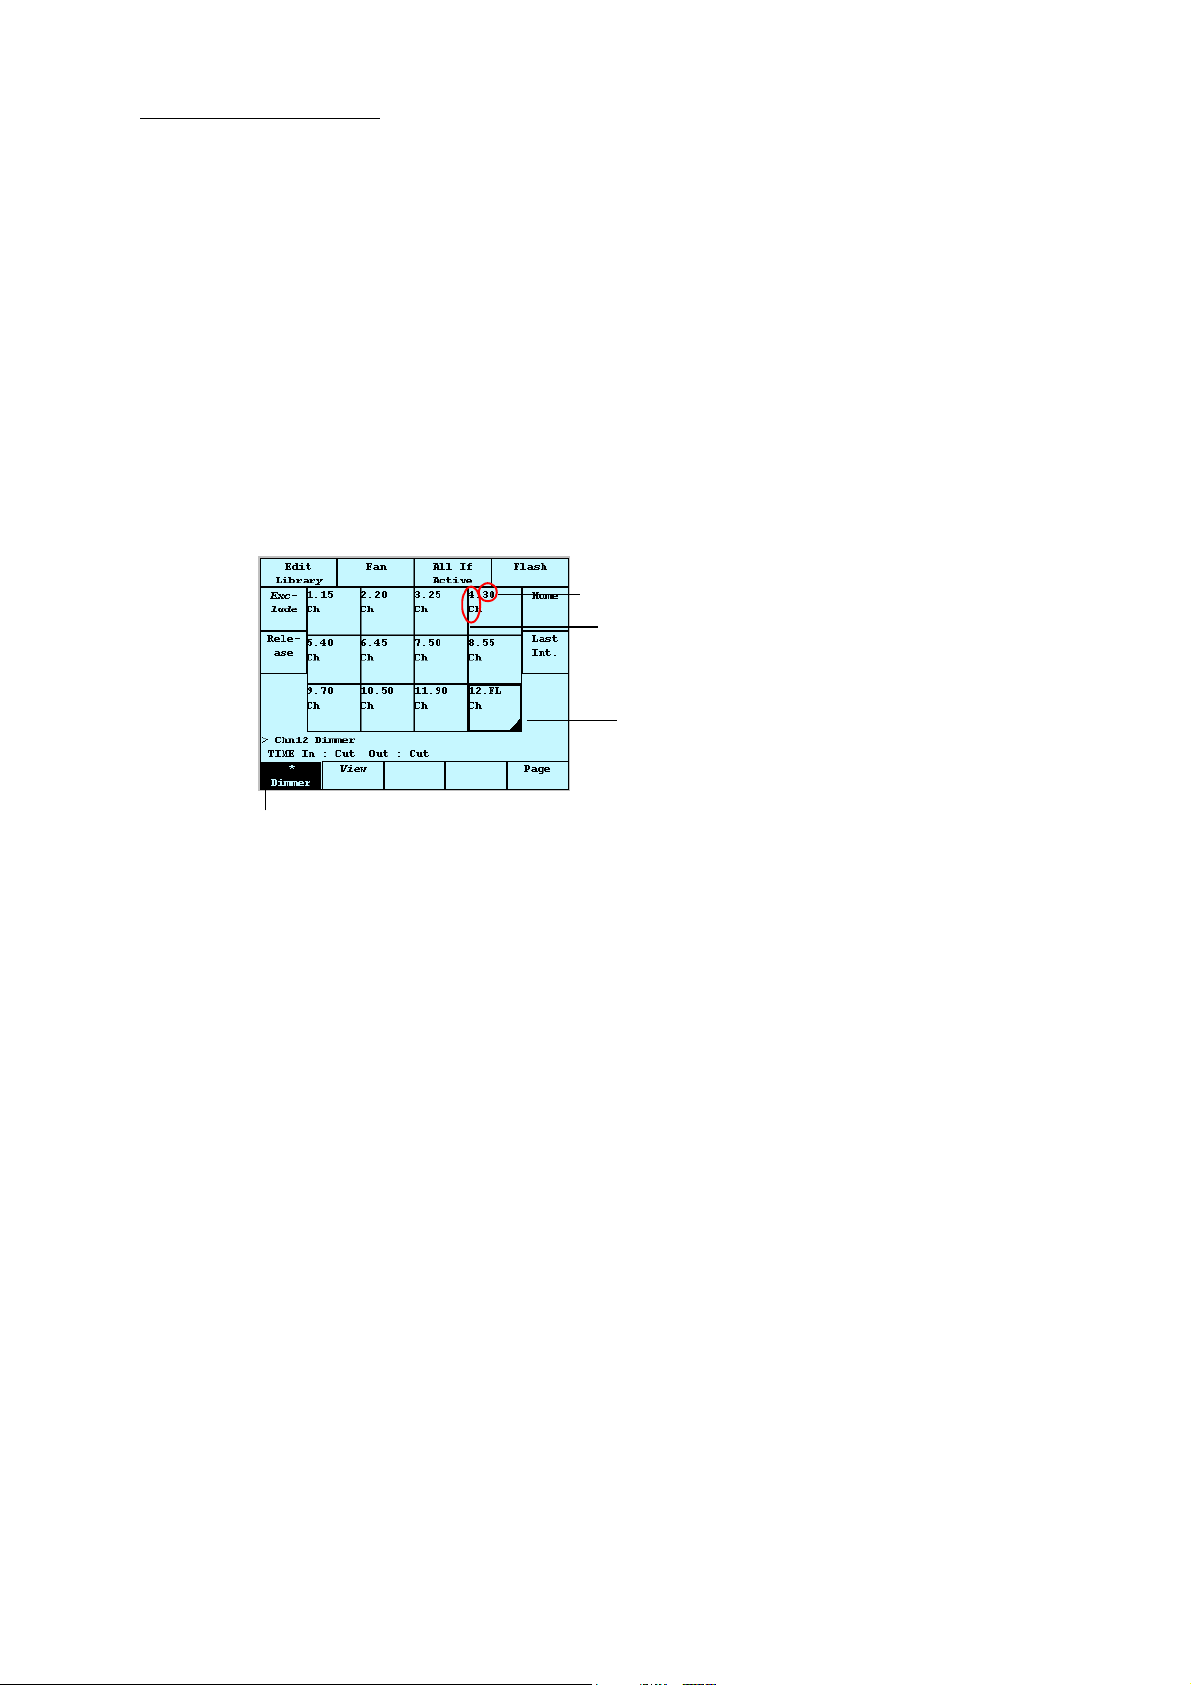
Compulite
Chapter 3
2 Press the first UK in the range.
3 Press and hold
SHIFT and press the last UK of the range.
The LEDs for the selected range blink.
To remove a fixture from the selection
Pressing a UK with a blinking LED (selected) removes the fixture from the selection. The
LED stops blinking.
Selecting fixtures on the touch screen
You can select fixtures on the touch screen’s fixture grid. The fixture grid is displayed after pressing
CHANNEL, SPOT, or EXTRA.
Intensity level
Channel number
A black corner represents channels active on the wheel
Dimmer is the active parameter
Figure 19: The touch screen in fixture mode showing channels
To select fixtures
1 Select the fixture type by pressing
CHANNEL, SPOT, or EXTRA.
The live grid is now displayed.
2 Tap the live grid numbers to select fixtures.
The selected fixtures appear on a dark field. The fixtures’ parameter levels can be set now.
Note: The live spot display shows the selected parameter.
To select a range of fixtures
1 Select the fixture type by pressing
CHANNEL, SPOT, or EXTRA.
2 Tap the first fixture in the range.
3 Press and hold
SHIFT and tap the last fixture of the range.
The selected fixtures appear on a dark field.
To remove a fixture from the selection
Tapping a selected fixture removes it from the selection.
40
Page 53
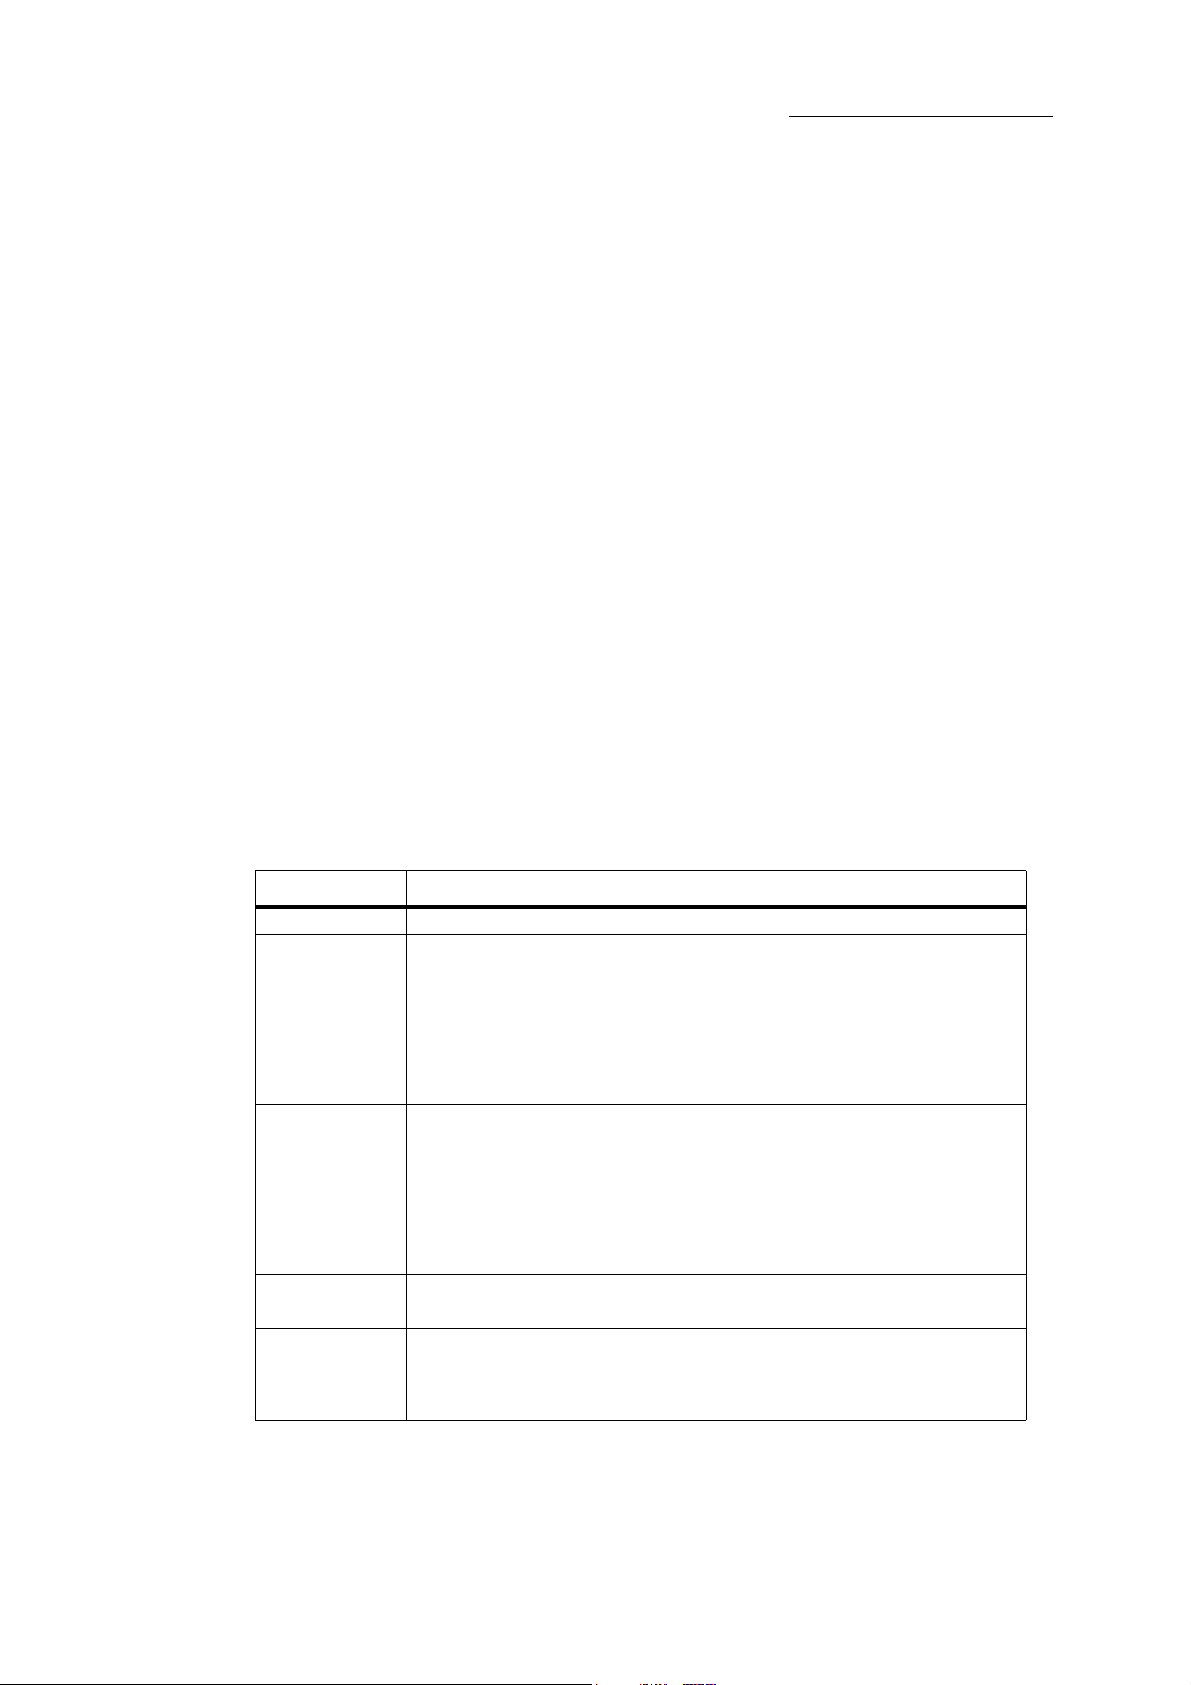
Selecting fixtures on the external monitor
Fixtures can be selected on the external monitor also.
To select fixtures on the external monitor
Click the spot, channel, or extra on the external monitor.
When selected, channel numbers appear on a brown field, spot numbers have a + (plus
sign.
To select a range of fixtures on the external monitor
1 Click the first spot, channel, or extra in the range.
DLITE
Selecting Fixtures and Setting Levels
2 Press and hold
3 Click the last fixture in the range.
When selected, channel numbers appear on a brown field, spot numbers have a + (plus
sign.
To remove a fixture from the selection
Again click the spot, channel, or extra on the external monitor.
Filtering selections
You can filter selections by using the EVERY options. The EVERY button is available, on the touch
screen, in fixture mode (after pressing
Button What it does
EVERY
ODDS
EVENS
THIRD
/
SHIFT.
CHANNEL, SPOT, or EXTRA).
Opens filter options
Selects every other fixture, within the designated range, starting with the
first fixture.
Example1: The range 1 thru 8 is selected. Tapping
ODDS selects 1, 3, 5,
and 7.
Example 2: The range 2 thru 8 is selected. Tapping
ODDS selects 2, 4, 6,
and 8.
Selects every other fixture, within the designated range, starting with the
second fixture.
Example1: The range 1 thru 8 is selected. Using
EVENS selects 2, 4, and
6.
Example 2: The range 2 thru 8 is selected. Using
EVENS selects 3, 5, and
7.
Selects every third fixture, within the designated range, starting with the
first fixture.
Advance selection by a specified increment.
Example: 4 / 2, selects the second fixture in each group of four fixtures.
Therefore: channel 1 g 20 every 4 / 2, selects channels 2, 6, 10, 14, and 18.
You can further refine the selection fixtures that are active in the editor by using
(see “Using Active to select fixtures” page 153.
ACTIVE
41
Page 54

Compulite
Chapter 3
Activating spots
CONTROL is a dedicated key for spot ignition, shut down, and reset.
To turn the lamp on
1 Select the spots.
2 Press
CONTROL.
3 The touch screen is now in control mode.
4 Ta p
LAMP ON.
To turn the lamp off
1 Select the spots.
2 Press
CONTROL.
The touch screen is now in control mode.
3 Ta p
LAMP OFF.
To reset spots
1 Select the spots.
2 Press
CONTROL.
The touch screen is now in control mode.
3 Ta p
RESET.
IMPORTANT! The lamp on, lamp off, and reset are mapped to a dedicated control
channel by the device’s manufacturer.
Setting parameter levels
Channels usually have 1 parameter, usually dimmer. Spots contain more than one parameter. The
number and type of parameters controlled by a spot depends on the type of device.
Spot parameters are organized into parameter banks:
Focus (F)
Color (C)
Beam (B)
Parameter bank Possible parameters
F(ocus) Dimmer, strobe, pan, tilt, movement speed
C(olor) Cyan, yellow, magenta, color wheels, color speed
B(eam) Focus, zoom, iris, gobo wheels, prism, gobo spin
42
Page 55
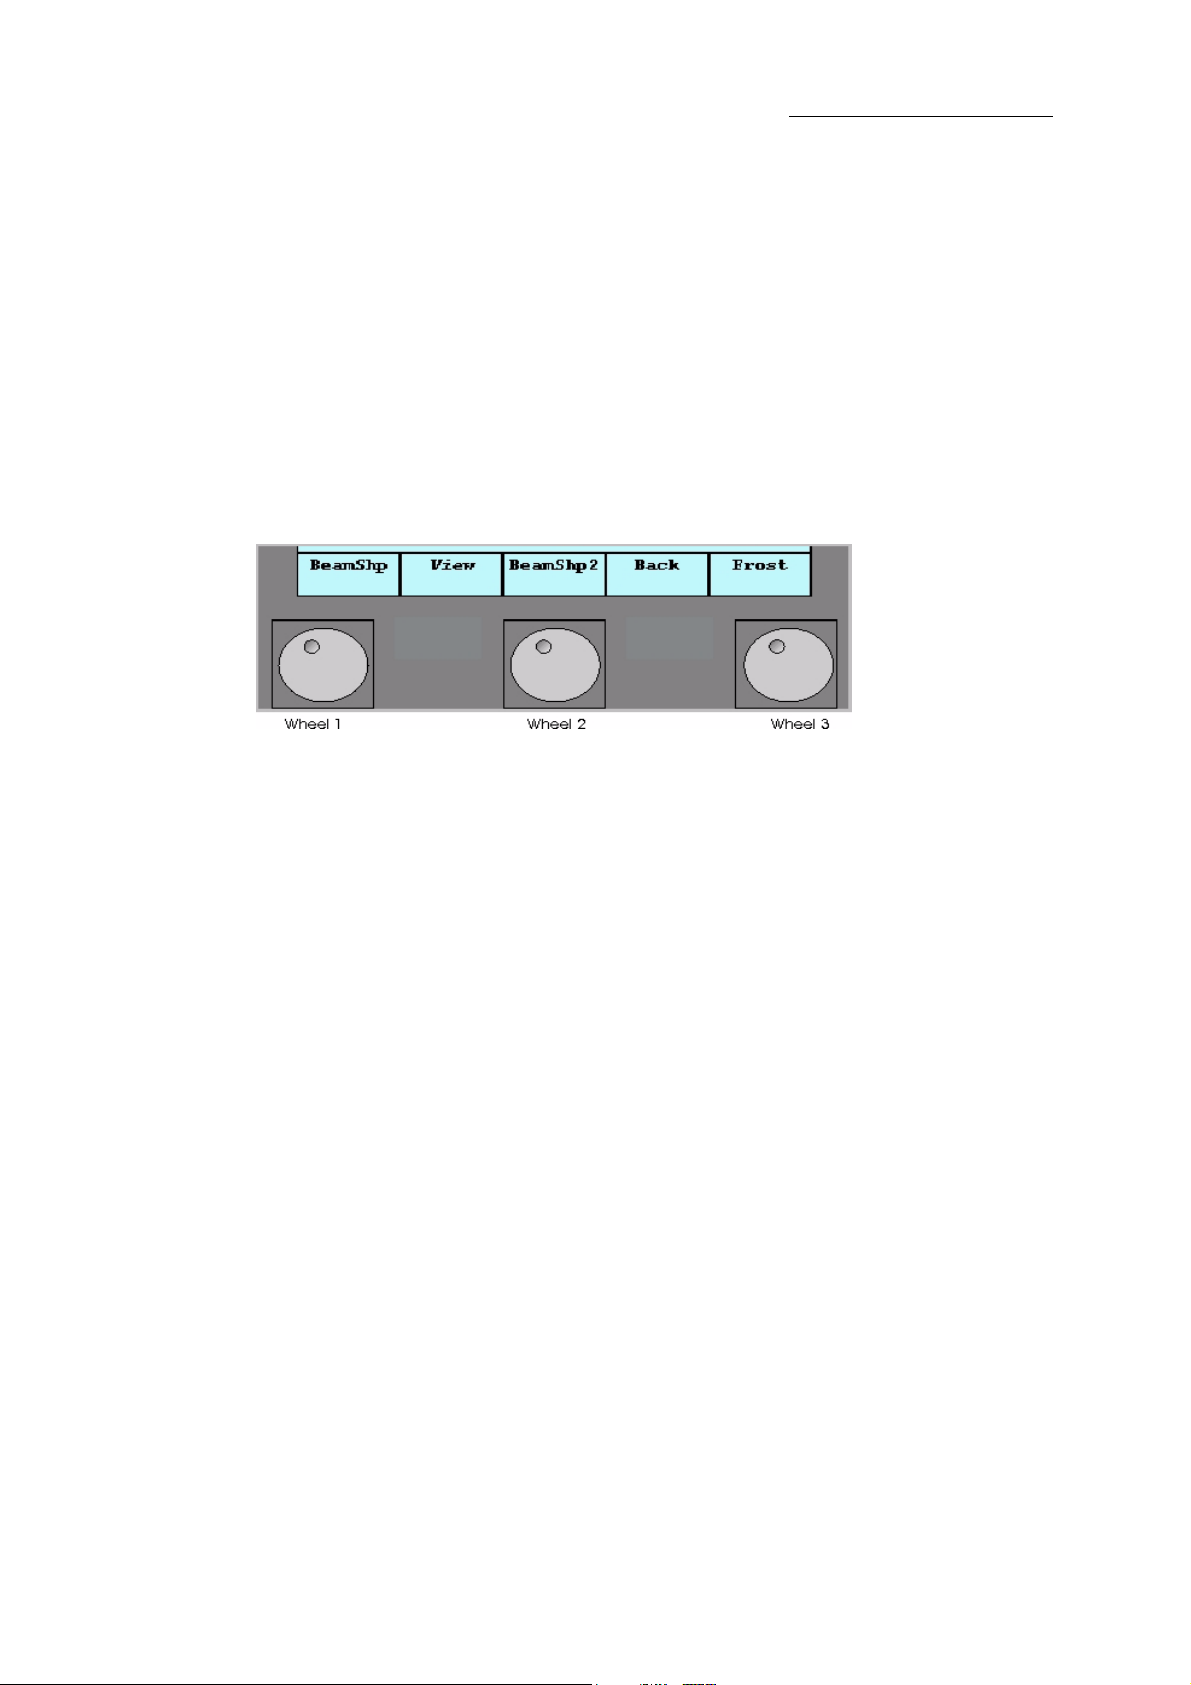
Parameter levels are set using:
Wheels
Console keypad
Faders in context mode
Wheels in parameter mode
When fixtures are selected, the wheels are available for setting parameter levels. The first wheel
defaults to dimmer (intensity) for both channels and spots. For multi parameter spots, the wheels
are organized in banks according to the parameter type. Parameters are organized into F(ocus),
C(olor), or B(eam) types. Dimmer belongs to parameter type F(ocus).
DLITE
Selecting Fixtures and Setting Levels
Figure 20: Wheel assignments are displayed on the touch screen above the wheels
Paging wheel banks
If the number of parameters in the selected bank exceed three parameters, then there is more than
one page in the wheel bank.
To page wheel banks
Page to the next layer by pressing F, C, or B again.
Pressing and holding SHIFT and pressing a bank key will return to the previous layer.
Wheel and trackball resolution
Some parameters may require finer wheel or trackball resolution.
To switch to fine wheel or trackball resolution
Press the wheel (or trackball) and turn it.
OR
Press and hold SHIFT while turning the wheel (or trackball).
Selecting parameters
You may want to select specific parameters and set levels using the keypad.
To select a parameter
1 Select the spots.
2 Press
F, C, or B to select the parameter bank.
43
Page 56

Compulite
Chapter 3
3 Press the wheel for the required parameter. If the parameter is not in the first wheel layer,
page the layers until it appears.
The parameter is now selected in the editor. You can set a level using the keypad.
Setting dimmer intensity
Dimmer intensity can be set for all fixtures using:
The dimmer wheel
Console keypad
Quick level keys
Faders -Dimmer intensity for channels and spots can also be set using the faders in context
mode. When the faders are in
nels only.
The trackball, if the selected fixtures do not have pan and tilt parameters.
Quick level keys are:
Wide or 2 Preset modes they control dimmer intensity for chan-
FULL - Fades the selected fixture’s dimmer to 100%.
ON - Fades the selected fixture’s dimmer to 50%.
ZERO - Fades the selected fixture’s dimmer to black (0%).
To set dimmer levels using quick level keys
1 Select the fixtures.
2 Press
FULL, ON, or ZERO.
To set dimmer levels using the wheel
1 Select the fixture(s) using the editor keypad or on the touch screen.
2 Use wheel 1 to set the intensity level.
Dimmer levels are displayed on the touch screen (in channel mode) or, if present, on the
external monitor.
To set dimmer levels using the keypad
Example: Set the dimmer level for spots 1 through 12 at 85%.
1 Select spots 1 through 12 (
2 Press
3 Press
@.
8 and 5. The selected fixtures fade to 85% intensity.
SPOT 1 12).
44
To set dimmer levels using the faders
In context mode, the faders control the dimmer for all types of fixtures
1 Select the fixtures.
2 Make sure the faders are in context
mode.
3 Raise the fader handles to the desired level.
Page 57
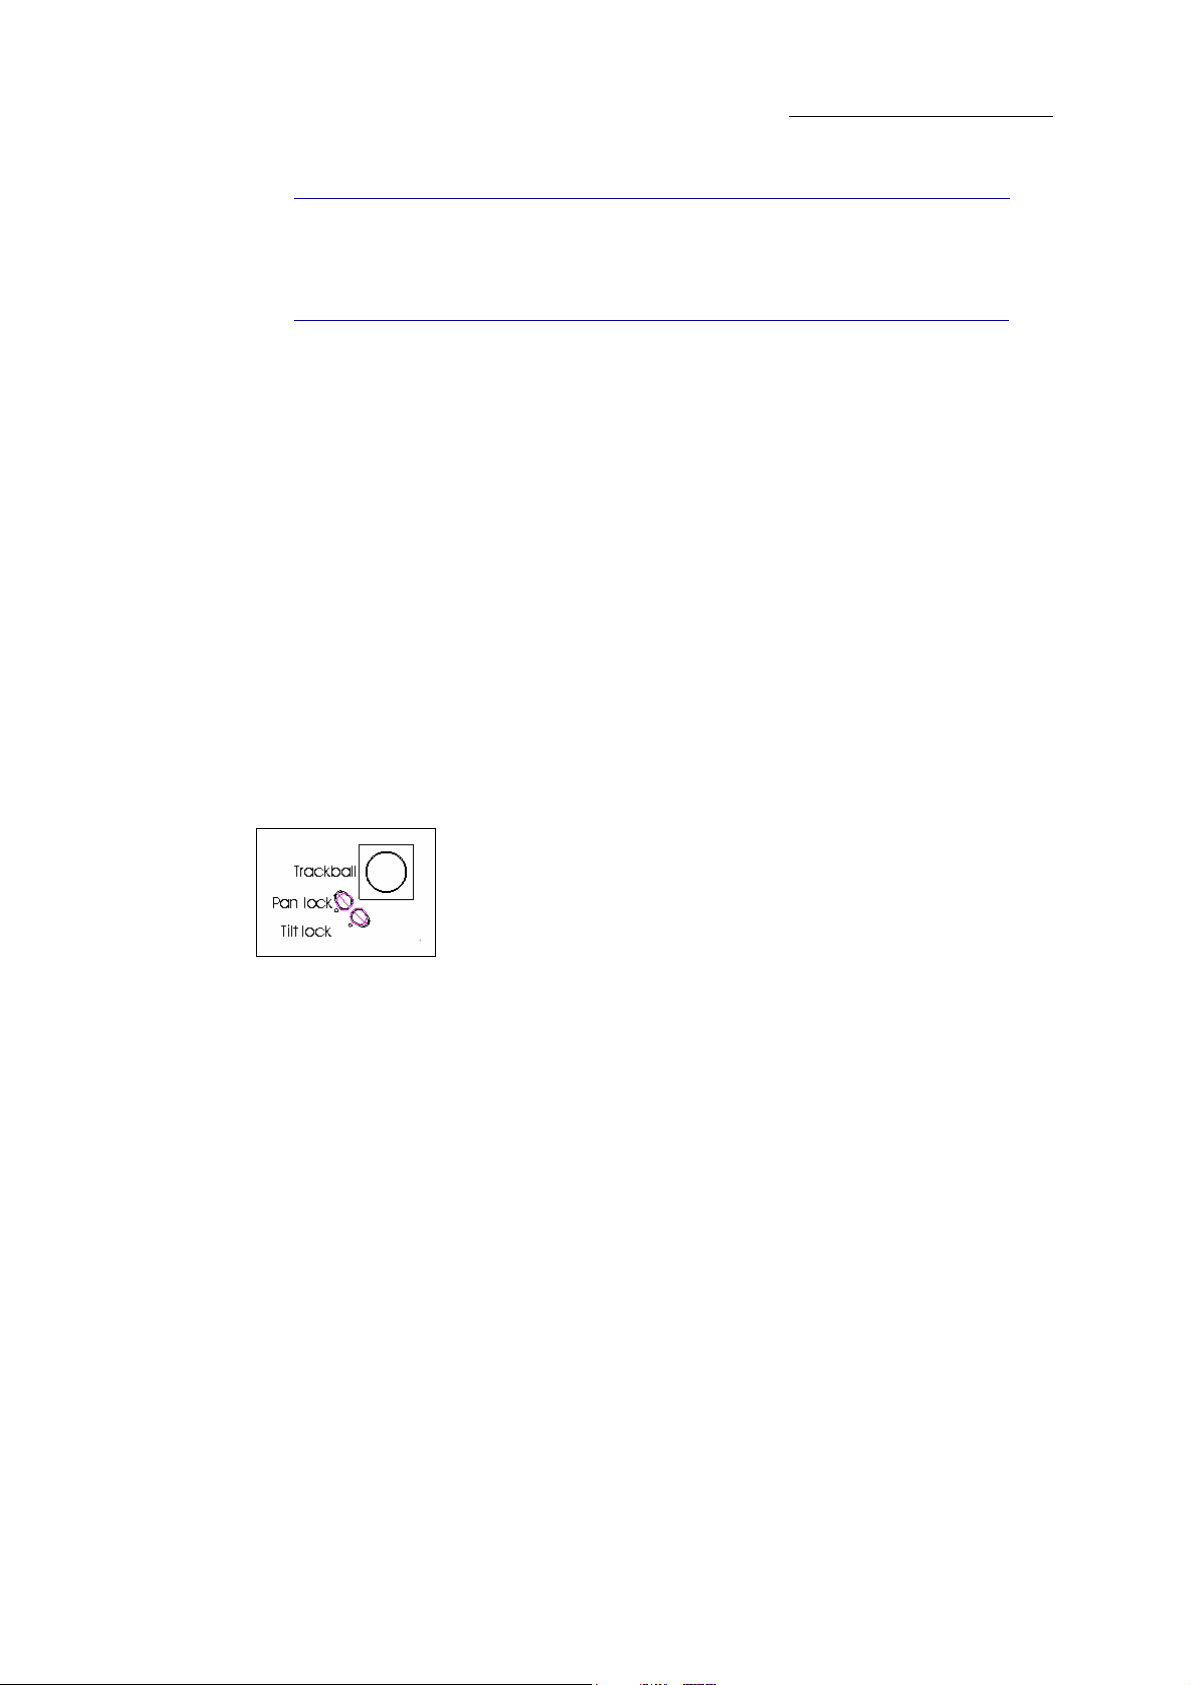
IMPORTANT! If the dimmers of the selected fixtures are output from the editor or
from a playback, you must move the fader handle until the level matches the output
level. When the fader reaches the output level, the fader grabs control of the fixture’s
dimmer.
Recalling the last editor level
One press recall for last parameter level.
To recall last level
1 Select the fixture(s).
2 Select the parameter by pushing its wheel.
Dimmer is the default selection.
DLITE
Selecting Fixtures and Setting Levels
3 Ta p
LAST LEVEL.
The parameter fades to its last editor level.
Setting pan (x) and tilt (y)
Pan and tilt are controlled by the trackball.
You can lock either pan or tilt in order to adjust just one of the axes.
Figure 21: The trackball with pan and tilt locks
To set position
Select the fixtures and use the trackball to set pan and tilt.
To set only pan or only tilt
1 Lock one of the axes, by pressing the its lock key.
2 Use the trackball to set the pan or tilt level.
Spot parameter types
There are two types of parameters:
Continuous parameters, which wheel up from 0 (zr) to 100% (FL) with no internal divisions.
Step parameters, which are defined with internal divisions. There can be continuous control
between steps or a step can transmit a preset value. Steps are commonly used for channels
controlling both dimmer intensity and strobe, for gobo wheels, and for color wheels.
45
Page 58

Compulite
Chapter 3
The display format for step parameters depends on the step’s definition in the device builder
application. Some examples of step displays are: 2.FL (step at its maximum value) or text,
such as,
FULL, ON, and ZR can also be used to set parameter levels.
Fast Strobe. see “Device Builder” page 167.
To set parameter levels
Example: Set levels for color and beam parameters.
1 Select the spots.
2 Set the dimmer intensity.
3 Press
C to switch wheels to the color bank.
4 Set levels using the wheels.
Or
Select a parameter press
@ and choose a level using the keypad.
Note: If the parameter you are looking for is not visible, press
to the next 3 parameters in the bank.
5 Press
B to switch wheels to the beam bank.
6 Set levels using the wheels.
Or
Select a parameter press
@ and choose a level using the keypad.
To set levels for step parameters
Example: Jump from color to color on the color wheel (CW).
1 Select the spots.
2 Set the dimmer intensity.
3 Press
C to switch wheels to the color bank.
Note: If the parameter you are looking for is not visible, press
to the next 3 parameters in the bank.
C again to page
C again to page
4 Press the (CW) wheel.
5 Ta p
STEP UP OR STEP DN.
The color wheel jumps from color to color.
Using the faders to set parameter levels
You can also use the faders in context mode to set parameter levels. Example: You have selected 4
spots of the same device type. This device uses 5 DMX channels. When
enabled, faders 1 through 5 control parameters for spot, faders 6 through 7 control parameters for
spot 2, etc.
46
PARAM CONTROL is
Page 59

To set spot parameter levels using the faders
1 Select the spots.
DLITE
Selecting Fixtures and Setting Levels
2 Make sure the faders are in
3 Ta p
PARAM CONTROL.
4 Raise the fader handles to fade a parameter to the desired level.
IMPORTANT! If the parameter is output from the editor or from a playback, you must
move the fader handle until the fader level matches the output level. When the fader
reaches the output level, the fader grabs control of the parameter.
Flip pan (x) and tilt (y)
The flip feature reverses the pan and tilt axes 180 degrees, returning to the fixture’s current position.
This is useful for yokes and fixtures whose heads have 360 degree movement.
Example: In its current position, a yoke is at the limit of its pan movement. To continue moving the
yoke on its pan axis, apply the flip feature. The yoke returns to its current position without the
movement limit.
To flip pan and tilt
1 Select the spot(s).
The touch screen is now in spot mode.
Context mode.
2 Press and hold
SHIFT.
More options are displayed on the touch screen.
3 Ta p
FLIP.
Changing pan (x) and tilt (y) orientation
See “Pan and tilt orientation” on page 29.
Resetting the editor and recalling parameter levels
Pressing RESET returns all parameters, for fixtures active in the editor, to their home levels. Home
levels are defined in the Device Builder application for each device type.
You can home all active parameters, selected parameters, or parameters grouped in the same wheel
bank. The
Occasionally, there are specific fixtures and parameters that require home levels that are different
than those in the device definition. You can create a special “home” scene for these specific levels.
See “create a scene for unusual home level requirements” on page 48.
To home all active parameters
Select the spots and tap HOME.
HOME button appears on the touch screen in spot mode.
47
Page 60

Compulite
Chapter 3
To home parameters grouped in the same wheel bank
Example: Home levels for all parameters in the beam bank.
1 Select the fixtures.
2 Press
3 Press and hold
BEAM.
SHIFT and tap HOME FCB.
All parameters in the selected bank fade to their home levels.
To home selected parameters
1 Select the spots.
2 Select the parameters.
3 Press
HOME.
To create a scene for unusual home level requirements
Parameters in some fixtures may require home levels that are different than those defined in
the device definition. A few examples of this: an unusual hanging position that requires special
home levels for pan and/or tilt, a gobo or color wheel that is not identical to the wheels in the
same devices. In these instances, you create a scene that contains levels that are referenced
when the parameters return to their home values.
1 Select the spots that have special home level requirements.
2 Select the parameter that has special home value requirements and set its unique home
level.
3 Repeat steps 1 and 2 for all fixtures and parameters as necessary.
4 Save as a scene:
STORE, SCENE #, ENTER.
Tip: Label this scene as “special home levels” or any other name that helps identify it as the
special home value scene.
5 Press
6 Ta p
7 Ta p
8 Ta p
SETUP.
SYSTEM OPTIONS.
DEFAULTS.
SPOT HOME VALUES.
The touch screen grid is now is scene mode.
9 Select the special home value scene.
10 Tap
OK.
Note: To cancel the special home levels, simply delete the scene.
48
Page 61

Releasing parameter levels from the editor
You can release fixtures, single or multiple parameters, or all parameter levels in the selected bank
from the editor. Released parameters and fixtures are not included when storing a scene, chase step,
or cue. Released parameters fade to home levels or maintain their current level, according to the
MAINTAIN LAST LEVEL setting ( see “Maint. Last Level” page 165).
To release fixtures
Select fixtures and tap RELEASE or press REL(ease).
To release one parameter
1 Select fixtures.
DLITE
Selecting Fixtures and Setting Levels
2 Press
F, B, or C to choose the parameter bank.
3 Press a parameter wheel to select the parameter.
4 Ta p
RELEASE or press REL(ease).
To release levels per parameter bank
1 Press
F, or C, or B to select the parameter bank.
Skip this step if one of the parameters in the bank is active (appears in red in the live fixture
display).
2 Press
SHIFT + REL(ease)
Or
SHIFT and tap RELEASE.
Press
The levels for all the parameters in the selected bank are released from the editor.
Resetting and recalling the editor
Resetting the editor clears all selections and levels in the editor.
To reset the editor
Press RESET. All levels held in the editor are released in a 2 second fade.
Or
Press RESET RESET quickly. All levels held in the editor bump out.
To recall the last editor state
Press SHIFT + RESET. All fixtures and parameter levels, which were active in the editor prior
to pressing
About groups
RESET, are recalled to the editor.
49
Page 62
Compulite
Chapter 3
Groups are collections of frequently used fixture selections. Groups can be combined and manipu-
lated like all other selection sequences. Dlite supports 108 groups. 60 groups are operator defined,
24 generic system generated groups, and up to 24 groups for devices.
Dlite automatically creates fixture groups according to the patched devices. Groups that are auto-
matically generated by the system cannot be edited or updated. They are, however, automatically
updated when fixtures are deleted from or added to the patch.
Auto Group # Auto Group
61 All Chns (channels)
62 Even Chns (channels)
63 Odd Chns (channels)
64 3rd Chns (every third channel)
66 All spots
67 Even spots
68 Odd spots
69 3rd spots
from 70 One group for each device type.
Working with groups
Groups can be stored, updated, copied, and deleted.
Storing groups
Groups can contain any number of fixtures and fixture types.
To store groups
1 Select fixtures using any selection sequence.
2 Press
3 Press
STORE.
GROUP and enter a number on the numeric keypad.
Example:
Group 70 - Channel
Group 71 - VL2500
Group 72 - Channel + Scroller
50
4 Press
ENTER.
The group is stored.
OR
1 Select fixtures using any selection sequence.
2 Press
STORE.
Page 63

Deleting groups
To delete groups
DLITE
Selecting Fixtures and Setting Levels
3 Press GROUP and select a group number using the touch screen grid, or, if the faders are in
context mode, the UKs.
The group is stored.
Tip! The selection order is saved with the group. Selection order controls how effects and
fan are applied to the selection.
Copying groups
To copy groups
1 Press
DELETE.
2 Select the group or select more than one group:
3 Press
ENTER.
Dlite requests confirmation.
4 Press
ENTER again or tap OK.
OR
1 Press
DELETE.
2 Select the group on the touch screen grid.
Confirmation is requested.
3 Press
ENTER again or tap OK or tap DELETE again.
Example: Copy group 4 from group 2.
1 Press
2 Press
EDIT.
GROUP.
The
Group screen is displayed.
GROUP # #.
3 Select the target group - group 4.
4 Ta p
COPY.
The message
Edit: Group 4 Copy from Group is displayed in the command line.
5 Select the source group 2 - on the keypad and press
Or
Tap cell 2 on the touch screen.
Or
Press UK 2 with the faders in
Context mode.
Group 4 is stored.
ENTER.
51
Page 64

Compulite
Chapter 3
Moving groups
Renumber groups by moving a group to a new number.
To move groups
ATTENTION! Automatically generated groups cannot be moved.
Example: Move group 1 to group 11.
Updating groups
To add fixtures to groups
1 Press
2 Press
3 Press
EDIT.
GROUP and select group 11 (the target group).
SHIFT + COPY.
Move appears in the command line.
4 Tap group 1 (the source group) on the touch screen.
5 Press
ENTER or STORE.
6 Group 1 is now renumbered as group 11.
Example: Add fixture 15 to the group.
1 Press
2 Press
EDIT.
GROUP.
The touch screen shows the existing groups.
3 Select the group.
4 Press
5 Press +
CHAN, SPOT, or EXTRA to select the type of fixture.
(plus) and enter 15 on the keypad.
52
Or
Tap fixture 15 on the touch screen.
6 Press
UPDATE.
The message
Group Stored is displayed.
To remove fixtures from groups
Example: Remove fixture 15 from the group.
1 Press
2 Press
EDIT.
GROUP.
The touch screen shows the existing groups.
3 Select the group.
4 Press
CHAN, SPOT, or EXTRA to select the type of fixture.
Page 65

5 Press - (minus) and enter 15 on the keypad.
Or
Tap fixture 15 on the touch screen.
DLITE
Selecting Fixtures and Setting Levels
6 Press
UPDATE.
The message
Group Stored is displayed.
Adding text tags to groups
Giving meaningful text tags to groups makes it easy to identify them. Groups’ text tags are
displayed on the touch screen in
To add text tags to groups
Example: Tag group 5.
1 Press
GROUP.
2 Select group 5.
3 Press
TEXT and type your text on the keyboard or use the soft keyboard on the touch
screen.
4 Press
ENTER or STORE or tap OK.
Using groups to select fixtures
To select fixtures using groups
1 Press
GROUP.
Group mode.
2 Tap the group on the touch screen.
Or
Choose the group number on the editing keypad.
Or
Press the UK, with the faders in context mode, corresponding to the group number.
The fixtures in the selected group are now available for editing.
To select a range of groups
1 Press
GROUP.
2 Select a range of groups using the editor keypad (
The fixtures in the selected groups are now available for editing.
OR
1 Press
GROUP.
2 Select more than one group on the UKs in context mode.
OR
1 Press
GROUP.
# #) or the UKs.
53
Page 66

Compulite
Chapter 3
2 Tap more than one group on the touch screen.
To remove a group from the selection
Press SHIFT + GROUP # to remove a group from the range selection.
To lock faders in group mode
In context mode, the faders can be locked for groups. The dimmers for the fixtures in a group
are output as long as the fader is off its bottom end stop and the faders are locked for groups.
1 Press
2 Double press
MODE until the LED next to context is on.
GROUP.
The command line shows:
>(G#) Group.
3 Press a UK to select a group or move a fader to raise the dimmer levels of the selected
fixtures.
To unlock groups on faders
Press SHIFT + GROUP.
OR
Exit context mode.
>(G#) Group is no longer displayed in the command line.
To select the active editor
Example: Some channels and spots are active in the editor. You want to select all of them.
1 Press
2 Ta p
GROUP.
SELECT EDITOR.
All the fixtures in the editor are selected.
OR
54
Use the ACTIVE feature (see “Using Active to select fixtures” page 153).
To recall the last group selected
1 Press
2 Ta p
GROUP.
LAST SELECTION.
OR
1 Press
GROUP.
2 Press z (dot).
Page 67

Blind Editor
Fixture levels in the blind editor are not output.
Exiting the blind editor loads any fixture levels, in the blind editor, to the live editor where
they fade to zero.
ATTENTION! Press RESET before exiting the blind editor, to avoid loading the levels to
the live editor.
To activate the blind editor
Press BLIND.
DLITE
Selecting Fixtures and Setting Levels
The key’s LED blinks. Blind mode is indicated on the external monitor where
is displayed in the title bar and there is an orange frame around the display.
To store cues in blind mode
1 Press
BLIND to enter the blind editor.
2 Select fixtures and assign values.
3 Use any store sequence.
To exit blind mode
Press BLIND.
The key’s LED turns off.
Blind Editor
55
Page 68

Compulite
Chapter 3
56
Page 69

Chapter 4 Programming Libraries
This chapter includes:
About libraries (see page 57)
Libraries are organized by the F, C, and B (Focus, Color, and Beam) banks. Dlite supports up
to 72 libraries of each library type. (see page 57)
Using libraries to program scenes, steps, and cues (see page 63)
About libraries
Libraries are a user defined data base of frequently used color settings, repeated positions, or
frequently used gobos and gobo combinations.
Libraries are organized by the F, C, and B (Focus, Color, and Beam) banks. Dlite supports up to 72
libraries of each library type.
It is recommended to use libraries when programming lighting looks. Updating focus libraries
globally updates scenes, chase steps, and cues that reference that library. Extensive use of libraries
makes programming more efficient and maintaining the show’s integrity easier.
The benefits of using libraries when programming lighting looks are:
If you have moved to a new venue, you need only update F(ocus) libraries to get the positions
on their marks.
If you have used CMY values to create unique colors, storing them as color libraries assures
that they are accurately reproduced each time.
Libraries can be used for setting base levels when programming effects.
Dlite automatically generates color libraries 61 through 75 and 80:
61 - Yellow 66 - Cyan 71 - CTO 80 - Color Spin
62 - Orange 67 - Blue 72 - CTB
63 - Red 68 - Congo Blue 73 - UV
64 - Pink 69 - Aqua 74 - Purple
65 - Magenta 70 - Green 75 - Open White
57
Page 70

Compulite
Chapter 4
Storing libraries
To store libraries
Example: Store a position library 1 for spots 1 through 5.
1 Select spots
1 5.
2 Turn on the dimmer so you can see what you are doing.
3 Set the pan and tilt positions.
4 Press
5 Press
6 Press
STORE.
LIB.
F(ocus).
7 Choose number 1 on the keypad and press
Or
Tap number 1 on the touch screen grid.
Or
Press UK 1 with the faders in
Focus library 1 is stored and can be applied to fixtures when programming scenes, steps,
and cues.
Storing fixture or device libraries
Libraries can be stored as fixture libraries or device libraries.
Fixture - Library levels are specific to individual fixtures. The default for focus libraries is by
fixture.
ENTER.
Context mode.
Device - The library levels are specific to the type of device. The parameter levels for the first
fixture, of the device type, are stored in the library. These levels can be applied to any fixture
belonging to the same device type. The default for color and beam libraries is by device.
To store fixture libraries
Example: Store color library 5 for fixtures.
1 Select fixtures.
2 Press
3 Press
4 Press
C and set levels for the color parameters.
STORE.
LIB.
The touch screen grid displays the color libraries.
5 Make sure that
BY FIXTURE is enabled.
When enabled the button has a dark field.
6 Choose number 5 on the keypad and press
ENTER.
Or
58
Page 71

Tap number 5 on the touch screen.
Or
DLITE
Programming Libraries
Press UK 5 with the faders in
To store device libraries
Example: Store color library 5 for device.
1 Select fixtures.
2 Press
3 Press
4 Press
5 If necessary, tap
C and set levels for the color parameters.
STORE.
LIB.
BY FIXTURE disable it.
When disabled the button has a light field.
6 Choose number 5 on the keypad and press
Or
Tap number 5 on the touch screen.
Or
Press UK 5 with the faders in
Grabbing all bank parameters
Context mode.
ENTER.
Context mode.
When the INCLUDE ALL option is enabled, the levels for all the parameters in the bank are stored in
the library. When
INCLUDE ALL is disabled only the edited parameters are stored in the library.
The default for focus and color libraries is INCLUDE ALL enabled. The default for beam libraries is
INCLUDE ALL disabled.
To grab all bank parameters
Example: Grab all parameters when storing beam library 5.
1 Select fixtures.
2 Press
3 Press
4 Press
B and set levels for some beam parameters.
STORE.
LIB.
The touch screen grid displays the beam libraries.
5 Ta p
6 Press
7 Choose number 5 on the keypad and press
INCLUDE ALL.
INCLUDE ALL appears on a dark field.
B.
ENTER.
Or
59
Page 72

Tap number 5 on the touch screen.
Or
Press UK 5 with the faders in
Context mode.
The library is stored with all the parameters belonging to the beam bank.
To store libraries with active parameters only
Example: The device’s color bank includes cyan, magenta, yellow, color wheel 1, and color
wheel 2. When storing color library 5, grab only the parameters with level settings - cyan,
magenta, and yellow parameters.
1 Select fixtures.
2 Press
3 Press
4 Press
C and set levels for cyan, magenta, and yellow.
STORE.
LIB.
The touch screen grid displays the color libraries.
5 Ta p
6 Press
7 Choose number 5 on the keypad and press
INCLUDE ALL to disable.
INCLUDE ALL appears on a pale field.
C.
ENTER.
Or
Tap number 5 on the touch screen.
Or
Press UK 5 with the faders in
The library includes the cyan, magenta, and yellow parameters. Color wheel 1 and color
wheel 2, also part of the color bank, are not stored in the library.
Copying libraries
You can copy libraries from existing libraries.
To copy libraries
Example: Copy C(olor library) 2 to C(olor library) 4.
1 Press
2 Press
3 Press
4 Select color library
5 Press
Note: Confirmation is requested when overwriting.
6 If confirmation is requested, press
Context mode.
COPY.
C for color libraries and select library 2.
@.
4.
ENTER, or STORE, or tap OK.
ENTER, or STORE, or tap OK again.
60
Page 73

Moving libraries
Renumber libraries by moving a library to a new number.
ATTENTION! Automatically generated libraries cannot be moved.
To move libraries
Example: Move focus library 1 to focus library 11.
DLITE
Programming Libraries
1 Press
2 Press
3 Press
SHIFT + MOVE.
Move appears in the command line.
F (focus library) and select library 1.
@.
4 Select library 11.
5 Press
ENTER or STORE.
Library 1 is now renumbered as library 11.
Adding text tags to libraries
Giving meaningful text tags to your libraries makes it easy to identify them. The text is displayed
on the touch screen grid in
To add text tags to libraries
1 Press
2 Press
3 Select the library.
EDIT.
F to view the focus libraries.
Press
C to access color libraries.
Press
B to access beam libraries.
Library mode.
4 Press
screen.
5 Ta p
Editing Libraries
UPDATE and STORE are used to edit libraries.
As a rule of thumb:
Use UPDATE to add new information to the library.
Use STORE to overwrite all current data in the library.
To update libraries in the editor
Example: Update color library 1.
1 Press
TEXT and type your text on the keyboard or use the text characters on the touch
OK or press STORE.
EDIT.
61
Page 74

Compulite
Chapter 4
2 Press C.
The color libraries are available on the touch screen grid.
3 Optional - press
VIEW SOLO to black out all output except the selected library.
Color library is active in the editor.
4 Select spots and set color levels.
5 Press
UPDATE.
The new information is added to color library 1.
OR
1 Select fixtures and set levels.
2 Press
3 Press
UPDATE.
LIB.
The color libraries are available on the touch screen grid.
4 Select the library number on the keypad and press
Or
Tap the library number on the touch screen grid.
Or
With the faders in
Context mode, press UK 1.
Color library 1 is updated with the new information.
ENTER.
To overwrite libraries
Example: Focus library 1contains spots 1 through 4 with pan at 30% and tilt at 45%. Overwrite
the library so it contains only spot 4 with pan at 60% and tilt at 45%.
1 Select spot 4 and set the pan and tilt levels.
2 Press
3 Press
STORE.
F.
The touch screen grid displays the focus libraries.
4 Choose number 1 on the keypad and press
ENTER.
Or
Tap number 1 on the touch screen.
Or
Press UK 1 with the faders in
Context mode.
Confirmation is requested.
5 Press
ENTER or STORE or tap OK.
The information in the editor is stored as focus library 1.
62
Page 75

Programming Libraries
To use VIEW SOLO
Example: The lighting look is comprised of scenes and chases output from the playbacks. You
want to isolate color library 5 for viewing or editing.
DLITE
1 Press
2 Press
3 Select color library 5.
4 Ta p
All output, except the selected library, fades to zero.
5 Optional - edit the library and press
Deleting libraries
Deleting libraries breaks the links with scenes, steps, and cues that were programmed using the
library levels. The levels originating from the library are now stand alone. All future scenes, chase
step, or cue updates must be done in each object.
To delete libraries
Example: Delete color library 1.
1 Press
2 Press
3 Press
4 Select color library 1.
EDIT.
C to access the color libraries.
VIEW SOLO.
UPDATE to store.
DELETE.
LIB.
C to access the color libraries.
Confirmation is requested.
5 Press
ENTER or tap OK.
Color library 1 is deleted.
Using libraries to program scenes, steps, and cues
Using libraries to build lighting looks makes scene, chase step, and cue editing easier, quicker, and
more accurate.
Use of position libraries is particularly important. If your show moves to a new venue, you only
need to update the position libraries to ensure that the positions stored in scenes, chase steps, and
cues will be on the mark.
You also have the option of updating libraries when updating cues, scenes, and chase steps.
Focus libraries in use are indicated in pan and tilt cells. The spot display shows
(f)/#. The (f) indicates that the source is a focus library followed by the library identifier.
#(pan or tilt level)
63
Page 76

Compulite
Chapter 4
To apply libraries to selected fixtures
Example: Program scene 6 using color library 1.
1 Select a range of spots and set the dimmer levels.
2 Press
3 Press
LIB.
C to access the color libraries.
4 Select color library 1.
The color parameter levels are retrieved from the library.
5 Continue selecting fixtures and setting parameter using libraries or wheels.
6 Press
7 Press
8 Choose number 6 on the keypad and press
STORE.
SCENE.
ENTER.
Or
Tap number 6 on the touch screen.
Or
Press UK 6 with the faders in
Context mode.
To load library contents to the editor
This procedure loads the entire library to the editor. You can then use this as a base for
programming a new lighting object.
1 Press
F, C, or B to select the type of library
2 Using the keypad, select the library number.
3 Press
ENTER.
The library is loaded to the editor.
4 Optional - Edit the parameter levels.
5 Store as a new lighting object.
To update libraries while updating cues, scenes, and chase steps
Example: Update the x and y levels for spot 2 and update the position library.
1 Press
UPDATE.
2 Select the cue, scene, or chase step.
3 Select spot 2.
4 Change the x and y levels.
5 Press
ENTER. or UPDATE.
You are prompted to update the library.
6 To update the library, tap
library, tap
NO.
Note: If you choose
YES. To save the x/y levels in this cue without updating the
NO, the link to the library is lost.
64
Page 77
Locking the soft keys to keep the library mode active
There is an option to lock the soft keys so libraries remain displayed on touch screen. Libraries
remain available after each fixture selection, making it unnecessary to select the library type again.
Pressing any other library type key (
An example of the use of the library lock
Keys & buttons Result
SPOT 1 5 Select spots 1 through 5.
F,C, or B), shows the libraries in the selected bank.
DLITE
Programming Libraries
LIB
COLOR
61
SPOT 6 8 Select spots 6 through 8 using the keypad or the UKs.
Set the console for library selection.
Select the type of library.
Tap color library 61 on the touch screen.
When the library lock is active the touch screen does not switch to the
fixture screen and continues to display the libraries.
63
SPOT 1 5 Select spots 1 through 5 again. Color libraries are still displayed.
B Now beam libraries are displayed on the touch screen.
Tap color library 61 on the touch screen.
To lock the touch screen for libraries
1 Press
2 Ta p
LIB.
LOCK LIBS.
The button is displayed on a dark field and the touch screen is locked for library selections
only.
To unlock the touch screen for libraries
1 Press
2 Ta p
LIB.
LOCK LIBS.
3 The button is displayed on a light field and the touch screen is unlocked.
65
Page 78

Compulite
Chapter 4
66
Page 79

Chapter 5 Programming Lighting Objects
This chapter includes:
About lighting objects (see page 67)
Programming scenes (see page 68)
Programming QLists and cues (see page 70)
Programming chases and chase steps (see page 76)
Updating and overwriting lighting objects (see page 83)
Copying, moving, deleting, and adding text tags (see page 87)
Setting fade times (see page 92)
Examining objects (see page 96)
About lighting objects
Lighting objects are objects that can be played back on the playbacks or crossfader.
These objects include:
Scenes
Chases and chase steps
QLists and cues
Note that scenes are stand alone objects, while (chase) steps, and cues are contained in chases and
QLists respectively.
Scenes, chase steps, and cues share common attributes. Chases have unique attributes for flexible
and accurate playback. See “Programming chases and chase steps” on page 76.
Overall fade times, the amount of time it takes for the lighting object to reach its maximum limit,
can be set for scenes, steps, cues, and chases.Individual parameters, within scenes, (chase) steps,
and cues, can have unique fade times. See “Setting fade times” on page 92.
Fixtures and their parameters, that are active in the editor, are stored in scenes, steps, and cues.
There are a number of store options that grab output from the faders, playbacks, and crossfader
when storing a lighting object. See “Using store options” on page 155.
Note: This chapter contains programming instructions specific to each lighting object
(scenes, cues, and chase steps). However, there are many procedures that are
common to all lighting objects. The common procedures start from Updating and
overwriting lighting objects.
67
Page 80
Compulite
Chapter 5
Programming scenes
A scene is a stand alone lighting object. Dlite supports up to 240 scenes. Scenes run on the
playbacks.
You can also store a single spot parameter in a scene, then load this scene to a playback and set
parameter levels using the playbacks to build the lighting objects. See “Using one- parameter
scenes on playbacks” on page 157.
Storing scenes
Scenes can be stored:
Directly on playbacks
Using the console keys
Tapping cells on the touch screen grid
Pressing UKs when the faders are in Context mode
Storing scenes on the playbacks
Scenes can be stored directly on the playbacks. If the playback is on, the scene is immediately
output.
When storing a scene on playbacks you can specify a scene number using the keypad. If no number
is specified, Dlite chooses the first available scene number.
To store scenes using the playbacks
Example: Store a scene directly on playback 1.
1 Select fixtures and set levels.
2 Press
3 Press the
STORE.
SELECT key for playback 1.
Figure 22: Playback with select key
When the command is successful Scene Stored (#) is displayed.
68
Dlite chooses the first available scene number.
4 Repeat steps 1 through 3 to store the next scene to the next playback.
Dlite automatically increments the scene number by 1.
Page 81

To store specific scenes using the playbacks
You can specify the scene number when storing scenes on playbacks.
Example: Store scene 12 directly on playback 1.
1 Select fixtures and set levels.
DLITE
Programming Lighting Objects
2 Press
3 Press
4 Press the
STORE.
SCENE and press 12 on the keypad.
SELECT key for playback 1.
Scene Stored (#) is displayed.
Storing scenes using the keypad, touch screen, or UKs
To store scenes using the keypad
Example: Store scene 3.
1 Select fixtures and set levels.
2 Press
3 Press
4 Press
5 Optional - press
STORE.
SCENE.
3 on the keypad.
TEXT and type a text tag for the scene. See “Adding text tags to lighting
objects” on page 91.
6 Press
ENTER or STORE.
Scene Stored (#3) is displayed.
OR
Use this quick procedure.
1 Select fixtures and set levels.
2 Press
3 Press
4 Press
STORE.
3 on the keypad.
ENTER or STORE.
Scene Stored (#3) is displayed.
ATTENTION! This short procedure stores scenes only if there is no QList on the
crossfader.
To store scenes using the touch screen grid
Example: Store scene 3.
1 Select fixtures and set levels.
2 Press
3 Press
STORE.
SCENE.
The touch screen is now in scene mode.
69
Page 82

Compulite
Chapter 5
4 Tap cell 3 on the touch screen grid.
Scene Stored (#3) is displayed.
To store scenes using UKs
Example: Store scene 3.
1 Select fixtures and set levels.
2 Press
3 Press
4 With the faders in
STORE.
SCENE.
Context mode, press UK 3 that corresponds with the scene number.
Scene Stored (#3) is displayed.
To store the next scene
STORE+ automatically stores the editor to the first available scene number.
Example 1: You have already stored scenes 1 through 6, using
Example 2: You have stored scenes 1, 5, and 6, using
1 Select fixtures and set levels.
2 Press
STORE+.
The first available scene number is used.
ATTENTION! This procedure is valid only if there is no QList on the crossfader.
Programming scenes with libraries
For programming scenes using libraries: See “Using libraries to program scenes, steps, and cues”
page 63.
STORE+ stores scene 7.
STORE+ stores scene 2.
Adding text tags, copying, moving, and deleting
These procedures are common to all objects. For adding text tags to scenes, copying, moving, and
deleting scenes, See “Copying, moving, deleting, and adding text tags” page 87.
Programming QLists and cues
QLists are containers for sequential cues that are played back on the crossfader or on the playbacks.
Dlite supports up to 72 QLists. Each QList can contain up to 999.9 cues.
Each time you store a new QList, the contents in the editor are automatically stored as cue 1.
Storing QLists and cues
Qlist and cues can be stored:
Directly on playbacks
70
Page 83
Using the console keys
Tapping cells on the touch screen grid
Pressing UKs when the faders are in Context mode
Storing QLists and cues on the playbacks and crossfader
QLists and cues can be stored directly on the playbacks and crossfader. If the playback is on, the
cue is immediately output. When using on the crossfader, the stored cue is immediately output.
When storing QLists and cues on playbacks you can specify a QList and cue numbers using the
keypad. If no number is specified, Dlite chooses the first available number.
To store QLists and cue 1 using the playbacks
Example: Store a QList and cues directly on playback 1.
1 Select fixtures and set levels.
DLITE
Programming Lighting Objects
2 Press
3 Press
STORE.
SHIFT + QLIST.
4 Optional - specify a QList number using the keypad. If no number is specified, Dlite
chooses the first available QList number.
5 Press the
Figure 23: Playback with select key
Cue Stored (#)
SELECT key for playback 1.
is displayed.
6 To store the next cue, select fixtures and set levels.
7 Press
STORE and the same SELECT key.
Cue 2 is stored in the Qlist.
8 Repeat steps 6 through 7 to store the next cue in the Qlist.
Dlite automatically increments the cue number by 1.
To store specific cues directly on the playbacks
Example: Store cue 12 in the QList on playback 1.
1 Select fixtures and set levels.
2 Press
3 Press
4 Press the
STORE.
CUE and press 12 on the keypad.
SELECT key for playback 1.
Cue Stored (#) is displayed.
Note: This sequence is not valid for Dlite Compact.
71
Page 84

Compulite
Chapter 5
To store new QLists and cues directly on the crossfader
1 Select fixtures and set levels.
2 Press
3 Press
STORE.
SHIFT + QLIST.
4 Choose a number for the QList by selecting a number on the keypad.
5 Press the crossfader’s
Cue Stored (#1.0) is displayed.
6 Continue storing cues by selecting fixtures, pressing
SELECT key.
STORE, and then pressing the SELECT
key for the playback.
To store the next cue
Example: Cue 1, QList 1 is the current cue on the crossfader. Store the next cue in QList 1.
1 Select the fixtures.
2 Set parameter levels.
3 Press
4 Optional - Press
STORE+.
Cue 2 is stored in QList 1.
GO to fade to cue 2.
Cue Stored (2.0) is displayed.
To store a cue to the Qlist on the crossfader
Example: Store cue 25 to the QList loaded on the crossfader.
1 Select the fixtures and set levels.
2 Press
3 Press
4 Press
STORE.
CUE and select 25 on the keypad.
ENTER or STORE.
Cue Stored (#) is displayed.
OR
Use this quick procedure.
1 Select fixtures and set levels.
2 Press
3 Press
4 Press
STORE.
3 on the keypad.
ENTER or STORE.
Cue Stored (#3) is displayed.
Storing QLists and cues using the keypad, touch screen, or UKs
To store QLists and cue 1 using the keypad
Example: Store QList 3, cue 1
1 Select fixtures and set levels.
72
2 Press
STORE.
Page 85

3 Press SHIFT + QLIST.
DLITE
Programming Lighting Objects
4 Press
5 Press
3 on the keypad.
ENTER or STORE.
Cue Stored (#) is displayed.
To store QLists and cues using the touch screen grid
Example: Store QList 3, cue 1.
1 Select fixtures and set levels.
2 Press
3 Press
STORE.
SHIFT + QLIST.
The touch screen switches to QList mode.
4 Tap cell 3 on the touch screen grid.
Cue Stored (#) is displayed.
5 Repeat procedure steps 1 through 4 to store more cues. Each time you tap the QList
number, the next cue is saved. Dlite increments the current cue by 1.
To store QLists and cues using UKs
Example: Store QList 3, cue 1.
1 Select fixtures and set levels.
2 Press
3 Press
4 With the faders in
STORE.
SHIFT + QLIST.
Context mode, press UK 3 (for QList 3).
Cue Stored (#) is displayed.
5 Repeat procedure steps 1 through 4 to store more cues.
Each time you press the UK, the next cue is saved. Dlite increments the current cue by 1.
To store a point cue
Example: Insert cue 5.2.
1 Select fixtures and set levels.
2 Optional - select store options or
3 Press
STORE
INCLUDE/EXCLUDE parameters.
4 Press QLIST and select the QList number using the keypad.
5 Press
6 Press
CUE and press 5, z, 2 on the keypad.
ENTER or STORE or tap OK.
Cue Stored (#) is displayed.
73
Page 86

Compulite
Chapter 5
To store a cue without selecting a QList
When there is no QList on the crossfader and no QList is specified, storing a new cue automat-
ically creates a new QList.
1 Select fixtures and set parameter levels.
2 Press
3 Press
CUE and select a cue number.
STORE.
The editor is stored as a cue in a new QList using the first available QList number.
OR
1 Select fixtures and set parameter levels.
2 Press
3 Press
4 Press
STORE.
CUE and select a cue number.
ENTER.
The editor is stored as a cue in a new QList using the first available QList number.
Loops and links for cues
Loops define a range of sequential cues, setting them to repeat a specified number of times. Cues
participating in loops fade according to their set fade times.
Links skip the cues in between the linked cues. Example: Cue 5 is linked to cue 8. When cue 5 is
the current cue, a go command initiates a fade to cue 8. The playback skips cues 6 and 7.
Programming loops
The number of loops determines how many times the sequence of cues or chase steps repeat. When
the loop setting is 0 (zero) the loop repeats an infinite number of times. Use the wheels to set the
number of loops:
Wheel 1 - x1 (units of 1)
Wheel 2 - x10 (units of 10)
Wheel 3 - x100 (units of 100)
To set the number of loops
Example: Set a range of sequential cues repeat (loop) 12 times.
1 Press
2 Ta p
QLIST, select the QList, and select the range of cues included in the loop: CUE #
#.
LOOP.
The command line displays:
Cue # QList # Loop to Cue : #
3 Use the wheels to set the number of repeats.
4 Turn wheel 2 until arriving at 10.
5 Turn wheel 1 until arriving at 2.
6 Ta p
OK.
74
Page 87

To clear loops
DLITE
Programming Lighting Objects
1 Press
2 Select the first cue in the loop.
3 Press and hold
Programming links
To link cues
Example: Link cues.
1 To link cues: Press
2 Ta p
3 Select the cue.
4 Ta p
To clear links
1 Press
QLIST and select the QList.
SHIFT and then tap CLEAR LOOP.
QLIST, select the QList. Press CUE and select the cue.
Note: If the QList is loaded to the crossfader, do not select the QList.
LINK TO.
OK.
CUE and select the first cue in the link.
Or
Press
STEP and select the first step in the link.
2 Press and hold
Renumber cues
Use the renumber feature to eliminate point cues or to move a range of cue.
When renumbering cues:
Loops are deleted
Links are saved.
All fade time settings are saved.
To renumber all cues
1 Press
2 Ta p
3 Optional: set the start number. If no start number is selected, the cues are renumbered
4 Press
5 Press
SHIFT and then tap CLEAR LINK.
QLIST and select the QList.
More than one QList can be selected.
RENUMBER.
sequentially starting at 1.
ENTER.
Confirmation is requested.
ENTER again to confirm the renumber command.
75
Page 88

Compulite
Chapter 5
To renumber a range of cues
1 Press
QLIST and select the QList.
More than one QList can be selected.
2 Press
3 Press
4 Ta p
CUE and select a range of cues.
SHIFT to access the RENUMBER button.
RENUMBER.
5 Optional: set the start number. If no start number is selected, the cues are renumbered
sequentially starting at 1.
6 Press
ENTER.
Confirmation is requested.
7 Press
ENTER again to confirm the renumber command.
Programming cues with libraries
For programming cues using libraries: See “Using libraries to program scenes, steps, and cues” on
page 63.
Adding text tags, copying, moving, and deleting
These procedures are common to all objects. For adding text tags to QLists and cues, copying,
moving, and deleting QLists and cues. See “Copying, moving, deleting, and adding text tags”
page 87.
Programming chases and chase steps
Chases are containers for one or more steps comprising dynamic lighting objects. Chases run on the
playbacks. Dlite supports up to 72 chases. Each chase can have up to 48 steps.
Chases can be programmed with attributes, which determine the look, direction, and speed of the
chase. Chases attributes include:
Run patterns
Infinite or finite number of loops
Unique fade times for each step
General fade in time
Chase playback rate
Chase character - hard or soft
Storing chases
Chases and chase steps are stored:
Directly on playbacks
76
Page 89
Using the console keys
Tapping cells on the touch screen grid
Pressing UKs when the faders are in Context mode
Fixtures and parameters that are active in the editor are stored in the step. There are a number of
store options available that grab output from the faders, playbacks, and crossfader when storing a
step. See “Using store options” on page 155.
Storing chases and chase steps on the playbacks
Chases and chase steps can be stored directly on the playbacks. If the playback is on, the step is
immediately output.
When storing a chases and chase steps on playbacks you can specify a chase and chase step
numbers using the keypad. If no number is specified, Dlite chooses the first available number.
When storing chases on playbacks, the chases start running immediately if the playback is on.
To store chases and steps using the playbacks
DLITE
Programming Lighting Objects
Example: Store a chase with steps 1 and 2 directly on playback 1.
1 Select fixtures and set levels.
2 Press
3 Press
STORE.
CHASE.
4 Optional - specify a chase number using the keypad. If no number is specified, Dlite
chooses the first available chase number.
5 Press the
SELECT key for playback 1.
The first available chase number is assigned to playback 1 and steps 1and 2 are stored. Step
2 is empty.
Chase Stored (#) is displayed.
6 To add content to step 2, select fixtures and set levels.
7 Press
STORE.
8 Press the same
Step Stored (#2) is displayed.
SELECT key.
9 To store the next step, select fixtures and set levels.
10 Repeat steps 6 through 8 until the chase is complete.
Dlite automatically increments the current step by 1.
Note: This sequence is not valid for Dlite Compact. See, “To store chase steps on play-
backs for Dlite Compact” on page 78.
77
Page 90

Compulite
Chapter 5
To store chase steps on playbacks for Dlite Compact
1 Select fixtures and set levels.
2 Press
3 Press
4 Press
5 Press the
STORE.
CHASE.
PB.
SELECT key for the playback.
The editor is stored as a chase step.
6 Follow steps 1 though 4 to store more chase steps.
Each step is stored to the next step number.
Storing chases and chase steps using the keypad, touch screen, or UKs
To store chases and chase steps using the keypad
Example: Create chase 1 and store the editor as step 1. Step 2 is automatically stored.
1 Select fixtures and set levels.
2 Press
3 Press
4 Press
5 Press
STORE.
CHASE.
1 on the keypad.
ENTER or STORE.
Chase Stored (#) is displayed.
To store chases and chase steps using the touch screen grid
Example: Create chase 1 and store the editor as step 1. Step 2 is automatically stored.
1 Select fixtures and set levels.
2 Press
3 Press
STORE.
CHASE.
The touch screen switches to chase mode.
4 Tap cell 1 on the touch screen grid.
The chase and its two steps are stored.
5 Repeat procedure steps 1 through 4 to store more steps. Each time you tap the chase
number, the next step is saved. Dlite increments the current step by 1.
To store chases and chase steps using UKs
1 Select fixtures and set levels.
2 Press
3 Press
4 With the faders in
STORE.
CHASE.
Context mode, press the UK that corresponds with the chase number.
The chase and step 1 is stored.
78
5 Repeat procedure steps 1 through 4 to store more steps.
Page 91

Each time you press the UK, the next step is saved. Dlite increments the current step by 1.
To store specific steps
Example: Store step 12 in chase 1.
1 Select fixtures and set levels.
DLITE
Programming Lighting Objects
2 Press
3 Press
STORE.
CHASE.
4 Select chase 1 on the keypad.
5 Press
SHIFT + STEP.
The chase steps are displayed on the touch screen grid. Dlite prompts for a step number.
6 Enter
12 on the keypad and press ENTER or STORE.
Or
Tap step 12 on the touch screen grid.
Or
With the faders in
The editor is stored as step 12.
Inserting chase steps
Inserted steps replace the original step and the original step is bumped to the next step number.
Example: Chase 1 has 5 steps. You want to insert a step between steps 2 and 3. Store the inserted
step as step 3. The original step 3 is now step 4, step 4 becomes step 5, step 5 becomes step 6.
To insert steps
Context mode, press UK 12.
Example: Add a step, between steps 2 and 3, to chase 1.
1 Select fixtures and set levels.
2 Press
3 Press
EDIT.
CHASE.
4 Select chase 1 on the keypad.
5 Ta p
INSERT STEP and tap cell 3.
Or
If you choose the step number on the keypad, press
The editor is stored as step 3. The original step 3 is bumped to step 4 and any subsequent
steps are also bumped to the next step number.
Changing step order
You can swap steps within the same chase or between different chases.
UPDATE or STORE or ENTER.
79
Page 92

Compulite
Chapter 5
To change step order
Example: Exchange step 1 and step 5 in chase 1. Step 1 becomes 5 and step 5 becomes 1.
1 Press
2 Press
CHASE and select chase 1.
SHIFT + STEP.
The touch screen shows the steps in chase 1.
3 Choose step 1.
4 Ta p
EXCHANGE.
The chases are displayed on the touch screen
5 Select chase 1.
6 Press
SHIFT + STEP.
The touch screen shows the steps in chase 1.
7 Ta p s t ep 5.
8 Press
ENTER or STORE.
Step Stored is displayed. The selected steps have been exchanged.
Chase attributes and run modes
There are two operation modes for running chases:
Automatic - Chases that run automatically are initiated on receiving a go command; the chase
continues running until a stop command is given or until it completes its number of loops.
The number of repeats depends on the number of loops set for the chase.
Chase attributes are:
The chase direction and operation modes can be set on-the-fly for chases running on the playbacks
or by editing the chase. When setting these attributes through the chase edit screen, the direction
and operation modes are saved with the chase. When changing the direction or operation mode for
chases running on playbacks, these attributes can be temporary or you can save them to the chase.
Chase patterns
Dlite provides four chase patterns:
Manual - Chases that are operated manually require a go command to initiate a fade to each
step.
Number of repeats (loops) - Chases can loop infinitely or the number of loops can be specified.
Direction - Set the chase direction.
Pattern - A prebuilt pattern can be assigned to the chase.
Normal - This is the default pattern.
Build - Adds each step to the previous steps.
Random - Runs chase steps in random order.
80
Page 93

DLITE
Programming Lighting Objects
Bounce - The pattern runs the step forwards and backwards. Example: A 5 step chase runs
steps 1,2, 3, 4, 5, and then steps 4, 3, 2, 1.
The default pattern is Normal. The default pattern can be changed in
Defaults Chase Pattern.
To assign a chase pattern
1 Press
2 Press
EDIT.
CHASE.
The
Edit Chase screen is displayed.
3 Select the chase.
4 Ta p
PATTERN.
5 Tap the required pattern.
6 Press
STORE or UPDATE.
Setting the number of loops for chases
The number of loops determines how many times the chase repeats. When the loop setting is 0
(zero) the chase repeats an infinite number of times. Chases are to loop infinitely require operator
action to stop the chase.
Use the keypad or the wheels to set the number of loops:
Wheel 1 - x1 (units of 1)
SETUP System Options
Wheel 2 - x10 (units of 10)
To set the number of loops
Example: Set chase 4 to repeat 26 times.
1 Press
2 Select the chase.
3 Ta p
# OF LOOPS.
The wheels or the keypad can be used to set the number of loops.
4 Turn wheel 2 until arriving at 20.
5 Turn wheel 1 until arriving at 6.
6 Press
Automatic rewind mode
When rewind is enabled, a chase is automatically reset to begin at step 1 each time it receives a go
command. When rewind is not enabled, the chase continues running from the step where it stopped.
To set chase for rewind
1 Press
CHASE.
STORE or UPDATE.
EDIT.
2 Press
CHASE.
81
Page 94

Compulite
Chapter 5
The Edit Chase screen is displayed.
3 Select the chase.
4 Ta p
5 Press
REWIND.
STORE or UPDATE.
Reversing chase direction
Chase steps can run increment consecutively (step 1, 2, 3, etc.) or run in the opposite direction (step
3, 2, 1, etc.). You can reverse the direction and save the chase or reverse direction on-the-fly
(See “reverse chase direction on-the-fly” page 102).
To reverse chase direction
1 Press
2 Press
EDIT.
CHASE.
The
Edit Chase screen is displayed.
3 Select the chase.
4 Ta p .
5 Press
STORE or UPDATE.
The chase now runs in the reverse direction.
Setting chases for manual operation
The default playback for chases is automatic fading from step to step. You can save chases as
manual operation chases or change to manual operation on-the-fly.
Manually operated chases require a go command to advance each step. Go commands are given by
pressing the flash key for the playback running the chase.
For manual operation on-the-fly, See “Chases on-the-fly” page 102.
To set and save a manual operation chase
1 Press
2 Press
EDIT.
CHASE.
The
Edit Chase screen is displayed.
3 Select the chase.
4 Ta p
5 Press
MANUAL.
STORE or UPDATE or tap OK.
Now each press on the playback’s select key advances the chase by one step.
Programming chases with libraries
For programming scenes using libraries: See “Using libraries to program scenes, steps, and cues”
page 63.
82
Page 95

Adding text tags, copying, moving, and deleting
These procedures are common to all objects. For adding text tags to chases and chase steps,
copying, moving, and deleting chases and chase steps. See “Copying, moving, deleting, and adding
text tags” on page 87.
Updating and overwriting lighting objects
UPDATE and STORE are used to edit scenes, cues, and chase steps.
As a rule of thumb:
UPDATE adds new information.
STORE overwrites.
Either UPDATE or STORE can be used to store when the entire object is active in the editor.
The procedure used for updating lighting objects depends whether the scene, chase step, or cue is
output on the playbacks or crossfader or not.
DLITE
Programming Lighting Objects
When a few scenes or cues comprise the stage picture, you can isolate a particular lighting object by
tapping
To use
VIEW SOLO, which is available on the touch screen in scene, chase step, and cue modes.
VIEW SOLO
Example: Scenes 1 through 6 are output from the playbacks. You want to see the output for
scene 2 only.
1 Select scene 2.
2 Ta p
VIEW SOLO.
All output, except the selected lighting object, fades to zero.
Updating or overwriting lighting objects on the playbacks
To update lighting objects on the playbacks
1 Select fixtures and adjust levels in the editor.
2 Press
3 Press
UPDATE to merge the editor’s contents with the existing object.
Or
STORE to overwrite the existing object.
Press
SELECT for the playback outputting the scene chase step, or cue.
Note: If some levels originate from libraries, an option to update the library is
available now. For information about libraries, See “Programming Libraries”
page 57.
OR
1 Press
2 Press the
EDIT.
SELECT key for the playback.
83
Page 96
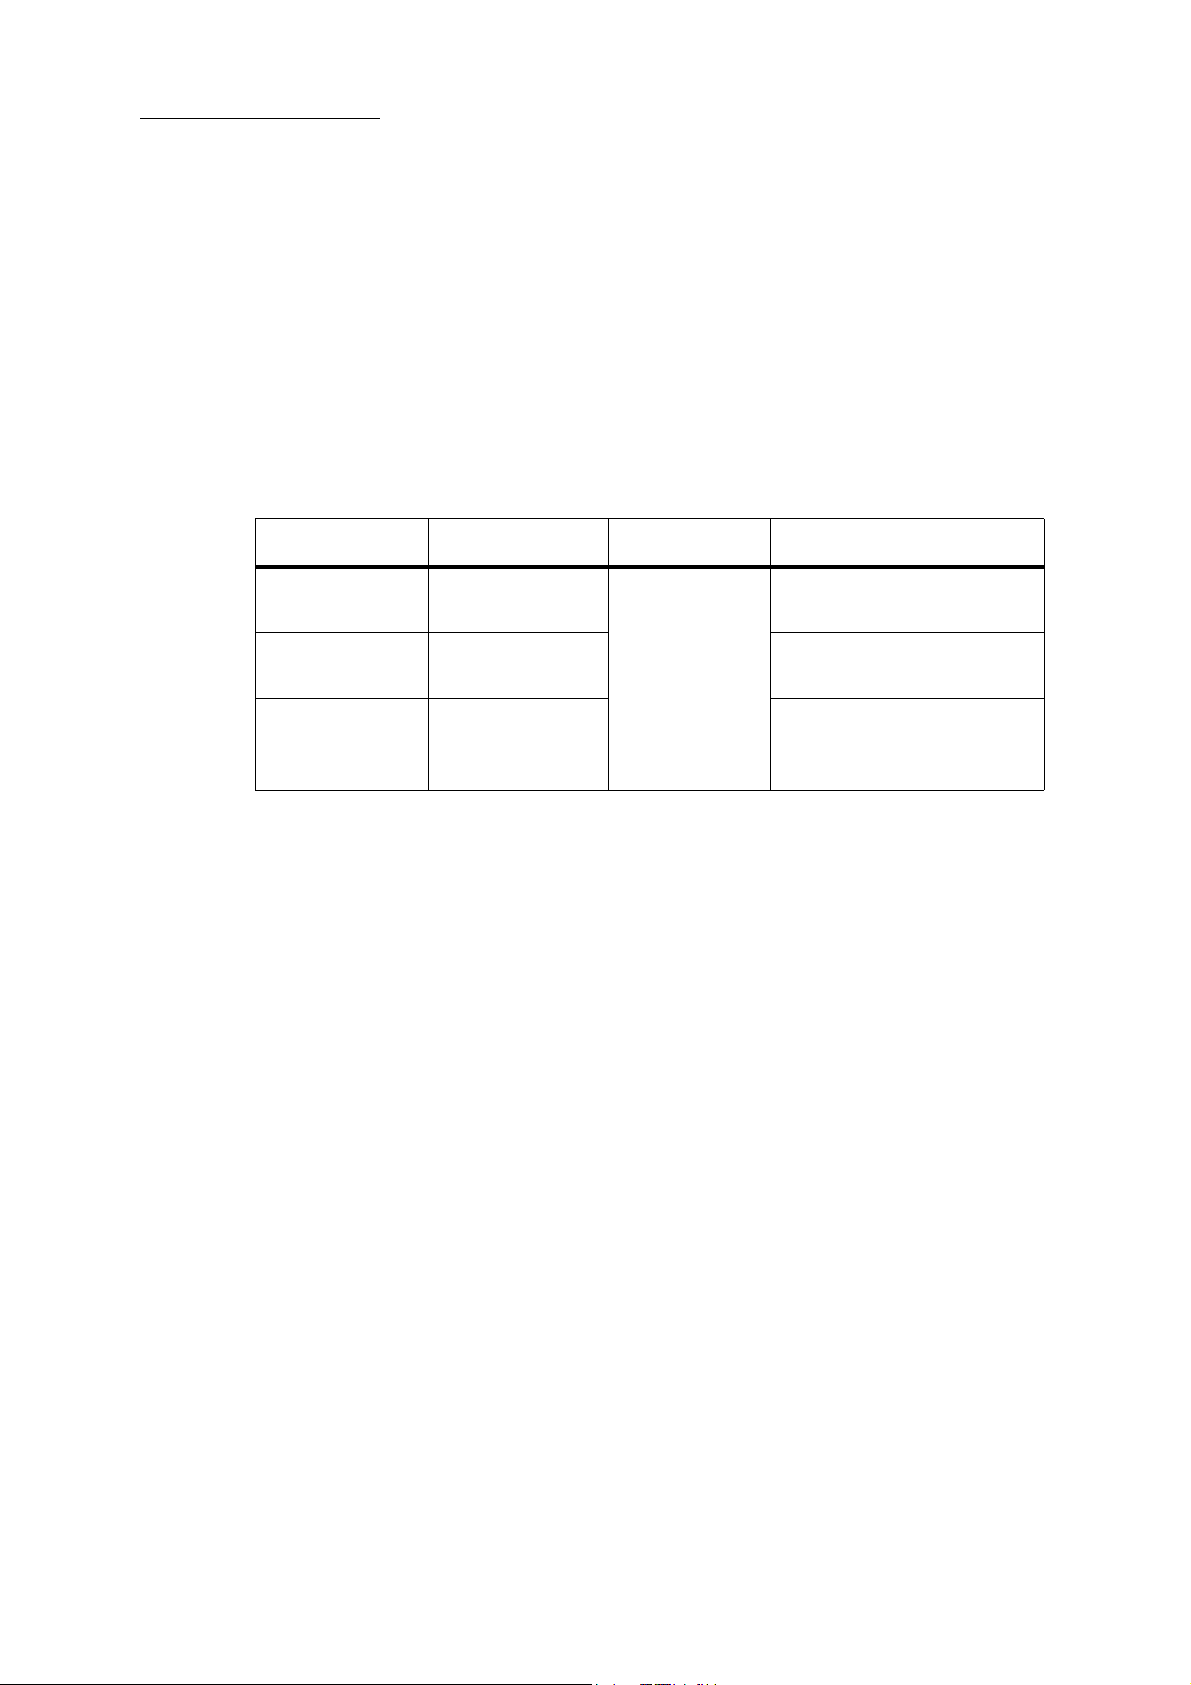
Compulite
Chapter 5
3 Press ENTER.
The scene, chase step, or cue is loaded to the editor.
4 Select the fixtures and set the new levels.
Press
UPDATE.
Updating lighting objects on a range of playbacks
Globally update scenes and cues, output from a range of playbacks, regardless of the type of
lighting object. If the object is a chase step, this procedure creates a new step.
Example: Dlite’s current output is:
Playback Device Lighting object Editor levels After update
Playback 2
Playback 3
Scene 2
QList 5 cue 5 Cue 5 is updated with the editor
Chase 6 step 6 Step 7, containing channel 1 @
Playback 4
To update lighting objects on a range of playbacks
Example: Update the objects on playbacks 2, 3, and 4.
1 Select fixtures and set levels.
2 Press
3 Press
4 Press
5 Press
UPDATE.
PB (playback).
2 4 to select the range of playbacks.
ENTER.
6 The lighting objects output from playbacks 2, 3, and 4 are updated.
Updating lighting objects via the editor
Channel 1 @ 85
Channel 10 @ 75
Channel 21 @ 63
Scene 2 is updated with the
editor levels.
levels.
85, channel 10 @ 75, channel
21 @ 63, is stored.
84
To update scenes, cues, or chase steps
Example: Update Scene 1, or QList 1- cue,1 or Chase 1- step 1.
1 Press
2 To update scenes: Press
UPDATE.
To update cues: Press
SCENE and press 1 on the keypad or tap 1 on the touch screen.
QLIST and press 1 and then press CUE and press 1 (on the editing
keypad).
To update chase steps: Press
CHASE and press 1 and then press STEP and press 1 (on the
editing keypad).
3 Press
CHANNEL, SPOT, or EXTRA to select fixtures.
Page 97

The selected lighting object is now active in the editor.
4 Select fixtures and set levels.
DLITE
Programming Lighting Objects
5 Optional - select store options or
6 Press
ENTER, or UPDATE, or tap OK.
INCLUDE/EXCLUDE parameters.
Tip! (FOR CHASE STEPS ONLY) Instead of pressing ENTER, or UPDATE, press
NEXT or PREV. The step is updated. The next or previous step is now ready for editing.
To update a range of scenes, cues, or chase steps
1 Select fixtures and set parameter levels.
2 Press
3 To select the range of scenes: Press
4 Press
UPDATE.
SCENE # --> #.
To select the range of cues: Press
SHIFT + QLIST #, CUE # --> #.
To select the range of chase steps: Press
ENTER or tap OK.
CHASE #, SHIFT + STEP # --> #.
The selected range is updated.
To release fixtures from lighting objects
1 To update scenes: Press
To update cues: Press
SCENE and select the scene.
QLIST and select the QList. Then press CUE and select the cue on
the keypad.
To update chase steps: Press
step on the keypad.
2 Press
CHANNEL, SPOT, or EXTRA to select fixtures.
The selected lighting object is now active in the editor.
3 Select the fixture(s).
4 Press
5 Press
RELEASE or tap RELEASE on the touch screen.
UPDATE.
The fixture is removed form the cue.
Merge levels to update cues
Update cues by merging editor levels to cues running on the crossfader. The updated levels track
through consecutive cues under the condition that the parameter level does not change. When
encountering a change in the parameter level, the update stops.
Example:
CHASE and select the chase. Then press STEP and select the
85
Page 98
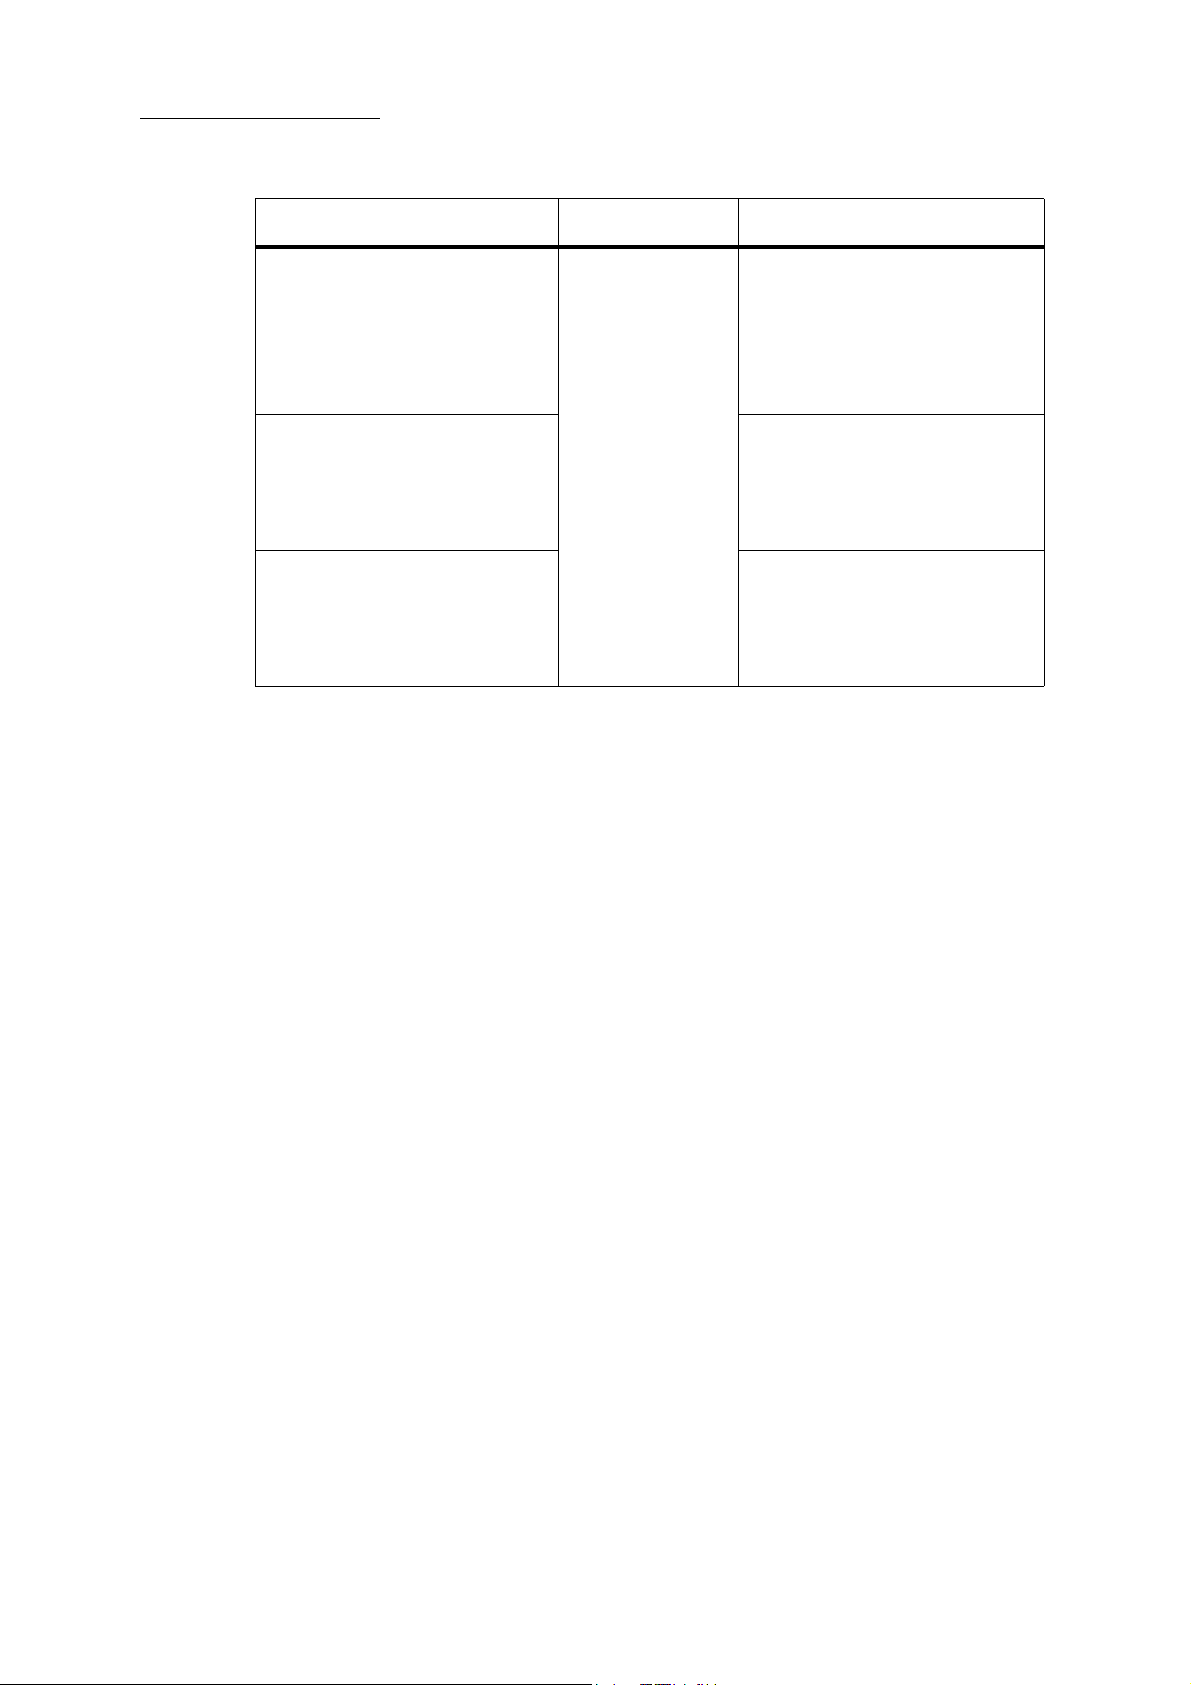
Compulite
Chapter 5
Cues Editor Cues after update
Cue 1: Channel 1 @ 50
Channel 2 @ 50
Channel 3 @ 50
Channel 4 @ 65
(Cue 1 is output on the crossfader) Channel 1 @ 40
Cue 2: Channel 1 @ 50
Channel 2 @ 50
Channel 3 @ 30
Channel 2 @ 40
Channel 3 @ 40
Channel 4 @ 85
Channel 4 @ 75
Cue 3: Channel 1 @ 50
Channel 2 @ 50
Channel 3 @ 20
Channel 4 @ 65
To update cues by merging editor levels
1 Set the levels in the editor.
2 Press
UPDATE.
3 Press .
Cue 1: Channel 1 @ 40
Channel 2 @ 40
Channel 3 @ 40
Channel 4 @ 85
Cue 2: Channel 1 @ 40
Channel 2 @ 40
Channel 3 @ 30
Channel 4 @ 75
Cue 3: Channel 1 @ 40
Channel 2 @ 40
Channel 3 @ 20
Channel 4 @ 65
4 Optional: Select an end cue number to limit the update. Example: Enter cue number 6 here
to limit the update for cues 1 6.
5 Press
ENTER.
6 Parameter levels are updated in all the cues in the QList or in the range of cues as desig-
nated in step 4.
Overwriting lighting objects via the editor
To overwrite scenes, cues, or chase steps
Example: Update Scene 1, or QList 1- cue,1 or Chase 1- step 1.
1 Select fixtures and set levels.
2 Press
3 To overwrite scenes: Press
4 Optional - select store options or
STORE.
SCENE and press 1 on the keypad or tap 1 on the touch screen.
To overwrite cues: Press
QLIST and press 1 and then press CUE and press 1 (on the editing
keypad).
To overwrite chase steps: Press
CHASE and press 1 and then press STEP and press 1 (on
the editing keypad).
INCLUDE/EXCLUDE parameters. See “Excluding or
including parameters when storing objects” on page 158.
86
5 Press
ENTER or tap OK.
Page 99

DLITE
Programming Lighting Objects
When overwriting, Dlite requests confirmation: the message Are you sure? is displayed.
6 Press
ENTER or tap OK again to confirm.
Copying, moving, deleting, and adding text tags
Copying lighting objects
Scenes, chase steps, and cues can be copied from existing objects to create new objects. All proper-
ties are copied, including: overall fade time, parameter fade times, loops, links, and text.
When copying objects, you first select the source object and then copy to the target object.
To copy a lighting object
Example: Copy object 1 to object 10.
1 Press
2 To copy scenes: Press
3 Press
COPY.
SCENE and press 1.
To copy cues: Press
QLIST and select the QList. Then press CUE and press 1.
To copy chase steps: Press
@.
CHASE and select the chase. Then press STEP and press 1.
4 Press
5 Press
10 on the keypad.
ENTER, or STORE.
Lighting object 10, a copy of the selected object 1, is stored.
Note: Confirmation is requested when overwriting.
6 If confirmation is requested, press
To copy a range of lighting objects
Example: Copy objects 1 3 to object 11 13.
1 Press
2 To copy scenes: Press
3 Press
4 Press
5 Press
COPY.
SCENE and press 1 3.
To copy chase steps: Press
@.
11 on the keypad.
ENTER, or STORE.
CHASE and select the chase. Then press STEP and press 1 3.
Lighting objects 11 13 are stored.
Note: Confirmation is requested when overwriting.
ENTER, or STORE, or tap OK again.
6 If confirmation is requested, press
ENTER, or STORE, or tap OK again.
87
Page 100
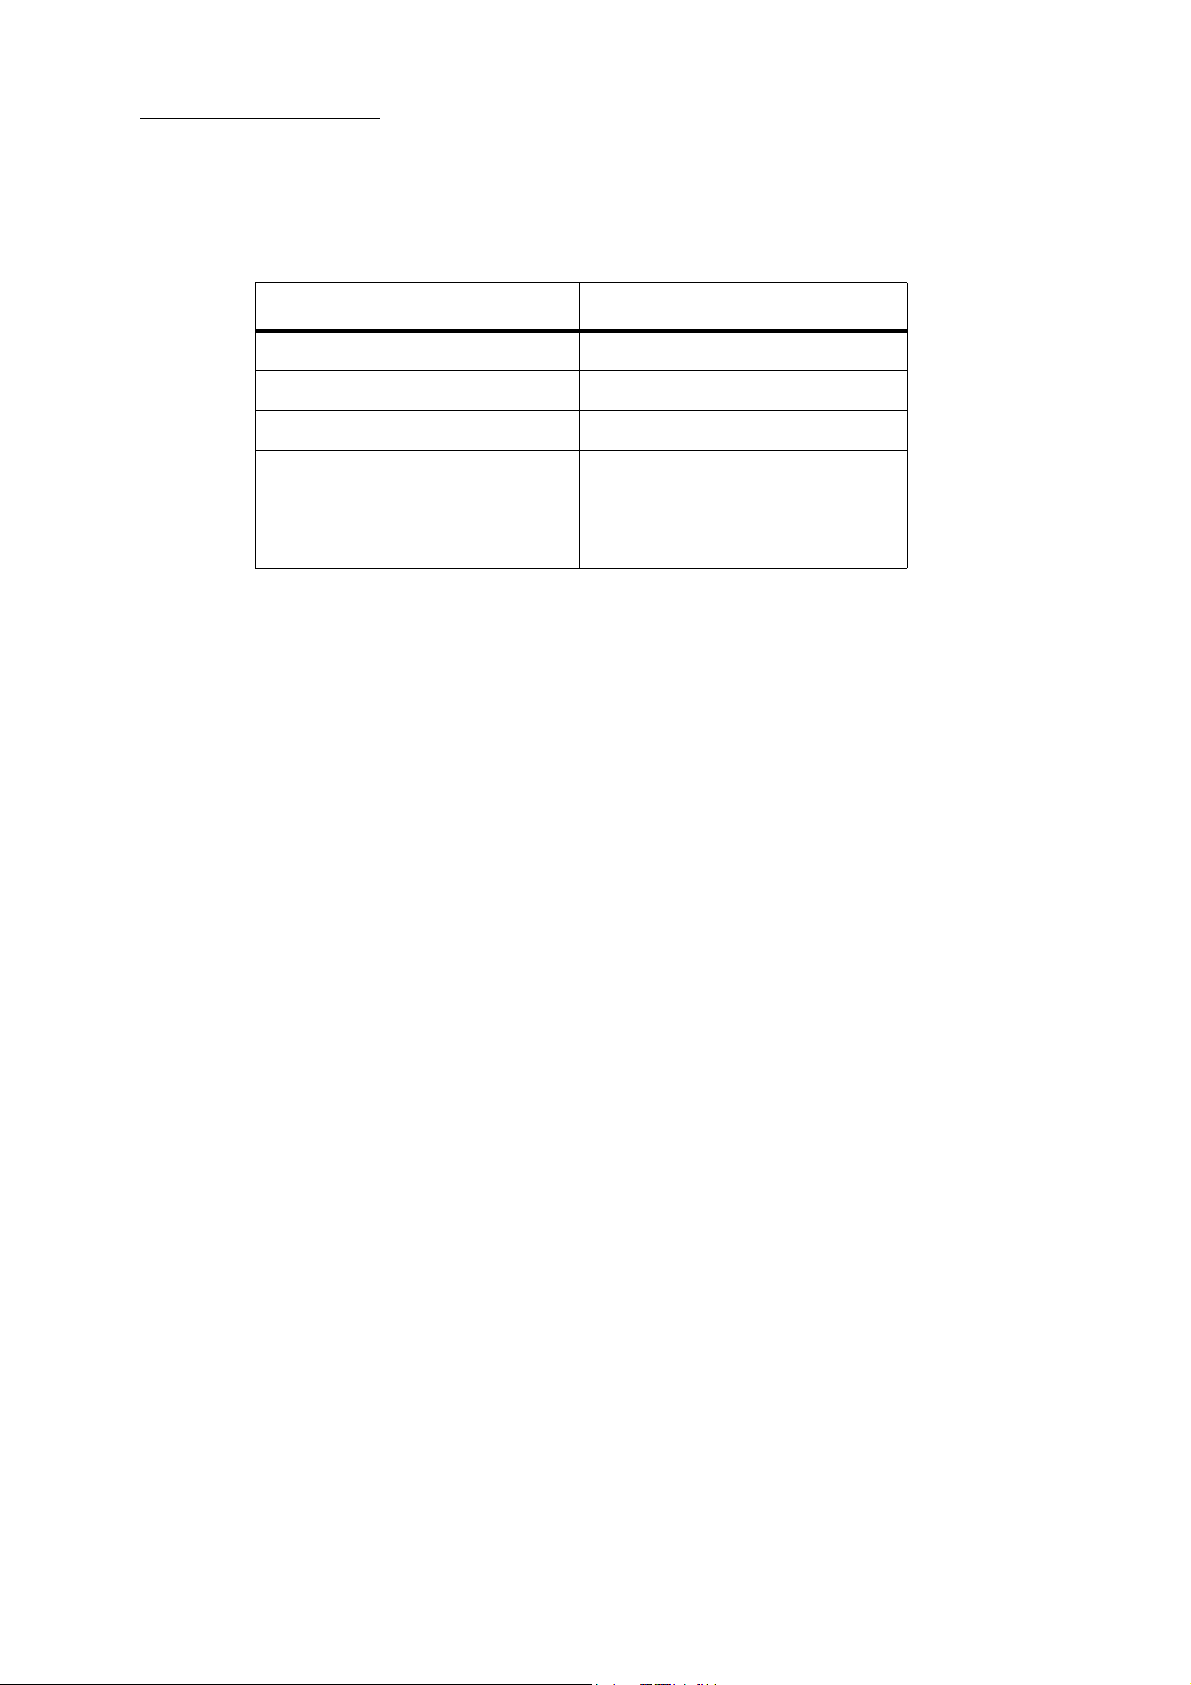
Compulite
Chapter 5
Copying parameter levels from scenes, chase steps, and cues
You can copy fixtures and their parameter levels from lighting object to lighting object.
Copy Copy to
Levels in a range of spots or channels A range of spots and channels
Levels in one spot or channel A range of spots or channels
Levels for a parameter type (F, C, B) The same bank for selected spots
Levels for selected parameters
Note: When copying pan and tilt
levels, the dimmer level is
automatically included.
The same parameter
To copy parameter levels from a range of fixtures
Example: Copy levels from spots 1 3 in scene 2 and apply them to spots 4 6 in scene 5.
1 Press
2 Press
COPY.
SCENE and select scene 3.
3 Select spots 1 3.
4 Press
@.
5 Select spots 4 6.
6 Press
7 Press
SCENE and select scene 5.
ENTER or STORE or UPDATE.
The copied parameter levels are applied to the selected range of spots.
Pressing store, overwrites the scene or stores a new scene.
Press Update adds the new information to the selected scene.
88
To copy parameter bank levels from one fixture and apply to a range of fixtures
Example: Copy the color settings from spot 1 in scene 2 to spots 1 10 in scene 5.
1 Press
2 Press
COPY.
SCENE and select scene 2.
3 Select spot 1.
4 Press
SHIFT + C.
The levels for all parameters in the color bank are copied.
5 Select spots 1 10.
6 Press
7 Press
SCENE and select scene 5.
ENTER or STORE or UPDATE.
The copied levels are applied to the selected range of spots and stored.
 Loading...