


VideoMate Vista H900F
PCI TV Tuner Card
Start Up Guide
Compro Technology, Inc.
www.comprousa.com
Table of Contents |
|
VideoMate Vista H900F PCI Tuner Card .............................................. |
1 |
VideoMate Vista H900F Package Contents .......................................... |
2 |
VideoMate Vista H900F Connectors ..................................................... |
3 |
Hardware Installation ............................................................................ |
4 |
Software Installation.............................................................................. |
7 |
Remote Wake Up .................................................................................. |
8 |
Windows Media Center Remote for Vista H900F................................ |
10 |
ComproDTV Vista Gadget Tool for Vista............................................. |
13 |
ComproDTV Windows Media Center Add-In....................................... |
15 |
HID(HumanInterfaceDevice)forComproRemote.......................................... |
16 |
Open and close the ComproDTV 4 control panel................................ |
17 |
ComproDTV 4 ..................................................................................... |
18 |
ComproFM 2 ....................................................................................... |
25 |
Troubleshooting .................................................................................. |
26 |
Copyright © 2001-2008. Compro Technology, Inc. No part of this document may be copied or reproduced in any form or by any means without the prior written consent of Compro Technology, Inc.
Compro, VideoMate, Poladyne, Play with Power, and the Compro logo are trademarks of Compro Technology, Inc. Other names and marks are trademarks of their respective owners.
Compro makes no warranties with respect to this documentation and disclaims any implied warranties of merchantability, quality, or fitness for any particular purpose. The information in this document is subject to change without notice. COMPRO reserves the right to make revisions to this publication without obligation to notify any person or entity of any such changes.
Compro Technology, Inc.
Tel. +886 2 2918 0169, Fax +886 2 2915 2389 4/F, No.12, Alley 6, Lane 45, Pao Shin Road
Hsintein City, Taipei, Taiwan. www.comprousa.com
ii
VideoMate Vista H900F PCI Tuner Card
VideoMate Vista H900F lets you watch and record TV (including hardware and software compression) on your PC with Microsoft certified Windows Media Center remote control. It features an analog TV tuner, 3D Y/C Separation for NTSC signal, FM Tuner, Remote Wake Up, and Power Up Scheduling. You can do Digital Video Recording (DVR) functions, scheduled recording at anytime, watching crystal video quality, intelligent TV viewing, and Multi-function Remote Control. Additionally, VideoMate Vista H900F also provides a video capture function so that you can transfer videos from video devices, such as video cameras, to your PC.
MINIMUM SYSTEM REQUIREMENTS
zPIII 1.7 GHz or above CPU for DVD-Quality recording or timeshifting
z512 MB System Memory
zSound card or on-board sound chip
zGraphics card or on-board graphics chip support DirectX9.0
zOpen PCI slot.
zCD-ROM drive for software installation.
zWindows XP SP2 or Vista x86/x64
z50 MB free disk space for basic software installation.
RECOMMENDED SYSTEM REQUIREMENTS
zP4 2.4 GHz or above for PIP/POP
z1.0 GB System Memory
zSound card or on-board sound chip
zGraphics card or on-board graphics chip support DirectX9.0
zOpen PCI slot.
zCD-ROM for software installation
zWindows XP SP2 or Vista x86/x64
zUpdate the latest drivers of VGA, motherboard, and soundcard from vendors.
z50 MB free space for software installation
zATX power supply and a computer case with a separate power switch cable from power on button.
1
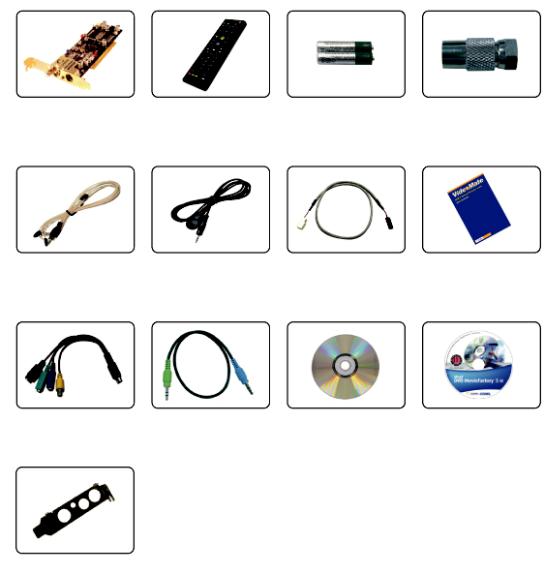
VideoMate Vista H900F Package Contents
Vista H900F |
Windows Media |
Batteries |
F-type to I-type |
|
PCI TV card |
Center remote |
converter |
||
|
FM antenna |
IR cable |
Power switch |
Start Up Guide |
|
patch cable |
||||
|
|
|
1 to 4 converter |
External Audio |
Installation CD |
Ulead Software |
cable |
patch cable |
|
CD |
Low-Profile
Bracket
2
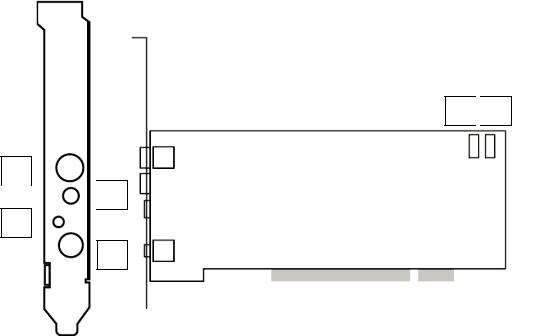
VideoMate Vista H900F Connectors
5 
 6
6
1 
 2
2
3
4
Item |
|
Function |
|
Description |
|
|
|
|
|
|
|
|
|
|
1 |
|
TV Tuner-In |
|
Connect to a TV antenna or TV cable feed. |
|
|
|
|
|
2 |
|
FM Tuner-In |
|
Connect to an FM antenna feed. |
|
|
|
|
|
3 |
|
IR |
|
Connect the IR receiver here. |
|
|
|
|
|
4 |
|
Audio-In (Blue) |
|
Use an audio patch cable to connect to an audio |
(1 to 4 |
|
|
|
source, such as a VCR, DVD or VCD. |
converter |
|
|
|
|
External |
|
Use the supplied audio patch cable to connect to |
||
cable) |
|
Audio-Out |
|
the Line-In port of your sound card. |
|
|
(Green) |
|
|
|
|
|
|
|
|
|
S-Video-In |
|
Use an S-Video patch cable to connect to a |
|
|
(Black) |
|
video source, such as a VCR, DVD or VCD. |
|
|
|
|
|
|
|
Composite-In |
|
Use a Composite video patch cable to connect to |
|
|
(Yellow) |
|
a video source, such as a VCR, DVD or VCD. |
|
|
|
|
|
5 |
|
To Case Power |
|
Connect the ATX Power Switch cable of your |
|
|
Switch |
|
computer case here. |
|
|
|
|
|
6 |
|
To Mainboard |
|
Use the supplied power switch patch cable to |
|
|
Power Switch |
|
connect to the ATX Power Switch pins on the |
|
|
Connector |
|
mainboard. |
3

Hardware Installation
Warning
Unplug your PC’s main power cord before installing VideoMate TV card.
Failure to do so may cause damage to your VideoMate TV tuner card and void your warranty.
1.Shut down your computer and unplug main power cord.
2.Remove the computer case cover.
Power Up Connections
3.Locate the ATX power switch pins on your computer case and trace the wires to the power switch connector on your mainboard. The ATX power switch cable is normally a twisted pair cable with a two-pin connector as shown above.
Note
On the mainboard, the ATX power switch pins are usually labeled “POWER SW” or similar. It is vital to remember the position of these pins for a later step in the installation process.
4.Unplug the ATX power switch cable from the mainboard and connect it to the connector JS1 on the VideoMate PCI TV
Tuner Card, as shown on the right.
4

5.Connect the black socket of Power Up power patch cable to the power switch connector on the mainboard.
6.Connect the white socket of Power Up patch cable to the connector JS2 on the VideoMate PCI TV Tuner card.
Note
Double check your work. If you plug the cables into the incorrect pins, your PC may not start or otherwise function improperly.
Connect the white end of the Power Up patch cable to the TV tuner card and the black end to the mainboard.
Power Up Scheduling is not a required for using VideoMate TV. If you don’t want to use Power Up Scheduling from the Windows Shut down state, you can skip the power switch circuit connections, in other words, you can skip Power Up Connections in steps 3 through 6. You can still use scheduled recording from Standby mode or powered on state.
7.Verify that the power cord to your PC case is unplugged.
8.Insert VideoMate TV in an open PCI slot. Compro recommends installing the card in the third or fourth PCI slot from AGP away from the AGP slot.
9.Before closing your PC case, plug in main power cord of the PC case. You should see a green LED light on the PCI TV tuner card. If you don't see the green light, please read the notes on the following page.
10.Replace the computer cover.
5

TV signal and FM cable
11.Connect your TV signal to the upper and the supplied FM antenna to the lower connector. Adjust FM antenna for optimal reception.
Note
If the computer cannot be turned on, verify the position of the power patch cable on the mainboard. Consult the mainboard documentation to determine the position of the ATX power switch connector. Also, double check that the AC power cable is properly connected to your PC.
Power Up will start your computer 5 minutes in advance of the scheduled recording time, for example, if you have set ComproDTV to record a program at 4 o’clock, it will start your computer at 3:55. Therefore, you need to shut down the computer before 3:54 in order to let Power Up start the computer.
Power Up from Windows Shutdown mode, i.e., ACPI S5 state, requires:
zAn ATX power supply in your PC.
zMainboard support for PCI version 2.2 in order to have 3.3V standby power.
zAn ATX power switch cable, which is a pair of twisted wires with a two-wire connector, as shown to the right.
If the don't have the above items, you can still use Power-Up Scheduling with Windows Stand by mode, i.e., ACPI S1/S3 state, if your system supports it.
If your ATX power switch cable in your PC case cannot reach to the power up socket of TV Tuner card, you cannot use the Power Up function with system shutdown mode. Please try to move the card to another PCI socket.
You can use VideoMate TV without using Power Up Scheduling. If you don’t want to use Power Up Scheduling from the Windows Shut down state, you can skip the power switch circuit connections, in other words, you can skip
Power Up Connections in steps 3 through 6. You can still use scheduled recording from Standby mode or leave your PC powered on.
The ATX power switch cable is not polarized. You can plug it in either direction.
6

Software Installation
After installing the PCI card and cables in your computer, you should restart it and follow these steps to install the software.
Step 1. After restarting, Windows will detect your VideoMate TV card and start the Add/Remove Hardware Wizard, prompting you to install the VideoMate TV drivers. Please press Cancel and go to the next step.
Step 2. Insert the installation CD into your CD drive. If you have Autorun enabled, the installer will start automatically. (If Autorun is disabled, double-click on “setup.exe” on the installation CD.) You can choose Complete to install all necessary software (VideoMate H900/H900F Driver, ComproDTV 4, ComproFM 2) or choose Custom to select item by item. Compro recommends you choose Complete.
Step 3. If you see the Windows Logo testing message, below, please press
“Continue Anyway” to proceed.
Press Next to install ComproDTV 4, ComproFM 2
When installation completes, press Finish to restart computer.
Step 4. Open ComproDTV to enjoy the show.
7

Remote Wake Up
Introduction
VideoMate Vista H900F features the Remote Wake Up function for more convenience.
Compro has always focused on developing products with great features. Integration of hardware and software support, you can start your computer from the shut down state by pressing a button on the remote keypad. You don’t need to reach over to your computer anymore. You can also shut down the computer by remote control as well. No more mouse clicks on the screen. This feature converts your PC into a convenient home entertainment video appliance.
Using Remote Wake Up
After install the TV card driver, put batteries in the remote control. Pressing the power button on the top of remote control, it will start your computer.
Note
You must correctly install the driver and Power Up connectors in order to use Remote Wake Up function.
There will be a two second delay before the PC powers on.
This feature cannot logon your system. You may need to enter your user name and password.
8
 Loading...