

Page 1

1
VideoMate Vista U100
USB 2.0 DVB-T Stick
Start Up Guide
Compro Technology, Inc.
www.comprousa.com
Page 2

2
Copyright © 2001-2008. Compro Technology, Inc. No part of this
document may be copied or reproduced in any form or by any means
without the prior written consent of Compro Technology, Inc.
Compro, VideoMate, Poladyne, Play with Power, and the Compro logo
are trademarks of Compro Technology, Inc. Other names and marks
are trademarks of their respective owners.
Compro makes no warranties with respect to this documentation and
disclaims any implied warranties of merchantability, quality, or fitness
for any particular purpose. The information in this document is subject
to change without notice. COMPRO reserves the right to make
revisions to this publication without obligation to notify any person or
entity of any such changes.
Compro Technology, Inc.
Tel. +886 2 2918 0169, Fax +886 2 2915 2389
4/F, No.12, Alley 6, Lane 45, Pao Shin Road
Hsintein City, Taipei, Taiwan.
www.comprousa.com
Page 3

3
Table of Contents
About This Guide ................................................................................. 4
VideoMate U100 Contents ................................................................... 5
Installation ............................................................................................ 6
Windows Media Center Remote for Vista U100 ................................. 7
ComproDTV Vista Gadget Tool for Vista............................................ 9
HID (Human Interface Device) for Compro Remote ...................................... 12
Open and close the ComproDTV 4 display panel............................ 13
ComproDTV 4 ..................................................................................... 14
Troubleshooting ................................................................................. 21
Page 4

4
About This Guide
VideoMate Vista U100 lets you watch and record digital terrestrial TV
broadcast on your computer or laptop. It can efficiently capture digital
terrestrial TV broadcast programs from your area. VideoMate U100 features a
TV tuner for digital TV broadcast, Digital Video Recording (DVR) functions,
scheduled recording at anytime, crystal video quality, and intelligent TV
viewing.
MINIMUM SYSTEM REQUIREMENTS
Your PC must meet or exceed the following system requirements to watch TV
on your PC.
z PIII 1.7 GHz CPU for TV viewing
z 512 MB RAM
z Available USB 2.0 ports (USB 2.0 only)
z Sound card or on-board sound chip
z Graphics Card or on-board graphics supports DirectX 9.0
z CD-ROM for software installation.
z Windows XP SP2 or above installed.
z 50 MB free disk space for basic software installation.
RECOMMENDED SYSTEM REQUIREMENTS
To use all the features of VideoMate U100, your PC should meet the following
requirements.
z 2.6 GHz CPU with SSE 2 support for DVD recording and timeshifting
z 3.0 GHz CPU with SSE 2 support for HDTV/TS viewing/recording and PIP
z 1GB RAM
z Sound card or on-board sound chip
z Available USB 2.0 ports
z CD-ROM for software installation
z Graphics Card or on-board graphics supports DirectX 9.0
z Windows Vista x86/x64
z Update the latest drivers of VGA, motherboard, and soundcard from
vendors.
z 50 MB free space for software installation
Page 5
5
VideoMate U100 Contents
Note
In order to receive digital terrestrial TV broadcast, the antenna is crucial. Digital
terrestrial TV broadcast uses about the same wave as analog TV. It’s
recommended to have a fishbone-like antenna on the roof for receiving. More
detail is on the troubleshooting chapter in this manual.
VideoMate U100 has to operate on USB 2.0 interface. Please check your
computer system to see if meets USB 2.0 requirement.
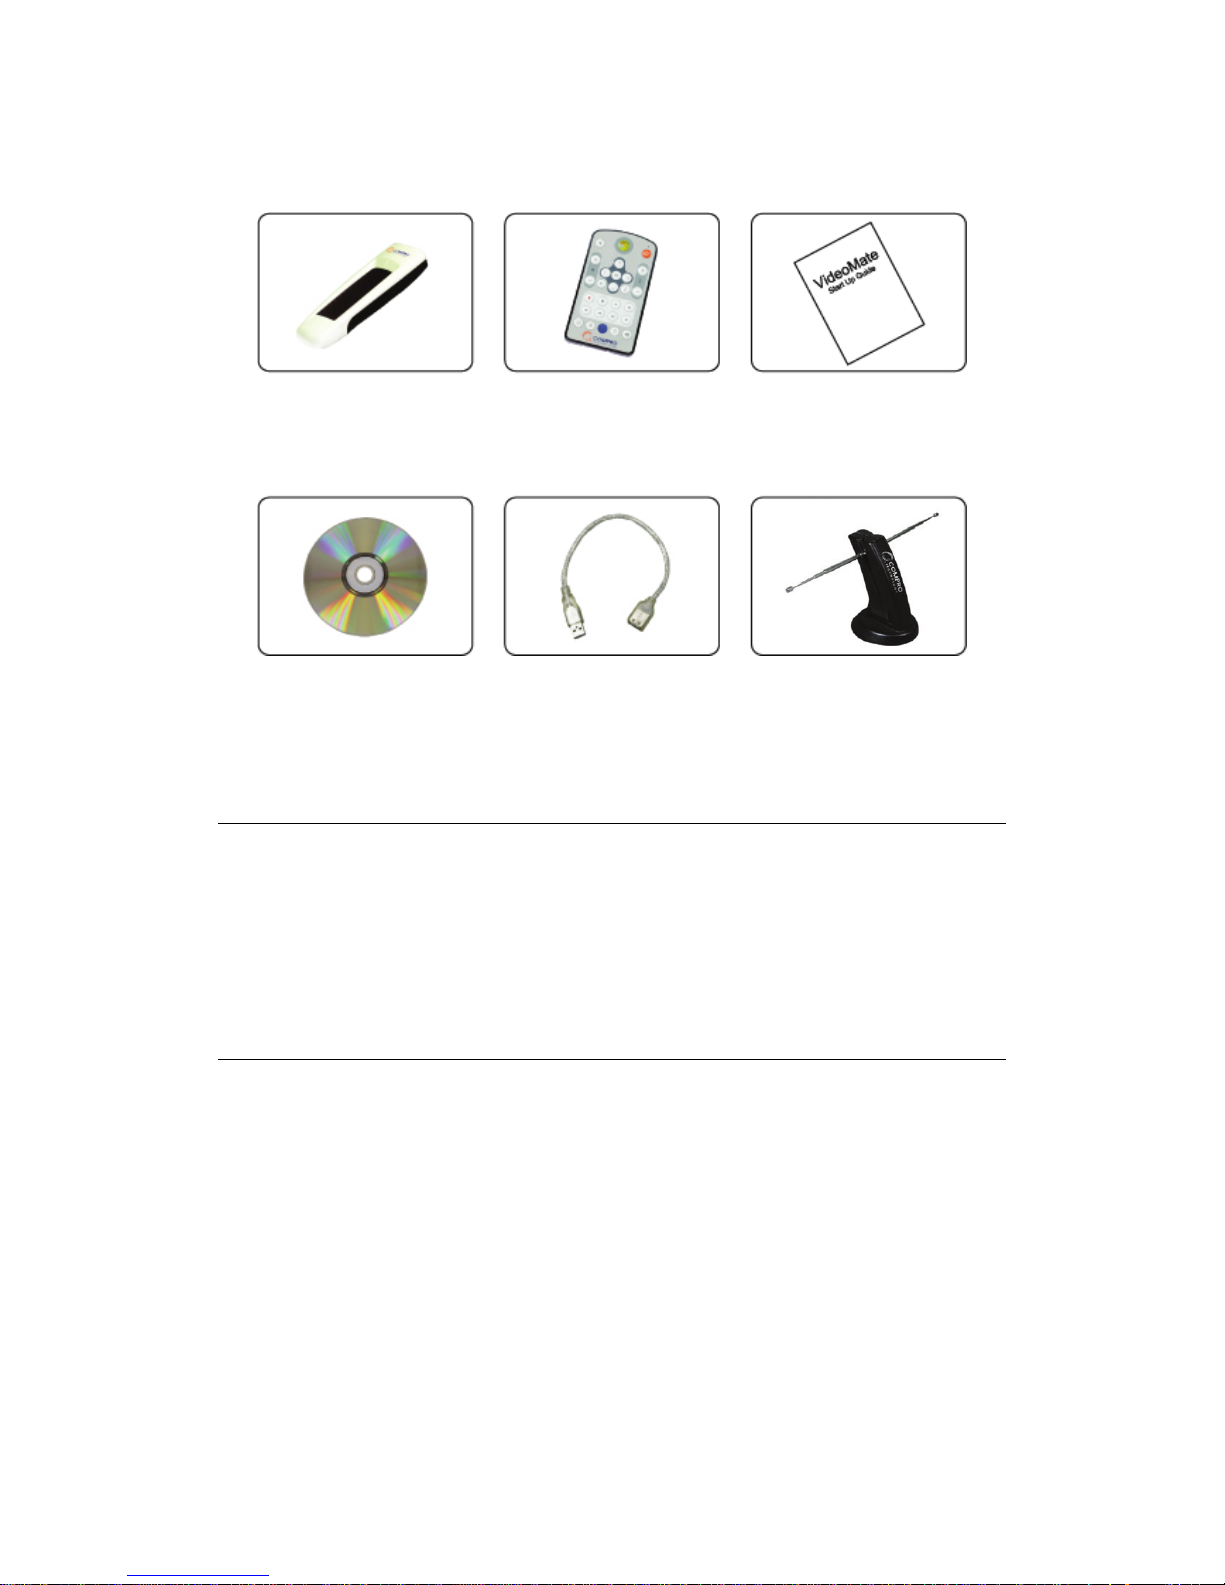
VideoMate U100
DVB-T stick
MCE Remote
with battery
USB 2.0 cable
Digital terrestrial
TV antenna
Software CD
Start Up Guide
Page 6
6
Installation
Start the computer. Make sure VideoMate U100 is connected to your computer
and insert the installation CD into your CD drive.
Step 1. Windows will detect a new device and start the Add/Remove
Hardware Wizard. Please press Cancel and go to the next step.
Step 2. Insert the installation CD into your CD drive. If you have Autorun
enabled, the installer will start automatically. (If Autorun is disabled,
double-click on “setup.exe” on the installation CD.) You can choose
Complete to install all necessary software (VideoMate U100 drivers,
ComproDTV4, or choose Custom to select item by item. Compro
recommends you choose Complete.
Step 3. After each program is successfully installed, press Finish to proceed.
Step 4. When installation completes, press Finish to restart computer.
Step 5. Connect TV signal.
Step 6. Open ComproDTV to enjoy the show.
Page 7
7
Windows Media Center Remote for Vista U100
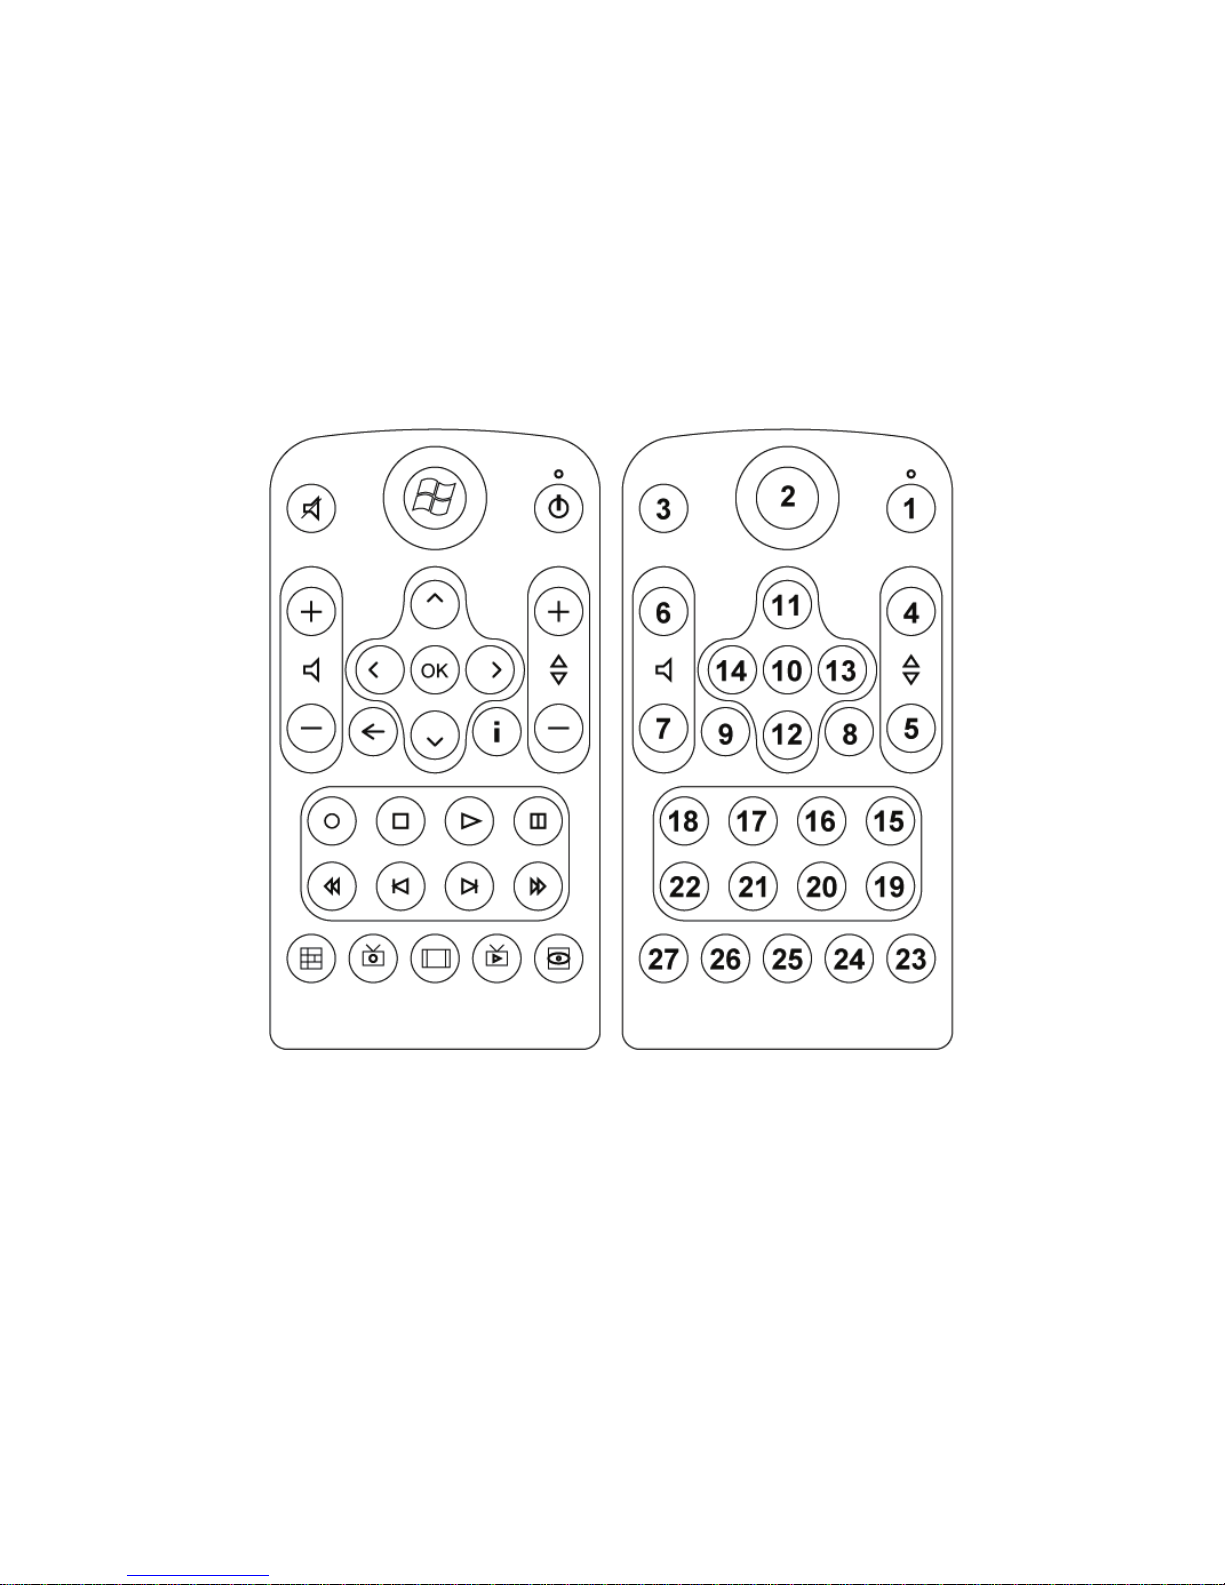
Compro VideoMate Vista U100 bundles the easy-to-use Microsoft certified
remote control to controls the Media Center and also ComproDTV, ComproFM
software. Some keys are special designed for Windows Vista
Premium/Ultimate, it may not be used in Windows XP system.
Page 8

8
No.
Windows Media
Center (MCE)
ComproDTV 4
1 Into sleep mode Into sleep mode
2 Media Center Media Center
3 Mute Mute
4 Channel Up Channel Up/Angle
5 Channel Down Channel Down/Subtitle
6 Volume Up Volume Up
7 Volume Down Volume Down
8 More Zoom
9 Back Guide/Menu
10 OK OK
11 Up Up, Mono/SAP/Stereo
12 Down Down/snapshot
13 Right Right/forward
14 Left Left/backward
15 Play/Pause Play/Pause, Timeshift
16 Play/Pause Play/Pause, Timeshift
17 Stop/Live Stop/Live
18 Record Record
19 Fast Forward Fast Forward
20 Skip Forward Aspect Ratio
21 Skip Rewind Last Channel
22 Rewind Rewind
23 DVD Menu (MCE) No function
24 Live TV (MCE) Live TV (MCE)
25 Zoom (MCE) ComproDTV
26 Recorded TV (MCE) Recorded TV (MCE)
27 MCE Guide MCE Guide
Page 9
9
ComproDTV Vista Gadget Tool for Vista
The Compro gadget tool is designed to provide the more convenient TV
experience in Windows Vista. It will be installed from the Compro installation
CD, and you can delete and add it from gadget setup.
Note
1. Vista Gadget is meant for Vista 32 bit operation system only.
2. Vista Gadget Tool needs the channel table from ComproDTV 4. Please
autoscan all the available digital TV channels in ComproDTV 4. Then you
can use the Vista Ggadget Tool.
3. If there is no picture when you click the live TV button, please right-click the
mouse button and select the video source you want.
UI Control
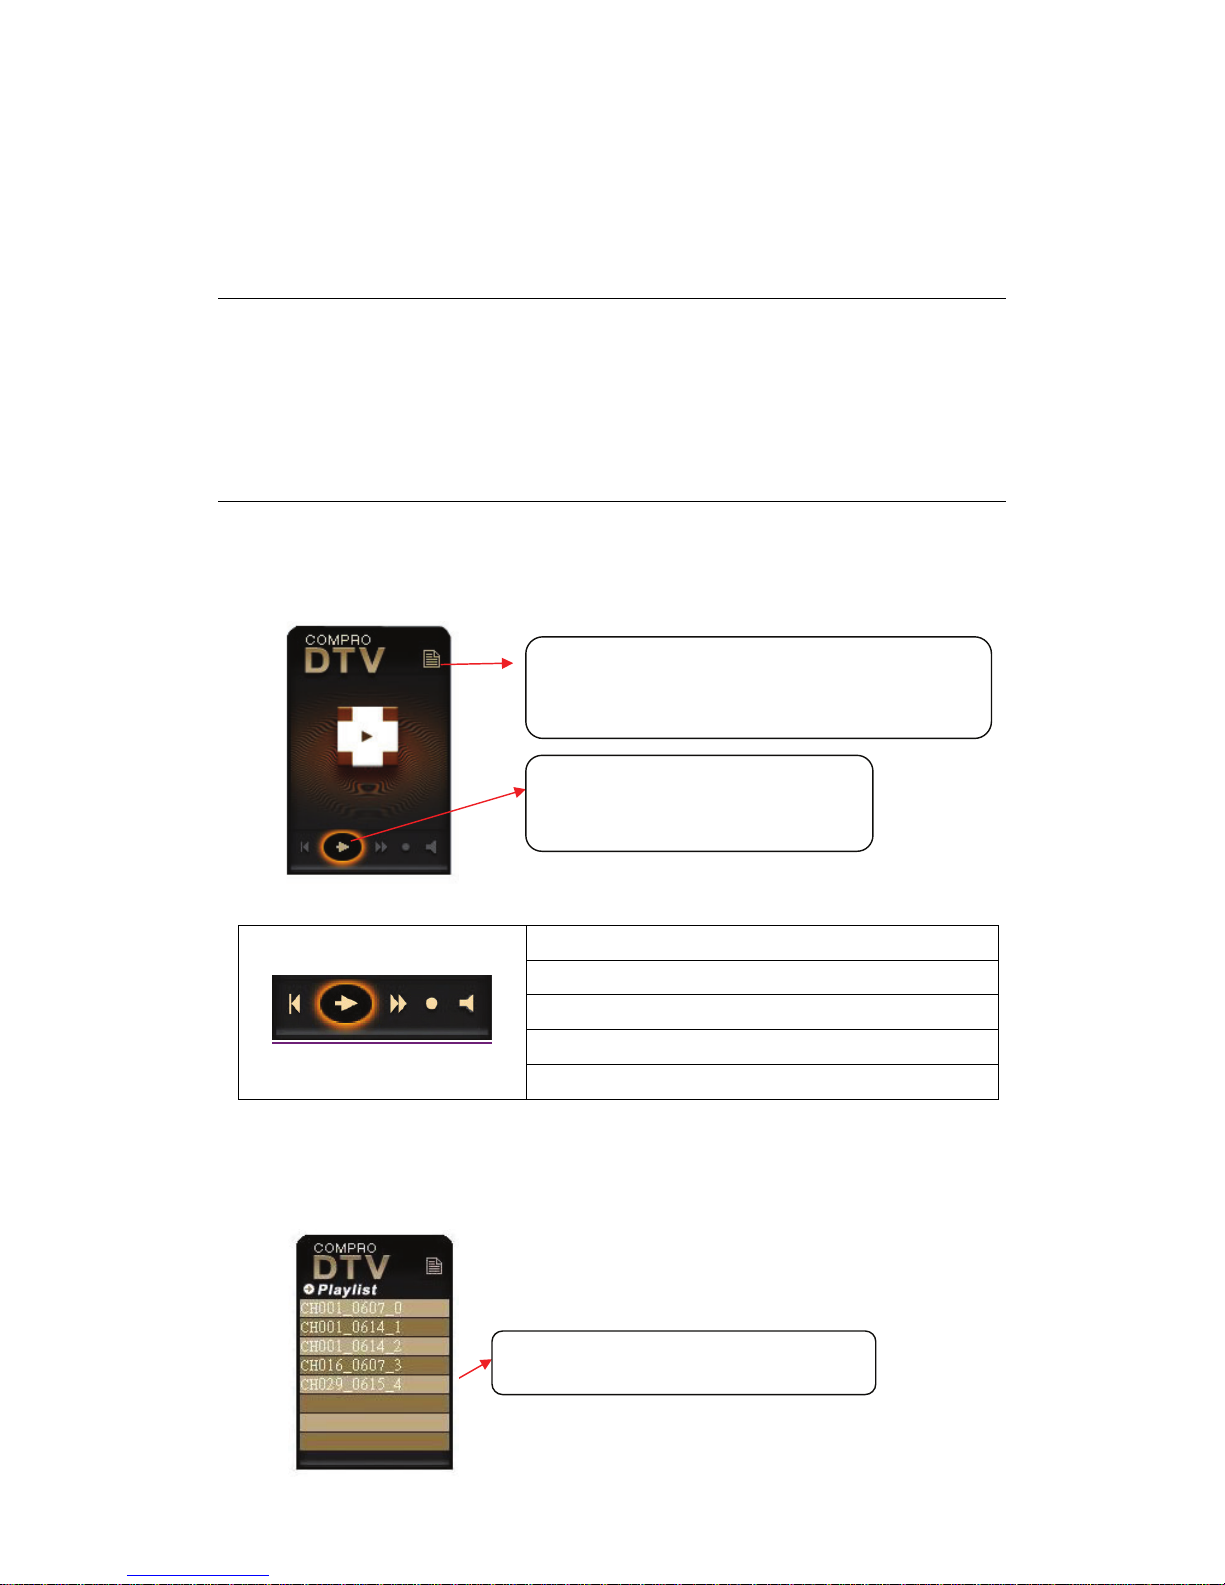
DTV Gadget has three modes including Live TV mode, display playlist, and
display scheduled list.
The buttons from left to right sides are:
Channel down in live TV mode
Start/Stop Live TV, Play/pause from playlist
Channel Up in live TV mode
Start/stop record live TV
Mute
Playlist mode: It just displays first eight files in the list you recorded, if there
are more than eight files in folder, the ninth file or rest of files will not be display.
The figure in below shows the playlist style:
5 files and 3 empty items in list
Press the button to load device
and start to play live TV
This button can change modes between
Live TV, display playlist and schedule list
Page 10
10
If clicking any files, the gadget will change to play mode from playlist mode,
then playing the file you clicked.
Scheduler list mode: This mode will display the top 5 of your current
scheduled list, you can click any of the scheduled item and check the detail
information of it.
The last mode is schedule view which has two different parts. First, there is a
table that has five rows; it means that schedule view will allow the first five
schedules in the list. Second, if clicking the item, it will change to another part,
which show in detail about the schedule you clicked. Clicking again will go
back to first part. The process showed as below:
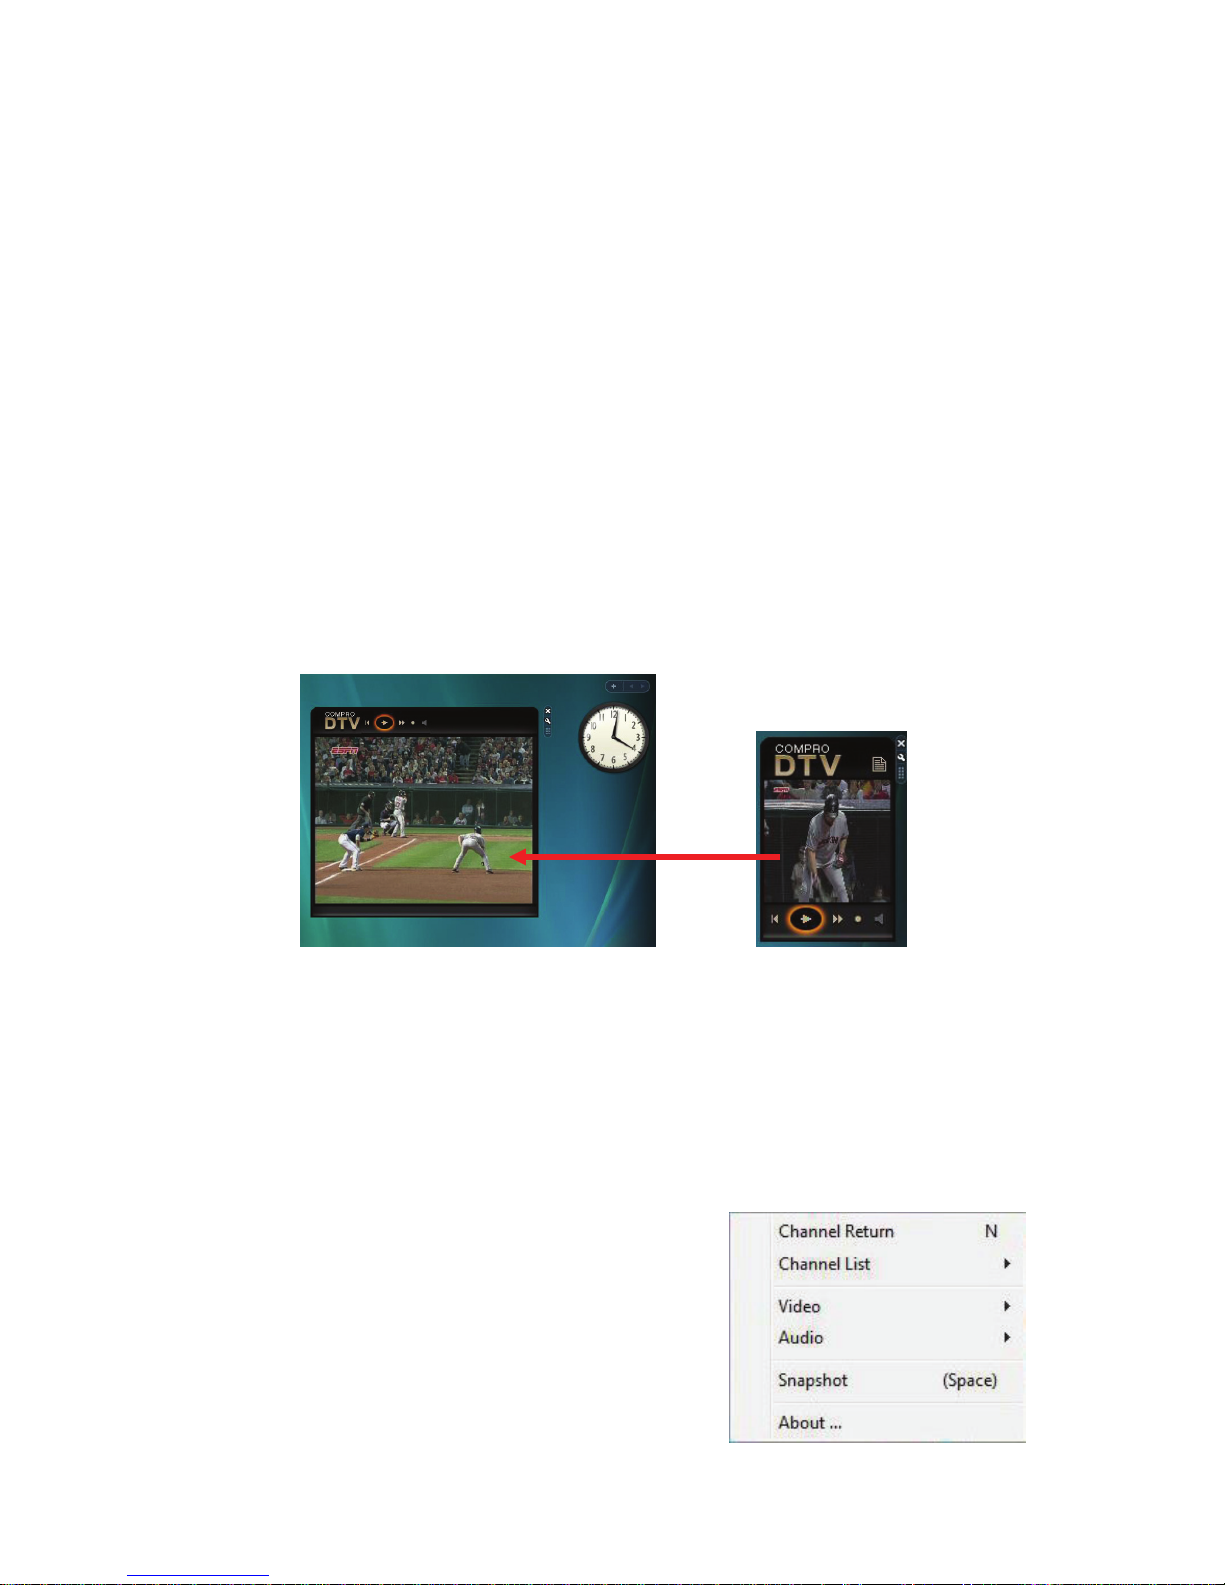
Dock and Undock Gadget Window:
Only docked gadget has three modes, the undocked gadget only support live
TV/playback video mode, and its size is bigger than docked one. You can
direct drag the gadget window to the other place out the sidebar and shows the
bigger undock window to watch TV or playback recorded video files.
Because undocked gadget lacks playlist, if you wants to play a file in undocked
mode, you can drop a file into the window of gadget to play a file .(in docked
mode, you can also play a file by dropping a file into gadget) The control of
button in undocked mode is the same as docked mode.
Pop Menu
Click the right mouse button on the gadget
window; it will open the pop menu for selection.
You can return to last channel, autoscan
available channels, select channel to watch from
channel list, select video source, adjust audio
volume, or snapshot TV screen.
Directly drag gadget windows out the sidebar and shows the bigger window
Page 11
11
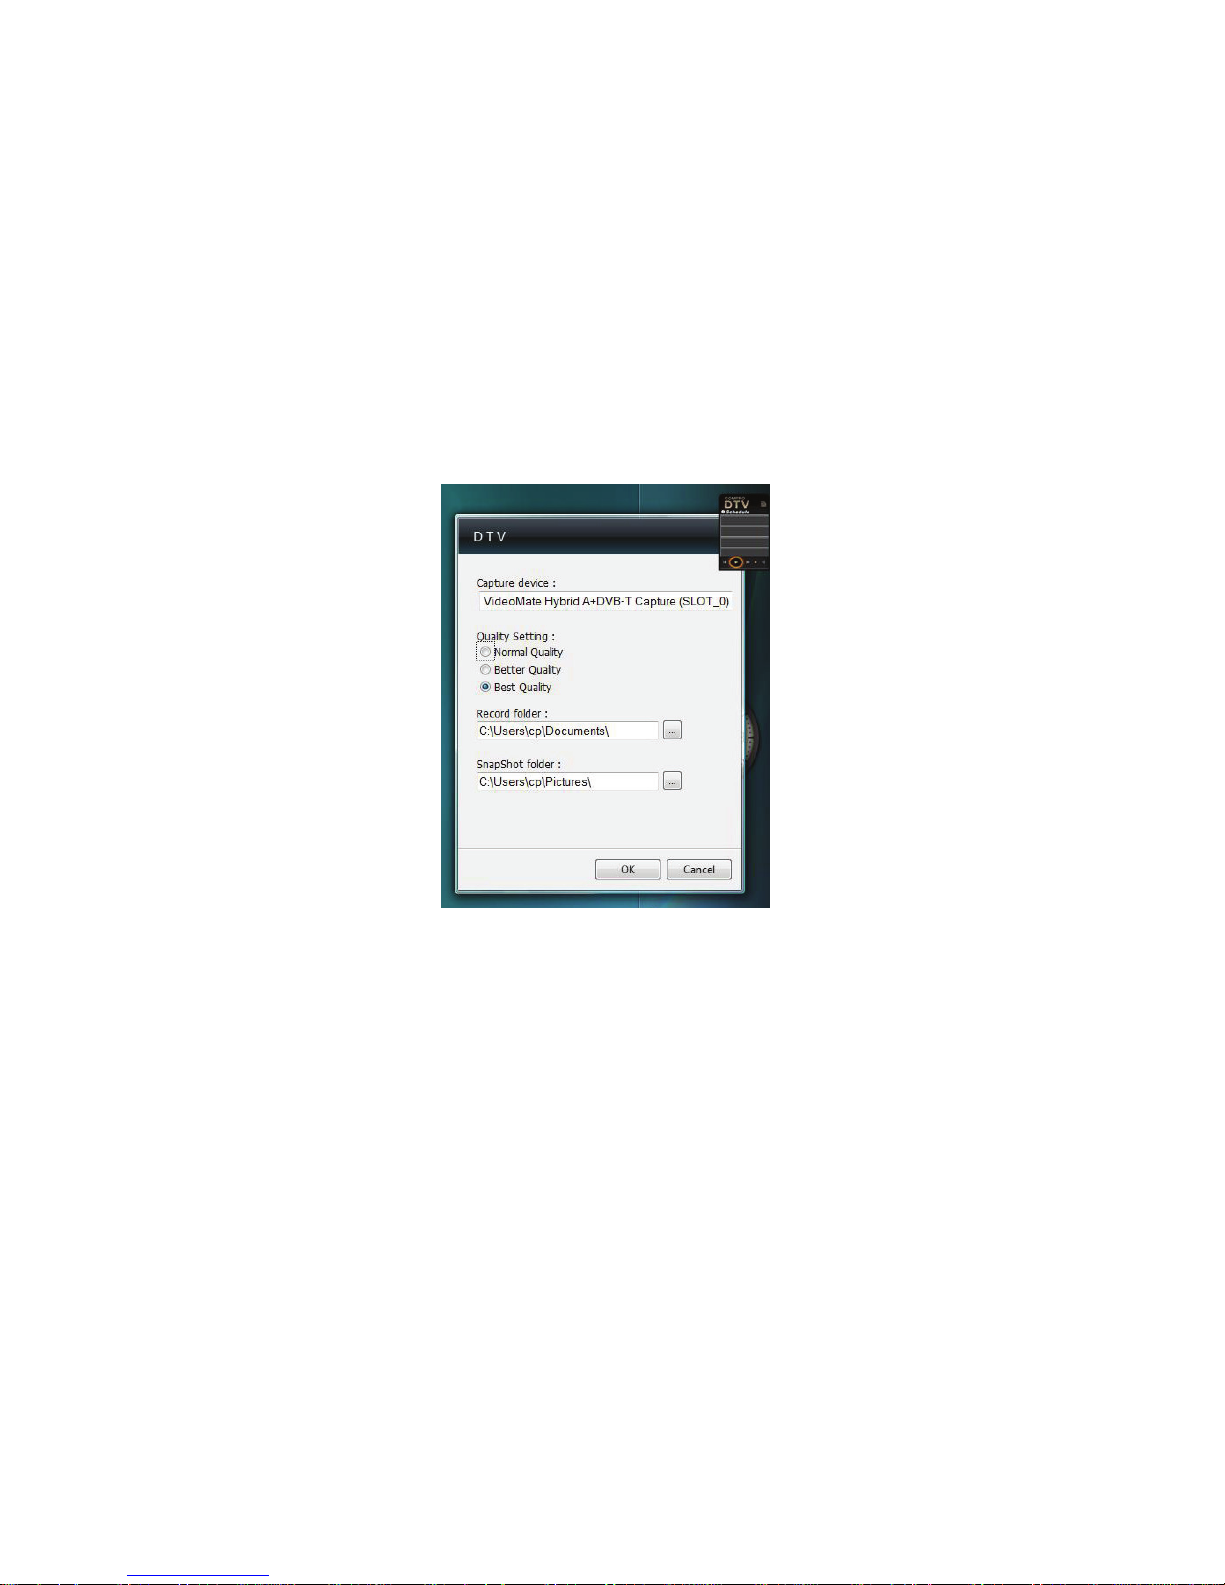
Gadget Settings
Settings of gadget have four parts included:
z Capture device : to select capture devices.
(when running gadget first time or having more than one device, this item is
needed)
z Quality setting : to select recording quality
Normal, Better, Best Quality
z Record folder: a directory to place recorded files.
z Snapshot folder: a directory to place picture.
Page 12
12
HID (Human Interface Device) for Compro Remote
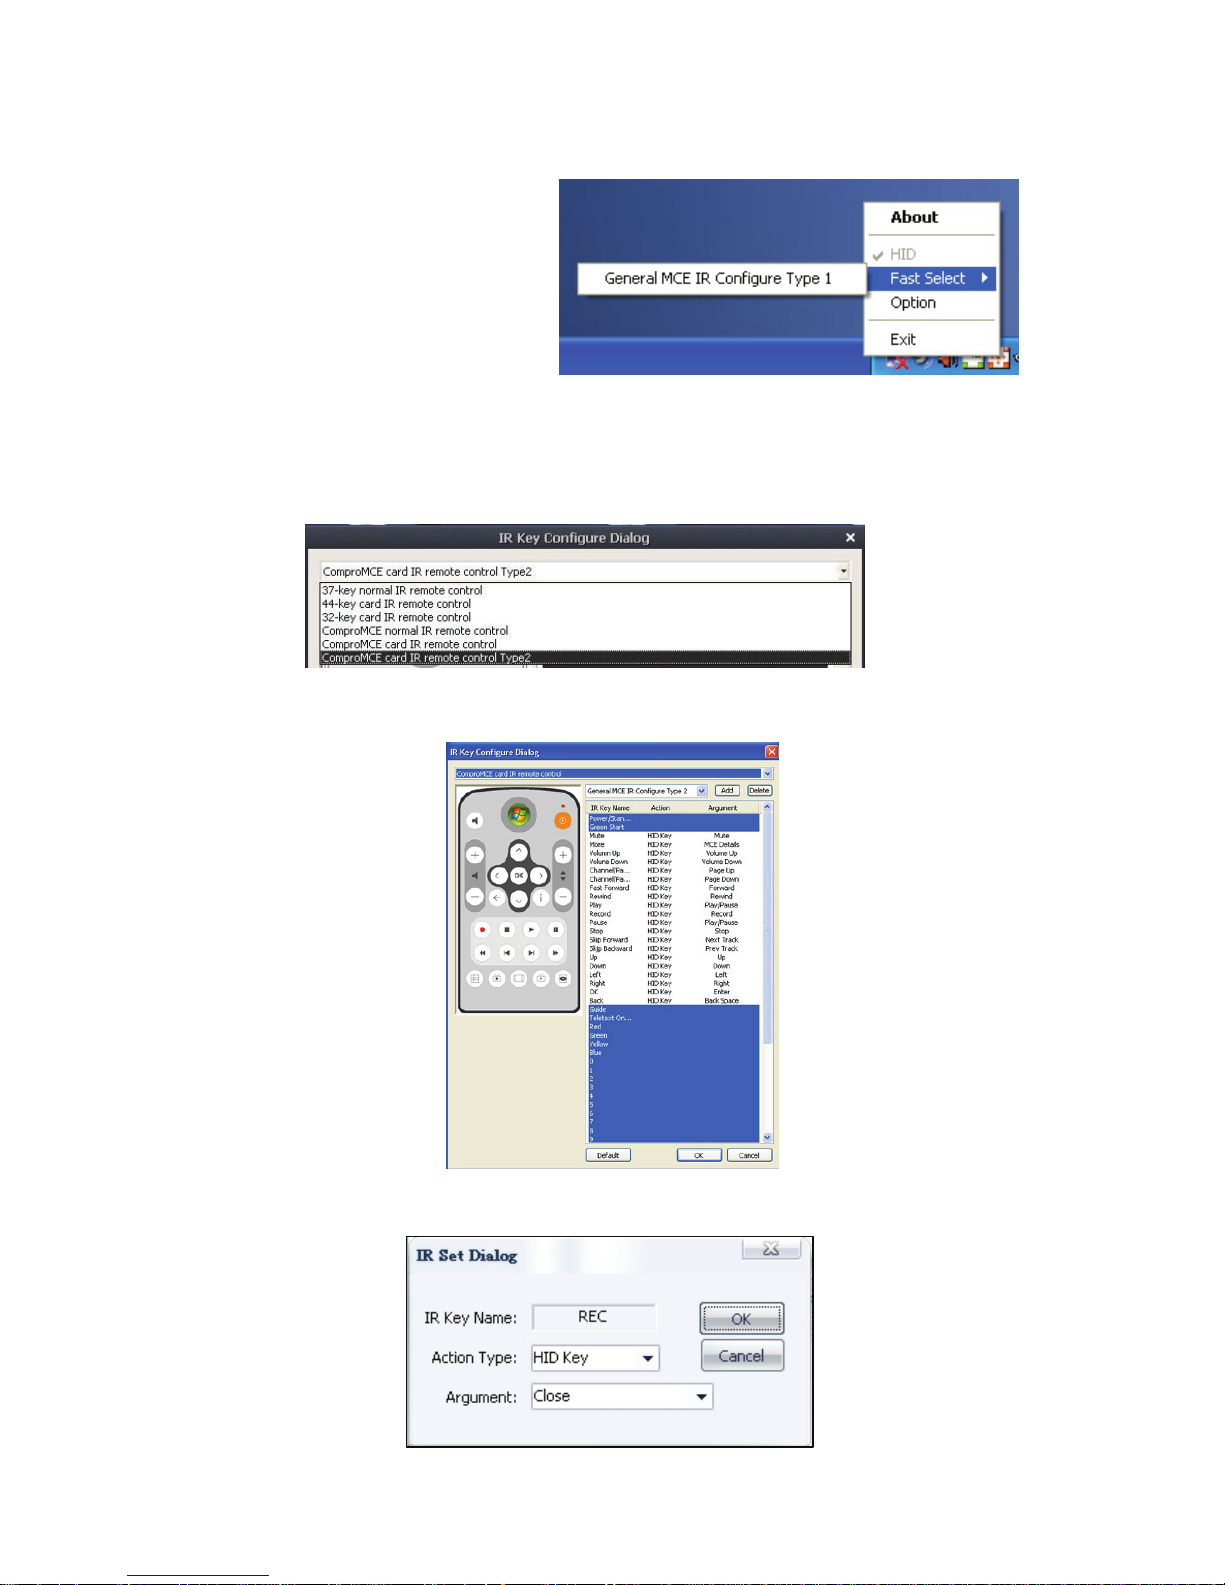
After you install the software,
you can see the remote logo
show in your system bar.
You can choose the “Option” to
enter the setup window.
Setup:
Step 1: Choose the type of your remote control. (There are many type of
remote from Compro, please select the remote picture as you have).
Step 2: Choose one IR function you want to change.
Step3: Set the IR dialog you want and press OK button.
Page 13
13
Step4: Repeat setp1 to 3 to run all the changes.
You can also set a whole new program of your remote control in some
particular software or window.
Press “Add” button and enter the name you want. Repeat the step 1 to 4.
Note
If you have any MCE system in your PC, such as Windows MCE, Vista
Premium, Vista Ultimate, this function can replace the windows remote control.
HID can also combine the Compro software control in the MCE interface to
make you more convenient.
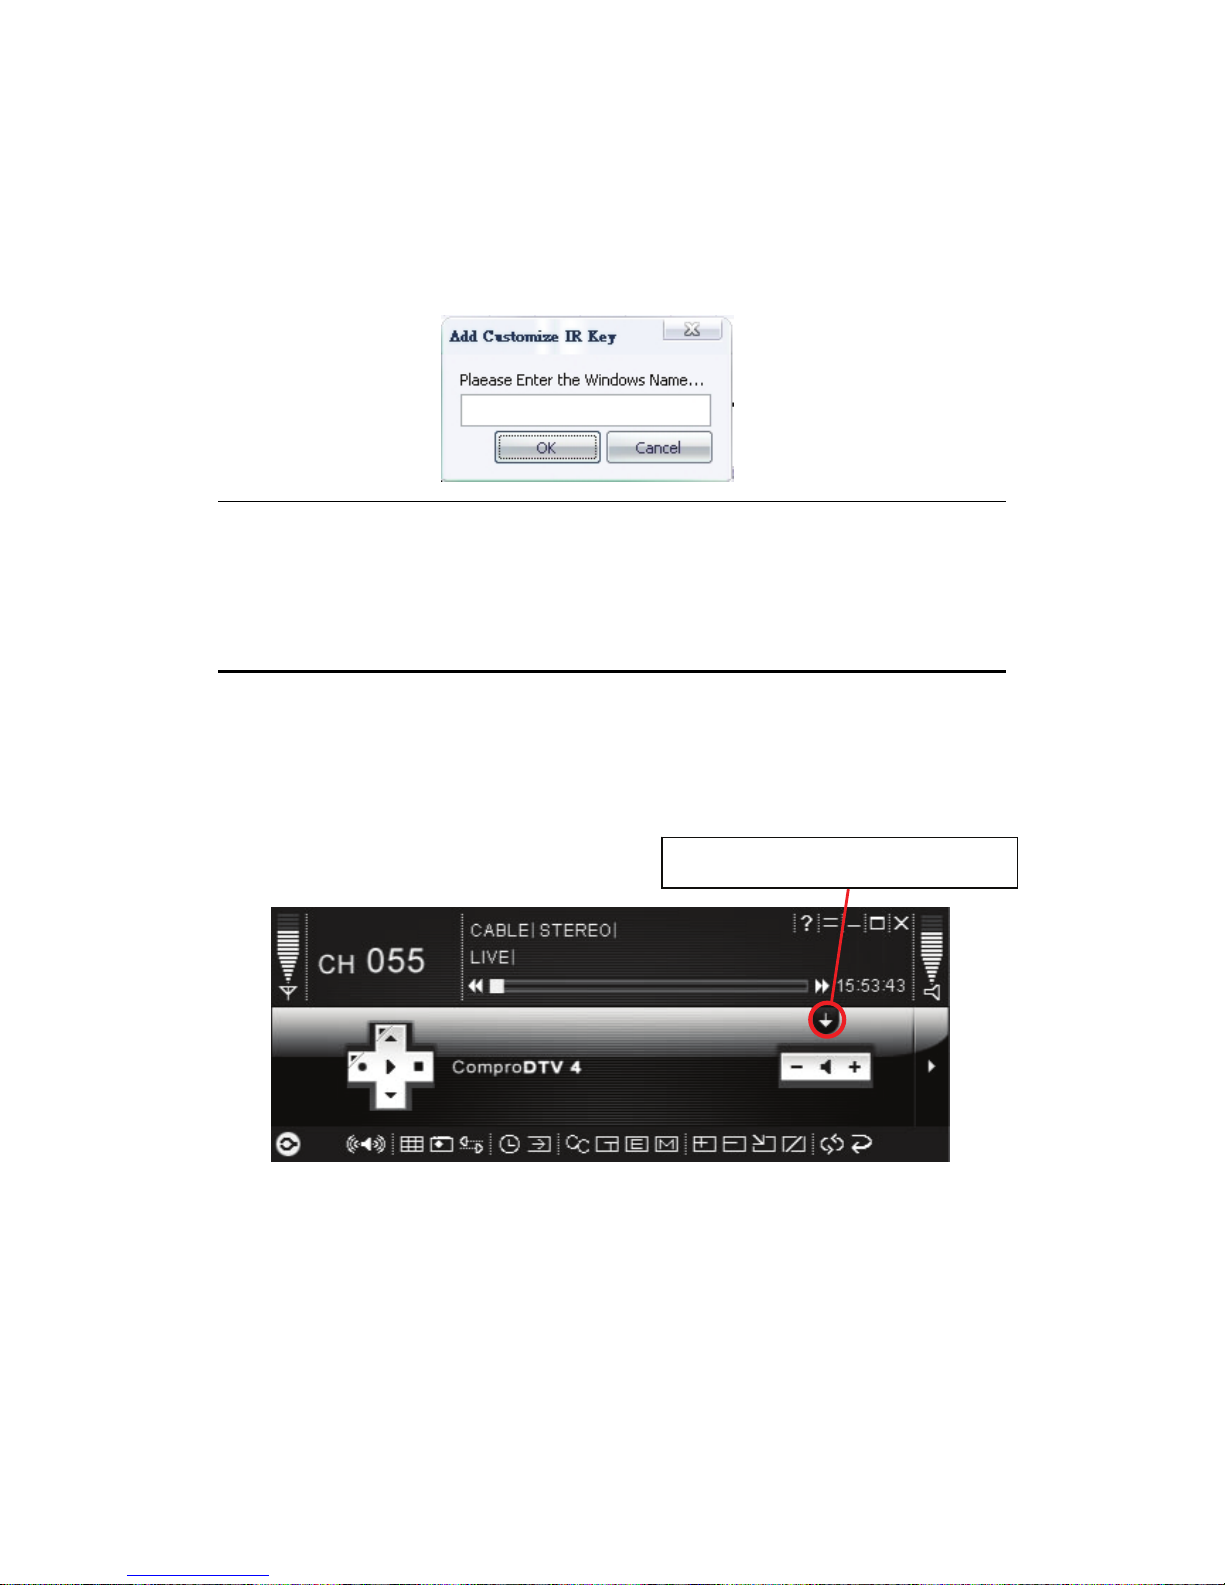
Open and close the ComproDTV 4 display panel
You can open and close the ComproDTV 4 display window by click the down
arrow on the right of ComproDTV panel.
Open and close display panel
Page 14
14
ComproDTV 4
Control Panel
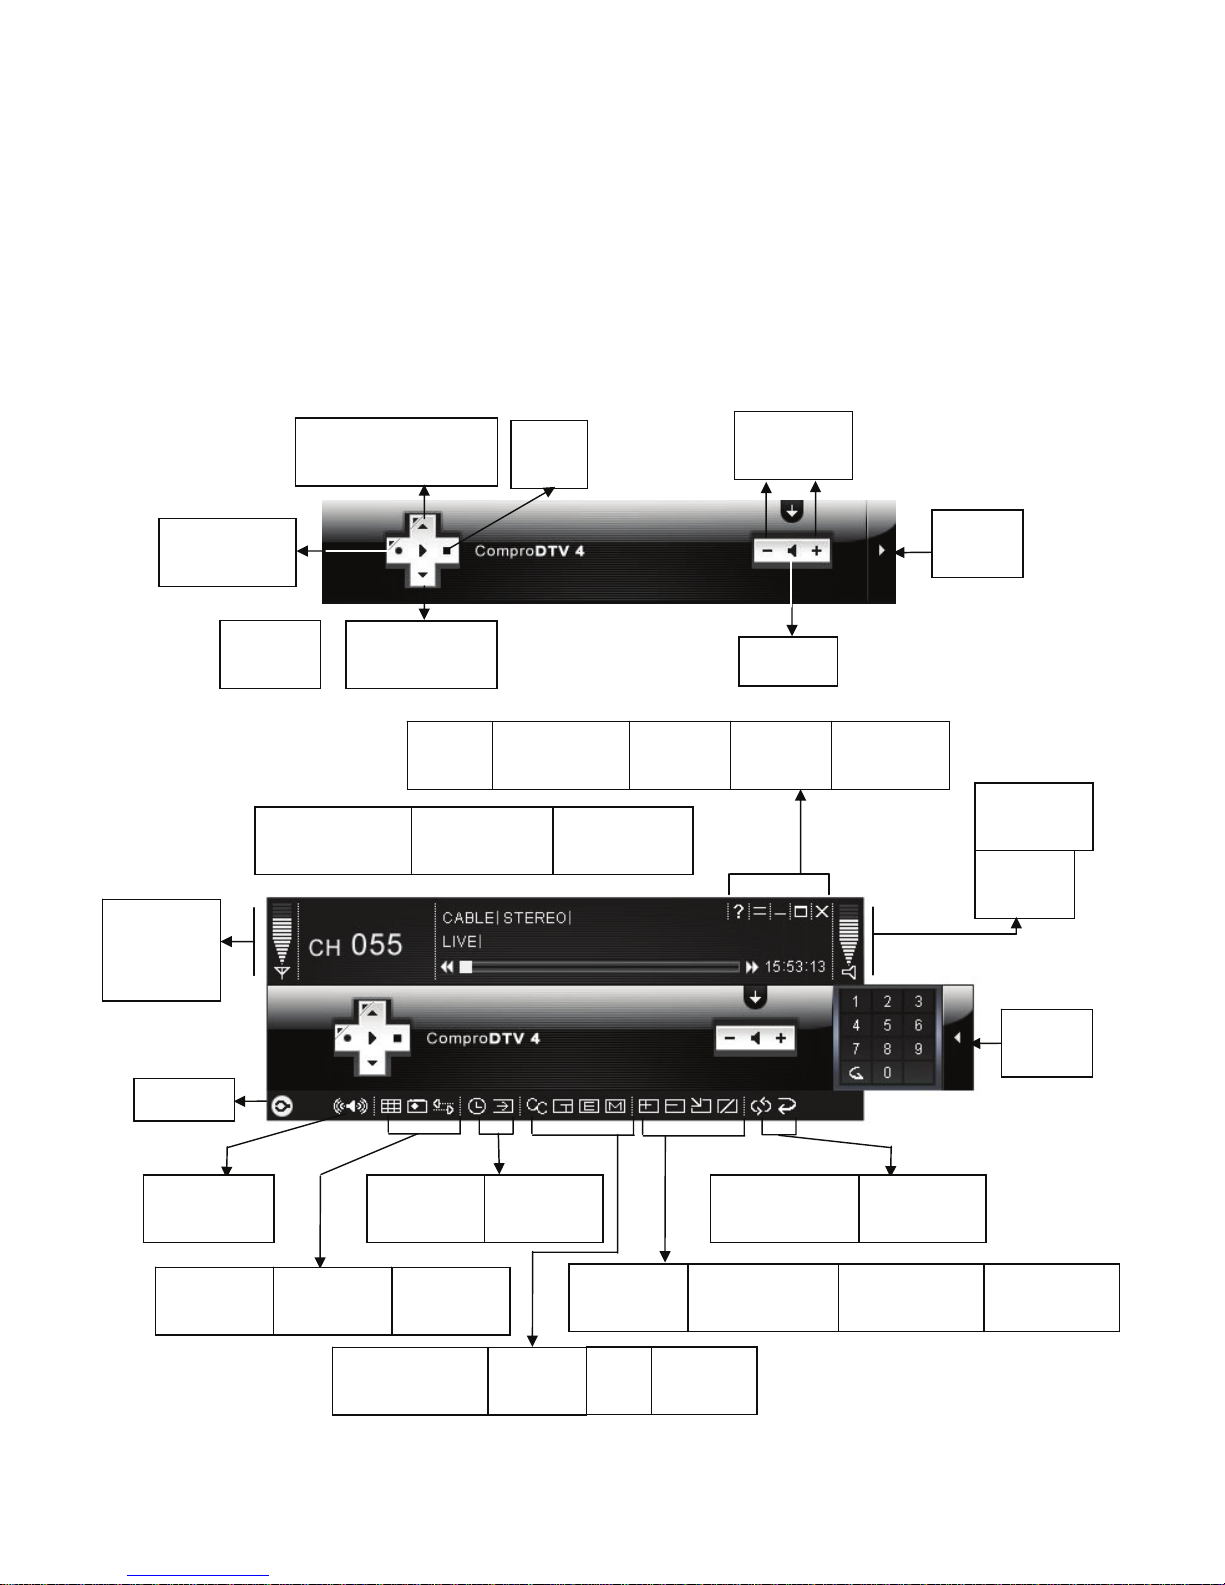
The ComproDTV 4.2 control panel resembles the controls on a VCR. Please
note that not all options are available at all times, and may be grayed out or
inaccessible depending on your hardware setup and TV services available.
The following figure gives you the function of the button with (Hot key)
Channel Down
(Page down)
Stop
(S)
Record (R) and
Record Option
Channel Up (Page Up)
with Quick Channel list (I)
Play (P) /
Pause (U)
Volume
(- , +)
Mute (M)
Num
Pad (W)
Close
(CTRL+X)
Docking
(D)
Full
Screen
Help
(H)
Minimize
(G)
Timeshift bar
Rewind
(Left Arrow)
Fast Forward
(Right Arrow)
Digital TV
Signal
Strength
Volume
(- , +)
Mute
(M)
Option (O)
Channel Surf
(F)
Time shift
(T)
Snapshot
(Space)
Schedule
(B)
Video
Source (V)
Left/Right
Audio Switch (J)
Reduce Window
(F2)
Close All
Windows (F6)
Add Window
(F3)
Windows
Alignment (F5)
EPG
(E)
Closed Caption
(C)
Te le t ex t
(X)
No function
Last Channel
(N)
Repeat Playback
Recorded Files
Number
Pad (W)
Page 15
15
Start ComproDTV 4 and watch TV
After installation, just press the yellow button of the last line on the remote or
double click the ComproDTV 4 icon on the desktop, you will be able to watch
TV. Same as operating a normal TV set. Watch TV programs on your PC, in
full-screen mode or in a window. Channel up and down. Close ComproDTV 4
and even shutdown the computer with the full function remote control keypad.
Options
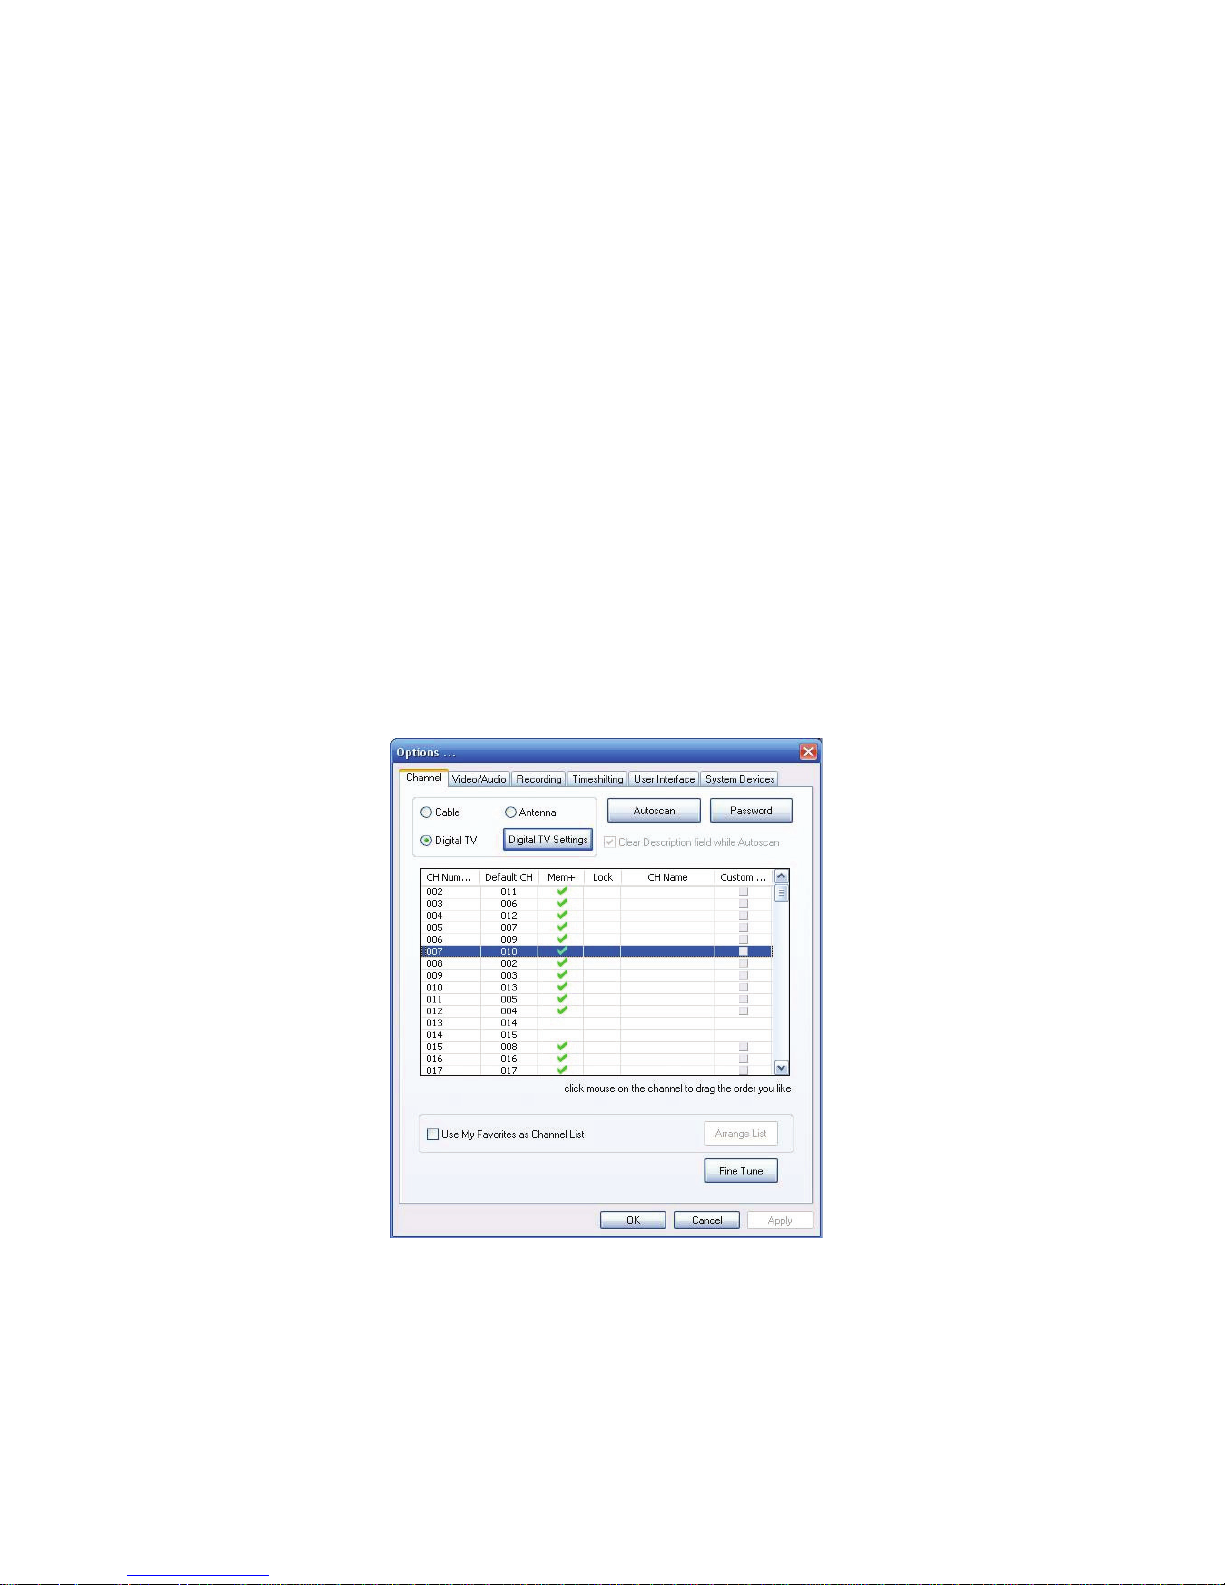
Press the Options button to open the Options dialog box. You can change
detail settings of ComproDTV 4 here.
TV Settings
This option gives you the way to manually set the method of scanning TV
programs. Select your choice here or use default channel table to do the
scanning.
Autoscan
The first time you start ComproDTV 4,
Autoscan will automatically scan for
available TV channels for TV signals.
Please select your TV source from
analog cable/antenna or from digital
antenna. You can rescan the channels
at any time by pressing the Autoscan
button.
When Autoscan is finished, detected
channels are automatically enabled
and marked with the green check mark
. Channels, where a valid signal
could not be detected, are disabled and marked with a blank. However, you
HotKey Description
A
Enable/Disable Always-on-Top function for
TV window.(Oregon circle on the upper-right
corner of the TV window)
L Sleep function
F7 Video Desktop
F8 Open snapshot dialog box
Note: Language select is only available while the program
supports it.
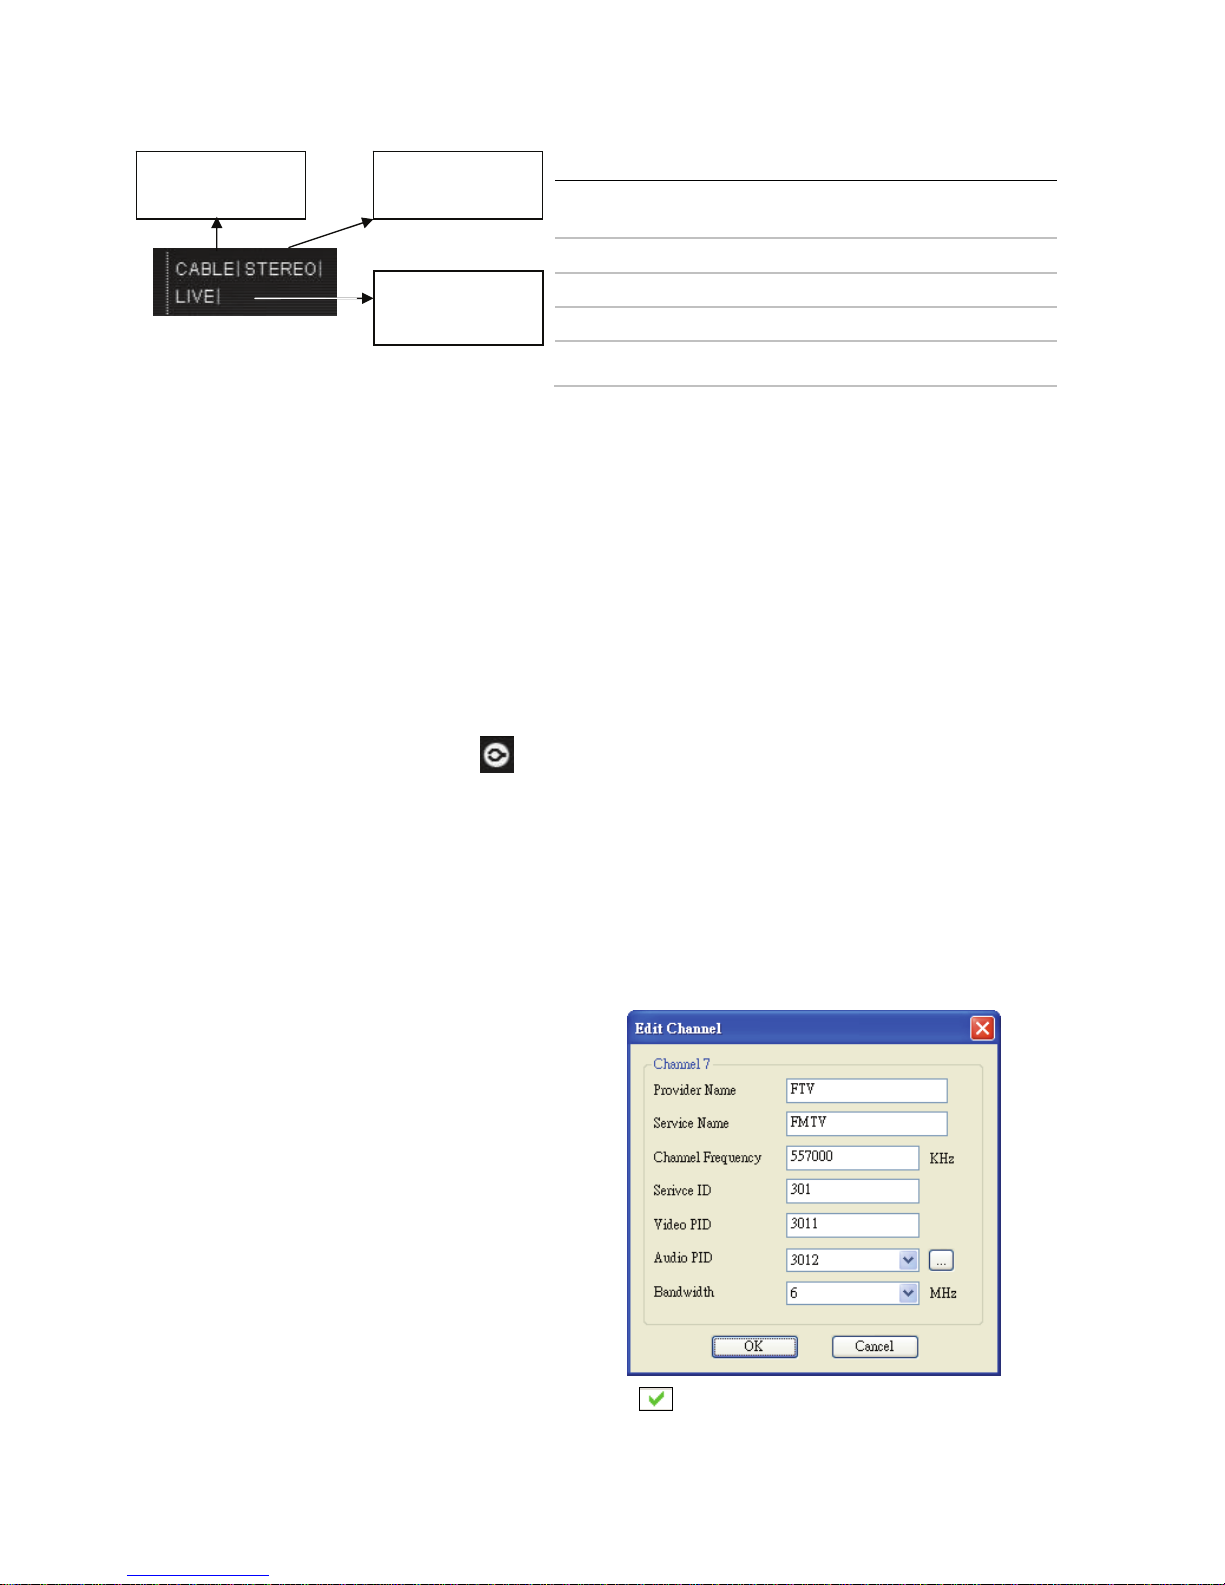
Video Source
Switch (V)
Audio mode
TV / Timeshifting
mode
Page 16
16
can interrupt the scanning process by pressing the Stop button.
After you are finished scanning for available channels, you may select OK to
return to the display window, or customize the channel list according to your
preferences, as described below.
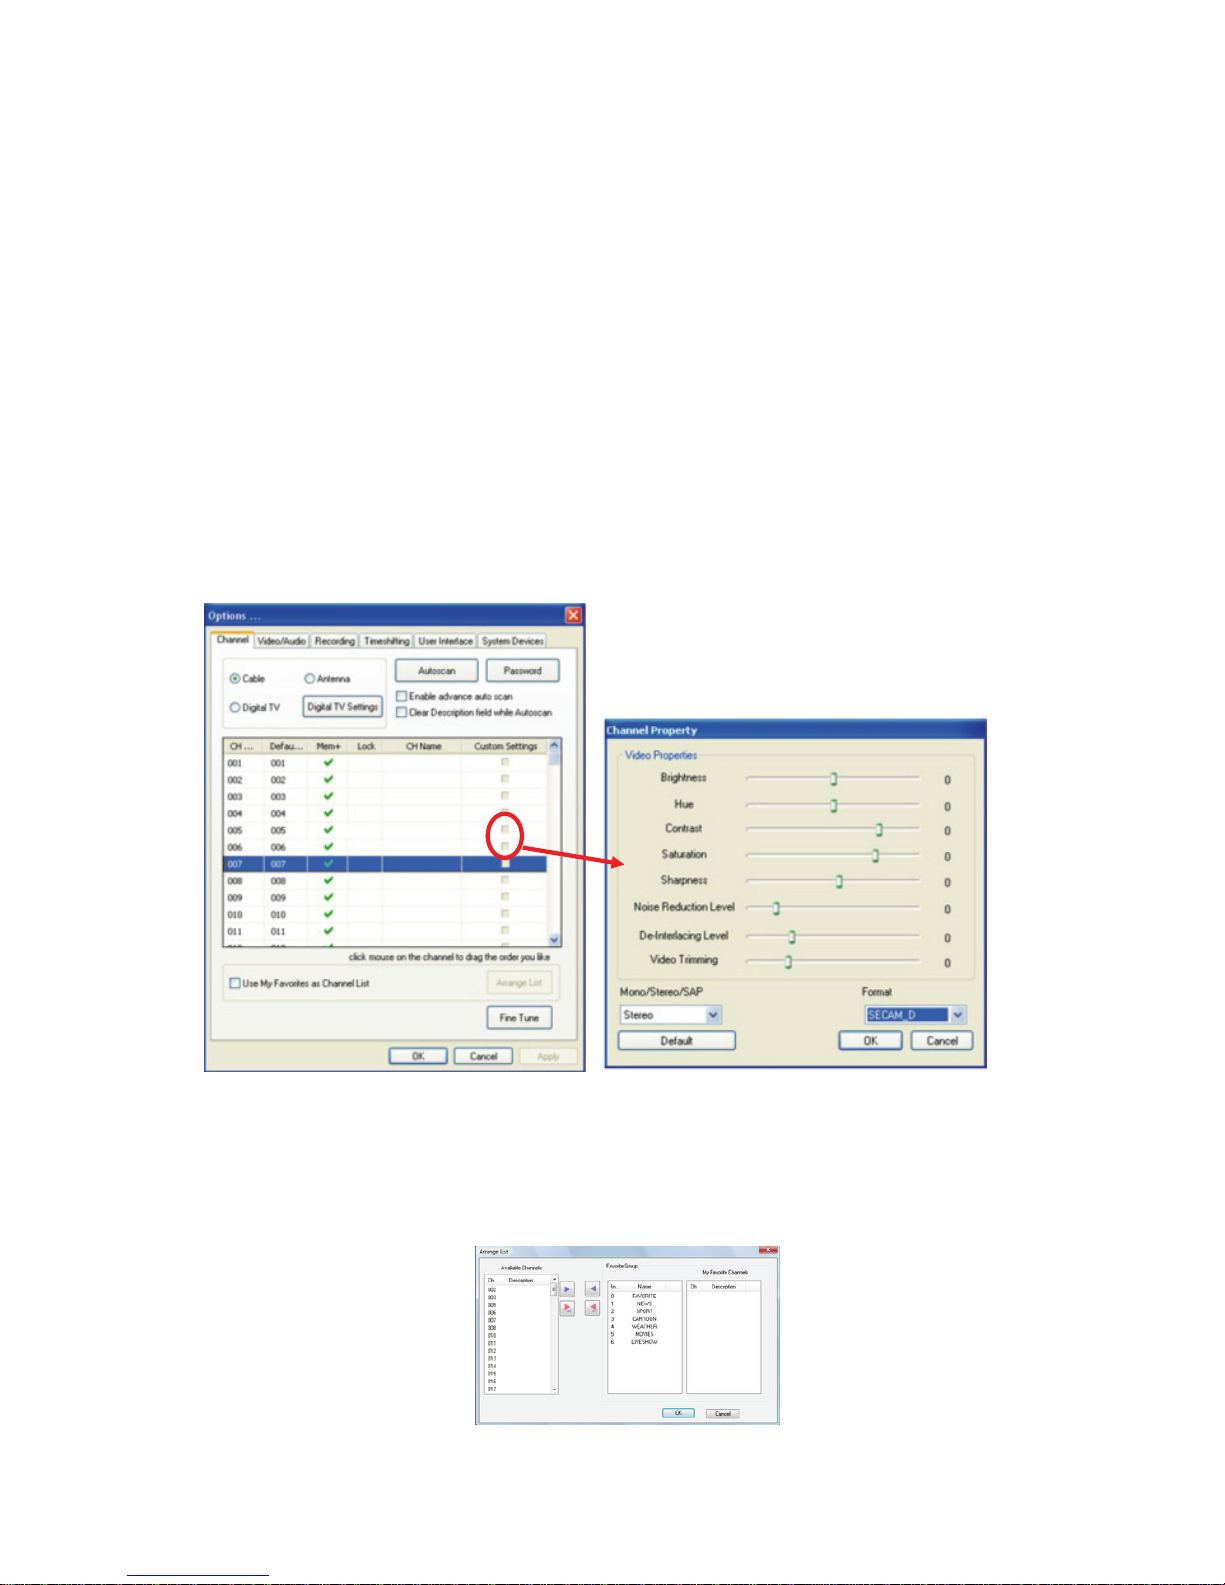
Channel Naming
You can customize the channel names by double-click on the Description
field of the channel you wish to rename.
You can do more changes on the channel’s property by right-click the mouse
on the Description field of the channel you wish to edit.
Custom Settings for each channel
You can customize each channel properties by click the icon in “Custom
Settings” filed and edit it.
Using my favorite channel list
You can click to select using my favorite channel list from option window. And
exit the list by yourselves to makes channel switch more convenient.
Page 17
17
Channel Surfing
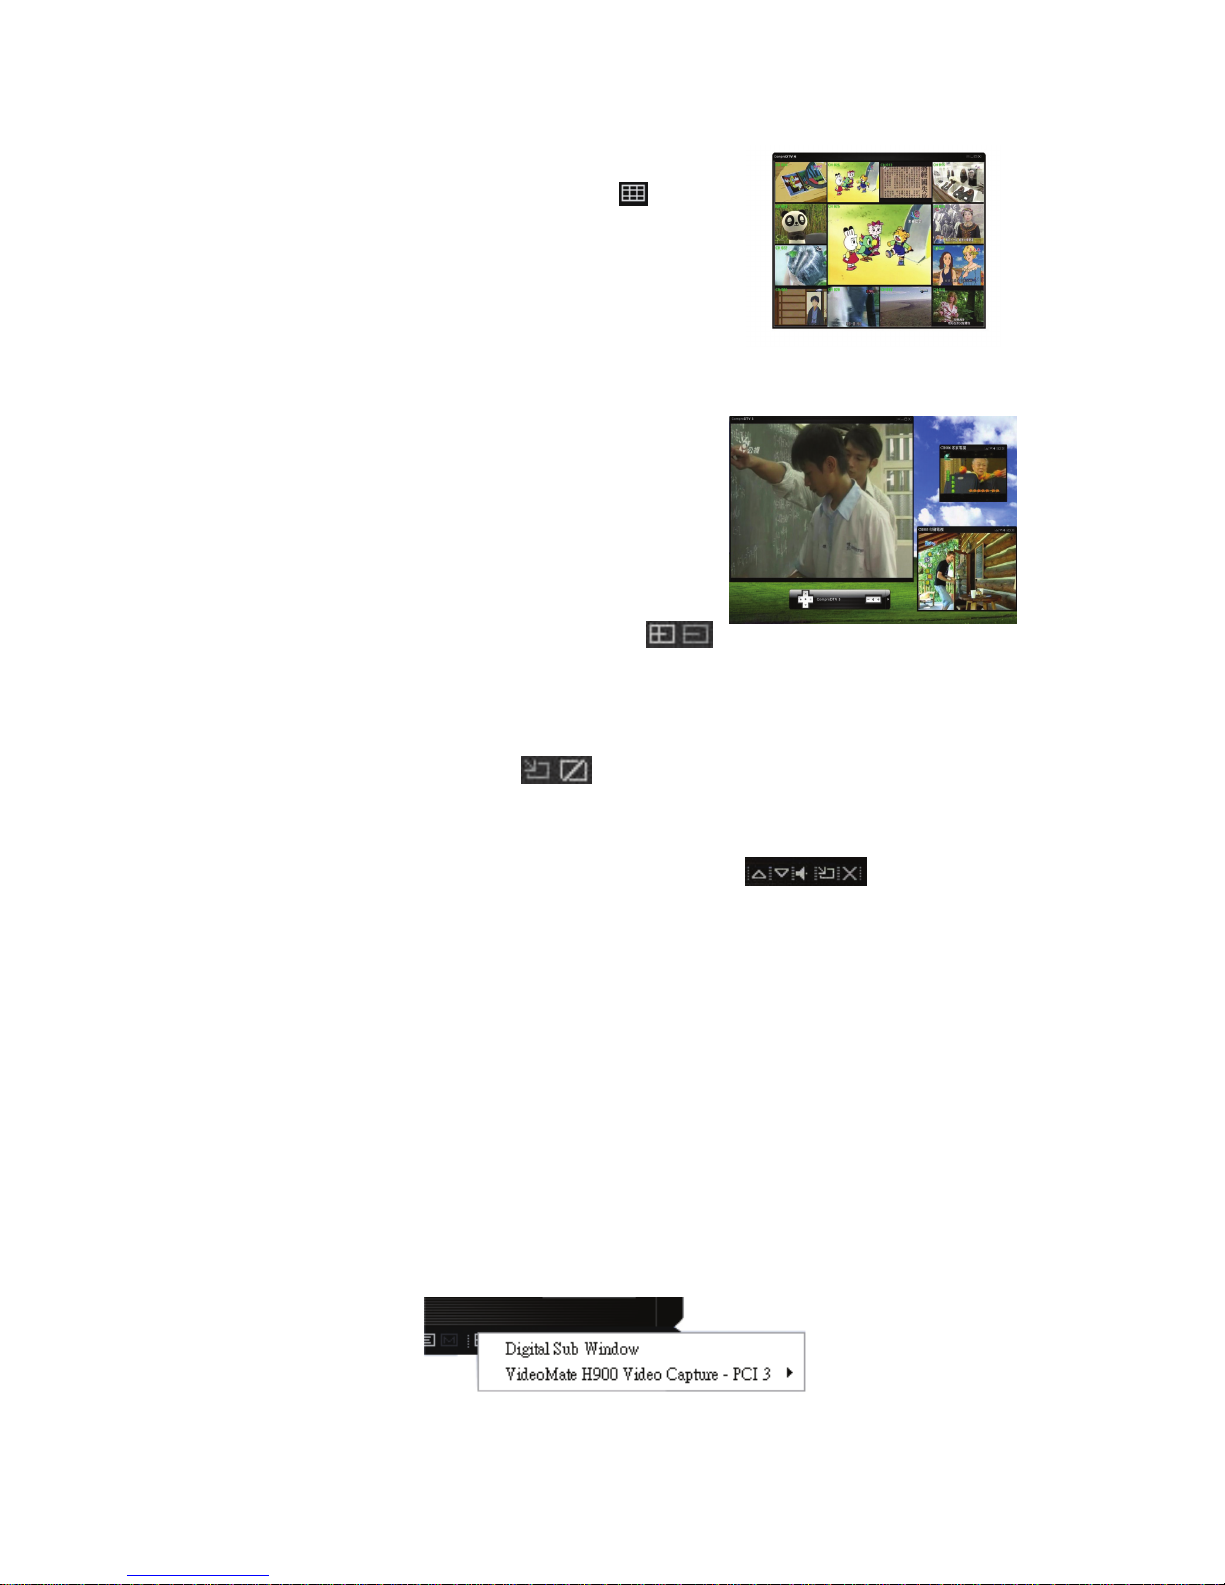
While watching TV, the channel surfing feature
displays a 4x4 grid of channel images to give you
an overview of available programming. Double
click the channel screen can direct jump to the
channel you want.
PIP/POP mode
Usually, digital TV station broadcasts multiple
programs on one frequency. Therefore,
ComproDTV 4 in Vista U100 TV stick supports up
to 1 main DVB-T channel windows, 3 sub
channel windows, and playback recorded video
file at the same time if available.
You can press the Add/Reduce Window
button to open a slave window for that. Please see the following picture.
Main window has all features while slave window has limited functions only.
Double-click on the slave window can switch the TV program to the main
window. Alignment Window button will put slave window(s) into main
window which is convenient for you to watch multiple programs on full screen
mode.
The buttons on the upper-left corner slave window are Channel
Up, Channel Down, Mute, Windows Alignment, and Close respectively. Slave
window can be resized by mouse dragging lower-left corner to any ratio.
Advanced Multiple Video Display Mode
ComproDTV 4 also supports 2 or above Compro products connect and watch it
at the same time. If you have more than one Compro analog or digital TV cards
and USB TV box, you can use it to watch the live TV from different devices.
When Starting PIP mode, there will be two option for you to choose;
1. “Digital Sub Window” Æ If any one of connected products have digital TV
feature.
2. “VideoMate xxx (another installed product name) Video Capture” Æ Other
analog or digital TV cards/USB box.
(Pictures below show the H900 for example of the second device)
Page 18
18
Choosing the “Digital Sub Window” will open a new window to view the digital
sub channels in the same frequency of the main window. Choosing the
“VideoMate xxx Video Capture” will open a new window to view digital or
analog channel with the second tuner in other products, which you are able to
tune to any channel you prefer. However, you are only allowed to have one
channel from the second tuner. Therefore, you can view total of five channels
with main window’s channel and three sub channels of the main window and
another channel of the second tuner. Furthermore, you can also have another
window to playback recorded file which now allows you to watch total of 6
windows at the same time.
Note
Running additional windows consumes more CPU usage. If CPU usage
reaches 100%, then video lag will occur. Please reduce the number of
windows.
When main window changes the channel to another frequency, slave
window(s) will move to available programs of another frequency. The slave
window will show black if there is no additional program on this frequency.
Slave window has no full screen mode. Please double-click on slave window
to switch program with main window in order to do so.
It is available to hear audio on multiple programs at the same time. You can
mute or un-mute the sound of slave window(s) at any time. However, main
window audio can’t be muted separately from slave window(s).
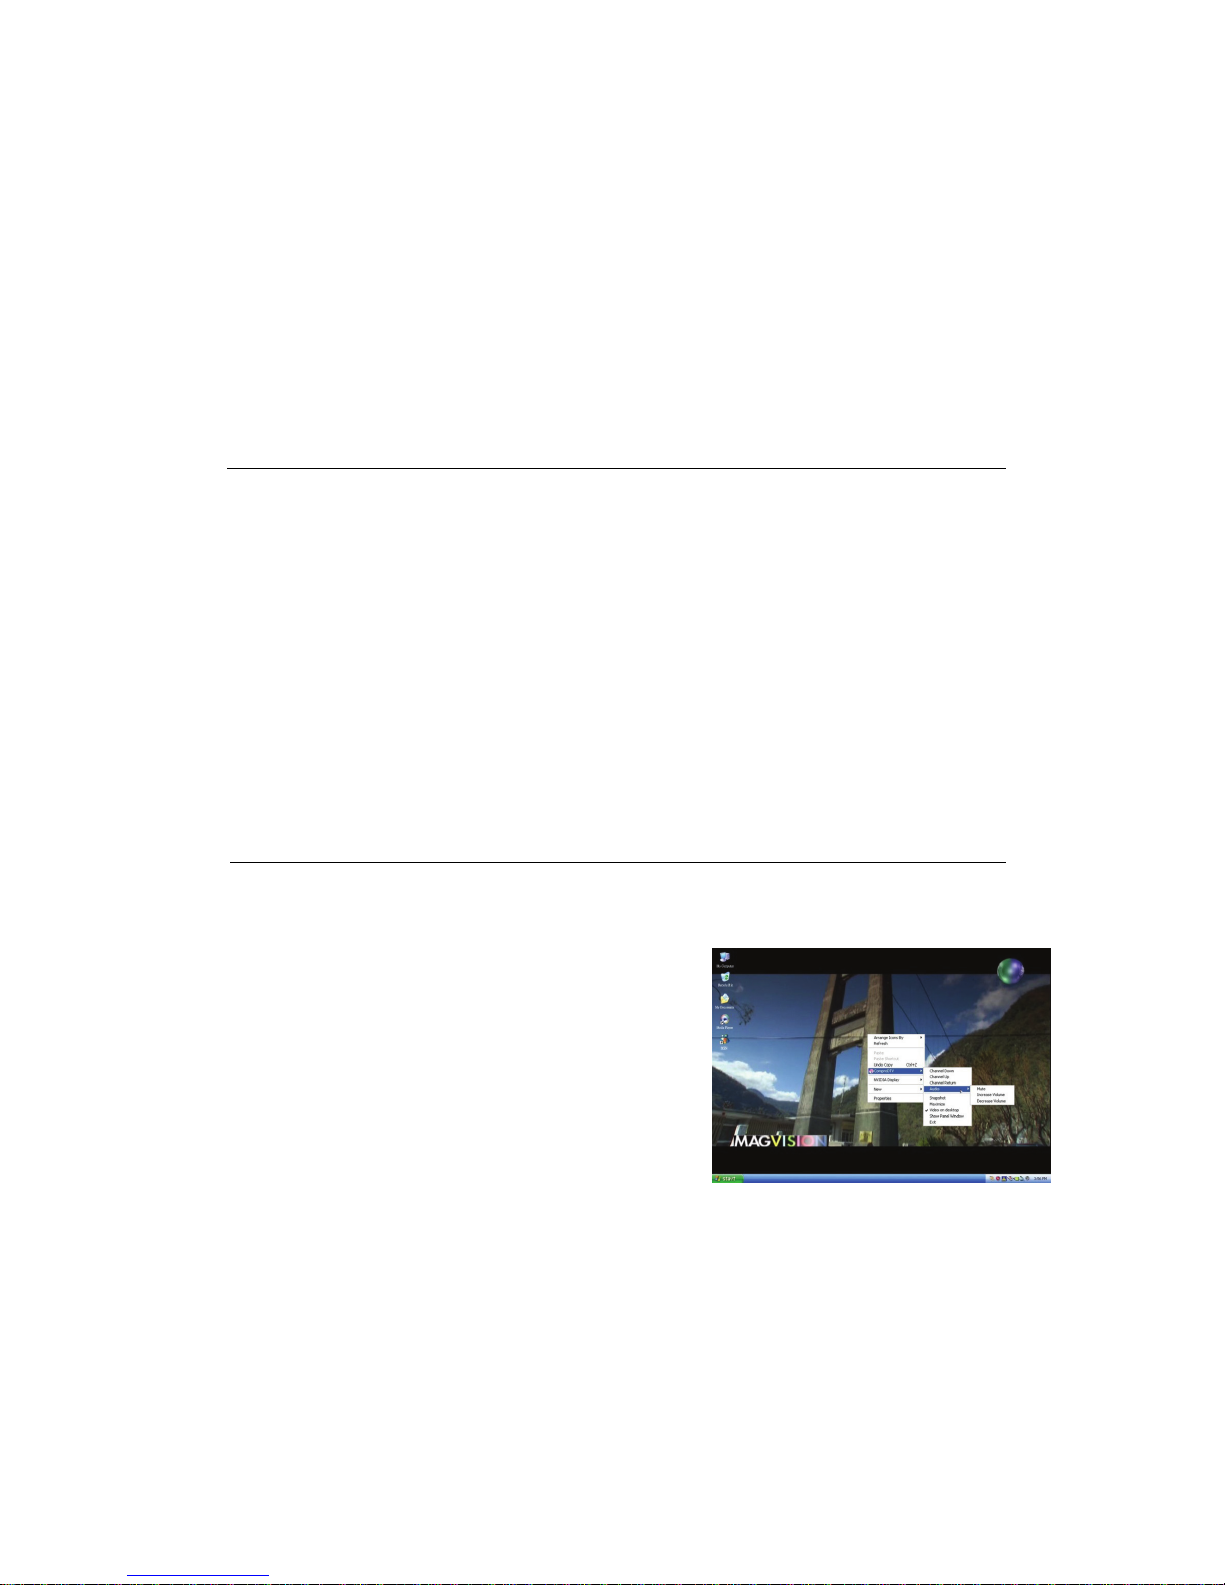
Video Desktop
While watching TV, you may right-click on the
TV screen and select video on desktop or press
the hotkey (F7) to activate Video Desktop mode.
This mode makes the video source as your
desktop screen. It is similar with full screen but
the desktop icons and taskbar will remain on
top. The following picture shows the TV on the
desktop.
For the Video Desktop feature, you needs to enable the “Use Overlay
Surface” feature in the setup dialog box of OptionÆVideo/Audio.
Right-Click Mouse Menu
If using mouse to right-click on the TV screen, you can see a menu pop up.
There are many useful options for your convenience.
Page 19
19
Zooming image
If you would like to see more details on a certain part of a video image, you can
press the mouse right button to drag a zone of the screen. You will see the
zoomed image.
Also you can press the mouse right button and move on the screen to shift the
zoomed area of the image. Just click the mouse left button to resume normal
mode.
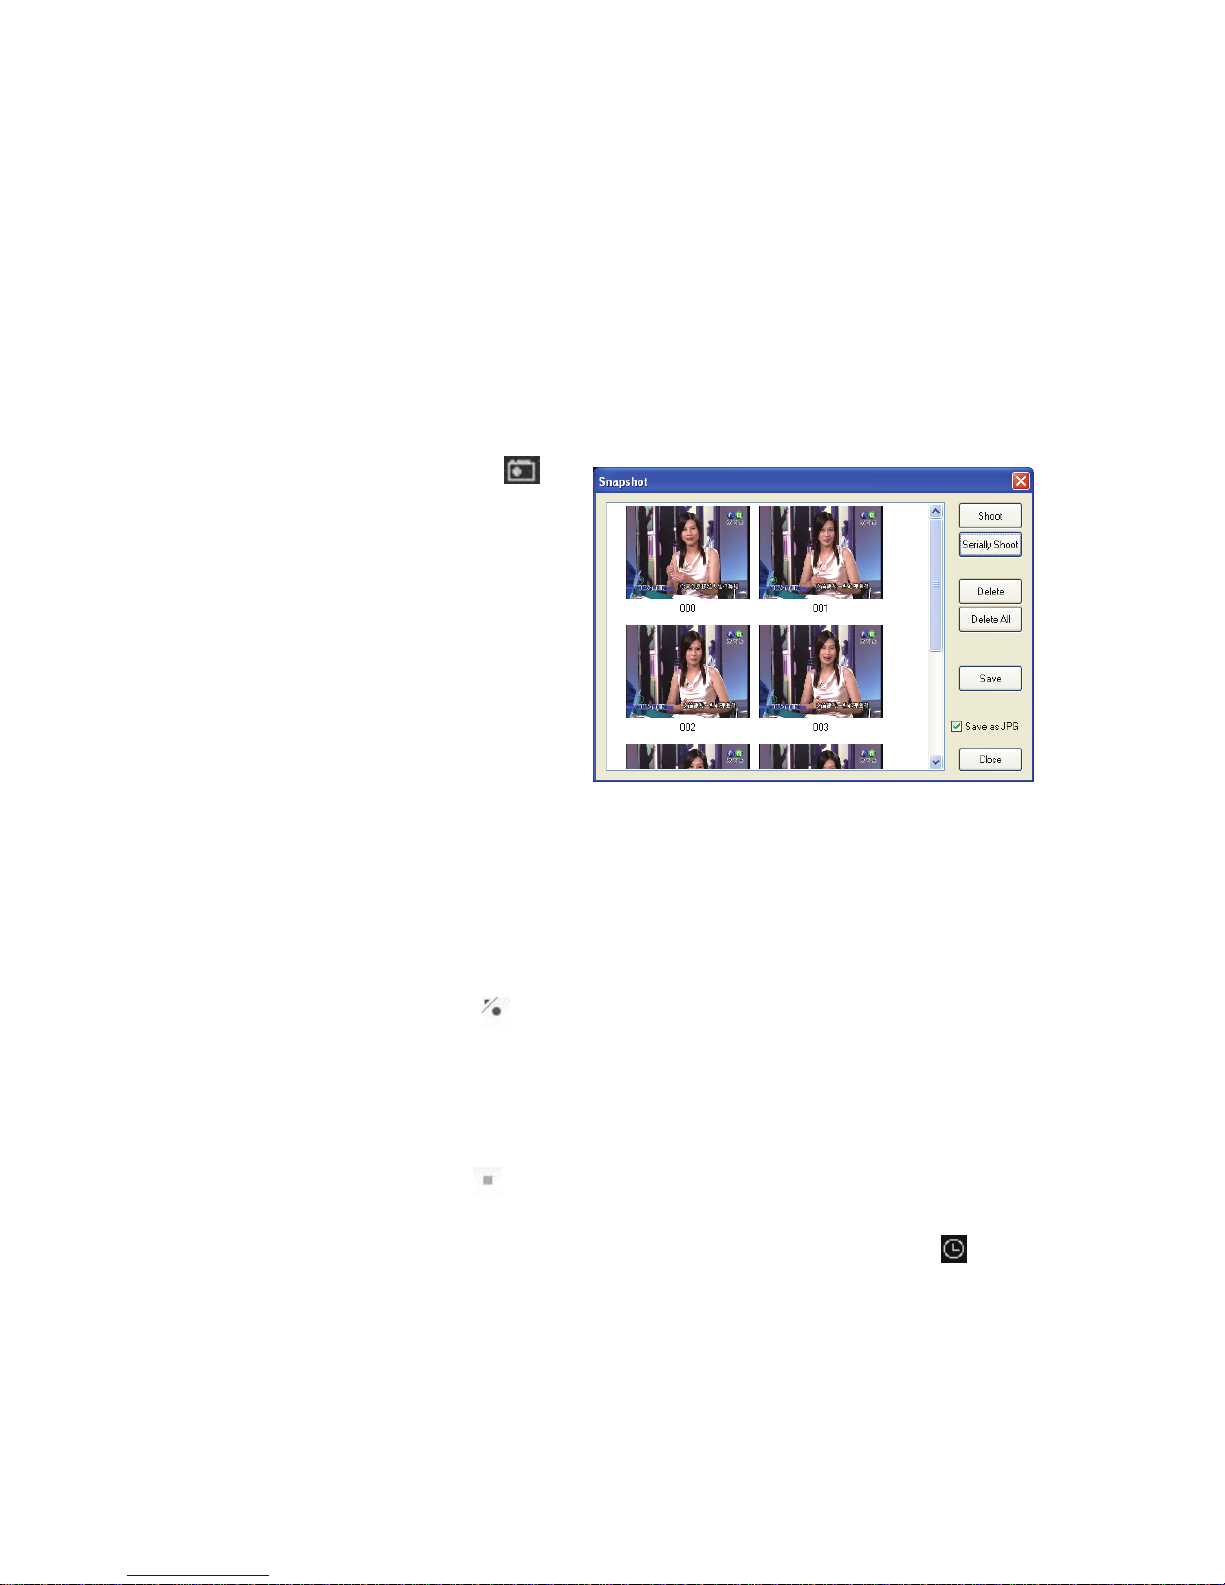
Still Image Capture
Click on the capture icon on
the control panel or hit the "Space
Bar" of the keyboard shortcut to
capture an image of the display
window. You can see the screen
capture dialog as below. You can
setup to save it as jpg or bmp
format in the ComproDTV option Æ
interface. And also setup the
picture compress quality in jpg file.
Recording
ComproDTV 4 supports MPEG-2 and Transport Stream formats recording in
digital TV.
To instantly start recording:
Press the Record button . ComproDTV 4 starts recording the video source
currently showing in the display window. It will save it to a file on your disk. If
you already start recording, you still can click the record button to setup
30, 60, 90, and 120 minutes recording immediately. Thus, you can go out
without worry about the record still ongoing.
Press the Stop button to stop recording. ComproDTV 4 will save it
automatically and show the file name on the screen.
You can also use the schedule recording by press Schedule button on
control panel of ComproDTV 4.
Page 20

20
Timeshifting
Timeshifting temporarily saves the video to your hard disk for a specified
period of time so that you can pause, replay, or skip commercials during live TV,
without interrupting an ongoing recording session.
Press the Timeshifting button and the Time Monitoring bar will appear.
You may also press the Advance (for commercial skip) and Replay (for instant
replay) buttons on the control panel or remote control to navigate through the
program. When you return to your seat, you can resume viewing the program
from the point when you left.
Page 21

21
Troubleshooting
Troubleshooting steps
If you have problem installing or running VideoMate Vista U100, please check
the following by step:
OS issue: VideoMate Vista U100 has to work on USB 2.0 interface. Note only
Windows XP SP2 or Vista support USB 2.0. You are welcome to
www.WindowsUpdate.com website for the Service Pack update of Microsoft.
USB 2.0 issue: you need to check your computer has USB 2.0 or not. Usually
you will see “USB 2.0 Root Hub” device in the "Sound, video and game
controllers" section of Windows Device Manager.
Driver issue: You should see " VideoMate Vista U100 " drivers, in the "Sound,
video and game controllers" section of Windows Device Manager. If these
drivers are not there, reinstalling the VideoMate Vista U100 drivers can help.
Power Issue: VideoMate Vista U100 takes power from the USB port. Note:
PCMCIA and USB hub won’t provide enough power so that you have to use
the kind of PCMCIA and USB hub which has power adapter included.
Sometimes plugging in another USB port may help. Some motherboards and
notebook’s USB ports do not meet the USB standard providing the standard
5V 500mA power. In these cases, VideoMate Vista U100 will not have enough
power to work. Please contact computer vendor for the issue.
Video OK / No Audio:
Make sure the audio device is “Your sound card device” in the System Device
in Settings of ComproDTV. Also, you have to select the audio source to be
“WAVE” in the System Device in Settings of ComproDTV.
Check that the sound is not muted or volume too low in the Windows Volume
Control dialog. (Double-click on the speaker icon in the system tray.)
Check that the sound is not muted or volume too low in the Windows Volume
Control dialog. (Double-click on the speaker icon in the system tray.)
Sometimes updating the sound card driver from vendor or VideoMate Vista
U100’s software from www.comprousa.com may help as well.
Page 22

22
No sound on the recorded file: Please see above “Video OK / No Audio.” on
the number 5.
Playback lags: VideoMate Vista U100 needs CPU resources to do the
encoding. Therefore, the lags come when CPU fails to encode in real time.
Usually, VCD quality needs about 1.7 GHz CPU for recording while DVD
quality needs about 2.4G CPU for recording. Press Ctrl + Alt + Del to check
your CPU usage. If it reaches 100%, then the lag is inevitable.
TV is not clear: Sometimes the signal could be reduced by the branching.
Please make sure the cable signal is good. Try to move the computer to a TV
set and connect the cable which is being used for the TV set. Also directly
connecting the cable before the splitter may help. This problem could also
come from static. Once you connect the cable to our TV card, the static
interferes with the system. It's possible to correct this problem by connecting a
wire from the grounding of the cable to ground. Also make sure computer
grounding is good.
Other issue: Please go to our website for the latest software update. Many
problems may be fixed on the newer software version. You are welcome to
visit our website at http://www.comprousa.com/support
No digital broadcast signal
In order to receive digital terrestrial TV
broadcasts, an antenna is crucial. Digital
terrestrial TV broadcast uses about the
same wave frequencies as analog TV (UHF).
It’s recommended to have a fishbone-like
antenna (see figure) on the roof for
reception.
Make sure you position the antenna in the
direction of the TV broadcast base. Adjust the position for the best reception.
Digital terrestrial TV’s determined by government policy. The broadcast bases
will be increased in order to cover the entire country. Please check the related
government website for more information about the strength of digital
terrestrial TV broadcast in your area.
You can check how good the signal is in your location by performing a simple
test. Please plug in the antenna into an analog TV set. Then check if this TV
set can receive a good TV signal. If the picture is not clear, the digital terrestrial
TV broadcast signal is about the same. The difference is when the program
data is not sufficient, you may see a blank screen or the video will be
scrambled.
Page 23

23
Note
Digital TV broadcast is different than normal analog TV. You will see no picture
instead of noisy or blurred picture when the signal is too weak. Make sure you
have a good antenna and strong digital TV signal in your location. Or you will
have no TV picture at all.
Why does the remote control fail?
Verify that the IR icon (ComproRemote) is in the system tray on the
lower-right corner of the screen. If you don't have ComproRemote on the
system tray, start the following program:
C:\Program Files\ Common Files\VideoMate\ComproRemoteDTV.exe
Then you should see the icon on the system tray. The IR icon should turn
bright when you press buttons on the remote.
If you see no response, please move your mouse cursor on the IR icon. If you
see it shows “No Device,” your drivers may not be not properly installed.
Please remove ComproDTV 4 using "Add/Remove programs" in the Control
Panel and reinstall it.
Why are images scrambled?
Please update the video and sound card drivers from vendors’ web sites. Make
sure the driver for motherboard chipset is also up to date. The default drivers
supplied with the Windows operating system are usually too old to operate
correctly. If you still have problems, please install the latest ComproDTV 4 and
driver from our website.
Page 24

24
Contacting Compro Technical Support
If above doesn’t help, please check support FAQs (Frequently Asked
Questions) on our web site http://www.comprousa.com/support
You are welcome to download the latest software from our website as well.
Most problems may be solved on the updates. When contacting Compro for
technical support, please use the Compro support request form and provide as
much of the requested information as possible. Please write the details in order
to determine the problem. And also provide the product serial number (15
digits numbers) on the VideoMate Vista U100. Please use the form from
http://www.comprousa.com/support/form.htm.
We will get back to you as soon as possible.
Note
Make sure you include the information of hitting the button of "E-mail Info" in
the System Device in Settings of ComproDTV in order to determine the
problem.
In order to solve the problem quickly, it is very important to provide as much
detail regarding the problem as possible.
P/N: 3GA0310409
 Loading...