

Page 1

ComproPVR 2 User's Guide
Compro Technology, Inc.
www.comprousa.com
Page 2

Copyright © 2001-2004. Compro Technology, Inc. No part of this
document may be copied or reproduced in any form or by any means
without the prior written consent of Compro Technology, Inc.
Compro, VideoMate, Poladyne, Play with Power, and the Compro
logo are trademarks of Compro Technology, Inc. Other names and
marks are trademarks of their respective owners.
Compro makes no warranties with respect to this documentation and
disclaims any implied warranties of merchantability, quality, or fitness
for any particular purpose. The information in this document is subject
to change without notice. Compro reserves the right to make
revisions to this publication without obligation to notify any person or
entity of any such changes.
Compro Technology, Inc.
Tel. +886 2 2918 0169, Fax +886 2 2915 2389
3/F, No.12, Alley 6, Lane 45, Pao Shin Road
Hsintein City, Taipei, Taiwan
www.comprousa.com
Page 3

Table of Contents
i
Table of Contents
1
Introduction ................................................................1
Key Features................................................................ 2
Installation.................................................................... 3
2 Remote Control ..........................................................5
Definitions and Usage.................................................. 5
3 User Interface .............................................................9
Control Panel ............................................................... 9
Configuration.............................................................. 12
Channel Options.................................................... 12
Video/Audio Options.............................................. 17
Recording Options................................................. 19
Timeshifting Options.............................................. 24
User Interface........................................................ 26
System Devices Options ....................................... 29
4 Using ComproPVR 2................................................31
Watching ....................................................................31
Recording................................................................... 34
Playback................................................................ 34
Scheduled Recording................................................. 35
Timeshifting................................................................ 41
Still Image Capture.....................................................42
Straight-to-Disc .......................................................... 43
Closed Captioning (USA only)............................... 44
Teletext (PAL TV systems only)............................. 44
5 ComproFM 2 .............................................................45
Introduction ................................................................ 45
Key Features.............................................................. 46
Control Panel ............................................................. 46
Listening..................................................................... 48
Recording................................................................... 48
Page 4

ComproPVR 2 User's Guide
ii
6
ComproDVD 2........................................................... 49
Introduction ................................................................ 49
Main Features ............................................................50
Control Panel ............................................................. 51
7 Troubleshooting....................................................... 53
Driver Installation................................................... 53
Error Code: 0x1000006 .........................................54
Audio OK / No Video ............................................. 55
Video OK / No Audio ............................................. 55
Why can’t I record? ...............................................56
No audio in the recorded file. What's wrong?........ 56
Why does recorded video lag?.............................. 56
The recorded file from VCR has no sound? .......... 57
Why can’t I playback the recorded video?.............57
Why can’t I choose MPEG-4 for recording? .......... 57
Why are images scrambled during recording? ....58
No response to the Settings button? ..................... 58
No Straight-to-Disc button? ...................................59
TV is not clear? .....................................................59
Contacting Compro Technical Support..................59
Page 5

Introduction
1
1 Introduction
ComproPVR is a complete digital entertainment solution
for your PC. Watch and record TV programs on your PC,
in full-screen mode or in a window. Timeshifting lets you
watch TV, pause live TV, or review your favorite scenes
without missing a minute of the program. Integrated
deinterlacing technology assures the highest picture
quality. All this, with the industry's first universal remote
control.
Note
Not all features in this manual are available for all
products. Please check the side of the product box to
confirm if this model supports such feature of
ComproPVR.
Page 6

ComproPVR 2 User's Guide
2
Key Features
Watch and record TV programs.
Supports up to 158 TV channels. View all available
TV programming.
Never miss a second with Timeshifting.
Powerful and easy to use schedule recording
functioning.
Capture video from analog video sources and encode
them to digital MPEG-1, MPEG-2 or MPEG-4 formats.
12 and 16 channels surfing.
Supports S-Video and Composite inputs.
Deluxe all functioning wireless remote control.
4:3, 16:9, full screen and customized ratio screens
available.
Convenient Snapshot feature, series or single shot
supports.
Zoom a zone of video image.
Completely customized On-Screen-Display (OSD)
function. Your choices of size, color, and position.
My favorite channels. Sorting and rearrangement
channel orders.
Mono/Stereo/SAP or Nicam support.
Supports Closed Caption and Teletext.
Electronic program guide support, for example,
TitanTV EPG in USA.
Always on top and hiding window frame.
Brightness, hue, contrast, saturation, and sharpness
options for adjustment.
Auto splitting of recording files.
Page 7

Introduction
3
Support for plug-in CODECs.
Auto tune for best picture quality frequencies.
Parental control to lock out selected channels.
Note
ComproPVR cannot duplicate VHS tapes and DVDs
protected by Macrovision™ technology.
Installation
Usually, ComproPVR is automatically installed upon
inserting the installation CD into your CD drive. You can
also manually install it by inserting the installation CD.
Open Explorer, double-click on “setup.exe” in the folder
named ComproPVR.
When you run ComproPVR for the first time, you will see
the following. Please choose the right setting in order to
run the program correctly.
Page 8

ComproPVR 2 User's Guide
4
Video Device
If you are using the VideoMate TV PCI Tuner card, the
video device should be “VideoMate TV Capture.”
Audio Device
ComproPVR automatically detects the audio input
devices available in your system. Here, you must select
the appropriate audio input devices for your system.
Note
You must select the proper Video and Audio devices for
correct operation.
If you do not see the appropriate Video and Audio
devices, the drivers are not properly installed. Please
reinstall these drivers and see the chapter entitled,
“Troubleshooting.”
TV Live Mixer
You can choose the audio source for watching live TV
programs.
When using VideoMate TV tuner card with an external
audio patch cable, connect to the “Line-In” port on your
sound card and choose “Line-In” in ComproPVR.
If you are using the internal audio patch cable to connect
to the “AUX-In” port on your sound card and choose
“AUX-In” in ComproPVR.
Recording Mixer
You can choose the audio source in this field while
recording live programs. Normally, this audio source is
the same as LIVE audio source..
Page 9

Remote Control
5
2 Remote Control
Definitions and Usage
The remote control keypad lets you control the
ComproPVR application with a familiar, user-friendly
interface.
The next two pages describe how to use the remote
control to operate ComproPVR.
Note
The Compro remote control cannot be reprogrammed to
control other appliances such as your VCR or satellite
decoder box.
Page 10

ComproPVR 2 User's Guide
6
Page 11

Remote Control
7
Key ComproPVR ComproFM ComproDVD
0-9 Number keys Pre-set stations Number keys
10 Mute sound Mute Mute sound
11 Zoom In/Out Minimize/Maximize Zoom In/Out
12 Start/Stop ComproDVD (if available)
13 Start/Stop ComproFM (if available)
14 Start/Stop ComproPVR
15 Replay Rewind Rewind
16
Pause or enable
timeshifting
Play/Pause during
playback
Play/Pause during
playback
17 Advance Forward Forward
18 Previous channel Jump to last station Last chapter
19 Stop Stop Stop
20 Tab function Not used Next chapter
21 Open on-line help Open on-line help Main manual
22
Open setup dialog
box
Open properties
setup dialog box
Open properties
setup dialog box
23
Up arrow or select
Mono/Stereo/SAP
Up arrow Up arrow
24
Replay or switch
TV format
Scan down Left arrow
25
Down arrow
or snapshot
Down arrow Down arrow
26 Advance Scan up Right arrow
27
Volume
adjustment
Volume adjustment Volume adjustment
28 Open play list Open play list OK
29 Channel up Station up Choose DVD angle
30 Channel down Station down DVD subtitle select
31 Record Record Snapshot
32
TV/ S-Video/
Composite
Not used Add to bookmark
33 Channel surfing Not used Go to bookmark
34 Closed caption Enter frequency Select language
35 Sleep function Sleep function AB repeat
Page 12

ComproPVR 2 User's Guide
8
Page 13

User Interface
9
3 User Interface
Control Panel
The ComproPVR control panel resembles the controls
on a VCR. Keep in mind that not all options are available
at all times, and may be grayed out or inaccessible
depending on your hardware setup and TV services
available. The following pages describe the ComproPVR
control panel functions, and tips for using ComproPVR.
Page 14

ComproPVR 2 User's Guide
10
Icon
Keyboard or
Mouse
Shortcut
Description
A
Enable/Disable Always-on-Top function for
TV window.(Oregon circle on the
upper-right corner of the TV window)
Ctrl-X Exit ComproPVR
Z or ESC Maximize or return to window mode
G Minimize ComproPVR
H Online Help System - Open HTML help file
D Ducking control panel to the window
Page Up or
Mouse scroll up
Channel Up - Jump up to next available
channel
Page Down or
Mouse scroll
down
Channel Down - Jump down to next
available channel
N
Last Channel - Jump back to last selected
channel
R Record – Start/stop recording TV to a file
P
Play - Begin playback of recorded
program
S
Stop – Stop current action, e.g., recording,
playback, Timeshifting.
Left Arrow Advance
Right Arrow Replay
U
Pause – Suspend current action, e.g.,
playback, live TV and recording
V
Video Source Switch – TV, S-Video or
Composite
Page 15

User Interface
11
Icon
Keyboard or
Mouse
Shortcut
Description
B
Schedule – Open window for scheduling
recordings, or reminders for program
times
E Electronic Programs Guide
C
Enable Closed Captioning or Teletext
(if available)
O
Options – Open ComproPVR options
window
I Channel lists
T Activate Timeshifting mode
Space bar
Still Capture – Capture still images of
current program
F
Surfing – Browse thumbnail images of
available channels
M Mute – Press to mute or restore sound
Q Switch Mono/Stereo/SAP or Nicam
+ Increase
- Decrease
Volume Control – Increase or decrease
sound intensity
W Show/Hide number pad
n/a L Sleep function
n/a K
Switch TV system format. (Only available
in Poland, Romania, and South of China.
This feature is only available on certain
models.)
Page 16

ComproPVR 2 User's Guide
12
Configuration
Click on the Options button to open the Options
dialog box.
Channel Options
Page 17

User Interface
13
Follow these steps to customize and configure your
channel list.
Video Source
First, select your video source, Cable or Antenna.
Autoscan
The first time you start ComproPVR, Autoscan will
automatically scan for available TV channels for both
Cable signal and Antenna signals. You can rescan the
channels at any time by pressing the Autoscan button.
1. ComproPVR will automatically scan all available
channels for content. The number of scanned
channels varies according to whether you use
antenna or cable TV input and your country settings.
2. You can interrupt the scanning process by pressing
the Stop button.
3. When Autoscan is finished, detected channels are
automatically enabled and marked with the green
check mark
. Channels, where a valid signal
could not be detected, are disabled and marked with
a blank.
After you are finished scanning for available channels,
you may select OK to return to the display window, or
customize the channel list according to your preferences,
as described below.
Channel Naming
You can customize the channel names by following
these steps.
Step1. Double-click on the Description field of the
channel you wish to rename.
Step2. Type a new name in the text box.
Page 18

ComproPVR 2 User's Guide
14
Step3. Repeat steps 1 through 2 for any other channels
you wish to rename.
Step4. Click OK to confirm your modifications.
Note
If you enable the checkbox of “Clear Description field
while Autoscan,” then the text in the field will be erased
while Autoscan. The default is disabled.
Set Mem+
During the Autoscan process, ComproPVR
automatically detects and enables channels with a valid
signal. By default, every available channel will be
enabled and marked with the green
icon. However,
you can shorten the list of enabled channels to reduce
channel-browsing time. Customize your list by enabling
or disabling channels from the channel list by clicking on
the green
icon.
Disabled channels will not be shown when you use the
channel Up and Down or channel surfing functions.
Set Lock (Parental Control)
By default, ComproPVR lets you access all available
channels. A Parental Control feature allows you to
restrict the viewing of certain channels altogether or
during limited times.
You can lock a channel by clicking in the column labeled
Lock next to the channel number you wish to restrict.
You will then see a red check mark
in the box
next to the channel. You can unlock it by clicking the
check mark.
To use this feature, you should first set a password and
follow these steps:
Step1. Start ComproPVR and click on the Options
button and select the Channels tab.
Page 19

User Interface
15
Step2. Click on the Password button and enter the new
password in the fields labeled Password and
Confirm.
Step3. If you have previously set a password, you must
also enter the old password in the appropriate
field.
Step4. Click on the OK button.
Change Password
Click on the Password button. Enter the old password in
the field labeled Old Password. Then enter the new
password in the field labeled Password and Confirm.
My Favorite Channels List
ComproPVR includes a channels sorting and re-ordering
feature. Check the “Use My Favorites as My Channel
Lists” checkbox. You can see the window below.
Page 20

ComproPVR 2 User's Guide
16
Select the channel you wish to add to “my favorite” and
press the proper arrow button. You may double-click on
the channel to move it as well. In addition, adjusts the
channel order by using the proper arrow button.
Fine Tuning
ComproPVR includes a fine-tuning feature. Select the
channel you wish to fine tune and press the button
labeled, "Fine Tune." You may then adjust the slider and
then press the button labeled, "Exit."
Fine-tuning is normally unnecessary.
Use Default Channel Table
The channel table contains data used to tune TV
channels. This should be selected, i.e., enabled, unless
you are otherwise instructed.
Page 21
User Interface
17
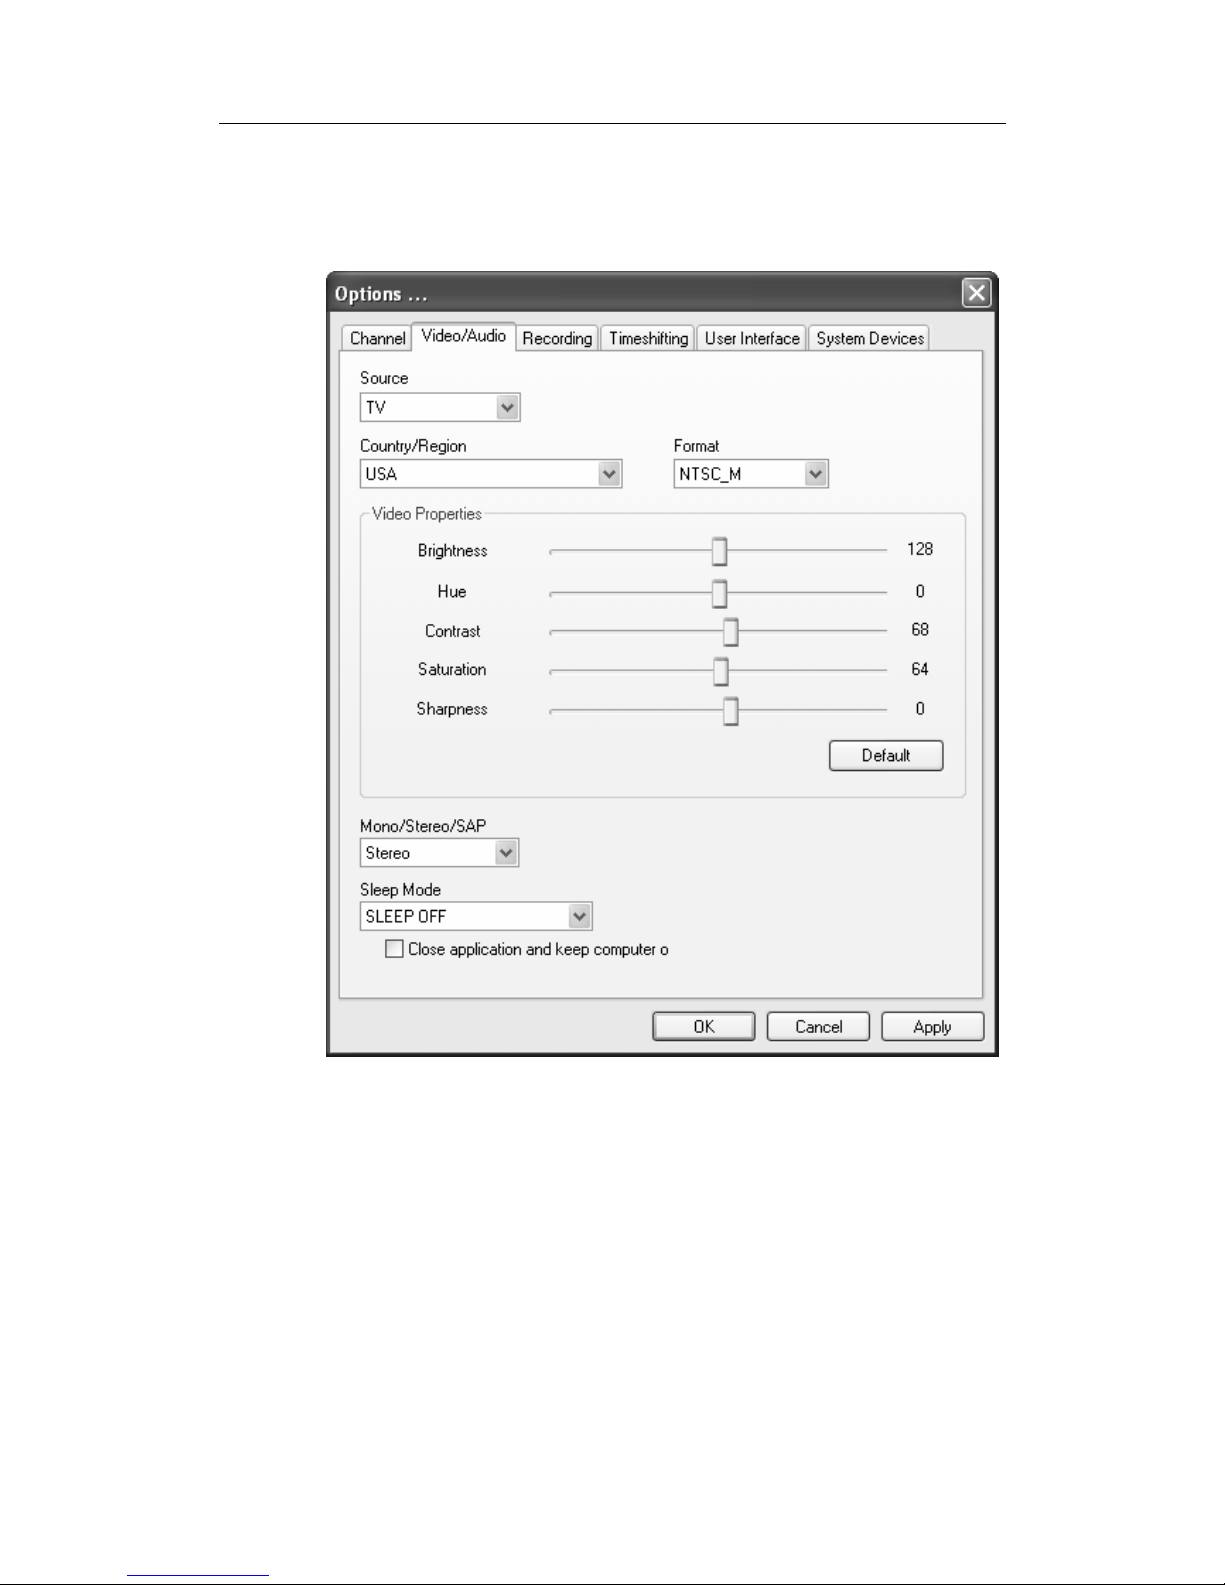
Video/Audio Options
Source
Select the video source from among TV, S-Video, or
Composite.
Country/Region
Use the pull-down menu to select the country you are in.
This allows ComproPVR to use the correct set of
frequencies for TV tuning.
Page 22

ComproPVR 2 User's Guide
18
Video Format
Select the proper video format for your area from the
drop-down menu. The options available depend on the
standards supported by the TV tuner in your system.
Video Properties Sliders
Use the sliders in this area to adjust:
Brightness: Adjusts the amount of white in the image.
Hue: Adjusts whether the image looks red, green,
blue, yellow, orange, etc.
Contrast: Adjusts the gradation of tone between the
image highlights, mid-tones, and shadows.
Saturation: Adjusts the color intensity of the image.
Sharpness: Adjusts the sharpness of the image.
Press the Default button to reset the sliders to their
original positions.
Mono/Stereo/SAP
You can select Mono, Stereo or SAP in this dialog box.
Stereo and SAP sound may not be available in your area
or for all programs in your area.
Set SAP as Dual Audio Mode Checkbox
In some country, you can check this box to record two
languages into left and right sound tracks at the same
time. If you see this checkbox, this feature is available in
your area.
Sleep Mode
You can set the timer to shut down the computer. If the
check box “Close application and keep computer on” is
checked, then it will close ComproPVR instead of
shutting down the computer.
Page 23
User Interface
19
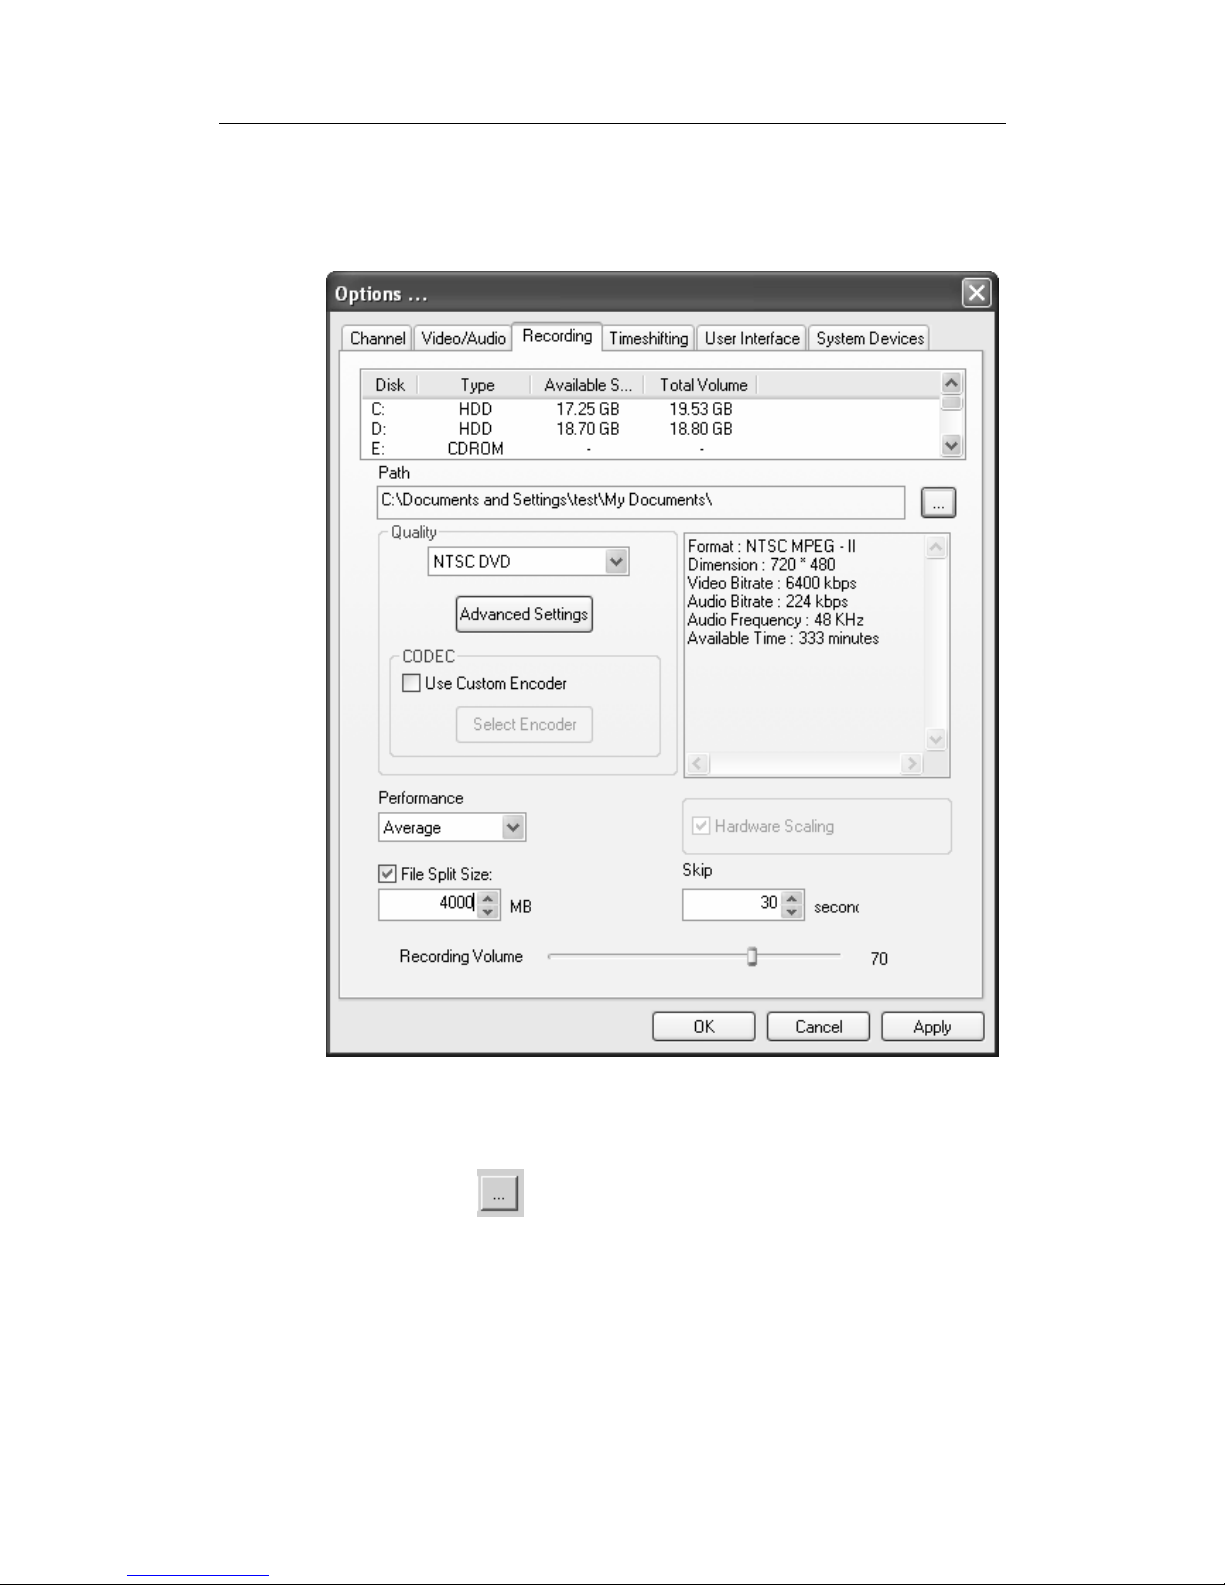
Recording Options
Path (Recorded Programs Folder)
Click on the
button to set the folder where recorded
programs are stored. Check that you have ample disk
space to store recorded programs.
Page 24
ComproPVR 2 User's Guide
20
Quality
Here you can select the video and audio quality settings
of recorded programs. ComproPVR includes useful
quality presets, from VCD to DVD-quality.
You can also use custom settings by following these
steps.
Note
Custom settings may not be compatible with standard
formats. Use it with caution.
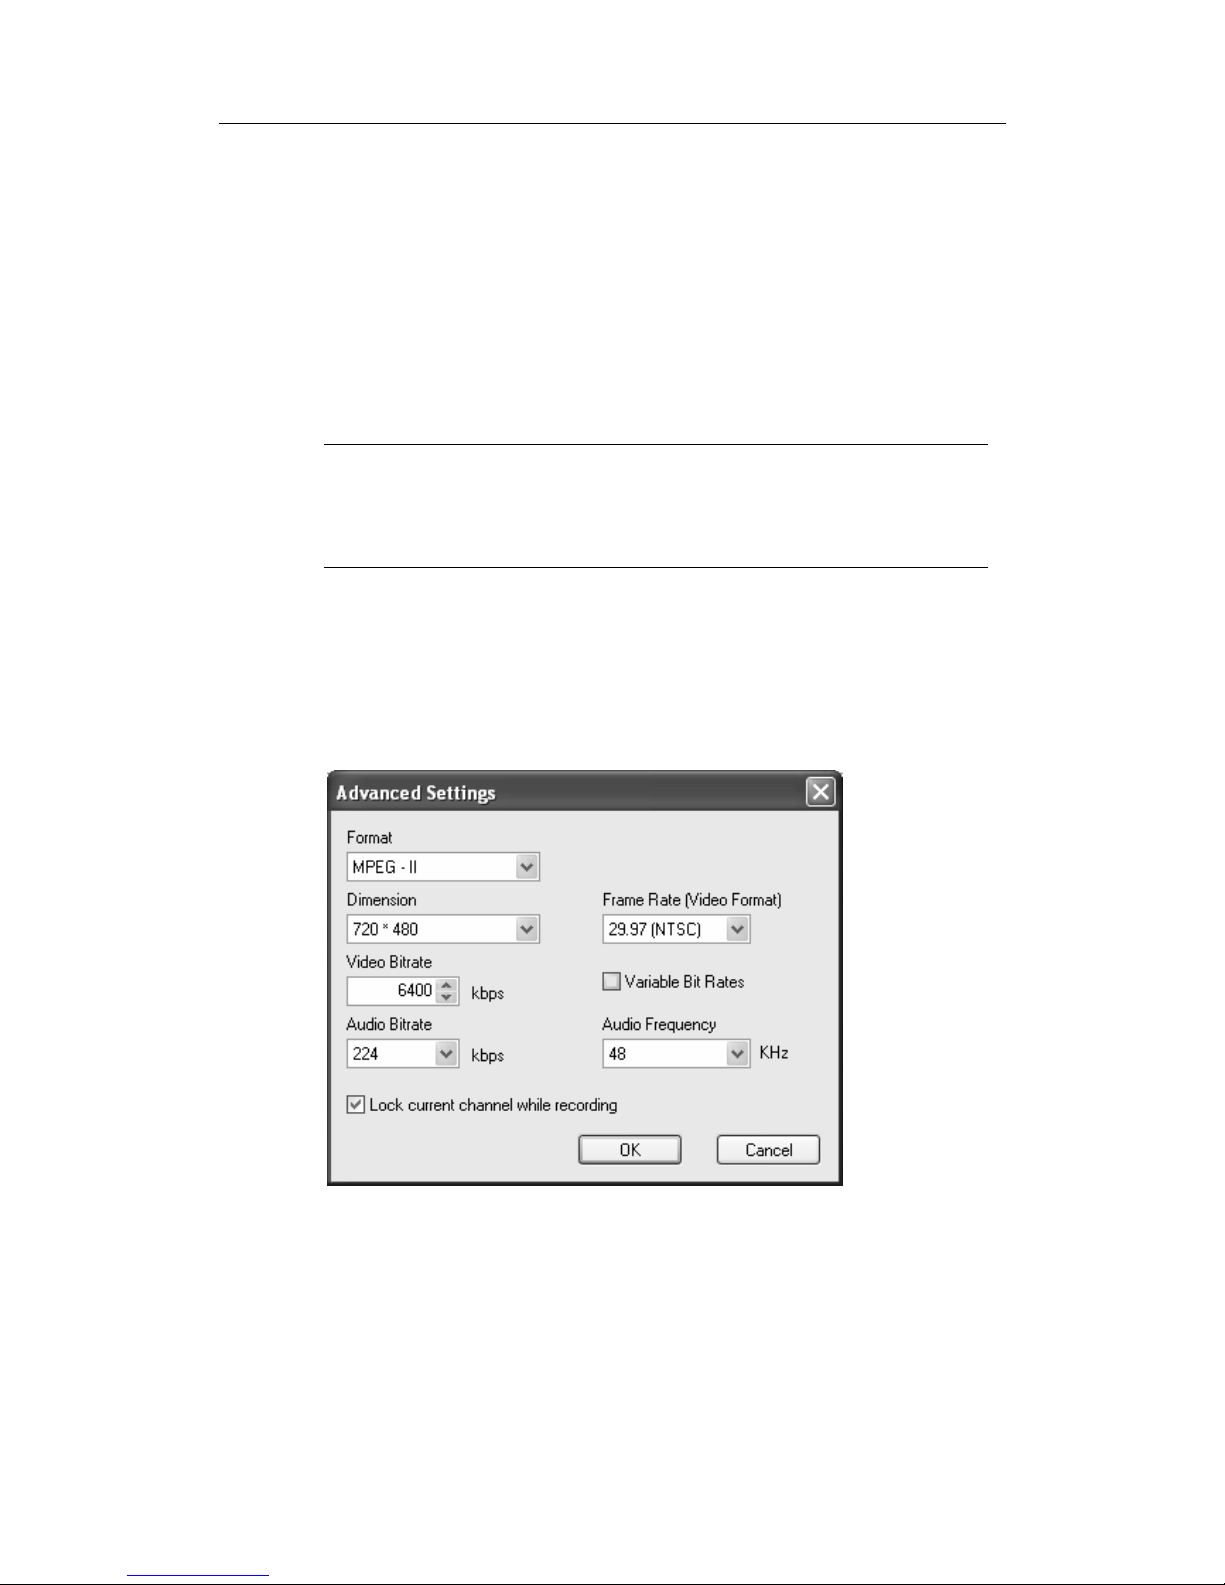
Advanced Settings
Here you can select the details of video and audio quality
settings of recorded programs.
Format: Choose between MPEG-1 or MPEG-2 video
encoding formats. For example, select MPEG-1 if you
want VCD format or select MPEG-2 if you want DVD
format.
Dimension: Select the recording resolution you like.
Page 25

User Interface
21
Video Bit Rate: Video bit rate is expressed in kilobits per
second. The higher the bit rate, the more processing
power and disk space are required to record and
playback video programs.
Audio Bit Rate: Choose the audio bit rate you like here.
Audio bit rate is expressed in kilobits per second.
Frame Rate: NTSC system uses 29.97 FPS (Frame Per
Second) while PAL system uses 25 FPS.
Variable Bit Rates: Checking this box will use variable
bit rates to record. Usually, this will have better video
quality. However, CPU loading is higher as well.
Audio Frequencies: Standard DVD audio frequencies
are 48 KHz while other formats use 44.1 KHz.
Lock current channel while recording: Checking this
box will disable the channel switching. Unchecking this
box can change channel while recording.
Note
Switching channel while recording doesn’t mean you can
record two channels simultaneously. Instead, it is to
record another channel after the switch.
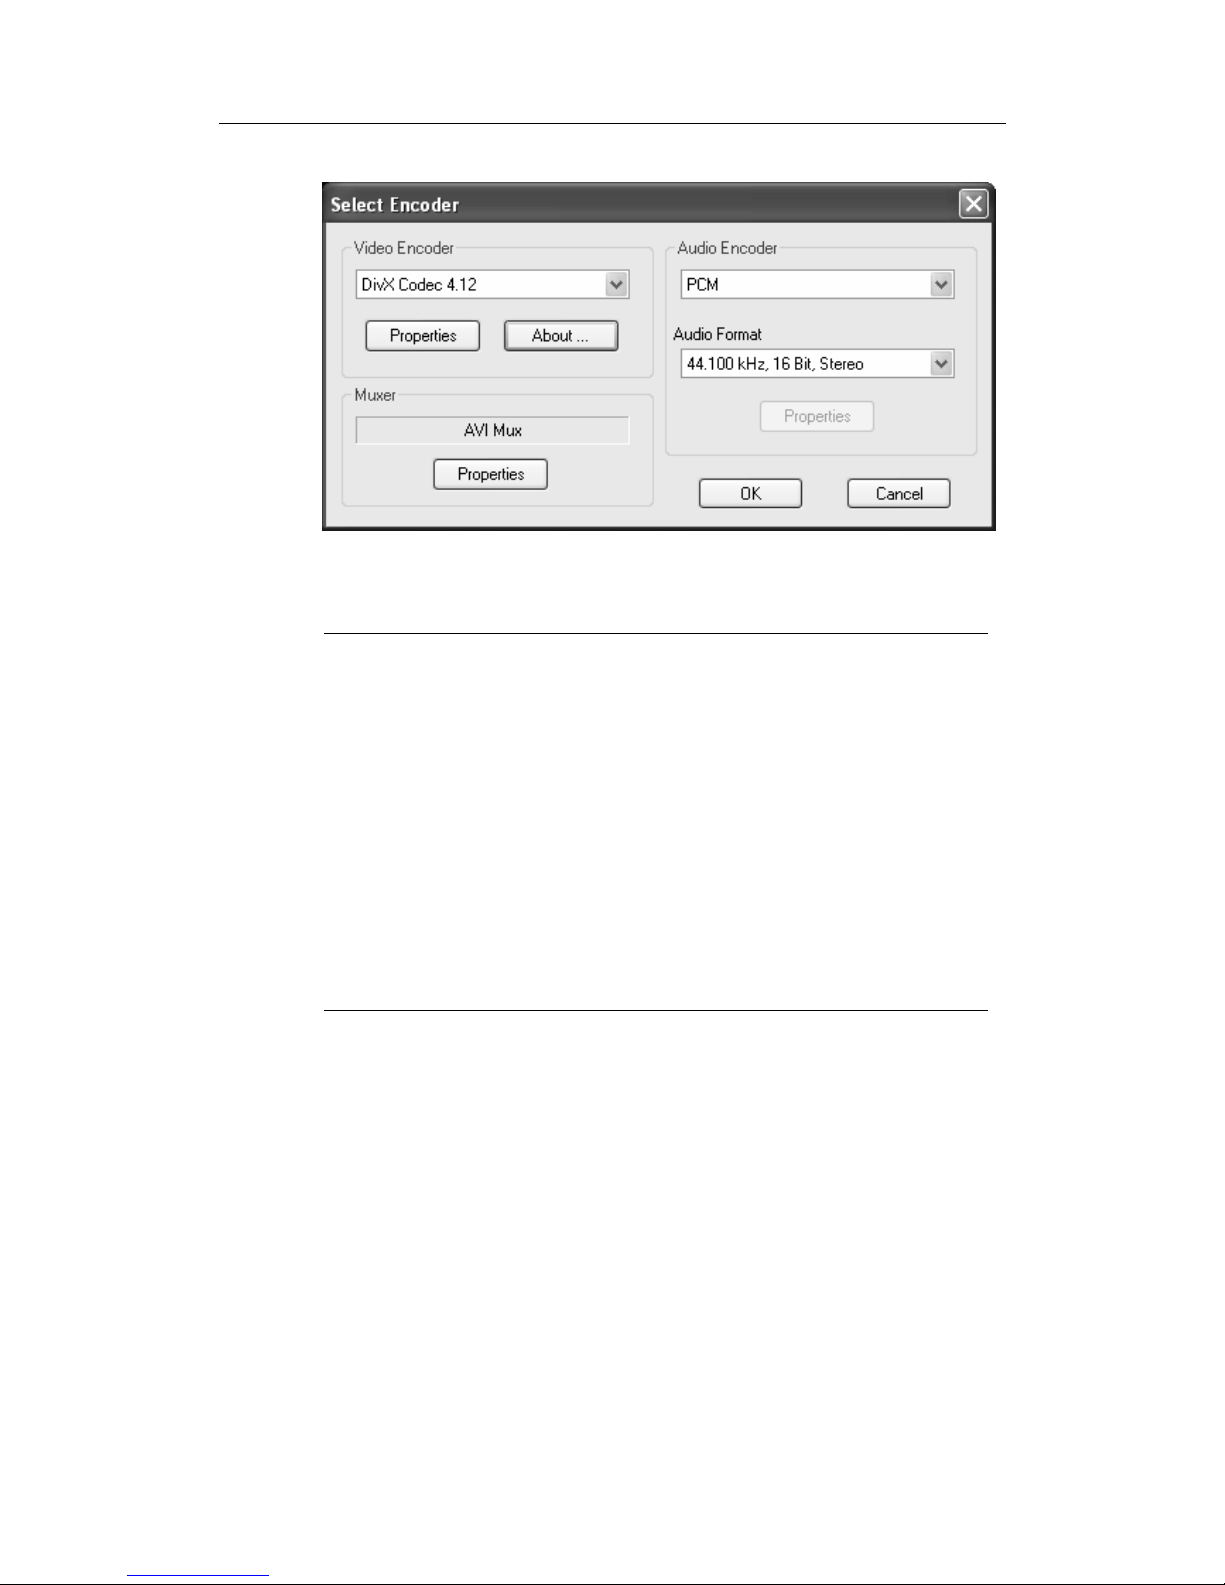
CODEC
CODECs encode to and decode from video files, usually
with a compression scheme, examples include, MPEG-4
and DiVX CODECs. In addition to the CODEC supplied
by Compro, ComproPVR can use third-party CODECs
that are already installed on your system. Select “Use
Custom Encoder” in other to use third-party CODECs.
You will then see the dialog as shown below.
Page 26
ComproPVR 2 User's Guide
22
Note
If you would like to record video in MPEG-4 format, you
must supply your own MPEG-4 CODEC. You can
download MPEG-4 CODECs from
http://www.divx.com/
After installing the CODEC software, you will see the
MPEG-4 format appear in the field of recording quality.
Compro does not guarantee compatibility or
performance with third-party CODECs.
Performance
You can choose the encoder performance here. The
better you choose, the picture quality will be better.
However, more processing power is required to record. If
CPU usage reaches 100%, the video will become jumpy.
Reduce the performance or choosing lower quality like
VCD will help.
Page 27

User Interface
23
File Split Size
Checking this box will enable the automatic splitting of
the recording file to the size at your choice. This is useful
for burning recording files to CD or DVD.
Hardware Scaling
Enable the hardware scaling function during recording. It
is recommended to turn this on.
This option depends on the software and hardware. It
may be grayed out if not available.
Skip
Set the amount of programming skipped, in seconds,
when you press the Replay and Advance buttons
during video playback.
Recording Volume
You can adjust recording audio volume here. Moving the
bar to the right will increase recording audio volume.
Page 28
ComproPVR 2 User's Guide
24
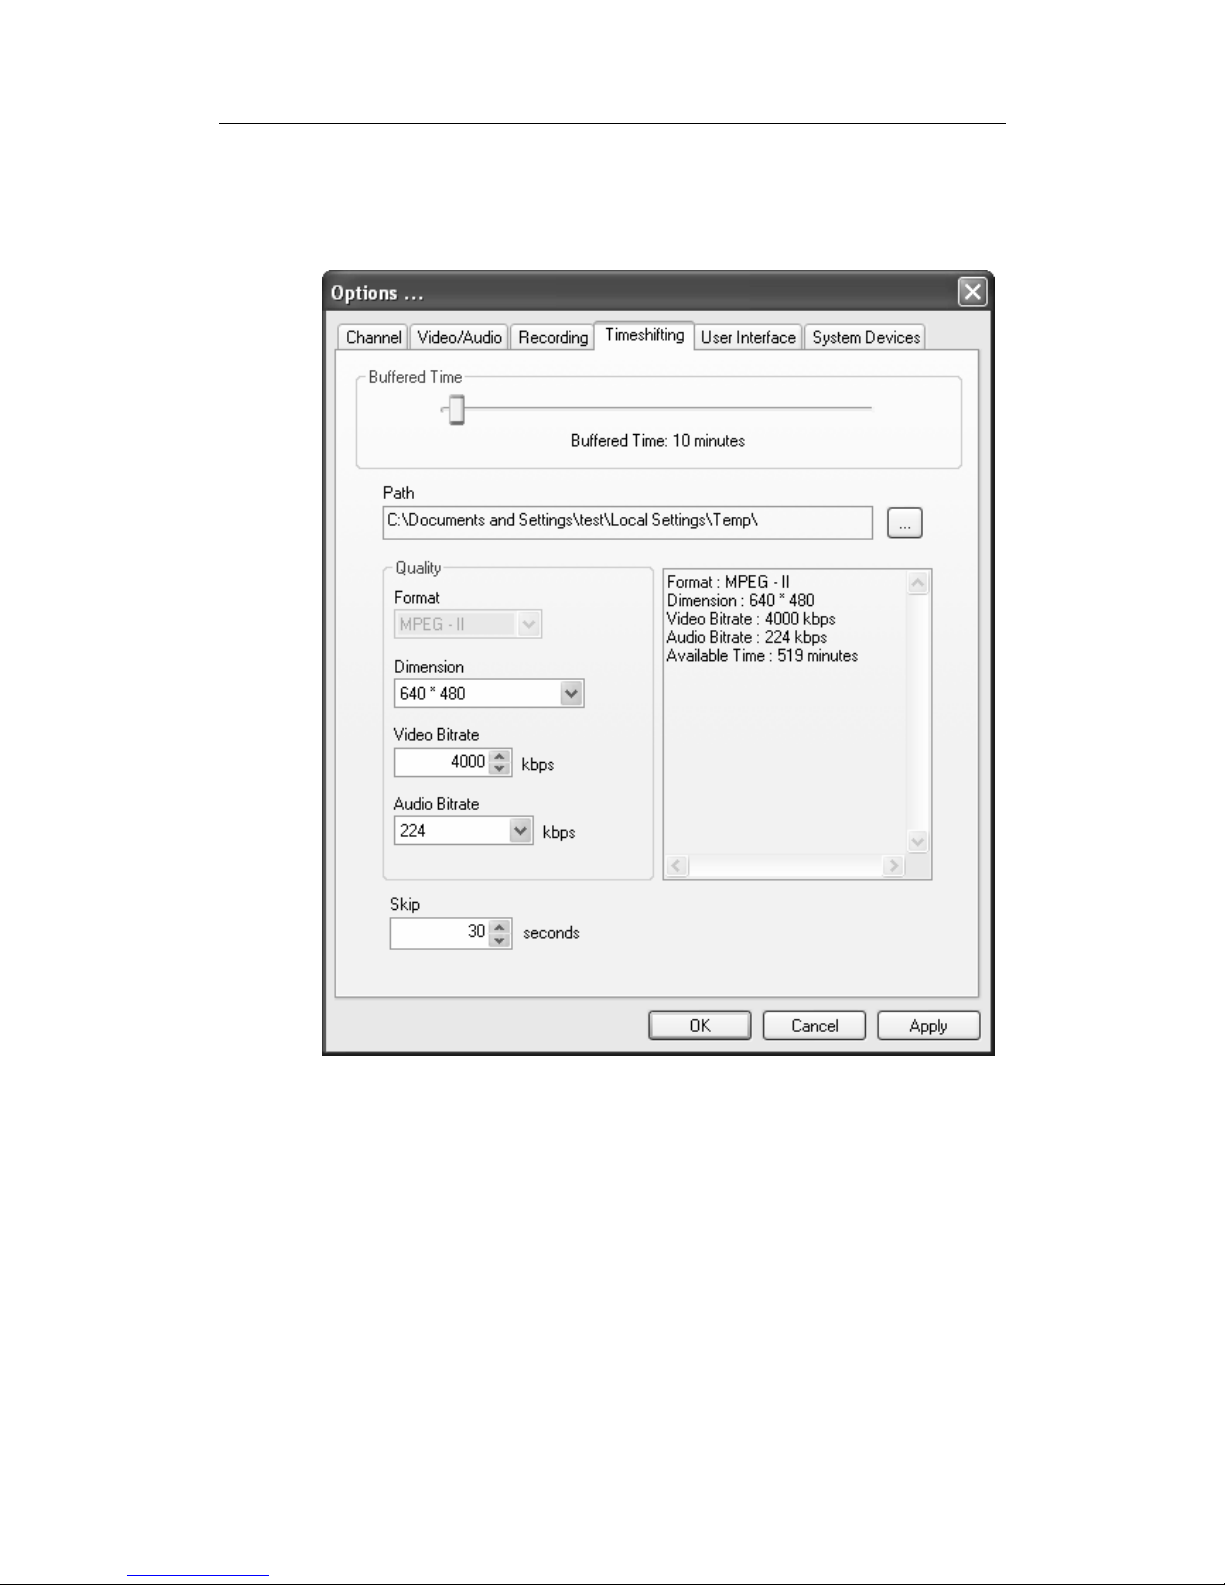
Timeshifting Options
Buffered Time
Set the amount of programming that is stored, or
“buffered” during Timeshifting. It also shows the total
recording time available.
Do not set the Buffered Time to consume all free disk
space.
Page 29

User Interface
25
Path (Buffer file storage location)
Choose the folder where the Timeshifting buffer file is
stored. Choose a folder in a disk partition with ample free
disk space. See the video format table for estimates of
the amount of disk space needed.
Quality
Choose the recording quality used during Timeshifting.
Higher quality levels consume more disk space.
The appropriate quality setting depends on many factors,
including the speed of your PC, the amount of free disk
space, and the quality of source material. For example,
when recording broadcast television for later viewing, a
medium quality level is usually sufficient. If you plan to
archive or edit the video, a higher video quality may be
more appropriate.
Skip
Set the amount of programming time skipped when you
press the Advance and Replay buttons during
Timeshifting.
Page 30
ComproPVR 2 User's Guide
26
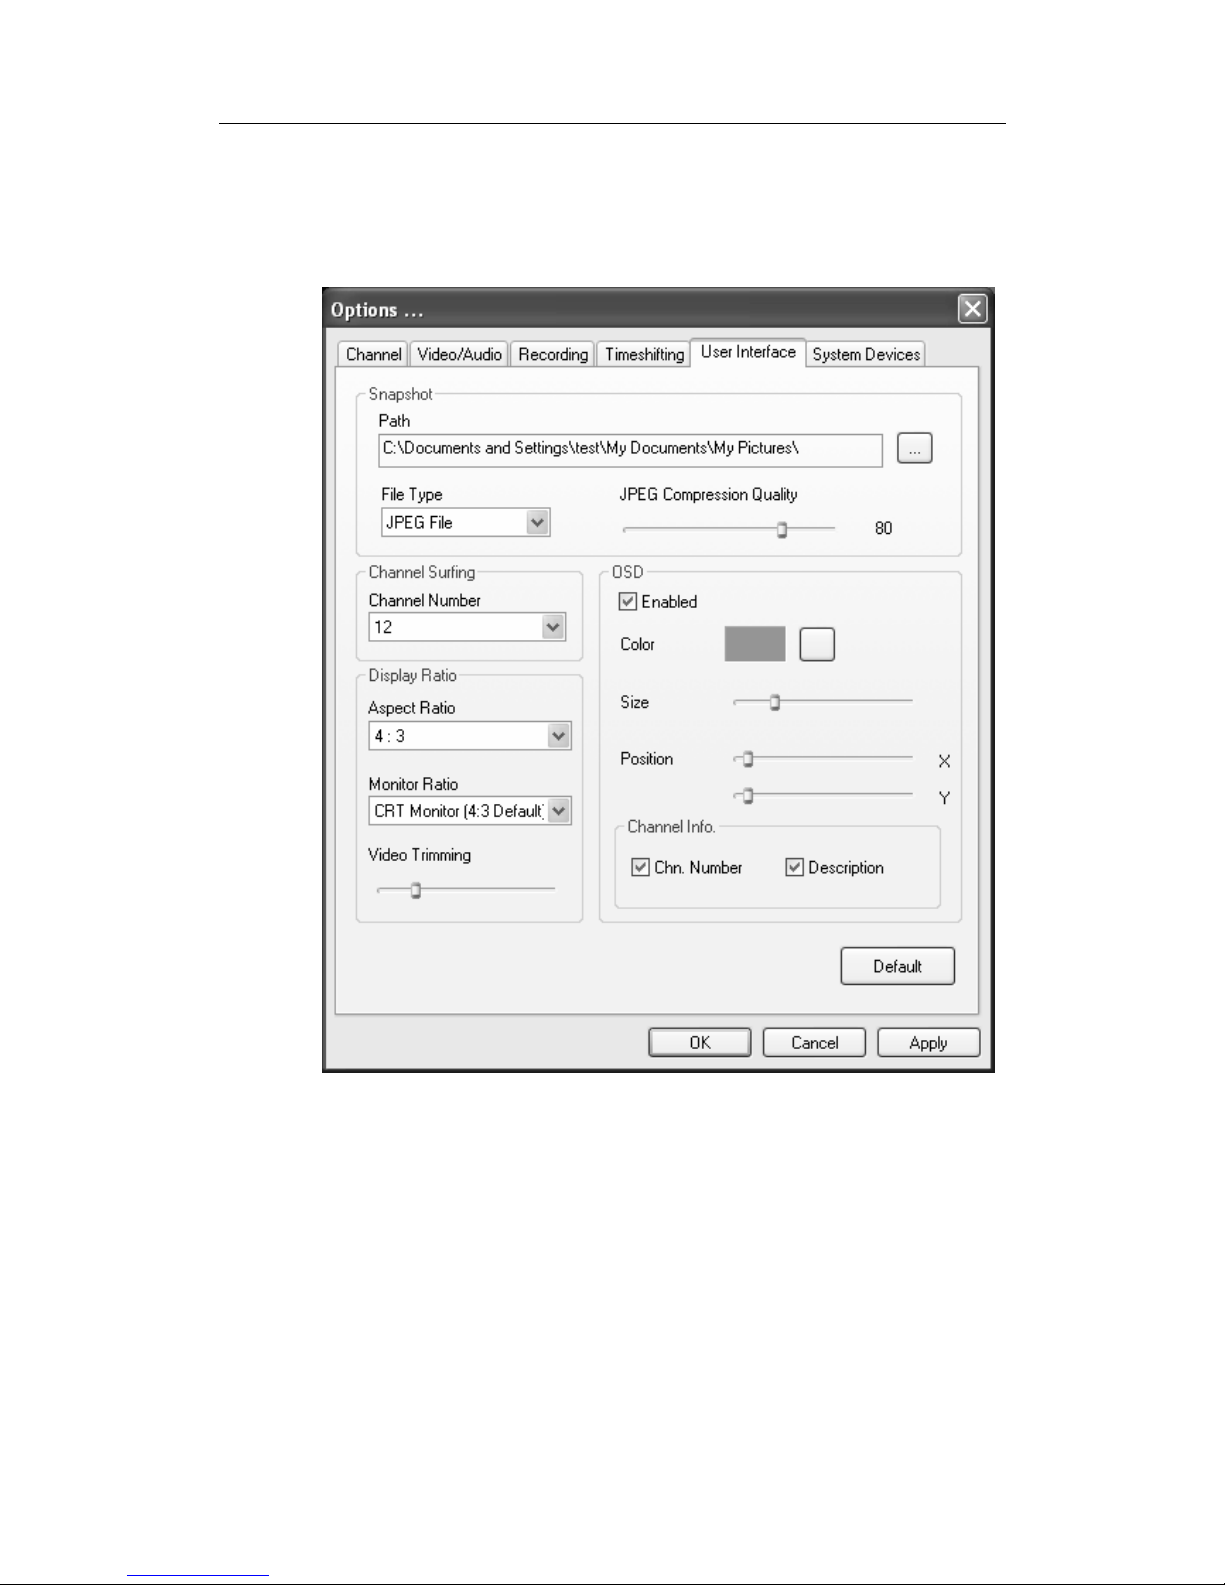
User Interface
Path (Snapshot file storage location)
Choose the folder where the snapshot pictures are
stored. Choose a folder in a disk partition with ample free
disk space. See the video format table for estimates of
the amount of disk space needed.
Page 31

User Interface
27
File Type (Snapshot file type)
Choose the snapshot file type. There are BMP and
JPEG format available.
If you choose JPEG format, you can also adjust the
JPEG Compression Quality on the bar on the right side.
Channel Surfing
Choose the number of channel surfing. There are 12 and
16 options available.
Aspect Ratio
Select the display screen aspect ratio, the ratio of screen
width to screen height. The default ratio is 4:3. You may
also choose the 16:9 wide-screen or custom ratios.
If you select a standard ratio, i.e., 4:3 or 16:9, the screen
will retain this ratio when you resize it. If you select a
Custom, ratio, you can modify the ratio by clicking and
dragging the lower-right corner of the ComproPVR
display window.
Monitor Ratio
Select your monitor’s ratio of screen width to screen
height. The default ratio is 4:3. If your monitor’s ratio is
not 4:3, you still can have a full screen of 4:3 ratio by
choosing the correct ratio of monitor here. This is very
convenient for your viewing.
Video Trim
When you see the static strip on the top or bottom of
screen, you can crop those lines by adjusting the bar.
The static strip is called the "green line." You won't see
this line on normal televisions because they do not show
you the entire picture. Standard TV sets trim the edges of
Page 32

ComproPVR 2 User's Guide
28
the TV picture. ComproPVR, on the other hand, can
show you the entire picture, including the "green line."
OSD (On-Screen Display)
When you select the checkbox next to enable OSD,
channel information such as channel numbers, channel
names, and audio quality will be displayed as you switch
channels. When this box is unchecked no information
will be displayed.
Also you can customize your own text color, position,
and size.
OSD can show two fields of Channel Info. One is
Channel number. The other is Description. Check the
boxes of your choice.
Default
If you press the default button, all User Interface tab
parameters will be set to the application program default
value.
Page 33
User Interface
29
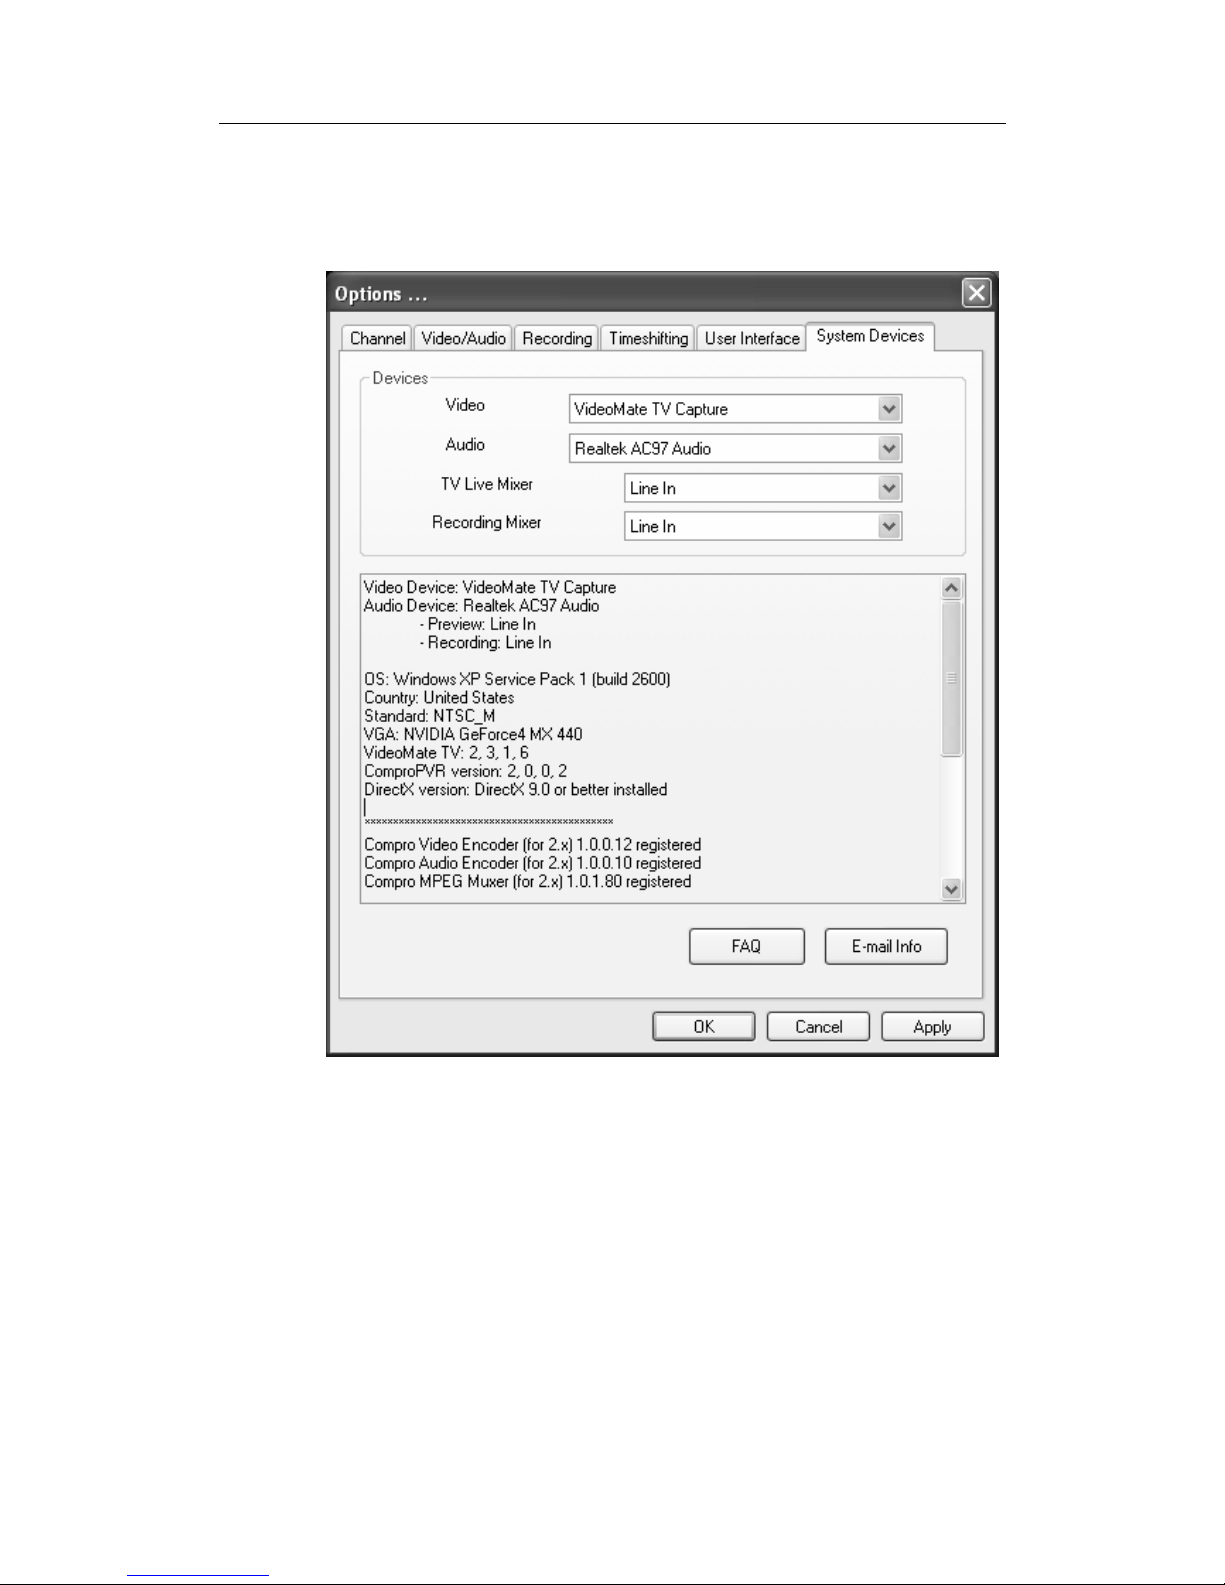
System Devices Options
Video Device
If you are using VideoMate TV PCI Tuner card, the video
device should be “VideoMate TV Capture.”
Audio Device
ComproPVR automatically detects the audio input
devices available in your system. Here, you must select
the appropriate audio input devices for your system.
Page 34

ComproPVR 2 User's Guide
30
Note
You must select the proper Video and Audio devices for
correct operation.
If you do not see the appropriate Video and Audio
devices, the drivers are not properly installed. Please
reinstall these drivers and see the chapter titled,
“Troubleshooting.”
TV LIVE Mixer
You can choose the audio source for watching live TV
programs.
When using VideoMate TV tuner card with an external
audio patch cable, connect to the “Line-In” port on your
sound card and choose “Line-In” in ComproPVR.
If you are using the internal audio patch cable to connect
to the “AUX-In” port on your sound card and choose
“AUX-In” in ComproPVR.
If you connect the external audio patch cable to “MIC” on
your sound card, you should use the “Microphone” for
Audio input. For better quality, use “Line-In” or “Aux-In”
instead.
Recording Mixer
You can choose the audio source in this field while
recording live programs. Normally, this audio source is
the same as TV LIVE audio source.
Note
TV sound output is from the green Audio-Out port on
VideoMate TV PCI Tuner card. You have to install the
provided audio patch cable in order to hear the sound.
Page 35

Using ComproPVR 2
31
4 Using ComproPVR 2
Watching
After installation, just press the ComproPVR button on
the remote or mouse click ComproPVR icon on the desk
you will be able to watch TV. Same as operating a
normal TV set. Watch TV programs on your PC, in
full-screen mode or in a window. Channel up and down.
Close ComproPVR and even shutdown the computer
with the full function remote control keypad.
Channel Browsing
When watching TV, you can browse channels with the
Channel Down
and Channel Up
buttons to
scroll up and down through the available, enabled
channels.
The keyboard shortcuts Page Up and Page Dn, and the
Compro remote control can also be used.
Jump directly to the desired channel by using the
number pad on your keyboard or remote control.
The Last Channel
(recall) button jumps back to
the previously selected TV channel.
If the On-Screen Display function is enabled on the
Display Options page, channel information will appear
briefly in the corner of the display window as you switch
channels.
Page 36
ComproPVR 2 User's Guide
32
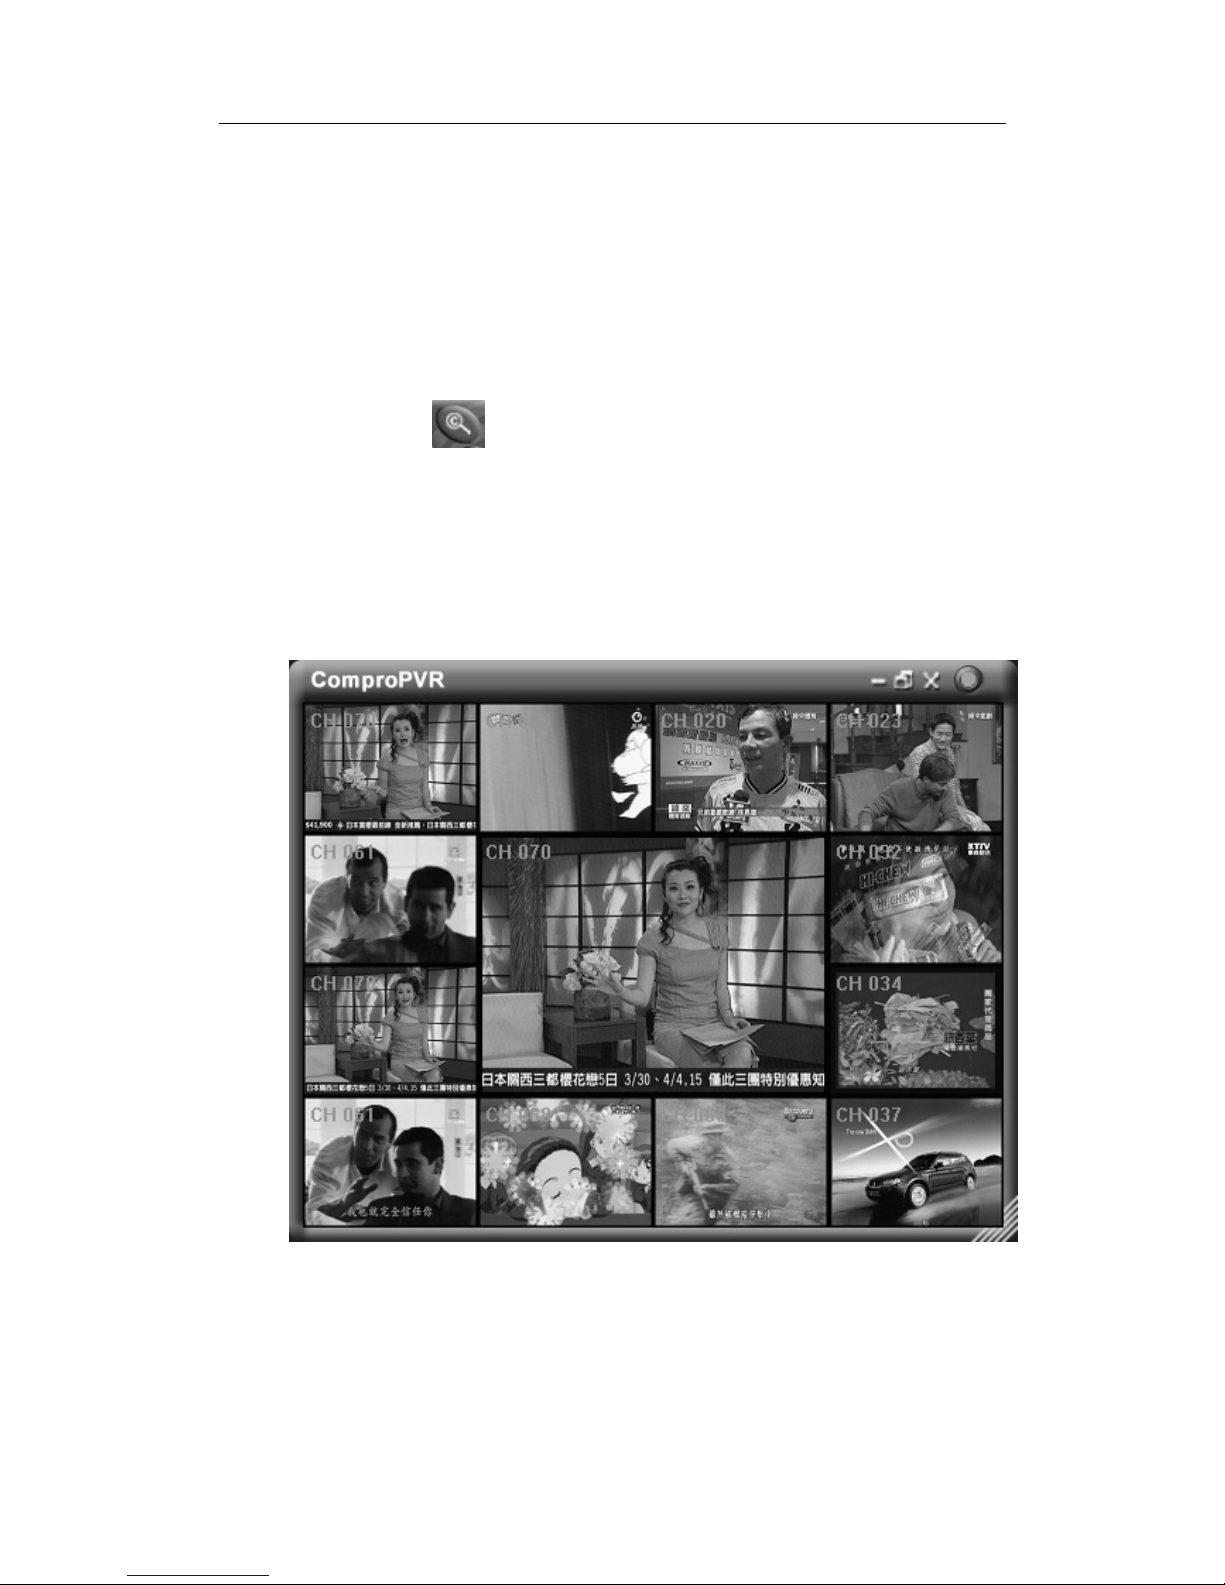
Channel Surfing
While watching TV, the channel surfing feature displays
a 4x4 grid of channel images to give you an overview of
available programming.
To start the channel surfing feature, press the Channel
Surfing
button on the ComproPVR control panel.
Thumbnail images will begin to appear in the display
window. With your mouse, click on the program you wish
to watch and you will exit surf mode. You can also return
to normal mode by clicking on the Channel Surfing
button again.
There are 12 and 16 options available for the number of
channel surfing. The setting is available on the User
Interface tab in the Options of ComproPVR.
Page 37
Using ComproPVR 2
33
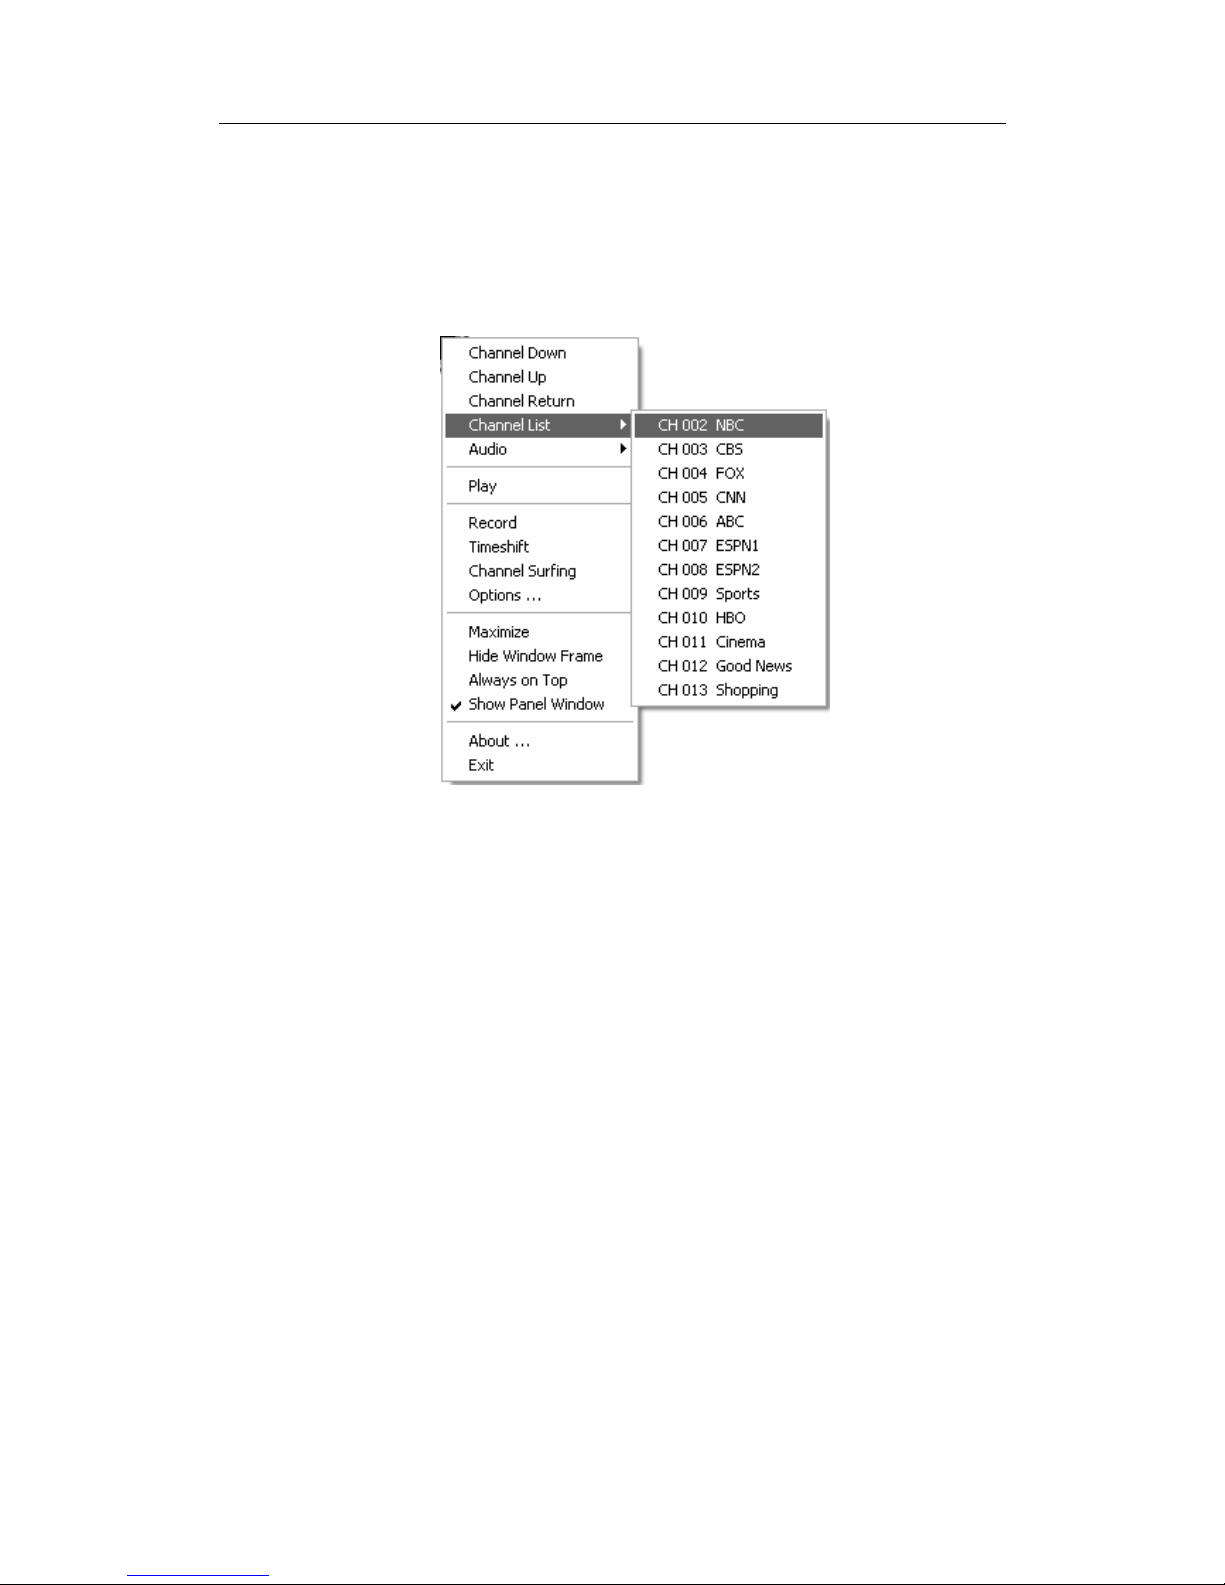
Right-Click Mouse Menu
If using mouse to right-click on the TV screen, you can
see the menu below. There are many useful options for
your convenience.
Zooming image
If you would like to see more details on the part of a
video image, you can press the mouse right button to
drag a zone of the screen. You will see the zoomed
image.
Also you can press the mouse right button and move on
the screen to shift the zoomed area of the image.
Just click the mouse left button to resume normal mode.
Page 38

ComproPVR 2 User's Guide
34
Recording
ComproPVR is a digital video recorder. ComproPVR can
record full-motion video and audio from your video
source and save it to your hard disk. ComproPVR
supports MPEG-1, MPEG-2, MPEG-4 encoding, which
saves disk space while providing high video quality.
To instantly start recording:
1. Press the Record button
. ComproPVR starts
recording the video source currently showing in the
display window. It will save it to a file on your disk.
2. Press the Pause button
to pause the
recording if you like. This is useful to skip recording
the commercials.
3. Press the Stop button
to stop recording.
4. When you stop recording, ComproPVR prompts you
to name the file containing the recorded video. Enter
the name and press OK.
To playback the recorded file, press the Play button and
select the file you wish to view.
Disk usage
The actual disk space used primarily depends on the
quality settings for recording. A higher quality setting,
e.g., DVD-quality, requires significantly more disk space
than a lower quality setting, such as VCD-quality. The
appropriate quality depends on the quality of the source
material, e.g., DV camera versus broadcast TV, and your
intended use of the recorded programming.
Playback
Press the Play button to open the Play dialog box.
Page 39
Using ComproPVR 2
35
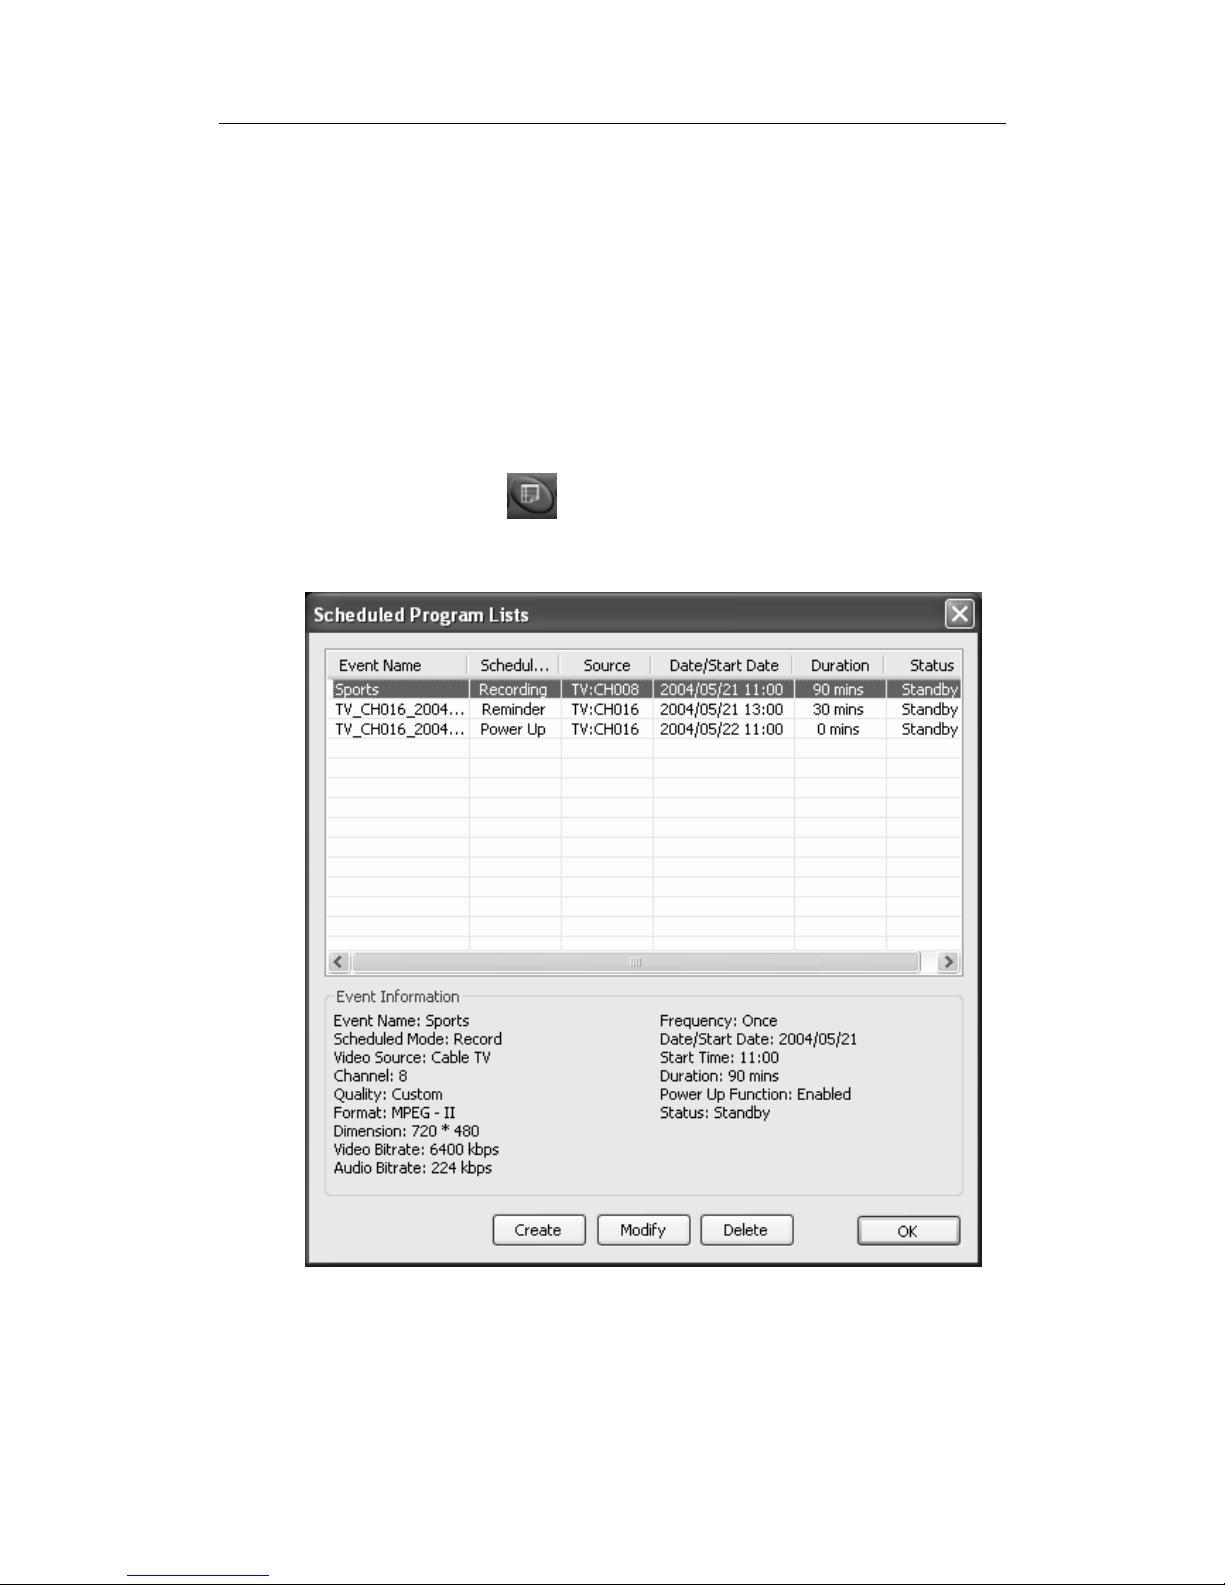
Scheduled Recording
ComproPVR can be scheduled to record a TV program
later or remind you of an upcoming program. The
schedule can be set for a one-time or a recurring session.
You can repeatedly record any regularly scheduled
programming. Relax. Never miss your favorite shows.
Press the icon
to open the Scheduled Recording
dialog box.
Scheduled Program Lists
Create: Create a new scheduled recording event.
Modify: Modify an existing recording event.
Page 40
ComproPVR 2 User's Guide
36
Delete: Delete an existing recording event.
OK: Exit the schedule list.
Event Information: Shows details about your recording
schedule.
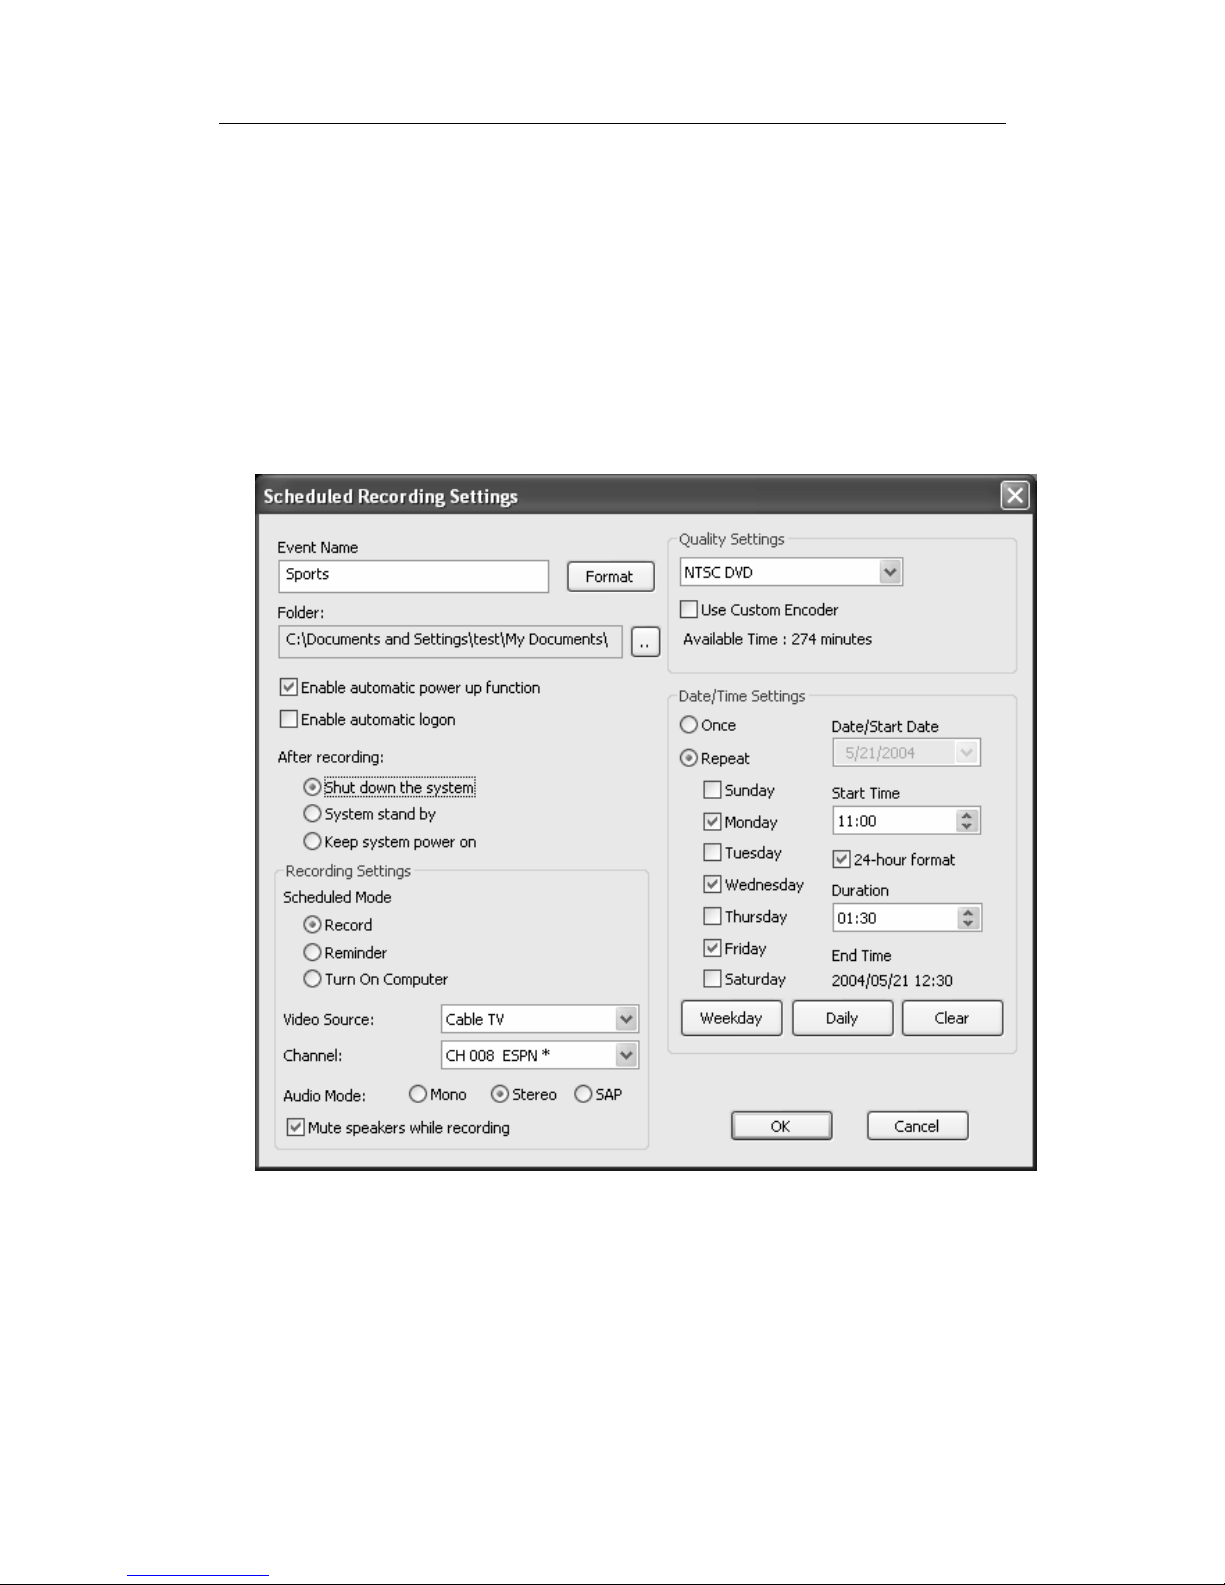
Scheduled Recording Settings
You can see the following after clicking Create.
Event Name: Type the event name. The saved
recording file will also use this name.
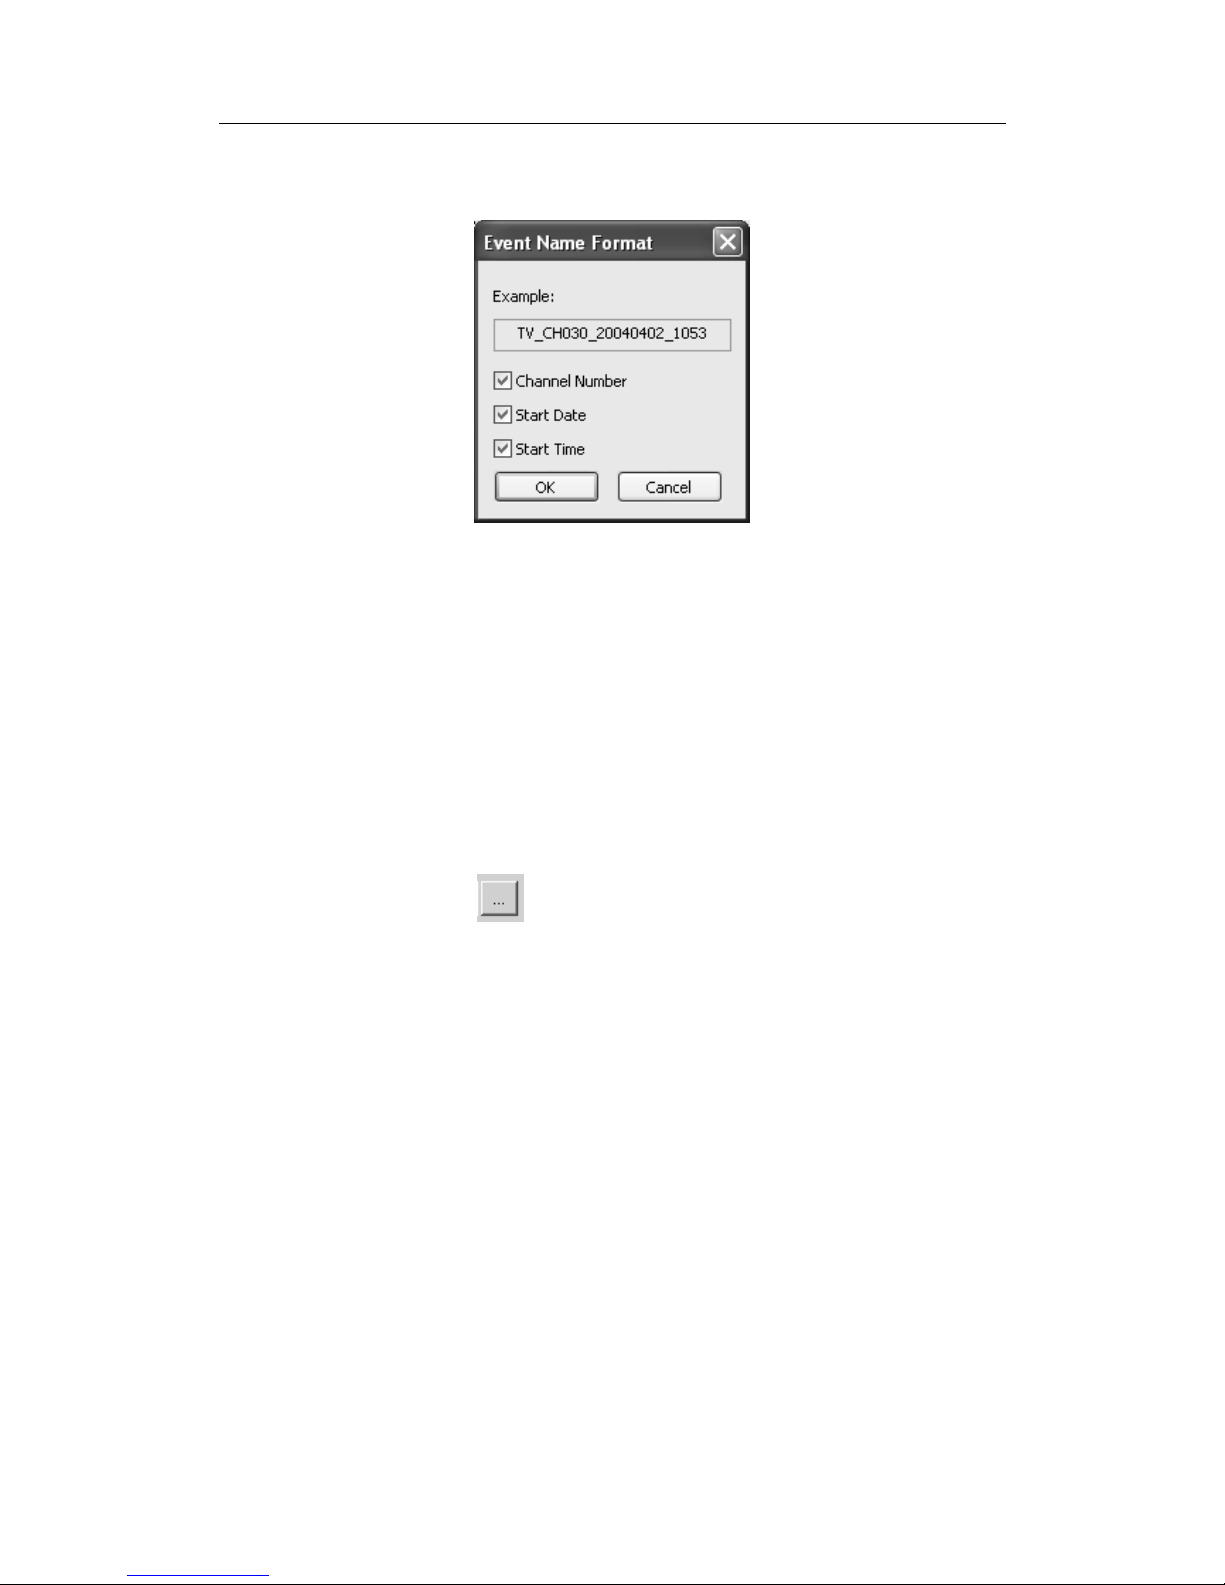
ComproPVR can automatically create the Event Name
and file name. The Format button lets you select the file
name format.
Page 41
Using ComproPVR 2
37
Channel Number: Check this box to add channel
numbers to the names of the recording files.
Start Date: Check this box to add the start date to the
names of the recording files.
Start Time: Check this box to add the start time to the
names of the recording files.
Folder (Recorded Programs Folder)
Click on the
button to set the folder where recorded
programs are stored. Check that you have ample disk
space to store recorded programs.
Power Up Scheduling feature
If your hardware supports Compro Power Up Scheduling,
ComproPVR can wake your PC from the Shutdown
state.
Enable automatic power function: Check this box if
you wish to use Power Up Scheduling function, i.e.,
wake up the computer from Shutdown or Stand by states
for scheduled recording.
This option is available only if your hardware supports
Power Up Scheduling.
Page 42

ComproPVR 2 User's Guide
38
Power Up will start your computer 5 minutes in advance
of the scheduled time. If you set the schedule to 4
o’clock, Power up will wake up your computer at 3:55.
Therefore, you need to shut down the computer before
3:54 in order to let Power Up start the computer.
There are three possible actions after recording is
complete:
Shut down the system: After recording, shut down
the system.
System stand by: After recording, put computer in
stand by mode.
Keep system power on: After recording, don’t
shutdown system.
Note
In order to enable scheduled recording from the
Shutdown state, the Power Up power switch circuit
connections must be properly connected.
Power Up Scheduling is only available with VideoMate
TV Gold, Gold Plus, and Ultra.
Enable automatic logon: When using Power Up
Scheduling, ComproPVR will start Windows. If Windows
requires you to enter a username and password during
start up, you should check this box and enter the
required information.
This option will be grayed out if your hardware doesn’t
support Power Up Scheduling.
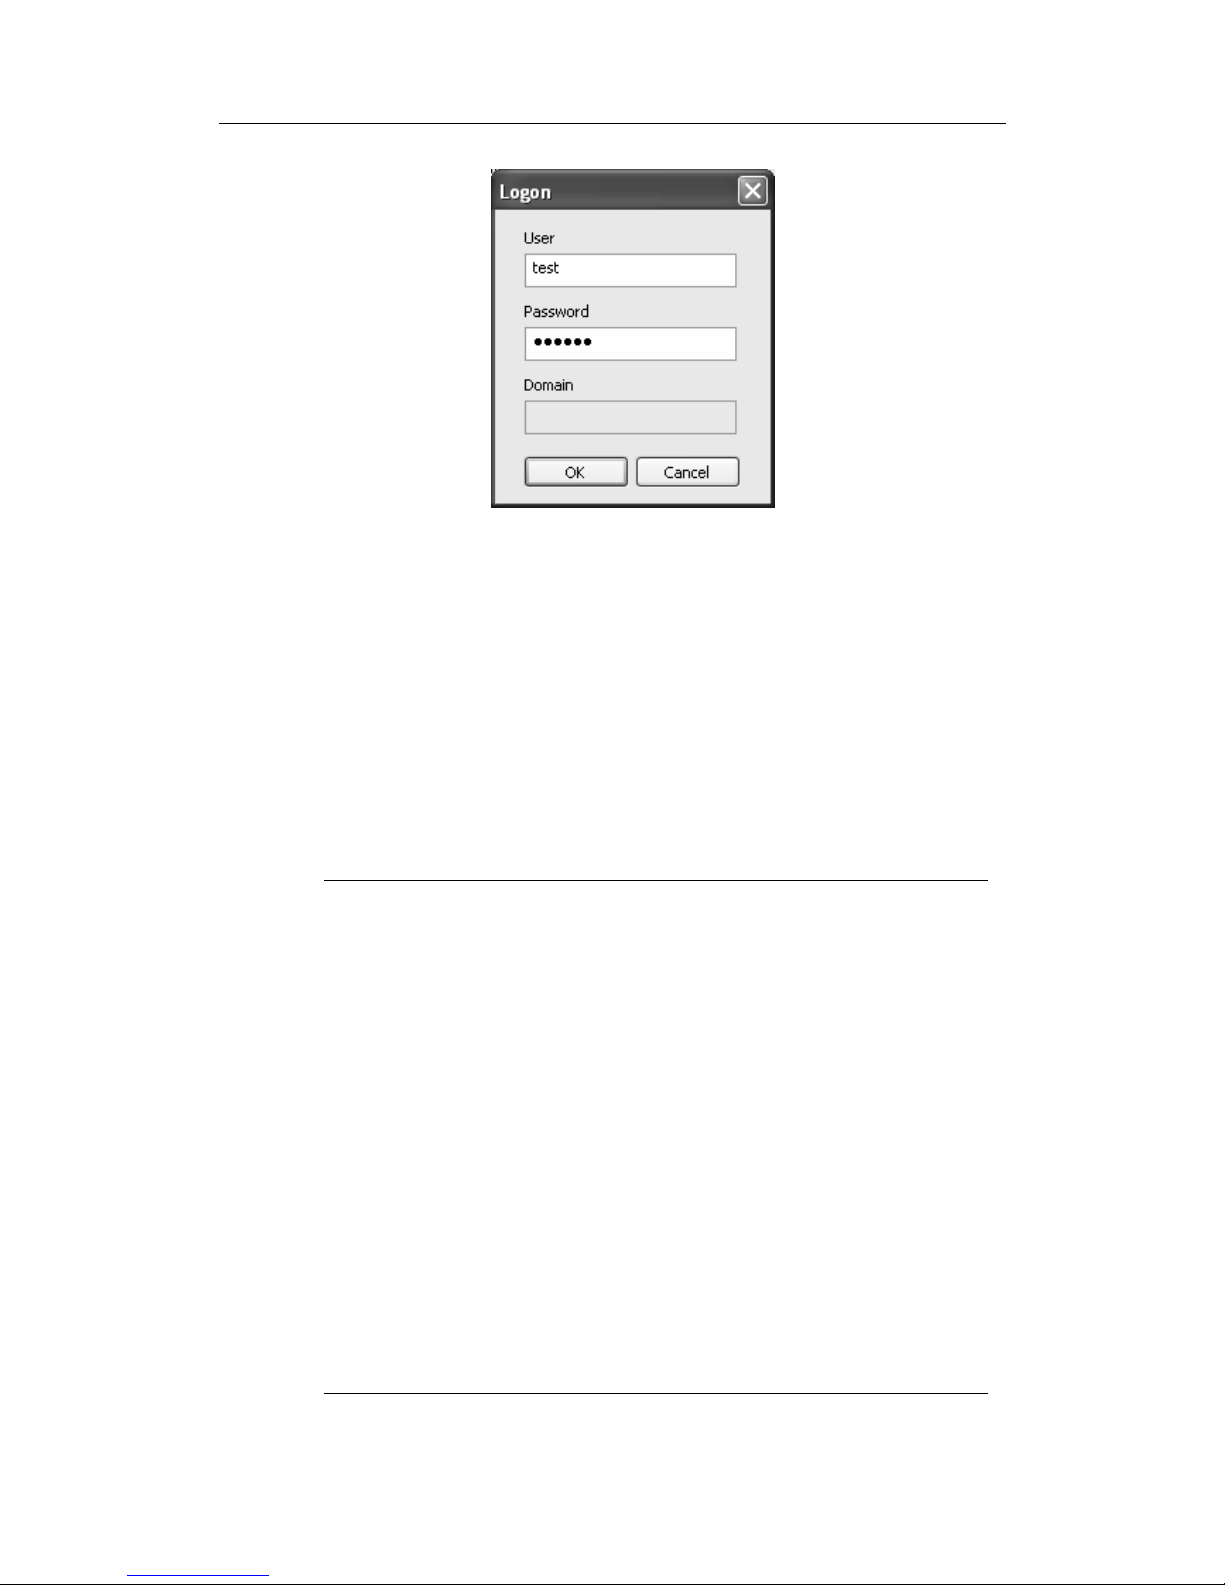
If “Enable automatic logon” is checked, you will see a
popup window.
Page 43
Using ComproPVR 2
39
User: ComproPVR will detect your current user name
automatically. Unless you wish to logon by a different
user, there is no need to change it.
Password: Type in your password.
Domain: ComproPVR will automatically detect your
Windows Domain name, if any. In most home PCs,
this field will be blank and need not be changed. (See
Note below).
Press the OK button to proceed.
Notes
Enabling the automatic logon function is only necessary
when you need to type user name and password to
logon to Windows.
The Windows Domain name is not the Internet domain
name that you may be familiar with, e.g., Yahoo.com.
Windows Domains usually only exist in business
networks. For most users, this field should be left blank.
Your password will be stored on your computer. There is
a chance that your password could be discovered by
another user
The ComproPVR does not use the logon information for
any other purpose.
Page 44

ComproPVR 2 User's Guide
40
Recording Settings
Schedule mode: There are three ways to set the
schedule.
Recording: At the set time, ComproPVR starts
recording the program.
Reminder: At the set time, ComproPVR starts
showing the program without recording it.
Turn On Computer: At the set time, ComproPVR
starts computer without doing anything else.
Video Source: Select video source from CATV or
Antenna.
Channel: Select the channel you want to record.
Audio mode: Select the Mono, Stereo, or SAP audio
you want to record.
Mute speakers while recording: Check this box to
mute speakers while recording. This feature is useful if
the program is to be recorded while you are asleep.
Quality Settings
Quality settings: Select the video quality at which you
wish to record.
Date/Time Settings
Once: Select this to record this program once.
Repeat: Select this to record this program repeatedly.
You can select any kind of combination in a week to
record the programs repeatedly. Date/Start Date: Select
the date you want to record the program or the start date
for repeat scheduling.
Start time: Select the starting time for recording.
Duration: Amount of programming to be recorded.
OK: Click it to add this schedule.
Page 45

Using ComproPVR 2
41
Timeshifting
Timeshifting lets you pause, replay, or skip commercials
during live TV, without interrupting an ongoing recording
session. Timeshifting gives you absolute control over
how you watch television, like never before. For example,
you watch your favorite sporting event, pause the live
action and help yourself to an ice-cold beverage from the
fridge.
Press the Timeshifting
button and the Time
Monitoring bar will appear. (See below.)
The Time Monitoring bar informs you of how much of the
timeshifting buffer is in use You can also use your mouse
to drag the Time Control Shuttle to jump to a specific
time in the program.
You may also press the Advance (for commercial skip)
and Replay (for instant replay) buttons on the control
panel or remote control to navigate through the program.
Timeshifting temporarily saves the video to your hard
disk for a specified period of time.
When you return to your seat, you can resume viewing
the program from the point when you left.
Note
Timeshifting can use significant disk space and cannot
automatically skip commercials.
Page 46
ComproPVR 2 User's Guide
42
Still Image Capture
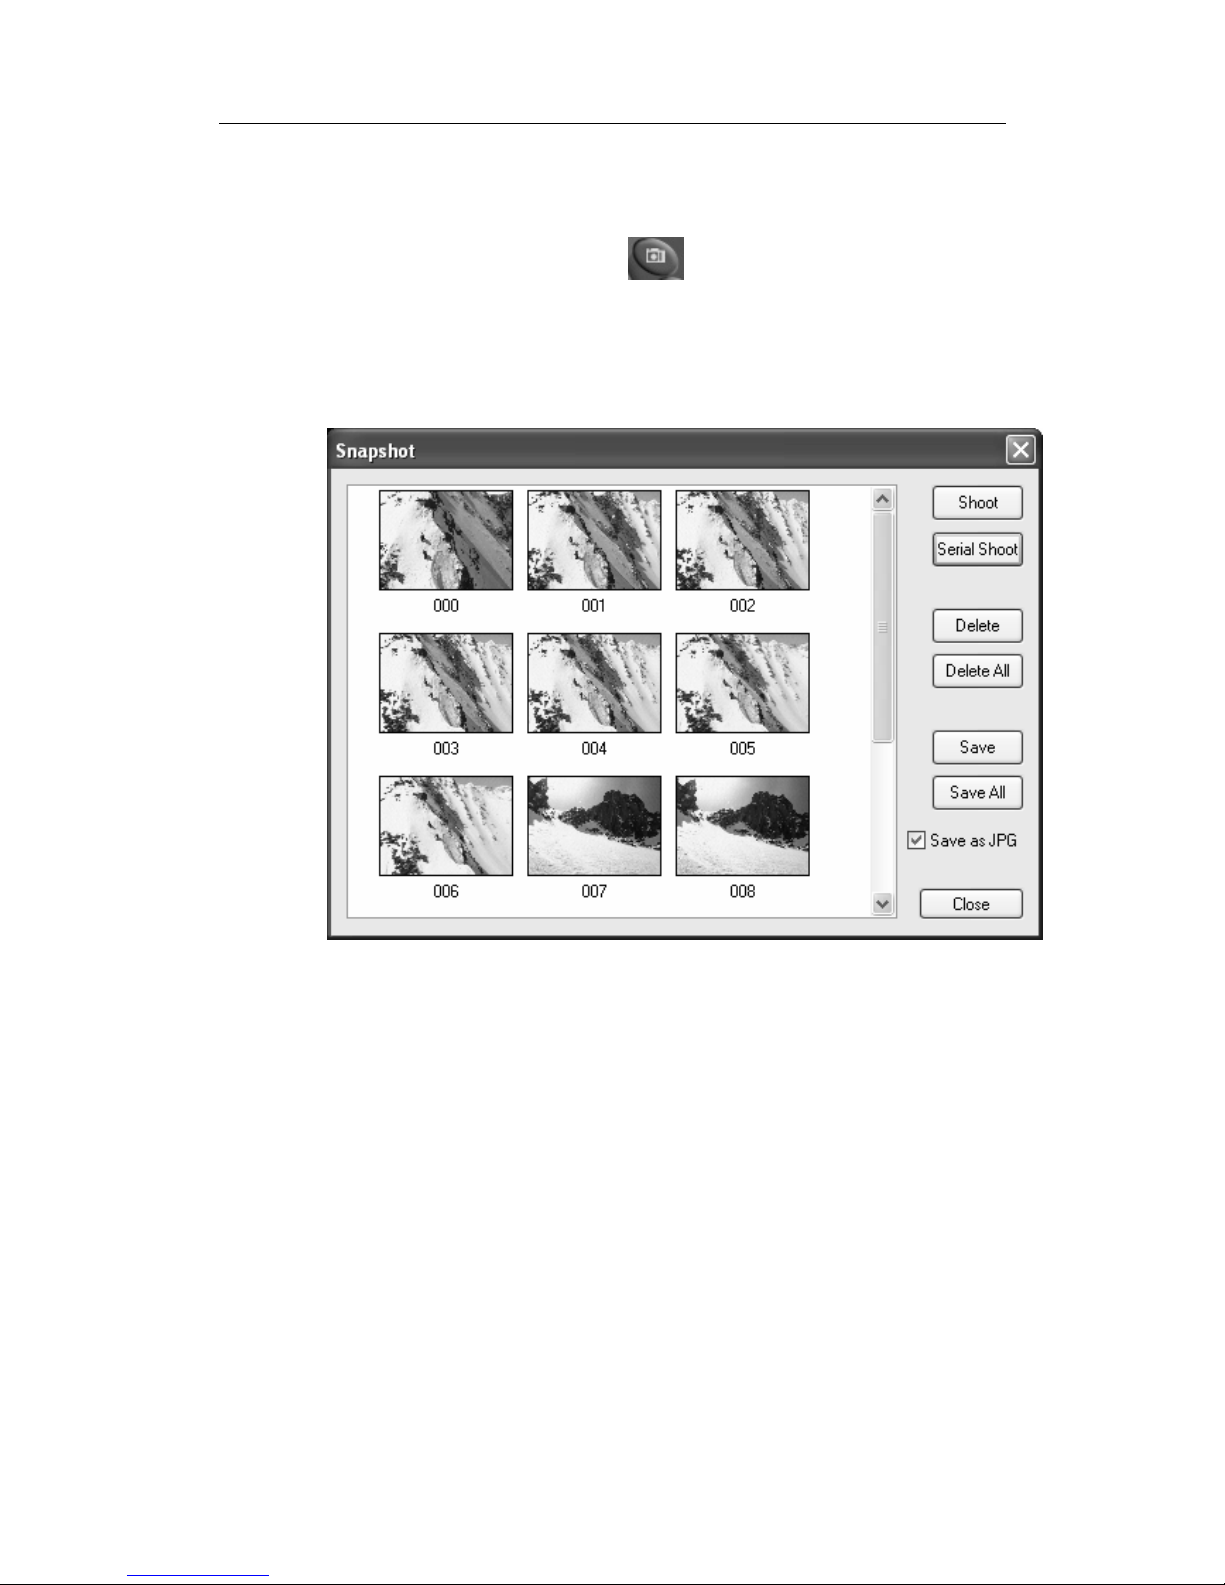
Click on the capture icon on the control panel or
hit the "Space Bar" of the keyboard shortcut to capture
an image of the display window. You can see the screen
capture dialog as below.
Click on the Shoot to take another shot. Serial Shoot
will shoot 6 straight shots at once. This is useful for
action scenes.
There are BMP and JPEG format available for snapshot
file type. Check “Save as JPG” box will save the
shapshot as JPEG file type.
More settings are available on the User Interface tab in
the Options of ComproPVR.
Make sure to Save your shots before closing this dialog
or the files will not be saved.
The screen capture image size is fixed at 640 x 480.
Page 47
Using ComproPVR 2
43
Straight-to-Disc
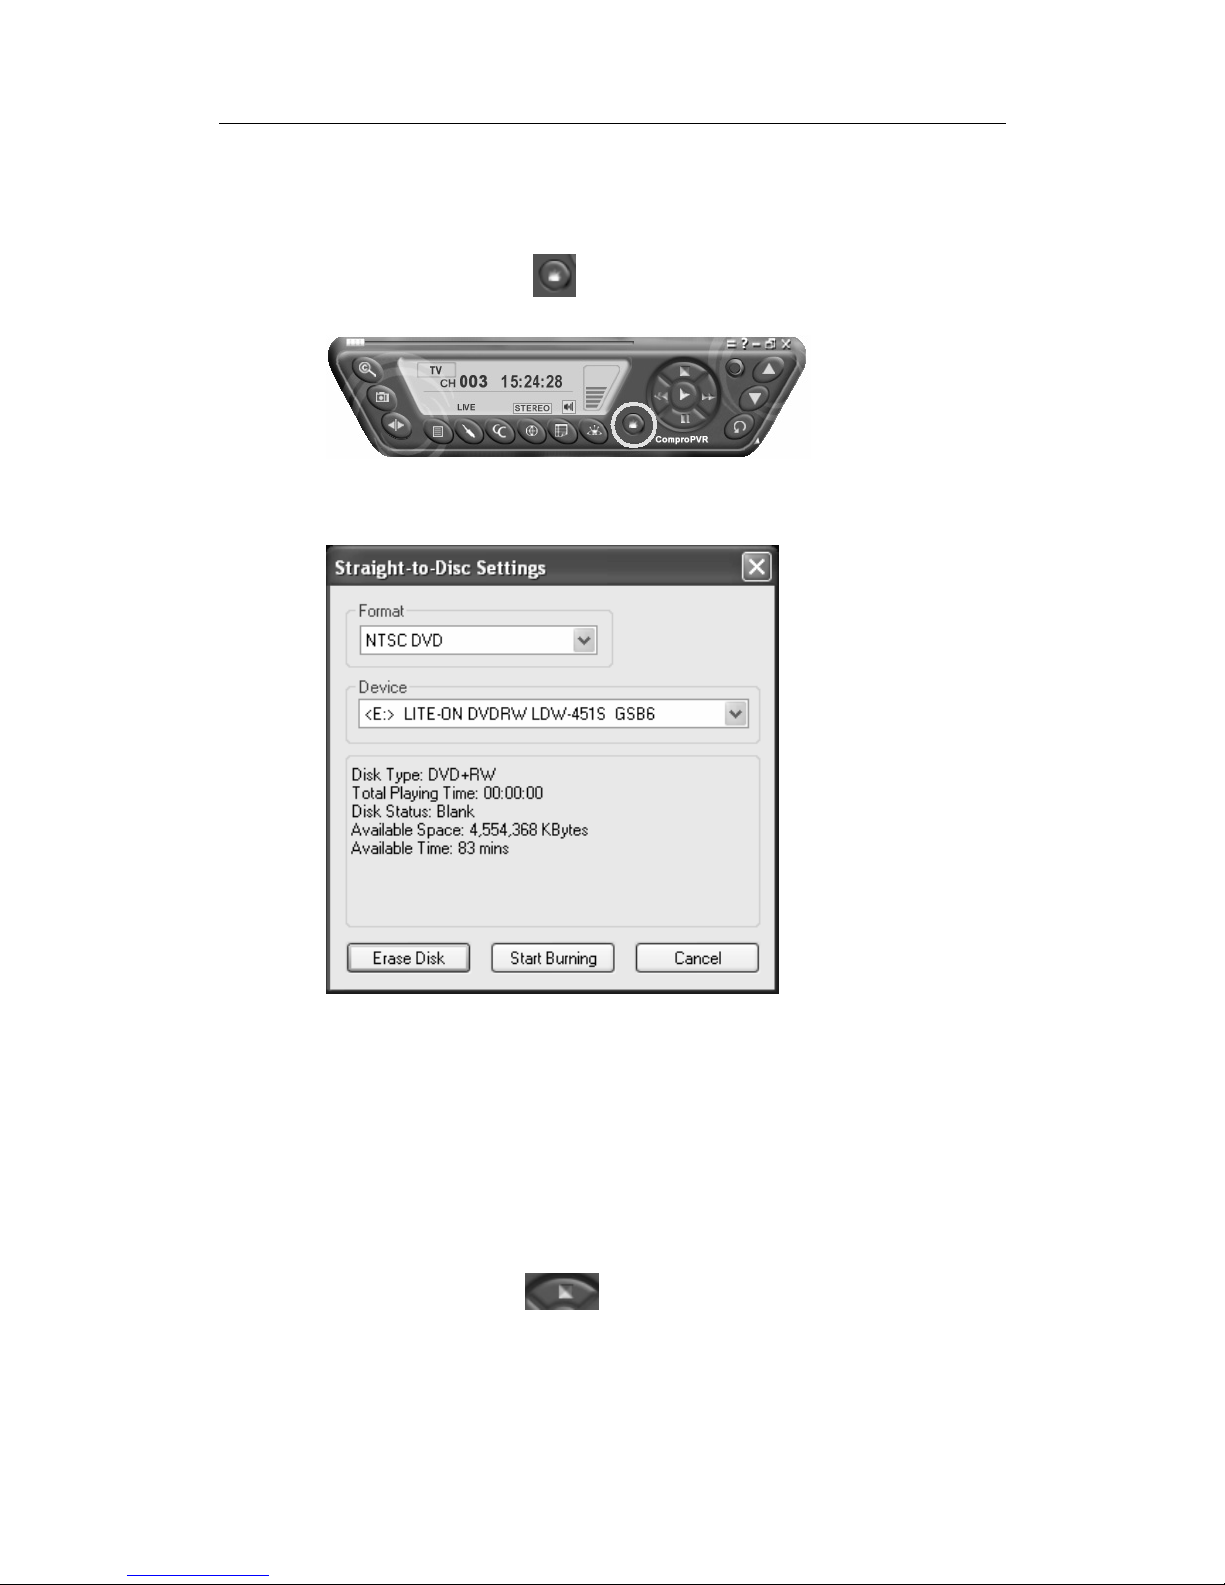
Click on the icon on the control panel.
You can see the straight-to-disc dialog as below.
Format: Choose the recording format you like.
Device: Choose the CD-R or DVD-R device here.
Erase Disk: If the disc is re-writable and not empty, you
need to erase it first.
Start Burning: Press this button to start burning disc.
Stop: Press the
button on the control panel of
ComproPVR to stop burning.
Cancel: Press this button to exit the dialog.
Page 48

ComproPVR 2 User's Guide
44
Note
Straight-to-Disc is only available with certain models.
Please check the side of the product box to confirm if this
model supports this feature.
This feature is only available on Windows XP and 2000.
You need to install the bundled Ulead DVD MovieFactory
software in order to have this feature. If you don’t have
Ulead DVD MovieFactory in the package, then this
model doesn’t support it.
CD-R or DVD-R is necessary to use this feature.
ComproPVR will estimate your CD or DVD capacity
automatically. It will stop recording when it comes full.
The recorded file will not be saved in the disk.
The quality is related to the recording performance.
Choosing better performance in the recording option will
result in a better video quality.
Closed Captioning (USA only)
Press the Closed Caption button to enable or
disable closed captioning. If supported, the overlaid text
captions will be displayed.
Teletext (PAL TV systems only)
ComproPVR includes Teletext display capabilities. Press
the
button to activate Teletext functions. Availability
of specific Teletext features depends on your local TV
broadcasters.
Page 49
ComproFM 2
45
5 ComproFM 2
Introduction
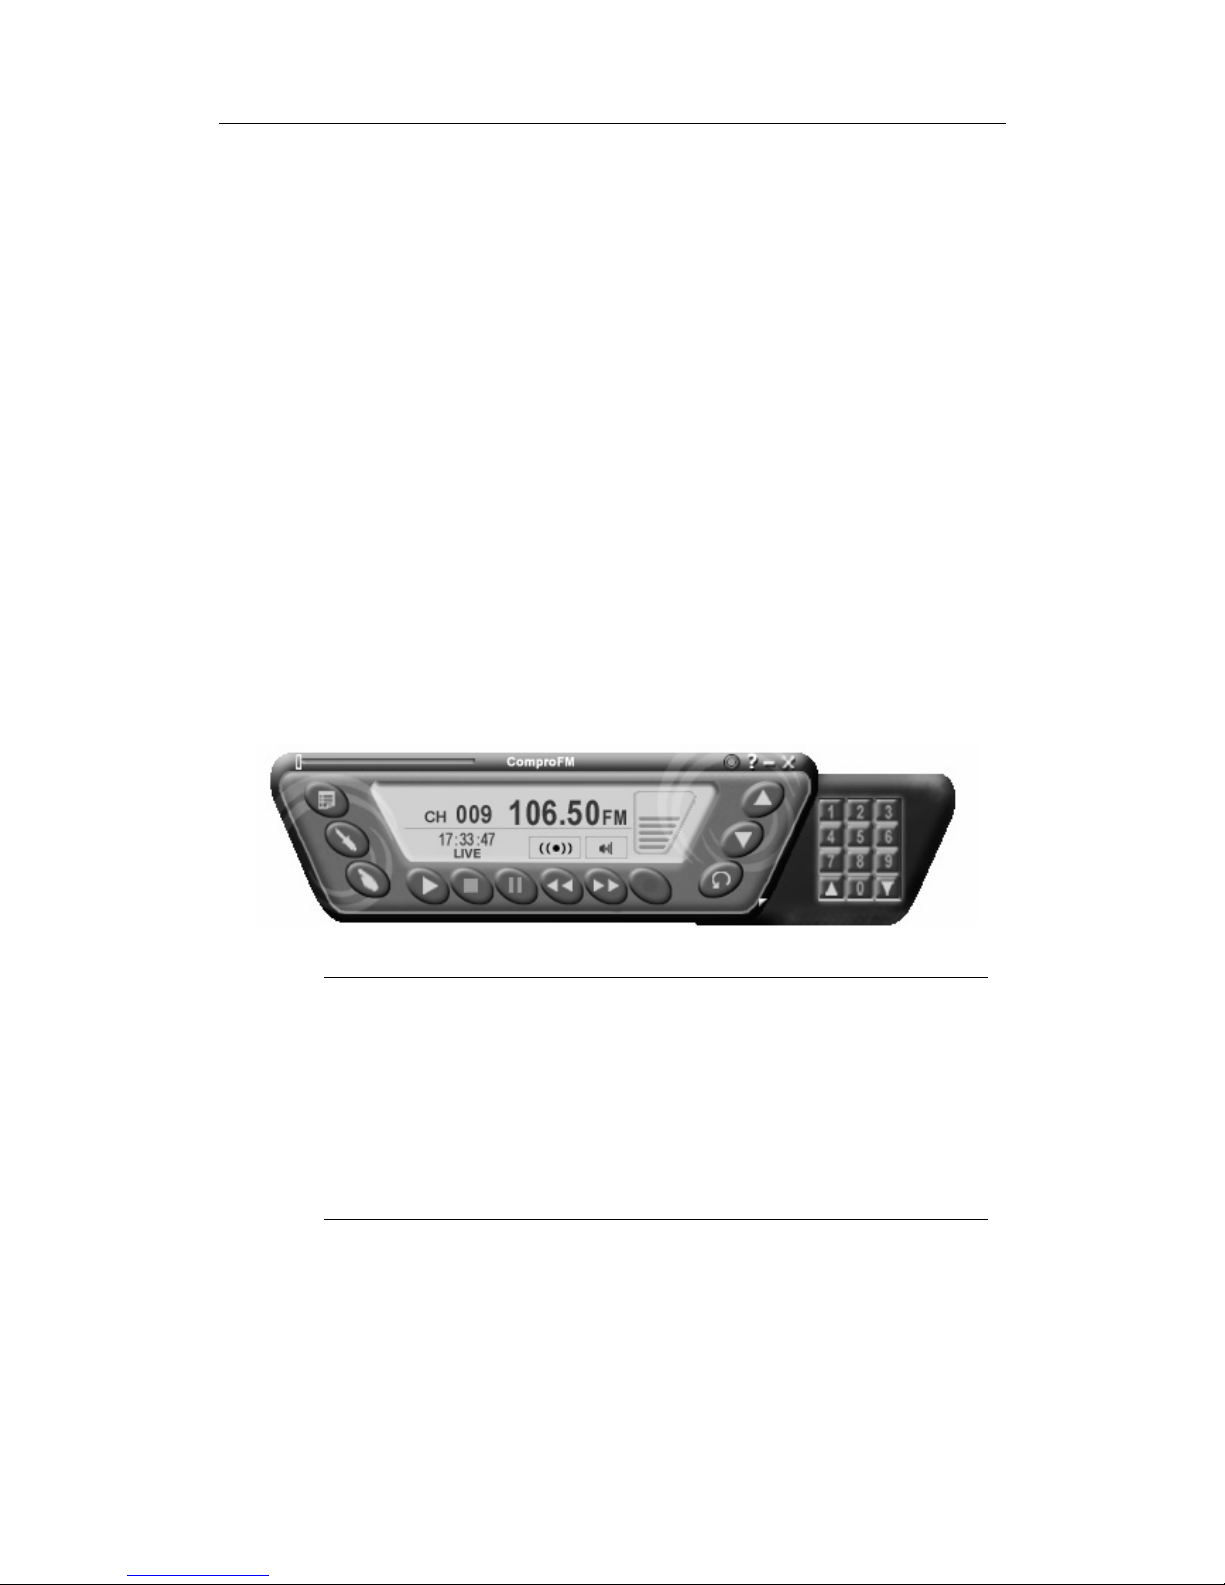
ComproFM lets you enjoy FM radio programs on your
PC. Listen to music or other programs while you work or
browse the Internet. All this, with the industry's first
universal remote control.
You can also record your favorite programs to MP3,
WMA, and WAV formats for later playback. You can later
download these recordings to your MP3 player
(purchased separately) for listening on the go.
Note
The hardware needs to have FM in order to use
ComproFM.
This section provides basic information for ComproFM.
For more details, please check the help file of
ComproFM or the manual in the installation CD.
Page 50
ComproPVR 2 User's Guide
46
Key Features
Listen to and record live FM programs.
Powerful and easy to use scheduled recording
function.
Easy-to-use, familiar user interface.
Deluxe, ergonomic, multi-function IR remote control.
Capture audio and encode to WAV, WMA or MP3
formats.
My favorite stations — Sort and rearrange station
order.
Easy to install.
Stereo and mono support.
Auto tune for best sound quality frequencies.
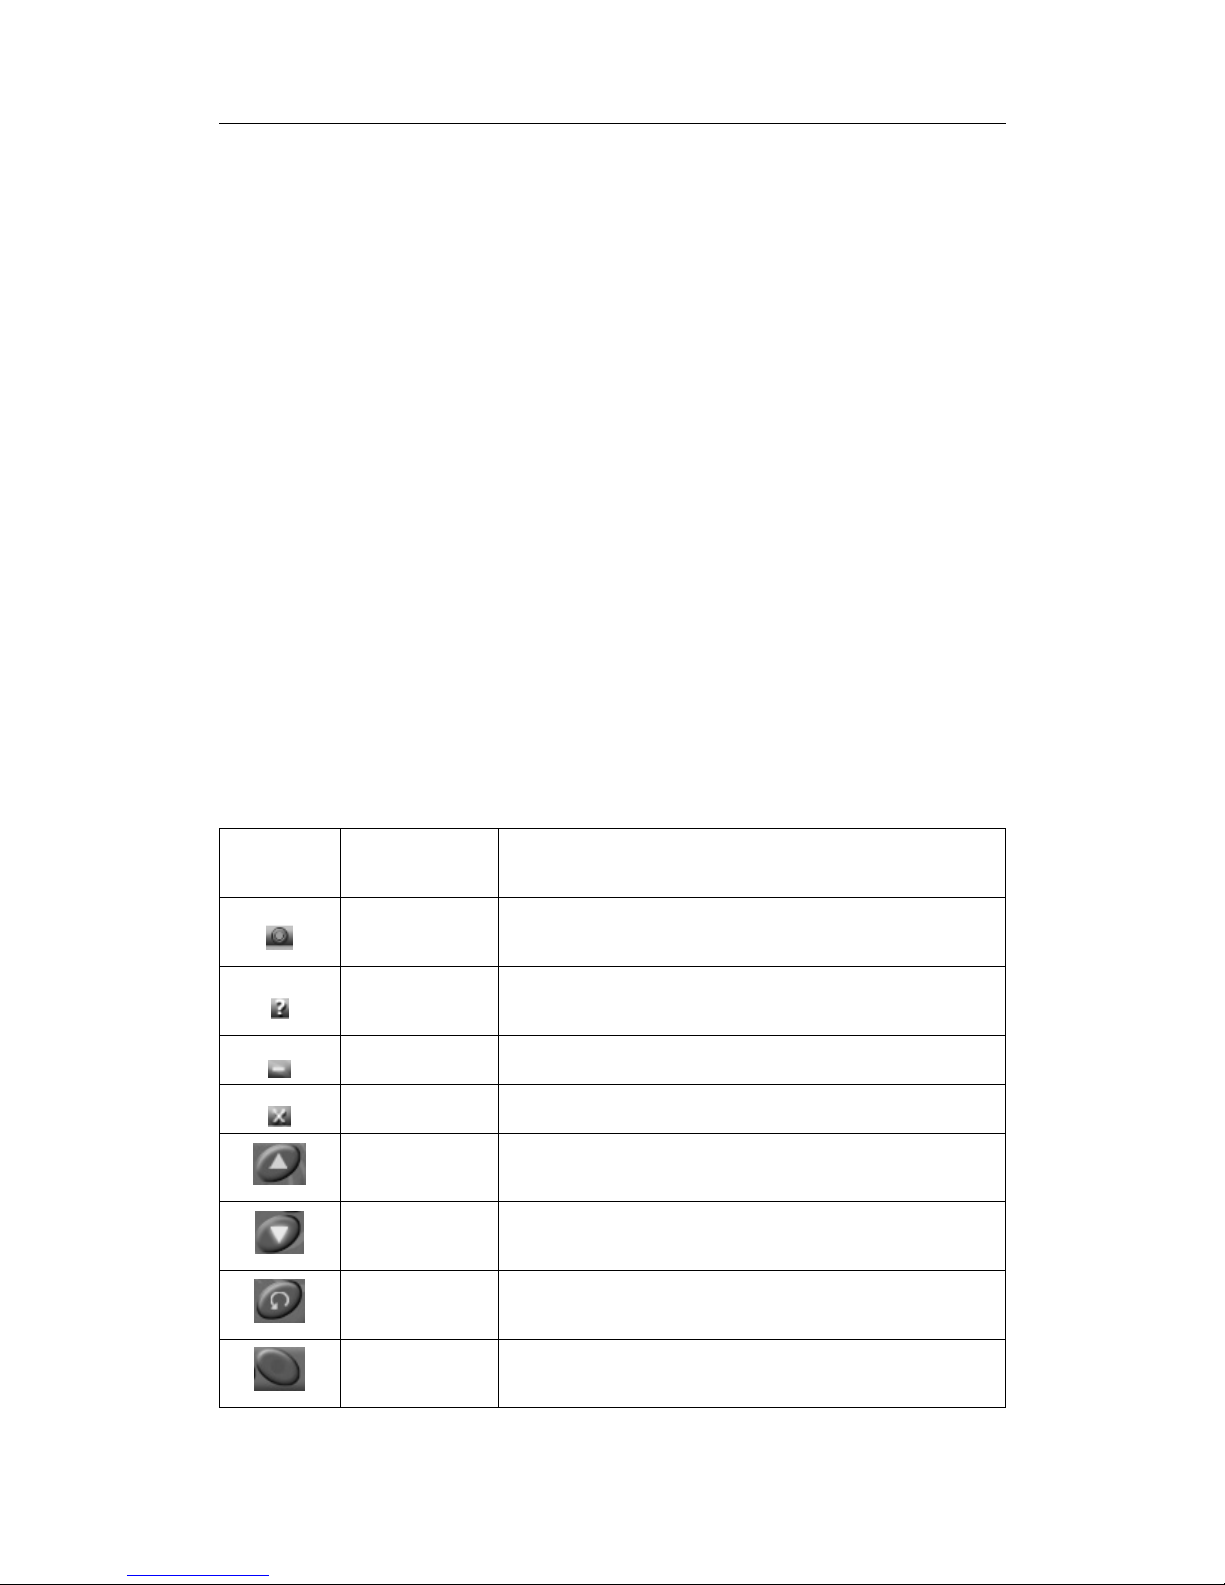
Control Panel
ICON
Keyboard
Shortcut
Description
Ctrl-A Always on top
F1
Online Help System - Open HTML help
file
Z Minimize ComproFM
Ctrl-W Exit ComproFM
Page Up
Station Up - Jump up to next pre-set
station
Page Down
Station Down - Jump down to next
pre-set station
N
Last station - Jump back to last selected
station
R
Record - Start recording FM audio
program to system
Page 51
ComproFM 2
47
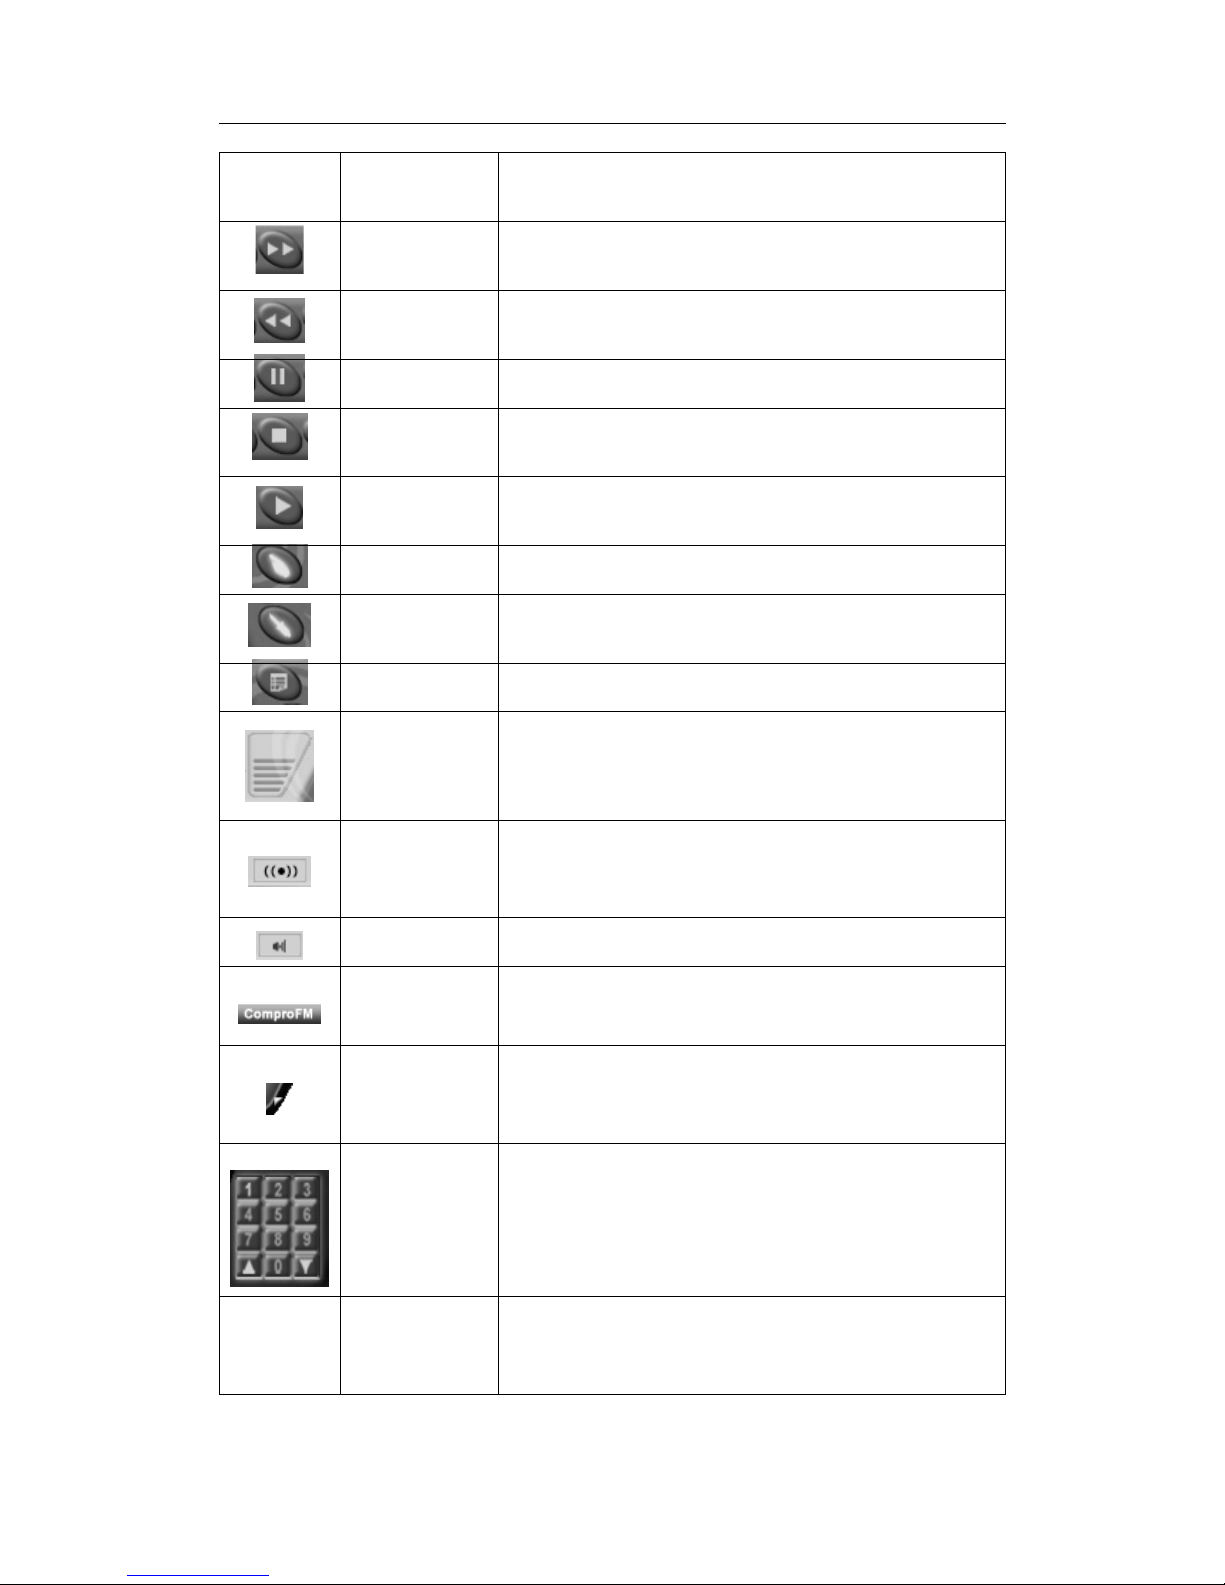
ICON
Keyboard
Shortcut
Description
Right Arrow
Station searching / Forward when
playing audio files
Left Arrow
Station searching / Backward when
playing audio files
Space Bar Pause - Suspend playback
O
Stop - Stop current action, e.g.,
recording, playback, Timeshifting.
Space Bar
Play - Begin playback of recorded
program
K Enter frequencies button
S
Properties - Open FM radio properties
window
B Schedule Recording setup.
+ / -
Volume Control - Increase or decrease
sound intensity. Drag your mouse over
this icon to change the audio volume.
Ctrl-S Stereo/Mono switch
M Mute - Press to mute or restore sound
I
About window - Shows ComproFM radio
version and copyright information
W Show/Hide number pad
Number
keypad
Select pre-set stations
n/a
L Sleep function
Page 52

ComproPVR 2 User's Guide
48
Listening
ComproFM lets you easily listen to your favorite FM
programs. After autoscanning the stations, you are ready
to listen.
Station Browsing
When listening to FM, you can browse stations with the
Station Down
and Station Up
buttons to
scroll up and down through the available, enabled
stations. The Page Up and Page Dn keys on your
keyboard can be used instead.
Jump directly to the desired station by typing your
keyboard or remote control, the station preset number.
The Last Station
(recall) button jumps back to the
previously selected FM station.
Recording
ComproFM is also a digital audio recorder. ComproFM
can record FM programming and save it to your hard
disk. ComproFM supports several encoding methods,
letting you choose between high quality and economical
use of disk space.
To instantly start recording:
1. Press the Record button
. ComproFM starts
recording the audio currently showing in the display
window. It will save it to a file on your disk.
2. Press the Stop button
to stop recording.
Page 53
ComproDVD 2
49
6 ComproDVD 2
Introduction
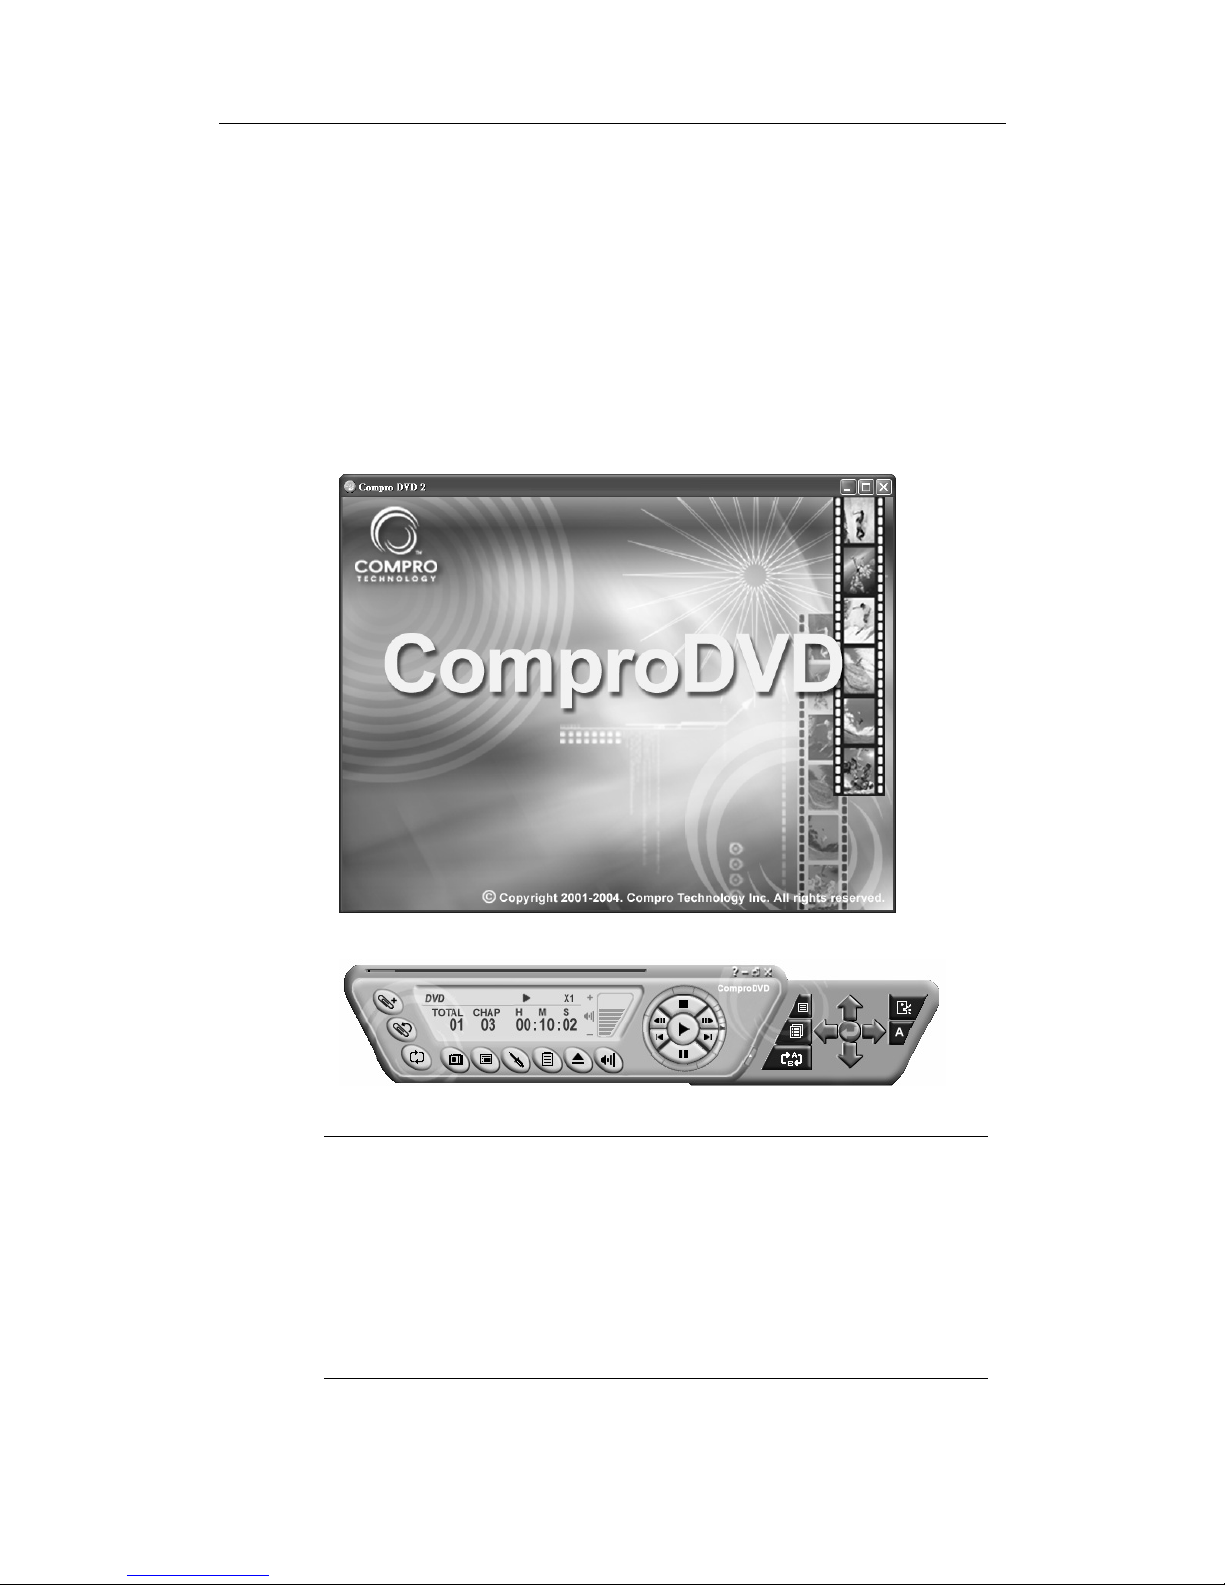
Stability, simplicity, and superiority. ComproDVD
epitomizes these traits to the maximum and gives users
all they wish for in a DVD player.
Note
The model needs bundled with ComproDVD in order to
use ComproDVD.
This section provides basic information for ComproDVD.
For more details, please check the help file of
ComproDVD or the manual in the installation CD.
Page 54

ComproPVR 2 User's Guide
50
Main Features
z Deluxe, ergonomic, multi-function IR remote control.
z Supports full resolution video playback at 720x480
for NTSC and 720x576 for PAL.
z Correct aspect ratio and deinterlaced video frame
capturing.
z Supports DVD (MPEG-2), DVD VR, VCD (MPEG-1),
SVCD, cDVD, cdDVD, miniDVD formats and DVD
files on hard disk drive (HDD) playback.
z Enriched playback smoothness and removal of
jitter/jerkiness.
z Supports audio CD and MP3 playback.
z Title and chapter navigation through numerous and
blazing fast methods.
z Navigation slider allows a direct and instantaneous
link to any scene.
z Step frame feature incorporating both forward and
backward directions.
z Proprietary dual subtitles capability.
z Closed captioning support.
z Language and subtitles selection.
z Auto-Resume continues exactly where DVD
playback had left off previously.
z A-B repeat function that lets you set your favorite
scenes for instant repeat to your heart's delight.
z Import and export your bookmarks.
z Bookmark viewer provides a visual display of all
bookmarked scenes.
z Snapshot your favorite pictures.
z Create playlist along with shuffle and repeat
functions
Page 55
ComproDVD 2
51
Control Panel
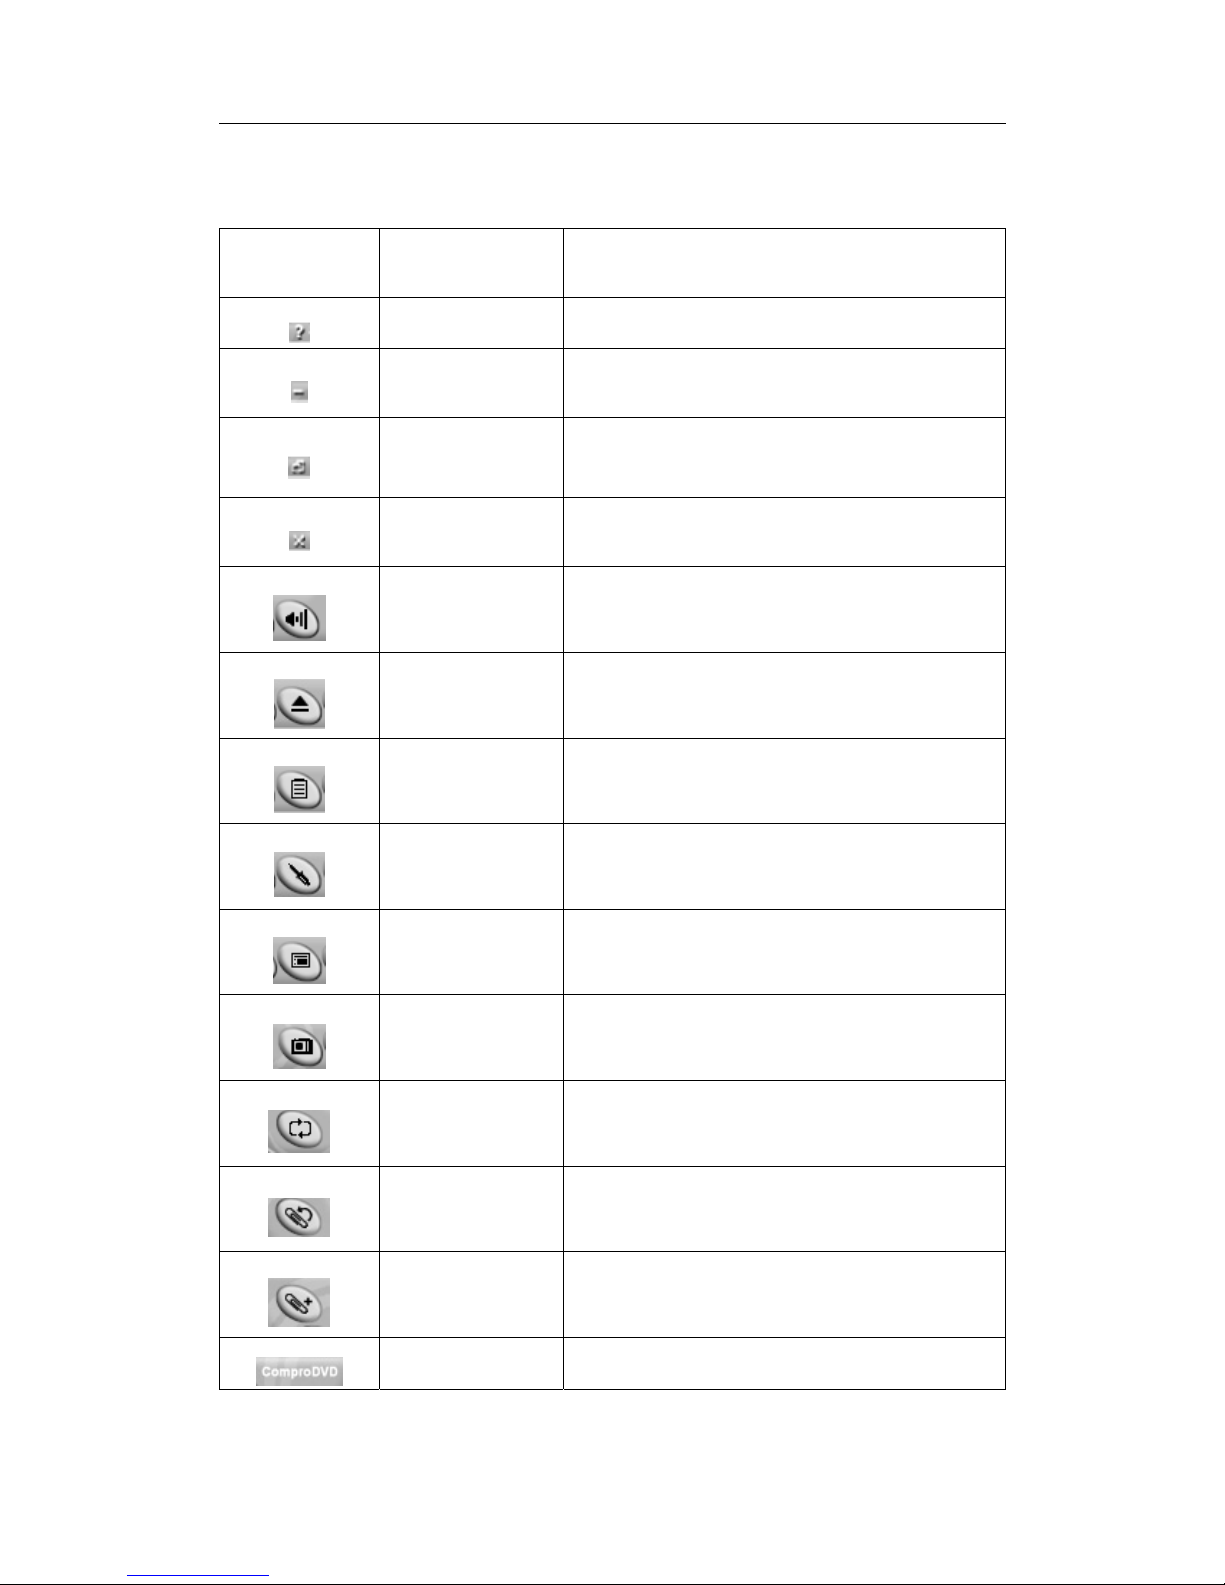
Icon
Keyboard Description
H Online Help System
Ctrl + N Minimize ComproDVD
W
Maximize or return to window
mode
Ctrl-X Exit ComproDVD
Ctrl-M Mute
Ctrl + E Eject / Insert CD or DVD
n/a Select media sources
E Options
M Menu
G Snapshot
R Title / Chapter repeat
F6 Move to bookmark
F5 Add to bookmark
Ctrl + A About ComproDVD version
Page 56
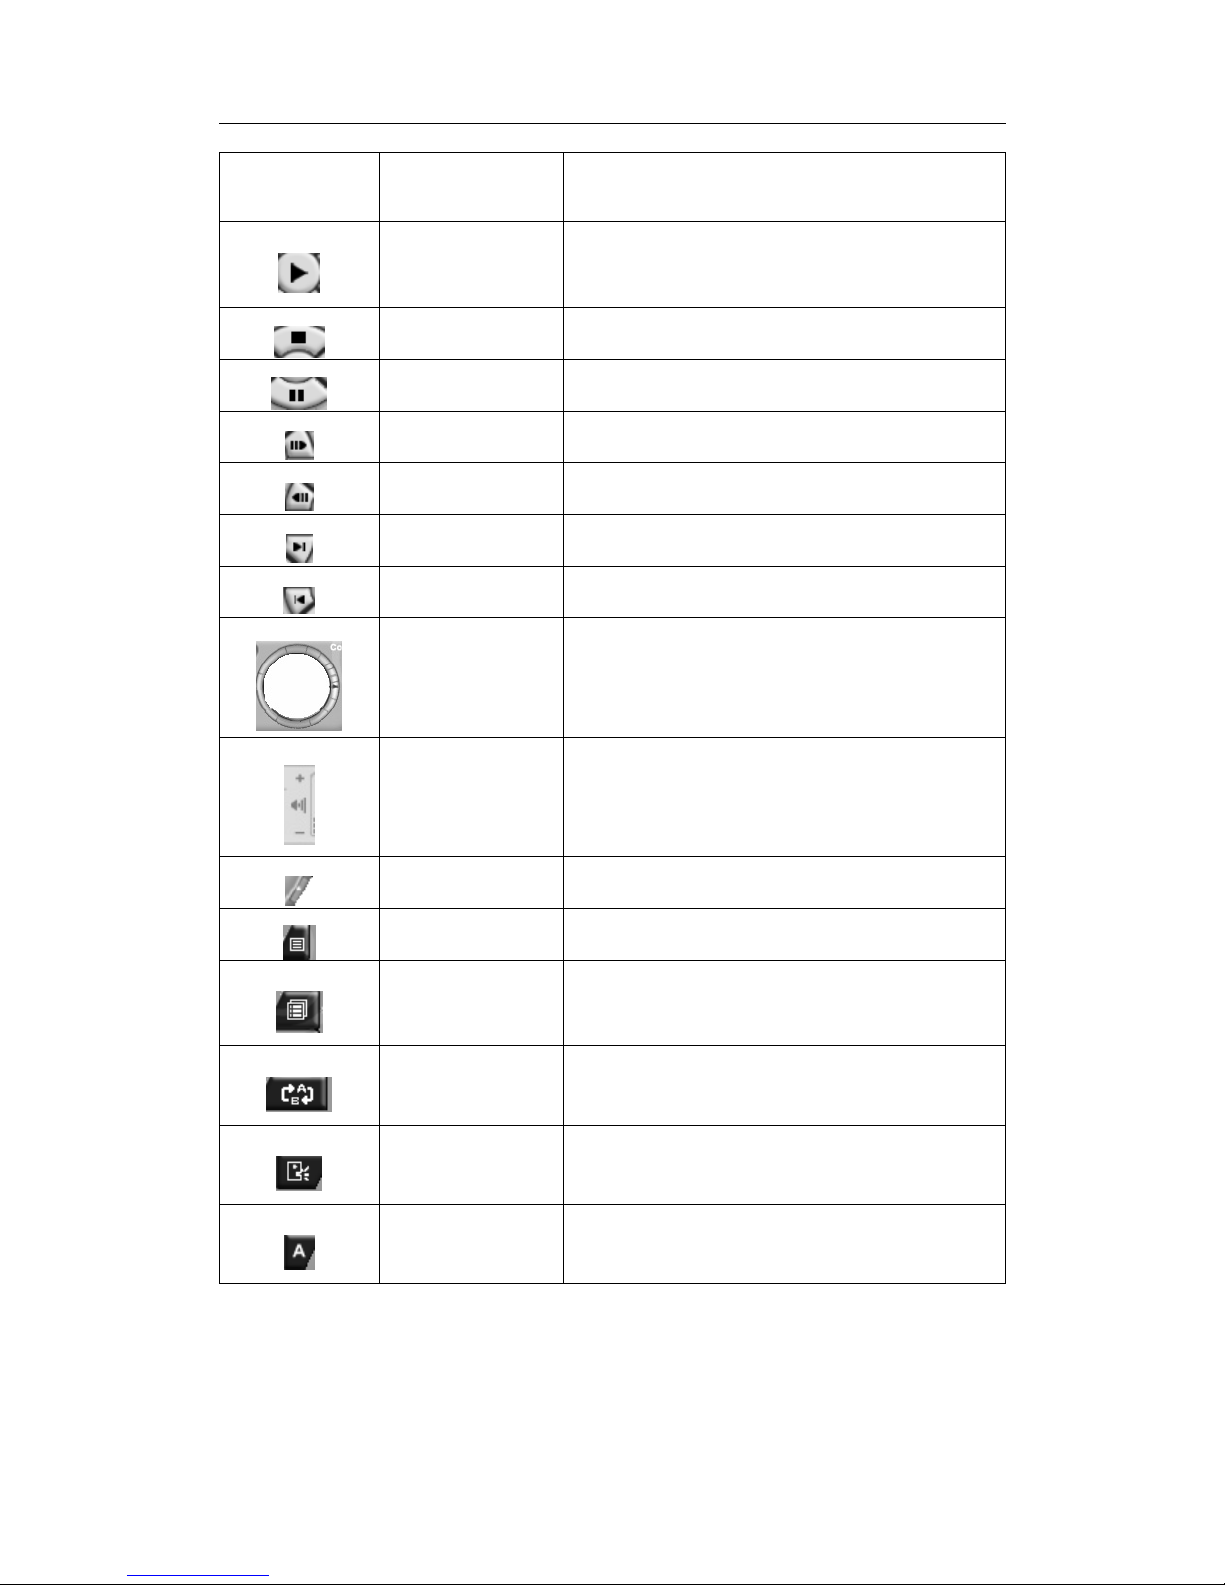
ComproPVR 2 User's Guide
52
Icon
Keyboard Description
Enter Play
S Stop
Space Pause
. Step forward
/ Step backward
N Next chapter
P Last chapter
n/a
Shuttle search controls (2 to 32
times speed forward or backward)
+ / - Volume Control
n/a Show/Hide keypad
T Main menu
n/a All menus
F4
A
B repeat (Set A / Set B to repeat /
Cancel)
L Select Language
U
Select Caption
Page 57
Troubleshooting
53
7 Troubleshooting
Driver Installation
The most common cause of problems with ComproPVR
is incorrect installation of TV Tuner card drivers. If you
have problems watching, recording, or timeshifting live
TV, please check the status of TV Tuner card drivers with
Device Manager.
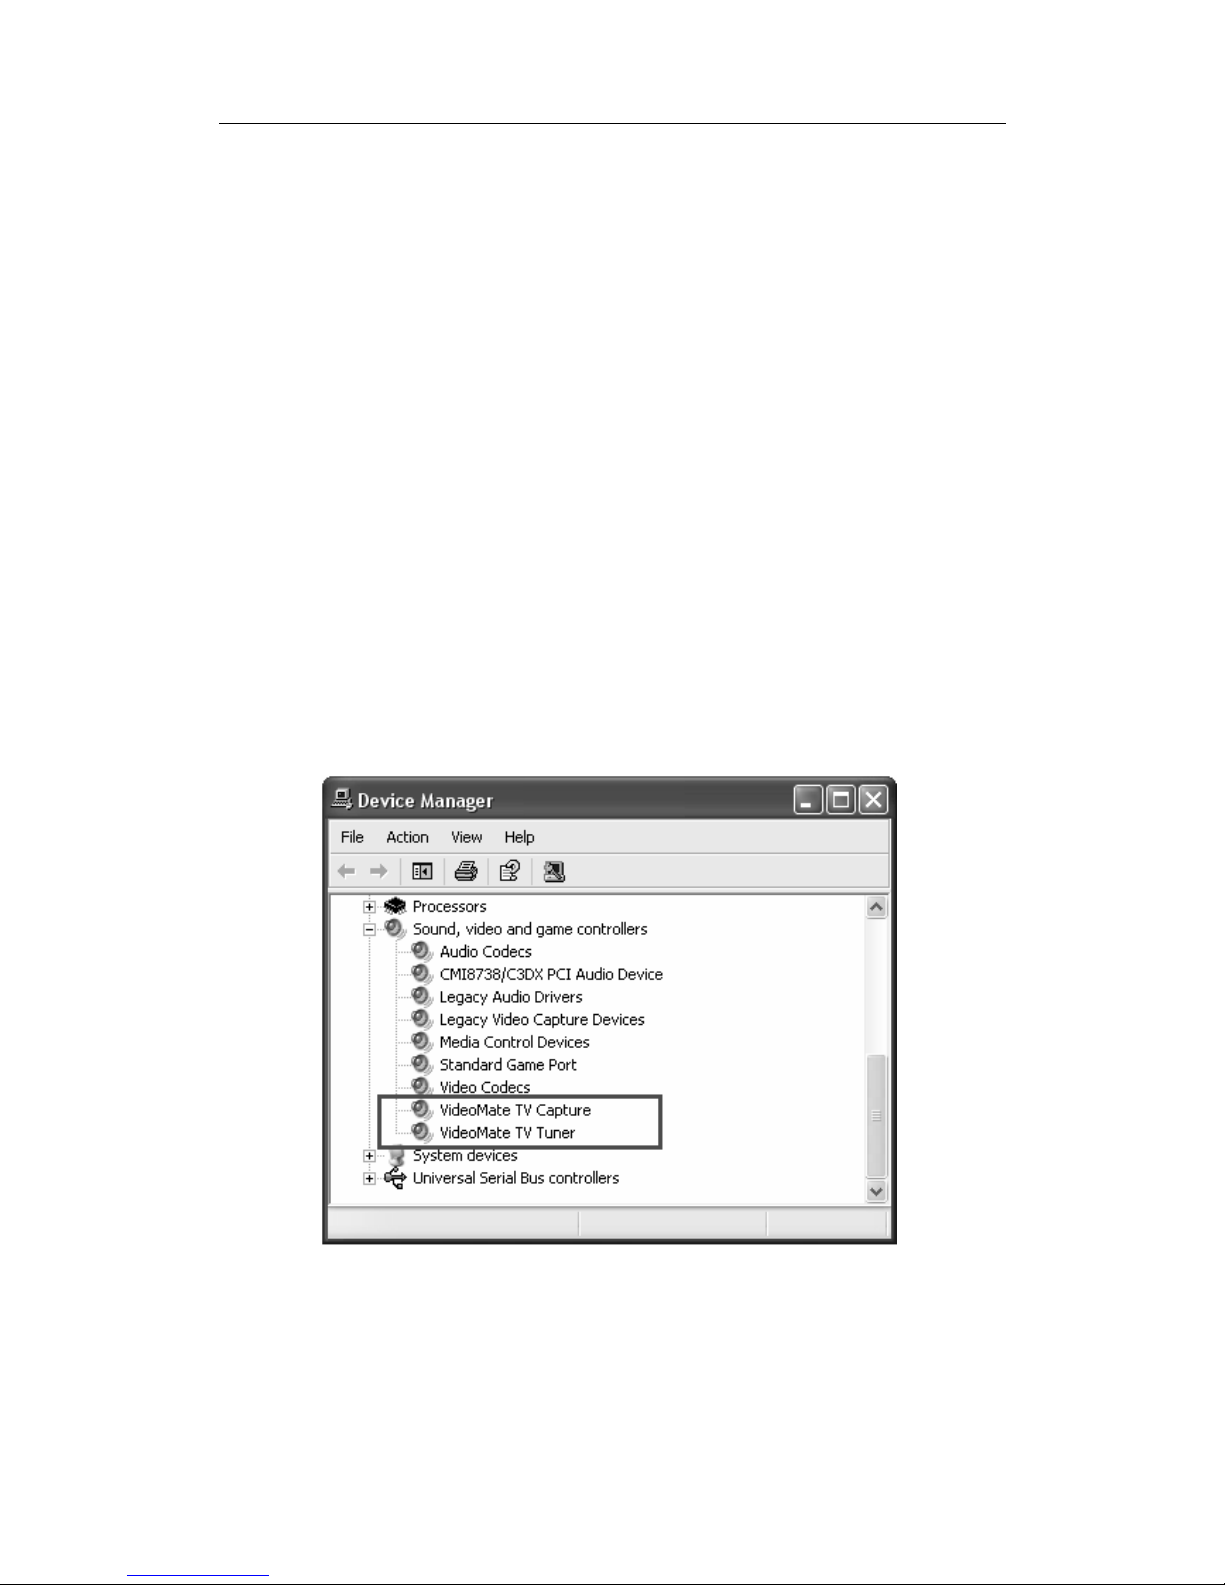
If you are using the Compro PCI Tuner card, you should
see
VideoMate TV Capture
VideoMate TV Tuner
drivers, in the "Sound, video and game controllers"
section of Windows Device Manager.
If these drivers are not there, uninstalling and reinstalling
the VideoMate TV drivers can help. Use the
Add/Remove Programs in Control Panel applet to
uninstall the old drivers if you see the icon. Then
reinstalling the drivers should fix this problem.
Page 58
ComproPVR 2 User's Guide
54
Error Code: 0x1000006
This error code generally indicates a driver installation
problem. Please uninstall and reinstall the drivers.
Follow the steps described above.
If the problem persists, your problem could also be the
result of an IRQ conflict. IRQ conflicts happen when
other devices, e.g., network card or sound card, in your
computer share the same IRQ with your TV tuner card.
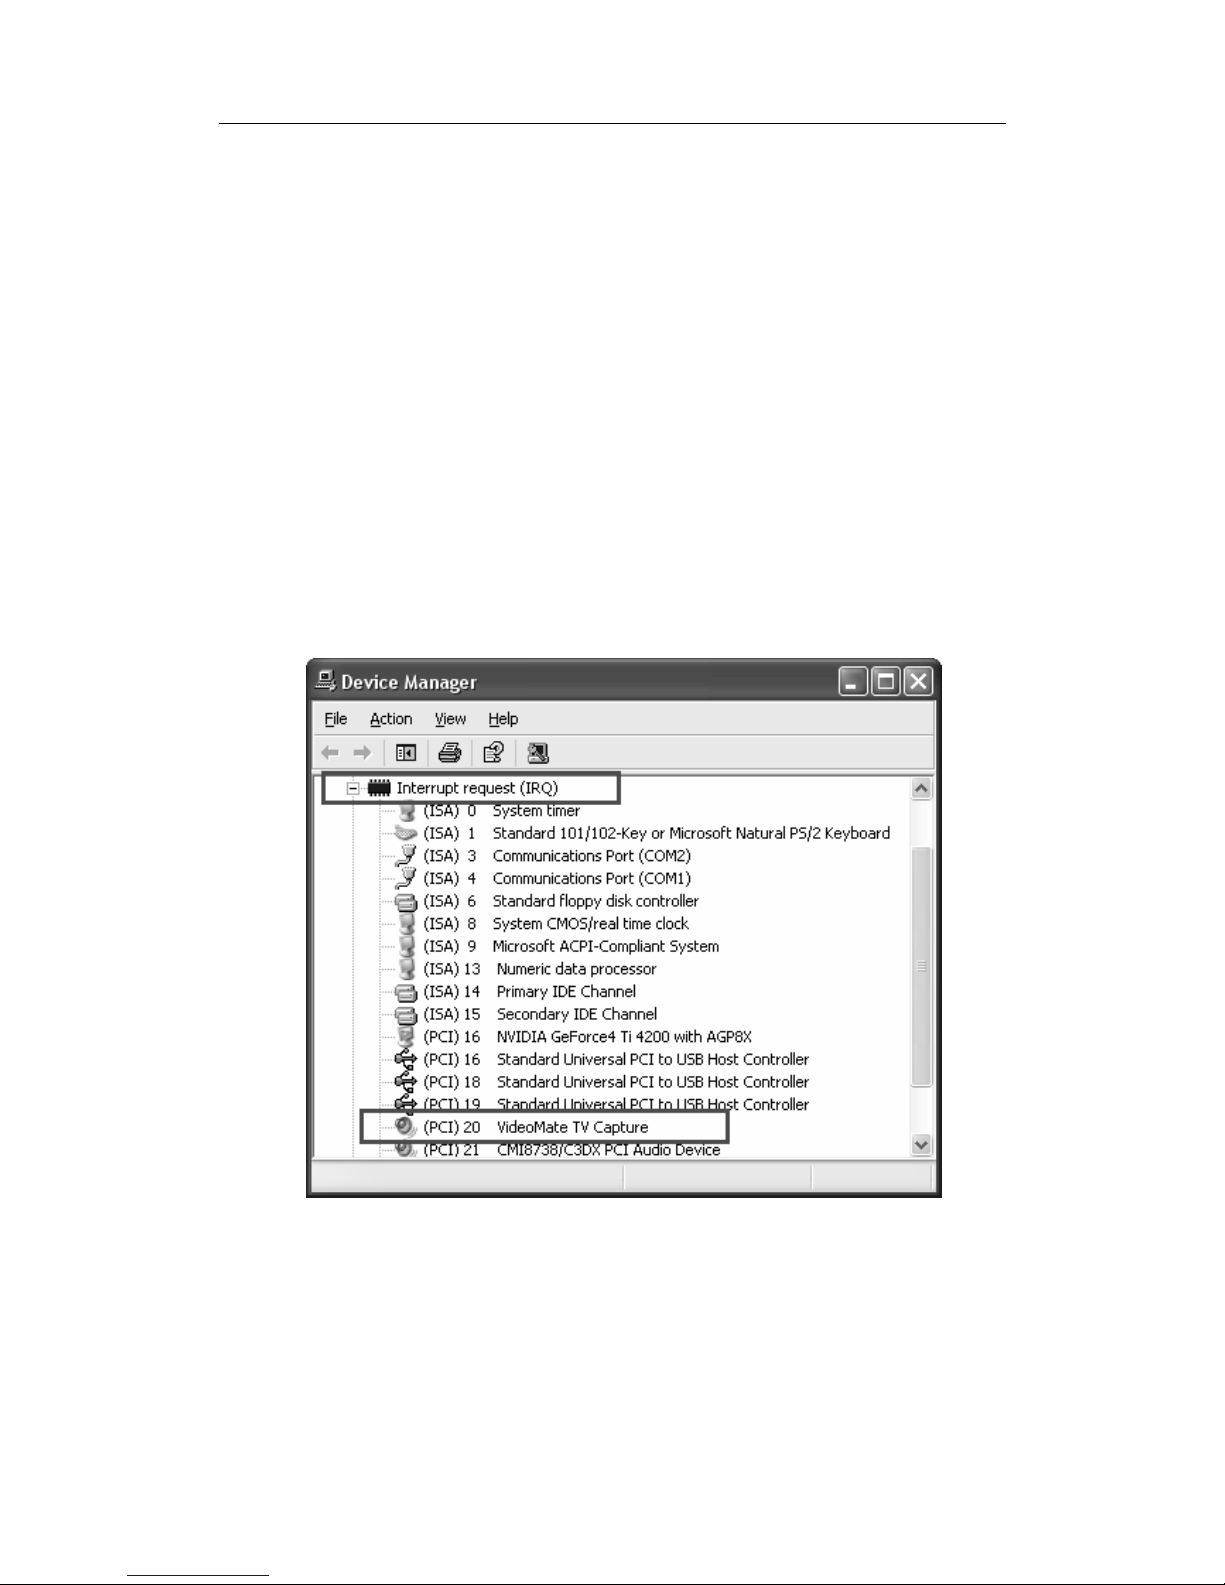
Use Device Manager to detect IRQ conflicts. In Device
Manager, choose "View->Resource by type" and click on
the "+" besides Interrupt request (IRQ). You should see
the following.
For best performance, no device should share an IRQ
with the VideoMate TV card.
If another device shares an IRQ with the TV tuner card,
remove other PCI cards from your PC and insert TV card
on the third or fourth slot from AGP only (if available).
Then uninstall and reinstall the TV card driver. This
Page 59

Troubleshooting
55
usually solves the problem. If the problem persists, you
should move the PCI TV Tuner card to another PCI slot.
After you are able to successfully use ComproPVR,
install the other PCI devices one at a time. Restart your
system and test ComproPVR after installing each card.
Audio OK / No Video
The main reason for this problem usually is the result of
an IRQ conflict. Please see Error Code: 0x1000006,
above, to solve it.
Video OK / No Audio
If you can view the TV picture but get no audio, you
should check the following:
First directly connect the speaker to the audio-out (green
circle) of TV card to see if the sound comes out. If so,
then the hardware is not defective.
Second, the external audio patch cable is color-coded.
Connect the green plug to the green Audio-Out port on
VideoMate TV PCI Tuner card and the blue plug to the
“Line-In” port of your sound card and that you have
selected the audio source to be “Line-In” in the System
Device in Settings of ComproPVR.
Third, check that the sound is not muted or volume too
low in the Windows Volume Control dialog. (Double-click
on the speaker icon in the system tray.)
Sometimes updating the sound card driver from vendor
or TV card’s driver and application may help as well.
Page 60

ComproPVR 2 User's Guide
56
Why can’t I record?
ComproPVR needs to use components of Ulead
PhotoExplore 8.0. If your computer doesn’t have
PhotoExplore, ComproPVR will fail to record. Please
reinstall Ulead PhotoExplore 8.0 from installation CD.
No audio in the recorded file. What's wrong?
This may be a result of choosing the wrong recording
audio source in the System Device in ComproPVR
Settings. If you are using an external audio patch cable,
verify that it is connected between the Audio-Out of TV
tuner card and Line-In of your sound card and that you
selected the audio source to be “Line-In.”
If using the internal audio patch cable, check that it is
connected between the internal Audio-Out of the TV
tuner card and AUX-In of your sound card and that you
selected the audio source to “AUX.” You may plug in to
CD-In. If so, please select the audio source to “CD-In.”
Check the recording volume levels in the Recording tab
in the Settings of ComproPVR.
Why does recorded video lag?
VideoMate TV PCI tuner card needs CPU to do the
encoding. Therefore, the lags come when CPU fails to
encode in real time. Usually, VCD quality needs about
900MHz CPU for recording while DVD quality needs
about 1.7G CPU for recording. Press Ctrl + Alt + Del to
check your CPU usage. If it reaches 100%, then the lag
is inevitable.
Page 61
Troubleshooting
57
The recorded file from VCR has no sound?
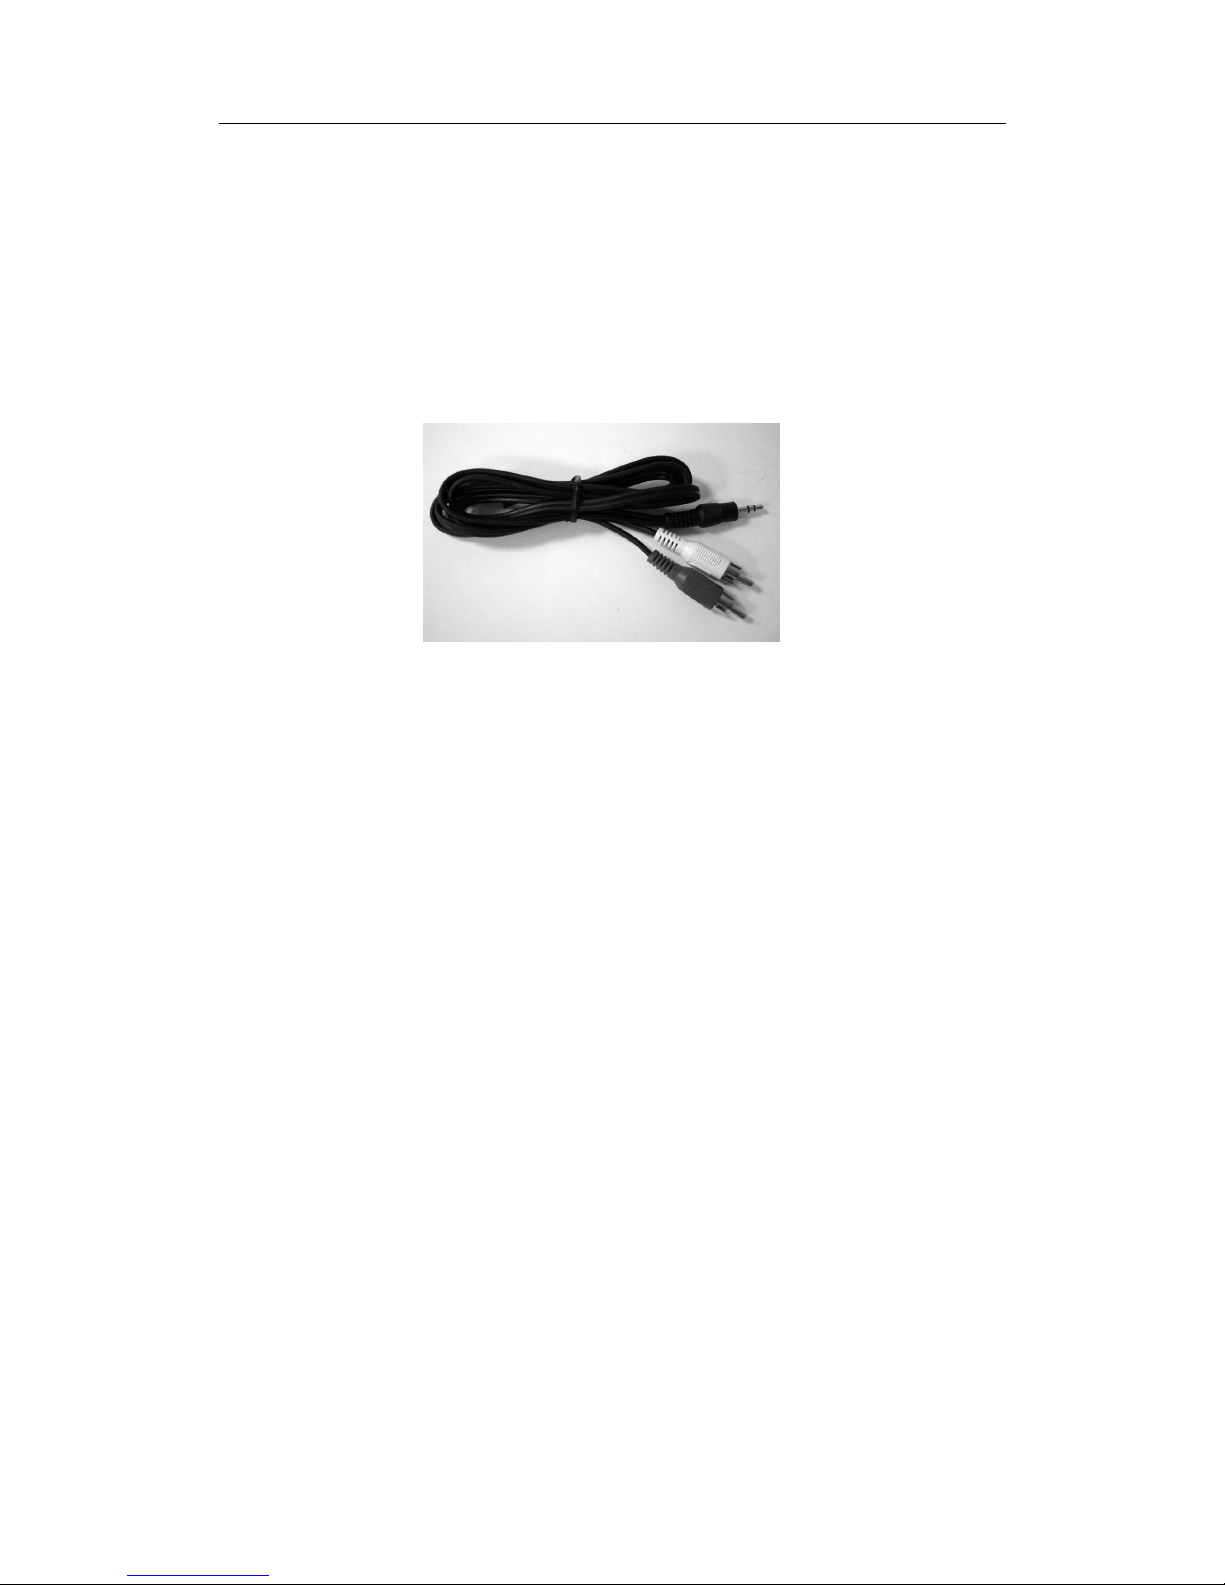
Please plug VCR Composite cable (yellow) into TV card
yellow connector. Composite Audio needs to connect to
the Audio-In port of TV card. You need to buy a converter
(see below) to transfer Composite Audio cable (red one
and white one) into stereo.
Why can’t I playback the recorded video?
The usual reason for this problem is due to a conflict with
some CODEC software, such as Nimo or K-Lite. This
kind of software forces applications to use their CODEC
for play back. Therefore, the recorded file cannot be
played since an incompatible CODEC is being used for
playback. Uninstalling the CODEC software will help.
Also reinstalling DirectX usually solves the problem.
(See our website for how to reinstall DirectX)
Why can’t I choose MPEG-4 format for recording?
If you would like to record video in MPEG-4 format, you
must supply your own MPEG-4 CODEC. Furthermore,
the CODEC must be installed before using ComproPVR.
In general, you can download MPEG-4 CODEC from the
following web sites.
http://www.divx.com/
http://www.microsoft.com/
Page 62

ComproPVR 2 User's Guide
58
After you install the CODEC software, you will see the
MPEG-4 format appear in the field of recording quality.
Note
Compro does not guarantee compatibility or
performance with third-party CODECs.
Why are images scrambled during recording?
Please update the video and sound card drivers from
vendors’ web sites. Make sure the driver for
motherboard chipset is also up to date. The default
drivers supplied with the Windows operating system are
usually too old to operate correctly. If you still have
problems, please install the latest ComproPVR and
driver from our website.
No response to the Settings button?
The main reason for this problem is usually the result of
installing other CODEC software like Nimo or K-Lite.
This kind of software forces applications to use their
CODEC for play back. Therefore, it causes corruption.
Uninstalling the CODEC software will help. Also
reinstalling DirectX usually solves the problem. (See our
website for how to reinstall DirectX)
It's also possible that Windows OS's system files has
been damaged by a virus or malicious software. If this is
the case, repair or fresh install the Windows OS
installation is the only way to solve this problem. Note
that repairing the OS will leave all the software and
settings.
Page 63

Troubleshooting
59
No Straight-to-Disc button?
Straight-to-Disc is only available with certain models.
Please check the side of the product box to confirm if this
model supports this feature.
This feature is only available on Windows XP and 2000.
You need to install the bundled Ulead DVD MovieFactory
software in order to have this feature. If you don’t have
Ulead DVD MovieFactory in the package, then this
model doesn’t support it.
TV is not clear?
Sometimes the signal could be reduced due to
branching. Please make sure the cable signal is good.
Try to move the computer to a TV set and connect the
cable which is being used for the TV set. Also directly
connecting the cable before the splitter may help.
This problem could also come from static. Once you
connect the cable to our TV card, the static interfere with
the system. It's possible to correct this problem by
connecting a wire from the grounding of the cable to
ground. Also make sure computer grounding is good.
Contacting Compro Technical Support
Before you submit an email for support, please check
support FAQs on our web site.
http://www.comprousa.com/support
When contacting Compro for technical support, please
use the Compro support request form and provide as
much of the requested information as possible. Please
write the details in order to determine the problem. And
also provide the product serial number (19 digits
Page 64

ComproPVR 2 User's Guide
60
numbers) on the PCI card. Please use the form from
below.http://comprousa.com/support/form.htm
Note
Providing the product serial number is crucial to verifying
exactly which product you are experiencing difficulty
with.
 Loading...