

Page 1
Rychlá instalační příručka
1. Úvod
Compex
Wireless-A/G
Dual-Band Network
Access Point
WPE54AG
www.cpx.cz
Verze 1.2
NETPASSAGE
Compex WPE54AG je dualbendový bezdrátový access point, který
pracuje na základě norem 802.11a, 11g a 11b.
Compex WPE54AG je kompaktní a velice výkonné accespointové
zařízení, které je navrženo a vyrobeno tak, aby podporovalo ty
nejvyšší bezpečnostní možnosti a vlastnosti jako jsou Wi-Fi Protected
Access (WPA1/2-PSK, WPA1/2-EAP), IEEE 802.1x Authentication
(TLS, TLLS, PEAP, EAP-SIM) a 64-bit nebo 128-bit Wired
Equivalent Privacy (WEP).
Exkluzivní Compex bezdrátová technologie je Wireless Pseudo
VLAN, která umožňuje po vytvoření přístupového bodu zajistit, aby
jednotliví uživatelé byly navzájem od sebe izolovaní (neviděli na
sebe). Je to způsobeno tím, že pro každého uživatele je vytvořena
samostatná VLAN, je možno zadat i více uživatelů do jedné VLAN.
Compex WPE54AG je schopen pracovat v celkem 6ti různým
operačních módech: Access Point Bridging, Access Point Client,
Gateway, Wireless Routing Client, Wireless Ethernet Adapter a
Wireless Bridge Link.
2. Instalace Hardwaru
1. Připojte jeden konec kříženého ethernetového kabelu do
Vašeho počítače a druhý konec kabelu do portu na zařízení
Compex WPE54AG.
2. Dále připojte napájecí adaptér, který je přibalen, do zásuvky.
3. Připojte kabel vedoucí z napájecího adaptéru do napájecí zdířky
Vašeho zařízení Compex WPE54AG.
Zásuvka
RJ45
Ethernet kabel
4. Zapněte Compex WPE54AG a počítač. Ujistěte se, že LAN
Compex
WPE54AG
Link/ACT LED a Power LED se rozsvítily. To pak indikuje,
že spojení je úspěšné a že byla dobře navázána konektivita
mezi Compex WPE54AG a počítačem.
PC
Page 2
3. Připojení do Webového konfigurační rozhranní
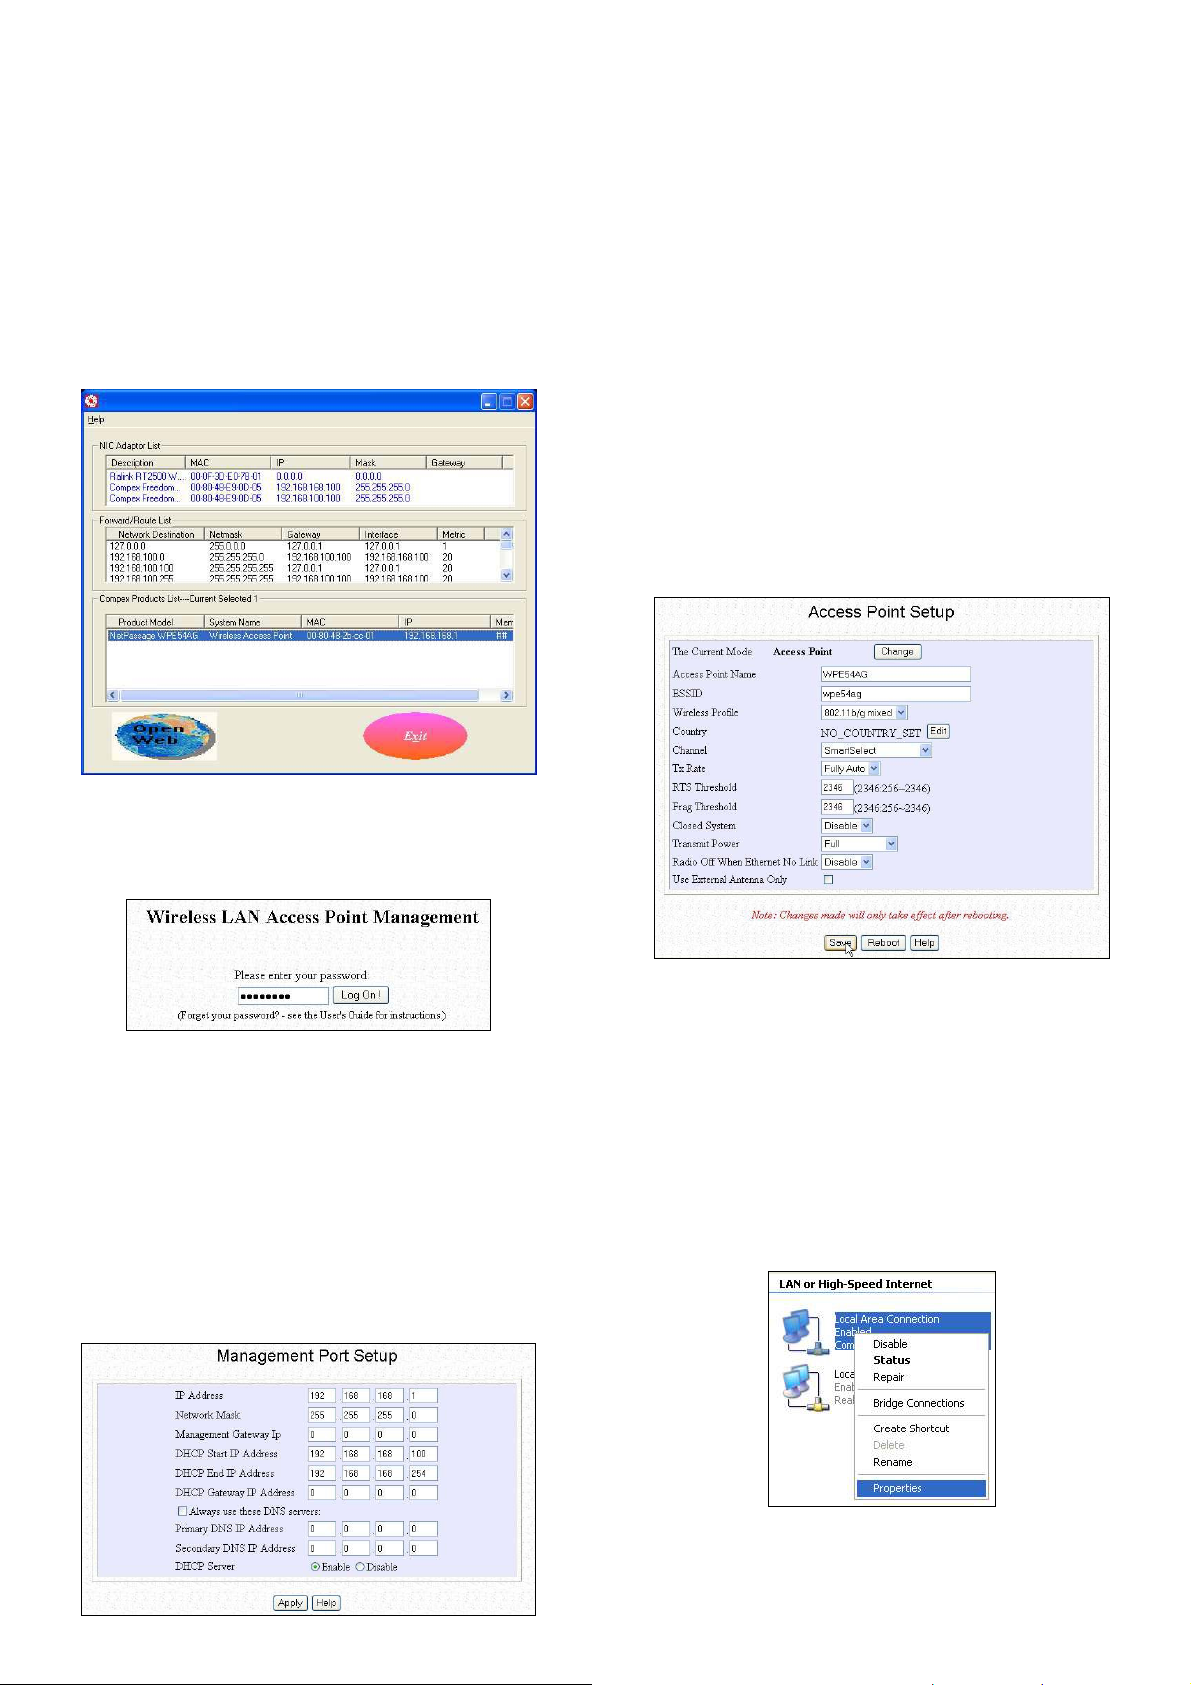
Compex vyvinul užitečnou utilitu uConfig, která Vám umožní velice
jednoduchý způsob, jak se z počítače připojit k Vašemu
konfiguračnímu rozhranní, aniž by bylo zapotřebí cokoli nastavovat.
Stačí jen
1. Vložte CD přiložené v balení do Vaší mechaniky. Přejděte do
sekce Utilities a vyberte uConfig a dejte spustit program.
2. Následující obrázek ukazuje příklad zobrazení. Vyberte
NetPassage WPE54AG a klikněte na tlačítko OpenWeb pro
otevření webové konsole.
Nyní je zařízení Compex WPE54AG funkční i jako DHCP Server,
který dokáže přidělovat IP adresy všem dostupným počítačům.
5. WLAN konfigurace Compex WPE54AG
1. Pro konfiguraci Compex WPE54AG pro bezdrátové klienty,
přejděte na menu WLAN Basic Setup v konfigurační sekci
CONFIGURATION.
2. Nejdůležitější ze stránky Access Point Setup je položka
ESSID, která identifikuje Vaši bezdrátovou síť pro klientská
zařízení.
3. Položku Chanel můžete nechat vyplněnou položkou
SmartSelect. Toto umožní Vašemu accesspointu automatický
výběr kanalů, který provede v závislosti na volném
frekvenčním pásmu tam, kde je umístěn.
4. Zbývající nastavení ponechte v původním stavu a stiskněte
tlačítko Apply pro akceptování změn.
3. Heslo je přednastaveno na password. Zároveň je toto heslo I
předvyplněno. Klikněte na Log On! Tlačítko pro přístup na
hlavní stránku.
Po otevření základní stránky Compex WPE54AG, můžete začít
konfigurovat zařízení podle Vašich potřeb.
4. Základní konfigurace Compex WPE54AG
1. Pro nastavení automatické IP adresace přejděte do
Management Port v konfigurační sekci CONFIGURATION.
2. Přejděte na položku DHCP Server a vyberte Enable. Klikněte
na tlačítko Apply pro potvrzení změn.
6. TCP/IP konfigurace pro WiFi klienty
Automatickou IP konfiguraci je možné na Vašem notebooku či
počítači nastavit následujícím způsobem. Je zapotřebí provést
konfiguraci TCP/IP nastavení, což se u Windows XP provádí takto:
1. Na Vaší pracovní ploše klikněte pravým tlačítkem na My
Network Places a vyberte položku Properties.
2. V dalším kroku vyberte připojený síťový adaptér, klikněte na
něj pravým tlačítkem a vyberte Properties.
Page 3

3. Označte Internet Protocol (TCP/IP) a klikněte na tlačítko
Properties.
6. Přejděte na záložku Wireless Networks a klikněte na tlačítko
Add..
4. Vyberte Obtain an IP address automatically a Obtain DNS
server address automatically. Klikněte na tlačítko OK pro
uložení změn.
Dále nastavení bezdrátového připojení pro Windows XP:
5. Pravým tlačítkem klikněte na
Wireless Network Connection
který se nachází mezi
síťovými adaptéry a který
chceme připojit k Access
pointu Compex WPE54AG.
Vyberte položku Properties.
7. Dále zadejte stejný název sítě (SSID) který se shoduje s tím, co
je zadáno jako ESSID v konfiguraci Vašeho Access Pointu.
Ujistěte se, že Network name (SSID) je stejné pro všechny
bezdrátové klienty v jedné síti
Pro tuto chvíli ponechte všechny ostatní nastavení v jejich výcozím
stavu.
Network Authentication: Open
Data encryption: Disabled
Pro podrobnější konfiguraci se podívejte to kopletního uživatelského
manuálu.
Page 4

7. Popis zařízení
1
2
Bod Popis
1 LAN Link/Act
LED
2 WLAN Link/Act
LED
3 Diagnostická
LED
4 Napájecí LED
5 Externí Anténa Otočná anténa
6 LAN RJ45
Ethernet Port
7 DC 3.3V 3A Napájecí port 3.3VDC
8 Reset tlačítko Stiskněte tlačítko:
6 7 8 5
žlutá Compex WPE54AG je
připojen rychlostí
10Mbps.
zelená Compex WPE54AG je
připojen rychlostí
100Mbps.
zelená K bezdrátové síti je
připojen více než 1
klient.
blikající zelená Pohyb dat po
bezdrátové síti.
zelená Zařízení je v režimu
access point nebo
gateway.
blikající zelená Zařízení nabíhá.
zhasnutá Zařízení je v klientském
módu.
modrá Zařízení je připojeno
k napájení.
zhasnutá Zařízení je vypnuto.
Using RJ45 Ethernet cable for connection.
2s pro restart zařízení
2s až 10s pro resete do výchozího
nastavení
> 10s pro změnu operačního módu
Disclaimer: Compex, Inc. provides this guide without warranty of any kind, either expressed or implied,
including but not limited to the implied warranties of merchantability and fitness for a particular purpose.
Compex, Inc. may make improvements and/or changes to the product and/or specifications of the product
described in this guide, without prior notice. Compex, Inc will not be liable for any technical inaccuracies or
5
3
4
typographical errors found in this guide. Changes are periodically made to the information contained herein
and will be incorporated into later versions of the guide. The information contained is subject to change
without prior notice.
Trademark Information: Compex
Inc. Microsoft Windows and the Windows logo are the trademarks of Microsoft Corp. NetWare is the
registered trademark of Novell Inc. All other brand and product names are trademarks or registered
trademarks of their respective owners.
Notice: Copyrights
without prior permission of Compex, Inc. is prohibited, except as allowed under the copyright laws.
Manual Revision by Ann
Manual Number: M-0428-V1.2C Verze 1.2, Únor 2005
FCC NOTICE: This device has been tested and found to comply with the limits for a Class B digital device,
pursuant to Part 15 of the FCC Rules. These limits are designed to provide reasonable protection against
harmful interference in a residential installation. This device generates, uses and can radiate radio frequency
energy and, if not installed and used in accordance with the instructions, may cause harmful interference to
radio communications. However, there is no guarantee that interference will not occur in a particular
installation. If this device does cause harmful interference to radio or television reception, the user is
encouraged to try to correct the interference by one or more of the following measures:
Reorient or relocate the receiving antenna.
Connect the computer into an outlet on a
circuit different from that to which the
receiver is connected.
Caution: Any changes or modifications not expressly approved by the grantee of this device could void the
user's authority to operate the equipment.
FCC Compliance Statement: This device complies with Part 15 of the FCC Rules. Operation is subject to
the following two conditions:
(1)
This device may not cause harmful interference, and
(2)
This device must accept any interference received, including interference that may cause undesired
operation.
Products that contain a radio transmitter are labeled with FCC ID and may also carry the FCC logo.
Caution: Exposure to Radio Frequency Radiation.
To comply with the FCC RF exposure compliance requirements, the following antenna installation and device
operating configurations must be satisfied:
a.
For configurations using the integral antenna, the separation distance between the antenna(s) and any
person’s body (including hands, wrists, feet and ankles) must be at least 2.5cm (1 inch).
b.
For configurations using an approved external antenna, the separation distance between the antenna and
any person’s body (including hands, wrists, feet and ankles) must be at least 20cm (8 inch).
The transmitter shall not be collocated with other transmitters or antennas.
ICES 003 Statement
This Class B digital apparatus complies with Canadian ICES-003.
DECLARATION OF CONFORMITY: Compex, Inc. declares that the product:
Product Name: Compex Wireless-A/G Dual-Band Network Access Point
Model No.: WPE54AG conforms to the following Product Standards:
Radiated Emission Standards: ETSI EN 300 328-2: July 2000; FCC: 47 CFR Part 15, Subpart B, ANSI
C63.4-1992; 47 CFR Part 15, Subpart C (Section 15.247), ANSI C63.4-1992.
Conducted Emission Standards: ETS 300 826: Nov. 1997.
Immunity Standards: IEC 801-2; IEC 801-3; IEC 801-4
Low Voltage Directive: EN 60 950:1992+A1: 1993+A2: 1993+A3; 1995+A4; 1996+A11: 1997
Therefore, this product is in conformity with the following regional standards: FCC Class B – following the
provisions of FCC Part 15 directive; CE Mark – following the provisions of the EC directive.
Manufacturer’s Name: Compex, Inc.
Address:840 Columbia Street , Suite B
Brea, CA 92821, USA
©
2004 by Compex, Inc. All rights reserved. Reproduction, adaptation, or translation
®
, ReadyLINK® and MicroHub® are registered trademarks of Compex,
Increase the separation between the computer and
receiver.
Consult the dealer or an experienced radio / TV
technician for help.
European Contact & Technical Support
ReadyLINK Networktechnology GmbH,
Albert Einstein Straβe 34/M21,
63322 Rödermark, Germany
Fax: ++49 (60) 749-0668
------ -Cut along the dotted line----------Cut along the dotted line----------Cut along the dotted line--------- --
WARRANTY REGISTRATION CARD
Register via the Internet at http://www.cpx.com or http://www.compex.com.sg
To activate the warranty, please complete this card and return to Compex within ninety
Please e-mail this warranty card to support@compex.com.sg.
Product: Purchase Date: Model: Serial No:
------ Cut along the dotted line-----
Name: E-mail:
Company:
Email:
Postal/Zip Code: Country:
Phone: ( )
--- Cut along the dotted line-----
Note:
For purchases within U.S.A and Canada, please fax to Compex, Inc. at (714) 482 0332
For purchases outside U.S.A and Canada, please fax to Compex Systems Pte Ltd at (65) 62809947
----Cut along the dotted line----
(90) days from the date of purchase.
[M-0088-V2.4C]
----Cut along the dotted line----
--
 Loading...