

Page 1
Page 2

© Copyright 2004 Compex Systems Pte Ltd
All Rights Reserved
This document contains information, which is protected by copyright. Reproduction, adaptation
or translation without prior permission is prohibited, except as allowed under the copyright
laws.
Trademark Information
Compex®, ReadyLINK® and MicroHub® are registered trademarks of Compex, Inc. Microsoft
Windows and the Windows logo are the trademarks of Microsoft Corp. NetWare is the
registered trademark of Novell Inc. All other brand and product names are trademarks or
registered trademarks of their respective owners.
Notice: Copyrights © 2004 by Compex, Inc. All rights reserved. Reproduction, adaptation, or
translation without prior permission of Compex, Inc. is prohibited, except as allowed under the
copyright laws.
Manual Revision by Ong
Manual Number: U-0334-V1.2C Version 1.2, July 2004
Disclaimer
Compex, Inc. provides this manual without warranty of any kind, either expressed or implied,
including but not limited to the implied warranties of merchantability and fitness for a particular
purpose. Compex, Inc. may make improvements and/or changes to the product and/or
specifications of the product described in this manual, without prior notice. Compex, Inc will
not be liable for any technical inaccuracies or typographical errors found in this guide. Changes
are periodically made to the information contained herein and will be incorporated into later
versions of the manual. The information contained is subject to change without prior notice.
Your Feedback
We value your feedback. If you find any errors in this user’s manual, or if you have suggestions
on improving, we would like to hear from you. Please contact us at:
Fax: (65) 62809947
Email: feedback@compex.com.sg
i
Page 3

FCC NOTICE
This device has been tested and found to comply with the limits for a Class A digital device,
pursuant to Part 15 of the FCC Rules. These limits are designed to provide reasonable
protection against harmful interference in a residential installation. This device generates, uses
and can radiate radio frequency energy and, if not installed and used in accordance with the
instructions, may cause harmful interference to radio communications. However, there is no
guarantee that interference will not occur in a particular installation. If this device does cause
harmful interference to radio or television reception, the user is encouraged to try to correct the
interference by one or more of the following measures:
• Reorient or relocate the receiving antenna.
• Connect the computer into an outlet on a circuit different from that to which the receiver is
connected.
• Increase the separation between the computer and receiver.
• Consult the dealer or an experienced radio/TV technician for help.
Caution: Any changes or modifications not expressly approved by the grantee of this device
could void the user's authority to operate the equipment.
FCC Compliance Statement: This device complies with Part 15 of the FCC Rules. Operation is
subject to the following two conditions:
1. This device may not cause harmful interference, and
2. This device must accept any interference received, including interference that may cause
undesired operation.
Declaration of Conformity
Compex, Inc. declares the following:
Product Name: Compex 24 Port 10/100Mbps plus 2 Port Gigabit Copper SNMP Managed
Switch
Model No: SGX3226 conforms to the following Product Standards:
This device complies with the Electromagnetic Compatibility Directive (89/336/EEC) issued by
the Commission of the European Community.
Electromagnetic Interference (Conduction and Radiation): EN 55022 (CISPR 22)
Electromagnetic Immunity: EN 55024 (IEC61000-4-2,3,4,5,6,8,11)
Power Line Harmonics: EN 61000-3-2 (IEC610000-3-2)
Power Line Flicker: EN 61000-3-3 (IEC610000-3-3)
Product Safety: EN 60950 (IEC60950)
ii
Page 4

Therefore, this product is in conformity with the following regional standards: FCC Class A
following the provisions of FCC Part 15 directive; CE Mark following the provisions of the
EC directive.
This Class A digital apparatus complies with Canadian ICES-003.
iii
Page 5

Technical Support Information
The warranty information and registration form are found in the Quick Install Guide.
For technical support, you may contact Compex or its subsidiaries. For your convenience, you
may also seek technical assistance from the local distributor, or from the authorized
dealer/reseller that you have purchased this product from. For technical support by email, write
to support@compex.com.sg.
Refer to the table below for the nearest Technical Support Centers:
Technical Support Centers
Contact the technical support center that services your location.
U.S.A., Canada, Latin America and South America
! Write
" Call
Fax
! Write
" Call
Fax
! Write
" Call
Fax
Internet
access/
Website: http://www.cpx.com or http://www.compex.com.sg
Compex, Inc.
4051 E. La Palma, Unit A
Anaheim, CA 92807, USA
Tel:
Tel:
Fax:
BBS:
+1 (714) 630-7302 (8 a.m.-5 p.m. Pacific time)
+1 (800) 279-8891 (Ext.122 Technical Support)
+1 (714) 630-6521
+1 (714) 630-2570 (24-hour access)
Europe
ReadyLINK Networktechnology Gmbh
Albert Einstein Straβe 34/M21
63322 Rödermark, Germany
Tel:
Fax:
BBS:
Support Email:
+49 (0) 6074 - 98017 (8 a.m.-5 p.m. local time)
+49 (0) 6074 - 90668
+49 (0) 6074 - 93974 (24-hour access)
readylink@compex.com.sg
Asia, Australia, New Zealand, Middle East
and the rest of the World
Compex Systems Pte Ltd
135, Joo Seng Road #08-01, PM Industrial Building
Singapore 368363
Tel:
Tel:
Fax:
BBS:
E-mail:
FTPsite:
(65) 6286-1805 (8 a.m.-5 p.m. local time)
(65) 6286-2086 (Ext.199 Technical Support)
(65) 6283-8337
(65) 6282-8854 (24-hour access)
support@compex.com.sg
ftp.compex.com.sg
iv
Page 6

About This Document
The product described in this document, Compex Web Management Switch Series, Compex
SGX3226 is a licensed product of Compex Systems Pte Ltd. This document contains
instructions for installing, configuring and using Compex SGX3226. It also gives an overview
of the key applications and the networking concepts with respect to the product.
This documentation is for both Network Administrators and the end user who possesses some
basic knowledge in the networking structure and protocols.
It makes a few assumptions that the host computer has already been installed with TCP/IP and
already up & running and accessing the Internet. Procedures for Windows 98/2000/XP
operating systems are included in this document. However, for other operating system, you may
need to refer to your operating system’s documentation for networking.
How to Use this Document
The document is written in such a way that you as a user will find it convenient to find specific
information pertaining to the product. It comprises of chapters that explain in details on the
installation and configuration of Compex SGX3226.
Firmware
This manual is written based on Firmware V1.80 Build 20040804.
Conventions
In this document, special conventions are used to help and present the information clearly. The
Compex 24 Port 10/100Mbps plus 2 Port Gigabit Copper SNMP Managed Switch SGX3226 is
often referred to as Compex SGX3226 in this document. Below is a list of conventions used
throughout.
NOTE
This section will consist of important features or instructions
CAUTION
This section concerns risk of injury, system damage or loss of data
WARNING
This section concerns risk of severe injury
v
Page 7

References on Menu Command, Push Button, Radio Button, LED and Label appear in Bold.
For example, “Click on the Ok button”
vi
Page 8

Table of Contents
Copyrights © 2004 Compex Systems Pte Ltd ..................................................................................i
Trademark Information.....................................................................................................................i
Disclaimer ........................................................................................................................................i
Your Feedback..................................................................................................................................i
FCC NOTICE..................................................................................................................................ii
Declaration of Conformity...............................................................................................................ii
Technical Support Information.......................................................................................................iv
About This Document .....................................................................................................................v
How to Use this Document..............................................................................................................v
Firmware .........................................................................................................................................v
Conventions..................................................................................................................................... v
Chapter 1 Product Overview.................................................................................... 1
1.1 Introduction............................................................................................................................1
1.2 Features and Benefits .............................................................................................................1
1.3 Network Applications ............................................................................................................3
Chapter 2 Getting Started ........................................................................................ 6
2.1 Packaging Content .................................................................................................................6
2.2 Setup Considerations..............................................................................................................7
2.2.1 Software Requirements..............................................................................................7
Chapter 3 Hardware Installation............................................................................. 8
3.1 Physical Setup for Compex SGX3226 ...................................................................................8
3.1.1 Desktop Installation................................................................................................... 8
3.1.2 Rack-Mounted Installation.........................................................................................8
3.1.3 Expansion Module Installation ..................................................................................9
3.1.4 To remove Expansion Module...................................................................................9
3.2 Connecting Your modem to Compex SGX3226..................................................................10
3.3 Connecting Your Compex SGX3226 to your Network........................................................ 10
3.4 Performing Power On Self Test (P.O.S.T.)..........................................................................10
Chapter 4 Software Installation............................................................................. 11
4.1 Configuring your PC’s setting - TCP/IP Configuration .......................................................11
4.2 NPfind Utility Software .......................................................................................................12
4.3 Hyper Terminal Configuration.............................................................................................13
4.4 Accessing to web-based Interface ........................................................................................ 15
4.4.1 Login to Web Browser Interface..............................................................................15
vii
Page 9

Table of Contents
Chapter 5 Web-based Interface Configuration for Compex SGX3226 .............. 19
5.1 Port Configuration................................................................................................................19
5.2 VLAN Configuration ...........................................................................................................21
5.3 Trunk Configuration.............................................................................................................22
5.4 DHCP Config.......................................................................................................................23
5.4.1 DHCP Active Leases...............................................................................................25
5.4.2 DHCP Server Reservations......................................................................................25
5.5 WAN Config ........................................................................................................................ 27
5.6 NAT Config .........................................................................................................................28
5.6.1 Static IP Setting (IP Forwarding)............................................................................. 29
5.6.2 Static Port Setting (Port Forwarding).......................................................................29
5.6.3 Filtering Setting.......................................................................................................31
Chapter 6 Configuring Your Wide Area Network............................................... 34
6.1 Selecting the Right connection for your Broadband Internet Service...................................34
6.2 Setup on Compex SGX3226 for Broadband Internet Access...............................................35
6.3 Configuring Static IP Connection ........................................................................................36
6.4 Configuring Dynamic IP Connection...................................................................................36
6.4.1 How to configure Singapore Cable Vision (SCV) Service ......................................37
6.4.2 How to Configure @HOME Cable Service.............................................................37
6.5 Configuring PPP over Ethernet Session (PPPoE).................................................................38
6.5.1 How to Configure SingNet, PacNet &QALA DSL Broadband...............................38
Chapter 7 Advanced Configuration for Compex SGX3226 ................................ 41
7.1 STP Config...........................................................................................................................41
7.1.1 STP Port...................................................................................................................41
7.1.2 STP Bridge ..............................................................................................................43
7.2 IGMP Config........................................................................................................................45
7.2.1 Definition on IGMP v1.0 and v2.0 ..........................................................................46
7.3 Stack Configuration .............................................................................................................47
7.3.1 Application on Stack Management .......................................................................... 49
7.4 SNMP Configuration............................................................................................................51
7.5 RMON Statistics ..................................................................................................................52
7.6 Port Security.........................................................................................................................53
7.6.1 To delete MAC Address/es......................................................................................53
7.7 MirrorPort Config ................................................................................................................54
7.7.1 Using Mirror Port to monitor Traffic.......................................................................54
7.8 Aging Control ......................................................................................................................55
7.9 Address Search.....................................................................................................................56
7.9.1 Host Search..............................................................................................................56
7.9.2 MAC Address Search .............................................................................................. 57
viii
Page 10

Table of Contents
Chapter 8 Using SYSTEM TOOLS Menu ............................................................ 58
8.1 Set System Clock .................................................................................................................58
8.2 Remote Management............................................................................................................59
8.3 System Configuration...........................................................................................................61
8.4 System Information..............................................................................................................62
8.5 Change Password .................................................................................................................62
8.5.1 Forget your password...............................................................................................63
8.6 Firmware Upgrade ...............................................................................................................64
8.7 Save or Reset Settings..........................................................................................................65
8.7.1 Save .........................................................................................................................65
8.7.2 Backup..................................................................................................................... 65
8.7.3 Restore..................................................................................................................... 66
8.7.4 Clear and Reset........................................................................................................ 67
8.8 Message Window ................................................................................................................. 68
8.9 Reboot Switch ...................................................................................................................... 68
8.10 Logout.................................................................................................................................. 69
Chapter 9 Using HELP Menu ................................................................................ 70
9.1 Technical Support ................................................................................................................70
Chapter 10 Application on Virtual LAN ................................................................. 71
10.1 Untagged and Tag Configuration using Web-based Interface.............................................. 71
Appendix I Panel Views and Descriptions............................................................... 74
Appendix II Technical Specifications........................................................................ 79
ix
Page 11

Chapter 1 Product Overview
Chapter 1 Product Overview
1.1 Introduction
Compex Managed Switch Series Compex SGX3226 is a 24-port 10/100Mbps Fast
Ethernet SNMP Managed Switch with Integrated Router, which comes with 2
expansion slots to support 1000 Base-T Gigabit Copper Modules for uplink
connection.
All 24 auto-sensing ports, which have the abilities to support full and half duplex
transmission, are on independent switching segment.
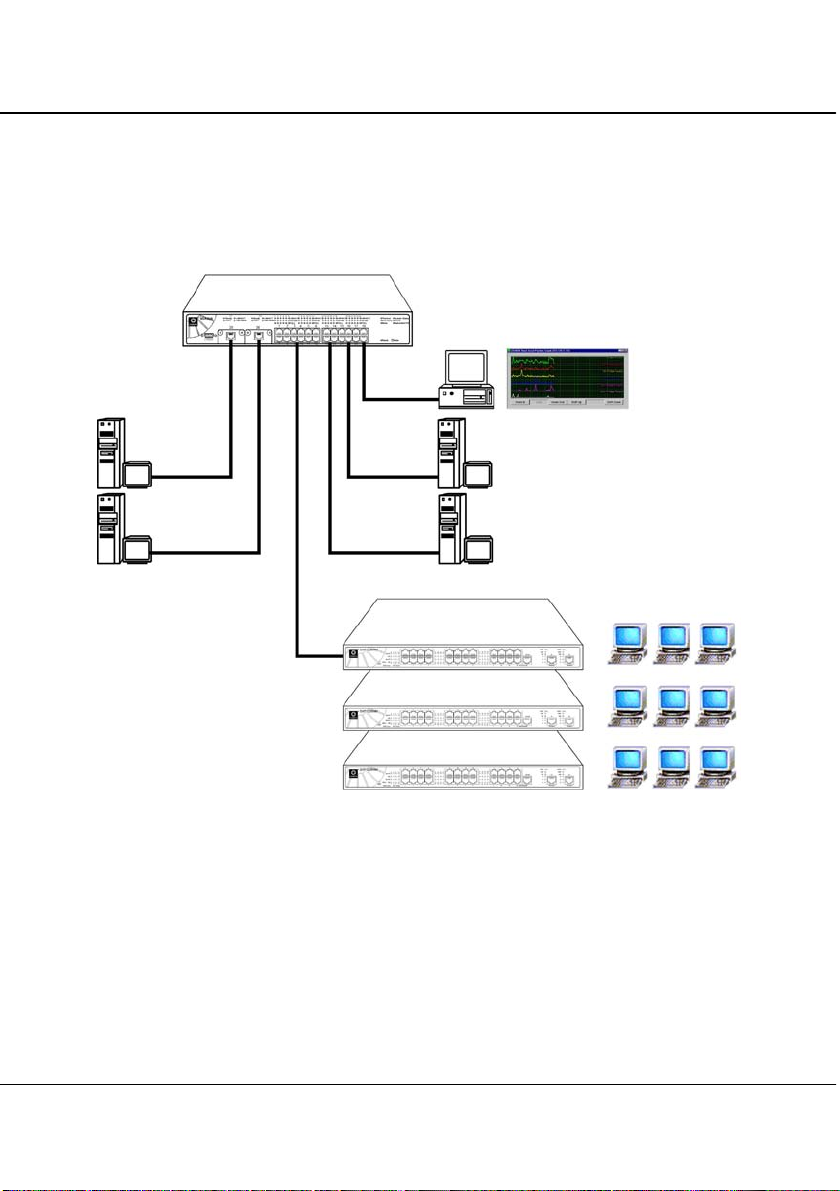
Compex SGX3226 is specially designed to support Broadband Internet sharing. Up to
4 ports may be connected to external Cable/ADSL modem, delivering combined
aggregated bandwidth to the Internet while providing fail-over redundant link.
In summary, Compex SGX3226 should perform whenever the demands, bandwidth,
reliability and security are required.
1.2 Features and Benefits
Compex SGX3226 is specially designed for building switched network system for
large enterprise and medium to small size workgroup. More enhanced features are
introduced to Compex SGX3226, making it a perfectly high-performance backbone
switch for today’s corporate network.
• Fast Ethernet Switching
Compex SGX3226 comes with 24 10/100Mbps Fast Ethernet auto-sensing ports
supporting full and half duplex transmission on its 12Gbps switching bus.
• SNMP Management Functions
Compex SGX3226 has been designed with SNMP management functions, which
has the capability to support 4 groups of RMONS: Ethernet Statistic, History,
Alarm and Event.
• Aggregated Router Capability
Compex SGX3226 also has the ability to support Broadband Internet sharing. Up
to 4 ports may be connected to external Cable/ADSL modems, delivering
combined aggregated bandwidth to the Internet while providing fail-over
redundant link.
1
Page 12

Chapter 1 Product Overview
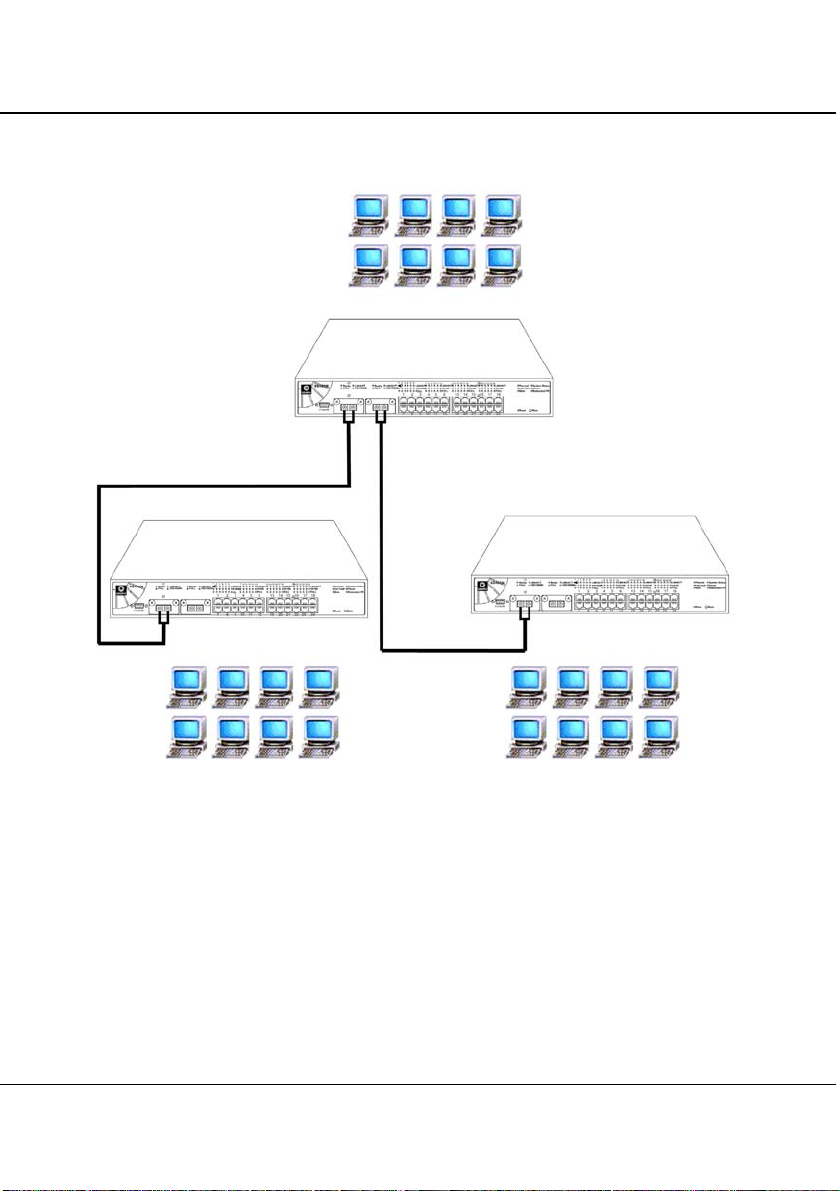
• Port Trunking
Up to 4 ports may be defined for Port Trunking, delivering up to 800Mbps
cascading bandwidth between two switches.
• VLAN support and tagging
Compex SGX3226 can support up to 32 port-based VLANs and static
configuration of 802.1Q VLAN tagging. It allows network administrator to
separate the network into a few segments by defining which port belong to which
VLAN segment. This can effectively control broadcast and multi-cast packet
flooding the network. This not only improvises the network performance, but
also provides security between workgroups.
• Optional Modules
Compex SGX3226 is designed with 2 expansion slots to support 3 types of
optional modules, 1000 Base-T Gigabit Fiber module, 1000 Base-SX Gigabit
Fiber module and 100 Base-FX Fast Ethernet Fiber module.
• Management Interface and capabilities
Compex SGX3226 allows you to manage the switch through common
management software. Web based management is also provided so that you do
not need to have expensive management software in order to manage your
Ethernet switch. You can use any popular Web browser software to browse the
HTTP server inside Compex SGX3226. From the Web page; you can do any
configuration and statistic inquiry on the switch. FreedomView Pro SNMP agent
is also bundle together in the package.
Through the management interface, you can also change the transmission mode
of all ports on Compex SGX3226 switch. This means that you can change the
operating mode of any port to 10 Base-T half duplex, 10 Base-T full duplex, 100
Base-TX half duplex, 100 Base-TX full duplex or N-way Auto-negotiation at
any time. It also means that you can change the transmission mode through the
Web browser interface, SNMP, console port or even Telnet interface.
• Redundant Power Supply
RPS is constructed to prevent Compex SGX3226 from power-down if the
primary power supply is malfunctioned.
• Spanning Tree Protocol
Provides redundant links while preventing network loops.
2
Page 13
Chapter 1 Product Overview
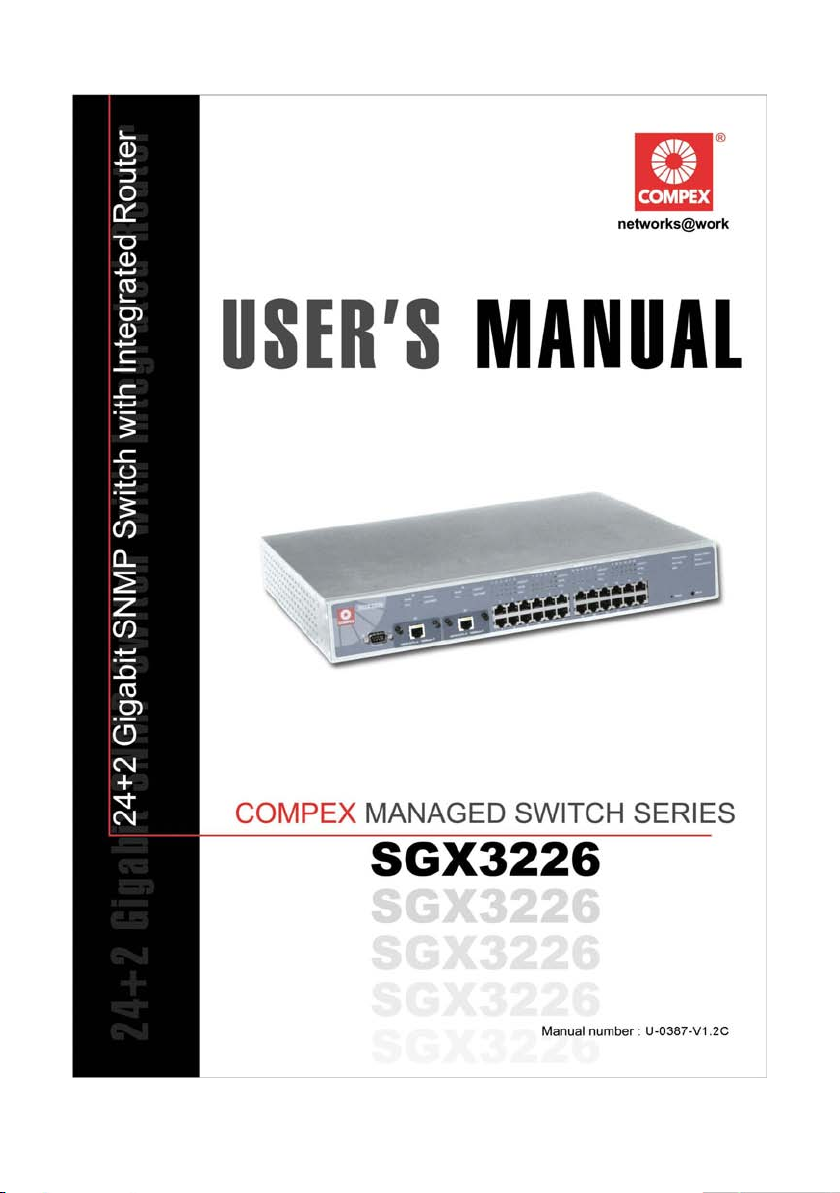
1.3 Network Applications
Compex SGX3226 may be used in the backbone with ADSL broadband connection as
the access to the Internet. Virtual LAN may be defined on Compex SGX3226 to
logically segmenting your LAN into multiple broadcast domains with workgroup
classifications.
SGX3226
High Bandwidth
Servers
SNMP Manager
Internet
Servers
SXP1226WM
User groups on Private
LAN Switching
Figure 1.2 Compex SGX3226 in the backbone
3
Page 14
Chapter 1 Product Overview
4
Page 15
Chapter 1 Product Overview
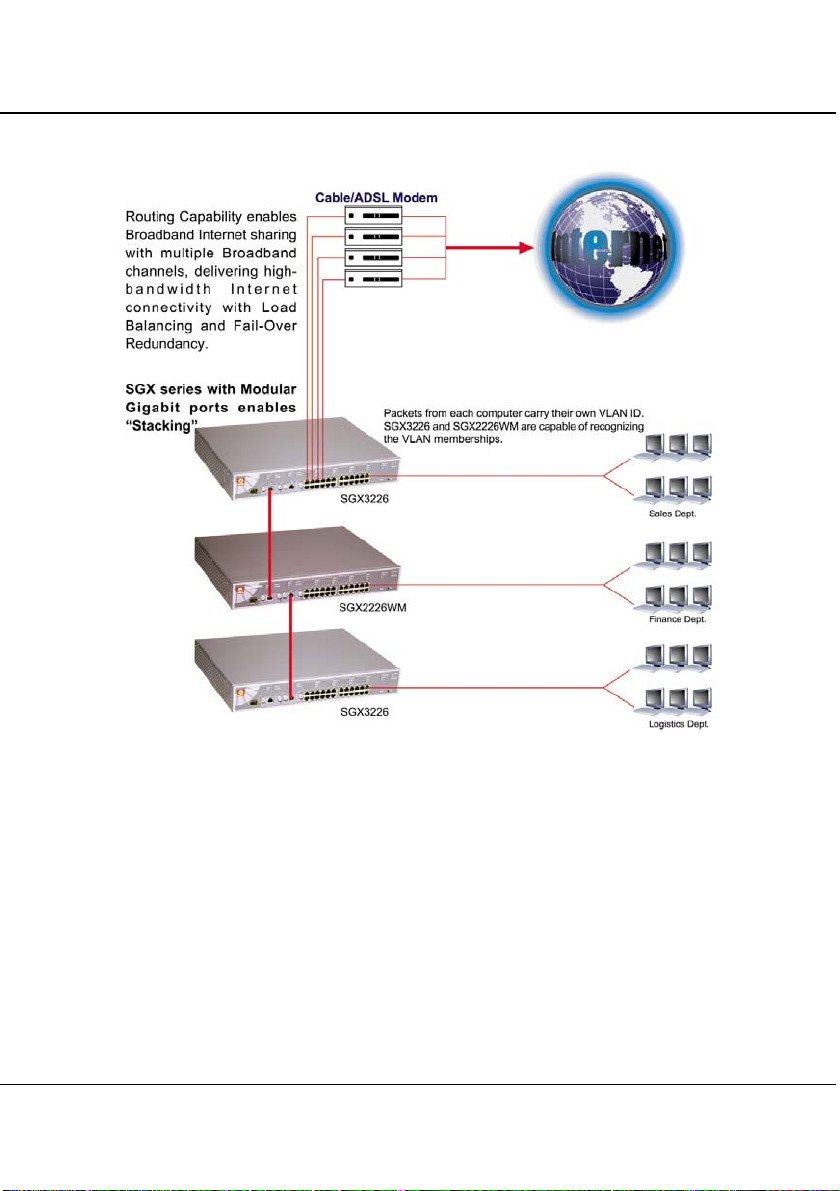
Optional modules may be installed on Compex SGX3226 to support inter-building
connectivity using fiber optical cables.
Gigabit Ethernet on
Fiber (1000 Base-SX) or
Fast Ethernet on Fiber
(100 Base-FX)
Building A
Building B
Figure 1.3 Compex SGX3226 installed with optional fiber optic module
Building C
5
Page 16
Chapter 2 Getting Started
Chapter 2 Getting Started
This chapter outlines the basic requirement for any installation and configuration of Compex
SGX3226.
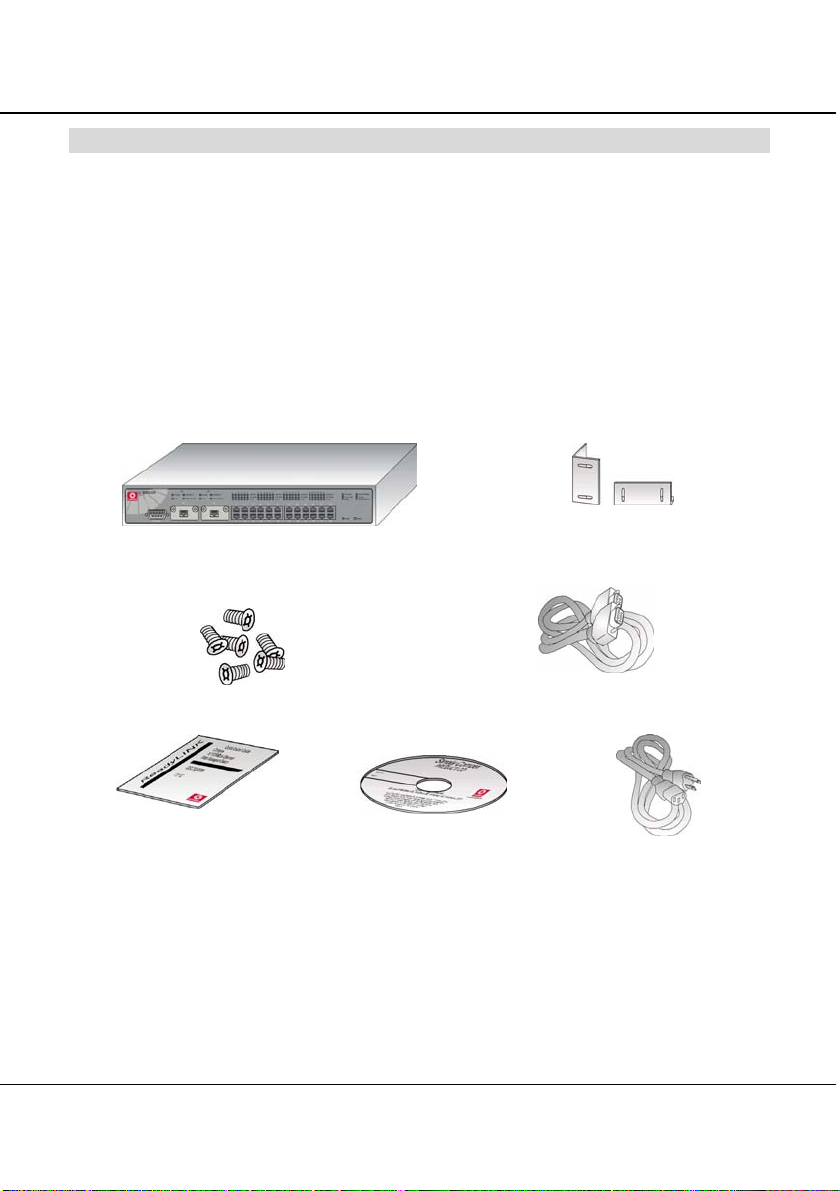
2.1 Packaging Content
Thank you for purchasing the Compex Web Managed Switch SGX3226. You will
find the following items in the package:
Please note that the actual product appearance may slightly differ depending on the
hardware version.
1 x Compex SGX3226 unit
2 x brackets
6 x screws
1x Quick Install Guide with
warranty card
1 x RS232 straight cable
1 x CD-ROM
1 x Power Cord
6
Page 17

Chapter 2 Getting Started
2.2 Setup Considerations
Prepare checklist before you start:
• Check your Local Area Network configurations. Check if the network has Static
IP addressing or dynamic IP assignment.
• Check whether any of the browsers (Netscape Navigator, Netscape
Communicator or Microsoft Internet Explorer) is installed in your PC.
2.2.1 Software Requirements
• Windows 95/98/98SE/2000/NT/ME/XP
• Any other TCP/IP-enabled systems like Mac OS and UNIX
• Hyper Terminal Program
• Web Browser, such as Microsoft Internet Explorer (4.0 and above) or
Netscape Navigator (4.0 and above)
• FreedomView Pro SNMP Manager Software
• Npfind utility software
7
Page 18

Chapter 3 Hardware Installation
Chapter 3 Hardware Installation
This chapter gives an in-sight on the hardware installation aspect from installing the physical
cables to resetting the device.
3.1 Physical Setup for Compex SGX3226
Compex SGX3226 is ideally suitable for office environment usage, which can be
either installed on a flat surface (desktop) or mounted on a 19-inch rack. The
following steps illustrate how a proper installation has to be done.
3.1.1 Desktop Installation
1. Unpack Compex SGX3226.
2. Remove the backing strip from the 4 rubber feet and attach to the
underside of the switch chassis firmly.
3. Place it with a power outlet located nearby. Be sure to set the device
with sufficient space for heat ventilation.
4. The surface to place Compex SGX3226 should be clean, smooth, level
and sturdy.
5. Ensure there is enough space around the unit to allow attachment of
network cables.
6. Connect the power cord to the power socket on the rear panel of
Compex SGX3226.
3.1.2 Rack-Mounted Installation
1. Position one bracket to align with the holes on one side of Compex
SGX3226 and secure it with the smaller bracket screws (1/8-inch
diameter). Then attach the other bracket to another side of it.
2. After attaching both mounting brackets, position the device in the rack
by lining up the holes in the brackets with the appropriate holes on the
rack. Secure it to the rack using the rack-mounting screws (5/16 inches
diameters) with a screwdriver.
8
Page 19

Chapter 3 Hardware Installation
3. Connect the power cord to the power socket on the rear panel of
Compex SGX3226.
NOTE
For proper ventilation, do allow about at least 4 inches of clearance on the
front and 4 inches on the back of the Switch. This is especially important for
enclosed rack installation.
3.1.3 Expansion Module Installation
A series of optional expansion modules are available for Compex SGX3226
to enhance the features. As Compex SGX3226 supports the hot plug
function, you may install or uninstall the modules without turning off the
switch.
1. Please note that Compex SGX3226 is shipped with the Gigabit
modules.
2. Insert the module carefully into the expansion module window and
push it along the module rail until it stops. Ensure that there is a secure
connection to the PCB Board of Compex SGX3226.
3. The Ready LED of the related port will lights up.
4. Tighten the screws on the module.
3.1.4 To remove Expansion Module
1. Disconnect any cable from the module.
2. Unscrew and pull out the module slowly from the expansion module
slot.
3. Slide the module completely out of the chassis and cover the window
with the cover plate, screwing back using the original screws.
9
Page 20

Chapter 3 Hardware Installation
3.2 Connecting Your modem to Compex SGX3226
Connect one end of the modem cable to any port of Compex SGX3226. The other end
of the modem cable is to be connected to your own ADSL/Cable modem. (Set up the
modem for dial-up connection. You may need to refer to your respective modem’s
manual for installation.)
NOTE
Connect Compex SGX3226 using one modem first. Once you have established
an Internet connection, then add the additional modem as and when you
needed.
3.3 Connecting Your Compex SGX3226 to your Network
You may connect Compex SGX3226 via the RJ45 Ethernet port to an external
hub/switch to increase the number of users for Internet access. Using a straight
through UTP network cable, connect one end to Compex SGX3226 and the other to
the network hub/switch.
Once all physical connections are established, turn on the power to the modem,
Compex SGX3226, PC and the network switch.
The figure shows on Page 4 an example how Compex SGX3226 can be connected to
an existing switch to increase the Internet access for the LAN users from just one
dedicated Internet access to multiple accesses.
3.4 Performing Power On Self Test (P.O.S.T.)
Compex SGX3226 has the ability to perform P.O.S.T. automatically upon power up.
On successful power up, System Status LED on the front panel will lights up steadily
in RED, indicating that Compex SGX3226 is running its Self Diagnostic Test. Once
the LED turns green, Compex SGX3226 is then ready for operation.
NOTE
If the System Status LED does not light up in RED after powered up, you may
need to reset your Compex SGX3226 by powering OFF and ON again. If it
still fails, please contact your dealer for repair or replacement.
10
Page 21
Chapter 4 Software Installation
Chapter 4 Software Installation
This chapter explains the basic setup procedures of configuring Compex SGX3226 using the
web-based interface. For more detailed information about Compex SGX3226, please refer to
Chapter 7 “Advanced Configuration for Compex SGX3226” on Page 41.
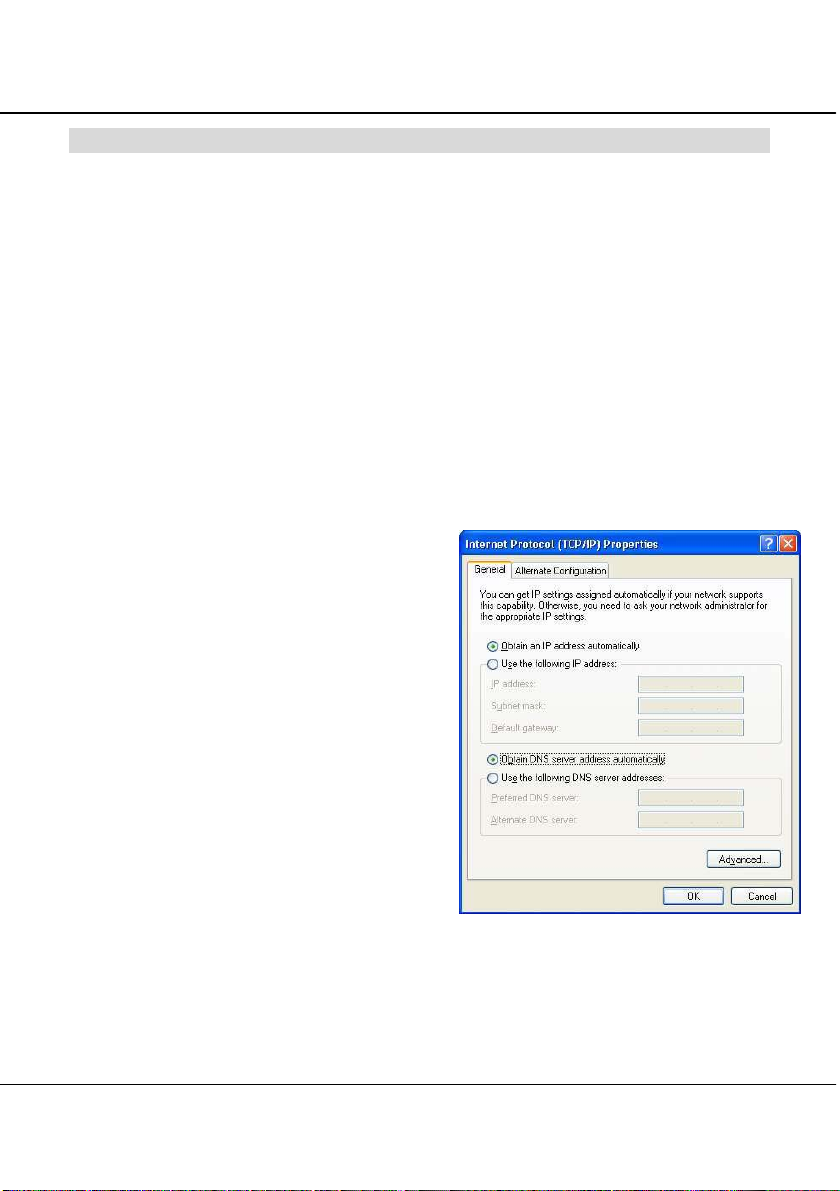
4.1 Configuring your PC’s setting - TCP/IP Configuration
The first step is to ensure that the PC gets an IP address for which it will use to
communicate across the network. You can begin by giving an IP address to your PC.
1. From My Network Places, right click and select Properties.
2. Next, go to your network adapter and right click to select Properties.
3. Select Internet Protocol (TCP/IP) and click the Properties button.
4. Click on the radio button for Use
the following IP address:. Enter
the IP addresses, such as IP address
- 192.168.100.10 and Subnet mask –
255.255.255.0.
5. If you are connected to Internet,
enter the IP address of your
Preferred DNS server.
6. Click on the Ok button to update
changes.
11
Page 22
Chapter 4 Software Installation
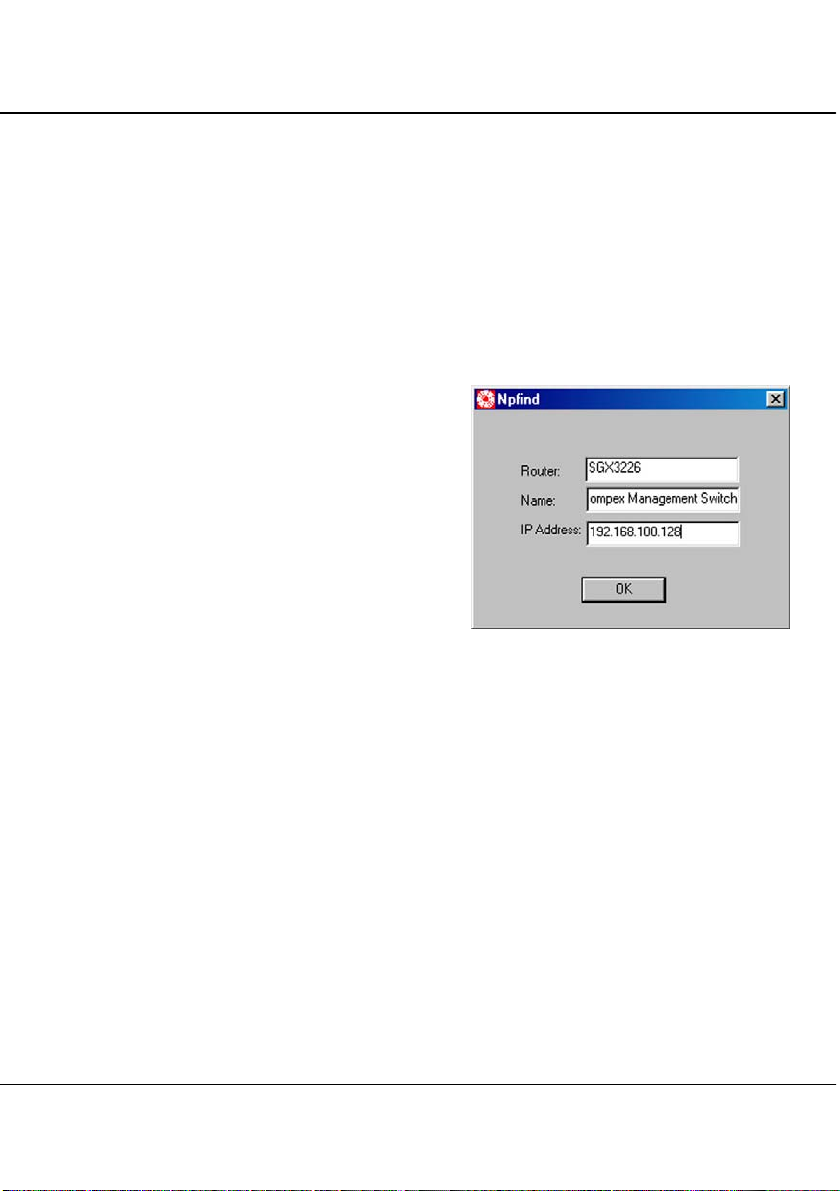
4.2 NPfind Utility Software
Npfind is an utility program for Windows which can be used to find out the IP address
of Compex’s product. To check the IP Address of your Compex SGX3226,
1. Connect one end of the RJ45 Ethernet MDI straight cable to one of the LAN port
of Compex SGX3226 and the other end to your PC.
2. Next, insert the Product CD to your CD-ROM Drive.
3. From the DRIVERS & UTILITIES section, click on Npfind utility.
The program will then automatically
displayed the IP address of your Compex
SGX3226.
12
Page 23
Chapter 4 Software Installation
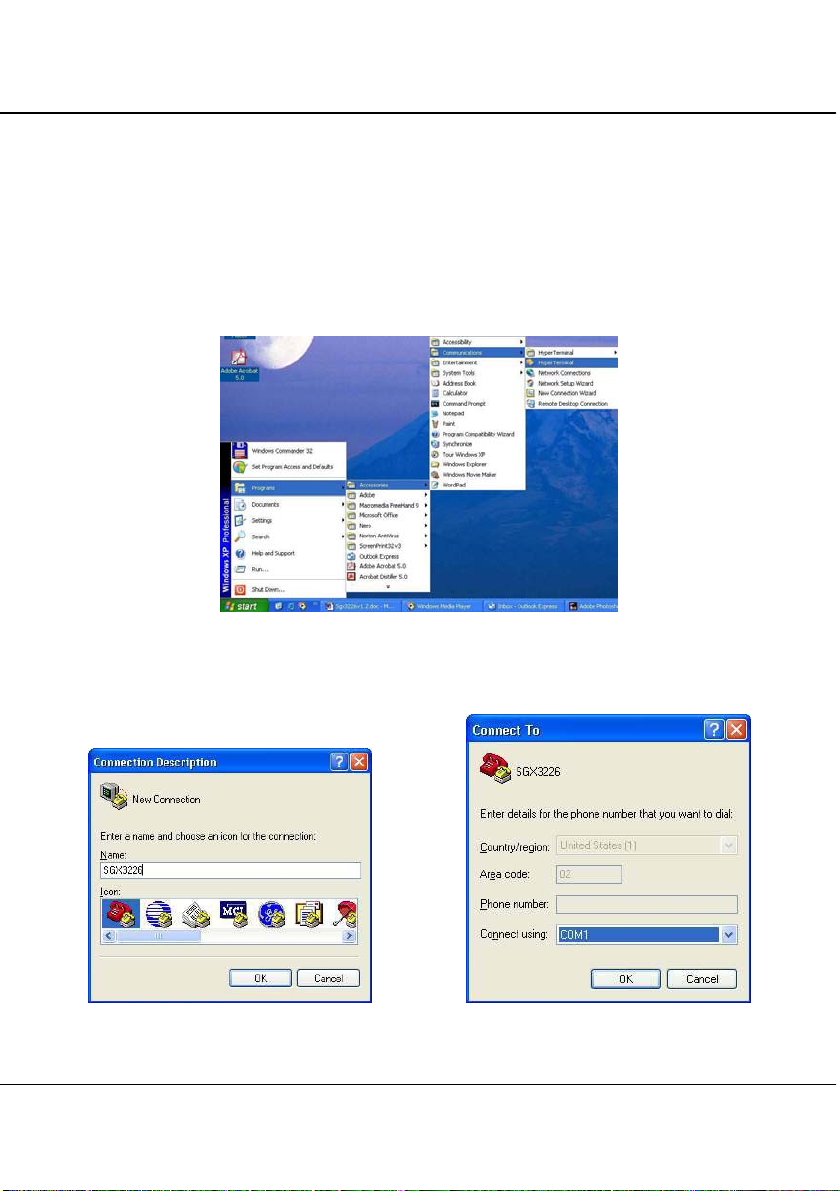
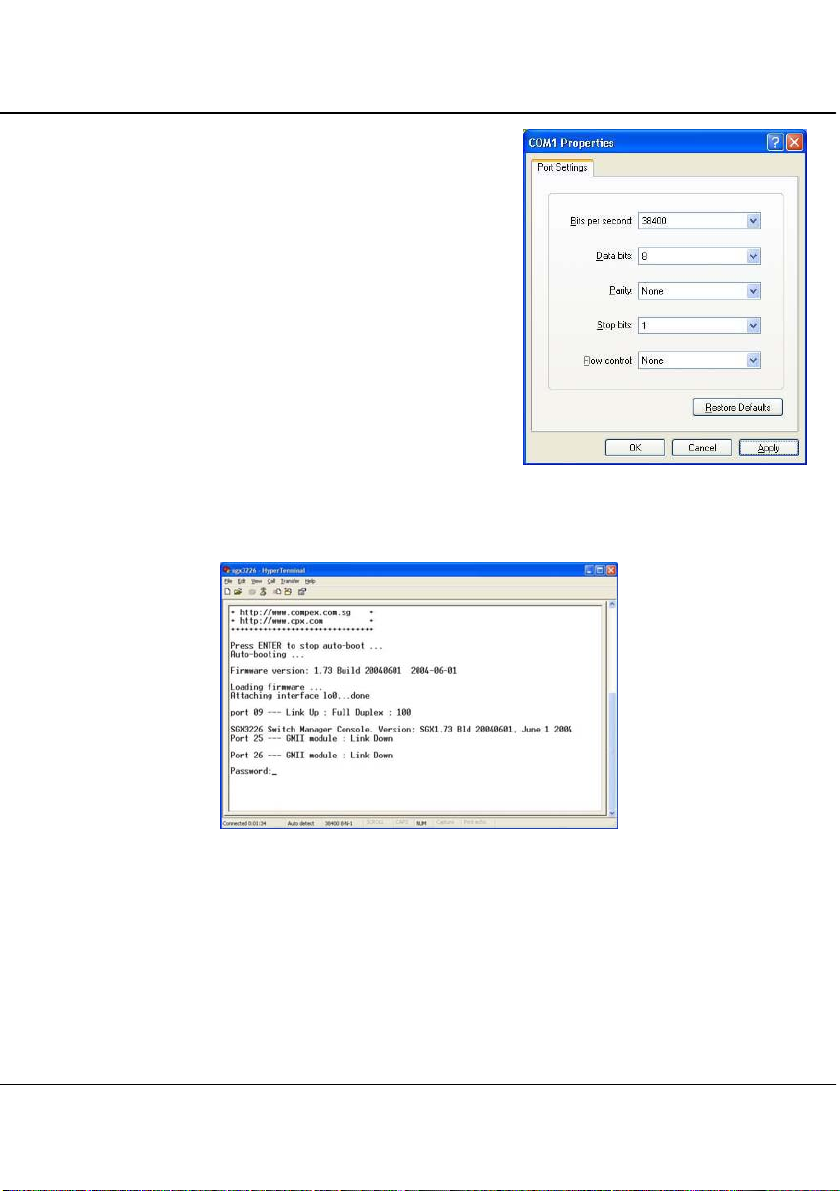
4.3 Hyper Terminal Configuration
Compex SGX3226 can easily be configured via Hyper Terminal or Web-based
Interface. In this section, we will go through the steps in configuring the Hyper
Terminal Program. For web-based interface configuration, you may refer to Chapter 5
for details.
1. From your Start menu, go to Program -> Accessories -> Communications ->
Hyper Terminal.
2. Give a name for your new connection, e.g. SGX3226 and select the COM port
that you intend to connect your Compex SGX3226 to your PC.
13
Page 24
Chapter 4 Software Installation
3. Next, configure your Port Settings as shown
in the figure and click Apply to update the
changes.
4. Click Ok button to confirm the settings.
After setting all configurations, reset the power supply of Compex SGX3226. A
screen will appear as shown below:
Now, you can start configuring your Compex SGX3226 using Hyper Terminal
program. Please refer to Appendix III for the list of hyper terminal commands.
14
Page 25

Chapter 4 Software Installation
4.4 Accessing to web-based Interface
Instead of using Hyper Terminal Program to configure your Compex SGX3226, you
can also use your Internet browser to access to the web-based interface to configure
your switch.
You need to ensure that your TCP/IP protocol has installed and configured.
Configuration will be much simpler, if you decided to obtain IP address dynamically
and use the gateway default IP addresses. Compex SGX3226 comes with a built-in
DHCP server that automatically assigns IP addresses, DNS and Gateway information
to the computers connected in the same network. It has been pre-configured with IP
address and Subnet Mask of 192.168.100.128 and 255.255.255.0 respectively.
An Internet browser would be used to configure Compex SGX3226. The most
commonly used browsers include Netscape Navigator, Netscape Communicator and
Microsoft Internet Explorer browsers as they support frames and Java. We
recommend you to use the Netscape Communicator V4.06 and higher, or Microsoft
Internet Explorer 4.0 and higher.
Start by running your browser on a PC connected onto the same network as Compex
SGX3226. Enter URL Address, http://192.168.100.128.
4.4.1 Login to Web Browser Interface
The following is a list of the various ways for different browsers in
accessing a website. Follow the instructions for the browser that you use.
In Netscape Navigator
1. Select the File menu, go to Open Location and enter the Gateway’s IP
address. This address is set to its factory default as
http://192.168.100.128.
2. Click on the Open button.
In Netscape Communicator
1. Select the File menu, go to Open Page and enter the Gateway’s IP
address. This address is set to its factory default as
http://192.168.100.128.
2. Ensure that the Navigator radio button is selected then click the Open
button.
15
Page 26
Chapter 4 Software Installation
In Internet Explorer
1. Select the File menu, go to Open and enter the Gateway’s IP address.
This address is set to its factory default as http://192.168.100.128.
2. Click on the OK button.
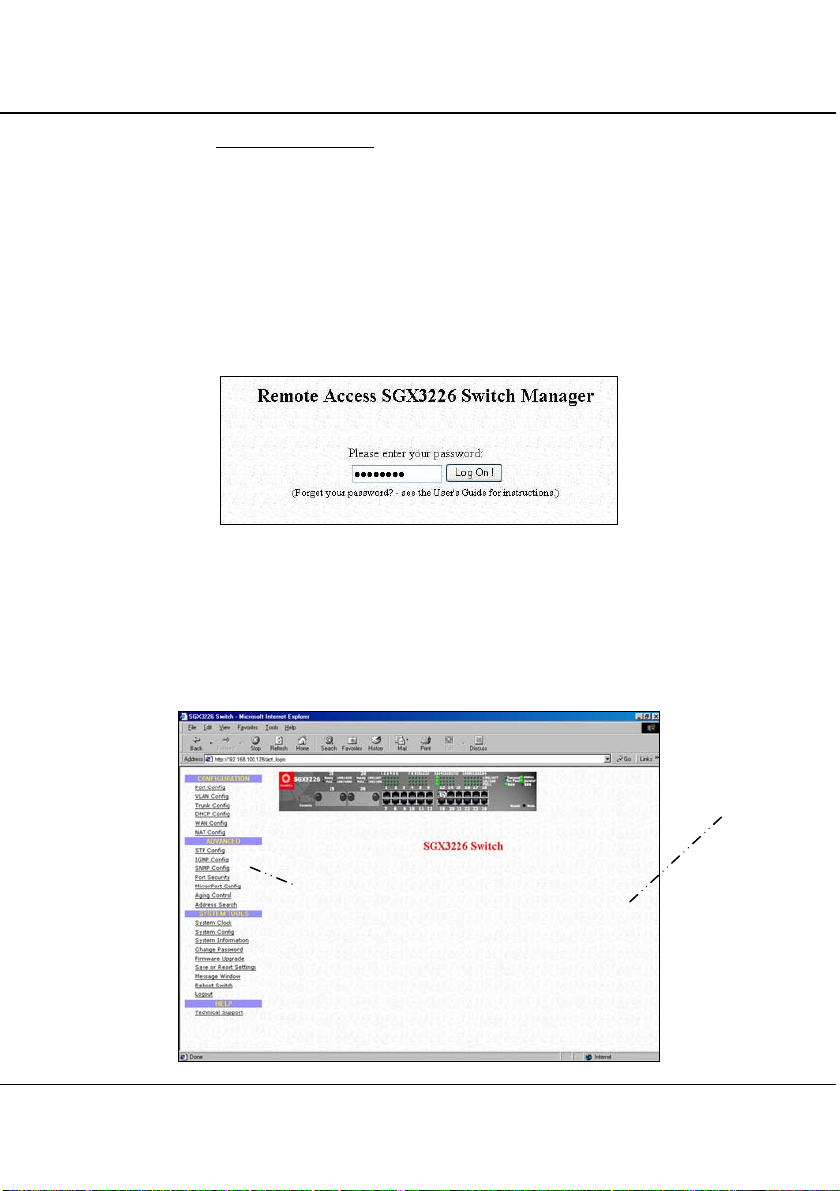
An authentication page will appeared as shown below. The default
password, which is password, is pre-configured in the field. Click Log On!
Button to access to the main page of Compex SGX3226.
After logging in to the management system, the main page will display as
shown below. The image of Compex SGX3226 is shown on the top
window. The status of each switch port (i.e. link, speed and duplex mode)
can be seen clearly from the LED displays on the image. The lower right
window is used to display the web pages of versatile configuration and
operations.
Command Menu
Window
Configuration
Window
16
Page 27

Chapter 4 Software Installation
The main menu includes four sections in the Command Menu Window, namely
CONFIGURATION, ADVANCED, SYSTEM TOOLS and HELP. The overall
descriptions for individual sub-functions are listed as shown:
CONFIGURATION menu
• Port Configuration – configuration for communications via network
• VLAN Configuration – setup Virtual LAN, whether in tagged or untagged-
based
• Trunking Configuration – Extend the limitation of bandwidth
• DHCP Configuration – setup, reserve or activate DHCP
• WAN Configuration – support Static, Dynamic and PPP over Ethernet services
• NAT Configuration – increase security for unauthorized access through WAN
ADVANCED menu
• STP Configuration - discovers and eliminates redundant paths in the network
topology
• IGMP Configuration - allows the device to forward multicast traffic
intelligently
• Stack Configuration - allows user to enable the stacking function of the
switches.
• SNMP Configuration – monitor and oversee network
• RMON Statistics - enables various network monitors and console systems to
exchange network-monitoring data
• Port Security – secure/reserve certain port/s from other user’s access
• MirrorPort Configuration – duplicate a port's traffic on a port
• Aging Control – limit the resource in the forwarding table
• Address Search – search for Host and MAC address of the connected device in
the network
SYSTEM TOOLS menu
• System Clock – managed and utilize timing based function
• Remote Management - access your Compex SGX3226 through Internet (WAN)
or Local Area Network.
• System Configuration – change of IP Address, Subnet Mask or Gateway
• System Information – indicates essential information of Compex SGX3226
• Change Password – amend system administrator’s password
• Firmware Upgrade – uploading latest firmware to Compex SGX3226
• Save or Reset Settings – save or reset all settings
17
Page 28

Chapter 4 Software Installation
• Message Window – various actions which is taken previously while configuring
can be seen in this window
• Reboot Switch – restart the device
• Logout – get out of web-based interface environment
HELP menu
• Technical Support – make enquiries when encounter problems while setting up
the device
18
Page 29

Chapter 5 Web-based Interface Configuration for Compex SGX3226
Chapter 5 Web-based Interface Configuration for Compex SGX3226
This chapter explains the configuration menu tool that comes with Compex SGX3226 when you
use the web-based configuration interface. Here, we will briefly discuss each Menu components
and its function.
An interactive image is located at the main page of Compex SGX3226. It allows you to view
the real time situation in the network, including the power and redundant power supply status.
In addition, you may click on any of the ports, including the expansion module, to view the port
status.
5.1 Port Configuration
This function allows you to have
an easy access to the network
via the ports of Compex
SGX3226. Notice that the “Link
state” option indicates ‘Up’.
This shows that the port is
connected to the network. It can
either be in “Up” (Connected) or
‘Down’ (No connection) state.
19
Page 30

Chapter 5 Web-based Interface Configuration for Compex SGX3226
Broadcast Rate Limit
This function sets broadcast limit to
the desired rate for the specified port.
It controls the reception of
broadcasting packets. The ranging for
Broadcast rate limit varies from 0% to
100%. The higher the rate is, the more
data can pass through the traffic. Rate
is the percent of the traffic to allow
before throttling.
Port VLAN ID
VLAN ID is the sequence number of a
VLAN. Compex SGX3226 has 32
VLANs to specify and therefore the
VLAN ID is from 1 to 4091.
Flow Control
This feature reports the Flow Control setting of the port. Enabling the Flow Control
function allows Half and Full Duplex mode.
NOTE
If the port (management port) that is connected to your management PC has
disabled, the communication link between users and the management system will
be severed and the management cannot be proceed further. So, disabling the
management port will be rejected automatically by the management system.
1. Click Apply and then Save button to update the changes.
Notice that the screen is divided into two sections. The Port Statistics page displays
the detailed information on each port. Click Refresh button to view the current port
status of Compex SGX3226.
Port Priority
To specify the VLAN priority to expedite
the VLAN traffic.
Port State
Enabling this function allows the chosen
port to receive and forward the packets,
and learns the respective source MAC
Addresses.
20
Page 31

Chapter 5 Web-based Interface Configuration for Compex SGX3226
5.2 VLAN Configuration
Compex SGX3226 supports Virtual LAN, which logically group the connection into
VLANs for traffic isolation and security purposes. Both tagged and untagged based
VLAN are supported with a total maximum of 31 groups. Each VLAN group only
forwards traffic within its member ports. For tagged VLAN, each port can be a
member of more than one VLAN group and it also supports priority with eight levels.
There is also provision for creating a tagged VLAN which support a connection with
a legacy untagged VLAN. The VLAN configuration feature also allows you to build,
delete and view tagged/untagged VLAN groups and setting priority for tagged
VLANs. The range of VID starts from 2 to 4091, inclusively, as VID 001 is the
default for Group 1.
1. Click on the dashed line ‘–’ to select either ‘T’ for Tagged or ‘U’ for Untagged
for your preferred VLAN Group.
2. Next, click on the Apply button to update the changes and then the Save button
to update the latest configuration.
Examples on the applications for Tagged & Untagged Virtual LAN will be illustrated
on Chapter 10.
21
Page 32

Chapter 5 Web-based Interface Configuration for Compex SGX3226
5.3 Trunk Configuration
Port Trunking is the ability to group together several switch ports to increase the
bandwidth between Compex SGX3226 and other switch. This is an inexpensive
method to increase throughput between switches (or to servers).
NOTE
To avoid broadcast storms, or looping in your network while configuring trunks,
you need to disable/disconnect all the ports that you wish to add/remove from
both sides of the trunk. Once you have finished configuring trunking, enable/reconnect the ports.
1. You can choose up to 4 ports for trunking by selecting ‘-’ as ‘T’.
2. Click on the Apply button to update the changes and then the Save button to
update the latest configuration.
NOTE
You may set up to 4 trunking ports for the switch.
22
Page 33

Chapter 5 Web-based Interface Configuration for Compex SGX3226
5.4 DHCP Config
The Dynamic Host Configuration Protocol (DHCP) provides configuration
Parameters to Internet hosts. DHCP consists of two components: a protocol for
delivering host-specific configuration parameters from a DHCP server to a host and a
mechanism for allocation of network addresses to hosts. DHCP is built on a clientserver model, where designated DHCP server hosts allocate network addresses and
deliver configuration parameters to dynamically configured hosts.
If you have set the TCP/IP protocol of your PC to dynamic IP address, the built-in
DHCP server will automatically assign the IP address/es within the range of DHCP
Start IP Address and DHCP End IP Address to the PCs connected in the same
network. For dynamic WAN IP, the DNS IP address is obtained automatically from
the ISP.
NOTE
If you are running different DHCP servers on your network, you will have to
enable only one DHCP server to prevent any conflict in the network addressing.
IP Address
This IP (Internet Protocol) address
uniquely identifies the Gateway in the
network. This is the IP address that the
users should point their Internet
gateway to if fixed IP addresses are
configured on the computers in the
network. However, the DHCP Server
will assign this information if the
computers are configured to
dynamically obtain IP addresses.
Subnet Mask
This is the Subnet Mask to identify the
class of the Gateway’s IP address. By
default, Class C Subnet Mask
255.255.255.0 is set. The users may
configure the network with Class A
(255.0.0.0) and Class B (255.255.0.0)
Subnet Mask as well. In addition,
Compex SGX3226 can be configured for
Classless Subnet to support certain
application.
23
Page 34

Chapter 5 Web-based Interface Configuration for Compex SGX3226
DHCP Start IP Address & DHCP
End IP Address
These parameters specify the range of
the IP address of which the DHCP
Server will assign.
DHCP Server
DHCP server dynamically assigns IP addresses to the PCs connected in the same
network. DHCP comes with a built-in DHCP server that automatically assigns IP
addresses, DNS and Gateway information to the computers connected in the same
network. It has been pre-configured with IP address and Subnet Mask of
192.168.100.128 and 255.255.255.0 respectively.
1. Enter the values for IP Address, Subnet Mask, DHCP Start and End IP Addresses
in its individual fields.
2. You can check on Always use these DNS servers: to disable the function of
retrieving DNS IP Address automatically, so that you can enter your preferred
DNS IP Address in the Primary and Secondary DNS IP Address field.
3. Next, you can set DHCP Server to Enable if you wish to use the built-in DHCP
server of Compex SGX3226.
4. Click on Save button to save your configuration.
NOTE
If your IP Address of the PC has set to “Obtain an IP address automatically”,
values in the fields will automatically appeared.
Primary DNS IP Address & Secondary
DNS IP Address
DNS is an Internet service that translates
domain names into IP addresses. If your
WAN connection is using Static IP, you
should configure the primary and
secondary DNS IP addresses with the
DNS information provided by your
Broadband Internet Service Provider. For
other WAN connection types, the DNS IP
addresses is obtained automatically from
ISP. The “Always use these DNS
servers:” checkbox can be used to disable
the automatic process, and your preferred
DNS IP addresses can be used.
24
Page 35

Chapter 5 Web-based Interface Configuration for Compex SGX3226
5.4.1 DHCP Active Leases
This section indicates the information of the PC whereby the IP addresses is
dynamically assigned to it in the same network. The expire time indicates
the time when the system needed to update the IP Address of that particular
PC.
5.4.2 DHCP Server Reservations
DHCP Server can also be configured to reserve specific IP address for
specific host or Mac address.
CAUTION
The reserved IP address to be assigned should NOT have the same Dynamic IP
address range as the DHCP Start and End IP address.
To reserve certain IP address for the specific workstation,
1. Enter the IP address in the field provided to be assigned to your designated PC is.
2. Give a name for the designated PC.
3. The MAC address of the designated PC needs to fill in the Hardware Address
field.
25
Page 36

Chapter 5 Web-based Interface Configuration for Compex SGX3226
NOTE
The DHCP server will ignore the Host Name if it finds a match in the
Hardware Address. It checks the Hardware Address first, so you need only to
enter either the Host Name or Hardware Address.
4. Click Add button to create an entry Save button to update your changes.
Delete IP Address in Server Reservations
If you wish to delete any of the IP Address stated on the screen,
1. Highlight that particular IP Address.
2. Click on Delete button and the IP Address will be deleted instantly.
26
Page 37

Chapter 5 Web-based Interface Configuration for Compex SGX3226
5.5 WAN Config
You are allowed to connect up to 4 modems to your Compex SGX3226. The WAN
type is pre-configured as disabled. Compex SGX3226 supports Static IP, Dynamic IP
and also PPP Over Ethernet (PPPoE).
If you have chosen self-installation when you register for the broadband service, you
should first test the ADSL modem together with the logon account with your PC or
notebook. Ensure that your modem is connected successfully before attempting to run
with Compex SGX3226. For simplicity and the purpose of illustrations, it is assumed
that LAN uses the IP address 192.168.100.xxx and Compex SGX3226 is using the
same settings as defaults.
However, if you have assigned a different IP address for Compex SGX3226, then use
the new settings in the setup procedures.
Figure 5.1 Default setting of Compex SGX3226 for WAN Setup
WAN Port
You may configure any 4 of the 24 ports as WAN port and connect to your
ADSL/Cable modem.
WAN Type
Static IP Address:
Select this WAN type if you have subscribed to a specific IP address or to a fixed
range of IP addresses from your ISP.
Dynamic IP Address:
This IP address is automatically assigned by your ISP. This type of connection
applies to most Cable Internet subscribers such as:
• Singapore Cable Vision subscribers.
• @HOME Cable Service users.
27
Page 38

Chapter 5 Web-based Interface Configuration for Compex SGX3226
PPPoE:
Select this connection type if you have subscribed to ADSL in a country utilising
standard PPPoE for authentication, for instance:
• If you are in Germany which uses T-1 connection.
• If you are a SingNet Broadband or Pacific Internet Broadband user in Singapore.
1. Click Save button to update your configuration.
Details on various broadband Internet services can be seen on “Configuring Your
Wide Area Network” on Page 34.
5.6 NAT Config
Network Address Translation allows an IP-based network to manage its public
(Internet) addresses separately from its private (intranet) addresses. With NAT, each
private IP address can be translated to a different public address, or multiple private
addresses can be aliases to a single public one. To accomplish this, NAT software
snoops both incoming and outgoing packets on the network. It modifies the source or
destination address in the IP header to reflect the mapping between internal and
external addressing for that network.
NAT functionality appears on Compex SGX3226 with low-level access to packets at
the network boundary. Several variations on NAT have also been implemented to
provide additional support for application-level protocols.
28
Page 39

Chapter 5 Web-based Interface Configuration for Compex SGX3226
5.6.1 Static IP Setting (IP Forwarding)
To set a static IP Address,
1. Enter a private IP Address, such as 192.168.100.20, in the field
provided and click Save button.
NOTE
You must enable the NAT function in the Configuration window if you are
using a single IP address account (fixed static IP) and want to share this
connection on your LAN.
5.6.2 Static Port Setting (Port Forwarding)
Defining Port-Forwarding Virtual Server
Port Forwarding redirects any incoming Internet request on the Public IP,
based on its TCP/UDP Port number to another computer in the Private IP.
Hence, when a user from WAN sends a request to your network, Compex
SGX3226 (based on the Port–Forwarding configurations) will forward these
requests to the assigned PC.
29
Page 40

Chapter 5 Web-based Interface Configuration for Compex SGX3226
When to use Port–Forwarding Virtual Server
When your ISP assign you with only one fixed Public IP address, and you
want to define the various servers (such as, FTP, HTTP, Netmeeting, Mail
server etc) to specific Private IP address in your LAN; hence, you can
choose to host the servers by using the Port-Forwarding Virtual server.
Example, suppose that you have a FTP Server with an IP address of
192.168.168.41. And your broadband ISP has assigned a Public IP address
of 203.120.12.100 to the gateway. To support a Web Server in your Private
Network, you need to define an NAT Static Port-based Entry to forward
TCP port 21 (used by FTP) to 192.168.168.41. Every http://203.120.12.100
requests will then be forwarded to the FTP Server.
Follow the steps shown below to configure Static Port.
1. Go to NAT function at the Command Window. Select the type of
Server you wish to configure as shown in the figure below:
2. Key in the Private IP Address.
3. Next, choose a transport protocol, either TCP or UDP, for the
respective IP Address.
30
Page 41

Chapter 5 Web-based Interface Configuration for Compex SGX3226
The Internet makes two transport protocols available to its applications,
namely TCP and UDP.
Transmission Control Protocol
(TCP)
For building a reliable
communications stream on top of
the unreliable packet Internet
Protocol (IP). TCP is the protocol
that supports nearly all Internet
applications.
5.6.3 Filtering Setting
Compex SGX3226 allows Packet Filtering rules be defined based on three
factors, Source IP Address, TCP Port and Time. IP Packet Filtering
examines the outgoing packets and decides whether to bypass or to block
them. After the Packet Filtering rules have been defined, the users may
select to bypass or to block the outgoing packets that do not match the rules.
For example, assume that a rule has been defined as "TCP Port 23 (used by
TELNET) from any IP on any day at any time". If the “forwarded” radio
button is selected, all outgoing packets will be sent except TELNET session.
If the blocked radio button is selected, all outgoing packets will be blocked
except TELNET session.
Click on Filtering section at the Configuration window and the GUI will
appear as shown:
User Diagram Protocol (UDP)
A connectionless protocol that
runs on top of IP networks.
UDP/IP provides very few errors
recovery services, offering instead
a direct way to send and receive
datagrams over an IP network. It is
used primarily for broadcasting
messages over a network.
31
Page 42

Chapter 5 Web-based Interface Configuration for Compex SGX3226
1. Select Add button and the screen will facilitate the users to add rules for IP
Packet Filtering.
IP Address
Three values are possible for this field:
Any, Range or Single. If you have
selected Any, you may leave the next
two fields blank. If you have selected
Range, enter the range of IP addresses
in (From) and (To) fields. If you have
selected Single, you only need to enter
the specific source IP address in the
(From) field.
Destination Port
Three values are possible for this field,
Any, Range or Single. If you have
selected Any, you may leave the next
two fields blank. If you have selected
Range, enter the range of TCP port in
(From) and (To) fields. If you have
selected Single, you only need to enter
the specific TCP port in the (From)
field.
Day of the Week
Two values are possible for this field,
Any or Range. If you have selected Any,
you may leave the next two fields blank.
If you have selected Range, enter the
duration of the weekdays in (From) and
(To) fields.
Time of the Day
Two values are possible for this field,
Any or Range. If you have selected Any,
you may leave the next two fields blank.
If you have selected Range, enter the time
in (From) and (To) fields.
32
Page 43

Chapter 5 Web-based Interface Configuration for Compex SGX3226
2. Enter the appropriate data in the respective entries for Rule Name, IP Address,
Destination Port, Day of the Week and Time of the Day.
3. Press the Apply button to add the new rule and Save button to update the
changes.
CAUTION
You must synchronize the clock of Compex SGX3226 to your PC’s time for
the rules to execute accurately. Refer to “Set System Clock” on Page 58 to
utilize the timing based function of Compex SGX3226.
33
Page 44

Chapter 6 Configuring Your Wide Area Network
Chapter 6 Configuring Your Wide Area Network
This section explains how to configure Compex SGX3226 to distribute Broadband Internet
Access to the Wide Area Network.
6.1 Selecting the Right connection for your Broadband Internet Service
Choosing the right connection type on Compex SGX3226 is important to ensure that
you are properly connected to your broadband Internet subscription. The following
summarizes the type of connection suitable for your broadband Internet subscription.
Static IP
This type of connection should only be used if and only if you have subscribed to fix
IP or a range of fix IP address from your service provider for your Cable Internet
connection or Direct Ethernet point.
Dynamic IP
This type of connection should be used if you are configuring Compex SGX3226 for
your Cable Internet service. Once powered on, Compex SGX3226 will request for an
IP address, which will be assigned by your service provider. Certain Cable Internet
Service Providers require DHCP Client ID to be passed in before an IP address is
released. For such cases, you must configure the System Config with a System Name
equivalent to the DHCP Client ID. The configuration of System Config may be found
in “System Configuration” on Page 61.
PPP Over Ethernet (PPPoE)
This type of connection should be chosen for ADSL services that use standard PPP
Over Ethernet (PPPoE) for authentication.
34
Page 45

Chapter 6 Configuring Your Wide Area Network
6.2 Setup on Compex SGX3226 for Broadband Internet Access
For such service, you should have the IP address info ready that is provided by your
ISP before proceeding.
Cable/ADSL
Modem
Compex SGX3226
PC
Figure 6.1 Connection between Compex SGX3226 and modem
1. Connect a crossover cable from the Ethernet port of Compex SGX3226 to your
workstation.
2. Connect an Ethernet cable from Ethernet port of SGX3226 to the ADSL/Cable
modem.
3. Power on the broadband modem and wait for broadband modem to complete the
initialization process.
4. Next, power on both your workstation and Compex SGX3226. The LNK/ACT
LED should light up, indicating the connection has established.
5. You may start to configure Compex SGX3226 before connecting to the Internet.
Please refer to Chapter 5 “Web-based Interface Configuration for Compex
SGX3226” on Page 19.
6. Once everything is checked, you can now access to the Internet.
35
Page 46

Chapter 6 Configuring Your Wide Area Network
6.3 Configuring Static IP Connection
1. Select WAN Config from the Command window.
2. Go to WAN Type and select
Static IP Address.
3. Enter the IP addresses in its
respective field. All these
information is provided by your
ISP/Network Administrator.
4. Click on Save button to update the
changes.
6.4 Configuring Dynamic IP Connection
If you are using Cable Internet, you do not need to configure the WAN connection.
However, if your account requires a DHCP Client ID in order to released an IP
address, you may need to configure the name of Compex SGX3226 with the DHCP
Client ID issued by your ISP.
Refer to Section 8.3 on “System Configuration” on Page 61, and remember to enter
the DHCP Client ID issued by the ISP into the System Name field in the System
Identity.
NOTE
If your computer is not able to resolve any web site, please verify that your DNS
entry of the computer has been defined correctly.
As mentioned before, this WAN type applies to most Cable Internet subscribers, such
as Singapore Cable Vision subscribers and @HOME Cable Service users. The
following section will elaborate on the configuration for these two types of services.
36
Page 47

Chapter 6 Configuring Your Wide Area Network
6.4.1 How to configure Singapore Cable Vision (SCV) Service
SCV provides Dynamic IP address connection service. Assume that your
SGX3226 is not in the Dynamic IP setting, please follow these procedures
to change to the appropriate WAN type.
1. Select WAN Config from the Command window.
2. Go to WAN Type and select Dynamic IP Address.
3. Click on Save button to update the changes.
6.4.2 How to Configure @HOME Cable Service
Many broadband services require a simple DHCP request for connection.
Two such cable services are Optus@Home and Roger@Home.
To configure @HOME Cable Service,
1. Select WAN Config from the Command window.
2. Go to WAN Type and select Dynamic IP Address.
3. Click on Save button to update the changes.
4. Next, proceed to System Config at the Command window
37
Page 48

Chapter 6 Configuring Your Wide Area Network
5. Enter the required entry as shown.
6. Click on Apply and then Save button to update the changes.
7. Reboot your Compex SGX3226.
6.5 Configuring PPP over Ethernet Session (PPPoE)
For Broadband service providers such as Pacific Internet Broadband and SingNet
Broadband, you have to select the PPPoE WAN configuration. This includes
Germany who are using T-1 connection.
NOTE
Certain ADSL Internet subscriptions require Service Name to be specified in
order to establish a PPPoE connection.
6.5.1 How to Configure SingNet, PacNet &QALA DSL Broadband
This procedure assumed your ADSL modem and PC/notebook is working
with the logon account from SingNet, Pacific Internet or QALA DSL
broadband service, and necessary hardware connection has been established
(refer to Section 6.2 on Page 35),
1. Select WAN Config from the Command window.
2. Go to WAN Type and select PPP over Ethernet.
38
Page 49

Chapter 6 Configuring Your Wide Area Network
3. Click on Save button to update the changes.
Username and Password
The information is given by the Internet
Service Provider.
Idling Timeout
Idle Timeout is the count down time to
cut off the broadband connection when
there is no traffic passing through the
WAN port i.e. when there is no more
activity at the WAN port after all your
PCs are turn off.
NOTE
For Singapore users should follow the format below to enter their usernames:
Pacific Internet Broadband: username@pacific.net.sg
SingNet Broadband: username@singnet.com.sg
QALA DSL: username@qala.com.sg
Service Name
Certain ADSL Internet subscriptions
require the user to enter the service
name. You may enter the service name
for your ADSL Internet subscription.
39
Page 50

Chapter 6 Configuring Your Wide Area Network
To connect to the Internet service
Click on the Connect button. When the connection is established, the status
appeared on the screen will indicated as connected.
Please note that before you click on the Connection button, ensure that you
have connected the broadband modem to Compex SGX3226’s remote port.
The cable connection is good when the indicating light for the LAN on the
broadband modem and the remote port on the switch is lighted up.
Click Disconnect button to terminate the Internet connection immediately.
40
Page 51

Chapter 7 Advanced Configuration for Compex SGX3226
Chapter 7 Advanced Configuration for Compex SGX3226
In this chapter, you can understand how the configuration on Spanning Tree Protocol (STP) was
easily done. Compex SGX3226 implements Internet Group Multicast Protocol (IGMP) function
which forwards multicast traffic intelligently. In fact, Simple Network Management Protocol
(SNMP) is also introduced to provide a standard mechanism to monitor and control network
devices.
7.1 STP Config
Spanning Tree Protocol is a link management protocol that provides path redundancy
while preventing undesirable loops in the network. For an Ethernet network to
function properly, only one active path can exist between two stations.
Multiple active paths between stations cause loops in the network. If a loop exists in
the network topology, the potential exists for duplication of messages. When loops
occur, some switches see stations appear on both sides of the switch. This condition
confuses the forwarding algorithm and allows duplicate frames to be forwarded.
7.1.1 STP Port
When Compex SGX3226 first powers up, all bridges will declare
themselves to be the root. The one with the lowest priority will be the root.
The bridges will stop advertising themselves and use the BPDUs of the root
bridge.
During normal operation for Compex SGX3226, the ports are either
forwarding or disabling.
In a forwarding state, the network can send and receive frames which takes
about 50 seconds for a port to go from disabling to forwarding.
In a blocking state, the port is not forwarding frames, but will receive the
BPDUs.
Active ports which can forward frames on the root bridge are known as
designated ports.
41
Page 52

Chapter 7 Advanced Configuration for Compex SGX3226
1. Select STP Config from the Command window.
Bridge Port
This option shows the port of the
bridge that connects to the root bridge.
Priority
The lower the number has higher
priority.
2. Select one port from 1 to 26 to connect to the root bridge.
3. Key in the value for Path Cost (from 1-65535) and set the priority
level (0-255).
Path Cost
This option sets the Spanning Tree path
cost for this port. A lower path cost
represents higher transmission speed.
42
Page 53

Chapter 7 Advanced Configuration for Compex SGX3226
7.1.2 STP Bridge
Spanning-Tree Protocol defines a tree that spans all switches in an extended
network. It forces certain redundant data paths into a standby (blocked)
state. If one network segment in the Spanning-Tree Protocol becomes
unreachable, or if Spanning-Tree Protocol costs change, the spanning-tree
algorithm reconfigures the spanning-tree topology and re-establishes the
link by activating the standby path.
Spanning-Tree Protocol operation is transparent to end stations, which are
unaware whether they are connected to a single LAN segment or a switched
LAN of multiple segments.
This section shows how configuration is done in Spanning Tree parameters.
STP State
When STP is enabled, it will
dynamically detect network looping
owing to mis-configuration of the
network topology. The redundant
connectors will be disabled to avoid
looping of packets. Looping would
often result in flooding of broadcast
packets, halting the normal traffic.
Root Priority
The priority of the switch is currently
acting as the root. The bridge with the
lowest value has the highest Spanning
Tree priority level and is related as the
root.
43
Page 54

Chapter 7 Advanced Configuration for Compex SGX3226
Hello Time
The Hello time of the Spanning Tree
field shows the number of seconds
between the transmissions of spanning
Tree protocol configuration messages.
Max Age
The maximum age time of the spanning tree shows the number of seconds the bridge
waits without receiving Spanning Tree Protocol configuration messages before
attempting a reconfiguration.
1. Select Spanning Tree state option and set Root Priority from 0 65535 s, and Hello Time from 1 - 10 s.
2. Key in the Forward Delay Time, Maximum Age and Hold Time.
3. Click Apply and Save button to update your configuration.
NOTE
The screen is divided into two sections. Current Spanning Tree Root section
displays the read-only Spanning Tree settings for the current root switch and
the parameters this switch is to use when it becomes the root switch only when
you click on Apply button.
Forward Delay
The Forward Delay field shows the
number of seconds a port waits before
changing from its Spanning Tree Protocol
learning and listening states to the
forwarding state. This wait is necessary so
that other switches on the network ensure
no loop is formed before they allow the
port to forward packets.
44
Page 55

Chapter 7 Advanced Configuration for Compex SGX3226
7.2 IGMP Config
Internet Group Management Protocol (IGMP) is an Internet protocol that provides a
way for an Internet computer to report its multicast group membership to adjacent
routers. It allows Compex SGX3226 to forward multicast traffic intelligently. The
switch "snoops" the IGMP query and report messages and forwards traffic to only the
ports that request the multicast traffic. This prevents the switch from broadcasting the
traffic to all ports and possibly affecting network performance.
The membership of a host group is dynamic - hosts may join and leave groups at any
time. There is no restriction on the location or number of members in a host group. A
host may be a member of more than one group at a time. A host need not be a member
of a group to send datagrams to it.
Host Group Addresses
Host groups are identified by class D IP addresses, i.e., those with "1110" as their
high-order four bits. Class E IP addresses, i.e., those with "1111" as their high-order
four bits, are reserved for future addressing modes.
In Internet standard "dotted decimal" notation, host group addresses range from
224.0.0.0 to 239.255.255.255. The address 224.0.0.0 is guaranteed not to be
assigned to any group, and 224.0.0.1 is assigned to the permanent group of all IP
hosts (including gateways). This is used to address all multicast hosts on the directly
connected network. There is no multicast address (or any other IP address) for all
hosts on the total Internet. The addresses of other well-known, permanent groups are
to be published in "Assigned Numbers".
45
Page 56

Chapter 7 Advanced Configuration for Compex SGX3226
1. Select IGMP Config from the Command window.
2. Choose enabled in the IGMP state field.
3. Click on the radio button to select the version for IGMP. Refer to the
next section for the explanation on IGMP v1.0 and v2.0
4. Hit on the Apply button and save your setting.
7.2.1 Definition on IGMP v1.0 and v2.0
For IGMP v1.0,
The Internet Group Management Protocol (IGMP v1.0) is used by IP hosts
to report their host group memberships to any immediately neighboring
multicast routers. IGMP is an asymmetric protocol and is specified here
from the point of view of a host, rather than a multicast router.
NOTE
NOTE: IGMPv1 has no leave mechanism. If a host no longer wants to receive
the traffic, it simply quits. If it is the last, the router will not have any answers to
its query and will delete the GDA for that subnet.
For IGMP v2.0,
IGMP v2.0 allows group membership termination to be quickly reported to
the routing protocol, which is important for high-bandwidth multicast
groups and/or subnets with highly volatile group membership.
Multicast routers use IGMP v2.0 to learn which groups have members on
each of their attached physical networks. A multicast router keeps a list of
multicast group memberships for each attached network, and a timer for
each membership. "Multicast group memberships" means the presence of at
least one member of a multicast group on a given attached network, not a
list of all of the members.
When a host receives a General Query, it sets delay timers for each group
(excluding the all-systems group) of which it is a member on the interface
from which it received the query.
46
Page 57

Chapter 7 Advanced Configuration for Compex SGX3226
When a router receives a Report, it adds the group being reported to the list
of multicast group memberships on the network on which it received the
Report and sets the timer for the membership to the [Group Membership
Interval].
When a host joins a multicast group, it should immediately transmit an
unsolicited Version 2 Membership Report for that group, in case it is the
first member of that group on the network
When a host leaves a multicast group, if it was the last host to reply to a
Query with a Membership Report for that group, it SHOULD send a Leave
Group message to the all-routers multicast group.
7.3 Stack Configuration
Stacking Management can be implemented in a multi-storey building or even in a
geographically dispersed campus. Upon activating the stacking management functions,
the system administrator is able to access to other switches easily.
By selecting the switch from the Stack Access field, you can configure any of the
switches that are connected to the network.
NOTE
A stack can only accepts up to 16 switches, including the master switch. All
switches in a particular stack must be in the same IP subnet. Upon clicking on
the Stack Config option, the Stack Management GUI will appear as shown in
the figure. The system will prompt you to manage the network through the
master switch after enabling it.
47
Page 58

Chapter 7 Advanced Configuration for Compex SGX3226
If you select Auto Select in the Stacking State field, the system will elect the
switches in connect in the stack with the smallest MAC address to be the master. The
Master switch election will start again when one of the following occurs:
• The master switch is power down
• The master switch rebooted
• The master switch failed
However, if you select either Master or Slave, the connected switch will be set as
your choice.
1. Select Stack Config from the Command window.
2. From the pull down menu, you may select the types of switch you wish to access,
and the information will be listed.
48
Page 59

Chapter 7 Advanced Configuration for Compex SGX3226
7.3.1 Application on Stack Management
From the figure shown below, SGX3226 Unit #1, #2 and #3 are stacked
accordingly. Individual switches are linked to its respective workgroup,
such as Workgroup A, B and C. Enabling the stacking function allows the
master switch to do the configuration on Unit #2 or Unit #3.
SGX3226 Unit #1(Master)
192.168.100.128
SGX3226 Unit #2 (Slave)
192.168.100.128
Control Station
Workgroup B
Workgroup A
SGX3226 Unit #3 (Slave)
192.168.100.128
Workgroup C
Figure 7.1 Application on Stacking function
In order to control all the slave switches, you need to enable the stacking
function for all switches. You may follow the procedures as shown below:
1. Connect a RJ45 MDI straight Ethernet cable from the Control Station
to SGX3226 Unit #1. Enter http://192.168.100.128 in the internet
browser and select Master option in the Stacking State field. You
49
Page 60

Chapter 7 Advanced Configuration for Compex SGX3226
may name your switch for identification. Refer to Section 8.3 “System
Configuration” for details.
2. Next, disconnect one end of the Ethernet cable from SGX3226 Unit #1
and establish a link to Unit #2. Please refer to Figure 7.2.
3. Go the MS DOS Prompt and enter this command:
arp –d 192.168.100.128.
This will delete the ARP cache so that you can access to Compex
SGX3226 successfully. Please note that adding the IP address in the
ARP command allows system to delete the ARP cache which is
belonged to that particular device.
4. Enter http://192.168.100.128 in the internet browser to select Slave
option in the field provided. Give a name to your switch.
NOTE
You may also use the console port to activate the stacking function of all
switches. We are using 3 switches in this example, therefore, please repeat the
procedures of Steps 1 and 2 for SGX3226 Unit #3. Select Slave option in the
Stacking State field.
SGX3226 Unit #1(Master)
192.168.100.128
SGX3226 Unit #2 (Slave)
192.168.100.128
Figure 7.2 Establish a connection to SGX3226 Unit #2
5. After selecting the options for individual switches, use RJ45 Ethernet
MDI straight cables to connect all three switches as shown in Figure
7.1 and power up all switches.
50
Page 61

Chapter 7 Advanced Configuration for Compex SGX3226
6. Access to the web-based interface again. This time, you will be able to
view all switches attached to this stack.
7. Next, after clicking on the selected switch, you will be able to view the
necessary information for switches.
7.4 SNMP Configuration
SNMP is a communication specification that defines how management information is
exchanged between network management applications and management agents.
You can manage Compex SGX3226 using an SNMP application if the switch and the
application contain the same community string. Use this page to set or modified the
SNMP configuration parameters. The Community String settings in this page provide
different levels of access for SNMP management applications.
Read Only Community String
The Read Only Community String is
used for in-band read-only SNMP
operation.
Read Write Only Community String
The Read Write Only Community String
is used for in-band read-write SNMP
operations.
51
Page 62

Chapter 7 Advanced Configuration for Compex SGX3226
1. Select SNMP Config from the Command window and enabled the SNMP state.
2. Type in either “Public” or “Private” for both Read-only Community String and
Read-Write Community String.
3. Choose the Trap Setting from 1 to 8 and enter the IP Address and Subnet
Mask correctly.
4. From the State field, select either “disable” or “enable”.
After clicking Apply button, the changes will appear on that particular data row. To
save your configuration, hit Save button.
7.5 RMON Statistics
Remote monitoring (RMON) is a standard monitoring specification that enables
various network monitors and console systems to exchange network-monitoring data.
RMON provides
network administrators
with more freedom in
selecting networkmonitoring probes and
consoles with features
that meet their
particular networking
needs.
1. Select RMON
Statistics from the
Command
window.
52
Page 63

Chapter 7 Advanced Configuration for Compex SGX3226
7.6 Port Security
Of all 26 ports, some of the ports may need to assign to the specific port. In order to
fulfill this act, MAC Address should be added to that particular port. This is to restrict
other users from using the static port. A port can accommodate up to 20 MAC
Addresses.
1. Select Port Security from the Command window.
2. Choose the port that you wish to assign the MAC Address.
3. Enter the MAC Address in the field provided, e.g. 00-80-1e-48-2a-7f, and click
Add button.
The system will then add in the New MAC Address into the listing on the right side of
the screen.
7.6.1 To delete MAC Address/es
If you want to delete MAC Address/es, simply
• Click on Del # button for single MAC Address, or
• Hit on DeleteAll button to delete all the MAC Addresses.
53
Page 64

Chapter 7 Advanced Configuration for Compex SGX3226
7.7 MirrorPort Config
7.7.1 Using Mirror Port to monitor Traffic
This function allows you to set up a ‘mirror’ port of any specified port/s,
such that you can monitor the traffics of the monitored port/s or VLAN
without intervening them. In effect, the traffics on the monitored port/s are
replicated on the mirror port that you can use a protocol analyzer to analyze
the traffic for specific problem.
1. Go to MirrorPort Config from the Command window.
2. Select one Mirror Port.
3. Click on the dashed line ‘–’ on that particular port if you want to select
it as a Mirrored Member (T).
4. Hit on Apply button after you are satisfied with the setup. Click Save
button to update the latest configuration.
54
Page 65

Chapter 7 Advanced Configuration for Compex SGX3226
7.8 Aging Control
Aging control is for the aging of address entries in the switch’s forwarding table. If
the aging control is enabled, a learned address entry (not include the static entry) will
be removed from the forwarding table if there is no update within a pre-determined
period (1 ~ 128 seconds). It is useful because the resource of the forwarding table is
limited. Enabling the aging control will not influence packets forwarding, for that the
packet is forwarded to all other ports when the destination MAC address cannot be
found in the forwarding table. If the aging control is disabled, all address entries will
not be removed.
1. Go to Aging Control from the Command window.
2. Select “Enable” from the Aging Control option.
3. Enter the Maximum Age of the Address Entries. If the aging control is
enabled, enter an integer from the range of 1 to 128 as the maximum age of
address entries. If the aging control is disabled, this step can be skipped.
55
Page 66

Chapter 7 Advanced Configuration for Compex SGX3226
7.9 Address Search
7.9.1 Host Search
Host Search is for searching a host by IP address on the network, and
getting the port number to which the host is connected. It is useful while
configuring the VLAN. With this function, you can easily detect the port at
which a host is connected to, and have an idea about which ports should be
included in a VLAN.
1. Go the Host Search from the Command window.
2. Enter the IP Address of the PC that you wish to search and click on the
Search button. The result will displayed as shown:
56
Page 67

Chapter 7 Advanced Configuration for Compex SGX3226
7.9.2 MAC Address Search
This feature helps to look for the particular MAC Address stated in the
field, which provides a useful way while configuring the VLAN. The
system will search through the device for the port’s ownership of that
particular PC.
1. Enter the MAC Address in the field provided.
2. Click on Search button and the system will show the result.
57
Page 68

Chapter 8 Using SYSTEM TOOLS Menu
Chapter 8 Using SYSTEM TOOLS Menu
8.1 Set System Clock
It is recommended that you configure Compex SGX3226’s timer to synchronize with
your PC so that you can utilize the time-based functions.
NOTE
To manage and utilize the timing based functions provided in Compex
SGX3226, (such as the Filtering functions), you MUST set its clock to
synchronize with your managing workstation.
1. Go to System Clock from the Command window.
2. Access to the System Clock function at the Command window.
3. Key in the appropriate time zone and click Apply button.
58
Page 69

Chapter 8 Using SYSTEM TOOLS Menu
8.2 Remote Management
This function allows you to access your Compex SGX3226 through Internet (WAN)
or Local Area Network.
The figure illustrates that you can configure the Compex SGX3226 even when you
are at home. This can be done by activating the remote management function from
your workplace.
Home
Workplace
WAN IP address:
203.120.12.12
HTTP Port:
50
To do so,
1. From your workplace, simply click on Remote Management from the
Command window.
2. Enter a HTTP Port in the field provided and click Save button to update the
changes.
59
Page 70

Chapter 8 Using SYSTEM TOOLS Menu
3. You may go to WAN Config to check for your WAN port’s IP address.
NOTE
You need to set the gateway of your Compex SGX3226 to 0.0.0.0 in order to
allow WAN access from your home.
4. Go to System Config from the
Command window. Ensure that your
gateway is set to 0.0.0.0.
5. Click Save button to update the changes.
6. Next, from your home’s PC, open your Internet browser, enter this IP address
203.120.12.12:50 in the address bar, where 203.120.12.12 is WAN port’s IP
address of Compex SGX3226; and 50 is the http port.
NOTE
At any one time, the switch can be managed by only one user from either
LAN or WAN. Concurrent switch management by multiple users is
prohibited.
60
Page 71

Chapter 8 Using SYSTEM TOOLS Menu
8.3 System Configuration
This is an easy access in configuring the system. You can configure IP address,
Subnet Mask or Default Gateway of the management board in Compex SGX3226. It
is likely that several VLANs are on the single switch, and each VLAN can be
regarded as an independent network, so their network addresses may be different.
System Name
You can obtain this information from
your ISP.
1. Go to System Configuration from the Command window.
2. Give a description for the System Name and System Location of Compex
SGX3226.
3. Key in the System Contact information and describe the Product Name of the
switch.
4. Enter your new IP address and Subnet Mask.
5. Click Apply button and save the setting.
Your system will prompt you to reboot your switch. Click on Yes button to take effect
on the changes.
Please note that you need to use your new IP address to login to the main page of
Compex SGX3226.
System Contact and Location
You may leave it as it is or fill in your
ISP contact and location information.
They are for your future reference only.
61
Page 72

Chapter 8 Using SYSTEM TOOLS Menu
8.4 System Information
This option displays the necessary data about the management system.
1. Click on System Information from the Command window.
8.5 Change Password
This option allows the System Administrator to amend the current password.
1. Go to Change Password from the Command window.
2. Type in your current and new password.
3. Enter the new password again for confirmation.
4. Click on Change Password button to activate the
new setting.
The system will alert you that the password has changed successfully.
62
Page 73

Chapter 8 Using SYSTEM TOOLS Menu
8.5.1 Forget your password
You can simply reset the password using Hyper Terminal program.
1. In the Hyper Terminal environment, switch OFF and ON Compex
SGX3226.
2. When “Press ENTER to stop auto-boot …” message appear on the
screen, hit “Enter” key on the keyboard within 5 seconds.
3. Upon seeing the word Password appeared on the screen, enter +=_-)0
and hit the Enter key from your keyboard to start resetting.
4. Next, the screen will display " Default password restored successfully".
This indicates that the system has successfully reset the password to
default setting.
5. Type in reboot to switch your Compex SGX3226 to normal mode.
This time, you can enter the default password, which is password to
login to the configuration page.
You may change your password using Hyper Terminal program by typing
the command, sys set password and hit Enter key from your keyboard. If
you cannot remember the command, type in help and the command listing
will be listed.
63
Page 74

Chapter 8 Using SYSTEM TOOLS Menu
8.6 Firmware Upgrade
You can simply download the newer firmware version from
http://www.compex.com.sg.
To check your current firmware version, refer to Section 8.4 on "System
Information” on Page 62. Once you downloaded the latest firmware, saved it into
your hard disk.
1. Go to Firmware Upgrade from the Command window
2. Click Browse button to select the file where you have just saved.
3. Next, click on the Upgrade button to start replacing the latest firmware revision.
4. The system will prompt you to reboot Compex SGX3226. Click Yes button to
restart the device.
5. Log on to the web site after 60 seconds if you still need to do some configuration
on Compex SGX3226.
64
Page 75

Chapter 8 Using SYSTEM TOOLS Menu
8.7 Save or Reset Settings
This function allows you to save your configuration or reset your configuration to its
default setting.
1. Click on Save or Reset Settings from the Command window
8.7.1 Save
By clicking Save button, you will save all your settings that you have
configured in Compex SGX3226. You need to reboot the switch to update
the changes.
8.7.2 Backup
This option allows you to backup the switch’s configuration and saved it to
a file.
1. Click on the Backup button and the system will prompt you to either
open or save the file.
65
Page 76

Chapter 8 Using SYSTEM TOOLS Menu
2. Select Save button and go
to your preferred folder to
save this file. Do
remember the location
that you intend to save
this file. Click OK button
to proceed the
transaction.
3. After downloading
process has completed,
the following message
will appear. Click Close
button if you do not want
to view the downloaded
file.
8.7.3 Restore
1. Click Browse button and select the file that you had saved previously
in order to allow the system to restore back the configuration.
2. Click on the Restore button to start the process.
3. The system will request you to reboot Compex SGX3226. Click Yes
button to restart the switch.
4. Wait for 60 seconds and the system will automatically return to the
Login Web page, prompting you to enter password again.
66
Page 77

Chapter 8 Using SYSTEM TOOLS Menu
8.7.4 Clear and Reset
By clicking this option, you will restore Compex SGX3226 to factory
defaults. And you will have to re-enter all the configuration information to
our network.
1. Click on Clear and Reset button. The system will prompt you to
choose whether you want to reset the configuration data.
2. Click Yes button to proceed and the system will automatically reset the
IP address to factory default, which is http://192.168.100.128
3. Click Logon button if you want to make some more changes.
67
Page 78

Chapter 8 Using SYSTEM TOOLS Menu
8.8 Message Window
This window will list out the action/s taken while doing configuring. It helps you to
dig out the history of various action/s.
1. Click on Message Window from the Command window.
To save all your actions,
1. Click on SaveAs button. The system will prompt you save your file in your
preference location.
2. Click Save button to keep a copy of your document.
8.9 Reboot Switch
Rebooting of Compex SGX3226 is required after changes are made in the
configuration or setting.
1. Click on Reboot Switch from the Command window.
68
Page 79

Chapter 8 Using SYSTEM TOOLS Menu
8.10 Logout
You may click on the Logon button to access to the main page of Compex SGX3226.
However, if you have assigned a new IP address to your switch, you need to enter
your new IP address at the address bar in order to access to the main page.
1. Click on Logout from the Command window.
NOTE
If you changed a new IP Address for Compex SGX3226, the system will NOT
automatically point to the new IP address to access the main page after you
click on the Logon button.
69
Page 80

Chapter 9 Using HELP Menu
Chapter 9 Using HELP Menu
9.1 Technical Support
For more information on technical support, click on Technical Support from the
Command window. Here, you can refer to the respective technical group supported by
Compex in the different countries as shown below:
1. Click on Technical Support from the Command window.
70
Page 81

Chapter 10 Application on Virtual LAN
Chapter 10 Application on Virtual LAN
In an untagged VLAN application, you can assign a group of ports within a switch as members
of a specific VLAN. Data traffic would be confined within the member ports. In this way,
devices connected with the switch can be partitioned into distinct groups each corresponds to a
different VLAN. The partition (VLAN) can be expanded when two untagged VLANs are
connected together through their member ports. No two VLANs can be overlapped. Each
VLAN is separate from the rest. It provides a simple means to implement a secure and managed
network.
In a tagged VLAN application, you still can assign specific ports within a switch to be a VLAN
group. In addition, the data transferred within the VLAN group is tagged with an ID as specified
with the 802.1Q Tagged VLAN standard. It allows the VLAN information to be carried along as
the data flow from switch to switch. It also allows a port to carry multiple VLANs data stream.
It is more flexible and scalable than the untagged VLAN application. However, all networking
devices have to support the 802.1Q Tagged VLAN standard for VLAN Tagging system to
work.
10.1 Untagged and Tag Configuration using Web-based Interface
71
Page 82

Chapter 10 Application on Virtual LAN
VLAN C, VLAN D and VLAN E are assigned with VID of 02, 03 and 04
respectively. Switch 1 and Switch 2 are interconnected via Port 26, whereby the port
are tagged with an ID. Control Station, PC 1, PC 2 and PC 3 are connected to Port 2,
9, 16 and 22 respectively. All Ethernet Ports are configured as untagged. All users are
able to communicate with one another within the same VLAN. For example, the
control unit is able to communicate with PC 1, but failed to communicate with PC 2
and PC 3. Creating VLAN E allows PC 2 to transmit data from switch 1 to switch 2
via tagged Port 26, without the need to connect another link in VLAN D.
Configuration for Switch 1
VLAN C
1. Open a browser and key in the IP address for Switch 1, such as 192.168.100.128.
2. Select VLAN Config from the command window and enabled the Status at
Group 2.
3. Set VID number to 2. (Any number between 2 to 4094.)
4. Click on ‘-’ to ‘U’ for Port 1 to Port 12 and ‘T’ for Port 26. Refer to Figure 10.1.
Notice that the picture illustrated on Page 71 used only Port 2, we still can
allocate the remaining ports to VLAN C for further usage.
VLAN D
5. Next, enabled the Status at Group 3. Set VID Number to 3.
6. Click on ‘-’ to ‘U’ for Port 13 to Port 24 and ‘T’ for Port 26. Also note that the
7. Click Save button upon confirmation.
VLAN E
8. Enabled the Status at Group 4. Set VID Number to 4.
9. Click on ‘-’ to ‘U’ for Port 1 to Port 24 and ‘T’ for Port 26. Refer to Figure 10.1.
10. Click Save button upon confirmation.
picture illustrated on Page 71 used only Port 16, we still can allocate the
remaining ports to VLAN D for further usage.
72
Page 83

Chapter 10 Application on Virtual LAN
Figure 10.1 Untagged and Tag VLAN setting for Switch 1
Configuration for Switch 2
Follow the procedures as shown in configuring Switch 1.
Now, users within the same VLAN is able to communicate with one another.
NOTE
Please note that for Tagged VLAN, VID number MUST BE the same from
Switch 1 and 2.
73
Page 84

Appendix I Panel Views and Descriptions
Appendix I Panel Views and Descriptions
Please note that actual product appearance may slightly differ depending on the hardware
version.
Figure 10.1 Overall view of Compex SGX3226
19 18 15 17
2 3
Figure 10.2 Front View of Compex SGX3226 (Section #1)
74
Page 85

Appendix I Panel Views and Descriptions
14 16 12 11 9 8
20
1 13 6 7 10
Figure 10.3 Front View of Compex SGX3226 (Section #2)
Features Status and Indication
1 24 RJ45 10/100Mbps
Ports
2 Console Port A serial 9 pin (DB9) socket is connected to PC COM Port
3 2 open expansion
module slots
4 Primary Power
Socket
5 4
Figure 10.4 Back View of Compex SGX3226
Use UTP/STP network cables to connect
• 10 Base-T
• 100 Base-TX
All ports will detect and automatically switch to uplink
mode when connected to a switch/hub
for monitoring the switch
• Comes with 1000 Base-T module
• Option for 1000 Base-SX and 100 FX modules
Flexible power input (range 100 V-250 V AC)
75
Page 86

Appendix I Panel Views and Descriptions
Features
5 Redundant Power
Socket
6 Reset Button By pushing the reset button once,
7 Mute Button To toggle the On or Off Switch of the Alarm Buzzer
8 System Status LEDs
9 Power LED
10 Redundant PS LED
Additional Power Socket (Optional). With this RPS,
Compex SGX3226 still able to operate even Primary Power
Supply is down.
• The switch will clear all previous temporary error
• P.O.S.T. will activate self-diagnostic program to check
any error.
• Switch would be re-configured with settings stored in
non-volatile flash memory.
Steady Green Normal Operation
Steady Red POST is running Self-diagnostic after reset
Steady Green Power supply is working in normal
Steady Red
Steady Green Primary power supply is working and RPS
Steady Red Primary power supply is faulty and RPS is
Off Both primary power supply and RPS
Status and Indication
or power up
condition.
• Power supply is faulty.
• Power supply fault occurs.
is in standby mode.
in working condition.
When the primary power resume its
electrical supply, RPS LED will still
remains Steady Red unless you reboot
your switch, then RPS LED will turn to
Steady Green.
turned off.
76
Page 87

Appendix I Panel Views and Descriptions
Features Status and Indication
11 Thermal Fault LED
12 Fan Fault LED
13 Mute LED
14 LNK/ACT LEDs
(Port #1 to Port #24)
15 LNK/ACT LEDs
(Port #25 & Port #26)
16 10/100M
(Port #1 to Port #24)
17 100/1000M
(Port #25 & Port #26)
18 Ready LED
(Port #25 & Port #26)
Steady Red Temperature inside the chassis is too high
for normal operation. Thermal fault
occurs.
Off In normal condition.
Steady Red Ventilation Fans have problems. Thermal
fault may result if condition persists.
Off Ventilation Fans are operating in good
condition.
Steady Green The alarm buzzer is turned off.
Off The alarm buzzer is turned on.
Steady Green In good link connection.
Blinking Green The LAN connection has activities going
on.
Steady Green In good link connection.
Blinking Green The LAN connection has activities going
on.
Steady Green The respective LAN connection is at
100Mbps.
Off The respective LAN connection is at
10Mbps.
Steady Green The respective LAN connection is at
1000Mbps.
Off The respective LAN connection is at
100Mbps.
Steady Green Valid expansion module is detected.
Off No expansion module is installed, or
expansion module installed is not ready.
77
Page 88

Appendix I Panel Views and Descriptions
Features Status and Indication
19 Full Duplex LEDs
(Port #25 & Port #26)
20 Full Duplex LEDs
(Port #1 to Port #24)
Steady Green Full Duplex Mode.
Off Half Duplex Mode.
Steady Green Full Duplex Mode.
Off Half Duplex Mode.
78
Page 89

Appendix II Technical Specifications
Appendix II Technical Specifications
Industry Standards Complies with
• IEEE 802.1d: Spanning Tree Protocol
• IEEE 802.1Q: Tagged VLAN
• IEEE 802.3: 10 Base-T
• IEEE 802.3u: 100 Base-TX
• IEEE 802.3ab: 1000 Base-T
• IEEE 802.3ad: Link Aggregation
• IEEE 802.3z: 1000 Base-SX
• IEEE 802.3x: Flow Control
Certificate Standards
Interface
SNMP Management
(4 groups of RMON)
Virtual LAN
Spanning Tree Protocol Yes
Flash ROM 2 M bits
Port Mirroring Yes
Management Interface
Port Trunking Up to 4 ports/trunk
• FCC Class A
• CE Mark
• C-Tick
• UL
• 24 RJ45 UTP 10/100Mbps ports
• 2 expandable slots with two 1000Mbps Modules installed
• 1 RS232 serial interface
• Group 1-Ethernet Statistic
• Group 2-History
• Group 3-alarm
• Group 9-events
• Port-based VLAN
• Tagged VLAN
• Web-based Interface
• RS232
• Telnet Console
• SNMP
79
Page 90

Appendix II Technical Specifications
Switching Method Store-and-Forward
LED Indicators
Operation Mode
Transmission Mode
Optional Modules
Power Supply
Environment Requirements Operating Temperature:
MAC Address Table 4 K
Switching Buffer 24 Mbytes
Back Plane Capacity 12Gbps
Physical Dimension 440 mm x 330 mm x 66 mm (L x D x H)
• System Status
• Power
• Link/Activity
• Redundant Power Supply
• Thermal and Fan Fault
• Mute
• Speed (10/100/1000Mbps)
• Duplex status
• Ready
• N-Way Auto-negotiation
• Force Mode
• Full Duplex
• Half Duplex
• 100 Base-FX module
• 1000 Base-SX module
• Internal power supply is provided with voltage ratings of
100 V AC to 250 V AC, 50~60 Hz
• Power consumption is 40 W maximum.
Storage Temperature:
Operating Humidity:
Storage Humidity:
0°C to 40°C
-20°C to 70°C
10% to 80% RH
5% to 90%
RH=Relative Humidity
80
 Loading...